bea weblogic integration - oracle bea weblogic ... bea weblogic integration, bea weblogic...
TRANSCRIPT
BEA
WebLogic Integration�Implementing Security with B2B Integration
Release 7.0Document Date: June 2002
Copyright
Copyright © 2002 BEA Systems, Inc. All Rights Reserved.
Restricted Rights Legend
This software and documentation is subject to and made available only pursuant to the terms of the BEA Systems License Agreement and may be used or copied only in accordance with the terms of that agreement. It is against the law to copy the software except as specifically allowed in the agreement. This document may not, in whole or in part, be copied photocopied, reproduced, translated, or reduced to any electronic medium or machine readable form without prior consent, in writing, from BEA Systems, Inc.
Use, duplication or disclosure by the U.S. Government is subject to restrictions set forth in the BEA Systems License Agreement and in subparagraph (c)(1) of the Commercial Computer Software-Restricted Rights Clause at FAR 52.227-19; subparagraph (c)(1)(ii) of the Rights in Technical Data and Computer Software clause at DFARS 252.227-7013, subparagraph (d) of the Commercial Computer Software--Licensing clause at NASA FAR supplement 16-52.227-86; or their equivalent.
Information in this document is subject to change without notice and does not represent a commitment on the part of BEA Systems. THE SOFTWARE AND DOCUMENTATION ARE PROVIDED �AS IS� WITHOUT WARRANTY OF ANY KIND INCLUDING WITHOUT LIMITATION, ANY WARRANTY OF MERCHANTABILITY OR FITNESS FOR A PARTICULAR PURPOSE. FURTHER, BEA Systems DOES NOT WARRANT, GUARANTEE, OR MAKE ANY REPRESENTATIONS REGARDING THE USE, OR THE RESULTS OF THE USE, OF THE SOFTWARE OR WRITTEN MATERIAL IN TERMS OF CORRECTNESS, ACCURACY, RELIABILITY, OR OTHERWISE.
Trademarks or Service Marks
BEA, Jolt, Tuxedo, and WebLogic are registered trademarks of BEA Systems, Inc. BEA Builder, BEA Campaign Manager for WebLogic, BEA eLink, BEA Manager, BEA WebLogic Commerce Server, BEA WebLogic Enterprise, BEA WebLogic Enterprise Platform, BEA WebLogic Express, BEA WebLogic Integration, BEA WebLogic Personalization Server, BEA WebLogic Platform, BEA WebLogic Portal, BEA WebLogic Server, BEA WebLogic Workshop and How Business Becomes E-Business are trademarks of BEA Systems, Inc.
All other trademarks are the property of their respective companies.
Implementing Security with B2B Integration
Part Number Date Software Version
N/A June 2002 7.0
Contents
About This DocumentWhat You Need to Know ................................................................................... viiHow to Print this Document .............................................................................. viiiContact Us! ........................................................................................................ viiiDocumentation Conventions ............................................................................... ix
1. Introducing WebLogic Integration B2B SecurityWebLogic Integration B2B Security Model...................................................... 1-1Principals, Users, and Groups ........................................................................... 1-8
About Configuring Trading Partners.......................................................... 1-8About Configuring the WebLogic Integration B2B System User ............. 1-9
Digital Certificates........................................................................................... 1-10Certificate Authority........................................................................................ 1-11SSL Protocol.................................................................................................... 1-13Configuration Restrictions to Ensure a Secure Environment.......................... 1-14
2. Authenticating and Authorizing Trading PartnersTrading Partner Authentication in WebLogic Integration................................. 2-1
Trading Partner Certificate Verification .................................................... 2-2Benefits of Certificate Verification..................................................... 2-2Certificate Verification Process .......................................................... 2-3Implementing a Certificate Verification Provider .............................. 2-4
Authentication of the Trading Partner Message......................................... 2-6Trading Partner Authorization in WebLogic Integration B2B.......................... 2-8
Trading Partner Authorization ................................................................... 2-8Conversation Authorization ..................................................................... 2-10
Implementing Security with B2B Integration iii
3. Configuring the KeystoreAbout the Keystore ........................................................................................... 3-1
Keystores You Create................................................................................. 3-2Steps for Creating and Configuring Keystores........................................... 3-3
Creating the Domain.......................................................................................... 3-4Creating the Keystores and Inserting the Server Certificates............................ 3-5Configuring the WebLogic Keystore Provider.................................................. 3-9Adding Trading Partner Certificates to the Keystore ...................................... 3-11
Adding the Certificates and Private Keys for a Local Trading Partner.... 3-12Adding the Certificates for a Remote Trading Partner............................. 3-17Bulk Loading and Importing Certificates into the Keystore .................... 3-18Removing Certificates and Private Keys from the Keystore.................... 3-20
Configuring the Domain to Use the Keystore ................................................. 3-22Using the Keystore in a Multinode Cluster ..................................................... 3-23
4. Configuring SecurityConfiguring the SSL Protocol and Mutual Authentication ............................... 4-2Configuring Access Control Lists for WebLogic Integration ........................... 4-7Configuring Security for the WebLogic Integration B2B Engine................... 4-10Configuring Trading Partner Security ............................................................. 4-14
Configuring Trading Partner Certificates.......................................... 4-15Configuring a Secure Transport ........................................................ 4-26Configuring a Secure Delivery Channel ........................................... 4-28Configuring a Secure Document Exchange ...................................... 4-30
Configuring Message Encryption .................................................................... 4-32How WebLogic Integration Message Encryption Works ........................ 4-32Configuring Message Encryption............................................................. 4-33
Configuring Digital Signatures for Nonrepudiation ........................................ 4-35Customizing the WLCCertAuthenticator Class .............................................. 4-37Configuring a Certificate Verification Provider Interface............................... 4-38Configuring WebLogic Integration B2B to Use an Outbound HTTP Proxy Server
4-40Configuring WebLogic Integration with a Web Server and a WebLogic Proxy
Plug-In ...................................................................................................... 4-43Configuring the Web Server..................................................................... 4-44
iv Implementing Security with B2B Integration

WebLogic Server User Identity for the Trading Partner.......................... 4-44Configuring Business Process Management Access to the WebLogic Integration
Repository ................................................................................................ 4-45Configuring Server-Side Authentication......................................................... 4-45
5. Implementing NonrepudiationOverview of Nonrepudiation............................................................................. 5-1
Digital Signature Support........................................................................... 5-2Business Protocols with Which You May Use Digital Signature Support
5-3Configuring Digital Signature Support ............................................... 5-3
Secure Timestamp Service ......................................................................... 5-3Configuring the Secure Timestamp Service ....................................... 5-4
Secure Audit Log Service .......................................................................... 5-5Writing to the Audit Log Directly....................................................... 5-6Configuring the Secure Audit Log...................................................... 5-8
Using the Service Provider Interfaces (SPIs) for Nonrepudiation .................. 5-10Using the SPI for the Secure Timestamp Service .................................... 5-10Using the SPI for the Secure Audit Log................................................... 5-11
Audit Log Messages.......................................................................... 5-12Audit Log DTD................................................................................. 5-12
Index
Implementing Security with B2B Integration v

vi Implementing Security with B2B Integration
About This Document
This document describes how to implement a security scheme for your WebLogic Integration B2B deployment.
This document is organized as follows:
! Chapter 1, �Introducing WebLogic Integration B2B Security,� provides an overview of WebLogic Integration B2B security and explains how it is based on WebLogic Server security.
! Chapter 2, �Authenticating and Authorizing Trading Partners,� describes the authentication and authorization processes used by the B2B software.
! Chapter 3, �Configuring the Keystore,� explains how to create and configure the WebLogic Server Keystore, in which you store trading partner certificates used for SSL authentication and authorization.
! Chapter 4, �Configuring Security,� explains how to configure security for your B2B trading partners and environment.
! Chapter 5, �Implementing Nonrepudiation,� explains how to implement a nonrepudiation mechanism in your business processes.
What You Need to Know
This document is intended primarily for:
! Business analysts and programmers who design security mechanisms for their WebLogic Integration deployments
! System administrators who will set up and administer B2B security
Implementing Security with B2B Integration vii

For an overview of the WebLogic Integration B2B architecture, see Introducing B2B Integration.
How to Print this Document
You can print a copy of this document from a Web browser, one file at a time, by using the File�>Print option on your Web browser.
A PDF version of this document is available on the WebLogic Integration documentation CD. You can open the PDF in Adobe Acrobat Reader and print the entire document (or a portion of it) in book format.
If you do not have the Adobe Acrobat Reader installed, you can download it for free from the Adobe Web site at http://www.adobe.com/.
Contact Us!
Your feedback on the WebLogic Integration documentation is important to us. Send us e-mail at [email protected] if you have questions or comments. Your comments will be reviewed directly by the BEA professionals who create and update the WebLogic Integration B2B documentation.
In your e-mail message, please indicate that you are using the documentation for the WebLogic Integration 7.0 release.
When contacting Customer Support, be prepared to provide the following information:
! Your name, e-mail address, phone number, and fax number
! Your company name and company address
! Your machine type and authorization codes
! The name and version of the product you are using
! A description of the problem and the content of pertinent error messages
viii Implementing Security with B2B Integration
Documentation Conventions
The following documentation conventions are used throughout this document.
Convention Item
boldface text Indicates terms defined in the glossary.
Ctrl+Tab Indicates that you must press two or more keys simultaneously.
italics Indicates emphasis or book titles.
monospace text
Indicates code samples, commands and their options, data structures and their members, data types, directories, and filenames and their extensions. Monospace text also indicates text that you must enter from the keyboard.Examples:#include <iostream.h> void main ( ) the pointer psz
chmod u+w *
\tux\data\ap
.doc
tux.doc
BITMAP
float
monospace boldface text
Identifies significant words in code.Example:void commit ( )
monospace italic text
Identifies variables in code.Example:String expr
UPPERCASE TEXT
Indicates device names, environment variables, and logical operators.Examples:LPT1SIGNONOR
Implementing Security with B2B Integration ix
{ } Indicates a set of choices in a syntax line. The braces themselves should never be typed.
[ ] Indicates optional items in a syntax line. The brackets themselves should never be typed.Example:buildobjclient [-v] [-o name ] [-f file-list]... [-l file-list]...
| Separates mutually exclusive choices in a syntax line. The symbol itself should never be typed.
... Indicates one of the following in a command line: ! That an argument can be repeated several times in a command line! That the statement omits additional optional arguments! That you can enter additional parameters, values, or other informationThe ellipsis itself should never be typed.Example:buildobjclient [-v] [-o name ] [-f file-list]... [-l file-list]...
.
.
.
Indicates the omission of items from a code example or from a syntax line. The vertical ellipsis itself should never be typed.
Convention Item
x Implementing Security with B2B Integration

CHAPTER
1 Introducing WebLogic Integration B2B Security
This topic includes the following sections:
! WebLogic Integration B2B Security Model
! Principals, Users, and Groups
! Digital Certificates
! Certificate Authority
! SSL Protocol
! Configuration Restrictions to Ensure a Secure Environment
WebLogic Integration B2B Security Model
The WebLogic Integration B2B security model incorporates the following primary features:
! Uses the security features of the underlying BEA WebLogic Server� platform to perform authentication and authorization of principals before granting access to B2B resources.
Implementing Security with B2B Integration 1-1

1 Introducing WebLogic Integration B2B Security
! Is extensible by allowing you to incorporate your own or third-party vendor tools to verify trading partner digital certificates and implement nonrepudiation support, which is a requirement for critical business messages.
This section describes the WebLogic Server and B2B entities involved in providing the authentication and authorization features of WebLogic Integration.
You must use WebLogic Server 6.x security realms and compatibility mode of the WebLogic Server Security Service. For more information about WebLogic Platform security, see Introducing WebLogic Platform 7.0 Security at the following URL:
http://edocs.bea.com/platform/docs70/secintro/index.html
WebLogic Integration B2B authentication is the process of verifying an identity claimed by or for a system entity. Authentication is concerned with who an entity is; it is the association of an identity with an entity. Authorization is concerned with what that identity is allowed to see and do. WebLogic Integration B2B uses the following methods to perform authentication:
! Username and password�human users (administrators) use usernames and passwords to prove their identity.
! Digital certificates�trading partners use digital certificates to prove their identity to the B2B engine.
! Secure sockets layer (SSL)�the SSL protocol provides data integrity and confidentiality to the connections between principals.
Authorization is a right or a permission that is granted to a system entity to access a system resource. The authorization process is a procedure for granting such rights. Permission to access B2B resources is assigned through access control lists (ACLs) and roles.
For complete details about how WebLogic Server and WebLogic Integration B2B work together to authenticate and authorize principals in the WebLogic Integration B2B engine, see Chapter 2, �Authenticating and Authorizing Trading Partners.�
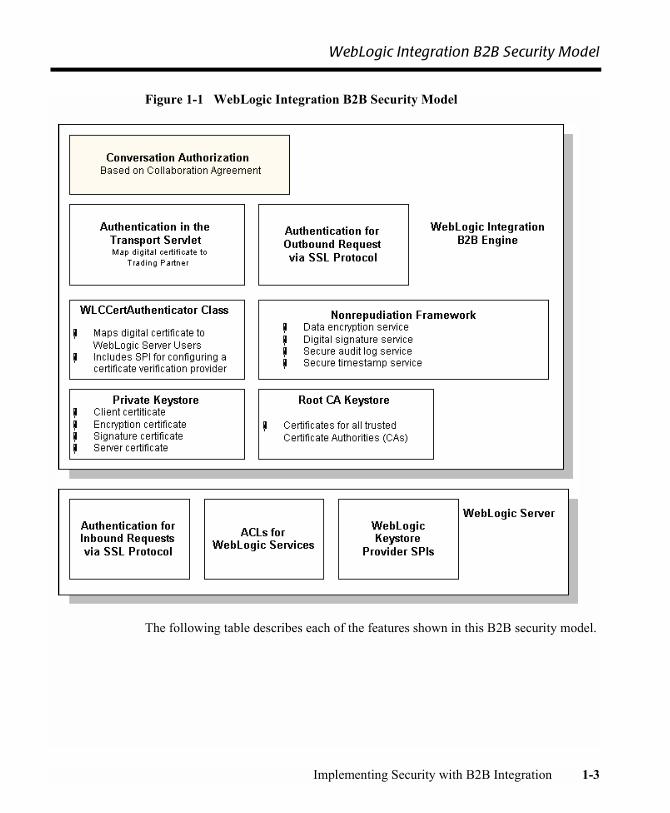
The following figure shows the entities and features in WebLogic Server and WebLogic Integration that provide the B2B security model.
1-2 Implementing Security with B2B Integration
WebLogic Integration B2B Security Model
Figure 1-1 WebLogic Integration B2B Security Model
The following table describes each of the features shown in this B2B security model.
Implementing Security with B2B Integration 1-3

1 Introducing WebLogic Integration B2B Security
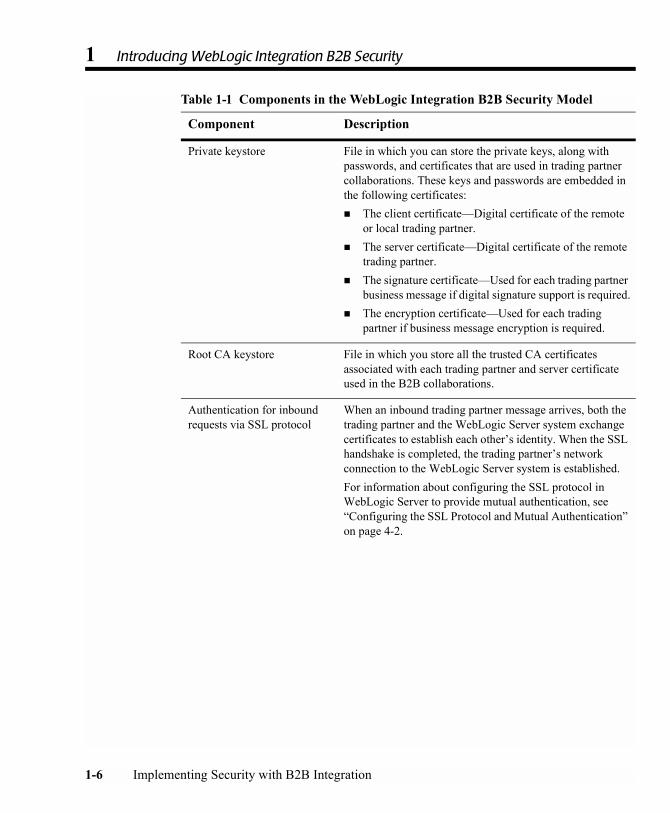
Table 1-1 Components in the WebLogic Integration B2B Security Model
Component Description
Conversation authorization When a business message arrives for a trading partner, the B2B engine, as part of the business message authorization process, examines the contents of the business message to validate it against the collaboration agreement. That is, the collaboration agreement defines the business messages a given trading partner may send and receive. The B2B engine verifies that the content of the incoming business message is consistent with the business messages that the trading partner is bound, by role and conversation definition in the collaboration agreement, to either send or receive.This authorization scheme makes sure that only the business messages that are consistent with the relevant collaboration agreement have access to B2B engine resources.
Data encryption service The data encryption service encrypts business messages for the business protocols that require it. Data encryption works by using a combination of the sender�s certificate, private key, and the recipient�s certificate to encode the business message. The message can then be decrypted only by the recipient using the recipient�s private key. For details about using the data encryption service, see �Configuring Message Encryption� on page 4-32.
Authentication in the transport servlet
A transport servlet is a WebLogic Integration-specific servlet that serves as the entry point for both HTTP and HTTPS access to B2B resources, including the following:! WebLogic Integration repository! WebLogic Integration workflow templates and
definitions! JDBC connection pool! JMS destinationsA transport servlet is dynamically registered in the WebLogic Server environment for trading partners bound to a specific collaboration agreement.
1-4 Implementing Security with B2B Integration

WebLogic Integration B2B Security Model
Authentication for outbound request via the SSL protocol
The B2B engine authenticates the recipient for all outbound messages using the SSL certificate obtained in the SSL handshake to ensure that the messages are consistent with the relevant collaboration agreement to which they are bound.
WLCCertAuthenticator class
The WLCCertAuthenticator class maps trading partner certificates to the corresponding WebLogic Server users that have been configured for the trading partner. The WLCCertAuthenticator class implements the weblogic.security.acl.CertAuthenticator interface. You can configure this class to invoke your own or a trusted third-party vendor�s implementation that verifies trading partner certificates. For more information, see Chapter 2, �Authenticating and Authorizing Trading Partners.�
Nonrepudiation framework The B2B security system provides a means to implement nonrepudiation support. Nonrepudiation is the ability of a trading partner to prove or disprove having previously sent or received a particular business message to or from another trading partner. Nonrepudiation requires the following services:! Data encryption! Digital signatures! Secure timestamps! Secure audit logWebLogic Integration provides out-of-the-box implementations for nonrepudiation and Service Provider Interfaces (SPIs) that allow you to incorporate your own or a trusted third-party�s implementation.For more information about nonrepudiation, see Chapter 5, �Implementing Nonrepudiation.�
Table 1-1 Components in the WebLogic Integration B2B Security Model
Component Description
Implementing Security with B2B Integration 1-5
1 Introducing WebLogic Integration B2B Security
Private keystore File in which you can store the private keys, along with passwords, and certificates that are used in trading partner collaborations. These keys and passwords are embedded in the following certificates:! The client certificate�Digital certificate of the remote
or local trading partner.! The server certificate�Digital certificate of the remote
trading partner.! The signature certificate�Used for each trading partner
business message if digital signature support is required.! The encryption certificate�Used for each trading
partner if business message encryption is required.
Root CA keystore File in which you store all the trusted CA certificates associated with each trading partner and server certificate used in the B2B collaborations.
Authentication for inbound requests via SSL protocol
When an inbound trading partner message arrives, both the trading partner and the WebLogic Server system exchange certificates to establish each other�s identity. When the SSL handshake is completed, the trading partner�s network connection to the WebLogic Server system is established.For information about configuring the SSL protocol in WebLogic Server to provide mutual authentication, see �Configuring the SSL Protocol and Mutual Authentication� on page 4-2.
Table 1-1 Components in the WebLogic Integration B2B Security Model
Component Description
1-6 Implementing Security with B2B Integration
WebLogic Integration B2B Security Model
For more information about the WebLogic Server security features used by the B2B engine, see the following topics:
! �Configuring the SSL Protocol� in Managing WebLogic Security, available at the following URL:
http://edocs.bea.com/wls/docs70/secmanage/ssl.html
! �Defining ACLs in the Compatibility Realm� in �Using Compatibility Security� in Managing WebLogic Security, available at the following URL:
http://edocs.bea.com/wls/docs70/secmanage/security6.html
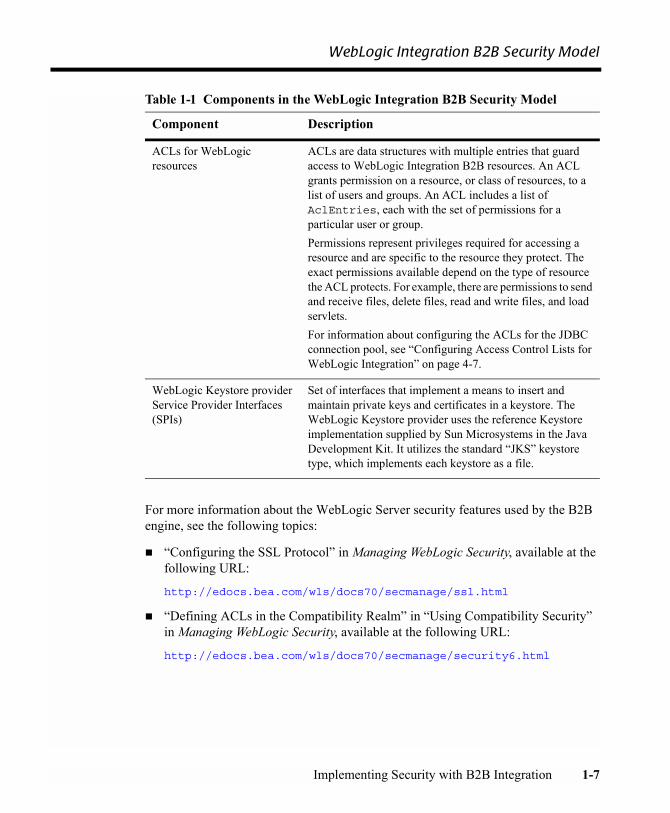
ACLs for WebLogic resources
ACLs are data structures with multiple entries that guard access to WebLogic Integration B2B resources. An ACL grants permission on a resource, or class of resources, to a list of users and groups. An ACL includes a list of AclEntries, each with the set of permissions for a particular user or group. Permissions represent privileges required for accessing a resource and are specific to the resource they protect. The exact permissions available depend on the type of resource the ACL protects. For example, there are permissions to send and receive files, delete files, read and write files, and load servlets.For information about configuring the ACLs for the JDBC connection pool, see �Configuring Access Control Lists for WebLogic Integration� on page 4-7.
WebLogic Keystore provider Service Provider Interfaces (SPIs)
Set of interfaces that implement a means to insert and maintain private keys and certificates in a keystore. The WebLogic Keystore provider uses the reference Keystore implementation supplied by Sun Microsystems in the Java Development Kit. It utilizes the standard �JKS� keystore type, which implements each keystore as a file.
Table 1-1 Components in the WebLogic Integration B2B Security Model
Component Description
Implementing Security with B2B Integration 1-7

1 Introducing WebLogic Integration B2B Security
Principals, Users, and Groups
Principals are entities that need access to the B2B environment and resources. WebLogic Integration B2B principals include:
! Trading partners
! Human users�WebLogic Integration B2B administrators
Principals are granted access to the WebLogic Integration B2B engine environment and resources through authentication and authorization mechanisms. Principals in WebLogic Integration B2B map to WebLogic Server users.
If the B2B engine can prove the identity of the WebLogic Server user, the B2B engine associates the user with a thread that executes code on behalf of the user. Before the thread begins executing code, WebLogic Integration B2B checks pertinent access control lists (ACLs) to make sure the WebLogic Server user has the proper permission to continue.
WebLogic Integration B2B supports the following types of WebLogic Server users:
! Trading partner users on WebLogic Integration
! WebLogic Integration B2B system user
! WebLogic Integration B2B administrator
Groups are sets of WebLogic Server users. Groups provide an efficient way to manage large numbers of users because an administrator can specify permissions for an entire group at one time.
About Configuring Trading Partners
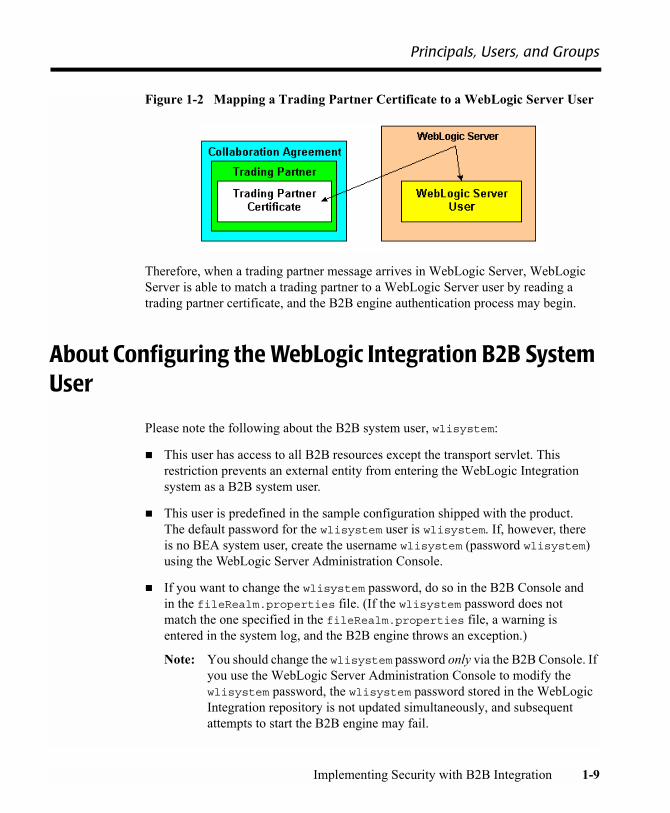
When you configure a collaboration agreement in WebLogic Integration, you also specify the trading partner name bound to that agreement. To associate a user with a trading partner in the B2B Console, specify the trading partner username, which is a WebLogic Server username. WebLogic Server maps the digital certificate for that trading partner to the trading partner user at run time.
1-8 Implementing Security with B2B Integration
Principals, Users, and Groups
Figure 1-2 Mapping a Trading Partner Certificate to a WebLogic Server User
Therefore, when a trading partner message arrives in WebLogic Server, WebLogic Server is able to match a trading partner to a WebLogic Server user by reading a trading partner certificate, and the B2B engine authentication process may begin.
About Configuring the WebLogic Integration B2B System User
Please note the following about the B2B system user, wlisystem:
! This user has access to all B2B resources except the transport servlet. This restriction prevents an external entity from entering the WebLogic Integration system as a B2B system user.
! This user is predefined in the sample configuration shipped with the product. The default password for the wlisystem user is wlisystem. If, however, there is no BEA system user, create the username wlisystem (password wlisystem) using the WebLogic Server Administration Console.
! If you want to change the wlisystem password, do so in the B2B Console and in the fileRealm.properties file. (If the wlisystem password does not match the one specified in the fileRealm.properties file, a warning is entered in the system log, and the B2B engine throws an exception.)
Note: You should change the wlisystem password only via the B2B Console. If you use the WebLogic Server Administration Console to modify the wlisystem password, the wlisystem password stored in the WebLogic Integration repository is not updated simultaneously, and subsequent attempts to start the B2B engine may fail.
Implementing Security with B2B Integration 1-9

1 Introducing WebLogic Integration B2B Security
Digital Certificates
Digital certificates are electronic documents used to uniquely identify principals and objects over networks such as the Internet. A digital certificate securely binds the identity of a user or object, as verified by a trusted third party known as a certificate authority, to a particular public key. The combination of the public key and the private key provides a unique identity to the owner of the digital certificate.
Digital certificates allow verification of the claim that a specific public key does in fact belong to a specific user or entity. The recipient of a digital certificate can verify that the certificate, including the public key of the subject, was issued and signed by a trusted certificate authority (CA). The recipient does this by using the trusted certificate authority�s public key to ensure that the digital signature was created using the corresponding CA private key. If such verification is successful, this chain of reasoning provides assurance that the corresponding private key is held by the subject named in the digital certificate, and that the digital signature was created by that particular certificate authority.
A digital certificate typically includes a variety of information, such as:
! The name of the subject (holder, owner) and other identification information required to uniquely identify the subject, such as a URL or an e-mail address
! The subject�s public key
! The name of the certificate authority that issued the digital certificate
! A serial number
! The validity period (or lifetime) of the digital certificate (defined by a start date and an end date)
The most widely accepted format for digital certificates is defined by the ITU-T X.509 international standard. Thus, digital certificates can be read or written by any application complying with the X.509 standard. The public key infrastructure (PKI) in WebLogic Server recognizes digital certificates that comply with X.509 version 1 (X.509v1) or version 3 (X.509v3).
1-10 Implementing Security with B2B Integration
Certificate Authority
Certificate Authority
Digital certificates are issued by a certificate authority. Any trusted third-party organization or company that is willing to vouch for the identities of those to whom it issues digital certificates and public keys can be a certificate authority. When a certificate authority creates a digital certificate, the certificate authority signs it with its private key, to ensure the detection of tampering. The certificate authority then returns the signed digital certificate to the requesting subject.
The subject can verify the signature of the issuing certificate authority by using the public key of the certificate authority. The certificate authority makes its public key available by providing a digital certificate issued from a higher-level certificate authority attesting to the validity of the public key of the lower-level certificate authority. This hierarchy of certificate authorities is terminated by a self-signed digital certificate known as the root certificate, as shown in the following figure.
Implementing Security with B2B Integration 1-11
1 Introducing WebLogic Integration B2B Security
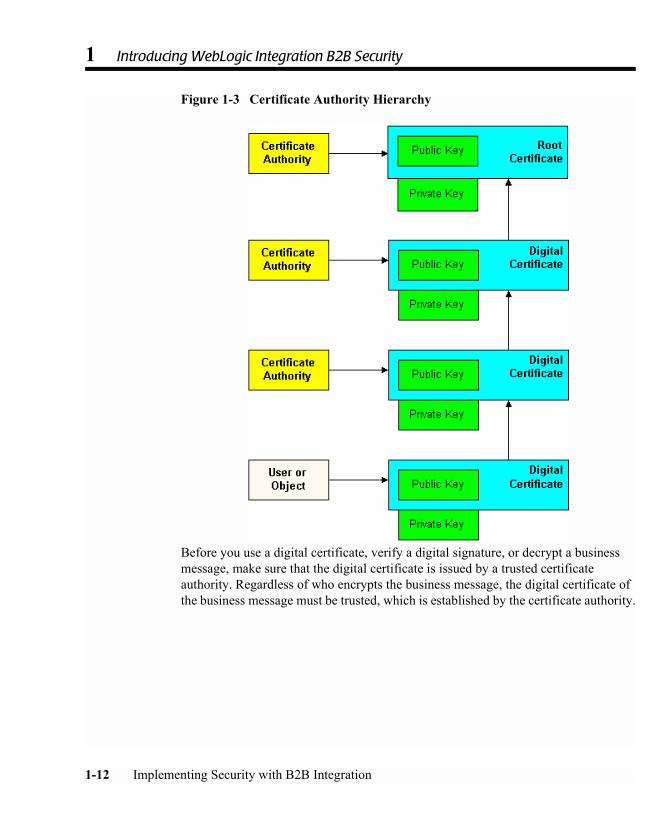
Figure 1-3 Certificate Authority Hierarchy
Before you use a digital certificate, verify a digital signature, or decrypt a business message, make sure that the digital certificate is issued by a trusted certificate authority. Regardless of who encrypts the business message, the digital certificate of the business message must be trusted, which is established by the certificate authority.
1-12 Implementing Security with B2B Integration

SSL Protocol
SSL Protocol
The SSL protocol provides secure connections by enabling two applications linked through a network connection to authenticate the other�s identity and by encrypting the data exchanged between the applications. An SSL connection begins with a handshake during which the applications exchange digital certificates, agree on the encryption algorithms to use, and generate encryption keys used for the remainder of the session.
The SSL protocol provides the following security features:
! Server authentication�the server uses its digital certificate, issued by a trusted certificate authority, to authenticate itself to clients.
! Client authentication�optionally, clients might be required to authenticate themselves to the server by providing their own digital certificates. This type of authentication is also referred to as mutual authentication. The authentication model in WebLogic Integration B2B uses mutual authentication.
! Data privacy�all client requests and server responses are encrypted to maintain the confidentiality of the data exchanged over the network.
! Data integrity�data that flows between a client and server is protected from a third party�s tampering.
The SSL protocol is used to implement link-level encryption of messages sent between trading partners.
Administrators use a Web browser to access the B2B Console. You can use the Hypertext Transfer Protocol with SSL (HTTPS) to secure this type of network communication.
Implementing Security with B2B Integration 1-13
1 Introducing WebLogic Integration B2B Security
Configuration Restrictions to Ensure a Secure Environment
WebLogic Integration B2B imposes the restrictions described in this section to ensure a secure environment. Some of these restrictions are repeated, as appropriate, in Chapter 4, �Configuring Security.�
! The B2B system user is not authorized to access the transport servlet. This ensures that no external entity can impersonate the B2B system user.
! Trading partners are not authorized to access B2B resources. (After a trading partner certificate has been authenticated, the trading partner certificate is mapped to a WebLogic Server user. Only after the trading partner business message has also been authenticated, the WebLogic Server user to whom the trading partner certificate has been mapped accesses the B2B resources on the trading partner�s behalf.)
! The architecture of the WebLogic Integration environment is designed so that there is never a need to divulge password information for trading partners because trading partners are always mapped in the B2B environment from their digital certificates.
The following figure shows how these security restrictions appear in the WebLogic Integration B2B security model.
1-14 Implementing Security with B2B Integration

Configuration Restrictions to Ensure a Secure Environment
Figure 1-4 The Secure WebLogic Integration B2B Environment
In the preceding figure, note the following callouts:
1. Any entity named wlisystem attempting to gain access to the B2B transport servlet is denied access.
2. After the trading partner certificate and business message are validated, the trading partner certificate is mapped to the corresponding WebLogic Server user.
3. The WebLogic Server user mapped in the previous step accesses the B2B resources required to service the trading partner business message.
Implementing Security with B2B Integration 1-15
1 Introducing WebLogic Integration B2B Security
1-16 Implementing Security with B2B Integration

CHAPTER
2 Authenticating and Authorizing Trading Partners
The topic includes the following sections:
! Trading Partner Authentication in WebLogic Integration
! Trading Partner Authorization in WebLogic Integration B2B
Trading Partner Authentication in WebLogic Integration
Authentication is the process by which WebLogic Integration B2B engine establishes the identity of a principal. Digital certificates using the SSL protocol with mutual authentication (HTTPS) are used between a trading partner and WebLogic Integration. The B2B engine examines and validates digital certificates against security information stored in the repository.
WebLogic Integration B2B incorporates a two-level authentication process:
! The first level involves verification of the trading partner certificate.
! The second level involves authentication of the trading partner message.
Implementing Security with B2B Integration 2-1
2 Authenticating and Authorizing Trading Partners
When a trading partner business message has passed both levels of authentication, the B2B engine performs the authorization process on the business message.
The sections that follow describe both levels of the B2B authentication process.
Trading Partner Certificate Verification
The WebLogic Integration B2B security model provides a Service Provider Interface (SPI) that allows you to insert a Java class that implements an interface that calls out to a third-party service to verify trading partner certificates. Such an implementation, called a certificate verification provider (CVP), can call out to one of the following certificate verification applications:
! A Certificate Revocation List (CRL) implementation
! An Online Certificate Status Protocol (OCSP) implementation that interacts with a trusted third-party entity, such as a certificate authority, for real-time certificate status checking
! Your own certificate verification implementation
Benefits of Certificate Verification
The purpose of trading partner certificate verification is to validate the trading partner�s digital certificate. For example, verifying a certificate may involve some or all of the following tasks:
! Traversing the certificate chain to the root certificate authority
! Checking a certificate revocation list (CRL) for all the certificates in the chain to identify any of those that have been revoked
! Performing a real-time certificate check with a trusted vendor, who can verify the certificate
! Checking to make sure all dates in the certificate chain are valid
! Verifying the signature of each certificate in the chain
Configuring and using a CVP implementation is optional, but doing so can provide an additional level of security in the certificate verification process.
2-2 Implementing Security with B2B Integration
Trading Partner Authentication in WebLogic Integration
Certificate Verification Process
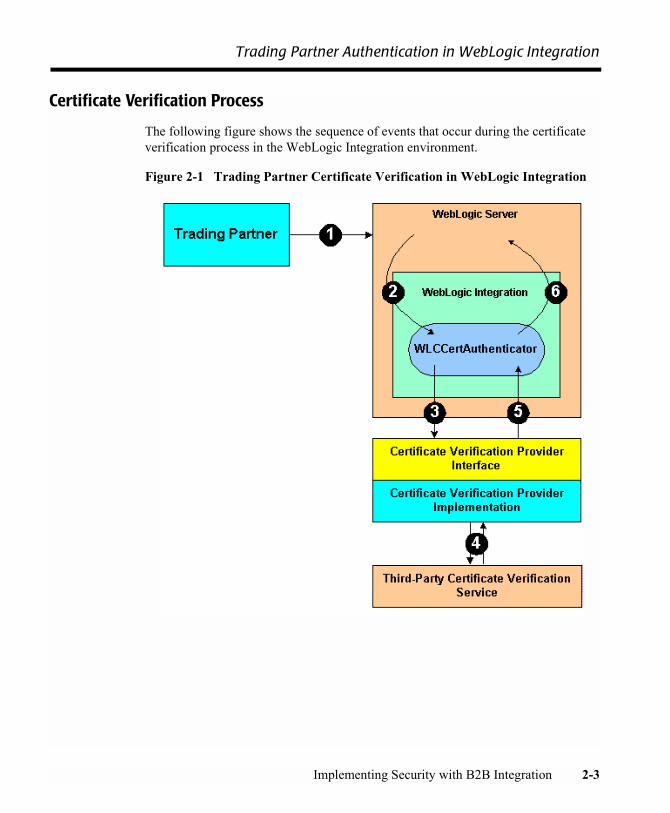
The following figure shows the sequence of events that occur during the certificate verification process in the WebLogic Integration environment.
Figure 2-1 Trading Partner Certificate Verification in WebLogic Integration
Implementing Security with B2B Integration 2-3

2 Authenticating and Authorizing Trading Partners
In the preceding figure, note the following callouts.
Implementing a Certificate Verification Provider
A certificate verification provider (CVP) Java class must implement the com.bea.b2b.security.CertificateVerificationProvider interface. You have two choices for what a CVP class can call out to:
Callout Description
1 Certificate verification is used only in SSL. The trading partner and the WebLogic Server system perform an SSL handshake, during which they exchange certificates to establish each other�s identity. The Certificate Authority of the trading partner digital certificate must be trusted in WebLogic Server. During this handshake, WebLogic Server verifies the following:! The Certificate Authority of the trading partner certificate must be one that
is trusted in the WebLogic Server environment.! The trading partner certificate has not expired.When the SSL handshake is completed, the trading partner�s network connection to the WebLogic Server system is established.
2 WebLogic Server invokes the WLCCertAuthenticator class in the B2B engine. The WLCCertAuthenticator class in turn implements the weblogic.security.acl.CertAuthenticator interface in order to map the trading partner certificate to the corresponding WebLogic Server user that has been configured for the trading partner.
3 The WLCCertAuthenticator class invokes the CVP interface to the implementation that calls out to the third-party certificate verification service.
4 The CVP implementation calls out to the third-party certificate verification service, which returns the status of the trading partner certificate.
5 The CVP implementation returns the appropriate status of the certificate to the WLCCertAuthenticator class.
6 If the trading partner certificate is valid, the B2B engine attempts to map the certificate to a valid trading partner name in the repository. If the certificate maps to a valid trading partner, WebLogic Integration returns a WebLogic Server user to WebLogic Server.
2-4 Implementing Security with B2B Integration
Trading Partner Authentication in WebLogic Integration
! A trusted third-party vendor that conforms to the service provider interface, as described in �Using the Service Provider Interface� on page 2-5.
! Your own certificate verification application.
Regardless of which choice you pick, you need to create a Java implementation of the CVP SPI that calls out to the application that performs the actual certificate verification. Creating, compiling, and configuring this CVP application is explained in the subsections that follow.
Using the Service Provider Interface
WebLogic Integration B2B allows you to implement a CVP via the com.bea.b2b.security.CertificateVerificationProvider interface, which provides the CVP service provider interface (SPI). If you implement or use a CVP using the SPI described in this section, you must later configure this CVP in the WebLogic Integration B2B Console so that the CVP is invoked properly during run time.
The com.bea.b2b.security.CertificateVerificationProvider interface has the following methods, which a CVP application must implement:
! void init()
This method is automatically invoked by the B2B engine to invoke any custom initialization processes in the class you create that implements this interface. This method is invoked only once, at the startup of WebLogic Integration.
! String verify(Certificate[] certs)
This method validates the certificate chain obtained during the SSL handshake. It returns one of the following String values:
" good�the trading partner certificate is valid and not expired.
" revoked�the trading partner certificate has been revoked by one of the certificate authorities in the certificate chain, or the trading partner certificate has expired.
" unknown�none of the certificate authorities in the certificate chain is able to establish the validity of the trading partner certificate.
The implementer can choose the validation procedure performed by this method. For example, this method can check certificate revocation lists (CRLs) stored in files, it can check the certificate status in real-time using the Online Certificate Status Protocol (OCSP), or it can use any other mechanism, as appropriate.
Implementing Security with B2B Integration 2-5

2 Authenticating and Authorizing Trading Partners
Notes: If you implement a CVP, you need to add a default public constructor for the CVP with no arguments. Neither the constructor nor any methods in the class should throw any exceptions.
If you do not configure a CVP, any certificate issued by a trusted certificate authority is considered by the B2B engine to be valid.
Compiling the Certificate Verification Provider Class
If you implement a CVP, note the following:
! After you create the CVP Java class, you must compile it and place it in the system CLASSPATH.
! You must configure the CVP via the B2B Console or the Bulk Loader utility. After you configure the CVP, restart WebLogic Server so that the CVP can take effect. If you do not configure a CVP, any certificate issued by a trusted certificate authority is considered by the B2B engine to be valid.
Configuring a Certificate Verification Provider with WebLogic Integration B2B
For complete details about using the B2B Console to configure a CVP, see �Configuring a Certificate Verification Provider Interface� on page 4-38. After you configure a CVP, restart WebLogic Server so that the CVP can take effect.
Authentication of the Trading Partner Message
After a trading partner�s certificate has been validated by WebLogic Server, the B2B engine needs to authenticate the trading partner message before the message itself can be serviced. Authenticating the trading partner message involves verifying that the sender of the business message is a valid trading partner listed in the WebLogic Integration repository. After a trading partner message has been authenticated, the trading partner�s identity becomes recognized for full access to B2B resources.
The following figure shows the process of authenticating a trading partner message.
2-6 Implementing Security with B2B Integration
Trading Partner Authentication in WebLogic Integration
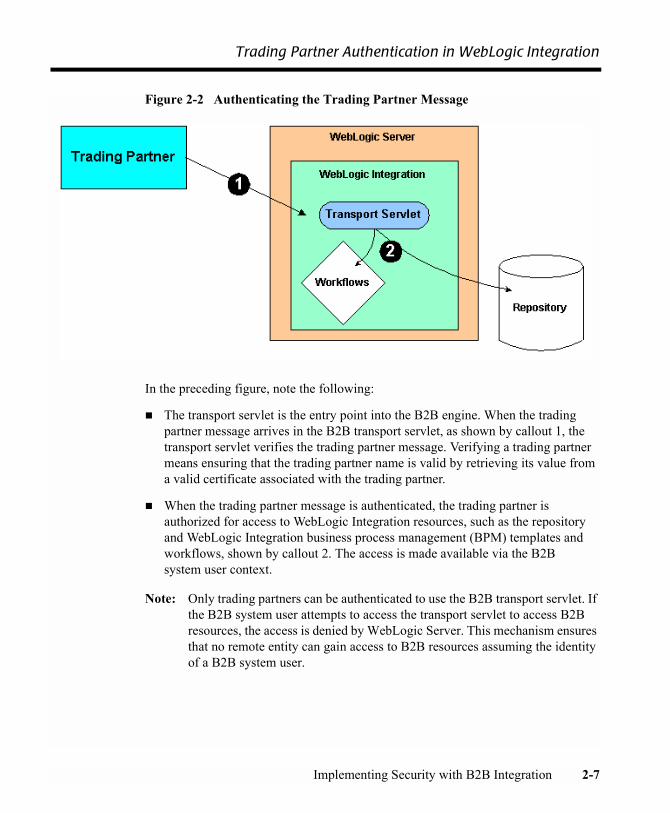
Figure 2-2 Authenticating the Trading Partner Message
In the preceding figure, note the following:
! The transport servlet is the entry point into the B2B engine. When the trading partner message arrives in the B2B transport servlet, as shown by callout 1, the transport servlet verifies the trading partner message. Verifying a trading partner means ensuring that the trading partner name is valid by retrieving its value from a valid certificate associated with the trading partner.
! When the trading partner message is authenticated, the trading partner is authorized for access to WebLogic Integration resources, such as the repository and WebLogic Integration business process management (BPM) templates and workflows, shown by callout 2. The access is made available via the B2B system user context.
Note: Only trading partners can be authenticated to use the B2B transport servlet. If the B2B system user attempts to access the transport servlet to access B2B resources, the access is denied by WebLogic Server. This mechanism ensures that no remote entity can gain access to B2B resources assuming the identity of a B2B system user.
Implementing Security with B2B Integration 2-7

2 Authenticating and Authorizing Trading Partners
Trading Partner Authorization in WebLogic Integration B2B
Authorization is the process of allowing a B2B principal access to a specific set of B2B resources. The authorization model in the B2B system is based on an ACL and permission mechanism and role-based authorization control.
The B2B system incorporates two levels of authorization:
! Authorization of the trading partner for access to the B2B transport servlet
! Authorization of the conversation associated with the trading partner business message
Trading Partner Authorization
This level of authorization is performed by WebLogic Server. When the trading partner message arrives in WebLogic Server, and the trading partner and WebLogic Server complete the mutual authentication procedure, the trading partner becomes authorized to access the B2B transport servlet.
The path of the transport servlet is dynamic, so you need to edit the web.xml file to allow trading partners to access the URL of the transport servlet. You cannot preconfigure this because of the dynamic nature of the URL corresponding to the transport servlet in the B2B environment.
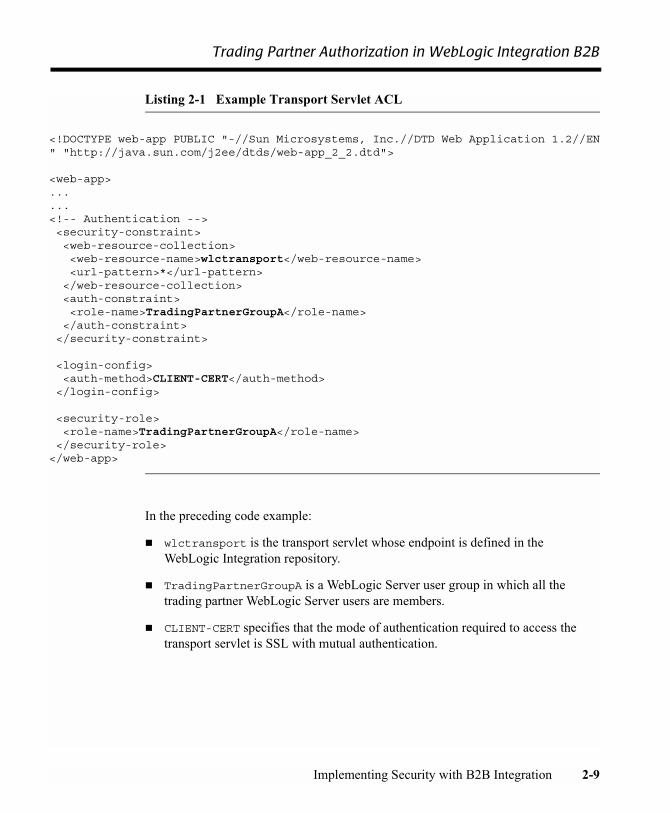
You need to specify transport servlet ACLs in the web.xml file. The following example shows a web.xml file that specifies the ACLs for a transport servlet named wlctransport.
2-8 Implementing Security with B2B Integration
Trading Partner Authorization in WebLogic Integration B2B
Listing 2-1 Example Transport Servlet ACL
<!DOCTYPE web-app PUBLIC "-//Sun Microsystems, Inc.//DTD Web Application 1.2//EN" "http://java.sun.com/j2ee/dtds/web-app_2_2.dtd">
<web-app>...... <!-- Authentication --> <security-constraint> <web-resource-collection> <web-resource-name>wlctransport</web-resource-name> <url-pattern>*</url-pattern> </web-resource-collection> <auth-constraint> <role-name>TradingPartnerGroupA</role-name> </auth-constraint> </security-constraint>
<login-config> <auth-method>CLIENT-CERT</auth-method> </login-config>
<security-role> <role-name>TradingPartnerGroupA</role-name> </security-role></web-app>
In the preceding code example:
! wlctransport is the transport servlet whose endpoint is defined in the WebLogic Integration repository.
! TradingPartnerGroupA is a WebLogic Server user group in which all the trading partner WebLogic Server users are members.
! CLIENT-CERT specifies that the mode of authentication required to access the transport servlet is SSL with mutual authentication.
Implementing Security with B2B Integration 2-9

2 Authenticating and Authorizing Trading Partners
Conversation Authorization
When the B2B engine performs conversation authorization, the server examines the content of the trading partner business message with respect to the collaboration agreement to which the trading partner is bound. That is, for a given role and party specified in a collaboration agreement, a trading partner may send only a specific set of business messages. The B2B engine validates the business message against the following information specified in the collaboration agreement for a particular conversation:
! Party information (trading partner and role)
! Conversation definition
! Document exchange ID
Once the conversation authorization is complete for an incoming business message, access to the B2B resources is dictated by ACLs.
2-10 Implementing Security with B2B Integration

Implementing Security with B2B Integration 3-1
CHAPTER
3 Configuring the Keystore
This topic includes the following sections:
! About the Keystore
! Creating the Domain
! Creating the Keystores and Inserting the Server Certificates
! Configuring the WebLogic Keystore Provider
! Adding Trading Partner Certificates to the Keystore
! Configuring the Domain to Use the Keystore
! Using the Keystore in a Multinode Cluster
For general information about configuring WebLogic Integration B2B, see �Basic Configuration Tasks� in Administering B2B Integration.
About the Keystore
A keystore is a protected database that holds keys and certificates. If you have keys and certificates and use message encryption, digital signatures, or SSL, we recommend that you use a keystore for storing those keys and certificates and make the keystore
3 Configuring the Keystore
3-2 Implementing Security with B2B Integration
available to applications that may need it for authentication or signing purposes, such as a B2B application. To create a keystore and make it available, you need a keystore provider, which has been introduced in the WebLogic Server 7.0 security architecture.
The WebLogic Keystore provider uses the reference Keystore implementation supplied by Sun Microsystems in the Java Development Kit. The WebLogic Keystore provider:
! Utilizes the JDK bundled Java KeyStore (JKS) provider, which implements the keystore as a file
! Protects each private key with an individual password
! Protects the entire keystore with a password
Keystores You Create
When you set up a WebLogic Integration domain for B2B collaborations, you configure the WebLogic Keystore provider to create the following keystores:
! Private keystore
Stores the trading partners� certificates and private keys, such as for the client, server, signature, and encryption certificates typically required for B2B collaborations. The B2B engine retrieves private keys and certificates from this keystore to use for SSL, message encryption, and digital signatures. You can use the JavaSoft JDK keytool utility or the WebLogic Server ImportPrivateKey utility to create this keystore and to add private keys and their associated certificates to it.
! Root CA keystore
Stores the certificates of all the trusted certificate authorities (CAs). The WebLogic Keystore provider creates a trusted CA keystore that WebLogic Server uses by default to locate the trusted CAs used by SSL to verify client, server, signature, and encryption certificates.
About the Keystore
Implementing Security with B2B Integration 3-3
Steps for Creating and Configuring Keystores
Complete the following basic steps to create and configure the keystores required for your B2B collaborations:
1. Create the B2B domain.
2. Create the keystores and insert the server certificates and keys required by SSL.
3. Configure the WebLogic Keystore provider.
4. Add trading partner certificates to the keystore.
5. Add trusted certificate authority certificates to the CA keystore.
6. Configure the domain to use the keystores.
This topic also includes a discussion about using keystore files in a multinode cluster.
For background information about keystores, certificates, and keys, see the following:
! For details about the WebLogic Keystore provider, see �The WebLogic Security Providers� in Introduction to WebLogic Security, available at the following URL:
http://edocs.bea.com/wls/docs70/secintro/model.html
! For details about certificates and keys, see:
" �Security Fundamentals� in Programming WebLogic Security, available at the following URL:http://edocs.bea.com/wls/docs70/security/concepts.html
3 Configuring the Keystore
3-4 Implementing Security with B2B Integration
Creating the Domain
We recommend that you use the BEA Configuration Wizard to create the WebLogic Integration B2B domain for which you will be configuring security. To create a WebLogic Integration domain, complete the following steps:
1. Start the Configuration Wizard as described in Using the Configuration Wizard, available at the following URL:
http://edocs.bea.com/platform/docs70/confgwiz/index.html
2. Complete the configuration of the WebLogic Integration domain, which can be any of the following:
" WebLogic Integration BPM Domain
" WebLogic Integration EAI Domain
" WebLogic Integration Domain
Note: Make sure you select a WebLogic Integration template for creating the new domain; do not use a WebLogic Server or a WebLogic Portal template. By using a WebLogic Integration template, you can ensure that the domain created in this step is based on the WebLogic Server 6.x security realm in compatibility mode. The new WebLogic Server 7.0 realm, based on LDAP, is not supported with WebLogic Integration. If you create a new domain by selecting a WebLogic Server template, the new domain uses the new WebLogic Server 7.0 security realm, which is based on LDAP.
3. After you exit from the Configuration Wizard, bring the following file from the newly created custom domain into a text editor:
DOMAIN_HOME/config.xml
In the preceding line, DOMAIN_HOME represents the path for the directory containing the custom domain. For example, the value of DOMAIN_HOME on Windows is:
c:\bea\user_projects\mydomain
Creating the Keystores and Inserting the Server Certificates
Implementing Security with B2B Integration 3-5
4. Disable the automatic deployment of the WebLogic Integration application created in the custom domain. To do so, set the Deployed attribute of the WLIapplication element in the config.xml file to false, as in the following example:
<Application Deployed="false" Name="WLIApplication"Path="<%WLI_HOME%\lib>” TwoPhase="true">
Creating the Keystores and Inserting the Server Certificates
This section explains how to create the private keystores for storing the server certificates and keys required to use SSL, and the associated CA keystores for CA certificates. For a description of how to add trading partner certificates to the private keystores, see �Adding Trading Partner Certificates to the Keystore� on page 3-11.
We strongly recommend that you use SSL for trading partner authentication. If you do so, however, you should also configure SSL for each machine in your B2B domain. When you configure SSL, you need to provide a certificate and private key for the local instance of WebLogic Server. This certificate is known as the server certificate. We recommend that you store the server certificate and private key for the local server in the keystore. This section explains how to add the server certificate and private key to the keystore.
During the trading partner authentication and authorization process, the SSL layer in the relevant WebLogic Server instance uses the keystores for obtaining the following:
! The local server�s certificate and private key from the private keystore
! The trusted CA certificates from the root CA keystore
For instructions on configuring WebLogic Server to use SSL, see �Configuring the SSL Protocol and Mutual Authentication� on page 4-2.

3 Configuring the Keystore
3-6 Implementing Security with B2B Integration
Because the WebLogic Integration security service is built on WebLogic Server, only JKS-provider based keystores are currently certified for use with WebLogic Integration. To create the keystores you need for B2B collaborations, you can use either of the following utilities:
! JavaSoft JDK keytool utility
For information about this utility, see keytool�Key and Certificate Management Tool, published by Sun Microsystems, at the following URL:
http://java.sun.com/products/jdk/1.2
! WebLogic Server ImportPrivateKey utility
For information about this utility, see �Using the WebLogic Java Utilities� in the WebLogic Server Administration Guide, at the following URL:
http://edoc.bea.com/wls/docs70/adminguide/utils.html
To create the keystore required for your WebLogic Integration B2B domain, complete the following steps:
1. Open a command window.
2. Go to the root directory of the domain. For example, on Windows:
c:\> cd bea\user_projects\b2bdomain
3. Obtain or create the following files:
" Server certificates and private keys
A server certificate and private key is required by SSL for authentication and authorization. You can create a server certificate and private key using the CertGen utility. We recommend that you use certificates and keys created by CertGen for testing purposes only; they are not meant to be used in a production environment. For more information about the CertGen utility, see �Using the WebLogic Java Utilities� in the WebLogic Server Administration Guide, at the following URL:
http://edocs.bea.com/wls/docs70//adminguide/utils.html
" Root CA certificate and private key
If necessary, you can use the CA keystore from the JDK bundled with WebLogic Server. This keystore, cacerts, resides in the following location:
JAVA_HOME/jre/lib/security

Creating the Keystores and Inserting the Server Certificates
Implementing Security with B2B Integration 3-7
4. Use either the keytool or ImportPrivateKey utility to create the private keystore, inserting the server certificate(s) and private key(s).
Note: The command for creating a keystore is the same as that for inserting a certificate and key. If the keystore does not exist when you insert a certificate and key, it is created when you enter the command.
The ImportPrivateKey command for creating a private keystore has the following syntax:
java utils.ImportPrivateKey keystoreName keystorepass alias keypass certfile keyfile
Note: When you run the ImportPrivateKey command, make sure that BEA WebLogic Platform is included in your classpath.
The following table describes the arguments available for the ImportPrivateKey utility.
Table 3-1 ImportPrivateKey Command Arguments
Command Argument Description
keystoreName Defines the name of the keystore file. A new keystore is created if one does not exist.
keystorepass Defines the password needed to open the keystore file.
alias Defines the name used to look up the certificate and key in the keystore. Note: We recommend you note the strength of the encryption used in the alias: domestic or export.
keypass Defines the password used to unlock the private key file and to protect the private key in the keystore. If you created the server certificate using CertGen, this is the password with which you created it.
certfile Defines the name of the certificate associated with the private key
keyfile Define the name of the file holding the protected private key. Note: We recommend that you include the encryption strength in the name of the keyfile. For example: keyDomestic.pem or keyExport.pem.
3 Configuring the Keystore
3-8 Implementing Security with B2B Integration
Execute the ImportPrivateKey or keytool command for each server certificate and key you want to add to the private keystore.
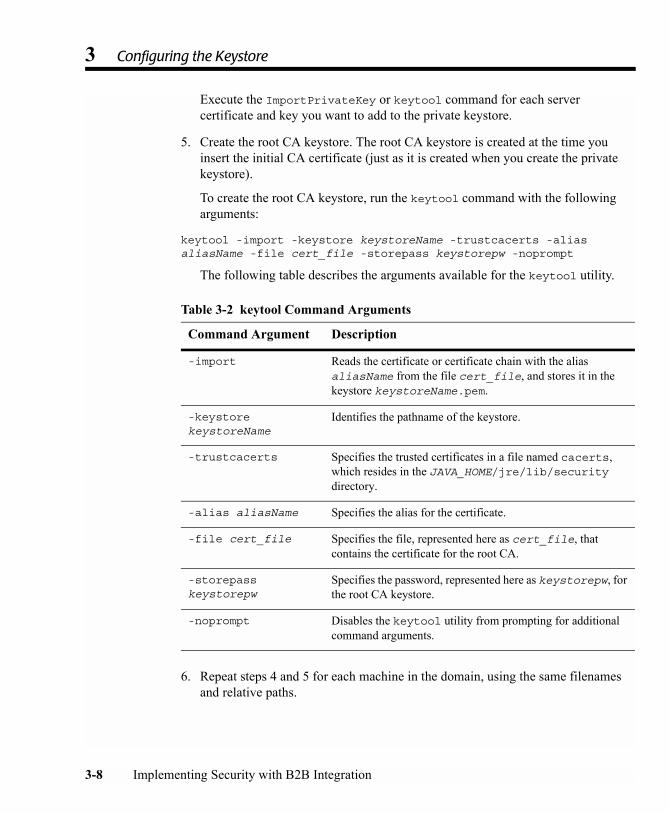
5. Create the root CA keystore. The root CA keystore is created at the time you insert the initial CA certificate (just as it is created when you create the private keystore).
To create the root CA keystore, run the keytool command with the following arguments:
keytool -import -keystore keystoreName -trustcacerts -aliasaliasName -file cert_file -storepass keystorepw -noprompt
The following table describes the arguments available for the keytool utility.
6. Repeat steps 4 and 5 for each machine in the domain, using the same filenames and relative paths.
Table 3-2 keytool Command Arguments
Command Argument Description
-import Reads the certificate or certificate chain with the alias aliasName from the file cert_file, and stores it in the keystore keystoreName.pem.
-keystore keystoreName
Identifies the pathname of the keystore.
-trustcacerts Specifies the trusted certificates in a file named cacerts, which resides in the JAVA_HOME/jre/lib/security directory.
-alias aliasName Specifies the alias for the certificate.
-file cert_file Specifies the file, represented here as cert_file, that contains the certificate for the root CA.
-storepass keystorepw
Specifies the password, represented here as keystorepw, for the root CA keystore.
-noprompt Disables the keytool utility from prompting for additional command arguments.
Configuring the WebLogic Keystore Provider
Implementing Security with B2B Integration 3-9
Note: To make sure that SSL authentication and authorization work properly, be sure that you use the same filenames and paths for the keystores, certificates, keys, and so on, on each machine.
7. If you are deploying your B2B domain in a multinode cluster, configure the Node Manager, as explained in �Managing Server Availability with Node Manager� in Creating and Configuring WebLogic Server Domains, at the following URL:
http://edocs.bea.com/wls/docs70/admin_domain/nodemgr.html
Configuring the WebLogic Keystore Provider
To configure the WebLogic Keystore provider with the keystores you created in �Creating the Keystores and Inserting the Server Certificates� on page 3-5, complete the following steps:
1. Start WebLogic Server in the newly-created custom domain. For example, on Windows, choose Start→ BEA WebLogic Platform7.0→ UserProjects→ domain→ servername.
2. Start the WebLogic Server Administration Console, as described in �Starting the WebLogic Server Administration Console� in �WebLogic Integration Administration and Design Tools� in Starting, Stopping, and Customizing BEA WebLogic Integration.
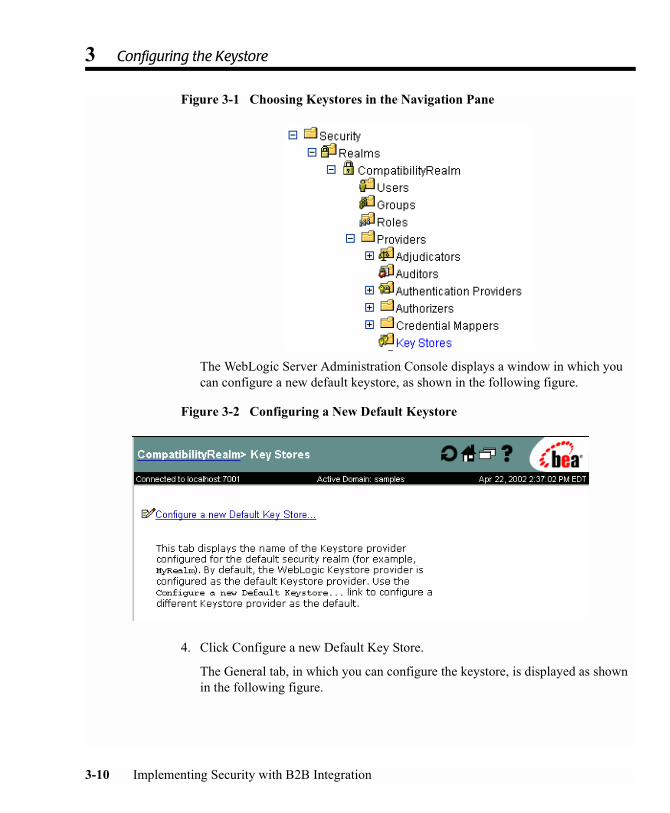
3. In the navigation pane on the left, choose Security→ Realms→ CompatibilityRealm→ Providers→ Key Stores.
3 Configuring the Keystore
3-10 Implementing Security with B2B Integration
Figure 3-1 Choosing Keystores in the Navigation Pane
The WebLogic Server Administration Console displays a window in which you can configure a new default keystore, as shown in the following figure.
Figure 3-2 Configuring a New Default Keystore
4. Click Configure a new Default Key Store.
The General tab, in which you can configure the keystore, is displayed as shown in the following figure.
Adding Trading Partner Certificates to the Keystore
Implementing Security with B2B Integration 3-11
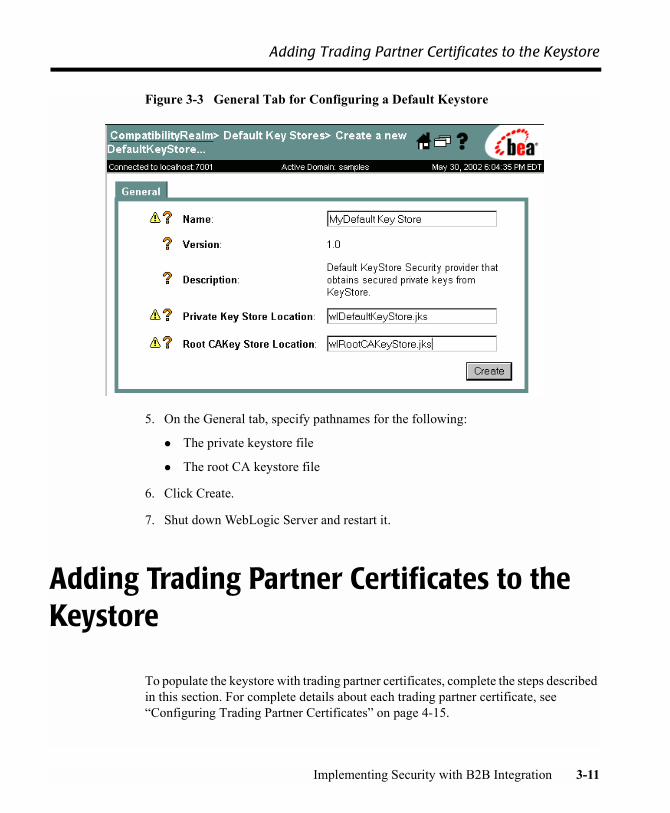
Figure 3-3 General Tab for Configuring a Default Keystore
5. On the General tab, specify pathnames for the following:
" The private keystore file
" The root CA keystore file
6. Click Create.
7. Shut down WebLogic Server and restart it.
Adding Trading Partner Certificates to the Keystore
To populate the keystore with trading partner certificates, complete the steps described in this section. For complete details about each trading partner certificate, see �Configuring Trading Partner Certificates� on page 4-15.

3 Configuring the Keystore
3-12 Implementing Security with B2B Integration
Notes: Even if your keystores are already populated with required certificates and private keys, you still need to perform the following tasks to populate the WebLogic Integration repository with the necessary information.
WebLogic Integration does not validate any of the trading partner certificates against a trusted Certificate Authority as you load them into the keystore.
1. Enable automatic deployment of the WebLogic Integration application created in the B2B domain by setting the Deployed attribute of the WLI application element in the config.xml file to true, as in the following example:
<Application Deployed="true" Name="WLI" Path="<%WLI_HOME%\lib>” TwoPhase="true">
2. Start the B2B Console, as described in �Starting the B2B Console� in �WebLogic Integration Administration and Design Tools� in Starting, Stopping, and Customizing BEA WebLogic Integration.
This section presents the following procedures for populating the private keystore for B2B collaborations:
! Adding the Certificates and Private Keys for a Local Trading Partner
! Adding the Certificates for a Remote Trading Partner
! Bulk Loading and Importing Certificates into the Keystore
! Removing Certificates and Private Keys from the Keystore
Adding the Certificates and Private Keys for a Local Trading Partner
A local trading partner requires the following certificates and private keys:
! Client certificate and private key
! Encryption certificate and private key
! Signature certificate and private key
To add these certificates and private keys to the private keystore, complete the steps described in this section.
Adding Trading Partner Certificates to the Keystore
Implementing Security with B2B Integration 3-13
Note: Do not configure a server certificate for a local trading partner. Although the encryption and signature certificates are optional, the client certificate is required if you are using SSL with mutual authentication. For complete details about local trading partner certificates, see �Configuring Trading Partner Certificates� on page 4-15. For information about using server-side, or one-way authentication, which does not require the use of a client certificate, see �Configuring Server-Side Authentication� on page 4-45.
1. In the navigation pane on the left, choose B2B→Trading Partners.
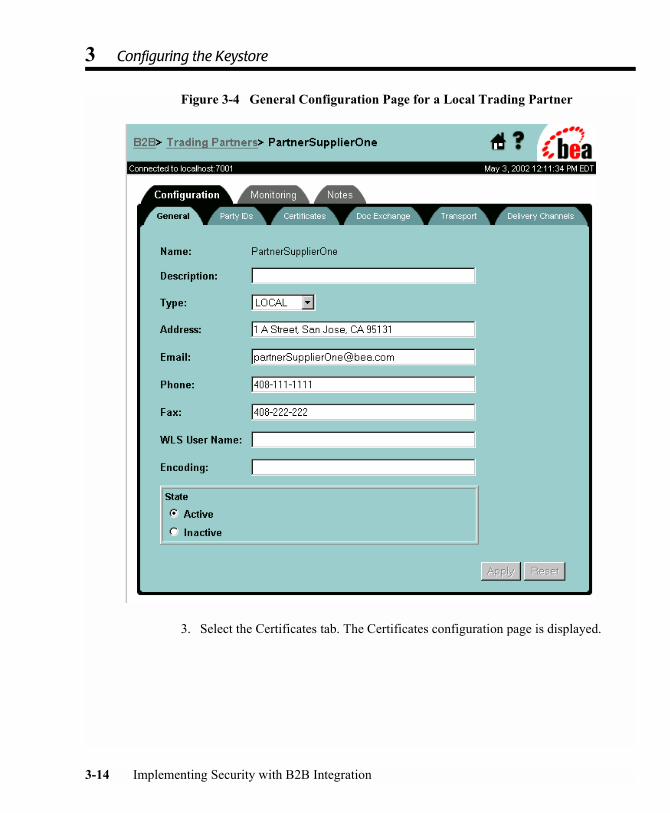
2. Click the name of the local trading partner for whom you are adding certificates. The General configuration tab is displayed.
3 Configuring the Keystore
3-14 Implementing Security with B2B Integration
Figure 3-4 General Configuration Page for a Local Trading Partner
3. Select the Certificates tab. The Certificates configuration page is displayed.

Adding Trading Partner Certificates to the Keystore
Implementing Security with B2B Integration 3-15
Figure 3-5 Certificates Configuration Page for a Local Trading Partner
4. Click Create a Certificate Entry. The console displays a page on which you can specify details about the certificate you are adding for your local trading partner.

3 Configuring the Keystore
3-16 Implementing Security with B2B Integration
Figure 3-6 Creating a Certificate Entry for a Local Trading Partner
5. For each trading partner certificate, enter the following information:
" A name or alias for the certificate. If the keystore has already been populated with this certificate, the alias that you specify must match the one used for this certificate�s initial entry in the keystore.
" The certificate type. For a local trading partner, valid types are Client Certificate, Signature Certificate, and Encryption Certificate.
" The certificate�s location. If you are deploying WebLogic Integration on a cluster, the location you specify needs to be the same on each machine.
" The location of the private key associated with the certificate. If you are deploying WebLogic Integration on a cluster, the location you specify needs to be the same on each machine.
" The password for the private key. This password is used by the server when it reads the contents of the private key and when it stores the private key in the keystore. The password itself is not stored or retained anywhere in the system. If the keystore has already been populated, the password that you specify must match the one used to store the private key in the keystore.
Adding Trading Partner Certificates to the Keystore
Implementing Security with B2B Integration 3-17
Note: When importing a plain-text (or unprotected) private key using the B2B Console, specify the password of the private keystore in the field labeled Private Key Password.
6. Click Add to add the certificate and private key to the WebLogic Integration repository.
7. Select the Save Certificate to Keystore check box to add the certificate and private key to the private keystore.
Adding the Certificates for a Remote Trading Partner
A remote trading partner has the following certificates:
! Client certificate
! Encryption certificate
! Signature certificate
! Server certificate
Note: Do not specify private keys for remote trading partner certificates. Although the encryption and signature certificates are optional, the client and server certificates are required for using mutual authentication with SSL. For complete details about remote trading partner certificates, see �Configuring Trading Partner Certificates� on page 4-15. For information about using server-side, or one-way authentication, which does not require the use of a client certificate, see �Configuring Server-Side Authentication� on page 4-45.
To add these certificates to the private keystore, complete the following steps:
1. Start the B2B Console, if necessary.
2. In the navigation pane on the left, choose B2B→ Trading Partners.
3. Click the name of the remote trading partner for whom you are adding certificates. The General configuration tab is displayed.
4. Select the Certificates tab. The Certificates configuration page is displayed.
3 Configuring the Keystore
3-18 Implementing Security with B2B Integration
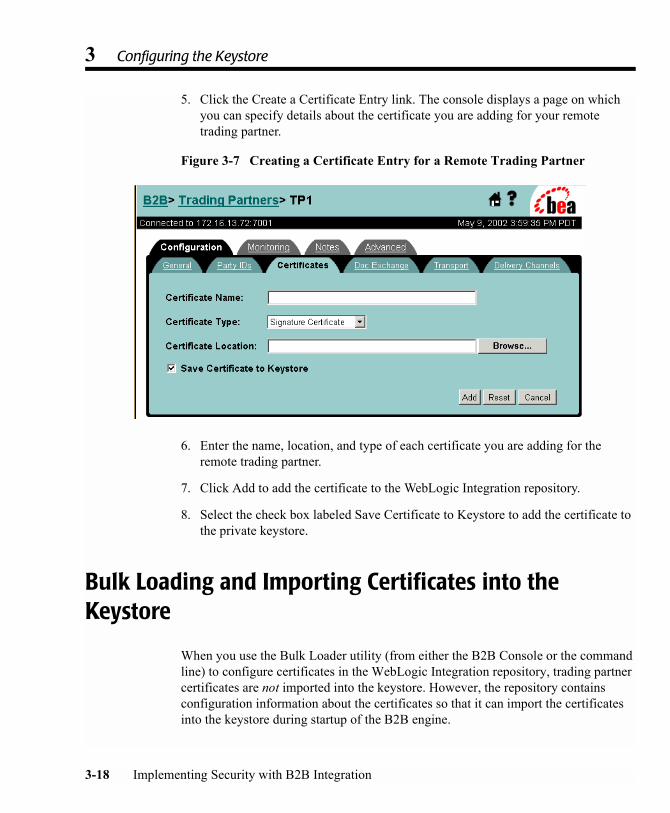
5. Click the Create a Certificate Entry link. The console displays a page on which you can specify details about the certificate you are adding for your remote trading partner.
Figure 3-7 Creating a Certificate Entry for a Remote Trading Partner
6. Enter the name, location, and type of each certificate you are adding for the remote trading partner.
7. Click Add to add the certificate to the WebLogic Integration repository.
8. Select the check box labeled Save Certificate to Keystore to add the certificate to the private keystore.
Bulk Loading and Importing Certificates into the Keystore
When you use the Bulk Loader utility (from either the B2B Console or the command line) to configure certificates in the WebLogic Integration repository, trading partner certificates are not imported into the keystore. However, the repository contains configuration information about the certificates so that it can import the certificates into the keystore during startup of the B2B engine.

Adding Trading Partner Certificates to the Keystore
Implementing Security with B2B Integration 3-19
Before the B2B engine can import trading partner certificates into the keystore, you must have automatic migration enabled in the startWeblogic script. To enable automatic migration, complete the following steps:
1. Shut down the WebLogic Server instance in the B2B domain created in �Creating the Domain� on page 3-4. You can do so by executing the stopWeblogic script, which is located in the B2B domain�s root directory. For example:
" Windows:
cd DOMAIN_HOMEstopWeblogic.cmd
" UNIX:
cd DOMAIN_HOMEstopWebLogic.sh
In the preceding examples, DOMAIN_HOME is the root directory of the B2B domain.
2. Add the Java system property wli.keystore.automigrate to the Java command line in the startWeblogic script, and set the property value to true, as shown in the following listing. The wli.keystore.automigrate property is shown in bold.
%JAVA_HOME%\bin\java %DB_JVMARGS% -Xmx256m -classpath %WLISERVERCP%-Dbea.home=%BEA_HOME% -Dwli.bpm.server.evaluator.supportsNull=false-Dweblogic.Domain=mydomain -Dweblogic.Name=myserver-Dweblogic.management.username= -Dweblogic.management.password=-Dweblogic.ProductionModeEnabled=true -Dweblogic.management.discover=false-Djava.security.policy==%WL_HOME%\lib\weblogic.policy weblogic.Server-Dwli.keystore.automigrate=true
3. Save your changes.
When WebLogic Server is restarted in the domain, the certificates and keys are imported.
3 Configuring the Keystore
3-20 Implementing Security with B2B Integration
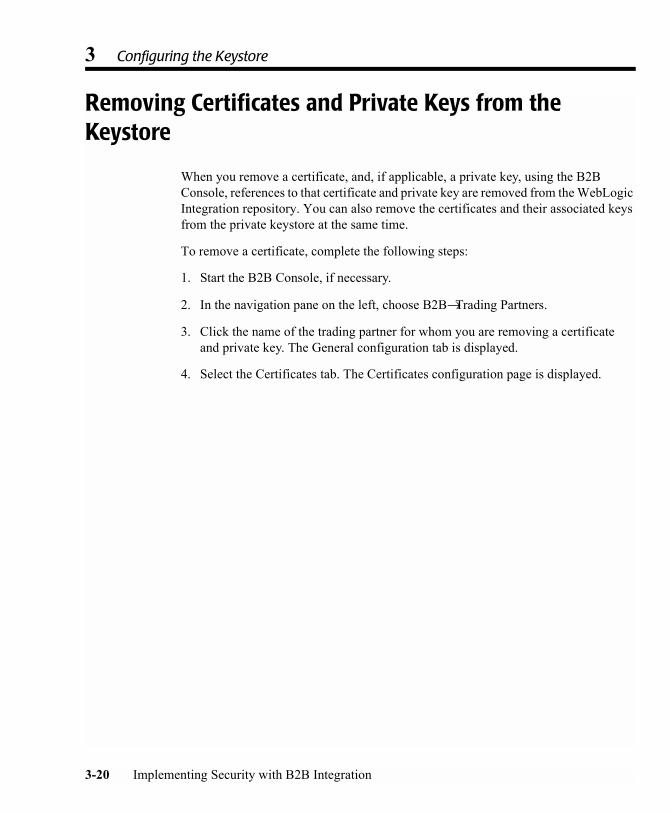
Removing Certificates and Private Keys from the Keystore
When you remove a certificate, and, if applicable, a private key, using the B2B Console, references to that certificate and private key are removed from the WebLogic Integration repository. You can also remove the certificates and their associated keys from the private keystore at the same time.
To remove a certificate, complete the following steps:
1. Start the B2B Console, if necessary.
2. In the navigation pane on the left, choose B2B→Trading Partners.
3. Click the name of the trading partner for whom you are removing a certificate and private key. The General configuration tab is displayed.
4. Select the Certificates tab. The Certificates configuration page is displayed.
Adding Trading Partner Certificates to the Keystore
Implementing Security with B2B Integration 3-21
Figure 3-8 Removing a Certificate from the Keystore
5. Choose the type of certificate you want to remove.
6. Select the alias for the certificate in the list box.
7. Click Remove to remove the certificate and, if applicable, private key, from the WebLogic Integration repository.
8. To remove the certificate and private key from the keystore, as well as from the repository, make sure the box labeled Remove Certificate from Keystore is checked, and click Remove.
3 Configuring the Keystore
3-22 Implementing Security with B2B Integration
Configuring the Domain to Use the Keystore
To configure your B2B domain to use the keystores you have created, you need to modify the startWeblogic script that resides in the root directory for your domain. To modify this script, complete the following steps:
1. Go to the root directory for the domain, as shown in the following examples.
" Windows:
c:\bea\user_projects\domain
" UNIX:
/usr/bin/bea/user_projects/domain
In the preceding pathnames, domain represents the name of your B2B domain.
2. In a text editor, open the startWebLogic.cmd script (for Windows) or the startWebLogic.sh script (for UNIX).
3. Locate the line on which the java command is issued to start WebLogic Server, as shown in the following example.
%JAVA_HOME%\bin\java %DB_JVMARGS% -Xmx256m -classpath %WLISERVERCP%-Dbea.home=%BEA_HOME% -Dwli.bpm.server.evaluator.supportsNull=false-Dweblogic.Domain=mydomain -Dweblogic.Name=myserver-Dweblogic.management.username= -Dweblogic.management.password=-Dweblogic.ProductionModeEnabled=true -Dweblogic.management.discover=false-Djava.security.policy==%WL_HOME%\lib\weblogic.policy weblogic.Server
4. To this java command, add the system property that specifies the private key passwords for the signature and message encryption certificates, using the following syntax:
-DKey.certificate-name.password=key_password *
In the preceding syntax:
" certificate-name represents the name or alias of the certificate that is added to the keystore in �Adding Trading Partner Certificates to the Keystore� on page 3-11.
" key_password represents the private key password specified for the certificate when the certificate is added to the keystore. Note that you do not
Using the Keystore in a Multinode Cluster
Implementing Security with B2B Integration 3-23
need to specify a password for plain-text private keys; the B2B engine uses the password of the keystore to retrieve such private keys.
5. Also to this java command, add the system properties that specify the passwords for the private keystore and the root CA keystore, using the following syntax:
-Dwli.privateKeystore.password=keystore_pass-Dwli.caKeystore.password=caKeystore_pass
In the preceding syntax:
" privateKeystore represents the private keystore created as described in �Creating the Keystores and Inserting the Server Certificates� on page 3-5.
" keystore_pass represents the password for the private keystore.
" caKeystore represents the root CA keystore, created as described in �Creating the Keystores and Inserting the Server Certificates� on page 3-5.
" caKeystore_pass represents the password for the root CA keystore.
Note: We recommend that you set passwords in environment variables, rather than hard-coding the passwords into scripts such as startWeblogic. When environment variables are used, scripts can obtain the values for passwords from the environments in which the scripts run.
Using the Keystore in a Multinode Cluster
If you are deploying your B2B domain on a multinode cluster, you need to do the following:
1. Replicate the private and root CA keystores on each machine in the cluster. These keystores must be in the same relative location on every machine.
2. Make sure that the server certificate is stored in the same relative location on every machine. To meet the requirements of SSL support, the server certificate location must be identified in the domain�s config.xml file.
3. Configure the private and root CA keystores with the WebLogic Keystore provider on the administration server, as described in �Configuring the WebLogic Keystore Provider� on page 3-9.
3 Configuring the Keystore
3-24 Implementing Security with B2B Integration
4. Make sure that the server certificate is configured on the administration server, as described in �Configuring the SSL Protocol and Mutual Authentication� on page 4-2.
As each managed server in the domain is started, with the help of the administration server, the WebLogic Keystore provider configuration is automatically propagated to it.
For more information about managing B2B security in a multinode cluster, see Deploying BEA WebLogic Integration Solutions.
Implementing Security with B2B Integration 4-1
CHAPTER
4 Configuring Security
This topic includes the following sections:
! Configuring the SSL Protocol and Mutual Authentication
! Configuring Access Control Lists for WebLogic Integration
! Configuring Security for the WebLogic Integration B2B Engine
! Configuring Trading Partner Security
! Configuring Message Encryption
! Configuring Digital Signatures for Nonrepudiation
! Customizing the WLCCertAuthenticator Class
! Configuring a Certificate Verification Provider Interface
! Configuring WebLogic Integration B2B to Use an Outbound HTTP Proxy Server
! Configuring WebLogic Integration with a Web Server and a WebLogic Proxy Plug-In
! Configuring Business Process Management Access to the WebLogic Integration Repository
! Configuring Server-Side Authentication
Before you configure B2B security, make sure you have configured your Keystores as described in Chapter 3, �Configuring the Keystore.� For general information about configuring WebLogic Integration, see �Basic Configuration Tasks� in Administering B2B Integration.

4 Configuring Security
4-2 Implementing Security with B2B Integration
Configuring the SSL Protocol and Mutual Authentication
To configure WebLogic Server to use the SSL protocol and mutual authentication, complete the following steps:
1. Obtain a digital certificate for WebLogic Server, as described in �Configuring the SSL Protocol� in Managing WebLogic Security at the following URL:
http://edocs.bea.com/wls/docs70/secmanage/ssl.html
2. Start the WebLogic Server Administration Console, as described in �Starting the WebLogic Server Administration Console� in �WebLogic Integration Design and Administration Tools� in Starting, Stopping, and Customizing BEA WebLogic Integration.
3. In the navigation tree (in the left pane) of the WebLogic Server Administration Console, choose Servers→ myserver for the domain you are configuring, as shown in the following figure.
Figure 4-1 Choosing a Domain
The Configuration page for WebLogic Server is displayed, as shown in the following figure.
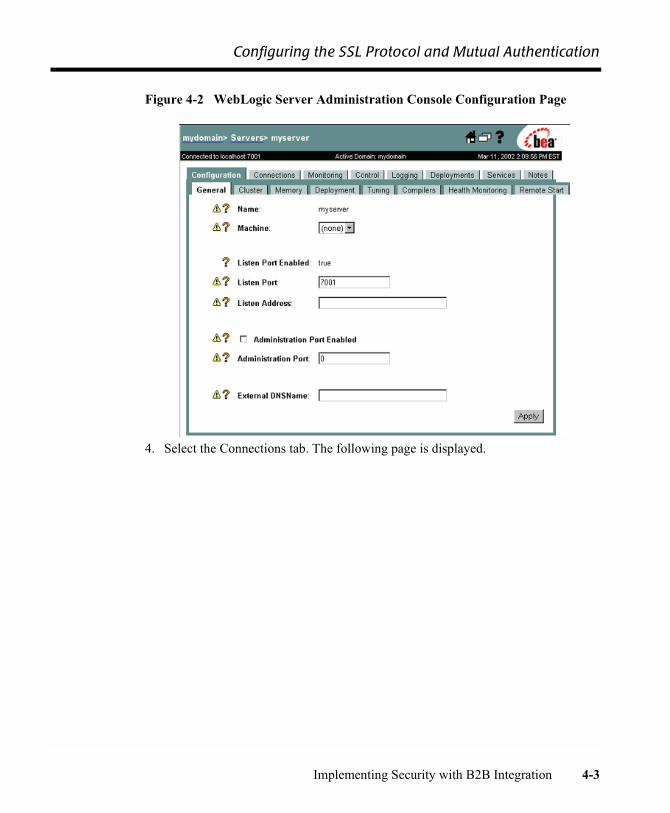
Configuring the SSL Protocol and Mutual Authentication
Implementing Security with B2B Integration 4-3
Figure 4-2 WebLogic Server Administration Console Configuration Page
4. Select the Connections tab. The following page is displayed.
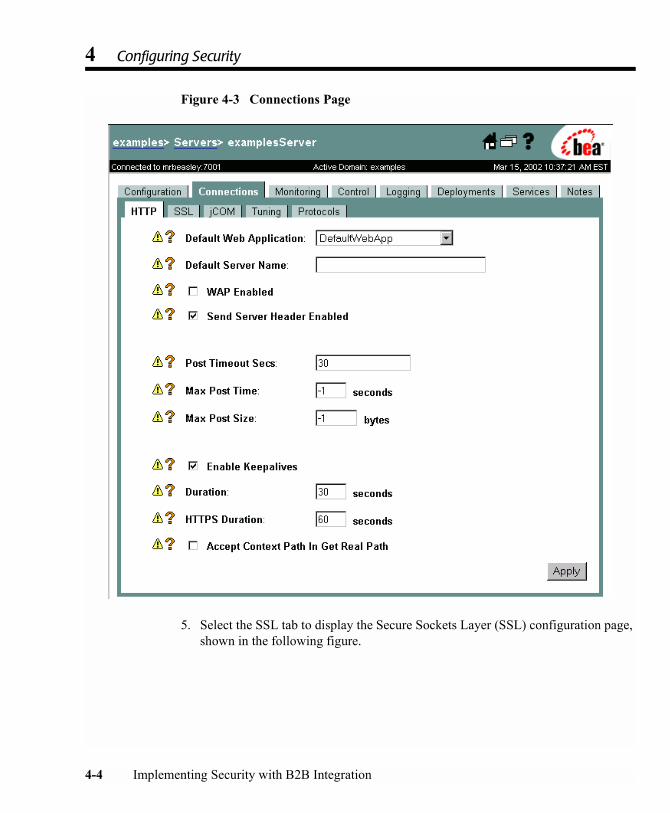
4 Configuring Security
4-4 Implementing Security with B2B Integration
Figure 4-3 Connections Page
5. Select the SSL tab to display the Secure Sockets Layer (SSL) configuration page, shown in the following figure.
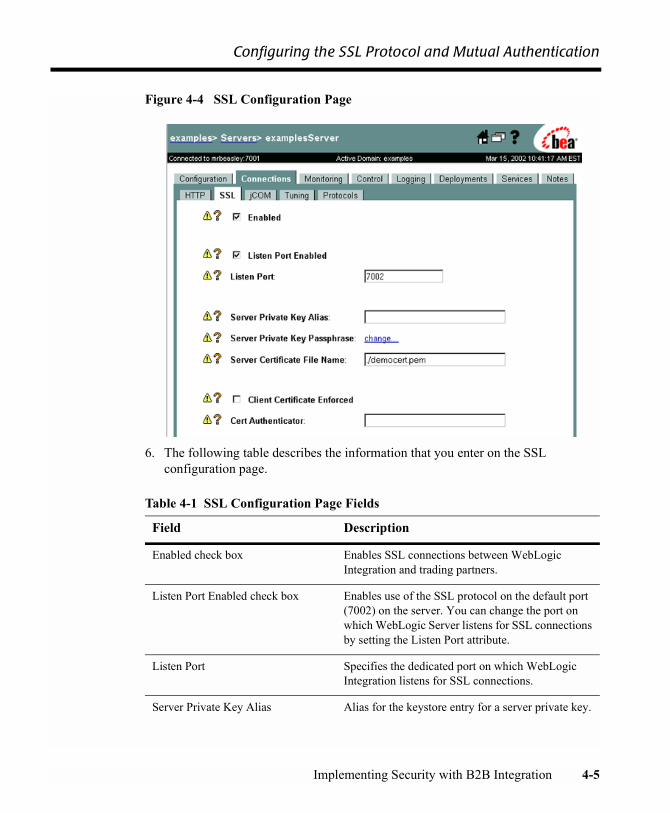
Configuring the SSL Protocol and Mutual Authentication
Implementing Security with B2B Integration 4-5
Figure 4-4 SSL Configuration Page
6. The following table describes the information that you enter on the SSL configuration page.
Table 4-1 SSL Configuration Page Fields
Field Description
Enabled check box Enables SSL connections between WebLogic Integration and trading partners.
Listen Port Enabled check box Enables use of the SSL protocol on the default port (7002) on the server. You can change the port on which WebLogic Server listens for SSL connections by setting the Listen Port attribute.
Listen Port Specifies the dedicated port on which WebLogic Integration listens for SSL connections.
Server Private Key Alias Alias for the keystore entry for a server private key.

4 Configuring Security
4-6 Implementing Security with B2B Integration
Server Private Key Passphrase Specifies a passphrase for a key in the keystore. (A passphrase is required for every key. In addition, you may also assign a passphrase to the keystore itself.)
Server Certificate File Name Specifies the full pathname of the digital certificate for WebLogic Server. This location is also known as the root certificate authority, or root CA.
Client Certificate Enforced check box Enables mutual authentication between WebLogic Integration and trading partners accessing WebLogic Integration resources.
Cert Authenticator Specifies the certificate authenticator to be used to determine the validity of the trading partner digital certificate.
Client Certificate Enforced check box Enables mutual authentication between WebLogic Integration and trading partners accessing WebLogic Integration resources.
Table 4-1 SSL Configuration Page Fields (Continued)
Field Description
Configuring Access Control Lists for WebLogic Integration
Implementing Security with B2B Integration 4-7
Configuring Access Control Lists for WebLogic Integration
The access control list (ACL) for a WebLogic Integration resource determines whether a user or group can access that resource. To define ACLs, you do the following:
1. In the WebLogic Server Administration Console, click Create a new ACL and specify the name of the resource.
2. Specify the permission for the resource.
3. Grant the permission to a specified set of users and groups.
For complete information about defining ACLs, see �Defining ACLs in the Compatibility Realm� in �Using Compatibility Security� in Managing WebLogic Security at the following URL:
http://edocs.bea.com/wls/docs70/secmanage/security6.html
For a B2B resource, one or more permissions can be granted.
The sample configuration shipped with WebLogic Integration provides a pre-set ACL for the JDBC connection pool. In this ACL, three permissions are set for the wlcSamplesUser user on this resource: reserve, shrink, and reset.
The following steps provide an example of the procedure you must complete to change the ACL permissions. In this example, we adjust the reset permissions on the JDBC connection pool in the domain WLIdomain:
1. Configure and start the instance of WebLogic Server in the WLI domain. For instructions, see �Configuring and Starting Domains� in �Getting Started� in Starting, Stopping, and Customizing BEA WebLogic Integration.
2. Start the WebLogic Server Administration Console, if it is not already running. (The default system administrator in WLIdomain has the username system and the password security.)
3. In the navigation tree, choose 6.x Security→ ACLs.

4 Configuring Security
4-8 Implementing Security with B2B Integration
Figure 4-5 Choosing ACLs in the Navigation Tree
The Access Control Lists configuration page is displayed. The ACLs configured for WebLogic Server are listed on this page.
4. Find the row containing the entry for the WebLogic Integration JDBC connection pool ACL, as shown in the following figure.
Figure 4-6 ACL for the JDBC Connection Pool
5. In the Permissions column of that row, click the reset link. A dialog box in which you can adjust the reset permission on the JDBC connection pool ACL is displayed, as shown in the following figure.

Configuring Access Control Lists for WebLogic Integration
Implementing Security with B2B Integration 4-9
Figure 4-7 ACL Dialog Box
6. To provide reset permissions for a user or group, enter the name of the user or group in the appropriate field, and click Apply. To remove reset permissions from any of the Grantees listed in the dialog box, select the appropriate user or group name, and click Apply.
For more information about access control lists, see �Defining ACLs in the Compatibility Realm� in �Using Compatibility Security� in Managing WebLogic Security at the following URL:
http://edocs.bea.com/wls/docs70/secmanage/security6.html

4 Configuring Security
4-10 Implementing Security with B2B Integration
Configuring Security for the WebLogic Integration B2B Engine
The WebLogic Integration repository contains security information about the WebLogic Integration security system and the trading partners that access B2B resources. You can configure repository information either by using the WebLogic Integration B2B Console, or by specifying the information in a data file that you then import into the repository using the Bulk Loader.
Note: Before importing a WebLogic Integration 2.1 or WebLogic Integration 2.1 SP1 repository data file into the WebLogic Integration 7.0 repository, you must change the system-password attribute of the WLC element in the repository data file to reflect the current password of wlisystem. For more information about migrating the repository, see �Step 12. Start and Test Your WebLogic Integration Application� in �Migrating WebLogic Integration 2.1 to WebLogic Integration 7.0� in BEA WebLogic Integration Migration Guide.
For the B2B security system, you need to configure the following as required:
! B2B system password
! Audit log class
! Certificate verification class
! Secure timestamp class
! Certificate authority directory
To configure these entities in the B2B security system, complete the following steps:
1. Start the B2B Console.
2. In the main pane of the B2B Console, click the link under WebLogic Integration, as shown in the following figure.

Configuring Security for the WebLogic Integration B2B Engine
Implementing Security with B2B Integration 4-11
Figure 4-8 WebLogic Integration B2B Console Main Window
The B2B configuration tabs are displayed, as shown in the following figure.

4 Configuring Security
4-12 Implementing Security with B2B Integration
Figure 4-9 B2B Configuration Tabs
3. Select the Security tab. The Security configuration page for the WebLogic Integration system is displayed, as shown in the following figure.
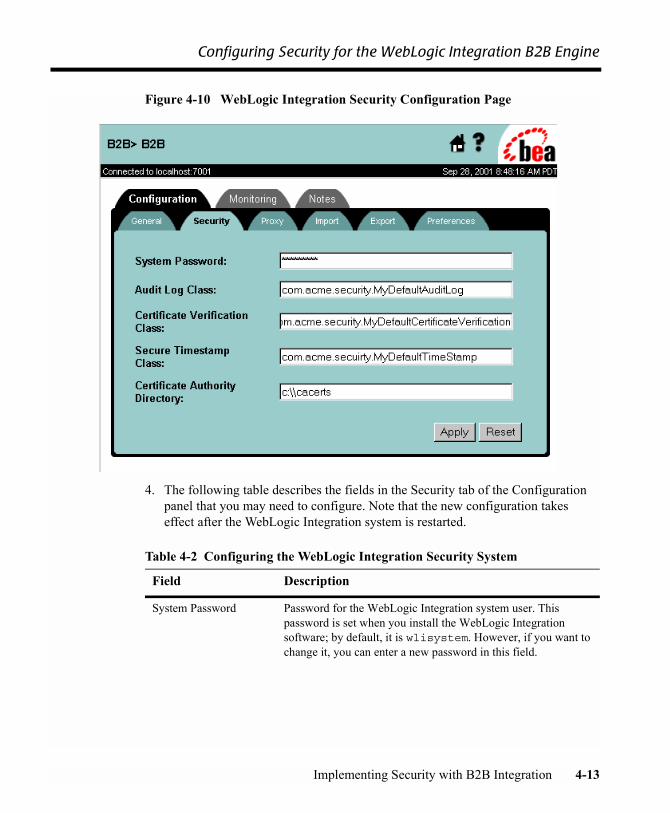
Configuring Security for the WebLogic Integration B2B Engine
Implementing Security with B2B Integration 4-13
Figure 4-10 WebLogic Integration Security Configuration Page
4. The following table describes the fields in the Security tab of the Configuration panel that you may need to configure. Note that the new configuration takes effect after the WebLogic Integration system is restarted.
Table 4-2 Configuring the WebLogic Integration Security System
Field Description
System Password Password for the WebLogic Integration system user. This password is set when you install the WebLogic Integration software; by default, it is wlisystem. However, if you want to change it, you can enter a new password in this field.
4 Configuring Security
4-14 Implementing Security with B2B Integration
Configuring Trading Partner Security
Configuring trading partner security involves setting the following for each trading partner:
! Certificates
! Transport security properties
! Document exchange security
Audit Log Class Java class that implements audit logging, which is used for nonrepudiation. You can use the audit log to reconstruct the sequence of events that have occurred during a conversation, along with the data exchanged. Depending on how you configure the audit log, the audit log may store each business message exchanged among trading partners along with digital signatures, timestamps, and other data. For more information about auditing, see �Secure Audit Log Service� on page 5-5.
Certificate Verification Class
Java class that calls out to software that verifies that a digital certificate submitted by a remote trading partner is valid. This class can call out to either the Online Certificate Status Protocol (OCSP) application that WebLogic Integration provides, or certificate verification provider software that you obtain from a trusted security vendor. For more information about the certificate verification class, see �Trading Partner Certificate Verification� on page 2-2.
Secure Timestamp Class Java class that provides secure timestamping of business messages exchanged among trading partners. Timestamping is used for nonrepudiation. For more information about secure timestamping, see �Secure Timestamp Service� on page 5-3.
Certificate Authority Directory
Location that contains the Certificate Authorities of all the trading partner certificates configured in the WebLogic Integration repository.
Table 4-2 Configuring the WebLogic Integration Security System (Continued)
Field Description
Configuring Trading Partner Security
Implementing Security with B2B Integration 4-15
! Delivery channel security
The following subsections describe how to configure trading partner security for each of these components.
Note: If you use the Bulk Loader to import data into the WebLogic Integration repository, the WebLogic Server users that represent each trading partner configured in the repository are not automatically created. You need to create these WebLogic Server users manually. For more information, see �Working with the Bulk Loader� in Administering B2B Integration.
Configuring Trading Partner Certificates
WebLogic Integration provides a means to configure the following trading partner certificates.
Table 4-3 Trading Partner Certificates Configured in WebLogic Integration
Certificate Description
Client certificate Digital certificate of the remote or local trading partner. Configuring the client certificate is required when using the SSL protocol.Certificate is:! Type X.509 version 1 or 3! Privacy Enhanced Mail (PEM) or Definite Encoding Rules
(DER) encoded. (The filename extension specifies the encoding type: .pem or .der.)
! Required for all trading partner types when HTTPS with mutual authentication is used.
Private Key is:! PEM or DER encoded. (The filename extension specifies the
encoding type: .pem or .der.)! Required only for local trading partner type! Password-protected or plain text
Note: When importing a plain-text private key using the B2B Console, use the password of the private keystore.
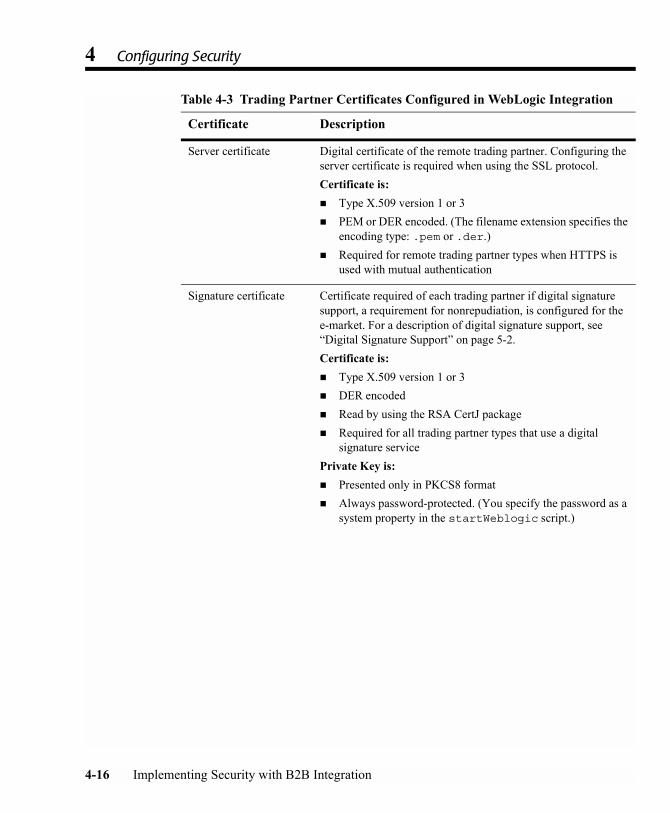
4 Configuring Security
4-16 Implementing Security with B2B Integration
Server certificate Digital certificate of the remote trading partner. Configuring the server certificate is required when using the SSL protocol.Certificate is:! Type X.509 version 1 or 3! PEM or DER encoded. (The filename extension specifies the
encoding type: .pem or .der.)! Required for remote trading partner types when HTTPS is
used with mutual authentication
Signature certificate Certificate required of each trading partner if digital signature support, a requirement for nonrepudiation, is configured for the e-market. For a description of digital signature support, see �Digital Signature Support� on page 5-2.Certificate is:! Type X.509 version 1 or 3! DER encoded! Read by using the RSA CertJ package! Required for all trading partner types that use a digital
signature servicePrivate Key is:! Presented only in PKCS8 format! Always password-protected. (You specify the password as a
system property in the startWeblogic script.)
Table 4-3 Trading Partner Certificates Configured in WebLogic Integration
Certificate Description
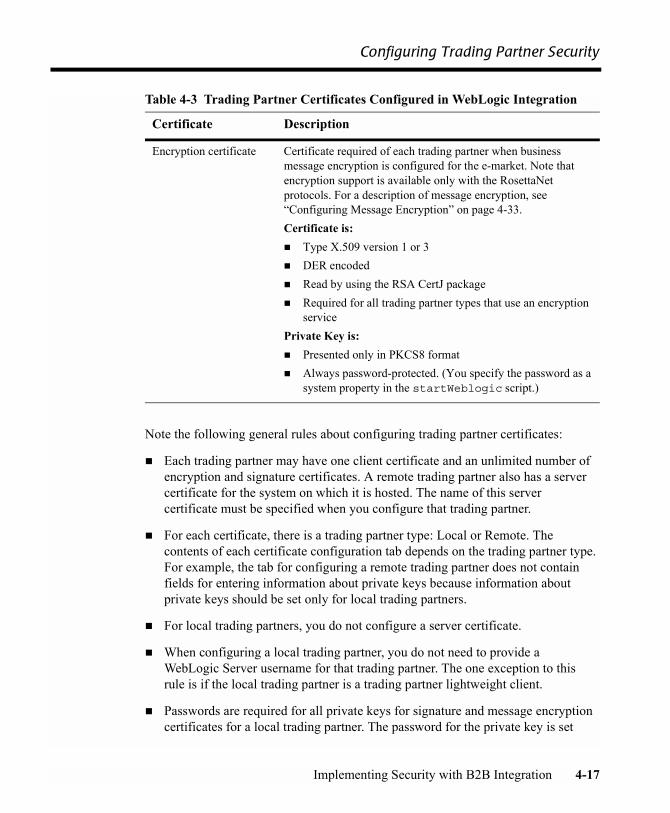
Configuring Trading Partner Security
Implementing Security with B2B Integration 4-17
Note the following general rules about configuring trading partner certificates:
! Each trading partner may have one client certificate and an unlimited number of encryption and signature certificates. A remote trading partner also has a server certificate for the system on which it is hosted. The name of this server certificate must be specified when you configure that trading partner.
! For each certificate, there is a trading partner type: Local or Remote. The contents of each certificate configuration tab depends on the trading partner type. For example, the tab for configuring a remote trading partner does not contain fields for entering information about private keys because information about private keys should be set only for local trading partners.
! For local trading partners, you do not configure a server certificate.
! When configuring a local trading partner, you do not need to provide a WebLogic Server username for that trading partner. The one exception to this rule is if the local trading partner is a trading partner lightweight client.
! Passwords are required for all private keys for signature and message encryption certificates for a local trading partner. The password for the private key is set
Encryption certificate Certificate required of each trading partner when business message encryption is configured for the e-market. Note that encryption support is available only with the RosettaNet protocols. For a description of message encryption, see �Configuring Message Encryption� on page 4-33.Certificate is:! Type X.509 version 1 or 3! DER encoded! Read by using the RSA CertJ package! Required for all trading partner types that use an encryption
servicePrivate Key is:! Presented only in PKCS8 format! Always password-protected. (You specify the password as a
system property in the startWeblogic script.)
Table 4-3 Trading Partner Certificates Configured in WebLogic Integration
Certificate Description

4 Configuring Security
4-18 Implementing Security with B2B Integration
when the certificate is imported into the keystore. At run time the password for the private key must match the one specified during the import. The private key password is specified as a system property on the java command line.
The following example shows the java command that starts WebLogic Server for the Hello Partner sample application:
%JAVA_HOME%\bin\java -classic -ms64m -ms64m -classpath %START_WL_CLASSPATH% -Dbea.home=%BEA_HOME% -Dweblogic.home=%WL_HOME% -Dweblogic.system.home=%WLC_SAMPLES_HOME% -Dweblogic.Domain=samples -Dweblogic.management.password=%SYSTEM_PASSWORD% -Dweblogic.Name=myserver -Djava.security.policy=%WL_HOME%\lib\weblogic.policy -DKey.certificate-name.password=%PASSWORD% weblogic.Server
In the preceding example, certificate-name represents the name of the certificate for which a private key password is being specified, and %SYSTEM_PASSWORD% and %PASSWORD% represent values of those two environment variables.
Note: We recommend that you set passwords in environment variables, rather than hard-coding the passwords into scripts, such as startWeblogic. When environment variables are used, the scripts obtain the values for the passwords from the environment in which the scripts run.
To configure trading partner certificates, complete the following steps:
1. Display the main trading partner configuration page, which you can do in one of two ways:
" Click Trading Partners in the navigation tree of the B2B Console.
Figure 4-11 Trading Partners Entry in the Navigation Tree
" Click the Trading Partners link in the right pane.

Configuring Trading Partner Security
Implementing Security with B2B Integration 4-19
Figure 4-12 Accessing the Trading Partners Configuration Page
The main Trading Partners configuration page, on which you can add, modify, and remove trading partners, is shown in the following figure.
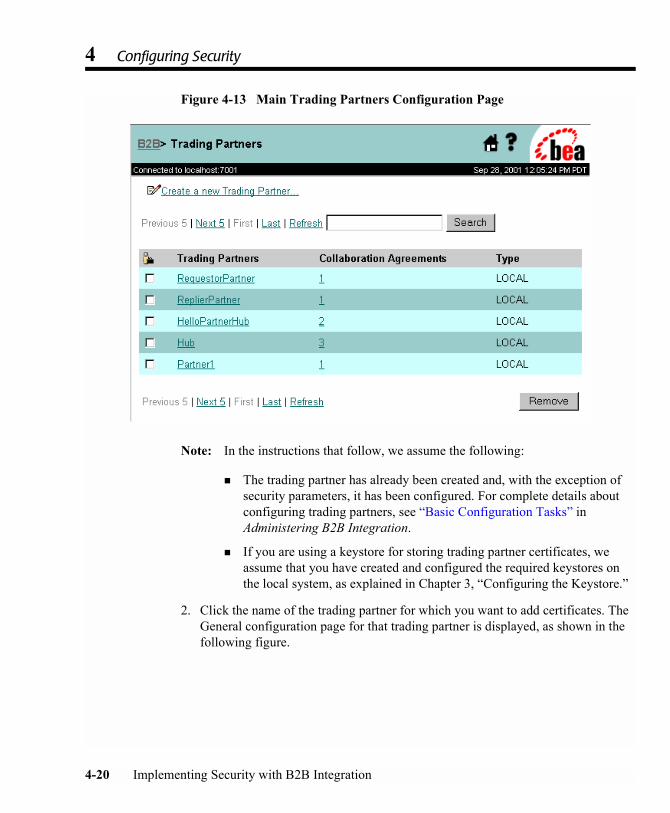
4 Configuring Security
4-20 Implementing Security with B2B Integration
Figure 4-13 Main Trading Partners Configuration Page
Note: In the instructions that follow, we assume the following:
! The trading partner has already been created and, with the exception of security parameters, it has been configured. For complete details about configuring trading partners, see �Basic Configuration Tasks� in Administering B2B Integration.
! If you are using a keystore for storing trading partner certificates, we assume that you have created and configured the required keystores on the local system, as explained in Chapter 3, �Configuring the Keystore.�
2. Click the name of the trading partner for which you want to add certificates. The General configuration page for that trading partner is displayed, as shown in the following figure.

Configuring Trading Partner Security
Implementing Security with B2B Integration 4-21
Figure 4-14 General Configuration Page for Trading Partner
3. Select the Certificates tab. The page on which you configure trading partner certificates is displayed, as shown in the following figure.
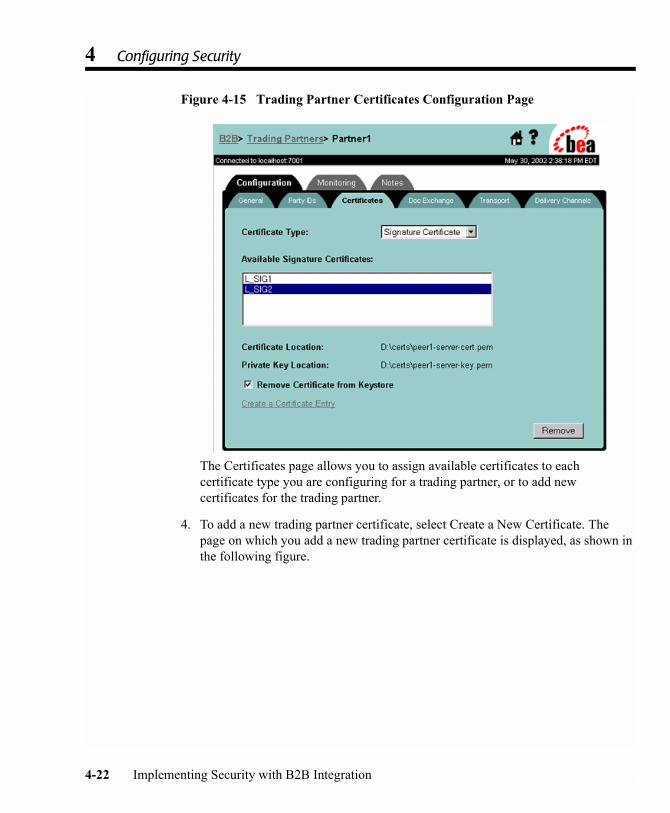
4 Configuring Security
4-22 Implementing Security with B2B Integration
Figure 4-15 Trading Partner Certificates Configuration Page
The Certificates page allows you to assign available certificates to each certificate type you are configuring for a trading partner, or to add new certificates for the trading partner.
4. To add a new trading partner certificate, select Create a New Certificate. The page on which you add a new trading partner certificate is displayed, as shown in the following figure.

Configuring Trading Partner Security
Implementing Security with B2B Integration 4-23
Figure 4-16 Adding a New Trading Partner Certificate
5. To configure each trading partner certificate, complete the steps listed in the following table.
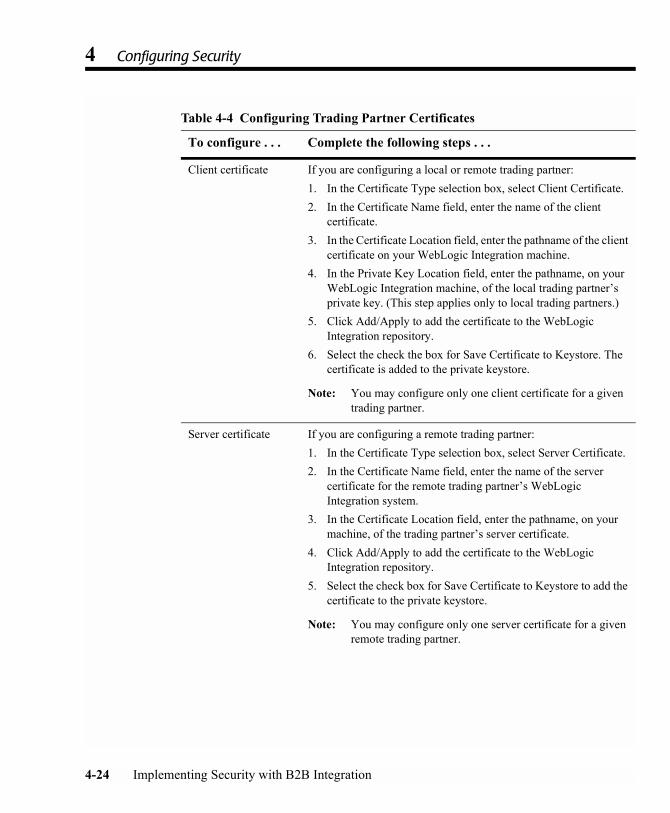
4 Configuring Security
4-24 Implementing Security with B2B Integration
Table 4-4 Configuring Trading Partner Certificates
To configure . . . Complete the following steps . . .
Client certificate If you are configuring a local or remote trading partner:1. In the Certificate Type selection box, select Client Certificate.2. In the Certificate Name field, enter the name of the client
certificate.3. In the Certificate Location field, enter the pathname of the client
certificate on your WebLogic Integration machine.4. In the Private Key Location field, enter the pathname, on your
WebLogic Integration machine, of the local trading partner�s private key. (This step applies only to local trading partners.)
5. Click Add/Apply to add the certificate to the WebLogic Integration repository.
6. Select the check the box for Save Certificate to Keystore. The certificate is added to the private keystore.
Note: You may configure only one client certificate for a given trading partner.
Server certificate If you are configuring a remote trading partner:1. In the Certificate Type selection box, select Server Certificate.2. In the Certificate Name field, enter the name of the server
certificate for the remote trading partner�s WebLogic Integration system.
3. In the Certificate Location field, enter the pathname, on your machine, of the trading partner�s server certificate.
4. Click Add/Apply to add the certificate to the WebLogic Integration repository.
5. Select the check box for Save Certificate to Keystore to add the certificate to the private keystore.
Note: You may configure only one server certificate for a given remote trading partner.
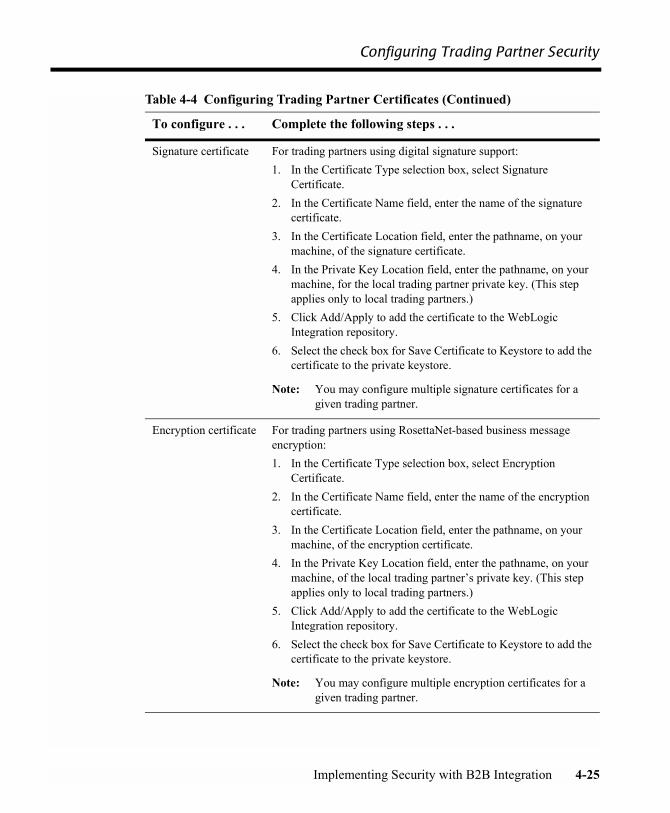
Configuring Trading Partner Security
Implementing Security with B2B Integration 4-25
Signature certificate For trading partners using digital signature support:1. In the Certificate Type selection box, select Signature
Certificate.2. In the Certificate Name field, enter the name of the signature
certificate.3. In the Certificate Location field, enter the pathname, on your
machine, of the signature certificate.4. In the Private Key Location field, enter the pathname, on your
machine, for the local trading partner private key. (This step applies only to local trading partners.)
5. Click Add/Apply to add the certificate to the WebLogic Integration repository.
6. Select the check box for Save Certificate to Keystore to add the certificate to the private keystore.
Note: You may configure multiple signature certificates for a given trading partner.
Encryption certificate For trading partners using RosettaNet-based business message encryption:1. In the Certificate Type selection box, select Encryption
Certificate.2. In the Certificate Name field, enter the name of the encryption
certificate.3. In the Certificate Location field, enter the pathname, on your
machine, of the encryption certificate.4. In the Private Key Location field, enter the pathname, on your
machine, of the local trading partner�s private key. (This step applies only to local trading partners.)
5. Click Add/Apply to add the certificate to the WebLogic Integration repository.
6. Select the check box for Save Certificate to Keystore to add the certificate to the private keystore.
Note: You may configure multiple encryption certificates for a given trading partner.
Table 4-4 Configuring Trading Partner Certificates (Continued)
To configure . . . Complete the following steps . . .
4 Configuring Security
4-26 Implementing Security with B2B Integration
Notes: When you create a trading partner in WebLogic Integration, a WebLogic Server user is created for that trading partner at run time, with a username that you specify. When you delete a trading partner from the WebLogic Integration repository, however, the corresponding WebLogic Server user is not automatically deleted. When you delete a trading partner, be sure that you also manually delete the corresponding WebLogic Server user.
For a list of resources that you might find helpful in managing WebLogic Integration B2B resources, visit BEA dev2dev Online at the following URL:
http://dev2dev.bea.com/index.jsp
Here you can find links to sites that provide useful utilities, such as tools for manipulating digital certificates and private keys.
Configuring a Secure Transport
When you configure a transport for a trading partner, you bind the trading partner�s transport to a transport security protocol. For example, if a trading partner is configured to use SSL certificates, you must bind that trading partner�s transport to a transport protocol that uses SSL. When a secure transport is configured, the client certificate is used for outbound SSL. Because WebLogic Integration allows only one client certificate, there is no need to select the client certificate while configuring a secure transport.
To configure a secure transport for a trading partner, complete the following steps:
1. Select the Transport tab. The Transport configuration page is displayed. The top of this page is shown in the following figure.
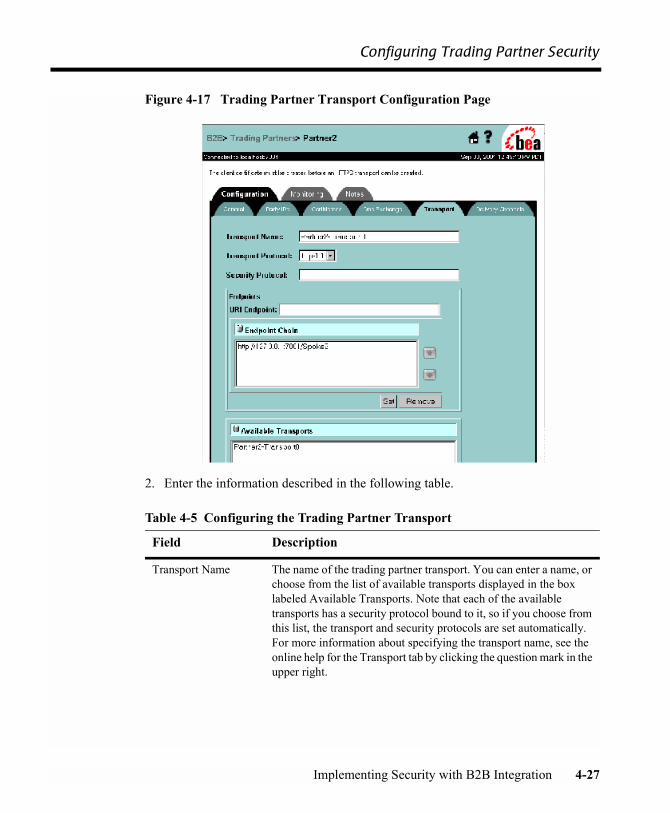
Configuring Trading Partner Security
Implementing Security with B2B Integration 4-27
Figure 4-17 Trading Partner Transport Configuration Page
2. Enter the information described in the following table.
Table 4-5 Configuring the Trading Partner Transport
Field Description
Transport Name The name of the trading partner transport. You can enter a name, or choose from the list of available transports displayed in the box labeled Available Transports. Note that each of the available transports has a security protocol bound to it, so if you choose from this list, the transport and security protocols are set automatically. For more information about specifying the transport name, see the online help for the Transport tab by clicking the question mark in the upper right.
4 Configuring Security
4-28 Implementing Security with B2B Integration
3. Click Add/Apply.
Configuring a Secure Delivery Channel
When you configure a trading partner�s delivery channel, you have the option of making the delivery channel secure by binding it to the secure transport configured in �Configuring a Secure Transport� on page 4-26.
To configure a secure channel, complete the following steps:
1. Select the Delivery Channels tab. The Delivery Channels configuration page is displayed, as shown in the following figure.
Transport Protocol The security protocol for the transport. You can choose between HTTP-1.1 and HTTPS-1.1. The HTTPS-1.1 protocol uses SSL. Note that if you choose HTTPS-1.1, the security protocol is displayed in the nonmodifiable field labeled Security Protocol.
URI Endpoint The URI for the transport on the trading partner�s B2B system. To specify the URI endpoint, you can enter a URI in this field, or choose from one of the available URIs displayed in the box below this field. When you enter the URI endpoint, click Set, to establish the URI, or Remove, to clear an existing entry in the URI Endpoint field. For more information about specifying the URI endpoint, see the online help for the Transport tab by clicking the question mark in the upper right.
Table 4-5 Configuring the Trading Partner Transport (Continued)
Field Description
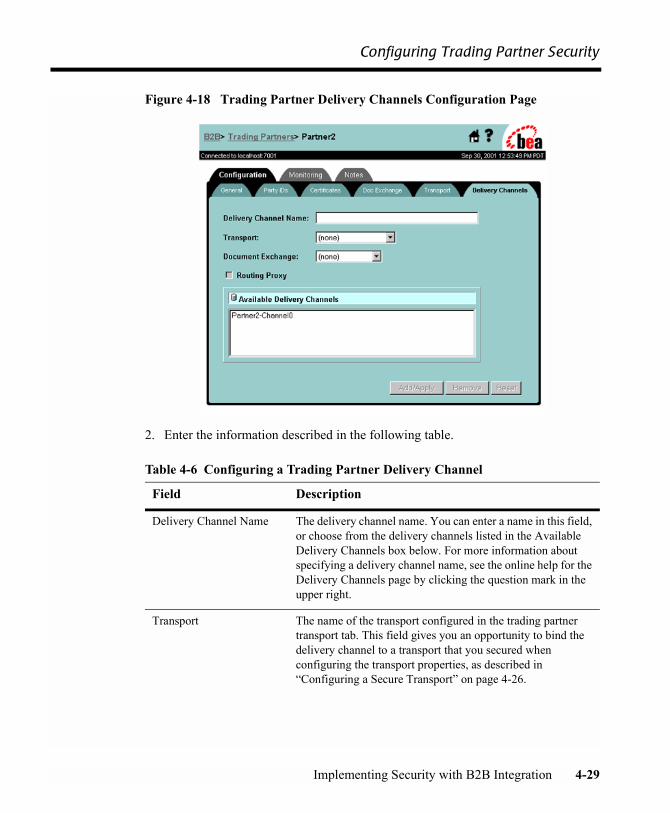
Configuring Trading Partner Security
Implementing Security with B2B Integration 4-29
Figure 4-18 Trading Partner Delivery Channels Configuration Page
2. Enter the information described in the following table.
Table 4-6 Configuring a Trading Partner Delivery Channel
Field Description
Delivery Channel Name The delivery channel name. You can enter a name in this field, or choose from the delivery channels listed in the Available Delivery Channels box below. For more information about specifying a delivery channel name, see the online help for the Delivery Channels page by clicking the question mark in the upper right.
Transport The name of the transport configured in the trading partner transport tab. This field gives you an opportunity to bind the delivery channel to a transport that you secured when configuring the transport properties, as described in �Configuring a Secure Transport� on page 4-26.
4 Configuring Security
4-30 Implementing Security with B2B Integration
3. Click Add/Apply.
Configuring a Secure Document Exchange
When you configure the trading partner document exchange, you can associate a document exchange with a business protocol binding that provides digital signature support or message encryption. Digital signature support is available with all the business protocols supported in WebLogic Integration; however, message encryption is available only with the RosettaNet protocol.
To enable digital signature or message encryption support, complete the following steps:
1. Select the Document Exchange tab. The Document Exchange configuration page is displayed, as shown in the following figure.
Document Exchange The name of the document exchange to which you want to bind the delivery channel. For more information about binding a document exchange to a delivery channel, see the online help for the Delivery Channels page by clicking the question mark in the upper right.
Routing Proxy Check this box if you want the trading partner delivery to act as a routing proxy (hub). For more information about proxy servers, see �Configuring WebLogic Integration B2B to Use an Outbound HTTP Proxy Server� on page 4-40.
Table 4-6 Configuring a Trading Partner Delivery Channel (Continued)
Field Description

Configuring Trading Partner Security
Implementing Security with B2B Integration 4-31
Figure 4-19 Trading Partner Document Exchange Configuration Page
2. Enter the information described in the following table.
3. For information about specifying data in the fields labeled Document Exchange Name, End Point Type, Confirmed Delivery, Message History, and Retries, see the online help for the Document Exchange page by clicking the question mark in the upper right.
Table 4-7 Configuring a Trading Partner Document Exchange
In the field labeled . . . Choose the following information . . .
Business Protocol Binding The business protocol and version that supports the digital signature or message encryption capabilities that you want. The protocol you choose becomes bound to the trading partner document exchange identified at the top of the page.
Business Protocol Definition
The business protocol associated with the business protocol binding chosen in the preceding selection box.

4 Configuring Security
4-32 Implementing Security with B2B Integration
4. For information about configuring digital signature information, see �Configuring Message Encryption� on page 4-32.
5. For information about configuring message encryption information, see �Configuring Digital Signatures for Nonrepudiation� on page 4-35.
Configuring Message Encryption
As mentioned in Chapter 1, �Introducing WebLogic Integration B2B Security,� the B2B message encryption service encrypts business messages for the business protocols that require it. Currently, message encryption is supported only for the RosettaNet 2.0 protocol.
How WebLogic Integration Message Encryption Works
Data encryption works by using a combination of the sender�s certificate, private key, and the recipient�s certificate to encode a business message. The message can then be decrypted only by the recipient using the recipient�s private key.
Note: The B2B message encryption feature is controlled by licensing (Encryption/Domestic or Encryption/Export), but the decryption of a business message is not. If WebLogic Integration does not have a valid encryption license, the B2B engine disables the encryption service. However, the B2B engine can always decrypt business messages that are received.
The WebLogic Integration message encryption service supports the following algorithms:
! Rivest-Shamir-Adleman (RSA)
! Data Encryption Standard (DES)
! Triple Data Encryption Standard (3DES)
The following figure shows how data encryption is performed using the public and private keys.
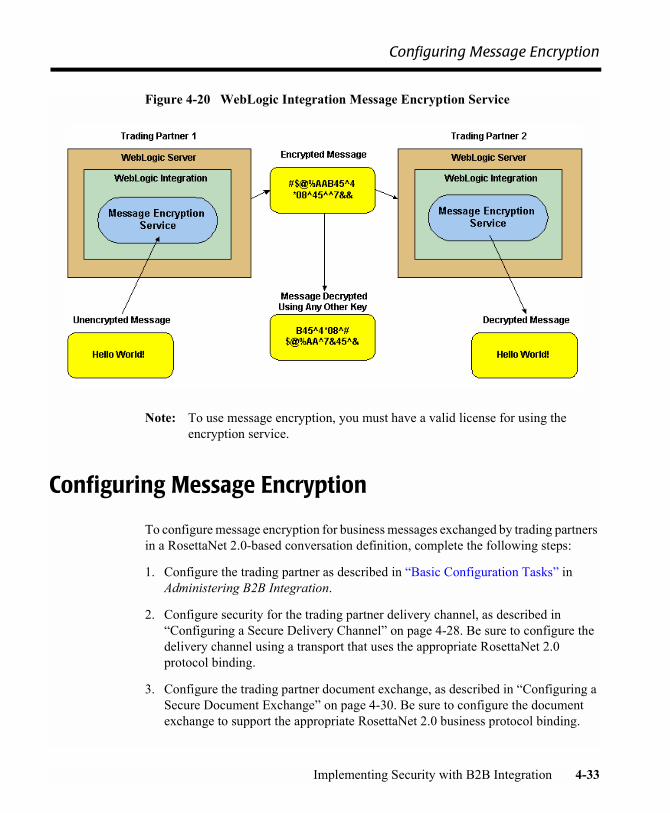
Configuring Message Encryption
Implementing Security with B2B Integration 4-33
Figure 4-20 WebLogic Integration Message Encryption Service
Note: To use message encryption, you must have a valid license for using the encryption service.
Configuring Message Encryption
To configure message encryption for business messages exchanged by trading partners in a RosettaNet 2.0-based conversation definition, complete the following steps:
1. Configure the trading partner as described in �Basic Configuration Tasks� in Administering B2B Integration.
2. Configure security for the trading partner delivery channel, as described in �Configuring a Secure Delivery Channel� on page 4-28. Be sure to configure the delivery channel using a transport that uses the appropriate RosettaNet 2.0 protocol binding.
3. Configure the trading partner document exchange, as described in �Configuring a Secure Document Exchange� on page 4-30. Be sure to configure the document exchange to support the appropriate RosettaNet 2.0 business protocol binding.
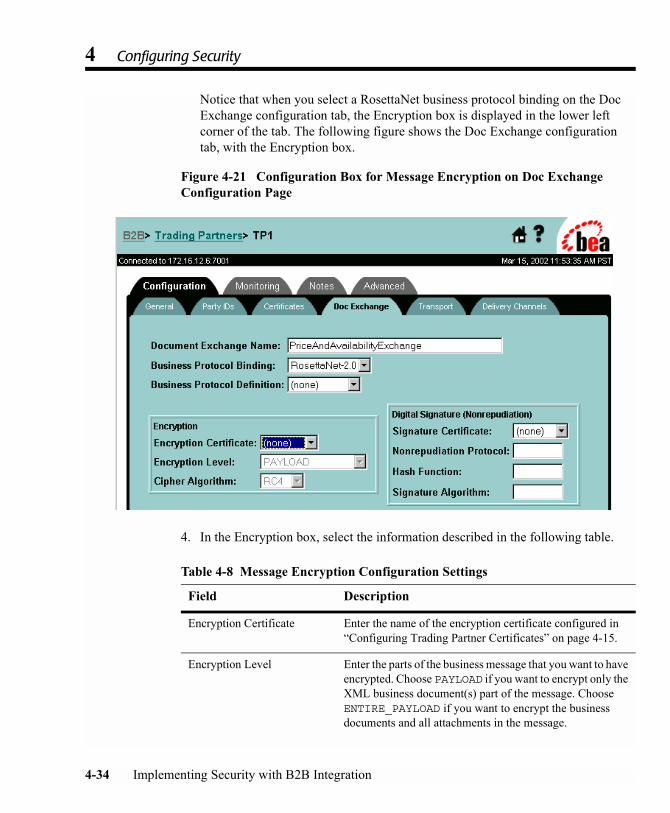
4 Configuring Security
4-34 Implementing Security with B2B Integration
Notice that when you select a RosettaNet business protocol binding on the Doc Exchange configuration tab, the Encryption box is displayed in the lower left corner of the tab. The following figure shows the Doc Exchange configuration tab, with the Encryption box.
Figure 4-21 Configuration Box for Message Encryption on Doc Exchange Configuration Page
4. In the Encryption box, select the information described in the following table.
Table 4-8 Message Encryption Configuration Settings
Field Description
Encryption Certificate Enter the name of the encryption certificate configured in �Configuring Trading Partner Certificates� on page 4-15.
Encryption Level Enter the parts of the business message that you want to have encrypted. Choose PAYLOAD if you want to encrypt only the XML business document(s) part of the message. Choose ENTIRE_PAYLOAD if you want to encrypt the business documents and all attachments in the message.
Configuring Digital Signatures for Nonrepudiation
Implementing Security with B2B Integration 4-35
5. Click Add/Apply.
Note: If cipher strength is specified in the repository data file, it is ignored at run time.
Configuring Digital Signatures for Nonrepudiation
Digital signature support (described in detail in �Implementing Nonrepudiation� on page 5-1) provides a means to prevent anyone or anything from tampering with the contents of a business message, especially when the business message is in transit between two trading partners. Digital signature support is a requirement for nonrepudiation.
If you are implementing nonrepudiation, you need to configure digital signature support in the B2B engine, which you can do by completing the following steps:
1. Configure the trading partner, as described in �Basic Configuration Tasks� in Administering B2B Integration.
2. Configure the trading partner signature certificate, as described in �Configuring Trading Partner Certificates� on page 4-15.
Cipher Algorithm A nonmodifiable information field containing the name of the cipher algorithm used. In WebLogic Integration, the available cipher algorithms are:! Rivest-Shamir-Adleman (RSA)! Data Encryption Standard (DES)! Triple Data Encryption Standard (3DES)
Table 4-8 Message Encryption Configuration Settings (Continued)
Field Description
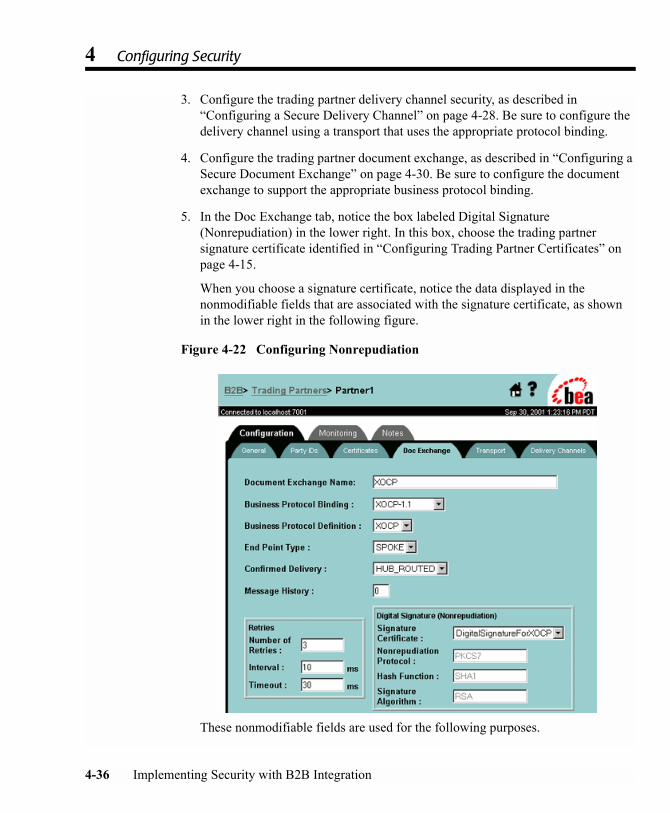
4 Configuring Security
4-36 Implementing Security with B2B Integration
3. Configure the trading partner delivery channel security, as described in �Configuring a Secure Delivery Channel� on page 4-28. Be sure to configure the delivery channel using a transport that uses the appropriate protocol binding.
4. Configure the trading partner document exchange, as described in �Configuring a Secure Document Exchange� on page 4-30. Be sure to configure the document exchange to support the appropriate business protocol binding.
5. In the Doc Exchange tab, notice the box labeled Digital Signature (Nonrepudiation) in the lower right. In this box, choose the trading partner signature certificate identified in �Configuring Trading Partner Certificates� on page 4-15.
When you choose a signature certificate, notice the data displayed in the nonmodifiable fields that are associated with the signature certificate, as shown in the lower right in the following figure.
Figure 4-22 Configuring Nonrepudiation
These nonmodifiable fields are used for the following purposes.

Customizing the WLCCertAuthenticator Class
Implementing Security with B2B Integration 4-37
" Nonrepudiation protocol�identifies the business protocol associated with the signature certificate.
" Hash Function�identifies the function used for encrypting passwords exchanged among trading partners. The hash function used by both the RosettaNet and XOCP protocols in WebLogic Integration is SHA1.
" Signature Algorithm�identifies the algorithm used for encrypting the signature certificates exchanged among trading partners. The signature algorithm used by both the RosettaNet and XOCP protocols in WebLogic Integration is RSA.
Customizing the WLCCertAuthenticator Class
The WLCCertAuthenticator class is an implementation of the WebLogic Server CertAuthenticator class. The default implementation of the WLCCertAuthenticator class maps the digital certificate of the trading partner to the corresponding trading partner user defined in the WebLogic Integration repository. You may want to extend this functionality to use mutual authentication for users other than trading partners. For example, you may want to modify the class to map a Web browser or Java client to a WebLogic Server user.
The WLCCertAuthenticator class is invoked by WebLogic Server after an SSL connection between the trading partner and WebLogic Server has been established. The class can extract data from a digital certificate to determine the trading partner name that corresponds to the digital certificate.
The following code example, in which the WebLogic default realm for retrieving users is used, shows how the WLCCertAuthenticator class is customized:
public User authenticate(String userName, Certificate[] certs, boolean ssl){
String user = null;
// If not using SSL, returnif (ssl == false){return null;}

4 Configuring Security
4-38 Implementing Security with B2B Integration
// Verify that the certificate is either a c-hub certificate or a trading partner// certificate, then return the corresponding WLS user.
if ((user = Security.isValidWLCCertificate(certs))!= null){return realm.getUser(user);}// Certificate is not a valid WLC certificate.// Check here for non-WLC certificate and return the corresponding user.}
Configuring a Certificate Verification Provider Interface
As explained in �Trading Partner Certificate Verification� on page 2-2, you use a certificate verification provider to validate a trading partner�s digital certificate. If you are using a certificate verification provider (CVP), you need to configure it in the B2B Console, using the steps described in this section.
To configure a CVP:
1. Start the B2B Console.
2. In the main page of the B2B Console, click the link under WebLogic Integration, as described in �Configuring Security for the WebLogic Integration B2B Engine� on page 4-10.
3. In the B2B Configuration panel, select the Security tab. This displays the page shown in the following figure.

Configuring a Certificate Verification Provider Interface
Implementing Security with B2B Integration 4-39
Figure 4-23 WebLogic Integration System Security Configuration Page
4. In the field labeled Certificate Verification Class, enter the fully qualified name of the Java class that implements the CVP.
5. Click Apply.
Note: You can load a certificate verification provider via the Bulk Loader. For more information, see �Working with the Bulk Loader� in Administering B2B Integration.
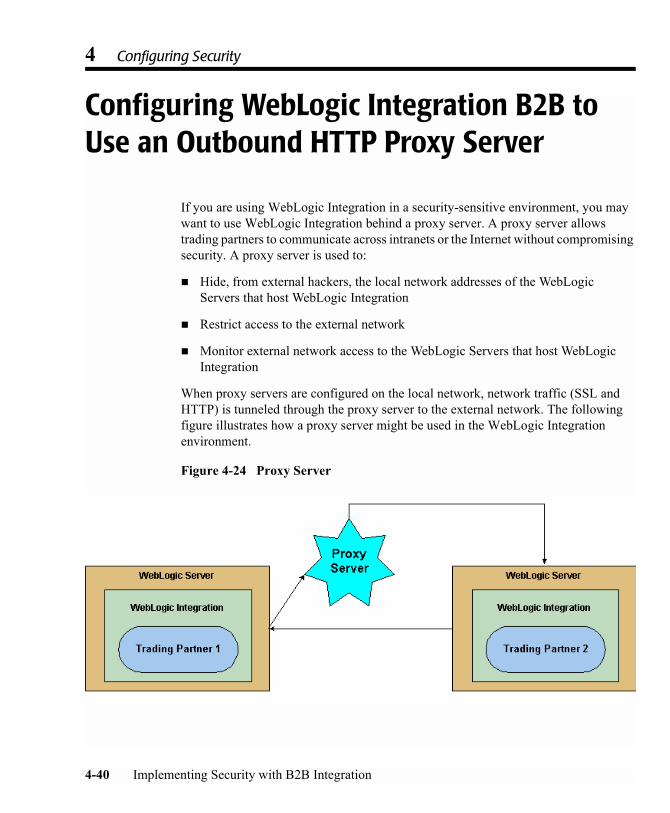
4 Configuring Security
4-40 Implementing Security with B2B Integration
Configuring WebLogic Integration B2B to Use an Outbound HTTP Proxy Server
If you are using WebLogic Integration in a security-sensitive environment, you may want to use WebLogic Integration behind a proxy server. A proxy server allows trading partners to communicate across intranets or the Internet without compromising security. A proxy server is used to:
! Hide, from external hackers, the local network addresses of the WebLogic Servers that host WebLogic Integration
! Restrict access to the external network
! Monitor external network access to the WebLogic Servers that host WebLogic Integration
When proxy servers are configured on the local network, network traffic (SSL and HTTP) is tunneled through the proxy server to the external network. The following figure illustrates how a proxy server might be used in the WebLogic Integration environment.
Figure 4-24 Proxy Server
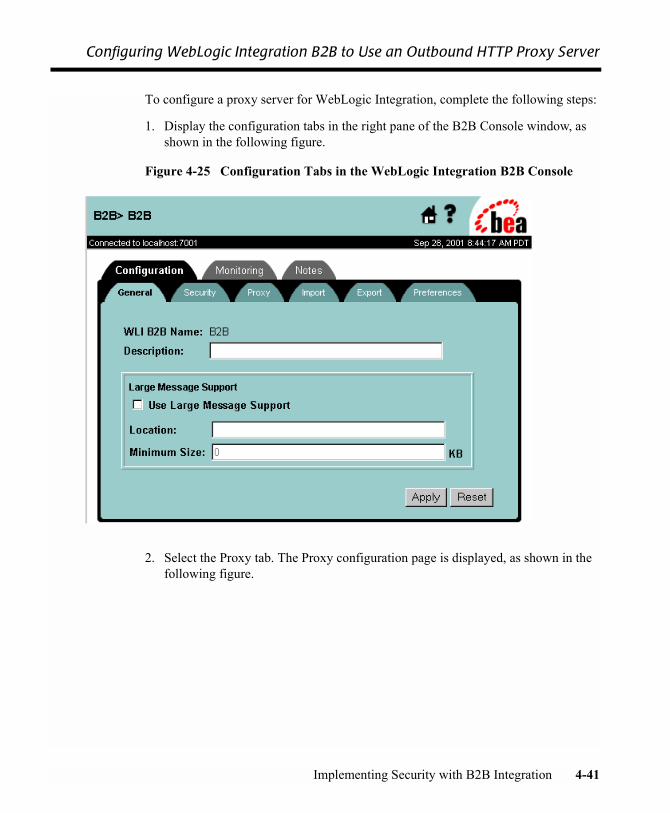
Configuring WebLogic Integration B2B to Use an Outbound HTTP Proxy Server
Implementing Security with B2B Integration 4-41
To configure a proxy server for WebLogic Integration, complete the following steps:
1. Display the configuration tabs in the right pane of the B2B Console window, as shown in the following figure.
Figure 4-25 Configuration Tabs in the WebLogic Integration B2B Console
2. Select the Proxy tab. The Proxy configuration page is displayed, as shown in the following figure.

4 Configuring Security
4-42 Implementing Security with B2B Integration
Figure 4-26 WebLogic Integration Proxy Server Configuration Page
3. In the field labeled Host, enter the address of the proxy server used for the WebLogic Integration server, if any. For example:
myproxy.mycompany.com.
4. In the field labeled Port, enter the port number for the proxy server.
5. Click Apply.
6. Add permissions to read and write the ssl.proxyHost and ssl.proxyPort system properties for the WebLogic Server. These system properties are stored in the weblogic.policy file, which is located in the directory where you installed WebLogic Server. Add the following lines to the grant section of the weblogic.policy file:
permission java.util.PropertyPermission "ssl.proxyHost", "read, write";permission java.util.PropertyPermission "ssl.proxyPort", "read, write";

Configuring WebLogic Integration with a Web Server and a WebLogic Proxy Plug-In
Implementing Security with B2B Integration 4-43
Configuring WebLogic Integration with a Web Server and a WebLogic Proxy Plug-In
You can configure WebLogic Integration with a Web server, such as an Apache server, that is programmed to service business messages from a remote trading partner. A Web server can provide the following services:
! Receive business messages from a remote trading partner
! Authenticate a trading partner digital certificate
The Web server uses the WebLogic proxy plug-in, which you can configure to provide the following services:
! Forward business messages received by the Web server to WebLogic Integration, which is running inside a secure internal network.
! Extract the remote trading partner certificate from the Web server and forward it to WebLogic Server for authentication. WebLogic Integration can then authenticate the trading partner certificate and business message.
The following figure shows the topology of an environment that uses a Web server, the WebLogic proxy plug-in, and WebLogic Integration.
Figure 4-27 Using a Web Server and the WebLogic Proxy Plug-In
4 Configuring Security
4-44 Implementing Security with B2B Integration
Notes: Even though the proxy plug-in uses HTTP, you must configure WebLogic Integration to use the HTTPS protocol when using the proxy plug-in to forward business messages.
If a trading partner in a conversation uses Microsoft IIS as a proxy server, all the certificates used in the conversation must be trusted by a well-known Certificate Authority, such as Verisign or Entrust. The use of self-signed certificates will cause a request passed through the IIS proxy server to fail. This is a restriction in IIS, not WebLogic Integration.
Configuring the Web Server
To configure the Web server, see �Configuring WebLogic Server Web Components� in the BEA WebLogic Server Administration Guide at the following URL:
http://edocs.bea.com/wls/docs70/adminguide/web_server.html
The following code example provides the segment of httpd.conf (for an Apache server) needed to configure the proxy plug-in:
# LoadModule foo_module libexec/mod_foo.soLoadModule weblogic_module libexec/mod_wl_ssl.<suffix>
<Location /weblogic> SetHandler weblogic-handler PathTrim /weblogic WebLogicHost myhost WebLogicPort 80</Location>
WebLogic Server User Identity for the Trading Partner
The WebLogic Server user identity is optional when you configure the remote trading partner. If a particular WebLogic Integration deployment has stringent security requirements, we recommend the following:
! Configure the ACLs for the transport servlet to enable permissions for the WebLogic Server users that map to the remote trading partner certificates.

Configuring Business Process Management Access to the WebLogic Integration Repos-
Implementing Security with B2B Integration 4-45
! Disable guest users so that users with unknown or invalid certificates are unable to enter the WebLogic Server system.
Configuring Business Process Management Access to the WebLogic Integration Repository
If you plan to use the business process management (BPM) functionality provided by WebLogic Integration, you need to make sure that BPM users can share access to the WebLogic Integration repository. To support such access, you need to configure BPM with permissions for using the repository: add the WebLogic Server group wlpiUsers to the ACL for the JDBC connection pool used by the WebLogic Integration repository.
In addition, if a user of the WebLogic Integration Studio or Worklist utility needs access to workflow templates stored in the WebLogic Integration repository, you need to add that user to the appropriate ACLs for the WebLogic Server administration MBeans. To do so, specify the following ACLs on the WebLogic Server MBeans for the user. In these settings, replace <user> with the name of the BPM user:
acl.access.weblogic.admin.mbean.MBeanHome=<user>acl.lookup.weblogic.admin.mbean.MBeanHome=<user>
For information about configuring ACLs for B2B resources, see �Configuring Access Control Lists for WebLogic Integration� on page 4-7.
Configuring Server-Side Authentication
By default, WebLogic Integration uses two-way SSL authentication. You might want to use server-side authentication, however, if you do not want to require certificate-based authentication among your trading partners.

4 Configuring Security
4-46 Implementing Security with B2B Integration
To configure server-side authentication, complete the following steps:
1. Stop the server running in your B2B domain.
2. Go to the root directory for the domain. For example:
c:\bea\user_projects\domain
3. Bring the config.xml file into a text editor.
4. Set the WebLogic Server SSL parameter ClientCertificateEnforced to false.
5. Set the WebLogic Server SSL parameter TwoWaySSLEnabled to true.
6. Save your changes to the config.xml file.
7. Start the server in your B2B domain, and start the B2B Console.
8. Remove the client certificate for each remote trading partner, as described in �Removing Certificates and Private Keys from the Keystore� on page 3-20.
CHAPTER
5 Implementing Nonrepudiation
This topic includes the following sections:
! Overview of Nonrepudiation
! Using the Service Provider Interfaces (SPIs) for Nonrepudiation
Overview of Nonrepudiation
Nonrepudiation is the ability of a trading partner to prove or disprove having previously sent or received a particular business message to or from another trading partner. Consider the following example.
Trading Partner A has agreed to purchase 1000 ergonomic chairs from Trading Partner B. In the course of this agreement, Trading Partner A has sent a business message to Trading Partner B agreeing to buy the chairs at a set price. Later, though, Trading Partner A disputes the original price and denies having sent a message in which they agreed to pay that price.
If a reliable nonrepudiation system has been in place, Trading Partner B can disprove Trading Partner A�s claim by producing a document from Trading Partner A specifying the amount Trading Partner A agreed to pay. Further, if this original document is digitally signed, timestamped, recorded, and secured by a trusted third-party source, the validity of this document has full legal recourse.
Implementing Security with B2B Integration 5-1

5 Implementing Nonrepudiation
Nonrepudiation, or the ability to provide legal evidence of the involvement of a denying party, is a requirement for critical business messages. WebLogic Integration B2B supports both nonrepudiation of origin and nonrepudiation of receipt:
! Nonrepudiation of origin links the business message and the sender of the message. It provides legal evidence that you have sent a business message.
! Nonrepudiation of receipt links the business message and the recipient of the message. It provides legal evidence that you have received a business message.
To support nonrepudiation, the B2B engine incorporates the following services:
! Digital signatures
! Secure timestamps
! Secure audit logs
The remaining sections in this topic describe each of these services and explain how to incorporate them into your B2B environment.
Digital Signature Support
The purpose of digital signature support is to provide a means to prevent anyone or anything from tampering with the contents of a business message, especially when the business message is in transit between two trading partners. The B2B engine provides digital signature support that conforms to the Public Key Cryptography Standard 7 (PKCS7) packaging for digital signatures.
A digital signature itself is a set of data appended to a business message consisting of an encrypted, one-way hash value of data packaged in a specific format (for example, PKCS7 SignedData). A digital signature:
! Validates that the contents of a digitally signed message have not been tampered with.
! Contains the identity of the sender of the business message.
The data required to create a digital signature is obtained from the trading partner configuration data in the repository. The information required to create a digital signature also includes the following:
! Trading partner signature certificate and private key
5-2 Implementing Security with B2B Integration

Overview of Nonrepudiation
! Certificate authority certificate for the trading partner signature certificate
! Hash algorithm name: SHA1
! Signature algorithm name: RSA
Business Protocols with Which You May Use Digital Signature Support
WebLogic Integration provides digital signature support for messages that use the following business protocols:
! RosettaNet 1.1
! RosettaNet 2.0
! XOCP 1.1
Configuring Digital Signature Support
When you configure WebLogic Integration, you have the option of specifying a digital signature service. To use a digital signature service, you must configure it as described in �Configuring Digital Signatures for Nonrepudiation� on page 4-35.
Secure Timestamp Service
If nonrepudiation is being used, secure timestamp services are required to attach a Coordinated Universal Time (UTC) timestamp to the secure audit log when business messages are also logged to the secure audit log. For example, when you receive a business message, a timestamp is entered as a nonrepudiation of receipt (NRR) message in the audit log. When you send a business message, a timestamp is entered as a nonrepudiation of origin (NRO) message in the audit log. WebLogic Integration B2B includes a Service Provider Interface (SPI) so that you can incorporate a secure timestamp service from a trusted third-party provider.
If you incorporate a secure timestamp service from a trusted third-party provider, you need to create a Java class file that implements the com.bea.b2b.security.TimestampProvider interface. In the class methods (for example, getTimestamp) of your class implementing the
Implementing Security with B2B Integration 5-3
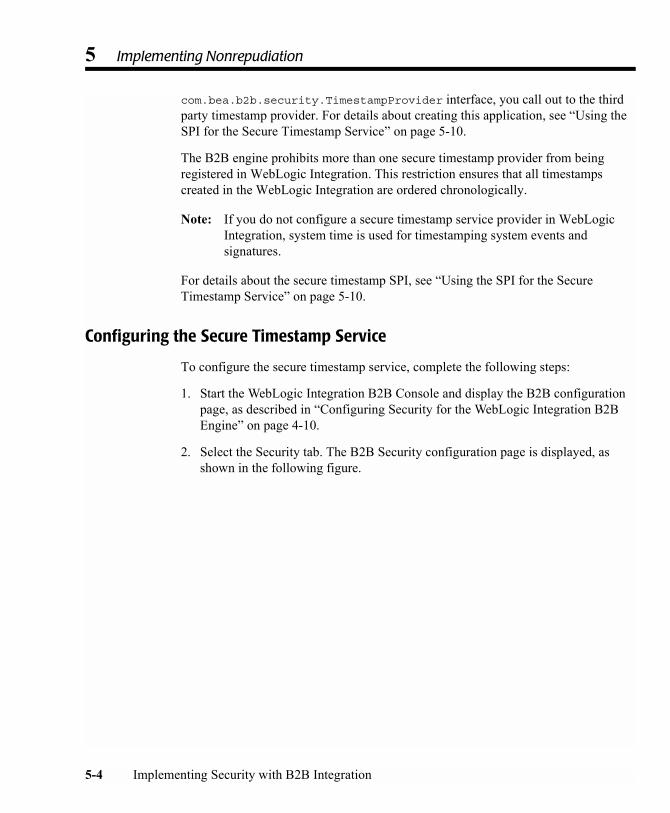
5 Implementing Nonrepudiation
com.bea.b2b.security.TimestampProvider interface, you call out to the third party timestamp provider. For details about creating this application, see �Using the SPI for the Secure Timestamp Service� on page 5-10.
The B2B engine prohibits more than one secure timestamp provider from being registered in WebLogic Integration. This restriction ensures that all timestamps created in the WebLogic Integration are ordered chronologically.
Note: If you do not configure a secure timestamp service provider in WebLogic Integration, system time is used for timestamping system events and signatures.
For details about the secure timestamp SPI, see �Using the SPI for the Secure Timestamp Service� on page 5-10.
Configuring the Secure Timestamp Service
To configure the secure timestamp service, complete the following steps:
1. Start the WebLogic Integration B2B Console and display the B2B configuration page, as described in �Configuring Security for the WebLogic Integration B2B Engine� on page 4-10.
2. Select the Security tab. The B2B Security configuration page is displayed, as shown in the following figure.
5-4 Implementing Security with B2B Integration
Overview of Nonrepudiation
Figure 5-1 B2B Security Configuration Page
3. In the field labeled Secure Timestamp Class, enter the fully qualified name of the Java class that implements the secure timestamp interface.
4. Restart WebLogic Server so that the new configuration takes effect.
Secure Audit Log Service
A secure audit log is also required for nonrepudiation. This log typically stores each business message with its digital signature and secure timestamp. You use an audit log to reconstruct the sequence of messages and other system events that have occurred during the exchange of business messages among trading partners.
As with the timestamp service, the B2B engine provides a Service Provider Interface (SPI) for you to configure a trusted, third-party provider of the secure audit log. If you incorporate a secure audit log service from a trusted third-party provider, you need to
Implementing Security with B2B Integration 5-5
5 Implementing Nonrepudiation
create a class file that implements the com.bea.b2b.security.AuditLogProvider interface. In the class methods of your class implementing the com.bea.b2b.security.AuditLogProvider interface (for example, log), you call out to the third party audit log provider. For details about creating this implementation, see �Using the SPI for the Secure Audit Log� on page 5-11.
Note: If you do not configure a third-party provider for a secure audit log service, the B2B system provides a default audit log in a file named secureaudit.log, which you can enable by setting the system property bea.secureaudit to on. This file is based on the logging subsystem in B2B, and is protected by only the underlying operating system�s file permissions system. This file is not digitally signed or encrypted.
Writing to the Audit Log Directly
As an alternative to writing a Java implementation of the com.bea.b2b.security.AuditLogProvider interface to call out to an application that writes to the audit log, you can write an application that writes to the audit log directly via an invocation to the com.bea.b2b.security.Audit.log(byte[] data) method, as shown in the code example provided in this section.
This example is a modification of the HelloPartnerServlet.java class, which is located in the following directory, where SAMPLES_HOME represents the directory in which the sample applications are installed:
! Windows
%SAMPLES_HOME%\integration\samples\HelloPartner\src\wlcsamples\servlets
! UNIX
$SAMPLES_HOME/integration/samples/HelloPartner/src/wlcsamples/servlets
In this example, the bolded code shows the statements that have been added to show writing to the audit log.
5-6 Implementing Security with B2B Integration
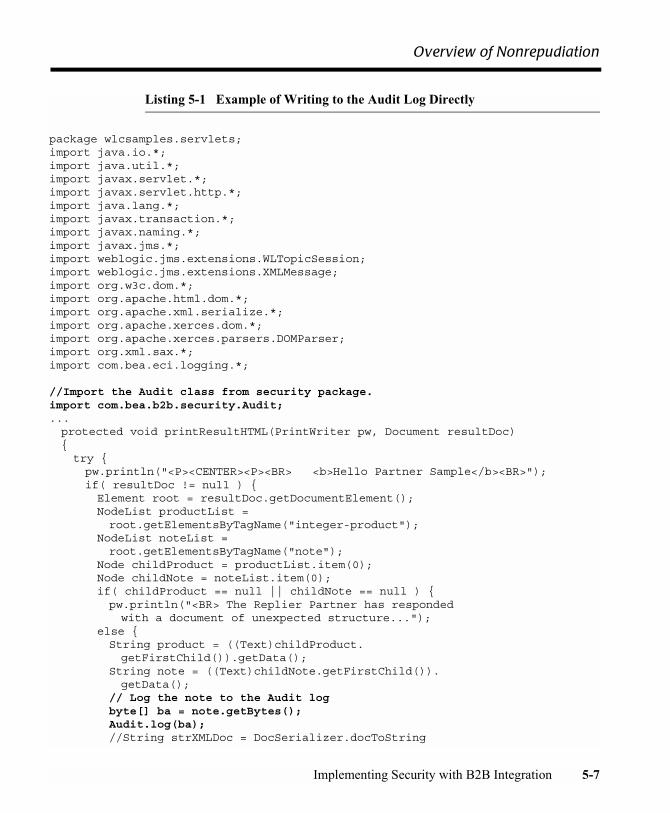
Overview of Nonrepudiation
Listing 5-1 Example of Writing to the Audit Log Directly
package wlcsamples.servlets;import java.io.*;import java.util.*;import javax.servlet.*;import javax.servlet.http.*;import java.lang.*;import javax.transaction.*;import javax.naming.*;import javax.jms.*;import weblogic.jms.extensions.WLTopicSession;import weblogic.jms.extensions.XMLMessage;import org.w3c.dom.*;import org.apache.html.dom.*;import org.apache.xml.serialize.*;import org.apache.xerces.dom.*;import org.apache.xerces.parsers.DOMParser;import org.xml.sax.*;import com.bea.eci.logging.*;
//Import the Audit class from security package.import com.bea.b2b.security.Audit;...protected void printResultHTML(PrintWriter pw, Document resultDoc){try {pw.println("<P><CENTER><P><BR> <b>Hello Partner Sample</b><BR>");if( resultDoc != null ) {Element root = resultDoc.getDocumentElement();NodeList productList = root.getElementsByTagName("integer-product");
NodeList noteList = root.getElementsByTagName("note");
Node childProduct = productList.item(0);Node childNote = noteList.item(0);if( childProduct == null || childNote == null ) {pw.println("<BR> The Replier Partner has responded with a document of unexpected structure...");
else {String product = ((Text)childProduct.getFirstChild()).getData();
String note = ((Text)childNote.getFirstChild()).getData();
// Log the note to the Audit logbyte[] ba = note.getBytes();Audit.log(ba);//String strXMLDoc = DocSerializer.docToString
Implementing Security with B2B Integration 5-7
5 Implementing Nonrepudiation
(resultDoc);pw.println("<BR> The Replier Partner has responded with the following result... <BR> ");
pw.println("<BR> Product: " + product + "");pw.println("<BR> Note: " + note + "<P><BR><BR></CENTER>");
pw.println("<CENTER><IMG SRC=\"Hello4.gif\" WIDTH=650 HEIGHT=220
BORDER=0 NATURALSIZEFLAG=3></CENTER>");}
}else {pw.println("<BR> ERROR: ");pw.println("<BR> The Requestor Trading Partner's private workflow did not return a result.<P><BR><BR></CENTER>");
pw.println("<CENTER><IMG SRC=\"Hello1.gif\" WIDTH=650 HEIGHT=220 BORDER=0 NATURALSIZEFLAG=3></CENTER>");
}pw.println("<P><CENTER><BR> <BR> ");pw.println("<P><CENTER><A HREF=\"/HelloPartnerLauncher.html\"><b>Click Here to Run Again</b></A></CENTER></P>");
} catch (Exception e) {e.printStackTrace();
}}
Configuring the Secure Audit Log
To configure the secure audit log, complete the following steps:
1. Start the B2B Console and display the WebLogic Integration B2B configuration page, as described in �Configuring Security for the WebLogic Integration B2B Engine� on page 4-10.
2. Select the Security tab. The B2B Security configuration page is displayed, as shown in the following figure.
5-8 Implementing Security with B2B Integration

Overview of Nonrepudiation
Figure 5-2 WebLogic Integration B2B Security Configuration Page
3. In the field labeled Audit Log Class, enter the fully qualified name of the Java class that implements the secure audit log.
4. Restart WebLogic Server so that the new configuration takes effect.
Implementing Security with B2B Integration 5-9

5 Implementing Nonrepudiation
Using the Service Provider Interfaces (SPIs) for Nonrepudiation
This section describes the SPIs for the following nonrepudiation services:
! Secure Timestamp Service
! Secure Audit Log Service
Using the SPI for the Secure Timestamp Service
WebLogic Integration B2B allows you to create a customized secure timestamp service by implementing the com.bea.security.TimeStampProvider interface. If you implement a timestamp using the SPI described in this section, you must configure this service later in the B2B Console so that the service is invoked properly during run time.
The com.bea.b2b.security.TimeStampProvider interface has the following methods, which a timestamp application must implement:
! String getTimestamp()
This method returns a string specifying the time in Coordinate Universal Time (UTC) format.
! long getTimestampInMillis()
This method returns a string specifying the UTC time in milliseconds.
Your implementation of the timestamp interface must include a default public constructor with no arguments. Neither the constructor nor any methods in the class that implements the TimeStampProvider interface should throw any exceptions.
5-10 Implementing Security with B2B Integration
Using the Service Provider Interfaces (SPIs) for Nonrepudiation
Using the SPI for the Secure Audit Log
WebLogic Integration B2B allows you to create a secure audit log service by implementing the com.bea.security.AuditLogProvider interface. If you implement an audit log service using the SPI described in this section, you must configure this service later in the B2B Console so that the service is invoked properly during run time.
The com.bea.b2b.security.AuditLogProvider interface has the following methods, which a secure audit log application must implement:
! void init()
This method initializes the audit log.
! void log (java.lang.String component, java.lang.String type, byte[] data, java.lang.String principal)
This method is invoked to log a message in the secure audit log. It has the following parameters:" java.lang.String component
Contains the component that is logging the message" java.lang.String type
Specifies the type of the nonrepudiation message" byte[] data
Contains the data to be logged " java.lang.String principal
Contains the name of the trading partner who is logging this message
Your implementation of the secure audit interface must include a default public constructor with no arguments. Neither the constructor nor any methods in the class that implements the AuditLogProvider interface should throw any exceptions.
Implementing Security with B2B Integration 5-11
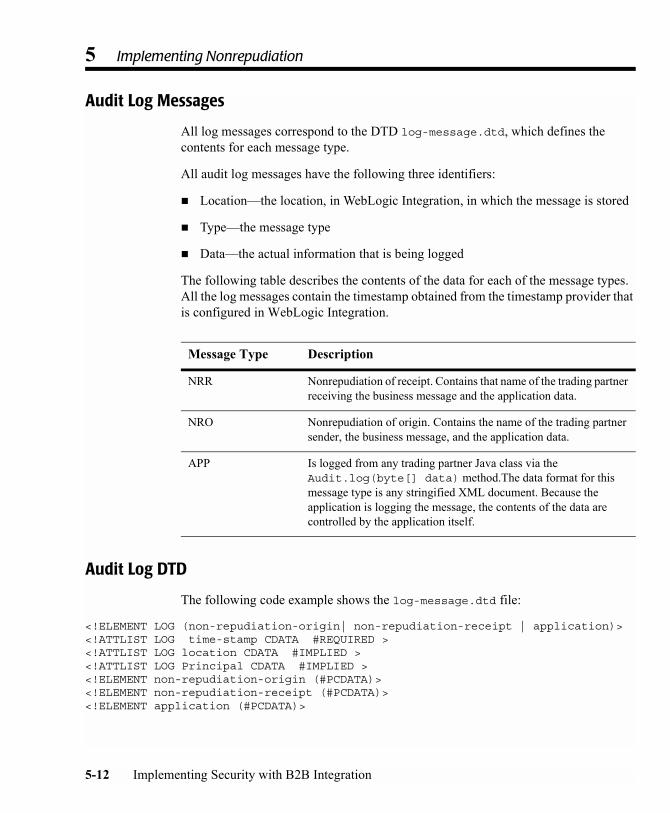
5 Implementing Nonrepudiation
Audit Log Messages
All log messages correspond to the DTD log-message.dtd, which defines the contents for each message type.
All audit log messages have the following three identifiers:
! Location�the location, in WebLogic Integration, in which the message is stored
! Type�the message type
! Data�the actual information that is being logged
The following table describes the contents of the data for each of the message types. All the log messages contain the timestamp obtained from the timestamp provider that is configured in WebLogic Integration.
Audit Log DTD
The following code example shows the log-message.dtd file:
<!ELEMENT LOG (non-repudiation-origin| non-repudiation-receipt | application)><!ATTLIST LOG time-stamp CDATA #REQUIRED ><!ATTLIST LOG location CDATA #IMPLIED ><!ATTLIST LOG Principal CDATA #IMPLIED ><!ELEMENT non-repudiation-origin (#PCDATA)><!ELEMENT non-repudiation-receipt (#PCDATA)><!ELEMENT application (#PCDATA)>
Message Type Description
NRR Nonrepudiation of receipt. Contains that name of the trading partner receiving the business message and the application data.
NRO Nonrepudiation of origin. Contains the name of the trading partner sender, the business message, and the application data.
APP Is logged from any trading partner Java class via the Audit.log(byte[] data) method.The data format for this message type is any stringified XML document. Because the application is logging the message, the contents of the data are controlled by the application itself.
5-12 Implementing Security with B2B Integration

Index
Numerics3DES 4-32
Aaccess control list
see ACLACLs
defining 4-7MBeans 4-45
algorithms, supported cipher 4-34Apache server
using with WebLogic Integration 4-43application, disabling automatic deployment
3-4audit log class
specifying location of 4-10audit log service
description 5-5DTD 5-12messages 5-12writing to directly 5-6
authenticationclient 1-13configuring 4-2definition 1-2description 2-1of business messages 2-6one-way 4-45server 1-13server-side 4-45
trading partner (overview) 2-1authorization
conversation 1-1conversations 2-10definition 1-2description 2-8trading partner (about) 2-8
automatic deployment, disabling 3-4automigrate, enabling 3-18
Bbulk loading certificates 3-18Bulk Migrator 4-10business messages
authenticating 2-6configuring encryption of 4-33encrypting 4-32
CCA
about 3-2certificate authorities 1-11, 3-2
specifying directory for 4-10Certificate Revocation List
see CRL 2-2certificate verification
process of 2-3certificate verification provider
see CVPcertificates
Implementing Security with B2B Integration I-1
adding to keystore for trading partner 3-11
alias 3-16bulk loading 3-18client (description) 4-15description of types 4-15encryption (description) 4-15location 3-16removing from keystore 3-20server (description) 4-15signature (description) 4-15trading partners
specifying location for 4-14verification of 2-2
cipher algorithms, supported 4-34client authentication 1-13client certificates
description 4-15not requiring 4-45
clusters, using keystores in 3-23com.bea.b2b.CertificateVerificationProvider
interface 2-5com.bea.b2b.security.AuditLogProvider
interface 5-11com.bea.b2b.security.TimeStampProvider
interface 5-3configuring
a CVP interface 4-38a WebLogic proxy plug-in 4-43ACLs for WebLogic Integration B2B
4-7an outbound HTTP proxy server 4-40digital signatures for nonrepudiation
4-35HTTP proxy server 4-40JDBC connection pool ACL 4-7message encryption 4-32mutual authentication 4-2secure audit log 5-8secure delivery channel 4-28secure document exchange 4-30
secure timestamp service 5-4secure transport 4-26SSL 4-2trading partner certificates 4-15trading partner security (about) 4-14WebLogic Integration repository 4-45webserver 4-44
conversationauthorization of 1-1, 2-10
Coordinated Universal Time stamp 5-3CRL
overview 2-2customer support contact information viiiCVP
implementing 2-4overview 2-3using SPI for 2-5
CVP classcompiling 2-6configuring 2-6, 4-38specifying location of 4-10
Ddata
integrity 1-13privacy 1-13
definingaccess control lists 4-7
delivery channelconfiguring a secure 4-28
DERdescription 4-15
DES 4-32digital certificates 1-10digital signatures
configuring 4-35description 5-2using 5-2
document exchangeconfiguring a secure 4-30
I-2 Implementing Security with B2B Integration
domainsand compatibility security 3-4and LDAP 3-4configuring to use keystore 3-22creating for B2B 3-4
Eencryption
configuring 4-33message (description) 4-32
encryption certificatesdescription 4-15specifying private key password 4-17
endpointURI 4-26
environmentmaking secure 1-14
Ggroups
definition 1-8
HHTTP proxy server 4-40
using 4-40
Iice 5-3ImportPrivateKey utility 3-6integrity 1-13
JJava KeysStore provider
see JKSJDBC connection pool
configuring ACL for 4-45JKS
about 3-1and WebLogic Server 3-1
Kkeystores
about 3-1adding trading partner certificates 3-11and bulk loading 3-18configuring for domain 3-22inserting server certificates into 3-5private, about 3-2removing certificates and keys 3-20root CA, about 3-2steps for creating 3-5steps for creating and configuring 3-3using in a cluster 3-23using the keytool utility keystores
using the ImportPrivateKey utility 3-6
keytool utility 3-6
MMBeans
setting ACLs for 4-45message encryption 4-32
configuring 4-33how it works 4-32
migrating repository security information 4-10
mutual authentication 4-2
NNode Manager 3-9nonrepudiation
of origin 5-12of receipt 5-12overview 5-1
NRO 5-3
Implementing Security with B2B Integration I-3
NRR 5-3
OOCSP
overview 2-2one-way authentication 3-12, 4-45Online Certificate Status Protocol
see OSCPoutbound HTTP proxy server
using 4-40
Ppasswords
encryption certificatespecifying private key 4-17
signature certificatespecifying private key 4-17
system 4-10PEM
description 4-15principals 1-8printing product documentation viiiprivacy 1-13private keys
adding for local trading partner 3-12password 3-16plain text (or unprotected) 3-16removing from keystore 3-20
Protocol 4-2proxy plug-in
WebLogic 4-43proxy server
configuring an outbound 4-40
Rrepository
sharing with WebLogic Integration BPM 4-45
restrictionssecurity 1-14
RSA 4-32, 4-35
Ssecure audit log service
configuring 5-8description 5-5DTD 5-12messages 5-12using SPI for 5-11
secure timestamp classspecifying location of 4-10
secure timestamp serviceconfiguring 5-4overview 5-3using SPI for 5-10
securityACLs, defining 4-7authentication, client 1-13authentication, definition 1-2authentication, description 2-1authentication, mutual 4-2authentication, server 1-13authorization, definition 1-2authorization, description 2-8certificate authorities 1-11data integrity 1-13data privacy 1-13digital certificates 1-10groups, definition 1-8HTTP proxy server 4-40principals, definition 1-8SSL, configuring 4-2SSL, description 1-13users, definition 1-8WLCCertAuthenticator class 4-37
server authentication 1-13server certificates
adding for remote trading partner 3-17
I-4 Implementing Security with B2B Integration

and local trading partner 3-12description 4-15inserting into keystore 3-5
server-side authentication 3-12service provider interface
see SPISHA1 4-35signature certificates
description 4-15specifying private key password 4-17
SPIfor CVP 2-5
SSLconfiguring 4-2description 1-13one-way 4-45
systempassword 4-10securing WebLogic Integration 4-10
system userWebLogic Integration B2B 1-9
Ttimestamp service
configuring 5-4secure 5-3
trading partnersadding certicate for remote 3-17authenticating message from 2-6authentication (overview) 2-1authorization (about) 2-8certificate types 4-15configuring security for 4-14mapping to a WebLogic Server user 1-8process of verifying 2-3verifying 2-2
transportconfiguring a secure 4-26protocol
choosing a secure 4-26
servletACL (example) 2-8
Uunprotected private key 3-16URI endpoint
choosing 4-26URLs
transport servlet 2-8users
definition 1-8UTC timestamp 5-3
Wweb.xml file 2-8WebLogic Integration B2B
about configuring system user 1-9WebLogic Integration BPM
sharing repository access with 4-45WebLogic Integration system
securing 4-10WebLogic Keystore provider, about 3-1WebLogic Keystore provider, configuring
3-9WebLogic MBeans
setting ACLs for 4-45WebLogic proxy plug-in 4-43WebLogic Server users
and trading partner mapping 1-8webserver
using with WebLogic Integration 4-43WLCCertAuthenticator class 4-37
overview 1-1wlpiUsers 4-45
Implementing Security with B2B Integration I-5

I-6 Implementing Security with B2B Integration