bartender manual - posera · as a bartender you have the ability to order drinks and have the...
TRANSCRIPT

Copyright © 2015 – 2017 Posera Page 1
Bartender Manual
Document version 1.0

Copyright © 2015 – 2017 Posera Page 2
Contents
Clock In .......................................................................................................................... 4
Clock Out ....................................................................................................................... 7
Change Job Skill ........................................................................................................... 8
Printing a Time Card ................................................................................................... 10
Navigating the Bartender Screen ............................................................................... 11
Modifying the Quantity ............................................................................................... 13
Using the Fast Bar Function ...................................................................................... 14
Starting a Tab .............................................................................................................. 16
Accessing and closing a Tab ..................................................................................... 19
Starting a Table ........................................................................................................... 23
Separating checks....................................................................................................... 26
Using Redistribution for Guest Checks .................................................................... 30
Item Discounts ............................................................................................................ 33
Taking Payment ........................................................................................................... 36
Closing Out to a Credit Card ...................................................................................... 37
Adding a TIP to a Credit Card .................................................................................... 38
Modifying Payment Tender ........................................................................................ 42
Personal Reading ........................................................................................................ 46
Item transfers .............................................................................................................. 48
Table Transfers ........................................................................................................... 49
Server Transfers .......................................................................................................... 51

Copyright © 2015 – 2017 Posera Page 3

Copyright © 2015 – 2017 Posera Page 4
Clock In
Biometrics: Touch Punch Clock and scan finger Maitre’D card: Touch Punch Clock and swipe card No Device: Enter POS # and touch Punch Clock
A screen with your name and your last punch will appear, select “OK” to continue
.

Copyright © 2015 – 2017 Posera Page 5
Select “Clock In/Out”
If you have more than one job skill you will need to select the appropriate skill, if not, the system will automatically select your job skill

Copyright © 2015 – 2017 Posera Page 6
Select “Ok” To Clock In

Copyright © 2015 – 2017 Posera Page 7
Clock Out
Biometrics: Touch Punch Clock and scan finger Maitre’D card: Touch Punch Clock and swipe card No Device: Enter POS # and touch Punch Clock A screen with your name and your last punch will appear, select “OK” to continue. Select “Clock In/Out” Select “OK” to clock out

Copyright © 2015 – 2017 Posera Page 8
Change Job Skill
Enter your Cashier number and touch “Punch Clock” A screen with your name and your last punch will appear, select “OK” to continue Select “Switch Job Skill”
Select new job skill
Select “OK” to change skill

Copyright © 2015 – 2017 Posera Page 9
You will now have clocked out of your first job skill and clocked in with the new job skill

Copyright © 2015 – 2017 Posera Page 10
Printing a Time Card
Enter your Server number and touch “Punch Clock” A screen with your name and your last punch will appear, select “OK” to continue Select “Weekly Time Card”
Select “Print

Copyright © 2015 – 2017 Posera Page 11
Navigating the Bartender Screen
Swipe your card or enter your number and touch BAR Note: If you have more than 1 function they will all appear.
This will bring you to the BARTENDER screen.

Copyright © 2015 – 2017 Posera Page 12
On the order screen items can be selected in a variety of ways:
Some buttons are items
Others are lists of items
Others take you to another screen

Copyright © 2015 – 2017 Posera Page 13
Modifying the Quantity
The quantity keys when selected prior to the item will add quantity. You can also use the “Add” or “Less” keys to adjust your order. The current total will be displayed.
You can use the up & down keys to scroll through the order. They will highlight if necessary. The Modifiers (Coke) will display in red under the revenue item (Rum) that it is attached to.

Copyright © 2015 – 2017 Posera Page 14
Using the Fast Bar Function
As a bartender you have the ability to order drinks and have the customer pay for them at the end of the sale instead of starting a tab or table for them. Since there is no table # you know you are in “fast bar” mode because it will display as Table 0.
On table 0 ring up items that you need – the total will display on the bottom and then close the sale to the form of payment received.

Copyright © 2015 – 2017 Posera Page 15
Note: Payment with a Credit Card will be covered in a later chapter.

Copyright © 2015 – 2017 Posera Page 16
Starting a Tab
To open a Tab for a customer select Tbl Name
An onscreen keyboard will appear – type in the name of the customer and hit the
ENTER key

Copyright © 2015 – 2017 Posera Page 17
If you have two functions you will need to select BAR:
Depending on your set up it may require you to enter the # of customers:

Copyright © 2015 – 2017 Posera Page 18
The Tab Name appears in the Table area of the display. The SEND/$ key now works as “SEND” feature instead of fast payment. It “sends” the order to the tab as well as to any printer if necessary. Example: Food items
After you “Send” the order you will be redirected back to your Bar Screen or to the screen to select your function as in the example above.

Copyright © 2015 – 2017 Posera Page 19
Accessing and closing a Tab
To access your TAB select your TAB NAME key: It will display the onscreen keyboard - instead of starting a new tab simply touch ENTER:
You will see your tabs listed – the system will automatically assign the TAB a number. Select the Tab you want to access:

Copyright © 2015 – 2017 Posera Page 20
Now you can see Joe’s tab. Items above the line have been ordered. You are now able to either add to the tab or close it out.

Copyright © 2015 – 2017 Posera Page 21
Adding to the order:
You can use the Reorder key for items above the blue line. Items below the line still need to be sent to the tab and printers by using your SEND key. If you need to change what you are ordering simply touch the item and hit LESS or MORE to adjust the items. Touch SEND to add the items to the tab.

Copyright © 2015 – 2017 Posera Page 22
With TABS and TABLES the SEND, PRINT AND CLOSE KEYS ALL WORK IN THE SAME WAY: SEND: Will send items to designated printers – Bar or Kitchen PRINT: Will SEND any new ordered items (below blue line) to designated printers and will PRINT the GUEST CHECK – at this point DISCOUNTS can be applied if necessary. CLOSE: Will SEND any new ordered items (below blue line) to designated printers and will PRINT the GUEST CHECK and go to the PAYMENT screen.

Copyright © 2015 – 2017 Posera Page 23
Starting a Table
As well as tabs it may be necessary for you to serve numbered tables in your bar. IMPORTANT NOTE: WHEN USING THE TABLE KEY IT WILL NOT SHOW UP ON YOUR TAB SCREEN. From the bar screen touch your TABLE# key:
Type in the Table number and touch ENTER

Copyright © 2015 – 2017 Posera Page 24
If prompted enter # of customers
Like the tab it will take you to your order screen. Select the items and select SEND

Copyright © 2015 – 2017 Posera Page 25
To recall a table, touch the TABLE key and ENTER
With TABS and TABLES the SEND, PRINT AND CLOSE KEYS ALL WORK IN THE SAME WAY: SEND: Will send items to designated printers – Bar or Kitchen PRINT: Will SEND any new ordered items (below blue line) to designated printers and will PRINT the GUEST CHECK – at this point DISCOUNTS can be applied if necessary. CLOSE: Will SEND any new ordered items (below blue line) to designated printers and will PRINT the GUEST CHECK and go to the PAYMENT screen.

Copyright © 2015 – 2017 Posera Page 26
Separating checks
Many guests request separate checks on either tabs or tables. This can be done either at the initial order or before presenting the guest with the check. Ordering by customer (separating at the initial order) From your order screen select Customer #1’s order and touch NEXT
This will take you to the next customer – continue the order for all customers. NOTE: The PREVIOUS key will take you back to the previous customer for review.

Copyright © 2015 – 2017 Posera Page 27
Touch SEND at the end of the last customer’s order – this will send everything on the table.
Separating checks before printing the check This can also be used to move items from person to person to correct mistakes. (You can also review the order before sending to the kitchen if ordering by customer in the previous example.) From the order screen touch STATUS
Touch the items and touch the column of the customer you want to move the items to: Touch TRANSFER to save

Copyright © 2015 – 2017 Posera Page 28
Printing separate checks After all the items have been separated to the correct customers you can print the check. You can choose to Print the Current Customer on the Order screen or Print All Customers.
If you select Print All the system will prompt you to select the number of checks

Copyright © 2015 – 2017 Posera Page 29
It will show you the breakdown on the settlement – touch OK
It will give you the option to PRINT ALL or If you touch PRINT CHECK it will print the check and then advance to the next check and you can print individual checks in the case that one person is leaving and the rest of the table is going to remain. You can use the EXIT key to skip printing.

Copyright © 2015 – 2017 Posera Page 30
Using Redistribution for Guest Checks
The REDISTRIBUTION function is the simplest way to deal with tables with multiple checks on them. For example: a table has 2 guests who have requested separate checks, but decide to pay all together or vice versa. The REDISTRIBUTION key will be either on your screen as a function key, or under the CMD key. In the previous example we had 2 separate checks. Now the guests have decided to just pay all together on one check. Log on and open the table

Copyright © 2015 – 2017 Posera Page 31
Select Redistribution
The system will prompt you for the # of checks

Copyright © 2015 – 2017 Posera Page 32
You can print the check and have the options to show totals by customer.
Because you have used the REDISTRIBUTION function if the party changed their minds you can reverse and go back to 3 customers – the system will remember what each customer had.

Copyright © 2015 – 2017 Posera Page 33
Item Discounts
Discounts depending on how they have been set up can be applied to an individual item or to the total of the check. They can be automatic (happy hour for example) or can be manually applied by either the bartender or manager. Applying discounts can also be dependent on your access rights which are determined by your management. Usually discounts are applied after all items have been added to the check and the customer is ready to pay for their service. If a discount is applicable it will appear when you print the check: Access your TABLE and touch PRINT:

Copyright © 2015 – 2017 Posera Page 34
Here you will see the discounts on the right:
Item discounts, depending on how they are set up, may prompt to the status screen for item choice:

Copyright © 2015 – 2017 Posera Page 35
Print the check – since it is based on an item you may add to the check without having to re-apply the coupon promotion.
Copyright © 2015 – 2017 Posera Page 36
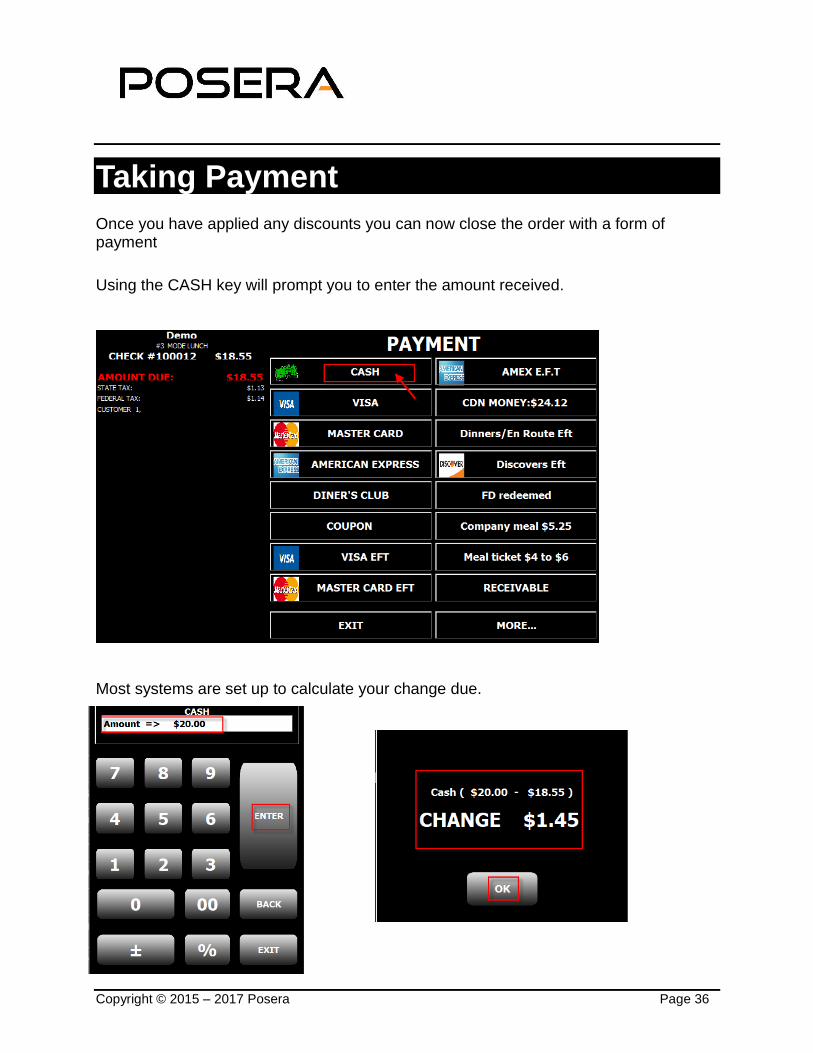
Taking Payment
Once you have applied any discounts you can now close the order with a form of payment
Using the CASH key will prompt you to enter the amount received.
Most systems are set up to calculate your change due.

Copyright © 2015 – 2017 Posera Page 37
Closing Out to a Credit Card
SWIPE the Credit Card when you have finished ringing up the items – Maitre’D will recognize the card type
Note: If the magnetic strip doesn’t read you can enter the information (Card # & expiration date manually). “ENTER” to automatically charge the entire sale to one credit card.
Note: This is only possible if you have integrated card processing SPLIT TENDER: If the customer is paying with 2 or more cards or a mix of card & cash, enter the amount for the first card and continue with the next form of payment. IF cash is a form of payment, enter that first and continue with credit card(s).

Copyright © 2015 – 2017 Posera Page 38
Adding a TIP to a Credit Card
Swipe your employee card or return to the Function selection screen (The Initial Welcome Screen) At the TABLE# prompt enter the LAST 4 DIGITS of the Check# and select the CLOSE key
OR you can touch CLOSE and choose the CC Authorization from the display

Copyright © 2015 – 2017 Posera Page 39
Touch the CC Authorization. Touch the green box or FINALIZATION below:
A number keypad will appear - enter the TOTAL amount INCLUDING the tip and touch ENTER A verification screen will appear. Touch OK.

Copyright © 2015 – 2017 Posera Page 40
Modifying Tip Amount: You have to access the tip modification screen by entering the last 4 digits of the check at the Table prompt (there will be NO box since a tip has already been entered) and Touch CLOSE: Touch the Red Finalization Box
Touch Modify Tip Amount and enter modified TOTAL.

Copyright © 2015 – 2017 Posera Page 41
A new verification screen will appear – select OK.

Copyright © 2015 – 2017 Posera Page 42
Modifying Payment Tender
You can modify a form of payment as long as you have the last 4 digits of the guest check.
Modifying a Credit Card BEFORE finalizing with a TIP (this
assumes that the customer is still present and a mistake was made before they left) At the TABLE NUMBER screen enter the last 4 digits of the order number on the check and hit CLOSE on the lower left corner. Touch Modify and select a new form of payment.
Voiding a credit card with a Tip already finalized Click on the square so you can void the transaction

Copyright © 2015 – 2017 Posera Page 43
Click on VOID CCA STATUS
Note: Voiding a credit card cca status will release the card, if you still need the credit card information, make sure the client is still on site. If they aren’t you wull have no way of retrieving the credit card information.
Changing from Credit to Cash

Copyright © 2015 – 2017 Posera Page 44
Click on MODIFY and choose CASH
Modifying a cash transaction: Follow steps from above – select MODIFY

Copyright © 2015 – 2017 Posera Page 45
Select New Form of Payment and process as normal.

Copyright © 2015 – 2017 Posera Page 46
Personal Reading
At the end of your shift you will need to take a personal reading to reconcile your day and see your sales information. Before taking your reading you must close all open checks and finalize your tips. From the Log-on Screen touch enter your server # and touch Reading:
If you have any open tables, checks or credit card authorizations they will appear:

Copyright © 2015 – 2017 Posera Page 47
Close all tables, checks or cc authorizations as instructed in other tutorials. Once they are closed, your financial information will be displayed.
The net deposit line total represents Cash minus the tips total amount. In this example we can calculate that the total cash amount taken was $115.96. Touch OK to Print the financial report. The printed version will show more detail in all of the areas on the screen.

Copyright © 2015 – 2017 Posera Page 48
Item transfers
Depending on how your system is set up you can transfer an item from one table to another Example: You put an item on the wrong table and need to move it to the appropriate table Open the Table with the wrong item on it and touch STATUS:
Enter the Table you need to transfer it to and the customer at the prompts

Copyright © 2015 – 2017 Posera Page 49
Table Transfers
Depending on how your system is set up you can transfer one table to another Examples: The customers are unhappy where they are sitting
The wrong table # was put in and items ordered Log on with your Server # and touch FUNCTION at the log on screen
Touch TABLE TRANSFER

Copyright © 2015 – 2017 Posera Page 50
Enter the OLD TABLE #
Enter the NEW TABLE #

Copyright © 2015 – 2017 Posera Page 51
Server Transfers
Depending on how your system is set up you can use the Server Transfer function. As a server you can transfer (take) a table from another server. You cannot transfer (give) a table to another server. Example: A server is going off shift and you are taking over their section. Log on with your Server # and touch FUNCTION at the log on screen
Touch SERVER TRANSFER

Copyright © 2015 – 2017 Posera Page 52
Enter the TABLE# you are transferring to yourself