banner general / middle tier implementation guide / 8 · “configure webutil for saving data...
TRANSCRIPT

What can we help you achieve?
Banner General Middle Tier Implementation Guide
Release 8.0April 2008

Notice of Rights
Copyright © SunGard Higher Education 2005, 2008. This document is proprietary and confidential information of SunGard Higher Education Inc. and is not to be copied, reproduced, lent, displayed or distributed, nor used for any purpose other than that for which it is specifically provided without the express written permission of SunGard Higher Education Inc.
SunGard Higher Education
4 Country View RoadMalvern, Pennsylvania 19355United States of America(800) 522 - 4827
Customer Support Center Website
http://connect.sungardhe.com
Documentation Feedback
http://education.sungardhe.com/survey/documentation.html
Distribution Services E-mail Address
Other Services
In preparing and providing this publication, SunGard Higher Education is not rendering legal, accounting, or other similar professional services. SunGard Higher Education makes no claims that an institution's use of this publication or the software for which it is provided will insure compliance with applicable federal or state laws, rules, or regulations. Each organization should seek legal, accounting and other similar professional services from competent providers of the organization's own choosing.
Trademark
Without limitation, SunGard, the SunGard logo, Banner, Campus Pipeline, Luminis, PowerCAMPUS, Matrix, and Plus are trademarks or registered trademarks of SunGard Data Systems Inc. or its subsidiaries in the U.S. and other countries. Third-party names and marks referenced herein are trademarks or registered trademarks of their respective owners.
Revision History Log
Publication Date SummaryApril 2008 New version to support Banner General 8.0 software.

Contents
Banner General 8.0Middle Tier Implementation Guide
Overview . . . . . . . . . . . . . . . . . . . . . . . . . . . . . . . . . . . . . .9
Single Sign-On through Banner Enterprise Identity Services. . . . . . . . . . . .9
Chapter 1 Configuring Internet-Native Banner
Overview . . . . . . . . . . . . . . . . . . . . . . . . . . . . . . . . . . . . . .11
Configuration Steps . . . . . . . . . . . . . . . . . . . . . . . . . . . . . . . .13
Step 1 Change SEED Numbers and Regenerate Banner Forms. . . . . . . . . .13Step 2 Verify Oracle Environment for Forms Deployment . . . . . . . . . . . . .14Step 3 Transfer Jar Files to INB Server. . . . . . . . . . . . . . . . . . . . . . .14Step 4 Transfer bannerid.jar File to Reports Server . . . . . . . . . . . . . . . .15Step 5 Configure Default Settings for INB . . . . . . . . . . . . . . . . . . . . .15Step 6 Configure Oracle Environment for INB . . . . . . . . . . . . . . . . . . .16Step 7 Configure Banner Online Help . . . . . . . . . . . . . . . . . . . . . . .16Step 8 Modify INB Preferences for Online Help Files. . . . . . . . . . . . . . . .17Step 9 Modify Font for INB . . . . . . . . . . . . . . . . . . . . . . . . . . . . .17Step 10 Set up Preferences for Banner ID Images . . . . . . . . . . . . . . . . .17Step 11 Verify Oracle Environment for Reports Deployment . . . . . . . . . . . .19Step 12 Set up Banner Data Extract . . . . . . . . . . . . . . . . . . . . . . . .20Step 13 Configure WebUtil for Saving Data Extract Output . . . . . . . . . . . .22Step 14 Configure Oracle Reports for INB . . . . . . . . . . . . . . . . . . . . .23Step 15 Modify INB Environment for Oracle Reports (UNIX Only) . . . . . . . . .24Step 16 Modify INB Preferences for Oracle Reports . . . . . . . . . . . . . . . .24Step 17 Modify the bannerid.jar File . . . . . . . . . . . . . . . . . . . . . . . .28Step 18 Modify the banorep.jar File (Optional) . . . . . . . . . . . . . . . . . . .29Step 19 Secure the Reports Server. . . . . . . . . . . . . . . . . . . . . . . . .32Step 20 Modify INB Preferences for Job Submission Output . . . . . . . . . . . .33Step 21 Modify default.env . . . . . . . . . . . . . . . . . . . . . . . . . . . . .34Step 22 Configure Multiple Environments (Optional) . . . . . . . . . . . . . . . .34
April 2008 Banner General 8.0 3Middle Tier Implementation Guide
Contents
Step 23 Configure Mac Environment (Optional) . . . . . . . . . . . . . . . . . .35Step 24 Customize the Color of Required Fields (Optional) . . . . . . . . . . . .35Step 25 Configure INB to Display Windows XP Themes (Optional) . . . . . . . .36Step 26 Customize Color Scheme for Disabled Text (Optional) . . . . . . . . . .36Step 27 Customize Color Scheme for Tabs (Optional) . . . . . . . . . . . . . . .37
Chapter 2 Configuring Self-Service Banner
Overview . . . . . . . . . . . . . . . . . . . . . . . . . . . . . . . . . . . . . .41
Prerequisites. . . . . . . . . . . . . . . . . . . . . . . . . . . . . . . . . . . .42
How to Create a DAD . . . . . . . . . . . . . . . . . . . . . . . . . . . . . . .43
Configuration Steps . . . . . . . . . . . . . . . . . . . . . . . . . . . . . . . .44
Step 1 Set up Your Web Server Files. . . . . . . . . . . . . . . . . . . . . . . .44Step 2 Review and Customize Global Web Rules . . . . . . . . . . . . . . . . .45Step 3 Review and Customize Global User Interface Settings . . . . . . . . . . .46Step 4 Review and Customize Graphic Elements . . . . . . . . . . . . . . . . .47Step 5 Review and Customize Web Menus and Web Procedures . . . . . . . . .47Step 6 Review and Assign Web Roles to Web Menus and Procedures . . . . . .49Step 7 Review and Define Links on Menus. . . . . . . . . . . . . . . . . . . . .50Step 8 Review and Customize Information Text (Info Text) . . . . . . . . . . . .52Step 9 Add Credit Card Processing (Optional) . . . . . . . . . . . . . . . . . . .53Step 10 Customize the Home Page . . . . . . . . . . . . . . . . . . . . . . . .53Step 11 Luminis Integration (Optional) . . . . . . . . . . . . . . . . . . . . . . .53Step 12 Configure Web Tailor for LDAP Server (Optional) . . . . . . . . . . . . .53Step 13 Assign View and Update Privileges for Addresses . . . . . . . . . . . .56Step 14 Establish Web User Parameters and Third Party History Information . . .57Step 15 Set Up Campus Directory Processing . . . . . . . . . . . . . . . . . . .64Step 16 Set Up Web E-Mail Address Options . . . . . . . . . . . . . . . . . . .67Step 17 Set Up Web Surveys. . . . . . . . . . . . . . . . . . . . . . . . . . . .69
Chapter 3 Required Tasks for Single Sign-On (SSO) to INB, SSB, and/or Channels
Overview . . . . . . . . . . . . . . . . . . . . . . . . . . . . . . . . . . . . . .71
About Single Sign-On . . . . . . . . . . . . . . . . . . . . . . . . . . . . . . . .71
ID Mappings Between Systems. . . . . . . . . . . . . . . . . . . . . . . . . . .73
Single Sign-On between Luminis and Banner . . . . . . . . . . . . . . . . . . .73
4 Banner General 8.0 April 2008Middle Tier Implementation GuideContents

Single Sign-On between Luminis and Self-Service Banner. . . . . . . . . . . . .73
Single Sign-On between Luminis/Channels and Banner . . . . . . . . . . . . . .74
Single Sign-On and Value-Based Security . . . . . . . . . . . . . . . . . . . . .74
Luminis IV Support . . . . . . . . . . . . . . . . . . . . . . . . . . . . . . . . .75
Implementation Steps . . . . . . . . . . . . . . . . . . . . . . . . . . . . . . .75
Step 1 Create an Encryption Key . . . . . . . . . . . . . . . . . . . . . . . . . .75Step 2 Create Entries in LDAP to Store Configuration Values . . . . . . . . . . .76Step 3 Configure Parameters using GUAUPRF . . . . . . . . . . . . . . . . . .78
Chapter 4 Implementing Single Sign-On for Internet-Native Banner
Step 1 Update New Entries in LDAP for INB . . . . . . . . . . . . . . . . . . . .81Step 2 Create DADs for Running SSO . . . . . . . . . . . . . . . . . . . . . . .85Step 3 Configure your INB Server . . . . . . . . . . . . . . . . . . . . . . . . .86Step 4 Verify Configuration Steps in Banner . . . . . . . . . . . . . . . . . . . .87Step 5 Configure your Luminis Server . . . . . . . . . . . . . . . . . . . . . . .89Step 6 Test . . . . . . . . . . . . . . . . . . . . . . . . . . . . . . . . . . . . .90Step 7 (Optional) Set up SSO INB on Macintosh . . . . . . . . . . . . . . . . . .90
Chapter 5 Implementing Single Sign-On for Self-Service Banner
Step 1 Create Entries in LDAP to Store Configuration Values . . . . . . . . . . .93Step 2 Update New Entries in LDAP for SSB. . . . . . . . . . . . . . . . . . . .95Step 3 Configure WebTailor for LDAP Server . . . . . . . . . . . . . . . . . . .97Step 4 Update WebTailor Parameters . . . . . . . . . . . . . . . . . . . . . . .99Step 5 Verify Configuration Steps in Self-Service . . . . . . . . . . . . . . . . .99Step 6 (Optional) Create DADs for Running SSO with VBS . . . . . . . . . . . .101Step 7 Configure your Luminis Server . . . . . . . . . . . . . . . . . . . . . . .103Step 8 Test . . . . . . . . . . . . . . . . . . . . . . . . . . . . . . . . . . . . .104
Chapter 6 Implementing Luminis Channels for Banner
Prerequisites. . . . . . . . . . . . . . . . . . . . . . . . . . . . . . . . . . . .105
Apply Upgrade . . . . . . . . . . . . . . . . . . . . . . . . . . . . . . . . . . .105
Set up Security on GSASECR . . . . . . . . . . . . . . . . . . . . . . . . . . .105
Perform Required Steps . . . . . . . . . . . . . . . . . . . . . . . . . . . . . .106
Architectural Overview . . . . . . . . . . . . . . . . . . . . . . . . . . . . . .107
April 2008 Banner General 8.0 5Middle Tier Implementation Guide
Contents

Preparing to Install Luminis Channels for Banner . . . . . . . . . . . . . . .109
Step 1 Create the Home Directory for Luminis Channels for Banner . . . . . . . .109Step 2 Edit the Configuration File . . . . . . . . . . . . . . . . . . . . . . . . . .110Step 3 Localize the Configuration File . . . . . . . . . . . . . . . . . . . . . . .113Step 4 Deploy the EAR File . . . . . . . . . . . . . . . . . . . . . . . . . . . . .114
Installing a Luminis Channel for Banner. . . . . . . . . . . . . . . . . . . . .115
Step 5 Install CAR Files. . . . . . . . . . . . . . . . . . . . . . . . . . . . . . .115Step 6 Publish the Channel . . . . . . . . . . . . . . . . . . . . . . . . . . . . .116Step 7 Check Your Work . . . . . . . . . . . . . . . . . . . . . . . . . . . . . .117Locale-Specific URLs . . . . . . . . . . . . . . . . . . . . . . . . . . . . . . . .117
Example INB Test for the My Banner Channel . . . . . . . . . . . . . . . . . . .117
Example SSB Test for Personal Information Channel . . . . . . . . . . . . . . .120
Appendix A Self-Service Technical Information
Third Party Access Form Table . . . . . . . . . . . . . . . . . . . . . . . . . .121
GOBTPAC . . . . . . . . . . . . . . . . . . . . . . . . . . . . . . . . . . . . .121
Third Party Access Audit Form Tables. . . . . . . . . . . . . . . . . . . . . .121
GOBTPAC . . . . . . . . . . . . . . . . . . . . . . . . . . . . . . . . . . . . .122
GORPAUD . . . . . . . . . . . . . . . . . . . . . . . . . . . . . . . . . . . . .122
Campus Directory Tables . . . . . . . . . . . . . . . . . . . . . . . . . . . . .122
GTVDIRO --- Directory Item Validation Table . . . . . . . . . . . . . . . . . . . .122
GOBDIRO --- Directory Options Rule Table . . . . . . . . . . . . . . . . . . . .123
GORDADD --- Directory Address Table. . . . . . . . . . . . . . . . . . . . . . .124
GORDPRF -- Directory Profile Table . . . . . . . . . . . . . . . . . . . . . . . .125
Appendix B Single Sign-On Connectivity Overview
Accessing Banner from Luminis . . . . . . . . . . . . . . . . . . . . . . . . .127
Accessing Self-Service Banner from Luminis . . . . . . . . . . . . . . . . . .129
Appendix C Oracle 10g Supplement
10g Database. . . . . . . . . . . . . . . . . . . . . . . . . . . . . . . . . . . .132
6 Banner General 8.0 April 2008Middle Tier Implementation GuideContents

Example Init.ora For Oracle RDBMS 10.2.0 . . . . . . . . . . . . . . . . . . . .132Oracle 10.2 init.ora . . . . . . . . . . . . . . . . . . . . . . . . . . . . . . . .132
Troubleshooting
Single Sign-On INB . . . . . . . . . . . . . . . . . . . . . . . . . . . . . . . .137
Single Sign-On for SSB . . . . . . . . . . . . . . . . . . . . . . . . . . . . . .138
Luminis Channels for Banner. . . . . . . . . . . . . . . . . . . . . . . . . . .140
Index
April 2008 Banner General 8.0 7Middle Tier Implementation Guide
Contents

8 Banner General 8.0 April 2008Middle Tier Implementation GuideContents

April 20
Overview
This document describes the steps you need to follow for the primary configuration of your Banner Middle Tier server. Depending on the products you have licensed, you may need to skip some of the sections. You may also need to look for details in other documents.
WarningYou should work your way through this document in order, except for the sections you skip because you do not have a particular product. Do not move randomly through the steps.
This document describes how to configure Internet-Native Banner (INB) with OAS10g, Self-Service Banner (SSB), Single Sign-On (SSO) with Luminis, and Luminis Channels with Banner. The configurations you need depend on the products that you have licensed. You must still set up various preferences, etc., as described in the Banner product-specific user guides (such as the Banner General User Guide, Banner Student User Guide, and others).
Single Sign-On through Banner Enterprise Identity Services
Banner Enterprise Identity Services offers a new approach to single sign-on (SSO) and integration across the Banner Unified Digital Campus. This document does not cover SSO setup through Banner Enterprise Identity Services. If you are using Banner Enterprise Identity Services, please refer to the Banner Enterprise Identity Services Handbook.
08 Banner General 8.0 9Middle Tier Implementation Guide

10
Banner General 8.0 April 2008Middle Tier Implementation Guide
April 20
1 Configuring Internet-Native Banner
Overview
This chapter describes how to configure Internet-Native Banner (INB) with Oracle Application Server Release 2 (OAS10gR2). You will be guided through the following steps:
1. “Change SEED Numbers and Regenerate Banner Forms” on page 13
2. “Verify Oracle Environment for Forms Deployment” on page 14
3. “Transfer Jar Files to INB Server” on page 14
4. “Transfer bannerid.jar File to Reports Server” on page 15
5. “Configure Default Settings for INB” on page 15
6. “Configure Oracle Environment for INB” on page 16
7. “Configure Banner Online Help” on page 16
8. “Modify INB Preferences for Online Help Files” on page 17
9. “Modify Font for INB” on page 17
10. “Set up Preferences for Banner ID Images” on page 17
11. “Verify Oracle Environment for Reports Deployment” on page 19
12. “Set up Banner Data Extract” on page 20
13. “Configure WebUtil for Saving Data Extract Output” on page 22
14. “Configure Oracle Reports for INB” on page 23
15. “Modify INB Environment for Oracle Reports (UNIX Only)” on page 24
16. “Modify INB Preferences for Oracle Reports” on page 24
08 Banner General 8.0 11Middle Tier Implementation Guide
Configuring Internet-Native Banner

12
17. “Modify the bannerid.jar File” on page 28
18. “Modify the banorep.jar File (Optional)” on page 29
19. “Secure the Reports Server” on page 32
20. “Modify INB Preferences for Job Submission Output” on page 33
21. “Modify default.env” on page 34
22. “Configure Multiple Environments (Optional)” on page 34
23. “Configure Mac Environment (Optional)” on page 35
24. “Customize the Color of Required Fields (Optional)” on page 35
25. “Configure INB to Display Windows XP Themes (Optional)” on page 36
26. “Customize Color Scheme for Disabled Text (Optional)” on page 36
27. “Customize Color Scheme for Tabs (Optional)” on page 37
The Windows Server 2000/2003 platforms are supported for Internet-Native Banner (INB), as well as the following Linux and UNIX platforms:
• Sun Solaris 5.9
• IBM Aix 5.1
• HP-UX 11.11
• HP/Compaq Tru64 5.1
• Red Hat Linux Advanced Server
NoteThe word UNIX in this chapter refers to all UNIX platforms. Any platform-specific instructions are noted.
Banner General 8.0 April 2008Middle Tier Implementation GuideConfiguring Internet-Native Banner
April 20
Platform
UNIX/Linu
NT
Configuration Steps
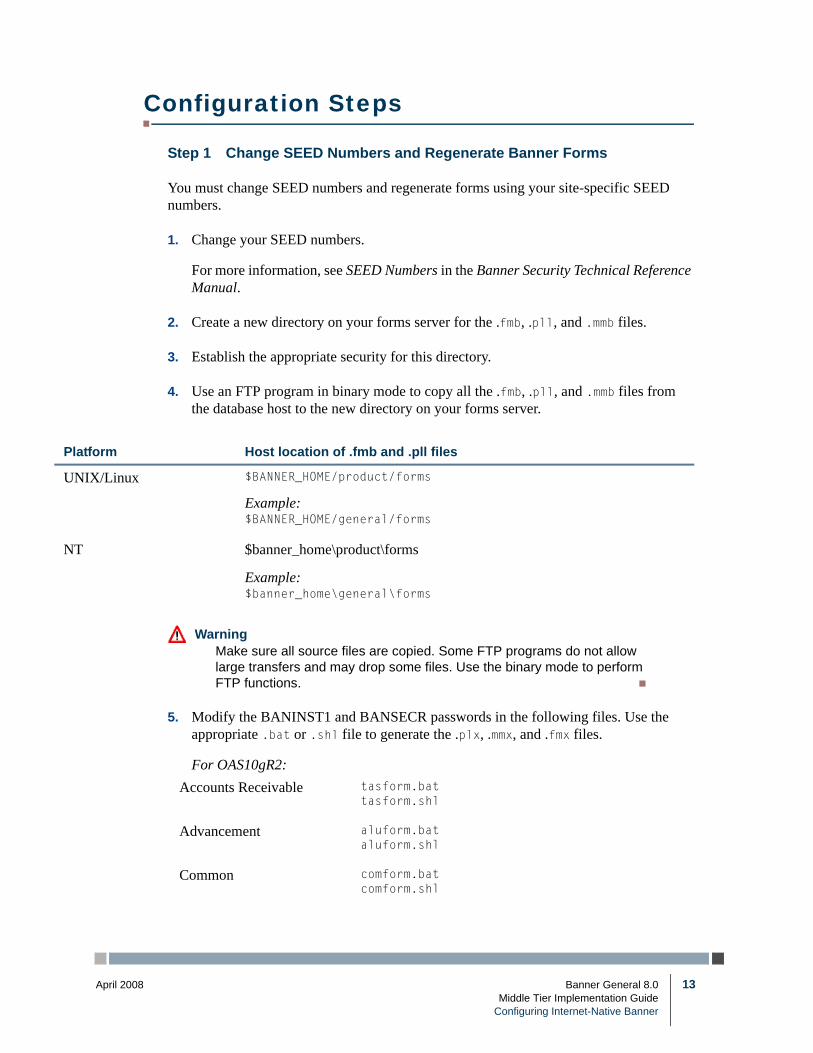
Step 1 Change SEED Numbers and Regenerate Banner Forms
You must change SEED numbers and regenerate forms using your site-specific SEED numbers.
1. Change your SEED numbers.
For more information, see SEED Numbers in the Banner Security Technical Reference Manual.
2. Create a new directory on your forms server for the .fmb, .pll, and .mmb files.
3. Establish the appropriate security for this directory.
4. Use an FTP program in binary mode to copy all the .fmb, .pll, and .mmb files from the database host to the new directory on your forms server.
WarningMake sure all source files are copied. Some FTP programs do not allow large transfers and may drop some files. Use the binary mode to perform FTP functions.
5. Modify the BANINST1 and BANSECR passwords in the following files. Use the appropriate .bat or .shl file to generate the .plx, .mmx, and .fmx files.
For OAS10gR2:
Host location of .fmb and .pll files
x $BANNER_HOME/product/forms
Example:$BANNER_HOME/general/forms
$banner_home\product\forms
Example:$banner_home\general\forms
Accounts Receivable tasform.battasform.shl
Advancement aluform.bataluform.shl
Common comform.batcomform.shl
08 Banner General 8.0 13Middle Tier Implementation Guide
Configuring Internet-Native Banner
14
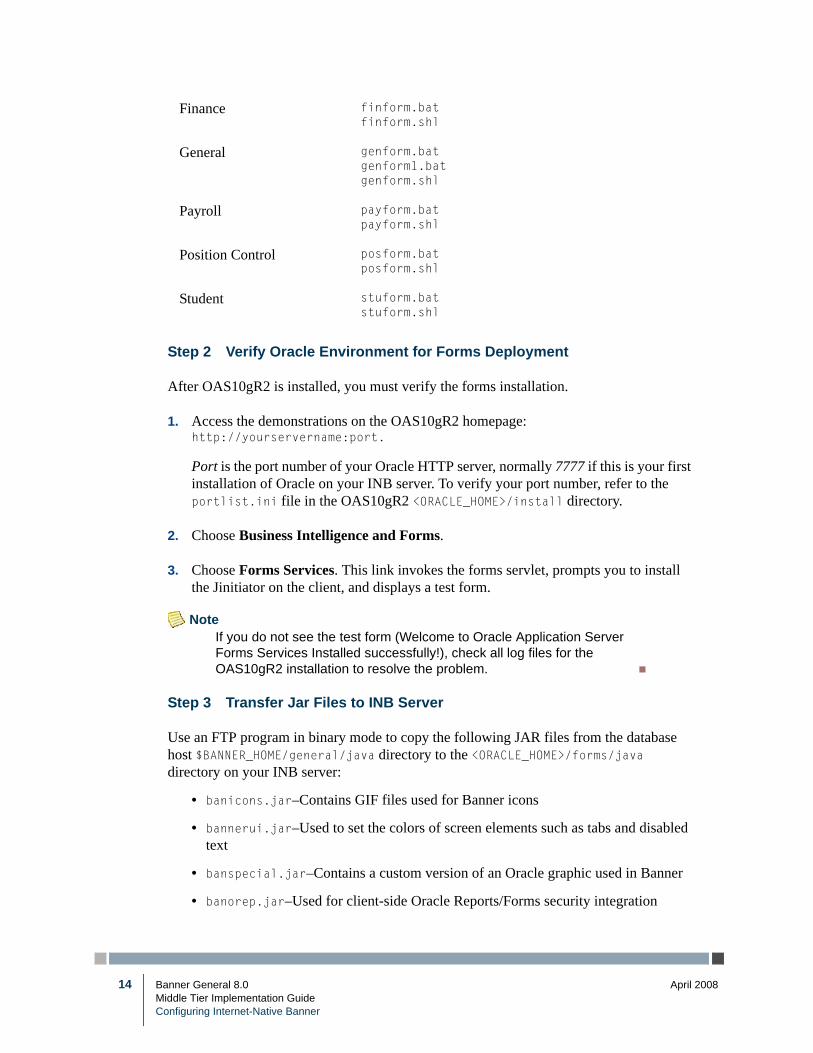
Step 2 Verify Oracle Environment for Forms Deployment
After OAS10gR2 is installed, you must verify the forms installation.
1. Access the demonstrations on the OAS10gR2 homepage: http://yourservername:port.
Port is the port number of your Oracle HTTP server, normally 7777 if this is your first installation of Oracle on your INB server. To verify your port number, refer to the portlist.ini file in the OAS10gR2 <ORACLE_HOME>/install directory.
2. Choose Business Intelligence and Forms.
3. Choose Forms Services. This link invokes the forms servlet, prompts you to install the Jinitiator on the client, and displays a test form.
NoteIf you do not see the test form (Welcome to Oracle Application Server Forms Services Installed successfully!), check all log files for the OAS10gR2 installation to resolve the problem.
Step 3 Transfer Jar Files to INB Server
Use an FTP program in binary mode to copy the following JAR files from the database host $BANNER_HOME/general/java directory to the <ORACLE_HOME>/forms/java directory on your INB server:
• banicons.jar–Contains GIF files used for Banner icons
• bannerui.jar–Used to set the colors of screen elements such as tabs and disabled text
• banspecial.jar–Contains a custom version of an Oracle graphic used in Banner
• banorep.jar–Used for client-side Oracle Reports/Forms security integration
Finance finform.batfinform.shl
General genform.batgenform1.batgenform.shl
Payroll payform.batpayform.shl
Position Control posform.batposform.shl
Student stuform.batstuform.shl
Banner General 8.0 April 2008Middle Tier Implementation GuideConfiguring Internet-Native Banner

April 20
Step 4 Transfer bannerid.jar File to Reports Server
Use an FTP program in binary mode to copy bannerid.jar from the database host $BANNER_HOME/general/java directory to a secure directory on your Reports server (C:\temp, for example).
This JAR file is used for Middle Tier Oracle Reports/Forms security integration. Refer to Step 17, “Modify the bannerid.jar file,” for more information.
Step 5 Configure Default Settings for INB
SunGard Higher Education recommends that you use Oracle Enterprise Manager for all configuration file changes. Use the sample formsweb.cfg file that is delivered with Banner as a reference for customizing your INB environment.
1. Access OEM on your INB server: http://yourservername:1810.
2. Choose Forms in the System Components section.
3. Choose Configuration.
4. Edit the following parameters in the default section.
NoteThe default section applies to all environments that your INB server serves.
Parameter Valueform guainit.fmx
width 1040
height 738
separateFrame true
lookAndFeel Oracle
colorScheme blaf
archive_jini banspecial.jar,frmall_jinit.jar,banicons.jar,bannerui.jar,banorep.jar
archive banspecial.jar,frmall.jar,banicons.jar,bannerui.jar,banorep.jar
imageBase codeBase
logo ‘ ‘
08 Banner General 8.0 15Middle Tier Implementation Guide
Configuring Internet-Native Banner

16
5. Choose Apply to save your changes.
Step 6 Configure Oracle Environment for INB
1. Back up fmrpcweb.res, which is delivered in the $BANNER_HOME/install directory.
Oracle provides this file as a sample key mapping resource file for Web-enabled forms. This file contains the key mappings that match the standard client/server keystrokes of Banner. The file is ASCII text and can be edited with any editor.
2. Rename fmrpcweb.res to fmrweb_utf8.res.
3. Move fmrweb_utf8.res to the <ORACLE_HOME>/forms/admin/resource/US directory on your OAS10g server.
Step 7 Configure Banner Online Help
Help files are contained in the bannerOHxx.war file (bannerOH80.war, for example) which is available on the Customer Support Center.
1. Download bannerOHxx.war from the software downloads section to a directory on your desktop.
NoteThe bannerOH.war file that is located in the $BANNER_HOME/general/help directory is only a placeholder file. You must always download the current version from the Customer Support Center.
2. Access OEM on your INB server. In most cases, OEM can be accessed using http://yourservername:1810.
3. Choose Home to display the default OC4J page.
4. Choose Applications.
5. Choose Deploy WAR file if this is the first time you are deploying online help. If you are replacing a previous version, undeploy the old version first.
6. Browse to the location of the bannerOHxx.war file on your INB server.
7. Enter bannerOH in the Application Name field.
8. Enter /bannerOH in the Map to URL field.
9. Choose Deploy to deploy the bannerOHxx.war file. The file is now listed under the OC4J:home deployed Applications.
Banner General 8.0 April 2008Middle Tier Implementation GuideConfiguring Internet-Native Banner

April 20
Step 8 Modify INB Preferences for Online Help Files
You must specify the directory location where online help files will be stored.
1. Logon to Banner as the BASELINE user.
2. Go to the General User Preferences Maintenance Form (GUAUPRF).
3. Select Directory Options.
4. Navigate to the record for the online help for Web access.
5. In the User Value field, change the URL to the server address and virtual path used by your site.
Delivered value:http://your.bannerOH.server/bannerOH/bannerOH
Example:http://server45.sungardhe.com:7778/bannerOH/bannerOH
Step 9 Modify Font for INB
1. Navigate to the OAS10gR2 <ORACLE_HOME>/forms/java/oracle/forms/registry directory.
2. Edit the Registry.dat file.
3. Comment out the following line:
default.fontMap.defaultFontname=Dialog
4. Add the following line:
default.fontMap.defaultFontname=Verdana
5. Save the Registry.dat file.
Step 10 Set up Preferences for Banner ID Images
The capability to display an image file (.bmp, .gif, .tif, or .jpg) associated with an ID is available from the ID fields in Banner. In order to use this functionality, you must do the following:
• Set up a directory to store the images.
• Change the Banner images record on GUAUPRF to point to the directory.
• (Optional) Configure the BAN_GUAIMGE_ID_RANGE and BAN_GUAIMGE_EXTENSION environment variables if you want to use a naming convention other than the DOS 8.3 standard with a file type of Windows Bitmap (.bmp).
08 Banner General 8.0 17Middle Tier Implementation Guide
Configuring Internet-Native Banner

18
The “1,9” and “3,7” Image Name Conventions
You can now choose to use the following convention for image names:
• Nine characters of the ID, starting with position one. (for example, an ID of A01394287 would become A01394287). This is referred to as the 1,9 convention.
• A file extension of .gif, .jpg, .tif, or .bmp (for example, A01394287.gif).
Prior to the General 7.4 release, image files that were displayed on the Personal Image Form (GUAIMGE) were limited to the following convention:
• Seven characters of the ID, starting with position three, and prefixed with the letter I (for example, an ID of A01394287 would become I1394287). This is referred to as the 3,7 convention, or the DOS 8.3 standard.
• A file extension of .bmp (for example, I1394287.bmp).
Set up a Directory for Banner ID Images
1. Create a directory on the INB server or a network directory where you want to store the images associated with Banner IDs.
2. Place the images in the directory, making sure that they are named correctly:
• If you are using the “3,7” naming convention--Use seven characters of the ID, starting with position three, and prefixed with the letter I. Use a file extension of .bmp . For example, an ID of A01394287 would become I1394287.bmp.
• If you want to use the “1,9” convention, or a different file extension--Use nine characters of the ID, starting with position one. Use a file extension of .gif, .jpg, .tif, or .bmp . For example, an ID of A01394287 would become A01394287.gif.
NoteIf you want to use the 1,9 convention or a file extension other than .bmp, you must also configure the BAN_GUAIMGE_ID_RANGE and BAN_GUAIMGE_EXTENSION environment variables.
Specify Directory for Banner ID Images
The Banner ID Images record on the General User Preferences Maintenance Form (GUAUPRF) must point to the images directory you created.
1. Log in to Banner as the BASELINE user and go to GUAUPRF.
2. Go to the Directory Options tab.
3. For the Enter the location of your Banner ID images record, enter the directory name you created for your Banner images.
• For Windows, you can use a network drive location, or a location local to the INB server.
Banner General 8.0 April 2008Middle Tier Implementation GuideConfiguring Internet-Native Banner
April 20
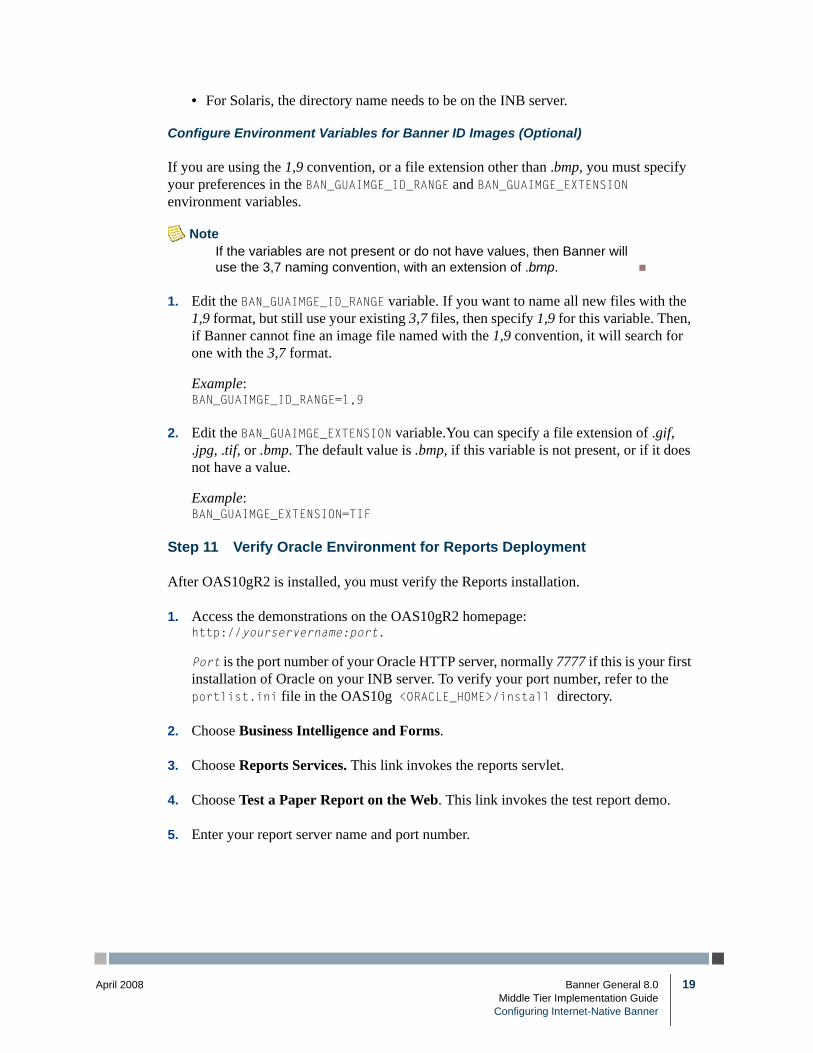
• For Solaris, the directory name needs to be on the INB server.
Configure Environment Variables for Banner ID Images (Optional)
If you are using the 1,9 convention, or a file extension other than .bmp, you must specify your preferences in the BAN_GUAIMGE_ID_RANGE and BAN_GUAIMGE_EXTENSION environment variables.
NoteIf the variables are not present or do not have values, then Banner will use the 3,7 naming convention, with an extension of .bmp.
1. Edit the BAN_GUAIMGE_ID_RANGE variable. If you want to name all new files with the 1,9 format, but still use your existing 3,7 files, then specify 1,9 for this variable. Then, if Banner cannot fine an image file named with the 1,9 convention, it will search for one with the 3,7 format.
Example:BAN_GUAIMGE_ID_RANGE=1,9
2. Edit the BAN_GUAIMGE_EXTENSION variable.You can specify a file extension of .gif, .jpg, .tif, or .bmp. The default value is .bmp, if this variable is not present, or if it does not have a value.
Example:BAN_GUAIMGE_EXTENSION=TIF
Step 11 Verify Oracle Environment for Reports Deployment
After OAS10gR2 is installed, you must verify the Reports installation.
1. Access the demonstrations on the OAS10gR2 homepage: http://yourservername:port.
Port is the port number of your Oracle HTTP server, normally 7777 if this is your first installation of Oracle on your INB server. To verify your port number, refer to the portlist.ini file in the OAS10g <ORACLE_HOME>/install directory.
2. Choose Business Intelligence and Forms.
3. Choose Reports Services. This link invokes the reports servlet.
4. Choose Test a Paper Report on the Web. This link invokes the test report demo.
5. Enter your report server name and port number.
08 Banner General 8.0 19Middle Tier Implementation Guide
Configuring Internet-Native Banner
20
6. Choose Run Report.
NoteIf you do not see the report output (Reports Server Test Report, The report ran successfully!), check all log files for the OAS10gR2 installation to resolve the problem.
Step 12 Set up Banner Data Extract
Use the following steps to set up Banner Data Extract functionality:
• Enable Data Extract for forms
• Choose default output format
• Configure environment variable for Data Extract (optional)
Enable the Data Extract Feature for a Form
1. Access the Object Maintenance Form (GUAOBJS).
2. Query for the form(s) you want to enable.
NoteNot all baseline forms have been tested for Data Extract functionality. For a list of tested forms, refer to chapter 3 of the Banner Getting Started Guide.
WarningIf you want to use the Data Extract feature on your institution’s local forms, you must test it on them first.
3. Select a value from the pull-down list in the Data Extract Option field for each form:
• Key and Data Block–Enable the extract feature for both key and data blocks.
• Data Block Only–Enable the extract feature for data blocks only.
4. Save.
Choose the Default Output Format
1. Log on to Banner as the BASELINE user.
2. Access the General User Preferences Maintenance Form (GUAUPRF).
Banner General 8.0 April 2008Middle Tier Implementation GuideConfiguring Internet-Native Banner

April 20
3. Go to the Directory Options window.
NoteFor each record on this window except for Oracle Reports Root Subfolder, you can choose whether changes to BASELINE values are used as the default values for all current users by using the Propagate pull-down list:
• Copy to All Users (default): The value you enter for the record will be copied into all user's individual user preference rows in the GURUPRF table. Any existing user value will be overwritten with this option.
• Copy to No Users: The value you enter for the record will not be copied to any users.
• Copy to Users having same value as BASELINE value: The system will compare the old BASELINE value with each user's individual row for this preference. If the value on the BASELINE row matches the value on the user's row, then the new BASELINE value will be copied into the user's row. If the user's current value is different than the current BASELINE value (prior to the change being made), then the user value will not be updated to match the BASELINE row.
4. Go to the record for Data extract format: FILE (.csv) , TEXT, or WEBUTIL.
5. Make an entry in the the User Value field.
• If you want extracted data to be placed into a file in comma separated value format (with a .csv extension), enter FILE in the User Value field. When users extract data, they will be prompted to save it to their local drive.
• If you want extracted data to be displayed in a separate browser window, enter TEXT. The information is display-only, but users can save it in a variety of formats.
• If you want to use the WebUtil option, enter WEBUTIL to save the .csv file to users’ local drives using the General WebUtil File Extract Form (GUQWUTL). If you choose this option, you must also follow the steps to “Configure WebUtil for Saving Data Extract Output” on page 22.
NoteEven if you do not use WebUtil as the BASELINE option at your instutition, then be aware that individual users will still be able to select WEBUTIL as their value for the User Value field, although they will receive an error when they try to use the General WebUtil File Extract Form (GUQWUTL) to save their file.
6. (Optional) If you are using the WebUtil option, you can specify a different default directory to save users’ output in the record for Local directory for saving output. The default delivered value is C:\temp.
7. Save.
08 Banner General 8.0 21Middle Tier Implementation Guide
Configuring Internet-Native Banner

22
Configure Environment Variable for Data Extract (Optional)
You can use the BAN_DATA_EXTRACT_PAD_COLUMNS environment variable to specify whether you want the columns of extracted data to be padded with spaces.
• If the variable is set to Y (Yes)--The Data Extract logic in the G$_WRITE_BLOCK will pad the columns with spaces. This option was the default prior to General Release 7.4.
Example:BAN_DATA_EXTRACT_PAD_COLUMNS=Y
• If the variable is set to N (No)--The columns will not be padded with spaces. The padding is not needed because the columns have a “wrapper” of double quotes around them.
Example:BAN_DATA_EXTRACT_PAD_COLUMNS=N
NoteIf the variable does not exist, then Banner assumes a value of N.
Step 13 Configure WebUtil for Saving Data Extract Output
WebUtil is an Oracle utility, portions of which SunGard Higher Education made available beginning with the General 7.3 release to assist with data transfer and web output. If configured, WebUtil provides a way to extract data from Banner to a user’s desktop, either by using Banner’s Data Extract feature, the GASB Parameter Form (FGAGASB), or the Saved Output Review Form (GJIREVO). Although it is primarily intended to provide a Data Extract solution for institutions with a RAC (Real Application Clusters) environment, SunGard Higher Education recommends that all institutions adopt this solution.
To configure WebUtil at your institution, do the following:
• Follow the instructions in the Oracle Forms Developer WebUtil User’s Guide, with the exception of the items listed below under the “Exceptions to the Standard WebUtil Configuration” heading.
• Choose WEBUTIL as the output format in the step to “Choose the Default Output Format” on page 20.
For more information about WebUtil, refer to the following page of Oracle’s web site:http://www.oracle.com/technology/products/forms/htdocs/webutil/readme.html
Exceptions to the Standard WebUtil Configuration
• SunGard Higher Education recommends that you install the webutil_db package in the baninst1 schema. In Banner General, the webutil_db package is delivered split into gokwutl.sql (package specification) and gokwutl1.sql (package body), in order to comply with Banner standards.
Banner General 8.0 April 2008Middle Tier Implementation GuideConfiguring Internet-Native Banner
April 20
• The banwebutil.jar file replaces Oracle’s frmwebutil.jar file in order to comply with Banner standards.
Using WebUtil for Other Purposes
SunGard Higher Education made a single form "WebUtil enabled" in support of the Data Extract features across Banner: the General WebUtil File Extract Form (GUQWUTL).
If you want to use other features of WebUtil at your institution, you must make each relevant form WebUtil enabled; however, Oracle recommends that you only WebUtil-enable forms which actually need the functionality. This is because each form that is WebUtil enabled generates a certain amount of network traffic and memory usage simply to instantiate the utility, regardless of whether any WebUtil functionality is used.
Step 14 Configure Oracle Reports for INB
Oracle Reports for Banner uses the RUN_REPORT_OBJECT Built-In function to run a report from the form.
The Reports server may be customized by defining the defaultEnvId parameter in the Reports server configuration file. This file allows for the definition of environment variables specific to the Reports server engine.
SunGard Higher Education recommends that you use OEM for all your configuration file changes.
1. Access OEM on your INB server: http://yourservername:1810.
2. Choose reportservername in the System Components section.
3. Choose Edit Configuration File in the Administration section.
4. Add the defaultEnvId parameter to the engine ID parameter. This parameter connects the user to a specific database.
Example:
In this example, defaultEnvId="test" is added to the end of the engine ID parameter:
<engine id="rwEng" class="oracle.reports.engine.EngineImpl" initEngine="1" maxEngine="1" minEngine="0" engLife="50" maxIdle="30" callbackTimeOut="60000" defaultEnvId="test">
5. Add the LOCAL and REPORTS_PATH parameters.
Example:
<environment id="test"/><envVariable name="LOCAL" value="test"/>
08 Banner General 8.0 23Middle Tier Implementation Guide
Configuring Internet-Native Banner
24
<envVariable name="REPORTS_PATH" value="D:\links"/></environment>
NoteIf you use Oracle SSO and Oracle Portal, skip step 6.
6. Remove the Oracle SSO and Oracle Portal tags by commenting them out using <!-- at the beginning and --> at the end of the security id and destination tags.
Example:
<!--security id="rwSec" class="oracle.reports.server.RWSecurity"><property name="securityUserid"value="%PORTAL_DB_USERNAME%/%PORTAL_DB_PASSWORD%@%PORTAL_DB_TNSNAME%"confidential="yes"encrypted="no"/><property name="oidEntity"value="%REPORTS_OID_ENTITY%"/></security>--><!--destination destype="oraclePortal" class="oracle.reports.server.DesOraclePortal"><property name="portalUserid" value="%PORTAL_DB_USERNAME%/%PORTAL_DB_PASSWORD%@%PORTAL_DB_TNSNAME%"confidential="yes" encrypted="no"/></destination> -->
7. Choose OK.
8. Choose Yes to restart the Reports server.
Step 15 Modify INB Environment for Oracle Reports (UNIX Only)
An enhancement was made to the Banner 7.1 release of Oracle Reports allowing the users to run a report without specifying the database name when logging into INB. If you are running your Reports Server on UNIX, you must add the following to your .env file:
local=<your database tns connect string>e.g local=test
Step 16 Modify INB Preferences for Oracle Reports
1. Logon to Banner as the BASELINE user.
2. Access the General User Preferences Maintenance Form (GUAUPRF).
3. Go to the Directory Options window.
4. Go to the Enter the name of your Oracle Reports Server record. In the Default Value field, change the URL to the report server used at your site.
Banner General 8.0 April 2008Middle Tier Implementation GuideConfiguring Internet-Native Banner

April 20
Delivered value: http://yourservername:port/reports/rwservlet?
5. Go to the Enter the name of your Oracle Reports Service Name record. In the Default Value field, change the reports server name to the name used at your site.
Delivered value: rep_yourservername
6. Go to the Enter name of your Oracle Reports Root Subfolder record, which allows you to control the file name format and location of Oracle Reports output. With this record, you can control where users send their report output when the report Destination Type is set to File (DESTYPE=FILE).
If you change nothing on the BASELINE row (i.e., where GURUPRF_USER_ID is equal to BASELINE), then the value DEFAULT_BEHAVIOR is used, and users send their output to the drive/folder/subfolder specified in the Destination Name field or to the default directory on the Reports server, if Destination Name is valued with only a file name. This is the same way this feature worked in previous releases. However, you have the option to enter the name of and Oracle Reports root-level folder/subfolder value (including an ending slash).
To this root-level folder/subfolder value, you have the option to append:
• An indication for including a timestamp in the report file name (date)
• An indication for having the report file written to an oracle-username-subfolder (user)
• Indications for both timestamp and username subfolder (user,date)
NoteIf your institution chooses not to append the string date to the report file name, then you must otherwise ensure that duplicate file names are not overwritten.
TipIf you use any of the new options, keep in mind that the methods you use to periodically purge the output on your Reports server may need to be adjusted. Also, when running the reports, users will enter just the file name (and extension) in the Destination Name field. The configured options will be dynamically constructed into this entered Destination Name value.
The delivered value for BASELINE is DEFAULT_BEHAVIOR. You may change this value to one of the following options:
• A root-level folder
• A root-level folder and the string user
• A root-level folder and the string date
• A root-level folder and the string user,date
08 Banner General 8.0 25Middle Tier Implementation Guide
Configuring Internet-Native Banner

26
These options are detailed below.
A root-level folder
Enter a root-level folder (including an ending slash) to which all Oracle Reports output with a Destination Type of File will be sent. This root-level folder must exist and be writable by the Reports server.
NoteIf you choose this option, make sure that all Oracle Reports users are configured to access files at this root location, and that the Windows share (or Unix security) is configured accordingly. Users need read access to this folder. Additionally, make sure that they do not send report output with sensitive data to this folder.
NoteIf a value exists in the User Value field for this corresponding type of BASELINE row, it will be ignored.
A root-level folder and user
Enter a root-level folder and the string user . If desired, users may specify subfolders within their username folder by entering the name of the subfolder in the corresponding User Value field of GUAUPRF (including an ending slash). This specified subfolder must exist.
Windows Unix/Linux
Example of the BASELINE row configuration
f:\orep_root\ /u02/orep_root/
Example of what output might look like with this BASELINE row configuration
f:\orep_root\sample_report.pdf
/u02/orep_root/sample_report.pdf
Banner General 8.0 April 2008Middle Tier Implementation GuideConfiguring Internet-Native Banner

April 20
NoteYou must create user folders for Oracle user IDs, if you choose this option. If you do not, the Reports server will not be able to write the file to the specified location. It is recommended that you create Windows share (or Unix security) on these user folders.
A root-level folder and date
Enter a root-level folder and the string date. If you choose this option, then a unique time stamp will be appended to the end of the report name, so that files will not be overwritten.
Windows Unix/Linux
Example of the BASELINE row configuration
f:\orep_root\user /u02/orep_root/user
Example of what output might look like with this BASELINE row configuration
f:\orep_root\jdoe\sample_report.pdf
/u02/orep_root/jdoesample_report.pdf
Example of what output might look like if a User Value subfolder of xyz\ (for Windows) or xyz/ (for Unix) is specified on the users GUAUPRF row
f:\orep_root\jdoe\xyz\sample_report.pdf
/u02/orep_root/jdoe/xyz/sample_report.pdf
Windows Unix/Linux
Example of the BASELINE row configuration
f:\orep_root\date /u02/orep_root/date
Example of what output might look like with this BASELINE row configuration
f:\orep_root\sample_report20061212081255.pdf
/u02/orep_root/sample_report20061212081255.pdf
08 Banner General 8.0 27Middle Tier Implementation Guide
Configuring Internet-Native Banner

28
A root-level folder and user,date
Enter a root-level folder and the string user,date.
NoteYou must create user folders for each Oracle user ID if you choose this option. If you do not, the Reports server will not be able to write the file to the specified location. It is recommended that you create Windows share (or Unix security) on these user folders.
Step 17 Modify the bannerid.jar File
The bannerid.jar file provides secured access for Oracle*Reports.
1. Create two temporary directories. (For example, C:\temp\jar\default and C:\temp\jar\new).
2. Place bannerid.jar into the C:\temp\jar\default directory.
3. Open a command prompt session at the C:\temp\jar\new directory.
4. Unpack the bannerid.jar file into the C:\temp\jar\new directory:
jar -xvf c:\temp\jar\default\bannerid.jar
5. Navigate to the C:\temp\jar\new\com\sct\banner\reports directory.
6. Modify the SEED1 and SEED3 parameters in the bannerID.properties and bannerID_en.properties files.
NoteInformation about changing SEED parameters is located in the Banner Security Technical Reference Manual.
7. Save your changes.
8. Repackage the bannerid.jar file in the C:\temp\jar\new directory using the jar command:
jar -Mcvf bannerid.jar *.*
Windows Unix/Linux
Example of the BASELINE row configuration
f:\orep_root\user,date /u02/orep_root/user,date
Example of what output might look like with this BASELINE row configuration
f:\orep_root\jdoe\sample_report20061212081255.pdf
/u02/orep_root/jdoe/sample_report20061212081255.pdf
Banner General 8.0 April 2008Middle Tier Implementation GuideConfiguring Internet-Native Banner

April 20
9. Create a secure directory on the server and copy the bannerid.jar file to this directory.
10. Modify the rep_<servername>.conf file in the following manner. SunGard Higher Education recommends that you use Oracle Enterprise Manager (OEM) for all configuration file changes.
10.1. Access OEM on your INB server: http://yourservername:1810.
10.2. Choose Reports Server Name in the System Components section.
10.3. Choose Edit Configuration File.
10.4. Add classPath="C:\temp\bannerid.jar" to the end of the engine id parameter.
Note<engine id="rwEng" class="oracle.reports.engine.EngineImpl" initEngine="1" maxEngine="5" minEngine="0" engLife="50" maxIdle="30" callbackTimeOut="60000"defaultEnvId=”test”classPath="C:\temp\bannerid.jar"></engine>
Step 18 Modify the banorep.jar File (Optional)
Banner is delivered with the banorep.jar file to control advanced Oracle Reports Security.
To avoid exposing the userid parameter, the userid connect string can be encrypted and stored in a temporary cookie on the client browser. This means the following for Reports to run:
• The userid parameter is left empty in the Reports HTML parameter form and does not show in the requested URL.
• The userid connect string is encrypted and stored as a temporary cookie. The cookie is deleted immediately when closing the browser.
• The cookie expires after 30 minutes even if the browser was not closed.
• The default cookie domain is derived from the host running Forms Services. This secures the cookie from applications hosted by other servers accessing this information.
The Reports userid cookie can be set from Forms using a Java Bean in Forms. The banorep.jar file handles setting the userid parameter in a cookie.
• maxAge –This property allows to specify a time in minutes for which the Reports userid cookie is valid. The cookie expiration is determined on the Reports Server. The default value is 30 minutes.
08 Banner General 8.0 29Middle Tier Implementation Guide
Configuring Internet-Native Banner
30
• cookieDomain –This property defines the scope of servers, the location from which hosted applications can access the cookie information. The minimum requirement is a domain that has a least two '.' in it. The domain can be set to a complete server name, therefore ensuring that only applications started on this server can access the cookie.
Example:
cookieDomain=.yourserver.com is a valid domain, whilecookieDomain=yourserver.com is not a valid domain
• cookiePath –This property defines the virtual path that an application needs in order to access the client side cookie. By default, the path is set to '/', which means that applications downloaded from any virtual path in the cookie's domain can access the cookie. To restrict access to only those applications downloaded from a specific virtual path, like "reports," use the following settings '/reports/'.
1. Create two temporary directories. (For example, C:\temp\jar\default and C:\temp\jar\new).
2. Place banorep.jar into the C:\temp\jar\default directory.
3. Open a command prompt session at the C:\temp\jar\new directory.
4. Unpack the banorep.jar file into the C:\temp\jar\new directory:
jar -xvf c:\temp\jar\default\banorep.jar
5. Navigate to the C:\temp\jar\new\oracle\reports\utility directory.
6. Access the conf.properties and conf_en.properties files.
7. Change the value for each property.
8. Save your changes.
9. Repackage the banorep.jar file in the C:\temp\jar\new directory using the jar command:
jar -Mcvf banorep.jar *.*
Forms Services Configuration
10. Copy the new banorep.jar file to the <ORACLE_HOME>/forms/java directory.
formsweb.cfg File
11. Add the following line to the named configuration section for your application in the formsweb.cfg file:
Banner General 8.0 April 2008Middle Tier Implementation GuideConfiguring Internet-Native Banner

April 20
Archive_jini= banspecial.jar,frmall_jinit.jar,banicons.jar,bannerui.jar,banorep.jar
Archive= banspecial.jar,frmall.jar,banicons.jar,bannerui.jar,banorep.jar
Basejini.htm File
12. In order for the Forms Applet to get permissions for setting the temporary authentication cookie, the MAYSCRIPT parameter needs to be set in basejini.htm template.
Internet Explorer section of basejini.htm:
<PARAM NAME="MAYSCRIPT" VALUE="true">
Netscape section of basejini.htm:
MAYSCRIPT=”true”
WarningThere is a known issue with the combination of Netscape 7.1, JInitiator 1.3.1.x, and the JSOBject class from Netscape. Forms that run in Netscape 7.1 must use the certified version of the Java Plug-In 1.4.
NoteIf you are using the Java Plug-In, you must change baseHTMLJInitiator= and baseHTMLie= parameters to point to just basejpi.htm. Add the banner jar files to the archive parameter.
Example:# System parameter: base HTML file for use with JInitiator clientbaseHTMLjinitiator=basejpi.htm# System parameter: base HTML file for use with Microsoft Internet Explorer# (when using the native JVM)baseHTMLie=basejpi.htm# Forms applet archive setting for other clients (Sun Java Plugin,Appletviewer, etc)archive=banicons.jar,bannerui.jar,banspecial.jar,frmall.jar,banorep.jar
13. Modify the REPORTS_ENCRYPTION_KEY:
Key Environment variables and Servlet Parameters
The REPORTS_ENCRYPTION_KEY specifies the encryption key used to encrypt the user name and password for the Authid & Userid Cookies. Because these cookies are sent back to the user's browser, there is a need to encrypt these values. The encryption key can be any character string. The default value is reports9.0. A change of the encryption key would change the final encrypted values of these cookies.
08 Banner General 8.0 31Middle Tier Implementation Guide
Configuring Internet-Native Banner

32
In order to secure your Oracle Reports Server environment, it is recommended you change the REPORTS_ENCRYPTION_KEY from the default value of "reports9.0" to some custom value.
You can find more information about changing the key in the document Oracle Forms Services - Secure Web.Show_Document() calls to Oracle Reports.
The SET_<nn>ENCRYPTION_KEY property allows the application developer to issue another key for encrypting the Reports cookie other than the default. Before changing the key in the cookie, make sure that the key is also changed in the Reports Server rwservlet.properties file (Reports9i and Reports 10g).
Examples:
set_custom_property('control.userid_bean',1,'SET_9iENCRYPTION_KEY', 'myOwnKeyFor9i');
set_custom_property(¿control.userid_bean¿,1,¿SET_10gENCRYPTION_KEY¿, ¿myOwnKeyFor10g¿);"
For more information, refer to Oracle Metalink Note222332.1, A Detailed Explanation of Oracle 9i Reports Security, and the whitepaper Oracle Forms Services - Secure Web.Show_Document() calls to Oracle Reports.
Step 19 Secure the Reports Server
1. Modify the ServerName directive in your Apache httpd.conf file to contain the full domain name:
ServerName <yourservername>.<yourdomainname>
NoteEnsure that the server name is the full DNS name. Be cautious if you accept the defaults during installation.
2. Any of the valid Reports Servlet commands listed on the Reports Servlet help page can be restricted. The list of help commands can be viewed at http://yourservername:port/reports/rwservlet/help.
To restrict Oracle Reports commands, add Location directives to your httpd.conf file after the default Location directive for /server-status :## Allow server status reports, with the URL of http://servername/server-status# Change the ".your_domain.com" to match your domain to enable.#<Location /server-status>SetHandler server-statusOrder deny,allowDeny from allAllow from localhost yourservername</Location>
Banner General 8.0 April 2008Middle Tier Implementation GuideConfiguring Internet-Native Banner

April 20
The following example disables the showmap command from the users and allows the call to rwservlet/showmap issued on the server yourserver.com for testing purposes:
<Location /reports/rwservlet/showmap*>Order deny,allowDeny from allAllow from localhost yourserver.com</Location>
The following example disables the upper, lower, or mixed case use of the showjobs command from the users and allows the call to rwservlet/showjobs issued from a PC with a certain IP address for testing purposes:
<Location /reports/rwservlet/[Ss][Hh][Oo][Ww][Jj][Oo][Bb][Ss]*>Order deny,allowDeny from allAllow from localhost 111.22.33.444</Location>
The following example disables the upper, lower, or mixed case use of the showjobid command from the users and allows the call to rwservelt/showjobid issued from the localhost:
<Location /reports/rwservlet/[Ss][Hh][Oo][Ww][Jj][Oo][Bb][Ii][Dd]*>Order deny,allowDeny from allAllow from localhost 111.22.33.444</Location>
3. If you installed the OAS10g Infrastructure and Middle Tier software, the WebCache software is automatically installed. The Web Cache software is a front end to the Apache HTTP server. The client IP does not get passed through to the Apache HTTP server. Therefore, Allow/Deny directives in httpd.conf will not work. You must add the following line to your httpd.conf file:
Locate and uncomment to "UseWebCacheIp On" directive in the httpd.conf fileRestart the Apache HTTP server
NoteIf you installed the Oracle Forms and Reports StandAlone Services, then you do not have WebCache installed and may skip this step.
Step 20 Modify INB Preferences for Job Submission Output
Job Submission output can be viewed on the Web from the Saved Output Review Form (GJIREVO). When you select Options--Show Document (Save and Print File), the Job Submission output is displayed in a browser window. You can then save the output to a local file or print it.
To view Job Submission or Data Extract output on the Web, a Database Descriptor (DAD) must be added in OAS10g. Refer to chapter 2 for basic information about creating a DAD.
08 Banner General 8.0 33Middle Tier Implementation Guide
Configuring Internet-Native Banner
34
If you have separate INB and SSB web servers, you should configure a DAD on your INB web server for Job Submission output.
1. Log on to Banner as the BASELINE user.
2. Access the General User Preferences Maintenance Form (GUAUPRF).
3. Go to the Directory Options tab.
4. Navigate to the record for the Web Output URL.
5. In the Default Value field, change the URL to the server address and virtual path used by your site.
Example: Delivered value: http://yourserver.com/directory/New value: http://yourserver.com/<dad name>/
NoteOAS10g no longer requires that you include /pls/ in the URL, although you can include it, if desired. Non-OAS10g users must include it, so your value would be:New value: http://yourserver.com/pls/<dad name>/
Step 21 Modify default.env
In default.env, add this new environment variable:NLS_LANG=AMERICAN_AMERICA.AL32UTF8
Step 22 Configure Multiple Environments (Optional)
Use these steps if you need to configure multiple environments. The steps will create new sections in your formsweb.cfg file.
1. Copy default.env to test.env.
2. Access OEM on your INB server: http://yourservername:1810.
3. Choose Forms in the System Components section.
4. Choose the Configuration tab.
5. Select the default configuration and choose Duplicate.
6. Enter test and click OK.
7. Edit the new test section and change value from:envFile = default.env
Banner General 8.0 April 2008Middle Tier Implementation GuideConfiguring Internet-Native Banner

April 20
to:envFile = test.env
8. Choose the Environment tab.
9. Edit the new test.env and change values as needed.
Example:FORMS_PATH - to the path of FMX/PLX/MMXsTWO_TASK(Unix) or LOCAL (Windows) - to the default database TNS_CONNECT_STRING
10. Append the new section name to the URL: http://yourservername:port/forms/frmservlet?config=test
Step 23 Configure Mac Environment (Optional)
Use these steps if you need to configure a Mac environment.
1. Download MRJ from the Apple Web site. Jinitiator is a Windows-only plug in.
2. Add client DPI=95 to the base.htm located in the OAS10g <ORACLE_HOME>/forms/server directory.
Example:<PARAM NAME="clientDPI" VALUE="95">
Step 24 Customize the Color of Required Fields (Optional)
Follow these steps if you want to display required fields in a different color.
1. Navigate to the OAS10g <ORACLE_HOME>/forms/java/oracle/forms/ registry.
2. Edit the registry.dat file.
3. Change the following line from false to true:
app.ui.requiredFieldVA=true
4. Add a line such as the following, which turns required fields red:
app.ui.requiredFieldVABGColor=255,0,0
NoteThe value for green is:app.ui.requiredFieldVABGColor=0,255,0
NoteThe value for blue is:app.ui.requiredFieldVABGColor=0,0,255
5. Save the registry.dat file.
08 Banner General 8.0 35Middle Tier Implementation Guide
Configuring Internet-Native Banner
36
6. Test:
6.1. Login to INB.
6.2. Go to GTVEMAL. The Required Description field should be red.
Step 25 Configure INB to Display Windows XP Themes (Optional)
Perform the following steps if your users prefer the XP theme display style. This change prevents scroll bars from appearing on the INB forms.
1. Edit the ORACLE_HOME\forms\server\basejini.htm file:
1.1. Find this line:<PARAM NAME="recordFileName" VALUE="%recordFileName%">
1.2. Change it to:<PARAM NAME="recordFileName" VALUE="%recordFileName%"><PARAM NAME="clientDPI" VALUE="%clientDPI%">
1.3. Find this line:recordFileName="%recordFileName%"
1.4. Change it to:recordFileName="%recordFileName%"clientDPI="%clientDPI%">
2. Access OEM on your INB server.
http://yourservername:1810
3. In the System Components section, choose Forms.
4. Choose Configuration.
5. Add the following parameter to the default section:
6. Save your changes.
Step 26 Customize Color Scheme for Disabled Text (Optional)
Banner is delivered with the following R, G, and B codes for disabled text:
R = 0G = 0B = 0
Parameter Value
ClientDPI 95
Banner General 8.0 April 2008Middle Tier Implementation GuideConfiguring Internet-Native Banner

April 20
If your site uses the OracleLookAndFeel parameter and colorScheme BLAF, disabled text is the same color (black) as regular text. If you want disabled text to be a different color, use the following steps to change the R, G, and B codes.
1. Create two temporary directories (for example, C:\temp\jar\default and C:\temp\jar\new).
2. Place bannerui.jar into the C:\temp\jar\default directory.
3. Open a command prompt session at the C:\temp\jar\new directory.
4. Unpack the bannerui.jar file into the C:\temp\jar\new directory:
jar -xvf c:\temp\jar\default\bannerui.jar
5. Navigate to the C:\temp\jar\new\com\sct\banner\forms\ui directory.
6. Access the disabledTextColor.properties and disabledTextColor_en.properties files.
7. Search for the OracleLookAndFeel parameter in the following heading:
#################################################### RGB settings to color Disabled Field Text (OracleLookAndFeel)####################################################
The delivered values for R, G, and B are:
R=0G=0B=0
8. Change the value for each code to produce the color you prefer.
9. Save your changes.
10. Repackage the bannerui.jar file in the C:\temp\jar\new directory using the jar command:
jar -Mcvf bannerui.jar *.*
11. Copy the new .jar file to the <ORACLE_HOME>/forms/java directory on the OAS10g server for deployment.
Step 27 Customize Color Scheme for Tabs (Optional)
You can customize the color of the forms’ tabs, if you wish. The tab color is determined by the tabPagesColor.properties and tabPagesColor_en.properties files, which are contained in the bannerui.jar file.
08 Banner General 8.0 37Middle Tier Implementation Guide
Configuring Internet-Native Banner

38
Banner is delivered with the following settings for tabs:
• For the active tab (only one tab can be active at one time):
• RCurrentTab=0
• GCurrentTab=51
• BCurrentTab=102
• For the other tabs that are available to the user but not currently in use:
• REnabledTab=204
• GEnabledTab=204
• BEnabledTab=204
• For the other tabs that are disabled and cannot be selected by the user:
• RDisabledTab=204
• GDisabledTab=204
• BDisabledTab=204
To change the tab colors, perform the following steps:
1. Create two temporary directories (for example, C:\temp\jar\default and C:\temp\jar\new).
2. Place bannerui.jar into the C:\temp\jar\default directory.
3. Open a command prompt session at the C:\temp\jar\new directory.
4. Unpack the bannerui.jar file into the C:\temp\jar\new directory:
jar -xvf c:\temp\jar\default\bannerui.jar
5. Navigate to the C:\temp\jar\new\com\sct\banner\forms\ui directory.
6. Access the tabPagesColor.properties and tabPagesColor_en.properties files.
7. Search for the OracleLookAndFeel parameter in the following heading:
######################################################### RGB settings to color Tab Pages (OracleLookAndFeel)###########################################################
8. Change the value for each code to produce the color you prefer.
9. Save your changes.
Banner General 8.0 April 2008Middle Tier Implementation GuideConfiguring Internet-Native Banner

April 20
10. Repackage the bannerui.jar file in the C:\temp\jar\new directory using the jar command:
jar -Mcvf bannerui.jar *.*
11. Copy the new .jar file to the <ORACLE_HOME>/forms/java directory on the OAS10g server for deployment.
08 Banner General 8.0 39Middle Tier Implementation Guide
Configuring Internet-Native Banner

40
Banner General 8.0 April 2008Middle Tier Implementation GuideConfiguring Internet-Native Banner
April 20
2 Configuring Self-Service Banner
Overview
This chapter describes the steps to install Web Tailor and Web General and to configure Self-Service Banner (SSB). You will be guided through the following steps:
1. “Set up Your Web Server Files” on page 44
2. “Review and Customize Global Web Rules” on page 45
3. “Review and Customize Global User Interface Settings” on page 46
4. “Review and Customize Graphic Elements” on page 47
5. “Review and Customize Web Menus and Web Procedures” on page 47
6. “Review and Assign Web Roles to Web Menus and Procedures” on page 49
7. “Review and Define Links on Menus” on page 50
8. “Review and Customize Information Text (Info Text)” on page 52
9. “Add Credit Card Processing (Optional)” on page 53
10. “Customize the Home Page” on page 53
11. “Luminis Integration (Optional)” on page 53
12. “Configure Web Tailor for LDAP Server (Optional)” on page 53
13. “Assign View and Update Privileges for Addresses” on page 56
14. “Establish Web User Parameters and Third Party History Information” on page 57
15. “Set Up Campus Directory Processing” on page 64
16. “Set Up Web E-Mail Address Options” on page 67
08 Banner General 8.0 41Middle Tier Implementation Guide
Configuring Self-Service Banner
42
17. “Set Up Web Surveys” on page 69
TipYou cannot implement any of the other self-service applications until you have implemented Web Tailor and Web General.
After you perform these steps, you must also set up various preferences, etc., as described in the Banner product-specific user guides (e.g., General, Student, Advancement). In addition, you need to set up the rest of your Self-Service Banner products using the product-specific implementation guides.
NoteYou do not need to perform the steps in this chapter if your institution has not licensed Self-Service Banner.
Keep in mind that there are three levels of settings maintained in Web Tailor:
• Global - applies to all the self-service products
• Module - applies to a single module, e.g., Student Self-Service
• Procedure - applies to a single procedure, e.g., bwgkomar.P_SelectMtypUpdate (Update Marital Status)
For technical information, please refer to the Banner Web Tailor User Guide.
Prerequisites• You must already have implemented Banner General.
• You must be a Web Tailor administrator in order to perform the steps in this chapter.
NoteTWADMINU.SQL has been delivered with Web Tailor and migrated to the production wtlweb/plus/ directory. This script can be used to assign the WEBTAILOR ADMINISTRATOR role to an existing Banner ID via SQL*Plus.
Banner General 8.0 April 2008Middle Tier Implementation GuideConfiguring Self-Service Banner
April 20
How to Create a DAD
SunGard Higher Education recommends that you use Oracle Enterprise Manager (OEM) for all configuration file changes.
NoteThe Oracle Web Packages must be installed in the database prior to following these steps. Installation of the Web Packages should have been completed as part of your Banner installation or upgrade process.
1. Access OEM on your SSB server: http://yourservername:1810 .
2. Choose HTTP Server.
3. Choose Administration.
4. Choose PL/SQL Properties.
5. Choose DADs.
6. Choose Create.
7. Choose General. Choose Next.
8. Enter the DAD name in the DAD Name or Location field.
9. Enter the Banner OAS10g username in the Username field (e.g. OAS_PUBLIC).
10. Enter the password in the Password field.
11. Enter TNS connect string information in the Connect String Format field.
12. Enter the name of your default home page in the Default Page field (for example, homepage.htm). Choose Next.
13. Choose Next.
14. (Optional, if you plan to configure user-friendly error messages). In the CGI Environment List section, enter REDIRECT_STATUS, REDIRECT_ERROR_NOTES. Select Apache Style from the drop-down list for the Error Style check box.
15. Enter twbklist.p_main for the Before Procedure value. Choose OK.
After your DAD has been created, use the following steps if you plan to configure user-friendly error mesages.
08 Banner General 8.0 43Middle Tier Implementation Guide
Configuring Self-Service Banner

44
16. Edit the dads.conf file on your OAS server and add the following line to the end of your DAD Location directive:ErrorDocument 404 /<DAD name>/twbkserr.p_system_error
17. Save the dads.conf file.
Configuration Steps
Step 1 Set up Your Web Server Files
Use the following steps to set up your Web server files:
1. Create a subdirectory called wtlhelp under the Web server's document root directory tree. This is the root directory defined during the Oracle Apache HTTP Listener configuration.
2. Transfer any Web Tailor installed HTML files (if they exist) from your Banner host machine to the Web server wtlhelp directory. The HTML files reside in the following Banner directories.
• UNIX: $BANNER_HOME/wtlweb/htm
• VMS: BAN_HOME:[wtlweb.htm]
• NT: drive letter:\${banner_home}\wtlweb\htm
You can transfer the text files to your Web server machine by using your site’s preferred file transfer utility (for example, ftp). Transfer the files in ASCII mode.
3. Transfer any Web Tailor-installed GIF files (if they exist) from your Banner host machine to the Web server wtlgifs directory. The GIF files will reside in the following Banner directories:
• UNIX: $BANNER_HOME/wtlweb/gif
• VMS: BAN_HOME:[wtlweb.gif]
• NT: drive letter:\${banner_home}\wtlweb\gif
You can transfer the graphic files to your Web server machine by using your site’s preferred binary file transfer utility. Transfer the files in BINARY mode.
4. Transfer any Web Tailor help GIF files (if they exist) from your Banner host machine to the Web server wtlhelp/images directory. The GIF files will reside in the following Banner directories:
• UNIX: $BANNER_HOME/wtlweb/htm/gif
• VMS: BAN_HOME:[wtlweb.htm.gif]
• NT: drive letter:\${banner_home}\wtlweb\htm\gif
Banner General 8.0 April 2008Middle Tier Implementation GuideConfiguring Self-Service Banner

April 20
You can transfer the graphic files to your Web server machine by using your site’s preferred binary file transfer utility. Transfer the files in BINARY mode.
5. Copy homepage.htm in the wtlhelp directory to the document root directory on the Web server machine. The file homepage.htm can be found in wtlweb/htm.
NoteThe homepage.htm file contains only an HTML redirect command to call a menu that is generated by Web Tailor.
6. In the homepage.htm file, change all occurrences of /test/owa to the DAD name created during the Oracle Apache HTTP Listener configuration. This is the Oracle Apache HTTP Listener that was configured to connect to your Banner host machine.
NoteThe file homefram.htm is no longer necessary since Web Tailor does not use framesets now.
7. Create a subdirectory called css (if it doesn’t already exist) under the Web server’s document tree. This is the root directory defined during the Oracle Apache HTTP Listener configuration.
8. Copy the .css files in the htm directory to the /css directory on the Web server. They are:
• web_defaulthome.css
• web_defaultmenu.css
• web_defaultapp.css
• web_defer.css
• web_color.css
• web_defaultprint.css
• web_defaulthelp.css
9. The Oracle Apache HTTP Listener component needs to be restarted to recognize the new files. Refer to the Oracle Apache HTTP Server Installation Guide for instructions on restarting the Oracle Apache HTTP Listener.
10. The SunGard Higher Education example home page is now accessible via the URL:
http://yourservername:port
Step 2 Review and Customize Global Web Rules
Web rules are global settings. They affect the look and feel of all your self-service pages and specify how the pages function. You will want to review the SunGard Higher Education-delivered rules to make sure they are appropriate for your institution.
08 Banner General 8.0 45Middle Tier Implementation Guide
Configuring Self-Service Banner
46
To define and customize Web rules, select Web Rules from the Web Tailor Administration Menu. The Customize Web Rules page (twbkrul.P_ModifyPg_WebRules) appears. It allows you to specify settings such as:
• The number of minutes the system will allow the user to be inactive before timing out the session
• The formats that will be used for date and time information
• How many days PINs are valid before they must be reset
• If users should see a Terms of Usage page when they first log on
NoteThe Java Classpath field is now obsolete.
NoteIf your institution is using an LDAP server to authenticate user logons, the Maximum Number of Login Attempts field and the PIN Expiration in days field will not be used.
For detailed information about the Customize Web Rules page, refer to the Web Tailor User Guide.
Step 3 Review and Customize Global User Interface Settings
Examine the basic look and feel of your Web site. You will want to make sure it is appropriate for your institution.
1. From the Web Tailor Administration Menu in Web Tailor, select Global User Interface Settings. The changes you make here will affect all the dynamic pages in your self-service products. These changes include:
• The name of your institution as you would like it displayed on the Web site
• (Optional) A header image that will overlay the background image at the top of the screen (defined in the CSS)
• The URL that points to the system-level Cascading Style Sheet (CSS) for application pages
• The URL that points to the system-level HTML Help text
• The URL that points to the CSS that controls how your dynamic Help text is displayed (Information Text with the label HELP)
NoteExit Image, Back Image, and Menu Image are obsolete.
Banner General 8.0 April 2008Middle Tier Implementation GuideConfiguring Self-Service Banner

April 20
2. To use an image of your own to designate error messages, warning messages, or required fields (optional):
2.1. Follow the instructions in this step to define a new image.
2.2. Return to the Customize Global User Interface Settings page (twbkglui.P_ModifyPgGlobalUI) and select the new image from the appropriate pull-down menu.
Step 4 Review and Customize Graphic Elements
Graphic elements are images that can be customized to display at various places in Self-Service Banner. They can be placed next to menu items, error and warning messages, links, Info Text, and the like. You will want to review the SunGard Higher Education-delivered graphic elements to make sure they are appropriate for your institution.
You can use Web Tailor to customize the graphics and icons that appear on your Web pages, or to define new ones. To do that, use the following steps:
1. Select Graphic Elements from the Web Tailor Administration Menu. Select the Create button to create a new element, or choose one from the pull-down menu. The Customize the Selected Graphic Element page appears.
2. Enter information about the graphic element, including:
• The name of the element. If you are customizing one that has been delivered by SunGard Higher Education, you may want to rename it to something unique to your institution
• The URL that points to the element
• The image’s width and height
• Any alternate text to be processed by a user agent such as a screen reader. This will help a visually-impaired user understand how the graphic element is used
Step 5 Review and Customize Web Menus and Web Procedures
Review the SunGard Higher Education-delivered menus and Web procedures, and customize them if necessary. The TWGBWMNU table stores the basic information for all menus and procedures.
NoteSunGard Higher Education-delivered data has the source BASELINE. You cannot change it. You can only change Local data. Select Copy Baseline entries to Local to make a copy of the BASELINE entries with the source Local. Data delivered by SunGard Higher Education in future releases will be delivered as BASELINE so the customizations you make will not be overwritten. This is true for the following four tables:
• TWGBWMNU--Web Tailor menus and procedures
08 Banner General 8.0 47Middle Tier Implementation Guide
Configuring Self-Service Banner
48
• TWGRWMRL--Web Tailor roles
• TWGRINFO--Web Tailor Information Text
• TWGRMENU--Web Tailor menu items and links
The menus in the self-service products are dynamic, containing a series of links to other Web pages. Procedures generate Web pages, and can appear as bottom-of-the-page links on menus.
The names of Web pages are defined as package.procedure combinations, e.g., bwgksrvy.P_ShowSurveys.
All dynamically-generated menus and interface procedures that are called from the Oracle Apache PL/SQL Agent must be defined in Web Tailor.
Menu items defined for a menu appear on the normal Web Tailor-generated menus. Menu items that are defined to appear on a procedure (an application Web page) will appear as a set of links on the bottom of the page.
The TWGBWMNU table stores the basic information for all menus and package.procedures.
Customizing Your Institution’s Menus and Procedures
To use Web Tailor to customize your institution’s menus, access Web Menus and Procedures from the Web Tailor Administration menu. On the Customize a Web Menu or Procedure page (twbkwmnu.P_ModifyPgWebMain), choose an existing menu or procedure from the pull-down menu. For example, to customize the home page provided by SunGard Higher Education, select homepage from the pull-down list.
Use these steps to enter or change the following information:
1. Create a local row by selecting the Copy Baseline to Local button.
2. Change any of the following:
• The page’s name and description
• The name of the self-service product to which the page belongs, e.g., Student Self-Service, Finance Self-Service, etc.
• Any comments about the page
3. Select the Enabled check box if you want the Web page to be available to menus and to other pages. Otherwise, leave it cleared. This is helpful if you are creating a new page and you have not finished yet; do not select the check box until the page is ready.
Banner General 8.0 April 2008Middle Tier Implementation GuideConfiguring Self-Service Banner
April 20
4. Select the Non Secured Access Allowed if you want to allow users to access your page without having them enter a user ID and PIN. Otherwise, leave it cleared.
NoteNon-secured items must appear on non-secured menus to be visible.
5. Set the caching method (if the browser supports caching). Select one of the following from the pull-down menu:
• Use System Setting
• Allow Caching
• Do Not Allow Caching
NoteYou will not usually change this setting.
6. (Optional) Change the page title.
7. (Optional) Change the page header.
8. (Optional) Change the name of the graphic you want displayed at the top of the page.
9. Change the location of the cascading style sheet you want to use for the Web page if you want to override the system-level style sheet and apply a custom style sheet to just this page
NoteThe Exit Link Image, Menu Link Image, Help Link Image, and Back Link Image fields are obsolete. The self-service applications use text links now instead of images.
NoteYou will make your Web pages available to a specific role or roles using Web Tailor.
Step 6 Review and Assign Web Roles to Web Menus and Procedures
A Web role is a SunGard Higher Education-assigned name for the access privileges that an end-user can have, based on specific records that exist in the Banner database. In addition, some roles can be assigned to specific individuals. These are usually administrative roles.
The roles identify the characteristics of the individual ID that logs on to the Web. They identify main functional areas of Banner that contain information about the person.
A person may have more than one role.
NoteA local TWGRWMRL row is automatically created when a local TWGBWMNU row is created.
08 Banner General 8.0 49Middle Tier Implementation Guide
Configuring Self-Service Banner

50
Menu Authorization
Roles determine what menus are displayed after logging on and what a person has access to. In addition, users can only see items on those menus that their roles authorize them to see.
NoteWeb user roles should not be confused with Banner security roles. Banner security roles are an element of Banner system security enforced above the application level. For information about Banner security roles, see the Banner Security Technical Reference Manual.
The system uses additional criteria and enforces secure access to additional Web pages the individual can access. For example, a student cannot register for classes if his current general student record is not active. Refer to each self-service product’s implementation guide for the rules that control a user’s access and update privileges.
At the bottom of the Customize a Web Menu or Procedure page (twbkwmnu.P_ModifyPgWebMain), you can identify the roles that can access the pages. The roles apply equally to menus and procedures.
1. Review the delivered roles to make sure they are appropriate for your institution.
2. If you add a new procedure, assign at least one Web role to it, or else no users will be able to access it.
Step 7 Review and Define Links on Menus
Now you should review the SunGard Higher Education-delivered links that appear on your menus. The TWGRMENU table stores the detail information about how to display individual menu items (menus or procedures).
There are three types:
• Menu item - a procedure or menu associated with (defined on) a menu. These are what you see on the full-page menus.
• Bottom-of-the-page link - a procedure or menu defined as a menu item on a procedure that generates a Web page. These links are navigation aids. For example, bottom-of-the-page links could be used to move back and forth between two associated Web pages. Bottom-of-the-page links cannot have a graphic in front of them; they are only text.
• Global menu bottom link - a menu that it has been selected to be at the bottom of every page in the a module via Customize a Module in Web Tailor.
NoteSunGard Higher Education has removed all graphics associated with menu items, in order to conform to the W3C’s accessibility guidelines.
Banner General 8.0 April 2008Middle Tier Implementation GuideConfiguring Self-Service Banner

April 20
You can still associate graphics with menu items, but SunGard Higher Education does not deliver them that way.
All these items will be displayed to the user based on three criteria:
• Is the menu item enabled for the current Web page?
• Is the page to which you want to link enabled in your system?
• Does the user’s role allow them to access the Web page where the link would take them?
All three questions must be answered yes for the item to appear.
Changing the Delivered Links
To change the delivered links, perform the following steps:
1. Select Menu Items from the Web Tailor Administration Menu.
2. Choose the menu that your links will appear on.
3. Make a local row by selecting the Copy Baseline to Local button.
4. Select Customize Menu Items.
• You can change the order that the items appear in by selecting the appropriate number from the pull-down menu, then selecting Reorder these Elements.
• You can change the URL, description, status bar text, etc., by selecting the link and entering the changes on the Customize the selected Menu Item page.
• You can add a menu item by selecting Add a New Menu Item and entering the information on the Customize the selected Menu Item page.
There are two check boxes when you add a new menu item:
• Submenu indicator - specifies that the object is a Web Tailor menu, not a package name. When you select it, its name is passed to twbkwbis.p_genmenu to display a menu of links.
• DB Procedure - if this check box is selected and the Submenu indicator is not, the object is an application page; a link is constructed to call the package.procedure directly to generate a Web page.
If neither check box is selected, the link is considered an external link to an outside site.
• You can add a bottom-of-the-page link by adding the item to the procedure as if it was a menu itself.
5. Implement optional menu changes.
08 Banner General 8.0 51Middle Tier Implementation Guide
Configuring Self-Service Banner
52
• You can add a global menu bottom link by selecting Web Modules from the Web Tailor Administrator menu. Select the appropriate module from the pull-down menu, and select Customize Module. Expand the pull-down menu next to Global Menu Bottom Links, and select the appropriate item. Save your changes.
• Menu items may be temporarily disabled without deleting them. This may be very useful for pages which allow student registration or employee open enrollment. When these functions are not allowed by your institution, simply clear the Enabled indicators. Your menu item information will be preserved for the next time the function should be available.
• Whenever you enable or disable menu items, make sure you find all the occurrences of the link. For example, View Addresses and Phones is available from the Personal Information menu and the Update Addresses and Phones page. For more information, refer to the Web Tailor User Guide.
Step 8 Review and Customize Information Text (Info Text)
Now you should review the delivered Info Text and customize it if necessary. Info Text is described in detail in the Web Tailor User Guide.
Customizing Info Text
To create or modify Info Text:
1. Select Information Text from the Web Tailor Administration Menu.
2. Choose a package.procedure combination from the pull-down list.
3. Create a local row by selecting the Copy Baseline to Local button.
4. Select Customize Info Text. The Reorder or Customize Information Text page appears.
5. Select the label of the text you want to change, and the Customize the selected Information Text Entry page (twbkwinf.P_ReorderPgInfoText) appears. You can alter the Info Text and save your changes. You can also include a graphic with it by selecting the graphic from the Image pull-down menu. The image will appear to the left of the Info Text when it is displayed.
The delivered Info Text has been written to be used with all of Self-Service Banner. If your institution has not licensed all the products, you may want to customize some of the messages to refer to only those which you have.
WarningIt is very easy to affect the entire page’s appearance by making an error in any of the embedded HTML in the Info Text. Please test your changes thoroughly.
Banner General 8.0 April 2008Middle Tier Implementation GuideConfiguring Self-Service Banner

April 20
Step 9 Add Credit Card Processing (Optional)
Generic Web Credit Card Payment logic exists in several Web General and Web Tailor packages. These packages let you populate, accept, validate, store, and verify or change address information.
Any of your Web applications may take advantage of Web Credit Card Payment processing. There are several aspects of the processing which you will want to evaluate and, perhaps, implement. For details, refer to Web Credit Card Payments Handbook.
Step 10 Customize the Home Page
To customize the content of the homepage that will be seen by the Web user:
1. Select Menu Items from the Web Tailor Administration Menu.
2. Select homepage from the pull-down list and select the Customize Menu Items button.
3. Create a local row by selecting the Copy Baseline to Local button.
4. Make your changes and save them.
Step 11 Luminis Integration (Optional)
To integrate Self-Service Banner with Luminis, refer to LDI for e-Learning Banner Implementation Guide, Volume 1.
Step 12 Configure Web Tailor for LDAP Server (Optional)
You can use the Lightweight Directory Access Protocol (LDAP) authentication process to authenticate your users’ IDs and passwords for Self-Service Banner. Users can use their LDAP user IDs and passwords to logon to all the self-service applications they need to use.
NoteAdmissions Self-Service (part of Student Self-Service) and Advancement Self-Service allow users to create logon IDs that are temporary (and are not stored in the SPRIDEN table). LDAP does not authenticate these users’ credentials.
The mapping between the LDAP user and the self-service user can be stored on the LDAP server as an attribute, or it can be stored on the Third Party Access Table (GOBTPAC) in Banner General.
NoteAuthentication in Self-Service Banner is accomplished either through a proprietary ID/PIN mechanism, or through an LDAP bind. These options are system-wide, and only one can be chosen. If you choose the LDAP
08 Banner General 8.0 53Middle Tier Implementation Guide
Configuring Self-Service Banner

54
option, the PIN field in the Banner database and all functions in Self-Service that deal with maintaining the PIN become irrelevant and are not used. These functions would need to be performed using features of your LDAP server.
You can set the LDAP authentication process to use Single Socket Layer (SSL).
You must perform the following steps to configure Web Tailor for use with your LDAP server:
1. Set up the LDAP options on the new LDAP Administration page (twbkldap.P_ModifyPgLDAP) in Web Tailor.
1.1. LDAP Protocol - Specifies the protocol to be used with self-service. Select LDAP_S if you are using LDAP with SSL at your institution
1.2. SSL Wallet Location - Specifies the wallet location. This is required if you are using a one-way or two-way SSL connection.
1.3. SSL Wallet Password - Specifies the wallet password. This is required if you are using a one-way or two-way SSL connection.
1.4. SSL Authentication Mode - Specifies the Authentication Mode.
These options are described in detail later in this chapter.
2. Set up the Web Tailor parameters on the existing Web Tailor Parameters page.
2.1. LDAPFUNCTION - the package.procedure combination that will perform the mapping between the LDAP user and self-service ID.
2.2. LDAPPWDLENGTH - the maximum number of characters for the password.
2.3. PINNAME - the PIN’s label on the LDAP logon page. You can customize this for your institution.
NoteThe PIN characteristics set up on the Enterprise PIN Preferences Form (GUAPPRF) in Banner General are ignored when you are using LDAP to authenticate your users.
2.4. USERIDLENGTH - the maximum number of characters a user ID can contain.
2.5. USERIDNAME - the user ID’s label on the LDAP logon page. You can customize this for your institution.
Banner General 8.0 April 2008Middle Tier Implementation GuideConfiguring Self-Service Banner

April 20
2.6. WEBUSER - this contains the Oracle user that Self-Service Banner will connect as. The new VBS and Personally Identifiable Information (PII) using FGAC needs this value to function appropriately.
The value delivered with this parameter is UPDATE ME. You must change this value to be the Oracle ID your users will use to connect to Self-Service Banner (e.g., OAS_PUBLIC).
NoteThis value is required for the system to function properly, regardless of whether you are using FGAC with VBS or PII.
3. (Optional) Use the column on the GOBTPAC table to map the user to their LDAP user ID. You can populate the column by using the GOATPAD form.
LDAP Function Mapping
The following functions are provided by SunGard Higher Education to perform LDAP mapping. You must define this function on the Web Tailor Parameters page (twbkparm.P_DispAllParams) as LDAPFUNCTION.
WarningWhen mapping an LDAP user ID on the GOATPAD form, be sure to assign a different LDAP ID for each Banner ID. They must be unique.
NoteIf you want to create a custom function, SunGard Higher Education recommends that you copy one of the existing functions, modify it, and change the Web Tailor parameter LDAPFUNCTION to point to it.
Delivered Function Description
Storage Location of Self-Service Mapping
F_LDAP_CUSTOMSEARCH Returns a string exactly as it is. Use this function if the LDAP user is mapped to Self-Service Banner by storing self-service IDs as an attribute in LDAP.
LDAP Server
08 Banner General 8.0 55Middle Tier Implementation Guide
Configuring Self-Service Banner
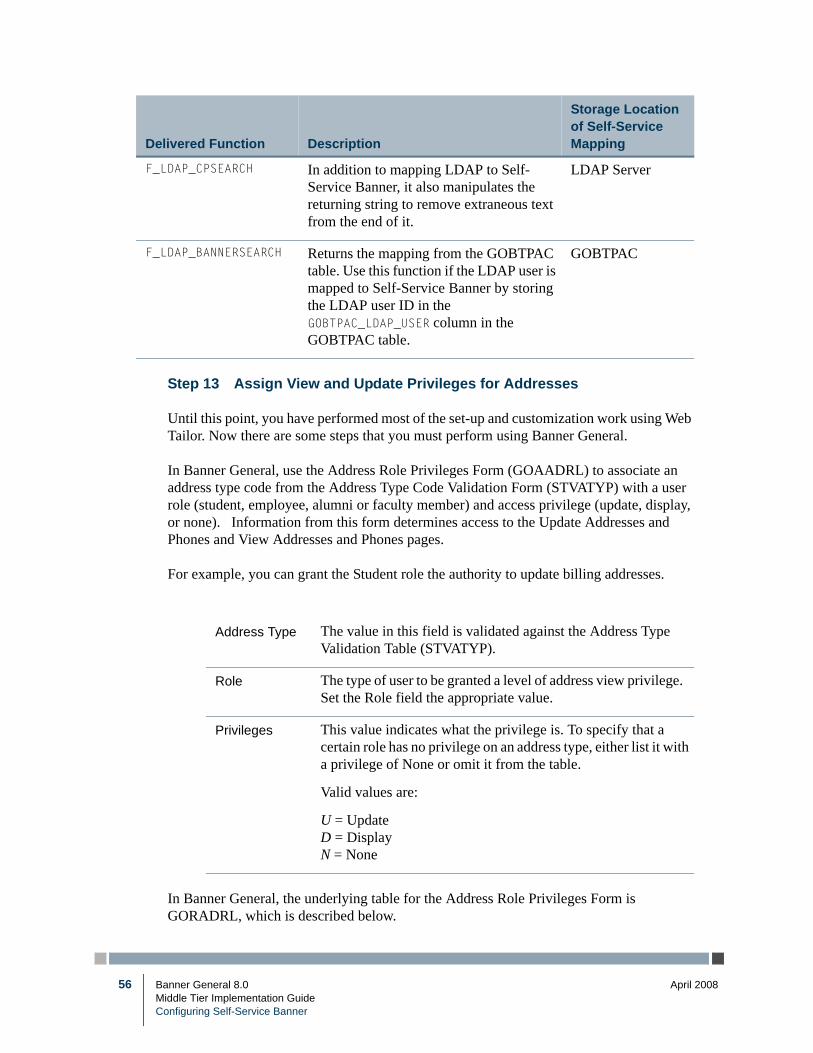
56
Step 13 Assign View and Update Privileges for Addresses
Until this point, you have performed most of the set-up and customization work using Web Tailor. Now there are some steps that you must perform using Banner General.
In Banner General, use the Address Role Privileges Form (GOAADRL) to associate an address type code from the Address Type Code Validation Form (STVATYP) with a user role (student, employee, alumni or faculty member) and access privilege (update, display, or none). Information from this form determines access to the Update Addresses and Phones and View Addresses and Phones pages.
For example, you can grant the Student role the authority to update billing addresses.
In Banner General, the underlying table for the Address Role Privileges Form is GORADRL, which is described below.
F_LDAP_CPSEARCH In addition to mapping LDAP to Self-Service Banner, it also manipulates the returning string to remove extraneous text from the end of it.
LDAP Server
F_LDAP_BANNERSEARCH Returns the mapping from the GOBTPAC table. Use this function if the LDAP user is mapped to Self-Service Banner by storing the LDAP user ID in the GOBTPAC_LDAP_USER column in the GOBTPAC table.
GOBTPAC
Delivered Function Description
Storage Location of Self-Service Mapping
Address Type The value in this field is validated against the Address Type Validation Table (STVATYP).
Role The type of user to be granted a level of address view privilege. Set the Role field the appropriate value.
Privileges This value indicates what the privilege is. To specify that a certain role has no privilege on an address type, either list it with a privilege of None or omit it from the table.
Valid values are:
U = UpdateD = DisplayN = None
Banner General 8.0 April 2008Middle Tier Implementation GuideConfiguring Self-Service Banner
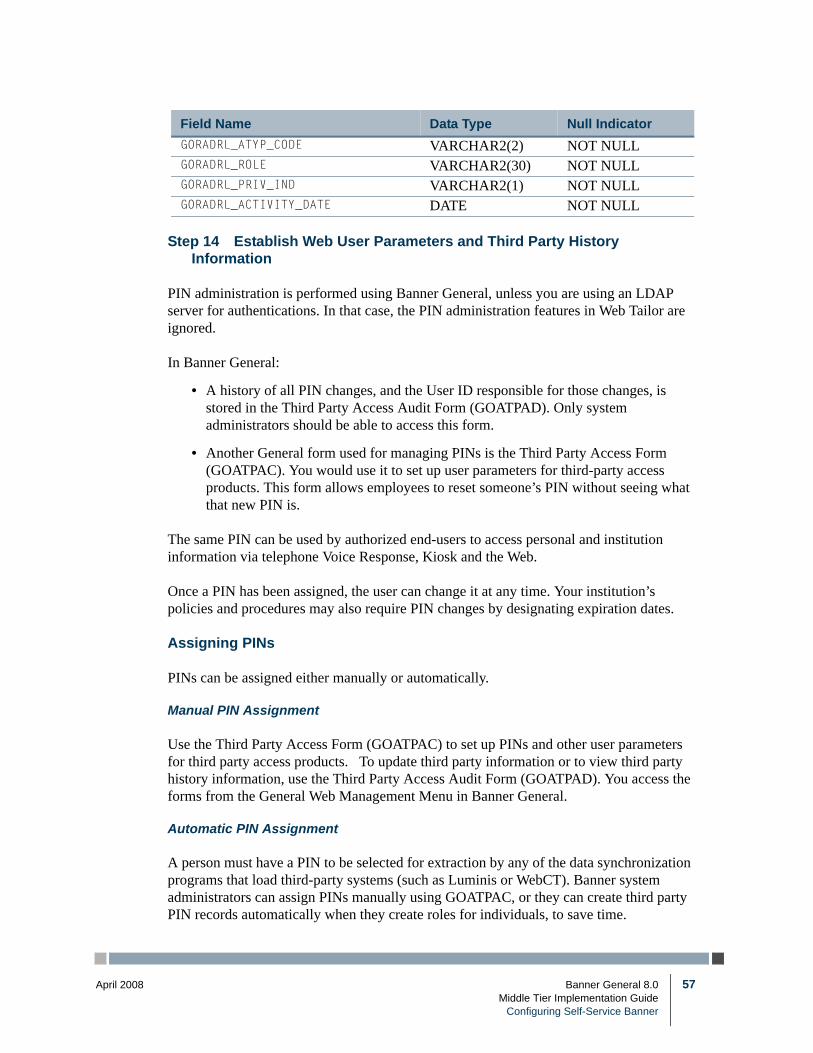
April 20
Step 14 Establish Web User Parameters and Third Party History Information
PIN administration is performed using Banner General, unless you are using an LDAP server for authentications. In that case, the PIN administration features in Web Tailor are ignored.
In Banner General:
• A history of all PIN changes, and the User ID responsible for those changes, is stored in the Third Party Access Audit Form (GOATPAD). Only system administrators should be able to access this form.
• Another General form used for managing PINs is the Third Party Access Form (GOATPAC). You would use it to set up user parameters for third-party access products. This form allows employees to reset someone’s PIN without seeing what that new PIN is.
The same PIN can be used by authorized end-users to access personal and institution information via telephone Voice Response, Kiosk and the Web.
Once a PIN has been assigned, the user can change it at any time. Your institution’s policies and procedures may also require PIN changes by designating expiration dates.
Assigning PINs
PINs can be assigned either manually or automatically.
Manual PIN Assignment
Use the Third Party Access Form (GOATPAC) to set up PINs and other user parameters for third party access products. To update third party information or to view third party history information, use the Third Party Access Audit Form (GOATPAD). You access the forms from the General Web Management Menu in Banner General.
Automatic PIN Assignment
A person must have a PIN to be selected for extraction by any of the data synchronization programs that load third-party systems (such as Luminis or WebCT). Banner system administrators can assign PINs manually using GOATPAC, or they can create third party PIN records automatically when they create roles for individuals, to save time.
Field Name Data Type Null IndicatorGORADRL_ATYP_CODE VARCHAR2(2) NOT NULLGORADRL_ROLE VARCHAR2(30) NOT NULLGORADRL_PRIV_IND VARCHAR2(1) NOT NULLGORADRL_ACTIVITY_DATE DATE NOT NULL
08 Banner General 8.0 57Middle Tier Implementation Guide
Configuring Self-Service Banner

58
The Enterprise PIN Preferences Form (GUAPPRF) allows you to specify institution-wide preferences for how PINs will be handled.
• Source Table Triggers
Individual triggers at the source tables are associated with base student-related processing for students themselves (SGBSTDN), for instructors (SIBINST), and for financial aid (RORSTAT). These triggers create updated PIN records for the GOBTPAC, GOBSRID, and GORPAUD tables.
Your institution may want to disable automatic PIN assignment at critical times, such as during a large financial aid data load.
• Batch Processing
Administrators may run the batch Third Party Access Creation Program (GURTPAC), specifying population selection parameters, to create PIN records for all the persons identified in the selection. The process generates PINs and associated detail (audit trails, external user ID, Sourced ID) if a previous PIN record does not exist. If a PIN record does exist, the person will be bypassed. The program prints a standard control report, but you may request a detailed status report, too.
Population selection required runtime parameters include: Application, Selection ID, Creator ID, and User ID. They are checked by a job-level validation routine to make sure that the combination of keys is valid with at least one associated PIDM. The routine converts any lower case input characters to upper case, to prevent rejection through job submission.
You can add the following parameters:
# - Parameter Description Length Validation
01 - Application Application for the selected population. Required.
30 characters GLBAPPL_EQUAL
02- Selection ID An identifier for the selected population. Required.
30 characters Null
03 - Creator ID The creator of the Selection ID rules. Required.
30 characters Null
04 - User ID The ID of administrator who performed the population selection. Required.
30 characters Null
Banner General 8.0 April 2008Middle Tier Implementation GuideConfiguring Self-Service Banner

April 20
Entering Current PIN Information
To enter current PIN information, enter the appropriate information into these fields on the Third Party Access Form (GOATPAC):
05 - Pre-expire PINs?
Specifies whether PIN numbers should be pre-expired. When set to Y, the PIN records you create have yesterday’s date as a PIN Expiration Date. When set to N, the PIN Expiration Date is null.
One character Null. Valid values are Y and N, from GJBPVAL.
06 - Print Report Detail?
Specifies whether to produce a detailed report in addition to the standard control report. When set to Y, the report lists each person in the selection, and the action that occurred. The detailed report includes the person’s current ID, current name, and a status message, sorted by last name. The generated PIN is not displayed for security reasons.
One character Null. Valid values are Y, N, and E, from GJBPVAL
N = Print only the standard report.
Y = Print the report plus detail.
E = Print errors only.
# - Parameter Description Length Validation
08 Banner General 8.0 59Middle Tier Implementation Guide
Configuring Self-Service Banner
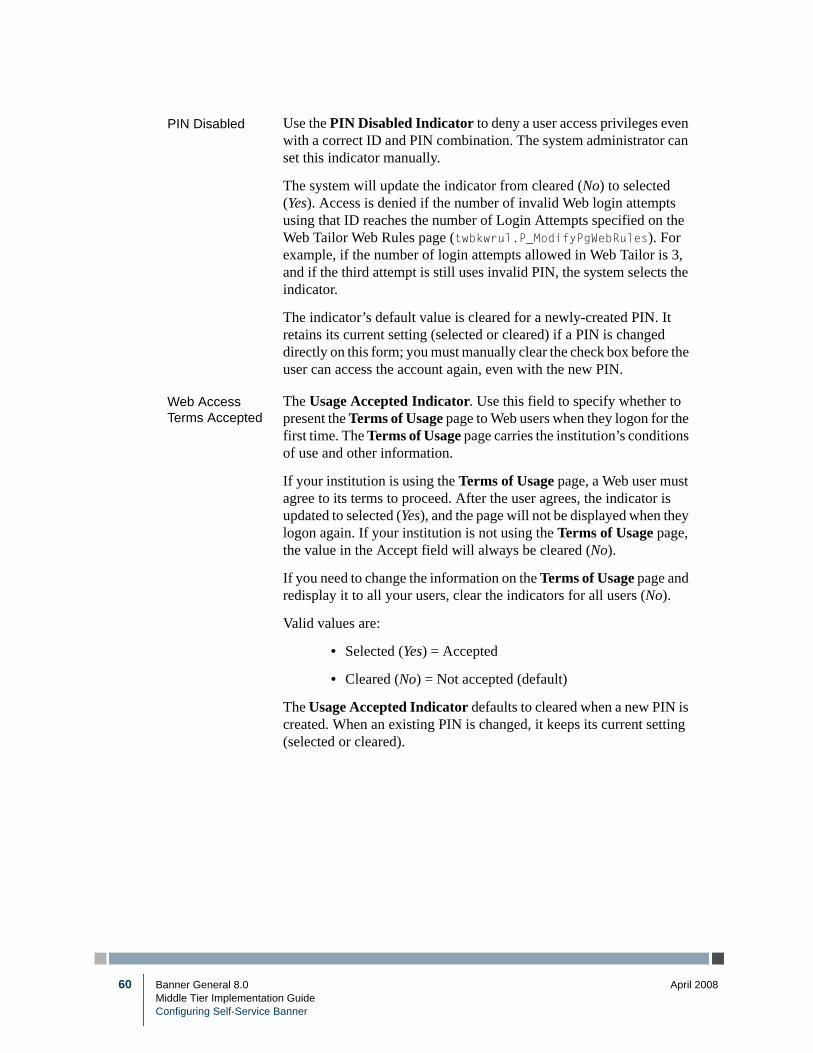
60
PIN Disabled Use the PIN Disabled Indicator to deny a user access privileges even
with a correct ID and PIN combination. The system administrator can set this indicator manually.
The system will update the indicator from cleared (No) to selected (Yes). Access is denied if the number of invalid Web login attempts using that ID reaches the number of Login Attempts specified on the Web Tailor Web Rules page (twbkwrul.P_ModifyPgWebRules). For example, if the number of login attempts allowed in Web Tailor is 3, and if the third attempt is still uses invalid PIN, the system selects the indicator.
The indicator’s default value is cleared for a newly-created PIN. It retains its current setting (selected or cleared) if a PIN is changed directly on this form; you must manually clear the check box before the user can access the account again, even with the new PIN.
Web Access Terms Accepted
The Usage Accepted Indicator. Use this field to specify whether to present the Terms of Usage page to Web users when they logon for the first time. The Terms of Usage page carries the institution’s conditions of use and other information.
If your institution is using the Terms of Usage page, a Web user must agree to its terms to proceed. After the user agrees, the indicator is updated to selected (Yes), and the page will not be displayed when they logon again. If your institution is not using the Terms of Usage page, the value in the Accept field will always be cleared (No).
If you need to change the information on the Terms of Usage page and redisplay it to all your users, clear the indicators for all users (No).
Valid values are:
• Selected (Yes) = Accepted
• Cleared (No) = Not accepted (default)
The Usage Accepted Indicator defaults to cleared when a new PIN is created. When an existing PIN is changed, it keeps its current setting (selected or cleared).
Banner General 8.0 April 2008Middle Tier Implementation GuideConfiguring Self-Service Banner
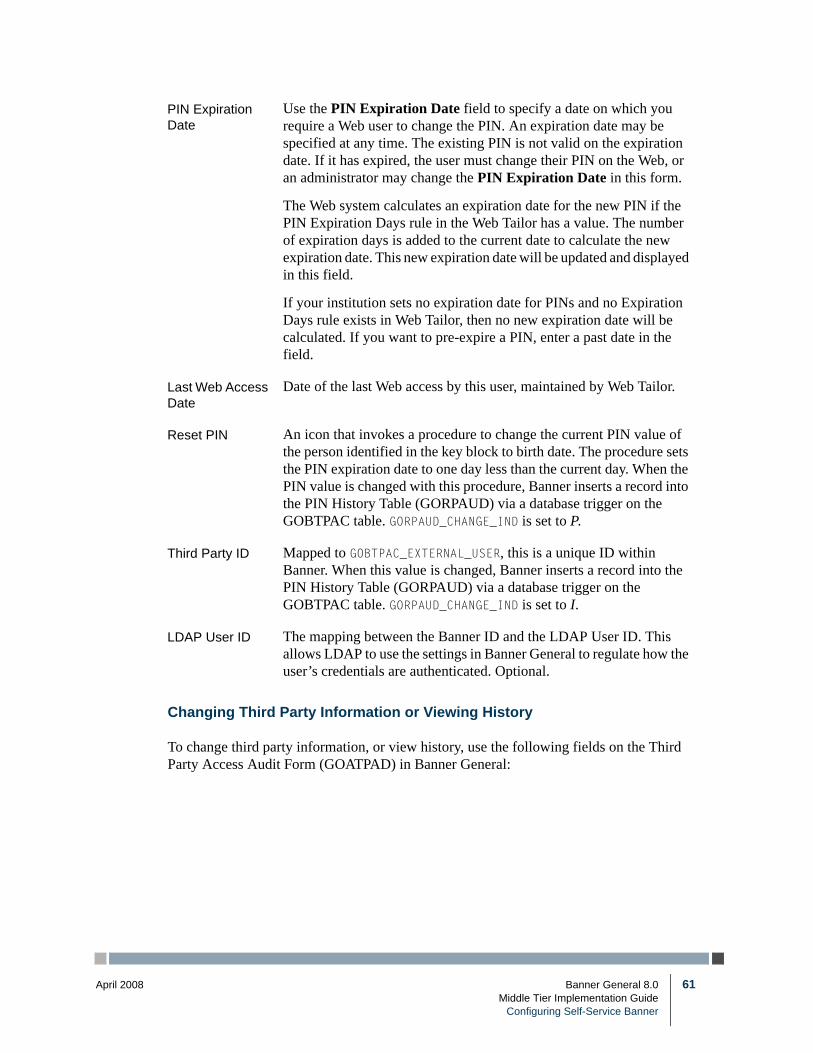
April 20
Changing Third Party Information or Viewing History
To change third party information, or view history, use the following fields on the Third Party Access Audit Form (GOATPAD) in Banner General:
PIN Expiration Date
Use the PIN Expiration Date field to specify a date on which you require a Web user to change the PIN. An expiration date may be specified at any time. The existing PIN is not valid on the expiration date. If it has expired, the user must change their PIN on the Web, or an administrator may change the PIN Expiration Date in this form.
The Web system calculates an expiration date for the new PIN if the PIN Expiration Days rule in the Web Tailor has a value. The number of expiration days is added to the current date to calculate the new expiration date. This new expiration date will be updated and displayed in this field.
If your institution sets no expiration date for PINs and no Expiration Days rule exists in Web Tailor, then no new expiration date will be calculated. If you want to pre-expire a PIN, enter a past date in the field.
Last Web Access Date
Date of the last Web access by this user, maintained by Web Tailor.
Reset PIN An icon that invokes a procedure to change the current PIN value of the person identified in the key block to birth date. The procedure sets the PIN expiration date to one day less than the current day. When the PIN value is changed with this procedure, Banner inserts a record into the PIN History Table (GORPAUD) via a database trigger on the GOBTPAC table. GORPAUD_CHANGE_IND is set to P.
Third Party ID Mapped to GOBTPAC_EXTERNAL_USER, this is a unique ID within Banner. When this value is changed, Banner inserts a record into the PIN History Table (GORPAUD) via a database trigger on the GOBTPAC table. GORPAUD_CHANGE_IND is set to I.
LDAP User ID The mapping between the Banner ID and the LDAP User ID. This allows LDAP to use the settings in Banner General to regulate how the user’s credentials are authenticated. Optional.
08 Banner General 8.0 61Middle Tier Implementation Guide
Configuring Self-Service Banner
62
PIN Enter a new PIN or change an existing PIN for the user. PINs must be six digits; letters are not permitted. To create a new PIN, enter the six digits for the PIN and save the record. To change an existing PIN to a new one, overtype the old PIN with the new one and save the change. You may also create or change a PIN by selecting the Update button located next to the PIN heading.
Disabled Use the PIN Disabled Indicator to deny a user access privileges even with a correct ID and PIN combination. As the system administrator, you may set this indicator manually.
The system will update the indicator from cleared (No) to selected (Yes), meaning that access is denied, if the number of invalid Web logon attempts using that ID reaches the number of specified on the Web Tailor Web Rules page (twbkwrul.P_ModifyPgWebRules). For example, if the number of logon attempts allowed in Web Tailor is 3, and if the third attempt is still uses invalid PIN, the system selects the indicator.
The indicator defaults to cleared when a new PIN is created. It retains its current setting (selected or cleared) if a PIN is changed directly on this form; you must manually remove it before the user can access the account again, even with the new PIN.
Accepted The Usage Accepted Indicator. Use this field to specify whether to present the Terms of Usage page to Web users when they log on for the first time. The Terms of Usage page carries the institution’s conditions of use and other information.
If your institution is using the Terms of Usage page, a Web user must agree to its terms to proceed. After the user agrees, the indicator is updated to selected (Yes), and the page will not be displayed when they log on again. If your institution is not using the Terms of Usage page, the value in the Accept field will always be cleared (No).
If you need to change the information on the Terms of Usage page and redisplay it to all your users, reset all the Accept indicators to cleared (No).
Valid values are:
• Selected (Yes) = Accepted
• Cleared (No) = Not accepted (default)
The Usage Accepted Indicator defaults to cleared when a new PIN is created. When an existing PIN is changed, it keeps its current setting (selected or cleared).
Banner General 8.0 April 2008Middle Tier Implementation GuideConfiguring Self-Service Banner
April 20
Expiration Date Use the Expiration Date field to specify when you require a user to change the PIN. You can specify an expiration date at any time. The existing PIN is no longer valid on the expiration date. If the PIN has expired, the user must change their PIN on the Web, or an administrator may change the PIN Expiration Date in this form.
The system calculates an expiration date for the new PIN if the PIN Expiration Days rule in the Web Tailor has a value. The number of expiration days is added to the current date, and this calculated date is displayed here.
If your institution sets no expiration date for PINs and no Expiration Days rule exists in Web Tailor, then no new expiration date will be calculated. If you want to pre-expire a PIN, enter a past date in the field.
User ID The User ID field displays the Oracle User ID associated with any change on this form. If the PIN is entered or changed in Banner, the User ID is the Banner Oracle User ID. If the PIN is changed on the Web by the user, the User ID is the Oracle Web Broker User ID. The cursor cannot be moved to this field, but in query mode the field can be accessed and used to specify query criteria.
Last Web Access Date
The date derived from Web Tailor Web Session Table, TWGBWSES, of the last time the user accessed a self-service product.
Activity Date The Activity Date field contains the system-maintained date on which the last change was made on the GOATPAD form. The cursor cannot be positioned to this field, but in query mode users can access the field to specify query criteria.
Third Party ID Mapped to GOBTPAC_EXTERNAL_USER, this is a unique ID within Banner. When this value is changed, Banner inserts a record into the PIN History Table (GORPAUD) via a database trigger on the GOBTPAC table. GORPAUD_CHANGE_IND is set to I. A Third Party ID may also be created or changed by selecting the Update button next to the Third Party ID field.
Sourced ID System-generated, one-up number used to synchronize the user's data with various SunGard Higher Education partner systems. The ID is unique for the PIDM. This is a display-only field.
LDAP User ID The mapping between the Banner ID and the LDAP User ID. This allows LDAP to use the settings in Banner General to regulate how the user’s credentials are authenticated. Optional.
PIN Hint Question A free-form text field, this value is mapped to GOBTPAC_QUESTION. The field is required if GOBTPAC_RESPONSE is populated.
08 Banner General 8.0 63Middle Tier Implementation Guide
Configuring Self-Service Banner

64
For details about the Third Party Access Form (GOATPAC), refer to “Self-Service Technical Information” on page 121.
Step 15 Set Up Campus Directory Processing
Web General lets your institution create campus directories for staff, and class member directories for alumni.
Batch program bwpredir collects directory information, storing it in tables for display on the Campus Directory page. The page lists address and phone information for each directory listing in alphabetical order by the individual’s last name or by Department. Online, Web readers may use the links to jump to different letters of the alphabet to find other student or staff listings.
The employee directory program runs through Job Submission.
The Employee Directory Report is delivered with the Employee Self-Service product. Please consult Employee Self-Service User Guide for detailed instructions on how to run the campus directory programs. The Alumni directories are delivered with Advancement Self-Service.
1. Review Banner General Directory Options. Although the campus directories themselves are generated using Web General, they are set up in Banner General:
1.1. Use the Directory Options Rule Form (GOADIRO) to determine the campus directory options, preferred addresses and telephone numbers to include in the campus directory.
1.2. Use the Directory Item Validation Form (GTVDIRO) to list the valid options of each individual in the directory.
2. Set up the Campus Directory Profile.
In Banner General, use the Directory Options Rule Form (GOADIRO) to determine which directory profile options from the Directory Profile Table (GORDPRF) will be included in the campus directory or alumni directory. The form contains indicators for all of the directory fields.
PIN Hint Response
A free-form text field, this value is mapped to GOBTPAC_RESPONSE. The field is required if GOBTPAC_QUESTION is populated.
Activity Source Describes the source of the PIN insert or update. Valid codes are:
SELF = User changed the PIN record;ADMIN = Administrator changed the PIN record;SYSTEM = Record was changed by logic in a process.
Banner General 8.0 April 2008Middle Tier Implementation GuideConfiguring Self-Service Banner
April 20
Another set of indicators allows your institution to determine whether to allow the user to choose to display a particular item of his or her information in the directory. Still another set of check boxes allows the institution to determine which profile information will be defaulted to the campus directory if a user does not have a directory profile setup.
GOADIRO includes other columns in which to enter address and telephone types, associated with a priority number to enable the directory processes and profile to know which addresses and numbers to display and/or update. If telephone types are not entered, the primary telephone type associated with the corresponding address will be used. If such a phone number cannot be found, then the system displays "Not Reported" on the Web page.
Note A separate address hierarchy is required because employees and students will often have different address types for their permanent addresses. With an address hierarchy, the employee directory will be able to find addresses for students who are also employees. Were there only one employee address type for permanent address, student employees would be listed in the employee directory without permanent addresses.
The following is an example of what GOADIRO needs to include to produce the Campus Directory.
Directory Information Code
Directory Information item Description
Print in Alumni, Employee or All Direct-ories
Item Type Indicator -- Address, Telephone, or Not Applicable (N/A)
Include in Directory Profile
Allow User to Choose to Display in Directory
Default to Directory for Users without a Directory profile
NAME Permanent Name
All N/A (Yes) (Yes) (Yes)
ADDR_PR Permanent Address
All Address (Yes) (Yes) (Yes)
TELE_PR Permanent Telephone
All Telephone (Yes) (Yes) (Yes)
ADDR_CP Campus Address
All Address (Yes) (Yes) (Yes)
TELE_CP Campus Phone
Employee Telephone (Yes) (Yes) (Yes)
ADDR_OF Office Address
Employee Address (Yes) (Yes) (Yes)
08 Banner General 8.0 65Middle Tier Implementation Guide
Configuring Self-Service Banner

66
For details about the Campus Directory tables, refer to “Self-Service Technical Information” on page 121.
TELE_OF Office Phone Employee Telephone
TELE_FAX FAX Number
All Telephone
EMAIL E-mail All N/A (Yes) (Yes)
DEPT Department Employee N/A
GRD_YEAR Expected Graduation Year
Employee N/A
COLLEGE College Affiliation
Alumni N/A
TITLE Employee Position Title
Employee N/A
MAIDEN Maiden Name
Alumni N/A
ADDR_HO Home Address
Alumni N/A
TELE_HO Home Phone Alumni N/A
ADDR_BU Business Address
Alumni N/A
TELE_BU Business Phone
Alumni N/A
CLASS_YR Class Year Alumni N/A
PR_COLL Preferred College
Alumni N/A
Directory Information Code
Directory Information item Description
Print in Alumni, Employee or All Direct-ories
Item Type Indicator -- Address, Telephone, or Not Applicable (N/A)
Include in Directory Profile
Allow User to Choose to Display in Directory
Default to Directory for Users without a Directory profile
Banner General 8.0 April 2008Middle Tier Implementation GuideConfiguring Self-Service Banner
April 20
Step 16 Set Up Web E-Mail Address Options
Web General allows users to change an e-mail address online. The end user can select the e-mail address type (personal, professional, alternate, school, etc.) to add or change.
Use Banner General to set up this feature:
• All of the end user’s addresses appear on the E-mail Address Form (GOAEMAL). If the Display on Web indicator is selected, that address will appear in Web General.
• The E-Mail Address Type Validation Form (GTVEMAL) determines which types of addresses are available in the pull-down list.
E-mail Address Form (GOAEMAL)
The E-mail Address Form lets you maintain one or more e-mail addresses for any ID already entered into Banner.
You can enter more than one of the same type of e-mail address, but you cannot enter the same e-mail address for the same type.
Only one e-mail record may be designated as the preferred e-mail address.
In the E-mail Address Block, users enter and update one or more e-mail addresses for an individual ID. When entering a new record, both the e-mail type and e-mail address must be specified.
If the Inactivate indicator is not selected on GOAEMAL, the e-mail address information is currently active, and an A is stored in the database field (goremal_status_ind). If the Inactivate indicator is selected on GOAEMAL, the e-mail address information is inactive, and an I is stored in the database field (goremal_status_ind).
When a user adds a new e-mail address, the system sets:
• The Preferred indicator to cleared (or No, meaning not preferred)
• The Inactivate indicator to cleared (or A, meaning active).
If a previous e-mail address had been the preferred address, its Preferred indicator is automatically cleared (not preferred).
08 Banner General 8.0 67Middle Tier Implementation Guide
Configuring Self-Service Banner
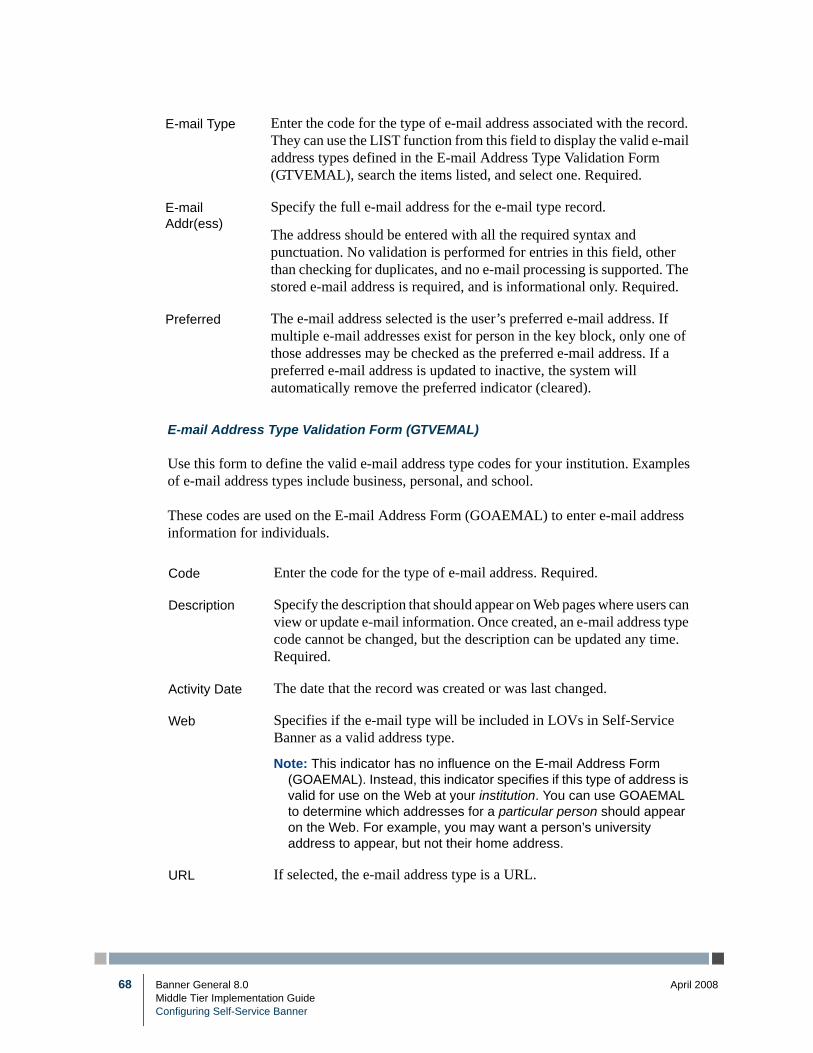
68
E-mail Address Type Validation Form (GTVEMAL)
Use this form to define the valid e-mail address type codes for your institution. Examples of e-mail address types include business, personal, and school.
These codes are used on the E-mail Address Form (GOAEMAL) to enter e-mail address information for individuals.
E-mail Type Enter the code for the type of e-mail address associated with the record. They can use the LIST function from this field to display the valid e-mail address types defined in the E-mail Address Type Validation Form (GTVEMAL), search the items listed, and select one. Required.
E-mail Addr(ess)
Specify the full e-mail address for the e-mail type record.
The address should be entered with all the required syntax and punctuation. No validation is performed for entries in this field, other than checking for duplicates, and no e-mail processing is supported. The stored e-mail address is required, and is informational only. Required.
Preferred The e-mail address selected is the user’s preferred e-mail address. If multiple e-mail addresses exist for person in the key block, only one of those addresses may be checked as the preferred e-mail address. If a preferred e-mail address is updated to inactive, the system will automatically remove the preferred indicator (cleared).
Code Enter the code for the type of e-mail address. Required.
Description Specify the description that should appear on Web pages where users can view or update e-mail information. Once created, an e-mail address type code cannot be changed, but the description can be updated any time. Required.
Activity Date The date that the record was created or was last changed.
Web Specifies if the e-mail type will be included in LOVs in Self-Service Banner as a valid address type.
Note: This indicator has no influence on the E-mail Address Form (GOAEMAL). Instead, this indicator specifies if this type of address is valid for use on the Web at your institution. You can use GOAEMAL to determine which addresses for a particular person should appear on the Web. For example, you may want a person’s university address to appear, but not their home address.
URL If selected, the e-mail address type is a URL.
Banner General 8.0 April 2008Middle Tier Implementation GuideConfiguring Self-Service Banner
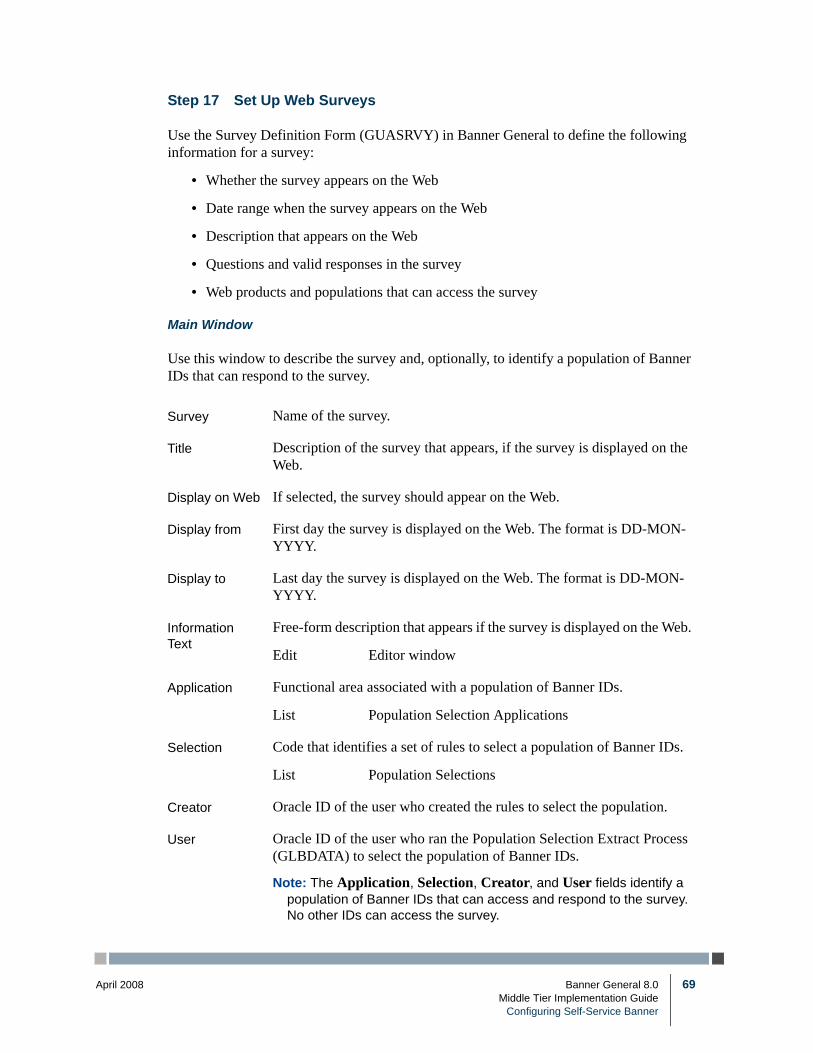
April 20
Step 17 Set Up Web Surveys
Use the Survey Definition Form (GUASRVY) in Banner General to define the following information for a survey:
• Whether the survey appears on the Web
• Date range when the survey appears on the Web
• Description that appears on the Web
• Questions and valid responses in the survey
• Web products and populations that can access the survey
Main Window
Use this window to describe the survey and, optionally, to identify a population of Banner IDs that can respond to the survey.
Survey Name of the survey.
Title Description of the survey that appears, if the survey is displayed on the Web.
Display on Web If selected, the survey should appear on the Web.
Display from First day the survey is displayed on the Web. The format is DD-MON-YYYY.
Display to Last day the survey is displayed on the Web. The format is DD-MON-YYYY.
Information Text
Free-form description that appears if the survey is displayed on the Web.
Edit Editor window
Application Functional area associated with a population of Banner IDs.
List Population Selection Applications
Selection Code that identifies a set of rules to select a population of Banner IDs.
List Population Selections
Creator Oracle ID of the user who created the rules to select the population.
User Oracle ID of the user who ran the Population Selection Extract Process (GLBDATA) to select the population of Banner IDs.
Note: The Application, Selection, Creator, and User fields identify a population of Banner IDs that can access and respond to the survey. No other IDs can access the survey.
08 Banner General 8.0 69Middle Tier Implementation Guide
Configuring Self-Service Banner

70
Survey Questions Window
Use this window to define the questions and valid responses for the survey.
Survey Roles Window
Use this window to define the self-service products where the survey can appear.
Survey Name Name of the survey. This field is display only.
Title Description of the survey. This field is display only.
Question Number
Sequential number that identifies each question in the survey. Use the scroll bar to scroll through the questions in the survey. The maximum number of questions is 999.
(untitled) Free-form text of each question in the survey.
If the question is too long to display in this field, select Edit to display the complete question in the Editor window.
Allow Multiple Responses
If selected, the person taking the survey can give more than one response to the question, and Y is stored in the database. If cleared, only one response is allowed and N is stored in the database.
Response [n] Free-form text that appears on the Web to describe each possible response to the question. A question can have up to five responses.
Allow Comments
If selected, the person taking the survey can enter comments as a response, and Y is stored in the database. If cleared, comments are not allowed and N is stored in the database.
Comment Text Free-form text that appears on the Web before the comment box if comments can be entered as a response.
Survey Name of the survey. This field is display-only.
Title Description of the survey. This field is display-only.
Roles Self-service product where the survey can appear. Valid values are ALUMNI, EMPLOYEE, FACULTY, and STUDENT.
Activity Date Date when the role was entered or last changed. Display-only.
Banner General 8.0 April 2008Middle Tier Implementation GuideConfiguring Self-Service Banner

April 20
3 Required Tasks for Single Sign-On (SSO) to INB, SSB, and/or Channels
Overview
This chapter contains the preliminary steps you must perform in order to set up Single Sign-On for either Internet-Native Banner (INB), Self-Service Banner (SSB), or both.
1. “Create an Encryption Key” on page 75
2. “Create Entries in LDAP to Store Configuration Values” on page 76
3. “Configure Parameters using GUAUPRF” on page 78
After completing the steps in this chapter, you must then proceed to the corresponding Single Sign-On chapter for INB (chapter 4) and/or SSB (chapter 5).
NoteThe use of Single Sign-On functionality is optional. If you do not use this feature at your institution, you do not need to perform the steps in this chapter.
NoteThis section does not cover SSO setup through Banner Enterprise Identity Services. If you are using Banner Enterprise Identity Services, please refer instead to the Banner Enterprise Identity Services Handbook.
The Banner implementation of SSO described in this chapter uses a Lightweight Directory Access Protocol (LDAP) server as a data store and for user validation. It is assumed that Luminis or another product will provide the SSO framework and session management for your institution. The implementation steps in this chapter tell you how to add Banner as a participant in an existing LDAP and SSO framework.
About Single Sign-On
In the context of Banner, the term Single Sign-On, or SSO, means that users can access your applications in two different ways:
08 Banner General 8.0 71Middle Tier Implementation Guide
Required Tasks for Single Sign-On (SSO) to INB, SSB, and/or Channels

72
• Through the Luminis Portal using the Campus Pipeline Integration Protocol (CPIP).
• Via an LDAP proxy–You can set up an LDAP server as a “proxy” for authentication, and require your users to enter their bind credential, for example, a user ID and password. If they successfully bind to the LDAP server, they are logged into Banner, too.
You can implement both options via the same set of database packages and a Java Applet that wraps the Oracle-delivered Forms Applet. The database packages use configuration data from the Personal Preference Table (GURUPRF), entries on the LDAP server, and other configuration data to define the names of servers and directories. These packages are implemented via the PL/SQL features of the OAS10g server.
If you are using the Luminis Portal:
3.1. You will configure Luminis to recognize the external system sctinb.
3.2. You will add a link to a page in Luminis that references both the sctinb external system and the INB URL.
3.3. When a user is logged on to Luminis and selects the above link, the package GOKKSSO gets the Luminis user ID and password from the Luminis server via a server-to-server HTTP connection, and validates it by binding back to the Luminis LDAP Server. The Luminis user ID is now mapped to the Banner user ID, if they are different.
The GOKSSSO package generates key information for SSO.
3.4. The user ID and password are then obfuscated using a key generated by GOKKSSO and the Oracle DBMS_OBFUSCATION_TOOLKIT utility, and a random session identifier is generated. The obfuscated user ID and password are DES Encrypted and placed on a DBMS_PIPE.
3.5. An HTTP Redirect sends the obfuscated information to the GOKCSSO package. This package generates client information for SSO.
3.6. The GOKCSSO package reads the encrypted data from the pipe, extracts the obfuscated user ID and password, and alters the Banner password to match the Luminis password. It then generates a new session identifier, puts the user ID and password on another DBMS_PIPE, and redirects it to the INB URL.
3.7. SunGard Higher Education’s configuration changes to the INB URL files cause the Oracle-delivered Applet to be wrapped by a SunGard Higher Education-delivered Applet. The SunGard Higher Education Applet reads the data from the DBMS_PIPE and extracts the obfuscated user ID and password. It then calls
Banner General 8.0 April 2008Middle Tier Implementation GuideRequired Tasks for Single Sign-On (SSO) to INB, SSB, and/or Channels
April 20
the Oracle Applet, passing it the user ID and password, and the user is logged into Banner.
The process is the same without Luminis, except that the user ID and password originate in a different place. A new Web page defined in gokssso.p_login prompts the user for an ID and password, then the same programming logic processes the information.
ID Mappings Between Systems
It is time-consuming and frustrating for users to have to remember different user IDs passwords for different systems. ID mappings enable you to store the IDs and passwords in a single location, so that when a user logs onto an application with one ID and password, and then goes to another application, the system can look up that user’s ID and password for the second application and enter it automatically.
Single Sign-On between Luminis and Banner
The following points describe how SSO works between Luminis and Banner:
• The mapping exists on the LDAP server, stored in a DN specified in configuration parameters.
• The configuration values are loaded into Banner to point to the SSO procedures at the Luminis LDAP server.
• The Luminis ID is mapped to the Banner ID. The Banner password is synchronized to the Luminis password for every login.
• You will logon to both Banner and Luminis using your Luminis ID and password.
• No mapping is defined for situations where your Luminis user ID and password are used to connect to Banner. If this mapping entry is not defined, the procedures assume that the Luminis and Banner users are identical.
Single Sign-On between Luminis and Self-Service Banner
The following points describe how SSO works between Luminis and Self-Service Banner:
• The mapping exists in the Luminis LDAP server in the pdsExternalSystemID attribute. It is a multi-value attribute, and the last five characters of it must be:
::SCT
The PIN for this user is also stored in the Luminis “secret store”.
08 Banner General 8.0 73Middle Tier Implementation Guide
Required Tasks for Single Sign-On (SSO) to INB, SSB, and/or Channels

74
• The values are loaded into Banner when the extract is run against Banner.
NoteThe mapping in the GOBEACC table is used to create an Oracle connection to self-service pages that are restricted via the Administration Secured feature. For more information, please refer to the WebTailor 7.0 Release Guide.
• The Luminis ID is mapped to the Banner ID.
• You will logon to both Banner and Luminis using your Luminis ID and password.
Single Sign-On between Luminis/Channels and Banner
The following points describe how SSO works between Luminis Channels and Banner:
• The UserMapDN exists on the LDAP server. For details, refer to:
• Step 1, “Update New Entries in LDAP for INB” in Chapter 4
• Step 2, “Update New Entries in LDAP for SSB” in Chapter 5
• The proxy package GSPPRXY determines which Oracle user is used to connect to the channels:
• If the mapping exists on the LDAP server, then the Oracle user defined in the map is used to connect to the channels.
• If the mapping does not exist on the LDAP server, then GSPPRXY checks to see if the Luminis user is defined in GOBEACC.
• If no mapping is defined anywhere, then GSPPRXY assigns the default user ID and password. The default user is defined in Banner Security - PXY_CHANNELS_LUMINIS.
NoteFor information about GXPPRXY, refer to the Banner Security Technical Reference Manual.
• The Luminis ID is mapped to the Banner ID.
• You will logon to Banner and connect to the channels using your Luminis ID and password.
Refer to the Luminis Channels for Banner documentation for more information.
Single Sign-On and Value-Based Security
To use SSO and VBS, you must make sure that the Oracle IDs that will be restricted under VBS have been granted the role ban_default_webprivs. This role is required for any Oracle IDs that will be using the self-service packages.
Banner General 8.0 April 2008Middle Tier Implementation GuideRequired Tasks for Single Sign-On (SSO) to INB, SSB, and/or Channels

April 20
Luminis IV Support
If you are using Luminis Platform IV, then Banner General 7.4.1 and Luminis Channels for Banner 7.2 (or later versions) are required. Refer to the chapter about working with users and user accounts in the Luminis Platform Administration Guide, as well as the Luminis Platform IV Release Notes for more information about specific Luminis functionality and configuration.
Implementation Steps
Step 1 Create an Encryption Key
The SSO process uses DES encryption as supported through the Oracle-delivered package DBMS_OBFUSCATION_TOOLKIT. This type of encryption uses a key, or password, to perform the encryption.
NoteDuring your Banner upgrade or new installation, you should have created the directory KEY_DIR. The GOKKSSO package looks for the key in the enckey file in the KEY_DIR directory.
Verify that this directory exists by selecting from the DBA_DIRECTORIES view to see the details of the directory that was created. If KEY_DIR exists in the database and the physical directory has been created on your database server, and you have a valid enckey file, then you may skip this step and proceed to Step 2, “Create Entries in LDAP to Store Configuration Values”.
If KEY_DIR does not exist in the DBA_DIRECTORIES table, and the physical directory has not been created on your database server, you must create it using the following steps.
Make sure your group permissions are readable by Oracle.
1. Create the physical directory on your database server (e.g. mkdir $BANNER_HOME/key_dir).
2. Create a plain text file named enckey in the directory you just created.
3. Edit the enckey file and enter the key (for example, PASSWORD).
Your key must start in column 1 and be a combination of letters and numbers, and be at least eight characters. It can be longer (in multiples of eight only), but the GOKKSSO package only uses the first 24 characters. The DES encryption only uses eight characters, but SunGard Higher Education has provided for eventual use of the DES3 algorithm in a future release, which uses a 24-character key. The string you enter as
08 Banner General 8.0 75Middle Tier Implementation Guide
Required Tasks for Single Sign-On (SSO) to INB, SSB, and/or Channels

76
the key is padded to a length of 24, but you must still use at least eight characters, since those are the ones used by the current DES encryption.
The passwords stored and passed by the SSO process will now be encrypted using DES and your key.
4. Edit the banssodir.sql script located in the $BANNER_HOME/install directory and change the directory name to match the name of the directory you just created (e.g. $BANNER_HOME/KEY_DIR).
NoteIf you cannot find the banssodir.sql script, you may need to manually copy the file from upgrade/Gen70/banssodir.sql to $BANNER_HOME/install/banssodir.sql.
5. Finally, run the script as follows:
sqlplus /nologconnect general/general_password
start banssodir
Step 2 Create Entries in LDAP to Store Configuration Values
You must add the configuration entries to your LDAP directory. The default DN path is: o=config,o=Banner,o=SCTSSOapplications
SunGard Higher Education delivers a number of sample LDIF files to help you. You can edit any of these files to customize them for your institution. They are located in the $BANNER_HOME\install directory, and you must use ASCII mode to transfer them to your LDAP server.
NoteLDIF files are temporary files which you can copy into a temporary directory on Luminis and then run. These files modify the schema.
For Oracle Internet Directory:
• sso_oclass_oid.ldif - Defines the required LDAP Object Classes so you can use them in the Oracle Internet Directory (OID) and many other servers.
For SUNOne:
• sso_oclass_sunone.ldif - Defines the required LDAP Object Classes if you are using the Iplanet LDAP server with Luminis. This file creates the LDAP attribute SCTSSOConfigString, a single-value string.
• sso_root_sunone.ldif - Defines a new root entry in the SUNOne LDAP directory where you will store parameters, if desired. This file creates an LDAP object class called SCTSSOConfig that has cn, SCTSSOConfigString, and description as its required attributes.
Banner General 8.0 April 2008Middle Tier Implementation GuideRequired Tasks for Single Sign-On (SSO) to INB, SSB, and/or Channels

April 20
• sso_root_sunone2.ldif - Defines a new database entry in the SUNOne LDAP directory where the root entries will be stored.
For All:
• sso_parms.ldif - Defines the parameters that must be present for the SSO process. This file creates the following entries with the object class SCTSSOConfig in the config directory:
INBServerNameDADNormalDADSpecialCPAuthCPDeAuthCPLastActUserPrefixSearchBaseUserMapDNPswdChangeMessageINBServletPathHTTPPrefixServerHTTPPrefixClientCSSURLAnonmsSearch
NoteThe delivered examples are for SUNOne and OID. You can, however, use them as examples to interface Banner with other LDAP directories (e.g., OpenLDAP and Novell Directory Server (NDS)).
1. Run ldapmodify, a utility delivered with your LDAP server, with the LDIF files you just edited. Run them in the order specified below.
WarningBe sure to run the ldapmodify that was delivered with your server. This is especially important with the platforms where LDAP is delivered as part of the operating system (e.g., some versions of SUN Solaris). You must use the ldapmodify command that was delivered with the SunOne software stored in the Luminis software directory.
The format of the ldapmodify command in a Luminis SunOne environment is:
ldapmodify -c -a -v -D"cn=Directory Manager" -w <password for Directory Manager> -f <file name from list above>
For SUNOne, run:
1.1. sso_oclass_sunone.ldif
Example:ldapmodify -c -a -v -D "cn=Directory Manager" -w yourpassword -f sso_oclass_sunone.ldif
08 Banner General 8.0 77Middle Tier Implementation Guide
Required Tasks for Single Sign-On (SSO) to INB, SSB, and/or Channels

78
1.2. sso_root_sunone.ldif
Example:ldapmodify -c -a -v -D "cn=Directory Manager" -w yourpassword -f sso_root_sunone.ldif
1.3. sso_root_sunone2.ldif
Example:ldapmodify -c -a -v -D "cn=Directory Manager" -w yourpassword -f sso_root_sunone2.ldif
1.4. sso_parms.ldif
Example:ldapmodify -c -a -v -D "cn=Directory Manager" -w yourpassword -f sso_parms.ldif
For OID, run:
1.1. sso_oclass_oid.ldif
1.2. sso_parms.ldif
Step 3 Configure Parameters using GUAUPRF
1. Logon to Banner as the BASELINE user.
2. Access the General User Preferences Maintenance Form (GUAUPRF).
3. Go to the LDAP tab.
4. Enter your institution’s values in the Default Value field for each configuration parameter (bind password, bind user ID, location in LDAP directory where SSO configuration parameters are stored, and URL for LDAP authentication server).
Banner General 8.0 April 2008Middle Tier Implementation GuideRequired Tasks for Single Sign-On (SSO) to INB, SSB, and/or Channels

April 20
Parameter Description
BIND_PASSWORD This is the password for the bind user. It is stored in the database using the DES encryption with the encryption key you configured in an earlier step.
BIND_USER This is a user with rights to bind to the LDAP server to retrieve the configuration data for SSO. This user should also be able to search your LDAP directory to determine if users exist.
DN This is the location in the LDAP directory where the SSO configuration parameters will be stored. Several LDIF files are delivered as examples of where this could be stored.
SERVER This defines the LDAP server that is used to validate users and to store additional SSO configuration parameters.
The parameter is formatted using Internet URL format for LDAP, for example: ldap://my.ldapserver:389
Note: If you are using LDAPS, you will need to configure the parameters in the SSL key as well.
08 Banner General 8.0 79Middle Tier Implementation Guide
Required Tasks for Single Sign-On (SSO) to INB, SSB, and/or Channels
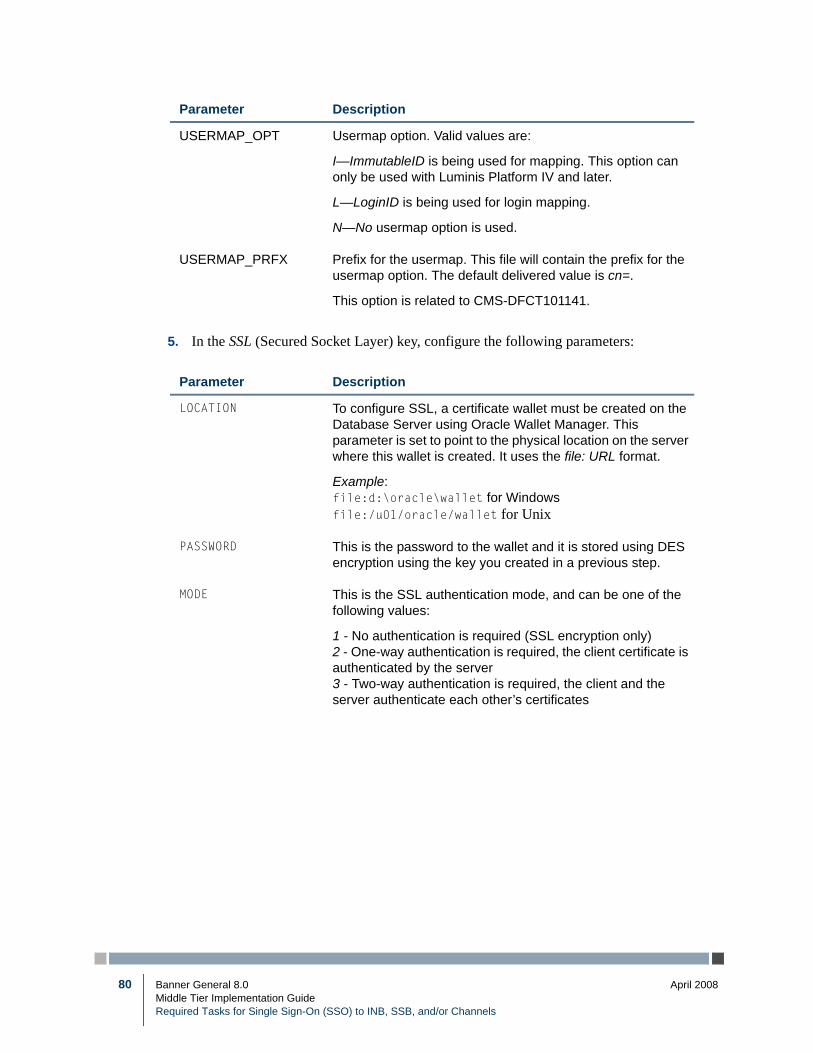
80
5. In the SSL (Secured Socket Layer) key, configure the following parameters:
USERMAP_OPT Usermap option. Valid values are:
I—ImmutableID is being used for mapping. This option can only be used with Luminis Platform IV and later.
L—LoginID is being used for login mapping.
N—No usermap option is used.
USERMAP_PRFX Prefix for the usermap. This file will contain the prefix for the usermap option. The default delivered value is cn=.
This option is related to CMS-DFCT101141.
Parameter Description
LOCATION To configure SSL, a certificate wallet must be created on the Database Server using Oracle Wallet Manager. This parameter is set to point to the physical location on the server where this wallet is created. It uses the file: URL format.
Example:file:d:\oracle\wallet for Windowsfile:/u01/oracle/wallet for Unix
PASSWORD This is the password to the wallet and it is stored using DES encryption using the key you created in a previous step.
MODE This is the SSL authentication mode, and can be one of the following values:
1 - No authentication is required (SSL encryption only)2 - One-way authentication is required, the client certificate is authenticated by the server3 - Two-way authentication is required, the client and the server authenticate each other’s certificates
Parameter Description
Banner General 8.0 April 2008Middle Tier Implementation GuideRequired Tasks for Single Sign-On (SSO) to INB, SSB, and/or Channels
April 20
4 Implementing Single Sign-On for Internet-Native Banner
Follow the steps in this chapter to implement Single Sign-On functionality for Internet-Native Banner (INB).
1. “Update New Entries in LDAP for INB” on page 81
2. “Create DADs for Running SSO” on page 85
3. “Configure your INB Server” on page 86
4. “Verify Configuration Steps in Banner” on page 87
5. “Configure your Luminis Server” on page 89
6. “Test” on page 90
7. “(Optional) Set up SSO INB on Macintosh” on page 90
NoteBefore performing these steps, you must already have performed the steps in chapter 3.
NoteThis section does not cover SSO setup through Banner Enterprise Identity Services. If you are using Banner Enterprise Identity Services, please refer instead to the Banner Enterprise Identity Services Handbook.
Step 1 Update New Entries in LDAP for INB
Update the following entries in the LDAP server location that you chose previously with the actual values for your institution. In the sample below, an LDAP browser was used.
08 Banner General 8.0 81Middle Tier Implementation Guide
Implementing Single Sign-On for Internet-Native Banner

82
NoteYou may not see sserv in your browser until you have completed more steps.
• INBServerName - Defines the name of your INB server, in the format server name:port. One example is my.inbserver.edu:8000, where the server name is my.inbserver.edu and the port is 8000.
NoteDo not use http:// on the server, as this is configured in another parameter.
NoteThe port is not required if you are using Port 80.
• DADNormal - The OAS10g URL snippet that indicates the DAD running under a "normal" database user, such as WWW_USER or OAS_PUBLIC. If you are running Self-Service Banner, this is the same as the DAD you use with that system. You should include the /pls prefix in the name if you are using the pls prefix in your configuration. One example would be /pls/dadnormal, where dadnormal is the DAD in OAS10g.
NoteOAS10g no longer requires that you include /pls in the URL, although you can include it, if desired.
• DADSpecial - The OAS10g URL snippet that indicates the DAD running under the special BANSSO user. You should include the /pls prefix in the name if you are using the pls prefix in your configuration. One example would be /pls/dadspecial,
Banner General 8.0 April 2008Middle Tier Implementation GuideImplementing Single Sign-On for Internet-Native Banner

April 20
where dadspecial is the DAD in OAS10g that connects to the database as BANSSO.
NoteOAS10g no longer requires that you include /pls in the URL, although you can include it, if desired.
• CPAuth, CPDeAuth, CPLastAct - These values should be left as delivered in the LDIF files. They have been made parameters to facilitate future modifications by SunGard Higher Education or your own local customizations.
• CPAuth should be set to gokssso.p_cp_login
• CPDeAuth should be set to gokssso.p_cp_logout
• CPLastAct should be set to gokssso.p_cp_lastact
• UserPrefix - Defines the prefix added to a userid when a bind is issued to the LDAP server. This provides the flexibility necessary to support users added to LDAP using the uid= or cn= formats.
• SearchBase - The user suffix used for searching and binding as users. It is appended to the end of user IDs when doing an LDAP bind.
An example of an LDAP user that would be formed by the system with the user ID myuser and the UserPrefix and SearchBase above is uid=myuser,ou=people,o=your.domain,o=cp
• UserMapDN - Points to a location in the LDAP directory where users can be mapped, if they are different from the LDAP server and the Banner database. Each entry in this location should be of the object class SCTSSOConfig, and the Common Name (CN) of the entry should be the same as the LDAP user. The SCTSSOConfigString attribute of the entry should be set to the user in the Banner database. If the user IDs for a user in both systems are the same, an entry in this location is not necessary for that user, and it is not recommended for performance reasons.
One example would be an entry with a DN of cn=StudentUser,o=usermap,o=Banner,o=SCTSSOapplications and an SCTSSOConfigString of saisusr. The UserMapDN would be set to o=usermap,o=Banner,o=SCTSSOapplications and at runtime the LDAP user of StudentUser would be changed to saisusr when the user logs in to Banner.
How to establish and test the mapping of a Luminis/LDAP ID to an Oracle/Banner ID
In order for users to use SSO to INB through Luminis using LDAP authentication, the LDAP and BannerIDs must either be:
• The same value (Luminis ID = jsmith - Oracle/Banner ID = jsmith)
• Mapped to one another in LDAP (Luminis ID = Joe.Smith - Oracle/Banner ID = jsmith)
08 Banner General 8.0 83Middle Tier Implementation Guide
Implementing Single Sign-On for Internet-Native Banner

84
The following example explains how to establish and test the ID mapping if the IDs are different from one another. In this example, the Oracle/Banner account name is jsmith, and the Luminis account name is Joe.Smith.
NoteWith Luminis IV, you could also use immutable ID to create the mapping. These options are defined in the USERMAP_OPT parameter.
1. First, create a mapping file, for example, sso_map.ldif.
sso_map.ldif
dn: cn=Joe.Smith,o=usermap,o=Banner, o=SCTSSOapplicationsSCTSSOConfigString: jsmithobjectClass: topobjectClass: SCTSSOConfigdescription: Map of Luminis ID - Joe.Smith to Banner/Oracle ID - jsmithcn: Joe.Smith
OR
sso_map.ldif (using immutable ID)
NoteThis option can only be used with Luminis IV.
dn: cn=1234987987,o=usermap,o=Banner, o=SCTSSOapplicationsSCTSSOConfigString: jsmithobjectClass: topobjectClass: SCTSSOConfigdescription: Map of Luminis ID - Joe.Smith to Banner/Oracle ID - jsmithcn: 1234987987
2. Import this file into the LDAP Server.
ldapmodify -a -c -v -f sso_map.ldif -D "cn=Directory Manager" -w pipeline
Note that you must wait approximately 20 minutes for the mapping to take effect.
3. Login to Luminis as Joe.Smith.
Click your direct INB SSO link or INB Channels link and you should be logged in to INB as jsmith.
Click your direct SSB SSO link or SSB Channels link and you should be logged in to SSB as jsmith (who has a Banner ID = 555555555 in this example).
• PswdChangeMessage - Defines the message presented to the user when their password is modified in the Banner database. It appears only when the password is
Banner General 8.0 April 2008Middle Tier Implementation GuideImplementing Single Sign-On for Internet-Native Banner

April 20
changed to a different value, and the message includes a link that continues the process of logging them into Banner.
• INBServletPath - The URL snippet concatenated to the INBServerName to launch Banner. It generally begins with /forms, and must include the config= parameter, which points to the proper configuration.
Examples:/forms/frmservlet?config=sctsso
This is addressed in greater detail later in this chapter.
• HTTPPrefixServer - Defines the http protocol for server-to-server HTTP communications. This is inserted before the INBServerName whenever communications between servers are performed. It should be http:// for normal HTTP and https:// for SSL.
• HTTPPrefixClient - Defines the http protocol used when communicating to the client browser. It should be http:// for normal HTTP and https:// for SSL.
• CSSURL - Defines a full URL to the Cascading Style Sheet (CSS) you want to use for the Logon screen. This can be the same value as the CSSURL you are using for that system.
• AnonmsSearch - Specifies if an anonymous search is performed to get the DN entry. Valid values are:
• Y - An anonymous search will be performed to get the DN entry, and that entry will be used to perform the bind.
• A - An authenticated search will be performed to get the DN entry, and that entry will be used to perform the bind.
• N - The entries defined in LDAP will be used to perform the bind.
Step 2 Create DADs for Running SSO
Refer to chapter 2 for basic information about creating a DAD.
SunGard Higher Education recommends that you use Oracle Enterprise Manager (OEM) for all configuration file changes.
1. Create two new DADs for INB:
• dadnormal.txt
• dadspecial.txt
Tip: If INB and SSB use the same Oracle web server at your site, then you can use the same dadnormal.txt file for both INB and SSB.
08 Banner General 8.0 85Middle Tier Implementation Guide
Implementing Single Sign-On for Internet-Native Banner
86
Sample DADs
To help you configure the DADs necessary for running your packages, SunGard Higher Education has delivered sample DAD files: dadnormal.txt and dadspecial.txt. These files are located in your $BANNER_HOME/install directory.
NoteYou must configure dadnormal to be logged on as a normal database user (e.g., OAS_PUBLIC or WWW_USER), but you must configure dadspecial to be logged on as the BANSSO special user. This is because BANSSO has the alter user Oracle privilege necessary to alter the users’ passwords after they have logged into Banner.
Step 3 Configure your INB Server
There are a number of steps you must perform to configure your INB server:
1. Copy the delivered bannersso.jar file from $BANNER_HOME/general/java to the <ORACLE_HOME>/forms/java directory. Be sure to transfer it in binary mode if you use FTP.
2. Modify your environment to use the delivered basejsso.htm file, which uses a different Java Applet and the new sctinb_token parameter. The sctinb_token parameter is used to pass a session token to the applet so it can access the DBMS_PIPE that contains the encrypted user ID and password.
2.1. Copy basejsso.htm from the $BANNER_HOME/install directory to the <ORACLE_HOME>/forms/server directory on your OAS10g server.
2.2. Access OEM on your INB server.
2.3. Choose Forms in the System Components section.
2.4. Choose Configuration.
2.5. Update the baseHTMLJinitiator parameter to point to basejsso.htm.
3. Update your forms configuration. You can use the formsweb_sso.cfg file that is located in the $BANNER_HOME/install directory for reference.
3.1. Open the formsweb_sso.cfg file that is located in $BANNER_HOME/ install/ directory.
3.2. Locate the sctsso configuration section for reference.
3.3. Access OEM on your INB server.
3.4. Choose Forms in the System Components section.
3.5. Choose Configuration.
Banner General 8.0 April 2008Middle Tier Implementation GuideImplementing Single Sign-On for Internet-Native Banner
April 20
3.6. Choose Create New Section and enter your new section name (for example, sctsso).
3.7. Add the parameters from the sample formsweb_sso.cfg to your new section.
Example sctsso configuration section on OAS10gR2:
baseHTMLJInitiator=d:\oas10g\forms\server\basejsso.htm
archive_jini=bannersso.jar,banspecial.jar,frmall_jinit.jar,banicons.jar,bannerui.jar
workingDirectory=c:\temp
envFile=sctsso.env
4. Copy the sctsso.env file from $BANNER_HOME/install/ to the <ORACLE_HOME>/forms/server directory on your OAS10gR2 server. Tailor it for your institution. Make sure the database connect string is set in either the LOCAL (Windows) or TWO_TASK (Unix) environment variable.
Step 4 Verify Configuration Steps in Banner
The sso_ldapinb script can be used to verify your SSO environment by reading all the parameters and displaying their values. It is delivered in the $BANNER_HOME/install directory.
1. Run this script logged on as BANINST1.
2. Verify that the output looks similar to the following example:
08 Banner General 8.0 87Middle Tier Implementation Guide
Implementing Single Sign-On for Internet-Native Banner

88
Sample Output (your values will differ)
You can then use the sso_bindinb script to verify that a successful bind went through for specified users.
3. Run this script logged on as BANINST1.
4. Verify that the output looks similar to the following example:
Sample Output (your values will differ)
SQL> @sso_ldapinb********** GURUPRF SETUP*****UPRF-> key=AUTHENTICATION str=BIND_PASSWORD val=UPRF-> key=AUTHENTICATION str=BIND_USER val=cn=Directory ManagerUPRF-> key=AUTHENTICATION str=DN val=o=config,o=Banner,o=SCTSSOAPPLICA-TIONSUPRF-> key=AUTHENTICATION str=SERVER val=ldap://my.ldapserver.com:389UPRF-> key=SSL str=LOCATION val=Wallet LocationUPRF-> key=SSL str=MODE val=Authentication ModeUPRF-> key=SSL str=PASSWORD val=Wallet PasswordDecrypt BIND_PASSWORDDecrypt Key is YOURKEYSDecrypted Password is ur.password********** LDAP INB SETTINGS*****INBServerName is my.ldapserver.com:7778DADNormal is /DADB70DADSpecial is /DADB70specCPAuth is gokssso.p_cp_loginCPDeAuth is gokssso.p_cp_logoutCPLastAct is gokssso.p_cp_lastactUserPrefix is uid=SearchBase is ou=people,o=sct.com,o=cpUserMapDN is o=usermap,o=Banner,o=SCTSSOapplicationsPswdChangeMessage is Your password in the Banner system has been changed to match your password in the Luminis system.INBServletPath is /forms90/f90servlet?config=sctssoHTTPPrefixClient is http://HTTPPrefixServer is http://CSSURL is http://my.ldapserver.com:99/css/web_defaultapp.cssAnonmsSearch is N
PL/SQL procedure successfully completed.
SQL> @sso_bindinbEnter value for bind_user: USERNAMEold 2: bind_credential varchar2 (100):='&Bind_User';new 2: bind_credential varchar2 (100):='USERNAME';Enter value for bind_password: 111111old 3: bind_password varchar2 (100):='&Bind_Password';new 3: bind_password varchar2 (100):='PASSWD';Input Server is ldap://my.ldapserver.com:389Server after string is my.ldapserver.com:389ldap_srch_base ou=people,o=sct.com,o=cpldap_prfx uid=Successful Server BindBefore user BindSuccessful user BindCookie string is http://my.ldapserver.com:7778/testdatabase/gokss-so.p_banner
PL/SQL procedure successfully completed.
Banner General 8.0 April 2008Middle Tier Implementation GuideImplementing Single Sign-On for Internet-Native Banner

April 20
5. Access Banner via the following URL, using your Luminis ID and password:
yourserver.com:port/testdatabase/gokssso.P_login
6. The General Menu Form (GUAGMNU) should appear.
Step 5 Configure your Luminis Server
This step should be performed by the Luminis adminstrator.
1. Use the Luminis console command configman to update the es.systems parameter, and to add the es.sctinb.configURL and es.sctinb.doGMTOffset parameters.
1.1. Navigate to the $CP_ROOT/webapps/luminis/WEB-INF directory on the Luminis server.
1.2. Export the current properties from Luminis by running the following command:configman -x ldi_banner.properties
1.3. Open the ldi_banner.properties configuration file in your text editor.
1.4. Locate the es.systems parameter and add sctinb to the end.
Example:es.systems = sct is cal epos mb gtmb webct wp sctwf sctinb
1.5. Go to the end of the ldi_banner.properties file.
1.6. Add the es.sctinb.configURL parameter with the value:http://your.inb.server:port/<YourNormalDAD>/gokssso.P_GetConfigVersion2
Example:es.sctinb.configURL = http://your.inb.server:port/testdatabase/gokssso.P_GetConfigVersion2
1.7. Add the es.sctinb.doGMTOffset parameter with the value false.
Example:es.sctinb.doGMTOffset=false
1.8. From the command prompt on the Luminis server, issue the following command to import the new values:
configman -i ldi_banner.properties
2. Stop and restart the Luminis server using the stopcp and startcp commands.
3. From a cygwin window on the Luminis server, issue the following commands to add filters to Luminis that are required for SSO:
08 Banner General 8.0 89Middle Tier Implementation Guide
Implementing Single Sign-On for Internet-Native Banner
90
cptool sync password -add cpip sctinb
NoteYou must wait at least 10 minutes for this to take effect, or you can stop and restart your Luminis server again to see the changes immediately.
Step 6 Test
You should always test your changes before migrating them to your production environment.
1. (Optional) For testing purposes, enter the following in Luminis to create a link that you can use to access Banner. Make sure you change the text to reflect your institution’s configuration.
Example:
http://your.luminisserver.edu/cp/ip/login?sys=sctinb&url=http://your.inbserver.edu/forms/frmservlet?config=sctsso
NoteThe timeout function in the URL above ensures that the Luminis and Banner sessions are not connected. This is necessary because the timeout functions of the CPIP protocol are not implemented in Banner.
2. Logon to Luminis and select the link to access Banner. The Banner main menu should appear.
NoteDo not implement any special Oracle Password Management features with your test account because they can cause problems with LDAP testing. Use the default Oracle profile with no Oracle Password Management features enabled.
Step 7 (Optional) Set up SSO INB on Macintosh
If you want to run Single Sign-on (SSO/LDAP) via INB through Luminis on a Macintosh, you must perform several additional steps. Otherwise, users will be prompted to enter the Banner/Oracle user ID and password again when they click the INB link in Luminis.
NoteThe following steps assume that your SSO/LDAP via INB through Luminis works perfectly on a PC running JINIT.
1. Access OEM on your INB server. In most cases, OEM can be accessed using: http://servername:1810.
1.1. Choose Forms in the System Components section.
1.2. Choose Configuration.
Banner General 8.0 April 2008Middle Tier Implementation GuideImplementing Single Sign-On for Internet-Native Banner

April 20
1.3. Locate your current SSO/LDAP configuration that works (for example, ban7_sctsso).
1.4. Edit the ban7_sctsso configuration.
1.5. Change the following lines to be SSO-specific:
baseHTMLJInitiator = basejsso.htm
archive_jini = bannersso.jar,banicons.jar,bannerui.jar,banspecial.jar,banorep.jar,frmall_jinit.jar
envFile = ban7_sctsso.env
1.6. Add the following two Mac lines to the configuration:
baseHTML=basejsso_mac.htm
archive=bannersso.jar,banicons.jar,bannerui.jar,banspecial.jar,banorep.jar,frmall.jar
1.7. Save your changes.
2. Copy the file ORACLE_HOME\FORMS\server\base.htm in OAS10gR2 and name it basejsso_mac.htm.
3. Edit the new basejsso_mac.htm file, making the following changes:
3.1. Find this value:CODE="oracle.forms.engine.Main"
And change it to:CODE="com.sct.banner.web.applet.BannerApplet"
3.2. Find this value:<PARAM NAME="serverArgs" VALUE="%escapeParams% module=%form% userid=%userid% sso_userid=%sso_userid% sso_formsid=%sso_formsid% sso_subDN=%sso_subDN% sso_usrDN=%sso_usrDN% debug=%debug% host=%host% port=%port% %otherParams%">
And change it to:<PARAM NAME="serverArgs" VALUE="module=%form% sso_userid=%sso_userid% %otherParams%">
3.3. Find this value:<PARAM NAME="imageBase" VALUE="%imageBase%">
And add the following additional line below it:<PARAM NAME="imageBase" VALUE="%imageBase%"> <PARAM NAME="sctinb_token" VALUE="%sctinb_token%">
4. Save your changes to the basejsso_mac.htm file.
08 Banner General 8.0 91Middle Tier Implementation Guide
Implementing Single Sign-On for Internet-Native Banner

92
5. Test:
5.1. Login to Luminis on the Mac and test the INB link. It should load the new .jar file bannersso.jar, and connect you to Banner without the extra Banner/Oracle login box.
5.2. Test the direct login URL: http://server4.xyz.com:9010/ban7_sctsso/gokssso.p_login
5.3. Login with the LDAP user ID and password and it should log you in without prompting for the Banner/Oracle user ID and password.
Banner General 8.0 April 2008Middle Tier Implementation GuideImplementing Single Sign-On for Internet-Native Banner

April 20
5 Implementing Single Sign-On for Self-Service Banner
Follow the steps in this chapter to implement Single Sign-On functionality for Self-Service Banner (SSB).
1. “Create Entries in LDAP to Store Configuration Values” on page 93
2. “Update New Entries in LDAP for SSB” on page 95
3. “Configure WebTailor for LDAP Server” on page 97
4. “Update WebTailor Parameters” on page 99
5. “Verify Configuration Steps in Self-Service” on page 99
6. “(Optional) Create DADs for Running SSO with VBS” on page 101
7. “Configure your Luminis Server” on page 103
8. “Test” on page 104
Before performing these steps, you must already have performed the steps in chapter 3.
NoteThis section does not cover SSO setup through Banner Enterprise Identity Services. If you are using Banner Enterprise Identity Services, please refer instead to the Banner Enterprise Identity Services Handbook.
Step 1 Create Entries in LDAP to Store Configuration Values
You must add the configuration entries to your LDAP directory. The default DN path is: o=config,o=Banner,o=SCTSSOapplications
08 Banner General 8.0 93Middle Tier Implementation Guide
Implementing Single Sign-On for Self-Service Banner

94
SunGard Higher Education delivers the sample LDIF file below to help you. You can edit this file to customize it for your institution. It is located in the $BANNER_HOME\install directory, and you must use ASCII mode to transfer it to your LDAP server.
NoteLDIF files are temporary files which you can copy into a temporary directory on Luminis and then run. These files modify the schema.
For all directories:
• sso_parms_sserv.ldif - Defines the parameters used by the SSO process for Self-Service Banner. This file creates the following entries in the sserv directory (a subdirectory under config):
SSBServerNameDADNormalCPAuthCPDeAuthCPLastActUserPrefixSearchBaseUserMapDNPswdChangeMessageHTTPPrefixServerHTTPPrefixClientCSSURLAnonmsSearch
NoteThe delivered examples are for OID and SUNOne. You can, however, use them as examples to interface Banner with other LDAP directories, e.g., OpenLDAP and Novell Directory Server (NDS).
1. Run ldapmodify, a utility delivered with your LDAP server, with the LDIF file you just edited.
WarningBe sure to run the ldapmodify that was delivered with your server. This is especially important with the platforms where LDAP is delivered as part of the operating system (e.g., some versions of SUN Solaris). You must use the ldapmodify command that was delivered with the SunOne software stored in the Luminis software directory.
The format of the ldapmodify command in a Luminis SunOne environment is:
ldapmodify -c -a -v -D"cn=Directory Manager" -w <password for Directory Manager> -f <file name from list above>
Banner General 8.0 April 2008Middle Tier Implementation GuideImplementing Single Sign-On for Self-Service Banner

April 20
For SUNOne, run:
1.1. sso_parms_sserv.ldif
Example:ldapmodify -c -a -v -D "cn=Directory Manager" -w yourpassword -f sso_parms_sserv.ldif
Step 2 Update New Entries in LDAP for SSB
Update the following entries in the LDAP server location that you chose previously with the actual values for your institution. In the sample below, an LDAP browser was used.
• SSBServerName - Defines the name of your Self-Service server, in the format server name:port. One example would be my.ssbserver.edu:8000, where the server name is my.ssbserver.edu and the port is 8000.
NoteDo not use http:// on the server, as this is configured in another parameter.
• DADNormal - The OAS10g URL snippet that indicates the DAD running under a "normal" database user, such as WWW_USER or OAS_PUBLIC. If you are running Self-Service Banner, this is the same as the DAD you use with that system. You should include the /pls prefix in the name if you are using the pls prefix in your
08 Banner General 8.0 95Middle Tier Implementation Guide
Implementing Single Sign-On for Self-Service Banner

96
configuration. One example would be /pls/dadnormal, where dadnormal is the DAD in OAS10g.
NoteOAS10g no longer requires that you include /pls in the URL, although you can include it, if desired.
• CPAuth, CPDeAuth, CPLastAct - These values should be left as delivered in the LDIF files. They have been made parameters to facilitate future modifications by SunGard Higher Education or your own local customizations.
• CPAuth should be set to gokssso.p_cp_login_sserv
• CPDeAuth should be set to gokssso.p_cp_logout_sserv
• CPLastAct should be set to gokssso.p_cp_lastact_sserv
• UserPrefix - Defines the prefix added to a userid when a bind is issued to the LDAP server. This provides the flexibility necessary to support users added to LDAP using the uid= or cn= formats.
• SearchBase - The user suffix used for searching and binding as users. It is appended to the end of user IDs when doing an LDAP bind.
An example of an LDAP user that would be formed by the system with the user ID myuser and the UserPrefix and SearchBase above is uid=myuser,ou=people,o=your.domain,o=cp
• UserMapDN - Points to a location in the LDAP directory where users can be mapped, if they are different between from the LDAP server and the Banner database. Each entry in this location should be of the object class SCTSSOConfig, and the Common Name (CN) of the entry should be the same as the LDAP user. The SCTSSOConfigString attribute of the entry should be set to the user in the Banner database. If the user IDs for a user in both systems are the same, an entry in this location is not necessary for that user, and it is not recommended for performance reasons.
One example would be an entry with a DN of cn=StudentUser,o=usermap,o=Banner,o=SCTSSOapplications and an SCTSSOConfigString of saisusr. The UserMapDN would be set to o=usermap,o=Banner,o=SCTSSOapplications and at runtime the LDAP user of StudentUser would be changed to saisusr when the user logs in to Banner.
• PswdChangeMessage - Defines the message presented to the user when their password is modified in the Banner database. It appears only when the password is changed to a different value, and the message includes a link that continues the process of logging them into Banner.
• HTTPPrefixServer - Defines the http protocol for server-to-server HTTP communications. This is inserted before the INBServerName whenever communications between servers are performed. It should be http:// for normal HTTP and https:// for SSL.
Banner General 8.0 April 2008Middle Tier Implementation GuideImplementing Single Sign-On for Self-Service Banner
April 20
• HTTPPrefixClient - Defines the http protocol used when communicating to the client browser. It should be http:// for normal HTTP and https:// for SSL.
• CSSURL - Defines a full URL to the Cascading Style Sheet (CSS) you want to use for the Logon screen. This can be the same value as the CSSURL you are using for that system.
• AnonmsSearch - Specifies if an anonymous search is performed to get the DN entry. Valid values are:
• Y - An anonymous search will be performed to get the DN entry, and that entry will be used to perform the bind
• N - The entries defined in LDAP will be used to perform the bind.
Step 3 Configure WebTailor for LDAP Server
You can use the Lightweight Directory Access Protocol (LDAP) authentication process to authenticate your users’ IDs and passwords for Self-Service Banner. Users can use their LDAP user IDs and passwords to logon to all the self-service applications they use.
Use the following steps to configure WebTailor specifically for Single Sign-On to Luminis. Your LDAP administrator can provide you with the values you need for this step.
NoteYou may have already completed several of the steps when you configured Self-Service Banner in chapter 2.
08 Banner General 8.0 97Middle Tier Implementation Guide
Implementing Single Sign-On for Self-Service Banner

98
1. Logon to WebTailor as the WebTailor Administrator.
2. Go to the LDAP Administration page (twbkldap.P_ModifyPgLDAP) in WebTailor and set up the LDAP options:
2.1. LDAP Protocol - Specifies the protocol to be used with self-service. Select LDAP_S if you are using LDAP with SSL at your institution.
NoteIf you are not using LDAP authentication for Self-Service Banner, then the protocol should be left as none.
2.2. Search Indicator–Indicates whether anonymous search should be performed before binding.
2.3. LDAP Server Name–LDAP server name that is used to validate users.
2.4. LDAP Port–Port number for LDAP server.
2.5. Search Base for LDAP–User suffix used for searching and binding users.
2.6. Suffix for LDAP User–User suffix that should be used before binding user.
2.7. Prefix for LDAP User–User prefix that should be used before binding user.
2.8. Attribute for Banner in LDAP–Attribute which stores Self-Service Banner ID in LDAP.
Banner General 8.0 April 2008Middle Tier Implementation GuideImplementing Single Sign-On for Self-Service Banner

April 20
2.9. SSL Wallet Location - Specifies the wallet location. This is required if you are using a one-way or two-way SSL connection.
2.10. SSL Wallet Password - Specifies the wallet password. This is required if you are using a one-way or two-way SSL connection.
2.11. SSL Authentication Mode - Specifies the authentication mode.
Step 4 Update WebTailor Parameters
1. Login to WebTailor as the WebTailor Administrator.
2. Go to the WebTailor Parameters page (twbkparm.P_DispAllParams) and enter values for the following parameters:
Step 5 Verify Configuration Steps in Self-Service
The sso_ldapssb.sql script can be used to verify your SSO environment by reading all the parameters and displaying their values. It is delivered in the $BANNER_HOME/install directory.
1. Run this script logged on as BANINST1.
2. Verify that the output looks similar to the following example:
Parameter Name Value
CPCOOKIEDOMAIN .yourdomain.com
CPCOOKIENAME CPSESSID
CPCOOKIEPATH /
CPTIMEOUTURL SCTSSB (where SCTSSB is the name specified for Banner Self-Service in your CPIP configuration)
Example:/cp/ip/timeout?sys=sctssb&api=
08 Banner General 8.0 99Middle Tier Implementation Guide
Implementing Single Sign-On for Self-Service Banner
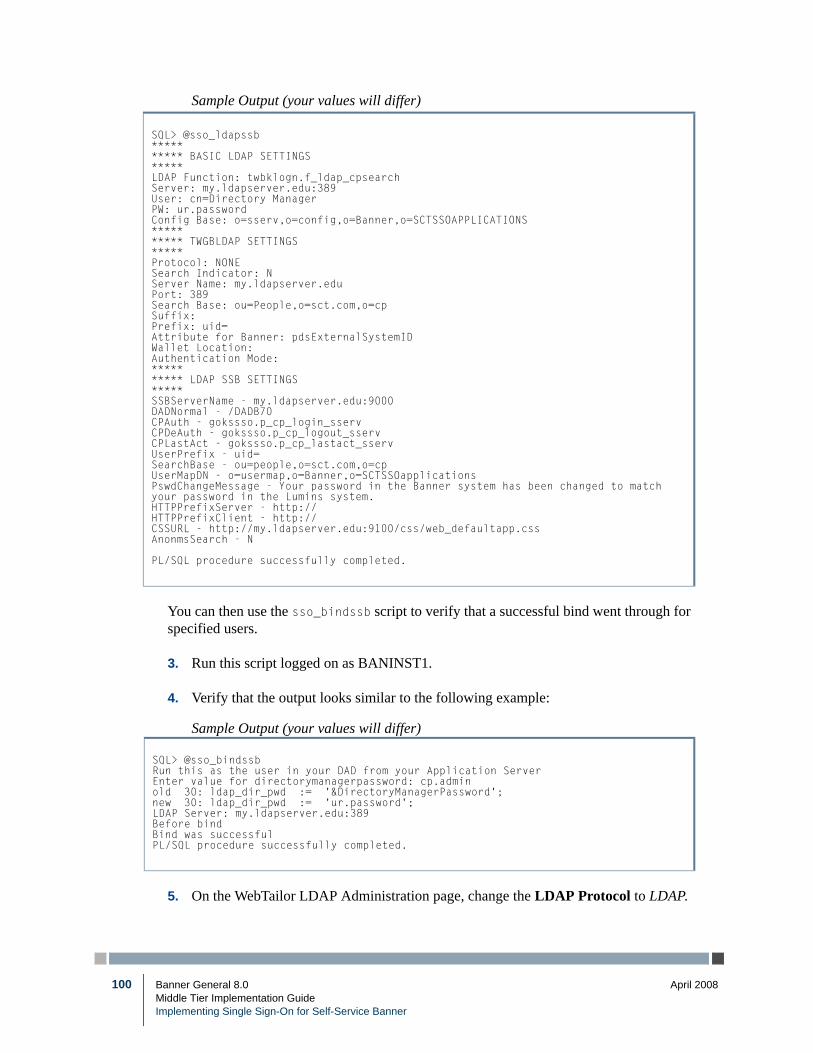
100
Sample Output (your values will differ)
You can then use the sso_bindssb script to verify that a successful bind went through for specified users.
3. Run this script logged on as BANINST1.
4. Verify that the output looks similar to the following example:
Sample Output (your values will differ)
5. On the WebTailor LDAP Administration page, change the LDAP Protocol to LDAP.
SQL> @sso_ldapssb********** BASIC LDAP SETTINGS*****LDAP Function: twbklogn.f_ldap_cpsearchServer: my.ldapserver.edu:389User: cn=Directory ManagerPW: ur.passwordConfig Base: o=sserv,o=config,o=Banner,o=SCTSSOAPPLICATIONS********** TWGBLDAP SETTINGS*****Protocol: NONESearch Indicator: NServer Name: my.ldapserver.eduPort: 389Search Base: ou=People,o=sct.com,o=cpSuffix:Prefix: uid=Attribute for Banner: pdsExternalSystemIDWallet Location:Authentication Mode:********** LDAP SSB SETTINGS*****SSBServerName - my.ldapserver.edu:9000DADNormal - /DADB70CPAuth - gokssso.p_cp_login_sservCPDeAuth - gokssso.p_cp_logout_sservCPLastAct - gokssso.p_cp_lastact_sservUserPrefix - uid=SearchBase - ou=people,o=sct.com,o=cpUserMapDN - o=usermap,o=Banner,o=SCTSSOapplicationsPswdChangeMessage - Your password in the Banner system has been changed to match your password in the Lumins system.HTTPPrefixServer - http://HTTPPrefixClient - http://CSSURL - http://my.ldapserver.edu:9100/css/web_defaultapp.cssAnonmsSearch - N
PL/SQL procedure successfully completed.
SQL> @sso_bindssbRun this as the user in your DAD from your Application ServerEnter value for directorymanagerpassword: cp.adminold 30: ldap_dir_pwd := '&DirectoryManagerPassword';new 30: ldap_dir_pwd := 'ur.password';LDAP Server: my.ldapserver.edu:389Before bindBind was successfulPL/SQL procedure successfully completed.
Banner General 8.0 April 2008Middle Tier Implementation GuideImplementing Single Sign-On for Self-Service Banner
April 20
6. Use your Luminis ID and password to log into Self-Service.
Step 6 (Optional) Create DADs for Running SSO with VBS
NoteThis step is required only if you are using VBS.
Self-Service Banner allows you to logon with your Oracle password instead of your Banner ID and PIN.
The process in which SSO works seamlessly between Banner and Luminis is as follows:
1. As part of the normal SSO process between Luminis and Banner, your Luminis ID is checked to see if it can be mapped to an Oracle/Banner ID.
2. The programming logic then checks the WebTailor tables to see if there are any for which the ADMIN switch is set to Y (TWGBWMNU_ADM_ACCESS_IND = Y).
3. If any ADMIN switches are set to Y, then the user ID and password are encrypted and stored in a cookie. The Oracle password is now identical to the one in Luminis.
4. You are then transferred to Self-Service Banner, and the CPSESSID cookie is set.
5. When you select a menu link in Self-Service Banner that has the ADMIN switch set, the programming logic checks to see if the CPSESSID cookie exists.
6. If it does, _admin is added to the end of the DAD name in the URL.
7. This is picked up by the Oracle Application Service via a rewrite rule, which does an internal redirect to a perl script.
8. The perl script changes the _admin to the actual ADMIN DAD, as defined by the WEBUSER WebTailor parameter.
9. The programming logic then redirects to the TWBKAUSR package that maintains all the post data, using the URL as a parameter.
10. The TWBKAUSR package receives the request from the perl script and uses the encrypted cookie to build an authentication header.
11. The utl_http package issues the actual URL request with this header set, providing the authorization to the ADMIN DAD so you aren’t prompted for a username and password.
08 Banner General 8.0 101Middle Tier Implementation Guide
Implementing Single Sign-On for Self-Service Banner
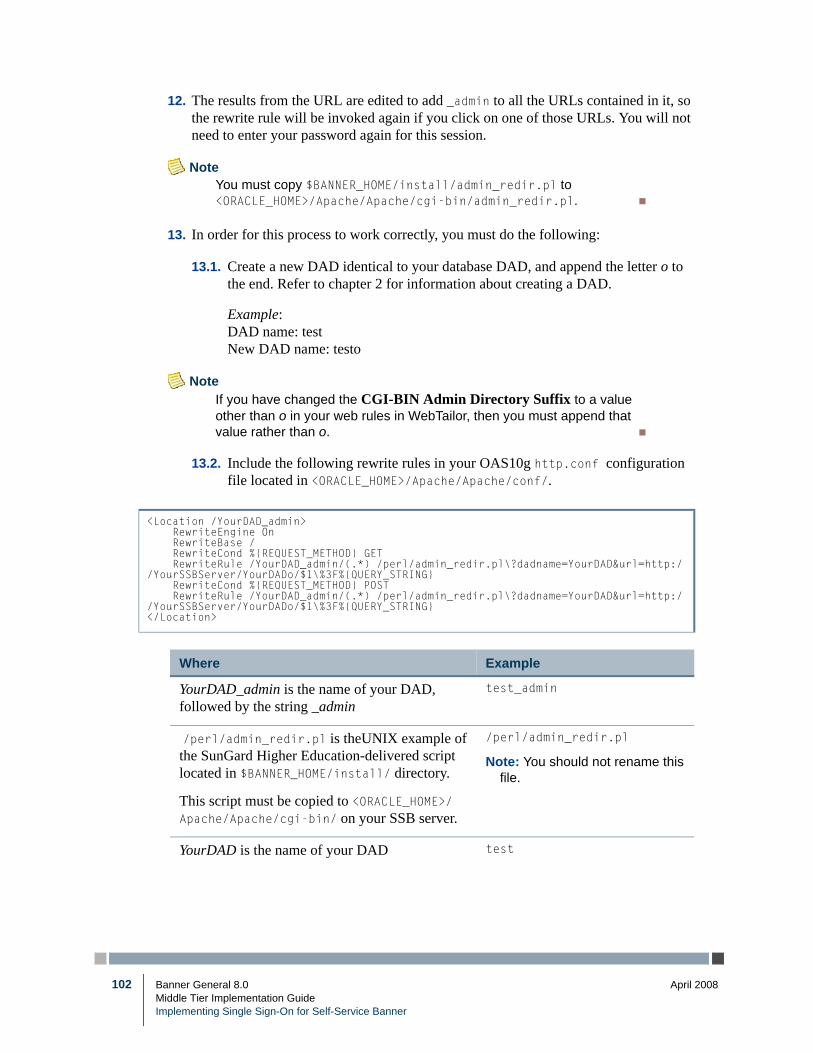
102
12. The results from the URL are edited to add _admin to all the URLs contained in it, so the rewrite rule will be invoked again if you click on one of those URLs. You will not need to enter your password again for this session.
NoteYou must copy $BANNER_HOME/install/admin_redir.pl to <ORACLE_HOME>/Apache/Apache/cgi-bin/admin_redir.pl.
13. In order for this process to work correctly, you must do the following:
13.1. Create a new DAD identical to your database DAD, and append the letter o to the end. Refer to chapter 2 for information about creating a DAD.
Example:DAD name: testNew DAD name: testo
NoteIf you have changed the CGI-BIN Admin Directory Suffix to a value other than o in your web rules in WebTailor, then you must append that value rather than o.
13.2. Include the following rewrite rules in your OAS10g http.conf configuration file located in <ORACLE_HOME>/Apache/Apache/conf/.
<Location /YourDAD_admin> RewriteEngine On RewriteBase / RewriteCond %{REQUEST_METHOD} GET RewriteRule /YourDAD_admin/(.*) /perl/admin_redir.pl\?dadname=YourDAD&url=http://YourSSBServer/YourDADo/$1\%3F%{QUERY_STRING} RewriteCond %{REQUEST_METHOD} POST RewriteRule /YourDAD_admin/(.*) /perl/admin_redir.pl\?dadname=YourDAD&url=http://YourSSBServer/YourDADo/$1\%3F%{QUERY_STRING}</Location>
Where Example
YourDAD_admin is the name of your DAD, followed by the string _admin
test_admin
/perl/admin_redir.pl is theUNIX example of the SunGard Higher Education-delivered script located in $BANNER_HOME/install/ directory.
This script must be copied to <ORACLE_HOME>/Apache/Apache/cgi-bin/ on your SSB server.
/perl/admin_redir.pl
Note: You should not rename this file.
YourDAD is the name of your DAD test
Banner General 8.0 April 2008Middle Tier Implementation GuideImplementing Single Sign-On for Self-Service Banner

April 20
Step 7 Configure your Luminis Server
This step should be performed by the Luminis administrator.
1. Use the Luminis console command configman to update the es.systems parameter, and to add the es.sctssb.configURL and es.sctssb.doGMTOffset parameters.
1.1. Navigate to the $CP_ROOT/webapps/luminis/WEB-INF directory on the Luminis server.
1.2. Export the current properties from Luminis by running the following command:configman -x ldi_banner.properties
1.3. Open the ldi_banner.properties configuration file in your text editor.
1.4. Locate the es.systems parameter and add sctssb to the end.
Example:
es.systems = sct is cal epos mb gtmb webct wp sctwf sctinb sctssb
1.5. Go to the end of the ldi_banner.properties file.
1.6. Add the es.sctssb.configURL parameter with the value:http://your.ssb.server:port/testdatabase/gokssso.P_GetConfigVersion2_sserv
Example:
es.sctssb.configURL = http://your.ssb.server:port/<YourNormalDAD>/gokssso.P_GetConfigVersion2_sserv
1.7. Add the es.sctssb.doGMTOffset parameter with the value false.
Example:es.sctssb.doGMTOffset=false
1.8. From the command prompt on the Luminis server, issue the following command to import the new values:
configman -i ldi_banner.properties
2. Stop and restart the Luminis server using the stopcp and startcp commands.
YourDADo is the name of your DAD, followed by an o
testo
YourSSBServer is the name or IP address of your server which runs Self-Service Banner
ssb.yourschool.edu:8000
Note: The port is not needed if it is 80.
Where Example
08 Banner General 8.0 103Middle Tier Implementation Guide
Implementing Single Sign-On for Self-Service Banner

104
3. From a cygwin window on the Luminis server, issue the following commands to add filters to Luminis that are required for SSO:
cptool sync password -add cpip sctssb
NoteYou must wait at least 10 minutes for this to take effect, or you can stop and restart your Luminis server again to see the changes immediately.
Step 8 Test
You should always test your changes before migrating them to your production environment.
1. (Optional) For testing purposes, enter the following in Luminis to create a link that you can use to access SSB. Make sure you change the text to reflect your institution’s configuration.
http://your.luminisserver.edu/cp/ip/login?sys=sctssb&url=http://your.ssbserver:port/YourDAD/bwgkogad.P_SelectAtypView
2. Logon to Luminis and select the link to access Self-Service Banner. In this example, you would be taken to your information in the Directory Profile.
Banner General 8.0 April 2008Middle Tier Implementation GuideImplementing Single Sign-On for Self-Service Banner

April 20
6 Implementing Luminis Channels for Banner
This chapter details the following steps for implementing Luminis Channels for Banner.
1. “Create the Home Directory for Luminis Channels for Banner” on page 109
2. “Edit the Configuration File” on page 110
3. “Localize the Configuration File” on page 113
4. “Deploy the EAR File” on page 114
5. “Install CAR Files” on page 115
6. “Publish the Channel” on page 116
7. “Check Your Work” on page 117
Each Luminis Channel for Banner is delivered as a .car (channel archive) file. The .car file is a .zip file that contains all elements needed to render the channel and to set up database elements, supporting automation, publishing characteristics, etc., for the channel.
Prerequisites
Before proceeding with your Luminis Channels for Banner implementation, make sure you have completed the following prerequisite activities:
Apply Upgrade
Apply the Luminis Channels for Banner upgrade to your Banner database.
Set up Security on GSASECR
1. Access the Security Maintenance Form (GSASECR).
2. Go to the Objects tab and verify that there has been an entry created for CHANNEL. The delivered record should look like this:
08 Banner General 8.0 105Middle Tier Implementation Guide
Implementing Luminis Channels for Banner

106
Object: CHANNEL
Current Version: 7.0
System Code: G
Default Role: BAN_DEFAULT_M
NoteThe Current Version value may be a higher version.
3. Go to the Classes tab and verify that there has been an entry created for PXY_CHANNEL_LUMINIS. Move your cursor to that record to highlight the record. Then press the Objects button and assign the CHANNEL object to this class with a role of BAN_DEFAULT_M. The PXY_CHANNEL_LUMINIS class determines the default user mapping for Banner Channels and will be used for all users that do not have an Oracle account in the Banner database (for example, students).
4. Define a default Oracle ID for Banner Channels. Go to the Users tab and enter the ID you would like to use. The recommended user ID is INTEGMGR, or you can create a new Oracle ID. Next, press the Modify button and then User Classes. Click the All radio button next under Show Classes and look for the PXY_CHANNEL_LUMINIS class. Click the value in the class code item for this record. If the field is protected against update, then there is already a default user assigned to the class (and GSASECR will not allow more than one user to be assigned to this class).
5. Press the Close button twice to return to the Users tab.
6. On the Users tab, enter the same user ID (INTEGMGR or new ID) that you just entered. Press the Alter button, check the Authorize BANPROXY box, and save your changes.
7. Users with existing Oracle accounts (such as employees, finance users, and so on) must be granted access to the CHANNEL object in order to use Banner Channels. The easiest way to do this is to assign the CHANNEL object to one or more classes that are assigned to your users. For example, to allow all users in the BAN_GENERAL_C class access to Channels, go to the Classes tab and highlight BAN_GENERAL_C. Then press the Objects button and add the CHANNEL object to this class with a role of BAN_DEFAULT_M.
8. Individual users also must be granted BANPROXY access. Go to the Users tab and enter the person’s Oracle ID. Then press the Alter button, check the Authorize BANPROXY box, and save your changes.
Perform Required Steps
Perform the required steps from chapter 3 of this guide, if you have not already performed them. Note that if the Single Sign-On steps from chapter 4 and chapter 5 are not also
Banner General 8.0 April 2008Middle Tier Implementation GuideImplementing Luminis Channels for Banner
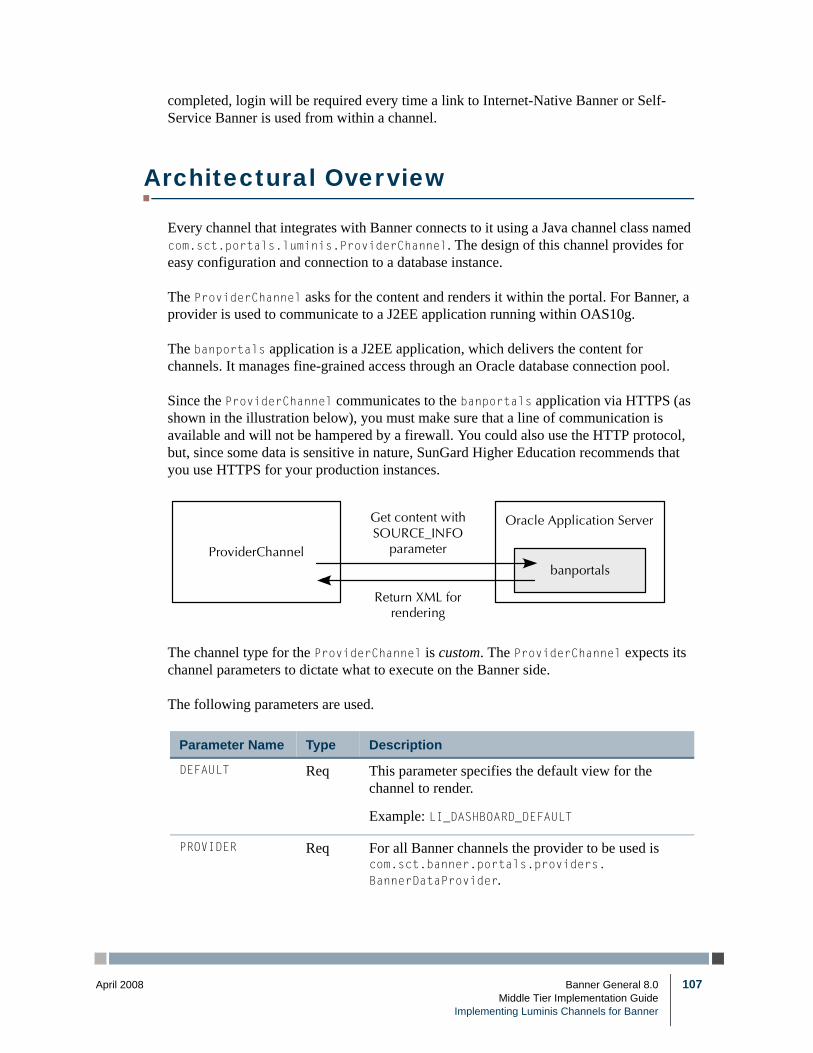
April 20
completed, login will be required every time a link to Internet-Native Banner or Self-Service Banner is used from within a channel.
Architectural Overview
Every channel that integrates with Banner connects to it using a Java channel class named com.sct.portals.luminis.ProviderChannel. The design of this channel provides for easy configuration and connection to a database instance.
The ProviderChannel asks for the content and renders it within the portal. For Banner, a provider is used to communicate to a J2EE application running within OAS10g.
The banportals application is a J2EE application, which delivers the content for channels. It manages fine-grained access through an Oracle database connection pool.
Since the ProviderChannel communicates to the banportals application via HTTPS (as shown in the illustration below), you must make sure that a line of communication is available and will not be hampered by a firewall. You could also use the HTTP protocol, but, since some data is sensitive in nature, SunGard Higher Education recommends that you use HTTPS for your production instances.
The channel type for the ProviderChannel is custom. The ProviderChannel expects its channel parameters to dictate what to execute on the Banner side.
The following parameters are used.
Parameter Name Type Description
DEFAULT Req This parameter specifies the default view for the channel to render.
Example: LI_DASHBOARD_DEFAULT
PROVIDER Req For all Banner channels the provider to be used is com.sct.banner.portals.providers.BannerDataProvider.
ProviderChannel
Oracle Application Server
banportals
Get content withSOURCE_INFO
parameter
Return XML forrendering
08 Banner General 8.0 107Middle Tier Implementation Guide
Implementing Luminis Channels for Banner

108
SOURCE_INFO Req This parameter is the driver command to acquire channel specific data.
CACHE_TIMEOUT Opt If a channel’s data is not refreshed often, it could be very beneficial to system performance to cache the channel for a period of time while the user is logged into the system. The CACHE_TIMEOUT value is the number of seconds on a per-user per-session basis to cache a channel.
The Banner channel framework will automatically refresh the cache if the channel is focused or if the edit button is clicked.
EDIT Opt If the channel appears different in edit mode from the way it appears in default mode, a different style sheet will be used.
SOURCE_SSL Opt An SSL is a map of all style sheet titles and their related XSL files. By default the ProviderChannel will take the SOURCE_INFO name and apply .ssl to the end to look up the SSL file. If a specific SSL file is needed that does not follow this naming convention, then an SSL can be specified via the SOURCE_SSL parameter.
Example: /com/sct/banner/portals/ui/gc_nav/gc_nav.ssl
CONNECTION_NAME Opt By default, channels will use the default connection database pool setup on the OAS10g server. If multiple connection pools are available, a channel can set the CONNECTION_NAME parameter to link the channel to a specific pool.
For example, if you have a PROD database that is your default connection pool, but want to have a channel interact with your TEST database you could specify TEST as your CONNECTION_NAME.
Review setting up your connection pools for more details.
Parameter Name Type Description
Banner General 8.0 April 2008Middle Tier Implementation GuideImplementing Luminis Channels for Banner

April 20
Preparing to Install Luminis Channels for Banner
Before you can configure and install the Luminis Channels for Banner, some files have to be moved to the Luminis servers and others need to be moved to the OAS10g server.
The following files are used in the installation and configuration of Luminis Channels for Banner.
Step 1 Create the Home Directory for Luminis Channels for Banner
1. To manipulate and configure the files, create a directory on the OAS10g server.
Example:/u01/PROD/sct/banner/channels
2. Copy the contents of your Banner production directory/channel/admin to this directory. In the instructions in this chapter, this directory is referred to as the CHANNEL_HOME directory.
File Name Description
sctecf.car This file lays down the foundation on which Luminis Channels for Banner are built. It stands for the Enterprise Channel Foundation. It will be placed in a specified directory on the Luminis server.
banportals.ear This file is deployed to the OAS10g server and is used to accept requests for content and return XML content to the portal.
bannerCommon.car This file provides the BannerDataProvider used to implement the Luminis Channels for Banner. It also contains the common XSL, images, and properties used by all Luminis Channels for Banner. This file contains a properties file that tells it the location of the OAS10g server that all channels will contact for content.
banportalsadmin.jar
This helper file provides a means to easily import properties from a file and disseminate them through both the banportals.ear and bannerCommon.car.
banportals.config This is a template file that is used to set values within banportals.ear and bannerCommon.car.
08 Banner General 8.0 109Middle Tier Implementation Guide
Implementing Luminis Channels for Banner

110
Step 2 Edit the Configuration File
Edit the banportals.config file that is located in your CHANNEL_HOME directory (for example, D:\SCT\BAN7\CHANNELS\banportals.config).
Banner Database Connection Configuration
Property Name Description
connectionName.list
Connection listings. Each item in this list will expect to have <connection name>.<property> specified.
For example, the default value in the list makes the configuration look for default.tnsName, default.UserName, etc.:connectionName.list=default
connectionName.list=default, other
connectionName.default
For channels that do not specify the connection name to use, the default name will be used.
Example:connectionName.default=default
default.tnsName TNS Name to use when connecting to the Banner database.
Example:default.tnsName=LB70.sct.com
default.userName Connection pool user to use.
Example:default.userName=banproxy
default.password Connection pool password to use.
Example:default.password=banproxy
default.poolConfig.min-limit
Minimum number of physical connections maintained by the pool.
Example:default.poolConfig.min-limit=1
default.poolConfig.max-limit
Maximum number of physical connections maintained by the pool.
Example:default.poolConfig.max-limit=5
Banner General 8.0 April 2008Middle Tier Implementation GuideImplementing Luminis Channels for Banner
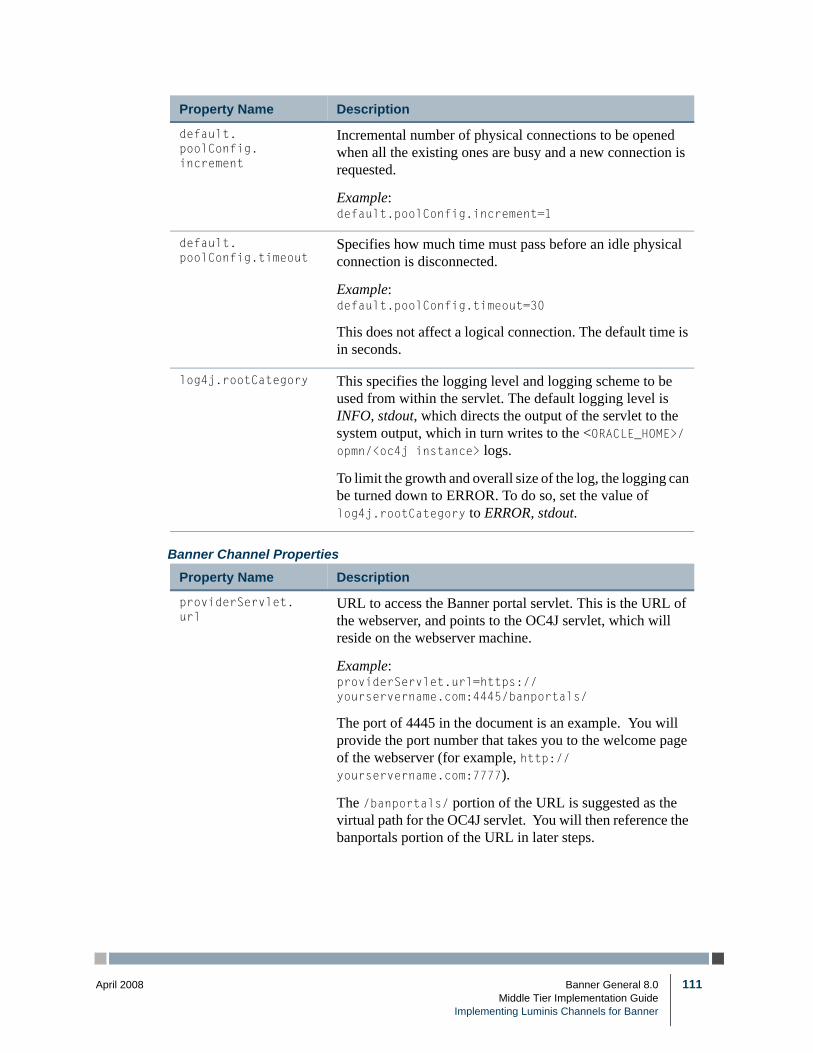
April 20
Banner Channel Properties
default.poolConfig.increment
Incremental number of physical connections to be opened when all the existing ones are busy and a new connection is requested.
Example:default.poolConfig.increment=1
default.poolConfig.timeout
Specifies how much time must pass before an idle physical connection is disconnected.
Example:default.poolConfig.timeout=30
This does not affect a logical connection. The default time is in seconds.
log4j.rootCategory This specifies the logging level and logging scheme to be used from within the servlet. The default logging level is INFO, stdout, which directs the output of the servlet to the system output, which in turn writes to the <ORACLE_HOME>/opmn/<oc4j instance> logs.
To limit the growth and overall size of the log, the logging can be turned down to ERROR. To do so, set the value of log4j.rootCategory to ERROR, stdout.
Property Name Description
providerServlet.url
URL to access the Banner portal servlet. This is the URL of the webserver, and points to the OC4J servlet, which will reside on the webserver machine.
Example:providerServlet.url=https://yourservername.com:4445/banportals/
The port of 4445 in the document is an example. You will provide the port number that takes you to the welcome page of the webserver (for example, http://yourservername.com:7777).
The /banportals/ portion of the URL is suggested as the virtual path for the OC4J servlet. You will then reference the banportals portion of the URL in later steps.
Property Name Description
08 Banner General 8.0 111Middle Tier Implementation Guide
Implementing Luminis Channels for Banner
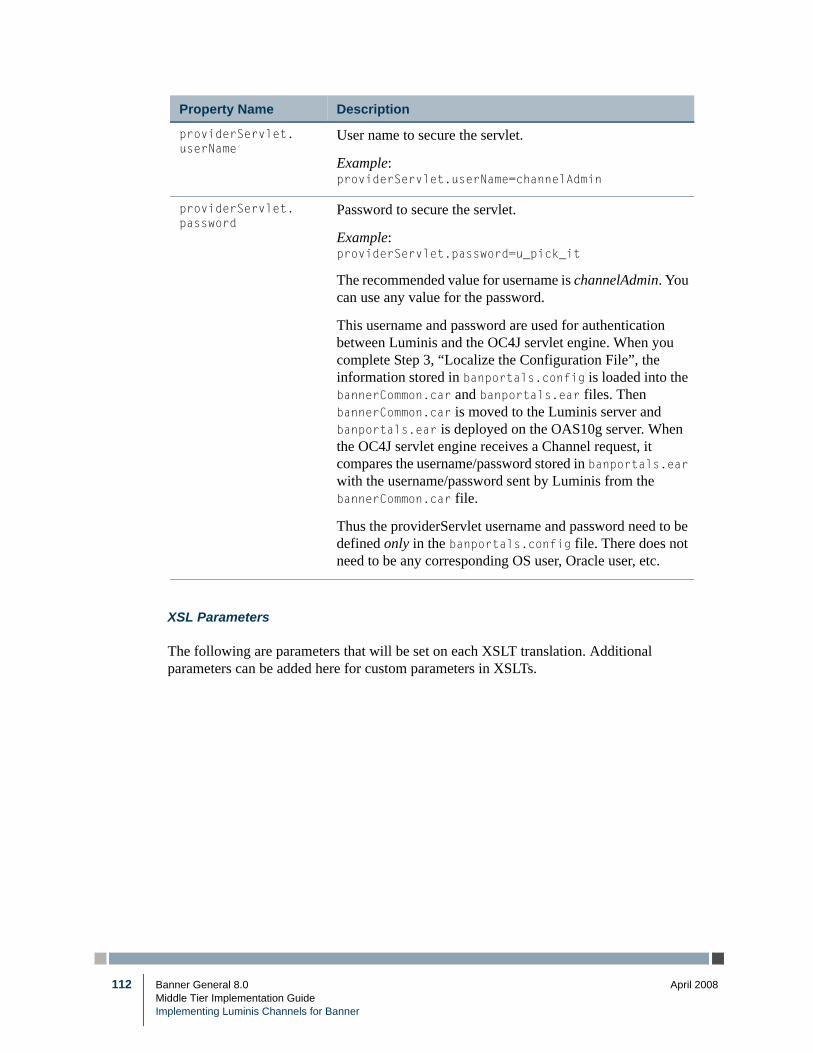
112
XSL Parameters
The following are parameters that will be set on each XSLT translation. Additional parameters can be added here for custom parameters in XSLTs.
providerServlet.userName
User name to secure the servlet.
Example:providerServlet.userName=channelAdmin
providerServlet.password
Password to secure the servlet.
Example:providerServlet.password=u_pick_it
The recommended value for username is channelAdmin. You can use any value for the password.
This username and password are used for authentication between Luminis and the OC4J servlet engine. When you complete Step 3, “Localize the Configuration File”, the information stored in banportals.config is loaded into the bannerCommon.car and banportals.ear files. Then bannerCommon.car is moved to the Luminis server and banportals.ear is deployed on the OAS10g server. When the OC4J servlet engine receives a Channel request, it compares the username/password stored in banportals.ear with the username/password sent by Luminis from the bannerCommon.car file.
Thus the providerServlet username and password need to be defined only in the banportals.config file. There does not need to be any corresponding OS user, Oracle user, etc.
Property Name Description
Banner General 8.0 April 2008Middle Tier Implementation GuideImplementing Luminis Channels for Banner

April 20
Step 3 Localize the Configuration File
The banportals.config file contains values that need to be inserted into the bannercommon.car and the banportals.ear file.
To roll out the changes an installer file, banportalsadmin.jar, is provided.To use this installer, a Java VM must be installed on the same machine as the CHANNEL_HOME. A Java VM of 1.3.1 or higher is required.
TipIf the CHANNEL_HOME is on the same machine as your OAS10g server, you can use the JAVA_HOME rooted at <ORACLE_HOME>/jdk. Set an environment variable JAVA_HOME and point it to <ORACLE_HOME>/jdk. Then ensure that JAVA_HOME\bin is the first item in your PATH.
TipTo check the java version, runjava –version
Property Name Description
xsl-parameter.erpUrlBase
URL for the INB server.
Example:xsl-parameter.erpUrlBase=http://yourservername.com:7777/forms90/f90servlet%3Fconfig%3Dsctsso%2526separateFrame%3Dfalse%2526otherParams%3Dlaunch_form%3D
Note: If you want to load Banner forms in a separate window, remove %2526separateFrame%3Dfalse from the URL above.
xsl-parameter.urlHostAndPath
URL for the self-service application.
Example:xsl-parameter.urlHostAndPath=http://yourservername.com:9001/YourDAD/
xsl-parameter.externalSystem-inb
CPIP URL for the INB system.
Example:xsl-parameter.externalSystem-inb=%2fcp%2fip%2ftimeout%3fsys%3dsctinb
xsl-parameter.externalSystem-ssb
CPIP URL for the self-service system.
Example:xsl-parameter.externalSystem-ssb=%2fcp%2fip%2flogin%3fsys%3dsct
08 Banner General 8.0 113Middle Tier Implementation Guide
Implementing Luminis Channels for Banner

114
To execute the installer, runjava –jar banportalsadmin.jar banportals.config
Step 4 Deploy the EAR File
NoteSunGard Higher Education recommends that you use Oracle Enterprise Manager to deploy the EAR file.
Using Oracle Enterprise Manager:
1. Create an OC4J instance for the EAR file. For example, the Banner database is named PROD:
PROD_banportals
It is recommended that you create a new OC4J instance for each channel servlet instance. SunGard Higher Education recommends a naming convention of <SID>_banportals where <SID> is the service identifier for your Banner instance.
2. Select the created OC4J instance, and go to the Applications tab. Click Deploy EAR file (or Deploy Application in older versions).
3. You may be shown an introduction. Read it, then click Next.
4. Browse for the banportals.ear file that has just been updated in the CHANNEL_HOME directory and select this file for deployment.
This step actually takes the EAR file within the CHANNEL_HOME directory and moves it up to the OAS10g server. The EAR file must be made available to the machine on which you are browsing the Enterprise Manager. If access is not readily available, the file must be moved locally to the browser machine to upload it to the OAS10g server.
When selecting an application, select:J2EE Application = the local file system location of the EAR file
For example, if the computer you are using to view the Enterprise Manager has a shared drive to the OAS10g server, the J2EE Application location would refer to CHANNEL_HOME/banportals.ear file. If you do not have access via mapped drives or symbolic links, you will need to FTP the file to the local machine and then select the file locally.
5. Select a name to identify the application within the OC4J instance. This name must be unique to the OC4J instance and should typically contain the application currently being deployed. The suggested name is <SID>_banportals.
6. Click Next.
Banner General 8.0 April 2008Middle Tier Implementation GuideImplementing Luminis Channels for Banner
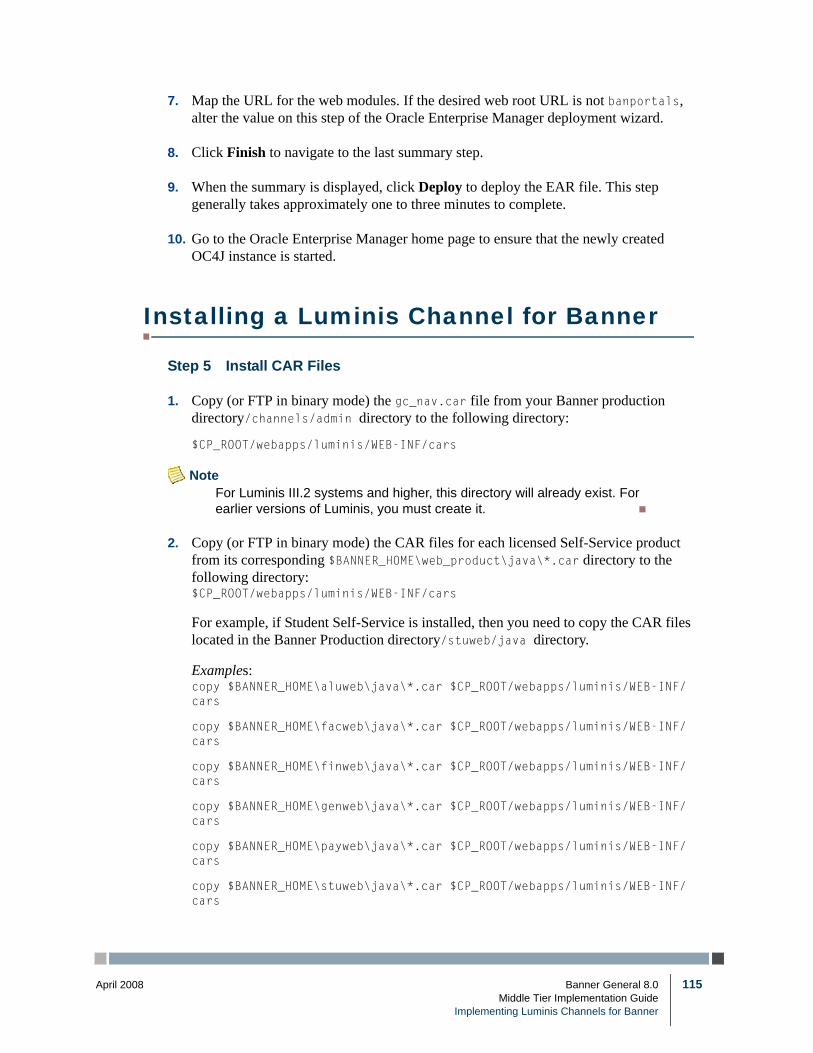
April 20
7. Map the URL for the web modules. If the desired web root URL is not banportals, alter the value on this step of the Oracle Enterprise Manager deployment wizard.
8. Click Finish to navigate to the last summary step.
9. When the summary is displayed, click Deploy to deploy the EAR file. This step generally takes approximately one to three minutes to complete.
10. Go to the Oracle Enterprise Manager home page to ensure that the newly created OC4J instance is started.
Installing a Luminis Channel for Banner
Step 5 Install CAR Files
1. Copy (or FTP in binary mode) the gc_nav.car file from your Banner production directory/channels/admin directory to the following directory:
$CP_ROOT/webapps/luminis/WEB-INF/cars
NoteFor Luminis III.2 systems and higher, this directory will already exist. For earlier versions of Luminis, you must create it.
2. Copy (or FTP in binary mode) the CAR files for each licensed Self-Service product from its corresponding $BANNER_HOME\web_product\java\*.car directory to the following directory:$CP_ROOT/webapps/luminis/WEB-INF/cars
For example, if Student Self-Service is installed, then you need to copy the CAR files located in the Banner Production directory/stuweb/java directory.
Examples:copy $BANNER_HOME\aluweb\java\*.car $CP_ROOT/webapps/luminis/WEB-INF/cars
copy $BANNER_HOME\facweb\java\*.car $CP_ROOT/webapps/luminis/WEB-INF/cars
copy $BANNER_HOME\finweb\java\*.car $CP_ROOT/webapps/luminis/WEB-INF/cars
copy $BANNER_HOME\genweb\java\*.car $CP_ROOT/webapps/luminis/WEB-INF/cars
copy $BANNER_HOME\payweb\java\*.car $CP_ROOT/webapps/luminis/WEB-INF/cars
copy $BANNER_HOME\stuweb\java\*.car $CP_ROOT/webapps/luminis/WEB-INF/cars
08 Banner General 8.0 115Middle Tier Implementation Guide
Implementing Luminis Channels for Banner
116
copy $BANNER_HOME\wtlweb\java\*.car $CP_ROOT/webapps/luminis/WEB-INF/cars
NoteYou can only install the products you have licensed.
3. Restart the Luminis Web server.
Once the restart is complete, the channel will be recognized by the system and any optional data required to set up its supporting elements will be processed.
Step 6 Publish the Channel
For detailed information about the WebTailor pages mentioned in this procedure, see the Luminis Channels for Banner Handbook.
1. Logon to Luminis as the administrator.
2. Choose the Channel Admin link.
3. Choose the Modify a currently published channel link.
The system displays the Channel Manager page. When the system was restarted previously, it automatically processed all the elements needed for the initial setup of the channel. Therefore, you will only need to modify values to customize the channel for your institution’s business practices.
4. Locate the channel you want to modify. You can use the page number links to go to a different page, and you can select a category from the pull-down list to reduce the number of channels displayed on the Channel Manager page.
5. Click the Edit button for the channel you want to modify. The system displays the Channel Manager page at the Review workflow “step.”
6. Click the Categories step.
7. For the Categories step, check the check box for the category you want the channel associated with (Applications is recommended), then click Next or the Groups step.
8. For the Group step, check the check box for the group you want the channel associated with, then click Next or the Review step.
NoteIf you are using Luminis III.2 or higher, the system automatically assigns SunGard Higher Education-delivered channels to the Auto-Published category, and only a user with the “Admin” role can subscribe to it. SunGard Higher Education recommends that an Admin user subscribe to
Banner General 8.0 April 2008Middle Tier Implementation GuideImplementing Luminis Channels for Banner

April 20
the channel to test it, modify institutional preferences if necessary, then reassign it to a different group as explained in this procedure.
Only users assigned to the group selected in this step will be able to subscribe to the channel.
9. For the Review step, click Finished.
NoteIf desired, you can modify any of the clickable values displayed on the Review step, but you do not need to do this for installation.
Step 7 Check Your Work
1. Return to the Luminis portal.
2. Subscribe to the channel.
3. Test it to make sure it works.
Locale-Specific URLs
For a multi-language implementation of Banner, you can set up locale-specific URLs for INB and SSB.
NoteThis setup is possible only for an international version of Banner.
1. Edit the banportals.config file to add locale-specific configurations to the end of the file. For example: xsl-parameter.erpUrlBase.<Locale>= Locale-specific INB URL
xsl-parameter.urlHostAndPath.<Locale>= Locale-specific SSB URL
2. Run banportaladmin.jar to generate the bannerCommon.car, sctecf.car, and banportals EAR files.
3. To deploy, restart the web server.
Example INB Test for the My Banner Channel
1. Create a BANSECR/Oracle account for testing, if you do not already have one:
1.1. Login to Banner as BANSECR.
1.2. Go to the User Maintenance section of GSASECR.
1.3. Enter a user such as testinb7 and choose insert.
08 Banner General 8.0 117Middle Tier Implementation Guide
Implementing Luminis Channels for Banner

118
1.4. Enter a password.
1.5. Enter TEMP for Temp Tablespace.
1.6. Enter USERS for Default Tablespace.
1.7. Enter BAN_DEFAULT_CONNECT for the Default Role.
1.8. Check the Authorize BANPROXY check box.
1.9. Save your changes.
1.10. Click Modify, and then User Classes, and finally BAN_GENERAL_C class (which should include object CHANNEL - BAN_DEFAULT_M) to enroll the user in that class.
1.11. Login to INB as testinb7 (or whatever test user you just set up) with the password to confirm that it works.
2. Set up a My Banner menu item for the E-mail Form (GOAEMAL):
2.1. While still logged in as testinb7, go to form GUAPMNU.
2.2. Enter a few personal forms such as GOAEMAL, SPAIDEN, and GTVEMAL.
2.3. Save your changes.
2.4. Exit Banner.
3. Log back into Banner as any user with access to GOAEACC:
3.1. Go to GOAEACC.
3.2. For Username, enter TESTINB7.
3.3. For ID, enter 111111111.
3.4. Save your changes.
3.5. Exit Banner.
Banner General 8.0 April 2008Middle Tier Implementation GuideImplementing Luminis Channels for Banner

April 20
4. Create a matching Luminis test account (such as testinb7), if do not already have one:
4.1. Login to Luminis as administrator.
4.2. Choose Admin Toolbox.
4.1. In User Admin, select New.
4.1. Enter test for First Name.
4.1. Enter inb7 for Last Name.
4.1. Enter 01-JAN-1980 (or some value) for Birthdate.
4.1. Enter the password.
4.1. Confirm the password.
4.1. Enter testinb7 as the Login Name.
4.1. Choose Next and then OK.
4.1. Exit Luminis.
5. Login to Luminis with your test account.
6. Choose Content/Layout.
7. Choose the Add Channel button in desired location.
8. Select Category = Application.
9. Choose GO.
10. Select My Banner.
11. Choose the Add Channel button.
12. Choose the Back to All Users Sample tab and review your work.
13. Choose the new My Banner link from your chosen location.
14. Choose the E-mail Address Form link and it should launch INB 7.x and the GOAEMAL form.
08 Banner General 8.0 119Middle Tier Implementation Guide
Implementing Luminis Channels for Banner

120
Example SSB Test for Personal Information Channel
1. Locate a Banner ID with access to SSB. Example:ID = 111111111 (ex. SPRIDEN_ID)
2. Login to Luminis as the administrator.
2.1. Choose Admin Toolbox.
2.2. In User Admin, select New.
2.3. Enter test for First Name.
2.4. Enter ssb7 for Last Name.
2.5. Enter 01-JAN-1980 (or some value) for Birthdate.
2.6. Enter 111111111 (ex. SPRIDEN_ID) in the External Information System ID field.
2.7. Enter the password.
2.8. Confirm the password.
2.9. Enter testssb7 as the Login Name.
2.10. Choose Next and then OK.
2.11. Exit Luminis.
3. Login to Luminis with testssb7 and the password.
4. Choose Content/Layout.
5. Choose the Add Channel button in desired location.
6. Select Category = Application.
7. Choose GO.
8. Select the Personal Information link.
9. Choose the Add Channel button.
10. Click the Back to All Users Sample tab, and review your work.
11. Choose the new Personal Information link from your chosen location.
12. Choose Update E-mail Addresses. You should be transferred directly into the SSB application on the Change E-mail web page.
Banner General 8.0 April 2008Middle Tier Implementation GuideImplementing Luminis Channels for Banner
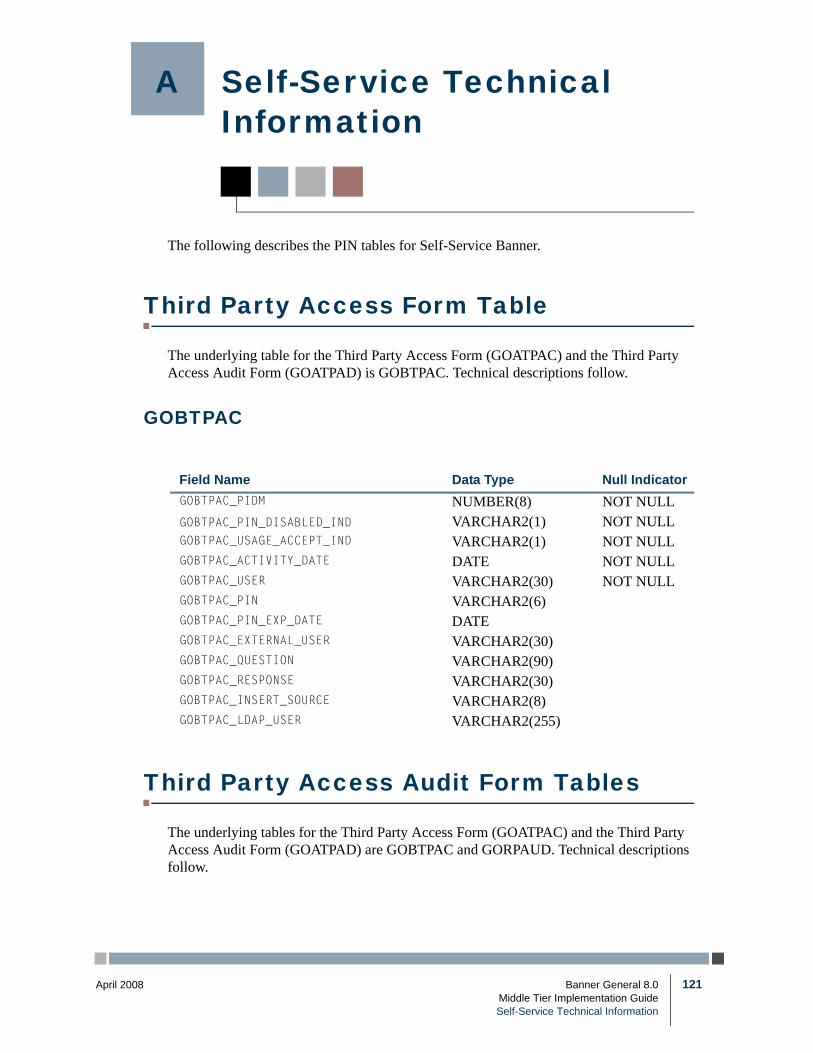
April 20
A Self-Service Technical Information
The following describes the PIN tables for Self-Service Banner.
Third Party Access Form Table
The underlying table for the Third Party Access Form (GOATPAC) and the Third Party Access Audit Form (GOATPAD) is GOBTPAC. Technical descriptions follow.
GOBTPAC
Third Party Access Audit Form Tables
The underlying tables for the Third Party Access Form (GOATPAC) and the Third Party Access Audit Form (GOATPAD) are GOBTPAC and GORPAUD. Technical descriptions follow.
Field Name Data Type Null IndicatorGOBTPAC_PIDM NUMBER(8) NOT NULLGOBTPAC_PIN_DISABLED_IND VARCHAR2(1) NOT NULLGOBTPAC_USAGE_ACCEPT_IND VARCHAR2(1) NOT NULLGOBTPAC_ACTIVITY_DATE DATE NOT NULLGOBTPAC_USER VARCHAR2(30) NOT NULLGOBTPAC_PIN VARCHAR2(6)GOBTPAC_PIN_EXP_DATE DATEGOBTPAC_EXTERNAL_USER VARCHAR2(30)GOBTPAC_QUESTION VARCHAR2(90)GOBTPAC_RESPONSE VARCHAR2(30)GOBTPAC_INSERT_SOURCE VARCHAR2(8)GOBTPAC_LDAP_USER VARCHAR2(255)
08 Banner General 8.0 121Middle Tier Implementation GuideSelf-Service Technical Information

122
GOBTPAC
GORPAUD
Campus Directory Tables
Use the following tables to understand Campus Directory tables related to Self-Service Banner.
GTVDIRO --- Directory Item Validation Table
Primary Key: GTVDIRO_CODE
Field Name Data Type Null IndicatorGOBTPAC_PIDM NUMBER(8) NOT NULLGOBTPAC_PIN_DISABLED_IND VARCHAR2(1) NOT NULLGOBTPAC_USAGE_ACCEPT_IND VARCHAR2(1) NOT NULLGOBTPAC_ACTIVITY_DATE DATE NOT NULLGOBTPAC_USER VARCHAR2(30) NOT NULLGOBTPAC_PIN VARCHAR2(6)GOBTPAC_PIN_EXP_DATE DATEGOBTPAC_EXTERNAL_USER VARCHAR2(30)GOBTPAC_QUESTION VARCHAR2(90)GOBTPAC_RESPONSE VARCHAR2(30)GOBTPAC_INSERT_SOURCE VARCHAR2(8)GOBTPAC_LDAP_USER VARCHAR2(255)
Field Name Data Type Null IndicatorGORPAUD_PIDM NUMBER(8) NOT NULLGORPAUD_ACTIVITY_DATE DATE NOT NULLGORPAUD_USER VARCHAR2(30) NOT NULLGORPAUD_PIN VARCHAR2(6)GORPAUD_EXTERNAL_USER VARCHAR2(30)GORPAUD_CHG_IND VARCHAR2(1) NOT NULL VALUES:
P = PIN ChangeI = ID Change
Banner General 8.0 April 2008Middle Tier Implementation GuideSelf-Service Technical Information

April 20
The form allows the user to query delivered data or to insert new data. Data with a system_req_ind of checked (Yes) cannot be deleted. Also, when the system_req_ind is checked (Yes), the gtvdiro_code cannot be updated.
GOBDIRO --- Directory Options Rule Table
Primary Key: GOBDIRO_CODE
Data with a system_req_ind of Y cannot be deleted.
Field Name Description Data TypeNull Indicator
GTVDIRO_CODE Code for Directory Item
VARCHAR2(8) NOT NULL
GTVDIRO_DESC Description for Directory Item
VARCHAR2(30) NOT NULL
GTVDIRO_SYSTEM_REQ_IND Is this a required code for the system? Valid values: selected (Yes) cleared (No)
VARCHAR2(1) NOT NULL
GTVDIRO_ACTIVITY_DATE Activity Date DATE NOT NULL
Field Name Description Data TypeNull Indicator
GOBDIRO_DIRO_CODE Code for Directory Item
VARCHAR2(8) NOT NULL
GOBDIRO_DIRECTORY_TYPE Alumni, Employee, or All Indicator Valid values: Employee (E)Alumni (D)All (A)
VARCHAR2(1) NOT NULL
GOBDIRO_ITEM_TYPE Address, Telephone, or Not ApplicableValid values:Address (A)Telephone (T)Not Applicable (N)
VARCHAR2(1) NOT NULL
GOBDIRO_DISP_PROFILE_IND Include in Directory Profile Indicator?Valid values: selected (Yes) cleared (No)
VARCHAR2(1) NOT NULL
08 Banner General 8.0 123Middle Tier Implementation GuideSelf-Service Technical Information

124
GORDADD --- Directory Address Table
Primary Key: GORDADD_DIRO_CODE, GORDADD_PRIORITY_NO
GOBDIRO_UPD_PROFILE_IND Allow user to choose to display in directory?Valid Values: selected (Yes) cleared (No)
VARCHAR2(1) NOT NULL
GOBDIRO_NON_PROFILE_DEF_IND
Default to directory for users without a directory profile? Valid Values:selected (Yes) cleared (No)
VARCHAR2(1) NOT NULL
GOBDIRO_SYSTEM_REQ_IND Is this a required code for the system?Valid Values: selected (Yes) cleared (No) (default)
VARCHAR2(1) NOT NULL
GOBDIRO_ACTIVITY_DATE Activity Date DATE NOT NULLGOBDIRO_SEQ_NO Sequence Number Number NOT NULL
Field Name Description Data TypeNull Indicator
GORDADD_DIRO_CODE Code for Directory Item
VARCHAR2(8) NOT NULL
GORDADD_PRIORITY_NO Priority Number NUMBER (1) NOT NULLGORDADD_ATYP_CODE Address Type Code VARCHAR2(2) NOT NULLGORDADD_TELE_CODE Telephone Type Code VARCHAR2(4) NOT NULLGORDADD_ACTIVITY_DATE Activity Date DATE NOT NULL
Field Name Description Data TypeNull Indicator
Banner General 8.0 April 2008Middle Tier Implementation GuideSelf-Service Technical Information
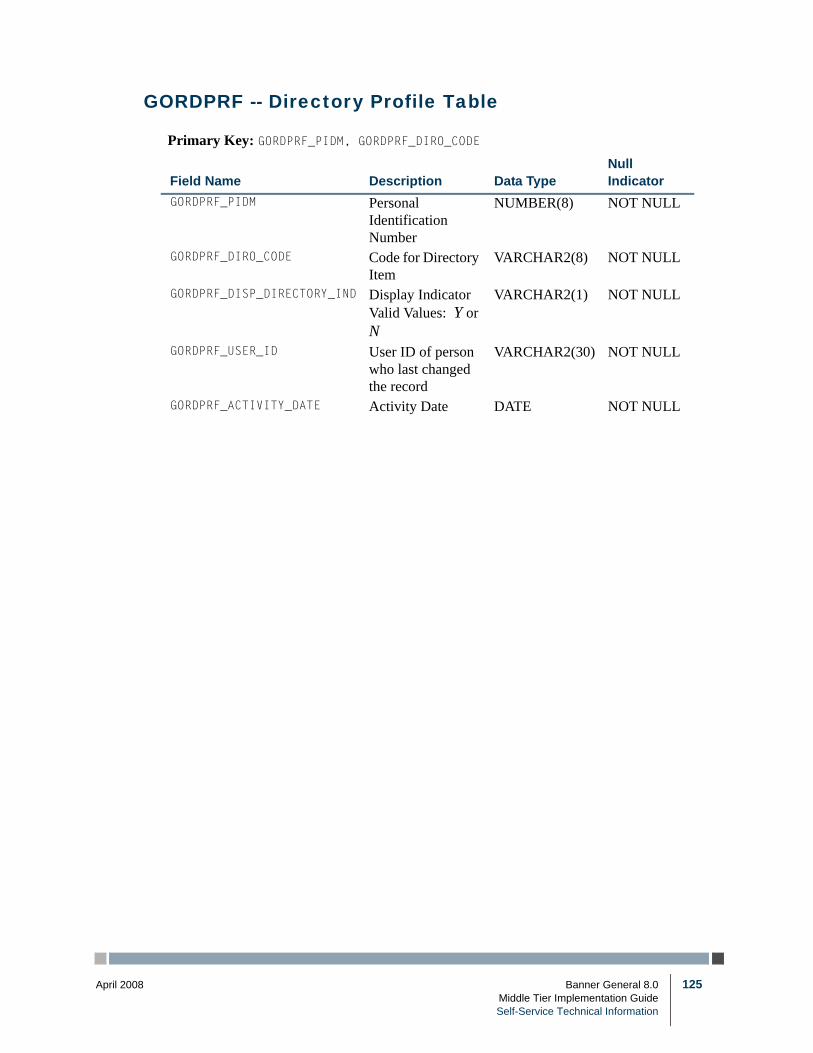
April 20
GORDPRF -- Directory Profile Table
Primary Key: GORDPRF_PIDM, GORDPRF_DIRO_CODE
Field Name Description Data TypeNull Indicator
GORDPRF_PIDM Personal Identification Number
NUMBER(8) NOT NULL
GORDPRF_DIRO_CODE Code for Directory Item
VARCHAR2(8) NOT NULL
GORDPRF_DISP_DIRECTORY_IND Display Indicator Valid Values: Y or N
VARCHAR2(1) NOT NULL
GORDPRF_USER_ID User ID of person who last changed the record
VARCHAR2(30) NOT NULL
GORDPRF_ACTIVITY_DATE Activity Date DATE NOT NULL
08 Banner General 8.0 125Middle Tier Implementation GuideSelf-Service Technical Information

126
Banner General 8.0 April 2008Middle Tier Implementation GuideSelf-Service Technical Information
April 20
B Single Sign-On Connectivity Overview
This section describes how the Banner database, Internet-Native Banner (INB), Luminis, and your browser interact when you log in to one product and access another. This information may be helpful if you already have Single Sign-On implemented at your institution, and that you are trying to add Banner, Self-Service Banner, and Luminis to it.
NoteThis appendix does not cover SSO setup through Banner Enterprise Identity Services. If you are using Banner Enterprise Identity Services, please refer instead to the Banner Enterprise Identity Services Handbook.
Accessing Banner from Luminis
1. The end user selects a link to INB, and Luminis receives the request.
NoteSteps 2 - 7 are performed only once, when the first user accesses the system from Luminis via SSO.
2. Luminis calls the configURL set in the Luminis configuration for Banner that is defined in the es.systems parameter. This URL calls the database procedure gokssso.P_GetConfigVersion2.
08 Banner General 8.0 127Middle Tier Implementation Guide
Single Sign-On Connectivity Overview
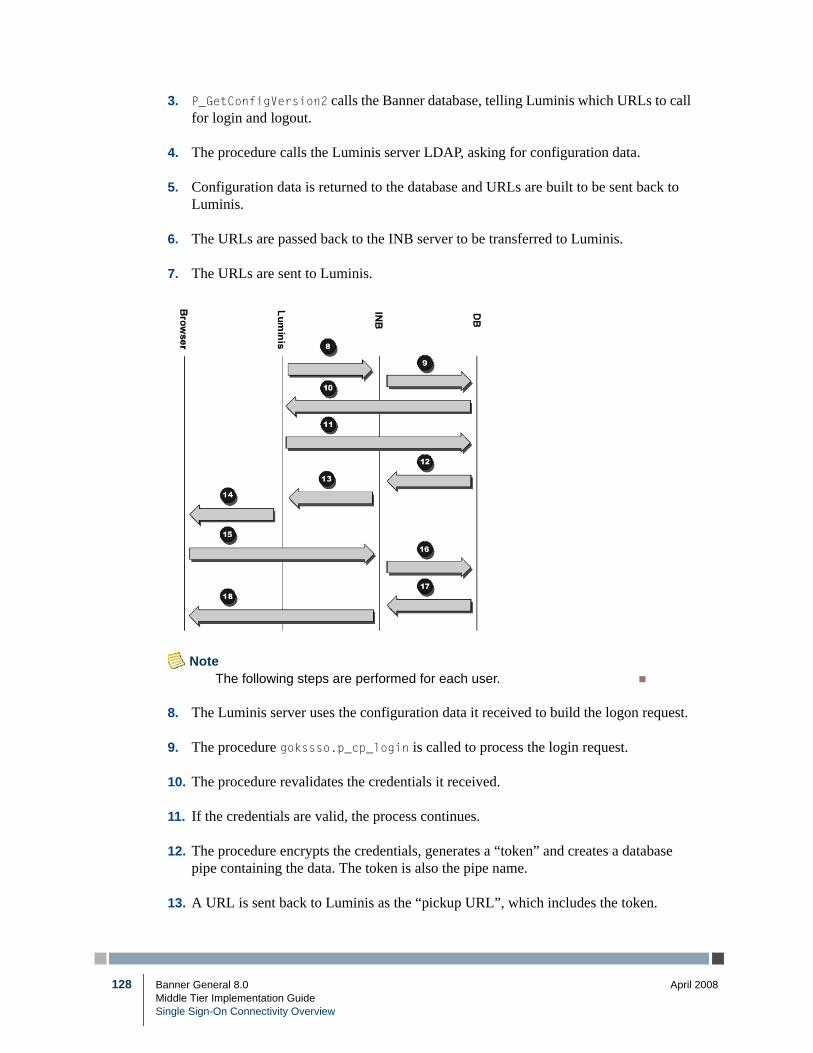
128
3. P_GetConfigVersion2 calls the Banner database, telling Luminis which URLs to call for login and logout.
4. The procedure calls the Luminis server LDAP, asking for configuration data.
5. Configuration data is returned to the database and URLs are built to be sent back to Luminis.
6. The URLs are passed back to the INB server to be transferred to Luminis.
7. The URLs are sent to Luminis.
NoteThe following steps are performed for each user.
8. The Luminis server uses the configuration data it received to build the logon request.
9. The procedure gokssso.p_cp_login is called to process the login request.
10. The procedure revalidates the credentials it received.
11. If the credentials are valid, the process continues.
12. The procedure encrypts the credentials, generates a “token” and creates a database pipe containing the data. The token is also the pipe name.
13. A URL is sent back to Luminis as the “pickup URL”, which includes the token.
Banner General 8.0 April 2008Middle Tier Implementation GuideSingle Sign-On Connectivity Overview

April 20
14. Luminis communicates the pickup URL back to the browser as a redirect.
15. The browser redirects to the pickup URL, which is a call to procedure gokcsso.p_call_banner.
16. The INB startup Java Applet receives the authentication information from the database pipe.
17. The authentication information passed in memory to the Oracle forms applet.
18. The forms applet starts and a Banner session is started.
Accessing Self-Service Banner from Luminis
1. The end user selects a link to Self-Service Banner (SSB in the diagrams that follow), and Luminis receives the request.
NoteSteps 2 - 7 are performed only once, when the first user accesses the system from Luminis via SSO.
2. Luminis calls the configURL set in the Luminis configuration for SSB that is defined in the es.systems parameter. This URL calls the database procedure gokssso.P_GetConfigVersion2_sserv.
3. P_GetConfigVersion2_sserv is a database call that tells Luminis which URLs to call for login and logout.
4. The procedure calls the Luminis server LDAP, asking for configuration data.
08 Banner General 8.0 129Middle Tier Implementation Guide
Single Sign-On Connectivity Overview
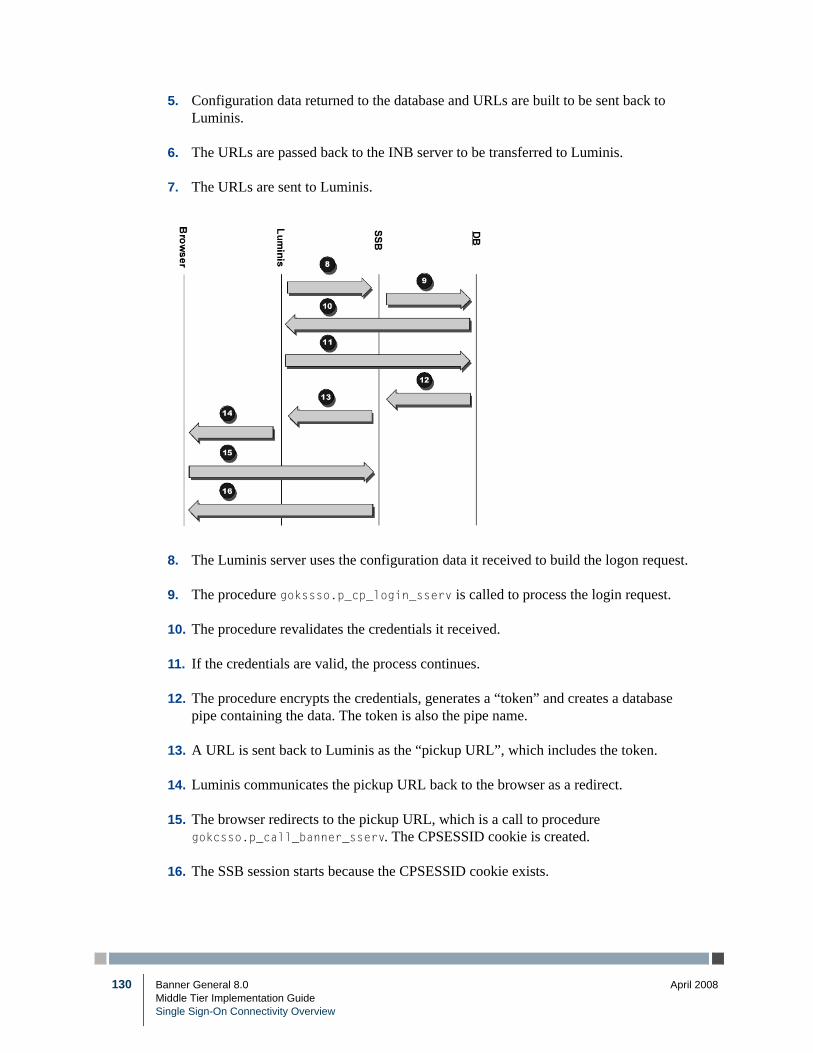
130
5. Configuration data returned to the database and URLs are built to be sent back to Luminis.
6. The URLs are passed back to the INB server to be transferred to Luminis.
7. The URLs are sent to Luminis.
8. The Luminis server uses the configuration data it received to build the logon request.
9. The procedure gokssso.p_cp_login_sserv is called to process the login request.
10. The procedure revalidates the credentials it received.
11. If the credentials are valid, the process continues.
12. The procedure encrypts the credentials, generates a “token” and creates a database pipe containing the data. The token is also the pipe name.
13. A URL is sent back to Luminis as the “pickup URL”, which includes the token.
14. Luminis communicates the pickup URL back to the browser as a redirect.
15. The browser redirects to the pickup URL, which is a call to procedure gokcsso.p_call_banner_sserv. The CPSESSID cookie is created.
16. The SSB session starts because the CPSESSID cookie exists.
Banner General 8.0 April 2008Middle Tier Implementation GuideSingle Sign-On Connectivity Overview

April 20
C Oracle 10g Supplement
This section includes FAQs related to configuring and maintaining an Oracle 10g database and Oracle 10g Application Server. Since new FAQs are added to the Customer Support Center on a frequent basis, you might want to periodically review FAQ #1-S35GU, which contains a listing of all 10g-related FAQs.
In addition, the following FAQs address specific issues:
• 14145--Contains answers to common questions about Oracle 10g support and requirements.
• 1-5K95Q--Provides steps for upgrading an Oracle 9.2.0.6 Banner 7.2 database to Oracle 10.2.0.1 on Linux Red Hat 3.0.
• 1-SEFVX--A listing of Banner problem resolutions related to Oracle Database 10g and Banner Cost-Based Optimization (CBO).
• 1-ST9HR--Instructions for correcting poor database performance if you have the database initialization parameter SGA_MAX_SIZE set to a value greater than 50% of physical memory on the server.
NoteThe SGA_MAX_SIZE parameter is described in the Example Init.ora For Oracle RDBMS 10.2.0 topic in the following section.
• 1-RUMST--How to adjust your Web Cache properties for a high volume of Self-Service Connections.
• 1-DY3Q5--How to bypass Oracle 10g v9.0.4 Web Cache for Forms.
• CMS-13884--Addressing performance problems with Forms 10g using SSL and INB.
• 1-4PGDH--Addressing performance issues with INB Webforms Forms 10g using Oracle Database 9i and Oracle Database 10g.
• 1-DH6D6--FAQs about Banner and Oracle Application Server 10g Release2.
• CMS-14077--Oracle MetaLink Note:294749.1 (Troubleshooting WebForms Tuning / Performance /Time out).
• 1-RZ7CW--Oracle 10g Release 10.2.0.2 Advisory - UNION with CONNECT BY.
08 Banner General 8.0 131Middle Tier Implementation Guide
Oracle 10g Supplement

132
10g Database
Example Init.ora For Oracle RDBMS 10.2.0
(FAQ#1-95O8T)
This note contains example starting point settings for a Banner or ODS (Operational Data Store) Oracle 10.2.0 initSID.ora file.
Using an SPFILE is recommended. An SPFILE can be created from the example initSID.ora in this note by using the information in CMS-10978 How To Migrate From A Pfile To A Spfile Metalink Doc ID: Note:166601.1.
Example:CREATE SPFILE FROM PFILE = 'initBAN7.ora';
To change a parameter use the alter system command.
Example:alter system set job_queue_processes=30;alter system set job_queue_processes=30 scope=spfile;create pfile='initBAN7.ora' from spfile;
Oracle 10.2 init.ora
The database name is set when the database is created. Typically the instance name is the same as the db_name.
Example:db_name = BAN7
Create three control files on different file systems in case one fails.
control_files = (/u01/oradata/ctl1BAN7.dbf,/u02/oradata/ctl2BAN7.dbf,/u03/oradata/ctl3BAN7.dbf)
• Required for Oracle RDBMS version 10.2.0.2 for Oracle Bug # FAQ 1-VDJ4I Note:373806.1 Hierarchical Query Dumps in evaopn2_optimizer_order_by_elimination_enabled = FALSE
• Required to fix Oracle Bug 4622729. Wrong results from queries using NOT EXISTS. Bug is fixed in Oracle11. _unnest_subquery = FALSE
false ONLY when applying Oracle patches and installing Java. May cause problems with database performance and integrity if set to FALSE during normal database activity._system_trig_enabled = false
Banner General 8.0 April 2008Middle Tier Implementation GuideOracle 10g Supplement

April 20
• Rollback segments - System Managed Undo
Normally you need only set undo_tablespace for RAC since Oracle will use the first undo tablespace available.undo_management = autoundo_tablespace = RBS
• Destination of the trace and core files:background_dump_dest = /u02/oracle/dumpcore_dump_dest = /u02/oracle/dumpuser_dump_dest = /u02/oracle/dumpaudit_file_dest = /u02/oracle/dumpmax_dump_file_size = 10240
• Required for SCT ODS (Operational Data Store) Databases for Metadata creation:utl_file_dir = /u02/oracle/UTL
• Buffer cache size
New parameter replacing db_block_buffers:db_cache_size = 100M 25 usersdb_cache_size = 400M#db_cache_size = 1G 100+ users
• New SGA parameter--See Metalink Note 270065.1 (FAQ 1-PCW2R). Total size of the SGA including buffer cache, log_buffer, shared_pool_size, large_pool_size.
Some customers have reported that explicitly setting minimum SHARED_POOL_SIZE along with SGA_TARGET has improved performance. See Metalink Note:257643.1. (FAQ 1-G88U0).sga_target = 500M 25 usersshared_pool_size = 300Msga_target = 1Gsga_target = 2G 100+ users
SGA_MAX_SIZE should be set to allow sga_target to dynamically increase
SGA_MAX_SIZE should not exceed 50% of physical memory of machine in order to prevent thrashing of memory.sga_max_size = 2G
• Cursor_Space_For_Time description:
Shared SQL areas are kept pinned in the shared pool. As a result, shared SQL areas are not aged out of the pool as long as an open cursor references them. Because each active cursor's SQL area is present in memory, execution is faster. However, the shared SQL areas never leave memory while they are in use. Therefore, you should set this parameter to TRUE only when the sga_target is large enough to hold all open cursors.cursor_space_for_time = true
• Although cursor_sharing=similar may reduce the parsing overhead for parsing similar SQL statements that differ only in literal values, exact should be set. Exact is the default value. Testing has shown similar may cause problems.cursor_sharing = exact
08 Banner General 8.0 133Middle Tier Implementation Guide
Oracle 10g Supplement

134
• Number of session cursors to cache.
Subsequent parse calls will find the cursor in the cache and will not need to reopen the cursorsession_cached_cursors = 50session_cached_cursors = 200 100+ users
• New parameters replacing sort_area_size
NoteFor OpenVMS, value must be 0.
pga_aggregate_target = 50M 25 userspga_aggregate_target = 500M pga_aggregate_target = 1G 100+ usersworkarea_size_policy = auto
• Maximum number of o/s user processes that can simultaneously connect to Oracle. Also include background processes - locks, job queueprocesses = 100 25 usersprocesses = 300processes = 800 100+ users
• Sessions should be twice the number of processessessions = 600dml_locks = 10000open_cursors = 1024
• New Optimizer settings For on 10.2
FIRST_ROWS_10 has shown to provide better performance than FIRST_ROWS for Banner databases. Some Banner customers may see even better performance with FIRST_ROWS_1.
For ODS databases, FIRST_ROWS is recommended.
Since the Cost-Based Optimizer is sensitive to the particular data in a database and the capabilities of a particular hardware configuration, it may be necessary to change the optimizer_index_caching and optimizer_cost_adj parameters to achieve optimal performance.
• FAQ 1-GGFI4 Init.ora Parameters Which Effect Oracle Cost Based Optimizer (CBO)optimizer_mode = FIRST_ROWS_10optimizer_index_caching = 90optimizer_index_cost_adj = 30optimizer_dynamic_sampling = 2
• See FAQs
• 1-MR8NU Oracle 10.2 Performance And optimizer_secure_view_merging And MERGE ANY VIEW.
Banner General 8.0 April 2008Middle Tier Implementation GuideOracle 10g Supplement

April 20
• 1-1A87XT Note5195882.8 Bug 5195882 - Queries in FGAC use full table scan instead of index access.optimizer_secure_view_merging = false
This parameter has been shown to fix performance problems with certain ODS composite views in 10.2.0.2 but has not been completely tested with all Banner processes.
• See FAQ 1-1A1HZ7 ODS Mapping Error _complex_view_merging = false
Set to the version of the database.This parameter may affect the optimizer pathcompatible = 10.2.0.2
• i/o calls for full table scan--If set too high may cause performance problems. Recommended values 8 to 32.db_file_multiblock_read_count = 16
• Allow users to see their trace files if database is in secured environment:_trace_files_public = true
• Year2000 date compliant format:nls_date_format = DD-MON-RR
• Back-up and Recovery:db_recovery_file_dest = /u01/oracle/flash_recovery#db_recovery_file_dest_size = 20G#log_archive_dest_1 = /u01/oracle/logs#log_archive_start = true#log_archive_format = %t_%s_%r.dbf
• Multi-Threaded Server MTS. Also known as Shared Server.instance_name = BAN7dispatchers = "(protocol=tcp)(dispatchers=2)"dispatchers = "(protocol=ipc)(dispatchers=2)"max_dispatchers = 10service_names = BAN7local_listener = "(address=(protocol=tcp)(host=YourHostName)(port=1521))"
• Required for SQL trace and Statspack. Has minimal performance impact.timed_statistics = true
• Required for 10.2 upgrade. Set the appropriate Database block size--2048 to 16384 (Linux, Solaris, Windows). 2048 to 32768 (AIX, HP, Tru64).db_block_size = 2048db_block_size = 8192db_block_size = 16384db_block_size = 32768
• Resource limits are enforced in database profiles.resource_limit = true
08 Banner General 8.0 135Middle Tier Implementation Guide
Oracle 10g Supplement
136
• Allow dba remote access using the orapwBAN7 password file.
The file orapwBAN7 can be used by only one database. The password file can contain names other than SYS.
Example: cd $ORACLE_HOME/dbs orapwd file=orapwBAN7 password=manager entries=5 remote_login_passwordfile = exclusive
Required for setting up Oracle Database Control 10g using emca:job_queue_processes = 10
• Oracle Database 10g supports automatic checkpoint tuning. 10g Automatic checkpoint tuning is in effect if FAST_START_MTTR_TARGET is unset.fast_start_mttr_target = 300
10.2 obsolete paramshash_join_enabled = truemax_enabled_roles = 50sql_trace = false_complex_view_merging = false
Banner General 8.0 April 2008Middle Tier Implementation GuideOracle 10g Supplement

April 20
Troubleshooting
Single Sign-On INB
Error Possible Solutions
Unsupported OID Service Verify syntax in the es.sctinb.configURL parameter in configman.
-OR-
Check that your DAD user has execute permissions on gokssso and gokcsso packages.
LDAP bind password and getting error ORA-29283
Double-check the permissions on the enckey file and make sure it is readable by Oracle.
-OR-
Recreate the KEY_DIR and enckey file.
LDAP Bind Failed. Message is ORA-31202: DBMS_LDAP: LDAP client/server error: No such object
Make sure login userid is defined in LDAP server.
-OR-
Check that you have the correct SearchBase configurations.
-OR-
Check that you have the correct UserPrefix configuration.
08 Banner General 8.0 137Middle Tier Implementation Guide
Troubleshooting

138
Single Sign-On for SSB
ORA-31202: DBMS_LDAP: LDAP client/server error: Invalid credentials
Make sure you are using the correct LDAP password to login.
FRM-92050: Failed to connect to the Server
OR
FRM-92102: A network error has occurred. The Form Client has attempted to re-establish its connection to the server 1 time(s) without success. Please check the network connection and try again later.
when allowing multiple INB sessions from one Luminis link.
Change the OAS webserver setting d:\oas10g\Apache\Jserv\servlets\zone.properties from:session.useCookies=true
To:session.useCookies=false
Error Possible Solutions
Unsupported OID Service Verify syntax in the es.sctssb.configURL parameter in configman.
-OR-
Check that your DAD user has execute permissions on gokssso and gokcsso packages.
LDAP bind password and getting error ORA-29283
Double-check the permissions on the enckey file and make sure it is readable by Oracle.
-OR-
Recreate the KEY_DIR and enckey file.
Error Possible Solutions
Banner General 8.0 April 2008Middle Tier Implementation GuideTroubleshooting

April 20
LDAP SSB Luminis numeric password issue Page Not Found - gokcsso.p_call_banner ORA-988
1. Edit BANNER_HOME\general\dbrpocs\gokcss1.sql
2. Find this line:execute immediate 'alter user '||sso_user||' identified by '||sso_pswd;
3. Change it to:execute immediate 'alter user '||sso_user||' identified by '|| '"' || sso_pswd || '"';
4. Save changes and rebuild package.
-OR-
Change the Luminis and Banner passwords to something that starts with a letter and does not require double quotes to issue create or alter user commands. For example, password abc1 instead of 1abc.
Invalid login information.Please try again.
Confirm the LDAP userid and password are correct.
-OR-
If the WebTailor Administration -- LDAP Administration Search Indicator is checked, try unchecking it and testing again.
Error Possible Solutions
08 Banner General 8.0 139Middle Tier Implementation Guide
Troubleshooting

140
Luminis Channels for Banner
Error Possible Solutions
A SQL exception has occurred.ORA-12154: TNS:could not resolve service name
1. Edit banportals.config and change default.tnsName=rocoram1_ban7 to default.tnsName=rocoram1_ban7.sct.com.
2. Rebuild the bannerCommon.car and banportals.ear java -jar banportalsadmin.jar banportals.config
3. Redeploy the banportals.ear and recopy the bannerCommon.car to Luminis.
A SQL exception has occurred.ORA-01017: invalid username/password; logon denied
1. Edit banportals.config and change default.password=banproxy to default.password=u_pick_it
2. Rebuild the bannerCommon.car and banportals.earjava -jar banportalsadmin.jar banportals.config
3. Redeploy the banportals.ear and recopy the bannerCommon.car to Luminis.
HTTP 404 web page errors related to gokcsso.p_call_banner ORA-20007
Disable Oracle Profiles for LDAP/SSO accounts.
-OR-
1. Set PASSWORD_REUSE_TIME UNLIMITED in profile.
2. Alter profile TEST2_PROFILE LIMIT PASSWORD_REUSE_TIME UNLIMITED.
Banner General 8.0 April 2008Middle Tier Implementation GuideTroubleshooting
April 20
Index
A
Address Role Privileges Form (GOAADRL) 56
Address Type Code Validation Form (STVATYP) 56
alumni directorysetting up 64
AnonmsSearch LDAP server entry 77, 85, 94, 97
assigning PINsfor individual users 62
assigning web user roles 50Authentication key parameters
BIND_PASSWORD 79BIND_USER 79DN 79SERVER 79USERMAP_OPT 80USERMAP_PRFX 80
B
bannersso.jar file 86banportals application 107BANSSO user 86BASELINE and Local records
Self-Service web menus and web procedures 47
BASELINE valuesCopying BASELINE values to users 21Using the Propagate field 21
BIND_PASSWORD parameter 79BIND_USER parameter 79bottom-of-the-page link
definition 50bottom-of-the-page links
adding 51
C
campus directories 64and address hierarchies 65creating 64creating profiles 65
certificate wallet 80changing an e-mail address online 67Common Name (CN) 83, 96configuring your INB server 86CPAuth LDAP server entry 77, 83, 94, 96CPDeAuth LDAP server entry 77, 83, 94, 96CPLastAct LDAP server entry 77, 83, 94, 96creating an alumni directory 64creating an alumni directory profile 65creating an employee directory 64creating an employee directory profile 65creating an encryption key 75creating campus directories 64creating campus directory profiles 65creating DADs for running SSO 86credit card processing 53CSSURL LDAP server entry 77, 85, 94, 97Current PIN Table (GOBTPAC) 61customizing graphic elements 47customizing graphics and icons 47customizing Info Text 52customizing web rules 46
D
DADNormal LDAP server entry 77, 82, 94, 95dadnormal.txt 86DADSpecial LDAP server entry 77, 82dadspecial.txt 86Data Extract
Choosing default output 20Configuring environment variable 22Enabling Data Extract for a form 20
08 Banner General 8.0 141Middle Tier Implementation Guide
Index

Setting up Data Extract 20WebUtil 22
data synchronization with SunGard Higher Education partner systems 63
DBA_DIRECTORIES view 75DBMS_OBFUSCATION_TOOLKIT Oracle
package 75DBMS_OBFUSCATION_TOOLKIT Oracle
utility 72DBMS_PIPE 72defining graphic elements 47defining graphics and icons 47defining web rules 46DES encryption 75DES3 algorithm 75directories 64Directory Address Table (GORDADD) 124Directory Item Validation Form (GTVDIRO)
64Directory Item Validation Table (GTVDIRO)
122Directory Options Rule Form (GOADIRO) 64,
65Directory Options Rule Table (GOBDIRO)
123Directory Profile Table (GORDPRF) 64, 125disabling a menu item temporarily 52DN parameter 79documentation
related 9
E
E-mail Address Form (GOAEMAL) 67E-mail Address Type Validation Form
(GTVEMAL) 67, 68e-mail addresses
changing online 67preferred 68
employee directorysetting up 64
enckey file 75encryption key
creating 75Environment variables
Banner ID images environment variables 19
Data Extract environment variable 22
establishing third party history information 57establishing web user parameters 57external system sctinb 72
F
FormsGUAUPRF General User Preferences
Maintenance Form 78forms
GOAADRL Address Role Privileges Form 56
GOADIRO Directory Options Rule Form 64, 65
GOAEMAL E-mail Address Form 67GOATPAC Third Party Access Form 57,
59, 121GOATPAD Third Party Access Audit
Form 57, 61, 63, 121GTVDIRO Directory Item Validation Form
64GTVEMAL E-mail Address Type
Validation Form 67, 68GUASRVY Survey Definition Form 69GUAUPRF General User Preferences
Maintenance Form 20STVATYP Address Type Code Validation
Form 56
G
General User Preferences Maintenance Form (GUAUPRF) 20, 78
GLBDATA Population Selection Extract Process 69
global menu bottom linkdefinition 50
global menu bottom linksadding 52
GOAADRL Address Role Privileges Form 56GOADIRO Directory Options Rule Form 64,
65GOAEMAL E-mail Address Form 67GOATPAC Third Party Access Form 57, 59,
121GOATPAD Third Party Access Audit Form
57, 61, 63, 121GOBDIRO Directory Options Rule Table 123GOBTPAC Current PIN Table 61
142 Banner General 8.0 April 2008Middle Tier Implementation GuideIndex

April 20
GOKCSSO package 72GOKKSSO package 72, 75goksso.p_cp_lastact 83, 96goksso.p_cp_login 83, 96goksso.p_cp_logout 83, 96gokssso.p_login 73GORDADD Directory Address Table 124GORDPRF Directory Profile Table 64, 125GORPAUD PIN Audit Trail History Table 121GORPAUD PIN History Table 61, 63GTVDIRO Directory Item Validation Form 64GTVDIRO Directory Item Validation Table
122GTVEMAL E-mail Address Type Validation
Form 67, 68GUASRVY Survey Definition Form 69GUAUPRF General User Preferences
Maintenance Form 20, 78GURUPRF Personal Preference Table 72
H
Home Directory for Luminis Channels for Banner 109
home pagecustomizing the contents of 45, 53customizing the look-and-feel 48file location 45
homepage.htm 45HTTPPrefixClient LDAP server entry 77, 85,
94, 97HTTPPrefixServer LDAP server entry 77, 85,
94, 96
I
INBServerName LDAP server entry 77, 82INBServletPath LDAP server entry 77, 85Info Text
changing the order of paragraphs displayed 52
creating 52customizing 52graphics 52modifying 52
K
KEY_DIR Oracle directory 75
L
LDAP 46, 53, 54, 55, 57, 61, 63, 97, 121, 122LDAP Lightweight Directory Access Protocol
71LDAP server entries
AnonmsSearch 77, 85, 94, 97CPAuth 77, 83, 94, 96CPDeAuth 77, 83, 94, 96CPLastAct 77, 83, 94, 96CSSURL 77, 85, 94, 97DADNormal 77, 82, 94, 95DADSpecial 77, 82HTTPPrefixClient 77, 85, 94, 97HTTPPrefixServer 77, 85, 94, 96INBServerName 77, 82INBServletPath 77, 85PswdChangeMessage 77, 84, 94, 96SearchBase 77, 83, 94, 96SSBServerName 94, 95UserMapDN 77, 83, 94, 96UserPrefix 77, 83, 94, 96
ldapmodify 77, 94LDAPS 79LDIF files 76, 94
sso_oclass_oid.ldif 76sso_oclass_sunone.ldif 76sso_parms.ldif 77sso_parms_sserv.ldif 94sso_root_sunone.ldif 76sso_root_sunone2.ldif 77
Lightweight Directory Access Protocol (LDAP) 46, 53, 54, 55, 57, 61, 63, 71, 97, 121, 122
LOCATION parameter 80Luminis to Banner SSO with ADMIN Access
86, 101
M
menu itemcriteria for display 51definition 50disabling temporarily 52
08 Banner General 8.0 143Middle Tier Implementation Guide
Index

menu itemsadding 51changing the order of 51modifying 51
MODE parameter 80
N
NDS 77, 94Novell Directory Server (NDS) 77, 94
O
online surveyscreating 69defining questions for 70defining the Web products where one can
appear 70defining who receives it 69
OpenLDAP 77, 94Oracle Apache HTTP Listener 45Oracle Apache PL/SQL Agent 48Oracle Wallet Manager 80
P
package.procedure combinations 48Packages
GOKCSSO 72GOKKSSO 72, 75
PASSWORD parameter 80Personal Preference Table (GURUPRF) 72PIN administration 57PIN Audit Trail History Table (GORPAUD)
121PIN Hint Question 63PIN Hint Response 64PIN History Table (GORPAUD) 61, 63PINs
assigning for individual users 57, 62assigning via batch processing 57, 58assigning via database triggers 58changing 62disabling 60, 62expiration 61, 63generating automatically 57historic information 57
pre-expiring 58, 59, 61, 63resetting 60, 61, 62
Population Selection Extract Process (GLBDATA) 69
preferred e-mail addresses 67, 68Propagate field on GUAUPRF 21ProviderChannel 107PswdChangeMessage LDAP server entry
77, 84, 94, 96Publishing a channel 116
R
resetting PINs 62root directory 44
S
sample DADsdadnormal.txt 86dadspecial.txt 86
screen reader 47sctinb 72SCTSSOConfig 83, 96SCTSSOConfig object class 76SCTSSOConfigString attribute 76, 83, 96SearchBase LDAP server entry 77, 83, 94, 96SERVER parameter 79setting up campus directories 64setting up campus directory profiles 65Setting up Data Extract 20
Choosing the default output 20Configuring environment variable 22Copying BASELINE values to users 21Enabling Data Extract for a form 20
Single Sign-On (SSO)Overview 71
SSBServerName LDAP server entry 94, 95SSL (Secured Socket Layer) key parameters
80SSL authentication mode 80SSL key parameters
LOCATION 80MODE 80PASSWORD 80
SSO Single Sign-OnOverview 71
144 Banner General 8.0 April 2008Middle Tier Implementation GuideIndex

April 20
sso_oclass_oid.ldif file 76sso_oclass_sunone.ldif file 76sso_parms.ldif file 77sso_parms_sserv.ldif file 94sso_root_sunone.ldif file 76sso_root_sunone2.ldif file 77STVATYP Address Type Code Validation
Form 56Survey Definition Form (GUASRVY) 69surveys
creating 69defining questions for 70defining the Web products where one can
appear 70defining who receives it 69
synchronization with SunGard Higher Education partner systems 63
System Functions/Administration formsGeneral User Preferences Maintenance
Form (GUAUPRF) 20
T
TablesGURUPRF Personal Preference Table
72tables
GOBDIRO Directory Options Rule Table 123
GOBTPAC Current PIN Table 61GORDADD Directory Address Table 124GORDPRF Directory Profile Table 64,
125GORPAUD PIN Audit Trail History Table
121GORPAUD PIN History Table 61, 63GTVDIRO Directory Item Validation Table
122TWGBWSES WebTailor Web Session
Table 63Terms of Usage
displaying 60, 62redisplaying 60, 62
Terms of Usage page 46Third Party Access Audit Form (GOATPAD)
57, 61, 63, 121Third Party Access Form (GOATPAC) 57, 59,
121third party history information
establishing 57viewing 61
third party ID 63third party information
changing 61timing out 46TWADMINU.SQL 42TWGBWSES WebTailor Web Session Table
63
U
USERMAP_OPT parameter 80USERMAP_PRFX parameter 80UserMapDN LDAP server entry 77, 83, 94,
96UserPrefix LDAP server entry 77, 83, 94, 96
V
validation formsE-mail Address Type Validation Form
(GTVEMAL) 68
W
web rules 46web user parameters
establishing 57web user roles
adding the WebTailor Administrator role to an existing Banner ID 42
assigning 50assigning address view privileges 56definition 49
WebTailor Web Session Table (TWGBWSES) 63
WebUtilAbout 22Changing Data Extract output type to
WebUtil 21
08 Banner General 8.0 145Middle Tier Implementation Guide
Index

146 Banner General 8.0 April 2008Middle Tier Implementation GuideIndex