ba gb hdtv-all europe 03-2013 - ten haaft
TRANSCRIPT

Version: 03/2013 Language: english
Innovative Mobile Technology
Operating instructions
HD receiver „Europe“

Table of contents
2
1. General information 1.1 Introduction 3 1.2 Proper use and operation 5 1.3 Safety information 62. Control elements at receiver 2.1 Remote controls 8 2.2 Sat-mouse - operation without remote control 103. Operating the satellite system 3.1 Functions of the satellite system 11 3.2 Automatic search 13 3.3 Search via location 15 3.4 Manual search 16 3.5 Retract and switch off 18 3.6 Retract and deactivate 18 3.7 Edit settings 19 3.8 Internet Service (optional) 23 3.9 Fault messages 25 3.10 Reception in remote areas 274. Operating the receiver 4.1 Receiver menu tree 29 4.2 Channel list / editing 32 4.3 Channel list / scan 34 4.4 Edit settings 35 4.5 Options 36 4.6 Timer 385. Device layout and description 5.1 Connections 39 5.2 CI Common Interface module 40 5.3 Software update 41 5.4 Specifi cations of receiver 42 5.5 Declaration of conformity 436. Appendices 6.1 Channel and TV programme list 44 6.2 Appendix: Search satellites 47 6.3 Notes on protection of the environment 49

1.1 Introduction
Your ten Haaft® HDTV digital satellite reception system is a smart and fully auto-matic system. It does not require any of the manual adjustments associated with conventional systems. Unlike normal television antennas for terrestrial reception, a satellite antenna always must be precisely aimed southward into the satellite‘s signal beam. This signal beam must not be interrupted by trees or other obstacles, as this will prevent reception.
Please ensure that the system always has a clear view to the satellite in the South. If the signal is blocked – for example by a tree – it is quite possible that a good satellite signal may be received without any problems in a position just a few meters away. In Scandinavia, even mountains in the far distance can interrupt the satellite signal.
Oyster® only
To allow reception even under such adverse conditions, the top-box (also called „antenna unit“) of the Oyster® system can be removed from the vehicle top and be set up near the vehicle in a position where a signal can be received. This requires a special pedestal and an extension cable which are available as an optional „ground kit“.
Satellite systems installed on buildings must usually only be adjusted once. By contrast, a mobile system will need to be readjusted even if it is moved only a few centimetres. Your ten Haaft® satellite system does this adjustment automatically at the push of a button.
3

Our HDTV satellite systems stand for exceptional operating convenience and a mul-titude of channels. At the touch of a button, the system folds out and starts scan-ning for receivable satellites. The micro-processor controlled fi ne-tuning and the di-gital receiver technology ensure the best possible picture quality. Using the remote control, you can then enjoy the full range of TV and radio programmes transmitted by satellites using the new digital standard. You can even adjust the volume of your television set with the satellite system‘s remote control. This eliminates the incon-venient handling of two remote controls.
To further enhance the operating convenience, a new function has been implemen-ted in your satellite system that allows it to be switched off with the antenna dish remaining in its folded-out position. This eliminates the daily folding out and ret-racting of the antenna when staying in one location for several days without having to dispense with the extremely effi cient power-saving stand-by mode.
The fi rst few pages of these instructions explain the general functions of the recei-ver and are followed by an explanation of all the functions specifi c to the satellite system and the search functions.
Your HDTV satellite system can receive unencrypted „Free-To-Air“ (FTA) programmes as well as encrypted programmes. The integrated „Common Interface“ (CI) accepts decoder modules for the various different encryption methods. It can hence receive encrypted programmes, provided that you have procured the corresponding decoder module and a valid „conditional access“ (CA) smart card.
Please observe section „Common Interface (encrypted programmes)“.
4
1.2 Proper use and operation
Your satellite receiver has been designed for use on mobile homes, camper trai-lers or other vehicles for the reception of standard satellite signals of the Ku band frequency range.
It is designed to automatically aim an antenna mounted on a stationary vehicle at one of the geostationary and directly transmitting television satellites commonly used to cover Europe.
The power to the system is supplied by a vehicle electric system with a rated volta-ge of 12 or 24 Volt. For installations where a connection to the vehicle‘s electrical system is not possible, a suitable 230-Volt-to-12-Volt power transformer must be used.
This product has been designed for use in a fi xed installation on mobile homes or camper trailers with a maximum speed of 130 km/h.
To ensure the reliable and proper operation of your system, it must not be used for any other than its intended purpose.
Changing the overall device by removing or adding individual components is not permissible. All applicable and approved guidelines of the automotive industry must be observed and complied with when installing the device. The installation instructions supplied with the system must be strictly observed when installing the pole and the antenna. The product does not require any regular maintenance. Enclosures must not be opened. Do not clean your mobile home with the mounted satellite system in a single-bay or drive-through car wash and do not use a high-pressure cleaner. Retract the antenna during periods of strong winds or storm. The equipment must only be installed on hard vehicle roofs which are suffi ciently strong and inherently stable. In the event of any problems, or if you are unsure about anything, please contact the manufacturer directly or a specialist workshop which is approved by the manufacturer.
ten Haaft GmbH Oberer Strietweg 8 . DE-75245 Neulingen Phone +49 (0) 7237 4855-0 . Fax +49 (0) 7237 4855-50 [email protected] . www.ten-haaft.com
5

1.3 Safety information
To avoid the risk of fi re or damage to the device, the receiver must never be exposed to moisture or rain.
Should an item or liquid get into the housing, immediately disconnect the de-vice from the power supply and have it checked by a qualifi ed professional before further usage.
Place the receiver in a place with suffi cient air circulation and away from any heat sources. This will prevent heat accumulation inside the receiver and
ensures a longer lifecycle. Do not place any items on the receiver – malfunctions, damage and even self-ignition may occur if the ventilation openings are blocked.
Should you ever notice an unusual smell or smoke, immediately disconnect the device from the power supply and have it checked by a qualifi ed professional.
Switch off the receiver before connecting other devices. The power supply line to the receiver must have a cross-section of 2.5 to 4,0 mm² and must be connected directly to the vehicle battery. Ensure that the device is not connected to an elect-ronic charge controller.
Keep a suffi cient distance to potential sources of interference such as mobile pho-nes, electronic heater controllers, igniter components or radio devices when routing the lines and positioning the components.
It is recommended that you ground your television set in the vehicle to avoid inter-ference on your television set or satellite receiver. Only connect the freely accessible ground of your television set to the vehicle chassis.
Only use the wiring harnesses supplied or the extension wiring harnesses available as accessories to connect the top box. The extension wiring harnesses are available for the Oyster® Digital system only.
6

7
Ensure that the opening motion of the antenna is not obstructed e.g. by a tree or sign before folding out the antenna.
The driver of the vehicle must inspect the top-box before driving off to ensure that the antenna is fully retracted.
The antenna may need up to 30 seconds to retract after the ignition is swit-ched on or the engine is started. Do not move the vehicle during this period!The antenna will only retract if the master switch at the receiver is set to ON (or ‚I‘) and if the receiver is connected to a power source. Automatic retraction may be prevented by technical defects of the vehicle or the antenna system. Ensure that the antenna is fully retracted before driving off!
Ensure that the system is installed in your vehicle in accordance with the installati-on instructions provided or have the correct installation confi rmed by the installer.
Please note that different legal requirements may apply to the operation of electri-cal and electronic equipment in different countries. As the user of this equipment, you are responsible for ensuring compliance with the relevant laws and regulations.
In case you are not familiar with the applicable legal regulations, we recommend that you fully disconnect the satellite system from the power supply by turning off the master switch of the receiver in order to avoid violating any applicable laws.
Keep in mind that all parts of this system may be dangerous to children. The swal-lowing of small parts such as batteries can be fatal! Never leave children unat-tended in the vicinity of the system or its components. Ensure that there are no persons within the operating radius of the antenna when it is operated.

2.1 Remote controls
8
P+
OK
P-
- +
TEL: +49(0)7237/4855-0www.ten-haaft.com
Switches the receiver on and off (Power)
Mutes the soundActivates sleep mode if pressed for more than 3 seconds
Number buttons for direct channel selection
Changes between TV and radio mode
Selects favourite channels list
Volume control
Channel up/down
Opens display menus
Returns to previously selected programmeSwitches teletext mix-mode on and off
Shows current programme information (EPG)
Menu navigation upNormal mode: Channel up/down
Menu navigation downNormal mode: Channel up/down
Menu navigation leftNormal mode: Volume control
Menu navigation rightNormal mode: Volume control
Selects or confi rms functions
Opens the programme list
Closes on-screen menus / switches teletext off
Blank button
Displays the electronic programme guide (EPG)
Starts the teletext function of the receiver
9
P+
OK
P-
- +
TEL: +49(0)7237/4855-0www.ten-haaft.com
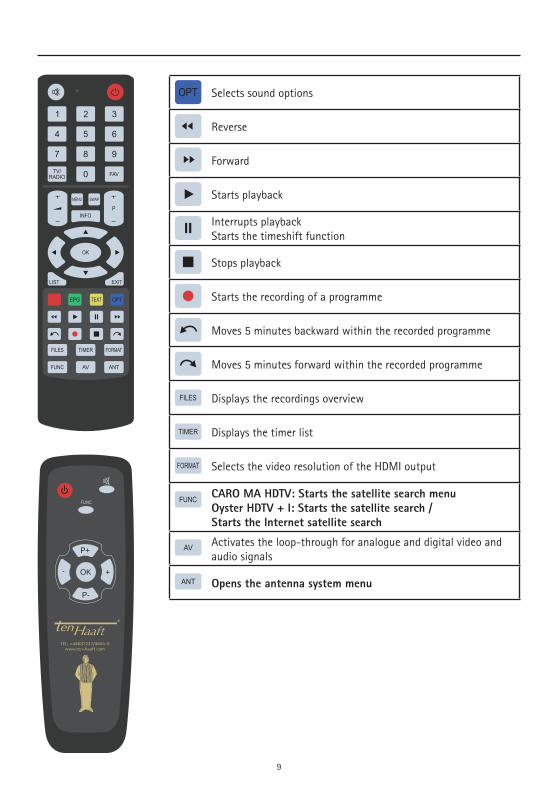
Selects sound options
Reverse
Forward
Starts playback
Interrupts playbackStarts the timeshift function
Stops playback
Starts the recording of a programme
Moves 5 minutes backward within the recorded programme
Moves 5 minutes forward within the recorded programme
Displays the recordings overview
Displays the timer list
Selects the video resolution of the HDMI output
CARO MA HDTV: Starts the satellite search menuOyster HDTV + I: Starts the satellite search /Starts the Internet satellite search
Activates the loop-through for analogue and digital video andaudio signals
Opens the antenna system menu

2.2 Sat-mouse - operation without remote control
The two buttons on the sat-mouse allow you to control the following basic functions of the receiver when the remote control is notavailable:
When in stand-by mode, a brief press on both buttons switches the receiver back on. When in „power-saving“ stand-by mode, the receiver can only be switched on using the button combination.
Another control element is the master switch on the front of the receiver.In position „0“ or „OFF“, the receiver is isolated from the vehicle‘s power supply. The switch must be in position „I“ or „ON“ for the receiver to operate.
Should the receiver no longer respond to commands, set the master switch to „0“ for approx. 10 seconds and then back to „I“.
Changes to the next channel in the channel list.
Changes to the previous channel in the channel list.
Press both buttons briefl y at the same time to toggle between RADIO and TV mode. Holding both buttons down will cause the receiver to switch off. This corresponds to pressing the red stand-by button (ON/OFF) on the remote control.
Sat-mouse connector (RJ-45)
Remote control receiver
Left sat-mouse button
Right sat-mouse button
Display1
4
2
5
3
12 3
4
5
10
3.1 Functions of the satellite system
11
Oyster / CARO / Cosmo HDTV
Automatic search The system searches for the satellite displayed
Search via location Selection of location
Manual search Azimuth; elevation; skew; last position; save position; retraction
Retract and switch off
Retract and deactivate
Antenna is retracted and the receiver is switched off
Antenna is retracted and deactivated with the receiver remaining on
Edit Settings
Internet Service Displays satellite/search
Standby Modus Convenient; Energy-save
LED display upside down Yes, No
Activate top box
Search satellite
Current location
Automat. satellite swap
Sleeptimer
Reinitialise satellite search
Search via location
Active, Ask, Off
TV satellite to be searched for
Location
Active, Off
Sleep mode, Stand-by
Yes, No
Selection of location, start scanning
Special functions CTRL Out 12V, 0VAudio Out On, OffHeadphone On, OffFront AUX relay On, Off
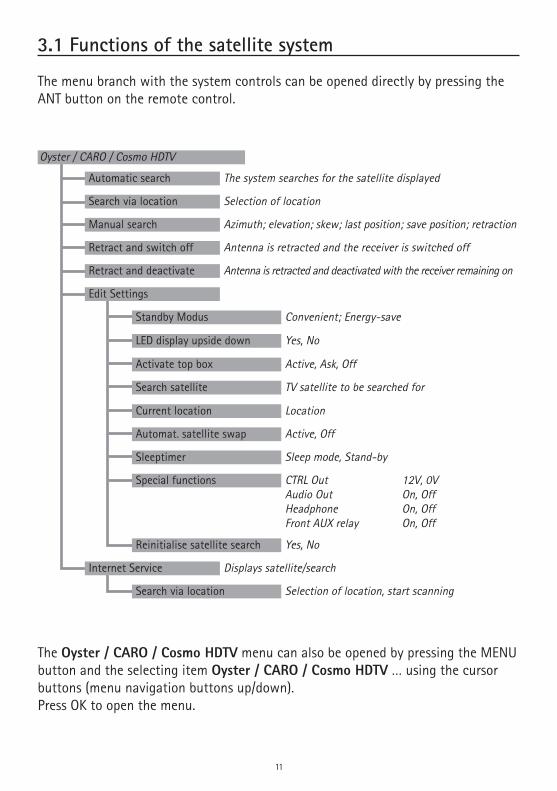
The menu branch with the system controls can be opened directly by pressing the ANT button on the remote control.
The Oyster / CARO / Cosmo HDTV menu can also be opened by pressing the MENU button and the selecting item Oyster / CARO / Cosmo HDTV … using the cursor buttons (menu navigation buttons up/down). Press OK to open the menu.

To select the individual menu items, use the cursor buttons (menu navigation but-tons) and confi rm with OK as usual. All search functions and the required settings are controlled via the Oyster / CARO / Cosmo HDTV … menu.To enhance your operating convenience, many functions are performed automati-cally.
For example, the antenna is automatically opened and moved into the previous reception position any time you switch on the system. If no image is received in this position, the automatic search function is started. Ensure that the moving antenna cannot cause harm to any person before switching on the system.
When the system is switched off using the red stand-by button or the buttons of the sat-mouse, the antenna retracts automatically. The antenna also retracts when switching on the vehicle ignition to start the engine. Of course, the antenna will need a few seconds to retract. Never drive off before the antenna is fully retracted and the receiver has been switched off.
Before driving off, always perform a visual check of the vehicle roof to ensure that the antenna is correctly retracted into its park position.The display must show the green stand-by dot or must be completely blank, depending on the settings.
Please note that the system is completely disconnected from the vehicle‘s electrical system and that the antenna will hence not be able to retract automatically when the master switch is switched off.
The receiver can be switched back from the power-saving stand-by mode only by pressing both buttons of the sat-mouse simultaneously.If you suspect a malfunction of your system, then fi rst press both buttons of the sat-mouse.
12
3.1 Functions of the satellite system
13
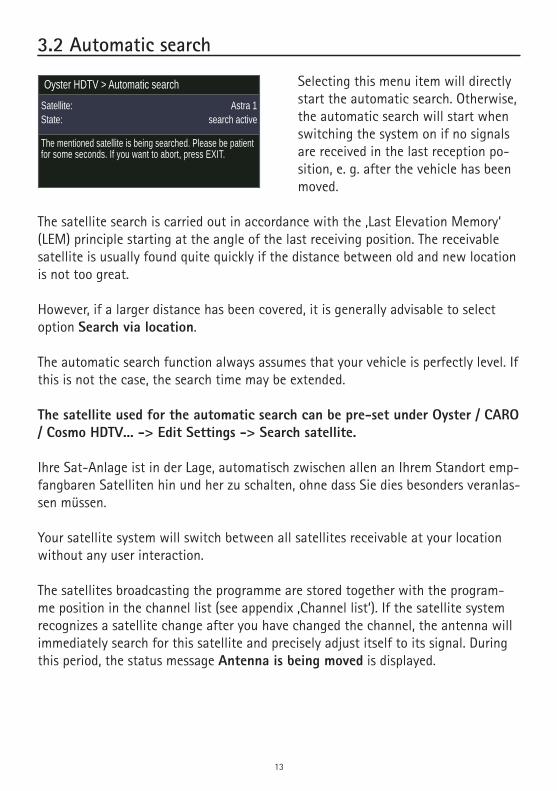
Selecting this menu item will directly start the automatic search. Otherwise, the automatic search will start when switching the system on if no signals are received in the last reception po-sition, e. g. after the vehicle has been moved.
The satellite search is carried out in accordance with the ‚Last Elevation Memory‘ (LEM) principle starting at the angle of the last receiving position. The receivable satellite is usually found quite quickly if the distance between old and new location is not too great.
However, if a larger distance has been covered, it is generally advisable to select option Search via location.
The automatic search function always assumes that your vehicle is perfectly level. If this is not the case, the search time may be extended.
The satellite used for the automatic search can be pre-set under Oyster / CARO / Cosmo HDTV... -> Edit Settings -> Search satellite.
Ihre Sat-Anlage ist in der Lage, automatisch zwischen allen an Ihrem Standort emp-fangbaren Satelliten hin und her zu schalten, ohne dass Sie dies besonders veranlas-sen müssen.
Your satellite system will switch between all satellites receivable at your location without any user interaction.
The satellites broadcasting the programme are stored together with the program-me position in the channel list (see appendix ‚Channel list‘). If the satellite system recognizes a satellite change after you have changed the channel, the antenna will immediately search for this satellite and precisely adjust itself to its signal. During this period, the status message Antenna is being moved is displayed.
3.2 Automatic search
Oyster HDTV > Automatic search
Satellite:
The mentioned satellite is being searched. Please be patient for some seconds. If you want to abort, press EXIT.
State:Astra 1
search active
14
If the selected programme cannot be found on the new satellite (e.g. due to an interruption of transmission or your location being out of range), the antenna will return to the position of the satellite from which the search was started and will switch back to one of the programmes from this satellite.
The time required for such a change depends on how far the two satellite positions are apart. For example, the change from Astra 1 to Hotbird takes less than 5 se-conds if the satellite positions are known. If the exact positions are not known, the fi rst change will take a little longer.
3.2 Automatic search

Menu item „Search via location“ opens a sub-menu with a selection of countries and regions. Use the cursor buttons (menu navigation buttons up/down) to select an entry and confi rm with OK to active it.
The system will then search for the satellite used for the automatic search which can be pre-set under Oyster / CARO / Cosmo HDTV... -> Edit Settings -> Search satellite.
The regionally applicable elevations are now allocated to the receivable satellites.Finding a satellite may now be quicker. This search option is especially con-venient if you have travelled a greater distance from your last location.
The satellite actually used for the search will be shown on screen. After the satellite has been found, the system automatically switches to a programme that is transmitted via this satellite.
Please note that not all satellites and all programmes can be received in all locations. Reception also depends on the size of the antenna.
3.3 Search via location
15
Search via location
MENU : Back
Germany (North)Germany (South)AustriaSwitzerlandNetherlandsBelgiumDanmarkPolandCzech RepublicFrace (North)Frace (South)England...

16
This menu item opens a sub-menu that allows the manual control and adjustment of your satellite system. Before selecting this menu item, switch to a programme that is re-ceivable at your current location, as otherwise no picture can be received.
The manual search is recommended if you wish to optimise the antenna position or aim the antenna at new satellites. The menu displays the rota-tion and elevation in degrees relative
to your vehicle and the signal strength. The strongest signal will provide the best picture quality.
However, signal strength varies with the channel and location. To receive an image, a signal strength with a C/N value of at least 7 (C/N 8 for encrypted channels) is required.
To move the antenna, use cursor buttons (menu navigation buttons) to highlight option „Azimuth“ (rotation, direction) or „Elevation“ (inclination angle). Then use the cursor buttons (menu navigation buttons) to move the antenna in incre-ments into the required direction.
The change of the antenna direction is indicated in the display. Please note that the indicated directional values relate to your vehicle and are not actual geographic degrees – i.e. previous values are invalid after you have moved the vehicle!
3.4 Manual search
Oyster HDTV > Manual search
MENU : Back EXIT : Close menu
AzimutElevationAzimuth step sizeElevation step sizeLast positionStore positionRetractSignal levelSignal qualityC/N
10,0°-72.0°
21
68%64%10,5

17
If you wish to move the antenna over a greater range, the increments can be increased.
Select item Store position to store the current position and then press OK. The current position is stored immediately.If you switch off the system now or retract the antenna, it will return to this posi-tion the next time the system is switched on. Accordingly, if you were receiving a picture when selecting option Store position and if you have not moved the vehicle since, you will again receive a picture only seconds after switching the system back on.
From the menu „Manual search“ you can also retract the antenna at any time. Move the red bar to „Retract“ and press OK. The antenna retracts, its movement is dis-played in the direction indicator window. At an elevation of approx. –73° the anten-na is fully retracted, but the system will not yet switch off. To return the antenna to its stored position, select „Last Position“ and press OK. This function is useful to manually open a previously retracted antenna.
When a DVB-T (optional) programme is selected, an optimization of the satellite antenna is not required. DVB-T is received by a separate antenna. A corresponding message is displayed accordingly if the manual search is started while a DVB-T channel is active.
If you wish to exit the „Manual search“ menu, press EXIT at any time. If the antenna is still moving when you press EXIT, the antenna stops.
3.4 Manual search

18
This function retracts the antenna and switches the receiver into stand-by.
This function can also be activated by pressing the red stand-by button on the remote control or by simultane-ously holding down both buttons of
the sat-mouse.
If option „Convenient“ is selected in Oyster / CARO / Cosmo HDTV… -> Konfi gu-ration -> Stand-by-Modus, the stand-by mode is indicated by a green dot in the sat-mouse.
This function retracts the antenna without switching the receiver off.
Reactivation:Select menu item Manual search ->Return to last position.
3.5 Retract and switch off
3.6 Retract and deactivate
The dish is retracting, afterwards the receiver will switch to standby. Press EXIT if you want to abort.
Retract and switch off
Azimuth:Elevation:
0,00,0
The dish is retracting. Press EXIT if you want to abort. When retracted you can use the PVR playback or the DVB-T mode.
Retract and deactivate
Azimuth:Elevation:
0,00,0

19
This menu contains several settings for the operation of the satellite system. Here, all settings concerning the automatic search are made. Settings concerning general functions of the receiver are made in Menu -> Edit settings.
The following settings of your satellite system can be edited:
Stand-by mode When the system is set to „Convenient“, it can be re-activated from stand-by mode by pressing the red button on the remote control. The stand-by mode is indicated by a green dot or hyphen in the satellite-mouse display.
When the system is set to „Energy Save“, the remote-control receiver and the green dot are switched off when the system is in stand-by mode. In this case, the system cannot be switched back on with the remote control. To switch the system back on, press both buttons of the sat-mouse (LED display) simultaneously.
LED display upside down If set to „Yes“, the channel number will be displayed bottom-up. This is useful if the sat-mouse is mounted upside down. Channel numbers are then seen in their normal position.
Setting „No“ must be used when the sat-mouse is mounted in „normal“ direction.
3.7 Edit settings

20
Activate top box
When the system is switched on, the top box (antenna unit) is usually activated immediately, aiming the antenna at the satellite. To prevent this, set this menu item to „Off“. This may be useful if you are in a location where no satellites can be received but you do wish to use the PVR or +T (optional) functions.
This function can also be used for operating an external satellite antenna. When option „Ask“ is enabled, the question whether the antenna shall be activated this time or not will be asked every time the system is switched on.
You can activate the top box at any time later on by opening the Oyster / CARO / Cosmo HDTV menu using the ANT button and by then selecting Activate top box in Edit settings.
Search satellite
This option allows you to select the satellite that the system shall to search for when being switched on or when the automatic search or the search by location is initiated. Several satellites covering different regions and offering programmes in different languages are available. Please note that not all satellites can be received in all locations (see appendix „Search satellites“).
Automat. satellite swap
When set to „Active“, the system will check at every programme change whether the new programme selected can also be received from a satellite other than the current one. If such a satellite change is recognized, the system will automatically adjust the antenna to the new satellite.
To deactivate the automatic satellite swap, set the setting to „Off“. This may be necessary if the automatic satellite change does not function because of weak signals or if you prefer to perform a manual search (see „Automatic satellite swap“).
3.7 Edit settings

21
Sleeptimer
When in stand-by mode, the antenna will be retracted and switched off when the sleep-timer is activated. When set to sleep mode, the system is switched into the sleep mode by the sleep timer without retracting the antenna.
The regular timer programmes are only executed in sleep mode and are inactive in stand-by mode.
Reinitialise search parameters
Select this menu item and confi rm it with OK if you assume that your satellite system does no longer reliably fi nd the selected satellite via the automatic search or the search via location. The satellite search function is reset to the default settings. Please note that the fi rst search after a parameter reset may take quite a long time. This function should hence only be used after due consideration.
Service menu
Select menu item Oyster / CARO / Cosmo HDTV… -> Edit settings and press the ANT button to open the Service menu.
Sat-mouse characters
The default setting for the number of characters shown by the sat-mouse is 4.
Search transponder / beam (to be used by specialist dealers only)
Some satellites have more than one footprint. As a consequence, not all channels of a satellite can be received within the satellite‘s overall coverage area. Also, it may be possible that the automatic search will not yield a satellite when a different footprint is selected for reference. With this menu item, a footprint suitable for your location can be allocated to each satellite in accordance with the specifi cations of the satellite operator.
3.7 Edit settings
22
Internet-service satellite
This option allows you to enable the Internet data service in an Oyster Digital sys-tem fi tted with the „Internet“ option. In the default settings, this function is already pre-set for the satellite modem included in the supply.
Test limits and Test power supply
Menu items Test limits and Test power supply are intended for the technician instal-ling the system and are not relevant for normal operation.
3.7 Edit settings
23
If you own an Oyster 85 Digital CI system fi tted with the „Internet“ option, then you can access the Internet directly via satellite. (The Internet option is not available for other models.)
Using the Internet requires a service agreement with an Internet provider and a spe-cifi c satellite modem as well as an iLNB capable of transmitting data. If you have purchased the Oyster 85 with the Internet option, the modem and iLNB are included in the supply. To enable the modem supplied you need to have a service agreement with an Internet provider. Information and further details have been provided to-gether with the system.
Internet communication can then be performed using any computer or laptop fi tted with a network port. The port is required to connect your PC to the satellite modem using the cable provided.
Your system is already set up for the satellite modem supplied and the Internet service provider recommended in the information provided with the system.
You can enable the Internet function either via MENU -> Oyster HDTV -> Inter-net Service or, alternatively, during TV mode by pressing the FUNC button on your remote control.
In both cases the system starts searching for the pre-set Internet satellite and assu-mes an adjustment for optimal Internet signal reception.After successful adjustment, the sat-mouse display will show „IP“ (Internet Pro-tocol). The modem now starts communicating with the network via satellite and logs itself in. The procedure usually requires 60 seconds, but may take signifi cantly longer in exceptional cases.
Successful communication of the modem with the network is indicated by the green „RX“ LED lighting up in the modem. If the green LED in the modem does not light up within 60 seconds after switching into „IP“ mode, then a fault is present in the modem.
3.8 Internet service (optional)

24
The yellow „Warning“ LED in the modem goes off when the modem has successfully logged into the network. Your PC is now connected to the Internet.
Please note: Your PC is assigned an IP address by the modem or by the satellite network via DHCP. Please be sure to enable the function „Obtain IP address auto-matically“!
To switch back from Internet mode to normal TV mode, press the „AV“ button on your remote control. You can then start a new search for the pre-set TV satellite using the remote control (MENU -> Oyster HDTV -> Automatic search).
Alternatively, use the „TV“ button to abort the Internet mode and directly return to the pre-set TV satellite.
It is of course also possible to directly switch off your satellite system and retract the antenna while in Internet mode by pressing the red stand-by button on the remote control.
Please note that the satellite system can only be used either in TV/radio mode or in Internet mode. It is not possible to use both features simultaneously.
3.8 Internet service (optional)

3.9 Fault messages
Malfunctions of the top box may occur if e. g. the antenna‘s motion is obstructed by branches or snow.Such malfunctions are automatically detected and will be displayed by the sat-mouse as fault codes.
Mes-sage
Fault description Remedial action
E 01 The search did not yield the reception of a satellite.
Change your location. Do you have a clear view to the South? Are you within the footprint (range) of a satellite?
E 02E 03
Antenna rotation (E02) or elevation (E03) motion is blocked.
Is the motion obstructed by obstacles? Is the supply voltage too low (weak batte-ry)?
E 04 Antenna does not fully ret-ract and switch off.
Press EXIT to re-open the antenna. Remo-ve snow, leaves or other items from the antenna.DO NOT switch off the system by setting the master switch to OFF before having eliminated the cause of the malfunction.
E 05E 06
Antenna does not react after activation or does not respond to commands.
Is the red fuse (10 A) at the receiver in order?Are all cables correctly connected?Contacts of the control cable may be slightly oxidized. Disconnect and recon-nect the cable.
E 07E 09
Short-circuit/open circuit in the antenna cable or at the antenna.
Check the white antenna cable and the connectors at the receiver and at the LNB.
E 08 No or insuffi cient voltage for top box.
Check fuses on the rear of the receiver.
E 10E 11E 12
Caution: The supply voltage drops considerably while the antenna is moving.
Recharge the battery as soon as possible. Check the wiring and the connection of the system to the voltage supply.Observe the information in the Installati-on Instructions!
25
26
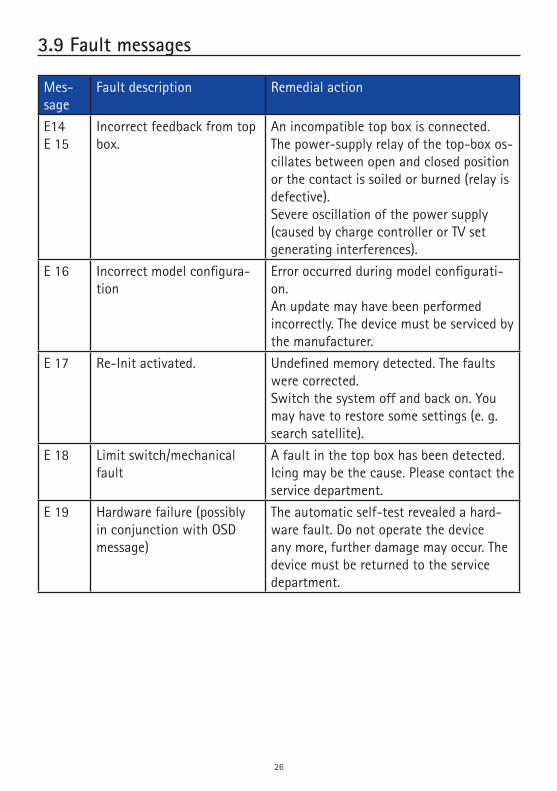
Mes-sage
Fault description Remedial action
E14E 15
Incorrect feedback from top box.
An incompatible top box is connected.The power-supply relay of the top-box os-cillates between open and closed position or the contact is soiled or burned (relay is defective).Severe oscillation of the power supply (caused by charge controller or TV set generating interferences).
E 16 Incorrect model confi gura-tion
Error occurred during model confi gurati-on.An update may have been performed incorrectly. The device must be serviced by the manufacturer.
E 17 Re-Init activated. Undefi ned memory detected. The faults were corrected.Switch the system off and back on. You may have to restore some settings (e. g. search satellite).
E 18 Limit switch/mechanical fault
A fault in the top box has been detected. Icing may be the cause. Please contact the service department.
E 19 Hardware failure (possibly in conjunction with OSD message)
The automatic self-test revealed a hard-ware fault. Do not operate the device any more, further damage may occur. The device must be returned to the service department.
3.9 Fault messages

3.10 Reception in remote areas
This section describes how to fi ne-tune the LNB to optimise reception in the fringe of a TV satellite‘s footprint. This requires loosening the antenna bolts and turning the antenna to a different angle. Such optimisation is only re-quired in the fringe areas of a satellite‘s footprint. It should be performed by expert users only.
State-of-the art digital technology can considerably enlarge the area in which a satellite can be received.
Most satellites broadcasting channels of interest to Central European viewers are aimed at Central Europe. In locations outside this area, the antenna has a „sideways view“ on the satellite. This effect is known as the „skew angle“ or „polarization angle“ and occurs particularly in southern regions such as Portugal, Spain, Morocco, Greece, Turkey, and most extremely on the Canary Islands.
The effect is mostly compensated by the receiver‘s electronics, but sometimes re-quires some manual fi ne-tuning by pivoting the LNB (reception head) or the entire fl at-panel antenna by some degrees.
The following defi nitions apply to the tables and angles below: To determine the sense of rotation, the viewer looks towards the satellite from the perspective of the antenna. Accordingly, the viewer must be located behind the antenna or at its side. Depending on the antenna model, either the LNB in front of the antenna dish (Oyster®), the LNB inside the antenna (Cosmo®) or the entire antenna (CARO®) must be turned.
Rotations in CLOCKWISE direction are negative (–). Rotations in COUNTERCLOCKWISE direction are positive (+). Accordingly, a rotation in „+“ direction means that the BOTTOM of the LNB or antenna is turned to the RIGHT. A rotation in „–“ direction means that the BOTTOM of the LNB or antenna is turned to the LEFT.
27

3.10 Reception in remote areas
Einstellung des LNBs in unterschiedlichen Gegenden:
Note: The skew angle values provided are for reference only!
Adjustments of less than 8° are usually not required as long as reception is undis-turbed. The fi ne-tuning of the skew angle often allows the reception of satellites in areas actually outside of their footprint. The footprints of the individual satellites can be found at www.lyngsat.com or www.satcodx.com. Both websites provide interesting general information about the channels and footprints of the various satellites.
Country Astra I 19.2° E
Astra II 28.2° E
Astra III 23.5° E
Hotbird 13° E
Atlantic Bird 3 5° W
Germany and neigh-bouring countries
0° +8° +4° -6° -23°
France +7° +14° +1° +2° -15°
Benelux +3° +9° +6° -2° -16°
England +7° +12° +10° +3° -9°
Ireland +11° +16° +13° +7° -6°
Portugal +22° +28° +25° +16° -4°
South of Spain, Gibraltar
+20° +28° +24° +14° -8°
Scandinavia -6° -2° -4° -9° -19°
Greece -12° 0° -7° -20° -38°
Turkey, Ukraine, Belarus -20° -11° -15° -26° -39°
Canary Islands +39° +44° +42° +34° +12°
Morocco +23° +31° +27° +17° -8°
Italy, Sicily -2° +8° +3° -8° -27°
Tunisia, Libya +4° +15° +9° -4° -27°
Near East -31° -19° -25° -38° ---
28

4.1 Receiver menu tree
Operation with remote control - Press „Menu“
Main menu
Channel list
Edit settings
Options
Timer
CI settings
Edit
Search
General settings
File manager
Languages
Reception
Tuner info
Network info
Restore from fi le
Transponder list
Save to fi le
Date and time
Web radio
Calendar
Password and protection of minors
System info
OSD
Update software
Audio, Video
PVR / Drives
Network
Restore factory settings
Programme info
Satellite list
Restore factory list
29

Operation with remote control:
30
Function Setting option
Main menu / Channel list
Edit Sorting channels, editing favourite-channel lists
Search Scan for channels
Save to fi le Export of channel list
Restore from fi le Import of channel list
Transponder list Add transponders, Delete transponders
Satellite list Edit basic settings of satellites
Restore factory list Channel lists are reset to default settings
Main menu / Edit settings
General settings CEC control, Remote control, Sleep-timer, Automatic power-down
Date and time Date, time, time zone, daylight-saving time
Languages Menu language, audio language, subtitle language
OSD OSD Display time, Transparency, Radio stillpicture, Channel number timeout
Password and pro-tection of minors
Setup menu lock, Password, Viewing age, Parental info
Reception Twin LNB, device control, satellite selection, satellite activation, LNB upper and lower LOF
Audio, Video Format, Scaling method, HDMI signal (resolution), YPbPr, Brightness, Contrast, Saturation, Digital audio output, HDMI audio output, Lip sync mode
PVR / Drives PVR/drives settings (Internal HDD power down (optional), PVR jump time, Timer pretime, Timer posttime, Rename selected drive, Format selected drive)
Programme info Programme information for selected channel
PVR / Drives PVR/drives settings (Internal HDD power down, PVR jump time, Timer pretime, Timer posttime, Rename selected drive, Format selected drive)
Network DHCP On/Off, DNS mode auto/manual
Restore factory settings
Restore factory settings
4.1 Receiver menu tree

31
Funktion Einstellmöglichkeit
Main menu / Options
File manager Display of drives and fi les
Web radio Webradio on/off
Calendar Display of calendar of current year
Update software Software update
System info System information
Tuner info Tuner information (current tuner, current satellite, current transponder, signal level, signal quality)
Programme info Programme information for selected channel
Network info Information about network connected
Main menu
Timer Timer list, Edit timer/Remove item
CI settings Information about CI module and smartcard
4.1 Receiver menu tree

4.2 Edit channel list
Your digital CI receiver provides 10 freely programmable favourite chan-nels lists.A favourite channels list is a selection of channels from the list of all chan-nels.
When a favourite channels list is acti-vated, only the channels maintained in this list are available, all other chan-nels will be suppressed. The possibility of creating up to 10 different favourite channels lists allows different receiver users to create personal lists without having to change the complete list of channels.
Creating favourite channels lists
The favourite channels lists are maintained under MENU -> Channel lists. In this sub-menu, any channel from the complete channel list can be allocated to any of the 10 favourite channels list. For operation, observe the help text displayed at the bottom of the screen. To exit the editing dialogue of the favourite channels list, press EXIT once or MENU twice. Changes must be confi rmed with OK.
Using favourite channels lists
Start the selection menu of the favourite channels list by pressing the „0“ button. Use P+/P- to select a list and confi rm your selection with OK. Now, the channel list only provides the channels maintained in the selected favourite channels list. To regain access to the full range of channels, press „0“ again and select <None>. Please note that you can directly select any channel even if a favourite channels list is active.
Sorting programs
Use this sub-menu to sort program lists, to insert programs into the list, to rename programs, to delete programs and to add programs to favourites.
32
SWAPPLAYFR/FFOKINFOMENU
STOPEXIT
: Switch active list: Tune to service: Index Up / down: Add to favorites: Mark service: Back
: Select Favorite list: Remove item: Sort list by name: Rename service/fav. list: Lock/unlock channel: Close menu
Service list editorTV services Favorites 1123
0001 Das Erste HD0002 ZDF HD0003 SAT.10004 RTL Television0005 ProSieben0006 RTL20007 VOX0008 WDR HD Köln0009 SWR BW HD

Creating a favourite list
Press the blue button to select a favourite list (list 1 is preselected). Highlight a pro-gram in list „TV programs“ and press [OK] to add it to the current favourites list. If you wish to also add the subsequent program, press [OK] again. Repeat this process to add all your favourite programs to the list.
Editing program or favourites list
Use the [SWAP] button to select list „TV programs“ or a „Favourites list“ for editing.
Highlight the program to be edited. Now use the buttons [◄◄] and [►►] to move the program within the list, use the [yellow] button to edit the program name or the [red] button to delete the program from the list.
Within the text box:
Highlight the text position you wish to edit and change the letters using the num-ber buttons (e.g. 1 x button [2] = «a», 4 x button [9] = «z»). Use the [blue] button to change the available character type, the [yellow] button to insert a character, the [green] button to delete a character, and the [red] button to delete the character left of the cursor.
This option requires appropriate technical knowledge
In the program menu (press MENU button once), option „Edit channel list“ provides a sub-menu option „Transponder list“. This sub-menu al-lows you to view and edit the settings required for the reception of the individual channels.
Wrong entries at the individual positions may prevent the reception of one or more channels.
4.2 Edit channel list
33

4.3 Channel list / Scan
First select the satellite to be scan-ned (e.g. „ASTRA“), then the type of scan: Auto for a complete scan of the satellite, or Channel to scan only one of the satellite‘s transponders.
Then select whether programs of type Only FTA, Only encrypted services or All services are scanned.
Then you can select whether TV + Radio, TV only or Radio only programs are scan-ned. If you wish to scan a specifi c transponder of a satellite, then you must set the transponder using the [◄] and [►].
Further information on the scan function:
Make yourself familiar with the scan function and use it regularly. Digital TV is cha-racterized by frequent additions of new channels.
Also, the data of existing channels is subject to change.
The search function automatically updates the internal channel list if you confi rm the security prompt with „OK“ when leaving the search function, even if you have not made any manual changes.
34
EXIT : Close menuMENU : Back
Satellite scan menu
Select satellite:Scan method:Kind of service:TV / Radio:Edit / select transponder:Signal levelSignal qualitySart scanning
0%0%
Astra 19,2°EAuto
Only FTATV + Radio
1: 10729 MHz V

4.4 Main menu / Edit settings
Editing the receiver settings
Editing the receiver settings /Menu item General settings
Editing the receiver settings /Menu item General settings-> Remote control selection(If competing remote controlsare used.)
35
Settings
MENU : Back
General settingsTime and DateLamguagesOSDPassword and parental controlReceptionAudio, VideoPVR / DrivesNetwork
Restore factory settings
Konfiguration: General settings
MENU : Back EXIT : Close menu
CEC controlAutomatic power downRemote control:Sleep Timer:
OnOnAOff

4.5 Options
1. Signal strength
Once the antenna is adjusted, you can view the signal level at any time via sub-menu „Options / Tuner info“. The signal level is then indicated as a vertical bar.
The C/N value will indicate the same value in dB. The higher the number, the better the reception quality will be. In satellite mode, and depending on the channel, a satisfactory TV picture should be received with any value above approx. 8. In DVB-T mode (optional), a C/N value above approx. 15 will provide interference-free reception.
Note:Further to the setting of your reception system and your position within the satellite‘s footprint, signal level also depends on the currently selected channel.
Please take this into account when checking the aim of your antenna using the si-gnal level display. It is normal that some channels are received with a strong signal while others are rather weak.
36
Extras
MENU : Back
File managerWeb radioCalendarSoftware update
System infoTuner infoService infoNetzwerk info

2. System info:
Open sub-menu „Options / System info“ to view the software version and serial number of your receiver.
This information is required for service purposes or software updates.
Example: ten Haaft Serial: 2800805030 ten Haaft Build: EU/3.00 PSU-Firmware: 1.00 Motor Revision: 00404 (automatic systems only)
37
4.5 Options
System info
MENU : Back EXIT : Close menu
Bootloader:Firmware:MAC address:Brandten Haaft Serial:ten Haaft Build:PSU-Firmware:Motor-Revision:
2012-04-21 23:47V1.0.0.0 2013-03-05 08:00
02:00:00:00:06:B3Oyster HDTV
*4294967295*EU/3.00 Mar 5 2013 08:59:55
1.00000404

The timer is used to conveniently record programs on the hard disk at pre-set times.
The timer function is also available on devices without optional hard disk. This func-tion is particularly helpful if you want to be sure not to miss a program on a certain channel. The receiver will then switch over to the channel programed in the timer.
38
4.6 TIMER
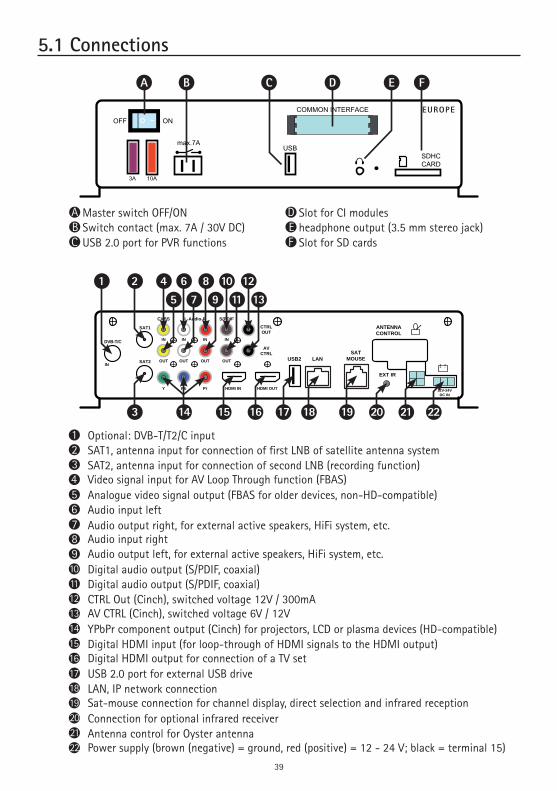
5.1 Connections
Master switch OFF/ON Slot for CI modulesSwitch contact (max. 7A / 30V DC) headphone output (3.5 mm stereo jack)USB 2.0 port for PVR functions Slot for SD cards
A DB EC F
OFF ON
max.7AUSB
SDHCCARD
3A 10A
COMMON INTERFACE EUROPE
A B C D FE
Optional: DVB-T/T2/C input
Analogue video signal output (FBAS for older devices, non-HD-compatible)
Digital audio output (S/PDIF, coaxial)
SAT1, antenna input for connection of fi rst LNB of satellite antenna system
Audio input left
Digital audio output (S/PDIF, coaxial)
USB 2.0 port for external USB drive
YPbPr component output (Cinch) for projectors, LCD or plasma devices (HD-compatible)
Connection for optional infrared receiver
SAT2, antenna input for connection of second LNB (recording function)
Audio output right, for external active speakers, HiFi system, etc.
CTRL Out (Cinch), switched voltage 12V / 300mA
LAN, IP network connection
Digital HDMI input (for loop-through of HDMI signals to the HDMI output)
Antenna control for Oyster antenna
Video signal input for AV Loop Through function (FBAS)
Audio output left, for external active speakers, HiFi system, etc.Audio input right
AV CTRL (Cinch), switched voltage 6V / 12V
Sat-mouse connection for channel display, direct selection and infrared reception
Digital HDMI output for connection of a TV set
Power supply (brown (negative) = ground, red (positive) = 12 - 24 V; black = terminal 15)
5
10
2
6
11
17
14
20
12
18
15
21
13
19
16
22
3
7
4
98
39
EXT IR
ANTENNACONTROL
USB2 LANSAT
MOUSE
12V-24VDC IN
DVB-T/C
SAT1
CVBS L-Audio-R S/PDIF
CTRLOUT
AVCTRL
IN
OUTIN
IN
OUT
IN
OUT
Y Pb Pr HDMI IN HDMI OUT
IN
OUTSAT2
1 2
3 15 16 17 18 19 20 21 2214
4 8 10 1265 7 9 11 13

At the front of the device there are is one slot for modules decoding encrypted programs.To prevent damage, only modules with the „PC Card“ logo must be inserted. Any other module may damage the receiver beyond repair.
Do not use excessive force to insert the module. Rather pull the module back out of the slot and try inserting it again. Ensure that you insert the module with the correct side up.Smartcards are sometimes printed in a confusing way as they are often designed to be used with other decoders. Most Common-Interface modules are designed to accept cards with the golden contacts facing upward. Before inserting a smartcard into the Common-Interface module, make sure that the usually gold-coloured con-tacts on the smartcard are clean and free of dust.
If a decoder module has been correctly identifi ed, its name is displayed in the main menu under „Encryption“. When you select the entry for this module in the list and press OK, a menu will be displayed that is provided by the decoder module. Please contact the module manufacturer in case of any questions concerning the module.
Note: Some modules only log in completely and provide a menu system if a valid smartcard is inserted. The OK and EXIT buttons are used to navigate within the manufacturer-specifi c menus. If a menu does not respond to the OK or EXIT command, the dialog can be cancelled by pressing MENU. The receiver then interrupts the connection to the module‘s menu system.
40
5.2 Common Interface module
Common interface
MENU : Back EXIT : Close menu
Slot: No module

5.3 Software update
Software and channel lists can be updated using the USB port via menu item Options / Software update.
Please refer to: www.ten-haaft.com
41
Software update
MENU : Back: Cancel
EXIT : Close menu
Update from fileUpdate over InternetCurrent software version is: V0.0.0.2 2013-01-23 08:23

5.4 Specifications of receiver
Input frequency range 950…2150 MHz
Input impedance 75 Ω
Input level range -60 … -25 dBm
2 input sockets F-standard, female
LNB control signal 22kHz - 13V/18V
Frequency range VHF (174MHz … 230MHz)UHF (470MHz … 790MHz)
Video decoder H.264 / AVC, MPEG-2
Video resolution 480i/480p/576i/576p/720p/1080i
Modulation types DVBS, DVBS2 QPSK and 8PSK
Video bit rate up to 18Mbit/s
Symbol rate 1 to 45 Msymb/s in DVB-S (QPSK)1 to 62 Msymb/s in DVB-S2 (QPSK and 8PSK)
FEC (error correction) DVB-S: Viterbi and Reed-SalomonDVB-S2: LDPC + BCH dual decoder
Signal outputs Video HDMI, YPbPr, FBAS (Cinch)
Audio decoder MPEG layer 1,2,3, AC-3, Dolby Digital
Signal outputs Audio HDMI, SPDIF (coaxial), analogue stereo (Cinch)
HDMI, SPDIF, FBAS, analogue audio
loop-through functionality
2 x USB 2.0
Ethernet 10/100 Base-T MAC
Common Interface CI 1.0 according to EN 50221
SDHC Card 1
External IR 1
Switched voltage output 12V / 300mA
Switched output AV 6V/12V 3mA
Switching relay max. 7A / 30V DC
12 V or 24 V (11 V to 30 V) DCBattery-buffered or electronically stabilized
Technical changes reserved42
SAT tuner
DVB-T2/C tuner
Audio
connections -Inputs
connections -Outputs
Operating voltage
Video

5.5 Declaration of conformity
Wir, der Hersteller, ten Haaft GmbH , Oberer Strietweg 8, D-75245 Neulingen, GERMANY / ALLEMAGNE erklären hiermit, dass folgende Produkte den wesentlichen Anforderungen der folgenden Vorschriften entsprechen und somit ein CE-Zeichen in Übereinstimmung mit der EMV-Richtlinie 89/336/EWG und der KFZ-Richtlinie 72/245/EWG (i.d.F. 2006/38/EG) tragen.
Oyster® Digital 85 HDCI + T SKEW Oyster® Digital 65 HDCI + T SKEW CARO® Digital HDCI+T CARO® Digital MA HDCI+T Cosmo® Digital HDCI+T SamY® Digital HDCI+T D5000 HDCI+T
Eine Bescheinigung gemäß Anhang IIIC der EG-RL 72/245/EWG (2006/28/EG) liegt dem Hersteller vor.
EN 55013 (2001) + A1 EN 55020 (2001) + A1, A2
Neulingen, den 01.11.2009
Roman BittigkofferGeschäftsführer
KonformitätserklärungDeclaration of Confirmity
Déclaration de Conformité
43

6.1 Channel and TV program list
Appendix Channel list:
In the original (TV) channel list, the programs are allocated to the individual satelli-tes as follows:
Satellite Position Channel CHAstra 1 19,2°E 001 - 499
Hotbird 13°E 500 - 999
Astra 2 28,2°E 1000 - 1269
Eutelsat W2 16°E 1270 - 1439
Atlantic Bird 3 5°W 1440 - 1499
Astra 3 23,5°E 1500 - 1599
Thor / Intelsat 10-02 1°W 1600 - 1839
Sirius 5°E 1840 - 1969
Hispasat 30°E 1970 - 2249
Astra 1 (Iber. Peninsula) 19,2°E 2250 - 2379
Eutelsat W3A 7°E 2380 - 2399
Hellas Sat 2 39°E 2400 - 2489
Eurobird 9 9°E 2500 - 2599
Amos 4°W 2600 - 2659
Eutelsat W1 10°E 2660 - 2699
Telstar 12 15°W 2700 - 2749
Türksat 2A 42°E 2750 - 2899
BADR 3 / 4 26°E 2900 - 2949
Atlantic Bird 2 8°W 2950 - 2999
Hotbird (Greek. Prog.) 13°E 3000 - 3079
Hotbird (Arabic Prog.) 13°E 3080 - 3299
Eutelsat W4 36°E 3300 - 3329
Astra 1 19°E 3450 - 3500
Channel list is subject to change without notice.
Please note that not all program numbers are assigned to a channel. Many numbers are kept blank for further system extensions.TV services frequently stop the transmission of individual programs.
44

You can re-sort the channel list of your receiver to your personal requirements at any time. New channel lists that are available for download at www.ten-haaft.com may be sorted and formatted in a different manner than the list originally stored in the receiver. Such changes may be required in the future to allow the update of the list with new satellites.
Appendix Encrypted programs:
The following encrypted programs are pre-set in the factory:
ORF (Austria) encrypted CH 100 bis CH 111 (Astra 1)
SKY Deutschland encrypted CH 120 bis CH 168 (Astra 1)
Arena encrypted CH 163 bis CH 199 (Astra 1)
Canal + (Netherlands) CH 200 bis CH 226 (Astra 1)
TV Vlaanderen (Belgium) CH 228 bis CH 243 (Astra 1)
Canal Sat France (France) CH 300 bis CH 473 (Astra 1)
SRG (Switzerland) CH 540 bis CH 546 (Hotbird)
BIS TV (France) CH 550 bis CH 594 (Hotbird)
Encrypted and unencrypted channels from various European countries with different dedicated themes (fashion, music, sports, …) are located between CH 200 and CH 499. Further program packages and channels can be searched at any time using the scan function and can be stored at program positions of your choice.
Please note that the reception of encrypted programs requires the corresponding CI module and a valid access card supplied by the program provider. Please contact the relevant program provider for more information. The program providers will also provide details about the type and source of the CI modules required. Always con-tact the program provider directly if you require any information about encrypted program packages or if you have technical queries.
For licensing reasons, many program packages may only be received in their country of origin. Accurate information can therefore only be obtained from the program providers. Caution: To avoid damage to your digital CI receiver and your CI module, only use original access cards provided by the corresponding program providers!
45
6.1 Channel and TV program list
Appendix TV channels:
At the factory, your digital CI receiver has been programmed with the country typi-cal channels.
46
6.1 Channel and TV program list

6.2 Appendix Search satellites
ASTRA 1:Astra I features more than 50 free-to-air programs in German language, including all major privately owned channels, channels under public law, their „third chan-nels“ and numerous radio programs. Reception in Turkey, the Eastern Mediterranean and Eastern Europe is however poor or unavailable.
ASTRA 2:Astra 2 primarily covers the English-speaking regions of Europe. It transmits the popular English-language news channels. Its footprint is split into different zones. The full range of channels is only available on the British Isles and Ireland.
ASTRA 3:Astra 3 transmits program packages from the Netherlands, the Czech Republic and Slovakia. Southern Europe is not covered reliably by the footprint of the Astra 3 signals.
HOTBIRD (also referred to as „Eutelsat Hotbird“):Like Astra, Hotbird is not a single satellite, but a system comprising several satel-lites. It transmits more than 200 digital free-to-air programs in several languages. Hotbird fully covers all of Europe, but at sometimes signifi cantly lower signal levels than Astra. Hotbird is the easiest way to receive German channels in Greece and Turkey.
THOR und SIRIUS:Channels and footprint of the satellites cover northern Europe. Many, sometimes all, channels of Thor and Sirius may be received even in southern Germany if an ade-quately sized antenna is used. Almost all channels are encrypted, though.
ATLANTIC BIRD 3:Atlantic Bird 3 mainly covers France and Benelux, but can also be received all over Europe if a suitable parabolic antenna is used. It transmits several digital free-to-air French channels.
47
HISPASAT:Hispasat covers mainly the Iberian Peninsula and the Canary Islands, but can also be received in Italy, France, Benelux etc. in good quality. The range of programs is focused on the Spanish region.
EUTELSAT W3A:This satellite has the largest footprint of all. It covers the whole of Europe and the Middle East region. However, the signals are signifi cantly weaker than those of the other satellites.
EUTELSAT W2:This satellite transmits various channel packages from smaller European states, but its signal is relatively weak.
HELLAS SAT 2:Hellas Sat 2 broadcasts some Greek programs and a large range of programs from Eastern European states such as Bulgaria or Ukraine.
EUROBIRD 9:EUROBIRD 9 transmits some Italian, Swedish and other programs across Europe.
Türksat:Türksat primarily transmits Turkish channels, with its two footprints covering almost all of Europe and the Arabic countries.
Telstar:The satellite transmits various channels in different European and Arabic language.
Amos:Amos transmits channel packages for Romania, Hungary and Ukraine. Amos can be received in central and eastern Europe.
48
6.2 Appendix Search satellites

6.3 Notes on the protection of the environment
At the end of its lifecycle, this product must not be disposed of with your normal waste, but instead must be returned to a recycling facility for electric and electronic devices. This is indicated by the symbol on the product, the operating manual or the packaging.
The materials can be reused in accordance with their identifi cation. By reusing or recycling old equipment or making use of it in other ways you are making an important contribution to protecting our environment. Please contact your local council to fi nd out where your nearest disposal facility is.
EC End-of-Life Vehicle DirectiveThe system is certifi ed and intended for use as an accessory of a motor vehicle. The system may be disposed of together with the vehicle in accordance with the End-of-Life Vehicle Directive ELV, 2000/53/EC. The receiver does not contain any materi-als rated as hazardous to the environment according to the directive.
We hope you get a lot of enjoyment out of your new ten Haaft product!
49

ten Haaft GmbH
Oberer Strietweg 875245 Neulingen-GöbrichenGERMANY
Phone + 49 (0) 72 37 / 48 55– 0Fax + 49 (0) 72 37 / 48 55– 50 E-mail: [email protected]
Office hours:
Monday – Friday 8:00 am – 12:00 am 1.00 pm – 4.30 pm
www.ten-haaft.com