axio dvr manual
DESCRIPTION
DVR CCTV ManualTRANSCRIPT

Stand Alone Type System DVR
SCORPION GROUP SECURITYwww.scorpion-group.co.uk For Service Call - 01452 525397
USER’S MANUAL(Axio 8 & 16 Channel DVR)
Revision Date : 2006. 12. 19.
• INDEX
• CHAPTER1.Specification&Systemorganization
1.ProductContentsList--------------------------------------------------------1
2.SystemOrganization---------------------------------------------------------2
• CHAPTER2.Description
1.FrontPanel---------------------------------------------------------------3
2.RearPanel---------------------------------------------------------------4
3.RemoteController----------------------------------------------------------5
• CHAPTER3.Display
1.System PowerON----------------------------------------------------------6
2.ScreenViewSelection------------------------------------------------------7
3.DisplayMode ------------------------------------------------ 7
4.PTZ/FOCUSControl--------------------------------------------------------8
5.System PowerOFF---------------------------------------------------------8
• CHAPTER4.Search
?ÈGotoSearchMode---------------------------------------------------------9
1.SearchbyDate/Time-------------------------------------------------------9
2.SearchbyEvent-----------------------------------------------------------10
• INDEX
• CHAPTER5.MENU
?�GotoMenu--------------------------------------------------------------11
?„GotoSystemSetup--------------------------------------------------------11
1.Display------------------------------------------------------------------12
2.Camera-----------------------------------------------------------------14
3.Audio-------------------------------------------------------------------17
4.System------------------------------------------------------------------18
5.Event/Sensor-------------------------------------------------------------23
6.DiskManagement----------------------------------------------------------26
?(GotoRecordMenu--------------------------------------------------------27
1.RecordingOperation--------------------------------------------------------27
2.Continuous/MotionRecordSchedule--------------------------------------------28
3.Alarm RecordSchedule-----------------------------------------------------29
?¨GotoArchiving-----------------------------------------------------------30
1.CD-RW andUSBBackup---------------------------------------------------30
• CHAPTER6.CLIENT
?�RemoteProgram Install-----------------------------------------------------31
1.FunctionIntroduction-------------------------------------------------------33
2.Setting------------------------------------------------------------------34
3.Monitoring---------------------------------------------------------------41
4.Search------------------------------------------------------------------45
5.WebClient---------------------------------------------------------------52
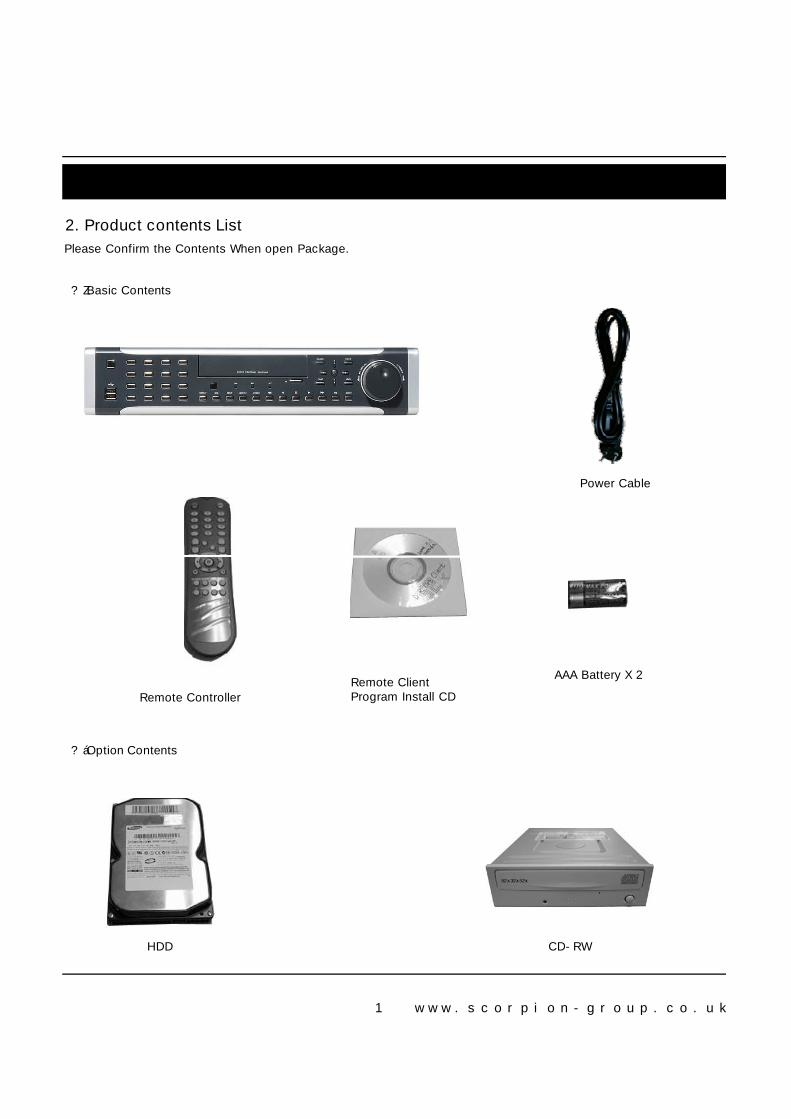
2.ProductcontentsList
PleaseConfirmtheContentsWhenopenPackage.
?ZBasicContents
PowerCable
1. Specification & Organization
RemoteController
RemoteClientProgramInstallCD
AAABatteryX2
?áOptionContents
HDD CD-RW
1 www.scorpion-group.co.uk
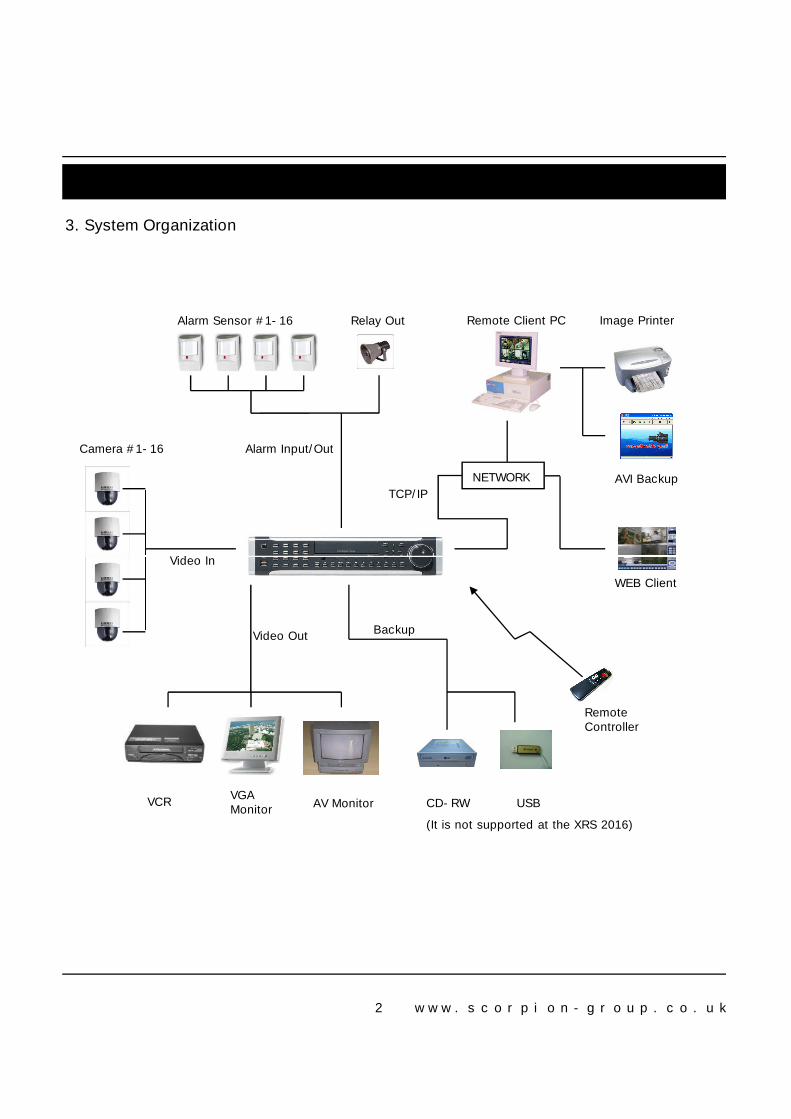
3.SystemOrganization
NETWORK
Camera#1-16
AlarmSensor#1-16 RelayOut RemoteClientPC ImagePrinter
VideoIn
TCP/IP
AlarmInput/Out
AVIBackup
1. Specification & Organization
VCRVGAMonitor
AVMonitor
VideoIn
VideoOut
RemoteController
CD-RW
(ItisnotsupportedattheXRS2016)
Backup
WEBClient
USB
2 www.scorpion-group.co.uk
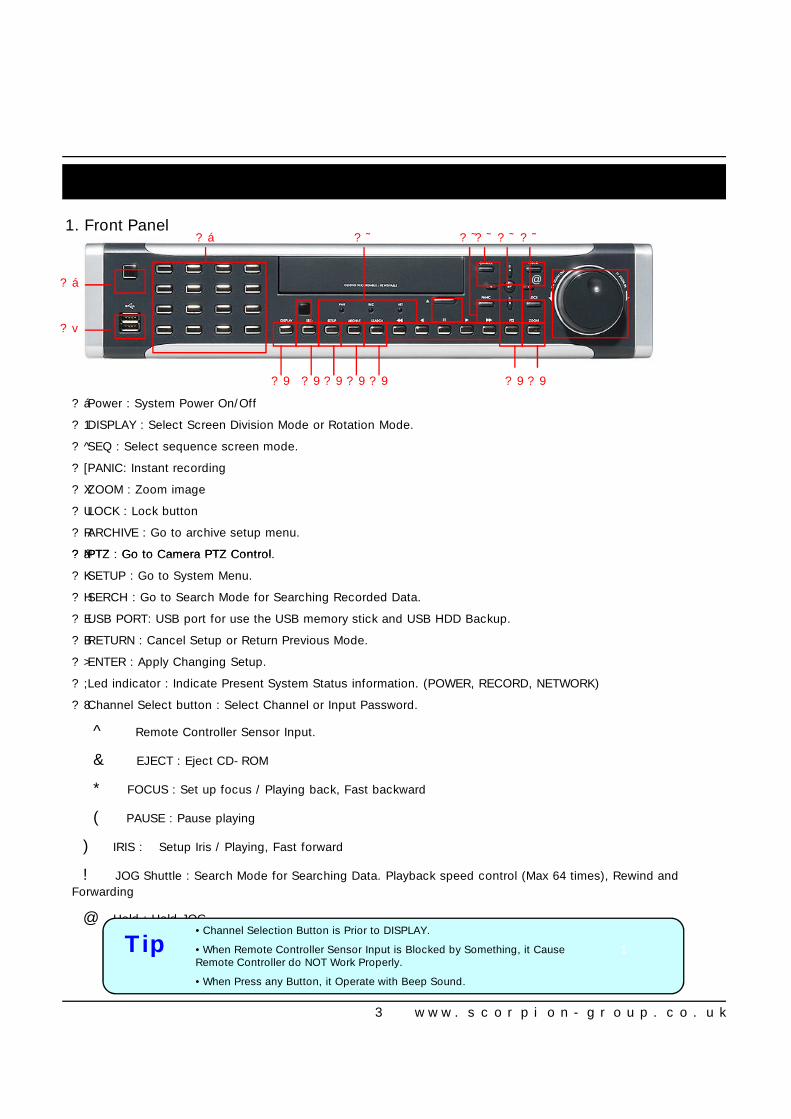
?áPower:SystemPowerOn/Off
?1DISPLAY:SelectScreenDivisionModeorRotationMode.
? SEQ:Selectsequencescreenmode.
?[PANIC:Instantrecording
?XZOOM:Zoomimage
?ULOCK:Lockbutton
?RARCHIVE:Gotoarchivesetupmenu.
?NPTZ:GotoCameraPTZControl.
1.FrontPanel
2. Description
�@?á
?á
?9 ?9
?˜ ?˜
?9 ?9 ?9?9 ?9
?v
?˜ ?˜?˜
?áPTZ:GotoCameraPTZControl.
?KSETUP:GotoSystemMenu.
?HSERCH:GotoSearchModeforSearchingRecordedData.
?EUSBPORT:USBportforusetheUSBmemorystickandUSBHDDBackup.
?BRETURN:CancelSetuporReturnPreviousMode.
?>ENTER:ApplyChangingSetup.
?;Ledindicator:IndicatePresentSystemStatusinformation.(POWER,RECORD,NETWORK)
?8ChannelSelectbutton:SelectChannelorInputPassword.
� ^ RemoteControllerSensorInput.
� & EJECT:EjectCD-ROM
� * FOCUS:Setupfocus/Playingback,Fastbackward
� ( PAUSE:Pauseplaying
� ) IRIS: SetupIris/Playing,Fastforward
� ! JOGShuttle:SearchModeforSearchingData.Playbackspeedcontrol(Max64times),Rewindand
Forwarding
� @ Hold:HoldJOG• ChannelSelectionButtonisPriortoDISPLAY.
• WhenRemoteControllerSensorInputisBlockedbySomething,itCause 1RemoteControllerdoNOTWorkProperly.
• WhenPressanyButton,itOperatewithBeepSound.
Tip
3 www.scorpion-group.co.uk
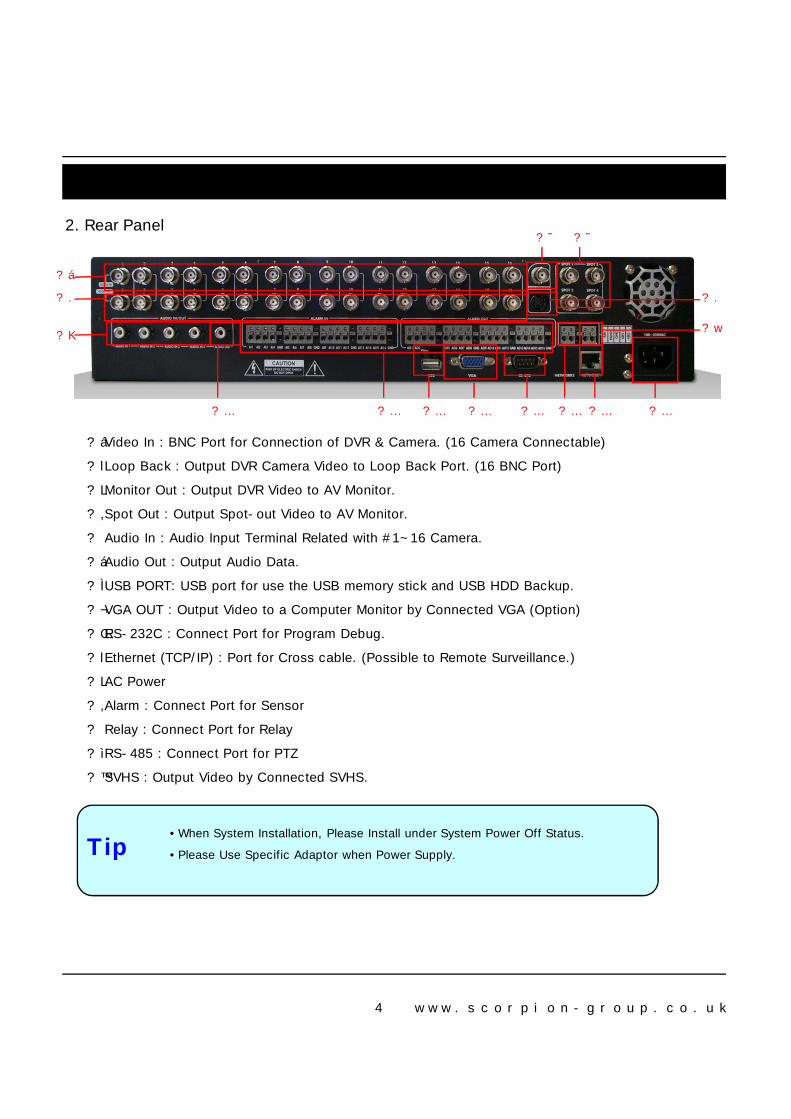
?áVideoIn:BNCPortforConnectionofDVR&Camera.(16CameraConnectable)
?lLoopBack:OutputDVRCameraVideotoLoopBackPort.(16BNCPort)
?LMonitorOut:OutputDVRVideotoAVMonitor.
?,SpotOut:OutputSpot-outVideotoAVMonitor.
?�AudioIn:AudioInputTerminalRelatedwith#1~16Camera.
?ìAudioOut:OutputAudioData.
2.RearPanel
2. Description
?á
?5
?S
?á
?w
?.
?˜ ?˜
?K
?… ?… ?… ?… ?… ?…?… ?…
?.
?áAudioOut:OutputAudioData.
?ÌUSBPORT:USBportforusetheUSBmemorystickandUSBHDDBackup.
?¬VGAOUT:OutputVideotoaComputerMonitorbyConnectedVGA(Option)
?ŒRS-232C:ConnectPortforProgramDebug.
?lEthernet(TCP/IP):PortforCrosscable.(PossibletoRemoteSurveillance.)
?LACPower
?,Alarm:ConnectPortforSensor
?�Relay:ConnectPortforRelay
?ìRS-485:ConnectPortforPTZ
?™SVHS:OutputVideobyConnectedSVHS.
• WhenSystemInstallation,PleaseInstallunderSystemPowerOffStatus.
• PleaseUseSpecificAdaptorwhenPowerSupply.Tip
4 www.scorpion-group.co.uk

POWER
SystemON/OFF
MENU:OpenMenu
RETURN
CancelSetuporReturntoPrevious
ENTER:ApplySetupChange
ChannelSelectionButton(16chAvailable,#1~4Button)
SearchController:ControlPlaybackOption,MenuMovement,PTZ/FocusControl
3.RemoteController
2. Description
Previous
ChangeScreenMode
OpenSearchMode
PTZ/IRISMode
• UnusedButton’sDescriptionisOmitted.
• EveryButtonisOperatedSameasFrontPanelButton.
• RemoteControllercanOperatewhenRemoteControllerSensorInputPartReactedEachOther.
?�IftherearemanyDVRatthesameplace,theyarereactedtogetherwhenpressremotecontroller.
MenuMovement,PTZ/FocusControl
5 www.scorpion-group.co.uk

1.SystemPowerON
CAMERA
2005/01/0100:00:00
• PressPowerButtontoStartSystem
• AfterCheckingHardDisk,NeedinputPasswordto1Operation
• InitialScreenViewModeisQuadDivisionMode1andRecordingMode
PictureforPowerOn
3. Display
PictureforPowerOnafterFinishingInstallation • EachChannelIndicateCameraName&RecordingStatus
• PresentTime&DateIndicateatMonitorCentralLowerSide
• CheckSystemConditionatLED
POWER:ShowingSystemOn/OffRECORD:ShowingRecordOn/OffNETWORK:ShowingClientConnectionStatus
Tip
6 www.scorpion-group.co.uk

3. Display
2.ScreenViewSelection
• SelectOneChannelamong16Channels
• MovetoOneEnlargementWatchModewhenQuadScreenDivisionMode
• MovetoOneEnlargementWatchModewhenRotationMode
WhenconnectbytheRemoteAgentorWebClient,
Indicatorappear.
• Indicatethenetworkcondition.
Green:Networkisstable.
Blue:Networkisunstable.
Red:Networkisveryunstable.
3.DISPLAYMODE
• UsercanSelectvariousWatchMode
• Quad(16CH)WatchModeisInitialModewhenSystemStart
7 www.scorpion-group.co.uk
3. Display
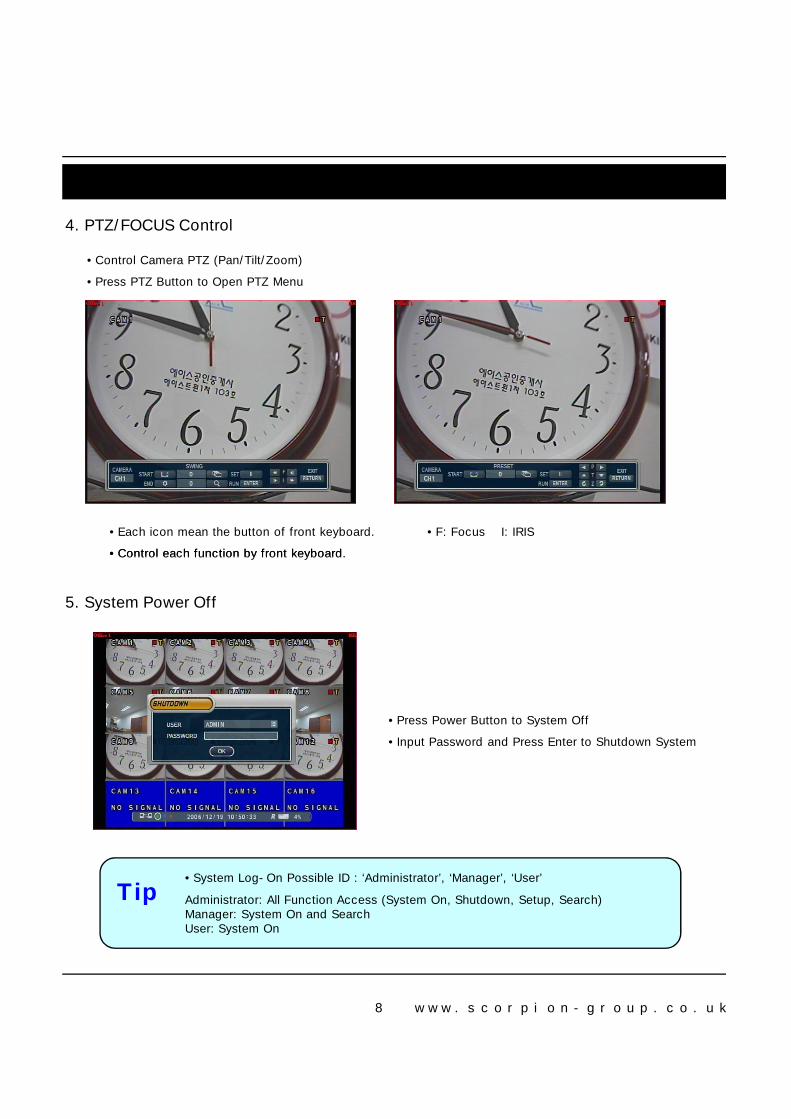
• Eachiconmeanthebuttonoffrontkeyboard. • F:Focus I:IRIS
• Controleachfunctionbyfrontkeyboard.
4.PTZ/FOCUSControl
• ControlCameraPTZ(Pan/Tilt/Zoom)
• PressPTZButtontoOpenPTZMenu
• Controleachfunctionbyfrontkeyboard.
5.SystemPowerOff
• PressPowerButtontoSystemOff
• InputPasswordandPressEntertoShutdownSystem
• SystemLog-OnPossibleID:‘Administrator’,‘Manager’,‘User’
Administrator:AllFunctionAccess(SystemOn,Shutdown,Setup,Search)Manager:SystemOnandSearchUser:SystemOn
Tip
8 www.scorpion-group.co.uk
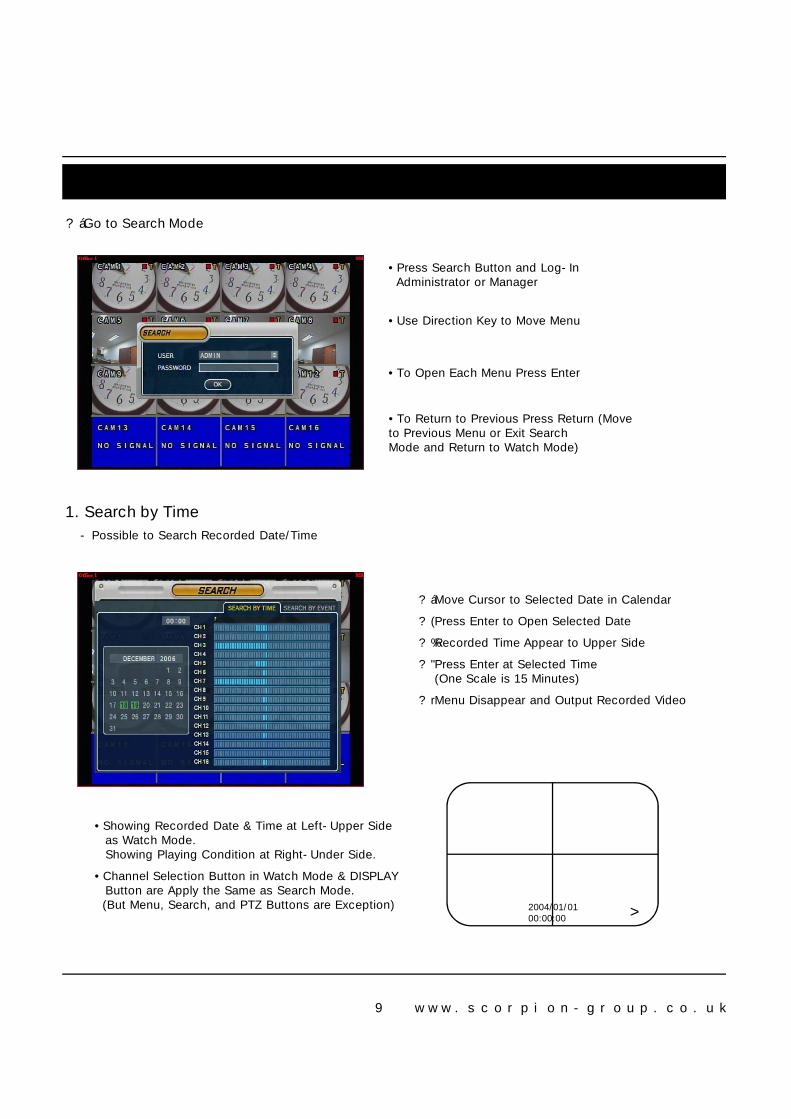
?áGotoSearchMode
• PressSearchButtonandLog-InAdministratororManager
• UseDirectionKeytoMoveMenu
• ToOpenEachMenuPressEnter1
• ToReturntoPreviousPressReturn(MovetoPreviousMenuorExitSearch 1ModeandReturntoWatchMode)
1.SearchbyTime
-PossibletoSearchRecordedDate/Time
4. Search
2004/01/0100:00:00 >
?áMoveCursortoSelectedDateinCalendar
?(PressEntertoOpenSelectedDate
?%RecordedTimeAppeartoUpperSide
?"PressEnteratSelectedTime(OneScaleis15Minutes)
?rMenuDisappearandOutputRecordedVideo
• ShowingRecordedDate&TimeatLeft-UpperSide1asWatchMode.1ShowingPlayingConditionatRight-UnderSide.
• ChannelSelectionButtoninWatchMode&DISPLAY1ButtonareApplytheSameasSearchMode.(ButMenu,Search,andPTZButtonsareException)
9 www.scorpion-group.co.uk

• ControlPlayingVideo
?� :BasicPlayingMode(NormalSpeed(1X)ForwardPlaying)
?C :NormalSpeedBackwardPlaying
?k :PauseVideo
?“ :FastForward(2~64Speed)
?» :FastBackward(2~64Speed)
?áPressNormalForward/BackwardButtoninPause,MovetoNext/PreviousFrame.
2.SearchbyEvent
4. Search
2.SearchbyEvent
-SearchingVideowithEventOccurrencetoSetupPeriod
• Alarm,Motion,SystemcanbeSelectpluralbyCheck(V)-(ENTER)
• ToChangeSetup,PressEnterandPressDirectionKeyAfterChangingSetup,PressEntertoExit.
SetupPeriodtoSelectStartDate&FinishDateforSearchingEvent
Alarm:SearchingAlarmEventduringtheSelected1 Period
Motion:SearchingMotionDetectedEventduring1 theSelectedperiod.
Timer:SearchingScheduleChangeorRecording1 SetupChangeEvent
System:SearchingPowerOn/OffEvent(etc.)1 ConcernedSystemEvent
EventListShowingatBelowOutputWindow
Channel:Choosethechannelforsearching.
Tip
10 www.scorpion-group.co.uk
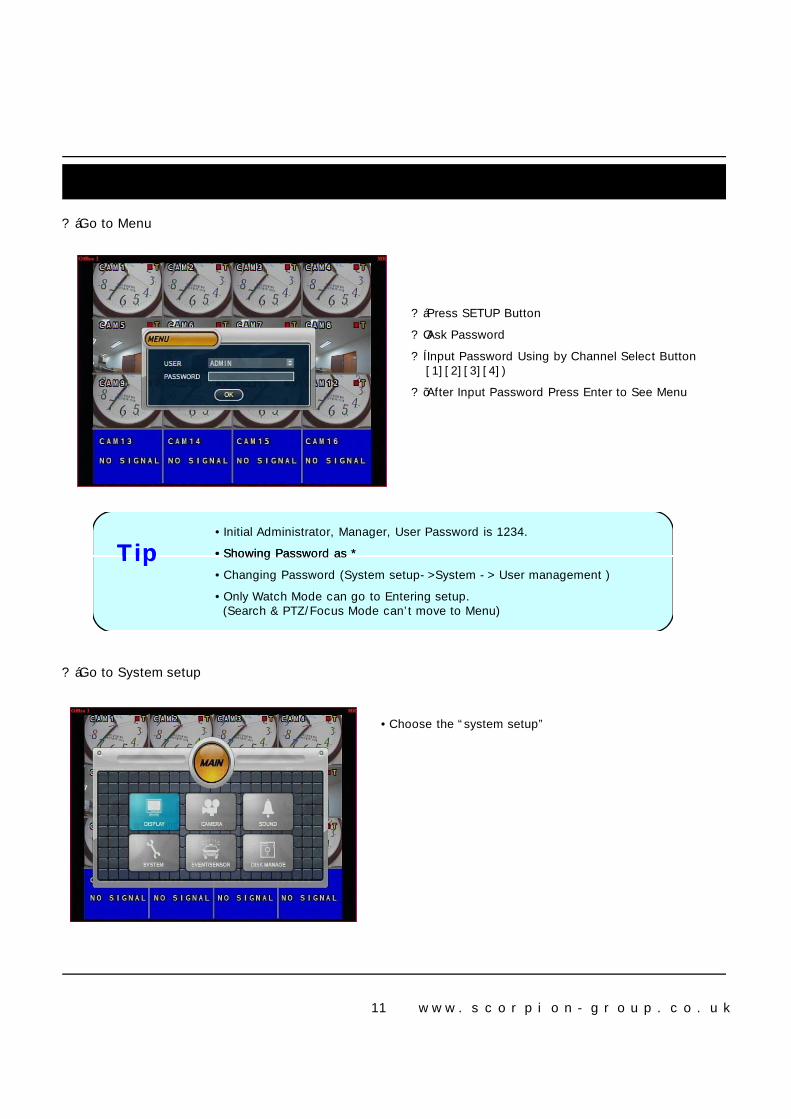
?áGotoMenu
?áPressSETUPButton
?OAskPassword
?ÍInputPasswordUsingbyChannelSelectButton1[1][2][3][4])
?õAfterInputPasswordPressEntertoSeeMenu
• InitialAdministrator,Manager,UserPasswordis1234.
• ShowingPasswordas*
5. Menu
Tip • ShowingPasswordas*
• ChangingPassword(Systemsetup->System->Usermanagement)
• OnlyWatchModecangotoEnteringsetup.(Search&PTZ/FocusModecan’tmovetoMenu)
• Choosethe“systemsetup”
?áGotoSystemsetup
Tip
11 www.scorpion-group.co.uk
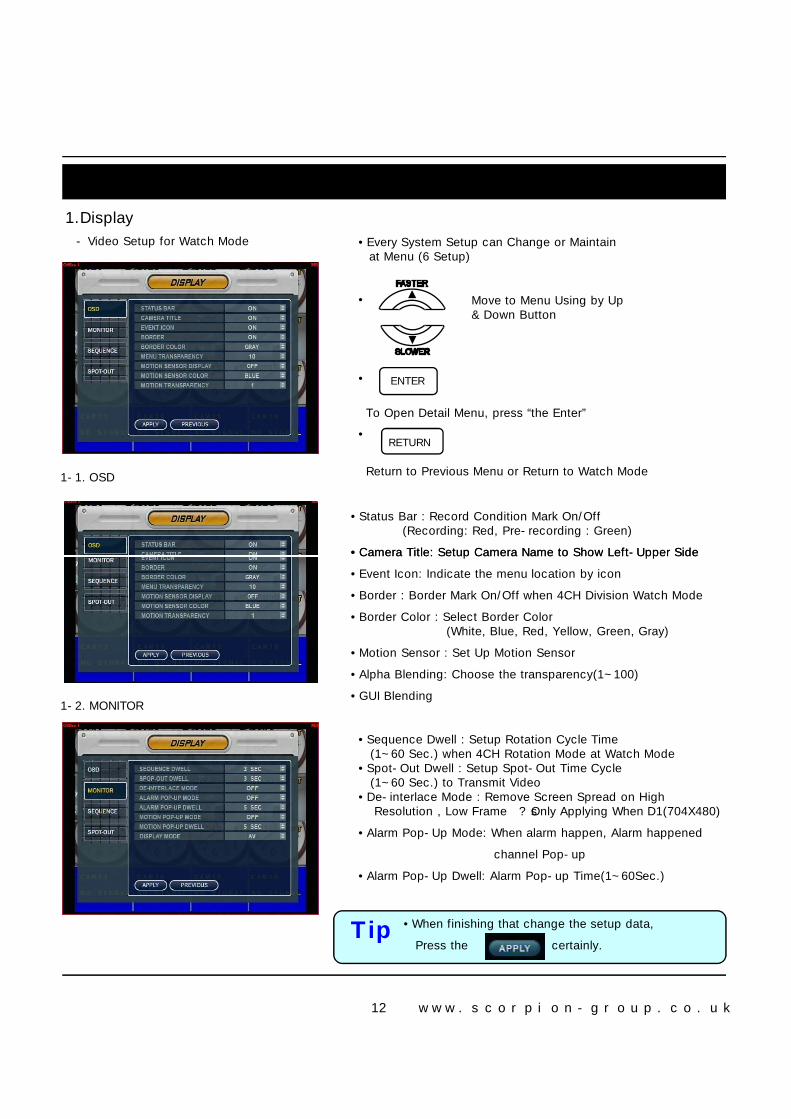
5. Menu1.Display
-VideoSetupforWatchMode
• StatusBar:RecordConditionMarkOn/Off(Recording:Red,Pre-recording:Green)
• CameraTitle:SetupCameraNametoShowLeft-UpperSide
• ENTER
RETURN•
• EverySystemSetupcanChangeorMaintain1atMenu(6Setup)
• MovetoMenuUsingbyUp&DownButton
ToOpenDetailMenu,press“theEnter”
ReturntoPreviousMenuorReturntoWatchMode1-1.OSD
• CameraTitle:SetupCameraNametoShowLeft-UpperSide
• EventIcon:Indicatethemenulocationbyicon
• Border:BorderMarkOn/Offwhen4CHDivisionWatchMode
• BorderColor:SelectBorderColor(White,Blue,Red,Yellow,Green,Gray)
• MotionSensor:SetUpMotionSensor
• AlphaBlending:Choosethetransparency(1~100)
• GUIBlending
• SequenceDwell:SetupRotationCycleTime(1~60Sec.)when4CHRotationModeatWatchMode• Spot-OutDwell:SetupSpot-OutTimeCycle(1~60Sec.)toTransmitVideo• De-interlaceMode:RemoveScreenSpreadonHighResolution,LowFrame ?sOnlyApplyingWhenD1(704X480)
• AlarmPop-UpMode:Whenalarmhappen,Alarmhappened
channelPop-up
• AlarmPop-UpDwell:AlarmPop-upTime(1~60Sec.)
1-2.MONITOR
Tip • Whenfinishingthatchangethesetupdata,
Pressthe certainly.
12 www.scorpion-group.co.uk
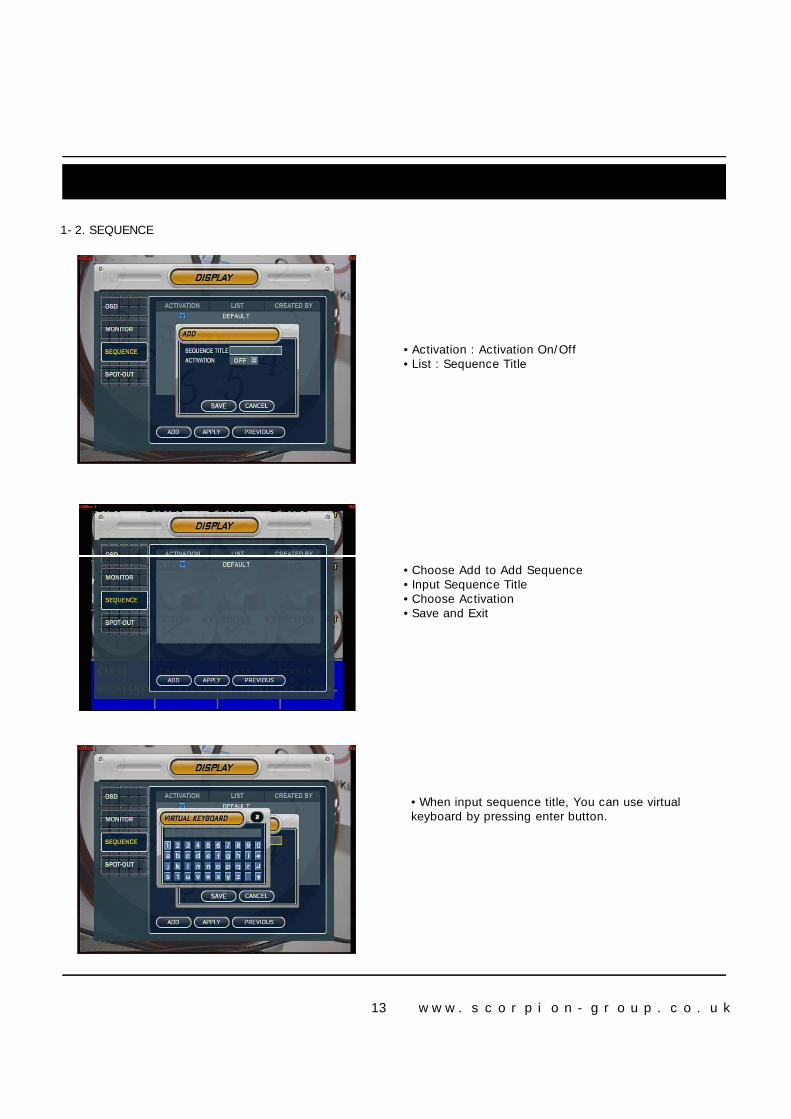
5. Menu
• Activation:ActivationOn/Off• List:SequenceTitle
1-2.SEQUENCE
• ChooseAddtoAddSequence• InputSequenceTitle• ChooseActivation• SaveandExit
• Wheninputsequencetitle,Youcanusevirtualkeyboardbypressingenterbutton.
13 www.scorpion-group.co.uk
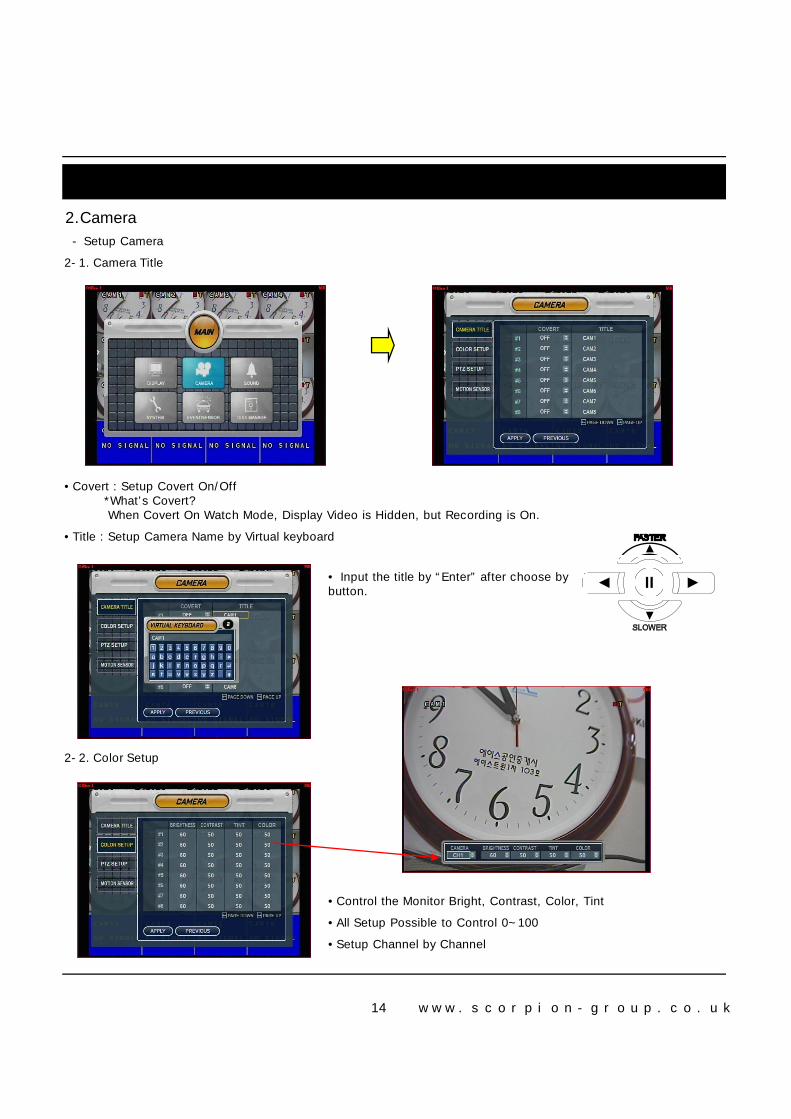
2.Camera
-SetupCamera
2-1.CameraTitle
5. Menu
• Covert:SetupCovertOn/Off*What’sCovert?WhenCovertOnWatchMode,DisplayVideoisHidden,butRecordingisOn.
• Title:SetupCameraNamebyVirtualkeyboard
• ControltheMonitorBright,Contrast,Color,Tint
• AllSetupPossibletoControl0~100
• SetupChannelbyChannel
2-2.ColorSetup
• Inputthetitleby“Enter” afterchoosebybutton.
14 www.scorpion-group.co.uk

5. Menu
?áHowtousetheVirtualKeyboard
• Inputthetitleby“Enter” afterchooseby
• Pressthe buttonforshiftthenchoosetheothercharacters.
Tip
2-3.PTZSetup
• Address:SelectPTZCameraAddress• PTZProtocol:SelectKindofPTZCamera • Enter buttonandsetupthedetailedPTZ• BaudRate:SetupPTZCommunicationSpeed
(2400,4800,9600,19200,38400BPS)
?ePTZSuppliedProtocol:Samsung(MRX-1000),Samsung(SCC641),Honeywell(SD1)Honeywell((GMC),Lilin(Fastdome),Fastrax(?�),GC(655N),D-MAX,SuninDSC-230,ScanDome-?²,Vicon,Philips8560-700Sensormatic,Panasonic(WV-CS850),Panasonic(WV-CSR604),VRX-2101Kalatel(KTD-312),PELCO-D,PELCO-P,Dynacolor(D7722)
15 www.scorpion-group.co.uk
5. Menu
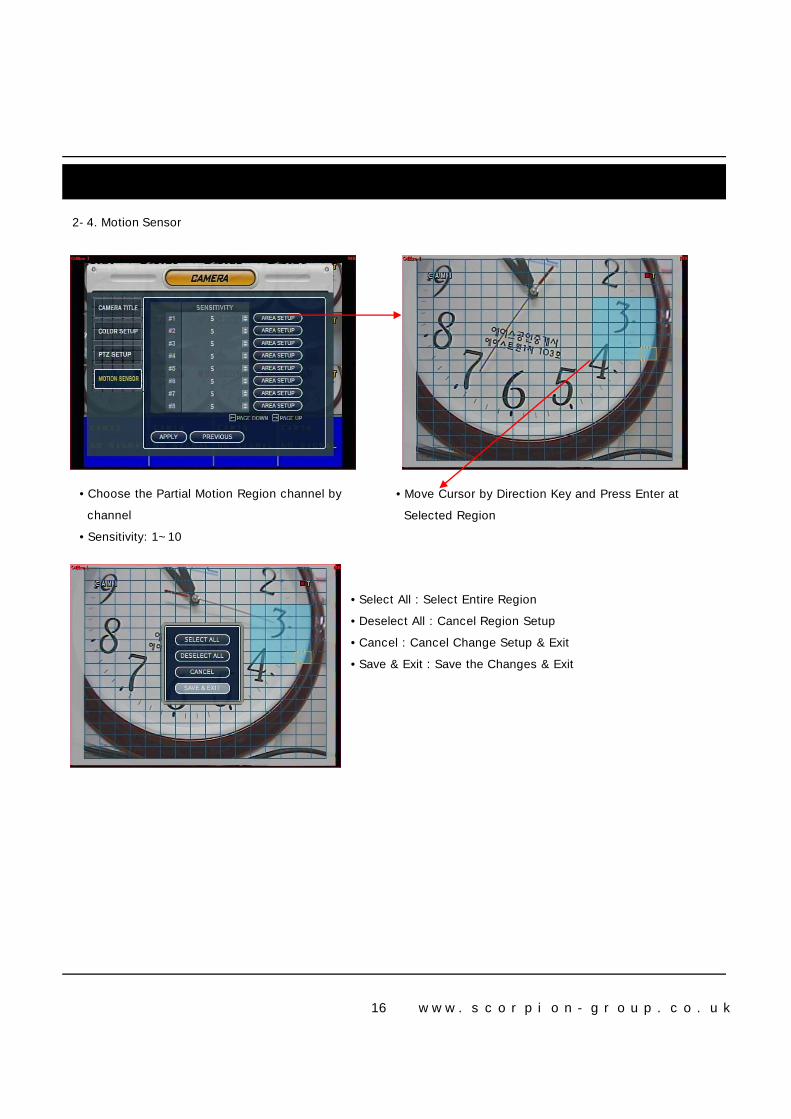
2-4.MotionSensor
• MoveCursorbyDirectionKeyandPressEnterat
SelectedRegion
• ChoosethePartialMotionRegionchannelby
channel
• Sensitivity:1~10
• SelectAll:SelectEntireRegion
• DeselectAll:CancelRegionSetup
• Cancel:CancelChangeSetup&Exit
• Save&Exit:SavetheChanges&Exit
16 www.scorpion-group.co.uk
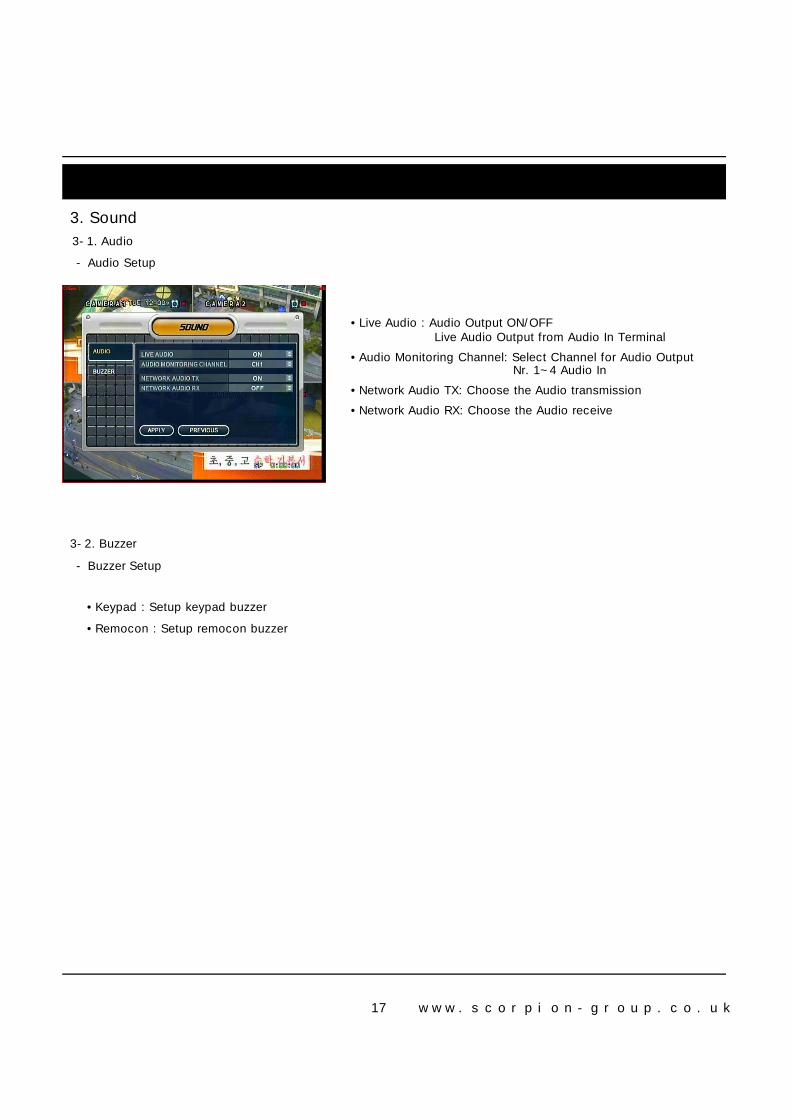
5. Menu3.Sound
3-1.Audio
-AudioSetup
• LiveAudio:AudioOutputON/OFFLiveAudioOutputfromAudioInTerminal
• AudioMonitoringChannel:SelectChannelforAudioOutput1 Nr.1~4AudioIn
• NetworkAudioTX:ChoosetheAudiotransmission
• NetworkAudioRX:ChoosetheAudioreceive
3-2.Buzzer
-BuzzerSetup
• Keypad:Setupkeypadbuzzer
• Remocon:Setupremoconbuzzer
17 www.scorpion-group.co.uk
5. Menu
4.System
-BasicEnvironmentSetup
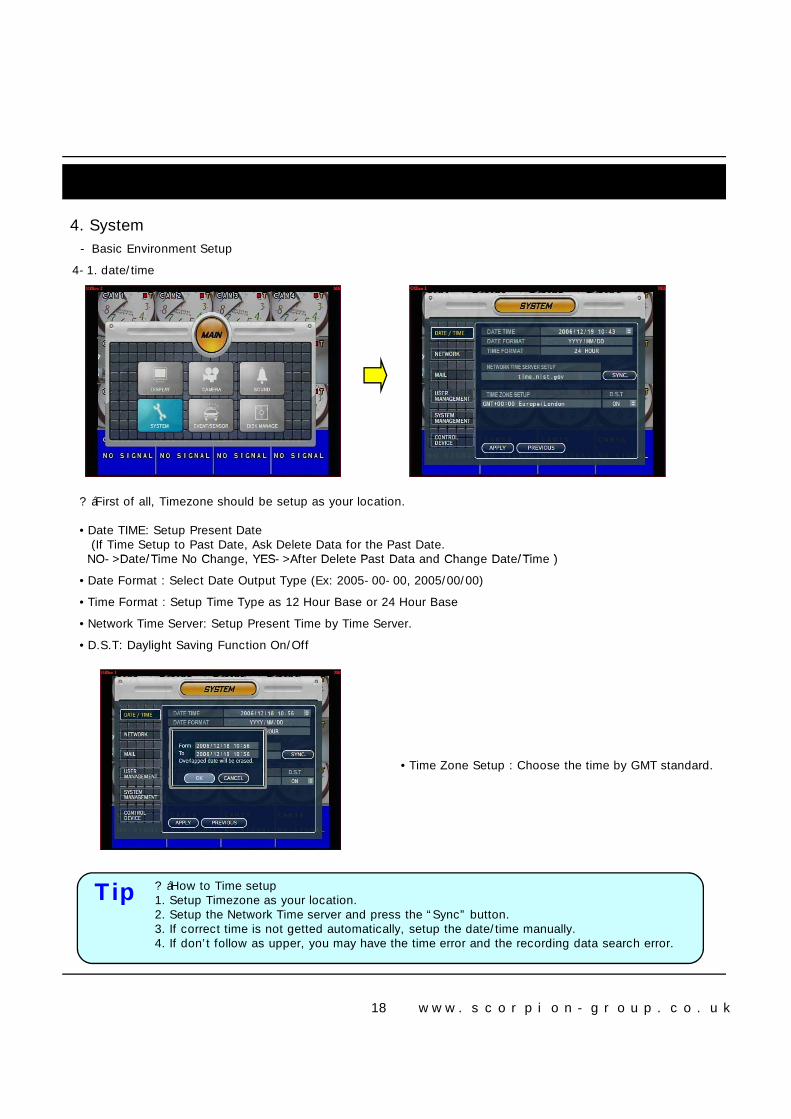
4-1.date/time
?áFirstofall,Timezoneshouldbesetupasyourlocation.
• DateTIME:SetupPresentDate(IfTimeSetuptoPastDate,AskDeleteDataforthePastDate.NO->Date/TimeNoChange,YES->AfterDeletePastDataandChangeDate/Time)
• TimeZoneSetup:ChoosethetimebyGMTstandard.
?áHowtoTimesetup1.SetupTimezoneasyourlocation.2.SetuptheNetworkTimeserverandpressthe“Sync” button.3.Ifcorrecttimeisnotgettedautomatically,setupthedate/timemanually.4.Ifdon’tfollowasupper,youmayhavethetimeerrorandtherecordingdatasearcherror.
Tip
NO->Date/TimeNoChange,YES->AfterDeletePastDataandChangeDate/Time)
• DateFormat:SelectDateOutputType(Ex:2005-00-00,2005/00/00)
• TimeFormat:SetupTimeTypeas12HourBaseor24HourBase
• NetworkTimeServer:SetupPresentTimebyTimeServer.
• D.S.T:DaylightSavingFunctionOn/Off
18 www.scorpion-group.co.uk
5. Menu
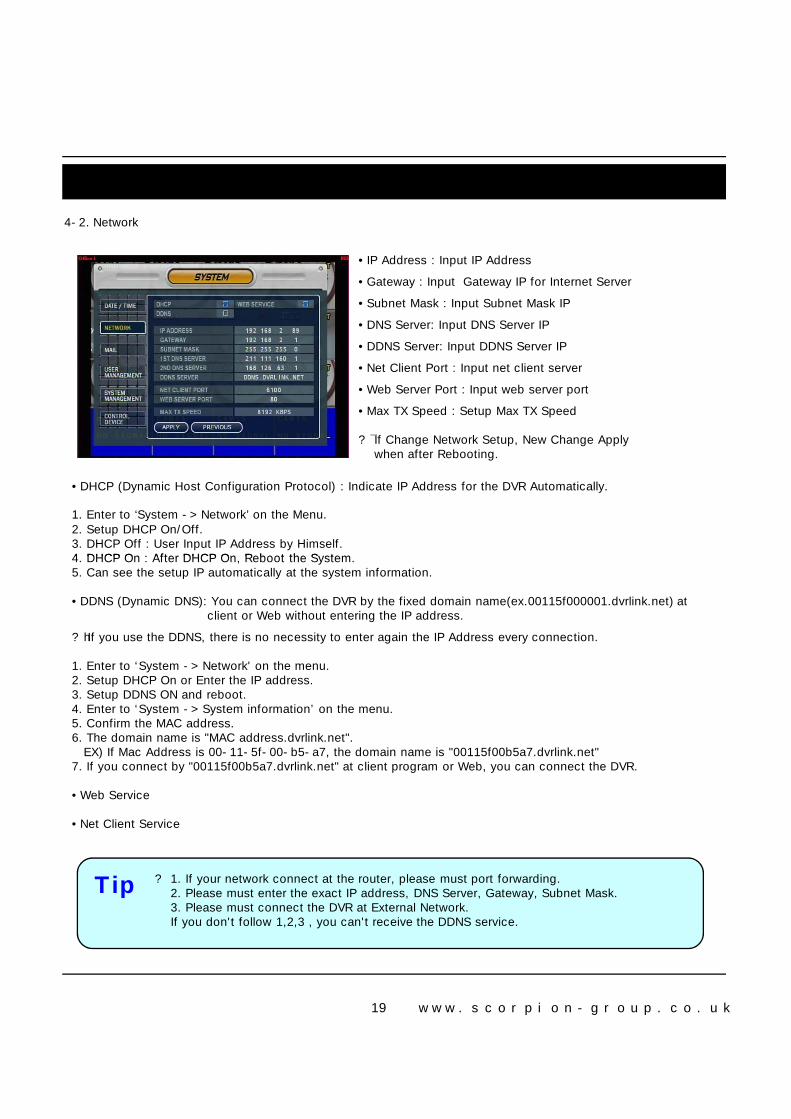
4-2.Network
• IPAddress:InputIPAddress
• Gateway:InputGatewayIPforInternetServer
• SubnetMask:InputSubnetMaskIP
• DNSServer:InputDNSServerIP
• DDNSServer:InputDDNSServerIP
• NetClientPort:Inputnetclientserver
• WebServerPort:Inputwebserverport
• MaxTXSpeed:SetupMaxTXSpeed
? IfChangeNetworkSetup,NewChangeApplywhenafterRebooting.
• DHCP(DynamicHostConfigurationProtocol):IndicateIPAddressfortheDVRAutomatically.
1.Enterto‘System->Network’ ontheMenu.2.SetupDHCPOn/Off.3.DHCPOff:UserInputIPAddressbyHimself.4.DHCPOn:AfterDHCPOn,ReboottheSystem.4.DHCPOn:AfterDHCPOn,ReboottheSystem.5.CanseethesetupIPautomaticallyatthesysteminformation.
• DDNS(DynamicDNS):YoucanconnecttheDVRbythefixeddomainname(ex.00115f000001.dvrlink.net)atclientorWebwithoutenteringtheIPaddress.
?hIfyouusetheDDNS,thereisnonecessitytoenteragaintheIPAddresseveryconnection.
1.Enterto‘System->Network'onthemenu.2.SetupDHCPOnorEntertheIPaddress.3.SetupDDNSONandreboot.4.Enterto‘System->Systeminformation’ onthemenu.5.ConfirmtheMACaddress.6.Thedomainnameis"MACaddress.dvrlink.net".EX)IfMacAddressis00-11-5f-00-b5-a7,thedomainnameis"00115f00b5a7.dvrlink.net"7.Ifyouconnectby"00115f00b5a7.dvrlink.net"atclientprogramorWeb,youcanconnecttheDVR.
• WebService
• NetClientService
?�1.Ifyournetworkconnectattherouter,pleasemustportforwarding.2.PleasemustentertheexactIPaddress,DNSServer,Gateway,SubnetMask.3.PleasemustconnecttheDVRatExternalNetwork.Ifyoudon'tfollow1,2,3,youcan'treceivetheDDNSservice.
Tip
19 www.scorpion-group.co.uk
5. Menu
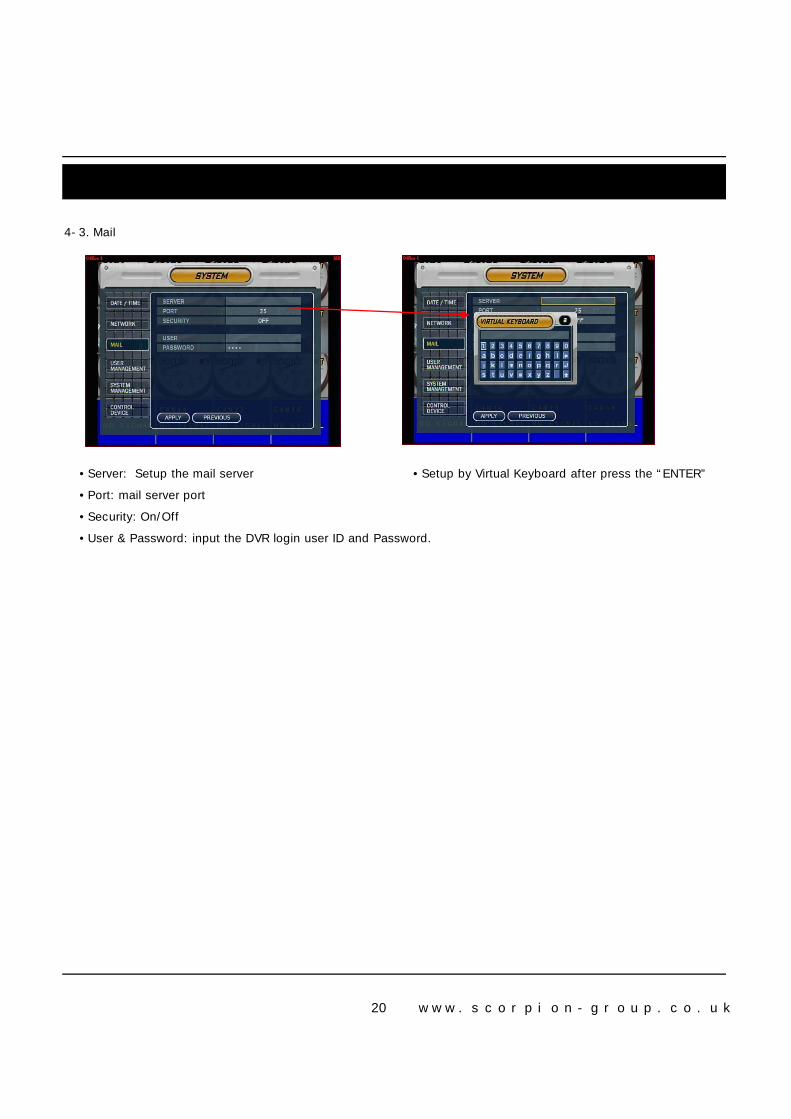
4-3.Mail
• Server:Setupthemailserver • SetupbyVirtualKeyboardafterpressthe“ENTER”
• Port:mailserverport
• Security:On/Off
• User&Password:inputtheDVRloginuserIDandPassword.
20 www.scorpion-group.co.uk
5. Menu
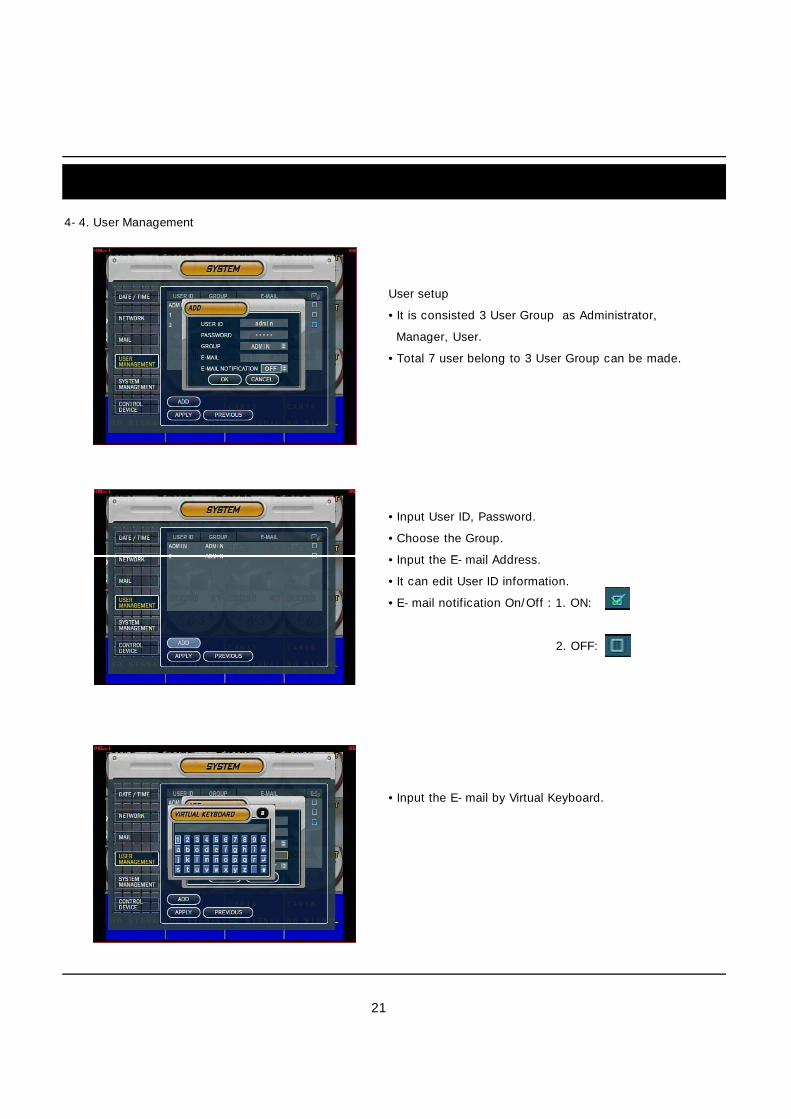
4-4.UserManagement
Usersetup
• Itisconsisted3UserGroupasAdministrator,
Manager,User.
• Total7userbelongto3UserGroupcanbemade.
• InputUserID,Password.
• ChoosetheGroup.
• InputtheE-mailAddress.• InputtheE-mailAddress.
• ItcaneditUserIDinformation.
• E-mailnotificationOn/Off:1.ON:
2.OFF:
• InputtheE-mailbyVirtualKeyboard.
21
5. Menu
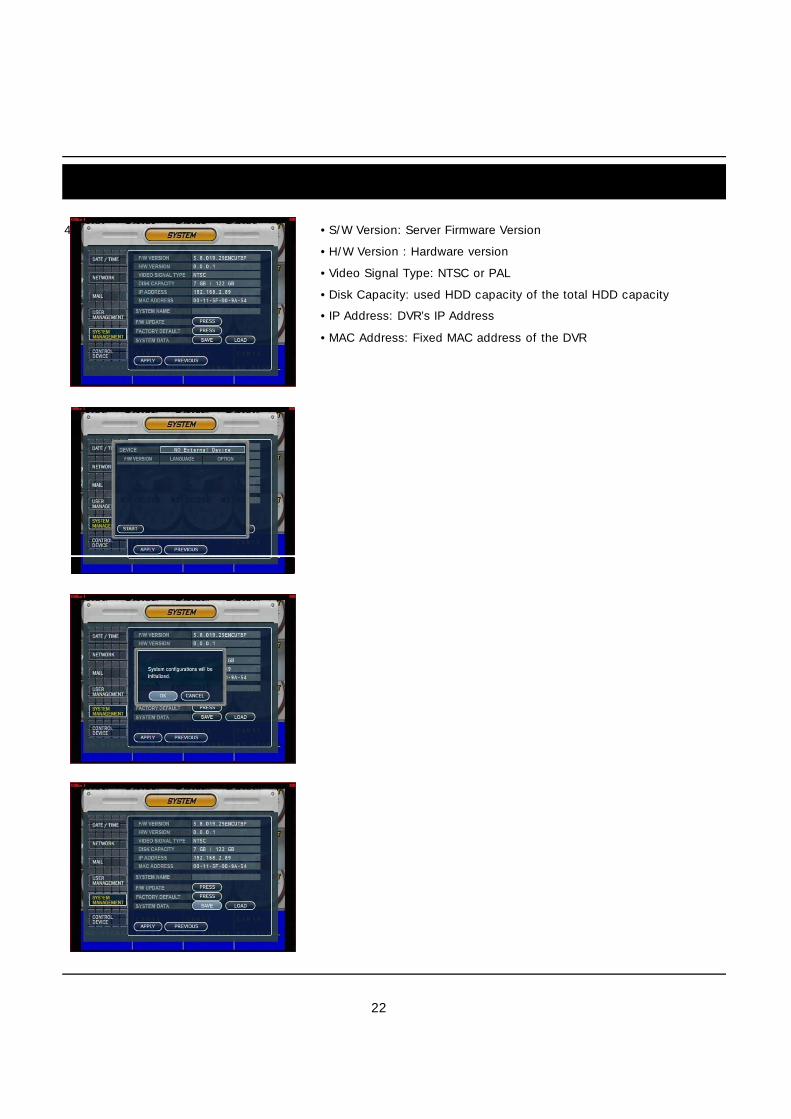
4-5.SystemInformation • S/WVersion:ServerFirmwareVersion
• H/WVersion:Hardwareversion
• VideoSignalType:NTSCorPAL
• DiskCapacity:usedHDDcapacityofthetotalHDDcapacity
• IPAddress:DVR’sIPAddress
• MACAddress:FixedMACaddressoftheDVR
22
5. Menu
4-6.FactoryDefault
• Press“Press” toStartInitialize.
• ShowingWarningMessageandPressOKtoRunInitialize.
• IfdoFactoryDefault,EverySetupisInitialized,butSavingImageisNotErase.
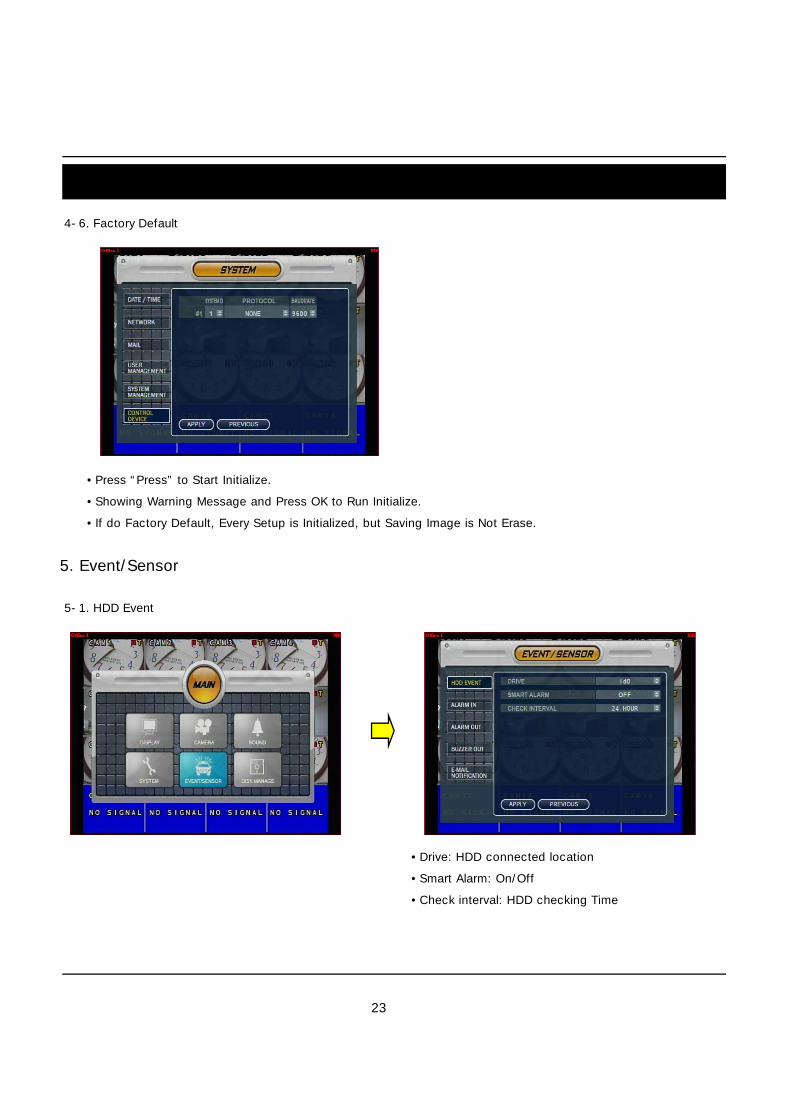
5.Event/Sensor
5-1.HDDEvent
• Drive:HDDconnectedlocation
• SmartAlarm:On/Off
• Checkinterval:HDDcheckingTime
23
5. Menu
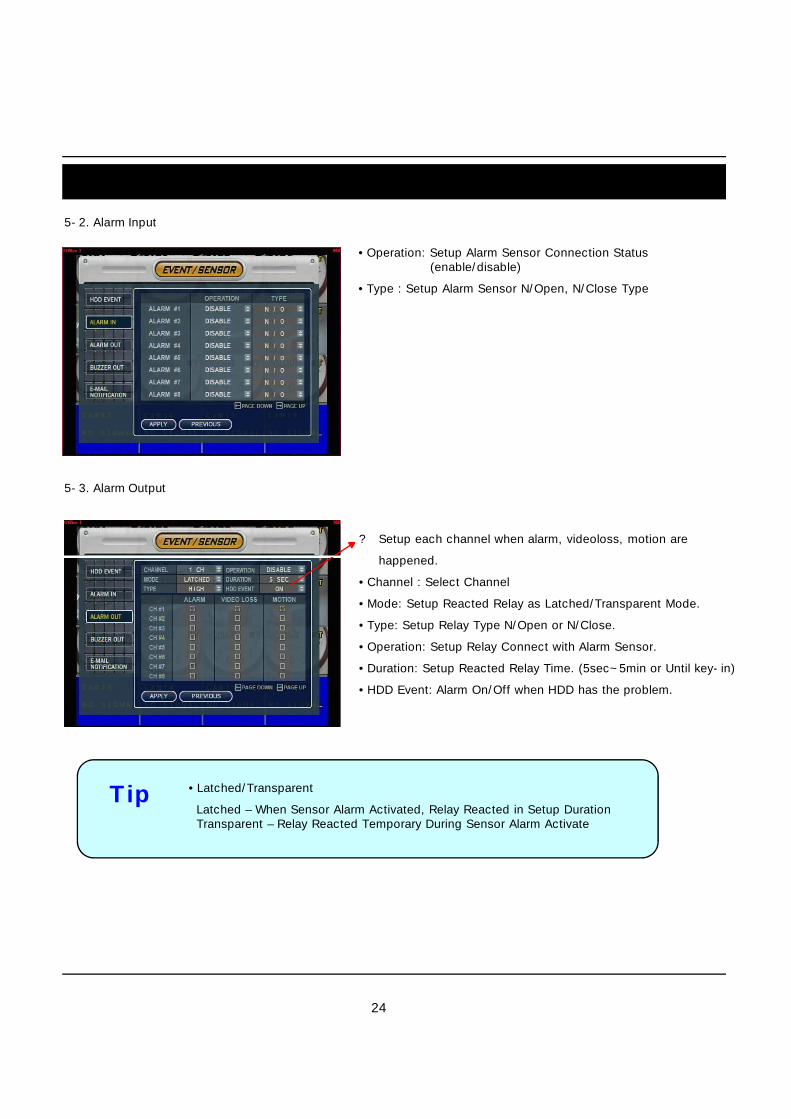
5-2.AlarmInput
5-3.AlarmOutput
?�Setupeachchannelwhenalarm,videoloss,motionare
happened.
• Operation:SetupAlarmSensorConnectionStatus(enable/disable)
• Type:SetupAlarmSensorN/Open,N/CloseType
happened.
• Channel:SelectChannel
• Mode:SetupReactedRelayasLatched/TransparentMode.
• Type:SetupRelayTypeN/OpenorN/Close.
• Operation:SetupRelayConnectwithAlarmSensor.
• Duration:SetupReactedRelayTime.(5sec~5minorUntilkey-in)
• HDDEvent:AlarmOn/OffwhenHDDhastheproblem.
• Latched/Transparent
Latched– WhenSensorAlarmActivated,RelayReactedinSetupDurationTransparent– RelayReactedTemporaryDuringSensorAlarmActivate
Tip
24

5. Menu
5-4.Buzzerout
• BuzzerOn/Off
• Operation:SetupBuzzer.
• Mode:SetupReactedRelayasLatched/TransparentMode.
• HDDEvent:BuzzerOn/OffwhenHDDeventishappened.
• Duration:Buzzertime(5sec~5minorUntilkey-in)
• setupeachchannelwhenalarm,videoloss,motionarehappened.
25
5. Menu
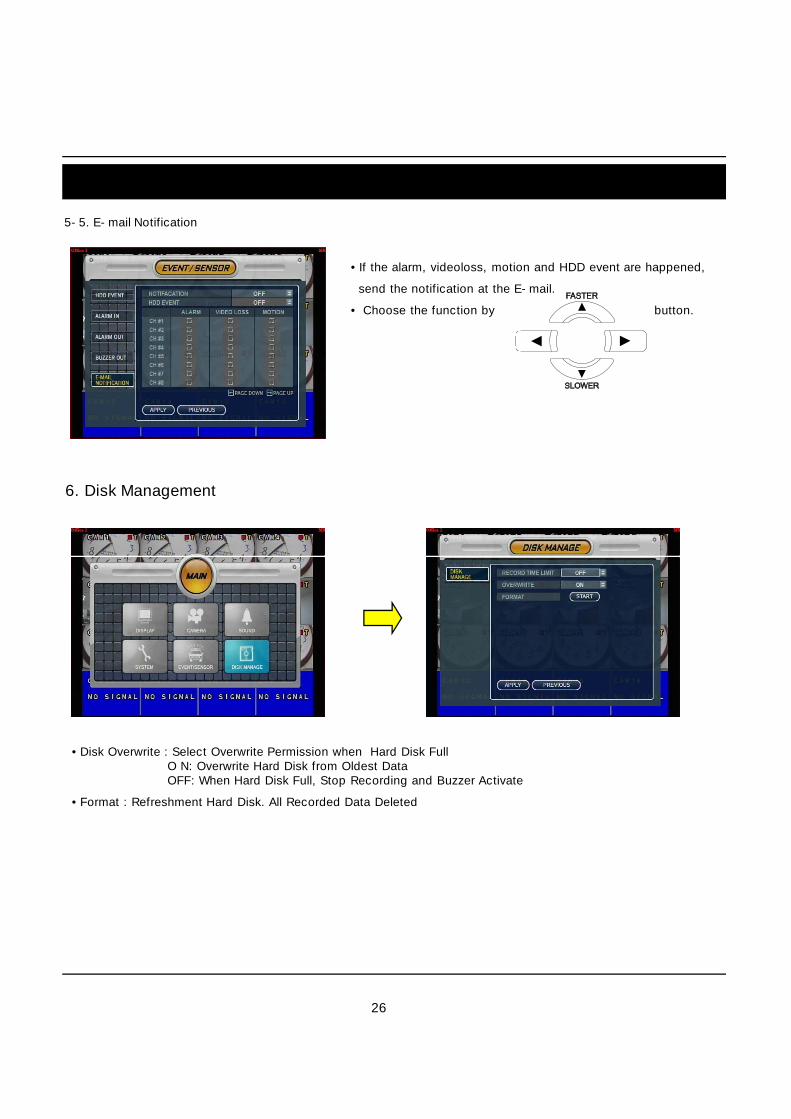
5-5.E-mailNotification
6.DiskManagement
• Ifthealarm,videoloss,motionandHDDeventarehappened,
sendthenotificationattheE-mail.
• Choosethefunctionby button.
• DiskOverwrite:SelectOverwritePermissionwhenHardDiskFullON:OverwriteHardDiskfromOldestDataOFF:WhenHardDiskFull,StopRecordingandBuzzerActivate
• Format:RefreshmentHardDisk.AllRecordedDataDeleted
26
5. Menu
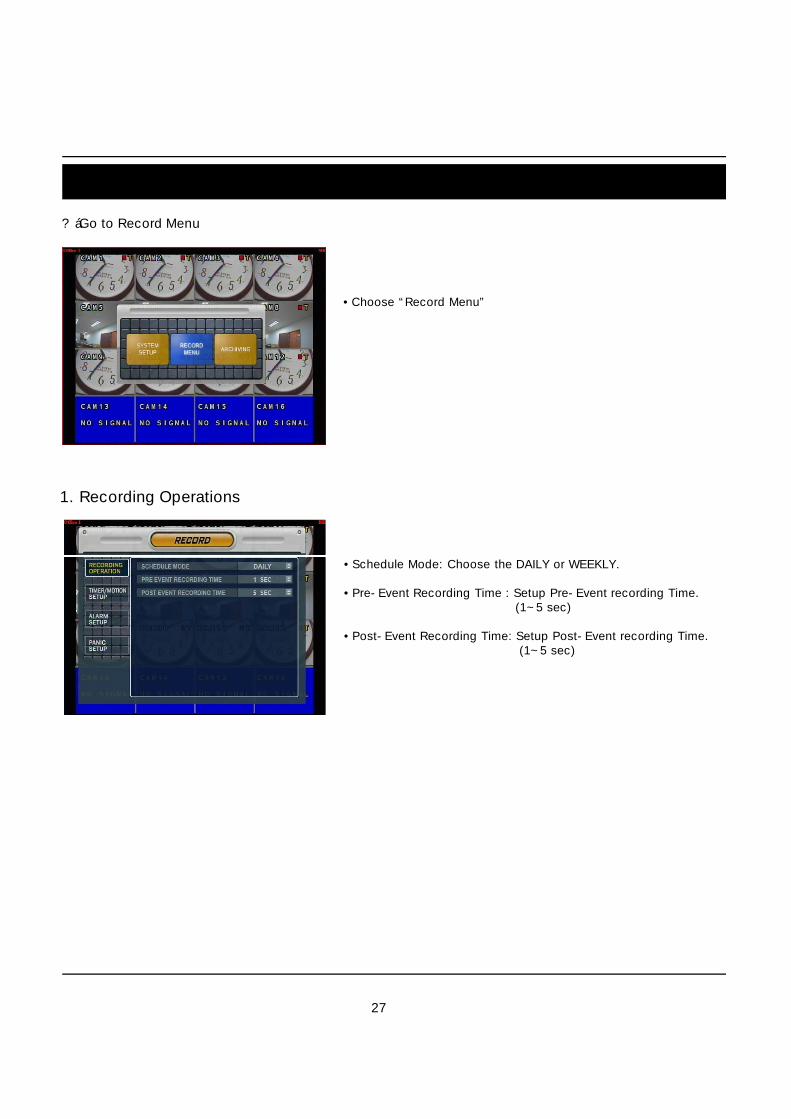
?áGotoRecordMenu
1.RecordingOperations
• Choose“RecordMenu”
• ScheduleMode:ChoosetheDAILYorWEEKLY.
• Pre-EventRecordingTime:SetupPre-EventrecordingTime. 1(1~5sec)
• Post-EventRecordingTime:SetupPost-EventrecordingTime. 1(1~5sec)
27

5. Menu
2.Continuous/MotionRecordSchedule
2-1.
2-2.
• Setupeachchannel
• Putthechooseareaathereandpress“Enter” button.
• Continuousrecordsetup
• Motionrecordsetup
• Setupeachchannel
• Setupeachday
28

5. Menu
3.AlarmRecordSchedule
3-1.
• Alarmrecordsetup• Setupeachchannel
• Putthechooseareaathereandpress“Enter” button.
3-2.
• Alarmrecordsetup
• Setupeachday
• Setupeachchannel
29
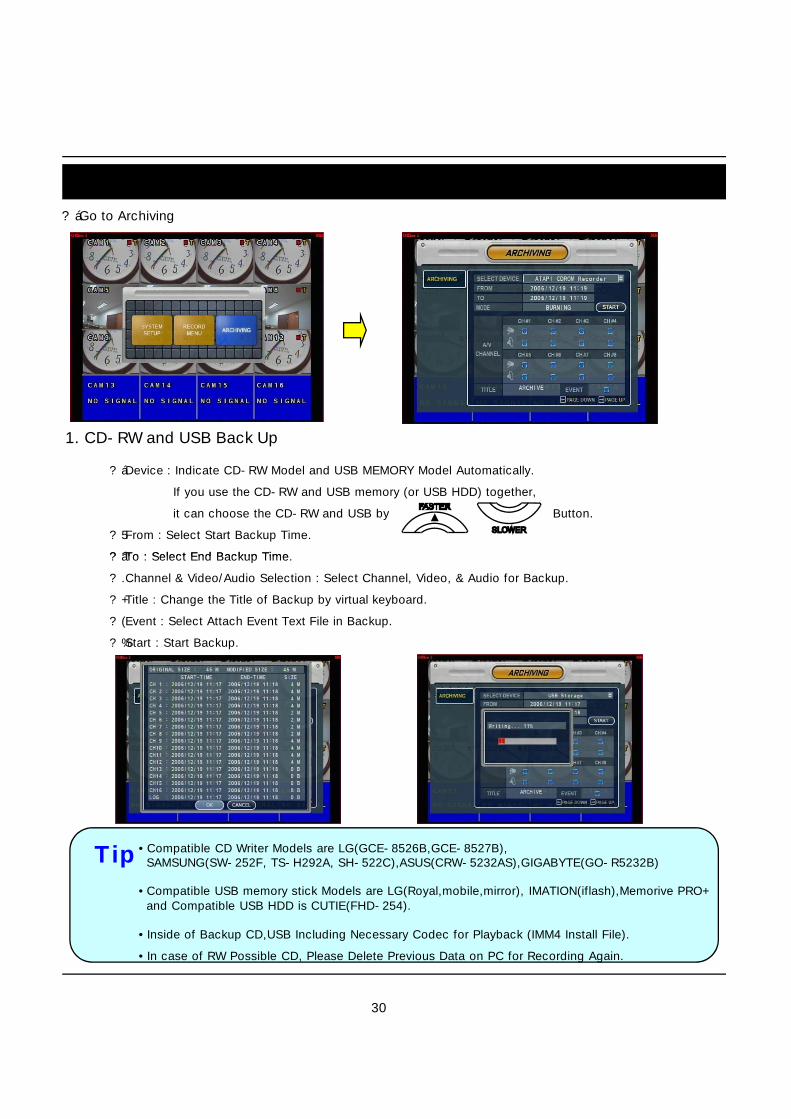
5. Menu?áGotoArchiving
?áDevice:IndicateCD-RWModelandUSBMEMORYModelAutomatically.
IfyouusetheCD-RWandUSBmemory(orUSBHDD)together,
itcanchoosetheCD-RWandUSBby Button.
?5From:SelectStartBackupTime.
?2To:SelectEndBackupTime.
1.CD-RWandUSBBackUp
?áTo:SelectEndBackupTime.
?.Channel&Video/AudioSelection:SelectChannel,Video,&AudioforBackup.
?+Title:ChangetheTitleofBackupbyvirtualkeyboard.
?(Event:SelectAttachEventTextFileinBackup.
?%Start:StartBackup.
Tip • CompatibleCDWriterModelsareLG(GCE-8526B,GCE-8527B),SAMSUNG(SW-252F,TS-H292A,SH-522C),ASUS(CRW-5232AS),GIGABYTE(GO-R5232B)
• CompatibleUSBmemorystickModelsareLG(Royal,mobile,mirror),IMATION(iflash),MemorivePRO+andCompatibleUSBHDDisCUTIE(FHD-254).
• InsideofBackupCD,USBIncludingNecessaryCodecforPlayback(IMM4InstallFile).
• IncaseofRWPossibleCD,PleaseDeletePreviousDataonPCforRecordingAgain.
30

7. Client
• SystemRequirement
?7MainBoard(CPU):Pentium-500(Minimum),Pentium4recommend?àOS:HigherthanWindows98,DirectX7.0A?ŠMemory(RAM):Morethan128M?3VGA:GraphiccardthatsupporttheDIRECT-X?ÝIMM4Codec(WhenPlaybackBackupFile)
• DVRRemoteAgentInstall
?•OpenCD-ROMDriveandRunDvrRemoteAgentSetup.exeandthenAppearSetupMenu
31
?áCloseAllRunningSoftwareandPressNexttoMoveNextStep
7. Client
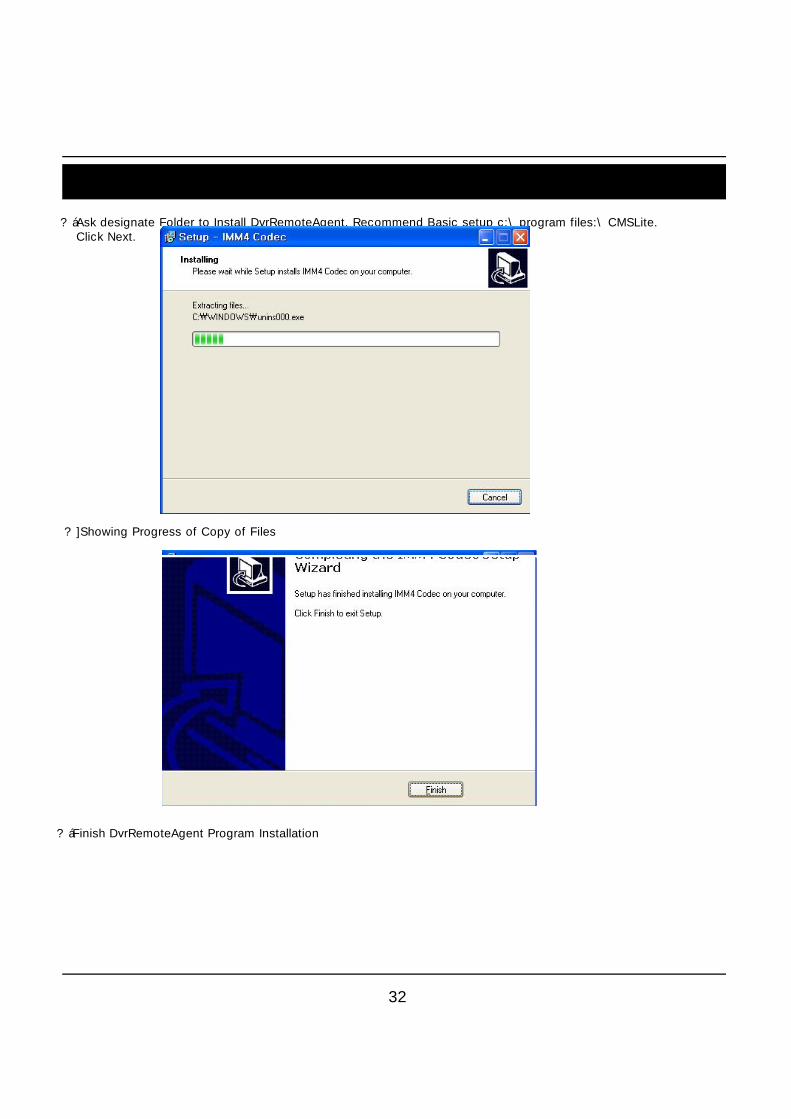
?áAskdesignateFoldertoInstallDvrRemoteAgent,RecommendBasicsetupc:\programfiles:\CMSLite.ClickNext.
?]ShowingProgressofCopyofFiles
32
?áFinishDvrRemoteAgentProgramInstallation
7. Client
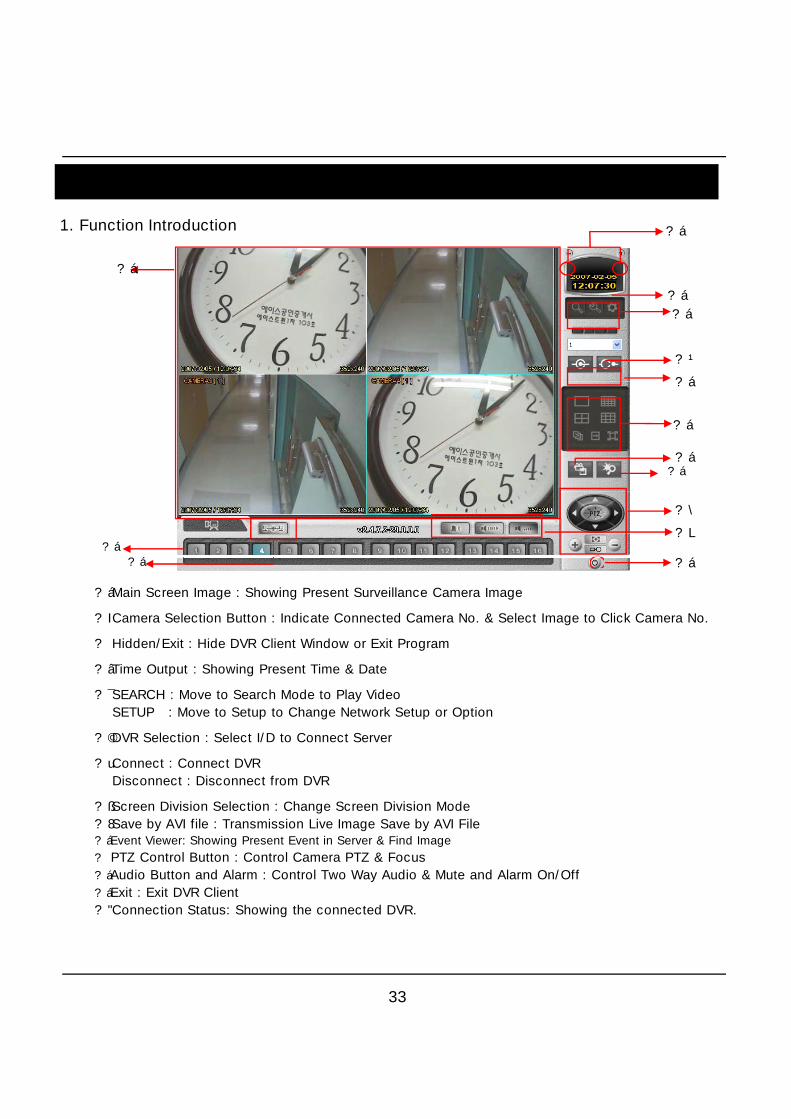
1.FunctionIntroduction ?á
?á
?á
?¹
?á
?á
?\
?L
?á?á
?á
?á
?á
?á
33
?áMainScreenImage:ShowingPresentSurveillanceCameraImage
?ICameraSelectionButton:IndicateConnectedCameraNo.&SelectImagetoClickCameraNo.
?�Hidden/Exit:HideDVRClientWindoworExitProgram
?âTimeOutput:ShowingPresentTime&Date
? SEARCH:MovetoSearchModetoPlayVideo
SETUP :MovetoSetuptoChangeNetworkSetuporOption
?©DVRSelection:SelectI/DtoConnectServer
?uConnect:ConnectDVR
Disconnect:DisconnectfromDVR
?ßScreenDivisionSelection:ChangeScreenDivisionMode
?8SavebyAVIfile:TransmissionLiveImageSavebyAVIFile?áEventViewer:ShowingPresentEventinServer&FindImage
?�PTZControlButton:ControlCameraPTZ&Focus
?áAudioButtonandAlarm:ControlTwoWayAudio&MuteandAlarmOn/Off
?áExit:ExitDVRClient
?"ConnectionStatus:ShowingtheconnectedDVR.
?á?á
7. Client2.Setting
?á
?r ?r ?r
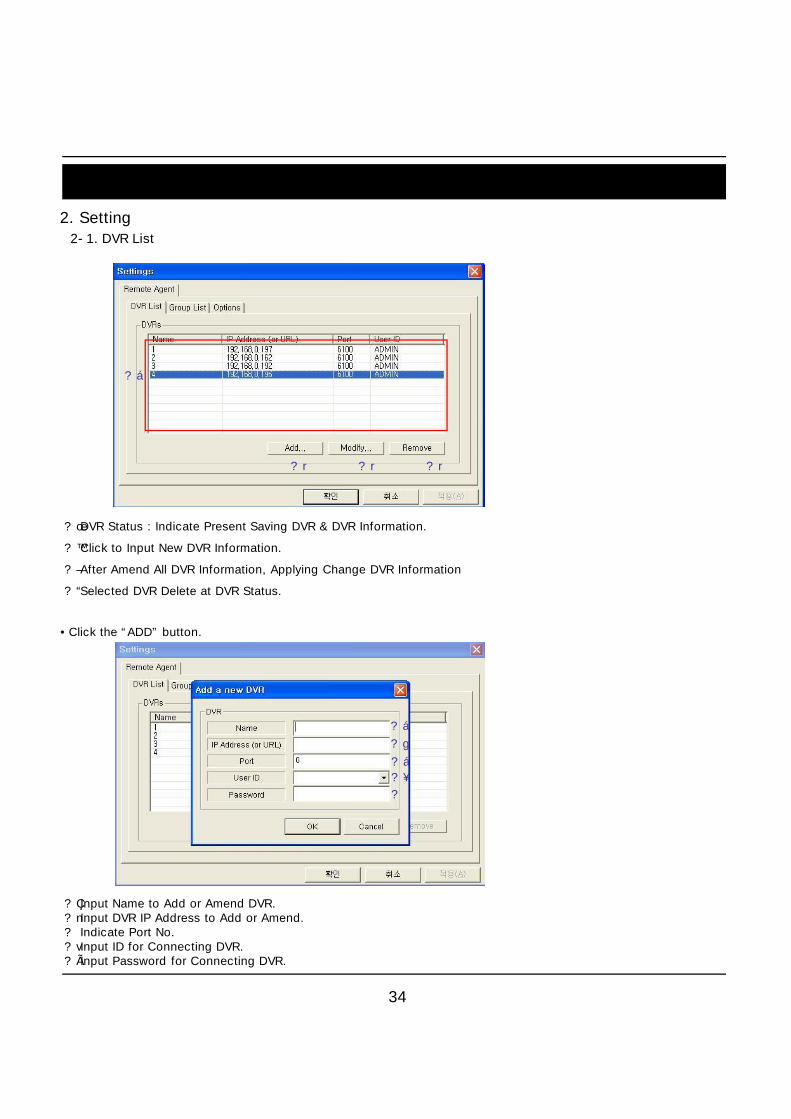
?œDVRStatus:IndicatePresentSavingDVR&DVRInformation.
?™ClicktoInputNewDVRInformation.
2-1.DVRList
34
• Clickthe“ADD” button.
?á
?g
?–AfterAmendAllDVRInformation,ApplyingChangeDVRInformation
?“SelectedDVRDeleteatDVRStatus.
?á
?¥
?
?ÇInputNametoAddorAmendDVR.?nInputDVRIPAddresstoAddorAmend.?�IndicatePortNo.?vInputIDforConnectingDVR.?ÃInputPasswordforConnectingDVR.
7. Client2-2.GroupList
?á
?á
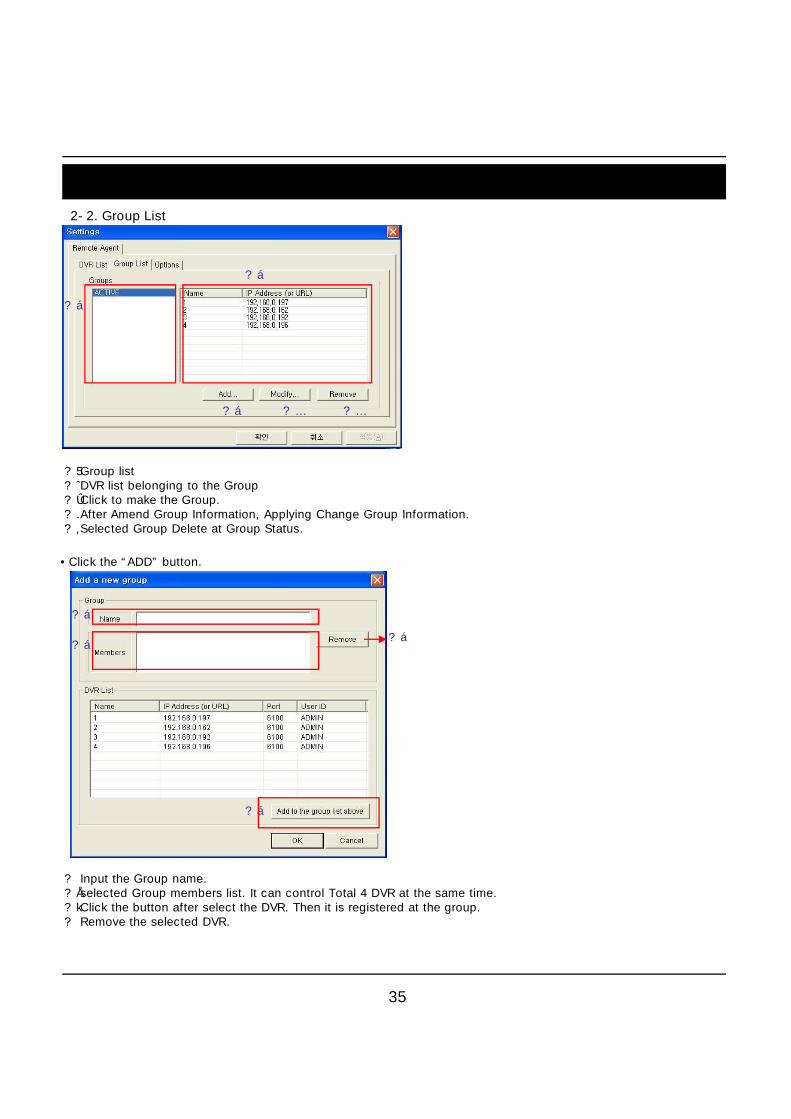
?5Grouplist?ˆDVRlistbelongingtotheGroup?ÛClicktomaketheGroup.?.AfterAmendGroupInformation,ApplyingChangeGroupInformation.?‚SelectedGroupDeleteatGroupStatus.
?á ?… ?…
• Clickthe“ADD” button.
35
• Clickthe“ADD” button.
?á
?á
?�InputtheGroupname.?ÅselectedGroupmemberslist.ItcancontrolTotal4DVRatthesametime.?kClickthebuttonafterselecttheDVR.Thenitisregisteredatthegroup.?�RemovetheselectedDVR.
?á
?á
7. Client2-3.Option
?á
?}
?Â
?L
?¾
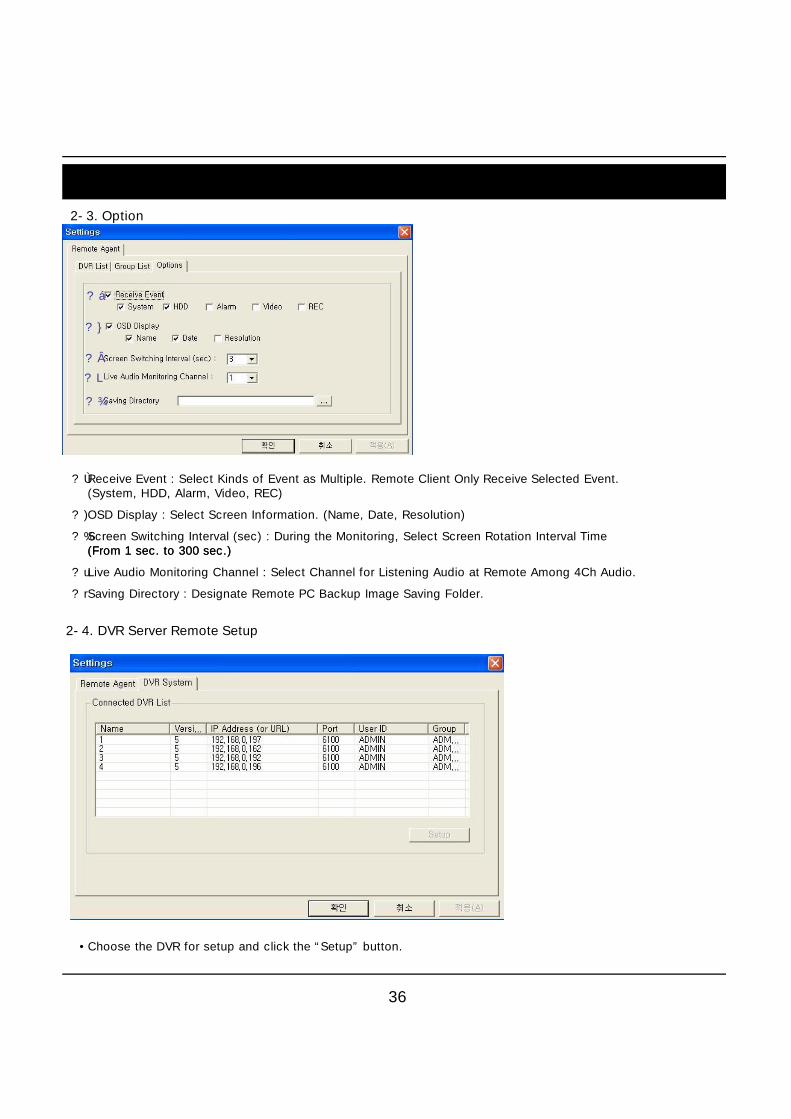
?ÙReceiveEvent:SelectKindsofEventasMultiple.RemoteClientOnlyReceiveSelectedEvent.(System,HDD,Alarm,Video,REC)
?)OSDDisplay:SelectScreenInformation.(Name,Date,Resolution)
?%ScreenSwitchingInterval(sec):DuringtheMonitoring,SelectScreenRotationIntervalTime(From1sec.to300sec.)
36
(From1sec.to300sec.)
?uLiveAudioMonitoringChannel:SelectChannelforListeningAudioatRemoteAmong4ChAudio.
?rSavingDirectory:DesignateRemotePCBackupImageSavingFolder.
2-4.DVRServerRemoteSetup
• ChoosetheDVRforsetupandclickthe“Setup” button.
7. Client
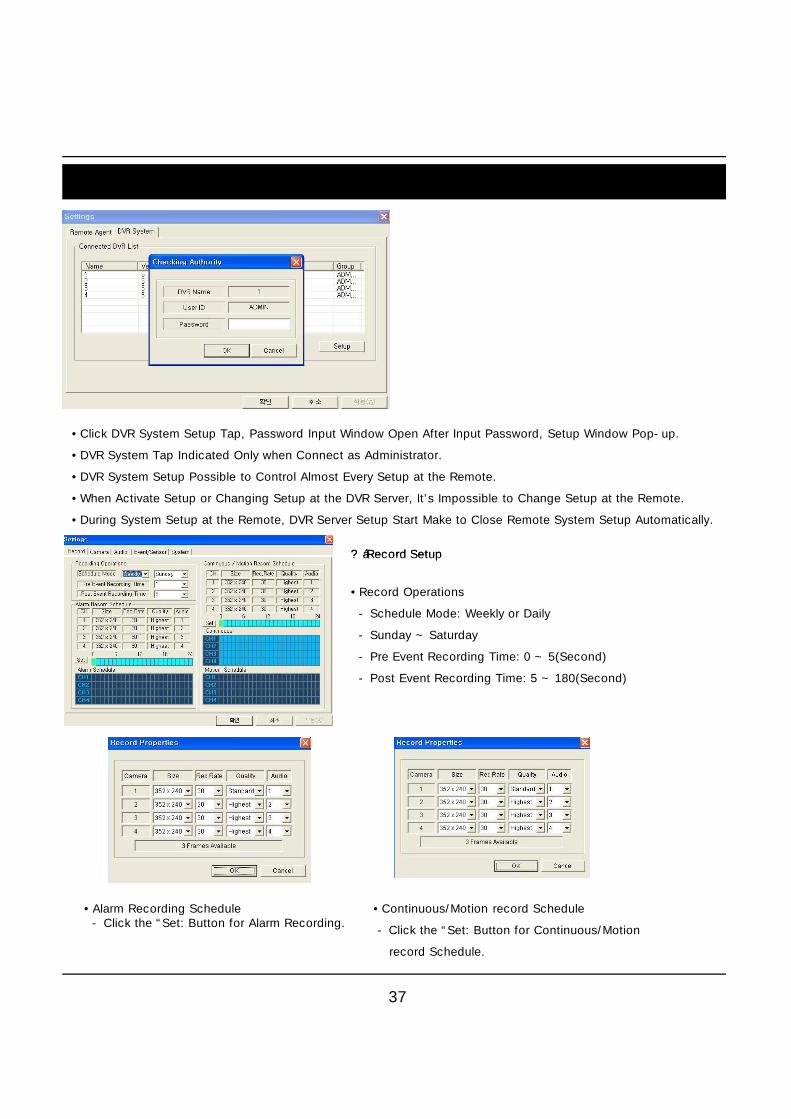
• ClickDVRSystemSetupTap,PasswordInputWindowOpenAfterInputPassword,SetupWindowPop-up.
• DVRSystemTapIndicatedOnlywhenConnectasAdministrator.
• DVRSystemSetupPossibletoControlAlmostEverySetupattheRemote.
• WhenActivateSetuporChangingSetupattheDVRServer,It’sImpossibletoChangeSetupattheRemote.
• DuringSystemSetupattheRemote,DVRServerSetupStartMaketoCloseRemoteSystemSetupAutomatically.
?áRecordSetup
37
• RecordOperations
-ScheduleMode:WeeklyorDaily
-Sunday~Saturday
-PreEventRecordingTime:0~5(Second)
-PostEventRecordingTime:5~180(Second)
• AlarmRecordingSchedule-Clickthe“Set:ButtonforAlarmRecording.
• Continuous/MotionrecordSchedule
-Clickthe“Set:ButtonforContinuous/Motion
recordSchedule.
?áRecordSetup
7. Client
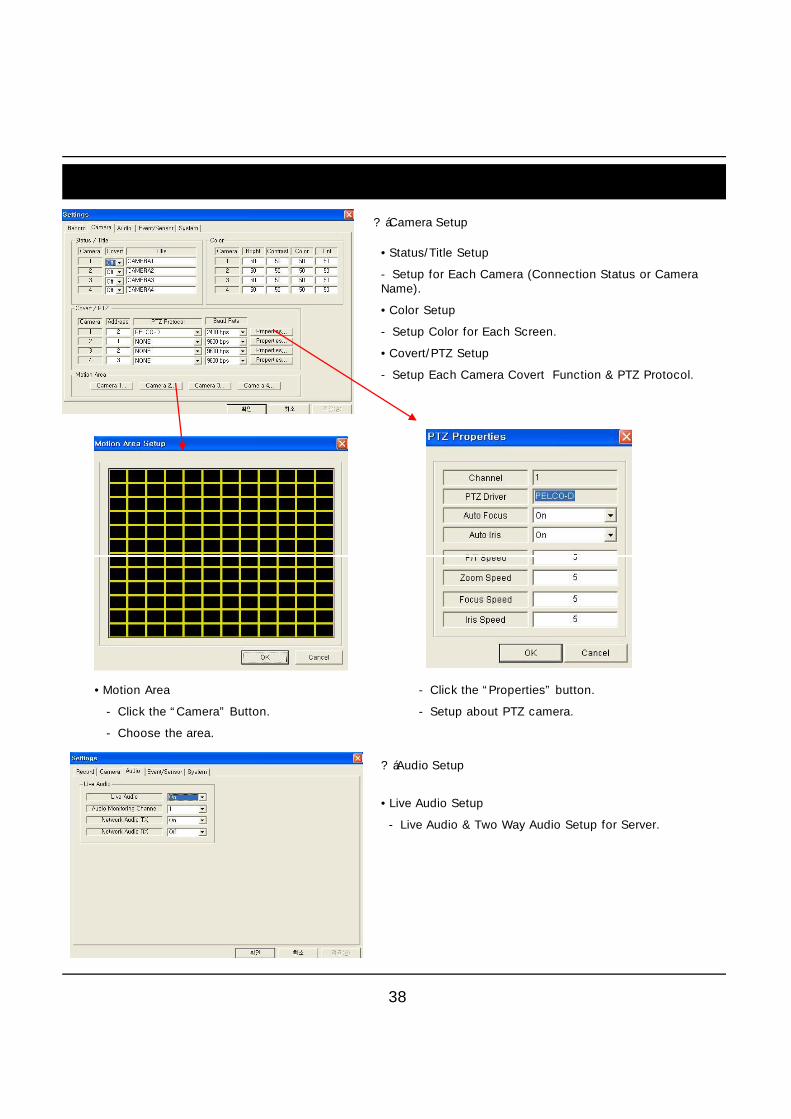
?áCameraSetup
• Status/TitleSetup
-SetupforEachCamera(ConnectionStatusorCameraName).
• ColorSetup
-SetupColorforEachScreen.
• Covert/PTZSetup
-SetupEachCameraCovertFunction&PTZProtocol.
38
-Clickthe“Properties” button.
-SetupaboutPTZcamera.
• MotionArea
-Clickthe“Camera” Button.
-Choosethearea.
?áAudioSetup
• LiveAudioSetup
-LiveAudio&TwoWayAudioSetupforServer.
7. Client
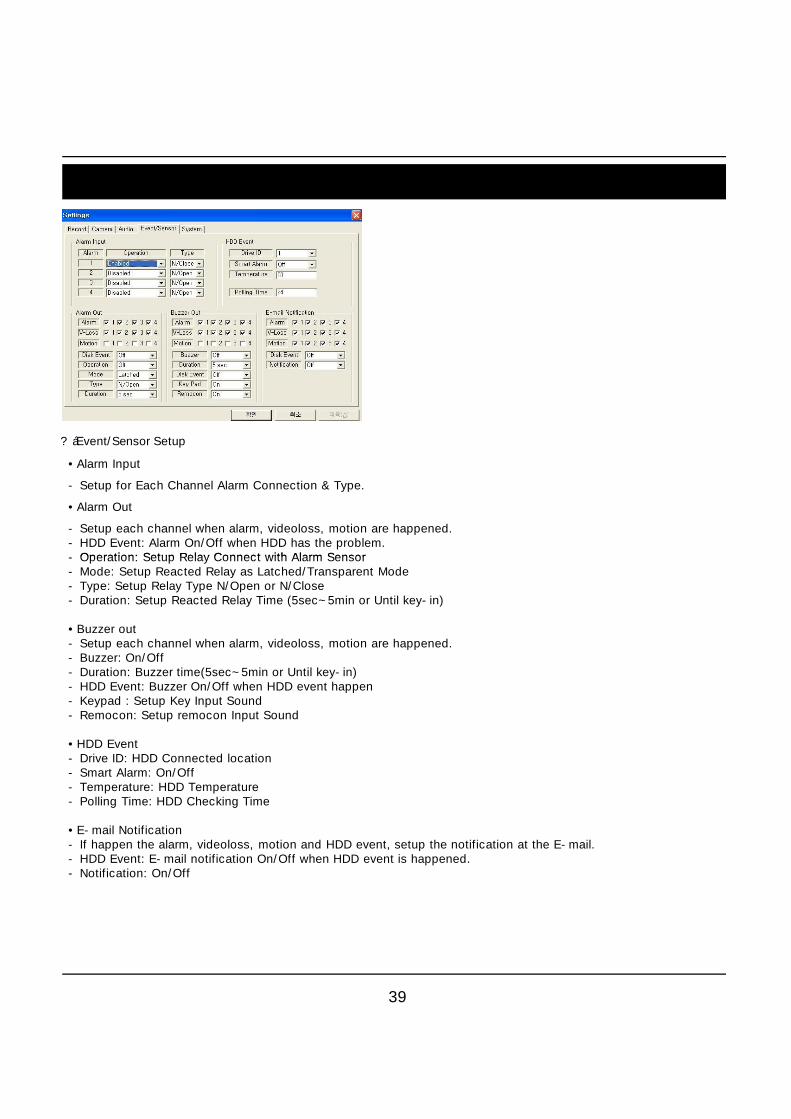
?áEvent/SensorSetup
• AlarmInput
-SetupforEachChannelAlarmConnection&Type.
• AlarmOut
-Setupeachchannelwhenalarm,videoloss,motionarehappened.-HDDEvent:AlarmOn/OffwhenHDDhastheproblem.-Operation:SetupRelayConnectwithAlarmSensor
39
-Operation:SetupRelayConnectwithAlarmSensor-Mode:SetupReactedRelayasLatched/TransparentMode-Type:SetupRelayTypeN/OpenorN/Close-Duration:SetupReactedRelayTime(5sec~5minorUntilkey-in)
• Buzzerout-Setupeachchannelwhenalarm,videoloss,motionarehappened.-Buzzer:On/Off-Duration:Buzzertime(5sec~5minorUntilkey-in)-HDDEvent:BuzzerOn/OffwhenHDDeventhappen-Keypad:SetupKeyInputSound-Remocon:SetupremoconInputSound
• HDDEvent-DriveID:HDDConnectedlocation-SmartAlarm:On/Off-Temperature:HDDTemperature-PollingTime:HDDCheckingTime
• E-mailNotification-Ifhappenthealarm,videoloss,motionandHDDevent,setupthenotificationattheE-mail.-HDDEvent:E-mailnotificationOn/OffwhenHDDeventishappened.-Notification:On/Off
7. Client
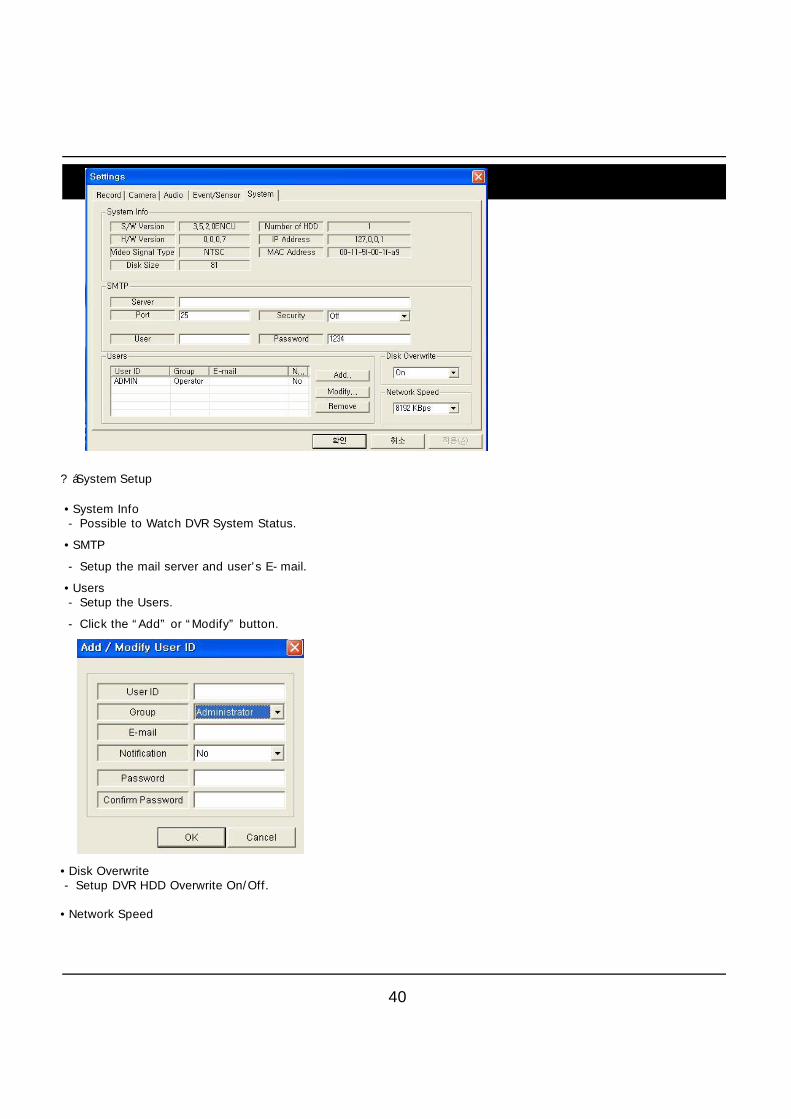
?áSystemSetup
• SystemInfo-PossibletoWatchDVRSystemStatus.
• SMTP
40
-Setupthemailserveranduser’sE-mail.
• Users-SetuptheUsers.
-Clickthe“Add” or“Modify” button.
• DiskOverwrite-SetupDVRHDDOverwriteOn/Off.
• NetworkSpeed
7. Client
3.Monitoring
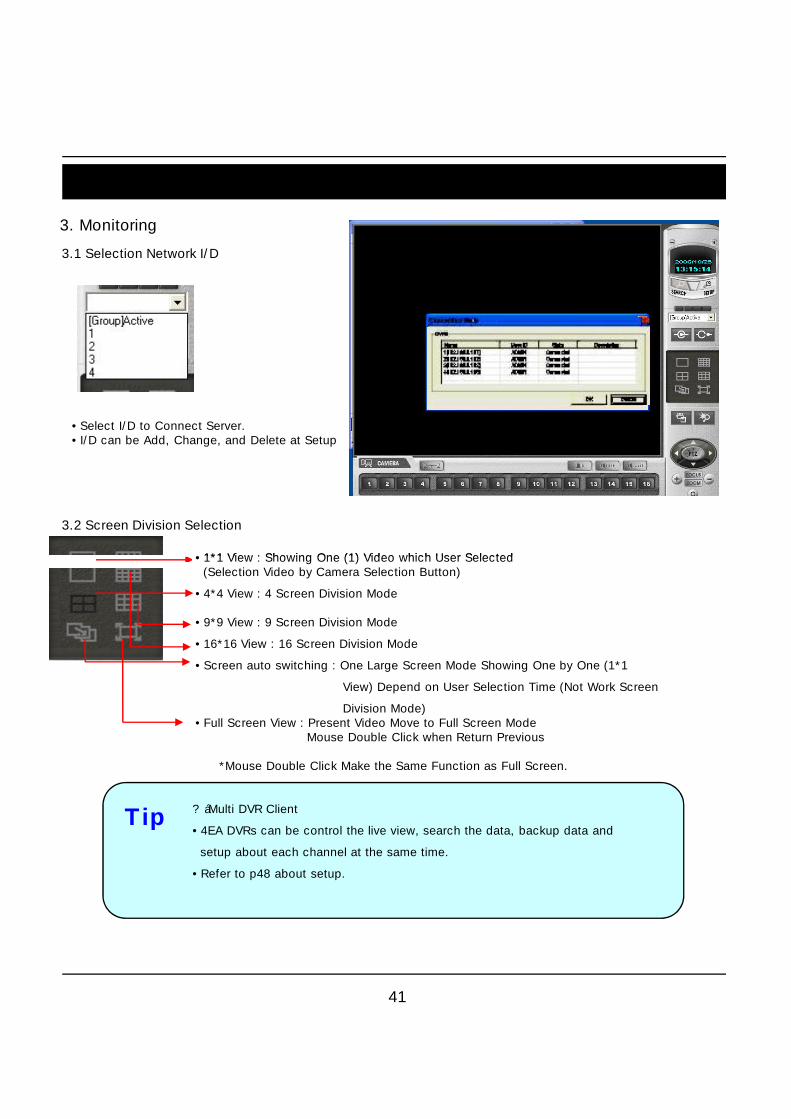
3.1SelectionNetworkI/D
• SelectI/DtoConnectServer.• I/DcanbeAdd,Change,andDeleteatSetup
3.2ScreenDivisionSelection
• 1*1View:ShowingOne(1)VideowhichUserSelected
41
• 1*1View:ShowingOne(1)VideowhichUserSelected(SelectionVideobyCameraSelectionButton)
• 4*4View:4ScreenDivisionMode
• 9*9View:9ScreenDivisionMode
• 16*16View:16ScreenDivisionMode
• Screenautoswitching:OneLargeScreenModeShowingOnebyOne(1*1
View)DependonUserSelectionTime(NotWorkScreen
DivisionMode)• FullScreenView:PresentVideoMovetoFullScreenMode
MouseDoubleClickwhenReturnPrevious
*MouseDoubleClickMaketheSameFunctionasFullScreen.
?áMultiDVRClient
• 4EADVRscanbecontroltheliveview,searchthedata,backupdataand
setupabouteachchannelatthesametime.
• Refertop48aboutsetup.
Tip
7. Client
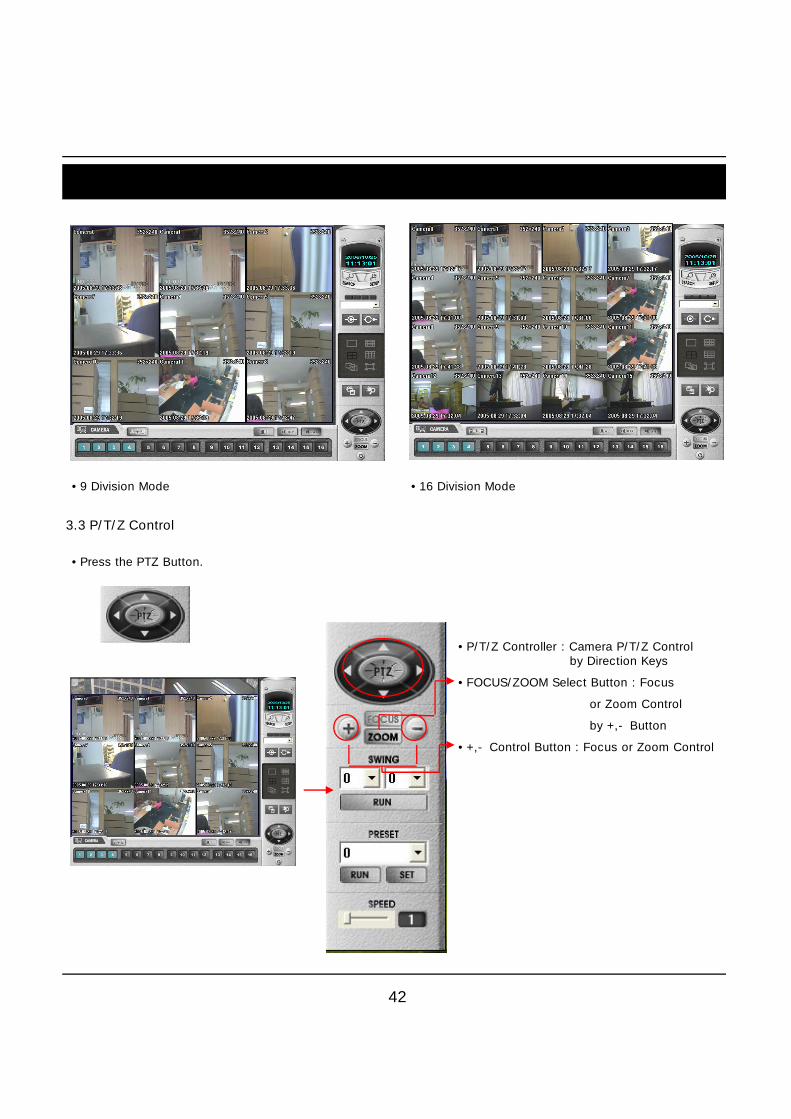
3.3P/T/ZControl
• 9DivisionMode • 16DivisionMode
• PressthePTZButton.
42
• P/T/ZController:CameraP/T/ZControlbyDirectionKeys
• FOCUS/ZOOMSelectButton:Focus
orZoomControl
by+,-Button
• +,-ControlButton:FocusorZoomControl
• PressthePTZButton.
7. Client
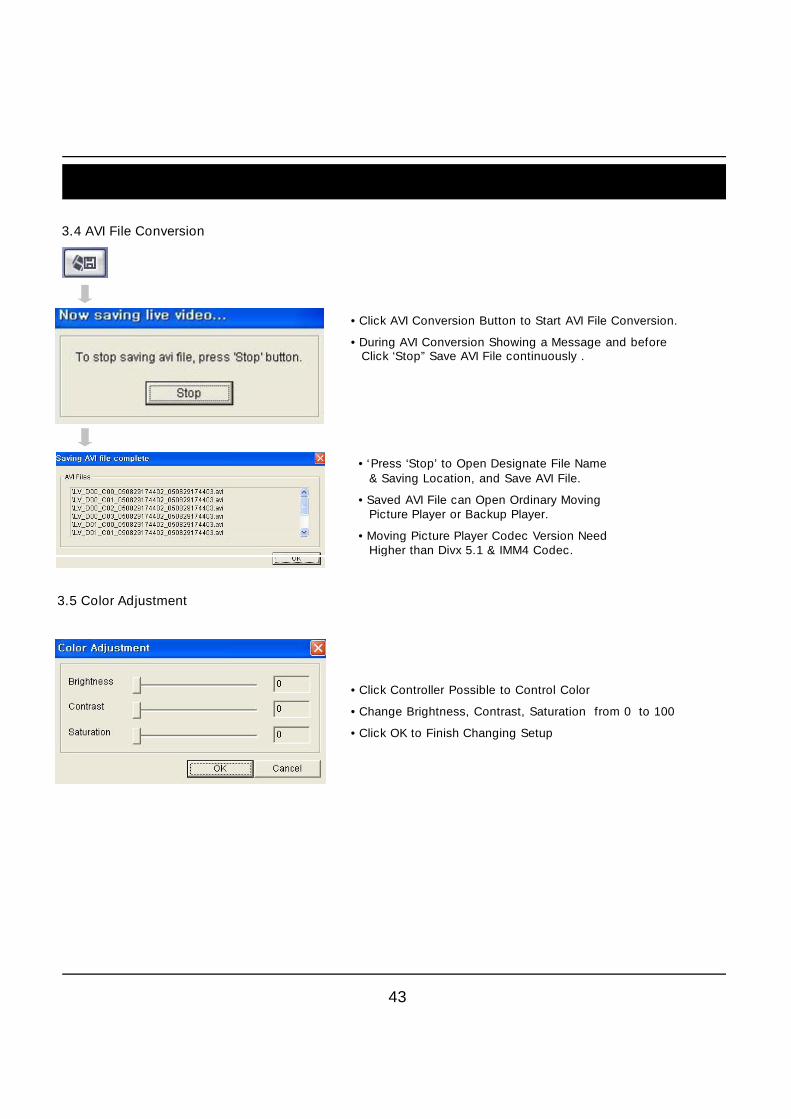
3.4AVIFileConversion
• ClickAVIConversionButtontoStartAVIFileConversion.
• DuringAVIConversionShowingaMessageandbefore1Click‘Stop” SaveAVIFilecontinuously.
• ‘Press‘Stop’ toOpenDesignateFileName1&SavingLocation,andSaveAVIFile.
• SavedAVIFilecanOpenOrdinaryMoving1PicturePlayerorBackupPlayer.
• MovingPicturePlayerCodecVersionNeed1HigherthanDivx5.1&IMM4Codec.
43
3.5ColorAdjustment
• ClickControllerPossibletoControlColor
• ChangeBrightness,Contrast,Saturationfrom0to100
• ClickOKtoFinishChangingSetup
7. Client
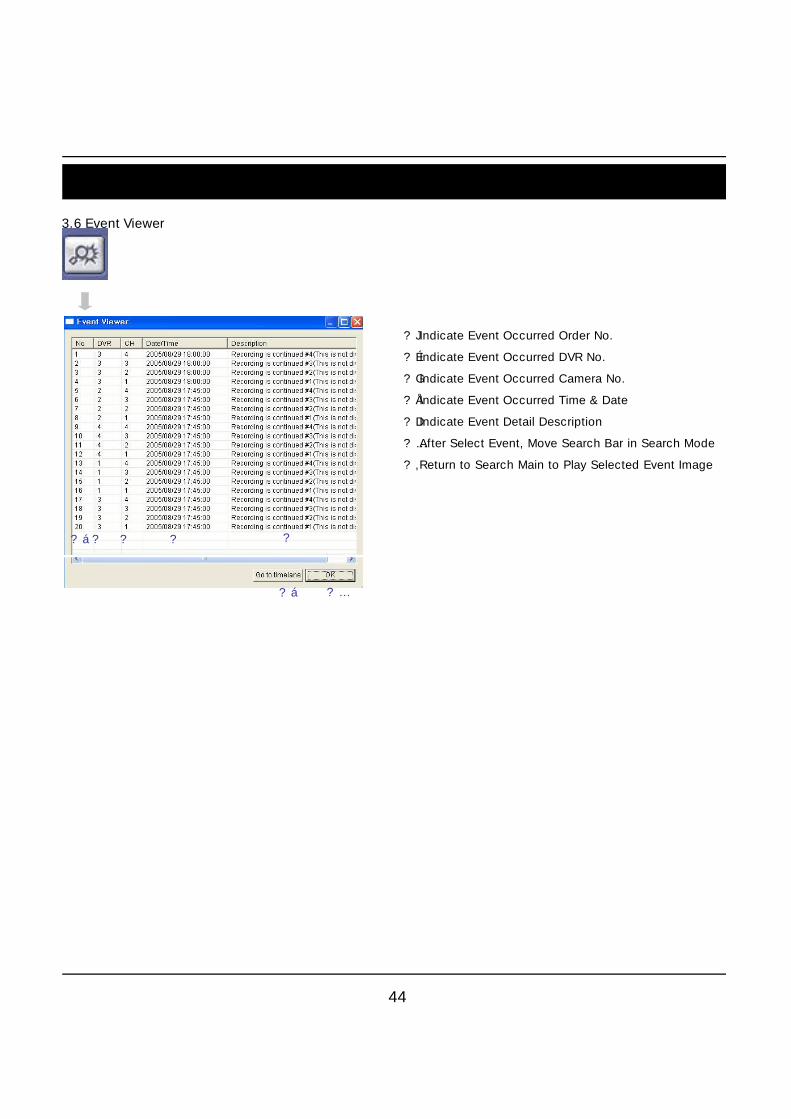
3.6EventViewer
?á?� ?� ?� ?�
?JIndicateEventOccurredOrderNo.
?ÉIndicateEventOccurredDVRNo.
?GIndicateEventOccurredCameraNo.
?ÅIndicateEventOccurredTime&Date
?DIndicateEventDetailDescription
?…AfterSelectEvent,MoveSearchBarinSearchMode
?‚ReturntoSearchMaintoPlaySelectedEventImage
44
?á ?…
7. Client
4.Search
?á
?0
?!
?�
?�
?‡
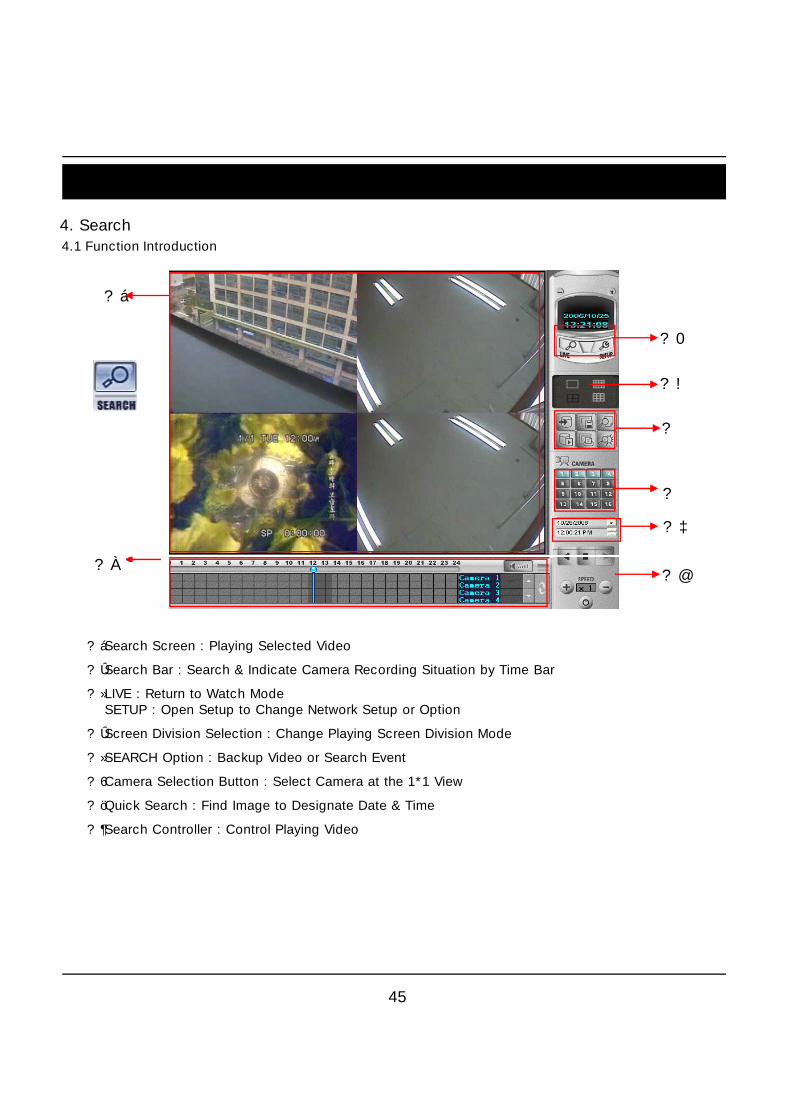
4.1FunctionIntroduction
45
?@?À
?áSearchScreen:PlayingSelectedVideo
?ÛSearchBar:Search&IndicateCameraRecordingSituationbyTimeBar
?»LIVE:ReturntoWatchModeSETUP:OpenSetuptoChangeNetworkSetuporOption
?ÛScreenDivisionSelection:ChangePlayingScreenDivisionMode
?»SEARCHOption:BackupVideoorSearchEvent
?6CameraSelectionButton:SelectCameraatthe1*1View
?öQuickSearch:FindImagetoDesignateDate&Time
?¶SearchController:ControlPlayingVideo
7. Client?á
?É ?¹?Œ
?¬
4.2SearchMethod
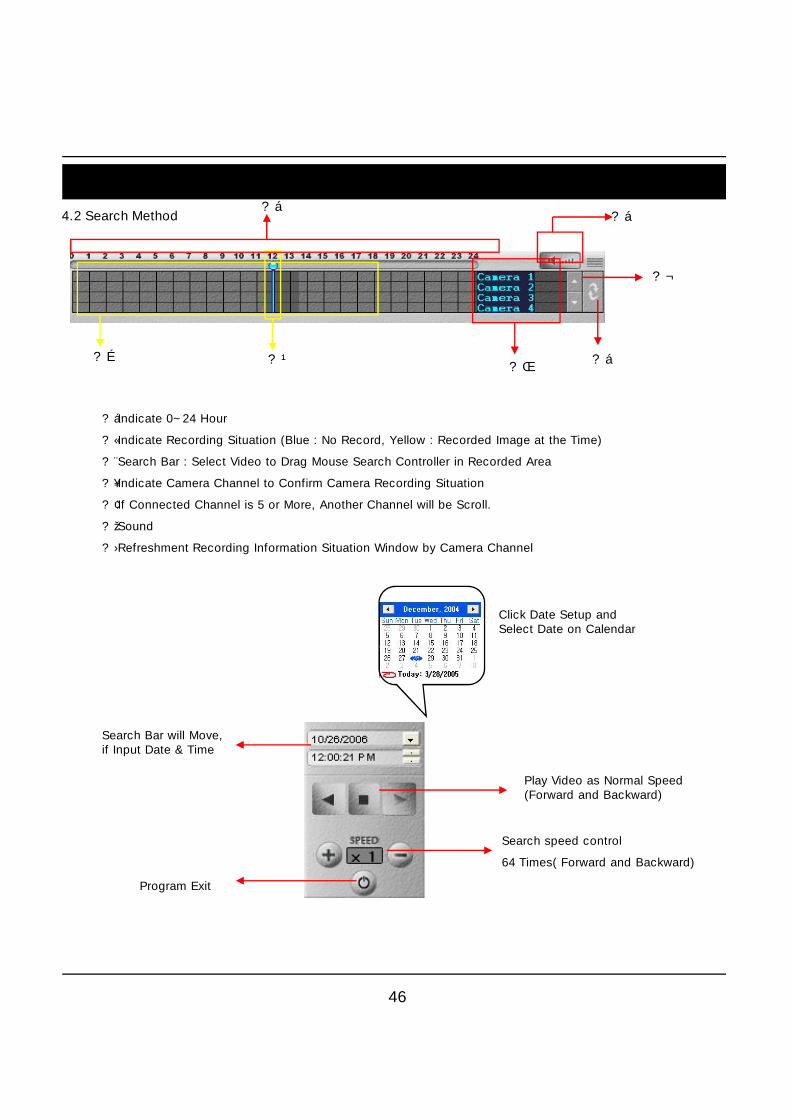
?áIndicate0~24Hour
?«IndicateRecordingSituation(Blue:NoRecord,Yellow:RecordedImageattheTime)
? SearchBar:SelectVideotoDragMouseSearchControllerinRecordedArea
?¥IndicateCameraChanneltoConfirmCameraRecordingSituation
?¢IfConnectedChannelis5orMore,AnotherChannelwillbeScroll.
?žSound
?›RefreshmentRecordingInformationSituationWindowbyCameraChannel
?á
?á
46
ClickDateSetupandSelectDateonCalendar
SearchBarwillMove,ifInputDate&Time
PlayVideoasNormalSpeed(ForwardandBackward)
Searchspeedcontrol
64Times(ForwardandBackward)
ProgramExit
7. Client
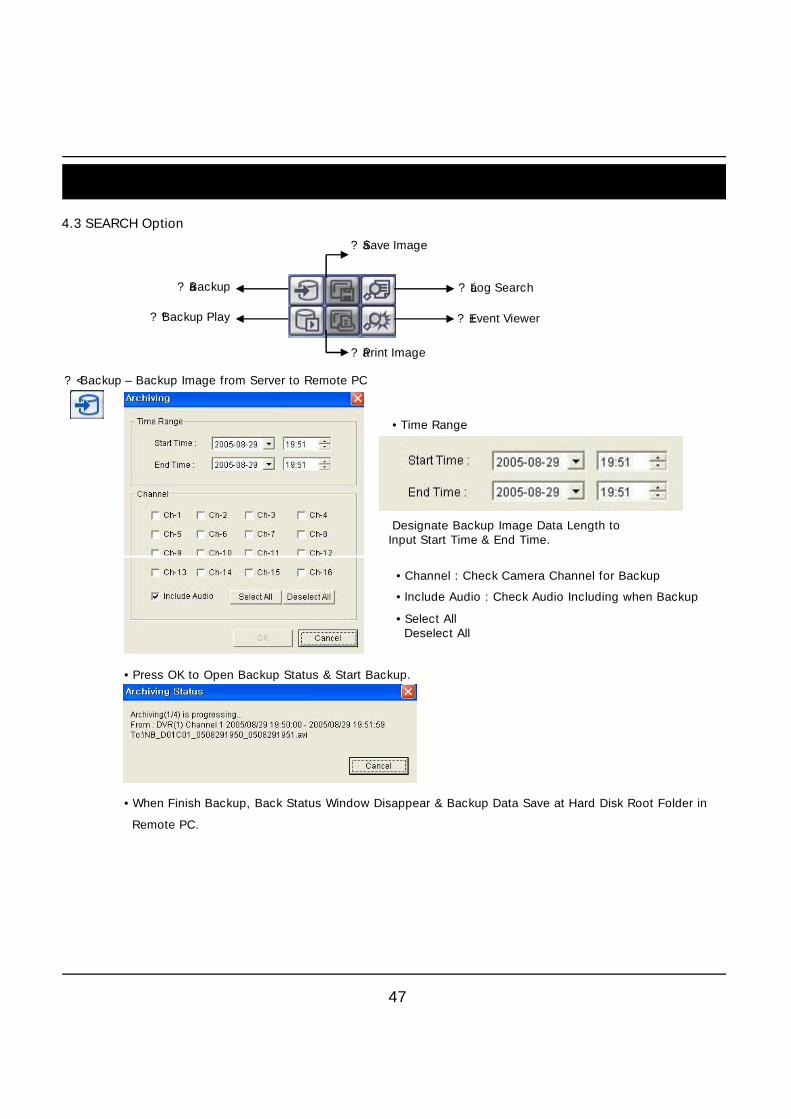
4.3SEARCHOption
?áBackup
?ºBackupPlay
?áLogSearch
?±EventViewer
?áSaveImage
?áPrintImage
?<Backup– BackupImagefromServertoRemotePC
• TimeRange
DesignateBackupImageDataLengthto 1InputStartTime&EndTime.
47
• Channel:CheckCameraChannelforBackup
• IncludeAudio:CheckAudioIncludingwhenBackup
• SelectAllDeselectAll
• PressOKtoOpenBackupStatus&StartBackup.
• WhenFinishBackup,BackStatusWindowDisappear&BackupDataSaveatHardDiskRootFolderin
RemotePC.
7. Client
?á
?á
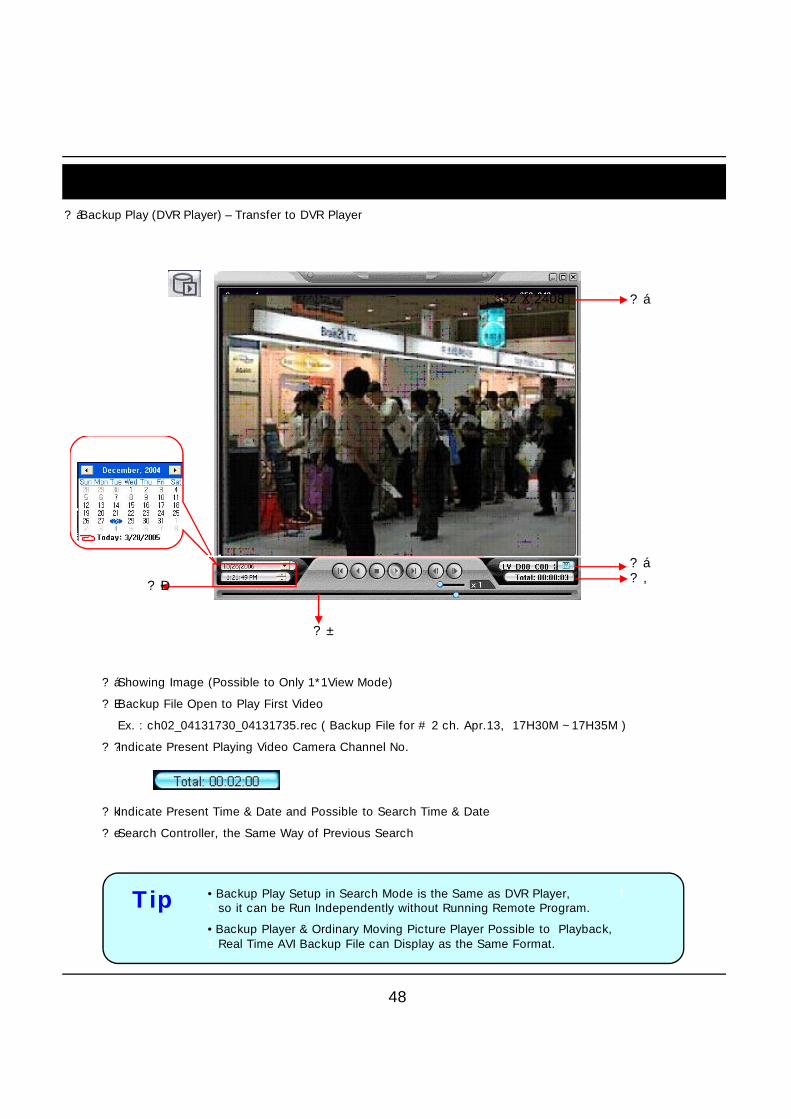
?áBackupPlay(DVRPlayer)– TransfertoDVRPlayer
352X2408
48
?á?,
?Ð
?±
?áShowingImage(PossibletoOnly1*1ViewMode)
?EBackupFileOpentoPlayFirstVideo
Ex.:ch02_04131730_04131735.rec(BackupFilefor#2ch.Apr.13,17H30M~17H35M)
??IndicatePresentPlayingVideoCameraChannelNo.
?kIndicatePresentTime&DateandPossibletoSearchTime&Date
?eSearchController,theSameWayofPreviousSearch
• BackupPlaySetupinSearchModeistheSameasDVRPlayer, 11soitcanbeRunIndependentlywithoutRunningRemoteProgram.
• BackupPlayer&OrdinaryMovingPicturePlayerPossibletoPlayback,1RealTimeAVIBackupFilecanDisplayastheSameFormat.
Tip
7. Client
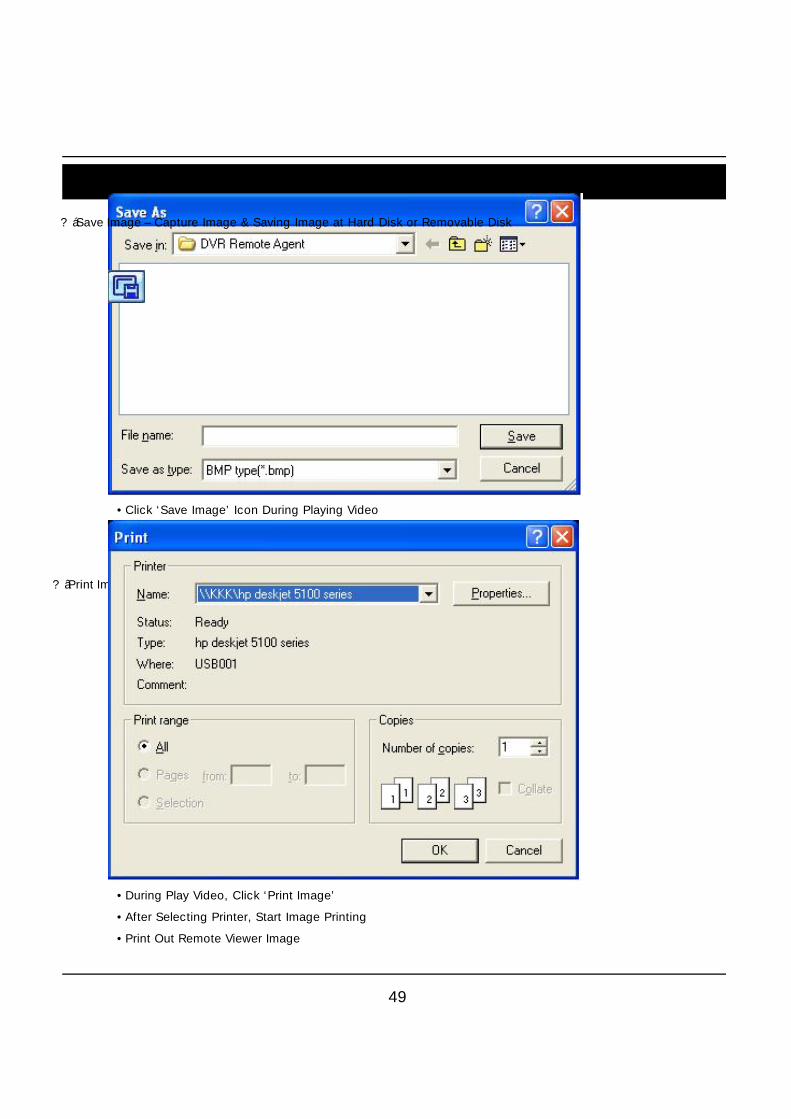
?áSaveImage– CaptureImage&SavingImageatHardDiskorRemovableDisk
• Click‘SaveImage’ IconDuringPlayingVideo
• DesignateFilename,FileType(JPG,BMP),andLocationandPressSaving
• ConversionandSavingImagefromRemoteViewer
49
• ConversionandSavingImagefromRemoteViewer
?âPrintImage– PresentImageCaptureandPrintOutImage
• DuringPlayVideo,Click‘PrintImage’
• AfterSelectingPrinter,StartImagePrinting
• PrintOutRemoteViewerImage
7. Client
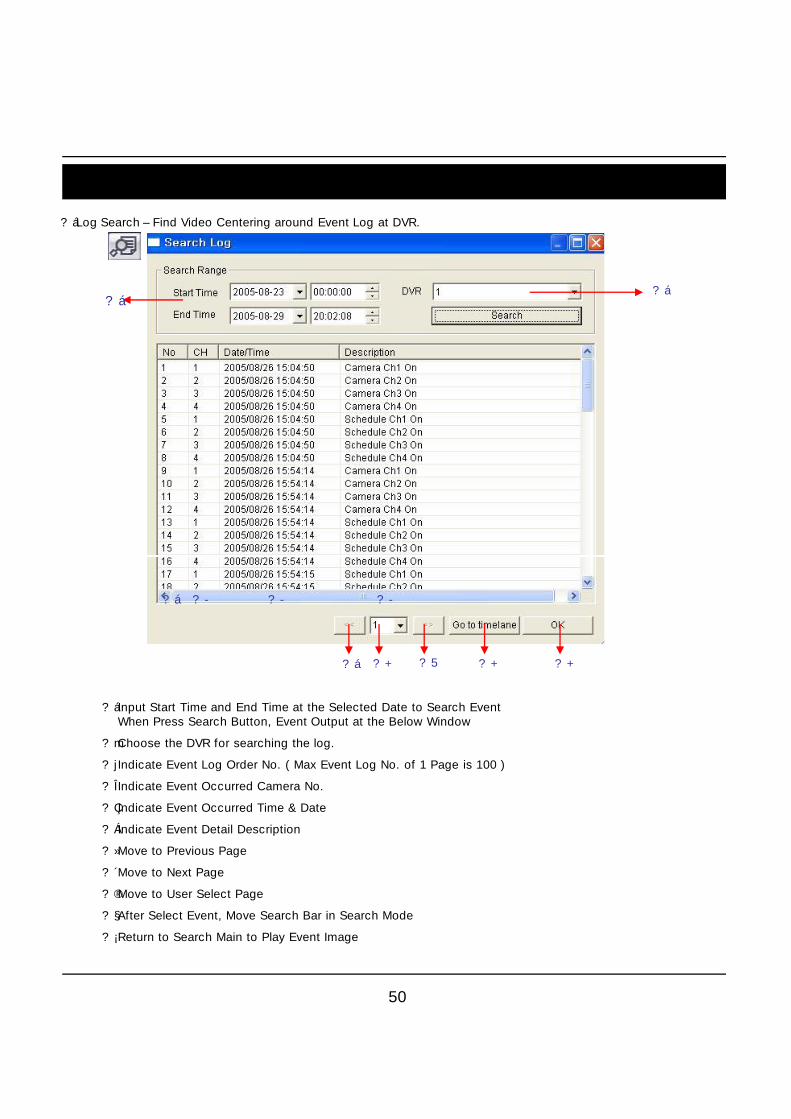
?áLogSearch– FindVideoCenteringaroundEventLogatDVR.
?á?á
50
?áInputStartTimeandEndTimeattheSelectedDatetoSearchEventWhenPressSearchButton,EventOutputattheBelowWindow
?mChoosetheDVRforsearchingthelog.
?jIndicateEventLogOrderNo.(MaxEventLogNo.of1Pageis100)
?ÎIndicateEventOccurredCameraNo.
?ÇIndicateEventOccurredTime&Date
?ÁIndicateEventDetailDescription
?»MovetoPreviousPage
?´MovetoNextPage
?®MovetoUserSelectPage
?§AfterSelectEvent,MoveSearchBarinSearchMode
?¡ReturntoSearchMaintoPlayEventImage
?á ?- ?- ?-
?á ?+ ?5 ?+ ?+
7. Client
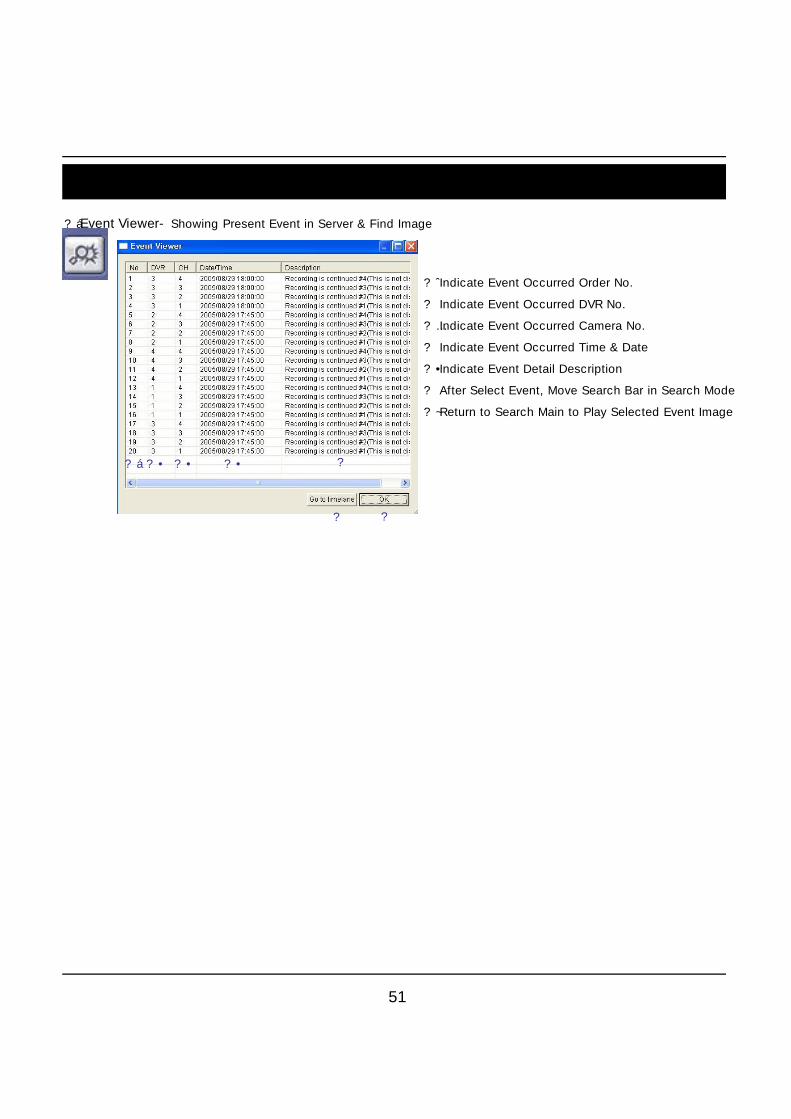
?áEventViewer-ShowingPresentEventinServer&FindImage
?á?• ?• ?• ?
?� ?�
?ˆIndicateEventOccurredOrderNo.
?�IndicateEventOccurredDVRNo.
?…IndicateEventOccurredCameraNo.
?�IndicateEventOccurredTime&Date
?•IndicateEventDetailDescription
?�AfterSelectEvent,MoveSearchBarinSearchMode
?~ReturntoSearchMaintoPlaySelectedEventImage
51
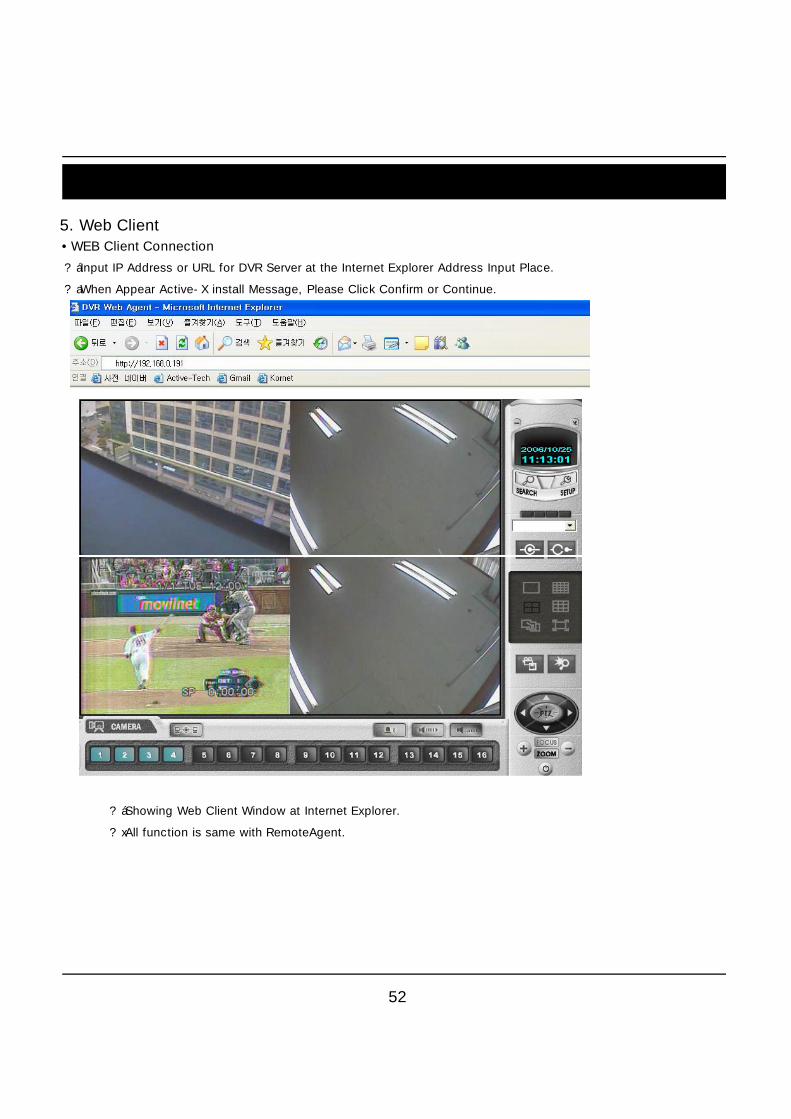
7. Client
5.WebClient• WEBClientConnection
?áInputIPAddressorURLforDVRServerattheInternetExplorerAddressInputPlace.
?aWhenAppearActive-XinstallMessage,PleaseClickConfirmorContinue.
52
?áShowingWebClientWindowatInternetExplorer.
?xAllfunctionissamewithRemoteAgent.
For Service Call - Scorpion Group 01452 525397
Unit/KITSerialNo. Remark
ErrorPhenomenonorSpecialReport
ImproveRequest
ComplementaryMeasure