automotive... · web viewflush brake hydraulic system as recommended by manufacturer until clear,...
TRANSCRIPT

1 of 120
Policies and Procedures
Manual
Updated 5/9/2023
2 of 120
Table of Contents[NOT COMPLETE. Will put in page numbers once manual is finalized –AS][Note: Topics in each section are organized alphabetically for now, but I will put it into a more logical order when it’s more complete. –AS]
I. Introduction
II. Customer ServiceAppointment-SettingCoupons and Comps.Customers’ Belongings Left in VehiclesCustomer Check-In and CommunicationCustomer DiscountsCustomer Email ProceduresCustomer Follow-UpCustomer VehiclesEstimatesFinancing CustomersFleet Customer ServiceLunch Coverage ProcedureNight/After Hours Drop ProcessingObtaining Customer and Vehicle InformationPaperwork and Job Board FlowPerceived Warranty/ComebacksPhone ProceduresQuoting Prices over the Phone/Without DiagnosisRental/Loaner Car Policies and ProceduresSchedulingSelling Diagnostic Testing/LaborSelling Premium Oil ChangesService RemindersShuttlingStandby ListTowingVehicle Pick-Up & Customer Pay ProceduresWarrantiesWashing VehiclesWork Distribution PolicyWrite-up Procedure
III. Vehicle ServiceAir Conditioning ServiceAlignmentBorrowing and Lending ToolsBrake Inspection – Comprehensive
Updated 5/9/2023
3 of 120
Brake System RepairCharging System InspectionClutch InspectionCompany Vehicle RepairsCompression Leak TestCooling System Inspection/ServiceCoolants Testing ProceduresCursory/No Wrench Inspection SpecsDiagnostic Procedures/The 3 CsDifferential RebuildsDocumentation & CommunicationDrivetrain VibrationFactory Maintenance ServicesFull Vehicle Inspection SpecsInspections and Repairs – paid and unpaidLabor Codes and Canned JobsLarge Jobs and Multiple-Day ProjectsMaster E-Time ListMenu ServicesMiscellaneous Vehicle InspectionsNuts & BoltsOil Change ProcedureParts InventoryParts Purchasing & DeliveryParts RequisitionsParts ReturnsRepair ProcedureReplacing Parts without DiagnosisReminder Lights, Accessory Memory, Radio Stations, ClocksSafetySnow and Ice on VehiclesSpecial ToolsStandby Work Stacker ProcedureSubletsTechnical Training Tapes and ManualsTechnicians’ ResponsibilitiesTest Drives and Inspection FormsTire Rotation/RemovalTune-UpsUsed Parts PolicyVehicle ComebackWheel Locks and Car Alarms
IV. Facility Procedures and MaintenanceDamage to Company Property and EquipmentEquipment Maintenance
Updated 5/9/2023

4 of 120
Materials HandlingOpening and Closing ProceduresOperations Enhancer – Daily ScheduleParking Lot ManagementShop Maintenance – WeeklyShop Maintenance – MonthlyThermostatUtility Position – Daily Tasks
V. Office and Accounting ProceduresAbandoned VehiclesAccounts PayableAccounts ReceivableApplying DiscountsCashiering ProceduresCash Drawer CloseCash Drawer Out of BalanceChanging Verifone PaperComputer SystemsCopier UseCoupon TrackingDeposits on Work to be PerformedFaxingFilingInsurance and Extended Warranty CompaniesInvoice Accounting ProceduresMiscellaneous MaxxTraxx ProceduresMonth End and Year End ProceduresNAPA Card ApplicationsNew Customer LettersNSF Check ProceduresParts InvoicesPayment PlansPayroll and TimecardsPetty Cash GuidelinesPhone System OperationPrinter ListScanner UseSuppliesTime TrackingWalton Beverage Company ProceduresVI. Employee Policies and ProceduresAfter Hours/Weekend Use of ShopAlarm ProceduresCompany Vehicle Policies and ProceduresComputer Usage Policies
Updated 5/9/2023

5 of 120
Employee Break PolicyEmployee Discount PolicyEmployee HoursJob DescriptionsKeysParts Buying PolicyPerformance-Based PayPersonal Phone CallsSmoking on Company PropertyTrainingUniform Policy/Dress Code
VII. Emergency Procedures and SafetyAccident and Incident ReportingBlood and Bodily Fluid SpillsBreak-InEmergency Generator Start & Return to Normal PowerFireFlood – Natural DisasterFlood – Burst Pipe(s)General Safety PoliciesMedical EmergenciesFirst Aid TreatmentOn-the-Job InjuryPhones Down (not power-related)Power FailureRobberyVehicle Accidents – Off Premises and On
VIII. Sample Forms and Examples
Updated 5/9/2023

6 of 120
I. Introduction
This manual is intended to be used as a guide to delivering consistent service both to the customer and their vehicle. Outlining Bellingham Automotive’s policies and procedures not only takes the ‘guess work’ out of our day-to-day operation, but also brings order and direction in. This manual should not be viewed as a constraint, but as a valuable tool that provides stability and assists our team in bringing “Trusted Auto Repair” to our community. To that end, we will adhere to its contents.
Updated 5/9/2023

7 of 120
II. Customer Service
Total customer satisfaction is a number one priority at Bellingham Automotive. With this in mind, any employee coming into contact with a customer will do everything possible to accomplish this goal.
Appointment-Setting (should be done by Service Advisors only)1. Get the customer’s name (“…and who am I talking with?”)2. Verify whether they are a new or existing customer3. Verify year, make, and model of vehicle4. If the customer is scheduling return service, be sure to discuss
previously recommended items—this is the best opportunity to check the vehicle history, if time allows. Estimate actual tech hours in MaxxTraxx.
5. Resist quoting a price if the car hasn’t yet been seen.6. Ask to call customer back before quoting difficult prices (always
quote wide price variance until the car is seen in the shop).7. Ask customer for their availability and schedule appointment8. Verify customer’s address and phone numbers—obtain and enter
in system if missing.9. Ask the customer, “How would you like us to communicate with
you?” Customer may prefer a phone call (home, cell, or work), an email, or a text message—note preferred contact method, and use that.
10. Clearly document the work needed, recommended initial tests, diagnostic levels, dollar amount authorized, and any special instructions in the Appointment screen.
11. Discuss length of time vehicle will need to be in the shop, realizing many repairs can take two working days. Ask if customer has a ride, or will need a shuttle or rental car. Having the customer wait should be the last option.
12. Immediately document if vehicle is to be picked up and/or re-delivered on white board and in Appointment screen.
13. Pre-order (submit parts requisition) for any parts not in stock that will be needed (or are highly suspected to be needed).
14. If not already done, check the vehicle history. This must be done before work is assigned. Within one hour of conversation with customer, review previous recommendations and customer history on every vehicle and note on tech copy/discuss with the technician as needed. (Look for Timing Belt, Tune, Valve Adjustment, 30k services, Brakes, FIS, Alignments.) Place a large H in upper right corner of RO to confirm history check. Write NPH for no previous history. Note: If additional service work is found, contact customer and discuss needs and time with them. Let the customer say no to preventative maintenance.
Updated 5/9/2023

8 of 120
Coupons, Comps., and DiscountsBonus BucksBonus Bucks, each of which is worth $5.00 off the customer’s bill, are located at the cashier’s desk. More than one bonus buck may be used on one RO, although each bonus buck may only be used once. They are included with all new customer letters, and can also be given to customers who are unable to use the complimentary car wash card.
Car Wash CouponsCoupons for a free “basic wash” at Sunset Car Wash are located at the cashier’s desk. One of these coupons is given out with each paid invoice.
Complimentary Oil ChangeComplimentary oil change coupons are located at the cashier’s desk, and each Service Advisor also has their own personal stock. They are given out as directed by the Service Manager. More than one per customer requires John’s approval.
WIN/WIN Program[Need to clarify when these are given out –AS]When a WIN/WIN card is received, Bellingham Automotive will perform a free oil change to the new customer. The Service Advisor will prepare a work order as normal and charge the customer for add-on sales. Service Advisor should attach card to invoice for accounting department.
[Move to Office & Accounting? –AS]-Phil says yesOnce the invoice and card are turned in, the Accounting department will date the back of card. It should be recorded under as WIN/WIN LOF in the Coupon Tracking spreadsheet for the current year. Card should then be filed in monthly Coupons envelope, and a Complimentary LOF card should be mailed to the person who referred the new customer.
Customer DiscountsBellingham Automotive offers:
10% discount on parts and labor to pastors 10% discount on parts and labor to fleet managers 5% discount on parts and labor to employees of Heath Tecna
(must show ID badge)
Customers’ Belongings Left in Vehicles
Updated 5/9/2023

9 of 120
All customer vehicles should remain locked except when being worked on. Valuables that have been left in plain sight (i.e., a wallet or purse) should be turned in to the front office. Front office will call the customer to notify them and secure the item(s).Customer Check-In and CommunicationService advisors should review the day’s expected customers and memorize their names so that they can be greeted by their first name when they come in. When customer is checking in, service advisors must obtain and document the customer’s address, the two best phone numbers to reach them, and their email address.
Before calling customer to give an update on their vehicle, service advisor should have a full understanding of the Technician’s report along with a history review. When calling with an update, service advisor should ask the customer if it is a good time to talk about their vehicle. The customer may be at work or busy and prefer to call the service advisor back.
[More? –AS]
Customer Email ProceduresIncoming messages: Emails sent via appointments, comments, or suggestions at bellinghamautomotive.com are received at Service Advisors’ computers. Service Advisors are responsible to communicate about emails received and split them up for reply.
Response Procedures:1. Reply to all email messages by using REPLY. Do not send a new
email.2. To avoid duplicate responses and eliminate any confusion if mail
has been responded to (especially when service advisor is absent), use BCC (blind carbon copy). This sends a copy of response to others in the office without the recipient knowing a copy has been sent.
3. If in doubt as to whether someone has responded to an incoming email, ask the person responsible for responding before replying. The BCC procedure will eliminate any questions.
4. Appointment requests should be sent a confirmation of receipt and scheduled the same day the message is received.
Updated 5/9/2023

10 of 120
5. Comments and suggestions should be responded to within 24 hours. If a specific response isn’t possible without further information, at least acknowledge receipt to the sender, i.e.: “Thank you for your email. I will look into this matter and get back to you shortly.”
6. Make sure the follow-up actually happens.Customer Follow-UpOnce a week (on Saturday), office staff goes through the Completed Invoices folder and calls each customer from the previous week. When making follow-up calls, employee should:
1. Review the customer's history to identify what the service work was.
2. Call the customer and identify who is calling.3. Ask customer how things are going with their vehicle4. If customer has any problems, questions, or complaints, explain
that the service advisor will personally call them.5. If necessary, leave a message on answering machine or
voicemail stating that employee is calling to ask about how the vehicle’s doing, leave phone number, and ask customer to call if they have any questions or concerns.
Calls should then be documented in the Customer Follow-up spreadsheet for the current year. The spreadsheet is found in SharedCustomer Follow-up on the server. Be sure the current month’s tab is selected in the workbook, and fill out all fields for each call made.
If customer has requested a phone call from their service advisor, office staff will fill out an Additional Follow-up Needed form and put it on the Service Advisor’s desk.
Customers’ RightsCustomers are entitled by law to:
A written estimate for repairs which will cost more than $100, unless waived or absent face-to-face contact
Return or inspection of all replaced parts, if requested at time of repair authorization
Authorize orally or in writing any repairs which exceed the estimated total presales tax cost by more than ten percent
Authorize any repairs orally or in writing if your vehicle is left with the repair facility personnel
If you have authorized a repair in accordance with the above information, you are required to pay for the costs of the repair prior to taking the vehicle from the premises
Customer VehiclesChecking in Vehicles:
Updated 5/9/2023

11 of 120
During the receiving of the vehicle, a Service Advisor will tag the customer’s key set with a pre-written shop key tag whenever possible. Service Advisor will confirm with the customer that the key(s) do work in all doors, ignition tumbler, trunk or rear hatch. Service Advisor will also confirm whether today’s key set is a spare set or their everyday set.
Service Advisor is responsible for obtaining or locating these keys from the customer: door lock key, door lock remote key fob, ignition tumbler key, gas cap/gas door key (if equipped), vehicle alarm control device (if equipped), hood lock or release key (if equipped), glove box key, hub cap or wheel lock key (confirm detailed location, if equipped).
When the Service Advisor receives customer keys with additional non-vehicle keys on it, the Service Advisor will ask the customer before the customer leaves the receiving area, “Are you going to need any of these extra keys before your vehicle is returned to you?” (i.e. house key, work keys, etc.) If the customer requests their key ring back to retrieve some personal items out of their vehicle, the Service Advisor should walk out with them and take back the keys after they have unlocked their vehicle door.
While Vehicle is in the Shop:Seat covers and floor mats should be used in every customer vehicle. After the job ticket is completed by the Advisor, (s)he will dispatch it out to the tech’s work station on a clip board with the tagged vehicle keys under the clip. There will be only two possible locations of vehicle keys:
1. On the Work-in-Progress board (located just inside the door from the Service Advisors’ area to the shop)
2. Hanging on the completed job key board in the office.When parking the vehicle for pick-up, insure that the seat cover and floor mat are removed and the vehicle is locked with either the key or the remote system. Never lock the vehicle from inside. Always back vehicle into parking space for ease of exit for customer and demonstrate to staff that it’s a completed job. Do not adjust customer seats unless absolutely necessary (return seat to original position if it is necessary to adjust seat). Never change a customer’s radio station, or touch customer’s CDs.
Damage to Customer Vehicles
Updated 5/9/2023

12 of 120
EstimatesFrom suggestions: When RO is turned in for estimate and there is any question about time needed, Service Advisors must consult the Technician assigned to that particular RO.
Fleet Customer ServicePut all pertinent information in MaxxTraxx, including:
Fleet contact information. List of drivers and vehicles, including contact numbers for
drivers. Vehicle Info: vehicle number, VIN number, production date, how
vehicle is equipped (Engine size, Transmission style, A/C, 4WD, etc.)
If possible, a pre-approved dollar limit, in writing, for each fleet. This will speed up the process and get the vehicle back to the fleet in a timely manner.
Shuttle system, vehicle pick-up/delivery system, or loaner vehicle system in place for drivers’/fleet’s convenience.
Billing procedures for each fleet—does driver receive invoice, do we mail it, or does it get faxed? Does the fleet need their P.O. numbers on the invoice?
Scheduling Fleet Appointments: Ask for fleet name, vehicle number, driver’s name, and driver’s
contact number. (Driver may need to be contacted and/or interviewed for further information regarding vehicle’s symptoms.)
Updated 5/9/2023

13 of 120
Make sure primary complaint is known and ask if there are any other concerns.
Obtain contact information for person responsible for vehicle maintenance and/or repair authorization.
Find out if vehicle is on a National-Type Maintenance Plan. (If vehicle is on a Maintenance Plan, need driver’s card and necessary contact number.)
Make sure driver has a way back to fleet headquarters or jobsite.
Extras: Develop a rapport with drivers and Fleet managers/owners. (This
may lead to work on personal vehicles.) If unable to speak with driver after repairs are completed, fill out
driver’s summary card with brief report of work performed and leave in the vehicle.
Periodically distribute donuts to Fleets. (This is great for personal rapport.)
Lunch Coverage ProcedureService advisors are expected to rotate covering the lunch hour each day, so that one service advisor is always available to take service calls and assist customers. The Office Assistant or Administrator will answer the phone during the lunch hour and transfer calls as needed. All service calls will be transferred to the service advisor on call. Office staff is not required—nor should they attempt to field—questions over the phone regarding vehicle service.
If customer comes in, acknowledge them and ask if they are picking up a vehicle. If so and paperwork is in the drawer, cashier them as normal. If they have questions on the invoice, refer them to the service advisor. If they are here for any other reason, the service advisor on duty should help them.
When a service call is transferred to the advisor on duty, the advisor can investigate and report to customer if vehicle is invoiced and ready. If not, then advisor will take message. If a situation seems urgent in nature, the advisor on duty will use their best judgment and timing in contacting the appropriate advisor involved.
Night/After Hours Drop ProcessingIf the customer is dropping off their vehicle before or after normal business hours and using the after hours key drop, the Service Advisor will explain to them over the telephone what they need to do and where the key box is located (to the right of the front doors when you’re facing the building). If explaining to a customer that is on the premises, hand them one of the key envelopes, write their name on it
Updated 5/9/2023

14 of 120
and actually show them how to open and use the drop box.
Obtaining Customer and Vehicle InformationService Advisors will be responsible to document the vehicle information on the RO, except the engine size, before the technician receives it. When busy, it is advisable for the Service Advisor to request assistance from other staff members (such as the technician assigned to the RO) to get the information. Service Advisors are ultimately responsible for the vehicle history check, thus assuring all potential safety and maintenance concerns have been addressed. Technicians are also expected to use the history check feature in MaxxTraxx as a tool to help determine vehicle needs. Customer Notes and Alerts must be kept current in MaxxTraxx. Service Advisors are expected to attach an inspection sheet to all new customer ROs. When retrieving vehicle information, Service Advisors should always inspect the lube sticker to see if: a) it’s due for service, b) it’s a Bellingham Automotive sticker, or c) it’s not there. If there is a question, ask the customer for details or if they would like to have the service done.
When retrieving vehicle information, Service Advisors should inspect the front tires for wear that may indicate an alignment problem. If indicated, recommend an alignment check or a full alignment. Note: if the vehicle needs new tires or the customer indicates they are planning on buying new tires, take the opportunity to recommend Discount Tire, offering them a business card if possible. When documenting vehicle mileage, be especially aware of mileage at or near a 30k interval. Document “30k?” on the repair order, prompting the technician to inspect components and make recommendations. In turn, discuss findings with the customer.
Paperwork and Job Board Flow1. Vehicle arrives: Advisor gathers vehicle info whenever possible
and prints RO. If not already scheduled, Advisor writes vehicle on standby board.
2. Advisor will print, attach, and review vehicle history before work is assigned. Notes will be made and discussion with technician is expected concerning any potential needs.
3. Advisor assigns job to a Tech: Advisor places RO in tech’s stacker and writes vehicle on tech’s board. Advisor places advisor’s “marker” on tech’s board in “assigned” position.
4. When Tech begins diagnosis: Tech takes RO to his work area and Tech moves the marker to “work started” position.
5. When diagnosed: Tech puts RO and parts requisition in Parts Manager’s basket. Tech moves marker to “diagnosed” position on board.
Updated 5/9/2023

15 of 120
6. Parts Manager puts priced parts requisition and RO in advisor’s In basket. Advisor consults tech on estimated times as needed. Advisor completes estimate, calls customer and moves marker to “customer contacted.” Advisor staples parts requisition and estimate to RO.
7. When job sold: Advisor puts RO/parts req/estimate in Parts Manager’s in-box (mark items to be ordered). Advisor moves marker to “sold” position and advises technician. After Parts Manager has ordered parts, Parts Manager places RO/parts requisition in tech’s stacker. Tech keeps RO at his work station during work.
8. Service Advisors are expected to process all reports turned in by technicians in a timely manner (1/2 hour or less is expected). Brake inspections that are torn down and waiting for approval of work are priority over all other estimates as the technician is waiting.
9. When work completed: Tech moves marker to “completed” position on board. Tech places work order in advisor’s basket.
10. Advisor turns RO into invoice. RO (with parts requisition and estimate) put in basket “to file.” Advisor puts invoice in completed invoice drawer.
11. When customer picks up vehicle: Advisor erases vehicle from board and sends customer to cashier window or places payment with our copy of invoice in invoice basket.
Note: If there are any special circumstances or problems, they are to be noted with red marker in the “comments” space on board. Service Advisors are expected to add helpful notes to the Work in Progress board, such as promised time, on-hold information, and anything else that would be good for the technician to know.
Note: Techs do not erase jobs from their board.
Perceived Warranty/ComebacksIt usually costs a lot less to keep an existing customer than to get a new customer in the door. As such, when dealing with unhappy customers, use the following guidelines:
1. Show empathy for the customer’s situation—apologize for the car breaking down without admitting fault, allow the customer to vent their frustrations without interrupting, and identify with the customer’s situation. Do not attempt to fix the problem over the phone. Arrange for the customer to bring the car in (only if it’s safe to drive). Offer towing and/or a loaner car as needed. Towing is covered for faulty parts or labor, but always ask if the customer has AAA or towing insurance first.
2. When speaking to the customer in person, go on their side of the counter whenever possible.
Updated 5/9/2023

16 of 120
3. Service advisors should always offer to have technician re-inspect recent repair work at no charge and let customer know we will report our findings. Advisor will tell customer that if it’s something we have caused, the company will certainly make the appropriate repairs at no charge. Service advisors should not discuss a dollar amount at this point with the customer, only that they will call with report and recommendations and that this initial re-inspection will be performed at no cost to the customer.
4. The service advisor who manages a comeback or perceived comeback is required to fill out a Comeback Tracking Form and attach it to the RO hard copy. A photocopy of this form must be made and placed in John’s in-basket.
5. The service advisor will assign a comeback/perceived comeback to the technician who performed the work, or another technician at their discretion.
6. Advisor will give RO to technician with a .5 hour max for re-inspection or scan test if needed. Tech is not to exceed this time unless it is an E-2 comeback flag at no charge to the company. This should be enough time in most cases for the technician to determine if it is the company’s responsibility to cover the needed repairs, though it may not be enough time to completely diagnose the concern.
7. At this point, the advisor should explain that re-inspection of repairs has been done and (if not under warranty) advise customer of the remaining tests needed for accurate pinpoint diagnosis and repair. If met with resistance, service advisor should remind the customer that should the completed diagnosis indicate it is the company’s responsibility, there would absolutely be no charges for repairs or diagnosis. (In most cases, a 1 hour diagnosis charge to the customer to complete testing should be estimated.)
Note:If customer is out of the area, they should be referred to another Pro Service Member shop, an ASA shop, or a NAPA Auto Care Center. Make direct contact with the other shop to verify warranty situation and for parts to be returned if not under NAPA’s program. Payment for repairs is to be made with company credit card as approved by John.
The goal of all warranty issues is to retain the customer. Giving money back or discounts to a customer does not give the customer a reason to return for future repairs. Credit for future repairs helps insure continued business from the customer. Unauthorized warranty repairs are subject to a 24-hour minimum review process and will usually result in a credit for future repairs, not a cash refund.
Updated 5/9/2023

17 of 120
Phone ProceduresService Advisors should answer the phone by the third ring. Use the greeting, “Thank you for calling Bellingham Automotive, this is ____, how can I help you?” In the evenings and after hours, use the greeting, “Bellingham Automotive Evening Service, this is ____, how can I help you?”
Office staff and others backing up the phones should answer after the third ring and use the greeting, “Thank you for calling Bellingham Automotive, this is ____, how may I direct your call?”
Answering the phone when the customer needs to be put on hold:“Bellingham Automotive, can you hold please?” (wait for answer)
Answering a phone that was put on hold:“Thank you for holding, this is ____, how may I help you?”
Quoting Prices over the Phone/Without DiagnosisThe goal of all phone conversations is to make an appointment, and quoting prices over the phone generally results in a very low appointment rate, unless the shop is the least expensive in town. Service Advisors should resist quoting a price even if they are 110% sure that will fix the car. Prices should only be quoted for routine service work, such as 30k, 60k, timing belts, etc. Refer to Master Price Guide. When quoting prices on large jobs, always give a variance (i.e., “$800 to $1200 without seeing the car”).
Rental/Loaner Car Policies and ProceduresPolicies:Bellingham Automotive’s rental cars are available to customers only when their car is in for repair. The fees charged for using the company’s rental car do not cover the company’s actual expenses to own and operate the vehicles. If a customer needs a rental car for any other reason, they should be directed to Enterprise Rent-A-Car.
Rental cars are very expensive to acquire, insure, and maintain. It is important not to be too generous when offering free rental cars, while still keeping in mind the value of additional work and offering good customer service.
Under most circumstances, customers will only be charged for a 1-day rental (24 hours). When renting a vehicle, Service Advisors must obtain a signed rental car agreement form (located at the front counter) with the following information:
Customer’s name, driver’s license, and insurance company name (customers must have insurance on their own personal vehicle)
Updated 5/9/2023

18 of 120
Rental car license #, year, make, and model Date car is leaving and returning Customer’s signature
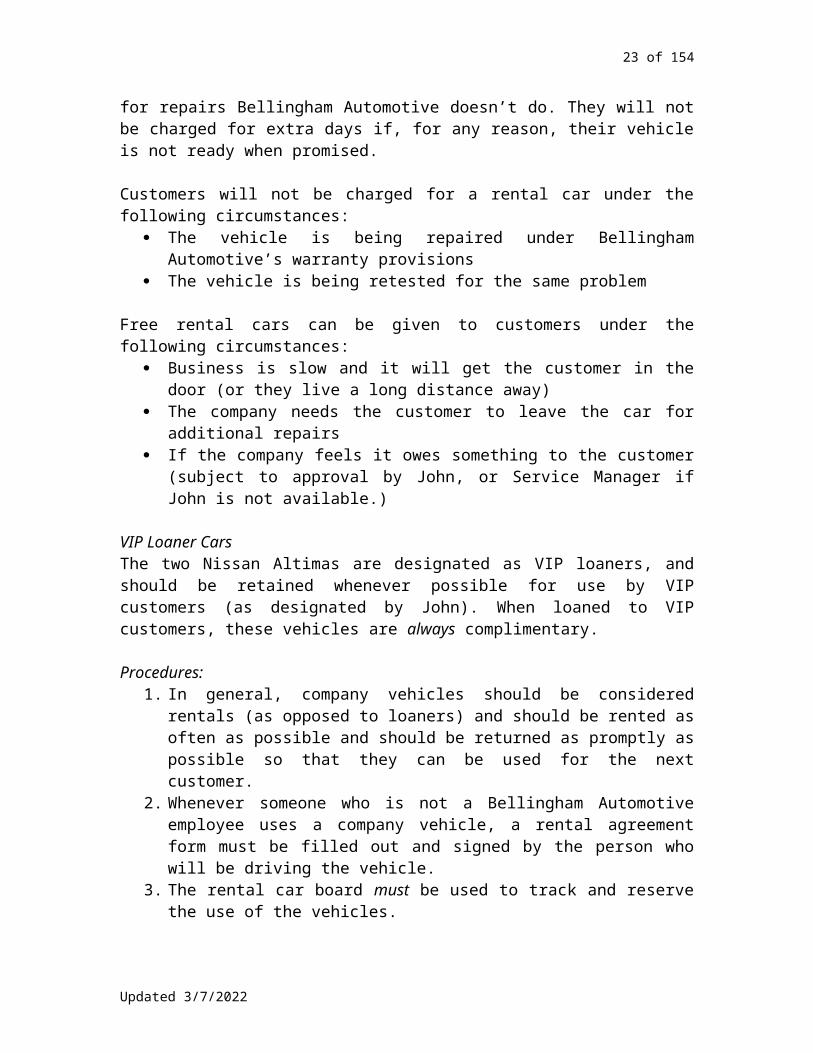
Smoking in rental cars is absolutely not allowed, and customers could be charged the actual costs the company incurs to have the vehicle shampooed and cleaned if they violate this policy. Customers will be charged for extra days when they are unable to authorize repairs for any reason, or if their vehicle has to be sent to another shop for repairs Bellingham Automotive doesn’t do. They will not be charged for extra days if, for any reason, their vehicle is not ready when promised.
Customers will not be charged for a rental car under the following circumstances:
The vehicle is being repaired under Bellingham Automotive’s warranty provisions
The vehicle is being retested for the same problem
Free rental cars can be given to customers under the following circumstances:
Business is slow and it will get the customer in the door (or they live a long distance away)
The company needs the customer to leave the car for additional repairs
If the company feels it owes something to the customer (subject to approval by John, or Service Manager if John is not available.)
VIP Loaner CarsThe two Nissan Altimas are designated as VIP loaners, and should be retained whenever possible for use by VIP customers (as designated by John). When loaned to VIP customers, these vehicles are always complimentary.
Procedures:1. In general, company vehicles should be considered rentals (as
opposed to loaners) and should be rented as often as possible and should be returned as promptly as possible so that they can be used for the next customer.
2. Whenever someone who is not a Bellingham Automotive employee uses a company vehicle, a rental agreement form must be filled out and signed by the person who will be driving the vehicle.
3. The rental car board must be used to track and reserve the use of the vehicles.
4. Service advisors will decide on a case-by-case basis whether vehicles are to be rented or loaned, and will determine the
Updated 5/9/2023

19 of 120
length of time the vehicle will be out. (See Rental/Loaner Car Policy, above)
5. Before a rental leaves the premises, service advisors are responsible to orient the driver to the vehicle, unless otherwise delegated. Advisors must also do a ‘walk-around’ of the vehicle with the customer, being careful to inspect and note any existing damage.
6. When a rental car is returned, service advisors are responsible to receive the keys from the customer and to inquire whether the customer experienced any problems with the vehicle. Advisors must also complete a post-rental walk-around inspection for any damage incurred.
7. The Utility department will be responsible to track maintenance needs on all rental vehicles and take action as needed to ensure the vehicles are maintained.
8. The Utility department will inspect each vehicle as soon as possible after it returns and take whatever action is necessary to prepare it for the next rental. This includes actions such as washing, vacuuming, cleaning windows (inside and out), checking fluids, test-driving, fueling, etc. When the vehicle is ready, he/she will use the rental board to indicate the vehicle is ready for use.
Rental Car Board:The use of the rental car board is crucial, as it tracks the availability and whereabouts of each rental vehicle.
1. The keys for each vehicle must be hung in the appropriate position on the board at all times, except when the vehicle is out.
2. When a vehicle is rented, the service advisor is responsible to write the customer’s name and dates of expected use in the appropriate space, and mark the OUT space on the board.
3. When the vehicle returns, the word RETURNED should be written in the appropriate space. This signals the Utility department that the vehicle must be made ready for its next use as soon as possible.
4. When the Utility department deems the vehicle ready, they write the word READY in the proper space.
5. When a vehicle is reserved, the service advisor writes the customer’s name, dates, and time of pick-up in the appropriate space and marks it RESERVED.
6. If an employee uses a vehicle, it must be designated on the board.
SchedulingIt is the responsibility of the Service Advisors to maintain a full and balanced schedule. This includes forethought to technician availability,
Updated 5/9/2023

20 of 120
tow-ins and drive-bys, as well as working through standbys. Any slow-down or car count concern should be reported by the Service Manager to John and/or the marketing department ASAP. It is expected that Service Advisors will review and implement ideas from the Slow Day document [Where is this? Should it be included in the SOP? –AS]. The standard of 3-4 vehicles per technician, per day will be followed, with diagnosing in the morning and repairing in the afternoon. Service advisors are expected to advise customers that most repairs can be expected to take two days.
When scheduling work, it is the responsibility of the service advisors to direct work back to the original technician who discovered the work needed. For any deviation, said technician and service advisor will discuss other options to accomplish the repair.
Service Advisors are expected to “huddle” in the morning, and to prioritize the order or importance for work to be completed by numbering jobs (with #1 being most important). This is to be reviewed immediately after lunch daily, and adjustments made as needed. Service Advisors should review carry-over work together at the end of each day and review the next day’s schedule to maximize production and efficiency (including talking with each technician before they leave as needed). They should also be sure all parts needed are in stock in an effort to attain little or no technician wait time.
Selling Diagnostic Testing/LaborThe goal of charging for tests and diagnostics is to provide a tangible value to the customer regardless of whether or not the problem is actually solved, and at the same time properly compensate the company and employees for the investment in training and equipment.
Giving a lower price range over the phone (i.e., $39-$78) for initial testing allows the company to be competitive while still providing value to the customer
Frequently asked questions by customers:Q. Can you guarantee that you will find the problem for the $39-$78 fee?A. The $39-$78 testing fees are for initial testing. While we are able
to find most problems during the initial testing process, some problems will require additional tests not included in the initial estimate. We will call you ahead of time if we need to run additional tests.
Q. What sort of tests will you be doing?
Updated 5/9/2023
21 of 120
A. After the technician test drives the vehicle, he will determine which tests need to be performed.
Q. Can you apply the testing fees toward the repairs?A. Due to the high costs of testing equipment and ongoing training
expenses, we are no longer able to apply testing and diagnostic fees toward repairs.
Q. Won’t a tune-up solve my problem?A. If it’s been over 30,000 miles, a tune-up would be a good place
to start, but that may not actually solve your problem. Would you like us to perform a tune-up before we start with testing procedures?
Selling Premium Oil ChangesJon Rick & Derek to script in
ShuttlingIt is the policy of Bellingham Automotive to provide complimentary shuttle service within Bellingham city limits to any customer who needs it. Service advisors will ask whether customer needs a ride either at time of scheduling or when customer drops off their vehicle. Service Advisors should use the Nextel cell phone at the front counter to reach someone in the Utility Department (using the push-to-talk feature) and have him/her pull up front to shuttle the customer.
Interacting with customers during shuttles is encouraged (while avoiding controversial topics). The radio should be off. If shuttling more than one customer, shuttle driver can determine the best order to drop customers off in.
Updated 5/9/2023

22 of 120
[Chip is developing list of possible topics to discuss w/ customers during shuttles. –AS]
Standby List
TowingFor customers in need of towing, first ask if customer has towing insurance and/or AAA. If they don’t, service advisor can offer to arrange towing for them, but it is often best for the customer to arrange it themselves. If the customer is on the premises and wishes to arrange for their own towing, direct them to the courtesy phone. It is Bellingham Automotive policy to recommend A-OK Towing, and towing can be sublet.
Unbillable Repair OrdersThe service manager must approve any un-billable work that a technician has created a time tag on and the service department has created a repair order on. The entire repair order will be placed in John’s inbox when completed.
Vehicle Pick-Up & Customer Pay ProceduresWhen a customer comes in to pick up their vehicle, the service advisor who sold the job should try to be the one who greets them at the counter, and should always have the invoice completed before they arrive. Some important things to remember are:
1. The advisor should engage in positive conversation with the customer about the project as they remove their invoice from the drawer.
2. If advisor intends customer to receive a gift or win-win coupon, they should paper clip it to the invoice and explain it to the customer upon presentation.
3. Service advisor should explain anything they think needs it as they hand the invoice to the customer. Advisor should allow the
Updated 5/9/2023
23 of 120
customer time to read over the invoice if they want to, and offer to explain anything they ask about.
4. When timing is right, advisor should walk the customer over to the cashier window. Advisor should use best judgment for winding down the conversation and handing customer off to the cashier.
5. The service advisor will make sure the cashier knows someone wants to pay.
6. The cashier will promptly greet the customer and process payment. Print two copies of the invoice if the customer is paying with a credit card, one copy if paying with cash or check.
7. The cashier will prompt the customer for a signature on the invoice, which validates the warranty and acts as the credit card receipt if they have paid with a credit card. It is important that they understand Bellingham Automotive’s 2 year/24,000 mile warranty is the best in town and is double what most other shops offer.
8. The cashier will present a wash card and/or Bonus Bucks (as needed) with the customer’s copy of the invoice.
9. The cashier will hand the customer their keys and thank them for choosing Bellingham Automotive for their vehicle service needs.
Note: For complete instructions on processing payments, see “Cashiering Procedures” under Office and Accounting Procedures.
WarrantiesBellingham Automotive provides a warranty on parts and labor for 24 months (2 years) or 24,000 miles (whichever comes first) unless stated otherwise. All warranty service is to be performed at Bellingham Automotive. This is stated clearly on all invoices, and is to be signed by the customer at time of vehicle pick-up.
Parts that are not installed by Bellingham Automotive personnel carry a 6 month or 6,000 mile warranty (whichever comes first). Warranty is only valid at Bellingham Automotive.
Bellingham Automotive does not provide a warranty for customer-supplied parts, and any customer wishing to supply their own parts should be made aware that Bellingham Automotive will not guarantee the part.
Washing VehiclesBellingham Automotive is not allowed to wash cars on the premises for environmental reasons. As such, Bellingham Automotive provides a coupon for a free basic car wash at Sunset Car Wash to each customer at time of payment.
Updated 5/9/2023

24 of 120
The technician or the Utility Department is responsible for vacuuming each car after service and before it is returned to the customer.
Work Distribution PolicyThe goal of the service advisor is not only to complete the customer’s requests in a timely manner, but also to distribute work as evenly as possible. Due to scheduling, parts availability, and other factors, it will not always be possible to distribute work to every technician’s satisfaction. It is the responsibility of the Service Team to track and stay aware of any technician out of work between 8:00 AM and 5:00 PM. This includes ensuring that each technician has work at 8:00 AM. Whenever possible, work shall be distributed in this order:
1. Customers first: Attaining customer satisfaction by completing the job in a timely manner is the company’s highest priority. Work shall be distributed to accomplish this goal.
2. Previously sold work: It is the Service Advisor’s responsibility to direct work back to the original technician who discovered the work needed. For any deviation, said technician and service consultant will discuss other options to accomplish the repair.
3. Work preferences: Work should be distributed to the best-qualified technician in reference to make of vehicle and type of work.
4. No one stands around: If Technician A works faster than Technician B, then Technician A will naturally be given more work.
5. Flagged hours: The advisor will try to distribute an even amount of ‘gravy’ work to all technicians on a weekly basis, regardless of hours flagged.
6. Split ROs: If a technician has more than one RO that can’t be finished by the time promised, then another available technician will be required to finish the job. If Technician A has more than one RO in process and Technician B is standing around, the service advisor will ask permission from Technician A to have Technician B finish the other RO (assuming it is not an issue of time).
7. Customer comebacks: Customer comebacks will always take priority over other work when possible. Remember, the customer has already paid for this work, and in their minds (whether or not it turns out to be a true comeback) the shop has let them down. Listen intently, write down their concerns, and offer them shuttle service or a loaner car if needed.
Updated 5/9/2023

25 of 120
Write-Up Procedure[This was listed in the June 2006 document and I’m not sure what it refers to, exactly. Is it covered under Paperwork/Job Board Flow? Does it mean service advisors writing up ROs or turning ROs into invoices? –AS]
Service advisors are expected to use the new customer write-up protocol form and/or strategy. [Where is this form? What does it say? –AS]
Inspection and test forms (except for the basic LOF sheet) are to be attached to the RO by the service advisors.
Updated 5/9/2023

26 of 120
III. Vehicle Service
These policies and procedures are designed to reduce stress and increase income for the technician and the company, as well as increase customer loyalty and reduce comebacks. Correct procedures must be followed in order for the company to pay warranty labor to the technician.
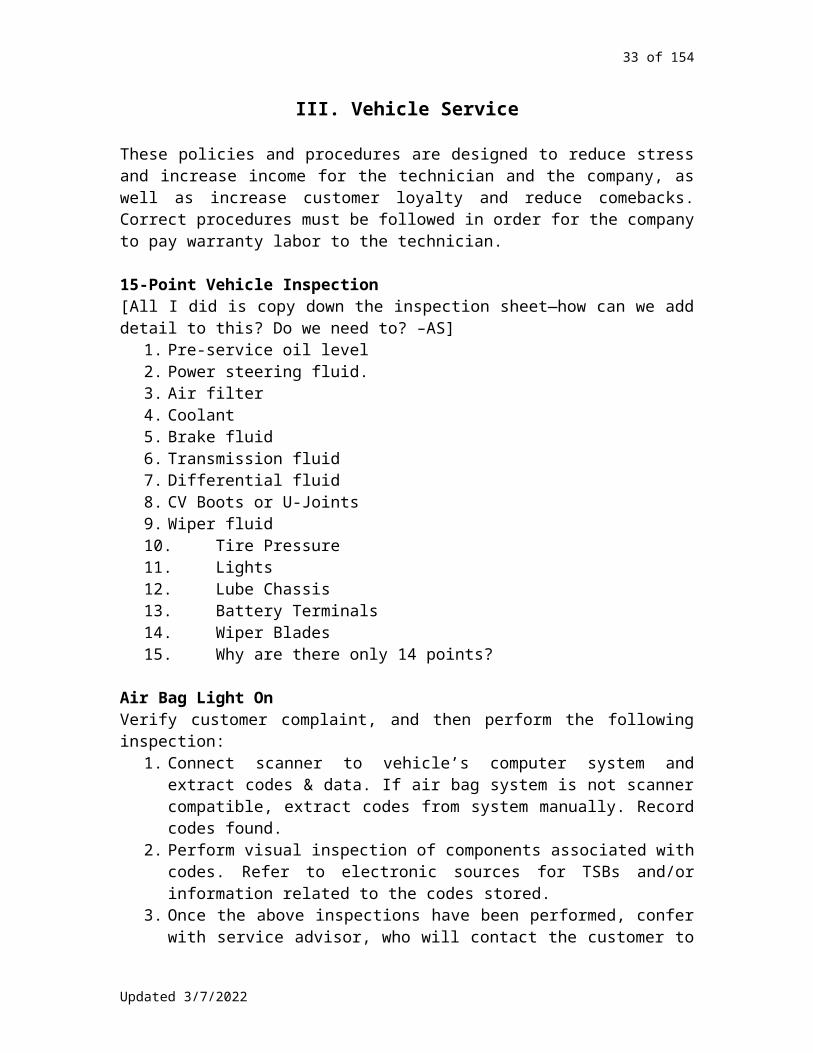
15-Point Vehicle Inspection[All I did is copy down the inspection sheet—how can we add detail to this? Do we need to? –AS]
1. Pre-service oil level2. Power steering fluid.3. Air filter4. Coolant5. Brake fluid6. Transmission fluid7. Differential fluid8. CV Boots or U-Joints9. Wiper fluid10. Tire Pressure11. Lights12. Lube Chassis13. Battery Terminals14. Wiper Blades15. Why are there only 14 points?
Air Bag Light OnVerify customer complaint, and then perform the following inspection:
1. Connect scanner to vehicle’s computer system and extract codes & data. If air bag system is not scanner compatible, extract codes from system manually. Record codes found.
2. Perform visual inspection of components associated with codes. Refer to electronic sources for TSBs and/or information related to the codes stored.
3. Once the above inspections have been performed, confer with service advisor, who will contact the customer to obtain additional authorization for the required inspections and test to isolate each individual code or failure.
Air Conditioning Inspection and Service[This definitely needs to be cleaned up. I’ve compiled several different sources together.–AS]Visual Inspection and Functional Test of Components
1. Normal engine temp?2. Compressor/clutch?
Updated 5/9/2023

27 of 120
3. Drive belt?4. Hoses/tubing/connections?5. Condenser?6. Auxiliary cooling fans/fan clutch?7. Accumulator/Receiver-drier?8. HVAC controls/switches?9. Evidence of A/C oil leaks?10. Equipped with rear A/C?11. Other?
A/C System EvaluationRecord:
1. Refrigerant type(s) & air content (system refrigerant type to be ID’ed before connecting A/C equipment to prevent contamination of equipment and other vehicles).
2. System pressures3. Duct temp4. Ambient temp
Note whether:1. System looks good—no service or repair recommendations at
this time.2. Needs evacuate and recharge?3. Needs partial charge and leak test?4. R134 retrofit candidate?5. Equipped with high side burst/relief valve?6. A/C system repairs/parts recommendations?
After Repairs/ServiceRecord:
1. System pressures2. Duct temp3. Ambient temp4. Improved A/C performance? (minimum 20°F “cooling effect”)5. Service ports sealed?6. Dye added?7. Leak test good?
-and/or-
1. Perform a visual inspection for leaks.2. Install pressure gauges.3. Check and note high/low pressures and center outlet duct
temperature.4. Check cooling fan operation.5. Advise of any needed or recommended repairs.
Updated 5/9/2023

28 of 120
Air Conditioning RechargesThe fees for recharging the air conditioning must always be sold as a “test”. When the air conditioning does not work on a vehicle it is because there is a problem. Recharging the air conditioning will not ever fix the problem. The system will always need repairs and recharging the system is part of the testing process to determine what repairs will be needed.
always include a receiver-drier in the price quote whenever replacing any A/C parts
include/add 1 extra hour in price quote when replacing A/C parts to cover recharging system
never show a direct labor charge for recharging the A/C system, make sure it is included in the A/C parts replacement
Air Conditioning ServiceFrom suggestions: When testing A/C, need to insert tester into dash and under-dash vents often in order to detect evaporation leaks (hard to find).
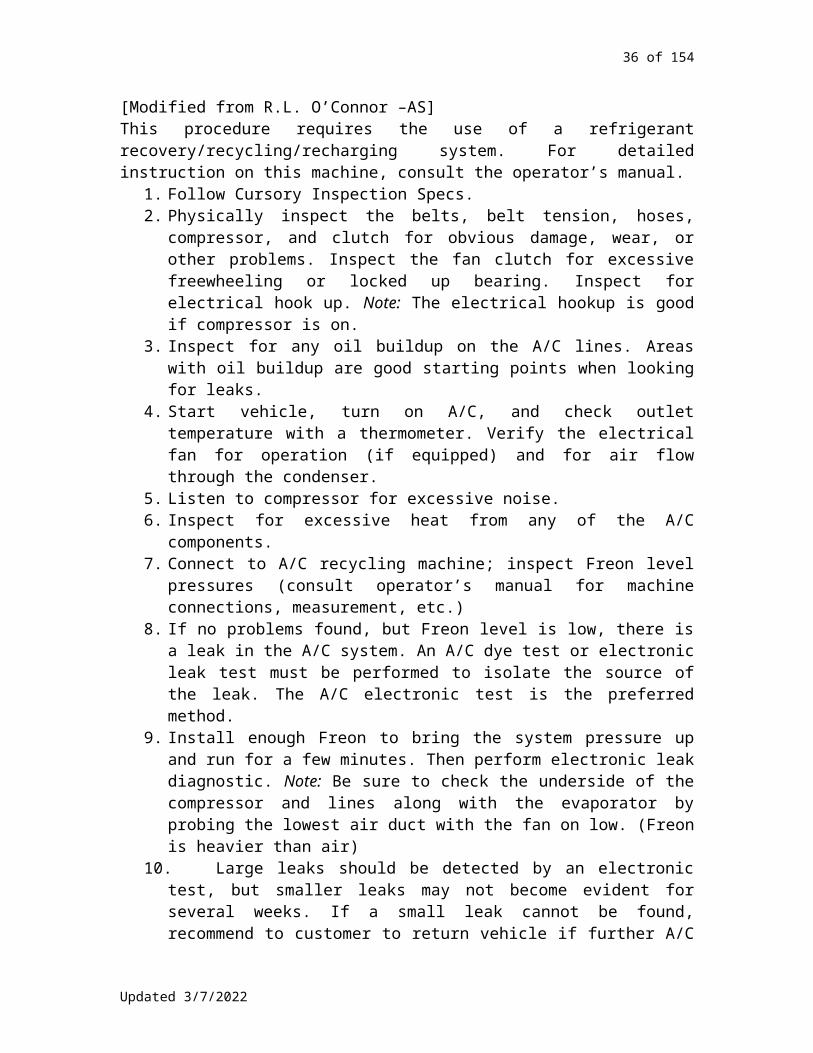
[Modified from R.L. O’Connor –AS]This procedure requires the use of a refrigerant recovery/recycling/recharging system. For detailed instruction on this machine, consult the operator’s manual.
1. Follow Cursory Inspection Specs.2. Physically inspect the belts, belt tension, hoses, compressor, and
clutch for obvious damage, wear, or other problems. Inspect the fan clutch for excessive freewheeling or locked up bearing. Inspect for electrical hook up. Note: The electrical hookup is good if compressor is on.
3. Inspect for any oil buildup on the A/C lines. Areas with oil buildup are good starting points when looking for leaks.
4. Start vehicle, turn on A/C, and check outlet temperature with a thermometer. Verify the electrical fan for operation (if equipped) and for air flow through the condenser.
5. Listen to compressor for excessive noise.6. Inspect for excessive heat from any of the A/C components.7. Connect to A/C recycling machine; inspect Freon level pressures
(consult operator’s manual for machine connections, measurement, etc.)
8. If no problems found, but Freon level is low, there is a leak in the A/C system. An A/C dye test or electronic leak test must be performed to isolate the source of the leak. The A/C electronic test is the preferred method.
9. Install enough Freon to bring the system pressure up and run for a few minutes. Then perform electronic leak diagnostic. Note: Be sure to check the underside of the compressor and lines along
Updated 5/9/2023

29 of 120
with the evaporator by probing the lowest air duct with the fan on low. (Freon is heavier than air)
10. Large leaks should be detected by an electronic test, but smaller leaks may not become evident for several weeks. If a small leak cannot be found, recommend to customer to return vehicle if further A/C problems occur (injected dye will assist in locating leak for several weeks/months).
11. If leak(s) are found, remove all Freon using recycling machine. The system should be evacuated twice with a wait time between to ensure that all Freon has been evacuated from the oil. Note: Recycling machine must be used when removing freon. Freon is NOT to be released into the air.
12. After obtaining authorization, repair the leak.13. Using the A/C recovery/recycling machine, vacuum down
approximately 30 minutes and let hold approximately 30 minutes while checking gauges. Caution: Be very careful when connecting lines for recharging. Eye protection is mandatory.
14. Recharge A/C system with correct amount of freon according to vehicle specifications.
15. Verify A/C system is working properly, including cooling fans. On late model vehicles verify that no AC Codes have been set in the computer. If so, clear the computer.
16. Road test the vehicle.
Estimated time for leak diagnostics is ______ hours.Estimated time for completion of air conditioning service procedure is ___ hours.See the A/C Inspection Form in Section VIII of this manual.
-also-
1. Perform visual inspection for leaks.2. Install pressure gauges.3. Check high and low pressures and center outlet duct
temperature.4. Check cooling fan operation.5. Evacuate and recycle refrigerant.6. Recharge to manufacturer’s specifications.7. Electronically check for leaks.8. Road test and check for proper air conditioning operation.
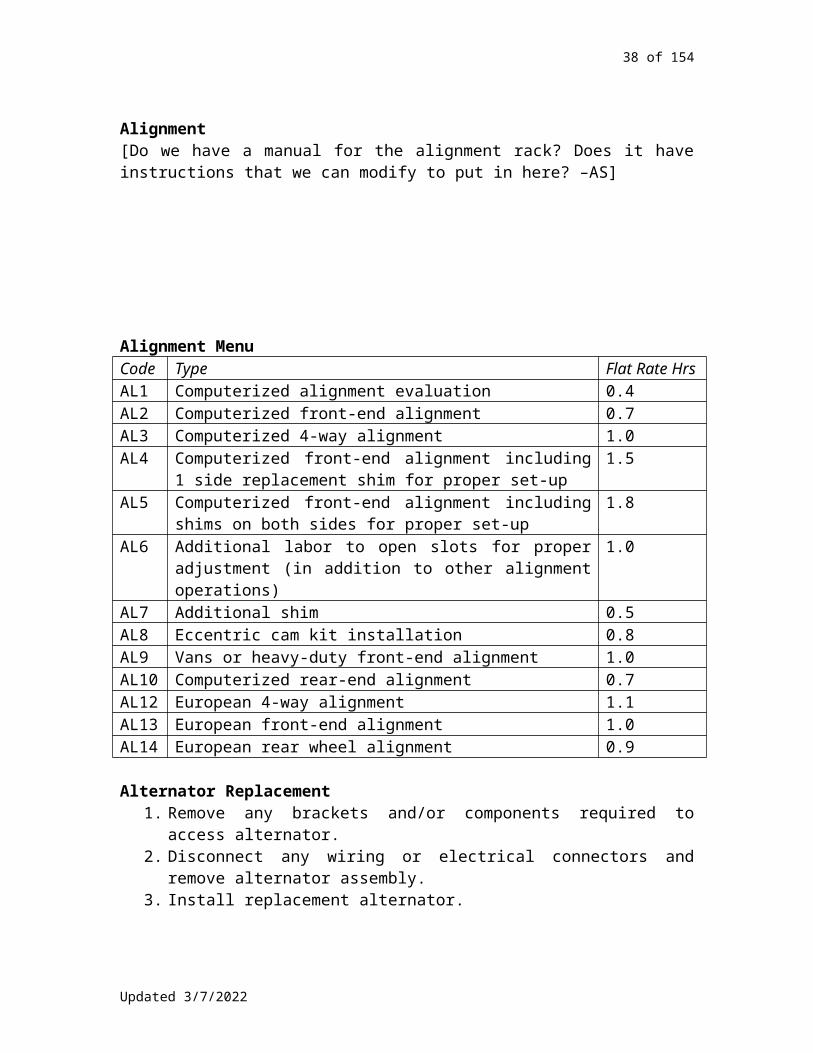
Alignment[Do we have a manual for the alignment rack? Does it have instructions that we can modify to put in here? –AS]
Updated 5/9/2023

30 of 120
Alignment MenuCode
Type Flat Rate Hrs
AL1 Computerized alignment evaluation 0.4AL2 Computerized front-end alignment 0.7AL3 Computerized 4-way alignment 1.0AL4 Computerized front-end alignment including 1 side
replacement shim for proper set-up1.5
AL5 Computerized front-end alignment including shims on both sides for proper set-up
1.8
AL6 Additional labor to open slots for proper adjustment (in addition to other alignment operations)
1.0
AL7 Additional shim 0.5AL8 Eccentric cam kit installation 0.8AL9 Vans or heavy-duty front-end alignment 1.0AL10 Computerized rear-end alignment 0.7AL12 European 4-way alignment 1.1AL13 European front-end alignment 1.0AL14 European rear wheel alignment 0.9
Alternator Replacement1. Remove any brackets and/or components required to access
alternator.2. Disconnect any wiring or electrical connectors and remove
alternator assembly.3. Install replacement alternator.4. Reconnect any wiring or electrical connectors. Re-install any
brackets and/or components removed during disassembly5. Start engine and evaluate alternator operation. Road test for
proper operation.
Antilock Brake System Light OnVerify customer complaint and perform the following inspection:
1. Connect scanner to vehicle’s computer system and extract codes & data. If ABS system is not scanner compatible, extract codes from system manually. Record codes.
2. Perform visual inspection of components associated with codes stored. Refer to electronic sources for TSBs and/or information related to the codes stored. Once the above inspections have been performed, consult with service advisor, who will contact
Updated 5/9/2023

31 of 120
the customer to obtain additional authorization for the required inspections and test to isolate each individual code or failure
Battery Service1. Remove battery cables, clean terminals and battery cable ends
and clean corrosion from battery area.2. Load test battery and note max load of ____ V @ ____ A.3. Apply anti-corrosion treatment to battery cables, reinstall battery
cables and recheck battery operation.
Belt and Hose InspectionInspect belts and hoses for wear cracking, hardening, soft spots and flexibility. Inspect for leaks. Advise on any needed or recommended repairs.
Borrowing and Lending Tools
Brake Fluid Flush1. Road test vehicle.2. Inspect brake hydraulic system for leaks.3. Flush brake hydraulic system as recommended by manufacturer
until clear, fresh brake fluid pours from each bleeder screw.4. Fill to proper level with fresh brake fluid and road test.
Brake Inspection – Comprehensive[Modified from R.L. O’Connor –AS]This service is recommended every 12,000 miles or 1 year, or for any vehicles experiencing abnormal braking conditions. All brake inspections will be accompanied by a completed Safety Brake Inspection Report.
1. Read RO and review vehicle service history to determine if any other maintenance should be recommended or other services performed.
2. Before starting vehicle, press down brake pedal and hold. Start vehicle and see if pedal goes down slightly. If it does not, there is a problem with the booster.
Updated 5/9/2023

32 of 120
3. Road test the vehicle: inspect braking efficiency and presence of any abnormal conditions such as noise, pulling, fading pedal, pulsating, hard pedal, etc. Inspect operation of parking brake (does it hold the vehicle?)
4. Inspect brake fluid level and condition (is it clean?)5. Inspect master cylinder for wetness buildup or leaks.6. Inspect proportioning valve for wetness buildup or leaks.7. Inspect operation of brake lights and brake warning light.8. Inspect wheel bearing for excessive play and remove all wheels.9. Inspect front disc pads for excessive or uneven wear, cracking,
and proper installation. Recommend pad replacement at 2/32”. Inspect disc hardware.
10. Inspect front rotors for minimum rotor thickness (if possible) and excessive or unusual wear. Note: If rotor cannot be measured without pulling caliper and it is customer’s second or greater brake job and/or the vehicle has high mileage (60,000+), let service advisor know there is a good chance the rotors will have to be replaced.
11. Inspect wheel cylinders and calipers for leaks and binding.12. Inspect brake lines/hoses for leaks and deterioration.13. Inspect brake hardware for damage and wear. Recommend
replacing hardware for high mileage or for second brake job.14. Inspect rear brake drums for minimum drum thickness and
excessive or unusual wear.15. Inspect rear brake shoes for excessive or uneven wear,
cracking, and proper installation. Recommend shoe replacement at 2/32”.
16. Inspect operation of the self-adjusters.17. Inspect the emergency brake cables.18. Notify service advisor of any needed repairs found during
inspection.
Estimated time for brake inspection is 0.5 hours.
-or-
1. Road test vehicle to check for proper brake operation and noise.2. Check for brake light operation and emergency brake operation.3. Rack vehicle, remove wheels, and inspect each wheel for
excessive wear, damage or leaking components.4. Measure remaining lining thickness.5. Measure brake rotors and drums.6. Inspect hydraulic system condition and operation.7. Advise of any needed or recommended repairs.
Brake System Repair
Updated 5/9/2023
33 of 120
All vehicles need to be test driven to test for brake shimmy. All brake rotors must be measured for minimum thickness. Rotor machining should be recommended whenever there is any question as to brake shimmy or proper brake performance.
Brake hydraulics and lines should be inspected and up-sold as necessary. Wheel cylinders should be recommended on all vehicles 10 years and older. Wheel cylinder replacement is required when cylinders are leaking into the dust seal area.
Front Brake JobsAlthough many shops have cut the basic front brake job from 2.0 hours to 1.5 hours for technicians, Bellingham Automotive will continue to pay 2.0 hours as to maintain and exceed industry quality for the repair. Technicians are expected to perform brake repair with the highest regard for safety, noise reduction, and quality, using the most up-to-date strategy and materials.
Front Brake Service (on car resurface):1. Perform road test and rack vehicle.2. Raise vehicle and remove front wheels.3. Remove calipers from spindle assemblies and remove old brake
pads.4. Install resurfacing machine on vehicle and resurface both rotors.5. Clean and lubricate caliper pivot and mounting points and install
new brake pads in calipers.6. Install calipers on spindles and torque caliper bolts to
manufacturer’s specifications.7. Adjust rear brakes.8. Install wheel assemblies and torque lug nuts to manufacturer’s
specifications.9. Road test to verify brake performance and to seat in new brake
pads.
Front Brake Service (off car resurface):1. Perform road test and rack vehicle.2. Raise vehicle and remove front wheels.3. Remove calipers from spindle assemblies and remove old brake
pads.4. Remove brake rotors from hub assemblies and resurface rotors.5. Install rotors onto hub assemblies, clean and lubricate caliper
pivot and mounting points, and install new brake pads into calipers.
6. Install calipers on spindles and torque caliper bolts to manufacturer’s specifications.
7. Adjust rear brakes.
Updated 5/9/2023

34 of 120
8. Install wheel assemblies and torque lug nuts to manufacturer’s specifications.
9. Road test to verify brake performance and to seat in new brake pads.
Front brake job (off car resurface, wheel-bearing pack):1. Perform road test and rack vehicle.2. Raise vehicle and remove front wheels.3. Remove calipers from spindle assemblies and remove old brake
pads.4. Remove brake rotors from spindle and resurface rotors.5. Clean, inspect and repack wheel bearings, and install new grease
seals.6. Install rotors on spindle and adjust wheel bearings to
manufacturer’s specifications.7. Clean and lubricate caliper pivot and mounting points and install
new brake pads in calipers.8. Install calipers on spindles and torque caliper bolts to
manufacturer’s specifications.9. Adjust rear brakes.10. Install wheel assemblies and torque lug nuts to
manufacturer’s specifications.11. Road test to verify brake performance and to seat in new
brake pads.
Rear Brake Service (Shoes):1. Road test and rack vehicle.2. Raise vehicle and remove rear wheels and drums.3. Remove brake shoes, clean, and inspect the backing plate for
excessive wear or damage.4. Lubricate contact points on the backing plate and install relined
brake shoes.5. Resurface the brake drums and clean.6. Install brake drums, wheels and torque lug nuts to
manufacturer’s specifications.7. Check brake adjustment and adjust as required. Check parking
brake adjustment and adjust if possible.8. Road test.
Rear Brake Service (shoe replacement, includes wheel cylinders replacement):
1. Road test and rack vehicle.2. Raise vehicle and remove rear wheels and drums.3. Remove brake shoes and wheel cylinders.4. Clean, inspect the backing plate for excessive wear or damage,
and install new wheel cylinders.
Updated 5/9/2023

35 of 120
5. Lubricate contact points on the backing plate.6. Install relined brake shoes.7. Resurface the brake drums and clean.8. Install brake drums, wheels and torque lug nuts to
manufacturer’s specifications.9. Check brake adjustment and adjust as required. Check parking
brake adjustment and adjust if possible.10. Bleed hydraulic system according to manufacturer’s
procedures.11. Road test.
Rear Brake Service (disc):1. Road test and rack vehicle.2. Raise vehicle and remove rear wheels.3. Remove calipers from caliper mounts and remove old brake
pads.4. Remove and resurface both rear rotors.5. Clean and lubricate caliper pivot and mounting points and install
new brake pads in calipers.6. Install calipers on caliper mounts and torque caliper bolts to
manufacturer’s specifications.7. Adjust E-brake if possible.8. Install wheel assemblies and torque lug nuts to manufacturer’s
specifications.9. Road test to verify brake performance and to seat in new brake
pads.
Bumper to Bumper Inspection Specs[All I did is copy down the inspection sheet—how can we add detail to this? Do we need to? –AS]
1. Test drive vehicle2. Check engine oil level3. Power steering fluid4. Air filter5. Crankcase filter6. Coolant7. Coolant protection8. Coolant color9. Coolant acidity10. Water pump hoses11. Water pump belts12. Spark plug13. Fan clutch14. Battery15. Brake fluid level16. Brake fluid color
Updated 5/9/2023
36 of 120
17. Fluid boiling point test18. Fluid leaks19. Clutch fluid20. Transmission fluid21. Shocks22. CV Boots or U Joints23. Exhaust condition24. Wiper operation25. Wiper fluid—front and rear26. Blade condition27. Lights28. Glass & mirrors29. Tire pressure30. Tire condition/Alignment evaluation31. Steering/suspension32. Gauges/Warning lights33. Horn34. Brakes (approximate % remaining front and rear)35. Transfer case fluid36. Differential fluid—front and rear37. Valve adjustment38. Timing belt condition39. Fuel filter (visual)40. PCV valve and hose41. HVAC blowing hot/cold42. Reset oil reminder43. Service sticker44. Check if due for factory-recommended service
Carburetor Overhaul1. Remove the air cleaner assemble, throttle linkage, fuel line, and
disconnect assorted electrical and vacuum connections to the carburetor.
2. Remove the carburetor, and disassemble for cleaning and inspection.
3. Reassemble carburetor with new gaskets, seals and o-rings, install new fuel filter and make internal adjustments as required by the manufacturer.
4. Install new base gasket, carburetor and assorted vacuum and electrical connections previously removed.
5. Install fuel line, throttle linkage and start engine.6. Check and adjust both the cold and hot idle speeds. Check
tailpipe emissions. Road test.7. Recheck cold start after complete cool down.
Charging System Test – Comprehensive
Updated 5/9/2023

37 of 120
1. When appropriate, hook up EZ-Red memory saver before testing charging system.
2. Inspect and clean all battery cables as needed3. Test for internal corrosion and resistance4. Charge battery as necessary5. Load and resistance test battery for reserve voltage6. Test alternator voltage and amperage output at battery7. Test alternator voltage and amperage at alternator connector8. Perform voltage drop test at positive cable to alternator9. Perform voltage drop test at negative cable to engine block10. Connect DVM tester and test for electrical draws that
exceed 100 milliamps.11. Check for any related TSB charging system bulletins.
Charging System Inspection [Modified from R.L. O’Connor –AS]This procedure is carried out for vehicles with problems in the charging system, such as a dead battery.
1. Read RO and review vehicle service history to determine if any other maintenance should be recommended or other services performed.
2. CAUTION: Batteries contain very explosive gases. Keep flames and sparks away from battery. Eye protection is mandatory.
3. Check the alternator belt tension. Physically check the battery and its connections for corrosion. Test the battery connections for voltage drop and inspect starter and solenoid for proper connection.
4. Check the battery, state of charge.5. CAUTION: Ensure polarity of battery is properly connected before
attempting to charge battery. If needed, connect charger cables to battery, then turn on charger. Charge battery for appropriate time based on state of charge.
6. If battery does not accept charge, recommend battery replacement and replace before proceeding. You may use a battery you know is good to continue with the diagnostic procedure.
7. Perform a parasitic draw test on the battery. Record results.8. If the parasitic draw results are within specifications, continue
with diagnostic procedure. If results are not within the specifications, notify service advisor more time will be needed to locate parasitic draw. Continue with diagnostic procedure.
9. Connect AVR tester to battery and perform load test. Record the results.
10. If results are not within specifications, recommend battery replacement. You may use a battery you know is good to continue with the diagnostic procedure.
Updated 5/9/2023
38 of 120
11. Connect AVR tester to battery and perform Alternator Output Test. Test the alternator for proper power to the battery and field wires. Record the results.
12. If Alternator Output Test results are within specifications, continue with diagnostic procedure. If not, proceed with voltage drop test. Perform A/C current test. (Must be less than 50 MV of A/C current.) Then recommend repair.
13. Using AVR tester, perform Starter Draw Test. Note: Disable vehicle’s ability to start when conducting Starter Draw Test. Record the results.
14. If Starter Draw Test results are within specifications, continue with diagnostic procedure. If not, proceed with voltage drop test, then recommend repair.
15. Re-enable vehicle’s ability to start.16. Notify service advisor of difficulty in tracking down problem
and request 1 hour of additional diagnostic time. Clearly explain that this additional time may or may not detect the problem. If time is approved, proceed to isolate problem.
Estimated time of completion for the charging system inspection is ____ hours.
Check Engine Light/Service Engine Soon Light Diagnostics1. Road test vehicle and verify customer complaint.2. Perform basic visual inspection. Check charging system, check
state of engine maintenance items and fuel pressure, and scan computer for stored trouble codes. Check data stream.
3. Check prom identification for being correct and check for prom updates.
4. Check for any TSBs related to customer concern. Perform factory recommended base diagnostic inspection procedures for codes stored in computer.
5. Advise on any needed or recommended repairs or additional diagnostic time required.
Clutch Inspection[Modified from R.L. O’Connor –AS]This procedure is recommended for vehicles that are hard to shift into gear or are experiencing slipping or lack of power.
1. Read RO and review vehicle service history to determine if any other maintenance should be recommended or other services performed.
2. Road test the vehicle, checking for slipping, lack of power, difficulty in shifting, etc.
3. Follow appropriate procedure below.Hydraulic Clutch
Updated 5/9/2023

39 of 120
1. Inspect fluid level and condition.2. Inspect for leaks in the clutch master or clutch slave. Note: If one
is bad, recommend replacement of the other as well.3. Repair any leaks in the hydraulic system before proceeding. If
the clutch fluid system is dirty, recommend flushing the system.4. Road test the vehicle. If symptoms still apparent, recommend
inspection of transmission and/or replacement of clutch.Linkage Clutch
1. Inspect for free play of the clutch pedal and adjust if possible.2. Inspect the linkage for worn rods or bushings.3. Repair or replace any damaged or worn-out rods or bushings.4. Road test the vehicle. If symptoms still apparent, recommend
inspection of transmission and/or replacement of clutch.Cable Clutch
1. Inspect for free play of the clutch pedal.2. Inspect for frayed cables and/or cracked or broken cable
housings.3. Inspect for proper cable adjustments and for bound or stretched
cables.4. Adjust, repair, or replace cable as necessary.5. Road test the vehicle. If symptoms still apparent, recommend
inspection of transmission and/or replacement of clutch.
Estimated time of completion for clutch inspection is ___ hours.Clutch (repair?)
1. Always verify the correct parts: compare new disc with old disc and slide onto input shaft to verify splines, and compare TO bearing and pressure plate height with old parts
2. Always torque flywheels and pressure plates (this will prevent clutch chatter)
3. Machine all flywheels4. Do not install remanufactured or rebuilt clutches5. Recommend rear crank seal if wet or high mileage6. Clutch hydraulics: always recommend both cylinders be
replaced, and inspect clutch hoses for leaks
Clutch Replacement1. Disconnect battery power to vehicle.2. Remove all brackets, any electrical connections, exhaust
components and driveshaft as needed to gain access to transmission-retaining hardware.
3. Remove transmission-retaining hardware and remove transmission.
4. Remove clutch-retaining bolts and remove clutch assembly.5. Remove flywheel-retaining bolts and remove flywheel. Sublet
flywheel for surface or replace flywheel with new or rebuilt unit.
Updated 5/9/2023

40 of 120
6. Install flywheel and clutch components (clutch disc, pressure plate and throw-out bearing) as directed and tighten all retaining hardware to specific torque values.
7. Install transmission and all components removed in reverse disassembly order.
8. Check and top off transmission fluid and clutch fluid as needed, and road test to verify proper clutch performance.
Company Vehicle RepairsBellingham Automotive vehicles are to be treated the same as any paying customer vehicle as far as inspecting, testing, recommended repairs, etc. Repairs on company vehicles must have John’s approval.
Technicians will be paid the full sold time (as documented by the Service Advisor) for all work on company vehicles.
Compression Leak Test1. Perform engine compression test.2. Verify engine has proper compression according to factory
manual.
[Modified from R.L. O’Connor –AS]This service is recommended for vehicles experiencing abnormal overheating, rough running, and/or no start conditions.
1. Read RO—review vehicle service history to determine if any other maintenance should be recommended, or any other services performed.
2. Check for water in the oil.3. Check coolant in the radiator and leave off the radiator cap.4. Remove all spark plugs.5. Disable vehicle from starting.6. Perform a dry compression test on all cylinders. Record the
results.7. Perform leak down test on all cylinders if problem with
compression is found. Record the results and location of the leak (intake, exhaust, crankcase, and/or radiator.)
8. Perform a wet compression test on all cylinders (if necessitated by dry compression test.) Record the results.
9. Make appropriate recommendations based on the Compression Leak Down test findings.
Estimated times of completion for the compression leak test are:4 cylinders: ______ hours6 cylinders: ______ hours8 cylinders: ______ hours
Updated 5/9/2023

41 of 120
Cooling System Flush1. Perform visual inspection of the cooling system.2. Pressure check cooling system for leaks.3. Pressure check radiator cap.4. Connect cooling system flush machine to the vehicle, start
engine and install flush into the cooling system.5. Allow engine to run though flush cycle and sample coolant after
flush process is complete.6. Check freeze point of coolant, and adjust as needed.7. Install inhibitors into the system, check coolant pH balance and
adjust as necessary to achieve a pH level of 9.5 to 10.5.8. Remove the cooling system flush machine.9. Check for proper cooling fan operation.10. Road test, and note running temp reading, check and top
off coolant level in the reservoir.
Cooling System Hose Replacement1. Drain cooling system and remove all radiator, heater and by-pass
hoses.2. Clean hose fittings, inspect for damage and install new hoses
using new hose clamps.3. Refill cooling system with manufacturer-recommended type and
mix of coolant/water.4. Bleed air from cooling system and pressure check for leaks.5. Check for proper cooling fan operation.6. Road test and recheck coolant level in the reservoir.
Cooling System Inspection/ServiceFrom suggestions: Cooling system flushes – higher [preferred?] valve for customer getting what they pay for.[Modified from R.L. O’Connor –AS]This service is recommended every 15,000 miles or 1 year, or for vehicles that have been overheating. Replacement of all belts and hoses is recommended every 45,000 miles or 4 years.
1. Read RO and review vehicle service history to determine if any other maintenance should be recommended or other services performed.
2. Inspect radiator and condenser for damage or obstruction. If the cooling system is dirty, recommend flushing or boiling out the system as necessary. CAUTION: Remove radiator cap very slowly if it’s hot. May have to let vehicle cool down before removing cap.
3. Inspect coolant level of radiator and recovery tank. If low, fill to proper level with 50/50 antifreeze and water mixture.
4. Inspect upper and lower radiator hoses and heater hoses. Look for leaks, splits, cracks, or bloating. Squeeze hose 4” from either
Updated 5/9/2023

42 of 120
clamp and feel if it cracks on the inside or if hose is too soft or too hard.
5. Inspect all hose clamps.6. Inspect all belts for wear, glazing, cracked sidewalls, ply
separation, and proper belt tension. Note: If problem with a belt is found, look for underlying cause of belt failure (tension, pulleys, etc.)
7. Inspect pulleys for wear and cracking.8. Inspect water pump shaft and other components for excessive
looseness.9. Connect pressure gauge. Pressure test radiator cap, then
radiator/cooling system, inspecting for leaks and pressure level.10. Start engine and look for proper coolant flow.11. Inspect thermostat with temperature gauge for proper
operation.12. Inspect fan and fan clutch for proper operation.13. Inspect coolant fan motor and condenser fan for proper
operation.14. Inspect heater and A/C for proper operation.15. Road test the vehicle to ensure problem has been
corrected.
Estimated time for completion of the cooling system inspection is ____ hours.
-or-
1. Perform visual inspections of all belts and hoses.2. Pressure check cooling system for leaks.3. Check coolant protection level and pH balance.4. Pressure check radiator cap and inspect radiator for internal
calcium deposits or debris in cooling fins.5. Road test vehicle to check for proper operating temp, check
cooling fan and/or fan clutch operation.6. Advise of any needed or recommended repairs.
Cooling System Service1. Perform a visual inspection of the cooling system.2. Pressure check cooling system for leaks and pressure check
radiator cap.3. Drain cooling system, flush with water.4. Refill cooling system with manufacturer’s recommended mixture
of coolant/water.5. Bleed air from cooling system and pressure check for leaks.6. Check for proper cooling fan operation.7. Road test and recheck coolant level in the reservoir.
Updated 5/9/2023

43 of 120
Coolants Testing Procedures
CV Axle Assembly Replacement1. Road test and rack vehicle.2. Raise vehicle and remove front wheels.3. Separate lower control arm from spindle, remove axle nut from
axle and remove axle assembly on the appropriate side.4. Install remanufactured/rebuilt axle assembly into vehicle and
install lower control arm into spindle.5. Torque lower control arm to spindle bolt to manufacturer’s
specifications.6. Install axle nut and torque to manufacturer’s specifications.7. Install wheel assembly and torque to manufacturer’s
specifications.8. Check transmission fluid level and road test
CV Boot Replacement1. Road test and rack vehicle.2. Raise vehicle and remove front wheels.3. Separate lower control arm from spindle, remove axle nut from
axle and remove axle assembly.4. Remove damaged boot from axle and remove CV joint from axle.5. Clean CV joint and inspect for excessive wear or damage.6. Repack CV joint with grease and install new boot.7. Reinstall axle into vehicle and install lower control arm into
spindle.8. Torque lower control arm to spindle bolt to manufacturer’s
specifications.9. Install axle nut and torque to manufacturer’s specifications.10. Install wheel assembly and torque to manufacturer’s
specifications.11. Check transmission fluid level and road test vehicle.
Diagnostic Procedures/The 3 CsWhen troubleshooting a vehicle, technicians should proceed as needed, but not exceed the sold or agreed time.
Updated 5/9/2023

44 of 120
Confirm Complaint, test drive. IATN Search and printed results Related TSB’s and printed documents Compression acceptable Spark good Fuel delivery within specs. Fuel quality good. On board computer functioning normal. Trouble codes report. Review history of vehicle for related previous concerns. Review history of vehicle for any maintenance needs due. All related report information in writing on the RO and attached
documents referred to in writing.
Differential Rebuilds (from suggestions notebook)Customer will be advised and sign off that if the ring and pinion gears look okay and have a good [pattern?] and are reused, they may still produce “harmonic” sound.
Differential Service – Cover Type1. Remove rear differential cover and drain fluid.2. Clean and inspect carrier, case and gears for damage or
excessive wear. Advise of any noted wear.3. Clean differential cover and differential gasket surfaces.4. Install new gasket or gasket maker and install cover.5. Torque to manufacturer’s specifications and fill to proper level
with manufacturer’s specified type and weight fluid.6. Road test and check for leaks.
Differential Service – Non-Cover Type1. Road test vehicle to warm fluids.2. Remove drain plug and drain fluid or remove fill plug and
evacuate fluid through suction method.3. Inspect fluid for debris and advise of any debris noted.4. Refill to proper level with manufacturer’s specified type and
weight fluid.5. Road test and check for leaks.
Differential/Transfer Case Service (4X4 Service)1. Remove differential cover(s) and drain fluid.
Updated 5/9/2023
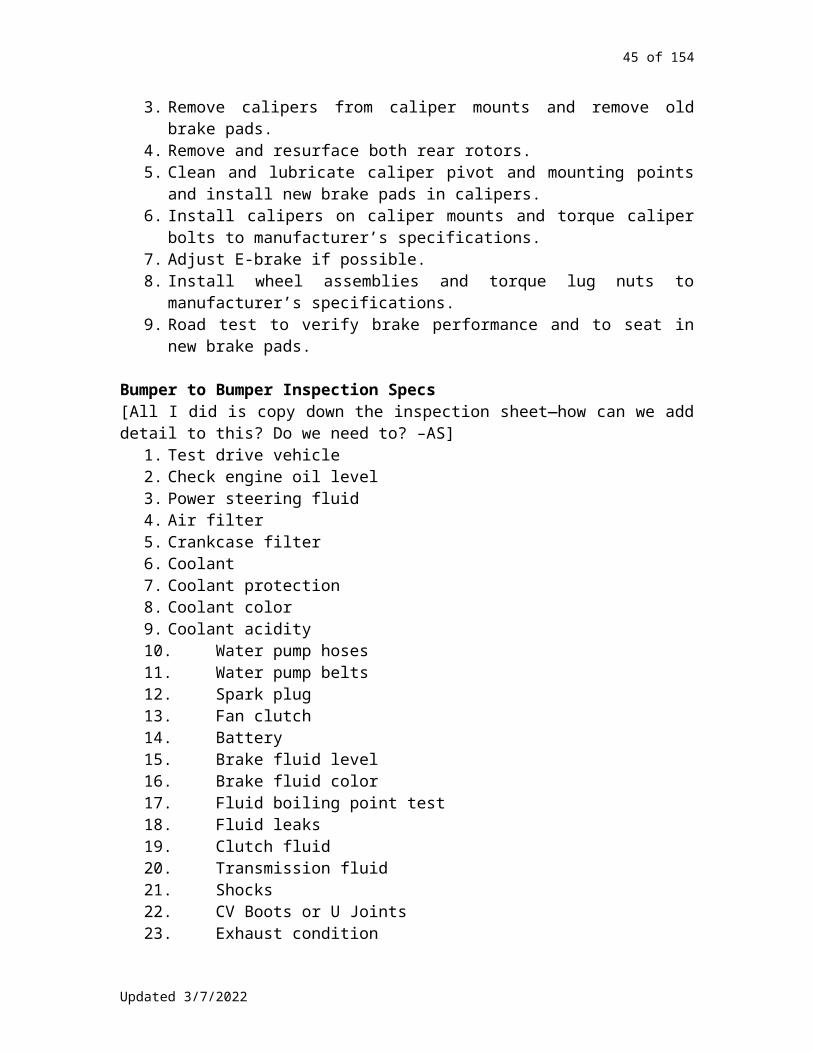
45 of 120
2. Clean and inspect carrier, case and gears for damage or excessive wear.
3. Clean differential cover(s) and differential gasket surfaces.4. Install new gasket or gasket maker and install cover.5. Torque to manufacturer’s specifications and fill to proper level
with manufacturer’s specified type and weight fluid.6. Remove Transfer Case drain plug and drain transfer case fluids.7. Check fluids for debris and advise customer of any noted.8. Refill to proper level with manufacturer’s specified type and
weight fluid.9. Road test and check for leaks.
Documentation & CommunicationTechnicians can expect the Service Advisor to present them an RO that reflects a comprehensive interview with the customer, combined with the necessary time and/or test(s) needed to begin the projects. The test or time allowed will be documented on the RO. If not, a ‘hand back’ of the RO will be expected.
Technicians are expected to review vehicle repair history and discuss any potential needs with their service advisor.
Technicians are expected to verify/document the following on every RO:
1. circle license # to verify it’s correct 2. record all vehicle information (report to advisor if car does not
match info on RO)3. record or circle current mileage4. verify estimate and sold time (see advisor if there is no estimate)5. enter part #s on RO or in computer before installing parts on
vehicle6. write complete description of repairs performed on RO7. look for one “no charge” item to enter on RO8. enter “checkmark” to the right of each completed labor
operation9. test drive every vehicle and use “completed” stamp on RO
After inspection, technicians must document their findings legibly on the RO and discuss them with their Service Advisor. ROs should be formatted to Bellingham Automotive’s specifications for ROs. This includes:
Using clear terminology that is as close to what the estimating guides use as possible.
Vehicle concerns and recommended repairs should be listed vertically, in order of priority.
Updated 5/9/2023
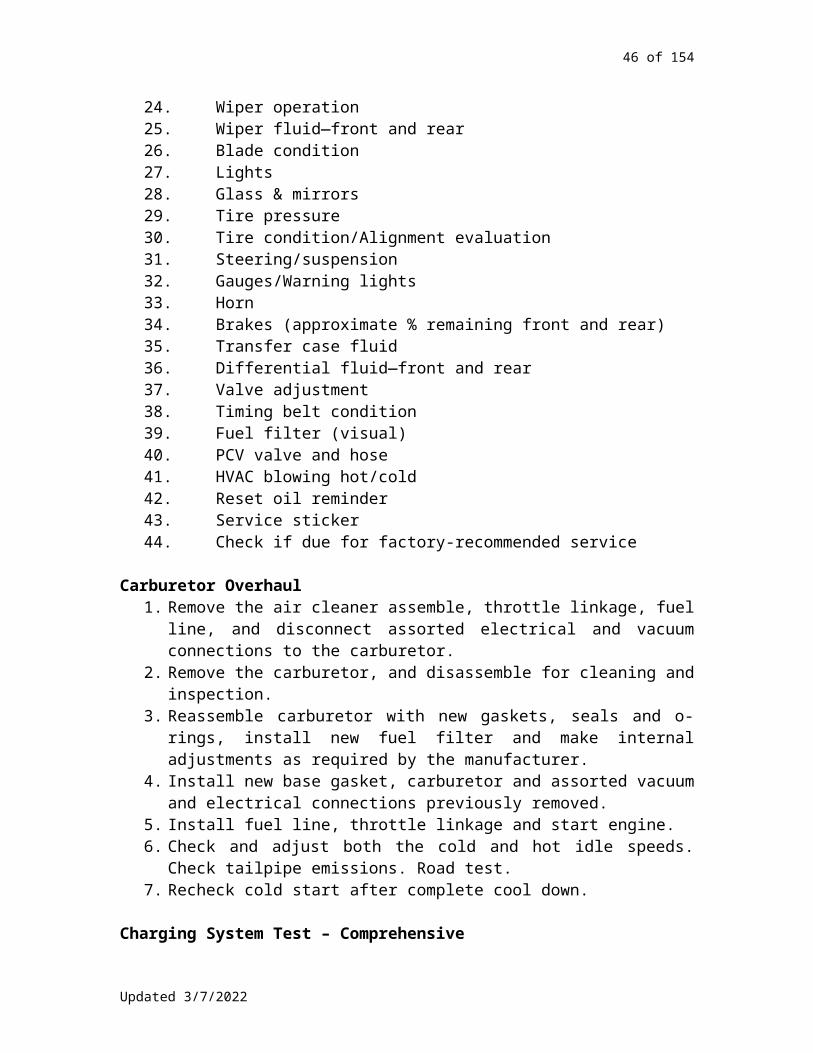
46 of 120
Labor times should be looked up in Alldata and documented at the end of each need (indicated with a circle). Technicians should leave an empty circle for unknown times, to indicate to the Service Advisor that discussion is needed concerning labor on this item.
It is highly recommended that Technicians and Service Advisors talk about the vehicle as well. A complete report should be based on the “3 Cs” (Complaint, Cause, and Correction), rather than just a list of items that need replacing. This includes test results, TSB search, IATN overview, and history check (if applicable). Leaks should be classified as major, minor, seep, etc.
Note: Inspections, testing and other customer concerns must always be addressed and performed before any repairs or service work is started to allow for additional upsells and parts ordering.
Drivability Complaint Diagnostics1. Road test to verify customer’s complaint.2. Scope check for proper mechanical/electrical engine operation.3. Scan computer system for codes and record if any are present.4. Check for proper sensor operation.5. Clear trouble codes from computer memory and re-road test.6. Scan computer system and check for recurring codes.7. Advise on any needed or recommended repairs or additional
diagnostic time required.
Drivability InspectionLevel One:
1. Perform road test to verify customer complaint.2. Check the charging system with a digital amp/load tester.3. Read engine vacuum and verify fuel pressure with fuel pressure
gauge.4. Retrieve trouble codes with the manufacturer's approved method
(if possible), and note any codes stored in memory.5. Provide results of these tests and recommendations for further
inspections.
Level Two:1. Perform road test to verify customer complaint.2. Visually inspect engine performance parts.3. Scope check engine for proper mechanical operation, check
ignition pattern, probe tailpipe & check four gas emissions and note all readings.
4. Check sensor readings for being out of normal parameters.5. If codes are present, record code(s), clear computer memory and
road test.
Updated 5/9/2023

47 of 120
6. Scan computer system and check for recurring trouble codes.7. Initiate preliminary trouble code diagnosis inspections if codes
return.8. Provide results of these tests and recommendation for further
inspections and or repairs.
Level Three:1. Perform road test to verify customer complaint.2. Visually inspect engine performance parts.3. Check the charging system with amp/load tester.4. Read engine vacuum and verify fuel pressure with fuel pressure
gauge.5. Scope check engine for proper mechanical operation, check
ignition pattern, probe tailpipe & check four gas emissions and note all readings.
6. Check sensor readings for being out of normal parameters.7. If codes are present, record code(s), clear computer memory and
road test.8. Scan computer system and check for recurring trouble codes.9. Initiate preliminary trouble code diagnosis inspections if codes
return.10. Provide results of these tests and recommendation for
further inspections and/or repairs.
Drivetrain Vibration
Emission Control Test1. Perform basic emission control component tests.2. Test for proper tail pipe emissions using 5 gas analyzer.
Engine Computer Tests1. Access engine computer to test and identify fault codes.2. Perform basic and preliminary diagnostic procedures as per
factory manual.
Updated 5/9/2023

48 of 120
Engine Ignition Performance ServiceMajor:
1. Perform road test to confirm engine performance.2. Perform visual inspection of the engine and replace the following
components, verified by the visual inspection:a. spark plugsb. air and fuel filtersc. distributor capd. distributor rotore. spark plug wiresf. positive crankcase ventilation (PCV) valve (if possible)
3. Adjust valves (if adjustable), check and adjust ignition timing (if possible), check and note tailpipe emissions.
4. Scope check secondary ignition system.5. Advise of any other items requiring attention, and road test.
Minor:1. Perform road test to confirm engine performance.2. Perform visual inspection of the engine and replace the following
components, verified by the visual inspection:a. spark plugsb. air and fuel filtersc. inspect positive crankcase ventilation (PCV) valve (if
possible)3. Check and adjust ignition timing (if possible), check and note
tailpipe emissions.4. Scope-check secondary ignition system.5. Advise of any other items requiring attention, and road test.
Engine Replacement ProcedureCheck the following and replace as necessary:
1. Motor mounts2. Belts3. Hoses (Upper/Lower)4. Check distributor for wear5. Radiator condition (send out for cleaning, replace, or repair—
must be done to qualify for engine supplier’s warranty)6. Clutch components7. Flex plate teeth or cracks8. Carburetor condition (OK or needs rebuild)9. Tune components (filters, plugs, wires, etc.)10. Engine paint11. Check exhaust manifolds for cracks or warp12. Replace water pump (must be done to qualify for engine
supplier’s warranty)13. Check alternator
Updated 5/9/2023

49 of 120
14. Check fuel pump history15. Check starter16. Start-up procedures followed17. Oil pressure18. Thermostat function19. Clean all tin20. Oil cooler sent out for cleaning or replacement (must be
done to qualify for engine supplier’s warranty)21. List all miscellaneous parts used on RO22. Service sticker installed, to return in 500 miles
Note: Do not proceed with engine replacement until you have verified that these items have been discussed with the customer. Make sure you note all recommendations on the hard copy.
Factory Maintenance ServicesEstimate factory maintenance services before they’re due and split them up so customer can decide. [Packages? –AS]
Fuel Induction Service1. Road test vehicle.2. Disconnect air boot at the air intake and install nozzle in air
intake. Reinstall air boot and start engine.3. After engine has reached normal operating temperature, activate
induction system cleaner.4. After chemical has been depleted remove the nozzle from the air
intake.5. Install fuel system cleaner in fuel tank and road test vehicle.
Check tailpipe emissions.
Fuel Pumps & Fuel InjectorsAlways sell a new fuel filter with a new fuel pump or replacement fuel injectors.
Fuel Injector Testing1. Connect DVOM to fuel injector connectors.2. Perform fuel injector function and resistance tests.
Fuel Pump Test
Updated 5/9/2023

50 of 120
1. Connect fuel pressure gauge to fuel rail.2. Test for cranking and running pressure.3. Test for fuel volume as per factory manual.
Fuel Pump Replacement1. Drain fuel from fuel tank.2. Disconnect any lines and connections required for removal of
fuel tank and remove fuel tank from vehicle as required to access the fuel pump assembly.
3. Remove fuel pump from tank, clean fuel pump mounting flange and mounting surface and install the new fuel pump assembly and mounting gasket.
4. Reinstall fuel tank assembly, replace fuel filter, start engine and inspect for any leaks.
5. Recheck fuel pressure and note PSI.6. Road test for proper operation.
Head Gasket Replacement1. Remove any brackets, linkages and electrical connections
required to gain access to cylinder head(s).2. Remove valve cover-retaining hardware and remove valve
covers.3. Remove intake and exhaust manifolds as required for cylinder
head removal.4. Remove cylinder head retaining hardware and remove cylinder
head(s).5. Sublet cylinder heads to machine shop for pressure check, clean
and inspect.6. Clean all gasket-mating surfaces and reassemble in reverse
disassembly order with new gaskets and fluids.7. Road test to verify proper engine performance and recheck fluid
levels.
Inspections and Repairs – paid, unpaid, and non-routineUnpaid Inspections and Repairs are:
1. Clutch inspections.2. Tune evaluation. Remove 1 spark plug to inspect and determine
wear, if possible. (Some vehicles are very difficult. In that case, tech will advise.)
3. Cursory inspection—a general “no wrench” look-over of the vehicle for any maintenance or repair needs. This is good for the customer and a great opportunity for the technician to find more work. This includes checking vehicle history and documenting any recommendations. When performing a cursory inspection, the technician is expected to flag “0” for the sold time for that inspection and not build into diagnostic flag.
Updated 5/9/2023

51 of 120
4. Lamp or bulb replacement (if replacement requires intensive labor, technician must get okay from service advisor to flag as paid time before procedure).
5. Clean battery terminals (maintenance). If very corroded, advise to sell 0.3.
6. Re-checking a job that just left and had an incident (i.e., a smell, noise, or light on). Technician is expected to find the problem while the customer is waiting, even if it is after hours.
7. Installing Bellingham Automotive license plate frames.Note: A repair order will be created on every job a technician is required to work on.
Paid inspections and hours of pay are:1. Brake inspection, wheels off, pays 0.2 per axle. This time is given
back when work is sold while vehicle is still on the rack in the stall. Note: the technician is expected to give the service advisor reasonable time to sell the work, and the service advisor is expected to sell the work in ½ hour or less. If for any reason the technician feels the need to re-assemble and move the vehicle off the hoist, the technician is responsible to discuss an action plan with their service advisor. This inspection includes measurement and documentation of rotors and pads condition, even on Bumper to Bumper Service.
2. Alignment check/Evaluation pays 0.4, including a shake down.3. Battery install pays 0.3, in most cases. Certain vehicles take
more time [which ones?]. Technician will advise if more time is needed when RO is turned in. Technicians are expected to do their best to save radio/clock memory (use of the new memory saver tool is mandatory wherever possible).
Non-routine inspections and repairs:1. Technicians will use the No. 1 Collision inspection sheet [not yet
created –AS] on all No. 1 vehicles.2. Technician and advisor will review any non-routine job before
starting.
Intake Manifold Gasket Replacement1. Disconnect any wiring, vacuum supply lines, or connectors
required.2. Remove any necessary brackets and/or components to access
intake manifold-retaining hardware and remove intake manifold.3. Clean and inspect sealing surfaces, install new intake manifold
gaskets, reinstall intake manifold and tighten to specs.4. Reinstall any brackets and/or components removed during
disassembly, including any wiring, vacuum supply lines, or connectors disconnected during disassembly.
Updated 5/9/2023

52 of 120
5. Start engine to confirm operation and recheck repairs performed.6. Road test to confirm proper operation.
Labor Codes and Canned Jobs[? –AS]
Labor MatrixA 10% labor matrix will be used on all repairs over 2 hours.
Large Jobs and Multiple-Day ProjectsLarge jobs and multiple-day projects should be flagged as straight time until final test drive and time punch, at which point (when the job is actually completed), the up flags or down flags may be applied.
Master E-Time List[Move to Facility Maintenance? –AS]During E-Time, technicians should:
Clean up and put away their tools Clean up their designated work area. Collect dirty rags and place them in designated container. Restock clean rags for their work area. Clean their designated air reel hose and retract. Clean and organize tech work station closest to their work area. Clean up and organize their waste oil drum. Straighten up and restock their supply shelf. Clean up their green and black drain pans and put away.
Updated 5/9/2023

53 of 120
Put away shop equipment. Clean up shop equipment. Crush oil filters if possible. Walk the lot. Make note of vehicles that have been on the
premises too long and report. Pick up any trash, and report problems to John.
Time to call John.
Menu Services[? –AS]
Miscellaneous Vehicle InspectionsFrom 2001 draft:All vehicles will have a cursory inspection unless otherwise indicated in writing.The inspection sheet will be filled out completely and accurately. Service advisor will indicate in writing if a ‘wheels pulled’ brake inspection is needed.Customer’s ‘special concerns’ will be indicated in writing.
[Emissions? Pre-purchase? Pre-trip? State Required? –AS]
No Wrench Inspection Specs[All I did is copy down the inspection sheet—how can we add detail to this? Do we need to? –AS]
1. Test drive vehicle.2. Check for dash warning indicators.3. 30, 60, 90K services due?4. Check engine oil level.5. Check transmission fluid.6. Check coolant.7. Check brake fluid.8. Check PS fluid.9. Check belts.
Updated 5/9/2023

54 of 120
10. Check hoses.11. Battery tests and cables?12. Check tire condition. Recommend alignment?13. Any leaks?14. Check parking brake function.15. Check air filter condition.16. Check fuel filter.17. Check wiper blades.18. Check CV boots and/or U-joints.19. Suspension/steering?20. For brakes: recommend inspection?21. Exhaust condition?
Nuts & BoltsTechnicians are expected to immediately tighten lug nuts or any other bolts as soon as they are installed. Walking away from a wheel or other part that has un-tightened nuts or bolts is cause for disciplinary action.
[More? –AS]
Oil Change ProcedureTechnicians are expected to participate in Bellingham Automotive’s oil change/marketing program. This usually means two oil changes per Tech, per day.
1. Circle license plate number to verify it’s correct and that the correct vehicle is in for service.
2. Use paper floor mat and seat cover to protect upholstery/carper and pull vehicle into lube bay. Leave steering wheel unlocked and transmission in neutral, then pull hood release.
3. Record mileage on RO and Date/Mileage on lube sticker. Mileage due interval is 3000 miles and 4 months, unless otherwise specified.
4. Open hood and remove oil cap.5. Lift car and drain oil.6. Check tire pressures and note if alignment or tires are needed.7. Perform no-wrench visual inspection of CV boots, suspension,
exhaust, brakes, oil leaks, etc. Document results on 15-point inspection sheet.
8. If unable to verify at least 40% left on front brakes, recommend brake inspection.
9. Remove oil filter if accessible from under car (wipe sealing surface to verify old seal has been removed and that there is no debris on the sealing surface).
10. Verify (circle #) or record oil filter number on RO.
Updated 5/9/2023

55 of 120
11. Install new drain plug washer or o-ring and torque oil drain plug.
12. Carefully clean undercarriage where oil has accumulated from filter removal and oil draining. Use brake cleaner if necessary.
13. Lower vehicle and immediately install new oil and tighten oil cap. (See computer program for correct amount of oil to install.)
14. Start and run vehicle for 15 seconds to verify oil filter is not leaking.
15. Finish no-wrench visual inspection of transmission fluid, brake fluid, coolant, power steering fluid, and windshield washer fluid. Also inspect for oil leaks, belts, hoses, and air filter. Document on 15-point inspection sheet.
16. Check oil level to verify the correct amount and top off as necessary.
17. Verify or record amount and type of oil on RO.18. Install lube sticker and reset maintenance light.19. Give RO to service advisor.20. Vacuum vehicle if customer is waiting and no utility person
is available, then move out front. Park vehicle and mark spot # on key tag. If customer is not waiting, hang key on vacuum board for the utility department.
Oil LeaksAlways advise customers that additional gaskets and/or seals may need to be replaced to correct their oil leaks and that the recommended repairs are a starting point. Crankshaft and camshaft journals that are grooved where the seal sits will need to be replaced in order to guarantee no oil leakage. Bellingham Automotive does not recommend or guarantee sleeve repair kits.
Overheating Repairs1. Testing fees include HC (hydrocarbon) testing2. Always recommend a new thermostat if an engine has been
overheated (thermostats can become defective under severe heat conditions)
3. Bad Hosea. recommend all new hosesb. recommend new thermostat
4. Head Gasket Proceduresa. This type of repair requires the MOST amount of
documentation on the RO, and time educating the customer.
b. Inform the customer that a blown head gasket is the most likely problem according to the testing procedures (blown
Updated 5/9/2023

56 of 120
head gaskets are usually a result of other cooling system problems). Additional repairs may be necessary to prevent the gasket from failing again and to restore the engine to proper operating condition. Because we are unable to inspect the engine, cylinder head and head gasket until the engine has been disassembled, we cannot guarantee that a head gasket replacement will solve the problem. If we disassemble the engine to inspect the engine and the vehicle needs more extensive repairs than just the head gasket, the vehicle will not be drivable. The cost to inspect the engine will be ½ the labor cost to replace the head gasket. The cost to reassemble the engine would be the total cost to replace the head gasket.
c. The customer must be informed that if the head gasket is determined to be bad, we will guarantee the head gasket during our normal warranty period, but are unable to guarantee any other part of the engine. In rare instances a visibly blown head gasket can be one of two or more problems. These other problems can sometimes be impossible to detect without replacing the head gasket and running the engine. Additional engine problems are not covered under our warranty.
d. Suggest pressure testing cylinder head (after head has been removed) to prevent possible comeback situation.
e. measure cylinder head for warpage and note on ROf. measure cylinder head heightg. If the gasket is not visibly blown, cylinder head must be
sent out for pressure testing. If the cylinder head is not defective then the block is suspect and an engine replacement should be recommended
h. replace thermostati. recommend radiator rod out (no warranty if head gasket
fails due to radiator being restricted)j. recommend hoses be replaced (especially on 10 year old
vehicles)k. mention possibility of piston ring problemsl. mention O2 sensor might need to be replacedm. note any declined repairs on RO along with reduced
warranties
Parts InventoryTechnicians should:
pull all parts before bringing in vehicle verify parts are correct before installing contact Parts Manager and/or Service Advisor immediately if part
does not look correct
Updated 5/9/2023

57 of 120
notify Parts Manager if using the last part on the shelf
Parts Purchasing & DeliveryFrom suggestions: Use of OEM parts for reliability and proper function of part.[list/table of suppliers? Parts pricing matrix?]
Cores In/OutFrom suggestions: when putting cores on shelf to be returned, write (core) next to part #.
Parts RequisitionsParts Requisition forms are located in the stacker inside the door between the Parts Room and the Service area. Technicians are expected to submit parts requisition with necessary items listed (including seals, gaskets, etc., for completion of job, and special type fluids that may increase the cost of the job.)
Parts Returns
Updated 5/9/2023

58 of 120
Pinion Seal Replacement1. Remove driveline assembly and remove pinion flange nut and
flange.2. Remove seal from carrier housing.3. Clean & inspect all visible surfaces for damage.4. Lube & install new pinion seal, re-install pinion flange and torque
to specs.5. Re-install driveline assembly & torque to specs.6. Check and adjust fluid level as needed and road test for proper
operation.7. Re-inspect for any signs of leaks.
Power Antenna Mast Replacement1. Remove trim panels to access antenna motor.2. Remove antenna nut and antenna stanchion from antenna.3. Disconnect electrical plugs and connectors and remove
necessary nuts/bolts to remove antenna motor.4. Remove antenna motor from vehicle.5. Disassemble antenna motor assembly.6. Remove broken antenna mast and reassemble antenna motor.7. Install antenna motor & tighten nuts/bolts removed.8. Reconnect electrical plugs and connectors, and install all trim
panels removed to access antenna motor.9. Feed new antenna mast into antenna motor.10. Install antenna nut and stanchion.11. Cycle antenna several times and inspect operation.
Problems with Repair Orders/Technician CompensationCommunication between technicians and service advisors is key to the running of our business. [Add in more? –AS]Not enough time sold:When bidding jobs at the counter, service advisors should always discuss job with the technician in question to determine the correct sold/retail time. The warranty team will be consulted if technician has underbid the job, and/or if remaining work is to be completed under E-2 flag.Not enough information to diagnose concern:
Updated 5/9/2023
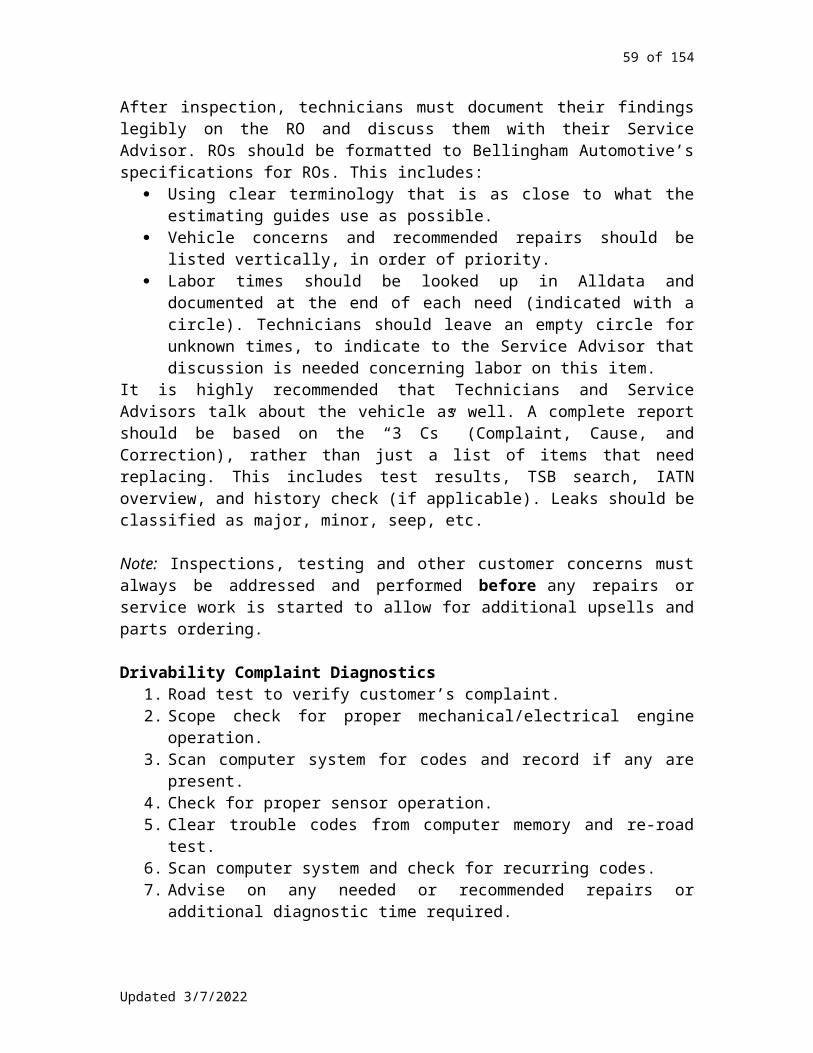
59 of 120
Technician will be paid sold/retail time, but should clock off the job after .5 hour and re-group with advisor to get more information about concern.Wrong tech for the job (LOST):Technician should stop at .5 hour and discuss with advisor before further time is flagged (if there is no direction to proceed).
Repair ProcedureFrom suggestions:Upon teardown on jobs, parts must be cleaned and inspected.When a part is installed or procedure performed and it does not fix the problem (and the technician is sure the part is good), technician must consult their service advisor ASAP and discuss options.No throwing, slamming, and/or banging parts onto cars. Parts installations and services should be performed with care and precision.
Replacing Parts without DiagnosisWe will replace parts without performing tests/diagnostics only when the customer expressly understands that the part may not correct the problem and is willing to physically sign an RO stating that fact.
"Customer requests ______________ be installed. No tests have been performed and no diagnosis made, and there is no warranty that the installed part will remedy or correct the customer’s problem or concerns. The installed part is non-returnable". Customer initials __________
The technician is responsible for making sure that all parts have been properly diagnosed by the company or that the customer has initialed the above statement before installing the requested part.
Reminder LightsTechnicians are expected to reset oil reminder lights when performing an oil change or if new oil is used.
Safety[Will probably merge this into the Emergency Procedures & Safety section. –AS]Confined space, ear protection, face shields, hazcom, protective attire, respirators, shop best management practices
Updated 5/9/2023

60 of 120
Hand tools: Employees must wear protective equipment when necessary. Defective tools must not be used. Sharp hand tools must not be carried in clothing (i.e., shirt pocket). All wiring on electric hand tools should be checked for proper
insulation and 3-prong plug grounding. Eye protection is mandatory when using hammers. The right size and type of screwdriver for the job must be used.
Screwdrivers are not to be used as chisels. Use the proper wrench for the job. It is easier to pull on the handle
than to push on it. Saws that are sharp and rust free are less likely to bind or jump. Insure
the object being cut is secured tightly to a flat surface.
Protective equipment: Approved eye protection (safety glasses with side shields, goggles,
etc.) must be worn at all times when assigned certain job classifications.
Moccasins and shoes with open toes or high heels are not permitted. Protective clothing and equipment is to be worn/used as needed to
protect against hazards. This includes, but is not limited to, hard hats, steel-toed shoes, gloves, fall safety harnesses, ear plugs, etc.
Welding Equipment Usage Safety:
Scope Test Engine1. Scope test engine ignition system using electronic engine
analyzer.2. Perform primary and secondary ignition system tests.3. Check ignition timing.4. Perform basic visual inspection of spark plugs and other ignition
components.
Seals and GasketsTechnicians are responsible for making sure they are installing the correct gasket or seal. Always inspect camshafts and crankshafts to
Updated 5/9/2023

61 of 120
make sure they are not grooved which will cause a new seal to leak. Crankshaft flex plates and flywheels must always be torqued to prevent crankshaft seals from leaking. Flex plate must also be inspected for cracks prior to installation. Verify that the engine does not have excessive amounts of crankcase “blow-by” before installing new seals or gaskets, as Bellingham Automotive cannot guarantee worn out engines from leaking oil.
Serpentine Drive Belt Replacement1. Remove existing serpentine drive belt.2. Inspect pulleys, idlers or tensioners for excessive wear or
damage and advise accordingly.3. Install new serpentine belt.4. Road test and check for proper tension.
Snow and Ice on VehiclesVehicles with snow and/or ice packed under them must be lowered to the ground overnight so as not to set off motion sensor and building alarm when melting.
Special ToolsWhat?How are they taken care of?StorageCheck in/outInspect on return (who?)Instructions for use
Standby Work Stacker ProcedureTechnicians looking for additional work are expected to go to the standby stacker and choose the next job or the top RO in the stacker. The technician will need the okay of the service manager or the shop’s technician-designated consultant to proceed. It is not acceptable to “stacker pick” or pass up a job without permission from one or the other as stated above. Additionally, taking more than one job must have the approval of said above individuals. Finally, it is not permissible to stall or ignore the standby work late in the day or if a technician has reached their incentive goal.
Starter Assembly Replacement1. Disconnect battery (Appropriate to use EZ-Red Memory Saver?).2. Remove all brackets, exhaust system components and electrical
connections to starter assembly as needed to remove starter.3. Remove starter-retaining hardware and starter.4. Install rebuilt starter in reverse disassembly order, and check
starter for proper amperage draw.
Updated 5/9/2023

62 of 120
Starter Replacement1. Remove any brackets and/or components required to access
starter.2. Disconnect any wiring or electrical connectors.3. Remove starter assembly and inspect flywheel for any signs of
damage.4. Install replacement starter.5. Reconnect any wiring or electrical connectors and reinstall any
brackets and/or components removed during disassembly.6. Start engine & evaluate starter operation.
Sublets[Or should this go under Customer Service? Or does it apply to both? –AS]
Technical Training Tapes and ManualsTapes – requirements
Technicians’ ResponsibilitiesIt is expected that all technicians will be dressed and ready to work by 7:55 AM. Technicians should always communicate with the Service Advisors concerning the day’s work, before 8:00 AM and before any work begins. If the technician’s Service Advisor is not available, the technician should review their Work in Progress board and their stacker and proceed to:
1. Continue with work in progress (only if approved by service advisor)
2. Or, take a repair order from the top of the stacker, read it, and if there are no questions, begin work immediately. (Note: Study RO carefully for all details concerning requested repairs.)
Updated 5/9/2023

63 of 120
Technicians should ensure that their Work in Progress board is updated and accurate. If the Technician finds their stacker empty, or is held up on work for any reason, they will:
1. Consult the service advisors2. Turn on the flashing indicator on their assignment board.3. Punch out and proceed directly to the posted “To Do” list and
begin E-Time work. Proceed with work as needed in and around the shop, performing tasks efficiently from the top of the list down.
4. If the technician addresses and completes all listed assignments, they should immediately call John’s extension (12) or cell phone, and inform him of their use of time (this is mandatory, not an option). John will need to sign off on the technician’s time card to validate pay.
Note:In an effort to maximize efficiency, it is expected that assigned work will be completed in the normal time allotted. It is not acceptable to drag out a work assignment, even if no other jobs have been assigned.
Commitment to QualityIn an effort to maintain the quality, dependability, and “above expectations” standard that this business has consistently delivered, all associates must know what is expected. We must first be able to depend on each other before the public can consistently depend on us. The following procedures are essential for us to remain consistent with the product we turn out.
Diagnostic: All vehicles will have a cursory (no wrench) inspection unless
otherwise indicated in writing. The repair order is to be filled out completely. If any vehicle
information is missing, fill it in. After your test drive, note any other problems, and discuss it with your Service Advisor. Document all important information, and present your case using the “cause and effect” format.
Always test drive before and after repairs. When completed, inspect the vehicle for fingerprints, or anything that is out of the order it arrived in. Make it right!
Once a technician turns in a repair order report, the Service Advisor will need to talk with the technician performing the work about any labor or procedure questions before the customer is contacted or the work is started (this is most important on “non-menu” items).
Test drive responsibly, driving slowly in the parking lot. Do not park box trucks or large vehicles in front of shop. Consult your
Updated 5/9/2023

64 of 120
supervisor for any parking problems. Back vehicles into parking spots when completed.
Technicians are required to use clear terminology, or as close as possible, to what the estimating guides use.
The Technician is the Service Advisor’s eyes to seeing what is wrong with the customer’s vehicle. Help him/her see the problem! Bring him out to see if you need to!
Service: Repair orders are assigned in order of priority, starting at the top
of your stacker. Review reasons for service, be sure you are clear on time or procedures sold or advised. If there are any questions, or you are not clear of the assignment, consult your advisor before work begins.
The type of service will be in writing on the repair order. The inspection sheet will accompany the repair order and be filled out completely and accurately. The Service Advisor will indicate in writing if a “wheels pulled” brake inspection is needed.
Engine oil level will be checked and documented on every vehicle you have a repair order on
Service sticker will be inspected and documented on every vehicle you have a repair order on
If a quart of oil is needed, add it, and document on RO. Consult your service advisor as well if: no oil is on the stick, oil is very dirty, is overdue for service, or there is no service sticker
If the air filter is dirty, consult your service advisor Always consult your service advisor early in the service process Lube the door hinges with every oil change or service If a key feels sticky in the door lock or ignition, lube as necessary Remember: see the car with a wide angle approach Always use the “brake washer” when repairing any drum brakes
or cleaning up where brake dust is present. Never use air pressure to clean! Violation of this will be immediate time off.
Always torque wheel nuts to spec. When a recommended part is installed or procedure performed,
and it does not fix the problem, consult your advisor immediately to discuss options. This should be done in the shop, or in a private conversation. If you suspect a faulty new part, consult the parts manager. Do not proceed without authorization!
After the tear down process, clean up and inspect all related parts. This will help prevent delays and expedite special order parts.
On all leaks reported, technicians will classify as major, minor, seep, damp, etc. If fluid was topped off, indicate on RO.
It is the technician’s responsibility to refill using OEM-recommended fluids.
Updated 5/9/2023

65 of 120
Test Drives and Inspection FormsTechnicians are expected to perform before and after test drives and document results in writing. Technicians are also expected to evaluate every line on inspection forms and document and report their findings.
Initial Test Drive Procedures[Should this be merged into something else? This needs to be double-checked—handwritten doc hard to read –AS]
1. Check tires and look for leaking fluids. Inspect fluid levels. Document results on RO.
2. Look for vehicle symptoms/chief complaint on RO and review vehicle history.
3. Inspect license plates for current tabs.4. Put floor mat and seat cover in vehicle. Inspect lube sticker for
service due. Check fuel level.5. Record mileage and check if factory service is due.6. Check that vehicle starts okay and all dash lights are on.7. Check function of: parking brake, clutch or automatic
transmission, instrumentation. Do 4x4 hub check.8. Road test for: bumps, suspicious noises, etc.9. Check function of: wipers, heat and air at all speeds.10. Check cruise control. [Maybe? Can’t tell what it says –AS]11. On return, lift hood—easy leak check, in air, no-wrench
brake inspection.12. Glance at suspension. Check exhaust for holes or
corrosion.13. Perform bounce test and back-up test.
Thermostat Replacement1. Remove any brackets, hoses and clamps required to access and
remove thermostat housing.2. Clean housing gasket surfaces, install new thermostat and
reassemble with new gasket.3. Refill cooling system with factory-recommended coolant/water
mixture.4. Purge cooling system of air, start engine, and verify correct
thermostat and cooling fan function.5. Perform final test-drive to verify proper thermostat function.
Tilt Wheel Repair1. Check for proper operation of all accessories attached to or
controlled by, the steering column.
Updated 5/9/2023

66 of 120
2. Remove steering wheel, lock plate, turn signal switch, ignition lock cylinder and assorted column covers to gain access to steering column tilt mechanism.
3. Remove tilt pivot pins and remove upper column to gain access to tilt-mounting bolts.
4. Remove mounting bolts, clean threads, apply thread sealer to tilt mounting bolts and re-install bolts.
5. Install tilt pivot pins and all covers, switches and contacts removed to gain access.
6. Install ignition lock cylinder, turn signal switch and lock plate.7. Install steering wheel.8. Recheck for proper operation of all accessories attached or
controlled by steering column, and road test.
Time TrackingAll technicians shall provide accurate time tagging on each job, including E-2 time. If not 100% confident how or what to tag, consult the service manager.
Timing Belt Replacement1. Remove any brackets, pulleys, belts, hoses, or electrical
connections required to access timing belt covers.2. Remove timing belt cover retaining hardware and remove
cover(s).3. Loosen timing belt tensioner(s) and remove timing belt.4. Inspect timing belt tensioner(s) and idler pulley(s) for damage,
inspect cam & crank seals for oil seepage/leakage, inspect water pump for indication of wear or leaks and note.
5. Install new timing belt and reassemble in reverse disassembly order.
6. Start engine, check and set ignition timing as required, and road test for proper engine performance.
Timing Belt Replacement with Cam & Crank Seals1. Remove any brackets, pulleys, belts, hoses, or electrical
connections required to access timing belt covers.2. Remove timing belt cover-retaining hardware and remove
cover(s).
Updated 5/9/2023
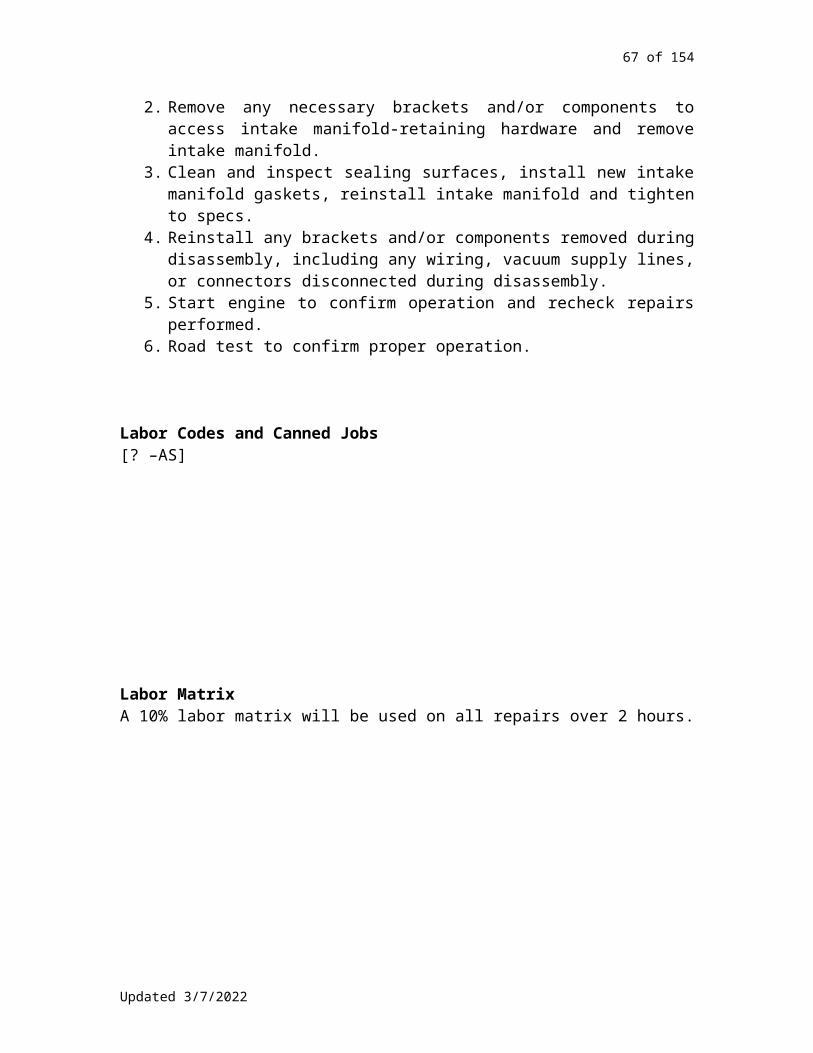
67 of 120
3. Loosen timing belt tensioner(s) and remove timing belt.4. Inspect timing belt tensioner(s) and idler pulley(s) for damage,
extract and replace with new, all cam and crank seals, inspect water pump for indication of wear or leaks and note.
5. Install new timing belt and reassemble in reverse disassembly order.
6. Start engine, check and set ignition timing as required, road test for proper engine performance.
Timing Belt Replacement with Cam & Crank Seals and Water Pump1. Remove any brackets, pulleys, belts, hoses, or electrical
connections required to access timing belt covers.2. Remove timing belt cover-retaining hardware and remove
cover(s).3. Loosen timing belt tensioner(s) and remove timing belt.4. Inspect timing belt tensioner(s) and idler pulley(s) for damage,
extract and replace with new, all cam & crank seals, remove water pump and clean mating surfaces, install new water pump and gasket.
5. Install new timing belt and reassemble in reverse disassembly order.
6. Start engine, check & set ignition timing as required and road test for proper engine performance.
Timing ChainsIf a timing chain tensioner is broken into pieces, the technician must recommend removing the oil pan to clean the debris in order to prevent future engine damage. This must be noted on the RO. (Have customer initial if work is refused)
Tire Balancing/Rotation1. Road test and remove wheels.2. Inspect wheels and tires for excessive wear or damage and
advise accordingly.3. Balance tires and/or rotate tires in the manner the manufacturer
recommends.4. Install wheels and torque to manufacturer’s specifications.5. Road test vehicle.
Updated 5/9/2023

68 of 120
Tire Rotation/RemovalFrom suggestions: Whenever tires are rotated or removed, technician must document brake % remaining. If brakes are due, technician must advise service advisor ASAP.
Transmission Flush – Automatic1. Road test vehicle to verify normal transmission operation.2. Scan computer system for transmission related codes (if
possible), and inspect for external leaks.3. Check fluid level, add cleaner to transmission, and drive vehicle
for 15 minutes.4. Install transmission flush machine, start vehicle and flush
transmission.5. Disconnect the transmission flush machine, add transmission
conditioner and check for fluid leaks.6. Scan computer system for transmission related codes. Road test
and recheck fluid level.
Automatic Transmission Flush with Filter1. Road test vehicle to verify normal transmission operation.2. Scan computer system for transmission related codes (if
possible), and inspect for external leaks.3. Check fluid level, add cleaner to transmission, and drive vehicle
for 15 minutes.4. Install transmission flush machine, start vehicle and flush
transmission.5. Disconnect the transmission flush machine. Remove
transmission pan and check for debris in pan.6. Remove and replace filter, clean pan of any debris, clean
transmission gasket surfaces and install new gasket.7. Install pan on transmission torque bolts to manufacturer’s
specifications, and refill with fluid.8. Add transmission conditioner, check for fluid leaks and scan
computer system for transmission related codes. Road test and recheck for leaks and proper fluid level.
Updated 5/9/2023

69 of 120
Transmission Service – Automatic1. Road test to verify transmission operation.2. Scan computer system for transmission related codes (if
possible).3. Inspect for external leaks.4. Remove transmission pan and check for debris in pan.5. Remove and replace filter, clean pan of any debris, clean
transmission gasket surfaces and install new gasket.6. Install pan on transmission torque bolts to manufacturer’s
specifications, refill with fluid, road test and recheck for leaks and proper fluid level.
Transmission Service – Manual1. Road test vehicle to warm fluids.2. Rack vehicle and inspect for fluid leaks.3. Remove transmission drain plug and drain transmission fluid.4. Inspect fluid for excessive debris.5. Check transmission mounts and linkage for excessive wear or
damage.6. Refill to proper level with the manufacturer’s recommended fluid
type and weight.7. Road test.
Transmission Bench Rebuild1. Completely disassemble and clean Transmission housing and all
components.2. Perform visual inspection of all wear components and rebuild
transmission using Master Rebuild Kit. Supply Exchange Rebuilt Torque Converter.
NOTE: Transmission is not shipped with any fluids, and the transmission cooler must be flushed before transmission is installed into the vehicle!
Transmission Dye Inspection1. Clean suspected leak area and add fluorescent dye into
transmission fluid.2. Slightly overfill transmission with transmission fluid3. Let vehicle sit over night and inspect with fluorescent reactive
light.
Transmission External Reseal1. Remove transmission from vehicle and remove torque converter
to gain access to front pump.2. Remove front pump assembly and disassemble.3. Replace front pump seal and bushing with new, reassemble
pump and install pump into transmission.
Updated 5/9/2023

70 of 120
4. Remove existing and install new external transmission seals and install new transmission filter and pan gasket.
5. Install transmission into vehicle, fill with fluid and road test to confirm proper operation.
6. Check for leaks and top fluid off to proper level.
Transmission Rebuild (generic)1. Remove transmission from the vehicle.2. Completely disassemble and clean transmission housing and all
components.3. Perform visual inspection of all wear components and rebuild
transmission using Master Rebuild Kit.4. Install exchange rebuilt torque converter.5. Perform transmission cooler and line flush.6. Install transmission into vehicle, fill with fluid and road test to
confirm proper operation.7. Check for leaks and top off fluid to proper level.
Transmission – Remanufactured1. Remove existing transmission.2. Perform transmission cooler and line flush.3. Install remanufactured transmission into vehicle, fill with fluid
and road test to confirm proper operation.4. Check for leaks and top off fluid to proper level.
Transmission Teardown and Inspect1. Remove transmission from the vehicle.2. Completely disassemble and clean components for inspections
and estimating purposes.
Tune-UpsFrom suggestions: It is standard procedure to clean throttle plates on all tune-ups
UpsellsThe objective of regular maintenance service (such as oil changes) is to extend engine life, promote customer loyalty, and have the
Updated 5/9/2023
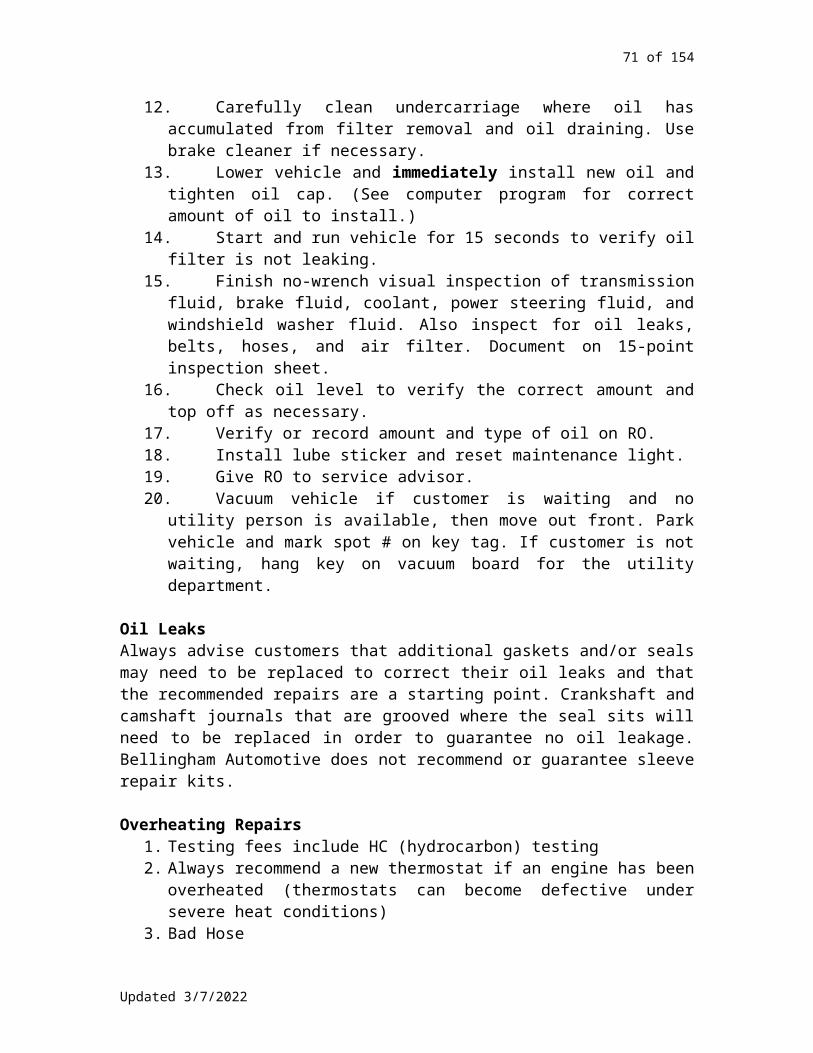
71 of 120
opportunity to sell other work. This must be done in a timely manner to keep customers coming back. The goal of all upsells is to prevent costly comebacks and customer complaints. The following list is an example of some of the most common upsells:
1. Timing Belts:a. Waterpumpsb. Cam sealsc. Crank sealsd. Tensioner bearings
2. 30,000 mile major services:a. Fuel injection serviceb. Transmission flushc. Fuel filterd. Brake flush
3. Ball joints4. CV Boots5. Axle seals6. Brakes
Used Parts PolicySometimes it is appropriate to suggest used parts especially on extremely expensive parts. Customers must always be advised of the risks involved. Advise customer of exact warranty provided by salvage yard, including the lack of a labor warranty, and make appropriate warranty notes on RO
Selling Used Engines – include these itemsInclude these items:
1. Can we warranty it? If so, how long?2. Install new thermostat3. Replace valve cover gasket4. Replace spark plugs5. Recommend any other easily-accessible gaskets6. Recommend new water pump & timing belt7. Recommend radiator rod-out8. Recommend new hoses
Selling Used Transmissions – include these items1. Change transmission oil2. Replace transaxle seals3. Flush cooler lines with chemical solvent (extra 0.5)4. Recommend rear crank seal if wet or high mileage.5. Verify you have the correct replacement transmission core so
that all parts fit correctly.
V-Belt Replacement
Updated 5/9/2023

72 of 120
1. Remove v-belts.2. Inspect pulleys and idlers for excessive wear or damage and
advise accordingly.3. Install new V-belts, and tension as required.4. Road test and recheck for proper tension.
Valve Adjustment1. Consult vehicle information system for specifics of valve adjust
with engine hot or cold.2. Remove all necessary components to gain access to the valve
cover(s).3. Remove valve cover(s) and perform valve adjust as
recommended by factory service manual.4. Reinstall valve cover(s) with new gaskets and any other
hardware removed during adjustment.5. Check oil level, start engine and perform final road test.
Valve Cover Gasket Replacement1. Remove all necessary components to gain access to the valve
cover(s).2. Remove valve cover retaining hardware and remove valve
covers.3. Clean all gasket-mating surfaces and reinstall valve cover(s) with
new gaskets and any other hardware removed during adjustment.
4. Check oil level, start engine and perform final road test.
Vehicle ComebackIf a situation is questionable, the technician will be given the benefit of the doubt. Example:
Technician diagnoses valve A as faulty within the agreed time of 1 hour. Technician installs valve A for the agreed 2 hours and road tests the vehicle (a total of 3 hours credited). Customer returns 2 days later with the same symptoms. A job ticket is opened with the prerequisite that technician will verify all their repairs were done correctly. Technician re-diagnoses for the agreed 1 hour, and states valve B is faulty. Valve B is installed for the agreed sold time of 4 hours, and technician road tests the vehicle. 5 hours is the presumed sold time. The customer drives for a week or two and the car runs fine.
NOTE: Bellingham Automotive pays technicians for correct answers, and will need to adjust back the previous pay to compensate for the misdiagnosis. This problem has many repercussions, and in any amount (beyond seldom) is detrimental to the shop’s survival.
Faulty Labor
Updated 5/9/2023

73 of 120
Performance-paid technicians are expected to perform comeback work that is considered failed workmanship on their own time.
Misdiagnosis ComebackWarranty team will be involved in determining, on a case-by-case basis, whether technician will be paid an hourly or flat rate for a misdiagnosed comeback.
Parts Failure (after-market part)The use of an after-market part must be justified and/or approved by the technician. The warranty team will be involved in determining whether the technician flags straight time or sold/retail time for the repair. Technician will sign a disclaimer.
Parts Failure (general/factory part, including 24/24 warranty)Technician will flag repair as straight time (not to exceed original actual straight time).
-or-
Parts Failure WarrantyBellingham Automotive will pay the technician 125% of actual time to replace a part that has failed under Bellingham Automotive’s stated warranty. Time is not to exceed the original actual time.
Wrong Part RecommendedTechnician will flag 125% of actual time (to be kept to a minimum). Ensure parts are on the shelf prior to pulling vehicle into shop and visually inspect before disassembly.
Warranty Jobs The warranty team consists of the service manager and lead
technicians (Tim Walker and KC Barbo). If indicated, the warranty team will review the concern with
persons involved. If the warranty team cannot come to a resolution, a meeting with John Beebe will be scheduled within 24 hours.
Every warranty, whether the warranty team is involved or not, will be kept to a 15-minute (or less) discussion, including racking the vehicle and inspecting as needed.
Service manager is responsible for typing a brief report on all warranties, which will be reviewed weekly by John Beebe. Report is to include: tech copy, customer receipt, short description of concern/actions taken, and signatures of warranty team and persons involved.
Updated 5/9/2023

74 of 120
Straight time warranty repairs help control costs and still provide the technician an incentive to get the warranty work done and move on to better jobs.
Water Pump Replacement1. Drain cooling system and remove any brackets, pulleys, belts
and hoses required for water pump removal.2. Remove water pump-retaining hardware and remove water
pump assembly.3. Clean all gasket surfaces and install a new water pump in
reverse disassembly order.4. Fill cooling system with factory recommended coolant and water
mixture.5. Purge air from the cooling system and verify proper thermostat
and cooling fan function.6. Road test to verify proper cooling system function, and recheck
for leaks.
Wheel BearingsTesting fees need to be charged to hook up ELECTRONIC EAR if technician is not 100% certain of which wheel bearing needs to be changed.
Wheel Locks and Car Alarms
Window Regulator/Motor Replacement1. Remove appropriate front door panel assembly.2. Disconnect any wiring or connectors to motor/regulator
assembly.3. Remove bolts and remove regulator/motor assembly.4. Install replacement regulator/motor assembly and reconnect
wiring and connectors disconnected during disassembly.5. Reinstall door panel and cycle window up & down multiple times.6. Recheck repairs performed.
Updated 5/9/2023

75 of 120
IV. Facility Procedures and Maintenance
Damage to Company Property and Equipment[Who to notify, who is responsible to fix/order repair, etc. –AS]
Equipment MaintenanceThe following pieces of equipment require periodic maintenance:Alignment Rack
Monthly, use compressed air to blow dirt from table/platform bearings
Semi-annually, grease/lube (8 pumps per fitting)Hoists
Monthly, grease (6 pumps per fitting), check for latch operation, check for mounting bolt tightness, and check hydraulic fluid level
Fork Lift Annually, perform LOF and check state of tune
Air Compressor Weekly, drain tank Annually, perform LOF
Generator Monthly, run to warm up Annually, perform LOF
Bay Doors As needed, clean Annually, lube
MotorVac Annually, replace filter
A/C Recharge Cart Annually (in winter), send out for service/calibration
Brake Lathe Weekly, brush off dust (DO NOT use air!) Annually, have serviced/calibrated
Cuda Parts Washer Weekly, add one scoop detergent and fill up water Monthly, lube, change water solution, and clean sump Every 6 weeks (automatic service schedule), Walter Miller
will clean, adjust, etc.
Updated 5/9/2023

76 of 120
Graco Oil Dispensers As needed, replace 9VDC battery and install new nozzles to
stop drippingBuilding Heat/AC System
As needed, change filters Annually, perform tune-up
Car Caddy Weekly/As needed, charge batteries
Materials Handling1. All containers with used chemicals, fluids, etc. must have lids or
caps on them and must be on a spill containment platform or tub.
2. New, sealed containers do not need to be on spill containment.3. Any containers, fuel tanks, or other containers that have used
materials in or on them should never be stored outside.4. All flammable liquids must be kept in flammable liquids cabinet.5. All spills must be cleaned up ASAP.6. All containers must be properly labeled. Chemicals and fluids
should never be put in a container that is marked for a different type of material.
Opening and Closing ProceduresOpening:
1. Turn on Cuda Parts Washer skimmer (15-30 min.) and heater (10 hours).
2. Turn on shop lights. Turn north and south thermostats to 55-60 degrees.
3. Turn on green “service lane” lights switch (upstairs outside John’s office).
4. Start coffee for customers and employees. Prepare customer waiting area.
5. Start air compressor (open air line valve, turn knife switch up), open shed door. Make sure back alarm is off.
6. Open south gate, bring in newspaper, check key drop box and stock with envelopes and pens as needed.
7. Prepare (check fluids, cleanliness, etc.) and stage shuttle vehicle(s).
8. Turn on both OPEN signs at 7:30. Unlock shop man doors.9. Review the day’s “special assignments” board with service team.10. Scan shop for cleaning or maintenance before technicians
arrive.Closing:
1. Walk the lots (front, side, and back) and lock all vehicles. Pay special attention to target-type vehicles. Park them under the
Updated 5/9/2023

77 of 120
portico, in the back secured area, or inside shop as discussed with service advisors.
2. Okay to leave one or two vehicles at front of service lanes for the night. Use company vehicles (loaner, van) if needed.
3. Make sure key drop box is clean and stocked with envelopes/pens.
4. At 5:15 lock south gate, turn off OPEN signs and green “service lane” lights.
5. Move coffee hot pots to shop sink area for cleaning. Restock waiting room refrigerator with soda and water. Restock cups, stirrers, sugar, creamer, etc.
6. Park shuttle vehicle(s) inside secured area or in shop.7. Secure all 12 shop overhead doors and all 3 man doors.8. Turn off air compressor (knife switch down, air line valve closed).
Close/lock shed door and turn off shed light. Back lot alarm is on auto.
9. Turn off shop lights, leaving “night” light switches on as labeled.10. Turn shop heat thermostats down to LOW11. Plug Zamboni to charger. Charge Car Caddy as needed.12. Review next day’s early morning needs, if any, with service
team.13. Check for remaining employees. Last employee to leave
sets building alarm and exits through back door, locks back gate.
Parking Lot ManagementParking lot management is an important component to help improve the flow of getting vehicles into the shop, repaired, and returned to the customer as efficiently as possible. Our parking area is the first thing customers experience as they arrive to drop off or pick up their vehicle, and the last thing they experience when they leave. It is also the company’s showroom to the public eye. Care must be taken to keep the front parking lot “set up” to attract customers throughout the work day, while moving, staging, and storing vehicles to proper areas on the premises. It is essential for the front lot and service lanes to be kept clean and clutter-free, in order to look inviting at all times to customers and the general public. General guidelines are:
Service Lanes: The two service lanes for customer vehicle drop-off can become filled and backed up quickly, blocking or confusing arriving customers. Vehicles in the middle and back of these lanes must be checked in and, if not being serviced immediately, moved forward or into a parking space to await service. It is good practice to leave at least one or two vehicles staged at the very front of the service lanes, to help guide arriving customers to park in those lanes. Large trucks and over-sized vehicles should be moved from the service lanes and staged in the back lot as soon as possible.
Updated 5/9/2023

78 of 120
Parking Spaces: The numbered parking spaces in the front and side lots are for staging vehicles awaiting service, and for completed vehicles awaiting pickup by customers. The spaces numbered 9 through 11 should be kept vacant, whenever possible, for arriving customers who don’t park in the service lanes. Parking spaces in the back lot, including the tow area just outside the back gate, are for vehicles awaiting service, large trucks, over-sized and disabled vehicles, or those needing to be stored inside the secure fenced area. If needed, a large number of vehicles can be staged/stored 3-deep in the back lot. Employees are strongly encouraged to back vehicles into parking spaces. It is safer to back in amongst stationary vehicles than to back out into moving traffic in the parking lots. Employees are also strongly encouraged to park their personal vehicles in the lower gravel lot. This leaves room in the paved lots for customers’ vehicles, and helps manage the flow and storage of vehicles in the busy and crowded parking lots.
Shop Maintenance OpportunitiesThese tasks can be performed at any time between normal duties.
Refill containers (brake wash, de-icer, anti-freeze/coolant, H2O, etc.) for technicians as needed/requested. Empty soiled rag buckets into larger bins. Collect used oil filters from technicians’ buckets and drain pans.
Return portable equipment after technicians’ use (BG machines, oil/grease drums, brake lathe, etc.) and refill or empty fluid containers and clean as necessary.
Squeegee excess water from work bays, mop or soak up spills as needed, sweep bays and work areas, and use Zamboni as needed.
Check storage shed area. Keep it organized and free of clutter and obstructions. Crush oil filters as needed. Note fill levels of coolant and oil drums. Check charge on car caddy and recharge as needed. Check discarded battery storage box.
Keep track of operations supplies on hand (such as ice melt, absorbent spill materials, gasoline/diesel, tire chains, biozyme, gear oils, brake wash, washer fluid, etc.) and note things needing to be ordered.
Empty shop vacuums and clean vacuum parts as needed. Clean shop’s overhead door ropes regularly (they get dirty
quickly). Wash squeegees, brooms, and clean Zamboni parts if needed. Ask Service Advisors if any paperwork filing needs to be done. Sweep or clean outside of shop doors, in-parking and driveway
area. Look for spills on ground outside and treat them immediately.
Updated 5/9/2023

79 of 120
Check Shop Maintenance List for equipment needing service by Utility crew.
Empty garbage cans into dumpster, haul metal to recycle barrel and cardboard to recycle bin.
Vacuum office area (before or after business hours only) Perform walk-around (do this several times throughout day).
Check that vehicles are in the proper areas, the waiting room and coffee bar are cleaned and stocked, and spills and/or obstructions are taken care of as needed.
Note: Utility personnel can only test drive or assist with vehicle repair with the permission of the Service Advisors.
Updated 5/9/2023

80 of 120
V. Office and Accounting Procedures
Abandoned VehiclesBellingham Automotive is not able to store vehicles on which no work is being done on a long-term basis. Occasionally, customers will make arrangements with a service advisor to pick up their vehicle at some point after they’ve paid (i.e., on a weekend). Aside from that, we must have tagged keys on either the Work in Progress or the Completed Job board for any vehicle on Bellingham Automotive property. Even if a vehicle is not drivable and the customer has declined further repairs, service advisors must make arrangements with customer to have the vehicle towed to the customer’s residence. If a vehicle is abandoned on company property, efforts will be made to contact the customer in question, up to and including a certified letter. Bellingham Automotive may offer to take possession of the vehicle (customer must bring in signed title) in order to arrange for disposal/salvage. If customer does not respond within a reasonable period of time, a registered tow truck company will have to be called to impound the vehicle.
Accounts PayableAccounts Payable records should be kept for 7 years.
Accounts ReceivableBellingham Automotive will post invoices to account for commercial customers. [Policies on this? Do we do a credit check or make them sign anything?] Invoices can usually be mailed in a Bellingham Automotive windowpane envelope.[More? –AS]
Exceptions are as follows: Birch Equipment: Service Advisor will call their accounting
department to get a PO #. Once this is received, advisor will write it on the invoice(s) and mail in a windowpane envelope.
Diamond B: Service Advisor will call their accounting department to get a PO # before completing RO. Once this is received, advisor will fill it in under the Miscellaneous section in MaxxTraxx and complete the RO. Office staff will then scan RO(s)
Updated 5/9/2023

81 of 120
and email to designated person at Diamond B, and fax them (Attn: info is taped to the fax machine).
H.D. Fowler: Invoices are first faxed to them (number is on speed dial, and Attn: info is taped to the fax machine). Invoices and supplementary paperwork (inspection checklists, alignment printouts, etc.) are then mailed in a windowpane envelope.
North Coast Electric: North Coast Electric requires that one of their employees sign the invoice and print their name above their signature when picking up the invoice. Then…
[Are there other accts. we have special procedures for? Should we put Walton/Advantage procedures here? –AS]
Accounts Receivable records should be kept for 7 years.
Applying Discounts1. Discounts should be applied before the customer pays. If the
repair order has not yet been completed, skip to step 5. If it has, proceed with step 2.
2. In the Service Counter screen in MaxxTraxx, click Options and then Search Appointments.
3. Bring up the appointment by searching the customer’s last name and then selecting “Go To Appointment.”
4. Right-click on the appointment and select Change StatusWork in Progress.
5. Next, double-click on the appointment to open the repair order. Select Miscellaneous on the left side of the window.
6. On the right side of the window, press Select next to the Source Box.
7. Select the appropriate discount from the menu that appears, and then click the Select Button.
8. It may be necessary to enter some discounts manually. Do this by entering the dollar amount or percent of the discount on parts and labor under the Discounts heading (still in Miscellaneous).
9. Finally, select OK/Save in the lower right corner of the window and choose the desired option. (If the customer is ready to pay, cashier directly from this window by selecting Pay & Print).
Cashiering ProceduresIn MaxxTraxx, open the Cashier Window at the top of the screen. Make sure Pay Completed Repair Order is selected and click Next. Select the correct customer and either double-click or click Next. Then, select the customer’s preferred method of payment from the drop-down menu and follow specific instructions for that method. For all payments, have the customer sign a copy of the invoice that shows payment, write current date in the upper right corner, and place in the Completed
Updated 5/9/2023
82 of 120
Invoices folder at the cashier’s desk. Note: Customers can pay one invoice using more than one method (i.e., part in cash and part on a credit card)—MaxxTraxx will automatically calculate the remaining balance after the first payment method is applied.
Cash Payments:1. Select Cash as the Method of Payment.2. In the Amount to Post box, type in the amount of cash tendered
and click Apply Payment.3. MaxxTraxx will calculate the change due (if any). Put the
payment in the cashbox and get the correct change for the customer.
4. Click Finish and print one copy of the invoice for the customer to sign.
Check Payments:1. Select Check as the Method of Payment.2. Make sure the Amount to Post box is correct and Apply Payment.3. MaxxTraxx will prompt for the check number. Enter it and click
OK.4. Click Finish and print one copy of the invoice for the customer to
sign.5. Endorse the back of the check using the Whidbey Island Bank
stamp and put it in the cashbox.
Credit Card Payments:1. Select Credit Card as the Method of Payment.2. Make sure the Amount to Post box is correct and Apply Payment.3. MaxxTraxx will prompt to swipe the card. Do so in the card
reader attached to the computer monitor. Be sure to give the card back to the customer.
4. If taking a phone payment, click Enter Card Manually in the lower left corner and fill in all fields, then click OK.
5. Click Finish and print two copies of the invoice—one for the customer to sign, and one for them to keep. This acts as their credit card receipt.
Debit Card Payments:1. Select Debit Card as the Method of Payment in MaxxTraxx.2. On the Debit Card Verifone, press Sale (F2).3. The machine will prompt to swipe the card. Do so, and then give
the card back to the customer.4. When prompted, select DEBIT, and then enter the amount of the
sale using the number keypad. Push the green button.5. Have the customer enter their PIN on the PIN pad. Be sure they
push the green button.
Updated 5/9/2023

83 of 120
6. Once the transaction has gone through, tear off Merchant copy of the receipt and print a Customer copy.
7. In MaxxTraxx, Apply Payment, then click Finish. Print one copy of the invoice for the customer to sign and give them their copy of the receipt from the Verifone. Merchant copy goes in the cashbox.
NAPA Card Payments:1. Select NAPA Card as the Method of Payment in MaxxTraxx.2. On the NAPA Card Verifone, press Transactions (F2).3. In the Transactions screen, select F2 again for Sales.4. Then, swipe the card or enter the account # manually. Press the
green button, and then select Promotional (F2).5. The machine will prompt to enter a transaction code.
Push the green button if sale is less than $150. Enter 103 for no interest if paid within 90 days ($150
minimum purchase) Enter 106 for no interest if paid within 6 months ($300
minimum purchase) Enter112 for no interest if paid within 12 months ($500
minimum purchase). Bellingham Automotive does not generally offer this option anymore, as the charges are too high.
6. When prompted, enter the amount of sale using the number keypad. Push the green button.
7. Once the transaction has gone through, tear off Merchant copy of the receipt and print a customer copy.
8. In MaxxTraxx, Apply Payment, then click Finish. Print one copy of the invoice for the customer to sign and give them their copy of the receipt from the NAPA Card Verifone. Merchant copy (signed) goes in the cashbox.
A/R Charge:1. Select A/R Charge as the Method of Payment in MaxxTraxx.2. Apply Payment and click Finish. Print a copy of the invoice if
needed.
Paying A/R Invoices1. Invoices that have been put to account will not show up in the
Cashier window in MaxxTraxx. Click Customer Search in the upper left corner of the screen and type the first few letters of the customer’s last name or the business name to bring up their account. Double click to open.
2. On the right side of the customer record, there should be a balance due. The payment will not necessarily pay off the entire balance.
Updated 5/9/2023

84 of 120
3. On the left side of the window, select Customer Options, and then click Pay A/R Invoices in the drop-down menu that appears.
4. A list of the customer’s unpaid invoices will appear. If it is from a business, they will often include which invoices they are paying with their check. Click the Pay column next to the invoice to select it for payment.
5. If the payment is for an amount less than an invoice total, select an invoice and then click Edit Payment Amount. Type in the amount in the box that appears and click Okay. Doing this will automatically select that invoice for payment.
6. Once the correct amount to pay is selected, click Next. This will open the cashiering screen, and payment can be processed as normal. It is usually not necessary to print a receipt, but if the customer is paying in person, ask if they’d like one.
Voiding Transactions1. Sometimes, it is necessary to void a transaction. To do this, click
“View Current Cash Drawer Transactions” in the lower left corner of the Cashier window.
2. Find the transaction to be voided in the table on the left side of the window and click once to highlight it.
3. Once the transaction is highlighted, click “Void Payment” in the lower left corner of the window. This will ‘gray out’ the transaction, and VOID will appear in the far left column of the transaction table.
4. Voiding the transaction will send the invoice back to the “Pay Completed Repair Order” option in the Cashier window. It will also appear in the Service Counter screen.
Cash Drawer Close (Daily)1. Around 5:15 PM, begin making preparations to close out the cash
drawer for the day. Look in the cashbox for any checks received and list them on a deposit slip. (The deposit slips and the green bank bag are found in the drawer below the cashbox.) Identify each check by last name or company name. Ensure that all checks have been endorsed with the check stamp and place in the green bank bag.
2. In MaxxTraxx, select Daily Sales. Ensure that Start Date and End Date are set to today’s date and click OK. Next, select Balance Drawer.
3. Look for the amount under Cash – Computed. $200.00 is to remain in the cashbox at all times. Take out the amount of cash over $200 (if any) and place in green bank bag. Put coins in the small manila envelope. Record cash and coin amount on the deposit slip.
4. If cash transactions have been recorded for the day, the amount of cash remaining must be counted (should total $200). After
Updated 5/9/2023

85 of 120
placing any cash to be deposited in the green bank bag, remove the black bank bag from the safe underneath the cashier’s desk. Count cash and coin, placing each denomination of coin into the plastic baggies in the black bag. If the total amount of cash and coin equals $200, enter the total amount (amount left in drawer plus amount to be deposited) under Cash – Counted. If the count is off, follow procedures under “Cash Drawer Out of Balance,” below.
5. Payments are grouped by method and listed in a table on the left side of the window. Double click each entry on that list, click Select All, and then OK. This ‘counts’ all transactions to match the computed amount.
6. If the table shows computed Debit Card and/or NAPA Card transactions, a separate close-out procedure must be done on the respective machines.
For Debit Card: On the Debit Card Verifone, push the purple Reports
button. Select F2 for Totals Report. Confirm that Totals Report matches computed Debit
Card transactions in MaxxTraxx, then exit out of the Reports display.
Push F4 for Settlement. Password is written on the side of the machine. If settlement is successful, wait for receipt to print, tear
off, and staple to individual transaction receipts.
For NAPA Card: Push the purple Reports button. Select F2 for Totals Report. Confirm that Totals Report matches computed NAPA
Card transactions in MaxxTraxx, then exit out of Reports display.
Push the purple Deposit Button. Select ____ to Send. If deposit is successful, wait for receipt to print, tear off,
and staple to individual transaction receipts.7. In the lower right corner, enter $200.00 for Cash Left in Drawer
for Tomorrow.8. If everything looks correct, click Post and Print. Several dialog
windows will pop up—confirm that you have chosen to leave cash in the drawer for tomorrow, and that the amount left is $200, then Print Reports.
9. When it asks if you’d like to export the transactions to Quickbooks, click YES. In the window that comes up, click “Select All,” then “Export Selected Items.”
Updated 5/9/2023
86 of 120
10. Staple the printed reports together and give to Administrator. Staple receipts and summaries from Debit and NAPA Card machines, if applicable, to the back of the first page of reports.
Cash Drawer Out of BalanceIf cash is out of balance:
1. If the amount is small (less than ________), try recounting the cash to be deposited and the petty cash to see if the count is off. If amount is still not correct, record in MaxxTraxx that you have counted the full $200.00 and leave a note in with the petty cash about the discrepancy. Sometimes these small imbalances resolve themselves after a few days. If not resolved, Chief Administrator can decide how to handle recording the imbalance.
2. If the amount is larger (more than ________), determine if any transaction was receipted as cash by mistake. To do this, click “Details” to the right of the cash tally in the “Balance Drawer” window and examine the listed cash transactions. If the source is discovered, you can void the incorrect transaction and reprocess it correctly. If this does not resolve the imbalance, the Chief Administrator can decide how to handle recording it.
If checks are out of balance:Examine each check to determine that it has been made out for the correct amount. If not, void the transaction and call the customer in question the next day to determine how they’d like to correct the problem (make out a new check, give credit card over the phone, etc.)
If debit/NAPA card totals are out of balance:???
Changing Verifone Paper1. Change the credit card paper when you see the pink show up on
the old roll.2. The rolls are located on the shelf underneath the two Verifone
machines.3. Open the lid on the machine and remove the old roll.4. Put in the new roll and close the lid.
Collecting on Outstanding Invoices
Updated 5/9/2023

87 of 120
There is a Collections/Unpaid Invoices folder located to the left of the fax machine. Office staff will place unpaid invoices in this folder approximately two weeks after customer receives the invoice (either in person, or through the mail). Once a week, office staff will go through this folder to determine the status of each invoice. Collection efforts should proceed as follows:
1. First, give the customer a friendly reminder call. If invoice was mailed, this can be a “just checking to see if you received the invoice” call. Give the customer the benefit of the doubt and offer to mail them another one. Let them know that we can take credit card payments over the phone.
2. Approximately one week after the first call, call the customer again. All phone contact with the customer is to be diplomatic and friendly, but still firm.
3. Approximately one week after the second phone call, office staff will mail a friendly form letter to customer. This is located in ManagementPayment Plans and Collections.
4. If no response from the customer after one week, place another phone call.
5. Two weeks after mailing the first letter, mail a second, formal letter. This is also located in ManagementPayment Plans and Collections, and should be sent as certified mail.
6. If customer does not respond to certified letter after 15 days, their debt will either be written off (if amount is less than ?.??) or sent to collections. A note should be placed in the customer’s file in MaxxTraxx stating the collection efforts and that the customer is not to be given service unless they are able to rectify their debt. They should also be taken off the mailing list (although mailing address should be retained for our records).
Note: Only proceed to next step if there is no contact from the customer. If you are able to talk to the customer in person, and they are cooperative/willing to pay their debt, work out a payment plan with them or make other arrangements. These steps are only intended for customers who are not communicating.
Computer Systems[Include backup procedures (who is trained) and failures. –AS]
Updated 5/9/2023

88 of 120
Copier UseTo Make Copies:
1. Open the lid of the copier and lay original face-down on the glass. The paper should be oriented “landscape”-wise.
2. Type in the number of copies desired, press the small button underneath the green light, and then press the green Start button.
Replenishing Paper1. When the copier is out of paper, it will display the number of
copies remaining to be made in the display.2. The paper tray is located on the left side of the machine, directly
underneath where the copies come out. Grab the tray and pull it straight out from the machine.
3. Paper is either located in the cabinet underneath the copier or in the boxes on the left side. Add paper to the tray, ensuring that the stack is tucked under the small metal clips on the right side.
4. Replace the paper tray and push the green Start button to continue.
Toner[How to install new toner? –AS]
Coupon Tracking1. When a coupon is received, the RO number, date, and invoice
total (after discount has been applied) should be written somewhere on the coupon itself. The coupon should then be put in the box located on the left-hand side of the middle shelf of the cashier’s desk.
2. Every few weeks, and at the end of the month, coupons must be entered into the current Coupon Tracking spreadsheet. This is located under ManagementMarketing.
3. Open the spreadsheet and make sure that the correct month is open.
4. Enter the appropriate information in each column (entering the invoice total under Net Sale should automatically fill in the Total Before Discount field).
Updated 5/9/2023
89 of 120
5. Every few months, data from the Coupon Tracking spreadsheet should be transferred to the Coupon Re-cap Sheets, also found under ManagementMarketing. It is especially important for John to have these updated before meetings.
Deposits on Work to be Performed[move this to Customer section? –AS]When to take a deposit:
Any time your gut says to Where repairs will exceed 50% of vehicle value or less (or is it a
set $ amount?)
Receiving Deposit:1. In MaxxTraxx, pull up the customer’s record using Customer
Search and double-click to open it.2. In the upper left corner, select Customer OptionsDeposit on
Account.3. Fill out all relevant fields in the pop-up window that appears and
print a copy of the receipt for the customer if desired.4. The customer will now have a credit which may be used to pay
their bill once work is completed.
[More? –AS]Faxing
1. Fax cover sheets are on the wall above and to the left of the Fax machine.
2. The document feeder on the fax machine is temperamental. Load stack of documents into feeder on top of machine, but hold onto all documents except the first sheet.
3. Dial number or select speed dial number and push the green Fax/Send button.
4. Once the first page has nearly finished scanning, release the next page. Continue until all pages have gone through.
FilingAccounts PayableWhen bills or statements come in, they should go in the stacker above the printer in the office (attached to the side of the tall filing cabinets). Once they have been processed [more detail? –AS], they are placed in the wire basket on top of the tall filing cabinets. These are filed, according to vendor, in the drawer marked Current Invoices. Accounts Payable and financial documents are stored in the locked storage room upstairs, and are kept for 7 years.
[What about the current payables drawers? What’s the paperflow? –AS]
Updated 5/9/2023

90 of 120
Accounts ReceivableCustomer Invoices:When Invoices have been paid, write the date paid in the upper right corner and file in the Completed Invoices folder at the cashier’s desk. Every 1-2 weeks, the Office staff goes through this folder and double checks that all new customers have been tagged for a new customer letter. Invoices are then moved to the basket on top of the tall filing cabinets in the office. At the end of the month, Office Assistant moves all of that month’s invoices to a storage box and puts it in long-term storage upstairs. Invoices should be kept for approximately 5 years.
Repair OrdersService Advisors put closed (completed and paid for) repair orders in a basket on the filing cabinet inside the door to the Parts Room. Office Assistant, Utility Person, or whoever has time then files the repair orders in that filing cabinet. ROs are filed newest (front of top drawer) to oldest, and separated by RO number into groups of 100 in the filing cabinet (i.e., 12300-12399). When the filing cabinet is full, fill a storage box with the oldest ROs. Write RO range and date on one end of box and move upstairs to long-term storage. ROs should be kept for approximately 5 years.
Insurance and Extended Warranty Companies[From Sun Automotive. They also have a policy of billing a few % extra to insurance/extended warranty companies in order to protect their profit margin –AS]When dealing with extended warranty or insurance companies there is always extra time involved dealing with a representative who is trying to squeeze every last penny out of the shop’s profit.
It is critical to make the customer aware early in the process that they will be liable for any fees and supplies that the insurance company will likely not pay. A clear expectation before the process is started will help eliminate misunderstandings.
Many insurance companies: Do not pay shop supplies. Do not allow more than dealer list price on parts. Do not allow diagnostic times on certain items. Do not allow the shop to ‘bump’ times on certain items like
engine jobs that rarely pay enough time. Want to supply their own parts or even used parts.
Invoice Accounting ProceduresRoutine ROs
Updated 5/9/2023

91 of 120
Service Advisors are required to use the “customer source” code accurately when putting their ROs to accounts. Parts and labor ratios, and final amounts are specified for each repair order as follows:
1. Labor is charged at Bellingham Automotive’s current rate.2. Parts are marked up 52%3. Environmental or supply fee is 3%
Non-Routine ROsIf several repairs are being addressed on a vehicle, create a separate repair order for Type 1, Type 2, and comebacks, miscommunication, and good will.
Type 1: This is a parts failure warranty that is not the result of improper installation or damage by a technician. This type of warranty involves parts, labor, and possibly sublet or towing expenses. The work is performed with the understanding that Bellingham Automotive will be receiving some form of compensation from a vendor.
1. Do not put in prices as in a routine repair order.2. Document labor “Type” in the labor field much like a PO #.3. Include it in the RO count (accounting department).4. Put the RO to account using the specified vendor in Type 1.5. Put amount not reimbursed by vendor to sales discount
(accounting dept.)
Type 2: This is a warranty provided by Bellingham Automotive that is not the result of a parts failure or improper installation by a technician. This type of warranty involves parts, labor, and possible sublet or towing expenses. The work is performed with the understanding that Bellingham Automotive will not be receiving any compensation.
1. Put prices in at cost. Labor at $30.00 per hour Parts at cost Zero environmental fee Sublet and towing at actual cost
2. Document labor “Type” in the labor field much like a p.o. #.3. Do not include in RO count (accounting dept.)4. Put to account using the Type 2 source code.
Comeback, Miscommunication, and Goodwill: The cause could be failure on the technician’s part to perform the repairs correctly, an inaccurate diagnosis, service advisor miscommunication, or simply a ‘good will’ gesture to be ‘more than fair’ or to save a customer.
1. Put invoice in at cost (see list under Type 2 above).2. Document labor “Type” in the labor field much like a p.o. #.3. Do not include in RO count (accounting dept.)4. Put to account using the Comeback source code.
Updated 5/9/2023

92 of 120
Note: The customer copy will be printed first and billed at the routine RO price, or all totals will be $0.00, depending on the customer. This will be at the Service Advisor’s discretion. Then proceed to put the RO to account as indicated above.
Company Vehicles:1. Put invoice in at cost.2. Document labor “Type” in the labor field much like a p.o. #.3. Do not include in RO count (accounting dept.)4. Put to account using the Company Vehicle source code.
Miscellaneous MaxxTraxx Procedures[i.e., how to schedule an appt. in the system, how to search appts., writing a new RO, searching previous ROs, etc. Basically, anything not covered in other sections –AS]
Miscellaneous Records Retention GuidelinesAccounting Records:Audit reports…………………………………………………………………………….
PermanentlyCharts of accounts…………………………………………………………………….
PermanentlyDepreciation schedules………………………………………………………………
PermanentlyExpense records………………………………………………………………………..
7 yearsFinancial statements (annual)……………………………………………………..
PermanentlyFixed asset purchases………………………………………………………………..
PermanentlyGeneral Ledger………………………………………………………………………….
PermanentlyInventory records………………………………………………………………………
7 yearsLoan payment schedules…………………………………………………………….
7 years
Updated 5/9/2023
93 of 120
Purchase orders………………………………………………………………………… 7 yearsSales records…………………………………………………………………………….
7 yearsTax returns……………………………………………………………………………….
Permanently
Bank Records:Bank reconciliations……………………………………………………………………
2 yearsBank statements……………………………………………………………………….
7 yearsCanceled checks……………………………………………………………………….. 7 yearsElectronic payment records…………………………………………………………
7 years
Corporate Records:Bylaws…………………………………………………………………………………….. PermanentlyBusiness licenses……………………………………………………………………….
PermanentlyContracts (major)………………………………………………………………………
PermanentlyContracts (minor)………………………………………………………………………
Life+4 yearsInsurance policies………………………………………………………………………
Life+3 yearsLeases/mortgages……………………………………………………………………..
Permanently
Employee Records:Benefit plans…………………………………………………………………………….
PermanentlyEmployee files (ex-employees)……………………………………………………
7 yearsEmployment applications……………………………………………………………
3 yearsEmployment taxes…………………………………………………………………….. 7 years
Updated 5/9/2023

94 of 120
Payroll records………………………………………………………………………….. 7 yearsPension/profit sharing plans……………………………………………………….
Permanently
Property Records:Construction records………………………………………………………………….
PermanentlyLeasehold improvements……………………………………………………………
PermanentlyLease payment records………………………………………………………………
Life+4 yearsReal estate purchases………………………………………………………………..
Permanently
Month End and Year End Procedures[Need to explain/expand this –AS]
1. Create Month End File Folder2. Make sure that all complete invoices are put to account3. Put all parts invoices that haven’t been paid to account4. Run A/R Aging Summary report and post all credits against
charges, etc..5. Run Month End Reports
a. In Maxxtraxx: Sales Summary (Reports, financial)b. Walton: Post all the credit against all open invoices.c. Advantage: Post any credit against invoices for A9 onlyd. In Maxxtraxx:
i. Go to customer (Walton)ii. Optionsiii. Adjust A/Riv. Lower amount by…..ov. Description, month end adjustment
e. In Quickbooks:i. Go to Companyii. Make Journal Entriesiii. Date (today), Entry (automatic)iv. Account… If credit
6. After all entries and adjustments run A/R Report Aging Summary (Maxxtraxx)
7. In Quickbooks run Profit & Loss Std. (Company, Financial) Choose EOM date, refresh
NAPA Card Applications
Updated 5/9/2023

95 of 120
Customers wishing to finance their repair work may apply for a NAPA AutoCare CarCareONE credit card through GE Money Bank. With approved credit, customers will have 90-120 days (depending on the balance) to pay off the credit card with deferred interest. If the balance is paid off in the promotional time, no interest will be charged. Accrued interest will be added to the account if there is still a balance after the promotional period expires. See NAPA Card under “Cashiering Procedures” in this section for instructions on how to process payments using a customer’s NAPA card.
NAPA card applications are kept in the file rack at the cashier’s desk. Ask the customer to fill out the form completely, including co-applicant information if they feel they need one. Note that the form does not contain space for the customer’s Driver’s License number and expiration date, even though this is required—ask them to write down that information somewhere on the application. GE Money also requires proof of some other form of credit, such as a personal credit card. Ask the customer to write down the credit issuer and the expiration date. It is not necessary to obtain the credit card number. To submit the completed application, use the following steps:
1. Go to https://businesscenter.gemoney.com/BusinessCenterPortal.2. Log in using Bellingham Automotive’s user name and password.3. Click Submit an Application.4. Fill out all required fields in the application, including that for the
co-applicant, if necessary. Typically, the credit limit requested should only be high
enough to cover the customer’s current/expected repair invoice with Bellingham Automotive. The customer can always contact GE Money and request a credit limit increase later.
It may be helpful to include the customer’s annual income, if they feel comfortable providing this information.
5. Once all information has been entered, click Submit. Approval only takes a few moments.
If approved, print out a copy of the Approval screen for the customer. This contains their account number. Explain that their card will be mailed to them.
If the application is denied, and the customer feels it should have been approved, [what do we do? –AS]
6. All approved applications are filed by year in the top drawer of the right-hand, tall filing cabinet in the office. Denied applications are filed in the folder marked Denied.
New Customer Letters1. Every new customer should be tagged for a new customer letter
in MaxxTraxx.
Updated 5/9/2023

96 of 120
2. Every 1-2 weeks, office staff double checks that all new customers have been tagged.
3. To print tagged customers, select Send Mail at the top of the screen in MaxxTraxx. This will print out the names and addresses of customers who need a new customer letter.
4. Record the names into the “New Customer List by name” spreadsheet found in the Shared folder on the server.
5. Open the “new letter template” Word document found in ManagementMarketing.
6. Type the customer’s name and address into all necessary fields and print on Bellingham Automotive letterhead, then give to John to sign.
7. Once signed, fold and place into Bellingham Automotive envelopes, then mail with one of Bellingham Automotive’s “Bonus Bucks”.
8. Occasionally new customer letters will be returned as undeliverable. If this happens, leave a customer alert in MaxxTraxx stating something to the effect of: “New customer letter returned as undeliverable on _________. Please verify address and offer bonus buck if customer comes in again.”
NSF Check Procedures When a check is returned for non-sufficient funds, the customer
should be contacted as soon as possible. Use a friendly tone and let them know that, unfortunately, their
check was returned, and ask how they’d like to rectify the situation.
Use your best judgment to determine if customer should be charged a $15.00 administrative fee.
If customer is reached right away or returns call promptly, and if the NSF check was merely an oversight, it’s okay to not charge them the fee (it is good practice to not mention that you aren’t charging them).
If customer is very difficult to get a hold of or does not return call within a reasonable period of time, let them know that there will be a $15.00 administrative fee to cover our bank costs.
If you can’t get a hold of the customer after approximately one week, follow collections procedures.
Parts Invoices
Updated 5/9/2023

97 of 120
Payment Plans1. Payment plans must be approved by _____________.2. Get a payment plan agreement form from the folder marked
Payment Plans that is located in the wire basket to the left of the fax machine.
3. Fill in the customer’s name, date balance is to be paid by, and the number or frequency of installments (if any). Have the customer sign.
4. Paperclip or staple the form to the customer’s invoice and keep in the Payment Plans folder.
5. Record the customer’s name, date posted, and initial balance in the table clipped to the inside front cover of the folder.
6. When customer makes a payment, find their form in the folder, record the payment, and update their balance.
7. Approximately once a week, office staff will go through the folder and check for overdue payments. If customer has passed the agreed-upon repayment deadline, check the Overdue? line in the upper right corner and highlight. This serves as an alert that the account is overdue.
8. For overdue payments, or past-due accounts, customers should be called every few weeks and given a friendly reminder. Note calls made and other contact with customer in the Customer Communication Notes on the form.
Payroll and TimecardsTotaling Time CardsTechnicians turn in their time cards at the end of each day in the bottom stacker located on the left side of the tall filing cabinets in the office. Each morning, office staff gets the previous day’s time cards from the stacker and totals them, using the following procedure:
1. Calculate the total available time from the times recorded in the upper right corner. Add the hours worked before lunch and the hours worked after lunch together to get the total, and record in the box to the left of Total Available Time in the upper right hand corner.
2. Add the hours in the Sold Time column and record the total under Total Sold Time.
3. Add the hours in the E Time column and record under Total E Time.
4. Add the hours in the Actual Time column and record under Total Actual Time.
Updated 5/9/2023

98 of 120
5. Finally, add together the values under Total E Time and Total Actual Time, and record under Total Avail Time. This total should match the total in the upper right corner. A variance of up to 0.04 is acceptable, but any more than that, the individual punches and hours calculated will need to be checked for errors.
6. Once that day’s time cards have been totaled, give to the Administrator.
Time Tracking SpreadsheetAt the beginning of each week, the previous week’s time cards are entered into the Time Tracking Spreadsheet for the current year. This spreadsheet can be found in ManagementPayroll & Timetracking.
1. Open the spreadsheet. A dialog box will pop up asking if you want to update. Click Don’t Update.
2. Each technician has their own sheet within the workbook. Select the correct technician’s tab and enter the totals from their time cards into the spreadsheet under the correct dates. Note: The Actual and E-Time columns are reversed from the way they are on the time cards themselves. Take care to enter the correct values.
3. Any E-Time must be divided up by code in the correct columns. To double-check that all E-Time has been entered and categorized, be sure that the value in the Total column on the far right side of the spreadsheet matches the value entered in the E-Time column. (The Total column contains a formula that adds up the individual E-Time categories.)
4. Check that all values have been entered correctly, and that the Productivity and Efficiency formulas have been calculated (no divide by 0 errors.)
5. Highlight that week’s cells, starting with Monday (column A) and ending with the row containing the Efficiency calculation, and column Q. Then select FilePrint AreaSet Print Area.
Print each technician’s spreadsheet and give to the administrator, along with the time cards (organized by technician and in order of date, and rubber-banded together).
Updated 5/9/2023

99 of 120
Petty Cash GuidelinesIf petty cash is paid out on a day when no cash is taken in, avoid receipting the cash paid out until cash is taken in. Keep receipt in cash box.
Phone System OperationSetting the Date and Time in Voice Mail
1. Dial Intercom 40, and as soon as a voice starts talking, press *2. When the system prompts you for a User ID, enter 999#3. Enter the security code 999997# when prompted4. This will bring you to the Admin Main Menu. Press 8 for System
Administration5. In the System Administration menu, press 6 for Set Date and
Time6. Press 1 for Set the Date
Enter date in the following format: MM/DD/YY, and the press #
Press option 1 to Confirm Entry Press 9 to go back a menu or hang up
7. Press 2 for Set the Time Enter time in the following format: HH/MM and then press
# Press 1 to Confirm Entry. Press 9 to go back a menu or hang up.
Changing the greeting in VoicemailTo change our regular daytime greeting, do the following (this is the message that comes on during daytime if we don’t answer)
1. Dial Intercom 40, and as soon as a voice starts talking, press *2. When the system prompts you for a User ID, enter 991#3. Enter the security code 991# when prompted4. Press 3 for manage mailbox5. Press 1 for change greeting6. Press 1 again for day greeting7. Press 2 to record new greeting8. After making changes, be sure to press 9 to save changes
Updated 5/9/2023
100 of 120
Default greeting:Thank you for calling Bellingham Automotive. Our service advisors are currently busy assisting others. If you know the extension of the person you are trying to reach, please enter it now.
To try again to reach a service advisor and to have an opportunity to leave them a message, please press 1
For a directory of our personnel, press 2 To leave a general message, press 3 To repeat this menu, press 9
Holiday greeting:Thanks for calling Bellingham Automotive. We will be closed Thursday and Friday for the Thanksgiving holiday and will be open again as usual beginning Monday. If you would like to leave a message you may use the following options:
To leave a message for a service advisor press 1 For a directory of our personnel, press 2 To leave a general message press 3 To repeat this menu press 9
[Instructions for changing greeting of personal mailbox? Is it different from the above? –AS]
Printer List[is this necessary? –AS]
Scanner UseThere is a scanner hooked up to the computer at the Cashier’s Desk. It is stored on the shelf below the monitor.
To Scan:1. Open the scanner lid and lay the document face down on the
glass. Document should be aligned in the lower right corner, with the top of the document furthest away from the lid’s hinge (see diagram on lid for assistance). Close the lid.
2. On the Cashier’s Desk computer, open the scanner software (startAll ProgramsCanonCanoScan Toolbox 4.1)
Updated 5/9/2023

101 of 120
3. Once the software opens, select Scan-1. From here, select where the scan should be saved and then press the blue Scan button in the lower right corner. Note that the default location for saved scans is the user’s “My Pictures” folder.
Supplies[Ordering, Storage, etc. –AS]
CopierToner for copy machine is ordered from Michael’s Business Machines. Call them, tell them the company name and the copier # (Toshiba #1360). It’s best to order two at a time, and they will deliver if it isn’t urgent.
Office SuppliesMost office supplies, including printer ink/toner, are stored in the tall metal cabinet in the Parts Room (just inside the door leading from the office). When using the last of something, or if it appears supply is getting low on an item, notify the office staff.
Walton Beverage Company Procedures[Need to explain/expand this. Move to Accounts Receivable? –AS]
Billing – weekly 120 day sheet to be updated monthly (as soon as ____ turns in to
Tammy, should be updated and returned to ___ the same day) Copy sent to Jim Callaghan every 3 months?? Extra billing submitted in timely manner Tires – sub contractor procedure for paperwork “To Do” list as requested by ____ Faxes – getting the attention they need? Work gets written down on _______’s “to do” list (information
gathered first hand, or from faxes sent from WBC.
Updated 5/9/2023

102 of 120
VI. Employee Policies & Procedures
After Hours/Weekend Use of ShopNo after-hours work is allowed in the shop, except on the employee’s own personal vehicle. The only exception to this rule is a special circumstance for which the employee may request permission in writing (forms are in the gray cabinet with the vacation forms, and must be filled out and turned in to John Joel says Human Resources).
If an employee is granted special permission, or if they are working on their personal vehicle, the following rules must be followed:
1. All parts used must be written on a parts requisition form and given to the parts department as soon as repairs are completed. This includes oil and supplies.
2. No parts will be ordered or charged to Bellingham Automotive without Parts Manager’s approval.
3. Any bay used for after-hours repairs will be cleaned by the employee before they leave, not the utility department.
4. No vehicle is to be left on the premises unless the keys are also tagged and left at the shop so that vehicle can be moved if needed.
5. Friends of the employee are not allowed in the shop after hours.
Note: It is a privilege to use Bellingham Automotive’s facilities and equipment to work on a personal vehicle. If an employee attempts to make money using the shop after hours, they will be considered a competitor to Bellingham Automotive and will be treated accordingly.
Alarm ProceduresWhen entering or leaving, employees must enter their individual code. If code is entered wrong, sirens will go off and an alarm will be sent to Guardian Security. If the system is disarmed within one minute a cancel alarm will be sent to the alarm company. Or, they can be called directly at the number on the employee’s card (1-888-660-7325) [is this correct? –AS]. The employee must know the account #, which is on their card, as well as the password. To disarm system, employees should enter their individual code, then OFF (which is key #1). To bypass zone enter the code then BYPASS (key #6) then the 2 digit zone number (list is posted next to panel, and below).
Alarm Zones:Zone 04 – Front DoorZone 05 – Shop East DoorZone 06 – Entry MotionZone 07 – Shop S.E. Motion
Zone 08 – Shop N.E. MotionZone 09 – John’s Office DoorZone 10 – File Room DoorZone 11 – Shop N.W. Door
Updated 5/9/2023
103 of 120
Zone 12 – Shop S.W. DoorZone 13 – Foyer WindowZone 14 – Waiting Room Window
Zone 15 – Office WindowZone 16 – Storage Overhead
Company Vehicle Policies and ProceduresWhen operating a company vehicle:
1. Obey all traffic laws and posted speed limits.2. No personal stops in company vehicle on company time.3. No smoking or eating is allowed. Also, no greasy/dirty parts or
open food/drink containers will be transported in the company vehicle at any time. Use common sense.
4. All passengers must wear seatbelts at all times. Children requiring child safety seats must have them supplied and installed by the customer. Driver will confirm all passengers are using seat belts before proceeding to drive.
5. No cell phone usage by driver while driving. Driver must pull over safely and park before using cell phone to call the shop or customer. Using the push-to-talk feature on the Nextel cell phone is allowed.
6. If an accident occurs, stay calm. Call 911 and then the shop immediately. For fender benders, call the shop and then exchange information with the other driver. Remember to obtain license plate number, make and model of car, name, phone number, driver’s license number, etc.
Bellingham Automotive has an account with Shell for the purpose of fueling company vehicles.[Need to insert Shell card policies & procedures—where they’re stored, who’s allowed to use them & when, etc. –AS]
All fuel receipts must be turned in to the office staff. There is a manila envelope taped to the right side of the tall filing cabinets in the office (it is labeled Gas Slips). If a situation arises where an employee needs to fuel a company vehicle (not being used for personal use) with their own money, the receipt must be turned into the Chief Administrative Officer for reimbursement. Note: John prefers that all company vehicles be fueled at Shell stations, regardless of payment method.
Computer Usage PoliciesCompany computers are for work use only. Employees may use computers for personal reasons on breaks, lunch, and after work.
Updated 5/9/2023
104 of 120
Employee Break PolicyEmployees working an 8-hour shift are entitled to two 10-minute breaks. The first break shall occur between 9:45 AM and 10:15 AM. The second break shall occur between 2:45 PM and 3:15 PM.
Employee Discount PolicyBellingham Automotive employees, past employees, family members, fleet managers, and others may be eligible for a discount.
Employees and their immediate household are entitled to a 50% discount on labor, and parts at 10% above cost.
Extended family of employees and previous employees are entitled to 10% off parts and labor from regular prices.
Note: Employees must ‘settle up’ by the end of each month. Customer pay work takes priority; Bellingham Automotive does
not turn away or delay customer work to work on employee vehicles.
Bellingham Automotive is unable to perform a major overhaul under this discount.
Oil changes run at $5.00 below normal price. Diesel is at the normal rate.
Employee Hours[i.e., salary vs. hourly, how to punch in & out, coding time for techs, who to report errors to –AS]
Technicians should punch in and out on the time clock for every job, and with a high degree of accuracy. Technicians’ employment and consideration for next pay raise depends on it.
Notes on the Flat Rate System:[How can we reword this? Are there systems in place to address these concerns? –AS]
The service advisor is the seller when he hands or “sells” the technician a repair order. The technician is expecting it to be valuable, something he feels will make him money.
On the other hand, the service advisor is the buyer when the technician hands him a report, something he feels is valuable, something he can in turn, sell to the customer and everyone wins (as long as their report is accurate). If it is not accurate, then it is a faulty product and should be returned for a correct assessment, or refunded.
Updated 5/9/2023

105 of 120
Flat rate technicians are paid for being right. Right now, I pay them if they are right or wrong. They are wrong sometimes, and since I pay them either way, I am not encouraging them to be pin-point accurate with their assessment, based on past experience or IATN, or TSB post. So I am encouraging them to shoot from the hip and hope they hit the target. And when they miss, I still pay them even though I have hired only expert marksmen. They are wrong just enough, they fly under the radar and are not noticed, or since there is no policy that they find the right answer on their time since I already paid them for the right answer, they continue to do what they have always done. Talk about a labor leak!
This is very hard on the service team if they are then going to go to the customer and say guess what, $$$ more money. Or…
Mostly I believe what is happening, is the labor and sometimes parts, are being sacrificed and we end up absorbing both and the tech walks away paid and no sweat off of them.
I am now expecting every service advisor to keep me in the loop on EVERY comeback and discuss the process with me, while the care is here!
We need an accurate tracking method right now for each technician’s labor and parts loss.
Job Descriptions[Did I forget any positions? Do we want to have separate descriptions for service manager, shop foreman, and fleet service tech? Or include them under the main description? –AS]Chief Administrative Officer
Fleet Service Coordinator
Updated 5/9/2023

106 of 120
Marketing Director
Office Assistant
Operations EnhancerThe Operations Enhancer is responsible for assisting where needed and working with all departments to improve the flow of getting vehicles into the shop, repaired, and back out as efficiently as possible. Working as a team is imperative. The expectations for this position are as follows:
Assist utility position with pick-up and delivery of vehicles and customers.
Carry 2-way radio at all times, have it on, and keep it charged. Parking maintenance of vehicles staged for repair (completed,
long-term storage, employee vehicles, oversized vehicles, keeping the flow clean, and specifically keeping the front lot set up to attract customers in).
Assist service advisors in writing up vehicles dropped off and staging them accordingly (see schedule).
Vacuum cars as indicated and prep for delivery or pick-up. Wash cars as indicated by service advisors using Sunset Car Wash.
Updated 5/9/2023
107 of 120
Managing rental vehicles: responsible for all of the rental vehicle needs. Turn-around time between customers is important, and vehicle must be prepared to rent again ASAP upon return. Communicate with service advisors and on white board the vehicle status. See “Rental Car Policies and Procedures” in Section III of this manual for further details.
Responsible to see that the shop is cleaned and maintenance needs addressed. See Section VI of this manual.
Walk-around of premises four times a day (see Operations Enhancer’s Daily Schedule in Section VI for description).
Parts Manager
Service Advisor
Technician
Updated 5/9/2023
108 of 120
Utility Position
Keys[Keys to building, equipment, company vehicles—not only where they’re stored, but policy for who gets a key to what. Where are key #s recorded, what’s the policy for use? –AS]
Parts Buying PolicyEmployees may buy parts for their personal use on company charge accounts. There will be a 10% charge on all parts. This will be totaled monthly and is payable by the 10th of the following month. It is the responsibility of the employee buying the parts or using parts and supplied from stock to inform in writing items used and confirm the agreed price.
Employees buying parts for others may use the buying discounts of the company, but must arrange payment direct with supplier or add 20% to be billed through company on a C.O.D. basis.
Performance-Based Pay[How does this relate back to John’s notes on the flat rate system? –AS]Bellingham Automotive, like all automotive repair shops, sells labor. This is not just any labor, but accurate, pinpoint information that the public perceives this shop is able to do better than other shops
Updated 5/9/2023

109 of 120
because it has the best-trained technicians, the best equipment, the best parts, and the best warranty—in other words, the best value. As such, performance-based technicians are hired and paid to produce correct answers. Wrong or inaccurate diagnosis or repairs that don’t fix the reported problem are an indication that the technician is falling short of expectations. Possible causes are:
1. Guessing and not testing.2. Lack of training to accomplish task.3. Lack of essential tools to accomplish task.
“Gray area” answers (i.e., “Well, it kind of fixed it,” or, “It’s better,”) are not acceptable results. Additional compensation will not be made for incorrect diagnosis or incorrect part replacement. E-2 on time cards is not under the performance pay agreement. Technicians will perform their own before and after test drives and document them, and comebacks will be assigned by the service advisors to the technician who performed the work whenever possible.
Performance-based pay results in customer confidence in the shop, ensures technicians’ testing is accurate, and makes training part of the solution for accuracy. Accurate and specific test results that are documented will not only protect the technician, but also the company’s liability, meaning job security for all employees.
Personal Phone Calls
Cell Phone Policy In Process – Examples:1. I have observed employees answering cell phones during working hours, even taking a call while talking to a co worker about a work project, on the cell phone while on a test drive, answering a cell call in the middle of a job, reading and responding to text messaging on company time.
2. Cell phones have the potential for problems in the work place including:
Lost time, Distractions leading to mistakes, A ringing cell phone while dealing with a customer.
Those in direct contact with customers should never be using the cell phone in the customers’ presence.
Cell phones should be left turned off or at least muted during working hours and messages checked on your break, lunch or E3 time.
All personal phone calls should be directed to your cell phones unless extremely important, urgent, or an emergency.
Updated 5/9/2023

110 of 120
We reserve the right to completely stop cell phone usage at any time.
3. The customers’ impression of the Company is often influenced by your telephone manners. You should always be polite and courteous to customers as well as to co-workers. Personal calls are not permitted except in the case of an emergency. Personal phone calls may be made at breaks and lunch.
Cell phones are not allowed to be used during business hours. However, you may use them during breaks or lunch. You may not stop work or production to answer cell phone calls.
4. I don't allow cell phones to be on during working hours. I just recently put my foot down on Internet usage. I banned it for all hourly employees. I don't allow my employees to have their cell phones on. My son-in-law tried to persuade me that he had a legitimate exception because my daughter couldn't reach the shop on her cell phone. The reasoning didn't work, I still said no. By the way, One last thing I forgot to mention. As for you or your management staff, your cell phones are a lifeline for business. I prefer that business associates (such as BLIG members, Part Store Owners, Napa Corporate or Marketing Consultants) call me on my cell phone, rather than disturb our staff that answers the business phone. It takes time to answer the call, locate you, transfer them or take a message. I have informed them is an important part of our business that I be accessible to these people when they need me or if I should need them. I certainly don't want to constantly take up their time having to answer calls for me. They get enough every day solicitation calls as it is. For that reason I have informed our staff that if they see me on a cell phone they know why and the importance of it. I believe in the rule 'lead by example" however there is an exception to every rule.
Smoking on Company PropertySmoking shall occur in the designated area (Southeast gravel area) during approved break times and at lunch time only. There are to be no exceptions.
TrainingAll technicians are expected to attend at least 40 hours of training annually.
From Phil: The shop foreman receives all training information and is available to review.
Updated 5/9/2023

111 of 120
Uniform Policy/Dress CodeService Advisors are to maintain a professional appearance at all times. Advisors are expected to display the company logo on a shirt, vest, or jacket. Employees are to select and purchase shirts, for which Bellingham Automotive will provide a $100 per year allowance. After the shirts have been approved for use as uniforms, the company will pay to have the logo put on the shirts. Uniform shirts should be a solid color (not plaid, striped, etc.), and should have a collar (no T-shirts). Advisors are expected to launder their uniforms. Pants are the responsibility of the employee and are expected to be a ‘Docker’ style (meaning pleated or plain front slacks). Black and khaki/tan are the acceptable colors. Blue or black jeans are acceptable for casual Fridays, but must be in good condition, not faded or torn. Nametags are expected to be worn and visible at all times. The employee and Company owner shall determine together when the above prescribed clothing is worn out and/or needs replacing.
Utility personnel are to maintain a professional appearance at all times. The company will provide three (3) shirts and one (1) winter jacket. These will be a “uniform” type much like the technician uniforms. If the employee prefers, they may purchase and launder their own black or blue jeans, as long as they are acceptable to management, and are not faded or torn. Leather boots or shoes are the standard footwear, and steel toes are preferred. Nametags are expected to be worn and visible.
Office staff are to maintain a professional appearance at all times. Nametags are expected to be worn and visible.
Technicians: It is the policy of Bellingham Automotive to provide uniforms, free of charge, to technical personnel requiring them. The employee is responsible for all loss or damage to uniforms, except normal wear and tear. Upon termination of employment, all uniforms are to be returned to the company. Leather boots or shoes are the standard footwear, and steel toes are preferred.
Updated 5/9/2023

112 of 120
VII. Emergency Procedures and Safety
Accident and Incident ReportingAll accidents and incidents that result in injury, illness, or damage (however slight), are to be reported to the employee’s supervisor immediately. Bellingham Automotive is responsible for investigating each incident
Blood and Bodily Fluid SpillsAll bodily fluid spills should be treated as infectious. Employees shall wear disposable, waterproof gloves when they expect to come into direct hand contact with bodily fluids (when treating bloody noses, handling clothes soiled by incontinence, or cleaning small spills by hand). Gloves used for this purpose shall be put in a plastic bag or lined trash can, secured, and disposed of immediately. Hands should always be washed after gloves are removed, even if the gloves appear to be intact.
If an employee has unexpected contact with body fluids or if gloves are not available (for example, applying pressure to a bleeding wound), the employee shall wash their hands and other affected skin for at least 20 seconds with soap and warm water after the direct contact has ended.
DisinfectantsAn EPA-approved germicide or a solution of 99 parts water to 1 part household bleach (or ¼ cup bleach to one gallon of water) will inactivate blood-borne pathogens, and should be used to clean all body fluid spills. Higher concentrations of bleach can be corrosive, and are unnecessary. Scrub the surface to remove any soil and apply a germicide (like the bleach/water solution described above) to the equipment used. Mops should be soaked in this solution after use and rinsed thoroughly with warm water. The solution should be promptly disposed of down a drainpipe. Remove gloves and discard them in appropriate receptacles, and wash hands as described above.
Break-In
Updated 5/9/2023

113 of 120
Emergency Generator1. If normal power is out, wait 2 minutes before beginning
generator start up procedure.2. After normal power has gone out, go to Main Electrical panels #1
and #2 and turn off main breakers in both panels. Then turn off ALL individual breakers in both panels.
3. Go to generator and make sure main breaker on generator is OFF. After verifying main breaker is off at generator you may start generator. Allow it to run at least 1 minute, then turn main breaker at generator to the on position.
4. Then go to the Emergency Generator panel located next to main panels #1 and #2. Turn on Main breaker in Emergency Generator panel then proceed to turn on ALL individual breakers in Emergency Generator panel. CAUTION: It is imperative that the main breakers remain OFF during generator power!
5. At this point you should have lights and power back on and be operational on emergency power.
Return to Normal Power Procedure1. Turn off ALL individual breakers at Emergency Generator panel,
then turn off MAIN breaker in same panel2. Go to generator and turn off main breaker at generator, but
leave generator running for 5-10 minutes for cool down before turning off.
3. Go to main power panels #1 and #2 and turn on both main breakers and then proceed to turn on ALL individual breakers – one at a time – in both panels until all breakers are turned on.
4. At this point, all lights and power should be restored to normal power system.
FireFire Safety: Employees must report all fire hazards to their supervisor
immediately. Fire fighting equipment shall be used only for fire fighting purposes. Smoking is not permitted at any time in areas where “No Smoking”
signs are posted. Access to fire fighting equipment must never be blocked. Doors, aisles, fire escapes and stairways must be completely
unobstructed at all times. Clothes soaked with oil, gasoline, paint thinner, or any other
flammable liquid are to be changed immediately.
Updated 5/9/2023
114 of 120
Discovering a Fire:[Is there further/different info about how to report a fire? –AS]
1. Remain calm. Do not shout “Fire!”2. Pull the nearest fire alarm.3. Call 911.
In Case of Fire:1. The safety of all persons is the first priority in the event of a fire.
Protection of property is secondary.2. Employees are to stop work and leave the building immediately
when the fire alarm sounds or when instructed to do so. Do not delay exit by looking for belongings or other people.
3. All employees should follow instructions, avoid panic, and cooperate with those responding to the emergency.
4. When leaving the building, employees should go to a clear area well away from the building. They should not obstruct fire hydrants or the responding fire/rescue workers and their equipment.
5. Employees may not re-enter the building until instructed to do so by their supervisor or a fire/rescue worker.
[I think we should add: locations of all fire extinguishers, and how to use them; fire exits to be used in an emergency (is there a map?) –AS]
Flood – Natural Disaster
Flood – Burst Pipe(s)
Updated 5/9/2023

115 of 120
General Safety PoliciesAll employees are expected to: Read and follow the safety notices and other information that is
posted. Observe and follow all safety instructions, signs, and operation
procedures. Help fellow employee(s) when they ask for assistance or when
needed for their safety. Never participate in “horseplay.” Horseplay that results in injury is
often not covered by Workers’ Compensation. Clean up spills immediately. Report all unsafe conditions, hazards, or equipment immediately.
Make sure other people are warned of the problem so that they may avoid it.
Wear personal protective equipment (i.e., gloves, safety glasses, back support belts, etc.) as needed to reduce injury potential.
Never stand on chairs, furniture, or anything other than an approved ladder or step stool.
Never use intoxicating beverages or controlled drugs before or during work.
Use prescription medication at work only with their doctor’s approval.
Material handling: When lifting, lift properly. Keep the back straight, stand close to the
load, and use leg muscles to do the lifting, keeping the load close to the body. Never twist upper body while carrying a load.
When lifting heavy objects, utilize a two-wheeled dolly, or ask for assistance from another employee.
Inspect the object for sharp corners, nails, black widow spiders, or other things that may cause injury before attempting to lift.
Use gloves when handling rough or sharp materials.
Facility safety: Do not place materials in aisles, stairways, or any designated path
of travel. Stack material at a safe height so that material will not fall if
bumped. Insure heavy loads have proper support, and make sure there is no overhanging or irregular stacking of material.
Place all trash or scrap in places provided. Clean up all spills immediately.
Report worn or broken flooring, stair treads, handrails, furniture, and equipment.
Updated 5/9/2023
116 of 120
Medical Emergencies1. First Aid Kits are located ___________________________________.2. ____________________ are trained in first aid.3. When calling 911, be prepared to tell the operator:
Whether you need fire, police, or ambulance. Your name. The shop’s address: 4116 Hannegan Road The gender and age of the victim and a description of their
injury/condition.4. Follow all instructions the 911 operator gives you. Do not hang
up until the operator tells you to.5. Station someone out front to direct medics to the victim.
First Aid TreatmentSevere injuries and illnesses require professional medical assistance—call 911! Whenever possible, first aid should be administered by a trained staff member. Some general guidelines for the treatment of wounds and illnesses are:
Wounds: NOTE: All employees need to follow proper procedures for blood-borne pathogens. See “Blood and Bodily Fluid Spills” in this section.
To treat minor wounds (cuts, lacerations, abrasions, or punctures):1. Wash the wound using soap and water; rinse it well.2. Cover the wound with a clean dressing.
To treat major wounds (large, deep, and bleeding):1. Call 9112. Stop the bleeding by pressing directly on the wound, using a
bandage or cloth as a barrier.3. Keep pressure on the wound until medical help arrives. If blood
soaks through, apply more layers directly on top—DO NOT remove the first bandage or cloth.
Broken bones:Note: Do not move the victim unless it is absolutely necessary.
1. Call 911 or arrange for transport to the hospital or urgent care facility.
2. If the victim must be moved, splint the injured area. Use a board, cardboard, or rolled newspaper as a splint.
Burns:Thermal (Heat) Burns:
1. If the burned area is large, blistered, charred, or the skin is sloughing off, call 911 immediately.
Updated 5/9/2023

117 of 120
2. Flush the burned area with cool, running water for several minutes, or until help arrives.
3. (Minor burns only) Gently blot-dry the area and cover it using sterile gauze or a clean cloth.
Chemical Burns:1. Call 911 if victim shows signs of shock or other illness.2. Remove any contaminated clothing.3. Flush the exposed area with cool water immediately for 15 to 20
minutes.
Eye injury:Small particles:
1. Do not rub eyes.2. Use the corner of a soft clean cloth to draw particles out, or hold
the eyelids open and flush the eyes continuously with water.Large or stuck particles:
1. If a particle is stuck in the eye, do not attempt to remove it.2. Cover both eyes with bandage. (This prevents blinking, which
can cause further injury.)3. Seek medical attention.
Chemical contamination:1. Immediately irrigate the eyes and under the eyelids, with water,
for 30 minutes.2. Seek medical attention.
Neck and spine injury:1. If the victim appears to have injured his or her neck or spine, or
is unable to move his or her arm or leg, call 911 immediately.2. Do not attempt to move the victim unless it is absolutely
necessary. Keep the victim as still as possible.
Heat exhaustion:1. Loosen the victim's tight clothing.2. Give the victim small sips of cool water.3. Make the victim lie down in a cooler place with the feet raised.
On-the-Job Injury[Where are the accident investigation forms? Who investigates? –AS]
Employees must notify their supervisor if they have a work-related injury or illness that requires professional medical assistance. Failing to notify their supervisor prior to receiving this assistance may render the employee ineligible for Worker’s Compensation, benefits to pay for doctor’s bills, and/or lost wages.
Updated 5/9/2023

118 of 120
Emergent Injuries (those requiring professional assistance):Employees must:
1. Inform their supervisor.2. Proceed to the posted medical facility. The employee’s
supervisor will assist with transportation if necessary.3. Provide details for the completion of the accident investigation
report.
Non-emergent Injuries:Employees must:
1. Inform their supervisor.2. Administer first aid treatment to the injury or wound.3. If a first aid kit is used, indicate usage on the accident
investigation report. Note: Access to a first aid kit is not intended to be a substitute for medical attention.
4. Provide details for the completion of the accident investigation report.
Phones Down (Not related to power failure)
Power Failure[Include procedures for computer shut-down, what to do about phones, etc.–AS]
Robbery
Updated 5/9/2023

119 of 120
Vehicle Accident – Off Premises and On
Updated 5/9/2023
120 of 120
VIII. Sample Forms and Examples
[Note: rather than scanning in all these documents, I recommend just keeping copies of important forms in the printed manual and using this page as a table of contents (updating as needed). Will keep the SOP word doc down in size and make organization easier. –AS]
Included in this section are:
15 Point Vehicle InspectionAir Conditioning Inspection SheetCommercial Credit ApplicationEngine Replacement Check SheetEstimate of RepairsFax TemplateInsufficient Funds Payment LetterMissing Invoice ListNew Customer Letter TemplateNo Wrench Inspection SheetParts Requisition FormPayment Plan AgreementDiagnosis/Repair Authorization FormShop Maintenance ChecklistShop Needs RequestTime Off RequestUtility Department MemoWork in Progress Board Flowchart
[Other Ideas? –AS]Time Card Sample
Updated 5/9/2023