audiowav player manual - digital dictation transcription ... player.pdf · dss and wave audio files...
TRANSCRIPT
Dataworxs Systems Limited
AudioWav Player User Guide
Version
2

D A T A W O R X S S Y S T E M S L I M I T E D
AudioWav Player™
AudioWav Player™
AudioWav Player User Guide Thank you for purchasing AudioWav Player, a Dataworxs software-based transcription solution that combines professional power with your personal touch. The contents of this manual are based on version 2.00.043 of AudioWav Player. The material provided in this manual is provided for informational purposes only and is subject to change without notice. Dataworxs Systems Limited assumes no responsibility for any errors, which may appear in this manual. Dataworxs welcomes your comments and inquiries. Address comments to: Dataworxs Systems Limited. 3391 Juneberry Road Mississauga, Ontario, Canada L5N 7E8 www.dataworxs.com Phone: (905) 824 8739 FAX: (905) 824 6110 E-mail: [email protected] Dataworxs Systems Limited may use or distribute any information you supply in any way it believes appropriate without incurring any obligations whatsoever. © Copyright 2004-2006 Dataworxs Systems Limited. All rights reserved. Audioworxs and AudioWav Player are trademarks of Dataworxs Systems Limited Windows 98SE, 2000 and XP are registered trademarks of Microsoft Corp. Outlook is a registered trademark of Microsoft Corp. Olympus is a registered trademark of Olympus Optical Corp. Philips is a registered trademark of Philips Electronics N. V. Sound Blaster is a registered trademark of Creative Technology Ltd.
All other product and brand names are trademarks or registered trademarks of their respective holders.

Introduction The Smart Solution: AudioWav Player Software The AudioWav Player software enhances efficiency and facilitates the editing, archiving and playback of DSS and WAVE audio files with support for Olympus and Philips versions of DSS. Thanks to the clear layout, file information can be read at a glance to improve identification and speed up the transcription process. AudioWav Player provides digital flexibility with digital quality. AudioWav Player is an advanced software-based transcription application that installs easily on you PC and works with your sound card. AudioWav Player has a friendly user interface that gives you full control of playback. AudioWav Player is perfect for medical, legal, insurance and other dictation applications.
AudioWav is a natural for the transcriptionist who transcribes TrueSpeech, ADPCM, PCM, DSS, GSM, VOX and other digital files, including proprietary formats from DVI and VoiceIQ/BCB/PC-DART, Dictaphone and WinScribe. Now you can work with the ease and flexibility of working from the same PC that you transcribe on.
AudioWav Player manages the automatic importation of audio files from many of the popular digital recorders made by Olympus and Philips.
Feature Overview
• Assign Word document templates based on specific input field values • Session reports • Adjustable demographic display • Auto import of audio files from digital portables • Conversion of proprietary formats to wave (.wav) • Auto archive and purge of imported audio • Upload of user keyword fields to digital portables • Multiple index locators (markers) with text comments • Separate volume and speed control • Preview and auto import DSS, MP3, MPG, WMA and WAV audio files • Preview and e-mail downloaded audio prior to transcription • Multiple vendor footpedal support – USB and Serial • Auto select and complete • E-mail of audio files (with encryption) using either SMTP or Outlook integration
ii

Table of Contents
Introduction...................................... ii Feature Overview........................................ ii
Key Software Components and System Requirements ...................... 1
Dictation Mode ..........................................................1 Preview Mode ............................................................1 Transcription Mode....................................................1
Installation........................................ 3 Software Installation ................................... 3
Hardware Installation.................................. 3 Headset Installation....................................................3 Footpedal Installation.................................................4
License Installation .......................... 9 Automated On-Line Registration................ 9
Running License Administrator................ 10
Installing a Default License ...................... 10
Obtaining an Activation Key .................... 11
Sample of E-mail response to Activation Request ..................................................... 11
Setup................................................ 13 Folders......................................................................14 Assign Document Templates ...................................19 Preferences Tab........................................................21 E-mail Options .........................................................24 Encryption Options ..................................................25 Olympus Folder Selection .......................................26 Olympus Digital Recorder Options .........................27 Priority Mapping......................................................30 Demographic Labels ................................................31
AudioWav Player Overview.......... 32
Preview Mode ................................. 33
Preview Player .......................................... 33
Author Mode...................................34 Main Tool Bar........................................... 34
Main Screen .............................................. 35
Import file ................................................. 35 Email file.................................................................. 37 Annotating a file ...................................................... 39 Move Selected Files to a Directory ......................... 39
Transcribe Mode ............................40 Display Modes .......................................... 40
Main Console........................................................... 41 Mini Console ........................................................... 41 System Tray Icon..................................................... 41
Player Controls and Operation.................. 42 Main Display Window............................................. 42 File Priority .............................................................. 43 Working with Audio Files ....................................... 43 Mouse Options (right click)..................................... 44 Change Demographics............................................. 44 Suspend Files ........................................................... 45 Import files............................................................... 46 Rename Folder......................................................... 46 Index/ Audio Tags ................................................... 46 Tool Bar Icons ......................................................... 48
Speed, Volume and Balance Controls....... 49
Additional Audio Adjustments ................. 49
Digital Portables .............................51 Installation ................................................ 51
Philips DPM2 Digital Portables .............................. 51 Olympus DS 4000 ................................................... 52 DPM2 Setup Options............................................... 54 Lanier M3 or Olympus Digital portables ................ 55
Frequently Asked Questions .........57
A U D I O W A V P L A Y E R
C H A P T E R 1
Key Software Components and System Requirements AudioWav Player AudioWav Player automatically detects and imports audio files from Olympus, Philips DPM and Lanier M3 digital portables and makes them available for author preview or transcription and provides the full playback control, including footpedal support that is required by a professional transcriptionist. Additional file formats such as those from Dictaphone/Grundig m5210 and the
Sanyo B150/5000 can be manually downloaded using the Import icon located on AudioWav Player’s tool bar. Dictation Mode
Allows speech recorded on Olympus, Philips, Dictaphone/Grundig, Lanier and Dictaphone DSS digital portables to be stored and managed as DSS audio files on a PC. Allows playback of audio for preview and the sending of audio files as e-mail attachments (optionally encrypted).
Preview Mode Associated audio file formats (selected during installation) can be accessed for review prior to importation into the transcription mode. Allowing files to played, imported or auto launched into the player transcription mode for immediate transcription. Preview mode is automatically started when any associated file is highlighted with a double mouse click.
Transcription Mode Plays audio files in the background while another application such as a word processor is running in the foreground. Full transcription control and management of audio files including session or productivity reporting. Licensing enables footpedal control of the playback process.
Document #2.00.000.20060620 Copyright © 2004-2006 Dataworxs Systems Ltd.
Chapter
1

A U D I O W A V P L A Y E R
System Requirements
MINIMUM PC hardware required
• Pentium II PC 350 MHz • 256 MB of System RAM • 100 MB Free Disk Space • Windows 2000, XP or better • SoundBlaster 16 Compatible Sound Card • Available 9-pin Serial or USB Port for Footpedal • Microsoft Windows Media Player (for additional CODECs)
RECOMMENDED PC hardware required
• Pentium III or Celeron PC 600 MHz or above • 512 MB or more of System RAM • 500 MB Free Hard Disk Space • Windows 2000, XP or better • SoundBlaster 16 Compatible Sound Card • External Speakers or a Stereo Headset • Available USB Port or Serial Port • Microsoft Windows Media Player (for additional CODECs)
** The hardware specifications above are approximate only. What you need will depend on many factors including what other processes you have installed and running on your computer.
Document #2.00.000.20060620 2 © 2004-2006 Dataworxs Systems Ltd.

Chapter
2 A U D I O W A V P L A Y E R
C H A P T E R 2
Installation
With your AudioWav Player Installation Package you should have received the following:
• The AudioWav Player Software CD (unless software was downloaded)
• A USB Footpedal and Adapter Cord (Serial for Windows NT)
• A Headset Software Installation
The AudioWav Player is designed to auto install. Simply insert the CD into your CD drive and the setup program should automatically launch. If it doesn’t, manually start the setup by using Windows Explorer and double-clicking on the program Setup.exe from the root of the CD. Answer the questions as they appear in the setup instructions. Selecting the default locations is preferred unless you are an experienced user.
During the installation you will be asked if you would like to associate DSS, WAV, WMA, MP3 and/or MPG files with the program. At least one these must be selected in order for the Preview option to launch automatically. It is recommended that you choose to associate the program with the format(s) that dictation files are normally provided to you in.
Hardware Installation Headset Instal lation
Installation is very simple. You will need to locate the Speaker Output Jack on your sound card usually found at the back of the PC. If you already have speakers attached to your sound card they will be plugged into the Speaker Output jack. You can use the player with speakers or with the stereo headset. If you decide to use the headset, disconnect the speakers and plug the headset into the output jack or plug the headset into the jack provided on the speakers (if supported). If you do not have speakers or are unsure of the connections please refer to your sound card or system documentation.
Document #2.00.000.20060620 3 © 2004-2006 Dataworxs Systems Ltd.

A U D I O W A V P L A Y E R
Footpedal Instal lation
VEC USB Footpedal Insta l la t ion
Use the following hardware installation steps for the USB Footpedal under Windows 98 and Windows 98/SE. If installing on Windows ME, 2000, or XP you may not necessarily see all of these dialogs once the footpedal is plugged into the USB port. However, the basic procedure is still the same. Windows 95 Release A and Windows NT do not support USB devices.
Power up your system and login normally.
Insert the USB Footpedal connector into an unused USB slot.
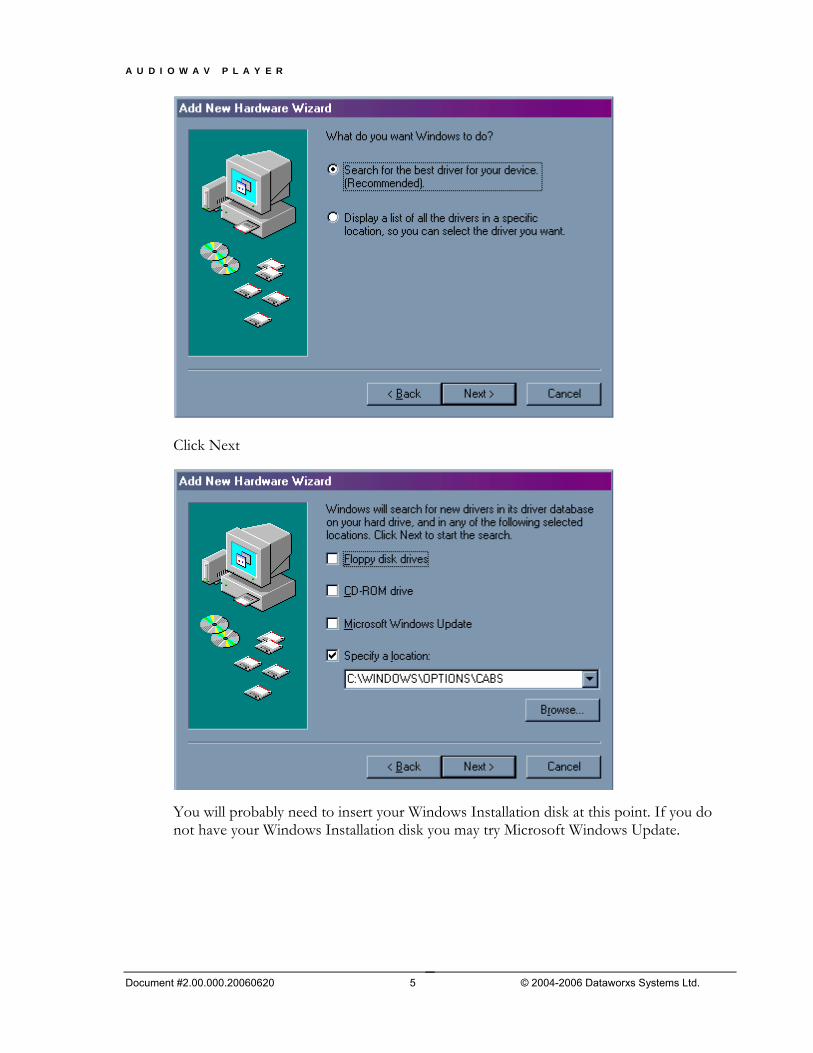
Windows should respond with the following dialog
Click Next
The next dialog will appear.
Document #2.00.000.20060620 4 © 2004-2006 Dataworxs Systems Ltd.
A U D I O W A V P L A Y E R
Click Next
You will probably need to insert your Windows Installation disk at this point. If you do not have your Windows Installation disk you may try Microsoft Windows Update.
Document #2.00.000.20060620 5 © 2004-2006 Dataworxs Systems Ltd.

A U D I O W A V P L A Y E R
Click Next.
You should see this dialog next. If you do not see this dialog select cancel and call technical support; if you do see this dialog select next.
Select finish. Your system is now set to use the USB Footpedal. Whenever you start AudioWav Player a dialog box may appear before the main application
Document #2.00.000.20060620 6 © 2004-2006 Dataworxs Systems Ltd.

A U D I O W A V P L A Y E R
Olympus RS23/RS24 Footpedal Installation 1 . Run the Olympus Footpedal Setup
Prior to connecting the footpedal run the program “Olympus Footpedal Setup” (Fsdist.exe). Run the setup by selecting, from the Windows task bar, Start ⇒Programs ⇒Dataworxs Systems ⇒AudioWav Player ⇒Olympus Footpedal Setup. 2. Connect ing the RS23 / RS24 Footpedal
Connect the footpedal either to a USB port or a serial port on your PC.
2a . Connect ing to a USB Port Connect the footpedal cable to the USB adapter cable. 1 Connect the USB adapter cable to the PC's USB port. 2 2b . Connect ing to a Ser ia l Port
Connect the footpedal cable to the serial adapter cable. 1 Connect the serial adapter cable to the PC's serial port. 2
Document #2.00.000.20060620 7 © 2004-2006 Dataworxs Systems Ltd.
A U D I O W A V P L A Y E R
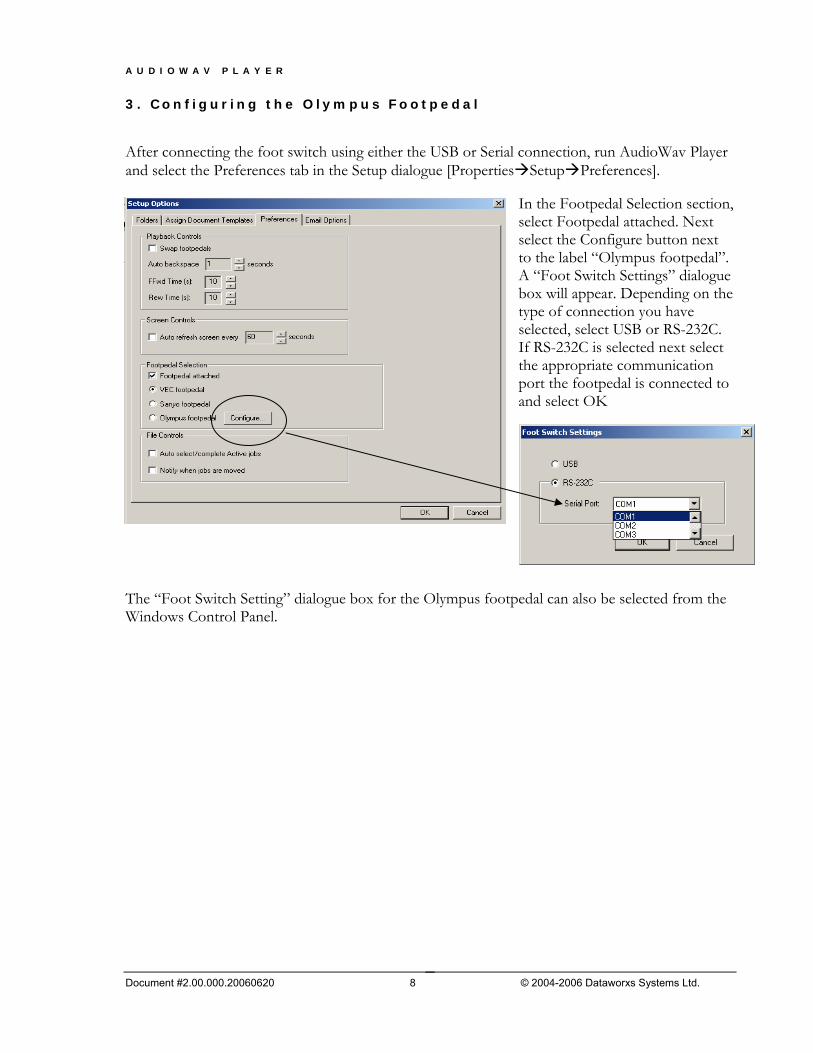
3. Conf igur ing the Olympus Footpedal
After connecting the foot switch using either the USB or Serial connection, run AudioWav Player and select the Preferences tab in the Setup dialogue [Properties Setup Preferences].
In the Footpedal Selection section, select Footpedal attached. Next select the Configure button next to the label “Olympus footpedal”. A “Foot Switch Settings” dialogue box will appear. Depending on the type of connection you have selected, select USB or RS-232C. If RS-232C is selected next select the appropriate communication port the footpedal is connected to and select OK
The “Foot Switch Setting” dialogue box for the Olympus footpedal can also be selected from the Windows Control Panel.
Document #2.00.000.20060620 8 © 2004-2006 Dataworxs Systems Ltd.
Chapter
3 A U D I O W A V P L A Y E R
C H A P T E R 3
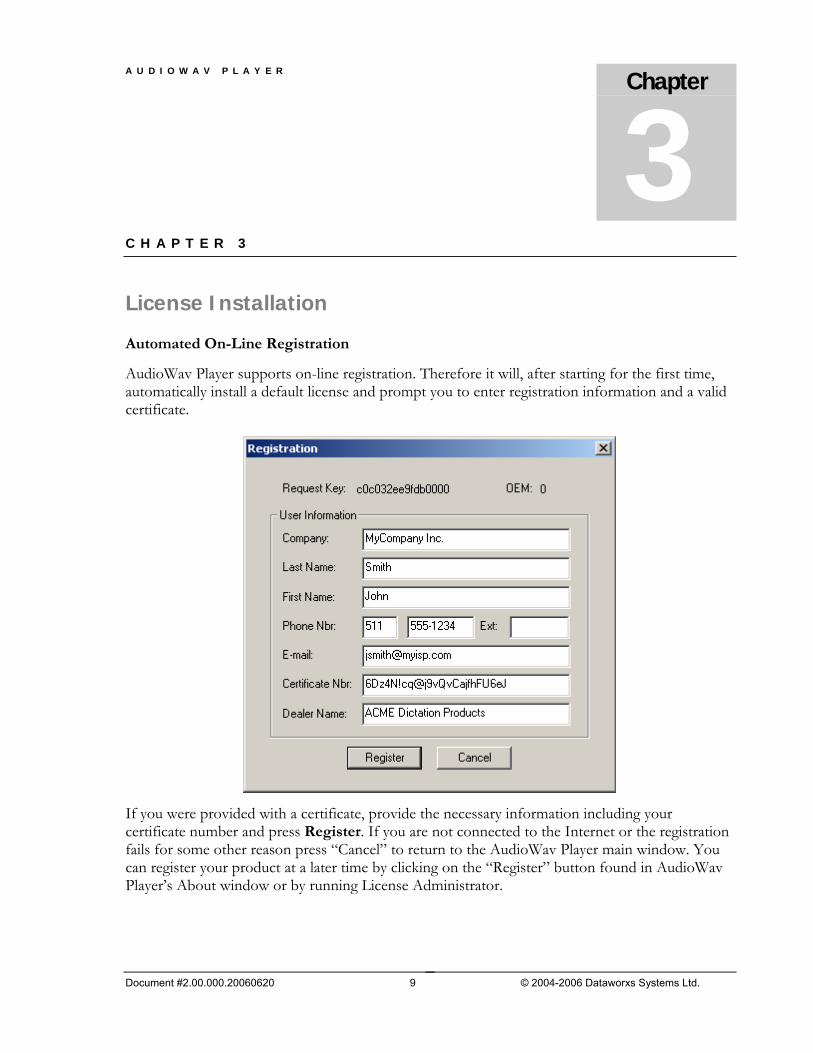
License Installation Automated On-Line Registration AudioWav Player supports on-line registration. Therefore it will, after starting for the first time, automatically install a default license and prompt you to enter registration information and a valid certificate.
If you were provided with a certificate, provide the necessary information including your certificate number and press Register. If you are not connected to the Internet or the registration fails for some other reason press “Cancel” to return to the AudioWav Player main window. You can register your product at a later time by clicking on the “Register” button found in AudioWav Player’s About window or by running License Administrator.
Document #2.00.000.20060620 9 © 2004-2006 Dataworxs Systems Ltd.

A U D I O W A V P L A Y E R
Running License Administrator To license AudioWav Player when you are not connected to the Internet or do not have a certificate you can run a program called License Administrator. The application’s setup program may have created a shortcut to License Administrator in the operating systems task bar. From the Windows task bar click on Start Programs Dataworxs Systems License Administrator and choose License Administrator to launch the program. If no shortcut exists launch the program LicenseAdministrator.exe from the install_folder\Dataworxs Systems\License Administrator folder. Installing a Default License License Administrator’s main screen provides a list of available Dataworxs applications that may be licensed. Select the appropriate application by clicking on AudioWav Player. The radio button to the left of AudioWav Player will indicate that the correct application has been selected. Click on the “Install Default License” button. This will install a default license allowing AudioWav Player to operate in a feature and time limited manner (no footpedal support will be available until a license is activated). To view the current license status click on the “Administer…” button. A window will display the current license status including features that are enabled and the current expiry date.
Select Correct Application
Document #2.00.000.20060620 10 © 2004-2006 Dataworxs Systems Ltd.

A U D I O W A V P L A Y E R
Obtaining an Activation Key To obtain an Activation Key complete the registration form obtained by selecting AudioWav Player and then pressing the “Register…” button. After filling in the required information select MAPI or SMTP e-mail and press the Register button to have the information e-mailed to Dataworxs. Alternatively, if e-mail is unavailable, select “Create Text File” to create a file with the necessary registration information. Send this file containing the 16-digit Request Key to Dataworxs Systems or your authorized dealer. In response to your activation request, you will be given one or more Activation Keys that will activate one or more features. Sample of E-mail response to Activation Request In response to your recent request for product activation Dataworxs Systems Limited is pleased to provide the following Activation Keys... Product: AudioWav Player Request Key: 14720a5c295a0000 Ref: PO# 0717020001 Use License Administrator to install the activation key(s) in the order provided. When the Current Request Key shows 14720a5c295a0000 use the Activation Key: yLc39Bc44AD32U28 Please make note of these keys as they will be required if the product must be reinstalled on the same computer for any reason and may be required in order to verify your qualification for support. Thank you for your purchase of a Dataworxs product. Activation Key provided. Alternatively, you may have been provided with a Dataworxs product certificate. A certificate is a 24 character string, 6Dz4N!cq@j9vQvCajfhFU6eJ for example, that contains information about a Dataworxs product including the product name, the expiration date, and features. Certificates represent a pre-paid purchase of a Dataworxs product and can be redeemed for an Activation Key by going to the Dataworxs Customer Services web site. Go to www.dataworxs.com and choose “Licensing” from the menu. This service is available 365 days a year, 7 days a week, 24 hours a day, and bypasses the waiting necessary when obtaining an Activation Key via e-mail or call-in.
Document #2.00.000.20060620 11 © 2004-2006 Dataworxs Systems Ltd.
A U D I O W A V P L A Y E R
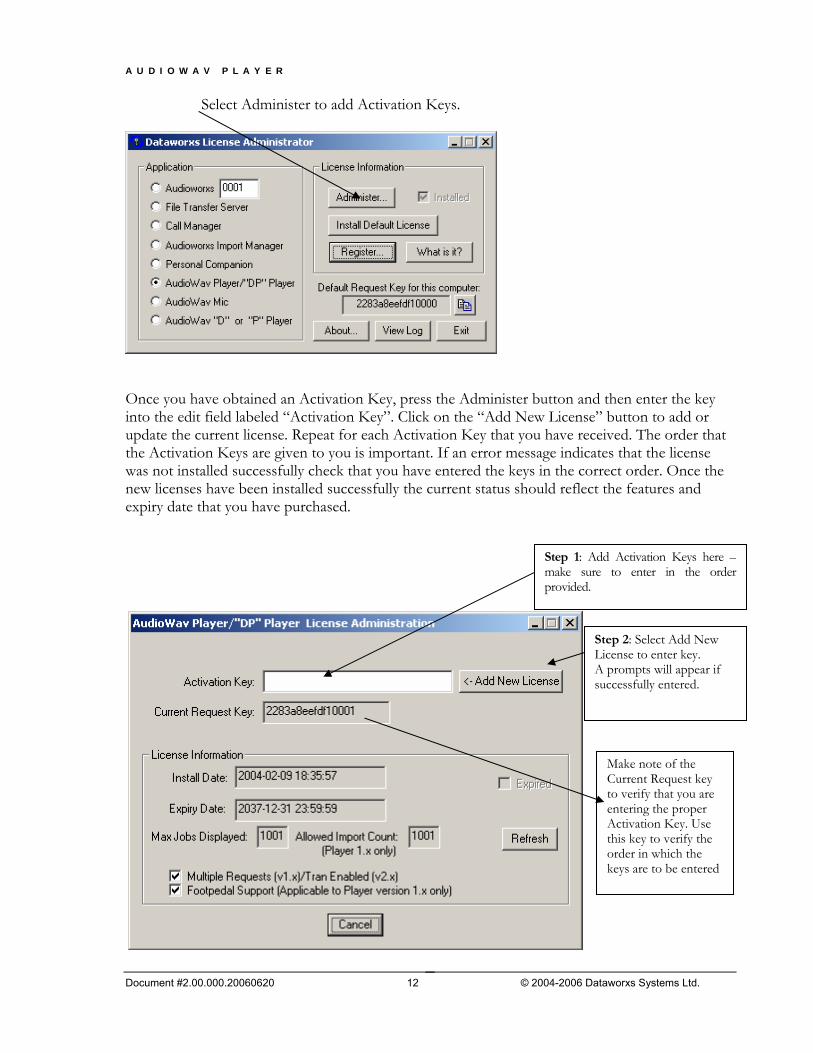
Select Administer to add Activation Keys.
Once you have obtained an Activation Key, press the Administer button and then enter the key into the edit field labeled “Activation Key”. Click on the “Add New License” button to add or update the current license. Repeat for each Activation Key that you have received. The order that the Activation Keys are given to you is important. If an error message indicates that the license was not installed successfully check that you have entered the keys in the correct order. Once the new licenses have been installed successfully the current status should reflect the features and expiry date that you have purchased.
Step 2: Select Add New License to enter key. A prompts will appear if successfully entered.
Make note of the Current Request key to verify that you are entering the proper Activation Key. Use this key to verify the order in which the keys are to be entered
Step 1: Add Activation Keys here –make sure to enter in the order provided.
Document #2.00.000.20060620 12 © 2004-2006 Dataworxs Systems Ltd.
Chapter
4 A U D I O W A V P L A Y E R
C H A P T E R 4
Setup
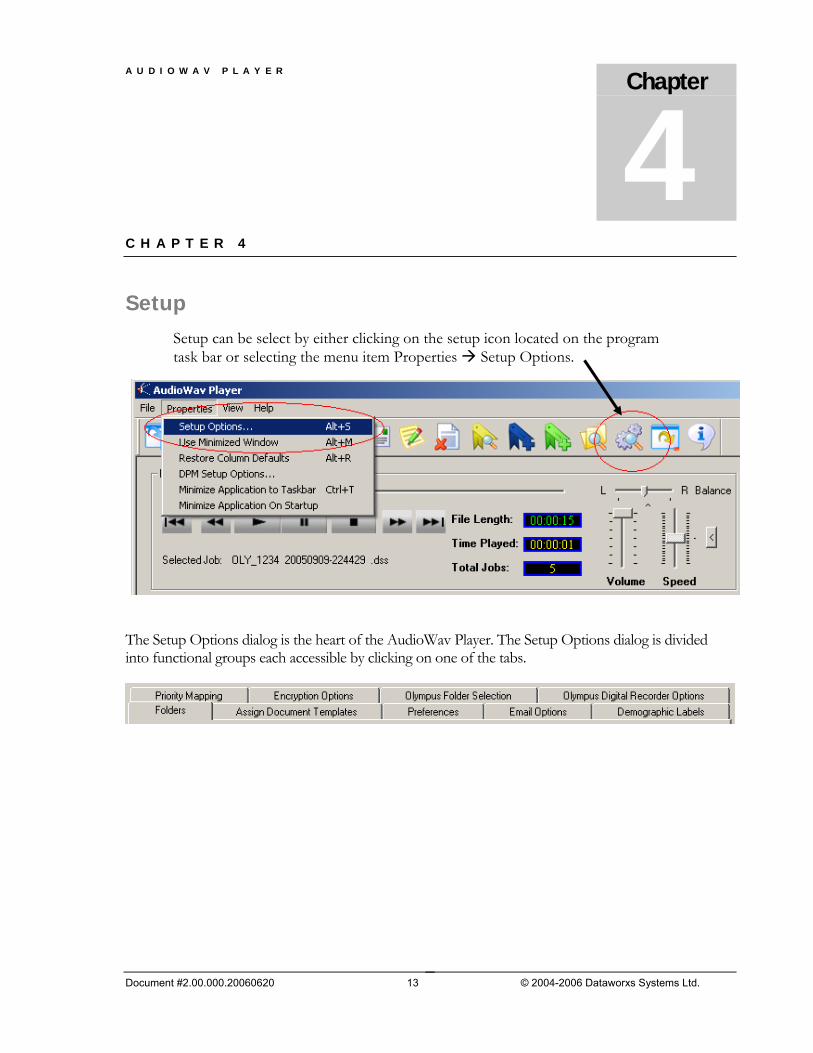
Setup can be select by either clicking on the setup icon located on the program task bar or selecting the menu item Properties Setup Options.
The Setup Options dialog is the heart of the AudioWav Player. The Setup Options dialog is divided into functional groups each accessible by clicking on one of the tabs.
Document #2.00.000.20060620 13 © 2004-2006 Dataworxs Systems Ltd.

A U D I O W A V P L A Y E R
Folders
Required folders are as follows: Main: The Main Folder is the primary location of dictation files to be
transcribed. Files are automatically moved to the Main folder when imported from a digital portable or using the manual
import icon, located on the tool bar. The display grid will display all files currently imported into this location.
Complete: The Complete folder is the location to which transcribed audio is moved when it is completed. To change the file location from the default location click on the folder icon located to the right of the Complete Folder and select the desired folder.
Document #2.00.000.20060620 14 © 2004-2006 Dataworxs Systems Ltd.

A U D I O W A V P L A Y E R
Suspend: This is the location that dictation files that are suspended are stored. Multiple files can be put in a suspend mode and moved to the suspend folder whenever a file has been selected for transcription, but for some reason has to be put on hold and another file or files selected for transcription. Files moved to the suspend folder can be moved back to the main folder anytime so you can resume from where you left off. While suspended, no one else will be able to select this file (if Player is used in a shared LAN environment).
Session Report: The Session Report Folder is the location for storage of
session reports. A session report is created each day, provided the option is selected, noting the length of the audio file, the time the file was active and the time it was completed.
Archive: Where a copy of the original file from the digital recorder is stored
after it has been downloaded. Note: the file name may be changed if a file already exists in the Archive folder with the same name. All files downloaded and imported into the AudioWav Player will be automatically backed up in their original state and stored in the Archive Folder location provided the archive option is enabled.
Achieved files can be moved into the Main folder by selecting the archive folder, highlighting the file to be retrieved and using the right button on your mouse select import file. The file will be move to the main folder. Archived files will be automatically deleted after a number of days as selected in the Delete archived files after… The Search for archived files every… determines how often the program will check for files to be deleted from the archive.
Inbox: Audio files placed in the Inbox are automatically detected, decrypted and then imported into the Main folder. Audio files received via e-mail should be put in this folder so that they can be decrypted (if required). Encrypted audio (sent from a compatible Dataworxs application – like AudioWav Player) is automatically recognized and decrypted using the appropriate password from your list of passwords (maintained in the Encryption Options setup tab). If the file was encrypted using a password not in your list then the file will remain in the Inbox until you add the correct password to the password list. If a file is not encrypted it will be moved to the Main folder without being changed.
To enable this feature check the checkbox labeled “Automatically decrypt and import audio found in the Inbox folder”. To control how often the Mail folder is checked for new audio files adjust the “Search Inbox folder every…” value.
Document #2.00.000.20060620 15 © 2004-2006 Dataworxs Systems Ltd.

A U D I O W A V P L A Y E R
Outbox: The Outbox is a folder used by Player to store files that are
queued for e-mailing using the Dock ‘N Send and Outlook integration features. Player will automatically check to see if Outlook is running and when it is will send the queued files. This folder is reserved for use by Player only. You cannot copy or move your own files into this folder.
Temporary: Using the Temporary folder allows for better response when playing DSS files over a network connection. Using this option has no affect when playing standard wave files. To enable this feature check the checkbox labeled “Use Temporary folder for all file conversions”. Do not enable this feature if your Main and other audio folders are on your local hard drive.
Auto Import: The folder specified here, along with its sub-folders, will be searched periodically by AudioWav Player. Audio files supported by AudioWav Player that are found will be imported (i.e. moved) to the Main folder. This feature is enabled by checking “Auto Import enabled” and the search interval is specified by the setting labeled “Search Auto Import folder every…”
Note: If the folder specified here is the same folder that results from attaching an Olympus digital recorder that uses DM1Service (e.g. DS-4000, DS-2) the Auto Import feature will take precedence over the DM1Service interface.
Advanced Hint If using the Auto Import feature to import audio files from a digital recorder (or any other device) that is identified as a removable drive when connected to the computer, you should ensure that the drive letter assigned to the device by Windows is always the same. One way to ensure that the drive letter remains the same each time the device is connected to the computer is to do the following:
1. Connect the device to the computer. 2. Run Administrative Tools->Computer Management 3. Choose Disk Management from the selection tree 4. Right click on the appropriate volume and choose “Change Drive Letter and
Paths…” 5. Assign a new drive letter, perhaps O: for an Olympus recorder and P: for a Philips
recorder. Now, each time the device is connected to the computer it will be recognized and assigned the drive letter you selected. Use this drive letter when specifying the Auto Import folder (e.g. “P:\”).
Document #2.00.000.20060620 16 © 2004-2006 Dataworxs Systems Ltd.
A U D I O W A V P L A Y E R
Download f i les of f portab le un i ts
When checked, Player will check for supported digital recorders and automatically download found audio files. Disable this option if not downloading audio from a supported digital recorder or when another application is being used to interface with the recorder.
Delete Source F i les (DPM/Olympus dev ices)
When checked, audio files downloaded from a supported digital recorder are automatically deleted from the device. In normal use this option should be enabled so that the same audio files are not downloaded more than once. If not enabled, the author will be responsible for manually deleting old audio files prior to downloading new audio. Note: This feature has no affect when interfacing with a digital recording device using the Auto Import feature.
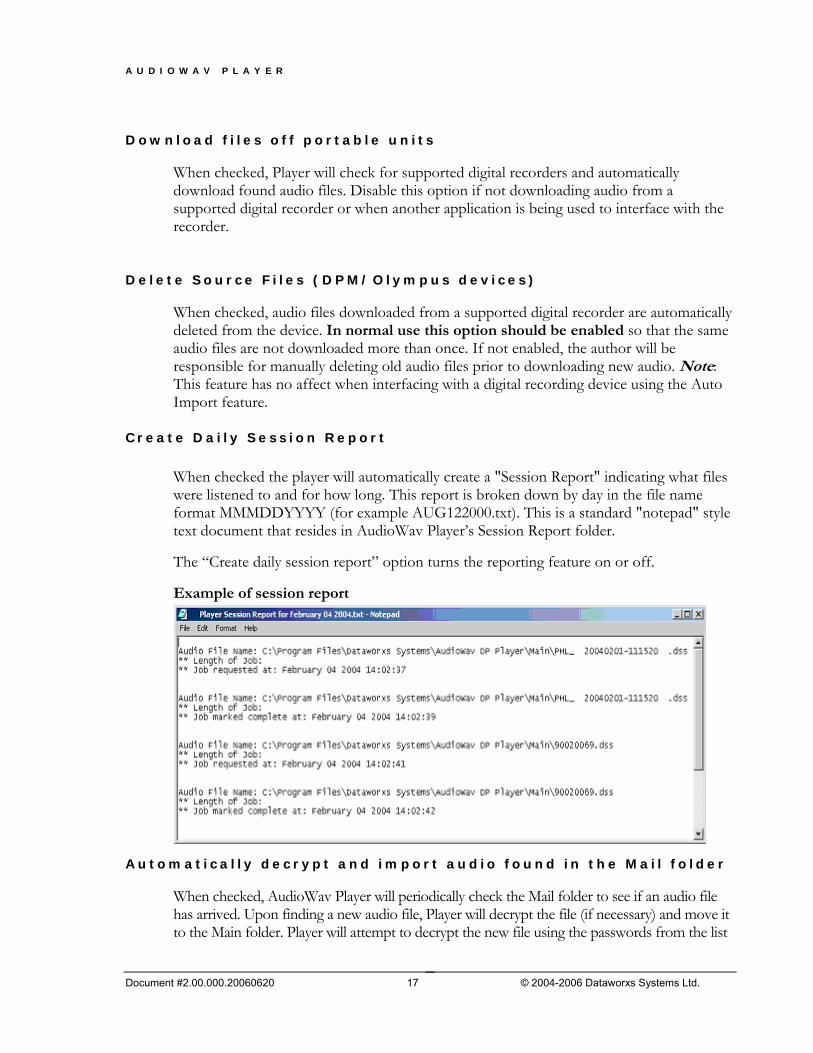
Create Dai ly Sess ion Report
When checked the player will automatically create a "Session Report" indicating what files were listened to and for how long. This report is broken down by day in the file name format MMMDDYYYY (for example AUG122000.txt). This is a standard "notepad" style text document that resides in AudioWav Player’s Session Report folder.
The “Create daily session report” option turns the reporting feature on or off.
Example of session report
Automat ica l ly decrypt and import audio found in the Mai l fo lder
When checked, AudioWav Player will periodically check the Mail folder to see if an audio file has arrived. Upon finding a new audio file, Player will decrypt the file (if necessary) and move it to the Main folder. Player will attempt to decrypt the new file using the passwords from the list
Document #2.00.000.20060620 17 © 2004-2006 Dataworxs Systems Ltd.

A U D I O W A V P L A Y E R
created in Setup’s Encryption Options tab. The frequency at which the Mail folder is checked is defined by the “Search Inbox folder every…” setting.
Search Inbox fo lder every…
Defines how often the Inbox folder is searched for new files to be imported. Valid only when “Automatically decrypt and import audio found in the Inbox folder” is enabled.
Search Outbox every…
Specifies how often the Outbox will be checked by AudioWav Player for new audio files to be mailed.
Outbox f i le ag ing
Specifies how old (in seconds) a file must be before it is deemed to be ready to be e-mailed. Aging a file is important to prevent it from being mailed while it is still being written to by another part of AudioWav Player or another program. Depending on how the system is configured and how “fast” the computer is you may be able to reduce this value to its minimum of 1 second without experiencing any problems.
Not i fy when jobs are emai led
When enabled a message is displayed every time one or more audio files in the Outbox are e-mailed.
Move emai led f i les to Arch ive fo lder
When checked, a copy of any audio file that is e-mailed is made in the archive folder. If the audio file needs to be resent for any reason it can be imported from the archive folder.
Auto Import enabled
Enables the Auto Import function. This feature is used to automatically detect when a removable drive is attached to the computer and then import audio files found on the drive. This feature can be used to detect any digital recorder that is seen as a removable drive when connected to the PC via a USB cable.
When a supported DSS audio file is detected and imported into AudioWav Player it is renamed (unless it already has an accompanying job descriptor (XML) file) using the following format: OLY_aaaa yyyymmdd_hhmmss .DSS, where aaaa is the author ID, yyyymmdd is the record date, and hhmmss is the record time.
In the case of Olympus DS-4000 and DS-2 digital recorders using this feature allows these devices to be detected without the need to have the Olympus service DM1Service running.
Search Auto Import fo lder every…
Defines how often the Auto Import folder is searched for new files to be imported. Valid only when an Auto Import folder is defined and Auto Import enabled is checked.
Document #2.00.000.20060620 18 © 2004-2006 Dataworxs Systems Ltd.

A U D I O W A V P L A Y E R
Auto Import f i le ag ing
Specifies how old (in seconds) a file must be before it is deemed to be ready to be imported from the Auto Import folder. Aging a file is important to prevent it from being imported while it is still being written to. In most cases you will be able to reduce this value to its minimum of 1 second without experiencing any problems when using the Auto Import feature to detect when a digital recorder is connected to the computer via a USB cable. Valid only when an Auto Import folder is defined and Auto Import enabled is checked. Important: Aging a file is affected by both the computer date and the date on the unit where the file was recorded. If the date and time on the recording device is more in the future relative to the computer running AudioWav Player it may take a long time before AudioWav Player determines that the file is “old” enough. Make sure that the date and time on the recording unit is correct or at least more in the past than the AudioWav Player computer to avoid long waiting times.
Assign Document Templates
This feature is designed to launch or activate a Word (or other word processor) document template automatically when an audio file is selected. A template is a predefined setup or page layout and is usually identified with a .dot file extension (when using Word).
A template determines the basic structure for a document and contains document settings such as AutoText entries, fonts, key assignments, macros, menus, page layout, special formatting, and styles. Word provides a variety of document templates, and you can create your own document templates.
When a work type (a.k.a. job type or document type) is used in creating a dictation, and a corresponding reference is used in the assign document template option, the assigned .dot file or template will be automatically launched in Microsoft Word when the file (job) is selected.
To enable this function select the Assign Document Template folder in your setup options.
Document #2.00.000.20060620 19 © 2004-2006 Dataworxs Systems Ltd.
A U D I O W A V P L A Y E R
3) Select template
4) Add to Assigned Template list
1) Select Input Field
2) Choose input field value
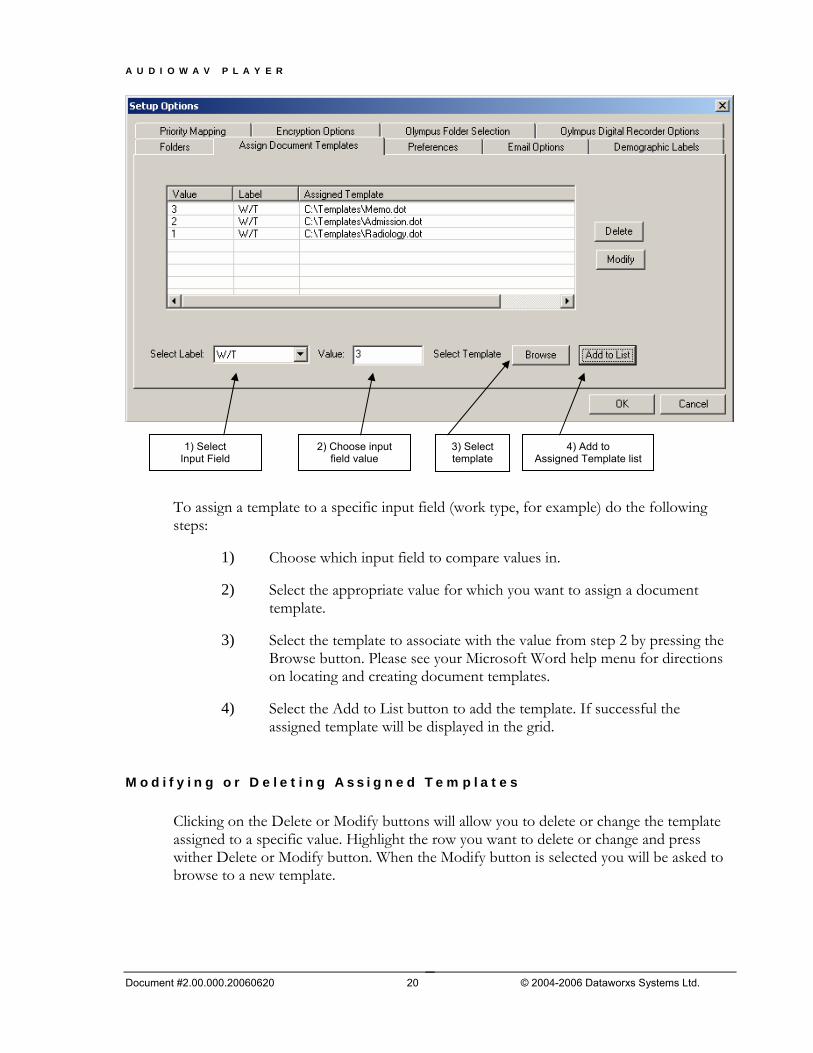
To assign a template to a specific input field (work type, for example) do the following steps:
1) Choose which input field to compare values in.
2) Select the appropriate value for which you want to assign a document template.
3) Select the template to associate with the value from step 2 by pressing the Browse button. Please see your Microsoft Word help menu for directions on locating and creating document templates.
4) Select the Add to List button to add the template. If successful the assigned template will be displayed in the grid.
Modify ing or De let ing Ass igned Templates
Clicking on the Delete or Modify buttons will allow you to delete or change the template assigned to a specific value. Highlight the row you want to delete or change and press wither Delete or Modify button. When the Modify button is selected you will be asked to browse to a new template.
Document #2.00.000.20060620 20 © 2004-2006 Dataworxs Systems Ltd.

A U D I O W A V P L A Y E R
Preferences Tab
The Preference Tab allows you to configure your foot pedal, adjust automatic backspace, screen refresh time and auto select and complete active files.
Swap Foot peda l
Allows you to reverse the right and left functions on the footpedal.
In the default configuration this is
Reverse. When Swap footpedal is selected
this is now Fast Forward.
In the default configuration this is Fast
Forward. When Swap footpedal is selected this
is now Reverse.
Document #2.00.000.20060620 21 © 2004-2006 Dataworxs Systems Ltd.
A U D I O W A V P L A Y E R
Auto Backspace
Provides an automatic backspacing feature useful to a professional transcriptionist while transcribing a job with the footpedal. The backup amount can be adjusted from 0 to a maximum of 5 seconds in quarter second increments. If the automatic backspace is set to 4, each time you stop the playback by lifting your foot from the pedal and then press the pedal to resume playback, the job will be rewound 1 second before playback begins.
To change the backup amount, adjust the number shown next to the Auto backspace, 0 = off and 20 = 5 seconds. Adjustments are made in quarter second increments.
FFwd and Rew T imes
Defines the number of seconds that the playback position will change when a rewind or fast-forward is done.
Auto Refresh Screen
When enabled AudioWav Player will automatically refresh the display at the selected interval. By default, the display screen is automatically refreshed every time an action is performed within the program, such as selecting a new dictation, completing or reserving a file. The auto refresh option extends this feature and also refreshes the screen at the defined time selected. This option should only be selected when the Player will not be accessed for an extended period of time and you wish to see new files appear in the display grid without performing an action. Each time the display is refreshed the position of files previously displayed may be repositioned to accommodate any new files that may appear since the last refresh. The auto refresh is disabled when a job is active. There is no refresh when a job is in an active state.
Auto se lect min i window when job requested
When enabled AudioWav Player will automatically change to the mini window mode after a job is selected for transcription.
Auto Se lect / Complete Act ive F i le
Option allows for the automatic completion and selection of the next dictation file when using the mini console display mode. Select the Auto Select/Complete Active file option to turn this feature on. When selected, files will automatically be
completed and the next available file made active by selecting the key. This allows for less keystrokes and greater productivity.
Document #2.00.000.20060620 22 © 2004-2006 Dataworxs Systems Ltd.

A U D I O W A V P L A Y E R
Not i fy when jobs are moved
When ever a job is completed, suspended or moved a confirmation dialog box can appear. This confirmation is enabled when this option is checked. When enabled, this option also causes a confirmation dialog box to be displayed when files are automatically imported from a supported digital recorder and/or automatically e-mailed using the Dock ‘N Send feature.
Check for O lympus Job Pr ior i t izat ion
When enabled, AudioWav Player will display the priority flag from an Olympus DSS audio file. This flag can be set by an author during the creation of a dictation file using an Olympus digital portable recorder. If the flag has been set by the author it will be displayed in the “OP” column as ‘Y’ and displayed as ‘N’ if not set. The “OP” column will be blank if the audio file is not an Olympus DSS format or this option is not enabled.
If the priority flag is not being set by authors or can safely be ignored then this option should not be enabled. When enabled there may be a small but noticeable delay every time the file list is refreshed.
Note: The priority flag is independent of the priority value (0 to 15) that can also be set on the unit and is mapped using the Priority Mapping setup tab.
Transcr ipt ion is t ID
The value you enter here is used to control access to audio files in a multi-transcriptionist environment. Your ID should be different than anyone else’s who is sharing the Main folder. If a job has been made Active by another transcriptionist you will receive the following error when you attempt to make the job active. If you must access the job and it was perhaps mistakenly made active using a different ID, simply change the Transcriptionist ID in the setup dialog and try again.
Document #2.00.000.20060620 23 © 2004-2006 Dataworxs Systems Ltd.
A U D I O W A V P L A Y E R
E-mail Options
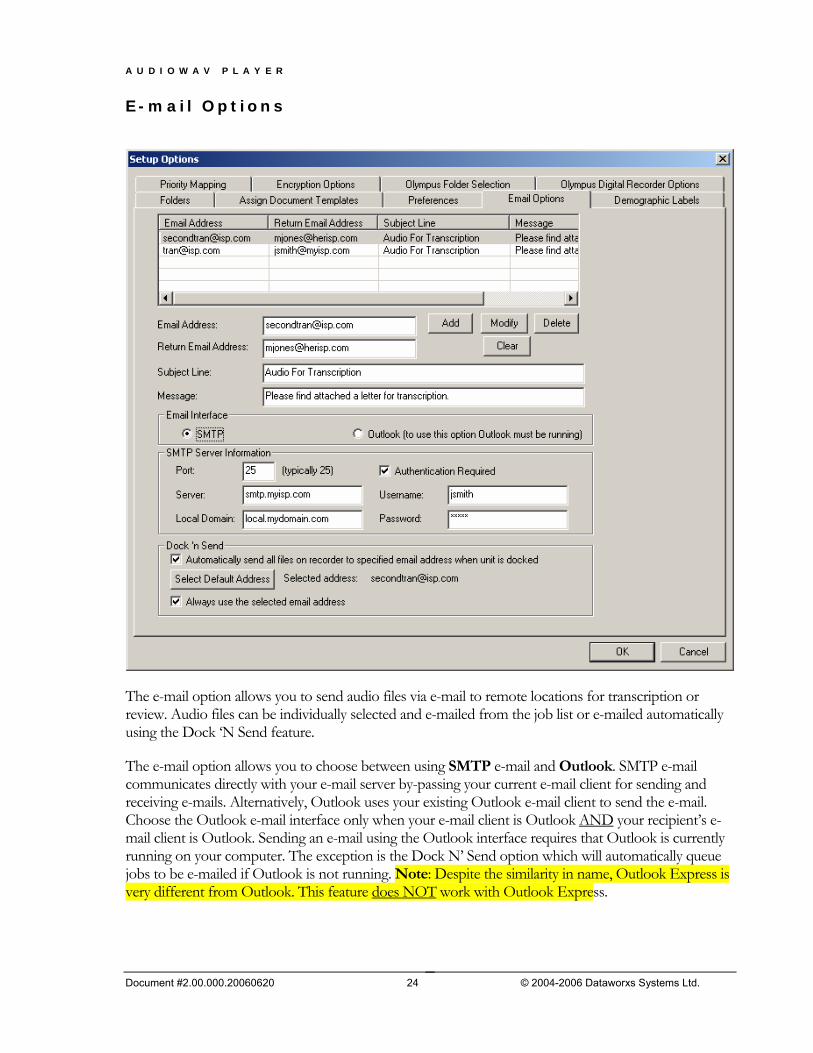
The e-mail option allows you to send audio files via e-mail to remote locations for transcription or review. Audio files can be individually selected and e-mailed from the job list or e-mailed automatically using the Dock ‘N Send feature.
The e-mail option allows you to choose between using SMTP e-mail and Outlook. SMTP e-mail communicates directly with your e-mail server by-passing your current e-mail client for sending and receiving e-mails. Alternatively, Outlook uses your existing Outlook e-mail client to send the e-mail. Choose the Outlook e-mail interface only when your e-mail client is Outlook AND your recipient’s e-mail client is Outlook. Sending an e-mail using the Outlook interface requires that Outlook is currently running on your computer. The exception is the Dock N’ Send option which will automatically queue jobs to be e-mailed if Outlook is not running. Note: Despite the similarity in name, Outlook Express is very different from Outlook. This feature does NOT work with Outlook Express.
Document #2.00.000.20060620 24 © 2004-2006 Dataworxs Systems Ltd.
A U D I O W A V P L A Y E R
To add an e-mail recipient to the list enter the required information in the appropriate fields and press “Add”. To modify an entry, highlight the entry, modify the fields as required and then press “Modify”. Use the “Delete” key to delete a previously added entry. The “Clear” button clears the entry fields.
Make sure that you press OK after making changes to the e-mail list. Changes will be discarded if you press Cancel.
• Email Address – Enter the e-mail address of the person you want to send to
• SMTP Server – Enter your SMTP mail server address. If you currently use Microsoft Outlook or Outlook express, check your e-mail settings under “Outgoing mail (SMTP)” for the correct information. An SMTP Server is formatted similar to these examples: smtp1.myservice.com and mail.dataworxs.com. If authentication is required select “Authentication Required” and provide the username and password provided by your Internet Service Provider (ISP).
• Return Email Address – Your e-mail address
• Subject Line – Subject of your e-mail message
• Message – Default message to be added to your e-mail whenever an audio file is sent.
Dock ‘N Send
The Dock ‘N Send feature is used when you always want to quickly e-mail all the audio files on a portable digital recorder to a specified e-mail recipient whenever the recorder is connected to the PC via a docking station or connected via a USB cable.
To enable this feature, check “Automatically send all files on recorder to specified email address when unit is docked”. To specify a default e-mail address select (highlight) one of the e-mail addresses in the list and then press the “Select Default Address” button. To have audio files always sent to the selected default address check the option “Always use the selected email address”. If this option is not checked a dialogue box will be displayed whenever a recorder is docked asking that the author choose one address from the list of available e-mail addresses.
To have AudioWav Player display a message dialog to notify the author that the e-mailing and importing of audio files has been completed also check the option “Notify when jobs are moved” in the Preferences setup tab.
Encryption Options
The Encryption Options setup tab is where passwords are defined for encrypting and decrypting audio files.
Document #2.00.000.20060620 25 © 2004-2006 Dataworxs Systems Ltd.
A U D I O W A V P L A Y E R
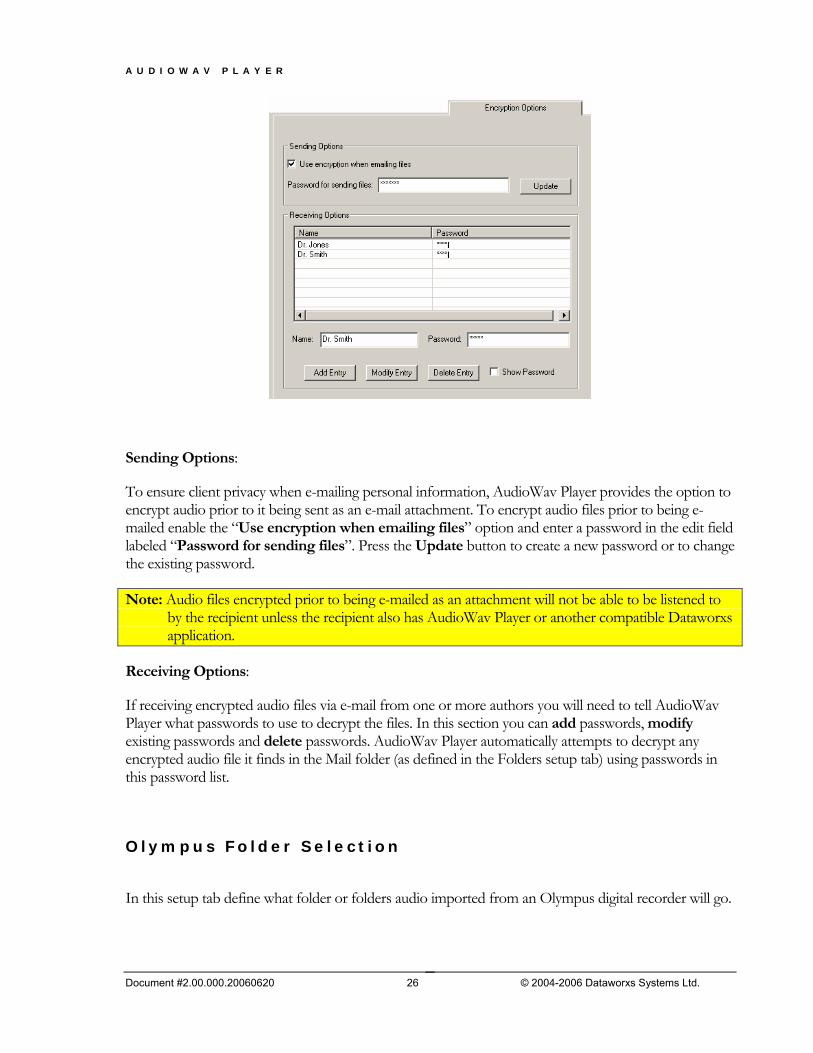
Sending Options:
To ensure client privacy when e-mailing personal information, AudioWav Player provides the option to encrypt audio prior to it being sent as an e-mail attachment. To encrypt audio files prior to being e-mailed enable the “Use encryption when emailing files” option and enter a password in the edit field labeled “Password for sending files”. Press the Update button to create a new password or to change the existing password.
Note: Audio files encrypted prior to being e-mailed as an attachment will not be able to be listened to by the recipient unless the recipient also has AudioWav Player or another compatible Dataworxs application.
Receiving Options:
If receiving encrypted audio files via e-mail from one or more authors you will need to tell AudioWav Player what passwords to use to decrypt the files. In this section you can add passwords, modify existing passwords and delete passwords. AudioWav Player automatically attempts to decrypt any encrypted audio file it finds in the Mail folder (as defined in the Folders setup tab) using passwords in this password list.
Olympus Folder Selection
In this setup tab define what folder or folders audio imported from an Olympus digital recorder will go.
Document #2.00.000.20060620 26 © 2004-2006 Dataworxs Systems Ltd.

A U D I O W A V P L A Y E R
To configure where audio recorded into the 5 different folders supported by the Olympus recorder (depending on model) are imported to, select an existing folder by pressing the folder icon. To have all Olympus audio imported to the same folder regardless of which Olympus folder they are found in check the checkbox labeled “Put all files in this folder” and then select an existing folder. If checked the Folders A to E are ignored.
Olympus Digital Recorder Options
From this setup tab you are able to upload demographic information to an Olympus DS-4000 digital recorder and change folder names on the unit. You can also change the user ID on an Olympus DS-330 digital recorder.
Document #2.00.000.20060620 27 © 2004-2006 Dataworxs Systems Ltd.

A U D I O W A V P L A Y E R
Change existing values or add new values.
Press to apply changes.
Changing User (Author) ID (DS-4000)
Up to 10 User ID’s can be uploaded to the recorder using the AudioWav Player. Enter the information in the appropriate Author ID field(s) and then select the Transfer to Unit button to update the information on the unit. Note: Unit must be attached to the computer using the appropriate USB cable or docking station for information to be updated.
Document #2.00.000.20060620 28 © 2004-2006 Dataworxs Systems Ltd.

A U D I O W A V P L A Y E R
Changing Worktype (DS-4000)
Up to 10 worktypes can be uploaded to the recorder using the AudioWav Player. Enter the information in the appropriate Worktype field(s) and then select the Transfer to Unit button to update the information on the unit. Note: Unit must be attached to the computer using the appropriate USB cable or docking station for information to be updated.
Changing a Folder Name (DS-4000)
Folders within the recorder can be renamed to reflect the type of recording they will contain. For example, Folder A might be used to store private information and thus be renamed PRIVATE, while Folder B might be dedicated to holding business information and thus be renamed BUSINESS. A folder name can be up to 20 characters long and cannot use the following special characters: \ /:*?"<>|. Enter the information in the appropriate Folders fields and then select the Transfer to Unit button to update the information on the unit. Note: Unit must be attached to the computer using the appropriate USB cable or docking station for information to be updated.
Changing Priority (DS-4000)
To change the default priority on the DS-4000, choose a value from 0 to 15 using the spin control labeled “Priority”. When the Transfer to Unit button is pressed the default priority on the unit will be updated.
Changing User (Author) ID (DS-330)
By entering an ID in the space provided and pressing the Set Olympus DS-300 User Id button, the ID programmed into an Olympus DS-330 can be modified. Press the Get Olympus DS-300 User Id button to read the current value on the unit.
Document #2.00.000.20060620 29 © 2004-2006 Dataworxs Systems Ltd.

A U D I O W A V P L A Y E R
Priority Mapping
This setup tab allows you to customize how demographics specific to DSS audio files imported from a Philips DPM or Olympus digital recorder are mapped to priority levels defined in AudioWav Player.
DSS audio files are natively identified with a priority between 0 and 15. Because AudioWav Player supports priorities between 0 and 100 this section allows you to map a DSS priority or range of DSS priorities to a specific AudioWav Player priority.
The AudioWav Player priority affects the color of the priority circle in the main audio list. Green represents a priority from 0 to 35. Yellow represents a priority from 36 to 74. Red represents a priority from 75 to 100.
Olympus Job Prioritization refers to a flag that can be set by an author when recording on an Olympus digital recorder. When the flag is set the specific dictation is identified by the author as a priority job. Although the priority flag is normally independent of the priority value (also set in a DSS audio file), with AudioWav Player you can link the two such that the color of the priority ball in the AudioWav Player’s audio list is affected. To link the priority flag and the priority value check the option “Link Olympus job prioritization to priority mapping” and then specify what priority value (0..15) that you want the priority flag to be equivalent to. The priority value that you choose will then be mapped to an AudioWav Player priority value (0..100) as defined in the Priority Mapping table.
The priority displayed in the main audio list and the color of the priority indicator in the main list, are based on the mapped priority (i.e. a value between 0 and 100) not the native DSS priority.
Document #2.00.000.20060620 30 © 2004-2006 Dataworxs Systems Ltd.

A U D I O W A V P L A Y E R
Demographic Labels
In this setup tab define what label to assign to the ten supported demographic (input) fields. The labels defined here will appear as the column headings for the 10 input fields in the main audio file list.
Document #2.00.000.20060620 31 © 2004-2006 Dataworxs Systems Ltd.
Chapter
5 A U D I O W A V P L A Y E R
C H A P T E R 5
AudioWav Player Overview
Player operates in three modes – Preview, Author and Transcription
Preview Mode is automatically available provided the appropriate DSS, WAV, WMA, MP3, and MPG associations were selected during the installation process. Files with the associated extension will automatically launch the AudioWav Preview Player whenever they are selected (i.e. double clicked) in a Window’s program such as Explorer. The preview player will automatically start to play the audio file and provide the options to cancel, import the audio into AudioWav Player’s “Main” folder for transcription, view file details and start the main AudioWav Player program. In the Author Mode the program will allow files to be automatically downloaded from a Philips DPM or Olympus digital portable, archived and presented in the Main folder. The Author mode is pre-licensed and allows the user to download, preview the audio files (playback), annotate (add a note), delete, move and e-mail the selected files. All actions that can be performed are also available by using the right button on the mouse. If the Player is used primarily to download audio from a supported digital recorder the application can be setup to automatically start minimized in the system tray. To have AudioWav Player automatically minimize itself to the system tray when the program is first started select the menu option “Properties->Minimize Application on Startup”. A check mark beside the menu option indicates that the option is enabled. . The Transcription Mode (separate license required) allows for full transcription features including manual importing into the Main folder, adding tags (indexing audio), creating session reports (for productivity tracking) and archiving transcribed audio. When not licensed, the transcription mode will allow a single file to be accessed before requiring the program to be restarted. Footpedal control only works when licensed.
Document #2.00.000.20060620 32 © 2004-2006 Dataworxs Systems Ltd.

A U D I O W A V P L A Y E R
Preview Mode Preview Mode is automatically available provided the supported audio format associations were selected during the installation process. DSS, MP3, WMA, MPG and WAVE files, when associated with AudioWav Player, will automatically launch the AudioWav Preview Player program whenever they are selected (i.e. double clicked) in a Window’s program such as Explorer. Audio files associated with AudioWav Preview Player will have the icon next to the file and will look similar to this example:
Associated audio, received by e-mail and using programs such as Microsoft Outlook or Outlook Express will be accessible by Player Preview and can be automatically imported to AudioWav Player’s “Main” folder. Preview Player
The Preview Player will automatically start playing when the file is selected. If the audio is encrypted the description will specify that the file is encrypted and it will not play. The options available from the preview player are: close the preview player and not import the audio, view file details (see example below), import (move) the audio into AudioWav Player and launch the AudioWav Player when a file is imported.
Files imported into AudioWav Player go directly to the “Main” folder if not encrypted and to the “Mail” folder if encrypted. If the “Automatically decrypt and import audio found in the Mail folder” option is enabled (in the Folders setup tab) encrypted audio files will automatically be decrypted (assuming you have the correct password specified in the Encryption Options setup tab) and moved to the “Main” folder. If the “Automatically decrypt…” option is not enabled or the correct password necessary to decrypt the audio is not provided the audio file imported into the Mail folder will stay there and you will need to import it manually.
Document #2.00.000.20060620 33 © 2004-2006 Dataworxs Systems Ltd.
A U D I O W A V P L A Y E R
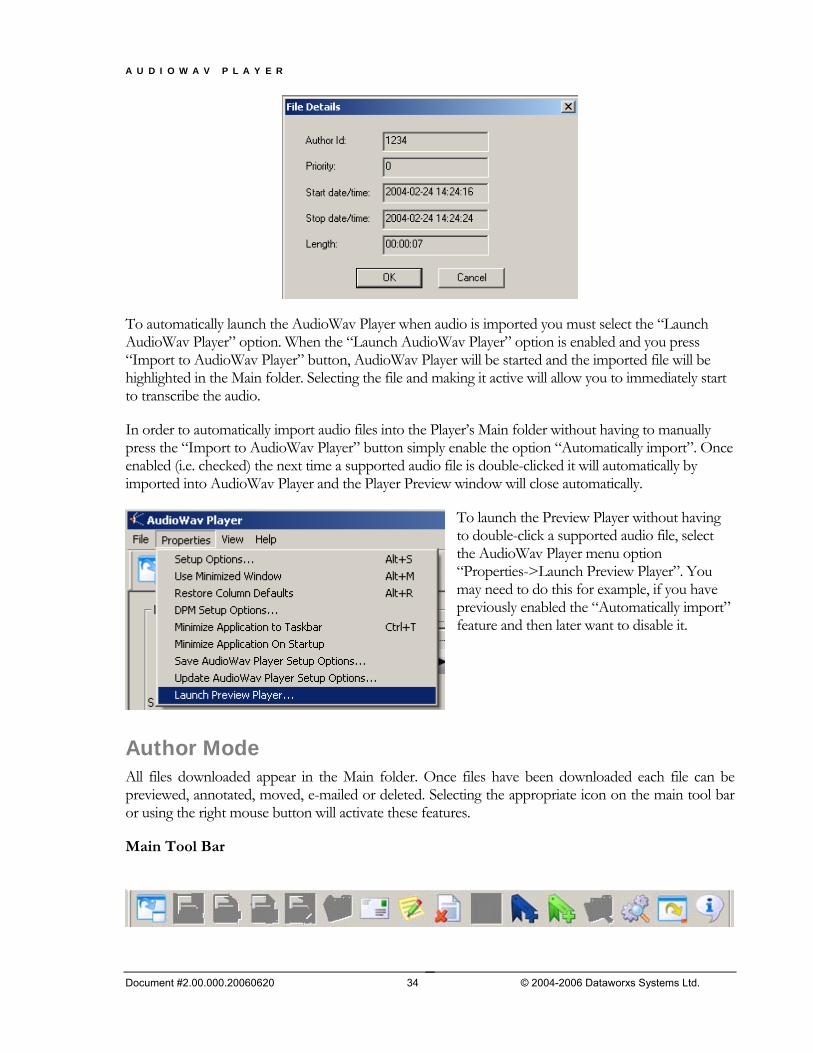
To automatically launch the AudioWav Player when audio is imported you must select the “Launch AudioWav Player” option. When the “Launch AudioWav Player” option is enabled and you press “Import to AudioWav Player” button, AudioWav Player will be started and the imported file will be highlighted in the Main folder. Selecting the file and making it active will allow you to immediately start to transcribe the audio.
In order to automatically import audio files into the Player’s Main folder without having to manually press the “Import to AudioWav Player” button simply enable the option “Automatically import”. Once enabled (i.e. checked) the next time a supported audio file is double-clicked it will automatically by imported into AudioWav Player and the Player Preview window will close automatically.
To launch the Preview Player without having to double-click a supported audio file, select the AudioWav Player menu option “Properties->Launch Preview Player”. You may need to do this for example, if you have previously enabled the “Automatically import” feature and then later want to disable it.
Author Mode All files downloaded appear in the Main folder. Once files have been downloaded each file can be previewed, annotated, moved, e-mailed or deleted. Selecting the appropriate icon on the main tool bar or using the right mouse button will activate these features.
Main Tool Bar
Document #2.00.000.20060620 34 © 2004-2006 Dataworxs Systems Ltd.

A U D I O W A V P L A Y E R
Only certain icons will be active in Author Mode. The icons grayed out only become active when the software is licensed for transcription. The active icons provide all the options available to an author. These include exiting the program, minimizing the application, preview the audio, moving the audio to a different folder, e-mailing, annotating or deleting the audio in addition to accessing the setup options.
Main Screen
The colored circles represent priority: green is low priority (0 to 35), yellow is middle priority (36 to 74), and red is high priority (75 to 100). A blue tag will appear next to each circle if one or more audio tags are present in the file.
Note: In versions of AudioWav Player before 2.00.033 the colored circles represent the different audio formats: red for Philips DSS format, blue for Olympus and green for general WAVE files.
Import file
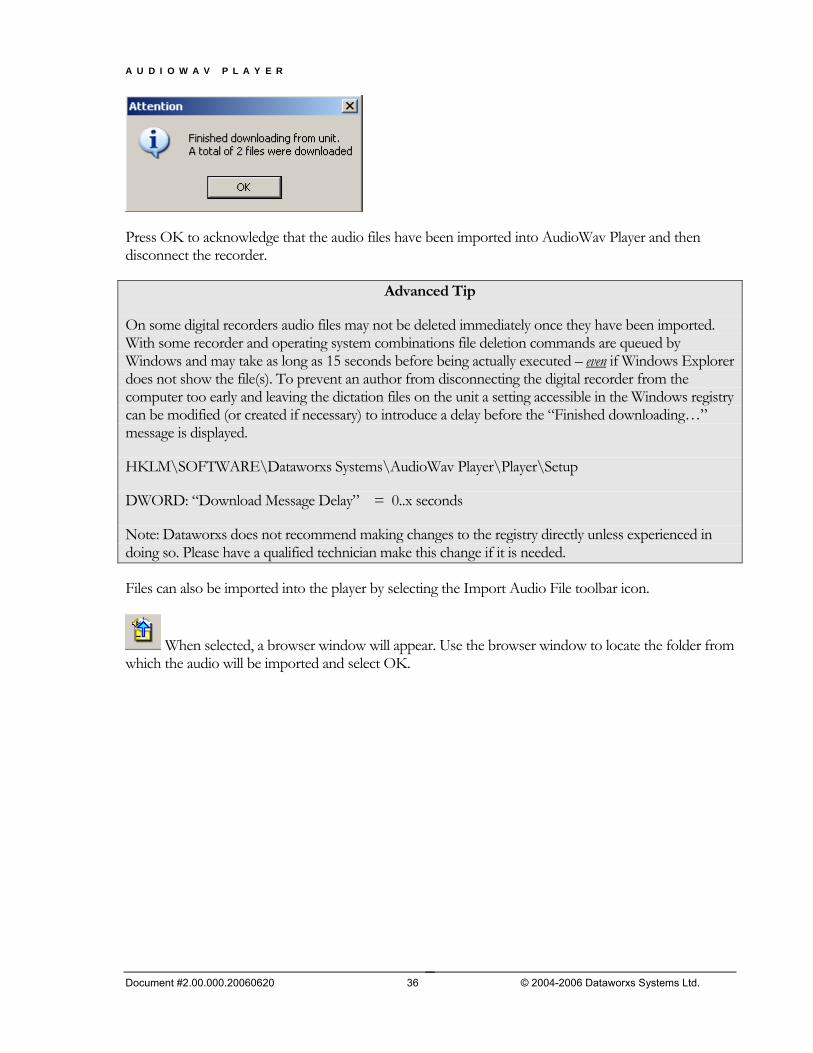
Files are automatically imported into the player when a supported digital portable is connected to the personal computer when AudioWav Player is running. If the option “Notify when jobs are moved” is enabled in Setup->Preferences a message will appear once downloading from the connected recorder is complete.
Document #2.00.000.20060620 35 © 2004-2006 Dataworxs Systems Ltd.
A U D I O W A V P L A Y E R
Press OK to acknowledge that the audio files have been imported into AudioWav Player and then disconnect the recorder.
Advanced Tip
On some digital recorders audio files may not be deleted immediately once they have been imported. With some recorder and operating system combinations file deletion commands are queued by Windows and may take as long as 15 seconds before being actually executed – even if Windows Explorer does not show the file(s). To prevent an author from disconnecting the digital recorder from the computer too early and leaving the dictation files on the unit a setting accessible in the Windows registry can be modified (or created if necessary) to introduce a delay before the “Finished downloading…” message is displayed.
HKLM\SOFTWARE\Dataworxs Systems\AudioWav Player\Player\Setup
DWORD: “Download Message Delay” = 0..x seconds
Note: Dataworxs does not recommend making changes to the registry directly unless experienced in doing so. Please have a qualified technician make this change if it is needed.
Files can also be imported into the player by selecting the Import Audio File toolbar icon.
When selected, a browser window will appear. Use the browser window to locate the folder from which the audio will be imported and select OK.
Document #2.00.000.20060620 36 © 2004-2006 Dataworxs Systems Ltd.

A U D I O W A V P L A Y E R
Upon selection of a folder, an “Import files From External Source” dialogue box will appear listing all the audio files available for import. Select a specific file by clicking on it or select multiple files by holding down the <Ctrl> key while clicking on each file to be imported. When one or more files are selected press the Import button to start the import process. All selected files will be deleted from the source folder and imported into the Main folder.
Note
Some proprietary formatted files can be imported but do not retain the file’s demographics. Check with Dataworxs or your authorized dealer for more information about what other Dataworxs products are
available to import proprietary formats with demographics.
Email f i le This option will send the file to the e-mail destination defined in the setup options. Single or multiple files can be e-mailed at any one time. To encrypt the audio before adding it as an attachment enable encryption in the Setup dialog’s Encryption Options tab.
Select the file to be e-mailed and then select the e-mail icon on the main tool bar or right click your mouse and select “Email File”.
Document #2.00.000.20060620 37 © 2004-2006 Dataworxs Systems Ltd.

A U D I O W A V P L A Y E R
Once the e-mail option is selected a window will appear allowing you to select one of the e-mail addresses from your predefined list. Pressing the Select button sends the selected file(s) to the selected recipient.
Rather than manually selecting one or more files from the file list and manually e-mailing them you can use the Dock ‘N Send feature to have your audio files automatically e-mailed to a specified e-mail address as soon as you connect a supported digital recorder to the computer. When enabled, this option
Document #2.00.000.20060620 38 © 2004-2006 Dataworxs Systems Ltd.
A U D I O W A V P L A Y E R
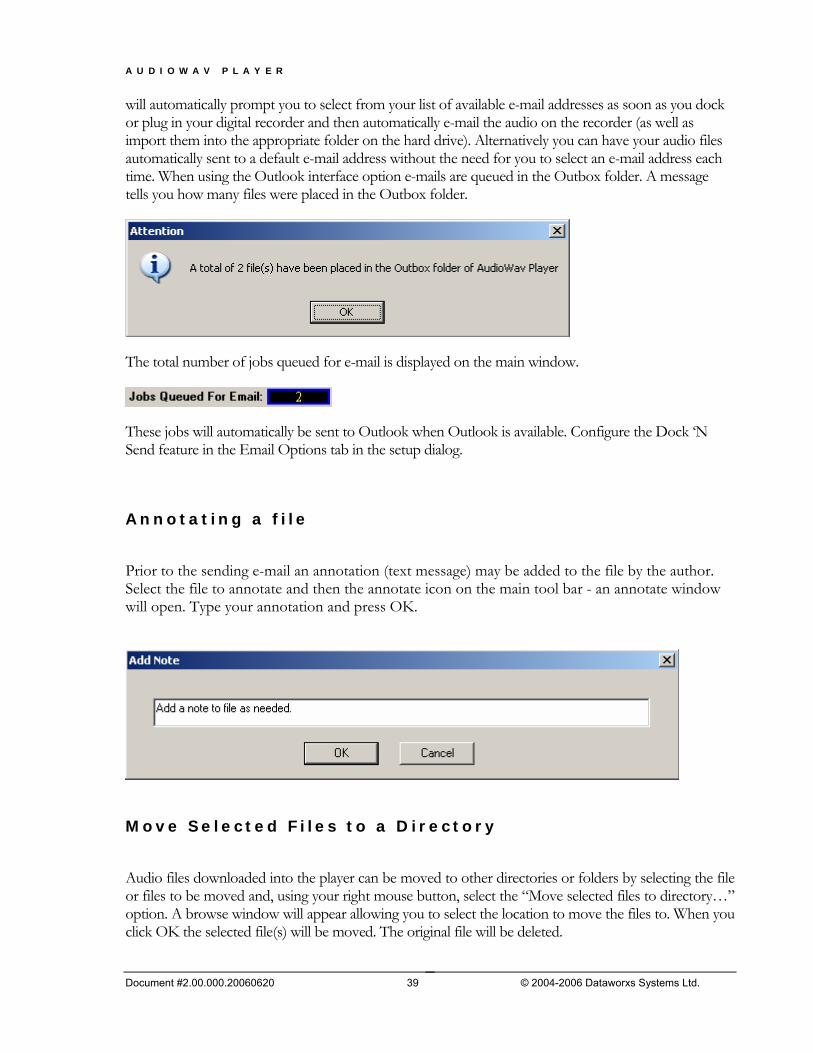
will automatically prompt you to select from your list of available e-mail addresses as soon as you dock or plug in your digital recorder and then automatically e-mail the audio on the recorder (as well as import them into the appropriate folder on the hard drive). Alternatively you can have your audio files automatically sent to a default e-mail address without the need for you to select an e-mail address each time. When using the Outlook interface option e-mails are queued in the Outbox folder. A message tells you how many files were placed in the Outbox folder.
The total number of jobs queued for e-mail is displayed on the main window.
These jobs will automatically be sent to Outlook when Outlook is available. Configure the Dock ‘N Send feature in the Email Options tab in the setup dialog.
Annotating a f i le
Prior to the sending e-mail an annotation (text message) may be added to the file by the author. Select the file to annotate and then the annotate icon on the main tool bar - an annotate window will open. Type your annotation and press OK.
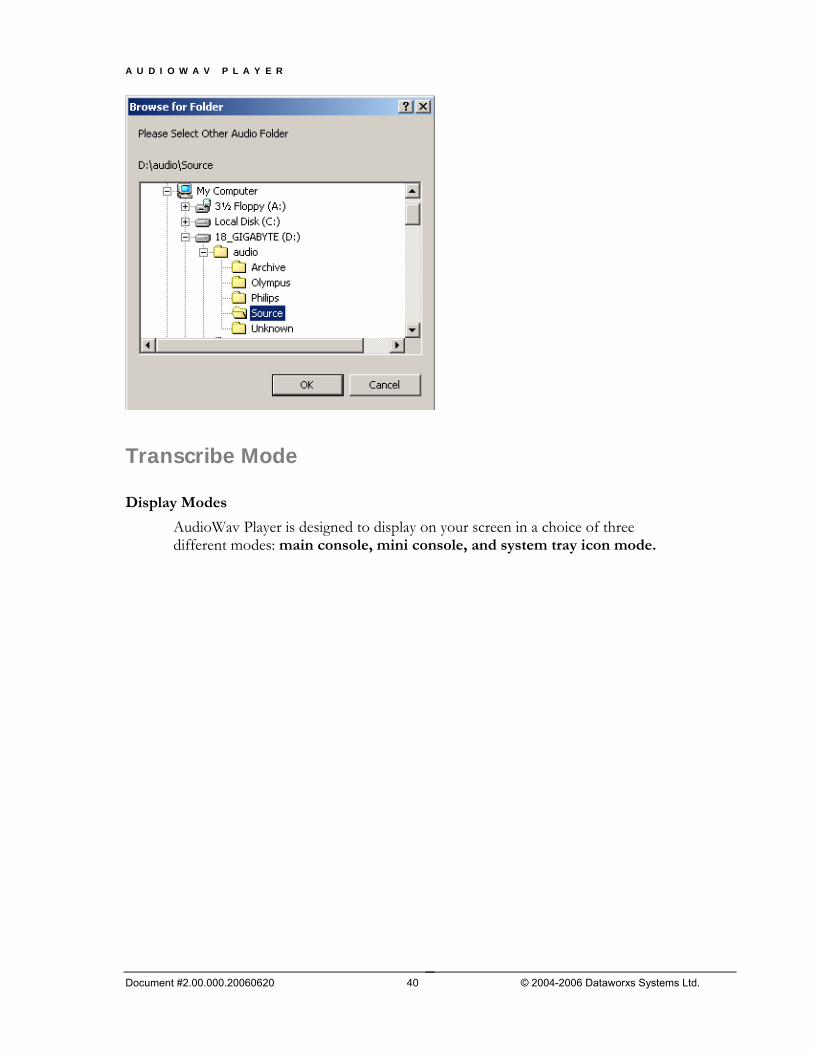
Move Selected Fi les to a Directory
Audio files downloaded into the player can be moved to other directories or folders by selecting the file or files to be moved and, using your right mouse button, select the “Move selected files to directory…” option. A browse window will appear allowing you to select the location to move the files to. When you click OK the selected file(s) will be moved. The original file will be deleted.
Document #2.00.000.20060620 39 © 2004-2006 Dataworxs Systems Ltd.
A U D I O W A V P L A Y E R
Transcribe Mode Display Modes
AudioWav Player is designed to display on your screen in a choice of three different modes: main console, mini console, and system tray icon mode.
Document #2.00.000.20060620 40 © 2004-2006 Dataworxs Systems Ltd.

A U D I O W A V P L A Y E R
Main Console
All functions are accessible by mouse click or keystroke. Audio files, statistics, and program information are displayed.
Mini Console
All functions are accessible by mouse click. Statistics, speed control and volume control are displayed in a window that takes very little screen area. By default, when you select the "Mini Console" it will be stationed in the upper right-hand corner of your screen. This mode is useful when typing with a full screen word processing program. You will still be able to see the player display, but the player will not be in the way while using your typing package.
System Tray Icon
Document #2.00.000.20060620 41 © 2004-2006 Dataworxs Systems Ltd.

A U D I O W A V P L A Y E R
In this mode there is no window displayed. The program can only be accessed by clicking on the AudioWav Player icon in the System Tray area (bottom right next to your time display). To have AudioWav Player automatically minimize itself to the system tray when the program is first started select the menu option “Properties->Minimize Application on Startup”. A check mark beside the menu option indicates that the option is enabled.
Player Controls and Operation
The main screen of the player provides access to the most commonly used features for transcription.
Main Display Window
Folder Selection and Display
Action Control Tool Bar
Play Controls
Audio Files Display
Document #2.00.000.20060620 42 © 2004-2006 Dataworxs Systems Ltd.

A U D I O W A V P L A Y E R
Keystroke access to main functions
File Priority Audio files are assigned a priority from 0 to 100 where 0 is the lowest and 100 is the highest.
The colored circles on the main job list represent priority: green is low priority (0 to 35), yellow is middle priority (36 to 74), and red is high priority (75 to 100). A blue tag will appear next to each circle if one or more audio tags are present in the file. Note: In versions of AudioWav Player before 2.00.033 the colored circles represent the different audio formats: red for Philips DSS format, blue for Olympus and green for general WAVE files.
Priorities are either assigned automatically using the priority mapping setup as is the case with DSS audio format (see Chapter 4:Setup) or manually modified using the “Change Demographics” feature (see the section “Change Demographics” later in this chapter). Working with Audio Fi les
Audio files (or jobs) displayed in the Main folder have a status assigned to them. A file that is new and has not been transcribed has a status of “Transcription” (i.e. it is ready for transcription) and will not have a Tran ID associated with it. It is always a good idea to refresh the file list before making a selection. Press F5 to refresh the file list. To simply listen to a file without changing its status, highlight the file and press the play pedal or press the play button in the playback control area. The playback control will always display the name of the file (job) that is currently active.
Document #2.00.000.20060620 43 © 2004-2006 Dataworxs Systems Ltd.
A U D I O W A V P L A Y E R
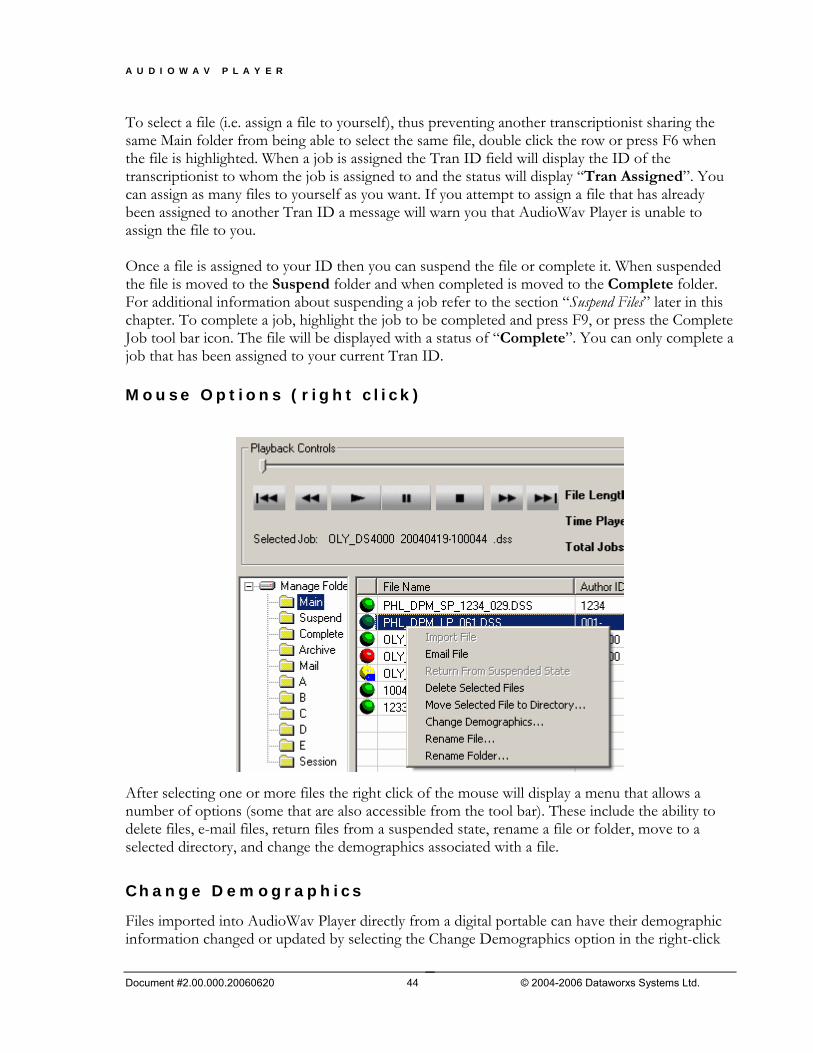
To select a file (i.e. assign a file to yourself), thus preventing another transcriptionist sharing the same Main folder from being able to select the same file, double click the row or press F6 when the file is highlighted. When a job is assigned the Tran ID field will display the ID of the transcriptionist to whom the job is assigned to and the status will display “Tran Assigned”. You can assign as many files to yourself as you want. If you attempt to assign a file that has already been assigned to another Tran ID a message will warn you that AudioWav Player is unable to assign the file to you. Once a file is assigned to your ID then you can suspend the file or complete it. When suspended the file is moved to the Suspend folder and when completed is moved to the Complete folder. For additional information about suspending a job refer to the section “Suspend Files” later in this chapter. To complete a job, highlight the job to be completed and press F9, or press the Complete Job tool bar icon. The file will be displayed with a status of “Complete”. You can only complete a job that has been assigned to your current Tran ID. Mouse Options (right cl ick)
After selecting one or more files the right click of the mouse will display a menu that allows a number of options (some that are also accessible from the tool bar). These include the ability to delete files, e-mail files, return files from a suspended state, rename a file or folder, move to a selected directory, and change the demographics associated with a file.
Change Demographics Files imported into AudioWav Player directly from a digital portable can have their demographic information changed or updated by selecting the Change Demographics option in the right-click
Document #2.00.000.20060620 44 © 2004-2006 Dataworxs Systems Ltd.
A U D I O W A V P L A Y E R
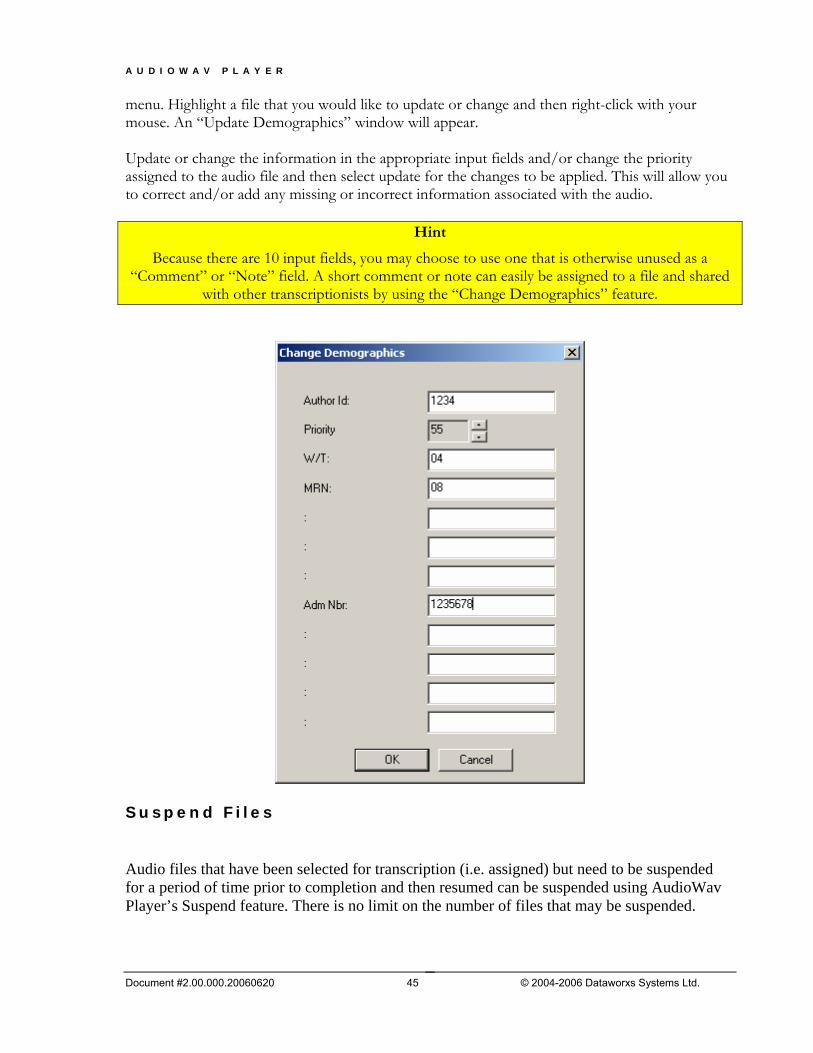
menu. Highlight a file that you would like to update or change and then right-click with your mouse. An “Update Demographics” window will appear. Update or change the information in the appropriate input fields and/or change the priority assigned to the audio file and then select update for the changes to be applied. This will allow you to correct and/or add any missing or incorrect information associated with the audio.
Hint
Because there are 10 input fields, you may choose to use one that is otherwise unused as a “Comment” or “Note” field. A short comment or note can easily be assigned to a file and shared
with other transcriptionists by using the “Change Demographics” feature.
Suspend Fi les
Audio files that have been selected for transcription (i.e. assigned) but need to be suspended for a period of time prior to completion and then resumed can be suspended using AudioWav Player’s Suspend feature. There is no limit on the number of files that may be suspended.
Document #2.00.000.20060620 45 © 2004-2006 Dataworxs Systems Ltd.

A U D I O W A V P L A Y E R
To suspend a file once it has been assigned press the suspend icon on the tool bar. Suspended files are moved from the main folder to the suspend folder. Retrieving a suspended file is accomplished by selecting the suspend folder and highlighting the file to be retrieved. Press the right mouse button and then select “Return From Suspended State”. The file will be moved back to the main folder and will now be available to be reselected and then completed.
Import f i les
Files that have been moved from the Main folder to the complete or archive folder can be moved back to the main folder by selecting the appropriate folder and audio file, then using the right button on your mouse select the “Import File” option. The selected file or files will be moved into the main folder.
Rename Folder
All the folders used by AudioWav Player can be renamed to suit your purposes. For example, folders A through E might represent different work types in your transcription environment. You might rename “A” to “Memo”, “B” to “Letter”, “C” to “Private”, etc. To avoid confusion it is recommended that you do not rename the Main, Suspend, Mail, and Archive folders.
Note: Renaming a folder in AudioWav Player also changes the actual folder name within the Windows operating system.
Index/ Audio Tags Index/Audio tags allow a transcriptionist to index the audio for review by the author or another transcriptionist, such as in the case where a portion of the audio is hard to understand. When the audio is being transcribed an index can be added at any time by selecting the tag icons in the toolbar.
Document #2.00.000.20060620 46 © 2004-2006 Dataworxs Systems Ltd.
A U D I O W A V P L A Y E R
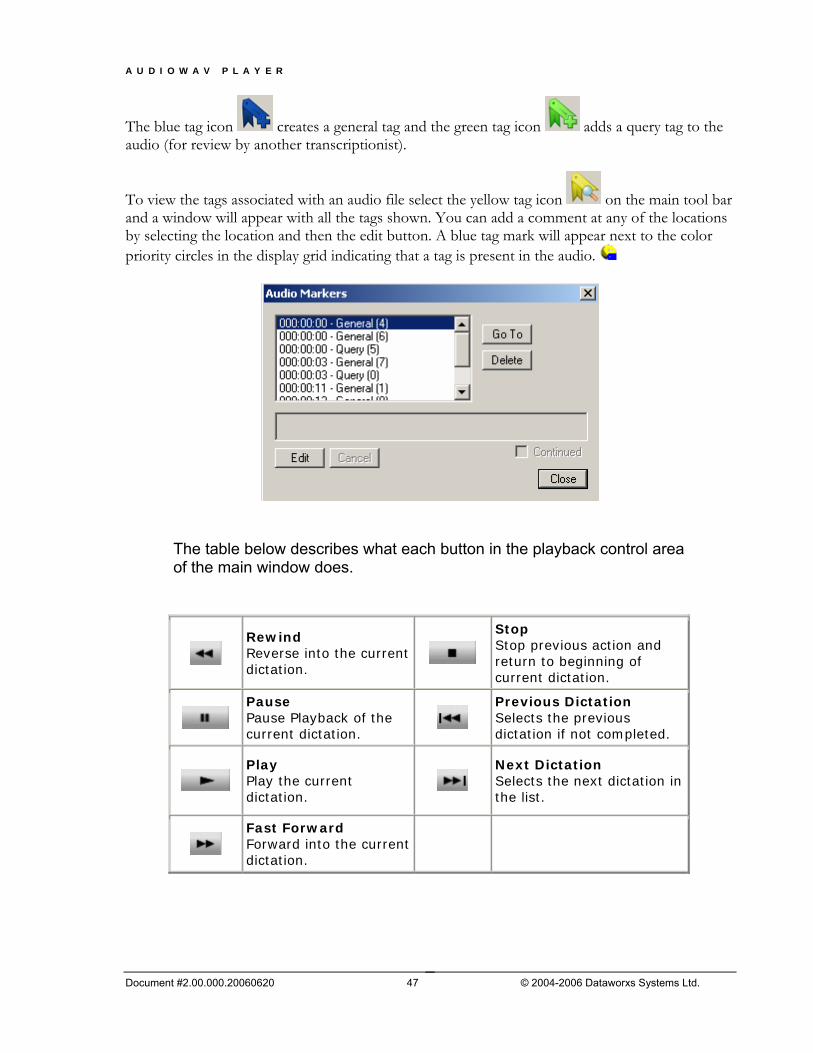
The blue tag icon creates a general tag and the green tag icon adds a query tag to the audio (for review by another transcriptionist).
To view the tags associated with an audio file select the yellow tag icon on the main tool bar and a window will appear with all the tags shown. You can add a comment at any of the locations by selecting the location and then the edit button. A blue tag mark will appear next to the color priority circles in the display grid indicating that a tag is present in the audio.
The table below describes what each button in the playback control area of the main window does.
Rewind Reverse into the current dictation.
Stop Stop previous action and return to beginning of current dictation.
Pause Pause Playback of the current dictation.
Previous Dictation Selects the previous dictation if not completed.
Play Play the current dictation.
Next Dictation Selects the next dictation in the list.
Fast Forward Forward into the current dictation.
Document #2.00.000.20060620 47 © 2004-2006 Dataworxs Systems Ltd.
A U D I O W A V P L A Y E R
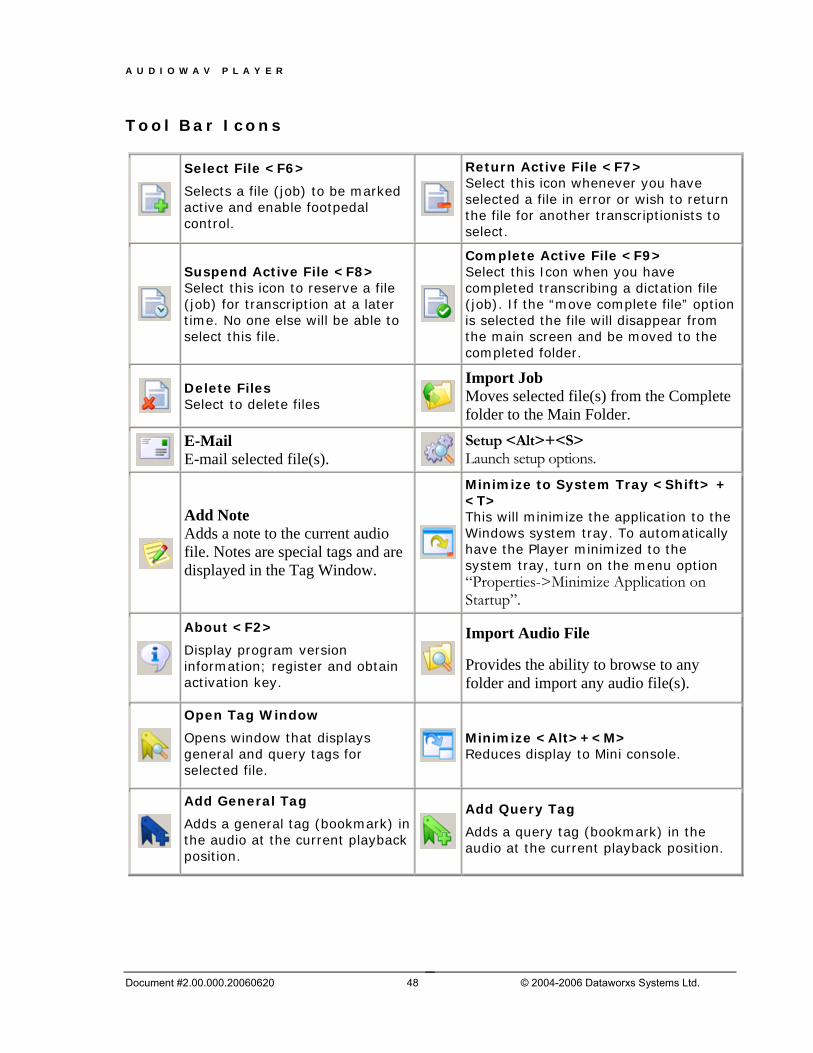
Tool Bar Icons
Return Active File <F7>
Select File <F6>
Selects a file (job) to be marked active and enable footpedal control.
Select this icon whenever you have selected a file in error or wish to return the file for another transcriptionists to select.
Suspend Active File <F8> Select this icon to reserve a file (job) for transcription at a later time. No one else will be able to select this file.
Complete Active File <F9> Select this Icon when you have completed transcribing a dictation file (job). If the “move complete file” option is selected the file will disappear from the main screen and be moved to the completed folder.
Delete Files Select to delete files
Import Job Moves selected file(s) from the Complete folder to the Main Folder.
E-Mail E-mail selected file(s).
Setup <Alt>+<S> Launch setup options.
Add Note
Minimize to System Tray <Shift> + <T> This will minimize the application to the Windows system tray. To automatically have the Player minimized to the system tray, turn on the menu option “Properties->Minimize Application on Startup”.
Adds a note to the current audio file. Notes are special tags and are displayed in the Tag Window.
About <F2>
Display program version information; register and obtain activation key.
Import Audio File
Provides the ability to browse to any folder and import any audio file(s).
Open Tag Window
Opens window that displays general and query tags for selected file.
Minimize <Alt>+<M> Reduces display to Mini console.
Add General Tag Add Query Tag
Adds a general tag (bookmark) in the audio at the current playback position.
Adds a query tag (bookmark) in the audio at the current playback position.
Document #2.00.000.20060620 48 © 2004-2006 Dataworxs Systems Ltd.

A U D I O W A V P L A Y E R
Speed, Volume and Balance Controls
Selecting the speed control slider located on the main console window changes audio playback speed. The volume control slider increases or decreases the volume.
Speed Reset
Action Keyboard Shortcut
Speed Up <Shift>+<PgUp>
Slow Down <Shift>+<PgDn>
Sliding the slider down will slow down the playback speed or decrease the volume of the audio file. Sliding the slider up will speed up the playback speed or increase the volume of the audio file. Clicking the Reset button or centering the speed control slider will return playback to normal speed.
When AudioWav Player is started the Volume will be positioned based on the system Wave Balance. Use the standard Windows Audio Control to adjust the volume that AudioWav Player defaults to (see Additional Audio Adjustments).
Note: Speed control is not available when playing WMA, MP3 or MPG audio files.
Use the balance control to listen to only the left or right audio channel. In a mono audio file the right and left channels are the same. The left and right audio channels may be different in a stereo audio file.
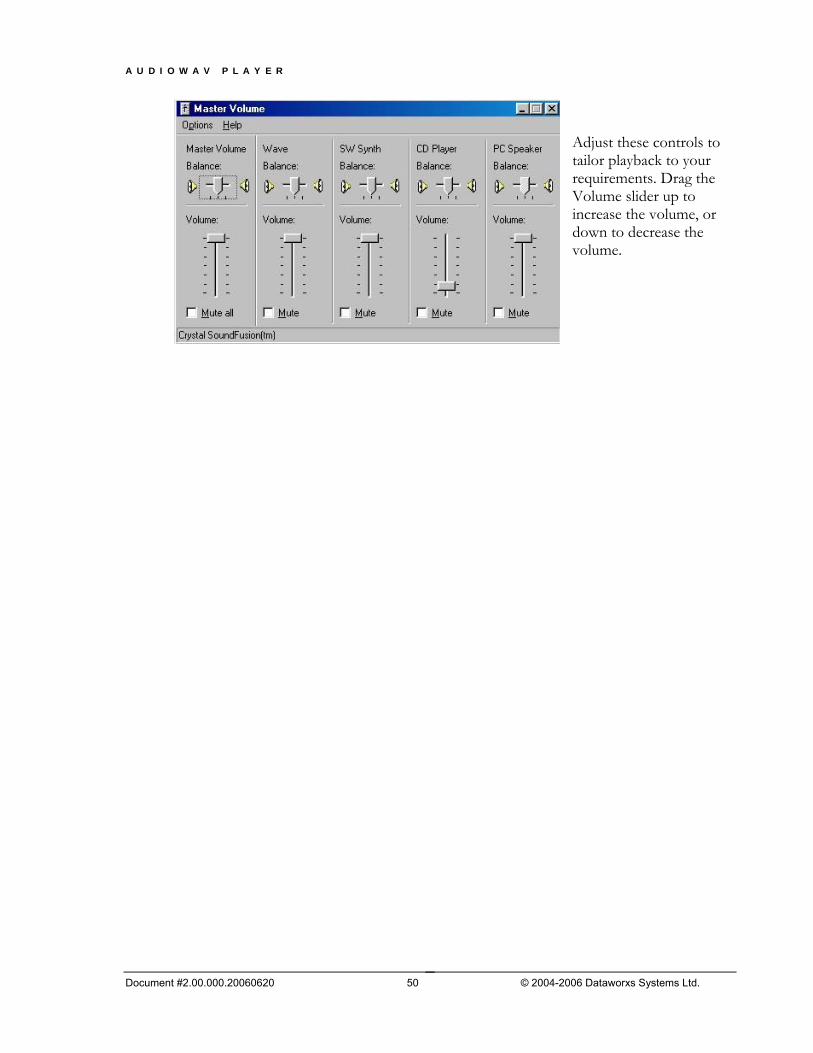
Additional Audio Adjustments
It may be necessary to make additional adjustments to your system to allow greater ranges of audio volume and tone control. To access Window’s volume control select Start on your Windows desktop. Then select Programs Accessories Entertainment Volume Control.
The standard Windows Audio Control sliders are illustrated below:
Document #2.00.000.20060620 49 © 2004-2006 Dataworxs Systems Ltd.
A U D I O W A V P L A Y E R
Document #2.00.000.20060620 50 © 2004-2006 Dataworxs Systems Ltd.
Adjust these controls to tailor playback to your requirements. Drag the Volume slider up to increase the volume, or down to decrease the volume.

C H A P T E R 6
Digital Portables
Notes - If you are running Windows 2000/XP on a network, you need to log in as an Administrator or use a user name that has administrator rights. Installation Phil ips DPM2 Digital Portables AudioWav Player supports automatic file download from Philip DPM2 digital portables 9400i, 9350, 9250, 9220 DSS format digital recorders. Additional file formats such as those from a
Dictaphone/Grundig m5210 or Sanyo B150/5000can be manually downloaded using the Import Icon located on the task bar. If you are planning on using the Olympus digital portables with AudioWav Player please note the folder name displayed in the Olympus-specific dialog box shown when the initial installation is almost complete. . Insert connector A of the USB cable into the PC's USB port.
Document #2.00.000.20060620 51 © 2004-2006 Dataworxs Systems Ltd.
Chapter
6

Olympus DS 4000 Connecting to Your PC Using the USB Cable Attach connector B of the USB cable to the digital recorder unit. Connecting Recorder to PC
1 Turn ON the recorder
2 Insert end A of the USB cable to your PC’s USB port or USB hub.
3 Make sure the recorder is in STOP mode before attaching end b of the USB cable to the terminal port of the recorder. If “REMOTE” is displayed on the recorder, it indicates proper connections. R E M O T E
................................................................................................................................................................
Notes
• NEVER remove the card or disconnect the USB cable while the record/play indicator lamp is flashing. If you do, the data on the card will get destroyed.
• Some PCs and USB hubs may not supply sufficient power and the recorder fails to
connect. Refer to your PC User’s Manual regarding the USB port or USB hub on your PC.
• When using a USB hub to connect the recorder, always use a self-powered (AC adapter) USB hub.
Document #2.00.000.20060620 52 © 2004-2006 Dataworxs Systems Ltd.
• Make sure to push the cable connector all the way in. Otherwise, the recorder may not operate properly. Once you connect the recorder to your PC, the recorder will be powered through the USB cable. The batteries and/or AC adapter will not be in use. Be sure to install the AudioWav Player software before connecting the recorder to a PC. However, if you do connect the recorder before or during the software installation, the “Add New Hardware Wizard” appears. In this case, cancel the wizard by pressing the [Cancel] button in the wizard screen and then install or continue the installation of AudioWav Player software. You can directly connect the recorder’s USB terminal to your PC, or use the cradle included in the package (desktop holder).

Connecting Recorder to PC using cradle
Place the recorder in the cradle
1Insert end A of the USB cable to your PC’s USB port or USB hub.
2Connect end b of the USB cable to the cradle.
3Turn ON the recorder, then set the recorder in the cradle.
If “REMOTE” is displayed on recorder, it indicates proper connection. ........................................................................................................ Notes Connecting to Your PC Using the Cradle Disconnecting Recorder from PC
• Never touch the contact points at the bottom of the cradle, as that may cause bad connection.
• To avoid data corruption or loss, make sure that the recorder’s record/play indicator lamp isn’t flashing, before removing the recorder from the cradle or disconnect the cable from the recorder terminal.
Windows will automatically detect that “New Hardware” has been added the first time you connect the recorder to the PC.
Note: For information about your PC's USB ports, refer to the user's guide supplied with the PC.
Document #2.00.000.20060620 53 © 2004-2006 Dataworxs Systems Ltd.
Never remove the USB cable while a communication session is in progress. Data files could be damaged if you do.

DPM2 Setup Options The Philips DPM2 recorder can be configured directly from the Player using the DPM Setup Options. From the main screen choose the menu option Properties DPM Setup Options.
Note: Make sure the DPM is connected to the PC and that the 4--Position Switch is in the Stop position. If the DPM is not connected you will not be able to access the DPM Setup Options. Choosing DPM Setup Options opens an Upload DPM Options dialog box that enables you to define DPM Keywords.
Keywords are a combination of a usage string and several content strings. They are transferred (uploaded) to the DPM where they become available to the authors. Up to 5 keywords are allowed. Each keyword is assigned a usage string that describes what the values are and then up to 10 values can be assigned to each keyword. In the example above, keyword 2 is assigned a usage string of “Worktype” and is assigned 10 content strings (i.e. values): “1123”, “1002”, etc. The Lock Settings on Device option of the Upload DPM Options dialog box enables you to set the M configuration to read-only. By enabling this option, the configuration is protected and cannot be changed using the DPM device itself preventing accidental changes by the author while using the device. Setting up a keyword and its contents in the Player is easy. Select the cell or cells you want to update, type in the word or value you would like to use and select the Upload button. It’s just that simple.
Document #2.00.000.20060620 54 © 2004-2006 Dataworxs Systems Ltd.
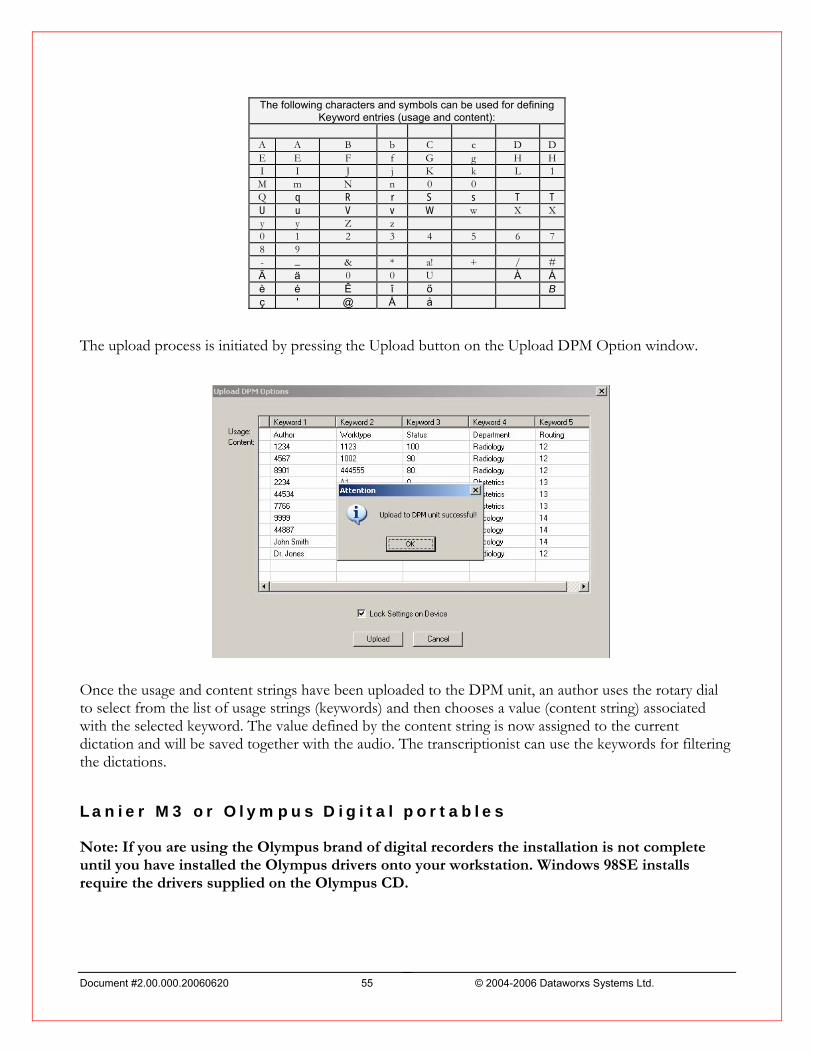
The following characters and symbols can be used for defining
Keyword entries (usage and content):
A A B b C c D D E E F f G g H H I I J j K k L 1 M m N n 0 0 Q q R r S s T T U u V v W w X X y y Z z 0 1 2 3 4 5 6 7 8 9 - _ & * a! + / # Ä ä 0 0 U À Á è é Ê î ő B ç ' @ Å å
The upload process is initiated by pressing the Upload button on the Upload DPM Option window.
Once the usage and content strings have been uploaded to the DPM unit, an author uses the rotary dial to select from the list of usage strings (keywords) and then chooses a value (content string) associated with the selected keyword. The value defined by the content string is now assigned to the current dictation and will be saved together with the audio. The transcriptionist can use the keywords for filtering the dictations.
Lanier M3 or Olympus Digital portables Note: If you are using the Olympus brand of digital recorders the installation is not complete until you have installed the Olympus drivers onto your workstation. Windows 98SE installs require the drivers supplied on the Olympus CD.
Document #2.00.000.20060620 55 © 2004-2006 Dataworxs Systems Ltd.
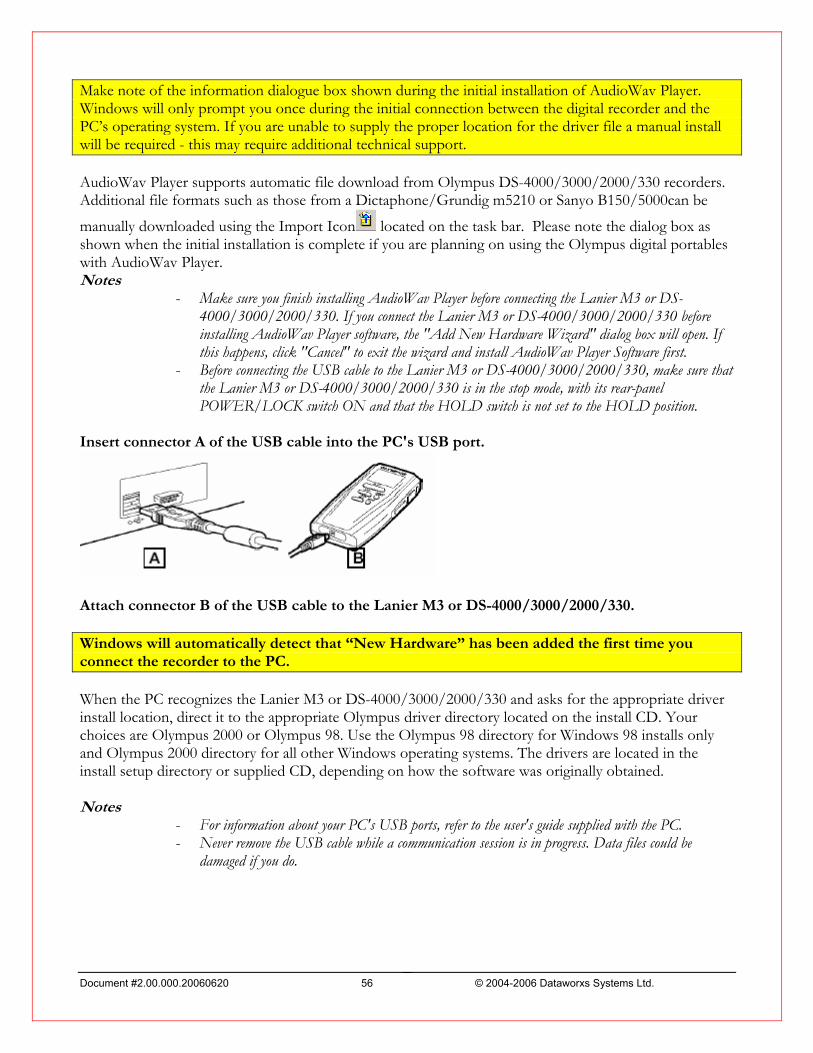
Make note of the information dialogue box shown during the initial installation of AudioWav Player. Windows will only prompt you once during the initial connection between the digital recorder and the PC’s operating system. If you are unable to supply the proper location for the driver file a manual install will be required - this may require additional technical support. AudioWav Player supports automatic file download from Olympus DS-4000/3000/2000/330 recorders. Additional file formats such as those from a Dictaphone/Grundig m5210 or Sanyo B150/5000can be
manually downloaded using the Import Icon located on the task bar. Please note the dialog box as shown when the initial installation is complete if you are planning on using the Olympus digital portables with AudioWav Player. Notes
- Make sure you finish installing AudioWav Player before connecting the Lanier M3 or DS-4000/3000/2000/330. If you connect the Lanier M3 or DS-4000/3000/2000/330 before installing AudioWav Player software, the "Add New Hardware Wizard" dialog box will open. If this happens, click "Cancel" to exit the wizard and install AudioWav Player Software first.
- Before connecting the USB cable to the Lanier M3 or DS-4000/3000/2000/330, make sure that the Lanier M3 or DS-4000/3000/2000/330 is in the stop mode, with its rear-panel POWER/LOCK switch ON and that the HOLD switch is not set to the HOLD position.
Insert connector A of the USB cable into the PC's USB port.
Attach connector B of the USB cable to the Lanier M3 or DS-4000/3000/2000/330. Windows will automatically detect that “New Hardware” has been added the first time you connect the recorder to the PC. When the PC recognizes the Lanier M3 or DS-4000/3000/2000/330 and asks for the appropriate driver install location, direct it to the appropriate Olympus driver directory located on the install CD. Your choices are Olympus 2000 or Olympus 98. Use the Olympus 98 directory for Windows 98 installs only and Olympus 2000 directory for all other Windows operating systems. The drivers are located in the install setup directory or supplied CD, depending on how the software was originally obtained. Notes
- For information about your PC's USB ports, refer to the user's guide supplied with the PC.
Document #2.00.000.20060620 56 © 2004-2006 Dataworxs Systems Ltd.
- Never remove the USB cable while a communication session is in progress. Data files could be damaged if you do.
Frequently Asked Questions Q. What do I do if I have forgotten the path to the Lanier / Olympus drivers? A. If you are running Windows 2000, the drivers are installed to
C:\Winnt\System32\Drivers\Win2000
Q. How do I install the Lanier / Olympus hardware drivers? A. After installing the AudioWav D Player software, simply plug the USB cable (which comes with
the DS2000/3000/330 unit) into the USB port on your computer (usually located in the back of your computer), then turn on the Olympus unit and plug the other end of the USB cable into the Olympus unit (the cable will only plug in one way for each). Follow the Windows Hardware Wizard instructions (using the file location above).
Q. When installing on a Windows 2000/XP computer, what rights should I have? A. You should always install software using a login ID with Administrator rights. Not doing so may
prevent other login ID’s on the same computer from using the application. Q: I installed AudioWav Player with Administrator rights but now certain features don’t work when logged in as a local user that does not have administrator rights. A: Most Dataworxs applications rely on the registry and INI files to perform routine license checks and to store and retrieve application settings. When logged into a workstation or server as a user that does not have administrator rights the user may not have the proper permissions that allow full access to the required files and registry keys. After installing a Dataworxs application on the computer as a user with administrator rights you must set the appropriate folder and registry key permissions for all other user logins that may use the station. You must be logged in as a user with administrator rights to perform these steps. 1) Use Windows Explorer to provide all users with full permissions to the C:\Program
Files\Dataworxs Systems folder and sub-folders. 2) In addition the user needs permissions to write to one or more (depending on what applications
are used) INI files in the WINNT (or WINDOWS) folder. The possible INI files used are AudioWav.ini, Audioworxs.ini and AWImport.ini.
3) The following steps will guide you through the process of setting the required permissions for registry keys:
Select Start-->Run… and type “regedt32” and press OK. Select the window titled “HKEY_LOCAL_MACHINE on Local Machine” Double-click the + sign just to the left of “SOFTWARE”. This will open the “SOFTWARE” branch of the tree. Highlight “Dataworxs Systems” by single clicking on it.
Document #2.00.000.20060620 57 © 2004-2006 Dataworxs Systems Ltd.
From the main menu select Security-->Permissions…

One at a time, select any group that contains one or more users that will be using a Dataworxs application. For each selected group, make sure that Read and Full Control are allowed by ensuring that a check mark is visible in the check box under the heading “Allow”. Press OK to save any changes. Exit the Registry Editor.
The computer should now ready for non-administrator users to login and use AudioWav Player. Q. When should I install the Olympus drivers? A. You should always fully complete the installation of both software and hardware – including the
Olympus drivers - before changing the user currently logged into the system.
Q. Why does the same file get downloaded over and over again from the Olympus unit? A. Olympus units use a “Flash” card to store the digital audio on. It is not uncommon for these cards
to become corrupt. Once the File Allocation Table (FAT) of the Flash card has been corrupted, the digital audio file can’t be deleted using any software. To fix this problem, format the Flash card using a Lanier M3 or Olympus DS-2000/3000 unit.
Q. Why are audio files on my digital recorder not always deleted by AudioWav Player? A. Some digital recorders such as the Olympus DS-4000, DS-2 mount as a removable drive in
Windows. With removable drives and card readers, it can take up to 10 seconds for the audio file to actually be deleted by Windows after AudioWav Player issues a delete command. This is a difference in how card readers and other removable media are treated over recorders that AudioWav Player has direct control over using hardware-specific drivers (such as with the Olympus DS-3000). Authors using a DS-4000 or DS-2 may need to leave their recorders connected somewhat longer as a result to insure that the files are properly deleted by Windows.
Document #2.00.000.20060620 58 © 2004-2006 Dataworxs Systems Ltd.
INDEX Activation .............................................................................................11 Activation Key .....................................................................................11 Active File .............................................................................................22 Administrator........................................................................................57 Annotate ...............................................................................................39 Archive ...........................................................................................15, 18 Assign .................................................................................................... ii AudioWav Player ................................................................... 0, i, ii, 1, 3 Author Mode ..................................................................................32, 34 Auto Import ....................................................................................16, 18 Backspace .............................................................................................22 Certificate ...............................................................................................9 CODEC...................................................................................................2 Complete.........................................................................................44, 48 Dataworxs......................................................................................0, i, 11 Default License.....................................................................................10 Delete..............................................................................................20, 48 DEMOGRAPHIC ................................................................................. ii Demographic Labels ............................................................................31 Demographics.......................................................................................44 Display Modes......................................................................................40 DM1Service....................................................................................16, 18 Dock 'N Send..................................................................... 16, 24, 25, 38 Document Templates............................................................................19 DS-2................................................................................................16, 18 DS-330............................................................................... 27, 29, 56, 57 DS-4000................................................................. 16, 18, 27, 29, 52, 56 DSS.................................................................................... 18, 32, 33, 51 E-Mail.................................................................... 15, 16, 24, 37, 38, 48 Encryption ......................................................................................25, 26 Explorer ..................................................................................................3 Folders ..................................................................................................14 Footpedal ..............................................................................2, 4, 6, 8, 21 Footpedal Installation.............................................................................7 General Tag ..........................................................................................47 GSM....................................................................................................... ii Headset ...................................................................................................3 Import .......................................................................................35, 46, 48 Import Manager.............................................................................. 0, i, ii Index Tags ............................................................................................46 Inf............................................................................................................2 Installation ..........................................................................................3, 5 Job Prioritization ..................................................................................30 License Administrator ..........................................................................10 License Installation ................................................................................9
Mail Folder........................................................................................... 15 Mini Console........................................................................................ 41 Minimize .............................................................................................. 48 MP3 ..........................................................................................32, 33, 49 MPG .........................................................................................32, 33, 49 Olympus .................................................................................7, 8, 27, 30 Olympus DSS Format ..............................................ii, 51, 55, 56, 57, 58 Outbox.................................................................................................. 16 Outlook.......................................................................................ii, 16, 24 Password .............................................................................................. 26 Philips DPM.............................................................................30, 51, 54 Preview Mode ...................................................................................... 33 Preview Player ..................................................................................... 33 Priority............................................................................................30, 43
DSS Native....................................................................................... 30 Priority Circle...........................................................................30, 35, 47 Priority Mapping .................................................................................. 30 Product Registration............................................................................... 9 Query Tag ............................................................................................ 47 Refresh ................................................................................................. 22 Rename Folders.................................................................................... 46 Reports .......................................................................................ii, 15, 17 Right Click Menu................................................................................. 44 Serial .................................................................................................. 2, 3 Serial Port........................................................................................... 7, 8 Session ....................................................................................................ii Session Report ...................................................................................... 15 Setup Options....................................................................................... 13 SMTP Server..................................................................................24, 25 Sound Card............................................................................................. 2 Speed Control.........................................................................................ii Suspend ....................................................................................44, 45, 48 System Tray .............................................................................32, 42, 48 Temporary Folder ................................................................................ 16 Toolbar Icons ....................................................................................... 48 Transcription Mode.............................................................................. 32 TrueSpeech .............................................................................................ii VEC Footpedal....................................................................................... 4 Volume Control..........................................................................ii, 49, 50 WAV ..............................................................................................32, 33 Windows 98SE............................................................................i, 57, 58 Winscribe ................................................................................................ii WMA........................................................................................32, 33, 49 Worktype.............................................................................................. 29
Document #2.00.000.20060620 59 © 2004-2006 Dataworxs Systems Ltd.