attention! read all instructions carefully
TRANSCRIPT

2 CYLINDERS FOR MAXIMUM POWER
PART #40026_Instructions 09.29.16
ATTENTION! READ ALL INSTRUCTIONS CAREFULLYFailure to follow warning instructions can result
in fire, injury to persons or property damage.
!
TIRE INFLATOR

RIGID CASE
12 VOLT POWER CONNECTOR • Direct connect battery clips• 8 ft. (2.43M) length
BRIGHT LED LIGHT • For nighttime emergencies
STANDARD SCHRADER STYLE CONNECTION
COIL AIR HOSE WITH INLINE GAUGE• 22 ft. (6.70M) length• Twist-connect fitting
ADAPTERS INCLUDEDTWIST-CONNECT
AIR HOSE FITTING
INTEGRATED FOLDING HANDLE

TO INFLATE TIRES:
1. Attach twist-connect air fitting to inflator, then screw the opposite end connector onto tire’s valve stem
2. Attach battery clips to battery, positive side first.
3. Switch inflator “ON”, and inflate tire to manufacturer’s recommended air pressure.
When proper pressure is reached, turn off inflator and disconnect power cord, ground side first.
CAUTION: HOT • DO NOT HOLD IN HAND WHILE OPERATING • PLACE INFLATOR ON A HARD, CLEAN SURFACE.
1. DONOTrunvehiclewhileinflatorisoperating.Youmayneedtobein“accessory”or“on”position.Pleasemakesureemergencybrakeissetandcarisinpark.Alwaysensureairhosechucktouchesthecoreofthevalvestemforproperinflation.
2. DONOTuseinflatorcontinuouslyformorethan10minutes.Allowunittocoolapproximately25minutesbetweenuses.Donotleaveinflatorunattended.
3. ALWAYSuseapressuregaugetochecktirepressure.DONOToverinflate.
4. Softinflatables(i.e.rafts,balls,etc.)maynothaverecommendedpressuremarkings.Becarefulnottoinflateitemsbeyondtheircapacity.
5. Whileoperating,neverblocktheinflatorinputoroutput.
6. Keepinflatoroutofreachofchildren.
7.Forusewith12voltDCpoweroutletsrated15ampsorhigher.Donotusewitholder8ampcigarettelighterreceptacles.

TROUBLESHOOTING: Inflator fails to operate when plugged in: 1. Thermal break may have “blown”.2. Allow inflator to cool for 25 mintues, then retry.
Inflator does not start:1. Ensure connection is secure.2. Make sure connectors and terminals are free of corrosion, debris, etc. Inflator runs but does not inflate:1. Be sure the connector is tightly screwed on the valve stem as far as possible.2. Check tire for leaks, and check hose for breaks and leaks at fittings.
Inflator runs slowly:1. Overheated from excessive use, shut it off and allow to cool for 25 minutes2. Voltage too low, check condition of battery
NOTE: If tire is totally deflated, it is possible that the tire could separate from the rim allowing air to leak out when trying to inflate. In the event this situation occurs, you will have to jack up the tire prior to inflation.
CAUTION: Keep inflator out of reach of children. Always use a tire gauge to check the actual pressure in tires. Do not over-inflate tire.
Warranty: For the period of one year from date of purchase, manufacturer guarantees that this Product will meet the specifications when used as directed. Manufacturer’s sole liability and Customer’s sole remedy under any warranty claim is limited to a Manufacturer’s coupon for a replacement product upon return of unit and proof of purchase.QUESTIONS OR COMMENTS: Call +1-805-489-0490 or visit www.slime.comITW Global Tire Repair • 125 Venture Drive, Suite 210, San Luis Obispo, CA 93401 USASlime® is a trademark of Illinois Tool Works, Inc., registered in the U.S. and other countries.

¡ATENCIÓN! LEA TODAS LAS INSTRUCCIONES DETALLADAMENTESi no sigue las instrucciones de advertencia, puede causar lesiones a personas o daños materiales debido a incendio.
DISEÑO DE DOBLE CILINDRO PARA MÁXIMA POTENCIA
!
SPANISH
TIRE INFLATOR

PROTECCIÓN RÍGIDA
CONECTOR DE CORRIENTE DE 12 V• Pinzas de batería de conexión directa• Longitud de 8 pies (2.43M)
LUZ LED BRILLANTE• Para emergencias de noche
CONEXIÓN ESTILO SCHRADER ESTÁNDAR
MANGUERA DE AIRE EN ESPIRAL CON MEDIDOR INTEGRADO• Longitud de 22 pies (6.70M)• Conector de conexión por torsión
ADAPTADORES INCLUIDOS
CONECTOR PARA MANGUERA DE AIRE DE CONEXIÓN POR TORSIÓN
MANIJA PLEGABLE INTEGRADA
PRECAUCIÓN: CALIENTE • NO SOSTENGA CON LA MANO AL OPERAR • COLOQUE EL INFLADOR SOBRE UNA SUPERFICIE FIRME Y LIMPIA.
1.NOPONGAENMARCHAelvehículocuandoelinfladorestéfuncionando.Puedesernecesariotenerloenlaposiciónde“accesorios”o“encendido.”Asegúresedehaberpuestoelfrenodeemergenciaydetenerlapalancadecambiosenlaposicióndeestacionado“park.”Siempreasegúresedequeelmandrildelamangueratoqueelcentrodelvástagodelaválvulaparainflarcorrectamente.
2. NOUSEelinfladorcontinuamentedurantemásde10minutos.Permitaquelaunidadseenfríeaproximadamente25minutosentrecadauso.Noinfladorfuncionandosolo.
3. SIEMPREuseunmanómetroparamedirlapresióndelallanta.NOINFLEexcesivamente.
4. Losinflablesblandos(balsas,pelotas,etc.)puedennotenermarcacionesdepresiónrecomendada.Tengacuidadodenoinflarlosartículosporarribadesucapacidad.
5. Durantelaoperación,nobloqueelaentradanilasalidadelinflador.
6. Mantengaelinfladorlejosdelalcancedelosniños.
7. Parausarseconunaalimentacióneléctricade12VCDyunacorrientenominalde15Aomayor.Nouseconlastomasantiguasparacigarrillosde8A.
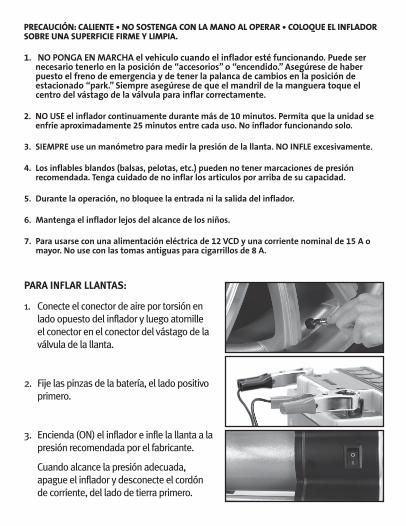
PARA INFLAR LLANTAS:
1. Conecte el conector de aire por torsión en lado opuesto del inflador y luego atornille el conector en el conector del vástago de la válvula de la llanta.
2. Fije las pinzas de la batería, el lado positivo primero.
3. Encienda (ON) el inflador e infle la llanta a la presión recomendada por el fabricante.
Cuando alcance la presión adecuada, apague el inflador y desconecte el cordón de corriente, del lado de tierra primero.

SOLUCIÓN DE PROBLEMAS: El inflador no funciona cuando se conecta:1. El interruptor térmico puede haberse “fundido”.2. Permita que el inflador se enfríe durante 25 minutos e intente nuevamente.
El inflador no arranca:1. Verifique que la conexión sea segura.2. Asegúrese de que los conectores y terminales estén libres de corrosión, residuos, etc.
El inflador funciona pero no infla:1. Compruebe que el conector esté firmemente atornillado en el vástago de la válvula la
mayor distancia posible.2. Revise si la llanta presenta fugas y si la manguera está agrietada y tiene fugas en sus
puntos de conexión.
El inflador funciona lentamente:1. Sobrecalentamiento por uso excesivo; apáguelo y espere 25 minutos para que se
enfríe.2. Voltaje demasiado bajo; revise el estado de la batería.
NOTA: Si la llanta está totalmente desinflada, es posible que esté separada del aro y éste permite que el aire se escape cuando trata de inflarla. Si ocurre esta situación, levante la llanta con un gato para inflarla.
PRECAUCIÓN: Mantenga el inflador fuera del alcance de los niños. Siempre use un manómetro para medir la presión real de la llanta. No infle excesivamente la llanta.
Garantía: El fabricante garantiza, durante el período de un año desde la fecha de compra, que este producto cumple con las especificaciones cuando se use según las indicaciones. La única responsabilidad del fabricante y la única solución para el cliente bajo cualquier reclamación de garantía se limita a un cupón del fabricante para el reemplazo del producto cuando se haya devuelto el artículo con el comprobante de compra.PREGUNTAS O COMENTARIOS: Llamar al +1-805-489-0490 o visitar www.slime.comITW Global Tire Repair • 125 Venture Drive, Suite 210, San Luis Obispo, CA 93401 USASlime® es una marca registrada de Illinois Tool Works, Inc., registrada en Estados Unidos y en otros países.