articulate word output - registrar.utk.edu€¦ · web viewwhile the banner grade entry interface...
TRANSCRIPT

Grade Entry in Banner – Fall 2017 MENU for Faculty Grade Entry
Transcript: [Select the “Click for audio” button in the upper right corner. Audio for all other slides plays automatically. Make sure your computer speaker or headphone sound is on and turned up. Use the “CC” button for closed captions.]This presentation provides instructions on how to enter final grades into the Banner system. Select one of the options displayed on this menu to learn more. Use the NEXT and PREV buttons in the lower-right corner to move through the content. To return to this menu, select the orange menu icon on any screen.
IMPORTANT NOTES on MENU
Do NOT bookmark the Faculty Grade Entry site in your browser! The URL must be entered each time you enter grades. You can, however, save the URL in a text or Word file on your desktop and copy and paste it into your browser window.
While the Banner Grade Entry Interface should function correctly in all common web browsers, the Banner parent company recommends using either Firefox or Internet Explorer. Of those two, UT recommends Firefox.
If desired, you can download a PDF copy of the screens for this instruction by selecting the “Resources” link in the upper-right corner of this presentation player. Then select the PDF
Grade Entry Instructions for Banner, 2017 Page 1 of 27

entitled “Grade Entry Instructions.”
1. ACCESSING GRADE ENTRY & THE GRADE ENTRY INTERFACE
Transcript:You can access the Banner Grade Entry system from MyUTK by either entering MyUTK.utk.edu into your web browser, or, by scrolling down to the MyUTK link on the main university webpage.
You will be prompted to enter your NetID and password using the Central Authentication Service.
Grade Entry Instructions for Banner, 2017 Page 2 of 27

Once on the MyUTK page, scroll down under Staff/Academic Resources and select “Faculty Grade Entry.”
(Note that the previous Banner final grade entry system can be used through the Fall semester of 2017, if desired. That interface is accessible from the “Instructor Grade Entry” link.)
Grade Entry Instructions for Banner, 2017 Page 3 of 27

Each time you access Faculty Grade Entry, you will be required to acknowledge the standard Family Educational Rights and Privacy Act, or FERPA agreement. Make sure that you are aware of the contents of the agreement, then select the “Click Here to Accept” link.
The Faculty Grade Entry screen is displayed, showing all your courses for the current and previous semesters.
Grade Entry Instructions for Banner, 2017 Page 4 of 27

To learn more, return to the main menu and select “Entering Final Grades.”
The Grade Entry Interface (1 OF 3)
Transcript: [Note: images that feature a magnifying glass symbol in the lower left corner can be enlarged by selecting with your mouse. Select again to reduce.]The 2017 Banner Grade Entry upgrade conveniently displays all your courses in one view: current and previous semester courses, and any future semester courses that have been scheduled. You can change the sort order by selecting any of the column headings, listing the courses in ascending or descending order. For each course, the listing provides the subject, course title, course number, section number, the term, the CRN, the grading status, and whether or not the grades have been rolled.
Grade Entry Instructions for Banner, 2017 Page 5 of 27

The Grade Entry Interface (2 of 3)
Transcript:Take a moment to examine the Grade Entry interface. In the upper right-hand corner you will see your name, the system sign out icon, and the tools menu gear for grade export/import. Just below that is a message notification center where error, warning, and save messages are displayed. A course search window is located just above the course listing, which is a helpful feature if you have a list of courses several pages long. You can also use the page controls at the bottom of the screen to navigate between pages.
The Grade Entry Interface (3 of 3)
Transcript:When you select and highlight a course, a course roster of students is displayed along with their final grades or blank fields for entering the final grades.
Grade Entry Instructions for Banner, 2017 Page 6 of 27

Selecting the small arrow to the right of the search window displays a popup window with two top tabs: the “Course Details” tab provides information about the course that is currently highlighted;
the “Getting Started” tab provides detailed information about the Grade Entry interface. Select the arrow again to hide the popup window.
Grade Entry Instructions for Banner, 2017 Page 7 of 27

Hover your mouse cursor over a student’s name in the roster, and the system will display detailed information for that student.
Select the down arrow to the right of the final grade field and the final grade options are displayed for the selected course. To learn about your options for entering grades using the Grade Entry Interface, return to the main menu for this presentation and select “Entering Final Grades.”
Grade Entry Instructions for Banner, 2017 Page 8 of 27

2. ENTERING FINAL GRADES
Transcript:There are two methods for entering final grades into Banner: Direct Entry and Spreadsheet Import.
Direct entry of each student’s final grade into the Banner Grade interface may be the best choice if your class is small.
If you have a large class or you wish to maintain a separate record of final grades, you can enter all grades at once by importing an Excel spreadsheet of the grades. Banner makes this method easy by enabling you to export all existing student information for your course into an initial Excel spreadsheet template that you can edit and then import back into Banner.
Select your preferred method, below, to view more instructions.
Direct Entry of Grades into Banner
Transcript:[This slide has no audio.]Direct Entry of Grades into BannerIf desired, you can enter final grades directly into Banner via the Faculty Grade Entry interface. Instructions on the following screens cover these topics:
1. Selecting CoursesGrade Entry Instructions for Banner, 2017 Page 9 of 27

2. Entering Grades3. Changing Grades4. Incomplete Grades5. Printing Grades6. Securing Grades
Direct Entry: Selecting Courses (1 of 6)
Transcript:All courses for which final grades have already been entered and the grades “rolled” will feature a green “Completed” button in both the Grading Status column and the Rolled column. A course for which no grades have been entered will feature a red “Not Started” button in both those columns. Courses for which some but not all final grades have been entered will feature an orange “In Progress” button in the Grading Status column. From the Faculty Grade Entry screen, select the course for which final grades must be entered. When you select a course, the student roster for that course is displayed.
Direct Entry: Entering Grades (2 of 6)
Transcript:Use the down arrow to display and select a final grade for each student. Save frequently to avoid losing data. When you have entered all grades or must take a break, select the “Save” button again
Grade Entry Instructions for Banner, 2017 Page 10 of 27

to preserve your work. A green “Save Successful” message will be displayed.
The “Reset” button will reset all grades that have not yet been saved. When you select “Reset,” a warning message is displayed requiring you to confirm your action.
Direct Entry: Changing Grades (3 of 6)
Transcript:If you need to change a grade, you can still do so here, as long as Grade Entry is still open for the semester. To change a grade, highlight the course, highlight the applicable student, use the drop down menu to select the correct grade, and "Save." Any grade changes required after Grade Entry has closed for the semester should be made according to your department's grade change procedures.
Grade Entry Instructions for Banner, 2017 Page 11 of 27

Direct Entry: Incomplete Grades (4 of 6)
Transcript:When one or more incomplete grades are assigned, the student listing for a course displays both a "Roster" tab and an "Incomplete Grades" tab. All incomplete grade changes must be made with the "Roster" tab selected, NOT the "Incomplete Grades" tab. After changing an incomplete grade, be sure to SAVE the grade change.NOTE: Changes to incomplete grades can only be made when Grade Entry is open! After Grade Entry closes, incomplete grade changes should be made according to your department’s grade change procedures.
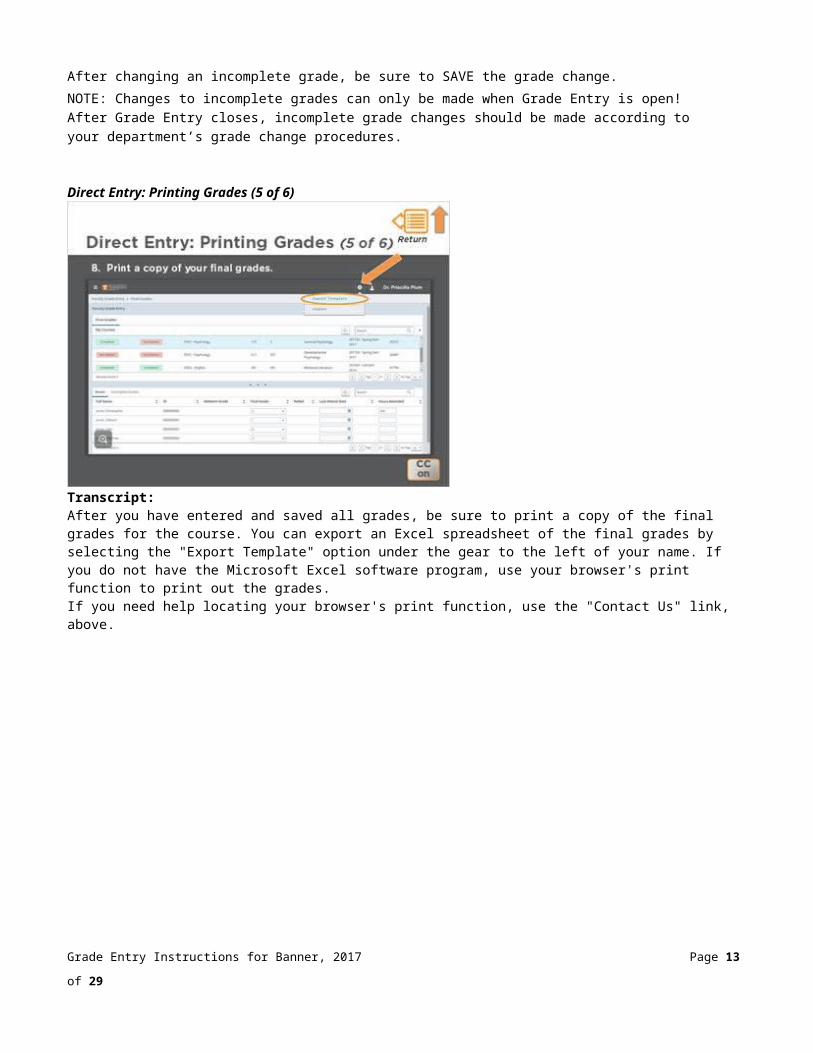
Direct Entry: Printing Grades (5 of 6)
Transcript:After you have entered and saved all grades, be sure to print a copy of the final grades for the course. You can export an Excel spreadsheet of the final grades by selecting the "Export Template" option under the gear to the left of your name. If you do not have the Microsoft Excel software program, use your browser's print function to print out the grades. If you need help locating your browser's print function, use the "Contact Us" link, above.
Grade Entry Instructions for Banner, 2017 Page 12 of 27
Direct Entry: Securing Grades (6 of 6)
Transcript:To ensure the security of your final grades, always exit the Banner Faculty Grade Entry interface. Use the “Sign Out” option under your profile button at the top right corner of the screen. This will completely close your session.
Spreadsheet Entry of Final Grades
Transcript: [This slide has no audio.]Spreadsheet Entry of Final GradesYou can enter all grades for a course into Banner in one smooth import by using an Excel spreadsheet template, produced initially by Banner with all pertinent student data. Instructions on the following screens cover these topics:
1. Exporting a Spreadsheet Template2. Importing Spreadsheet Grades3. Checking and Adjusting Grades4. Incomplete Grades5. Saving or Resetting Grades6. Printing Grades7. Securing Grades8. Exiting the Browser
Grade Entry Instructions for Banner, 2017 Page 13 of 27

Spreadsheet Entry: Exporting a Template (1 of 8)
Transcript:It is easy to enter course grades for an entire class using an Excel spreadsheet. Begin by exporting an initial spreadsheet template containing student information from the Banner system. From the Faculty Grade Entry interface, select the course for which you will enter final grades. Select the gear wheel to the left of your name in the upper right corner of the interface screen, and then select “Export Template.”
When the Export Template window is displayed, select the type of Excel file that corresponds to your version of Microsoft Excel and then select “Export.”
Grade Entry Instructions for Banner, 2017 Page 14 of 27

The downloaded Excel file is displayed at the bottom of the Banner window. Open and save the file to your computer.
After exporting and saving the Excel file, check and edit the spreadsheet. First, turn off any Excel features that may automatically change what you enter in the spreadsheet based on your previous entries. Key features to disable include the “Auto Complete” feature and the “Automatically Flash Fill” feature. The features and where they are located in Excel vary by software version, but you will typically find them in the Excel menu by going to File, then to Options, and then to Advanced.
Grade Entry Instructions for Banner, 2017 Page 15 of 27

Next, make sure these eight (8) column headings are included in the spreadsheet, even if there is no data in the columns. They should be included in this order from left-to-right, although other columns can be interspersed between them, as illustrated: Term Code, CRN, Student ID, Final Grade, Last Attended Date, Hours Attended, Incomplete Final Grade, and Extension Date.
Next, enter each student’s final grade, check your work, and save the file. For any student receiving a failing grade, it is a good idea to enter the Last Attended Date. This date is not required but is helpful in determining late withdrawals.Do not enter the Hours Attended.
Grade Entry Instructions for Banner, 2017 Page 16 of 27

Spreadsheet Entry: Importing Spreadsheet Grades (2 of 8)
Transcript:After entering all grades and saving your spreadsheet file, return to the Banner Faculty Grade Entry interface and select the course.Select the gear wheel and select “Import.”
When the Import window is displayed, place your cursor in the Browse field and a search window will be displayed showing the files on your computer. Locate and select your course Excel file and then select the Upload button. Then select the bottom “Continue” bar.
Grade Entry Instructions for Banner, 2017 Page 17 of 27

The Banner Import window displays your Excel file data. Use the scroll bars to preview your data, making sure that all eight (8) required columns are present, including Term Code, CRN, Student ID, Final Grade, Last Attended Date, Hours Attended, Incomplete Final Grade, and Extension Date. Be sure to check the box marked “My Spreadsheet has headers.” Then select “Continue.”
Banner displays the 8 required headings and a drop down list above each column of your spreadsheet to enable you to “map” or match your spreadsheet data headings to the required headings. Use the drop down menus and scroll bars to map each column of your spreadsheet to either the appropriate required field, or, to ”Other.” A green circled check mark is displayed to the left of each required field that is successfully mapped. When finished, select Continue.
Grade Entry Instructions for Banner, 2017 Page 18 of 27

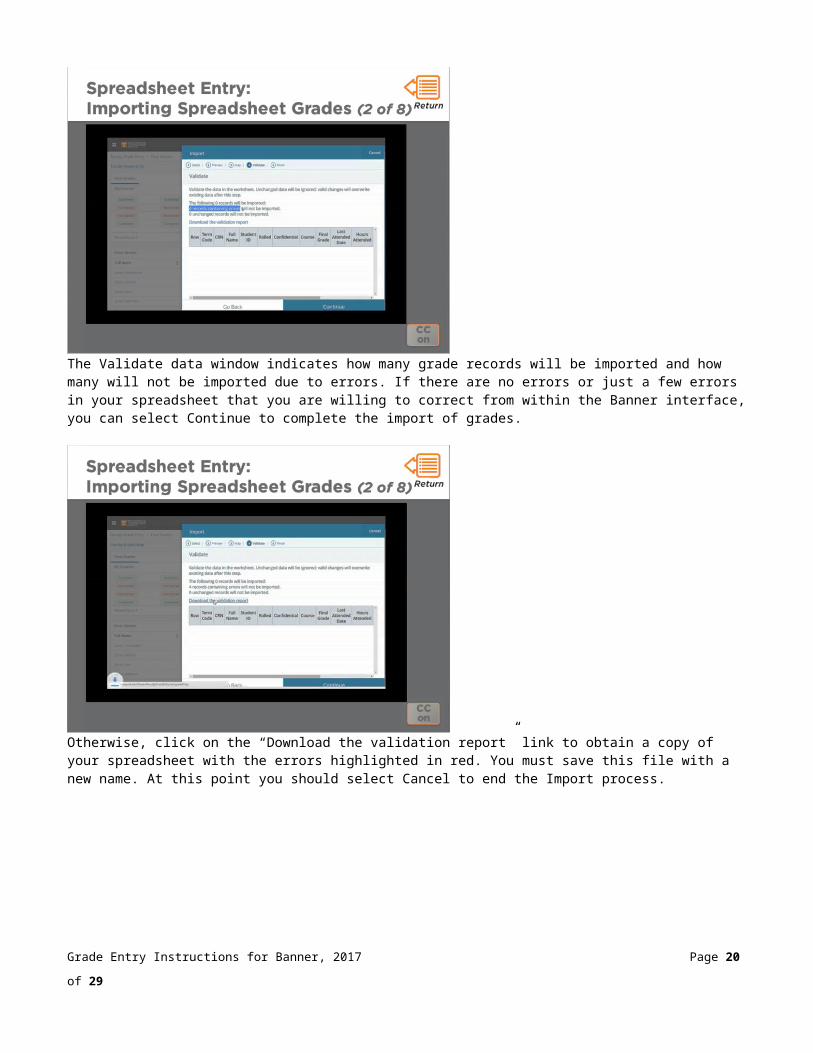
The Validate data window indicates how many grade records will be imported and how many will not be imported due to errors. If there are no errors or just a few errors in your spreadsheet that you are willing to correct from within the Banner interface, you can select Continue to complete the import of grades.
Otherwise, click on the “Download the validation report” link to obtain a copy of your spreadsheet with the errors highlighted in red. You must save this file with a new name. At this point you should select Cancel to end the Import process.
Grade Entry Instructions for Banner, 2017 Page 19 of 27
Then, correct the spreadsheet errors, save the file, and repeat the Import process with the corrected spreadsheet. If the Validate screen indicates that there are no errors in the spreadsheet, select Continue and the system will display the “Import Complete” window. Select “Finish” and your grade entry is complete!
Spreadsheet Entry: Checking & Adjusting Grades (3 of 8)
Transcript:When you return to the main Grade Entry interface, you will see that the grading status for the course is now marked as ”Completed” and the grades you entered have been saved.
If you need to change a grade, you can still do so here, as long as Grade Entry is still open for the semester. To change a grade, highlight the course, highlight the applicable student, use the drop down menu to select the correct grade, and "Save."
Any grade changes required after Grade Entry has closed for the semester should be made according to your department's grade change procedures.
Grade Entry Instructions for Banner, 2017 Page 20 of 27

Spreadsheet Entry: Incomplete Grades (4 of 8)
Transcript:When one or more incomplete grades are assigned in a course, the student listing for that course displays both a "Roster" tab and an "Incomplete Grades" tab. All incomplete grade changes must be made with the "Roster" tab selected, NOT the "Incomplete Grades" tab. After changing an incomplete grade, be sure to SAVE the grade change.NOTE: Changes to incomplete grades can only be made when Grade Entry is open! After Grade Entry closes, incomplete grade changes should be made according to your department’s grade change procedures.
Spreadsheet Entry: Saving or Resetting Grades (5 of 8)
Transcript:Select the “Save” button to preserve your work and a green “Save Successful” message is displayed in the upper right corner of the screen.
You can use the “Reset” button to clear all grade entries that have not yet been saved. When you select “Reset,” a warning message is displayed requiring you to confirm your action.
Grade Entry Instructions for Banner, 2017 Page 21 of 27

Spreadsheet Entry: Printing Grades (6 of 8)
Transcript:After all grades are finalized and saved, make sure you have a copy of them for your records. You can either update your Excel spreadsheet template with any grade changes made in the interface since your import, or you can re-export the template that will now be populated with the final grades. Again, the “Export Template” option is located under the gear to the left of your name.
Spreadsheet Entry: Securing Grades (7 of 8)
Transcript:To ensure the security of your final grades, always exit the Banner Faculty Grade Entry interface. Use the “Sign Out” option under your profile button at the top right corner of the screen. This will completely close your session.
Grade Entry Instructions for Banner, 2017 Page 22 of 27

Spreadsheet Entry: Exiting the Browser (8 of 8)
Transcript:Once you receive confirmation that you have been logged out of the Banner system, it is a good practice to completely close your web browser for purposes of security.
TROUBLESHOOTING
Transcript:[This slide has no audio.]3. TroubleshootingSelect desired topic:A. Notification Center MessagesB. General Grade Entry ErrorsC. Grade Spreadsheet Import ErrorsD. Getting Help
Grade Entry Instructions for Banner, 2017 Page 23 of 27

Notification Center Messages
Transcript:[This slide has no audio.]Notification Center MessagesMessages displayed in the Notification Center can be recognized by distinct colors and symbols - select an image below to enlarge it:
Save = Green, circled checkmarkWarning = Yellow, exclamation point in a triangleError = Red, exclamation point in a circle (error location is also marked)
General Grade Entry Errors
Transcript:[This slide has no audio.]General Grade Entry ErrorsWhen grades are entered, Banner checks for errors and will display messages similar to the following:
- Last date of attendance errors……cannot be greater than current date
Grade Entry Instructions for Banner, 2017 Page 24 of 27

…must be between semester start and end dates…date 10/32/2017 is not valid - either:- Date does not exist, or- Date is in the wrong format (correct format: MMDDYYYY)
- Invalid grade error- Hours Attended error
Grade Spreadsheet Import Errors
Transcript:[This slide has no audio.]Grade Spreadsheet Import ErrorsWhen entering grades using the Excel spreadsheet template process, you may experience errors similar to the following:
Error:Invalid grade/Missing last date of attendance
Error Resolution:Check valid grade list and correct. If entering an “F”, enter Last Date of Attendance, making sure that the date format is correct.
Error:Internal server error on large import
Error Resolution:If importing a large (e.g., 900 records) spreadsheet of grades, try reloading. If this does not work, you may have to divide the spreadsheet into two files.
Error:Excel data entry errors
Error Resolution:Make sure to disable Excel features that may alter the data you enter, including “AutoComplete” and “Automatically Flash Fill”.
Grade Entry Instructions for Banner, 2017 Page 25 of 27

VALID COURSE GRADES for UTK Courses
Transcript:This section provides information on valid grades for types of courses offered at the University of Tennessee Knoxville. This includes undergraduate and graduate courses graded A through F, courses graded satisfactory - no credit, progress grades for thesis and dissertation hours, and courses graded ABC - no credit.
Valid Grades Summary Chart
Transcript:This is a summary of the valid grades for types of courses offered at the University of Tennessee Knoxville. You can obtain a copy of this chart for future reference by using the “Resources” link in the upper-right-hand corner of this presentation player. Just select and download the PDF document entitled, “Valid Grades Summary Chart.”
Grade Entry Instructions for Banner, 2017 Page 26 of 27

CONTACT USQuestions? Concerns?
Transcript:[This slide has no audio.]Questions? Concerns?Contact us!Email Kathy Abbott at [email protected] callTeresa Gilbert at 865-974-0487Or Wilma Siler at 865-974-2102
Grade Entry Instructions for Banner, 2017 Page 27 of 27