arnie berle fretboard fundamentals
TRANSCRIPT
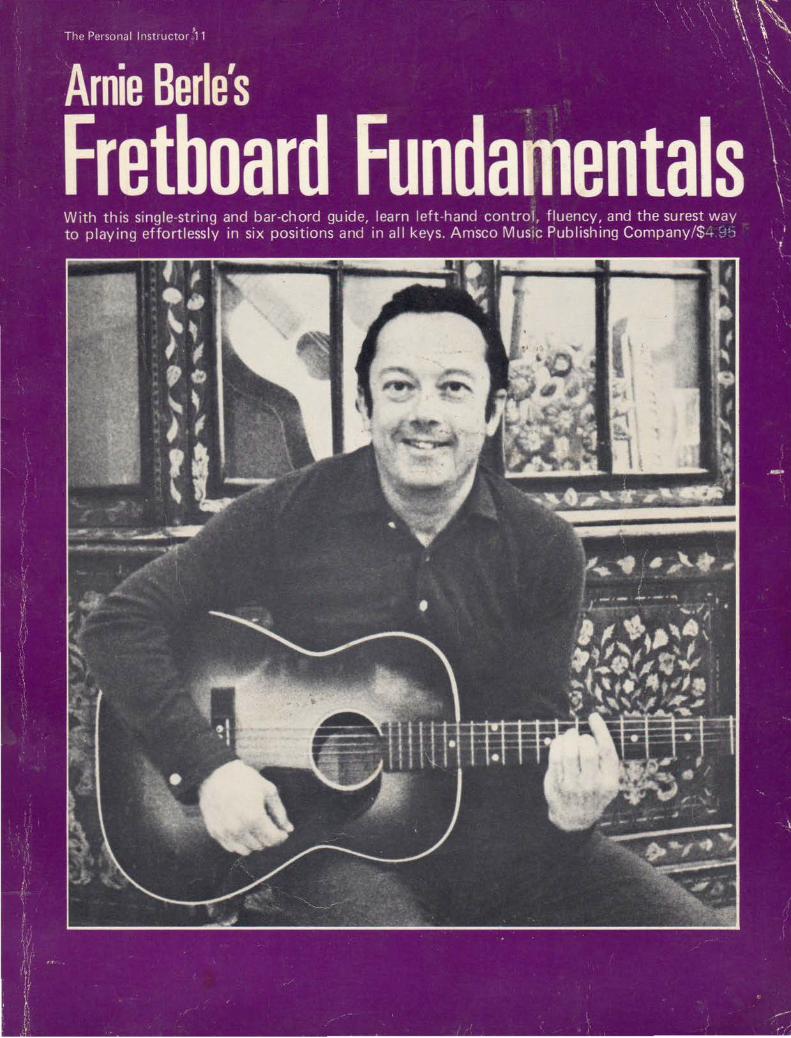
. Anie Berle's
Fretboard Fundamentals
Amsco Music Publishing Company New York • London • Tokyo • Sydney • Cologne
The illustrations in this book were taken from Handbook of l:."arly Advertising Art, Dover Publications, Inc.
Book design by Ira Haskell
© Amsco Music Publishing Company, 1974 A Division of Music Sales Corporation All Rights Reserved
International Standard Book Number: 0-8256-281 J-3 Library of Congress Catalog Card Number: 73-91386
Distributed throughout the world by Music Sales Corporation:
33 West 60th Street, New York 10023 78 Newman Street, London W 1 4-26-22 Jingumae, Shibuya-ku, Tokyo 27 Clarendon Street, Artarmon, Sydney NSW Kelner Strasse 199, 5000 Cologne 90
4
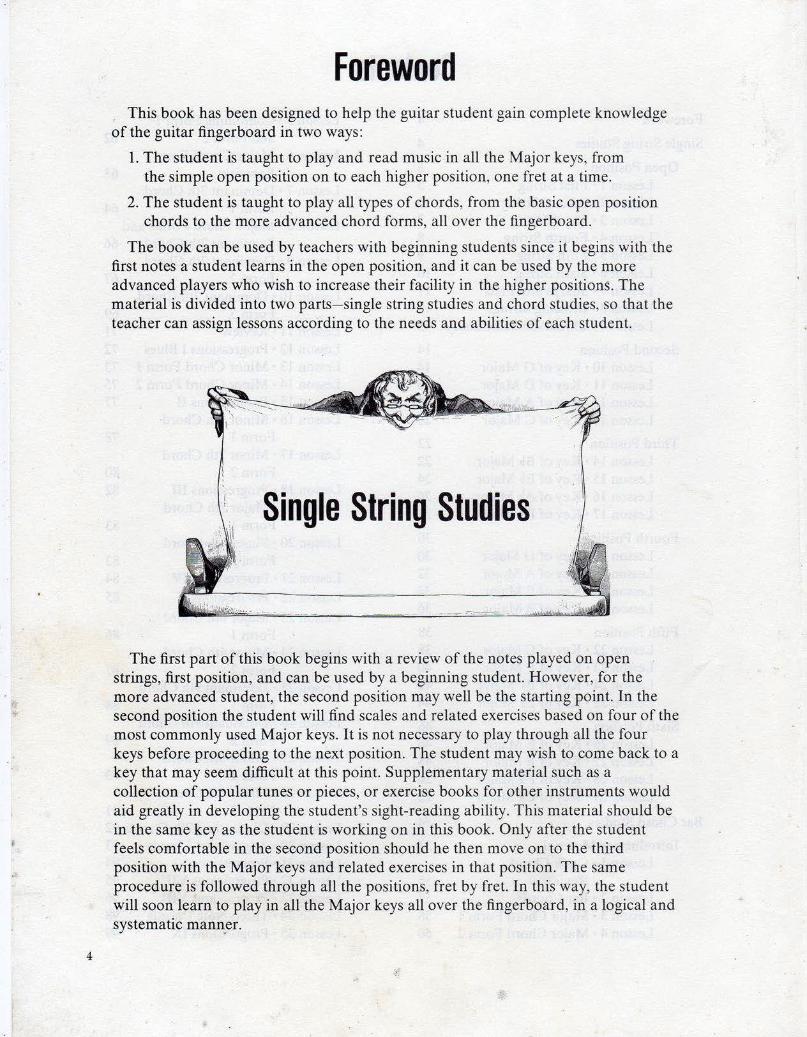
Foreword This book has been designed to help the guitar student gain complete knowledge
of the guitar fingerboard in two ways:
1. The student is taught to play and read music in all the Major keys, from the simple open position on to each higher position, one fret at a time.
2. The student is taught to play all types of chords, from the basic open position chords to the more advanced chord forms, all over the fingerboard.
The book can be used by teachers with beginning students since it begins with the first notes a student learns in the open position, and it can be used by the more advanced players who wish to increase their facility in the higher positions. The material is divided into two parts-single string studies and chord studies, so that the teacher can assign lessons according to the needs and abilities of each student.
Single String Studies
The first part of this book begins with a review of the notes played on open strings, first position, and can be used by a beginning student. However, for the more advanced student, the second position may well be the starting point. In the second position the student will find scales and related exercises based on four of the most commonly used Major keys. It is not necessary to play through all the four keys before proceeding to the next position. The student may wish to come back to a key that may seem difficult at this point. Supplementary material such as a collection of popular tunes or pieces, or exercise books for other instruments would aid greatly in developing the student's sight-reading ability. This material should be in the same key as the student is working on in this book. Only after the student feels comfortable in the second position should he then move on to the third position with the Major keys and related exercises in that position. The same procedure is followed through all the positions, fret by fret. In this way, the student will soon learn to play in all the Major keys all over the fingerboard, in a logical and systematic manner.
• . I
• '" •
\ .
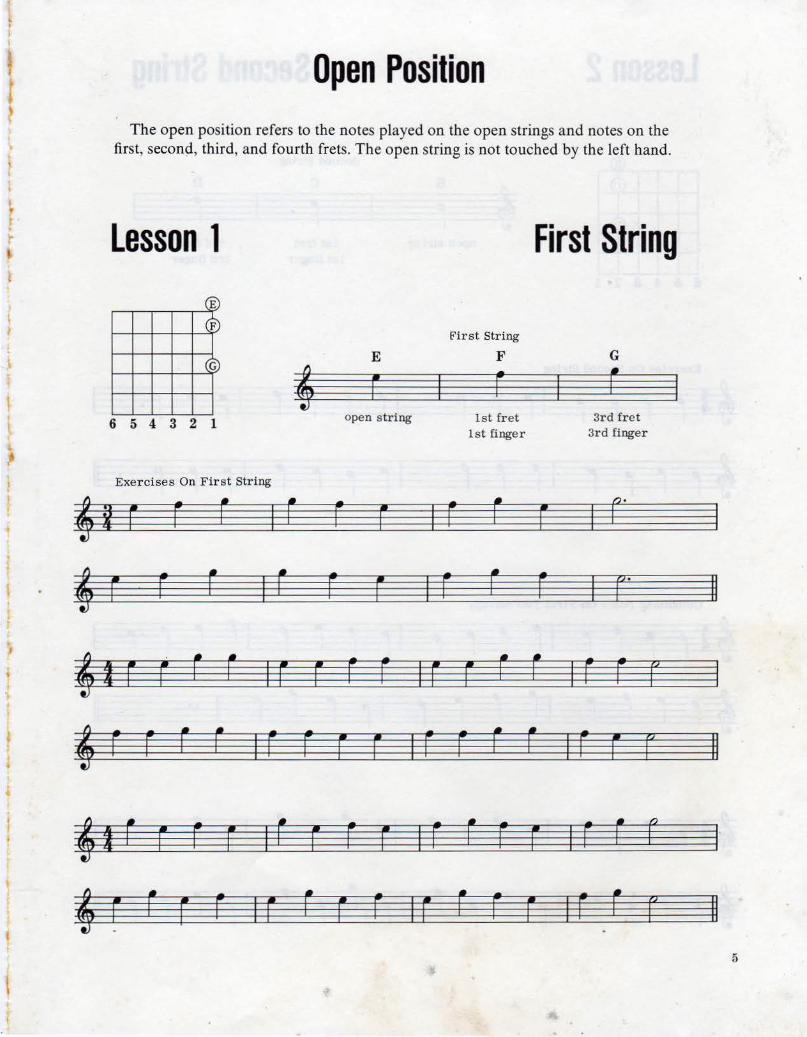
Open Position The open position refers to the notes played on the open strings and notes on the
first, second, third, and fourth frets. The open string is not touched by the left hand.
Lesson 1 First String (E)
® E'irst String
© E F G
4 r F r open s tring 1st fr et 3rd fret
1st finger 3rd finger 6 5 4 3 2 1
Exercises On Firs t String
4¥ F F r I r r F I F r r I t"
4 F F r I r F F I F r F I r II
4tE Err IE EFFIE E r L IFF r 4F F L L IFF E E IFF r rIFE r II
4tL Err 1L r r E IF r r E IF L L I
4 r r r F 1 E r r F 1 r r r r 1 F r r 11 5
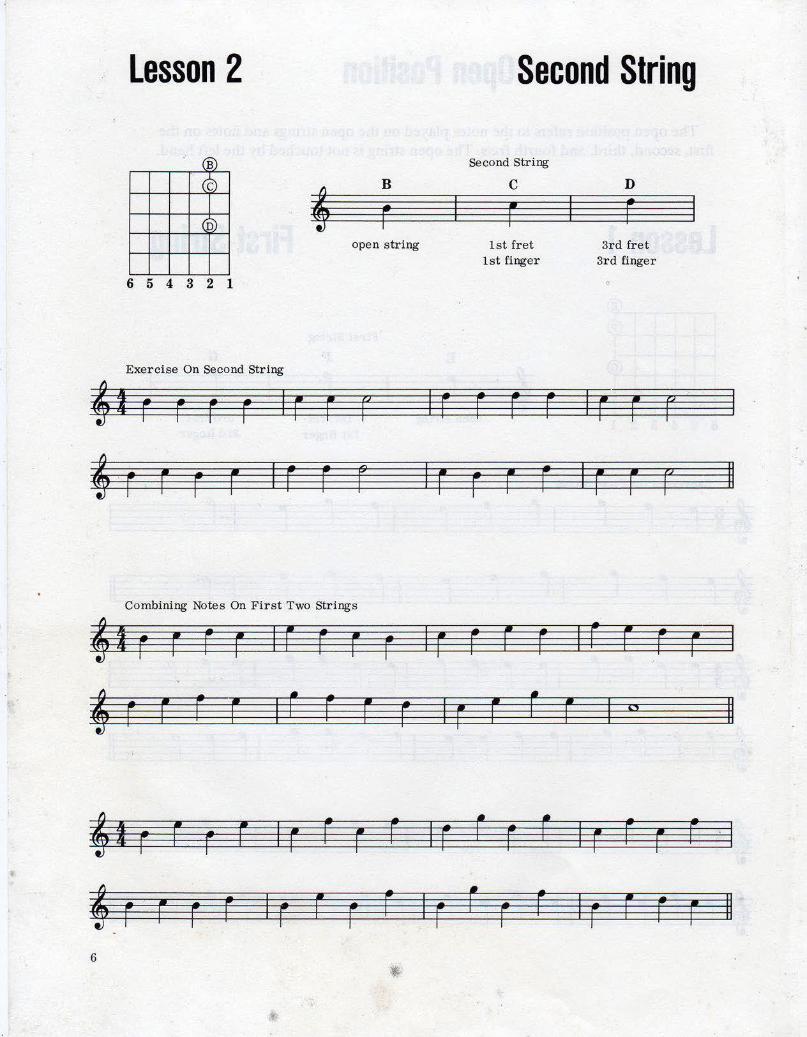
Lesson 2 Second String
. ® Second Stri ng
©
<$) 4 B c n ·
r r r open string 1st fret 3rd fret
1st finger 3rd finger
6 5 4 3 2 1
Exer cise On Second String
41 r r r r 1 r r r 1 F r r r 1 r r r 1
4 r r r r 1 r r r 1 r r r r 1 ~ r r 11
Combining Notes On Fir st Two Strings
41 F r F r IF F r r I r F E F IF E F ~
4 r r r r 1 r r r F 1 r r r r 1 " 11
41 r r r r I F F r F I r r r r I F F F F I ..
4 r r r r I r F F r I r r r r I r F F F II 6
i • • ;
f
1 f
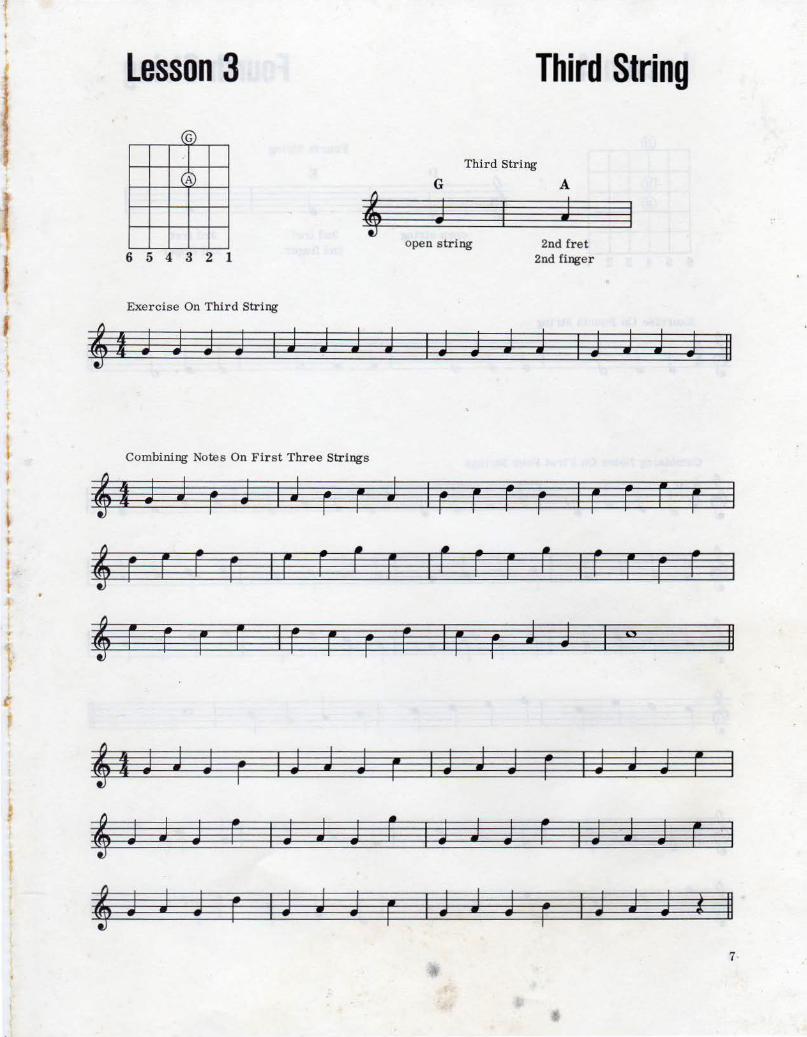
Lesson 3 Third String
(G)
ct Third String
G A
' J J open string 2nd fret
6 5 4 3 2 1 2nd finger
Exercise On Third String
4t J J J J I J J J J I J J J J I J J J J
Combining Notes On First Three Strings
4tJ J r J iJ r r J lr r r r lr r r r 4r r r r IE r r r 1r r r r IF r r r
4 r r r r 1 r r r r 1 r r J u 1 "
41 J J J r I J J J F I J J J r I J J J r
' J J J r I J J J r I J J J F I J J J F
4 J J J F I J J J F I J J J r I J J J l
II
II
I
. I
II 7
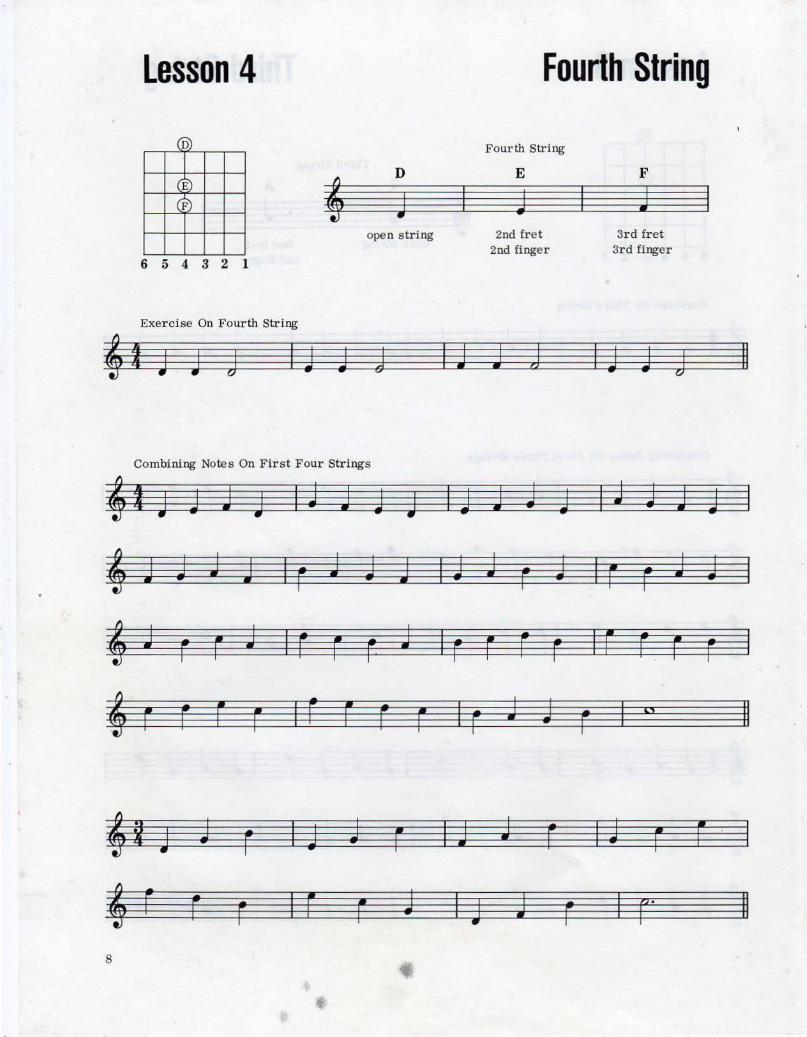
Lesson 4 Fourth String
(D) Fourth String
® (F) ~
D E F
J J J open string 2nd fret 3rd fret
2nd finger 3rd finger 6 5 4 3 2 1
Exercise On Fourth String
~ f J J J I J J J I J J g I J J J II
Combining Notes On First Four Strings
~~ J J J J I J J J J I J J J J I J J J J
~ J J J J I r J J J I J J r J I F r J J
~ J r F J I r F r J I r F r r I F r F r
' F r F F I r F r F I r J J r I ,, II
~~ J J r I J J F I J J r I J F r I
~ r r r I F F J I J J r I r· II
8
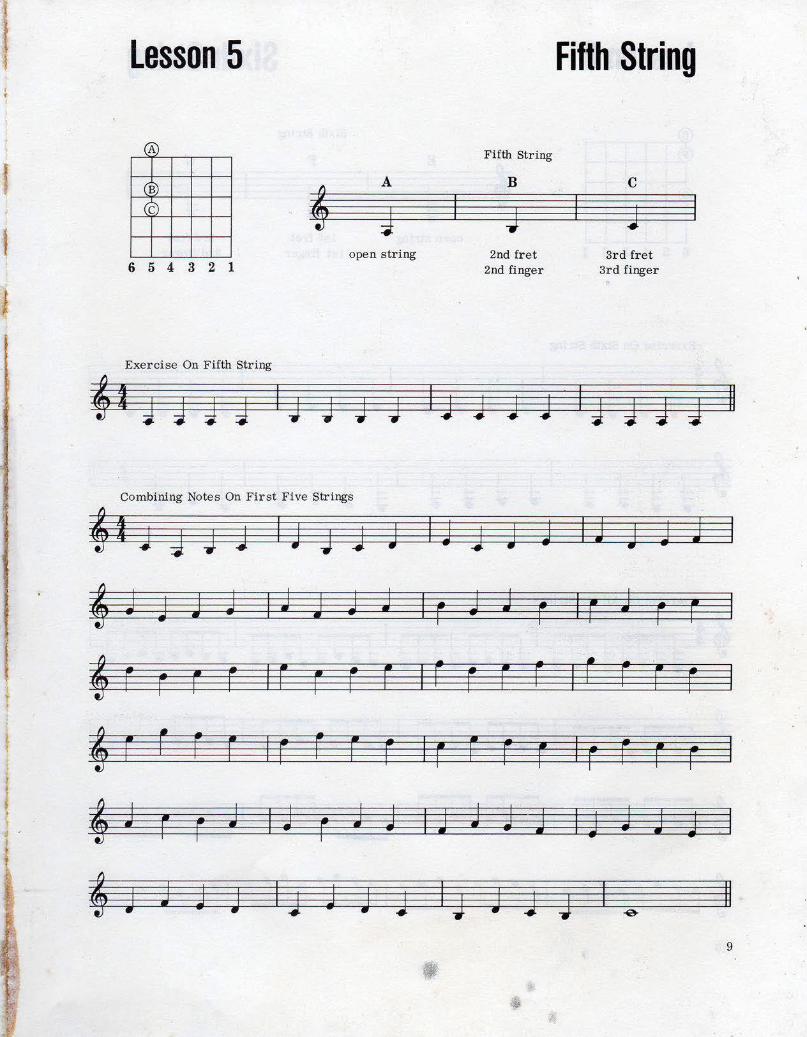
Lesson 5 Fifth String
@ Fifth String
@
4 A B c
cb J J J open string 2nd fret 3r d fret
6 5 4 3 2 1 2nd finger 3r d finger
Exercise On Fifth String
41 J JJ J IJJJJ IJ JJJ IJJJ J II ·
Combining Notes On First Five Strings
4t J 4 J J I J J J J I J J J J I J J J J
I 4 J j J w I J J w J I r w J r I F J r F
l 4 r r I r r r r F F I r F r F I r F F F
4 r r r r I r r F F I F F F r I r F r r I
I 4 J J I J J J I J J J J I J J J J . I ' F r r
4 J J J J I J J J J I J J II J J -e-
9
i
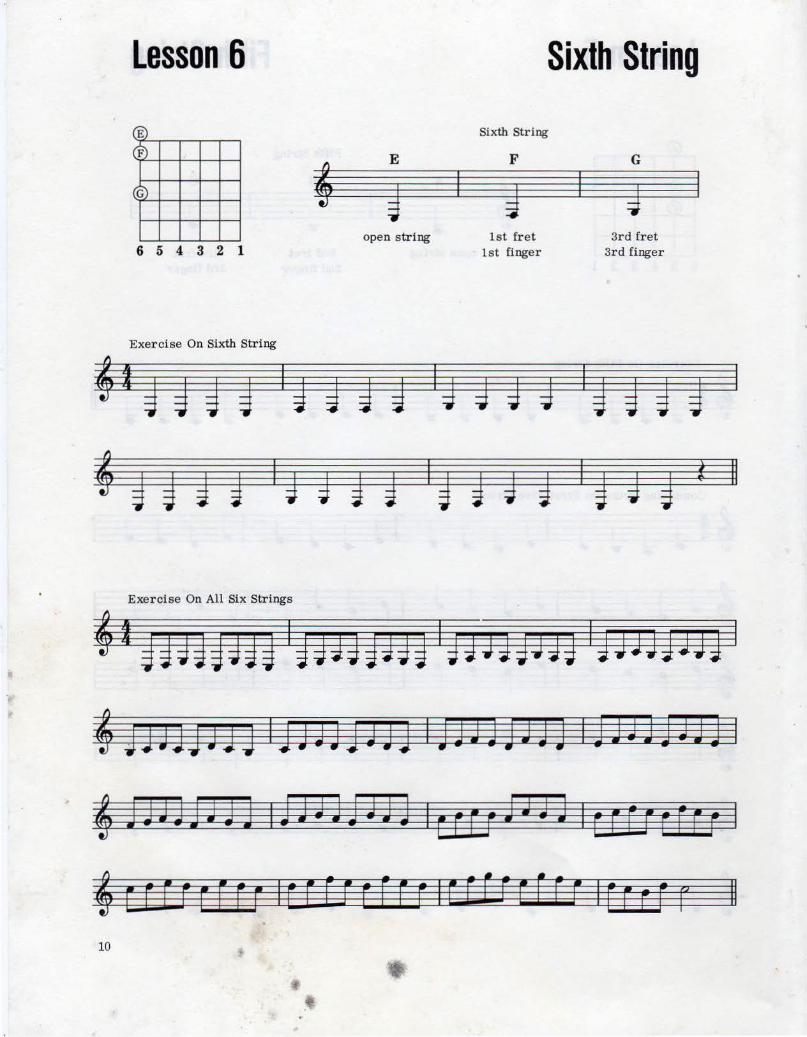
Lesson 6 Sixth String
(E) Sixth String
@) E F G
' I I <};)
~ J g open string 1st fret 3rd fret
6 5 4 3 2 1 1st finger 3rd finger
Exercise On Sixth Str ing
4 I g g g ~ I J J J J lg J g g I~ ~ g g
. 4 J J J J I g g J J I ~ J g J I ~ g ~ t II
Exercise On All Six Strings
4t gJJJJJ4@ lgJJJJJJJIJJJJJJJJ IJJJJJJJJ I
4 JJ JJJ JJ g I J JJ JJ J JJ I J JJ J J JJ j I jJ J Jj J Jj I
. 4 JJJJ JJJ] 1JJJJ j JJ3 lerr; JJJJ I[E[H fFr I
4cr Er ELEF IUfrrf U ICf Er rfFr I[Erf F II 10
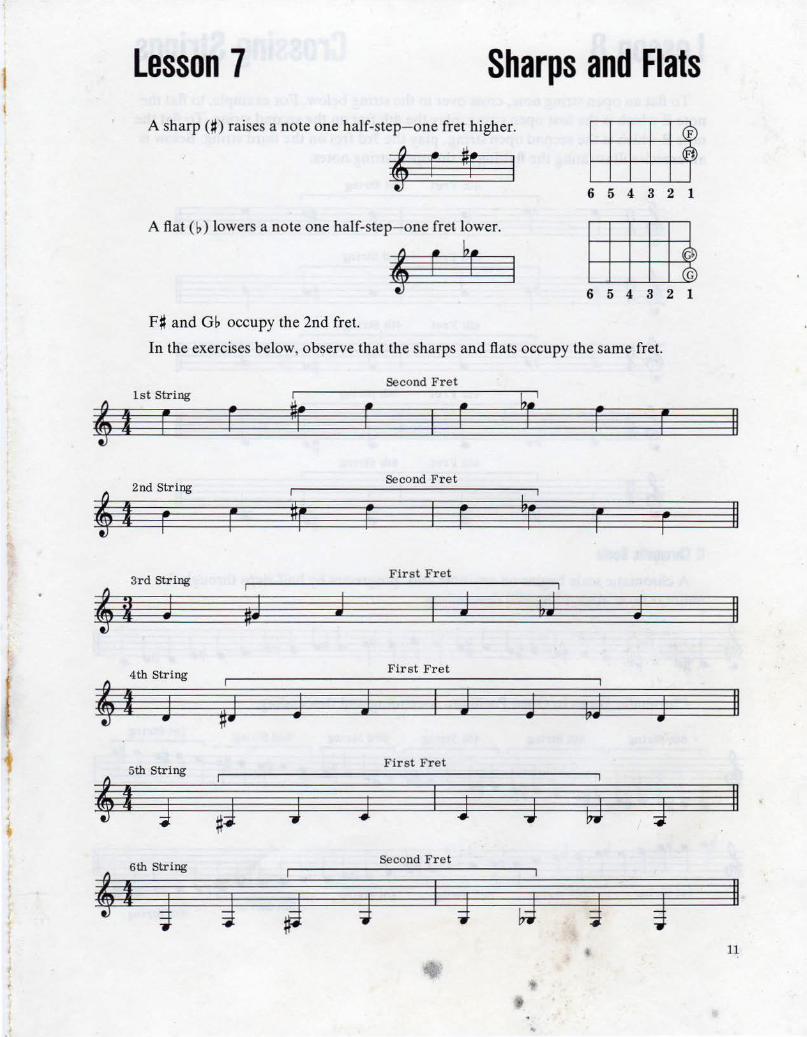
Lesson 7 Sharps and Flats A sharp(#) raises a note one half-step-one fret higher. (F)
~
6 5 4 3 2 1
A fiat (b) lowers a note one half-step- one fret lower.
' r br 6 5 4 3 2
F# and Gb occupy the 2nd fret.
In the exercises below, observe that the sharps and fiats occupy the same fret.
Second Fret 1st String
'I E r r r r r II
~ 2nd String
t r Second Fret
r r r F r II
First Fret
J J II
4th String
*I J
First Fret
J I J J II
First Fret
J J I J J 4 II
Second Fret
g I g II
11
..
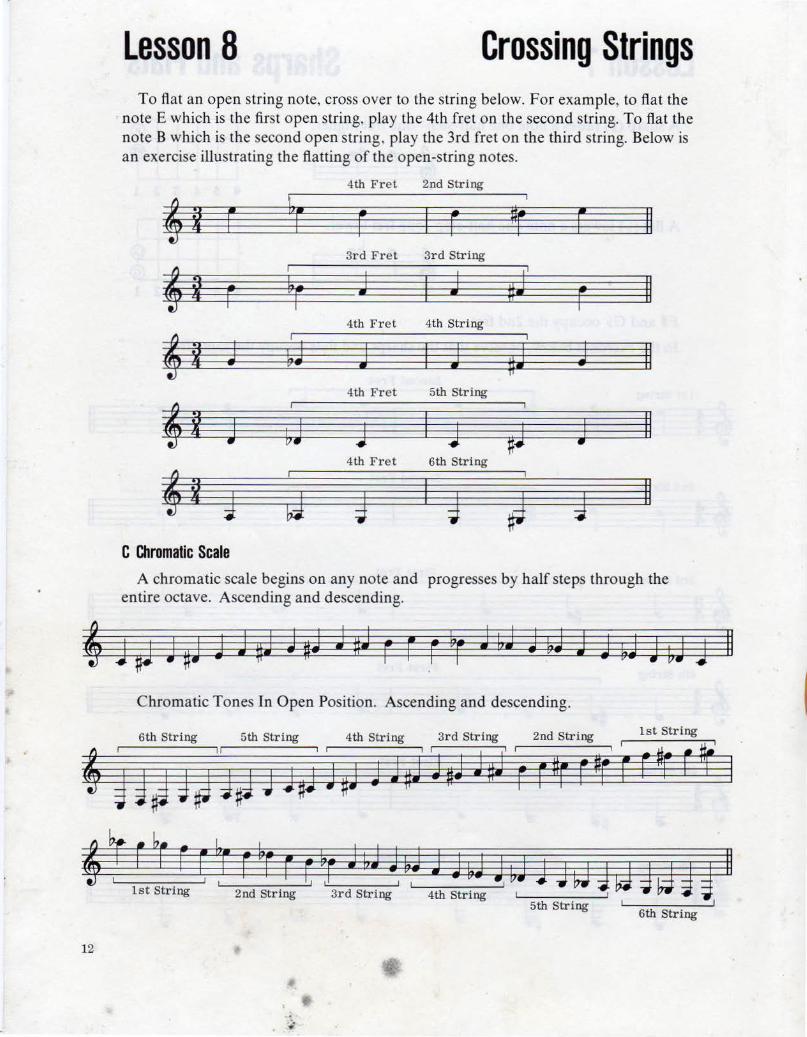
Lesson 8 Crossing Strings To flat an open string note, cross over to the string below. For example, to flat the
note E which is the first open string, play the 4th fret on the second string. To flat the note B which is the second open string, play the 3rd fret on the third string. Below is an exercise illustrating the flatting of the open-string notes.
4th Fret 2nd String
3rd Fret 3rd String
4th Fret 4th String
J J ~J 4th Fret 5th String
1 I 1 #J 4th Fret 6th String
g I g ~ C Chromatic Scale
r
r j
J
II
II
II
II
II
A chromatic scale begins on any note and progresses by half steps through the entire octave. Ascending and descending.
Chromatic Tones In Open Position. Ascending and descending.
"! ~ 6th String 5th String , '=; 4th String 3rd String , 2nd String , lsttri; t ~ ~ JJJ~J#JJ#dwJ J JnJ JaJ J~ r rDr r•r r r r; I
1st String 2nd String 3rd String 4th String
12
. ..
r
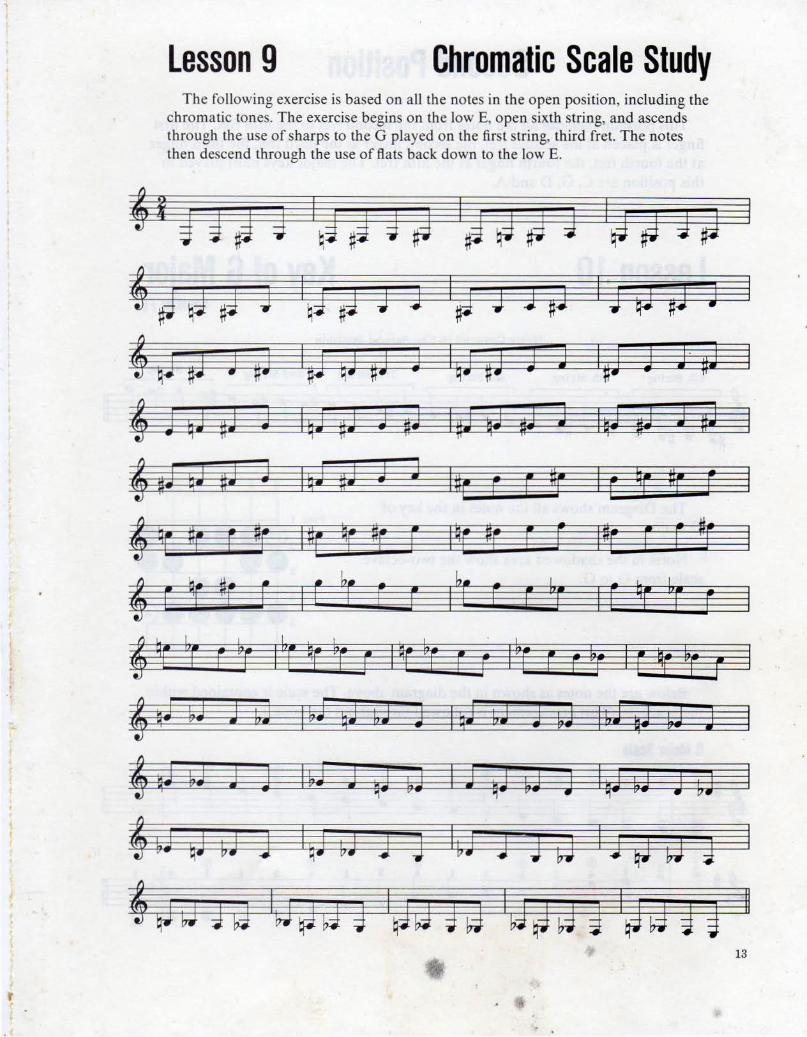
Lesson 9 Chromatic Scale Study The fo llowing exercise is based on all the notes in the open position, including the
chromatic tones. The exercise begins on the low E, open sixth string, and ascends through the use of sharps to the G played on the first string, third fret. The notes then descend through the use of fiats back down to the low E.
4 i g J #J J '~g #J J J '#g w J J 'J # J J
' J J #J J lqJ #J J J IJ J J f1 I J ~ nJ J
' qJ p J #J I p qJ #J ; I qi #J J J I #J J J #J
' J qJ ,J W I ~J iJ W 1J I,; ~; •J J lqJ ,J J #J
' •J §J DJ ; I §J #J J J I Dr: F F Dr I F §r #t F
' §E #E E 1F I Dr •c 1E F lqr 1F E ~ I'E F F #f
' r QE ~E r 1 t T c E 1 6t r r ~r 1 r !E 1t r
@ qr 1t r ~ 11'Pr ~a r 1•r ~r c ; 1 ~r c d; I c ~r T 1
' ~J ~J J ~,J I ~J gJ bJ J I gJ bJ 3 ~J I bJ •J ~; J
' •J ~; J 3 I ~J J ~ J ~J I J ~J ~J J I qJ ~; J ~J
' ~J qJ ~J 3 I1J ~J 3 3 I & J 3 J W I J ijJ W 3
' qJW JQ IW¢@ g IJU JJ IQJJ J IJ J J @ II 13
" .
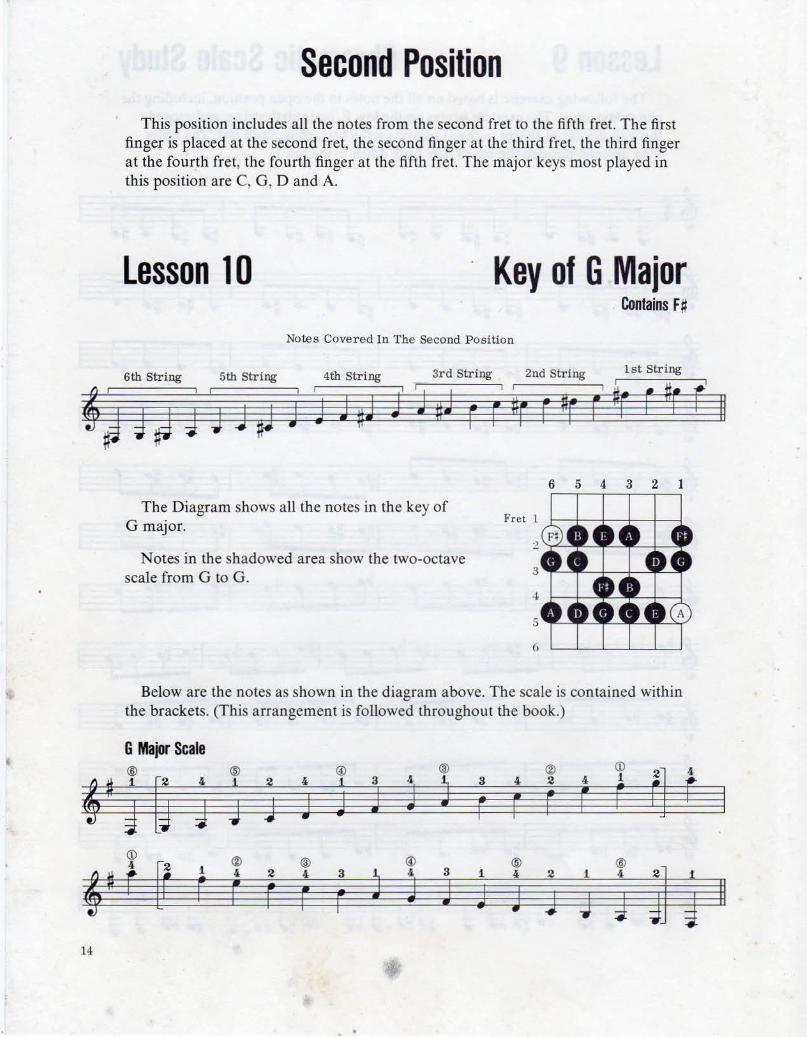
Second Position This position includes all the notes from the second fret to the fifth fret. The first
finger is placed at the second fret, the second finger at the third fret, the third finger at the fourth fret, the fourth finger at the fifth fret. The major keys most played in this position are C, G, D and A.
Lesson 10 Key of G Major Contains f#
Notes Covered In The Second Position
6th String 5th String 4th String 3rd String 2nd String lst String
4 #J g # J J J p J J J "J J 'J fiJ r r Ur r •r c -r r #t r 11
,-'M
14
The Diagram shows all the notes in the key of G major.
Notes in the shadowed area show the two-octave scale from G to G.
Below are the notes as shown in the diagram above. The scale is contained within the brackets. (This arrangement is followed throughout the book.)
G Major Scale ® @ @ ® ® co g 1
[J 4
j j 4
i 3 4
J 3 4 2 4 1
J J J r F r r r d J (i)
® ® @ @ ® 4
@ 1
JJ r 4 2 4 3
J 4 3 1 4 2 1 4 r F r F r J J j J J J J
4 r
J II
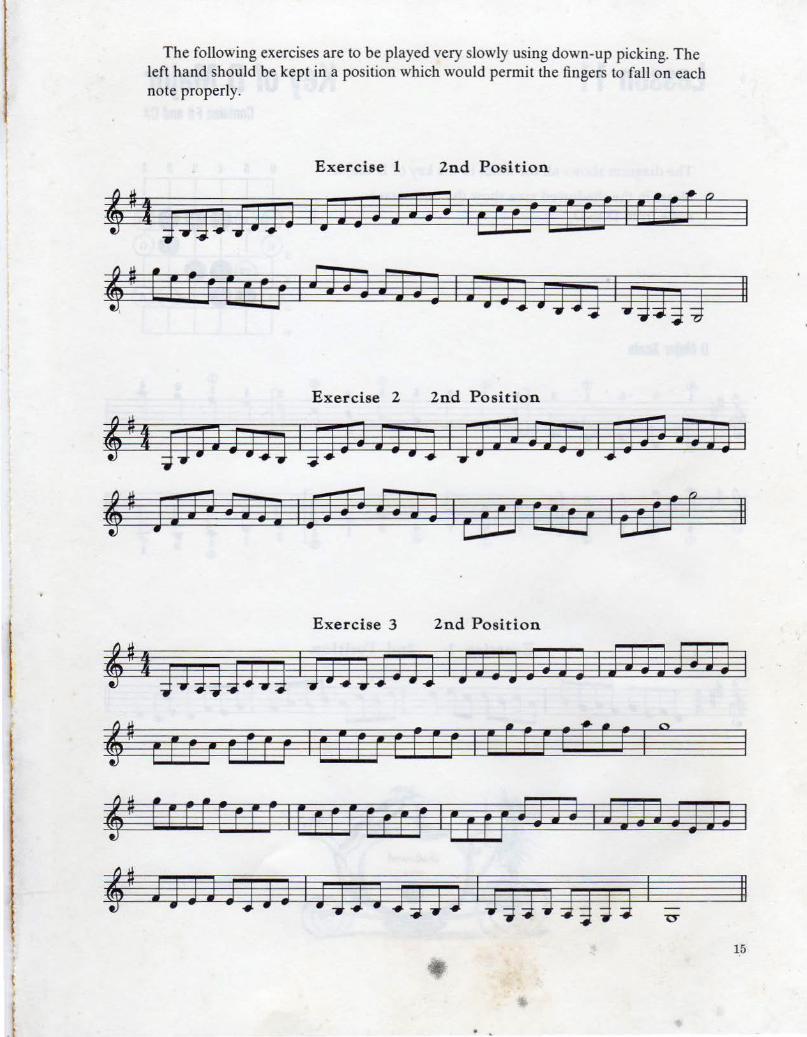
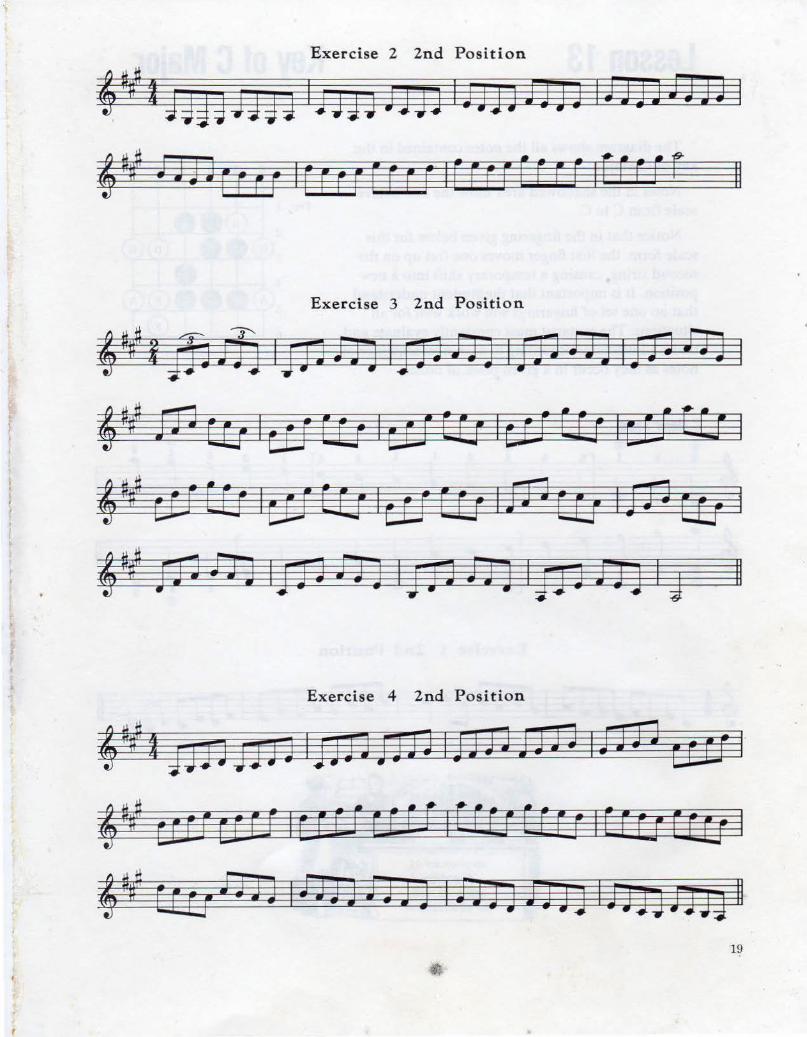
The following exercises are to be played very slowly using down-up picking. The left hand should be kept in a position which would permit the fingers to fall on each note properly.
Exercise 1 2nd Position
4•tfJJJJJJJ IJJJJJJJJ lcrrrcrcr 1crr rr 4• ECF;Er[J lfJJJJJJ)IJJJ)JjJj IJJJ@ J II
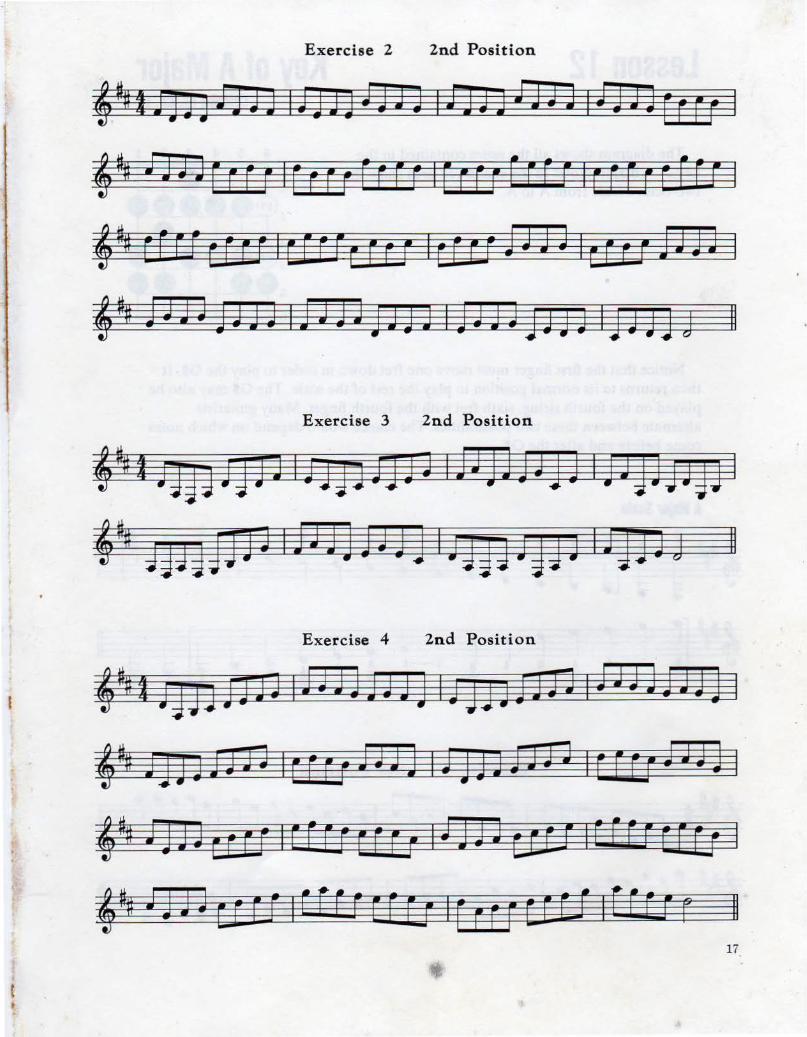
Exercise 2 2nd Position
f•t J)JZl RJO IJ)JJ J J JJ I ~] J] !J 311JJ JJ !J J] I
II
Exercise 3 2nd Position
f•t gJJgJJJJ IJJ]j ]J J) IJJJJ)JJj IJJJjjJJJ I
f• l E [ [ ( t: E F IE r r F [ r: E f I r r r r J 3 J J I J J J J J J J J I
f- Jj JJ Jj JJ I J j 3 J J J J J I J J 3 J J 4 g 3 I u: II 15
~~
~~
16
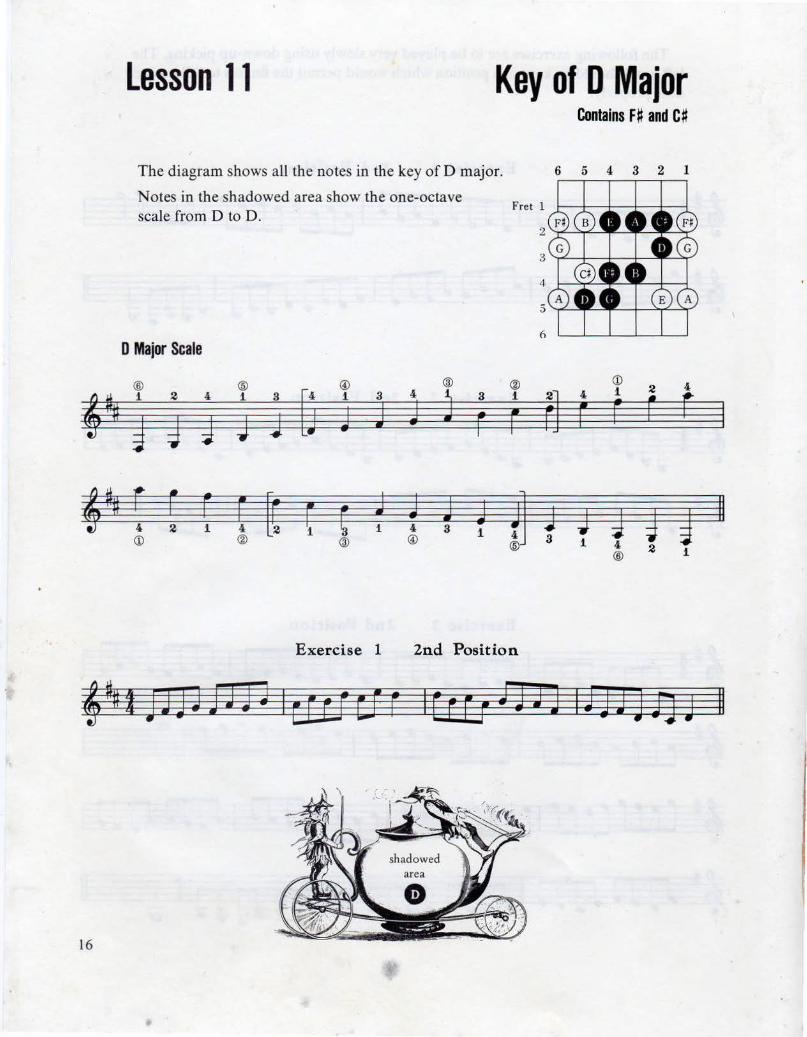
lesson 11 Key of D Major
The diagram shows all the notes in the key of D major.
Notes in the shadowed area show the one-octave scale from D to D.
0 Major Scale
® ® @ ® 1 2 4 1 3 [j 1 3 4 J 3
J j J j r d g J J
r r r F m [ ~ J j J J
4 2 1 4 1 4 3 1 (j) ® @ @
® 1
F
~ ®
Exercise 1 2nd Position
•
Contains F# and C#
6 5 4 3 2 1
(j) 2 4
a 4 1 r r F r
J J J g d 8 1 4 ®
2 1
II
Exercise 2 2nd Position
4~ J J J J [ E C F If r E r fEE r I [ E C r f E [ r IrE [FE f Lf I
4 ~ Ef F! tU! I tF U LE rf I l H± JJ JJ I a U J J 3J I
4~ jJJJjJJJ idJJJjJJJ IJJJJjJJJ ljJJ] J II
Exercise 3 2nd Position
Exercise 4 2nd Position
4~"1 ugg;HJJ 1HJJJJJj UjjJtJH 1JJJJJJJj I
4~ JjjJiJJJ IHcrJJJj IJjJJEJN lrF[!JJJj I
4~ J J J J u a 1 c r Err c r r 1 J J J J cr u 1 E r c r cr c; 1
4 ~" J J J J u nr 1 e E r r c r EJ 1 r t E r cr u 1 E r r c r 11 17
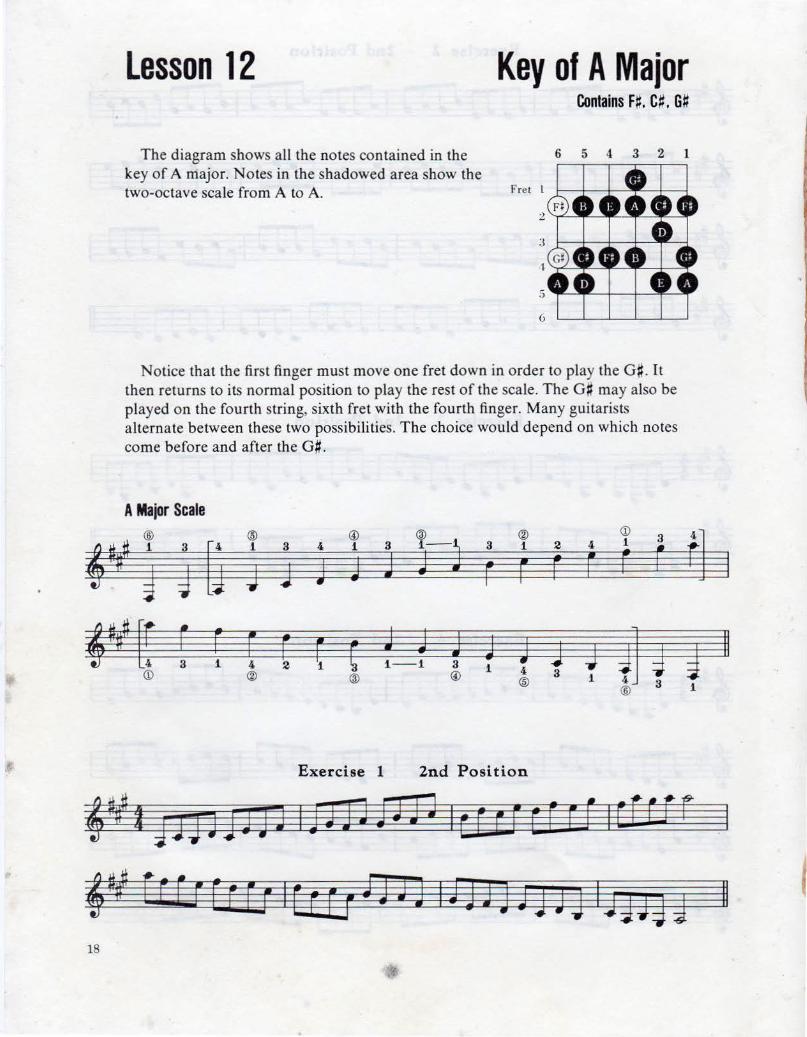
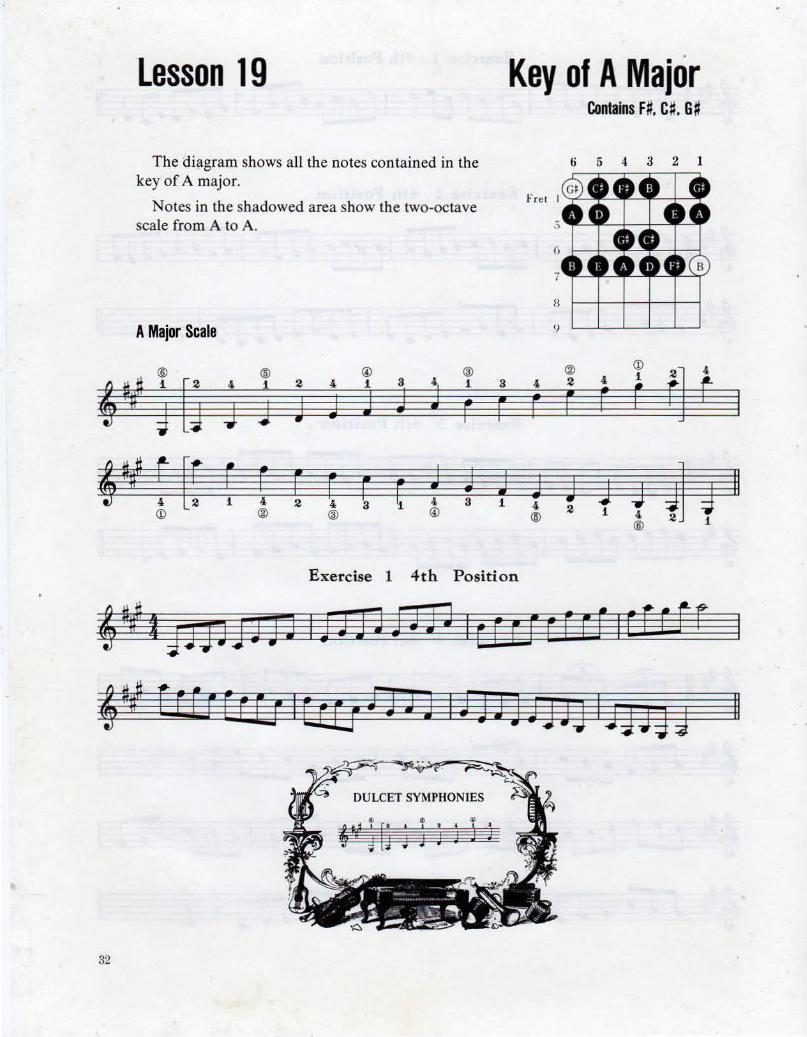
Lesson 12 Key of A Major Contains F~. C#. G#
The diagram shows all the notes contained in the 6 5 4 3 2 1
key of A major. Notes in the shadowed area show the two-octave scale from A to A. Fret L 1-+--+-~---1-------l
2
·1
5
Notice that the first finger must move one fret down in order to play the G#. It then returns to its normal position to play the rest of the scale. The G# may also be played on the fourth string, sixth fret with the fourth finger. Many guitarists alternate between these two possibilities. The choice would depend on which notes come before and after the G#.
A Major Scale ® ® @ ® ® <D 3 t] ,#~ 1
g n 1 3 4 1 8 1-~ 8 1 2 4 1 r d J J J J J J r F r F r
'U# [f r r r r ( ( J J J J J J m J g 4 8 1 4 2 1- 1 8 1 4 <D ® ® @ ®
3 1 ®
3 1
Exercise 1 2nd P osition
4UitJJJJJJJ3 liJH£lN lr:rrFcfE11CHJf
II
4 u~ F r f r f r E f I Er CJ J J J J I J J J J J j J j I J J Jj J II
18
·,
Exercise 2 2nd Position
4 ~1JJJJ JJJJ IJJJJJJJJ IJJ)JJJJJ IJJJJJJJJ I
4 •# JJ H r rr r 1 rr rr rr rr 1 rc rr rr rr 1 rr rc r 11
Exercise 3 2nd Positio n
4~~ j1) Jfa IJP h11J J J !JJ ljJ1 ffl IJ J1 ffl I
4 ~ fJ1 C:U I td EO I tcJ (£] I ( rJ Dr; I (FJ E E:t I
4 ~ tfJ Ci11 t£1 EEJ I E1J EO I JJ] E1J I ~ JJ ffi l
4 ~ fJ:3 £J J I jJ J f3 3 I ;1 1 fJ] I JJ J JJ J I 4 II
Exercise 4 2nd Position
4•#t=t1J1JJEiiiJJ)fJJJ IDJlJHJ 1£JJJ tFrl I
4*i gHaU IUrlrFFofiEE&UU IElc:tFFEJ I # - - ~ 4 ~ 0 EJ fJ E I JJ JJ .U J] I fJJ J 8 JJ I n n JJ JQ II
19
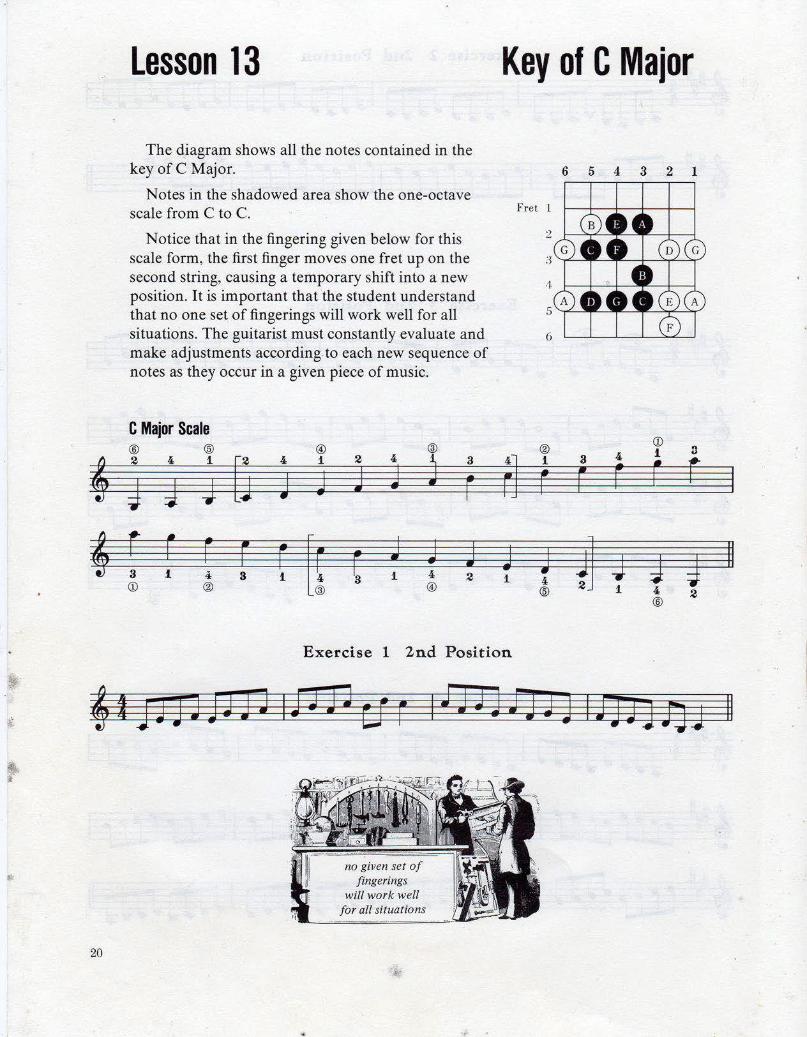
Lesson 13 Key of C Major
' '
The ~iagram shows all the notes contained in the key of C Major.
Notes in the shadowed area show the one-octave scale from C to C.
Notice that in the fingering given below for this scale form, the first finger moves one fret up on the second string, causing a temporary shift into a new position. It is important that the student understand that no one set of fingerings will work well for all situations. The guitarist must constantly evaluate and make adjustments according to each new sequence of notes as they occur in a given piece of music.
C Major Scale ® ® @ ® 2 4 1 [j 4 1 2 4
J 3
J J J J J J j r t r r r r f! [ J J J 3 1 4 3 1 1 4 2 <D ® @
M
j 1
Exercise 1 2nd Position
'I iJJ3 [.J J] liJJ) tf r IJJJJfJ
for all situations
20
6 5 4 3 2 1
<D ® 4 1 3 1 8 r t r r r
J 4] J J J 4 ® 1 4 2
®
J J I!J J]J)J
II
II
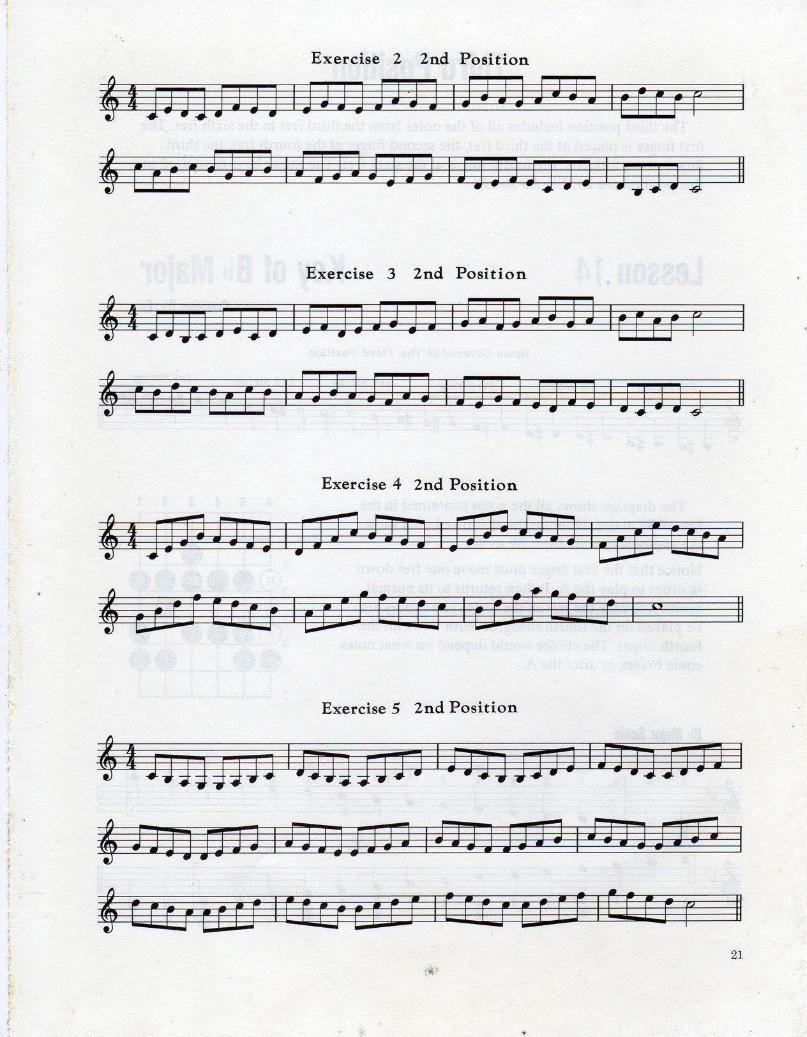
·. Exercise 2 2nd Position
Exercise 3 2nd Position
Exercise 4 2nd Position
Exercise 5 2nd Position
~~JHJJQJJ IIJJQfJJJ lfJJJJJJJ I!JJ]}JJ"3 I
~ i33Qf9JJ IJJ JJ EJH 1HJJJJJJ ,nnnn 1
~ CEer:rri IEE~UE E I Er g U !$IEEE; ~ II 21
..
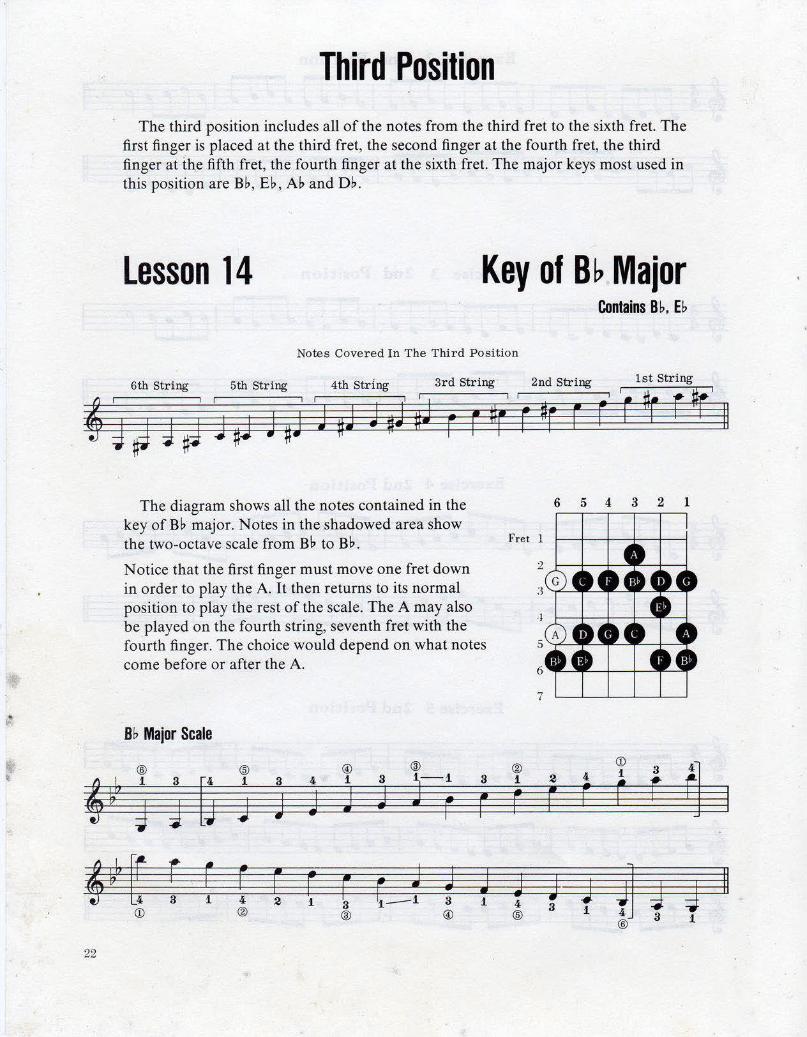
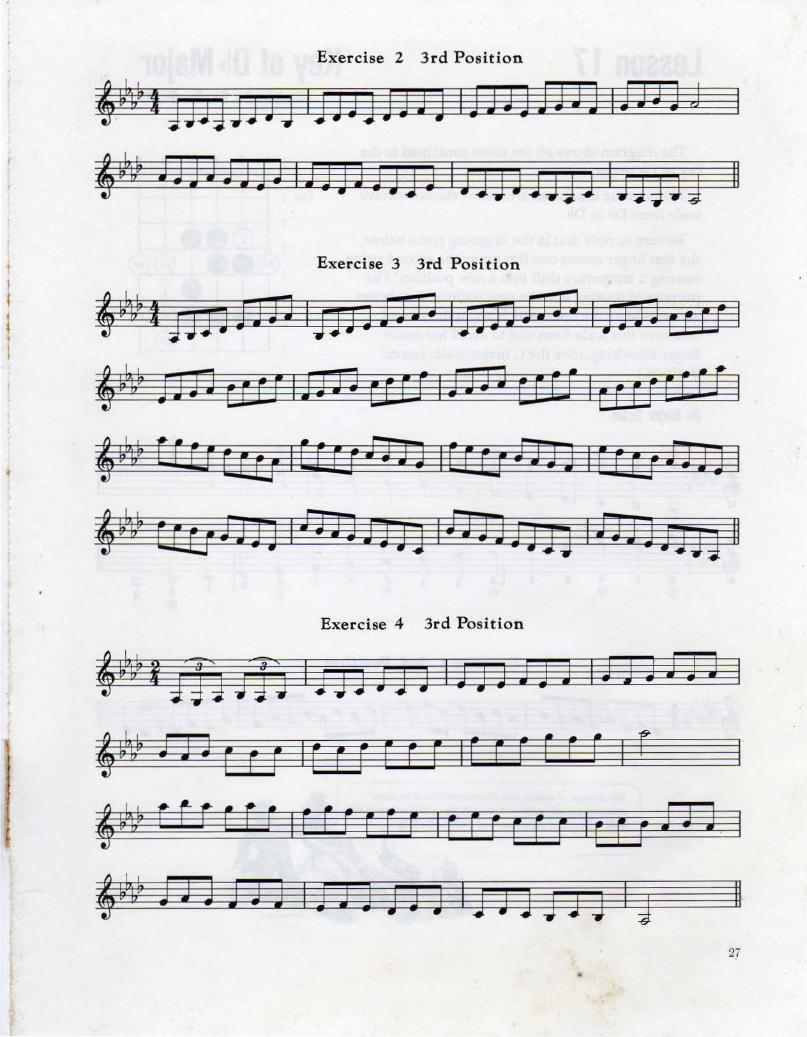
Third Position The third position includes all of the notes from the third fret to the sixth fret. The
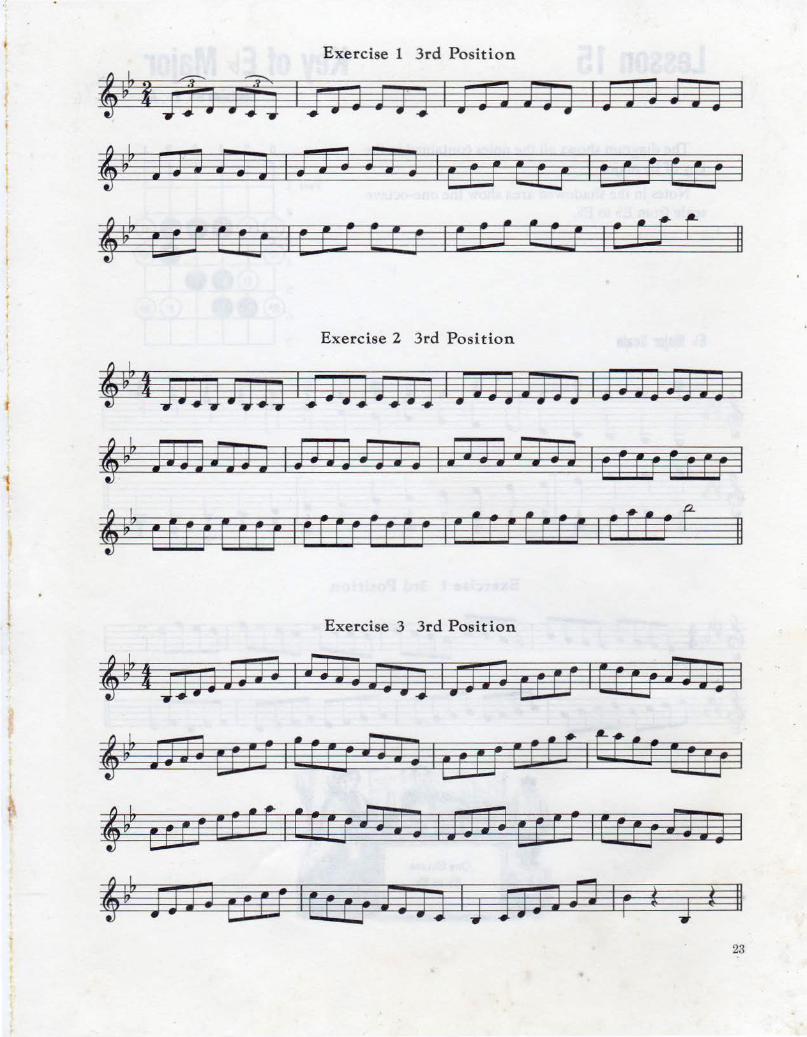
first finger is placed at the third fret, the second finger at the fourth fret, the third finger at the fifth fret, the fourth finger at the sixth fret. The major keys most used in this position are Bb, Eb , Ab and Db.
Lesson 14 Key of B~ Major Contains B b. Eb
Notes Cover ed In The Thir d Position
6th String 5th String 4th String 3rd String 2nd String 1s t String
4 J J J #j J tl J #j J #J J •J' fiJ r r fir' r •r E r' , r #r r t , II
The diagram shows all the notes contained in the 6 5 4 3 2 1
key of Bb major. Notes in the shadowed area show the two-octave scale from Bb to Bb.
Notice that the first finger must move one fret down in order to play the A. It then returns to its normal position to play the rest of the scale. The A may also be played on the fourth string, seventh fret with the fourth finger. The choice would depend on what notes come before or after the A. 6
7
Bb Major Scale
® ® @ ® ® <D 8
~ 1
~~ 1 3 [j 1 3 4 1 8 1-1 8 1 2 4 r r
J J J J J J r r r F r g J
,~~ r F r F r r ~ J J J J J ~ II [_1 J J 3 1 4 2 1 3 8 1 4 8 <D ® ® @ ® 1
® 8 1
22
Exercise 1 3rd Position
'W i ;fi J f5 I fJ J JJ J I i J 1 JJ J I i J J J JJ I
'V· i J 3 fJ J I J J J A J I r r 1 E CJ lc C F E ~ ; I
'W c r 1 UJ I C r:; C r; I C EJ L FJ I C r; t II
Exercise 2 3rd Position
@lf'IJJJJJjJJ ljJJ]JjJj IJJJJJJJJ IJJJ]JjJJ I
@~' JJJJ!Jn iJJJJJJJJ 1JJJJJJJJ lrFrrFrrr I
' ~b r FE r r ~ rr 1 r r rr r r rr 1 ~ r rr rr rr 1 r rr r r 11
Exercise 3 3rd Position
'w u JJJ u a 1 cr ann 1 c:r a rr E11 tr r; cr u 1
,W, LJ a H CJ I LE LI oE<l JJ I JJ JJ H Ei IE Er; fJ J3 I
'W H JJ cEFJ I rr u JJ JJ I J jJ H D I r * J t II 23
I
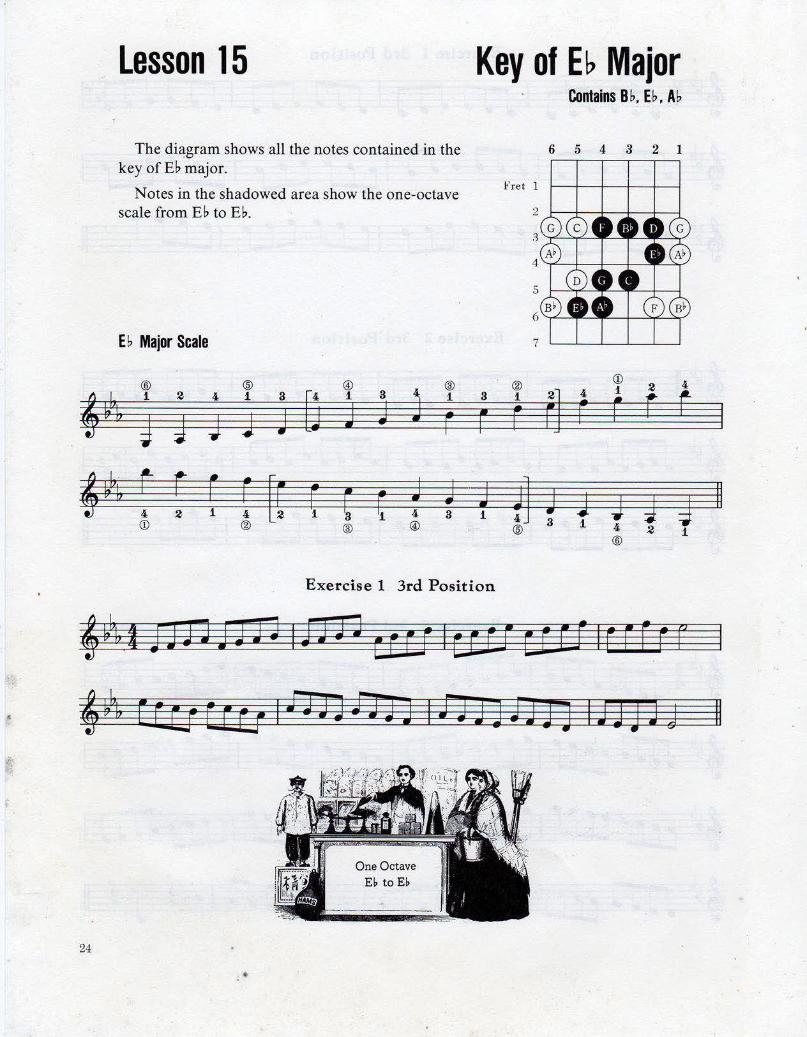
Lesson 15
The diagram shows all the notes contained in the key of Eb major.
Notes in the shadowed area show the one-octave scale from Eb to Eb.
E b Major Scale
® ® @ ®
tb 1 2 4 1 3 u
1 3 4 1
J J J J J r J J J
4Wi t t r r [~ [ c [ J J 4 2 1 4 4 3 <D ® @ ®
Key of E ~ Major Contains B b, Eb, Ab
6 5 4 3 2 1
Fret l f--t-+---+--+---l
® CD 2 4
3 1 a 4 1 r r r r r r
·J f] J J J J g 1 3 1 4 ® 2 1
®
Exercise 1 3rd Position
24
One Octave E~ toE~
II
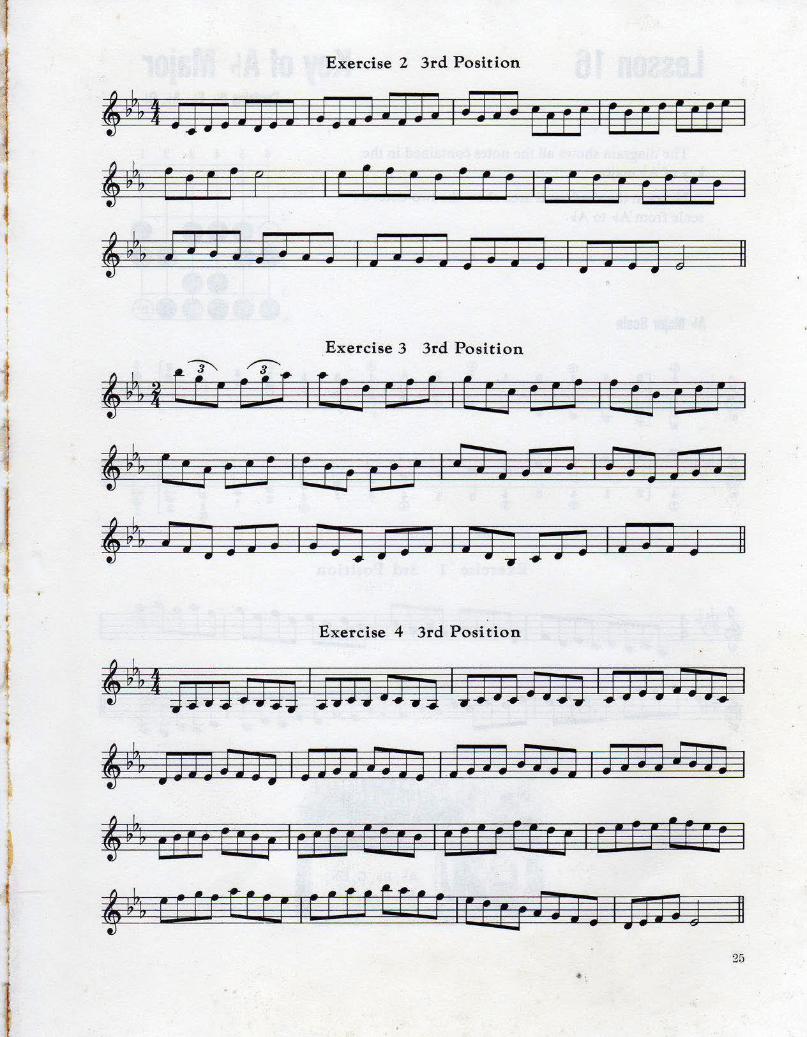
Exercise 2 3rd Position
I @V\ F rE F F: I r f F r r FE F IEEE r r Err I
.
l
@ #1. J J J J j J J J I J J 3 J j J J J I j J 3 J J II
.Exercise 3 3rd Position . ~ /3'
' Wt t frE.t erst 1LF1 cr~ 100 cr:J If e; ~r r 1
@ V1, C EJ c rJ I Q EJ UJ I FJ l J J J llJ J J J 1 I
~' !'7 -p ~J 3 i J J I £) ] J J J I J J 1 i J J I J J J J II
Exercise 4 3rd Position .
@ ~ lgJJJJJJgiJJJJJJH IJJJJiJJOIJJJJBJJ I
@ ~ jJJJJ)JQ I]JJJIJJ] IJJJJijJJ 1JJJJ£<lJJ I
@ ~, ~err CE u I rF Er Er EJI H Fr EF U I U fJ CE U I
@ W\ H Er Er El I C Ef! CE & I E rr~ £l J] I J] JJ J II 25
F
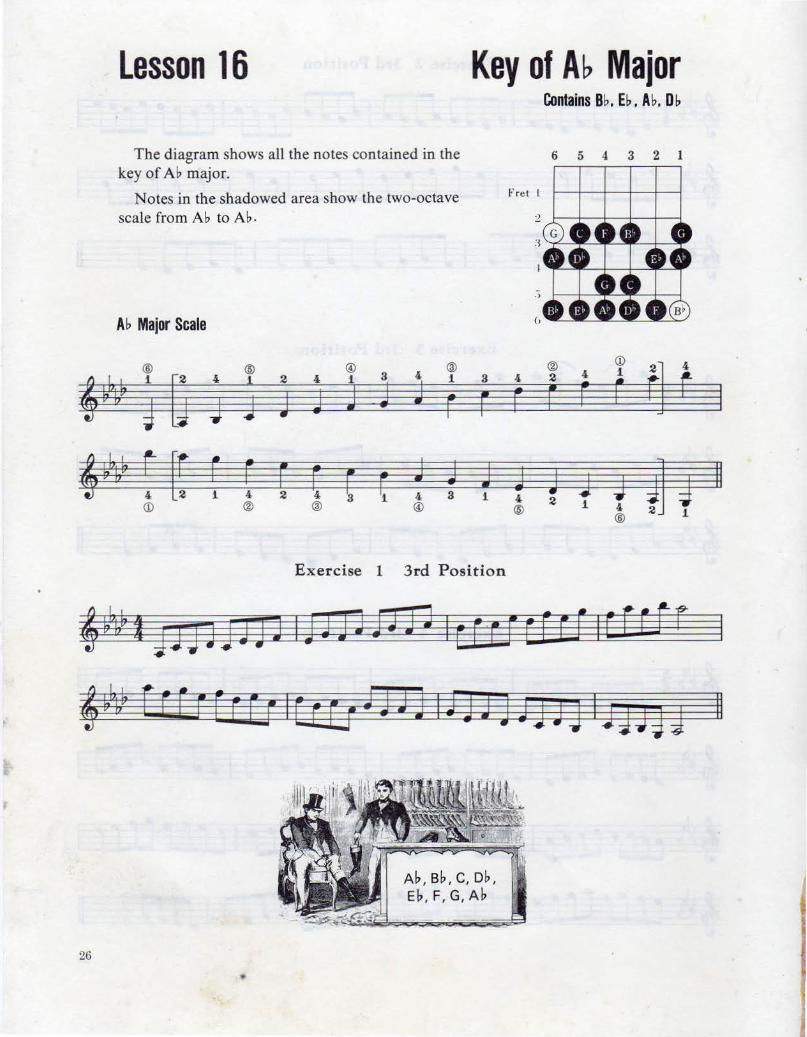
Lesson 16
The diagram shows all the notes contained in the key of Ab major.
Notes in the shadowed area show the two-octave scale from Ab to Ab.
Ab Major Scale
® @ @ @
4W1 1
[J 4
J 2 4 1 a 4 1
J J J J J r g J
44" t ! F r F t [ [ J J 4 1 4 2 4 3 <D ® ® @
Key of Ab Major Contains Bb. Eb. A b. Db
6 5 4 3 2 1
® <D
t] 4
4 1 3 4 2
F r r r r r
J J J J ij J g 1 4 2 @ 1 4
® 1
Exercise 1 3rd Position
4W1l fJJJ J3 J J J 13 JJ9 D N I cUi cfFJ IE Erff
II
4 WJ? f H H HJ I Er t; J 3J J I J JJ jJ JJ J IJJ J J J II
26
•
A~, B~, C, Db, E~, F, G, A~
Exercise 2 3rd Position
{ Exercise 3 3rd Position I
: ,~ tnaunn 1nnnn IJ:JJJDD IJHJ urr 1
t
' w,.~ D Y3 g rr I JJ 3J c:HJ I D JJ CE U I c: UT EO rJ I
' vv trueru 1traJJJJ 1aunn IFEufJJJ 1
,~ Q:gJJJQ liJJJJJJQ li:JJJfJjJ I!JJJJJJg II
Exercise 4 3rd Position
' wv J J J r r r 1 t c F r r r 1 r r r r r r 1 r 'W rtf F f L IF E F r [ r I r F r E [ F I r r r J J J
' W1.~ J J 3 J J J I J J 3 J J J I j J j J J j I J II 27
..
28
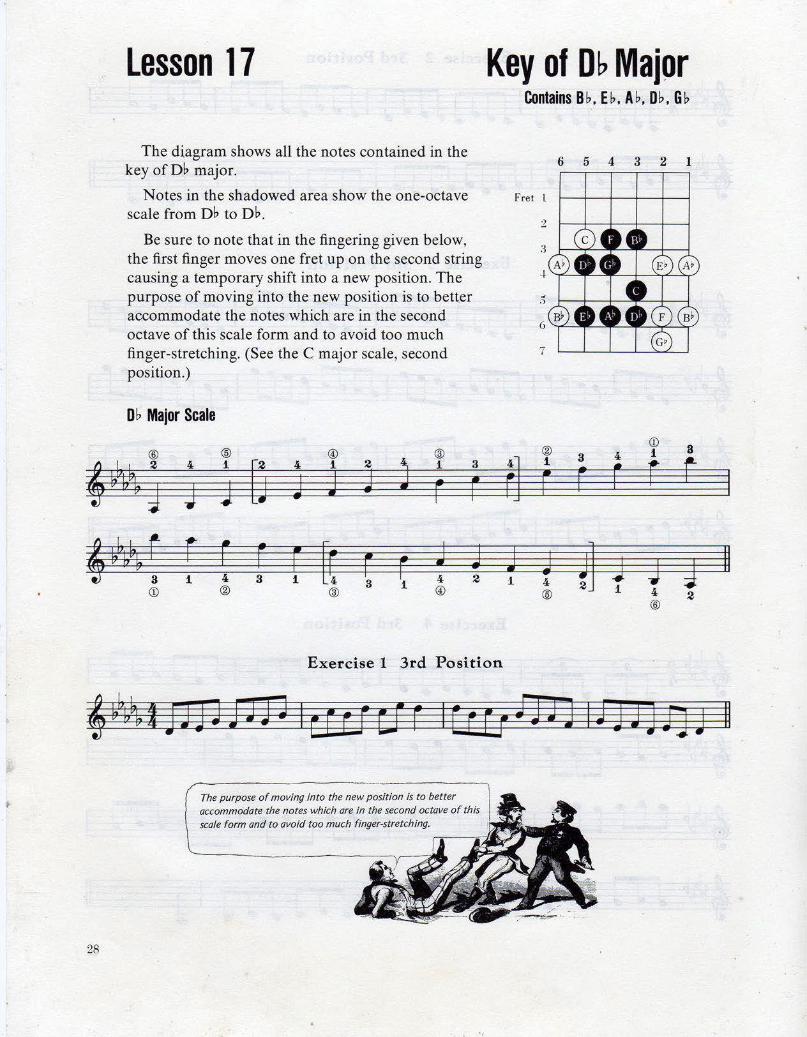
Lesson 17
The d~agram shows all the notes contained in the key of Db major.
Notes in the shadowed area show the one-octave scale from Db to Db.
Be sure to note that in the fingering given below, the first finger moves one fret up on the second string causing a temporary shift into a new position. The purpose of moving into the new position is to better accommodate the notes which are in the second octave of this scale form and to avoid too much finger-stretching. (See the C major scale, second position.)
Db Major Scale
J
r 1
® 1
J
r 4 ®
4
J [j
r r 3 1
@ 1
J 2
j
r 3
r 1
@ 1
r
J
3
F
2
Key of Db Majpr
J 1
Contains Bb, H. Ab, Db, Gb
® 1
F
4 ®
6 5 4 3 2 1
3
r 4
r <D 1
f
J J 1 4
®
3
t
J 2
Exercise 1 3rd Position
The purpose of moving Into the new position is to better accommodate the notes which are in the second octave of this scale form and to avoid too much finger-stretching.
...
II
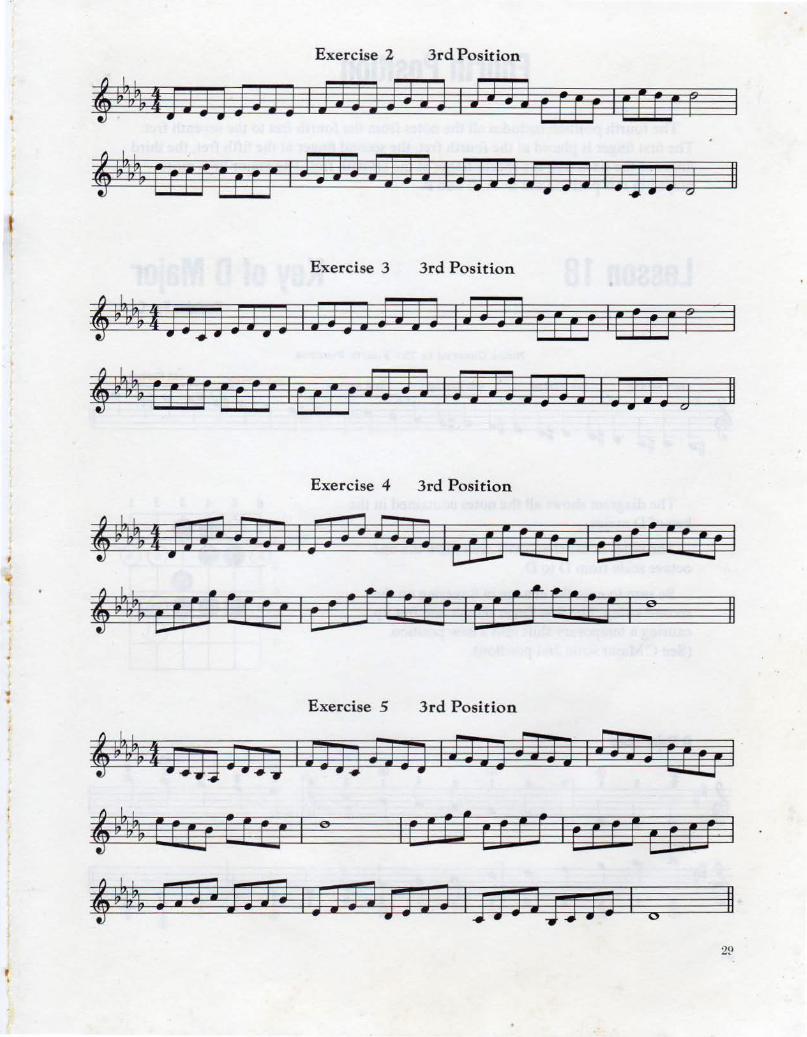
Exercise 2 3rd Position
4 ~ F r E f F t E F I ;J J J J J J J J I J J J J J J J J I J j J J <J II
Exercise 3 3rd Position
Exercise 4 3rd Position
Exercise 5 3rd Position
4 M I JJJJ J1 3J I JJ JJ J1 31 I JJ JJ iJ JJ I fJ JJ OF U I
t '~ !! ·~ tj 07% E F EJ E r CJ I " I C F CJ ( F FJ I E r F F c: F L1 · I
4 ~i\ H n JJ JJ I D H H J3 I fJ JJ J 3 JJ I ., II
, I
~ ~fi
~~D
30
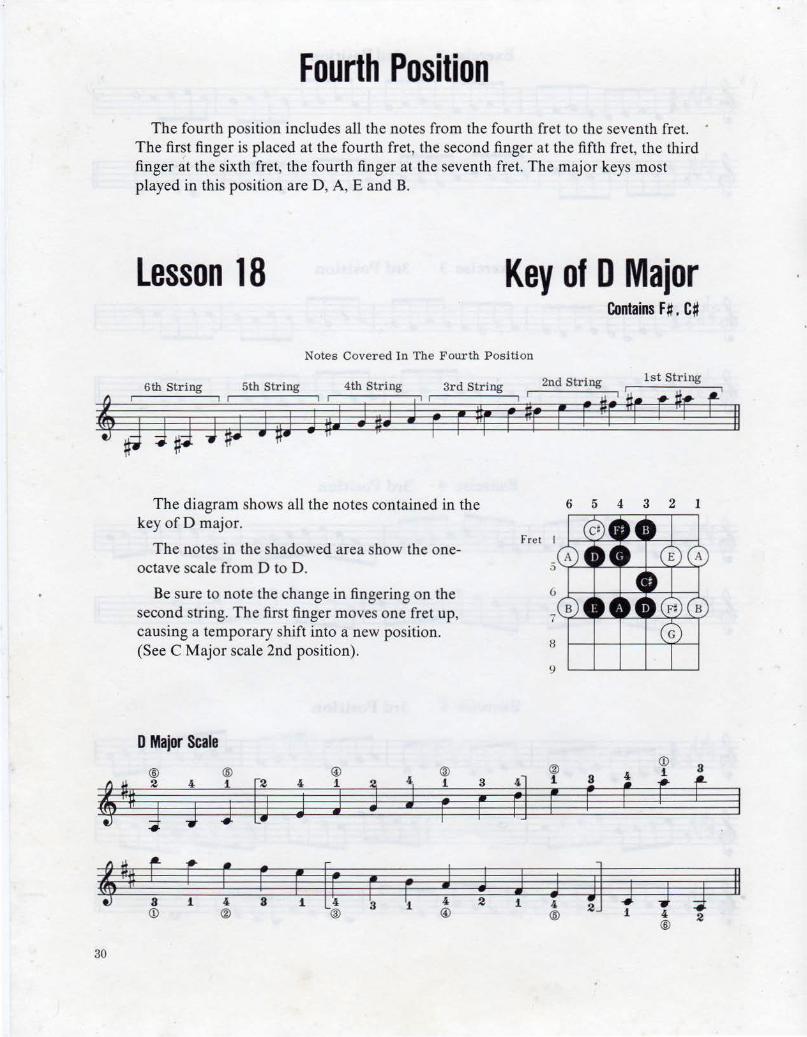
Fourth Position The fourth position includes all the notes from the fourth fre t to the seventh fret. ·
The first finger is placed at the fourth fret, the second finger at the fifth fret, the third finger at the sixth fret, the fourth finger at the seventh fret. The major keys most played in this position are D, A, E and B.
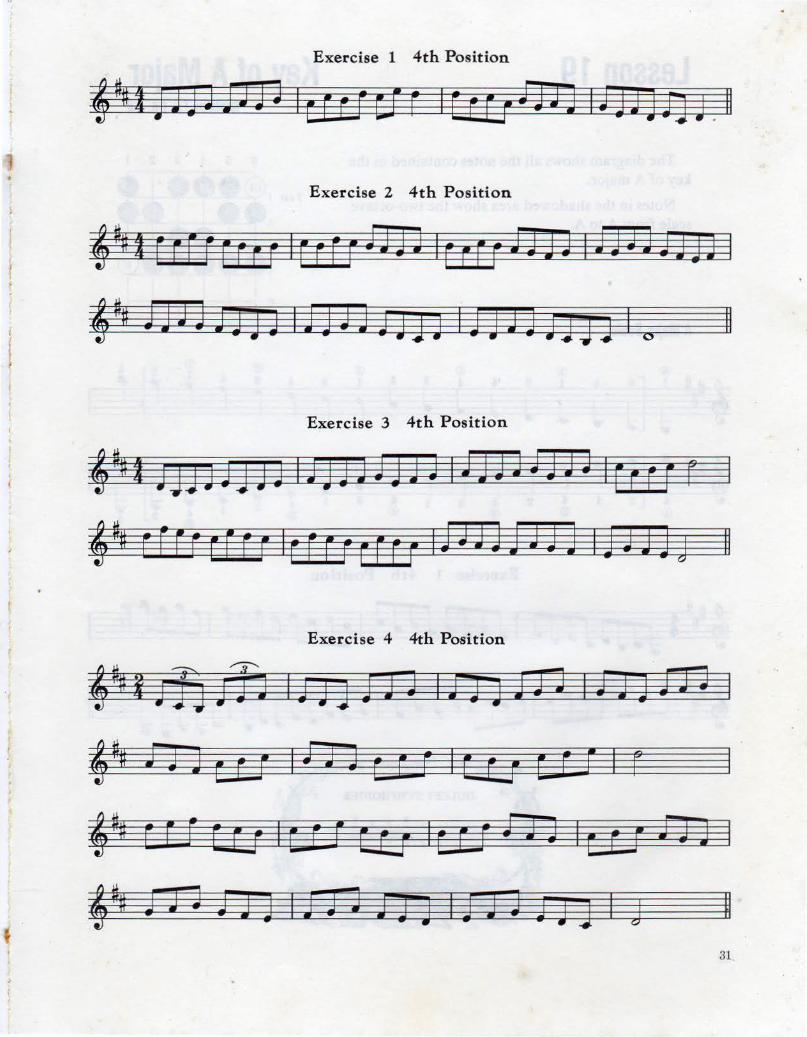
Lesson 18 Key of D Major Contains F # . C#
Notes Cover ed In The F ourth Position
The diagram shows all the notes contained in the key of D major.
The notes in the shadowed area show the oneoctave scale from D to D.
Be sure to note the change in fingering on the second string. The first finger moves one fret up, causing a temporary shift into a new position. (See C Major scale 2nd position).
0 Major Scale
® ® @ @ 2 4, 1
m 4, 1 j J
1
J j J r 4 J
r r r r F [[ F [ J a 1 4, a i 3 4,
<D ® @ @
3
r j 2
6 5 4 3 2 I
® <D a 4, 1
n 1 a r r ~ r r
J w ~ J J J 1 4 ® 1 4 2
®
II
(
f I
I •
Exercise 1 4th Position
Exercise 2 4th Position
Exercise 3 4th Position
' ~ I J JJ J J j J J I J J J J J 3 J J I J J J J J 3 J J I F r L F r
' ~ F Fr U [ U I E [ U e F rr I J J J3 J J3 J I J J J ]J II
Exercise 4 4th Position
,-~iJJ)if11JJj£JJ IJJa;J"J IJJ]JJJ I
,~ fJ J l r J I J J J t r F I LJ LJ ( F oJ I F
,-ft r F ~ C r; I ( F f E E=i I L F1 fJ J It: r 1 fJ J
,~ J J J J J 3 I i J J J 3 J I i J J J J J I <J ~ 31
Lesson 19
The diagram shows all the notes contained in the key of A major.
Notes in the shadowed area show the two-octave scale from A to A.
A Major Scale
® @ @ @
*~ i
G 4 j
2 4 1 8
J 1
J j J j r g J
*~ r [! r r r F [ [ J j 4 1 4 2 4 4 3
CD ® ® @
Key of A Major Contains F#. C~. G#
® <D
f] 4 i
3 4 2 4 r ~ r r F r
J j J J ~ J g i 4 ®
2 i 4 ® i
Exercise 1 4th Position
*~lpgJJJJJ I ~ J HfJf31crr£rFrfiCEr;r
II
*-~ fHEEC(JIEt[JJHJ IJJJJJJJJIJJJJJ II
DULCET SYMPHONIES
32
I
t
t .
I
t
Exercise 2 4th Position
,~IJJJJJJJJ IJJjjJj)J IJJJJJJJJ ljJJJJjJJ I
4 ~ 3 JJj J JJ J iJ JJ J J JJ J I J JJ 3 ij JJ I J JJ J JJ n I
4 -~ r r rr [ u r 1 tf r rE rr r 1 r r rr r r rr 1 rf U r 11
Exercise 3 4th Position
Exercise 4 4th Position
,~ r Ef rr H r I EE fr E Ef r I EE E U r f r I & I
4~ r rr rr rc r 1 rr r rr rr r 1 rr r r cr rr 1 n J a JJ J J 1
4*~ JJjJJJjJ IJJ]JJjjJ IJJJJJJjJ I & II
33
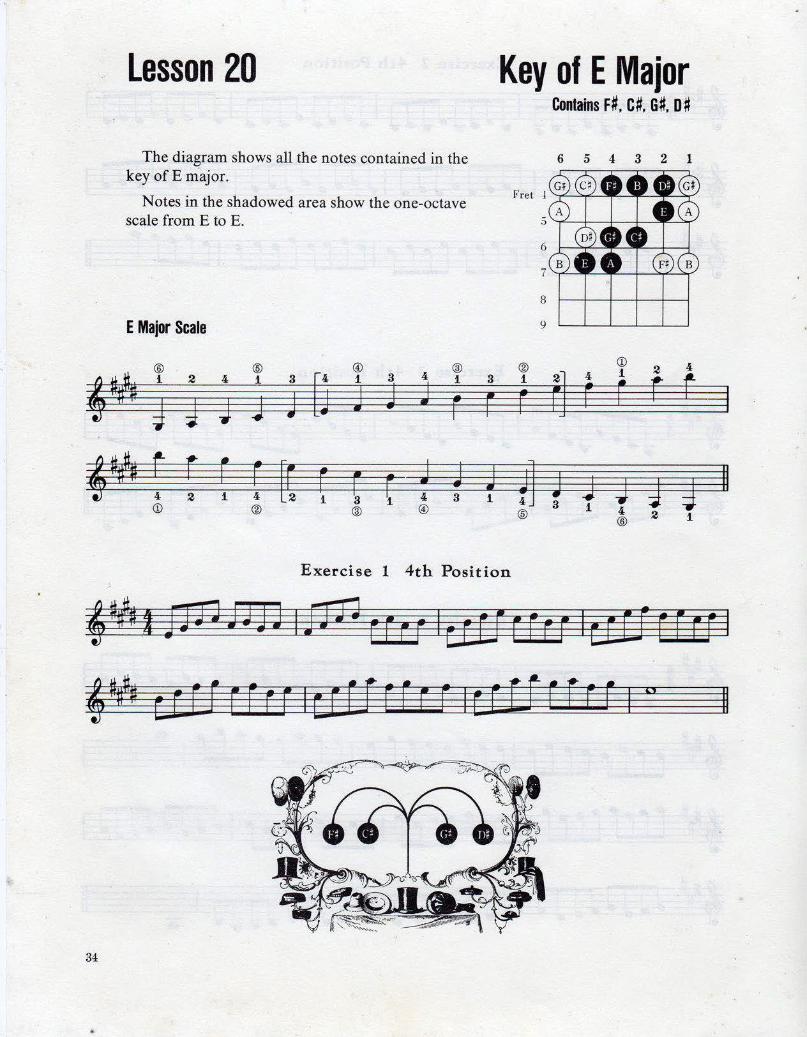
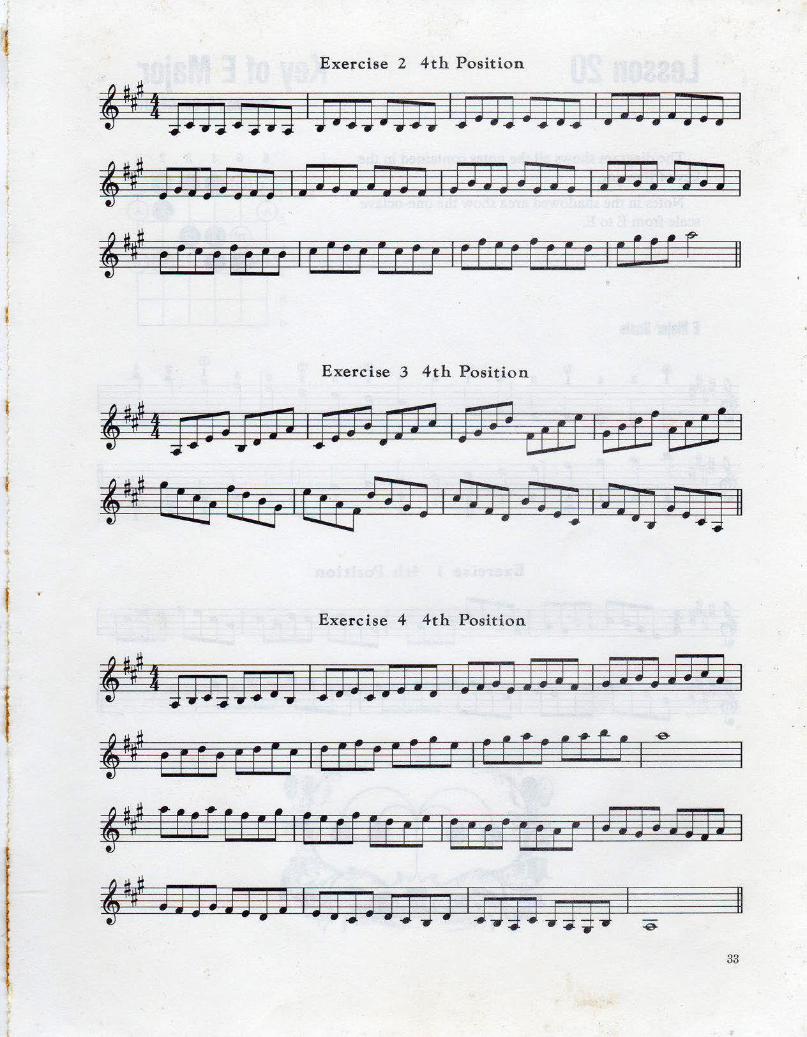
Lesson 20 Key of E Major
The diagram shows all the notes contained in the key of E major.
Notes in the shadowed area show the one-octave scale from E to E.
E Major Scale
@ ® 1 3 4 1
J j J r
[ [ J J 4 8 @ ®
3
F
J 1
Exercise 1 4 t h Position
® 1
r
t] ®
Contains F#, C#, G#, O·#
6 5 4 3 2 1
7
8 1-----+----+----1--+---l
9 '----'-----'----'-----__._________,
<D 2 4
a 4 1 r r r F
J J J J J 8 1 4 2 1 ®
II
~~~ DDJJJJ 1tPJ EEr:r lar1rFH lrJfi FfrF I
~~ trf1 Ff H I c:f ri rf r E I cr f f E f rE I " II
34
l
Exercise 2 4th Position
~~~ ffa EELE 1Ecurrrr lEEr:: rccr IFr e crrr 1 ~#h EctJrrEr 18 JJJJJJ 1IJJ]JJJJ IBJJw 11
~ f Exercise 3 4th Position I I
l ~~ 1 J n r:r a 1 r u n JJ 1 J n H tJ 1 r u u e 1
~~ r aLEEfiC fJCFg lr SJJJ] IJ n£JJJ I
~~#• F EJ fJ J] IJ £3 cE FE IF U JJ J3 I J ~ J II
Exercise 4 4th Position
~~~ rECftEU lcHJEEU lcrEJCFrrlurrcru I
4-h r:E Ef E E EJ I iJ J"il Er U I JJ JJ iJ JJ I D JZl £J JJ I
~*h ;JJJ!)J] IJlHiUJJ IJJJJJJJ] liJJ JnJJ I i:- # - ) ! H i]JJ JJJQ ljJJJ klJJ liJJ Ug IEJQ J II
35
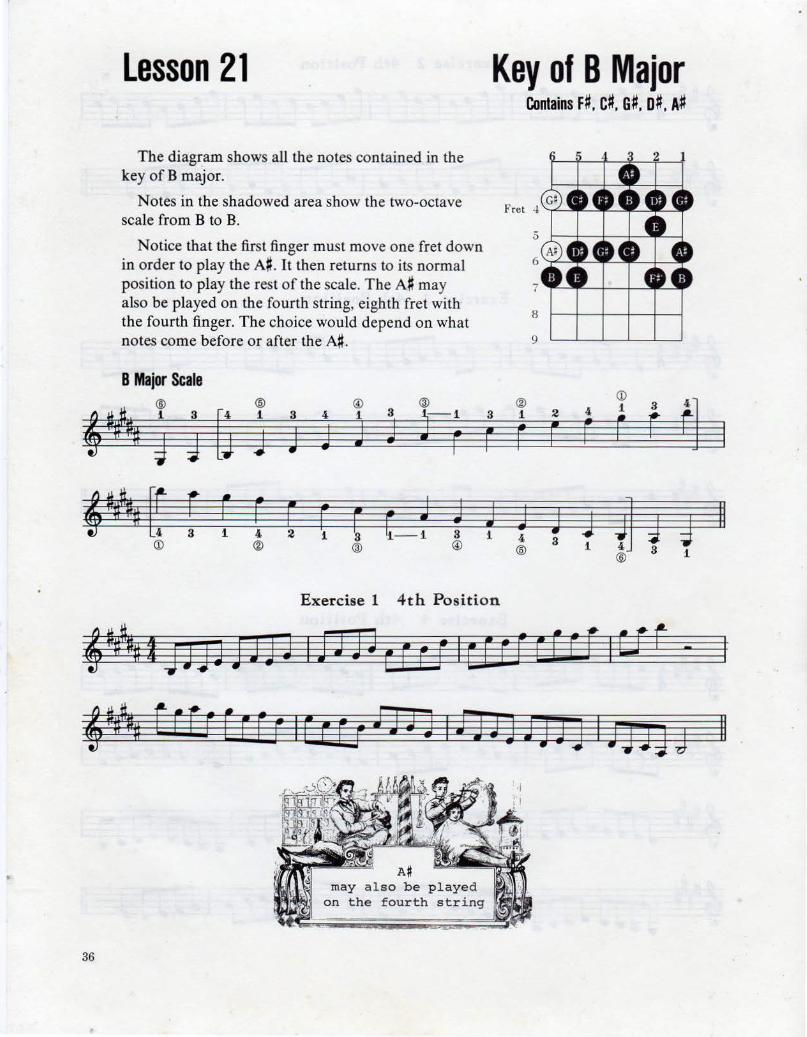
Lesson 21
The diagram shows all the notes contained in the key of B major.
Notes in the shadowed area show the two-octave scale from B to B.
Notice that the first finger must move one fret down in order to play the A#. It then returns to its normal position to play the rest of the scale. The A# may also be played on the fourth string, eighth fret with the fourth finger. The choice would depend on what notes come before or after the A#.
B Major Scale ® ® @ ®
,~ i 3
[J 1 3 4 1 3 ~-1
J J J J J g J r
4~ [f r r F r F [ ~ J [ _ 1 a 1 4 2 1 3
<D ® ® @
Key of B Major Contains F#, C#, G#, o#. A#
<D ® 4 1 3 tl 3 1 2 r f r F F F
J J J J 4] J g 1 4 3 ® 1 3
® 1
Exercise 1 4th Position
36
may also be played on the fourth string
II
.. ;
I
! ~
( (
t (
'
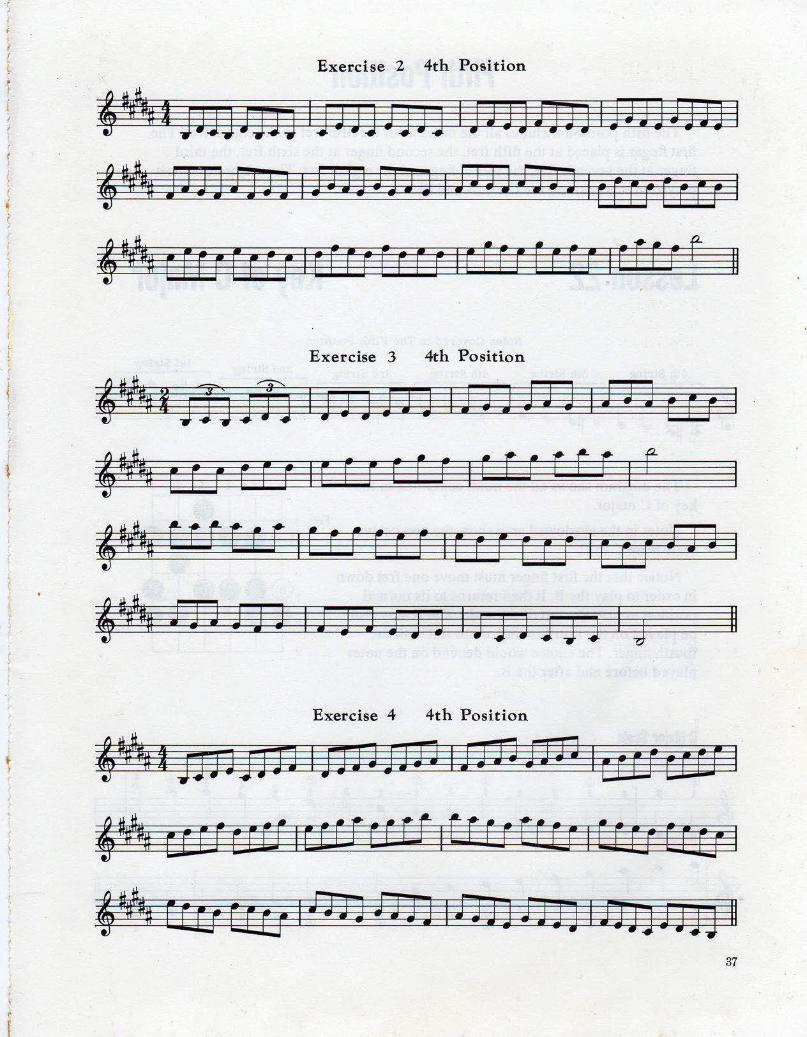
Exercise 2 4th Position
,~ljJJJJj)J ljJJ]JjJJ IJJJJJ]JJ I]JJjJJJJ I
4~ JJJjtJJJ idJJJJJJJ iJJJJJJJ) lrfEFfrEF I
4 ~ E E F r f r F r I r F E F [ E E F I E f E r [ E E r I E [ E F f II
Exercise 3 4th Position
\ 4~1JJJJTJ IJJJJJJ IJJJHJ 1JJJru I ·
1 ,~ r r r r E r 1 r E r E r r 1 r E r r t r 1 r
4##fft E: r t E r E I C F C E r E I E E E E r E I r r r JJ J I
'~~ ffi J J J I J 3 J J J J I J J J J J J I J II
Exercise 4 4th Position
\ ,~IJJJJ-fl£J IJJJJBH liJHtlD lrU~crrll
,~ c:UicFC!ICCCfUffiCEEJErU ltHJ EF[J 1
,~ ECCJBgliJJJJJJJ lilJ]iJJQIJJJ]JJJJ II 37
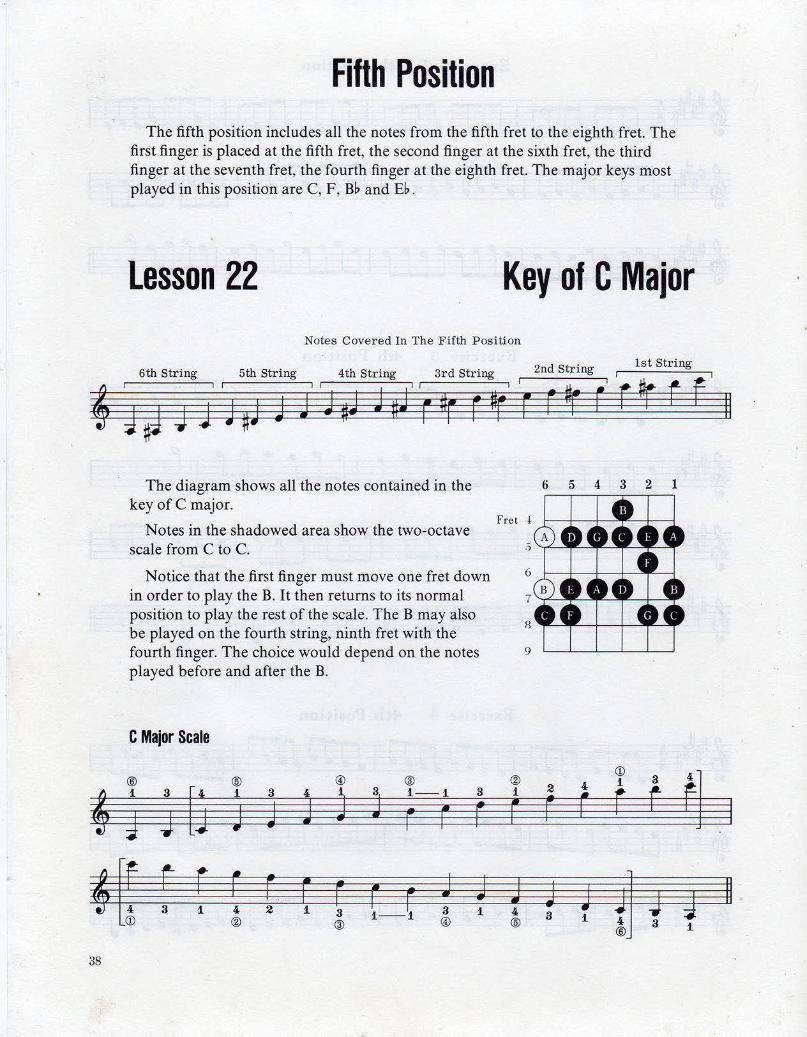
Fifth Position The fifth position includes all the notes from the fifth fret to the eighth fret. The
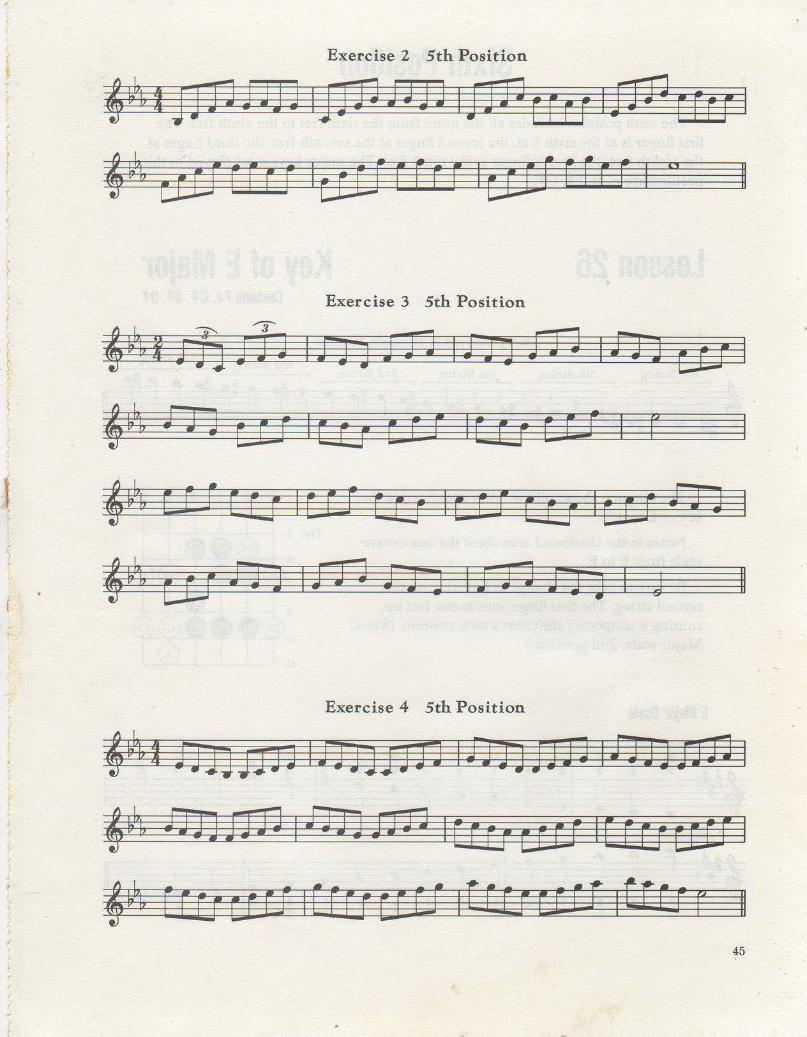
first finger is placed at the fifth fret, the second finger at the sixth fret, the third finger at the seventh fret, the fourth finger at the eighth fret. The major keys most played in this position are C, F, Bb and Eb.
lesson 22 Key of C Major Notes Covered In The Fifth Position
. 2nd String 1st String 6th String 5th String 4th String 3rd Strmg
' J ~J 4 J ·hJ 3 J J 1J Jni r Dr r ~· r r t r' r t r f 11
'
The diagram shows all the notes contained in the key of C major.
Notes in the shadowed area show the two-octave scale from C to C.
Notice that the first finger must move one fret down in order to play the B. It then returns to its normal position to play the rest of the scale. The B may also be played on the fourth string, ninth fret with the fourth finger. The choice would depend on the notes played before and after the B.
C Major Scale
@ ® ® ® 1 3 [j 1 3 4- J j 1 - 1 3
J J J r F F J J
4r. t r r F. F F F F J J 3 1 4- 2 1 3 3 1
® ® 1 - 1 @ <D
38
6 5 4 3 2 1
® <D
3
El 4- 1
1 2 r r F F r
J J J ~ II J 4 4-®
3 1 a 1
(
Exercise 1 5th Position
Exercise 2 5th Position
--:::-..33 4t ffiJjjJJJJJJ IJ130)D3JJJ I)JJfflftlDJ 1J18Jwffl1
4 mcurrrwiE!fEffrrrrrrlccHtrrrrrrrl ., 11
Exercise 3 5th Position
'IJJHflJ1 IJJJJ r:rtr li:JJ) UF-f IJJJJ EJE11
4 DD crrc luarrrJ 1c:rucrrJ ICfrJ~EEfl
fH& [E CJ 1tEu E U:t 1EE Er Erg I DE E1 fJ JJ I
4 EEafWJJ IF[r~EJJ IErgfJ)J 1£lJJJJJ)II 39
4~
4~
40
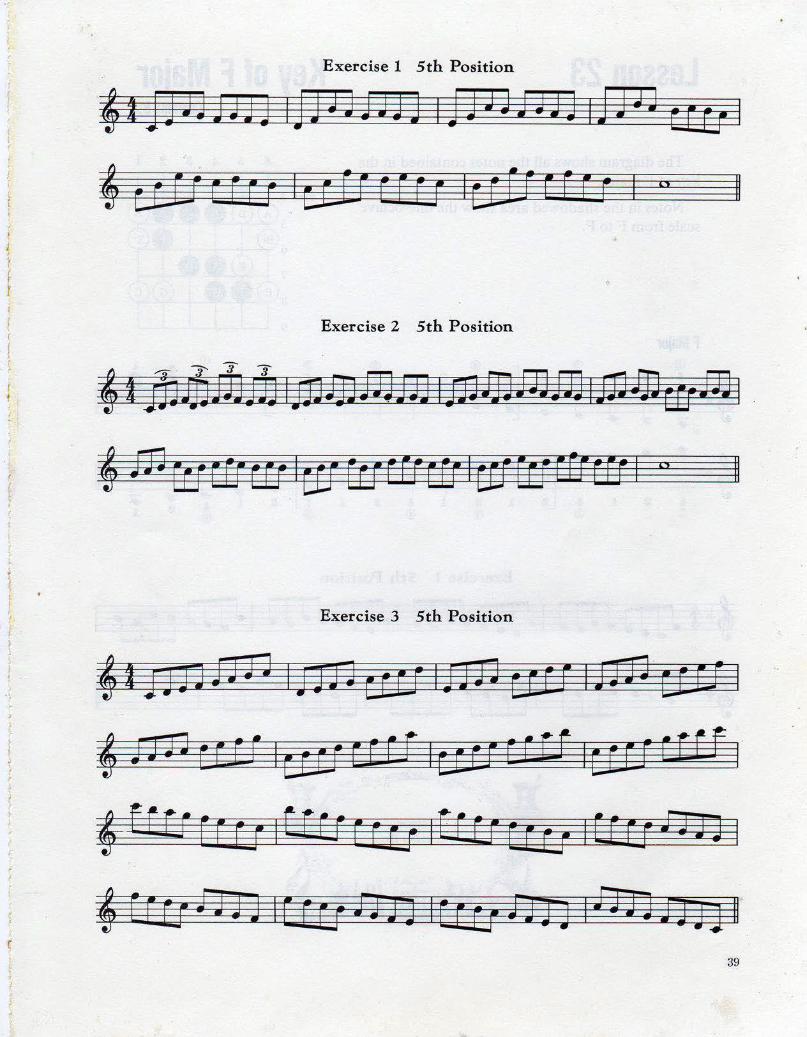
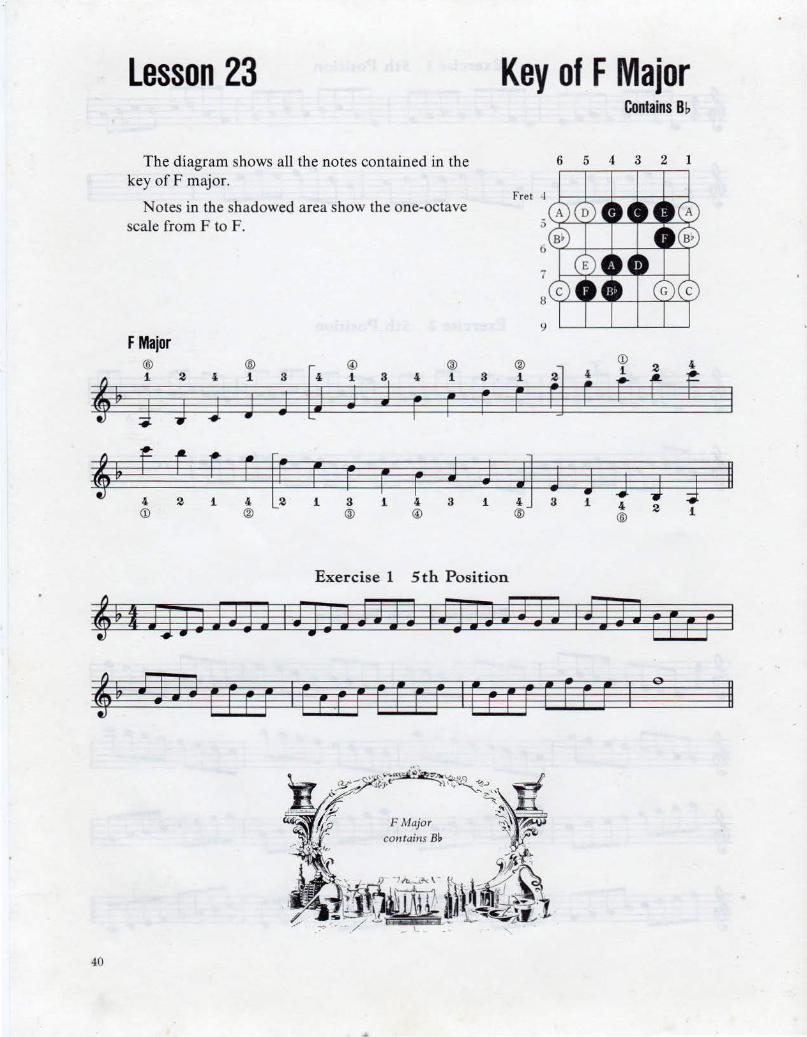
Lesson 23
The diagram shows all the notes contained in the key ofF major.
Notes in the shadowed area show the one-octave
Key of F Major Contains Bb
6 5 4 3 2 1
scale from F to F. 5 ~""--
F Major ® ® i 2 i i 3
J J J J j
f r r r r. i 2 i 4 <D ®
D @ ® i J
4, i 3
j r F F
F F F r J j i 3 i 4 3 i
® @
Exercise 1 5th Position
8
® <D 4 i $ • i • ~ c ~ r r r +=
~] j J J J J 3 i 4 2 ® ® i
II
, I ' (
~ , t
r f
J
Exercise 2 5th Position
II
Exercise 3 5th Position
4~ i J D U rJ I r ti f-J JJ I J g CJ Cf If L1 E Er~ I
4~ r gcra 1E acre; lr n nn1a Rc::cCll
4~ E CJ JJ H I J fi (C c; I C U cr e I J a J II
Exercise 4 5th Position
41
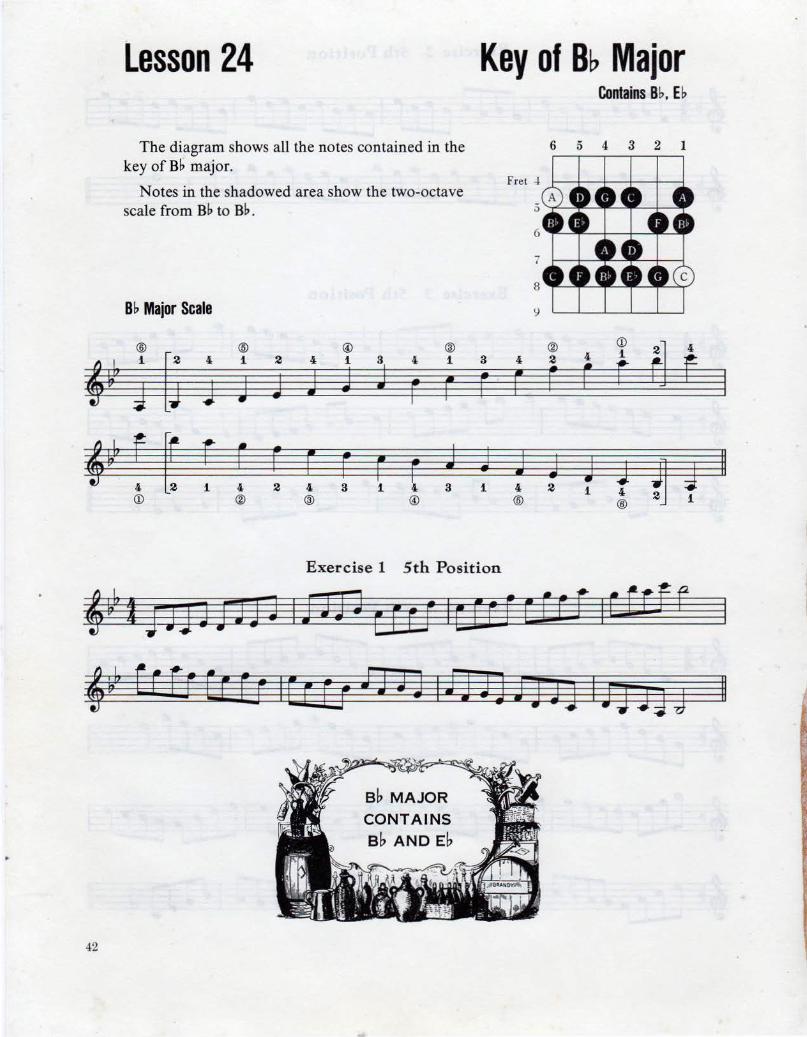
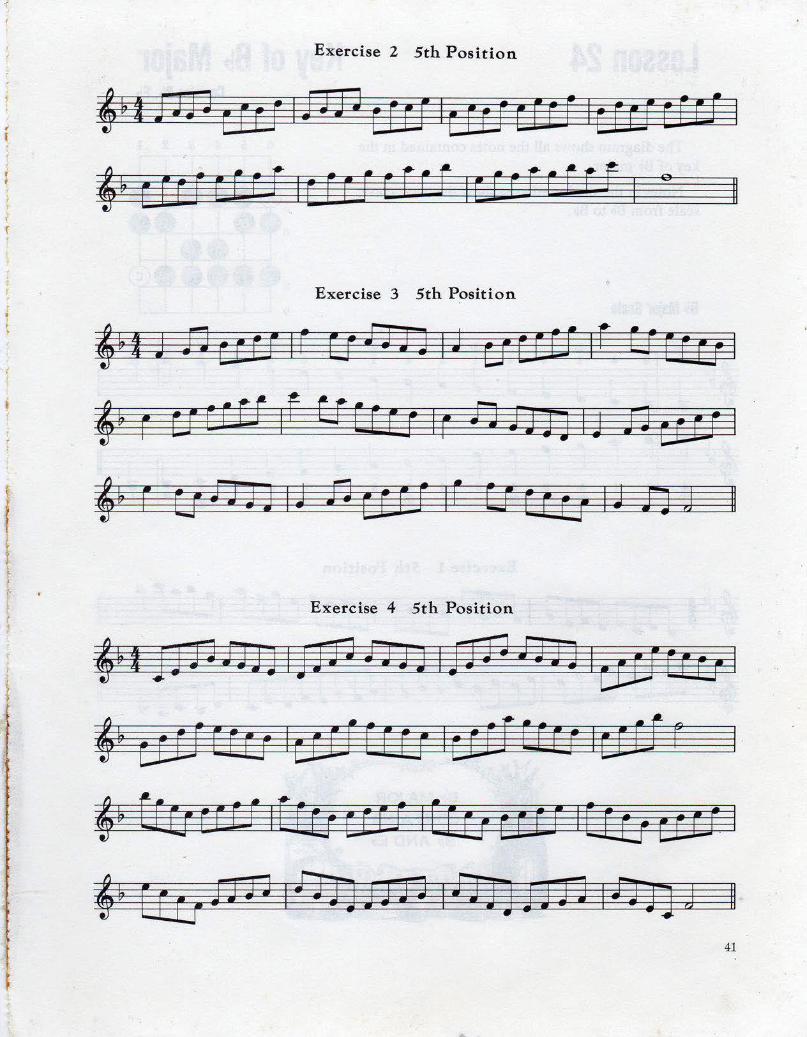
Lesson 24 Key of Bb Major Contains Bb, Eb
The diagram shows all the notes contained in the 6 5 4 3 2 I
key of Bb major.
Notes in the shadowed area show the two-octave Fret -1
scale from Bb to Bb . 5
6
i
8
Bb Major Scale 9
® @ @ @ ® <D
Fj 4
i [j ' i 2 4, i j ' i 3 ' 2 4, i
f 4 ~' J J J J J r F r F r r E J
4 ~ f ~ r r F r F F ( J J J J J J ~ J II 4, i ' 2 4 3 i 3 i 4, 2 i 4 <D ® ® @) ® ® i
Exercise 1 5th Position
4Wif=JjJJJJJ IJJJJ (ErJ lcEftrCFf 1t£rft
4? fHtr Cr Et I Er rJ J JJ 3 I J JJJ J jJ 3 I !J J) J II
42
Bb M A JOR
CONTAINS
Bb AND Eb

• )
•
(
' ~
Exercise 2 5th Position
~ f I j JJJ i1J JJ 1j J J] 1J JJ I J JJ J iJ JQ I J JJ HJ JJ I
~w HJJJJJJ 1JJJJJJJJ lrrrrrrrr IEErrrrrr I
~ W F f FF f rF r I E CE F CE Er I r f Fr f r Er I cHI f II
Exercise 3 5th Position
~WI Lrfrcrrc 1frf[frrr 1EEHEFEE IEELErFrFI
~#EEEFfFEFIEFfFErrriFEfrJJJJ I a II
Exercise 4 5th Position
43

Lesson 25 Key of Eb Major Contains B~ . H. A~
The diagram shows all the notes contained in the 6 5 4 3 2 1
key of E~ major.
Notes in the shadowed area show the one-octave Fret -1-
scale from E~ to Eb. 5
Be sure to note the change in fingering on the 6
second string. The first finger moves one fret up 7 causing a temporary shift into a new position. (See C Major scale, 2nd position.)
H Major Scale <D ® ®
u @ ®
a ® I l 3
2 4 1 4 1 2 I 1 3 I 3 r f ' d\ J J J j J r F r r r r J
,~ f r f r r ~ r F r J J J ~ J J II J 3 I 4 3 i 3 1 4 2 1 4 1 " <D ® ® @ ® ® 2
Exercise 1 5th Position
'rt rFFrrFFr IEfErrfFF 1JJJJj JJj ldJJ]j II
44
SHIFT TO NEW
POSITION!
Exercise 2 5th Position
4~tfJJZlJJJ31JJ3JJJJJ lf]Y3rcer lflErccr 1
II
Exercise 3 5th Position
44t rf; tTJ IJ J1 J JJ lfJJ f3J 1£JJ c:u 1
4 Wt t J J c rJ I E ry ( rJ I E EJ C EJ I r
4 ~ C: L fi E Gr I C F4 r b; I E ri c: ry I c El fJ J
4~t E U fJ 1 I J J J fJ J I fJ ?.l J 3 J I :J II
Exercise 4 5th Position
4Wti1JJJJJH IJJJ)iJH 1n13!3JJ 11DJJtJD I
4~ iJJ]flJJifJJJDN IOEuc:rUIEfUUE!I
4rt. Eruua ICfEJCEGf IEC(Jc;U=f 1tE~ r II 45
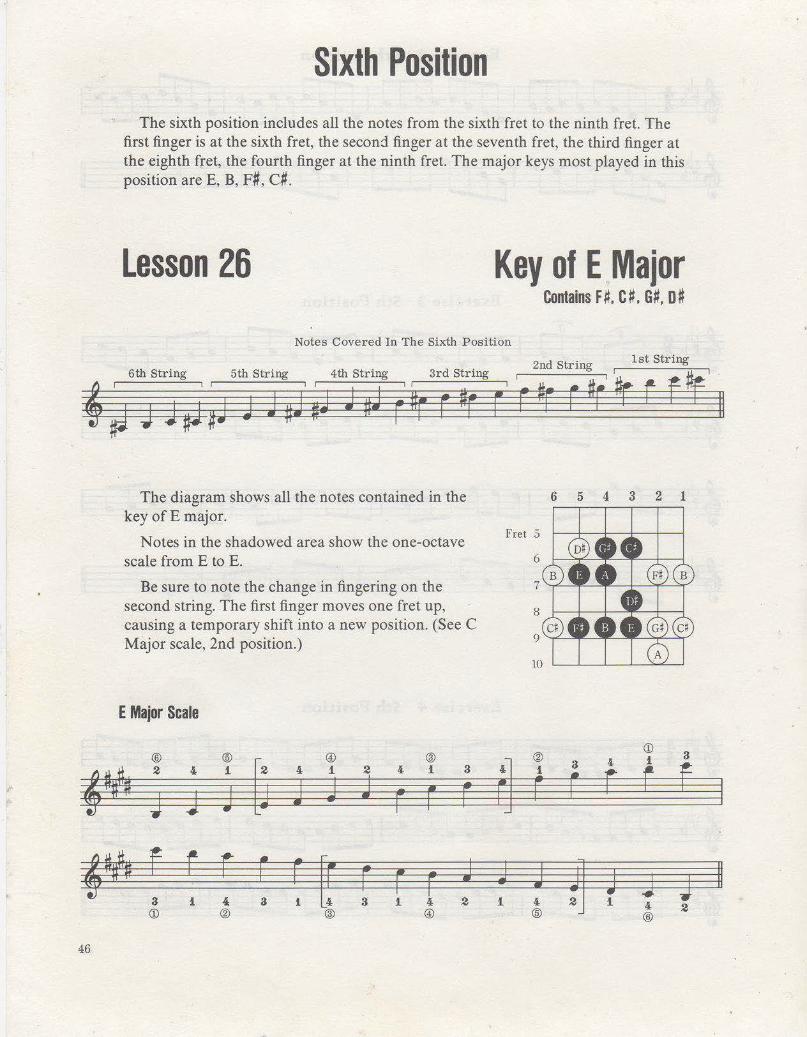
Sixth Position The sixth position includes all the notes from the sixth fret to the ninth fret. The
first finger is at the sixth fret, the second finger at the seventh fret, the third finger at the eighth fret, the fourth finger at the ninth fret. The major keys most played in this position are E, B, F#, C#.
Lesson 26 Key of E Major Contains F#. C#, G#, 0#
Notes Covered In The Sixth Position
2nd Strin 1st String 6th String , 5th String , 4th String , 3rd String , ~ , t f t 4 #J 4 ; #:i#J J J #hJ J nJ r ur r •r r r tr r r r 11
The diagram shows all the notes contained in the key of E major.
Notes in the shadowed area show the one-octave scale from E to E.
Be sure to note the change in fingering on the second string. The first finger moves one fret up, causing a temporary shift into a new position. (See C Major scale, 2nd position.)
E Major Scale
® ® @ ®
D ,~ 2 4 1 4 i 2 4 1 3
J J J J J r r r J
,~ f r E r r ~ r F r J 3 i 4 3 l 3 1 4 2
<D ® ® @
46
6 5 4 3 2 1
® <D 3
E] I i
i 3 r f r r r
j J ~ J J J II i 4 1 4 2 ® ®
i f
Exercise 1 6th Position
Exercise 2 6th Position
4~ I FE FEE Fr r I fr fF EF rr I Fr FF J J H I rr EF JJ JJ I
,~ J jJ J JJ H I dJ J3 JJ J J I JJ JJ J JJ 3 I .. II
Exercise 3 6th Position
()
Exercise 4 6th Position
,~~ fJ) ifa IJJ J fJJ IRJ flJ lA J c:U I
,.,. RJcr± lcr1 trJ lcr:;crr 1 r # -'*" E rr E 0 I CEJ F r:r I t F F EJ fJ I c e;f fJ J I
,.,. r rJ FJ 3 I J 3 J EJ J I J J 3 J 3 J I J II 47
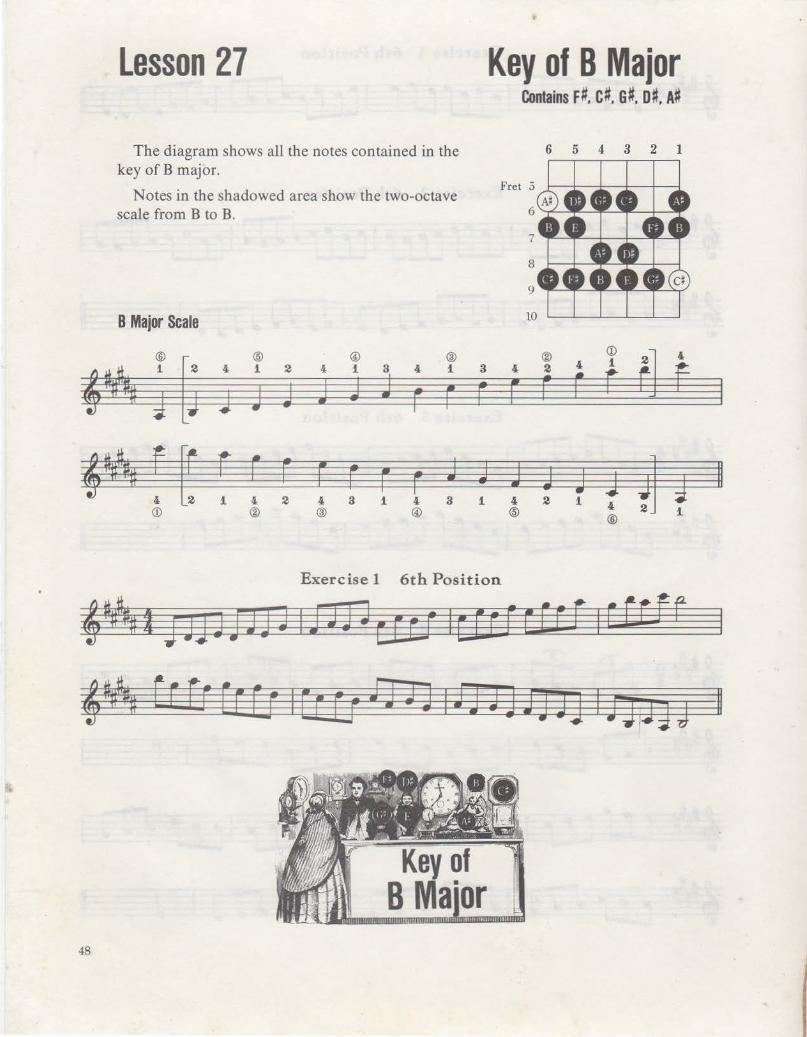
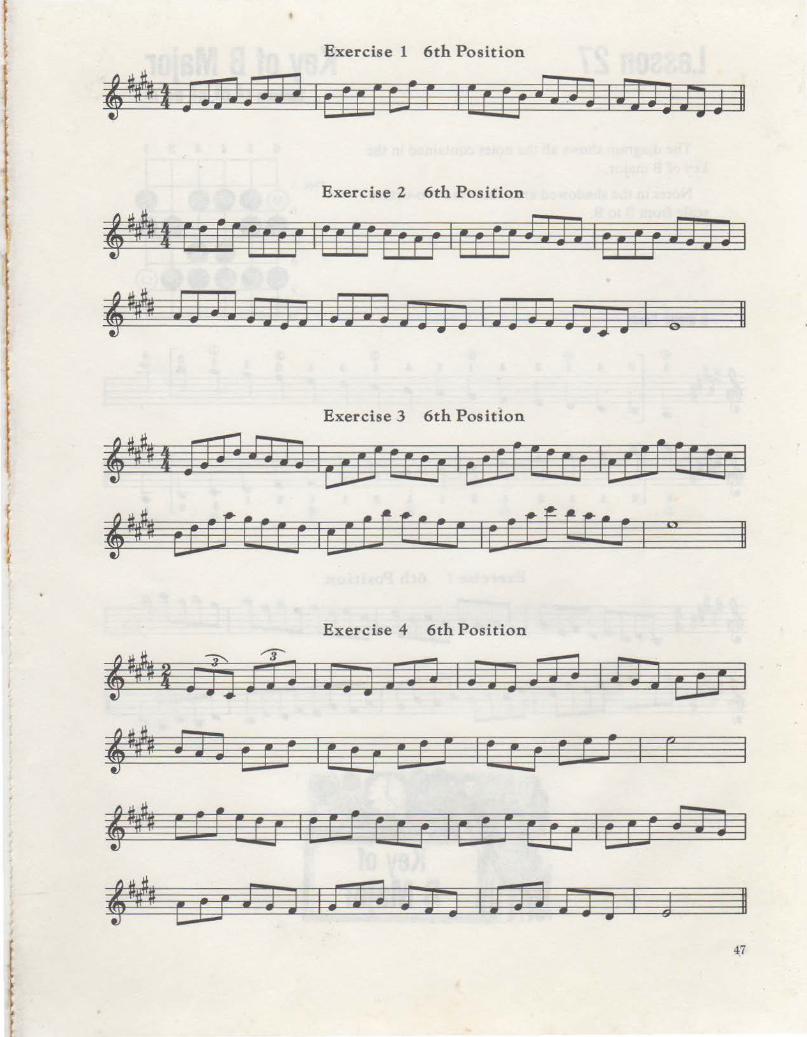
Lesson 27
The diagram shows all the notes contained in the key of B major.
Notes in the shadowed area show the two-octave scale from B to B.
B Major Scale
®
[J ® @ ®
4~ i 4, i 2 4, i 3 4 i
J J j J j J r F J
4~ f [f r r r F r F r J 4 i ' 2 4 a i 4. a <D ® ® @
Key of 8 Major Contains F#, c#, G#, 0#, A#
6 5 4 3 2 1
® <D
~~ 4
3 4 2 ' i f r F r r r
j J J J J ¥1 J i 4 2 i 4 ® ®
i
Exercise 1 6th Posit ion
II
4~ t iJJJ iJJ J I J 3 J J tJ a I tf rT rr rr I r rr ff
4~ f E Ef Cr Q I Er p JJ JJ I J JJ 3J JJJ I J J Jg J I -r I
48
I
(
Exercise 2 6th Position
,~trrrrrrfr lrFErEEEE!EEErFELE 1Effrf 1
,~ rrnrrrrrriEEcrrrrr IEFEfrrcr lrrrr r 11
Exercise 3 6th Position
,~ljJJj]JjjiJUJJ]JjJIWJJJJJJJ 1JJ]JF I
4~ EtFrJJJJiJJJJJ]JJ IJJUJJJJJ IJJJJJ II
Exercise 4 6th Po.;ition
,~~ fJJ1JJ1JI]JfiBJJ IJJiDIJJJ ,pnnun 1
II
Exercise 5 6th Position
4¥fit jJjjJJJJ ljJJJJ)JJ IJJJJJJJJ IJJJHJJJ I
,~ffl JJJJJJJJ 1JJJJJJJJ 1J JJJflJJ I rEEF Frrr I
4~ EffF fEEr IE fF r FEE r IE E.EE EE FE !EfEJ L II 49.
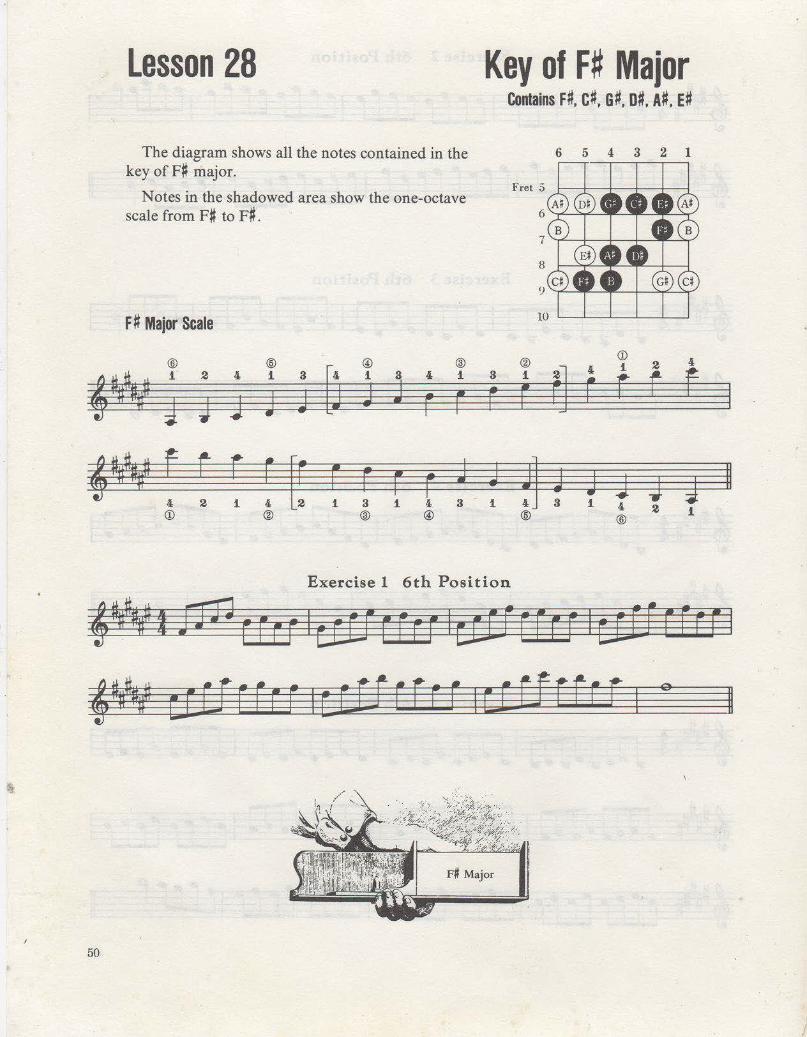
Lesson 28
The diagram shows all the notes contained in the key ofF# major.
Notes in the shadowed area show the one-octave scale from F# to F# .
F # Major Scale
® ® @ ®
[j ,.., 1 2 4 1 3 1 3 4. 1
J J J J r F J J J
,~ f r r F [! F r F r J
4 2 1 4- 1 3 1 4. 3 <D ® @ @)
Key ofF# Major Contains F#, C#, G#, 0#, A#, E#
6 5 4 3 2 1
® <D 4
0 4 1 2
~ 3 1
F r ~ r F
J ~] J J J J J 1 3 i 4 2 1 ® ®
Exercise 1 6th Position
II
4"-f! I tl iP r r r r I cJ r1 r E c F I ct U F [ F F I c:F FiFE C F I
,~ e:E rJ FfrF 1 c f f! E Err lEE t!FfE E I .. II
50
r
f I
Exercise 2 6th Position
4W I F L f F F F r F IF E f F fEE r If E [ f F r r r IF r f F iJ 3 0 I
~~ Fr U J3 JJ I Jj J J J JJ J I JJ J3 JJ J J I ., II
Exercise 3 6th Position
4~1 JJJJdJJJ 1JJJJrrrr IE[trrErr 1r rrrr
~~ ErEF[rFFI(EffFrEF 1JJJJJJH IJ]JJ;J II
Exercise 4 6th Position
4~1 nJJ n n lc:r r; cr u 1c:r r1 u r11 rc E cr ~~§11 EE Et Ef U I E1 U tJ JJ I iJ 3J fJ JJ I JJ J JJ II
Exercise 5 6th Position ~ "3"
f*#f#1 tu err 1fLJ cc~ 1Er; c:r r ICEJ ccr 1 ~ ~
4~# f U cr r lEt; cr11EU cr:J lA] J JJ I
4~ lJ J J JJ I A ] iJ J I i 3 J i J J I J J 3 J II 51
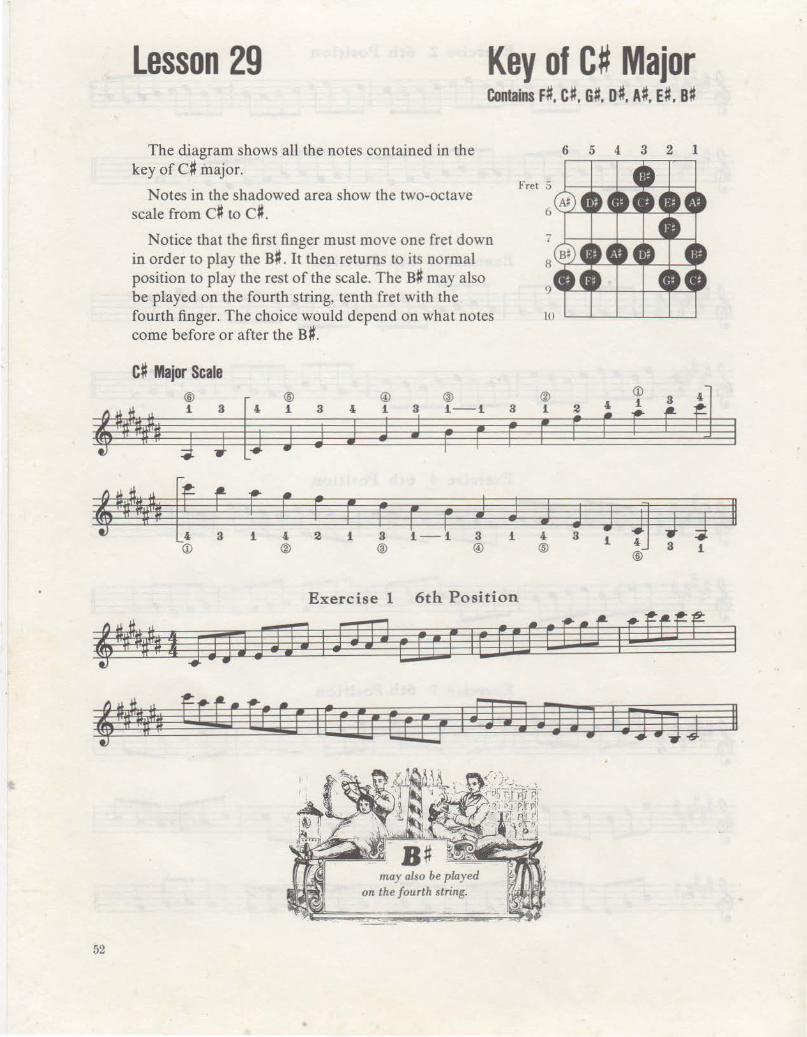
Lesson 29 Key of C# Major Contains F#, C~. G#, o#, A#, E#. 8#
The diagram shows all the notes contained in the key of C# major.
Notes in the shadowed area show the two-octave scale from c~ to c#.
Notice that the first finger must move one fret down in order to play the B#. It then returns to its normal position to play the rest of the scale. The B# may also be played on the fourth string, tenth fret with the fourth finger. The choice would depend on what notes come before or after the B~.
C# Major Scale
® ~ ® ~ i 3 " i 3
,~ J ;J J J
@ ® 4 i 3 i-i
J J J r F
r r r r J i 3 i-i 3 " 3 i ' 2 <D ® ® @
3
r
J 1
Exercise 1 6th Position
6 5 4 3 2 1
® <D 3 f] i 2 " i r r r r r
J J J ¥] J J ' 3 1 ® 3 i
®
, __ 1 J J J J ] J ]3 I D Y3 c FE r I C F r1 Cf r1 If fr.ff
II
4W. frtr fEE r lEE EF U U IJ HJ Ij JJ I iJJJJ II
52
may also be played on the fourth string.
Exercise 2 6th Position
@~ 1 j J Jj J 3 J J I 3 J Jj j J J J I J J J J j J J 3 I r ~ ~ r ~
@ ~ F Fr F J J3 J I JJ J JJ JJ J I JJ J JJ JJ J I JJJ JJ II
Exercise 3 6th Position
@~t JJJJJJJJIJJJoJJJJ IJJJHJJJ 1IJD rrrrl
@~ [FEFffrFI~Fr~fFrJ 1EEEEffrF 1trrrf 11
Exercise 4 6th Position
" II
Exercise 5 6th Position
i~~ ~ ; 7 ~ ~ -!*'H rJJ fJJ u J n n IDJ n J lih rn 1
4~ £JJ £J J lc::U EJU lcrJ tr; IU ~ ~ r;;; 1
,. cr:± Cg; IFf~ LEJ ICW'f:E; 1rrr F II 53
54
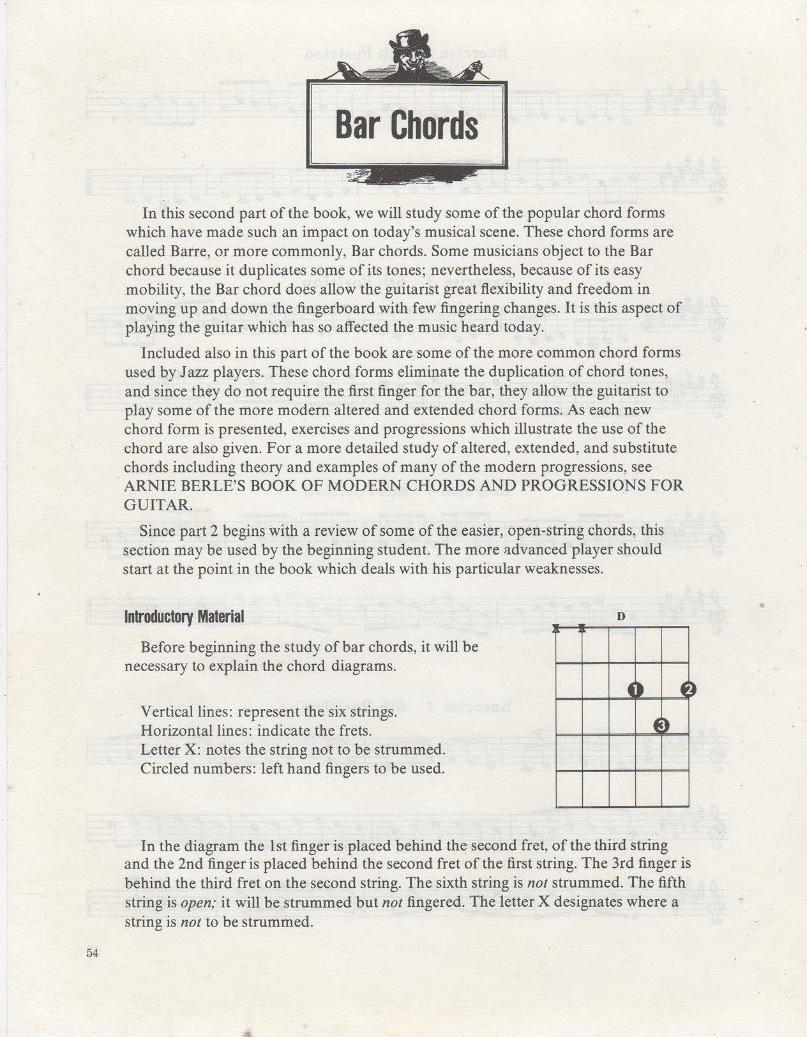
Bar Chords
In this second part of the book, we will study some of the popular chord forms which have made such an impact on today's musical scene. These chord forms are called Barre, or more commonly, Bar chords. Some musicians object to the Bar chord because it duplicates some of its tones; nevertheless, because of its easy mobility, the Bar chord does allow the guitarist great flexibility and freedom in moving up and down the fingerboard with few fingering changes. It is this aspect of playing the guitar which has so affected the music heard today.
Included also in this part of the book are some of the more common chord forms used by Jazz players. These chord forms eliminate the duplication of chord tones, and since th€y do not require the first finger for the bar, they allow the guitarist to play some of the more modern altered and extended chord forms. As each new chord form is presented, exercises and progressions which illustrate the use of the chord are also given. For a more detailed study of altered, extended, and substitute chords including theory and examples of many of the modern progressions, see ARNIE BERLE'S BOOK OF MODERN CHORDS AND PROGRESSIQNS FOR GUITAR.
Since part 2 begins with a review of some of the easier, open-string chords, this section may be used by the beginning student. The more advanced player should start at the point in the book which deals with his particular weaknesses.
Introductory Material
Before beginning the study of bar chords, it will be necessary to explain the chord diagrams.
Vertical lines: represent the six strings. Horizontal lines: indicate the frets. Letter X: notes the string not to be strummed. Circled numbers: left hand fingers to be used.
D
~ )
f ;)
4~
In the diagram the 1st finger is placed behind the second fret, of the third string and the 2nd finger is placed behind the second fret of the first string. The 3rd finger is behind the third fret on the second string. The sixth string is not strummed. The fifth string is open; it will be strummed but not fingered. The letter X designates where a string is not to be strummed.
I
l
1
t
f
t
L
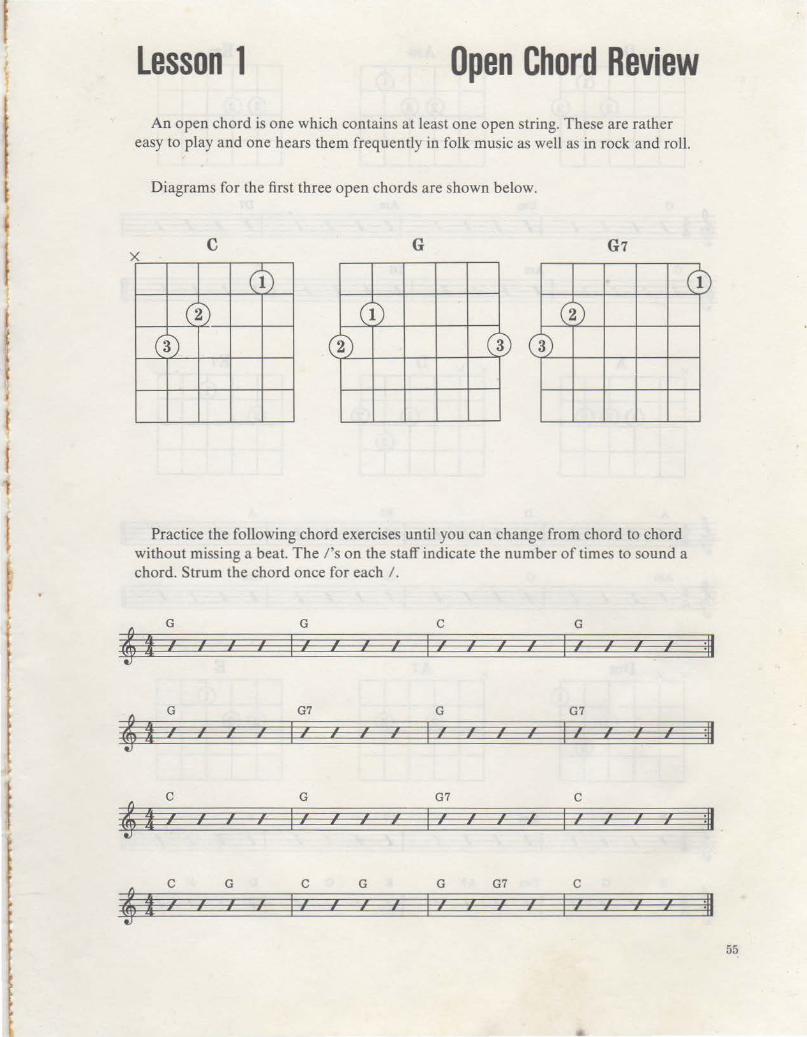
Lesson 1 Open Chord Review An open chord is one which contains at least one open string. These are rather
easy to play and one hears them frequently in folk music as well as in rock and roll.
Diagrams for the first three open chords are shown below.
X c G G1
(t) (t) (2) (i) (2)
(a) (2) _(a (3)
Practice the following chord exercises until you can change from chord to chord without missing a beat. The /'s on the staff indicate the number of times to sound a chord. Strum the chord once for each I.
4 G G c G
I I •' .( I I I I I .( I I I I I I I I I I :II I , I I , I I I I I I I j
G G7 G G7
4 f I I I I I I ,.t I I I I I I I I I I I I :II I I i I i I I I I I I I
c G G7 c
4 I I I I kl I I I I I I I I I I I I I I I :II I I I I I I I I j I I I I I
' c G c G G G7 c
t I I I I I I I ,' I I I I I I I I •' I I :II I I I I I I I I I I
55
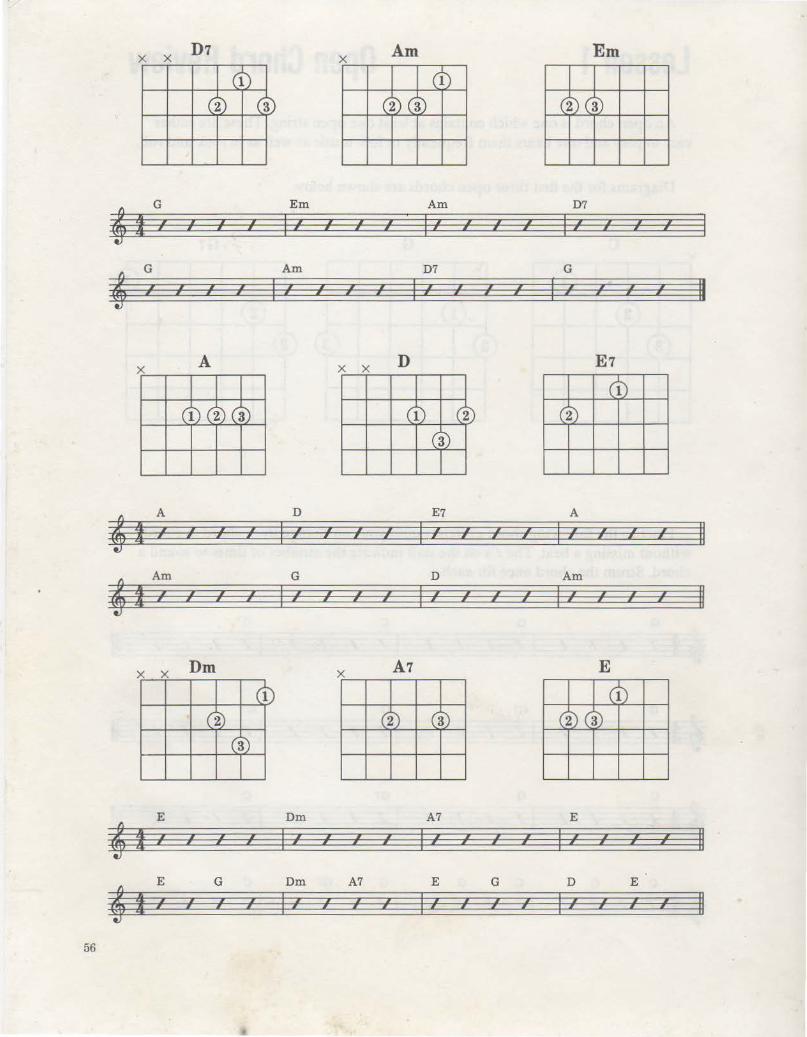
X X D7 X Am Ern
(t) ®®
' G Em Am D7
I I I , , I , I , , I , ,.t I
, I I I , ,
• • I I I I I j I
' G Am D7 G , , ,
I I I , , , I I I ,
I I I , , , II I i I » i i » I I I
X A X X D E 7
cb (2)
' A D E7 A
I , , , I I I , , , I , I , , I , , I , II I I I I I I I I I I I I I I )
' Am G D Am
I , , , , I , , , , I ,' , , , I I , , I II I j I I j I i j ; I I I I
x x Drn X A7 E
cb (2) c2J ®
(3)
E Dm A7 E
' I I I
, , I I , , , I , I ,
I I , I , , II I i I i I i I I I I
' E G Dm A7 E G D E
I , , , , I I •' , , I , I I I I , , , , II I I I I I j j I j I I
56
' I
~
J t
t
f
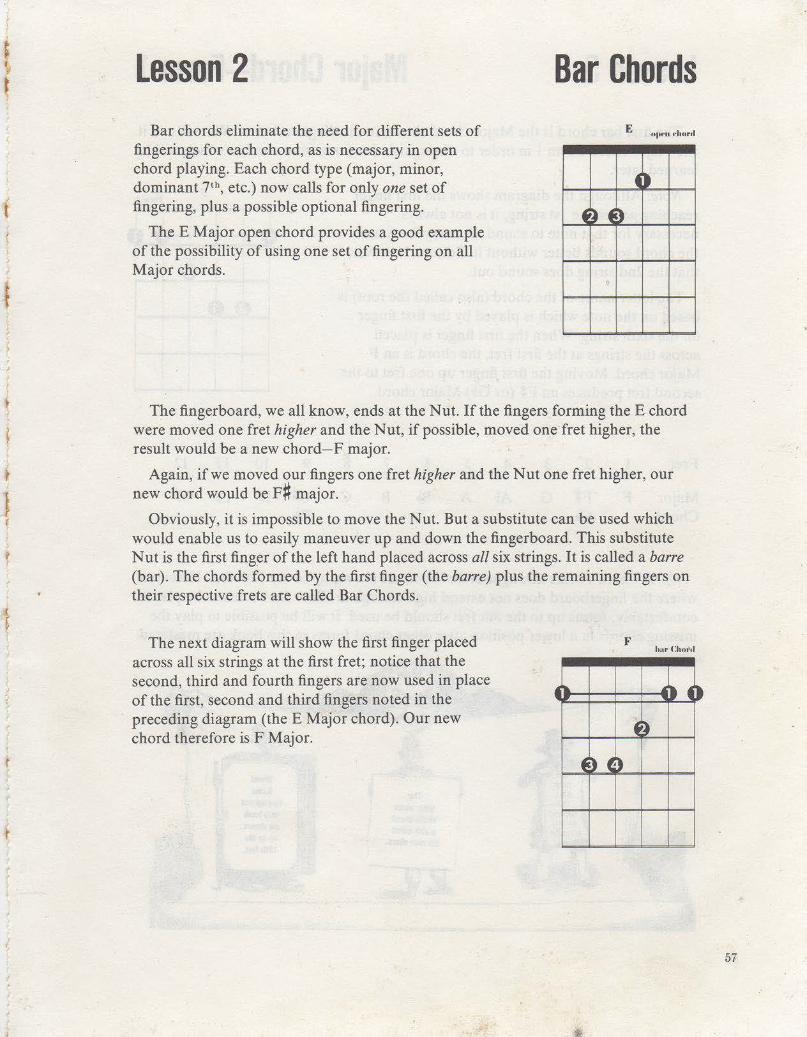
Lesson 2 Bar chords eliminate the need for different sets of
fingeri~gs for each chord, as is necessary in open chord playing. Each chord type (major, minor, dominant 7th, etc.) now calls for only one set of fingering, plus a possible optional fingering.
The E Major open chord provides a good example of the possibility of using one set of fingering on all Major chords.
Bar Chords E
~· ~ ) f ~
The fingerboard, we all know, ends at the Nut. If the fingers forming theE chord were moved one fret higher and the Nut, if possible, moved one fret higher, the result would be a new chord- F major.
Again, if we moved our fingers one fret higher and the Nut one fret higher, our new chord would be F# major.
Obviously, it is impossible to move the Nut. But a substitute can be used which would enable us to easily maneuver up and down the fingerboard. This substitute Nut is the first finger of the left hand placed across all six strings. It is called a barre (bar). The chords formed by the first finger (the barre) plus the remaining fingers on their respective frets are called Bar Chords.
The next diagram will show the first finger placed across all six strings at the first fret; notice that the second, third and fourth fingers are now used in place of the first, second and third fingers noted in the preceding diagram (theE Major chord). Our new chord therefore is F Major.
F lmr ( :lwftl
' ~·
57
58
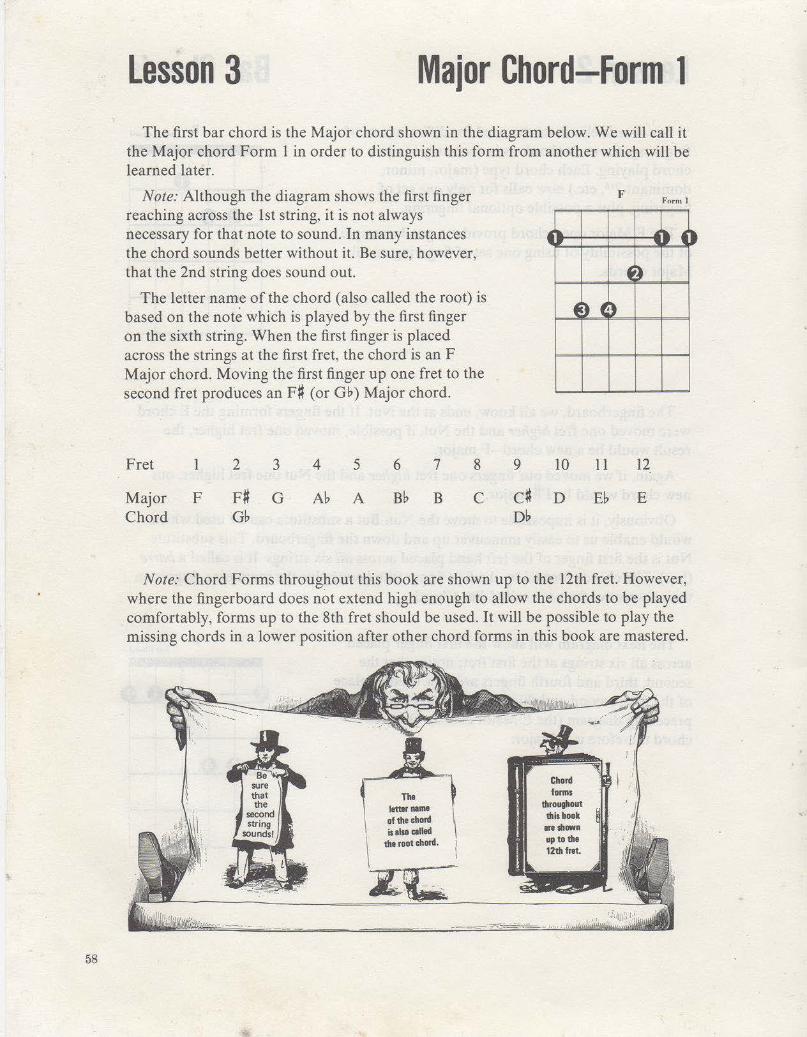
Lesson 3 Major Chord-Form 1 The first bar chord is the Major chord shown in the diagram below. We will call it
the Major chord Form 1 in order to distinguish this form from another which will be learned later.
Note: Although the diagram shows the first finger reaching across the lst string, it is not always necessary for that note to sound. In many instances the chord sounds better without it. Be sure, however, that the 2nd string does sound out.
The letter name of the chord (also called the root) is based on the note which is played by the first finger on the sixth string. When the first finger is placed across the strings at the first fret, the chord is an F Major chord. Moving the first finger up one fret to the second fret produces an F# (or Gb) Major chord.
Fret 1
Major F Chord
2 3
F# G Gb
4 5
Ab A
6 7 8
Bb B c
F
~:
i) (·) f
9 10 11
c# D Eb Db
• ~
12
E
Fnrrn l
,., ~·
Note: Chord Forms throughout this book are shown up to the 12th fret. However, where the fingerboard does not extend high enough to allow the chords to be played comfortably, forms up to the 8th fret should be used. It will be possible to play the missing chords in a lower position after other chord forms in this book are mastered.
The lettlr IIIIM
of the chord is also called
the root chord.
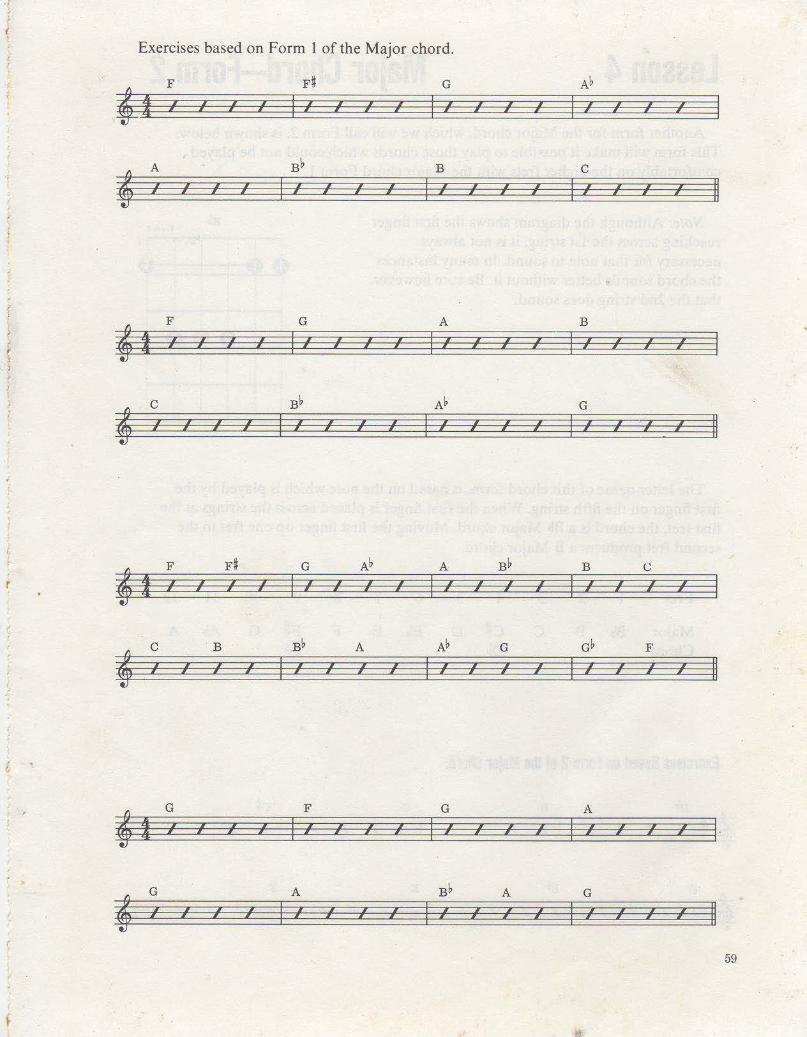
Exercises based on Form 1 of the Major chord.
F F~ G A~ ifi I I I I jl I I I jl I I I I I I I I
B~ B c j1 I I I j1111 II I I I II
4 F G A B
I I I I I I I I I I I ,' I .f ,' I ,' I I I I I I I I I I I I I I
4 c B~ A~ G
I I I ,• I I I I I I I I I I I I I I ;' II I I I I I I I I I I I
' F F# G A~ A B~ B c
r I ,' I I I I I I I I I ,' I I I I I I I I j I I I I I I I I I I I
(
4 c B B~ A A~ G G~ F
I I I I I I •' I I I •' I I I I I I I II I I I I I I I i I I i
" .
~ G F G A
i I I I I I I I I I I ,• I I I I I I I I I· I j I I I I j I I j I j j I
" B~
4 G A A G
I I I I I ,' ,t I I I I I I I I I ,.r I II I I I I I I l I j I
59
60
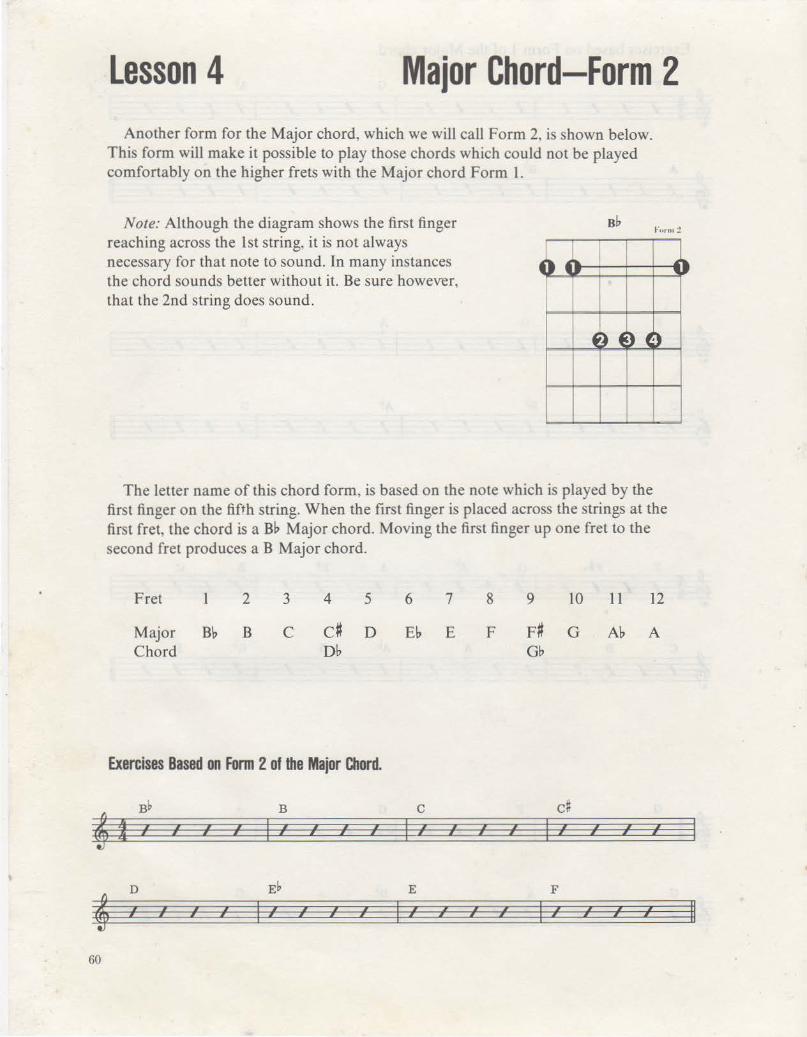
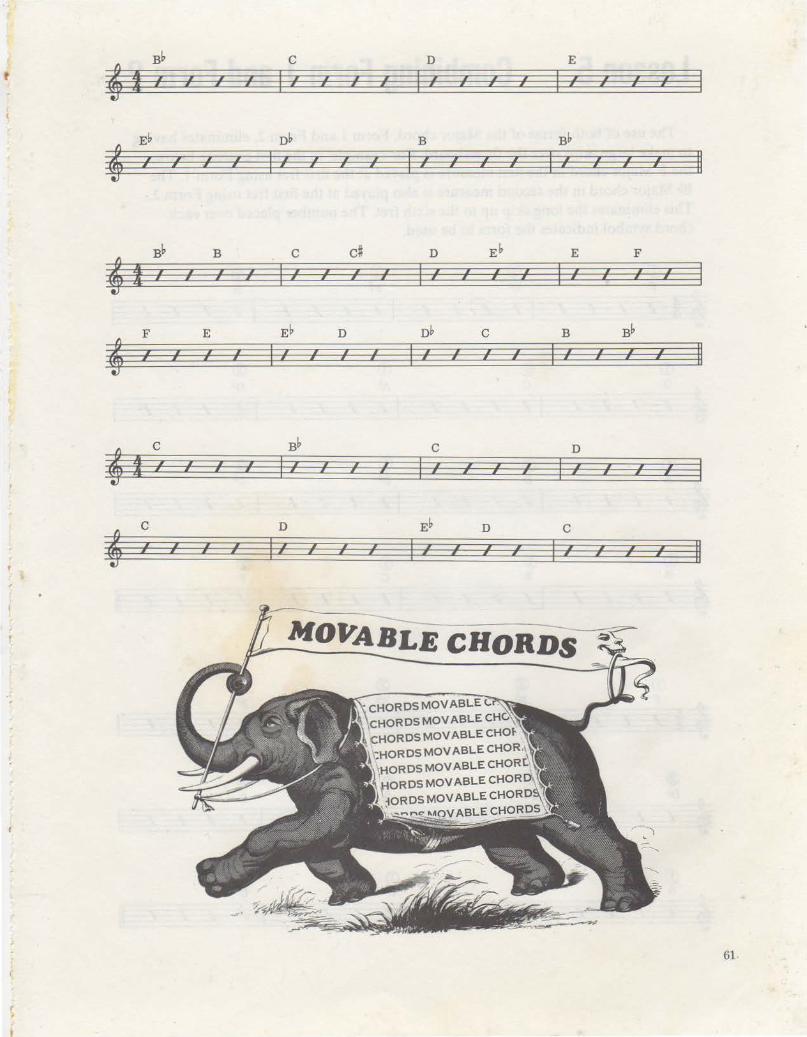
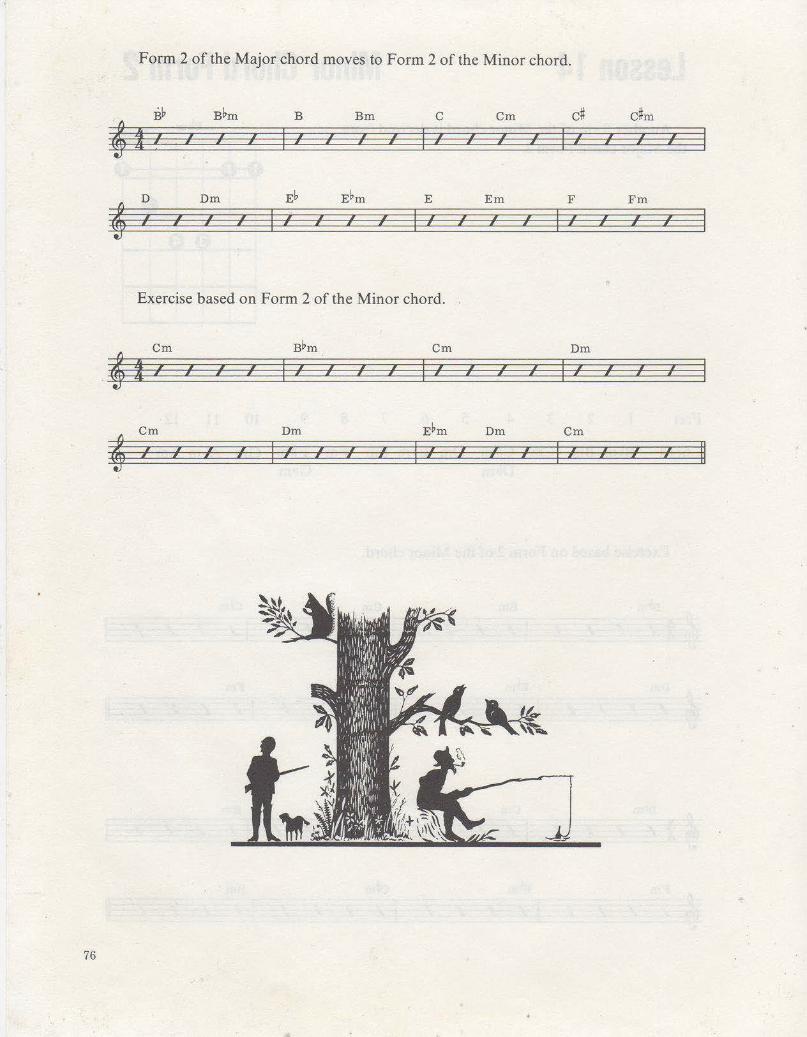
Lesson 4 Major Chord-Form 2 Another form for the Major chord, which we will call Form 2, is shown below.
This form will make it possible to play those chords which could not be played comfortably on the higher frets with the Major chord Form l.
Note: Although the diagram shows the first finger reaching across the 1st string, it is not always necessary for that note to sound. In many instances the chord sounds better without it. Be sure however, that the 2nd string does sound.
~) ~ ... •
'
sb 1-"uru• .:!
.
) ~ ) ~t)
The letter name of this chord form, is based on the note which is played by the first finger on the fifth string. When the first finger is placed across the strings at the first fret, the chord is a B~ Major chord. Moving the first finger up one fret to the second fret produces a B Major chord.
Fret 2
Major Bb B Chord
3
c
4 5 6 7
c# D E~ E D~
Exercises Based on Form 2 of the Major Chord.
B c f
I f
I f » f
I f
j f
I f
l f
I I
D Eb E f
I f , f
I I 1/ I f I
f I
f I
I i
f I
8
F
f I
f i
f I
9 10 11 12
F# G A~ A Gl1
d
I f j
f I
I I
I j
F
I ,' I I
,
II
' D E c
I I I
B~
I I I I i I ,., I r I I I I r 4 I I I f I I I I I j •
B Bb
II nb
I I I
Eb I I I r I I I I I r r r 4 I •' I I I I I
I I I I I I I
Eb E F c d D
I 1- I
Bb B
I I I I If. I I I r r 4 I I I I I I I I I I , I I ) I
nb c B Bb E Eb D
I -1- •' I I II F
I I { j I I •' j 4 I I I • I I I •' I I I
Bb c D
I 1- I
c
I I I I 1- r I 11 r ' I I I I I I I I I I ,' I I ,• I I I
Eb D c
II D
I 1- 11 I 11
c
I I I I -1 r r 4 11 I I I I I I I I I I I I
-----------------MOVABLE CHORDS
61
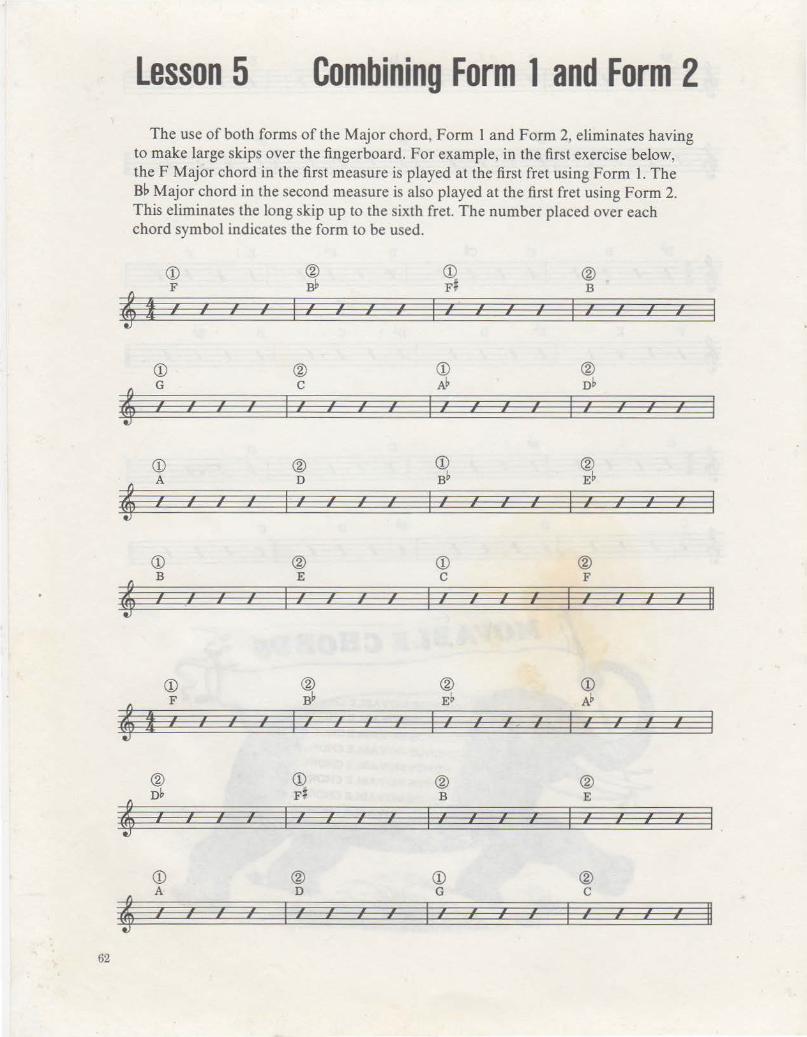
Lesson 5 Combining Form 1 and Form 2 The use of both forms of the Major chord, Form 1 and Form 2, eliminates having
to make large skips over the fingerboard. For example, in the first exercise below, the F Major chord in the first measure is played at the first fret using Form 1. The Bb Major chord in the second measure is also played at the first fret using Form 2. This eliminates the long skip up to the sixth fret. The number placed over each chord symbol indicates the form to be used.
CD ® CD ® F B~ F# B
' I I I I I I I I I I I I I I I I I I I
I I I I I I I j I i i I I
CD ® CD ®
' G c A~ nh .f: I I I I .f: I I I I I I I I I I I I I
I ; 1 I I I I I I I I I I I I I
CD ® CD ® A D Bh Eh
4 I I I I I I I I I I I I I I I I I I I I I I I i i I ;
CD ® CD ® B E c F
' I I I I I I I I 11 I 11 I I .f I I I I II I I 1 I I I 1 I I • I •
CD ® ® CD
' F Bh Eh Ah
I I I I I I I I I I I I I I I I I I I I • I I • • I • I • • I I •
® CD ® ® D~ F# B E
4 • I I I I I I I I I I I I I I I I I I • I I I I I I I I I I
CD ® CD ® A D G c
~ I I I I I I • I 11 I I 11 I I I I I I II I I I I I I I I I 1 I j
62
1
! i
I
•t ~
I r,
. I "' ' f t t r
I r (
t
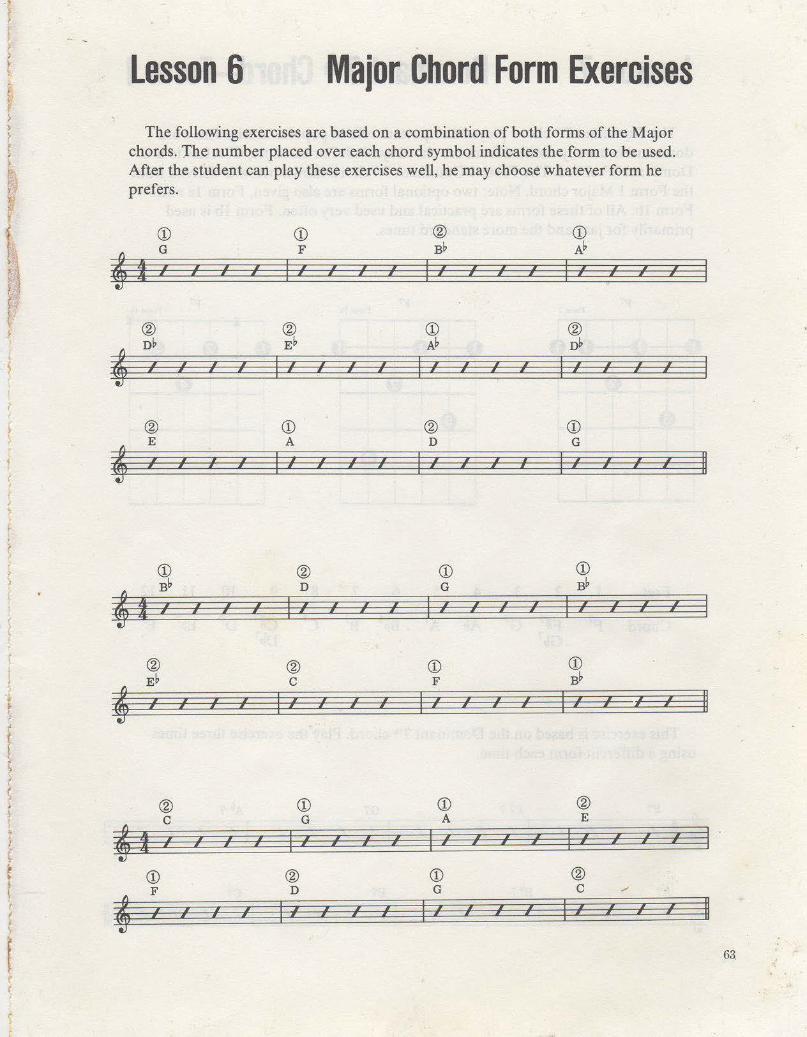
Lesson 6 Major Chord Form Exercises The following exercises are based on a combination of both forms of the Major
chords. The number placed over each chord symbol indicates the form to be used. After the student can play these exercises well, he may choose whatever form he prefers.
I I I r r »
® D~ 4 I I I I
® E
~ I / I /
CD
4 B~
I ,' ,' I ( I
® Eb
4 I I I I I I
® c
' I •' I I I I •
CD F
4 I I I I
• I I
CD F
11 I I I
11 I I
CD A
I •
I -1 I I I r r r ,
® D
I ,• I I
I I
® c
I •' I I I I
I
CD G
I I I • I
® D
•'
I I
I I • •' I I I
® B~
I , , , I Y Y I I
11 I I I
® D
I I I I .1 I
CD G
I I I I I
I I
CD F
I I I
I I I I
I
CD A
I I I ;' I
j I
I
CD G
I I • I • I I •
I I I
® nb
I ,. ,.
CD G
I I r »
I I I I I r r , ,
CD Bb
I I I
I I
I I
I I
CD Bb
I I I I I I
I
® E
I I I
I I
I » I I
® c /
I I I I
I I
I i
II
II
II 63

64
Lesson 7 Dominant 7th Chord-Form 1 The Dominant 7 t h chord plays an important role in popular music. The word
domin<:~.nt is usually omitted from the chord symbol. For example, C' refers to a C Dominant 7th chord. The Form 1 Dominant 7 t h chord shown below is derived from the Form 1 Major chord. Note: two optional forms are also given, Form la and Form 1 b. All of these forms are practical and used very often. Form 1 b is used primarily for jazz and the more standard tunes.
Form I Form la Fun n I I.
4~ .. ,..
~t 4 ) ..... 4: .. ~) ... 4) ' ~ f )
~ ) ~ ) 0 E) ~ ~
~,
Fret 2 3 4 5 6 7 8 9 10 11 1·2
Chord F7
This exercise is based on the Dominant 7 t h chord. Play the exercise three times using a different form each time.
~ F7 Fh G7 A~ 7
I I I I I I I I I ,' ,, I ,' I I I I I I j I I I I I I 1 I I
~ A7 Bb7 B7 C7
I I I I I •' I I I I I I I I I I I I ; I I I I I I I I I j II
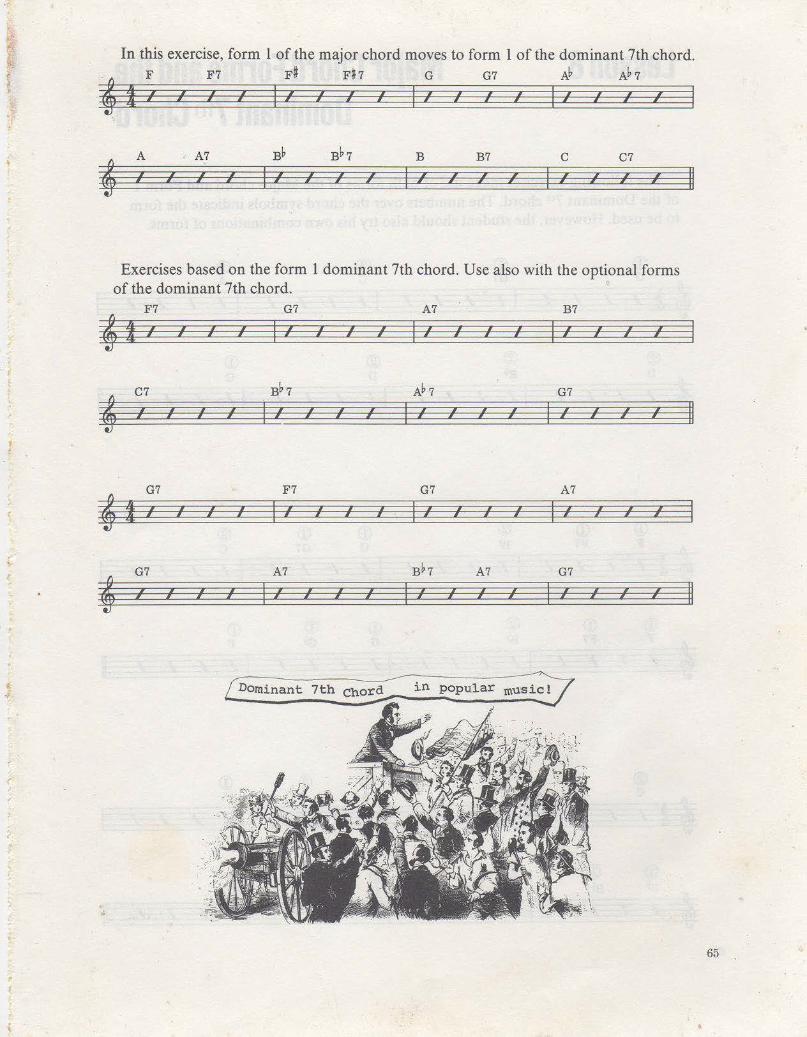
In this exercise, form 1 of the major chord moves to form 1 of the dominant 7th chord.
4 F F7 F# Fh G G7 AI> A~ 7
I I I 4: I I I ,' I I I I I I I I ,' I I I I I I • j I I I I j
' A A7 B~ Bb7 B B7 c C7 I I ;' I I I I I I I I I I I ,.r I I I
I I I I I I I I I I I j I
Exercises based on the form 1 dominant 7th chord. Use also with the optional forms of the dominant 7th chord.
F7 G7 A7 B7
' I I I I I I I I I I I I I I I I I I I I
I I I I I I I • I I I I I I
~ C7 Bb7 A~7 G7
I I I I I I I I I I I I I I I I I I I I j I I I I I I j I I
G7 F7 G7 A7
' f I I I I I I I I I I I I I I I I I I I I I I I I • I I ) • I I
G7 A7 Bb7 A7 G7
' I I I I I I I I I ,' I I I I I I I j i I I I j I I
[Dominant 7th Cho~ in popular m~
II
II
II
65
66
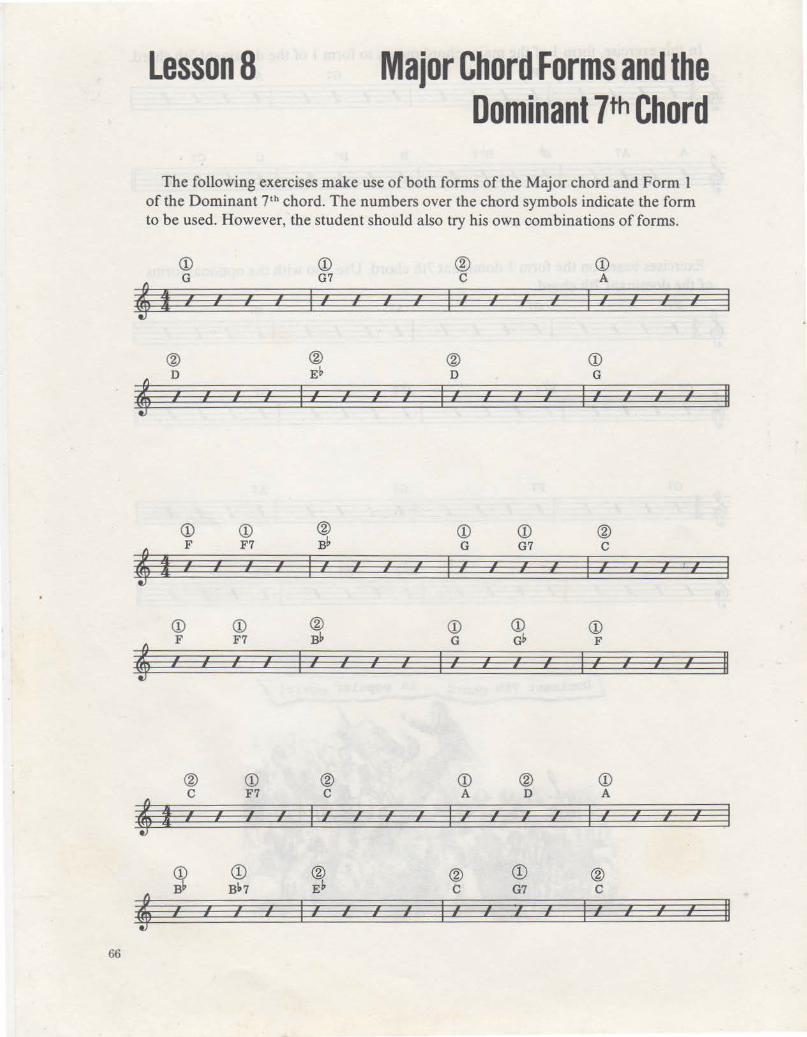
LessonS Major Chord Forms and the Dominant 7th Chord
The following exercises make use of both forms of the Major chord and Form 1 of the Dominant 7th chord. The numbers over the chord symbols indicate the form to be used. However, the student should also try his own combinations of forms.
CD CD ® CD G G7 c A
4 I I I I I I I I I I I I I I I I I I I I I I I I • ) • i • i •
® ® ® CD D E~ D G
' I I .f I I I I I I I I I I I I I I I I
i • I • • i • • • • • I I i
CD CD ® CD CD ®
4 F F7 B~ G G7 c
I I I I I I I I I I I I I •• I I I I I I I • • • I • I I I • •
CD CD ® CD CD CD
4 F F7 B~ G G~ F I I I I I I •' •• •• I I I I I I I I •• I I i • • • • • •
® CD ® CD ® CD c F7 c A D A
4 I I I I I I I I I I I I I I I I I I I I
• I ; I i I I I I • • • I
~ CD ® ® CD ® B~7 E~ c G7 c
' I I I I I I I I I I I I "I I I I I I I • i I • • I • • I • • • • i
II
II
II
1
Lesson 9 Dominant 7th Chord-Form 2 Another form for the Dominant 7th chord is derived from the Major chord
Form 2. Note that an optional form is also given, Form 2a.
Fnrm 2 Fnrm :?a
~H ... ..... ~-• .. .. ~H )
... ~) e ~ ) ~ ) E )
·)
Fret 2 3 4 5 6 7 8 9 10 11 12
Chord Bl? B7 C7 C# 7 D7 Eb7 E7
Db7
The following exercise based on Form 2 of the Dominant 7th chord should also be practiced using the optional Form 2A. This form is more difficult to play and the student may have to come back to it at a later date.
B~7 B7 C7 4 I I I I I I I I I I I I
I
4 D7 Eb7 E7 I I ,• I I I I I I I I I
I I I I • I j
••
I I
I •
I
F7
I
I I
I »
In the next exercise, Form 2 of the Major chord moves to Form 2 of the Dominant 7th chord. Try also using Form 2a for the Dominant 7th
B~ B~7 B B7 C C7 c# 4 f I I I I I I I I I I I
I • I I
I i
4 D D7 E~ E~7 E E7 F I I I I I I ,• I I I I I I I ,• I
j I I I I I I I I I •
I I
I I
c#7 I
F7
,•
I I
I
I I
I I
II
II 67

Exercises based on Form 2 of the dominant 7 th chord.
' B~7 C7 D7 E7
i I I , ;' I , , ,• I , I I I
, , I
, I i i I I I I I I I I I
E~7 nh7 B7 Bh7
' I I I I I , , , , ,• I I I I I ,• I II j I I j I 1 I I I I I I I
C7 Bh7 C7 D7
4 ! I I I , I ,• I I ,• I I I I ,• I I I I I I I I 1 I I I I I I
' C7 D7 Eh7 D7 C7 , I I I I I I I .f , , , , I I I I II I I I I I I I , I I I I i
68
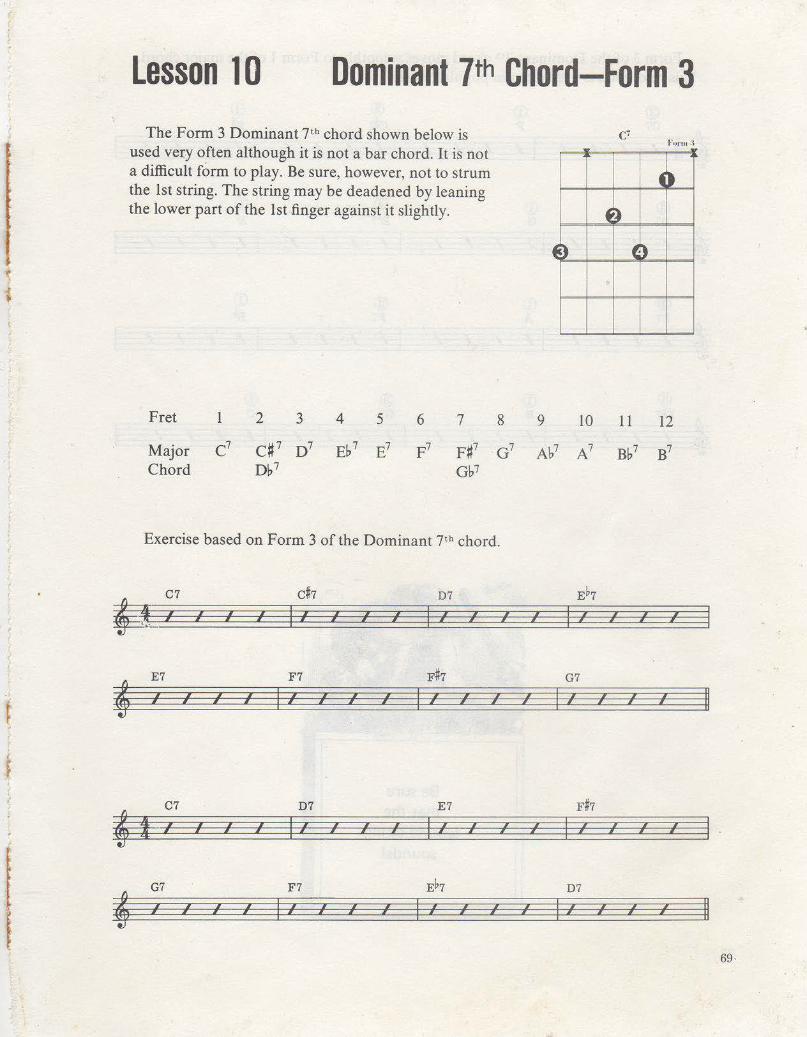
Lesson 10 Dominant 7th Chord-Form 3 The Form 3 Dominant 7th chord shown below is
used very often although it is not a bar chord. It is not a difficult form to play. Be sure, however, not to strum the 1st string. The string may be deadened by leaning the lower part of the 1st finger against it slightly.
Fret 1 2 3 4 5 6 7
C'
~)
-~ ~) C·)
8 9 10 11 12
Major C7 C#7 D7 E~7 E7
Chord D~7 F7 F#7 0 7 Ab7 A7 B~7 B7
Gb7
70
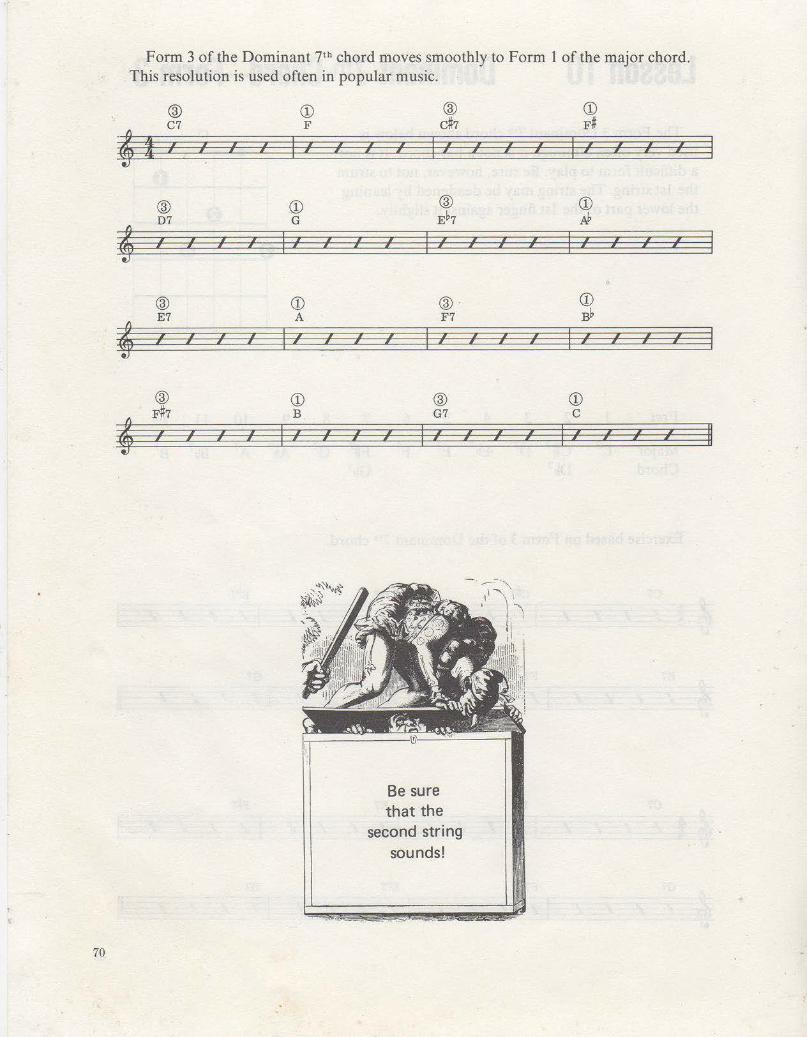
Form 3 of the Dominant 7th chord moves smoothly to Form This resolution is used often in popular music.
® CD
·~ C7 F
I , I ,' ,
I I I
® CD D7 G
4 I , I , I , I I I
® CD E7 A
4 11 , , , I , I I I I l
@ CD
4 F#7 B
11 , , , I ,' I I I I
, I
I ,
I
, I
, I
, I
, I
® c#7
, I
, I I , I
® E~7
, I I , i
® F7
, I
, I
@ G7
11 I I , I
Be sure that the
second string sounds!
, I
, I
, I
, ) •• I
, • I ,
I
-, I
, I I
1 of the major chord.
CD F#
I I , I I
, I
CD » I •' ,
i ;' ,
I
CD w ;'
, i •• 11
I
CD c
I I I ,' II II
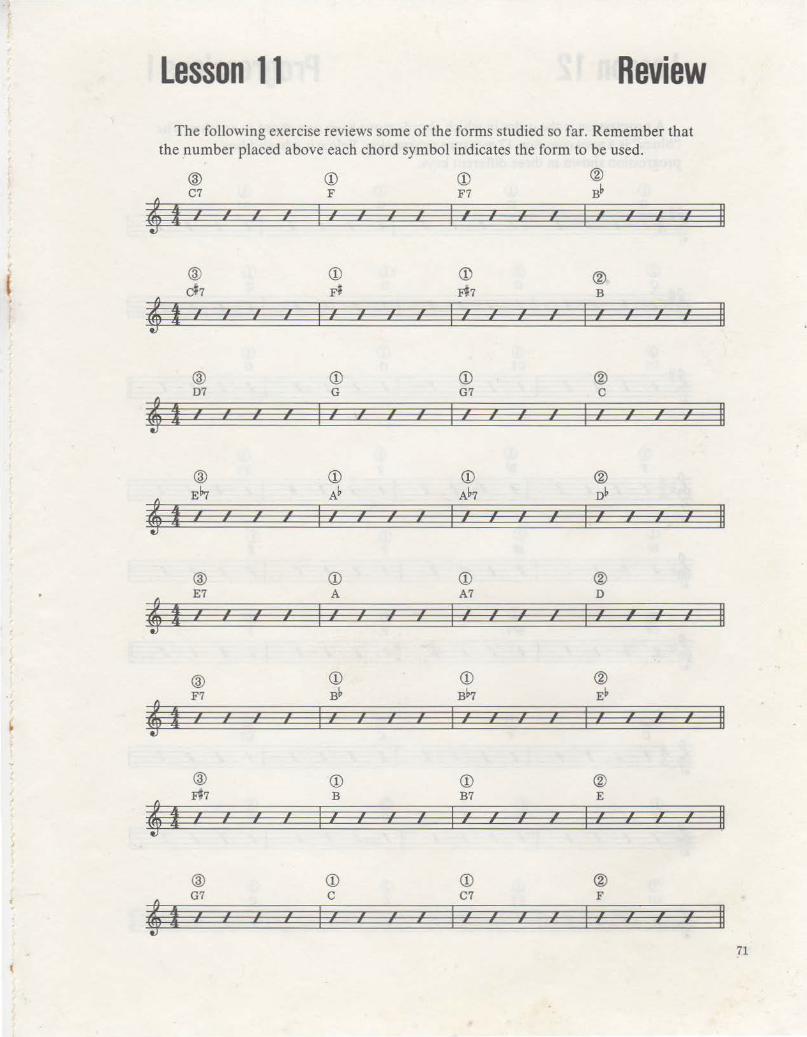
Lesson 1 1 Review The following exercise reviews some of the forms studied so far. Remember that
the number placed above each chord symbol indicates the form to be used.
® CD CD ® C7 F F7 Bb
' t I I I I I I I I I I I I I I I I I I -1 II i • I • I I I • • i i .. • •
[ ® CD CD ® d7 F~ rl7 B .
4 I I I I II I I I I I I I f! I I I I I I I I I i I i I I I I I I I I
® CD CD ® 07 G G7 c
' I I I I I I I I I I I I I I I I I I I I II I • .. I I j I I I • • • I
® CD CD ®
4 Eb7 Ab Ab7 ob
I I •' I f! I I I I f! I I I I -1 I I I I I II I I l I I I i I I i I I I
® CD CD ®
4 E7 A A7 D
I I •' I I I I I I I I I I I I I I I I I II I • • I I • • I I I I • •
(
® CD CD ® ,
4 F7 Bb Bb7 Eb
I I I I •' I I I I I I I I I I I •• I I I II ' I I I I I • • I •
® CD CD ® F#7 B B7 E
4 f I I •' I I I I I I I I I I I I I I I I II • I I • • I i I I i
@ CD CD ® t
4 G7 c C7 F
I I I I I I I I I I I I -l -l I I I I I I II • • • I • • i • i • • I I I
71
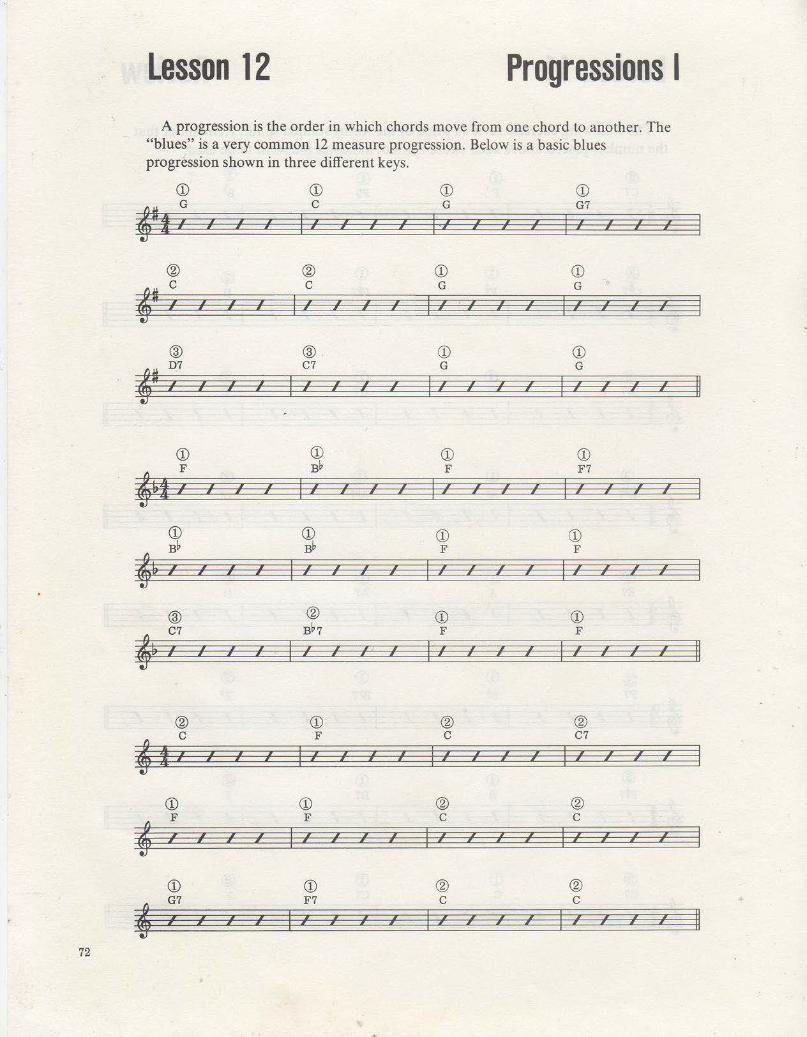
Lesson 12 Progressions I A progression is the order in which chords move from one chord to another. The
"blues" is a very common 12 measure progression. Below is a basic blues progression shown in three different keys.
<D <D <D <D
'uf G c G G7 II l 11 II I 11 11 11 I I 11 I 11 I I I 11 11 11 • I I I I I l I I I I
® ® <D <D
'# c c G G 11 11 ,• 11 I 11 11 11 I I 11 11 11 11 I 11 I JJ 11
I I I I I I I I I I I I I
® ® <D <D ,- D7 C7 G G JJ I JJ JJ JJ JJ JJ 11 I I I I JJ ,.t I 11 11 II I I I I I I I I I I
<D <D <D <D
4&1 F Bb F F7 11 l I I I II I 11 I I I 11 ;f II I II 11 I I I I I I • I I
<D <D <D <D B~ ~ F F
'& 11 11 11 II I 11 11 II ,' I 11 11 11 I I 11 11 11 11
I I I I I • l I I I I I I I
® ® <D <D C7 Bb7 F F
'& 11 II I II II I / ] 11 I 11 II II II ,• 11 I I II I I I I I I I I I •
® <D ® ® c F c C7
' I 11 ,• 11 I I 11 11 I 11 I ,• I 11 ,' I 11 I Jl 11
i • I I • I I I I
<D <D ® ® F F c c
~ 11 11 11 11 I I 11 11 I 11 11 I Jl I JJ Jl Jl I I I I I I I I I I I I I
<D <D ® ®
' G7 F7 c c
11 11 11 ,• I 11 •• II I I 11 11 - 11 Jl 11 11 II I II I I I i I I I I I I I I
72
\
~ ,
t
(
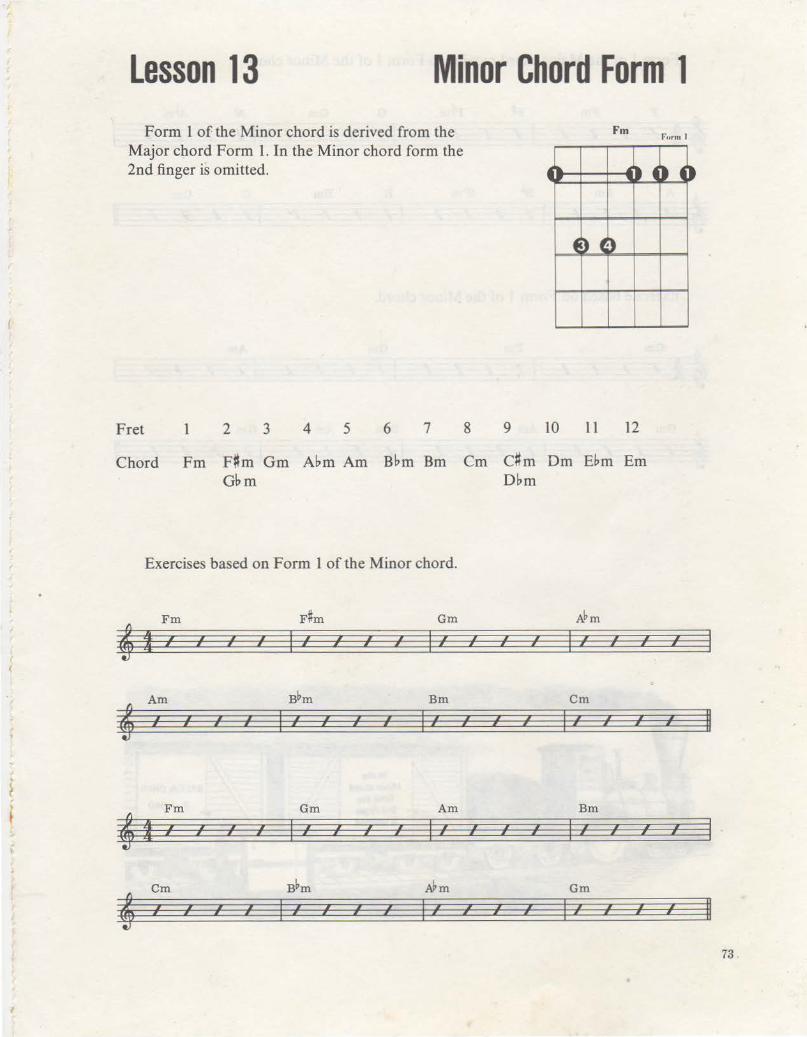
Lesson 13 Minor Chord Form 1 Form 1 of the Minor chord is derived from the
Major chord Form 1. In the Minor chord form the 2nd finger is omitted.
Fret 1 2 3 4 5 6 7 8
Fm
~~ ~, ~
4 ) Ct)
9 10 11 12
Chord Fm F#m Gm A~m Am B~m Bm Cm C#m Dm E~m Em Gbm D~m
Exercises based on Form 1 of the Minor chord.
Fm F~m Gm Abm
' I ,, 11 11 11 I I 11 I 11 I I 11 •' ,' I •' 11 I i I I I I I I
' Am Bbm Bm Cm
I •' 11 I I I 11 11 11 I I I •' 11 I 11 I 11 I I • I I • I • •
Fm Gm Am Bm
' I 11 11 11 11 I 11 11 11 •' I 11 11 I 11 I 11 11 I i i I I • I • I I I i i
' Cm Bbm #m Gm
11 11 11 11 I 11 11 11 11 I 11 11 I 11 I 11 I I i • • I I i i • • I i I
) ~)
I
11 i
I
11 I
II
II 73

Form 1 of the Major chord moving to Form 1 of the Minor chord.
F Fm F# F#m G Gm # Ahm
' I •' I ,' I I I I I I I I I I I I I I I ,' I I I I 1 j I I I i
' A Am Bb Bhm B Bm c Cm
I I I I I I ,' I •' I I I I I I I I I I II I j I I I , I I I I I I
Exercise based on Form 1 of the Minor chord.
' Gm Fm Gm Am
I I I , I ,' I , I I I I ,' I I I I I I I I I I I • I I I I I I I I
Gm Am Bbm Am Gm
' I , I I I I ,' I I I I I I I I I I I I II I I i I j I I I j j
74
"( r
. I f
' '
I
{
( I ~ ; \ "'f'
f
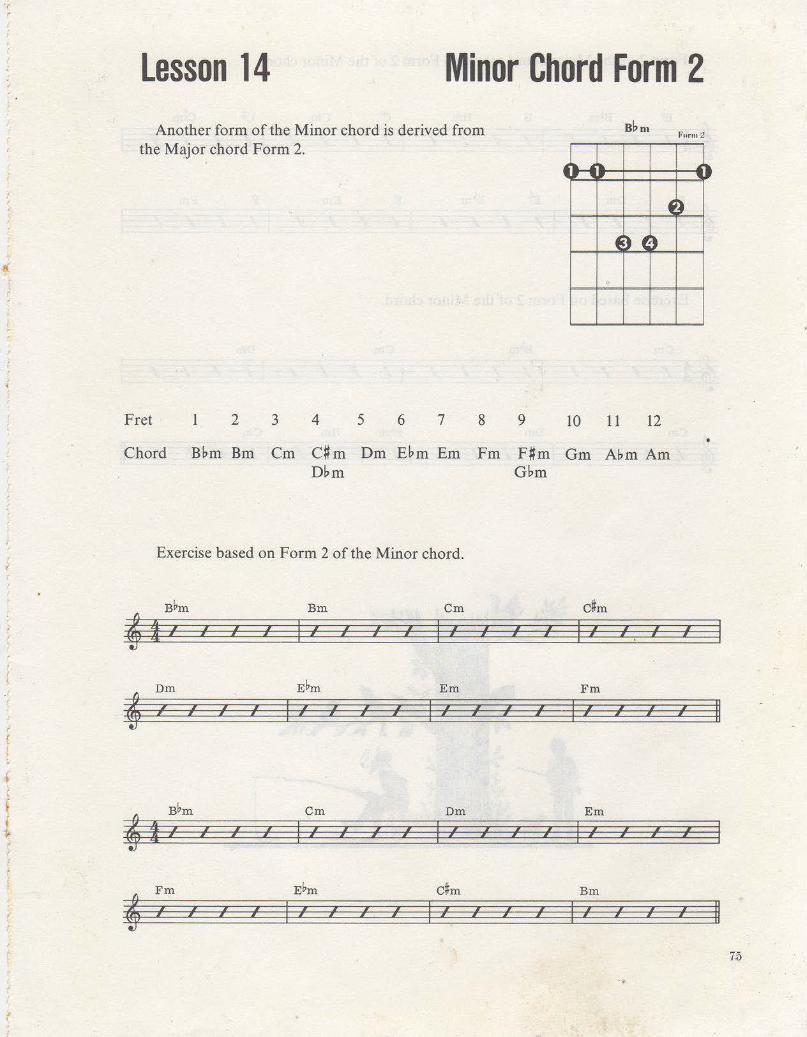
Lesson 14 Minor Chord Form 2 Another form of the Minor chord is derived from
the Major chord Form 2.
Fret 1 2 3 4 5 6 7 8
Bbm
4H ,._ ,
' ~ ·) ~ ~
9 10 11 12
Chord Bbm Bm Cm C# m Dm Ebm Em Fm F#m Gm Abm Am Dbm Gbm
Exercise based on Form 2 of the Minor chord.
B~m Bm Cm dm
4 i I I I , I , , I I I , I I I I , , I
I I I I I I I I I I •
Dm E~m Em Fm
4 7 I ,' , I ,t I I ,' I , I I I I I I I I I I I I I I I I I
B~m Cm Dm Em
' I I , I I I , I 7 7 I I I I I I I 7 7
I j I j l I I
' Fm E~m dm Bm
,' 7 I , I ,
I I I I ,' , I I , , I j I j I I i I I I
Furtu 2
.)
~
I
I ;
I I
,'
II
II
7.5
Form 2 of the Major chord moves to Form 2 of the Minor chord.
:Bb B~m B Bm e em d dm
' f 1 I I ,' I I I I I I I I I I I I I I I I I I I I j j I I I
D Dm E~ E~m E Em F Fm
' I I I I ,• I I I I I I I I I I I
I I I j I I I I I I j I I ) I
Exercise based on Form 2 of the Minor chord.
em B~m em Dm
' I I I I I I ,' I I I I ,' I I I I I I I
I I I I I I I I 1 j I I I I
em Dm E~m Dm em
' I I II ,' I I I I I I I I I I I I I II I I I I I I I I I I I I
76
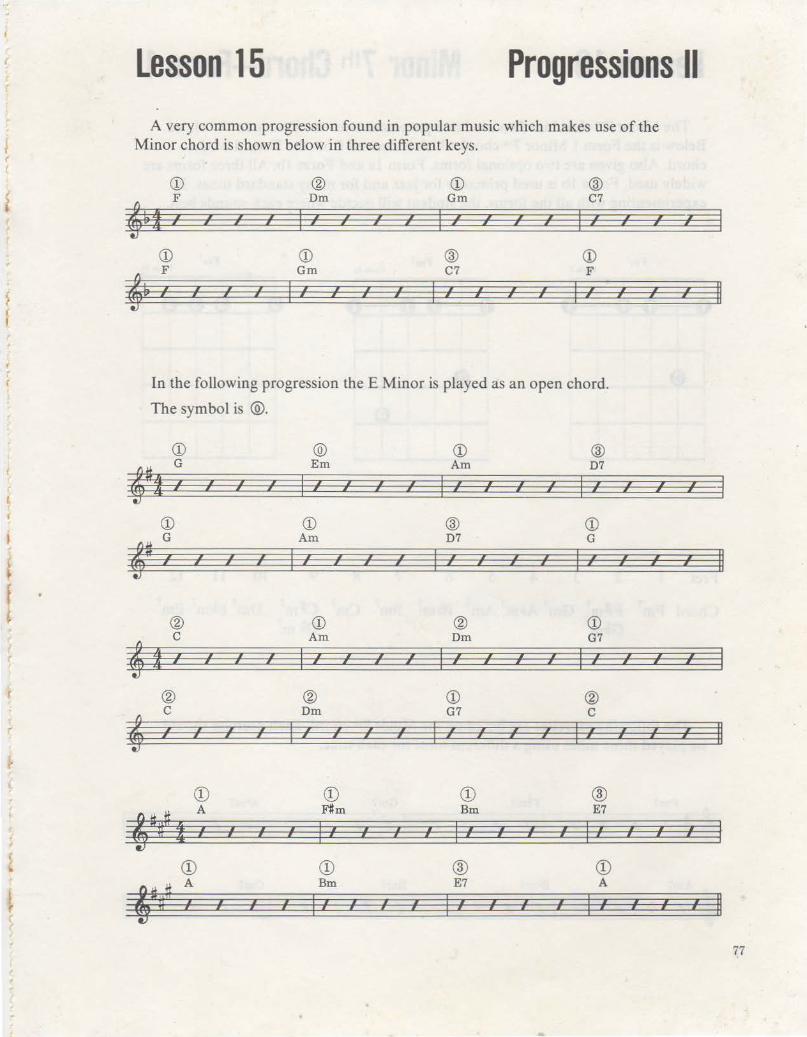
( Lesson 15 Progressions II A very common progression found in popular music which makes use of the
~ (
Minor chord is shown below in three different keys. (
i CD ® CD ®
4&t F Dm Gm C7
I , ,' , I , , I , I , , , , I , , , Ej I I i i I I I I I I I I
CD CD ® CD
4& F Gm C7 F I ,• , , I I I I I I I I I I I I I , I II ~
I I I I I I I I I
J
(
" In the fo llowing progression the E Minor is played as an open chord.
The symbol is ®.
CD ® CD ®
@#! G Em Am D7
I , I I I I I I I I I I I I I I , I I g I I i l j I I I I I I I
CD CD ® CD • G Am D7 G .
'# I I I II , I I
, I I I , I I ,' I , I
, I I I I I I I I I I I I
~ t ® CD ® CD
c Am Dm G7
~ j I I , I I I I I , I I I I »' I ,• I I I
I I I I I I I I I
® ® CD ® c Dm G7 c ~ 4 ,, I I I I , , I I I I I I , I I I I I II I i I I I I I I i • f
CD CD CD ®
f; ij«n i A F#m Bm E7
.. .. I I I I / I I I : I I I I , I I .. • • I • I • • I • •
CD CD ® CD
·-~ A Bm E7 A
I I l I I I .. I I I I I I I I I I I I •• II r • I • • • I • • • •
77
78
Lesson 16 Minor 7th Chord-Form 1 The Minor 7 th chord is often used as a preparation for the Dominant 7 th chord.
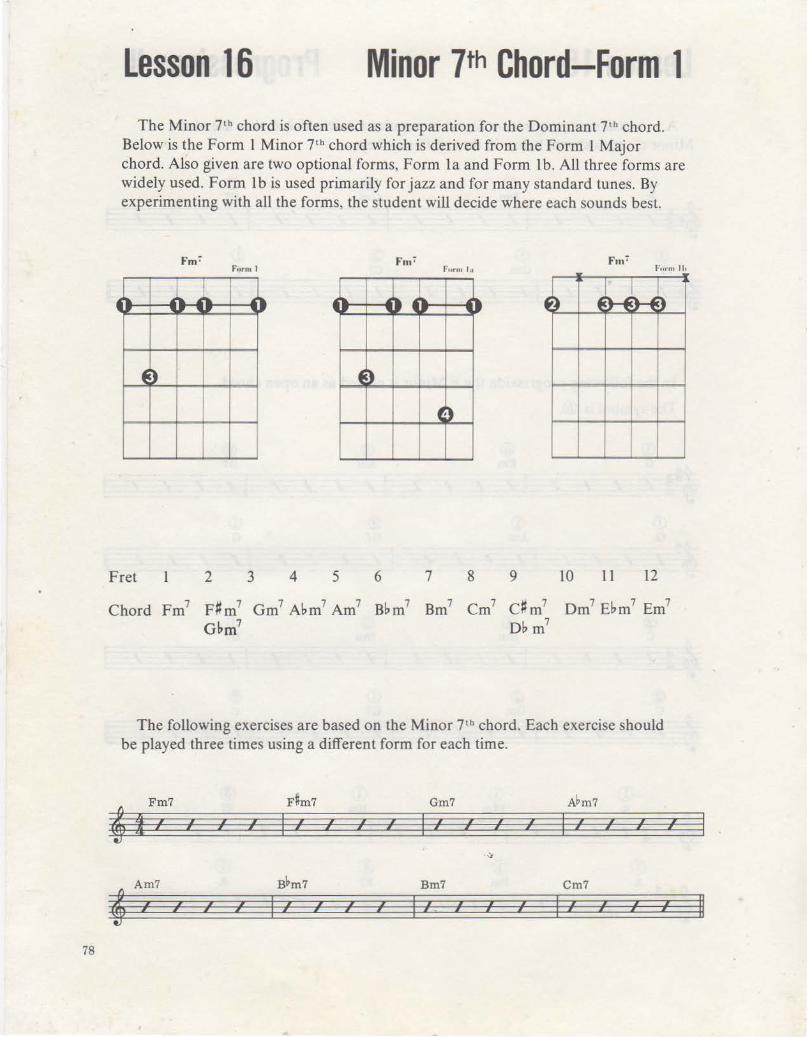
Below is the Form 1 Minor 7th chord which is derived from the Form 1 Major chord . Also given are two optional forms, Form l a and Form 1 b. All three forms are widely used. Form 1b is used primarily for jazz and for many standard tunes. By experimenting with all the forms, the student will decide where each sounds best.
fur111 Ia
~~ ~H ~ , , ~~ .. ) ~ ~ .... , ... 0 I. l ~ ~ ....., ... .., " 'J
f~ f ~ ' c ·)
Fret 1 2 3 4 5 6 7 8 9 10 11 12
Chord Fm7 F#m7 Gm7 Abm7 Am7 Bbm7 Bm7 Cm7 C#m7 Dm7 Ebm7 Em7
Gbm7 Db m7
The following exercises are based on the Minor 7 th chord. Each exercise should be played three times using a different form for each time.
Fm7 Gm7 A~m7 4 f I I
I I
I I
I I I r »
I I i' I
I I
I I I r »
I I
I I
Bm7 Cm7 I
I I
I I I I I
I i
,,, I
i I I I
I I
I I
I I
I I II
·r
~
t (
{
~ f '
f
' ! j
J
(
t
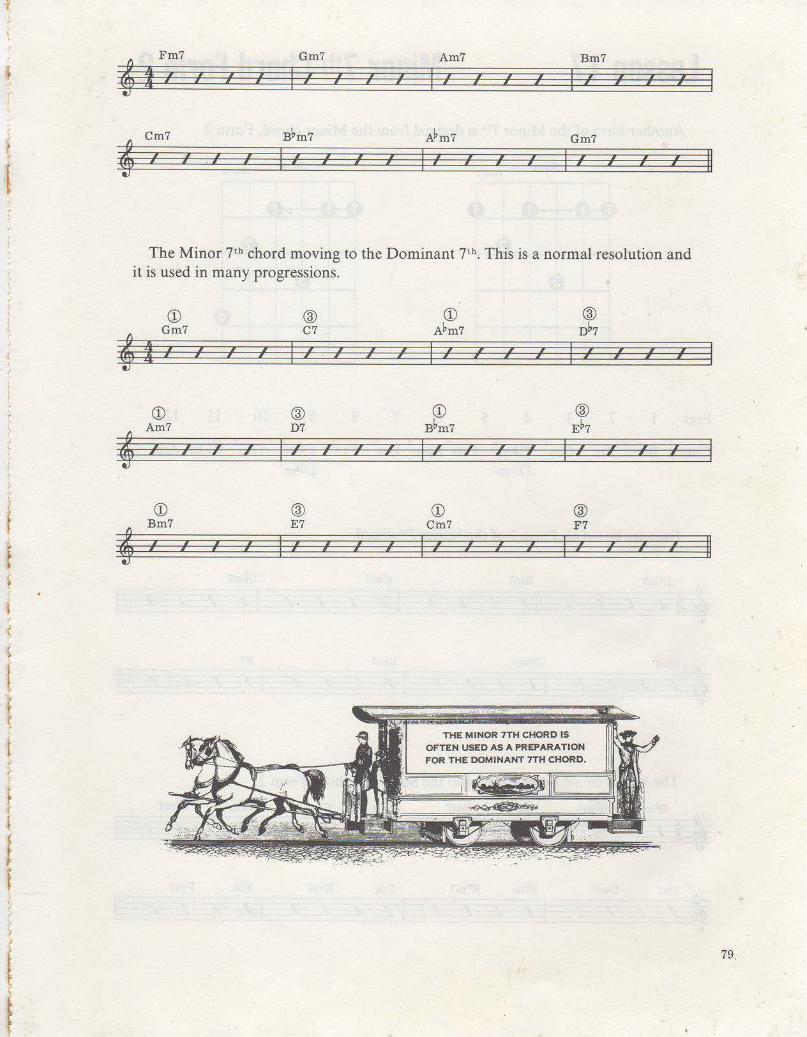
4 Fm7 Gm7 Am7 Bm7
f 11 11 11 11 I II 11 11 ,' I 11 11 I 11 I 11 •' .f! I I I I I I I I I 1 I
4 Cm7 B~m7 Abm7 Gm7
11 I I , 11 11 I
, I , 11 , , , , I 11 I I I I I I • I I I I I
The Minor 7tb chord moving to the Dominant 7th. This is a normal resolution and it is used in many progressions.
CD
4 Gm7
I I , , 11
I I I
@ CD @ C7 Ahm7 nh7
11 I I 11 11 I I 11 11 11 I 11 I I I ; ; I I I
CD
4 Am7
11 I 11 11 I I I
@ CD @ D7 Bbm7 Eh7
11 •' I 11 I 11 , 11 , 11 11 ,' , I I I I I I I I I
CD @ CD @
~ Bm7
11 11 I I I , E7 Cm7 F7
11 ,• 11 I 11 11 11 I I I 11 11 I i I I I I i
THE MINOR 7TH CHORD IS
II
II
79
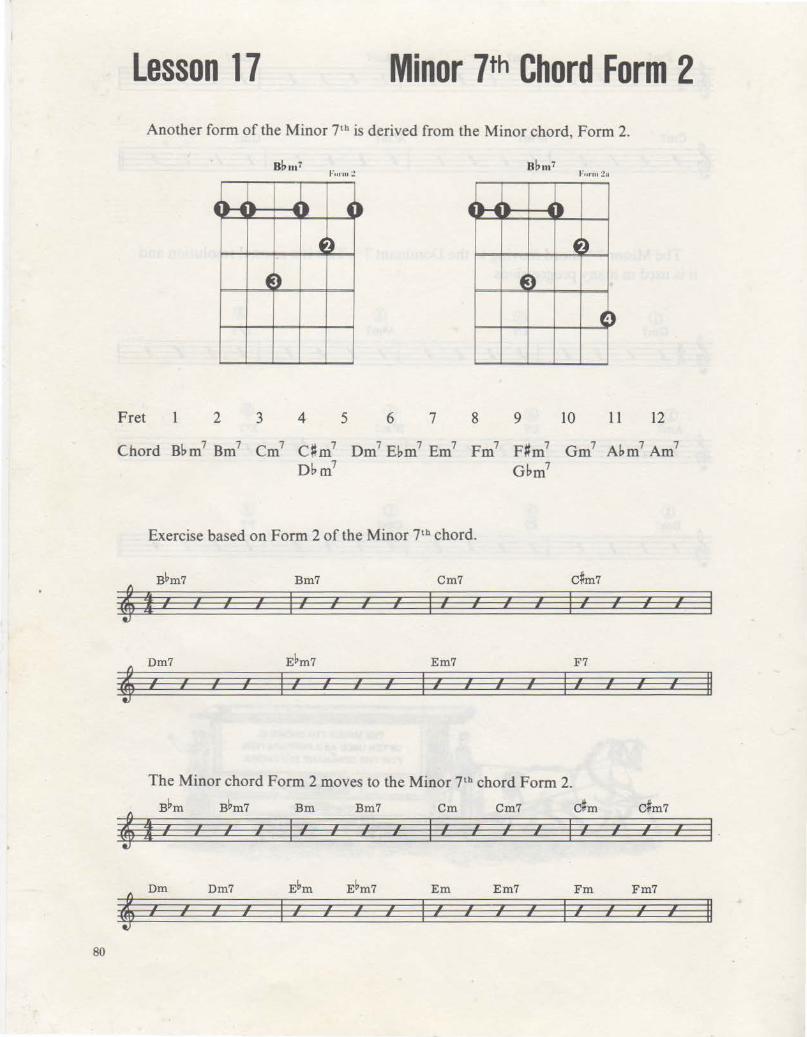
Lesson 17 Minor 7th Chord Form 2 Another form of the Minor 7th is derived from the Minor chord, Form 2.
Bbm7 Funu:.!
~~ • .41) ~) ~~ ~ .411~ ,
• ~ 4~
4 !) f ~
~·)
Fret 1 2 3 4 5 6 7 8 9 10 11 12
Chord Bbm7 Bm7 Cm7 C#m7 Dm7 Ebm7 Em7 Fm7 F#m7 Gm7 Abm7 Am7
Db~ Gb~
Exercise based on Form 2 of the Minor 7th chord.
B~m7 Bm7 Cm7 dm7
4 f , « , , I I , , « I , I , , I , , , ,
I , • I I » I , I I I I I I
Dm7 E~m7 Em7 F7
4 , , , , I , , I , I , , , , I , , , , II I I • I I I I • I I • • • • I
The Minor chord Form 2 moves to the Minor 7th chord Form 2.
Bbm Bbm7 Bm Bm7 Cm Cm7 c#m c#m7
4 I , , , , I I , , , I , I , , I , , , I • I I I • • • • • I • • •
Dm Dm7 E~m Ebm7 Em Em7 Fm Fm7
~ ,
•' ,
I I , , , , I , •• , , I , I , , II • I • • • • I • I I i )
80
f
f
! (
' 1 ~
t
! f
' ' ' 4
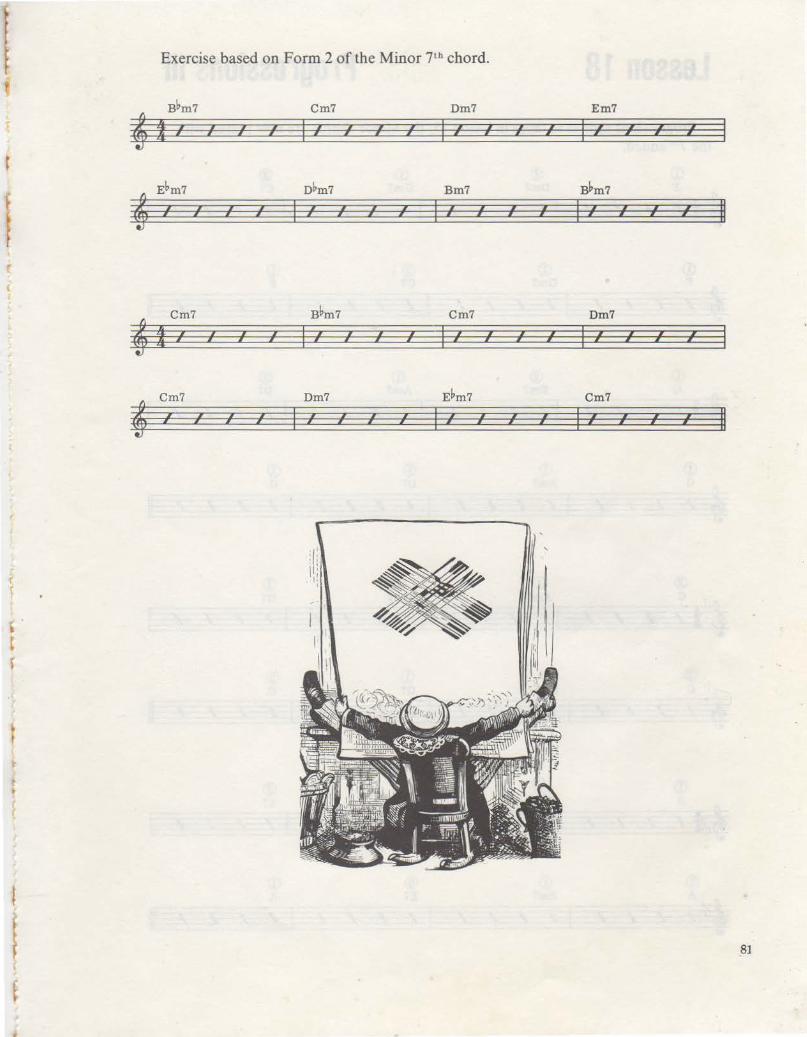
Exercise based on Form 2 of the Minor 7th chord.
Bbm7 Cm7 Dm7
f I I (
I I I I I I
I I
I I
I I
) I I I
I I
Ebm7 obm7 Bm7
I I I I
I I I , I
I j
I I I I I I •
Cm7 Bbm7 Cm7
I , I
I I
I • I I I • I I ,• I
I I I I
, I
Cm7 Dm7 E~m7 ,
I ,
I I
i I
I I
I I
I I • I
I I I 1 I
Em7 I , I
I I , I ,
I I I I
B~m7 I
I I I I I I I
I ,
I II
Dm7 I
I ,
I I , i ,
) ,
j ,
i
Cm7
I I i I , I
I i
( I
I • II
'
81
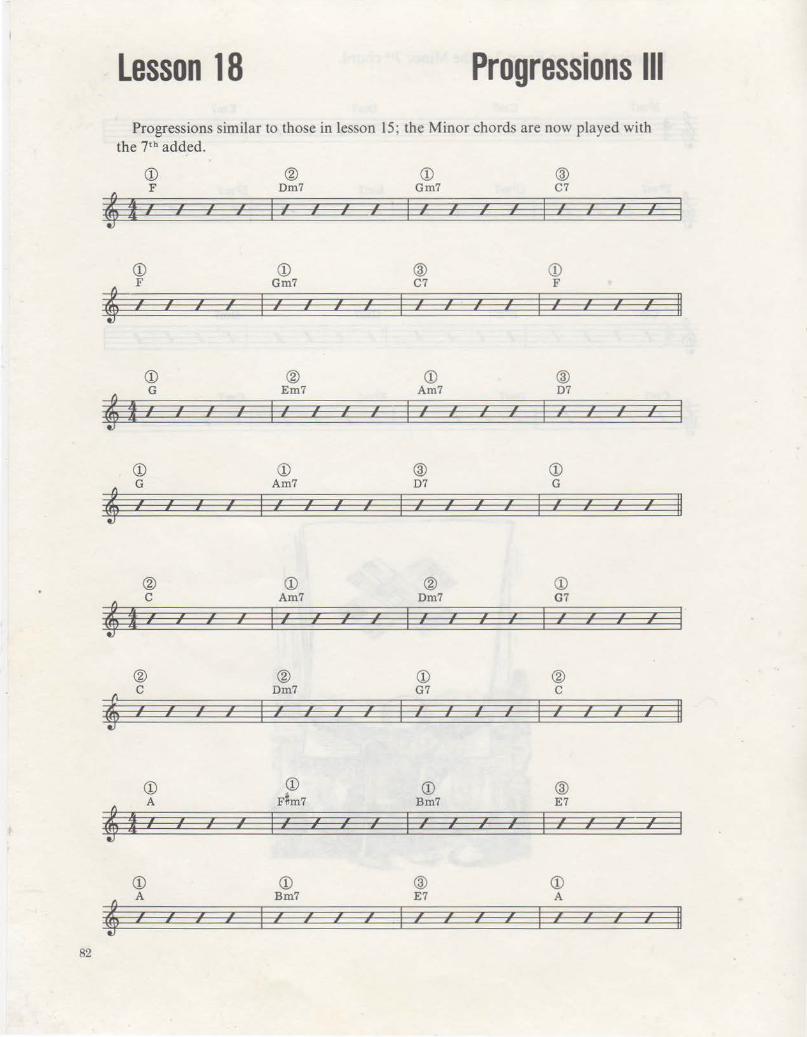
Lesson 18 Progressions Ill Progressions similar to those in lesson 15; the Minor chords are now played with
the 7th added.
CD ® CD @ F Om7 Gm7 C7
4 I •' I •' I I I I I I I I ,' , , I I •' I •' • I I I I j I I I I
CD CD @ CD F Gm7 C7 F
4 I I I , I I I I I I I I I I ,' .~ I II I • I I I I I I I I I I
CD ® CD @ G Em7 Am7 07 4t! ! ! ! I! ! ! ! I I I I , I , I I I =: := :- :~ :- :- : :- :- :- :- r • » r r • r »
CD CD @ CD
•' I I I I I I I
G
I I I I II ' ; I I I
Am7 07
® CD ® CD
4 c Am7 Om7 G7
i ;' I I I I I I I , I I I I I I I , I I I I I I I I I I i I I I
® ® CD ®
i c Om7 G7 c I I I I I I I
, f: I I I I I I ,' II i I I I I j I I I I I
CD CD CD @ A F3m7 Bm7 E7
4 I I I I , I , , I I I I I I I I , II l I I I I I I I I I I I I
CD CD @ CD
4 A Bm7 E7 A
•' , , , I , 7 I 7 I , I , I I , I II I I I I I I I I I I I I I
82
I
l
f 1
r
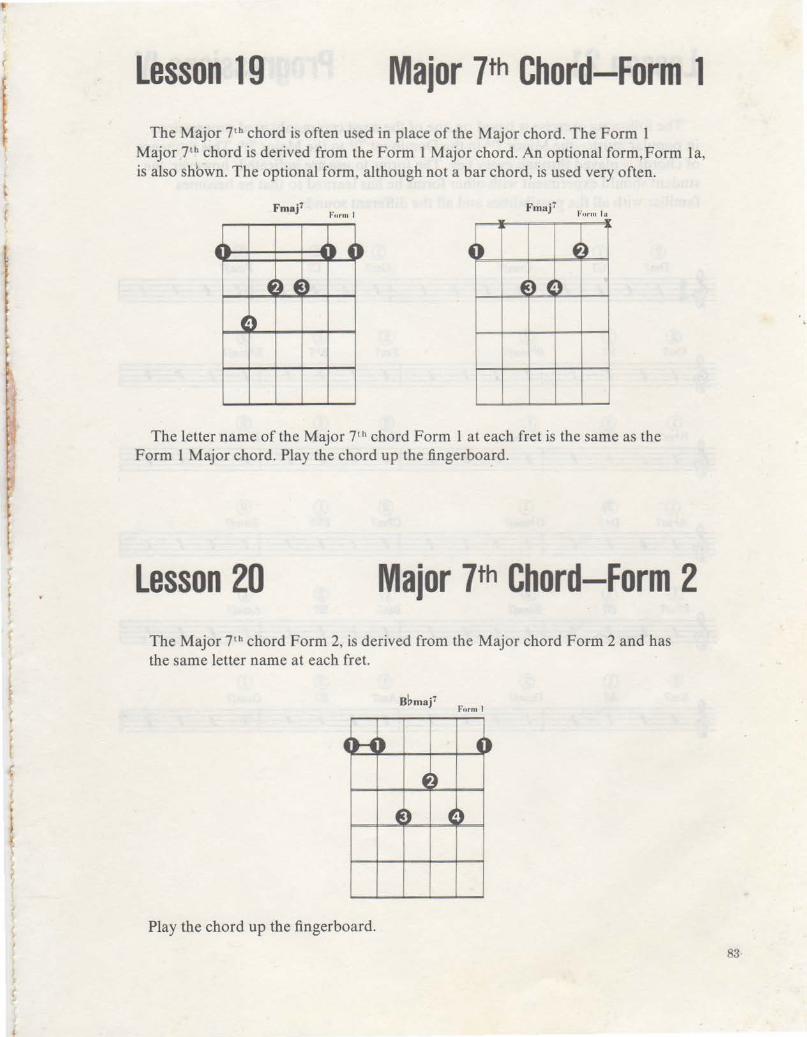
Lesson 19 Major 7th Chord-Form 1 The Major 7 tb chord is often used in place of the Major chord. The Form 1
Major 7tb chord is derived from the Form 1 Major chord. An optional form, Form la, is also shbwn. The optional form, although not a bar chord, is used very often.
Fmaf Fmaj? Funn '"
~~ ,.t 4~ 4) fl)
~ ~ ~ E f ) (· ) '
·) c
The letter name of the Major 7 th chord Form 1 at each fret is the same as the Form 1 Major chord. Play the chord up the fingerboa.rd.
Lesson 20 Major 7th Chord-Form 2 The Major 7 th chord Form 2, is derived from the Major chord Form 2 and has the same letter name at each fret.
B~maf Furnt 1
4H~
Play the chord up the fingerboard.
83
Lesson 21 Progressions IV The following exercise is based on one of the most commonly used progressions
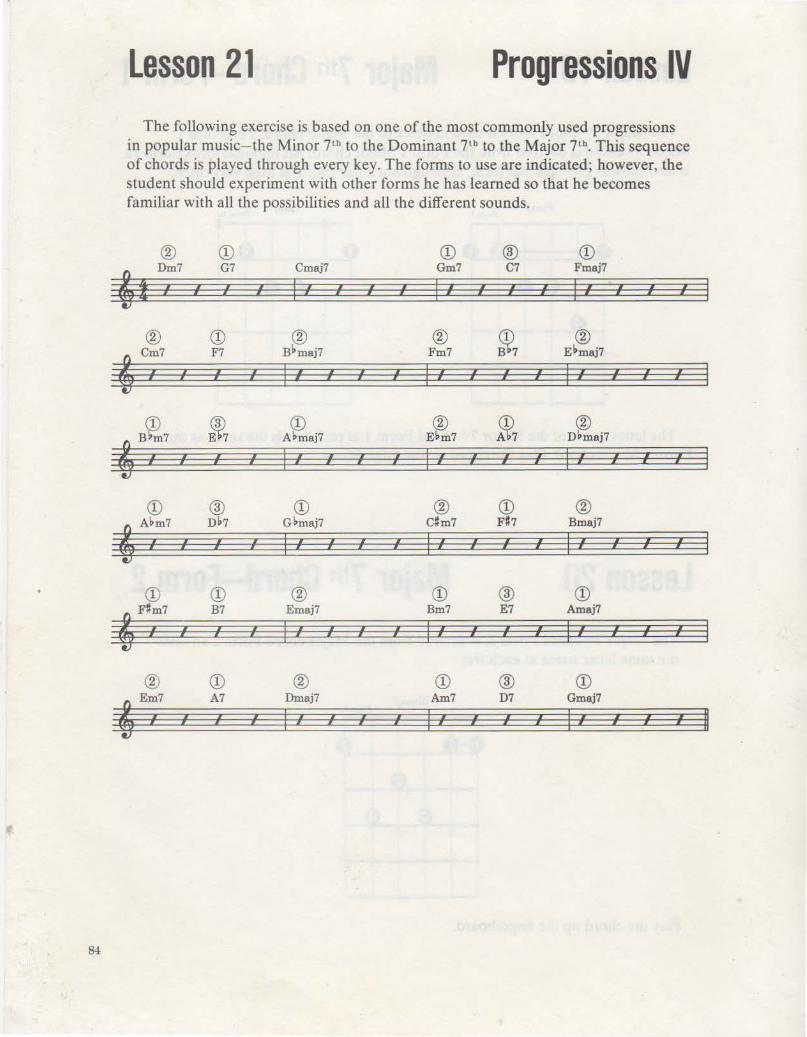
in popular music-the Minor 7tb to the Dominant 7tb to the Major 7tb. This sequence of chords is played through every key. The forms to use are indicated; however, the student should experiment with other forms he has learned so that he becomes familiar with all the possibilities and all the different sounds.
® <D CD ® <D
f;! Dm7 G7 Cmaj7 Gm7 C7 Fmaj7
11 .. 11 11 I 11 .. 11 : I .. 11 .. 11 I : 11 : .. • I • • • • • •
® CD ® ® ~7 ®
' c;' F7 B1>maj7 Fm7 E1>maj7
l : 11 I 11 11 11 ,. I 11 11 11 11 I 11 11 : 11 • • • • • • • • I • I
B~7 ~7 CD ® CD ® A~maj7 Ebm7 Ab7 Dbmaj7
.11
11 11 I I 11 11 11 11 I 11 I 11 .. I 11 11 11 11
• • • • • • I • • • • • •
<D ® CD ® CD ® ' A~m7 D1>7 Gbmaj7 C#m7 F#7 Bmaj7
11 11 11 I I .. I 11 I : 11 11 I I .. 11 11 11 • • • • I • • • •
CD CD ® CD ® CD ' Ft1m7 B7 Emaj7 Bm7 E7 Amaj7
11 : 11 I 11 I 11 11 I I 11 11 11 I I .. .. I • • • I • I • •
® <D ® CD ® <D
f:' A7 Dmaj7 Am7 D7 Gmaj7
I I 11 11 11 I 11 I I I 11 11 I 11 11 11 I II I • • I • • • • •
84
'
(
, ' f r
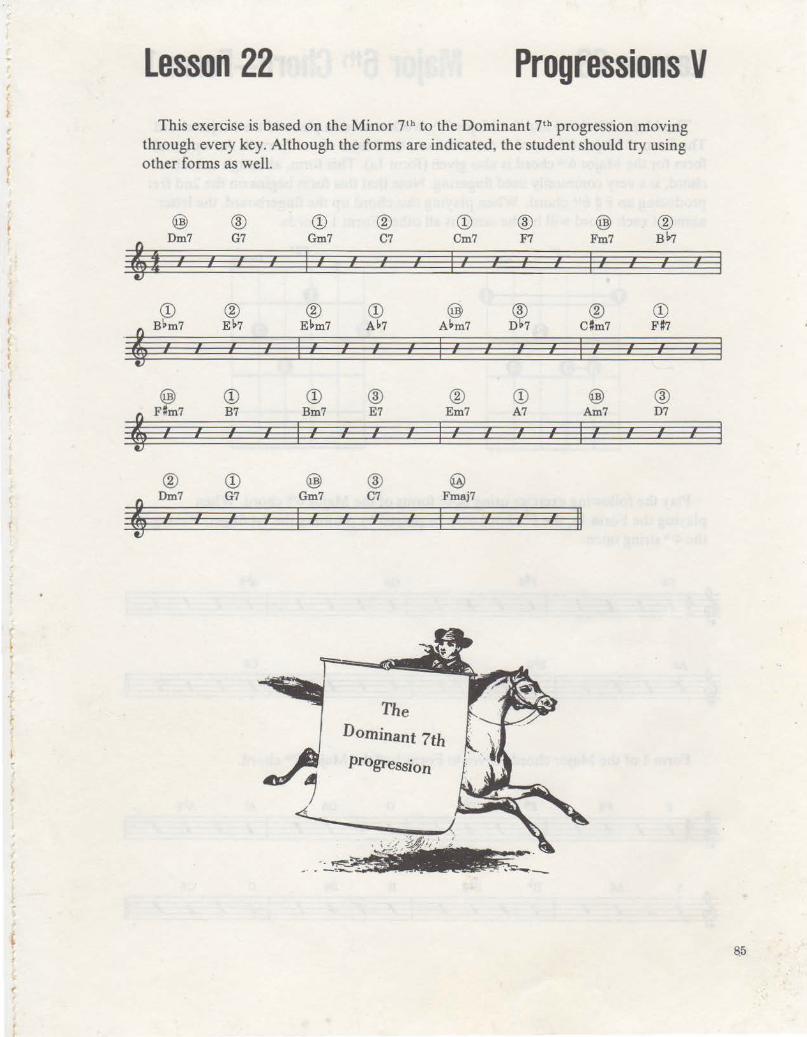
Lesson 22 Progressions V This exercise is based on the Minor 7th to the Dominant 7th progression moving
through every key. Although the forms are indicated, the student should try using other forms as well.
@ ® CD
f;i Dm7 G7 Gm7
l I I I I { • • •
CD ® ®
'B~m7 E~7 E ~m7
I I .. I I • • •
@ CD CD
' F#m7 B7 Bm7
.. { I I I I • • •
® CD @)
' Dm7 G7 Gm7
I I I I : • •
® CD C7 Cm7
I • I • I • I ..
CD @ A~7 A~m7
I I
I • I • I I •
® ® E7 Em7
.. I I • I I •
® @ C7 Fmaj7
I • I I
I •
The
Dom inant 7th
progression
I •
I •
I •
I
® @ ® F7 Fm7 Blo?
I • I • I • I I • I • ..
~ ® CD C#m7 F #7
.. I I I • l ..
CD @) ® A7 Am7 D7
I • I .. I • I •
I • I • II
..
I •
I •
85
il!
86
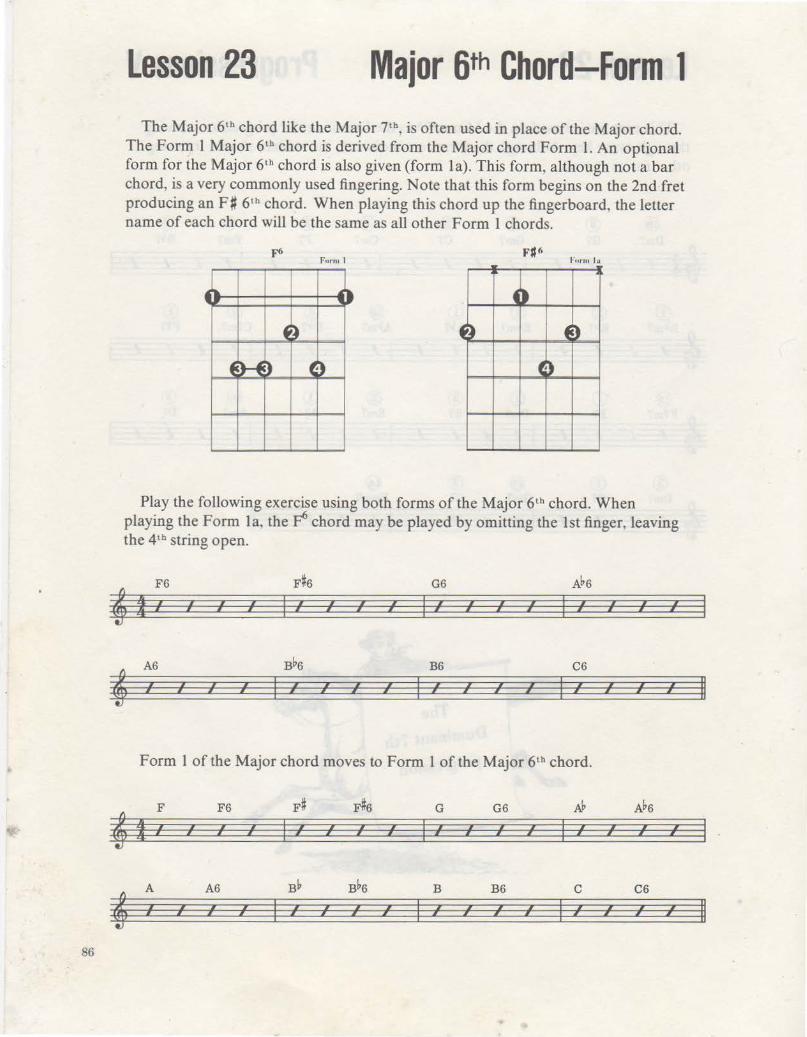
Lesson 23 Major 6th Chord-Form 1 The Major 6th chord like the Major 7th, is often used in place of the Major chord.
The Form 1 Major 6th chord is derived from the Major chord Form 1. An optional form for the Major 6th chord is also given (form la). This form, although not a bar chord, is a very commonly used fingering. Note that this form begins on the 2nd fret producing an F# 61
h chord. When playing this chord up the fingerboard, the letter name of each chord will be the same as all other Form 1 chords.
Furm l ., I ) ~· ~ ~ ·~ f~
fH~ ·~ t ·) t
Play the following exercise using both forms of the Major 6th chord. When playing the Form la, the p6 chord may be played by omitting the 1st finger, leaving the 4th string open.
F~6 G6 Abs
I • I • I I ;' I
I I
I I
i I I i ,• I
I I
I I
I I
I
' A6
I ;' I I I I
B~6 B6 C6 I I ,• I I I I I I I I I I I I I I I I I I
Form 1 of the Major chord moves to Form 1 of the Major 6th chord.
F F6 F~ F#s G G6 » A~6
' I ,• I •' I I I I .( I I I I .( I I I I
I I i I I I I I I I I I I
A A6 Bb B~6 B B6 c C6
' I I I ,' I I I I I I I I I I II I
I I I I I • I I • I I
II
II

f
( r j
.,..
T
Lesson 24 Major 6th Chord-Form 2 The Major 6th chord Form 2 is derived from the Major chord Form 2. While this
chord is part of the series of bar chords, a more commoniy used Major 6th chord form is the optional Form 2a. This form however, begins with the C6Chord. The root of this chord or the letter name, is the note fingered by the 1st finger on the 2nd string.
i 4)
f ~ f )
~·)
The following exercise should be played first using the Form 2 fingering, then played again beginning from the c6 (third measure) using the Form 2a.
B~6 B6
' I I I I I I I I I ,• I • I I I I
C6 c#G I I ;' I ,• I ,• I • j 1 I
' D6 E~6
I I I I I I I I I I I I I • I I
E6 F6 I I I I I I I I
I I I I I I
Form 2 of the Major chord moves to Form 2 of the Major 6th chord .
B~ B~6 B B6 c C6 d d6
' I I I I I I I I I I I I I I I I I I
I I I j I I I j i I
D D6 E~ E~6 E E6 F F6
4 I I I I I I I I I I I I I I I I I I I I I I I I I I I I I I I
II
II
87

88
Lesson 25 Dominant Qth Chord-Form 1 The Dominant 9th chord may be used in place of
the Dominant 7th. Form 1 of this chord is derived from the Major chord, Form 1, and follows the same pattern up the fingerboard.
Exercise based on Form 1 of the Dominant 9th chord:
F9 F#9 G9
4 I I I I I I I I I I I I I I j I I j I I j I • I
4 A9 Bb9 B9
I I I I I I •' I I I I • I I i I • I I • I
Funu I
b .411'11. ! _.411 ) ...,, .
'~ ~ ) C·)
~
Ab9 I
I I I i
I I
I I
I I
C9 I
I I
I I
I I
i ,'
The Dominant 9th chord is used here in place of the Dominant 7th, and progresses to the Major chord Form 2.
CD ® X ® F9 Bb B
' I I I I I I I I I •• I I I I I I I I I .f I I I • I j j I I I I • I
CD ® CD ®
' G9 c N9 ob
I I I I I I I I I I I I I I I I • I I , I I I I • • I • I I •
II
II
·r , .
r r (
f
(
( ..
. t
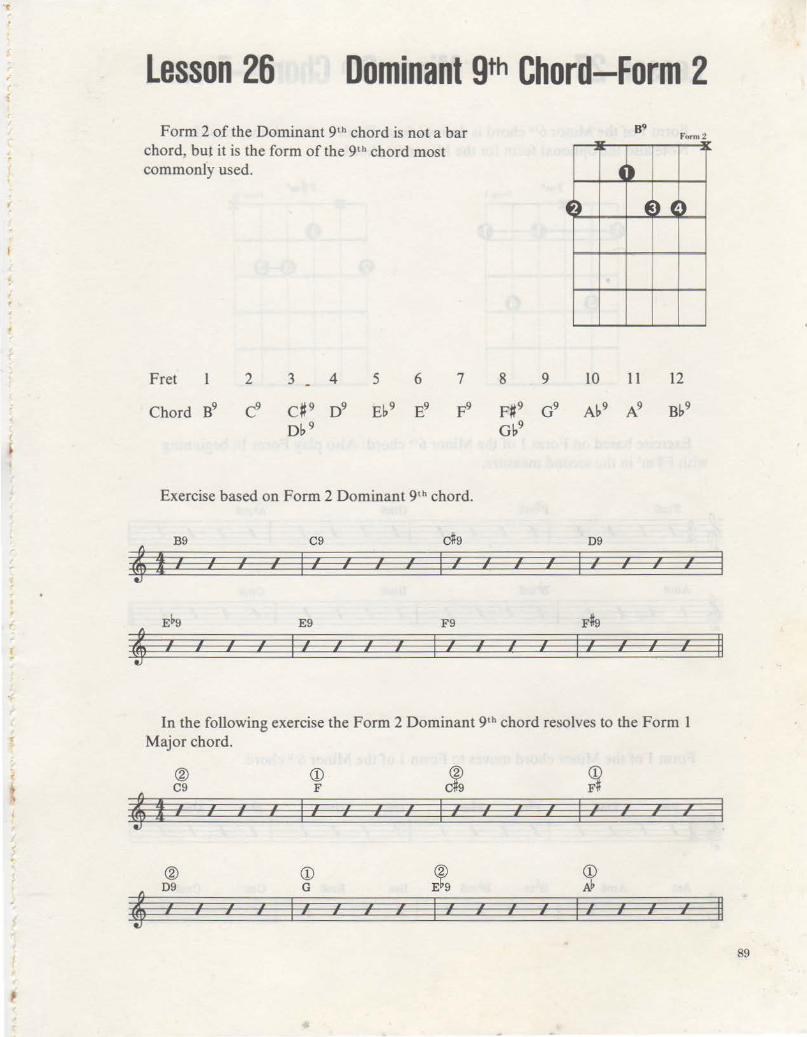
Lesson 26 Dominant 9th Chord-Form 2 Form 2 of the Dominant 9th chord is not a bar
chord, but it is the form of the 9th chord most commonly used.
Fret 1 5 6 7
Chord B9 Eb9 E9
Exercise based on Form 2 Dominant 9th chord.
B9 C9 d9
4 t , , ,• , I , I ,' , I I I I i I I
E~9 E9 F9
' I
, , , I , , I , I I I I I I I
Form:l
~
~)
4~ ~ ) (·)
09 ,
I I , I I I I
, I
, j
, I
F#s ,
I ,
I I I , I .f: I ,
j ,
I
In the following exercise the Form 2 Dominant 9th chord resolves to the Form 1 Major chord.
® (!) c<fs ~ C9 F
4 f , I I I I , , , , I .f: , .f: , I .f: , , ,
I , • I I j I I I I I I I I
® (!) ~ (!)
4 09 G />/ , , , I I , I ,• , I ,• , , , I ,• I I ,
I i I I I I I I I • I I
II
II
89
90
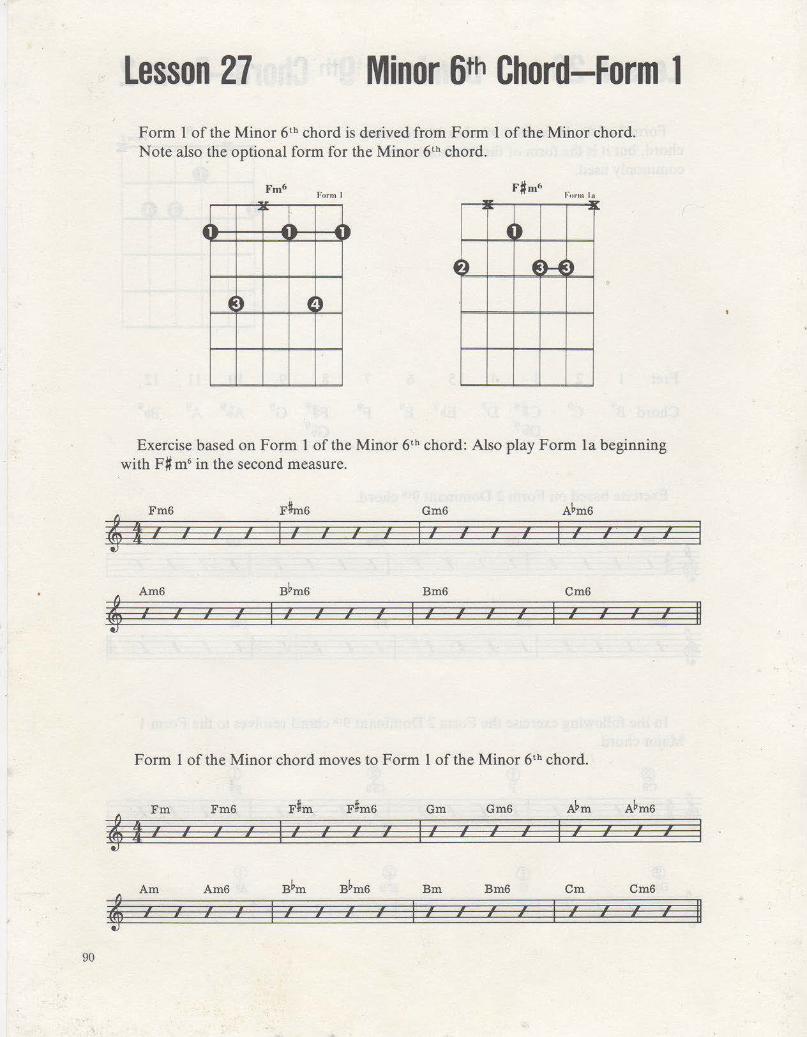
Lesson 27 Minor 6th Chord-Form 1 Form 1 of the Minor 6th chord is derived from Form 1 of the Minor chord. Note also the optional form for the Minor 6th chord.
Furm l Furm Ia
~
4~ .41'- ) , 4)
~~ ' w ~
~ ) ~ ·)
Exercise based on Form 1 of the Minor 6th chord: Also play Form 1a beginning with F# m6 in the second measure.
' Fm6 Films Gm6 A~m6
I I I I I I I I I I I I -t I I ( ( I I I I I , I I I I I I I I j I
' Am6 B~m6 Bm6 Cm6
I I I I I I I I I I I I I I I ,• j I i I I i I I
Form 1 of the Minor chord moves to Form 1 of the Minor 6th chord.
Fm Fm6 F#m F#ms Gm Gm6 A~m A~m6
6 I I I I I I I I I I I I I I I I I I ,• • • I I I • I i I I I
Am Am6 Bbm Bbms Bm Bm6 Cm Cm6
4 I I I I I .f I I I I I I I I .f I ; I I I I I I I i I I I I i
II
II
I
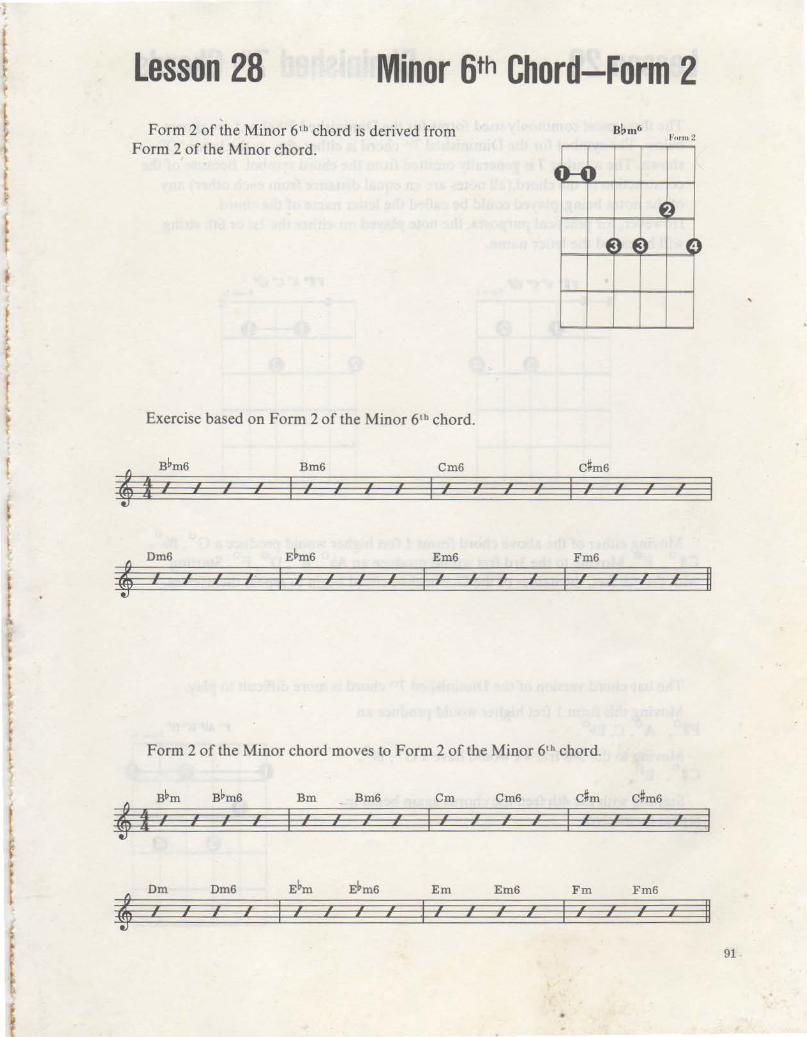
Lesson 28 Minor 6th Chord-Form 2 Form 2 of the Minor 6th chord is derived from
Form 2 of the Minor chord.
~~~
4 ) 4
~~
1) ~tl
92
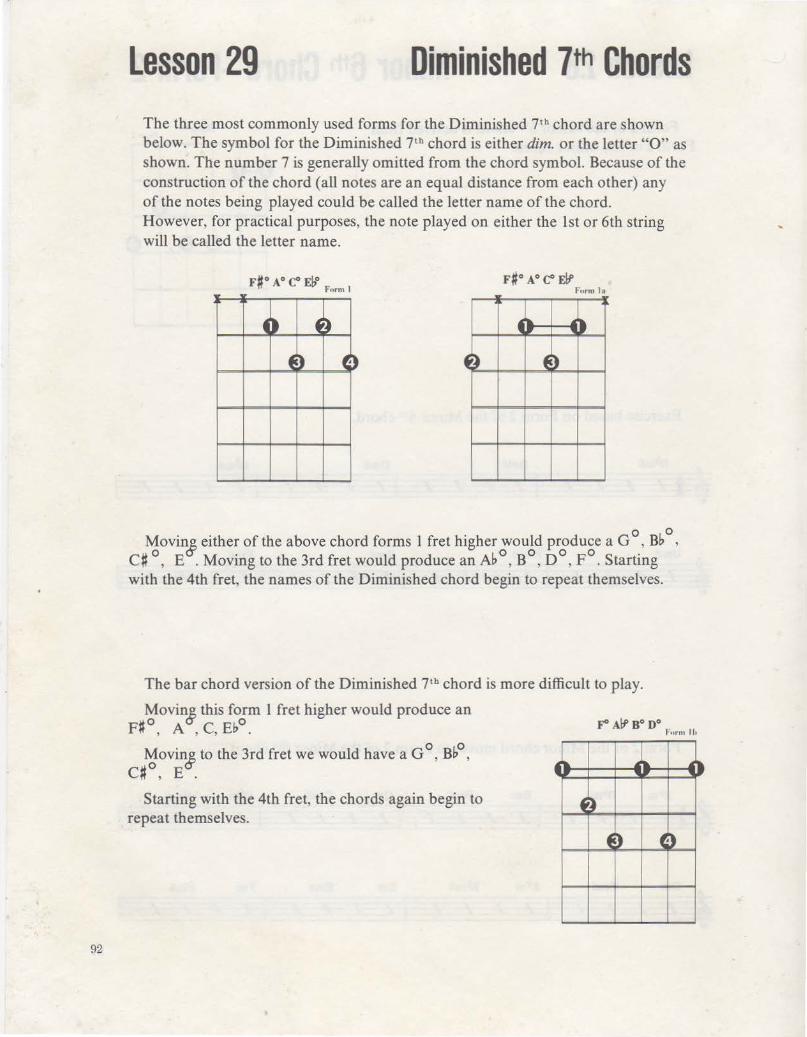
Lesson 29 Diminished 7th Chords The three most commonly used forms for the Diminished 7 th chord are shown below. The symbol for the Diminished 7 th chord is either dim. or the letter "0" as shown. The number 7 is generally omitted from the chord symbol. Because of the construction of the chord (all notes are an equal distance from each other) any of the notes being played could be called the letter name of the chord. However, for practical purposes, the note played on either the 1st or 6th string will be called the letter name.
~ ) 4 ~ 4: .. ~ .... f ) (·) ~~ E )
Movin& either of the above chord forms 1 fret higher would produce a G 0
, Bb 0
,
C# 0
, E . Moving to the 3rd fret would produce an Ab 0
, B 0
, D 0
, F0
. Starting with the 4th fret, the names of the Diminished chord begin to repeat themselves.
The bar chord version of the Diminished 7th chord is more difficult to play.
Movin& this form l fret higher would produce an F# 0
, A , C, Eb0.
Movin& to the 3rd fret we would have a G 0
, Bb0
,
C#0
, E .
Starting with the 4th fret, the chords again begin to repeat themselves.
4~
~
... )
E ) C·)
.. ,
'
t (
r
~ I
r l
r.
' t
• "
j
(
f
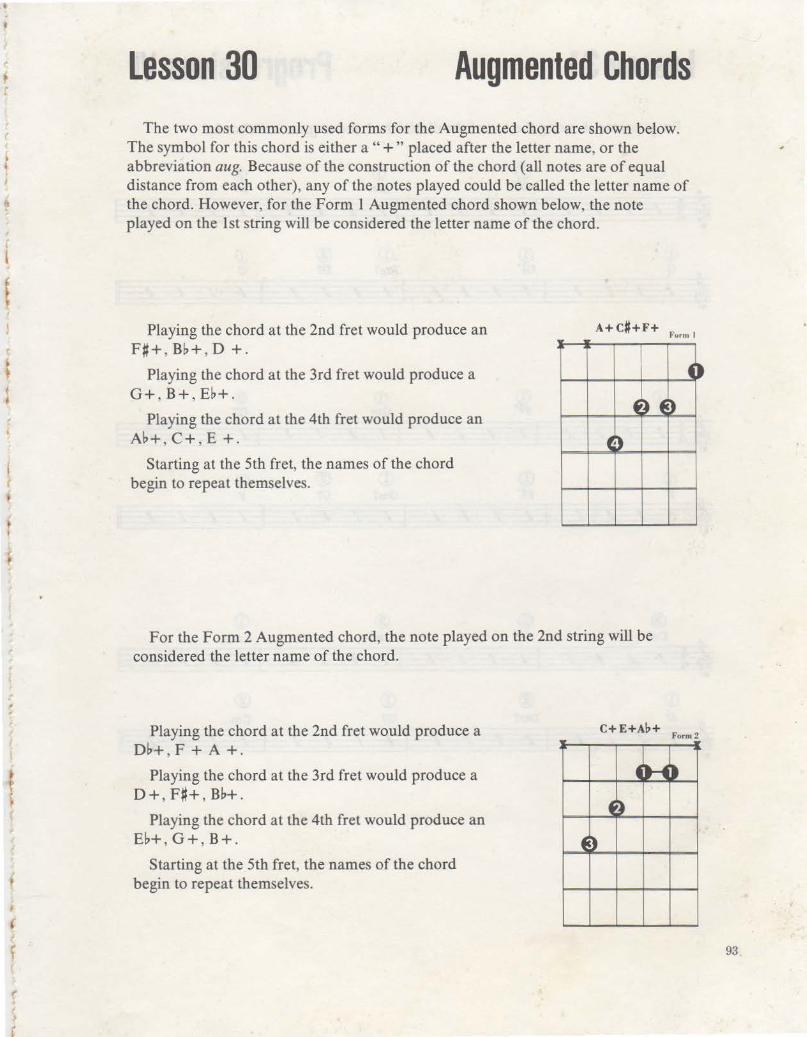
Lesson 30 Augmented Chords The two most commonly used forms for the Augmented chord are shown below.
The symbol for this chord is either a "+" placed after the letter name, or the abbreviation aug. Because of the construction of the chord (all notes are of equal distance from each other), any of the notes played could be called the letter name of the chord. However, for the Form 1 Augmented chord shown below, the note played on the 1st string will be considered the letter name of the chord.
Playing the chord at the 2nd fret would produce an F#+ , Bb+ , D +.
Playing the chord at the 3rd fret would produce a G+ , B+, Eb+.
Playing the chord at the 4th fret would produce an Ab+ , C+ , E +.
Starting at the 5th fret, the names of the chord begin to repeat themselves.
A+ C#+F+ Furm I
I ~,
f ~ ~ )
~·)
For the Form 2 Augmented chord, the note played on the 2nd string will be considered the letter name of the chord .
Playing the chord at the 2nd fret would produce a Db+ , F +A+.
Playing the chord at the 3rd fret would produce a D+, F#+, Bb+.
Playing the chord at the 4th fret would produce an Eb+ , G+, B+.
Starting at the 5th fret, the names of the chord begin to repeat themselves.
~ )
C+E+Ap+ Form2
~H )
~ ~
93
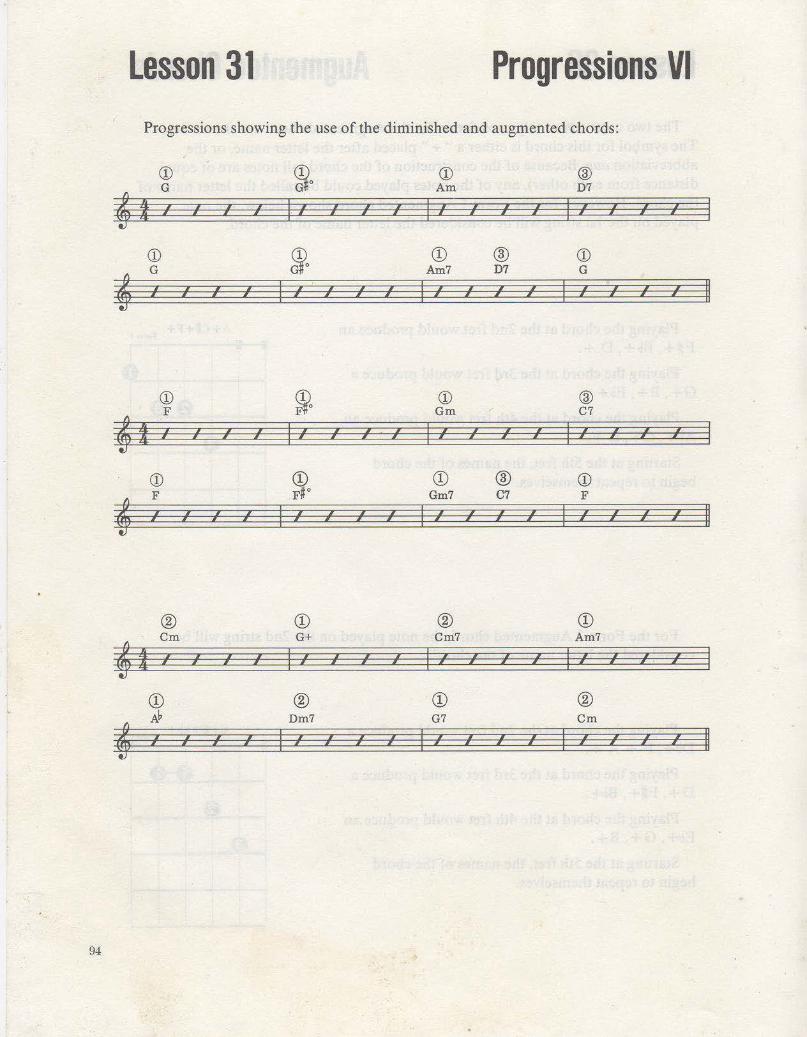
Lesson 31 Progressions VI Progressions showing the use of the diminished and augmented chords:
<D ~0 <D ®
' G Am D7
I I , , I I I , I ( I
, ( ,• , I I , , , I I I I I I I I I I
<D ~0 CD ® <D
' G Am7 D7 G ,
I I I I , , I ,• I
, , ( , •' I , ,
II I I I I I I I I I
<D ~ <D ® F Gm C7
' I , , , I I I
, ,• I I I I I I I , ( I I
I • I I I I I I I I I
<D ~0 CD ® <D
4 F Gm7 C7 F
I I , I I , I I ,• I I I I ,
I I ,' I II I j I I I I I I I I
® CD ® CD
4 Cm G+ Cm7 Am7
I I , I I I , I , , I , I , I I
, I I I I I I I I I j I I I I I
CD ® CD ®
' A~ Dm7 G7 Cm , ,
I' I , I I ,
I , ,• I I I I , I II I I I I I I I I I I
94

· r r
(
f
J
I
~
•
r
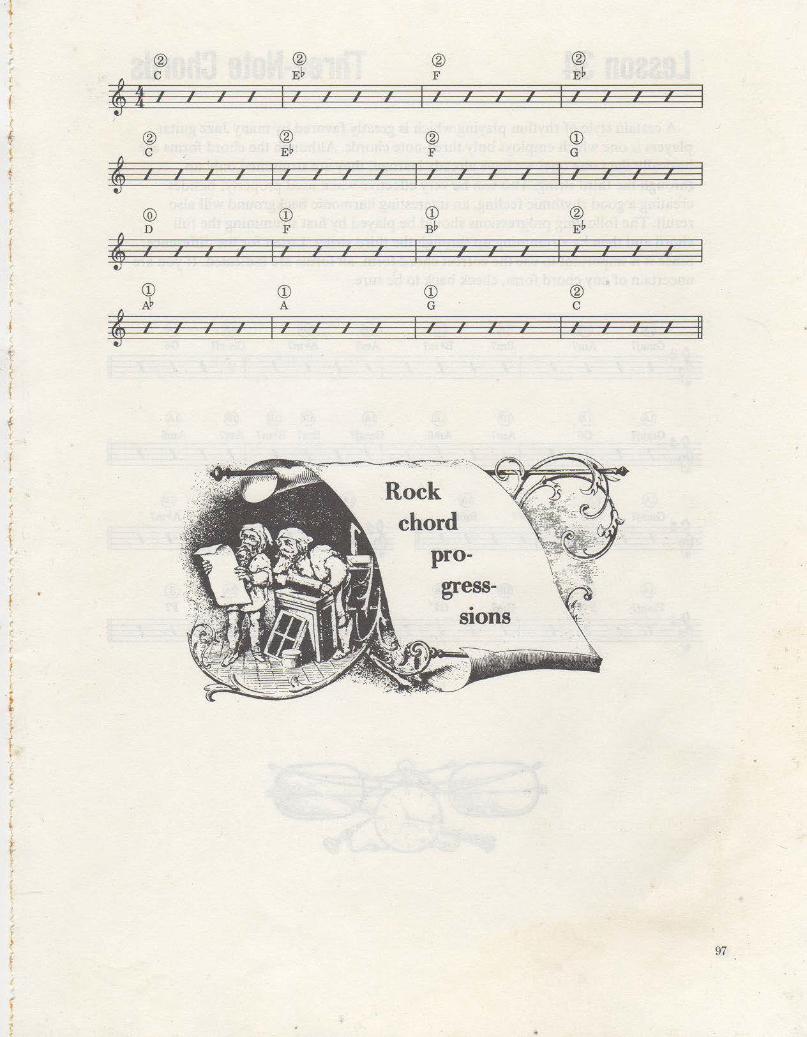
Lesson 32 Progressions VII The following progressions are typical of those found in the more modern or
Jazz-type tunes. Note the greater use of the optional chord forms.
® @ Dm7 G7
• I I : .. I
® @)
• Em7 A7
: • • • • • •
@ ® Am7 D9
• t • • ~ ~ • I I •
@ ®
• Bm7 E7
I • • • • • •
@ C6
I I
@ D6
I • • • •
@ Gmaj7
I ..
@ Amaj7
I .. ~ •
• • • •
.. ..
@ G6
.. • •
@ A6 ~ • ~ •
NOTE THE GREATER USE OF
:
• •
THE OPTIONAL CHORD FORMS
® @ @ E~m7 A~7 D~6
I • I • • { I I • • I • I
® @) @ Fm7 B~7 E~6
I / • • • • • • I • • .. • •
@ ® @ @ B~m7 E~9 A~maj7 A~6
I • • • • ~ • ~ • I ~ • ~ • ~ •
@ ® @ @ Cm7 F7 B~maj7 B~6
I 0
• • ~ I .. ~ • I • • : ~ •
• •
..
• •
• I ~
95
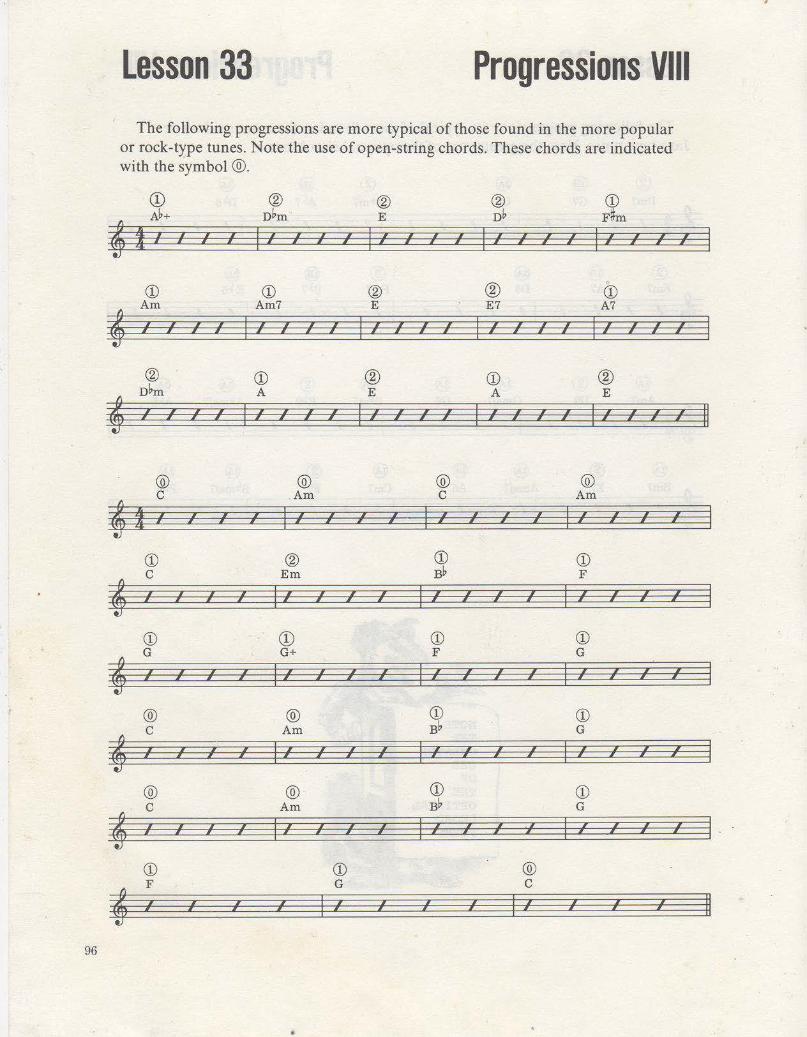
Lesson 33 Progressions VIII The following progressions are more typical of those found in the more popular
or rock-type tunes. Note the use of open-string chords. These chords are indicated with the symbol®.
CD ® ® ® CD
' A~+ D~m E n b F#m
I I I I I I I I I 11 I ,' ,' 11 11 I 11 I I I I 11 11 11 11 • I I I I j I I I I I I I I
CD CD ® ® CD Am Am7 E E7 A7
~ 11 11 11 11 I 11 I 11 11 I ( 11 I I I ( 11 11 11 I 11 ( ( I I I j I I I I I I I I I I I I I
® CD ® CD ® n bm A E A E
4 11 I 11 11 I 11 11 11 11 I 11 11 11 I I 11 11 I f I 11 11 f ( II I 1 j j I ; I ) I I I j I I I I I I
@ @ @ @ c Am c Am
~ I I 11 I 11 I 11 11 ( 11 I 11 11 11 11 I ,• f I 11 I I I I I ; I I I I I I I
CD ® CD CD c Em B~ F
~ I I I 11 I ,' 11 11 11 I ( 11 11 I I 11 11 11 11 I I I I I I I , I I I I I j
CD CD CD CD G G+ F G
~ ,' 11 I 11 I 11 I I 11 I 11 11 f 11 I 11 11 11 11 I I I j I i i I I I I I
® ® CD CD c Am B~ G
4 I 11 11 11 I 11 11 11 I I 11 11 11 11 I 11 11 11 11 I I I I I I I I I I I I I I I
® ® CD CD c Am B~ G
' I I II 11 I II I II 11 I I I 11 ·I 11 ,t I 11 I I I I I I I I I I I I
CD CD ® F G c
~ I I 11 11 I I II II ,' I 11 I 11 I II • I I I • I I I i
96
'
97
98
Lesson 34 Three-Note Chords A certain style of rhythm playing which is greatly favored by many Jazz guitar
players is one which employs only three-note chords. Although the chord forms are basically the same ones we have already learned, they are strummed only up through the third string. This can be very effective when used properly; besides creating a good rhythmic feeling, an interesting harmonic background will also result. The following progressions should be played by first strumming the full chord and then by strumming up through the third string. Listen for the difference. Since it is important to use the correct chord form, all forms are indicated. If you are uncertain of any chord form, check back to be sure.
@) Am7
@) Bm7
@) B~m7
@) Am7
@) A~m7
@ Gmaj7
@ G6
I I I : / I • I I • I • I : I • I , I •
@ @ @) @) @> @ G6 Am7 Am6 Gmaj7 Bm7 B~m7 Am7 Am6 I • I • I : I • I I I I y • : : I : I • I •
@ Am6
@ @ B~o Bm6
@ @ Am7 A~m7
I I y I I I I I II I • I I • • I I I I I y y y •
@ @ @) @) @ @ ®
~ Fmaj7 F#0
# I I I I
Am7 B~m7 Bm7 F6 F7
I I I I I / I / I I I I I I I I I y y y •
II
II
II
II
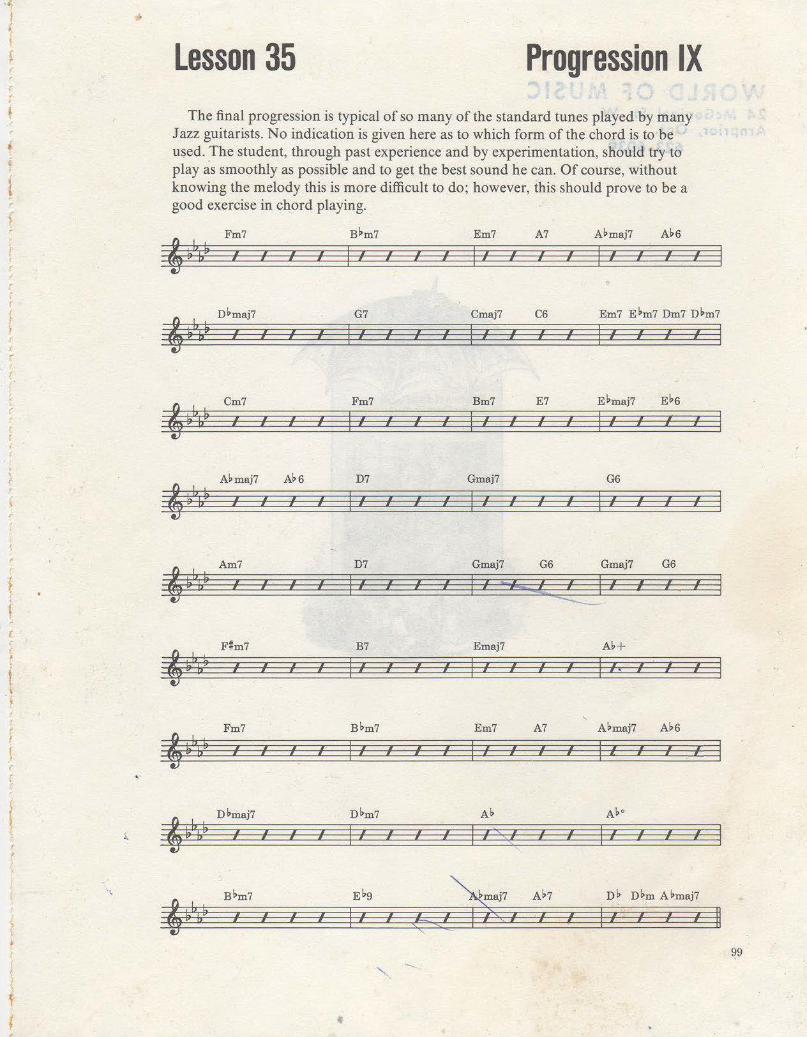
·• I
l Lesson 35 Progression IX ~
(
' • J The final progression is typical of so many of the standard tunes played by many
' Jazz guitarists. No indication is given here as to which form of the chord is to be used. The student, through past experience and by experimentation, should try to
f play as smoothly as possible and to get the best sound he can. Of course, without
l knowing the melody this is more difficult to do; however, this should prove to be a r good exercise in chord playing. ( r
Fm7 B~m7 Em7 A7 A~maj7 A~6
'~" ~ I , ,
I , .. .. I I , ,
/ : I , , : # • • • • • I
,,
( r
D~maj7 El>m7 Dm7 Dl>m7
'~'v G7 Cmaj7 C6 Em7
, I
, , , , , , I .. /
, , I l I • • • I • • , • •
(
&~'' ~ Cm7 Fm7 Bm7 E7 E~maj7 E~6 , ,
I , I l , , , , l l l : , .. I • • • • • • • I !,
r (
( A~maj7 A~6 D7 Gmaj7 G6 . &~" ~ I .. , , .. .. ,
f : , , , I .. I I I • I • • • • ,,
"'
'~lz ~ Am7 D7 Gmaj7 G6 Gmaj7 G6
' , , .. , I , ,. I , ,
'.J , I I I I I .. t • • • , I • "' • • • • lz
f ---(
'~lz ~ F#m7 B7 Emaj7 Ab+
, , , .. I I , , , , : .. I { .. I "l I • • • • • • I • • , • I>
Fm7 B~m7 Em7 A7 A~maj7 Al>6
&~" & .. I , : I I I I I I I I : I .. I I I I • I I • !. ·,
&~" ~ D~maj7 Dbm7 Ab Ab•
I I I I I , I I / I I s ~
, : I I I I I .. I I I • • • I I • • !, s•
&~'· &
B~m7 E~9 ,))~7 A~7 Db D~m Ahnaj7
f I I I I I I , : I I .. , I II I • • • lfs!~Ss f • • • ,,
99
"" -..
~ I
100