application enablement services - avaya · 4 application enablement services installation guide ......
TRANSCRIPT
Application Enablement ServicesInstallation Guide Software-Only OfferRelease 4.0
An Avaya MultiVantage® Communications Application
02-300355Issue 3.0
March 2007
© 2007 Avaya Inc.All Rights Reserved
NoticeWhile reasonable efforts were made to ensure that the information in this document was complete and accurate at the time of printing, Avaya Inc. can assume no liability for any errors. Changes and corrections to the information in this document may be incorporated in future releases.
For full support information, please see the complete document,Avaya Support Notices for Software Documentation, document number03-600758.To locate this document on our Web site, simply go tohttp://www.avaya.com/support and search for the document number in the search box.
Documentation disclaimerAvaya Inc. is not responsible for any modifications, additions, or deletions to the original published version of this documentation unless such modifications, additions, or deletions were performed by Avaya. Customer and/or End User agree to indemnify and hold harmless Avaya, Avaya's agents, servants and employees against all claims, lawsuits, demands and judgments arising out of, or in connection with, subsequent modifications, additions or deletions to this documentation to the extent made by the Customer or End User.
Link disclaimerAvaya Inc. is not responsible for the contents or reliability of any linked Web sites referenced elsewhere within this documentation, and Avaya does not necessarily endorse the products, services, or information described or offered within them. We cannot guarantee that these links will work all of the time and we have no control over the availability of the linked pages.
WarrantyAvaya Inc. provides a limited warranty on this product. Refer to your sales agreement to establish the terms of the limited warranty. In addition, Avaya’s standard warranty language, as well as information regarding support for this product, while under warranty, is available through the following Web site:http://www.avaya.com/support.
CopyrightExcept where expressly stated otherwise, the Product is protected by copyright and other laws respecting proprietary rights. Unauthorized reproduction, transfer, and or use can be a criminal, as well as a civil, offense under the applicable law.
Avaya supportAvaya provides a telephone number for you to use to report problems or to ask questions about your product. The support telephone number is 1-800-242-2121 in the United States. For additional support telephone numbers, see the Avaya Web site: http://www.avaya.com/support.
Issue 3.0 March 2007 3
Chapter 1: Audience and prerequisites . . . . . . . . . . . . . . . . . . 7Intended audience . . . . . . . . . . . . . . . . . . . . . . . . . . . . . . . . . . . 7AE Services server hardware requirements . . . . . . . . . . . . . . . . . . . . . 7Platform and third-party software required for AE Services server . . . . . . . . 8
Software platform . . . . . . . . . . . . . . . . . . . . . . . . . . . . . . . . . 8Third-party software . . . . . . . . . . . . . . . . . . . . . . . . . . . . . . . . 8
Client application machine requirements . . . . . . . . . . . . . . . . . . . . . . 10Communication Manager and media server requirements . . . . . . . . . . . . . 11Required network characteristics . . . . . . . . . . . . . . . . . . . . . . . . . . 11
Network interface configurations. . . . . . . . . . . . . . . . . . . . . . . . . 11Supported network configurations . . . . . . . . . . . . . . . . . . . . . . . . 12Network interface speed and duplex settings . . . . . . . . . . . . . . . . . . 12IP Migration Readiness and Optimization analysis . . . . . . . . . . . . . . . 12
Chapter 2: Installing the Linux platform software . . . . . . . . . . . . . 13
Chapter 3: Installing the server software and third-party software . . . 15Obtaining the server software ISO image . . . . . . . . . . . . . . . . . . . . . . 15Installing the server software . . . . . . . . . . . . . . . . . . . . . . . . . . . . . 15
Running the AE Services installer . . . . . . . . . . . . . . . . . . . . . . 16Installed files . . . . . . . . . . . . . . . . . . . . . . . . . . . . . . . . . . . . . . 21Locations of Installation logs and RPMs. . . . . . . . . . . . . . . . . . . . . . . 22Uninstalling the AE Services RPMs . . . . . . . . . . . . . . . . . . . . . . . . . 22Installation problems . . . . . . . . . . . . . . . . . . . . . . . . . . . . . . . . . 22
Chapter 4: Installing licenses. . . . . . . . . . . . . . . . . . . . . . . . 23Installing the Application Enablement Services license file . . . . . . . . . . . . 23Restarting mvap . . . . . . . . . . . . . . . . . . . . . . . . . . . . . . . . . . . . 24Troubleshooting the AE Services license installation . . . . . . . . . . . . . . . 24
If you receive error messages from WebLM . . . . . . . . . . . . . . . . . . . 25If you do not have a license . . . . . . . . . . . . . . . . . . . . . . . . . . . . 25
Identifying the MAC address . . . . . . . . . . . . . . . . . . . . . . . . . 26
Chapter 5: Initial administration for AE Services . . . . . . . . . . . . . 27Administering Communication Manager for AE Services . . . . . . . . . . . . . 27Administering AE Services . . . . . . . . . . . . . . . . . . . . . . . . . . . . . . 28
Contents
Contents
4 Application Enablement Services Installation Guide
Chapter 6: Testing connectivity . . . . . . . . . . . . . . . . . . . . . . 31Running tests from the OAM pages . . . . . . . . . . . . . . . . . . . . . . . . . 31Running the sample application (Device, Media, and Call Control only) . . . . . 32
Chapter 7: Upgrading and updating the AE Services software . . . . . 33Upgrading the software . . . . . . . . . . . . . . . . . . . . . . . . . . . . . . . . 33
Preparing for the upgrade. . . . . . . . . . . . . . . . . . . . . . . . . . . . . 33Backing up the LDAP database . . . . . . . . . . . . . . . . . . . . . . . . 34
Performing the upgrade . . . . . . . . . . . . . . . . . . . . . . . . . . . . . . 34Restoring the LDAP database. . . . . . . . . . . . . . . . . . . . . . . . . 36
Updating the software . . . . . . . . . . . . . . . . . . . . . . . . . . . . . . . . . 37Updating from a previous AE Services 4.0 build . . . . . . . . . . . . . . . . 37Installing patches . . . . . . . . . . . . . . . . . . . . . . . . . . . . . . . . . 38Uninstalling updates and patches . . . . . . . . . . . . . . . . . . . . . . . . 38
Uninstalling the AE Services software . . . . . . . . . . . . . . . . . . . . . . . . 39
Chapter 8: Security considerations and guidelines. . . . . . . . . . . . 41
Appendix A: Running the sample application(Device, Media, and Call Control only) . . . . . . . . . . . . 43
Before you begin. . . . . . . . . . . . . . . . . . . . . . . . . . . . . . . . . . . . 43The sample application files . . . . . . . . . . . . . . . . . . . . . . . . . . . . . 43Administer AE Services for the sample application. . . . . . . . . . . . . . . . . 44Administer Communication Manager for the sample application . . . . . . . . . 44
Administer a station . . . . . . . . . . . . . . . . . . . . . . . . . . . . . . . . 45Administer network region/gateway configuration (if needed) . . . . . . . . . 45
Edit the tutorial properties file . . . . . . . . . . . . . . . . . . . . . . . . . . . . 45Running the sample application . . . . . . . . . . . . . . . . . . . . . . . . . . . 46Troubleshooting the sample application . . . . . . . . . . . . . . . . . . . . . . . 47
Appendix B: Administering SELinux. . . . . . . . . . . . . . . . . . . . 49Link to SELinux information . . . . . . . . . . . . . . . . . . . . . . . . . . . . . 49Using selinuxenabled . . . . . . . . . . . . . . . . . . . . . . . . . . . . . . . . . 49
selinuxenabled . . . . . . . . . . . . . . . . . . . . . . . . . . . . . . . . . 49
Appendix C: Setting up for remote access(serial modem only) . . . . . . . . . . . . . . . . . . . . . . 51
Setting up the Linux PC for remote access . . . . . . . . . . . . . . . . . . . . . 51Before You Begin . . . . . . . . . . . . . . . . . . . . . . . . . . . . . . . . . 52

Contents
Issue 3.0 March 2007 5
Installing the additional software components . . . . . . . . . . . . . . . . . 52Configuring the Linux PC . . . . . . . . . . . . . . . . . . . . . . . . . . . . . 53
Editing the inittab file . . . . . . . . . . . . . . . . . . . . . . . . . . . . . 53Editing the login.config file . . . . . . . . . . . . . . . . . . . . . . . . . . 53Editing the pap-secrets file . . . . . . . . . . . . . . . . . . . . . . . . . . 53Checking the PPP options file . . . . . . . . . . . . . . . . . . . . . . . . 54Editing the options.tty file . . . . . . . . . . . . . . . . . . . . . . . . . . . 54
Setting up the client to dial in to the server . . . . . . . . . . . . . . . . . . . . . 55Windows clients . . . . . . . . . . . . . . . . . . . . . . . . . . . . . . . . . . 55Linux clients . . . . . . . . . . . . . . . . . . . . . . . . . . . . . . . . . . . . 55Connection Requirements . . . . . . . . . . . . . . . . . . . . . . . . . . . . 55
Appendix D: Configuring an LDAP server forCommon User Service utilization . . . . . . . . . . . . . . . 57
Prerequisites . . . . . . . . . . . . . . . . . . . . . . . . . . . . . . . . . . . . . . 57Configure the LDAP server . . . . . . . . . . . . . . . . . . . . . . . . . . . . . . 57Create an LDAP User account . . . . . . . . . . . . . . . . . . . . . . . . . . . . 58
Appendix E: AE Services WAN requirements . . . . . . . . . . . . . . . 61
Index . . . . . . . . . . . . . . . . . . . . . . . . . . . . . . . . . . 63

Contents
6 Application Enablement Services Installation Guide

Issue 3.0 March 2007 7
Chapter 1: Audience and prerequisites
Intended audience ● Developers performing the installation of the Application Enablement Services server
software. These can be independent software vendors, enterprise application developers, and Avaya partners.
● Communication Manager administrators to administer Communication Manager for AE Services, if necessary.
AE Services server hardware requirementsAE Services requires a 3.0-GHz single-processor Pentium IV class machine with:
● 1GB RAM (required)
● 10 GB free disk space (after installing Linux)
● Hard disk drive with at least 7200 rpm rating
● 512 KB L2 cache
● 100 BaseT Ethernet NIC (should be set to full duplex)
Avaya strongly recommends two NICs.
● DVD/CD-ROM drive
Note:Note: While AE Services 4.0 does support Symmetrical Multiprocessing, it should be
noted that AE Services is a network-centric application platform as opposed to a processor-intensive application platform. Adding more processors would not necessarily increase the capacity or performance of the platform.
Note:Note: The hostname of the AE Services server must be 15 characters or less. To
determine the hostname associated with an AE Services server, run the following Linux command from the command line: uname –n.

Audience and prerequisites
8 Application Enablement Services Installation Guide
Platform and third-party software required for AE Services server
Software platformRed Hat Enterprise Linux ES 4.0 update 3
Note:Note: Check the latest AE Services release notes for the latest update supported.
Note:Note: The AE Services server is supported only on the English version of the Red Hat
Linux OS. AE Services is not localized to other languages at this time.
Third-party softwareThe AE Services installer installs and configures all of the required third-party packages. We strongly recommend that you accept this option when installing the server software.
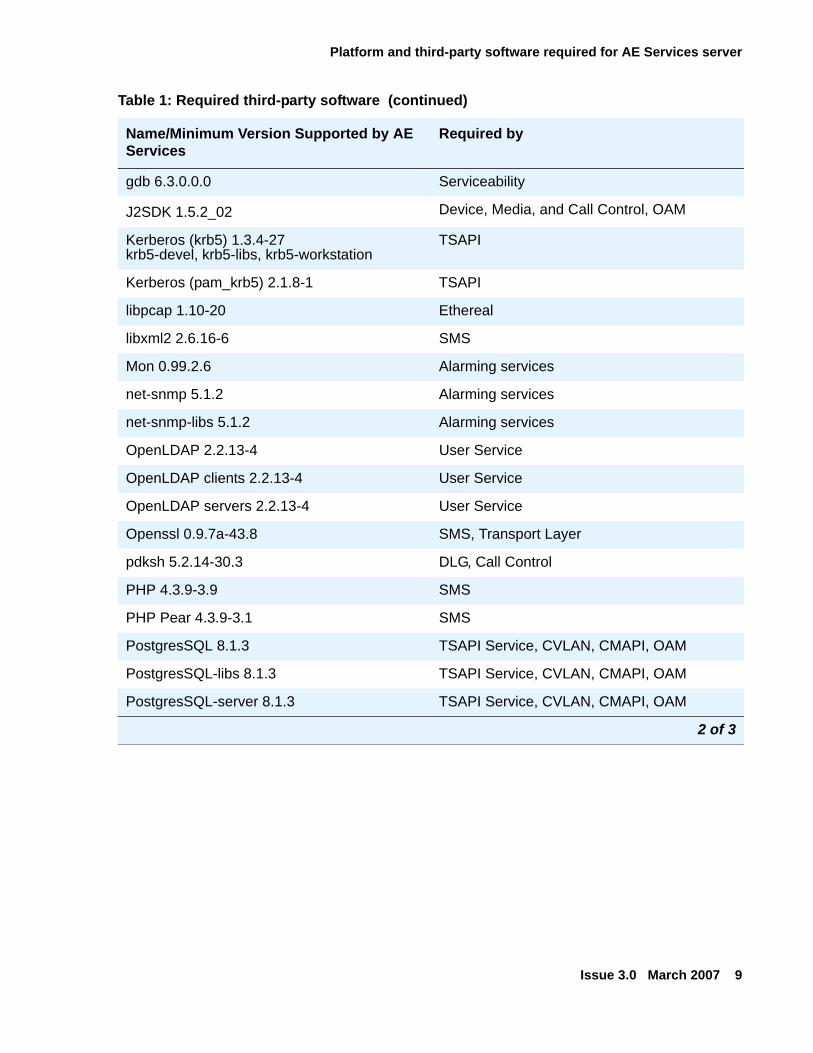
Table 1: Required third-party software
Name/Minimum Version Supported by AE Services
Required by
ActiveMQ 3.0 System Configuration
Apache Http Server 2.0.52-22 SMS
Apache mod_ssl 2.0.52-22 SMS
Apr(apr-util) 0.9.4 Httpd
Axis 1.2 User Service, Telephony Service
Curl 7.12.1-8 Installer
Dialog 1.0 Installer
distcache 1.4.5-6 Httpd
Ethereal 0.10.6-3 Avaya Services if you have a Services contract
1 of 3
Platform and third-party software required for AE Services server
Issue 3.0 March 2007 9
gdb 6.3.0.0.0 Serviceability
J2SDK 1.5.2_02 Device, Media, and Call Control, OAM
Kerberos (krb5) 1.3.4-27 krb5-devel, krb5-libs, krb5-workstation
TSAPI
Kerberos (pam_krb5) 2.1.8-1 TSAPI
libpcap 1.10-20 Ethereal
libxml2 2.6.16-6 SMS
Mon 0.99.2.6 Alarming services
net-snmp 5.1.2 Alarming services
net-snmp-libs 5.1.2 Alarming services
OpenLDAP 2.2.13-4 User Service
OpenLDAP clients 2.2.13-4 User Service
OpenLDAP servers 2.2.13-4 User Service
Openssl 0.9.7a-43.8 SMS, Transport Layer
pdksh 5.2.14-30.3 DLG, Call Control
PHP 4.3.9-3.9 SMS
PHP Pear 4.3.9-3.1 SMS
PostgresSQL 8.1.3 TSAPI Service, CVLAN, CMAPI, OAM
PostgresSQL-libs 8.1.3 TSAPI Service, CVLAN, CMAPI, OAM
PostgresSQL-server 8.1.3 TSAPI Service, CVLAN, CMAPI, OAM
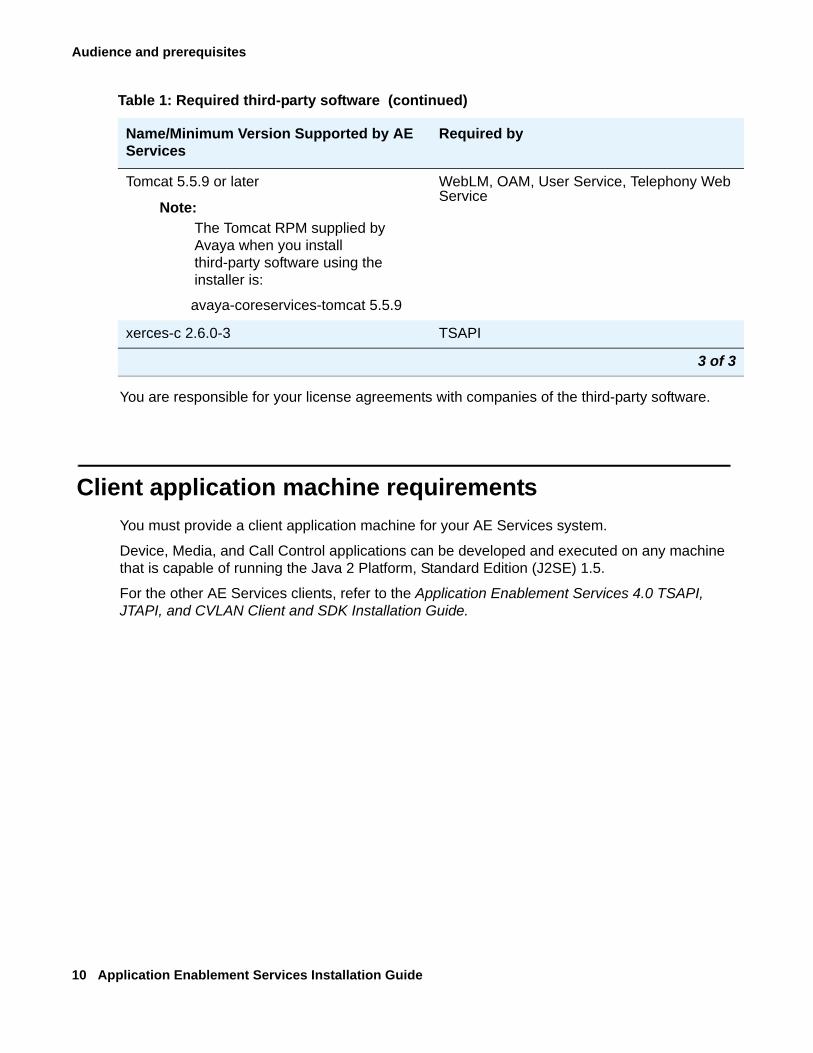
Table 1: Required third-party software (continued)
Name/Minimum Version Supported by AE Services
Required by
2 of 3
Audience and prerequisites
10 Application Enablement Services Installation Guide
You are responsible for your license agreements with companies of the third-party software.
Client application machine requirementsYou must provide a client application machine for your AE Services system.
Device, Media, and Call Control applications can be developed and executed on any machine that is capable of running the Java 2 Platform, Standard Edition (J2SE) 1.5.
For the other AE Services clients, refer to the Application Enablement Services 4.0 TSAPI, JTAPI, and CVLAN Client and SDK Installation Guide.
Tomcat 5.5.9 or later
Note:Note: The Tomcat RPM supplied by
Avaya when you install third-party software using the installer is:
avaya-coreservices-tomcat 5.5.9
WebLM, OAM, User Service, Telephony Web Service
xerces-c 2.6.0-3 TSAPI
Table 1: Required third-party software (continued)
Name/Minimum Version Supported by AE Services
Required by
3 of 3

Communication Manager and media server requirements
Issue 3.0 March 2007 11
Communication Manager and media server requirementsAE Services is compatible with all existing Communication Manager R3.x and R4.0.
AE Services supports all media servers and gateways that support Communication Manager 4.0.
Required network characteristics
Network interface configurationsWith one exception, Avaya Services recommends that you configure AE Services to use dual NICs (eth0 and eth1).
● Single NIC
The application machine, AE Services server, and Communication Manager server reside on a private LAN, virtual LAN (VLAN), or WAN.
Note:Note: The single NIC configuration is recommended for most S8300, S8400, and
S8500c servers that use a Processor Ethernet interface because the IP interface for these servers must be publicly accessible for registration of IP endpoints.
● Dual NIC (recommended)
In a dual NIC configuration, one interface is for the communication channel between the AE Services server and the application, and the second interface is for the communication channel between the AE Services server and the Communication Manager C-LAN or processor C-LAN.
- The application and the AE Server are on a LAN (production LAN or VLAN) or WAN.
- The AE Services server and the Communication Manager C-LAN interfaces are on a private LAN or VLAN.

Audience and prerequisites
12 Application Enablement Services Installation Guide
Supported network configurationsRegardless of whether a LAN, VLAN or WAN is used, The TCP/IP links between the AE Services server and Avaya Communication Manager can be connected with the following network latency requirements:
● No more than a 200ms average round trip packet delivery time as measured with ping over every one-hour time period
● Periodic spiked delays of no more than two seconds while maintaining the 200ms average round trip delivery time as measured with ping over every one-hour time period
These requirements are to maintain the AE Services communication channel with Communication Manager (C-LANs) over a LAN/VLAN or WAN.
Network interface speed and duplex settingsAE Services has been tested at 100BaseT full duplex, and these are the required speed and duplex mode settings. The NIC settings should be verified before installing AE Services.
IP Migration Readiness and Optimization analysisWe also recommend that you use the Avaya IP Migration Readiness and Optimization services to help you safely implement IP-based solutions in a stable, optimized infrastructure.
These services include a two-phased, detailed analysis of the entire network to help assess whether you can deploy a converged IP solution such as AE Services without adversely affecting your existing network applications and services.
The first phase of this analysis is the Customer Infrastructure Readiness Survey (CIRS). Certified Avaya engineers conduct a high-level evaluation of the local and wide area network infrastructure to identify any significant network issues that must be resolved prior to deploying the proposed IP solution.
Phase 2 of this analysis, Network Analysis/Network Optimization (NANO) is required when the CIRS indicates that the network will not support the proposed IP solution at the desired performance levels. Starting with the information and data gathered for the CIRS, Avaya engineers perform problem diagnosis to get at the root causes of network issues. They also provide functional requirements and recommendations for a network design that optimizes all of the resources needed to support the IP solution.
Issue 3.0 March 2007 13
Chapter 2: Installing the Linux platform software
You must obtain and install the Linux platform software. Avaya does not provide a Linux RPM or a Linux installation script. Install Linux before you install the Application Enablement Services server software because the installation script also configures Linux for AE Services.
To install Red Hat Enterprise Linux ES 4.0 update 3:
1. Follow the instructions of the Red Hat installation utility to install your system.
2. During the Linux install, on the Firewall Configuration screen disable all Security Enhanced Linux (SELinux) features.
For information about verifying whether SELinux is turned on and about turning SELinux on or off, see Appendix B: Administering SELinux.
3. Follow these additional guidelines:
● Select the minimum install for Linux. Performing a complete install may result in version conflicts with some of the third-party software packages required by AE Services.
● For security reasons, you should enable only a specific list of ports on the server firewall. This list includes all of the ports that the AE Services software uses. For a list of these ports, see the White-paper on Security in Application Enablement Services for Bundled and Software only solutions.
● Use the Linux default partitioning.
4. Complete the Linux installation and reboot the system.
5. To the /etc/hosts file, add a separate line that specifies the IP address of the AE Services server. For example:127.0.0.1 localhost135.9.30.106 dr-dfla0 dr-dfla0.dr.avaya.com
Under some circumstances, Apache httpd may need this line. If this file contains an incorrect address, AE Services will not start.

Installing the Linux platform software
14 Application Enablement Services Installation Guide
Issue 3.0 March 2007 15
Chapter 3: Installing the server software and third-party software
Obtaining the server software ISO imageObtain the server ISO image from one of these sources:
● The AE Services CD-ROM that was shipped to you
● The Avaya DevConnect site
Installing the server software
To install from the ISO image, you can either:
● Create a CD-ROM from the ISO image and install from the CD-ROM
or
● Download and mount the ISO image and install from the mounted image
You must Install the server software from a window that emulates xterm or is recognized by Linux. If you install the software from a DOS window, you may have display problems.
To mount the drive and start the installer:
1. Log in as a user with root privileges.
2. Check /etc/fstab to find out the media directory, which will be your mountpoint in the next step.
3. Mount the drive or the image:
● Insert the CD-ROM into the CD-ROM drive and mount the drive:
mount mountpoint
Where mountpoint = your media directory
For example:
mount /media/cdrom or mount /media/cdrecorder
or
Installing the server software and third-party software
16 Application Enablement Services Installation Guide
● Download the ISO image to the /tmp directory of the AE Services server and mount the image as a CD-ROM:
mount -t iso9660 -o loop /tmp/xxxx.iso mountpoint
where:
xxxx = is the name of the ISO image
mountpoint = your media directory, for example, /media/cdrom
4. If AE Services is installed, stop the mvap, DBService, and tomcat5 services.
5. Run the installer script (it may run automatically).
/mountpoint/install
The installer script starts.
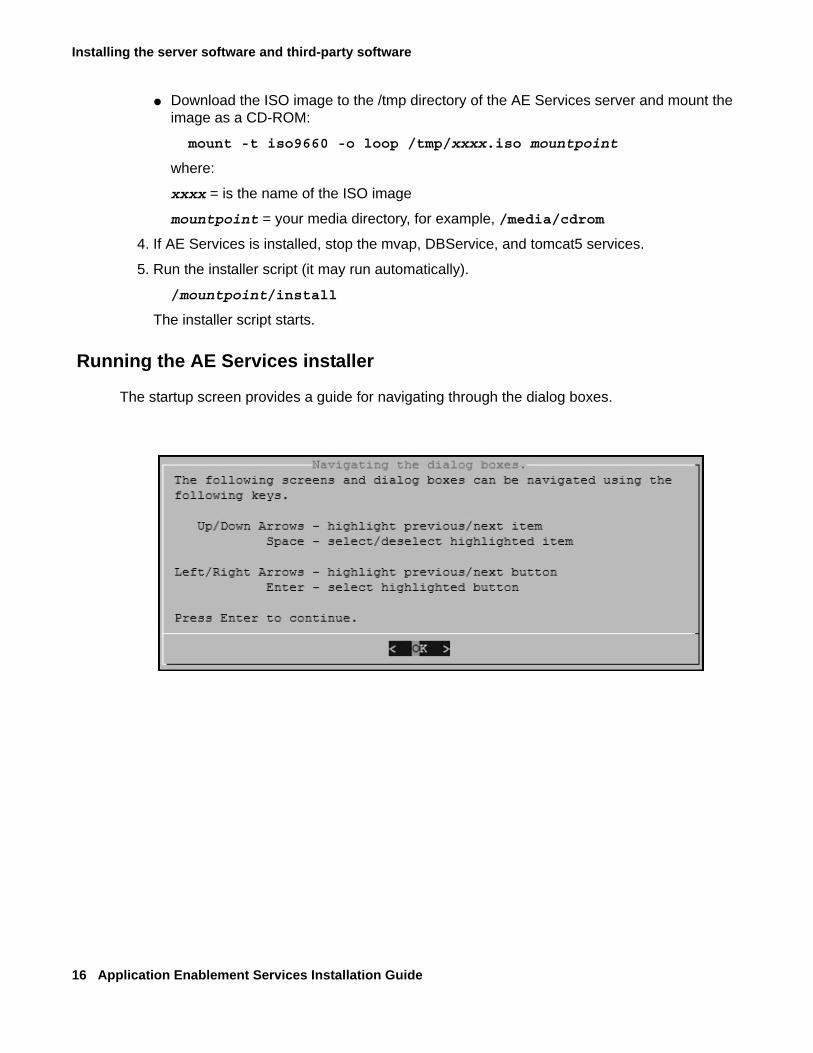
Running the AE Services installer
The startup screen provides a guide for navigating through the dialog boxes.
Installing the server software
Issue 3.0 March 2007 17
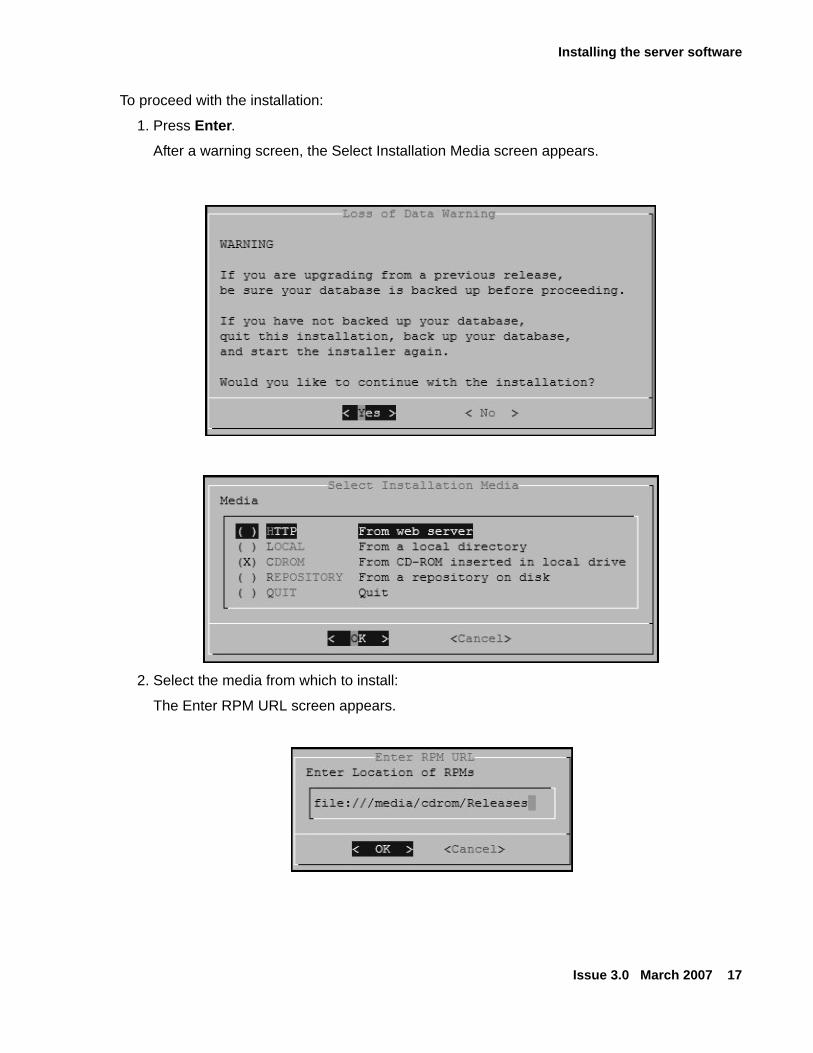
To proceed with the installation:
1. Press Enter.After a warning screen, the Select Installation Media screen appears.
2. Select the media from which to install:
The Enter RPM URL screen appears.
Installing the server software and third-party software
18 Application Enablement Services Installation Guide
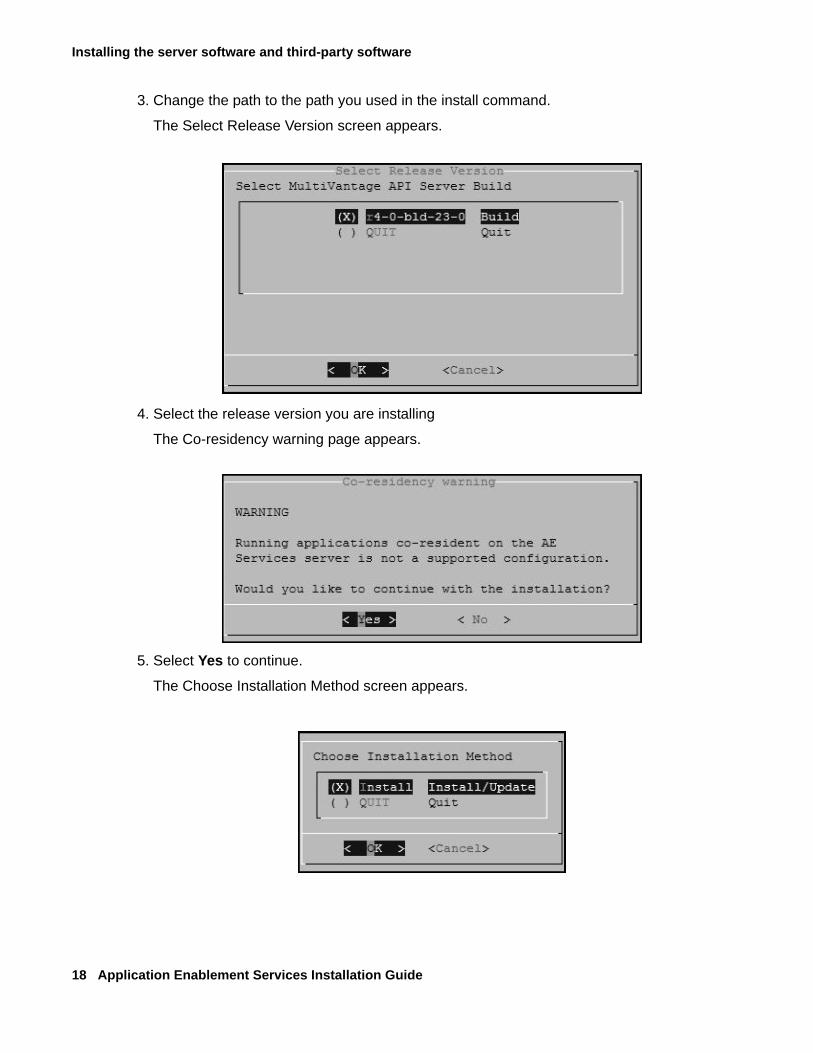
3. Change the path to the path you used in the install command.
The Select Release Version screen appears.
4. Select the release version you are installing
The Co-residency warning page appears.
5. Select Yes to continue.
The Choose Installation Method screen appears.
Installing the server software
Issue 3.0 March 2007 19
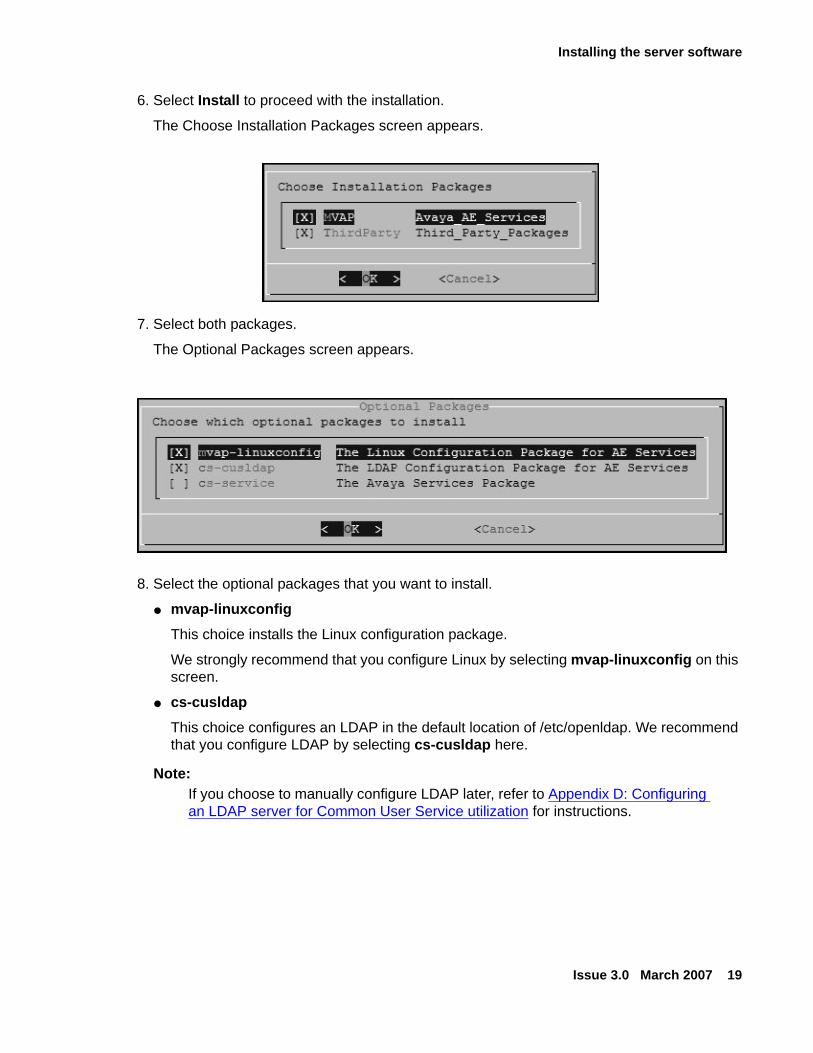
6. Select Install to proceed with the installation.
The Choose Installation Packages screen appears.
7. Select both packages.
The Optional Packages screen appears.
8. Select the optional packages that you want to install.
● mvap-linuxconfigThis choice installs the Linux configuration package.
We strongly recommend that you configure Linux by selecting mvap-linuxconfig on this screen.
● cs-cusldap
This choice configures an LDAP in the default location of /etc/openldap. We recommend that you configure LDAP by selecting cs-cusldap here.
Note:Note: If you choose to manually configure LDAP later, refer to Appendix D: Configuring
an LDAP server for Common User Service utilization for instructions.
Installing the server software and third-party software
20 Application Enablement Services Installation Guide
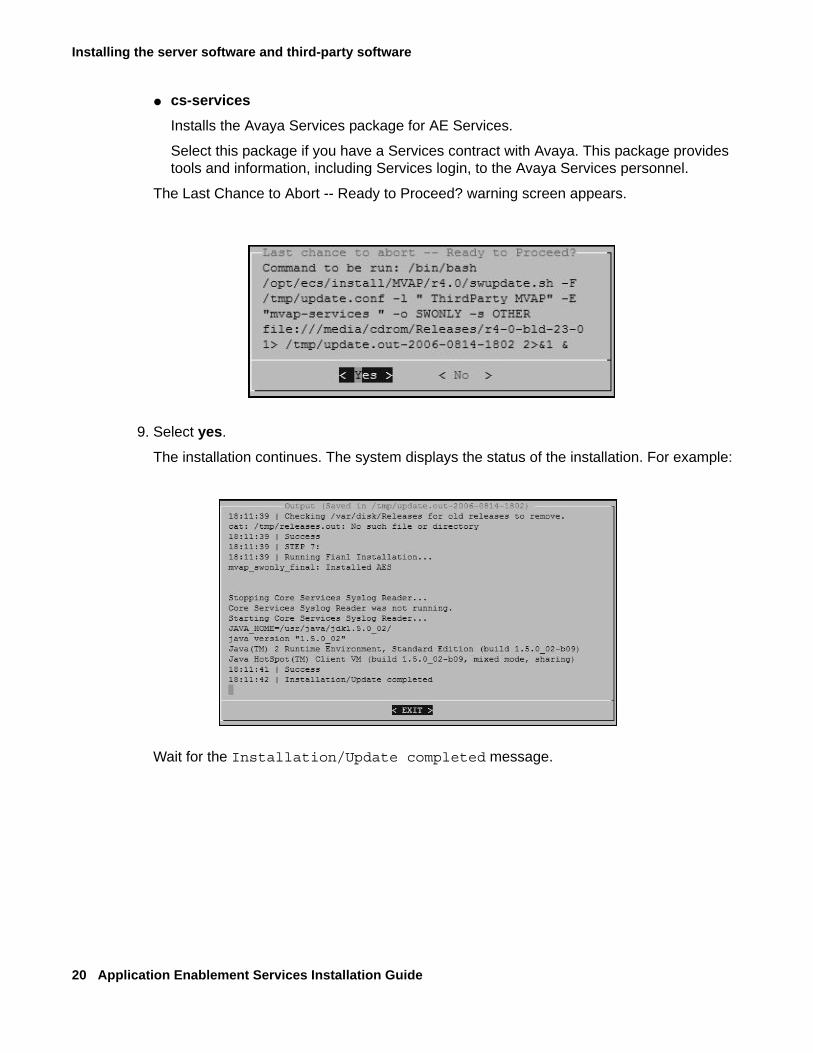
● cs-servicesInstalls the Avaya Services package for AE Services.
Select this package if you have a Services contract with Avaya. This package provides tools and information, including Services login, to the Avaya Services personnel.
The Last Chance to Abort -- Ready to Proceed? warning screen appears.
9. Select yes.
The installation continues. The system displays the status of the installation. For example:
Wait for the Installation/Update completed message.
Installed files
Issue 3.0 March 2007 21
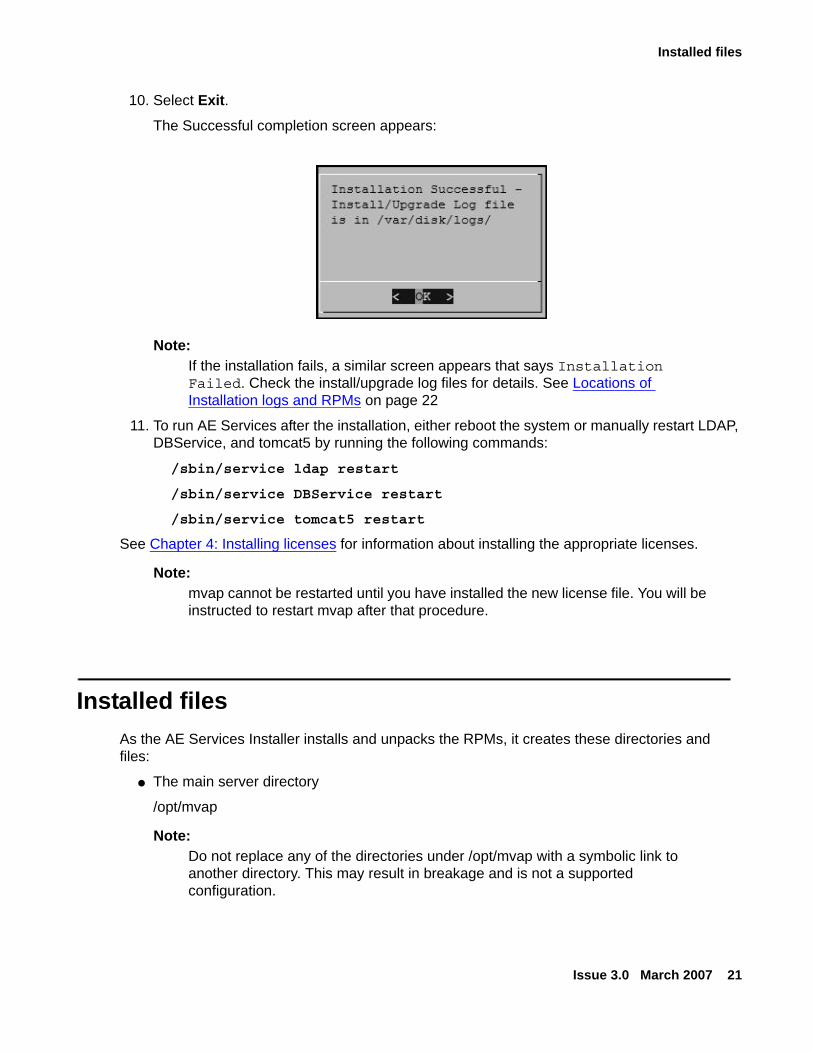
10. Select Exit.The Successful completion screen appears:
Note:Note: If the installation fails, a similar screen appears that says Installation
Failed. Check the install/upgrade log files for details. See Locations of Installation logs and RPMs on page 22
11. To run AE Services after the installation, either reboot the system or manually restart LDAP, DBService, and tomcat5 by running the following commands:
/sbin/service ldap restart
/sbin/service DBService restart
/sbin/service tomcat5 restart
See Chapter 4: Installing licenses for information about installing the appropriate licenses.
Note:Note: mvap cannot be restarted until you have installed the new license file. You will be
instructed to restart mvap after that procedure.
Installed filesAs the AE Services Installer installs and unpacks the RPMs, it creates these directories and files:
● The main server directory
/opt/mvap
Note:Note: Do not replace any of the directories under /opt/mvap with a symbolic link to
another directory. This may result in breakage and is not a supported configuration.

Installing the server software and third-party software
22 Application Enablement Services Installation Guide
● The AES server startup configuration file
/etc/sysconfig/mvap
● Log files
/opt/mvap/logs
● The AE Services certificate
/etc/opt/avaya/certs/private/server.pkcs12
Locations of Installation logs and RPMs● The Installation log files are in: /var/disk/logs/update.out-xxxx
where xxxx = a time stamp
(for example, /var/disk/logs/update.out-2005-0307-0951)
● Copies of RPMs for each release that is installed (up to two installs) are kept in:
/var/disk/Releases/rx-xxx
where rx-xxx is the release number.
Note:Note: For a list of all the RPMs you have installed, run swversion -a.
Uninstalling the AE Services RPMs
To uninstall all of the AE Services RPMs, run the command: swuninstall.
This script is located in /opt/mvap/bin.
Installation problemsIf you have problems installing the AE Services software, call 1-800-344-9670, prompt 2. or contact your local Avaya distributor.

Issue 3.0 March 2007 23
Chapter 4: Installing licenses
AE Services 4.0 users must install a valid 4.0 license file. AE Services will not start with a license file that is missing or from the wrong release.
Installing the Application Enablement Services license fileThe AE Services license file is distributed separately in an email from Avaya. If you have not received a license file from Avaya, see If you do not have a license on page 25.
1. Locate the email containing the AE Services license file.
2. Detach the license file from the email, and store it locally on a PC.
Note:Note: The PC that the license file is stored on does not have to be same PC that the AE
Services server is installed on.
3. Start your browser and type the appropriate URL based on this example:
https://aeshostname/WebLM/
where:
● aeshostname is your AE Services server host name
For example:
https://myaessrv.abc.com/WebLM/
or
https://192.168.1.1/WebLM/
4. Accept the SSL certificate that is presented.
The browser then displays the WebLM Administrator Login page.
Note:Note: If the SSL certificate is not presented, check to make sure that WebLM server is
running on an AE Services server.
5. Accept the default User name (admin) and type the default password.
6. Click Continue.
Your browser displays the Change Administrator Password page.
Installing licenses
24 Application Enablement Services Installation Guide
Note:Note: WebLM issues the Change Administrator Password page the first time you log in
to WebLM. If you get a new license, you do not have to change your password the next time you log in to WebLM.
7. Complete the Change Administrator Password page and click Change Password.
The browser goes back to the login page.
8. Log in as admin with the new password you specified.
The browser displays the Install License page.
9. Under Enter License Path, click Browse and locate the AE Services license file. Once you have located the license file, click Install. WebLM uploads the license file from your PC to the WebLM server and displays the following message: License File is installed successfully.
If you do not receive this message, see Troubleshooting the AE Services license installation.
10. Log out of WebLM and restart AE Services to use the capabilities of the new license.
This completes the AE Services license installation.
Restarting mvapYou must restart mvap at this time (not when restarting the other services) because mvap can not restart until after the license file is installed.
/sbin/service mvap restart
Troubleshooting the AE Services license installation Use the information in this section to troubleshoot problems you might encounter during installation of the license. It covers the following topics:
● If you receive error messages from WebLM
● If you do not have a license
Troubleshooting the AE Services license installation
Issue 3.0 March 2007 25
If you receive error messages from WebLM If your browser displays the following messages, contact your Avaya representative.
If you do not have a license If you discover that you have not received the AE Services license file in an email from Avaya, contact your Avaya representative or Avaya Partner representative. To ensure that your request is processed as quickly as possible, be ready to provide the information listed in Required information for requesting a license file.
Note:Note: You must send a separate request for each license file.
Message Explanation
License file is invalid or not created for this server. License file was NOT installed.
The file is corrupt or the MAC address in the license file does not match the MAC address in the server.
Attempting to install a license file that is currently installed. License file was NOT installed
The license has already been activated.
No valid license file found This WebLM message may appear after AES provides this successful license installation message: "license file installed successfully"
If this happens, make sure that in step 3 in Installing the Application Enablement Services license file on page 23, aeshostname is your AE Services server’s host name (not the IP address).
Table 2: Required information for requesting a license file
Required information Description
Return email address Avaya emails this license file to you. You must provide a secure email address where you want to receive the license file.
MAC Address of the NIC For more information, see Identifying the MAC address.
Installing licenses
26 Application Enablement Services Installation Guide
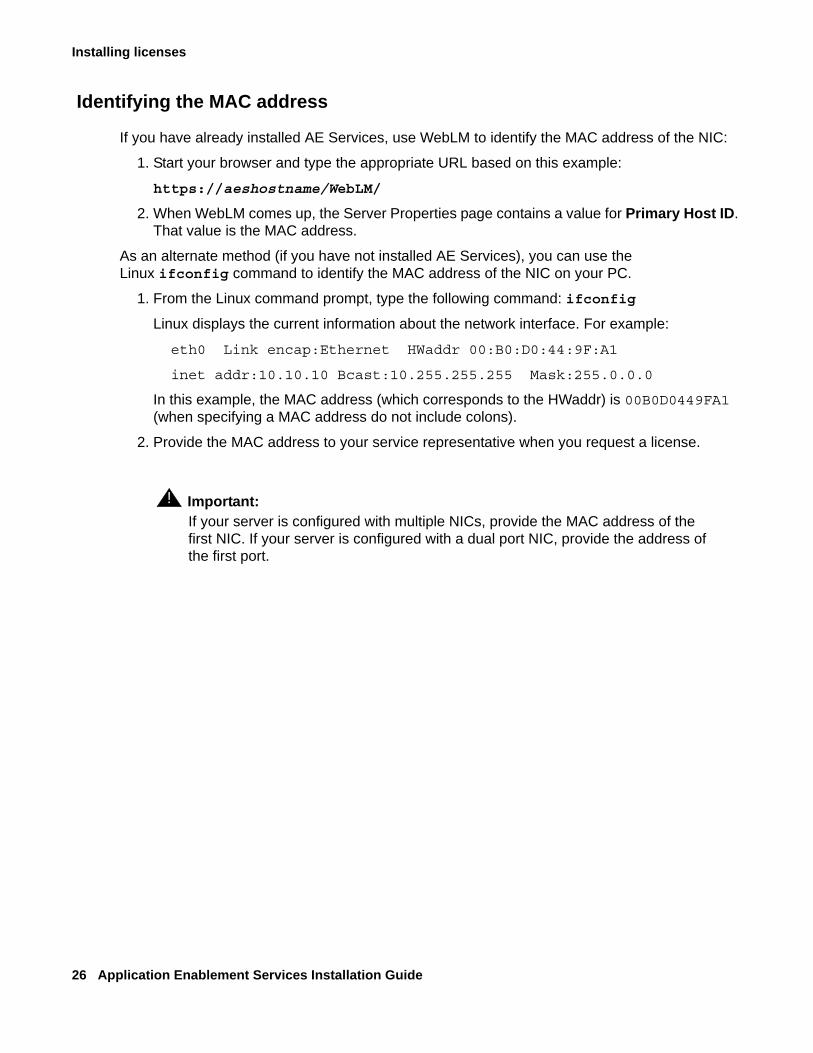
Identifying the MAC address
If you have already installed AE Services, use WebLM to identify the MAC address of the NIC:
1. Start your browser and type the appropriate URL based on this example:
https://aeshostname/WebLM/
2. When WebLM comes up, the Server Properties page contains a value for Primary Host ID. That value is the MAC address.
As an alternate method (if you have not installed AE Services), you can use the Linux ifconfig command to identify the MAC address of the NIC on your PC.
1. From the Linux command prompt, type the following command: ifconfig
Linux displays the current information about the network interface. For example:
eth0 Link encap:Ethernet HWaddr 00:B0:D0:44:9F:A1
inet addr:10.10.10 Bcast:10.255.255.255 Mask:255.0.0.0
In this example, the MAC address (which corresponds to the HWaddr) is 00B0D0449FA1 (when specifying a MAC address do not include colons).
2. Provide the MAC address to your service representative when you request a license.
! Important:Important: If your server is configured with multiple NICs, provide the MAC address of the
first NIC. If your server is configured with a dual port NIC, provide the address of the first port.
Issue 3.0 March 2007 27
Chapter 5: Initial administration for AE Services
You must administer both Communication Manager and AE Services to complete the installation of AE Services. This chapter provides tables of these administration procedures, which:
● Establish initial connectivity between AE Services and Communication Manager:
● Allow Communication Manager to interact with Application Enablement Services client applications.
The tables direct you to the appropriate section or sections in the Application Enablement Services Administration and Maintenance Guide.The tables also explain the services for which you perform each procedure.
Administering Communication Manager for AE Services
Procedure Performed if you use these services
Which section in Chapter 1 ofAE Services Admin Guide
Check for call control features licensed on Communication Manager
Call Control “Checking for call control features licensed on Communication Manager”
Set up a transport link Check the referenced sections in the Administration and Maintenance Guide to decide which links you need to set up.
“Configuring IP Services”
Set up a CTI link “Call Control Settings”
Initial administration for AE Services
28 Application Enablement Services Installation Guide
Administering AE Services
Check for appropriate VOIP resources
Device, Media, and Call Control
“Checking for appropriate VOIP resources”
Check for IP_API_A licenses
“Checking for IP_API_A licenses”
Add stations for a Device, Media, and Call Control application
“Adding stations for the application”
Configure Communication Manager for signaling and media encryption
● For signaling encryption:“Administering a network region”
● For media encryption:“Checking for media encryption”
See also the White paper on Security in Application Enablement Services for Bundled and Software only solutions. This white paper is available on the Avaya support site along with the customer documents.
Procedure Performed if you use these services
Which section in Chapter 1 ofAE Services Admin Guide
Procedure Perform procedure If using:
Where to find in AE Services Admin Guide
Create a user account for OAM access
All (without a services contract)
“Adding a Linux user and setting the OAM account password” in Chapter 7, “Administering AE Services from the Operating System Command Prompt”
Administer CT users TSAPI, JTAPI and Device, Media, and Call Control
“Adding a CT User to the AE Services User Service database” in Chapter 3, “AE Services OAM administration and CTI OAM Administration”
Administering AE Services
Issue 3.0 March 2007 29
If integrating with a Microsoft Live Communications Server
After completing all installation and configuration procedures, you should restart AE Services.
Specify NICs for AE Services All “Administering the local IP for all AE Services” in Chapter 3, “AE Services OAM administration and CTI OAM Administration”
Administer transport link connectivity to Communication Manager C-LAN/P-C-LAN
Check the referenced sections in the Administration and Maintenance Guide to decide when to administer a transport link.
“Administering Switch Connections,” in Chapter 2, “AE Services OAM Administration and CTI OAM Administration”
Administer H.323 Gatekeepers
Device, Media, and Call Control
“Administering Switch Connections,” in Chapter 2, “AE Services OAM Administration and CTI OAM Administration”
Administer links All call control “Link Administration - CTI Link Admin on AE Services OAM” in Chapter 2, “AE Services OAM Administration and CTI OAM Administration”
Check application link encryption
Device, Media, and Call Control Services
“Checking application link encryption” in Chapter 2, “AE Services OAM Administration and CTI OAM Administration”
Administer the Security Database settings
TSAPI or Telephony Web Services
Chapter 5, “TSAPI Configuration and the Security Database”
Procedure Perform procedure If using:
Where to find:
Administer TR/87 TR/87 to integrate with a Live Communications Server
AE Services TR/87 Implementation Guide
Procedure Perform procedure If using:
Where to find in AE Services Admin Guide

Initial administration for AE Services
30 Application Enablement Services Installation Guide
Issue 3.0 March 2007 31
Chapter 6: Testing connectivity
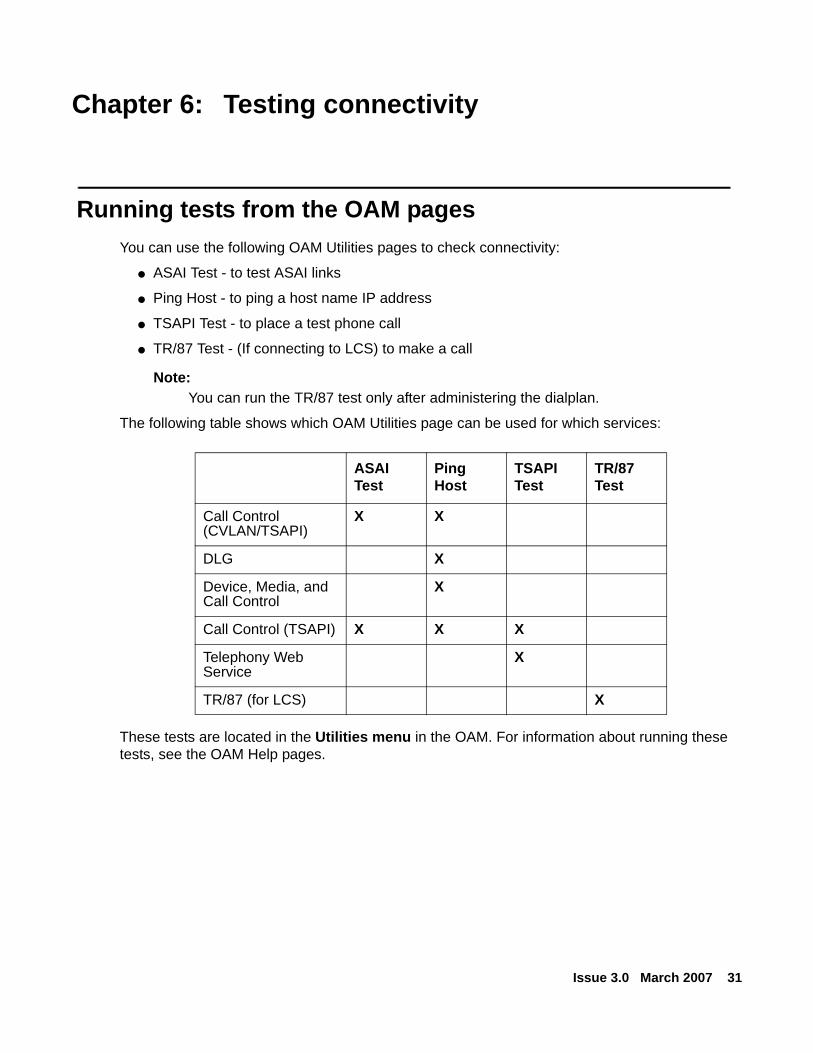
Running tests from the OAM pagesYou can use the following OAM Utilities pages to check connectivity:
● ASAI Test - to test ASAI links
● Ping Host - to ping a host name IP address
● TSAPI Test - to place a test phone call
● TR/87 Test - (If connecting to LCS) to make a call
Note:Note: You can run the TR/87 test only after administering the dialplan.
The following table shows which OAM Utilities page can be used for which services:
These tests are located in the Utilities menu in the OAM. For information about running these tests, see the OAM Help pages.
ASAI Test
Ping Host
TSAPI Test
TR/87 Test
Call Control (CVLAN/TSAPI)
X X
DLG X
Device, Media, and Call Control
X
Call Control (TSAPI) X X X
Telephony Web Service
X
TR/87 (for LCS) X

Testing connectivity
32 Application Enablement Services Installation Guide
Running the sample application (Device, Media, and Call Control only)
If you are using the Device, Media, and Call Control Services, you can also set up and use the sample application created for these services. Running this application tests that the server files are installed correctly and that you have achieved connectivity with Communication Manager.
See Appendix A: Running the sample application (Device, Media, and Call Control only).
Upgrading the software
Issue 3.0 March 2007 33
Chapter 7: Upgrading and updating the AE Services software
Upgrading the softwareThis section provides the procedure for upgrading from AE Services 3.0/3.1 to AE Services 4.0.
Upgrades can be performed only on a server that already has a version of AE Services installed on it.
Note:Note: There are some differences between upgrading from 3.0 and upgrading from 3.1.
Any steps specific to upgrading a certain release are noted.
Preparing for the upgrade
1. Ghost the drive so you can restore it if anything goes wrong in the upgrade process.
2. From the OAM pages, perform a backup.
CTI OAM Admin > Maintenance > Backup DatabaseSave the database backup file to a safe location that will not be affected by the AE Services 4.0 installation. The backup file is stored at that location under the name mvapdbddmmyyyy.tar.gz
For information about performing the backup from the OAM, see “Backing up the database” in Chapter 2, “AE Services OAM Administration and CTI OAM Admin” in the Application Enablement Services Administration and Maintenance Guide.
3. Back up any files in directories that are not automatically preserved. This includes the home directories of accounts created by the previous installation (for example, craft, avaya, sroot).
4. From the CTI OAM Main menu, select Administration > Local IP and record the Local IP settings listed on the Local IP screen.
Upgrading and updating the AE Services software
34 Application Enablement Services Installation Guide
Backing up the LDAP database
! Important:Important: This procedure is important only if you are upgrading from AE Services 3.0.
To maintain a synchronized LDAP and Postgres database.
1. Log in to the 3.0 AE Services server and su to a user with root privileges (for example, use su - root).
2. From the command line, execute the following commands:
cd /var/lib/ldap
tar -cvf tar_file_name.tar *.dbb
3. Save the tar file in a safe location that will not be affected by the 4.0 installation.
Performing the upgradeYou can upgrade AE Services from a CD or from an ISO image.
To upgrade the software:
1. Log in to the server as a non-Avaya user and su to an account with root privileges (for example, using the command su - root).
2. From the command line, stop tomcat:
service tomcat_version stop
Where tomcat_version =
For AE Services 3.0: tomcat4
For AE Services 3.1.x: tomcat5
Note:Note: If you are upgrading from one 4.0 load to another, you do not need to stop
tomcat.
3. From the command line, uninstall the AE Services 3.x software:
swuninstall
Note:Note: If you are ugrading from one 4.0 load to another, you do not need to uninstall.
Upgrading the software
Issue 3.0 March 2007 35
4. From the command line, remove third-party software packages that are different in 4.0.
For an upgrade from AE Services 3.0:
rpm -e avaya-axis
rpm -e avaya-tomcat
rpm -e j2sdk-1_4_2_07-linux.i586.rpm
For an upgrade from AE Services 3.1.x:
rpm -e avaya-coreservices-axis-1.1-13
rpm -e avaya-coreservices-tomcat-5.0.28-0.0
rpm -e jdk-1.5.0_02-fcs
5. Select upgrade from the Linux main menu and follow the steps provided by Red Hat to upgrade Linux to RHEL4.0 update 3.
6. Run the installer by performing the appropriate steps below.
For a complete explanation of running the installer, including example screens, see Running the AE Services installer on page 16.
7. Follow the menu to update the AE Services software.
If upgrading from a CD If upgrading from an ISO image
a. Insert the CD containing the AE Services 4.0 and third-party RPMs software.
b. Start the AE Services Installer.- If the Autorun RPM is already
installed and configured on your machine, the AE Services installer starts automatically.
- If the Autorun RPM was not already installed and configured on your machine, first mount the CD ROM and then run the AE Services Installer.
- Use these commands:
mount mountpointmountpoint/install
Where mountpoint = the media directory specified in /etc/fstab
a. Download the ISO image to the /tmp directory on the AE Services server.
b. Using the following command, mount the ISO image:
mount -t iso9660 -o loop XXX.iso mountpoint
Where:
XXX = the AE Services ISO Image Build version
mountpoint = the media directory specified in /etc/fstab
c. Launch the Software-Only installer:
mountpoint/install
Upgrading and updating the AE Services software
36 Application Enablement Services Installation Guide
8. Reboot the server.
9. Verify that the upgrade was successful.
● From the command line run swversion and verify that the version number and build number are correct.
● Validate the configuration data:
a. Log in to the AE Services OAM.
b. Select CTI OAM Admin > Administration.
c. Check all of the OAM pages listed under Administration on the Administration page. Verify that the information is complete and correct.
10. Restore the database from the OAM:
From the CTI OAM Main menu: Maintenance > Restore Database and follow the instructions on the Restore Database page.
Restoring the LDAP database
! Important:Important: This procedure is important only if you are upgrading from AE Services 3.0.
You should have also performed Backing up the LDAP database on page 34 before the upgrade.
1. Log in to the updated 4.0 AE Services server and su to a user with root privileges (for example, using the command su - root).
2. Copy the saved tar file to /var/lib/ldap.
3. From the command line, execute the following commands:
cd /var/lib/ldap
tar -xvf tar_file_name.tar
rm tar_file_name.tar
service ldap restart
Updating the software
Issue 3.0 March 2007 37
Updating the softwareAvaya provides updates and patches for updating the software.
● An update provides new features or enhancements to the AE Services platform. An update may also include bug fixes. Updates are released only on an as-needed basis for critical fixes. Avaya tests updates before releasing them.
● A patch addresses a specific issue to a specific component or a set of components in the AE Services platform. We do not test patches before releasing them.
● The install script installs the new version of the RPMs in /var/disk/software.
Note:Note: /var/disk/software also contains all of the previous versions of the RPMs.
● The update script backs up the current version before installing the new version of the RPM.For a list of all the RPMs you have installed, run swversion -a.
Updating from a previous AE Services 4.0 build
1. From the OAM pages, perform a backup.
This procedure backs up the database, LDAP, and AE Services configuration.
For more information, see the section “Backing up the database” in Chapter 2, “AE Services OAM Administration and CTI OAM Admin” in the Application Enablement Services Administration and Maintenance Guide.
2. Log in to the server via ssh as a Linux user and su to root.
3. Stop tomcat:
service tomcat5 stop
4. Insert the DVD containing the AE Services 4.0 ISO image or mount the ISO image.
5. Launch the software-only installer and follow the menus to update the software.
For a complete explanation of running the installer, including example screens, see Running the AE Services installer on page 16.
6. Reboot the server.
7. Log in to the AE Services OAM.
8. Restore the database from the OAM. From the CTI OAM Main menu, select Maintenance > Restore Database and follow the instructions.

Upgrading and updating the AE Services software
38 Application Enablement Services Installation Guide
Installing patchesPatches are organized as ZIP files of RPMs. Multiple updates or patches can be applied to the system.
! Important:Important: Always use this procedure, not an RPM command, to install AE Services
patches.
Check the Avaya DevConnect site (www.devconnectprogram.com) or the Avaya support site (support.avaya.com) periodically to see if there is a new patch. to install
Note:Note: You should always perform a backup of the database before installing an update.
To install an update or a patch:
1. Log in to the AE Services server and su to a user with root privileges (for example, using the command su - root).
2. Download any new patches (xxxx.zip) to the current directory.
3. From the command line, enter update -u xxxx.zip
The update/patch ID and the RPMs contained in the package are displayed and the system prompts you to confirm the installation of the RPMs.
● If you enter y, the installation of the updates/patches proceeds:
- AE Services, Tomcat service, and DBService are stopped.
- RPMs contained in the package are installed.
- AE Services, Tomcat service, and DBService are restarted.
● If you enter n, the installation of the updates/patches aborts.
Use swversion -a if you want to look at all the updates/patches installed in the system.
Uninstalling updates and patches
Note:Note: The directory /opt/mvap/resources/patch-update contains the patchnumber.txt
files. RPMs installed in each update/patch are listed in this patchnumber.txt file. Use swversion if you want to look at all the updates/patches installed in the system.
Uninstalling the AE Services software
Issue 3.0 March 2007 39
To uninstall updates or patches:
1. Log in to the server machine where AE Services and patches are already installed.
2. su to a user with root privileges (for example, using the command su - root).
3. Use swversion -a to find out the number of the update/patch you want to remove.
4. From the command line, enter: update -e patchnumber.
The screen displays a list of all the RPMs to be uninstalled, and the system prompts you for confirmation before uninstalling these RPMs.
● If you enter y, the system uninstalls the updates/patches by performing these tasks:
- AE Services, Tomcat service, and DBService are stopped.
- RPMs specified in patchnumber.txt are rolled back to the previous version.
- AE Services, Tomcat service, and DBService are restarted.
● If you enter n, the upgrade script exits.
Uninstalling the AE Services softwareTo uninstall the AE Services software:
1. Uninstall all of the AE Services RPMs:
swuninstall.
This script is located in /opt/mvap/bin.
! Important:Important: If you have any patches installed, you must first remove them before running
swuninstall.
Note:Note: swuninstall also removes the users (for example, avaya, craft, user).
2. After uninstalling the software, some configuration and log files will remain in the /opt/mvap and /opt/ecs directories. You may remove these directories and their contents. Be sure to save any configuration, properties or log files to a safe place before removing these directories.
3. Stop tomcat5:
/sbin/service tomcat5 stop

Upgrading and updating the AE Services software
40 Application Enablement Services Installation Guide
Issue 3.0 March 2007 41
Chapter 8: Security considerations and guidelines
For a complete discussion of the security considerations and guidelines for AE Services, see the White-paper on Security in Application Enablement Services for Bundled and Software only solutions. This white paper is available on the Avaya support site along with the customer documents.

Security considerations and guidelines
42 Application Enablement Services Installation Guide
Issue 3.0 March 2007 43
Appendix A: Running the sample application(Device, Media, and Call Control only)
If you are using the Device, Media, and Call Control capabilities of AE Services, the files for running several sample applications were installed. This section explains how to administer and run one of these sample applications (the Tutorial application) in order to:
● Test connectivity between AE Services and Communication Manager
● Perform the various steps involved in running an application
● Learn which files are involved in running an application
● See some of the capabilities of an AE Services Device, Media, and Call Control application
Note:Note: The Tutorial application is the only application that should be run directly on the
AE Services Server. All other applications should be run on another machine.
Before you beginBefore you can run the sample application, you must:
● Administer AE Services for the sample application
● Administer Communication Manager for the sample application
● Edit the tutorial properties file
You will need to know the dial plan and which Communication Manager extensions are available.
The sample application filesThe following sample application and sample application-related files are included on the AE Services server:
● The application properties file for the sample application (the tutorial properties file)
/opt/mvap/cmapi/cmapijava-sdk/examples/resources/tutorial.properties

Running the sample application (Device, Media, and Call Control only)
44 Application Enablement Services Installation Guide
● The sample application media files
/opt/mvap/cmapi/cmapijava-sdk/examples/media/0001.wav/opt/mvap/cmapi/cmapijava-sdk/examples/media/0002.wavopt/mvap/cmapi/cmapijava-sdk/examples/media/0003.wav/opt/mvap/cmapi/cmapijava-sdk/examples/media/0004.wav
● A README file containing a description of how to set up and run the sample application.
/opt/mvap/cmapi/cmapijava-sdk/examples/bin/README.txt
These files are referred to throughout the following procedures.
Administer AE Services for the sample application
1. Ensure that you have specified the same directory for these fields on the OA&M Media Properties screen:
- Player Directory- Recorder Directory
Note:Note: The default value for both fields is /tmp.
2. Copy the application media files (listed in The sample application files on page 43) into the directory you have specified for Player Directory and Recorder Directory.
Administer Communication Manager for the sample application
To run the sample application, you must administer the following on Communication Manager:
● Administer a station to use with the application
● (If needed) Administer out-of-band digit detection
● (If not already configured) Configure network region and gateway configuration
Edit the tutorial properties file
Issue 3.0 March 2007 45
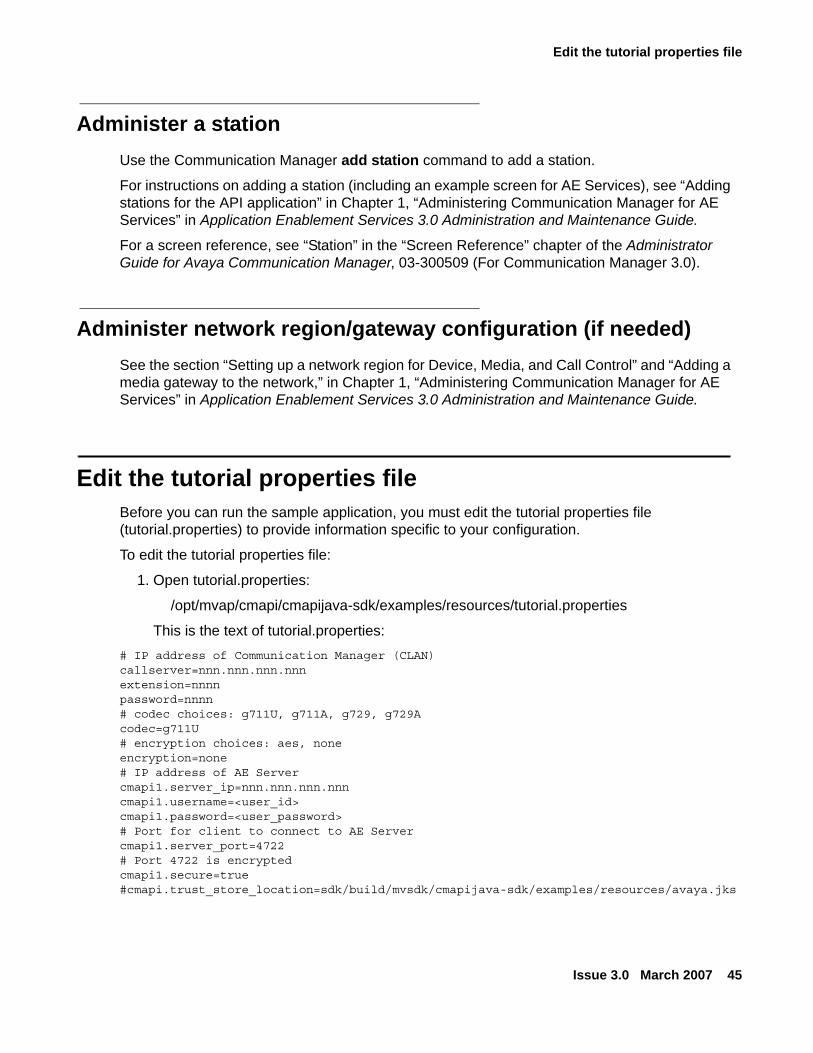
Administer a stationUse the Communication Manager add station command to add a station.
For instructions on adding a station (including an example screen for AE Services), see “Adding stations for the API application” in Chapter 1, “Administering Communication Manager for AE Services” in Application Enablement Services 3.0 Administration and Maintenance Guide.
For a screen reference, see “Station” in the “Screen Reference” chapter of the Administrator Guide for Avaya Communication Manager, 03-300509 (For Communication Manager 3.0).
Administer network region/gateway configuration (if needed)See the section “Setting up a network region for Device, Media, and Call Control” and “Adding a media gateway to the network,” in Chapter 1, “Administering Communication Manager for AE Services” in Application Enablement Services 3.0 Administration and Maintenance Guide.
Edit the tutorial properties fileBefore you can run the sample application, you must edit the tutorial properties file (tutorial.properties) to provide information specific to your configuration.
To edit the tutorial properties file:
1. Open tutorial.properties:
/opt/mvap/cmapi/cmapijava-sdk/examples/resources/tutorial.properties
This is the text of tutorial.properties:# IP address of Communication Manager (CLAN)callserver=nnn.nnn.nnn.nnnextension=nnnnpassword=nnnn# codec choices: g711U, g711A, g729, g729Acodec=g711U# encryption choices: aes, noneencryption=none# IP address of AE Servercmapi1.server_ip=nnn.nnn.nnn.nnncmapi1.username=<user_id>cmapi1.password=<user_password># Port for client to connect to AE Servercmapi1.server_port=4722# Port 4722 is encryptedcmapi1.secure=true#cmapi.trust_store_location=sdk/build/mvsdk/cmapijava-sdk/examples/resources/avaya.jks
Running the sample application (Device, Media, and Call Control only)
46 Application Enablement Services Installation Guide
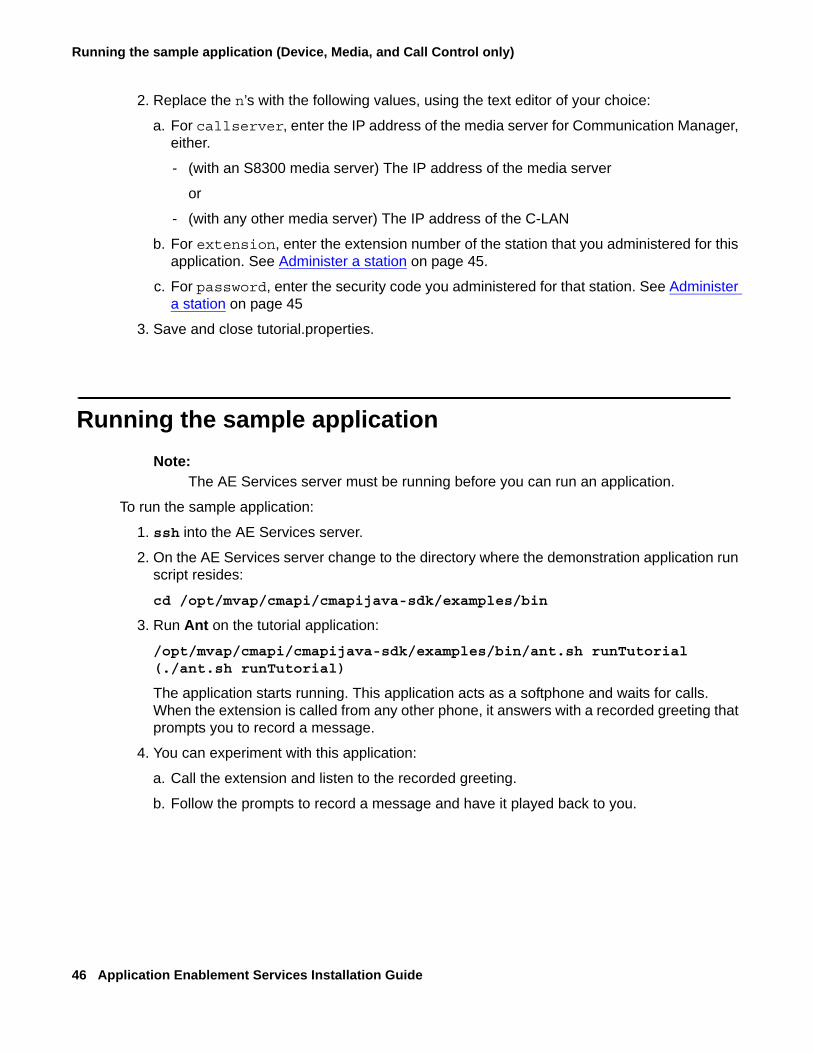
2. Replace the n’s with the following values, using the text editor of your choice:
a. For callserver, enter the IP address of the media server for Communication Manager, either.
- (with an S8300 media server) The IP address of the media server
or
- (with any other media server) The IP address of the C-LAN
b. For extension, enter the extension number of the station that you administered for this application. See Administer a station on page 45.
c. For password, enter the security code you administered for that station. See Administer a station on page 45
3. Save and close tutorial.properties.
Running the sample applicationNote:
Note: The AE Services server must be running before you can run an application.
To run the sample application:
1. ssh into the AE Services server.
2. On the AE Services server change to the directory where the demonstration application run script resides:
cd /opt/mvap/cmapi/cmapijava-sdk/examples/bin
3. Run Ant on the tutorial application:
/opt/mvap/cmapi/cmapijava-sdk/examples/bin/ant.sh runTutorial (./ant.sh runTutorial)
The application starts running. This application acts as a softphone and waits for calls. When the extension is called from any other phone, it answers with a recorded greeting that prompts you to record a message.
4. You can experiment with this application:
a. Call the extension and listen to the recorded greeting.
b. Follow the prompts to record a message and have it played back to you.

Troubleshooting the sample application
Issue 3.0 March 2007 47
Note:Note: The sample application can only play the last recorded message on a given call.
If you make a new call, you will not hear a recording from a previous call. All the recorded files are saved in the directory you have specified in the OAM as the location of the recorded files.
Note:Note: There are also other sample applications installed with the server. After you have
checked the AES server/Communication Manager connectivity by running this application, you may want to run those applications from an application machine.
Troubleshooting the sample applicationIf the application does not run or does not run as expected:
● Check the log files on the server in /opt/mvap/logs:
- mvap-trace.log.x
- mvap-error.log.x
- mvap-api.log.x
- mvap-wrapper.log
The best log file to check for Exceptions when troubleshooting is the mvap-error.log.0 file (The.0 file is the latest log file).
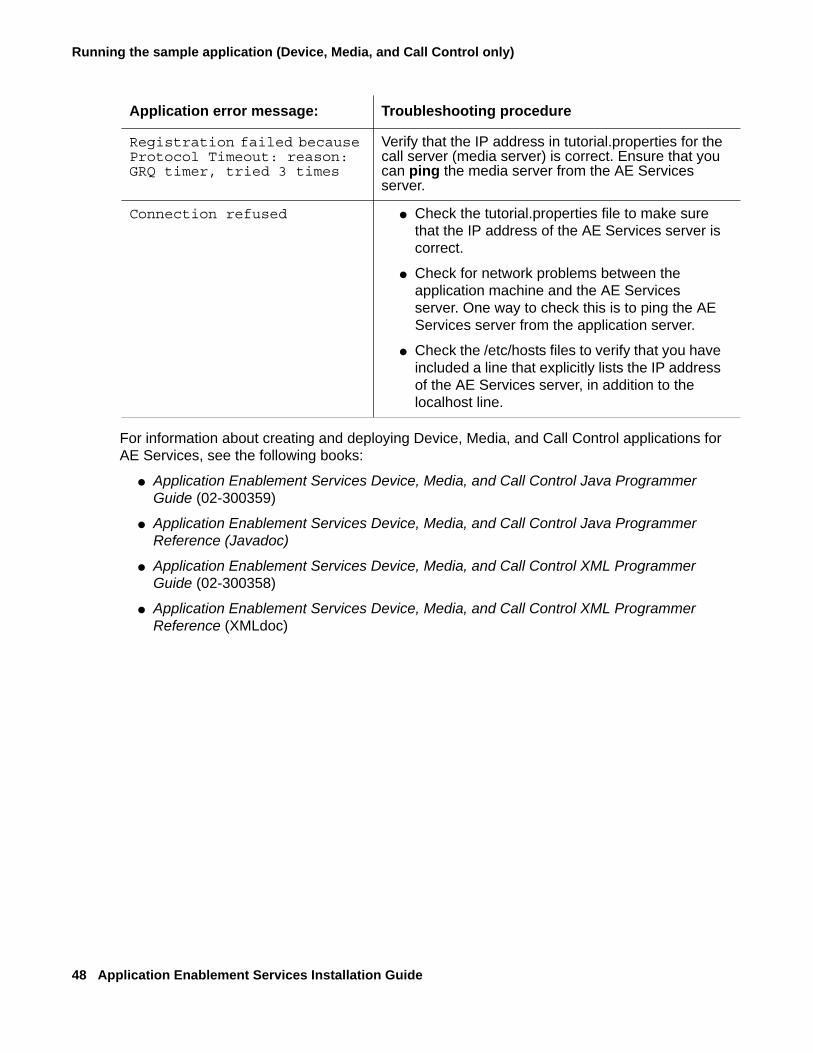
● Check for application error messages:
Application error message: Troubleshooting procedure
Registration failed because Gatekeeper Reject reason: terminalExcluded
Ensure that the extension number in tutorial.properties corresponds to a correctly administered extension number in Communication Manager.
Registration failed because Gatekeeper Reject reason: securityDenial
Verify that the password in tutorial.properties matches the password administered in Communication Manager for the station.
Running the sample application (Device, Media, and Call Control only)
48 Application Enablement Services Installation Guide
For information about creating and deploying Device, Media, and Call Control applications for AE Services, see the following books:
● Application Enablement Services Device, Media, and Call Control Java Programmer Guide (02-300359)
● Application Enablement Services Device, Media, and Call Control Java Programmer Reference (Javadoc)
● Application Enablement Services Device, Media, and Call Control XML Programmer Guide (02-300358)
● Application Enablement Services Device, Media, and Call Control XML Programmer Reference (XMLdoc)
Registration failed because Protocol Timeout: reason: GRQ timer, tried 3 times
Verify that the IP address in tutorial.properties for the call server (media server) is correct. Ensure that you can ping the media server from the AE Services server.
Connection refused ● Check the tutorial.properties file to make sure that the IP address of the AE Services server is correct.
● Check for network problems between the application machine and the AE Services server. One way to check this is to ping the AE Services server from the application server.
● Check the /etc/hosts files to verify that you have included a line that explicitly lists the IP address of the AE Services server, in addition to the localhost line.
Application error message: Troubleshooting procedure
Issue 3.0 March 2007 49
Appendix B: Administering SELinux
The SELinux is specified during the Linux install process on the Firewall Configuration screen. By default SELinux is enabled. Turn SELinux off after the Linux OS has been installed so that you do not have to perform another Linux install.
Link to SELinux informationThe following link provides information about how to use SELinux. This includes information about verifying whether SELinux is on or off and how to turn it on or off.
http://fedora.redhat.com/docs/selinux-faq-fc3/index.html#id2825880
Using selinuxenabled You can also use the root user command selinuxenabled.to determine whether SELinux is turned on:
selinuxenabled
Indicates whether SELinux is enabled or disabled. Exits with status 0 if SELinux is enabled and -256 if it is not enabled.

Administering SELinux
50 Application Enablement Services Installation Guide
Setting up the Linux PC for remote access
Issue 3.0 March 2007 51
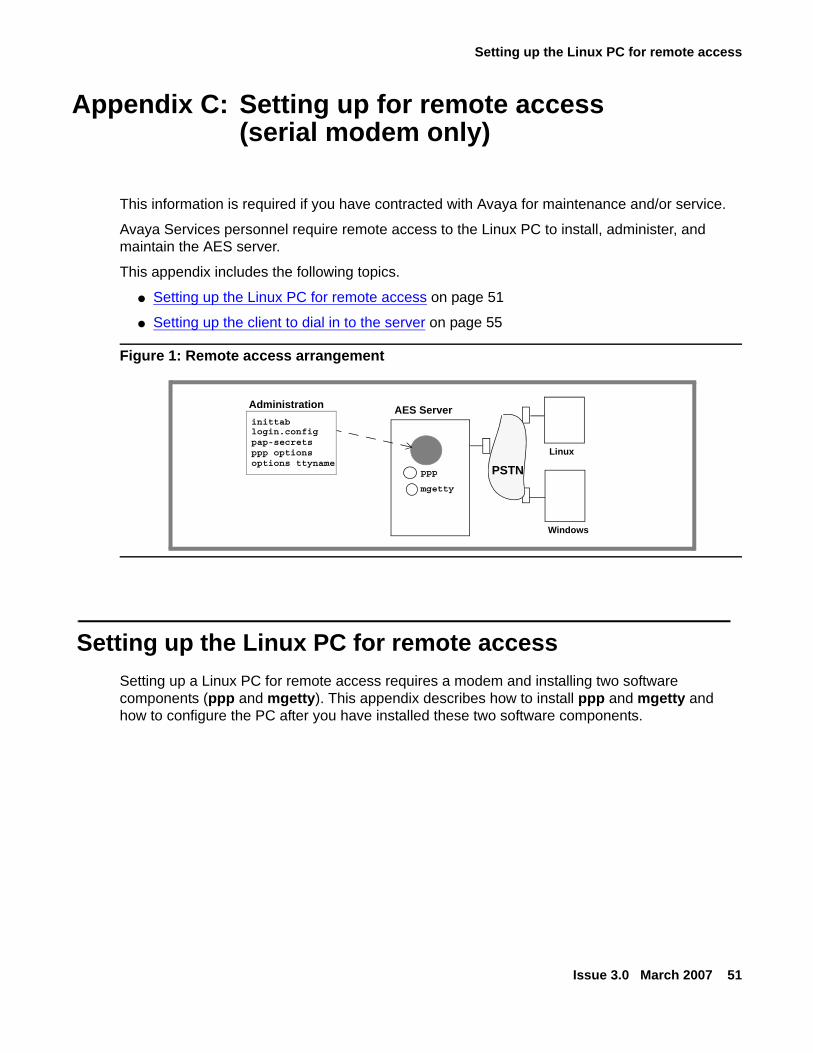
Appendix C: Setting up for remote access(serial modem only)
This information is required if you have contracted with Avaya for maintenance and/or service.
Avaya Services personnel require remote access to the Linux PC to install, administer, and maintain the AES server.
This appendix includes the following topics.
● Setting up the Linux PC for remote access on page 51
● Setting up the client to dial in to the server on page 55
Figure 1: Remote access arrangement
Setting up the Linux PC for remote accessSetting up a Linux PC for remote access requires a modem and installing two software components (ppp and mgetty). This appendix describes how to install ppp and mgetty and how to configure the PC after you have installed these two software components.
AES ServerAdministrationinittablogin.configpap-secretsppp optionsoptions ttyname
ppp
mgetty
Linux
Windows
PSTN
Setting up for remote access (serial modem only)
52 Application Enablement Services Installation Guide
Before You BeginIf you have a Linux PC with the default Red Hat Enterprise Linux software components already installed, the only additional requirements are as follows
● Red Hat Enterprise Linux-compatible modem
● ppp -- Point-to-Point Protocol software
● mgetty -- a program that handles modem communications
Use this checklist to make sure you are ready to start.
● You are logged in as root.
● You are at the command prompt.
● You have the complete Red Hat Enterprise Linux ES CD-ROM set on hand.
Installing the additional software componentsFrom the command prompt, follow this procedure to install ppp and mgetty.
1. Insert the Red Hat Enterprise Linux Installation CD-ROM disk 2 into the CD-ROM drive, and type the following command to mount the file system:
mount /mnt/cdrom/
2. Type the following command to change to the directory containing the RPM packages:
cd /mnt/cdrom/RedHat/RPMS
3. Type the following command to install ppp.
rpm -i ppp-2.4.2-6.4.RHEL.i386.rpm
4. Type the following command to install mgetty.
rpm -i mgetty-1.1.31-2.i386.rpm
This completes the procedure to install ppp and mgetty. Continue with Configuring the Linux PC on page 53.
Setting up the Linux PC for remote access
Issue 3.0 March 2007 53
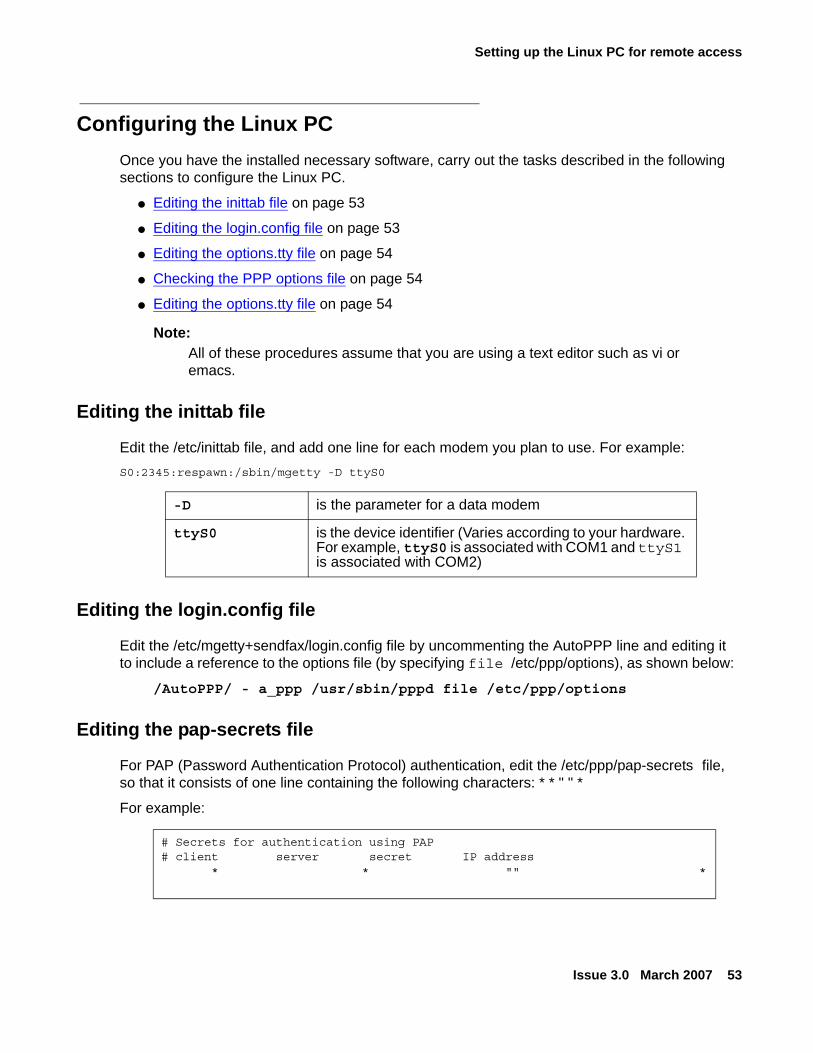
Configuring the Linux PCOnce you have the installed necessary software, carry out the tasks described in the following sections to configure the Linux PC.
● Editing the inittab file on page 53
● Editing the login.config file on page 53
● Editing the options.tty file on page 54
● Checking the PPP options file on page 54
● Editing the options.tty file on page 54
Note:Note: All of these procedures assume that you are using a text editor such as vi or
emacs.
Editing the inittab file
Edit the /etc/inittab file, and add one line for each modem you plan to use. For example:S0:2345:respawn:/sbin/mgetty -D ttyS0
Editing the login.config file
Edit the /etc/mgetty+sendfax/login.config file by uncommenting the AutoPPP line and editing it to include a reference to the options file (by specifying file /etc/ppp/options), as shown below:
/AutoPPP/ - a_ppp /usr/sbin/pppd file /etc/ppp/options
Editing the pap-secrets file
For PAP (Password Authentication Protocol) authentication, edit the /etc/ppp/pap-secrets file, so that it consists of one line containing the following characters: * * " " *
For example:
-D is the parameter for a data modem
ttyS0 is the device identifier (Varies according to your hardware. For example, ttyS0 is associated with COM1 and ttyS1 is associated with COM2)
# Secrets for authentication using PAP# client server secret IP address
* * "" *

Setting up for remote access (serial modem only)
54 Application Enablement Services Installation Guide
These settings enable any registered user to log in. (Alternatively, you could specify user names, passwords and IP addresses.)
Checking the PPP options file
Check the /etc/ppp/options file and make sure the following options are specified.
Editing the options.tty file
Edit the options file for the modem to include a <serverIP>:<clientIP> entry for each tty.
For example if your modem is connected to ttys0, edit /etc/ppp/options.ttyS0 as follows (be sure to include the colon between the server IP address and the client IP address). The default <serverIP>:<clientIP> entry for each tty is:
192.168.25.10:192.168.25.20
Table 3: PPP options
lock Creates a lock file that has exclusive access to a specific device.
-detach Prohibits the pppd process from forking and becoming a background process (this happens when a serial device is specified).
modem Sets up the server to use modem control lines. The client waits for a signal from the modem before opening a serial device (default) behavior. You can change this handshake if necessary.
crtscts Specifies hardware flow control.
proxyarp Lets the client appear as if it is on the same LAN as its peers.
asyncmap 0 Prohibits the pppd process from setting up and using escape control sequences.
Server IP Client IP
Setting up the client to dial in to the server
Issue 3.0 March 2007 55
Setting up the client to dial in to the serverThis section contains some basic tips for setting up the two most frequently used clients:
● Windows
● Linux
It also includes connection requirements, which apply to both.
Windows clientsFrom a Windows client, use Windows Dial-up Network Connections to establish a PPP connection to the AES server.
Linux clientsFrom a Linux client, use either the GNOME or KDE Dialer to establish a PPP connection to the AES server.
Connection RequirementsVerify the PPP connection requirements and administer accordingly, for example:
● You may need to administer a login and password for the client connection. By default, no login and password are administered on the AES server.
● You will need to administer an IP address for the client connection. The default Client IP address is 192.168.25.20.

Setting up for remote access (serial modem only)
56 Application Enablement Services Installation Guide
Issue 3.0 March 2007 57
Appendix D: Configuring an LDAP server forCommon User Service utilization
This appendix explains how to manually configure an LDAP Server for Common User Service utilization.
These instructions assume that the target LDAP is an OPEN LDAP server of version 2.1.22-28 or later.
PrerequisitesThe cs-userservice RPM must be installed (the cs-cusldap RPM is not needed) before you can configure the LDAP server.
The cs-userservice RPM was installed with the third-party RPMs when you installed the server software:
Configure the LDAP serverTo manually configure your LDAP Server for Common User Service utilization:
1. Copy the mvapus schema file (mvapus.schema) from /var/mvap/config/cus to the LDAP schema directory (/etc/openldap/schema)
2. Edit the /etc/openldap/schema/core.schema file:
a. Locate the userid attribute specification section.
b. Add the following specification element:
ORDERING caseIgnoreOrderingMatch after the EQUALITY caseIgnoreMatch line.
c. Save the file.
3. Edit the /etc/openldap/slapd.conf file
4. Add the following include statement to the already existing set of \include statements: include /etc/openldap/schema/mvapus.schema
5. Note the suffix value used in the current slapd.conf file
6. Save and close the slapd.conf file.

Configuring an LDAP server for Common User Service utilization
58 Application Enablement Services Installation Guide
7. Modify the init.ldif file to match the chosen organizationalUnit for the \users and the existing suffix used by the enterprise:
a. Eliminate the first entry in the init.ldif file.
b. Revise the second entry to reflect the desired organizationalUnit \(ex. ou=users)
c. Revise the DN attribute of the next two entries to reflect the chosen organizationalUnit and suffix in use in the enterprise.
8. Save and close the init.ldif file.
9. Restart the LDAP server.
10. Use the ldapadd tool or equivalent to add the entries in the ldif.init file into the LDAP server:
ldapadd -x -D bind credentials DN -W -f init.ldif
Create an LDAP User accountYou must now create an LDAP user account for the User Service. This account must have privileges to add, modify, and delete avayauser class entries in the specified region of the Directory Information Tree (DIT).
To create and administer an LDAP User account:
1. Open the /var/mvap/config/cus/user.properties file for editing
2. Edit he LDAP storage section to reflect the LDAP configuration work completed in Configure the LDAP server on page 57:
a. Set the LDAP provider to the correct host and suffix combination.
b. Set the userroot property to the suffix value in use.
c. Set the principal to the DN of the LDAP you created in Configure the LDAP server on page 57.
d. Set the password attribute to the generated encrypted value.
Run /usr/share/tomcat5/webapps/axis/WEB-INF/lib/makepassword.sh against the plain text password furnished by the enterprise LDAP administrator for the User account you created.
e. Set the orgunit property to the organizationalUnit selected for the user data space.
3. Save and close the modified user.properties file.
4. Make identical changes to the corresponding properties in the var/mvap/config/cus/ldapfilter.properties file.
Create an LDAP User account
Issue 3.0 March 2007 59
5. If the User Service has not already been deployed by the relevant Tomcat/Axis server, then deploy the service:
a. Make sure the Tomcat service is running.
b. Go to:
/usr/share/tomcat5/webapps/axis/WEB-INF/lib/
c. Run the org.apache.axis.client.AdminClient application against the cusdeploy.wsdd file.
For example:
java -classpath Axis jar files org.apache.axis.client.AdminClient cusdeploy.wsdd
6. Restart the Tomcat service that is the container for the User Service.

Configuring an LDAP server for Common User Service utilization
60 Application Enablement Services Installation Guide
Issue 3.0 March 2007 61
Appendix E: AE Services WAN requirements
The WAN requirements changed in AE Services 3.1.
This section details the requirements for the customer’s network to support CTI links over a WAN/VLAN/LAN. These are links, connected via a WAN/VLAN/LAN, between the AE Services server machine and the C-LAN(s) in a Communication Manager (CM).
● No more than a 200ms average round trip packet delivery time as measured with ping over every one-hour time period
● Periodic spiked delays of no more than two seconds while maintaining the 200ms average round trip delivery time as measured with ping over every one-hour time period
These requirements are to maintain the CTI link over a WAN/VLAN/LAN. If the implementation is going to issue route requests, then the associated “wait” step must always have a value greater than the largest “periodic spiked delay”. With a maximum of 2 seconds allowed (as stated above) your wait step should be greater than 2 seconds. If you can guarantee “periodic spiked delays” less than 2 seconds, then you can reduce the wait step time-out accordingly. If no response to a route select is received by the switch, the call will follow the remaining vector steps in this specific vector. In other words, you will program the vector to deal with this condition.
If you cannot guarantee “periodic spiked delays” of less than two seconds, then it is important to note the following condition:
If you are using AE Services 3.1/4.0 and encounter “periodic spiked delays” greater than two seconds, then messages will either be:
● Stored and retransmitted after recovering from a short network outage
or
● Dropped during a long network outage

AE Services WAN requirements
62 Application Enablement Services Installation Guide
Issue 3.0 March 2007 63
Index
Index
Aadministering
CT users . . . . . . . . . . . . . . . . . . . . 28H.323 Gatekeepers . . . . . . . . . . . . . . . 29links . . . . . . . . . . . . . . . . . . . . . . 29Security Database settings . . . . . . . . . . . 29transport link connectivity . . . . . . . . . . . . 29
administration proceduresAE Services . . . . . . . . . . . . . . . . .28, 29Communication Manager . . . . . . . . . . . . 27
AE Server machineminimum hardware specifications . . . . . . . . . 7
AE Servicesuninstalling . . . . . . . . . . . . . . . . . . . 22
application link encryption, checking . . . . . . . . 29application properties file for sample application . . . 43
Cchecking application link encryption . . . . . . . . . 29Choose Installation Method screen . . . . . . . . . 18client
setting up for remote access. . . . . . . . . . . 55client application machine . . . . . . . . . . . . . 10Communication Manager administration
adding stations . . . . . . . . . . . . . . . . . 28checking for appropriate VOIP resources. . . . . 28checking for call control features . . . . . . . . . 27checking for IP_API_A licenses . . . . . . . . . 28configuring for signaling and media encryption . . 28setting up transport link . . . . . . . . . . . . . 27table of tasks . . . . . . . . . . . . . . . . . . 27
connectivitytesting
OAM tests . . . . . . . . . . . . . . . . . 31Co-residency warning page. . . . . . . . . . . . . 18creating a user account . . . . . . . . . . . . . . 28CT users
administering . . . . . . . . . . . . . . . . . . 28
Ddirectories installed . . . . . . . . . . . . . . . . 21
Eencryption
application link . . . . . . . . . . . . . . . . . 29Enter RPM URL screen . . . . . . . . . . . . . . . 17
Ffiles installed . . . . . . . . . . . . . . . . . . . . 21
HH.323 Gatekeepers
administering . . . . . . . . . . . . . . . . . . 29
Iinittab file
editing for remote access . . . . . . . . . . . . 53installation logs . . . . . . . . . . . . . . . . . . . 22installing
AE Services license file . . . . . . . . . . . . . 23license file . . . . . . . . . . . . . . . . . . . 23updates and patches . . . . . . . . . . . . . . 38
ISO imageobtaining . . . . . . . . . . . . . . . . . . . . 15
LLast Chance to Abort screen . . . . . . . . . . . . 20LDAP
configuring for Common User Service . . . . . . 57creating User account . . . . . . . . . . . . . . 58
license fileerror messages . . . . . . . . . . . . . . . . . 25installing . . . . . . . . . . . . . . . . . . . . 23requesting . . . . . . . . . . . . . . . . . . . 25required information . . . . . . . . . . . . . . . 25troubleshooting . . . . . . . . . . . . . . . . . 24
linksadministering . . . . . . . . . . . . . . . . . . 29
Linux operating system . . . . . . . . . . . . . . . 13log files
for sample application . . . . . . . . . . . . . . 47login.config file
editing for remote access . . . . . . . . . . . . 53

64 Application Enablement Services Installation Guide
Index
logsinstallation . . . . . . . . . . . . . . . . . . . 22locating . . . . . . . . . . . . . . . . . . . . 22upgrade . . . . . . . . . . . . . . . . . . . . 22
MMAC address for WebLM. . . . . . . . . . . . . . 26maintaining security . . . . . . . . . . . . . . . . 41media files
sample application . . . . . . . . . . . . . . . 44media server requirements . . . . . . . . . . . . . .11mgetty
installing for remote access . . . . . . . . . . . 52
Nnetwork requirements for AE Services. . . . . . . . .11NICs
specifying for AE Services. . . . . . . . . . . . 29
OOptional Packages screen . . . . . . . . . . . . . 19options.tty file
editing for remote access . . . . . . . . . . . . 54
Ppacket delivery time . . . . . . . . . . . . . . . . 61pap-secrets file
editing for remote access . . . . . . . . . . . . 53periodic spiked delays . . . . . . . . . . . . . . . 61Ping Host . . . . . . . . . . . . . . . . . . . . . 31PPP
checking options file . . . . . . . . . . . . . . 54connection requirements . . . . . . . . . . . . 55installing for remote access . . . . . . . . . . . 52
prerequisites. . . . . . . . . . . . . . . . . . . . . 7
RRed Hat Linux . . . . . . . . . . . . . . . . . . . 13remote access
checking the PPP options file . . . . . . . . . . 54configuring the Linux PC . . . . . . . . . . . . 53editing inittab file . . . . . . . . . . . . . . . . 53editing login.config file . . . . . . . . . . . . . 53editing options.tty file . . . . . . . . . . . . . . 54editing pap-secrets file . . . . . . . . . . . . . 53installing mgetty . . . . . . . . . . . . . . . . 52installing ppp . . . . . . . . . . . . . . . . . . 52setting up client . . . . . . . . . . . . . . . . . 55setting up the Linux PC . . . . . . . . . . . . . 51
requirementsAE Server machine . . . . . . . . . . . . . . . . 7media server . . . . . . . . . . . . . . . . . . 11network characteristics . . . . . . . . . . . . . 11PPP connection . . . . . . . . . . . . . . . . . 55WAN . . . . . . . . . . . . . . . . . . . . . . 61
Ssample application
application error messages . . . . . . . . . . . 47application properties file. . . . . . . . . . . . . 43log files . . . . . . . . . . . . . . . . . . . . . 47media files . . . . . . . . . . . . . . . . . . . 44running . . . . . . . . . . . . . . . . . . . . . 46troubleshooting . . . . . . . . . . . . . . . . . 47tutorial properties file . . . . . . . . . . . . . . 45
screensChoose Installation Method screen . . . . . . . . 18Co-residency warning page . . . . . . . . . . . 18Enter RPM URL . . . . . . . . . . . . . . . . . 17Last Chance to Abort . . . . . . . . . . . . . . 20Optional Packages . . . . . . . . . . . . . . . 19Select Installation Media . . . . . . . . . . . . . 17Select Release Version screen . . . . . . . . . . 18status of the installation . . . . . . . . . . . . . 20successful completion . . . . . . . . . . . . . . 21
security . . . . . . . . . . . . . . . . . . . . . . 41Security Database settings
administering . . . . . . . . . . . . . . . . . . 29Select Installation Media screen . . . . . . . . . . . 17Select Release Version screen . . . . . . . . . . . 18server software
configuring . . . . . . . . . . . . . . . . . . . 15installing . . . . . . . . . . . . . . . . . . . . 15ISO image . . . . . . . . . . . . . . . . . . . 15obtaining ISO image . . . . . . . . . . . . . . . 15
software platform . . . . . . . . . . . . . . . . . . . 8software requirements
third-party. . . . . . . . . . . . . . . . . . . . . 8specifying NICs for AE Services . . . . . . . . . . . 29status of the installation screens . . . . . . . . . . . 20successful completion screen . . . . . . . . . . . . 21
Ttesting connectivity
OAM tests . . . . . . . . . . . . . . . . . . . 31Ping Host . . . . . . . . . . . . . . . . . . . . 31test phone call . . . . . . . . . . . . . . . . . 31
third-party software requirements . . . . . . . . . . . 8transport link connectivity
administering . . . . . . . . . . . . . . . . . . 29
Issue 3.0 March 2007 65
Index
tutorial properties filefor sample application. . . . . . . . . . . . . . 45
tutorial.properties file . . . . . . . . . . . . . . . . 45
Uuninstalling
AE Services . . . . . . . . . . . . . . . . . . 22updates and patches . . . . . . . . . . . . . . 38
Updating AES software. . . . . . . . . . . . . . . 37upgrade logs . . . . . . . . . . . . . . . . . . . 22upgrading
from a CD . . . . . . . . . . . . . . . . . . . 35from an ISO image . . . . . . . . . . . . . . . 35
user account, creating . . . . . . . . . . . . . . . 28
Vverification application
running . . . . . . . . . . . . . . . . . . . . . 46troubleshooting . . . . . . . . . . . . . . . . . 47
WWAN requirements . . . . . . . . . . . . . . . . . 61WebLM
error messages . . . . . . . . . . . . . . . . . 25troubleshooting . . . . . . . . . . . . . . . . . 25

66 Application Enablement Services Installation Guide
Index