aonixadt quick start guide and build an ada program ... appendix a executing and debugging on...
TRANSCRIPT

UD/NOTE/ADTN0000-06011/006 November 2012
AonixADTQuick Start Guide

Copyright © 2012 Atego™. All rights reserved. No part of this document may be reproduced in any form or by any means without permission in writing from Atego. Atego reserves the right to make changes in specifications and other information contained in this publication without prior notice. Consult Atego to determine whether such changes have been made.
Atego™ is a trademark of Atego. All other company and product names are the trademarks of their respective companies.
Atego Systems, Inc.5930 Cornerstone Court West, Suite 250
San Diego, CA 92121
Tel: 888-912-8346
Fax: 858-824-0212
For the addresses and phone numbers of Atego distributors and support organizationsworldwide, please refer to the Atego web site www.atego.com.

iii
Table of Contents
Before you begin ............................................................................................................... 1
Building and executing with the Eclipse IDE ..................................................................... 21. Start Eclipse............................................................................................................ 22. Open the Ada perspective ...................................................................................... 33. Create the project ................................................................................................... 34. Create and build an Ada program ........................................................................ 10
a. Create an Ada main program......................................................................... 10b. Compile the source ........................................................................................ 14c. Link the program ............................................................................................ 14
5. Execute the program ............................................................................................ 15
Using the debugger......................................................................................................... 17Ada configurations.................................................................................................... 17A debugging example............................................................................................... 20Debugging a running program.................................................................................. 23
Appendix A Executing and Debugging on VxWorks 6.x
Setting up a target connection ........................................................................................ 27
Appendix B Executing and Debugging on VxWorks 653
Executing with the VxWorks simulator ............................................................................ 31
Debugging with the WindRiver Workbench debugger .................................................... 33Launching the debugger........................................................................................... 33Setting breakpoints ................................................................................................... 34
Debugging with ADT ....................................................................................................... 35Creating a debug configuration ................................................................................ 35Launching the debugger........................................................................................... 37

iv AonixADT
Setting breakpoints ...................................................................................................37
Appendix C Raven-Specific Run and Debug Procedures
Adding required Raven libraries ......................................................................................39
Specifying execution parameters.....................................................................................41
Appendix D Additional Information
Large-scale development ................................................................................................43
A demonstration of some ADT features ..........................................................................46Semantic navigation features....................................................................................48
Navigate to Declaration ......................................................................................48Reference search ...............................................................................................48
Debugger features ....................................................................................................50Source formatting......................................................................................................57Additional Eclipse features available under ADT ......................................................58
Notes for ObjectAda users ..............................................................................................59Building with ObjectAda ............................................................................................59Finding ObjectAda information..................................................................................59

1
Quick Start Guide
This is the Quick Start Guide for users of AonixADT, the Aonix Ada Development Toolkit for Eclipse. AonixADT supports ObjectAda and GNAT Ada toolchains.
Use the document you are reading to get a feeling for using AonixADT to develop, build, execute, and debug Ada applications from within the Eclipse framework. The Quick Start Guide uses the ObjectAda toolchain in descriptions and examples. Except where noted, functionality is identical when using the GNAT toolchain.
This Quick Start Guide uses images taken from the Windows-hosted version of AonixADT. UNIX-hosted versions of AonixADT function in a similar manner, except for differences due to the underlying operating system (such as file-naming conventions).
Note: For Raven- and VxWorks-based products, there are variations in the procedures and in the images shown. Where significant differences occur, they will be accompanied by a “Raven variation” or a "VxWorks variation" note.
Before you beginTo use AonixADT with Eclipse, first make sure all required components are installed correctly.
• Install the compilation environment.
Install ObjectAda from the ObjectAda CD. This can be done before or after installing the remaining components. Refer to the Installation section of the ObjectAda Release/Installation Notes for installation instructions. Refer to the GNAT documentation for GNAT installation instructions.
• Make sure the ADT components are installed. For details, see the Installation section of the ADT Release Notes (provided with AonixADT).
• Set AONIX_LM_DIR to point to the location of the directory where the Aonix License Manager server software is installed, so that you will be able to access the licensed portions of ObjectAda (compiler, etc.). For example, use:

2 AonixADT
<ObjectAda_inst_dir>/alm/bin
This step assumes that the Aonix license server has already been configured and that the license daemon is running. See “Configuring the license manager server’’ in the ObjectAda Release/Installation Notes for information on configuring the Aonix License Manager.
Note: When using AonixADT it is not necessary to set the compiler /bin directory in your PATH, nor to set the value of $ObjectAda. This will be done when you select a toolchain for your Ada project.
Building and executing with the Eclipse IDEIf you follow the steps as described, you will create, compile, and execute a simple Ada program with the Eclipse IDE. In this exercise you will create a “managed” Ada project.
Note: Some of the dialogs shown in this document may differ slightly from what you see on your version of Eclipse. The functionality remains the same, however.
1. Start Eclipse1. First make sure you have Eclipse installed and have access to the ObjectAda
environment as noted in “Before you begin” on page 1. 2. Start Eclipse. If this is the first time you have opened Eclipse, you will be presented
with the Eclipse welcome screen.3. When prompted, specify a workspace. Click OK when finished.

Quick Start Guide 3
Building and executing with the Eclipse IDE
2. Open the Ada perspectiveTo open the Ada perspective, select Window > Open Perspective > Ada. You will see the newly created Eclipse workspace, similar to the following. Note: If Ada does not appear on the Open Perspective menu, select Other > Ada.
3. Create the projectBefore you start, turn off the automatic build feature. Otherwise, builds will be performed whenever a file is saved. To deselect the feature, select Project, then, if Build Automatically is checked, uncheck it.

4 AonixADT
1. Select File > New > Project. Then select Ada > Ada Managed Project from the New Project wizard.
2. Click Next. The dialog shown below appears. Type “HelloWorld” in the Project name field of the dialog (see below).

Quick Start Guide 5
Building and executing with the Eclipse IDE
3. Click Next. In the dialog that appears (see below), select the Ada Toolchain you will be using from the Toolchain Type pulldown menu. Select “Executable” from the Build Type pulldown. Then select the default settings to use for the initial build configuration. Typically the available default settings are either "Debug" or "Release", but some toolchains may have additional options, such as to specify the target platform for the build.

6 AonixADT
4. Indicate the location of the Ada toolchain. This can be done either by selecting the Specify Path radio button and indicating the location of the toolchain (for example, “c:\Program Files\ObjectAda”), or as we will be doing, by selecting a toolchain from the Use Installed Toolchain dropdown list. Since no toolchains are installed in our workspace, check Use Installed Toolchain and press Manage.
A list of installed toolchains appears.

Quick Start Guide 7
Building and executing with the Eclipse IDE
Since we have yet to install any toolchains, the list will be empty. At this stage it is possible to import a list of toolchains from a different workspace by using the Import button, or to export the current workspace’s toolchains by using the Export button. Lists of installed toolchains are saved in an XML file.
5. Press Add to add a toolchain. The Install a new Ada toolchain dialog appears.

8 AonixADT
6. Indicate the type of toolchain you wish to install, the name by which you’d like it to be known, and the directory where it is located.
At this point, pressing Finish will install the toolchain. However, since we will be including an additional step, press Next.
7. In order for Ada semantic navigation and code-assist to work, ADT needs to know where to search for source files to include in its semantic analysis. The location of these files is indicated in the Select source directories page. (The locations can also be specified on a project’s Ada Build properties page (Source Folders tab for ObjectAda; Source Directories tab for GNAT.)
For example, in order for these features to work with the Ada predefined packages:• Select the location of the Ada predefined packages using the tree selector.• Press Finish to install the toolchain.

Quick Start Guide 9
Building and executing with the Eclipse IDE
Note: The image above shows the location of the ObjectAda predefined packages. The equivalent GNAT directory is located in a directory labeled “adainclude” (for example, D:/GNATPRO5.03a/lib/gcc/pentium-mingw32msv/3.4.4/adainclude).
The installed toolchain’s Preferences window now contains the toolchain just installed.8. Press OK.
The New Ada Project window now indicates the toolchain just installed.9. Click Finish. If all goes well, your workspace will look something like this:
Raven variation:Because Text_IO is not included in the standard predefined libraries, you must also select the extensions directory in order for code assist to work in the Quick Start Guide examples.

10 AonixADT
Note that the placement of windows will vary according to how the windows were set in previous Eclipse sessions.
4. Create and build an Ada programHere you will be creating and building an Ada program. The build process involves both compiling and linking.
a. Create an Ada main program1. Right click the name of the project in the Ada Navigator panel, then select New > Ada
Procedure. The New Ada Procedure wizard appears.
Note: This functionality may also be accessed by selecting File > New in the main menu bar, or by using the Alt+Shift+N accelerator key sequence. Ada file template wizards exist for procedures, functions, packages, and files.

Quick Start Guide 11
Building and executing with the Eclipse IDE
2. Type the name of the unit (bonjour) in the Name field.
3. Click Finish. The Ada Navigator window now shows "bonjour.adb" and the workspace now shows an editor window for bonjour.adb (see below). If your project settings specify Build Automatically (on the Project menu), you will also see messages in the console window indicating that the file was compiled.

12 AonixADT
4. Type the following code for bonjour.adb in the editor window.
For Raven:with System.Raven_IO;procedure bonjour isbegin System.Raven_IO.Put_Line(”Hello, World”);end bonjour;
For others:with Ada.Text_IO;procedure bonjour isbegin Ada.Text_IO.Put_Line(item => "Hello, World");end bonjour;

Quick Start Guide 13
Building and executing with the Eclipse IDE
Code assist may be activated by using the sequence Ctrl+Space at any point after the first dot (‘.’) in an identifier as shown below (the contents of the Ada editor window will be different for Raven).
In addition, if Enable Automatic Dot Completion is selected in the Window > Preferences > Ada > Editor tab, code assist will automatically be activated when a dot is typed. (Note: The code assist operation may take longer than usual the first time it is invoked within a file. It may also be necessary to have successfully compiled the file for code assist to function.)
You may also notice that clicking on some Ada constructs (e.g.,. “End”, ‘(‘, “Procedure” ), will cause a rectangular box to appear around the construct’s complement. This behavior can be disabled by deselecting Show Matching Delimeters on the Window > Preferences > Ada > Editor window.
Note that the editor window says “*bonjour.adb”, which means that the program has not been saved.

14 AonixADT
5. Save the file by selecting File > Save or using the accelerator sequence Ctrl+S.
If you expand HelloWorld in the Ada Navigator view, you’ll notice that bounjour.adb has now been populated with objects created from your code. Double clicking on one of those objects highlights the corresponding line in the source file in the editor.
Note: To make the Outline view (or any other view in the perspective) visible, select Window > Show View, then select the desired view. Refer to the Eclipse documentation for more information on standard Eclipse views.
b. Compile the source
If you previously unchecked Project > Build Automatically, you need to build the project by hand. To do so, right-click anywhere in the editor and choose Compile Selected Ada Files. Compilation may also be performed by right clicking on the file in the Ada Navigator and choosing Compile bonjour.adb or by using the accelerator Shift+F7. (If Build Automatically had been set, the File > Save operation in the previous step would have compiled the file.)
Note: You can check the Console view to see build messages. If the compilation under ObjectAda is successful, the final message in the Console view will be “Front end of hello.adb succeeded with no errors”. If there are compilation errors, they will be displayed in the Problems view as well. Clicking on the error message in the Problems view will highlight the line where the error occurred in the source file in the editor. In addition, right clicking on the error in the Problems view and selecting Display LRM will allow you to display the corresponding reference in the Ada Reference Manual. (Note: This functionality is not currently implemented for GNAT toolchains.)
c. Link the programNow that the source file is compiled, it must be linked to create an executable. To do so, right-click in the editor and select Link Main Units. This may also be accomplished by pressing F7 or by right clicking on the file name in the Ada Navigator then selecting Link Main Units. Check the box next to HelloWorld in the Select main units dialog (see below) and press OK.
Raven variation: You must specify all required Raven libraries before building your application. See “Adding required Raven libraries” on page 39 for details.

Quick Start Guide 15
Building and executing with the Eclipse IDE
5. Execute the program
To execute the program you just created and built:
1. Select Run > Run Configurations....2. In the Run dialog that appears, create a new Ada configuration.
To do this, click Ada, then click New_configuration under Ada in the left panel. A new dialog view appears with the name "New_configuration" in the Name field. You may change the name if you wish. Make sure the Project and Ada Application fields are correct as shown in the figure below.
VxWorks 653 variation: This section does not apply to programs created with ObjectAda for VxWorks 653. Such programs run on a target platform separate from where they are developed. See Appendix B, “Executing and Debugging on VxWorks 653” for additional information.
VxWorks 6.x variation: In order to run programs created with ObjectAda for VxWorks 6.6, you must first cre-ate a connection to the target. See Appendix A, “Executing and Debugging on VxWorks 6.x” for additional information.

16 AonixADT
3. Press the Run button. If all goes well, “Hello, World” appears in the console window.
Congratulations. You have just finished creating your first Ada application under Eclipse.
Raven variation: You may need to define your embedded-application parameters before run-ning your program. See “Specifying execution parameters” on page 41 for details.

Quick Start Guide 17
Using the debugger
Using the debugger
The debugger allows you to control the execution of a program by setting breakpoints, suspending executing programs, stepping through code, examining and modifying the contents of variables, and attaching and detaching from running executables.
In order to use the debugger, your program must be compiled and built with debugging symbols enabled, so that appropriate code and information needed for debugger operation can be generated.
Ada configurations Rather than change the options we are using so that debugging information can be included, we will be creating a separate Ada configuration to generate a debuggable executable from the bonjour.adb source file.
Ada configurations indicate to various tools how actions are to be performed. This can include such information as what compilation options to use, where to find source files, which toolchain to use, which executables to build when linking, etc.
To create and use an Ada configuration that we will use to compile and build a debuggable executable, follow the steps below.
1. In the Ada Configuration view, right click HelloWorld and choose Create Configuration.
2. Type “debug” as the name of the configuration and ensure that the values of the other fields are properly specified (see below). Press OK.
VxWorks 653 variation: For information on debugging applications created with ObjectAda for VxWorks, see Appendix B, “Executing and Debugging on VxWorks 653”
VxWorks 6.x variation: In order to run programs created with ObjectAda for VxWorks 6.6, you must first cre-ate a connection to the target. See Appendix A, “Executing and Debugging on VxWorks 6.x” for additional information.
Raven variation: Attaching to and detaching from a process is not supported.

18 AonixADT
3. Press Yes when you are asked if you’d like to make this the active configuration for HelloWorld.
You’ll notice that HelloWorld now has two children in the Ada Configuration view, “lib” and “debug”. In addition, “debug” is the active configuration as indicated by its presence in brackets following the name of the configuration, that is, “HelloWorld [debug]”.
When an Ada configuration is created with the ObjectAda toolchain (including the initial Ada configuration created during project creation), debugging is enabled by default. This is not the case when using the GNAT toolchain. For the purposes of this demonstration, we will assume that the initial Ada configuration was created without debug information.
4. To include debugging information with ObjectAda, you will need to make sure the Project > Properties > Ada Build > Ada > Generate debugging info (or Ada debug for Windows platforms) box is checked. If it is not, check it and then recompile

Quick Start Guide 19
Using the debugger
and link bonjour.adb as done above. Since this is a new configuration, you will once again need to indicate the main unit to link when prompted. Notice that the console window indicates which configuration is being used for each action taken: “(HelloWorld:debug) Launching ObjectAda build”.
Specifying source locationsAn operation that needs to be performed frequently when creating new configurations or adding new sources is to indicate to the builder where to look for source files. This is done by right clicking on the project in the Ada Navigator view, selecting Properties > Ada Build > Source Folders, then specifying the required source folders. This operation can be performed more easily by selecting the folder(s) in the project in the Ada Navigator and selecting Source Folders > Add/Remove Selected Folders as shown below.
A list of folders and subfolders can be selected by right clicking the project in the Ada Navigator and selecting Source Folders > Select Source Folders. Important: Choosing source folders is valid only for the active configuration. Ensure that the currently active configuration is correct before using these operations.

20 AonixADT
Note for GNAT usersGNAT tool options, including options for creating debugging information, can be entered via the Project > Properties > Ada Build > Project Options tab as shown below.
A debugging exampleHere is a brief example of how to use the debugger in Eclipse.
1. Select Window > Open Perspective > Debug to open the debug perspective.2. Create a debug configuration:
• Select Run > Debug Configurations.... The debug configuration dialog appears.

Quick Start Guide 21
Using the debugger
• Select Ada and then select New_configuration. You may change “New_configuration” to another name if you wish. The screen should now look something like this:
3. Press Debug. An application window opens briefly, the program runs, and a Debug window opens. The workspace will now look something like this:
Raven variation: You may need to define your embedded-application parameters before debugging your program. See “Specifying execution parameters” on page 41 for details.
22 AonixADT
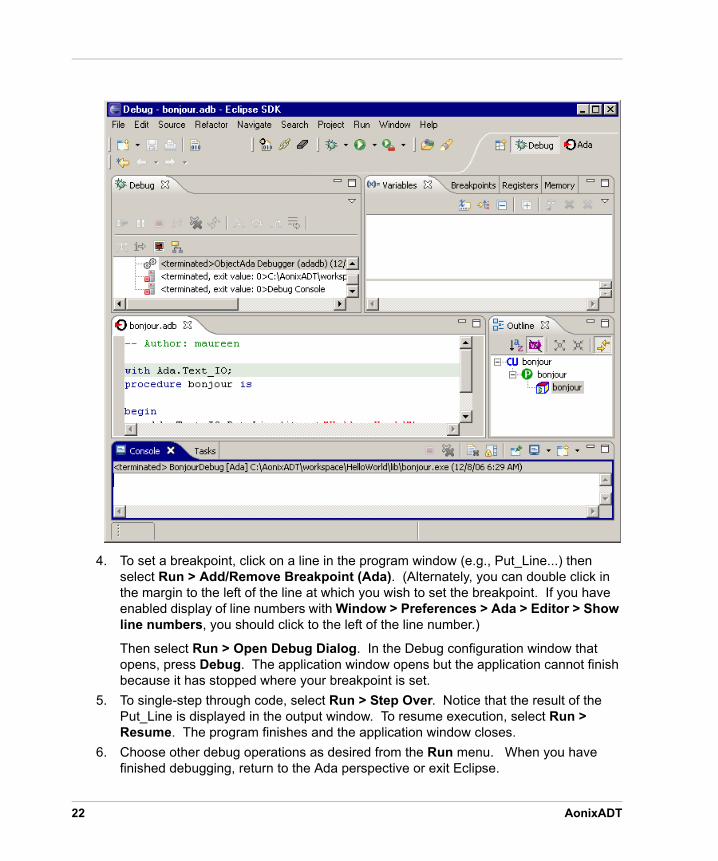
4. To set a breakpoint, click on a line in the program window (e.g., Put_Line...) then select Run > Add/Remove Breakpoint (Ada). (Alternately, you can double click in the margin to the left of the line at which you wish to set the breakpoint. If you have enabled display of line numbers with Window > Preferences > Ada > Editor > Show line numbers, you should click to the left of the line number.)
Then select Run > Open Debug Dialog. In the Debug configuration window that opens, press Debug. The application window opens but the application cannot finish because it has stopped where your breakpoint is set.
5. To single-step through code, select Run > Step Over. Notice that the result of the Put_Line is displayed in the output window. To resume execution, select Run > Resume. The program finishes and the application window closes.
6. Choose other debug operations as desired from the Run menu. When you have finished debugging, return to the Ada perspective or exit Eclipse.

Quick Start Guide 23
Using the debugger
For more information about exercising other debugger features, refer to “Debugger features” on page 50.
Debugging a running program
With ObjectAda, It is possible to attach to a program already executing and bring it under control of the debugger. To do this, modify bonjour.adb in order to create a program that executes sufficiently long enough for us to attach to it – for example: ’
-- Author: user1with Ada.Text_Io;procedure Bonjour is
Infinite : Boolean := True; Counter : Integer := 0;
begin while Infinite loop Ada.Text_Io.Put_Line("Hello, World" & Integer'Image(Counter)); Counter := Counter +1; delay 5.0; end loop;end Bonjour;
(If you would like to copy this code from the PDF you are viewing, change to Adobe Acrobat’s text-selection tool. Note: Make sure that Integer'Image(Counter) contains a "straight" tick; otherwise compilation errors will result.)
Note: You can reformat your code automatically if you wish. See “Source formatting” on page 57 for more information. If you wish just to adjust the indentation rather than entirely reformat the code, which might entail unwanted changes in capitalization, you can use the Source > Fix Indentation (Ctrl+I) functionality.
To debug a running program:
1. Compile and link the program. Be sure that [debug] is still the active configuration.2. Execute the program you’ve just created. This may be done either from the system
command prompt, or from within Eclipse by using a Run configuration as we saw previously.
3. Create an Ada Attach to Process debug configuration:• Select Run > Debug Configurations.... The debug configuration dialog appears.
Raven variation: This section does not apply to Raven platforms: Raven does not support attaching to and detaching from a process.

24 AonixADT
• Select Ada Attach to Process and then select New_configuration. You may change “New_configuration” to another name if you wish.
4. Press Debug. The “Attach to Process” process selection screen will appear, similar to the one below.

Quick Start Guide 25
Using the debugger
All running processes with the same name as specified in the Ada Application field of the debug configuration dialog will be displayed. Selecting the process in the list will display information about the process. In this example, there should only be one copy of bonjour.exe listed. Select the process and click OK .
5. In a short time, the running process will be suspended and brought under the control of the debugger. You will need to open the Debug perspective if it is not already active. The debug window will look as pictured below.

26 AonixADT
6. Set a breakpoint on the line “Counter := Counter +1;” and resume execution. The application will continue running and will stop at the line where the breakpoint was set. You may now continue debugging the program as desired.
7. When you wish to leave the debugging session (assuming the application has not already finished executing), follow these steps:• Make sure that the application is executing and not halted at a breakpoint. To do
this you may need to remove or disable some or all of the breakpoints you have set and then resume execution. You can verify that bonjour.exe is once again running by looking at the output being produced.
• Detach from the process with Terminate and Remove or Terminate. In a couple of seconds, the Debugger view will update to reflect the fact that bonjour.exe is no longer under control of the debugger. It is possible that an error dialog may appear indicating that the attempt to terminate failed. You may safely ignore this warning. Important: If the application is not executing (i.e., is stopped at a breakpoint) when attempting to detach, the application (in this case bonjour.exe) may be unexpectedly killed.

27
A Executing and Debugging on VxWorks 6.x
VxWorks 6.x programs can be run directly from Eclipse either by downloading them to a target system or using VxWorks simulator (VxSim) without downloading to a target system. In both cases, it is necessary to set up a target connection as described in "Setting up a target connection" below. You can also attach to the running program with either the ADT debugger or the Wind River Workbench debugger to debug your application. This section explains the process of launching your program using the simulator, as well as attaching the ADT or Workbench debugger to a running application for debugging.
Setting up a target connectionWind River Workbench provides the capability to run Ada programs using hte VxSim simulator.
The following instructions apply to Workbench 3.0. The details may vary depending on the version of Workbench you are running. Consult the Wind River Documentation in the Workbench online help for more information.
1. Open the Application Development perspective2. From the Remote Systems view, click on Define a connection to a remote system.
This connection will be used to launch the VxSim simulator (if you are running on the simultor) and the target server process.a. Select Wind River VxWorks 6.x Simulator Connection to run using the VxSim
simulator or Wind River VxWorks 6.x Target Server Connection to run on a target platform. For the rest of this example we wil be working with a simulator connection. Consult the Wind River Workbench online documentation for instructions on setting up a target server connection.
This appendix applies only to VxWorks 6.x

Executing and Debugging on VxWorks 6.x
28 AonixADT
Press Next.
b. Select Custom simulator. enter the path to the vxWorks image file located in your ObjectAda installation under "simpc_lib/system_image", and press Next.
Note: If the path to your ObjectAda installation has spaces, you will need to convert the path segments containing spaces to the 8.3 filename format. For example, if ObjectAda is installed at "C:\Program Files\Aonix\ObjectAda", the path to the vxWorks image file will be "C:\PROGR~1\Aonix\ObjectAda\simpc_lib\system_image\vxWorks".

Quick Start Guide 29
Setting up a target connection
c. Press Next util you get to the final page, where you can enter the name for the new connection. Press Finish.
3. In the Remote Systems view, right click on the connection you just created and select "Connect <connection_name>", where <connectin_name> is the name of the connection you created in the previous step.
4. The simulator will not start, with the ouput appearing in a new window.
After initiating the connection, the item in the Remote Systems view associated with your connection should expand to contain information on the simulator.
You can now execute or debug your program. For instructions on setting up a launch configuration see section “5. Execute the program” on page 15 to run the program or section “A debugging example” on page 20 to debug the program.

Executing and Debugging on VxWorks 6.x
30 AonixADT

31
B Executing and Debugging on VxWorks 653
Since VxWorks programs are generally made to run on a target platform separate from where they are developed, applications created with ObjectAda for VxWorks cannot be run directly from Eclipse like a typical Ada program. Instead, you must first build an "application object file" with ObjectAda, then create a VxWorks "system module" within the VxWorks environment, and finally download the system module to the target system and run it there. Alternatively, you can use the VxWorks simulator (VxSim) to run the system module without downloading it to a target.
Once the program is running, you can attach to the running program with either the ADT debugger or the Wind River Workbench debugger to debug your application. This section explains the process of launching your program using the simulator, as well as attaching the ADT or Workbench debugger to a running application for debugging.
For information on executing with the WindRiver VxWorks simulator, see "Executing with the VxWorks simulator" (immediately below). For information on debugging such applications, choose one of the following:
• Debugging with the WindRiver Workbench debugger
• Debugging with ADT
Executing with the VxWorks simulatorWind River Workbench provides the capability to run Ada programs using the VxSim simulator. The following instructions apply to Workbench 2.6.1. The details may vary depending on the version of Workbench you are running. Consult the Wind River Documentation in the Workbench online help for more information.
1. Open the Application Development perspective.2. From the Target Manager view, click on Create a New Target Connection. The
target manager connection is used to launch the simulator and to provide information on running VxWorks programs, such as the ID of the Ada task.
This appendix applies only to VxWorks 653.

Executing and Debugging on VxWorks 653
32 AonixADT
a. Select Wind River VxWorks Simulator Connection then press Next
b. Select Custom simulator, and enter the path to the boot.txt file from your VxWorks build directory, and press Next.
Note: If the path to the boot.txt file contains spaces, you will need to convert the path segmentss containing spaces to the 8.3 filename format. For example, if the path to the boot.txt file is "C:\Directory With Spaces\system-build\boot.txt", you must convert the path to "C:\Direc~1\system-build\boot.txt".

Quick Start Guide 33
Debugging with the WindRiver Workbench debugger
c. Press Next until you get to the final page, where you can enter the name for the new connection. Press Finish..
3 In the Target Manager view, right click on the connection you just created and select "Connect '<connection_name>'", where <connection_name> is the name of the target manager connection you created in the previous step.
The simulator will now start with the output appearing in a new window.
After your program has been running for a short time, the target manager connection in the Target Manager view associated with your program should expand to contain information on your running program. Expand the item named “protection domains” until you see an item named “t<sm_name>”, where <sm_name> is the name of the static module file for your Ada program. From here, you can attach to the running program with one of the following:
• The WindRiver Workbench debugger
• The ADT debugger
Debugging with the WindRiver Workbench debugger
Launching the debuggerTo attach the WindRiver Workbench debugger to the running application, right click on the “t<sm_name>” item identified in Executing with the VxWorks simulator, and select Attach to Protection domain task (Task Mode). The debug session starts; execution will halt if a breakpoint is reached.

Executing and Debugging on VxWorks 653
34 AonixADT
Setting breakpointsBreakpoints for the Wind River debugger can be set from the Wind River Workbench Ada editor, or from the Breakpoints view in the Debug perspective.
• To insert a breakpoint from the Workbench editor, double click on the left border of the editor on the line you want to set the breakpoint, or right click on the border and select Toggle Breakpoint.
• To insert a breakpoint from the Breakpoints view, select Add Line Breakpoint from the Breakpoints view menu (the down arrow in the Breakpoints view toolbar). Enter the name of file and the number of the line line where you want to set the breakpoint.
More information on running the simulator can be found in the online documentation for Workbench. To access the documentation, select Help > Help Contents from the Workbench main menu, and select Wind River Documentation.

Quick Start Guide 35
Debugging with ADT
Debugging with ADT
Creating a debug configurationTo attach the ADT debugger to the running application, you must create an Ada Attach to Process launch configuration. From the Workbench main menu, select Run > Open Debug Dialog, click on Ada Attach to Process, and press the New launch configuration button.
In the Main tab for your debug configuration (see below), make sure that the Project and Configuration refer to the project and ADT build configuration that were used to build the ObjectAda program, and that the result of the build is entered in Ada Application.

Executing and Debugging on VxWorks 653
36 AonixADT
In the Toolchain tab, three fields must be filled out.
Target NameThe name of the entry in the Target Manager view associated with your application.
Task IDThe task ID for the ObjectAda application. The task ID can be found as a subitem of the target manager connection associated with your program after the program has been launched. The task ID appears with the protection domain item in the Target Manager view named “t<sm_name>”, where <sm_name> is the name of the static module file for your Ada program. In the figure on shown on page 34, the task ID is the portion after the colon for the “tSimpc_part1” item (0x2037c098).
Static Module File The file name of the static module file created for your ObjectAda application created during the VxWorks build.

Quick Start Guide 37
Debugging with ADT
Launching the debuggerOnce the application is running and the target manager connection associated with your application has expanded to show the ObjectAda task, verify that the task ID specified for your debug configuration is correct, and press Debug to start the debugging session.
Setting breakpointsBreakpoints for the ADT debugger can only be set from the ADT editor. To set a breakpoint, do one of the following:
• Double click on the left border of the ADT editor on the line you wish to set a breakpoint,
• Right click on the left border and select Add Breakpoint.

Executing and Debugging on VxWorks 653
38 AonixADT

39
C Raven-Specific Run and Debug Procedures
From a user standpoint, building and running or debugging an Ada application with a Raven toolchain is generally similar to building and running with other toolchains. There are some major exceptions:
• You must add required Raven libraries to your library search path before building your application.
• You must specify required embedded-execution parameters before executing your application.
• In addition, you must set up the embedded target to be able to communicate with the ObjectAda IDE and respond to commands. This involves loading and executing the "monitor" program, AdaMonitor, on the target.
For more information on installing and running AdaMonitor on the target, refer to "Loading the monitor" in the "Building a Raven Application" chapter of the ObjectAda Cross Development Guide, which is in the "documents" folder of your ObjectAda installation.
Adding required Raven librariesBefore building a Raven application, you need to define the target board environment. This means selecting the target board, selecting a run-time model, and selecting a system environment.
For the purpose of the current discussion, we will assume that the target board is an mvme2603, the run-time model is the development environment, the system environment is the Raven Ada ‘‘monitor’’ program, and that the extensions library is linked to the application. An example library path is shown below.
<ObjectAda>/lib/rts<ObjectAda>/bsp/board/ultra603
This appendix does not apply to ObjectAda for VxWorks 653 (Raven). For information on executing and debugging with VxWorks 653 (Raven), refer to Appendix A,

Raven-Specific Run and Debug Procedures
40 AonixADT
<ObjectAda>/bsp/raven/development_model<ObjectAda>/bsp/system/monitor<ObjectAda>/lib/extensions
To add the required libraries:
1. Open the Search tab on the properties page (Project > Properties > Ada Build > Search). The Search tab will list a representative set of Raven libraries (see below).
2. If you wish to change any of the three Raven libraries listed, press Raven Libraries, browse to the desired location, and press OK.

Quick Start Guide 41
Specifying execution parameters
3. Add the "extensions" library to the list.
Press Add From External, then browse to the location of the extensions directory, <ObjectAda>/lib/extensions, then press OK.
4. Press OK on the Properties dialog to accept the changes.
Specifying execution parametersIn order to run or debug a Raven application, you must have your target hardware (including the target monitor) configured and running.
A major configuration component for ObjectAda/Raven is targets.database, which contains a list of supported target configurations and communication protocols. It located in the lib/oamonitor directory of the Raven installation.
Note: For details on setting up target components, see the "Building a Raven application" chapter of the Objectada Cross Development Guide, which is in the "documents" folder of your ObjectAda installation. (Note that the user interface references in the document are for the ObjectAda IDE, not AonixADT. The functionality of the two interfaces is similar, however.)
In AonixADT, target components and execution options are displayed on the Toolchain tab of the Run/Debug dialogs. Change the default entries on the Toolchain tab as necessary. An example is shown below.

Raven-Specific Run and Debug Procedures
42 AonixADT

43
D Additional Information
This appendix contains additional information about using ADT.
Large-scale developmentAonixADT has functionality that allows linking of projects to facilitate different development environment organizations and styles. To illustrate this, we will be creating another project and reference objects in files in that project from within the bonjour main program created earlier.
1. Create an Ada project called HelloHelper in the current workspace via New > Project > Ada > Ada Managed Project. Be sure that you choose the correct toolchain.
2. Create the body and specification for a package called HelloHelper by using the Ada template-creation wizard for packages (New > Other > Ada > Ada Package), Be sure these files are created in the HelloHelper project and not the HelloWorld project.

Additional Information
44 AonixADT
3. Enter the following code in hellohelper.ads and hellohelper.adb respectively.
-- Author: user1package Hellohelper is type Htype is new Integer; procedure Hproc; procedure Hproc(Int : in Integer); function Hfunc return Integer; Global_Var : Integer := 77;end Hellohelper;
with Ada.Text_Io;package body Hellohelper is Package_Var : Integer := 777;
procedure Hproc is begin Ada.Text_Io.Put_Line ("Hello from Hproc"); end Hproc;
procedure Hproc(Int : in Integer) is begin Ada.Text_Io.Put_Line ("Hello from Hproc. Parameter is " & Integer'Image(Int)); end Hproc; function Hfunc return Integer is
begin Ada.Text_Io.Put_Line ("Hello from Hfunc."); return 123; end Hfunc;begin Ada.Text_Io.Put_Line ("Hello from HelloHelper Package Elaboration.");end Hellohelper;
4. If using GNAT, add the –g option to the preference page. Make sure the two files compile without error.
5. We will now add a reference to objects found in the HelloHelper package to our bonjour main program. Add the following with statement and variable declaration to bonjour.adb, then compile bonjour.adb.with HelloHelper;procedure Bonjour isBonjour_Var : HelloHelper.Htype := 5;
Notice the compilation errors produced, indicating that the package HelloHelper

Quick Start Guide 45
Large-scale development
and its contents could not be found.
If using ObjectAda, click on the HelloWorld project’s Properties > Ada Build > Search > Directory Link > Add From Workspace button and select the lib directory under HelloHelper.

Additional Information
46 AonixADT
If using GNAT, click on the HelloWorld project’s Properties > Ada Build > Projects tab and check the HelloHelper box. Select the lib directory under HelloHelper (see below).
6. Recompile bonjour.adb. If all goes well, HelloHelper will be visible from the bonjour main program and bonjour will have compiled without errors.
For more information about using the debugger, see “Debugger features” on page 50.
A demonstration of some ADT featuresIn this section we will be demonstrating some additional features of ADT – specifically, source navigation features (page 48), debugging features (page 50), source formatting (page 57), and additional Eclipse features available under ADT (page 58).
In order to demonstrate these features, first modify the three source files created above as follows, making sure they compile without errors when you’ve finished.

Quick Start Guide 47
A demonstration of some ADT features
-- Author: user1-- File: bonjour.adbwith Ada.Text_Io;with Hellohelper;procedure Bonjour is
Bonjour_Var : Hellohelper.Htype := 5; Bonjour_Var2 : Integer := 9;
begin Hellohelper.Hproc;
Ada.Text_Io.Put_Line("Hello, World" & Integer'Image(Bonjour_Var2));
Hellohelper.Hproc;end Bonjour;
-- Author: user1-- File: HelloHelper.adspackage Hellohelper is
type Htype is new Integer; type Hellorecord is record Field1 : Integer := 12345; Field2 : Float := 1.2345; Field3 : Boolean := True; end record; procedure Hproc; procedure Hproc(Int : in Integer); ‘function Hfunc return Integer; Global_Var : Integer := 77;end Hellohelper;
-- Author: user1-- File: HelloHelper.adbwith Ada.Text_Io;package body Hellohelper is
Package_Record : Hellorecord;
procedure Hproc is Hproc_Var : Integer := 56; begin Ada.Text_Io.Put_Line ("Hello from Hproc"); Hproc_Var := Hfunc; end Hproc;
procedure Hproc(Int : in Integer)is Hproc2_Var : Integer := 40;

Additional Information
48 AonixADT
begin Ada.Text_Io.Put_Line ("Hello from Hproc. Parameter is " & Integer'Image(Int)); end Hproc;
function Hfunc return Integer is Hfunc_Var : Integer := 6; begin Ada.Text_Io.Put_Line ("Hello from Hfunc."); Hproc(313); return 123; end Hfunc;begin Ada.Text_Io.Put_Line ("Hello from HelloHelper Package Elaboration.");end Hellohelper;
Semantic navigation featuresThis section demonstrates various navigation features based on the sample files created above.
Navigate to DeclarationYou can select the name of an object in the Ada source editor and open an editor on the declaration of the element.
In the editor, click once on the name of the object, then do one of the following:
• From the menu bar, select Navigate > Open Body/Spec Declaration.
• From the editor's pop-up menu, select Open Body/Spec Declaration.
or
• Hold down the Ctrl or Shift Ctrl keys. Move the mouse over the name of an object until the name becomes underlined (blue or red depending on which key(s) are being held down).
• Click the hyperlink once to navigate to the declaration.
Reference searchTo demonstrate reference searching:

Quick Start Guide 49
A demonstration of some ADT features
1. Use the mouse to select the identifier Hproc in the line “Hellohelper.Hproc;” of bonjour.adb.
2. From the editor's pop-up menu, select References.
Alternately, you may also open the Eclipse Search dialog (Search > Search), choose the Ada Search tab, and enter the object whose references you wish to display. Since this is a semantically aware Ada search, you’ll need to fully qualify the object when using the second method.
The results will be displayed in the Search view.
In the Search view, all places where that object is used will be listed. You can then navigate from the listing in the search tab to the item in the Ada editor. Note that it may be necessary to recompile certain files in order to find all references.

Additional Information
50 AonixADT
Debugger featuresTo demonstrate debugger features, set a breakpoint on the last occurrence of the line “Hellohelper.Hproc;” in bonjour.adb, as well as on the line Ada.Text_Io.Put_Line in procedure Hproc(int) of HelloHelper.adb. Make sure that bonjour compiles and links without error. Run the debug configuration “BonjourDebug” that we created earlier. The program will begin running and execution will stop at the breakpoint we just set.
• Examining and modifying local variables
If you select the Variable view in the upper right quadrant, you will see the values of the variables local to the procedure or task currently executing, in this case Int (a parameter) and Hproc2_Var (a local variable). To change the value of a variable, select the variable in the variable view, and select Change Value. Modify the variable as desired. In this case the parameter Int is not modifiable.

Quick Start Guide 51
A demonstration of some ADT features
• Execution stack trace
If you look at the Debug view, you will see information about the currently executing processes. In this example, we see that the program consists of a single thread that is suspended in the procedure Hproc at line 18 of Hellohelper.adb. This was called from the function Hfunc at line 26 of hellohelper.adb, which in turn was called from Hproc at line 12, and so on.
If there were Ada tasks in the program, they would be listed in the Debug view as additional threads. The ADT Eclipse debugger supports multi-process and multi-language debugging, as illustrated in the following image.

Additional Information
52 AonixADT
Four processes are displayed in the Debug view. • An Ada application called Client. It is currently stopped at a breakpoint in the
ObjectAda debugger, as indicated by the line “ObjectAda Debugger (adadb) …”
• A separate instance of the Client application. In this case, however, the application has been launched via a Run configuration rather than a Debug configuration and so is executing outside debugger control. Note that this process has no line indicating debugger status.
• A C/C++ program called server. It is currently stopped in the GDB debugger. • An Ada application called Monitor. It is currently stopped at a breakpoint in
the GDB debugger in C function cdriver() at line 8 in file cdriver.c. The Variables view shows the values of the C variables local to cdriver(). The execution stack for Monitor shows that cdriver was called from line 9 of the

Quick Start Guide 53
A demonstration of some ADT features
Ada procedure monitor() in the file monitor.adb. Note that the expression j=0 is displayed in red. This is a visual indication that the value of j was changed by the last debugger action that was executed.
• Examining and modifying scoped local variables
To examine and modify variables that are in frames on the stack, simple select the proper stack frame in the Debug view. The Variable view will be updated automatically with the variables local to that frame. The variables may then be modified as described in ”Examining and modifying local variables” on the previous page.
• Examining and modifying variables that are not local to a stack frame
Select the variable Package_Record in the package body Hellohelper by double-clicking on it. Choose Run > Add Expression (Ada). The following dialog appears.
Press OK. The global variable Package_Record will be displayed in the Expressions view. Expand the record and the various record fields are available for inspection and modification.
• Examination of expressions
Select the variable Bonjour_Var2 from bonjour.adb by double clicking on it. Choose Run > Add Expression (Ada). In the dialog that appears, change the Expression to add field to read “Bonjour.Bonjour_Var2 + Bonjour_Var – 45” and press OK.

Additional Information
54 AonixADT
In the Expressions View, the value of the expression just entered is displayed. Notice that it is not modifiable. Unlike the first expression we entered, this expression needs to be calculated rather than simply read from a memory location, and so changing its value does not make sense.
As with objects in the Variables view, the values of objects in the Expressions view are automatically updated after each breakpoint.
• Conditional breakpoints
The following window allows setting conditions on breakpoints:

Quick Start Guide 55
A demonstration of some ADT features
This window can be accessed either by selecting Breakpoint Properties from the popup menu that appears when right clicking on a breakpoint icon in the margin of the Ada editor, or by selecting Properties from the popup menu that appears when right-clicking on a breakpoint in the Breakpoints view.
• Breakpoint actions
By selecting Actions from the popup menu that appears when right-clicking on a breakpoint in the Breakpoints view, it is possible to indicate actions to be taken when a breakpoint is hit. Currently, the only action supported is the logging of variables to the Debug Console window. The user may choose to resume execution automatically after the variables’ values have been logged by selecting the “Resume the suspended thread when actions have completed” toggle button. The Debug Console window is may be accessed using the Display Selected Console dropdown list whose position is indicated by the pointer in the image below-

Additional Information
56 AonixADT
• Break on exceptions
Breakpoints may be set on Ada exceptions by clicking the Add Ada Exception Breakpoint icon in the Breakpoints view as indicated by the pointer in the image below.
Note: Until the Ada Development User Guide is available from the Help menu of Eclipse, you can find general information on debugging with the Eclipse IDE in the C/C++ Development Guide (select Help > Help Contents from Eclipse). Much of the debugging information there applies to Ada as well as to C/C++.
Quick Start Guide 57
A demonstration of some ADT features
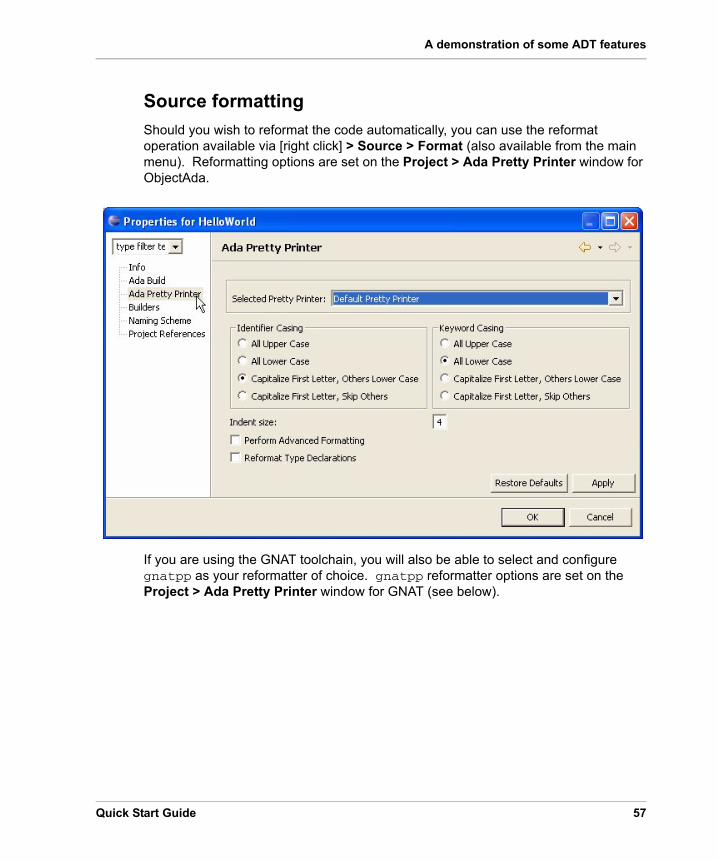
Source formattingShould you wish to reformat the code automatically, you can use the reformat operation available via [right click] > Source > Format (also available from the main menu). Reformatting options are set on the Project > Ada Pretty Printer window for ObjectAda.
If you are using the GNAT toolchain, you will also be able to select and configure gnatpp as your reformatter of choice. gnatpp reformatter options are set on the Project > Ada Pretty Printer window for GNAT (see below).

Additional Information
58 AonixADT
Additional Eclipse features available under ADTMany standard Eclipse functionalities are available when developing Ada applications with AonixADT. These include, but are not limited to-
• Importing Ada projects into a workspace
• Importing source files
• Support for configuration management (CVS) via “Team” functions
• Eclipse tasks
• Eclipse bookmarks
• Comparisons between two files (Compare With Each Other)
• Comparisons between different versions of the same file (Compare With Local History)
• Reverting to a previous version of the file (Replace With)
• Automatic updates of AonixADT via the Eclipse Update Manager (Help > Software Updates > Find and Install > Search for Updates of the Currently Installed Features)

Quick Start Guide 59
Notes for ObjectAda users
• Reverting to previous versions of AonixADT (Help > Software Updates > Manage Configuration > Revert to Previous)
• Obtaining AonixADT version and build information (Help > Software Updates > Manage Configuration >>> Eclipse Ada Development Tools )
Notes for ObjectAda users
Building with ObjectAdaBuilding a program with Eclipse involves compiling and linking to create an executable. Compiling involves the adacomp command; linking involves the adabuild command. However, a program can be built with just adabuild, which calls adacomp as necessary.
It is important to note that compilation creates an ”Ada program library.” The Ada program library consists of ADA.LIB, which contains the information that describes the configuration of the library, UNIT.MAP, which contains a unit-to-source mapping for use by the compiler and program builder, and other source and generated files.
For more information on how the Ada program library works, refer to the tables in the next section.
Finding ObjectAda informationYou can find more information on ObjectAda by searching.the ObjectAda help. To do so:
For UNIX platforms:
(1) Navigate to the ObjectAda installation directory, (2) follow the path lib > html > DocUX.web > html/, then (3) open index.html and select the appropriate topic.
Topic Go to
ObjectAda CLI commands User Guide > Using the Command Line Interface
How ObjectAda libraries work User Guide > Using the Program Library
Using the CLI debugger Debugger User Guide
How ObjectAda implements the Ada 95 Reference Manual
Ada 95 Implementation Notes

Additional Information
60 AonixADT
For Windows platforms:(1) Navigate to the ObjectAda installation directory, (2) navigate to the help directory, then (3) click oa.hlp, then select the appropriate topic.
For all platforms:Note that the topics listed above are also available in PDF form, in books accessible from the ObjectAda documentation catalog. Click on
<ObjectAda>/documents/START.HERE.pdfto access the documents.
Developing applications with ObjectAda For native products: ObjectAda Reference > Developer’s Mini-ReferenceFor cross products: Cross Development
Topic Go to
ObjectAda CLI commands User Guides > Using the Command Line Interface
Using the CLI debugger User Guides > CLI Debugger User Guide
How ObjectAda libraries work User Guides > The ObjectAda Program Library
How ObjectAda implements the Ada 95 Reference Manual
Ada 95 > Ada 95 Reference Manual Notes
Developing applications with ObjectAda For native products: Reference Material > Developer’s Mini-ReferenceFor cross products: Reference Material > Cross Development Guide