debugging tips for vxworks bootrom images - vxdev.comvxdev.com/down/appnote/appnote237.pdfdebugging...
TRANSCRIPT
Version 1 January 2003
AppNote-237
Debugging tips for vxWorks Bootrom images Copyright © 1984-2003 Wind River Systems Inc. ALL RIGHTS RESERVED.
Understanding the bootrom image
This AppNote is intended for those people who need to get the vxWorks bootrom or bootrom_uncmp image working. The developer has made changes to config.h, sysLib.c, romInit.s and potentially some other files and things build just fine, but it doesn't execute as expected. Now what?
This document will describe the files utilized by the bootrom builds, the bootrom program flow, and some useful debugging techniques to achieve the desired bootrom.
To confirm that the bootrom code is getting programmed into the correct location in ROM we will briefly discuss the HEX file format.
Throughout this document the terms ROM and Flash will be used interchangeably.
It is assumed that the hardware has a serial output device, otherwise the vxWorks bootrom code would not be used.
This document will not explore the actual steps needed to program the Flash that contains the bootrom.
Abstract
Understanding the bootrom image AppNote-237
2
Program Flow and Files used
Skip this section and go directly to the Debugging Techniques section if the developer is very familiar with the files used and the program flow of the bootrom code.
Since the bootrom is built using the command line we need to set up the environment variables. The bootrom can be built from within the project facility but that eventually makes a command line make request for the specified build target.
The best way to do this is to run the torVars script in the $(WIND_BASE)/host/$(WIND_HOST_TYPE)/bin directory. It looks like this for Tornado 2.2 on a Windows machine in a DOS window.
C:\T22\ppc\host\x86-win32\bin>torVars
C:\T22\ppc\host\x86-win32\bin>rem Command line build environments
C:\T22\ppc\host\x86-win32\bin>set WIND_HOST_TYPE=x86-win32
C:\T22\ppc\host\x86-win32\bin>set WIND_BASE=C:\T22\ppc
C:\T22\ppc\host\x86-win32\bin>set PATH=C:\T22\ppc\host\x86-win32\bin;C:\WINNT\SYSTEM32;C:\WINNT;
C:\T22\ppc\host\x86-win32\bin>rem Diab Toolchain additions
C:\T22\ppc\host\x86-win32\bin>set DIABLIB=C:\T22\ppc\host\diab
C:\T22\ppc\host\x86-win32\bin>set PATH=C:\T22\ppc\host\diab\WIN32\bin;C:\T22\ppc\host\x86-win32\bin;C:\WINNT\SYSTEM32;C:\WINNT;
Now we are ready to run make in the BSP directory. Below is an example we will use for discussion. It is a bootrom build using the Tornado 2.2 wrSbc824x BSP.
C:\T22\ppc\target\config\wrSbc824x>make bootrom
Automatic dependency generation
ccppc -M -MG -w -mcpu=603 -mstrict-align -ansi -O2 -fvolatile -fno-builtin -Wall -I/h -I. -IC:\T22\ppc\target\config\all -IC:\T22\ppc\target/h -IC:\T22\ppc\target/src/config -IC:\T22\ppc\target/src/drv -DCPU=PPC603 -DTOOL_FAMILY=gnu -DTOOL=gnu eeprom.c i8250Sio.c m8240AuxClk.c m8240Epic.c sysCacheLockLib.c sysFei82557End.c sysLib.c sysNet.c sysPci.c sysPciAutoConfig.c sysPnic169End.c sysSerial.c sysVware.c C:\T22\ppc\target\config\all/bootConfig.c C:\T22\ppc\target\config\all/bootInit.c C:\T22\ppc\target\config\all/dataSegPad.c C:\T22\ppc\target\config\all/usrConfig.c C:\T22\ppc\target\config\all/version.c > depend.wrSbc824x
ccppc -E -P -M -w -mcpu=603 -mstrict-align -E -xassembler-with-cpp -I/h -I. -IC:\T22\ppc\target\config\all -IC:\T22\ppc\target/h -IC:\T22\ppc\target/src/config -IC:\T22\ppc\target/src/drv -DCPU=PPC603 -DTOOL_FAMILY=gnu -DTOOL=gnu romInit.s >> depend.wrSbc824x
ccppc -E -P -M -w -mcpu=603 -mstrict-align -E -xassembler-with-cpp -I/h -I. -IC:\T22\ppc\target\config\all -IC:\T22\ppc\target/h -IC:\T22\ppc\target/src/config -IC:\T22\ppc\target/src/drv -DCPU=PPC603 -DTOOL_FAMILY=gnu -DTOOL=gnu sysALib.s >> depend.wrSbc824x

Understanding the bootrom image AppNote-237
3
Clean up the dependencies file by stripping ^M and adding $WIND_BASE where needed.
wtxtcl C:\T22\ppc/host/src/hutils/bspDepend.tcl depend.wrSbc824x
The bootInit.c file contains the romStart() function. Which is the C code entry point. At the end of romStart() we call usrInit(). The purpose of romStart() is to get the Text and Data in the proper locations in RAM, so that usrInit() can be executed.
ccppc -c -mcpu=603 -mstrict-align -ansi -O2 -fvolatile -fno-builtin -Wall -I/h-I. -IC:\T22\ppc\target\config\all -IC:\T22\ppc\target/h -IC:\T22\ppc\target/src/config -IC:\T22\ppc\target/src/drv -DCPU=PPC603 -DTOOL_FAMILY=gnu -DTOOL=gnu C:\T22\ppc\target\config\all\bootInit.c
The romInit.s file contains the romInit() entry point and is the first code to execute as it is positioned at the reset vector. At the end of romInit() we call romStart(). Note that some registers can only be written once after power on reset. These registers might be modified in romInit(), which can sometimes cause problems if a soft reset is performed. Make sure to modify these registers in the cold boot section of romInit.s.
ccppc -mcpu=603 -mstrict-align -ansi -O2 -fvolatile -fno-builtin -I/h -I. -IC:\T22\ppc\target\config\all -IC:\T22\ppc\target/h -IC:\T22\ppc\target/src/config-IC:\T22\ppc\target/src/drv -DCPU=PPC603 -DTOOL_FAMILY=gnu -DTOOL=gnu -P -xassembler-with-cpp -c -o romInit.o romInit.s
The bootConfig.c file contains usrInit() and contains the flow for bringing up the vxWorks kernel. We will discuss this in detail later. If the developer needs to change bootConfig.c, do not modify the copy in $(WIND_BASE)/target/config/all. Instead, copy bootConfig.c to the BSP directory and change/add the BOOTCONFIG macro in the BSP’s Makefile. (ie. BOOTCONFIG = ./mybootConfig.c)
ccppc -c -mcpu=603 -mstrict-align -ansi -O2 -fvolatile -fno-builtin -Wall -I/h-I. -IC:\T22\ppc\target\config\all -IC:\T22\ppc\target/h -IC:\T22\ppc\target/src/config -IC:\T22\ppc\target/src/drv -DCPU=PPC603 -DTOOL_FAMILY=gnu -DTOOL=gnu C:\T22\ppc\target\config\all\bootConfig.c
The sysALib.s file will not be used, unless certain assembly level functions are required.
ccppc -mcpu=603 -mstrict-align -ansi -O2 -fvolatile -fno-builtin -I/h -I. -IC:\T22\ppc\target\config\all -IC:\T22\ppc\target/h -IC:\T22\ppc\target/src/config -IC:\T22\ppc\target/src/drv -DCPU=PPC603 -DTOOL_FAMILY=gnu -DTOOL=gnu -P -xassembler-with-cpp -c -o sysALib.o sysALib.s
The sysLib.c file is the key file for mapping the hardware to the vxWorks kernel.
ccppc -mcpu=603 -mstrict-align -ansi -O2 -fvolatile -fno-builtin -Wall -I/h -I. -IC:\T22\ppc\target\config\all -IC:\T22\ppc\target/h -IC:\T22\ppc\target/src/config -IC:\T22\ppc\target/src/drv -DCPU=PPC603 -DTOOL_FAMILY=gnu -DTOOL=gnu-c sysLib.c
Understanding the bootrom image AppNote-237
4
The version.c file is just a simple file to create the vxWorks version information and the creation time and date of the bootrom image for the RAM based executable.
ccppc -c -mcpu=603 -mstrict-align -ansi -O2 -fvolatile -fno-builtin -Wall -I/h-I. -IC:\T22\ppc\target\config\all -IC:\T22\ppc\target/h -IC:\T22\ppc\target/src/config -IC:\T22\ppc\target/src/drv -DCPU=PPC603 -DTOOL_FAMILY=gnu -DTOOL=gnu -o version.o C:\T22\ppc\target\config\all/version.c
Create the executable part of the bootrom that gets copied or uncompressed to RAM_HIGH_ADRS. Make note of the -Ttext 01F00000 value as it should be equal to RAM_HIGH_ADRS for this specific BSP.
ldppc -o tmp.o -X -N -e usrInit -Ttext 01F00000 bootConfig.o version.o sysALib.o sysLib.o --start-group -LC:\T22\ppc\target/lib/ppc/PPC603/gnu -LC:\T22\ppc\target/lib/ppc/PPC603/common -lcplus -lepcommon -lepdes -lgnucplus -lsnmp -lvxcom -lvxdcom -larch -lcommoncc -ldcc -ldrv -lgcc -lnet -los -lrpc -ltffs-lusb -lvxfusion -lvxmp -lwdb -lwind -lwindview C:\T22\ppc\target/lib/libPPC603gnuvx.a --end-group -T C:\T22\ppc\target/h/tool/gnu/ldscripts/link.RAM
This creates the binary file containing just text and data for the RAM based executable.
C:\T22\ppc\host\x86-win32\bin\objcopyppc -O binary --binary-without-bss tmp.o tmp.out
Compress the RAM executable portion of the bootrom.
C:\T22\ppc\host\x86-win32\bin\deflate < tmp.out > tmp.Z
Deflation: 60.52%
Take the compressed data and create a data array in assembly.
C:\T22\ppc\host\x86-win32\bin\binToAsm tmp.Z >bootrom.Z.s
Assemble the compressed data array, binArrayStart[], to get the object code. Keep in mind that binArrayStart[] contains the compressed image that will eventually run from RAM_HIGH_ADRS.
ccppc -mcpu=603 -mstrict-align -ansi -O2 -fvolatile -fno-builtin -I/h -I. -IC:\T22\ppc\target\config\all -IC:\T22\ppc\target/h -IC:\T22\ppc\target/src/config-IC:\T22\ppc\target/src/drv -DCPU=PPC603 -DTOOL_FAMILY=gnu -DTOOL=gnu -P -xassembler-with-cpp -c -o bootrom.Z.o bootrom.Z.s
Once again, create the versioning information but this time for the ROM based executable.
ccppc -c -mcpu=603 -mstrict-align -ansi -O2 -fvolatile -fno-builtin -Wall -I/h-I. -IC:\T22\ppc\target\config\all -IC:\T22\ppc\target/h -IC:\T22\ppc\target/src/config -IC:\T22\ppc\target/src/drv -DCPU=PPC603 -DTOOL_FAMILY=gnu -DTOOL=gnu -o version.o C:\T22\ppc\target\config\all/version.c
Understanding the bootrom image AppNote-237
5
Perform the final link of the executable that goes into ROM. Notice the entry point _romInit is located at -Ttext 00100000 or RAM_LOW_ADRS for this specific BSP. Why not RAM_TEXT_ADRS? That will be explained later.
ldppc -X -N -e _romInit -Ttext 00100000 -o bootrom romInit.o bootInit.o version.o bootrom.Z.o --start-group -LC:\T22\ppc\target/lib/ppc/PPC603/gnu -LC:\T22\ppc\target/lib/ppc/PPC603/common -lcplus -lepcommon -lepdes -lgnucplus -lsnmp -lvxcom -lvxdcom -larch -lcommoncc -ldcc -ldrv -lgcc -lnet -los -lrpc -ltffs -lusb -lvxfusion -lvxmp -lwdb -lwind -lwindview C:\T22\ppc\target/lib/libPPC603gnuvx.a --end-group -TC:\T22\ppc\target/h/tool/gnu/ldscripts/link.RAM
Check to see that the size of the bootrom will fit on the flash. The size of the flash is defined by the macro ROM_SIZE in the BSP’s Makefile and the config.h file. For this specific BSP ROM_SIZE is defined as 512KB(0x80000).
C:\T22\ppc\host\x86-win32\bin\romsize ppc -b 00080000 bootrom
bootrom: 16784(t) + 206048(d) = 222832 (301456 unused)
That is the build for the bootrom image. If the developer were to create the bootrom_uncmp image it would be even simpler as it is not necessary to compress the RAM based executable. Keep in mind that the bootrom program has a fully functional vxWorks pre-emptive priority scheduler running within it. The very same scheduler found in the vxWorks application kernel.
A very helpful build time debugging technique is to get the post processed output from the compiler. The developer can do this by using the following command make ADDED_CFLAGS=-E file.o > file.i. Then remove all the lines starting with "#" and all blank lines, as there will be many. This is a good way to see what the macro's evaluated to and a good way to see which code is being used. There are many conditional compiles within the bootrom source code. It is pretty messy to wade through, but it is very flexible and it works.
Here is an example of what romStart() in bootInit.c looks like after doing the command make ADDED_CFLAGS=-E bootInit.o > bootInit.i.
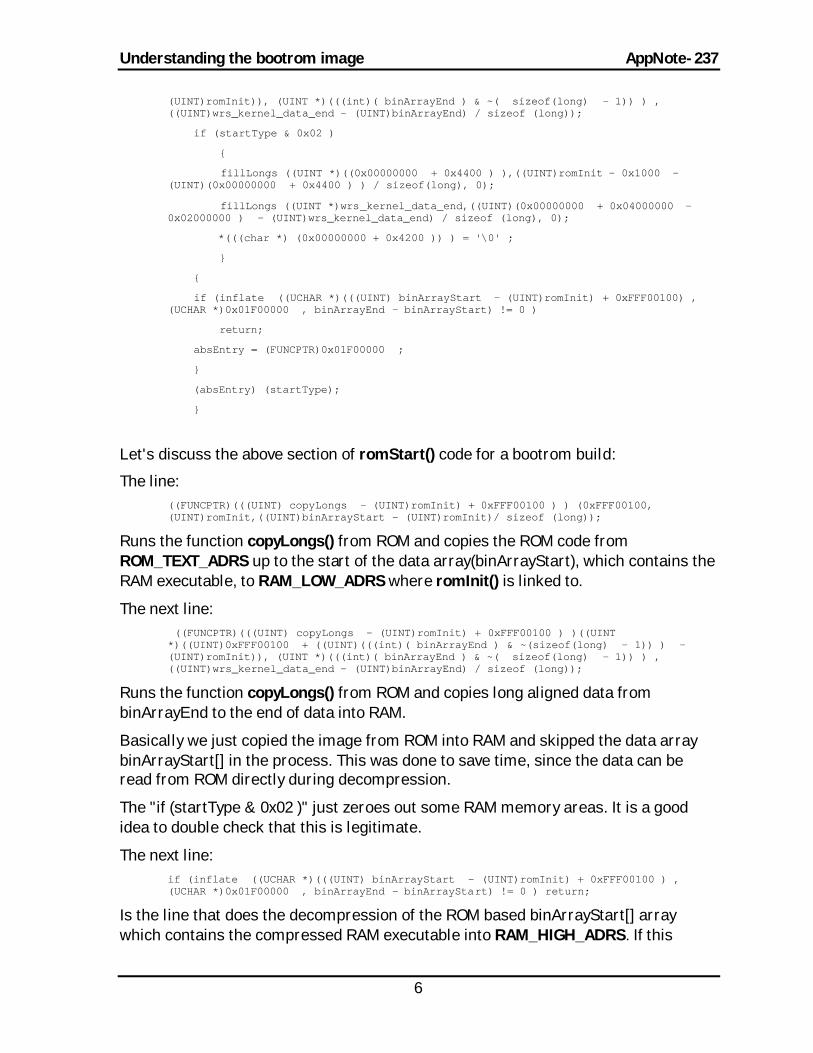
void romStart
(
register int startType
)
{
volatile
FUNCPTR absEntry;
((FUNCPTR)(((UINT) copyLongs - (UINT)romInit) + 0xFFF00100 ) ) (0xFFF00100, (UINT)romInit,((UINT)binArrayStart - (UINT)romInit)/ sizeof (long));
((FUNCPTR)(((UINT) copyLongs - (UINT)romInit) + 0xFFF00100 ) ) ((UINT *)((UINT)0xFFF00100 + ((UINT)(((int)( binArrayEnd ) & ~( sizeof(long) - 1)) ) -
Understanding the bootrom image AppNote-237
6
(UINT)romInit)), (UINT *)(((int)( binArrayEnd ) & ~( sizeof(long) - 1)) ) , ((UINT)wrs_kernel_data_end - (UINT)binArrayEnd) / sizeof (long));
if (startType & 0x02 )
{
fillLongs ((UINT *)((0x00000000 + 0x4400 ) ),((UINT)romInit - 0x1000 - (UINT)(0x00000000 + 0x4400 ) ) / sizeof(long), 0);
fillLongs ((UINT *)wrs_kernel_data_end,((UINT)(0x00000000 + 0x04000000 - 0x02000000 ) - (UINT)wrs_kernel_data_end) / sizeof (long), 0);
*(((char *) (0x00000000 + 0x4200 )) ) = '\0' ;
}
{
if (inflate ((UCHAR *)(((UINT) binArrayStart - (UINT)romInit) + 0xFFF00100) , (UCHAR *)0x01F00000 , binArrayEnd - binArrayStart) != 0 )
return;
absEntry = (FUNCPTR)0x01F00000 ;
}
(absEntry) (startType);
}
Let's discuss the above section of romStart() code for a bootrom build:
The line: ((FUNCPTR)(((UINT) copyLongs - (UINT)romInit) + 0xFFF00100 ) ) (0xFFF00100, (UINT)romInit,((UINT)binArrayStart - (UINT)romInit)/ sizeof (long));
Runs the function copyLongs() from ROM and copies the ROM code from ROM_TEXT_ADRS up to the start of the data array(binArrayStart), which contains the RAM executable, to RAM_LOW_ADRS where romInit() is linked to.
The next line: ((FUNCPTR)(((UINT) copyLongs - (UINT)romInit) + 0xFFF00100 ) )((UINT *)((UINT)0xFFF00100 + ((UINT)(((int)( binArrayEnd ) & ~(sizeof(long) - 1)) ) - (UINT)romInit)), (UINT *)(((int)( binArrayEnd ) & ~( sizeof(long) - 1)) ) , ((UINT)wrs_kernel_data_end - (UINT)binArrayEnd) / sizeof (long));
Runs the function copyLongs() from ROM and copies long aligned data from binArrayEnd to the end of data into RAM.
Basically we just copied the image from ROM into RAM and skipped the data array binArrayStart[] in the process. This was done to save time, since the data can be read from ROM directly during decompression.
The "if (startType & 0x02 )" just zeroes out some RAM memory areas. It is a good idea to double check that this is legitimate.
The next line: if (inflate ((UCHAR *)(((UINT) binArrayStart - (UINT)romInit) + 0xFFF00100 ) , (UCHAR *)0x01F00000 , binArrayEnd - binArrayStart) != 0 ) return;
Is the line that does the decompression of the ROM based binArrayStart[] array which contains the compressed RAM executable into RAM_HIGH_ADRS. If this

Understanding the bootrom image AppNote-237
7
completes successfully we have the RAM based executable sitting at RAM_HIGH_ADRS which is where the code was linked to.
Note that the inflate() routine is running from the RAM copy of the function not the ROM copy. It is here that we stop executing code from ROM, but we do read the data from the binArrayStart[] array out of ROM.
The final lines: absEntry = (FUNCPTR)0x01F00000 ;
(absEntry) (startType);
Jump to the usrInit() function in bootConfig.c. Remember from the build output above, usrInit() was linked at RAM_HIGH_ADRS. This is where we leave the ROM based executable for good and are now completely running from RAM.
Now lets take a look at some of the post processed bootConfig.c file. Specifically the usrInit(), usrRoot(), and bootCmdLoop() functions.
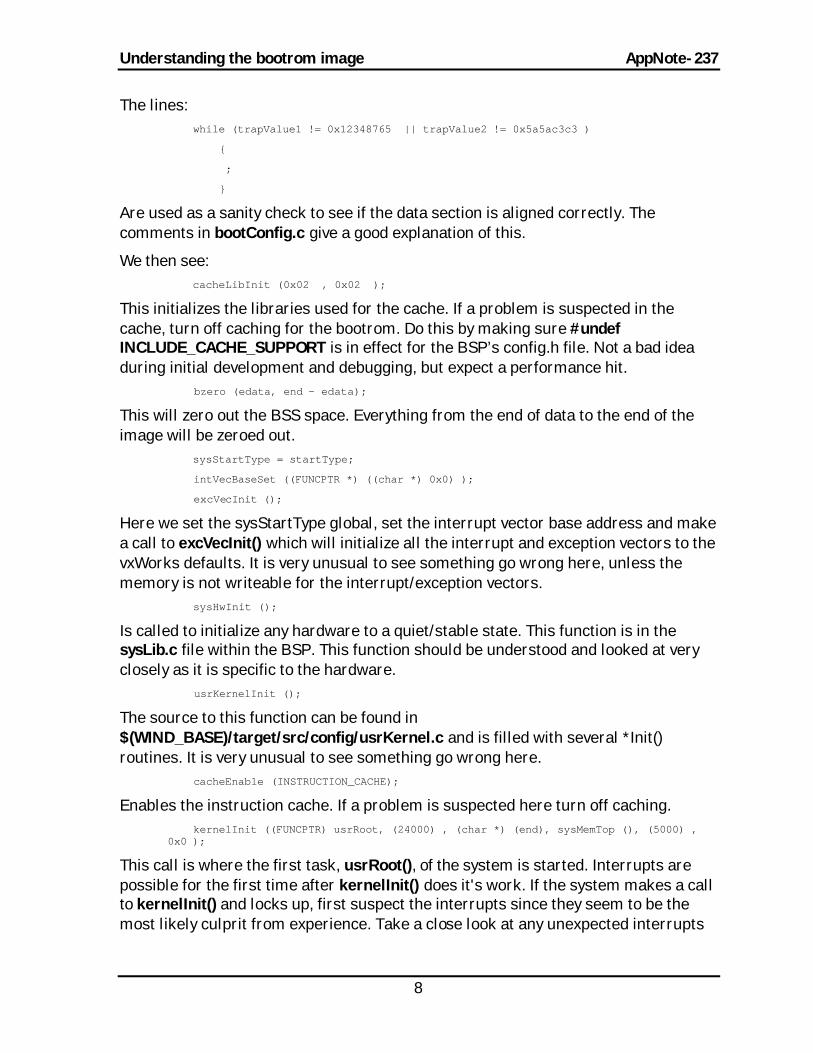
void usrInit
(
int startType
)
{
while (trapValue1 != 0x12348765 || trapValue2 != 0x5a5ac3c3 )
{
;
}
cacheLibInit (0x02 , 0x02 );
bzero (edata, end - edata);
sysStartType = startType;
intVecBaseSet ((FUNCPTR *) ((char *) 0x0) );
excVecInit ();
sysHwInit ();
usrKernelInit ();
cacheEnable (INSTRUCTION_CACHE);
kernelInit ((FUNCPTR) usrRoot, (24000) ,
(char *) (end) ,
sysMemTop (), (5000) , 0x0 );
}
Understanding the bootrom image AppNote-237
8
The lines: while (trapValue1 != 0x12348765 || trapValue2 != 0x5a5ac3c3 )
{
;
}
Are used as a sanity check to see if the data section is aligned correctly. The comments in bootConfig.c give a good explanation of this.
We then see: cacheLibInit (0x02 , 0x02 );
This initializes the libraries used for the cache. If a problem is suspected in the cache, turn off caching for the bootrom. Do this by making sure #undef INCLUDE_CACHE_SUPPORT is in effect for the BSP’s config.h file. Not a bad idea during initial development and debugging, but expect a performance hit.
bzero (edata, end - edata);
This will zero out the BSS space. Everything from the end of data to the end of the image will be zeroed out.
sysStartType = startType;
intVecBaseSet ((FUNCPTR *) ((char *) 0x0) );
excVecInit ();
Here we set the sysStartType global, set the interrupt vector base address and make a call to excVecInit() which will initialize all the interrupt and exception vectors to the vxWorks defaults. It is very unusual to see something go wrong here, unless the memory is not writeable for the interrupt/exception vectors.
sysHwInit ();
Is called to initialize any hardware to a quiet/stable state. This function is in the sysLib.c file within the BSP. This function should be understood and looked at very closely as it is specific to the hardware.
usrKernelInit ();
The source to this function can be found in $(WIND_BASE)/target/src/config/usrKernel.c and is filled with several *Init() routines. It is very unusual to see something go wrong here.
cacheEnable (INSTRUCTION_CACHE);
Enables the instruction cache. If a problem is suspected here turn off caching. kernelInit ((FUNCPTR) usrRoot, (24000) , (char *) (end), sysMemTop (), (5000) , 0x0 );
This call is where the first task, usrRoot(), of the system is started. Interrupts are possible for the first time after kernelInit() does it's work. If the system makes a call to kernelInit() and locks up, first suspect the interrupts since they seem to be the most likely culprit from experience. Take a close look at any unexpected interrupts
Understanding the bootrom image AppNote-237
9
that may occur in the system. The kernelInit() function NEVER returns. Always check the arguments to this function for legitimacy.
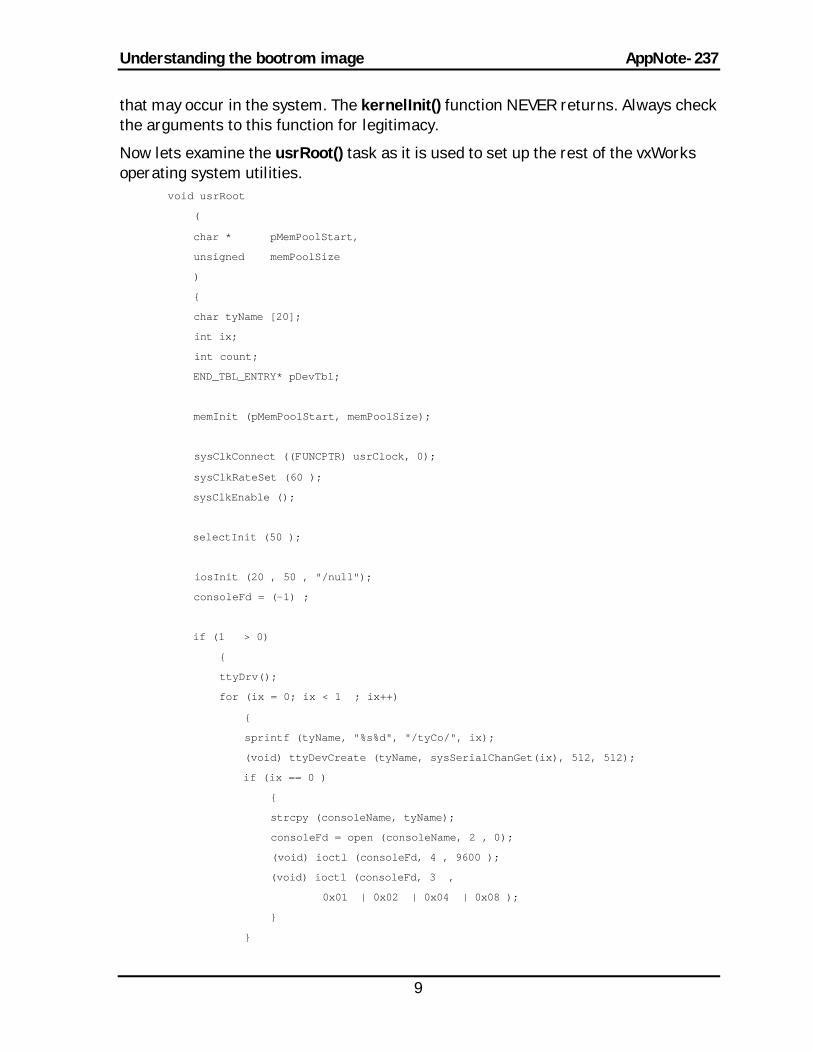
Now lets examine the usrRoot() task as it is used to set up the rest of the vxWorks operating system utilities.
void usrRoot
(
char * pMemPoolStart,
unsigned memPoolSize
)
{
char tyName [20];
int ix;
int count;
END_TBL_ENTRY* pDevTbl;
memInit (pMemPoolStart, memPoolSize);
sysClkConnect ((FUNCPTR) usrClock, 0);
sysClkRateSet (60 );
sysClkEnable ();
selectInit (50 );
iosInit (20 , 50 , "/null");
consoleFd = (-1) ;
if (1 > 0)
{
ttyDrv();
for (ix = 0; ix < 1 ; ix++)
{
sprintf (tyName, "%s%d", "/tyCo/", ix);
(void) ttyDevCreate (tyName, sysSerialChanGet(ix), 512, 512);
if (ix == 0 )
{
strcpy (consoleName, tyName);
consoleFd = open (consoleName, 2 , 0);
(void) ioctl (consoleFd, 4 , 9600 );
(void) ioctl (consoleFd, 3 ,
0x01 | 0x02 | 0x04 | 0x08 );
}
}

Understanding the bootrom image AppNote-237
10
}
ioGlobalStdSet (0 , consoleFd);
ioGlobalStdSet (1 , consoleFd);
ioGlobalStdSet (2 , consoleFd);
pipeDrv ();
excShowInit ();
excInit ();
excHookAdd ((FUNCPTR) bootExcHandler);
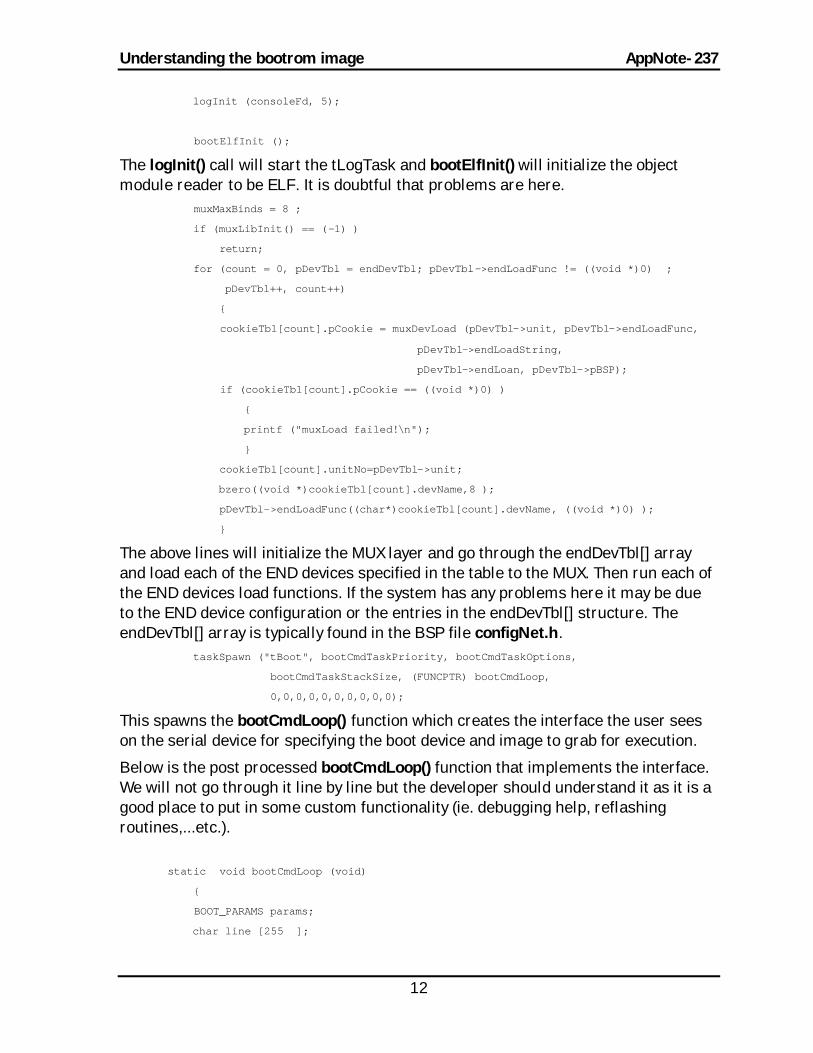
logInit (consoleFd, 5);
bootElfInit ();
muxMaxBinds = 8 ;
if (muxLibInit() == (-1) )
return;
for (count = 0, pDevTbl = endDevTbl; pDevTbl->endLoadFunc != ((void *)0) ;
pDevTbl++, count++)
{
cookieTbl[count].pCookie = muxDevLoad (pDevTbl->unit, pDevTbl->endLoadFunc,
pDevTbl->endLoadString,
pDevTbl->endLoan, pDevTbl->pBSP);
if (cookieTbl[count].pCookie == ((void *)0) )
{
printf ("muxLoad failed!\n");
}
cookieTbl[count].unitNo=pDevTbl->unit;
bzero((void *)cookieTbl[count].devName,8 );
pDevTbl->endLoadFunc((char*)cookieTbl[count].devName, ((void *)0) );
}
taskSpawn ("tBoot", bootCmdTaskPriority, bootCmdTaskOptions,
bootCmdTaskStackSize, (FUNCPTR) bootCmdLoop,
0,0,0,0,0,0,0,0,0,0);
}
The line: memInit (pMemPoolStart, memPoolSize);
Sets up the system memory heap so that malloc()/free() can be used after this call. It is a good idea to check the arguments to this function if the system seems to be having memory allocation problems.
sysClkConnect ((FUNCPTR) usrClock, 0);

Understanding the bootrom image AppNote-237
11
sysClkRateSet (60 );
sysClkEnable ();
The above three lines connect the system tick interrupt and turn it on. From this point on we will have system ticks occurring.(ie. taskDelay(), wdStart(),...etc can be used).
selectInit (50 );
iosInit (20 , 50 , "/null");
consoleFd = (-1) ;
if (1 > 0)
{
ttyDrv();
for (ix = 0; ix < 1 ; ix++)
{
sprintf (tyName, "%s%d", "/tyCo/", ix);
(void) ttyDevCreate (tyName, sysSerialChanGet(ix), 512, 512);
if (ix == 0 )
{
strcpy (consoleName, tyName);
consoleFd = open (consoleName, 2 , 0);
(void) ioctl (consoleFd, 4 , 9600 );
(void) ioctl (consoleFd, 3 ,
0x01 | 0x02 | 0x04 | 0x08 );
}
}
}
ioGlobalStdSet (0 , consoleFd);
ioGlobalStdSet (1 , consoleFd);
ioGlobalStdSet (2 , consoleFd);
The above lines initialize the I/O system and set the system console to be the "/tyCo/0" device and direct STDIN, STDOUT, and STDERR to this device. At this point the system should be able to write to the serial device if the BSP is configured correctly for the Hardware.
pipeDrv ();
excShowInit ();
excInit ();
excHookAdd ((FUNCPTR) bootExcHandler);
The above lines install the pipe driver, setup the exception printout routines, star t the tExcTask, and install the boot exception handling routine. Generally the system will not have any problems with any of these.
Understanding the bootrom image AppNote-237
12
logInit (consoleFd, 5);
bootElfInit ();
The logInit() call will start the tLogTask and bootElfInit() will initialize the object module reader to be ELF. It is doubtful that problems are here.
muxMaxBinds = 8 ;
if (muxLibInit() == (-1) )
return;
for (count = 0, pDevTbl = endDevTbl; pDevTbl->endLoadFunc != ((void *)0) ;
pDevTbl++, count++)
{
cookieTbl[count].pCookie = muxDevLoad (pDevTbl->unit, pDevTbl->endLoadFunc,
pDevTbl->endLoadString,
pDevTbl->endLoan, pDevTbl->pBSP);
if (cookieTbl[count].pCookie == ((void *)0) )
{
printf ("muxLoad failed!\n");
}
cookieTbl[count].unitNo=pDevTbl->unit;
bzero((void *)cookieTbl[count].devName,8 );
pDevTbl->endLoadFunc((char*)cookieTbl[count].devName, ((void *)0) );
}
The above lines will initialize the MUX layer and go through the endDevTbl[] array and load each of the END devices specified in the table to the MUX. Then run each of the END devices load functions. If the system has any problems here it may be due to the END device configuration or the entries in the endDevTbl[] structure. The endDevTbl[] array is typically found in the BSP file configNet.h.
taskSpawn ("tBoot", bootCmdTaskPriority, bootCmdTaskOptions,
bootCmdTaskStackSize, (FUNCPTR) bootCmdLoop,
0,0,0,0,0,0,0,0,0,0);
This spawns the bootCmdLoop() function which creates the interface the user sees on the serial device for specifying the boot device and image to grab for execution.
Below is the post processed bootCmdLoop() function that implements the interface. We will not go through it line by line but the developer should understand it as it is a good place to put in some custom functionality (ie. debugging help, reflashing routines,...etc.).
static void bootCmdLoop (void)
{
BOOT_PARAMS params;
char line [255 ];
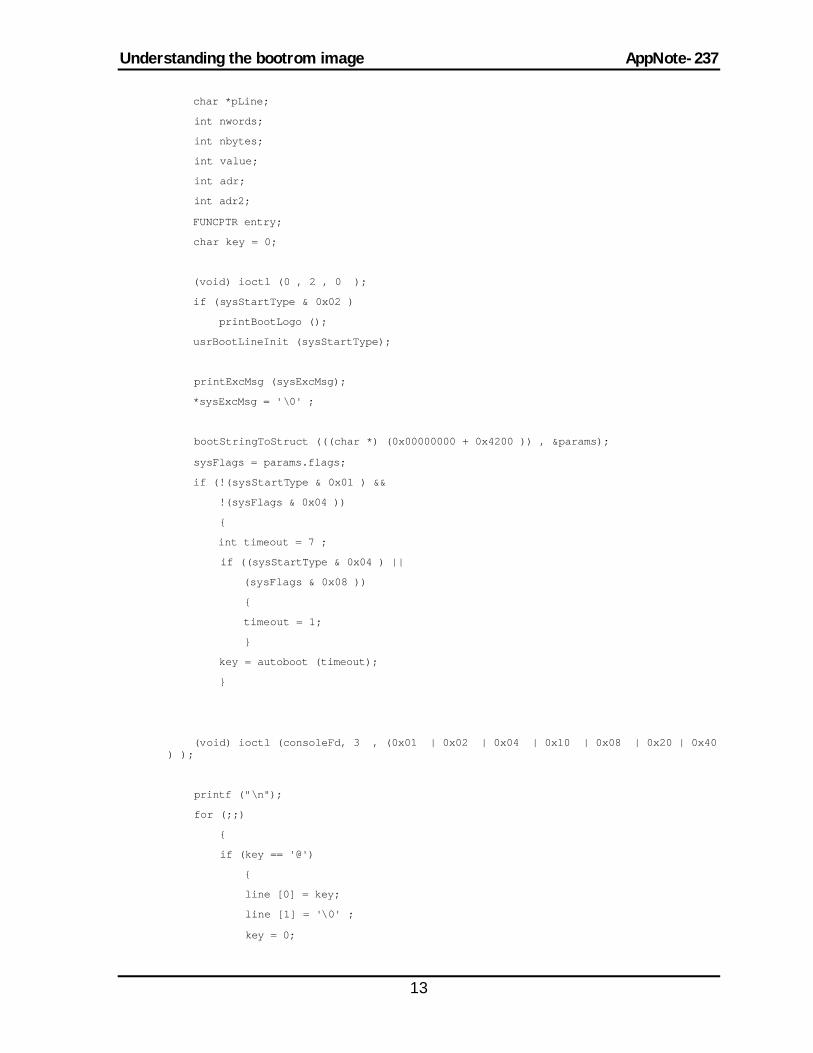
Understanding the bootrom image AppNote-237
13
char *pLine;
int nwords;
int nbytes;
int value;
int adr;
int adr2;
FUNCPTR entry;
char key = 0;
(void) ioctl (0 , 2 , 0 );
if (sysStartType & 0x02 )
printBootLogo ();
usrBootLineInit (sysStartType);
printExcMsg (sysExcMsg);
*sysExcMsg = '\0' ;
bootStringToStruct (((char *) (0x00000000 + 0x4200 )) , ¶ms);
sysFlags = params.flags;
if (!(sysStartType & 0x01 ) &&
!(sysFlags & 0x04 ))
{
int timeout = 7 ;
if ((sysStartType & 0x04 ) ||
(sysFlags & 0x08 ))
{
timeout = 1;
}
key = autoboot (timeout);
}
(void) ioctl (consoleFd, 3 , (0x01 | 0x02 | 0x04 | 0x10 | 0x08 | 0x20 | 0x40 ) );
printf ("\n");
for (;;)
{
if (key == '@')
{
line [0] = key;
line [1] = '\0' ;
key = 0;

Understanding the bootrom image AppNote-237
14
}
else
{
printf ("[VxWorks Boot]: ");
fioRdString (0 , line, sizeof (line));
}
adr = adr2 = 0;
nwords = 0;
pLine = line + strlen (line) - 1;
while ((pLine >= line) && (*pLine == ' '))
{
*pLine = '\0' ;
pLine--;
}
pLine = line;
skipSpace (&pLine);
switch (*(pLine++))
{
case '\0' :
break;
case 'd':
if ((getArg (&pLine, &adr, 1 , 1 ) == 0 ) &&
(getArg (&pLine, &nwords, 0 , 1 ) == 0 ))
d ((char *) adr, nwords);
break;
case 'e':
printExcMsg (sysExcMsg + 1);
break;
case 'f':
if ((getArg (&pLine, &adr, 1 , ! 1 ) == 0 ) &&
(getArg (&pLine, &nbytes, 0 , ! 1 ) == 0 ) &&
(getArg (&pLine, &value, 0 , ! 1 ) == 0 ))
{
bfillBytes ((char *) adr, nbytes, value);
}
break;
case 't':
if ((getArg (&pLine, &adr, 1 , ! 1 ) == 0 ) &&
(getArg (&pLine, &adr2, 1 , ! 1 ) == 0 ) &&
(getArg (&pLine, &nbytes, 1 , ! 1 ) == 0 ))
{
bcopy ((char *) adr, (char *) adr2, nbytes);
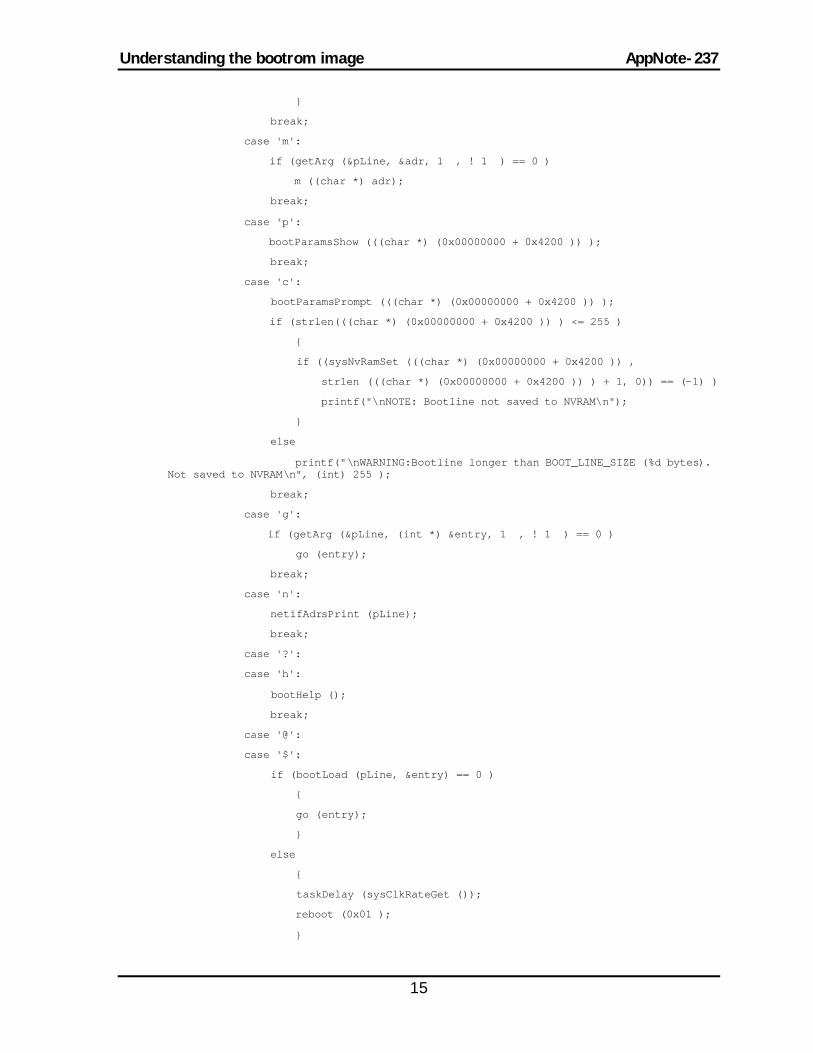
Understanding the bootrom image AppNote-237
15
}
break;
case 'm':
if (getArg (&pLine, &adr, 1 , ! 1 ) == 0 )
m ((char *) adr);
break;
case 'p':
bootParamsShow (((char *) (0x00000000 + 0x4200 )) );
break;
case 'c':
bootParamsPrompt (((char *) (0x00000000 + 0x4200 )) );
if (strlen(((char *) (0x00000000 + 0x4200 )) ) <= 255 )
{
if ((sysNvRamSet (((char *) (0x00000000 + 0x4200 )) ,
strlen (((char *) (0x00000000 + 0x4200 )) ) + 1, 0)) == (-1) )
printf("\nNOTE: Bootline not saved to NVRAM\n");
}
else
printf("\nWARNING:Bootline longer than BOOT_LINE_SIZE (%d bytes). Not saved to NVRAM\n", (int) 255 );
break;
case 'g':
if (getArg (&pLine, (int *) &entry, 1 , ! 1 ) == 0 )
go (entry);
break;
case 'n':
netifAdrsPrint (pLine);
break;
case '?':
case 'h':
bootHelp ();
break;
case '@':
case '$':
if (bootLoad (pLine, &entry) == 0 )
{
go (entry);
}
else
{
taskDelay (sysClkRateGet ());
reboot (0x01 );
}
Understanding the bootrom image AppNote-237
16
break;
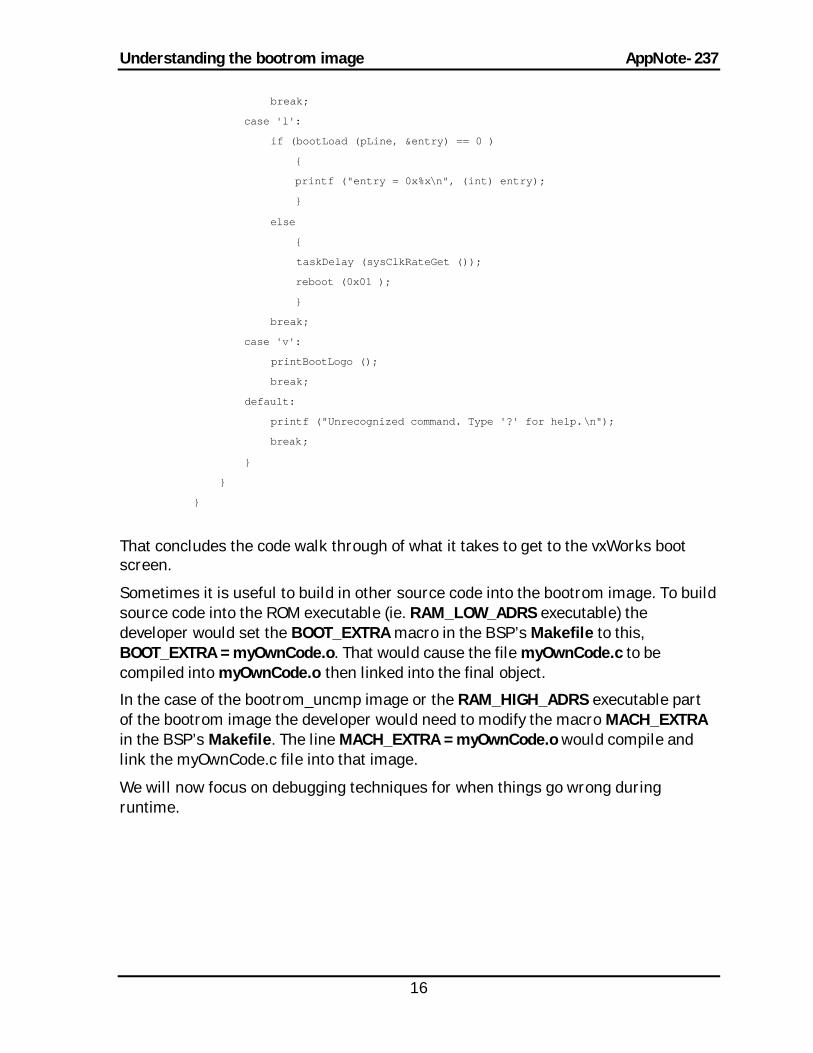
case 'l':
if (bootLoad (pLine, &entry) == 0 )
{
printf ("entry = 0x%x\n", (int) entry);
}
else
{
taskDelay (sysClkRateGet ());
reboot (0x01 );
}
break;
case 'v':
printBootLogo ();
break;
default:
printf ("Unrecognized command. Type '?' for help.\n");
break;
}
}
}
That concludes the code walk through of what it takes to get to the vxWorks boot screen.
Sometimes it is useful to build in other source code into the bootrom image. To build source code into the ROM executable (ie. RAM_LOW_ADRS executable) the developer would set the BOOT_EXTRA macro in the BSP’s Makefile to this, BOOT_EXTRA = myOwnCode.o. That would cause the file myOwnCode.c to be compiled into myOwnCode.o then linked into the final object.
In the case of the bootrom_uncmp image or the RAM_HIGH_ADRS executable part of the bootrom image the developer would need to modify the macro MACH_EXTRA in the BSP’s Makefile. The line MACH_EXTRA = myOwnCode.o would compile and link the myOwnCode.c file into that image.
We will now focus on debugging techniques for when things go wrong during runtime.
Understanding the bootrom image AppNote-237
17
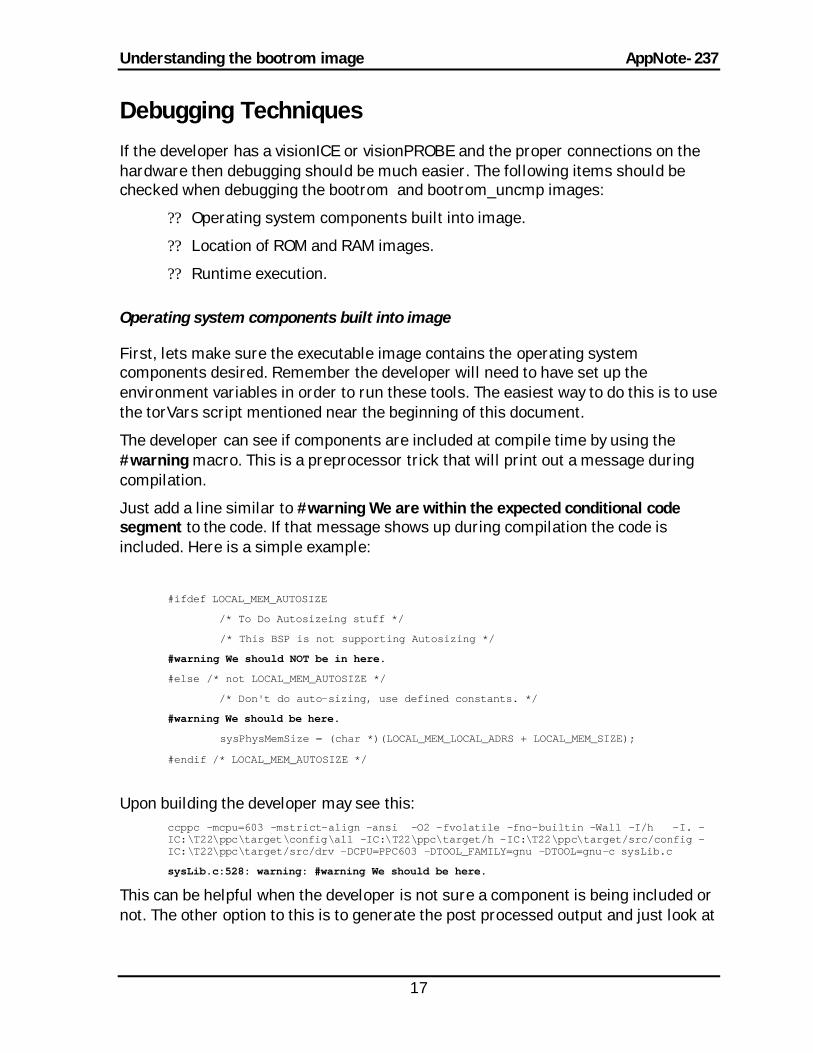
Debugging Techniques
If the developer has a visionICE or visionPROBE and the proper connections on the hardware then debugging should be much easier. The following items should be checked when debugging the bootrom and bootrom_uncmp images:
?? Operating system components built into image.
?? Location of ROM and RAM images.
?? Runtime execution.
Operating system components built into image
First, lets make sure the executable image contains the operating system components desired. Remember the developer will need to have set up the environment variables in order to run these tools. The easiest way to do this is to use the torVars script mentioned near the beginning of this document.
The developer can see if components are included at compile time by using the #warning macro. This is a preprocessor trick that will print out a message during compilation.
Just add a line similar to #warning We are within the expected conditional code segment to the code. If that message shows up during compilation the code is included. Here is a simple example:
#ifdef LOCAL_MEM_AUTOSIZE
/* To Do Autosizeing stuff */
/* This BSP is not supporting Autosizing */
#warning We should NOT be in here.
#else /* not LOCAL_MEM_AUTOSIZE */
/* Don't do auto-sizing, use defined constants. */
#warning We should be here.
sysPhysMemSize = (char *)(LOCAL_MEM_LOCAL_ADRS + LOCAL_MEM_SIZE);
#endif /* LOCAL_MEM_AUTOSIZE */
Upon building the developer may see this: ccppc -mcpu=603 -mstrict-align -ansi -O2 -fvolatile -fno-builtin -Wall -I/h -I. -IC:\T22\ppc\target\config\all -IC:\T22\ppc\target/h -IC:\T22\ppc\target/src/config -IC:\T22\ppc\target/src/drv -DCPU=PPC603 -DTOOL_FAMILY=gnu -DTOOL=gnu-c sysLib.c
sysLib.c:528: warning: #warning We should be here.
This can be helpful when the developer is not sure a component is being included or not. The other option to this is to generate the post processed output and just look at
Understanding the bootrom image AppNote-237
18
that. See previous description for how to do this. This is helpful to confirm that the expected include file is getting picked up before some other include file.
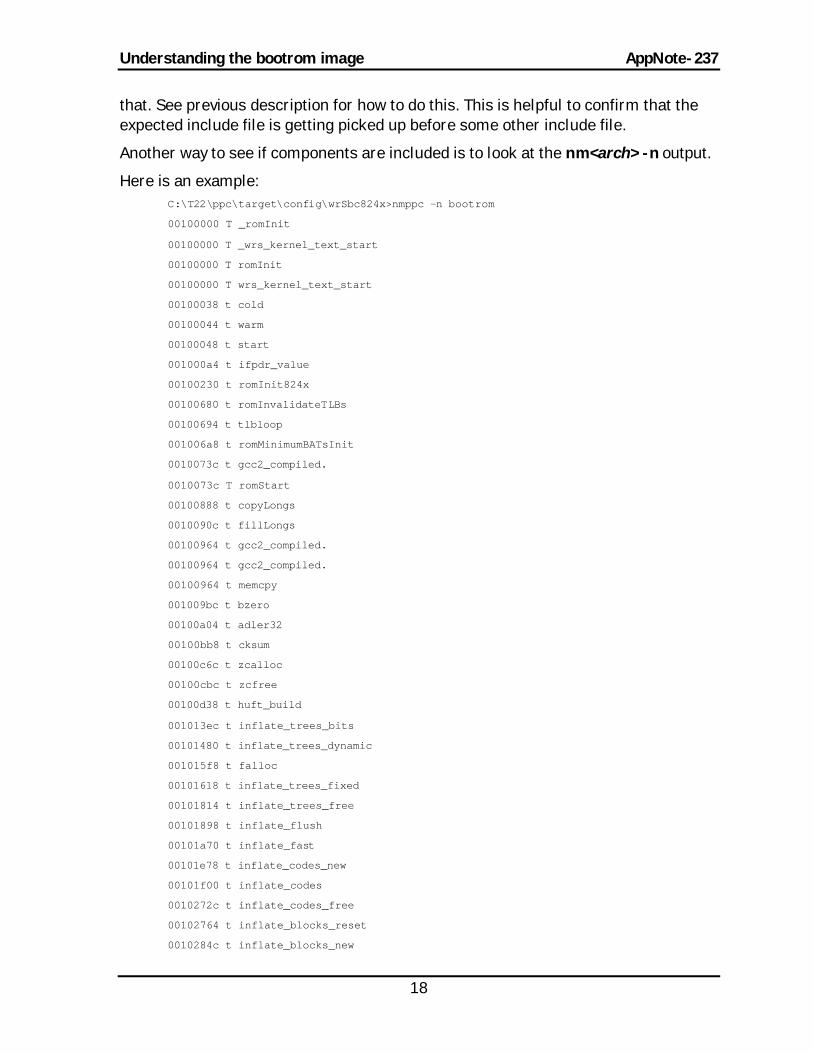
Another way to see if components are included is to look at the nm<arch> -n output.
Here is an example: C:\T22\ppc\target\config\wrSbc824x>nmppc -n bootrom
00100000 T _romInit
00100000 T _wrs_kernel_text_start
00100000 T romInit
00100000 T wrs_kernel_text_start
00100038 t cold
00100044 t warm
00100048 t start
001000a4 t ifpdr_value
00100230 t romInit824x
00100680 t romInvalidateTLBs
00100694 t tlbloop
001006a8 t romMinimumBATsInit
0010073c t gcc2_compiled.
0010073c T romStart
00100888 t copyLongs
0010090c t fillLongs
00100964 t gcc2_compiled.
00100964 t gcc2_compiled.
00100964 t memcpy
001009bc t bzero
00100a04 t adler32
00100bb8 t cksum
00100c6c t zcalloc
00100cbc t zcfree
00100d38 t huft_build
001013ec t inflate_trees_bits
00101480 t inflate_trees_dynamic
001015f8 t falloc
00101618 t inflate_trees_fixed
00101814 t inflate_trees_free
00101898 t inflate_flush
00101a70 t inflate_fast
00101e78 t inflate_codes_new
00101f00 t inflate_codes
0010272c t inflate_codes_free
00102764 t inflate_blocks_reset
0010284c t inflate_blocks_new
Understanding the bootrom image AppNote-237
19
0010292c t inflate_blocks
001035f8 t inflate_blocks_free
00103678 t inflateReset
001036f4 t inflateEnd
00103780 t inflateInit
00103880 t zinflate
00103db4 T inflate
00104190 A _etext
00104190 D _wrs_kernel_data_start
00104190 A _wrs_kernel_text_end
00104190 A etext
00104190 D runtimeName
00104190 D wrs_kernel_data_start
00104190 A wrs_kernel_text_end
00104194 D runtimeVersion
00104198 D vxWorksVersion
0010419c D creationDate
001041a0 D _binArrayStart
001041a0 D binArrayStart
0010c190 T _SDA2_BASE_
001363d0 D _binArrayEnd
001363d0 D binArrayEnd
001363d0 d cplens
0013644c d cplext
001364c8 d cpdist
00136540 d cpdext
001365b8 d inflate_mask
001365fc d border
00136648 d fixed_built
0013664c d fixed_bl
00136650 d fixed_bd
00136654 d fixed_tl
00136658 d fixed_td
0013665c d buf
00136660 d nextBlock
00136664 D inflateCksum
00136670 A _edata
00136670 B _wrs_kernel_bss_start
00136670 A _wrs_kernel_data_end
00136670 A edata
00136670 b fixed_mem
00136670 B wrs_kernel_bss_start
00136670 A wrs_kernel_data_end

Understanding the bootrom image AppNote-237
20
00137700 b intBuf
0013e660 D _gp
0013e668 D _SDA_BASE_
0014fda8 b c
0014fde8 b u
0014fe24 b v
001502a4 b x
001502f0 A _end
001502f0 A _wrs_kernel_bss_end
001502f0 A end
001502f0 A wrs_kernel_bss_end
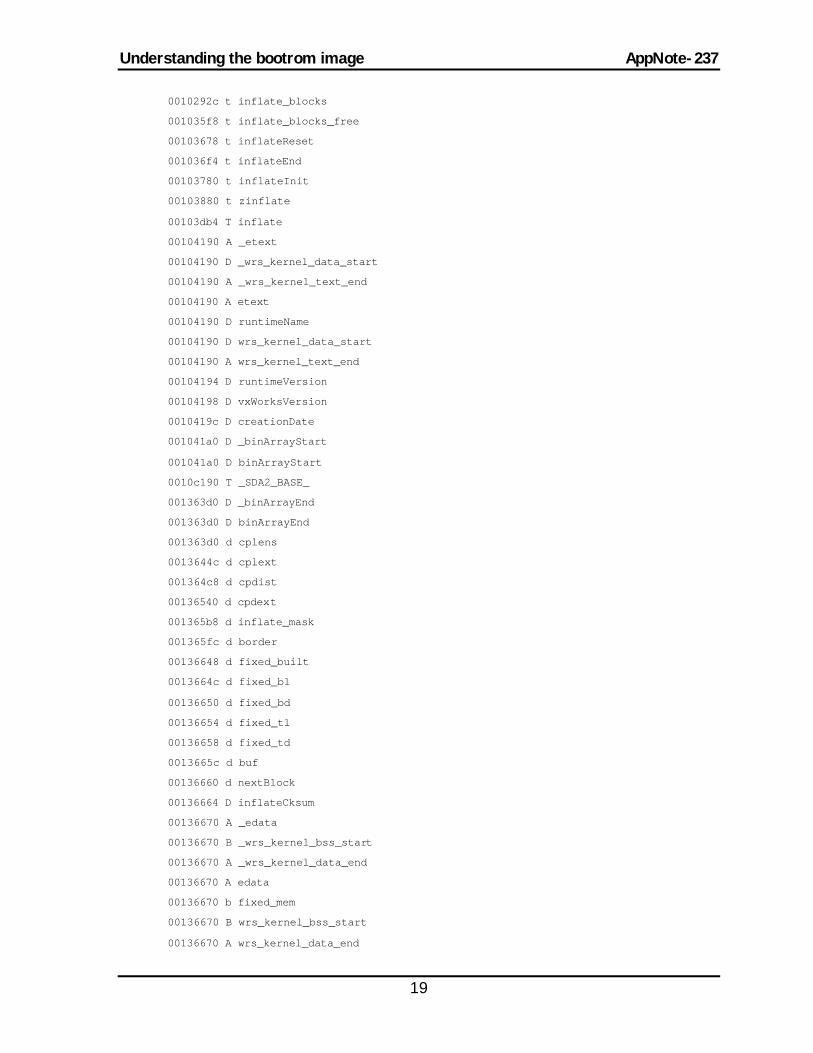
Since this is the bootrom image it is not exactly interesting, but the developer could just as well look at the tmp.o image to see which components are getting included within the vxWorks kernel for the bootcode. The bootrom_uncmp image will contain the full information if that is the target build, since there is no tmp.o created.
Location of ROM and RAM images
Next, lets make sure the image is in the right places in ROM and RAM:
To do this we will use two utilities: nm<arch> -n and objdump<arch> -D. For example in the above nmppc -n output we see some pretty key values.
00100000 T romInit - Start of execution address in RAM, should be RAM_LOW_ADRS.
00104190 A etext - End of text.
001041a0 D binArrayStart - start of data array holding compressed bootcode image.
001363d0 D binArrayEnd - end of data array holding compressed bootcode image.
00136670 A edata - end of data.
001502f0 A end - end of BSS.
The developer may be thinking these addresses should be mapped to ROM and the reset vector. Keep in mind that this image starts out running in ROM and is copied to RAM_LOW_ADRS by romStart() and then continues execution from RAM, that is why it is linked to RAM. All the function calls within ROM are done position
Understanding the bootrom image AppNote-237
21
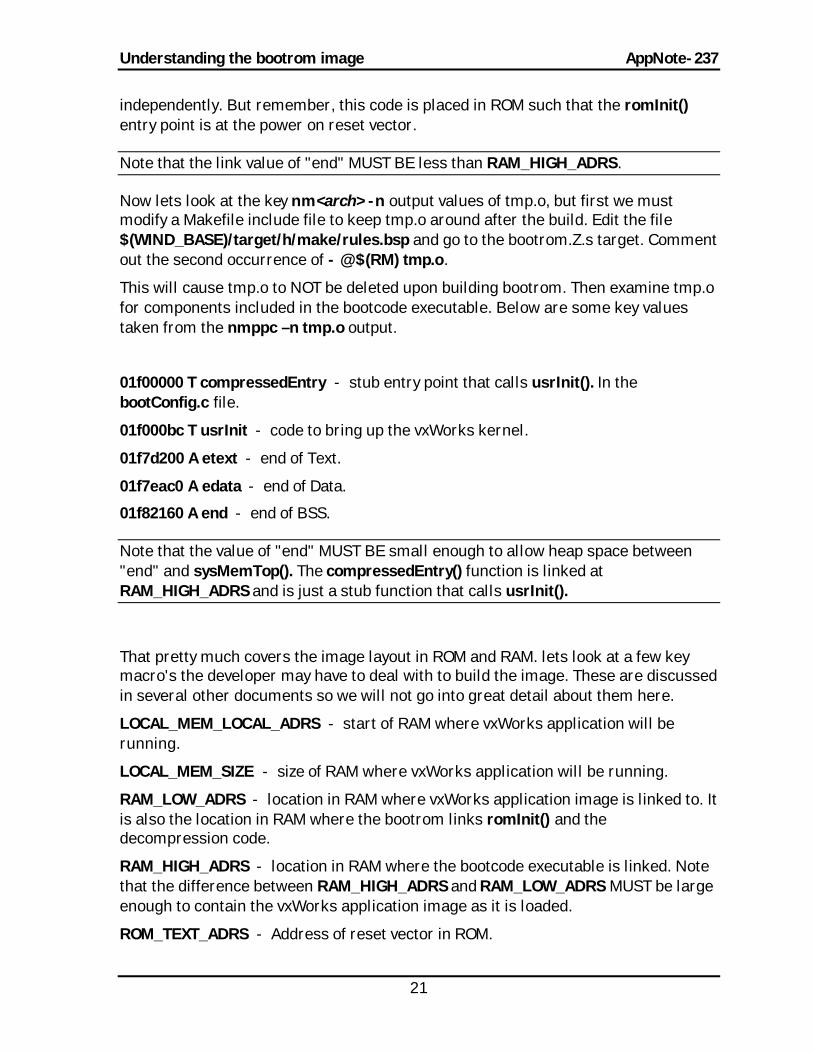
independently. But remember, this code is placed in ROM such that the romInit() entry point is at the power on reset vector.
Note that the link value of "end" MUST BE less than RAM_HIGH_ADRS.
Now lets look at the key nm<arch> -n output values of tmp.o, but first we must modify a Makefile include file to keep tmp.o around after the build. Edit the file $(WIND_BASE)/target/h/make/rules.bsp and go to the bootrom.Z.s target. Comment out the second occurrence of - @ $(RM) tmp.o.
This will cause tmp.o to NOT be deleted upon building bootrom. Then examine tmp.o for components included in the bootcode executable. Below are some key values taken from the nmppc –n tmp.o output.
01f00000 T compressedEntry - stub entry point that calls usrInit(). In the bootConfig.c file.
01f000bc T usrInit - code to bring up the vxWorks kernel.
01f7d200 A etext - end of Text.
01f7eac0 A edata - end of Data.
01f82160 A end - end of BSS.
Note that the value of "end" MUST BE small enough to allow heap space between "end" and sysMemTop(). The compressedEntry() function is linked at RAM_HIGH_ADRS and is just a stub function that calls usrInit().
That pretty much covers the image layout in ROM and RAM. lets look at a few key macro's the developer may have to deal with to build the image. These are discussed in several other documents so we will not go into great detail about them here.
LOCAL_MEM_LOCAL_ADRS - start of RAM where vxWorks application will be running.
LOCAL_MEM_SIZE - size of RAM where vxWorks application will be running.
RAM_LOW_ADRS - location in RAM where vxWorks application image is linked to. It is also the location in RAM where the bootrom links romInit() and the decompression code.
RAM_HIGH_ADRS - location in RAM where the bootcode executable is linked. Note that the difference between RAM_HIGH_ADRS and RAM_LOW_ADRS MUST be large enough to contain the vxWorks application image as it is loaded.
ROM_TEXT_ADRS - Address of reset vector in ROM.
Understanding the bootrom image AppNote-237
22
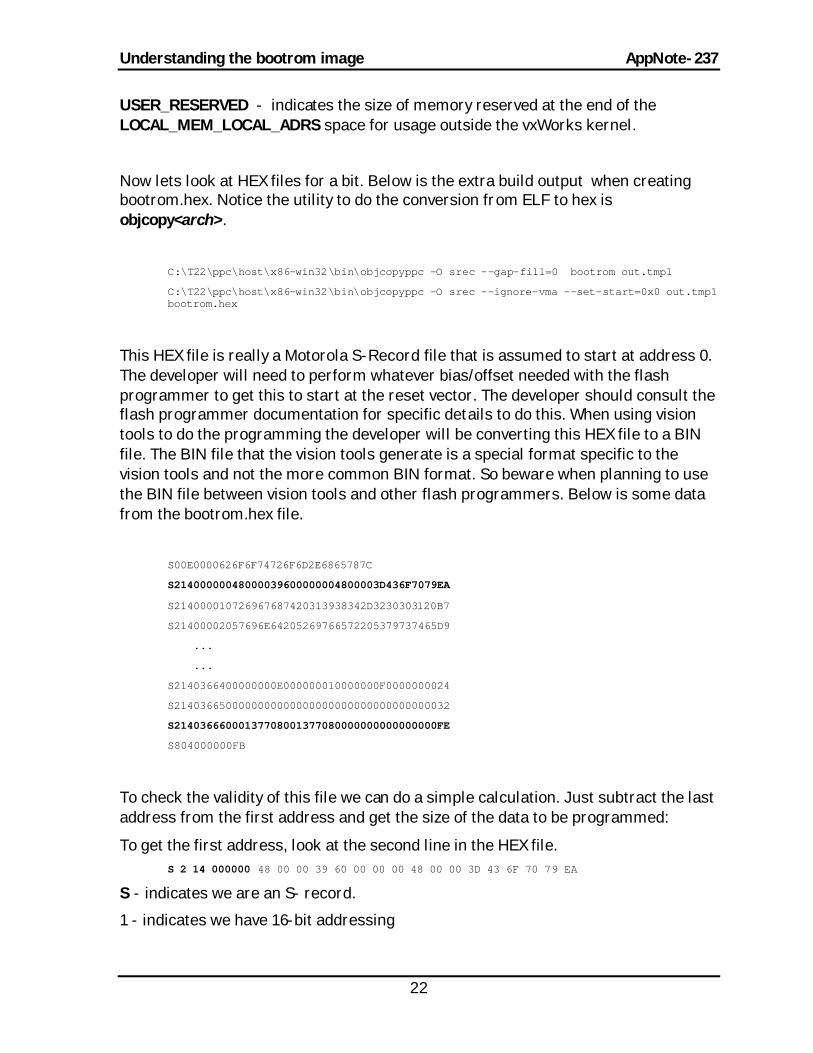
USER_RESERVED - indicates the size of memory reserved at the end of the LOCAL_MEM_LOCAL_ADRS space for usage outside the vxWorks kernel.
Now lets look at HEX files for a bit. Below is the extra build output when creating bootrom.hex. Notice the utility to do the conversion from ELF to hex is objcopy<arch>.
C:\T22\ppc\host\x86-win32\bin\objcopyppc -O srec --gap-fill=0 bootrom out.tmp1
C:\T22\ppc\host\x86-win32\bin\objcopyppc -O srec --ignore-vma --set-start=0x0 out.tmp1 bootrom.hex
This HEX file is really a Motorola S-Record file that is assumed to start at address 0. The developer will need to perform whatever bias/offset needed with the flash programmer to get this to start at the reset vector. The developer should consult the flash programmer documentation for specific details to do this. When using vision tools to do the programming the developer will be converting this HEX file to a BIN file. The BIN file that the vision tools generate is a special format specific to the vision tools and not the more common BIN format. So beware when planning to use the BIN file between vision tools and other flash programmers. Below is some data from the bootrom.hex file.
S00E0000626F6F74726F6D2E6865787C
S21400000048000039600000004800003D436F7079EA
S214000010726967687420313938342D3230303120B7
S21400002057696E64205269766572205379737465D9
...
...
S2140366400000000E000000010000000F0000000024
S2140366500000000000000000000000000000000032
S21403666000137708001377080000000000000000FE
S804000000FB
To check the validity of this file we can do a simple calculation. Just subtract the last address from the first address and get the size of the data to be programmed:
To get the first address, look at the second line in the HEX file. S 2 14 000000 48 00 00 39 60 00 00 00 48 00 00 3D 43 6F 70 79 EA
S - indicates we are an S- record.
1 - indicates we have 16-bit addressing
Understanding the bootrom image AppNote-237
23
2 - indicates we have 24-bit addressing
3 - indicates we have 32-bit addressing
The next two bytes are record length in hexadecimal.
14 - gives us 16 data bytes + 1 checksum byte + 3 address bytes for a total of 0x14 bytes.
000000 - indicates the address.
The second to last line in the HEX file is S 214 036660 00137708001377080000000000000000FE
036660 - indicates the starting address but we filled data up through the 0x3666f address. So the end is really 0x36670.
In this example we have 0x036670 - 0x000000 = 0x036670. Notice that edata – romInit (eg. 0x36670 - 0x000000) is 0x033670 from the above nm<arch> -n output. This gives our HEX file some validity. It is always a good idea to double check this if things are not working as expected.
Another good check is to use the objdump<arch> -D command to look at the disassembly of the executable. Here is a small example of objdumpppc -D bootrom below.
bootrom: file format elf32-powerpc
Disassembly of section .text:
00100000 <_romInit>:
100000: 48 00 00 39 bl 100038 <cold>
100004: 60 00 00 00 nop
100008: 48 00 00 3d bl 100044 <warm>
10000c: 43 6f 70 79 .long 0x436f7079
100010: 72 69 67 68 andi. r9,r19,26472
100014: 74 20 31 39 andis. r0,r1,12601
100018: 38 34 2d 32 addi r1,r20,11570
10001c: 30 30 31 20 addic r1,r16,12576
100020: 57 69 6e 64 rlwinm r9,r27,13,25,18
100024: 20 52 69 76 subfic r2,r18,26998
<rest of output cut off here>
Notice how the data in the above S-record matches up with the data in the disassembly.
48 00 00 39
Understanding the bootrom image AppNote-237
24
60 00 00 00
48 00 00 3d
43 6f 70 79
vs
48 00 00 39 60 00 00 00 48 00 00 3D 43 6F 70 79
After programming the Flash, read back the Flash contents to confirm that the Flash has been programmed correctly. Something the developer should be checking when bringing up the board for the first time to confirm the development processes are valid.
Looking at the disassembly of an object file is helpful when given the address of an exception and the developer needs to find out where it was in the code. The objdum<arch> -D command works great for that.
The above tools should help the developer confirm the location of the images in ROM and RAM. Once that is done, we can now focus on runtime execution.
Runtime execution
At this point we are building our image and programming the Flash with it. The image is located in the correct area and we are ready to power on and run the bootrom code. We now need a way to debug the runtime image. Lets make the assumption that the developer does not have an ICE debug tool, but the developer does have at least one LED that can be used or a port pin that can be connected to a logic analyzer.
One useful bit of code the developer can add to the bootConfig.c file or the bootInit.c file would be some LED routines like the ones below. The developer would add this code to bootConfig.c if the system has already started to execute the RAM_HIGH_ADRS code in RAM. The developer would add this code to the bootInit.c file when needing to debug the romInit() and romStart() function. Basically, the developer needs to make sure that the image gets uncompressed to the RAM_HIGH_ADRS area correctly. If the system does not have an LED to use then set these routines up to use a port pin that the developer can read with the logic analyzer. Expect to be very creative to see what is happening within the system.

Understanding the bootrom image AppNote-237
25
Note that the addresses and values used in the below example are hardware specific and will almost certainly be different for the new hardware.
void ledEnable(void)
{
*(short *)(0x306102) = 0x8000; /* code to turn enable the LED to be used */
}
void ledOn(void)
{
*(short *)(0x306100) = 0x8000; /* code to turn on the LED */
}
void ledOff(void)
{
*(short *)(0x306100) = 0x0; /* code to turn off the LED */
}
void ledBlink(int n)
{
int i,j;
/*
* The 200000 value is picked to be around 1 second of delay. Adjust as needed.
*/
ledEnable();
for(j=0; j < n; j++) {
for(i=0; i < 200000; i++) ledOn();
for(i=0; i < 200000; i++) ledOff();
}
/* just to create a pause between blinks */
for(i=0; i < 200000; i++) ledOff();
}
The call to make is the ledBlink() call. It is useful to start off with ledBlink(1) and then use ledBlink(2) ...etc. It is an easy way to tell where the system is within the code as it is executing. This is a powerful runtime tool that should get the developer to the point of seeing the vxWorks boot banner and menu system on the serial output device. Once that happens the developer should be able to use printf()’s to complete the task or some of the debug facilities already built into the boot menu.
Understanding the bootrom image AppNote-237
26
Even before printf()’s are available some debug information can be output on the serial device after sysHwInit() has been called. Add the following code to the BSP’s sysLib.c file. This should work with any BSP whose serial driver can be operated in polled mode output.
void sysPrintDebug(char *msg)
{
unsigned long msgIx;
for (msgIx = 0; msgIx < strlen(msg); msgIx++)
while (sioPollOutput (sysSerialChanGet(0), msg[msgIx]) == EAGAIN);
}
You'll need to format your end lines with “\r\n” to get both carriage return and line feed. For example:
sysPrintDebug("Made it to sysHwInit2().\r\n");
Now lets assume the developer does have an ICE debug tool and needs to debug the bootrom code that is running from RAM. One problem, is stopping program execution when there is no chance to set up software breakpoints in the RAM executable. Remember that the RAM executable is uncompressed into the RAM_HIGH_ADRS location and starts running when romStart() jumps to it. A way to stop the code in its tracks is to put an infinite loop in the romStart() code after the inflate() call or at the beginning of the usrInit() code. That way when the infinite loop is hit, the developer has the ability to set software breakpoints in the now existing code at the RAM_HIGH_ADRS location. After setting up the desired breakpoints the developer can then modify the program counter with the ICE tool to proceed with the next instruction. The breakpoint should be hit and the developer can now step through the code for the RAM executable part of the bootrom. There is a macro called FOREVER within the vxWorks.h include file that implements this infinite loop, in C code as for(;;), if the developer cares to use it.
Summary
The bootrom and bootrom_uncmp images can be easily understood when the time is taken to understand the build model and code execution path. Knowing which code
Understanding the bootrom image AppNote-237
27
executes from ROM and which code executes from RAM helps in determining the best debug techniques to be used.
This Application Note helps with:
?? Getting the post-processed output from the C compiler.
?? Examining the object files using the tools nm<arch> and objdump<arch>.
?? Confirming that executables are located in the correct place in ROM and RAM.
?? Building in custom code to the bootrom and bootrom_uncmp images.
?? Using the runtime debug tips and knowing when they can be used.
These tools should help any developer obtain a successful bootrom image. Good Luck.
References
VxWorks Programmer’s Guide.
BSP Developer’s Kit.
GNU ToolKit User’s Guide.
VxWorks Reference Manual.
GNU Make User’s Guide
VxWorks for PPC architecture Supplement