allstar 1 tg
TRANSCRIPT
7/25/2019 AllStar 1 TG
http://slidepdf.com/reader/full/allstar-1-tg 1/34
7/25/2019 AllStar 1 TG
http://slidepdf.com/reader/full/allstar-1-tg 2/34
1. INTRODUCTION 1
2. GETTING STARTED 2
Minimum system requirements 2
Installing the application 2
3. THE CONTROL PANEL 3
The Application Tools 4
The Whiteboard Tools 5
Pen 5
Highlighter 5
Text box functions 6
Rubber 6
Undo / redo 6
Zoom 7
Hide / show part of screen 7
Clear notes 7
Customise page 8
Print 8
Save customisations / notes 8
Load customisations / notes 9
Notes exist / no notes indicator 9
Return to Mouse mode 10
Hide toolbar 10
4. TASK INSTRUCTIONS 11
Display answer key 11
Underline the answer 12
Drag and drop 13
Multiple choice 14
5. TEACHING SUGGESTIONS 16
6. USING THE CONTENT CREATION TOOL 18
CCT main authoring interface 18
Creating a task 19
Uploading images and audio 27 Using the LINK feature 29
Preview, editing, saving & sharing a task 30
Accessing & using a task in the classroom 31
CONTENTS
Match 15

7/25/2019 AllStar 1 TG
http://slidepdf.com/reader/full/allstar-1-tg 3/34
1
Al l Star 1 IWB is an interactive whiteboard application
that is intended for classrooms using the Al l Star 1Student’s Book . The application has been developed
with the following aims in mind:
• er aper potsdeenr ehcaetaemitehtecuder ot
for each lesson
• napsnoitnetta’sr enr aelesaer cniot
• to save time during common classroom tasks,
e.g. drawing grammar tables on the board,
checking learners’ answers when working on their
books, managing group activities such as games or
collaborative tasks, etc.
• etomor potstnemeleaidemitlumtiolpxeot
active learning• gnisulair etamehtnodnapxeotsr ehcaetwollaot
the Content Creation Tool (CCT) provided.
This manual will present the features of the application
and familiarise you with the functions of your control panel,
as well as outline the functions of the CCT. The teaching
suggestions made here represent only a fraction of
the ways in which you can use this software, and you
are certain to discover your own ways of presenting the
material according to the needs of your class.
1 INTRODUCTION
INTRODUCTION
7/25/2019 AllStar 1 TG
http://slidepdf.com/reader/full/allstar-1-tg 4/34
2
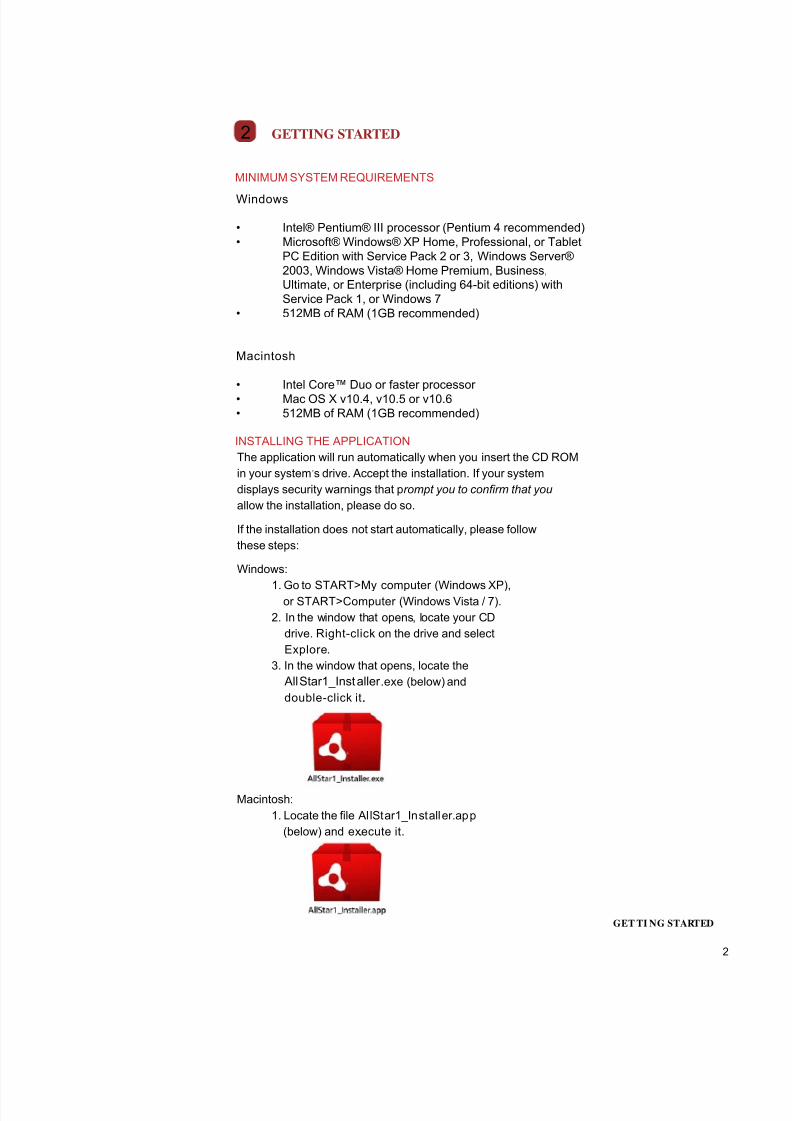
MINIMUM SYSTEM REQUIREMENTS
INSTALLING THE APPLICATION
GETTING STARTED2
Windows
• Intel® Pentium® III processor (Pentium 4 recommended)
• Microsoft® Windows® XP Home, Professional, or Tablet
PC Edition with Service Pack 2 or 3, Windows Server®
2003, Windows Vista® Home Premium, Business,Ultimate, or Enterprise (including 64-bit editions) with
Service Pack 1, or Windows 7
• 512MB of RAM (1GB recommended)
Macintosh
• Intel Core™ Duo or faster processor
• Mac OS X v10.4, v10.5 or v10.6
• 512MB of RAM (1GB recommended)
GET TI NG STARTED
The application will run automatically when you insert the CD ROM
in your system’s drive. Accept the installation. If your system
displays security warnings that prompt you to confirm that you
allow the installation, please do so.
If the installation does not start automatically, please follow
these steps:
Windows:
1. Go to START>My computer (Windows XP),or START>Computer (Windows Vista / 7).
2. In the window that opens, locate your DC
drive. Right-click on the drive and select
Explore.
3. In the window that opens, locate the
AllStar1_Installer .exe (below)
double-click it.
and
.
Macintosh:
1. Locate the file Al lStar1_Installer.app
(below) and execute it..
7/25/2019 AllStar 1 TG
http://slidepdf.com/reader/full/allstar-1-tg 5/34
3
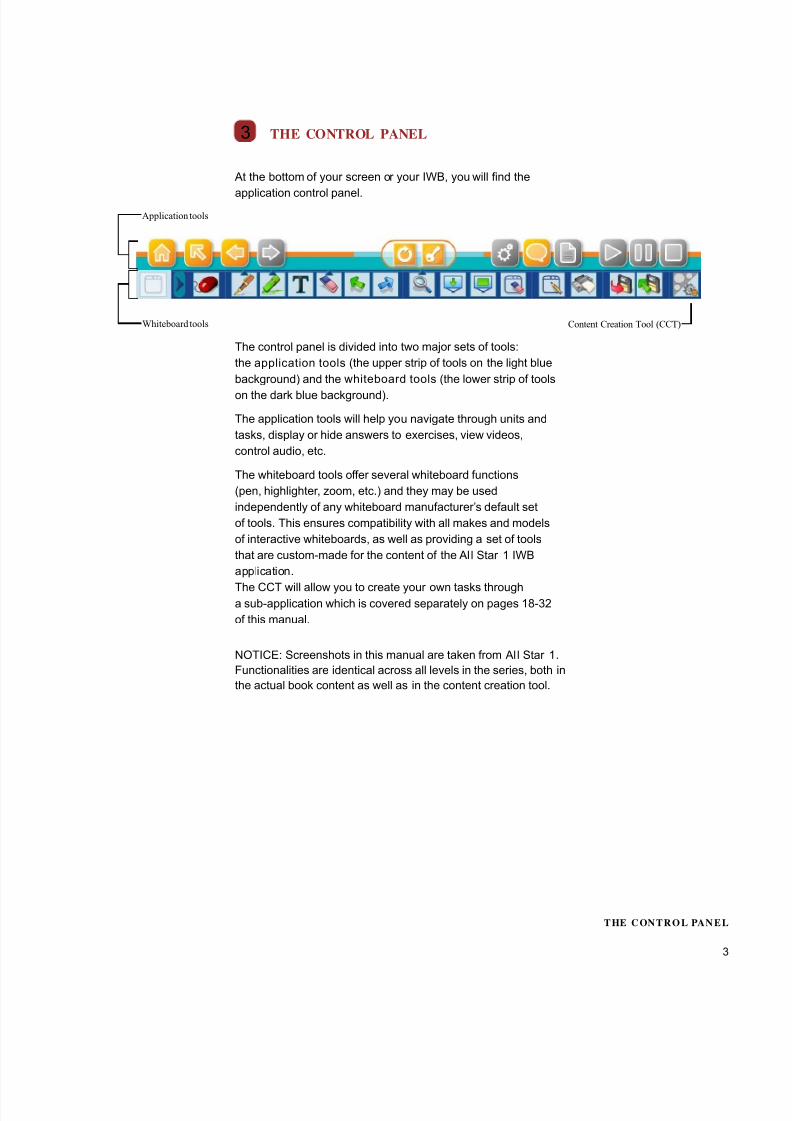
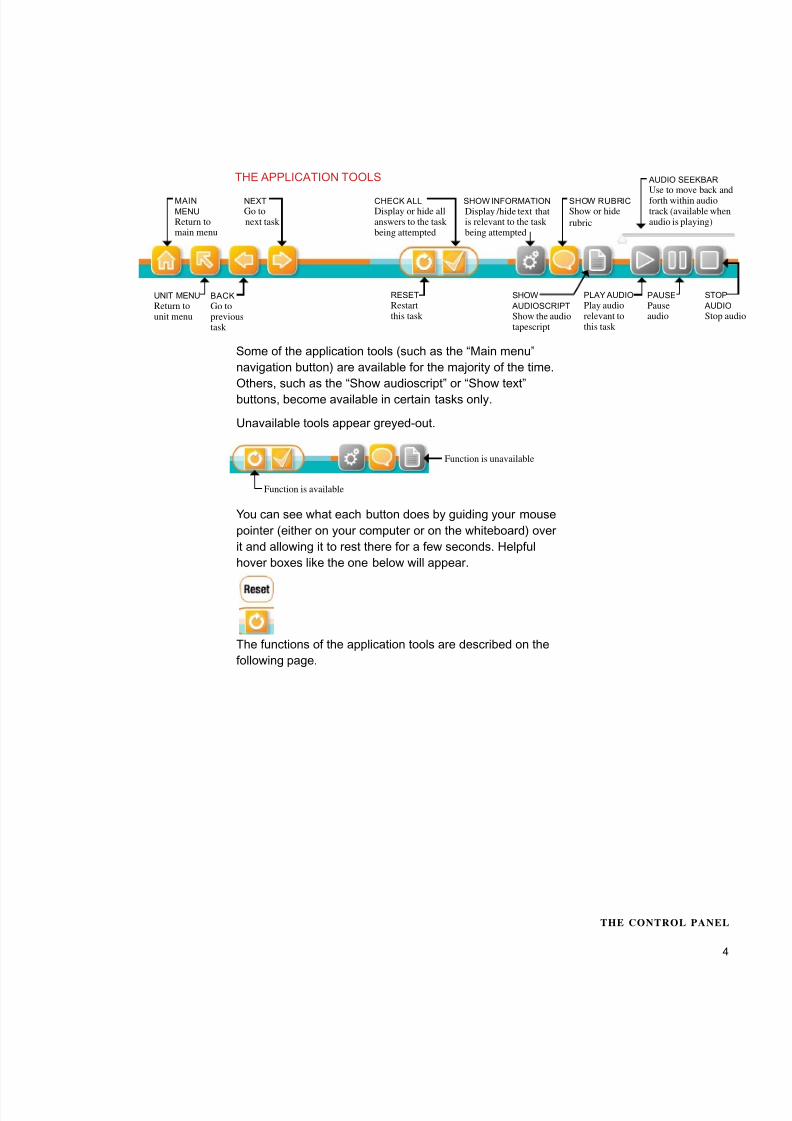
At the bottom of your screen or your IWB, you will find the
application control panel.
The control panel is divided into two major sets of tools:
the application tools (the upper strip of tools on the light blue
background) and the whiteboard tools (the lower strip of tools
on the dark blue background).
The application tools will help you navigate through units and
tasks, display or hide answers to exercises, view videos,
control audio, etc.
The whiteboard tools of fer several whiteboard functions
(pen, highlighter , zoom, etc.) and they may be used
independently of any whiteboard manufacturer’s default set
of tools. This ensures compatibility with all makes and models
of interactive whiteboards, as well as providing a set of tools
that are custom-made for the content of the Al l Star 1 IWB
application.
The CCT will allow you to create your own tasks througha sub-application which is cover ed separately on pages 18-32
of this manual.
NOTICE: Screenshots in this manual are taken from Al l Star 1.
Functionalities are identical across all levels in the series, both in
the actual book content as well as in the content creation tool.
THE CONTROL PANEL3
Whiteboard tools
Application tools
THE CONTR OL PA NEL
Content Creation Tool (CCT)
7/25/2019 AllStar 1 TG
http://slidepdf.com/reader/full/allstar-1-tg 6/34
4
Some of the application tools (such as the “Main menu”
navigation button) are available for the majority of the time.
Others, such as the “Show audioscript” or “Show text”
buttons, become available in certain tasks only.
Unavailable tools appear greyed-out.
You can see what each button does by guiding your mouse
pointer (either on your computer or on the whiteboard) over
it and allowing it to rest there for a few seconds. Helpful
hover boxes like the one below will appear.
The functions of the application tools are described on the
following page.
THE APPLICATION TOOLS
BACK
Go toprevioustask
NEXT
Go tonext task
MAIN
MENU
Return tomain menu
UNIT MENU
Return tounit menu
SHOW RUBRIC
Show or hide
rubric
CHECK ALL
Display or hide allanswers to the taskbeing attempted
RESET
Restartthis task
STOP
AUDIO
Stop audi
PLAY AUDIO
Play audiorelevant tothis task
PAUSE
Pauseaudio
SHOW
AUDIOSCRIPT
Show the audiotapescript
Display / hide text thatis relevant to the taskbeing attempted
Function is unavailable
Function is available
THE CONTROL PANEL
AUDIO SEEKBAR
Use to move back andforth within audiotrack (available whenaudio is playing)
SHOW INFORMATION
7/25/2019 AllStar 1 TG
http://slidepdf.com/reader/full/allstar-1-tg 7/34
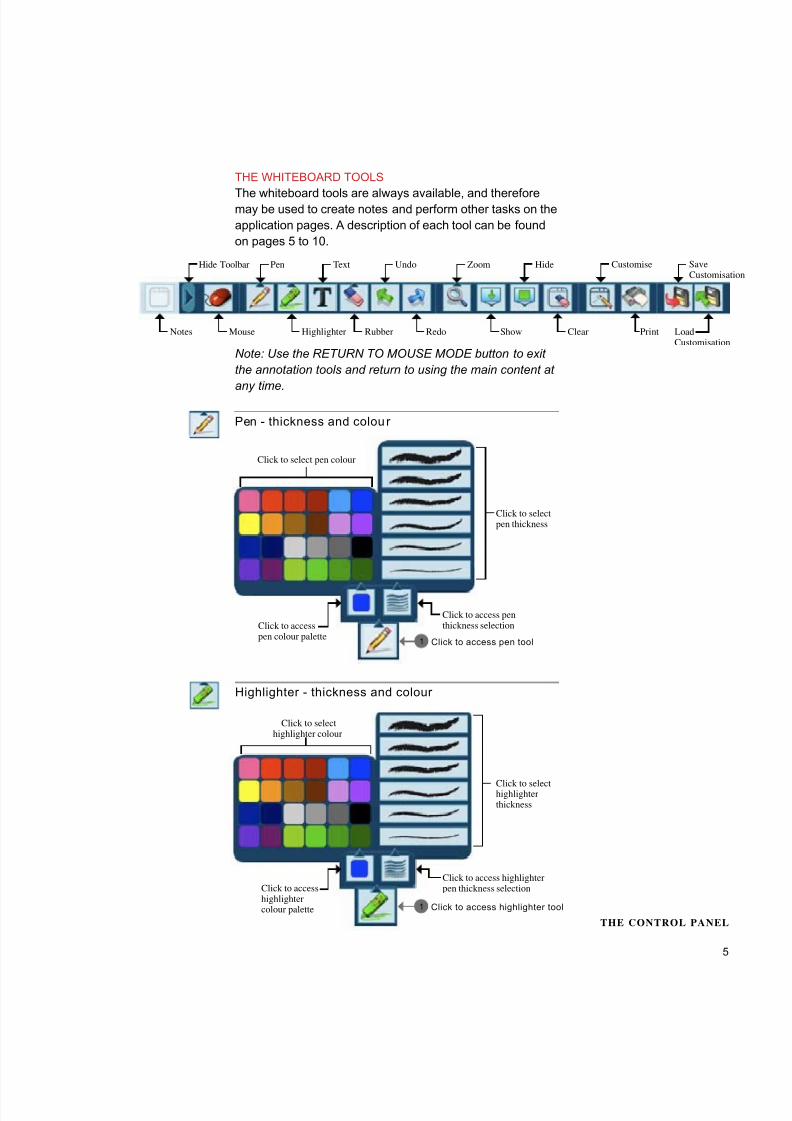
THE WHITEBOARD TOOLS
The whiteboard tools are always available, and thereforemay be used to create notes and perform other tasks on the
application pages. A description of each tool can be found
on pages 5 to 10.
Mouse Highlighter
Pen Text
Rubber
Undo Zoom
Redo Show
Hide Customise SaveCustomisatio
Print LoadCustomisation
Clear
Pen - thickness and colou r
Notes
Hide Toolbar
Note: Use the RETURN TO MOUSE MODE button to exit
the annotation tools and return to using the main content at
any time.
Click to access penthickness selectionClick to access
pen colour palette
Click to select pen colour
Click to selectpen thickness
Highlighter - thickness and colour
Click to access highlighterpen thickness selectionClick to access
highlightercolour palette
Click to selecthighlighter colour
Click to selecthighlighterthickness
Click to access highlighter tool1
Click to access pen tool1
5
THE CONTROL PANEL
7/25/2019 AllStar 1 TG
http://slidepdf.com/reader/full/allstar-1-tg 8/34
6
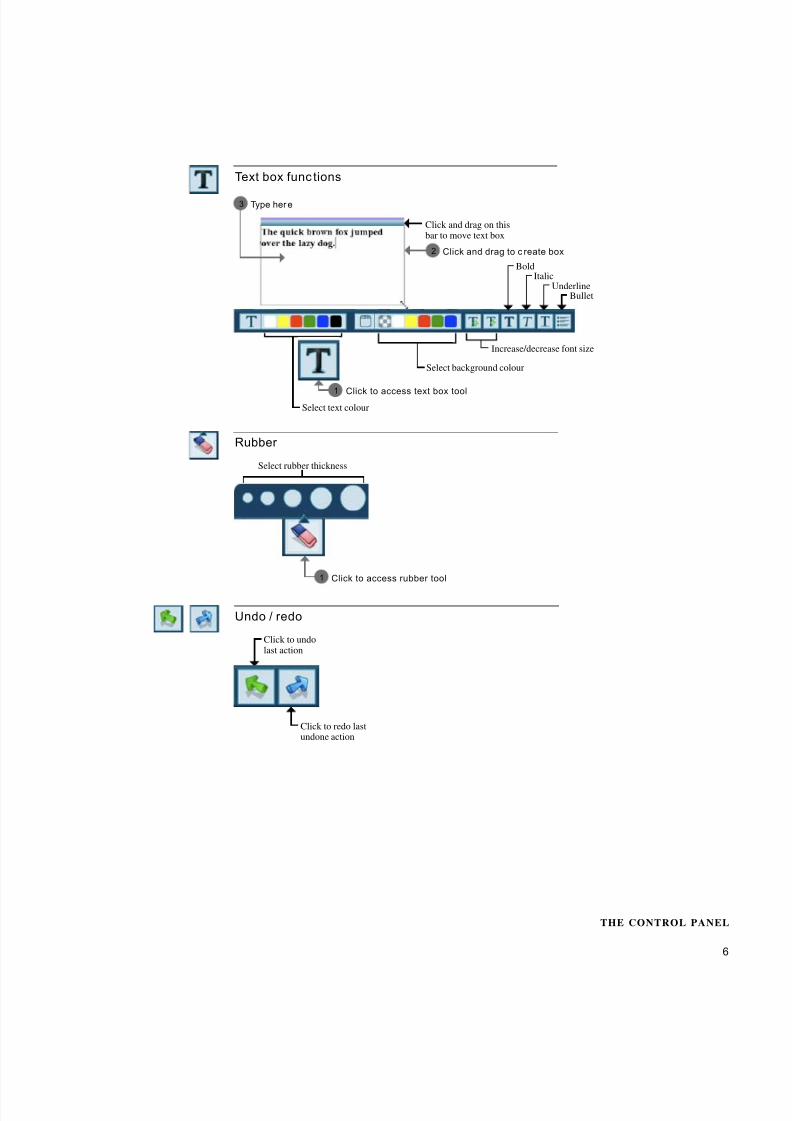
Text box func tions
Click and drag on thisbar to move text box
Click and drag to c reate box2
Click to access text box tool1
Type here3
Select background colour
Increase/decrease font size
Select text colour
Bold
BulletUnderline
Italic
THE CONTROL PANEL
Rubber
Select rubber thickness
Undo / redo
Click to redo lastundone action
Click to undolast action
Click to access rubber tool1
7/25/2019 AllStar 1 TG
http://slidepdf.com/reader/full/allstar-1-tg 9/34
7
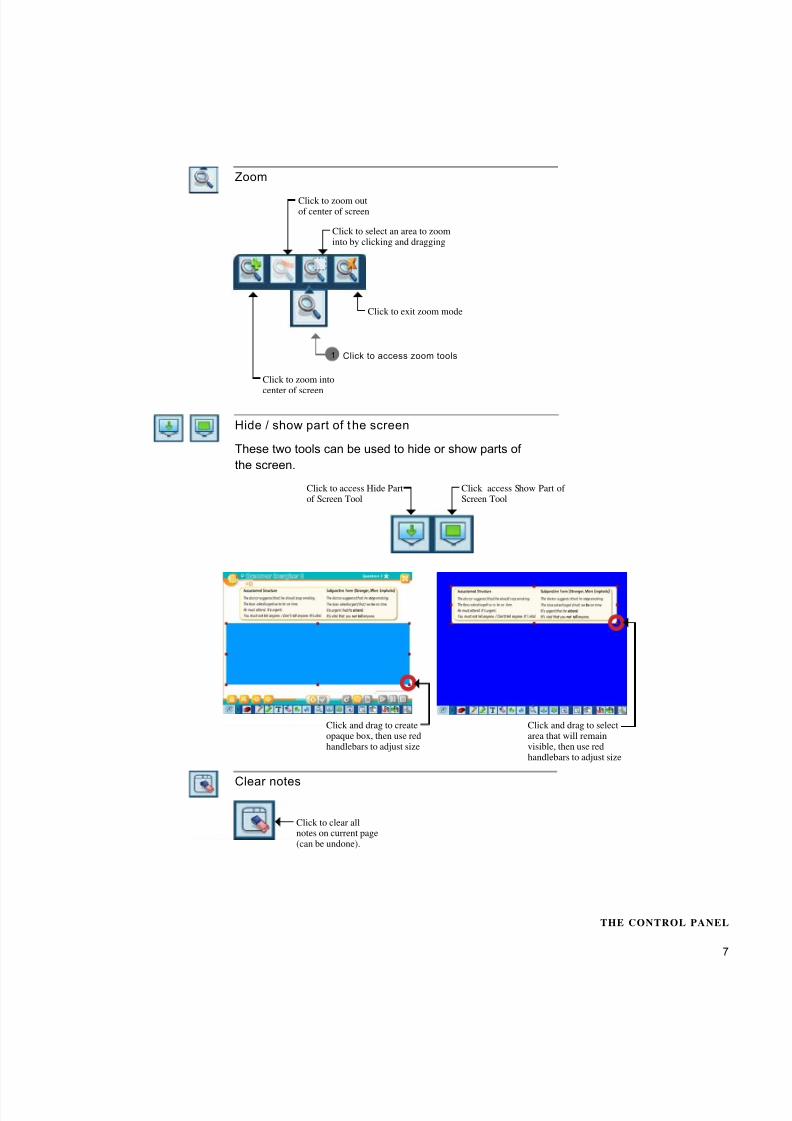
Zoom
THE CONTROL PANEL
Click to zoom outof center of screen
Click to zoom into
center of screen
Click to select an area to zoominto by clicking and dragging
Click to exit zoom mode
Click to access zoom tools1
Hide / show part of the screen
These two tools can be used to hide or show parts of
the screen.
Click to access Hide Partof Screen Tool
Click access Show Part ofScreen Tool
Clear notes
Click to clear allnotes on current page(can be undone).
Click and drag to createopaque box, then use redhandlebars to adjust size
Click and drag to selectarea that will remainvisible, then use redhandlebars to adjust size
7/25/2019 AllStar 1 TG
http://slidepdf.com/reader/full/allstar-1-tg 10/34
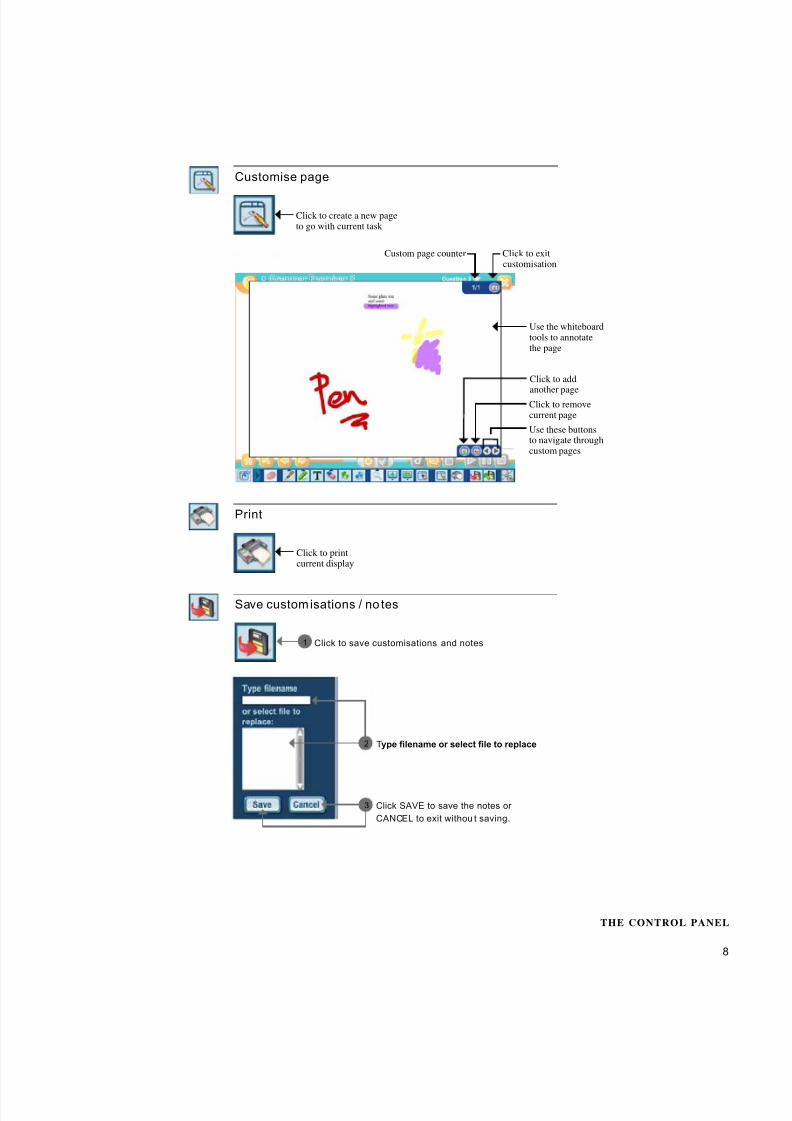
8
Click to create a new pageto go with current task
Custom page counter Click to exitcustomisation
Use the whiteboardtools to annotatethe page
Click to add
another pageClick to removecurrent page
Use these buttonsto navigate throughcustom pages
Click to printcurrent display
Customise page
THE CONTROL PANEL
Save custom isations / no tes
Click to save customisations and notes1
Type filename or select file to replace2
Click SAVE to save the notes or
CANCEL to exit withou t saving.
3
7/25/2019 AllStar 1 TG
http://slidepdf.com/reader/full/allstar-1-tg 11/34
9
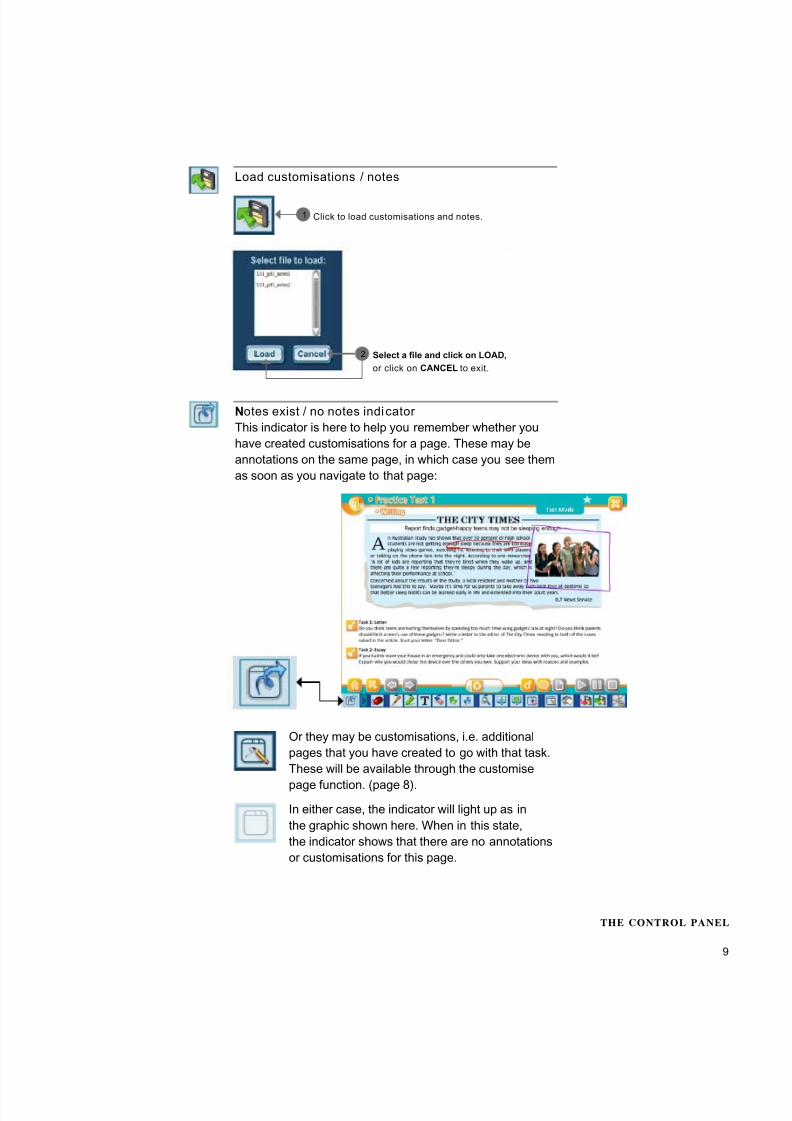
Load customisations / notes
Click to load customisations and notes.1
Select a file and click on LOAD,
or click on CANCEL to exit.
2
THE CONTROL PANEL
Notes exist / no notes indi cator
This indicator is here to help you remember whether you
have created customisations for a page. These may be
annotations on the same page, in which case you see them
as soon as you navigate to that page:
Or they may be customisations, i.e. additional
pages that you have created to go with that task.
These will be available through the customise
page function. (page 8).
In either case, the indicator will light up as in
the graphic shown here. When in this state,
the indicator shows that there are no annotations
or customisations for this page.

7/25/2019 AllStar 1 TG
http://slidepdf.com/reader/full/allstar-1-tg 12/34
10
Return to Mouse mode
Use this button to exit the following modes:
• Pen
• Highlighter
• Text
• Rubber
• Zoom
• Hide / show part of screen and regain control
of the main application tools (back, forward,
reset etc.) as well as the functionalities within
each task.
THE CONTROL PANEL
Hide toolbar
Use this button to hide the toolbar.
When the toolbar is hidden, the button changes and
moves to the right side of the screen. Click it to
make the toolbar reappear.

7/25/2019 AllStar 1 TG
http://slidepdf.com/reader/full/allstar-1-tg 13/34
11
Display answer key
Click to choose an answer. Click on the Submit buttonto evaluate an answer.
4 TASK INSTRUCTIONS
TASK INSTRUCTIONS

7/25/2019 AllStar 1 TG
http://slidepdf.com/reader/full/allstar-1-tg 14/34
12
Underline the answer
Click on answer choices to underline them. Click the Solution button to solve the exercise in one click, or to show and
evaluate answers.
TASK INSTRUCTIONS

7/25/2019 AllStar 1 TG
http://slidepdf.com/reader/full/allstar-1-tg 15/34
13
Drag and drop
Drag and drop the lozenge to the correct place; correctlydragged items stay in place, incorrectly dragged items
bounce back. Click on the Solution button to solve the
exercise in one click.
TASK INSTRUCTIONS
7/25/2019 AllStar 1 TG
http://slidepdf.com/reader/full/allstar-1-tg 16/34
14
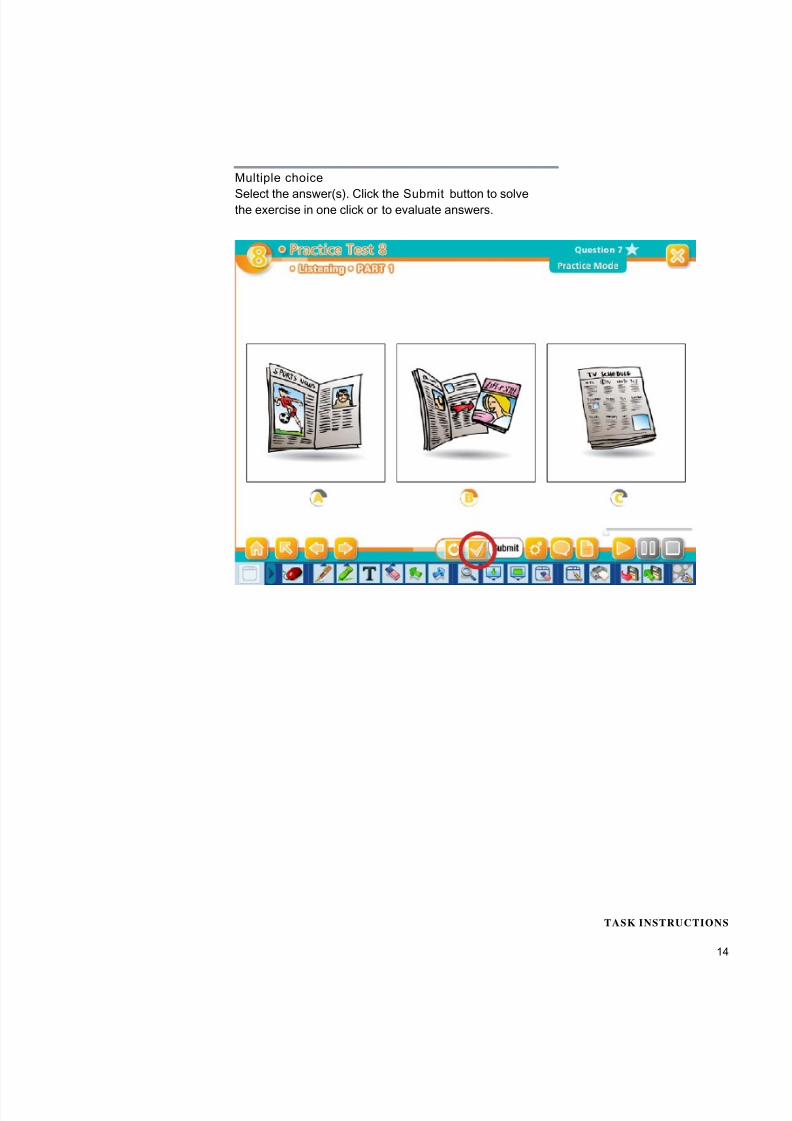
Multiple choice
Select the answer(s). Click the Submit button to solvethe exercise in one click or to evaluate answers.
TASK INSTRUCTIONS
7/25/2019 AllStar 1 TG
http://slidepdf.com/reader/full/allstar-1-tg 17/34
15
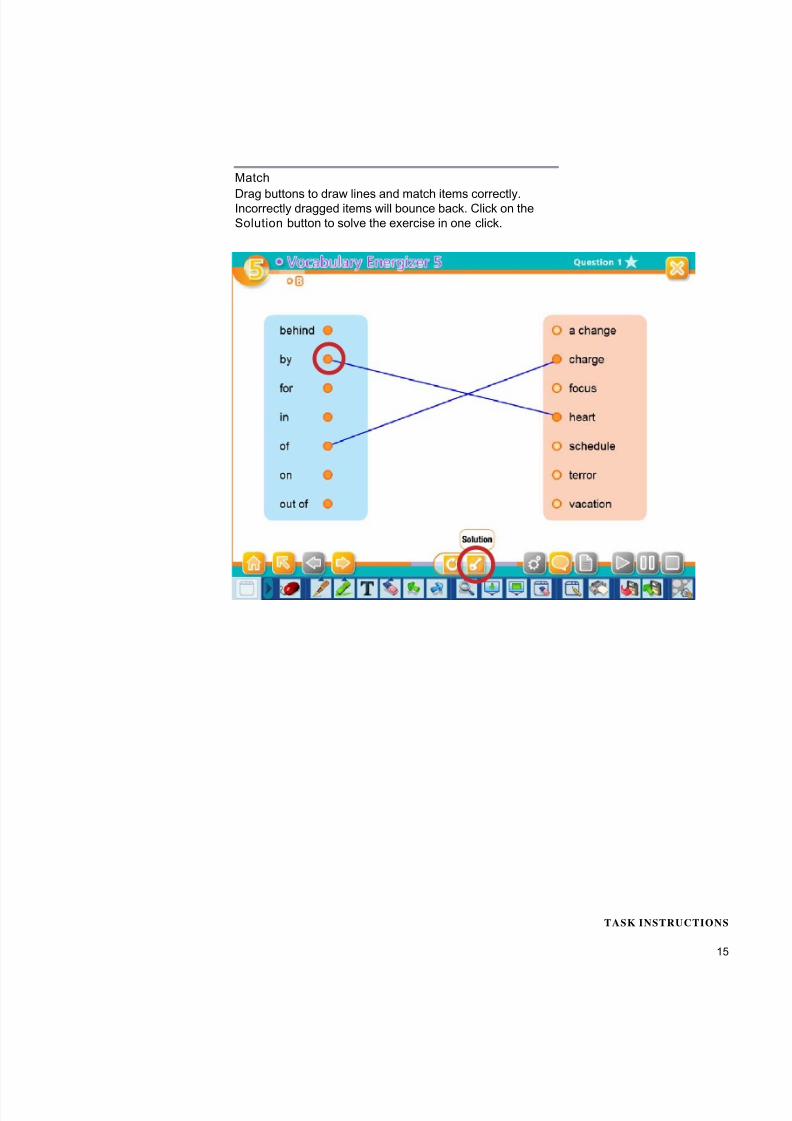
Match
Drag buttons to draw lines and match items correctly.Incorrectly dragged items will bounce back. Click on the
Solution button to solve the exercise in one click.
TASK INSTRUCTIONS
7/25/2019 AllStar 1 TG
http://slidepdf.com/reader/full/allstar-1-tg 18/34
16
The following suggestions are only a small fraction of
what you can do by combining the main application withthe whiteboard tools; you will undoubtedly come up with
your own ideas on how to use the application to your
students’ benefit.
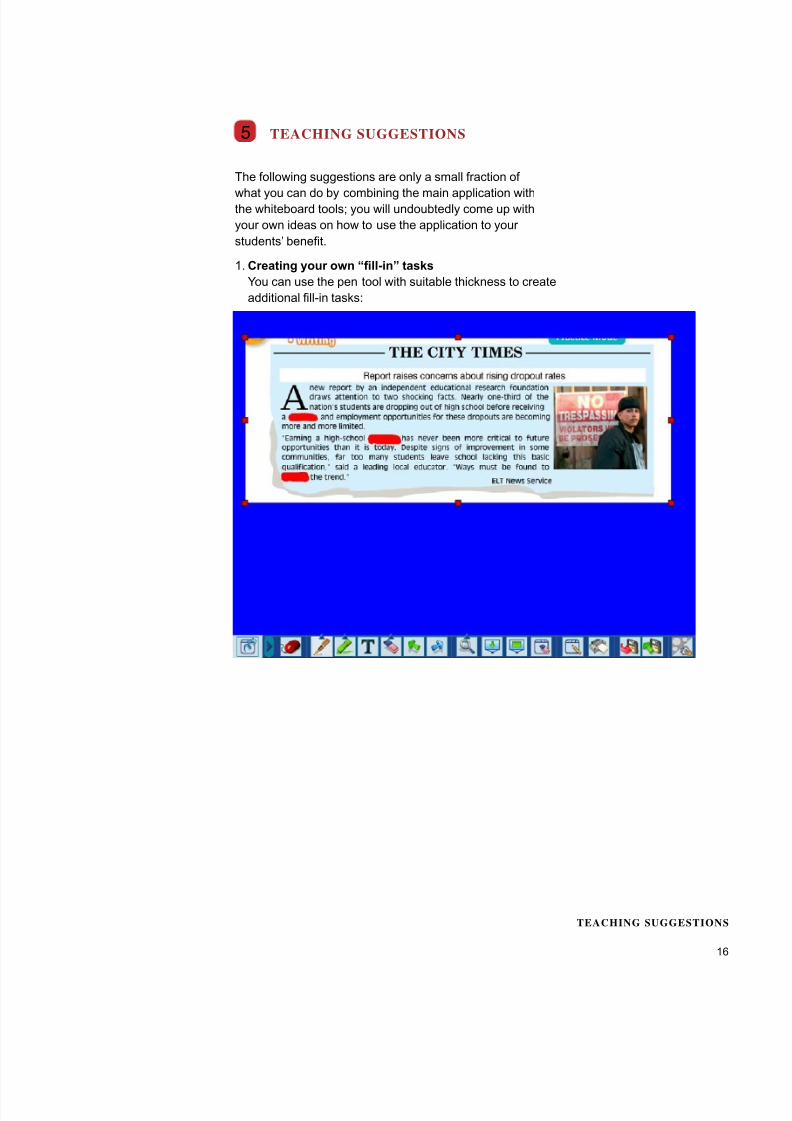
1. Creating your own “fill-in” tasks
You can use the pen tool with suitable thickness to create
additional fill-in tasks:
5 TEACHING SUGGESTIONS
TEACHING SUGGESTIONS

7/25/2019 AllStar 1 TG
http://slidepdf.com/reader/full/allstar-1-tg 19/34
17
2. Zoom and highlight important sections
Combine the zoom and highlight tools to help learnersfocus their attention on important sections:
TEACHING SUGGESTIONS
7/25/2019 AllStar 1 TG
http://slidepdf.com/reader/full/allstar-1-tg 20/34
18
The Content Creation Tool allows you to create your own
tasks quickly and easily. The tasks you create are storedwith the already included task that you want to expand on,
and are readily accessible with a single click.
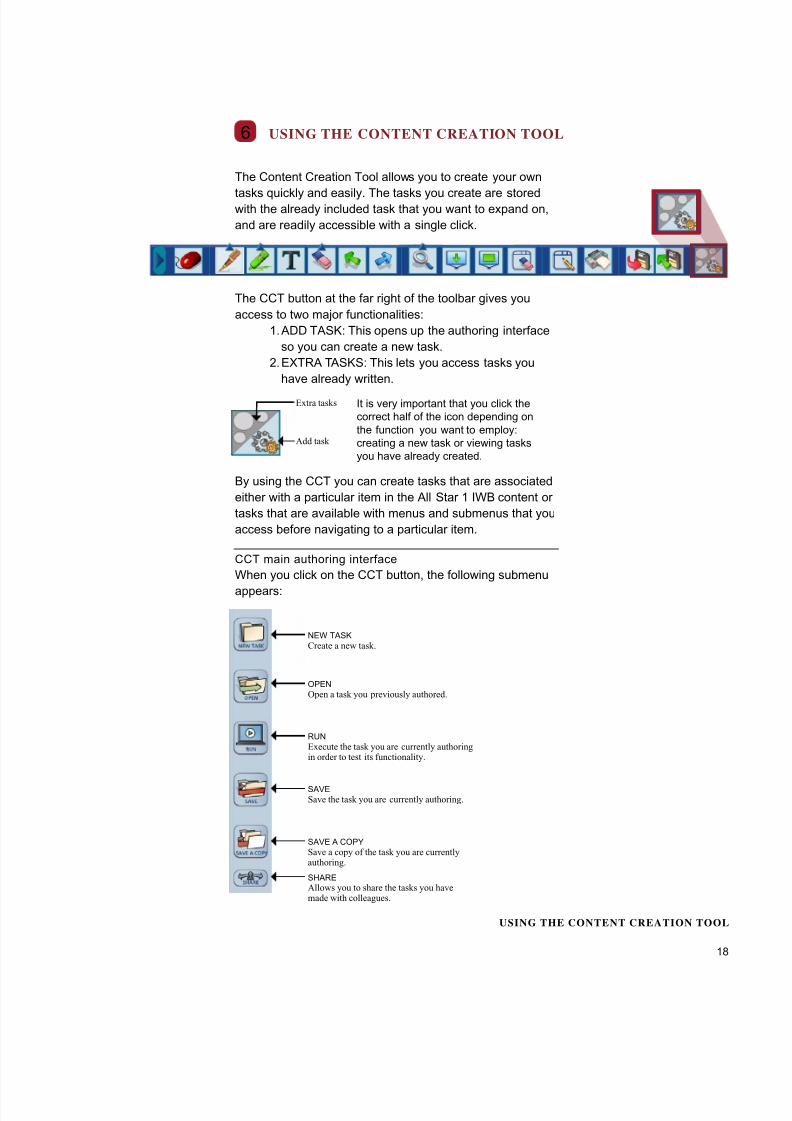
6 USING THE CONTENT CREATION TOOL
The CCT button at the far right of the toolbar gives you
access to two major functionalities:
1. ADD TASK: This opens up the authoring interface
so you can create a new task.
2. EXTRA TASKS: This lets you access tasks you
have already written.
By using the CCT you can create tasks that are associated
It is very important that you click the
correct half of the icon depending on
the function you want to employ:
creating a new task or viewing tasks
you have already created.
either with a particular item in the All Star 1 IWB content or
tasks that are available with menus and submenus that you
access before navigating to a particular item.
CCT main authoring interface
When you click on the CCT button, the following submenu
appears:
Add task
Extra tasks
NEW TASK
Create a new task.
OPEN
Open a task you previously authored.
RUN
Execute the task you are currently authoringin order to test its functionality.
SAVE
Save the task you are currently authoring.
SAVE A COPY
Save a copy of the task you are currentlyauthoring.
SHARE
Allows you to share the tasks you havemade with colleagues.
USING THE CONTENT CREATION TOOL

7/25/2019 AllStar 1 TG
http://slidepdf.com/reader/full/allstar-1-tg 21/34
19
Creating a task
The following task types can be authored using the All Star 1 IWB Content Creation Tool:
Each of these types seen at the top of your screen have
several sub-types. In the following pages you will see
how to create your own exercises using the CCT.
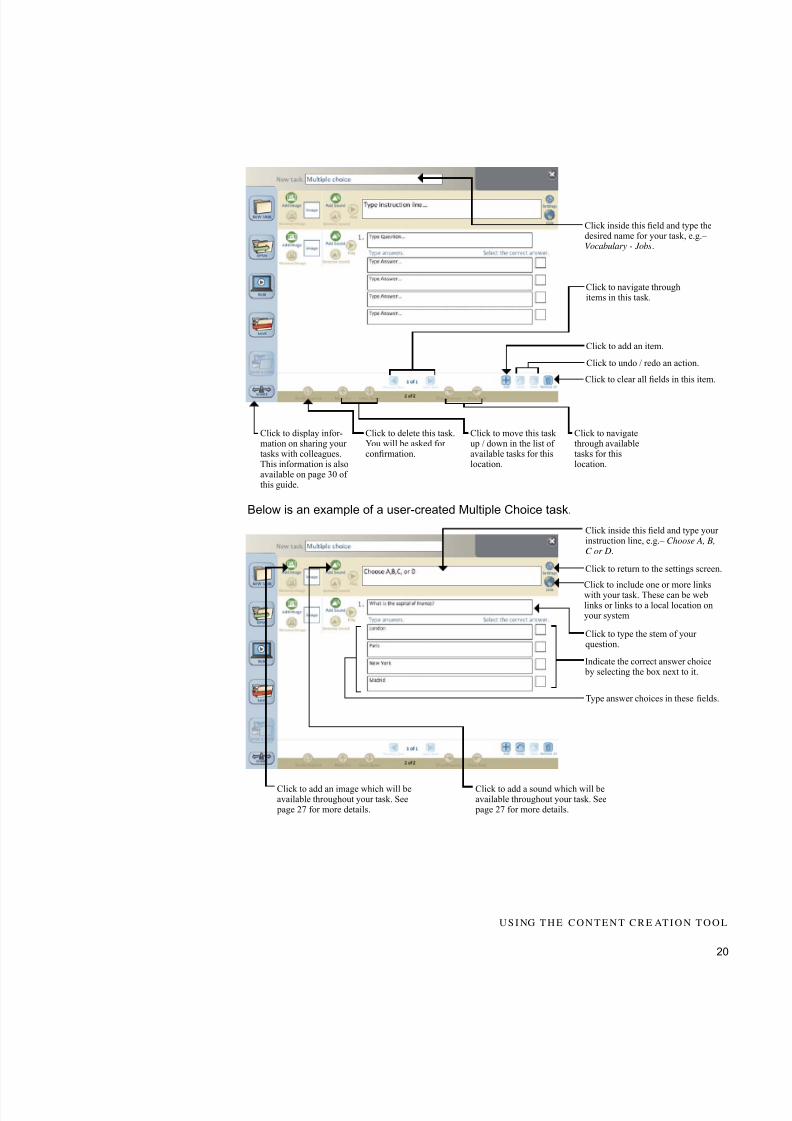
1. Multiple choice tasks
Click NEW TASK, then click MULTIPLE CHOICE.
The multiple choice settings screen appears:
ABC task are typical multiple choice tasks.
Y/N/ANL ta sks are multiple choice tasks in which students are askedto decide if a statement is correct (Y), incorrect (N), or there is notenough information to answer it (ANL) based on input from text.
Answer bu ttons creates multiple choice tasks much like ABC, but the whole answer is clickable.
Choose the type of buttonyou want.
You can make answer choicesappear in random order by selectingthis option (ABC and Answer
buttons type only).
Select the type of exercise you want to create here.
Set scoring options here.To create a score for a task select GRAPHICS and/or PERCENTAGE
depending on how you want the
scoring displayed.
Click DONE to continue.
U S I NG T H E C O N T E N T C R E AT I O N T O O L
7/25/2019 AllStar 1 TG
http://slidepdf.com/reader/full/allstar-1-tg 22/34
20
Click inside this field and type yourinstruction line, e.g.– Choose A, B,C or D.
Click inside this field and type thedesired name for your task, e.g.–Vocabulary - Jobs.
Click to add an item.
Click to clear all fields in this item.
Click to undo / redo an action.
Click to move this taskup / down in the list ofavailable tasks for thislocation.
Click to delete this task.You will be asked forconfirmation.
Click to display infor -mation on sharing yourtasks with colleagues.This information is alsoavailable on page 30 ofthis guide.
Click to add an image which will beavailable throughout your task. See page 27 for more details.
Click to add a sound which will beavailable throughout your task. See page 27 for more details.
Click to return to the settings screen.
Click to include one or more linkswith your task. These can be weblinks or links to a local location onyour system
Click to type the stem of yourquestion.
Type answer choices in these fields.
Indicate the correct answer choice by selecting the box next to it.
Click to navigate throughitems in this task.
Click to navigatethrough availabletasks for thislocation.
Below is an example of a user-created Multiple Choice task.
U S I NG T H E C O N T E N T C R E AT I O N T O O L
7/25/2019 AllStar 1 TG
http://slidepdf.com/reader/full/allstar-1-tg 23/34
21
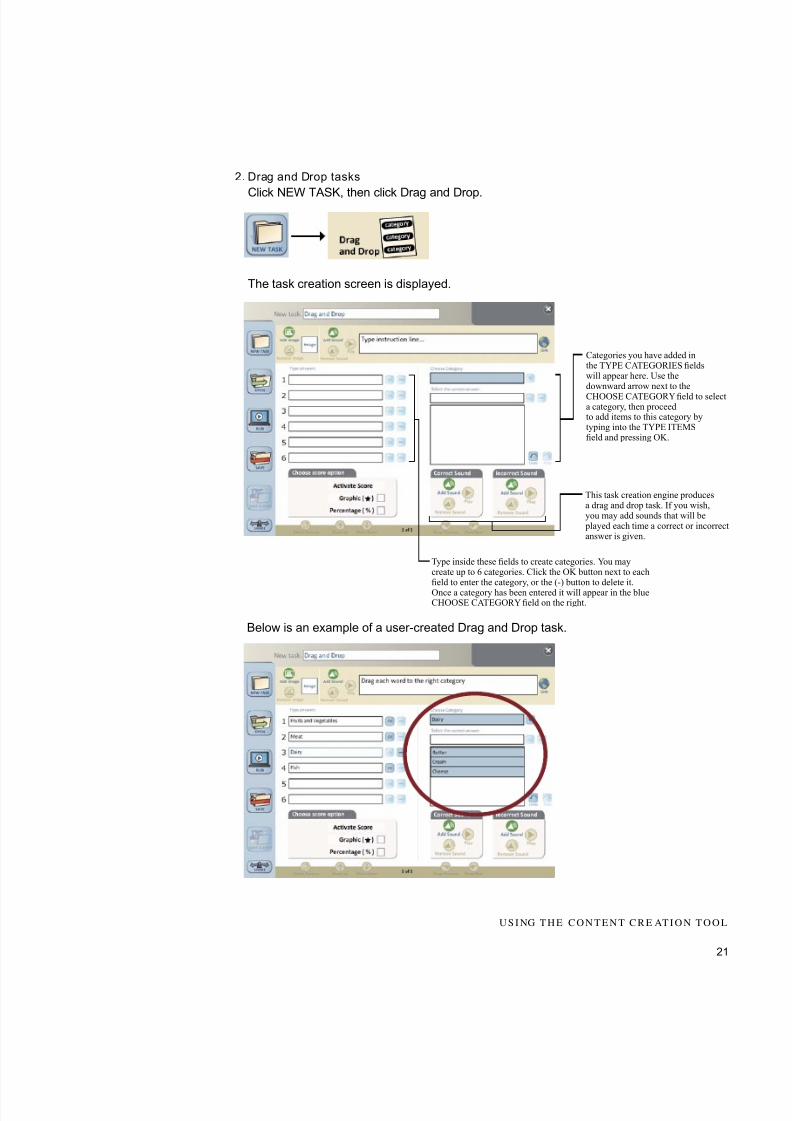
2. Drag and Drop tasks
Click NEW TASK, then click Drag and Drop.
The task creation screen is displayed.
Type inside these fields to create categories. You maycreate up to 6 categories. Click the OK button next to eachfield to enter the categor y, or the (-) button to delete it.Once a category has been entered it will appear in the blueCHOOSE CATEGORY field on the right.
Categories you have added inthe TYPE CATEGORIES fieldswill appear here. Use thedownward arrow next to theCHOOSE CATEGORY field to selecta categor y, then proceedto add items to this category bytyping into the TYPE ITEMSfield and pressing OK.
This task creation engine producesa drag and drop task. If you wish,you may add sounds that will be played each time a correct or incorrectanswer is given.
Below is an example of a user-created Drag and Drop task.
U S I NG T H E C O N T E N T C R E AT I O N T O O L

7/25/2019 AllStar 1 TG
http://slidepdf.com/reader/full/allstar-1-tg 24/34
22
3. Dual Choice tasks
Click NEW TASK, then click DUAL CHOICE.
The settings screen for the DUAL CHOICE task types
appears.
Choose the type of dual choiceexercise here. True / False tasks allow youto enter sentences which can
then be evaluated as being trueor false:
Yes / No tasks work similarlyto True / False tasks with smallchanges in style. Underline tasks allow you toenter a sentence, a part of whichis written in two ways – correctlyand incorrectly. In this task typelearners have to underline thecorrect word / phrase.
RC EATING A T/F TASK
Indicate correct answer by checkingone of these boxes.
Type item here.
USING THE CONTENT CREATION TOOL
7/25/2019 AllStar 1 TG
http://slidepdf.com/reader/full/allstar-1-tg 25/34
23
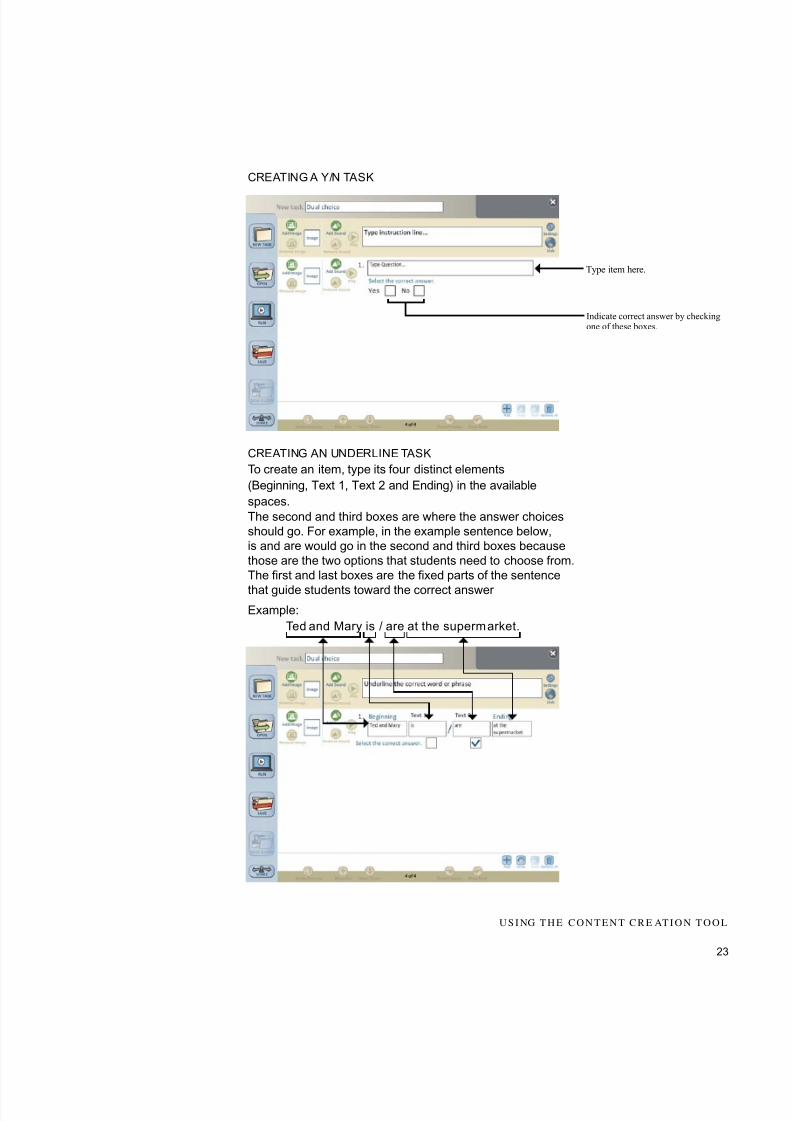
RC EATING A Y/N TASK
Indicate correct answer by checkingone of these boxes.
Type item here.
RC EATING AN UNDERLINE TASK
To create an item, type its four distinct elements
(Beginning, Text 1, Text 2 and Ending) in the available
spaces.
Example:
Ted and Mary is / are at the supermarket.
The second and third boxes are where the answer choices
should go. For example, in the example sentence below,
is and are would go in the second and third boxes because
those are the two options that students need to choose from.
The first and last boxes are the fixed parts of the sentence
that guide students toward the correct answer
U S I NG T H E C O N T E N T C R E AT I O N T O O L

7/25/2019 AllStar 1 TG
http://slidepdf.com/reader/full/allstar-1-tg 26/34
24
4. “ Click and Solve” tasks
Click NEW TASK, then click CLICK AND SOLVE.
Click and Solve tasks display a question on the screen,
and display the answer to it with one click.
Type question here.
Type answer here.
Here is an example of a user-created Click and Solve task:
U S I NG C O N T E N T C R E A T I O N T O O L
7/25/2019 AllStar 1 TG
http://slidepdf.com/reader/full/allstar-1-tg 27/34
25
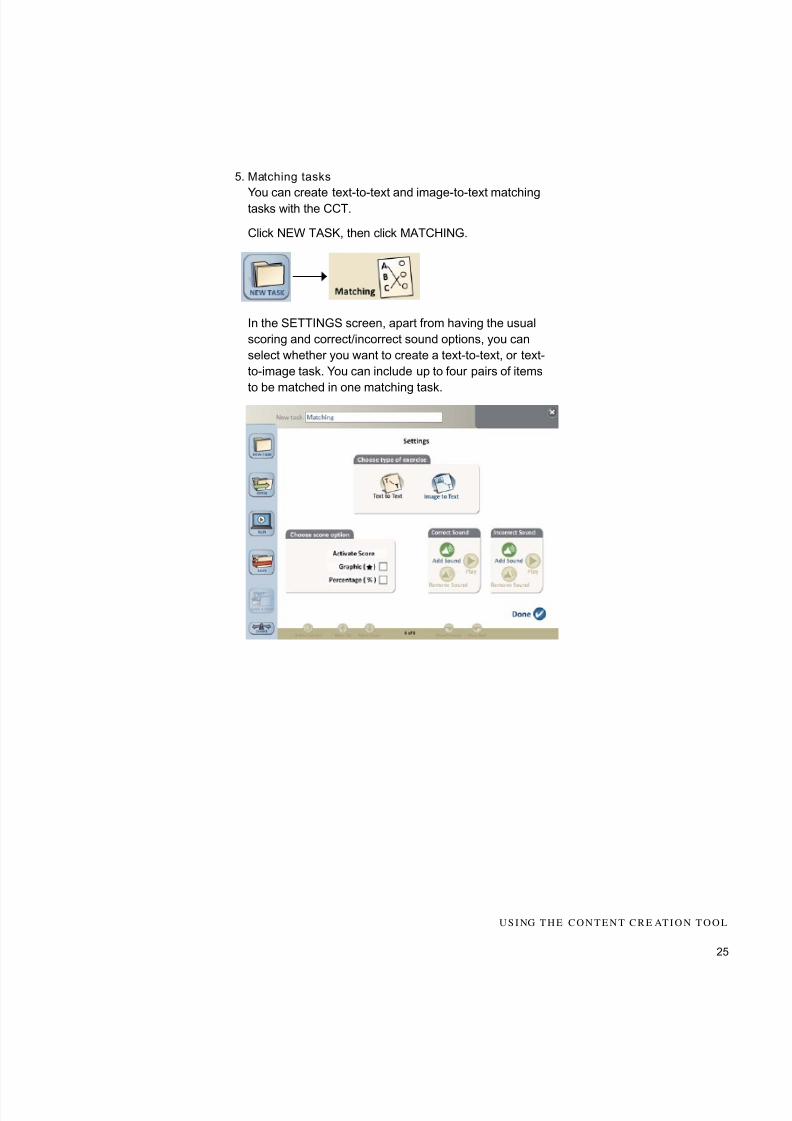
5. Matching tasks
You can create text-to-text and image-to-text matchingtasks with the CCT.
Click NEW TASK, then click MATCHING.
In the SETTINGS screen, apart from having the usual
scoring and correct/incorrect sound options, you can
select whether you want to create a text-to-text, or text-
to-image task. You can include up to four pairs of items
to be matched in one matching task.
U S I NG T H E C O N T E N T C R E AT I O N T O O L
7/25/2019 AllStar 1 TG
http://slidepdf.com/reader/full/allstar-1-tg 28/34
26
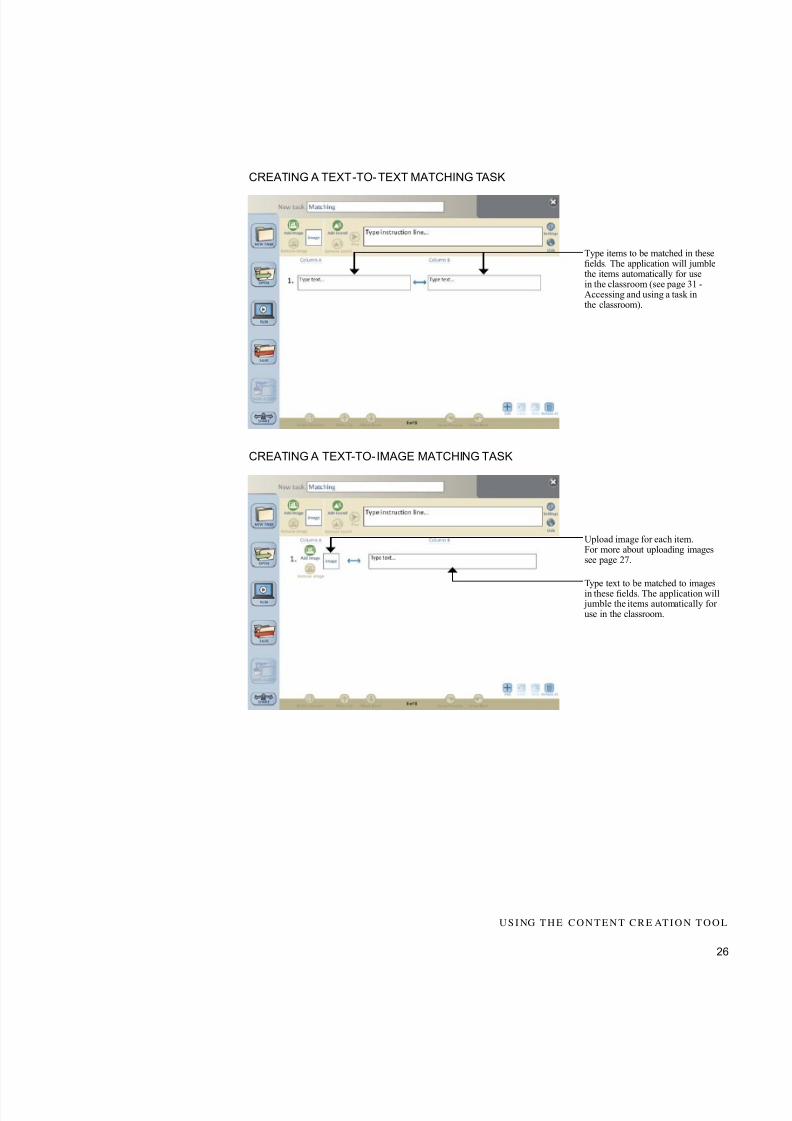
CREATING A TEXT-TO-TEXT MATCHING TASK
Type items to be matched in thesefields. The application will jumblethe items automatically for usein the classroom (see page 31 -Accessing and using a task inthe classroom).
CREATING A TEXT-TO-IMAGE MATCHING TASK
Upload image for each item.For more about uploading imagessee page 27.
Type text to be matched to imagesin these fields. The application will
jumble the items automatically for use in the classroom.
U S I NG T H E C O N T E N T C R E AT I O N T O O L
7/25/2019 AllStar 1 TG
http://slidepdf.com/reader/full/allstar-1-tg 29/34
27
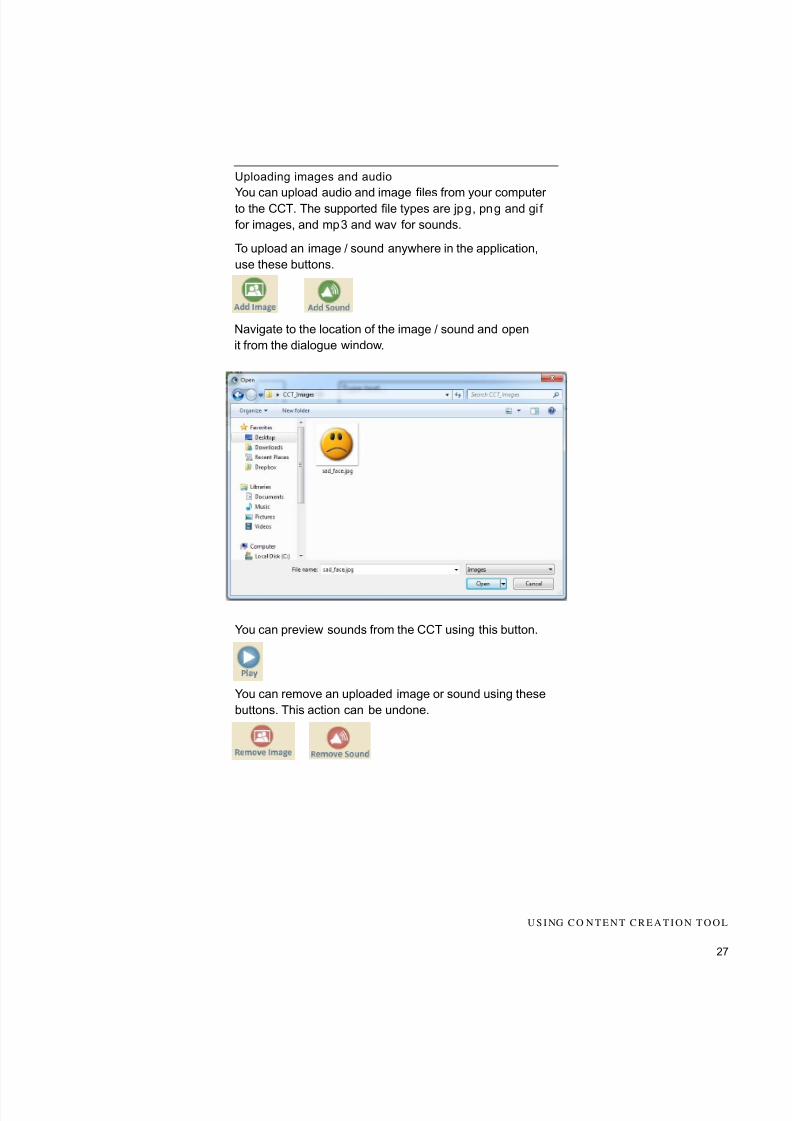
Navigate to the location of the image / sound and open
it from the dialogue window.
You can preview sounds from the CCT using this button.
You can remove an uploaded image or sound using these
buttons. This action can be undone.
Uploading images and audio
You can upload audio and image files from your computerto the CCT. The supported file types are jpg, png and gi f
for images, and mp3 and wav for sounds.
To upload an image / sound anywhere in the application,
use these buttons.
U S I NG C O N T E N T C R E A T I O N T O O L

7/25/2019 AllStar 1 TG
http://slidepdf.com/reader/full/allstar-1-tg 30/34
28
The remove image / sound buttons are only
available when you have uploaded an image
or sound.
When no image or sound has been uploaded,
they appear greyed out.Note: It is good practice to upload images and sounds that
are reasonably sized and not larger than 10MB. The CCT
will work with larger files, but the greater the size file the
more demands it puts on your computer’s RAM and CPU.
Creating your own audio files
The CCT will work with all properly structured audio files.
For your audio creation needs, the open-source and free-
to-use program Audacity is highly recommended. Audacity
may be downloaded from http://audacity.sourceforge.net/.
About royalty–free audio files
The CCT will play all correctly structured MP3 and WAVsounds, but it will not load sounds with incorrect sample
rates. Therefore, some sounds freely available on the
internet may not work. If you experience this, please
try with a different file, preferably downloaded from
a different website.
The CCT always displays thumbnails of images. Click on an
image to enlarge it, then click it again to restore thumbnailsize. Please note that thumbnails might occasionally appear
“cropped”; full-size images will display correctly.
U S I NG T H E C O N T E N T C R E AT I O N T O O L

7/25/2019 AllStar 1 TG
http://slidepdf.com/reader/full/allstar-1-tg 31/34
29
U S I NG T H E C O N T E N T C R E AT I O N T O O L
Using the LINK feature
You can include up to four links to web pages or to locallystored (e.g. videos) with the tasks you create. To do
this, click on the LINK button next to the instruction line
typing
This will bring up the Enter Link(s) tool. Type desired link(s)
in the provided, then click DONE.
To link to a local type and then enter the path
to the folder where the is contained and the name,
e.g., on a MacOS system
and on a PC system
If you are unsure what the path to the local is, locate it,
right-click it, select PROPERTIES and go to the DETAILS
tab. Scroll down until you see the “Path to folder”.Copy the contents of that and past them into the CCT
link Place your cursor at the end of the path, and add
the with its extension.
Web links can be typed or copy-pasted into the from
your web browser URL address bar.
Make sure that the URL address starts with http://
e.g. http://www.myaddress.com

7/25/2019 AllStar 1 TG
http://slidepdf.com/reader/full/allstar-1-tg 32/34
30
Preview, editing , saving & sharing a task
To preview a task to test its functionality, click onthis button:
The CCT changes to preview mode, where you can
check the functionality of your task. To go back to
editing the task, click this button:
Click SAVE to save your task. To rename your task,
please change its name in this field.
Click SAVE A COPY to create a duplicate of your
task and use it as a template to create a new one.
The task will be saved with “Copy of...” in front of its
current filename.
To share the tasks you have created with
colleagues, or to simply use them on another
machine, please follow these steps:
1. Go to DOCUMENTS.
2. Locate folder AllStar1.CUSTOM
3. COPY the whole folder or OPEN it and
SELECT THE UNITS / LESSONS / TASKS
you wish to COPY.
4. PASTE the content into your preferred
storage device (floppy drive, external USB
hard disk, etc.).
5. TRANSFER (COPY-PASTE) the content toDOCUMENTS/AllStar1.CUSTOM
folder on any other computer that has
Al l Star 1 IWB with CCT installed.
U S I NG T H E C O N T E N T C R E AT I O N T O O L

7/25/2019 AllStar 1 TG
http://slidepdf.com/reader/full/allstar-1-tg 33/34
31
S E C T I O N
Access ing & using a task in the classroom
The CCT saves each task you create so that it appearswith the Al l Star 1 task you were viewing when you
accessed the CCT.
Similarly, tasks you create on the Table of Contents (TOC)
page will be available there, and tasks you create on
subsequent menu pages will be available with those pages.
When you click Extra Tasks, the application displays a list
of items you have created in this location. Click on the taskyou want to use.
Tasks created withthis task will becomeavailable throughthis button when younavigate to this task.
U S I NG T H E C O N T E N T C R E AT I O N T O O L
7/25/2019 AllStar 1 TG
http://slidepdf.com/reader/full/allstar-1-tg 34/34
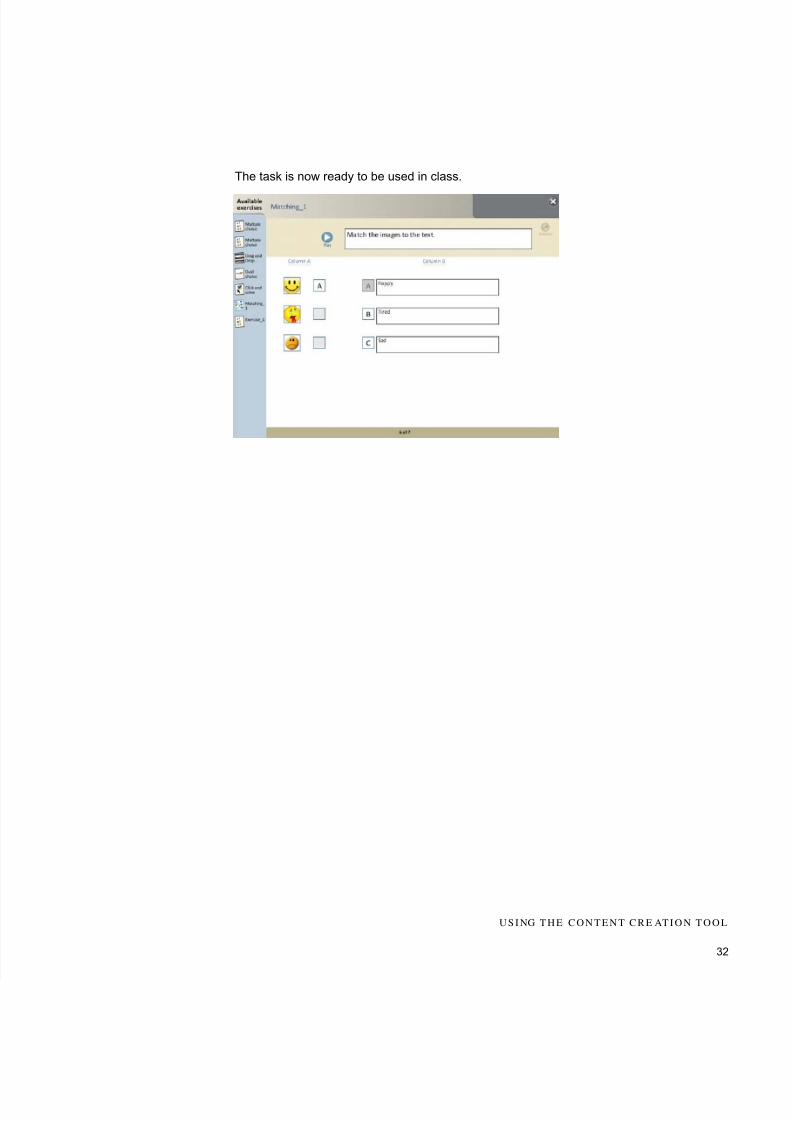
The task is now ready to be used in class.