advisor manual registration in datatel - explore your path ... · 1 southwestern community college...
TRANSCRIPT

Advisor Manual
Registration in Datatel

1
Southwestern Community College
Business Office Registration Policies
Please share the following information with your advisees:
Students receiving financial aid no longer need to come to the
business office to notify us. We do not need signatures from these
students. If they have any questions regarding their financial aid, they
should speak with the financial aid office.
Business office cannot print schedules for students. Please provide
the schedule to the student at registration. The Bookstore requires a
schedule when purchasing books.
The easiest payment method is online with a credit card at:
http://www.southwesterncc.edu/admissn/credit-card-auth.htm
Accepted credit card payment methods:
1. Online
2. In person
3. Fax
Sponsored students need to verify with Lesley Roper (ext. 395) that
their sponsorship letter has been received. They can call or come to
the cashier’s window. If their letter is not received by final
registration, then they forfeit their sponsorship payment.
Full Time Employees taking classes:
1. Need to contact Jody Woodring (ext 253) in Admissions for
application status.
2. Advisor needs to be sure to enter the class with the highest
credit hours first.
3. Pay fees.

2
To Begin:
Double Click on the Datatel Icon
Login box appears
User ID: ___________________ (ID should be entered in lowercase)
Password: __________________(Password should be entered in lowercase)
Database: collive (This will default for training purposes)
Important Note: Please remember you will be prompted to change your password every 60
days
After logging in an Alert Box will appear
Click OK
Your access may open to the ST (Student) module.
3
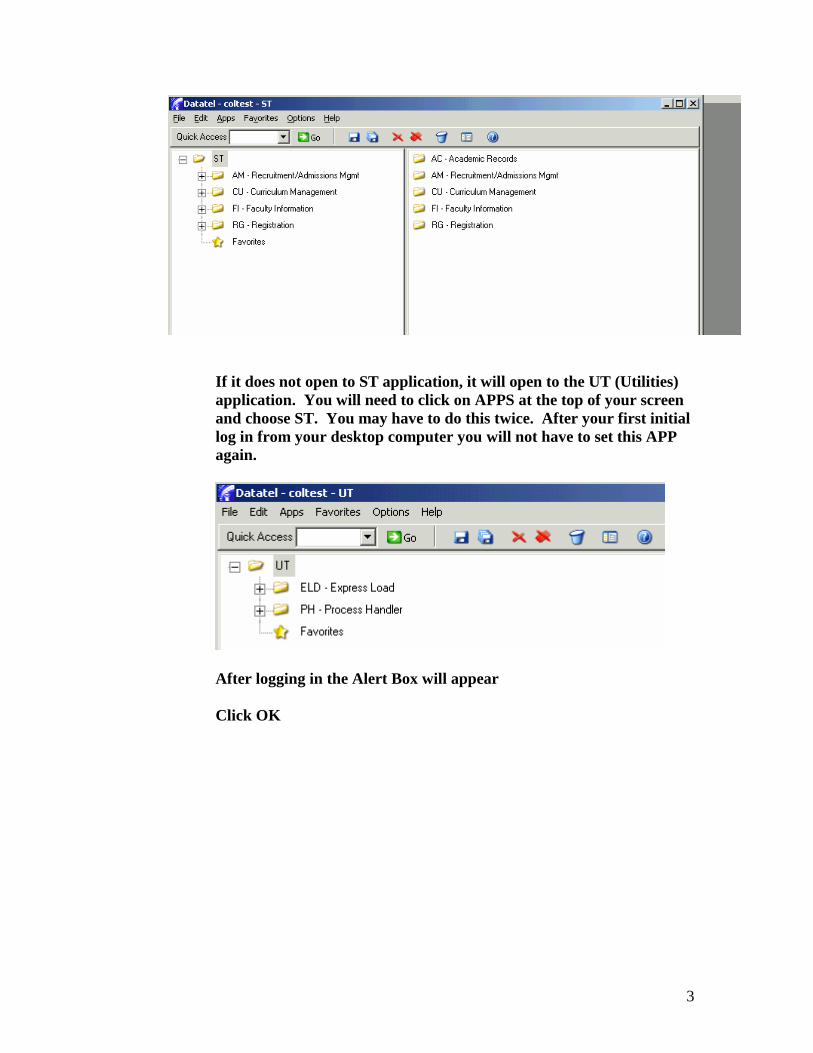
If it does not open to ST application, it will open to the UT (Utilities)
application. You will need to click on APPS at the top of your screen
and choose ST. You may have to do this twice. After your first initial
log in from your desktop computer you will not have to set this APP
again.
After logging in the Alert Box will appear
Click OK

4

5
To view student demographics type in SPRO in the mnemonic box.
This allows you to see addresses, phone #, major, SS#, colleague #, etc.
Student Lookup Box will appear
Type in student colleague #, or last name and first name, or SS #
Press Enter or Click OK

6
Student SS#, Colleague ID#, and Phone # is located in the header of the record.
Mailing address
Academic Program – Some students may have a double major - you will need to
click in the small arrows to the right of the admit status to see other majors.

7
To view student placement test scores type in TSUM.
Person Lookup box will appear
Type Student SS#, or Colleague ID#, or last name and first name
Press Enter or Click OK
TSUM screen will appear
Test and Test scores will populate
Health Occupation Aptitude Exam scores may also be listed here
X to Exit
Click Cancel
Finish or enter another student

8
To view student transcripts received type in IASU in the mnemonic box.
This screen will allow you to view what transcripts have been received from other
institutions. You will want to drill down beside the institution name to verify official
transcript receipt. The transcript received may be only an unofficial or partial. Only
official transcripts are evaluated for transfer credits.
Student lookup box will appear
Enter Student SS#, or Colleague ID#, or last name and first name on the “Students”
line.

9
To view student records type in STAC in the mnemonic box.
This allow you to see a list of graded courses, credit earned from placement tests
and also what the student is currently taking.
Student lookup box will appear
Enter Student SS#, or Colleague ID#, or last name and first name
Press enter or Click OK
Return
X to Exit
Click Cancel
Finish or enter another student

10
To view student transcript type in TRAN in the mnemonic box.
This screen will allow you to view a student’s transcript. The transcript will consist of
courses completed and those transferred into the college.
Student lookup box will appear
Enter Student SS#, or Colleague ID#, or last name and first name on the “Students”
line.
In the transcript grouping box you can either select “CU” or “ADV.” The CU
format is the official transcript. The ADV will group the courses by prefix.
The following two boxes must be set to “No” so that it will not print out to the
Registrar printer. You will not enter in or change any other information on this
screen.
Click on the save button.
On this screen make sure you type “H” in the Output Device line. Hit enter and then
save and update.

11
Save through this next screen

12
Here is what you will see if you choose CU.

13
Here is what you will see if you choose ADV.
You can print a transcript by selecting the first printer button. This will print to
your local printer.

14
To view student GPA type in STAT in the mnemonic box.
This will allow you to see a student’s GPA by semester.
Student lookup box will appear
Enter Student SS#, or Colleague ID#, or last name and first name

15

16

17
Registering a Student
To Register a Student type RGN in the mnemonics box.
Select, CUPRINT by checking the box beside it and clicking on the save button at
the bottom of the screen.
A copy of the student schedule will print automatically after you register a student
by entering the schedule and clicking the save and update buttons. The schedule will
print to the printer you have labeled as default under the printer folder in the
control panel of your computer. Make sure this is changed to the appropriate local
printer before you register a student.

18
Student Lookup Box will appear
Type the Student SS#, or Colleague ID#, or last name and first name
Press Enter of Click OK
(Check to see if the correct term is shown, see Term Box)
If the correct term is showing, enter the desired courses (example: ENG 111 SD1
You may search for courses several ways:
a. By semester, ex. 2006FA or 2007SP -this will show all the
courses for that semester which are offered
b. By course prefix , ex. ENG -this search will limit results to
courses with only that prefix
c. By course prefix and number, ex. ENG 111 -this search will list
all the sections for that particular course
d. By course prefix, number, and section, ex. ENG 111 SD1- this
will show this specific course only

19
If a different term is showing, enter the correct term, on the first available line,
space, and then the Courses to be registered.
Continue entering courses until all courses have been entered.
Click Save
Click Update

20
To look up a course to see what sections are available type in only the course prefix
and number, and it will show the capacity and availability on the right side of the
screen.
Under the status section if you see “Wlst” this means the course has a waiting list
because it has met its capacity. The number under availability in this case is
referring to the number of slots on the waitlist.
If you choose a course that has a waitlist the following screen will appear. If there
are spaces available on the waitlist then you will have the option to click on “W.” If
there are not spaces available then it will prompt you that the course cannot be
registered.

21
From the RGN Screen you can access other screens by detailing on
Other Info
If you have a student that has a registration flag, you may click on Other Info on the
RGN screen and choose PERC (Person Restriction) and click OK.

22
The PERC screen will appear. Then you can detail on the restriction and know what
the restriction is. Send the student to the specified office.
X to Exit
Cancel
Finish

23
VERY IMPORTANT NOTE: When completing a drop/add of classes with the same
number of hours, please remember to do both (drop/add) in the same session to prevent
the student from incurring a 25% charge for the drop.
To drop classes for students:
Go to RGN
Student Lookup box will appear
Enter Student SS#,or Colleague ID#, or last name and first name
Click on the Stat field, for the class or classes to be dropped
A box will populate and choose “X” for Delete during Pre-registration and on
Registration Day. Press enter . During the Drop-Add period,
you will need to choose “D” in the stat box.
Click SAVE
Click Update
This will generate another printout for the student at your local printer.

24
To add classes for students:
Go to RGN
Student Lookup box will appear
Enter Student SS#, or Colleague ID#, or last name and first name
Click on the line below the last class listed and enter the class to be added and
return
Click SAVE
Click Update
This will generate another printout for the student at your local printer

25
How to View/Print a Section Roster
To View a roster on Colleague if you do not need to print you can go to the RSTR (Academic
Roster Inquiry) mnemonic.
After typing the RSTR mnemonic in the quick access box at the top of the screen you will see a
lookup box for course section. You will then enter in the course prefix number and section.
Select “Ok”

26
You should then be able to see a screen that lists the student names and Colleague ID numbers
that are registered for the course.

27
To Print a roster you will need to go to the SROS (Section Roster) mnemonic. This screen offers
you various different criteria to enter on the screen. The simplest way is to type in the term
2007FA and then under sections list the course and then save and update.

28
Once you save it will take you to another screen that shows you how it will be sorted by just save
and update through this screen.

29
On the next screen the first line will state "Output Device" change that "P" to an "H" because
the "P" status sets it to print to a line printer and you want to print it to a local one. Once you
have done this select save and update.

30
Next save and update through the next screen that comes up.

31
You will then see a box come up that says processed.
Select the finish button.
32
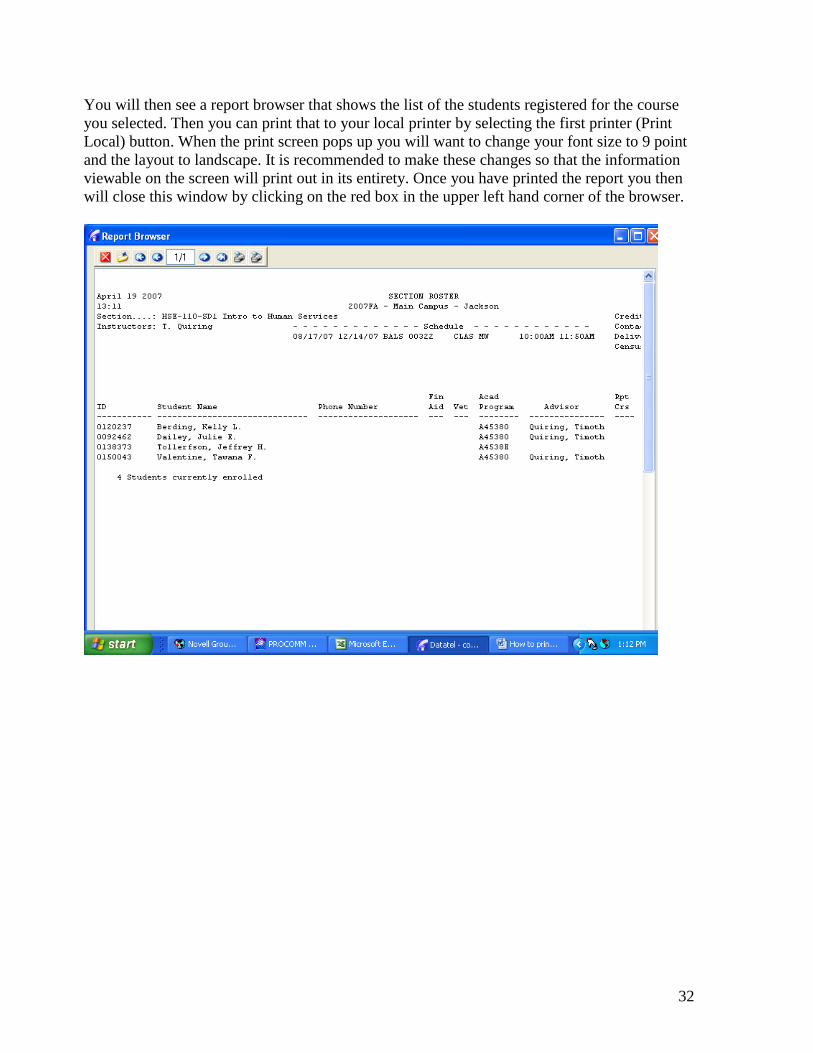
You will then see a report browser that shows the list of the students registered for the course
you selected. Then you can print that to your local printer by selecting the first printer (Print
Local) button. When the print screen pops up you will want to change your font size to 9 point
and the layout to landscape. It is recommended to make these changes so that the information
viewable on the screen will print out in its entirety. Once you have printed the report you then
will close this window by clicking on the red box in the upper left hand corner of the browser.

33
TROUBLESHOOTING
Restriction Message: Inactive Program
Look up student to register

34
This alert lets you know this student does not have an active application on file in
admissions.
35
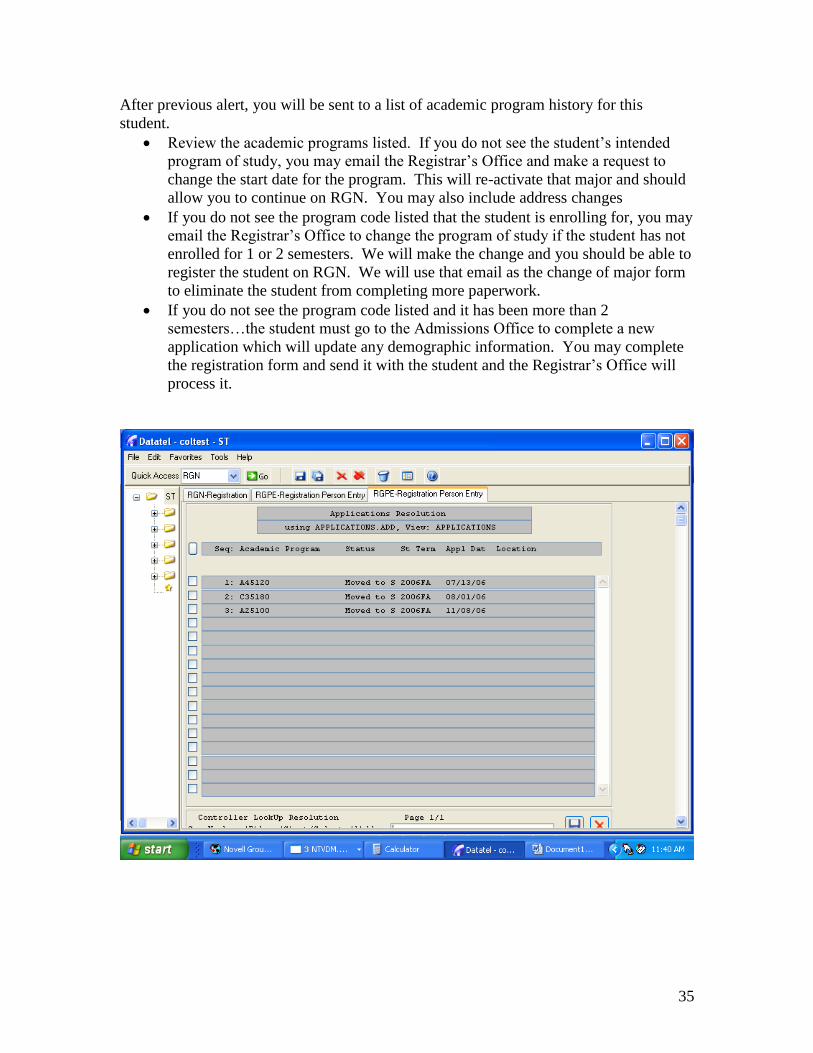
After previous alert, you will be sent to a list of academic program history for this
student.
Review the academic programs listed. If you do not see the student’s intended
program of study, you may email the Registrar’s Office and make a request to
change the start date for the program. This will re-activate that major and should
allow you to continue on RGN. You may also include address changes
If you do not see the program code listed that the student is enrolling for, you may
email the Registrar’s Office to change the program of study if the student has not
enrolled for 1 or 2 semesters. We will make the change and you should be able to
register the student on RGN. We will use that email as the change of major form
to eliminate the student from completing more paperwork.
If you do not see the program code listed and it has been more than 2
semesters…the student must go to the Admissions Office to complete a new
application which will update any demographic information. You may complete
the registration form and send it with the student and the Registrar’s Office will
process it.

36
Should you select one of the previous programs listed it will give you this Alert letting
you know the student’s major is not active.

37
Restriction Message: Alert for Academic Level
Continuing Education Student
This error occurred because she is only listed with Con Ed. She does not have a current
academic program for CU.

38

39
After you see this rule, save & update…you will return to RGN…the course you tried to
enter will disappear from the schedule. This student needs to go to Admissions and
submit a curriculum application.

40
Restriction Message: Petitions for Health Programs
When you receive the alert below, please contact the Admissions Office to take care
of removing the petition if appropriate.

41
Additional Restrictions
This is a few Message/Rules you may see when you go to register a student who has a
library fine, parking fine, transcript hold, etc… The student must go to the appropriate
department or the advisor must contact the department to take care of restrictions before
he/she may register.

42