datatel colleague learning guide: basic navigation for purchasers
TRANSCRIPT

1
Last Update 10/28/2011
W
Datatel Colleague
Learning Guide: Basic Navigation
For Purchasers
2
Last Update 10/28/2011
Introduction The purpose of this document is to acquaint you with Colleague software’s Web User Interface.
Colleague software is a product of Datatel, a company that provides administrative software to higher
education. The College uses this software to collect and report upon administrative data, including
student, alumni, accounting and human resource information.
Please contact Applications Development with any questions concerning this document at 330-263-2304
(Ext 2304 on campus).
3
Last Update 10/28/2011
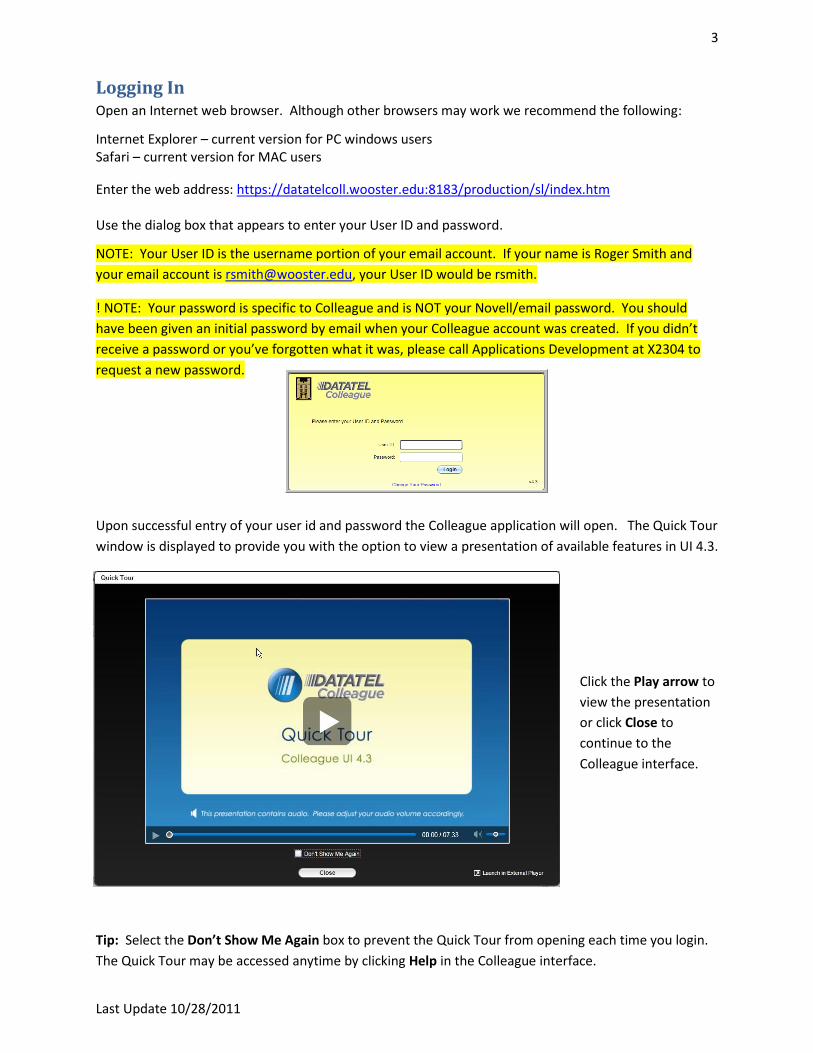
Logging In Open an Internet web browser. Although other browsers may work we recommend the following:
Internet Explorer – current version for PC windows users Safari – current version for MAC users
Enter the web address: https://datatelcoll.wooster.edu:8183/production/sl/index.htm Use the dialog box that appears to enter your User ID and password.
NOTE: Your User ID is the username portion of your email account. If your name is Roger Smith and
your email account is [email protected], your User ID would be rsmith.
! NOTE: Your password is specific to Colleague and is NOT your Novell/email password. You should
have been given an initial password by email when your Colleague account was created. If you didn’t
receive a password or you’ve forgotten what it was, please call Applications Development at X2304 to
request a new password.
Upon successful entry of your user id and password the Colleague application will open. The Quick Tour
window is displayed to provide you with the option to view a presentation of available features in UI 4.3.
Click the Play arrow to
view the presentation
or click Close to
continue to the
Colleague interface.
Tip: Select the Don’t Show Me Again box to prevent the Quick Tour from opening each time you login.
The Quick Tour may be accessed anytime by clicking Help in the Colleague interface.
4
Last Update 10/28/2011
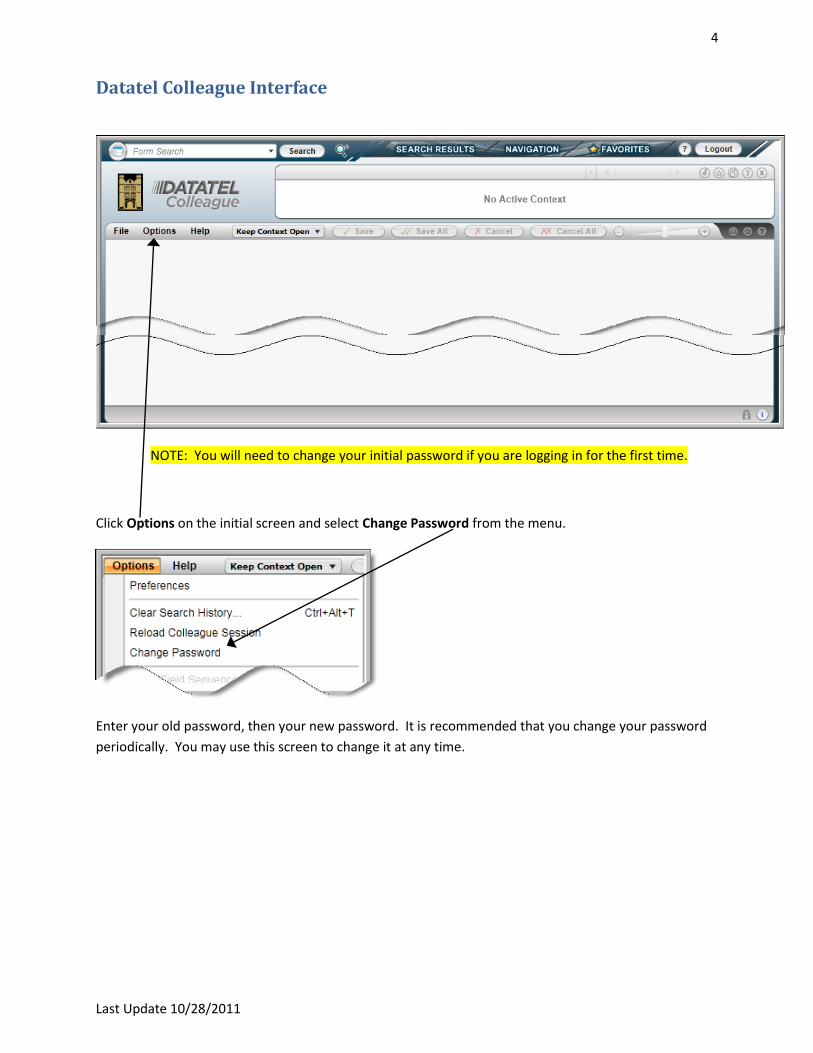
Datatel Colleague Interface
NOTE: You will need to change your initial password if you are logging in for the first time.
Click Options on the initial screen and select Change Password from the menu.
Enter your old password, then your new password. It is recommended that you change your password
periodically. You may use this screen to change it at any time.

5
Last Update 10/28/2011
Sections of the Colleague Web Application
Search Area Context Area Form Area
Search Area
The Search area allows you to search by form.

6
Last Update 10/28/2011
Form Search Note: The REQM (Requisition Maintenance) form used in this document is for illustration purposes only.
This is not intended as a guide or replacement for purchasing training.
Forms may be accessed by searching or navigating through the menus.
Forms can be located by one of two methods:
If you know the screen mnemonic (such as REQM), type it in the Forms search area
Type a word from the forms title (such as requisition) in the Forms search area
Click the Search button or press the Enter key after entering the required information. The desired form
will open immediately if the mnemonic has been entered in the search area.
The ‘Search Results Tab’ will display all the results of your search if a word from the forms title has been
entered in the search area.
Forms are opened by one of three methods:
Double click the record
Single click the record, then click the Open button at the bottom
Enter the record number (1 - 4 in example) in the Select # box, then click the Open button or
Press the Enter key.
The Search Results Tab may be closed by clicking the ‘Up arrows’ (circled) in the lower left corner,
clicking away from the form, or pressing the Esc key.

7
Last Update 10/28/2011
The Navigation Tab opens the Colleague menu structure for browsing all forms and menus to which you
have access.
Click to browse all menus and forms in an application.
Forms are opened by one of two methods:
Double click the record (REQM in example)
Single click the record, then click the Open button at the bottom
The REQM (Requisition Maintenance) form opens.
8
Last Update 10/28/2011
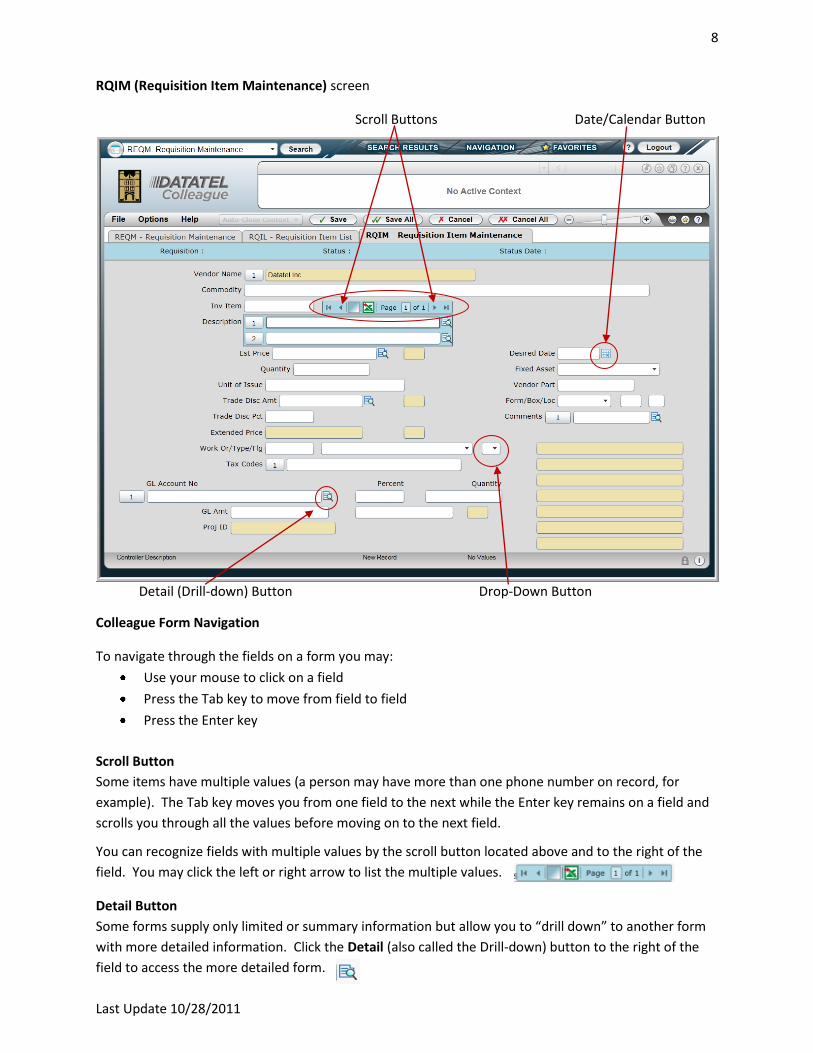
RQIM (Requisition Item Maintenance) screen
Scroll Buttons Date/Calendar Button
Detail (Drill-down) Button Drop-Down Button
Colleague Form Navigation
To navigate through the fields on a form you may:
Use your mouse to click on a field
Press the Tab key to move from field to field
Press the Enter key
Scroll Button
Some items have multiple values (a person may have more than one phone number on record, for
example). The Tab key moves you from one field to the next while the Enter key remains on a field and
scrolls you through all the values before moving on to the next field.
You can recognize fields with multiple values by the scroll button located above and to the right of the
field. You may click the left or right arrow to list the multiple values.
Detail Button
Some forms supply only limited or summary information but allow you to “drill down” to another form
with more detailed information. Click the Detail (also called the Drill-down) button to the right of the
field to access the more detailed form.
9
Last Update 10/28/2011
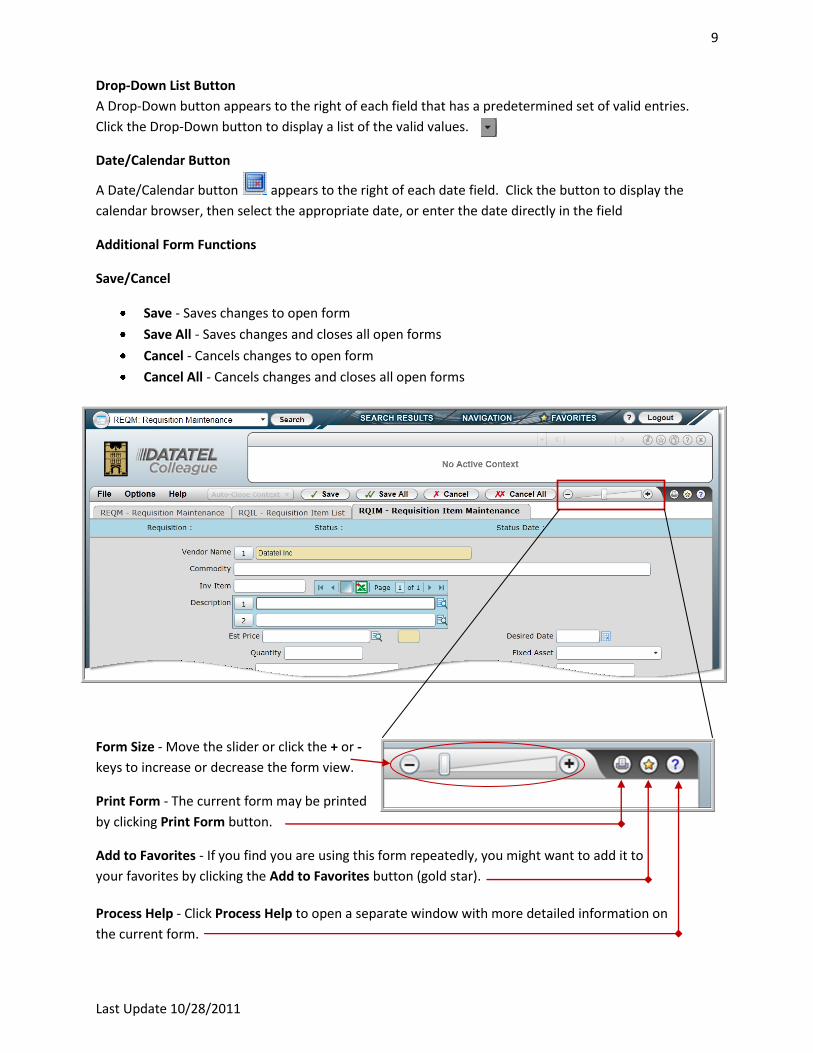
Drop-Down List Button
A Drop-Down button appears to the right of each field that has a predetermined set of valid entries.
Click the Drop-Down button to display a list of the valid values.
Date/Calendar Button
A Date/Calendar button appears to the right of each date field. Click the button to display the
calendar browser, then select the appropriate date, or enter the date directly in the field
Additional Form Functions
Save/Cancel
Save - Saves changes to open form
Save All - Saves changes and closes all open forms
Cancel - Cancels changes to open form
Cancel All - Cancels changes and closes all open forms
Form Size - Move the slider or click the + or -
keys to increase or decrease the form view.
Print Form - The current form may be printed
by clicking Print Form button.
Add to Favorites - If you find you are using this form repeatedly, you might want to add it to
your favorites by clicking the Add to Favorites button (gold star).
Process Help - Click Process Help to open a separate window with more detailed information on
the current form.

10
Last Update 10/28/2011
Multiple Forms
When detailed into multiple forms you may select any tab across the top of the window to view data on
a prior form, BUT YOU CANNOT MAKE CHANGES TO ANY DATA EXCEPT ON THE RIGHTMOST (CURRENT)
FORM.
You must save changes or cancel changes to the current form and navigate to the prior form to make
changes there. In the example below REQM was the original form accessed, RQIL was detailed into from
REQM and RQIM was detailed into from RQIL. RQIM is the current form.
Additional Features
The Favorites Tab contains all forms
and vendors you have saved as
favorites. Forms and vendors can be
saved to Favorites by clicking the Add
to Favorites (gold star) button in the
context area for vendors or the UI
Form Area for forms. Double click to
open the desired vendor or form.

11
Last Update 10/28/2011
The Window Help Button (?) will open a
separate window or tab containing
information regarding the overall Web
application. This includes additional
information about the various sections,
tabs, and options available on the UI.
The Logout Button is located at the far right of the Tab Area.
Please be sure to logout before closing your browser window.