adventnet manageengine opmanager 7 :: user...
TRANSCRIPT


AdventNet ManageEngine OpManager 7 :: User Guide
AdventNet, Inc. 1
Table Of Contents
MANAGEENGINE OPMANAGER - NETWORK MONITORING SOFTWARE.......... 5
GETTING STARTED ................................................................................................. 6
Starting OpManager ............................................................................................................ 6 Enabling SSL in OpManager ............................................................................................... 7
REGISTERING OPMANAGER.................................................................................. 8
Migrating Database.............................................................................................................. 9 Data Backup and Restoration............................................................................................ 10 Changing Ports in OpManager .......................................................................................... 11 What Should Be Monitored?.............................................................................................. 12 Monitoring Interval for a Device Category ......................................................................... 13
DISCOVERY ............................................................................................................ 14
Add Credentials ................................................................................................................. 14 Discovering Networks Using OpManager.......................................................................... 15
Discover Individual Devices............................................................................................... 16
MANAGING DEVICES............................................................................................. 17
Managing and Unmanaging a Device................................................................................ 17 Device Snapshot................................................................................................................ 18 Viewing Asset Details ........................................................................................................ 20 Viewing Installed Software................................................................................................. 21 Configuring Additional Device Properties .......................................................................... 22 Configuring Additional Interface Properties ....................................................................... 23
CLASSIFYING AND MAPPING THE DEVICES...................................................... 24
Classification and Device Templates................................................................................. 24 Using Interface Templates................................................................................................. 25 Categorization into Default Maps....................................................................................... 26 Adding New Infrastructure Views....................................................................................... 27 Integrating Google Maps ................................................................................................... 28
Business Views.................................................................................................................. 29 Sorting Devices in Maps.................................................................................................... 31 Different Types of Map Views............................................................................................ 32 Import Devices................................................................................................................... 33
AdventNet ManageEngine OpManager 7 :: User Guide
AdventNet, Inc. 2
MANAGING USERS................................................................................................ 34
Create New Users ............................................................................................................. 34 Changing User Passwords ................................................................................................ 35 Removing Users ................................................................................................................ 36
MONITORING NETWORK RESOURCES............................................................... 37
Monitoring CPU, Memory, Disk Using SNMP.................................................................... 37 Monitoring Resources Using WMI ..................................................................................... 38 Monitoring Resources Using CLI ....................................................................................... 39 Adding More Monitors........................................................................................................ 40 Adding Custom Monitors ................................................................................................... 41 Device-specific Monitors.................................................................................................... 42 Viewing Process Diagnostics............................................................................................. 43 Monitoring Packet Loss for Devices .................................................................................. 44 Monitoring Packet Loss for Devices .................................................................................. 44 Monitoring Response Time of Devices .............................................................................. 45 Monitoring TCP Services ................................................................................................... 46 Monitoring TCP Services in a Device ................................................................................ 47 Monitoring Windows Services............................................................................................ 48 Adding New Windows Service Monitors ............................................................................ 49 Active Directory Monitoring................................................................................................ 50 Exchange Server Monitoring ............................................................................................. 51 Monitoring URLS for Availability ........................................................................................ 54 Associating URL Monitors to Servers ................................................................................ 55
ALERTING............................................................................................................... 56
Managing Faults in Network .............................................................................................. 56 Alert Actions....................................................................................................................... 58
Receiving SNMP Traps in OpManager.............................................................................. 60 Processing SNMP Traps into Alarms ................................................................................ 61
Configuring Mail Server Settings ....................................................................................... 64 Configuring Pxoxy Server Settings .................................................................................... 65 Configuring SMS Server Settings ...................................................................................... 66 Configuring Email Alerts .................................................................................................... 67 Using a Run Program Notification Profile .......................................................................... 69 Creating a Sound Notification Profile................................................................................. 71
AdventNet ManageEngine OpManager 7 :: User Guide
AdventNet, Inc. 3
Modifying and Deleting Notification Profiles ...................................................................... 72 Associating Notification with Managed Devices ................................................................ 73
INTEGRATING WITH OTHER ME APPLICATIONS............................................... 74
Integrating with NetFlow Analyzer ..................................................................................... 74 Integrating with ServiceDesk Plus ..................................................................................... 75 Integrating with DeviceExpert ............................................................................................ 76 Integrating with Firewall Analyzer ...................................................................................... 77
OTHER UTILITIES AND TOOLS............................................................................. 78
Configuring Database Maintenance .................................................................................. 78 Scheduling Downtime........................................................................................................ 79 Scheduling Reports ........................................................................................................... 80 Using the Quick Configuration Wizard............................................................................... 81 MIB Browser: Overview ..................................................................................................... 82
REPORTING............................................................................................................ 84
About Reports.................................................................................................................... 84 Viewing Device Health Report at a Glance........................................................................ 85 Custom Reports................................................................................................................. 86
APPENDIX............................................................................................................... 88
Installing SNMP Agent on Windows System ..................................................................... 88 Installing SNMP on Linux Systems.................................................................................... 90
Installing SNMP Agent on Solaris Systems ....................................................................... 91 Configuring SNMP Agents................................................................................................. 92 Configuring SNMP Agent in Cisco Devices ....................................................................... 95 Configuring SNMP Agent in Lotus Domino Server ............................................................ 96
Configuring SNMP Agent in MSSQL Server...................................................................... 97 Configuring SNMP Agent in Oracle Server........................................................................ 98

5
ManageEngine OpManager - Network Monitoring Software With the growing need for the network monitoring software in the IT industry, OpManager has been built to satisfy the needs of network administrators by monitoring servers, routers, switches, firewalls, printers, critical services and applications from a single console. Network Monitoring Software ManageEngine OpManager is a comprehensive network monitoring software that provides the network administrators with an integrated console for managing routers, firewalls, servers, switches, and printers. OpManager offers extensive fault management and performance management functionality. It provides a lot of out-of-the-box graphs and reports, which give a wealth of information to the network administrators about the health of their networks, servers and applications. OpManager's network monitoring functionality includes the following: Network Monitoring: OpManager discovers switches, routers and firewalls in the network during the network discovery automatically and monitors the critical parameters such as the traffic rate, error and discards rate, buffer hits and misses and so on. You can get the availability report of each port and interface. Using the Switch Port Mapper tool, you can get the list of devices connected to each port of the switch. You can also create your own views and draw the diagram to virtually represent your network and get the availability of the interfaces visually. Server Monitoring: OpManager allows you to classify devices as servers and desktops. This facilitates separating critical servers from end-user workstations and allows for more meaningful management. You can manage Windows Event Logs and Windows Services. Applications and Services Monitoring: OpManager discovers and actively monitors services and applications running in the servers. Out-of-the-box support is provided for services such as Web, HTTPS, FTP, IMAP, LDAP, Telnet, MySQL, MS-Exchange, SMTP, POP3, WebLogic, etc., and applications such as MSSQL, MS Exchange, Oracle and Lotus. Special add-ons are available for monitoring Exchange 2000/2003 and Active Directory Services. URL Monitoring: OpManager monitors your Web sites, both global URLs and URLs in the servers, and promptly notifies you when the host becomes unavailable. Fault Management: OpManager detects faults in the network through periodical status polling and generates color-coded alarms for the faults. OpManager can also be configured to notify the administrator about the fault detected in the network. Performance Management: OpManager measures the performance of the network hardware and software, such as the bandwidth, memory, disk and CPU utilization, and service response time by collecting data at regular intervals. These data are provided in the form of reports and graphs to the administrators. The threshold limits can be configured to pro-actively monitor the critical parameters in the managed devices.
AdventNet ManageEngine OpManager 7 :: User Guide
AdventNet, Inc. 6
Getting Started Starting OpManager After installation, all the OpManager-related files will be available under the directory that you choose to install OpManager. This is referred to as OpManager Home directory.
• Starting OpManager on Windows • Starting OpManager on Linux • Connecting the Web Client
On Windows Machines If you have chosen to install OpManager as Windows service, you will be prompted to start the service after successful installation. The Web Client is invoked automatically on installing as a Service. Enter the log-on details. The default user name and password is 'admin' and 'admin' respectively. To later start OpManager as a Windows Service, follow the steps below:
1. Click Start, point to Settings, and then click Control Panel. 2. Under Administrative Tools, select Services. 3. In the details pane, right-click ManageEngine OpManager and click Start.
To stop the ManageEngine OpManager service, right-click the ManageEngine OpManager service in the Services window and click Stop. On Windows machines, an icon is displayed on the system tray to manage the application. You can start the client, start the server, and shut down the server using this icon. On Linux Machines
1. Log in as 'root' user. 2. Execute the StartOpManagerServer.sh file present in the <OpManager Home>/bin directory. 3. Once the server is started successfully, execute StartOpManagerClient.sh to start the client.
In the displayed login window, type the User Name and Password and press Enter. To stop OpManager running on a linux machine, execute the ShutDownOpManager.sh file present in the <OpManager Home>/bin directory. Type the User Name and Password in the Shut Down OpManager window and press Enter. Connecting the Web Client
1. Open a JavaScript-enabled Web browser such as Internet Explorer or Mozilla Firefox. 2. Type https://<host_name>:<port_number> in the address bar and press Enter. Here,
<host_name> is the name of the machine in which OpManager is running and <port_number> is the port that you have chosen to run OpManager Web Server during installation.
3. Type the User Name and Password and click Login. The default user name and password are 'admin' and 'admin' respectively.
Alternatively, if the OpManager server is running on Windows machines, you can start the Web client using Start > Programs > ManageEngine OpManager > OpManager Web Client. [OR] Right-click the tray icon and select Start Client option. If you have migrated to OpManager 7 from version 6, you can enable SSL after migration.
AdventNet ManageEngine OpManager 7 :: User Guide
AdventNet, Inc. 7
Enabling SSL in OpManager OpManager 7 (build 7010 onwards) supports SSL. All the users who have been using version 6 can now migrate to version 7 and enable SSL. Here are the steps to enable SSL:
1. Stop OpManager Service. 2. Open a command prompt and change directory to /opmanager/bin. 3. Execute the script OpManagerService.bat with -r option as shown below:
OpManagerService.bat -r This removes the Service entry.
4. Rename the folder called apache under /opmanager to apache-old. 5. Download the SSL-enabled Apache from the following link:
http://bonitas.adventnet.com/opmanager/12Sep2007/apache.zip
6. Extract the zip file on /opmanager folder such that a new apache folder is seen under /opmanager.
7. From the command prompt, with /opmanager/bin as the current directory, execute the script ssl_gen.bat. This creates the SSL Certificate.
8. Now, execute the OpManagerService.bat script once again, but with the argument as -i as shown below. This recreates the OpManager Service. OpManagerService.bat -i
9. Restart OpManager Service and connect as https://<opmanager host name or IP address>:<port number>. For instance, if the host name is OpM-Server and the port is 80, you will connect as https://OpM-Server:80
The WebClient is now SSL-enabled.

AdventNet ManageEngine OpManager 7 :: User Guide
AdventNet, Inc. 8
Registering OpManager You can register OpManager by applying the license file that you receive from AdventNet. To apply the license, follow the steps given below:
1. Click Register at the top right corner of the client page. 2. Click Browse and choose the license file from the location it is saved. 3. Click the Register button to apply the license file and close.
Should you encounter any errors when applying the license, contact Support with the license error code.
AdventNet ManageEngine OpManager 7 :: User Guide
AdventNet, Inc. 9
Migrating Database OpManager supports MySQL and MSSQL as the backend database. At a later time, you can choose to migrate from one database to another. Here are the steps: Migrating from MySQL to MSSQL Prerequisites
• The Build Number of OpManager must be 6000 or higher. • MSSQL database must be installed as this is not bundled with OpManager.
Steps to migrate are,
1. Stop OpManager again and take a backup of the data using BackupDB.bat present under /bin/backup directory .
2. Select Start --> Programs --> ManageEngine OpManager --> DB Manager --> DB Configuration.
3. A DB Configuration window pops up. Select MSSQL option. 4. Configure the following information:
1. DB Host : The name or the IP address of the machine where MSSQL is installed. 2. Port: The port number in which OpManager must connect with the database. Default
is 1433. 3. User Name and Password: The user name and password with which OpManager
needs to connect to the database. 4. Driver Jars: Specify the path of the Database driver 5. Click OK.
5. Restore the data using RestoreDB.bat present in /bin/backup directory and restart OpManager.
Refer to our online knowledgebase article to configure Microsoft MSSQL JDBC driver.
AdventNet ManageEngine OpManager 7 :: User Guide
AdventNet, Inc. 10
Data Backup and Restoration Backup To take a backup of the data and configurations in OpManager,
• Go to <OpManager Home>/bin/backup directory • Execute BackupDB.bat/sh to start the data backup
Once the backup is over, a directory backup is created in <OpManager Home>, and the backup file with .data extension is placed in this directory. The name of the backup file contains the date and time at which backup is taken. Example: BackUp_FEB28_2005_15_51.data Restoration To restore the backed up data,
• Go to <OpManager Home>/bin/backup directory • Execute RestoreDB.bat/sh with the backup file name as argument. See example below:
C:\<OpManager Home>\bin\backup>RestoreDB.bat BackUp_FEB28_2005_15_51.data
During restoration, the existing tables are dropped, new tables are created, and the data is restored in all the tables.
AdventNet ManageEngine OpManager 7 :: User Guide
AdventNet, Inc. 11
Changing Ports in OpManager You will be prompted to change Web Server port during installation. You can change it after installation. The script for changing the Web Server port number, ChangeWebServerPort (in Windows this will be a .bat file and in Linux, .sh file) is available under the <OpManager Home>/bin directory. The steps to change the port number are as follows:
1. Stop the OpManager server. If you are running OpManager as Windows service, stop the service.
2. Execute the script as follows: In Windows, ChangeWebServerPort <old_port_number> <new_port_number> In Linux, sh ChangeWebServerPort.sh <old_port_number> <new_port_number> Here, old_port_number is the port number you specified during installation and new_port_number is the one where you want to run the Web server.
3. Start the OpManager server. Changing Other Ports You can also change the port by editing the value of WEBSERVER_PORT=80 in the file /conf/Port.properties. You can change the following ports too in this file if the default ports are occupied: WEBCONTAINER_PORT=8009 NMS_BE_PORT=2000 WEBSERVER_PORT=80 TOMCAT_SHUTDOWNPORT=8005 RMI_PORT=1099

AdventNet ManageEngine OpManager 7 :: User Guide
AdventNet, Inc. 12
What Should Be Monitored? Active network monitoring is a must to gain accurate and real-time visibility of the health of your network. However frequent monitoring can become a huge strain on your network resources as it generates a lot of traffic on the network, especially in large networks. We recommend monitoring only the critical devices on the network. This is a best practice adopted by the network administrators worldwide. Following are the components of networks that are considered critical:
• WAN Infrastructure: Routers, WAN Switches, Firewall, etc. • LAN Infrastructure: Switches, Hubs, and Printers. • Servers, Services, and Applications: Application Servers, Database servers, Active Directory,
Exchange Servers, Web servers, Mail servers, CRM Applications, etc. • Host Resources: CPU, Memory, and Disk Utilization of critical devices. • Critical Desktops and Workstations.
AdventNet ManageEngine OpManager 7 :: User Guide
AdventNet, Inc. 13
Monitoring Interval for a Device Category OpManager allows you to set a common monitoring settings for all the devices under a specific category. To do so, follow the steps given below:
1. Click the Admin tab. 2. Under Monitoring, click Monitoring Intervals. 3. To enable monitoring for a category, select the check box under Enable corresponding to the
category and type the monitoring interval in minutes, in the adjacent box. To disable monitoring a specific category, clear the respective check box.
4. Click Save to save the settings. For instance, if you want to monitor servers every minute, ensure that the check box corresponding to Servers is selected and type 1 in the adjacent box. How Frequently Should I Monitor? The general practice is to monitor critical devices more frequently than non-critical devices. Given below are the recommended monitoring intervals for small and medium-sized networks (up to 1000 devices):
• Routers and Critical Servers: 10 minutes • Switches, Hubs, and Printers: 10 - 20 minutes • Critical Services like Exchange, Active Directory: 10 - 20 minutes • Desktops and Workstations: We recommend turning off monitoring for desktops and
workstations to reduce the amount of network traffic generated by OpManager. This is done by removing selection for Desktop category in Admin > Monitoring Intervals. Alternatively, monitor them less frequently, say for every hour or 30 minutes. If there are a few critical workstations that you want to monitor, you can turn on monitoring for those devices individually.
AdventNet ManageEngine OpManager 7 :: User Guide
AdventNet, Inc. 14
Discovery Add Credentials OpManager accesses the remote devices using the protocols SNMP, CLI, or WMI. The credentials like the password/snmp community, port etc., may differ for different device types. Pre-configuring a set of credentials in OpManager helps applying them to multiple devices at a time, saving a lot of manual effort. 1.Go to Admin --> Credential Settings 2.Click New in this screen 3.Configure the following parameters and click Add to add the credentials: Credential Type: Select the relevant protocol. Name: Configure a name for the credential and also provide the description. SNMP Community & Port : For SNMP v1 and SNMP v2 protocols, configure the correct Read and Write community, and the SNMP Port. WMI: If you select WMI as the protocol, configure the Domain Name, the user name, and the password. Example:- TestDomain\TestUser Telnet/SSH: For Telnet/SSH, make sure you configure the correct login prompt, command prompt, and password prompt besides the user name and password to access the device. The SNMP credentials created is used during the intial discovery and classfications. OpManager uses these credentials to classify and add the devices into OpManager. Using Quick Configuration Wizard You can also use the Quick Configuration Wizard to associate a service to several devices at one go. Here are the steps:
1. From the Admin tab, select Quick Configuration Wizard. 2. Select the option Associate a credential to several devices and click Next. 3. All the available Credentials are listed. Select the Credential which you want to associate to
your devices. 4. Select the devices to which you want to assign the credential from the column on the left and
move them to the right. 5. Click Finish. The Credential is associated to the selected devices.
AdventNet ManageEngine OpManager 7 :: User Guide
AdventNet, Inc. 15
Discovering Networks Using OpManager You can discover devices on a network by either specifying a range or the entire network OpManager uses ICMP/Nmap to discover the devices on a network. Discover a range To discover devices from a selected range specify the start and end ip address and select the netmask for the devices to be discovered within that range.
1. Click the Admin tab. 2. Under Discovery, select Discover Devices. 3. Use IP Range: Select this option to specify the range. 4. Start IP: Specify the IP address of the device in the range from where OpManager should
start discovery. 5. End IP: Specify the IP address till which OpManager should discover. 6. Netmask: Select the correct netmask. 7. Discovery Credentials: Select the configured Credentials to be used for discovery. 8. Advanced SNMP Settings: Click here to configure an increase SNMP timeout or SNMP
retries. Discover a complete network
1. Use CIDR: Select this option to discover an entire network. 2. Network IP: Specify the Network IP to be discovered. 3. Credentials: Select the credentials and SNMP settings as mentioned above. 4. Click Discovery for the discovery to start.
Import the Devices into OpManager All the discovered devices are listed category-wise.
1. Click Import Devices to add all the devices for monitoring. 2. Click Finish once the devices are added.

AdventNet ManageEngine OpManager 7 :: User Guide
AdventNet, Inc. 16
Discover Individual Devices You might have added more devices to your network and may therefore need to forcefully discover these devices. You can discover such devices on demand by following the steps below:
1. Click the Admin tab. 2. Under Discovery, select Add Device . 3. Type either the IP Address or the Device Name of the device to be discovered. 4. Select the discovery credentials. 5. Click Add Device to start discover
The device is discovered and classified properly. Note: If you are unable to add the device or if does not show up in the map in which you are looking for, try pinging the device from the OpManager machine and check for response. Search the device using the Device Search box on the top right corner in the WebClient.
AdventNet ManageEngine OpManager 7 :: User Guide
AdventNet, Inc. 17
Managing Devices Managing and Unmanaging a Device By default, OpManager manages all the discovered devices. However, there might be some known devices that are under maintenance and hence cannot respond to status polls sent by OpManager. These devices can be set to unmanaged status to avoid unnecessary polling. Once maintenance gets over, they can be set to managed status. To unmanage a device
1. Go to the device snapshot page. 2. Under Actions, select Unmanage.
This stops the status polling and data collection for the device and changes the device status icon to gray . To start managing an unmanaged device
1. Go to the device snapshot page. 2. Under Actions, select Manage.
This resumes the status polling and data collection for the device. The status icon shows the current status of the device. To manage or unmanage many devices at a time, you can use Quick Configuration wizard of OpManager. To do so, follow the steps below:
1. In the Admin tab, under Tools, click Quick Configuration Wizard. 2. Select Manage/Unmanage devices and click Next. 3. Select the category from which you want to umnanage. 4. To stop managing the devices, move them to the list in the right. To start managing the
unmanaged devices, move them to the list in the left. 5. Click Finish.
You can also schedule downtimes for the devices incase you do not want it monitored for a specified interval.
AdventNet ManageEngine OpManager 7 :: User Guide
AdventNet, Inc. 18
Device Snapshot OpManager's Device Snapshot shows the device health and that of its resources at a glance. To view the snapshot page of the device, click the device name link in the map, or type the name of the device in the Device Search box and hit Go. If there are many devices satisfying the specified criteria, a list of devices are displayed with their IP Address and category. Click the device whose snapshot you want to view. The descriptions for various sections of Device Snapshot are as follows: Device Details: Displays the system's details such as the IP address, operating system, time stamp of previous and next polls and a description on the system hardware details. System description is seen on the SNMP-enabled devices. Device Notes: This tab shows additional device details. You can add additional fields to denote the
device details. Click the . The added fields are displayed in the snapshot page. Today's Availability: Displays the device availability of the current day in the form of a pie graph. Click or to view the availability report for the past 7 days or 30 days respectively. Response Time: Shows the current response time of the device. Click or to view the response time details for the past 7 days or 30 days respectively. Click to configure response-time based threshold. Packet Loss: Shows the packet loss percentage for the device on that day. By default, OpManager sends 1 ping packet during a poll. The ping counts, retries, timeout etc are configurable in the file /conf/Ping.properties. CPU Utilization: Shows the current CPU load of the device. Clicking the graph shows the trend chart of CPU utilization Memory Utilization: Displays the current memory utilization of the device. Disk Utilization: Displays the current disk usage of the device incase of servers. Monitors: This tab lists different monitors for the device. Select each monitor section to view the monitors. You can add more monitors from the available template, or even remove the unwanted monitors from the device. Notification Profiles: This tab lists the notification profiles associated to the device. You can add more profiles from here. Interfaces: Displays the list of interfaces in the selected device with their status and other details. Click the interface name link to view its availability and graphs on traffic and bandwidth utilization. Actions Menu: List of actions that can be performed on the device include:
• Update Status • Rediscover Now • Ping • Trace Route • Show Alarms • Monitoring Interval • Delete • Manage/UnManage • Custom Report

AdventNet ManageEngine OpManager 7 :: User Guide
AdventNet, Inc. 19
Device Info Menu: The device information that can viewed from this menu include:
• Asset Details- The Hard Disk and RAM details are shown here. More detailed information is shown when integrated with ServiceDesk Plus.
• Installed Software- A list of software installed on the server is shown here and this information is retrieved using SNMP.
• Active Processes- A list of processes up and running in the server is shown and is again retrieved from SNMP.
At a Glance Report: This is a report showing the device health at a glance. It shows details like the availability, response time, packet loss, resource utilizations etc.

AdventNet ManageEngine OpManager 7 :: User Guide
AdventNet, Inc. 20
Viewing Asset Details If you have both, OpManager and ServiceDesk Plus running in your network, you can view a detailed asset information of a device, provided the device is discovered in both the applications, and the ServiceDesk settings are configured in OpManager. To view the Asset Details, select the device and click Device Info --> Asset Details. This will show the detailed asset information from ServiceDesk Plus. If ServiceDesk Plus is not integrated, then make sure SNMP is enabled. The device name, the hard disk size, and the RAM size is gathered for SNMP-enabled devices. To update these details incase you upgrade your systems, follow the steps given below:
1. Select the device and click Device Info --> Asset Details. 2. Enter the values of RAM size and Hark Disk. 3. Click Save to apply the changes.

AdventNet ManageEngine OpManager 7 :: User Guide
AdventNet, Inc. 21
Viewing Installed Software OpManager provides you the information on the software installed and currently running on the managed device. You need to have SNMP agent running in the device to view this information. To view the details, click the device icon in the map. Under Device Info, click Installed Software Viewing Active Processes OpManager provides you the information on the processes that are currently running on the managed device. You need to have SNMP agent running in the device to view this information. To view the details, click the device icon in the map. From the snapshot page, under Device Info menu, click Active Processes.

AdventNet ManageEngine OpManager 7 :: User Guide
AdventNet, Inc. 22
Configuring Additional Device Properties Configure additional properties of a device by adding additional fields. This makes device management easy.
1. From Admin tab, select Additional Fields. A list of pre-populated fields is shown. 2. Select Device from Associate pre-defined fields to all list-box. 3. Click Add Field button on the top right corner of this table and configure the following values.
1. Field Name: Configure the name of the additional property 2. Type: Select the property type 3. Field Length: Set the length of the field. 4. Description : Add a meaningful description for the field. 5. Click Save to apply the configuration.
The properties added is applied to all the devices. The additional fields are displayed when you click the Device Notes tab in the device snapshot page. These properties are useful when configuring notification profiles. To delete these fields, select the corresponding check-box, and click the Delete link on the top right corner of this table.

AdventNet ManageEngine OpManager 7 :: User Guide
AdventNet, Inc. 23
Configuring Additional Interface Properties Configure additional properties of a device by adding additional fields. This makes device management easy.
1. From Admin tab, select Additional Fields. A list of pre-populated fields is shown. 2. Select Interfaces from Associate pre-defined fields to all list-box. 3. Click Add Field button on the top right corner of this table and configure the following values.
1. Field Name: Configure the name of the additional property 2. Type: Select the property type 3. Field Length: Set the length of the field. 4. Description : Add a meaningful description for the field. 5. Click Save to apply the configuration.
These properties are useful when configuring notification profiles. To delete these fields, select the corresponding check-box, and click the Delete link on the top right corner of this table.
AdventNet ManageEngine OpManager 7 :: User Guide
AdventNet, Inc. 24
Classifying and Mapping the Devices Classification and Device Templates During initial discovery, OpManager categorizes the network devices into servers, printers, switches, routers and firewalls. For proper classification, install and start the SNMP agent on all the managed devices. OpManager comes with over 300 device templates which carry the initial configurations to classify the devices into the pre-defined categories, and to associate monitors to them. The device templates enables you to effect a configuration once and is applied to several devices at a time whenever there is a change. The templates carry the information required to classify the devices and to associate relevant monitors. You can define your own templates and modify the existing ones. Creating/Modifying Device Templates
1. Go to Admin --> Device Templates 2. Click ‘New Template’ to define a template for a new device type. Click the Template name to
modify an existing one. 3. Configure/Modify the following properties:
o Device Template: Specify the device type. o Vendor Name: Select the vendor. Click Add New to add a new vendor, and Save. o Category: Select the category for the device type. On discovery, the devices are
automatically placed in the select Category map. o Monitoring Interval: Configure the interval at which the device needs monitoring. o Device Image: Select the image for this device type. o System OID: Type the sysOID and click Add. Click Query Device for OpManager to
query the device for the OID. o Add Monitor: Click this option to select the monitors. o Edit Thresholds: Click this option to edit thresholds. o Click Create button to create the new device template.
The classified devices are placed under different maps for easy management. For proper device classification, make sure you have installed and started SNMP in all the network devices before starting OpManager service. The default maps include:
• Servers • Routers • Desktops • Switches • Firewalls • DomainControllers • Wireless • Printers • UPS
You can also add your own infrastructure views. Custom infrastructure views can be added to group devices which cannot be classified under the default views provided. For instance, if you would like to monitor some IP Phones, it will not be appropriate to classify them as servers or desktops. This initial classification may not be accurate if
• the network devices do not support SNMP. • some devices have their SNMP settings different from those specified in the Credential
Settings.

AdventNet ManageEngine OpManager 7 :: User Guide
AdventNet, Inc. 25
Using Interface Templates Monitoring requirement differs for different interfaces on a device. OpManager allows you to define configuration templates for interfaces of specific types. For instance, the configurations specified for an Ethernet interface can be applied to interfaces of this type across all devices, saving a lot of time. 1. Go to Admin a Interface Templates 2. Click an Interface Template to modify its properties. The changes are applied to all interfaces of the same type.
AdventNet ManageEngine OpManager 7 :: User Guide
AdventNet, Inc. 26
Categorization into Default Maps Devices are categorized into the following default maps in OpManager: The classification is done using SNMP and NMAP.
• Servers • Routers • Switches • Desktops • Firewalls • DomainControllers • Wireless • Printers • UPS
The discovered devices are classified into the above categories based on response to SNMP requests sent by OpManager to the devices. The devices that are not SNMP enabled, and the device types which are not included in the template are incorrectly classified under desktop. You can also add your own infrastructure maps to group your devices according to categories, or create business views to logically group devices, for instance, based on geography.
AdventNet ManageEngine OpManager 7 :: User Guide
AdventNet, Inc. 27
Adding New Infrastructure Views You can create more defined groups under infrastructure views by adding more custom views. For instance, you might want to group all your Environment Sensors or IP Phones into separate infrastructure views. Here are the steps:
1. From the pop-up in the Maps tab, click Add Infrastructure View option . 2. Specify the category name and click Add 3. From the listed devices, select and move the required devices to this view 4. Click Import Now option.
The selected devices are displayed in the newly created infrastructure views. After you create new infrastructure views, you can create device templates for devices of this category. This allows you to define monitors specific to the category and automatically applies the configurations defined in the template to the devices as soon as they are discovered.
AdventNet ManageEngine OpManager 7 :: User Guide
AdventNet, Inc. 28
Integrating Google Maps You can now enable Google Maps integration with OpManager and place the devices on the maps according to the geographic distribution. Here are the steps to integrate Google Maps and Place devices on them.
• Providing the Google Maps API Key
1. Make sure you have a Google Account or create one. 2. Mouse-over the Maps tab in the OpManager WebClient. 3. Click on Google Maps link in the Business Views column. 4. You will be prompted to enter the key. Click on the link Sign up for a Google Maps
API key to generate a key. You will be taken to a sign up page. 5. Scroll down the page and provide the website URL as http://<host name running
OpManager>. For instance, if the name of the device running OpManager is OpM-Server, your URL will be http://OpM-Server.
6. Click on the Generate API Key button. A key is generated. 7. Copy the entire Key.
• Viewing the Google Map in OpManager WebClient
1. Go back to the OpManager Webclient and provided the key in the corresponding field.
2. Click on Submit Key. 3. The Google Map is shown in the interface.
• Adding Devices on the Google Map
1. Now, zoom in/out the map and double-click on the location where you want to place a discovered device.
2. A device list box pops up allowing you to select a device to be placed in that location. 3. Select the device and click on Add. 4. Add the required devices on to the map by double-clicking the location. 5. You can also add the devices to the map from the device snapshot page. 6. Go to the device snapshot page. 7. Click on Add to Google Map link in the page to add the deivce to the map.
• Viewing Device Details from Google Map
1. Click on the device balloons on the Google Map to see a popup. 2. Click the device name/ip address on this popup to get into the device snapshot page. 3. The popup also shows the device status.
• Deleting Devices from Google Map
1. Click on the device balloons on the Google Map to see a popup. 2. Click the Delete link on this popup to delete the device from the map.
AdventNet ManageEngine OpManager 7 :: User Guide
AdventNet, Inc. 29
Business Views OpManager 7 comes with an in-built flash-based MapMaker. No more hassles of invoking a separate tool to create business views. • Adding Business Views • Drawing Link between Devices • Modifying Business Views • Adding Shortcuts Click the small down arrow in the Maps tab or simply mouse-over. The default maps, with options to add more maps are seen. Adding Views:
1. From the pop-up in the Maps tab, click Add Business View option. 2. Configure a name for the business view. 3. From the available devices list, select the devices you want to be grouped in this business
view, and move them to the right- to the Selected Devices column, 4. Select the background from the corresponding list box. 5. Click Apply. 6. Drop the devices on the map and click on the confirmation check-box that appears. 7. Once the devices are dropped on the map, select and drag-drop the devices to be placed in
the required location on the map. 8. Click Save button on the left to create and save the map. 9. Click Exit to see the newly created business view. You will also find the availability dashboard
for the devices in the business view. Drawing a Link Between Devices To represent the network diagram in the map, OpManager allows you to draw links between the devices in a business view. You can assign a meaningful name to the link and also configure to change the color of the link to indicate its status. To draw a link, follow the steps given below:
1. Click the Add Link button on the left. 2. From the map on the right, click the device from which you want to draw a link (the source
device) and move the mouse to the destination device and click that device. A link properties dialog pops up.
3. Configure a display name for the link. 4. In the Get Status from field, select any interface from either the source device or the
destination device. The link will inherit the status of the interface that you choose here. For instance, if the source device goes down, and if you have selected an interface from that device, the link also inherits the status of that device.
5. Select the thickness of the link. 6. Click Apply. 7. Click Save on the left to save the changes. 8. Select the two devices to be linked either by holding the Ctrl key or dragging the mouse over
the devices. 9. Click Add link between devices 10. Type a meaningful Display Name for this link. 11. Using the (...) browse button beside the Get status from field, select an interface of one of
the devices, whose status should be shown as the link status. 12. Choose the Thickness for the line drawn as the link. 13. Click OK.

AdventNet ManageEngine OpManager 7 :: User Guide
AdventNet, Inc. 30
Modifying Business Views You can make changes to the business views created. Access the business view either from the Maps tab or from the list of views under the Home tab. Click the Edit icon to modify the view properties. After you modify the properties like adding/removing links, adding more devices to the view, adding shortcuts on the view etc, click the Save button on the left to save the changes. Adding Shortcuts You can add shortcut icons to business views that helps you to drill-down the network. This helps you to easily navigate to a view from another view when objects are grouped based on their geographical location. Note: You must have created atleast two business views to be able to add a shortcut from one view to another. Here are the steps to add shortcuts on the business views:
1. Go the the business view and click the Edit option on right-top corner of the view. 2. Click the Add Shortcut button on the left. A shortcut properties dialog pops up. 3. Configure a name for the shortcut in the Shortcut Name field. 4. From the Open Submap list-box, select the map which should be opened when you click the
shortcut. 5. Select the icon to be used for the shortcut from the Default Icons or select from the Custom
Icon combo-box. 6. Click Apply for the shortcut to be added.

AdventNet ManageEngine OpManager 7 :: User Guide
AdventNet, Inc. 31
Sorting Devices in Maps You can sort the devices on maps by the Name, Display Name, Device Type, or the Severity of the device. This helps you locate a resource faster. To sort the devices in a map, from the Sort By combo-box, select the required option based on which you need the sorting to be done. Note: Sorting of devices is supported only in the default maps.

AdventNet ManageEngine OpManager 7 :: User Guide
AdventNet, Inc. 32
Different Types of Map Views Three different types of views are supported for the default maps. Click the Select View combo-box on the top right corner in the Servers, Router, and Switches maps to select the required view type:
1. Details: This is a list view of all devices on that map. This is useful when you have a large number of devices on a map.
2. Large: This shows bigger device icons, and gives more visibility. For instance, in the Servers map, the device icon also shows a couple of TCP Services monitored on the server indicating the service status. In the Routers and Switches map, all the interfaces are also shown in the map.
3. Small: This shows small device icons. The Router/Switch maps show only the parent devices, and in the Servers map, the services are not displayed.

AdventNet ManageEngine OpManager 7 :: User Guide
AdventNet, Inc. 33
Import Devices A few devices are classified into Desktops map even if they are not desktops. This happens when either SNMP is not enabled on the device, or that particular device does not have a device template. You can import these devices into the correct maps as follows.
1. Go to the Map into which you want the devices imported. 2. Click the Import button on the top right corner. A corresponding dialog opens. 3. From the Available Devices list, select the devices and move them to the Selected Devices
list. 4. Click Import Now to import the devices into the required category.
For instance, if a Router is classified into Desktops, go to the Router map and import the Router.
AdventNet ManageEngine OpManager 7 :: User Guide
AdventNet, Inc. 34
Managing Users Creating Users You can create users in OpManager and provide required privileges to them. The option to create users is available only for the admin login account or those accounts which have 'Full Control' privilege. Here is how users are added: Note: If you have procured a license for a limited number of devices, you can add any number of Users in OpManager. If the license is based on the number of users, you can add only the numbers as allowed in the license.
1. From Admin tab, click User Manager. 2. Click Add User option in the User Configuration screen. 3. Configure the following user details: 4. Login Details:
User Name - a user account name Password - a password for the above user Re-type Password- retype the password for confirmation
5. Contact Details: Email ID - email ID of the above user Phone number: the user's phone number Mobile number: the user's mobile number
6. Access Details: User Permission- Select the permission as Full Control to provide complete admin privilege to the user, or select Read-only Access to restrict the scope of the user to only read operations. A user with this permission can only view the details. Has access to - You can provide this user an access to either All Devices, or only specific Business Views, and/or WAN.
7. Click Add User to add the user according to the scope specified here. Logout and try logging in as the new user and check the privileges.
AdventNet ManageEngine OpManager 7 :: User Guide
AdventNet, Inc. 35
Changing User Passwords You can change the password for the users. Either the admin user or an user with full control privelege only can change the passwords.
1. Go to Admin --> User Manager.
2. Click the Edit icon against the user name whose password you want changed.
1. Password Details: Password - a password for the above user Re-type Password- retype the password for confirmation
2. Contact Details: Email ID - email ID of the above user Phone number: the user's phone number Mobile number: the user's mobile number
3. Access Details: For users with only partial permission, the business views assigned to that user is displayed. Remove selection for the view if you want to remove the views from the user's purview. For users with full control, this option is not displayed.

AdventNet ManageEngine OpManager 7 :: User Guide
AdventNet, Inc. 36
Removing Users You can remover the users.
1. Go to Admin --> User Manager. 2. Click the Delete icon against the user name whose account you want ot delete. 3. A confirmation dialog pops up. Click OK. The user account is deleted.
AdventNet ManageEngine OpManager 7 :: User Guide
AdventNet, Inc. 37
Monitoring Network Resources Monitoring CPU, Memory, Disk Using SNMP The monitors for CPU, Memory, and Disk Utilization are automatically associated for the devices based on the device template definitions. For instance, for Linux servers, the default template has SNMP-based monitors associated. So, all Linux servers will have SNMP-based resource monitors associated. You will see the dial graphs for these three resources in the device snapshot page if SNMP is enabled. All the Server templates have the monitors defined for various host resources. By default, the CPU, Memory, and Disk Monitors are associated to the servers. The device snapshot page shows the values of these monitored resources with dial-graphs. If you do not see these monitors associated to the devices, it could be due to any or all of the following reasons:
• These monitors are not present in the device template. • SNMP is not enabled on the device. In such case, enable SNMP and add the monitors to the
device once again. • Incorrect SNMP credentials are associated. Check the credential details like the SNMP
version, community string etc. Steps to add the monitors to the device again:
1. From the device snapshot page, select the Monitors tab. 2. From the monitor types, select Performance Monitors. 3. You will see the monitors displayed on the right if associated. Click Add Monitors link on the
right. 4. From the list of monitors, select the SNMP monitors for CPU, Memory, and Disk Utilization. 5. You can also add other required monitors like Partition monitors etc. 6. The selected monitors are associated to the device and the resources are monitored.
To check if the SNMP agent in the device returns response, try the following:
1. Click the Edit icon against any of the associated monitor names. 2. From the edit screen, click Test Monitor link. This does a dynamic query to the device for the
value of the selected resource, and show the data. Incase the agent does not respond, you see a message to this effect. Refer to the troubleshooting tips to resolve the issue. As an alternative, you can monitor the non-SNMP Linux servers using CLI (telnet or SSH), or the non-SNMP Windows devices using WMI.
AdventNet ManageEngine OpManager 7 :: User Guide
AdventNet, Inc. 38
Monitoring Resources Using WMI OpManager monitors the system resources using SNMP by default. However, in the absence of SNMP on the devices, the non-SNMP windows devices can be monitored using WMI. All the Windows device templates have the resource monitors preconfigured. All you will need to do is, disable the SNMP monitors associated and select the WMI monitors and associate them to the required devices. Prerequisites For monitoring the Windows environment, OpManager must necessarily be installed on a Windows machine. Besides, the device where OpManager is installed and the monitored remote Windows devices must have WMI, RPC, and DCOM services enabled on them. Authentication to the remote devices using WMI requires you to login as a domain user with administrator privileges. This is a requirement of the WMI protocol. If the device is in a workgroup, the system user name and password should suffice. Steps to configure WMI Monitoring Go to the device snapshot page.
1. From Monitors --> Performance Monitors section, remove the SNMP-based monitors if any. 2. Click Add Monitors link on the right bottom. 3. Now, from the list of resource monitors, select the CPU, Memory, and Disk Utilization
monitors which has the protocol name as WMI against the monitor name. 4. Click OK. The monitors are added in the template under the Monitors column. 5. Click Apply. All the Windows devices to which the monitors are associated are listed. Another
column also displays devices which are classified as 'Unknown'. You can pull the required devices from this list too. Click Apply once again.
The WMI-based monitors are associated to the device. .
AdventNet ManageEngine OpManager 7 :: User Guide
AdventNet, Inc. 39
Monitoring Resources Using CLI OpManager monitors the system resources using SNMP by default. However, in the absence of SNMP on the devices, the non-SNMP Linux devices can be monitored using CLI, ie., Telnet or SSH.. All the Unix Servers templates have the resource monitors preconfigured. All you will need to do is disable the SNMP monitors associated and select the CLI monitors and associate them to the required devices. Prerequisites For monitoring the unix servers, make sure either Telnet or SSH is enabled on them. Steps to configure Telnet/SSH Monitoring Go to the device snapshot page.
1. From Monitors --> Performance Monitors section, remove the SNMP-based monitors if any. 2. Click Add Monitors link on the right bottom. 3. Now, from the list of resource monitors, select the CPU, Memory, and Disk Utilization
monitors which has the protocol name as CLI against the monitor name. 4. Click OK. The monitors are added in the template under the Monitors column. 5. Click Apply. All the servers to which the monitors are associated are listed. Another column
also displays devices which are classified as 'Unknown'. You can pull the required devices from this list too. Click Apply once again.
The CLI-based monitors are associated to the device.
AdventNet ManageEngine OpManager 7 :: User Guide
AdventNet, Inc. 40
Adding More Monitors Following are the monitors associated by default for the different device categories:
• Servers: CPU, Memory, Disk Utilization • Routers: CPU, Memory, Buffer Hits/Misses, Temperature • Switches: CPU, Memory, BackPlane Utilization • Firewalls: CPU, Memory, and Connection Count.
Similarly, other categories also have few resources monitoring triggered by default. Besides the ones automatically associated, you can monitor more parameters. Here are the steps to configure more monitors:
1. From Admin, select Device Templates. 2. From the list of templates, select the template for the device type to which you want to
associate more monitors. Select the corresponding letter to get to the template quickly. 3. In the device template, from the Monitors column, click the Add Monitor button. 4. All the predefined monitors are listed. Select the required monitors from here and click OK. 5. All the devices of the same type are listed. Click Apply for the selected monitors to be
associated to all the selected devices.
AdventNet ManageEngine OpManager 7 :: User Guide
AdventNet, Inc. 41
Adding Custom Monitors In addition to OpManager's default monitors, you can also create your own monitors for the SNMP-enabled devices in your network. The SNMP variable for which you intend configuring a monitor should return a numeric output when queried. To add a custom monitor for a resource of a particular device type, the device template must be modified. The new monitor should be defined in the device template so that the monitor is associated for all devices of that type. Here are the steps.
1. Go to Admin --> Device Templates. 2. Select the template in which you want to add a new monitor. Eg: Linux. Click the letter L to
displays templates starting with this letter. 3. From here, click any template. Example - Linux. Scroll down the template and click Add
Monitors under Monitors column. 4. Click the New Monitor link in this page. 5. Click the Select button in the Add a new monitor page to browse and select the OID for which
you want add a monitor. The MibBrowser is shown. 6. Load the required MIB and select the OID. Eg: hrStorageSize from HostResource MIB. Click
OK after selecting this OID. 7. Configure all the other properties of the monitor like the name, displayname, units etc. Click
OK. The new custom monitor is listed under Monitors column in the template. 8. Click Apply. 9. The devices are listed prompting you to select the devices for which you want the monitor to
be associated. Check the list of devices and click Apply. 10. The modified template is applied to all devices of type Linux. Go to the snapshot page of any
of the Linux devices. You will find the new custom monitor in the list of associated performance monitors.
11. For SNMP-based monitors to work, make sure to enable SNMP on the devices and check if the OID is implemented.
12. To easily apply a new monitor to a set of devices, you must add the monitor to the device template.
AdventNet ManageEngine OpManager 7 :: User Guide
AdventNet, Inc. 42
Device-specific Monitors The monitoring configuration may need alteration for specific devices. Doing a bulk-configuration using the device templates, applies the same set of configurations for the devices of the same type. Inorder to change the configuration for specific devices, here are the steps:
1. Go to the device snapshot page. 2. Scroll down to the Monitors section. 3. From here select the required monitors. Monitors of the selected category are listed on the
right. 4. Click the Edit icon against the monitor name. The Edit Monitor page is displayed. 5. Change the values for the required parameters and and click OK.
The changes to the monitor are effected only for that device.

AdventNet ManageEngine OpManager 7 :: User Guide
AdventNet, Inc. 43
Viewing Process Diagnostics You can view the top ten proccesses utilizing the maximum resources. Process statistics is retrieved using Telnet/SSH/WMI, for which the correct credential must be associated to the devices. To be able to view the diagnostics,
1. Configure relevant CLI and WMI credentials. 2. Click the link on top of the dial graphs for CPU, Memory, and Disk graphs. The top 10
processes are shown. You can also end the processes from here.

AdventNet ManageEngine OpManager 7 :: User Guide
AdventNet, Inc. 44
Monitoring Packet Loss for Devices You can monitor the packet loss percentage on a per device basis and view even the packet loss reports.
1. Go to the device snapshot page. 2. Look at the Today's Packet Loss value shown on the right. 3. Click the corresponding small icons to see the packet loss report for the last 7 or 30 days. 4. Click the icon to configure threshold value in percentage. If the packet loss percentage
exceeds the threshold value, a threshold violation alarm is triggered. This alarm can inturn be notified.

AdventNet ManageEngine OpManager 7 :: User Guide
AdventNet, Inc. 45
Monitoring Response Time of Devices You can monitor the response time on a per device basis and view even the packet loss reports.
1. Go to the device snapshot page. 2. Look at the Response Time value shown on the right to know the device response time.. 3. Click the corresponding small icons to see the response time report for the last 7 or 30 days. 4. Click the icon to configure threshold value in milliseconds. If the device response time
exceeds the threshold value, a threshold violation alarm is triggered. This alarm can inturn be notified.
AdventNet ManageEngine OpManager 7 :: User Guide
AdventNet, Inc. 46
Monitoring TCP Services OpManager provides out-of-the-box support for the following services: Web, HTTPS, FTP, IMAP, LDAP, Telnet , MySQL, MS-Exchange, SMTP, POP3, WebLogic, Finger, Echo, DNS, and NTTP. By default, during discovery, OpManager scans the devices for the services: DNS, MSSQL, MySQL, Oracle, SMTP, Web. You can also select other services in the list. When they are found running on their default ports, OpManager starts monitoring the services. Scanning Services during Discovery By default, OpManager scans each device on the network for the services that are chosen during discovery. To modify this list, follow the steps given below:
1. Click the Admin tab. 2. Under Discovery, click Services. 3. Select the check boxes under Scan during discovery?, corresponding to the services to be
discovered and clear the selection for the services that are not to be discovered. 4. You can modify the service monitor properties in OpManager. When the service is not running
on the default port, you can configure the actual port in which it is running, and you can change the timeout interval. Save the changes.
5. Click Update to apply the changes. OpManager allows you to change the settings for monitoring these services as per your network needs. You can configure new services that are not available in the list. OpManager can manage services running on standard TCP ports. Note:
• The list contains the service names and the corresponding port numbers. To edit the settings of any of the available services, click Edit icon.
• If you do not find the service you want to manage in the list, you can add the service by clicking Add Service under Actions menu. For details, refer to Adding a New Service.
Viewing Service Status and Response Time
1. Go to the device snapshot page. 2. Under Service Monitors, you will see the list of services managed in the device, if any, with
their status and current response time. o Click the service name to view the historical report on the response time and the
availability chart of the service. o Click the Availability chart to view the service downtime/uptime chart, summary and
historical information.

AdventNet ManageEngine OpManager 7 :: User Guide
AdventNet, Inc. 47
Monitoring TCP Services in a Device To select the services to be monitored in a device, follow the steps given below:
1. Click the Server in the map. 2. In the Monitors section, select Service Monitors to see the monitors listed. 3. Cclick Add Monitor at the bottom of this list to see the complete services list.. 4. Select the services to be discovered from the list and click OK.
AdventNet ManageEngine OpManager 7 :: User Guide
AdventNet, Inc. 48
Monitoring Windows Services Certain applications in Windows machine run in the background as services. OpManager discovers and monitors the status of such services using WMI. Â OpManager generates alarms whenever they fail. Prerequisites To monitor Windows services, OpManager should be installed in a Windows machine. OpManager uses WMI to monitor the Windows services and hence you need to provide the log on details of a user with administrative privilege to connect to the device. So, make sure you configure a WMI credential so that you can apply this to the windows devices. Associate Windows Services to a Device To monitor a Windows service, follow the steps given below:
1. Go to the device snapshot page. 2. Confirm if the correct WMI credential is associated to the device. Else, configure the
password details in the device. 3. Click Add Monitor in the Windows Service Monitors section. This option will be available
only for Windows servers. 4. Select the services to be monitored in the device and click OK.
Associate Windows Service Monitors to several devices From the Admin tab, select Windows Service Monitors. Select Associate option from the Actions menu. From the drop-down list box, select the services one-by-one and move the devices from the 'not monitored' column to the 'monitored' column. Click Save. The selected service monitor is added to the device. Using Quick Configuration Wizard You can also use the Quick Configuration Wizard to associate a service to several devices at one go. Here are the steps:
1. From the Admin tab, select Quick Configuration Wizard. 2. Select the option Add a new service monitor to several devices and click Next. 3. Now, select Associate a Windows service option and click Next again. 4. All the available Windows services are listed. Select the service which you want to monitor on
your servers. Click Next. 5. Select the devices on which you want to monitor the service from the column on the left and
move them to the right. 6. Click Finish. The service monitor is associated to the selected devices.
AdventNet ManageEngine OpManager 7 :: User Guide
AdventNet, Inc. 49
Adding New Windows Service Monitors In addition to the Windows services monitor supported by OpManager out-of-the-box, you can add monitors for other windows services too.. To add a new Windows service monitor, follow the steps given below:
1. Under the Admin tab, click Windows Service Monitors. 2. Under Actions, click Add Service. 3. Type the name of the device in the Device Name field. 4. Type the domain administrator user name password for the device in the respective fields and
click Next. 5. A list of all the Windows Services available on that machine is displayed. From this select the
services that you want monitored across all other Windows Servers. 6. Based on whether or not you want to restart the service or the machine when the service
goes down, select the corresponding option. 7. Click Finish. A list of Services for which a monitor is added is shown. 8. Click the link at the bottom of this list to associate these service monitors to devices. 9. From the drop-down list box, select the services one-by-one and move the devices from the
'not monitored' column to the 'monitored' column. 10. Hit Save.
The newly added services are also monitored on the selected servers.
AdventNet ManageEngine OpManager 7 :: User Guide
AdventNet, Inc. 50
Active Directory Monitoring Active directory monitoring feature takes OpManager a step further in proactive monitoring of Windows environment. The system resources of the Domain Controllers where the Active Directory (AD) database resides, and few critical Active Directory Services are monitored in OpManager. To make AD monitoring more simple and easily accessible, The Domain Controllers are classified under a separate category under Infrastructure Views. The categorization of the device as a Domain Controller is done automatically if SNMP is enabled. The system resources of the device and the AD services are monitored using WMI. The snapshot page of the Domain Controller shows a dial graph for AD Store in addition to the dial graphs for CPU, Memory, and Disk Utilization. The other utilization data displayed in the snapshot page for the Domain Controller are:
• Resource Utilization by LSASS ( Local Security Authority Subsystem Service) • Resource Utilization by NTFRS (NT File Replication Service) • Ad Store Utilization • Performance Counters showing information such as the AD Reads, the AD Replication
objects etc Besides these, following are the AD Services monitors associated by default:
• Windows Time service : The service synchronizes the time between domain controllers, which prevents time skews from occurring.
• DNS Client Service : This service resolves and caches (Domain Name Server) DNS names. • File Replication Service : This service maintains file synchronization of file directory
contents among multiple servers. • Intersite Messaging Service : This service is used for mail-based replication between sites.
Active Directory includes support for replication between sites by using SMTP over IP transport.
• Kerberos Key Distribution Center Service : This service enables users to log on to the network using the Kerberos version 5 authentication protocol.
• Security Accounts Manager Service : This service signals other services that the Security Accounts Manager subsystem is ready to accept requests.
• Server Service : This service enables the computer to connect to other computers on the network based on the SMB protocol.
• Workstation Service : This service provides network connections and communications. • Remote Procedure Call (RPC) Service : This service provides the name services for RPC
clients. • Net Logon Service : This service supports pass-through authentication of account logon
events for computers in a domain. You can add more AD Monitors to be monitored by clicking the Add Monitor button.
AdventNet ManageEngine OpManager 7 :: User Guide
AdventNet, Inc. 51
Exchange Server Monitoring You can monitor critical MSExchange 2000/2003 Services and parameters using OpManager. Monitoring is done using WMI. Thresholds are pre-configured for critical services. You can also modify or enable thresholds for other services and parameters. The services monitored are:
• Information Store • Site Replication Store • MTA Stacks • Exchange Management • SMTP • POP3 • IMAP4 • System Attendent • Routing Engine • Event Service
The Exchange parameters that are monitored can be classified under the following categories:
• Address List Monitors • POP3 and IMAP Monitors • Information Store Public Folder Monitors • Event Service Monitors • SMTP Monitors • Information Store Mailbox Monitors • Message Transfer Agent Monitors • Directory Service Monitors • Information Store Monitors
Configuring Exchange Parameters and Services Monitoring
1. Go to the snapshot page of a device that has Exchange running. 2. Scroll down and select the Monitors tab. 3. Click on Performance Monitors. The monitors are listed on the right. 4. Click the Add Monitor button on the right. A list of monitors is displayed. 5. Click the Exchange Monitors button on top of this list. The monitors of all the
Exchange parameters and services are displayed. 6. From this list, select the required Monitors and associate it to the Server.
These monitors are associated to the device. Ensure to associate the correct WMI credential to the device. OpManager uses these credentials to connect to the device using WMI.

AdventNet ManageEngine OpManager 7 :: User Guide
AdventNet, Inc. 52
Monitoring MSSQL Parameters MSSQL Services and Parameters can be monitored using WMI. Here are the steps to associate the MSSQL monitors to a device:
1. Go to the snapshot page of a device that has MSSQL running. 2. Scroll down and select the Monitors tab. 3. Click on Performance Monitors. The monitors are listed on the right. 4. Click the Add Monitor button on the right. A list of monitors is displayed. 5. Click the MSSQL Monitors button on top of this list. The monitors of all the MSSQL
parameters are displayed. 6. From this list, select the required MSSQL Monitors and associate it to the Server.
These monitors are associated to the device. Ensure to associate the correct WMI credential to the device. OpManager uses these credentials to connect to the device using WMI.

AdventNet ManageEngine OpManager 7 :: User Guide
AdventNet, Inc. 53
Monitoring Windows Event Logs The Event Log is a Windows service that logs about program, security, and system events occurring in Windows devices. The events can be related to some application, system or security. You can monitor these events using OpManager and configure to generate alarms when critical events are logged. OpManager uses WMI to fetch the details of these logs and hence you need to provide the log on details of a user with administrative privilege to connect to the Windows machine. You can view the list of all events monitored by OpManager, by clicking Event Log Rules under the Admin tab. Monitoring Windows Events in a Device To monitor Windows events, you need to associate the event log monitors with the device. To do so, follow the steps given below:
1. Go to the device snapshot page. 2. From the Actions menu, click Event Log Rules. 3. Select the event logs to be monitored in the device. 4. Change the Polling Interval if necessary. During each poll, the selected event logs are
compared with the events logged in the device and for the matching events, alarms are generated.
5. Click Save to save the changes. Alternatively, you can associate an event log rule with many devices at a time using Quick Configuration wizard. Creating an Event Log Monitor To create an event log monitor, follow the steps given below:
1. Under the Admin tab, click Event Log Rules. In this page, you can see the rules supported by OpManager. They are categorized into Applications, Security, System, DNS Server, File Replication Service, and Directory Service. You can add the event logs that you want to monitor under any of these categories.
2. Click New Rule under any one of the categories to add a rule in it. Entries to all the fields except Rule Name are optional. Event ID is a required field to identify the event but can be left empty in few exceptional cases, such as you want to monitor all events that are of the Event Types, say, error or information. Here the filter will be based on the Event Type.
o Type a unique Rule Name. o Enter the Event ID to be monitored. This is the unique identifier for the event logs. o Enter the event Source. This is the name of the software that logs the event. o Enter the event Category. Each event source defines its own categories such as
data write error, date read error and so on and will fall under one of these categories. o Type the User name to filter the event log based on the user who has logged on
when the event occurred. o Choose the Event Types to filter the event logs based on its type. This will typically
be one among Error, Warning, Information, Security audit success and Security audit failure.
o Enter the string to be compared with the log message. This will filter the events that contains this string in the log message.
o Choose a severity for the alarm generated in OpManager for this event. 3. Click Add Rule to save the event log rule.
You can now associate this rule to the required devices.
AdventNet ManageEngine OpManager 7 :: User Guide
AdventNet, Inc. 54
Monitoring URLS for Availability You can configure OpManager to monitor your Web sites. Many business enterprises require continuous monitoring of their Web sites, as the failure of these sites might have an impact on the business. You can monitor global URLs, such as www.yahoo.com and www.adventnet.com or URLs in a server, such as http://192.168.4.11/index.html, http://web and so on. You can perform a content match on these URLs and confirm their availability. Further, for pages that require a form submit, such as user name and password, you can provide these details and verify the availability of the next page. Note: If a proxy server is configured in your network, make sure to provide its details in the Proxy Server Settings page of OpManager. Refer to Configuring Proxy Server Settings for steps to do this. This is required for monitoring any URL in a proxy-enabled LAN. To configure a global URL monitor, follow the steps given below:
1. Under the Admin tab, click URL Monitors. In this page you can add, edit, and delete the URL monitors.
2. To add a URL monitor, click Add URL. 3. Enter a name to the URL monitor in the URL Monitor name field. 4. Type the URL address to be monitored. 5. Type the Monitoring Interval and the value of Timeout in the respective fields. 6. Enter the Email ID in the Send Alert to field to be notified when this URL goes down. 7. Type the string to be compared with the contents of the monitored Web page. 8. Select between Get and Post, the methods for any HTTP/HTTPS-based URLs. This is
required because certain URLs cannot be accessed using a Get request. 9. Type the request parameters and their values in the form <parameter name>=<value>, if any,
to know the actual availability of the URL. Note that you can enter only one parameter in a line.
10. Configure the user name and password for authorization. This will be required in the pages where you need to log-on and test the availability of the host.
11. Click Check Now to check the availability of the URL based on the given details. You can verify the correctness of the given details using this instant check.
12. Click OK to add the URL monitor. Viewing URL Response Time and Availability You can get the details about the URL response time and availability in the URL snapshot page. To view the URL snapshot, click the URL link in the Home page or Maps tab. Then click the URL whose snapshot you want to view. Click the Availability chart to view the availability history and the URL downtime/uptime chart.

AdventNet ManageEngine OpManager 7 :: User Guide
AdventNet, Inc. 55
Associating URL Monitors to Servers You can add URL monitors to Servers to check the availability of the URL from those servers.
1. Go to the device snapshot page. 2. Scroll down to the Monitors section and click URL Monitors. 3. On the right, you will find a link to add the monitors. Click to add monitors 4. Configure all the values for the URL Monitor.
The configured URL is monitored for availability from that Server. You can configure to receive an e-mail or SMS when the URL monitored in a server goes down. For this, you need to create a notification profile for the 'URL is down' criteria and associate it to the server.

AdventNet ManageEngine OpManager 7 :: User Guide
AdventNet, Inc. 56
Alerting Managing Faults in Network There can various types of faults in a network. With the network health depending on various resources like the system resources, services, network connectivity etc, getting to the root of the problem is simplified when the monitoring solution raises meaningful alarms. OpManager helps you identify the fault quickly with its detailed alarms indicating the resource that is poorly performing in the device . The different types of OpManager alarms inlcude:
• Status-poll Alarms (device, service, interface, port down alarms). • Threshold-based alarms for host resources, response times etc proactive monitoring. • Alarms from SNMP Traps. • Windows event logs based alarms.
OpManager monitors the resources for availability and performance and triggers alarms for all the criteria mentioned above. These alarms can also be sent as email or sms alerts from OpManager.
AdventNet ManageEngine OpManager 7 :: User Guide
AdventNet, Inc. 57
Viewing Alerts The Alarms tab in OpManager shows all the latest alerts. From the list box on the top right corner, you can access the following:
• All Alarms: A complete list of alarms is displayed here.
• Active Alarms: This view lists only the active alarms that are not yet cleared
• Unsolicited Traps: The unsolicited traps sent by the agents in the managed devices are listed here. These are the traps that are not configured to be processed in OpManager. If you find any of these traps to be critical, you can configure OpManager to process the traps using the information received from the agent. Refer to Creating a Trap Processor for details.
• Windows Events: This view lists only the alarms that are triggered from Windows event logs as the source.
• Devices to Watch: You can view the devices with fault in this list view.

AdventNet ManageEngine OpManager 7 :: User Guide
AdventNet, Inc. 58
Alert Actions You can perform the following alert actions: Acknowledge: This option is useful for the operators to pick up the problem and work on it. When you select an alarm and click on Acknowledge button on top the alarms list, the administrator/operator's name is populated in the technician's field. Unacknowledge: The assigned technician is removed and the alarm is back in the unassigned list. Clear: You can click this to clear an alarm manually. Delete: You can delete an alarm. View History: Click on the alarm message to view the Adding Notes:You can add notes to the alarms to explain the steps you have followed to correct the fault or to give tips to the operator who is working on the fault. In the Alarm history page, click the Add Notes option.

AdventNet ManageEngine OpManager 7 :: User Guide
AdventNet, Inc. 59
Escalating Alarms The alarms of critical devices should not be left unnoticed for a long time. For instance, the mail-servers, web-servers, backup-servers, switches, and routers are so critical that if their faults are not solved within a specified time, the networking functionality will be brought down. You can configure OpManager to escalate such unnoticed alarms by sending an e-mail to the person concerned. To configure an alarm escalation rule, follow the steps given below:
1. Click the Admin Tab. 2. Under Alerts, click Alarm Escalation. 3. Click Add Rule to create a rule. 4. Select Enable this rule check-box. 5. Assign a name to the rule in the Rule Name field. 6. Select the Severity and Category of the alarm. Then configure the the interval in either hours
or minutes to wait for the alarm to get cleared. 7. Type the values for the fields under Escalation Email Details to send an e-mail if the alarm is
not cleared within the specified interval. 8. Configure the From Email Address, the Subject and the Message of the escalation mail. 9. In the Run this check every box, set the interval in minutes to execute this rule. 10. Click Save.

AdventNet ManageEngine OpManager 7 :: User Guide
AdventNet, Inc. 60
Receiving SNMP Traps in OpManager OpManager listens for SNMP traps from devices on the defautl port 162. So, it automatically acts as a trap receiver and based on the trap processors defined in OpManager, the traps are processed and shown as OpManager alarms.
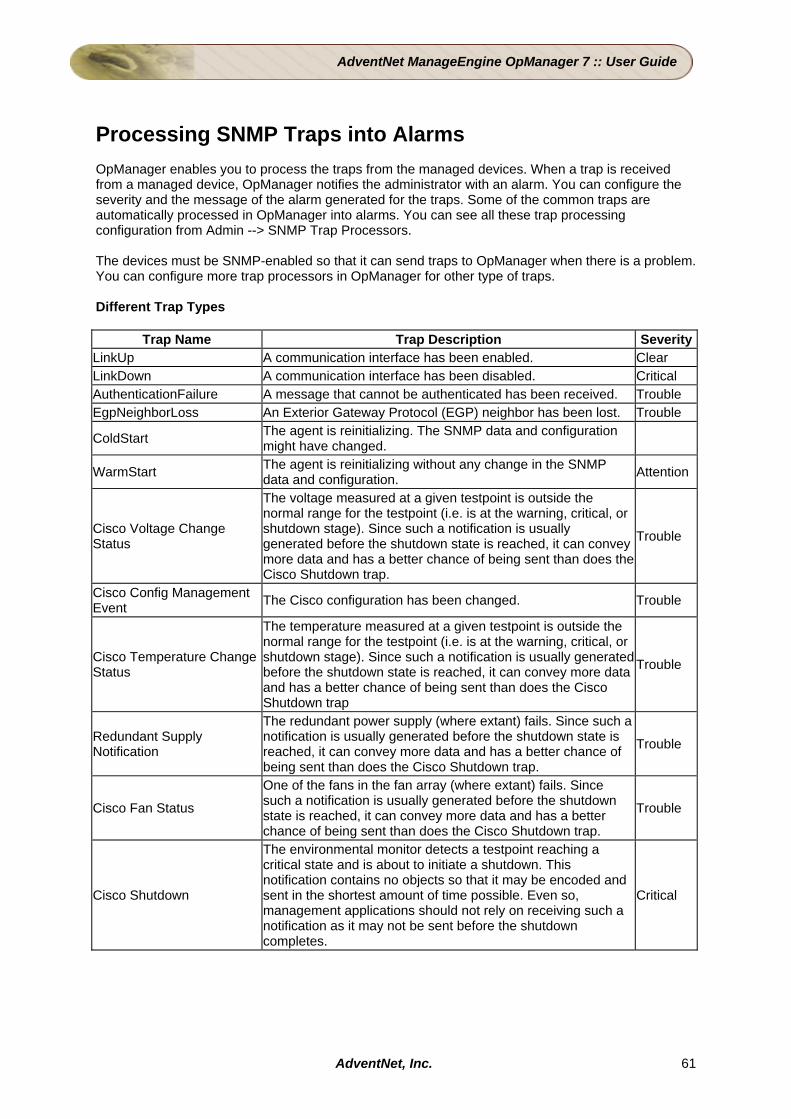
AdventNet ManageEngine OpManager 7 :: User Guide
AdventNet, Inc. 61
Processing SNMP Traps into Alarms OpManager enables you to process the traps from the managed devices. When a trap is received from a managed device, OpManager notifies the administrator with an alarm. You can configure the severity and the message of the alarm generated for the traps. Some of the common traps are automatically processed in OpManager into alarms. You can see all these trap processing configuration from Admin --> SNMP Trap Processors. The devices must be SNMP-enabled so that it can send traps to OpManager when there is a problem. You can configure more trap processors in OpManager for other type of traps. Different Trap Types
Trap Name Trap Description SeverityLinkUp A communication interface has been enabled. Clear LinkDown A communication interface has been disabled. Critical AuthenticationFailure A message that cannot be authenticated has been received. Trouble EgpNeighborLoss An Exterior Gateway Protocol (EGP) neighbor has been lost. Trouble
ColdStart The agent is reinitializing. The SNMP data and configuration might have changed.
WarmStart The agent is reinitializing without any change in the SNMP data and configuration. Attention
Cisco Voltage Change Status
The voltage measured at a given testpoint is outside the normal range for the testpoint (i.e. is at the warning, critical, or shutdown stage). Since such a notification is usually generated before the shutdown state is reached, it can convey more data and has a better chance of being sent than does the Cisco Shutdown trap.
Trouble
Cisco Config Management Event The Cisco configuration has been changed. Trouble
Cisco Temperature Change Status
The temperature measured at a given testpoint is outside the normal range for the testpoint (i.e. is at the warning, critical, or shutdown stage). Since such a notification is usually generated before the shutdown state is reached, it can convey more data and has a better chance of being sent than does the Cisco Shutdown trap
Trouble
Redundant Supply Notification
The redundant power supply (where extant) fails. Since such a notification is usually generated before the shutdown state is reached, it can convey more data and has a better chance of being sent than does the Cisco Shutdown trap.
Trouble
Cisco Fan Status
One of the fans in the fan array (where extant) fails. Since such a notification is usually generated before the shutdown state is reached, it can convey more data and has a better chance of being sent than does the Cisco Shutdown trap.
Trouble
Cisco Shutdown
The environmental monitor detects a testpoint reaching a critical state and is about to initiate a shutdown. This notification contains no objects so that it may be encoded and sent in the shortest amount of time possible. Even so, management applications should not rely on receiving such a notification as it may not be sent before the shutdown completes.
Critical

AdventNet ManageEngine OpManager 7 :: User Guide
AdventNet, Inc. 62
Loading Traps from other MIBs Following are the steps to load the traps from various MIBs.
1. Under the Admin tab, select SNMP Trap Processors. All the configured processors are listed here.
2. On the right, select Load From Mibs under Actions 3. From the list of MIBs, select the MIB from which you would like to load the trap variable. The
traps in that MIB are listed. 4. Select the required trap variable, and click Add Trap Processor(s).
A Processor for the selected trap is added, and is listed under the SNMP Trap Processors. Adding New Processors Directly You can add processors for traps from any custom SNMP MIB. OpManager can extract useful information that is sent with SNMP traps as variable bindings (SNMP varbinds). So if you have bought devices from different vendors, all you need to do is get access to those vendor-specific MIBs and you can easily have OpManager monitor critical variables on that device. If a managed device sends a trap that has not been defined, you can view them in the Unsolicited Traps view until a processor is configured. To create a trap processor, follow the steps given below:
1. Click SNMP Trap Processors under the Admin Tab. 2. Click Add Custom under Actions. 3. Fill in the values for the text fields in this dialog. 4. Click Add.
The processor is added.
AdventNet ManageEngine OpManager 7 :: User Guide
AdventNet, Inc. 63
Configuring Notifications When a fault is detected in your network, an event occurs and multiple events correlate to trigger an alarm. You can configure OpManager to notify the network administrator or perform automatic actions based on the alarm raised for a device. The different types of notifications available are:
• Email Alerts • SMS Alerts • Run a Program • Run a System Command • Log a Ticket (Trouble ticketing in ServiceDesk Plus)
The configured notification settings are available as profiles and these can be associated to different devices for different fault criteria.
AdventNet ManageEngine OpManager 7 :: User Guide
AdventNet, Inc. 64
Configuring Mail Server Settings OpManager allows you to configure e-mail alerts and SMS alerts to get notified on the fault in your network. By default, OpManager sends the mail to the mail server specified in the e-mail notification profile. To configure the SMTP server settings globally and to provide the secondary mail server settings, follow the steps given below:
1. Under the Admin tab, click Mail Server Settings. 2. Enter the SMTP Server name and Port number. 3. Select Requires Authentication and enter the User name and Password details, if the
server requires authentication to send e-mail. 4. Configure the From and To Email ID fields.
Verifying Configuration
• To test the settings enter the Email ID and click Test Mail. This e-mail ID will be considered as the default To Email ID while creating Email and SMS notification profiles.
• If you have a secondary mail server in your network, select Add a secondary mail server and provide the details. In case of failure of primary mail server, OpManager uses secondary mail server to send e-mail and SMS.

AdventNet ManageEngine OpManager 7 :: User Guide
AdventNet, Inc. 65
Configuring Pxoxy Server Settings Any business enterprise will have a proxy server to optimize its connectivity to Internet and to filter access to restricted Web sites. In OpManager, to monitor URLs over internet, you need to provide the proxy server details of your enterprise. To enter the details, follow the steps given below:
1. Under the Admin tab, click Proxy Server Settings. 2. Select the Enable Proxy check-box. 3. Enter the Proxy server name, port number in which the Web service is running on the proxy
server, and the user name and password to connect to the proxy server. 4. For the devices that do no require to go through a proxy, specify the name or the IP Address
of the devices as a comma separated list in the No Proxy field. 5. Click Save to save the details.
AdventNet ManageEngine OpManager 7 :: User Guide
AdventNet, Inc. 66
Configuring SMS Server Settings Besides the email-based SMS notifications, OpManager allows you to configure modem-based SMS alerts. Configure the SMS Server Settings in OpManager as follows:
1. Ensure if yours is one of the supported modems. 2. Connect the GSM Modem to the Serial Communication Port. 3. Go to Admin --> SMS Server Settings. 4. Configure the port number to which the Modem is connected. 5. Click OK.
AdventNet ManageEngine OpManager 7 :: User Guide
AdventNet, Inc. 67
Configuring Email Alerts You can configure OpManager to send e-mail to network administrators when a fault is detected in the device. You can create separate profiles for each administrator and assign them to devices so that whenever the device has a fault, an e-mail is sent to the technician concerned. To create an email alert profile, follow the steps given below:
1. Select Admin --> Notification Profiles 2. Click Add New option against Email Alerts. 3. Type the profile name. 4. Type valid To and From Email addresses. 5. Select the required alarm variables that you would like to see in the email alert. 6. Click Associate link on the right to associate the profile to devices. 7. Select the Profile and click Next. 8. Select the fault criteria for which you need to be notified. For instance, if you want to be
notified of threshold violation, select 'Threshold rule is violated'. Click Next 9. Select the devices or the category of devices for which you want to be notified. For instance, if
you want to be notified of threshold violation for all Servers, select Server category from the combo-box. Click Next.
The profile is associated to all the servers. A notification is sent everytime a threshold is violated for a server. Note: Primary and secondary SMTP server settings can be provided in the Mail Server Settings page in OpManager. Whenever a new email profile is created, the values of the primary SMTP server and the authentication details are retrieved from the Mail Server settings. Refer to Configuring Mail Server Settings for steps to enter the details. If the SMTP server is not available while sending e-mail, secondary mail server is used to send the mail automatically.
AdventNet ManageEngine OpManager 7 :: User Guide
AdventNet, Inc. 68
Configuring SMS Alerts You can configure OpManager to send SMS to network administrators whenever a fault is detected in the device. You can create separate profiles for each administrator and assign them to devices so that whenever a device has trouble, depending on the trouble, SMS is sent to the technician concerned. OpManager supports email-based SMS alerts and also modem-based SMS alerts. Please note that Modem-based SMS alerts comes as an add-on over OpManager and needs to be licensed seperately. Modem-based SMS Alerts To create a modem-based SMS notification profile, here are the steps:
1. Configure the SMS Server Settings. 2. Click the Admin tab. 3. Under Alerts, click Notification Profiles. 4. From Modem-based SMS column, click Add New. 5. Type the profile name. 6. Type the mobile number. 7. Select the required alarm variables. The selected variables will be seen in the sms alert
received. Refer to the support modems list to use this notification profile. Email-based SMS Alerts To create an email-based SMS notification profile, follow the steps given below:
1. Configure the Mail Server Settings if you have'nt configured yet. 2. Click the Admin tab. 3. Under Alerts, click Notification Profiles. 4. From Email-based SMS column, click Add New. 5. Assign a meaningful name to this profile. 6. Type valid To and From Email addresses. 7. Select the required alarm variables that you would like to see in the sms alert. 8. Save the Profile. 9. Associate the profile to the required devices. This triggers alerts when faults occur.
Note: Primary and secondary SMTP server settings can be provided in the Mail Server Settings page in OpManager. Whenever a new SMS profile is created, the values of the primary SMTP server and the authentication details will be considered from the Mail Server settings. Refer to Configuring Mail Server Settings for steps to enter the details. If the SMTP server is not available while sending e-mail, secondary mail server will be used to send the mail automatically.
AdventNet ManageEngine OpManager 7 :: User Guide
AdventNet, Inc. 69
Using a Run Program Notification Profile You can configure OpManager to automatically run a program whenever a fault is detected in the device. For instance, you can configure OpManager to execute a program that corrects the fault or simply produces a sound or that whenever a specific type of an alarm is raised for a device. To create a profile that executes the specified program, follow the steps given below:
1. Select Admin --> Notification Profiles 2. Click Add New option against Run Program. 3. Type the profile name. 4. In the Command Name field, specify the name of the program to be executed with the
absolute path. Example C:\profiles\testprogram.bat. 5. If the program requires some arguments, specify the arguments. 6. Save the profile. 7. Click Associate link on the right to associate the profile to devices. 8. Select the Profile and click Next. 9. Select the fault criteria for which you need to be notified. For instance, if you want to be
notified of threshold violation, select 'Threshold rule is violated'. Click Next 10. Select the devices or the category of devices for which you want to be notified. Click Next.
The profile is associated to all the servers. The program is executed with the specified arguments whenever a fault matching the selected criteria occurs.
AdventNet ManageEngine OpManager 7 :: User Guide
AdventNet, Inc. 70
Using a Run Command Notification Profile You can configure OpManager to automatically run a system command whenever a fault is detected in the device. For instance, you can configure OpManager to execute a netsend command to send popup messages to users machines whenever a specific type of an alarm is raised for a device. To create a profile that executes the specified program, follow the steps given below :
1. Select Admin --> Notification Profiles 2. Click Add New option against Run System Command. 3. Type the profile name. 4. In the Command String field, specify the command name with additional arguments if any. 5. Select the Err Append and Append check-boxes to append the output and the error
message on executing the command. 6. Save the profile. 7. A ssociate the profile to devices.
The system command is executed with the specified arguments whenever a fault matching the selected criteria occurs.

AdventNet ManageEngine OpManager 7 :: User Guide
AdventNet, Inc. 71
Creating a Sound Notification Profile By default, OpManager provides a sound notification that plays a beep sound when a fault is detected in the associated devices. You can also create profiles to play the sound of your interest. To create a sound profile, follow the steps given below:
1. Copy the sound file you want to play in the <OpManager Home>/conf/application/scripts directory.
2. Create a Run Program notification profile with the following values to the fields: Command Name: ./jre1.4.1/bin/java Program arguments: Â -classpath ./classes/OpManagerServerClasses.jar com.adventnet.me.opmanager.server.alert.AudioNotifier ./conf/application/scripts/<audio_file_name>
You need to associate the profile to the device for triggering it during a fault. The sound can be heard in the OpManager server.

AdventNet ManageEngine OpManager 7 :: User Guide
AdventNet, Inc. 72
Modifying and Deleting Notification Profiles You can modify or remove an existing notification profile. Here are the steps:
1. From the Admin tab, select Notification Profiles. 2. All the configured profiles are listed here. 3. Click the Delete icon against the profiles name to delete the profiles. 4. Click the Edit icon against the profiles name to modify the profile properties.
The changes made here are applied for all the devices to which the profile is associated.
AdventNet ManageEngine OpManager 7 :: User Guide
AdventNet, Inc. 73
Associating Notification with Managed Devices You need to associate the notification profiles with devices to trigger the corresponding action whenever these devices are under trouble. To associate a profile with devices or a category of devices, you can use the Quick Configuration wizard. For doing so, follow the steps given below:
1. From the Admin tab, under Configuration, click Quick Configuration wizard. 2. Select Assign a notification profile... and click Next. 3. Select the profile to be associated to the devices and click Next. 4. Select the fault criteria for the selected profile. 5. Select one of these options to associate the profile and click Next.
o If you select a category, then the profile is associated to all the devices in the category automatically.
o If you choose Select devices manually, the next page will list all the managed devices. Move the devices from the list in the left to the one in the right and click Finish.
o If you select a business view, the profile is associated to all the devices in the selected view.
To associate a notification profile to a single device, follow the steps given below:
1. Open the snapshot page of the device. 2. Select the Notification Profiles tab at the bottom. 3. Click the corresponding link to select and assoicate the required profiles.
AdventNet ManageEngine OpManager 7 :: User Guide
AdventNet, Inc. 74
Integrating with Other ME Applications Integrating with NetFlow Analyzer OpManager can seamlessly integrate with the network traffic monitoring tool, Netflow Analyzer, one  of the AdventNet ManageEngine suite of products. Netflow Analyzer provides detailed interface traffic reports. To view the detailed traffic report from Netflow Analyzer, the prerequisites are,
1. Netflow Analyzer must be up and running in your network 2. The interface whose traffic you would like to monitor must be discovered in both, OpManager
and Netflow Analyzer. 3. The NetFlow Analyzer settings must be configured properly in OpManager
Configure NetFlow Analyzer Settings To configure the NetFlow Analyzer Settings in OpManager
1. Click Admin tab, click Add-On/Products Settings 2. Click NetFlow Settings icon in this screen 3. Type the following NetFlow Analyzer server details:
1. Server Name 2. Port (default is 8080) 3. User Name 4. Password 5. Polling Interval in mins
4. Save the settings. After configuring the settings, you can follow the steps given below to see the detailed reports:
1. Go to the Routers map 2. Click the required interface icon in the Routers map to see its snapshot page 3. In the Interface Traffic details column, do a mouse-over the  Netflow icon. Select
1. Top Applications 2. Top Sources 3. Top Destinations 4. Top Conversations
Traffic details are shown in detail based on the above options.
AdventNet ManageEngine OpManager 7 :: User Guide
AdventNet, Inc. 75
Integrating with ServiceDesk Plus If you have ServiceDesk Plus installed in your network, you can automatically log trouble tickets from OpManager for specific network faults. So, besides the provision to email, sms, or notify fault in other forms, you can also track the faults by logging trouble tickets to ServiceDesk Plus. This helps in issue tracking. For logging the trouble ticket to ServiceDesk Plus correctly, you need to ensure the following:
1. Incoming Mail Settings must be configured properly in ServiceDesk Plus 2. ServiceDesk Plus Settings must be configured in OpManager 3. A notificaton profile to log a trouble ticket to ServiceDesk Plus must be configured and
associated. Configure Servers Settings Following are the steps to configure the ServiceDesk Plus and OpManager Server settings:
1. Configure Incoming Mail Settings in ServiceDesk Plus 2. Configure Mail Server Settings in OpManager 3. OpManager must 'know' where ServiceDesk Plus resides to log the ticket. To configure the
ServiceDesk Plus settings details, follow the steps given below 4. Click Admin tab, and select Add-On/Products Settings and configure the following values:
Server where ServiceDesk Plus is running: Name or the IP address of the machine where ServiceDesk Plus is installed and running. ServiceDesk Plus server port number : The port number in which the ServiceDesk Plus application is running. Default port is 8080. ServiceDesk Plus login:Â The user name with which you will log in into ServiceDesk Plus. Default is admin ServiceDesk Plus password : The password to log in into ServiceDesk Plus. Default password for admin user is admin HelpDesk Email Address :Â The email address in the mail server to which the email must be sent. This should be the same as configured in the mail-server settings in ServiceDesk Plus. Example: [email protected] From Email Address : The initiator's email address. Example: [email protected]
After the settings are configured correctly, you can configure a notification profile to log a trouble ticket.
AdventNet ManageEngine OpManager 7 :: User Guide
AdventNet, Inc. 76
Integrating with DeviceExpert OpManager can seamlessly integrate with the DeviceExpert, a network change and configuration management solution for network devices. The configurations of devices like routers, switches, and firewalls can be managed using this solution. When integrating with OpManager, you can monitor the devices and their resources for performance, and also manage changes and configurations across these devices. To view the configuration and the changes from OpManager,
1. DeviceExpert must be up and running in your network 2. The network devices whose changes you want to monitor must be discovered in both,
OpManager and DeviceExpert. 3. The DeviceExpert settings must be configured properly in OpManager
Configure DeviceExpert Settings To configure the DeviceExpert Settings in OpManager
1. Copy the file server.keystore from /DeviceExpert/conf folder to a folder on your local machine. 2. From OpManager WebClient, select Admin tab and click on Add-On/Products Settings 3. Click DeviceExpert Settings link in this screen 4. Type the following DeviceExpert server details:
1. Server Name 2. Port (default is 6060) 3. Browse and select the server.keystore file copied to the local machine. 4. User Name 5. Password 6. Hit Test Connection and Save option to verify the integration.
After configuring the settings, you can follow the steps given below to see the detailed reports:
1. Go to the snapshot page of the Router/Switch/Firewall 2. From the Device Info menu, select Startup Configuration to see the initial configuration of
the device. 3. From the same menu, select Running Configuration to see the runtime configuration
changes made to the device. Troubleshooting What to do when you encounter an error message 'Unable to fetch values from DeviceExpert, The server might not be running or the network traffic may be too high' when configuring the DeviceExpert details in OpManager:
• Check if the DeviceExpert service details are correctly configured. Specially, the port number and the proper server.keystore file is selected.
• Despite correct details, if you still face issues, try the following: o Open a command prompt and change directory to /opmanager/bin o Execute the script ssl_deviceexpert.bat with the absolute path of OpManager
installation folder. For instance, if the OpManager path is C:\Program Files\AdventNet\ME\OpManager, the script should be executed as follows: C:\Program Files\AdventNet1\ME\OpManager\bin>ssl_deviceexpert.bat "C:\Program Files\AdventNet1\ME\OpManager"
AdventNet ManageEngine OpManager 7 :: User Guide
AdventNet, Inc. 77
Integrating with Firewall Analyzer OpManager can seamlessly integrate with Firewall Analyzer, a web-based Firewall Log Analysis & Reporting Tool. Integrating OpManager with Firewall Analyzer allows you to monitor your Server's Security, Traffic, & Bandwidth utilization in depth. To view the detail traffic and security reports from Firewall Analyzer, the prerequisites are,
1. Firewall Analyzer must be up and running in your network 2. The firewall whose logs you would like to analyze must be available in both, OpManager and
Firewall Analyzer. That is, configure your firewalls to forward syslog messages to the server running Firewall Analyzer. These firewalls should be discovered in OpManager for monitoring.
3. The Firewall Analyzer settings must be configured properly in OpManager. Configure Firewall Analyzer Settings To configure the Firewall Analyzer Settings in OpManager
1. Click Admin tab, click Add-On/Products Settings 2. Click Firewall Analyzer Settings icon in this screen 3. Type the following Firewall Analyzer server details:
1. Server Name 2. Port (default is 8500) 3. User Name 4. Password 5. Select the Polling Interval in minutes
4. Test and save the settings by clicking on Test Connection and Save button. After configuring the settings, you can follow the steps given below to see the detailed reports:
1. Go to the Firewalls map 2. Click the required Firewall icon in this map to see its snapshot page 3. From the Reports menu on the right in the snapshot page, select any of the following options
to view the respective reports: 1. Traffic Reports 2. Security Reports 3. Custom Reports 4. All Reports
Detailed reports retrieved from Firewall Analyzer are shown based on the reports selected.
AdventNet ManageEngine OpManager 7 :: User Guide
AdventNet, Inc. 78
Other Utilities and Tools Configuring Database Maintenance To plot graphs and generate reports, OpManager collects data from the managed devices at regular intervals. By default, OpManager aggregates the performance data into hourly data at the end of each hour. The hourly data thus calculated will be aggregated into daily data at the end of each day. These aggregated data will be used in graphs and reports. OpManager allows you to maintain the database with the required data. By default, the detailed data will be maintained for 7 days, the hourly data for 30 days and the daily data for 365 days. After the specified period, the database will be cleaned up automatically. To configure your own settings for database maintenance, follow the steps given below:
1. Click the Admin tab. 2. Under Tools, click Database Maintenance. 3. Specify the values for the following fields:
1. Alarms Database- the maximum number of recent alarms to be maintained must be specified here. For instance, if you want an history of last 500 alarms, specify the value as 500 here.
2. Events Database- multiple events correlate to generate a single alarm. This is essentially a history information.
3. Performance Database- the cleanup interval of the raw data as well as the archived data must be specified here.
4. Click OK to apply the changes.
AdventNet ManageEngine OpManager 7 :: User Guide
AdventNet, Inc. 79
Scheduling Downtime Maintenance of network devices forms an integral part of network administration. You may want to perform a maintenance of specific device types at specific intervals. If such devices are removed from the network, or rebooted, then you will see alarms indicating that the device, or the applications in the device are unavailable. Since the devices are not available when polled for status during the maintenance period, unnecessary alarms are fired. To prevent the devices from being monitored for status during maintenance, you can schedule a maintenance task for such devices. Following are the steps:
1. From the Admin tab, select Downtime Scheduler option under Tools. 2. Click on New Schedule. 3. In the New Downtime Schedule form, provide the following details:
o Schedule Name o Schedule Description o Select the Status as Enabled, if you want the Scheduled task to take effect
immediately. Else select Disabled, so that you can enable it when required. o Select the frequency at which the Task has to be scheduled/executed. It can be
Once, Every Day, Every Week. o Specify the start and end time/day of the task in the corresponding fields. o If it is a schedule to be executed every day, then specify the date from which the task
must be scheduled. o You can assign the task to only the required devices, or a device category like
switches, routers, to a Business view, or to URL Monitors. The schedule will be executed as configured.
AdventNet ManageEngine OpManager 7 :: User Guide
AdventNet, Inc. 80
Scheduling Reports You can configure OpManager to generate reports based on a specified schedule. The generated reports can also be automatically emailed to the concerned email IDs. Here are the steps to schedule reports:
1. From Admin tab, select Select Reports under Tools. 2. In the Report Scheduler page, click the Add Schedule button on the right. 3. Configure the following details:
o Name: Configure a name for the schedule. o Choose Report Type: You can choose to schedule reports for specific devices, top n
devices, or for all devices. o Click Next.
Scheduling Top N Reports / All Devices reports If you have selected to schedule the Top N Reports, configure the following details:
1. Top N Reports: Select from Top 10/25/50/100 reports. 2. Period: Choose the period for which you want the report scheduled. 3. Select Report(s): Select the required resource reports to be scheduled. 4. Business View Reports: Select the relevant check-box and the business view to generate
reports specific to the devices in that business view. 5. Click Next.
Scheduling Device specific Availability reports If you have chosen to schedule reports for device specific availability details, configure the following:
1. Select either a category of devices, or the required business view, or select specific devices manually for generating the availability reports.
2. Select the period for which you want to generate the reports. 3. Click Next.
Configuring the Time Settings for generating reports
1. Daily: Select the time at which the reports must be generated every day. 2. Weekly: Select the time and also the days on which the reports must be generated. 3. Monthly: Select the time, day, and the months for which the reports must be generated. 4. Report Delivery: Configure the email ids to which the reports are to be sent as attachments.
[Or] 5. Configure the url where the reports can be published. 6. Period: Choose the period for which you want the report scheduled. 7. Select Report(s): Select the required resource reports to be scheduled. 8. Click Next.
Verify the details of the configured schedule and hit Submit for the schedule to take effect. Enabling the Configured Schedule Once you configure the report schedules, they are listed in the Report Schedule page (Admin --> Schedule Reports page). Select the required schedules and click on the Enable button at the bottom of the list. You can also diable or delete a schedule from here.
AdventNet ManageEngine OpManager 7 :: User Guide
AdventNet, Inc. 81
Using the Quick Configuration Wizard OpManager's quick configuration wizard helps you to configure monitors, notification profiles, dependency, and so on, for many devices at a time. To invoke the wizard, in the Admin tab under Configuration, click Quick Configuration wizard. You can perform the following configurations for multiple devices:
• Assign a notification profile to several devices • Delete associated notification profile • Add a new service monitor to several devices • Add a new windows service monitor to several devices. • Associate Event log rules to several devices • Configure Device Dependencies • Associate a credential to several devices • Delete devices • Manage / Unmanage devices
AdventNet ManageEngine OpManager 7 :: User Guide
AdventNet, Inc. 82
MIB Browser: Overview The MIB Browser tool is a complete SNMP MIB Browser that enables loading and browsing MIBs and allows you to perform all SNMP-related operations. You can also view and operate on the data available through the SNMP agent running on a managed device. The features of MIB Browser include the following:
• Saving the MIB Browser settings. • Loading and viewing MIB modules in a MIB tree. • Traversing the MIB tree to view the definitions of each node for a particular object defined in
the MIB. • Performing the basic SNMP operations, such as GET, GETNEXT, GETBULK, and SET. • Support for multi-varbind requests. This feature is available only in the Java client. • Real-time plotting of SNMP data in a graph. Line graph and bar graph are the two types of
graphs that are currently supported. This feature is available only in the Java client. • Table-view of SNMP data. This feature is available only in the Java client. • Enables loading of MIBs at startup. This feature is available only in the Java client.
MIB Browser Interface Menu bar: Contains menus with related commands to perform all administrative operations. Toolbar: Contains frequently used administrative commands for easy access. MIB Tree: Shows all the loaded MIBs. You can traverse the tree and view the definition of each node in the tree. SNMP Settings: Displays the SNMP settings of the selected node. Result Display Area: Displays the result of the SNMP operations. Object Attributes: Shows the attributes of the selected node

AdventNet ManageEngine OpManager 7 :: User Guide
AdventNet, Inc. 83
Switch Port Mapper OpManager shows the connectivity between a switch and other connected devices in the network in Switch Port Mapper. You get the details such as the MAC address, IP Address and DNS names of the devices connected to the switch. You need to provide the details such as the community string and port number of the switch and if needed, the details of the server or router that may contain the layer 3 details. To view the switch port mapping details, follow the steps given below:
1. Click the switch icon in the map. 2. In the displayed Snapshot page, click Switch Port Mapper under Device Info. 3. Click Show Mapping in the Switch Port Mapper window to view the mapping details.
AdventNet ManageEngine OpManager 7 :: User Guide
AdventNet, Inc. 84
Reporting About Reports Intuitive dashboards and detailed reports helps you determine the performance of your network in very less time. The default reports available in OpManager include:
• Servers: Servers Health report shows a report of complete server health for top ten servers. Reports for Servers by resource utilization gives a detailed account of resource utilizations for the servers. The resources include CPU, Memory, Disk utilization, Interface traffic and utilization, all servers disk usage report and all servers availability reports.
• Routers: Routers Health report shows a report of complete router health for top ten routers. Reports for Servers by resource utilization gives a detailed account of resource utilizations for the servers. The resources include CPU, Memory, Interface traffic and utilization, and all routers availability report.
• Switches: Reports for switches include a full Switch health report, Port traffic, utilization and error reports.
• Services: Response time reports are available for HTTP, SMTP, MySQL , Telnet, and FTP Services.
• DomainControllers: The reports for DomainControllers include the availability report, CPU, Memory, and Disk usage reports. Besides this, the DomainController snapshot shows a special dashboard of performance of all DC resources.
• All Devices: CPU and memory utilization, interface traffic and utilization reports are available for all devices.
• Inventory: Inventory reports are available for servers, desktops, all devices, SNMP-enabled devices and non-SNMP devices.

AdventNet ManageEngine OpManager 7 :: User Guide
AdventNet, Inc. 85
Viewing Device Health Report at a Glance Performance of various resources on a device can impact the health of that device. For instance, it can be due to insufficient hardware, high resource utilization of a resource by a process, too many processes running on that system, or too much incoming and out-going traffic, or even network latency. OpManager helps you see the performance of all the resources at a glance for a single device. This helps troubleshooting the problem much easier. To access this report, go to the device snapshot page and click on At a Glance Report option on the right corner. This is a report showing the device health at a glance. It shows details like the availability, response time, packet loss, resource utilizations etc

AdventNet ManageEngine OpManager 7 :: User Guide
AdventNet, Inc. 86
Custom Reports You can view multiple graphs of a device under a single view and get a printer version of the same using custom reports. To get a multi-graph report for a device, follow the steps given below:
1. Under the Reports tab, select Custom Reports. 2. Click the Select Device link to select a device from the list. Once the device is selected, all
the monitors configured in the device will be listed. 3. Select the graphs you want to view. 4. Select the start and end time, the period for which you want to see the report. 5. Click Show Report.
You can export the reports to PDF format by clicking Export to PDF. To print the report, click Printer Friendly View and then click Print from the displayed window. You can also access the custom report feature from the device snapshot page. Select Cutom Reports option from Actions menu in the snapshot page.

AdventNet ManageEngine OpManager 7 :: User Guide
AdventNet, Inc. 87
Business View-based Reports OpManager provides an intuitive Availability Dashboard for your business view. You can track the fault to the root in no time. To access the business view dashboard, follow the steps below:
1. Go to the required business view. 2. Click on the Dashboard tab. The business view dashboard shows the availability distribution
and also the least available devices in that view. 3. Click on the bar indicating a problem to drill down to the actual fault. 4. You can also view the dashboard for various periods like the last 24 hours, or last few days to
analyze the trend.

AdventNet ManageEngine OpManager 7 :: User Guide
AdventNet, Inc. 88
Appendix Installing SNMP Agent on Windows System (Adapted from Windows help)
• Installing SNMP Agent on Windows XP/2000/2003 • Installing SNMP Agent on Windows NT • Installing SNMP Agent on Windows 98
You need to know the following information before you install the Simple Network Management Protocol (SNMP) service on your computer:
• Community names in your network. • Trap destinations for each community. • IP addresses and computer names for SNMP management hosts.
To install SNMP on Windows XP, 2000, and 2003, follow the steps given below: You must be logged on as an administrator or a member of the Administrators group to complete this procedure. If your computer is connected to a network, network policy settings may also prevent you from completing this procedure.
• Click Start, point to Settings, click Control Panel, double-click Add or Remove Programs, and then click Add/Remove Windows Components.
• In Components, click Management and Monitoring Tools (but do not select or clear its check box), and then click Details.
• Select the Simple Network Management Protocol check box, and click OK. • Click Next. • Insert the respective CD or specify the complete path of the location at which the files stored. 6. SNMP starts automatically after installation.
This completes the installation process. This also implements the Host Resources MIB automatically. To configure SNMP agents respond to SNMP requests, refer to Configuring SNMP agents. To install SNMP in Windows NT, follow the steps given below:
• Right-click the Network Neighborhood icon on the Desktop. • Click Properties. • Click Services. • Click Add. The Select Network Service dialog box appears. • In the Network Service list, click SNMP Service, and then click OK. • Insert the respective CD or specify the complete path of the location at which the files stored
and click Continue. • After the necessary files are copied to your computer, the Microsoft SNMP Properties dialog
box appears. This completes the installation process. This also implements the Host Resources MIB automatically. To configure SNMP agents respond to SNMP requests, refer to Configuring SNMP agents. To install SNMP in Windows 98 Make sure your Windows 98 CD is in the drive. Then follow the steps given below:
• On the Network control panel, click Add. • Double-click Service in the Select Network Component Type dialog box. • Click Have Disk in the Select Network Service dialog box.

AdventNet ManageEngine OpManager 7 :: User Guide
AdventNet, Inc. 89
• Type the path to the "TOOLS\RESKIT\NETADMIN\SNMP" directory on your computer's CD drive in the Install From Disk dialog box and then click OK.
• Select Microsoft SNMP agent from the Models list in the Select Network Service dialog box and then click OK.
This completes the installation process. This also implements the Host Resources MIB automatically. To configure SNMP agents respond to SNMP requests, refer to Configuring SNMP agents.
AdventNet ManageEngine OpManager 7 :: User Guide
AdventNet, Inc. 90
Installing SNMP on Linux Systems The installation of new version of SNMP is required only for versions prior to 8. Download the latest rpm version of SNMP using the following URL: http://prdownloads.sourceforge.net/net-snmp/net-snmp-5.1.1-1.rh9.i686.rpm?download Download the zip version of SNMP using the following URL: http://heanet.dl.sourceforge.net/sourceforge/net-snmp/ucd-snmp-4.2.6.tar.gz To install using the rpm, follow the steps given below:
1. Login as "root" user. 2. Before installing the new version of net-snmp, you need to remove the earlier versions of net-
snmp in your machine. To list the versions of net-snmp installed in your machine, execute the following command: rpm -qa | grep "net-snmp"
3. If there are already installed version in your machine, remove them using the command: rpm -e <version of net-snmp listed as the output for previous command> --nodeps
4. If there are no previously installed versions in your machine, then execute the following command to install the new version: rpm -i <new downloaded version of SNMP agent> --nodeps
To install using the zip, follow the steps given below: Extract the file using following command: tar -zxvf ucd-snmp-4.2.6.tar.gz To install SNMP, follow the steps given below:
1. Login as root user. 2. Execute the command to set the path of the C compiler:
export PATH=<gcc path>:$PATH 3. Execute the following four commands from the directory where you have extracted the ucd-
snmp: o ./configure --prefix=<directory_name> --with-mib-modules="host"
directory_name is the directory to install SNMP agent. Preferably choose a directory under /root. The directories /usr and /local might contain the files of an older version of SNMP and so do not choose these directories to ensure proper installation.
o make o umask 022 o make install
This completes the installation process. For configuring SNMP agents to respond to SNMP requests, refer to Configuring SNMP agents.
AdventNet ManageEngine OpManager 7 :: User Guide
AdventNet, Inc. 91
Installing SNMP Agent on Solaris Systems Download the latest version of SNMP using the following URL: http://heanet.dl.sourceforge.net/sourceforge/net-snmp/ucd-snmp-4.2.6.tar.gz Extract the file using following command: tar -zxvf ucd-snmp-4.2.6.tar.gz To install SNMP, follow the steps given below:
1. Login as root user. 2. Execute the command to set the path of the C compiler:
export PATH=<gcc path>:$PATH 3. Execute the following four commands from the directory where you have extracted the ucd-
snmp: o ./configure --prefix=<directory_name> --with-mib-modules="host"
directory_name is the directory to install SNMP agent. Preferably choose a directory under /root. The directories /usr and /local might contain the files of an older version of SNMP and so do not choose these directories to ensure proper installation.
o make o umask 022 o make install
This completes the installation process. To configure SNMP agents respond to SNMP requests, refer to Configuring SNMP agents.
AdventNet ManageEngine OpManager 7 :: User Guide
AdventNet, Inc. 92
Configuring SNMP Agents
• Configuring SNMP agent in Windows XP/2000,2003 • Configuring SNMP agent in Windows NT • Configuring SNMP agent in Linux versions prior to 8 • Configuring the Agent in Linux versions 8 and above • Configuring SNMP agent in Solaris
Configuring SNMP Agent in Windows XP, 2000, and 2003 Systems For details about installing SNMP agents in Windows systems, refer to Installing SNMP Agent on Windows Systems. To configure SNMP agent in Windows XP and 2000 systems, follow the steps given below:
1. Click Start, point to Settings, click Control Panel. 2. Under Administrative Tools, click Services. 3. In the details pane, right-click SNMP Service and select Properties. 4. In the Security tab, select Send authentication trap if you want a trap message to be sent
whenever authentication fails. 5. Under Accepted community names, click Add. 6. Under Community Rights, select a permission level for this host to process SNMP requests
from the selected community. 7. In Community Name, type a case-sensitive community name, and then click Add. 8. Specify whether or not to accept SNMP packets from a host:
o To accept SNMP requests from any host on the network, regardless of identity, click Accept SNMP packets from any host.
o To limit acceptance of SNMP packets, click Accept SNMP packets from these hosts, click Add, type the appropriate host name, IP or IPX address, and then click Add again.
9. Click Apply to apply the changes. To configure SNMP traps, follow the steps given below:
1. Click Start, point to Settings, click Control Panel. 2. Under Administrative Tools, click Services. 3. In the details pane, right-click SNMP Service and select Properties. 4. In the Traps tab, under Community name, type the case-sensitive community name to which
this computer will send trap messages, and then click Add to list. 5. Under Trap destinations, click Add. 6. In the Host name, IP or IPX address field, type host name or its IP address of the server
(OpManager server) to send the trap, and click Add. 7. Repeat steps 5 through 7 until you have added all the communities and trap destinations you
want. 8. Click OK to apply the changes.
Configuring SNMP Agent in Windows NT Systems For details about installing SNMP agents in Windows systems, refer to Installing SNMP Agent on Windows Systems. To configure SNMP agent in Windows NT systems, follow the steps given below:
• Click Start, point to Settings, click Control Panel. • Under Administrative Tools, click Services. • In the details pane, right-click SNMP Service and select Properties.
AdventNet ManageEngine OpManager 7 :: User Guide
AdventNet, Inc. 93
• In the Security tab, select Send authentication trap if you want a trap message to be sent whenever authentication fails.
• Under Accepted Community Names, click Add. • In the Community Names box, type the community name to authenticate the SNMP
requests. • To move the name to the Accepted Community Names list, click Add. • Repeat steps 6 and 7 for any additional community name. • To specify whether to accept SNMP packets from any host or from only specified hosts, click
one of two options: o Accept SNMP Packets From Any Host, if no SNMP packets are to be rejected on
the basis of source computer ID. o Only Accept SNMP Packets From These Hosts, if SNMP packets are to be
accepted only from the computers listed. To designate specific hosts, click Add, type the names or addresses of the hosts from which you will accept requests in the IP Host or IPX Address box, and then click Add.
• Repeat step 11 for any additional hosts. • In the Agent tab, specify the appropriate information (such as comments about the user,
location, and services). • Click OK to apply the changes.
Further, the SNMP Agent running Windows NT does not respond to Host Resource Data, by default. To include this support, you should have Windows NT Service Pack 6 & above. Verify this and then follow the steps given below:
• Extract the NTHR-MIB.zip available at http://bonitas.adventnet.com/opmanager/09Sep2004/NTHR-MIB.zip into C:\WinNT\system32 folder.
• Double click on the registry files to import the mibs into Windows registry. • Restart your Windows NT box.
To Configure SNMP Traps, follow the steps given below:
• Click Start, point to Settings, and then click Control Panel. Double-click Administrative Tools, and then double-click Services.
• In the details pane, click SNMP Service, and then click Properties. • Click the Traps tab. • To identify each community to which you want this computer to send traps, type the name in
the Community Name box. Community names are case sensitive. • After typing each name, click Add to add the name to the list. • To specify hosts for each community you send traps to, after you have added the community
and while it is still highlighted, click Add under Trap Destination. • To move the name or address to the Trap Destination list for the selected community, type
the host name in the IP Host/Address or IPX Address box, and then click Add. • Repeat step 10 for any additional hosts. • Click OK to apply the changes.
Configuring the Agent in Linux versions prior to 8 For details about installing SNMP agents in Linux systems, refer to Installing SNMP Agent on Linux Systems.
• Stop the agent if it is running already using the command: /etc/rc.d/init.d/snmpd stop
• Make the following changes in /etc/rc.d/init.d/snmpd file o Replace the line
daemon /usr/sbin/snmpd $OPTIONS with daemon /root/ucd_agent/sbin/snmpd $OPTIONS
AdventNet ManageEngine OpManager 7 :: User Guide
AdventNet, Inc. 94
o Replace the line killproc /usr/sbin/snmpd with killproc /root/ucd_agent/sbin/snmpd This is to choose the current installed version while starting and stopping the SNMP agent.
• Start the agent using the command /etc/rc.d/init.d/snmpd start. Configuring the Agent in Linux versions 8 and above On Linux versions 8 and above, the latest version of SNMP will already be available. You need to just make the following changes in snmpd.conf file:
• Insert the line view allview included .1.3.6 next to the line # name incl/excl subtree mask(optional)
• Change the line access notConfigGroup "" any noauth exact systemview none none next to the line # group context sec.model sec.level prefix read write notif as access notConfigGroup "" any noauth exact allview none none
• Then restart the snmp agent using the following command: /etc/rc.d/init.d/snmpd restart
Configuring the Agent in Solaris Systems For details about installing SNMP agents in Solaris systems, refer to Installing SNMP Agent on Solaris Systems.
• Stop the agent if it is running already using the following command: /etc/init.d/init.snmpdx stop
• Make the following changes in /etc/init.d/init.snmpdx file
o Replace the lines if [ -f /etc/snmp/conf/snmpdx.rsrc -a -x /usr/lib/snmp/snmpdx ]; then /usr/lib/snmp/snmpdx -y -c /etc/snmp/conf -d 3 -f 0 with <Installation Directory>/sbin/snmpd
o Replace the line /usr/bin/pkill -9 -x -u 0 '(snmpdx|snmpv2d|mibiisa)' with /usr/bin/pkill -9 -x -u 0 '(snmpd)'
• Restart the agent using the following command: /etc/init.d/init.snmpdx start.
AdventNet ManageEngine OpManager 7 :: User Guide
AdventNet, Inc. 95
Configuring SNMP Agent in Cisco Devices For configuring SNMP agents in Cisco devices, you need to log into the device and switch to privileged mode. Use the following set of commands listed below to enable SNMP: To enable SNMP: From the command prompt, run the following commands: #configure terminal #snmp-server community <community_string> rw/ro (example: snmp-server community public ro) #end #copy running-config startup-config To enable trap: Again, from the command prompt, run the following commands: #configure terminal #snmp-server enable traps snmp authentication #end #copy running-config startup-config To set OpManager as host: Run the following commands from the command prompt: #configure terminal #snmp-server host <OpManager server running system's IP> <Trap community string> snmp (example: snmp-server host 192.168.9.58 public snmp) #end #copy running-config startup-config
AdventNet ManageEngine OpManager 7 :: User Guide
AdventNet, Inc. 96
Configuring SNMP Agent in Lotus Domino Server The Domino SNMP Agent is configured as a Windows Service and is set up to run automatically. This means that once the Domino SNMP Agent is configured, it is virtually always running, even when Domino is not. If you later upgrade Domino you should stop the LNSNMP and Windows SNMP Services before beginning the upgrade process.
• Stop the LNSNMP and SNMP services. Enter these commands: net stop lnsnmp net stop snmp
• Configure the Lotus Domino SNMP Agent as a service. Enter this command: lnsnmp -Sc
• Start the SNMP and LNSNMP services. Enter these commands: net start snmp net start lnsnmp
AdventNet ManageEngine OpManager 7 :: User Guide
AdventNet, Inc. 97
Configuring SNMP Agent in MSSQL Server Verify whether SNMP agent is running in the server. If the agent is not installed in the server, refer to Installing SNMP Agent on Windows System and Configuring SNMP agents for installing and configuring SNMP agent. Then, start the SQLSERVERAGENT service following the steps given below: In Windows 2000/XP:
• Click Start, point to Settings, and then click Control Panel. Double-click Administrative Tools, and then double-click Computer Management.
• In the console tree, click Services and Applications and then click Services. • Right-click SQLSERVERAGENT and click Start.
In Windows NT:
o Right-click on the Network Neighborhood icon on the Desktop. o Click Properties. o Click Services. o Right-click SQLSERVERAGENT and click Start.
AdventNet ManageEngine OpManager 7 :: User Guide
AdventNet, Inc. 98
Configuring SNMP Agent in Oracle Server To collect data from the Oracle servers and to receive traps from them using OpManager, you need to install and configure Oracle Intelligent Agent. The Oracle Intelligent Agent supports SNMP, allowing third-party systems management frameworks to use SNMP to receive SNMP traps directly from the Agent. By configuring the Agent to recognize SNMP requests from the master agent, third-party systems can gather relevant data. In Windows machines 1. Once you have installed and configured the SNMP agents in your Windows machines, you have to integrate SNMP with Intelligent agent. This requires Oracle Peer SNMP Master Agent and SNMP Encapsulator Agent to be installed in the Oracle server. Note that these agents must be the same version as the Intelligent Agent and installed in the same ORACLE_HOME. After the installation completes, the following new NT services will be created: Oracle SNMP Peer Encapsulator Oracle Peer SNMP Master Agent. If you do not install the Intelligent Agent software in the default $ORACLE_HOME, the names of all the services will begin with the following: Oracle<home name> For SNMP master agent to communicate with both the standard SNMP service and the Intelligent Agent, the SNMP services file must be configured properly. Specify an unused port where the encapsulated agent, Microsoft SNMP Service, should be listening. Microsoft SNMP Service typically uses port 1161. The port is specified in the SERVICES file located in the NT_HOME\SYSTEM32\DRIVERS\ETC directory. Make sure that you have the following lines in the file: snmp 1161/udp snmp snmp-trap 1162/udp snmp Note: If an entry for SNMP already exists in the file, change the port from 161 (default number) to another available port (1161 in this example). 2. In the same location, check that the HOSTS and LMHOSTS.SAM files contain the mappings of IP addresses to host names for all computers in the SNMP setup. System performance will improve if more computer addresses can be resolved locally. Even if you use DHCP and WINS, adding the IP addresses will speed up the SNMP integration.