adsense getting started guide - google · pdf file · 2016-12-08adsense getting...
TRANSCRIPT

AdSense Getting Started Guide !
! "!
How AdSense Works
Just as ads appear on google.com, you too can display ads on your site. Advertisers submit and manage their ads to Google by using AdWords while you, the publisher, use AdSense to display these ads on your site.
How do relevant ads display on my site?
Contextual Targeting
These ads created by advertisers are automatically matched to the content of your site (even if that content changes).
Site Placement Targeting
Advertisers can bid to appear on your site based on demographics, vertical (topic), geographical location, or audience interest.
Real Time Auction
Ads compete in a real-time auction to appear on your pages, and the winning ads will always be those that will generate the most money for you.

AdSense Getting Started Guide !
! #!
Creating Ad Units
Step 1) Select a Product
To begin, sign in and click the “My ads” tab. Confirm the product selected is Content and
click New ad unit.
Step 2) Design Your Ad
Now it’s time to name and customize your ad unit!
1. Choose a name for this AdSense unit:
Provide a descriptive name that you’ll recognize so you can easily find this ad
unit later if you want to change its settings. This name will appear in your code,
but you can remove it from the code if needed. Example: 300x250, top right,
homepage
2. Pick your ad size from the drop-down:
We recommend using larger and wider ad sizes, which tend to perform best. For
instance, if you manage a blog, consider a “Skyscraper” for your sidebars, and a
“Rectangle” after individual posts.
!

AdSense Getting Started Guide !
! $!
To see all the size options, please visit the Ad Formats page in the AdSense Help
Center.
3. Select ad type:
This setting defines which types of ads can appear on your pages. We
encourage you to choose both text and image/rich media ads, which will allow
the widest variety of ads to appear on your pages.
4. Set the ad style:
You can customize the style of your ad units by choosing fonts and colors. We
recommend choosing a color scheme that matches the look and feel of your site.
5. Add custom channels:
Custom channels are used to group ad units together to help you track the
effectiveness of your ads. For now, let’s skip this optional step – we’ll explain
channels in detail later, since they’re a little bit complicated for your first ad unit.
6. Set backup ads:
Backup ads are another advanced option that let you choose what to display on
your pages if Google isn’t able to show targeted ads.
7. Click Save and get code.
Step 3) Get and Paste Code
1. Copy the ad code.
The pop-up box shows the code for the ad unit you’ve designed.
To copy your code, click anywhere in the “Ad code” box to select its contents. You’ll
know the code has been selected when the entire box is highlighted in blue.

AdSense Getting Started Guide !
! %!
Then, from your browser’s “Edit” menu, choose “Copy” in order to copy the highlighted
area.
2. Paste the ad code.
The next step is to paste the code into your website’s HTML source code. To paste the
code and show ads, you need to be able to edit the HTML source code of your pages.
Step 4) Confirm The Ad Shows On Your Site
After you’ve pasted the code and saved your site, please confirm your ad unit appears
on your website.
Can’t see the ads?
It might take about 10 minutes before AdSense shows up on your website. Most of the
time, related ads will appear in 48 hours.
See ads that aren’t relevant?
This can happen for a few reasons.
• Have you added ads to your page within the last 48 hours? If so, our
crawler might not have had a chance to visit your page yet.
• Have you recently updated your site? Our crawler can take 1-2 weeks to
learn about content you’ve updated.
• Do you have enough text content? Sometimes, if you don’t, our crawler
can’t determine what it’s about and won’t be able to display targeted ads.
Please visit the AdSense Help Center for detailed information on this and all other
AdSense-related topics.

AdSense Getting Started Guide !
! &!
Channels
Channels are like labels that let you group ad units as you choose – for example, by
colors, categories, or pages.
Here are a few types of tracking you can do with channels:
• Track performance of a Leaderboard format on several pages versus a banner
format on other pages
• Compare overall ad earnings from your motorcycle pages against earnings from
your automobile pages
• A channel to track each of your separate domains, so you can see where your
clicks are coming from
While channels can be used to track performance and revenue, they won’t have any
effect on your earnings or ad targeting.
There are two types of channels: URL Channels and Custom Channels
URL Channels track the performance of particular pages in your site.
Custom Channels track any ad units you choose to group together, allowing you to get
detailed, customized reports. By pasting channel-specific ad code into your pages, you
can track a variety of metrics across a range of URLs. Use custom channels to track the
performance of different ad formats, for example, or to compare different page topics to
one another. You can also turn any custom channel into an ad placement on which
advertisers can choose to place their ads.
Creating Channels: URL Channels
URL Channels are easy to implement. You don’t have to change your ad code to use
channels, so you can create channels in your account, then immediately begin tracking
performance.
You can use URL channels to track individual pages, or groups of pages based on the
directory structure of your site.
Create a URL Channel
1. Sign into your account
2. Visit the Performance Reports tab
3. From the sidebar, choose URL Channels

AdSense Getting Started Guide !
! '!
4. Above the table, click Add URLs to track
5. In the text box, enter the URL that you would like to track (For details on how to enter
your URL, see the section below on defining a URL)
6. Click Add URLs
The new URL channel will begin tracking data almost immediately.
• To track a single page: enter the full path of the page
o Example: example.com/sample.html
• To track a script that generates multiple pages: enter the full path of the script
o Example: example.com/sample.asp?keyword=one
• To track all pages below a specific directory: enter a partial URL
o Example: example.com/sample
• To track only pages across a specific subdomain: enter the subdomain
o Example: sports.example.com
• To track all pages on a domain: enter the domain
o Example: example.com

AdSense Getting Started Guide !
! (!
Creating Channels: Custom Channels
Before creating your custom channels, take some time to consider how channels can
best be used on your site. Think about which metrics you’d like to track.
• Want to compare performance of various ad layouts?
• Want to find out which groups of pages are generating the most clicks?
Create a Custom Channel
1. Sign into your account
2. Visit the My ads tab
3. In the sidebar, click Custom channels
4. Click New custom channel
5. Enter a name that will help you to quickly identify this channel later in your reports.
For example:
a. If you have pages about cars and bikes, you can make “car_pages” or “bike_pages”
channels to find out which groups of pages is generating more clicks.
b. If you’d like to compare performance by colors and formats, you might name one of
your channels “blue_skyscraper” and another “green_med_rectangle”.
Choose Ad Units to Track with this Channel
Select the group of ad units that you want to track with your channel. For example, if
you’re making a “skyscraper” channel, make sure you add all the ad units with the
Skyscraper ad size to that channel.
Set Your Channel as Available for Placement Targeting
If you check the targeting box, your custom channel will be displayed to advertisers as a
targetable ad placement where they can place their ads.
• If you make your custom channel available as a targetable ad placement, you’ll need
to enter additional details*. If not, create a custom channel for tracking purposes
only.
• Click Save. Your new channel will be added to the active channels list.
*You have the ability to define your own ad placements using your custom channels. You choose
how to group together specific ad units on your site that you want advertisers to be able to target.
AdSense Getting Started Guide !
! )!
Common ways of grouping ad units into custom channels are by topic, ad format, or location on a
page. When advertisers target publisher-defined ad placements, their ads may only appear in the
specific ad units the publisher has selected.
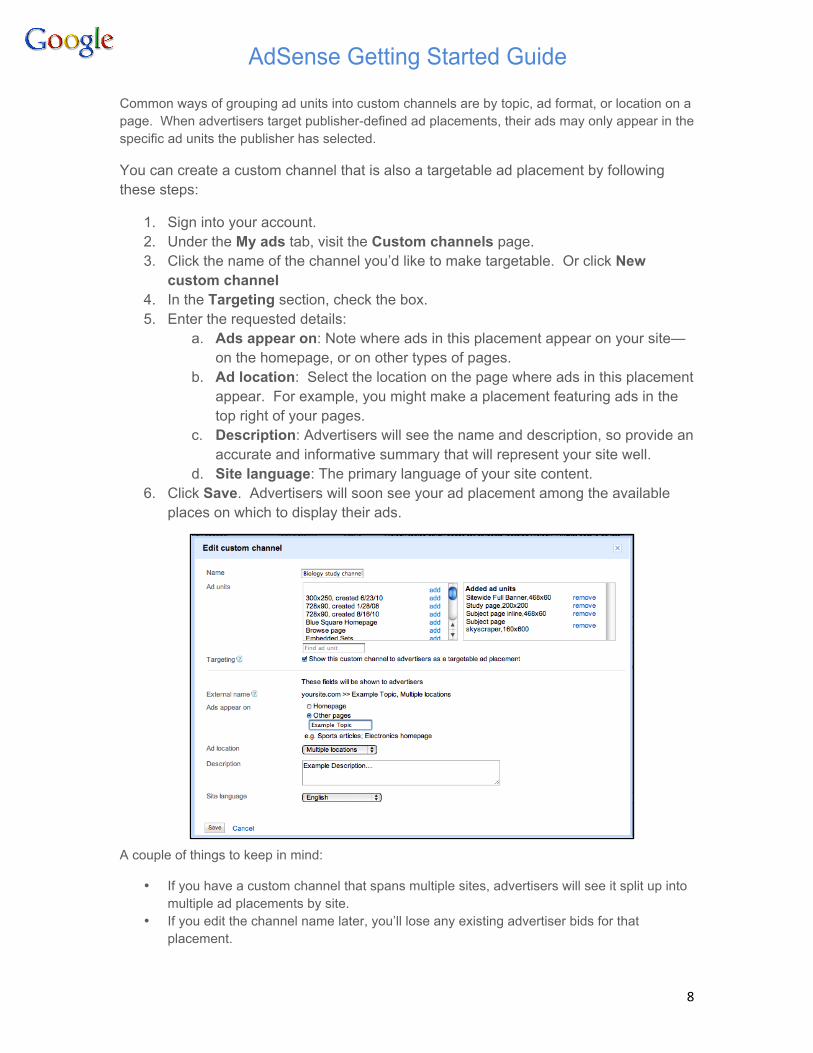
You can create a custom channel that is also a targetable ad placement by following
these steps:
1. Sign into your account.
2. Under the My ads tab, visit the Custom channels page.
3. Click the name of the channel you’d like to make targetable. Or click New
custom channel
4. In the Targeting section, check the box.
5. Enter the requested details:
a. Ads appear on: Note where ads in this placement appear on your site—
on the homepage, or on other types of pages.
b. Ad location: Select the location on the page where ads in this placement
appear. For example, you might make a placement featuring ads in the
top right of your pages.
c. Description: Advertisers will see the name and description, so provide an
accurate and informative summary that will represent your site well.
d. Site language: The primary language of your site content.
6. Click Save. Advertisers will soon see your ad placement among the available
places on which to display their ads.
A couple of things to keep in mind:
• If you have a custom channel that spans multiple sites, advertisers will see it split up into
multiple ad placements by site.
• If you edit the channel name later, you’ll lose any existing advertiser bids for that
placement.

AdSense Getting Started Guide !
! *!
Tracking Earnings & Payment
Overview
You’ll see a daily summary of your estimated earnings on your Home page. For more
granular reporting, you can track your estimated AdSense earnings on the Performance
Reports tab. There is also important information included in the Payments page, which
is linked from the Home tab.
The Payments page tracks the status of previously issued payments, as well as monthly
account calculations. You can click the Earnings details link for any month to view your
total finalized earnings, as well as any adjustments made to your account. Once your
payment has been issued, you’ll see it listed on this page as Payment issued. Click on
the link to see the payment details.

AdSense Getting Started Guide !
! "+!
Performance Reports
The Performance Reports tab is designed to provide more insight into not just how much
you’re earning, but also what impacts those earnings. It includes graphs so you can
view trends and compare important metrics more easily. It also offers ways to segment
your statistics.
Data Breakdowns:
Divide your data in order to better understand your performance at a more granular
level.
• Time: View activity by days, weeks, or months. Or, just use the date range at the
top of the account to view a specific time period. You can also compare one date
range to another.
• Channels: View activity by URL channels, for tracking by pages of your site, and
custom channels, for more flexible tracking.
• Ad types: Learn how often text ads, image ads, and rich media ads appear on
your pages.
• Ad sizes: See what sizes of ads perform well on your site.
• Bid types: See how advertisers are paying for the ads on your site – cost-per-
click (CPC) or cost-per-thousand impressions (CPM).
• Targeting types: Learn how ads are matched to your pages – through
contextual or placement targeting.
• Products: If you’re earning with AdSense in multiple ways (e.g. with AdSense for
Content and AdSense for Search), see how these different products contribute to
your overall earnings at a high level.
• Ad units: View performance for individual ad units you’ve customized.

AdSense Getting Started Guide !
! ""!
Graphs:
Charts on several pages throughout your account provide a visual representation of your
performance.
• View multiple metrics: Use the Compare button to see the total performance for
multiple items. Select items in the table then click Combine to see the combined
total of those items in the graph and table.
The lines in the graph represent the statistics you’ve chosen, such as clicks and
earnings.
• View multiple items: Use the Chart button to visually compare up to five items
from the table below. For example, you could select and chart several custom
channels to compare their performance over the same period.

AdSense Getting Started Guide !
! "#!
Customization:
You can choose any report as the default report that will automatically display when you
sign into your account – simply select your preferred report settings and click the Save
as default report button.
You can also customize which metrics appear in your report. Just click on the drop-
down arrow next to Columns and select your preferred metrics from the list, whether
you want to view by Page views, Ad requests, or Individual ad impressions.
Finally, you can save reports for quick reference. Just generate a report with your
preferred settings and click the Save report button above the table.
Saved reports are accessible in your sidebar.

AdSense Getting Started Guide !
! "$!
Allowing & Blocking Ads
Overview
We offer several tools that provide you with more control and greater transparency into
the ads that appear on your site. These tools are grouped under the Allow & block ads
tab.
Ad Review Center
Think of the Ad Review Center as the holding pen for Placement-Targeted ads. Here,
you can review ads that are eligible to display on your pages and either allow or block
them, by ad group or advertiser.
Under Settings, you have two options:
• Hold all ads for a 24-hour review period
This option lets you take a look at the ads and decide whether or not you want to
allow them to run on your site.
• Run ads immediately
This option maximizes your revenue potential by opening up competition among
all ads eligible to appear on your site right away.
If you choose “Hold ads”, you’ll see the new ads under the Awaiting Review tab.
If you choose “Run ads”, you’ll see them on the Allowed tab.
Ads you’ve blocked in the past are, logically, found on the Blocked tab.

AdSense Getting Started Guide !
! "%!
Other Blocking Options
By Advertiser URL: Block sites (such as your competitors) with the URL filter.
1. Select “Advertiser URLs” under Blocking options
2. Click Block new URLs and enter the URLs into the space provided
3. Select a reason for blocking these sites from the options provided or select Other
and fill in your own reason
4. Click Block sites to save
By Ad category: You can block ads from categories related to general categories such
as Finance, Health, or Job Listings as well as sensitive topics such as Religion, Politics,
and References to Sex and Sexuality.
You can choose to block an entire category or, by clicking on the arrow next to the category
name, choose to block only a few sub-categories within the main category. For example, you
may only want to block the sub-category of “Credit & Lending” but not the entire main category of
“Finance”.
By Ad network: Ads from certified Google ad networks are allowed to appear on your
pages by default. On this page, you can allow and block specific third-party ad
networks, or all future ad networks.

AdSense Getting Started Guide !
! "&!
Optimizing Your Site
The best way to optimize your account is to test different ad formats, placements, and
color palettes.
Ad Formats Our top performing ad formats are:
• 728*90 Leaderboard
• 300*250 Medium Rectangle
• 160*600 Wide Skyscraper
Tip: Ad Formats without borders work best
Ads Above the Fold Work Better The “heat map” above illustrates the ideal placing on a sample page layout. The colors
fade from dark orange (strongest performance) to light yellow (weakest performance).
Optimization TipsThe best way to optimize your account is to test di!erent ad formats, placements and color palettes.
Ad FormatsOur top performing ad formats are:
728 x 90 Leader Board300 x 250 Medium Rectangle160 x 600 Wide Skyscraper
Tip: Ad Formats without borders work best
Ads Above the Fold work betterThe “heat map” above illustrates the ideal placing on a sample page layout. The colors fade from dark orange (strongest performance) to light yellow (weakest performance).
Tip: All other things being equal, ads located above the fold tend to perform better than those below the fold. Also, ads placed near rich content and navigational aids usually do well because users are more focused on those areas of a page.
Adjust Color Palettes
Check out the AdSense blog to see more case studies and optimization tips: adsense.blogspot.com/search/label/Optimization
728 x 90 Leader Board
300 x 250 Medium Rectangle
160 x 600 Wide Skyscraper
Heat Map
Blend Complement Contrast

AdSense Getting Started Guide !
! "'!
Complimentary Products
Other AdSense Products

AdSense Getting Started Guide !
! "(!
Publisher Support Service