accreditation training courseware - pegasus...
TRANSCRIPT

iI
Opera 3 System
Accreditation
Training Courseware

Pegasus Software Ltd Opera 3 Accreditation Training Courseware
October 2010
Copyright © Pegasus Software Limited, 2010
Manual published by:
Pegasus Software Limited
Orion House
Orion Way
Kettering
Northamptonshire
NN15 6PE
www.pegasus.co.uk
All rights reserved. No part of this manual or any accompanying programs may be copied, sold, loaned or in any way disposed of by way of trade or for any kind of profit or incentive without the express permission of Pegasus Software Limited in writing, or as specified in the licence agreement which accompanies this manual and associated programs.
Whilst Pegasus Software Limited takes reasonable steps to ensure that the contents of this manual are up to date, and correctly describe the functioning of the programs, neither Pegasus Software Limited nor any of its Partners give any warranty that the manual is error free, nor that the programs will perform all functions stated in the manual. Pegasus Software Limited has a policy of continual improvement of its software and accordingly this manual may describe features which are no longer available in the current release of the software available to customers, or which are proposed for a future release of the software. Under no circumstances will Pegasus Software Limited or any of its Partners have any liability to any customer arising out of any error, omission or inaccuracy in this manual.
All trademarks are acknowledged.
Pegasus Opera 3 is a trademark.
Accreditation Training Courseware - O3Training_Accreditation_ADM50SystemR2.3.docx
© Pegasus Training Services I
Accreditation Training Courseware
Contents
INTRODUCTION ......................................................................................................................................... V
ABOUT OPERA 3 ............................................................................................................................................. V ABOUT THIS GUIDE .......................................................................................................................................... V INTRODUCING THE MODULE .............................................................................................................................. V FEEDBACK ...................................................................................................................................................... V KEY ............................................................................................................................................................. VI TRAINING LITERATURE RELEASES ....................................................................................................................... VI
MODULE MENU STRUCTURE .................................................................................................................... VII
GLOSSARY (OF MENU STRUCTURE) ............................................................................................................IX
THE MODULE .............................................................................................................................................. 1
1 SET-UP ................................................................................................................................................. 2
1.1 RECOMMENDED ORDER OF SET-UP ...................................................................................................... 2 1.2 COMPANY PROFILES .......................................................................................................................... 3
1.2.1 Upgrade Wizard .................................................................................................................... 9 1.2.1.1 Upgrade System .................................................................................................................. 11 1.2.1.2 Upgrading System Information from Opera II to Opera 3 .................................................. 16
1.2.2 Company Background Options............................................................................................ 18 1.3 USER PROFILES ............................................................................................................................... 19
1.3.1 Admin Login ........................................................................................................................ 20 1.3.2 Manager Login .................................................................................................................... 20 1.3.3 User Login ........................................................................................................................... 20 1.3.4 Menu Access ....................................................................................................................... 20 1.3.5 User Groups ........................................................................................................................ 21
1.4 EXCHANGE RATES ........................................................................................................................... 21 1.4.1 Copying Currencies .............................................................................................................. 23
1.5 VAT PROCESSING ........................................................................................................................... 23 1.5.1 Copying VAT Codes (System) ............................................................................................... 25 1.5.2 Printing the VAT Audit Report (System) .............................................................................. 26 1.5.3 Printing the VAT Values Report (System) ............................................................................ 27 1.5.4 Submitting the VAT Return & RCSL (System) ...................................................................... 28 1.5.5 VAT Online (Vat 100) ........................................................................................................... 30
1.5.5.1 Online Filing Manager – VAT Return ................................................................................... 31 1.5.5.2 VAT100 Submissions ........................................................................................................... 32 1.5.5.3 To File VAT100 Submissions ............................................................................................... 34
2 MAINTENANCE................................................................................................................................... 38
2.1 PEOPLE PROFILES ............................................................................................................................ 38 2.2 REPORT LAYOUT ............................................................................................................................. 39
2.2.1 Chained Reports .................................................................................................................. 40 2.2.2 Defining the Paper Source ................................................................................................... 40 2.2.3 Paper Sizes and Continuous Form Stationery...................................................................... 40 2.2.4 Company-specific Report Layouts ....................................................................................... 41 2.2.5 To change report layout settings ........................................................................................ 41 2.2.6 Example setting up Company/Customer specific chained reports ...................................... 42
2.3 E-MAIL PROFILES ............................................................................................................................ 43 2.3.1 Amending Profiles ............................................................................................................... 44 2.3.2 Duplicate Attachment Names ............................................................................................. 44 2.3.3 Company and System Field Variables ................................................................................. 44
2.3.3.1 Customers ........................................................................................................................... 46
Accreditation Training Courseware - O3Training_Accreditation_ADM50SystemR2.3.docx
© Pegasus Training Services II
2.3.3.2 Suppliers ............................................................................................................................. 51 2.4 TASK MANAGER ............................................................................................................................. 53 2.5 ADDITIONAL SYSTEMS ...................................................................................................................... 53
3 PROCESSING ...................................................................................................................................... 55
3.1 LOGON ......................................................................................................................................... 55 3.2 DATE & COMPANY .......................................................................................................................... 56
3.2.1 Changing the Date .............................................................................................................. 56 3.2.2 Changing the Active Company ............................................................................................ 56
3.3 PREFERENCES (USER) ....................................................................................................................... 57 3.3.1 Workstation Settings .......................................................................................................... 58 3.3.2 User Background Options ................................................................................................... 58
3.4 SPOOLER CONTROL ......................................................................................................................... 59
4 REPORTS ............................................................................................................................................ 60
4.1 PUBLISHING A REPORT ..................................................................................................................... 60 4.2 HIDDEN PRINTS AND EXPORT FUNCTIONALITY ....................................................................................... 61
5 UTILITIES ............................................................................................................................................ 62
5.1 MONITOR COMPANIES ..................................................................................................................... 62 5.2 MONITOR USERS ............................................................................................................................ 62 5.3 RE-ORGANISE SYSTEM FILES ............................................................................................................. 63
5.3.1 Tidying System Files ............................................................................................................ 63 5.3.2 Clearing Temporary Files .................................................................................................... 63 5.3.3 Tidying VAT Files ................................................................................................................. 64 5.3.4 To Reorganise System Files ................................................................................................. 64
5.4 UPDATE DATA STRUCTURES .............................................................................................................. 64 5.4.1 Updating Additional Systems .............................................................................................. 65 5.4.2 Update NIPY tables (to system specific) .............................................................................. 65 5.4.3 Diagnosing Problems and Re-indexing Tables .................................................................... 66 5.4.4 Executive Dashboards Manager [VFP] ................................................................................ 67 5.4.5 To Update the Data Structures ........................................................................................... 67
5.6 VIEW ERROR FILES .......................................................................................................................... 69 5.6.1 Command Line .................................................................................................................... 69
5.7 SYSTEM PREFERENCES ...................................................................................................................... 70 5.8 BACK-UP ....................................................................................................................................... 73
5.8.1 Multiple Company Backup .................................................................................................. 74 5.8.2 Other Files included in the Backup ...................................................................................... 74 5.8.3 Before Starting the Backup ................................................................................................. 75 5.8.4 Backing up data .................................................................................................................. 76
5.9 RESTORE ....................................................................................................................................... 76 5.9.1 Before Restoring a Backup .................................................................................................. 77
5.10 DATA STATUS CHECK ....................................................................................................................... 77 SYSTEM MANAGER - PRACTICAL EXERCISE .......................................................................................................... 81
6 SCHEDULING ...................................................................................................................................... 82
6.1 USER GROUPS ................................................................................................................................ 86 6.2 SCHEDULER .................................................................................................................................... 87 6.3 NOTIFICATION ................................................................................................................................ 87 6.4 SHUTDOWN ................................................................................................................................... 92 6.5 WINDOWS NOTIFICATION AREA ........................................................................................................ 96
APPENDIX ................................................................................................................................................. 98
APPENDIX A – VAT INFORMATION ................................................................................................................... 98 Setting Up Reverse Charge Accounting (Goods) ............................................................................... 98 Setting Up Reverse Charge Accounting (Services) ........................................................................... 100 Sales VAT codes ............................................................................................................................... 100 Purchase VAT codes ........................................................................................................................ 101
APPENDIX B VISUAL FOXPRO AND TECHNICAL INFORMATION .......................................................................... 102 Why the Visual FoxPro development environment? ....................................................................... 102
Accreditation Training Courseware - O3Training_Accreditation_ADM50SystemR2.3.docx
© Pegasus Training Services III
The Data Dictionary ........................................................................................................................ 102 Data Container ................................................................................................................................ 102 Links and Relationships ................................................................................................................... 103 Free Tables ...................................................................................................................................... 103 Data Types....................................................................................................................................... 103 Update Data Structures ................................................................................................................... 103 The Data Validation Tool (DVT) ....................................................................................................... 104 Database Command Line ................................................................................................................ 104 The Data .......................................................................................................................................... 106 Temporary Tables (Cursors) ............................................................................................................ 107
APPENDIX C - UPGRADING FROM CAPITAL GOLD ACCOUNTS ............................................................................... 108 What Data Can Be Converted? ........................................................................................................ 108 Steps You Will Need to Take in Capital Gold Before the Upgrade ................................................... 108 Steps You Will Need to Take in this application Before the Upgrade ............................................. 109 Carrying Out the Upgrades in the Proper Order .............................................................................. 110 Recommended Upgrade Procedure ................................................................................................ 110 About the 'Revert Current Process on Error' Option ........................................................................ 111 Step 1: Company Creation and Nominal Upgrade .......................................................................... 111 Step 2: Sales Upgrade...................................................................................................................... 112 Step 3: Purchase Upgrade ............................................................................................................... 113 Step 3: Stock Upgrade ..................................................................................................................... 114 Step 4: SOP/Invoicing Upgrade ....................................................................................................... 115 Step 5: Completing the Process ....................................................................................................... 116 Some General Considerations ......................................................................................................... 116 About the Upgrade Wizard ............................................................................................................. 116
APPENDIX D – GENERAL FAQS PUT TOGETHER FOR V1.00 OF OPERA 3 ................................................................ 117 APPENDIX E – HISTORICAL README’S ............................................................................................................. 119
Pegasus Opera 3 (1.20) Readme ..................................................................................................... 119 Pegasus Opera 3 (1.10.11) Readme ................................................................................................ 121 Pegasus Opera 3 (1.10.10) Readme ................................................................................................ 121 Pegasus Opera 3 (1.10) Readme ..................................................................................................... 121 Pegasus Opera 3 (v1.00.10) Readme .............................................................................................. 126 Pegasus Opera 3 (v1.00) Readme ................................................................................................... 126 Pegasus Opera II (6.82.10) Readme ................................................................................................ 128 Pegasus Opera II (6.82) Readme ..................................................................................................... 128 Pegasus Opera II (6.81) Readme ..................................................................................................... 129 . Pegasus Opera II (6.80.20) Readme .............................................................................................. 130 Pegasus Opera II (6.80.10) Readme ................................................................................................ 131 Pegasus Opera II (6.80) Readme ..................................................................................................... 132
APPENDIX F - IMPORTER & OPEN PERIOD ACCOUNTING ..................................................................................... 134 Options ............................................................................................................................................ 134 Financial Calendar in the Nominal Ledger ...................................................................................... 134 Which date does the Importer use to update the Nominal Ledger? ............................................... 134 Sales Ledger and Purchase Ledger transactions ............................................................................. 135 Stock Control movements ............................................................................................................... 136 Cashbook transactions .................................................................................................................... 136 Nominal Ledger journals ................................................................................................................. 137
APPENDIX G – DATA STRUCTURES & TECHNICAL INFORMATION ........................................................................... 138 Table Break-down ........................................................................................................................... 138
Payroll System Tables ............................................................................................................................... 138 Joins Information ............................................................................................................................. 139 Codes of interest.............................................................................................................................. 139 VAT & Exchange Rates .................................................................................................................... 140 Pegasus Opera 3 Enterprise VFP Database Structures (System) ..................................................... 141
OTHER GUIDES AND HELP ....................................................................................................................... 150
README FILE .............................................................................................................................................. 150 RELEASE GUIDE ........................................................................................................................................... 150 INSTALLATION GUIDE ................................................................................................................................... 150 DEMONSTRATION DATA GUIDE ...................................................................................................................... 150
Accreditation Training Courseware - O3Training_Accreditation_ADM50SystemR2.3.docx
© Pegasus Training Services IV
IMPLEMENTATION GUIDE .............................................................................................................................. 150 SYSTEM REQUIREMENTS GUIDE ..................................................................................................................... 150 HELP ......................................................................................................................................................... 150 DOCUMENT MANAGEMENT & EXECUTIVE DASHBOARDS GUIDES ......................................................................... 150

Accreditation Training Courseware - O3Training_Accreditation_ADM50SystemR2.3.docx
© Pegasus Training Services V
Accreditation Training Courseware
Introduction
About Opera 3
Opera 3 is the most versatile and user-friendly accounting, supply chain management, payroll & HR, manufacturing and reporting solution from Pegasus Software. A modular solution, Opera 3 enables you to select the components that match your current business model, whilst making it possible to add further functionality as requirements change. This means that the capability or capacity of a system can be seamlessly expanded whilst safeguarding the investment.
For more information about Opera 3, select the Solutions link on the Pegasus web site.
About this Guide
This Accreditation Training Courseware offers an accompanying guide to the accreditation training course.
If you are new to Opera 3, read the Getting Started section of the Opera 3 Help that covers the application in more detail. You can access this from the Windows Start menu, or by using the F1 Key or Help menu when you have logged in to the product.
Opera 3 is available for both Visual FoxPro and SQL Server database platforms. This Accreditation Training Courseware applies to both database platforms, however, there are certain elements that are only included in one or the other database, and as such, the relevant sections or paragraphs are clearly identified with the following labels:
[SQL] – only relevant if you are running the application on an SQL Server database.
[VFP] – only relevant if you are running the application on a Visual FoxPro database.
Sections that are not identified with these labels are relevant to both database types.
For more information, see the section Functional Differences between Opera 3 Enterprise & Opera 3 Enterprise SQL section in the release guide.
Introducing the module
The System Manager module provides a comprehensive and organised means of controlling areas concerned with the compilation of a company‘s accounts. This module must be set up first.
Opera 3 is a modular application, which means that a business is able to pick and choose the areas of the software that are to be activated and utilised, provided the selections are relevant.
Feedback
Pegasus is interested to hear your views on the documents we provide. To give your feedback, send an email to [email protected]. Please type ―O3Training_Accreditation_ADM50SystemR2.3.docx Accreditation Training Courseware‖ in the subject box.
Please note that product support is not offered through the above email address.
Intro
du
ctio
n

Accreditation Training Courseware - O3Training_Accreditation_ADM50SystemR2.3.docx
© Pegasus Training Services VI
Key
Icon Meaning
Useful Hint, Tip or Note. General Comments / Notes
Useful Report obtained from clicking on the print icon while sitting on the form
During the literature, some basic Question and Answer / Troubleshooting points are discussed. May include a few did you knows…
Website link
Exercises / Example solution
Report to XLS
Potential Report Enhanced from Opera II (more than simple field adjustments)
FAQs - Only
Training Literature Releases
Release Added Information
R1.0 Originating document (Uplift to O3)
R2.0 New System Functionality (Including)
Updated Database Structures
Password Expiry
Opera 3 Info Centre
Ribbon Bar
VAT100
R2.1 Updated and enhanced Database Structures, inc Payroll System Tables overview
UDS Enhancement
Upgrade System Wizard (from OII)
R2.2 FAQs Added
R2.3 Notification Services (v1.20 Uplift) Inc. general tidy ups and updates.
Question
Answer
Example –
Examples
Accreditation Training Courseware - O3Training_Accreditation_ADM50SystemR2.3.docx
© Pegasus Training Services VII
Accreditation Training Courseware
Module Menu Structure
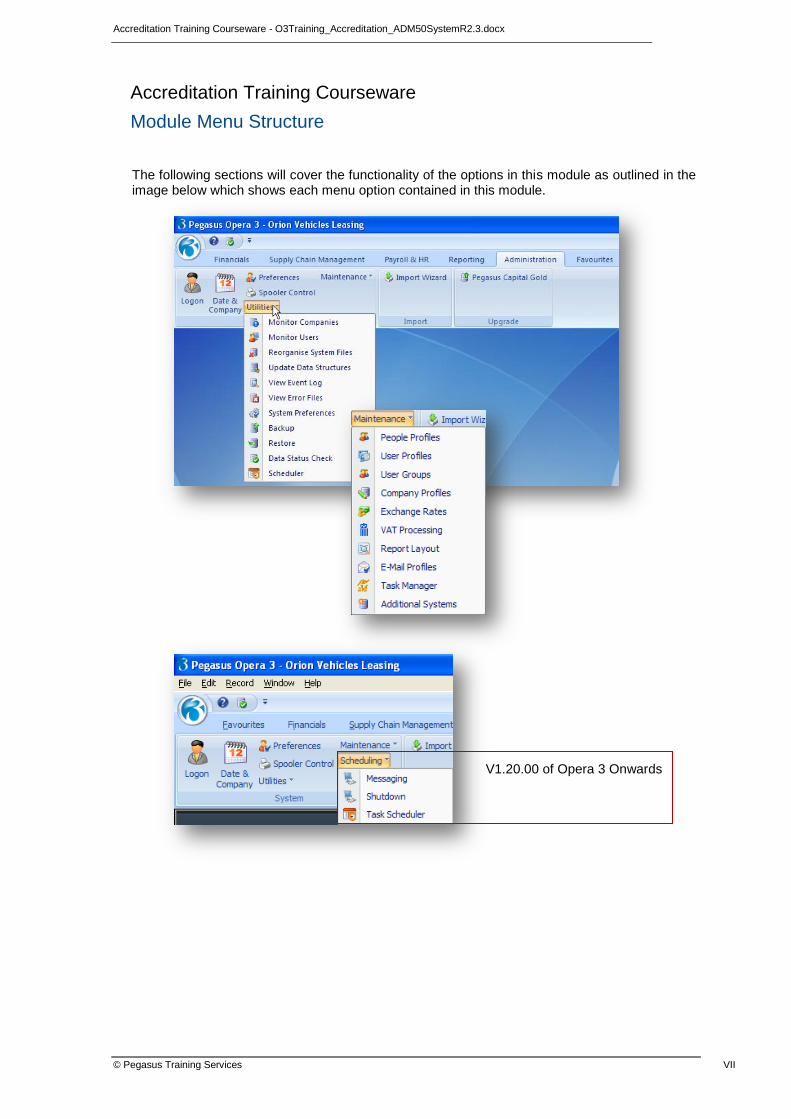
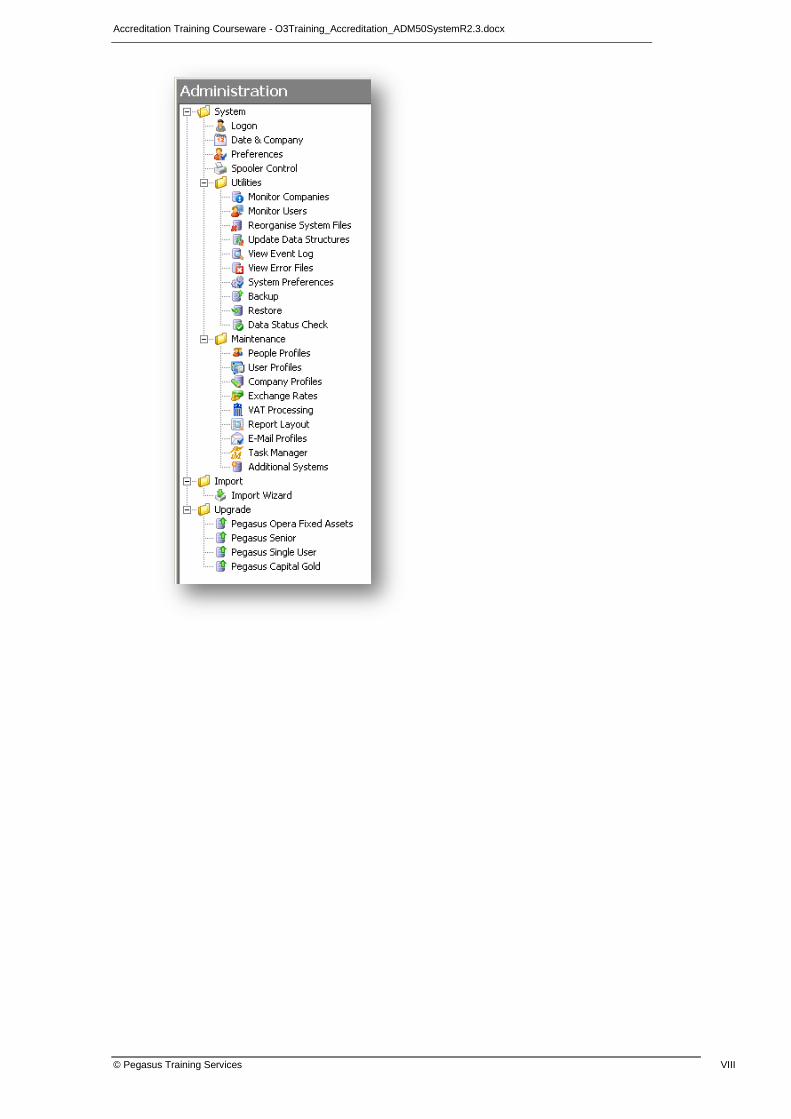
The following sections will cover the functionality of the options in this module as outlined in the image below which shows each menu option contained in this module.
V1.20.00 of Opera 3 Onwards
Accreditation Training Courseware - O3Training_Accreditation_ADM50SystemR2.3.docx
© Pegasus Training Services VIII
Accreditation Training Courseware - O3Training_Accreditation_ADM50SystemR2.3.docx
© Pegasus Training Services IX
Accreditation Training Courseware
Glossary (of Menu Structure)
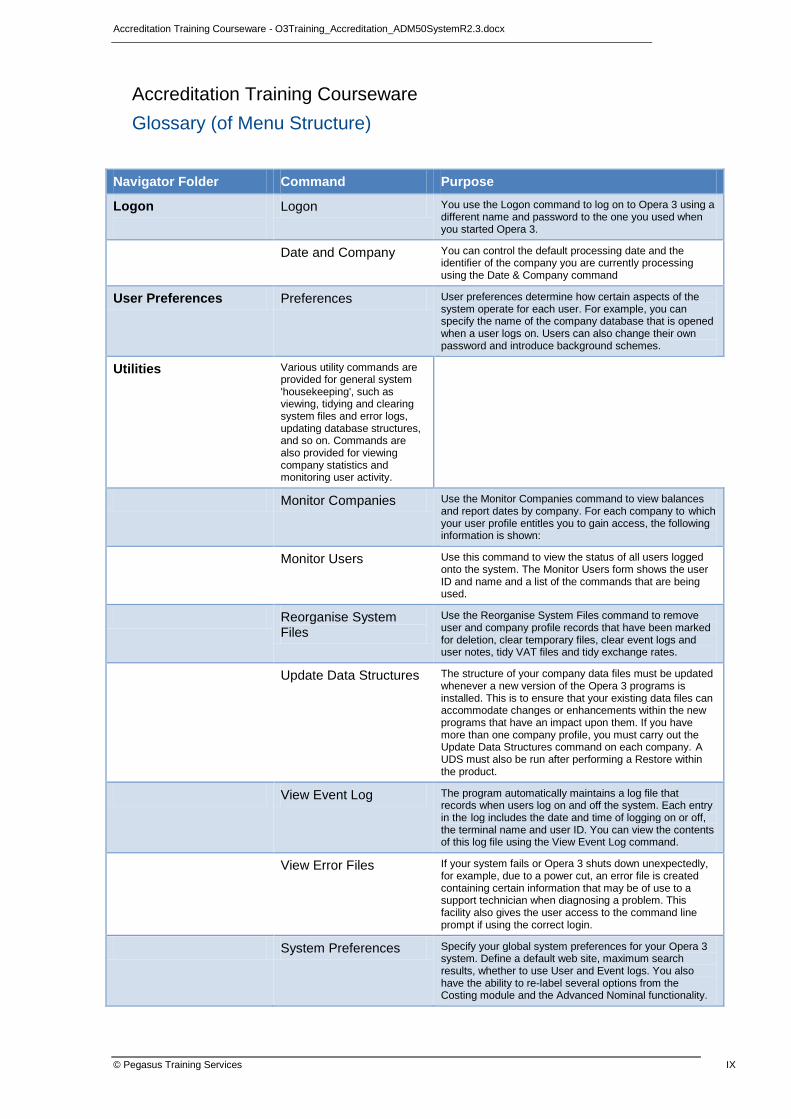
Navigator Folder Command Purpose
Logon
Logon You use the Logon command to log on to Opera 3 using a different name and password to the one you used when you started Opera 3.
Date and Company You can control the default processing date and the identifier of the company you are currently processing using the Date & Company command
User Preferences Preferences User preferences determine how certain aspects of the system operate for each user. For example, you can specify the name of the company database that is opened when a user logs on. Users can also change their own password and introduce background schemes.
Utilities Various utility commands are provided for general system 'housekeeping', such as viewing, tidying and clearing system files and error logs, updating database structures, and so on. Commands are also provided for viewing company statistics and monitoring user activity.
Monitor Companies Use the Monitor Companies command to view balances and report dates by company. For each company to which your user profile entitles you to gain access, the following information is shown:
Monitor Users Use this command to view the status of all users logged onto the system. The Monitor Users form shows the user ID and name and a list of the commands that are being used.
Reorganise System Files
Use the Reorganise System Files command to remove user and company profile records that have been marked for deletion, clear temporary files, clear event logs and user notes, tidy VAT files and tidy exchange rates.
Update Data Structures The structure of your company data files must be updated whenever a new version of the Opera 3 programs is installed. This is to ensure that your existing data files can accommodate changes or enhancements within the new programs that have an impact upon them. If you have more than one company profile, you must carry out the Update Data Structures command on each company. A UDS must also be run after performing a Restore within the product.
View Event Log The program automatically maintains a log file that records when users log on and off the system. Each entry in the log includes the date and time of logging on or off, the terminal name and user ID. You can view the contents of this log file using the View Event Log command.
View Error Files If your system fails or Opera 3 shuts down unexpectedly, for example, due to a power cut, an error file is created containing certain information that may be of use to a support technician when diagnosing a problem. This facility also gives the user access to the command line prompt if using the correct login.
System Preferences Specify your global system preferences for your Opera 3 system. Define a default web site, maximum search results, whether to use User and Event logs. You also have the ability to re-label several options from the Costing module and the Advanced Nominal functionality.
Accreditation Training Courseware - O3Training_Accreditation_ADM50SystemR2.3.docx
© Pegasus Training Services X
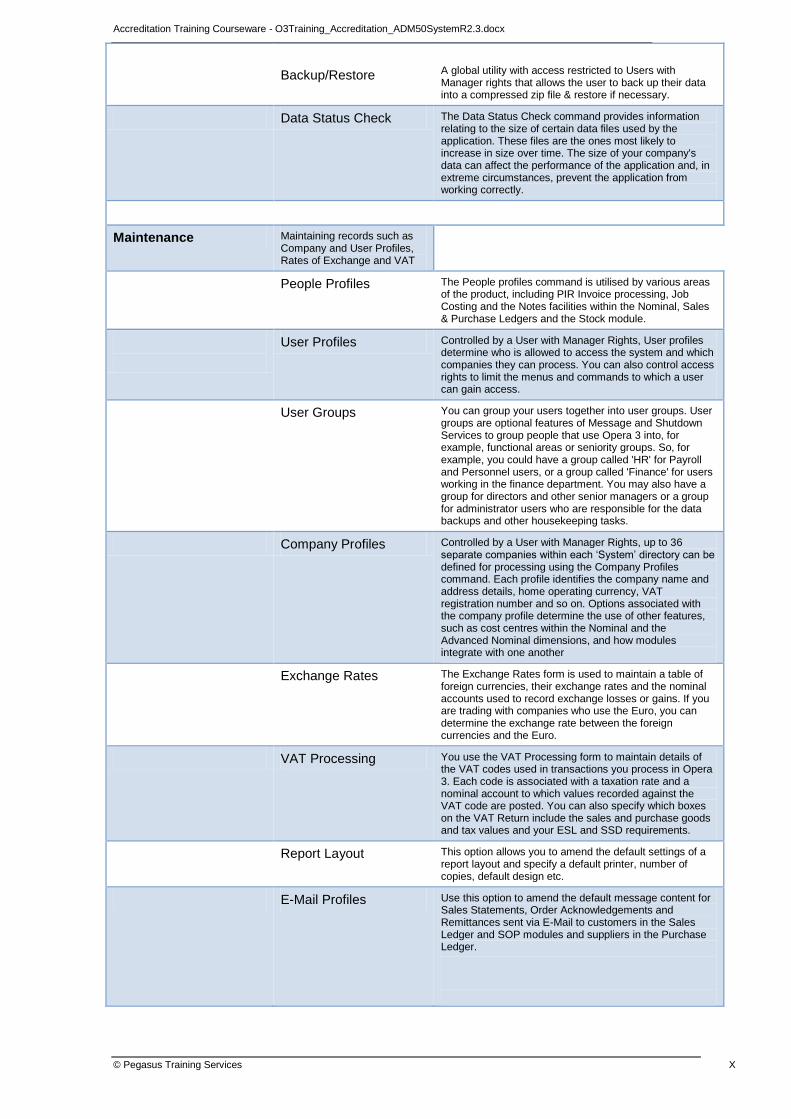
Backup/Restore
A global utility with access restricted to Users with Manager rights that allows the user to back up their data into a compressed zip file & restore if necessary.
Data Status Check The Data Status Check command provides information relating to the size of certain data files used by the application. These files are the ones most likely to increase in size over time. The size of your company's data can affect the performance of the application and, in extreme circumstances, prevent the application from working correctly.
Maintenance Maintaining records such as Company and User Profiles, Rates of Exchange and VAT
People Profiles The People profiles command is utilised by various areas of the product, including PIR Invoice processing, Job Costing and the Notes facilities within the Nominal, Sales & Purchase Ledgers and the Stock module.
User Profiles Controlled by a User with Manager Rights, User profiles determine who is allowed to access the system and which companies they can process. You can also control access rights to limit the menus and commands to which a user can gain access.
User Groups You can group your users together into user groups. User groups are optional features of Message and Shutdown Services to group people that use Opera 3 into, for example, functional areas or seniority groups. So, for example, you could have a group called 'HR' for Payroll and Personnel users, or a group called 'Finance' for users working in the finance department. You may also have a group for directors and other senior managers or a group for administrator users who are responsible for the data backups and other housekeeping tasks.
Company Profiles Controlled by a User with Manager Rights, up to 36 separate companies within each ‗System‘ directory can be defined for processing using the Company Profiles command. Each profile identifies the company name and address details, home operating currency, VAT registration number and so on. Options associated with the company profile determine the use of other features, such as cost centres within the Nominal and the Advanced Nominal dimensions, and how modules integrate with one another
Exchange Rates The Exchange Rates form is used to maintain a table of foreign currencies, their exchange rates and the nominal accounts used to record exchange losses or gains. If you are trading with companies who use the Euro, you can determine the exchange rate between the foreign currencies and the Euro.
VAT Processing You use the VAT Processing form to maintain details of the VAT codes used in transactions you process in Opera 3. Each code is associated with a taxation rate and a nominal account to which values recorded against the VAT code are posted. You can also specify which boxes on the VAT Return include the sales and purchase goods and tax values and your ESL and SSD requirements.
Report Layout This option allows you to amend the default settings of a report layout and specify a default printer, number of copies, default design etc.
E-Mail Profiles Use this option to amend the default message content for Sales Statements, Order Acknowledgements and Remittances sent via E-Mail to customers in the Sales Ledger and SOP modules and suppliers in the Purchase Ledger.
Accreditation Training Courseware - O3Training_Accreditation_ADM50SystemR2.3.docx
© Pegasus Training Services XI
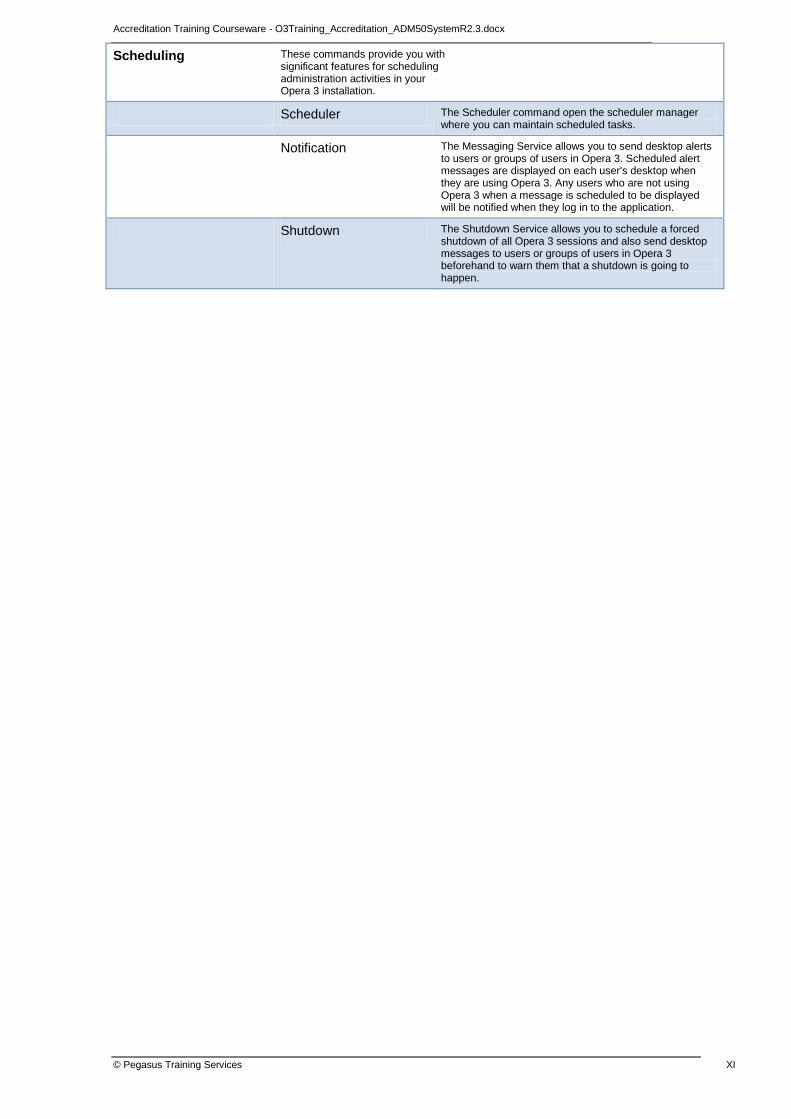
Scheduling These commands provide you with significant features for scheduling administration activities in your Opera 3 installation.
Scheduler The Scheduler command open the scheduler manager where you can maintain scheduled tasks.
Notification The Messaging Service allows you to send desktop alerts to users or groups of users in Opera 3. Scheduled alert messages are displayed on each user's desktop when they are using Opera 3. Any users who are not using Opera 3 when a message is scheduled to be displayed will be notified when they log in to the application.
Shutdown The Shutdown Service allows you to schedule a forced shutdown of all Opera 3 sessions and also send desktop messages to users or groups of users in Opera 3 beforehand to warn them that a shutdown is going to happen.
Accreditation Training Courseware - O3Training_Accreditation_ADM50SystemR2.3.docx
© Pegasus Training Services Page 1
Notes
Accreditation Training Courseware
The Module
The System Manager module provides a comprehensive and organised means of controlling areas concerned with the compilation of a company‘s accounts. This module must be set up first.
Opera 3 is a modular application, which means that a business is able to pick and choose the areas of the software that are to be activated and utilised, provided the selections are relevant.
Each Opera 3 system must have a System Manager module. As well as being where the user is able to log into the application, this module is used to control settings and maintain records used by other areas of the application.
Company details are maintained from within System Manager, enabling unique system settings for up to 36 companies. If you require more company databases than this, you can create separate groups of companies, each of up to 36 companies, using the Additional Systems command. The number of additional systems available depends on your licence.
Th
e M
od
ule
Accreditation Training Courseware - O3Training_Accreditation_ADM50SystemR2.3.docx
© Pegasus Training Services Page 2
Notes
Accreditation Training Courseware
1 Set-Up
1.1 Recommended Order of Set-up
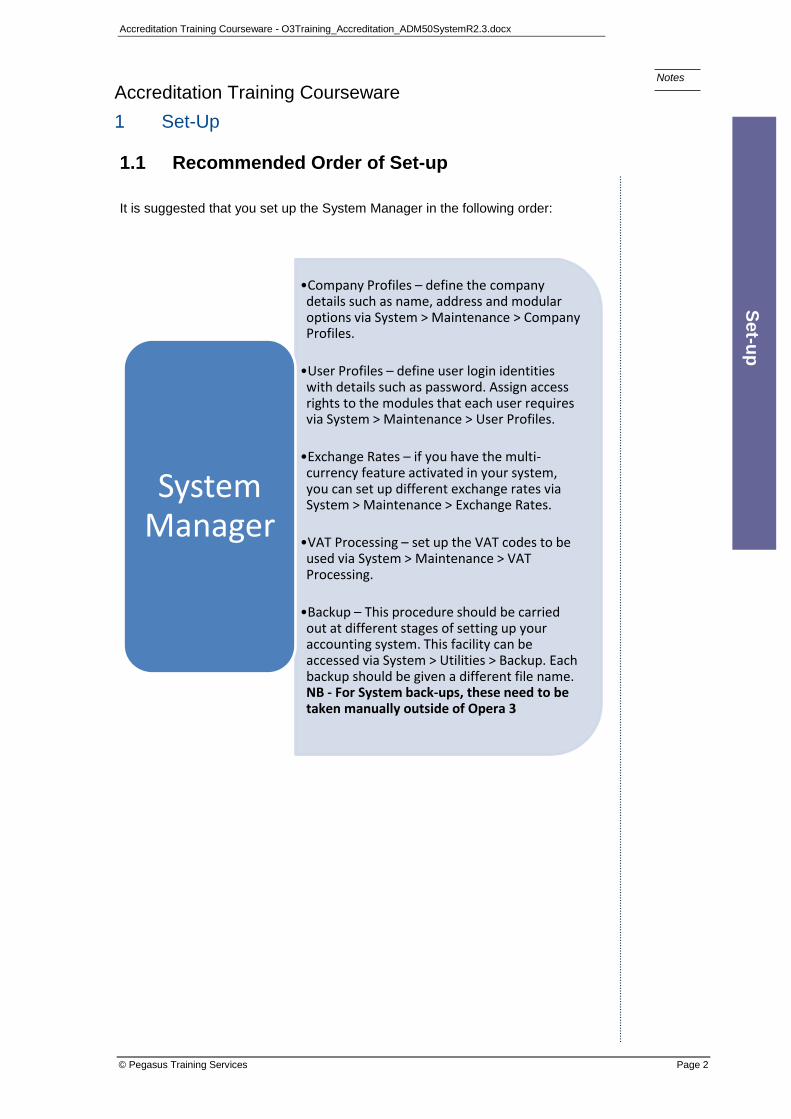
It is suggested that you set up the System Manager in the following order:
•Company Profiles – define the company details such as name, address and modular options via System > Maintenance > Company Profiles.
•User Profiles – define user login identities with details such as password. Assign access rights to the modules that each user requires via System > Maintenance > User Profiles.
•Exchange Rates – if you have the multi-currency feature activated in your system, you can set up different exchange rates via System > Maintenance > Exchange Rates.
•VAT Processing – set up the VAT codes to be used via System > Maintenance > VAT Processing.
•Backup – This procedure should be carried out at different stages of setting up your accounting system. This facility can be accessed via System > Utilities > Backup. Each backup should be given a different file name. NB - For System back-ups, these need to be taken manually outside of Opera 3
System Manager
Se
t-up

Accreditation Training Courseware - O3Training_Accreditation_ADM50SystemR2.3.docx
© Pegasus Training Services Page 3
Notes
1.2 Company Profiles
Within any one system, you can create up to 36 separate company data sets, each identified by a unique ID. The software is supplied with one company for demonstration purposes which uses the letter 'Z' as the ID. At least one other company profile must exist for you to store your own company data. To do this, you must create a company profile record using the Company Profiles command. The profile record stores the company name and address details as used by certain reports and documents produced from the system and you can also determine various settings that control the integration between the ledgers and whether cost centres are used in the nominal ledger.
If your software licence permits, you may create additional systems, each permitting up to 36 company databases to be maintained. By default, companies are created as part of the 'Main System' group, but if you are able to create additional companies, the databases you create and maintain using the Company Profiles command will depend on what additional systems you have created, and which one you selected when logging on.
To Define Company Profiles
1. Open the System folder and click Maintenance - Company Profiles or click the Administration tab and then click System - Maintenance - Company Profiles on the Ribbon Bar.
2. To create a new record, click the icon on the toolbar or press CTRL+N.
3. In the boxes provided, enter the company details.
4. On the Options tab, click to clear or select the options you want to apply to the company.
5. To save the record, click the icon on the toolbar or press CTRL+S.
Accreditation Training Courseware - O3Training_Accreditation_ADM50SystemR2.3.docx
© Pegasus Training Services Page 4
Notes
Company Profile Entries – General
Box Description
Company Code A unique ID for the company. You can use a letter from A to Z or a number from 0 to 9.
Company Name, address and contact details
Boxes in which you can record the company name, address, telephone, facsimile and contact details.
VAT (Tax) Reg No.
The VAT registration number of the company. This is included on appropriate reports and documents.
Home Currency The name of the operating currency of the company. If this box is left blank, the foreign currency features of the system are unavailable.
Company E-Mail The e-mail address for the company.
Company Web Site
The URL for the company web site.
Tax Description The description of the sales or purchase tax applicable to this company (for example, 'VAT' or 'GST'). The description you enter is used on forms and reports wherever tax applies.
Data Path The drive and folder location of the data files for the company. You can use the browse button to find the location you want. If the Opera 3 installation is activated for the Sales Pipeline Management SPM Remote feature, this is the local data path for the laptop installation. Remote SPM users can download data from the network server to their laptops, then synchronise their changes back to the server.
VFP: This only applies to Opera 3 Enterprise installations.
PDF Path The drive and folder location of the PDF files and certain database files for the company. You can use the browse button to find the location you want.
Server The SQL Server Name to be used for this company.
SQL Server: This only applies to Opera 3 Enterprise SQL installations.
Database The Database Name to be used for this company.
SQL Server: This only applies to Opera 3 Enterprise SQL installations.
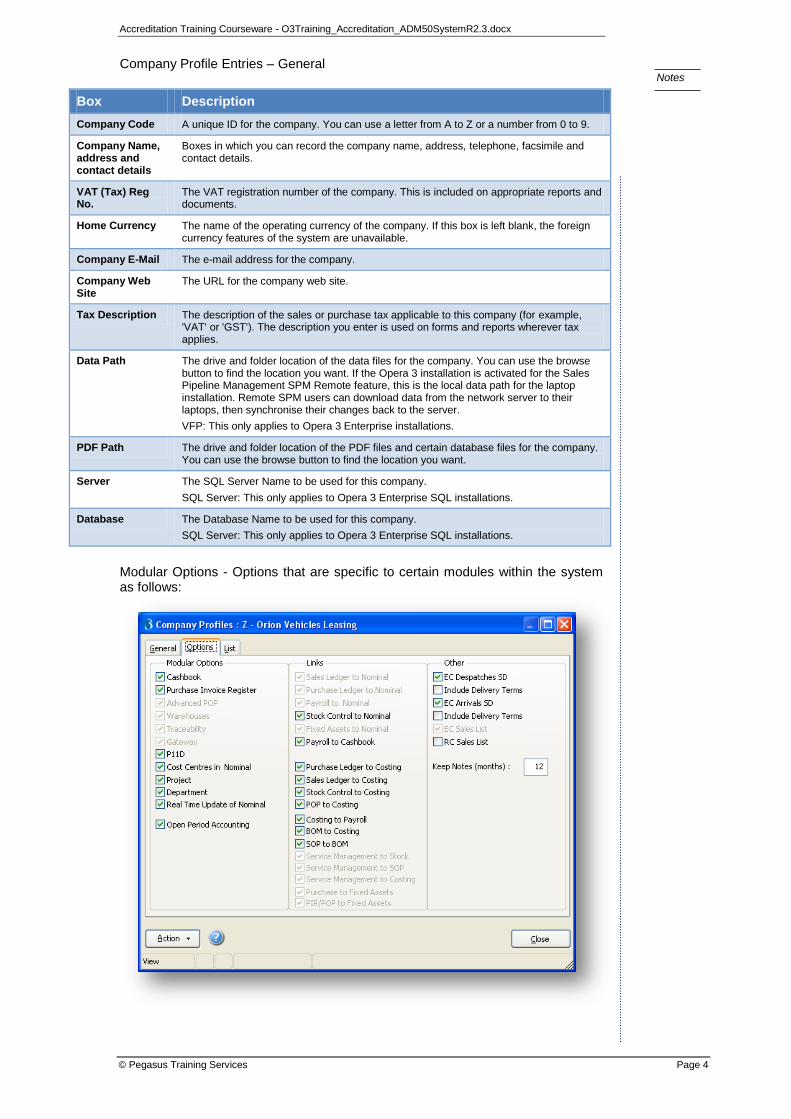
Modular Options - Options that are specific to certain modules within the system as follows:

Accreditation Training Courseware - O3Training_Accreditation_ADM50SystemR2.3.docx
© Pegasus Training Services Page 5
Notes
Option Description
Cashbook An option that determines whether the Cashbook module is used for the company. If you use the Sales Ledger, the Sales Ledger to Nominal option must be ticked before you can tick the box. If you use the Purchase Ledger, the Purchase Ledger to Nominal option must be ticked before you can tick the box.
Purchase Invoice Register
An option that determines whether the Purchase module uses the PIR Processing and PIR Reports commands.
Advanced POP Note: This applies if you use the POP module.
An option that determines whether you want to use purchase order documents. Purchase order documents are a way of entering uncommitted purchase orders into the application without affecting your suppliers account balances and, if you use the Stock module, any stock balances. These documents can then be changed to committed purchase orders at a later date. This option will be automatically selected if you have upgraded from Pegasus Opera and your Opera data includes uncommitted documents. Refer to the P.Orders - Documents Help topic for more information.
Warehouses An option that determines whether you want to use multiple warehouses within the Stock module. This only applies if you have the multi-warehouses feature activated. As a minimum, at least one main and one quarantine warehouse is provided. You only need to select this option if you want to maintain stock records in additional warehouses. Refer also to the Stock module documentation for details about warehouse maintenance and processing.
Traceability An option that determines whether you want to maintain records of stock items that are assigned to serial or batch numbers. Traceable stock only applies if you have the traceability feature activated. If you need to process stock records that are traceable by serial or batch numbers, refer to the Traceability section of the Help file.
Gateway An option that determines whether you are using the Gateway module in conjunction with the Gateway Client application. For more information about this, refer to the documentation that accompanies the Gateway Host and Gateway Client applications. This option only applies if you have the Gateway module installed and activated.
P11D An option that indicates whether you intend to use the P11D Organiser in conjunction with the the application's payroll. For more information about the P11D Organiser, refer to the documentation that accompanies the P11D Organiser application.
Cost Centres in Nominal or Cost Centres in External Nominal
If you have the Nominal module, this is an option that determines whether cost centres are used in the nominal ledger. If the option is selected, a further level of accounting analysis is available within the nominal ledger by associating accounts with cost centre codes.
If you do not have the Nominal module, but do have the Payroll module, you can select the Cost Centres in External Nominal option. This enables you to analyse payroll costs by cost centre. You define cost centre details using the Nominal Cost Centres command on the Maintenance menu of the Payroll module.
Project and Department
Options that determine whether you want to use additional dimensions with nominal accounts. These options are only available if you have the Nominal Ledger activated. You can choose one or both dimensions for additional analysis purposes. The default names of these dimensions are 'Project' and 'Department' but you can change these by amending the entries in the Dimension 1 and Dimension 2 boxes in the System - Utilities - System Preferences form. When you select an option, you can use the corresponding command on the Maintenance menu in the Nominal module to maintain descriptions and budget settings for the dimension. For more information, refer to the topic on projects and departments associated with the Nominal module.
Real Time Update of Nominal
An option that determines whether the Nominal module is updated in real-time as opposed to batch transfer. If this option is not selected, the transfer of transactions from other modules must be done using the appropriate transfer command. The Nominal - Utilities menu includes commands for the transfer of nominal postings that originate in the Sales, Purchase, Cashbook, Stock and Payroll modules.
When you select this option the application checks for the existence of nominal postings awaiting transfer. If there are untransferred batches found, you will be prompted to run the corresponding transfer command to update the nominal before the option is selected.
If the option is selected, the batch transfer facilities are not normally required because, assuming the correct conditions apply, the Nominal Ledger is updated as soon as a transaction is posted in the corresponding module. This option affects all modules that can originate nominal transactions including Sales, Purchase, Cashbook, Fixed Assets, Invoicing, SOP, Purchase Invoice Register, Stock and Payroll transactions.
Accreditation Training Courseware - O3Training_Accreditation_ADM50SystemR2.3.docx
© Pegasus Training Services Page 6
Notes
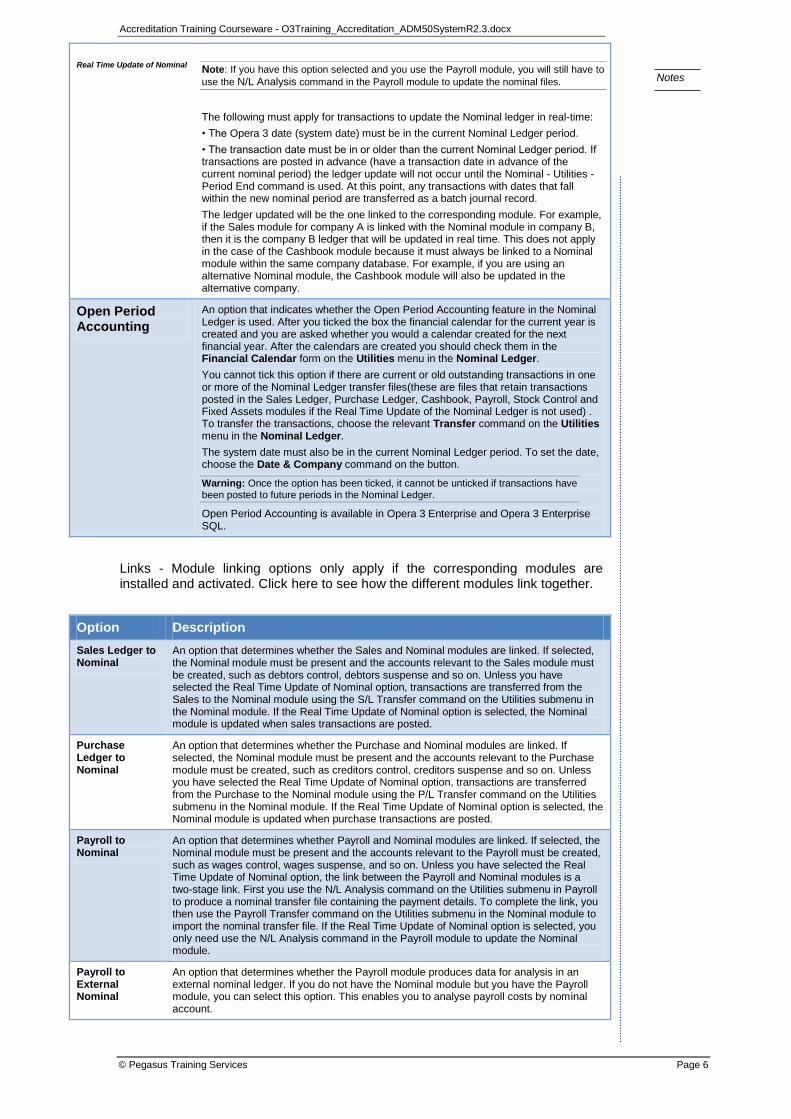
Real Time Update of Nominal
Note: If you have this option selected and you use the Payroll module, you will still have to
use the N/L Analysis command in the Payroll module to update the nominal files.
The following must apply for transactions to update the Nominal ledger in real-time:
• The Opera 3 date (system date) must be in the current Nominal Ledger period.
• The transaction date must be in or older than the current Nominal Ledger period. If transactions are posted in advance (have a transaction date in advance of the current nominal period) the ledger update will not occur until the Nominal - Utilities - Period End command is used. At this point, any transactions with dates that fall within the new nominal period are transferred as a batch journal record.
The ledger updated will be the one linked to the corresponding module. For example, if the Sales module for company A is linked with the Nominal module in company B, then it is the company B ledger that will be updated in real time. This does not apply in the case of the Cashbook module because it must always be linked to a Nominal module within the same company database. For example, if you are using an alternative Nominal module, the Cashbook module will also be updated in the alternative company.
Open Period Accounting
An option that indicates whether the Open Period Accounting feature in the Nominal Ledger is used. After you ticked the box the financial calendar for the current year is created and you are asked whether you would a calendar created for the next financial year. After the calendars are created you should check them in the Financial Calendar form on the Utilities menu in the Nominal Ledger.
You cannot tick this option if there are current or old outstanding transactions in one or more of the Nominal Ledger transfer files(these are files that retain transactions posted in the Sales Ledger, Purchase Ledger, Cashbook, Payroll, Stock Control and Fixed Assets modules if the Real Time Update of the Nominal Ledger is not used) . To transfer the transactions, choose the relevant Transfer command on the Utilities menu in the Nominal Ledger.
The system date must also be in the current Nominal Ledger period. To set the date, choose the Date & Company command on the button.
Warning: Once the option has been ticked, it cannot be unticked if transactions have been posted to future periods in the Nominal Ledger.
Open Period Accounting is available in Opera 3 Enterprise and Opera 3 Enterprise SQL.
Links - Module linking options only apply if the corresponding modules are installed and activated. Click here to see how the different modules link together.
Option Description
Sales Ledger to Nominal
An option that determines whether the Sales and Nominal modules are linked. If selected, the Nominal module must be present and the accounts relevant to the Sales module must be created, such as debtors control, debtors suspense and so on. Unless you have selected the Real Time Update of Nominal option, transactions are transferred from the Sales to the Nominal module using the S/L Transfer command on the Utilities submenu in the Nominal module. If the Real Time Update of Nominal option is selected, the Nominal module is updated when sales transactions are posted.
Purchase Ledger to Nominal
An option that determines whether the Purchase and Nominal modules are linked. If selected, the Nominal module must be present and the accounts relevant to the Purchase module must be created, such as creditors control, creditors suspense and so on. Unless you have selected the Real Time Update of Nominal option, transactions are transferred from the Purchase to the Nominal module using the P/L Transfer command on the Utilities submenu in the Nominal module. If the Real Time Update of Nominal option is selected, the Nominal module is updated when purchase transactions are posted.
Payroll to Nominal
An option that determines whether Payroll and Nominal modules are linked. If selected, the Nominal module must be present and the accounts relevant to the Payroll must be created, such as wages control, wages suspense, and so on. Unless you have selected the Real Time Update of Nominal option, the link between the Payroll and Nominal modules is a two-stage link. First you use the N/L Analysis command on the Utilities submenu in Payroll to produce a nominal transfer file containing the payment details. To complete the link, you then use the Payroll Transfer command on the Utilities submenu in the Nominal module to import the nominal transfer file. If the Real Time Update of Nominal option is selected, you only need use the N/L Analysis command in the Payroll module to update the Nominal module.
Payroll to External Nominal
An option that determines whether the Payroll module produces data for analysis in an external nominal ledger. If you do not have the Nominal module but you have the Payroll module, you can select this option. This enables you to analyse payroll costs by nominal account.
Accreditation Training Courseware - O3Training_Accreditation_ADM50SystemR2.3.docx
© Pegasus Training Services Page 7
Notes
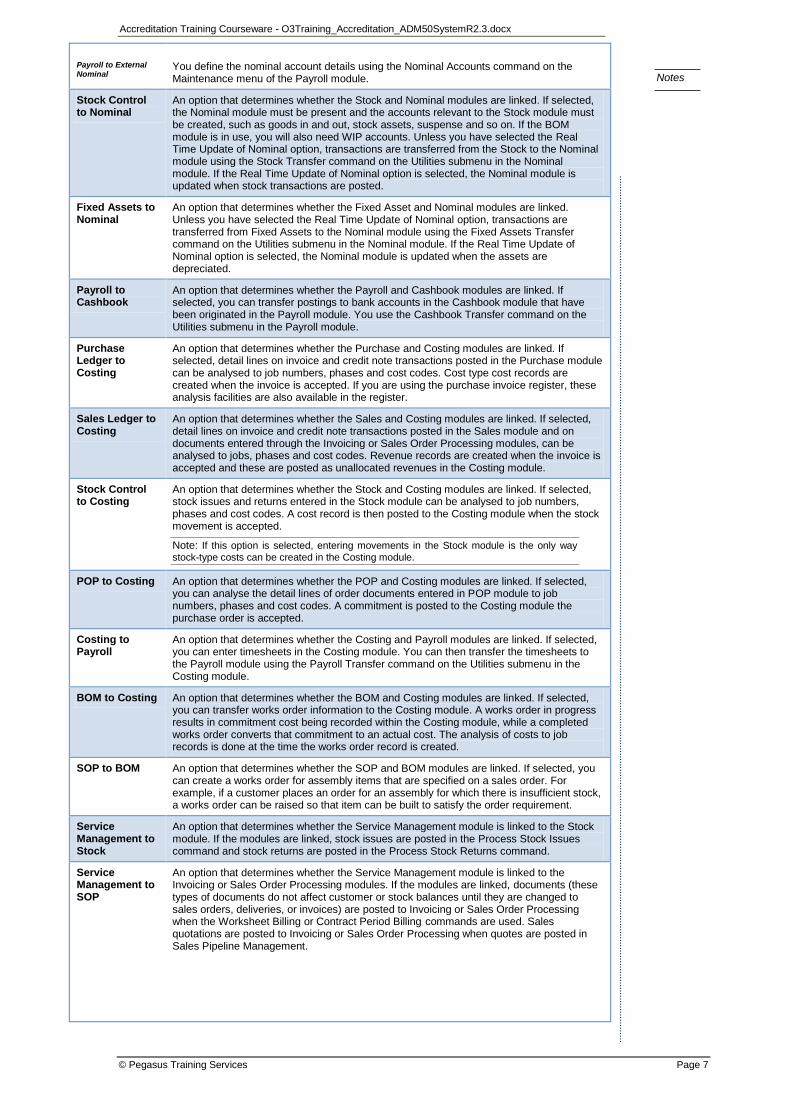
Payroll to External Nominal
You define the nominal account details using the Nominal Accounts command on the Maintenance menu of the Payroll module.
Stock Control to Nominal
An option that determines whether the Stock and Nominal modules are linked. If selected, the Nominal module must be present and the accounts relevant to the Stock module must be created, such as goods in and out, stock assets, suspense and so on. If the BOM module is in use, you will also need WIP accounts. Unless you have selected the Real Time Update of Nominal option, transactions are transferred from the Stock to the Nominal module using the Stock Transfer command on the Utilities submenu in the Nominal module. If the Real Time Update of Nominal option is selected, the Nominal module is updated when stock transactions are posted.
Fixed Assets to Nominal
An option that determines whether the Fixed Asset and Nominal modules are linked. Unless you have selected the Real Time Update of Nominal option, transactions are transferred from Fixed Assets to the Nominal module using the Fixed Assets Transfer command on the Utilities submenu in the Nominal module. If the Real Time Update of Nominal option is selected, the Nominal module is updated when the assets are depreciated.
Payroll to Cashbook
An option that determines whether the Payroll and Cashbook modules are linked. If selected, you can transfer postings to bank accounts in the Cashbook module that have been originated in the Payroll module. You use the Cashbook Transfer command on the Utilities submenu in the Payroll module.
Purchase Ledger to Costing
An option that determines whether the Purchase and Costing modules are linked. If selected, detail lines on invoice and credit note transactions posted in the Purchase module can be analysed to job numbers, phases and cost codes. Cost type cost records are created when the invoice is accepted. If you are using the purchase invoice register, these analysis facilities are also available in the register.
Sales Ledger to Costing
An option that determines whether the Sales and Costing modules are linked. If selected, detail lines on invoice and credit note transactions posted in the Sales module and on documents entered through the Invoicing or Sales Order Processing modules, can be analysed to jobs, phases and cost codes. Revenue records are created when the invoice is accepted and these are posted as unallocated revenues in the Costing module.
Stock Control to Costing
An option that determines whether the Stock and Costing modules are linked. If selected, stock issues and returns entered in the Stock module can be analysed to job numbers, phases and cost codes. A cost record is then posted to the Costing module when the stock movement is accepted.
Note: If this option is selected, entering movements in the Stock module is the only way
stock-type costs can be created in the Costing module.
POP to Costing An option that determines whether the POP and Costing modules are linked. If selected, you can analyse the detail lines of order documents entered in POP module to job numbers, phases and cost codes. A commitment is posted to the Costing module the purchase order is accepted.
Costing to Payroll
An option that determines whether the Costing and Payroll modules are linked. If selected, you can enter timesheets in the Costing module. You can then transfer the timesheets to the Payroll module using the Payroll Transfer command on the Utilities submenu in the Costing module.
BOM to Costing An option that determines whether the BOM and Costing modules are linked. If selected, you can transfer works order information to the Costing module. A works order in progress results in commitment cost being recorded within the Costing module, while a completed works order converts that commitment to an actual cost. The analysis of costs to job records is done at the time the works order record is created.
SOP to BOM An option that determines whether the SOP and BOM modules are linked. If selected, you can create a works order for assembly items that are specified on a sales order. For example, if a customer places an order for an assembly for which there is insufficient stock, a works order can be raised so that item can be built to satisfy the order requirement.
Service Management to Stock
An option that determines whether the Service Management module is linked to the Stock module. If the modules are linked, stock issues are posted in the Process Stock Issues command and stock returns are posted in the Process Stock Returns command.
Service Management to SOP
An option that determines whether the Service Management module is linked to the Invoicing or Sales Order Processing modules. If the modules are linked, documents (these types of documents do not affect customer or stock balances until they are changed to sales orders, deliveries, or invoices) are posted to Invoicing or Sales Order Processing when the Worksheet Billing or Contract Period Billing commands are used. Sales quotations are posted to Invoicing or Sales Order Processing when quotes are posted in Sales Pipeline Management.

Accreditation Training Courseware - O3Training_Accreditation_ADM50SystemR2.3.docx
© Pegasus Training Services Page 8
Notes
Service Management to Costing
An option that determines whether the Service Management module is linked to the Costing module. If the modules are linked, costs are posted to Costing when activities are cleared in the Sales Pipeline Management, Service Management, and Helpdesk modules. Revenue is posted to Costing when sales documents that are created in the Worksheet Billing or Contract Period Billing commands in Service Management are invoiced in Sales Order Processing or Invoicing.
Note: You can tick this option only if the Service Management to SOP and the Sales Ledger to Costing options are ticked:
- The Service Management to SOP option drives whether sales quotations are posted to Sales Order Processing or Invoicing from the Company Processing in Sales Pipeline Management. The option also drives whether sales documents are posted to Sales Order Processing or Invoicing from Worksheet Billing or Contract Period Billing in Service Management.
- The Sales Ledger to Costing option drives whether revenue is posted to Costing when sales documents that are created in Service Management are invoiced in Sales Order Processing or Invoicing.
Purchase to Fixed Assets
An option that determines whether the Purchase Ledger is linked to the Fixed Assets module. If the modules are linked, you can create new assets in the Purchase Ledger when supplier invoices are posted.
PIR/POP to Fixed Assets
An option that determines whether the Purchase Invoice Register feature in the Purchase Ledger, and the Purchase Order Processing module is linked to the Fixed Assets module. If the modules are linked, you can create new assets when supplier invoices are posted.
Other - EC VAT-related options only apply if you have the EC VAT module installed and activated.
Option Description
EC Despatches SD
An option that determines whether you must maintain despatch records for the SD (Supplementary Declaration report that is used by HMRC (HM Revenue and Customs) to collect trade statistics between the United Kingdom and other countries in the EU) report. The report is accessed in the EC VAT - Reports - S.D. Report command.
Include Delivery Terms
An option that determines whether to force the recording of the delivery terms for SD details when processing sales invoice and credit note transactions or related sales order processing documents.
EC Arrivals SD
An option that determines whether you must maintain arrival records for SDs. The report is accessed in the EC VAT - Reports - S.D. Report command.
Include Delivery Terms
An option that determines whether to force the recording of the delivery terms for SD details when processing purchase invoice and credit note transactions or related purchase order processing documents.
EC Sales List An option that determines whether you must submit EC Sales Lists to HMRC. The report is accessed in the EC VAT - Reports - E.S.L Report command.
RC Sales List An option that determines whether you must submit Reverse Charge Sales Lists to HMRC. This applies if you supply certain high value products to VAT registered domestic customers meaning you must account for VAT using Reverse Charge Accounting. If, after you have supplied the high value items you then stop, you must inform HMRC and clear this option. What's Reverse Charge Accounting?
Note: You can select this option even if you do not use the EC VAT Module.
Keep Notes (months)
The number of months for which you want to retain Notes records.
Accreditation Training Courseware - O3Training_Accreditation_ADM50SystemR2.3.docx
© Pegasus Training Services Page 9
Notes
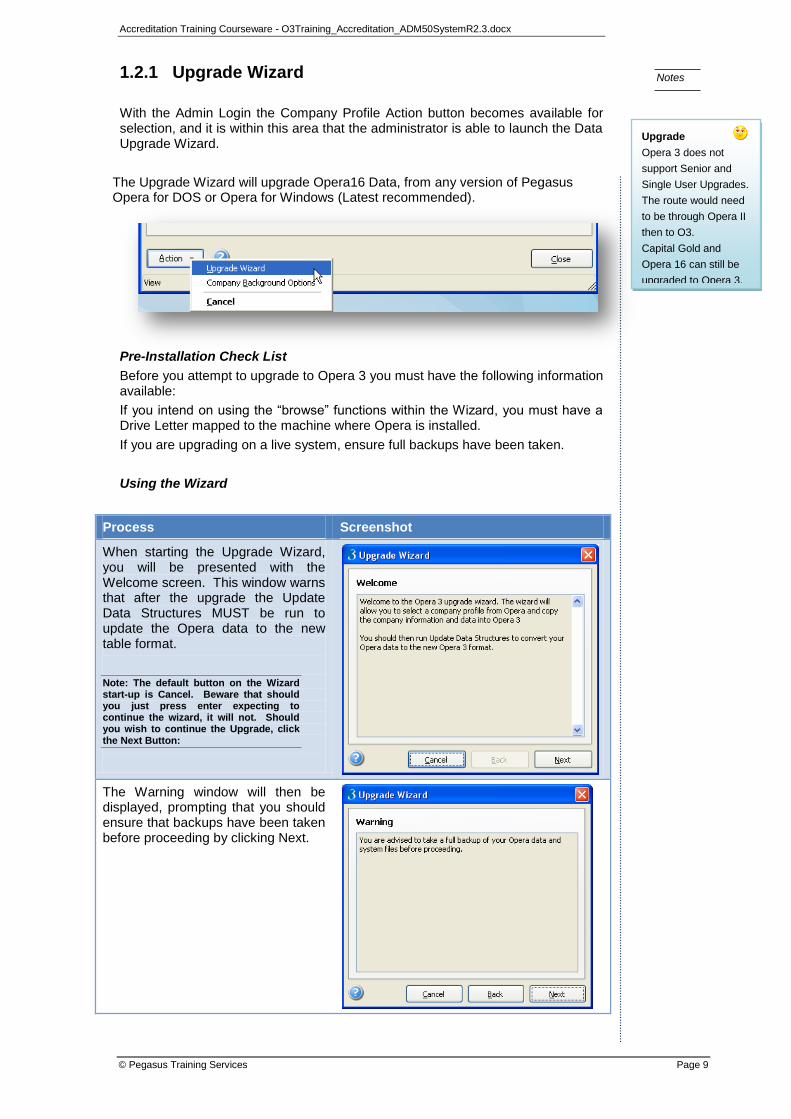
1.2.1 Upgrade Wizard
With the Admin Login the Company Profile Action button becomes available for selection, and it is within this area that the administrator is able to launch the Data Upgrade Wizard.
The Upgrade Wizard will upgrade Opera16 Data, from any version of Pegasus Opera for DOS or Opera for Windows (Latest recommended).
Pre-Installation Check List
Before you attempt to upgrade to Opera 3 you must have the following information available:
If you intend on using the ―browse‖ functions within the Wizard, you must have a Drive Letter mapped to the machine where Opera is installed.
If you are upgrading on a live system, ensure full backups have been taken.
Using the Wizard
Process Screenshot
When starting the Upgrade Wizard, you will be presented with the Welcome screen. This window warns that after the upgrade the Update Data Structures MUST be run to update the Opera data to the new table format.
Note: The default button on the Wizard start-up is Cancel. Beware that should you just press enter expecting to continue the wizard, it will not. Should you wish to continue the Upgrade, click the Next Button:
The Warning window will then be displayed, prompting that you should ensure that backups have been taken before proceeding by clicking Next.
Upgrade
Opera 3 does not
support Senior and
Single User Upgrades.
The route would need
to be through Opera II
then to O3.
Capital Gold and
Opera 16 can still be
upgraded to Opera 3.
Accreditation Training Courseware - O3Training_Accreditation_ADM50SystemR2.3.docx
© Pegasus Training Services Page 10
Notes
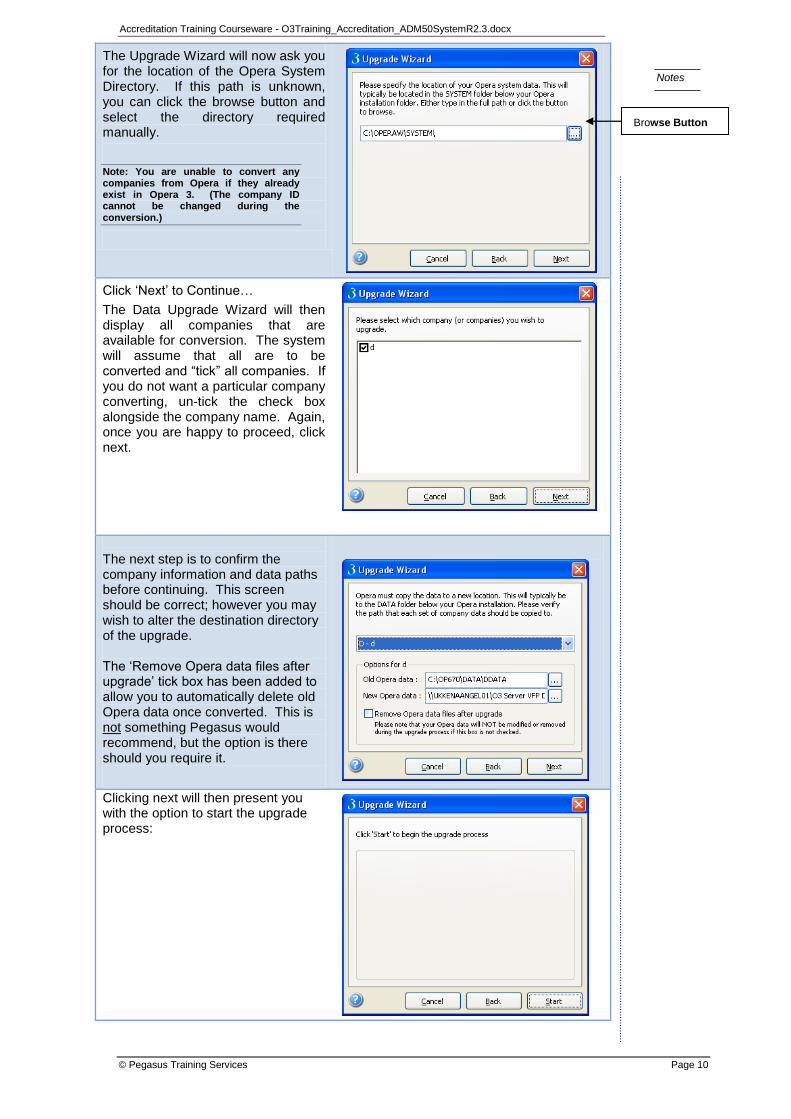
The Upgrade Wizard will now ask you for the location of the Opera System Directory. If this path is unknown, you can click the browse button and select the directory required manually.
Note: You are unable to convert any companies from Opera if they already exist in Opera 3. (The company ID cannot be changed during the conversion.)
Click ‗Next‘ to Continue…
The Data Upgrade Wizard will then display all companies that are available for conversion. The system will assume that all are to be converted and ―tick‖ all companies. If you do not want a particular company converting, un-tick the check box alongside the company name. Again, once you are happy to proceed, click next.
The next step is to confirm the company information and data paths before continuing. This screen should be correct; however you may wish to alter the destination directory of the upgrade. The ‗Remove Opera data files after upgrade‘ tick box has been added to allow you to automatically delete old Opera data once converted. This is not something Pegasus would recommend, but the option is there should you require it.
Clicking next will then present you with the option to start the upgrade process:
Browse Button
Accreditation Training Courseware - O3Training_Accreditation_ADM50SystemR2.3.docx
© Pegasus Training Services Page 11
Notes
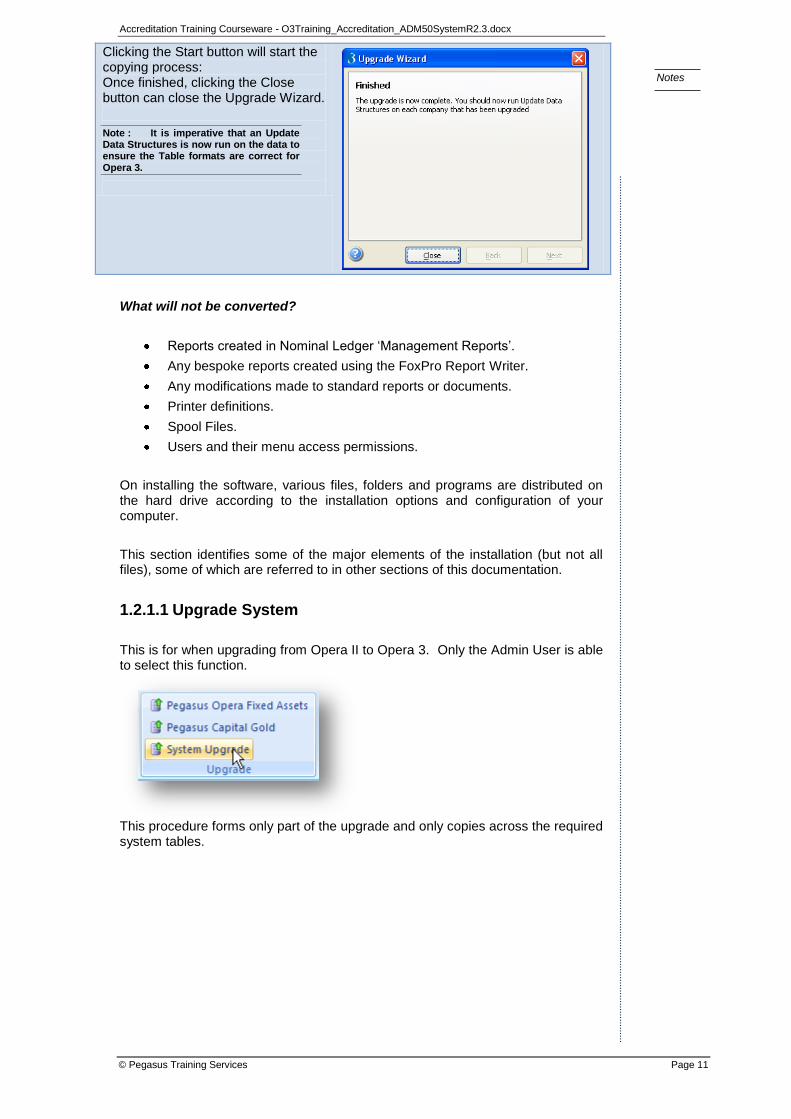
Clicking the Start button will start the copying process: Once finished, clicking the Close button can close the Upgrade Wizard.
Note : It is imperative that an Update Data Structures is now run on the data to ensure the Table formats are correct for Opera 3.
What will not be converted?
Reports created in Nominal Ledger ‗Management Reports‘.
Any bespoke reports created using the FoxPro Report Writer.
Any modifications made to standard reports or documents.
Printer definitions.
Spool Files.
Users and their menu access permissions.
On installing the software, various files, folders and programs are distributed on the hard drive according to the installation options and configuration of your computer.
This section identifies some of the major elements of the installation (but not all files), some of which are referred to in other sections of this documentation.
1.2.1.1 Upgrade System
This is for when upgrading from Opera II to Opera 3. Only the Admin User is able to select this function.
This procedure forms only part of the upgrade and only copies across the required system tables.
Accreditation Training Courseware - O3Training_Accreditation_ADM50SystemR2.3.docx
© Pegasus Training Services Page 12
Notes
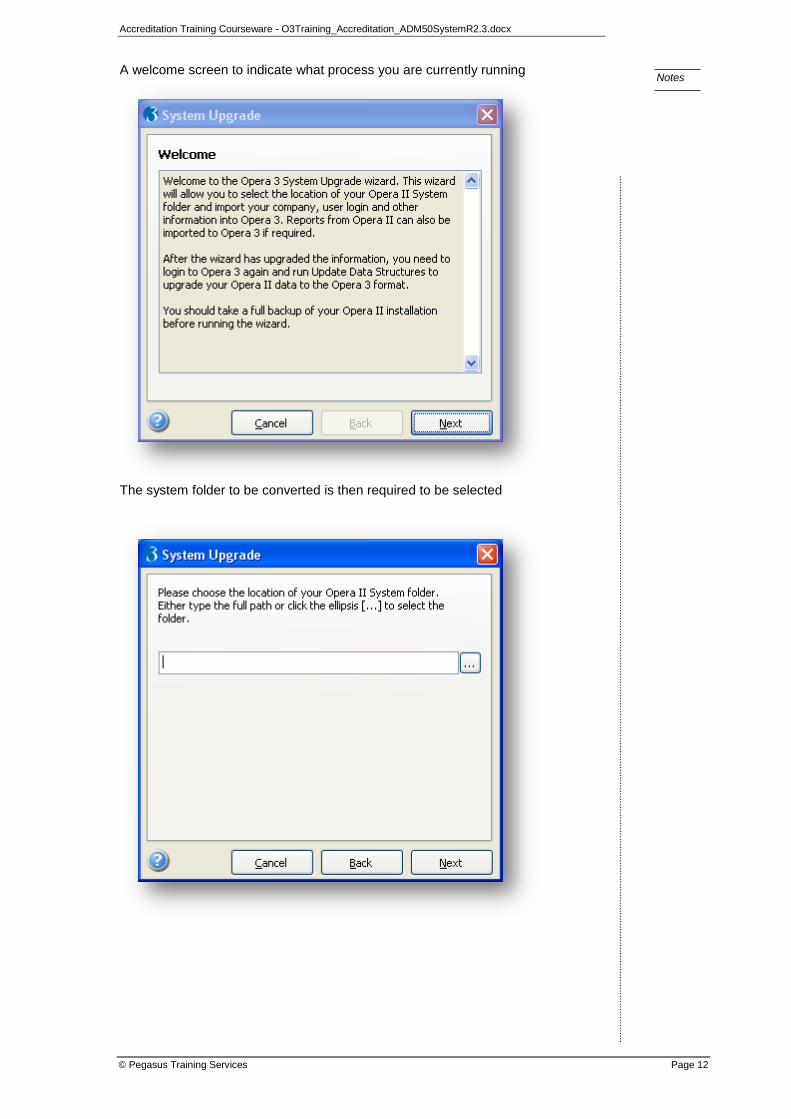
A welcome screen to indicate what process you are currently running
The system folder to be converted is then required to be selected

Accreditation Training Courseware - O3Training_Accreditation_ADM50SystemR2.3.docx
© Pegasus Training Services Page 13
Notes
Click start to begin the process.

Accreditation Training Courseware - O3Training_Accreditation_ADM50SystemR2.3.docx
© Pegasus Training Services Page 14
Notes
Select if remember form position and sizes are to be converted.
Confirm whether or not the Reports directory is to be copied across.
Locate the Reports DIR to be converted.
Reports
The scenario of a
―structural‖ change
usually warrants a
redesign –
introductions of for
example new tables
and fields would
mean existing
redesigned reports
won‘t know about
them. The new
reports provided by
Pegasus will have
these new elements
in the designs and
can be used as the
template for a
redesign.
Accreditation Training Courseware - O3Training_Accreditation_ADM50SystemR2.3.docx
© Pegasus Training Services Page 15
Notes
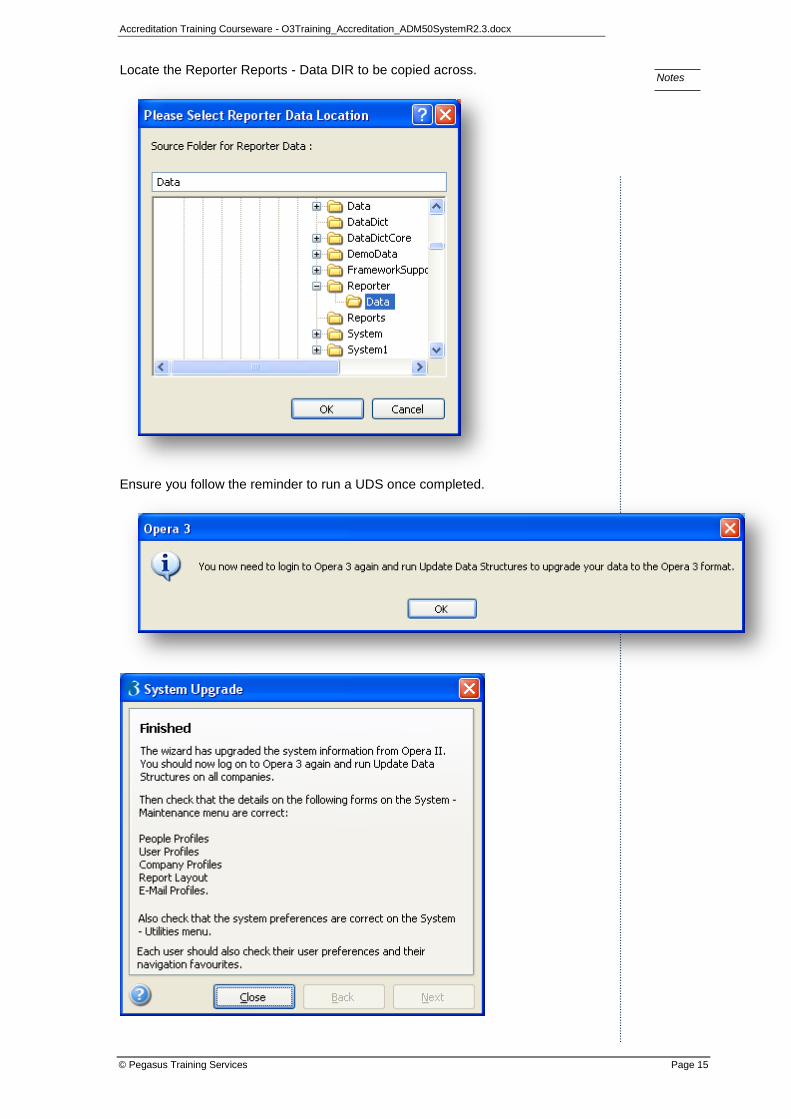
Locate the Reporter Reports - Data DIR to be copied across.
Ensure you follow the reminder to run a UDS once completed.
Accreditation Training Courseware - O3Training_Accreditation_ADM50SystemR2.3.docx
© Pegasus Training Services Page 16
Notes
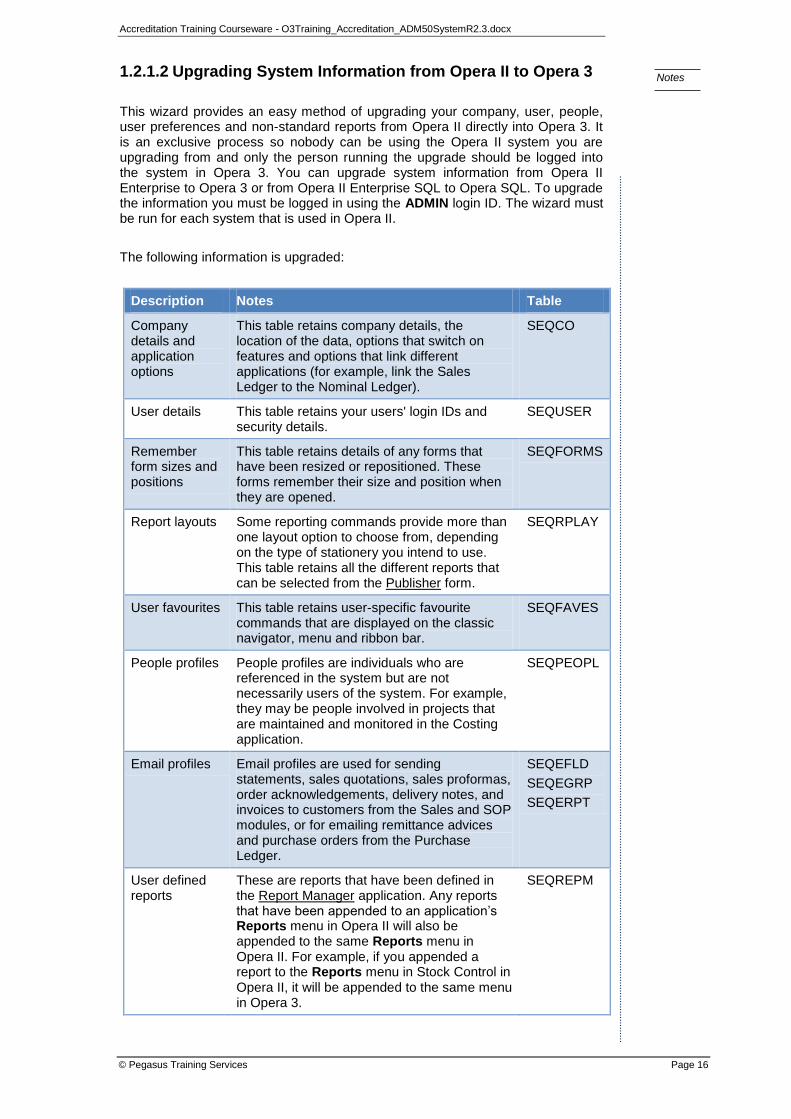
1.2.1.2 Upgrading System Information from Opera II to Opera 3
This wizard provides an easy method of upgrading your company, user, people, user preferences and non-standard reports from Opera II directly into Opera 3. It is an exclusive process so nobody can be using the Opera II system you are upgrading from and only the person running the upgrade should be logged into the system in Opera 3. You can upgrade system information from Opera II Enterprise to Opera 3 or from Opera II Enterprise SQL to Opera SQL. To upgrade the information you must be logged in using the ADMIN login ID. The wizard must be run for each system that is used in Opera II.
The following information is upgraded:
Description Notes Table
Company details and application options
This table retains company details, the location of the data, options that switch on features and options that link different applications (for example, link the Sales Ledger to the Nominal Ledger).
SEQCO
User details This table retains your users' login IDs and security details.
SEQUSER
Remember form sizes and positions
This table retains details of any forms that have been resized or repositioned. These forms remember their size and position when they are opened.
SEQFORMS
Report layouts Some reporting commands provide more than one layout option to choose from, depending on the type of stationery you intend to use. This table retains all the different reports that can be selected from the Publisher form.
SEQRPLAY
User favourites This table retains user-specific favourite commands that are displayed on the classic navigator, menu and ribbon bar.
SEQFAVES
People profiles People profiles are individuals who are referenced in the system but are not necessarily users of the system. For example, they may be people involved in projects that are maintained and monitored in the Costing application.
SEQPEOPL
Email profiles Email profiles are used for sending statements, sales quotations, sales proformas, order acknowledgements, delivery notes, and invoices to customers from the Sales and SOP modules, or for emailing remittance advices and purchase orders from the Purchase Ledger.
SEQEFLD
SEQEGRP
SEQERPT
User defined reports
These are reports that have been defined in the Report Manager application. Any reports that have been appended to an application‘s Reports menu in Opera II will also be appended to the same Reports menu in Opera II. For example, if you appended a report to the Reports menu in Stock Control in Opera II, it will be appended to the same menu in Opera 3.
SEQREPM
Accreditation Training Courseware - O3Training_Accreditation_ADM50SystemR2.3.docx
© Pegasus Training Services Page 17
Notes
System-wide preferences
These preferences apply to the system as a whole, for example industry specific names for ‗projects‘, ‗departments, or ‗phases‘ in the Costing application.
SEQSYS
Non standard reports
See below -
Reports
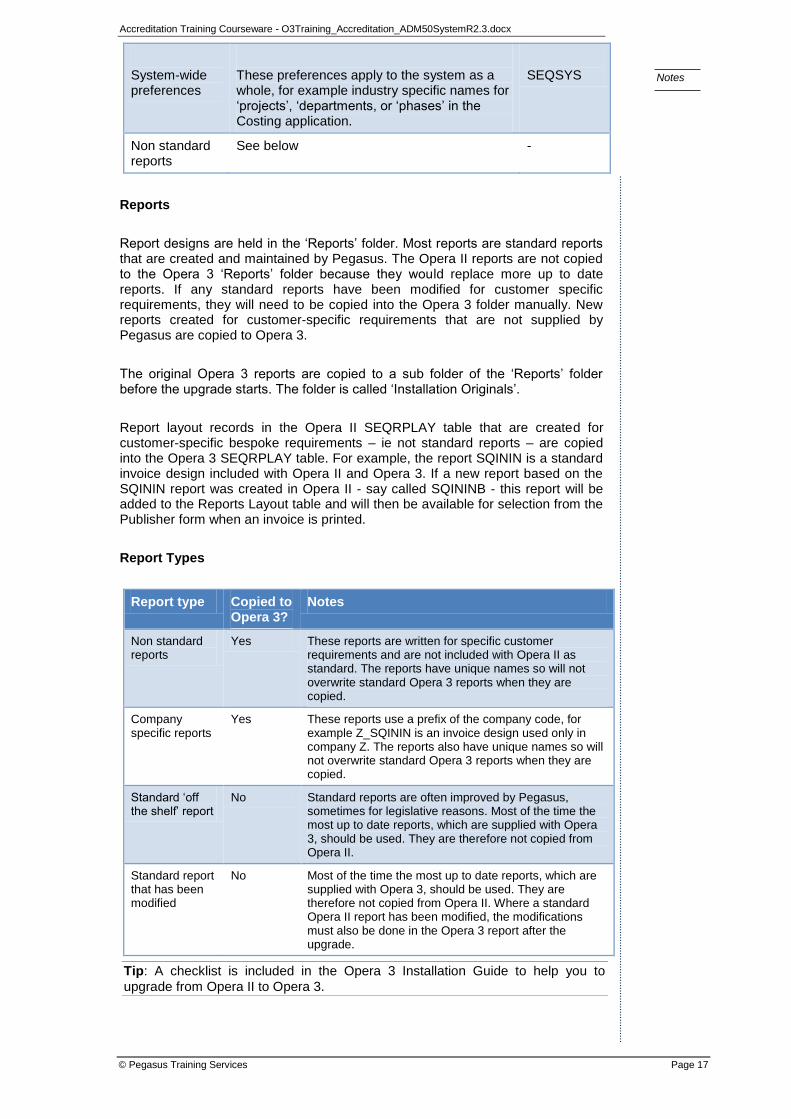
Report designs are held in the ‗Reports‘ folder. Most reports are standard reports that are created and maintained by Pegasus. The Opera II reports are not copied to the Opera 3 ‗Reports‘ folder because they would replace more up to date reports. If any standard reports have been modified for customer specific requirements, they will need to be copied into the Opera 3 folder manually. New reports created for customer-specific requirements that are not supplied by Pegasus are copied to Opera 3.
The original Opera 3 reports are copied to a sub folder of the ‗Reports‘ folder before the upgrade starts. The folder is called ‗Installation Originals‘.
Report layout records in the Opera II SEQRPLAY table that are created for customer-specific bespoke requirements – ie not standard reports – are copied into the Opera 3 SEQRPLAY table. For example, the report SQININ is a standard invoice design included with Opera II and Opera 3. If a new report based on the SQININ report was created in Opera II - say called SQININB - this report will be added to the Reports Layout table and will then be available for selection from the Publisher form when an invoice is printed.
Report Types
Report type Copied to Opera 3?
Notes
Non standard reports
Yes These reports are written for specific customer requirements and are not included with Opera II as standard. The reports have unique names so will not overwrite standard Opera 3 reports when they are copied.
Company specific reports
Yes These reports use a prefix of the company code, for example Z_SQININ is an invoice design used only in company Z. The reports also have unique names so will not overwrite standard Opera 3 reports when they are copied.
Standard ‗off the shelf‘ report
No Standard reports are often improved by Pegasus, sometimes for legislative reasons. Most of the time the most up to date reports, which are supplied with Opera 3, should be used. They are therefore not copied from Opera II.
Standard report that has been modified
No Most of the time the most up to date reports, which are supplied with Opera 3, should be used. They are therefore not copied from Opera II. Where a standard Opera II report has been modified, the modifications must also be done in the Opera 3 report after the upgrade.
Tip: A checklist is included in the Opera 3 Installation Guide to help you to
upgrade from Opera II to Opera 3.
Accreditation Training Courseware - O3Training_Accreditation_ADM50SystemR2.3.docx
© Pegasus Training Services Page 18
Notes
To Use the System Upgrade Wizard
1. Before starting the upgrade, make sure no one is logged into the Opera II system you are running the upgrade for and you are the only person logged into the Opera 3 system. To check whether other people are logged in, use the Monitor Users command. Also take a full backup of your Opera II installation.
2. Open the Upgrade folder and then click System Upgrade. The welcome screen is displayed.
3. Click Next. Then enter the path to the Opera II system folder. The default share name to the system folder is \\<Servername>\Server XXX Dynamic\System or \\<Servername>\Server XXX Static and Dynamic\System (where XXX is either VFP or SQL).
4. Click Next and then click Start to start the upgrade. Follow the on-screen prompts and respond as necessary.
5. Run the Update Data Structures command and select all companies to update the structure of your company data files and the system data files to match the latest Opera 3 data dictionary.
6. After the upgrade finishes, you should check that the details on the following forms on the System - Maintenance menu are correct: People Profiles, User Profiles, Company Profiles, Report Layout and E-Mail Profiles. Also check that the system preferences are correct on the System - Utilities menu.
Notes:
- This wizard does not move your company data files. If you need to move the company data, you must do this manually using Windows Explorer after running the System Upgrade wizard.
- If you use the Additional Systems feature, you need to run this wizard in each separate system to upgrade these details.
- As standard Opera II reports (the 'off the shelf' reports) are not copied to Opera 3, if any have been modified for customer-specific reasons, you must ensure that the changes are also done in the Opera 3 report.
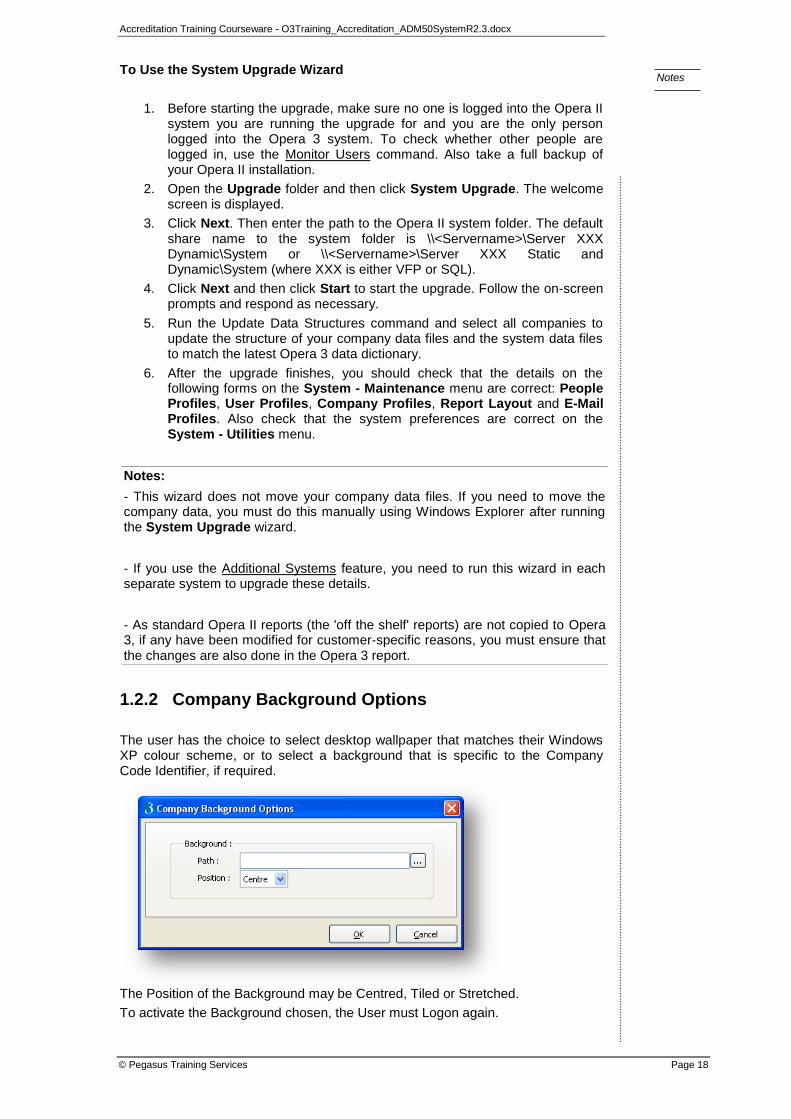
1.2.2 Company Background Options
The user has the choice to select desktop wallpaper that matches their Windows XP colour scheme, or to select a background that is specific to the Company Code Identifier, if required.
The Position of the Background may be Centred, Tiled or Stretched.
To activate the Background chosen, the User must Logon again.
Accreditation Training Courseware - O3Training_Accreditation_ADM50SystemR2.3.docx
© Pegasus Training Services Page 19
Notes
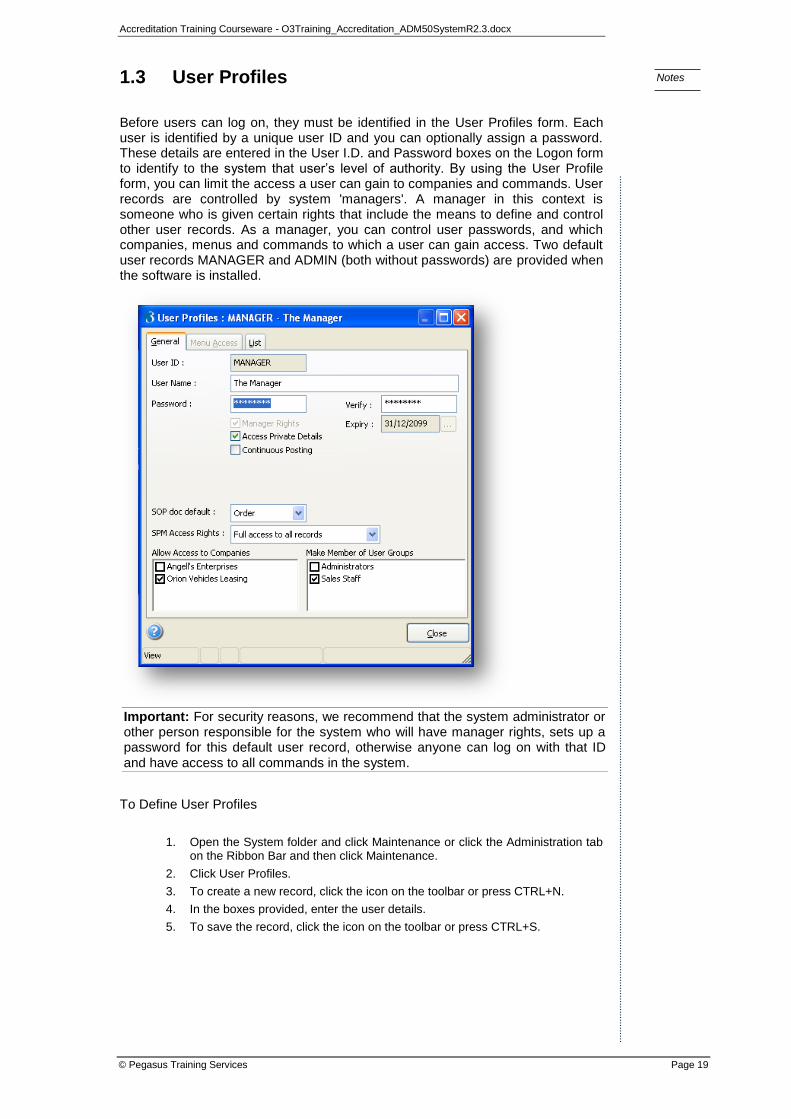
1.3 User Profiles
Before users can log on, they must be identified in the User Profiles form. Each user is identified by a unique user ID and you can optionally assign a password. These details are entered in the User I.D. and Password boxes on the Logon form to identify to the system that user‘s level of authority. By using the User Profile form, you can limit the access a user can gain to companies and commands. User records are controlled by system 'managers'. A manager in this context is someone who is given certain rights that include the means to define and control other user records. As a manager, you can control user passwords, and which companies, menus and commands to which a user can gain access. Two default user records MANAGER and ADMIN (both without passwords) are provided when the software is installed.
Important: For security reasons, we recommend that the system administrator or other person responsible for the system who will have manager rights, sets up a password for this default user record, otherwise anyone can log on with that ID and have access to all commands in the system.
To Define User Profiles
1. Open the System folder and click Maintenance or click the Administration tab on the Ribbon Bar and then click Maintenance.
2. Click User Profiles.
3. To create a new record, click the icon on the toolbar or press CTRL+N.
4. In the boxes provided, enter the user details.
5. To save the record, click the icon on the toolbar or press CTRL+S.
Accreditation Training Courseware - O3Training_Accreditation_ADM50SystemR2.3.docx
© Pegasus Training Services Page 20
Notes
1.3.1 Admin Login
The Admin login is the most powerful user login within the Opera 3 system. Admin will allow access to:
Data Upgrade Wizard - The Upgrade Wizard facilitates the migration of Data from Opera (16-bit) to Opera 3.
Report designs.
Re-Index facility when running an Update Data Structures.
Access to FoxPro Command line.
Create Additional Systems – The Additional Systems options allows the user to have more than 36 companies, depending on licence.
This login ought not to be used as an everyday login and for Security reasons a password should be assigned. See the relevant chapters on each Module for details.
1.3.2 Manager Login
The Manager login is a user with ‗Manager Rights‘. The granting of ‗Manager Rights‘ allows the user access to certain areas of the system, which a user without ‗Managers Rights‘ would not be afforded. A user with ‗Managers rights‘ will be allowed access to Company and User Profiles and restrictions in other modules will be relaxed. For example an ordinary ‗user‘ WITHOUT ‗Managers rights‘ will not be allowed to view cost prices in Stock Control or re-post journals in Nominal Ledger. See the relevant chapters on each Module for details.
1.3.3 User Login
The User login is a user with standard user rights. That is no rights over and above the ability to process within the modules to which the user has been given access. The standard ‗user‘ login will not be able to create Companies or Users and there will be a restriction on options reserved for those with Managers rights.
For ease of set-up profiles may be used and copied to new user identities.
1.3.4 Menu Access
Access to menus and commands can be controlled for each user record.
For Example; In your organization there are users whose job is to deal with sales ledger credit control enquiries. Using the Menu Access tab on the User Profiles form, you can limit access only to those commands that allow them to locate and view customer records and print sales reports. No other commands will be available to such users after logging on.
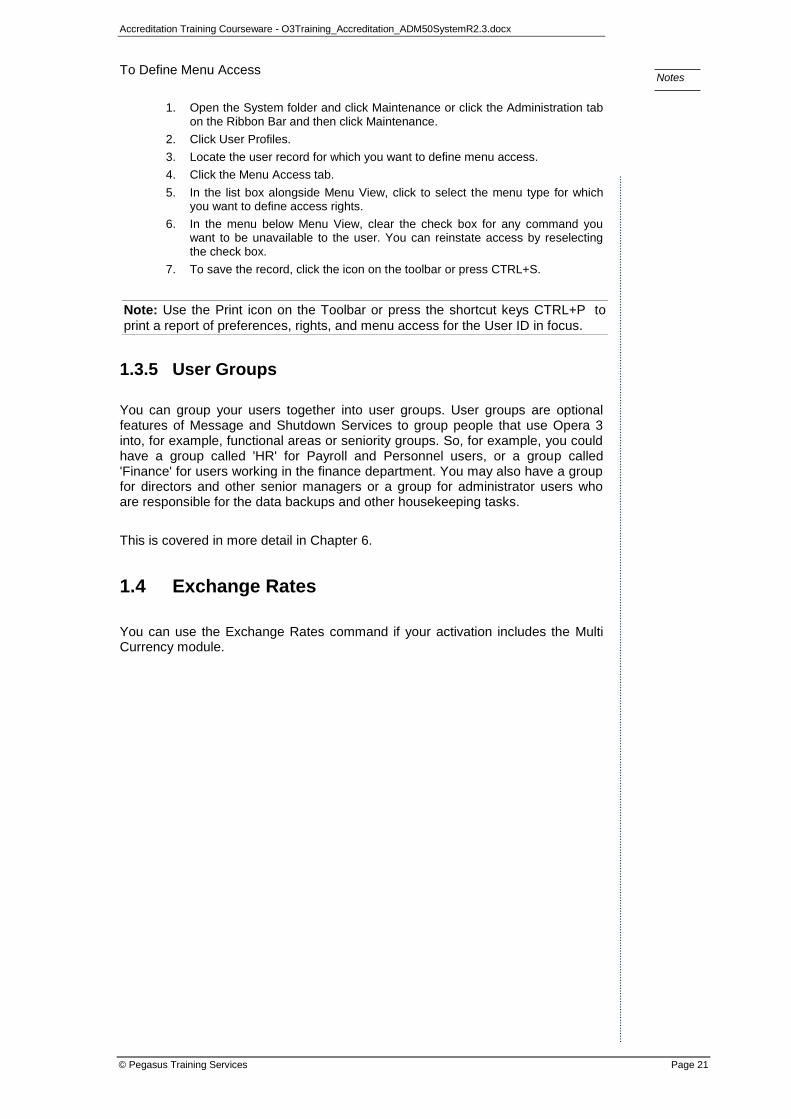
Accreditation Training Courseware - O3Training_Accreditation_ADM50SystemR2.3.docx
© Pegasus Training Services Page 21
Notes
To Define Menu Access
1. Open the System folder and click Maintenance or click the Administration tab on the Ribbon Bar and then click Maintenance.
2. Click User Profiles.
3. Locate the user record for which you want to define menu access.
4. Click the Menu Access tab.
5. In the list box alongside Menu View, click to select the menu type for which you want to define access rights.
6. In the menu below Menu View, clear the check box for any command you want to be unavailable to the user. You can reinstate access by reselecting the check box.
7. To save the record, click the icon on the toolbar or press CTRL+S.
Note: Use the Print icon on the Toolbar or press the shortcut keys CTRL+P to
print a report of preferences, rights, and menu access for the User ID in focus.
1.3.5 User Groups
You can group your users together into user groups. User groups are optional features of Message and Shutdown Services to group people that use Opera 3 into, for example, functional areas or seniority groups. So, for example, you could have a group called 'HR' for Payroll and Personnel users, or a group called 'Finance' for users working in the finance department. You may also have a group for directors and other senior managers or a group for administrator users who are responsible for the data backups and other housekeeping tasks.
This is covered in more detail in Chapter 6.
1.4 Exchange Rates
You can use the Exchange Rates command if your activation includes the Multi Currency module.
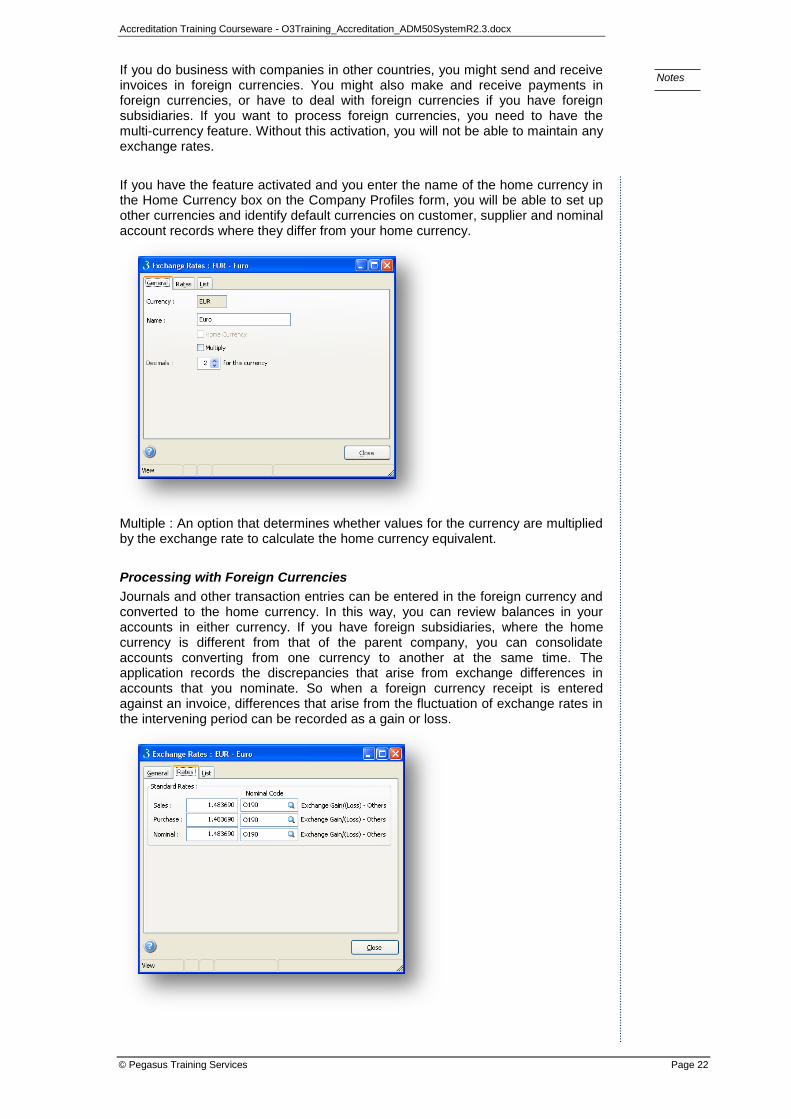
Accreditation Training Courseware - O3Training_Accreditation_ADM50SystemR2.3.docx
© Pegasus Training Services Page 22
Notes
If you do business with companies in other countries, you might send and receive invoices in foreign currencies. You might also make and receive payments in foreign currencies, or have to deal with foreign currencies if you have foreign subsidiaries. If you want to process foreign currencies, you need to have the multi-currency feature. Without this activation, you will not be able to maintain any exchange rates.
If you have the feature activated and you enter the name of the home currency in the Home Currency box on the Company Profiles form, you will be able to set up other currencies and identify default currencies on customer, supplier and nominal account records where they differ from your home currency.
Multiple : An option that determines whether values for the currency are multiplied by the exchange rate to calculate the home currency equivalent.
Processing with Foreign Currencies
Journals and other transaction entries can be entered in the foreign currency and converted to the home currency. In this way, you can review balances in your accounts in either currency. If you have foreign subsidiaries, where the home currency is different from that of the parent company, you can consolidate accounts converting from one currency to another at the same time. The application records the discrepancies that arise from exchange differences in accounts that you nominate. So when a foreign currency receipt is entered against an invoice, differences that arise from the fluctuation of exchange rates in the intervening period can be recorded as a gain or loss.
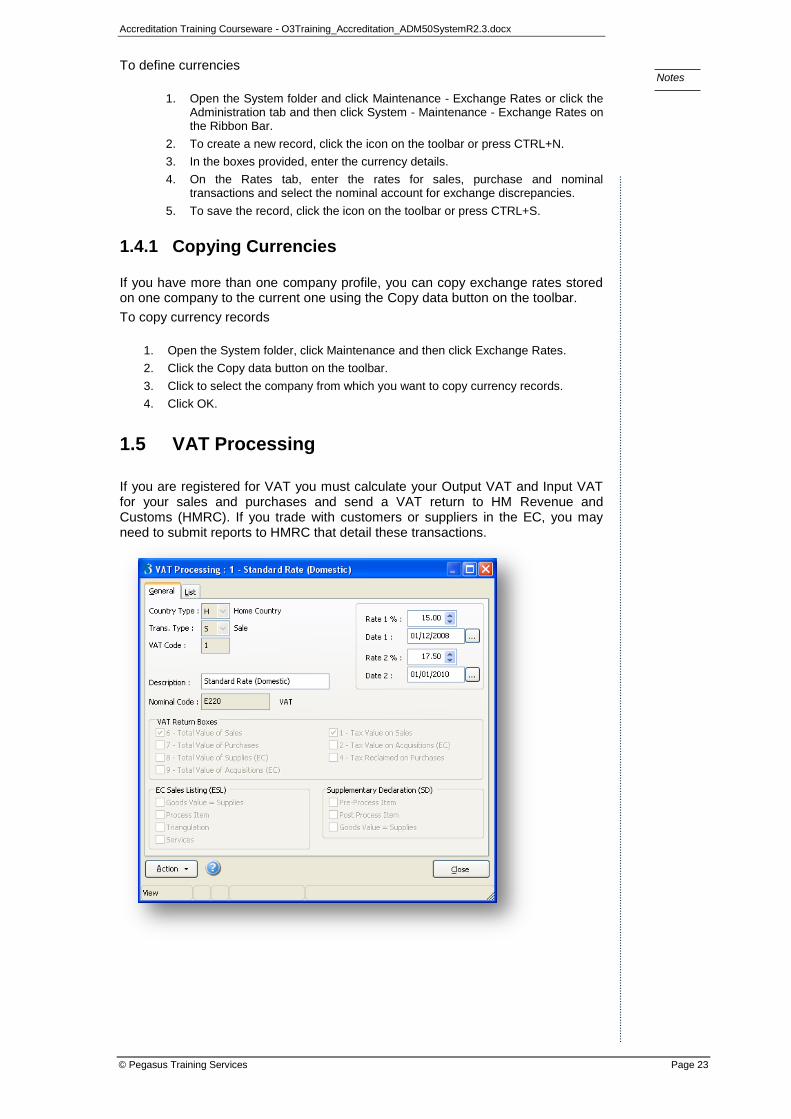
Accreditation Training Courseware - O3Training_Accreditation_ADM50SystemR2.3.docx
© Pegasus Training Services Page 23
Notes
To define currencies
1. Open the System folder and click Maintenance - Exchange Rates or click the Administration tab and then click System - Maintenance - Exchange Rates on the Ribbon Bar.
2. To create a new record, click the icon on the toolbar or press CTRL+N.
3. In the boxes provided, enter the currency details.
4. On the Rates tab, enter the rates for sales, purchase and nominal transactions and select the nominal account for exchange discrepancies.
5. To save the record, click the icon on the toolbar or press CTRL+S.
1.4.1 Copying Currencies
If you have more than one company profile, you can copy exchange rates stored on one company to the current one using the Copy data button on the toolbar.
To copy currency records
1. Open the System folder, click Maintenance and then click Exchange Rates.
2. Click the Copy data button on the toolbar.
3. Click to select the company from which you want to copy currency records.
4. Click OK.
1.5 VAT Processing
If you are registered for VAT you must calculate your Output VAT and Input VAT for your sales and purchases and send a VAT return to HM Revenue and Customs (HMRC). If you trade with customers or suppliers in the EC, you may need to submit reports to HMRC that detail these transactions.
Accreditation Training Courseware - O3Training_Accreditation_ADM50SystemR2.3.docx
© Pegasus Training Services Page 24
Notes
Use the VAT Processing form to create the VAT codes you need when you post VAT transactions in the application. VAT codes are set up to update the relevant boxes on the VAT return, update the EC Sales List (ESL) and Supplementary Declaration (SD) reports, and update the Reverse Charge Sales List (RCSL).
The ESL report is used to capture details of intra-EC goods sales, and intra-EC services sales that are subject to the Reverse Charge procedure.
The SD report lists the movement of goods between EC countries.
The RCSL report lists transactions of specific high value items moved between EC countries.
You can print the VAT return and RCSL from the Action button on this form. The ESL and SD reports are printed from the EC VAT module.
Note: The application provides VAT processing based on invoices and credit notes posted rather than the cash accounting method.
General tab
Box Description
Country Type This displays a code that identifies the country to which the VAT code applies.
H for 'Home' country. This applies if the customers or suppliers are located in the same country as your company.
R for a 'Registered' EC country. This applies if the customers or suppliers are located in an EC country where you are registered for VAT.
U for an 'Unregistered' EC country. This applies if the customers or suppliers are located in an EC country where you are not registered for VAT.
N for 'Non' EC country. This applies if the suppliers or customers are located in a country outside the EC.
Trans. Type An option that determines the type of transaction to which the VAT code applies. You can select one of the following from a list:
F for 'Purchase - Unregistered EC Supplier'.
N for 'Beyond the Scope of VAT'.
P for 'Purchase'. Use this for purchase transactions from suppliers that are VAT registered other than those specified by transaction type 'F' or 'R'.
R for 'Reverse Charge Purchase'. Use this for transactions from domestic suppliers for certain high value products where you must account for VAT using Reverse Charge Accounting for goods.
Note: You cannot use Reverse Charge Purchase codes for suppliers that are
marked as VAT Inclusive.
S for 'Sale'. Use this type if the VAT code is for sale transactions to customers other than those specified by transaction type 'U'.
U for 'Sale - Unregistered EC Customer'.
V for 'Reverse Charge Sales'. You can only select this transaction type if the RC Sales List option is selected on the Company Profiles form in the System module. Use this for transactions for domestic customers for certain high value products where you must account for VAT using Reverse Charge Accounting for goods.
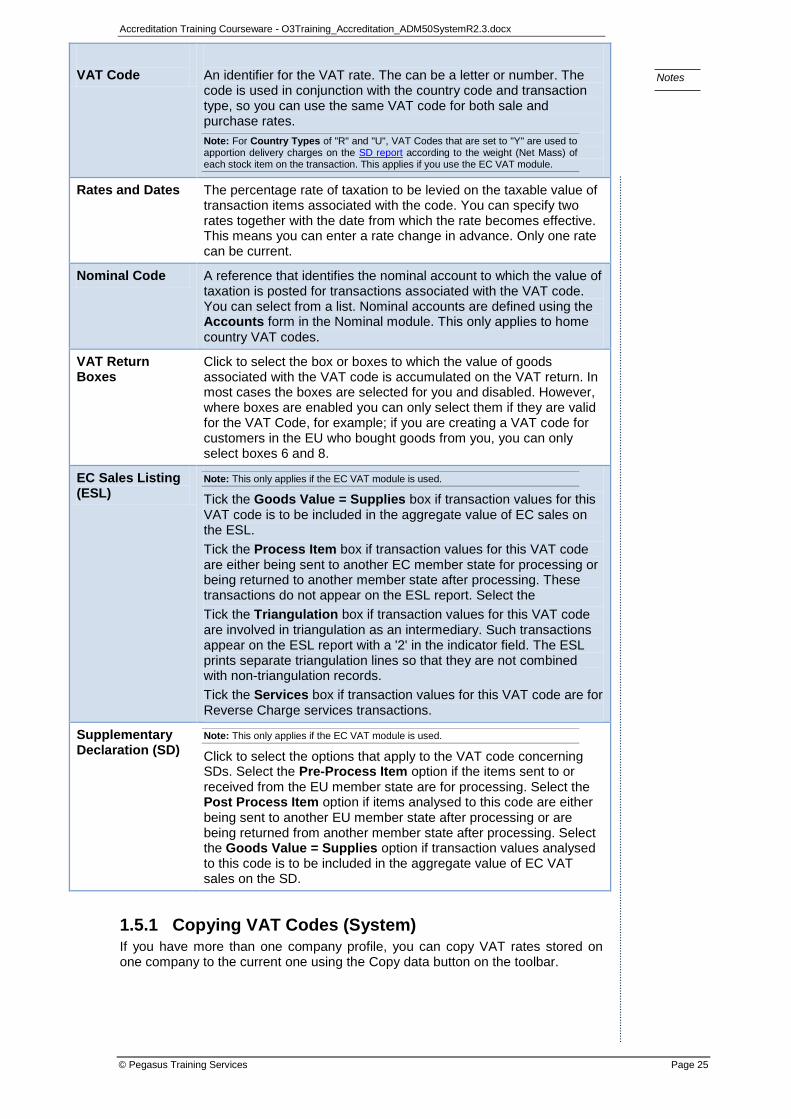
Accreditation Training Courseware - O3Training_Accreditation_ADM50SystemR2.3.docx
© Pegasus Training Services Page 25
Notes
VAT Code
An identifier for the VAT rate. The can be a letter or number. The code is used in conjunction with the country code and transaction type, so you can use the same VAT code for both sale and purchase rates.
Note: For Country Types of "R" and "U", VAT Codes that are set to "Y" are used to apportion delivery charges on the SD report according to the weight (Net Mass) of each stock item on the transaction. This applies if you use the EC VAT module.
Rates and Dates The percentage rate of taxation to be levied on the taxable value of transaction items associated with the code. You can specify two rates together with the date from which the rate becomes effective. This means you can enter a rate change in advance. Only one rate can be current.
Nominal Code A reference that identifies the nominal account to which the value of taxation is posted for transactions associated with the VAT code. You can select from a list. Nominal accounts are defined using the Accounts form in the Nominal module. This only applies to home country VAT codes.
VAT Return Boxes
Click to select the box or boxes to which the value of goods associated with the VAT code is accumulated on the VAT return. In most cases the boxes are selected for you and disabled. However, where boxes are enabled you can only select them if they are valid for the VAT Code, for example; if you are creating a VAT code for customers in the EU who bought goods from you, you can only select boxes 6 and 8.
EC Sales Listing (ESL)
Note: This only applies if the EC VAT module is used.
Tick the Goods Value = Supplies box if transaction values for this VAT code is to be included in the aggregate value of EC sales on the ESL.
Tick the Process Item box if transaction values for this VAT code are either being sent to another EC member state for processing or being returned to another member state after processing. These transactions do not appear on the ESL report. Select the
Tick the Triangulation box if transaction values for this VAT code are involved in triangulation as an intermediary. Such transactions appear on the ESL report with a '2' in the indicator field. The ESL prints separate triangulation lines so that they are not combined with non-triangulation records.
Tick the Services box if transaction values for this VAT code are for Reverse Charge services transactions.
Supplementary Declaration (SD)
Note: This only applies if the EC VAT module is used.
Click to select the options that apply to the VAT code concerning SDs. Select the Pre-Process Item option if the items sent to or received from the EU member state are for processing. Select the Post Process Item option if items analysed to this code are either being sent to another EU member state after processing or are being returned from another member state after processing. Select the Goods Value = Supplies option if transaction values analysed to this code is to be included in the aggregate value of EC VAT sales on the SD.
1.5.1 Copying VAT Codes (System)
If you have more than one company profile, you can copy VAT rates stored on one company to the current one using the Copy data button on the toolbar.
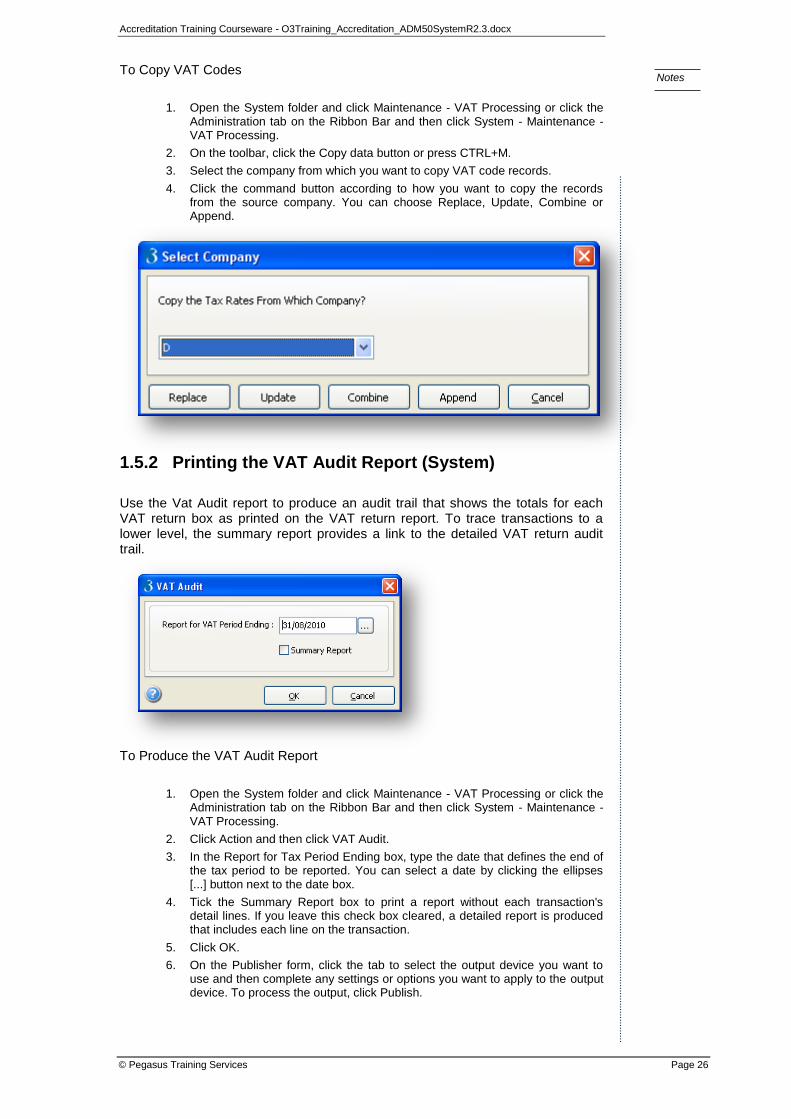
Accreditation Training Courseware - O3Training_Accreditation_ADM50SystemR2.3.docx
© Pegasus Training Services Page 26
Notes
To Copy VAT Codes
1. Open the System folder and click Maintenance - VAT Processing or click the Administration tab on the Ribbon Bar and then click System - Maintenance - VAT Processing.
2. On the toolbar, click the Copy data button or press CTRL+M.
3. Select the company from which you want to copy VAT code records.
4. Click the command button according to how you want to copy the records from the source company. You can choose Replace, Update, Combine or Append.
1.5.2 Printing the VAT Audit Report (System)
Use the Vat Audit report to produce an audit trail that shows the totals for each VAT return box as printed on the VAT return report. To trace transactions to a lower level, the summary report provides a link to the detailed VAT return audit trail.
To Produce the VAT Audit Report
1. Open the System folder and click Maintenance - VAT Processing or click the Administration tab on the Ribbon Bar and then click System - Maintenance - VAT Processing.
2. Click Action and then click VAT Audit.
3. In the Report for Tax Period Ending box, type the date that defines the end of the tax period to be reported. You can select a date by clicking the ellipses [...] button next to the date box.
4. Tick the Summary Report box to print a report without each transaction's detail lines. If you leave this check box cleared, a detailed report is produced that includes each line on the transaction.
5. Click OK.
6. On the Publisher form, click the tab to select the output device you want to use and then complete any settings or options you want to apply to the output device. To process the output, click Publish.
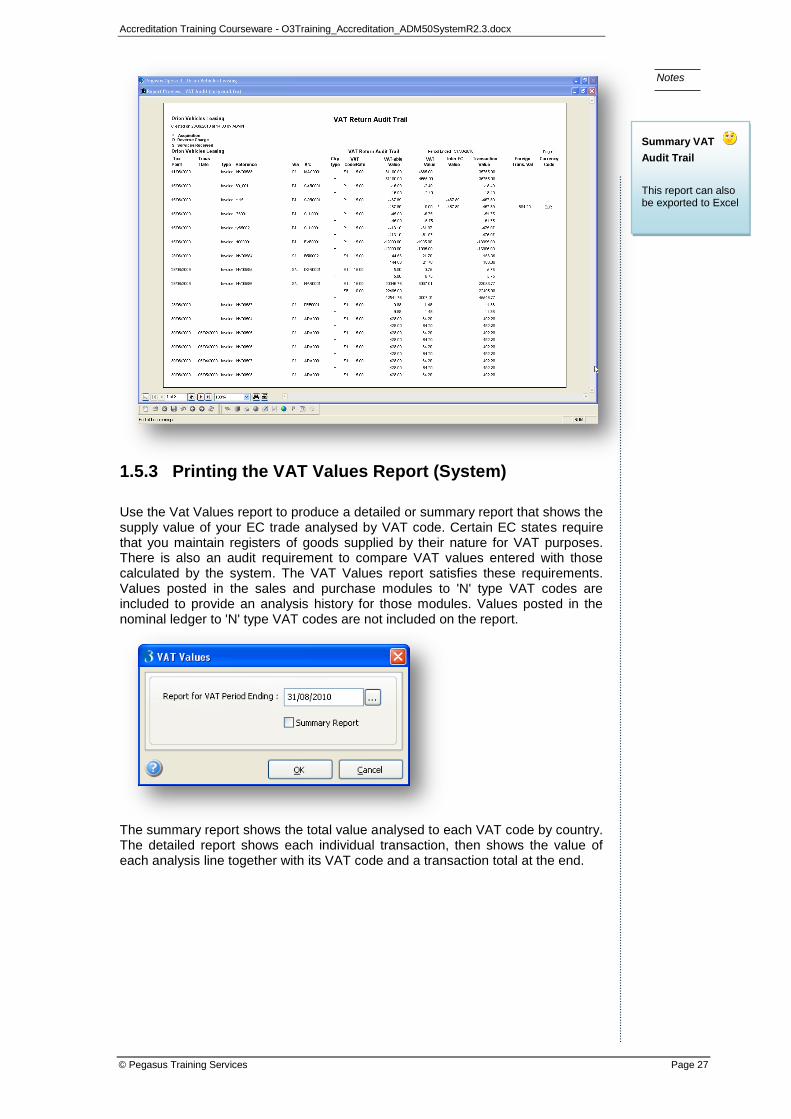
Accreditation Training Courseware - O3Training_Accreditation_ADM50SystemR2.3.docx
© Pegasus Training Services Page 27
Notes
1.5.3 Printing the VAT Values Report (System)
Use the Vat Values report to produce a detailed or summary report that shows the supply value of your EC trade analysed by VAT code. Certain EC states require that you maintain registers of goods supplied by their nature for VAT purposes. There is also an audit requirement to compare VAT values entered with those calculated by the system. The VAT Values report satisfies these requirements. Values posted in the sales and purchase modules to 'N' type VAT codes are included to provide an analysis history for those modules. Values posted in the nominal ledger to 'N' type VAT codes are not included on the report.
The summary report shows the total value analysed to each VAT code by country. The detailed report shows each individual transaction, then shows the value of each analysis line together with its VAT code and a transaction total at the end.
Summary VAT
Audit Trail
This report can also be exported to Excel

Accreditation Training Courseware - O3Training_Accreditation_ADM50SystemR2.3.docx
© Pegasus Training Services Page 28
Notes
To Produce the VAT Values Report
1. Open the System folder and click Maintenance - VAT Processing or click the Administration tab on the Ribbon Bar and then click System - Maintenance - VAT Processing.
2. Click Action and then click VAT Values.
3. In the Report for Tax Period Ending box, type the date that defines the end of the tax period to be reported. You can select a date by clicking the ellipses [...] button next to the date box.
4. Tick the Summary Report box to print a report without each transaction's detail lines. If you leave this check box cleared, a detailed report is produced that includes each line on the transaction.
5. Click OK.
6. On the Publisher form, click the tab to select the output device you want to use and then complete any settings or options you want to apply to the output device. To process the output, click Publish.
1.5.4 Submitting the VAT Return & RCSL (System)
Use the Vat Return menu on the Action menu of the VAT Processing form to produce a report of the information you need to complete your VAT 100 form.
If you need to submit the Reverse Charge Sales List (RCSL) to HMRC as well, you can create a file here to upload to HMRC.

Accreditation Training Courseware - O3Training_Accreditation_ADM50SystemR2.3.docx
© Pegasus Training Services Page 29
Notes
The RCSL is only relevant if the RC Sales List option is ticked on the Company Profiles form in the System module, which reports on trade with EC countries that is subject to the Reverse Charge accounting for goods.
To Produce the VAT Return & RCSL
1. Open the System folder and click Maintenance - VAT Processing or click the Administration tab on the Ribbon Bar and then click System - Maintenance - VAT Processing.
2. Click Action and then click VAT Return.
3. If the RCSL box is ticked so that the Reverse Charge Sales List is printed, and transactions have not been committed to the VAT Return for an earlier period, enter a date in the VAT Period Start Date box for the start of the period. You can select a date by clicking the ellipses [...] button next to the date box. This box is disabled if transactions have been committed to the VAT Return for an earlier period or if the RCSL box is not ticked.
4. In the VAT Period End Date box, enter the date for the end of the VAT period. You can select a date by clicking the ellipses [...] button next to the date box.
5. Tick the Commit VAT & Reverse Charge Data box to commit the VAT transactions to the period. These transactions will not be included on a subsequent return. You must commit both the VAT Return and RCSL at the same time.
6. Leave the Commit VAT & Reverse Charge Data box unticked to print the VAT return and RCSL for the period without committing the transactions to the period. Make sure that the VAT Return box or RCSL is ticked as necessary.
7. Tick the RCSL box if you need to complete the Reverse Charge Sales List. Then tick the Create HMRC Upload File box to create a file to submit to HMRC. More details on the RCSL file.
The RCSL file is created as a CSV file in the folder defined in the Data Path field on the Company Profiles form in the System module. It is called
?_RCSL_Upload.csv (where ? is the company ID) and must be submitted to HMRC via the HMRC web site and the Government Gateway. If you have previously created an upload file for the RCSL you will be prompted that one already exists when you click OK. You are asked whether it should be overridden. Select No if you want to keep the existing file and then move it to
another folder and run the report again.
Important: If you have informed HMRC that you trade in items that must be
accounted for using Reverse Charge accounting for goods, you must submit an RCSL even if you have not traded the items in the period you are creating the report for. For more information, see the Reverse Charge accounting for goods Help topic.
8. Click OK.
9. On the Publisher, click the tab to select the output device you want to use and then complete any settings or options you want to apply to the output device. To process the output, click Publish.
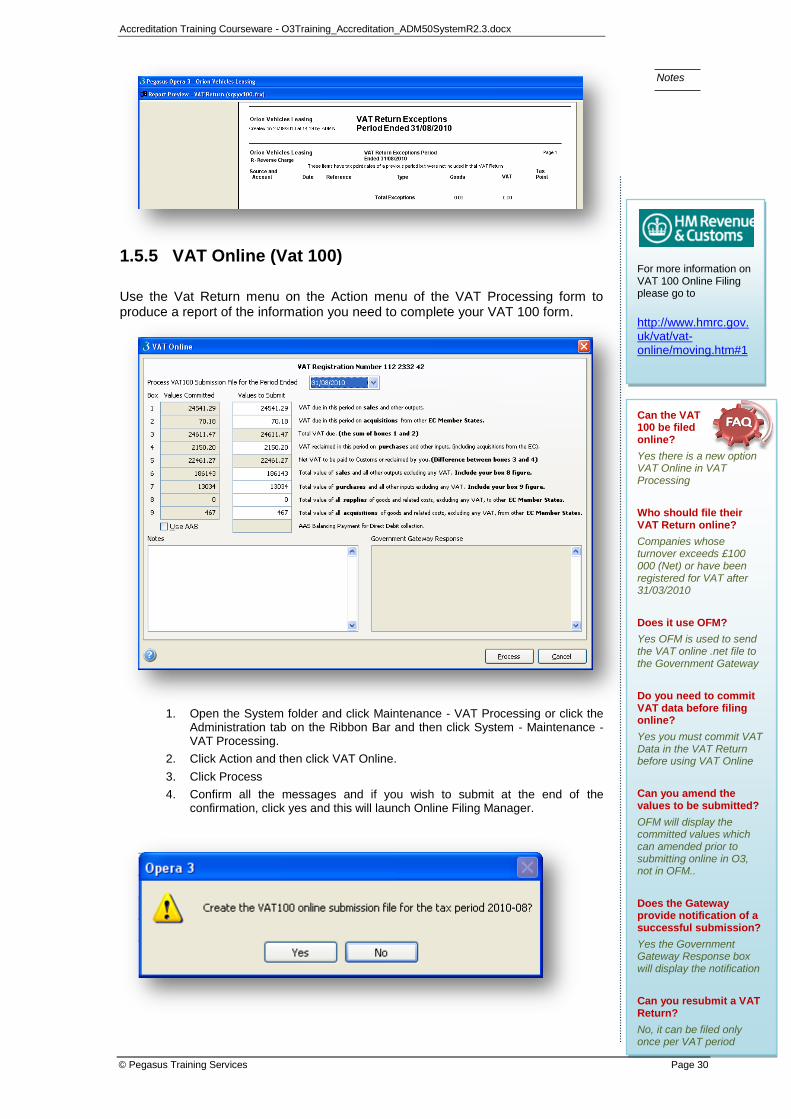
Accreditation Training Courseware - O3Training_Accreditation_ADM50SystemR2.3.docx
© Pegasus Training Services Page 30
Notes
1.5.5 VAT Online (Vat 100)
Use the Vat Return menu on the Action menu of the VAT Processing form to produce a report of the information you need to complete your VAT 100 form.
1. Open the System folder and click Maintenance - VAT Processing or click the
Administration tab on the Ribbon Bar and then click System - Maintenance - VAT Processing.
2. Click Action and then click VAT Online.
3. Click Process
4. Confirm all the messages and if you wish to submit at the end of the confirmation, click yes and this will launch Online Filing Manager.
Can the VAT 100 be filed online?
Yes there is a new option VAT Online in VAT Processing
Who should file their VAT Return online?
Companies whose turnover exceeds £100 000 (Net) or have been registered for VAT after 31/03/2010
Does it use OFM?
Yes OFM is used to send the VAT online .net file to the Government Gateway
Do you need to commit VAT data before filing online?
Yes you must commit VAT Data in the VAT Return before using VAT Online
Can you amend the values to be submitted?
OFM will display the committed values which can amended prior to submitting online in O3, not in OFM..
Does the Gateway provide notification of a successful submission?
Yes the Government Gateway Response box will display the notification
Can you resubmit a VAT Return?
No, it can be filed only once per VAT period
For more information on VAT 100 Online Filing please go to
http://www.hmrc.gov.uk/vat/vat-online/moving.htm#1

Accreditation Training Courseware - O3Training_Accreditation_ADM50SystemR2.3.docx
© Pegasus Training Services Page 31
Notes
1.5.5.1 Online Filing Manager – VAT Return
Mandatory VAT100 Return Filing
HMRC is phasing out paper VAT returns. Some companies have to submit their VAT returns online and pay any VAT due electronically. This applies if either of the following applies:
A company has an annual turnover of £100,000 or more (exclusive of VAT)
A company has registered or should have registered for VAT on or after 1 April 2010 (regardless of turnover).
Opera 3 works with Online Filing Manager so that you can file your VAT return online using the Government Gateway. The Government Gateway is an Internet portal that provides UK citizens and businesses with a convenient way to link to the Online Services provided by a range of Government departments.
Transaction values that are linked to VAT codes that are marked to be included on the VAT 100 return are also included on the VAT Online form which is accessed from the VAT Processing form in the System module. The form displays the values for each box on the VAT 100 return, calculated by Opera 3 from the sales and supply transactions posted in the application. You can amend the calculated values if required.
What is the name of the file created by the VAT Online routine?
?_vat100_nnnnnnnnn_yyyypp.net (where ?=company code, n=VAT registration number, yp=Year and Period being submitted)
Where is this file stored?
In the Data folder for the company
Which table holds the VAT Online data?
The zvonline table holds the values from VAT Online processing
Once a file is created - can you create it again?
Only if a new entry (committed period) has not been created - there is a red warning to indicate a file exists. Once you commit another VAT return then you can only create files for the one you have just committed
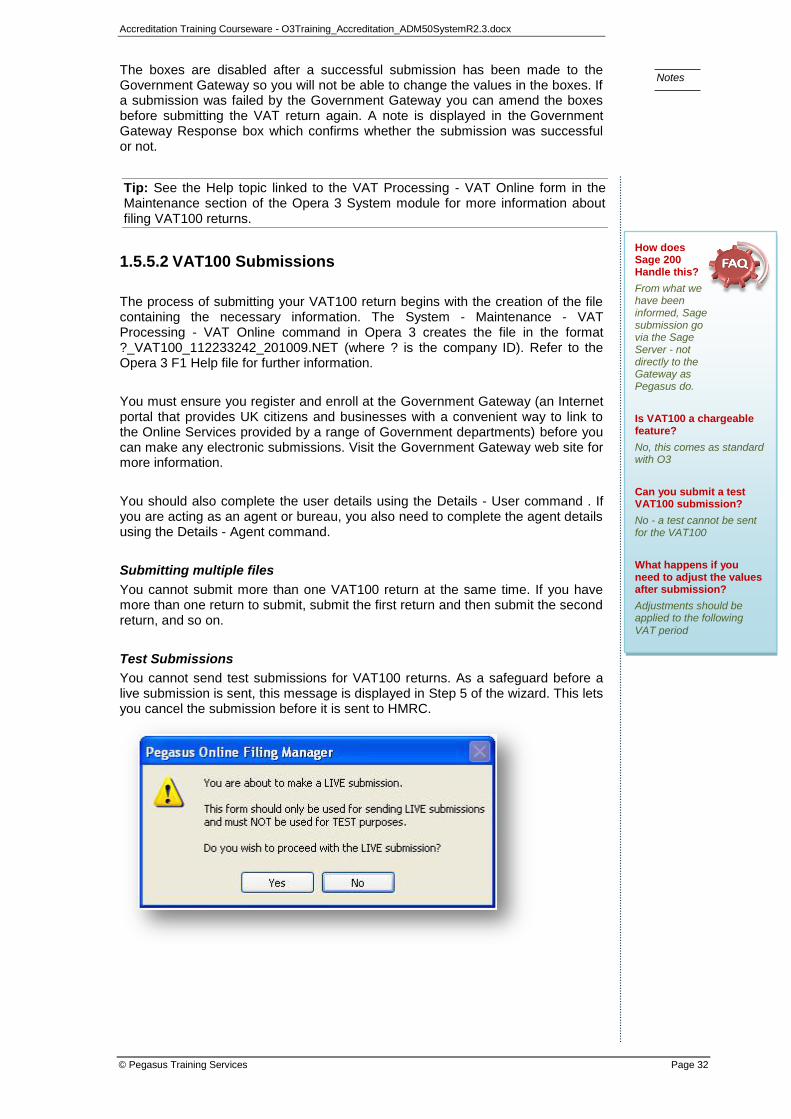
Accreditation Training Courseware - O3Training_Accreditation_ADM50SystemR2.3.docx
© Pegasus Training Services Page 32
Notes
The boxes are disabled after a successful submission has been made to the Government Gateway so you will not be able to change the values in the boxes. If a submission was failed by the Government Gateway you can amend the boxes before submitting the VAT return again. A note is displayed in the Government Gateway Response box which confirms whether the submission was successful or not.
Tip: See the Help topic linked to the VAT Processing - VAT Online form in the Maintenance section of the Opera 3 System module for more information about filing VAT100 returns.
1.5.5.2 VAT100 Submissions
The process of submitting your VAT100 return begins with the creation of the file containing the necessary information. The System - Maintenance - VAT Processing - VAT Online command in Opera 3 creates the file in the format ?_VAT100_112233242_201009.NET (where ? is the company ID). Refer to the Opera 3 F1 Help file for further information.
You must ensure you register and enroll at the Government Gateway (an Internet portal that provides UK citizens and businesses with a convenient way to link to the Online Services provided by a range of Government departments) before you can make any electronic submissions. Visit the Government Gateway web site for more information.
You should also complete the user details using the Details - User command . If you are acting as an agent or bureau, you also need to complete the agent details using the Details - Agent command.
Submitting multiple files
You cannot submit more than one VAT100 return at the same time. If you have more than one return to submit, submit the first return and then submit the second return, and so on.
Test Submissions
You cannot send test submissions for VAT100 returns. As a safeguard before a live submission is sent, this message is displayed in Step 5 of the wizard. This lets you cancel the submission before it is sent to HMRC.
How does Sage 200 Handle this?
From what we have been informed, Sage submission go via the Sage Server - not directly to the Gateway as Pegasus do.
Is VAT100 a chargeable feature?
No, this comes as standard with O3
Can you submit a test VAT100 submission?
No - a test cannot be sent for the VAT100
What happens if you need to adjust the values after submission?
Adjustments should be applied to the following
VAT period
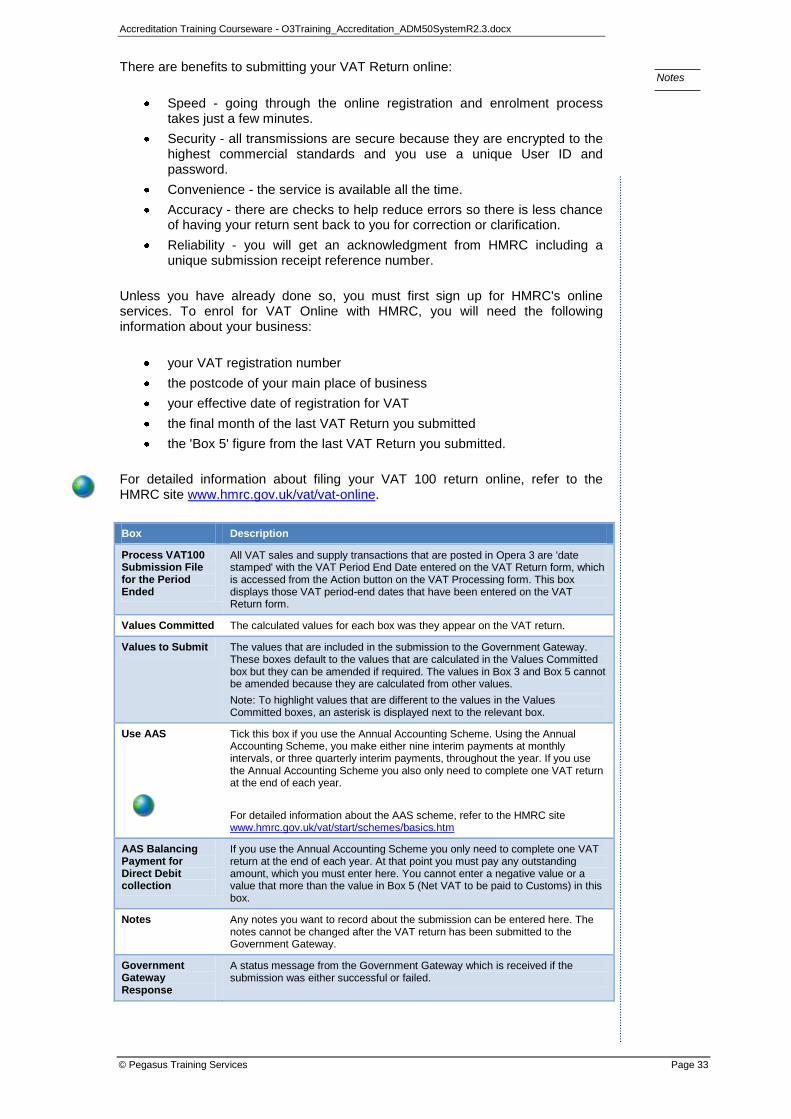
Accreditation Training Courseware - O3Training_Accreditation_ADM50SystemR2.3.docx
© Pegasus Training Services Page 33
Notes
There are benefits to submitting your VAT Return online:
Speed - going through the online registration and enrolment process takes just a few minutes.
Security - all transmissions are secure because they are encrypted to the highest commercial standards and you use a unique User ID and password.
Convenience - the service is available all the time.
Accuracy - there are checks to help reduce errors so there is less chance of having your return sent back to you for correction or clarification.
Reliability - you will get an acknowledgment from HMRC including a unique submission receipt reference number.
Unless you have already done so, you must first sign up for HMRC's online services. To enrol for VAT Online with HMRC, you will need the following information about your business:
your VAT registration number
the postcode of your main place of business
your effective date of registration for VAT
the final month of the last VAT Return you submitted
the 'Box 5' figure from the last VAT Return you submitted.
For detailed information about filing your VAT 100 return online, refer to the HMRC site www.hmrc.gov.uk/vat/vat-online.
Box Description
Process VAT100 Submission File for the Period Ended
All VAT sales and supply transactions that are posted in Opera 3 are 'date stamped' with the VAT Period End Date entered on the VAT Return form, which is accessed from the Action button on the VAT Processing form. This box displays those VAT period-end dates that have been entered on the VAT Return form.
Values Committed The calculated values for each box was they appear on the VAT return.
Values to Submit The values that are included in the submission to the Government Gateway. These boxes default to the values that are calculated in the Values Committed box but they can be amended if required. The values in Box 3 and Box 5 cannot be amended because they are calculated from other values.
Note: To highlight values that are different to the values in the Values Committed boxes, an asterisk is displayed next to the relevant box.
Use AAS Tick this box if you use the Annual Accounting Scheme. Using the Annual Accounting Scheme, you make either nine interim payments at monthly intervals, or three quarterly interim payments, throughout the year. If you use the Annual Accounting Scheme you also only need to complete one VAT return at the end of each year.
For detailed information about the AAS scheme, refer to the HMRC site www.hmrc.gov.uk/vat/start/schemes/basics.htm
AAS Balancing Payment for Direct Debit collection
If you use the Annual Accounting Scheme you only need to complete one VAT return at the end of each year. At that point you must pay any outstanding amount, which you must enter here. You cannot enter a negative value or a value that more than the value in Box 5 (Net VAT to be paid to Customs) in this box.
Notes Any notes you want to record about the submission can be entered here. The notes cannot be changed after the VAT return has been submitted to the Government Gateway.
Government Gateway Response
A status message from the Government Gateway which is received if the submission was either successful or failed.
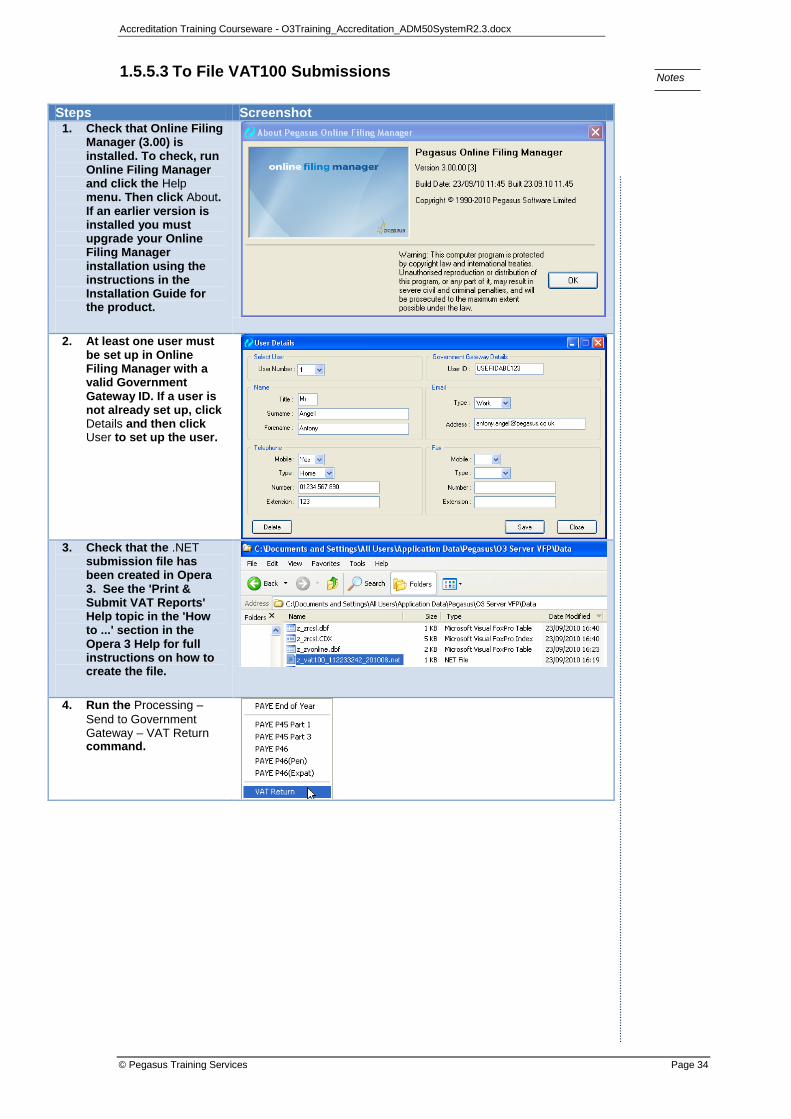
Accreditation Training Courseware - O3Training_Accreditation_ADM50SystemR2.3.docx
© Pegasus Training Services Page 34
Notes
1.5.5.3 To File VAT100 Submissions
Steps Screenshot 1. Check that Online Filing
Manager (3.00) is installed. To check, run Online Filing Manager and click the Help menu. Then click About. If an earlier version is installed you must upgrade your Online Filing Manager installation using the instructions in the Installation Guide for the product.
2. At least one user must be set up in Online Filing Manager with a valid Government Gateway ID. If a user is not already set up, click Details and then click User to set up the user.
3. Check that the .NET
submission file has been created in Opera 3. See the 'Print & Submit VAT Reports' Help topic in the 'How to ...' section in the Opera 3 Help for full instructions on how to create the file.
4. Run the Processing –
Send to Government Gateway – VAT Return command.

Accreditation Training Courseware - O3Training_Accreditation_ADM50SystemR2.3.docx
© Pegasus Training Services Page 35
Notes
5. In Step 1, enter or browse to the location where the .NET submission file that was saved in Opera 3. The submission file is created in the company's data folder, the default location is the Server XXX Dynamic share (where XXX is either VFP or SQL) on the Opera 3 server, normally '\<ServerName>\O3 Server XXX\Data'.
Step 1
6. In Step 2, select the company for which you want to submit the VAT return. You can select only one company at a time.
7. In Step 3, review the
details of the submission.
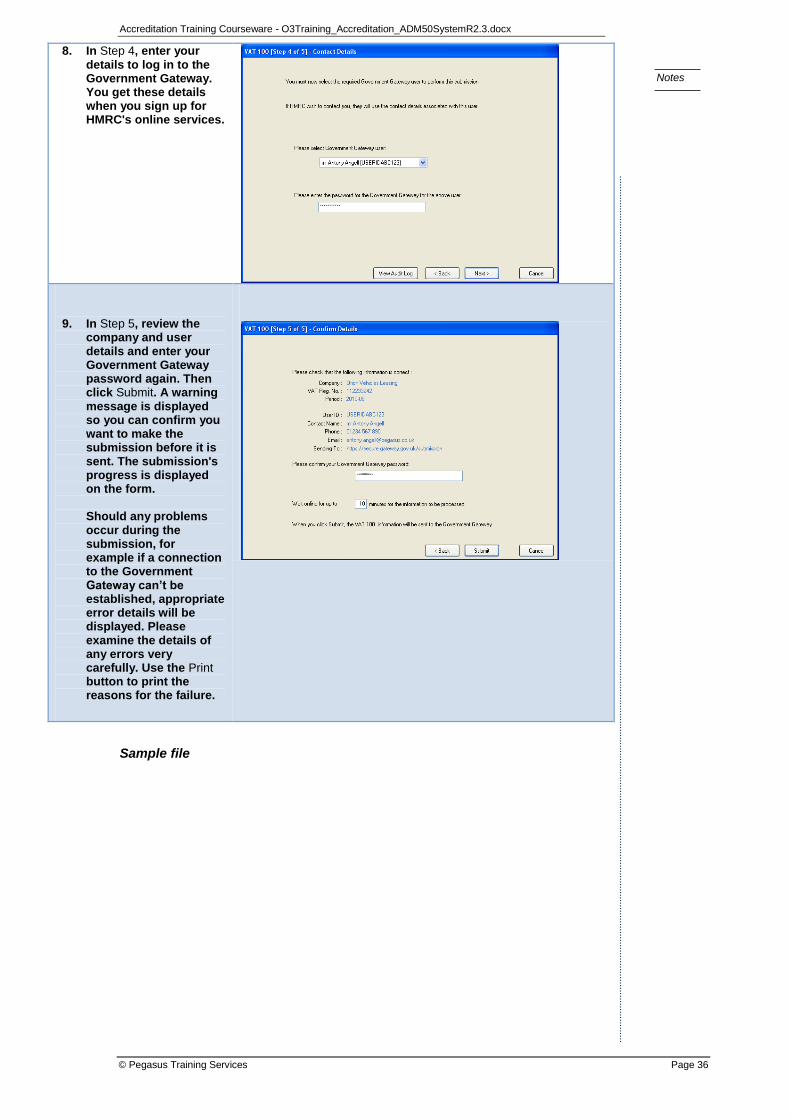
Accreditation Training Courseware - O3Training_Accreditation_ADM50SystemR2.3.docx
© Pegasus Training Services Page 36
Notes
8. In Step 4, enter your details to log in to the Government Gateway. You get these details when you sign up for HMRC's online services.
9. In Step 5, review the company and user details and enter your Government Gateway password again. Then click Submit. A warning message is displayed so you can confirm you want to make the submission before it is sent. The submission's progress is displayed on the form. Should any problems occur during the submission, for example if a connection to the Government Gateway can’t be established, appropriate error details will be displayed. Please examine the details of any errors very carefully. Use the Print button to print the reasons for the failure.
Sample file
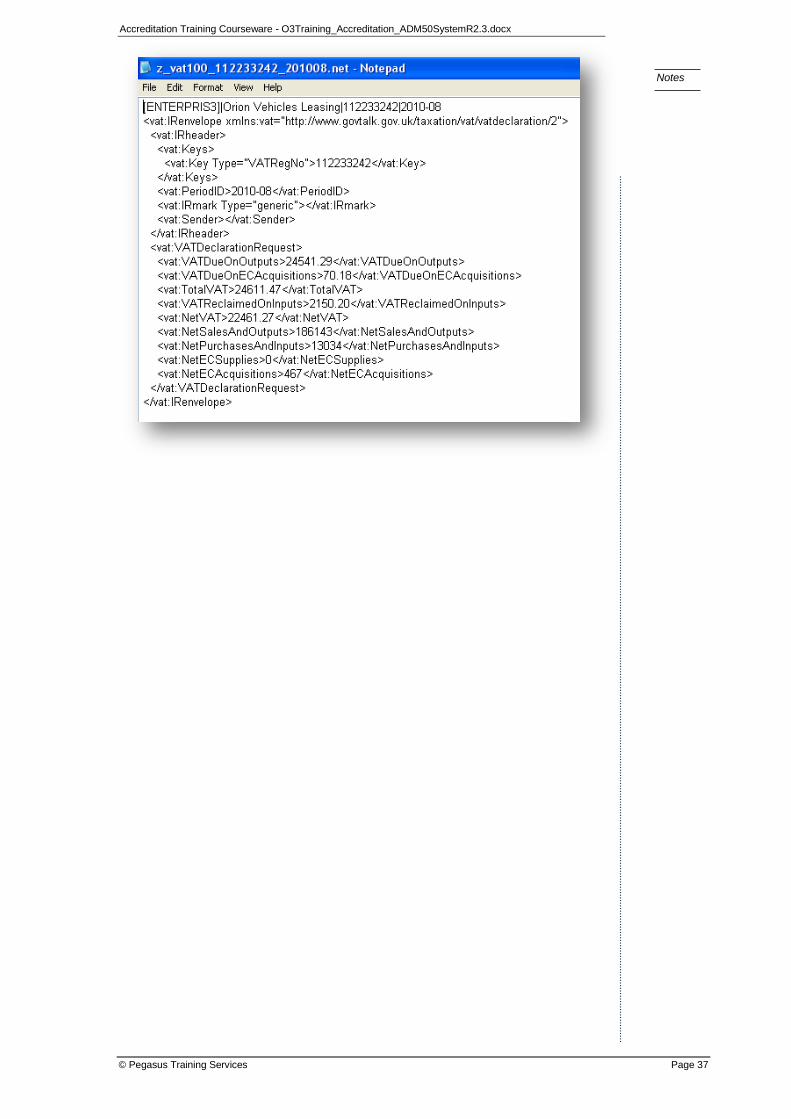
Accreditation Training Courseware - O3Training_Accreditation_ADM50SystemR2.3.docx
© Pegasus Training Services Page 37
Notes
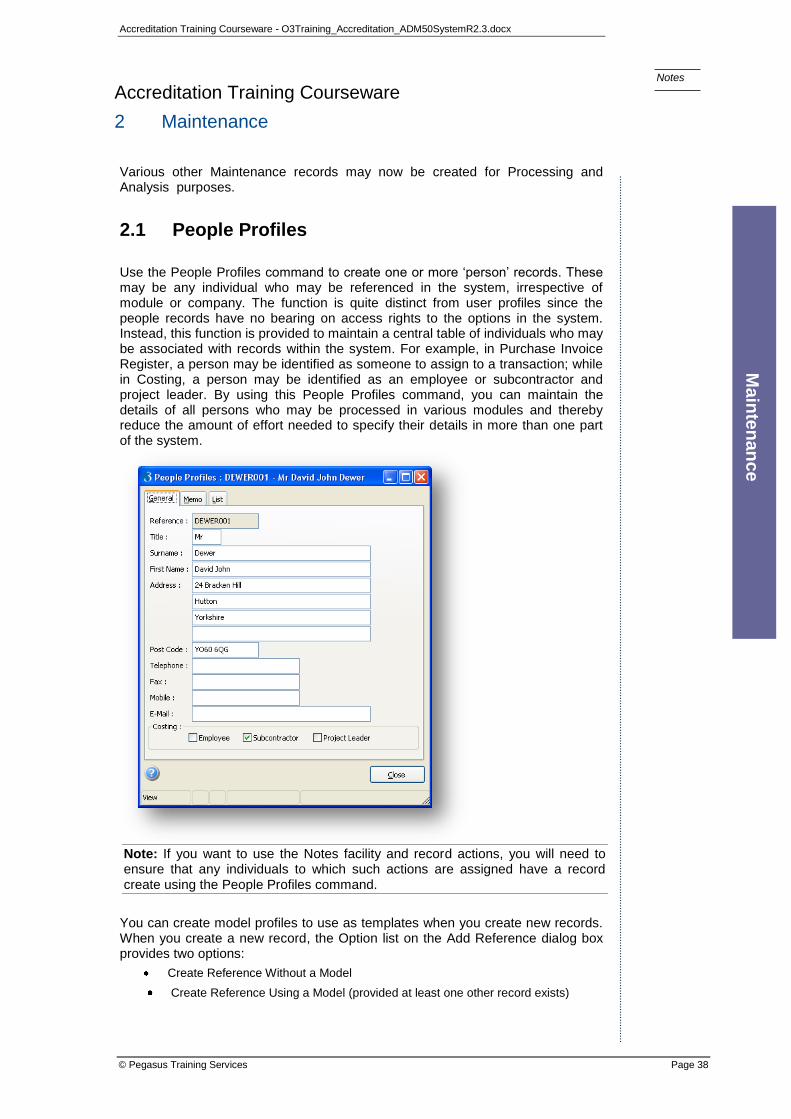
Accreditation Training Courseware - O3Training_Accreditation_ADM50SystemR2.3.docx
© Pegasus Training Services Page 38
Notes
Accreditation Training Courseware
2 Maintenance
Various other Maintenance records may now be created for Processing and Analysis purposes.
2.1 People Profiles
Use the People Profiles command to create one or more ‗person‘ records. These may be any individual who may be referenced in the system, irrespective of module or company. The function is quite distinct from user profiles since the people records have no bearing on access rights to the options in the system. Instead, this function is provided to maintain a central table of individuals who may be associated with records within the system. For example, in Purchase Invoice Register, a person may be identified as someone to assign to a transaction; while in Costing, a person may be identified as an employee or subcontractor and project leader. By using this People Profiles command, you can maintain the details of all persons who may be processed in various modules and thereby reduce the amount of effort needed to specify their details in more than one part of the system.
Note: If you want to use the Notes facility and record actions, you will need to ensure that any individuals to which such actions are assigned have a record create using the People Profiles command.
You can create model profiles to use as templates when you create new records. When you create a new record, the Option list on the Add Reference dialog box provides two options:
Create Reference Without a Model
Create Reference Using a Model (provided at least one other record exists)
Ma
inte
nan
ce

Accreditation Training Courseware - O3Training_Accreditation_ADM50SystemR2.3.docx
© Pegasus Training Services Page 39
Notes
Provided you have created at least one profile record, you can use the Create Reference Using a Model option to determine default entries for most of the boxes on the People Profiles form. These defaults can be overridden to customize the record before saving.
To maintain people profiles
1. Open the System folder and click Maintenance or click the Administration tab on the Ribbon Bar and then click Maintenance.
2. Click People Profiles.
3. To create a new record, click the icon on the toolbar or press CTRL+N.
The Add Reference dialog box appears.
4. In Reference type a unique code to identify the person.
5. In the Options list, click to select whether you want to create a record with or without a model. If you choose to create a record using a model, click to select the model in the Model Reference list.
6. In the boxes provided, enter the user profile details.
7. To save the record, click the icon on the toolbar or press CTRL+S.
Notes: If you have the Costing module, use the options under Costing to determine whether the person is an employee or subcontractor. In either case, you can also determine whether the person is a project leader for a job.
To record notes for the person record, use the Memo tab.
2.2 Report Layout
Some reporting commands provide more than one layout option to choose from, depending on the type of stationery you intend to use. For example, some documents are available in continuous or laser format, and so on. Where you have a choice, this is provided in the Report Layout list box on the Publisher form which appears when you have completed and accepted any criteria for the document in question. The purpose of the Report Layout command on the Maintenance submenu of the System module is to provide a means to control these list box options. Each layout has a report name and is associated with a file that contains the design. If you have an alternative design to the ones supplied with the software, you can identify the file to be used. Other settings control which of the designs associated with a particular document is the default. You can define a default printer selection applicable to a given design and check the alignment of the stationery. You can control the paper length and width in tenths of a millimetre. You also specify the left-hand position of the document using the Left margin setting and the Align command on the Action menu to test the alignment on the printer.
Memo Field
The memo field for generic reports will contain all the code for the ―Impact Printer ― lines used on the reports.
OII 2 O3 Reports There are a few reports which have had structural changes, these include;
All Nominal Transfer Reports
Audit Trail
Snapshot Report
These are most likely required to be redesigned if previously modified.
About 75-85 % of reports have had slight modifications due to the advanced Previewer enhancements. Copying over original designs may cause the preview to slightly mis-align but should still fit to stationary.
All designs replaced would be subject to the users testing and development.
Accreditation Training Courseware - O3Training_Accreditation_ADM50SystemR2.3.docx
© Pegasus Training Services Page 40
Notes
All laser stationery is defined as A4 size paper, while continuous-form stationery is dependent on the document. By changing the value in the No. of Copies box, you can determine the default number of copies of the report that should be printed. This value is automatically transferred to the Windows Print Manager whenever the report is produced. Unless otherwise changed here, the default number of copies for all reports is 1.
2.2.1 Chained Reports
For some reports, you might want to print different information on different copies. For example, while printing an invoice, you might also want to produce a delivery note that excludes the invoice values. This can be achieved by 'chaining' one report to run straight after another. To do this, you identify the report to follow in the Chained Report list box.
The list only shows documents that have the same report name (for example, sqinin) but different file names. The report you select in the Chained Report list box can also be chained to another report; so you can chain multiple reports. However, the application will make validation checks to ensure you do not inadvertently chain reports that would cause a loop back to another report in the same chain (for example, the application will prevent a situation in which report A chains report B, which chains report C, which chains to report A and therefore loops back on itself).
When you select the output destination for chained reports using the Publisher form, selecting the Screen option will direct all chained reports to the screen. If you select the File or E-Mail options, all chained reports will be directed to the same spooler or PDF (Portable Document Format) file. If you select the Printer option, all chained reports are sent to the same printer unless the report layout definition for one or more of the chained reports identifies a different printer, in which case, the chained reports will be directed to different printers accordingly. The same condition applies to number of copies specified on the report layout record.
NB: XLS reports are not tested in a Chained Reports environment (however are unlikely to be chained).
2.2.2 Defining the Paper Source
If a report layout definition identifies a printer in the Printer list box, the Source list box becomes available. This enables you to determine the paper source for multi-tray printers. This might be helpful where you have a multi-tray printer holding different stationery for different reports. Where a source has been identified in the report layout record, you can override this on the Publisher form when you subsequently print reports in the system.
2.2.3 Paper Sizes and Continuous Form Stationery
It is important that paper sizes are correctly specified when printing continuous stationery reports. On the Report Layouts form, the paper length and paper width for a particular layout is specified in 10ths of a millimetre. For standard layouts supplied with the system, these are predefined. As well as defining paper sizes on the Report Layouts form, the paper size for the printer must be compatible. This means ensuring that any printers identified in the Printer list box that will be used to print continuous-form documents, have their paper sizes set to the layout‘s dimensions.
Accreditation Training Courseware - O3Training_Accreditation_ADM50SystemR2.3.docx
© Pegasus Training Services Page 41
Notes
2.2.4 Company-specific Report Layouts
You can add company-specific reports to the Report Layout form. Company-specific reports are identified by the inclusion of the company identifier at the beginning of the Report Code (for example a_inin for an invoice layout for company A). Where no company-specific report exists, the application uses the default. If the company-specific report (for example, a_inin.frx) exists only in the Reports folder and there is no entry in the Report Layout table, this report will always be used. Entering the company-specific report in the Report Layout table will enable you to have a generic company-specific report as the details can be entered in the memo. It will also enable you to have multiple designs for the same company-specific report by simply entering the required document references against the same Report Code.
Note: If you have created additional systems using the Additional Systems command in the System module, you can copy company-specific reports from the main system to the other system(s). You will need to copy the relevant report files to the Reports subfolder of the Systemx folder (where x is the system number).
2.2.5 To change report layout settings
1. Open the System folder and click Maintenance or click the Administration tab on the Ribbon Bar and then click Maintenance.
2. Click Report Layout.
3. Locate the report for which you want to change settings. In the boxes provided, enter the details required. You can change the description and browse to locate the file that contains the layout to be used.
4. To specify a particular file as the default, select the Default option. In the case of layouts, you can also identify the default design used for e-mailed documents by selecting the E-Mail Default option. This only applies to records set up to use e-mail profiles.
5. To set the default number of copies to be printed to more than 1, change the value in the No. of Copies box accordingly.
6. To check the alignment of the stationery, click Action and then click Align. You can adjust the left margin position using the Left margin box.
7. Use the Printer list to select a default printer for the report.
8. To save the record, click the icon on the toolbar or press CTRL+S.
Notes: For continuous form stationery, you can change the default length and width of the report design using the Paper length and Paper width boxes. These dimensions are in tenths of a millimetre. These dimensions must be compatible with the paper settings associated with the printer's properties.
For certain special reports where you want one or more reports printed in succession after the current one, identify the next report to be printed in the Chained Report list box.
If you select a printer in the Printer list box, you can use the Source list box to identify the paper source if you are using a multi-tray printer.

Accreditation Training Courseware - O3Training_Accreditation_ADM50SystemR2.3.docx
© Pegasus Training Services Page 42
Notes
2.2.6 Example setting up Company/Customer specific chained reports
Company specific design chained reports......
In Opera 3 - Reports folder - copy SQINOR (both .frx & .frt) X 2 each and rename as follows:
Z_INOR.frx
Z_INOR.frt
Z_INOR2.frx
Z_INOR2.frt
These will be the default standard designs for company Z.
Open Z_INOR.frx and key in `Default/Standard design` underneath `Order` to identify this when it prints - Save changes.
Open Z_INOR2.frx and key in `Default/Standard design - copy 2` underneath `Order` to identify this when it prints - Save changes.
In System - Maintenance - Report Layout - Create 2 new reports as follows:
New Report 1...
Report = Z_INOR
Description = Standard Design
Document = Z_INOR.frx
Default = ticked
Save.
New Report 2...
Report = Z_INOR
Description = Standard Design - copy 2
Document = Z_INOR2.frx
Save.
Go into Report Layout for New Report 1 and in Chained Report - select New Report 2 - Save.
Go into SOP - Processing - Orders - ADA0001 - Raise new Order - this prints standard design and standard design copy 2 correctly.
Customer Specific design chained reports......
In Opera 3 - Reports folder - copy SQINOR (both .frx & .frt) X 2 each and rename as follows:
Z_INORCC.frx
Z_INORCC.frt
Z_INOR2CC.frx
Z_INOR2CC.frt
These will be the customer specific designs for customers using document design = CC.
Open Z_INORCC.frx and key in `Customer specific design` underneath `Order` to identify this when it prints - Save changes.

Accreditation Training Courseware - O3Training_Accreditation_ADM50SystemR2.3.docx
© Pegasus Training Services Page 43
Notes
Open Z_INOR2CC.frx and key in `Customer specific design - copy 2` underneath `Order` to identify this when it prints - Save changes.
In System - Maintenance - Report Layout - create 2 new reports as follows:
New Report 1...
Report = Z_INORCC
Description = Customer Specific Design
Document = Z_INORCC.frx
Save.
New Report 2...
Report = Z_INORCC
Description = Customer Specific Design - Copy 2
Document = Z_INOR2CC.frx
Save.
Go into New Report 1 and in Chained Report - select New Report 2 - Save.
In Sales - Processing - AHL0001 - Action - Options - Document Design = enter CC in this field - Save.
Go itno SOP - Processing - Orders - AHL0001 - Raise new Order - this is printing Customer Specific design and customer specific design copy 2 correctly.
2.3 E-mail Profiles
Use the E-Mail Profiles command to amend the default message content for documents sent by e-mail to customers in the Sales and SOP modules, or remittance advices and purchase orders sent by email to suppliers. E-mail profiles are only used where customer or supplier accounts are set up to use them. You can email any document or report to a customer or supplier anyway using the Email tab on the Publisher form, but where accounts are not set up to use e-mail profiles, you have to complete the message details manually.

Accreditation Training Courseware - O3Training_Accreditation_ADM50SystemR2.3.docx
© Pegasus Training Services Page 44
Notes
The benefit of using email profiles is to predefine the message content and to provide a means of automatically selecting the e-mail output destination for qualifying customers when statements, sales quotations, sales proformas, order acknowledgements, delivery notes, and invoices are produced, or suppliers remittance advices or purchase orders are produced. You cannot amend the profiles' name or description, or add or remove any new profiles but you can change the text and variables that determine the message content. Each email profile has a predetermined list of variables you can use to create the message content.
2.3.1 Amending Profiles
You cannot add or remove the profiles but you can change the text and variables that determine the message content to which the PDF (Portable Document Format) document is attached. The parts of the message you can change on the E-Mail Profiles form include the email address, the message title, the message and the attachment name. For each part, you can type your own text and add field variables to be replaced at runtime. The fields variables available depend on the profile you are amending (they are different for order acknowledgements, sales invoices, statements and so on). Field variables are selected from a list under Field Selector and are placed at the cursor position within the element box, represented by text in curly brackets. For example, in the Message box for the home currency statement profile, the following default entry exists:
Please find attached statement from {CompanyName} as at {SystemDate}.
In this example, {CompanyName} represents the field variable for your company name as it appears on the Company Profiles form. {SystemDate} represents the current processing date (the one you specify using the Date & Company command which itself defaults to your computer's system date.
You can add a variable in the element box by double-clicking the field under Field Selector.
2.3.2 Duplicate Attachment Names
The Allow Duplicates option determines whether duplicate attachment file names are allowed when the email is sent. If this option is not ticked and a file exists with the same name as the attachment name, the file will be overwritten with the attachment. If the Allow Duplicates option is ticked and a file exists with the same name as the attachment name, the attachment file name will be given the suffix 001 (for example, <filename>001.PDF). If a file exists with this name, the suffix is changed to 002 and so on, until the name is unique.
2.3.3 Company and System Field Variables
These field variables are available to include on all Email templates. There are also template-specific field variables that are detailed for each email template.
Group Variable
Company Id
Name
Address
Postcode
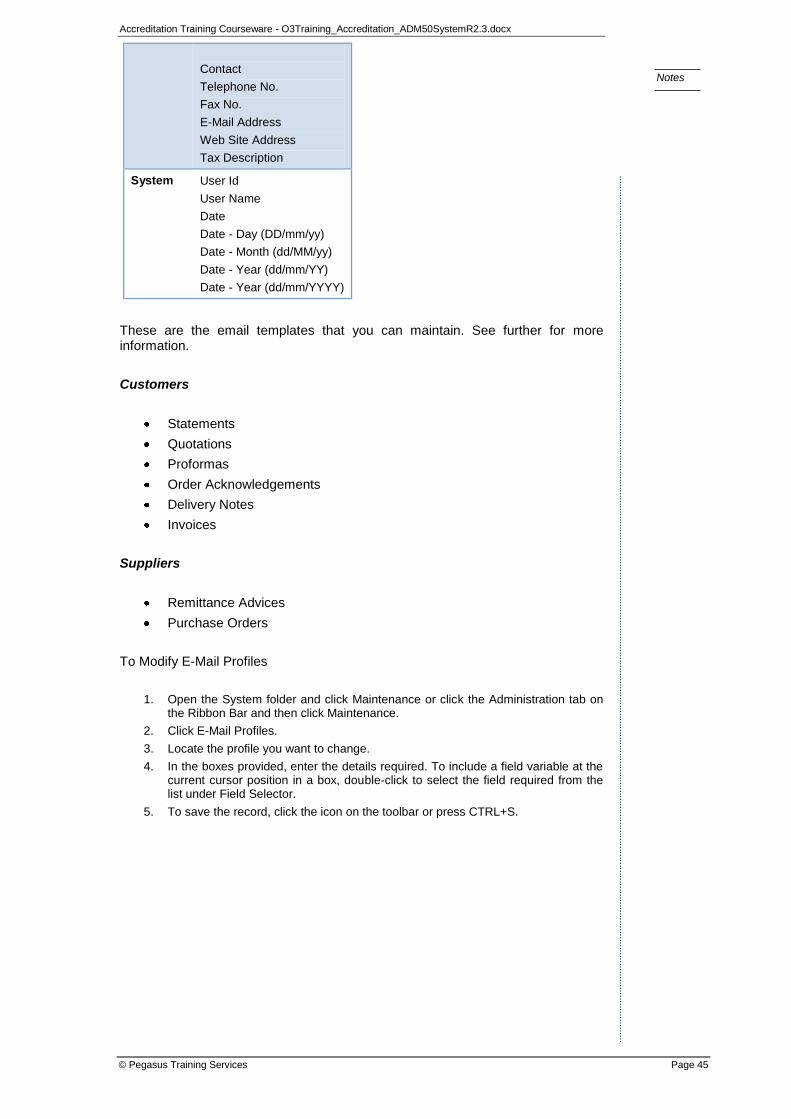
Accreditation Training Courseware - O3Training_Accreditation_ADM50SystemR2.3.docx
© Pegasus Training Services Page 45
Notes
Contact
Telephone No.
Fax No.
E-Mail Address
Web Site Address
Tax Description
System User Id
User Name
Date
Date - Day (DD/mm/yy)
Date - Month (dd/MM/yy)
Date - Year (dd/mm/YY)
Date - Year (dd/mm/YYYY)
These are the email templates that you can maintain. See further for more information.
Customers
Statements
Quotations
Proformas
Order Acknowledgements
Delivery Notes
Invoices
Suppliers
Remittance Advices
Purchase Orders
To Modify E-Mail Profiles
1. Open the System folder and click Maintenance or click the Administration tab on the Ribbon Bar and then click Maintenance.
2. Click E-Mail Profiles.
3. Locate the profile you want to change.
4. In the boxes provided, enter the details required. To include a field variable at the current cursor position in a box, double-click to select the field required from the list under Field Selector.
5. To save the record, click the icon on the toolbar or press CTRL+S.

Accreditation Training Courseware - O3Training_Accreditation_ADM50SystemR2.3.docx
© Pegasus Training Services Page 46
Notes
2.3.3.1 Customers
Statements
For a customer to receive emailed statements using an e-mail profile, the Statements box on the Sales - Processing - Terms form must be ticked and the E-Mail Address box below the A/C Contact box on the Customer form must contain an e-mail address. The default layout for the statement is the sqslstat or, if foreign currency statements are used, the sqslstaf report with the E-Mail Default option ticked in the System - Report Layout command.
Additional Variables for Statements
Group Variable
Sales Account Reference
Name
Address Line 1
Address Line 2
Address Line 3
Address Line 4
Postcode
Telephone No.
Fax No.
E-Mail Address
Web Site Address
Contact
Order Contact
Order E-Mail Address
Turnover
Last Invoice Date
Last Receipt Date
Current Balance
Order Balance
Quotations
For a customer to receive emailed quotations using an e-mail profile, the Quotation box on the Sales - Processing - Terms form must be ticked and the E-Mail Address box below the Order Contact box on the Customer form must contain an e-mail address. The default layout for the quotation is the sqinqu report with the E-Mail Default option ticked in the System - Report Layout command..
Additional Variables for Quotations
Group Variable
Quotation Document
Quotation No.
Date
Document No.
Address Name
Address Line 1
Address Line 2
Address Line 3
Address Line 4

Accreditation Training Courseware - O3Training_Accreditation_ADM50SystemR2.3.docx
© Pegasus Training Services Page 47
Notes
Quotation Document
Address Postcode
Customer Reference
Delivery Address Line 1
Delivery Address Line 2
Delivery Address Line 3
Delivery Address Line 4
Delivery Address Line 5
Delivery Address Postcode
Narrative Line 1
Narrative Line 2
Sales Account Reference
Name
Address Line 1
Address Line 2
Address Line 3
Address Line 4
Postcode
Telephone No.
Fax No.
E-Mail Address
Web Site Address
Contact
Order Contact
Order E-Mail Address
Turnover
Last Invoice Date
Last Receipt Date
Current Balance
Order Balance
Proformas
For a customer to receive emailed proformas using an e-mail profile, the Proforma box on the Sales - Processing - Terms form must be ticked and the E-Mail Address box below the A/C Contact box on the Customer form must contain an e-mail address. The default layout for the proforma is the sqinpr report with the E-Mail Default option ticked in the System - Report Layout command..
Additional Variables for Proformas
Group Variable
Proforma Document
Proforma No.
Date
Document No.
Address Name
Address Line 1
Address Line 2
Address Line 3
Address Line 4
Address Postcode
Customer Reference
Delivery Address Line 1
Delivery Address Line 2
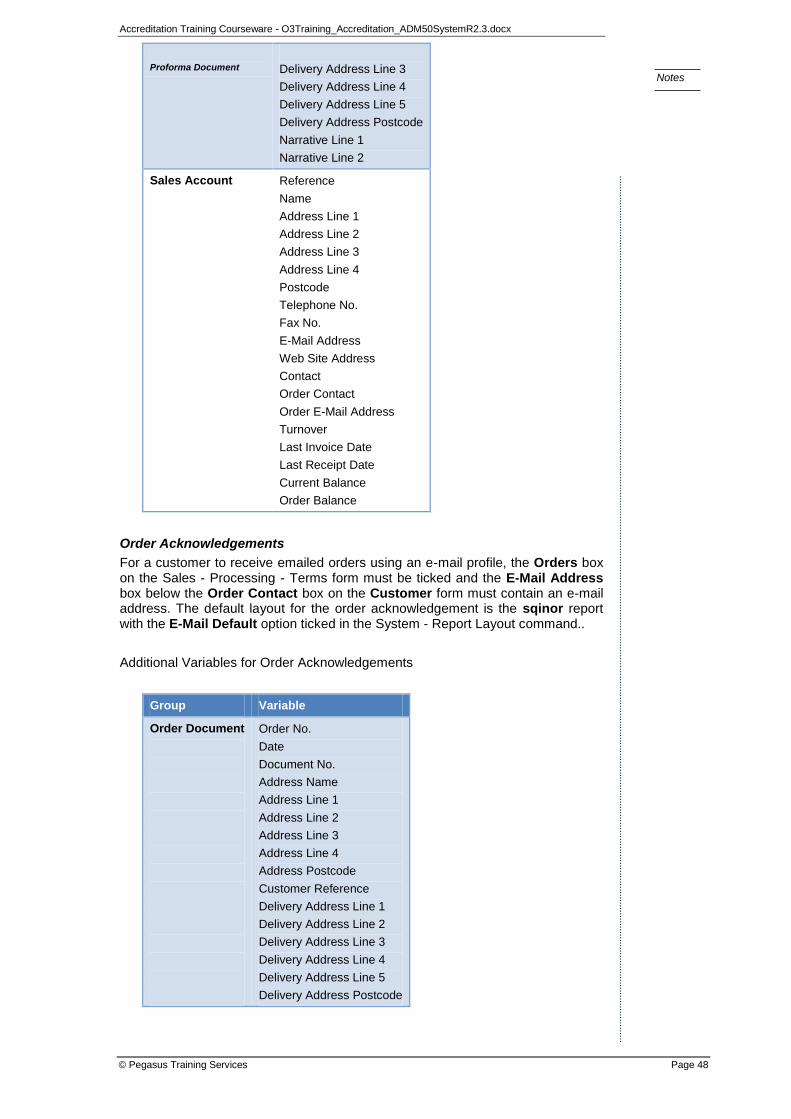
Accreditation Training Courseware - O3Training_Accreditation_ADM50SystemR2.3.docx
© Pegasus Training Services Page 48
Notes
Proforma Document
Delivery Address Line 3
Delivery Address Line 4
Delivery Address Line 5
Delivery Address Postcode
Narrative Line 1
Narrative Line 2
Sales Account Reference
Name
Address Line 1
Address Line 2
Address Line 3
Address Line 4
Postcode
Telephone No.
Fax No.
E-Mail Address
Web Site Address
Contact
Order Contact
Order E-Mail Address
Turnover
Last Invoice Date
Last Receipt Date
Current Balance
Order Balance
Order Acknowledgements
For a customer to receive emailed orders using an e-mail profile, the Orders box on the Sales - Processing - Terms form must be ticked and the E-Mail Address box below the Order Contact box on the Customer form must contain an e-mail address. The default layout for the order acknowledgement is the sqinor report with the E-Mail Default option ticked in the System - Report Layout command..
Additional Variables for Order Acknowledgements
Group Variable
Order Document
Order No.
Date
Document No.
Address Name
Address Line 1
Address Line 2
Address Line 3
Address Line 4
Address Postcode
Customer Reference
Delivery Address Line 1
Delivery Address Line 2
Delivery Address Line 3
Delivery Address Line 4
Delivery Address Line 5
Delivery Address Postcode
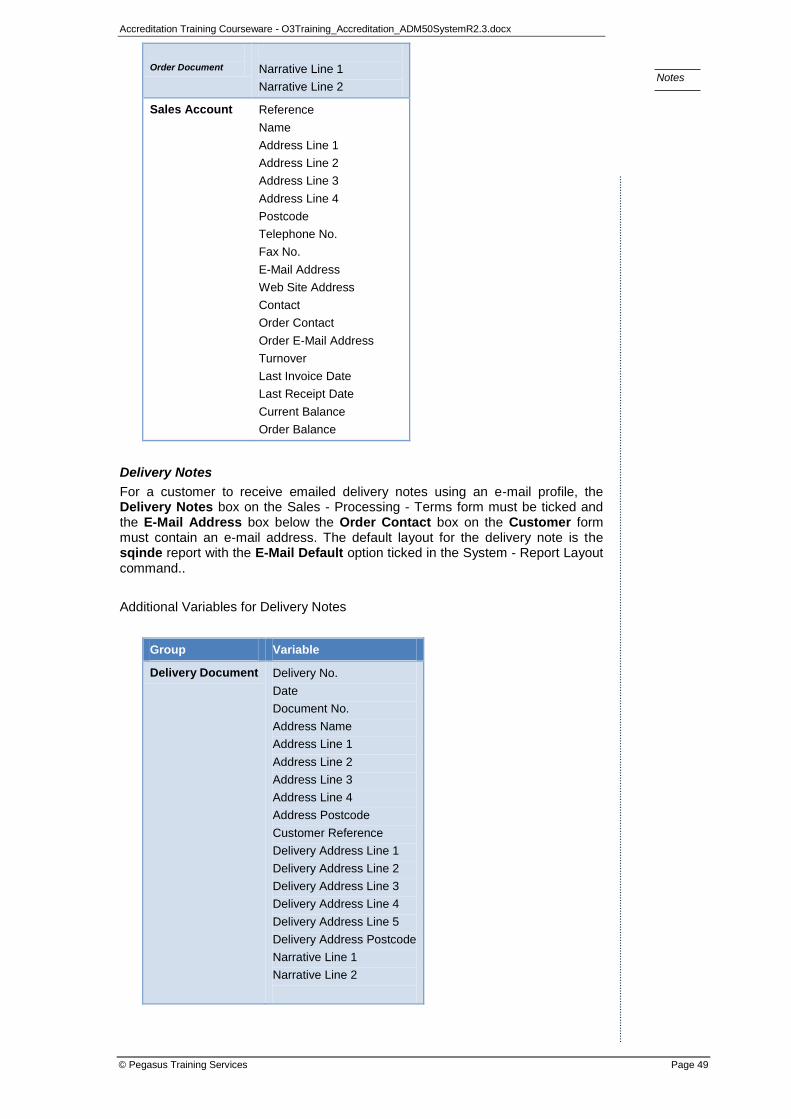
Accreditation Training Courseware - O3Training_Accreditation_ADM50SystemR2.3.docx
© Pegasus Training Services Page 49
Notes
Order Document
Narrative Line 1
Narrative Line 2
Sales Account Reference
Name
Address Line 1
Address Line 2
Address Line 3
Address Line 4
Postcode
Telephone No.
Fax No.
E-Mail Address
Web Site Address
Contact
Order Contact
Order E-Mail Address
Turnover
Last Invoice Date
Last Receipt Date
Current Balance
Order Balance
Delivery Notes
For a customer to receive emailed delivery notes using an e-mail profile, the Delivery Notes box on the Sales - Processing - Terms form must be ticked and the E-Mail Address box below the Order Contact box on the Customer form must contain an e-mail address. The default layout for the delivery note is the sqinde report with the E-Mail Default option ticked in the System - Report Layout command..
Additional Variables for Delivery Notes
Group Variable
Delivery Document Delivery No.
Date
Document No.
Address Name
Address Line 1
Address Line 2
Address Line 3
Address Line 4
Address Postcode
Customer Reference
Delivery Address Line 1
Delivery Address Line 2
Delivery Address Line 3
Delivery Address Line 4
Delivery Address Line 5
Delivery Address Postcode
Narrative Line 1
Narrative Line 2
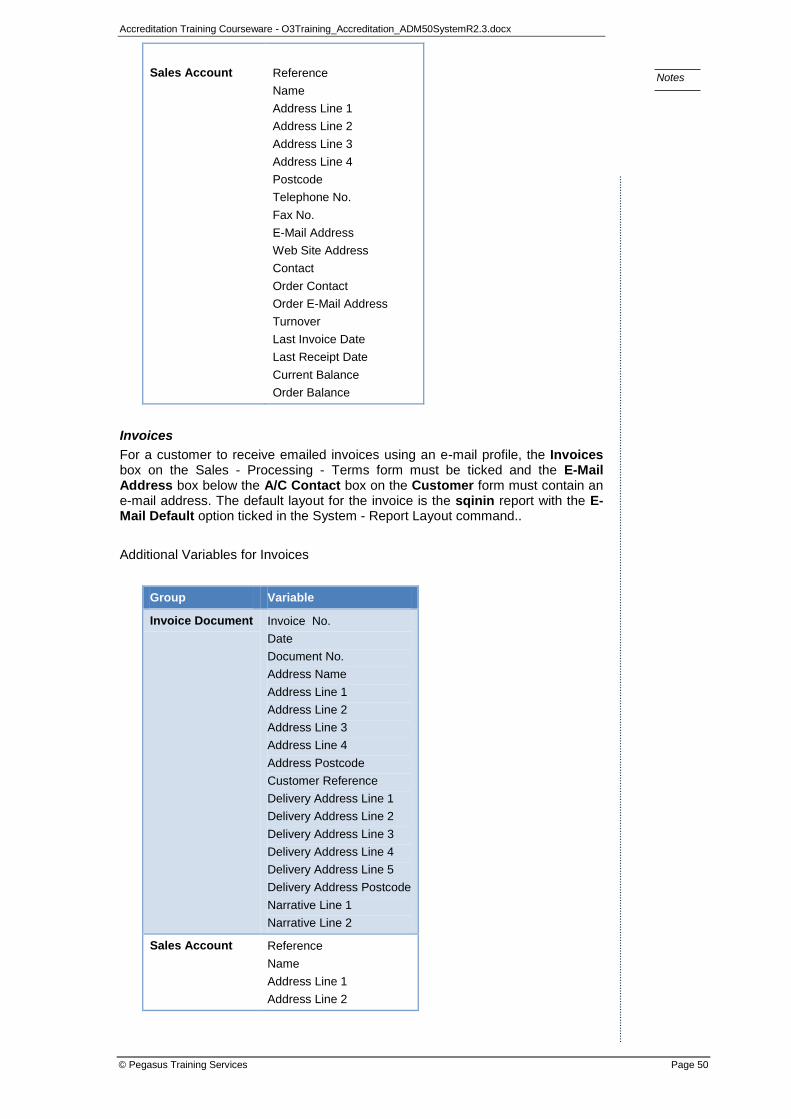
Accreditation Training Courseware - O3Training_Accreditation_ADM50SystemR2.3.docx
© Pegasus Training Services Page 50
Notes
Sales Account
Reference
Name
Address Line 1
Address Line 2
Address Line 3
Address Line 4
Postcode
Telephone No.
Fax No.
E-Mail Address
Web Site Address
Contact
Order Contact
Order E-Mail Address
Turnover
Last Invoice Date
Last Receipt Date
Current Balance
Order Balance
Invoices
For a customer to receive emailed invoices using an e-mail profile, the Invoices box on the Sales - Processing - Terms form must be ticked and the E-Mail Address box below the A/C Contact box on the Customer form must contain an e-mail address. The default layout for the invoice is the sqinin report with the E-Mail Default option ticked in the System - Report Layout command..
Additional Variables for Invoices
Group Variable
Invoice Document Invoice No.
Date
Document No.
Address Name
Address Line 1
Address Line 2
Address Line 3
Address Line 4
Address Postcode
Customer Reference
Delivery Address Line 1
Delivery Address Line 2
Delivery Address Line 3
Delivery Address Line 4
Delivery Address Line 5
Delivery Address Postcode
Narrative Line 1
Narrative Line 2
Sales Account
Reference
Name
Address Line 1
Address Line 2
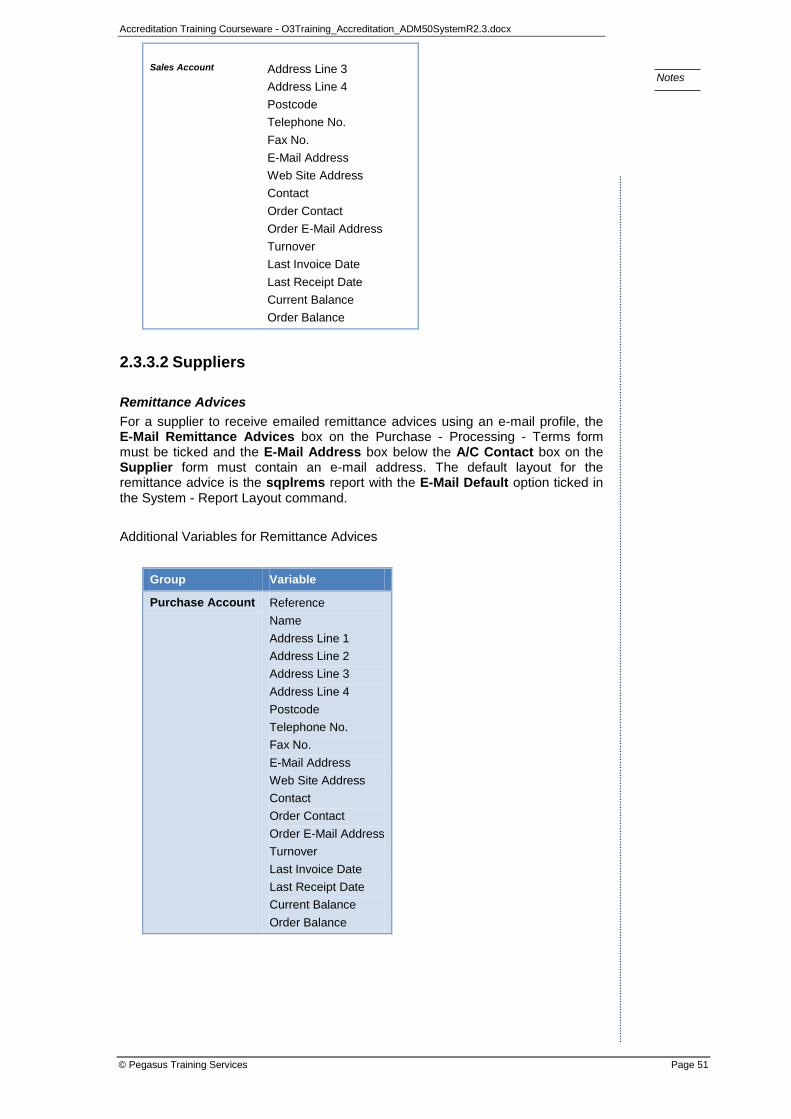
Accreditation Training Courseware - O3Training_Accreditation_ADM50SystemR2.3.docx
© Pegasus Training Services Page 51
Notes
Sales Account
Address Line 3
Address Line 4
Postcode
Telephone No.
Fax No.
E-Mail Address
Web Site Address
Contact
Order Contact
Order E-Mail Address
Turnover
Last Invoice Date
Last Receipt Date
Current Balance
Order Balance
2.3.3.2 Suppliers
Remittance Advices
For a supplier to receive emailed remittance advices using an e-mail profile, the E-Mail Remittance Advices box on the Purchase - Processing - Terms form must be ticked and the E-Mail Address box below the A/C Contact box on the Supplier form must contain an e-mail address. The default layout for the remittance advice is the sqplrems report with the E-Mail Default option ticked in the System - Report Layout command.
Additional Variables for Remittance Advices
Group Variable
Purchase Account Reference
Name
Address Line 1
Address Line 2
Address Line 3
Address Line 4
Postcode
Telephone No.
Fax No.
E-Mail Address
Web Site Address
Contact
Order Contact
Order E-Mail Address
Turnover
Last Invoice Date
Last Receipt Date
Current Balance
Order Balance
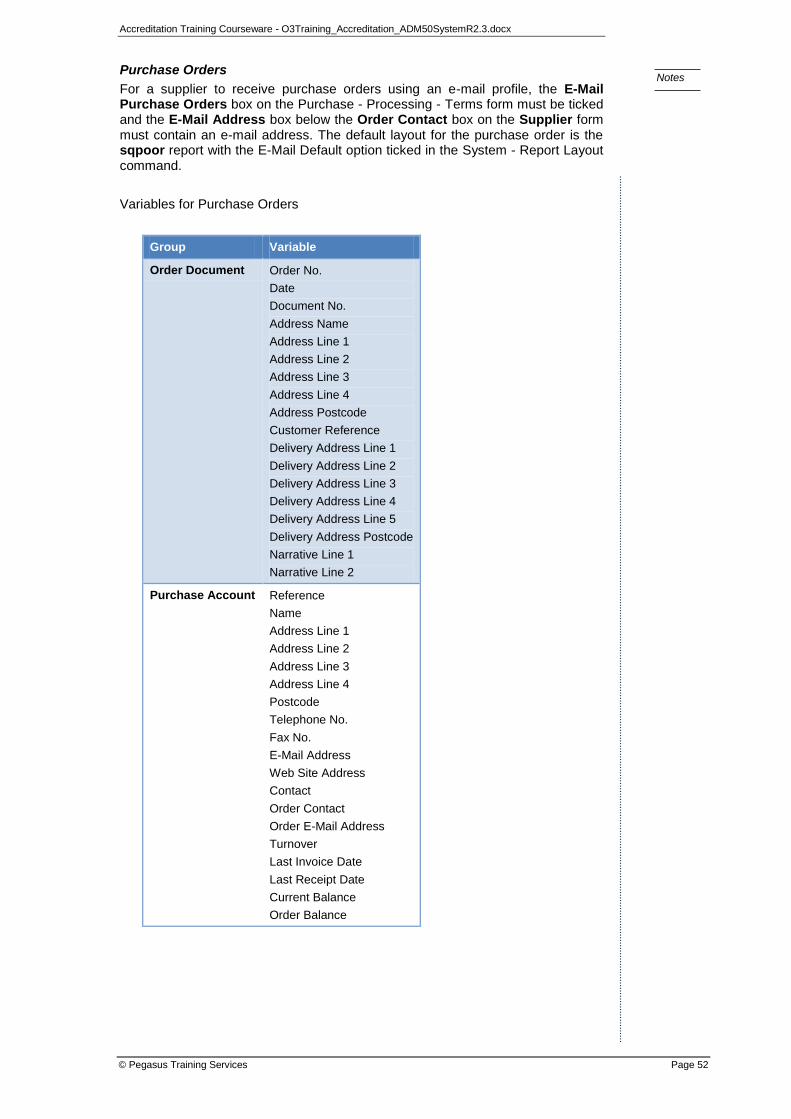
Accreditation Training Courseware - O3Training_Accreditation_ADM50SystemR2.3.docx
© Pegasus Training Services Page 52
Notes
Purchase Orders
For a supplier to receive purchase orders using an e-mail profile, the E-Mail Purchase Orders box on the Purchase - Processing - Terms form must be ticked and the E-Mail Address box below the Order Contact box on the Supplier form must contain an e-mail address. The default layout for the purchase order is the sqpoor report with the E-Mail Default option ticked in the System - Report Layout command.
Variables for Purchase Orders
Group Variable
Order Document Order No.
Date
Document No.
Address Name
Address Line 1
Address Line 2
Address Line 3
Address Line 4
Address Postcode
Customer Reference
Delivery Address Line 1
Delivery Address Line 2
Delivery Address Line 3
Delivery Address Line 4
Delivery Address Line 5
Delivery Address Postcode
Narrative Line 1
Narrative Line 2
Purchase Account Reference
Name
Address Line 1
Address Line 2
Address Line 3
Address Line 4
Postcode
Telephone No.
Fax No.
E-Mail Address
Web Site Address
Contact
Order Contact
Order E-Mail Address
Turnover
Last Invoice Date
Last Receipt Date
Current Balance
Order Balance
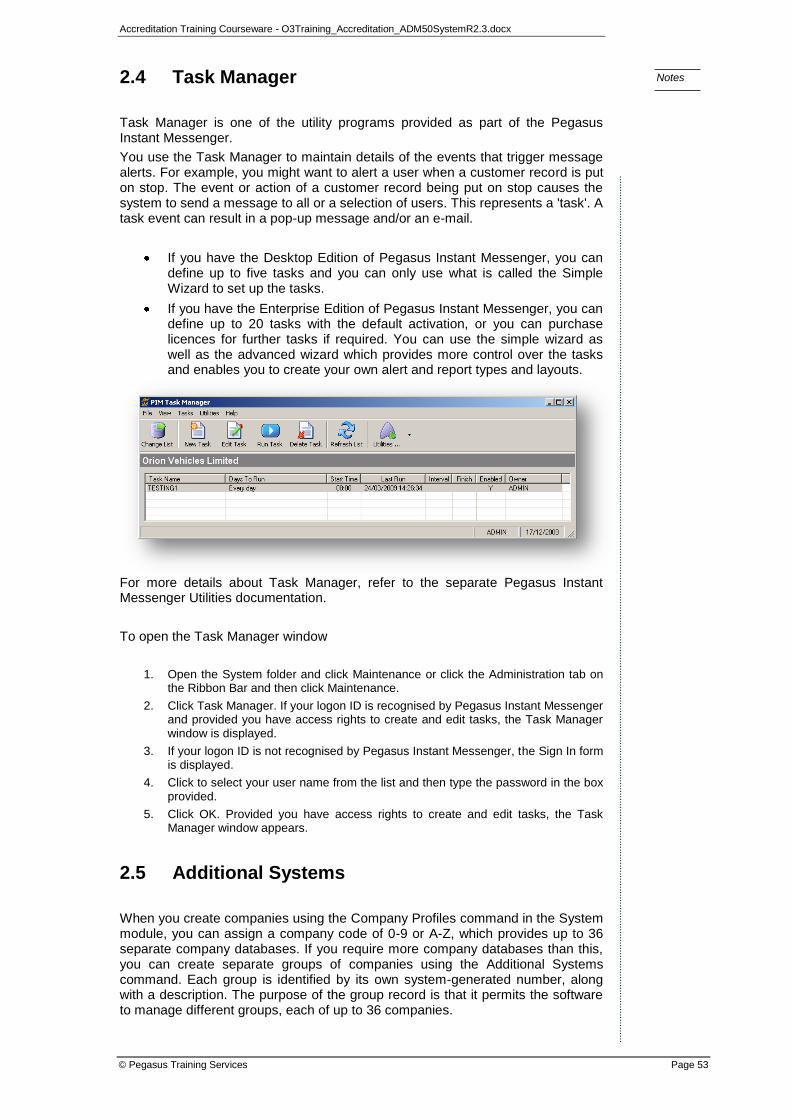
Accreditation Training Courseware - O3Training_Accreditation_ADM50SystemR2.3.docx
© Pegasus Training Services Page 53
Notes
2.4 Task Manager
Task Manager is one of the utility programs provided as part of the Pegasus Instant Messenger.
You use the Task Manager to maintain details of the events that trigger message alerts. For example, you might want to alert a user when a customer record is put on stop. The event or action of a customer record being put on stop causes the system to send a message to all or a selection of users. This represents a 'task'. A task event can result in a pop-up message and/or an e-mail.
If you have the Desktop Edition of Pegasus Instant Messenger, you can define up to five tasks and you can only use what is called the Simple Wizard to set up the tasks.
If you have the Enterprise Edition of Pegasus Instant Messenger, you can define up to 20 tasks with the default activation, or you can purchase licences for further tasks if required. You can use the simple wizard as well as the advanced wizard which provides more control over the tasks and enables you to create your own alert and report types and layouts.
For more details about Task Manager, refer to the separate Pegasus Instant Messenger Utilities documentation.
To open the Task Manager window
1. Open the System folder and click Maintenance or click the Administration tab on the Ribbon Bar and then click Maintenance.
2. Click Task Manager. If your logon ID is recognised by Pegasus Instant Messenger and provided you have access rights to create and edit tasks, the Task Manager window is displayed.
3. If your logon ID is not recognised by Pegasus Instant Messenger, the Sign In form is displayed.
4. Click to select your user name from the list and then type the password in the box provided.
5. Click OK. Provided you have access rights to create and edit tasks, the Task Manager window appears.
2.5 Additional Systems
When you create companies using the Company Profiles command in the System module, you can assign a company code of 0-9 or A-Z, which provides up to 36 separate company databases. If you require more company databases than this, you can create separate groups of companies using the Additional Systems command. Each group is identified by its own system-generated number, along with a description. The purpose of the group record is that it permits the software to manage different groups, each of up to 36 companies.

Accreditation Training Courseware - O3Training_Accreditation_ADM50SystemR2.3.docx
© Pegasus Training Services Page 54
Notes
Note: The number of additional systems available will depend on the licence you have. The default system is known as the Main System, and is always available in all activations.
When you create an additional system, you can choose certain items to copy from the main system. These are:
User profiles.
The list of accessible company codes attributed to the user profile records.
User Groups & Membership
People profiles.
Reporter module report designs (VFP Only)
To create a additional system
1. Log in as ADMIN. If one or more additional systems have already been created, you must log on to the Main System. This is because additional systems can only be created from within the Main System.
2. Open the System folder, click Maintenance and then click Additional Systems.
3. To create a new record, click the icon on the toolbar or press CTRL+N.
A system-generated number is assigned to the additional system.
4. In the Description box, type the description or name you want to give the additional system.
5. To save the record, click the icon on the toolbar or press CTRL+S.
6. On the dialog box displayed, choose which system items you want to copy from the main system.
7. Click OK.
The Logon form will then include a drop-down list box called System, from which you can select the system you want to use.
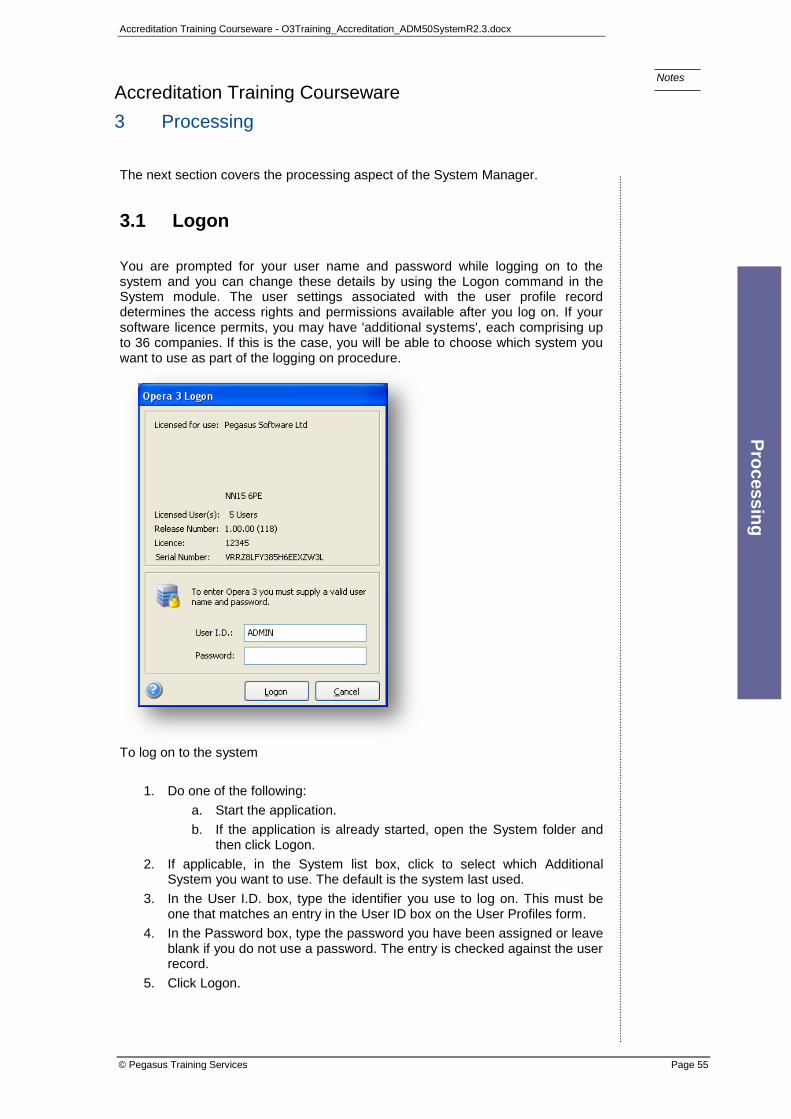
Accreditation Training Courseware - O3Training_Accreditation_ADM50SystemR2.3.docx
© Pegasus Training Services Page 55
Notes
Accreditation Training Courseware
3 Processing
The next section covers the processing aspect of the System Manager.
3.1 Logon
You are prompted for your user name and password while logging on to the system and you can change these details by using the Logon command in the System module. The user settings associated with the user profile record determines the access rights and permissions available after you log on. If your software licence permits, you may have 'additional systems', each comprising up to 36 companies. If this is the case, you will be able to choose which system you want to use as part of the logging on procedure.
To log on to the system
1. Do one of the following:
a. Start the application.
b. If the application is already started, open the System folder and then click Logon.
2. If applicable, in the System list box, click to select which Additional System you want to use. The default is the system last used.
3. In the User I.D. box, type the identifier you use to log on. This must be one that matches an entry in the User ID box on the User Profiles form.
4. In the Password box, type the password you have been assigned or leave blank if you do not use a password. The entry is checked against the user record.
5. Click Logon.
Pro
ces
sin
g

Accreditation Training Courseware - O3Training_Accreditation_ADM50SystemR2.3.docx
© Pegasus Training Services Page 56
Notes
3.2 Date & Company
Use the Date & Company command to change the system processing date or the currently selected company database.
To change the processing date and company
1. Open the System folder and then click Date & Company or click on the O3 icon and select Date & Company
2. In the Processing Date box, type the new date or click the button alongside to choose a date using the Date Selector.
3. In the Company ID list, click to select the ID for the company you want to use.
4. Click OK.
3.2.1 Changing the Date
The processing date is the one that appears as the default posting date on all transactions entered or created in the system. It is also the date used for reports and documents. The default processing date is the same as your computer's date setting. Some forms display the date so you can change it, if required, you can also change the default using the Date & Company command in the System module or the Change System Date button on the toolbar. This is especially useful if you want to process a number of records for a particular date that is different to today's date. Changing the processing date using the Date & Company command will not alter the system date stored on your computer; so it only remains in use until you either change it again or log off.
3.2.2 Changing the Active Company
Each set of company data files is identified by a letter from A to Z or a number from 0 to 9. User profile records, that identify who has authority to use the system, define which company or companies a particular user can process. If a user is allowed to gain access to more than one company, the default company loaded after logging on will be the one defined on the User Preferences form. If you want to change to a different company, use the Date & Company command in the System module. In the Company ID list you can select any ID that is included in your user profile record. If only one company is set up, or you have authority to gain access to only one company, the Company ID box will be unavailable.

Accreditation Training Courseware - O3Training_Accreditation_ADM50SystemR2.3.docx
© Pegasus Training Services Page 57
Notes
3.3 Preferences (User)
Use the Preferences command to determine how certain aspects of the system operate for each user. For example, you can specify the name of the company database that is opened when a user logs on. Users can also change their own password. Each set of preferences is specific to a user profile record, so each user logged on to the system can have a different set of defaults.
Note: The password can also be changed using the User Profiles command in the System module, but only by a user with 'manager' rights.
To define user preferences
1. Open the System folder and click Preferences or click the Administration tab on the Ribbon Bar and then click Preferences .
2. In the boxes provided, enter the preference settings.
3. To make changes to the background settings, click Action and then click User Background Options. Complete the details required in the boxes provided and then click OK.
4. To store your settings and close the Preferences form, click OK.
Opera 3
Information Centre
(O3IC)
When a user logs in
to a version of the
product that they
have not previously
been logged in to,
the Info Centre page
will display in the
browse form
(regardless of any
settings the user has
in respect of that
form). The user‘s
preference will be
honoured for any
further logins until
the software is
upgraded in which
case the Info Centre
page will be
displayed once
again (and only
once again). The
behaviour is user-
specific, i.e.
MANAGER could
have logged in
several times but the
first log in for USER
will launch the Info
Centre page.
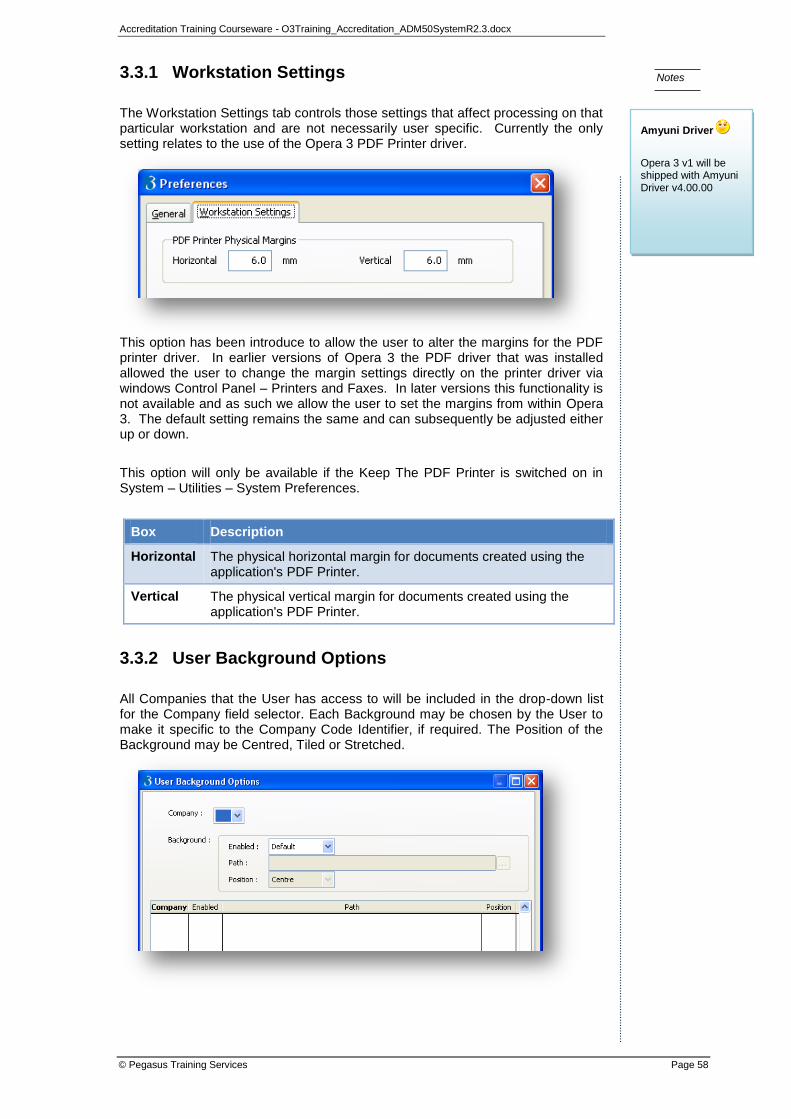
Accreditation Training Courseware - O3Training_Accreditation_ADM50SystemR2.3.docx
© Pegasus Training Services Page 58
Notes
3.3.1 Workstation Settings
The Workstation Settings tab controls those settings that affect processing on that particular workstation and are not necessarily user specific. Currently the only setting relates to the use of the Opera 3 PDF Printer driver.
This option has been introduce to allow the user to alter the margins for the PDF printer driver. In earlier versions of Opera 3 the PDF driver that was installed allowed the user to change the margin settings directly on the printer driver via windows Control Panel – Printers and Faxes. In later versions this functionality is not available and as such we allow the user to set the margins from within Opera 3. The default setting remains the same and can subsequently be adjusted either up or down.
This option will only be available if the Keep The PDF Printer is switched on in System – Utilities – System Preferences.
Box Description
Horizontal The physical horizontal margin for documents created using the application's PDF Printer.
Vertical The physical vertical margin for documents created using the application's PDF Printer.
3.3.2 User Background Options
All Companies that the User has access to will be included in the drop-down list for the Company field selector. Each Background may be chosen by the User to make it specific to the Company Code Identifier, if required. The Position of the Background may be Centred, Tiled or Stretched.
Amyuni Driver
Opera 3 v1 will be shipped with Amyuni Driver v4.00.00

Accreditation Training Courseware - O3Training_Accreditation_ADM50SystemR2.3.docx
© Pegasus Training Services Page 59
Notes
3.4 Spooler Control
Use the Spooler Control command to view or print reports that have been created in the system where have selected the Print Spooler option on the File tab of the Publisher form. When the Spool Printing form is displayed, you can use the browse toolbar buttons or the List tab to retrieve the spool file you want to print. The following options are available on the menu displayed when you click Action.
Important: When sending spool files to the printer, the Windows print spool manager is not used. If your printer is not connected or on line, you will receive no message to this effect. Instead, the report will time out depending on the Timeout settings defined in the printer's properties. This also means you will not be able to cancel a spooled report sent to a printer.
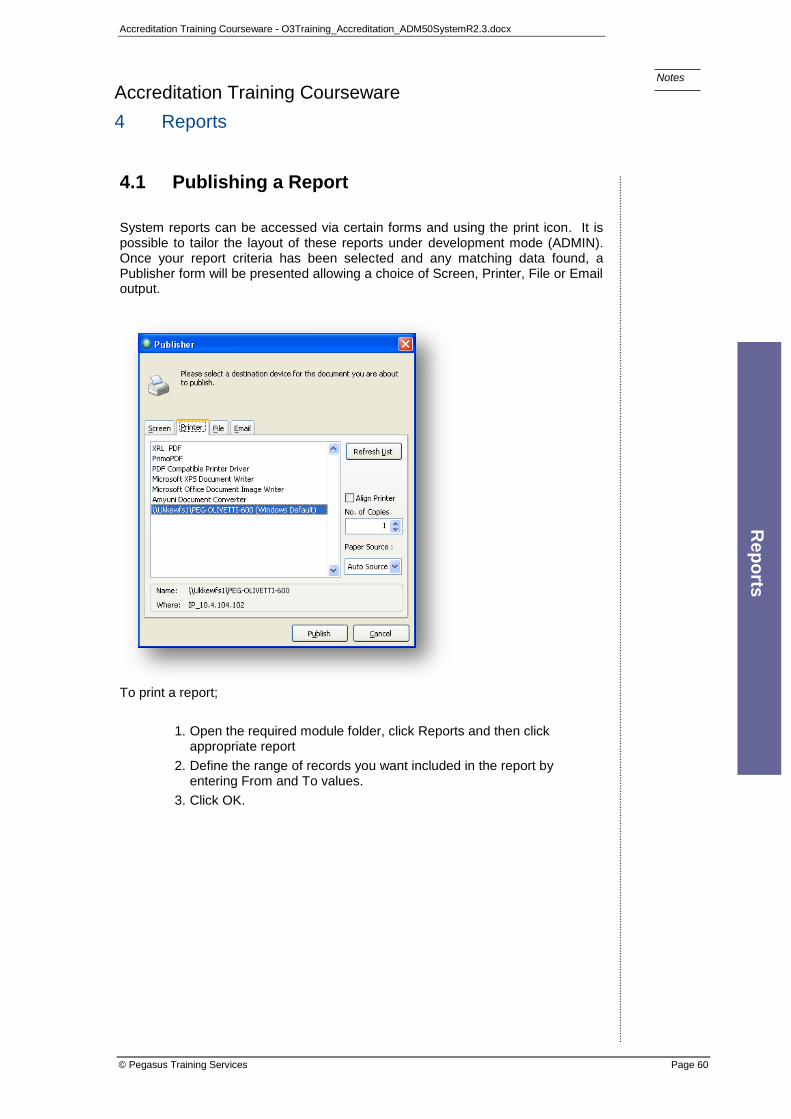
Accreditation Training Courseware - O3Training_Accreditation_ADM50SystemR2.3.docx
© Pegasus Training Services Page 60
Notes
Accreditation Training Courseware
4 Reports
4.1 Publishing a Report
System reports can be accessed via certain forms and using the print icon. It is possible to tailor the layout of these reports under development mode (ADMIN). Once your report criteria has been selected and any matching data found, a Publisher form will be presented allowing a choice of Screen, Printer, File or Email output.
To print a report;
1. Open the required module folder, click Reports and then click appropriate report
2. Define the range of records you want included in the report by entering From and To values.
3. Click OK.
Re
po
rts
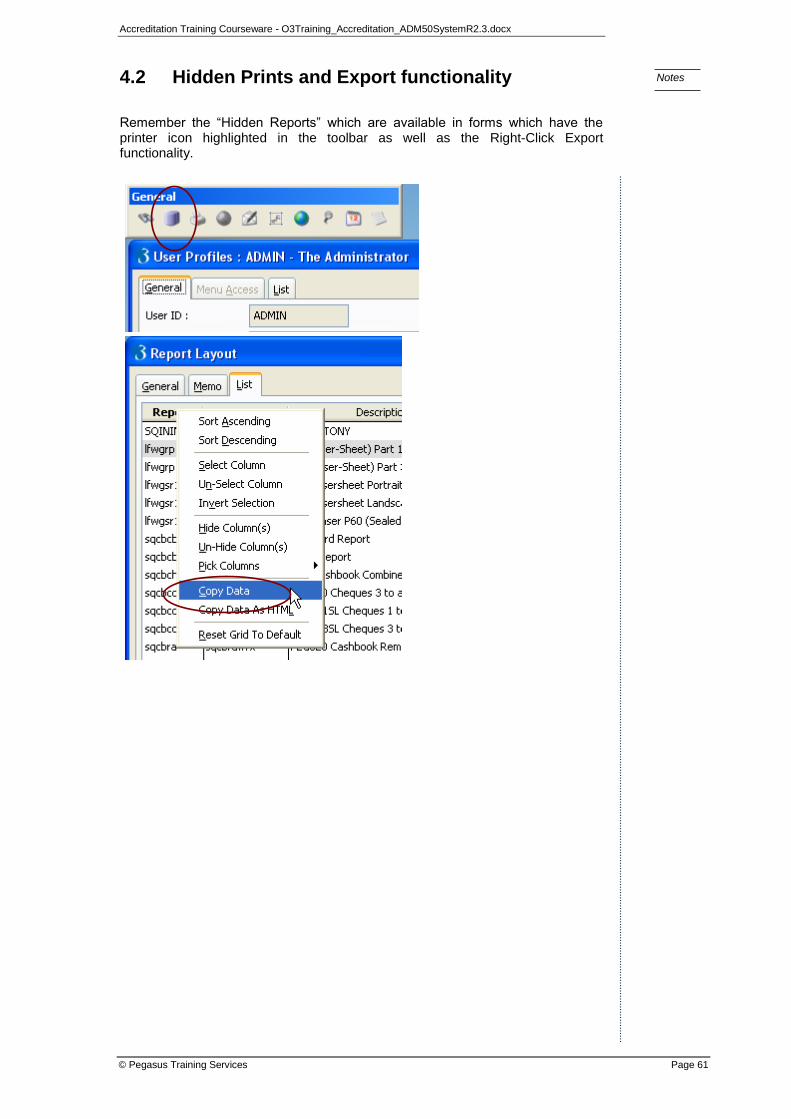
Accreditation Training Courseware - O3Training_Accreditation_ADM50SystemR2.3.docx
© Pegasus Training Services Page 61
Notes
4.2 Hidden Prints and Export functionality
Remember the ―Hidden Reports‖ which are available in forms which have the printer icon highlighted in the toolbar as well as the Right-Click Export functionality.

Accreditation Training Courseware - O3Training_Accreditation_ADM50SystemR2.3.docx
© Pegasus Training Services Page 62
Notes
Accreditation Training Courseware
5 Utilities
5.1 Monitor Companies
Use the Monitor Companies form to view different company balances, submit dates for HMRC returns, aged debts and aged creditors, and sales and purchase turnover graphs for each company. The company balance information shown for the company will depend on which modules you are using.
The form is updated automatically if the Update Company Balances box on the System - Utilities - System Preferences form is ticked and the Automatic Refresh (every 10 secs) box on this form is ticked. If the Update Company Balances box is not ticked, the totals on this form are updated when you click the Calculate Balances button.
5.2 Monitor Users
Use this command to view the status of all users logged onto the system. The Monitor Users form shows the user ID and name and a list of the commands that are being used. The list of commands used in the Current Process column reflect the activity when the form was opened and can be updated immediately using the Refresh command button or automatically by selecting the Automatic Refresh (every 10 secs) option. You can disable this facility by clearing the User Event and User Logs option on the System Preferences form. If disabled, the form will show 'Unknown - User Log Disabled' in the Current Process and Company columns.
Utilitie
s
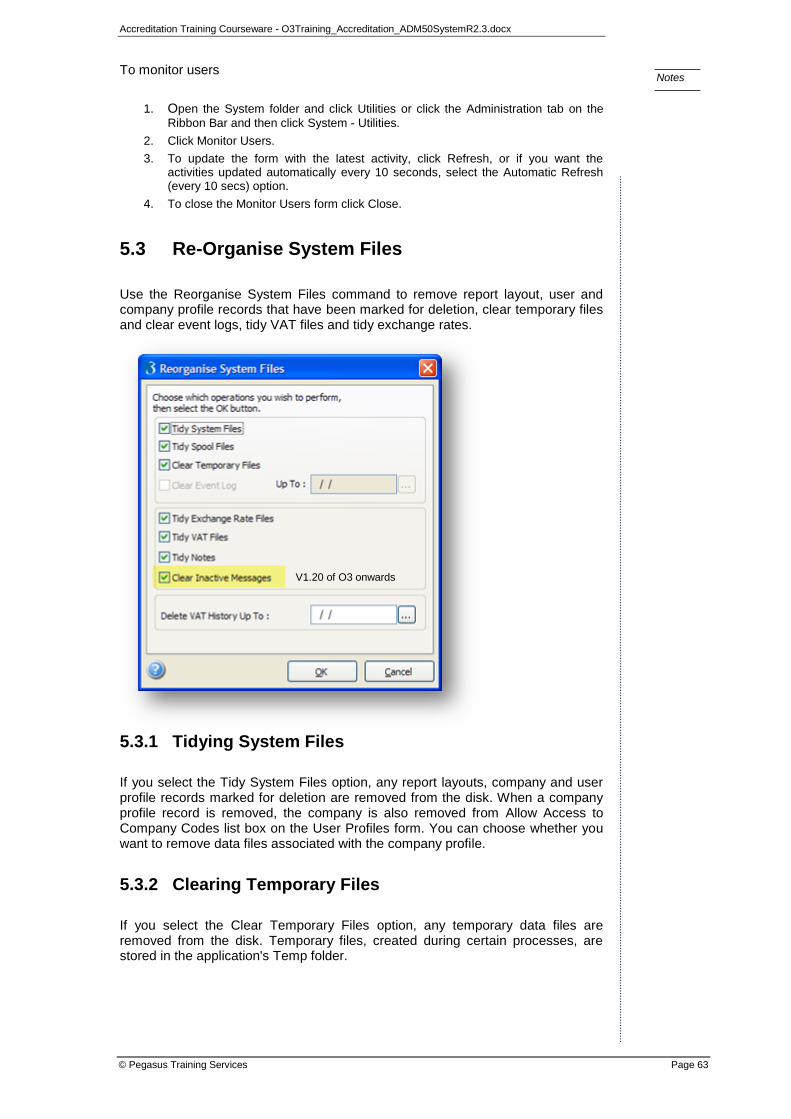
Accreditation Training Courseware - O3Training_Accreditation_ADM50SystemR2.3.docx
© Pegasus Training Services Page 63
Notes
To monitor users
1. Open the System folder and click Utilities or click the Administration tab on the
Ribbon Bar and then click System - Utilities.
2. Click Monitor Users.
3. To update the form with the latest activity, click Refresh, or if you want the activities updated automatically every 10 seconds, select the Automatic Refresh (every 10 secs) option.
4. To close the Monitor Users form click Close.
5.3 Re-Organise System Files
Use the Reorganise System Files command to remove report layout, user and company profile records that have been marked for deletion, clear temporary files and clear event logs, tidy VAT files and tidy exchange rates.
5.3.1 Tidying System Files
If you select the Tidy System Files option, any report layouts, company and user profile records marked for deletion are removed from the disk. When a company profile record is removed, the company is also removed from Allow Access to Company Codes list box on the User Profiles form. You can choose whether you want to remove data files associated with the company profile.
5.3.2 Clearing Temporary Files
If you select the Clear Temporary Files option, any temporary data files are removed from the disk. Temporary files, created during certain processes, are stored in the application's Temp folder.
V1.20 of O3 onwards
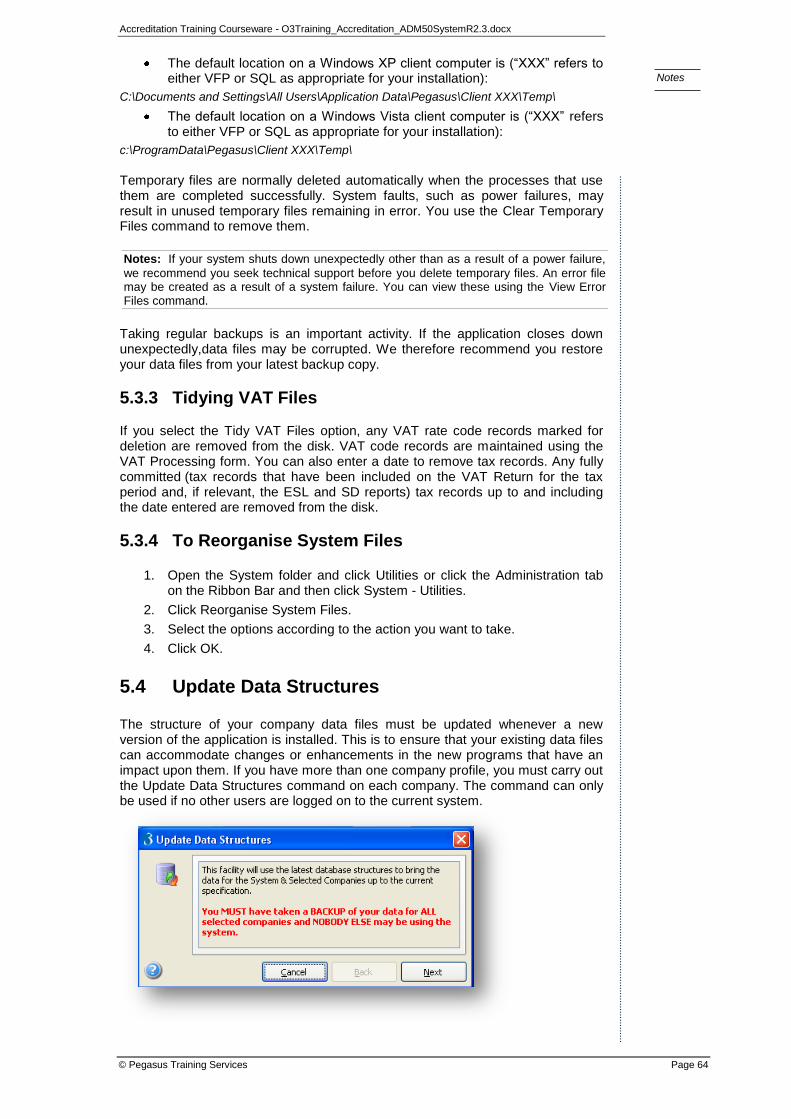
Accreditation Training Courseware - O3Training_Accreditation_ADM50SystemR2.3.docx
© Pegasus Training Services Page 64
Notes
The default location on a Windows XP client computer is (―XXX‖ refers to either VFP or SQL as appropriate for your installation):
C:\Documents and Settings\All Users\Application Data\Pegasus\Client XXX\Temp\
The default location on a Windows Vista client computer is (―XXX‖ refers to either VFP or SQL as appropriate for your installation):
c:\ProgramData\Pegasus\Client XXX\Temp\
Temporary files are normally deleted automatically when the processes that use them are completed successfully. System faults, such as power failures, may result in unused temporary files remaining in error. You use the Clear Temporary Files command to remove them.
Notes: If your system shuts down unexpectedly other than as a result of a power failure,
we recommend you seek technical support before you delete temporary files. An error file may be created as a result of a system failure. You can view these using the View Error Files command.
Taking regular backups is an important activity. If the application closes down unexpectedly,data files may be corrupted. We therefore recommend you restore your data files from your latest backup copy.
5.3.3 Tidying VAT Files
If you select the Tidy VAT Files option, any VAT rate code records marked for deletion are removed from the disk. VAT code records are maintained using the VAT Processing form. You can also enter a date to remove tax records. Any fully committed (tax records that have been included on the VAT Return for the tax period and, if relevant, the ESL and SD reports) tax records up to and including the date entered are removed from the disk.
5.3.4 To Reorganise System Files
1. Open the System folder and click Utilities or click the Administration tab on the Ribbon Bar and then click System - Utilities.
2. Click Reorganise System Files.
3. Select the options according to the action you want to take.
4. Click OK.
5.4 Update Data Structures
The structure of your company data files must be updated whenever a new version of the application is installed. This is to ensure that your existing data files can accommodate changes or enhancements in the new programs that have an impact upon them. If you have more than one company profile, you must carry out the Update Data Structures command on each company. The command can only be used if no other users are logged on to the current system.
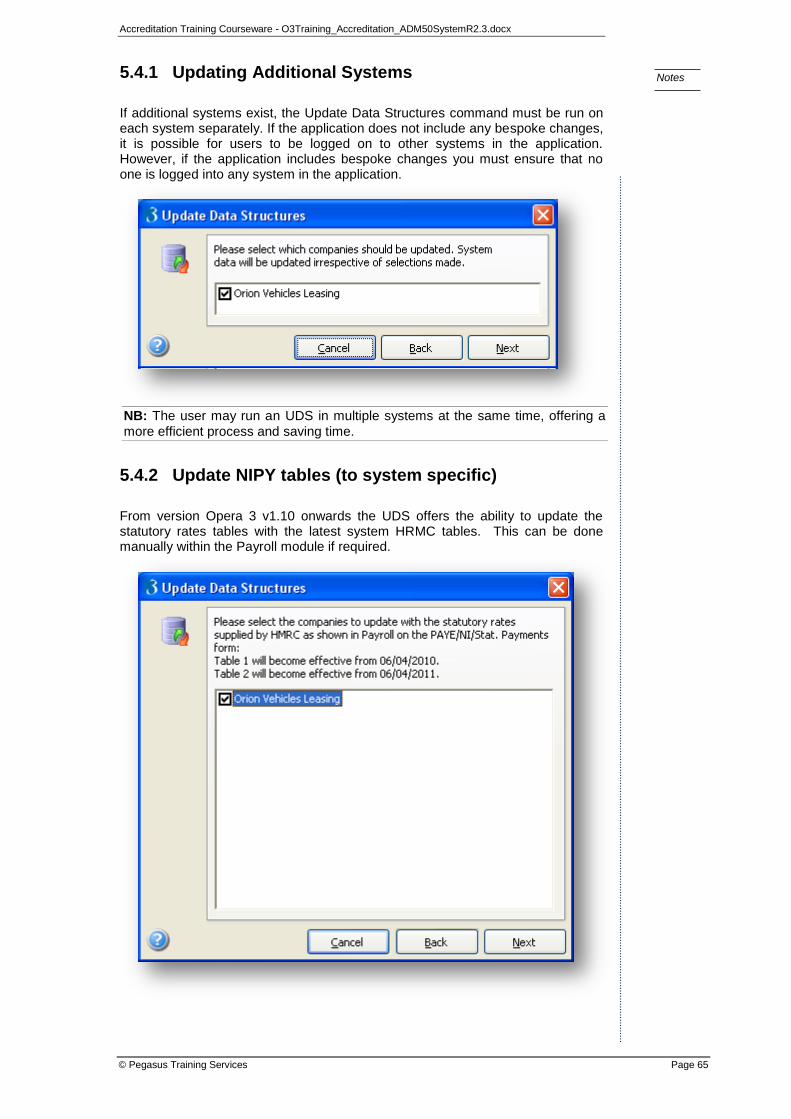
Accreditation Training Courseware - O3Training_Accreditation_ADM50SystemR2.3.docx
© Pegasus Training Services Page 65
Notes
5.4.1 Updating Additional Systems
If additional systems exist, the Update Data Structures command must be run on each system separately. If the application does not include any bespoke changes, it is possible for users to be logged on to other systems in the application. However, if the application includes bespoke changes you must ensure that no one is logged into any system in the application.
NB: The user may run an UDS in multiple systems at the same time, offering a
more efficient process and saving time.
5.4.2 Update NIPY tables (to system specific)
From version Opera 3 v1.10 onwards the UDS offers the ability to update the statutory rates tables with the latest system HRMC tables. This can be done manually within the Payroll module if required.
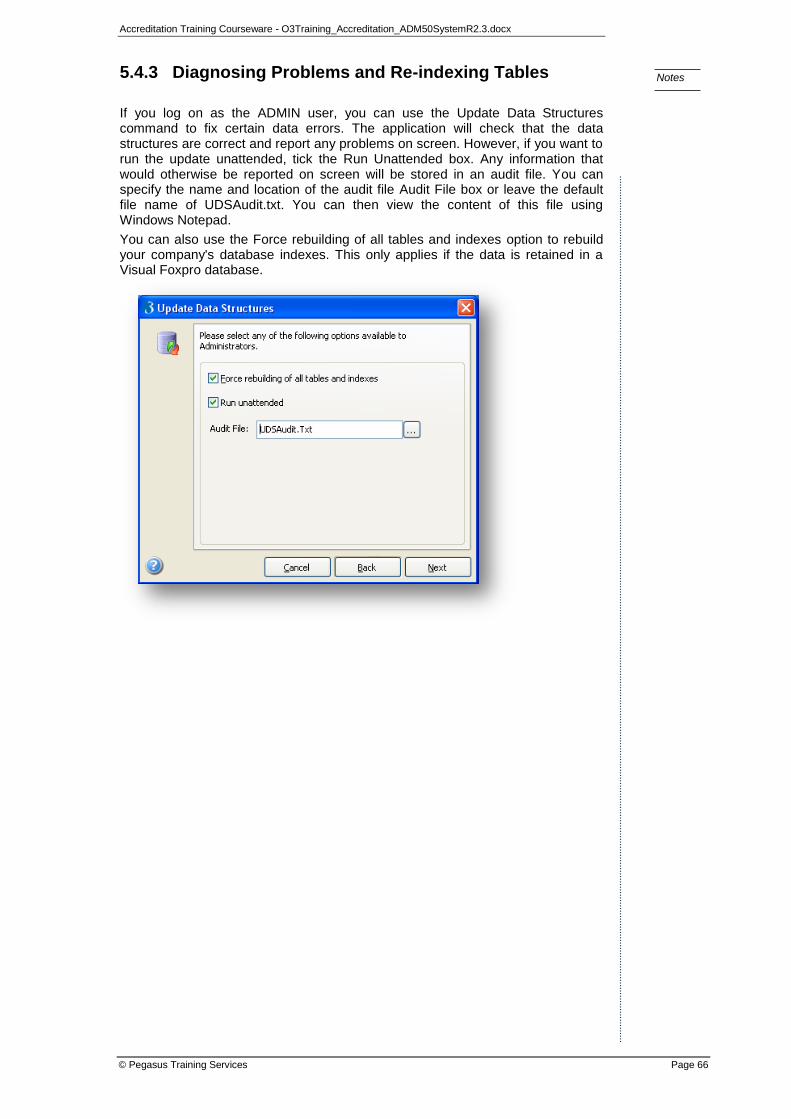
Accreditation Training Courseware - O3Training_Accreditation_ADM50SystemR2.3.docx
© Pegasus Training Services Page 66
Notes
5.4.3 Diagnosing Problems and Re-indexing Tables
If you log on as the ADMIN user, you can use the Update Data Structures command to fix certain data errors. The application will check that the data structures are correct and report any problems on screen. However, if you want to run the update unattended, tick the Run Unattended box. Any information that would otherwise be reported on screen will be stored in an audit file. You can specify the name and location of the audit file Audit File box or leave the default file name of UDSAudit.txt. You can then view the content of this file using Windows Notepad.
You can also use the Force rebuilding of all tables and indexes option to rebuild your company's database indexes. This only applies if the data is retained in a Visual Foxpro database.
Accreditation Training Courseware - O3Training_Accreditation_ADM50SystemR2.3.docx
© Pegasus Training Services Page 67
Notes
5.4.4 Executive Dashboards Manager [VFP]
If your Opera 3 Enterprise activation includes Executive Dashboards Manager, the Update Data Structures command needs full access to the Executive Dashboards installation folder.
This message is displayed if the correct share settings are not set:
The PED Server location \\fileserver\ActiveDashboards\App_Data was not found.
This message is displayed if the correct permission settings are not set:
The path \\fileserver\ActiveDashboards\App_Data could not be written to.
If one of these messages are displayed, you must create the necessary share and permissions, and then run Update Data Structures again before using Executive Dashboards Manager. Instructions to do this are included in the Executive Dashboards Installation guide.
5.4.5 To Update the Data Structures
The structure of your company data files must be updated whenever a new version of the application is installed. This is to ensure that your existing data files can accommodate changes or enhancements in the new programs that have an impact upon them. If you have more than one company profile, you must carry out the Update Data Structures command on each company. The command can only be used if no other users are logged on to the current system.
Diagnosing Problems and Re-indexing Tables
If you log on as the ADMIN user, you can use the Update Data Structures command to fix certain data errors. The application will check that the data structures are correct and report any problems on screen. However, if you want to run the update unattended, tick the Run Unattended box. Any information that would otherwise be reported on screen will be stored in an audit file. You can specify the name and location of the audit file Audit File box or leave the default file name of UDSAudit.txt. You can then view the content of this file using Windows Notepad.
You can also use the Force rebuilding of all tables and indexes option to rebuild your company's database indexes. This only applies if the data is retained in a Visual Foxpro database.
To Update the Data Structures
Warning: Take a backup copy of your data files before running the Update Data Structures command.
1. Open the System folder and click Utilities - Update Data Structures or click the Administration tab on the Ribbon Bar and then click System - Utilities - Update Data Structures.
2. Provided you have taken a backup of your data files and made sure no other user is logged on, click Next.
3. In the list box, click to select the company or companies for which you want to update the data structures.
4. Click Next.
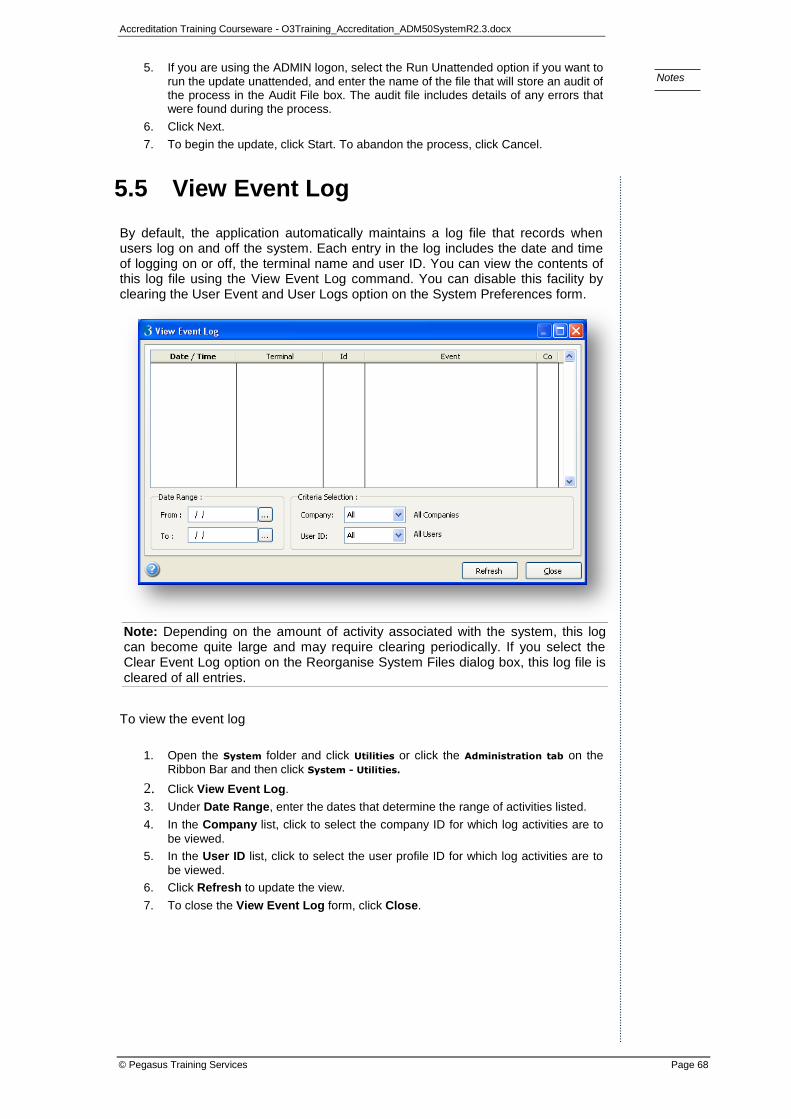
Accreditation Training Courseware - O3Training_Accreditation_ADM50SystemR2.3.docx
© Pegasus Training Services Page 68
Notes
5. If you are using the ADMIN logon, select the Run Unattended option if you want to run the update unattended, and enter the name of the file that will store an audit of the process in the Audit File box. The audit file includes details of any errors that were found during the process.
6. Click Next.
7. To begin the update, click Start. To abandon the process, click Cancel.
5.5 View Event Log
By default, the application automatically maintains a log file that records when users log on and off the system. Each entry in the log includes the date and time of logging on or off, the terminal name and user ID. You can view the contents of this log file using the View Event Log command. You can disable this facility by clearing the User Event and User Logs option on the System Preferences form.
Note: Depending on the amount of activity associated with the system, this log can become quite large and may require clearing periodically. If you select the Clear Event Log option on the Reorganise System Files dialog box, this log file is cleared of all entries.
To view the event log
1. Open the System folder and click Utilities or click the Administration tab on the Ribbon Bar and then click System - Utilities.
2. Click View Event Log.
3. Under Date Range, enter the dates that determine the range of activities listed.
4. In the Company list, click to select the company ID for which log activities are to
be viewed.
5. In the User ID list, click to select the user profile ID for which log activities are to
be viewed.
6. Click Refresh to update the view.
7. To close the View Event Log form, click Close.
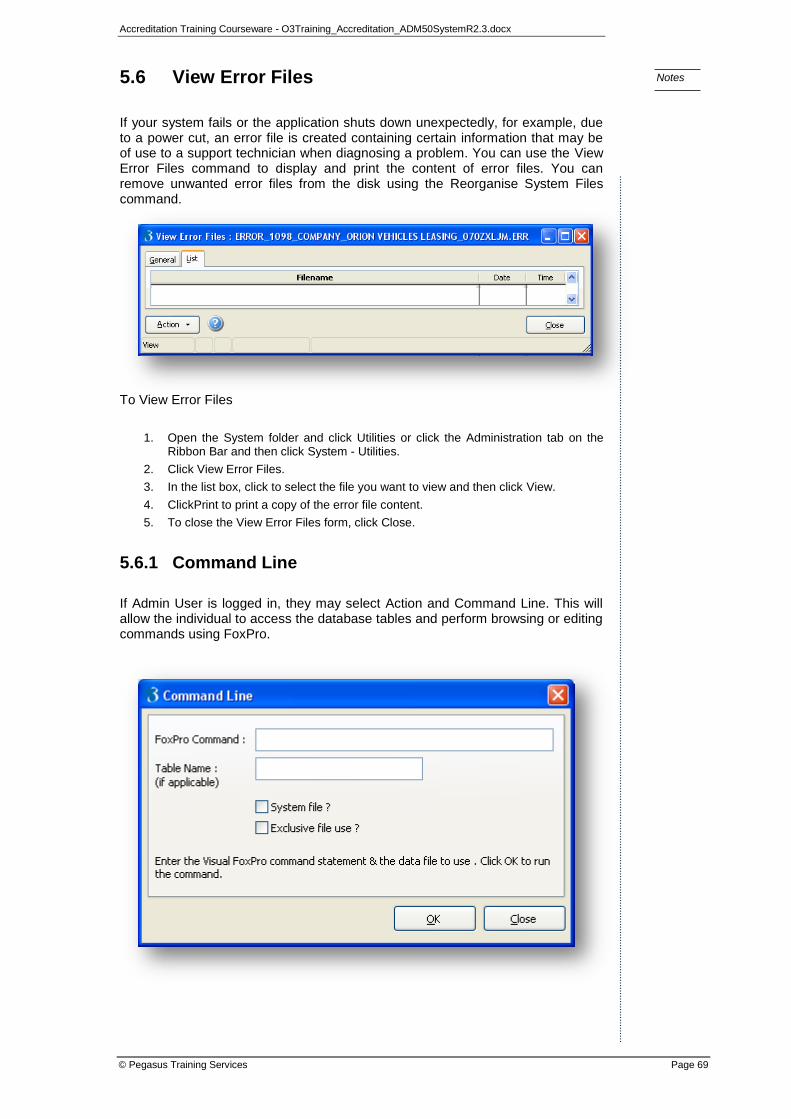
Accreditation Training Courseware - O3Training_Accreditation_ADM50SystemR2.3.docx
© Pegasus Training Services Page 69
Notes
5.6 View Error Files
If your system fails or the application shuts down unexpectedly, for example, due to a power cut, an error file is created containing certain information that may be of use to a support technician when diagnosing a problem. You can use the View Error Files command to display and print the content of error files. You can remove unwanted error files from the disk using the Reorganise System Files command.
To View Error Files
1. Open the System folder and click Utilities or click the Administration tab on the Ribbon Bar and then click System - Utilities.
2. Click View Error Files.
3. In the list box, click to select the file you want to view and then click View.
4. ClickPrint to print a copy of the error file content.
5. To close the View Error Files form, click Close.
5.6.1 Command Line
If Admin User is logged in, they may select Action and Command Line. This will allow the individual to access the database tables and perform browsing or editing commands using FoxPro.
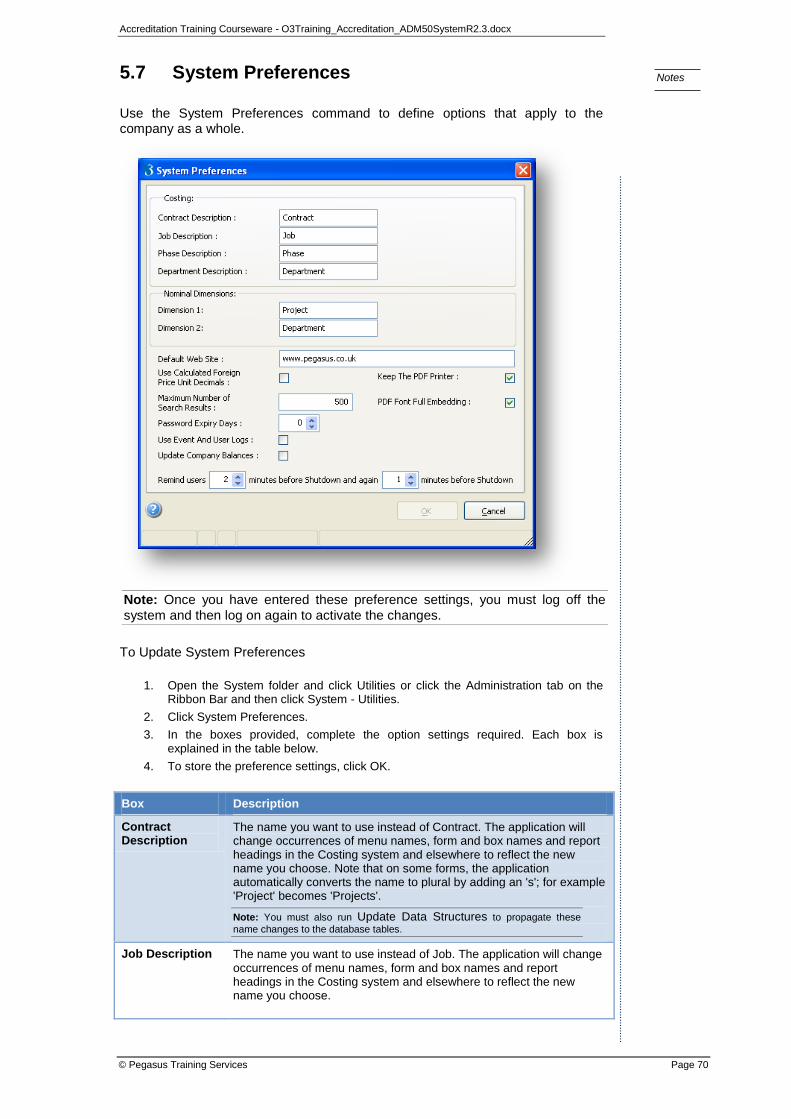
Accreditation Training Courseware - O3Training_Accreditation_ADM50SystemR2.3.docx
© Pegasus Training Services Page 70
Notes
5.7 System Preferences
Use the System Preferences command to define options that apply to the company as a whole.
Note: Once you have entered these preference settings, you must log off the
system and then log on again to activate the changes.
To Update System Preferences
1. Open the System folder and click Utilities or click the Administration tab on the Ribbon Bar and then click System - Utilities.
2. Click System Preferences.
3. In the boxes provided, complete the option settings required. Each box is explained in the table below.
4. To store the preference settings, click OK.
Box Description
Contract Description
The name you want to use instead of Contract. The application will change occurrences of menu names, form and box names and report headings in the Costing system and elsewhere to reflect the new name you choose. Note that on some forms, the application automatically converts the name to plural by adding an 's'; for example 'Project' becomes 'Projects'.
Note: You must also run Update Data Structures to propagate these
name changes to the database tables.
Job Description
The name you want to use instead of Job. The application will change occurrences of menu names, form and box names and report headings in the Costing system and elsewhere to reflect the new name you choose.
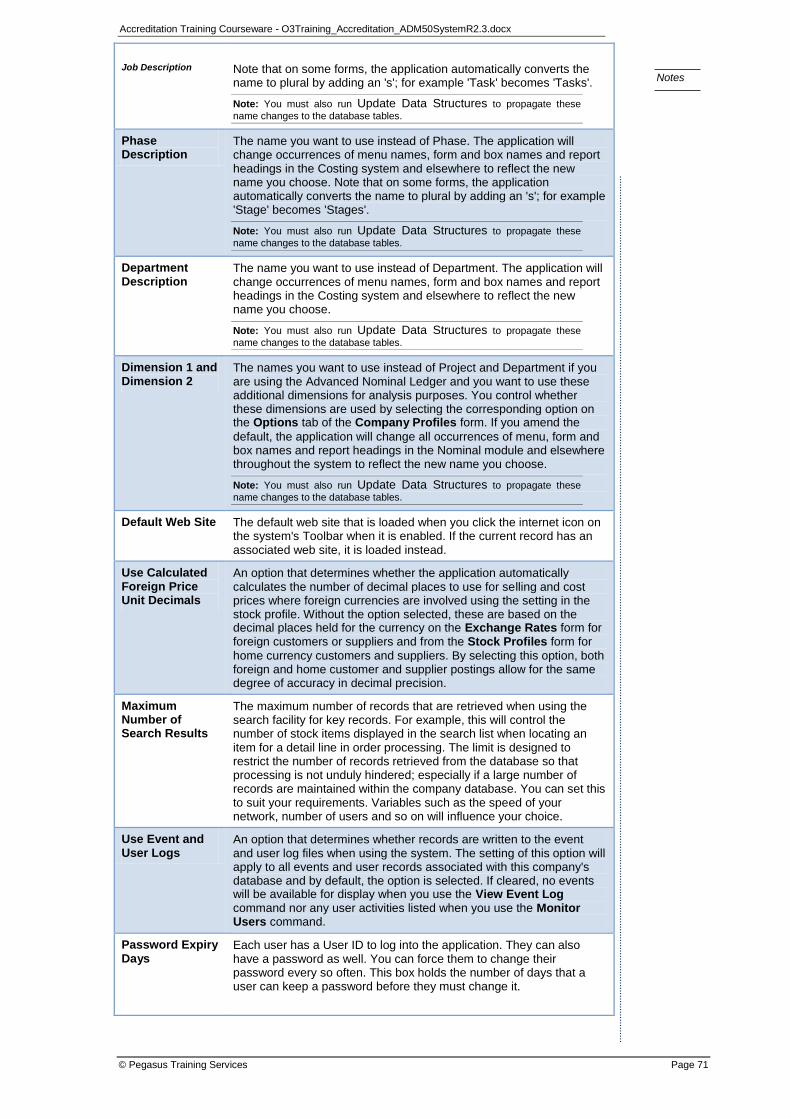
Accreditation Training Courseware - O3Training_Accreditation_ADM50SystemR2.3.docx
© Pegasus Training Services Page 71
Notes
Job Description
Note that on some forms, the application automatically converts the name to plural by adding an 's'; for example 'Task' becomes 'Tasks'.
Note: You must also run Update Data Structures to propagate these
name changes to the database tables.
Phase Description
The name you want to use instead of Phase. The application will change occurrences of menu names, form and box names and report headings in the Costing system and elsewhere to reflect the new name you choose. Note that on some forms, the application automatically converts the name to plural by adding an 's'; for example 'Stage' becomes 'Stages'.
Note: You must also run Update Data Structures to propagate these
name changes to the database tables.
Department Description
The name you want to use instead of Department. The application will change occurrences of menu names, form and box names and report headings in the Costing system and elsewhere to reflect the new name you choose.
Note: You must also run Update Data Structures to propagate these
name changes to the database tables.
Dimension 1 and Dimension 2
The names you want to use instead of Project and Department if you are using the Advanced Nominal Ledger and you want to use these additional dimensions for analysis purposes. You control whether these dimensions are used by selecting the corresponding option on the Options tab of the Company Profiles form. If you amend the
default, the application will change all occurrences of menu, form and box names and report headings in the Nominal module and elsewhere throughout the system to reflect the new name you choose.
Note: You must also run Update Data Structures to propagate these
name changes to the database tables.
Default Web Site The default web site that is loaded when you click the internet icon on the system's Toolbar when it is enabled. If the current record has an associated web site, it is loaded instead.
Use Calculated Foreign Price Unit Decimals
An option that determines whether the application automatically calculates the number of decimal places to use for selling and cost prices where foreign currencies are involved using the setting in the stock profile. Without the option selected, these are based on the decimal places held for the currency on the Exchange Rates form for foreign customers or suppliers and from the Stock Profiles form for
home currency customers and suppliers. By selecting this option, both foreign and home customer and supplier postings allow for the same degree of accuracy in decimal precision.
Maximum Number of Search Results
The maximum number of records that are retrieved when using the search facility for key records. For example, this will control the number of stock items displayed in the search list when locating an item for a detail line in order processing. The limit is designed to restrict the number of records retrieved from the database so that processing is not unduly hindered; especially if a large number of records are maintained within the company database. You can set this to suit your requirements. Variables such as the speed of your network, number of users and so on will influence your choice.
Use Event and User Logs
An option that determines whether records are written to the event and user log files when using the system. The setting of this option will apply to all events and user records associated with this company's database and by default, the option is selected. If cleared, no events will be available for display when you use the View Event Log command nor any user activities listed when you use the Monitor Users command.
Password Expiry Days
Each user has a User ID to log into the application. They can also have a password as well. You can force them to change their password every so often. This box holds the number of days that a user can keep a password before they must change it.

Accreditation Training Courseware - O3Training_Accreditation_ADM50SystemR2.3.docx
© Pegasus Training Services Page 72
Notes
Password Expiry Days
Note: The default number of days is set to zero which sets each user's expiry date to 31/12/2099 and disabled. This means there is effectively no expiry date for the users' passwords.
The application checks the computer's date and warns users when they log in if their password will expire in the following ten days. If they get a warning they must change their password in those ten days. If they do not, they cannot log in after the password has expired; the administrator will have to change the password for them.
Each user has a password expiry date on the User Profile form:
When the Password Expiry Days box is set for the first time, all the users' expiry dates are set to the number of days after that day. For example, if the box is set to '30' on the 01/12/2010, each user's password expiry date is set to 31/12/2010.
If this box is set again to a different number of days, only those users' with expiry dates after the new date are reset. Users with expiry dates before the new date are not changed. For example, if the box is set to '20' on the 01/12/2010, users with expiry dates later than 21/12/2010 will be reset to 21/12/2010. Those users with expiry dates before 21/12/2010 will not be reset.
When a new user is created, their password's expiry date is set to the date after the number of days in this box. For example, if they are created on the 01/12/2010 and this box is set to '30', their password's expiry date is set to 30/12/2010.
Keep The PDF Printer
An option that determines whether the PDF printer is removed when the Publisher form is used to create a document in the system. If this option is cleared, the Publisher creates the PDF printer whenever it is
required and then removes it when the printing is finished. If the option is selected, the PDF printer is retained.
Notes: With the option selected, printing from the application will be faster, and non-power users will be able to create documents. However the PDF printer will also be visible in other Windows applications. We strongly recommend you do not use the PDF printer in other applications.
Warning: If this option is cleared, each user needs to have 'power user rights' so that the PDF printer can be created, and then removed each time a document is generated in the Publisher.
PDF Font Full Embedding
An option that determines whether some fonts are fully embedded in PDFs created in the application. PDFs that include embedded fonts are typically larger than those where fonts are not embedded. However, the on-screen and print quality is improved. The PDF is portable between computers without losing print quality.
Note: Even if this option is selected, only some fonts are embedded in PDFs.
An example of a font that can be embedded is the Tahoma font. Other fonts are never fully embedded in PDFs, for example; the Arial font. Most reports in the application use the Arial font so unless reports have been modified to use other fonts like Tahoma, the PDF size is not affected.
Update Company Balances
An option that determines whether balances on the Monitor Companies form are updated automatically, or controlled manually using a Calculate Balances command. If the option is selected, the totals on the Monitor Companies form will reflect the latest figures and can be updated manually using the Refresh command button or automatically by selecting the Automatic Refresh (every 10 secs) option. If the option is cleared, the totals on the Monitor Companies
form will reflect the figures from the last time balances were calculated. The form then includes a Calculate Balances command
button that you can use to recalculate balances for one or more companies.
Reverse Charge De-minimis level
If you supply certain high value items to VAT registered domestic customers, this option
determines the transaction value level when the HMRC Reverse Charge accounting procedure must be used . This level is set by HMRC so should only be changed if you are advised by HMRC to do so. You must have Manager Rights to change the level. What's Reverse Charge Accounting?
Remind Users Integration with the Shutdown service. The User is able to apply time settings (up to 999 minutes) for 2 reminders in regards to the automated Shutdown procedure.
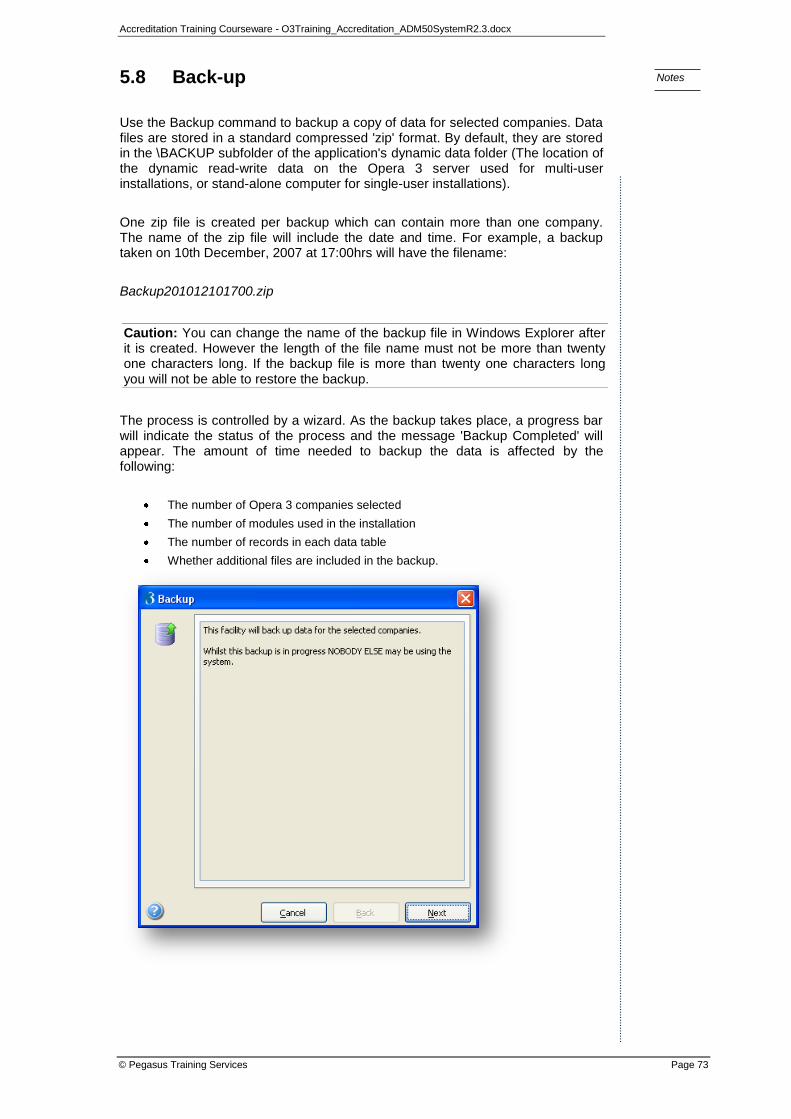
Accreditation Training Courseware - O3Training_Accreditation_ADM50SystemR2.3.docx
© Pegasus Training Services Page 73
Notes
5.8 Back-up
Use the Backup command to backup a copy of data for selected companies. Data files are stored in a standard compressed 'zip' format. By default, they are stored in the \BACKUP subfolder of the application's dynamic data folder (The location of the dynamic read-write data on the Opera 3 server used for multi-user installations, or stand-alone computer for single-user installations).
One zip file is created per backup which can contain more than one company. The name of the zip file will include the date and time. For example, a backup taken on 10th December, 2007 at 17:00hrs will have the filename:
Backup201012101700.zip
Caution: You can change the name of the backup file in Windows Explorer after it is created. However the length of the file name must not be more than twenty one characters long. If the backup file is more than twenty one characters long you will not be able to restore the backup.
The process is controlled by a wizard. As the backup takes place, a progress bar will indicate the status of the process and the message 'Backup Completed' will appear. The amount of time needed to backup the data is affected by the following:
The number of Opera 3 companies selected
The number of modules used in the installation
The number of records in each data table
Whether additional files are included in the backup.

Accreditation Training Courseware - O3Training_Accreditation_ADM50SystemR2.3.docx
© Pegasus Training Services Page 74
Notes
5.8.1 Multiple Company Backup
You can back up data for one or more companies. If the application detects that you have more than one company and companies have linked nominal ledgers (for example, company A's Sales module is linked to company B's Nominal module) a message will appear recommending you also back up those linked companies. This is to ensure the data remains synchronised.
5.8.2 Other Files included in the Backup
File Type Action
PDF PDF files are saved in the '?_PDF' subfolder of the Opera 3 dynamic data folder (The location of the dynamic read-write data on the Opera 3 server used for multi-user installations, or stand-alone computer for single-user installations, where ? is the company's code). Tick the PDF field to include these Portable Document Format files in the backup.
Spool Spool files are saved in the '?_SPOOL' subfolder of the Opera 3 dynamic data folder (where ? is the company's code). Tick the Spool field to include these spool files in the backup.
Email Opera 3 emails are saved in the '?_MAIL' subfolder of the Opera 3 dynamic data folder (where ? is the company's code). Tick the Email field to include these emails in the backup.
PDM Tick the PDM field to include Pegasus Document Management (PDM) files in the backup. This field is enabled if the system includes the PDM module which uses these SQL Server databases to store data:
The DM database retains PDM system-wide data like users and user roles
The DM_? database (where ? is the company's code) retains PDM company-specific data like document information types and the information library that links to the document image.
Note: The actual document images are stored beneath the '?_DOCUMENTS' subfolder of the
Opera 3 Data folder (where ? is the company's code). The images are held in an encrypted format in files suffixed with 'WEI'. If the PDM field is ticked, the backup includes the contents of the '?_DOCUMENTS' folder as well as backing up the SQL Server databases mentioned above.
SPM Tick the SPM field to include the Sales Pipeline Management related additional files in the backup. This field is enabled if the system includes the Sales Pipeline Management (SPM) module. The SPM module works with Microsoft Office Excel spreadsheets (XLS, XLSB, XLSM, XLSX, XLTM, XLTX, XLAM formats), Word documents (DOC, DOT, DOCX, DOCM, DOTM, DOTX formats), and Outlook emails (MSG format). The files are saved by SPM in the '?_SPREADSHEET', '?_MAILMERGE', and '?_LETTERTEMPLATE' folders (where ? is the company's code).
Note: File formats that end with an 'X' are used by Microsoft Office 2007 or higher.
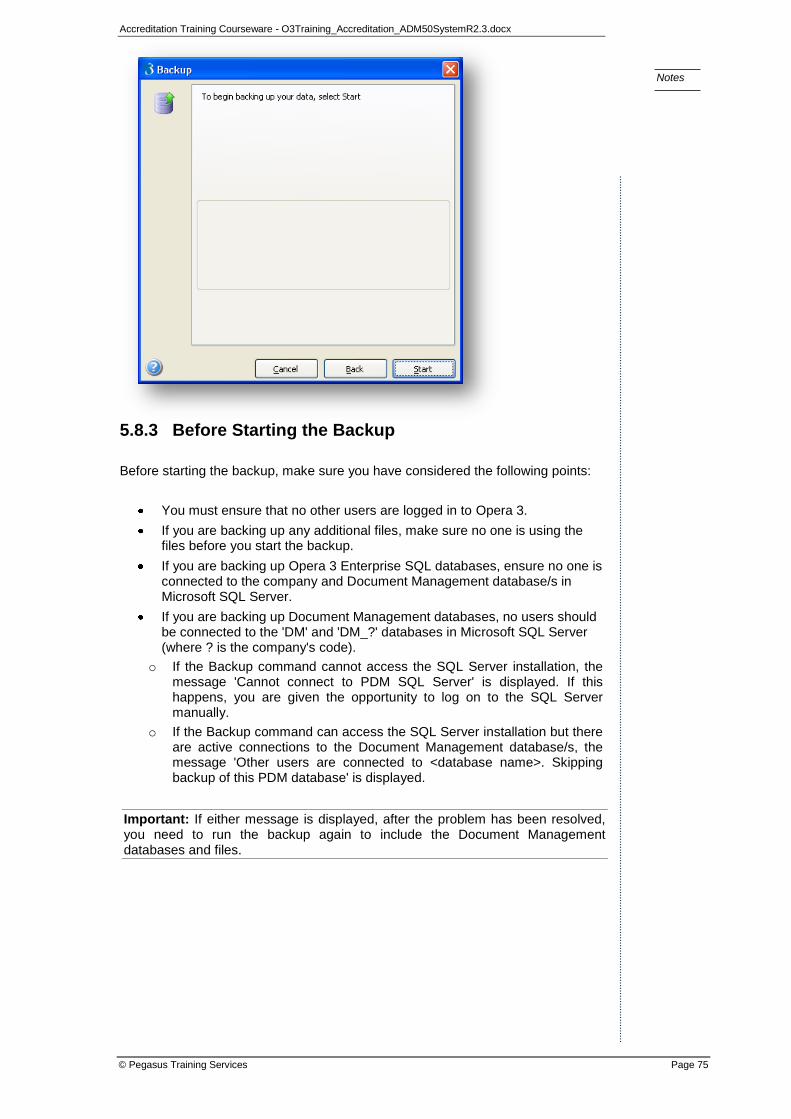
Accreditation Training Courseware - O3Training_Accreditation_ADM50SystemR2.3.docx
© Pegasus Training Services Page 75
Notes
5.8.3 Before Starting the Backup
Before starting the backup, make sure you have considered the following points:
You must ensure that no other users are logged in to Opera 3.
If you are backing up any additional files, make sure no one is using the files before you start the backup.
If you are backing up Opera 3 Enterprise SQL databases, ensure no one is connected to the company and Document Management database/s in Microsoft SQL Server.
If you are backing up Document Management databases, no users should be connected to the 'DM' and 'DM_?' databases in Microsoft SQL Server (where ? is the company's code).
o If the Backup command cannot access the SQL Server installation, the message 'Cannot connect to PDM SQL Server' is displayed. If this happens, you are given the opportunity to log on to the SQL Server manually.
o If the Backup command can access the SQL Server installation but there are active connections to the Document Management database/s, the message 'Other users are connected to <database name>. Skipping backup of this PDM database' is displayed.
Important: If either message is displayed, after the problem has been resolved, you need to run the backup again to include the Document Management databases and files.
Accreditation Training Courseware - O3Training_Accreditation_ADM50SystemR2.3.docx
© Pegasus Training Services Page 76
Notes
5.8.4 Backing up data
1. Open the System folder and click Utilities or click the Administration tab on the Ribbon Bar and then click System - Utilities.
2. Click Backup.
3. In the box, click to select the company or companies for which you want to back up data.
4. By default, the backup will include the additional files. If you do not want to include some or all of these files in the backup, clear the relevant files.
5. In Backup To, specify the location in which the backed up files will be stored. You can use the browse button to locate a folder. The default location is the \BACKUP subfolder of the application's dynamic data folder.
6. Click Next.
7. To begin the backup process, click Start.
8. When the process is finished, click Close.
Tip: We recommend you retain copies of your backups on removable media. That is, if you back up to a hard disk location, such as the default folder, you should consider transferring the backup to removal media for security. For example, you might want to store backups on external drives, tape, CDs, or DVDs. The backup process does not support spanning across multiple disks.
5.9 Restore
Use the Restore command to restore data that has been backed up previously using the Backup command in the System module. You need to know the location of the backup file you want to restore. The default location is the \BACKUP subfolder of the application's dynamic data folder. However, if you stored your backup elsewhere or on removable media, you can browse to a different location. You can only restore data from one backup file at a time and you can only restore data for companies that exist in the system. Note that when restoring a backup that contains more than one company, you must have access rights to all such companies. If the backup contains additional files, you can choose whether to restore those files or not. If the application detects that you have more than one company and companies have linked nominal ledgers (for example, company A's Sales module is linked to company B's Nominal module) a message will appear recommending you restore those linked companies also. This is to ensure the data remains synchronized.
The process is controlled by a wizard. As the restore takes place, a progress bar will indicate the status of the process and the message 'Restore Completed' will appear.
Caution: You can change the name of the backup file in Windows Explorer before you restore it. However the length of the file name must not be more than twenty one characters long. If the backup file is more than twenty one characters long you will not be able to restore the backup.

Accreditation Training Courseware - O3Training_Accreditation_ADM50SystemR2.3.docx
© Pegasus Training Services Page 77
Notes
5.9.1 Before Restoring a Backup
Before restoring a backup, make sure you have considered the following points:
You must ensure that no other users are logged in to Opera 3.
Consider whether you want to backup the existing data before you restore an earlier backup.
If you are restoring Opera 3 Enterprise SQL databases, no users should be connected to the 'COMP_?' databases in Microsoft SQL Server (where ? is the company's code).
If you are restoring Document Management databases, no users should be connected to the 'DM' and 'DM_?' databases in Microsoft SQL Server (where ? is the company's code).
o If the Restore command cannot access the SQL Server installation, the message 'Cannot connect to PDM SQL Server' is displayed.
o If the Restore command can access the SQL Server installation but there are active connections to the Document Management database/s, the message 'Other users are connected to <database name>. This PDM database not restored' is displayed.
To Restore Data
Important: If the data backup was taken before an upgrade to a later version of Opera 3, you must use the Update Data Structures command on the System > Utilities menu before using the restored data.
1. Open the System folder and click Utilities or click the Administration tab on the Ribbon Bar and then click System - Utilities.
2. Click Restore.
3. In Restore From, specify the location in which the backed up files are stored. You can use the browse button to locate a folder. The default location is the \BACKUP subfolder of the application's dynamic data folder.
4. Click Next.
5. In the box, click to select the file you want to restore and then click Next.
6. To begin the restore process, click Start.
7. If the application detects that the backup file contained additional files, you will be prompted to confirm whether you want to restore these as well. Click Yes or No accordingly.
8. Confirm again that you want to restore the files. Click Yes or No accordingly.
9. When the process is finished, click Close.
5.10 Data Status Check
The Data Status Check command provides information relating to the size of certain data files used by the application. These files are the ones most likely to increase in size over time. The size of your company's data can affect the performance of the application and, in extreme circumstances, prevent the application from working correctly.
The application's permanent data store is either a Microsoft Visual Foxpro database or a Microsoft SQL Server database. The About form displays the type of database your installation uses.
Accreditation Training Courseware - O3Training_Accreditation_ADM50SystemR2.3.docx
© Pegasus Training Services Page 78
Notes
You can access the form from these locations:
From the Help menu when the Classic Navigator or Navigation Pane is used.
From the Opera 3 button when the Ribbon Bar is used.
Individual files in a Visual Foxpro database have a size limitation; they cannot be larger than 2 gigabytes (GB) in size. Individual files in SQL Server do not have this limit. However the application does use temporary Visual Foxpro data files during certain processes even if your system uses Microsoft SQL Server as its database. A temporary data file is used for processing data on your computer before your company's permanent database is updated. Once the permanent database is updated, the temporary data file is removed.
The limitation applies to the following data files:
Visual Foxpro data files (.DBF)
Visual Foxpro memo files (.FPT)
Note: Most data files are not affected by the limitation. It is very unusual for
individual data files to be larger than 1 GB.
Data files monitored by the application
Sales Transactions
Sales Nominal Transfer
Sales History
Purchase Transactions
Purchase Nominal Transfer
Purchase History
Nominal Transactions
Nominal Journal Memo
Nominal History
Cashbook Transactions Lines
Cashbook Nominal Transfer
Fixed Assets Transactions (Enterprise editions only)
Invoicing/SOP Transactions
Stock Transactions
Stock Nominal Transfer
Stock Price Details
System VAT Data Collection
Payroll History
Sales Pipeline Management Activities (Enterprise editions only)
Sales Pipeline Management Notes (Enterprise editions only)
Sales Pipeline Management Contacts/Activities (Enterprise editions only).
Checking data files in a Visual Foxpro database
The application monitors the size of the data and related memo files. The Data Status Check form displays each file as a percentage of 2 GB limitation under the Data and Memo headings. If a data file does not have a related memo file, None is displayed. The approximate number of new records that can be added to each file is shown under the Approx. Capacity heading.

Accreditation Training Courseware - O3Training_Accreditation_ADM50SystemR2.3.docx
© Pegasus Training Services Page 79
Notes
The application checks the size of the files when:
you select the Data Status Check command.
you log in to a company using the Logon command in the System module or the Change System and Date button on the toolbar. The application checks whether any of the data files have a rating of Exceeded or Critical. If they do, a form displays the data files in question. The data files with the lowest remaining capacity are displayed at the top of the list.
Checking data files in a SQL Server database
The application monitors the size of the data and related memo files. The Data Status Check form displays each file as a percentage of 2 GB limitation under the Data and Memo headings. If a data file does not have a related memo file, None is displayed. The approximate number of new records that can be added to each file is shown under the Approx. Capacity heading.
The application checks the size of the files when:
you select the Data Status Check command.
you log in to a company using the Logon command in the System module or the Change System and Date button on the toolbar. As the application creates temporary Visual Foxpro data and memo files to process data before updating the SQL Server database, it checks whether any of these files will have a rating of Exceeded or Critical. If they will, a form displays the data files in question. The data files with the lowest remaining capacity are displayed at the top of the list.
the application is processing, it checks whether any Visual Foxpro data and memo files it will create exceeds the 2 GB limitation. A message is displayed if the 2 GB limitation will be breached. The message also suggests the next course of action.
Note: The size of the temporary files is calculated based on the largest expected
subset of the data files.
Rating the status of data files
The status of each data file is rated according to its size in megabytes, as follows:.
Rating Description
Exceeded The 2 GB limit for the data file has been exceeded.
Critical The size of the data file is between 90% and 100% of the maximum 2 GB size.
High The size of the data file is between 75% and 90% of the maximum 2 GB size.
Normal The size of the data file is less than 75% of the maximum 2 GB size.
Note: If the status of a data file cannot be calculated, the text Unavailable is displayed. This happens if the application cannot access the data file. If this happens click Refresh and contact your system administrator if the issue
persists.
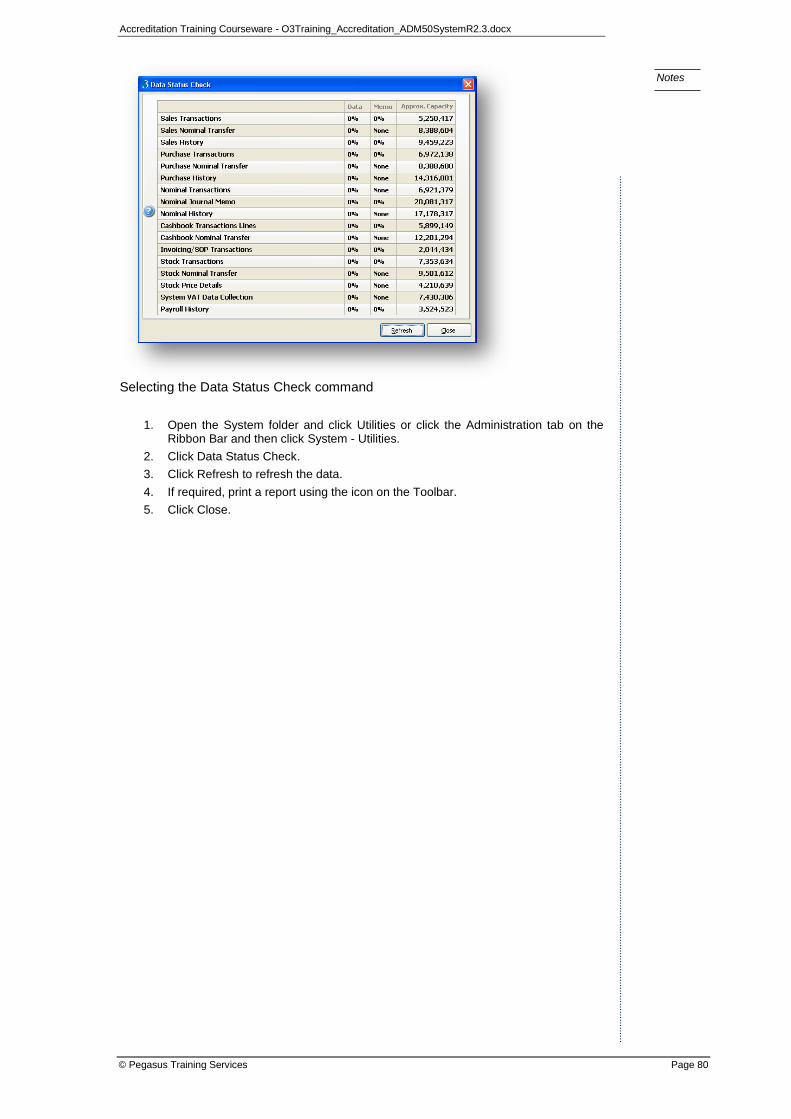
Accreditation Training Courseware - O3Training_Accreditation_ADM50SystemR2.3.docx
© Pegasus Training Services Page 80
Notes
Selecting the Data Status Check command
1. Open the System folder and click Utilities or click the Administration tab on the Ribbon Bar and then click System - Utilities.
2. Click Data Status Check.
3. Click Refresh to refresh the data.
4. If required, print a report using the icon on the Toolbar.
5. Click Close.

Accreditation Training Courseware - O3Training_Accreditation_ADM50SystemR2.3.docx
© Pegasus Training Services Page 81
Notes
System Manager - Practical Exercise
(Time Allowed 30 Minutes)
Objectives
At the end of this practical assignment you will be able to:
- Set up a new company using the Company Profiles function
- Create a new Opera 3 user through the User Profiles function
- Give the user created certain menu access throughout the system
through the User Profiles function
Exercise Details
You are required to create a new company within Opera 3. Details of the
company name and address are given below:-
(You must ensure that the identifying code for this company is ‘A’)
Attwood Barton Valeting Services Tel Number: 01604 826268
The Old Station House Fax Number: 01604 828288
Westley-On-The-Hill
Northampton VAT Reg. Number: 169 0943 36
NN6 7RT
Contact: William Attwood
Home Currency: Sterling
Tax Description: VAT
Data Path: C:\DOCUMENTS AND SETTINGS\ALL USERS\APPLICATION
DATA\PEGASUS\SERVER VFP\DATA
The Opera system you have installed for them includes the Sales, Purchase
and Nominal Ledgers. At this early stage of the installation, there is no need
to specify any integration between the modules or whether cost centres are
being used in the Nominal. They have also bought the multi-currency features
for Sales and Purchase Ledgers as a number of the organisations they deal
with trade in currencies other than Sterling. Please ensure that the set-up of
this new Company has full multi-currency processing invoked.
For the time being the company require only one additional user created on
the system, in addition to the MANAGER, ADMIN & USER. They want a new
User Id created for the ACCOUNTS SUPERVISOR, with full access to the
Sales and Purchase Ledger modules, restricted access within the Nominal
Ledger to Journals, Views, the Un-Posted Journal Report and the
Consolidation routine in the Nominal Utilities. Restricted access must also be
given to the System Manager module, allowing access to the Logon, Date &
Company, Preferences & Spooler Control functions only.
Accreditation Training Courseware - O3Training_Accreditation_ADM50SystemR2.3.docx
© Pegasus Training Services Page 82
Notes
Accreditation Training Courseware
6 Scheduling
Various notification functionality is covered in this section;
These commands provide you with significant features for scheduling administration, housekeeping and end of period activities in your Opera 3 installation.
Messaging Messaging allows you to send desktop alerts to users or groups of users in Opera 3. Scheduled alert messages are displayed on each user's desktop when they are using Opera 3. Any users who are not using Opera 3 when a message is scheduled to be displayed will be notified when they log in to the application if the message is still relevant. You can also view messages from the Windows Notification Area after logging in to Opera 3.
Shutdown Shutdown allows you to schedule a forced shutdown of Opera 3 sessions and also send desktop messages to users or groups of users in Opera 3 beforehand to warn them that a shutdown is going to happen. You can also view messages from the Windows Notification Area after logging in to Opera 3.
Task Scheduler
Task Scheduler allows you to schedule some tasks in Opera 3 to run at any time on a chosen day. Running some tasks during normal working hours can interrupt other essential daily processing tasks in Opera 3 and reduce data processing time. This can disrupt the day-to-day running of your business and cost you time and money. Using the Task Scheduler you can plan and process the tasks outside of your normal working day and be confident that your staff can carry out their normal day to day processing tasks without interruption.
User Groups
User Groups is an optional feature of Notification Services that allows you to arrange people that use Opera 3 into different groups. These groups can be used when you send messages or schedule shutdowns. For example, you could have a group called 'HR' for Payroll and Personnel users, or a group called 'FINANCE' for users working in the finance department. You may also have a group for directors and other senior managers or a group for administrator users who are responsible for the data backups and other housekeeping tasks.
Messaging
Messaging allows you to send desktop alerts to users or groups of users in Opera 3. Scheduled alert messages are displayed on each user's desktop when they are using Opera 3. Any users who are not using Opera 3 when a message is scheduled to be displayed will be notified when they log in to the application if the message is still relevant. You can also view messages from the Windows Notification Area after logging in to Opera 3.
You can write your own messages to inform users of planned activities in Opera 3, for example that a batch invoice run will commence at a certain time or a end of period process is planned. For processes like these, that require exclusive access to data, users may not be able to use Opera 3 until the process is completed. You can also use messages for events that are nothing to do with Opera 3, for example to remind employees of company events or to send them season's greetings.
When you set up a message, you can add a title, date and time, frequency (once, daily, weekly or monthly) and the amount of time it is displayed on the Opera 3 desktop. You can also define a message as relevant only for specified users or specified user groups, and whether it should be displayed in all Opera 3 systems or only selected systems.
Note: Desktop messages are defined on the System - Scheduling - Messaging form.
Sc
he
du
ling
How does the timing work with the times set for notification and Shutdown?
It is built into VFP/Opera 3 to automatically handle the polling. It will look to the date and time set on the message or shutdown and use the system date and time as the goal to activate the required process. Polling is set to run every <1 minute.
When were these functions introduced?
Scheduler was introduced in v1.00 of O3 and Notification and Shutdown came in v1.20 of O3.
Does Notifications work across Multiple Systems?
Yes, it handles multiple systems.
Accreditation Training Courseware - O3Training_Accreditation_ADM50SystemR2.3.docx
© Pegasus Training Services Page 83
Notes
Background Processing - Messaging
A Notification Service timer program is installed on all Opera 3 client computers by the Opera 3 installer and runs in the background. Each minute the program checks for messages that have been scheduled to be sent using the time on the Opera 3 server for its geographical location. When the timer program finds a message that must be sent, it is displayed on the user's desktop either immediately if they are using Opera 3 or when they log in to Opera 3 (as long as the message has not lapsed). The user can then close the message after they have read it and followed any instructions in the message.
Note: In a network environment, it is possible that the time on a workstation computer is different to the time on the Opera 3 server. As the timer program uses the time for the geographical location on the Opera 3 server rather than the time on the client computer, if they are set to a different time it may look like message alerts are displayed at the wrong time. For example, if the server is located in Amsterdam (GMT +2 hours) and the client computers are located in the United Kingdom (GMT), the alerts will use the GMT +2 time.
Shutdown
IMPORTANT: Any unsaved entries that users are working on will be lost when Opera 3 is shutdown. Also, if a lengthy process like a Period End command is being run when a shutdown happens, your data may be damaged.
YOU MUST ALLOW SUFFICIENT TIME FOR LENGTHY PROCESSES TO COMPLETE AND FOR USERS TO SAVE THEIR WORK BEFORE THE SHUTDOWN IS SCHEDULED TO HAPPEN. YOU CAN USE THE MONITOR USERS FORM TO CHECK WHICH USERS ARE STILL LOGGED IN AND DISABLE THE SHUTDOWN IF NECESSARY.
If anyone is using a Pegasus product that links to Opera 3 - Pegasus Document Management, Pegasus XRL, Pegasus Instant Messenger, Pegasus CIS, Operations II, Pegasus Dashboards and Online Filing Manager - these products will not shutdown. It is advisable to close these products individually before the scheduled shutdown.
Shutdown allows you to schedule a forced shutdown of Opera 3 sessions and also send desktop messages to users or groups of users in Opera 3 beforehand to warn them that a shutdown is going to happen. You can also view messages from the Windows Notification Area after logging in to Opera 3. Users will receive three messages before the shutdown happens. You can define when the messages are displayed so users have time to save their work. For example, the first message can be scheduled to be displayed 1 hour beforehand, the second message 30 minutes beforehand and the final message 5 minutes beforehand.
Shutdowns are likely to be scheduled so that essential maintenance, like upgrading the Opera 3 programs or running the Update Data Structures or Backup commands, can be completed by a system administrator. All affected Opera 3 sessions are closed by the shutdown event. However, an administrator can use the ADMIN user to log in to Opera 3 so that a maintenance task can be completed but all affected users will be locked out for a defined amount of time. The ADMIN user will be locked out of Opera 3 for between one and two minutes after the shutdown has occurred.
Shutdowns can be scheduled for either users or user groups, or for a company or more than one company. If companies are selected, all users who have access to the companies will be locked out for a prescribed amount of time.
Accreditation Training Courseware - O3Training_Accreditation_ADM50SystemR2.3.docx
© Pegasus Training Services Page 84
Notes
Example of a User Group Shutdown
A group called FINANCE includes three users - Jason, David and Naresh. Another group called PROJECTS includes Geraldine and Shaun. Everyone is permitted to use both company A and company B. Everyone is working in company A.
You schedule a shutdown for the FINANCE group only for 2pm with a lockout period of one hour. At 2pm, Jason, David and Naresh's Opera 3 sessions are shut down. Geraldine and Shaun's Opera 3 sessions are not shut down.
Even though Jason, David and Naresh were using company A when the shutdown happened, they are locked out of both company A and company B for one hour. Geraldine and Shaun are unaffected because they are not members of the FINANCE user group.
Example of a Company Shutdown
A group called FINANCE includes three users - Jason, David and Naresh. Another group called PROJECTS includes Geraldine and Shaun. Jason and David are working in company A. Geraldine, Naresh and Shaun are working in company B. Everyone is permitted to use both company A and company B.
You schedule a shutdown for company A only for 2pm with a lockout period of one hour. At 2pm, Jason and David's Opera 3 sessions are shut down. Geraldine, Naresh and Shaun are unaffected as they are working in company B.
Jason and David can log in to company B if required. However, nobody will be able to use company A for one hour.
Note: Shutdown events and associated messages are defined on the System -
Scheduling - Shutdown form.
Background Processing - Shutdown
A Notification Service timer program is installed on all Opera 3 client computers by the Opera 3 installer and runs in the background. Each minute the program checks for shutdowns that have been scheduled to be sent using the time on the Opera 3 server for its geographical location. When the timer program finds a shutdown, the respective messages are displayed on the user's desktop either immediately if they are using Opera 3 or when they log in to Opera 3 (as long as the message has not lapsed). The user can then close the message after they have read it and followed any instructions in the message. The shutdown then happens at the time chosen.
Note: In a network environment, it is possible that the time on a workstation computer is different to the time on the Opera 3 server. As the timer program uses the time for the geographical location on the Opera 3 server rather than the time on the client computer, if they are set to a different time it may look like message alerts are displayed at the wrong time. For example, if the server is located in Amsterdam (GMT +2 hours) and the client computers are located in the United Kingdom (GMT), the alerts will use the GMT +2 time.
Task Scheduler
Task Scheduler allows you to schedule some tasks in Opera 3 to run at any time on a chosen day. Running some tasks during normal working hours can interrupt other essential daily processing tasks in Opera 3 and reduce data processing time. This can disrupt the day-to-day running of your business and cost you time and money. Using the Task Scheduler you can plan and process the tasks outside of your normal working day and be confident that your staff can carry out their normal day to day processing tasks without interruption.
For more information, see the Introducing Task Scheduler Help topic.
Note: Scheduler tasks are defined on the System - Scheduling - Task Scheduler
form.
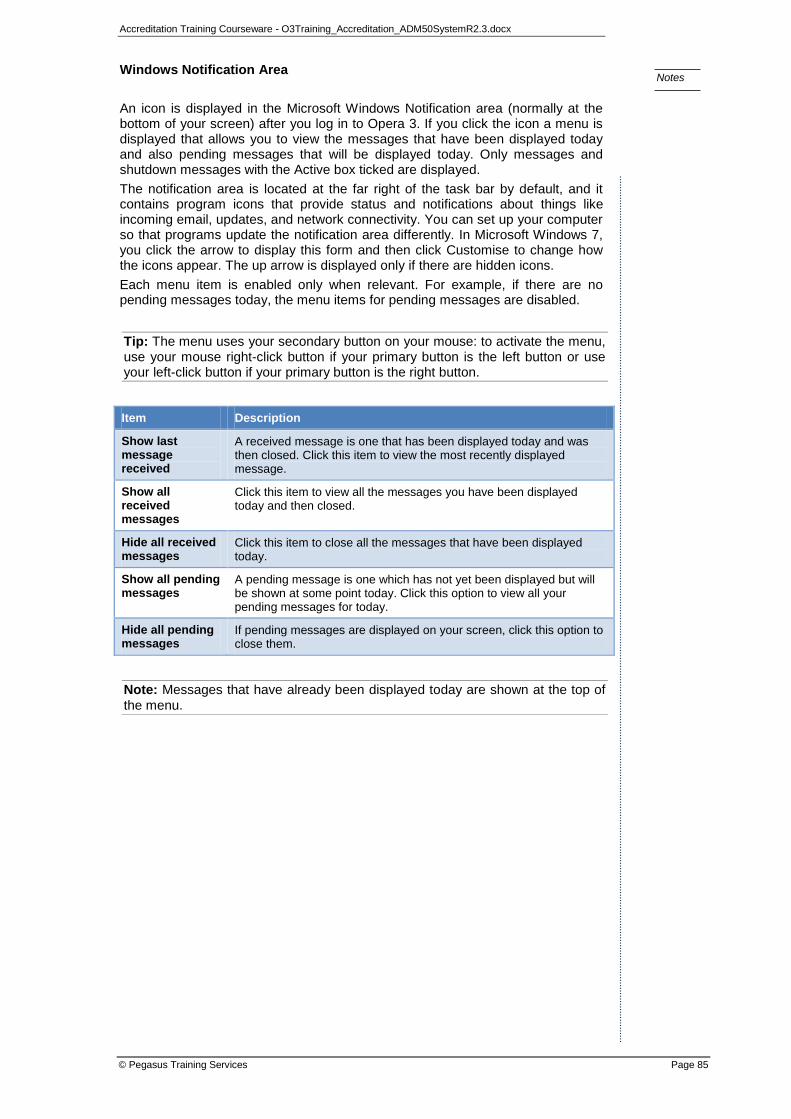
Accreditation Training Courseware - O3Training_Accreditation_ADM50SystemR2.3.docx
© Pegasus Training Services Page 85
Notes
Windows Notification Area
An icon is displayed in the Microsoft Windows Notification area (normally at the bottom of your screen) after you log in to Opera 3. If you click the icon a menu is displayed that allows you to view the messages that have been displayed today and also pending messages that will be displayed today. Only messages and shutdown messages with the Active box ticked are displayed.
The notification area is located at the far right of the task bar by default, and it contains program icons that provide status and notifications about things like incoming email, updates, and network connectivity. You can set up your computer so that programs update the notification area differently. In Microsoft Windows 7, you click the arrow to display this form and then click Customise to change how the icons appear. The up arrow is displayed only if there are hidden icons.
Each menu item is enabled only when relevant. For example, if there are no pending messages today, the menu items for pending messages are disabled.
Tip: The menu uses your secondary button on your mouse: to activate the menu, use your mouse right-click button if your primary button is the left button or use your left-click button if your primary button is the right button.
Item Description
Show last message received
A received message is one that has been displayed today and was then closed. Click this item to view the most recently displayed message.
Show all received messages
Click this item to view all the messages you have been displayed today and then closed.
Hide all received messages
Click this item to close all the messages that have been displayed today.
Show all pending messages
A pending message is one which has not yet been displayed but will be shown at some point today. Click this option to view all your pending messages for today.
Hide all pending messages
If pending messages are displayed on your screen, click this option to close them.
Note: Messages that have already been displayed today are shown at the top of
the menu.

Accreditation Training Courseware - O3Training_Accreditation_ADM50SystemR2.3.docx
© Pegasus Training Services Page 86
Notes
6.1 User Groups
You can group your users together into user groups. User groups are optional features of Message and Shutdown Services to group people that use Opera 3 into, for example, functional areas or seniority groups. So, for example, you could have a group called 'HR' for Payroll and Personnel users, or a group called 'Finance' for users working in the finance department. You may also have a group for directors and other senior managers or a group for administrator users who are responsible for the data backups and other housekeeping tasks.
Box Description
Code The group's unique code.
Description The group's description, which is displayed on distribution lists on the System - Maintenance - Messages and the System - Maintenance - Shutdown forms.
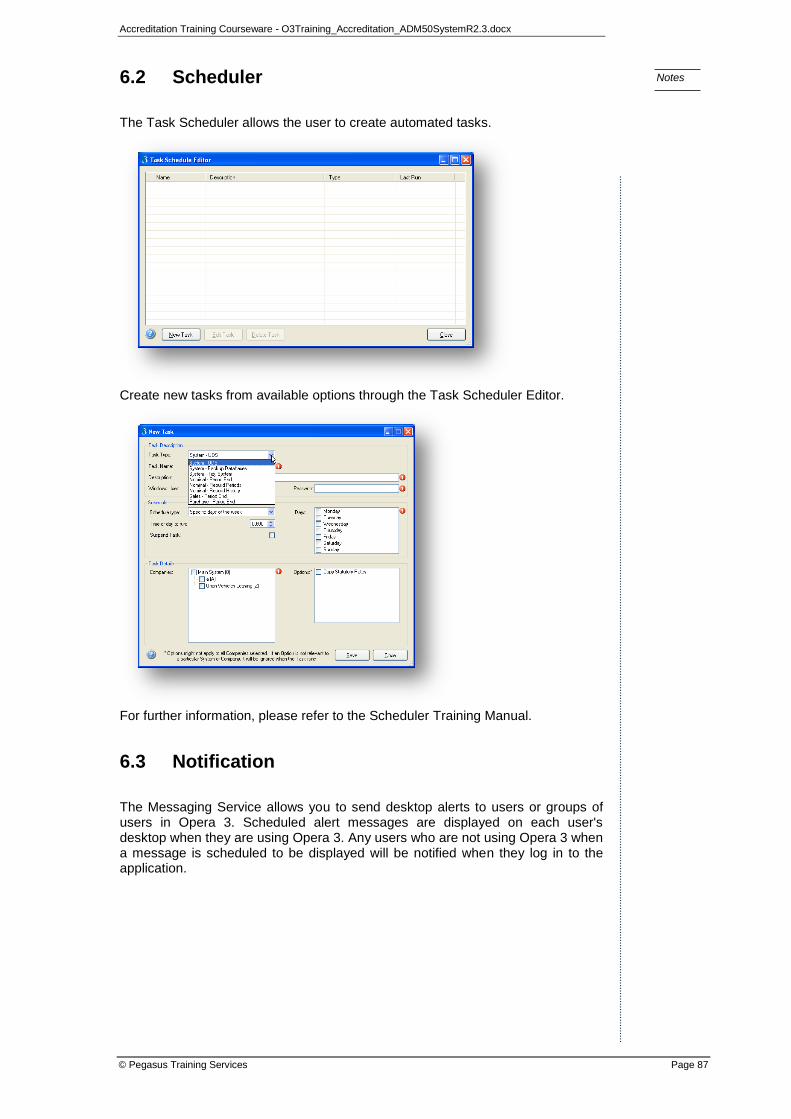
Accreditation Training Courseware - O3Training_Accreditation_ADM50SystemR2.3.docx
© Pegasus Training Services Page 87
Notes
6.2 Scheduler
The Task Scheduler allows the user to create automated tasks.
Create new tasks from available options through the Task Scheduler Editor.
For further information, please refer to the Scheduler Training Manual.
6.3 Notification
The Messaging Service allows you to send desktop alerts to users or groups of users in Opera 3. Scheduled alert messages are displayed on each user's desktop when they are using Opera 3. Any users who are not using Opera 3 when a message is scheduled to be displayed will be notified when they log in to the application.
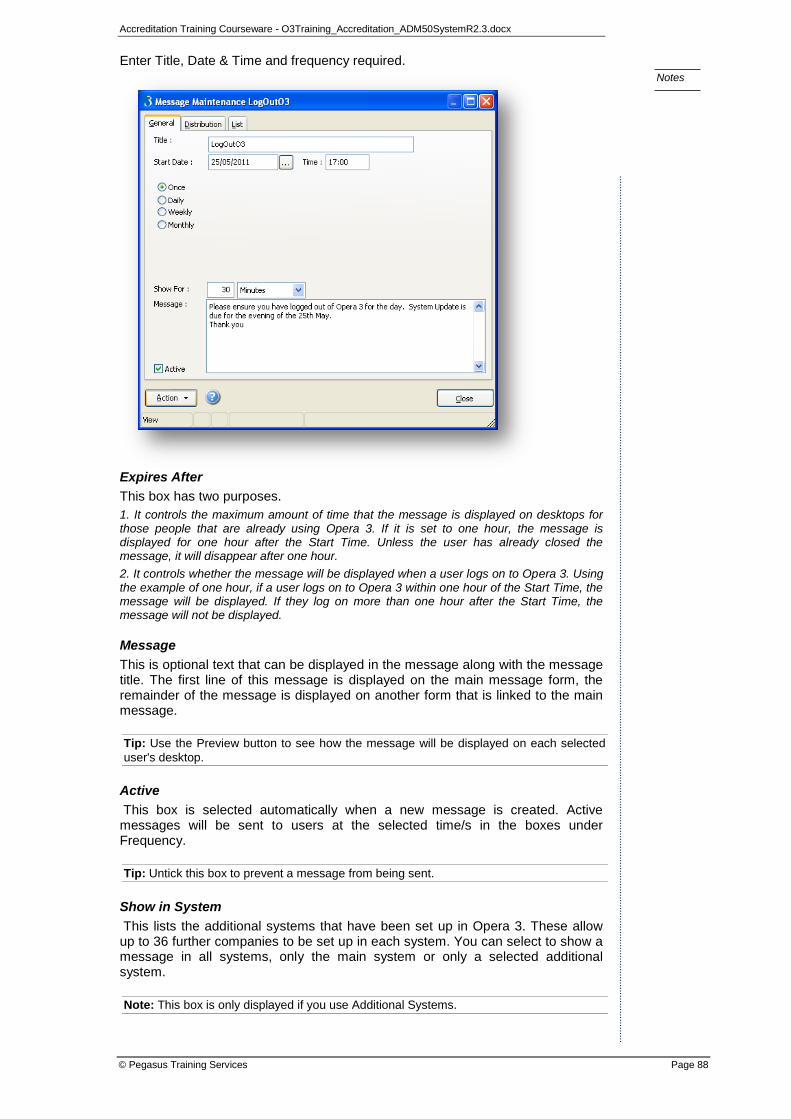
Accreditation Training Courseware - O3Training_Accreditation_ADM50SystemR2.3.docx
© Pegasus Training Services Page 88
Notes
Enter Title, Date & Time and frequency required.
Expires After
This box has two purposes.
1. It controls the maximum amount of time that the message is displayed on desktops for those people that are already using Opera 3. If it is set to one hour, the message is displayed for one hour after the Start Time. Unless the user has already closed the message, it will disappear after one hour.
2. It controls whether the message will be displayed when a user logs on to Opera 3. Using the example of one hour, if a user logs on to Opera 3 within one hour of the Start Time, the message will be displayed. If they log on more than one hour after the Start Time, the message will not be displayed.
Message
This is optional text that can be displayed in the message along with the message title. The first line of this message is displayed on the main message form, the remainder of the message is displayed on another form that is linked to the main message.
Tip: Use the Preview button to see how the message will be displayed on each selected
user's desktop.
Active
This box is selected automatically when a new message is created. Active messages will be sent to users at the selected time/s in the boxes under Frequency.
Tip: Untick this box to prevent a message from being sent.
Show in System
This lists the additional systems that have been set up in Opera 3. These allow up to 36 further companies to be set up in each system. You can select to show a message in all systems, only the main system or only a selected additional system.
Note: This box is only displayed if you use Additional Systems.
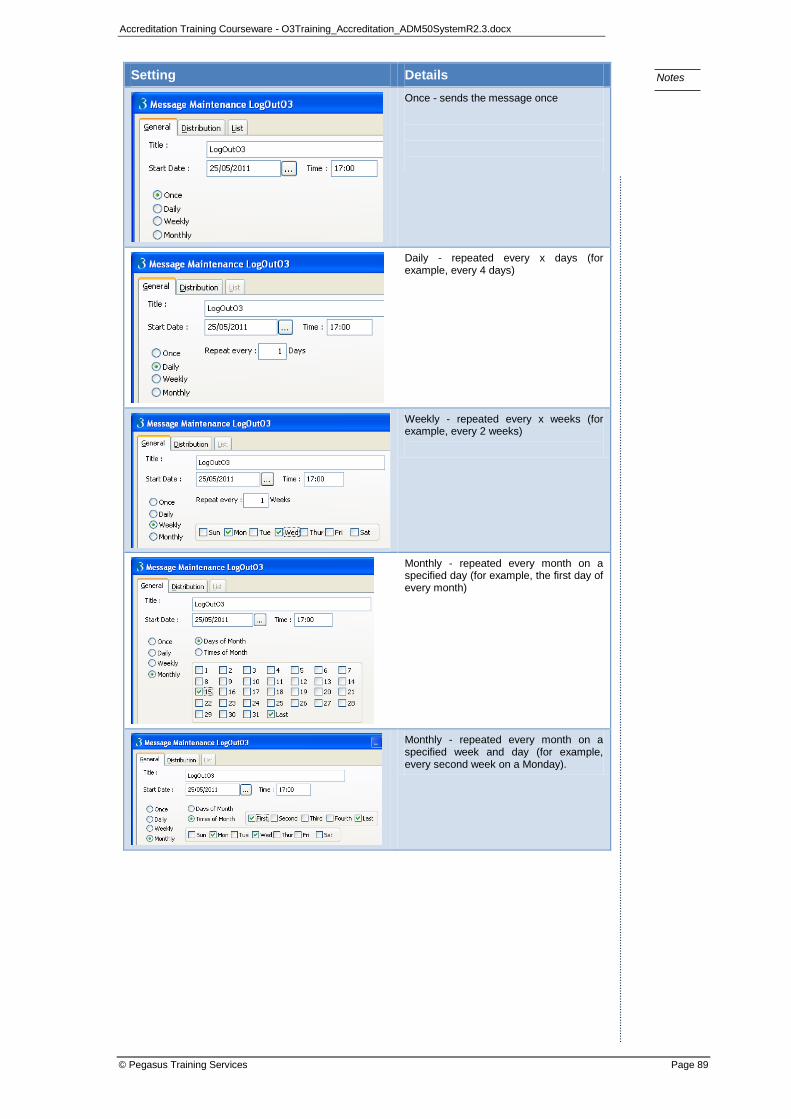
Accreditation Training Courseware - O3Training_Accreditation_ADM50SystemR2.3.docx
© Pegasus Training Services Page 89
Notes
Setting Details
Once - sends the message once
Daily - repeated every x days (for example, every 4 days)
Weekly - repeated every x weeks (for example, every 2 weeks)
Monthly - repeated every month on a specified day (for example, the first day of every month)
Monthly - repeated every month on a specified week and day (for example, every second week on a Monday).
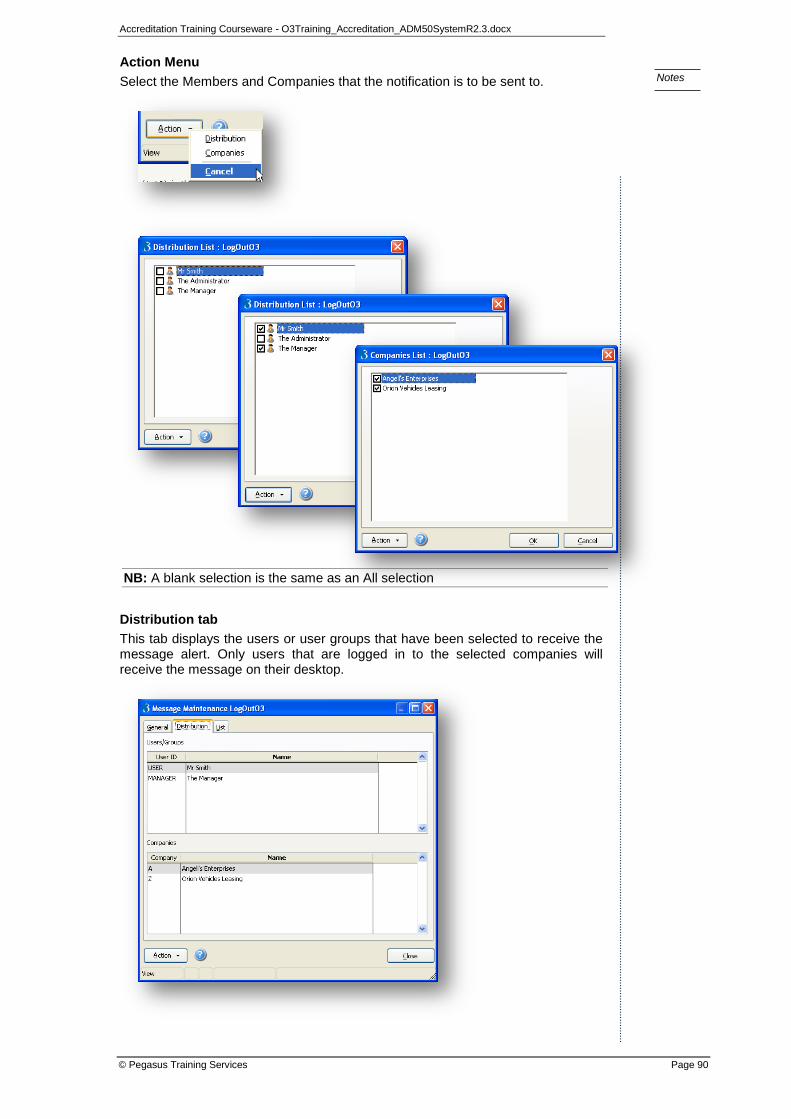
Accreditation Training Courseware - O3Training_Accreditation_ADM50SystemR2.3.docx
© Pegasus Training Services Page 90
Notes
Action Menu
Select the Members and Companies that the notification is to be sent to.
NB: A blank selection is the same as an All selection
Distribution tab
This tab displays the users or user groups that have been selected to receive the message alert. Only users that are logged in to the selected companies will receive the message on their desktop.
Accreditation Training Courseware - O3Training_Accreditation_ADM50SystemR2.3.docx
© Pegasus Training Services Page 91
Notes
Notification Preferences
Each user can define how alerts sent by the Notification Service or Shutdown Service in Opera 3 are displayed on their desktop.
How transparent should be desktop alert be?
This option allows individual users to set the transparency of their desktop alerts. The higher the percentage, the more opaque the alert is. The lower the percentage, the more transparent the alert is.
Play a sound when the Alert appears
Tick the box if you want an audio alert to accompany a desktop message.
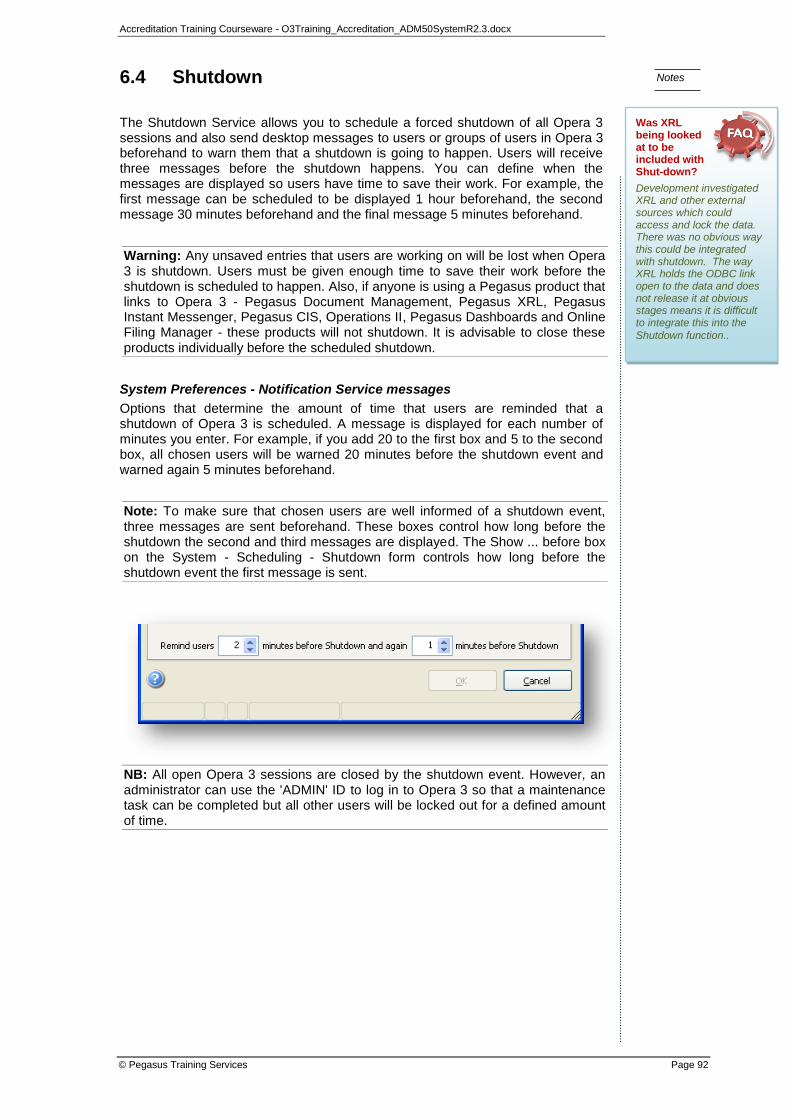
Accreditation Training Courseware - O3Training_Accreditation_ADM50SystemR2.3.docx
© Pegasus Training Services Page 92
Notes
6.4 Shutdown
The Shutdown Service allows you to schedule a forced shutdown of all Opera 3 sessions and also send desktop messages to users or groups of users in Opera 3 beforehand to warn them that a shutdown is going to happen. Users will receive three messages before the shutdown happens. You can define when the messages are displayed so users have time to save their work. For example, the first message can be scheduled to be displayed 1 hour beforehand, the second message 30 minutes beforehand and the final message 5 minutes beforehand.
Warning: Any unsaved entries that users are working on will be lost when Opera 3 is shutdown. Users must be given enough time to save their work before the shutdown is scheduled to happen. Also, if anyone is using a Pegasus product that links to Opera 3 - Pegasus Document Management, Pegasus XRL, Pegasus Instant Messenger, Pegasus CIS, Operations II, Pegasus Dashboards and Online Filing Manager - these products will not shutdown. It is advisable to close these products individually before the scheduled shutdown.
System Preferences - Notification Service messages
Options that determine the amount of time that users are reminded that a shutdown of Opera 3 is scheduled. A message is displayed for each number of minutes you enter. For example, if you add 20 to the first box and 5 to the second box, all chosen users will be warned 20 minutes before the shutdown event and warned again 5 minutes beforehand.
Note: To make sure that chosen users are well informed of a shutdown event, three messages are sent beforehand. These boxes control how long before the shutdown the second and third messages are displayed. The Show ... before box on the System - Scheduling - Shutdown form controls how long before the shutdown event the first message is sent.
NB: All open Opera 3 sessions are closed by the shutdown event. However, an administrator can use the 'ADMIN' ID to log in to Opera 3 so that a maintenance task can be completed but all other users will be locked out for a defined amount of time.
Was XRL being looked at to be included with Shut-down?
Development investigated XRL and other external sources which could access and lock the data. There was no obvious way this could be integrated with shutdown. The way XRL holds the ODBC link open to the data and does not release it at obvious stages means it is difficult to integrate this into the
Shutdown function..

Accreditation Training Courseware - O3Training_Accreditation_ADM50SystemR2.3.docx
© Pegasus Training Services Page 93
Notes
Enter similar details as seen in the messaging form, title, date & frequency etc.
Show ... before
The first of three messages that is sent to warn users can be displayed for a chosen time before a scheduled shutdown. For example, you may want to display the message two hours beforehand so that your users have plenty of time to complete their work in advance of the shutdown.
Note: Three messages are displayed on each selected user's desktop before the shutdown event happens. The amount of time before the shutdown that Opera 3 displays the second and third messages are defined on the System - Utilities - System Preferences form.
Lock out for
After a shutdown event you may want to prevent anyone from using Opera 3 for a certain amount of time. For example, if the reason for the shutdown is to back up your data, you will not want users logging in to Opera 3 whilst that is happening. You need to use your understanding of the time needed to complete the activity to decide how long to lock people out for.
Note: If anyone tries to log in to Opera 3 during the lock out period, they will be prevented from doing so. A message will tell them when they will be able to log in again.
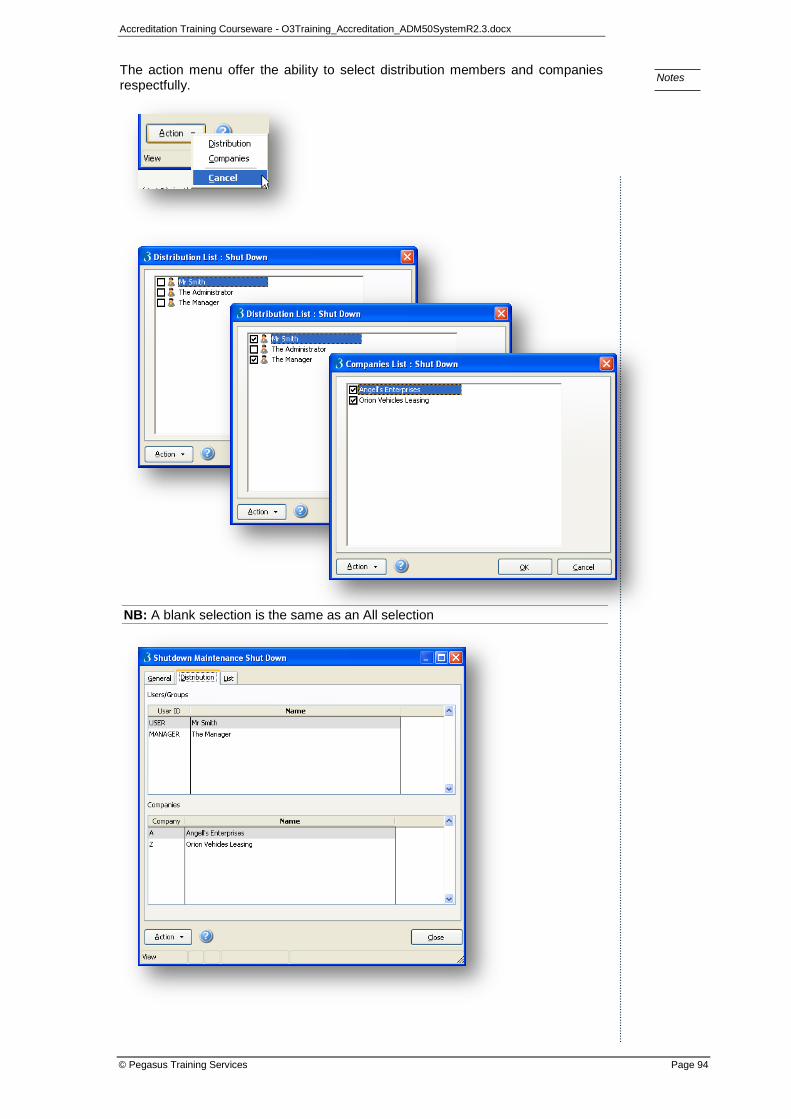
Accreditation Training Courseware - O3Training_Accreditation_ADM50SystemR2.3.docx
© Pegasus Training Services Page 94
Notes
The action menu offer the ability to select distribution members and companies respectfully.
NB: A blank selection is the same as an All selection
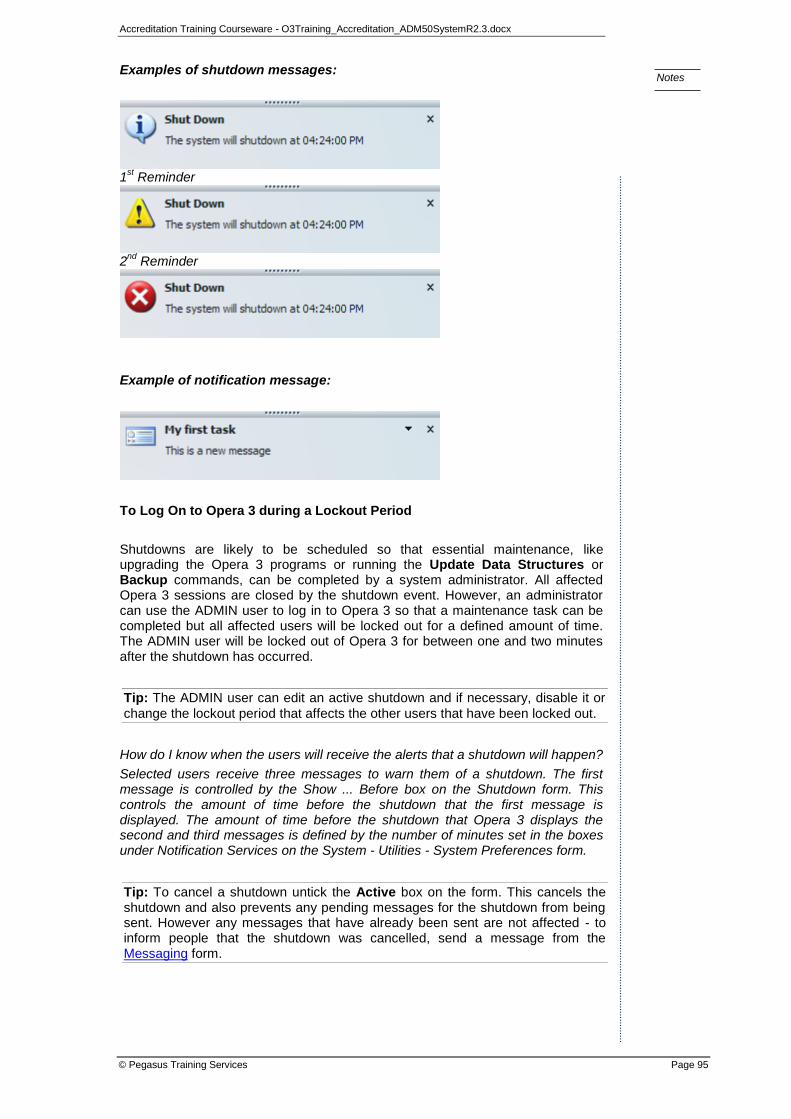
Accreditation Training Courseware - O3Training_Accreditation_ADM50SystemR2.3.docx
© Pegasus Training Services Page 95
Notes
Examples of shutdown messages:
1
st Reminder
2
nd Reminder
Example of notification message:
To Log On to Opera 3 during a Lockout Period
Shutdowns are likely to be scheduled so that essential maintenance, like upgrading the Opera 3 programs or running the Update Data Structures or Backup commands, can be completed by a system administrator. All affected Opera 3 sessions are closed by the shutdown event. However, an administrator can use the ADMIN user to log in to Opera 3 so that a maintenance task can be completed but all affected users will be locked out for a defined amount of time. The ADMIN user will be locked out of Opera 3 for between one and two minutes after the shutdown has occurred.
Tip: The ADMIN user can edit an active shutdown and if necessary, disable it or
change the lockout period that affects the other users that have been locked out.
How do I know when the users will receive the alerts that a shutdown will happen?
Selected users receive three messages to warn them of a shutdown. The first message is controlled by the Show ... Before box on the Shutdown form. This controls the amount of time before the shutdown that the first message is displayed. The amount of time before the shutdown that Opera 3 displays the second and third messages is defined by the number of minutes set in the boxes under Notification Services on the System - Utilities - System Preferences form.
Tip: To cancel a shutdown untick the Active box on the form. This cancels the shutdown and also prevents any pending messages for the shutdown from being sent. However any messages that have already been sent are not affected - to inform people that the shutdown was cancelled, send a message from the Messaging form.
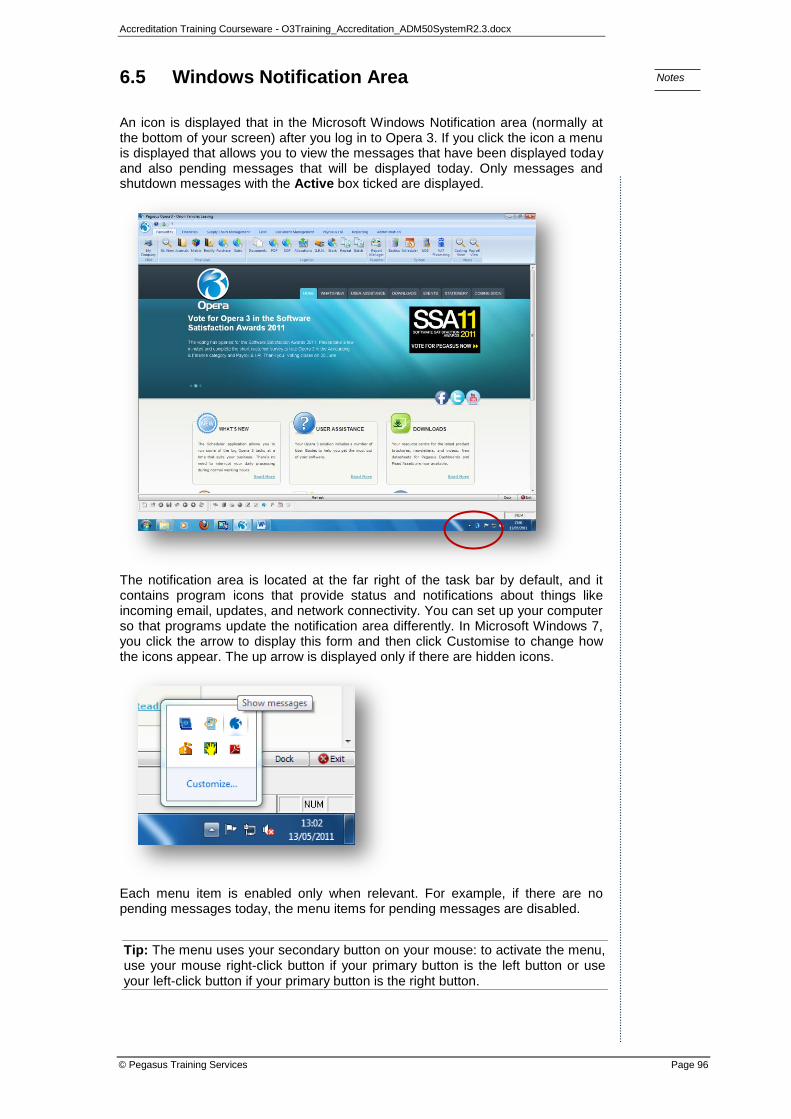
Accreditation Training Courseware - O3Training_Accreditation_ADM50SystemR2.3.docx
© Pegasus Training Services Page 96
Notes
6.5 Windows Notification Area
An icon is displayed that in the Microsoft Windows Notification area (normally at the bottom of your screen) after you log in to Opera 3. If you click the icon a menu is displayed that allows you to view the messages that have been displayed today and also pending messages that will be displayed today. Only messages and shutdown messages with the Active box ticked are displayed.
The notification area is located at the far right of the task bar by default, and it contains program icons that provide status and notifications about things like incoming email, updates, and network connectivity. You can set up your computer so that programs update the notification area differently. In Microsoft Windows 7, you click the arrow to display this form and then click Customise to change how the icons appear. The up arrow is displayed only if there are hidden icons.
Each menu item is enabled only when relevant. For example, if there are no pending messages today, the menu items for pending messages are disabled.
Tip: The menu uses your secondary button on your mouse: to activate the menu, use your mouse right-click button if your primary button is the left button or use your left-click button if your primary button is the right button.

Accreditation Training Courseware - O3Training_Accreditation_ADM50SystemR2.3.docx
© Pegasus Training Services Page 97
Notes
Item Description
Show last message received
A received message is one that has been displayed today and was then closed. Click this item to view the most recently displayed message.
Show all received messages
Click this item to view all the messages you have been displayed today and then closed.
Hide all received messages
Click this item to close all the messages that have been displayed today.
Show all pending messages
A pending message is one which has not yet been displayed but will be shown at some point today. Click this option to view all your pending messages for today.
Hide all pending messages
If pending messages are displayed on your screen, click this option to close them.
Note: Messages that have already been displayed today are shown at the top of
the menu.
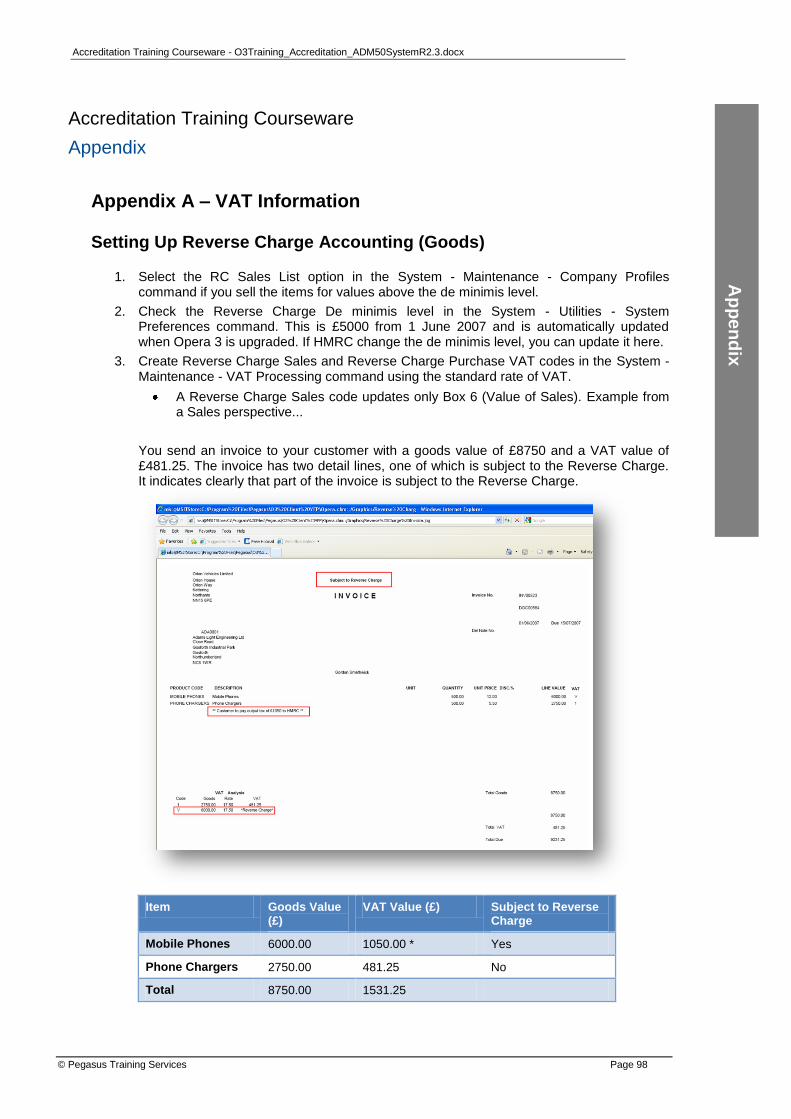
Accreditation Training Courseware - O3Training_Accreditation_ADM50SystemR2.3.docx
© Pegasus Training Services Page 98
Accreditation Training Courseware
Appendix
Appendix A – VAT Information
Setting Up Reverse Charge Accounting (Goods)
1. Select the RC Sales List option in the System - Maintenance - Company Profiles command if you sell the items for values above the de minimis level.
2. Check the Reverse Charge De minimis level in the System - Utilities - System Preferences command. This is £5000 from 1 June 2007 and is automatically updated when Opera 3 is upgraded. If HMRC change the de minimis level, you can update it here.
3. Create Reverse Charge Sales and Reverse Charge Purchase VAT codes in the System - Maintenance - VAT Processing command using the standard rate of VAT.
A Reverse Charge Sales code updates only Box 6 (Value of Sales). Example from a Sales perspective...
You send an invoice to your customer with a goods value of £8750 and a VAT value of £481.25. The invoice has two detail lines, one of which is subject to the Reverse Charge. It indicates clearly that part of the invoice is subject to the Reverse Charge.
Item Goods Value (£)
VAT Value (£) Subject to Reverse Charge
Mobile Phones 6000.00 1050.00 * Yes
Phone Chargers 2750.00 481.25 No
Total 8750.00 1531.25
Ap
pe
nd
ix

Accreditation Training Courseware - O3Training_Accreditation_ADM50SystemR2.3.docx
© Pegasus Training Services Page 99
Your VAT Return is updated in the following way:
Box 1 (Output Tax) is updated only with the £481.25 VAT for the Phone Chargers
Box 6 (Value of Sales) is updated with Total Goods value of £8750.00
Your customer must account for the Output Tax on the mobile phones of £1050. *
A Reverse Charge Purchase code updates Box 1 (Output Tax), Box 4 (Input Tax), and Box 7 (Value of Purchases). Example from a Purchase perspective..
You receive an invoice from your supplier with a goods value of £8750 and a VAT value of £1531.25. The invoice has two detail lines, one of which is subject to the Reverse Charge. The invoice clearly indicates that the Reverse Charge applies to some of the invoice.
Item Goods Value (£)
VAT Value (£) Subject to Reverse Charge
Mobile Phones 6000.00 1050.00 * Yes
Phone Chargers 2750.00 481.25 No
Total 8750.00 1531.25
Your VAT Return is updated in the following way:
Box 1 (Output Tax) is updated with the Reverse Charge VAT value of £1050.00 *
Box 4 (Input Tax) is updated with total VAT value of £1531.25
Box 7 (Total value of Supplies) is updated with Total Goods value of £8750.00
Therefore Input Tax of £481.25 (Box 1 - Box 4) from the item that is not subjected to the Reverse Charge is reclaimed from HMRC.
4. Select the Reverse Charge option for each stock item or product record where the Reverse Charge accounting procedure applies. The option is displayed in the Stock - Processing command on the Options form and where the Stock module is not used, in the SOP/Invoicing - Maintenance - Products and P.Orders - Maintenance - Products commands.
You can identify a Reverse Charge item by an icon that appears in the form's status bar:
5. Your sales invoice and credit note designs must be updated to indicate when the Reverse
Charge accounting procedure has been used on a transaction. You can check the demonstration data's invoice design to see what needs to be done.
Each line on the document must indicate whether it is a reverse charge item.
The VAT Analysis section of the document must indicate whether VAT is subject to the Reverse Charge procedure.
The VAT value that is being reverse charged must be displayed after the final line of the document.
Accreditation Training Courseware - O3Training_Accreditation_ADM50SystemR2.3.docx
© Pegasus Training Services Page 100
6. To process a transaction to a VAT registered customer above the HMRC de minimis level, use a Reverse Charge Sales VAT code. Use Reverse Charge Purchase VAT code when you receive an invoice or credit note that are subject to Reverse Charge accounting from a VAT registered supplier. You can use Reverse Charge codes on credit notes even if the goods value is below the de minimis level.
Note: If HMRC change the de-minimis level you must update the Reverse Charge De-minimis level box on the System - Utilities - System Preferences form.
7. If you selected the RC Sales List option in the System - Maintenance - Company Profiles command, create the RCSL upload file in the System - Maintenance - VAT Processing command and submit the RCSL to HMRC for each VAT period, whether or not you actually make Reverse Charge supplies. You must then submit the RCSL for each VAT period until you permanently cease to make these supplies, when you must tell HMRC the date on which you ceased.
Setting Up Reverse Charge Accounting (Services)
To set up Reverse Charge accounting for services you need to create VAT codes in the System - Maintenance - VAT Processing command that are set up to update the VAT Return and EC Sales List.
If you are the supplier of services that are subject to the Reverse Charge, you need to create a zero-rated Sales VAT code with the VAT Return Box 6 ticked and the EC Sales List Services box ticked. The code is then available in the Sales Ledger, Sales Order Processing, Invoicing and Importer modules.
If you receive services that are subject to the Reverse Charge, you need to create a standard rate Purchase VAT code with the VAT Return Boxes 1, 4, 6 and 7 ticked. The code is then available in the Purchase Ledger, Purchase Order Processing and Importer modules.
Sales VAT codes
If you provide services that are subject to Reverse Charge accounting to different EC countries, you may need to create one VAT code for the countries you are registered in, and another VAT code for the countries you are not registered in. If your customers are in one country, you need to create one VAT code.
After the VAT codes have been created they are available in the Sales Ledger, Sales Order Processing, Invoicing and Importer modules. The VAT rate for these transactions must be set to zero percent.
1. Open the System folder, click Maintenance and then click VAT Processing. Then click New on the Record menu.
2. In the Country Type box, select 'R' if you are registered in the EC country, or 'U' if you are not registered in the EC country.
3. In the Trans. Type box, select 'S' for Sales.
4. In the VAT Code box, enter a number or letter to identify the code. This must be a code that is not already used. Then enter a description for the VAT code, for example 'RC Services'.
Important: Do not use 'Y' as the VAT code. These codes are used for apportioning delivery
charges for transactions that are included on the Supplementary Declaration (SD) report.
5. Under EC Sales Listing (ESL), untick the Goods Value = Supplies box and tick the Services box. The box 6 - Total Value of Sales box under VAT Return Boxes remains ticked and the other VAT Return boxes are automatically unticked and disabled. The Goods Value = Supplies box under Supplementary Declaration (SD) is also automatically unticked.
6. On the Record menu, click Save.
Accreditation Training Courseware - O3Training_Accreditation_ADM50SystemR2.3.docx
© Pegasus Training Services Page 101
Tip: HMRC does not require that invoices indicate that a transaction must be accounted for under the Reverse Charge mechanism. However, to help your customer, it may be worthwhile having an invoice design for these transactions only with a statement that highlights that the transaction needs to be accounted for under the mechanism. To add a new invoice design, use the System - Maintenance - Report Layouts command. You could use the following text, or similar: These services are outside the scope of UK VAT. You may be required to make a reverse charge VAT declaration under Article 196 of EU Council Directive 2006/112/EC.
Purchase VAT codes
If you receive services that are subject to Reverse Charge accounting from different EC countries, you may need to create one VAT code for the countries you are registered in, and another VAT code for the countries you are not registered in. If your suppliers are in one country, you need to create only one VAT code.
After the VAT codes have been created, they become available in the Purchase Ledger, Purchase Order Processing and Importer modules.
1. Open the System folder, click Maintenance and then click VAT Processing. Then click New on the Record menu.
2. In the Country Type box, select 'R' if you are registered in the EC country, or 'U' if you are not registered in the EC country.
3. In the Trans. Type box, select 'P' for Purchase.
4. In the VAT Code box, enter a number or letter to identify the code. This must be a code that is not already used. Then enter a description for the VAT code, for example 'RC Services'.
Important: Do not use 'Y' as the VAT code. These codes are used for apportioning delivery charges for transactions that are included on the Supplementary Declaration (SD) report.
5. In the Rate 1 % box, enter the standard rate of VAT, and enter the date from which the VAT code will be used in the Date 1 box. This date must not be before 1 January 2010.
6. In the Nominal Code box, enter the Nominal Account to which the VAT will be posted in the Nominal Ledger.
7. Under VAT Return Boxes, tick box 1 - Tax Value on Sales. Box 4 - Tax Reclaimed on Purchases, box 6 - Total Value of Sales and box 7 - Total Value of Purchases are ticked automatically and the other boxes are unticked. The Goods Value = Supplies box under Supplementary Declaration (SD) is also automatically unticked.
8. On the Record menu, click Save.

Accreditation Training Courseware - O3Training_Accreditation_ADM50SystemR2.3.docx
© Pegasus Training Services Page 102
Appendix B Visual FoxPro and Technical Information
Why the Visual FoxPro development environment?
In 1993 Pegasus Software Ltd. launched Pegasus Opera, which was developed under the FoxPro Relational Database Management System (RDMS). This offered several advantages over standard programming languages such as Quick Basic.
These advantages included:
The fact that it is an RDMS means that programs, screens, menus and tables are all generated by one application meaning no compatibility issues will arise
Simple, easy to use interface
Easy to generate data tables
Easy to generate and use indexes
Rushmore record searching for greater speed with locating information
Data Integrity Improvements
Fast access of the data
Development tools such as Visual Basic and SQL Server are together a very powerful environment. Visual FoxPro however offers similar flexibility and technical specifications as these two products combined allowing the developer to make use of Stored Procedures, Triggers and Views all stored with the database rather than having to be written into the program.
The Data Dictionary
The data dictionary is held in a folder called datadict. The database container for the dictionary is called Datadict.dbc. Default location being C:\Documents and Settings\All Users\Application Data\Pegasus\Server VFP\DataDictCore.
The tables with in the container can be used in a reporting product such as Crystal Reports to create a document detailing what the tables are, what the fields are within the table, rules that are applied to a field, and the fields proper name and description. Basically creating a Database Schema.
table.dbc and field.dbc
Data Container
Pegasus Opera 3 now uses a Visual FoxPro Database Container. This is a file located within the data directory. This is a key difference between Opera 16 and Opera 3, where O16 had free standing tables, OPERA 3 uses a DBC.
There are three files named:
Database Container: COMP_Z.DBC
Data Dictionary COMP_Z.DCT
Database Index COMP_Z.DCX
Database
Container
COMP_Z
Table
Z_SNAME
Table
Z_STRAN
Table
Z_SPARM
Accreditation Training Courseware - O3Training_Accreditation_ADM50SystemR2.3.docx
© Pegasus Training Services Page 103
The purpose of the database container is to hold information about all the tables,
the number of records in each table
when it was last updated,
who updated it.
It is for this reason that you can not just replace a table without some extensive work. The container will assume that the data is corrupt if it does not match its criteria. (See Free Tables)
Links and Relationships
There are no table relationships maintained by Opera 3. There are several reasons why this is but the major reason is that Companies do not always purchase all the modules and not all tables are required. Thus links do not always have to exist.
This makes Opera 3 more flexible in hooking in Third Party Applications. (No links to deal with.)
Free Tables
There are some rare circumstances where free tables must be used. Freeing a table will allow the table to be altered without the container having to know. This is not a recommended procedure and cannot be supported by Pegasus.
Data Types
There are five data types within the Opera 3 tables:-
Date
Time
String
Numeric
Logical
Memo
There are no currency fields.
Update Data Structures
What does it do?
The standard Update Data Structures or UDS basically carries out the following functions:
Checks the Structure of the Tables within each Database Container based upon a standard Database.
Checks the indexes within the tables
If any problems with invalid fields or indexes are discovered then these will be corrected, and set according to the Standard databases.
It is normally used when updating from one version of Opera 3 to another. Any tables or fields that do not exist are created or altered according to our data structures.
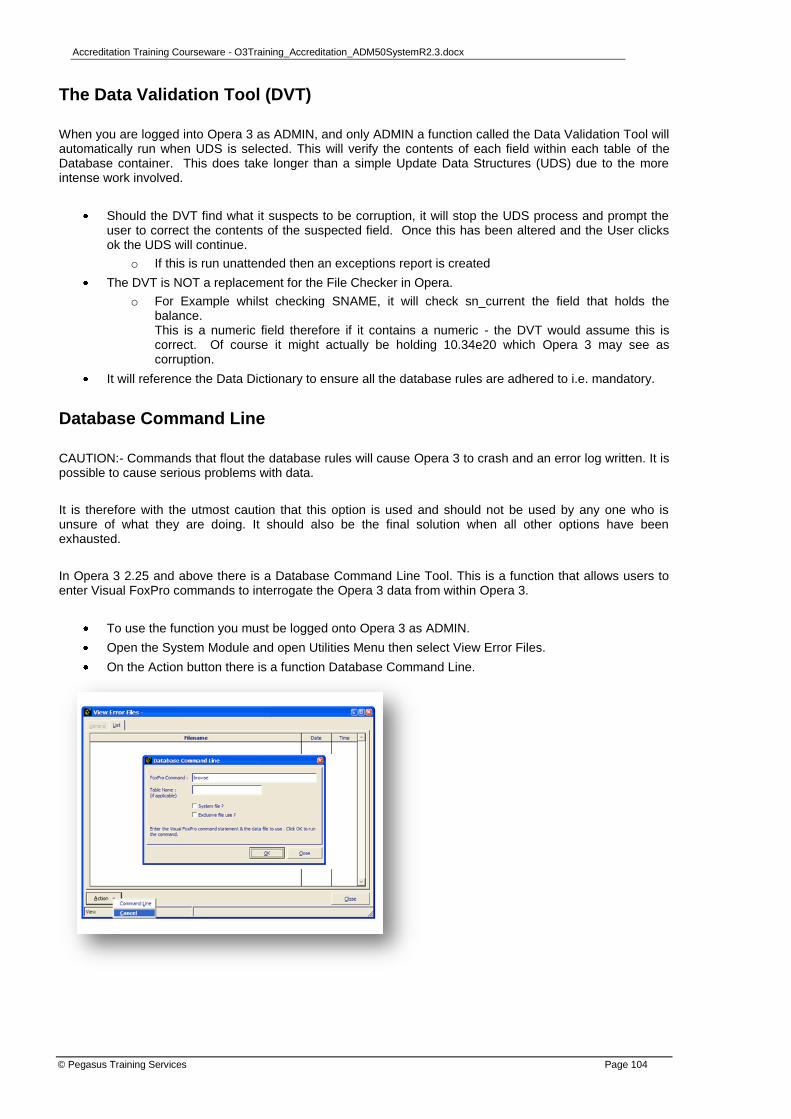
Accreditation Training Courseware - O3Training_Accreditation_ADM50SystemR2.3.docx
© Pegasus Training Services Page 104
The Data Validation Tool (DVT)
When you are logged into Opera 3 as ADMIN, and only ADMIN a function called the Data Validation Tool will automatically run when UDS is selected. This will verify the contents of each field within each table of the Database container. This does take longer than a simple Update Data Structures (UDS) due to the more intense work involved.
Should the DVT find what it suspects to be corruption, it will stop the UDS process and prompt the user to correct the contents of the suspected field. Once this has been altered and the User clicks ok the UDS will continue.
o If this is run unattended then an exceptions report is created
The DVT is NOT a replacement for the File Checker in Opera.
o For Example whilst checking SNAME, it will check sn_current the field that holds the balance. This is a numeric field therefore if it contains a numeric - the DVT would assume this is correct. Of course it might actually be holding 10.34e20 which Opera 3 may see as corruption.
It will reference the Data Dictionary to ensure all the database rules are adhered to i.e. mandatory.
Database Command Line
CAUTION:- Commands that flout the database rules will cause Opera 3 to crash and an error log written. It is possible to cause serious problems with data.
It is therefore with the utmost caution that this option is used and should not be used by any one who is unsure of what they are doing. It should also be the final solution when all other options have been exhausted.
In Opera 3 2.25 and above there is a Database Command Line Tool. This is a function that allows users to enter Visual FoxPro commands to interrogate the Opera 3 data from within Opera 3.
To use the function you must be logged onto Opera 3 as ADMIN.
Open the System Module and open Utilities Menu then select View Error Files.
On the Action button there is a function Database Command Line.
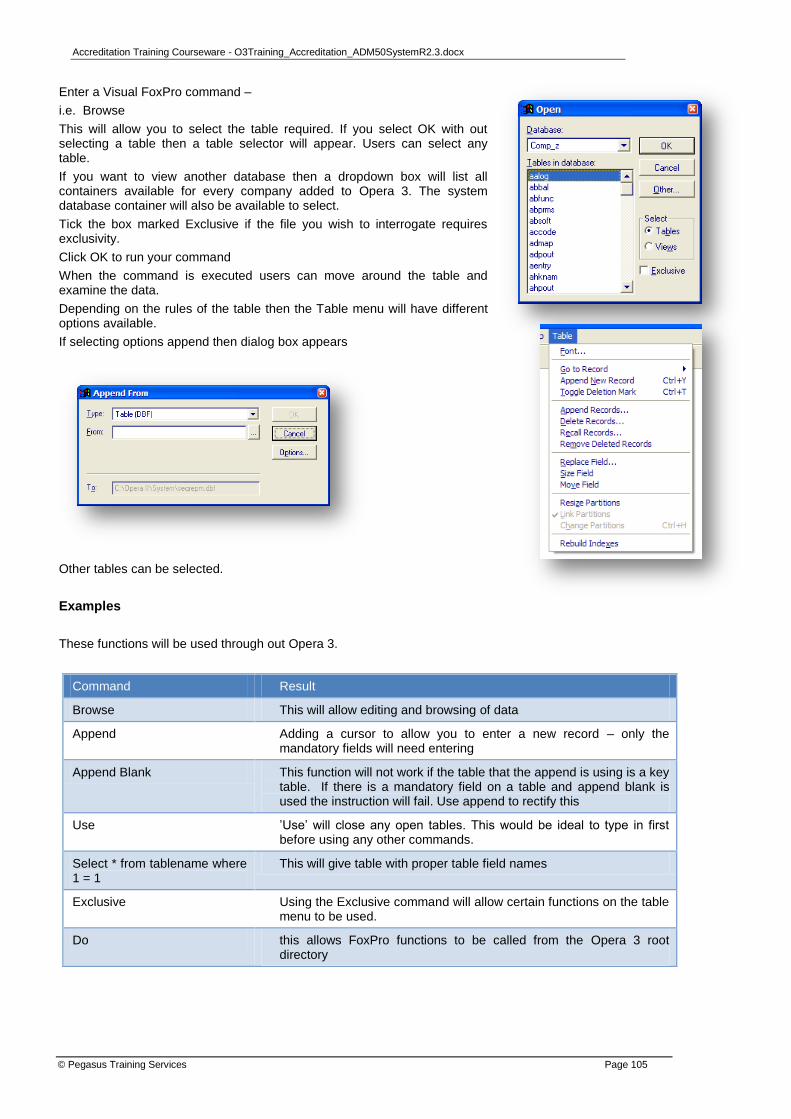
Accreditation Training Courseware - O3Training_Accreditation_ADM50SystemR2.3.docx
© Pegasus Training Services Page 105
Enter a Visual FoxPro command –
i.e. Browse
This will allow you to select the table required. If you select OK with out selecting a table then a table selector will appear. Users can select any table.
If you want to view another database then a dropdown box will list all containers available for every company added to Opera 3. The system database container will also be available to select.
Tick the box marked Exclusive if the file you wish to interrogate requires exclusivity.
Click OK to run your command
When the command is executed users can move around the table and examine the data.
Depending on the rules of the table then the Table menu will have different options available.
If selecting options append then dialog box appears
Other tables can be selected.
Examples
These functions will be used through out Opera 3.
Command Result
Browse This will allow editing and browsing of data
Append Adding a cursor to allow you to enter a new record – only the mandatory fields will need entering
Append Blank This function will not work if the table that the append is using is a key table. If there is a mandatory field on a table and append blank is used the instruction will fail. Use append to rectify this
Use ‘Use‘ will close any open tables. This would be ideal to type in first before using any other commands.
Select * from tablename where 1 = 1
This will give table with proper table field names
Exclusive Using the Exclusive command will allow certain functions on the table menu to be used.
Do this allows FoxPro functions to be called from the Opera 3 root directory
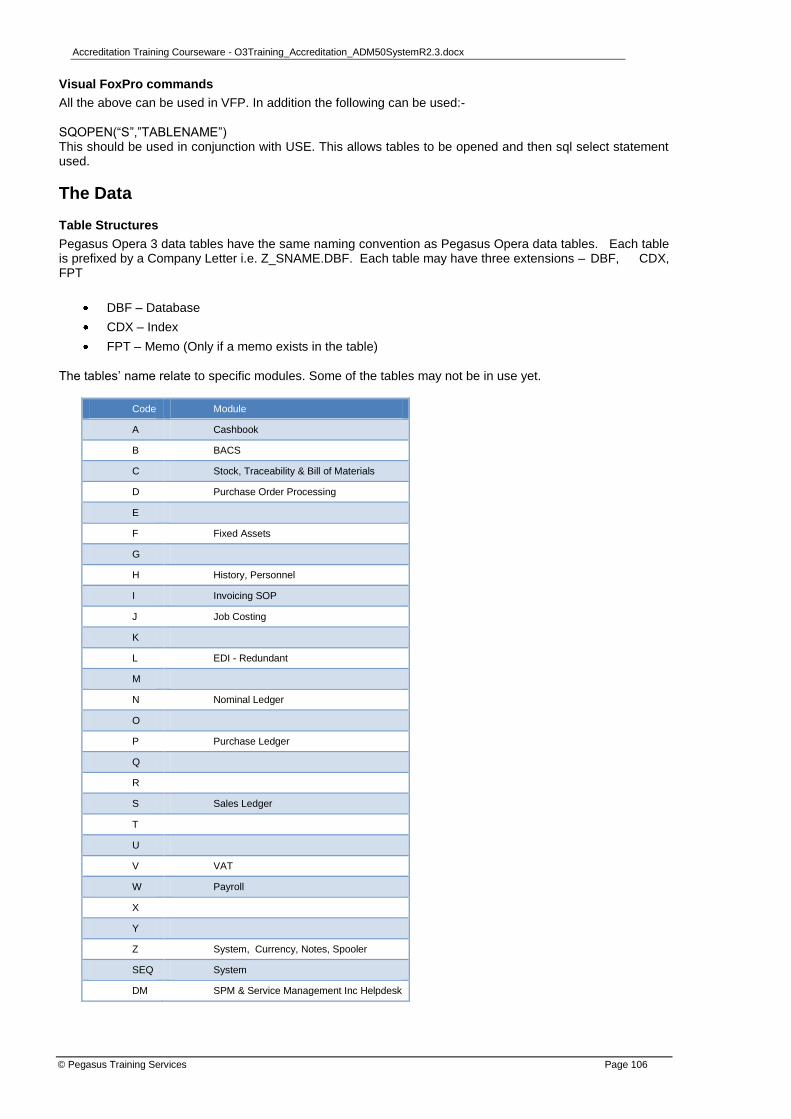
Accreditation Training Courseware - O3Training_Accreditation_ADM50SystemR2.3.docx
© Pegasus Training Services Page 106
Visual FoxPro commands
All the above can be used in VFP. In addition the following can be used:-
SQOPEN(―S‖,‖TABLENAME‖) This should be used in conjunction with USE. This allows tables to be opened and then sql select statement used.
The Data
Table Structures
Pegasus Opera 3 data tables have the same naming convention as Pegasus Opera data tables. Each table is prefixed by a Company Letter i.e. Z_SNAME.DBF. Each table may have three extensions – DBF, CDX, FPT
DBF – Database
CDX – Index
FPT – Memo (Only if a memo exists in the table)
The tables‘ name relate to specific modules. Some of the tables may not be in use yet.
Code Module
A Cashbook
B BACS
C Stock, Traceability & Bill of Materials
D Purchase Order Processing
E
F Fixed Assets
G
H History, Personnel
I Invoicing SOP
J Job Costing
K
L EDI - Redundant
M
N Nominal Ledger
O
P Purchase Ledger
Q
R
S Sales Ledger
T
U
V VAT
W Payroll
X
Y
Z System, Currency, Notes, Spooler
SEQ System
DM SPM & Service Management Inc Helpdesk
Accreditation Training Courseware - O3Training_Accreditation_ADM50SystemR2.3.docx
© Pegasus Training Services Page 107
Temporary Tables (Cursors)
A temporary table is created as you open a form with data in it Opera 3.
A record set is created (copied from the data tables) and held in a temporary table each time a form with data in it is opened.
The temporary table remains until the form is closed.
The temporary table is saved to various locations.
o VFP Beneath the windows directory
o Opera 3 Saved in the location specified in the opera.ini file. (Usually Opera 3\temp)
o Reports Beneath the Opera 3 root directory.
It is given a random name then deleted as the table is closed.
Users can change the data but this is not committed to the table until the save button is clicked.
When the save button is clicked the Temporary table is flushed then deleted.
TITRAN – IHEADQ
TITRAN and IHEADQ are two temporary tables that are created when posting documents in SOP. These tables only exist at the time of posting – they are cleared when the routine ends.
NEXTID
The NEXTID table is used all over Opera 3 and gives the next unique number available to a record.
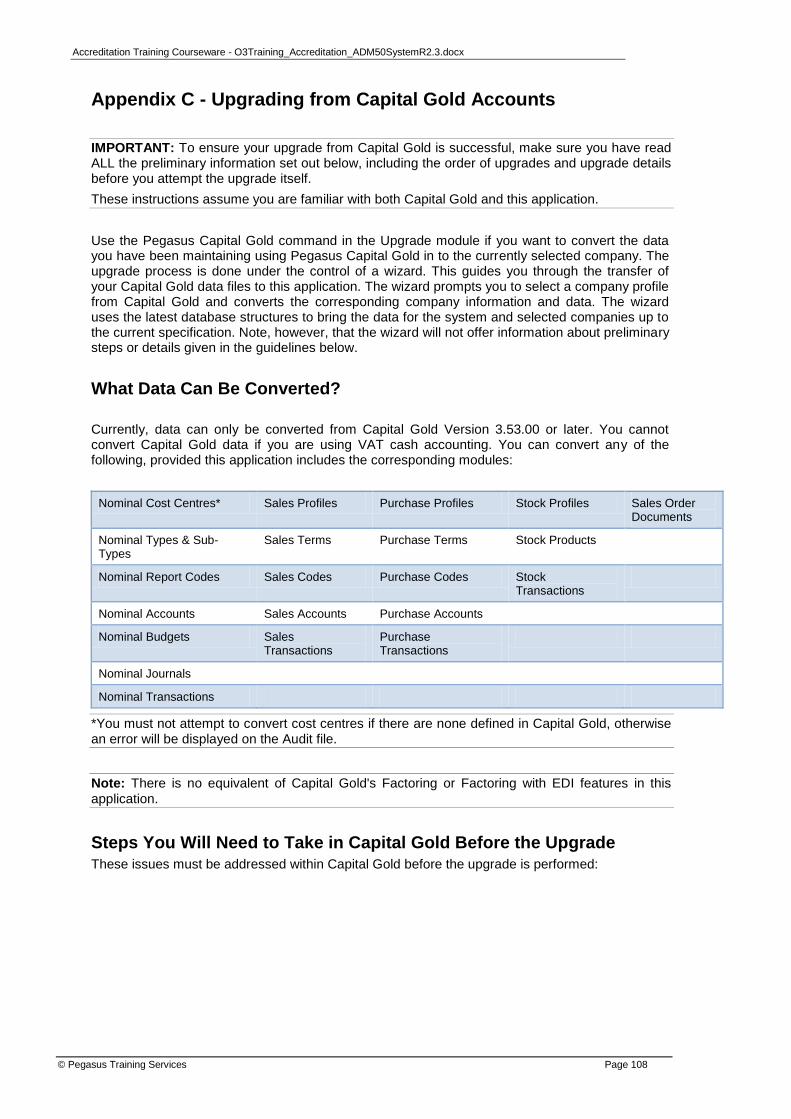
Accreditation Training Courseware - O3Training_Accreditation_ADM50SystemR2.3.docx
© Pegasus Training Services Page 108
Appendix C - Upgrading from Capital Gold Accounts
IMPORTANT: To ensure your upgrade from Capital Gold is successful, make sure you have read ALL the preliminary information set out below, including the order of upgrades and upgrade details before you attempt the upgrade itself.
These instructions assume you are familiar with both Capital Gold and this application.
Use the Pegasus Capital Gold command in the Upgrade module if you want to convert the data you have been maintaining using Pegasus Capital Gold in to the currently selected company. The upgrade process is done under the control of a wizard. This guides you through the transfer of your Capital Gold data files to this application. The wizard prompts you to select a company profile from Capital Gold and converts the corresponding company information and data. The wizard uses the latest database structures to bring the data for the system and selected companies up to the current specification. Note, however, that the wizard will not offer information about preliminary steps or details given in the guidelines below.
What Data Can Be Converted?
Currently, data can only be converted from Capital Gold Version 3.53.00 or later. You cannot convert Capital Gold data if you are using VAT cash accounting. You can convert any of the following, provided this application includes the corresponding modules:
Nominal Cost Centres* Sales Profiles Purchase Profiles Stock Profiles Sales Order Documents
Nominal Types & Sub-Types
Sales Terms Purchase Terms Stock Products
Nominal Report Codes Sales Codes Purchase Codes Stock Transactions
Nominal Accounts Sales Accounts Purchase Accounts
Nominal Budgets Sales Transactions
Purchase Transactions
Nominal Journals
Nominal Transactions
*You must not attempt to convert cost centres if there are none defined in Capital Gold, otherwise an error will be displayed on the Audit file.
Note: There is no equivalent of Capital Gold's Factoring or Factoring with EDI features in this
application.
Steps You Will Need to Take in Capital Gold Before the Upgrade
These issues must be addressed within Capital Gold before the upgrade is performed:
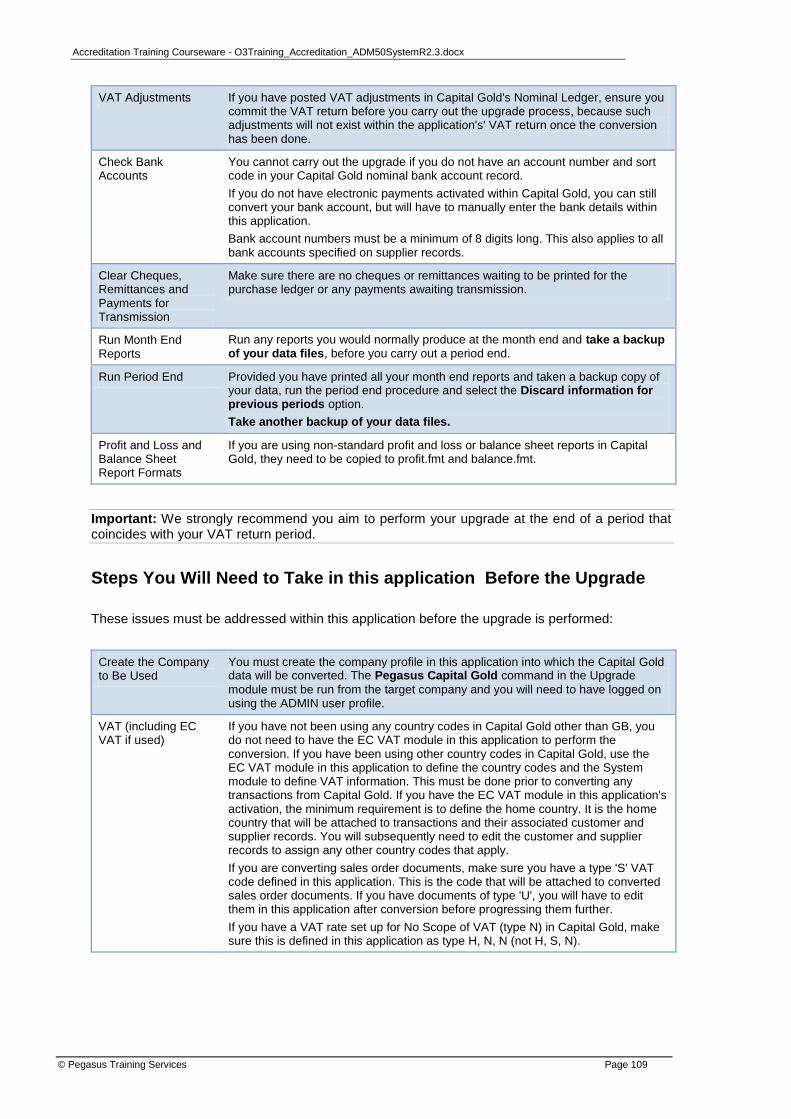
Accreditation Training Courseware - O3Training_Accreditation_ADM50SystemR2.3.docx
© Pegasus Training Services Page 109
VAT Adjustments If you have posted VAT adjustments in Capital Gold's Nominal Ledger, ensure you commit the VAT return before you carry out the upgrade process, because such adjustments will not exist within the application's' VAT return once the conversion has been done.
Check Bank Accounts
You cannot carry out the upgrade if you do not have an account number and sort code in your Capital Gold nominal bank account record.
If you do not have electronic payments activated within Capital Gold, you can still convert your bank account, but will have to manually enter the bank details within this application.
Bank account numbers must be a minimum of 8 digits long. This also applies to all bank accounts specified on supplier records.
Clear Cheques, Remittances and Payments for Transmission
Make sure there are no cheques or remittances waiting to be printed for the purchase ledger or any payments awaiting transmission.
Run Month End Reports
Run any reports you would normally produce at the month end and take a backup of your data files, before you carry out a period end.
Run Period End Provided you have printed all your month end reports and taken a backup copy of your data, run the period end procedure and select the Discard information for previous periods option.
Take another backup of your data files.
Profit and Loss and Balance Sheet Report Formats
If you are using non-standard profit and loss or balance sheet reports in Capital Gold, they need to be copied to profit.fmt and balance.fmt.
Important: We strongly recommend you aim to perform your upgrade at the end of a period that coincides with your VAT return period.
Steps You Will Need to Take in this application Before the Upgrade
These issues must be addressed within this application before the upgrade is performed:
Create the Company to Be Used
You must create the company profile in this application into which the Capital Gold data will be converted. The Pegasus Capital Gold command in the Upgrade
module must be run from the target company and you will need to have logged on using the ADMIN user profile.
VAT (including EC VAT if used)
If you have not been using any country codes in Capital Gold other than GB, you do not need to have the EC VAT module in this application to perform the conversion. If you have been using other country codes in Capital Gold, use the EC VAT module in this application to define the country codes and the System module to define VAT information. This must be done prior to converting any transactions from Capital Gold. If you have the EC VAT module in this application's activation, the minimum requirement is to define the home country. It is the home country that will be attached to transactions and their associated customer and supplier records. You will subsequently need to edit the customer and supplier records to assign any other country codes that apply.
If you are converting sales order documents, make sure you have a type 'S' VAT code defined in this application. This is the code that will be attached to converted sales order documents. If you have documents of type 'U', you will have to edit them in this application after conversion before progressing them further.
If you have a VAT rate set up for No Scope of VAT (type N) in Capital Gold, make sure this is defined in this application as type H, N, N (not H, S, N).
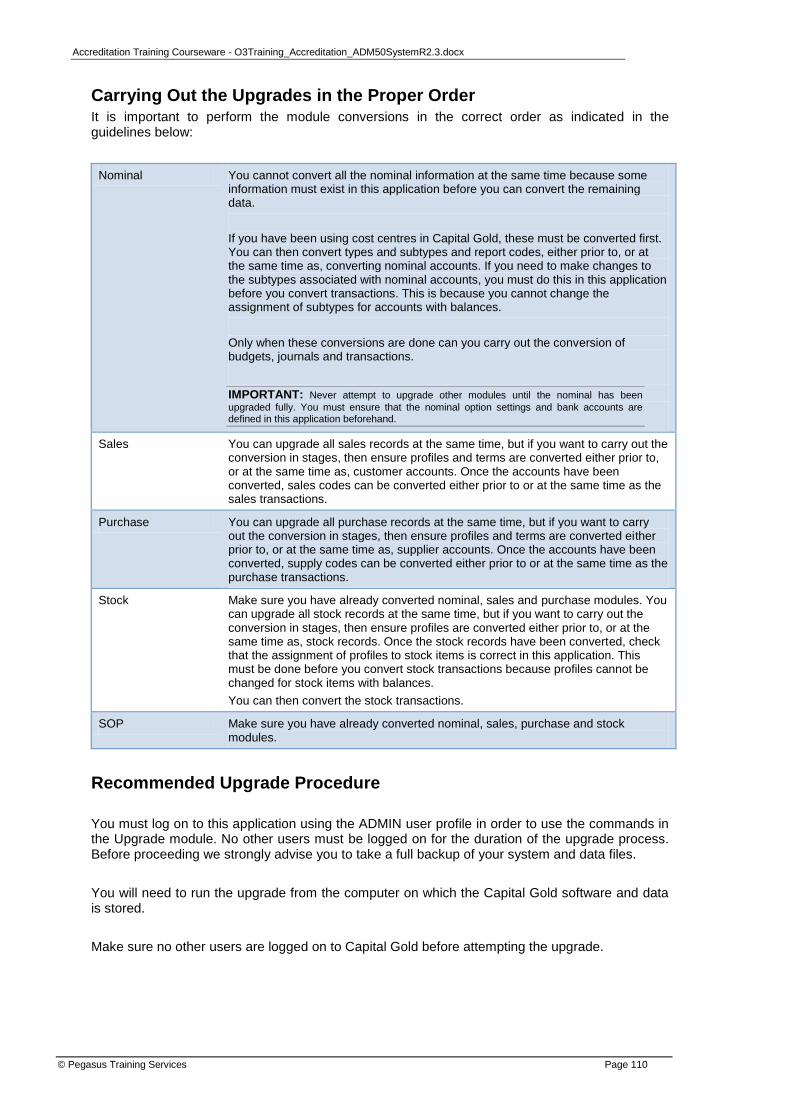
Accreditation Training Courseware - O3Training_Accreditation_ADM50SystemR2.3.docx
© Pegasus Training Services Page 110
Carrying Out the Upgrades in the Proper Order It is important to perform the module conversions in the correct order as indicated in the guidelines below:
Nominal You cannot convert all the nominal information at the same time because some information must exist in this application before you can convert the remaining data.
If you have been using cost centres in Capital Gold, these must be converted first. You can then convert types and subtypes and report codes, either prior to, or at the same time as, converting nominal accounts. If you need to make changes to the subtypes associated with nominal accounts, you must do this in this application before you convert transactions. This is because you cannot change the assignment of subtypes for accounts with balances.
Only when these conversions are done can you carry out the conversion of budgets, journals and transactions.
IMPORTANT: Never attempt to upgrade other modules until the nominal has been
upgraded fully. You must ensure that the nominal option settings and bank accounts are defined in this application beforehand.
Sales You can upgrade all sales records at the same time, but if you want to carry out the conversion in stages, then ensure profiles and terms are converted either prior to, or at the same time as, customer accounts. Once the accounts have been converted, sales codes can be converted either prior to or at the same time as the sales transactions.
Purchase You can upgrade all purchase records at the same time, but if you want to carry out the conversion in stages, then ensure profiles and terms are converted either prior to, or at the same time as, supplier accounts. Once the accounts have been converted, supply codes can be converted either prior to or at the same time as the purchase transactions.
Stock Make sure you have already converted nominal, sales and purchase modules. You can upgrade all stock records at the same time, but if you want to carry out the conversion in stages, then ensure profiles are converted either prior to, or at the same time as, stock records. Once the stock records have been converted, check that the assignment of profiles to stock items is correct in this application. This must be done before you convert stock transactions because profiles cannot be changed for stock items with balances.
You can then convert the stock transactions.
SOP Make sure you have already converted nominal, sales, purchase and stock modules.
Recommended Upgrade Procedure
You must log on to this application using the ADMIN user profile in order to use the commands in the Upgrade module. No other users must be logged on for the duration of the upgrade process. Before proceeding we strongly advise you to take a full backup of your system and data files.
You will need to run the upgrade from the computer on which the Capital Gold software and data is stored.
Make sure no other users are logged on to Capital Gold before attempting the upgrade.

Accreditation Training Courseware - O3Training_Accreditation_ADM50SystemR2.3.docx
© Pegasus Training Services Page 111
About the 'Revert Current Process on Error' Option
The upgrade wizard includes an option called Revert current process on error. If this option is selected and any errors are encountered during the upgrade, the process is abandoned and any records and files involved in the current process will automatically revert to their pre-upgrade status.
If the option is cleared, the upgrade will continue for those records unaffected by errors, but if a file error is encountered, an error message dialog box appears that includes two command buttons: Close and Continue.
If you click Close, the file containing the error will revert to its pre-upgrade and no further files are processed.
If you click Continue, the file that contains the error will revert to its pre-upgrade status, but the application will attempt to process the next file to be converted.
Step 1: Company Creation and Nominal Upgrade
1. In this application, create a new company and make sure the following options are selected on the Company Profiles menu: Sales Ledger to Nominal, Purchase Ledger to Nominal, Cost Centres in Nominal (if cost centres have been used in Capital Gold) and Real Time Update of Nominal. Make sure the Cashbook option is CLEARED before the upgrade. You will need to select the option AFTER the upgrade if you intend to use the Cashbook module.
2. Take a backup of this application's company data.
3. Use the upgrade application to convert cost centres (if cost centres have been used in Capital Gold), types, subtypes, report codes and nominal accounts. Follow the instructions in the wizard. Take notice of the information under the heading Carrying Out the upgrades in the Proper Order.
4. Check the following control accounts are defined in the Nominal module with these settings:
Account Type Subtype Class
Creditors Control 02 02 Liability
Debtors Control 01 02 Asset
Creditors Suspense 05 02 Expense
Debtors Suspense 04 02 Income
Profit and Loss 03 02 Cap/Res
5. Other nominal accounts and classifications might need to be checked and amended depending on the nominal accounts set up in Capital Gold. In particular, check that the way in which subtypes are assigned to nominal accounts this application is correct. If you need to make changes to the subtypes associated with nominal accounts, you must do this in this application before you convert transactions. This is because you cannot change the assignment of subtypes for accounts with balances.
6. Work through the nominal option settings in this application to ensure they correspond as far as possible with your Capital Gold configuration.
7. Create bank accounts in the Nominal module.
8. Create VAT codes in this application that correspond with those used in Capital Gold. You may also need to create VAT records for different country codes unless all your transactions are home based (GB). For non-VAT companies, you will need to create the VAT code of HNN — Not Applicable.

Accreditation Training Courseware - O3Training_Accreditation_ADM50SystemR2.3.docx
© Pegasus Training Services Page 112
9. Use the upgrade application to convert budgets, journals and nominal transactions. Follow the instructions in the wizard. Take notice of the information under the heading Carrying Out the upgrades in the Proper Order.
10. Print a trial balance from the Nominal module (make sure you include advanced transactions where appropriate) and check it corresponds with the nominal trial balance in Capital Gold. Similarly, check the budgets by printing and comparing budget reports.
11. Use the Rebuild History command in the Nominal Ledger.
12. Take a backup of this application's company data.
Please note the following with respect to the conversion of nominal records:
Journals will have been converted with the user name set to MANAGER. You can change this on journal records in the Nominal Ledger.
Recurring journals that have the Cancel with Immediate Effect option selected will not be converted.
Step 2: Sales Upgrade
1. Work through the sales option settings in this application to ensure they correspond as far as possible with your Capital Gold configuration.
2. Create an Adjustment Name using the description Adjustment (this is case sensitive) and identify a corresponding nominal account code.
3. Create a Receipt Name using the description Receipt (this is case sensitive).
4. Create a Refund Name using the description Refund (this is case sensitive).
5. Use the upgrade application to convert sales profiles, terms, codes, accounts and transactions. Follow the instructions in the wizard. Take notice of the information under the heading Carrying Out the upgrades in the Proper Order.
6. Set this application's system date to the period end date (the date on which the period end was performed in Capital Gold) and carry out a period end procedure in the Sales Ledger. All transactions converted will appear in 'This Period' reports until you run a sales period end in this application. This will not affect the ageing of transactions.
7. Print a debtors report in this application and check it corresponds with the debtors report in Capital Gold.
8. Take a backup of this application's company data.
Please note the following with respect to the conversion of sales records:
Settlement discount will always be calculated before VAT in this application unless you have the EC VAT module, in which case you can change this.
The second telephone number on Capital Gold customer records is not converted to this application. Additional contact information can be specified in this application using the Contacts form in the Sales module.
The first created date on customer records in this application will be the system processing date in Capital Gold at the time of conversion.
There is no equivalent in this application of the Due Date setting of '3rd month following invoice' (as available in Capital Gold). Any records with this setting will be converted to '2nd month following invoice' in this application.
The Include Delivery Charges option associated with Settlement Discount will always be selected for records converted in this application.
The priority setting for all customers will be 0 (zero).
The acknowledgement required option will be selected.

Accreditation Training Courseware - O3Training_Accreditation_ADM50SystemR2.3.docx
© Pegasus Training Services Page 113
The Allow Quantity (Line) Discount and Allow Invoice Value Discount settings on customer records in Capital Gold will not be transferred. In this application, such settings must be specified on stock records.
Product discounts associated with customer records in Capital Gold will not be transferred. In this application, such settings are defined in the SOP or Invoicing module.
The setting of the Display Euro Values option on customer records in Capital Gold will be ignored.
Factoring details will be not converted.
Delivery addresses associated with customer records in Capital Gold will not be converted. In this application, these have to be created as separate customer records and flagged as delivery address accounts.
The country code assigned to customer records in Capital Gold will not be transferred. In this application, such codes are only defined if you have the EC VAT module.
If you choose to convert customer account records only (that is, without converting transactions), the current balance and order balance will not be transferred. These values will only be updated if transactions are also converted; otherwise they will be updated when you begin processing transactions in this application.
Sales codes will be given a default VAT code of 1 for VAT companies, or N for non-VAT companies. If other VAT codes are required in association with sales codes, you must edit the records in this application before you begin processing.
Credit limit and turnover values will not convert properly if they are at their limit within Capital Gold (that is, at the maximum of 99,999,999).
Step 3: Purchase Upgrade
1. Work through the purchase option settings in this application to ensure they correspond as far as possible with your Capital Gold configuration.
2. Create an Adjustment Name using the description Adjustment (this is case sensitive) and identify a corresponding nominal account code.
3. Create three Payment Names using the descriptions BACS, Cheque and Cash (these are case sensitive).
4. Create a Refund Name using the description Refund (this is case sensitive).
5. Use the upgrade application to convert purchase profiles, terms, codes, accounts and transactions. Follow the instructions in the wizard. Take notice of the information under the heading Carrying Out the upgrades in the Proper Order.
6. Set this application's system date to the period end date (the date on which the period end was performed in Capital Gold) and carry out a period end procedure in the Purchase module. All transactions converted will appear in 'This Period' reports until you run a purchase period end in this application. This will not affect the ageing of transactions.
7. Print a creditors report in this application and check it corresponds with the creditors report in Capital Gold.
8. Take a backup of this application's company data.
Please note the following with respect to the conversion of purchase records:
The second telephone number on Capital Gold supplier records is not converted to this application. Additional contact information can be specified in this application using the Contacts form in the Sales module.
The first created date on supplier records in this application will be the system processing date in Capital Gold at the time of conversion.
There is no equivalent in this application of the Due Date setting of '3rd month following invoice' (as available in Capital Gold). Any records with this setting will be converted to '2nd month following invoice' in this application.
Accreditation Training Courseware - O3Training_Accreditation_ADM50SystemR2.3.docx
© Pegasus Training Services Page 114
The setting of the Display Euro Values option on supplier records in Capital Gold will be ignored.
Some reports in this application will not show advanced-posted transactions, so when comparing reports between the two systems there may be a difference if advanced transactions exist. If you check the supplier account record, you will see that the advanced transactions have been transferred.
The country code assigned to supplier records in Capital Gold will not be transferred. In this application, such codes are only defined if you have the EC VAT module.
If you choose to upgrade supplier account records only (that is, without converting transactions), the current balance and order balance will not be transferred. These values will only be updated if transactions are also converted; otherwise they will be updated when you begin processing transactions in this application.
Supply codes will be given a default VAT code of 1 for VAT companies, or N for non-VAT companies. If other VAT codes are required in association with supply codes, you must edit the records in this application before you begin processing.
Credit limit and turnover figures will not convert properly if they are at their limit within Capital Gold (that is, at the maximum of 99,999,999).
By default, the Open Item and Print Remittance options will be selected once supplier records are transferred to this application.
If you have a negative balance on the suggested payments list for a particular supplier, this will not appear in the corresponding report in this application.
Step 3: Stock Upgrade
1. Work through the stock option settings in this application to ensure they correspond as far as possible with your Capital Gold configuration.
2. Create a supply code record in this application called STOCK. This will be used as the default supply code assigned to all converted stock records.
3. Use the upgrade application to convert stock profiles and products. Follow the instructions in the wizard. Take notice of the information under the heading Carrying Out the upgrades in the Proper Order.
4. Once the stock profiles and products have been converted, check that the assignment of profiles to stock items is correct in this application. This must be done before you convert stock transactions because profiles cannot be changed for stock items with balances.
5. Use the upgrade application to convert stock transactions. Follow the instructions in the wizard. Take notice of the information under the heading Carrying Out the upgrades in the Proper Order.
6. Print stock reports in this application and check they correspond with the stock information in Capital Gold. In particular, compare the stock valuation reports (you will need to ensure the Show Negative Stock option is selected on the criteria form in this application).
7. Take a backup of this application's company data.
Please note the following with respect to the conversion of stock records:
Cost prices are not converted for Product Only items.
BOM assembly items are upgraded as individual stock records. Any links between them are lost and must be redefined within the Bill Of Materials module.
Sales VAT codes will be given a default code of 1 for VAT companies, or N for non-VAT companies. If other VAT codes are required in association with stock records, you must edit the records in this application before you begin processing.
The unit description, location and packed/per details are not converted to this application.
Items in Capital Gold marked as weighed will lose this information on converting to this application.
Supplier details relating to stock items are not converted.
Accreditation Training Courseware - O3Training_Accreditation_ADM50SystemR2.3.docx
© Pegasus Training Services Page 115
Only the selling price is converted; not the VAT-inclusive value.
Only average cost prices are converted; not the cost.
Allocated figures will not be converted because sales orders in Capital Gold are converted to unallocated documents in this application.
Purchase order information will not be converted.
When viewing transactions in this application after the upgrade, cost and selling values are taken as at the time of the upgrade process. Stock issues will show the price as entered in Capital Gold.
Step 4: SOP/Invoicing Upgrade
1. Work through the SOP/Invoicing option settings in this application to ensure they correspond as far as possible with your Capital Gold configuration. Note that Capital Gold does not use the delivery process as available in this application.
2. Use the upgrade application to convert sales order documents. Follow the instructions in the wizard. Take notice of the information under the heading Carrying Out the upgrades in the Proper Order.
3. Print SOP reports in this application and check they corresponds with the sales order information in Capital Gold.
4. Take a backup of this application's company data.
Please note the following with respect to the conversion of SOP records:
All sales orders in Capital Gold are converted to Documents in this application, NOT sales orders. You will have to progress them within this application to give them sales order status. You might need to check the documents contain the correct information, including VAT settings before doing so. No other document types in Capital Gold are converted.
Only outstanding items will be transferred from the sales order records.
The Despatch By information is not transferred. If you want to use despatch methods in this application, you must define these on the Delivery form associated with customer records. For orders already converted, you can edit these details on the document header before progression.
Area codes used on sales orders in Capital Gold are placed in the Analysis field of documents on conversion to this application.
All order documents converted will be given a type 'S' VAT code in this application. If you have documents of type 'U', you will have to edit them in this application before progressing them further.
The Raised By field on the document records will be populated with the ADMIN user name.
Carriage charge information entered as part of the header details in Capital Gold will not appear on SOP/Invoicing header details in this application, but will appear as a separate detail line on the document.
Invoice value discounts included on orders raised in Capital Gold will appear in this application in the Inv. Disc box on the Analysis form associated with the document header.
None of the records maintained using the options on the Discounts submenu associated with the Maintenance menu in Capital Gold are converted to this application, because this application does not have equivalent tables. You will need to use the Discounts command on the Maintenance menu in SOP/Invoicing to create the discount structures you need.
The cost prices for items included in the sales order documents will be based on the average cost price stored in Capital Gold's product file.
Only settlement terms 1 will be converted to the sale order documents. If you use a second level of settlement discount, you will have to enter that information manually in this application on the Discounts form associated with the document header.

Accreditation Training Courseware - O3Training_Accreditation_ADM50SystemR2.3.docx
© Pegasus Training Services Page 116
Step 5: Completing the Process
Once you have converted the modules required, do the following:
1. Run Update Data Structures in this application.
2. Take a backup of this application's company data.
3. Review all records converted by checking corresponding reports or reviewing the content of forms in both this application and Capital Gold. Make sure you add any necessary records and set options this application before you begin processing.
Some General Considerations
Where data fields within Capital Gold are larger than the target system, the corresponding field information will be truncated.
Do NOT upgrade transactions more than once otherwise information will be duplicated.
If you choose to upgrade information that does not exist in Capital Gold, the audit file will show an error to this effect.
Remember that some information to convert is optional. For example, you might want to convert only master records (such as nominal, customer and supplier accounts and stock items) and not convert any current transactions but create them in this application instead.
About the Upgrade Wizard
The transfer of data from Capital Gold to this application is controlled by a wizard run from the Upgrade module in this application. You must ensure that Capital Gold and this application reside on the same computer. You need to be logged on to this application as ADMIN and during the upgrade process you will be prompted to log on to Capital Gold as Administrator. No other users should be present on either system. Make sure you have read and understood the prerequisite information given above and that you have completed any preparatory tasks necessary.
You will be prompted to select the company to upgrade if you have more than one defined in Capital Gold.
If you select the Revert current process on error option shown on the wizard, the application will 'undo' anything converted in the current session so that it is reverted to its previous status.
If any errors occur during the upgrade process, the application will display a message on the screen and you will be given the opportunity to view the audit file for details. The application may terminate the upgrade process and you will have to resolve the problem before you retry. You may be given the opportunity to continue with upgrading other modules or data, but take notice of the information under the heading Carrying Out the upgrades in the Proper Order.
Some problems may be reported only as 'warnings' and not cause the upgrade process to be terminated. Depending on whether you chose the roll back option, you might need to rerun the upgrade if required, but only after restoring data to the status it was before the upgrade. Remember that if you run the upgrade more than once on transactions, records will be duplicated.

Accreditation Training Courseware - O3Training_Accreditation_ADM50SystemR2.3.docx
© Pegasus Training Services Page 117
Appendix D – General FAQs put together for V1.00 of Opera 3
# Question Response
1 Will current bespoke software work with Opera 3 v1.0?
Yes they should. Bespoke ToolGroups will be displayed in the Ribbon bar as applicable. As with any new release of software, all bespoke should be thoroughly tested especially if affecting the Nominal module. There has been an uplift to DIT3 for development of bespoke. This version is backward compatible for Opera II and Operations II.
2 Will existing bespoked reports require updating (naming convention stays the same – i.e. sqinin etc)?
Existing reports may not require any updating, however there are a few which have had structural changes due to the OPA tables and fields added. These include all the Nominal Transfer Reports, Audit Report and the Snapshot report (print icon when in snapshot view) - these should not be replaced. The majority (75-80%) of other reports may have had slight size and field alterations to ensure these work correctly with the new advanced preview window. If replacing any reports with ones from OII these would be subject to your Testing & Development.
3 Which modules are written in .NET? The Scheduler module is written in .NET v4
4 Is Office 2010 supported on Opera 3 v1.0? Opera 3 v1.0 does support Office 2010 (note currently XRL does with v1.45) – 32bit Office integration only.
5 Do partners require .NET skills to support Opera 3 v1.0?
Partners will not require .NET skills at present
6 Will the command line be available? Yes, in the VFP version only
7 Will the Payroll release be for Opera 3 v1.0 only?
No, Opera II and Opera 3 v1.0 will include a payroll release for 2011
8 Can Opera II and Opera 3 v1.0 be installed on the same machine?
Yes, the folders for each installation are different so they can be installed side by side
9 Where can I find out which modules are included on the activation?
O3 button > About > Applications
10 Which version of Visual Foxpro is required to edit the tables?
VFP 9.0
11 Is there a SQL version of Opera 3 v1.0? Yes
12 What are the recommended system requirements?
These would be detailed in the installation guide as provided with the installation files
13 Will Opera 3 v1.0 support multiple systems?
Yes
14 Can you have more than 36 companies in one system?
No
15 How does XRL work with both OII and O3 installed?
Only foreseeable in a test, Pegasus or Partner environment. They would need to switch between the two by changing the link to the System.DBC file and it should work correctly or creating a new connection.
16 How does PIM work with both OII and O3 installed?
Both should be available for selection (O3 and OII databases)
17 How does Dashboards work with both OII and O3 installed?
This can only work with one install at the time (just like OII VFP and OII SQL). This is defined at the point of installation. If you wish to use it with O3 you must install and link/point to O3 and if you want it to then work with OII it must be de-installed and re-installed and pointed to OII.
Alternatively repoint the ―PathToGoApp.ini‖ file to the appropriate path.
18 How does Document Management work with both OII and O3 installed?
Once installed it appears to automatically work with both simultaneously. So a scan in O3 would be seen in OII and visa versa – however the paths from the first time it is initialised and set-up remain in the DM databases and will be specific to OII or O3 etc.
19 How does Importer work with both OII and O3 installed?
There are now two separate dll files and this has been tested. Opera II : C:\Documents and Settings\All Users\Application Data\Pegasus\Client VFP - OperaImport.dll Opera 3 v1.0 : C:\Documents and Settings\All Users\Application Data\Pegasus\O3 Client VFP - OperaImport3.dll
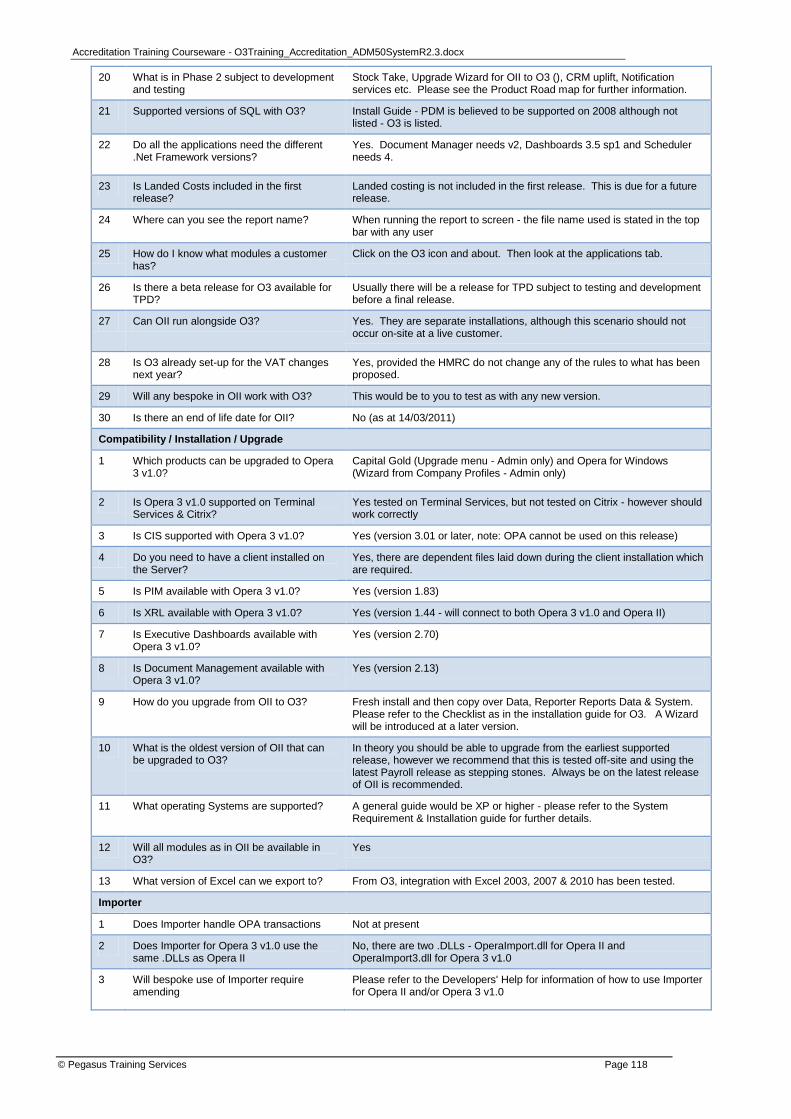
Accreditation Training Courseware - O3Training_Accreditation_ADM50SystemR2.3.docx
© Pegasus Training Services Page 118
20 What is in Phase 2 subject to development and testing
Stock Take, Upgrade Wizard for OII to O3 (), CRM uplift, Notification services etc. Please see the Product Road map for further information.
21 Supported versions of SQL with O3? Install Guide - PDM is believed to be supported on 2008 although not listed - O3 is listed.
22 Do all the applications need the different .Net Framework versions?
Yes. Document Manager needs v2, Dashboards 3.5 sp1 and Scheduler needs 4.
23 Is Landed Costs included in the first release?
Landed costing is not included in the first release. This is due for a future release.
24 Where can you see the report name? When running the report to screen - the file name used is stated in the top bar with any user
25 How do I know what modules a customer has?
Click on the O3 icon and about. Then look at the applications tab.
26 Is there a beta release for O3 available for TPD?
Usually there will be a release for TPD subject to testing and development before a final release.
27 Can OII run alongside O3? Yes. They are separate installations, although this scenario should not occur on-site at a live customer.
28 Is O3 already set-up for the VAT changes next year?
Yes, provided the HMRC do not change any of the rules to what has been proposed.
29 Will any bespoke in OII work with O3? This would be to you to test as with any new version.
30 Is there an end of life date for OII? No (as at 14/03/2011)
Compatibility / Installation / Upgrade
1 Which products can be upgraded to Opera 3 v1.0?
Capital Gold (Upgrade menu - Admin only) and Opera for Windows (Wizard from Company Profiles - Admin only)
2 Is Opera 3 v1.0 supported on Terminal Services & Citrix?
Yes tested on Terminal Services, but not tested on Citrix - however should work correctly
3 Is CIS supported with Opera 3 v1.0? Yes (version 3.01 or later, note: OPA cannot be used on this release)
4 Do you need to have a client installed on the Server?
Yes, there are dependent files laid down during the client installation which are required.
5 Is PIM available with Opera 3 v1.0? Yes (version 1.83)
6 Is XRL available with Opera 3 v1.0? Yes (version 1.44 - will connect to both Opera 3 v1.0 and Opera II)
7 Is Executive Dashboards available with Opera 3 v1.0?
Yes (version 2.70)
8 Is Document Management available with Opera 3 v1.0?
Yes (version 2.13)
9 How do you upgrade from OII to O3? Fresh install and then copy over Data, Reporter Reports Data & System. Please refer to the Checklist as in the installation guide for O3. A Wizard will be introduced at a later version.
10 What is the oldest version of OII that can be upgraded to O3?
In theory you should be able to upgrade from the earliest supported release, however we recommend that this is tested off-site and using the latest Payroll release as stepping stones. Always be on the latest release of OII is recommended.
11 What operating Systems are supported? A general guide would be XP or higher - please refer to the System Requirement & Installation guide for further details.
12 Will all modules as in OII be available in O3?
Yes
13 What version of Excel can we export to? From O3, integration with Excel 2003, 2007 & 2010 has been tested.
Importer
1 Does Importer handle OPA transactions Not at present
2 Does Importer for Opera 3 v1.0 use the same .DLLs as Opera II
No, there are two .DLLs - OperaImport.dll for Opera II and OperaImport3.dll for Opera 3 v1.0
3 Will bespoke use of Importer require amending
Please refer to the Developers' Help for information of how to use Importer for Opera II and/or Opera 3 v1.0
Accreditation Training Courseware - O3Training_Accreditation_ADM50SystemR2.3.docx
© Pegasus Training Services Page 119
Appendix E – Historical ReadMe’s
Below is a historical guide for historical read-me‘s which offer summary information of what went into the Major releases of Opera 3 (and in time will include some historical Opera II info).
Pegasus Opera 3 (1.20) Readme This Readme contains information relevant to Opera 3, June 2011.
--------------------------------------------------------------------------------
What's New in This Release
This release includes changes to a number of areas of the software. Full details of these changes are included in the Release Guide included with this release.
Sales Pipeline Management, Service Management and Helpdesk Management
There are more than sixty improvements to Sales Pipeline Management, Service Management and Helpdesk Management in the following areas:
· Company Processing
· Contacts Processing
· Service Contracts
· Equipment Register
· Helpdesk Processing
· Maintenance (in Sales Pipeline Management, Service Management and Helpdesk Management)
· Utilities (in Sales Pipeline Management, Service Management and Helpdesk Management)
· Reports (Service Management and Helpdesk Management).
Note: Sales Pipeline Management, Service Management and Helpdesk Management are not available in Opera 3 SQL.
Document Management Desktop
This is a new feature included with Document Management (3.0).
Document Management Desktop works directly from your Microsoft Windows desktop. It is both an easy retrieval system of paper documents and electronic files that have been captured to the Document Management databases and an ad-hoc capture system to quickly capture electronic files to the Document Management databases. Document Management Desktop needs access to both the Opera Server installation and the Document Management databases. However, the Opera Client installation does not need to be installed.
Document Management Desktop is a secure application – you have to log on using a user ID that is created in Opera. Even if you are someone who does not use Opera, your system administrator still needs to create an Opera login ID for you to use Document Management Desktop. An Opera installation includes a certain number of users. For example, an Opera five-user system means that five people can use Opera at the same time. However, more user IDs can be set up if necessary to use in Document Management Desktop. Each installation of Document Management includes one Document Management Desktop user. If you require more people to use Document Management Desktop, there is additional cost for each user.
Notification Services
This is a new feature, which includes messaging and shutdown.
Messaging allows you to send desktop alerts to users or groups of users in Opera 3. Scheduled alert messages are displayed on each user's desktop when they are using Opera 3. Any users who are not using Opera 3 when a message is scheduled to be displayed will be notified when they log in to the application.
Shutdown allows you to schedule a forced shutdown of Opera 3 sessions and also send desktop messages to users or groups of users in Opera 3 beforehand to warn them that a shutdown is going to happen. Users will receive three messages before the shutdown happens. You can define when the messages are displayed so users have time to save their work. For example, the first message can be scheduled to be displayed 1 hour beforehand, the second message 30 minutes beforehand and the final message 5 minutes beforehand.

Accreditation Training Courseware - O3Training_Accreditation_ADM50SystemR2.3.docx
© Pegasus Training Services Page 120
You can group your users together into user groups. User groups are optional features of Notification and Shutdown Services to group people that use Opera 3 into, for example, functional areas or seniority groups.
Stocktake
The Stock Control application now includes Stocktake, an inventory management application that helps you monitor your stock position and make corrections where the actual stock quantities in your stock locations are different to the quantities in Opera. Doing stock takes is important so that your Opera 3 Stock Control application reflects the actual physical quantities in your stock locations. Accurate stock quantities in Opera 3 means that you can trust that the quantities displayed reflect the real stock position in your stock locations. If there is a difference, Stocktake can post a stock adjustment to Opera 3 for each item affected.
Improvements to Other Areas
These are brief details of the other improvements in Opera 3:
· A new ad-hoc BACS payment option called Bankline Ad Hoc has been add to the Purchase Ledger Cashbook and Payroll applications.
· The Importer application now works with the Open Period Accounting (OPA) feature in the Opera 3 Nominal Ledger. OPA is an optional feature that allows you to control whether your Nominal Ledger accounting periods are open or closed for new postings.
· The Opera 3 Nominal Ledger Rectify journals command has been improved to allow the following:
Foreign journals can be reposted at a different exchange rate
Journals can be reposted to distribution cost centre accounts if the distribution percentages changes after the original posting.
· Pegasus XRL (1.46) has been updated to include the database changes for this release. Windows 7 Service Pack 1 and Windows Server 2008 R2 Service Pack 1 have also been tested with this release.
· Dashboards Manager and the Reporter applications have been updated to include the database changes for this release. New tables and fields can therefore be used in reports.
· The Opera 3 Information Centre is now automatically displayed on your Windows desktop after upgrading to this version. The Information Centre includes information about new features in Opera 3, new Pegasus events for you to attend plus other information.
· The Opera 3 Task Scheduler has been updated to include the following:
A new option called Clear Inactive/Expired Messages is displayed on the System – Tidy System task form. When selected, inactive or expired messages and shutdown records that were created from the System – Scheduling menu in Opera 3 are removed.
A new option called Export is displayed on the System – Backup Databases task form. When selected, all files that are in the Export folder are included in the data backup.
Windows 7 & Windows Server 2008 R2
Windows 7 Service Pack 1 and Windows Server 2008 R2 Service Pack 1 have been tested with this release. The System Requirements guide has been updated to include these products.
Internet Explorer 9
Internet Explorer 9 has been tested and is now mentioned in the System Requirements guide.
--------------------------------------------------------------------------------
Other Sources of Information
PDF Guides
We recommend you read these guides supplied as PDF files:
· The Installation Guide for information on how to install and upgrade from Opera II
· The Release Guide for detailed information about this release
· The Implementation Guide for help with how to set up a new implementation after installing Opera 3
· The System Requirements Guide for hardware and software requirements to run Opera 3.
The guides are on the Opera 3 CD in a folder called DOCUMENTS and are also installed as part of the Opera 3 Client installation. The location of the Client installation folder depends on the edition of the Windows product Opera 3 is installed on: normally C:\Program Files\Pegasus\O3 Client XXX\ or C:\Program Files (x86)\Pegasus\O3 Client XXX\ (where XXX is either VFP or SQL).
Opera 3 Help
Accreditation Training Courseware - O3Training_Accreditation_ADM50SystemR2.3.docx
© Pegasus Training Services Page 121
Opera 3 Help includes details of the new features in this release of Opera 3 and provides details of all the functions available in the application.
Information Description
Concept An 'Introduction to ... " topic that gives an overview of an application, describes the different areas of an application, and includes a chart of how the applications link together.
Reference These topics describe the different boxes on each form in Opera 3.
Task These topics describe the steps required to do tasks in Opera 3.
New Features A 'What's New' Help file provides information on features in a new release, plus other information that is relevant to the release that can be read on-screen.
--------------------------------------------------------------------------------
Adobe Reader (9.4)
You need to have Adobe Reader (7.0) or higher installed on your computer before you can view these guides. If you do not already have the reader, you can install Adobe Reader (9.4) from the Opera 3 CD by running the Setup.exe program in the Acrobat folder.
Pegasus Opera 3 (1.10.11) Readme This Readme contains information relevant to Opera 3, March 2011.
What's New in This Release
This is a patch release of Opera 3 to resolve an issue caused by a change in the SOP/Invoicing application. The change affected how the SOP Processing form calculated the suggested delivery quantity when a delivery note was posted. The delivery quantity was always calculated as either the quantity of stock that was allocated to the customer, or the picked stock quantity if picking was is use. This also affected the suggested invoice quantity if the delivery process is not in use. Now, a new option called Suggest Allocated or Picked Quantities has been introduced on the SOP – Utilities – Set Options form. When this option is ticked, the delivery quantity will be calculated as either the quantity of stock that is allocated to the customer, or the picked stock quantity if picking is used. You must tick this option if this behavior is required. It is not ticked by default. Any customers who want the suggested delivery quantity, or suggested invoice quantity if deliveries are not used, to be either the free stock quantity at the selected warehouse or the forced allocated quantity if the Forced Allocations option is ticked, should not tick the new option. Important: You must run Update Data Structures in the System Manager after installing the software.
Pegasus Opera 3 (1.10.10) Readme This Readme contains information relevant to Opera 3, March 2011.
What's New in This Release
This is a maintenance release of Opera 3 that also includes improvements to the Purchase Ledger that were not included in Pegasus Opera 3 (1.10).
Purchase Ledger
This release includes an enhancement to the Suggested Payments report in the Purchase Ledger. When the Purchase Ledger is linked to the Nominal Ledger, you can now select bank accounts that are held in currencies other than Sterling or Euro. This means, for example, that suppliers that are paid from bank accounts in US Dollars can be included on the Suggested Payments report. In earlier releases, only suppliers paid from Sterling or Euro bank accounts could be included.
Pegasus Opera 3 (1.10) Readme This Readme contains information relevant to Opera 3, February 2011.
Accreditation Training Courseware - O3Training_Accreditation_ADM50SystemR2.3.docx
© Pegasus Training Services Page 122
What's New in This Release
Payroll
This release includes changes to the software for the tax year end and the new tax year. Full details are in the Release and Upgrade Guide (PAYINFO.PDF) or the Payroll Upgrade 2010-11 chapter in the F1 Help. These changes affect this year‘s upgrade:
1. For the 2010-11 year end
Almost all employers must file their P35 (Employer Annual Return) and their employees' P14 (End of Year Summaries) returns online for the 2010-11 year end. HMRC has withdrawn support for submitting P14 and P35 year-end returns on floppy disk. In addition, as most employers will need to make online submissions, HMRC have discontinued all continuous printer and laser printer versions of the P14.
The only employers who can file on paper are:
o Employers entitled to operate PAYE using the Simplified Deduction Scheme for domestic employees if they have not
previously received a tax-free payment for online filing
o Practising members of religious societies or orders whose beliefs are incompatible with the use of electronic methods of
communication
o Employers who employ someone to provide care or support services at or from their home
o Limited companies filing a return solely to submit an entry in box 28 of form P35 ('CIS deductions suffered').
Note: There are no changes to the P11D for the 2010-11 tax year.
2. For the 2011-12 tax year
From 6 April 2011, the National Insurance Earnings Threshold will be split into two thresholds - one for employees and another for employers. The employees' threshold is called the Primary Threshold (PT) and the employers' threshold is called the Secondary Threshold (ST). Each threshold will be set to different levels. The way to calculate employees' and employers' NI has therefore changed.
From 6 April 2011, the NI rate used to calculate both employees' and employers' national insurance contributions will increase by 1%. The only employees that are exempt from this increase are those who have already reached the state pension age and use the NI category letter C. These employees have a zero rate contribution.
Additional Statutory Paternity Leave & Pay (ASPL&P) is being introduced for babies due on or after 3 April 2011 and adoptions with a matching date on or after 3 April 2011. This allows a father to take between 2 and 26 weeks ASPL&P if the mother has not taken all her maternity pay period weeks and has returned to work. Up to 19 weeks can be paid. The existing Statutory Paternity Pay scheme is also being renamed to Ordinary Statutory Paternity Pay.
A new method of reporting child maintenance orders - Deduction from Earnings Orders (DEO) - is being introduced for use from 2011. Employers' payments to the Child Support Agency must be accompanied by this new report.
From 6 April 2011, almost all employers must file starter and leaver returns - for example, P45 and P46 - online.
From 6 April 2011, a new tax code - D1 - will be introduced. This code is for employees who earn more than £150,000 per annum in their main job but also have other jobs, the earnings from which must be taxed at 50% using the D1 code.
Late Breaking News
3. Small Employers Relief (SER)
From 6 April 2011, Small employers who qualify for Small Employers Relief (SER) are allowed to recover 100% of Statutory Payments (SMP, OSPP, ASPP & SAP) paid to their employees plus 3% compensation. The compensation amount is being reduced from 4.5%. Why has the rate of the additional amount changed? The additional amount is calculated using a formula laid down in legislation based on the employers' share of NICs paid and is reviewed each year to see if it needs to be adjusted to reflect the shift in the ratio of SMP, OSPP, ASPP and SAP paid out and the employers' NICs paid on these payments. The employers NICs threshold for the 2011-12 tax year is rising from £110 to £136 per week. This means that from 6 April 2011, NICs are not payable on the £128.73 weekly standard rate of any relevant statutory payment, so employers will be paying less NICs on statutory payments. The change in the additional amount - from 4.5 per cent to 3 per cent - reflects this reduction on employers‘ NICs payments.
Known Issue – Payroll
The following issue has been found in Payroll that affects customers upgrading from Opera II 6.82 or earlier if the Remember Form Positions and Sizes option is used. This is an option that determines whether the system retains the position and size of forms so when you open a form, it appears as it was when it was closed. After the upgrade to Opera II (6.90) or Opera 3 (1.10), the Select Groups form may not size correctly. This form is displayed throughout Payroll if more than one group has been set up to allow groups to be opened.

Accreditation Training Courseware - O3Training_Accreditation_ADM50SystemR2.3.docx
© Pegasus Training Services Page 123
To correct the problem, click the resize button on the toolbar when the form is open. Then click OK on the form. When the form is next opened it will be properly sized.
Other Software Changes in this Release
The following features are not mentioned in the Release Guide or What‘s New sections of the Help. Please refer to the relevant sections of the Opera 3 Help for detailed information.
4. Opera II to Opera 3 System Upgrade Wizard
A new wizard called System Upgrade has been added to the Opera 3 System Manager to upgrade your Opera II system information to Opera 3. The wizard is in the Administration group under ‗Upgrade‘. It can be opened from the Opera 3 Ribbon Bar and Navigation Pane. This wizard provides an easy method of upgrading your company, user, people, user preferences and reports from Opera II directly into Opera 3. It is an exclusive process so nobody can be using the Opera II system you are upgrading from and only the person running the upgrade should be logged into the system in Opera 3. You can upgrade system information from Opera II Enterprise to Opera 3 or from Opera II Enterprise SQL to Opera 3 SQL. The wizard must be run for each system that you need to use in Opera 3. To upgrade the information you must be logged in using the ADMIN login ID. The following information is upgraded:
Description Notes Table
Company details and application options This table retains company details, the location of the data, options that switch features on and options that link different applications (for example, link the Sales Ledger to the Nominal Ledger).
SEQCO
Remember form sizes and positions This table retains details of any forms that have been resized or repositioned. These forms remember their size and position when they are opened.
SEQFORMS
Report layouts Some reporting commands provide more than one layout option to choose from, depending on the type of stationery you intend to use.
SEQRPLAY
User favourites This table retains user-specific favourite commands that are displayed on the classic navigator, menu and ribbon bar.
SEQFAVES
People profiles People profiles are individuals who are referenced in the system but are not necessarily users of the system.
SEQPEOPLE
Email profiles Email profiles are used for sending statements, sales quotations, sales proformas, order acknowledgements, delivery notes, and invoices to customers from the Sales and SOP modules, or for emailing remittance advices and purchase orders from the Purchase Ledger.
SEQEFLD
SEQEGRP
SEQERPT
User defined reports These are reports that have been defined in the Report Manager application. Any reports that have been appended to an application‘s Reports menu in Opera II will also be appended to the same Reports menu in Opera II. For example, if you appended a report to the Reports menu in Stock Control in Opera II, it will be appended to the same menu in Opera 3.
SEQREPM
System-wide preferences These preferences apply to the system as a whole, for example industry specific names for ‗projects‘, ‗departments, or ‗phases‘ in the Costing application.
SEQSYS
Non standard reports See below
Reports Report designs are held in the ‗Reports‘ folder. Most reports are standard reports that are created and maintained by Pegasus. These Opera II reports do not replace the equivalent reports in the Opera 3 ‗Reports‘ folder because they would replace more up to date reports. If any ‗off the shelf‘ reports have been modified for bespoke requirements, they will need to be copied into the Opera 3 folder manually. New reports, created for customer-specific bespoke requirements that are not supplied by Pegasus, are copied to Opera 3. The original Opera 3 reports are automatically copied to a sub folder of the ‗Reports‘ folder called ‗Installation Originals‘ before the upgrade starts. Report layout records in the Opera II SEQRPLAY table that are created for customer-specific requirements – ie not standard reports – are copied into the Opera 3 SEQRPLAY table. For example, the report SQININ is a standard invoice design included with Opera II and Opera 3. If a new report based on the SQININ report was created in Opera II – for example SQININB - this report will be added to the Reports Layout table and will then be available for selection from the Publisher form when an invoice is printed.
Report type Copied to Opera 3?
Reason
Non standard reports Yes These Opera II reports were supplied as bespoke solutions for customers and are therefore also required in Opera 3. The reports have unique names so will not overwrite standard Opera 3 reports when they are copied.
Company specific reports Yes These reports use a prefix of the company code, for example Z_SQININ is an invoice design used only in company Z. The reports also have unique names so will not overwrite standard Opera 3
Accreditation Training Courseware - O3Training_Accreditation_ADM50SystemR2.3.docx
© Pegasus Training Services Page 124
reports when they are copied.
Standard ‗off the shelf‘ report No Standard reports are often improved by Pegasus, sometimes for legislative reasons. Most of the time the most up to date reports, which are supplied with Opera 3, should be used. They are therefore not copied from Opera II.
Standard report that has been modified No Most of the time the most up to date reports, which are supplied with Opera 3, should be used. They are therefore not copied from Opera II. Where a standard Opera II report has been modified, the modifications must also be done in the corresponding Opera 3 report after the upgrade.
Tip: A checklist is included in the Opera 3 Installation Guide to help you to upgrade from Opera II to Opera 3.
5. Report Manager - Output to Excel
The Report Manager includes a new option called Excel Output Option that allows you to create an Excel sheet from a report using the Opera 3 Publisher. This option creates a properly formatted report with a relevant heading and criteria information that can be modified as necessary.
6. Shortcut Keys in the Ribbon Bar
The Ribbon Bar now includes shortcut keys to make it accessible to the keyboard. In earlier releases the Ribbon Bar could only be used with a mouse. The keyboard shortcut keys are activated by pressing the ALT button + one of the following:
F for the Financials tab
S for the Supply Chain Management tab
R for the Payroll & HR tab
M for the CRM tab
E for the Reporting tab
V for the Favourites tab. Once a tab is activated, you can use the keyboard‘s arrow buttons to move to a command and open the required form.
Other Sources of Information
PDF Guides
We recommend you read these guides supplied as PDF files:
The Installation Guide for information on how to install and upgrade from Opera II
The Release Guide for detailed information about this release
The Implementation Guide for help with how to set up a new implementation after installing Opera 3
The System Requirements Guide for hardware and software requirements to run Opera 3.
The guides are on the Opera 3 CD in a folder called DOCUMENTS and are also installed as part of the Opera 3 Client installation. The location of the Client installation folder depends on the edition of the Windows product Opera 3 is installed on: normally C:\Program Files\Pegasus\O3 Client XXX\ or C:\Program Files (x86)\Pegasus\O3 Client XXX\ (where XXX is either VFP or SQL).
Opera 3 Help
Opera 3 Help includes details of the new features in this release of Opera 3 and provides details of all the functions available in the application.
Information Description
Concept An 'Introduction to ... " topic that gives an overview of an application, describes the different areas of
an application, and includes a chart of how the applications link together.
Reference These topics describe the different boxes on each form in Opera 3.
Task These topics describe the steps required to do tasks in Opera 3.
New Features A 'What's New' Help file provides information on features in a new release, plus other information that
is relevant to the release that can be read on-screen.

Accreditation Training Courseware - O3Training_Accreditation_ADM50SystemR2.3.docx
© Pegasus Training Services Page 125
Adobe Reader (9.4)
You need to have Adobe Reader (7.0) or higher installed on your computer before you can view these guides. If you do not already have the reader, you can install Adobe Reader (9.4) from the Opera 3 CD by running the Setup.exe program in the Acrobat folder.
Document Version: 1.00 February 2011

Accreditation Training Courseware - O3Training_Accreditation_ADM50SystemR2.3.docx
© Pegasus Training Services Page 126
Pegasus Opera 3 (v1.00.10) Readme
This Readme contains information relevant to Opera 3, December 2010.
What's New in This Release
This is a maintenance release of Opera 3 which includes a small number of defect fixes. A list of the fixed defects is available to your Pegasus partner. The release also includes the following:
A new VAT transaction type is available on the System – Maintenance – VAT Processing form. Transaction type C is for non EC services received. This is available for installations that include the EC VAT application and those without the EC VAT application.
When the Ribbon Bar is used, minimized forms are docked to the bottom left hand corner of the desktop
The original posting date is now displayed on the Nominal Ledger – Rectify Journal form
A new release of the Scheduler application is also available.
Pegasus Opera 3 (v1.00) Readme
This Readme contains information relevant to Opera 3, November 2010.
What's New in This Release
This is the first release of Opera 3 which includes the following:
The charting feature makes it possible to view your company's data in graphical format using a number of different chart types.
Reports throughout the application can be saved as Microsoft Excel spreadsheets.
The Nominal Ledger 'Open Period Accounting' feature allows you to update the Nominal Ledger in any open period in the prior, current or three future financial years. You can block periods to prevent postings when required.
The Nominal Ledger Rectify command is used to change journal details after they have been posted. There may be occasions when a mistake has been made in a journal that is only noticed after it has been posted. For example, the wrong account or cost centre may have been used or a journal may have been posted to the wrong period.
The VAT reporting capabilities include the option to file your VAT100 return online using Opera 3 and Online Filing Manager.
Passwords for people using Opera 3 can be set to expire in a defined number of days. Users will be forced to change their passwords within 10 days of the expiry date.
Using the Scheduler, tasks can be scheduled to run at required times of the day, thereby removing unproductive 'down time' during the working day.
The Online Help has been structured to provide more focus on the type of information you need. The information provided has been separated into an introduction about each module, explanations of the purpose of the forms in Opera 3 and the boxes on the forms, and a 'How to' section dedicated to providing the instructions you need to do tasks.
You can use your mouse wheel button to move between records in Opera 3 on forms that display a List tabbed page. This is in addition to using toolbar icons or using list tabbed pages on the forms.
Before printing reports you can view them in a preview form that includes a number of useful features. You can also leave the report preview form open and do another task in Opera 3.
The Ribbon bar is a navigation panel that groups the different applications using tabbed pages and provides a Microsoft Office 2007 look and feel. You can add links to external applications like Microsoft Excel, and group your most-used Opera 3 commands together in the Favourites tabbed page.
Icons that are displayed on a form's status bar can be used to open a form that is linked to the icon. For example, if you use the Open Period Accounting feature and have posted a transaction to a future period, the Nominal Ledger - Accounts form will display an icon to indicate an advanced posting. You can open a view form to see the details by double clicking on the icon.
Opera 3 works with these Pegasus products:
o Online Filing Manager (3.00)
o Pegasus Document Management (2.13)
o Pegasus Instant Messenger (1.83)
o Pegasus XRL (1.44)
o Pegasus Dashboards (2.70) & Dashboards Manager
o Pegasus CIS (3.01)
o Operations II (3.12.20).
Opera 3 integrates with the 32-bit editions of Microsoft Office 2003, Office 2007 and Office 2010 for emailing using Microsoft Outlook, mail merge using Microsoft Word and spreadsheet reporting using Microsoft Excel. 64-bit editions are not supported.
Accreditation Training Courseware - O3Training_Accreditation_ADM50SystemR2.3.docx
© Pegasus Training Services Page 127
Late Breaking News
The following features are not mentioned in the Release Guide or What‘s New sections of the Help. Please refer to the relevant sections of the Opera 3 Help for detailed information.
Advanced Nominal Ledger dimensions
7. Nominal Ledger Audit Trail
If you select the 'Account' sequence, you can choose to include a range of cost centres and Advanced Nominal Ledger dimensions if you use the Advanced Nominal Ledger feature. By default these dimensions are called ‗Project‘ and ‗Department‘.
8. Fixed Assets Spreadsheet Import
The Fixed Assets Spreadsheet Import now imports Advanced Nominal Ledger dimensions. If the import record includes these dimensions codes, the import checks the Nominal Dimensions settings (Project and Department) for the Nominal Ledger codes attached to the Asset Category code on the import record. If either of the dimensions settings on a category's Nominal Ledger Account is:
'Mandatory', the import record must include one or two dimensions for the asset. If they are not included, the record will not be imported.
'Optional', the import record may include a dimension for the asset. If they are not included, the record will still be imported.
'Do Not Use', the import record should not include a dimension for the asset. If they are included, the record will still be imported but the dimensions will be ignored.
9. Cashbook View
The Cashbook View form displays Advanced Nominal Ledger dimensions on the Transactions paged tab.
Pegasus Opera 3 (v1.00.10)
This is a maintenance release of Opera 3 (v1.00) which includes a small number of defect fixes. A list of the fixed defects is available to your Pegasus partner.
Other Sources of Information
PDF Guides
We recommend you read these guides supplied as PDF files:
The Installation Guide for information on how to install and upgrade from Opera II
The Release Guide for detailed information about this release
The Implementation Guide for help with how to set up a new implementation after installing Opera 3
The System Requirements Guide for hardware and software requirements to run Opera 3.
The guides are on the Opera 3 CD in a folder called DOCUMENTS and are also installed as part of the Opera 3 Client installation. The location of the Client installation folder depends on the edition of the Windows product Opera 3 is installed on: normally C:\Program Files\Pegasus\O3 Client XXX\ or C:\Program Files (x86)\Pegasus\O3 Client XXX\ (where XXX is either VFP or SQL).
Opera 3 Help
Opera 3 Help includes details of the new features in this release of Opera 3 and provides details of all the functions available in the application.
Information Description
Concept An 'Introduction to ... " topic that gives an overview of an application, describes the different areas of
an application, and includes a chart of how the applications link together in the application.
Reference These topics describe the different boxes on each form in Opera 3.
Task These topics describe the steps required to do tasks in Opera 3.
New
Features
A 'What's New' Help file provides information that can be read on-screen on features in a new
release, plus other information that is relevant to the release.
Accreditation Training Courseware - O3Training_Accreditation_ADM50SystemR2.3.docx
© Pegasus Training Services Page 128
Adobe Reader (9.4)
You need to have Adobe Reader (7.0) or higher installed on your computer before you can view these guides. If you do not already have the reader, you can install Adobe Reader (9.4) from the Opera 3 CD by running the Setup.exe program in the Acrobat folder.
Pegasus Opera II (6.82.10) Readme
This Readme contains information relevant to Opera II (6.82.10), August 2010.
We recommend you use these information resources which are located on the Opera II CD in a folder called DOCUMENTS:
1. The Installation Guide for information on how to install and upgrade Opera II
2. The Release Guide for details of earlier releases
3. The System Requirements Guide for hardware and software requirements
4. The Implementation Guide and Getting Started section of the Online Help if you are new to Opera II. You access the
Help by pressing F1 when using the product.
The guides are on the Opera II CD and also in the Opera II Client installation‘s main folder, normally c:\Program Files\Pegasus\Client XXX\ (where XXX is either VFP or SQL) or c:\Program Files (x86)\Pegasus\Client XXX\ (64-bit Windows products).
What's New in This Release
This is a technical-uplift release for customers that use both Operations II and Opera II Client installations on the same computer. The software product that is used to create PDF files in Opera II and Operations II has changed. Both products now use the Amyuni software version 4.0, which is certified for use with Microsoft Windows 7. Do you need to upgrade to this release? You must upgrade your Opera II installation to version 6.82.10 if you upgrade your Operations II client installation to version 3.12.10 and the computer also has the Opera II client installed. If Opera II and Operations II clients are installed on different computers, you do not need to upgrade your Opera II installation.
Pegasus Opera II (6.82) Readme
This Readme contains information relevant to Opera II (6.82), July 2010.
We recommend you use these information resources which are located on the Opera II CD in a folder called DOCUMENTS:
1. The Installation Guide for information on how to install and upgrade Opera II
2. The Release Guide for details of earlier releases
3. The System Requirements Guide for hardware and software requirements
4. The Implementation Guide and Getting Started section of the Online Help if you are new to Opera II. You access
the Help by pressing F1 when using the product.
The guides are on the Opera II CD and also in the Opera II Client installation‘s main folder, normally c:\Program Files\Pegasus\Client XXX\ (where XXX is either VFP or SQL) or c:\Program Files (x86)\Pegasus\Client XXX\ (64-bit Windows products).

Accreditation Training Courseware - O3Training_Accreditation_ADM50SystemR2.3.docx
© Pegasus Training Services Page 129
What's New in This Release
This maintenance-only release includes the following:
Opera II Enterprise and Opera II Enterprise SQL (6.82)
Pegasus Document Management (2.12).
These releases include software fixes for a small number of defects. A full list of the fixes is available to Pegasus partners. Important: You must run Update Data Structures on your company‘s data after upgrading to this release.
Pegasus Opera II (6.81) Readme
This Readme contains information relevant to Opera II (6.81), May 2010.
We recommend you use these information resources which are located on the Opera II CD in a folder called DOCUMENTS:
The Installation Guide for information on how to install and upgrade Opera II
The Release Guide for full details of this release
The System Requirements Guide for hardware and software requirements
The Implementation Guide and Getting Started section of the Online Help if you are new to Opera II. You access the Help by
pressing F1 when using the product.
The guides are on the Opera II CD and also in the Opera II Client installation‘s main folder, normally c:\Program Files\Pegasus\Client XXX\ (where XXX is either VFP or SQL) or c:\Program Files (x86)\Pegasus\Client XXX\ (64-bit Windows products).
What's New in This Release
This release includes a number of significant enhancements to the Executive Dashboards Manager module in Opera II Enterprise, which allows you to create custom dashboards and charts to view in Pegasus Executive Dashboards. Executive Dashboards Manager is not available in Opera II Enterprise SQL.
A number of other modules in Opera II have been enhanced and a new release of Pegasus Document Management - version 2.11 – is available.
Both Opera II Enterprise SQL and Pegasus Document Management have been tested using Microsoft SQL Server 2008 and Pegasus Executive Dashboards has been tested using Internet Explorer (8.0).
Executive Dashboards Manager & Pegasus Executive Dashboards (2.60)
The enhancements to the Executive Dashboards Manager module greatly enhance the Pegasus Executive Dashboards product in response to feedback from customers and Pegasus partners. These enhancements are included in this release:
You can create custom dashboards to display the charts for a certain user or group of users. Custom dashboards look like the standard out-of-the-box dashboard but they display only the charts required. For example, you may want each sales manager in your organisation to have their own personal dashboard that includes charts only for their sales regions, territories or other information.
You can configure charts to link to other charts to drill down to more information. Typically, drilldown charts display the underlying details of the information in a main chart. For example, each segment in a pie chart displaying sales values by region can link to a drilldown chart that displays the detailed information behind the values.
You can configure charts to link to a web site. For example, you can link a customer‘s postcode in a grid chart to a site like Multimap.com or you can link a customer‘s name in a grid chart to their corporate site.
You can configure charts to link to a separate dashboard. For example, you may have a dashboard that displays all the key performance indicators including a chart displaying employee turnover. You can link that chart to a different dashboard that displays only payroll and personnel related charts. Only users who have the necessary security permissions will be able to view the dashboard.
Accreditation Training Courseware - O3Training_Accreditation_ADM50SystemR2.3.docx
© Pegasus Training Services Page 130
You can configure charts so that only certain users can view them. You can use filters so that a chart displays information that is relevant for a user, for example, by geographic region or sales territory.
You can create charts that group information together to display totals. For example, in a list chart you may want to present a total of sales values by sales person.
A number of new features are included on the Chart Details form in Executive Dashboards Manager.
Note: This release of Pegasus Executive Dashboards uses Microsoft .NET 3.5 Service Pack 1 instead of Microsoft .NET 2.0. This must be installed on the server computer where Pegasus Executive Dashboards is installed and on the Opera II client computer if Executive Dashboards Manager is installed. If Microsoft .NET 3.5 Service Pack 1 is not already installed, you can download it from www.microsoft.com.
Other Enhancements in Opera II
These additional enhancements are included in this release of Opera II:
If you use the Additional Systems feature, you can now run the Update Data Structures command on more than one Opera II system at the same time.
You can import assets into the Fixed Assets module from a spreadsheet. This is useful for customers that maintain their asset register in a spreadsheet but now want to upgrade to the Fixed Assets module in Opera II. You can also import assets on an ad hoc basis.
You can use the Fixed Assets module without the Nominal Ledger. Previously the Nominal Ledger had to be included in the activation. The System module is still required.
Northern Bank is now a banking option in the Purchase Ledger and Cashbook modules.
A number of new options are included in the Sales Pipeline Management, Service Management and Helpdesk modules.
Note – Barclays BOBS: All references to Barclays BOBs has been removed from Opera II. This payment type is no longer supported by Barclays Bank.
Microsoft SQL Server 2008 & Internet Explorer 8
This release has been tested using Microsoft SQL Server 2008 (Service Pack 1) with both Opera II Enterprise SQL and Document Management. For details of the system requirements for Microsoft SQL Server 2008, please refer to the Microsoft web site. Internet Explorer 8 has also been tested.
For full details of the release, refer to the Release Guide.
. Pegasus Opera II (6.80.20) Readme
This Readme contains information relevant to Opera II (6.80.20), March 2010.
We recommend you use these information resources which are located on the Opera II CD in a folder called DOCUMENTS:
The Installation Guide for information on how to install and upgrade Opera II
The System Requirements Guide for hardware and software requirements
The Implementation Guide and Getting Started section of the Online Help if you are new to Opera II. You access the Help
by pressing F1 when using the product.
The guides are on the Opera II CD and also in the Opera II Client installation‘s main folder, normally c:\Program Files\Pegasus\Client XXX\ (where XXX is either VFP or SQL) or c:\Program Files (x86)\Pegasus\Client XXX\ (64-bit Windows operating systems).
Accreditation Training Courseware - O3Training_Accreditation_ADM50SystemR2.3.docx
© Pegasus Training Services Page 131
What's New in This Release
In this release of Opera II it is possible to use the Fixed Assets module without needing to purchase the Opera II Nominal Ledger. This enhancement has been done for customers who want to use the Fixed Assets module and link it to a Nominal Ledger in another software
product. This was not possible in earlier releases.
A small number of fixes for defects in the Fixed Assets module that were reported by Pegasus partners have also been fixed.
Pegasus Opera II (6.80.10) Readme
This Readme contains information relevant to Opera II (6.80.10), February 2010.
We recommend you use these information resources which are located on the Opera II CD in a folder called DOCUMENTS:
The Installation Guide for information on how to install and upgrade Opera II
The Release and Upgrade Guide (PAYINFO.PDF) for full details of this release
The System Requirements Guide for hardware and software requirements
The Implementation Guide and Getting Started section of the Online Help if you are new to Opera II. You access the
Help by pressing F1 when using the product.
The guides are on the Opera II CD and also in the Opera II Client installation‘s main folder, normally c:\Program Files\Pegasus\Client XXX\ (where XXX is either VFP or SQL) or c:\Program Files (x86)\Pegasus\Client XXX\ (64-bit Windows operating systems).
What's New in This Release
This release includes the Payroll changes for this tax year-end and the new 2010-11 tax year. It also includes an
enhancement to the Sales Pipeline Management module and a small number of fixes for defects reported by Pegasus
partners.
Payroll (also included in version 6.80.00)
This release also includes changes to the software for the tax year-end and the new tax year. Full details are in the Release and Upgrade Guide (PAYINFO.PDF).
These changes affect this year‘s upgrade:
The format of the P14 End of Year Summary and P60 End of Year Certificate for the 2009-10 year end has changed. This affects both paper returns and online returns.
Almost all employers must file their Employer Annual Return (P35) and End of Year Summary (P14) for each employee online for the 2009-10 year end. HMRC may charge a penalty if they file on paper.
From 6 April 2010, tax codes ‗NT‘ and ‗D0‘ (D-Zero) can also be operated on a cumulative basis as well as a ‗week1‘ or ‗month1‘ basis.
From 6 April 2010, Scottish Court Orders calculations will change – affecting Earnings Arrestment Orders and Current Maintenance Arrestments.
Starting on 6 April 2010 and continuing until 5 April 2020, the state pension age for women will gradually increase until it is the same as the current state pension age for men – 65 years. After that, both men and women‘s state pension age will gradually increase until it is 68 years.
From 6 April 2010, the NI Lower Earnings Limit will change.
From 6 April 2010, a new 50% tax rate for earnings above £150,000 per annum is introduced.
Sales Pipeline Management (Opera II Enterprise) (also included in version 6.80.00)
You can now define the start and end times to be displayed on the Daily Calendar, Weekly Calendar, Group Calendar and SPM Today forms in the Sales Pipeline Management module. When tasks are allocated to internal contacts in Sales Pipeline Management, the tasks are displayed on the calendars at the relevant time.
Accreditation Training Courseware - O3Training_Accreditation_ADM50SystemR2.3.docx
© Pegasus Training Services Page 132
You set the times on the Set Options form in Sales Pipeline Management.
Defect Fixes in version 6.80.10
Module Description Software Change Request #
Helpdesk The Resource Schedule form displays an error when an activity for an engineer is not linked to a Helpdesk call.
SCR 35597
SOP/Invoicing An error is displayed on the Batch Processing form when the OK button is selected (Error 13, Alias not found). This happens only when the EC VAT module is not used.
SCR 35588
The detail line value is incorrect on a foreign invoice if it is delivered in 2009 but invoiced in 2010 and a second VAT rate is used on the VAT code.
SCR 35571
Sales Ledger/ Purchase Ledger
The VAT Analysis report displays multiple lines for the same VAT code and rate if transactions in 2009 are posted after transactions in 2010 .
SCR 35582
Pegasus Opera II (6.80) Readme
This Readme contains information relevant to Opera II (6.80), January 2010.
We recommend you use these information resources which are located on the Opera II CD in a folder called DOCUMENTS:
The Installation Guide for information on how to install and upgrade Opera II
The Release and Upgrade Guide (PAYINFO.PDF) for full details of this release
The System Requirements Guide for hardware and software requirements
The Implementation Guide and Getting Started section of the Online Help if you are new to Opera II. You access the
Help by pressing F1 when using the product.
The guides are on the Opera II CD and also in the Opera II Client installation‘s main folder, normally c:\Program Files\Pegasus\Client XXX\ (where XXX is either VFP or SQL) or c:\Program Files (x86)\Pegasus\Client XXX\ (64-bit Windows operating systems).
What's New in This Release
Payroll
This release includes changes to the software for the tax year end and the new tax year. Full details are in the Release and Upgrade Guide (PAYINFO.PDF).
These changes affect this year‘s upgrade:
The format of the P14 End of Year Summary and P60 End of Year Certificate for the 2009-10 year end has changed. This affects both paper returns and online returns.
Almost all employers must file their Employer Annual Return (P35) and End of Year Summary (P14) for each employee online for the 2009-10 year end. HMRC may charge a penalty if they file on paper.
From 6 April 2010, tax codes ‗NT‘ and ‗D0‘ (D-Zero) can also be operated on a cumulative basis as well as a ‗week1‘ or ‗month1‘ basis.
From 6 April 2010, Scottish Court Orders calculations will change – affecting Earnings Arrestment Orders and Current Maintenance Arrestments.
Accreditation Training Courseware - O3Training_Accreditation_ADM50SystemR2.3.docx
© Pegasus Training Services Page 133
Starting on 6 April 2010 and continuing until 5 April 2020, the state pension age for women will gradually increase until it is the same as the current state pension age for men – 65 years. After that, both men and women‘s state pension age will gradually increase until it is 68 years.
From 6 April 2010, the NI Lower Earnings Limit will change.
From 6 April 2010, a new 50% tax rate for earnings above £150,000 per annum is introduced.
Sales Pipeline Management (Opera II Enterprise)
You can now define the start and end times to be displayed on the Daily Calendar, Weekly Calendar, Group Calendar and SPM Today forms in the Sales Pipeline Management module. When tasks are allocated to internal contacts in Sales Pipeline Management, the tasks are displayed on the calendars at the relevant time.
You set the times on the Set Options form in Sales Pipeline Management.

Accreditation Training Courseware - O3Training_Accreditation_ADM50SystemR2.3.docx
© Pegasus Training Services Page 134
Appendix F - Importer & Open Period Accounting
The Importer works the Open Period Accounting (OPA) feature to update the Nominal Ledger with transactions supplied in either a FoxPro compatible format (a file with the file name extension of .dbf) or a comma separated variables format (a file with the file name extension of .csv). The following types of imports are affected if the respective application in Opera 3 is linked to the Nominal Ledger:
Sales Ledger transactions
Purchase Ledger transactions
Stock Control transactions
Cashbook transactions
Nominal Ledger journals.
The Importer consolidates all transactions for a certain period and year in the Nominal Ledger into one journal. If transactions update different periods in the Nominal Ledger, for example, period 6 in year 2011 and period 7 in year 2011, a journal is posted to each period which includes the imported relevant transactions.
Options
The Importer uses these two options if Open Period Accounting is used. They are displayed on the wizard in Opera 3 only if Open Period Accounting is switched on in the Nominal Ledger company. If you are importing Nominal Ledger journals the options are enabled if the Update Nominal option is ticked.
Parameter Description
Bypass OPA Processing
This controls whether the OPA feature is used by the importer. The importer automatically assumes that OPA is in use unless this option is either ticked in the wizard or set to ‗A‘ by developers using the importer as a command line utility.
NL Posting Date
This overall date controls the period in the Nominal Ledger that is updated for all the Sales Ledger transactions, Purchase Ledger transactions, Cashbook transactions or Stock Control transactions being imported. For other transactions, the main transaction date for each transaction is used.
Financial Calendar in the Nominal Ledger
Each period in the Financial Calendar in the Nominal Ledger has a status of either ‗Open‘, ‗Closed‘ or ‗Blocked‘.
- If the transaction‘s date is in a ‗Closed‘ or Blocked‘ period, it is not imported unless the period is in the future. Transactions to future periods that are not open are imported but only update the Nominal Ledger in a batch update command in Opera 3 after the period‘s status changes.
- If the transaction's date is in an 'Open' period and the Real Time Update of Nominal Ledger feature is used, the Importer updates that Nominal Ledger period. If the Real Time Update of Nominal Ledger feature is not used, the transaction is imported but the Nominal Ledger is not updated until a batch update command is run in Opera 3.
Which date does the Importer use to update the Nominal Ledger?
The rules explained in the Financial Calendar in the Nominal Ledger section above are followed for each type of transaction.
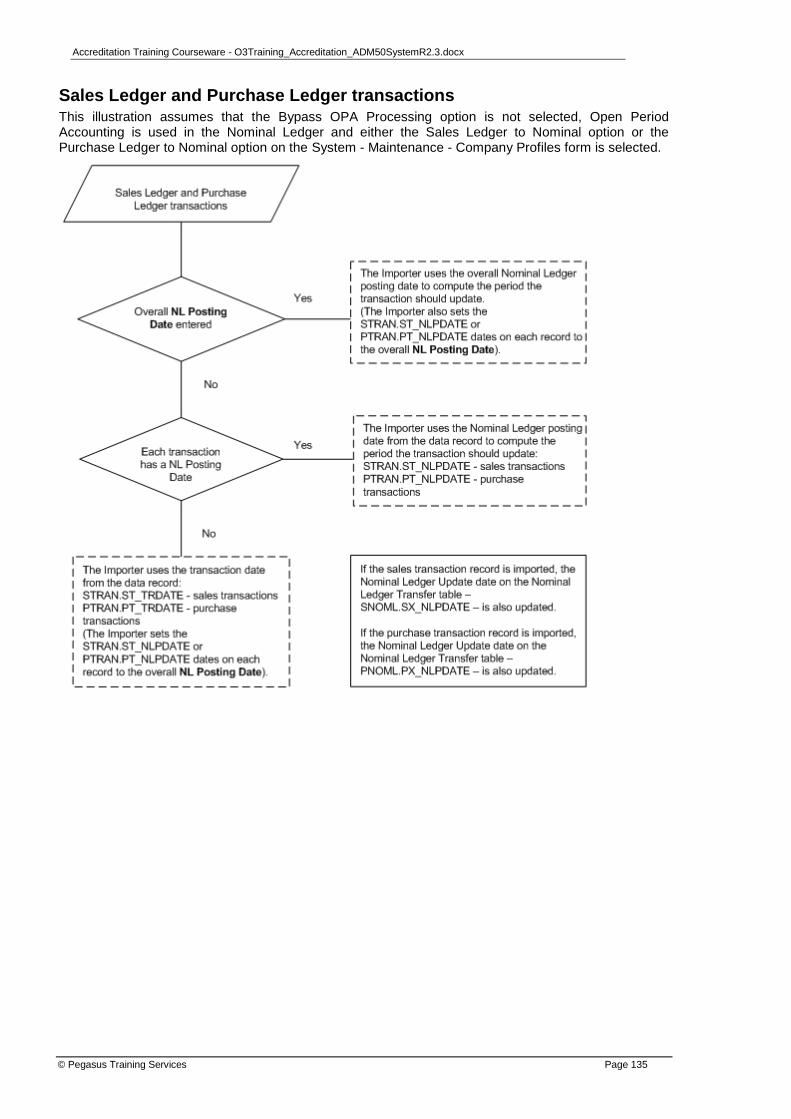
Accreditation Training Courseware - O3Training_Accreditation_ADM50SystemR2.3.docx
© Pegasus Training Services Page 135
Sales Ledger and Purchase Ledger transactions This illustration assumes that the Bypass OPA Processing option is not selected, Open Period Accounting is used in the Nominal Ledger and either the Sales Ledger to Nominal option or the Purchase Ledger to Nominal option on the System - Maintenance - Company Profiles form is selected.
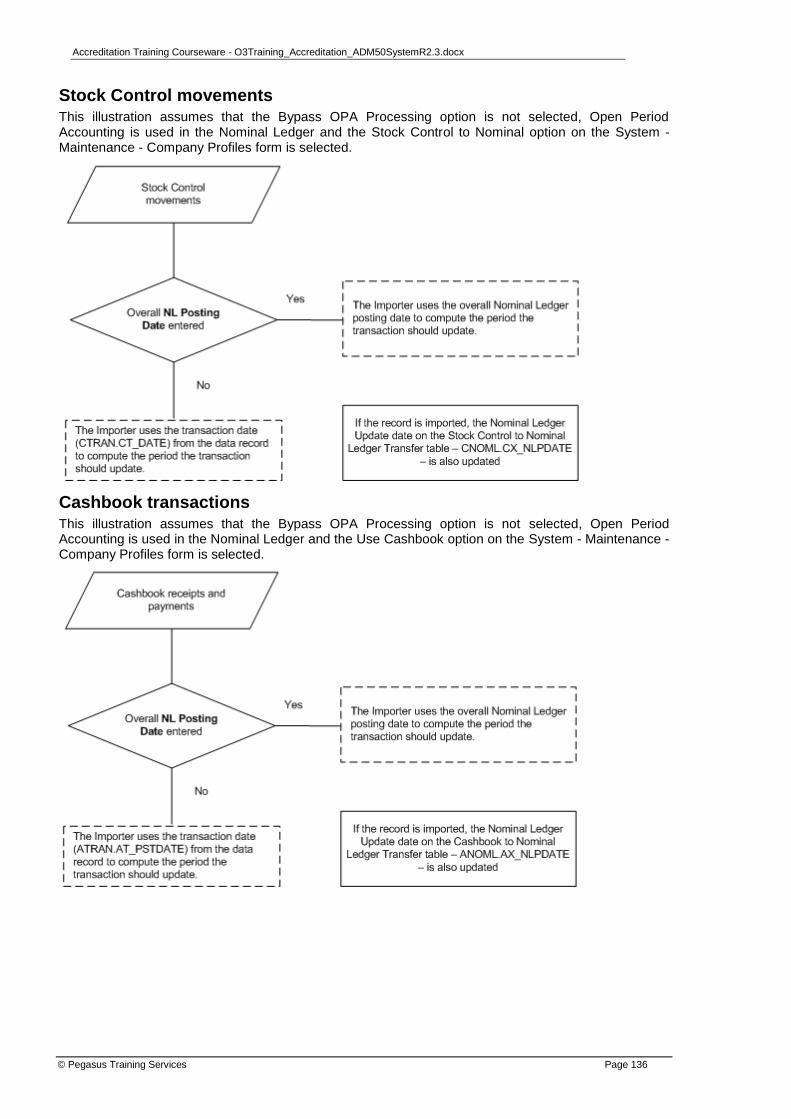
Accreditation Training Courseware - O3Training_Accreditation_ADM50SystemR2.3.docx
© Pegasus Training Services Page 136
Stock Control movements This illustration assumes that the Bypass OPA Processing option is not selected, Open Period Accounting is used in the Nominal Ledger and the Stock Control to Nominal option on the System - Maintenance - Company Profiles form is selected.
Cashbook transactions
This illustration assumes that the Bypass OPA Processing option is not selected, Open Period Accounting is used in the Nominal Ledger and the Use Cashbook option on the System - Maintenance - Company Profiles form is selected.
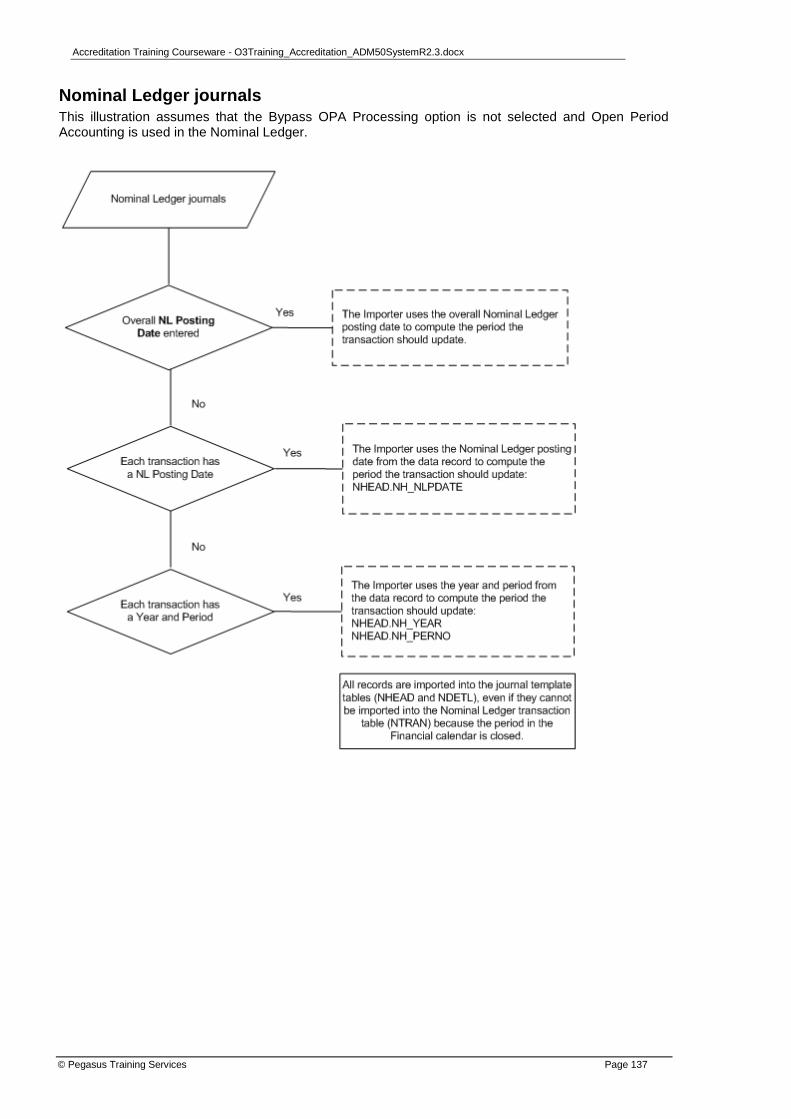
Accreditation Training Courseware - O3Training_Accreditation_ADM50SystemR2.3.docx
© Pegasus Training Services Page 137
Nominal Ledger journals This illustration assumes that the Bypass OPA Processing option is not selected and Open Period Accounting is used in the Nominal Ledger.
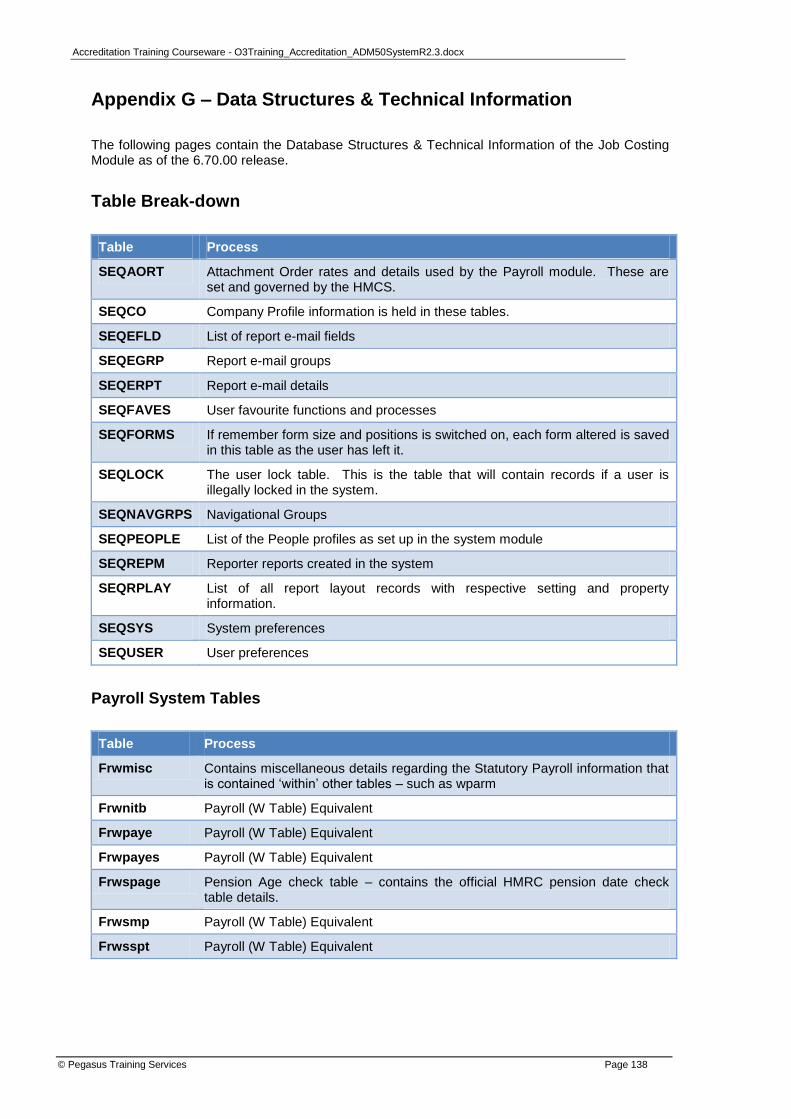
Accreditation Training Courseware - O3Training_Accreditation_ADM50SystemR2.3.docx
© Pegasus Training Services Page 138
Appendix G – Data Structures & Technical Information
The following pages contain the Database Structures & Technical Information of the Job Costing Module as of the 6.70.00 release.
Table Break-down
Table Process
SEQAORT Attachment Order rates and details used by the Payroll module. These are set and governed by the HMCS.
SEQCO Company Profile information is held in these tables.
SEQEFLD List of report e-mail fields
SEQEGRP Report e-mail groups
SEQERPT Report e-mail details
SEQFAVES User favourite functions and processes
SEQFORMS If remember form size and positions is switched on, each form altered is saved in this table as the user has left it.
SEQLOCK The user lock table. This is the table that will contain records if a user is illegally locked in the system.
SEQNAVGRPS Navigational Groups
SEQPEOPLE List of the People profiles as set up in the system module
SEQREPM Reporter reports created in the system
SEQRPLAY List of all report layout records with respective setting and property information.
SEQSYS System preferences
SEQUSER User preferences
Payroll System Tables
Table Process
Frwmisc Contains miscellaneous details regarding the Statutory Payroll information that is contained ‗within‘ other tables – such as wparm
Frwnitb Payroll (W Table) Equivalent
Frwpaye Payroll (W Table) Equivalent
Frwpayes Payroll (W Table) Equivalent
Frwspage Pension Age check table – contains the official HMRC pension date check table details.
Frwsmp Payroll (W Table) Equivalent
Frwsspt Payroll (W Table) Equivalent

Accreditation Training Courseware - O3Training_Accreditation_ADM50SystemR2.3.docx
© Pegasus Training Services Page 139
Joins Information
TABLE JOIN
seqpeopl LEFT JOIN seqpeopl ON dname.dn_ref =seqpeopl.pe_ref
seqpeopl LEFT JOIN seqpeopl ON jsctr.ju_subcnt=seqpeopl.pe_ref
seqpeopl LEFT JOIN seqpeopl ON jchead.jh_leader = seqpeopl.pe_ref
seqpeopl LEFT JOIN seqpeopl ON jcntr.jc_leader = seqpeopl.pe_ref
seqpeopl LEFT JOIN seqpeopl ON jehead.jh_leader = seqpeopl.pe_ref
seqpeopl LEFT JOIN seqpeopl ON jehead.jh_leader = seqpeopl.pe_ref
seqpeopl LEFT JOIN seqpeopl ON jchead.jh_leader = seqpeopl.pe_ref
seqpeopl LEFT JOIN seqpeopl ON jchead.jh_leader = seqpeopl.pe_ref
seqpeopl LEFT JOIN seqpeopl ON jchead.jh_leader = seqpeopl.pe_ref
seqpeopl LEFT JOIN seqpeopl ON jscon.js_subcnt = seqpeopl.pe_ref
Codes of interest
Breakdown of Codes
Attachment Order Type
Status Description
1 CCAEO
2 CCAEO/CTAEO
3 CTAEO
4 EA
5 CMA
6 MCF

Accreditation Training Courseware - O3Training_Accreditation_ADM50SystemR2.3.docx
© Pegasus Training Services Page 140
VAT & Exchange Rates
ZVTRAN
Sales Ledger
Sales Order
Processing
Purchase Ledger
Purchase Order
Processing
ZXCHG
ZTAX
Nominal Ledger
ZVTRAN is updated either
at month end or when an
audit trail is run
Exchange
Rates are used
by the Modules
ZVONLINE
SEQCO
Tables Updated
during VAT
Processing
functionality –
Committing &
VAT100 etc.

Pegasus Opera 3 Enterprise VFP Database Structures (System)
Database Structures
Payroll AO Rates
Field Name Length Type Description DPs Further information
Table : Table Description : SEQAORT
WAR_TYPE Attach. Order Type N 2.00 0.00 Attachment Order Type WAR_FROMDT Date From Which Rate Applies D 8.00 0.00 Date From Which the Rate Applies WAR_TODT Date To Which Rate Applies D 8.00 0.00 Date Up To Which the Rate Applies WAR_PAYFRQ Pay Frequency C 1.00 0.00 Pay Frequency applicable for this bandwidth and rate
WAR_BAND Upper Bandwidth Amount N 10.00 2.00 Upper Bandwidth Amount WAR_RATE Rate N 10.00 2.00 Rate WAR_RTPERC Rate Percent Ind L 1.00 0.00 Is rate figure a percent or value (indicator) WAR_RMDR Remainder for Bandwidth N 10.00 2.00 Percentage Remainder for bandwidth (set against last
bandwidth) ID Unique ID N 10.00 0.00
NEWID(ALIAS()) WAR_USEBND Use Bandwidth Earn L 1.00 0.00 False = use "all of the arrestable earnings",
True = use "portion of the arrestable earnings that
exceed the bandwidth" This field will only affect the behaviour of order
types whose deduction is to be calculated as a
percentage.
WAR_MIN Min. Deduction Amount N 10.00 2.00 Empty/zero = No. minimum deduction amount
applies. Non-zero = Min. deduction amount.
Company Controls
Field Name Length Type Description DPs Further information
Table : Table Description : SEQCO
CO_CODE Company Id C 1.00 0.00 Id code of the company. Company database names
areprefixed with this code. "Company ID cannot be blank" Rule :
.NOT.EMPTY(co_code) Rule Expression :
CO_NAME Company Name C 40.00 0.00 Company title - used as heading on reports etc.. "Company Name cannot be blank" Rule :
.NOT.EMPTY(co_name) Rule Expression :
CO_ADDR1 Address Line 1 C 30.00 0.00 First line of company address. CO_ADDR2 Address Line 2 C 30.00 0.00 Second line of company address. CO_ADDR3 Address Line 3 C 30.00 0.00 Third line of company address. CO_ADDR4 Address Line 4 C 30.00 0.00 Fourth line of company address. CO_POST Post Code C 8.00 0.00 Company post code. CO_TEL Telephone Number C 20.00 0.00 Company telephone number. CO_FAX Fax Number C 20.00 0.00 Company's facsimile number. CO_CONTACT Contact C 20.00 0.00 Contact name within company (useful for
bureauservices). CO_VAT Sales VAT Reg.Number C 20.00 0.00 Company's sales tax (VAT in EEC)
registrationnumber. CO_SUBDIR Data Path C 254.00 0.00 Pathname for the company's data files. This may
beanywhere on the system. CO_SL2NL Sales Linked NL L 1.00 0.00 Is Sales ledger linked to Nominal?. Only allowedto
be set if Nominal is available. CO_PL2NL Purchase Linked NL L 1.00 0.00 Is Purchase ledger linked to Nominal?. Onlyallowed
to be set if Nominal is available. CO_CURRNCY Multi Currency C 20.00 0.00 Operate company with multi-currency? Y or N. CO_COSTON Cost Centres L 1.00 0.00 Cost Centres Used ?, Y or N.
1 © Pegasus Training Services

Pegasus Opera II Enterprise VFP Database Structures
CO_TAX Tax Description C 3.00 0.00 Tax description. e.g. VAT or GST or TVA. "Tax description cannot be blank" Rule :
.NOT.EMPTY(co_tax) Rule Expression :
"VAT" CO_DEBTORS Debtors Balance N 13.00 2.00 Company's debtors balance. CO_CRDTORS Creditors Balance N 13.00 2.00 Company's creditors balance. CO_STOCKV Stock Valuation N 13.00 2.00 Company's stock valuation. CO_ORDRBAL Sales Order Book N 13.00 2.00 Company's order book value (sales). CO_WG2NL Payroll Linked NL L 1.00 0.00 Is Payroll linked to Nominal?,. Only allowed to beset
if Nominal is available. CO_DESPSSD EC Despatch SD's L 1.00 0.00 EC Despatch SD's required? CO_ARRVSSD EC Arrivals SD's L 1.00 0.00 EC Arrivals SD's required ? CO_SALELST EC Sales Lists L 1.00 0.00 EC Sales Lists required ? CO_LASTVRN Last VAT Return Date D 8.00 0.00 Last 'to date' used on a committed VAT
ReturnReport CO_LASTESL Last ESL Date D 8.00 0.00 Last 'to date' used on a committed ESL Report CO_LASTSSD Last SD Date D 8.00 0.00 Last 'to date' used on a committed SD Report CO_ESLNAME ESL Signatory C 40.00 0.00 ESL Signatory CO_ESLCONT ESL Contact C 30.00 0.00 ESL Contact name CO_ESLTEL ESL Telephone No. C 20.00 0.00 ESL Telephone No CO_ESLBRAN ESL Branch Id C 3.00 0.00 ESL Branch Id CO_ESLFAX ESL Fax No. C 20.00 0.00 ESL Fax No. CO_SSDPLAC SD Place of Signing C 30.00 0.00 SD Place of Signing CO_ST2NL Link Stock - Nominal L 1.00 0.00 CO_JC2WG Costing/Payroll L 1.00 0.00 Set to true if integrated to payroll.References to
Labour Items and Timesheets will berequired to be
part of the Payroll module.
CO_PIR2JC PIR/Costing L 1.00 0.00 Set to true if PIR integrated to Costing.PIR will be
able to post Job Details to theCosting Module. CO_SL2JC S/L to Costing L 1.00 0.00 If true, S/L is Linked to Costing CO_ST2JC Stock/Costing L 1.00 0.00 If true, Stock is linked to Costing CO_PO2JC POP/Costing L 1.00 0.00 If true, POP is linked to Costing CO_ANA Company ANA/EDI Ref. C 20.00 0.00 Companies ANA or EDI Reference Number. CO_EAN1 EDI Enabling Prod. 1 C 15.00 0.00 Name of EDI Enabling Product 1 in use. CO_EAN2 EDI Enabling Prod. 2 C 15.00 0.00 Name of EDI Enabling Product 2 in use. CO_EAN3 EDI Enabling Prod. 3 C 15.00 0.00 Name of EDI Enabling Product 3 in use. CO_EAN4 EDI Enabling Prod. 4 C 15.00 0.00 Name of EDI Enabling Product 4 in use. CO_E1P Enabler 1 Command C 60.00 0.00 Command use to invoke EDI Enabling product 1. CO_E2P Enabler 2 Command C 60.00 0.00 Command use to invoke EDI Enabling product 2. CO_E3P Enabler 3 Command C 60.00 0.00 Command use to invoke EDI Enabling product 3. CO_E4P Enabler 4 Command C 60.00 0.00 Command use to invoke EDI Enabling product 4. CO_BARC Bar Code Validation C 1.00 0.00 Barcode validation method. N - None E - EAN13
CO_MRN Manufacturers Ref.No C 7.00 0.00 Manufacturers Reference No. as allocated by
body(Usually ANA) for Bar Codes designated by
thiscompany. CO_BANKBAL Bank Balance N 13.00 2.00 Company's Overall Bank balance.
0.00 CO_CASHB Enable Cashbook L 1.00 0.00 Is Cashbook Being Used?,. Only allowed to be setif
Cashbook is available. CO_WG2CB Payroll To Cashbook L 1.00 0.00 Is Payroll linked to Cashbook?,. Only allowed tobe
set if Payroll is available. CO_SNRF Transmission Ref C 6.00 0.00 Last Transmission Reference_ CO_OPERTN Operations Path C 60.00 0.00 Path to Pegasus Operations for Edition forOperations
CO_SLNLCO Sales - Nominal Link C 1.00 0.00 Nominal Analysis Company Identifier CO_PLNLCO Purch - Nominal Link C 1.00 0.00 Nominal Analysis Company Identifier CO_FA2NL FA Linked NL L 1.00 0.00 Is Fixed Assets linked to Nominal? Only allowed
tobe set if Nominal is available. CO_FANLCO FA - NL Company C 1.00 0.00 Nominal Analysis Company Identifier CO_BM2JC BOM to Costing L 1.00 0.00 If true, BOM is Linked to Costing CO_BM2SOP BOM to SOP L 1.00 0.00 If true, BOM is Linked to SOP CO_WWWPAGE Company web Site C 40.00 0.00 Company web Site CO_EMAIL Company E-Mail Address C 40.00 0.00 Company E-Mail Address CO_SDDESPDEL SD Desp Include Delivery Terms L 1.00 0.00 SD Despatches Include Delivery Terms
2 © Pegasus Training Services
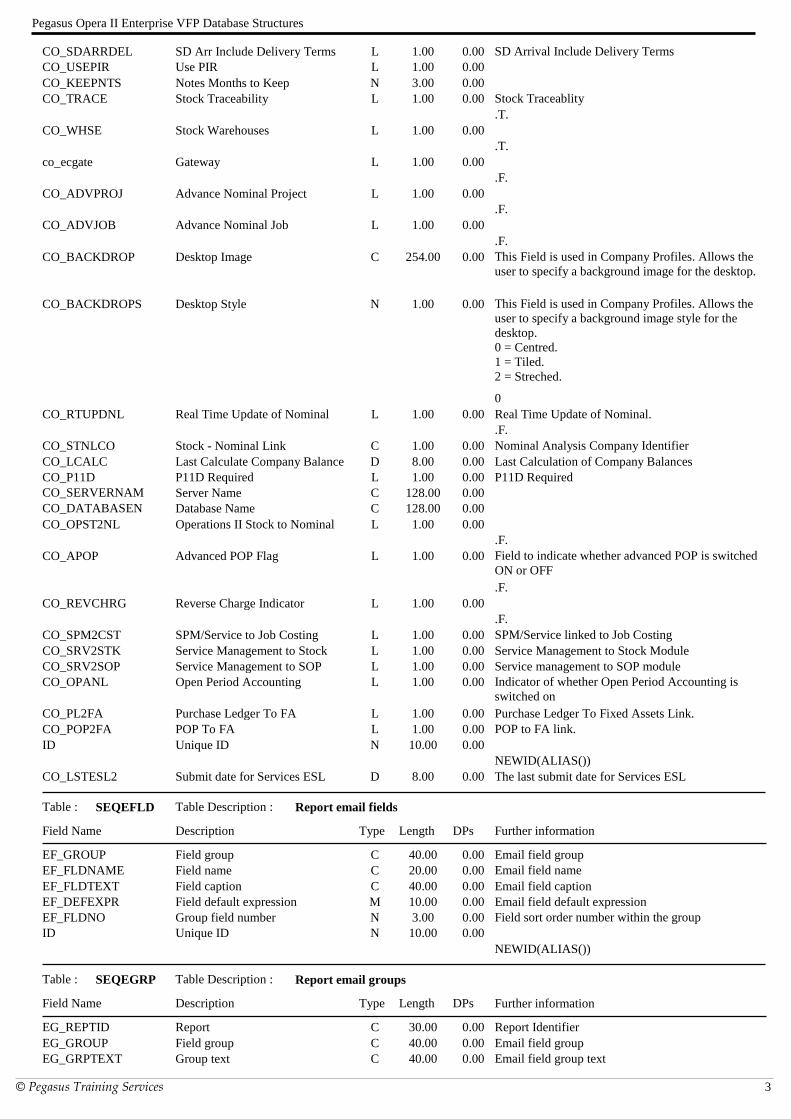
Pegasus Opera II Enterprise VFP Database Structures
CO_SDARRDEL SD Arr Include Delivery Terms L 1.00 0.00 SD Arrival Include Delivery Terms CO_USEPIR Use PIR L 1.00 0.00 CO_KEEPNTS Notes Months to Keep N 3.00 0.00 CO_TRACE Stock Traceability L 1.00 0.00 Stock Traceablity
.T. CO_WHSE Stock Warehouses L 1.00 0.00
.T. co_ecgate Gateway L 1.00 0.00
.F. CO_ADVPROJ Advance Nominal Project L 1.00 0.00
.F. CO_ADVJOB Advance Nominal Job L 1.00 0.00
.F. CO_BACKDROP Desktop Image C 254.00 0.00 This Field is used in Company Profiles. Allows the
user to specify a background image for the desktop.
CO_BACKDROPS Desktop Style N 1.00 0.00 This Field is used in Company Profiles. Allows the
user to specify a background image style for the
desktop. 0 = Centred. 1 = Tiled. 2 = Streched.
0 CO_RTUPDNL Real Time Update of Nominal L 1.00 0.00 Real Time Update of Nominal.
.F. CO_STNLCO Stock - Nominal Link C 1.00 0.00 Nominal Analysis Company Identifier CO_LCALC Last Calculate Company Balance D 8.00 0.00 Last Calculation of Company Balances CO_P11D P11D Required L 1.00 0.00 P11D Required CO_SERVERNAM
E Server Name C 128.00 0.00
CO_DATABASEN
AME Database Name C 128.00 0.00
CO_OPST2NL Operations II Stock to Nominal L 1.00 0.00 .F.
CO_APOP Advanced POP Flag L 1.00 0.00 Field to indicate whether advanced POP is switched
ON or OFF .F.
CO_REVCHRG Reverse Charge Indicator L 1.00 0.00 .F.
CO_SPM2CST SPM/Service to Job Costing L 1.00 0.00 SPM/Service linked to Job Costing CO_SRV2STK Service Management to Stock L 1.00 0.00 Service Management to Stock Module CO_SRV2SOP Service Management to SOP L 1.00 0.00 Service management to SOP module CO_OPANL Open Period Accounting L 1.00 0.00 Indicator of whether Open Period Accounting is
switched on CO_PL2FA Purchase Ledger To FA L 1.00 0.00 Purchase Ledger To Fixed Assets Link. CO_POP2FA POP To FA L 1.00 0.00 POP to FA link. ID Unique ID N 10.00 0.00
NEWID(ALIAS()) CO_LSTESL2 Submit date for Services ESL D 8.00 0.00 The last submit date for Services ESL
Report email fields
Field Name Length Type Description DPs Further information
Table : Table Description : SEQEFLD
EF_GROUP Field group C 40.00 0.00 Email field group EF_FLDNAME Field name C 20.00 0.00 Email field name EF_FLDTEXT Field caption C 40.00 0.00 Email field caption EF_DEFEXPR Field default expression M 10.00 0.00 Email field default expression EF_FLDNO Group field number N 3.00 0.00 Field sort order number within the group ID Unique ID N 10.00 0.00
NEWID(ALIAS())
Report email groups
Field Name Length Type Description DPs Further information
Table : Table Description : SEQEGRP
EG_REPTID Report C 30.00 0.00 Report Identifier EG_GROUP Field group C 40.00 0.00 Email field group EG_GRPTEXT Group text C 40.00 0.00 Email field group text
3 © Pegasus Training Services

Pegasus Opera II Enterprise VFP Database Structures
EG_ORDER Group Order N 3.00 0.00 Email field group order EG_MODULES Modules C 5.00 0.00 Modules in activation ID Unique ID N 10.00 0.00
NEWID(ALIAS())
Report email details
Field Name Length Type Description DPs Further information
Table : Table Description : SEQERPT
ER_REPTID Report C 30.00 0.00 Report Identifier ER_MODULES Modules C 5.00 0.00 Modules, one of which needs to be active, to activate
the email report details ER_RECPNT Recipient C 254.00 0.00 Email recipient ER_SUBJECT Subject C 254.00 0.00 Email subject ER_BODY Body M 10.00 0.00 Email body ER_ATTNAME Attachment Filename C 254.00 0.00 Email attachment filename ER_VERDGTS Attachment file version digits N 1.00 0.00 Number of digits to append to the end of the
attachment filename in case of duplication 0
ER_REPTNAM Report name C 50.00 0.00 Report name ID Unique ID N 10.00 0.00
NEWID(ALIAS())
User favourites
Field Name Length Type Description DPs Further information
Table : Table Description : SEQFAVES
FAV_USER User ID C 8.00 0.00 FAV_GROUP Favourites group ID C 30.00 0.00 FAV_COMMAND Command ID / EXE C 240.00 0.00 FAV_CAPTION Caption to use in favourites C 60.00 0.00 FAV_IMAGE Path to image file M 4.00 0.00 ID Unique ID N 10.00 0.00
NEWID(ALIAS())
Persistence info
Field Name Length Type Description DPs Further information
Table : Table Description : SEQFORMS
PER_USER User ID C 8.00 0.00 PER_RESOURCEID Resource ID C 60.00 0.00 PER_TOP Item Y pos N 5.00 0.00 PER_LEFT Item X pos N 5.00 0.00 PER_HEIGHT Item height N 5.00 0.00 PER_WIDTH Item width N 5.00 0.00 PER_DOCKPOS Dock position (for toolbars) N 5.00 0.00 PER_CARGO Misc information M 4.00 0.00 LASTUSED Datetime resource last used T 8.00 0.00 ID Unique ID N 10.00 0.00
NEWID(ALIAS())
Notification Group
Field Name Length Type Description DPs Further information
Table : Table Description : SEQGRP
GP_GRPID Group Code C 8.00 0.00 Group Code GP_GRPDESC Group Name C 40.00 0.00 Group Name GP_SYSID Group System C 2.00 0.00 Group System
User locks
Field Name Length Type Description DPs Further information
Table : Table Description : SEQLOCK
LK_USERID User Id C 8.00 0.00 User Id Code LK_CODE Lock Code C 30.00 0.00 LK_PROCESS Lock Process C 30.00 0.00 LK_CO Lock Company C 30.00 0.00 LK_CRASH System Crash User Id L 1.00 0.00 LK_TIDY System Tidy Ref C 1.00 0.00 LK_SESSIONID LK_SESSIONID C 10.00 0.00
4 © Pegasus Training Services
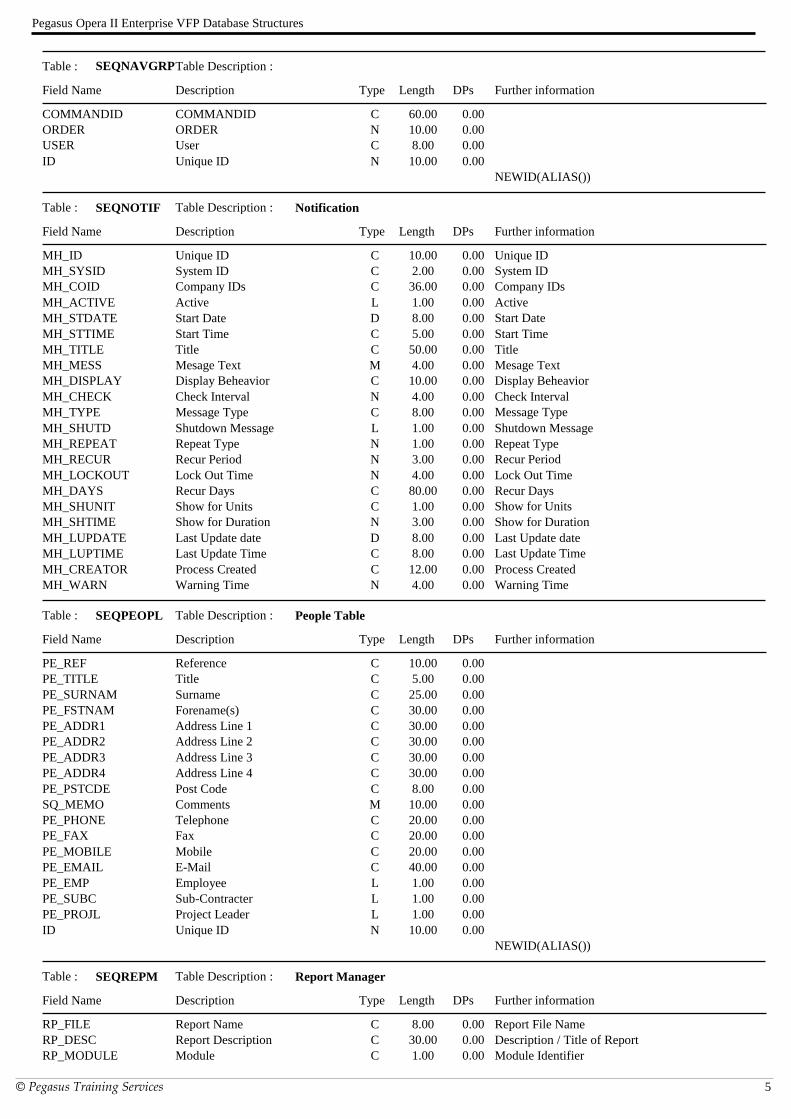
Pegasus Opera II Enterprise VFP Database Structures
Field Name Length Type Description DPs Further information
Table : Table Description : SEQNAVGRP
S
COMMANDID COMMANDID C 60.00 0.00 ORDER ORDER N 10.00 0.00 USER User C 8.00 0.00 ID Unique ID N 10.00 0.00
NEWID(ALIAS())
Notification
Field Name Length Type Description DPs Further information
Table : Table Description : SEQNOTIF
MH_ID Unique ID C 10.00 0.00 Unique ID MH_SYSID System ID C 2.00 0.00 System ID MH_COID Company IDs C 36.00 0.00 Company IDs MH_ACTIVE Active L 1.00 0.00 Active MH_STDATE Start Date D 8.00 0.00 Start Date MH_STTIME Start Time C 5.00 0.00 Start Time MH_TITLE Title C 50.00 0.00 Title MH_MESS Mesage Text M 4.00 0.00 Mesage Text MH_DISPLAY Display Beheavior C 10.00 0.00 Display Beheavior MH_CHECK Check Interval N 4.00 0.00 Check Interval MH_TYPE Message Type C 8.00 0.00 Message Type MH_SHUTD Shutdown Message L 1.00 0.00 Shutdown Message MH_REPEAT Repeat Type N 1.00 0.00 Repeat Type MH_RECUR Recur Period N 3.00 0.00 Recur Period MH_LOCKOUT Lock Out Time N 4.00 0.00 Lock Out Time MH_DAYS Recur Days C 80.00 0.00 Recur Days MH_SHUNIT Show for Units C 1.00 0.00 Show for Units MH_SHTIME Show for Duration N 3.00 0.00 Show for Duration MH_LUPDATE Last Update date D 8.00 0.00 Last Update date MH_LUPTIME Last Update Time C 8.00 0.00 Last Update Time MH_CREATOR Process Created C 12.00 0.00 Process Created MH_WARN Warning Time N 4.00 0.00 Warning Time
People Table
Field Name Length Type Description DPs Further information
Table : Table Description : SEQPEOPL
PE_REF Reference C 10.00 0.00 PE_TITLE Title C 5.00 0.00 PE_SURNAM Surname C 25.00 0.00 PE_FSTNAM Forename(s) C 30.00 0.00 PE_ADDR1 Address Line 1 C 30.00 0.00 PE_ADDR2 Address Line 2 C 30.00 0.00 PE_ADDR3 Address Line 3 C 30.00 0.00 PE_ADDR4 Address Line 4 C 30.00 0.00 PE_PSTCDE Post Code C 8.00 0.00 SQ_MEMO Comments M 10.00 0.00 PE_PHONE Telephone C 20.00 0.00 PE_FAX Fax C 20.00 0.00 PE_MOBILE Mobile C 20.00 0.00 PE_EMAIL E-Mail C 40.00 0.00 PE_EMP Employee L 1.00 0.00 PE_SUBC Sub-Contracter L 1.00 0.00 PE_PROJL Project Leader L 1.00 0.00 ID Unique ID N 10.00 0.00
NEWID(ALIAS())
Report Manager
Field Name Length Type Description DPs Further information
Table : Table Description : SEQREPM
RP_FILE Report Name C 8.00 0.00 Report File Name RP_DESC Report Description C 30.00 0.00 Description / Title of Report RP_MODULE Module C 1.00 0.00 Module Identifier
5 © Pegasus Training Services
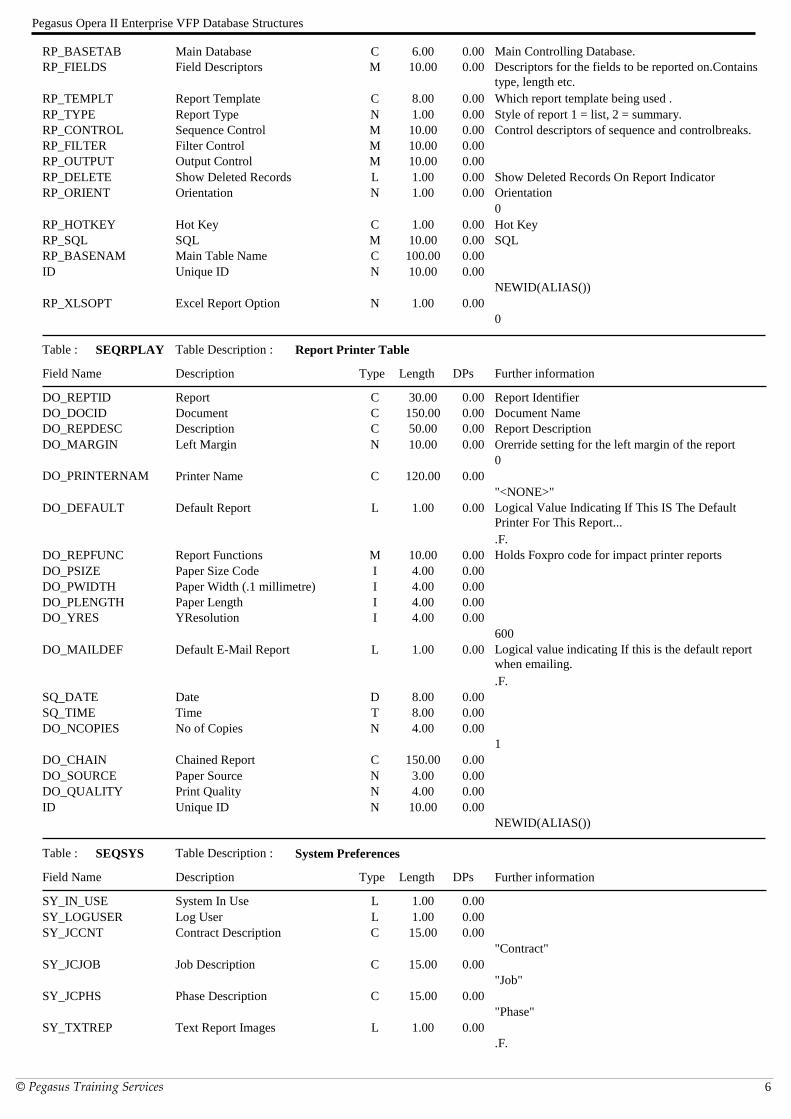
Pegasus Opera II Enterprise VFP Database Structures
RP_BASETAB Main Database C 6.00 0.00 Main Controlling Database. RP_FIELDS Field Descriptors M 10.00 0.00 Descriptors for the fields to be reported on.Contains
type, length etc. RP_TEMPLT Report Template C 8.00 0.00 Which report template being used . RP_TYPE Report Type N 1.00 0.00 Style of report 1 = list, 2 = summary. RP_CONTROL Sequence Control M 10.00 0.00 Control descriptors of sequence and controlbreaks. RP_FILTER Filter Control M 10.00 0.00 RP_OUTPUT Output Control M 10.00 0.00 RP_DELETE Show Deleted Records L 1.00 0.00 Show Deleted Records On Report Indicator RP_ORIENT Orientation N 1.00 0.00 Orientation
0 RP_HOTKEY Hot Key C 1.00 0.00 Hot Key RP_SQL SQL M 10.00 0.00 SQL RP_BASENAM Main Table Name C 100.00 0.00 ID Unique ID N 10.00 0.00
NEWID(ALIAS()) RP_XLSOPT Excel Report Option N 1.00 0.00
0
Report Printer Table
Field Name Length Type Description DPs Further information
Table : Table Description : SEQRPLAY
DO_REPTID Report C 30.00 0.00 Report Identifier DO_DOCID Document C 150.00 0.00 Document Name DO_REPDESC Description C 50.00 0.00 Report Description DO_MARGIN Left Margin N 10.00 0.00 Orerride setting for the left margin of the report
0 DO_PRINTERNAM
E Printer Name C 120.00 0.00
"<NONE>" DO_DEFAULT Default Report L 1.00 0.00 Logical Value Indicating If This IS The Default
Printer For This Report... .F.
DO_REPFUNC Report Functions M 10.00 0.00 Holds Foxpro code for impact printer reports DO_PSIZE Paper Size Code I 4.00 0.00 DO_PWIDTH Paper Width (.1 millimetre) I 4.00 0.00 DO_PLENGTH Paper Length I 4.00 0.00 DO_YRES YResolution I 4.00 0.00
600 DO_MAILDEF Default E-Mail Report L 1.00 0.00 Logical value indicating If this is the default report
when emailing. .F.
SQ_DATE Date D 8.00 0.00 SQ_TIME Time T 8.00 0.00 DO_NCOPIES No of Copies N 4.00 0.00
1 DO_CHAIN Chained Report C 150.00 0.00 DO_SOURCE Paper Source N 3.00 0.00 DO_QUALITY Print Quality N 4.00 0.00 ID Unique ID N 10.00 0.00
NEWID(ALIAS())
System Preferences
Field Name Length Type Description DPs Further information
Table : Table Description : SEQSYS
SY_IN_USE System In Use L 1.00 0.00 SY_LOGUSER Log User L 1.00 0.00 SY_JCCNT Contract Description C 15.00 0.00
"Contract" SY_JCJOB Job Description C 15.00 0.00
"Job" SY_JCPHS Phase Description C 15.00 0.00
"Phase" SY_TXTREP Text Report Images L 1.00 0.00
.F.
6 © Pegasus Training Services
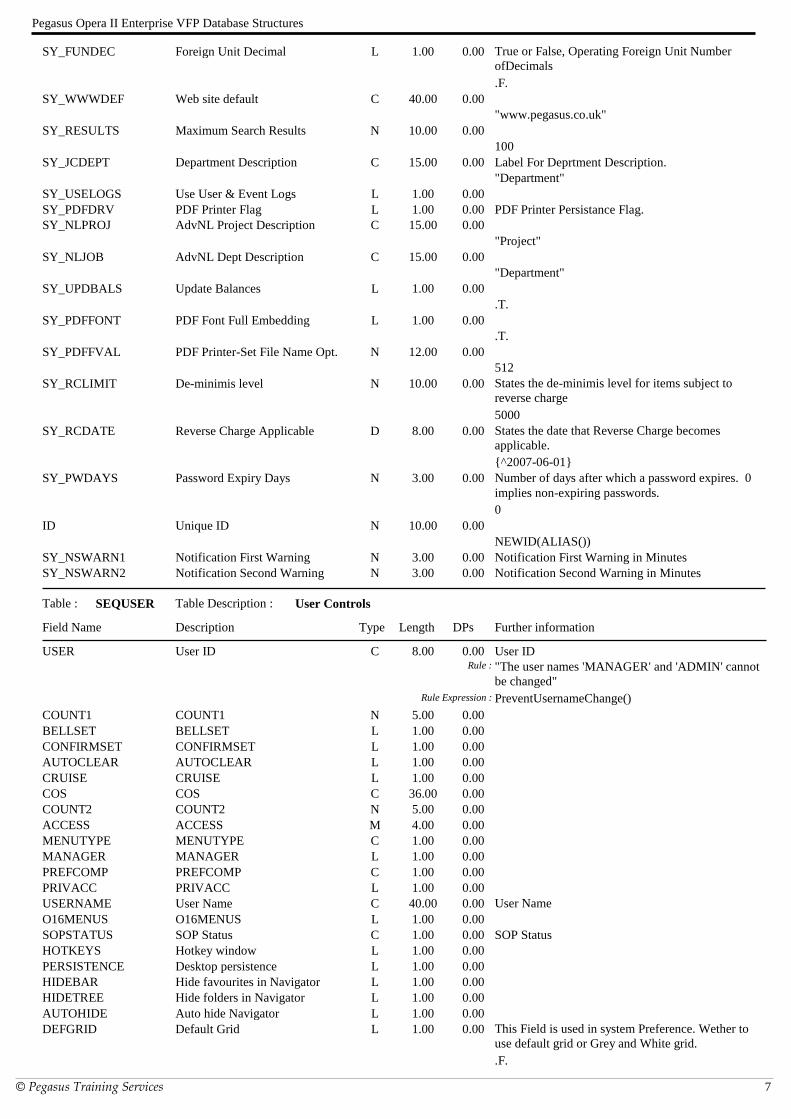
Pegasus Opera II Enterprise VFP Database Structures
SY_FUNDEC Foreign Unit Decimal L 1.00 0.00 True or False, Operating Foreign Unit Number
ofDecimals .F.
SY_WWWDEF Web site default C 40.00 0.00 "www.pegasus.co.uk"
SY_RESULTS Maximum Search Results N 10.00 0.00 100
SY_JCDEPT Department Description C 15.00 0.00 Label For Deprtment Description. "Department"
SY_USELOGS Use User & Event Logs L 1.00 0.00 SY_PDFDRV PDF Printer Flag L 1.00 0.00 PDF Printer Persistance Flag. SY_NLPROJ AdvNL Project Description C 15.00 0.00
"Project" SY_NLJOB AdvNL Dept Description C 15.00 0.00
"Department" SY_UPDBALS Update Balances L 1.00 0.00
.T. SY_PDFFONT PDF Font Full Embedding L 1.00 0.00
.T. SY_PDFFVAL PDF Printer-Set File Name Opt. N 12.00 0.00
512 SY_RCLIMIT De-minimis level N 10.00 0.00 States the de-minimis level for items subject to
reverse charge 5000
SY_RCDATE Reverse Charge Applicable D 8.00 0.00 States the date that Reverse Charge becomes
applicable. {^2007-06-01}
SY_PWDAYS Password Expiry Days N 3.00 0.00 Number of days after which a password expires. 0
implies non-expiring passwords. 0
ID Unique ID N 10.00 0.00 NEWID(ALIAS())
SY_NSWARN1 Notification First Warning N 3.00 0.00 Notification First Warning in Minutes SY_NSWARN2 Notification Second Warning N 3.00 0.00 Notification Second Warning in Minutes
User Controls
Field Name Length Type Description DPs Further information
Table : Table Description : SEQUSER
USER User ID C 8.00 0.00 User ID "The user names 'MANAGER' and 'ADMIN' cannot
be changed" Rule :
PreventUsernameChange() Rule Expression :
COUNT1 COUNT1 N 5.00 0.00 BELLSET BELLSET L 1.00 0.00 CONFIRMSET CONFIRMSET L 1.00 0.00 AUTOCLEAR AUTOCLEAR L 1.00 0.00 CRUISE CRUISE L 1.00 0.00 COS COS C 36.00 0.00 COUNT2 COUNT2 N 5.00 0.00 ACCESS ACCESS M 4.00 0.00 MENUTYPE MENUTYPE C 1.00 0.00 MANAGER MANAGER L 1.00 0.00 PREFCOMP PREFCOMP C 1.00 0.00 PRIVACC PRIVACC L 1.00 0.00 USERNAME User Name C 40.00 0.00 User Name O16MENUS O16MENUS L 1.00 0.00 SOPSTATUS SOP Status C 1.00 0.00 SOP Status HOTKEYS Hotkey window L 1.00 0.00 PERSISTENCE Desktop persistence L 1.00 0.00 HIDEBAR Hide favourites in Navigator L 1.00 0.00 HIDETREE Hide folders in Navigator L 1.00 0.00 AUTOHIDE Auto hide Navigator L 1.00 0.00 DEFGRID Default Grid L 1.00 0.00 This Field is used in system Preference. Wether to
use default grid or Grey and White grid. .F.
7 © Pegasus Training Services
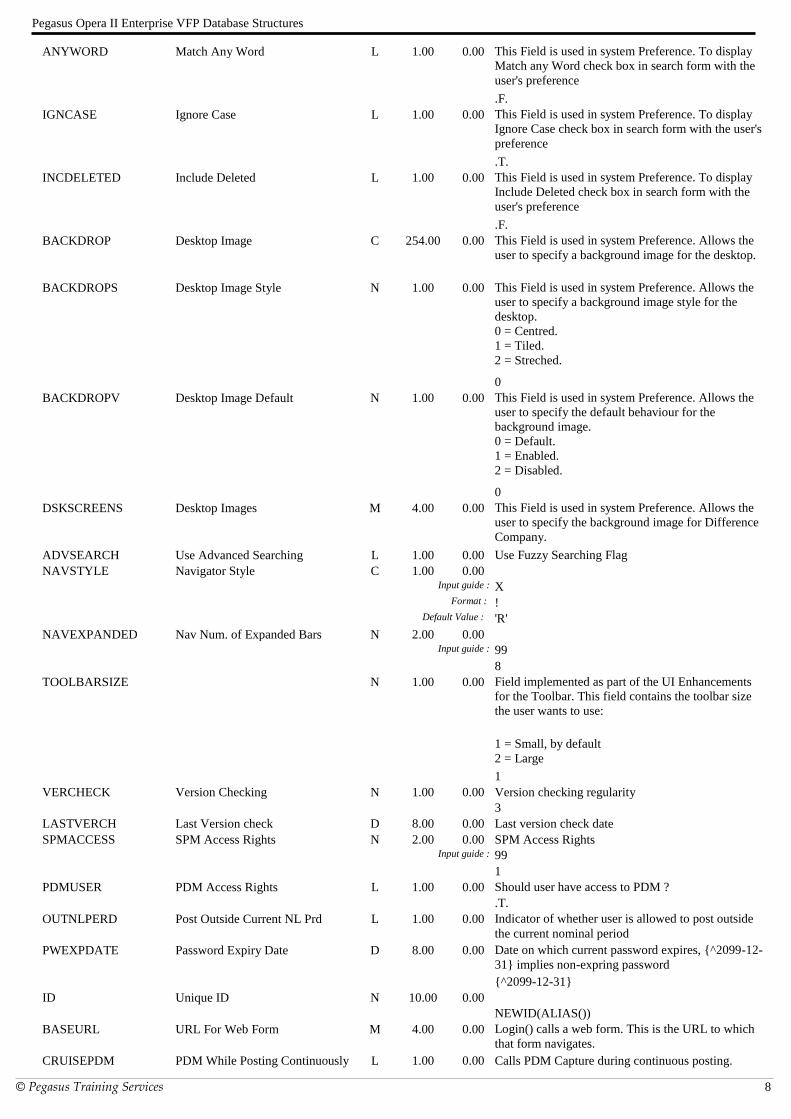
Pegasus Opera II Enterprise VFP Database Structures
ANYWORD Match Any Word L 1.00 0.00 This Field is used in system Preference. To display
Match any Word check box in search form with the
user's preference
.F. IGNCASE Ignore Case L 1.00 0.00 This Field is used in system Preference. To display
Ignore Case check box in search form with the user's
preference
.T. INCDELETED Include Deleted L 1.00 0.00 This Field is used in system Preference. To display
Include Deleted check box in search form with the
user's preference
.F. BACKDROP Desktop Image C 254.00 0.00 This Field is used in system Preference. Allows the
user to specify a background image for the desktop.
BACKDROPS Desktop Image Style N 1.00 0.00 This Field is used in system Preference. Allows the
user to specify a background image style for the
desktop. 0 = Centred. 1 = Tiled. 2 = Streched.
0 BACKDROPV Desktop Image Default N 1.00 0.00 This Field is used in system Preference. Allows the
user to specify the default behaviour for the
background image. 0 = Default. 1 = Enabled. 2 = Disabled.
0 DSKSCREENS Desktop Images M 4.00 0.00 This Field is used in system Preference. Allows the
user to specify the background image for Difference
Company.
ADVSEARCH Use Advanced Searching L 1.00 0.00 Use Fuzzy Searching Flag NAVSTYLE Navigator Style C 1.00 0.00
X Input guide :
! Format :
'R' Default Value :
NAVEXPANDED Nav Num. of Expanded Bars N 2.00 0.00 99 Input guide :
8 TOOLBARSIZE N 1.00 0.00 Field implemented as part of the UI Enhancements
for the Toolbar. This field contains the toolbar size
the user wants to use: 1 = Small, by default 2 = Large 1
VERCHECK Version Checking N 1.00 0.00 Version checking regularity 3
LASTVERCH Last Version check D 8.00 0.00 Last version check date SPMACCESS SPM Access Rights N 2.00 0.00 SPM Access Rights
99 Input guide :
1 PDMUSER PDM Access Rights L 1.00 0.00 Should user have access to PDM ?
.T. OUTNLPERD Post Outside Current NL Prd L 1.00 0.00 Indicator of whether user is allowed to post outside
the current nominal period PWEXPDATE Password Expiry Date D 8.00 0.00 Date on which current password expires, {^2099-12-
31} implies non-expring password {^2099-12-31}
ID Unique ID N 10.00 0.00 NEWID(ALIAS())
BASEURL URL For Web Form M 4.00 0.00 Login() calls a web form. This is the URL to which
that form navigates. CRUISEPDM PDM While Posting Continuously L 1.00 0.00 Calls PDM Capture during continuous posting.
8 © Pegasus Training Services
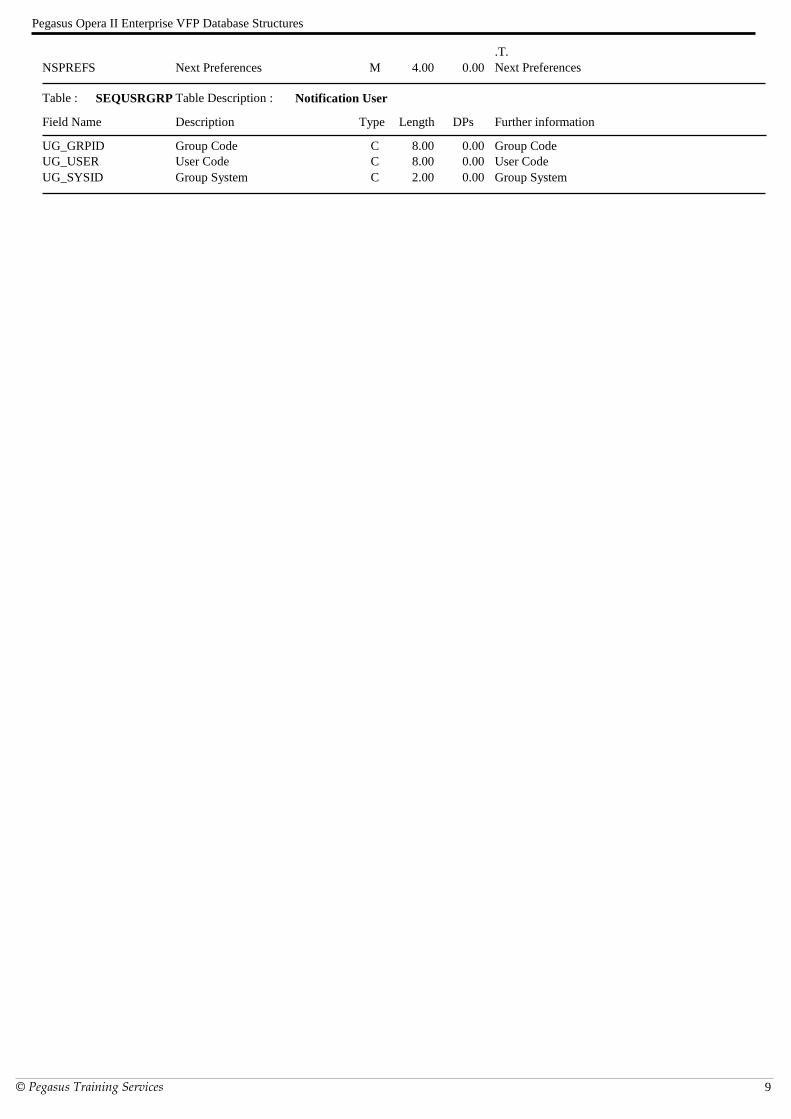
Pegasus Opera II Enterprise VFP Database Structures
.T. NSPREFS Next Preferences M 4.00 0.00 Next Preferences
Notification User
Field Name Length Type Description DPs Further information
Table : Table Description : SEQUSRGRP
UG_GRPID Group Code C 8.00 0.00 Group Code UG_USER User Code C 8.00 0.00 User Code UG_SYSID Group System C 2.00 0.00 Group System
9 © Pegasus Training Services

Accreditation Training Courseware - O3Training_Accreditation_ADM50SystemR2.3.docx
© Pegasus Training Services Page 150
Accreditation Training Courseware
Other Guides and Help
The following user documents are also provided with the respective software. Guides are available from various sources including Answerlink, the Opera 3 CD and from the Opera 3 Client installation‘s main folder, normally C:\Program Files\Pegasus\O3 Client XXX\User documents (where XXX is either VFP or SQL). Some guides are also available from the Opera 3 Help menu or respective software Help menu.
Readme File
The Readme file is an HTML document. It contains late breaking news and any other release specific important information.
Note: This file can also be accessed from the Opera 3 CD Installation Menu with regards to Opera 3.
Release Guide
When new versions are released such as Opera 3, they are normally accompanied by a Release Guide that contains information such as What‘s New in this Release, Release History, and Functional Differences between versions.
Note: This guide can also be accessed from the Opera 3 CD Installation Menu with regards to Opera 3.
Installation Guide
The Installation Guide is provided to help you install the application in your chosen Windows environment. It contains technical information and advice to ensure the installation process is successful.
Demonstration Data Guide
This guide is provided to assist the use of the demonstration data and contains pertinent information that is not contained elsewhere in the product documentation. It is recommended that the Help be used at the same time.
Implementation Guide
The Implementation Guide provides a high-level view of an application such as Opera 3 and how to approach an implementation. It details how the modules are integrated, and recommends the order in which elements should be set up.
System Requirements Guide
The System Requirements Guide details the minimum and recommended computer hardware and software requirements that are required to install and use software such as Opera 3 Enterprise and Opera 3 Enterprise SQL.
It also includes guidance on using Opera 3 Enterprise and Opera 3 Enterprise SQL in a Terminal Services environment run in Windows Server 2003 and Windows Server 2008 (32-bit & 64-bit).
Help
F1 Help provides details of all the functions available in the application.
Document Management & Executive Dashboards Guides
Installation Guides are available for both Document Management and Executive Dashboards. A user guide is also available for Executive Dashboards. Help for Document Management is in the Opera 3 Help.
Note: The guides are in the respective folders on the Opera 3 CD and can be accessed from the Opera 3
CD Installation Menu.
OT
HE
R G
UID
ES
& H
EL
P