accounting 101 with iconcmo purpose of this …...debits and credits against popular belief, debit...
TRANSCRIPT

Accounting 101 with IconCMO
Purpose of this Guide This guide is designed to do two things: 1. Offer a very basic understanding of the differences between for profit accounting and non-profit, fund-based accounting. 2. To offer a very basic understanding of how to set up your funds, assets and liabilities in IconCMO. 3. Something to notice, we will spend very little time setting up the Chart of Accounts. This is something that can be done gradually as needed.
Debits and Credits Against popular belief, debit does not mean minus and credit does not mean plus. Debits and credits change depending on the type of account being used. 1. A debit increases an asset or expense account, or decreases a liability or revenue account. 2. A credit increases a liability or revenue account, or decreases an asset or expense account. If you’re wondering…..then why does my bank give me a debit card that lowers the money in my bank account. The answer is…...your bank account is an asset to you, but it’s a liability to the bank. It’s money they owe you and a debit lowers a liability account. Asset Accounts Debit(+) Credit(-) Liability Accounts Debit(-) Credit(+) Revenue Accounts Debit(-) Credit(+) Expense Accounts Debit(+) Credit(-) Net Assets: Assets minus liabilities equals net assets. Net assets are your fund balances.
Nonprofit Fund Based Accounting vs For-profit
1. Transaction Requirements: Every transaction in accounting requires a Debit and a Credit and both must equal each other. NonProfit Fund Based accounting requires a Debit, a Credit and a Fund for each transaction. To emphasize the importance of how this works let’s review a few transactions.
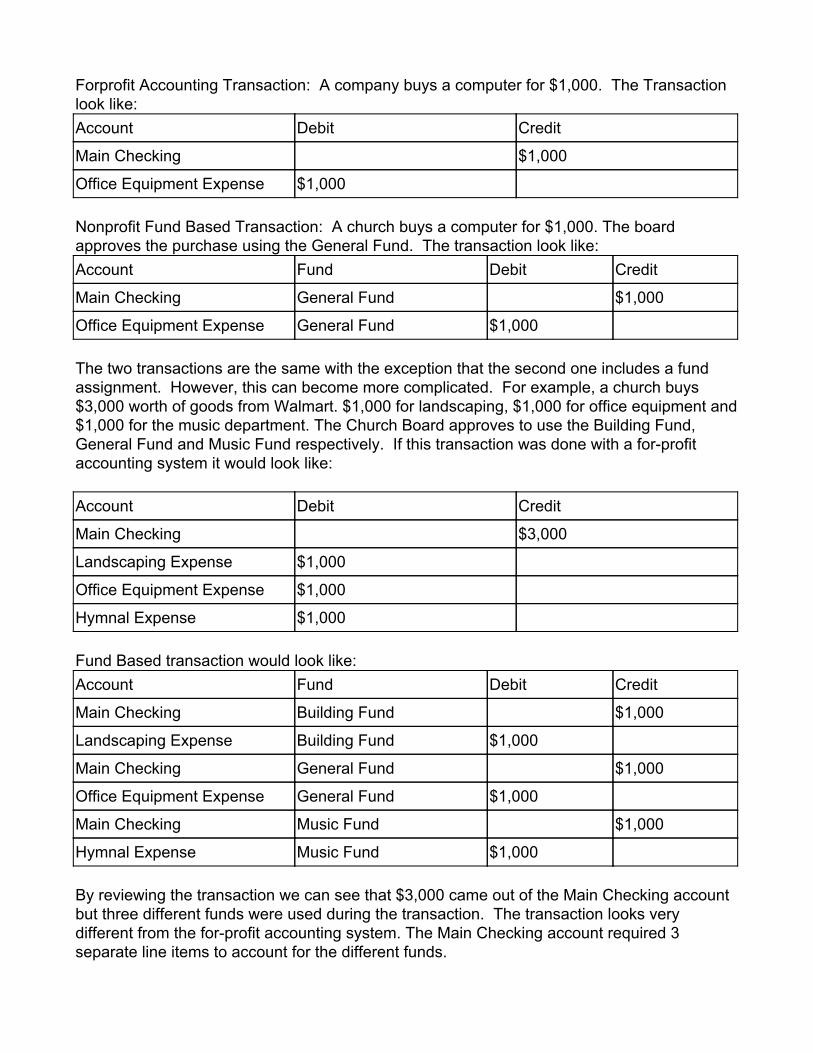
Forprofit Accounting Transaction: A company buys a computer for $1,000. The Transaction look like: Account Debit Credit
Main Checking $1,000
Office Equipment Expense $1,000 Nonprofit Fund Based Transaction: A church buys a computer for $1,000. The board approves the purchase using the General Fund. The transaction look like: Account Fund Debit Credit
Main Checking General Fund $1,000
Office Equipment Expense General Fund $1,000 The two transactions are the same with the exception that the second one includes a fund assignment. However, this can become more complicated. For example, a church buys $3,000 worth of goods from Walmart. $1,000 for landscaping, $1,000 for office equipment and $1,000 for the music department. The Church Board approves to use the Building Fund, General Fund and Music Fund respectively. If this transaction was done with a for-profit accounting system it would look like: Account Debit Credit
Main Checking $3,000
Landscaping Expense $1,000
Office Equipment Expense $1,000
Hymnal Expense $1,000 Fund Based transaction would look like: Account Fund Debit Credit
Main Checking Building Fund $1,000
Landscaping Expense Building Fund $1,000
Main Checking General Fund $1,000
Office Equipment Expense General Fund $1,000
Main Checking Music Fund $1,000
Hymnal Expense Music Fund $1,000 By reviewing the transaction we can see that $3,000 came out of the Main Checking account but three different funds were used during the transaction. The transaction looks very different from the for-profit accounting system. The Main Checking account required 3 separate line items to account for the different funds.

Prior to the Walmart transaction our main checking account had a balance of $25,000. The $25,000 was dispersed among 4 funds. General Fund ($15,000), Building Fund ($6,000), Music Fund ($2,000) and Memorial Fund ($2,000). So it would look like: Account Fund Balance
Main Checking General Fund $15,000
Main Checking Building Fund $6,000
Main Checking Music Fund $2,000
Main Checking Memorial Fund $2,000
=========
Total Main Checking $25,000 After the Walmart transaction occurred above the Main Checking would be adjusted to look like: Account Fund Balance
Main Checking General Fund $14,000
Main Checking Building Fund $5,000
Main Checking Music Fund $1,000
Main Checking Memorial Fund $2,000
=========
Total Main Checking $22,000 Prior to fund accounting, some churches would go to the bank and create multiple checking and savings accounts to track funds. Other churches would place the balances in a spreadsheet and require the treasurer to update the spreadsheet after every transaction. Changing over to a true fund-based accounting system like IconCMO that is capable of displaying the fund balances of your assets will make it dramatically easier to account for the dollars in the church.
2. Equity versus Funds: (a) For-Profit Standard Accounting: Assets – Liabilities = Equity. (b) Nonprofit Fund Accounting: Assets – Liabilities = Net Assets or
Assets – Liabilities = Funds (c) The Term Net Asset is often referred to as a Fund but a Fund is not always a Net
asset. This will be explained in greater detail under the Defining Funds section below.
(d) In a for-profit standard accounting system a company will have equity accounts. Equity accounts reflect the ownership of the company and the current year profit/loss. The current year profit/loss is typically reflected in a reserved account called Retained Earnings. At the end of the year Retained Earnings is transferred to
the respective owners equity accounts based on an owners percentage of ownership. This zeroes the Retained Earnings account and allows the new year to start at zero.
(e) In a nonprofit Fund Based accounting system, Funds will hold their balance at the end of the year.
Basic Rules to consider for your Accounting System
Your chart of accounts should NOT have the name of a fund anywhere. IE: You should NOT have a General Revenue, Building Revenue or a Building Expense account. If you have a Choir fund you should NOT have a Choir Expense. Understand that Accounting is a valuable tool to aid in managing your church. How items will be reported is critical to properly setting up your accounting. This document will offer examples on how to build your accounts and funds and what you need to do to properly manage them. If properly managed, reporting tools will help remind you of incomplete tasks. A Income Statement or Profit and Loss is called a Statement of Activities in non-profit accounting. ◦ The Income Statement is made up of Revenue and Expense accounts. ◦ The purpose of this report is to provide a financial snapshot over a given period of
time. ◦ Revenue and Expense accounts do not hold a balance. If you print a report and
zero transactions have occurred for an account in the date range specified the account will not appear on the report.
A Balance Sheet is called a Statement of Financial Position in non-profit accounting ◦ The Balance Sheet is made up of Assets and Liabilities. ◦ The purpose of this report is to provide a point in time visual of your financial status. ◦ Assets and Liabilities hold balances. Consider your savings account. Just because
no transactions were processed against the savings account for a period of time does not mean the balance goes to zero. The balance of the savings account will exist until a transaction is processed against it.
When creating accounts it can make things easier if you suffix each account with the type of account it is. Example: Offerings by itself doesn’t tell you much. But Offering Rev tells you that the Offering account belongs to Revenue. When entering Pass Through Liability accounts use World Hunger Liab.
Defining Funds
Please keep in mind that it’s impossible to detail all the ways in which a user may define and use funds in the accounting system. The term fund is often overly vague. Users must break that definition down and define each one separately. What we describe here is simply a suggestion in how to manage funds and in no way should be construed as the only way to accomplish a task. IconCMO has two clear methods of defining funds and one not so obvious way of defining funds.

1) Contributions Funds: Easily defined by going to Contributions → Funds and Pledges. These are funds that the congregation may donate to. These are the funds that will show up on your members contribution statements at the end of the year. 2) Accounting Funds: Easily defined by going to General Ledger → Fund Maintenance. These are funds that the church uses to track how money is being received, spent, held and owed. 3) Pass Through Money: We define this as money that comes into the church for another organization or charity. Note: For Clarity purposes we will NOT use the term Fund here. It is not money that belongs to the church. For the purposes of this document we will refer to it as Pass Through Money and never use the term Fund when referencing pass through dollars. Refer to Pass Through Money below for more information. Contribution Funds are often abbreviated as C-Funds and Accounting Funds as A-Funds. C-Funds do not necessarily have a one to one comparison with A-Funds. For example: You may have 2 deceased individuals in a year (John Doe and Mary Smith). You will most likely create 2 memorial C-Funds and label them Memorial John Doe and Memorial Mary Smith. But on the accounting side you will have a single A-Fund called Memorial. You may also not have a corresponding A-Fund. For Example: You may have a C-Fund called World Hunger that is not defined as an A-Fund but is rather defined as Pass Through Money on the accounting side. Refer to Pass Through Money below for more information.
Pass Through Money Most churches will collect donations on behalf of missions. Usually all the donations will be sent directly to those missions. Most churches do not want this type of money affecting their accounting, so we have designed a unique way to manage this process. Create a Pass Through called World Hunger: Go to General Ledger → Chart of Accounts → Add New Account. Select Liabilities, Other Current Liabilities, Other Misc Current Liabilities and set your Sub-Account of to Pass Through Liab. If Pass Through Liab does not yet exist, create it first and then add the World Hunger Liab. How does World Hunger dollars pass through IconCMO to the World Hunger mission? Donations given to the C-Fund World Hunger in the contributions module will link to the accounting side. IconCMO requires 3 fields to be defined to link C-Funds and the Accounting system. Go to Contributions: Management; Funds & Pledges: and select the C-Fund called World Hunger. Once it populates to the right, click on the “Accounting Link” button at the bottom.

1. A-Fund: We must define what A-Fund the C-Fund will affect 2. Bank Account: (Debit) We must define what bank account will the money be deposited. 3. Revenue or Liability: (Credit) We must define what account will reflect the offset of the deposit. For our example, we will deposit to the Checking account and the World Hunger Liab and the entire transaction will be applied to the General Fund. Yes, you read that correctly. We applied the World Hunger dollars to the General Fund. So it will look like: 1. A-Fund: General Fund 2. Bank Account: Checking 3. Revenue or Liability: World Hunger Liab Using it in this capacity the pass through money will never hit a Revenue or Expense account. The money comes into the Liability and exits through the liability. Because Liabilities hold balances the treasurer can print a Statement of Financial Position at the end of each month for the General Fund and look at the Liabilities section of the report. If any balances exist in the Pass Through section the treasurer can write a check to that mission using the General Fund and apply the check to the corresponding liability. Here is an example of what that check may look like.

Stage 1: Prepare and Enter Liquid Assets
Before entering data into IconCMO you must have some information organized so that the transition is done correctly and efficiently. Some of these things you must have and some of these items are optional. Time to break it down.
1. Fiscal Year: Most churches run their fiscal year the same as the calendar year, but not always. If your Fiscal Year is from July to June then the first month of your fiscal year is July. Go to Organization → Information in IconCMO and set your first month of the fiscal year. For our examples, we will be using January as the first month of our fiscal year.
2. Point in Time: When do you plan to start using the system? This is important as every dollar you enter needs to be recorded once you start using IconCMO. If you plan to start using Icon on April 1st then March will be your beginning Balance month. Go to Organization → Information and set the Beginning Balance Date to March 15th of whatever year you’re in. For our example we will enter beginning balances as of December 15th of 2019.
3. Define Accounting Funds and Pass Through Money: For our example we are going to use the following. Accounting Funds Pass Through Money
General Fund Property Fund Youth Fund Senior Fund
World Hunger Liab Mississippi Flood Liab Oklahoma Dorothy Liab Homeless Assoc Liab
To create the A-Funds: Go to General Ledger → Fund Maintenance. General Fund should already exist so all you need to do is add Property Fund, Youth Fund and Senior Fund.
To create Pass Through Money accounts: Go to General Ledger → Chart of Accounts → Add New Account. Select Liabilities, Other Current Liabilities, Other Misc Current Liabilities and set your Sub-Account of to Pass Through Liab. If Pass Through Liab does not yet exist, create it first and then add your liability accounts.

4. Liquid Assets: Defined as cash on hand or items that can quickly be converted to cash. Most churches have a checking and a savings account. IconCMO does not allow users to reconcile savings accounts that are set up as “Type Detail” Savings. If you have a large number of transactions that hit your savings account or you want to be able to reconcile it, it’s best to use the “Type Detail” of “Checking” when creating your savings account within the Chart of Accounts. Locate the bank statements for all bank accounts. In our example, we will have two bank accounts; Checking and Savings. The Checking will have $25,000 and the Savings will have $55,000. In this example, we will have one outstanding check from the General fund for $200. Below is the breakdown of each account. Account Fund Amount Liability
Checking General Fund $14,800 World Hunger Liab ($300) Mississippi Flood Liab ($600) Oklahoma Dorothy ($200) Homeless Assoc Liab ($100)
Checking Youth Fund $6,000
Checking Senior Fund $4,000
Savings Property Fund $45,000
Savings General Fund $10,000 Based on the table we can see that the General Fund currently has $15K but $1,200 is earmarked as Pass Through Money. The savings account is primarily money that will be used for property improvements with $10K of it belonging to General. Before we can enter the beginning balance we must create the accounts. Go to General Ledger → Chart of Accounts. If you have any Predefined Checking, Savings, Money Market, Petty Cash or Certificates of Deposits that do not belong go ahead and delete them right now. Once cleaned up add the new accounts by clicking the Add New Account Button.

In our Sample we only have one Checking account and one Savings. A well defined Account name will help if you have multiple checking accounts. Example: Bell Bank Checking
5. Defining Primary Account: Once you have finished entering all your Checking, Savings, Money Market etc accounts you should define which account is your primary. To do so go to Organization → Banking Preferences. Set the Default Checkbook to use:
6. Beginning Bal: Now you are ready to enter the beginning balances. To enter Beginning Balance information go to General Ledger → Beginning Balances. Do the same for other Checking and Savings accounts.
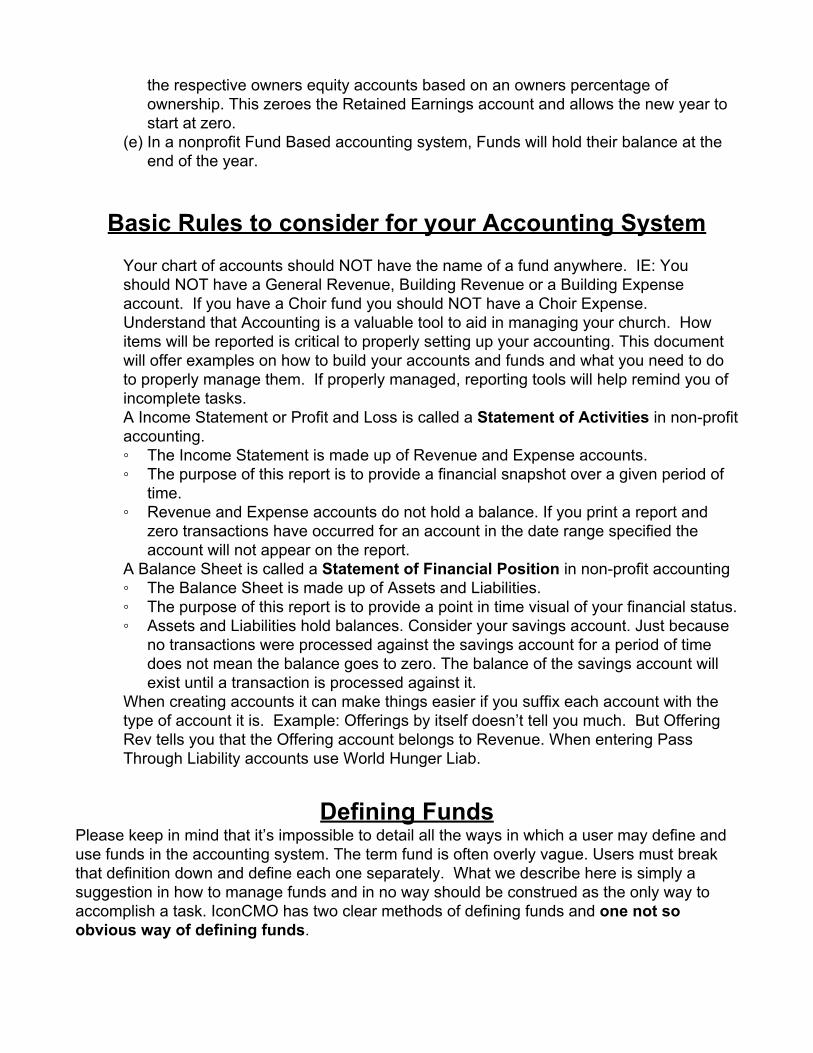
Once done click on Liabilities on the left side of the window and select one of the Pass Through Liability accounts. Enter the values and save. Pay attention to the funds for Liabilities. Notice the negative values. This is correct. Positive Liabilities create negative fund balances. Congratulations, if you made it here you have all of your liquid assets, funds and Pass Through information entered. Let’s post your information and print a Statement of Financial Position to see exactly what you have. On the Beginning Balance window click the Post or Clear button on the left. Click the Post Beginning Balances button. You can post these as often as you wish. Each time you Post beginning balances it will remove previous information and post the updated information from the window. Once you reconcile information on the checkbook it will lock down the beginning balance window. Once posted go to General Ledger → GL-Reports and select the Statement of Financial Position report. Since we used December 15th 2019 as our beginning balance date the report date should be 01/01/2020. Here is our current Statement of Financial Position (Balance Sheet). Things to notice: 1. The Checking account reflects the unreconciled balance. 2. We can see that we own money by viewing the 4 pass through liability accounts. 3. The Funds at the bottom reflect the values of Assets minus the Liabilities. 4. Notice that the Property Fund is $40,000. This will show dramatically higher once we finish entering the Fixed Assets.


Stage 2: Enter your Fixed Assets What are Fixed Assets: Items that have value yet are not easily turned into cash. Examples might be Church Building, Parking Lot, Van etc… For our example we will keep it relatively simple. Our sample church will have a Church Land (400K), Church Building ($1.2M), Parking Lot ($100K) and a 2018 Ford Transit Van ($20K) as our fixed assets. These are items that should be placed in our Chart of Accounts.
1. Create the Fixed Assets: So let’s start. Go to General Ledger → Chart of Accounts. There may be some default accounts already in the chart of accounts for Fixed Assets. Remove them first. Then enter the accounts through “Add New Account” button.
Notice the Ford Transit Van 2018 is a slightly different Category – Detail. Since it is not a Building Other Fixed Assets would be more appropriate. Enter beginning Balances for Fixed Assets: Unlike the Checking accounts Fixed Assets can only be applied to a single fund. That is a restriction of the Beginning Balance window. If you would like the Fixed Assets split between funds, which is extremely rare, you will have to do this manually. We will use the Property Fund. A large percentage of churches will use the General Fund rather than a property fund which will also work fine. The advantage of using a Property fund over the General is it won’t over inflate the Statement of Financial Position when strictly viewing the General Fund. It provides a more basic liquid style report. Whereas the Statement of Financial Position for the Property Fund will provide a clear view of hard assets.

Once Complete go ahead and post the beginning balances again and reprint the Statement of Financial Position. Below is our example: View the Results of entering Fixed Assets: Notice the Property Fund at the bottom. It is a sum of the Fixed Assets and the $40K in the Savings account. You can’t actually see the breakdown of the Checking and Savings accounts when we print this report for all funds.
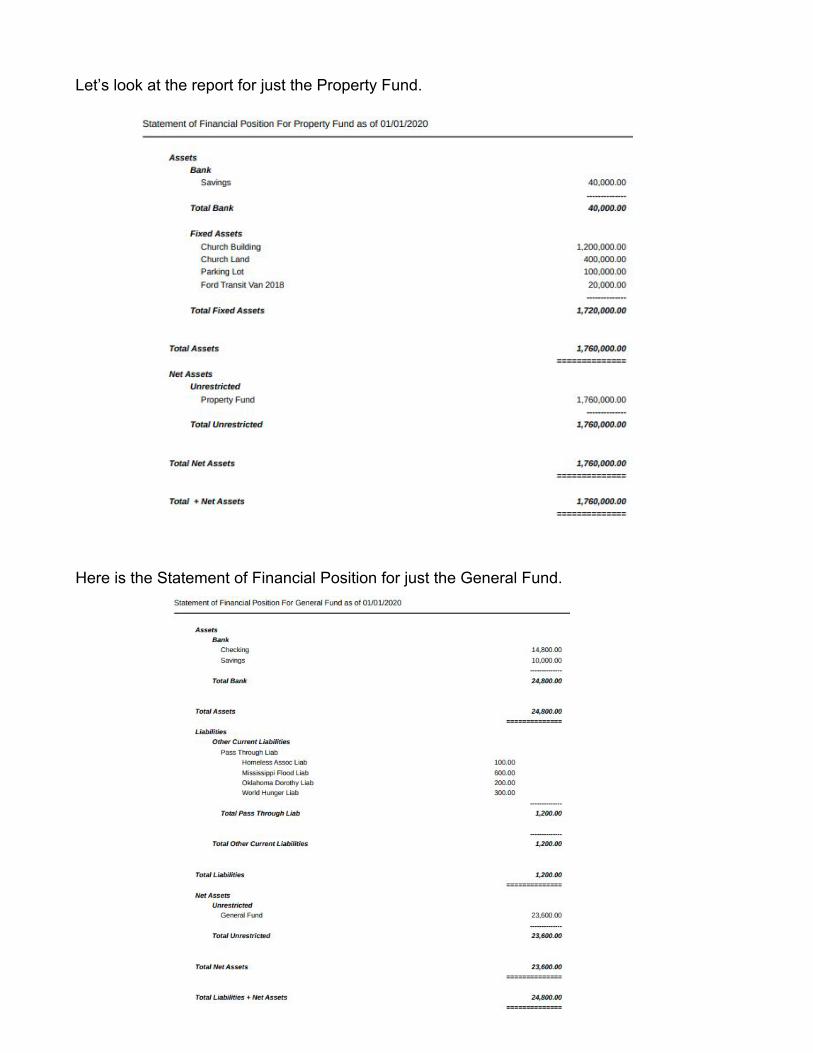
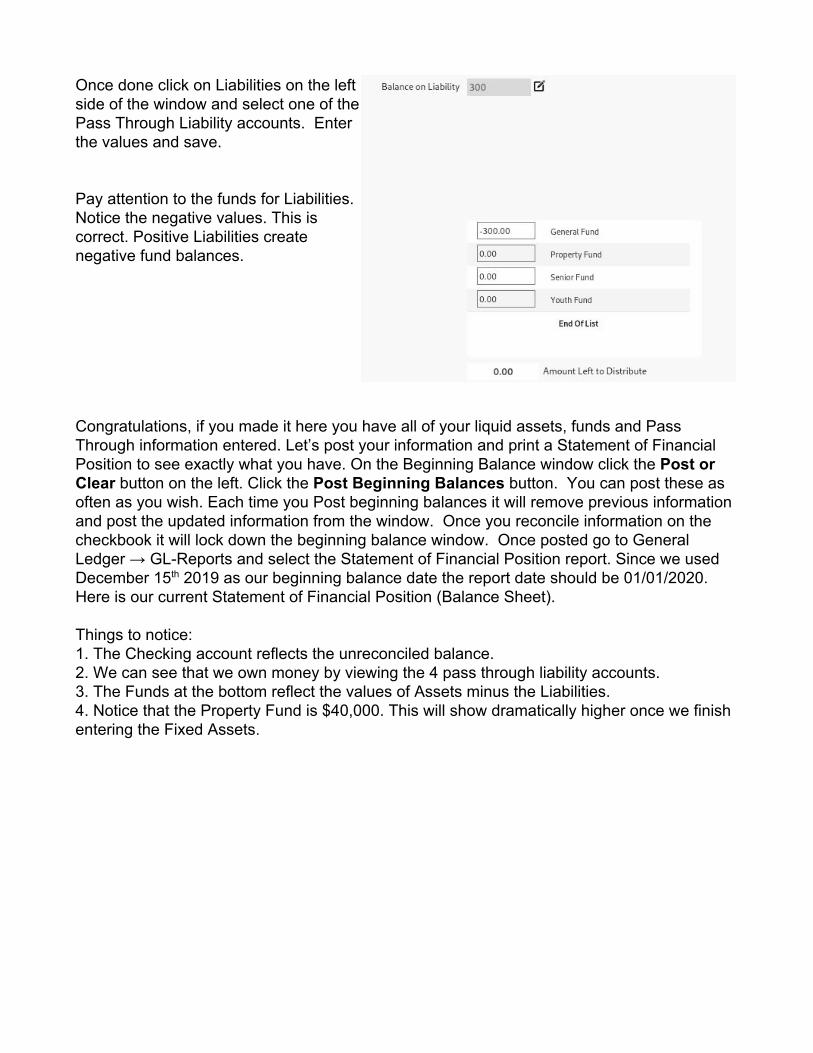
Let’s look at the report for just the Property Fund. Here is the Statement of Financial Position for just the General Fund.

Stage 3: Mortgages Overview: Most churches will have a mortgage. We’ve already added the church to the fixed assets. But we need to create a Liability account to track the balance of what is owed for the loan. We also need an expense account to record the interest from the loan. Bank loans are considered “Notes” so we will create this loan under the Notes Payable section of the Chart of Accounts. Interest is not considered an “operating” expense but rather an “Other” expense.
1. Enter the Mortgage Balance: Go to General Ledger → Chart of Accounts → Add New Account. Here are the two screenshots to create the accounts needed.
Once the two accounts are set up you can enter the current mortgage balance in the beginning balance window and record it to the General Fund. Why the General Fund and not the Property Fund? Most mortgages are paid out using the General Fund so changing it to the Property Fund would only increase the number of steps needed to accomplish your task. Keeping it all in General Fund makes things simple and less prone to human errors. In our sample we still owe $215,433.89. Once again, notice the negative 215433.89 in the General Fund. This is correct since liabilities reduce the value of a fund.

Now if we Post beginning balances this is our new Statement of Financial Position. We are very close to having a nice clean Statement of Financial Activities that accurately represents the churches current financial status.
You may have additional information that needs to be entered into the beginning balance window but we have covered in good detail how to enter the majority of what most churches will need. The last step we need to do is our first bank reconciliation.
Stage 4: The First Bank Reconciliation The first reconciliation is a bit different than most. Why? Because you don’t have any transactions that will be matching what the bank statement reflects.
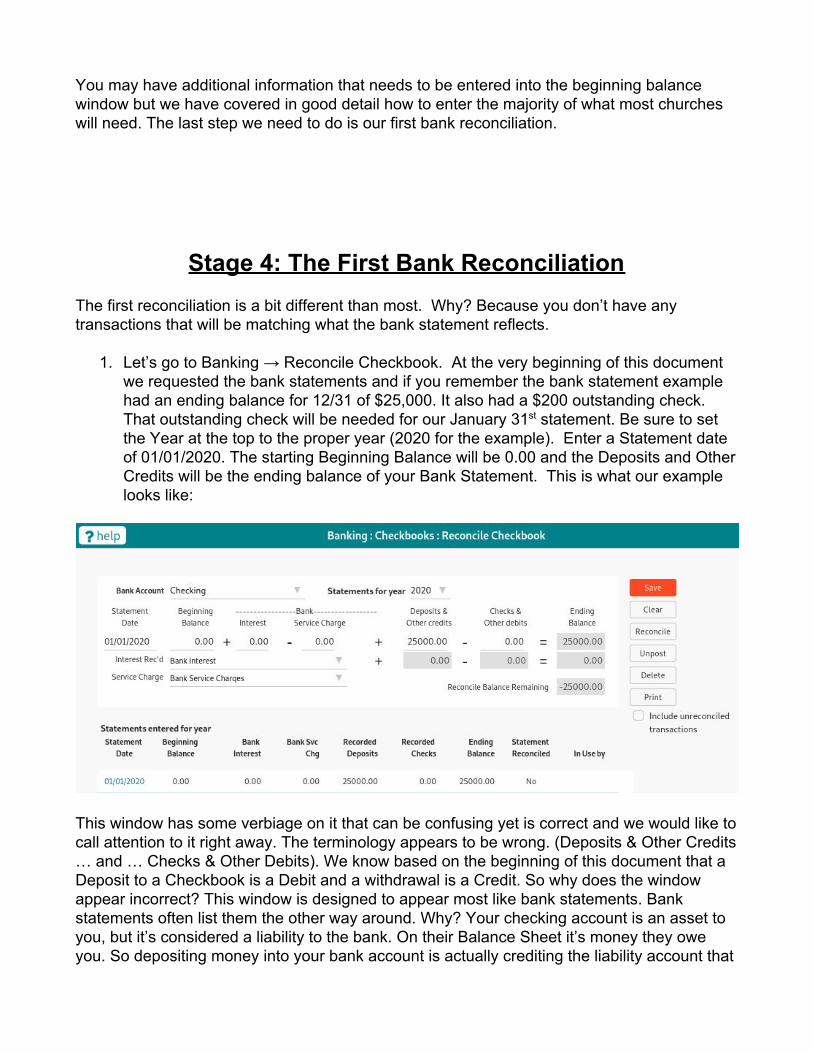
1. Let’s go to Banking → Reconcile Checkbook. At the very beginning of this document we requested the bank statements and if you remember the bank statement example had an ending balance for 12/31 of $25,000. It also had a $200 outstanding check. That outstanding check will be needed for our January 31st statement. Be sure to set the Year at the top to the proper year (2020 for the example). Enter a Statement date of 01/01/2020. The starting Beginning Balance will be 0.00 and the Deposits and Other Credits will be the ending balance of your Bank Statement. This is what our example looks like:
This window has some verbiage on it that can be confusing yet is correct and we would like to call attention to it right away. The terminology appears to be wrong. (Deposits & Other Credits … and … Checks & Other Debits). We know based on the beginning of this document that a Deposit to a Checkbook is a Debit and a withdrawal is a Credit. So why does the window appear incorrect? This window is designed to appear most like bank statements. Bank statements often list them the other way around. Why? Your checking account is an asset to you, but it’s considered a liability to the bank. On their Balance Sheet it’s money they owe you. So depositing money into your bank account is actually crediting the liability account that

they have reserved for you. While writing a check you are reducing the amount the bank owes hence reducing (debiting) the Banks Liability.
2. Once you have the window filled out click Save and then click Reconcile. Check the Beginning balance entries that should total to $25K. Do not click the unreconciled checks or deposits. Our sample looks like this.
Notice the “X” next to the 25000.00 amount. We clicked the 25000.00 dollar value to place the “X” here. The Deposits & Other Credits at the top now matches and so does our Ending Balance. Note that there is NOT an X on the Checks side for the -$200.00 on the right. It will be checked on the January 31st 2020 reconcile. We can click the Save Work button at the bottom and our first reconcile is complete. Now lets validate the system to ensure that the balance in Icon matches our bank statement. Go to Banking → Checkbook Activity. Press the Print button at the top right and enter a large date range such as 01/01/2019 to 12/31/2020. Sort it by Reconcile-Date and press Print. The report should look like:
Things to notice: 1. The 4th column is the Reconcile column. The very last entry for 01/01/2020 has a balance on the right of $25,000.00 which is identical to what our Checkbook reconciliation window
displays and is identical to the ending balance of the Bank Statement. This is exactly what we want. 2. The report also displays all unreconciled entries so that the last entry on the window will display our unreconciled balance. 3. This is a great report to ensure you are balanced to the penny with the Bank.
Stage 5: Payroll Payroll Definitions: Employee versus Employer: Employee means it is the responsibility of the employee to pay while Employer means it is a benefit the Church is providing. Employee versus Pastor: People that work at the church are employees. Pastors are not typically employees. They are considered self employed and are taxed differently. Pastors are responsible for paying their own tax payments. Gross Pay: This is the total amount being paid to the Employee before taxes are removed. Net Pay: This is the actual amount being paid to the Employee after taxes are removed. Federal Taxes: This is the Amount owed to the Federal Government State Taxes: This is the Amount owed to the State an employee resides. Employee FICA: This is the social security that Employees pay and is deducted from the Gross Pay. This is a flat rate of 6.2%. Also referred to as FICA SS. Employee Medicare: This is the Medicare that Employees pay and is deducted from the Gross Pay. It is a flat rate of 1.45%. Also referred to as FICA Med. Employer FICA: This is the social security that the Employer(Church) pays. It is a flat rate of 6.2%. Also referred to as FICA SS Employer Employer Medicare: This is the medicare that the Employer(Church) pays. It is a flat rate of 1.45%. Also referred to as FICA Med Employer. SECA: Self Employment Contributions Act. Because Pastors are self employed they do not pay FICA and Medicare. They pay SECA instead. SECA is a flat rate of 15.3%. If you add the two FICAs and Medicares together the total also equals 15.3%. The difference is that with SECA the pastor must pay the entire percentage rather than just half. Because of this it is common for churches to reimburse the pastor the 7.65% in FICA and Medicare that is typically paid by the church.

Exemptions: The more exemptions you have the less you will pay in taxes based on the table calculations. Payroll Expenses: These are the expense accounts related to paying employees and pastors. Some churches will break this up by position for budget purposes. Payroll Liabilities: The dollars withheld from the Gross Pay of an employee or the benefits owed by the employer. Payroll Accounts For our purposes we are going to define the following accounts. Payroll Liability Accounts Payroll Expense Accounts
Federal Withholding Tax Payable FICA Tax Payable Employee FICA Tax Payable Employer Medicare Tax Payable Employee Medicare Tax Payable Employer State Withholding Tax Payable
Staff Salary Exp Pastor Salary Exp
It is good to group these accounts together under a parent account. We will create all the payroll liability accounts under a primary account called Payroll Withholding & Taxes and all the payroll expense accounts under Salaries Expense. If these do not exist you will need to make them first and then create the remaining accounts. They must be defined correctly for them to appear in Payroll. Below is an example of how to define them.

When you are finished your Chart of Accounts will look like this:
Adding Accounts to Payroll: Before we can use these accounts in Payroll we must tell Payroll to recognize them. This avoids clutter and accidentally using incorrect accounts in Payroll. To activate the accounts we specified go to Payroll → PR Preferences. Locate the accounts in the expense section and check the two accounts. Then check the liabilities that you have defined as well. The result should look like:

Things to note: 1. The fourth column is liability. Both FICA Tax Payable Employer and Medicare Tax Payable Employer both had to be changed to a liability of Employer. Once we changed that we had to assign it to the Staff Salaries Exp account. 2. Notice that both Employer Liabilities used Staff Salaries Exp. Pastors do not have FICA and Medicare removed from their paychecks. 3. All the accounts were listed as Tax. An HSA, FSA or 401k would require a different designation. Common Withholding Accounts Before we enter employee names we can do a little bit of work to make their withholding window a little easier to use. Since all employees, other than pastors, have FICA and Medicare withhold we can set those up once under Maintain Common Accounts. Go to Payroll → Employees → Maintain Common Accounts at the very bottom right corner of the employees window. You will want four accounts set up here.

Things to notice: 1. We used the Calculation method in step 2 for all four definitions. 2. FICA is listed in all four areas of the calculation section. This is correct. Notice the FICA SS versus FICA Med. SS stands for the Social Security portion of FICA and Med is for Medicare. Create Employees All employees should fill out a W-4. Once you have them go to Payroll → Employees. Enter the information for Employees here. We will enter Mary Anderson and John Smith as Employees and Ronald Larson as the Pastor. Things to Notice: 1. Default Expense. This should be the Expense line created in the Chart of Accounts. For the Pastor you would select Pastor Salary. 2. Default Fund. Most churches will pay employees out of the General Fund. 3. Filing Status and Federal Exemptions. These fields are used to help calculate taxes.

Withholdings
Go to Payroll → Employees → select one of the employees on the left and press the Withholding View/ Setup button on the right. Execute A, B & C below for each employee, not pastors.
A. Click the Copy Common Accounts to This Employee button at the very bottom of the window. This will add the two FICA lines and the two Medicare lines to this employee.
B. Go back to Step 1 and select Federal Withholding Tax & Payable. Step 2, choose Calculate with tax tables and click the drop down and select Federal Income Tax. You may need to adjust some of the numbers here based on the submitted W-4 from the employee. Click the Add to Withholding button in Step 3.
C. Go back to Step 1 and select State Withholding Tax Payable. Step 2 Choose Calculate with tax tables and select the State you are withholding for this employee. Click the Add to Withholding button in Step 3.

Rate Cards
Go to Payroll → Employees → Select an Employee → Rate Card Maintenance.
In the Rate Card Name box enter a name for the rate card and fill out the form. When you click the save button it will add all available withholdings you have entered on the right hand side Rate Card Withholdings window. Example Below:
Things to notice:
1. Each rate card can be applied to a different expense account.
2. Each rate card can be applied to a different Accounting Fund.
3. To remove a tax from a rate card, click on a withholding under Rate Card Withholdings at the bottom right.

4. Note the Include on Gross Wages Checkbox.
Executing your first Payroll through Icon
While it is possible to enter payroll checks one at a time most churches will batch checks together and process payroll all at once. Batching Payroll checks is the method we will display in our example. Proceed to Payroll → PR Batches. A really good batch name is the date spelled out. Example: 01/15/2020 would have a batch name of Jan 15th 2020. Pay period for semi-monthly would be 01/01/2020 to 01/15/2020. The window would appear as:
Once you have the information for the batch entered click the “Create Batch” button.This will also open the batch.
Select each employee and the appropriate rate cards that you will be using. For each rate card click the Add to Batch button. The result would appear as:
Things to Notice:
1. We made John Smith an hourly employee for his rate card. Because of this you can see on the left side of the window that we were required to designate the number of hours they worked for the pay period (Both Regular and Overtime).
2. The top right of the window displays each withholding and the amount that will be withheld.
3. After press the Add to Bach button the Employee List in Batch window will display each employee that will be paid via this batch and the Net Pay.
4. If you click an employee’s name that is currently in the “Employee List in Batch” they will be removed from the batch.
Once you are done adding Employees to the batch and everything looks correct click the Close Batch button. This will return you to the Batch creation window. Before a batch can be used to generate checks the Edit report must be printed and the Batch must be approved.
1. Select the Batch on the left and press the Print Edit List button.
2. If the Edit List appears correct press the Approve Edit button.
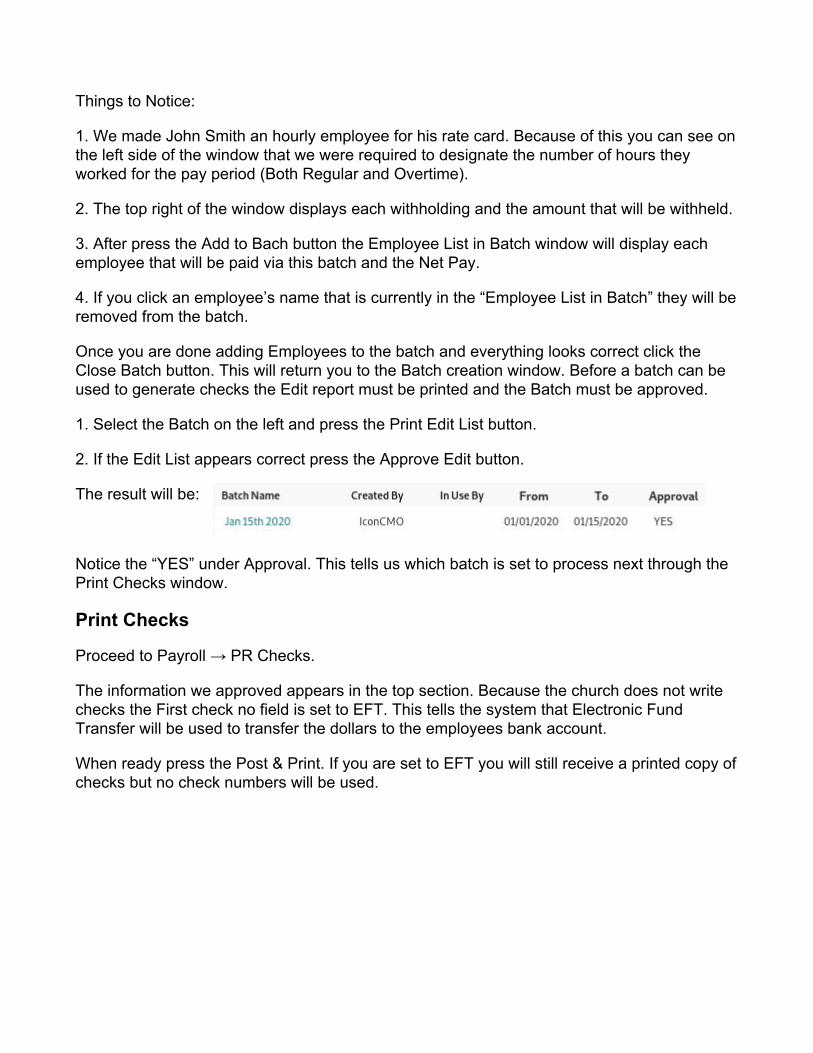
The result will be:
Notice the “YES” under Approval. This tells us which batch is set to process next through the Print Checks window.
Print Checks
Proceed to Payroll → PR Checks.
The information we approved appears in the top section. Because the church does not write checks the First check no field is set to EFT. This tells the system that Electronic Fund Transfer will be used to transfer the dollars to the employees bank account.
When ready press the Post & Print. If you are set to EFT you will still receive a printed copy of checks but no check numbers will be used.

Thank you for using Icon Systems. I hope this guide was helpful.