accelero hybrid ii 140114 en - zaward.co.jp · accelero hybrid ii dear customer, thank you for...
TRANSCRIPT
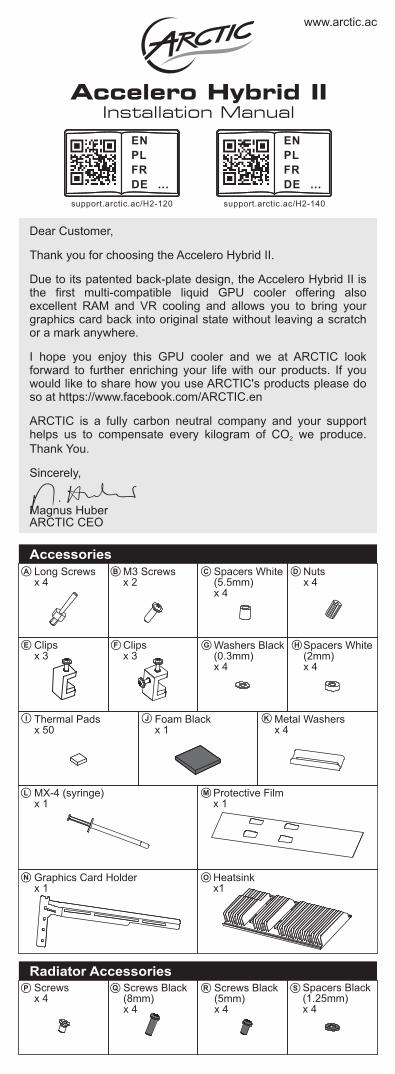
Spacers White(5.5mm)x 4
Washers Black(0.3mm)x 4
Thermal Padsx 50
Spacers White(2mm)x 4
Accessories
Protective Filmx 1
Heatsinkx1
Long Screwsx 4
M3 Screwsx 2
Graphics Card Holderx 1
Foam Blackx 1
Clipsx 3
Clipsx 3
Installation ManualAccelero Hybrid II
www.arctic.ac
Dear Customer,
Thank you for choosing the Accelero Hybrid II.
Due to its patented back-plate design, the Accelero Hybrid II is the first multi-compatible liquid GPU cooler offering also excellent RAM and VR cooling and allows you to bring your graphics card back into original state without leaving a scratch or a mark anywhere.
I hope you enjoy this GPU cooler and we at ARCTIC look forward to further enriching your life with our products. If you would like to share how you use ARCTIC's products please do so at https://www.facebook.com/ARCTIC.en
ARCTIC is a fully carbon neutral company and your support helps us to compensate every kilogram of CO we produce. 2
Thank You.
Sincerely,
Magnus HuberARCTIC CEO
Radiator AccessoriesScrewsx 4
Screws Black(8mm)x 4
Screws Black(5mm)x 4
Spacers Black(1.25mm)x 4
Metal Washersx 4
Nutsx 4
MX-4 (syringe)x 1
support.arctic.ac/H2-120
EN
PL
FR
DE ...
support.arctic.ac/H2-140
EN
PL
FR
DE ...
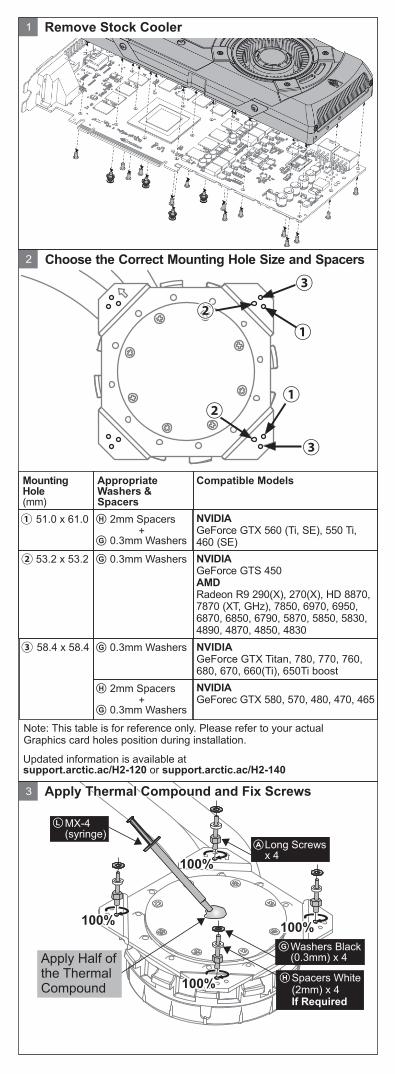
Mounting Hole(mm)
Compatible Models
NVIDIAGeForce GTX Titan, 780, 770, 760,680, 670, 660(Ti), 650Ti boost
Appropriate Washers & Spacers
NVIDIA GeForec GTX 580, 570, 480, 470, 465
NVIDIA GeForce 460 (SE)
GTX 560 (Ti, SE), 550 Ti,
NVIDIA GeForce GTS 450AMDRadeon R9 290(X), 270(X), HD 8870, 7870 (XT, GHz), 7850, 6970, 6950, 6870, 6850, 6790, 5870, 5850, 5830,4890, 4870, 4850, 4830
1
3
Choose the Correct Mounting Hole Size and Spacers
Note: This table is for reference only. Please refer to your actual Graphics card holes position during installation.
Updated information is available at support.arctic.ac/H2-120 or support.arctic.ac/H2-140
Washers Black(0.3mm) x 4
Long Screwsx 4
Remove Stock Cooler
2
MX-4(syringe)
Spacers White (2mm) x 4If Required
Apply Half of the Thermal Compound
51.0 x 61.0
53.2 x 53.2
58.4 x 58.4
①①
②② 0.3mm Washers
③③
+2mm Spacers
0.3mm Washers
0.3mm Washers
+2mm Spacers
0.3mm Washers
Apply Thermal Compound and Fix ScrewsApply Thermal Compound and Fix Screws
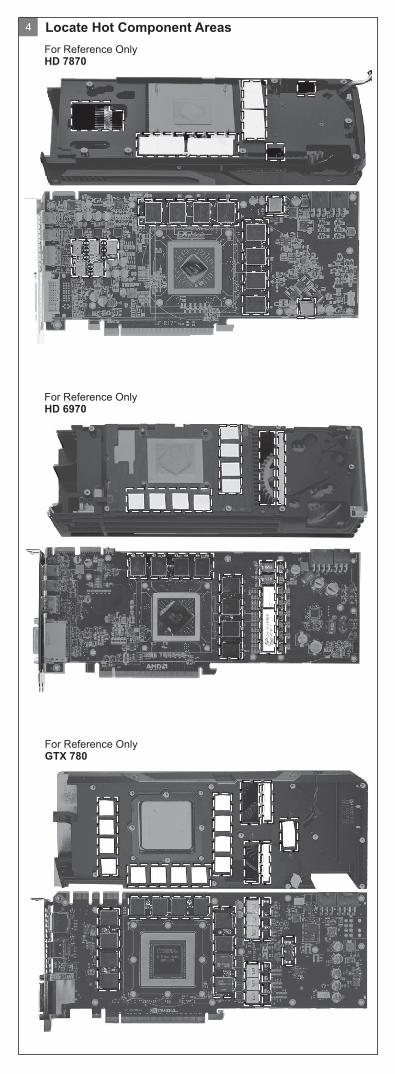
Locate Hot Component Areas4
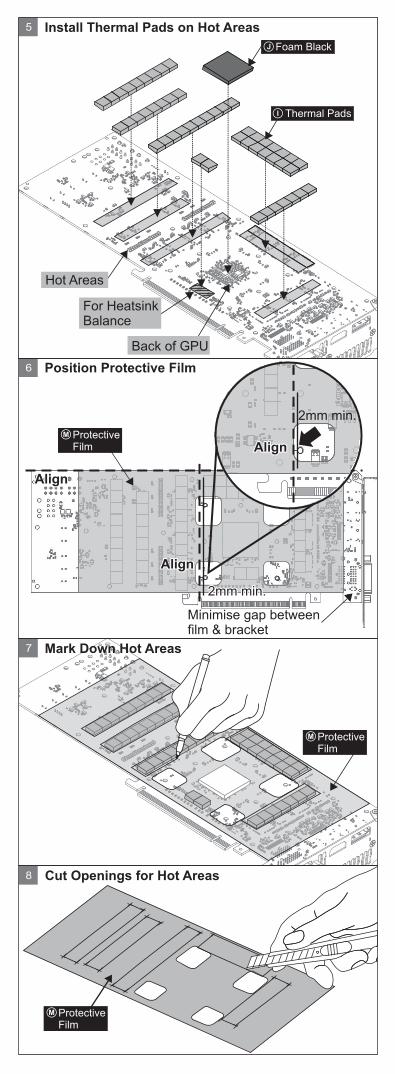
ProtectiveFilm
5 Install Thermal Pads on Hot Areas
6
AlignAlign
AlignAlign
ProtectiveFilm
Minimise gap betweenfilm & bracket
2mm min.2mm min.
For HeatsinkBalance
Hot Areas
Position Protective Film
7 Mark Down Hot Areas
8 Cut Openings for Hot Areas
ProtectiveFilm
Thermal Pads
AlignAlign
2mm min.
Foam Black
10
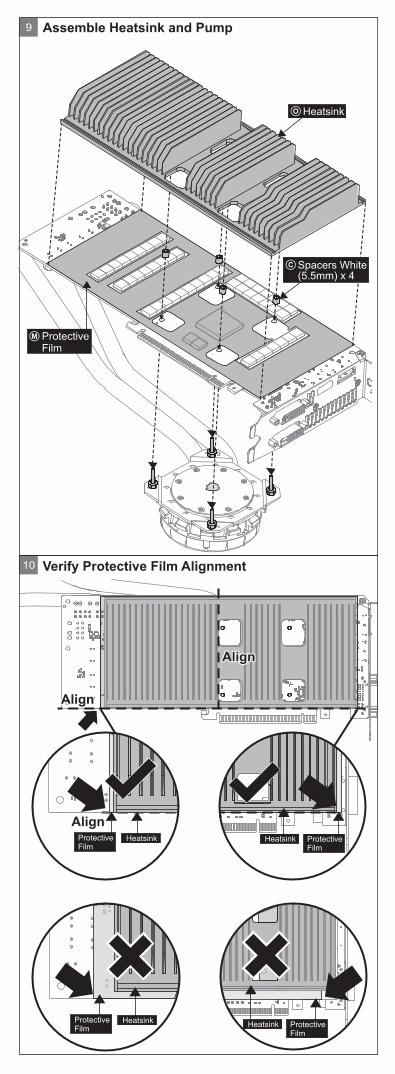
AlignAlign
AlignAlign
AlignAlign
ProtectiveFilm
HeatsinkHeatsinkProtectiveFilm
HeatsinkProtectiveFilm
ProtectiveFilm
Heatsink
9
Verify Protective Film Alignment
Assemble Heatsink and Pump
Spacers White(5.5mm) x 4
ProtectiveFilm
Heatsink
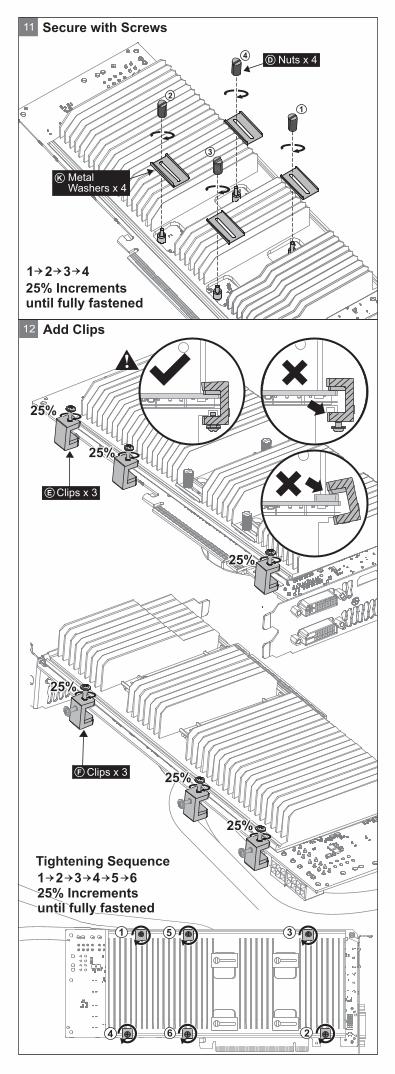
11 Secure with Screws
Add Clips
Incrementsuntil fully fastened25% until fully fastened
Increments1 2 3 4
12
Incrementsuntil fully fastened25% until fully fastened
Increments1 2 3 4 5 6
25%25%
25%25%
25%25%
25%25%
25%25%
25%25%
Clips x 3
Clips x 3
Nuts x 4
MetalWashers x 4
Tightening Sequence
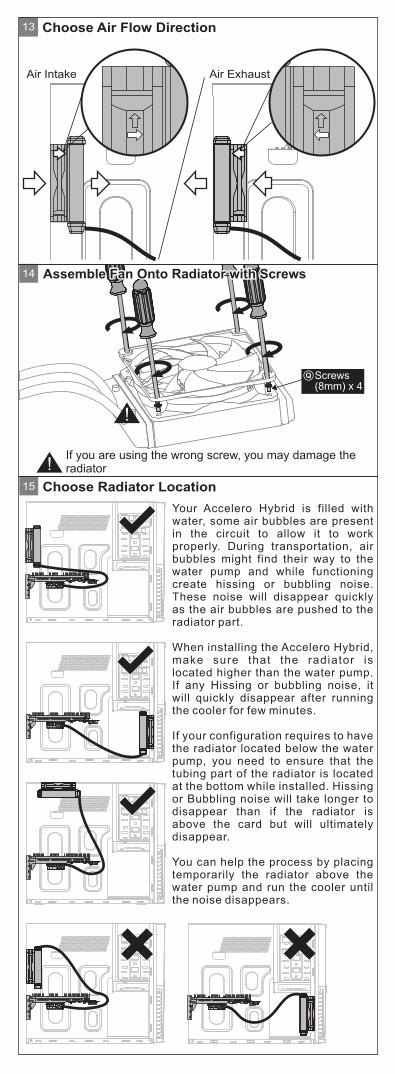
If you are using the wrong screw, you may damage the radiatorIf you are using the wrong screw, you may damage the radiator
Air Intake Air Exhaust
13
14
13
15
Screws(8mm) x 4
Choose Air Flow Direction
Assemble Fan Onto Radiator with ScrewsAssemble Fan Onto Radiator with Screws
Choose Radiator Location
Your Accelero Hybrid is filled with water, some air bubbles are present in the circuit to allow it to work properly. During transportation, air bubbles might find their way to the water pump and while functioning create hissing or bubbling noise. These noise will disappear quickly as the air bubbles are pushed to the radiator part.
When installing the Accelero Hybrid, make sure that the radiator is located higher than the water pump. If any Hissing or bubbling noise, it will quickly disappear after running the cooler for few minutes.
If your configuration requires to have the radiator located below the water pump, you need to ensure that the tubing part of the radiator is located at the bottom while installed. Hissing or Bubbling noise will take longer to disappear than if the radiator is above the card but will ultimately disappear.
You can help the process by placing temporarily the radiator above the water pump and run the cooler until the noise disappears.
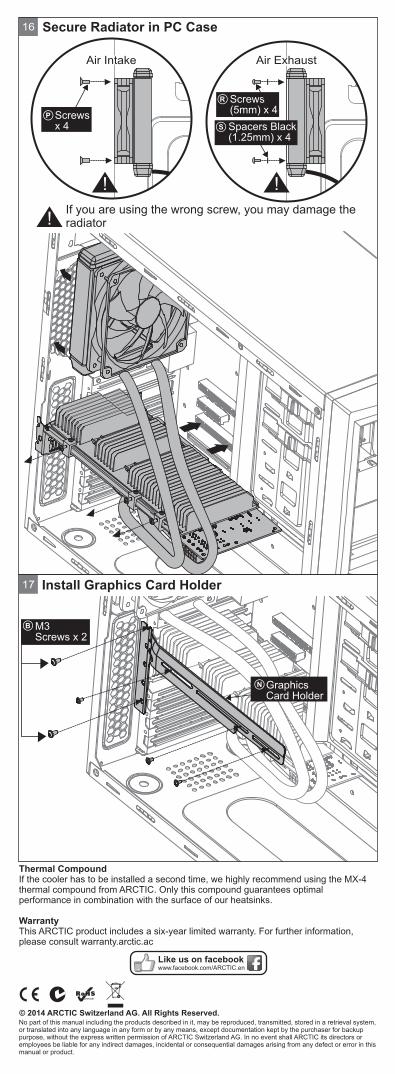
Thermal CompoundIf the cooler has to be installed a second time, we highly recommend using the MX-4 thermal compound from ARCTIC. Only this compound guarantees optimal performance in combination with the surface of our heatsinks.
WarrantyThis ARCTIC product includes a six-year limited warranty. For further information, please consult warranty.arctic.ac
16
© 2014 ARCTIC Switzerland AG. All Rights Reserved.No part of this manual including the products described in it, may be reproduced, transmitted, stored in a retrieval system, or translated into any language in any form or by any means, except documentation kept by the purchaser for backup purpose, without the express written permission of ARCTIC Switzerland AG. In no event shall ARCTIC its directors or employees be liable for any indirect damages, incidental or consequential damages arising from any defect or error in this manual or product.
Like us on facebookwww.facebook.com/ARCTIC.en
17
M3Screws x 2
Secure Radiator in PC Case
Install Graphics Card Holder
Graphics Card Holder
If you are using the wrong screw, you may damage the radiator
Screwsx 4
Screws (5mm) x 4
Spacers Black(1.25mm) x 4
Air ExhaustAir Intake