· about milestones ............48 to define a milestone for a task.......49 about date dependency...
TRANSCRIPT

IBM Unica Distributed MarketingVersion 8 Release 6May 25, 2012
Corporate Marketer's Guide
���

NoteBefore using this information and the product it supports, read the information in “Notices” on page 227.
This edition applies to version 8, release 6, modification 0 of IBM Unica Distributed Marketing and to allsubsequent releases and modifications until otherwise indicated in new editions.
© Copyright IBM Corporation 2001, 2012.US Government Users Restricted Rights – Use, duplication or disclosure restricted by GSA ADP Schedule Contractwith IBM Corp.

Contents
Chapter 1. About IBM Unica DistributedMarketing . . . . . . . . . . . . . . 1Distributed Marketing use cases . . . . . . . . 1About corporate marketers . . . . . . . . . 1About field marketers . . . . . . . . . . . 2To log in to IBM Unica Marketing . . . . . . . 3
Chapter 2. About customizingDistributed Marketing . . . . . . . . . 5Setting your basic settings . . . . . . . . . . 5To set your instance options . . . . . . . . . 5Setting your start page . . . . . . . . . . . 6The calendar . . . . . . . . . . . . . . 6
About calendar features . . . . . . . . . 6To access the calendar . . . . . . . . . . 9Navigating the calendar . . . . . . . . . 9To set per-session calendar views . . . . . . 10To access calendar objects by date . . . . . . 10To access an object from the calendar . . . . . 10To export the calendar . . . . . . . . . . 10To publish the calendar . . . . . . . . . 10Viewing the timeline . . . . . . . . . . 11Viewing the text or graphical calendar . . . . 12
Chapter 3. About Corporate Campaigns 15Why field marketers participate in CorporateCampaigns . . . . . . . . . . . . . . 15How Corporate Campaigns link to campaigns inCampaign . . . . . . . . . . . . . . . 16About the Corporate Campaign workflow . . . . 16Example flow for creating a Corporate Campaigntarget list . . . . . . . . . . . . . . . 17
Chapter 4. Corporate Campaign tasks 19About creating Corporate Campaigns. . . . . . 19
To create a Corporate Campaign . . . . . . 19About assigning and inviting people to a CorporateCampaign . . . . . . . . . . . . . . . 20
About the People tab . . . . . . . . . . 20To manage Corporate Campaign members . . . 21To select team members for a CorporateCampaign . . . . . . . . . . . . . . 21To edit Corporate Campaign member accesslevels . . . . . . . . . . . . . . . 22To assign work by role . . . . . . . . . 22
About linking a Corporate Campaign to Campaign 22To create a campaign linked to a CorporateCampaign . . . . . . . . . . . . . . 23To access a Corporate Campaign from Campaign 23
About generating the target list from the flowchart 23To open a linked campaign in Campaign . . . 23To create and run the flowchart for the linkedcampaign . . . . . . . . . . . . . . 23
About submitting the target list to field marketers 24
To notify field marketers to review a proposedtarget list using notifications. . . . . . . . 24
About checking the validation status for target lists 24To check the validation status for CorporateCampaign lists . . . . . . . . . . . . 24
About fulfilling the Corporate Campaign . . . . 25To select the finalized list for the new flowchart 25To fulfill a Corporate Campaign . . . . . . 25
Chapter 5. Corporate Campaigns andfield marketers . . . . . . . . . . . 27Field marketer access to Corporate Campaigns . . 27About Corporate Campaign proposed target lists . . 27
About reviewing the Corporate Campaignproposed target lists . . . . . . . . . . 28About adding customers to Corporate Campaign 28About making permanent additions anddeletions to a list . . . . . . . . . . . 28To review proposed target customers for aCorporate Campaign . . . . . . . . . . 29
Chapter 6. About subscriptions . . . . 33The Subscription task in a Corporate Campaignworkflow . . . . . . . . . . . . . . . 34The Subscription task and territories . . . . . . 34About Selection Levels . . . . . . . . . . 34About the List of Territories . . . . . . . . . 34About Subscription Levels . . . . . . . . . 35Subscription example . . . . . . . . . . . 35How territories, hierarchies, and user associationsare defined . . . . . . . . . . . . . . 36
Chapter 7. Workflows . . . . . . . . 37Workflow concepts . . . . . . . . . . . . 37About System tasks. . . . . . . . . . . . 38
Subscription system task . . . . . . . . . 39Flowchart Run system task . . . . . . . . 39Notify Field Marketers system task . . . . . 39List Review system task . . . . . . . . . 40Recurrence system task . . . . . . . . . 41To create a flowchart run task . . . . . . . 42To create a Notify Field Marketers system task 42To create a List Review system task . . . . . 42To enable permanent updates to a list . . . . 43To create a Subscription task. . . . . . . . 43To configure the Subscription task . . . . . . 43Example of a Corporate Campaign workflowwith system tasks . . . . . . . . . . . 44
About User tasks . . . . . . . . . . . . 44About task status . . . . . . . . . . . . 45To edit the default workflow . . . . . . . . 45
To add roles to tasks . . . . . . . . . . 46To fill data into a range of cells . . . . . . . 46To print the Workflow tab . . . . . . . . 47To add an attachment to a task . . . . . . . 47
© Copyright IBM Corp. 2001, 2012 iii

About milestones . . . . . . . . . . . . 48To define a milestone for a task. . . . . . . 49
About date dependency calculations . . . . . . 49To automatically calculate workflow dates . . . 50To calculate date dependencies above a lockedtask . . . . . . . . . . . . . . . . 50
About schedules . . . . . . . . . . . . . 51To use a baseline schedule . . . . . . . . 51To keep an up-to-date schedule. . . . . . . 51
About designing for multiple drops, lots, waves,and offers . . . . . . . . . . . . . . . 52
About multi-drop design . . . . . . . . . 52About multi-lot design . . . . . . . . . 53About multi-wave design. . . . . . . . . 53About multi-offer design . . . . . . . . . 54
Updating and finishing tasks . . . . . . . . 56To complete multiple tasks . . . . . . . . 56To skip multiple tasks . . . . . . . . . . 57About copying and pasting tasks . . . . . . 57Post task update dialog box . . . . . . . . 58
Managing task dependencies . . . . . . . . 60About adding a stage or task . . . . . . . . 61About editing a stage or task . . . . . . . . 62To add a stage or task . . . . . . . . . . . 62To add a stage or task below a locked task . . . . 63About the workflow spreadsheet view . . . . . 63
About the workflow process flowchart view . . 63About the workflow timeline view . . . . . 63Workflow tab layout page . . . . . . . . 64Workflow tab fields. . . . . . . . . . . 65Workflow toolbar . . . . . . . . . . . 67Workflow links . . . . . . . . . . . . 68To change the layout of the workflow . . . . 69To set first column width on workflowspreadsheet . . . . . . . . . . . . . 69
Chapter 8. About flowcharts forCorporate Campaigns . . . . . . . . 71About flowcharts for On-demand Campaigns . . . 71About flowcharts for Lists . . . . . . . . . 71About list selection flowcharts . . . . . . . . 71
About List selection flowcharts for CorporateCampaigns . . . . . . . . . . . . . 72About list selection flowcharts for On-demandCampaigns and Lists . . . . . . . . . . 73
About campaign fulfillment flowcharts . . . . . 76About campaign fulfillment flowcharts forCorporate Campaigns . . . . . . . . . . 76About campaign fulfillment flowcharts forOn-demand Campaigns . . . . . . . . . 77
About viewing campaign and list attributes inDistributed Marketing . . . . . . . . . . . 78
To make flowchart attributes visible inDistributed Marketing . . . . . . . . . . 78Process display settings and field marketeractions . . . . . . . . . . . . . . . 79
About running flowcharts . . . . . . . . . 81About attaching flowchart output files toOn-demand Campaigns . . . . . . . . . 81
Chapter 9. Working with Lists,On-demand Campaigns, and CorporateCampaigns . . . . . . . . . . . . . 83To view and edit the Summary page . . . . . . 83To modify the default contents of the Lists,On-demand Campaigns, and Corporate Campaignspages . . . . . . . . . . . . . . . . 83To modify how Lists, On-demand Campaigns, andCorporate Campaigns are displayed . . . . . . 84To view specific Lists, On-demand Campaigns, orCorporate Campaigns . . . . . . . . . . . 85To open and edit a List, On-demand Campaign, orCorporate Campaign . . . . . . . . . . . 85List, On-demand Campaign, and CorporateCampaign status. . . . . . . . . . . . . 85
To change the Lists, On-demand Campaigns, orCorporate Campaign status . . . . . . . . 86
To print a List, On-demand Campaign, or CorporateCampaign . . . . . . . . . . . . . . . 86To export a List, On-demand Campaign, orCorporate Campaign . . . . . . . . . . . 86To copy a List, On-demand Campaign, or CorporateCampaign . . . . . . . . . . . . . . . 87About people . . . . . . . . . . . . . . 87
About the People tab . . . . . . . . . . 87To manage Corporate Campaign members . . . 87To select team members for a CorporateCampaign . . . . . . . . . . . . . . 88To edit Corporate Campaign member accesslevels . . . . . . . . . . . . . . . 88To assign work by role . . . . . . . . . 89
About attachments . . . . . . . . . . . . 89To add an attachment to a List, On-demandCampaign, or Corporate Campaign . . . . . 90To remove an attachment from a List,On-demand Campaign, or Corporate Campaign . 90
To post a message . . . . . . . . . . . . 91To read messages . . . . . . . . . . . 91
To delete Lists, On-demand Campaigns, orCorporate Campaigns . . . . . . . . . . . 92
To delete a List, On-demand Campaign, orCorporate Campaign . . . . . . . . . . 92
Chapter 10. Alerts . . . . . . . . . . 93To subscribe to alerts for an object . . . . . . . 93Viewing alerts . . . . . . . . . . . . . 93
Chapter 11. About templates . . . . . 95About template components . . . . . . . . . 95About creating templates . . . . . . . . . . 96
Chapter 12. Building and managingtemplates . . . . . . . . . . . . . 99Templates Definition page . . . . . . . . . 100To build a template . . . . . . . . . . . 101
Effects of template changes . . . . . . . . 101About template folders . . . . . . . . . 101
To edit a template . . . . . . . . . . . . 102Template Properties tab . . . . . . . . . . 102
iv IBM Unica Distributed Marketing: Corporate Marketer's Guide

Template People tab . . . . . . . . . . . 103Template Recurrence tab. . . . . . . . . . 103Template Workflow tab . . . . . . . . . . 105
To create workflow templates . . . . . . . 105To use workflow templates . . . . . . . . 105To configure workflow for a template . . . . 106
Template Campaign tab . . . . . . . . . . 106Template Tabs tab . . . . . . . . . . . . 107
To add a tab to a template . . . . . . . . 107To move a tab or form on a template . . . . 108To delete a form or custom tab from a template 108
Template Attachments tab . . . . . . . . . 108Template Custom Links tab. . . . . . . . . 109Workflow templates page . . . . . . . . . 109
To export a workflow template . . . . . . 110Data Mapping Definitions page . . . . . . . 111
To add a data mapping . . . . . . . . . 111To edit a data mapping . . . . . . . . . 111
Icons page . . . . . . . . . . . . . . 112To add or edit an icon . . . . . . . . . 112
About importing and exporting templates . . . . 113To import templates . . . . . . . . . . 113About exporting templates . . . . . . . . 114
About template validation . . . . . . . . . 115About database validation . . . . . . . . 115About attribute validation . . . . . . . . 116
Chapter 13. About the Form Editor 117How forms and Campaign flowcharts relate . . . 117
Integrating offers in flowchart . . . . . . . 118Adding a form generated from Campaign . . . . 119About invalid forms . . . . . . . . . . . 119Form Definitions page . . . . . . . . . . 120
To edit a form . . . . . . . . . . . . 120To revert a form . . . . . . . . . . . 121To delete a form . . . . . . . . . . . 121
About Run History series . . . . . . . . . 121About merging forms . . . . . . . . . . 121
To republish a form . . . . . . . . . . 122To change values displayed in forms . . . . . 122Form status . . . . . . . . . . . . . . 123Form Editor page . . . . . . . . . . . . 123
Add an Element tab . . . . . . . . . . 124Element Properties tab . . . . . . . . . 126Form Properties tab . . . . . . . . . . 127To remove a custom attribute from a form. . . 127
Single Select Database . . . . . . . . . . 127Single Select Database Object Reference . . . 128Single Select Database Attribute Reference. . . 128
Appendix A. About flowcharts . . . . 131Creating flowcharts . . . . . . . . . . . 131
Flowchart design considerations . . . . . . 131To create a new flowchart . . . . . . . . 131
Copying flowcharts . . . . . . . . . . . 132To copy a flowchart . . . . . . . . . . 132
Viewing flowcharts . . . . . . . . . . . 132To view a flowchart . . . . . . . . . . 133
Reviewing flowcharts. . . . . . . . . . . 133To review the processes in a flowchart . . . . 133
Editing flowcharts . . . . . . . . . . . . 134To open a flowchart for editing . . . . . . 134To edit a flowchart's properties . . . . . . 134
Validating flowcharts . . . . . . . . . . . 135To validate a flowchart . . . . . . . . . 135
Testing flowcharts . . . . . . . . . . . . 135To test run a flowchart . . . . . . . . . 135To test run a flowchart branch. . . . . . . 136
Running flowcharts . . . . . . . . . . . 136To run a flowchart. . . . . . . . . . . 136To run a flowchart branch . . . . . . . . 137To run a flowchart process . . . . . . . . 137To pause a flowchart run . . . . . . . . 137To continue a paused flowchart run . . . . . 137To stop a flowchart run . . . . . . . . . 138To continue a stopped flowchart run . . . . 138Troubleshooting runtime errors . . . . . . 138
Deleting flowcharts . . . . . . . . . . . 138To delete a flowchart . . . . . . . . . . 139
To print a flowchart . . . . . . . . . . . 139Packaging flowchart files for troubleshooting . . . 139
To package flowchart files for troubleshooting 139Transmitting the flowchart data package to IBMUnica Technical Support. . . . . . . . . 140Options for packaging flowchart data . . . . 140
Flowchart reference . . . . . . . . . . . 143Flowchart tab icons (View mode) . . . . . . 143Flowchart page icons (Edit mode) . . . . . 143
Appendix B. List of processes . . . . 145Data manipulation processes . . . . . . . . 145
Audience . . . . . . . . . . . . . . 145Extract . . . . . . . . . . . . . . 155Merge . . . . . . . . . . . . . . . 159Sample . . . . . . . . . . . . . . 160Segment . . . . . . . . . . . . . . 162Select . . . . . . . . . . . . . . . 168
Run processes . . . . . . . . . . . . . 169Call List . . . . . . . . . . . . . . 169Create Seg . . . . . . . . . . . . . 173Cube . . . . . . . . . . . . . . . 174Mail List . . . . . . . . . . . . . . 176Schedule . . . . . . . . . . . . . . 179Snapshot . . . . . . . . . . . . . . 184
Optimization processes . . . . . . . . . . 186Model . . . . . . . . . . . . . . . 186Response . . . . . . . . . . . . . . 187Score . . . . . . . . . . . . . . . 189Track . . . . . . . . . . . . . . . 191
Appendix C. About processes . . . . 195Types of processes. . . . . . . . . . . . 195
Contact processes . . . . . . . . . . . 195Data manipulation processes . . . . . . . 195Run processes . . . . . . . . . . . . 196Optimization processes . . . . . . . . . 196
Using processes in flowcharts . . . . . . . . 197To add a new process to a flowchart . . . . 197To copy and paste a process . . . . . . . 198To cut a process . . . . . . . . . . . 198
Contents v

To paste processes from the template library . . 198To move a process. . . . . . . . . . . 199To delete a process . . . . . . . . . . 199To connect two processes . . . . . . . . 199To delete a connection between two processes 200Example: Process Connections . . . . . . . 200Configuring processes . . . . . . . . . 201To run a process . . . . . . . . . . . 202
Choosing data sources for processes . . . . . . 204To select an incoming cell, segment, or table asthe input to a process . . . . . . . . . 204To select multiple tables as the input to aprocess . . . . . . . . . . . . . . 204To map a new table for selecting as a source 204
Choosing in-database processing for processes . . 205Turning in-database processing on or off . . . 205To turn in-database processing on or off for aflowchart . . . . . . . . . . . . . . 206To turn in-database processing on or off globally 206
Creating queries in processes . . . . . . . . 206How queries are evaluated in Campaignprocesses . . . . . . . . . . . . . . 206To create a query with Point & Click . . . . 207To create a query with Text Builder . . . . . 208To create a query using Query Helper . . . . 208Building raw SQL statements in Campaign . . 209Creating queries using SQL . . . . . . . 210
Profiling fields . . . . . . . . . . . . . 213To profile a field . . . . . . . . . . . 213Restricting input for profiling . . . . . . . 214Disallowing profiling . . . . . . . . . . 216Setting profiling options . . . . . . . . . 217Refreshing a profile count . . . . . . . . 218To insert a profile category into a query . . . 218To print the results of a profile . . . . . . 218To export profile data . . . . . . . . . 218
Specifying an output file or table for contactlogging . . . . . . . . . . . . . . . 219
To specify an output file for contact logging . . 219To specify a database table for contact logging 220
Changing the seed for random selection . . . . 220To change the random seed for selecting records 220
Skipping duplicate IDs in process output . . . . 221To use the Calendar tool. . . . . . . . . . 221
Appendix D. About user variables . . 223To create a user variable . . . . . . . . . . 223
Contacting IBM Unica technicalsupport . . . . . . . . . . . . . . 225
Notices . . . . . . . . . . . . . . 227Trademarks . . . . . . . . . . . . . . 229
vi IBM Unica Distributed Marketing: Corporate Marketer's Guide

Chapter 1. About IBM Unica Distributed Marketing
IBM® Unica® Distributed Marketing provides marketing organizations with theability to distribute the execution of centrally managed marketing campaignsthroughout the enterprise. It allows centralized marketers to maintain control overcorporate standards and business rules, while allowing remote users to tailor orprovide input to the campaign for greater local customization and relevance,ultimately increasing response rates and revenue.
Distributed Marketing supports campaign customization by remote users; but theremote users can change only those parameters specified by the campaigndesigner.
For example, a retail company might want to centrally control certain selectioncriteria, but allow individual store owners to control selections related to theirstores or locations.
Distributed Marketing use casesDistributed Marketing enables organizations to accomplish their goals bysupporting multiple distributed marketing use cases. Specifically, DistributedMarketing enables you to:v Centralize marketing efforts while ensuring that corporate business rules, logic,
and best practices are enforced, allowing execution and controlled customizationthroughout the organization.
v Promote field compliance by having corporate marketers centralize campaigndesign with corporate business rules (such as opt-outs) and customerpreferences.
v More efficiently design, conduct, manage, and measure both global and localizedcross-channel marketing initiatives.
v Increase the number of users who are able to contribute to and executecampaigns, providing more flexibility within an organization and enablingmeasurement and management of marketing efforts.
v Provide "self-serve" customer interaction management within an enterprise, forless technical-oriented marketers and individuals closest to the customer,without compromising corporate rules, goals, or objectives.
v Manage customer interactions in real-time through email and the web.v Allow marketing decision-making and campaign management to be handled by
field marketers, while corporate marketers manage corporate marketingcommunication and policies.
About corporate marketersIn Distributed Marketing, corporate marketers develop templates for reusablecampaign logic and lists of customer contacts. Corporate marketers managecorporate campaigns and oversee marketing activities of field marketers.
Corporate marketers specialize in designing and generating campaigns from whichthe field marketer can choose.
© Copyright IBM Corp. 2001, 2012 1

Primary corporate marketer tasks
In Distributed Marketing, corporate marketers perform the following tasks:v Design campaign flowcharts.v Create corporate campaigns.v Manage campaign workflow.v Create reports used to assess campaign success.v Design templates for Corporate Campaigns, On-demand Campaigns, and Lists,
for use by field marketers and other corporate marketers.
Corporate marketer tasks in Campaign
Corporate marketers also frequently use Campaign, through which they designand build flowcharts that are associated with Lists, On-demand Campaigns, andCorporate Campaigns.
Corporate marketer roles
Corporate marketers must be assigned the Corporate Marketer role in the Globalsecurity policy, or its equivalent, in order to perform their tasks.
To work in Campaign, corporate marketers must be assigned the following roles:v Global Policy Executev Global Policy Designv Global Partition Design or Execute
About field marketersField marketers create and run local or regional marketing activities for a territoryor line of products. Field marketers work directly with customers, understand theirneeds, and can make good decisions on how best to reach their customers withon-demand or corporate marketing campaigns.
Field marketers may be line-of-business users, partners, branch office managers,retail store managers, or members of local sales forces. Field marketers createon-demand (local) campaigns that they can run at any time to target a localcustomer base.
Field marketers tasks
In Distributed Marketing, field marketers work with:v Lists
Field marketers typically create Lists in Distributed Marketing and define criteriato select contacts for the Lists. These Lists can then be used by one or moreOn-demand Campaigns as needed.
v On-demand CampaignsField marketers can create and run On-demand Campaigns to target their set ofcustomers.
v Corporate CampaignsField marketers subscribe to the Corporate Campaigns they want to participatein. For those Corporate Campaigns, field marketers review and choose which oftheir customers are targeted by the Corporate Campaign.
2 IBM Unica Distributed Marketing: Corporate Marketer's Guide

Field marketer roles
Field marketers must be assigned the Field Marketer role in the Global securitypolicy, or its equivalent, in order to perform their tasks.
To log in to IBM Unica Marketing
Before you begin working with IBM Unica Marketing, you need the following.v An intranet (network) connection to access your IBM Unica Marketing server.v Microsoft Internet Explorer installed on your computer.v User name and password to sign in to IBM Unica Marketing.v The URL to access IBM Unica Marketing on your network. If you are uncertain
of the correct URL or need a user name or password, contact your IBM UnicaMarketing administrator.
1. Launch the Microsoft Internet Explorer browser.2. Enter the IBM Unica Marketing URL in the browser's address field.
If IBM Unica Marketing is integrated with Windows Active Directory or with aweb access control platform, and you are logged on to that system, IBM UnicaMarketing displays the dashboard or the default start page configured by theIBM Unica Marketing administrator. Your login is complete. Otherwise, a loginpage appears.If your version of IBM Unica Marketing uses SSL, you may be prompted toaccept a digital security certificate the first time you sign in. Click Yes to acceptthe certificate.
3. Enter your user name and password, then click Sign In.A Change Password page may display, depending on how IBM UnicaMarketing password rules are configured. Enter a new password, confirm byentering it again, and click Change Password.
If your login is successful, IBM Unica Marketing displays the dashboard or thedefault start page configured by the IBM Unica Marketing administrator.
Chapter 1. About IBM Unica Distributed Marketing 3

4 IBM Unica Distributed Marketing: Corporate Marketer's Guide

Chapter 2. About customizing Distributed Marketing
You can customize the Distributed Marketing interface to meet your needs.Customization settings are available in Distributed Marketing when you clickSettings or Settings > Distributed Marketing Settings. The following tabledescribes what you can customize.
Table 1. Options for customizing Distributed Marketing
Option Description
Set current pageas Home
Set the current page to display automatically as soon as you log in toDistributed Marketing.
Basic Settings Set the security policy to apply to new items by default.
Instances Options Customize your default view of Lists, On-demand Campaigns, andCorporate Campaigns.
Calendar/Timeline Settings
Select options to customize how you view the calendar and taskmilestones. See ../MktOps/Calendar/Setting_calendar_appearance.dita.
Setting your basic settings
The basic settings option allows you to choose the security policy used by defaultwhen you create new items.1. Select Settings > Distributed Marketing Settings.
The Administrative Settings page opens.2. Click Basic Settings.
The Basic Settings page opens.3. Select the security policy you want to use by default when you create new
items in Distributed Marketing in the Default Security Policy field.You can leave Global selected, which is the default, to use the global securitypolicy defined by your administrator, or you can select a security policy thatyour administrator instructed you to select. As a best practice, do not changethe security policy without the guidance of your administrator.
4. Click Save Changes to save your changes.
To set your instance options
Instance options allow you to customize your default views of Lists, On-demandCampaigns, and Corporate Campaigns. For example, you may want to specify thatthe On-demand Campaigns list that opens by default only shows On-demandCampaigns set to run in the current week.1. Select Settings > Distributed Marketing settings.
The Administrative Settings page opens.2. Click Instances Options.
The Instances Options page opens.3. In each of the List, On-demand Campaign, and Corporate Campaign sections,
select the default view.4. Click Save Changes to save your changes.
© Copyright IBM Corp. 2001, 2012 5
When you open the Lists, On-demand Campaigns, or Corporate Campaigns page,your default list is shown.
Setting your start pageIf you do not want a dashboard page to appear when you first log in to IBM UnicaMarketing, you can select a page from one of the installed IBM products as yourstart page.
To set a page you are viewing as your start page, select Settings > Set currentpage as home. Pages available for selection as a start page are determined by eachIBM Unica Marketing product and by your permissions in IBM Unica Marketing.
On any page you are viewing, if the Set current page as home option is enabled,you can set the page as your start page.
The calendarField marketers and corporate marketers can use the Distributed Marketingcalendar to view the time horizon for marketing campaigns.
Historically, organizations produced paper-based calendars and updated them withthe latest calendar-driven data. The calendar feature provides marketing groupswith an electronic means of viewing and updating this data.
You can use the calendar as an aid for planning marketing campaigns as follows.v You can view and update the time lines for Lists, On-demand Campaigns, or
Corporate Campaigns.v You can get an up-to-date view of planned or executed marketing efforts over
time.
You can customize the appearance of the calendar in the following ways.v You can set your default view of the calendar by using the Calendar/Timeline
Settings screen.v You can choose the look of the calendar by using the Set View Options dialog
box.v You can filter the items displayed on the calendar by using an Advanced Search.
About calendar featuresThe Distributed Marketing calendar has the following features:v You can display a calendar for Lists, On-demand Campaigns, or Corporate
Campaigns.v The calendar includes start and end dates for the displayed items.v You can display Corporate Campaigns and On-demand Campaigns on the same
calendar in different colors for easy differentiation.v You can open a Corporate Campaign, List, or On-demand Campaign directly
from the calendar.
Default and per session calendar views
You can use one of two types of settings when you view the calendar:v The default calendar settings, which are in effect every time you log in.
6 IBM Unica Distributed Marketing: Corporate Marketer's Guide
v The per session calendar settings. The per session calendar is the calendar thatresults from making temporary changes to the calendar view, without changingthe default settings.
Objects displayed in a calendar
You can display any of the following objects in a calendar:v Corporate Campaignsv On-demand Campaignsv Listsv Corporate Campaigns and On-demand Campaigns
Calendar item dates
Each List, On-demand Campaign, or Corporate Campaign displayed in a calendarhas a start and end date. These are the target start and end dates you set whenyou create the object.
About display options for the calendar
You can modify the calendar display in the following ways:v You can modify the default calendar settings.v You can set the calendar view for the current session.v You can toggle between calendar views:
– Timeline view– Calendar grid view– Text view
v You can use the advanced search feature to filter the Lists, On-demandCampaigns, or Corporate Campaigns displayed in the calendar.
Timeline view
This view displays a time-based view of the Lists, On-demand Campaigns, orCorporate Campaigns you select to display. You can select the time range for thecalendar items you select to display in a timeline view.
In a timeline view, each calendar item is displayed as a horizontal bar across itsdate range. If you enable color coding, each calendar item is colored according toattributes you select.
You can select the date range for the timeline from the following options:v Week displays one week. Each day is listed as a column. The starting day is
either Sunday or Monday, depending on the default calendar settings.v Month displays a single calendar month. Each day is listed as a column, and
days are grouped into weeks.v Quarter displays three calendar months. Each week is listed as a column, and
weeks are grouped into months.v Fiscal Year displays a fiscal year. Your administrator can configure the starting
month for a fiscal year. Each month is listed as a column, and the months aregrouped into quarters.
Chapter 2. About customizing Distributed Marketing 7

v Calendar Year displays a calendar year that starts in January and ends inDecember. Each month is listed as a column, and the months are grouped intoquarters.
Note: Any day specified as non-work time is grayed out in a timeline view.
Month-based text or calendar grid view
A month-based calendar view displays a calendar for a selected month.
In addition to a month-based timeline view, you can select from the followingmonth-based calendar views:v 1-Month Text: Each day contains a text listing of selected Lists, On-demand
Campaigns, or Corporate Campaigns.v 1-Month Calendar Grid: Each calendar item is displayed as a horizontal bar that
begins on the item start date and ends on the item end date. If you enable colorcoding, each calendar item is colored according to attributes you select.
Note: Any day specified as non-work time is indicated by a gray X in thebackground in a calendar grid view.
Color-coded by attribute view
You can color-code the calendar display for Lists, On-demand Campaigns, orCorporate Campaigns by selected attributes. You can apply color-coding to acalendar grid view or to a timeline view.
You can filter the calendar display for Lists, On-demand Campaigns, or CorporateCampaigns according to the values of a selected attribute, such as the following:v Execution statusv Schedule statusv Template type
The calendar displays a legend in the lower-right corner of the screen.
For example, consider the following On-demand Campaign attribute and itspossible values:v Attribute name: Campaign Execution Statusv Valid attribute values: Active, Complete, Under development
If you group and display On-demand Campaigns by Campaign Execution Status,the resulting calendar appears with four colors in the legend. There is one color foreach valid attribute value, and one for N/A.
Note: The color assigned to N/A appears in the calendar when calendar items arenot assigned a value for the selected attribute.
About the horizontal bars used in calendars
The timeline view and calendar grid view display calendar items as horizontalbars.
Note the following about the bars:v The bars represent the date range for objects displayed on the calendar.
8 IBM Unica Distributed Marketing: Corporate Marketer's Guide

v The bar color depends on values of an attribute you optionally select for colorcoding.
v The shape of the bars determines the following about item start and end dates:– Rounded left end: The start date is the date indicated by the left end of the
bar.– Rounded right end: The end date is the date indicated by the right end of the
bar.– Flat left end: The start date is before the visible date range.– Flat right end: The end date is beyond the visible date range.
To access the calendar
You can access the calendar in one of the following ways:v View the calendar for Corporate and On-demand Campaigns from the home
page.v View the default calendar.v View a calendar for a set of Lists, On-demand Campaigns, or Corporate
Campaigns.1. From the Distributed Marketing menu, select Lists, On-demand Campaigns,
or Corporate Campaigns.2. From the View menu, select from Set View Options.3. Set view options, and select to view the calendar.4. Click Apply.
Navigating the calendar
All calendar/timeline views contain the following icons:
Icon Description
Opens the Set View Options dialog box. Use this link to change theway the calendar appears.
Opens the Advanced Search dialog box.
Changes the date range displayed, moving back one unit in time. Forexample, if your current calendar view is a monthly timeline of
September 2009, clicking displays August 2009.
Current daterange
Opens a drop-down list of available date ranges. Use this link toquickly change to any other date range.
For example, if you are viewing a monthly calendar for July 2009, youcan change the view to January 2010 by clicking this link and thenchoosing January 2010 from the drop-down list.
Changes the date range displayed, moving forward one unit in time.For example, if your current calendar view is a weekly timeline from
7/20/2009 through 7/26/2009, clicking displays 7/27/2009through 8/2/2009.
Chapter 2. About customizing Distributed Marketing 9

To set per-session calendar views
You can change the views of the calendar from default settings by clicking Viewfrom any of the following:v The Calendar pagev A listing of Lists, On-demand Campaigns, or Corporate Campaigns.1. Access the calendar.2. Click View.
The Set View options dialog box opens.3. Select options to change the view.4. Click Apply.
To access calendar objects by date
You can filter the calendar to display all of the Distributed Marketing objects for aselected date.
For example, if the calendar is currently displaying Corporate Campaigns for June2009, you can click 7 to open a list page containing all Corporate Campaignswhose date ranges contain June 7th, 2009.
Click the date in an open calendar displaying Lists, On-demand Campaigns, orCorporate Campaigns.
To access an object from the calendar
You can view the List, On-demand Campaign, or Corporate Campaign from itscalendar.
Click the List, On-demand Campaign, or Corporate Campaign on the calendar.
The List, On-demand Campaign, or Corporate Campaign opens.
To export the calendar
You can save a snapshot of the current calendar in HTML format. The calendar issaved in a ZIP archive file.
1. With the calendar open, click the menu next to the print icon ( ) and selectExport.
2. Choose one of the following options:v Click Open to open the ZIP file of the calendar.v Click Save and choose a location, to save the calendar to disk.v Click Cancel to return to the Calendar screen without publishing.
The system publishes the calendar into a ZIP file archive.
To publish the calendar
To get a snapshot of the current calendar, save it in HTML format (into a ZIPcompressed archive file).
10 IBM Unica Distributed Marketing: Corporate Marketer's Guide
1. Choose the calendar view to publish.Select the objects, time range, and appearance for the calendar view. You canmake selections in either of the following ways:v From the Local Marketing menu, select Calendar, then select items to view.v At a list page for Lists, On-demand Campaigns, or Corporate Campaigns,
click the View icon ( ) and choose a calendar view.
2. Click the Print icon ( ) and select Export.3. Do one of the following.
v Click Open to open the compressed file of the calendar.v Click Save and choose a location, to save the calendar to disk.v Click Cancel to return to the Calendar page without publishing.
The system publishes the calendar into a compressed file archive. You can use anyapplication for working with compressed files to access the calendar HTML pages.You can navigate to the next and previous pages of the calendar view in your webbrowser. If you exported any project data, you can also navigate to that data fromthe calendar HTML pages.
Viewing the timelineIf you choose a timeline view, you can choose from several date ranges. The screencan display data for a single week all the way up to data for an entire year.
About timeline view of the calendarThe timeline view displays a grid-like view of the objects by some unit of time,depending on which timeline view you selected.
Each object is displayed in a horizontal bar across its date range. The name of theobject displays on the bar.
Note: If you select Enable Color Coding from the calendar view options screen,the bar for each object appears in a color based on an attribute you chose.
Choose a date-range for the timeline.v Week: displays one week, with each day listed as a column. The starting day is
either Sunday or Monday depending on the option selected in theCalendar/Timeline Settings screen.
v Month: displays a single calendar month. Each day is listed as a column, anddays are grouped into weeks.
v Quarter: displays three calendar months. Each week is listed as a column, andthose weeks are grouped into months.
v Fiscal Year: displays a fiscal year (starting month depends on a configurationsetting, firstMonthInFiscalYear). Each month is listed as a column, and themonths are grouped into quarters.
v Calendar Year: displays a calendar year (starts in January and ends inDecember). Each month is listed as a column, and the months are grouped intoquarters.
Chapter 2. About customizing Distributed Marketing 11

Note: Any day that is specified as non-work time has its column disabled.Additionally, the name of the non-work time (for example, Labor Day) displayswhen you point to the date.
Navigating the timeline view
You can navigate the timeline by doing any of the following:v Click the expand icon (+) next to an object to display objects contained in the
hierarchy. For example, clicking + next to a program displays projects thatparticipate in that program.
v Click the expand icon (+) next to an object to display tasks within the workflowfor that object.
v Click the object name to drill down to a timeline containing the objectscontained in its hierarchy.
Note: Clicking a task opens the Workflow page of the project with which thetask is associated.
v Click the zoom in ( ) and zoom out ( ) icons. These icons appear abovethe timeline. Zooming changes the date range of the timeline. For example,zooming in from a monthly timeline takes you to a weekly timeline. The toplevel is yearly, and the lowest level is weekly.
Viewing the text or graphical calendarThe calendar views display data for a selected month. The page displays a gridcontaining a column for each day of the week: either five columns representing theweekdays, or seven, if you choose to display weekend days. You set this option onthe Calendar/Timeline Settings page. The page contains either five or six rows,each representing a week.
The view contains a cell for each day of the selected month. The cell for a daycontains either a list of items active on the day (text) or a portion of a horizontalbar for each active item (graphical).
About the monthly calendarThe monthly calendar view displays a calendar of the selected month. It lists theobjects you selected and filtered on.
Choose either of these monthly calendar views.v 1-Month Text: Each day contains a list of objects. An object is displayed for all
days in its date range.v 1-Month Graphical: Each object is displayed in a horizontal bar that begins on
its start date and ends on it end date. If you select Enable Color Coding fromthe calendar view options page, the bar for each object appears in a differentcolor.
Note: Any day that is specified as non-work time is indicated by a gray X in thebackground. Additionally, the name of the non-work time (for example, LaborDay) displays when you point to the date.
Navigating the text/graphical calendar
Navigate the calendar by performing any of the following actions:
12 IBM Unica Distributed Marketing: Corporate Marketer's Guide

v Click the object to display its summary page. For example, clicking a List opensthe List's Summary page.
v Click the date to display a list page containing objects falling on that date. Forexample, if the calendar is currently displaying Lists for June 2009, clicking 9opens a page containing all Lists whose date ranges contain June 9, 2009.
About calendar color codingYou can display objects in a color-coded manner on either the graphical calendaror in the timeline views.
You first select the Enable Color Coding check box in either theCalendar/Timeline Settings page or the Set View Options dialog box. After youcheck the box, the Based on values for menu displays. This list contains attributesfor your Lists, On-demand Campaigns, and Corporate Campaigns.
From this list, you can choose any attribute that is an enumerated type. Forexample, consider the following attribute:v Name: Product Familyv Valid values: CDs, Credit Card, Home Mortgage
If you choose to group objects by this attribute, your calendar contains four colors:one for each valid value plus N/A, corresponding to any objects that do notcontain a value for the Product Family attribute.
The calendar also displays a legend in the lower-right corner of the screen. Thelegend lists all valid values (plus N/A) along with the color corresponding to thatvalue.
About horizontal bars on the calendarThe timeline view and graphical calendar view display horizontal bars.
Note the following.v The bars represent the date range for objects displayed on the calendar.v The name of the object displays on the bar.v The bars can be colored based on an attribute you select.v The shapes of the bars indicate the following:
– Rounded-end "start": indicates that the object starts on the date where the barhas a rounded end.
– Rounded-end "end": indicates that the object ends on the date where the barhas a rounded end.
– Flat-end "start": indicates that the object starts before the visible date range.– Flat-end "end": indicates that the object ends after the visible date range.
To color-code calendar items
You can use color-coding to display objects in a calendar according to a selectedattribute.
For example, you can display different colors of Corporate Campaigns, accordingto whether the Corporate Campaign is active or not.
Note: You can also set color-coding for the default calendar settings.1. Open one of the following:
Chapter 2. About customizing Distributed Marketing 13

v Calendarv Listsv Corporate Campaignsv On-demand Campaigns
2. Click View.The Set View Options dialog box opens.
3. Check Enable Color Coding.4. Choose a calendar item and corresponding attribute on which to base
color-coding from the lists that appear.5. Click Apply.
To zoom in or out of a timeline view
When you select a timeline view, you use the zoom feature to expand or collapsethe date range for the view.
The top level for zooming out displays a year-based date range.
The lowest level for zooming in displays a week-based date range.
For example, zooming in from a monthly timeline takes you to a weekly timeline.
Click the zoom in icon ( ) or zoom out icon ( ) to change the view.
14 IBM Unica Distributed Marketing: Corporate Marketer's Guide

Chapter 3. About Corporate Campaigns
Corporate Campaigns are marketing campaigns that are planned, scheduled, andexecuted by a centralized marketing team.
Corporate Campaigns are campaigns that present a corporate marketing messageto targeted contacts. In Distributed Marketing, Corporate Campaigns execute on afixed schedule, which you specify using scheduled workflow tasks in theCorporate Campaign Workflow tab.
Corporate marketers typically use Distributed Marketing to incorporaterecommendations about which target customers to include with a CorporateCampaign from field marketers throughout an organization. A corporate Campaignallows corporate marketers and field marketers to collaborate on a corporate-levelcampaign.
Why field marketers participate in Corporate CampaignsBy participating in Corporate Campaigns, field marketers help distribute themarketing campaign effort, enabling the organization to take advantage of themarketing design and strategy expertise provided by a central team of marketingspecialists, as well as the familiarity field marketers have with their personalcontacts.
Corporate marketer's role in a Corporate Campaign
Using Distributed Marketing, corporate marketers present the following to fieldmarketers:v The campaign marketing initiative, in the form of marketing messages and other
materialsv The portions of a proposed target list assigned to each field marketer
Field marketer's role in a Corporate Campaign
Field marketers participate in specific Corporate Campaigns. Optionally, you canuse the Subscription feature to manage field marketers' participation in CorporateCampaigns. Participating field marketers review their portions of the proposedtarget list and provide input to corporate marketers about whom to add or deletefrom the campaign. Once each field marketer provides final feedback on his or herportion of the list, the corporate office fulfills the campaign.
Examples
The following examples illustrate situations in which field marketers decide whichcustomers to include in a Corporate Campaign:v One field marketer may decide that a particular corporate initiative is not
appropriate for some of her assigned customers and removes those customersfrom the proposed target list.
v Another field marketer may not have enough resources to handle the demandgenerated by the corporate initiative. In this case, the field marketer decides toremove some customers from the proposed target list.
© Copyright IBM Corp. 2001, 2012 15

v Another field marketer may want to include customers not originally targetedby the corporate marketing campaign, and adds them to the proposed target list.
How Corporate Campaigns link to campaigns in CampaignYou create a Corporate Campaign in Distributed Marketing. Then, through theCorporate Campaign user interface, you create a linked campaign in Campaign.The values of the following attributes of the campaign created in Campaign matchthe values in the Corporate Campaign you created in Distributed Marketing:v Campaign namev Campaign codev Target start and end datesv Any custom fields assigned in the data mapping between Distributed Marketing
and Campaign.
Matching campaign codes
Corporate marketers must ensure that the Corporate Campaign code matches thatof the campaign in Campaign.
Corporate Campaign template designers can create the templates so that these twocodes match automatically when:1. Corporate marketers create the Corporate Campaign before creating the linked
campaign in Campaign.2. Corporate marketers use Distributed Marketing to initially create the linked
campaign in Campaign.
Note: In order for corporate marketers to create linked campaigns, the corporatetemplate developer must map the data between Campaign and DistributedMarketing.
About the Corporate Campaign workflowCorporate and field marketers typically work on Corporate Campaigns as follows:1. Corporate marketers design the corporate marketing campaign.2. Corporate marketers create a Corporate Campaign in Distributed Marketing.3. Using the optional Subscription workflow task, corporate marketers invite
appropriate field marketers to subscribe to the Corporate Campaign.4. Field marketers subscribe to the Corporate Campaign.5. Corporate marketers create the proposed target list for the campaign.6. Corporate marketers notify field marketers of the availability of the List.7. Field marketers review the Corporate Campaign and provide feedback to
corporate marketers on the target list.8. Corporate marketers can check field marketer review status.9. Corporate marketers incorporate field marketer feedback to generate the final
target list.10. Field marketers optionally analyze campaign success.
16 IBM Unica Distributed Marketing: Corporate Marketer's Guide

Example flow for creating a Corporate Campaign target list
The typical workflow for creating a final target list for a Corporate Campaign is:1. The corporate marketer generates a proposed target list2. Field marketers review and revise the proposed target list.3. The corporate marketer generates the final target list.
In this example, the corporation is a financial institution. A corporate marketer isintroducing a new financial product and expects marketing decision feedback froma team of field marketers.
The corporate marketer generates a proposed target list
After designing a marketing campaign for the new financial product, the corporatemarketer selects customers from the corporate database who are appropriaterecipients of this campaign.
The corporate marketer may use the optional Subscription task in the workflow toinvite the appropriate field marketers to participate in the Corporate Campaign.
If the corporate marketer does not use the Subscription task, all field marketerswho have access to any records in the original target list (as defined by Data LevelFilters) are invited to participate in the Corporate Campaign through its FieldMarketer Notify task. If there are no data level filters, all field marketers areautomatically invited to participate in the Corporate Campaign, and they receivenotifications to review of the target list.
Field marketers review the proposed target list
Field marketers subscribe to the Corporate Campaign. They then review theirportions of the target list.
Field marketer target assignments are made through the corporate database. Forthis example, assume the following target assignments for two field marketerswithin the same corporation:v Field_Marketer_1 is responsible for target_FM11 and target_FM12.v Field_Marketer_2 is responsible for trget_FM21, target_FM22, and target_FM23.
Field marketers can view only those target customers assigned to them from aCorporate Campaign, as defined through data level filters.
In this example, the following occurs:v Field_Marketer_1 accepts both of her target customers on the proposed list.v Field_Marketer_2 declines all of his target customers on the proposed list due to
business constraints.v Both field marketers finalize their customer selection for the Corporate
Campaign.v Final customer selections made by the field marketers are recorded in the
database used by Campaign.
Chapter 3. About Corporate Campaigns 17

The corporate marketer generates the final target list
After the field marketers review the proposed customers and make their finaldecisions, the corporate marketer generates a final target list that incorporates fieldmarketer feedback. When they are satisfied that the list review is complete, theycan click Verify and Lock, and mark the Review List task as complete in theworkflow, to enable the Fulfillment tasks to begin.
18 IBM Unica Distributed Marketing: Corporate Marketer's Guide

Chapter 4. Corporate Campaign tasks
The goal of a Corporate Campaign is to target customers that local field marketershave approved. To reach the fulfillment of the Corporate Campaign, corporatemarketers perform the following tasks:1. “About creating Corporate Campaigns.”2. “About assigning and inviting people to a Corporate Campaign” on page 20.3. “About linking a Corporate Campaign to Campaign” on page 22.4. “About generating the target list from the flowchart” on page 23.5. “About submitting the target list to field marketers” on page 24.6. “About checking the validation status for target lists” on page 24.7. “About fulfilling the Corporate Campaign” on page 25.
About creating Corporate CampaignsCorporate marketers create Corporate Campaigns with a Wizard that guides themthrough the required steps.
In the first step, corporate marketers select a Corporate Campaign template onwhich the new Corporate Campaign is based. The template should have therequired tabs, workflow, people, and other settings for the Corporate Campaign.Corporate marketers can then modify the Corporate Campaign as necessary.
Required information
The following information is required when creating a Corporate Campaign:v Target start datev Target end datev Corporate Campaign code, which you can have generated automatically
Post-creation tasks
After creating the Corporate Campaign, corporate marketers can:v Attach campaign messages or other information about the initiative.v Assign participants to the Corporate Campaign.
To create a Corporate Campaign1. From the Local Marketing menu, select Corporate Campaigns.
2. Click the Add icon ( ).The Select a Corporate Campaign Template dialog box opens. Templates arelisted on the left. If you select a template, information about that templateappears on the right.
3. Select a template from the list on the left, and click Continue.4. Continue through the Wizard pages, entering all required information, and
optional information as needed.5. Click Finish when you have entered the necessary information.
© Copyright IBM Corp. 2001, 2012 19

The new Corporate Campaign is saved.
You can modify the Corporate Campaign as necessary now.
About assigning and inviting people to a Corporate CampaignYou can manually assign users to participate in a Corporate Campaign. You canalso automate the invitation process.
Manually assigning users to a Corporate Campaign
You can manually assign users as participants in a Corporate Campaign in eitherof these ways:v When you create a Corporate Campaign, you can select participants through the
Corporate Campaign Wizard.Assigning field marketers to the Corporate Campaign is automated through theNotify Field Marketer task in the workflow.
v You can view and assign Corporate Campaign participants from the People tabof a Corporate Campaign after creating the Corporate Campaign.
You can assign participants as individuals, or by role. When you assignparticipants by role, you can assign an entire group of field marketers toparticipate in a Corporate Campaign at once.
Automatically inviting field marketers to a Corporate Campaign
You can automate the field marketer invitation process by using one of two tasksin the Corporate Campaign workflow:v Notify Field Marketer taskv Subscription task
Note: If you are manually inviting field marketers, ensure you do not includethese tasks in Corporate Campaign workflow, so that field marketers do notreceive automatic invitations.
About the People tabEach Corporate Campaign contains its own People tab. Use this screen to do thefollowing.v Manage the members of a Corporate Campaign.v Edit access level for a member.v Replace a person in a role when a user becomes unavailable.v Add or remove a role.
A Corporate Campaign template can contain information about the functional rolesfor the project. A template can reduce some of the work necessary to assign peopleor teams to units of work within the Corporate Campaign.
Note: By default, the People tab is available only for Corporate Campaigns. Forinformation about making it available for Lists or On-demand Campaigns, see theDistributed Marketing Administrator's Guide.
20 IBM Unica Distributed Marketing: Corporate Marketer's Guide
To manage Corporate Campaign members1. Navigate to the People tab of the Corporate Campaign.
2. Click the Edit Member/Role Settings icon ( ).The Select Team Members dialog box opens.
3. Do one of the following.a. To add a person, select the name from the left pane of the dialog, and click
>>.b. To remove a person, select the name in the Select Team Members list box
and click <<.c. To change the role for a person, select the name in the Select Team
Members list box and use the Up and Down controls to move them to therequired role.
Note: You cannot remove a user assigned to a task.4. Click Save Changes.
The Select Team Members dialog box closes. The People tab becomes theactive window.
The changes you make are reflected in the list of people and roles. For example, ifyou added a creative lead, the screen would contain a line similar to the following.Member/Access Level Role Email AddressP Picasso (participant) Creative Lead [email protected]
To select team members for a Corporate Campaign
You can select other Distributed Marketing users to participate in the CorporateCampaign. You can assign participants as individuals, or by role. When you assignparticipants by role, you can assign an entire group of field marketers toparticipate in a Corporate Campaign at once.1. Open the Corporate Campaign.2. Open the People tab.
3. Click the Edit Member/Role Settings icon ( ).The Select Team Members dialog box opens.
4. To assign team members by role:a. In the upper left of the dialog box, click Roles.b. Select roles to assign to the Corporate Campaign from the list on the left.c. Click the right-pointing arrow button to move the selected roles to the
Selected Team Members list on the right.5. To assign individual users:
a. In the upper left of the dialog box, click Folders.b. Expand the folder entries and select individuals to assign to the Corporate
Campaign from the list on the left.c. Click the right-pointing arrow button to move the selected users to the
Selected Team Members list on the right.6. Click Save Changes.
You can now assign work for the Corporate Campaign by role.
Chapter 4. Corporate Campaign tasks 21

To edit Corporate Campaign member access levels
You can control the access level other Distributed Marketing users have to theCorporate Campaign. You can specify whether users are Owners or Participants ofthe Corporate Campaign. The specific privileges of Owners and Participants aredetermined by the user permissions defined by the Distributed Marketingadministrator.1. Open the Corporate Campaign.2. Open the People tab.
3. Click the Edit Member/Role Settings icon ( ).The Select Team Members dialog box opens.
4. To add users:a. Expand the folder entries and select individuals to assign to the Corporate
Campaign from the list on the left.b. Click the right-pointing arrow button to move the selected users to the
Selected Team Members list on the right.5. To make a user an owner of the Corporate Campaign:
a. In the Selected Team Members list, select the user.b. Click Up.
Repeat this step until the user appears under Owner in the list.6. To make a user a participant in the Corporate Campaign:
a. In the Selected Team Members list, select the user.b. Click Down.
Repeat this step until the user appears under Participant in the list.7. Click Save Changes.
To assign work by role
Before completing this task, you should select team members for the CorporateCampaign.1. Open the Corporate Campaign.2. Open the People tab.
3. Click the Assign Work by Role icon( ).A dialog box opens asking how you want to assign work. You can choose to:v Add the new user to any existing users assigned to the taskv Replace any existing assigned users with the new user.
4. Select append the new user to add the new user to any existing users assignedto the task, or select replace the existing assignment to replace any existingassigned users with the new user.
5. Click Apply.Users are assigned to tasks as you specified.
6. Click Close.
About linking a Corporate Campaign to CampaignAfter you create a Corporate Campaign and assign members, you must create acampaign in Campaign that is linked to the Corporate Campaign.
22 IBM Unica Distributed Marketing: Corporate Marketer's Guide

You must link a Corporate Campaign to a campaign in Campaign so that flowchartrun tasks in the workflow of a Corporate Campaign can execute flowcharts thatare part of the campaign.
You can create a linked campaign directly from Distributed Marketing. After youdo this, you can create and run the flowchart for the linked campaign inCampaign.
After you link a campaign in Campaign to a Corporate Campaign, you can openthe campaign in Campaign from the Corporate Campaign.
To create a campaign linked to a Corporate Campaign
You can create a new campaign linked to a Corporate Campaign in Campaign,while working directly with a Corporate Campaign.1. Open the Corporate Campaign.
2. In the Summary tab, click the Create a Linked Campaign icon ( ).3. From the icon's drop-down list, select Create a Linked Campaign.
The linked campaign is created in Campaign.
To access a Corporate Campaign from Campaign
If you are working on a campaign in Campaign, you can open a CorporateCampaign.1. Open the Summary tab of the campaign.
2. Click the Distributed Marketing link in the tab list ( ).
The Summary page of the Corporate Campaign opens.
About generating the target list from the flowchartAfter you create a Corporate Campaign and link it to a campaign in Campaignwith the same ID, you must create and publish the campaign flowchart inCampaign to generate the list of proposed targets for the Corporate Campaign.
To open a linked campaign in Campaign
Click the Implementation icon ( ) in the tabs at the top of theCorporate Campaign page. The Summary page of the campaign in Campaignopens.
To create and run the flowchart for the linked campaign1. In Campaign, select the Flowchart tab for the linked campaign.2. Create the flowchart with the same name as defined in the Corporate
Campaign workflow to select the target list according to your corporatecampaign strategy.
3. Publish the flowchart.
You can now confirm the target start and end dates, and start the CorporateCampaign.
Chapter 4. Corporate Campaign tasks 23

About submitting the target list to field marketersYou can notify field marketers that you are distributing the target list for them toreview their portion.
You can use the field marketer notification feature to notify participant fieldmarketers who are responsible for targets on the list.
Notifying field marketers
Note the following about notifying field marketers to review a proposed target listfor a Corporate Campaign:v You must first generate the proposed target list.v You must be the Corporate Campaign owner.v Only field marketers responsible for targets on the proposed target list are
notified.v Each field marketer who is responsible for targets in the list receives a
personalized message you type, along with a message similar to the following:The campaign Name has just started. You have until Date to validatethe list content.
Note: A field marketer becomes responsible for target records through data levelfilters. If data level filters are not defined, then all field marketers are notifiedduring the execution of the Notify Field Marketer system task.
To notify field marketers to review a proposed target list usingnotifications
You can use notifications to alert field marketers to review the CorporateCampaign proposed target list.1. Open the Summary tab of the Corporate Campaign.2. Click Notify the Field Marketers.
Note: This task is dependent on a List Generation task.3. Optionally, select a role to assign the Corporate Campaign review to a group of
field marketers.4. Type a personalized message.5. Click OK.
About checking the validation status for target listsYou can check the review status for a Corporate Campaign to see that participatingfield marketers have made final decisions on the proposed target list before yougenerate the final target list.
To check the validation status for Corporate Campaign lists1. Open the Summary tab of the Corporate Campaign.2. Open the Analysis tab.3. View the validation data.
The work of each field marketer is complete when the status of all records isValidated or Added.
24 IBM Unica Distributed Marketing: Corporate Marketer's Guide
About fulfilling the Corporate CampaignAfter your participating field marketers finalize selections for the proposed targetlist, the field marketers' choices are recorded in the uacc_corporate_lists table inthe Campaign database. In this table:v Records with a value of A in the status column were added by field marketers.v Records with a value of V in the status column were validated by field
marketers. Validated records are accepted in the target list, and locked.
The final stage of the Corporate Campaign consists of running the campaign inorder to deliver the offer to the final targets through a selected channel such asmail or email.
You fulfill the Corporate Campaign by running the fulfillment flowchart inCampaign.
To select the finalized list for the new flowchart1. Open the linked campaign in Campaign.2. Create a new flowchart.3. Select target records from the uacc_corporate_lists database table for which
the status is A (for added records) or V (for validated (accepted and locked)records from the original list).
4. Complete the flowchart with any required exclusion rules with processes forany of the following:v Generating targetsv Generating output datav Response tracking
To fulfill a Corporate Campaign1. In the workflow for the Corporate Campaign, create the flowchart run task.2. In Campaign, create and publish the flowchart.3. Set the dates for the Corporate Campaign and run it.
Chapter 4. Corporate Campaign tasks 25

26 IBM Unica Distributed Marketing: Corporate Marketer's Guide

Chapter 5. Corporate Campaigns and field marketers
When a corporate marketer uses the Subscription task in the workflow for aCorporate Campaign, invited field marketers choose whether to subscribe to theCorporate Campaign. When field marketers subscribe to a Corporate Campaign,they provide corporate marketers with recommendations about which targetcustomers to include in the campaign or wave.
By using field marketer recommendations, central marketing teams can runprograms on behalf of some or all of their field marketing teams, while allowingfield marketers to provide input about specific individuals to contact.
Multi-wave Corporate Campaigns and field marketers
When a Corporate Campaign contains multiple waves, and uses the Subscriptionsystem task in the workflow, invited field marketers choose which waves tosubscribe to. A field marketer can subscribe to any subset of waves in theCorporate Campaign.
Field marketer access to Corporate Campaigns
By default, only corporate marketers are authorized to create and modify allaspects of Corporate Campaigns.
As a field marketer, you can view Corporate Campaigns to which you subscribed.
You can view proposed target customers that are assigned to you. You cannot viewtarget customers assigned to other field marketers.
You can typically perform the following tasks:v View the Corporate Campaign summary.v View any attachments included with the Corporate Campaign.v Review, accept, add, or remove target customers from the proposed target list.v Finalize your portion of the proposed target list.v View the calendar to see the Corporate Campaign schedule.
For more information about your access privileges, see you administrator.
About Corporate Campaign proposed target listsThe proposed target list for a corporate marketing campaign is the initial list ofcustomers for whom the campaign is intended when the campaign is first designedby a corporate marketer.
These customers are associated with field marketers in the corporate database; forexample, the associations may be based on the customer's region.
Field marketers are assigned those proposed target customers in a CorporateCampaign to whom they are associated. They must then review those customersand decide on the final list for the Corporate Campaign.
© Copyright IBM Corp. 2001, 2012 27

Field marketers can:v Accept or decline each customer.v Add target customers to the list of proposed customers.v Finalize the target list for the Corporate Campaign.
About reviewing the Corporate Campaign proposed targetlists
Field marketers typically perform the following tasks for Corporate Campaigns towhich they are subscribed:v Review Corporate Campaign status information and other data in the Corporate
Campaign Summary page.v Review attachments to the Corporate Campaign.
Corporate marketers may include attachments to provide field marketers withinformation that is relevant to the Corporate Campaign. For example, anattachment may contain marketing messages.
v Review his or her portion of the proposed target list.v Provide the corporate marketer with recommendations for modifications to the
proposed target customer list.
Note the following:v The changes field marketers make to the proposed target customer list are stored
in the corporate database; corporate marketers access the changes there.v When field marketers finalize their portions of the proposed target list, target
customer review data status is updated in a database table.
About adding customers to Corporate CampaignField marketers can add target customers to a proposed list for a CorporateCampaign to which they subscribe.
For example, corporate marketers may propose that the list targets previouscustomers, while field marketers have new target customers in mind. Fieldmarketers can filter their lists of personal contacts to select target customers to add.
When field marketers add customers to the proposed list for a corporate marketingcampaign, they can select a set of customers with specific characteristics. Forexample, corporate marketers can allow field marketers to select from thefollowing criteria when adding customers to a proposed list:v Namev Agev Income range
About making permanent additions and deletions to a listWhen working with a recurring workflow, you might be tasked with several listreview steps within the course of a single Corporate Campaign. If wanted, you canmake permanent additions or deletions from the list; these additions or deletionsremain in effect for all future occurrences of the List Review task.
Note: The ability to make permanent additions or deletions to a contact list iscontrolled by the Review List task in the Corporate Campaign workflow. If thisoption has not been selected for a List Review task, you are not able to add ordelete contacts permanently in the corresponding list.
28 IBM Unica Distributed Marketing: Corporate Marketer's Guide

When to add or remove contacts permanently
You should make permanent additions or deletions to a list when the followingstatements are true:v You are using a recurring workflow.v The recurring workflow includes several List Review tasks.v You know that the list as generated is incomplete; you need to add or delete
contacts. You want these additions and deletions to remain in effect for eachfuture occurrence of the recurring campaign.
To review proposed target customers for a CorporateCampaign
When you participate in a Corporate Campaign, you must review the proposedtarget customers for that campaign. When you are presented with a proposed listof target customers for review, you must either accept or decline each customerbefore you can finalize your target list selections for the corporate campaign.
You can accept or decline proposed target customers individually, or all at once.You can also add one or more of your customers to the proposed list.
In recurring Corporate Campaigns, if you are allowed to do so by the campaigncreator, you can add to or exclude contacts from a list for each recurrence of theworkflow. When you add or remove contacts in this way, the changes you makeremain in effect throughout all list review tasks within the recurring workflow. Ifyou are not allowed this option, you can modify only the target list for the currentoccurrence of the workflow.1. Open the Corporate Campaign.2. In the Summary page, click Waiting items.
The Contact to Validate page opens.3. Accept or decline customers as needed.
v To accept all proposed customers, click Accept All Records.v To decline all proposed customers, click Decline All Records.v To accept specific customers only, check the Accept column in the rows for
those customers.v To decline specific customers only, check the Decline column in the rows for
those customers.v To decline specific customers permanently, check the Dec. Perm. column in
the rows for those customers.v To add customers:
a. Click Add Records.b. Select one or more target list filtering criteria from the options presented
on the form, then click Search.The target records resulting from your search are displayed.
c. Check one or more of the customer records to add to the target list.d. Click Accept Selected.
If you selected to add or delete contacts permanently, a message opensasking whether you want to add the contacts permanently for recurringcampaigns.
e. Click OK to make the additions permanent.
Chapter 5. Corporate Campaigns and field marketers 29
Or click Cancel to make the additions apply to the current occurrenceonly.
4. Optionally check After the next save, consider my review complete to validateand lock this list when you save changes.
Note: If you do not check this option, any customer records that you do notaccept or decline appear when you next review the target contacts.
Note: Added contacts do not appear until you close the window and clickNewly added by Field Marketer.
5. Click Save to save changes and complete your review of the proposed targetlist.Accepted and removed contacts disappear from the list, and are only viewablein the Accepted/removed lists page.
To view or accept previously declined targets
You can view previously declined target customers before finalizing your portionof the proposed target list, and, if desired, accept those customers.1. Open the Corporate Campaign for which you declined target customers on the
proposed list.2. Click View Declined.3. You can accept any declined target customers from this list by checking the
customer entries under the Accept column.You can also select Accept All Records or Set All Records to Review to acceptor review all the previously declined records.
Those customers are now included in the list.
You must now finalize the list.
To view or decline previously accepted targets
You can view previously accepted target customers before finalizing your portionof the proposed target list, and, if desired, decline those customers.1. Open the Corporate Campaign for which you accepted target customers on the
proposed list.2. Click View Accepted.3. You can decline any accepted target customers from this list by checking the
customer entries under the Decline column.You can also select Decline All Records or Set All Records to Review todecline or review all the previously accepted records.
Those customers are now removed from the list.
You must now finalize the list.
To view or remove added targets
You can view previously added target customers before finalizing the proposedtarget list. You can also remove previously added target customers.1. Open the Corporate Campaign for which you added customers to the proposed
list.
30 IBM Unica Distributed Marketing: Corporate Marketer's Guide

2. Click View Additions.3. You can remove any added target customers from the list by checking the
customers under the Remove column.You can also select Decline All Records to decline all the previously acceptedrecords.
Those customers are now removed from the list.
You must now finalize the list.
To finalize your portion of a Corporate Campaign target list
You can finalize the proposed target list for a Corporate Campaign after you have:v Reviewed the proposed target list.v Accepted or declined each customer in the proposed target list.v Optionally, added target customers to the proposed list.1. Open the Corporate Campaign.2. In the Summary page, click Validate and lock list.
Note: You cannot reverse this action.
The list is now finalized.
Chapter 5. Corporate Campaigns and field marketers 31

32 IBM Unica Distributed Marketing: Corporate Marketer's Guide

Chapter 6. About subscriptions
A subscription is the invitation to a field marketer to include his or her territory ina Corporate Campaign, or a wave of a multi-wave Corporate Campaign. Throughsubscriptions, field marketers can control which Corporate Campaigns and waves,and potentially which territories within a campaign or wave, they participate in.
In addition, supervisors can control the Corporate Campaigns or waves their staffsparticipate in. When a supervisor subscribes to a Corporate Campaign, fieldmarketers that are under the supervisor in a defined territory hierarchy are alsosubscribed to the campaign. For example, if the territory supervisor for NewEngland subscribes to a corporate campaign, the state manager for Vermont alsoparticipates in the campaign.
Subscriptions and data level filters
Subscriptions can be used in combination with data level filters to control bothwhat data is included in the generated list of customers for a Campaign, and whois invited to review the list of customers that is generated.
Example
If MA_FM is the field marketer for Massachusetts (MA), you can use a state-levelsubscription to invite MA_FM to include or exclude Massachusetts customers fromthe Corporate Campaign contact list. If MA_FM accepts the invitation, MAcustomers are on the contact review list. Using data level filters, MA_FM can alsobe configured to see only MA customers, thus limiting his view to those customersof interest to him. When data level filters are present, only Field Marketers whohave data of interest on the generated list are invited by the Notify Field Marketersystem task.
Subscriptions can operate at multiple levels. So for example, NE_FM might be theNortheast Regional FM who supervises the state field marketers in his region,which might include Massachusetts. The corporate marketer can invite regionalfield marketers to subscribe for their region.
If NE_FM is invited to subscribe, he could accept or decline. If he accepts, data forall customers in his region are included in the list generation. So continuing theexample above, data for Massachusetts's customers would be included in the list.In this case, the MA_FM has no control over whether MA data is included, becausethe subscription invitation is issued at the region level. However, if the data levelfilters are configured to allow MA_FM to see MA customers, MA_FM is invited toreview the MA customers when the Corporate Campaign contact list is generated.
Defining territories
To support subscriptions, the administrator must define a territory hierarchy on theDistributed Marketing server. For more information, see the Campaign and RelatedProducts Installation Guide or the Distributed Marketing Administrator's Guide.
© Copyright IBM Corp. 2001, 2012 33

The Subscription task in a Corporate Campaign workflowCorporate marketers enable subscriptions by adding the Subscription task to theCorporate Campaign workflow, or to each occurrence in a recurring workflow. Bydefining Subscriptions tasks in workflows, as opposed to the Corporate Campaignas a whole, you enable field marketers to subscribe to individual waves, drops,and lots of recurring Corporate Campaigns.
The Subscription task is a system task and starts and stops automatically accordingto its target start and end dates.
The Subscription task and territoriesSubscription invitations are sent to field marketers based on their associatedterritories.
Territories are defined in a hierarchical relationship. For example, a typicalhierarchy would be:Country
RegionState
In this scenario, there could be a Country manager for each country, under whichthere would be several region managers for the regions in the country. Under eachregion manager, there would be managers for each state in the region.
When a corporate marketer configures the Subscription task, he or she specifies thefollowing:1. Selection Level2. List of Territories3. Subscription Level
About Selection LevelsThe Selection Level in a Subscription task filters territories and subscription levelsthat are available to the corporate marketer.
All levels of the defined territory hierarchy are available values for the SelectionLevel.
For example, the corporate marketer might select one of the following:v Country, in this case the top level in the territory hierarchy. These countries, for
example the United States, France, and Germany among others, become theoptions in the List of Territories field.
v Region, the second level in the territory hierarchy. Each country containsmultiple regions; each region contains multiple states.
v State, the bottom level in the territory hierarchy. Each state is grouped under aregion.
About the List of TerritoriesThe territories that appear as options in the List of Territories field are determinedby the Selection Level. All territories defined at the selected level are shown.
34 IBM Unica Distributed Marketing: Corporate Marketer's Guide
For example, if you select Region as the Selection Level, all regions, from allcountries, are listed as options in the List of Territories field.
You must select one or more of the territories listed.
About Subscription LevelsThe Subscription Level is the level in the hierarchy for which users receivesubscription invitations.
The Subscription Level can be at the level of the Selection Level, or beneath thatlevel, but not above that level. For example:
If you select Region as the Selection Level, you can select Region or State as theSubscription Level:v If you select Region, regional managers for the regions you select in the List of
Territories field receive a subscription invitation.v If you select State, state managers for the states within the regions you select in
the List of Territories field receive a subscription invitation.v You cannot select Country as the Subscription Level, as it is a higher level than
the Selection Level.
Subscription example
A corporate marketer may specify that for a Subscription task:1. The Selection Level is Country.2. The List of Territories is the United States3. The Subscription Level is State
When this Corporate Campaign starts, each user designated as a state manager fora state within the United States receives an invitation to subscribe to the CorporateCampaign.
The corporate marketer may instead have set the Subscription Level to Region. Inthis case, each user designated as a region manager receives an invitation tosubscribe to the Corporate Campaign. State managers, lower in the territoryhierarchy than region managers, do not receive the invitation. However, if theregion manager subscribes to the Corporate Campaign, managers of states withinthat region also participate in the Corporate Campaign.
Subscriptions and user variables
When a Corporate Campaign has a Subscription system task linked to a FlowchartRun system task, the Flowchart Run system task needs to have an associatedflowchart that makes use of the subscription response information. You do this bydefining a user variable in the flowchart called SubscriptionList. This uservariable can then be used in a query such as the following:Contact_Info.State IN (UserVar.SubscriptionList)
When the flowchart is run from Distributed Marketing, the list of states or regionsthat are subscribed is sent as a parameter to Campaign, and the query above isexecuted as something like:Contact_info.state in (’MA’, ’VT’)
Chapter 6. About subscriptions 35

How territories, hierarchies, and user associations are definedThe Distributed Marketing administrator defines the territories, hierarchicalrelationships, and territory managers by loading an XML file on the DistributedMarketing server.
For more information, see the Distributed Marketing Administrator's Guide or onlinehelp.
36 IBM Unica Distributed Marketing: Corporate Marketer's Guide

Chapter 7. Workflows
You can manage tasks associated with an Advanced List, On-Demand Campaign,or Corporate Campaign. The Workflow tab provides a spreadsheet on which youcan list all tasks. You can assign dates to the task, and team members to performthem.
When you create a Advanced List, On-demand Campaign, or Corporate Campaign,you use the Workflow tab to customize the workflow provided by the template.When you participate in a Advanced List, On-demand Campaign, or CorporateCampaign, you use the Workflow tab to track your work. If you have theappropriate permissions, you can save a workflow as a workflow template.
Any member of the Advanced List, On-demand Campaign, or CorporateCampaign (with the appropriate access permission) can edit any column of theWorkflow tab.
The workflow tab has an edit mode and three view modes.
v To edit the workflow on the tab, click the Edit icon ( ).v You can view the workflow as a spreadsheet, a timeline, or a process flowchart.
Workflow conceptsTasks
Tasks are steps in the workflow where a user or the system must take action. Thetask is not complete until the action is complete.
Tasks have several types of data associated with them, described in this chapter.
Stages
You can group workflow tasks under headings called stages. Stages can help youwith task organization. For example, you can create a stage that has all tasksperformed by your field marketers-specific. Stages are the headings in bold thatgroup the tasks together.
Dates
Workflows contain the following types of dates.v Actual dates specify when tasks start and finish.v Target dates are dates used to plan the schedule. Typically, they are set at the
beginning of the project.v Anchored dates are fixed dates that cannot change, even if the dates of the tasks
upon which they are dependent change.v Non-work time represents dates when people do not work, so the system skips
those dates when calculating durations for tasks. Distributed Marketingcurrently supports system-wide non-work time that applies to all tasks. It is upto the List, On-demand Campaign, or Corporate Campaign manager to
© Copyright IBM Corp. 2001, 2012 37

determine whether overriding any of these dates is necessary. Systemadministrators enter and maintain these dates.
v Weekend dates are dates you use to specify work that occurs on a weekend ona per-task basis. You can schedule work on a weekend date using the ScheduleThrough option for each task.
Duration
Duration is the actual number of days assigned to a task. If you assign actual startand end dates, the duration is automatically calculated as the difference betweenthe actual start date, and the actual end date for a task. You can assign durationusing any non-negative number. For example, you can use 0.25 to assign a quarterof a day for the task duration.
Effort
The work effort in days (as opposed to duration) that it takes a user to complete atask. For example, a task takes three calendar days to complete, but the task owneronly spends half a day on the task for each of the three days. The effort for thetask is one and a half days even though its duration is three days.
Locked tasks
When you edit a task, the task is locked so no other user can edit it at the sametime.
If anyone attempts to edit a locked task, they receive a warning message,indicating that it is currently in use.
People and roles
You can assign tasks to individual team members or you can assign tasks to allteam members in a given role. When you assign a task to one or more teammembers, they are considered to be the task owner. You assign roles to teammembers from the People tab of the List, On-demand Campaign, or CorporateCampaign.
Workflows use the following concepts to identify the people who perform work.v Task owners are the people responsible for executing or managing tasks.v are reviewers of approval tasks. These members become the approvers of the
task.v Reviewers are reviewers of approval tasks.v Roles are used as a bridge between tasks and people. When a role is assigned to
a task in a List, On-demand Campaign or Corporate Campaign, all usersassociated with that role are owners of the task. Templates can contain roles forcertain tasks. Then when you create a List, On-demand Campaign or CorporateCampaign, some (or all) of the tasks have a default role already associated withthem.
About System tasksSystem tasks are workflow tasks that start automatically, based on a combinationof start date and completion of tasks on which they are dependent.
38 IBM Unica Distributed Marketing: Corporate Marketer's Guide

Note: When you pause a workflow, system tasks scheduled during the time theworkflow is paused do not execute until the workflow resumes.
You can create these types of system tasks:v Subscriptionv Flowchart Runv Notify Field Marketersv List Reviewv Recurrence
Subscription system taskA Subscription system task allows you to have field marketers subscribe to, andparticipate in, a Corporate Campaign.
The Subscription system task is only used in Corporate Campaigns.
A Subscription system task starts and finished automatically, according to thetarget start and end date. You can also mark it complete manually.
Flowchart Run system taskA Flowchart Run system task allows you to specify a flowchart that should run ata particular place in the workflow. When you create a Flowchart Run system task,you specify one of the following:v For corporate marketers working with Corporate Campaigns, the name of the
flowchart in the linked campaign (in Campaign) in the workflow.v For field marketers working with On-demand Campaigns and Lists, the name of
the tab that is associated with the flowchart in the On Demand Campaign orList that you want to use to gather data.
When Distributed Marketing executes a Flowchart Run system task, flowchart runis started in Campaign.
Flowchart Run system tasks start and finish automatically when there is amatching flowchart in Campaign, when the target start date is reached and whenall tasks it depends on are finished; you do not need to manually start or stop aFlowchart run system tasks. The % Complete field fills in automatically as the taskproceeds.
Flowchart run tasks with no assigned flowchart
The icon for the Flowchart Run system task appears red when no known flowchartis assigned to the task. After you assign a flowchart, the color of the icon changesto black.
Flowchart Run tasks and Corporate Campaigns
For Corporate Campaigns, for the Flowchart Run system task to run correctly, youmust save and publish the flowchart of the linked campaign in Campaign.
Notify Field Marketers system taskA Notify Field Marketers system task allows you to include, within the workflow,automatic notification to Field Marketers. This type of system task is used onlywith Corporate Campaigns.
Chapter 7. Workflows 39

Note: A Notify Field Marketers system task must be dependent on a RunFlowchart system task.
When a Notify Field Marketers system task starts, Distributed Marketing sendsnotification to Field Marketers, informing them that contact lists are ready for theirreview. Distributed Marketing also adds all selected Field Marketers to the Peopletab of the Corporate Campaign.
The Notify Field Marketers system task starts and finishes automatically; you donot need to manually start or stop a Notify Field Marketers system task. The %Complete field fills in automatically as the task proceeds.
List Review system taskA List Review system task allows you to identify time within the workflow duringwhich Field Marketers will be reviewing contact lists that result from a flowchartrun. Unlike any other Workflow Task, this task can be finished by a link present onSummary Tab of On-demand Campaign. Without going to workflow tab, you canfinish this task directly from Summary Tab.
Note: A List Review system task must be dependent on a Run Flowchart systemtask.
List Review system tasks start and finish automatically. You can manually finish aList Review system task when you are sure that all Field Marketers havecompleted the review. Once you manually finish the List Review task, the nextdependent task (if any) in the workflow starts when its target start date has beenreached.
When the List Review is completed, manually or automatically, the List is lockedto field marketers; field marketers can no longer change their portions of the List.
The two permissions, Update System Task status and Update all System Task, areapplied to all Workflow System Tasks along with List Review Task. If thesepermissions are not granted, then a task cannot be completed from workflow alongwith List Review Task. List Review can be finished from the summary tab of anOn-demand Campaign using the Finish List Review link, even if these securitypermissions are not granted in the Security Policy.
To specify the number of records to show, you can use the Limit List View option.In List Manager, only the number of records specified in the List Review Task aredisplayed.
The fields to limit additions are as follows:v On list review pop-up for templates of On-Demand Campaign, Corporate
Campaign, and Advanced Lists.v Corporate Campaign – it will be displayed and editable for corporate marketers
only. In case of corporate campaigns, field marketers cannot access this pop-upbased on security settings. Even if they are allowed access, they can view butcannot edit the settings.
v On-Demand Campaigns and advanced lists - these fields are displayed butcannot be edited
40 IBM Unica Distributed Marketing: Corporate Marketer's Guide

If the value of Limit List View option is set to limit the number of records that canbe viewed, then the field is automatically set to select the second radio buttonoption with value set to "0." You get an explicit message that no records can beadded when the list view is limited.
Note: User cannot set both number and percent. For example, to limit to 10% witha maximum of 100.
In the List Manager task, you can specify the available Display Formats. You canidentify or filter by Audience Level. Only formats selected in the List Review Taskare available.
List Review system tasks and recurring workflows
In recurring On-demand Campaigns or Corporate Campaigns, you can enablepermanent updates so that any additions or removals that take place during ListReview are applied automatically in all occurrences.
List Review system tasks and multi-offer campaigns
In multi-offer On-demand Campaigns or Corporate Campaigns, you can divide alist generated by a single Run Flowchart system task into several segments. Theresults of the Run Flowchart system task are presented as several Lists.
Recurrence system taskRecurrence can be created in template workflow and instances workflow, accordingto permissions.
Recurrence starts when predecessors are complete. It then recalculates previousdependent tasks that target the start date when these previous tasks are set.
The available recurrence types are Monthly, Weekly, Daily, and Hourly. Date andtime calculations must apply to working hours and business days.
On the Recurrence tab, you are given the option to choose the CampaignWorkflow Type (Nonrecurring or Recurring). After selecting the workflow type,you are able to choose Frequency and Time between occurrences.
There can be only one recurrence task in a sequence of dependant tasks. A controlis made when saving the workflow.
Hourly recurrence
For Template Run Flowchart Task Recurrence, you have the Ending option whereyou can choose No End or Total number of occurrences. You also choosePermissions to modify the recurrence in the instance (All options, No option, andAll options but frequency). Run Flowchart Task properties if the recurrence on taskis chosen. You can also get a preview of the next occurrences.
Note: All options allow you to turn from Not recurring to Recurring.
For Instances Run Flowchart Tasks, under the Recurrence tab, you have a start dateto choose along with the Ending (no end, total number of occurrences, and endby).
Chapter 7. Workflows 41

To create a flowchart run task1. In the workflow spreadsheet, in Edit view, select the row after which you want
the Flowchart Run task to appear.
2. Click the Add Task Row icon ( ).3. Select Flowchart Run.
A new task row is added to the flowchart.4. In the Flowchart Name column, perform one of the following tasks:
v For Corporate Campaigns, enter the name of the flowchart from your linkedcampaign.
v For On Demand Campaigns and Lists, select the name of the tab that runsthe Campaign flowchart.
5. Complete the Schedule Through, Target Start, Target End, Duration, andMember Role fields as desired.You can also change the name of the task.
6. Click Save and Finish.
If the workflow is part of a Corporate Campaign, you must save and publish theassociated flowchart in Campaign.
To create a Notify Field Marketers system task1. In the workflow spreadsheet, in Edit view, select the row after which you want
the Flowchart Run task to appear.
2. Click the Add Task Row icon ( ).3. Select Notify Field Marketers.
A new task row is added to the flowchart.4. Complete the Schedule Through, Target Start, Target End, Duration, and
Member Role fields as desired.You can also change the name of the task.
5. Make the new Notify Field Marketers system task dependent on a RunFlowchart system task.
6. Click Save and Finish.
To create a List Review system task1. In the workflow spreadsheet, in Edit view, select the row after which you want
the Flowchart Run task to appear.
2. Click the Add Task Row icon ( ).3. Select List Review.
A new task row is added to the flowchart.4. Complete the Schedule Through, Target Start, Target End, Duration, and
Member Role fields as desired.You can also change the name of the task.
5. Make the new List Review system task dependent on a Run Flowchart systemtask.
6. Click Save and Finish.7. if you are working on a multi-offer campaign:
42 IBM Unica Distributed Marketing: Corporate Marketer's Guide

a. Click the name of the List Review system task.The Task properties screen opens.
b. In the Segment Code field, enter the name of the segment as it appears inthe flowchart in your linked campaign.
c. Click Save and Return.
You can now enable permanent updates to a list.
To enable permanent updates to a list1. In the workflow spreadsheet, in Edit view, double-click the List Review system
task you want to change.The Post Task dialog box opens.
2. Check the Allow permanent updates check box.
To create a Subscription task1. In the workflow spreadsheet, in Edit view, select the row after which you want
the Flowchart Run task to appear.
2. Click the Add Task Row icon ( ).3. Select Subscription.
A new task row is added to the flowchart.4. Complete the Schedule Through, Target Start, Target End, Duration, and
Member Role fields as desired.You can also change the name of the task.
5. Click Save and Finish.
You must now configure the Subscription task.
At least one flowchart run task must depend on the subscription task. You mustadd the flowchart run task with this dependency.
To configure the Subscription task
Before completing these instructions, you must create the Subscription task.
When you configure the Subscription task, in addition to setting the target taskdates, you set the subscription Selection Level, the List of Territories, and theSubscription Level. These settings determine which field marketers receiveinvitations to subscribe to the Corporate Campaign.1. View the workflow spreadsheet, not in Edit mode.2. Double-click the Subscription task.
The Post Task dialog box opens.3. Enter the Target Start and Target End dates as needed.4. Select a Selection Level.5. Select one or more territories in the List of Territories field.6. Select a Subscription Level.7. Click Save and Finish.
Chapter 7. Workflows 43

Example of a Corporate Campaign workflow with systemtasks
A typical workflow for a Corporate Campaign might include two flowcharts: onethat initially selects a list of contacts, and another that fulfills the campaign afterField Marketers have reviewed and approved the initial list.
Task 1: Subscription
Task 1 is a Subscription system task. You configure a subscription task to inviterelevant field marketers to participate in the Corporate Campaign.
Task 2: Flowchart Run
Task 2 is a Flowchart Run system task. The Flowchart Name column identifies thename of the flowchart in the linked campaign (in Campaign) that should be run tocomplete this task. When task 2 runs, the flowchart Corporate Campaign Selectionruns in the linked campaign in Campaign to create a list that Field Marketersshould review. Task 2 starts and finishes automatically.
Task 3: Notify Field Marketers
Task 3 is a Notify Field Marketers system task. This task notifies Field Marketersthat the flowchart run has completed and a list is ready for their review. This taskstarts automatically when Task 2 completes. Task 3 also finishes automatically.
Task 4: List Review
Task 4 is a List Review system task. This task identifies time within the workflowduring which Field Marketers should be reviewing the list generated in Task 2.Task 4 starts automatically when Task 3 finishes and finishes automatically whenits target end date is reached; however, you can still manually finish the task whenall Field Marketers complete their reviews.
Task 5: Flowchart Run
Task 5 is a Flowchart Run system task. The Flowchart Name column identifies thename of the flowchart in the linked campaign (in Campaign) that should be run tocomplete this task. When task 5 runs, the flowchart Corporate CampaignFulfillment runs in the linked campaign in Campaign This fulfillment flowchartcreates the final list of contacts using the results of the Field Marketer review thatoccurred in Task 4. Task 5 starts and finishes automatically.
About User tasksUser tasks are workflow tasks that you define and that must be started manually.For example, you can add a user task to the workflow to accommodate the timenecessary to develop creative material for the campaign, followed by a user task toapprove the creatives.
Users must manually update the status and progress for user tasks.
44 IBM Unica Distributed Marketing: Corporate Marketer's Guide

About task statusEach task in a workflow has a status, which is shown in the spreadsheet view. Youcan also view and modify the status by clicking the task to open the Post Taskdialog box.
The task status can be:v Activev Pendingv Finishedv Skipped
Important: If you change the status of a task from Finished to Pending, you mustchange the percent complete value to 0%.
To edit the default workflow
Before you can edit a workflow, the Advanced List, On-demand Campaign, orCorporate Campaign must not be in the In Progress state. If it is, you must pauseit.
When you create a new Advanced List, Corporate Campaign, or On-demandCampaign, the system guides you through a wizard based on the template youselected. When you finish with the wizard forms, you might need to customize thedefault workflow provided by the project template. The ability to customizedefault workflows is controlled by your user permissions.
When you open the Workflow tab in edit mode, if any of the toolbar icons aredisabled or the values in the columns are read-only, it means that you do not havethe appropriate security permissions to edit the workflow.1. Open the Advanced List, Corporate Campaign, or On-demand Campaign that
has a workflow to set up and open the Workflow tab.This tab displays the workflow as designed in the template.
2. Click the Edit icon ( ).3. Edit the names listed in the first column to change the default task and stage
names to specific tasks and stages.Stages are the headings in bold that group the tasks together.
4. Add any stages or tasks as necessary.
v To add a stage, click the Add Stage Row icon ( ).
v To add a user task, click the Add Task Row icon ( ).5. Enter target dates.
v You can enter start dates, end dates, and duration for a task. Enter any two,the third value is calculated automatically. For example, if you enter a targetstart and a target end date, the system calculates the duration.
v You are not prevented from picking any dates that are not in agreement withthe per-task options for non-work-time. For example, even if a task is notscheduled to include weekends, you can still pick a Sunday as an end-datefor the task.
Chapter 7. Workflows 45

6. To specify that a task is a milestone of some sort, for example, a drop date,select the Milestone Type column and select a milestone that appears in thedrop-down list.Your administrator can set the milestones that appear in the list.
7. Select members or roles to assign the task to in the Members column.8. Enter any notes about the task in the Notes section.9. Perform one of the following actions.
v Click Save to save your changes and remain in edit mode. If you are makingextensive edits, it is a best practice to click Save occasionally to prevent anyloss of work.
v Click Save and Finish to save your changes and return to view mode.v Click Cancel to undo any changes and return to view mode.
To add roles to tasks
Normally, when you create a Advanced List, On-demand Campaign, or CorporateCampaign, the workflow automatically contains member and reviewer roles for alltasks if the template selected contains this information.
However, you can also assign roles to workflow tasks that are different from thetemplate settings.1. Navigate to the Workflow tab of your project.
2. Click Edit ( ).3. Select the Member Role cell for the task you want to assign.
4. Click the turndown icon ( ) to expand the list of available roles, and selectthe one to assign to this task. Repeat this step until you assign all the tasks.
5. Save your work.
To fill data into a range of cells
You can copy a value in one or more cells to a group of continuous cells above orbelow the selected cells. This feature can greatly reduce the data entry time foradding duplicate information. For example, assume that you have a workflow thatcontains 10 consecutive tasks all having the same target start, target end, targetduration, and target effort.
You can enter this data for the first task. Then, copy the values to all the othertasks by selecting these four columns for all 10 tasks and using Fill Down.1. Open the Advanced List, On-demand Campaign, or Corporate Campaign that
has the task values to duplicate, and click the Workflow tab.
2. Click the Edit icon ( ).3. Select the first cell.4. Point to the final cell, then Shift+click this cell.
The range of cells you selected is highlighted.
Note: You must select a continuous range of cells, rather than selectingmultiple, disconnected cells.
46 IBM Unica Distributed Marketing: Corporate Marketer's Guide
5. Click the Tools icon ( ) and select Fill Down or Fill Up.v Fill Down copies the values in the top-most cell (or cells) to all the other
selected cells, including the bottom-most.v Fill Up copies the values in the bottom-most cell (or cells) to all the other
selected cells, including the top-most.
All the selected cells now contain the same value.
Remember to save the workflow to keep your changes.
To print the Workflow tab
You can print all information found on your Advanced List, On-demandCampaign, or Corporate Campaign Workflow tab, or select certain columns ofinformation to print.
1. From the Workflow tab, click the Print icon ( ).A window appears with a list of columns from which you can choose to print.By default, all columns are selected.
2. Clear any columns you do not want to print.By default, the Shrink to Fit Landscape Page Width check box is selected.
3. Optionally, clear this check box to print the columns at a size of 100%.If you keep this option checked, all selected columns print on a single page. Ifyou use this feature, change your printing preference (for this print job) tolandscape.
4. Click Print Selected Columns.5. Click Print.6. Select your printer and printer options, then click Print to print the selected
workflow columns.Choose landscape mode for best results.
7. In the preview window, click Close to close the print preview.
To add an attachment to a task
To add attachments for a task, a project owner must enable adding attachments forthe task. The following users can add or remove task attachments.v Task owners can only add attachments to their tasks.v Task owners and users with the Delete Attachment security permission for
projects can delete task attachments.
Note the following.v You cannot use markup on task attachmentsv There is no versioning for task attachments: uploading a new version overwrites
the existing version of the attachment.v It is possible to have multiple task attachments with the same name for the same
task. This situation can occur if multiple owners of the task each upload a filewith the same name. You can differentiate the files by the user who created theattachment.
Chapter 7. Workflows 47

v You can add and remove attachments no matter the state of the task. That is,even if a task is marked complete or skipped, you can still add and removeattachments.
v The Attachments tab for projects is divided into two sections: one for filesattached to the tasks in the project, and one for files attached directly to theproject.
v If a task owner adds task attachments, and later the project owner sets theEnable Task Attachment flag to false, nobody would be able to add or removeattachments from the Post Task Update dialog. However, task attachments forthe project could still be removed from the project attachment tab.
1. Navigate to the task to which you would like to add an attachment.Click the task from a project workflow or from the Tasks list page. The PostTask Update dialog box opens.
2. Click the Attachments tab.The tab displays any attachments that exist for the task.
3. In the File to Attach field, select From My Computer, From the Asset Library,or URL.
4. Do one of the following:v Click Browse to attach a file that is on your computer. When the dialog box
appears, navigate to the file you want to attach and click Open.v Click Browse Library to attach a file in an asset library. Click the library that
contains the file you want to add. Use the tree in the left pane of the screento navigate to the folder and then the asset that you want to attach. ClickAccept Asset when viewing the asset in the right pane.
v Enter the URL in the field provided.5. Add any comments about the attachment.6. Click Add More to display an additional set of fields for each additional
attachment you want to add.7. After you add all your attachments, click Save and Return to close the dialog
box.
Any new attachments are added to the Attachments tab for the task.
About milestonesA milestone is a point in time within workflow at which all tasks until that timemust be complete in order for work to continue.
If tasks before the milestone are not complete, the milestone is not met, and thenext task cannot begin.
Why use milestones
By using milestones within a workflow, you can better enforce process for yourlists and campaigns, so that tasks take place in the intended order. In addition, thespecific milestones you select in a workflow aid in reporting.
Setting milestones in a workflow
You can set milestones for tasks within a workflow for an Advanced List,On-demand Campaign, and Corporate Campaign.
48 IBM Unica Distributed Marketing: Corporate Marketer's Guide

When you set a milestone, the next task in the workflow cannot begin until themilestone is reached.
Example
For example, the workflow for an On-demand Campaign may consist of thefollowing tasks:1. Run the flowchart to generate the list of targets.2. A user task to produce creatives for the campaign.3. A user task to approve creatives for the campaign.
At this task, a milestone called Creatives Approved is set.4. Run the flowchart to fulfill the campaign.
By using a milestone at task 3, you can ensure that all creatives for the On-demandCampaign are approved by the necessary people before campaign fulfillmentbegins.
How available milestones are defined
The specific milestones available for selection in a workflow are defined in adatabase table by your administrator. See the Distributed Marketing installationand administration documentation for more information.
To define a milestone for a task
Before you can define a milestone for a task:v Your administrator must define milestones in the Distributed Marketing
database.v The Milestone Type column must be present in the workflow layout. You can
ensure that it is present by basing the Advanced List, On-demand Campaign, orCorporate Campaign on a template that uses milestones, or by editing theworkflow layout.
You can set a milestone for a task in order to ensure that task is complete beforethe workflow proceeds.1. Open the Advanced List, On-demand Campaign, or Corporate Campaign, and
open the Workflow tab.
2. If necessary, change the layout of the spreadsheet view to show the MilestoneType column.
3. Click Edit to make the workflow spreadsheet editable.4. In the Milestone Type column, in the task row for which you want to set a
milestone, select a milestone from the drop-down list.5. Click Save or Save and Finish to save the milestone you set.
The milestone is now in effect for the Advanced List, On-demand Campaign, orCorporate Campaign.
About date dependency calculationsWhen you enter or change the date for a task, Distributed Marketing can calculateother dates based on your entry. It uses an internal algorithm to bidirectionallycalculate the dates of dependencies, starting with the cell where you entered thedate.
Chapter 7. Workflows 49

When you initiate date dependency calculations for a workflow, note the following.v In addition to factoring in non-work days and hours, date dependency
calculations use two additional system-wide properties: start time of day andnumber of hours per day. Your system administrator configures theseparameters.
v If a task row is anchored, the date dependency calculation does not update itsdates (even if the date columns are empty).
v Date dependency calculations do not affect active and finished tasks; only taskswith a status of Pending.
v Date dependency calculations observe the per-task options for non-work time.The calculation algorithm takes into account whether a task is scheduled toprogress during non-work time, weekends, or both.
v Do not log target times outside of business hours if you intend to do datedependency or other automatic calculations afterward. That information isoverwritten by the automated process.
To automatically calculate workflow dates
When you enter or change the date of a task, Distributed Marketing can calculateother dates based on your entry.1. Enter or change the date for a task in any of the date fields.2. Select the date and click anywhere on the screen except for another date field.
The Date Dependency Calculation icon ( ) appears next to the end date.3. Click the Date Dependency Calculation icon.
Alternatively, you can select one of the toolbar icons for recalculatingdependency dates.
The other dates in the workflow change based on the new entry.
To calculate date dependencies above a locked task
If a workflow has a locked task, and you change the date of a task that is locatedabove that task, you receive a warning when you calculate date dependencies.
To clarify this task, the procedure that follows assumes:v Task 1.8 is locked.v You need to change the duration of task 1.5 from 5 days to 10 days.v All tasks are dependent on the previous task.1. Open the workflow for editing, and change the duration on task 1.5 from 5
days to 10 days.
2. Click the Date Dependency Calculation icon ( ) next to the end date of task1.5.The system displays a warning message, saying you cannot recalculate throughthe locked row.
3. Click the start date of task 1.8
50 IBM Unica Distributed Marketing: Corporate Marketer's Guide

4. Click the Date Dependency Calculation icon ( ).
The system calculates the dates below the locked task.
About schedulesThere are two options for scheduling in workflows.v Baselinev Up-to-date
Baseline scheduling
You use baseline scheduling when you want to compare actual dates to fixedtarget dates. With baseline scheduling, you never change the target dates, allowingthem to serve as a baseline. Users who are assigned tasks receive reminders oncompleting the actual dates.
While working with a baseline schedule, the owner of the Advanced List,On-demand Campaign, or Corporate Campaign sets the initial Target Start andEnd dates for each task. These dates stay fixed throughout the entire workflow. Asthe List, On-demand Campaign, or Corporate Campaign progresses, the owner canupdate the actual dates with real data based on status information received fromteam members.
Up-to-date scheduling
You use up-to-date scheduling when you want to use actual dates to update theofficial schedule (defined by the Target Start and End dates) regularly. This modeenables project managers to capture the most up-to-date, official schedule;however, it does not provide an easy way of viewing a baseline version of theschedule.
To use a baseline schedule
Before creating your Lists, On-demand Campaigns, or Corporate Campaigns, havethe system administrator set up permissions and reminders as follows.v Set permissions so that only List, On-demand Campaign, or Corporate
Campaign owners can update Target dates.v Set reminders (alerts) based on the Actual dates.
While working with a baseline schedule, team members perform the followinghigh-level steps.1. The owner sets the Target Start and End dates for each task.
These dates stay fixed throughout the entire List, On-demand Campaign, orCorporate Campaign.
2. As the List, On-demand Campaign, or Corporate Campaign progresses, teammembers update the Actual dates with real data.
To keep an up-to-date schedule
Before creating your Lists, On-demand Campaigns, or Corporate Campaigns, haveyour system administrator set up permissions and reminders as follows.
Chapter 7. Workflows 51

v Set permissions so that only List, On-demand Campaign, or CorporateCampaign owners can update Target dates.
v Set reminders (Alerts) based on the Target dates.v Set reminders to be sent only to the owner or owners.v Optionally, set reminders on the Actual dates to be sent to team members.
While working with an up-to-date schedule, team members perform the followinghigh-level steps.1. The owner sets the initial Target Start and End dates for each task.2. As the List or On-demand Campaign progresses, team members update the
Actual dates with real data.3. If a task is delayed (the owner receives reminders based on Target dates), the
owner assesses the situation and adjusts the Target dates and durations asnecessary.
About designing for multiple drops, lots, waves, and offersWith Distributed Marketing, you can design Corporate Campaigns, On-demandCampaigns, and Lists that fulfill a number of business needs.
About multi-drop designMulti-drop Corporate Campaigns, On-demand Campaigns, or Lists are recurringcampaigns or Lists that run at specified intervals (each month, for example) over adefined time.
Multi-drop campaigns and Lists use a workflow or a workflow stage that isconfigured to repeat at specified intervals. Each drop, or stage, in the workflow ismade up of the tasks necessary to fulfill one complete drop, or stage, of thecampaign.
When to use a multi-drop design
Organizations use multi-drop campaigns or Lists to manage campaigns that spantime and require multiple contact points, usually at regular intervals. Examples ofmulti-drop campaigns are:v Newsletter campaign: You might create a multi-drop Corporate or On-demand
Campaign to manage distribution of newsletters at regular intervals on anongoing basis.
v Birthday campaign: You might create a multi-drop Corporate or On-demandCampaign to manage a campaign where some offer and greeting are sent tocontacts during the months of their birthdays.
Setting up multi-drop Corporate Campaigns, On-demandCampaigns, and Lists
Multi-drop Corporate Campaigns, On-demand Campaigns, and Lists use recurringtemplates. In the multi-drop template, you must:v Define the stage of your workflow that contains the tasks you want to recur
(only one stage can be recurring)v Define properties for recurrence using the Recurrence tab
Multi-drop design is applied when you create a Corporate Campaign, On-demandCampaign, or List using the recurring templates you have established.
52 IBM Unica Distributed Marketing: Corporate Marketer's Guide

About multi-lot designMulti-lot Corporate Campaign and On-Demand Campaigns are campaigns thatdistribute the effort of customer contact over time when dealing with a large list oftargeted customers.
When to use a multi-lot design
Organizations use multi-lot features to manage customer lists that are too large tohandle at once. A multi-lot design allows Field Marketers to accept a subset of alist for contact in one "lot." Field Marketers can then accept more contacts forcontact at subsequent lots, distributing the effort over time.
Setting up multi-lot Corporate Campaigns and On-demandCampaigns
To achieve a multi-lot design, your Corporate Campaigns or On-demandCampaigns must use flowcharts in Campaign that are designed specifically foreach lot. You can use a single flowchart for all lots, or a separate flowchart for eachlot. In either case:v The list generation task for the initial lot selects from your Campaign database
to create the first list for Field Marketer review.v The list generation task for the second lot targets those contacts that were left in
the Waiting state after the first list review, as well as any new contacts includedfrom the latest list generation.
About multi-wave designA multi-wave design for Corporate Campaigns and On-demand Campaigns allowsyou to distribute offers through several waves of contact. Multi-wave CorporateCampaigns and On-demand Campaigns are typically nonrecurring campaigns,with workflows made up of different stages, or waves. Multi-wave campaigns takeadvantage of Campaign response tracking. You can design a "second wave" ofoffers to be sent to contacts who did not respond to the initial offer.
When to use a multi-wave design
Use a multi-wave design when you want to manage campaigns that present aseries of offers to customers. For example, an organization may want to create amulti-wave Corporate Campaign to:1. Send an offer to a list of contacts.2. Send a second offer to contacts who did not respond to the initial offer.
For example, Field Marketers may use the same flowchart each month toidentify prospects who have birthdays in the current month. In this case, thefirst wave of the campaign must complete, so that you can identify thenonresponders. Once this wave is complete, the second wave of the campaigncan be used to distribute the second offers to the nonresponders.
Understanding multi-wave Corporate Campaigns and On-demandCampaigns
To achieve a multi-wave design, your Corporate Campaigns and On-demandCampaigns must use flowcharts in Campaign that are designed to accommodateeach wave of contact. You can use a single flowchart for all waves, or create aseparate flowchart for each individual wave. In either case:
Chapter 7. Workflows 53

v The list generation task for the initial wave selects from your Campaigndatabase and creates the first list for Field Marketer review.
v The list generation task for all subsequent waves should select from only thosecontacts generated by the previous wave as input. For example, if you want tosend an offer to contacts who did not respond to the first wave, the flowchartused for the second wave should filter out the responders and select thenonresponders from the first wave.
About multi-offer designA multi-offer design for Corporate Campaigns, On-demand Campaigns, and Listsallows you to create a campaign or List that sends different offers to differentcustomers.
Multi-offer Corporate Campaigns, On-demand Campaigns, or Lists can benonrecurring or recurring. These campaigns take advantage of the segmentingcapabilities in Campaign to target different contact segments with different offers.
When to use a multi-offer Corporate Campaign, On-demandCampaign, or List
Organizations use multi-offer design to manage campaigns and Lists that targetdifferent segments of the customer population. Examples of multi-offer designinclude:v Offers for responders and nonresponders: You might create a multi-offer
campaign to provide one offer to those who respond to a campaign, and anotherseparate offer to those who do not respond.
v Offers for different audiences: You might create a multi-offer campaign tomanage different offers for different audiences. For instance, a financialinstitution might send one offer to college students and another offer toindividuals who are head-of-household.
Flowchart design in Campaign for multi-offer campaigns andListsTo achieve multi-offer design, your Corporate Campaigns, On-demand Campaigns,and Lists must use Campaign flowcharts that divide contacts into Segments. Eachsegment represents a different customer list; each customer list is paired with adifferent offer in Campaign.
You can use Distributed Marketing to ensure that each customer list is reviewed bythe right Field Marketers.
Note: The flowchart must be configured to write the Segment Code for a segmentinto the List Manager table
The List Review task matches the segment code in the task with the code writteninto the List Manager table; it can then filter the list by segment code.
List Review task/segment association for multi-offer campaigns andLists
For multi-offer campaign and Lists, you create a workflow that consists of userand system tasks, just as you would for any other Corporate Campaign,On-demand Campaign, or List.
54 IBM Unica Distributed Marketing: Corporate Marketer's Guide

With multi-offer campaigns and Lists, however, you must ensure that all customerlists created by the flowchart are reviewed. You do so by associating each ListReview task in your workflow with each segment created by the flowchart in thecampaign in Campaign
The Segment Code field that appears allows you to identify the appropriatesegment for the review.
Note: The Segment Code you enter must match the segment name as it appears inCampaign.
To create a multi-offer Corporate Campaign1. Create a Corporate Campaign.2. Modify the workflow.
Enter the flowchart names that will be used for each Flowchart Run task. Foreach List Review system task:a. Click the task name.
The task properties window appears.b. Complete the task properties window as desired.
In the Segment Code field, enter the appropriate segment name as itappears in the flowchart in your linked campaign (in Campaign).
3. Create the linked campaign in Campaign.4. Create the flowcharts corresponding to one or more Flowchart Run tasks in the
workflow.Ensure the following:v The flowcharts create different segments.v The Segment Codes are written to the List Manager table.
5. Save and publish each flowchart.6. Start the Corporate Campaign in Distributed Marketing.
To create a multi-offer On-demand Campaign or List
In most cases, field marketers create multi-offer On-demand Campaigns and Listsby selecting a template in which a corporate marketer or administrator has alreadyset up the necessary segments, flowcharts, and workflows.
The instructions below describe the steps to take before the field marketer actuallycreates the On-demand Campaign or List, to be performed by others working withCampaign and Distributed Marketing templates.1. Create flowcharts and forms for your On-demand Campaign or List.
Ensure the following:v The flowcharts create different segments.v The Segment Codes are written to the List Manager table.
2. Create an On-demand Campaign or List template and add forms as a customtab.
3. Modify the workflow.For each List Review system task:a. Click the task name.
The task properties window appears.b. Complete the task properties window as desired.
Chapter 7. Workflows 55

In the Segment Code field, enter the appropriate segment name as itappears in the flowchart used to create your forms/tabs.
4. Create an On-demand Campaign or List using the template.5. Start the On-demand Campaign or List.
Updating and finishing tasksWhen you create a task, or open a new workflow with existing tasks, the status ofthe task or tasks is Pending. As project members work on tasks, they update thestatus to indicate the current progress.
To place a task into any status, ensure that the workflow is in edit mode, and clickthe Status column of the task, then choose the appropriate status from thedropdown list.
Table 2. Task Statuses
Status Description
Pending Indicates that a task is not yet in progress. When you create a task,it defaults to the pending state. The pending state is symbolizedby a blank status field.
ActiveIndicates that a task is in progress. Symbolized by the icon.You can also type A to place a task in the active state
SkippedIndicates that a task was skipped. Symbolized by the icon.Skipped tasks are tasks for which members no longer do work.Any dependencies of this task are also disregarded. You can alsotype S to place a task in the skipped state.
FinishedIndicates that a task is complete. Symbolized by the icon. Youcan also type F to place a task in the finished state.
Note the following behavior.v If you enter 100 in the % Complete column for a task, the status is updated to
Finished.v If you enter 0 in the % Complete column for a task (if it was previously
finished), the status is updated to Pending.v If you enter any number from 1 to 99 in the % Complete column for a task (if it
was previously finished), the status is updated to Active.v If you mark the status for a task as Skipped, all of the dates for the task are
cleared. Until you hit Save (or Save and Finish), you can retrieve the dates bycanceling the editing session. However, after you save the spreadsheet with thedates cleared you cannot retrieve them.
To complete multiple tasks
You are assigned tasks for one or more Advanced Lists, On-demand Campaigns, orCorporate Campaigns.1. Open the Tasks list page to view all of your assigned tasks.2. Select the check box for each task you want to complete.3. Click Complete Selected.4. In the Complete Selected Tasks dialog box, select one of the following:
56 IBM Unica Distributed Marketing: Corporate Marketer's Guide

v Leave all dates as they are. The tasks are marked as complete, but no enddates are modified.
v Set all actual end dates to now. Each selected task is marked complete, andits actual end date field is set to the current date and time.
5. Click Continue to complete the selected task or tasks, or Cancel to return tothe list page without making changes.
Any tasks you selected are removed from the Tasks list page, and their status ischanged to Complete. Additionally, their end dates are set, if you selected thatoption.
To skip multiple tasks
You can perform this task when you are assigned tasks for one or more AdvancedLists, Corporate Campaigns, or On-demand Campaigns.1. Open the Tasks list page to view all of your assigned tasks.2. Select the check box for each task to skip.3. Click Skip Selected.4. In the confirmation dialog box, click OK to skip the selected tasks, or Cancel to
return to the list page without making changes.
Any tasks you selected and skipped are removed from the Tasks list page, andtheir status is changed to Skipped.
About copying and pasting tasksWhen copying and pasting tasks, note the following.v For copying, you must select a continuous range of tasks, rather than selecting
multiple, disconnected tasks (by using Ctrl+click).v If you do not insert enough blank tasks to correspond to the ones you are
copying, existing tasks are overwritten.v To paste rows at the insertion point, you can click Paste from the Tools menu or
press Ctrl+V. To paste rows after the selected row, you must click Paste RowsAfter from the Tools menu.
v You can copy the status from one approval task and paste it in another approvaltask status column (but not in a standard task status column).
v If you copy the status from one approval and paste it in a new row of anapproval that is not saved, the Not started status is supplied regardless of whatyou copied.
To copy tasks in Internet Explorer
You can copy a continuous group of tasks to another place in the same workflowor into the workflow for another Advanced List, On-demand Campaign, orCorporate Campaign.1. Open the Advanced List, On-demand Campaign, or Corporate Campaign that
has the tasks to copy and click the Workflow tab.2. Click Edit.3. Select the first source task. If this task is the only task you are copying, skip to
step 5.4. Point to the final source task, then press Shift and click over this task. A range
of tasks you selected is highlighted.
Chapter 7. Workflows 57

5. From the workflow toolbar, select Copy from the Tools menu item to copy theselected task or tasks.If you are pasting the tasks into the same workflow, skip to step 7.
6. If you are copying the tasks to another project workflow, navigate to thedestination workflow tab, and open it for editing (click its Edit link).
7. Optionally, insert enough blank rows below the destination to act asplaceholders for the tasks you are copying.For example, if you are copying six tasks, make sure that there are six blankrows available. If you do not create the necessary rows, existing tasks below theinsertion point are overwritten.
8. Click the destination task.9. From the workflow toolbar, select Paste from the Tools menu item to paste the
task.
The source tasks are placed in the workflow, starting from the selected destinationtask.
Post task update dialog box
This dialog appears when you click a workflow task in view mode. Use this dialogas a quick alternative to editing the entire workflow, when you need to update asingle task only. From this dialog, you can update certain items, add taskattachments, and add comments to the revision history of the Advanced List,On-demand Campaign, or Corporate Campaign.
The Post Task Update dialog box contains two tabs, Status and Attachments.
Status
The Status tab contains the following fields.
Table 3. Fields on the Status tab
Field Description
Owner(s) The task owner or owners. At the task level, Advanced List,On-demand Campaign, or Corporate Campaign members are referredto as task owners.
That is, in the workflow spreadsheet, you use the Members column toadd people to a task; this column refers to Advanced List, On-demandCampaign, or Corporate Campaign members. When you open the taskin the Post Task Update screen, these members are listed as Owners(which refers to task owners).
Target Dates The target start and end dates and duration for the task. You can editeither or both of the date and time selectors to update the information.
Status The status of the task. Edit this field by selecting a value from the pulldown menu.
% Complete The current progress for the task. Enter a number 0-100 to change thevalue.
Actual Effort The effort for the task, measured in days. Enter a value to update thefield. This field can contain partial days, for example, 3D-2H-0M.
58 IBM Unica Distributed Marketing: Corporate Marketer's Guide

Table 3. Fields on the Status tab (continued)
Field Description
Actual date andtime fields
The Actual begin and end dates and times for the task. You can editeither or both of the date and time selectors to update the information.Note: Begin and end dates are mandatory; you receive a warning ifyou attempt to save without entering values for both fields.Additionally, the system checks to ensure that the end date is notearlier than the begin date.
Comments Displays comments for the task. You can enter text to update the field.
These notes go in to the revision history of the project and anynotifications that may be sent about the task.
Enable TaskAttachments
A flag to determine whether the task can contain attachments. Thisfield is visible to Advanced List, On-demand Campaign, or CorporateCampaign owners only. Check the box to allow the task to containattachments.
Note: Make sure that you close the dialog box by clicking either Save and Returnor Cancel; if you do not use one of the buttons to close the dialog box, the task canremain locked, and no one else can edit it.
Note: To change the state of a finished task back to active, you must set both theStatus to Pending, and the % Complete field to an integer less than 100. If you donot change both fields, after you close the dialog box, the task is still marked ascompleted.
Attachments
The Attachments tab contains the following fields.
Table 4. Fields on the Attachments tab
Item Description
Currentattachmentssection
The top portion of the page describes the current attachments of thetask. It contains the following columns of information for eachattachment:
v File: Contains a link to the attachment file and describes the file typeand size.
v Description: Contains revision history and description for theattachment.
v Actions: Contains links for deleting the attachment or for sendingthe attachment by email.
File to Attach Contains a dropdown menu that allows you to specify the source ofthe file to attach.
Browse Click to browse your computer or the asset libraries for the file toattach.
Comments Use this text box to add any comments for the attachment.
Attach SelectedFile
Click to attach the selected file or URL.
Chapter 7. Workflows 59

Managing task dependenciesIBM Unica Distributed Marketing has several options for managing dependencieson tasks as new rows are added to the spreadsheet and existing rows are removed.v Normal: no dependencies are automatically created. If you need dependencies
for the new tasks and stages, create them manually.v Sequential: insert the new task in an existing chain of tasks.v Parallel: insert a new task branch parallel to an existing chain of tasks.
Inserting tasks in sequence
Insertion in sequence makes the new task dependent on the task before it, andthen makes all items that were dependent on that task dependent on the new task.
You insert a task in sequence when it can start only after the previous task iscomplete. For example, in this figure, if task X cannot be worked on until task B iscomplete, you insert task X in sequence.
A B C
A B C
becomes
becomes
A B
A B
C
C
Insert a step after "B" in Sequence
DD
X
X
Inserting tasks in parallel
Insertion in parallel makes the task dependent on the items (tasks or stages) thatthe task before it was dependent on, and makes the items dependent on theprevious task dependent on the new task as well.
You insert a task in parallel when it can be worked on at the same time as anothertask. For example, in this figure, if task X can be worked on simultaneously withtask B, you insert task X in parallel.
A B C
A B C
becomes
becomes
A B
A B
C
C
Insert a step after "B" in Parallel
DD X
X
60 IBM Unica Distributed Marketing: Corporate Marketer's Guide

Deleting tasks
Deleting a task removes the selected task from the chain, but relinks the tworemaining segments of the chain together so that it is one continuous chain again.
A B X D
E
A B X D
becomes
becomes
A B
A B
D
D
Remove step "C"preserving chains
E
When a task is deleted its dependents are made dependent on its dependenciesbefore the deletion takes place. This practice preserves all sequential chains ofdependencies.
Default and "last used" modes
To make adding a task as simple and consistent as possible, IBM Unica DistributedMarketing provides the following behavior.v The default mode is "in series"; when you begin an editing session, this mode is
used as the insertion mode.v The "last used mode" is remembered for each editing session. After you select a
mode from the menu, this mode is used each time you add a task during theremainder of your session.
For example, to add several tasks in parallel, you need to select in parallel modeonly once. Then, every time you insert another task, the system inserts it in parallelunless you explicitly select another mode.
About adding a stage or taskTo add a task or stage to a workflow, your security role must grant you thepermission named Add/Edit/Delete Steps, Dependencies, and Targets for thetemplate you select. If the Add icon is missing from the toolbar, contact youradministrator about obtaining the appropriate access rights.
Note the following about stage and task rows.v When adding a stage or task, if you place the number of the task in front of the
task name, the task is inserted in the place that the number indicates.For example, if you enter 2.3 Have team meeting anywhere in the task list, thetask is placed under the task labeled 2.2 and the numbers of subsequent tasksshift, so that the step previously labeled 2.3 is now 2.4.
v You can add a stage or task anywhere in the list and then use the up and downicons on the toolbar to move the stage or task to the appropriate place in the list.
v There are several options for managing dependencies on tasks as new rows areadded and existing rows are removed.
v After you create an approval from a workflow task, you can edit only theapproval itself; you cannot edit the corresponding task in the workflow.
Chapter 7. Workflows 61

If you try to edit the approval from its workflow task, you receive an errorstating the task row is locked. You must navigate to the approval to update anyof its fields.
About editing a stage or taskIf you change the number for a task or stage, the task is inserted before the rowmatching the new number.
For example, assume the stage order as shown here.1. Planning2. Collateral Design3. Lead Generation4. Show Setup-to-Breakdown5. Marketing Review
If you edit task 5, Marketing Review, changing its number to 3, the new order is asfollows.1. Planning2. Collateral Design3. Marketing Review4. Lead Generation5. Show Setup-to-Breakdown
Now suppose that you edit task 2, Collateral Design, changing its number to 4.The new order is the following.1. Planning2. Marketing Review3. Collateral Design4. Lead Generation5. Show Setup-to-Breakdown
To move a task or stage to the end, give it any number higher than the final taskor stage. For example, to move stage 2, Marketing Review to the end, change itsnumber to 6 or higher.
To add a stage or task
Before adding a stage or task, open a workflow in edit mode.1. In the workflow, select the stage or task above the place to insert the new stage
or task.2. Add a stage, or standard task.
v To add a stage, click the Add Stage Row icon ( ).
v To add a user task, click the Add Task Row icon ( ).3. Optionally, to make a task dependent on another task, enter the number of the
task it is dependent on after the task in parentheses ( ).For example, suppose that task is named Generate List. To make this taskdependent upon task 1.3, name the task 2.5 Generate List (1.3).
62 IBM Unica Distributed Marketing: Corporate Marketer's Guide

4. When you finish editing the workflow, save your changes.
The stage or task is added to the workflow, after the insertion point.
If the date of one task changes, it changes the dates of all the dependent tasks.
If a task has more than one dependency, separate the task numbers with commas.For example, use 2.2 Setup Milestone Schedule (1.1, 2.1).
To add a stage or task below a locked task
Before adding a stage or task, open a workflow in edit mode.
If you select a locked task, the insert task or stage links do not work. To add a taskdirectly below a locked task, you must perform the following steps.1. Navigate to the workflow page to change and click Edit.2. Select any task row that is not locked.3. Add a stage, or standard task.
v To add a stage, click the Add Stage Row icon ( ).
v To add a user task, click the Add Task Row icon ( ).4. Change the number of the task or stage so that it directly follows the locked
task it should follow.For example, suppose that the locked task is 2.5 Review copy - informal(2.3). You would set the number of the new task to 2.6. After you finishnaming the task, the system moves it so it is after task 2.5.
About the workflow spreadsheet viewWhen you display the workflow as a spreadsheet (the default), information aboutthe stages and tasks in your workflow appear in a list in a spreadsheet. You usethis view to update task status, add reviewers, and change dates, among othertasks.
About the workflow process flowchart viewThe process flowchart view shows displays the tasks in a network diagram style,as follows.v Each task is displayed as a box with a task number and ID.v Tasks that have dependencies are connected to any tasks they depend on.v Sequential tasks are displayed on the same line.v Parallel tasks are displayed on different lines.v Independent/orphan tasks are displayed on their own line, with no connections.
About the workflow timeline viewThe timeline view of the workflow tab presents a view of the List, On-demandCampaign, or Corporate Campaign over a period of weeks or months. To view theproject schedule in a timeline view, click the View as Timeline icon.
You can customize the timeline view by using the Layout link from the workflowtab. Use this dialog box for the following purposes.
Chapter 7. Workflows 63

v Select the captions, if any, to appear next to each bar in timeline.v Choose a weekly or monthly view of the timeline.v Select the types of dates to view.
Note: If you click the Edit link from the timeline view, the spreadsheet opens forediting.
Workflow tab layout page
Use this page to set the appearance for both the spreadsheet and timeline views ofa workflow tab.
Note: To hide the Spreadsheet Layout or Timeline Layout section, click the iconnext to the title. To view a hidden section, click the icon.
Spreadsheet layout section
Table 5. Fields in the Spreadsheet layout section
Field Description
Columns Check a column to display, or clear to hide.
Preset Columngroups
Click to select a preset group of columns to display.
v All: default setting; all boxes checked (all columns display).
v Targets: hides Status, % Complete, and Actual date columns.
v Actuals: hides Target Dates/Effort and Member/Reviewer rolescolumns.
v All dates: displays all columns related to target and actual dates.
v Responsibility: displays columns related to who is assigned tocomplete the tasks.
First ColumnWidth
Select either:
v Remember Last Setting: When viewing the workflow spreadsheet,you can adjust the first column width to see more or less of the tasknames.
v Exactly: Select to enter a number that sets the column to an exactwidth in pixels.
Timeline layout section
Table 6. Fields in the Timeline layout section
Field Description
Time Scale The increment of time used for measurement. Select either Weeks orMonths. The default setting is Weeks.
Bars Represent The bars in the timeline view indicate durations. You can choose todisplay Actual/Forecast dates, Target dates, or both. The default is todisplay both.
Bar Captions By default, the bars do not have captions. Select one of the choicesfrom the dropdown menu to display certain information as barcaptions. For example, you can have the task name or milestone typedisplay as a caption.
First ColumnWidth
See the description for the Spreadsheet Layout section.
64 IBM Unica Distributed Marketing: Corporate Marketer's Guide
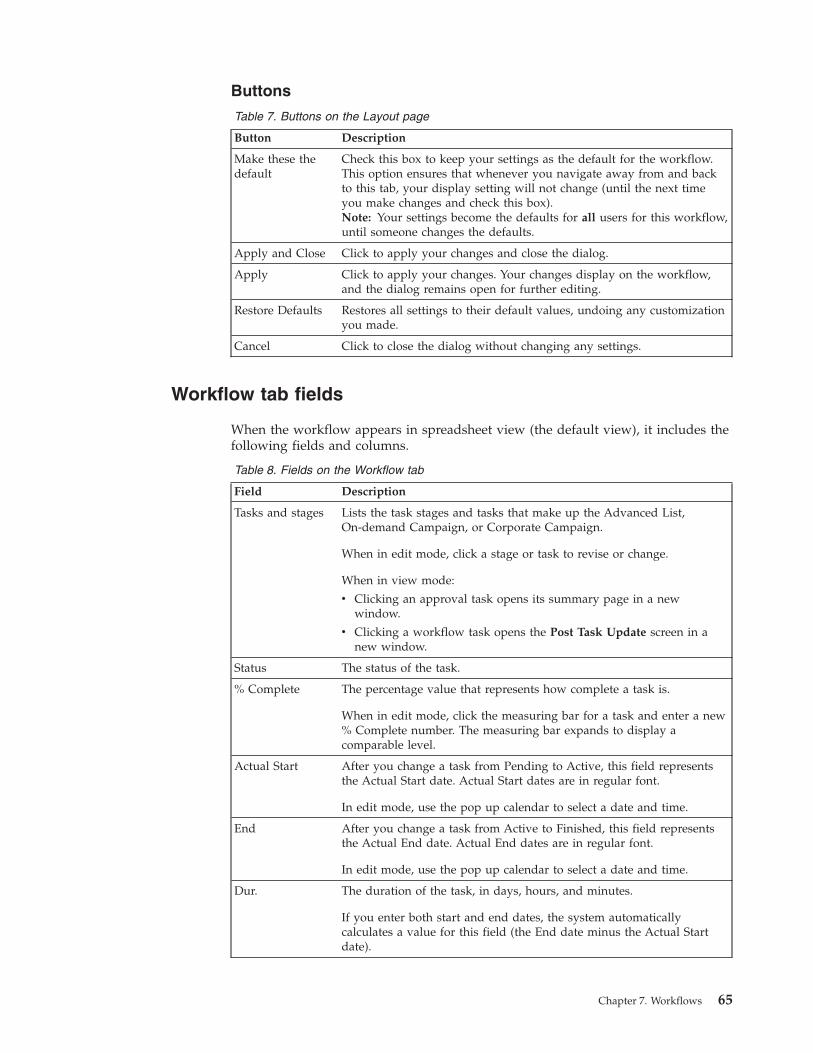
Buttons
Table 7. Buttons on the Layout page
Button Description
Make these thedefault
Check this box to keep your settings as the default for the workflow.This option ensures that whenever you navigate away from and backto this tab, your display setting will not change (until the next timeyou make changes and check this box).Note: Your settings become the defaults for all users for this workflow,until someone changes the defaults.
Apply and Close Click to apply your changes and close the dialog.
Apply Click to apply your changes. Your changes display on the workflow,and the dialog remains open for further editing.
Restore Defaults Restores all settings to their default values, undoing any customizationyou made.
Cancel Click to close the dialog without changing any settings.
Workflow tab fields
When the workflow appears in spreadsheet view (the default view), it includes thefollowing fields and columns.
Table 8. Fields on the Workflow tab
Field Description
Tasks and stages Lists the task stages and tasks that make up the Advanced List,On-demand Campaign, or Corporate Campaign.
When in edit mode, click a stage or task to revise or change.
When in view mode:
v Clicking an approval task opens its summary page in a newwindow.
v Clicking a workflow task opens the Post Task Update screen in anew window.
Status The status of the task.
% Complete The percentage value that represents how complete a task is.
When in edit mode, click the measuring bar for a task and enter a new% Complete number. The measuring bar expands to display acomparable level.
Actual Start After you change a task from Pending to Active, this field representsthe Actual Start date. Actual Start dates are in regular font.
In edit mode, use the pop up calendar to select a date and time.
End After you change a task from Active to Finished, this field representsthe Actual End date. Actual End dates are in regular font.
In edit mode, use the pop up calendar to select a date and time.
Dur. The duration of the task, in days, hours, and minutes.
If you enter both start and end dates, the system automaticallycalculates a value for this field (the End date minus the Actual Startdate).
Chapter 7. Workflows 65

Table 8. Fields on the Workflow tab (continued)
Field Description
Actual Effort The actual effort it took to complete the task, as opposed to calendarduration. Effort is measured in days, hours, and minutes.
Anchored Dates Indicates whether the task is anchored. If a lock appears in this field,the dates for the task are anchored.
To specify anchored dates for a task, click the column, then selectAnchored from the menu. The task date cannot move even if the datesof the tasks it is dependent on change.
If a dependency is not met, the dates in conflict appear with a differenticon and in a different font.
For example, suppose task 2.2 is dependent on task 2.1. If the targetend date of task 2.1 is after the target start date of task 2.2, both thetarget end date of 2.1 and the target start date of 2.2 appear in red, ifyou anchored the date for task 2.2 by selecting the lock icon in theAnchored Dates column.
Schedule Through Indicators for which dates to use when determining task dates. Thefollowing options are available.
v Business: indicates that this task includes only standard,non-holiday, non-weekend dates. This schedule is the default for alltasks.
v Weekends: indicates that this task includes weekends. The systemincludes weekends when it calculates dates for this task.
v Off.: indicates that this task includes system-wide non-work timethat is defined. The system takes into account these times when itcalculates dates for this task.
v All: indicates that this task includes all dates. No dates are ignoredwhen dates are calculated for this task.
Target Start The targeted start date of the task. In edit mode, use the pop upcalendar to select a date.
Target End The targeted end date of the task. In edit mode, use the pop upcalendar to select a date.
Target Dur. The duration of the task, in days, hours, and minutes. The Target Endminus the Target Start dates.
Target Effort The targeted effort estimated to complete the task, as opposed tocalendar duration.
Milestone Type A task milestone that you choose from a dropdown list. Exampleoptions might be Meeting, Event, and Job Start. System administratorsset the milestone types that appear on the list.
For more information about setting up milestones, see the DistributedMarketing Administrator's Guide.
Member Role(s) A role or roles associated with the task. These roles can be loadedautomatically from the project template used to create the project, orthe project owner can set them up manually.
When an approval task has a status of In Progress, On hold, orCompleted, this field is read-only.
66 IBM Unica Distributed Marketing: Corporate Marketer's Guide

Table 8. Fields on the Workflow tab (continued)
Field Description
Members The people associated with the task.
If a workflow task has a role in its Member Role(s) column, when youassign people to roles, the workflow automatically adds a person in thecorresponding Members column.
You can also add people to the Members column manually whileediting the workflow.
When you edit the workflow for an approval task, teams are not listedin this field because a team cannot be the owner of the approval task.
Typically, standard tasks have members.
Workflow toolbar
When the Workflow tab is in edit view, a toolbar appears. You use the toolbaricons to change the workflow. For example, you can insert and delete tasks, add astage, or clear all entries.
The following table explains each button.
Table 9. Icons on the Workflow toolbar
Icon Description
Add Task Row. Adds a new standard task in the spreadsheet.
Click a dependency option
v No dependencies
v In series
v In parallel
This option determines how IBM Unica Distributed Marketing behaveswhen adding new tasks.
Add Stage Row. Adds a new stage in the spreadsheet. Tasks aregrouped in stages.
The Tools menu contains the following choices.
v Copy: copies the contents of the selected cells to the clipboard.
v Paste: pastes the contents of the clipboard, beginning at the selectedcell.
v Paste Rows After: pastes the contents of the clipboard below theselected row.
v Mark as: marks the selected task appropriately. For example,selecting Mark as Finished changes the status of the selected task toFinished. You can mark the task Skipped, Finished, Active, orPending.
v Fill Down/Up: copies cell values to a range of cells.
v Clear: erases all entries in the selected cell or group of cells.
v Clear Column: erases all entries in the selected column.
v Clear All: erases all entries in the workflow.
Chapter 7. Workflows 67

Table 9. Icons on the Workflow toolbar (continued)
Icon Description
Click to recalculate dependent dates while preserving slack time.Recalculates all date dependencies based on your changes; leaves anyexisting slack time between dependent tasks.
Click to recalculate dependent dates while removing slack time.Recalculates all date dependencies based on your changes; removesany slack time between dependent tasks.
Click to undo your last change.
Click to reapply a change you undid with the Undo action.
Move row up. Click to move the selected task or stage upward. If youmove a stage, the associated tasks move with it.
Move row down. Click to move the selected task or stage downward.If you move a stage, the associated tasks move with it.
Delete row. Click to delete the selected task or stage. Note thefollowing.
v If you delete a stage, all of its associated tasks move up one stage.
v If you delete the first stage, the first task associated with it becomesthe stage for the rest of the tasks.
Workflow links
The Workflow tab displays the following links.
Table 10. Links on the Workflow tab
Link Description
Breadcrumbs Click any active link in the breadcrumb trail to go to that page.
Breadcrumbs (links to the pages you visited before arriving at thecurrent page) are located above the List, On-demand Campaign, orCorporate Campaign name.
Edit
Click the icon to add, remove, or change workflow stagesand tasks.
View as spreadsheetClick the icon to view the workflow as a spreadsheet.
This view provides access to granular information about a task,presented in table format. For example, you can easily look up thestatus, duration, forecasted end date, and team members for a taskusing the column headers. The View as spreadsheet view is thedefault view.
View as timeline Click the icon to view the workflow as a timeline.
This view provides a graphic view of information such as taskduration and status. From the Project Timeline dropdown list,select various options such as Dates/Progress to show thisinformation about the timeline.
68 IBM Unica Distributed Marketing: Corporate Marketer's Guide

Table 10. Links on the Workflow tab (continued)
Link Description
Layout
Click the icon to open a dialog for adding and removingcolumns from the spreadsheet view.
Save as template Click to save the workflow definition directly into the templatelibrary (if you have the permission to do so).
A dialog opens for you to name the template. For more details, seethe Distributed Marketing Administrator’s Guide.
Tasks and stages In the spreadsheet view, tasks are links that behave as follows:
v Clicking an approval task pops up the summary page for theapproval in a new window.
v Clicking a workflow task pops up the Post Task Update dialogin a new window.
To change the layout of the workflow
You can change the layout of the spreadsheet and timeline views of the workflowto display the information that you need.1. In the Workflow tab, click Layout.
The Instance Workflow Tab Layout dialog box opens.2. In the Spreadsheet Layout section, select the check boxes of all columns you
want to show in the workflow.You can also use the links after Columns to display: to select subsets ofavailable columns.
3. Set the first column width for the spreadsheet view.4. In the Timeline Layout section, select values from the Time Scale, Bars
Represent, and Bar Captions drop-down lists.5. Set the first column width for the timeline view.6. To have these settings apply only to the currently opened workflow, as
opposed to all workflows you view, check Use these settings for currentworkflow only.
7. Click Apply or Apply and Close to save your selections.
The view of the workflow is updated to reflect your selections.
To set first column width on workflow spreadsheet
You can change the width of the first column in the workflow spreadsheet view,and keep this setting for your entire session. That is, your changes remain afteryou navigate to other pages and then return to this tab.1. Navigate to the Workflow tab of the Advanced List, On-demand Campaign, or
Corporate Campaign.2. Use the column width control to resize the first column to your preferred
width.3. Click the Layout link in the upper right section of the screen.4. In the Instance Workflow Tab Layout dialog, do the following:
Chapter 7. Workflows 69

a. In the First Column Width section, select the Remember Last Setting radiobutton.
b. At the bottom of the dialog, check the Make these the default settings forthis project's workflow tab box.
5. Click Apply and Close to save your changes and close the dialog.
The first column width is now set for this Advanced List, On-demand Campaign,or Corporate Campaign for the remainder of your session. No matter which pagesyou navigate to, when you navigate back to this workflow tab, the first columnwidth remains as you set it.
70 IBM Unica Distributed Marketing: Corporate Marketer's Guide

Chapter 8. About flowcharts for Corporate Campaigns
For a Corporate Campaign, two flowcharts are typically executed by corporatemarketing through Campaign:v A List selection flowchart selects target customers from your customer database.
Field marketers then accept or decline the target customers who are associatedwith them.
v A second flowchart runs the campaign. It selects those customers approved byfield marketers, associates them with offers, and fulfills the campaign.
About flowcharts for On-demand CampaignsFor On-demand Campaigns, field marketers typically specify selection criteriamade available by the administrator in the On-demand Campaign template. Thatselection criteria is sent to the associated List selection flowchart in Campaign andused to select customers from the customer database.
A second flowchart runs the On-demand Campaign based on criteria youconfigure. For example, the On-demand Campaign can have an attribute toindicate whether it should be fulfilled locally or by the corporate office. If it's to befulfilled locally, the flowchart generates a file that is attached to the On-demandCampaign, and the field marketer can use this file to fulfill the campaign. If it's tobe fulfilled by the corporate office, then the results are written to a table that thecorporate marketer can use for fulfillment.
While the flowcharts run in Campaign, field marketers can complete all their workthrough Distributed Marketing. The Flowchart Run tasks in the workflow executethe Campaign flowcharts in the background.
Typically, corporate marketers design and create the flowcharts in Campaign, aswell as templates and forms in Distributed Marketing; field marketers work onlywithin Distributed Marketing.
About flowcharts for ListsFor Lists, field marketers typically specify selection criteria made available by theadministrator in the List template. That selection criteria is sent to the associatedlist selection flowchart in Campaign and used to select customers from thecustomer database.
While the flowchart runs in Campaign, field marketers can complete all their workthrough Distributed Marketing. The Flowchart Run task in the workflow executesthe Campaign flowchart in the background.
Typically, corporate marketers design and create the List selection flowcharts inCampaign; field marketers work only within Distributed Marketing
About list selection flowchartsA list selection flowchart in Campaign uses certain criteria to select customers fromthe customer database. This criteria is specified in a Select process.
© Copyright IBM Corp. 2001, 2012 71

The flowchart must also contain a Snapshot or Extract process to write the selectedlist to the Distributed Marketing database.
About List selection flowcharts for Corporate CampaignsFor Corporate Campaigns, the corporate marketer creates and generates the Listthrough Campaign. The contact list is then made available to subscribed fieldmarketers using Distributed Marketing for validation.
Steps for generating the Corporate Campaign List
The following steps outline the tasks for generating the Corporate Campaign List:1. The corporate marketer creates the Corporate Campaign and the linked
campaign, by accessing the Corporate Campaigns page through the CorporateCampaign command in the Local Marketing menu.
2. The corporate marketer configures the linked campaign, by accessing thecampaign through the Campaigns command in the Campaign menu.
3. The corporate marketer builds the List selection flowchart, by accessing thecampaign through the Campaigns command in the Campaign menu.
4. A Corporate Campaign workflow task runs the List selection flowchart.5. In Campaign, the flowchart runs, resulting in the List being written to the
Distributed Marketing database.6. The corporate marketer accepts the contact list.
How Corporate Campaign selections are storedYou should design the list selection flowchart associated with a CorporateCampaign so that when it runs in Campaign, the selected customers are stored inthe Distributed Marketing system database, in the uacc_corporate_lists table.
Generating and storing the list through the flowchart
Note: Before the flowchart can store the list selections in the uacc_corporate_liststable, the table must be mapped in Campaign.
List selections are made through a Select process in the flowchart. You define theSQL statements to select desired customers for the Corporate Campaign. Forexample, the Select process might select all customers with a savings accountwithin a specific range.
You can use one or more Select processes to select the target customers for theCorporate Campaign list.
Following the Select processes, you add a Snapshot or Extract process. Whenconfiguring the Snapshot or Extract process, ensure that you:v Export the selections to the uacc_corporate_lists table.v Select the Append to Existing Data radio button.
Note: The uacc_corporate_lists table contains the history of all the generatedlists. If you select either Replace All Records or Update Records, the contents ofthe table are overwritten or updated and all the lists are deleted or updated.
Mapping database fields to the uacc_corporate_lists table
In the list selection flowchart, you must map fields in your customer database tothe following fields in the uacc_corporate_lists table:
72 IBM Unica Distributed Marketing: Corporate Marketer's Guide

Field Field Type Saved Value
ListId CampaignGenerated Field
CampaignCode. Generated field CampaignCode shouldbe mapped against ListId field.
AudienceLevel Derived Field The audience level(s) configured in the List Managermodule must be hard-coded with the valuesconfigured in the listmanager_tables.xml file (forexample, "P" for People Table or "P/C" for PeopleTable/Contract Table).
UserBranch N/A Not required.
UserID <Customer_User> The user name of the field marketer or corporatemarketer running the flowchart.Note: Internally, all flowcharts are run by the sameCampaign user. The flowchart uses the UserNamevariable to store in the UserID field the user nameof the field marketer or corporate marketer who ranthis flowchart.
GenerationDate <Generate_Date> Date on which the records are generated. This canbe a specific date, a formula, or a date indicated inthe campaign.
Status Derived Field All records are initially set to T, for To Accept,which corresponds to Waiting in the user interface.
List records can have one of four status values,depending on the actions of field marketers duringvalidation:
v T: To Accept
v V: Accepted
v A: Added
v D: Deleted
Audience LevelID
<CustomerID> or<AccountID>
The unique ID for the target of the campaign,typically a Customer ID Or Account ID.
You may need to map additional fields for filtering purposes. For example, if theregion_id column was added for Data Level Filtering, you need to map it as well.
About list selection flowcharts for On-demand Campaigns andLists
For On-demand Campaigns and Lists, the corporate marketer typically creates theflowchart in Campaign, then field marketers run the flowchart and generate thelists.
Steps for generating the On-demand Campaign or List customerlist
The following steps outline the tasks for generating the customer list for anOn-demand Campaign or List:1. In Campaign, create and publish the list selection flowchart.2. In Distributed Marketing, create and publish forms, then add them to a
template with custom tabs for displaying the flowchart forms.3. In Distributed Marketing, create the On-demand Campaign or List using the
appropriate template.4. In Distributed Marketing, select the list composition criteria.
Chapter 8. About flowcharts for Corporate Campaigns 73
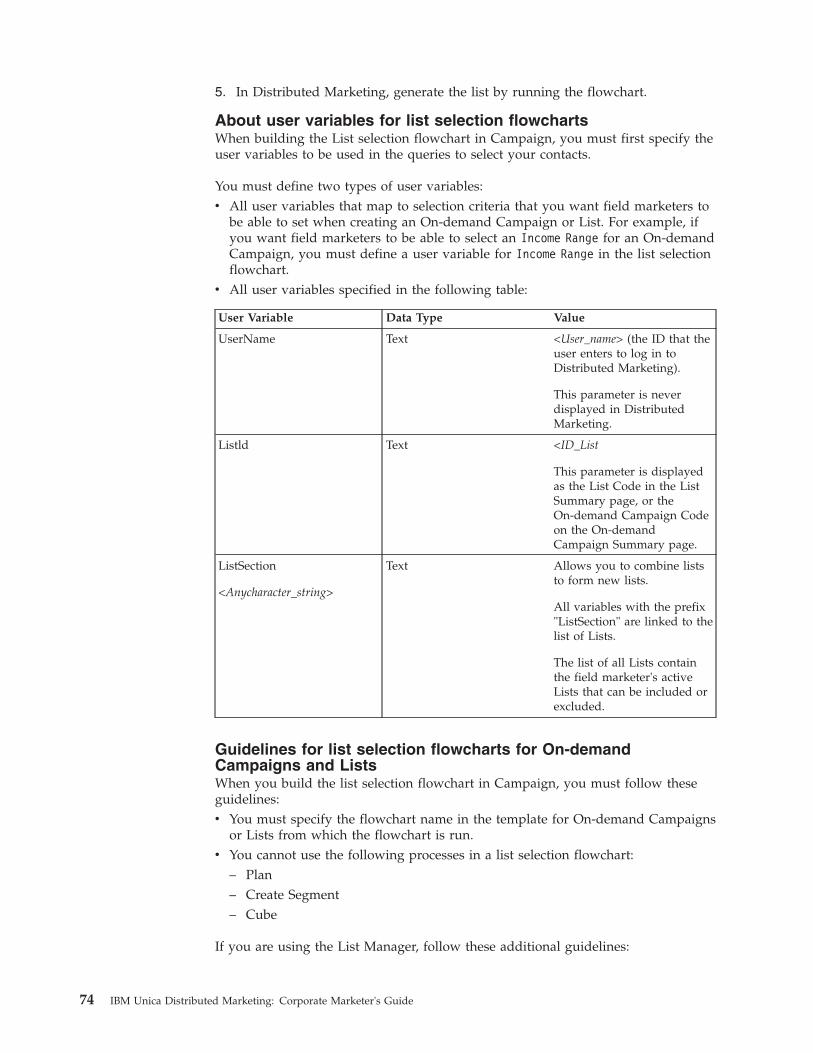
5. In Distributed Marketing, generate the list by running the flowchart.
About user variables for list selection flowchartsWhen building the List selection flowchart in Campaign, you must first specify theuser variables to be used in the queries to select your contacts.
You must define two types of user variables:v All user variables that map to selection criteria that you want field marketers to
be able to set when creating an On-demand Campaign or List. For example, ifyou want field marketers to be able to select an Income Range for an On-demandCampaign, you must define a user variable for Income Range in the list selectionflowchart.
v All user variables specified in the following table:
User Variable Data Type Value
UserName Text <User_name> (the ID that theuser enters to log in toDistributed Marketing).
This parameter is neverdisplayed in DistributedMarketing.
Listld Text <ID_List
This parameter is displayedas the List Code in the ListSummary page, or theOn-demand Campaign Codeon the On-demandCampaign Summary page.
ListSection
<Anycharacter_string>
Text Allows you to combine liststo form new lists.
All variables with the prefix"ListSection" are linked to thelist of Lists.
The list of all Lists containthe field marketer's activeLists that can be included orexcluded.
Guidelines for list selection flowcharts for On-demandCampaigns and ListsWhen you build the list selection flowchart in Campaign, you must follow theseguidelines:v You must specify the flowchart name in the template for On-demand Campaigns
or Lists from which the flowchart is run.v You cannot use the following processes in a list selection flowchart:
– Plan– Create Segment– Cube
If you are using the List Manager, follow these additional guidelines:
74 IBM Unica Distributed Marketing: Corporate Marketer's Guide

v For On-demand Campaigns, the flowchart must end with a Snapshot or Extractprocess that writes the selections to the uacc_ondemand_lists table in theDistributed Marketing system database.
v For Lists, the flowchart must end with a Snapshot or Extract process that writesthe selections to the uacc_lists table in the Distributed Marketing systemdatabase.
How On-demand Campaign or List selections are storedWhen the list selection flowchart associated with an On-demand Campaign or Listruns in Campaign, the selected customers are stored in the Distributed Marketingsystem database:v On-demand Campaign selections are stored in the uacc_ondemand_lists table.v List selections are stored in the uacc_lists table.
Generating and storing the list through the flowchart
Note: Before the flowchart can store the list selections in the uacc_ondemand_listsor uacc_lists table, the table must be mapped in Campaign.
List selections are made through one or more Select processes in the flowchart. Youdefine the SQL statements to select desired customers for the On-demandCampaign or List. For example, the Select process might select all customers with asavings account within a specific range.
You also use user variables to specify parameters in Distributed Marketing that areused as selection criteria in the flowchart in Campaign.
If you are using the List Manager following the Select processes, you add aSnapshot or Extract process. When configuring the Snapshot or Extract process,ensure that you:v Export the selections to the uacc_ondemand_lists or uacc_lists table.v Select the the Add to Existing Data radio button.
Note: The uacc_ondemand_lists and uacc_lists tables contain the histories ofall the generated lists. In the flowchart in Campaign, if you select either ReplaceAll Records or Update Records, the contents of the tables are overwritten orupdated and all the lists are deleted or updated. The life cycle of data in thesetables is meant to be managed through Distributed Marketing. For example,when you delete a List, the data for that List is cleared. In addition, when theList is rerun, entries from previous runs of that list are cleared from the table.
Mapping database fields to the uacc_ondemand_lists or uacc_liststable
In the list selection flowchart, you must map fields in your customer database tothe following fields in the uacc_ondemand_lists or uacc_lists table:
Field Field Type Saved Value
ListId User Variable UserVar.ListId
AudienceLevel Derived Field The audience level(s) configured in the List Managermodule must be hard-coded with the valuesconfigured in the listmanager_tables.xml file (forexample, "P" for People Table or "P/C" for PeopleTable/Contract Table).
Chapter 8. About flowcharts for Corporate Campaigns 75

Field Field Type Saved Value
UserBranch N/A N/A
UserID User Variable UserVar.UserName
User to which the selected customer is associated.The value must correspond to the ID that the useruses to log in.
GenerationDate <Generate_Date> Date on which the records are generated. This canbe a specific date, a formula, or a date indicated inthe campaign.
Status Derived Field "V" is hard-coded.
All records are set to "Accepted" by default.
List records can have one of four status values,depending on the actions of field marketers duringvalidation:
v T: To Accept
v V: Accepted
v A: Added
v D: Deleted
AudienceLevelID <CustomerID> ID of reference(s)
You may need to map additional fields for filtering purposes. For example, if theregion_id column was added for Data Level Filtering, you need to map it as well.
About campaign fulfillment flowchartsA campaign fulfillment flowchart in Campaign begins the actual marketingcampaign and controls how specific offers are sent to selected customers.
For On-demand Campaigns, corporate marketers build the campaign fulfillmentflowchart in Campaign and associate it with an On-demand Campaign template inDistributed Marketing. Field marketers then run the campaign fulfillmentflowchart from within Distributed Marketing.
The selected customers are handled differently for Corporate Campaigns andOn-demand Campaigns.
About campaign fulfillment flowcharts for CorporateCampaigns
The Corporate Campaign fulfillment flowchart can be executed by a RunFlowchart task in the workflow, or the corporate marketer can create and run thefulfillment flowchart through Campaign.
How you select target customers in the campaign fulfillmentflowchart
You select target customers in the campaign fulfillment flowchart from theuacc_corporate_lists table in the Distributed Marketing system database.
In a Corporate Campaign, field marketers must approve their associated targetcustomers for inclusion in the campaign. Field marketers can also add customers
76 IBM Unica Distributed Marketing: Corporate Marketer's Guide

who were not in the original list generated by the list selection flowchart. Onlyapproved or added customers should be selected by the Corporate Campaign'sfulfillment flowchart.
The list selection flowchart records the original list of customers in theuacc_corporate_lists table in the Distributed Marketing system database. Whenfield marketers review the customer list, their approvals, rejections, and additionsare recorded in the uacc_corporate_lists table as well.
Therefore, the campaign fulfillment flowchart must select the approved targetcustomers from the uacc_corporate_lists table, not the original table in thecustomer database.
Filtering targets in the uacc_corporate_lists table to select theright customers
When you select customers from the uacc_corporate_lists table in the DistributedMarketing system database, you must filter your selections based on two criteria:v Project Code
You must select only target customers for this Corporate Campaign by matchingthe campaign's unique code with the project_code value. For example, theSelect process in the flowchart could include the statement:project_code = "CorpCamp029"
v Status
You must select only approved target customers by matching values of A or V inthe Status column. The Select process in the flowchart should include thestatement:Status in (’A’, ’V’)
About campaign fulfillment flowcharts for On-demandCampaigns
For On-demand Campaigns, the corporate marketer creates and publishes thecampaign fulfillment flowchart through Campaign. Corporate marketers, oradministrators, then add the form that is automatically created by the publishingof the flowchart to an On-demand Campaign template. Field marketers then usethe On-demand Campaign template to create new On-demand Campaigns.
A field marketer runs the campaign fulfillment flowchart for an On-demandCampaign through Distributed Marketing.
How you select target customers in the campaign fulfillmentflowchart
You select target customers in the campaign fulfillment flowchart from theuacc_ondemand_lists table in the Distributed Marketing system database.
The list selection flowchart for the On-demand Campaign records the list ofcustomers in the uacc_ondemand_lists table. Field marketers refine this list byrefining the selection criteria for the On-demand Campaign and re-running the listselection flowchart.
Chapter 8. About flowcharts for Corporate Campaigns 77

Filtering targets in the uacc_ondemand_lists table to select theright customers
When you select customers from the uacc_ondemand_lists table in the DistributedMarketing system database, you must filter your selections based on theUserVar.ID_List user variable.
On-demand Campaign fulfillmentCorporate marketers can specify On-demand Campaign fulfillment requirements tofield marketers through a custom tab on the On-demand Campaign template.
Local or corporate service fulfillment
Depending on how your administrator configured the On-demand Campaigntemplate, you may need to fulfill the On-demand Campaign. Or, you may berequired to use a corporate service to fulfill the campaign. Or you may have tochoose between these methods.
When you are permitted by the corporate office to fulfill the On-demandCampaign, the corporate marketers may configure the mail merge feature tofacilitate fulfillment.
The mail merge feature
Field marketers or corporate marketers can use the Distributed Marketing mailmerge feature to personalize standard letters by merging a Microsoft Word letterdocument with a file containing contact data for on-demand marketing campaigntarget customers.
About viewing campaign and list attributes in Distributed MarketingCorporate marketers can expose the list and campaign attributes. The attributescan then be viewed by field marketers for On-demand Campaigns and Lists.
Field marketers view of campaign and list attributes
Field marketers can view the selection criteria for a List or On-demand Campaign,and the fulfillment specifications for an On-demand Campaign. This informationcomes from the flowchart attributes the corporate marketer exposes in DistributedMarketing.
Selection criteria and fulfillment specifications are made available as tabs in thetemplate for the On-demand Campaign or List.
Field marketers cannot view this information for Corporate Campaigns; thereforethese tabs are not available in Corporate Campaigns.
To make flowchart attributes visible in Distributed Marketing
Before you can complete this task, you must define the selection criteria as uservariables.
For On-demand Campaigns, corporate marketers can follow these steps to makelist and campaign attributes visible to field marketers using Distributed Marketing.1. Edit the flowchart with the criteria you want to make visible to field marketers.
78 IBM Unica Distributed Marketing: Corporate Marketer's Guide

2. In the flowchart editor, click the Options icon ( ).3. From the drop-down menu, select Parameter List.
The CampaignDistributed Marketing Settings window displays the ExposeParameters tab.This tab contains all the settings used in the processes contained in theflowchart, as well as the user variables that you have already defined.
4. Check the box next to the parameters that you want to be visible to fieldmarketers.Only the selected parameters are visible in Distributed Marketing.
Important: Each published flowchart must have the user variables UserNameand ListID. If these two user variables are not present when the flowchart ispublished, the associated form in Distributed Marketing is not saved. Thesevariables must also be exposed to publish and create forms.
5. Select the name of each checked user variable or setting to define how they aredisplayed in Distributed Marketing:a. Enter the name of the setting selected in the Prompt field to use as the
name of the linked field in Distributed Marketing.b. Enter the text that is displayed in a help bubble if the field marketer selects
the associated help icon in Distributed Marketing.c. Select desired interface in which the criteria value are input or selected in
Distributed Marketing.The following types are available:v Edit Boxv Select One From Drop-Down Listv Select One using Radio Buttonsv Select Multiple From Listv Select Multiple Using check box
6. Redefine the default value if it is not correct.The default value of the user variable is specified in the Default Value field, ifit is assigned to the variable.
Note: If you do not select a user variable, Distributed Marketing uses the valuespecified in the Default Value field. If no default value is specified, then allpossible values are selected.
7. Click OK when finished.
Process display settings and field marketer actions
Each process in Campaign has its own group of settings to which you can provideaccess. The following table describes the possible actions a field marketer can takefor each selected setting.
Chapter 8. About flowcharts for Corporate Campaigns 79

Processes Display Settings Supported Field Marketer Actions
Select
Export
Query Expression
Cell Size Limit
Cell Size Limit Method
Cell Size Limit Random Seed
Result Cell Size (output)
Enables the user to edit the requestused by the process.
Enables the user to set this limit
Not supported
Not supported
Displays the total number ofcustomers who meet the selectionor export criteria in the Resultstab.
Merge
Reference
Cell Size Limit
Result Cell Size (output)
Enables the user to set a targetcount limit.
Displays the total number ofcustomers who meet the selectionor export criteria in the Resultstab.
Segment Mutually Exclusive Segments
For each segment:
Cell Size Limit / Query Expression/ Result Cell Size (output)
Not supported.
See above. Query Expression is notsupported.
Sample Random Seed
Specify Size by
For each sample:
Cell Size Limit / Result Cell Size(output)
Enables the user to select recordsrandomly.
Enables the user to specify thetype of sample (percent or numberof records).
See above.
Snapshot
Output
Event
Export To
Export Operation
Export Table/File Name
Delimited file
Include Headers
Output File/Table Name
Enables the user to save theextraction result in a table or a file.
If the process is configured toexport data to a table or a file, youcan view the file name andlocation, or let the user specify herown name and location for the file.
Enables the user to include thecolumn headers in the tables.
If the process is configured toexport data to a table or a file, thename of the output file must beentered for the generated file to beattached to the list or campaign inDistributed Marketing.
Segment Mutually Exclusive Segments
For each segment:
Cell Size Limit / Query Expression/ Result Cell Size (output)
Not supported.
See above. Query Expression is notsupported.
80 IBM Unica Distributed Marketing: Corporate Marketer's Guide

Processes Display Settings Supported Field Marketer Actions
MailList
CallList
Random Seed If the process is configured toexport a contact list, the name ofthe export table/file must also beentered for the generated file to beattached to the On-demandCampaign in DistributedMarketing.
About running flowchartsRunning flowcharts for Corporate Campaigns
For Corporate Campaigns, the corporate marketer must run the list generationflowchart through a Flowchart Run task in the workflow. For fulfillmentflowcharts, the corporate marketer has the option of running the flowchart throughCampaign.
Running flowcharts for On-demand Campaigns and Lists
For On-demand Campaigns or Lists, the field marketer schedules the flowchartswhen editing the On-demand Campaign or List workflow, or runs them directlyvia the Generate List and Run Campaign links in the Summary tab of theOn-demand Campaign or list in Distributed Marketing.
A field marketer can also run the flowchart from the Summary tab of theOn-demand Campaign or List, by clicking Run Campaign or Generate Listrespectively.
Note: Field marketers typically do not work directly in Campaign.
Reviewing run history
You can view the history of flowchart runs in the Analysis tab of the CorporateCampaign, On-demand Campaign, or List. In the Analysis tab, select Run Historyfrom the drop-down list in the upper-right corner.
For each run, the run history shows user variables, input and output parametersand counts for the generated lists.
About attaching flowchart output files to On-demandCampaigns
For an On-demand Campaign, you can have flowchart output files attachedautomatically. To do so, follow these guidelines:v Output files must be exported by the flowchart to a single folder on the
Campaign server under partitions/partition_x.v You must expose the Output File output parameter to Distributed Marketing so
that the system knows which file in the directory to attach to the List orOn-demand Campaign.
v You must make flowchart attributes visible in Distributed Marketingv You must specify the access mode and path between the Distributed Marketing
server and the Campaign server in the collaborate_config.xml file.You can choose to retrieve files by:
Chapter 8. About flowcharts for Corporate Campaigns 81

– Accessing the Unica Campaign folder (the default)– FTP– HTTP– TFTP
82 IBM Unica Distributed Marketing: Corporate Marketer's Guide
Chapter 9. Working with Lists, On-demand Campaigns, andCorporate Campaigns
This section contains common information about working with Lists, On-demandCampaigns, and Corporate Campaigns. The content in this section applies to eachof these objects, as the instructions are the same. For example, you delete a List,On-demand Campaign, or Corporate Campaign in the same way; thereforeinformation about deleting these objects is presented together.
Where necessary, differences between Lists, On-demand Campaigns, and CorporateCampaigns are noted.
Note: You may not have the necessary permissions to perform all tasks describedin this section, or you may have permissions to perform the task on some objects,but not others. For example, field marketers can typically make changes to Listsand On-demand Campaigns, but can only view Corporate Campaigns. For moreinformation, see your administrator.
To view and edit the Summary page
You can edit some, but not all, data on the Summary page for a List, On-demandCampaign, or Corporate Campaign.1. Open the List, On-demand Campaign, or Corporate Campaign to view the
Summary page.
2. Click the Edit icon ( ).Certain fields in the Summary page become editable. For example, fields thatyou can typically edit are:v Namev Descriptionv Security Policyv Target Start and Target End datesv Other custom attributes created by your administratorTypically, you cannot edit campaign codes or List Review data.
3. Edit data as necessary.4. Click Save Changes.
The Edit Summary page closes, and the changes you made are reflected in theSummary page.
To modify the default contents of the Lists, On-demand Campaigns,and Corporate Campaigns pages
When you select Lists, On-demand Campaigns, or Corporate Campaigns from theLocal Marketing menu, a page opens listing those objects.
You can change which Lists, On-demand Campaigns, or Corporate Campaigns aredisplayed by default, as well as the columns included in the page.
© Copyright IBM Corp. 2001, 2012 83

1. While viewing the Lists, On-demand Campaigns, or Corporate Campaigns
page, click the Options icon ( ).The Options dialog box opens.
2. In the Default drop-down list, select the set of Lists, On-demand Campaigns, orCorporate Campaigns that you want shown by default when you open thatpage.
3. Determine which columns to show by selecting columns from the AvailableColumns list and Selected Columns list and using the horizontal arrow keys tomove columns between lists.Continue until the columns you want to display are all in the SelectedColumns list.
4. Determine the order of columns by selecting columns in the Selected Columnslist and using the vertical arrow keys to move columns up and down.Continue until the columns are in the wanted order.
5. Click Save Changes.
The Lists, On-demand Campaigns, or Corporate Campaigns page changes to reflectyour selections. These changes remain in effect when you view the page later.
To modify how Lists, On-demand Campaigns, and CorporateCampaigns are displayed
When you select Lists, On-demand Campaigns, or Corporate Campaigns from theNavigation pane, a page opens listing those objects. The exact content of this pagedepends on settings defined by your administrator.
You can change how Lists, On-demand Campaigns, or Corporate Campaigns aredisplayed in multiple ways.
1. To change how objects are displayed, click the View icon ( ).The Set View Options dialog box opens.You can select:v Timeline, to show the objects in a table format.v Text Calendar, to show the objects as text entries in the calendar.v Graphical Calendar, to show the objects as graphics in the calendar.You also select the time period and color coding.To return to the table view, click the object name in the Navigation pane.
2. To sort the objects when viewing as a table, click the name of the column tosort by. You can click the name again to switch between ascending anddescending order.
The number of objects may be too high for a single screen. If there are multiplescreens, you can click the screen number to view at the bottom of the table to seeother objects. Additionally, you can click Show All to fit all objects in one screen.
84 IBM Unica Distributed Marketing: Corporate Marketer's Guide

To view specific Lists, On-demand Campaigns, or CorporateCampaigns
When you select Lists, On-demand Campaigns, or Corporate Campaigns from theLocal Marketing, a page opens listing those objects. The exact content of this pagedepends on settings defined by your administrator.
You can change which Lists, On-demand Campaigns, or Corporate Campaigns aredisplayed in multiple ways.1. To view all objects, click All ... at the top of the page.
All objects are displayed, as well as various filters for the display, for example,Last Weeks ..., My ..., and Completed .... You can click a filter name to see onlyobjects that meet that criteria.
2. To view objects that meet certain criteria, click the Filter icon ( ).The Search for dialog box opens.
3. Fill in the search criteria you need, then click Apply.
To open and edit a List, On-demand Campaign, or CorporateCampaign
You must have the required permissions to open and edit a List, On-demandCampaign, or Corporate Campaign. For more information, see your administrator.
You can open a List, On-demand Campaign, or Corporate Campaign from theDashboard, or from the page listing that object.
Once you open a List, On-demand Campaign, or Corporate Campaign, you canedit any of its tabs.1. Click the name of the List, On-demand Campaign, or Corporate Campaign.
The Summary tab for that object opens.2. Click the name of the tab you want to edit, or remain on the Summary tab to
edit it.For example, if you edit the Workflow, you must open the Workflow tab beforeyou click Edit.
3. Near the top of the page, next to the object's name, click the Edit icon ( ).4. Edit the contents of the tab as necessary.5. Click Save Changes.
Edits you made to the tab are saved.
List, On-demand Campaign, and Corporate Campaign status
A List, On-demand Campaign, or Corporate Campaign is in one of the followingstates:v Not Startedv In Progressv Paused
Chapter 9. Working with Lists, On-demand Campaigns, and Corporate Campaigns 85
v Canceledv Finished
Simple Lists begin in the In Progress state.
Advanced Lists, On-demand Campaigns, and Corporate Campaigns, whetherrecurring or not, begin in the Not Started state.
To change the Lists, On-demand Campaigns, or CorporateCampaign status
The status of the List, On-demand Campaign, or Corporate Campaign is shown inthe home page, the pages listing these objects, and in the Summary page. Tochange the status, you must be viewing the List, On-demand Campaign, orCorporate Campaign Summary page.1. View the Summary page for the List, On-demand Campaign, or Corporate
Campaign.
2. Click the Status icon ( ).3. From the drop-down list, select the status to change to.
A dialog box prompts you to add comments about the status change.4. Add a comment and click Continue to close the dialog box.
The status of the List, On-demand Campaign, or Corporate Campaign changes toyour selection.
To print a List, On-demand Campaign, or Corporate Campaign
When viewing a List, On-demand Campaign, or Corporate Campaign, you canprint it on your local printer.1. Open the List, On-demand Campaign, or Corporate Campaign.
2. Click the Print icon ( ), and select Print.The Print dialog box opens.
3. Complete the Print dialog box as needed.
To export a List, On-demand Campaign, or Corporate Campaign
When viewing a List, On-demand Campaign, or Corporate Campaign, you canexport it to a Microsoft Excel file.1. Open the List, On-demand Campaign, or Corporate Campaign.
2. Click the Print icon ( ), and select Export.The File Download dialog box opens.
3. Click Open to open the Microsoft Excel file directly, or Save to save it to yourcomputer.If you choose to save it, you are prompted for the location on your computer.
86 IBM Unica Distributed Marketing: Corporate Marketer's Guide

To copy a List, On-demand Campaign, or Corporate Campaign
When viewing a List, On-demand Campaign, or Corporate Campaign, you cancopy it to create one with the same settings.1. Open the List, On-demand Campaign, or Corporate Campaign.
2. Click the Copy icon ( ).You are prompted to confirm the copy.
3. Click OK.The Summary page for the new List, On-demand Campaign, or CorporateCampaign opens. The name of the new object is Copy of existing objectname.
4. Edit information in the Summary page as needed.5. Click Save Changes.
The object closes.6. To edit other pages in the List, On-demand Campaign, or Corporate Campaign,
open, and edit the object.
About peopleYou assign people to units of work. You make assignments primarily through thePeople tab of a List, On-demand Campaign, or Corporate Campaign.
Note: You may see only a subset of the people available. Your organization canlimit the view of available resources.
About the People tabEach Corporate Campaign contains its own People tab. Use this screen to do thefollowing.v Manage the members of a Corporate Campaign.v Edit access level for a member.v Replace a person in a role when a user becomes unavailable.v Add or remove a role.
A Corporate Campaign template can contain information about the functional rolesfor the project. A template can reduce some of the work necessary to assign peopleor teams to units of work within the Corporate Campaign.
Note: By default, the People tab is available only for Corporate Campaigns. Forinformation about making it available for Lists or On-demand Campaigns, see theDistributed Marketing Administrator's Guide.
To manage Corporate Campaign members1. Navigate to the People tab of the Corporate Campaign.
2. Click the Edit Member/Role Settings icon ( ).The Select Team Members dialog box opens.
3. Do one of the following.a. To add a person, select the name from the left pane of the dialog, and click
>>.
Chapter 9. Working with Lists, On-demand Campaigns, and Corporate Campaigns 87
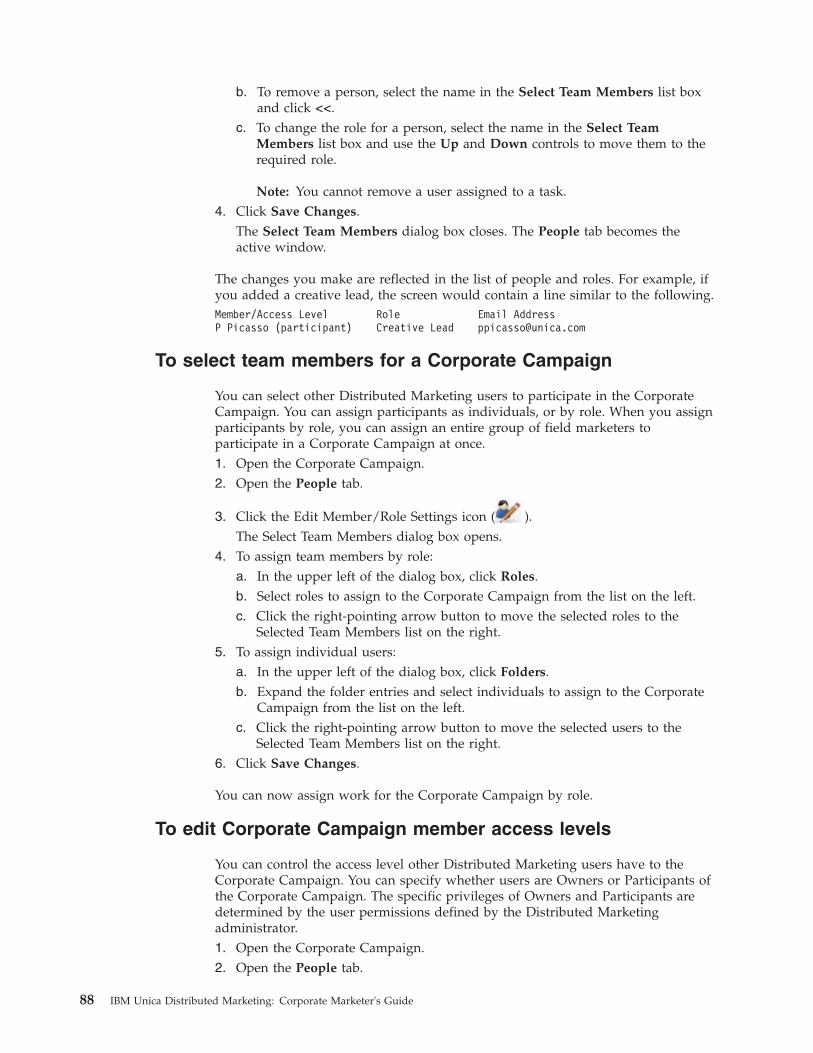
b. To remove a person, select the name in the Select Team Members list boxand click <<.
c. To change the role for a person, select the name in the Select TeamMembers list box and use the Up and Down controls to move them to therequired role.
Note: You cannot remove a user assigned to a task.4. Click Save Changes.
The Select Team Members dialog box closes. The People tab becomes theactive window.
The changes you make are reflected in the list of people and roles. For example, ifyou added a creative lead, the screen would contain a line similar to the following.Member/Access Level Role Email AddressP Picasso (participant) Creative Lead [email protected]
To select team members for a Corporate Campaign
You can select other Distributed Marketing users to participate in the CorporateCampaign. You can assign participants as individuals, or by role. When you assignparticipants by role, you can assign an entire group of field marketers toparticipate in a Corporate Campaign at once.1. Open the Corporate Campaign.2. Open the People tab.
3. Click the Edit Member/Role Settings icon ( ).The Select Team Members dialog box opens.
4. To assign team members by role:a. In the upper left of the dialog box, click Roles.b. Select roles to assign to the Corporate Campaign from the list on the left.c. Click the right-pointing arrow button to move the selected roles to the
Selected Team Members list on the right.5. To assign individual users:
a. In the upper left of the dialog box, click Folders.b. Expand the folder entries and select individuals to assign to the Corporate
Campaign from the list on the left.c. Click the right-pointing arrow button to move the selected users to the
Selected Team Members list on the right.6. Click Save Changes.
You can now assign work for the Corporate Campaign by role.
To edit Corporate Campaign member access levels
You can control the access level other Distributed Marketing users have to theCorporate Campaign. You can specify whether users are Owners or Participants ofthe Corporate Campaign. The specific privileges of Owners and Participants aredetermined by the user permissions defined by the Distributed Marketingadministrator.1. Open the Corporate Campaign.2. Open the People tab.
88 IBM Unica Distributed Marketing: Corporate Marketer's Guide

3. Click the Edit Member/Role Settings icon ( ).The Select Team Members dialog box opens.
4. To add users:a. Expand the folder entries and select individuals to assign to the Corporate
Campaign from the list on the left.b. Click the right-pointing arrow button to move the selected users to the
Selected Team Members list on the right.5. To make a user an owner of the Corporate Campaign:
a. In the Selected Team Members list, select the user.b. Click Up.
Repeat this step until the user appears under Owner in the list.6. To make a user a participant in the Corporate Campaign:
a. In the Selected Team Members list, select the user.b. Click Down.
Repeat this step until the user appears under Participant in the list.7. Click Save Changes.
To assign work by role
Before completing this task, you should select team members for the CorporateCampaign.1. Open the Corporate Campaign.2. Open the People tab.
3. Click the Assign Work by Role icon( ).A dialog box opens asking how you want to assign work. You can choose to:v Add the new user to any existing users assigned to the taskv Replace any existing assigned users with the new user.
4. Select append the new user to add the new user to any existing users assignedto the task, or select replace the existing assignment to replace any existingassigned users with the new user.
5. Click Apply.Users are assigned to tasks as you specified.
6. Click Close.
About attachmentsYou can include attachments with a List, On-demand Campaign, or CorporateCampaign. These attachments provide information that is relevant to the campaignor List.
For example, corporate or field marketers may include the following asattachments:v Marketing messages for the initiative, including content for a mail campaignv Data, such as customer names, generated after running a List or On-demand
Campaign
Chapter 9. Working with Lists, On-demand Campaigns, and Corporate Campaigns 89
A List or On-demand Campaign owner or participant can include attachments onlyif the corporate template developers include the Attachments tab in the List orOn-demand Campaign templates.
If the template developer includes attachments in the On-demand Campaigntemplates, field marketers or corporate marketers can use the attachments to helpfulfill campaigns.
Corporate marketers can also add attachments to an On-demand Campaign whenthe Attachments tab is available through the On-demand Campaign template.
You can also include restricted attachments, such as upload_allowedFileTypes andupload_fileMaxSize. upload_allowedFileTypes indicates the types of files that canbe uploaded in Distributed Marketing, and upload_fileMaxSize indicates the limiton the maximum size of the file that can be uploaded.
To add an attachment to a List, On-demand Campaign, orCorporate Campaign
If the template designer allowed it, when viewing a List, On-demand Campaign,or Corporate Campaign, you can add a file as an attachment.
The file you add can come from your computer, or a URL.1. Open the List, On-demand Campaign, or Corporate Campaign.2. Open the Attachments page.
3. Click the Add Attachments icon ( ).4. In the File to Attach field, select From My Computer or URL.5. In the field to the right, enter the path to the file.
If you selected From My Computer, you can click Browse to visually find thefile on your computer.
6. Optionally, add notes about the attachment.7. Click Save Changes.
The file is attached to the List, On-demand Campaign, or Corporate Campaign.
To remove an attachment from a List, On-demand Campaign,or Corporate Campaign
1. Open the List, On-demand Campaign, or Corporate Campaign.2. Open the Attachments page.3. In the row for the attachment to remove, click Remove.
You are prompted to confirm the deletion.4. Click OK.
The file is no longer attached to the List, On-demand Campaign, or CorporateCampaign.
90 IBM Unica Distributed Marketing: Corporate Marketer's Guide

To post a message
When viewing a List, On-demand Campaign, or Corporate Campaign, you canpost a message. This message is associated with the List, On-demand Campaign, orCorporate Campaign only. You have the option of having these messages sent toother Distributed Marketing users. You may need to post messages to convey toothers working on the List, On-demand Campaign, or Corporate Campaign toconvey important information about the project.
Note: These messages are separate from alerts. An alert is created when you createa message, but the alert does not contain the content of your message.1. Open the List, On-demand Campaign, or Corporate Campaign.2. While viewing any page of the List, On-demand Campaign, or Corporate
Campaign, click the Communicate icon ( ), then select Post a Message.The Messages dialog box opens.
3. Enter your message in the message field.4. Select the delivery option.5. Click Post Message.
The message is then associated with the List, On-demand Campaign, or CorporateCampaign. If indicated, it is also sent to users by email.
For those working with the List, On-demand Campaign, or Corporate Campaign,
the number next to the Communicate icon ( ), indicating that the newmessage is there.
To read messages
Other Distributed Marketing users may attach messages to a List, On-demandCampaign, or Corporate Campaign in order to pass on important information toother team members. When you view the List, On-demand Campaign, orCorporate Campaign, you can view these messages.
Note: These messages might also be sent to you by email, if the other users chosethis option.1. Open the List, On-demand Campaign, or Corporate Campaign.
The number of messages associated with the List, On-demand Campaign, or
Corporate Campaign is indicated next to the Communicate icon ( ). Inthis example, there is one message to read.
2. Click , then select Read Messages.The Messages dialog box opens, listing the messages associated with the ListOn-demand Campaign, or Corporate Campaign.
Note: You can post a new message from this dialog box.3. Click Close when finished.
Chapter 9. Working with Lists, On-demand Campaigns, and Corporate Campaigns 91

To delete Lists, On-demand Campaigns, or Corporate Campaigns
You must have the required permissions to delete a List, On-demand Campaign, orCorporate Campaign. Typically, field marketers cannot delete CorporateCampaigns. For more information, see your administrator.1. From the Local Marketing menu, click Lists, On-demand Campaigns, or
Corporate Campaigns.The page listing that object type opens.
Note: To complete this task, you must view the objects in the Timeline view.2. Check the field next to the name of one or more List, On-demand Campaign,
or Corporate Campaign you want to delete.You can also check the field next to the Name column header at the top of thetable to select all currently displayed objects.
Note: Checking this field selects only the objects currently displayed on screen.If the list of objects spans multiple pages, those objects on other pages are notselected.
3. Click the Delete icon ( ).You are prompted to confirm the deletion.
4. Click OK.
The selected objects are deleted.
To delete a List, On-demand Campaign, or CorporateCampaign
You must have the required permissions to delete a List, On-demand Campaign, orCorporate Campaign. Typically, field marketers cannot delete CorporateCampaigns. For more information, see your administrator.
While viewing a List, On-demand Campaign, or Corporate Campaign, you candelete it.
Note: You can also delete multiple Lists, On-demand Campaigns, or CorporateCampaigns from the pages listing each of these objects.1. Open the List, On-demand Campaign, or Corporate Campaign.
2. Click the Delete icon ( ).You are prompted to confirm the deletion.
3. Click OK to delete the object.
The List, On-demand Campaign, or Corporate Campaign is deleted.
92 IBM Unica Distributed Marketing: Corporate Marketer's Guide

Chapter 10. Alerts
You can use alerts to communicate information to specific people about the state ofan object or about an action that the user needs to take. Default alert subscriptionsare set by administrators, but can be overridden on a per-object basis by ownersand participants of the specific objects.
To subscribe to alerts for an object
You can override default settings within a List, On-demand Campaign, orCorporate Campaign even if you are not an administrator, which allows you tocontrol the alerts that each object owner and participant receives. However, if thereare permissions configured for any of the tabs of a List, On-demand Campaign, orCorporate Campaign, the system filters alerts appropriately.1. Open the object for which you want to change alert subscriptions.
2. Click the Communicate icon ( ) and select Subscribe to Alerts from thedrop-down list.
3. From the list of alerts, select the check boxes that correspond to the alert thatyou want to change. You can set or clear alert subscriptions for each type ofuser, Owner, or Participant. The possible entries are as follows:v Check mark: indicates that the user receives the alert or alarmv Blank: indicates that the user does not receive the alert or alarmv n/a: indicates that you did not specify users for this access level when you
created the object. After you add with the corresponding access level, youcan set alerts for that access level.
4. Click Accept to save your changes or Cancel to leave the alert settings as theywere.
Viewing alerts
When you receive an alert, go to the Alerts page to view it. Alerts are also sent toaffected users' email addresses (for each user that has a valid email address setup).
To view alerts, log in and click the Alerts icon ( ). Clicking, or scrolling, overthe alerts icon shows a drop-down menu separating the alerts for your installedapplications. The number of alerts appears to the left of each application name.After you choose which application's alerts to view, the page displays thefollowing information:
Table 11. Columns on the Alerts page
Column Description
Page heading Contains the number of unread alerts (which appears in parentheses)and the total number of alerts
© Copyright IBM Corp. 2001, 2012 93

Table 11. Columns on the Alerts page (continued)
Column Description
Check box Each alert contains a check box; use check boxes to select alerts for aspecific action (for example, to mark a group of alerts for deletion).
Check the box in the first line (next to the Message Text label) to selectall the alerts.
Message text Displays the text of the alert.
Date/Time Displays the time of the event that triggered the alert.
You can perform the following actions from the page.
Table 12. Controls on the Alerts page
Link/Button Description
Select the yellow envelope icon next to an alert to mark the alert asread.
After you click the icon, the alert is disabled. Reselect the icon to markthe alert as unread.
Alert title Click the link in the alert to go to the object that is the subject of thealert.Note: The Alerts page remains open while you view the information ina separate window.
Pages Click a page number to list the corresponding page of alerts.
Delete Selected Click to delete the selected alerts.
Delete All Click to delete all of your alerts.
Mark All as Read Click to mark all your alerts as read, graying out each alert. Aconfirmation screen appears to ensure that you want to mark all alertsas read.
Mark All asUnread
If you have no unread alerts, click this link to mark all your alerts asunread.
Close Click to close the Alerts page.
94 IBM Unica Distributed Marketing: Corporate Marketer's Guide

Chapter 11. About templates
A template is a definition of a List, On-demand Campaign, or Corporate Campaignthat corporate and field marketers use to create new objects.
As an administrator, you create templates and specify various parts of the object.For example, among the many settings you determine for a Corporate Campaigntemplate are:v The associated flowchart in Campaignv Team membersv Workflowv Custom tabs
All Lists, On-demand Campaigns, and Corporate Campaigns are based on atemplate you create, and the object inherits all settings from the template.Corporate or field marketers can change the object's settings as needed.
Why use templates?
Templates are the required building blocks for Lists, On-demand Campaigns, andCorporate Campaigns. Users cannot create these objects without templates.
By using templates, you help users save time because they do not have toconfigure objects from the beginning; they only need to change settings that arespecific to the List or campaign.
For example, if your organization is running multiple Corporate Campaigns thathave the same team members and workflow, you can create a template with theright settings for the team and workflow. Corporate marketers then create theCorporate Campaigns based on this template, and do not have to configure theteam members or workflow.
About template componentsTemplates are made up of other components that you, as the administrator, createand manage.
Specifically, templates can include the following:
Component Description
Tabs Individual screens for the campaign. Tabs contain one or more forms.
Forms Sub-section of a tab, containing fields.
Field Data element contained within a form. Each field has a specific format;some fields, for example contain text, and others contain a set of radiobuttons. You can place fields into groups, and display them in either a1- or 2-column layout.
Data mapping Mappings of data between Distributed Marketing and Campaign.
Icons Small images representing the object within the Distributed Marketinguser interface.
© Copyright IBM Corp. 2001, 2012 95

Component Description
Attachments Files or folders appearing on the Attachment tab of the List,On-demand Campaign, or Corporate Campaign.
Custom links Hypertext links appearing on selected tabs.
Workflow The set of stages and tasks appearing in the project's workflow tab.
About creating templatesYou create a template by assembling existing components. Therefore, as you set upyour system, you must create the other components before you can createtemplates.
Planning your templates
Before you begin building templates, you must analyze your organization's needs,then decide on the templates you need.
For example, your organization might run three different types of On-demandCampaigns, with different target selection criteria and different workflows. Youmost likely need three different templates for these On-demand Campaigns.
In addition to planning the number and types of templates, you must plan for thetypes of objects you need in those templates. For example, the three On-demandCampaign templates you need can share the same Summary form, but requiredifferent Selection Criteria forms and Workflows.
Planning template contents
Once you have planned the types of templates you need, you must determine thecontents of those templates; that is, you must decide which fields to include, andhow to organize those fields.
You should capture this information about paper or in a spreadsheet, then use theForms Editor to define the tabs and fields you need.
For example, you might determine that an On-demand Campaign template mustinclude a field for the business unit that requests the campaign. You could list therequirements for this field as follows:
Field Attribute Value
Internal Name Business Unit
Display Name Business Unit
Tab/grouping In the Summary tab under the CollateralRequest Info section
Input field type Single-Select
Possible values or database table to retrievevalues from
Retail Banking, Investment Services,Insurance, Credit Card Brochure, Postcard,DataSheet, Intro Folder, White Paper, PrintAd, or a table name or column name whereDistributed Marketing should look up thesevalues.
Required field/error message if missing Business Unit is a required field.
96 IBM Unica Distributed Marketing: Corporate Marketer's Guide

Field Attribute Value
Help Tip Enter the business unit requesting thiscollateral piece.
As a best practice, create a similar table for each field you require, before youbegin creating fields and tabs in the Forms Editor.
Before creating templates
Templates depend on the existence of other, lower-level components. Therefore,you must set up the following objects before you set up templates:1. Forms2. Icons3. Data Mapping4. Workflows5. Roles
Chapter 11. About templates 97

98 IBM Unica Distributed Marketing: Corporate Marketer's Guide

Chapter 12. Building and managing templates
To create and manage templates and template components, you use the TemplateConfiguration page. To display the page, select Settings > Distributed MarketingSettings. Then click Template Configuration.
The available items and functions are organized into two sections, TemplateConfiguration and Templates Components. There is also an option to validate alltemplates.
Template Configuration section
The template configuration section of the page contains the Templates link, whichopens a page that lists all the existing templates and template folders. You use thelinks on that page to create, delete, and organize templates, and to edit or exportindividual templates.
Validating templates
To run a utility that validates templates and forms and displays any validationerrors, click Validate Templates in the template configuration section.
Template Components section
The template components section of the page contains the following links.
Table 13. Links in the Template Components section
Link Description
Forms Opens a list of the forms and displays the following information:
v Name of the form definition
v Database table name that stores the answers users enter in theform fields
v List of templates that use the form
Click the Add ( ) icon to add a form.
Workflow Opens a list of the workflow templates and displays the followinginformation.
v Name
v The number of stages and tasks in the workflow template
v When it was first created and last modified
v Whether it is enabled or disabled
You create workflow templates from the Workflow tab of a List,On-demand Campaign, or Corporate Campaign template orinstance. You can use the links on this list page to delete,enable/disable, import, or export a workflow template.
© Copyright IBM Corp. 2001, 2012 99

Table 13. Links in the Template Components section (continued)
Link Description
Data Mapping Opens a list of data maps and displays the following information.
v Data mapping file names
v Type; Campaign data
v List of templates that use the mapping.
v Click the Add icon ( ) to add a data mapping.
Icons Opens a list of icons and displays the following information.
v Icon images; large and small
v Icon name
v List of templates that use the icon
v Delete link for deleting the icon (does not delete the file from itslocation on disk)
Click the Add icon ( ) to add an icon.
Templates Definition page
Use the links and commands on the Templates Definition page to work withtemplates.
From this page, you can perform the following actions:
Action Description
Edit Click the template name to edit the template.
Enable or disable Click the link to toggle the state of the template, from Enabled toDisabled and back.
When a template is enabled, you can use it to create an object.
Delete Click to delete a template from the system. The link is onlyavailable for templates that do not have any objects created fromthem.
Add Click Add template in the section of the list for the type oftemplate you want to add a new template.
Click the Add icon ( ) to add a new template. From the icon'sdrop-down list, select the type of object for which you want tocreate the template.
Open folder Click the folder name to open the folder.
Jump to Folder Click Jump to Folder to navigate to and open another templatefolder.
Move items
Select the items to move, then click the Move Items icon ( ) todisplay a screen where you can choose a new folder for selecteditems.
Select the item(s) to move, then click Move Item(s) to. You thenselect a template folder to which to move the template.
100 IBM Unica Distributed Marketing: Corporate Marketer's Guide

Action Description
Add folder Click Add Folder to create a new template folder.
Click the Add Folder icon ( ) to create a new template folder.
To build a template
Before you create templates for Lists, On-demand Campaigns, and CorporateCampaigns, determine whether you must add custom tabs. If you do, see thechapter on the Forms Editor and use the procedures in that chapter to create formsfor custom tabs.
When the template components you need are available, create a new template andassemble the pieces. The steps to create a template are generally the same for eachobject type.1. From the Settings menu, select Distributed Marketing Settings.
The Administrative Settings screen opens.2. Click Templates.
The Template Configuration Screen opens
3. Click the Add icon ( ).4. From the icon's drop-down list, select the type of object for which you want to
create a template.5. Use the information provided in the rest of this chapter to determine how to fill
out each of the tabs for this template.
Important: When assembling a template, click Save Changes when you finishediting a tab, before navigating to another tab in the template. Otherwise, yourchanges are not saved.
Effects of template changesWhen editing a template, be aware you are changing all instances of objectspreviously created from the template.
The exceptions are workflow, people, or an attachment. When you change theworkflow template, add or remove roles, or add or remove an attachment, yourchanges apply only to objects you create after the changes are made. Existingworkflows are not changed, nor are roles or attachments for any existing Lists,On-demand Campaigns, or Corporate Campaigns.
About template foldersYou can create folders for templates in the Templates Definition screen.
You can move templates to any existing folders.
Chapter 12. Building and managing templates 101
To edit a template
Template editing is spread across the following tabs. Depending on the object type,only a subset of these tabs may be available.v Properties: basic template properties, such as name and description.v Project Roles: roles definition. Project templates only.v Requests: defines rules for requests made using this template. Project templates
only.v People: roles definition.v Campaign: IBM Unica Campaign integration settings (Corporate Campaign
templates only)v Recurrence: recurrence settings.v Workflow: workflow settings (not available for simple Lists).v Budget Approval Rules: define rules for line item approvals. Program, project,
and invoice templates only.v Tabs: Tab definitions; add additional forms and custom tabs.v Attachments: files attached by default to all objects created from the template.v Custom Links: custom links to programs, web pages, etc.v Customize Alerts: options that control the alerts IBM Unica Marketing
Operations sends for objects created using this template1. Click Settings > Distributed Marketing Settings.2. In the Administrative Settings screen, select Template Configuration (located
under Other Options).3. Select Templates.4. Select the name of the template you want to edit.
The Properties tab of the selected template appears. You can edit fields on anyof the object templates tabs; click a tab in the menu bar to navigate to it.
5. Click Save Changes to save any changes you made to the template.
Template Properties tab
For all objects, the templates Properties tab contains the following properties foryou to set.
Table 14. Properties for all templates
Property Description
Name The display name for the template, used in the Templates list page.
Description Short description of the template that displays on the template selectorpage when adding a List, On-demand Campaign, or CorporateCampaign.
Icon Large and small icon images for the template. The large icon isdisplayed when you create an object based on this template. The smallicon is displayed next to the icon name in the list page.
Security Policies List of security policies that determine which users have access to thetemplate.
102 IBM Unica Distributed Marketing: Corporate Marketer's Guide

Table 14. Properties for all templates (continued)
Property Description
Template ID Internal name for the template. Avoid spaces and special characters.
Note:
v Template IDs must be unique across Distributed Marketing.
Additionally, once you use a template ID, you cannot use it again,even if you delete it.
v Once created, you can edit this field only if no objects have beencreated based on this template.
Default Name The default name given to an object (project, marketing object, etc.)created using this template.
You can leave this field blank.
ID Prefix Prefix for the external ID of the object. Each List, On-demandCampaign, and Corporate Campaign has an external ID assigned to it.For example, you could enter an ID Prefix of TRS for the TradeshowOn-demand Campaign template. The first tradeshow On-demandCampaign you create would then have an ID of TRS1001.
You can set the ID prefix by template, to easily determine the templateon which an object is based.
ID GenerationClass
Java class to specify a numbering algorithm for objects. By default,Distributed Marketing assigns a sequential number to each object.
However, you can configure Distributed Marketing to use an algorithmdefined by you to set the external ID. If you choose to do this, the IDGeneration Class specifies the Java class used to generate the code. Youmust edit this attribute only if you want to generate IDs according toan algorithm other than the default.
Template People tab
You use the People tab of a template to define roles that are added to Lists,On-demand Campaigns, or Corporate Campaigns created from this template.
You must define list definitions for roles before adding roles to a template.
To add a role, select a role from the drop-down list. The available values arepopulated from the list definitions.
To delete a role, click Remove next to the role you need to delete.
Template Recurrence tab
You use this tab to establish properties for a recurring campaign. Recurringcampaigns reference a basic workflow; you can set up recurrence properties todefine how many times the basic workflow should recur.
Note that this tab appears in both templates and in the actual instance of aCorporate Campaign, On Demand Campaign, and List. When creating a template,you can access this tab only after you have created a Workflow template.
Chapter 12. Building and managing templates 103

Depending on permissions, users can modify recurrence properties when theycreate or edit a Corporate Campaign, On-Demand Campaign, or List. If they do so,all tasks in the workflow are replaced by new tasks, with dates that are calculatedbased on the new recurrence properties.
The Recurrence tab contains the following settings:
Property Description
CampaignWorkflow Type
Specifies whether the workflow used by the Corporate Campaign,On-Demand Campaign, or List contains a recurring stage. Options are:
v Nonrecurring
v Recurring
If you select Recurring, the properties on this tab are applied to thestage in the Workflow that is marked for recurrence.Note: Note that Recurrence properties you set up here can apply toonly a single stage of a workflow.
Frequency Specifies the recurrence pattern. Options are:
Daily—Occurs on a daily basis. When you select Daily, you mustspecify the number of days between each occurrence of the workflowor workflow stage.
Weekly—Occurs on a weekly basis. When you select Weekly, you mustspecify the number of weeks between each occurrence of the workflowor workflow stage. (To specify every other week, enter 2 for thenumber of weeks between each occurrence.) You must also specify theday or days of the week on which the occurrence should take place.
Monthly—Occurs on a monthly basis. When you select Monthly, youmust specify the number of months between each occurrence of theworkflow or workflow stage. You must also choose one of theseoptions:
v Each date of month—Choose this option if you want the occurrenceto take place on a specific date each month.
v Each day of week—Choose this option if you want to schedule theoccurrence to run on a specific day of a specific week each month.For instance, if you want to run the campaign monthly, on the thirdThursday of each month, you should select this option.
Keep in mind that your calendar options apply to your recurrenceschedule; that is, the recurrence schedule is built using your settingsfor valid working days.
Ending Specifies the total number of occurrences of the workflow or workflowstage. You can also choose to specify a date by which the recurrenceshould end.
Permissions tomodify therecurrences in theinstance
Allows you to specify the recurrence options that can be changed ineach Corporate Campaign, On-Demand Campaign, or List.
This field appears only in the Corporate Campaign, On DemandCampaign, or List template; it does not appear in the actual instance ofthe Corporate Campaign, On-Demand Campaign, or List. Options are:
v All options—Users can change all recurrence options.
v No options—Users cannot change any recurrence options.
v All options but frequency—Users can change all options exceptfrequency.
104 IBM Unica Distributed Marketing: Corporate Marketer's Guide

Template Workflow tabThe Workflow tab of a template is similar to the workflow spreadsheet displayedin an individual List, On-demand Campaign, or Corporate Campaign. Use theWorkflow tab to set up the stages, tasks, and that are common for all Lists,On-demand Campaigns, or Corporate Campaigns created from the template. Then,List, On-demand Campaign, or Corporate Campaign owners use the workflowspreadsheet to modify the workflows as necessary for their projects.
Like the workflow spreadsheet, the template Workflow tab has two modes: viewand edit. To edit the workflow displayed on the tab, click the Edit link.
You can save a workflow as a template from either the List, On-demandCampaign, or Corporate Campaign template Workflow tab or from the workflowspreadsheet in an individual List, On-demand Campaign, or Corporate Campaign.
To create workflow templates
To create workflow templates, you start by creating a List, On-demand Campaign,or Corporate Campaign template. When you are finished configuring the workflowfor the template, you save the workflow as a template.
A workflow template retains the stage and task definitions.1. Select the Workflow tab of the appropriate List, On-demand Campaign, or
Corporate Campaign template.
2. While the tab is still in view mode, click the Save as Template icon ( ).3. Enter a descriptive name for the template and click Continue.4. Click Save Changes.
The workflow is saved as a template in the template library.
To use workflow templates1. Create the List, On-demand Campaign, or Corporate Campaign template as
usual, but skip setting up roles because they are imported with the workflowtemplate.
2. Select the Workflow tab.
3. While the tab is still in view mode, click the Import Template icon ( ).A warning is displayed stating that the import will overwrite the existingworkflow.
4. Click OK.A list of templates opens.
5. Select a template from the list and click Import.The workflow opens in the tab, and the roles referenced in the task and stagerows are now listed on the People tab.
6. If you must modify or add stages or tasks, click Edit.Then customize the workflow as necessary for the project template. Rememberto save your changes.
7. When the workflow is complete, click Save and Finish to return to view mode.
Chapter 12. Building and managing templates 105
To configure workflow for a template
To configure the workflow for a List, On-demand Campaign, or CorporateCampaign template, you create the template, specify the roles, and then create theworkflow.1. Select Settings > Distributed Marketing Settings.2. Click Template Configuration.
3. Under Templates, click the Add Template icon ( ).4. Complete the fields in the Template Properties form and click Save changes.5. Use the People tab to specify the roles of the participants and click Save
changes.
6. Select the Workflow tab and click the Edit icon ( ).7. Add the appropriate system and user tasks, and stages.
Remember to save frequently.8. When the workflow is complete, click Save and Finish. The tab returns to view
mode.9. Optionally, click the flowchart button to display the workflow as a process
flowchart.
Template Campaign tab
You use this tab in a Corporate Campaign template to set up communicationbetween Distributed Marketing and Campaign. This tab is not available forOn-demand Campaigns and Lists.
It contains the following settings:
Property Description
Campaign ServiceURL
The URL used to start Campaign. For example:
http://engsvr1:9001/Campaign/services/CampaignServices
Distributed Marketing uses this value to access services provided by aCampaign server when you create a linked campaign.Note: Enter a value here only if you are mapping data betweenDistributed Marketing and Campaign.
Campaign DataMapping
The XML file containing the data map for creating a Campaigncampaign from a Distributed Marketing object instance.
Options A single check box, Use Campaign Code Generated by Campaign.Check this box to force Campaign and Distributed Marketing campaigncodes to match.
Partition ID The Partition ID identifies the partition of the Campaign instancecontaining the linked campaign.
The default value is partition1, which is correct if Campaign isinstalled to a single partition. If Campaign is installed on multiplepartitions, you can specify the partition to use for creating campaigns.
If you leave this field blank, Distributed Marketing obtains thepartition ID from the defaultCampaignPartition parameter underPlatform > Configuration > Distributed Marketing.
106 IBM Unica Distributed Marketing: Corporate Marketer's Guide

Property Description
Folder ID The folder ID where Campaign stores campaigns created from withinDistributed Marketing.
This ID comes from the CampaignUA_Folder system table. You must setup this system table in Campaign before you define it here.
Template Tabs tabUse this tab to add forms to the Summary tab and create custom tabs. Forexample, you could create a custom tab called Printing, where you want users tospecify information about the outside vendor that they plan to use to get thecollateral printed. In this tab, you could add a drop-down list that allows users toselect a printing company from a list of several vendors. You could also add a textbox that allows users to enter the quoted price of each page of the collateral.
Tab Page Style
Select summary to add additional forms to the bottom of the Summary tab.Typically, you select this option for forms containing a relatively small amount ofdata that you want users to see on the Summary tab when they first open theobject.
Click tab to specify that the tab’s contents should appear on a separate tab. Usethis option for forms, or groups of forms, that require their own page, as in thePrinting tab example.
Tab Visibility
Click Show in Wizard to make the tab visible in the new object wizard in IBMUnica Distributed Marketing. If you leave this unchecked, the tab does not displaywhen you create an object using the wizard, but appears once you save the object.
To add a tab to a template1. Navigate to the Tabs page for the template.
2. Click the Add a Tab icon ( ).3. Enter a descriptive name for the tab in the Name text box.
The name you choose becomes the name of the tab in objects created from thistemplate.
4. Choose whether to show the form on the Summary tab or its own custom tab.5. Select a form from the Form pull-down list.
This list contains all the forms available in IBM Unica Distributed Marketing.
Note: For List templates, forms of type Campaign are not listed.6. Select the visibility options for the tab.
7. Click Save Changes to save the tab, or the Add a Tab icon ( ) to addanother tab.
Chapter 12. Building and managing templates 107
To move a tab or form on a template1. Navigate to the template’s Tabs tab.2. Click one of the following buttons after Move:
v Down to move a tab down. Moving a summary tab down places it lower onthe object's Summary page. Moving a separate tab down places it further tothe right in the tab list. For example, if the tab was fourth in the list, movingit down once makes it fifth.
v Up to move a tab up. Moves it up or forward one position.
Note: Summary tabs must come before non-summary tabs.
To delete a form or custom tab from a template
Important: Deleting a form or custom tab from a template deletes it from allexisting objects created from the template. Do not delete a form or custom tab froma template that has already been used to create items. If you do, data will be lost.1. Navigate to the template’s Tabs page.2. Scroll to the section that defines the form or custom tab you want to remove
and click Delete (on the right side of the page).The form or custom tab is removed from the object template.
3. Click Save Changes.
Template Attachments tab
You can store attachments with a template, so that whenever an object is createdfrom the template, certain images or documents are attached to the object bydefault.
Use this tab to perform the following actions.v Add one or more attachment folders to organize attachments; use the Add a
Folder link.v Attach one or more files to the template.v Move folders up or down in the list; use the Up and Down links to reorder
attachment folders.v Delete default attachments; click the Delete link next to the file you want to
remove.v Delete folders; click the Delete link next to the folder you want to remove. All
attachments under the folder are also deleted.1. Navigate to a template's Attachments page.2. Click the Add an Attachment link next to the folder to contain the asset.
The Upload Attachment dialog appears.3. Enter the file name and path or use the Browse button to locate the attachment.4. Click Save Changes to attach the file.
The attachment file is displayed in the list under its folder.5. On the Attachments tab, click Save Changes to save the new default
attachment.Repeat the steps to add as many attachments as needed.
108 IBM Unica Distributed Marketing: Corporate Marketer's Guide

Template Custom Links tab
Use this tab to create custom links that appear on one or more tabs for the objectcreated from this template. For example, you may want to link to an applicationthat your organization uses to generate ID codes for collateral pieces or directmarketing offers.
When adding parameters, the screen contains a series of pull-down menus. Thechoices you make in one list determine the choices available from the subsequentlist. This screen contains the following properties.
Property Description
Name Enter a name for the link. This value becomes the name of the link.
ID Enter the unique internal ID of the custom link.
Description Enter some descriptive text for the link This text is shown on themouseover for the link.
URL Enter the URL to open when users click the link.
Add a Custom
Link icon ( )
Click to add a new link; a new group of fields appears. To add thelink, fill in the fields and click Save Changes.
Add Parameter Click to add a parameter to the custom link. Name and Value fieldsappear. Depending on your selections, new name/value field pairsappear.
IBM Unica Distributed Marketing looks for a question mark(?) at theend of the URL and places the parameters after the question mark. If itdoes not find a question mark, it appends one to the end of the URLand then adds the parameters.
Delete (link) Click to delete a custom link. This link appears next to the AddParameter link for the link that you are deleting.
Delete(parameter)
Click to delete a parameter for a custom link. This link appears nextparameter you are deleting.
Up Down If you have more than one custom link, use the Up and Down links toreorder the custom links.
Workflow templates page
Use the Workflow templates page to import, export, delete, enable, or disableworkflow templates.
To edit workflow templates, use the Workflow tab of a project template. That is,import the workflow template into a project template, edit the workflow, and thenresave the workflow template.
Workflow templates fields and functions
The Workflow templates page lists all the workflow templates and presents thefollowing information and functions.
Icon Item Description
Name The name of the workflow template.
Chapter 12. Building and managing templates 109
Icon Item Description
Stages/Tasks The number of stages and tasks in the workflow, separatedby a ‘/’ character. For example, this column’s value for aworkflow that has 5 stages and 30 tasks is 5 / 30.
Created Date The date the template was created.
Last ModifiedDate
The date of the most recent change made to the template.
Status Whether the template is enabled or disabled. When aworkflow template is created, its status is set to Enabled bydefault.
Export A link that enables you to export an individual workflowXML file. You can then import it into another IBM UnicaDistributed Marketing system.
Importicon (
)
Import WorkflowTemplate
A link that enables you to import an individual workflowXML file, typically one that was exported from another IBMUnica Distributed Marketing system.
Deleteicon (
)
Delete SelectedWorkflowTemplate
A link that allows you to delete selected workflowtemplates.
Enable/Disablebutton
Enable/DisableWorkflowTemplate
Marks the selected templates as enabled or disabled. Adisabled workflow template cannot be selected from a List,On-demand Campaign, or Corporate Campaign template.
To export a workflow template
You can export individual workflow templates. You may want to edit the exportedXML file, then reimport the workflow template back into IBM Unica DistributedMarketing.1. Select Settings > Distributed Marketing Settings.2. Click Template Configuration.3. Click Workflow.4. Click the Export link for the workflow you want to export.5. Choose a location to save the XML file, and save it.6. Open the file with a text or XML editor, make your changes, then save the file.7. Navigate back to the templates library (Settings > Distributed Marketing
Settings).
8. Click the Import Workflow Template icon ( ) and browse to your editedXML file.
9. Name the file to differentiate it from the previous version.For example, if you export Marketing Collateral, you could name youredited file Marketing Collateral 2. (You can always rename the file later.)
10. Create a template and use the new workflow; or open an existing templateand replace the old workflow template with the new one.
110 IBM Unica Distributed Marketing: Corporate Marketer's Guide

Data Mapping Definitions page
The Data Mapping Definitions page allows you to map data between objects inDistributed Marketing and campaigns in Campaign. Use the Data Mapping linkfrom the Template Configuration page to configure data mapping.
The Data Mapping Definitions page contains the following columns:
Column Description
Name The name of the data mapping file.
Type Campaign Data: maps Distributed Marketing attributes to Campaignattributes.
If you have map files from previous versions, you may see othervalues in the Type column.
Used By A list of templates that use this data map.
Note: You cannot create a map file within Distributed Marketing; use a text orXML editor to create and edit the necessary map files.
The Campaign Service URL field on the Campaign tab in a Corporate Campaigntemplate behaves as follows:v If it is blank, data mapping does not occur.v If it contains information, the value in the field is used to map data between
Distributed Marketing and Campaign.
To add a data mapping
Use a text or XML editor to create or edit a data mapping file. After you have adata mapping file, you add it to Distributed Marketing using the followingprocedure.1. Select Settings > Distributed Marketing Settings.2. Click Template Configuration > Data Mapping.
3. Click the Add a data mapping icon ( ).The Upload Data Mapping dialog box appears.
4. Enter a name.This is the display name for the data mapping file.
5. Browse to the XML file that defines the data mapping.6. Click Continue.
To edit a data mapping
If you want to update a data mapping file, you must first edit the XML file, andthen reload it back into Distributed Marketing.1. Open the data mapping XML file in a text editor and make your changes.2. Select Settings > Distributed Marketing Settings.3. Click Template Configuration > Data Mapping.4. Click the file name you are updating.
The Update Data Mapping dialog box appears.
Chapter 12. Building and managing templates 111

5. Select File, and browse to the XML file.6. Click Continue.
You are prompted to overwrite the existing file.7. Click:
v Save to overwrite the existing file with the newer version, orv Cancel to leave the previous version of the file.
Icons page
The Icons page allows you to view and add icon files. These icons are displayed invarious sections of Distributed Marketing, and for object templates you choose.
Use the Icons link from the Template Configuration page to manage icons used inobject templates.
The Icons page contains the following columns:
Column Description
Image files A large and small image for each icon. Click the images to change theicon name or the image files.
Name The name of icon.
Used By A list of object templates that use this icon.
Delete A link to delete the form. This link is only available for icons that arenot used in any templates.
When you specify icons, specify two image files for each icon:v Main icon: the large image is displayed when a file of this type is presented in
the system. For example, the main icon is shown in the List, On-demandCampaign, or Corporate Campaign selector (the dialog box that appears whenyou create a List, On-demand Campaign, or Corporate Campaign; you selectfrom a list of templates).
v List icon: the small image appears on the object list page. For example, the List,On-demand Campaign, or Corporate Campaign list page contains the list iconsfor all List, On-demand Campaign, or Corporate Campaign on the page.
To add or edit an icon1. From the Settings menu, select Distributed Marketing settings.2. Click Template Configuration.3. Click Icons.
The Icons list page appears.4. Click:
v The Add an Icon icon ( at the upper right section of the page, to addan icon, or
v An icon image (large or small) to edit an icon.The Update Icon dialog appears.
5. Type or edit the name of the icon.
112 IBM Unica Distributed Marketing: Corporate Marketer's Guide

Note: If you are updating an existing icon's name only, do not check the boxnext to the File or List Icon Image File labels and skip step 6. If you want toupdate either image, check the box corresponding box and continue to step 6.
6. Enter file names for the icon images:v Navigate to a main image file using the Browse button of the File field to
add or change the main image.v Navigate to a list image file using the Browse button of the List Icon Image
File field to add or change the list image.
Note: Distributed Marketing is installed with a set of default icons; you canchoose from these icons, or add icons customized for your organization. Fileimages have a maximum size of 46 x 54 pixels. List icon images a maximumsize of 20 x 24 pixels.
7. Click Continue to load the files into Distributed Marketing, or Cancel to stopthe upload:
8. Click Save Changes to confirm the upload, or Cancel to stop the upload.The new or edited icon appears in the list.
About importing and exporting templatesThe template import/export functionality allows you to:v Export templates into a self-contained archive, andv Import templates that have previously been exported or saved to a
self-contained archive.
Specifically, the export command downloads a ZIP archive to your computer;import uploads a ZIP archive to the Distributed Marketing server.
You can use the import and export commands to create a portable archive. Forexample, you can export all of your templates from a test server after you verifythey work correctly, then import them to a production server.
To import templates
You can use the import button to import workflow templates that were created inthe same version of Distributed Marketing that you are using. To import templatesfrom an earlier version of Distributed Marketing, you must upgrade.1. From the Settings menu, select Distributed Marketing Settings.2. Click Template Configuration.
3. Click the Import icon ( ).The Import Templates dialog appears.
4. Enter the path name of the template archive you are importing, or navigate toit using the Browse button.
5. In the Update Database section, choose which database scripts to run:v Drop tablesv Create/Update tablesv Drop Lookup Tablesv Create/Update Lookup TablesChecking all the boxes will fully import the template. However, you will loseany data you had if you are reimporting the same templates.
Chapter 12. Building and managing templates 113

Note: If you are concerned about overwriting data, you can examine the SQLscript files in the template archive to see the details, and create the necessarytables and columns manually.
6. Click Continue to import the selected template(s).A summary page appears, detailing templates being imported, and anywarnings about current template files that will be overwritten.
7. Click:v Save Changes to import the templates, orv Cancel to stop the import, and avoid overwriting any existing templates.The system reads the template files and analyzes them, and reports any errors.Imported templates are saved to the template database, then all availabletemplates are reloaded from the database.
Note: The archives containing the example templates are located in the\tools\admin\ folder under your Distributed Marketing installation. Use thearchive for your database type. (For example, use sample_templatesDB2 if youare using a DB2® database.)
About exporting templates
If you create or edit a group of templates on a development or test DistributedMarketing server, you can export them and then import them to a productionserver.
The template export feature in Distributed Marketing allows you to export a groupof templates or a single template. In either case, the system creates a self-containedZIP archive; you can use this archive to import the templates to anotherDistributed Marketing server.
Export creates separate SQL scripts. These separate scripts give you more controlover updating your database to work with the new templates when you importthem. For example, if you need to add a column here or there, you can run onlythe create/alter scripts, so as not to needlessly delete tables and existing data.
The system generates the following script files (to use when you import thetemplate archive).
Table 15. Generated script files
File Description
createlkup.sql Adds columns to existing lookup tables, and creates new lookup tablesneeded for the templates.
droplkup.sql Deletes existing lookup tables used by the templates. If you do notmind possibly deleting data, you run this script before createlkup.sql toensure that the database is set up correctly.
insertlkup.sql Inserts data into the lookup tables. This script makes it possible to savecomplete lookup tables (schema plus data) with the template archive.
To export a group of templates1. From the Settings menu, select Distributed Marketing Settings.2. Click Template Configuration.
3. Click the Export icon ( ).
114 IBM Unica Distributed Marketing: Corporate Marketer's Guide

The Export Templates dialog appears.4. Select the Database Type from the pull-down list.
This determines the format of the SQL script files generated with the exportedtemplates.
5. Click:v Continue to export the templates, orv Cancel to stop the export; skip the remainder of the instructions.
6. Click Open or Save from the File Download dialog that appears.The system creates a ZIP archive containing the template and SQL script files.
To export a single template1. From the Settings menu, select Distributed Marketing Settings.2. Click Template Configuration.3. Click Templates.4. Click the name of the template to export.
The Properties tab appears.
5. Click the Export icon ( ).6. Specify the Database Type of the system that will receive the template
metadata through an import operation. The selected database type determinesthe format of the SQL script files that are generated by the export process.
7. Click Continue to export the template, or Cancel to cancel the export; skip theremainder of the instructions.
8. Click Open or Save on the File Download dialog that appears.The system creates a compressed archive containing the xml and SQL scriptfiles for the selected template. Open or extract the archive file to view thesefiles.
About template validationYou can perform two types of template validation:v Database validationv Attributes validation
You can perform validation at any time by clicking the Validate Templates link onthe Templates Configuration page. Additionally, the system performs certainvalidation automatically as described in the following sections.
About database validationDatabase validation checks:v The validity of the database schema, andv Whether form attributes match their data type in the database.
Notes about database validation:v The system performs this type of validation on import, upgrade, and export of
templates. For export, only forms not linked to any template are validated.v On import and upgrade, you can save templates even if invalid. You receive
warnings, but can still save.v When adding a form, you cannot save the form if validation finds any errors.
Chapter 12. Building and managing templates 115

About attribute validationTemplates attributes type validation checks whether two form columns from twotemplates point to same table column but with different type (for example, one hasa type of select and the other is multi-select).
If two or more form attributes with different types point to the same table column,the system generates an error describing the inconsistency.
116 IBM Unica Distributed Marketing: Corporate Marketer's Guide

Chapter 13. About the Form Editor
You use the Form Editor to create and edit template components. Forms captureinformation about the List, On-demand Campaign, or Corporate Campaign. Formsare also the way a field marketer provides input to Campaign flowcharts.
Forms and attributes
Forms are collections of attributes. Attributes are used to collect data about Lists,On-demand Campaigns, or Corporate Campaigns.
Forms define how the attributes are displayed for input by field marketers orcorporate marketers, and how the supplied values are stored in a database.
Forms and Campaign flowcharts
When a flowchart is published in Campaign, an associated form is automaticallycreated in Distributed Marketing.
How forms and Campaign flowcharts relateWhen a flowchart is published in Campaign, an associated form is automaticallycreated in Distributed Marketing. You use this form to capture and sendinformation from Distributed Marketing to Campaign.
By using the form in this way, you give field marketers control over certain aspectsof On-demand Campaigns and Lists.
The administrator does this by exposing parameters in Campaign, publishing theflowchart, and then working with the automatically created form in DistributedMarketing.
Campaign tasks
In Campaign, you must create flowcharts, expose parameters, and publish theflowcharts. The typical workflow is as follows:1. Create an input flowchart. The function of this flowchart is to create a list as an
input to Distributed Marketing.2. For the input flowchart, expose the parameters that the field marketer should
be able to control, for example, gender and income range.3. Create an output flowchart. The function of this flowchart is to hold the final
list of prospects for the On-demand Campaign.4. For the output flowchart, expose the parameters that the field marketer should
be able to control.For example, you may want to field marketer to be able to customize thegreeting and the branch name.
5. Publish both the input and output flowcharts.
© Copyright IBM Corp. 2001, 2012 117
Distributed Marketing tasks
In Distributed Marketing, you must create a template for an On-demandCampaign or List. The typical workflow is as follows:1. Run the SQL commands produced as part of the flowchart publishing process.2. Edit the forms that were created when the flowcharts were published in
Campaign.3. On the Form Definitions screen, click Publish next to the form to make the
form available for use in templates.4. Create a template for an On-demand Campaign or List.5. Add two tabs to the template, one for the input form and one for the output
form.6. Create a new On-demand Campaign or List, using the new template.7. Generate the list.8. Run the On-demand Campaign or List.
Integrating offers in flowchartWith offer integration, the offers assigned in a flowchart are sent to DistributedMarketing as part of the publish process. The publish web service call toDistributed Marketing now has the information of cells and their respective offers.
Corporate Marketers design the flowchart in Campaign and publish it toDistributed Marketing. They also configure On-demand Campaign templates withthe same flowchart form. After, the template is ready to be used by FieldMarketers. While designing the flowchart, the Corporate Marketer assigns offers totarget cells. When the Field Marketer runs a flowchart, the offers configured by theCorporate Marketer are used.
The Field Marketer is only able to choose between available offers for each cell,and the offer selection will be used during a flowchart execution in Campaign.
Note: This feature is available for On-demand Campaigns only.
Field Marketers are not able to view or select offers in an instance if OfferIntegration is turned off. If Offer Integration is turned on, the Field Marketer willbe able to view and select offers in an instance.
By default, settings for Offer Integration at template level will be disabled.
Republishing flowchart after changes
A Campaign user may edit the process configuration of a mail or call list bychanging the offer association with the target cells. If the flowchart is alreadypublished, using Save & Finish will automatically republish the flowchart. Tonotify Distributed Marketing about the changes made, the Campaign user will saveand publish the flowchart.
Note: If the Corporate Marketer does not publish the updated flowchart form, theField Marketer will receive an error message and will not be able to run theflowchart.
After the changes have been made, a new set of offers with their ID, name,description, and cell information will be propagated to Distributed Marketing.
118 IBM Unica Distributed Marketing: Corporate Marketer's Guide

Deleting offers
Campaign users may delete offers currently being used in flowcharts and inDistributed Marketing campaigns.
If a cell or offer used in the flowchart is updated or deleted from the campaignand the user does not publish the flowchart, there will not be a version mismatchfor the flowchart. Also, while executing the flowcharts from Distributed Marketing,the system verifies that the offer or cell used for execution is not correct, andflowchart execution will fail. Campaign notifies Distributed Marketing with theappropriate changes in the flowchart.
Adding a form generated from CampaignWhen you publish a flowchart in Campaign, an associated form is automaticallycreated in Distributed Marketing. However, the underlying schema for the formdoes not yet exist in the Distributed Marketing database.
When you open such a form, you are presented with a screen where you can selectthe database type and the action to take. You select one of the following:v Preview SQL
Select this option to preview the SQL script that will be used to create thedatabase table for the form.
v Run SQL Script
Select this option to run the SQL script to create the database table for the form.
You cannot work with the form unless the underlying schema exists. That is,before you can edit or publish the form, someone must run the generated SQLcommands to create the table(s) to store the contents of the form.
About invalid formsIf a flowchart in Campaign that is associated with a form in Distributed Marketingis modified, then the form becomes invalid. Templates that use the form alsobecome invalid.
Furthermore, all flowchart run tasks that use the form are canceled.
In order to make the form and templates that use it valid, and to be able to runflowchart run tasks that use the form, you must run the SQL generated by therepublished flowchart.
Note: Invalid forms are marked with a red exclamation point. If a form is deleted(for example, when flowchart is removed in Campaign), then the template ismarked with a red cross.
For an upgraded system, if you want to use a user variable value with 450characters for existing values or tables, then you need to manually alter thelook-up table that you want to use. Otherwise, the form will be invalid.
Chapter 13. About the Form Editor 119

Form Definitions page
Use the links and commands on the Forms Definition page to work with forms.You access this page by selecting Settings > Distributed Marketing Settings, thenclicking Template Configuration, then Forms.
The following table describes the links contained in the Form Definitions page:
Link Description
Name The name of the form. Click the name to open the form.
The Pencil icon after a form Name indicates that the form hasbeen updated but the changes are not yet published.
The red exclamation mark indicates that a form is temporarilyinvalid because the associated flowchart was republished fromCampaign.
The yellow triangle icon indicates that a form has beenrepublished and there are changes that must be validated; youmust run a SQL script to validate the form.
Disable/Enable Link to toggle the form between Enabled and Disabled states.
v Disable: indicates that the form is currently Enabled. Clickto disable the form. Disabling the form prevents it frombeing selected in a template.
v Enable: indicates that the form is currently Disabled. Clickto enable. Enabling a form allows it to be selected in atemplate.
Used By The list of templates that currently use the form. Click atemplate name to open that template.
Publish Click to publish the form.
Revert Click to discard all the changes made to the form and revert itto the previous published version.
Delete Click to delete the form.
To edit a form
You cannot edit a form in the Published state. You must first disable a publishedform in order to edit it.
The system continues to use the published version of the form while you areediting it.1. From the Settings menu, select Distributed Marketing settings.
The Administrative Settings screen opens.2. Click Template Configuration.
The Template Configuration screen opens.3. Click Forms.
The Form Definitions screen opens.4. Make changes to the form as necessary.
If you are making multiple changes, you should periodically click SaveChanges to save the form and continue working.
5. When you are finished editing the form, click Save and Exit.
120 IBM Unica Distributed Marketing: Corporate Marketer's Guide

The Form Editor closes and you return to the Form Definitions screen.
You must now either republish or revert the form.
To revert a form
You can revert a form to its last published state when you do not want to userecent changes.1. From the Settings menu, select Distributed Marketing settings.
The Administrative Settings screen opens.2. Click Template Configuration.
The Template Configuration screen opens.3. Click Forms.
The Form Definitions screen opens.
Forms that have changed are indicated by a pencil icon ( ).4. In the row for the modified form, click Revert.
The form reverts to its last published state.
To delete a form
You cannot delete a form that is referenced by a template.1. From the Settings menu, select Distributed Marketing settings.
The Administrative Settings screen opens.2. Click Template Configuration.
The Template Configuration screen opens.3. Click Forms.
The Form Definitions screen opens.4. In the row for the form, click Delete.
You are prompted to confirm the deletion.5. Click OK to delete the form.
The form is removed from the system.
About Run History seriesDistributed Marketing produces a series of run histories, with each seriesconceptually tied to a version of the form used to generate the results. You viewthe run history series in the Run History drop-down menu in the Analysis tab. TheRun History drop-down menu allows you to see all revisions or the "run historyseries," with the most recent one selected by default.
About merging formsWhen a flowchart is republished in Campaign, a new form is generated that mustbe merged with the old one. For example, the flowchart may expose a newparameter; you must merge the form to have that parameter appear.
When merging forms, note the following:
Chapter 13. About the Form Editor 121

v For trivial flowchart changes (for example, when a lookup value for an existinguser variable is added), you do not need to take any action, other thanrepublishing the flowchart in Campaign. Distributed Marketing recognizes thesechanges automatically.
Note: However, in this example, you do have the option of not merging thechange if Distributed Marketing uses different lookup values.
v If user variables are added to or deleted from the flowchart, the system alertsmarketers to the fact they need to revalidate their Lists and On-demandCampaigns.
v Some small changes made to a flowchart are ignored by Distributed Marketing.For example, changes to localized text such as labels, prompts, and optionprompts are ignored, because Distributed Marketing users typically modify thisdata. Therefore the system does not overwrite these changes.
v If you expose new user variables in a flowchart, and there are already objects inDistributed Marketing that use this flowchart, the system does not update theexisting objects with a default value for any new attributes.
To republish a form
You must republish a form when its associated flowchart in Campaign changes.1. From the Settings menu, select Distributed Marketing settings.
The Administrative Settings screen opens.2. Click Template Configuration.
The Template Configuration screen opens.3. Click Forms.
The Form Definitions screen opens.Forms for which the associated flowchart have changed are indicated by a
pencil icon ( ).4. In the row for the modified form, click Publish.5. Edit the form as necessary.
If you are making multiple changes, you should periodically click SaveChanges to save the form and continue working.
Field marketers should revalidate List and On-demand Campaign instances thatuse the updated form.
To change values displayed in forms
You can modify the display values contained in lookup tables that are used topresent choices in drop-down lists and selection tables contained in forms. Thisallows you to display choices to corporate and field marketers in your organizationin their native language. You do this in the Form Editor by modifying individualelements of the form.1. Edit the form for which you want to modify how values are displayed.2. Select an element.3. Click Update Lookup Table.
The Update Lookup Table window opens.4. Modify or translate the values in the table.
122 IBM Unica Distributed Marketing: Corporate Marketer's Guide

For example, translate the values for Acquisition, Cross-selling, and Loyaltyinto a language other than English.Your changes replace the text displayed in the drop-down list or display tablethat is populated by the lookup table.
Note: This step fails if the lookup table is a view rather than a table.5. Save and republish the form when you are finished.
Form status
The follow table lists the possible form status values:
Status Value Description
Published The form has been published to make it available for use in templates.You cannot edit a form in this state; you must first disable it.
A Published form is also Enabled.
Disabled A previously Published form was disabled so that it could be edited.
Enabled A previously Disabled form was enabled so that it could be used bytemplates.
Form Editor page
The Forms Editor is a visual tool to help you lay out how you want pages toappear to corporate and field marketers.
The form layout is displayed in the main area of the page. In this area, you can:v Change the format and labels of the parameters.v Rearrange the layout by selecting and moving elements around the page.v Add help text, default values, and mark parameters as required
Form Editor tabs
The Form Editor contains three tabs:v “Add an Element tab” on page 124 tabv “Element Properties tab” on page 126 tabv “Form Properties tab” on page 127 tab
Form Editor Commands
The Form Editor contains the following commands:
Command Description
Save Changes Saves the changes made to this form and continue editing.
Save and Exit Saves the changes made to this form and returns the user tothe Form Definitions page.
Preview Opens a pop-up window that shows how the form looks tocorporate and field marketers.
Cancel Discards the non-saved changes and returns to the FormDefinitions page.
Chapter 13. About the Form Editor 123

Add an Element tab
The Add an Element tab of the Form Editor allows you to select elements and dragthem to the desired location on the form. In this tab, you work with two kinds ofelements:v General Elements, which include the Attribute Group Headerv Custom Elements
Attribute Group Header
You can add group headers to group the fields on the form. When you add a newgroup header, you specify its properties, then drag it onto the form. The followingtable describes the properties for a group header:
Property Description
Group Internal Name Internal name of the group.
Group Display Name The label that is displayed to users on the form.
Description Descriptive text for the group; this is useful for determiningthe purpose. This text is not displayed to users.
Show Group Heading Determines if the Group Display Name is shown on the form.
Group Layout Determines whether the group is displayed in one or twocolumns. The value of this property sets the form layout untilthe next group header on the form appears.
Custom Attributes
You can add custom attributes to the form.
You must first create custom attributes; the custom attributes you create are onlyavailable on the current form.
The following custom attribute types are supported:
Type Description
Text - Single-Line Text field allowing users to enter a single line of text.
Text - Multi-Line Text field allowing users to enter multiple lines of text.
Single-Select Enumerated field, allowing a user to select one value from alist. The choices are driven by a hard-coded list of options youspecify when creating the attribute.
Single-Select DatabaseAttribute reference(SSDAR)
Represents a single property (column) from a row in thelookup table used by the parent SSDOR attribute.
Single-Select DatabaseObject reference (SSDOR)
Extends the capability of an SSDB attribute, and provides usersthe ability to create attributes which represent an entity withmultiple properties.
Single-Select Database Same as the Single-Select attribute, except that the list ofchoices is loaded from a database table containing valid items.
Multiple-Select Database Same as the Single-Select Database attribute, except that youcan choose more than one item from the list.
124 IBM Unica Distributed Marketing: Corporate Marketer's Guide

Type Description
Yes/No Boolean field, allowing a user to select one of two values. Canappear in any of the following ways:
v Check box
v Drop-down list
v Radio button group
Date Select Date selector, where the user can enter a date or select a smallcalendar from which to choose a date.
Integer Numeric field, allowing users to enter whole numbers.
Float Numeric field. You can specify the number of decimal places.
Money Numeric field, allowing users to enter currency values. Thesystem uses the localized currency symbol. You can specify theprecision (number of decimal places) for the field.
User-Select Creates a user selector, which is populated (from MarketingPlatform) with all system users. You can use this attributewhere the value should come from a list of users.
List of Lists Special type of multi-select attribute that displays all of thelists of a field marketer in a multi-select format.
Hidden Used to pass the ListID and Username properties from aCampaign flowchart that is brought into Distributed Marketingas a form.
You can also use this type to create a field to which you assigna default value that you do not need users to see, for example,a field used only for reporting.
Note: Note the following:v Each attribute type can be displayed with different controls as indicated by the
icon in the list.v To create a new attribute, click Create a New Custom Attribute at the bottom of
the custom attribute list.
To create an attribute
Before you can create any custom attributes for the form, the database schema forthe lookup tables must be created. You must do this outside of DistributedMarketing, with your database management software.
You can create custom attributes from the Add an Element tab of the Form Editor.
Note: Custom attributes you create are only available in the form you are editing.1. Open the Form Editor for the form to which you want to add a custom
attribute.2. With the Add an Element tab open, click Create a New Custom Attribute.
The Create a New Custom Attribute dialog box opens.3. Enter information in the Basic Options section as needed.
Fields marked with two red asterisks (**) are required.Additional Basic Options fields may be added, and the Display Options maychange, based on the Attribute Type you select.
4. Set the Display Options as needed.5. Click Save and Exit to save the attribute and return to the form editor.
Chapter 13. About the Form Editor 125

You can also click Save and Create Another to save this attribute, and thencreate another attribute in the same dialog box.
The custom attribute is now available for use in this form.
To create a dependent attribute
Dependent attributes are attributes whose values are constrained by anotherattribute value. For example, if you want to have a field that displays all the citiesfor a selected state, you could make the City attribute dependent upon the Stateattribute.
You can make only the following attribute types dependent on other attributes:v Single-Select - Databasev Multiple-Select - Database1. Create the parent attribute.
To continue with the example above, you would create the State attribute.2. Place the parent attribute onto the form.
The Create a New Custom Attribute dialog box opens.3. Create the child attribute.
For example, you would create the City attribute.4. In the child attribute, check the field This field is dependent on the following
column.5. Select the database table column on which this attribute is dependent.
For example, you would select the State column.6. Click Save and Exit to save the attribute and return to the form editor.
You can also click Save and Create Another to save this attribute, and thencreate another attribute in the same dialog box.
The dependent custom attribute is now available for use in this form.
To delete a custom attribute
Note: You cannot delete custom attributes from forms that were createdautomatically from a published Campaign flowchart.1. In the Form Editor, select the custom attribute to delete from the Custom
Attributes list.The custom attribute to delete must be in this list, and not in the form itself.
2. Click Delete the selected attribute.You are prompted to confirm the deletion.
3. Click OK.The custom attribute is deleted.
4. Click Save Changes or Save and Exit to save the form with the deletion.To cancel the deletion, click Cancel.
Element Properties tab
The Element Properties tab displays the properties of the currently selectedelement in the Form Editor. This tab is displayed when you select a single elementin the form.
126 IBM Unica Distributed Marketing: Corporate Marketer's Guide

The values displayed in this tab are read-only. To edit the values, click EditCustom Attribute or Edit Attribute Group.
Form Properties tab
The Form Properties tab displays the properties related to the form. Use this tab toview or edit the form properties. The tab contains the following information:
Property Description
Form name The name of the form.
If the form was created automatically when a Campaignflowchart was published, the Flowchart name, ID, type aredisplayed in read-only mode.
Form Description Description for the form.
Form Layout Radio button group indicating whether the form has a one- ortwo-column layout.
Properties for forms associated with Campaign flowcharts
If the form was created through the publishing of a Campaign flowchart, it hasseveral additional properties:
Property Description
Flowchart Type The flowchart type is either List or Campaign. On-demandCampaigns and Lists typically have two tabs, one for inputand one for output. The input form should be designated asList, and the output form should be designated as Campaign.
Flowchart Name The read-only name of the corresponding flowchart inCampaign.
Flowchart Version The read-only version of the corresponding flowchart inCampaign.
To remove a custom attribute from a form
Note: You cannot remove custom attributes from forms that were createdautomatically from a published Campaign flowchart.1. In the Form Editor, select the element to delete.
2. Click the Delete icon ( ).The element is deleted from the form.
3. Click Save Changes or Save and Exit to save the form with the deletion.To cancel the deletion, click Cancel.
Single Select DatabaseSingle Select Database (SSDB) gives you the ability to create single selectdrop-down attributes based on database tables.
You can select only one value at a time from a drop-down list or a radio buttongroup depending on the display format selected while creating the attribute.
Chapter 13. About the Form Editor 127

You use single select databases when the underlying lookup table exhibits akey-value relationship, and when one entity can be defined by one attribute andidentified by one key column.
These tables must follow certain conventions.1. The table names must have a prefix: lkup.2. It must have at least two columns: a key column and a column storing display
values.3. It is recommended to have the key column with a primary key constraint to
avoid repetition. Even if the lookup table being pointed to is a view, ensurethat the data in the view has unique records.
4. It is recommended to not have more than three columns, where the thirdcolumn refers to the relationship with another SSDB attribute. Having morethan three columns in the lookup table will render the unused columnsredundant.
5. Set the Sort-by Column field to the same column as the Display Column, sothat your Display Column values are visible when you select a column sortorder.
Single Select Database Object ReferenceSingle Select Database Object Reference (SSDOR) attributes extend the capability ofan SSDB attribute, and provides users the ability to create attributes whichrepresent an entity with multiple properties.
Follow the below conventions while creating an SSDOR.v Select database look up table having numerous columns representing an entity.v Select the key column carefully as this table might have many columns, and
based on the value in the key column, the dependent attributes will bepopulated. You should use a primary key constraint on this table as data maykeep growing in this table. If the look up table being pointed to is a view, ensurethat the data in the view has unique records identified by a unique key column.
v Choose the appropriate columns from the available ones to be displayed at theinstance level.
v SSDOR attributes are mandatory, but are not read-only.
The underlying database lookup table will have multiple columns. An entire rowin the look up table would represent the object (entity). The data in this table maykeep on growing.
SSDOR attributes will allow users to select the columns they would like to view sothat they can make more informed choices of the value to be selected at the outset.
Note: Date/date time type fields are not supported in the SSDOR display column.
Single Select Database Attribute ReferenceA Single Select Database Attribute Reference (SSDAR) represents a single property(column) from a row in the lookup table used by the parent SSDOR attribute.
Selection of the look up table is automatic, depending on the parent SSDORselected. The lookup table for an SSDAR will always point to parents lookup table.
Use the following conventions while creating SSDAR attributes.
128 IBM Unica Distributed Marketing: Corporate Marketer's Guide

v The form must have at least one SSDOR attribute.v Select the parent attribute carefully, and the lookup table will be populated
automatically.v Give intuitive names to attributes to easily map the attribute to the database
column.v By default, this is a read-only attribute.
The parent lookup table should have a unique key in the table, and that should bemade the attribute key in the Form Editor as well. The parent key column shouldbe present in the child attribute lookup table.
Chapter 13. About the Form Editor 129

130 IBM Unica Distributed Marketing: Corporate Marketer's Guide

Appendix A. About flowcharts
You use flowcharts to perform a sequence of actions on your data for executingyour campaign logic. Campaigns are made up of one or more flowcharts.Flowcharts are made up of processes, which you configure to perform the datamanipulation, contact list creation, or contact and response tracking required foryour campaign. In effect, the processes are how you define and implement acampaign.
Note: Working with flowcharts requires the appropriate permissions. Forinformation about permissions, see the IBM Unica Campaign Administrator's Guide.
Creating flowchartsYou can add a new flowchart to your campaign either by creating a new one, orcopying an existing one.
Copying an existing flowchart may save time because you can start with acompleted flowchart and modify it to meet your needs.
To facilitate constructing flowcharts, you can use pre-configured flowcharttemplates to quickly create common campaign logic or process box sequences. Youcan also save and reuse other objects such as queries, table catalogs, triggers,custom macros, user variables, and definitions of derived fields.
Flowchart design considerationsYou should be aware of the following considerations when creating flowcharts.v Avoid cyclical dependencies. Be careful not to create cyclical dependencies
among your processes. For example, your flowchart has a Select process thatprovides input to a Create Seg process. If you choose as input in your Selectprocess a segment that will be created by the same Create Seg process that theSelect process provides output to, you will have created a cyclical dependency.This situation will result in an error when you try to run the process.
v Applying global suppressions. If your organization uses the global suppressionfeature, be aware that a particular set of IDs might be automatically excludedfrom use in target cells and campaigns.
To create a new flowchart
Note: If you are creating an interactive flowchart, see the IBM Unica Interactdocumentation for information.1. In the campaign or session to which you want to add a flowchart, click the
Add a Flowchart icon.The Flowchart Properties page appears.
2. Enter a name and description for the flowchart.
Note: Under Flowchart Type, Standard Batch Flowchart is the only optionunless you are a licensed user of Interact. If you have installed a licensedversion of Interact, you can also select Interactive Flowchart.
3. Click Save and Edit Flowchart.
© Copyright IBM Corp. 2001, 2012 131

The Flowchart page displays the process palette and a blank flowchartworkspace.
4. Add processes to your flowchart.A flowchart typically begins with one or more Select or Audience processes todefine the customers or other marketable entities with which to work.
Important: Be sure to click Save frequently while adding and configuring theprocesses in your flowchart.
5. Click Save or Save and Exit when you have finished creating your flowchart.
Copying flowchartsCopying an existing flowchart to add to a campaign saves time because you canstart with a completed flowchart and modify it to meet your needs.
If the copied flowchart includes contact processes (Mail List or Call List) withtarget cells linked to target cells defined in the target cell spreadsheet, new cellcodes will be generated for cells in the new copy of the flowchart so that duplicatecell codes do not occur. If the target cells were defined in the flowchart, and if theAuto-generate cell code option in the contact process is off, new cell codes areNOT generated when you paste the copied flowchart.
Note: When you copy a flowchart, if the flowchart logic uses derived fields thatreference cell codes from the old flowchart, the logic will be broken in the newflowchart.
Process configuration settings are copied to the new flowchart. However, any tempfiles or temp tables that were created as a result of running the original flowchartare not copied to the new flowchart.
To copy a flowchart1. View the flowchart you want to copy.
For example, you can click the flowchart's tab while viewing its campaign.2. Click the Copy icon.
The Duplicate Flowchart window appears.3. Select the campaign into which you want to copy the flowchart.
Navigate through the list by clicking the + sign next to a folder to expand it.4. Click Accept this Location.
Note: You can also double-click a folder to select and accept the location in onestep.
The flowchart is moved to the campaign you selected.
Viewing flowchartsIf you have View permissions for a flowchart, you can open it in Read-Only modefor viewing, which allows you to view the flowchart structure, but not to openprocess configuration dialogs or make any changes. In Read-Only mode, you canview the processes and connections between processes to quickly see the purposeof the flowchart.
132 IBM Unica Distributed Marketing: Corporate Marketer's Guide

When the flowchart is open for viewing, you can also zoom out to see moreprocesses at once or zoom in to magnify a portion of the flowchart more closely.
To see more details of the flowchart, such as how the processes in the flowchartare configured, you must open the flowchart for reviewing or editing.
To view a flowchart
You can view a flowchart in three ways:v On the Campaigns page, click the View a tab icon next to the campaign and
select the flowchart you want to view from the menu.v Open the flowchart tab directly from the campaign.v Open the campaign’s Analysis tab, then click the flowchart name from the list of
flowcharts.
To zoom in and out
Click the Zoom In and Zoom Out icons.
Reviewing flowchartsIf you have Review permissions (and not Edit permissions) for flowcharts, you canopen them only in Review mode, which allows you to view process configurationsand modify the flowchart, but you cannot save any changes or perform productionruns of flowcharts or any of their processes. This allows you to safely verify aflowchart’s contents, or copy and reuse processes within a flowchart without fearof inadvertently changing the flowchart.
Important: Be aware that test runs can write output, and that test runs can executetriggers. In addition, even in Review mode, if you have the appropriatepermissions, you can edit custom macros and triggers in the flowchart, and thusmight change the flowchart.
Other actions you can perform in Review mode are:v Test runs if you have the appropriate permissions.v Save processes or the flowchart you are reviewing as a template.
Important: In Review mode, the flowchart auto-save option is disabled and cannotbe enabled. To save changes to a flowchart, you must have Edit permissions.
To review the processes in a flowchart
Note: You open a flowchart in Review mode in the same way as you open aflowchart in Edit mode. Your permissions settings automatically ensure that youcan only access flowcharts in Review mode if you do not also have Editpermissions.
You can open a flowchart for reviewing in several ways:v On the Campaigns page, click the Edit a tab icon next to the campaign and
select the flowchart you want to review from the menu.v Open the campaign, then click the flowchart tab. On the flowchart page, click
the Edit icon.
Appendix A. About flowcharts 133

You can also press Ctrl and click the flowchart tab to open the flowchart directlyin Review mode.
v Open the campaign’s Analysis tab, click the link to the flowchart you want toreview, then click the Edit icon.On the Analysis tab, you can also press Ctrl and click the flowchart link to openthe flowchart directly in Review mode.
When you enter a flowchart in Review mode, you see a message indicating thatthe flowchart is in review mode and that any changes you make cannot be saved.The page header indicates "Reviewing", and only the Cancel option is visible.
Editing flowchartsYou edit a flowchart to add or remove processes or to configure the processes. Youcan also edit the flowchart’s name and description.
Important: If you try to edit a flowchart that is already being edited by someoneelse, Campaign warns you that the flowchart is open by another user. If youcontinue opening the flowchart, the other user’s changes are immediately andpermanently lost. To prevent the loss of work, do not continue opening theflowchart without first checking with the other user.
To open a flowchart for editing
You can open a flowchart for editing in several ways:v On the Campaigns page, click the Edit a tab icon next to the campaign, and
select the flowchart from the menu.v Open the campaign, then click the flowchart tab. On the flowchart page, click
the Edit icon.You can also press Ctrl and click the flowchart tab to open the flowchart directlyin Edit mode.
v Open the campaign’s Analysis tab, click the link to the flowchart you want toedit, then click the Edit icon.You can also press Ctrl and click the flowchart name to open the flowchartdirectly in Edit mode.
To edit a flowchart's properties1. Open the flowchart for editing.2. Click the Properties icon in the Flowchart toolbar.
The Edit Flowchart Properties page appears.3. Modify the flowchart name or description.
Note: Flowchart names have specific character restrictions.4. Click Save Changes.
The modified flowchart details are saved.
134 IBM Unica Distributed Marketing: Corporate Marketer's Guide

Validating flowchartsYou can check the validity of a flowchart at any time (except when the flowchart isrunning) using the Validate Flowchart feature. You do not need to have saved aflowchart to run validation on it.
Validation performs the following checks for a flowchart:v that the processes within the flowchart are configured.v that cell codes are unique within the flowchart, only if the
AllowDuplicateCellCodes configuration parameter is set to No. If this parameteris set to Yes, duplicate cell codes within flowcharts are allowed.
v that cell names are unique within the flowchart.v that offers and offer lists referenced by contact processes are valid (that is, that
they have not been retired or deleted). Offer lists that are referenced but areempty will not generate an error, only a warning.
v that any cells linked to a top-down entry from the target cell spreadsheet are stillconnected.
The validation tool reports the first error found in the flowchart. You might needto run the validation tool several times in succession (after correcting eachdisplayed error) to ensure that you have fixed all found errors.
Note: A best practice is to run validation on flowcharts before executingproduction runs, particularly if you will be running flowcharts by batch mode orwill not be actively monitoring the run.
To validate a flowchart1. On a flowchart page in Edit mode, click the Run icon and select Validate
Flowchart.Campaign checks your flowchart.
2. If errors exist in the flowchart, a message box appears, displaying the first errorfound. As you correct each error and rerun the validation.tool, the remainingerrors are displayed successively.
Testing flowchartsYou can conduct a test run on a flowchart or branch if you do not want to outputdata or update any tables or files. However, note that triggers execute oncompletion of both test and production runs.
When testing processes, branches, or flowcharts, note that global suppression isapplied.
Note: A best practice is to conduct test runs on processes and branches as you arebuilding flowcharts, so that you can troubleshoot errors as they occur. Also,remember to save each flowchart before you run or test it.
To test run a flowchart1. On a flowchart page in Edit mode, click the Run icon and select Test Run
Flowchart.The flowchart runs in test mode. Data is not written to any tables.
Appendix A. About flowcharts 135
Each process displays a blue check mark when it has run successfully. If thereare errors, the process displays a red "X".
2. Click Save and Exit to save the flowchart.You can also click Save to save the flowchart and leave it open for editing.If you click Save and Exit before the flowchart has finished running, theflowchart will continue running and save when it finishes. If you or anotheruser reopen the flowchart while it is still running, any changes made to theflowchart are lost. For this reason, always save a flowchart before running it.To pause the run, right click the process box and select Run > Pause. To stopthe run, right click the process box and select Run > Stop.
3. Click the Analysis tab on the Campaign toolbar and view the CampaignFlowchart Status Summary report to determine if there were any errors in theflowchart run.
To test run a flowchart branch1. On a flowchart page in Edit mode, click a process on the branch you want to
test.2. Click the Run icon and select Test Run Selected Branch.
The flowchart runs in test mode. Data is not written to any tables.
Each process displays a blue check mark when it has run successfully. If there areerrors, the process displays a red "X".
Running flowchartsYou can choose to run an entire flowchart, a branch, or an individual process inthe flowchart. For best results, conduct test runs as you are building flowcharts, sothat you can troubleshoot errors as they occur, and be sure to save each flowchartbefore you test or run it.
Important: For flowcharts containing contact processes, note that each productionrun of a flowchart can generate contact history only once. To generate multiplecontacts from the same list of IDs, snapshot out the list of IDs and read from thelist for each flowchart run.
Note: Users with Administrative privileges can access the Monitoring page, whichdisplays all running flowcharts and their statuses, and provides controls tosuspend, resume, or stop flowchart runs.
To run a flowchart1. If you are viewing a flowchart, you can run it by clicking the Run icon and
selecting Run This.If you are editing a flowchart, click the Run icon and select Save and RunFlowchart.
2. If the flowchart has already been run, click OK on the confirmation window.Data from the run is saved to the appropriate system tables. Each processdisplays a blue check mark when it has run successfully. If there are errors, theprocess displays a red "X".
3. Click Save and Exit to save the flowchart.You can also click Save to save the flowchart and leave it open for editing.
136 IBM Unica Distributed Marketing: Corporate Marketer's Guide

You must save the flowchart once after running to view the results of the runin any reports. Once you have saved the flowchart, results of repeated runs areimmediately available.
Note: If you click Save and Exit before the flowchart has finished running, theflowchart will continue running and save when it finishes.
4. Click the Analysis tab on the Campaign toolbar and view the CampaignFlowchart Status Summary report to determine if there were any errors in theflowchart run.
To run a flowchart branch1. On a flowchart page in Edit mode, click a process on the branch you want to
run.2. Click the Run icon and select Save and Run Selected Branch.
Note: Running only a process or a branch of a flowchart does not incrementthe Run ID of a flowchart. When you run only a process or a branch, if contacthistory records exist, you are prompted to choose run history options beforeyou can proceed. For details, see “About run history options” on page 202.Each process displays a blue check mark when it has run successfully. If thereare errors, the process displays a red X.
To run a flowchart process
Running only a process or a branch of a flowchart does not increment the Run IDof a flowchart. When you run only a process or a branch, if contact history recordsexist, you are prompted to choose run history options before you can proceed.1. On a flowchart page in Edit mode, click a process on the branch you want to
run.2. Click the Run icon and select Save and Run Selected Branch.
Each process displays a blue check mark when it has run successfully. If thereare errors, the process displays a red X.
To pause a flowchart run
When you pause a running flowchart, branch, or process, the server stops running,but saves all the data already processed. You might want to pause a run to free upcomputing resources on the server.
After pausing a run, you can continue the run or stop it.
On a flowchart page, click the Run icon and select Pause This.
Note: If you have the appropriate permissions, you can also control flowchartsfrom the Monitoring page.
To continue a paused flowchart run
When you continue running a paused run, the run resumes at the exact point atwhich it stopped. For example, if a Select process were paused after processing 10records, it would resume running by processing the 11th record.
On a flowchart page, click the Run icon and select Continue This.
Appendix A. About flowcharts 137

Note: If you have the appropriate permissions, you can also control flowchartsfrom the Monitoring page. For details, see the Campaign Administrator's Guide.
To stop a flowchart run
On a flowchart page, click the Run icon and select Stop This.
The results of any currently running processes are lost and a red X appears onthose processes.
Note: If you have the appropriate permissions, you can also control flowchartsfrom the Monitoring page.
To continue a stopped flowchart run
You can continue running a stopped flowchart by running the flowchart branchthat begins with the process where the flowchart stopped. That process will bererun along with all downstream processes.1. On a flowchart page in Edit mode, click the process that displays a red X.2. Click the Run icon and select Save and Run Selected Branch.
Note: If you have the appropriate permissions, you can also control flowchartsfrom the Monitoring page. For details, see the Campaign Administrator's Guide.
Troubleshooting runtime errorsCorrectly configured processes are displayed in color (the specific color reflects thetype of process). A gray process with its name in italics has a configuration error.To find out more information about the error, hold your mouse over the process todisplay a descriptive error message.
If a flowchart stops running due to an error, the processes that were runningdisplay a red X. Hold your mouse over the process to see an error message.
Note: If Campaign is configured so that system tables are stored in a database,you are not viewing the flowchart, and the run stops due to a database connectionfailure, the processes will not display a red X. Instead, the flowchart appears as itdid when it was last saved.
You should also consult the log file for system error information and review theAnalysis and Performance/Profitability reports for the campaign to see that theresults are what you expected.
Deleting flowchartsDeleting a flowchart permanently removes a flowchart and all of its associatedfiles, including the log file. If there are portions of your flowchart that you want tostore for reuse, you can save them as a stored object.
Output files (such as those written by a Snapshot, Optimize, or a contact process)are not deleted, and contact and response history information is retained.
Important: If you try to delete a flowchart that is being edited by someone else,Campaign warns you that the flowchart is open by another user. If you continue
138 IBM Unica Distributed Marketing: Corporate Marketer's Guide

deleting the flowchart, the other user’s changes will be permanently lost. Toprevent the loss of work, do not continue deleting the flowchart without firstchecking with the other user.
To delete a flowchart1. Open the flowchart you want to delete in View mode.
The flowchart tab appears.2. Click the Delete Flowchart icon.3. Click OK on the confirmation window.
The flowchart and all its associated files are removed.
To print a flowchart
You can print hardcopies of flowcharts from Campaign.
Note: Do not use your Web browser’s File > Print command, as flowcharts mightnot print correctly.1. Open the flowchart that you want to print, in either View or Edit mode.2. Click the Print icon.
You see the Page Setup window.3. Click OK.
You see the Print window.4. Click OK to print the current flowchart.
You see a Campaign window indicating that the flowchart is printing.
Packaging flowchart files for troubleshootingIf you need help from IBM to troubleshoot a flowchart, you can automaticallycollect relevant data to send to IBM Technical Support. You can select from a list ofitems to include, and specify date ranges by which to limit data. The data iswritten to the folder you choose, and the contents can be compressed and sent toIBM Technical Support.
In addition to the data items you select, Campaign also creates a summary file thatidentifies:v Current date and timev Version and build numbers of the softwarev Your user namev The selections you included in the package
To package flowchart files for troubleshooting
Only a user with permissions to edit or run a flowchart (either test or productionrun) can perform this procedure. If you do not have “View logs” permission, youcannot select the log-related entries in the selection window.
Use this task to automatically package flowchart data files so you can send them toIBM Technical Support if you need help troubleshooting a flowchart.1. From a flowchart page in Edit mode, select Admin > Collect Flowchart Data.
You see the Create Data Package for Troubleshooting window.
Appendix A. About flowcharts 139

2. Type a name for the package, or leave the default name. The package namewill be used to create a subfolder in which the selected data items will bewritten.
3. Click Browse and select the folder under which the data package will be saved.4. Select the check box for each item you want to include in the package. Some
items, when selected, may allow additional information to be entered withwhich to filter the extracted data.Alternatively, you can check the Select default items check box. This check boxautomatically selects all data commonly required for troubleshootingflowcharts; this includes all of the listed items except the log files and thecontents of the user table, contact and response history tables, strategicsegments, and stack trace files.
5. Click OK to create the package.
Transmitting the flowchart data package to IBM UnicaTechnical Support
You can send the data package to IBM Unica Technical Support by email or usinga method recommended by your support representative. IBM Unica TechnicalSupport will accept uncompressed data (the entire package subdirectory), but youmay optionally compress, encrypt, and package the files into a single file beforesending them to IBM.
Options for packaging flowchart dataTable 16. Options for packaging flowchart data
Item Description of what is includedAdditional specifications you mayset
Select DefaultItems check box
All data commonly required fortroubleshooting flowcharts. Thisincludes all of the listed itemsexcept the log files and thecontents of the user table andcontact history table.
Flowchart The flowchart .ses file. Include run results? Optionallyinclude or exclude the runtimedata files, also called the“underscore” files.
Flowchart Log The flowchart .log file. Optionally set start and end timestamps. If you do not set them, thedefault is the entire log file.
Listener Log The unica_aclsnr.log file. Optionally set start and end timestamps. If you do not set them, thedefault is the entire log file.
Startup Log The AC_sess.log file. Optionally set start and end timestamps. If you do not set them, thedefault is the entire log file.
Web MessageLog
The AC_web.log file. Optionally set start and end timestamps. If you do not set them, thedefault is the entire log file.
140 IBM Unica Distributed Marketing: Corporate Marketer's Guide
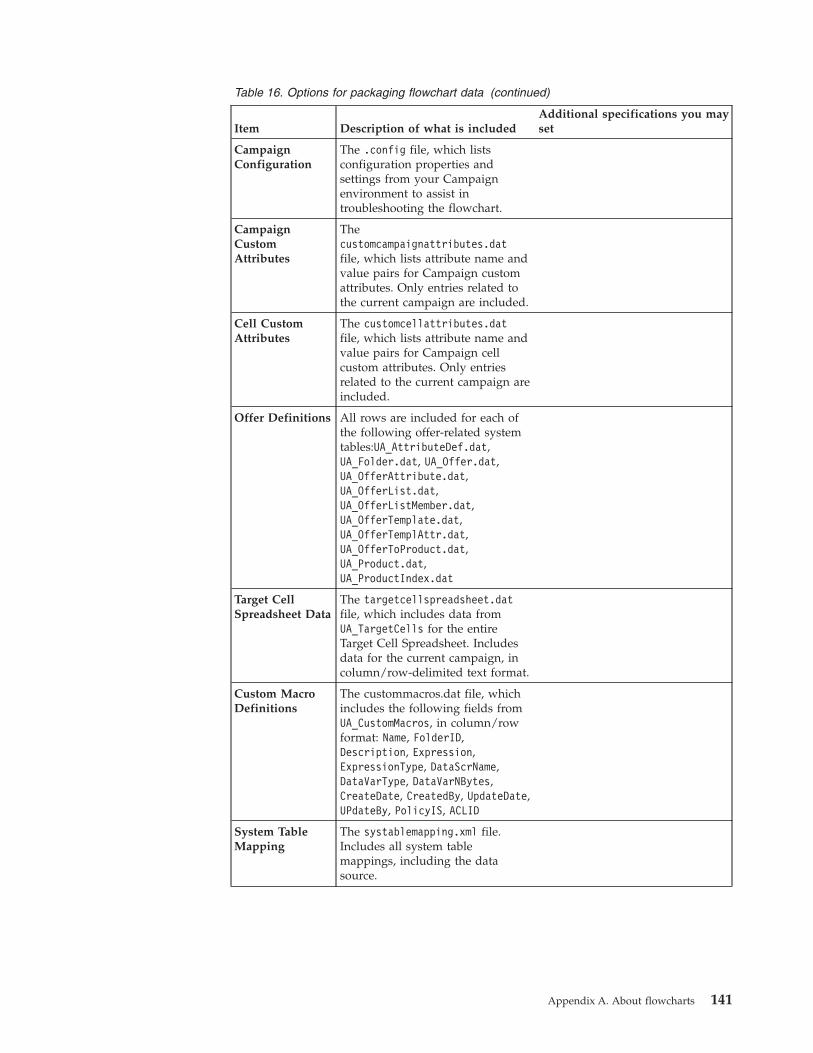
Table 16. Options for packaging flowchart data (continued)
Item Description of what is includedAdditional specifications you mayset
CampaignConfiguration
The .config file, which listsconfiguration properties andsettings from your Campaignenvironment to assist introubleshooting the flowchart.
CampaignCustomAttributes
Thecustomcampaignattributes.datfile, which lists attribute name andvalue pairs for Campaign customattributes. Only entries related tothe current campaign are included.
Cell CustomAttributes
The customcellattributes.datfile, which lists attribute name andvalue pairs for Campaign cellcustom attributes. Only entriesrelated to the current campaign areincluded.
Offer Definitions All rows are included for each ofthe following offer-related systemtables:UA_AttributeDef.dat,UA_Folder.dat, UA_Offer.dat,UA_OfferAttribute.dat,UA_OfferList.dat,UA_OfferListMember.dat,UA_OfferTemplate.dat,UA_OfferTemplAttr.dat,UA_OfferToProduct.dat,UA_Product.dat,UA_ProductIndex.dat
Target CellSpreadsheet Data
The targetcellspreadsheet.datfile, which includes data fromUA_TargetCells for the entireTarget Cell Spreadsheet. Includesdata for the current campaign, incolumn/row-delimited text format.
Custom MacroDefinitions
The custommacros.dat file, whichincludes the following fields fromUA_CustomMacros, in column/rowformat: Name, FolderID,Description, Expression,ExpressionType, DataScrName,DataVarType, DataVarNBytes,CreateDate, CreatedBy, UpdateDate,UPdateBy, PolicyIS, ACLID
System TableMapping
The systablemapping.xml file.Includes all system tablemappings, including the datasource.
Appendix A. About flowcharts 141

Table 16. Options for packaging flowchart data (continued)
Item Description of what is includedAdditional specifications you mayset
+ Include SystemTable Contents
When you select this option, itexpands to list all system tables.
Select each system table to include.The entire table will be included(all rows and all columns).
If you do not select anysub-options, the package will notinclude any system tables.
+ IncludeContact HistoryTables
When you select this option, itexpands to show the contacthistory and detailed contacthistory tables for each audiencelevel.
For each set you select, thepackage will include the contacthistory and detailed contacthistory records for that audiencelevel.
You can optionally set start andend time stamps. If you do not setthem, the default is all records.
If you do not select a suboption,the package will not contain anycontact history table information.
+ IncludeResponse HistoryTables
When you select this option, itexpands to show response historytables for all audience levels.
For each table you select, thepackage will include the responsehistory records for that audiencelevel.
For each table you select, you canoptionally set start and end timestamps. If you do not set them, thedefault is all records.
If you do not select a table, thepackage will not contain anyresponse history table information.
+ Include UserTable Contents
When you select this option, itexpands to show the user tablecontents that you can select for thepackage.
Select the user tables from the flowchart to include.
If you do not select any, thepackage will not include any usertable contents.
For each user table that you select,you can optionally set maximumnumber of rows to include. If youdo not set a maximum number ofrows, the package will include theentire table.
+ IncludeStrategicSegments
When you select this option, itexpands to show all the strategicsegments that you can select forthe package.
+ Include StackTrace Files
Option available for Unix versionsonly. When you select this option,it expands to show the list of stacktrace files (*.stack) in the samedirectory as unica_aclsnr.log.
Select the stack trace files that youwant to include in the package. Ifyou do not select any suboptions,the package will not include anystack trace files.
142 IBM Unica Distributed Marketing: Corporate Marketer's Guide

Flowchart reference
This section describes the icons in the Campaign interface for working withflowcharts.
Flowchart tab icons (View mode)
The flowchart tab uses the following icons in View mode.
The icons, left to right, are described in the following table.
Note: Many of the icons in the interface are associated with features that requirepermissions. For more information, see the Marketing Platform Administrator's Guide.The Copy and Delete Flowchart icons do not appear without the appropriatepermissions:
Table 17. Flowchart tab icons for View mode
Icon Name Description
Edit Click this icon to edit the flowchart.
Run Click this icon to access the Run menu.
Add a flowchart Click this icon to add another flowchart to the campaign.
Zoom In Click this icon to increase the view size of the flowchart.
Zoom Out Click this icon to decrease the view size of the flowchart.
Print this Item Click this icon to print the flowchart.
Copy Click this icon to create a copy of this flowchart.
Delete Flowchart Click this icon to delete the flowchart.
Flowchart page icons (Edit mode)
The Flowchart page uses the following icons in Edit mode.
The icons, left to right, are described in the following table.
Note: Many of the icons in the interface are associated with features that requirepermissions. For more information, see the Marketing Platform Administrator's Guide.
Table 18. Flowchart page icons for Edit mode
Icon Name Description
Run Click this icon to access the Run menu.
Properties Click this icon to view or edit the Flowchart Propertieswindow.
Options Click this icon to access the Options menu.
Appendix A. About flowcharts 143
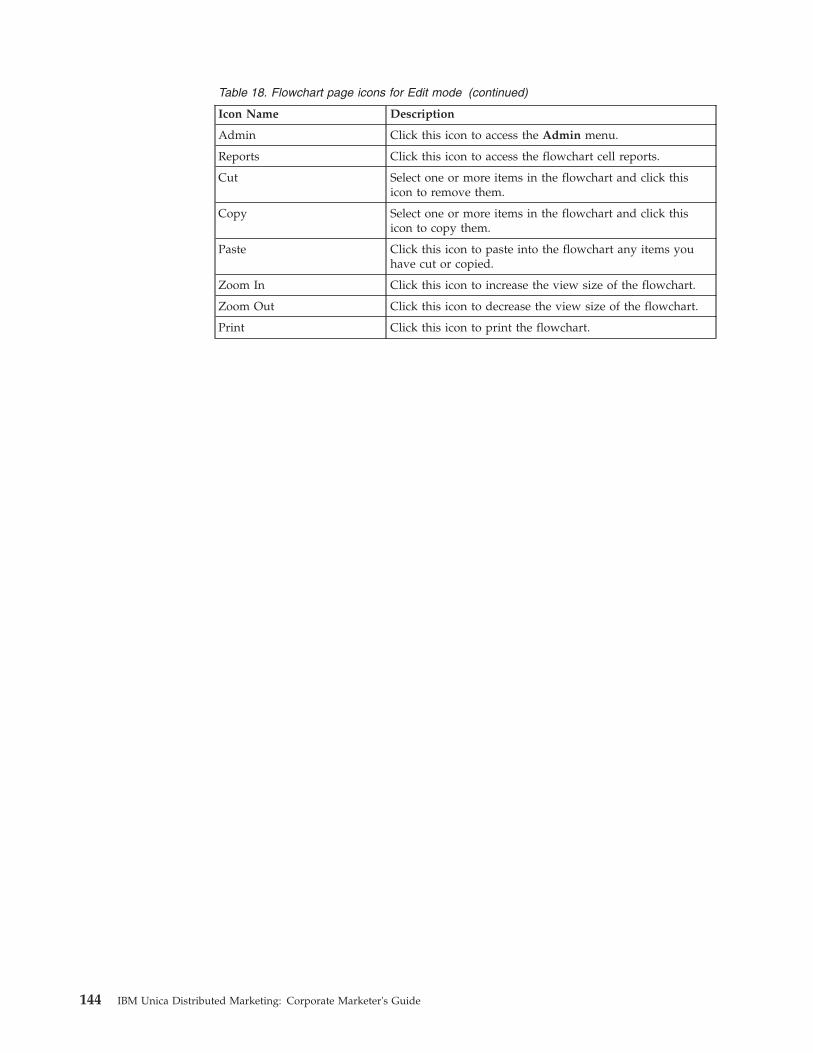
Table 18. Flowchart page icons for Edit mode (continued)
Icon Name Description
Admin Click this icon to access the Admin menu.
Reports Click this icon to access the flowchart cell reports.
Cut Select one or more items in the flowchart and click thisicon to remove them.
Copy Select one or more items in the flowchart and click thisicon to copy them.
Paste Click this icon to paste into the flowchart any items youhave cut or copied.
Zoom In Click this icon to increase the view size of the flowchart.
Zoom Out Click this icon to decrease the view size of the flowchart.
Print Click this icon to print the flowchart.
144 IBM Unica Distributed Marketing: Corporate Marketer's Guide

Appendix B. List of processes
The following processes, grouped by process type, are available in Campaign.
The sections for the individual processes provide step-by-step guidance forconfiguring each process. Each set of the individual process configurationinstructions assumes that you have added the process to your flowchart as a firststep. For details about how to add a process to a flowchart, see “To add a newprocess to a flowchart” on page 197.
You should also see “Using processes in flowcharts” on page 197 for informationabout configuring processes in general.
Campaign provides the following types of processes:v “Data manipulation processes” on page 195v “Run processes” on page 196v “Optimization processes” on page 196
Note: Interact, Optimize, and eMessage provide additional processes. For moreinformation, see the documentation for those products.
Data manipulation processesCampaign provides the following data manipulation processes:v “Audience”v “Extract” on page 155v “Merge” on page 159v “Sample” on page 160v “Segment” on page 162v “Select” on page 168
AudienceAudience levels define the target entity with which you want to work, such asaccount, customer, household, product, or business division, and are definedduring the table mapping process by your system administrators.
Use the Audience process in a flowchart to switch between audience levels, or tofilter out IDs by audience level. Using this process, you can select all, some, or asingle entity at one level in relation to another level.
For example, you can use the Audience process to:v Select one customer per household based on some business rule (for example,
oldest male or the person with the highest account balance);v Select all accounts belonging to a particular set of customers;v Select all accounts with a negative balance belonging to a particular set of
customers;v Select all households with individuals holding checking accounts;v Select customers with three or more purchases within a specified time-frame.
© Copyright IBM Corp. 2001, 2012 145

Note: The Audience process can select from any defined table(s), so you can alsouse it as a top-level process in your flowchart to initially select data.
Audience levelsAudience levels are defined by Campaign administrators to represent differentpotential targets of campaigns, such as account, customer, household, product, orbusiness division. Audience levels are often, but not always, organizedhierarchically. Here are some examples of hierarchical audience levels that arecommonly found in customer marketing databases:v Household > Customer > Accountv Company > Division > Customer > Product
Your organization can define and use an unlimited number of audience levels. Ifyou are using multiple audience levels (for example, customer and household), it isimportant to understand how to use the Audience process to best accomplish yourbusiness objectives.
Audience levels are created and maintained by a Campaign administrator. Movingfrom one audience level to another requires that all of the audience levels that youuse have keys defined within the same table. This provides a “look up”mechanism to switch from one level to another.
Audience levels are global, and are attached to each mapped base table. Thus,when a flowchart is loaded, the audience levels are loaded along with the tablemappings within that flowchart.
If you have permissions to map tables in Campaign, you can map a new table toone or more existing audience levels, but you cannot create new audience levels.Only users with the appropriate permissions, usually system administrators, cancreate audience levels.
In the Audience process, you specify an input audience level and an outputaudience level. The input and output audience levels can be the same (for example,Customer) or different (for example, Customer and Household). Use the Audienceprocess to stay within the same audience level, or to switch audience levels.
Householding"Householding” is as a general term to describe reducing the number of membersin the current audience level by scoping using another audience level. One of themost common examples of householding is to identify a single individual to targetwithin each household. You might select one individual per household accordingto a marketing business rule such as:v The individual with the greatest dollar value across all accounts;v The individual with the most purchases in a particular product category;v The individual with the greatest tenure; orv The youngest male over 18 within the household.
You can use the Audience process to change audience levels and filter IDsaccording to user-specified criteria.
Switching levelsSome complex campaigns require processing at different audience levels to arriveat the list of final target entities. This can involve starting at one audience level,performing some computations and taking this output, then moving to anotheraudience level, and performing other computations.
146 IBM Unica Distributed Marketing: Corporate Marketer's Guide

For example, you might want to support complex suppressions at different levels.As a result, in a data model where there is a one-to-many or many-to-manyrelationship between customers and accounts, a marketing analyst might want tobuild a campaign that does the following:v Eliminates all accounts of customers that satisfy certain criteria (for example,
eliminate any account that is in default);v Eliminates particular accounts that satisfy certain criteria (for example, eliminate
all the low-profitability accounts).
In this example, the campaign might start at the customer level, performcustomer-level suppressions (suppress accounts in default), switch to the accountlevel, apply account-level suppressions (suppress low-profitability accounts), andthen switch back to the customer level to obtain the final contact information.
Configuring the audience processTo use the Audience process, you must work with tables for which multipleaudience levels are defined. These levels, defined within a single table, provide arelationship to “translate” from one level to another.v One key is defined as the “primary” or “default” key for the table. (This default
key represents the audience used most frequently for this data source.)v The other keys are “alternate” keys that are available for switching audience
levels.
Once you switch audience levels, Campaign displays only those tables whosedefault key is defined at the same audience level. If you work at different audiencelevels on a regular basis, you might need to map the same table more than oncewithin Campaign, each time with a different primary/default key. The default levelassociated with a table is specified during the table mapping process. For moreinformation about mapping tables, see the Campaign Administrator’s Guide .
The options available in the Audience process configuration dialog depend onvarious choices that you can make:v Whether the input and output audience levels are the same or different;v Whether the audience level values are normalized in these tables;v Whether there are multiple audience levels defined for the selected tables.
For this reason, not all of the options described in the following sections areavailable for all pairs of input and output table selections.
To configure an Audience process:
1. Within a campaign, open a flowchart for editing.2. Click the Audience process in the palette, then click the workspace to add the
process to your flowchart.3. Ensure that your Audience process is connected to one or more configured
processes (such as a Select or Merge process) whose output cells will be usedas input by the Audience process.
4. Double-click the Audience process in the flowchart workspace.The process configuration dialog appears.
5. On the Source tab, choose the input data source from the Input drop-downlist. If one or more processes are connected to the Audience process, theiroutput cells will also appear in the list.
Appendix B. List of processes 147
The audience level corresponding to this input is now displayed next to theInput field. If there is no input into the Audience process, the audience levelis shown as “not selected.”The Select options also reflect your input audience level. For example, if youchose an input with an audience level of Customer, the Select options changeto All Entries, Some Entries, and One Entry per Customer.
6. Select the output audience from the Choose Audience drop-down list. The listdisplays only audience levels defined for tables containing keys defined at thesame audience level as the input data source. If a table has more than onelevel defined, each level is available as an entry in the Choose Audience list.
Note: If you do not see a desired audience level, you might need to remap atable.The Select options now reflect both your input and your output audiencelevels.For example, if your input has an audience level of Household and youchoose an output audience level of Individual, the Select options are labeled:All Individual ID Entries , Some Individual ID Entries , One Individual IDEntry per Household ID, so you can specify how IDs are selected while youswitch from one audience level to another.
7. Use the Select and Filter options to specify how you want the records to beselected. These options vary depending on whether you are selecting All IDs(in which case there are no filtering options), switching levels, or staying atthe same level. For details on how to select and filter based on whether youare switching audience levels, see:v Using the same input and output audience levelsv Using different input and output audience levels
8. Click the Cell Size Limit tab if you want to limit the number of IDs generatedby the process.
9. Click the General tab to supply a Process Name and a Note that indicates thepurpose of the process (for example, "This box contacts one individual perhousehold"). You can also modify the Output Cell names or Cell Codes.
10. Click OK. The process is configured and is enabled in the flowchart. You cantest run the process to verify that it returns the results you expect.
148 IBM Unica Distributed Marketing: Corporate Marketer's Guide

Example: Audience processThe following figure shows a configured Audience process.
v The selected input audience level is Customer; it is the default audience level ofthe DEMO_ACCOUNT table (this audience level is displayed to the right of the Inputfield).
v The output audience level is the same: Customer as defined in the DEMO_ACCOUNTtable. The DEMO_ACCOUNT table has two other audience levels defined: Branch andHouseHold .
v The process is configured to choose one Customer Entry per HouseHold basedon the maximum of the field HIGHEST_ACC_IND.
Example: Filtering recordsWhen you configure an Audience process to select IDs based on a count, or astatistical function ( MaxOf , MedianOf , MinOf ) or Any One , the Filter buttonbecomes available. When you click Filter , the Specify Selection Criteria windowappears, which allows you to enter a query expression to specify which recordswill be used in the Based On calculation.
Note: The filtering criteria is applied before the Based On calculation isperformed, allowing you to remove records from consideration.
For example, you might want to constrain the date range over which an operationis performed. To use only purchase transactions over the last year, you can enter afilter query expression such as:CURRENT_JULIAN() - DATE(PURCH_DATE) <= 365
Appendix B. List of processes 149

Then, if you are computing a Based On calculation that chooses the sum of theAmount field, only the amounts from transactions within the last year are summedtogether.
Using the same input and output audience levelsWhen the same audience level is selected in the Choose Audience list and theInput list, you can use the Select options to perform the following operations:v “To select one <Input/Output Audience> entry per <Different Audience>”v “To select some <Audience> records per <Different Audience>” on page 151v “To select entries for each entry at that audience level” on page 152
The Select options vary depending on the relationship of the selected input andoutput audience levels. Options that are not meaningful are disabled.
Note: Campaign includes the name of the selected audience level in the Selectoption labels. For example, if the input audience level is Customer, the One Entryper option appears as One Customer Entry per. In the following sections, thisdynamically changing portion of the option text is indicated with <Input/OutputAudience> where appropriate.
The Select options include:
Table 19. The Select options for Audience process configuration
Method Description Example
One Per One member of the input/outputaudience level, scoped by anotheraudience level
One customer per household
Some Per Some members of the input/outputaudience level, scoped by anotheraudience level
All customers with aboveaverage purchases within thehousehold
For Each Select members if the number ofmembers at the selected audience levelsatisfies some condition
Number of accounts > 1, ornumber of purchases > 3
To select one <Input/Output Audience> entry per <Different Audience>:
Choose this option if the input and output audience levels are the same, but adifferent audience level is used to scope the output. For example, you can selectthe one customer within each household who has the oldest account. (Inputaudience level is customer, output audience level is customer, scoping byHousehold level, using MinOf(BaseInfo.AcctStartDt) to select.)
Specify a business rule to indicate how the single entity is selected (for example,the minimum, maximum, or median of some field), or else choose Any One (inthis case, no field choices are available).1. Select an input source for Input and the same audience level for the output
audience in the Audience process.The relevant Select options become available.
2. Select the One Entry per option.A drop-down list appears next to the selected option.
3. Select an audience level from the drop-down list.All alternate defined audience levels (other than the input audience) appear inthe list.
150 IBM Unica Distributed Marketing: Corporate Marketer's Guide
4. Choose a value to use from the Based On drop-down list:v Any One eliminates the need to pick a Based On valuev MaxOf returns the maximum value of the selected fieldv MedianOf returns the median value of the selected fieldv MinOf returns the minimum value of the selected fieldEach of these functions will return exactly one member from the input audiencelevel. If more than one entry is tied at the maximum, minimum, or medianvalue, the first encountered entry is returned.
5. If you selected a Based On criterion other than Any One, select a field onwhich the function operates. This drop-down list includes all the fields fromthe table selected in the Choose Audience field, and any mapped dimensiontables. Expand a table by clicking the “ + ” sign. Created derived fields arelisted at the bottom.For example, to select the account holder from each household with the highestaccount balance, you would select “MaxOf” for the Based On criteria andAcct_Balance from the list of table fields.You can also create or select derived fields by clicking Derived Fields.
6. (Optional) If you selected a count to be based on, the Filter button becomesavailable.Use the Filter function to reduce the number the IDs that will be available tothe Based On calculation. For example, you might want to select customersbased on their average account balance in the last 6 months, but prior to doingthat, you would want to filter out all customers whose accounts are inactive.To filter records before performing the Based On computation, click Filter . TheSpecify Selection Criteria window appears. You can enter a query expression tospecify which records will be used in the Based On calculation. The filteringcriteria is applied before performing the Based On calculation, therebyallowing you to remove records from consideration.
7. Click OK to save your query and close the Specify Selection Criteria window.8. Continue configuring the process by completing the fields on the remaining
tabs.
To select some <Audience> records per <Different Audience>:
This selection indicates that there are multiple entries per audience. In thissituation, the input and output audience levels are the same, but a differentaudience level is used to scope the output. You might select this option, forexample, to select all customers within each household who have made purchasesover $100 (Input audience level is customer, output audience level is customer,scoping by Household level, using Maximum Purchase Value>$100.
In addition to creating a query, the Based On criterion also supports keywordsallowing the functional equivalent of a GROUPBY macro function to be performed.1. Select an input source for Input and the same audience level for the output
audience in the Audience process. The relevant Select options become available.2. Select the Some Entries per... option. A drop-down list appears next to the
selected option.3. Select an audience level from the drop-down list. All alternate defined audience
levels (other than the input audience) appear in the list.4. Click in the Based On field to enter a query. The Specify Selection Criteria
window opens.
Appendix B. List of processes 151

5. Enter or build a valid query expression, then click OK to save it and close theSpecify Selection Criteria window.
6. Continue configuring the process by completing the fields on the remainingtabs.
To select entries for each entry at that audience level:
This selection indicates that there are multiple selections from multiple audiencelevels. Select this option if the number of members at the selected audience levelssatisfies some condition (for example, Number of Accounts > 1 or Number ofPurchases > 3 ).
Note: This option is available only if the input audience level is not normalized(that is, the record ID is not unique in the selected Choose Level table), and theinput and output levels are the same. It is the only option available if no alternatekeys have been defined for your output audience table.1. Select an input source for Inputand the same audience level for the output
audience in the Audience process.The relevant Select options become available.
2. Select the For Each option.
Note: This option is available only if the input audience level is notnormalized (that is, the record ID is not unique in the selected Choose Leveltable).A drop-down list appears next to the selected option.
3. Choose a Based On selection.If the table you select under Choose Audience (that is, the output audience) isnot normalized, there might be duplication in your results. You can use a BasedOn method for Campaign to use when selecting records, to avoid duplication.(For example, if your results might include more than one individual in thesame household, you can use Based On to select only one individual from thathousehold, based on the criterion you configure in this feature.)You must select one of the Based On methods, either Count or Condition:v Specify a Count to use in Based On:This option lets you select the <Input Audience Level> ID, where the numberof occurrences of the <Input Audience Level> ID satisfies the specifiedcondition.To toggle between different relationships (<,<=,>,>=,=), click the operatorbutton repeatedly until the desired relation is displayed.-- OR --v Specify a Condition to use in Based On:Click in the text box to the right of Condition.The Specify Selection Criteria window appears.Enter or build a valid query expression, then click OK to save your entry andclose the Specify Selection Criteria window.
4. (Optional) If you selected a count to be based on, Filter becomes available.Use the Filter function to reduce the number the IDs that will be available tothe Based On calculation. For example, you might want to select customer IDsbased on their average account balance in the last six months, but before doingthat, you would want to filter out all customers whose accounts are inactive.
152 IBM Unica Distributed Marketing: Corporate Marketer's Guide

To filter records before performing the Based On computation, click Filter. TheSpecify Selection Criteria window appears. You can enter a query expression tospecify which records will be used in the Based On calculation. The filteringcriteria is applied before performing the Based On calculation, allowing you toremove records from consideration.
5. Click OK to save your query and close the Specify Selection Criteria window.6. Continue configuring the process by completing the fields on the remaining
tabs.
Using different input and output audience levelsIf you selected different input and output audiences for the Choose Audience listand the Input list, you can use the Select options to perform the followingoperations:v “To select all <Output Audience Level> entries”v “To select some <Different Output Audience Level> entries” on page 154v “To select one <Output Audience> per <Different Input Audience>” on page 154
Note: Campaign includes the name of the selected audience level in the Selectoption labels. For example, if the input audience level is Customer, the One Entryper option appears as One Customer Entry per. In the following sections, thisdynamically changing portion of the option text is indicated with <Input/OutputAudience> where appropriate.
The Select options include:
Table 20. The Select options for Audience process configuration (different input and output)
Method Description Example
All Select all members of the input audiencelevel, scoped by another audience level
All customers perhousehold
Some Select some members of the outputaudience level, keeping only those IDs thatsatisfy a specified condition
All customers aged 18 orover within a household
One Per Select exactly one output audience recordfor each input audience record
One customer perhousehold
To select all <Output Audience Level> entries:
Select this option to switch to the output audience level without performing anyfiltering (for example, to select all customers in a household or all accountsbelonging to a customer). This creates an output cell with all output audience levelentries associated with the input IDs. It switches audience levels without applyingany selection or filtering criteria.
If you change from a primary audience level to another audience level, you will nolonger be able to use derived fields in the following processes.1. Select an input source for Input and a different output audience for Choose
Audience.The Select options become available.
2. Select All <Output Audience Level> Entries.3. Click OK to close the Audience process configuration dialog and save the
configuration.
Appendix B. List of processes 153

To select some <Different Output Audience Level> entries:
Select this option to switch from the input audience level to a different outputaudience level, keeping only those IDs that satisfy a specified condition. Forexample, you could select all customers aged 18 or over within a household, orselect all accounts of a customer with positive balances.
The Based On criteria allows you to enter a query expression to limit the outputaudience level entries selected.1. Select an input source for Input and a different output audience for Choose
Audience.The Select options become available.
2. Click to select Some <Output Audience Level> Entries.The Based On field becomes available.
3. Click in the Based On field to enter a query.The Specify Selection Criteria window appears.
4. Enter or build a valid query expression, then click OK to save the query andclose the Specify Selection Criteria window.
5. Click OK to close the Audience process configuration dialog, saving yourentries.
To select one <Output Audience> per <Different Input Audience>:
Select this option to choose exactly one output audience record for each inputaudience record (for example, to choose one email address per customer). Youmust specify a business rule to indicate how the single entity should be selected(min/max/median of some field) or choose Any One (in this case, no field choicesare available).
This option is available only if the input audience level is not normalized (that is,the record ID is not unique in the selected Choose Level table).
In addition to creating a query, the Based Oncriterion also supports keywordsallowing the functional equivalent of a GROUPBY macro function to be performed.1. Select an input source for Input and an output audience for the Audience
process.The Select options become available.
2. Select One <Output Audience Level> per <Input Audience Level>.3. Select a value from the Based On drop-down list.
(Field selection, using the drop-down list to the right, becomes inactive whenyou select Any One. If this is your selection, skip to step 5.)
4. Select a field in the next drop-down list to which the Based On functionrelates:a. Click in the Based On text box.
The Select Field window appears. All fields from the table selected in theChoose Audience drop-down list appear, including any mapped dimensiontables.You can expand a table by clicking the “+” sign. Created derived fields arelisted at the bottom.
b. Select a field and click OK.c. (Optional) Create derived fields by clicking Derived Fields.
154 IBM Unica Distributed Marketing: Corporate Marketer's Guide
5. (Optional) To filter records before performing the Based On computation, useFilter.
6. Click OK to close the Audience process configuration dialog, saving yourentries.
ExtractThe Extract process allows you to select fields from one table and write them outto another table for subsequent processing. It is designed to pare down a largeamount of data to a manageable size for subsequent operations, resulting in vastimprovements in performance.
The Extract process can take input from a cell (if it is connected to a Select process,for example), single table, strategic segment, optimized list (Optimize only), oreMessage landing page (eMessage only). If you select a strategic segment as input,you must join it to a table before you can extract fields.
If you use several Extract processes in a series, only the fields in the final Extractprocess are written out.
If you use several Extract processes in parallel (that is, in different branches in thesame flowchart), they behave in the same way as persistent derived fields:v The extracted fields attach to the inbound cellv The extracted fields are calculated before query execution in that processv Multiple extracted fields are available in subsequent processesv When extracted fields are sent to a contact process:
– If an extracted field is not defined for a cell, its value = NULL– If a single ID is in more than one cell, one row is output for each cell
v When extracted fields are sent to a Segment or Decision process, an extractedfield must exist in all selected input cells for it to be used in segmenting byquery.
Extracted tables
Data is extracted as either a binary file on the Campaign server or as a table in adata mart with a UAC_EX prefix.
Unlike a temp table, an extracted table is not deleted at the end of a flowchart run.It needs to persist so that users can continue to access it in order to performoperations on it, like profiling its fields, for example.
An extracted table is only deleted when you delete its associated Extract process,flowchart, campaign, or session.
Note: In order to conserve space in the data mart, your system administrator canperiodically delete tables with a UAC_EX prefix. Note, however, that if these tablesare removed, before rerunning their flowcharts or attempting to profile fields in thenow-missing tables, users must first rerun their affected Extract processes.Otherwise, Campaign generates "Table Not Found" errors.
Example: Extracting transaction dataAssume that you have designed a campaign to perform selections or calculationsbased on the last three months of purchase transactions for all non-delinquentcustomers (approximately 90% of your customer base), resulting in 4 Gb of data.
Appendix B. List of processes 155

Even if Campaign created a temporary table for these customers, joining it back tothe purchase transaction table would entail pulling over approximately 90% of the4 Gb rows (and discarding all transactions except for the last three months) toexecute a GROUPBY macro, for example.
Instead, you can configure an Extract process (placed at the purchase transactionlevel) to pull out all transactions within the last three months, put them into atable in the database, and then subsequently run multiple GROUPBY macros andother calculations against it (for example, min/max and average).
Prerequisites for extracting data from eMessage landing pagesThe following prerequisites must be met before you can configure an Extractprocess to accept input from eMessage landing pages:v eMessage must be installed, running, and enabled.v eMessage landing pages must be appropriately configured.v The mailing must be executed and responses from mailing recipients must be
received.
For more information about eMessage landing pages, see the eMessage User's Guide.
Configuring an Extract processThe procedure for configuring the Extract process differs depending upon which ofthe following input sources you choose:v “To extract data from a cell, single table, or strategic segment”v “To extract data from an eMessage landing page” on page 157v Optimized list (see the Optimize User's Guide)
To extract data from a cell, single table, or strategic segment1. Within a campaign, open a flowchart for editing.2. Double-click the Extract process in the flowchart workspace.3. Click the Extract process in the palette, then click the workspace to add the
process to your flowchart.The process configuration dialog appears.
4. On the Source tab, select an input cell, a single table, or a strategic segmentfrom the Input list. If you select a strategic segment, associate it with a tableby selecting a table from the Select Based On list.
5. Specify the records to use as input:v Select All Records to include all records in your input data source.v Select Records With to select records based on criteria you define using
queries.6. If you chose Select Records With, create a query using one of the following
methods:v Point & Click: Click in the Field Name, Oper., Value, and And/Or column
cells to select values to build your query. This method provides the easiestway to create a query and helps to avoid syntax errors.
v Text Builder: Use this tool to write raw SQL or use the provided macros.You can use the Query Helper within Text Builder to select IBM Unicamacros, including logical operators and string functions.
You can select fields from the Available Fields list, including IBM UnicaCampaign Generated Fields and Derived Fields. For more information,see“Creating queries in processes” on page 206.
156 IBM Unica Distributed Marketing: Corporate Marketer's Guide

Note: If your query includes a table field that has the same name as aCampaign Generated Field, you must qualify the field name using thefollowing syntax: <table_name>.<field_name>.
7. On the Extract tab, use the Target Data Source field to select an outputlocation:v To store the data in binary format, select IBM Unica Campaign Server.v To store the data in a uniquely named table with a UAC_EX prefix, select an
available database.8. Select fields from the list of Candidate Fields, and add them to the Fields to
Extract list. Use the controls to remove or reorder fields. For informationabout the fields on the Extract tab, see “Extract tab reference” on page 158.
9. Perform any of the following optional tasks:v Click Profile to preview a list of values for the selected field. See“Profiling
fields” on page 213.v Click Derived Fields to create a variable in the list of candidate fields.v Click More to exclude duplicate IDs from the output. See“Skipping
duplicate IDs in process output” on page 221.10. Optionally, use the Cell Size Limit tab to limit the number of IDs generated
by the process.11. Optionally, use the Dimension tab to add existing dimension tables to the
extract table and specify the key fields to join on. The extract table becomes abase table for the selected dimension tables and can be used in downstreamprocesses.
12. Click the General tab to modify the Process Name, Output Cell names, orCell Codes, link to a target cell, or enter a Note about the process.
13. Click OK.
You can test run the process to verify that it returns the results you expect.
To extract data from an eMessage landing page
Ensure that your IBM Unica environment meets the requirements beforeattempting to extract eMessage landing page data. For more information, see“Prerequisites for extracting data from eMessage landing pages” on page 156.1. In a flowchart in Edit mode, double-click the Extract process in the flowchart
workspace.The process configuration dialog appears.
2. On the Source tab, select eMessage Landing Pages.3. In the popup window, select an eMessage landing page as input.
Note: You can select only one eMessage landing page as input to an Extractprocess. To extract data from more than one landing page, configure multipleExtract processes.
4. If there is more than one audience level available for the landing page, selectthe appropriate audience level from the drop-down list. If there is only oneaudience level available, it is automatically selected.
5. Click OK.6. On the Extract tab, select an output location.
v To store the data in binary format, select IBM Unica Campaign Server.v To store the data in a uniquely named table with a UAC_EX prefix, select an
available database.
Appendix B. List of processes 157

7. Select fields to extract from the list of Candidate Fields.v Click Add to add selected fields to the list of Fields to Extract.v To remove fields from the list of Fields to Extract, select them and click
Remove.v Use the Up 1 and Down 1 buttons to change the order of fields in the Fields
to Extract list.v To change the default output name of a field to extract, select the field in the
Fields to Extract list, click the name in the Output Name column, then enterthe new name.
For information about the fields on the Extract tab, see “Extract tab reference.”8. Perform any of the following optional tasks:
v Add a derived field to the list of candidate fields.v Specify that duplicate IDs are excluded from the output. See “Skipping
duplicate IDs in process output” on page 221.v Limit the size of the output cell (that is, limit the number of IDs generated
by the process).v Click the General tab to modify the Process Name, Output Cell names, or
Cell Codes, link to a target cell, or enter a Note about the process.
Note: Profiling is not available for eMessage landing page attributes.9. Click OK.
The process is configured. You can test the process to verify that it returns theresults you expect.
Note: During the extraction process, Campaign creates an intermediate view in thesystem tables database with a UCC_LPV prefix. This internal view remains in thedatabase until the process box is deleted. If you remove the view, you mustreconfigure its corresponding Extract process before rerunning the process orflowchart; otherwise, Campaign generates a missing table error.
Extract tab reference
The following table describes the fields on the Extract tab:
Table 21. Fields on the Extract tab
Field Description
Target Data Source Location to which the output from this process will bewritten. The Campaign Server and any other data sourcesto which you are connected are available from the TargetData Source drop-down list.
Candidate Fields List of fields available to extract, including field name anddata type, based on your input data source.
If your input source is a landing page in eMessage, eachfield name is an attribute of the landing page. If theattribute contains special characters or spaces, it isconverted to a valid field name. Data types of all landingpage attributes are listed as text.Note: Schema object names are limited to 30 characters.Restrict your attribute names to 30 characters or less toproduce valid column names for extracted output.
158 IBM Unica Distributed Marketing: Corporate Marketer's Guide

Table 21. Fields on the Extract tab (continued)
Field Description
Fields to Extract Fields you chose to extract from the Candidate Fields list.The Output Name defaults to the field name in the Fieldsto Extract column.
Profile button Opens the Profile Selected Field window, which calculatesthe values and distributions of records in the selected field.Active only when a field name is selected in the CandidateFields list.
Derived Fields button Opens the Create Derived Field window.
More button Opens the Advanced Settings window, which includes theoption to skip duplicate records and to specify howCampaign identifies duplicates.
MergeUse the Merge process to specify which input cells are included and combined,and which are excluded (suppressed). This allows you to include or exclude cellsfrom subsequent processes in your flowchart. For example, use the Merge processto suppress "opt-out" customers who have requested that they not receive anymarketing materials.
To configure a Merge process
The Merge process accepts one or more input cells and produces one output cell.You specify which input cells are included and combined or excluded from theoutput.1. Within a campaign, open a flowchart for editing.2. Click the Merge process in the palette, then click the workspace to add the
process to your flowchart.3. Ensure that the Merge process is connected to one or more configured
processes whose output cells will be used as input by the Merge process.
Note: All input cells should have the same audience level.4. Double-click the Merge process in the flowchart workspace.
The process configuration dialog appears. Cells from processes connected to theMerge process are automatically displayed in the Input list.
5. On the Method tab, specify the input cells that you want to include or exclude.Click each cell in the Input list, and use the appropriate Add>> button to addit to the Records to Include list or the Records to Exclude list.The IDs in the cells in the Records to Include list will be combined into one listof unique IDs. IDs in the Records to Exclude list will not appear in the mergedoutput.
6. Specify how you want to handle duplicate IDs in the input cells (specified inthe Records to Include list) by selecting one of the following:v Merge/Purge on Include: Remove duplicate IDs to produce a list of unique
IDs that appear in at least one input cell. This is a logical "OR" or "ANY."v Match (AND) on Include: Include only those IDs that appear across all input
cells. This is a logical "AND" or "ALL."The first option will include customer A if that customer is in either theGold.out cell OR the Platinum.out cell (but the record will only be includedonce, so you will not have duplicates). The second option will include customer
Appendix B. List of processes 159

A only if that customer appears in both the Gold.out cell AND thePlatinum.out cell,. The second option is useful when you want to includecustomers only if they meet multiple criteria.
7. Click the Cell Size Limit tab if you want to limit the number of IDs generatedby the process.
8. Click the General tab to assign a Process Name, Output Cell name, and CellCode, and enter a Note that describes the process.
9. Click OK.
The process is configured and enabled in the flowchart. You can test run theprocess to verify that it returns the results you expect.
SampleUse the Sample process to create one or more cells for different treatments, controlgroups, or a subset of data for modeling. A wide variety of configurations isavailable for sampling.
To configure a Sample process1. In a flowchart in Edit mode, ensure that one or more configured processes
(such as a Select process) are connected as input to the Sample process box.2. Double-click the Sample process in the flowchart workspace.
The process configuration dialog appears.3. Use the Input drop-down list to select the cells that you want to sample. The
list includes all output cells from any process connected to the Sampleprocess. To use more than one source cell, select the Multiple Cells option. Ifmore than one source cell is selected, the same sampling is performed on eachsource cell.
Note: All selected cells must be defined at the same audience level.4. Use the # of Samples/Output Cells field to specify how many samples to
create for each input cell. By default, three samples are created for each inputcell, with default names "Sample1", "Sample2" and "Sample3."
5. To change the default sample names, select a sample in the Output Namecolumn, then type a new name in the Cell Name box in the Edit Output Cellsection. You can use any combination of letters, numbers, and spaces. Do notuse periods (.) or slashes (/ or \).
Important: If you change the name of a sample, you must update allsubsequent processes that use this sample as an input cell. Changing a samplename might unconfigure subsequent connected processes. In general, youshould edit the names of samples before connecting subsequent processes.
6. Specify the size of your samples using one of the following methods:v Specify Size by %: After selecting this option, use the % (percentage) field
in the Edit Output Cell section to specify the percentage of records to usefor the sample selected in the Output Name column. Use the Max #Records field if you want to limit the size of the sample. The default isUnlimited. After changing any values, click in any other field to see thechange in the list of Output Names. Select another sample in the OutputName column and adjust the percentage for it, or use the All Remainingcheck box to assign all remaining records to that sample. You can onlyselect All Remaining for one output cell.
v Specify Size By # Records: After selecting this option, use the Max #Records field to specify the maximum number of records to be allocated to
160 IBM Unica Distributed Marketing: Corporate Marketer's Guide

the sample group selected in the Output Name column. Select the nextsample in the Output Name column and specify a maximum number ofrecords for that group, or use the All Remaining check box to assign allremaining records to that sample. You can only select All Remaining forone output cell.
7. Ensure that each sample in the Output Name list has a Size defined or hasAll Remaining checked.
8. (Optional) Click Sample Size Calculator to use the calculator to help youunderstand the statistical significance of sample sizes in evaluating campaignresults. You can specify the level of accuracy you want by entering an errorbound and computing the sample size needed, or you can enter a sample sizeand compute the error bound that will result. Results are reported at the 95%confidence level.
9. In the Sampling Method section, specify how to build the samples:v Random Sample: Use this option to create statistically valid control groups
or test sets. This option randomly assigns records to sample groups using arandom number generator based on the specified seed. Seeds are explainedlater in these steps.
v Every Other X: This option puts the first record into the first sample, thesecond record into the second sample, up to the number of samplesspecified. This process repeats, until all records have been allocated to asample group. To use this option, you must specify the Ordered By optionsto determine how records are sorted into groups. The Ordered By optionsare explained later in these steps.
v Sequential Portions: This option allocates the first N records into the firstsample, the next set of records in the second sample, and so on. This optionis useful for creating groups based on the top decile (or some other size)based on some sorted field (for example, cumulative purchases or modelscores). To use this option, you must specify the Ordered By options todetermine how records are sorted into groups. The Ordered By options areexplained later in these steps.
10. If you selected Random Sample, in most cases you can simply accept thedefault seed.In rare cases, you may want to click Pick to randomly generate a new seedvalue, or enter a numeric value in the Seed field. Examples of when youmight need to use a new seed value are:v You have exactly the same number of records in the same sequence and if
you use the same seed value, records are created into the same sampleseach time.
v You find that the random sample produces undesired results (for example,if all males are being allocated to one group and all females to another).
11. If you selected Every Other X or Sequential Portions, you must specify howrecords will be sorted. The sort order determines how records will be allocatedto sample groups:a. Select an Ordered By field from the drop-down list or use a derived field
by clicking Derived Fields.b. Select Ascending to sort numeric fields in increasing order (low to high)
and sort alphabetic fields in alphabetical order. If you choose Descending,the sort order is reversed.
12. Click the General tab if you want to modify the default Process Name andOutput Cell Names. By default, output cell names consist of the process namefollowed by the sample name and a digit. You can accept the defaultCell
Appendix B. List of processes 161
Codes or uncheck the Auto Generate Cell Code box and assign codesmanually. Enter a Note to clearly describe the purpose of the Sample process.
13. Click OK.
The process is configured and enabled in the flowchart. You can test run theprocess to verify that it returns the results you expect.
About the sample size calculatorCampaign provides a sample size calculator to help you understand the statisticalsignificance of sample sizes in evaluating campaign results. You can specify thelevel of accuracy you want by entering an error bound and computing the samplesize needed, or you can enter a sample size and compute the error bound that willresult. Results are reported at the 95% confidence level.
To use the sample size calculator:
1. On the Sample tab of the Sample process configuration dialog, click SampleSize Calculator.The Sample Size Calculator window appears.
2. Under Response Rate Estimate, enter your estimates of the minimum andmaximum response rates expected from your marketing campaign.These two values must be percentages between 0–100. The lower the expectedresponse rate, the larger the sample size must be to achieve the same level ofaccuracy.
3. Under Modeling Estimate, provide modeling estimate information.v If you are not using a model, select No Model.v If you are using a model, select Model Performance, then enter the
appropriate model performance percentage. This represents the area underthe lift curve and is reported in the Model Performance report.
4. To compute the required sample size for a specific error bound:a. In the Error Bound (+ or -) field, enter a value 0 - 100 for the acceptable
error bound.b. Click Compute Sample Size. The minimum sample size required to achieve
the specified error bound is displayed in the Min. Sample Size text box.5. To compute the error bound expected with a particular sample size:
a. Enter the sample size in the Min. Sample Size text box.b. Click Compute Error Bound.
The error bound is displayed in the Error Bound (+ or -) text box.6. When you are finished, click Done.
The Sample Size Calculator window closes.
Note: You can copy and paste the calculated sample size to use in the Sampleprocess configuration dialog.
SegmentUse the Segment process to divide data into distinct groups (segments) to receivedifferent treatments or offers. After the segments have been created, you connectthe Segment process to a contact process (such as CallList or MailList) to assigntreatments or offers to the segments. There is no limit to the number of segmentsyou can create.
162 IBM Unica Distributed Marketing: Corporate Marketer's Guide

For example, you might want to divide your customers into high-value,medium-value, and low-value segments based on their prior purchase history. Eachof these segments can then receive a different offer when connected to a contactprocess.
You can segment data in two ways: by using the distinct values in a field, or byfiltering the data in a field using a query. In addition to database table fields, youcan use derived fields to segment data. This allows you to perform custombinning.
Important: The segments created by the Segment process are not the same as theglobally persistent strategic segments created by the Create Seg process, which canbe used in any session or campaign.
Segmenting by fieldWhen you segment data by a field in a database table, each distinct value in thefield creates a separate segment. This option is most useful when the values in thefield correspond to the segments you want to create.
For example, assume that you want to assign a different offer to customers in eachof 10 regions. Your customer database contains a field called regionID, whichindicates the region to which each customer belongs. Segment by the regionIDfield to create the 10 regional segments.
Segmenting by queryThe segment by query option segments your data based on the results of a querythat you create. This option is most useful when it is necessary to filter the data ina field to create the required segments.
For example, assume that you want to divide your customers into high-value(more than $500), medium-value ($250-$500), and low-value (under $250) segmentsbased on their purchase history over the last year. The PurchaseHistory field inyour customer database stores the total dollar amount of each customer'spurchases. Use a separate query to create each segment, selecting records withvalues in the PurchaseHistory field that meet the criteria of the segment.
Note: You can also segment data using raw SQL.
Using segments as input to another Segment processSegments can also be used as input cells to another Segment process. For example,assume that you want to segment your customers into six age ranges. Yourdatabase contains a field called AgeRange that assigns one of six age ranges to eachcustomer. Segment by the AgeRange field to create the six segments.
You could then use these six segments as input to another Segment process thatfurther divides customers by another field or query. For example, assume that yourdatabase contains a field called PreferredChannel, which specifies each customer'spreferred contact channel — direct mail, telemarketing, fax, or email. Using the sixage range segments as input, you could then create a second Segment process tosegment by the PreferredChannel field. Each of the six age range segments isfurther segmented into four preferred channel segments, to produce a total of 24output segments.
Segmenting considerationsConsider the following options and guidelines when segmenting data:v “Choosing a segmenting method” on page 164
Appendix B. List of processes 163

v “Making segments mutually exclusive”v “Restricting segment size”v “Selecting source cells”
Choosing a segmenting method: In some cases, the same results can be achievedwhen segmenting either by field or by query. For example, assume that theAcctType field in your database divides your customer accounts into Standard,Preferred and Premier levels. Segmenting by the AcctType field will create threesegments for these account types. You could achieve the same results usingqueries, but creating the segments would require writing three separate queries.Determine the most efficient method based upon the data you are segmenting.
Making segments mutually exclusive: You can specify segments to be mutuallyexclusive, meaning that each qualifying record is guaranteed to be placed into nomore than one segment. When the segments are assigned to offers, this will ensurethat each customer receives only one offer.
Records are placed in the first segment whose criteria they satisfy, based on apriority order that you define. For example, if a customer qualifies for segments 1and 3, and segment 1 is before segment 3 in the priority order, that customer willappear only in segment 1.
Restricting segment size: The default size for the number of records per segmentis Unlimited. You may want to restrict the size of the created segment if, forexample, you are performing test runs of the flowchart or process.
You can limit the segment size to any positive integer. If the segment size youspecify is less than the total number of records generated, the segment will consistof randomly selected qualifying records.
Selecting source cells: All selected cells must be defined at the same audiencelevel. If more than one source cell is selected, the same segmentation is performedon each source cell.
To configure a Segment process by field1. On the Segment tab of the Segment Process Configuration window, specify
the input to the process, using the Input drop-down list. To use more than onesource cell, click the Multiple Cells button and select the cells from the dialogbox.
2. Select Segment by Field and use the drop-down list to select the field youwant to use to create the segments.The Profile Selected Field window opens, and profiling of the selected fieldautomatically starts.
3. Wait for profiling to finish before clicking OK, to ensure that all segments areproperly created.The list of segments and the # of Segments field are updated based on theprofiling results of the selected field. To reprofile the field at any time afterinitially selecting it, click Profile.
4. Set the remaining configuration options, if desired.5. Click OK.
The process is configured and appears enabled in the flowchart.You can test theprocess to verify that it returns the results you expect.
164 IBM Unica Distributed Marketing: Corporate Marketer's Guide

To configure a Segment process by query1. On the Segment tab of the Segment Process Configuration window, specify
the input to the process, using the Input drop-down list. To use more than onesource cell, click the Multiple Cells button and select the cells from the dialogbox.
2. Select Segment by Query.3. Determine the number of segments that you want to create, and enter that
number in the # of Segments field.4. To construct a query for each segment, select the segment and click Edit to
access the Edit Segment window. For details, see “New Segment and EditSegment dialogs” on page 167.
5. Set the remaining configuration options, if desired.6. Click OK.
The process is configured and appears enabled in the flowchart. You can testthe process to verify that it returns the results you expect.
Segment Process Configuration: Segment tab
The following table describes the fields, buttons, and controls on the Segment tabof the Segment Process Configuration window.
Table 22. Segment tab
Field/control Description
Input Specifies the input to the Segment process. The drop-downlist contains all output cells from any process connected tothe Segment process.
Multiple Cells button Allows you to choose more than one source cell as input tothe Segment process.
Segment by field Specifies a field to use for segmenting data. The data issegmented using the distinct values that exist for theselected field. Each distinct value in the field will create aseparate segment.
Profile button Opens the Profile Selected Field window, which calculatesthe values and distributions of records in the selected field.Active only when segmenting by field.
Derived Fields button Opens the Create Derived Field window. Active onlywhen segmenting by field.
Segment by query Segments data based on a query that you create.
# of Segments Specifies the number of segments to create. Active onlywhen segmenting by query. By default, three segments arecreated, with default names "Segment1," "Segment2," and"Segment3."
When segmenting by field: The # of Segments field isupdated based on the profiling results of the selected field.
Mututally Exclusive Segments Specifies whether the segment is to be mutually exclusive(that is, each qualifying record is guaranteed to fall into nomore than one segment).
Appendix B. List of processes 165

Table 22. Segment tab (continued)
Field/control Description
Create Extract tables Indicates whether the segment should create Extract tablesfor each output cell. Selecting this option ensures thatCampaign can provide a later process with the informationnecessary to keep track of duplicate target audiences acrosssegments.
Selecting this check box enables the options on the Extracttab.
This check box is disabled if Mutually Exclusive Segmentsis selected.
Segment Name Lists all segments by name. By default, three segments arecreated, with default names "Segment1," "Segment2," and"Segment3."
When segmenting by field: Segment names are updatedbased on the profiling results of the selected field. Forexample, if you are segmenting on a field called"Acct_Status" which has two distinct values "A" and "B",two segments are created, named "Acct_Status_A" and"Acct_Status_B."
Max. Size Maximum number of records allowed in each segment.
Size Number of records that meet the criteria for the segment.Before the process is run, this number defaults to the totalnumber of records in the output cell.
Query Query that defines the criteria for this segment. Appearsonly when segmenting by query.
Up 1 Move the selected segment one position higher in theprocessing order. Segments are processed in the order listedin the table.
Down 1 Move the selected segment one position lower in theprocessing order. Segments are processed in the order listedin the table.
New Segment button Opens the New Segment window. Active only whensegmenting by query.
Edit button Opens the Edit Segment window for editing the selectedsegment.
Remove Removes the selected segment. When a segment isremoved, the # of Segments field updates automatically.
Do Not Run SubsequentProcesses For EmptySegments
Prevents processes downstream from this process fromrunning for empty segments.
Segment Process Configuration: Extract tab
Use the Extract tab of the Segment Process Configuration window to allow theoutput you specify from the Segment process to be accessible as input to Mail Listor Call List processes in the flowchart. The following table describes the fields,buttons, and controls on the Extract tab.
166 IBM Unica Distributed Marketing: Corporate Marketer's Guide
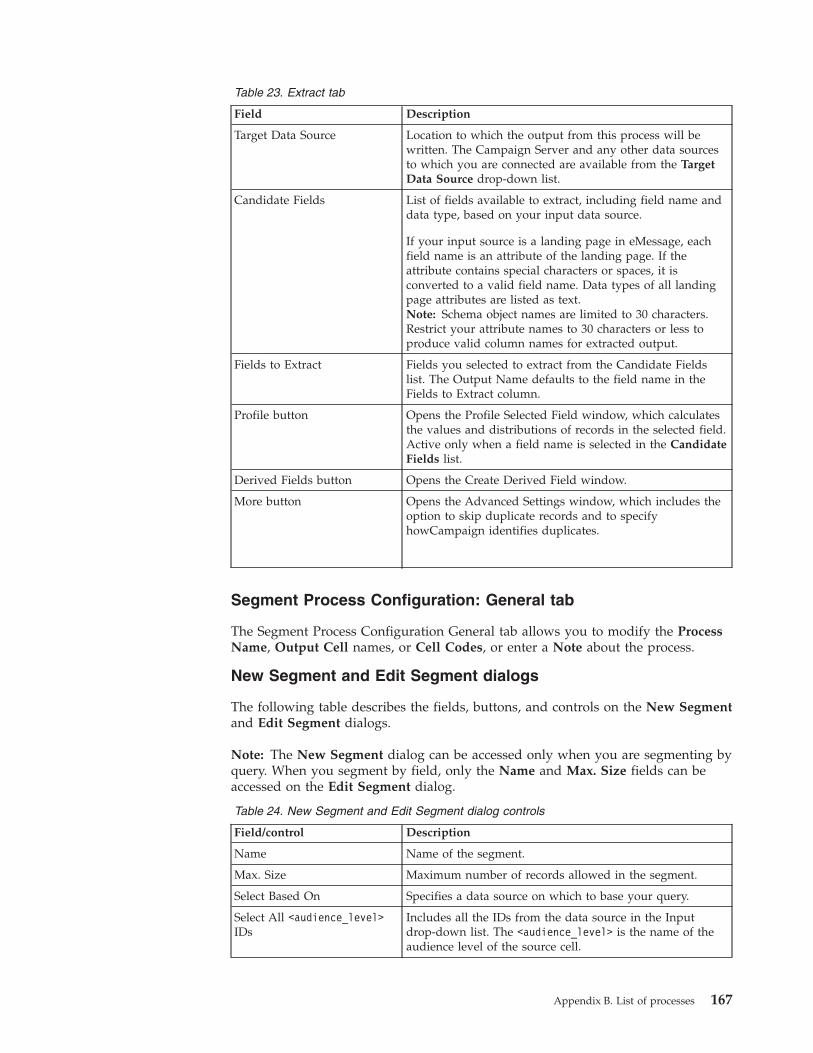
Table 23. Extract tab
Field Description
Target Data Source Location to which the output from this process will bewritten. The Campaign Server and any other data sourcesto which you are connected are available from the TargetData Source drop-down list.
Candidate Fields List of fields available to extract, including field name anddata type, based on your input data source.
If your input source is a landing page in eMessage, eachfield name is an attribute of the landing page. If theattribute contains special characters or spaces, it isconverted to a valid field name. Data types of all landingpage attributes are listed as text.Note: Schema object names are limited to 30 characters.Restrict your attribute names to 30 characters or less toproduce valid column names for extracted output.
Fields to Extract Fields you selected to extract from the Candidate Fieldslist. The Output Name defaults to the field name in theFields to Extract column.
Profile button Opens the Profile Selected Field window, which calculatesthe values and distributions of records in the selected field.Active only when a field name is selected in the CandidateFields list.
Derived Fields button Opens the Create Derived Field window.
More button Opens the Advanced Settings window, which includes theoption to skip duplicate records and to specifyhowCampaign identifies duplicates.
Segment Process Configuration: General tab
The Segment Process Configuration General tab allows you to modify the ProcessName, Output Cell names, or Cell Codes, or enter a Note about the process.
New Segment and Edit Segment dialogs
The following table describes the fields, buttons, and controls on the New Segmentand Edit Segment dialogs.
Note: The New Segment dialog can be accessed only when you are segmenting byquery. When you segment by field, only the Name and Max. Size fields can beaccessed on the Edit Segment dialog.
Table 24. New Segment and Edit Segment dialog controls
Field/control Description
Name Name of the segment.
Max. Size Maximum number of records allowed in the segment.
Select Based On Specifies a data source on which to base your query.
Select All <audience_level>IDs
Includes all the IDs from the data source in the Inputdrop-down list. The <audience_level> is the name of theaudience level of the source cell.
Appendix B. List of processes 167
Table 24. New Segment and Edit Segment dialog controls (continued)
Field/control Description
Select <audience_level> IDsWith
Provides access to the functions for creating a query toselect only certain IDs based on criteria you define. The<audience_level> is the name of the audience level of thesource cell.
Advanced button Opens the Advanced tab, which provides the followingoptions:
v Use Raw SQL: Use a raw SQL query to segment data.
v Use Query Scope from Input Cell: Available only if asource cell to this Segment process uses a query. Selectthe check box to have the source cell’s query combined(using “AND”) with the current selection criteria.
Derived Fields button Opens the Create Derived Field window.
Query text box and buttons For information about using the query text box and relatedfields and buttons, see “Creating queries in processes” onpage 206.
SelectUse the Select process to define the criteria to build lists of contacts, such ascustomers, accounts, or households, from your marketing data. Select is the mostfrequently used process in Campaign. Most flowcharts begin with one or moreSelect processes. The Select process outputs a cell containing a list of IDs, such ascustomer IDs, which can be modified and refined by other processes.
To configure a Select process
Define a Select process to build a list of contacts from your marketing data. Youcan specify all IDs in a segment or table, or you can use a query to select specificIDs. One or more Select processes can then be used as input into another process.For example, you could select all Loyal Customers, then create another selection ofall Opt-Outs, and merge them into a single list.1. Within a campaign, open a flowchart for editing.2. Click the Select process in the palette, then click the workspace to add the
process to your flowchart.The Select process box in the work area is gray until it has been configured.
3. Double-click the Select process box in the flowchart workspace.The process configuration dialog appears.
4. On the Source tab, use the Input drop-down list to select a Segment or Tablethat will serve as the data source for the process.
5. Choose one of the Select All options. The option names depend on theaudience level of your input data source. For example, if your audience levelis Customer, you would see Select All Customer IDs and Select CustomerIDs With:v Choose Select All IDs to include all the rows from the data source selected
in the Input list.v Choose Select IDs With to select IDs based on a query.
6. If you chose Select IDs With, create a query using one of the followingmethods:v Point & Click: This is the default view. Click in the Field Name, Oper.,
Value, and And/Or column cells to select values from the list at the right
168 IBM Unica Distributed Marketing: Corporate Marketer's Guide

side of the dialog, to build your query. This method is the easiest way tocreate a query, and it helps avoid syntax errors.
v Text Builder: Click this button to write raw SQL or use the Query Helperto select from a wide variety of supplied macros, such as logical operatorsand string functions.
7. If you are constructing a query, select the fields you want to include in yourquery from the Available Fields list, including IBM Unica CampaignGenerated Fields and Derived Fields. For more information, see“Creatingqueries in processes” on page 206. Use Check Syntax and Test Query toensure that your query does not have errors.
Note: If your query includes a table field that has the same name as aCampaign Generated Field, you must qualify the field name using thefollowing syntax: <table_name>.<field_name>
8. Click the Cell Size Limit tab if you want to limit the number of IDs generatedby the process.
9. Click the General tab to specify the Process Name (for example, call it LoyalCustomers), the Output Cell name (by default, this matches the ProcessName), and the Cell Code (generally, just accept the default). Enter a Note todescribe what this Select process is intended to achieve.
10. Click OK.The process is now configured. You can test run the process to verify that itreturns the results you expect.
Run processesCampaign provides the following run processes:v “Call List”v “Create Seg” on page 173v “Cube” on page 174v “Mail List” on page 176v “Schedule” on page 179v “Snapshot” on page 184
Call ListThe Call List process is a contact process. Use it to generate a contact list (forexample, for a telemarketing campaign), assign specific offers to that contact list,and log the contact history.
You configure a Call List process in the same way as you configure a Mail Listprocess. See “To configure a contact process (Mail List or Call List).”
To configure a contact process (Mail List or Call List)1. In a flowchart in Edit mode, ensure that your contact process is connected to
one or more configured processes whose output cells will be used as input bythe contact process.
Important: All the cells that you select as input cells must have the sameaudience level.
2. Double-click the contact process in the flowchart workspace.The process configuration dialog appears.
3. On the Fulfillment tab, specify the fulfillment details of your list output.
Appendix B. List of processes 169
a. From the Input drop-down list, specify the input cells to use as the datasource for the contact list.
Note: If the contact process is not connected to a process that providesoutput cells, there will be no cells to select from in the Input drop-downlist. The Multiple Cells option in the drop-down list is only available ifthe input process generates multiple cells.
b. (Optional) To specify where to write the contact list output, be sure thatthe Enable Export To check box is selected and use the drop-down list tospecify one of the following options:v If you want to write the process output to a database table, select its
name from the Enable Export To drop-down list.v If the database table that you want to use does not appear in the list, or
if you want the process output to be written to an unmapped table,select Database Table from the drop-down list to open the SpecifyDatabase table window. Use this window to specify the table anddatabase names. User variables are supported in the table name youspecify here.
v If you want to write the process output to a file, select File from theEnable Export To drop-down list to open the Specify Output Filewindow. Use this window to specify the type of file you want to writethe output to, its file name, and corresponding data dictionary.
v If you want to create a new user table, select New Mapped Table fromthe Enable Export To drop-down list. For instructions, see the CampaignAdministrator's Guide.
Note: You can test the contact process by running the process with outputexported to a temporary file that you can review.The Enable Export To check box is selected by default. If you clear it, youcan run the process without any output to a file or database table.
c. (Optional) Create a Summary File (.sum) for this process by entering apath and file name in the Summary File field, or navigate to a location byclicking the ellipsis button. A summary file contains information about theexport that might be required by a mailing house to facilitate mailings.
d. (Optional) Send a trigger when the process finishes running by selectingthe Send Trigger(s) check box, and choosing the trigger you want to sendfrom the drop-down list. To send multiple triggers, use Ctrl+Click to selecteach trigger you want to add. The selected triggers will appear in theSend Trigger(s) field, separated by commas.
4. Click the Treatment tab to assign one or more offers or offer lists to eachtarget cell defined in this process. Click the Parameters tab to specify offerparameters for each cell.
5. Click the Personalization tab to specify the fields that are written out to yourcontact list.a. Select the fields that you want to include in your output from the
Candidate Fields list.You can use IBM Unica Campaign Generated Fields by expanding the IBMUnica Campaign Generated Fields list, or use derived fields by clickingthe Derived Fields button. Select multiple fields at one time usingCtrl+Click or a contiguous range of fields using Shift+Click.
b. Move selected fields to the Export Fields list by clicking Add>>.
170 IBM Unica Distributed Marketing: Corporate Marketer's Guide

c. Remove fields from the Export Fields list by selecting them and clicking<<Remove.
d. If you selected a table as the export destination, the fields in that tableappear in the Export Fields list under the Table Field column. You canautomatically find matching fields by clicking Match>>. Fields with exactmatches for the table field names are automatically added to the ExportFields list. If there are multiple matching fields, the first match is taken.You can manually modify the pairings by clicking <<Remove or Add>>.
e. If desired, reorder the fields in the Export Fields list by selecting a fieldand clicking Up1 or Down1 to move it up or down in the list.
Note: To view the values in a field, select the field and click Profile.6. To specify that records with duplicate IDs are skipped, or specify the order in
which records are output, click More.You see the Advanced Settings window.a. To specify that any records with duplicate IDs are skipped, select the Skip
Records with Duplicate IDs check box, and choose the criteria thatCampaign will use to decide which record to retain if duplicate IDs arereturned. For example, you can select MaxOf and Household_Income tospecify that when duplicate IDs are returned, Campaign exports only theID with the highest household income.
Note: This option only removes duplicates within the same input cell.Your contact list can still contain duplicate IDs if the same ID appears inmultiple input cells. If you want to remove all duplicate IDs from thecontact list, you must use a Merge or Segment process upstream of thecontact process to purge duplicate IDs or create mutually exclusivesegments.
b. To specify that the output contact list is ordered in some way, select theOrder By check box, the field to sort by, and the sort order. For example,you can select Last_Name and Ascending to specify that the list of IDs issorted by family name in ascending order.
7. Click OK to close the Advanced Settings window.The duplicate ID skipping and sort order that you have specified is displayedbelow the Export Fields list on the Personalization tab.
8. Click the Log tab to specify how you want to log contact transactions fromthis process.
Note: You must have the appropriate permissions to enable or disable thecontact history logging options.a. To log contact history to the system tables, check the Log to Contact
History Tables check box.
Note: To make the contact information available for tracking and reportingthroughout Campaign, log to the system tables. If you are configuring amailing list, do not log to system tables if you plan to send your mailinglist to a mailing house that performs processing (such as validatingaddresses or householding). Instead, use a Track process to log theinformation returned from the mailing house instead to capture only thelist of customers who were mailed an offer.
b. To additionally, or instead, log to another destination than the systemtables, check the Log into Other Destination check box.
Appendix B. List of processes 171

Note: You might want to store the contact information in another table orfile if your organization requires further processing of the information inanother format. You might also want to log the information outside thesystem tables if you want to test the information output by the contactprocess before saving it to the system tables.
c. If you selected Log into Other Destination, use the Log to drop-down listto specify a table or file.If you select File, you see the Specify Output File window, where youspecify the type of file you want to write the output to, its file name, andcorresponding data dictionary.
9. Specify the fields that you want to output to contact history by selecting fieldsfrom the Candidate Fields list, and moving them to the Fields to Output listusing the Add>> button. You can also use derived fields for Candidate Fields.Remove fields from the Fields to Output list by selecting them and clicking<<Remove.If desired, reorder the fields in the Fields to Log list by selecting a field andclicking Up1 or Down1 to move it up or down in the list.You can automatically find matching fields by clicking Match>>. Fields withexact matches for the Table Field names are automatically added to the Fieldto Log list. If there are multiple matching fields, the first match is taken.
10. Select an option to specify how updates to the output file or table arehandled:v Append to Existing Data — append the new contact information to the end
of the table or file. If you select this option for a delimited file, labels willnot be exported as the first row. This is the best practice for database tables.
v Replace All Records — remove any existing data from the table or file, andreplace it with the new contact information.
11. To customize the information that will be written to contact history, click MoreOptions.The Contact History Logging Options window appears.a. To avoid updating the contact history when this process runs, select Create
Treatments Only.This option generates new treatments in the Treatments table withoutupdating the contact history, essentially allowing for a delayed update tothe history. For example, you might avoid writing contact history becauseyou plan to remove invalid and duplicate addresses throughpost-processing. If you wait for the list of IDs to which offers are sent, theresulting contact history will be smaller and more accurate.Be aware that if you select this check box, other options in this windowthat no longer apply (because no contact history will be logged) aredisabled.By default, this check box is not selected, and contact history is updatedwhen the process is run.
b. To generate new treatments with the same package ID as in the mostrecent process run, select Use Last Package ID.All offers given in the same contact process to an individual are consideredto be a single "package"; by default, Use Last Package ID is not selected,which specifies that each package is assigned a unique ID for eachproduction run of the contact process.If you selected Create Treatments Only to prevent the customer historyfrom being updated, you might also select this check box to ensure that the
172 IBM Unica Distributed Marketing: Corporate Marketer's Guide

package ID from the prior run is assigned to each set of offers, which linksthe offers to the existing contact history.
c. Select the audience level at which you are tracking contact history from theTracking Audience Level drop-down list.
d. Enter the date on which the people in the contact list will be contacted inthe Contact Date field. You can also click to select the date from acalendar. If you do not enter a date in this field, Campaign uses theflowchart run date.
e. Enter a status code for tracking, using the Contact Status Code drop-downlist.
f. Select and move fields to and from the Candidate Fields and the Fields toLog list using the Add>>, <<Remove, Match>>, Up1, and Down1 buttonsin the same way as you did to select fields on the Log tab.
g. Click Close when you have finished specifying additional fields to log.You are returned to the Log tab of the process configuration dialog.
12. (Optional) To clear some or all existing contact history and associatedresponse history entries before the next run of the contact process, click ClearHistory.
Important: Clear History permanently deletes contact and response historyrecords from the system tables. This data is not recoverable.
13. (Optional) Click the General tab to assign a name and/or notes to the process.The name appears on the process in the flowchart. The notes appear whenyou point to the process in the flowchart.
14. Click OK.
The process is configured and appears enabled in the flowchart. You can test theprocess to verify that it returns the results you expect.
Create SegUse the Create Seg process to create lists of audience IDs from customer databasetables. The segments can then be used as input for Select processes and to createdimensions and cubes, or as the global suppression segment for an audience level.
The Create Seg process is designed to be used by Campaign administrators. TheCreate Seg process should be created in the Sessions area of Campaign so that thesegments are strategic and are available globally for use in all campaigns.
Note: A best practice is to create all global constructs in the Sessions area ofCampaign, for use in multiple campaigns. However, it is possible to use Create Segwithin a campaign rather than in a session flowchart.
To work with strategic segments, you do the following:v Create a segment in the Sessions area.v Manage segments from the Segments area.v Use these segments in campaigns from the Campaign section.
To configure a Create Seg process
Note: The Create Seg process is designed to be used by Campaign administrators,and should be created and defined in the Sessions area of the application, so thatthe segments are strategic and are available globally for use in all campaigns.
Appendix B. List of processes 173

1. In a session flowchart in Edit mode, add a Create Seg process to the flowchartworkspace.
2. Provide input to the Create Seg process by connecting it to one or more datamanipulation processes (for example, a Select process).
3. Double-click the Create Seg process.The process configuration dialog appears.
4. On the Define Segments tab, do the following:a. Select one or more source cells from the Input drop-down list. These source
cells will be turned into segments.b. Select Create Mutually Exclusive Segments if you want the created
segments to be mutually exclusive.c. In the Result Segments area, highlight an input cell and click Edit to
configure the segment.The Edit Segment window appears.
5. From the Edit Segment window, do the following:a. Give the segment a name that describes its purpose, and a brief description
of what the segment is designed to do.b. From the Under Folders drop-down list, select a folder where the segment
will be stored.c. From the Temp Table Data Source drop-down list, select a data source in
which to cache the strategic segment.
Note: Selecting a data source is required only if thedoNotCreateServerBinFile property on the Campaign|Server|OptimizationConfiguration page is set to TRUE. If this property is not set to True, at leastone data source must be selected.
d. From the Security Policy drop-down list, select a security policy, ifapplicable, to which the created segment will belong.
e. When you have finished, click OK to return to the Define Segments tab.6. (Optional) Click the General tab to assign a name and/or notes to the process.
The name appears on the process in the flowchart. The notes appear when youmouse over the process in the flowchart.
7. Click OK.
The process is configured and appears enabled in the flowchart.
Note: Strategic segments are created and made available for selection only whenthe Create Seg process has run successfully in production mode. Running theCreate Seg process in test mode does not create or update strategic segments.
You can test the Create Seg process, but test runs do not create strategic segmentsor update existing ones.
CubeThe Cube process supports the creation of data cubes from dimensions based onstrategic segments that have been created from customer database tables.
Note: The Cube process is intended to be used by technical users or IBM Unicaconsultants. A best practice is to create all global constructs (cubes and strategicsegments, for example) in the Sessions area of the application.
174 IBM Unica Distributed Marketing: Corporate Marketer's Guide

Users can select one or more defined segments, create a cube, and then drill intothe data to select a target audience which can then be converted into theappropriate processes (the Select process, for example) for inclusion in a flowchart.
To configure a Cube process
Any cubes created in the Sessions area will be available globally.1. Before you can create a cube using a Cube process, you must create a strategic
segment or dimension hierarchy.2. In a session flowchart, select a Cube process and drag it onto the workspace.3. Double-click the Cube process in the flowchart workspace.
You see the process configuration dialog.4. On the Source tab, use the Input Segments drop-down list to select one or
more segments as input for the cube.
Important: If you are selecting more than one source segment, ensure that theyall have the same audience level.
5. Click the Cube Definitions tab to define your cube. The Cube Definitionswindow appears.From the Cube Definitions window you can:v Click Add to add a new cubev Select an existing cube and click Edit to modify itv Select an existing cube and click Remove to delete it
6. To add a cube:a. Click Add. The Edit Cube window appears.b. Enter a name and a description of the cube in the appropriate areas.c. Select up to three dimensions from the corresponding drop-down lists. The
dimensions must be related to the strategic segments that the cube source isbased on.
d. Click OK when you have finished entering information for the cube. TheEdit Cube window closes and the new cube definition is displayed in thelist of cubes on the Cube Definitions tab.
7. Click the Select Additional Fields to Track tab to specify additional fields fortracking.The Select Additional Fields window appears.From the Select Additional Fields window you can:v Select and move the fields you want to track from the Available Fields list to
the Selected Fields list, using the Add>> buttonv Click Derived Fields to select or create derived fields to track.v Click Profile to profile a selected field.
8. (Optional) Click the General tab to assign a name and/or notes to the process.The name appears on the process in the flowchart. The notes appear when youmouse over the process in the flowchart.
9. Click OK.The process is configured and appears enabled in the flowchart. You can testthe process to verify that it returns the results you expect.
Appendix B. List of processes 175

Mail ListThe Mail List process is one of the contact processes. It uses output cells fromother processes in your flowchart to generate a contact list for a direct mailcampaign, assign specific offers to that contact list, and log the contact history.
To configure a contact process (Mail List or Call List)1. In a flowchart in Edit mode, ensure that your contact process is connected to
one or more configured processes whose output cells will be used as input bythe contact process.
Important: All the cells that you select as input cells must have the sameaudience level.
2. Double-click the contact process in the flowchart workspace.The process configuration dialog appears.
3. On the Fulfillment tab, specify the fulfillment details of your list output.a. From the Input drop-down list, specify the input cells to use as the data
source for the contact list.
Note: If the contact process is not connected to a process that providesoutput cells, there will be no cells to select from in the Input drop-downlist. The Multiple Cells option in the drop-down list is only available ifthe input process generates multiple cells.
b. (Optional) To specify where to write the contact list output, be sure thatthe Enable Export To check box is selected and use the drop-down list tospecify one of the following options:v If you want to write the process output to a database table, select its
name from the Enable Export To drop-down list.v If the database table that you want to use does not appear in the list, or
if you want the process output to be written to an unmapped table,select Database Table from the drop-down list to open the SpecifyDatabase table window. Use this window to specify the table anddatabase names. User variables are supported in the table name youspecify here.
v If you want to write the process output to a file, select File from theEnable Export To drop-down list to open the Specify Output Filewindow. Use this window to specify the type of file you want to writethe output to, its file name, and corresponding data dictionary.
v If you want to create a new user table, select New Mapped Table fromthe Enable Export To drop-down list. For instructions, see the CampaignAdministrator's Guide.
Note: You can test the contact process by running the process with outputexported to a temporary file that you can review.The Enable Export To check box is selected by default. If you clear it, youcan run the process without any output to a file or database table.
c. (Optional) Create a Summary File (.sum) for this process by entering apath and file name in the Summary File field, or navigate to a location byclicking the ellipsis button. A summary file contains information about theexport that might be required by a mailing house to facilitate mailings.
d. (Optional) Send a trigger when the process finishes running by selectingthe Send Trigger(s) check box, and choosing the trigger you want to sendfrom the drop-down list. To send multiple triggers, use Ctrl+Click to select
176 IBM Unica Distributed Marketing: Corporate Marketer's Guide
each trigger you want to add. The selected triggers will appear in theSend Trigger(s) field, separated by commas.
4. Click the Treatment tab to assign one or more offers or offer lists to eachtarget cell defined in this process. Click the Parameters tab to specify offerparameters for each cell.
5. Click the Personalization tab to specify the fields that are written out to yourcontact list.a. Select the fields that you want to include in your output from the
Candidate Fields list.You can use IBM Unica Campaign Generated Fields by expanding the IBMUnica Campaign Generated Fields list, or use derived fields by clickingthe Derived Fields button. Select multiple fields at one time usingCtrl+Click or a contiguous range of fields using Shift+Click.
b. Move selected fields to the Export Fields list by clicking Add>>.c. Remove fields from the Export Fields list by selecting them and clicking
<<Remove.d. If you selected a table as the export destination, the fields in that table
appear in the Export Fields list under the Table Field column. You canautomatically find matching fields by clicking Match>>. Fields with exactmatches for the table field names are automatically added to the ExportFields list. If there are multiple matching fields, the first match is taken.You can manually modify the pairings by clicking <<Remove or Add>>.
e. If desired, reorder the fields in the Export Fields list by selecting a fieldand clicking Up1 or Down1 to move it up or down in the list.
Note: To view the values in a field, select the field and click Profile.6. To specify that records with duplicate IDs are skipped, or specify the order in
which records are output, click More.You see the Advanced Settings window.a. To specify that any records with duplicate IDs are skipped, select the Skip
Records with Duplicate IDs check box, and choose the criteria thatCampaign will use to decide which record to retain if duplicate IDs arereturned. For example, you can select MaxOf and Household_Income tospecify that when duplicate IDs are returned, Campaign exports only theID with the highest household income.
Note: This option only removes duplicates within the same input cell.Your contact list can still contain duplicate IDs if the same ID appears inmultiple input cells. If you want to remove all duplicate IDs from thecontact list, you must use a Merge or Segment process upstream of thecontact process to purge duplicate IDs or create mutually exclusivesegments.
b. To specify that the output contact list is ordered in some way, select theOrder By check box, the field to sort by, and the sort order. For example,you can select Last_Name and Ascending to specify that the list of IDs issorted by family name in ascending order.
7. Click OK to close the Advanced Settings window.The duplicate ID skipping and sort order that you have specified is displayedbelow the Export Fields list on the Personalization tab.
8. Click the Log tab to specify how you want to log contact transactions fromthis process.
Appendix B. List of processes 177

Note: You must have the appropriate permissions to enable or disable thecontact history logging options.a. To log contact history to the system tables, check the Log to Contact
History Tables check box.
Note: To make the contact information available for tracking and reportingthroughout Campaign, log to the system tables. If you are configuring amailing list, do not log to system tables if you plan to send your mailinglist to a mailing house that performs processing (such as validatingaddresses or householding). Instead, use a Track process to log theinformation returned from the mailing house instead to capture only thelist of customers who were mailed an offer.
b. To additionally, or instead, log to another destination than the systemtables, check the Log into Other Destination check box.
Note: You might want to store the contact information in another table orfile if your organization requires further processing of the information inanother format. You might also want to log the information outside thesystem tables if you want to test the information output by the contactprocess before saving it to the system tables.
c. If you selected Log into Other Destination, use the Log to drop-down listto specify a table or file.If you select File, you see the Specify Output File window, where youspecify the type of file you want to write the output to, its file name, andcorresponding data dictionary.
9. Specify the fields that you want to output to contact history by selecting fieldsfrom the Candidate Fields list, and moving them to the Fields to Output listusing the Add>> button. You can also use derived fields for Candidate Fields.Remove fields from the Fields to Output list by selecting them and clicking<<Remove.If desired, reorder the fields in the Fields to Log list by selecting a field andclicking Up1 or Down1 to move it up or down in the list.You can automatically find matching fields by clicking Match>>. Fields withexact matches for the Table Field names are automatically added to the Fieldto Log list. If there are multiple matching fields, the first match is taken.
10. Select an option to specify how updates to the output file or table arehandled:v Append to Existing Data — append the new contact information to the end
of the table or file. If you select this option for a delimited file, labels willnot be exported as the first row. This is the best practice for database tables.
v Replace All Records — remove any existing data from the table or file, andreplace it with the new contact information.
11. To customize the information that will be written to contact history, click MoreOptions.The Contact History Logging Options window appears.a. To avoid updating the contact history when this process runs, select Create
Treatments Only.This option generates new treatments in the Treatments table withoutupdating the contact history, essentially allowing for a delayed update tothe history. For example, you might avoid writing contact history becauseyou plan to remove invalid and duplicate addresses through
178 IBM Unica Distributed Marketing: Corporate Marketer's Guide

post-processing. If you wait for the list of IDs to which offers are sent, theresulting contact history will be smaller and more accurate.Be aware that if you select this check box, other options in this windowthat no longer apply (because no contact history will be logged) aredisabled.By default, this check box is not selected, and contact history is updatedwhen the process is run.
b. To generate new treatments with the same package ID as in the mostrecent process run, select Use Last Package ID.All offers given in the same contact process to an individual are consideredto be a single "package"; by default, Use Last Package ID is not selected,which specifies that each package is assigned a unique ID for eachproduction run of the contact process.If you selected Create Treatments Only to prevent the customer historyfrom being updated, you might also select this check box to ensure that thepackage ID from the prior run is assigned to each set of offers, which linksthe offers to the existing contact history.
c. Select the audience level at which you are tracking contact history from theTracking Audience Level drop-down list.
d. Enter the date on which the people in the contact list will be contacted inthe Contact Date field. You can also click to select the date from acalendar. If you do not enter a date in this field, Campaign uses theflowchart run date.
e. Enter a status code for tracking, using the Contact Status Code drop-downlist.
f. Select and move fields to and from the Candidate Fields and the Fields toLog list using the Add>>, <<Remove, Match>>, Up1, and Down1 buttonsin the same way as you did to select fields on the Log tab.
g. Click Close when you have finished specifying additional fields to log.You are returned to the Log tab of the process configuration dialog.
12. (Optional) To clear some or all existing contact history and associatedresponse history entries before the next run of the contact process, click ClearHistory.
Important: Clear History permanently deletes contact and response historyrecords from the system tables. This data is not recoverable.
13. (Optional) Click the General tab to assign a name and/or notes to the process.The name appears on the process in the flowchart. The notes appear whenyou point to the process in the flowchart.
14. Click OK.
The process is configured and appears enabled in the flowchart. You can test theprocess to verify that it returns the results you expect.
Schedule
Note: The Schedule process is not related to the Unica Scheduler. The Schedulerstarts a flowchart even if it is not running, while the Schedule process in aflowchart works only if the flowchart is running. You should not use the Schedulerto schedule a flowchart that uses the Schedule process.
Appendix B. List of processes 179

Use the Schedule process to initiate a process, series of processes, or an entireflowchart. A Schedule process is active for a defined period of time. During thattime, specified events might occur that cause subsequent connected processes tobegin execution. The most common use of the Schedule process is to control timingof the entire flowchart.
You can configure a Schedule process to define the total scheduling period bysetting up a time limit in days, hours, and minutes starting from when the processbegins executing.
Scheduling options are both fine-grained and flexible:v You can schedule a process to run in a wide variety of ways, including
repetitively, by trigger, by calendar, and so on.v You can combine multiple scheduling options, such as scheduling the process to
run every Monday at 9:00 a.m., but also to run whenever it is triggered by aspecific event (such as a hit on the website).
v You can schedule a batch process, for example, to run late at night when it willnot cause interfere with daytime jobs.
There are no predetermined limits on the number of options you can usesimultaneously in scheduling a flowchart, providing that the selections do notactively conflict. (For example, you cannot schedule a flowchart to run both "OnceOnly" and "Every Monday.")
In general, a process runs only when all of its inputs have run successfully (that is,when all processes connected to the current process have run, even if thedependency is only temporal). However, when multiple schedule inputs existwithin a branch, the process will run whenever any one of its inputs completes (an"or" rather than an "and" of its inputs).
A contact process with tracking enabled contains an inherent schedule. Using aSchedule process in the middle of a flowchart is an advanced feature. Make sureyou are getting the desired behavior and correct results.
Note: If the Schedule process in your flowchart tells the flowchart to run before aprevious run is complete, Campaign holds the request until the previous run isfinished. Only one run can be held in this manner. In certain cases, this mightmean that the flowchart does not run as many times as you expect.
For example, if your flowchart takes two hours to run, and you have a Scheduleprocess that tries to trigger three runs that are only 10 minutes apart, Campaignwill start the first run. When the Schedule process attempts to start the second run,Campaign will queue it. When the Schedule process attempts to start the third run,Campaign will ignore it. When the first run is finished, Campaign will start thesecond run. The third run will never start.
To configure a Schedule process1. In a flowchart in Edit mode, double-click the Schedule process in the flowchart
workspace.The process configuration dialog appears.
2. On the Schedule tab, specify the scheduling conditions:a. Specify a value for Total Schedule Period by entering the appropriate
values in the Days, Hours, and Minutes fields. The total schedule period is
180 IBM Unica Distributed Marketing: Corporate Marketer's Guide

the total time over which the Schedule process is to be active. By default,the total schedule period is set to 30 days.
b. Select a run frequency from the Schedule to Run drop-down list, to specifyexactly when the Schedule process will activate subsequent connectedprocesses.v If you select the Once Only option, the flowchart will run exactly once,
regardless of what other schedule options have been added. If any othervalue is selected, then the scheduling options are connected as ORstatements and the Schedule process kicks off any process to which it isconnected when any option is satisfied.
v The first option that is satisfied will begin the Schedule run. If ScheduleTo Run is the only option enabled and the setting is Once Only, theprocess runs immediately (unless a delay or user authorization has beenenabled).
v The Hours and Minutes fields enable you to specify the time at whichyou want the schedule to run. The time entry form is based on a 24 hourclock (also referred to as "military time"). In other words, 9 hours 30minutes is 9:30 a.m., and 22 hours 45 minutes is 10:45 p.m. Because thetime base is 24 hours, there is no need to designate a.m. or p.m.
3. If you select Custom Run from the Schedule to Run drop-down list, theCustom Run options become enabled. Specify whether the schedule runs at aparticular time or times, or based on inbound triggers, by selecting the Run OnTime check box and/or the Run On Trigger(s) check box. For more detailsabout triggers, see the Campaign Administrator's Guide.
Note: These choices are not mutually exclusive: you can choose to use triggersin conjunction with scheduled times.v If you choose Run On Time, you must specify one or more dates and times.
Multiple entries must be separated by commas. Click Calendar to access theCalendar feature for choosing dates and times.
v If you choose Run On Trigger(s) you must specify one or more triggers.The named trigger(s) must be defined using Tools > Stored Triggers for theSchedule process to be fully configured. Enter the name of each trigger thatcan activate this Schedule process. Separate multiple triggers with commas.The trigger name can contain any characters except commas. A trigger namedoes not have to be unique. You can use the same trigger in multiplecampaigns or flowcharts and activate them all at the same time.
4. Specify any Delay and Authorization settings by selecting the Wait for UserAuthorization Before Each Run check box and/or the Delay Period BeforeEach Run check box.
Note: These choices are not mutually exclusive: you can choose either or both.v If you choose Wait for User Authorization Before Each Run, a prompt for
user authorization will appear each time any other schedule conditions aresatisfied, and the Schedule process will not activate unless specificauthorization is provided. If you specify this option, it takes precedence overany other schedule indicators; the process will not start unless authorizationis given.
Note: When a flowchart is running with a client attached, user authorizationcan only occur through the client. If no client is attached, any user withread/write privileges for the campaign can authorize it to continue.
Appendix B. List of processes 181
v If you choose Delay Period Before Each Run, you must specify the amountof time to wait after a schedule condition has been satisfied before theprocess runs, using the Days, Hours, and Minutes fields. This delay appliesto all other specified schedule options. For example, if a Schedule process isconfigured to run at 9:00 a.m. on Monday morning with a delay of one hour,subsequent processes will begin to run at 10:00 a.m.
5. (Optional) Specify triggers to send after the Schedule run is completed byselecting the Send Trigger(s) After Each Run check box and specifying one ormore triggers.If you select the Send Trigger(s) After Each Run check box, Campaign runsone or more triggers each time the Schedule process is activated. An outboundtrigger executes a command line, which can be a batch file or a script file. Thenamed trigger(s) must be defined using Tools > Stored Triggers. If you specifymultiple trigger names, they must be separated by commas.
6. (Optional) Click the General tab to assign a name and/or notes to the process.The name appears on the process in the flowchart. The notes appear when youpoint to the process in the flowchart.
7. Click OK.
The process is configured and appears enabled in the flowchart. You can test theprocess to verify that it returns the results you expect.
To use the Calendar tool in the Schedule process
The Calendar tool is available from the Schedule process configuration dialog ifyou select Custom Run from the Schedule to Run drop-down list.
It is the same as the Calendar tool elsewhere in Campaign except that it allowsyou to select the time as well as the date.1. On the Schedule tab of the Schedule process configuration dialog, click
Calendar. This button is only enabled if you have selected Custom Run fromthe Schedule to Run drop-down list.The Calendar tool appears. The current date and time are already selected bydefault.
2. Specify the date you want the flowchart to run or start:v Click the date on the displayed month, orv Change the month, year, and time using the Month drop-down listv Change the year using the up and down arrows.
3. Specify the time by entering the desired time in the Run Time field, using theformat hh:mm, followed by an a.m. or p.m. designation.
4. Click Apply to enter the specified date and time, leaving the Calendar windowopen, or click OK to enter the specified date and time and close the Calendarwindow.Leaving the Calendar window open allows you to easily enter multiple dateand time selections.
Scheduling based on triggersThe Schedule process can work with triggers in the following ways:v “Running on triggers” on page 183v “Sending triggers after each run” on page 183v “Using triggers with other scheduling options” on page 183
182 IBM Unica Distributed Marketing: Corporate Marketer's Guide

To configure a Schedule process to run on a trigger:
1. On the Schedule tab of the Schedule process configuration dialog, selectCustom Run from the Schedule to Run drop-down list.The Custom Run features become enabled.
2. In the Run On Trigger(s) field, enter the name of each trigger that can activatethis Schedule process. Separate multiple triggers with commas.v The trigger name can contain any characters except commas.v A trigger name does not have to be unique. You can use the same trigger in
multiple campaigns or flowcharts and activate them all at the same time.
Running on triggers: When you select Custom Run from the Schedule to Rundrop-down list, the Run On Trigger(s) option is available. Enable this option tospecify one or more inbound triggers that activate the Schedule process.
If you enable Run on Trigger(s), you must specify one or more triggers. Thenamed trigger(s) must be defined using Tools > Stored Triggers for the Scheduleprocess to be fully configured.
An inbound trigger is an external event that will automatically set a flowchart or acampaign in motion. A trigger can be anything that you define; for example,clicking a website link, receiving an email message, a telemarketer’s responseindicator, completion of a database upload, or any other defined event.
The Run On Trigger(s) option uses the IBM Unica applicationunica_actrg(included with your Campaign installation) to run. To understand howRun On Trigger works behind the scenes, it is helpful to look at an example.
Example: Run on Trigger: An online retailer has a cross-sell campaign that runson a trigger, so that when a customer makes a purchase, it triggers cross-sell offers.
Specifically, when the customer makes a purchase:v The website runs the unica_actrg executable, passing the campaign code and the
trigger name (web_purchase).v The Campaign listener checks that the campaign is active and the trigger name
exists, then runs the Schedule process, and the campaign flowchart is triggered.For more details about triggers, see the Campaign Administrator's Guide.
Sending triggers after each run: An outbound trigger executes a command line,which can be a batch file or a script file. You can have Campaign run one or moretriggers each time the Schedule process activates the trigger names in the SendTrigger(s) After Each Run field. If you specify multiple trigger names, they mustbe separated by commas.
This function allows you to send an outbound trigger to an executable file. The fullpath and the name of the file must be defined in the Stored Trigger Definitionswindow. Each time the Schedule process is activated, Campaign runs the specifiedexecutable file.
Using triggers with other scheduling options: Triggers can be used with anyother scheduling options or alone. Used in combination, you can, for example, setup a flowchart to run every Monday at 9:00 a.m. as well as every time someoneclicks on an internet banner advertisement.
Appendix B. List of processes 183

If, for example, you have scheduled the flowchart to Run On Trigger(s) based onhits on a website, and you also specify a Delay Period Before Each Run, theflowchart will not begin until both the event (the Web "hit") occurs and the delayperiod has expired.
SnapshotUse the Snapshot process to capture a list of IDs and associated data, and exportthem to a table or a file.
To associate or track offers with the list, use a Mail List or Call List process. Tomake sure that duplicate rows are not exported, use an Extract process, thensnapshot the results.
To configure a Snapshot process1. In a flowchart in Edit mode, ensure that your Snapshot process is connected to
one or more configured processes whose output cells will be used as input bythe Snapshot process.
Note: All the cells that you select as input cells must have the same audiencelevel.
2. Double-click the Snapshot process in the flowchart workspace.The process configuration dialog appears.
3. Click the Snapshot tab.a. From the Input drop-down list, specify the input cells to use as the data
source for the snapshot.
Note: If the Snapshot process is not connected to a process that providesoutput cells, there will be no cells to select from in the Input drop-downlist. The Multiple Cells option in the drop-down list is only available if theinput process generates multiple cells.
b. From the Export To drop-down list, specify a table or file to which theSnapshot output will be written.
Note: You can test the Snapshot process by running the process with outputexported to a temporary file that you can review.v If the table that you want to use does not appear in the list, or if you
want to output to an unmapped table, select Database Table. You see theSpecify Database table window, where you specify the table and databasenames. User variables are supported in the table name you specify here.
v If you select File from the Export To drop-down list, you see the SpecifyOutput File window, where you specify the type of file you want to writethe output to, its file name, and corresponding data dictionary.
v If you want to create a new user table, select New Mapped Table fromthe Export To drop-down list. For instructions, see the CampaignAdministrator's Guide.
c. Select an option to specify how updates to the output file or table arehandled:v Append to Existing Data. Append the new information to the end of the
table or file. If you select this option for a delimited file, labels will not beexported as the first row. This is a best practice for database tables.
v Replace All Records. Remove any existing data from the table or file, andreplace it with the new information.
184 IBM Unica Distributed Marketing: Corporate Marketer's Guide

v Update Records. Available only if you are exporting to a table. All fieldsspecified for snapshot are updated with the values from the current runof the process.
v Create New File. Available only if you are exporting to a file. This optionis selected by default if you are exporting to a file. Each time you run theprocess, a new file is created with "_1," "_2" and so on, appended to thefile name.
4. Specify the fields that are written out by the Snapshot process.a. Select the fields that you want to include in your output from the
Candidate Fields list.You can use Campaign Generated Fields by expanding the list of CampaignGenerated Fields, or use derived fields by clicking the Derived Fieldsbutton. Select multiple fields at one time using Ctrl+Click or a contiguousrange of fields using Shift+Click.
b. Move selected fields to the Fields to Snapshot list by clicking Add>>.c. Remove fields from the Fields to Snapshot list by selecting them and
clicking <<Remove.d. If you selected a table as the snapshot destination, the fields in that table
appear in the Export Fields list under the Table Field column. You canautomatically find matching fields by clicking Match>>. Fields with exactmatches for the table field names are automatically added to the ExportFields list. If there are multiple matching fields, the first match is taken. Youcan manually modify the pairings by clicking <<Remove or Add>>.
e. If desired, reorder the fields in the Fields to Snapshot list by selecting afield and clicking Up1 or Down1 to move it up or down in the list.
Note: To view the values in a field, select the field and click Profile.5. To specify that records with duplicate IDs are skipped, or specify the order in
which records are output, click More.You see the Advanced Settings window.a. To specify that any records with duplicate IDs are skipped, select the Skip
Records with Duplicate IDs check box, and choose the criteria thatCampaign will use to decide which record to retain if duplicate IDs arereturned. For example, you can select MaxOf and Household_Income tospecify that when duplicate IDs are returned, Campaign exports only the IDwith the highest household income.
Note: This option only removes duplicates within the same input cell. Yoursnapshot data can still contain duplicate IDs if the same ID appears inmultiple input cells. If you want to remove all duplicate IDs, you must usea Merge or Segment process upstream of the Snapshot process to purgeduplicate IDs or create mutually exclusive segments.
b. To specify that the snapshot output is ordered in some way, select the OrderBy check box, the field to sort by, and the sort order. For example, you canselect Last_Name and Ascending to specify that the list of IDs is sorted byfamily name in ascending order.
6. Click OK to close the Advanced Settings window.The duplicate ID skipping and sort order that you have specified is displayedbelow the Fields to Snapshot list on the Snapshot tab.
7. (Optional) Click the General tab to assign a name and/or notes to the process.The name appears on the process in the flowchart. The notes appear when youpoint to the process in the flowchart.
Appendix B. List of processes 185
8. Click OK.
The process is configured and appears enabled in the flowchart. You can test theprocess to verify that it returns the results you expect.
Optimization processesCampaign provides the following optimization processes:v “Model”v “Response” on page 187v “Score” on page 189v “Track” on page 191
ModelUse the Model process to create a runtime model file, which you can use forreal-time or batch scoring. It automates the creation of a response model that canbe used to score customers or prospects to determine the candidates most likely torespond.
Typically, you set up the Model process in your flowchart to take input from twocells, one representing the responders (contacts who reacted positively or tooksome action upon receiving an offer or communication), and one representing thenon-responders (contacts who took no action).
For example, you could use two Select processes, one selecting the people whowere contacted with an offer, and the other selecting the responders. Then, use aMerge process to exclude the responders so that you have a list of non-responders.Connect the Merge output and the "responders" Select output to your Modelprocess to provide the non-responder and responder cells for the model.
In another scenario, you could use a Select process to select all contacts for anoffer, then use a Segment process to segment that cell into responders andnon-responders.
To configure a Model process1. In a flowchart in Edit mode, ensure that your Model process is connected to
one or more configured processes whose output cells will be used as input bythe Model process.
2. Double-click the Model process in the flowchart workspace.The process configuration dialog appears.
3. On the Source tab, select your responder and non-responder cells from theResponder and Non-Responder drop-down lists. The drop-down lists arepopulated with input cells to the Model process; they are empty if you haveno inputs to the process.
Note: Both input cells must have the same audience level.4. From the Variables to be Used for Modeling list, select the variables to be
used by the Model process during model generation. You can select allvariables (by clicking Use All) and let the Model process decide which set ofinputs are most effective for modeling. However, by eliminating variables thatdo not add value to the model (for example, variables containing the samevalue for all records or different values for all records), you can speed up theautomatic variable selection process.
186 IBM Unica Distributed Marketing: Corporate Marketer's Guide

Note: If you are in doubt as to the predictive value of a variable, include itand let the Model process decide whether it should be used.You can also use derived fields in the configuration of a model.
5. On the Method tab, used the Best Model options to choose how the datamining algorithms should arrive at the best model: based on a specifiedlength of time, or from among a specified number of candidate models.v Best Model In – (Default) Allows you to specify a time limit for modeling.
The Model process retains the best models built in the time period that youspecify. The default is three hours.
v Best Models Among – Allows you to specify the number of models tobuild. The Model process will retain the best of these models. The default is20.
6. Select the type of modeling that will be done by choosing an algorithm fromthe Algorithm to Use drop-down list. You can select one, several, or all.
Note: Selecting All Algorithms (the default) will result in a more accuratemodel, but it might take longer.
7. Set the maximum number of models to keep by entering any positive integerin the Max. # of Models to Keep field. The default is five. Each of the topmodels are saved by appending a pound sign (#) to the end of the specifiedfile name. If more than one model is kept, an index is appended to the basefile name, indicating the rank of the model.
Note: The more models you elect to keep, the more disk space is required tosave the corresponding information.
8. In the Model File Name field, specify the absolute path name for the modelfile that is to be created, or click Browse to navigate to a file. Once you runthe process it will generate a NAME.rtm model file, which you can use forscoring with the Score process.
9. (Optional) Click the General tab to assign a name and/or notes to the process.The name appears on the process in the flowchart. The notes appear whenyou mouse over the process in the flowchart.
10. Click OK.
The process is configured and appears enabled in the flowchart. You can test theprocess to verify that it returns the results you expect.
ResponseThe Response process tracks the responses of customers who were contacted in acontact process, such as Mail List or Call List. Based on rules that you defineduring process configuration, the Response process evaluates which responses areconsidered valid, and how they are credited back to campaigns or offers. Theoutput of the Response process is written to several response history system tables,where the data can be accessed for analysis using Campaign performance andprofitability reports.
In its simplest form, the Response process can appear in its own flowchartconnected to a Select process (and optionally a Segment process). In such aflowchart, the Select process selects IDs from a mapped table containing data aboutresponders and their response actions. These IDs are segmented by the Segmentprocess into meaningful groups, and finally passed to a Response process, whereresponse tracking rules are applied and output is written to response historytables.
Appendix B. List of processes 187

A Response process is tightly aligned with its corresponding contact process, inwhich the responders now being tracked were possibly members of cells targetedwith particular offers. Therefore, before you can configure a Response process, youmust:v Know the audience level of your contact list and ensure that contact history and
response history system tables for each audience level that you are contactingand tracking, have been mapped. This is usually done by your systemadministrators.
v Set up a separate Response process for each audience level in which you aretracking responders.
v Know the codes representing the response types that you want to track.v Know what Campaign-generated codes (campaign, cell, offer, or treatment
codes) were sent out to your contact list, so you can map them for tracking.v Enable Campaign to create temp tables in the Campaign system tables database
(i.e., the AllowTempTables property must be set to true).
To configure a Response process1. In a flowchart in Edit mode, ensure that your Response process is connected to
one or more configured processes whose output cells will be used as input bythe Response process.
2. Double-click the Response process in the flowchart workspace.The process configuration dialog appears.
3. Click the Source tab.a. Select your source cell(s) from the Input drop-down list. The source cells
originate from the mapped table in your data mart that holds yourcustomer response information.
Note: If you are using a delimited flat file as input to the Response process,you must ensure that all data types in the input files are mappedappropriately, as this is not enforced by the Response process. Using amismatched data type (for example, having a treatment code mapped as“numeric” when the UA_Treatment.TreatmentCode field is a “string” type)causes a database error on some databases (for example, system tables onDB2).
b. Select the date that you want to have associated with the records output bythe Response process, using the Response Date drop-down list. By default,a value of "Today" is selected. You can also use derived fields to populateResponse Date.
c. Select the Response Type Code that you want to track. The response typecodes are globally defined and available for all campaigns.
4. Click the Mapping to Treatments tab.You see the Candidate Action Fields list, from which you choose the relevantfields to be tracked. In the Matched Offer/Treatment Fields list, theOffer/Treatment Attribute column lists all offer or treatment attributes in thesystem.a. Select the fields that you want to track from the Candidate Action Fields
list, and move them to the Matched Offer/Treatment Fields list using theAdd>> button, so that the appropriate fields to match are paired.You can select multiple fields at one time using Ctrl+Click or a contiguousrange of fields using Shift+Click. You can also used derived fields forCandidate Action Fields.
188 IBM Unica Distributed Marketing: Corporate Marketer's Guide

b. Remove fields from the Matched Offer/Treatment Fields list by selectingthem and clicking <<Remove.
c. If desired, reorder the fields in the Matched Offer/Treatment Fields list byselecting a field and clicking Up1 or Down1 to move it up or down in thelist.
Note: Unmapped fields, and fields for which values not available (orNULL) are not used for response attribution. For a treatment instance toreceive response credit, all populated fields must match, except for controls,for which all codes are ignored.
5. Click the Log tab to specify the fields you want to log to response history.Select fields from the Candidate Fields list and move them to the Fields to Loglist using the Add>> button. You can also used derived fields for CandidateFields.Remove fields from the Fields to Log list by selecting them and clicking<<Remove.Reorder the fields in the Fields to Log list by selecting a field and clicking Up1or Down1 to move it up or down in the list.You can automatically find matching fields by clicking Match>>. Fields withexact matches for the Table Field names are automatically added to the Fieldsto Log list. If there are multiple matching fields, the first match is taken.
6. (Optional) Click the General tab to assign a name and/or notes to the process.The name appears on the process in the flowchart. The notes appear when youpoint to the process in the flowchart.
7. Click OK.
The process is configured and appears enabled in the flowchart. You can test theprocess to verify that it returns the results you expect.
ScoreUse the Score process to rate the likelihood of each customer making a purchase orresponding to an offer and to identify the best customers or prospects for thecampaign that you plan to run. Scoring is based on modeling results importedfrom a runtime model file (.rtm file) created by PredictiveInsight or the Modelprocess in Campaign.
The Score process might be used in a flowchart in the following way: Theflowchart begins with a Schedule process which runs the flowchart every month. Itis connected to a Select process which generates a list of customer IDs from data inthe data mart. The IDs are then sent to a Score process for scoring against a datamodel. Finally, the results of the Score process are sent to a Snapshot process to bewritten out to a spreadsheet.
Appendix B. List of processes 189

To configure a Score process1. In a flowchart in Edit mode, ensure that your Score process is connected to a
configured process whose output cell(s) will be used as input by the Scoreprocess.
2. Double-click the Score process in the flowchart workspace.The process configuration dialog appears.
3. Use the Input drop-down list to select a source cell containing the customerIDs that you want to score.
Important: You cannot select multiple source cells to score.4. In the Number of Models field, specify the number of models you want to
create by entering an integer, or by using the up and down arrow buttons toincrease or decrease the count.
Note: The Parameters For drop-down list will contain as many models as youspecified in the Number of Models field, named Model 1, Model 2, Model 3,and so on. If you change the number of models, the models listed in theParameters For drop-down list automatically change.
5. For each model that you are scoring, specify a Score Field Name and a ModelFile. Use the Parameters For drop-down list to select each model that youneed to configure.
190 IBM Unica Distributed Marketing: Corporate Marketer's Guide

6. In the Score Field Name field, type the name of the field where you want thescoring results stored for that model. The default name is scoreN_1.
If you type MYSCORE in the field and there is a single output field definedin the specified model, the score field name will be MYSCORE. If there aremultiple outputs, the score field names will be MYSCORE_1, MYSCORE_2,MYSCORE_3, and so on.When Campaign displays the list of available fields, the score fields willappear as if they belong to a table.
7. In the Model File field, enter the full path and file name of the model file thatyou will be using to score the customer IDs.Enter the full path and file name of the model you want to use, or clickBrowse to evoke a standard Windows file selection window.
8. Click Match Variables Names to match variable names with fields from thetable in the input source. The Match Variable Names window appears.For customers to be scored properly, you must ensure that you can match thevariables used by the model with corresponding fields in the data set to bescored. For example, if the model uses an average_balance variable, you mustmatch that variable with a field containing average balance in the data set tobe scored.a. Select fields in the Available Fields list that match with fields in the data
set, and move them to the Matched Variables list using the Add>> button.You can match identical field names automatically by clicking Match. Thiswill override any manual matching.You can also create derived fields by clicking Derived Fields.
Important: You must match all the variables in the Matched VariablesList to configure the Score process. Variable names do not need to matchthe field names, but the data types (numeric or string) must match.
b. When you have finished matching variable names, click OK.The Match Variable Names window closes and you are returned to theScore tab in the process configuration dialog.
9. (Optional) Click the General tab to assign a name and/or notes to the process.The name appears on the process in the flowchart. The notes appear whenyou mouse over the process in the flowchart.
10. Click OK.The process is configured and appears enabled in the flowchart. You can testthe process to verify that it returns the results you expect.
TrackUse the Track process to update the contact statuses or additionally tracked fieldsfor existing records in contact history.
Note: The Track process can only update existing rows in contact history; it cannotcreate new rows.
For example, if records were initially written to contact history with a contactstatus of "Proposed," you can use the Track process to later update records incontact history that were contacted, with a contact status of "Contacted." Or, forexample, if all contacts who were sent a direct mail were written to contact historywith a contact status of "Contacted" and you later received a list of undeliverablemailings, you could update individuals on that list with contact statuses of"Undeliverable."
Appendix B. List of processes 191

To configure a Track process1. In a flowchart in Edit mode, ensure that your Track process is connected to one
or more configured processes whose output cells will be used as input by theTrack process.
2. Double-click the Track process in the flowchart workspace.The process configuration dialog appears.
3. Click the Source tab.a. Select your source cell(s) from the Input drop-down list.b. Select the contact date that you want to have associated with the records
updated by the Track process, using the Contact Date drop-down list. Bydefault, a value of "Today" is selected. You can also use derived fields topopulate Contact Date.
c. Select the Contact Status Code that you want to associate with the recordsthat you are updating in contact history.
4. Click the Mapping to Treatments tab.The Candidate Action Fields list appears, from which you can choose therelevant field to match to the Treatment Code. The treatment code uniquelyidentifies the row in the contact history to update.Select the field you want to use for matching from the Candidate Action Fieldslist, and move it to the Matched Offer/Treatment Fields list using the Add>>button, so that it is paired with Treatment Code.
5. Click the Log tab to specify how you want to update contact history from thisprocess.
Note: You must have the appropriate permissions to enable or disable updatesto contact history tables.a. To update contact history in the system tables, select the Log to Contact
History Tables check box.If you select Log to Contact History Tables and you want to writeadditional fields to the contact history, click Additional Fields to displaythe Contact History Logging Options dialog. Use the Add, Remove, Match,Up1, and Down1 buttons to select and move the desired fields from theCandidate Fields list to the Fields to Log list in the same way you did toselect fields on the Log tab. Unmatched fields are not updated.Click Close when you have finished specifying additional fields to log.
b. To log to a destination other than, or in addition to, the contact history inthe system tables, select the Log into Other Destination check box to enablewriting to an alternate table or file.
c. If you selected Log into Other Destination, use the Log To drop-down listto specify whether the output should be written to a file, or to a new tablein the database:If you select File, the Specify Output File window appears. Use thiswindow to specify the type of file to which you want to write the output,the file name, and the corresponding data dictionary.If you select New Table, use the New Table Definition dialog that appears tospecify the information about the new table to which you want Campaignto write the log output.
d. If you selected Log into Other Destination, specify the fields that you wantto output by selecting fields from the Candidate Fields list, and movingthem to the Fields to Output list using the Add>> button.You can also used derived fields for Candidate Fields.
192 IBM Unica Distributed Marketing: Corporate Marketer's Guide

Remove fields from the Fields to Output list by selecting them and clicking<<Remove.If desired, reorder the fields in the Fields to Log list by selecting a field andclicking Up1 or Down1 to move it up or down in the list.You can automatically find matching fields by clicking Match>>. Fieldswith exact matches for the Table Field names are automatically added tothe Field to Log list. If there are multiple matching fields, the first match istaken.
e. Only if you have chosen Log into Other Destination, select an option tospecify how updates to the output file or table are handled:v Append to Existing Data — append the new contact information to the
end of the table or file. If you select this option for a delimited file, labelswill not be exported as the first row. This is the best practice for databasetables.
v Replace All Records — remove any existing data from the table or file,and replace it with the new contact information.
6. (Optional) Click the General tab to assign a name and/or notes to the process.The name appears on the process in the flowchart. The notes appear when youpoint to the process in the flowchart.
7. Click OK.
The process is configured and appears enabled in the flowchart. You can test theprocess to verify that it returns the results you expect.
Appendix B. List of processes 193

194 IBM Unica Distributed Marketing: Corporate Marketer's Guide

Appendix C. About processes
Processes are the building blocks of flowcharts, which you configure to performparticular tasks to achieve the outputs you want. For example, you use the Mergeprocess to merge two distinct audience groups, or use the contact processes (CallList or Mail List) to write out the results of an entire campaign.
Tasks are usually accomplished using processes that work with cells. Cells are listsof identifiers of marketing message recipients (such as customer or prospect IDs).Generally, each process in a flowchart takes one or more cells as input, transformsthe data, and produces one or more cells as output.
The processes available to you in Campaign are visible on the flowchart processpalette—the space that you use for creating a flowchart and working withprocesses.
The different types of processes are distinguished by color: data manipulationprocesses are shown in blue, run processes in red, and optimization processes ingreen.
To create a flowchart, you move processes of the required type from the processpalette to the flowchart workspace, and connect and configure them.
Types of processesCampaign processes are divided into three types by function, which aredistinguished by color in the flowchart process palette:v Data manipulation processes - blue.v Run processes - red.v Optimization processes - green.
A specialized set of run processes called "contact processes" generates contact lists(Mail List or Call List).
Note: In addition to the Campaign processes described in this section, Interact,Optimize, and eMessage provide additional processes for use in campaignflowcharts. See the documentation for these products for information about theprocesses that they provide.
Contact processesThe Mail List and Call List processes are called contact processes (in previousreleases, these were called "contact-style processes" (CSPs)). These processesgenerate contact lists.
Note: The Mail List and Call List processes are also run processes.
Data manipulation processesYou use data manipulation processes to select customer IDs from your data sourceand work with those IDs in various ways to create meaningful groups or targetaudiences.
© Copyright IBM Corp. 2001, 2012 195

Data manipulation processes allow you to perform tasks such as selectingcustomers based on a set of criteria, merging lists of customers together forinclusion or exclusion, segmenting customers into meaningful groups, sampling fortest or control groups, or specifying target audiences for your campaign.
The data manipulation processes are:v “Select” on page 168v “Merge” on page 159v “Segment” on page 162v “Sample” on page 160v “Audience” on page 145v “Extract” on page 155
Run processesOnce you have built your campaign to select the audience you want, you need tooutput the results in a usable way using the run processes. Run processes controlthe running of the flowchart and trigger actual customer contact.
Run processes control the actual execution of completed campaigns, whichincludes the management and output of contact lists, the treatment of targetaudiences, the tracking of responses and contacts, the logging of data, and thescheduling of campaign or session runs.
The run processes are:v “Snapshot” on page 184v “Schedule” on page 179v “Cube” on page 174v “Create Seg” on page 173v “Mail List” on page 176v “Call List” on page 169
Note: The Mail List and Call List processes are also referred to as contactprocesses.
Optimization processesOptimization processes let you fine-tune your campaign to maximize effectiveness.You use optimization processes to generate scores to refine audience selection.They allow you to track contacts and responses, and use the results of predictivemodeling from Campaign or from data mining products like PredictiveInsight torefine audience selection and maximize ROI. Optimization processes can alsoprovide the ability to determine the most effective campaign, offer, and channelacross your entire organization to use for contacting each individual prospect.
The optimization processes are:v “Track” on page 191v “Response” on page 187v “Model” on page 186v “Score” on page 189
196 IBM Unica Distributed Marketing: Corporate Marketer's Guide

Using processes in flowchartsCampaign allows you to easily create campaign flowcharts by visuallymanipulating processes. You can create, connect, configure, and run your processes,experimenting with different flowchart designs. The following section describes thetasks that you can perform with processes.v “To add a new process to a flowchart”v “To copy and paste a process” on page 198v “To paste processes from the template library” on page 198v “To move a process” on page 199v “To delete a process” on page 199v “To connect two processes” on page 199v “To delete a connection between two processes” on page 200v “To access a process configuration window” on page 201v “To run a process” on page 202
To add a new process to a flowchart
You add a process to a flowchart by clicking a process box in the palette, thenclicking in the flowchart workspace.
You can also copy an existing configured process, or paste a template from thetemplate library. Templates contain one or more configured processes andconnections.1. Within a campaign, open a flowchart for editing.2. In the process palette, click the process that you want to add to your flowchart.3. Click the location in the workspace where you want to place the box. Note that
you cannot drag the box to a location. You must click.When you add processes, try to place them in a logical order in the flowchart,based on the campaign flow. Avoid placing process boxes on top of each otherin the workspace. If this happens, click the top process box and move it so youcan see the next box in the stack.Newly added processes are gray until they are configured. Configuredprocesses are displayed in color based on their type (data manipulationprocesses are blue, run processes are red, and optimization processes are green).
4. Right-click the process to see a list of actions you can perform on it.
Typically, the next step is to configure the process, by double-clicking it in theworkspace and using the resulting dialogs. You must connect the boxes todetermine the workflow. (Some processes must be connected before they areconfigured because they require input from a source process.) For example, youmight configure a Select process to select households in a specific earning bracket,then connect it to an Audience or Merge process. Finally, you would test run theprocess. Save your flowchart frequently as you work.
See the other available topics for information about configuring, connecting, andrunning processes.
Appendix C. About processes 197
To copy and paste a process
Copying a configured process can save time when you build flowcharts. You canpaste the process elsewhere in the workspace or in another flowchart.1. Within a campaign, open a flowchart for editing.2. In the workspace, click the process that you want to copy.
Note: To select multiple processes, you can Shift+Click the processes, drag aselection box around them, or use Ctrl+A to select all the processes in theflowchart.
3. Click the Copy icon.You can also select Copy from the menu or press Ctrl+C.
4. Click the Paste icon.You can also select Paste from the menu or press Ctrl+V.A copy of the process appears in the workspace.
5. Click and drag the copied process to the desired location.
To cut a process1. Within a campaign, open a flowchart for editing.
You see the process palette and workspace.2. From the processes that are already in the workspace, click the process that you
want to cut.
Note: You can Shift+Click to select multiple processes, drag the mouse toselect a group of processes, or use Ctrl+A to select all the processes in theflowchart.
3. Click the Cut icon on the Flowchart toolbar.You can also click Cut from the menu, or press Ctrl+X.
The process is removed from the flowchart and saved on the clipboard. You canthen paste this process back into the current flowchart or into another flowchart.
To paste processes from the template library
Using templates from the template library can save time when you buildflowcharts. Templates contain one or more configured processes and connections.1. Within a campaign, open a flowchart for editing.
You see the process palette and workspace.2. Click the Options icon and select Stored Templates.
You see the Stored Templates window, listing the available templates.3. Select the template you want to paste into your flowchart from the Items List.4. Click Paste Template.
The process or processes in the template you selected are pasted into theflowchart.If one or more process boxes are pasted on top of another process box in theflowchart workspace, they will appear stacked. Click the top process box andmove it if you want to see the next process box in the stack.
198 IBM Unica Distributed Marketing: Corporate Marketer's Guide

To move a process
You can move any process in a flowchart you are editing by dragging it to adifferent location on the workspace.
Campaign allows you to position processes on top of each another; however, if youhave a large flowchart with many processes, it may be easier to use the zoomfunctionality so that you can see all processes, instead of overlapping them.1. Within a campaign, open a flowchart for editing.
You see the process palette and workspace.2. In the workspace, click and drag the process that you want to move to its new
location.When you release the mouse, the process is moved to the new position.Existing connections to and from the process you are moving remain, and areredrawn for the new location.
To delete a process
As you design and build flowcharts you might need to remove processes that youhave added.1. Within a campaign, open a flowchart for editing.
You see the process palette and workspace.2. In the workspace, right-click the process that you want to delete, and select
Delete from the menu.
Note: You can select more than one process at the same time by holding downthe Shift key as you select using the mouse.You see a confirmation message asking if you want to remove the selecteditems.
3. Click OK.4. The selected process(es) are removed from the workspace. Any connections to
and from the processes are also deleted from the flowchart.
To connect two processes
You connect the processes in your flowchart to specify the direction of data flowand the order in which processes are run. If you move processes within theworkspace, existing connections will remain, and will adjust to the movedprocess’s new location. Connections can be easily added or deleted.1. Within a campaign, open a flowchart for editing.
You see the process palette and workspace.2. Move your cursor over the connection box in the process from which you want
to create a connection.The cursor changes to three downward arrows.
3. Click and drag a line to the process to which you want to make a connection.The source process is highlighted. As you drag your cursor, the connecting lineis drawn from the source process.
4. Release the mouse anywhere over the destination process.
Appendix C. About processes 199

The source and destination process are connected with an arrow showing thedirection of data flow. The source process will run before the destination process,and data output from the source process can be available as input to thedestination process.
Note: If the destination process receives data from the source process, theconnection is shown as a solid line. If the destination process does not receive datafrom the source process but cannot run successfully until the source process hascompleted, the connection is shown as a dotted line.
To delete a connection between two processes1. Within a campaign, open a flowchart for editing.
You see the process palette and workspace.2. Click the connection that you want to delete.3. Do one of the following:
v Right-click the connection, and select Delete from the menu.v Press the Delete key.v Click the Cut icon on the Flowchart toolbar.v Press Ctrl+X.
The connection is deleted.
Example: Process Connections
The following flowchart is scheduled to run automatically each night. The dottedline connections between the Schedule process and three Select processes indicatethat the Select processes will not run until the Schedule process finishes running,but that no data is passed from the Schedule process to the Select processes.
200 IBM Unica Distributed Marketing: Corporate Marketer's Guide

Configuring processesYou must configure a process after adding it to your flowchart. By configuring aprocess, you provide Campaign with important information, such as the source ofthe data the process will use, which IDs to work with, and what to do with theoutput. For example, you could configure a Select box to select all customers whomade a purchase in the last six months.
A best practice is to place the processes in your flowchart in the order in whichthey will be used when the campaign is run. Some processes must be connectedbefore they are configured because they require input from a source process.
To access a process configuration window1. Within a campaign or session, open a flowchart for editing.
You see the process palette and workspace.
Appendix C. About processes 201

2. Double-click the process that you want to configure. You can also right-click theprocess and select Process Configuration from the menu.You see the process configuration window for the process.
3. Enter information into the fields on each tab of the process configurationwindow. For assistance, click Help.
4. When you have finished entering the configuration details, click OK.Correctly configured processes are displayed in color (the specific color reflectsthe type of process). A gray process with its name in italics has a configurationerror. To find out more information about the error, hold your mouse over theprocess to display a descriptive error message.
To run a process
To make sure that your configuration is successful and that the results are whatyou expect, be sure to run each process as soon as you configure and connect.
Note: When you run a process, any results from a previous run are lost.1. Within a campaign, open a flowchart for editing.2. Click the process that you want to run.
If the process requires data from a source process, be sure that the sourceprocess has already run successfully so that its data is available.
3. Click the Run icon or right-click a process box, then select one of the followingoptions:v Test Run Selected Process: Use this option when building your flowchart, so
you can troubleshoot errors as they occur. Test runs do not output data orupdate any tables or files. (However, triggers run on completion of test runs,and global suppression is applied.)
v Save and Run Selected Process: Do a production run. Processes such as MailList and Call List will write entries into Contact History. Each production runcan generate contact history only once. Contact processes that have alreadyexecuted for that production run can be re-run only if the contact historyfrom the current run is first deleted. Triggers run on completion of theproduction run.
Note: Running only a process or a branch of a flowchart does not incrementthe Run ID of a flowchart. When you run only a process or a branch, if contacthistory records exist, you are prompted to choose run history options beforeyou can proceed. For details, see“About run history options.”
4. When the process finishes running, click OK on the confirmation window.
The process displays a blue checkmark when it has run successfully. If there areerrors, the process displays a red "X."
About run history options
Note: You see the Run History Options window only when you run a branch orprocess that has already generated contact history for the current Run ID. If a newrun instance does not exist for a particular re-run branch or process, the RunHistory Options window does not appear.
Use the Run History Options window to choose how the new contact history yougenerate is written to the contact history table.
202 IBM Unica Distributed Marketing: Corporate Marketer's Guide
Run history options scenario: You have a flowchart with two branches and twocontact processes, A and B, both configured to log to contact history.
You run the entire flowchart (from the top, using the Run Flowchart command)once. This creates a new Run ID (for example, Run ID = 1) and generates contacthistory for this Run ID.
After this first successful run of the entire flowchart, you edit contact process A togive a follow-up offer to the same individuals who received the first offer.Therefore, you want to rerun contact process A. The current Run ID is "1" andcontact history already exists for process A and Run ID=1.
When you select contact process A and click "Run Process," you see the RunHistory Options window. You can choose to leave the Run ID unchanged (RunID=1) and replace the existing contact history associated with this Run ID, or youcan create a new run instance (that is, increment the Run ID to 2), leave the contacthistory associated with Run ID=1 untouched and append new contact historyassociated with Run ID=2.
You are sending a follow-up offer and do not want to lose the contact historyassociated with the first offer, so you choose Create a new run instance. Thischanges the Run ID to "2" and appends contact history records for the same IDswho received the first offer to the contact history table.
If you now edit and run contact process B, you will not see a Run History Optionswindow, because the current Run ID = 2 and contact history associated with RunID =2 does not exist for contact process B. Running only contact process B willsimply generate additional contact history records for Run ID = 2.
Run History Options window reference:
The Run History Options window contains the following options.
Table 25. Run History Options window options
Option Description
Create a new run instance Rerun a specific branch or process of the flowchart using anew Run ID. Append the results, associated with the new RunID, to the contact history table. Existing contact historyremains intact.
Replace the contacthistory of the previousrun
Reuse the previous Run ID and replace the contact historypreviously generated for that Run ID (only for the process orbranch that is being run). Contact history records that werepreviously generated for other branches or processes of theflowchart remain intact.
Cancel Cancel the branch or process run and do nothing to existingcontact history. The flowchart remains open in Edit mode.
You cannot replace contact history if associated response history exists. Therefore,if you selected Replace the contact history of the previous run and associatedresponse history records exist, you can choose one of two options:v Click OK to clear the associated response history records as well as the contact
history records. This is your only option if response history exists and you wantto replace the contact history from the previous run.
Appendix C. About processes 203

v Click Cancel to cancel clearing the contact history records. You can chooseCreate a new run instance instead, to create a new run instance to run thecurrent contact process.
Choosing data sources for processesIn many processes, including Audience, Create Seg, Cube, Extract, Model,Response, Segment, and Select, you must specify a source of the data that theprocess will act on. The data source for a process might be an incoming cell,segment, table, or multiple tables.
In most cases, you specify the data source for a process in the Input field on thefirst tab of the configuration window, using the Input drop-down list. Forinstructions, see the instructions for configuring each process. For example, see “Toconfigure a Select process” on page 168.
To select an incoming cell, segment, or table as the input to aprocess
On the first tab of the process configuration dialog, select the incoming cell,segment, or table from the Input drop-down list. The Input drop-down listdisplays all the base tables currently mapped in the table catalog, along with theiraudience levels. If there is an incoming cell, then only those tables with the sameaudience level as the cell are displayed.
To select multiple tables as the input to a process
You can select more than one table as input to a process.1. In the process configuration dialog, select Tables > Multiple Tables from the
Input drop-down list.
Note: If you select multiple tables, the tables must have the same audiencelevel.You can also click the ellipsis button. The Select Tables to Use window displaysall the base tables in the campaign’s table catalog.
2. Check the box next to each table that you want to select.3. Click OK to return to the process configuration dialog. The Input field displays
"Multiple Tables", which you can view by clicking the ellipsis button.
To map a new table for selecting as a source
In the process configuration dialog, select Tables > New Table from the Inputdrop-down list.
The New Table Definition window preselects the Base Record Table type. You mapa new base table in a process configuration dialog in the same way that you map atable from the Table Mappings dialog.
Note: You must have the appropriate permissions to be able to map tables. Fordetails about mapping tables, see the Campaign Administrator’s Guide.
204 IBM Unica Distributed Marketing: Corporate Marketer's Guide

Choosing in-database processing for processesIn-database processing is an option that you can turn on or off for your flowchartprocesses both globally, and for each flowchart.
Note: In-database processing is not supported for all databases. Your Campaignadministrator can confirm whether this option is available for your data sources.
The in-database processing option determines:v what operations are done at the database level or at the local Campaign server
level; andv what happens to the results of operations.
In general, the in-database processing option improves flowchart performance bypreventing IDs from your database from being unnecessarily copied down to theCampaign server for processing. With in-database processing turned on, processingtasks such as sorting, joining, and merging of data are, whenever possible, done onthe database server rather than on the Campaign server, and output cells ofprocesses are stored in temporary tables on the database server.
Depending on the logic required, some functions will still be performed on theCampaign server, even with in-database processing turned on. For example, whenCampaign calculates a derived field, it first evaluates the derived field formula tosee if any part of the calculation can be performed using SQL. If simple SQLstatements can be used to perform the calculation, then the calculation can be done"in-database". If not, then temporary tables are created on the Campaign server tohandle the calculations and persist the results from process to process within aflowchart.
Important: In-database processing cannot be done if you have specified anylimitations on the output cell size or if temporary tables are disabled for theprocess.
Processing of custom macros consisting of raw SQL statements is performedin-database, with the following limitations:v All raw SQL custom macros must begin with select and must contain exactly
one from in the rest of the text.v For databases that support only insert into <TempTable> syntax, you must have
at least one base table mapped to the same data source at the same audiencelevel as the raw SQL custom macro. If the fields selected by the raw SQL custommacro are too large for the fields of the temp table, a runtime error will occur.
Important: If you are using raw SQL with in-database processing, you must codethe raw SQL to join with the temp table from the upstream process, otherwise, theresults will not be scoped by the results from the upstream process.
Turning in-database processing on or offThe in-database processing setting can be set:v for each flowchartv globally, for the entire system
A best practice for this option is to turn off the global setting, and set the option atthe flowchart level.
Appendix C. About processes 205

To turn in-database processing on or off for a flowchart
The in-database processing option for an individual flowchart overrides the globalsetting.1. From a flowchart page in Edit mode, click the Admin icon and select
Advanced Settings.The Advanced Settings window appears.
2. Select the Use In-DB Optimization during Flowchart Run check box.3. Click OK.
When you save and run the flowchart, in-database processing will be usedwherever possible.
To turn in-database processing on or off globally
To turn on in-database processing or turn off globally, set the Campaign >partitions > partition[n] > server > optimization > useInDbOptimizationproperty on the Configuration page to the appropriate value (TRUE or FALSE).
For information about using the Configuration page, see the IBM Unica MarketingPlatform Administrator's Guide.
Creating queries in processesWhen you configure particular processes, you can use queries to return specificdata from your data sources. Campaign makes it easy for you to create queriesusing any of the following methods:v “To create a query with Point & Click” on page 207v “To create a query with Text Builder” on page 208v “To create a query using Query Helper” on page 208v “Creating queries using SQL” on page 210
How queries are evaluated in Campaign processesQueries in Campaign processes are evaluated left to right using mathematicalrules.
For example, the following statement:
[UserVar.1] < PDF < [UserVar.2]
is evaluated as:
([UserVar.1] < PDF) < [UserVar.2]
That is, the first part of the statement ([UserVar.1] < PDF) is evaluated as true orfalse (1 or 0), and the result is passed to the second statement:
[1 | 0 ] < [UserVar.2]
For the example to be evaluated as PDF greater than [UserVar.1] and less than[UserVar.2], you would need to construct the following query:
[UserVar.1] < PDF AND PDF < [UserVar.2]
206 IBM Unica Distributed Marketing: Corporate Marketer's Guide

This statement is equivalent to the following:
([UserVar.1] < PDF) AND (PDF < [UserVar.2])
To create a query with Point & Click
These instructions explain how to create a query using the Point & Click feature ina Process Configuration dialog.
To edit a query, double-click any item in the query to select another value.Selecting a new item from the Select Based On drop-down list will remove theexisting query.1. In a process that uses queries, such as Segment, Select, or Extract, access the
process configuration dialog where queries can be constructed. For example,open a Select process box and click Select Customer IDs) with on the Selecttab.By default, the Point & Click query builder is displayed.
2. To create a query, click in each column cell (Field Name, Oper., Value,And/Or), then double-click a selection from the list on the right. If the Profileoption appears, you can use it to display the values in the field. By clicking ineach column, then double-clicking a selection, you can build your query:v Use Field Name to indicate which field to query. You can select from the list
of Available Fields, including IBM Unica Campaign Generated Fields. Youcan also create Derived Fields.
v Use Oper. to select a comparison operator (for example, =, <, >, Between).v Select a Value for the field.v To add another expression, click the And/Or column, then double-click AND
or OR to indicate how to combine the expressions.v To add parentheses to control evaluation order, select an expression, then use
Add (...) to add a set of parentheses, Remove (...) to remove a single set ofparentheses, or Clear all (...) to remove all of the parentheses in the selectedexpression. Parentheses allow you to group expressions when definingcomplex queries. For example, (AcctType = 'Gold' AND Rank = 'A') ORNewCust = 'Yes' is different from AcctType = 'Gold' AND (Rank = 'A' ORNewCust = 'Yes').
v Select one or more expressions, then use Move Up or Move Down to reorderexpressions.
v Select an expression then use Insert to add a blank row.3. Click Check Syntax to confirm whether your query syntax is valid. Checking
the syntax does not put any load on the database server.Campaign indicates whether the syntax contains any errors.
4. To see the results of the query, click Test Query.
Important: Global suppressions and cell size limits are not applied in TestQuery counts. Queries might also return non-normalized data. To obtain anaccurate result count, test run the process.A progress bar is displayed while the query is being tested. Click Cancel tostop the testing.When testing is complete, Campaign indicates the number of rows the queryreturned. (This number might be different when the campaign is run.)
5. Click OK.
Appendix C. About processes 207

To create a query with Text Builder
These instructions describe how to create a new query using the Text Builderfeature in the process configuration dialog.
To edit an existing query, edit the text of the query directly in the query text box.1. In a process that requires queries, such as Segment, Select, or Extract, access the
process configuration dialog containing the query text box.By default, the Point & Click query builder is displayed. Any existing queriesare shown in the query text box.
2. Click Text Builder.The Point & Click query columns are replaced with a blank text box.
3. Choose an Input data source, and a data source to query from the Select BasedOn drop-down list.The list of Available Fields is displayed based on your Select Based On choice.
4. Create your query by:v Selecting the field or table name(s) from the Available Fields list and
double-clicking to enter them in the query text box. You can also click oncethen click <-Use to move it to the query text box.
v Entering the required operators and values. To see the values of a selectedfield, you can click Profile.
Note: Although you can enter field and table names directly in the query textbox, selecting them from the list helps to avoid syntax errors.
5. To check the syntax of the query, click Check Syntax.Campaign displays a confirmation window that displays any found errors.Click OK
Checking the syntax of your query does not put any load on the databaseserver.
6. If you want to see the results of running the query, click Test Query.
Important: Global suppressions and cell size limits are not applied in TestQuery counts. Queries might also return non-normalized data. To obtain anaccurate result count, perform a test run of the process.A progress bar is displayed while the query is being tested. Click Cancel tostop the testing.When testing is complete, Campaign displays a confirmation window thatdisplays the number of rows the query returned. (This number might bedifferent when the campaign is run.)
7. When you have finished creating your query, click OK.The process configuration box closes and you are returned to the flowchartpage in Edit mode.
To create a query using Query Helper
The Query Helper provides selectable operators and functions that you cancombine with available fields to build a query. The Query Helper can help youconstruct queries in Campaign’s macro language or with custom macros.1. In a process that requires queries, such as Segment, Select, or Extract, access the
process configuration dialog containing the query text box.
208 IBM Unica Distributed Marketing: Corporate Marketer's Guide

By default, the Point & Click query builder is displayed. Any existing queriesare shown in the query text box.
2. Click Text Builder.The Point & Click query columns are replaced with a blank text box. TheQuery Helper button is enabled.
3. Click Query Helper.The Query Helper appears below the query text box. The Query Helpercontains a set of buttons for inserting commonly used operators, and acomplete list of macros.
4. Create your query by:a. Selecting the macro you want to use from the list of macros in the Query
Helper and double-clicking to enter it in the query text box. When youselect a macro, the Query Helper displays a brief description and the syntaxof the selected macro.
Note: If you select a custom macro, the description and syntax were createdby the person who wrote the macro.
b. Entering the required operators by typing or using the Query Helperbuttons.
Note: Although you can enter field and table names directly in the querytext box, selecting them from the list helps to avoid syntax errors.
5. Continue creating your query using the Text Builder.6. When you have finished creating your query, click Close.
The Query Helper closes.7. Click OK to close the process configuration dialog.
Building raw SQL statements in CampaignIn processes which require queries, click Advanced on the query editing windowto access the Advanced Settings features. The actual features will vary amongprocesses.
For example, in the Select process, you can use the Advanced Settings to create aquery using raw SQL or to execute pre- and/or post-processing SQL commands.
The Advanced Settings window includes two panes:v Pre-processing — enter raw SQL to be processed before the query executesv Post-processing — enter raw SQL to be processed after the query executes
This feature allows you to incorporate SQL procedures as part of the process run,and is useful in employing Campaign in efforts including ETL, routine martupdates, in-line performance tuning, and security functions.
You can use pre- and post-processing SQL statements in Advanced Settings to:v Run stored procedures in the databasev Create, drop, and recreate tables and indexesv Grant or change privileges to other users or groupsv Organize multi-step database commandsv Run complex database routines, without having to use external scripts to
connect to the database
Appendix C. About processes 209

The SQL statements are run in the order in which they appear.v Pre-Processing SQL statements are run before the query executes.v Post-Processing SQL statements are run after the query executes.
They can be used with either raw SQL or standard processing in the Select processquery.
Raw SQL queries and in-database processing
For details about in-database processing with raw SQL queries, see “Choosingin-database processing for processes” on page 205.
Creating queries using SQLIf you are an experienced SQL user, you can write your own SQL query or useSQL queries created in other applications by copying and pasting them. Writingraw SQL is an advanced function of Campaign; users are responsible for correctsyntax and query results.
Important: Getting correct results when using raw SQL in a Select process (that is,the correct list of audience IDs) requires the use of the <TempTable> token whenin-DB optimization is enabled and there is an input cell to the Select process. Inaddition, to significantly improve performance when Campaign processes verylarge tables, use the <TempTable> token even when not using in-DB optimization.
A SQL query must return a list of only the unique IDs as defined by the key on abase table.
Your query should use the following syntax:
SELECT DISTINCT(<key1> [<key2>,...]) FROM <table> WHERE <condition> ORDERBY<unique_id>
The query requests the database to perform the sorting and data deduplication. Ifyou omit either the DISTINCT or ORDERBY clause, Campaign will still sort anddeduplicate the data on the application server, so you will still receive the correctresults, but the performance will likely be slower.v If you have chosen to Select All Customer IDs, you can write raw SQL
commands to be run against records in a specified database before or after theSelect process is executed.
v If you have chosen to apply select criteria to the customer IDs, in addition to theabove, you can also enable the use of raw SQL in the Query Builder whencreating your select criteria. Otherwise, you can only use Unica Expressions andCustom Macros.
Using the TempTable and OutputTempTable tokens in raw SQLqueriesWhen you use a raw SQL query in a Select process with an input cell, behavior inCampaign is different depending on whether in-DB optimization is enabled ordisabled.
When in-DB optimization is disabled, the list of IDs from the raw SQL query isautomatically matched against the ID list from the incoming cell so that theresulting list of IDs is a subset of the cell as expected. However, when in-DBoptimization is enabled, Campaign expects the ID list generated from the Selectprocess to be the final list, and does not automatically match this list against the ID
210 IBM Unica Distributed Marketing: Corporate Marketer's Guide

list of any incoming cell. Therefore, when in-DB optimization is enabled, it iscritical that the raw SQL query written for an intermediate Select process (in otherwords, a Select process with an input cell) uses the <TempTable> token to properlyjoin against the incoming cell. Not only does this ensure correct results, joiningagainst the input cell also improves performance by preventing extraneousprocessing for audience IDs that are not in the input cell.
Note: For best performance, use the <TempTable> token even when not usingin-DB optimization. Using the <TempTable> token can significantly improveperformance, especially when Campaign processes very large tables.
In addition, using the <OutputTempTable> token maintains in-DB optimizationand prevents the audience IDs from being retrieved from the database back to theCampaign server.
Example: Using the TempTable and OutputTempTable tokens: Assume that youhave a Select1 process that selects 10,000 customers who are “Gold” customers (forexample, Indiv.AcctType = ‘Gold’). You then connect Select1 to a second Selectprocess (“Select2”) using a raw SQL query:
Select p.CustID from Indiv p, <TempTable> where p.CustID =<TempTable>.CustID group by p.CustID having sum(p.PurchAmt) > 500
This example selects customers the sum of whose purchases exceeds $500 and whoare in the input cell (in other words, customers who have a “Gold” account type).
In contrast, a raw SQL query omitting the <TempTable> token and join:
Select p.CustID from Purchases p group by p.CustID having sum(p.PurchAmt) >500
first calculates the sum of purchases for all customers in the Purchases table (whichcould be millions of customers) and then selects all customers the sum of whosepurchases exceed $500, regardless of whether they are “Gold” customers or not.
Therefore, for best performance, even if in-DB optimization is disabled, write yourraw SQL queries using the <TempTable> token when there is an input cell.
For simplicity, this example does not use the <OutputTempTable> token, but tomaintain in-DB optimization and prevent the audience IDs from being retrievedfrom the database back to the Campaign server, you must include the<OutputTempTable> token in your raw SQL query. For example:
Create table <OutputTempTable> as Select p.CustID from Purchases p,<TempTable> where p.CustID = <TempTable>.CustID group by p.CustID havingsum(p.PurchAmt) > 500
Referencing Extract tables in raw SQL queriesYou can reference an Extract table in downstream processes via raw SQL using the<Extract> token. Use this token to specify subsets of data for subsequentprocessing, which can improve performance when working with large tables.
The following example queries an Extract table to select the customer IDs of allcustomers whose account balance exceeds $1,000.
Appendix C. About processes 211

Select p.CUSTOMERID from USER_TABLE p, <Extract> where p.CUSTOMERID =<Extract>.CUSTOMERID group by p.CUSTOMERID having sum(p.BALANCE) > 1000
For flowcharts containing multiple Extract processes, the <Extract> token alwaysrefers to the latest available Extract table.
Note: After a Merge, the <Extract> token may or may not be valid. Test run theflowchart to determine if the token works as expected.
To create a raw SQL query in the SQL Text Entry Area1. Enable the Select records with option in the Source tab of the Select process.2. Click Advanced.
The Advanced Settings window appears.3. Enable Use Raw SQL for Record Selection.4. Select the data source to query from the Database drop-down list.5. Select the audience to target from the Audience Level drop-down list.6. Click OK to close the Advanced Settings window.7. Click inside the SQL text entry area.8. Build a query by:
v Entering raw SQL in the SQL text entry panev Using the Query Helper
v Using Point & Click
Note: If you click Point & Click, you will return to building a non-SQLquery expression.
9. (Optional) Click Test Query.
Important: Global suppressions and cell size limits are not applied in TestQuery counts. Queries might also return non-normalized data. To obtain anaccurate result count, perform a test run of the process.
10. When you have finished building and testing your query, click OK to closethe window and save your configuration.
To pass multiple commands in a raw SQL statement
You can pass multiple commands in a raw SQL statement.
If your database allows multiple commands to be passed, you can enter as manyvalid SQL commands as you need, with the following rules:v Commands are separated with the appropriate delimiter;v The last command must be a select command;v This select command must select all the relevant fields required in defining your
audience level in the same order the audience level is defined;v No other select statements are used.1. Enable the Select records with option in the Source tab of the Select process.2. Click Advanced.
The Advanced Settings window appears.3. Click to enable Use Raw SQL.
This activates raw SQL, a feature that passes your exact query syntax to thedatabase.
212 IBM Unica Distributed Marketing: Corporate Marketer's Guide
4. Select the database to use and the desired audience level.Click OK.
5. Enter your SQL commands in the Select records with text box.Click OK.
To specify pre- or post-processing SQL statements1. From the Source tab of a Select process, click Advanced.
The Advanced Settings window appears.2. To enter a pre-processing raw SQL statement, double-click inside the
Pre-Processing field and enter the SQL statement you want to run before theprocess runs.
3. Next, click in the Database field on that line, and select the name of thedatabase on which you want to run this statement.
Note: The Database drop-down list displays all of the available databases(those for which a data source category has been configured on theConfiguration page in Marketing Platform). If your database does not appear inthis drop-down list, contact your Campaign system administrator.
4. Click to select the SQL check box if you want to view only SQL functions inthe list pane. Click again to clear and see the full list of available functions andoperators.
Note: If you already enabled the Use Raw SQL option on the AdvancedSettings window, the SQL option in the Query Helper is enabled. This will hideCampaign macro functions, so that only SQL operators and functions aredisplayed.
Profiling fieldsThe Profile feature lets you preview a list of distinct values and their frequency ofoccurrence for a selected field. You can profile any field that is available in anyprocess where the Profile button appears, such as the Segment by Fielddrop-down list in the Segment process, or Available Fields or Candidate Fieldslists in other process configuration dialogs. Only records in the current cell areincluded in the count, unless the counts have been pre-computed.
Note: You must have the appropriate permissions to profile fields. Ask yoursystem administrator if you have questions about your access to this feature.
To profile a field
Campaign profiles a field when you select it in a list then click the Profile button.You can profile any field in any mapped data source. You can also profile derivedfields.1. In the configuration window of a process that includes the Profile button,
select the field that you want to profile.2. Click Profile .
The Profile Selected Field window opens.
Campaign profiles the data in the selected field. The categories and frequencycounts update as profiling progresses.
Appendix C. About processes 213

Note: Wait until profiling is complete before using the results, to ensure that allcategories are processed and counts are complete.
When profiling is complete, the Profile Selected Field window shows the followinginformation:v The list of values in the selected field, shown in the Category column, and the
corresponding Count of IDs with that value.
Note: Campaign organizes values by category, grouping them to createapproximately equal-sized segments. The default maximum number ofcategories (distinct bins of values) for display is 25. You can change themaximum number of categories.
v The Statistics pane on the right shows the total count of IDs and other detailsabout the data for that field, including:– The number of NULL values found– The total number of categories, or values, for that field– Statistical values for the data including the mean, standard deviation,
minimum, and maximum values.
Note: Mean, Stdev., Min., and Max. are not available for ASCII fields. Whenyou profile text fields, these values appear as all zeros.
Restricting input for profilingWhen Campaign profiles a field, it creates only those segments that are available inthe input to the process in which you are performing profiling.
In other words, if you restrict input to the Segment process, then profile that databased on that same field on which it was restricted, the Profile results can onlydisplay segments that were available in the restricted input.
For example, in a Segment process, if you use a query to select only those IDsassociated with Credit Score < 5 out of a list of 10 potential credit score levels, thenif you profile the same field (in this example, Behavior.CreditScore), thenCampaign can only display the four segments corresponding to those fourremaining credit score levels.
The following examples compare an unrestricted profile (where Input Cell on theProfile Selected Field window is set to None), and a restricted profile (where theInput Cell is set to Select1.out).
214 IBM Unica Distributed Marketing: Corporate Marketer's Guide

On the Profile Selected Field window, the Input Cell is set to None. Whenprofiling is performed, all 10 distinct values in the field Behavior.CreditScore aredisplayed.
Appendix C. About processes 215
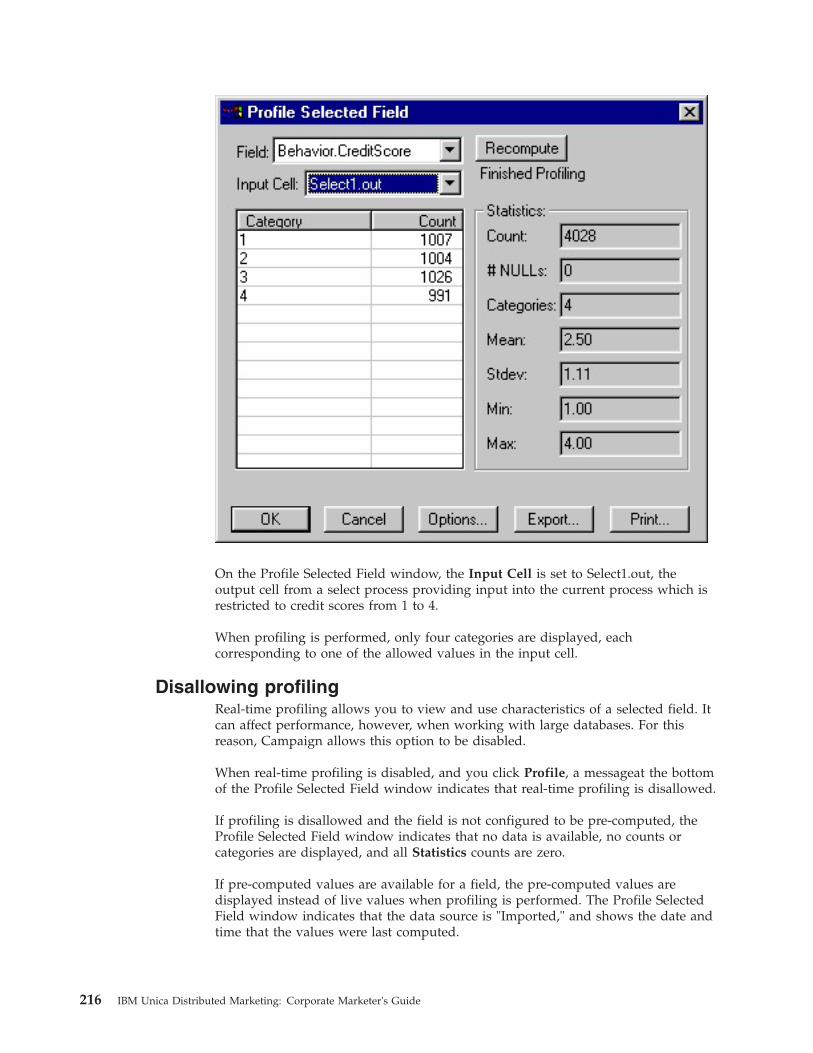
On the Profile Selected Field window, the Input Cell is set to Select1.out, theoutput cell from a select process providing input into the current process which isrestricted to credit scores from 1 to 4.
When profiling is performed, only four categories are displayed, eachcorresponding to one of the allowed values in the input cell.
Disallowing profilingReal-time profiling allows you to view and use characteristics of a selected field. Itcan affect performance, however, when working with large databases. For thisreason, Campaign allows this option to be disabled.
When real-time profiling is disabled, and you click Profile, a messageat the bottomof the Profile Selected Field window indicates that real-time profiling is disallowed.
If profiling is disallowed and the field is not configured to be pre-computed, theProfile Selected Field window indicates that no data is available, no counts orcategories are displayed, and all Statistics counts are zero.
If pre-computed values are available for a field, the pre-computed values aredisplayed instead of live values when profiling is performed. The Profile SelectedField window indicates that the data source is "Imported," and shows the date andtime that the values were last computed.
216 IBM Unica Distributed Marketing: Corporate Marketer's Guide

For more information about disallowing real-time profiling, see the IBM UnicaCampaign Administrator's Guide.
Setting profiling optionsYou can affect how the Profile feature performs by:v “Restricting input for profiling” on page 214v “Disallowing profiling” on page 216
In addition, you can set these options in the Profiling Options window:v “Specifying the maximum number of profile segments”v “Profiling by meta type”
To access the Profiling Options window1. From any process configuration dialog in which the Profile option is available,
select a field for profiling, or click Profile.The Profile Selected Field window appears.
2. From the Profile Selected Field window, click Options.The Profiling Options window appears.
Specifying the maximum number of profile segmentsWhen you Profile a field, Campaign automatically creates up to the maximumnumber of segments set in the Profiling Options window. By default, a maximumof 25 segments are allowed.
You can change the maximum number of segments to be used for profiling. Afterthis setting is changed, the new setting is used for all subsequent profiles until it isreset.
Note: If the number of distinct values in the field you are profiling exceeds themaximum allowed number of segments, Profile will group values together intoapproximately equal sized segments to prevent exceeding the maximum number ofsegments.
To set the maximum number of segments for profiling1. On the Profile Selected Field window, click Options.
The Profiling Options window appears.2. In the Number of Segments field, enter an integer to indicate the maximum
number of segments into which you want the field values grouped. The defaultvalue is 25.
3. Click OK.
The profile is recomputed using the new maximum number of segments setting.
Profiling by meta typeYou can specify whether metadata type information should be used when profilingby enabling or disabling the Profile By Meta Type check box on the ProfilingOptions window.
Profile By Meta Type enabled is usually the desired behavior. Data typesassociated with fields containing dates, money, telephone numbers, and othernumeric information are correctly sorted and binned using the metadatainformation, rather than sorting purely based on ASCII text.
Appendix C. About processes 217

For example, the following table shows a date field sorted using meta typeinformation and without. Profiling done without using meta type produces resultssorted purely numerically, while profiling done using meta type recognizes that thedata are formatted as dates, and sorts them accordingly.
Profiled by Meta Type Profiled Without using Meta Type
25-DEC-2006 20-FEB-2007
20-FEB-2007 20-MAR-2007
20-MAR-2007 25-DEC-2006
Refreshing a profile countYou might want to refresh the profile count when something occurs that mightchange the results (for example, when new values are added to a field), orwhenever the database table might have been updated.
To refresh the profile results for a field from the Profile Selected Field window,click Recompute.
Note: When you first profile a field from a dimension table, Campaign returnscounts that match the field in the dimension table. When you click Recompute torefresh the profile results, Campaign returns counts from the resulting join with thebase table that is linked to the dimension table. If you want to profile a dimensiontable field without joining to a base table, map the dimension table as a base table.
To insert a profile category into a query
While building a query expression in a process configuration dialog, you can inserta field value into your query expression.1. Perform profiling on the selected field.2. When profiling is finished, from the Profile Selected Field window, double-click
a category to insert that value at the current cursor location in the query textbox.
Note: If you do not see the value you want, this might be due to multiplevalues being grouped together into a profile segment. If you set the maximumnumber of profile segments to a number greater than the number of categories(reported in the Profile Selected Field window), each field value will be listedas a separate category. This makes it possible to access all of the existingcategories.
To print the results of a profile1. Click Print from the Profile Selected Field window.
The Page Setup page appears, from which you can specify the printer andprinting options.
2. Click OK to confirm sending the print job to the printer.
To export profile data
After performing profiling on a field, you can export the profile data to a delimitedtext file.1. In the Profile Selected Field window, click Export.
218 IBM Unica Distributed Marketing: Corporate Marketer's Guide

Note: The Export button is available only when profiling is finished.The Export Report Data window appears.
2. (Optional) Select the Include Column Labels check box to include columnheads in your exported data.
3. Click Export.The File Download window appears.
4. Click Open to open the profile data, or click Save to specify a location forsaving the file.If you clicked Open, the profile data is displayed in a spreadsheet window.If you clicked Save, the Save As window appears.
5. If you clicked Save, in the Save As window, navigate to the location where youwant the export file to be saved, and enter the file name that you want to usefor the exported file. By default, the name of the export file is Campaign.xls.
6. Click OK.The data is exported to the file you specified. The Download Complete windowappears.
Specifying an output file or table for contact loggingContact processes such as Mail List or Call List can write results to:v system tablesv a new or existing external file that you specifyv an unmapped database table
To specify an output file for contact logging1. In a flowchart in Edit mode, from the process configuration dialog, select File
from the Export To or Log To drop-down list. The File option usually appearsat the bottom of the list, following the list of mapped tables.The Specify Output File window appears.
2. Select the type of file to which you want to write:v Flat file with data dictionary to create a new fixed-width file and new data
dictionary file.v Flat file based on existing data dictionary to create a new fixed-width file
and select an existing data dictionary file.v Delimited file to create a new file in which field values are delimited by a
tab, comma, or other character.3. If you selected Delimited file:
v Select the Tab, Comma, or Other option. If you selected Other, enter thecharacter to use as the delimiter in the Other field.
v Check Include Labels in Top Row if you want the first row of the file tocontain labels for each column of data.
4. Enter the complete path and name of the file in the File Name field. You canalso click Browse to navigate to a directory and select an existing file.
Note: You can use user variables in the output file name. For example, if youspecify MyFile<UserVar.a>.txt as the file name, and the value of the uservariable "a" is "ABC" at the time that the process is run, the output is written toa file named MyFileABC.txt. Be aware that you must set the Initial Value andthe Current Value of the user variable before executing the flowchart.
Appendix C. About processes 219
5. Campaign automatically fills in the Data Dictionary field with a .dct file withthe same name and in the same location as the file you entered.
6. If you want to use a different data dictionary, or to rename the data dictionary,enter the complete path and name of the data dictionary file in the DataDictionary field.
7. Click OK.The Specify Output File window closes. You are returned to the processconfiguration dialog, and the Export/Log to field displays the path and filename you entered.
To specify a database table for contact logging1. In the process configuration dialog, select New Table or Database Table from
the Export To or Log To drop-down list. This option usually appears at thebottom of the list, following the list of mapped tables.The Specify Database Table window appears.
2. Specify the table name.
Note: You can use user variables in the table name. For example, if you specifyMyTable<UserVar.a> as the table name, and the value of the user variable "a" is"ABC" at the time that the process is run, the output is written to a tablenamed MyTableABC. You must set the Initial Value and the Current Value ofthe user variable before executing the flowchart.
3. Select the database name from the drop-down list.4. Click OK.
The Specify Database Table window closes. You are returned to the processconfiguration dialog, and the Export/Log to field displays the name of thedatabase table you entered.
5. If a table of the name you specified exists, choose an option for writing theoutput data:v Append to Existing Data — if you choose this option, the existing table must
have a schema compatible with the output data. In other words, field namesand field types must match, and field sizes must allow for the output data tobe written.
v Replace All Records — if you choose this option, existing rows in the tableare replaced with the new output rows.
Changing the seed for random selectionThe random seed represents the starting point that Campaign uses to select recordsrandomly. If you are selecting records randomly, you might want to change therandom seed in situations such as the following:v You have the same number of records in the same sequence, and using the same
seed value each time you run this process results in records being created intothe same samples.
v Your current random sample produces highly skewed results (for example, if allmales in your data fall into one group and all females into another).
To change the random seed for selecting records
On the Cell Size Limit tab of the process configuration dialog, change the startingpoint for the random selection in one of these ways:
220 IBM Unica Distributed Marketing: Corporate Marketer's Guide

v Enter a numeric value in the Random Seed text box; orv Click Pick to have Campaign randomly select a new seed value for you.
Skipping duplicate IDs in process output
The Extract, Call List, Mail List, and Snapshot processes allow you to specify howto treat duplicate IDs in the process output. The default is to allow duplicate IDs inthe output. Follow these steps to exclude records with duplicate IDs from theoutput.1. From the configuration window of the process, click More.
You see the Advanced Settings window.a. Select Skip records with duplicate IDs, and specify the criteria to
determine which record to retain if duplicate IDs are returned. For example,select MaxOf and Household_Income to export only the ID with the highesthousehold income.
Note: This option only removes duplicates within the same input field.Your data can still contain duplicate IDs if the same ID appears in multiplefields. To remove all duplicate IDs, you must use a Merge or Segmentprocess upstream of the Extract process to purge duplicate IDs or createmutually exclusive segments.
2. Click OK to close the Advanced Settings window.Your duplicate ID settings are displayed on the configuration window.
Note: In the Mail List or Call List process box, the Skip records with duplicateIDs option on the Log tab pertains only to the fulfillment table created by theprocess and not to records that are written to contact history. The contacthistory tables only handle unique IDs. The flowchart designer must ensure thatthe result set obtains the correct records before reaching the contact historytables. Use the Extract process to de-dupe the result set before the Mail List orCall List process box to ensure that the correct records are written to both thefulfillment table and contact history.
To use the Calendar tool
The Calendar tool is available for fields throughout Campaign where you can entera date value into a field.1. Click the ellipsis button next to the field requiring a date value.
The Calendar tool appears. The current date is selected by default.2. Click the date on the displayed month to select it, or:
v Change the month using the Month drop-down listv Change the year using the up and down arrows
3. Click OK to enter the specified date into the field and close the Calendarwindow.
Appendix C. About processes 221

222 IBM Unica Distributed Marketing: Corporate Marketer's Guide

Appendix D. About user variables
Campaign supports user variables, which can be used during process configurationwhen creating queries and expressions.
Guidelines for using user variables
The following guidelines apply to user variables:v User variables are local to the flowchart in which they are defined and used, but
have global scope within that flowchart.v User variables use the following syntax: UserVar.UserVarNamev User variables have Initial Values, which is the value assigned when a user
variable is initially defined in the User Variables dialog. The Initial Value isonly used to set the Current Value before executing a flowchart run. It is theCurrent Value that Campaign uses during a flowchart run.
Note: If the Current Value for a user variable is not set and you execute aprocess run or a branch run, Campaign will not be able to resolve the uservariable. Campaign only sets the Current Value of a user variable to the InitialValue before a flowchart run.
v You can change the Current Value of a user variable in the Derived Fieldwindow of a Select process.
v User variables can be set to constants or to expressions, such as UserVar.myVar= Avg(UserTable.Age).
Note: If you use an expression that returns multiple values (such asUserTable.Age+3, which will return one value for each record in the table), theuser variable is set to the first value returned.
v When using user variables within SQL statements, do not enclose user variablesin quotation marks, either single or double.
v If you pass object names to your database (for example, if you use a uservariable that contains a flowchart name), you must ensure that the object namecontains only characters supported by your particular database. Otherwise, youwill receive a database error.
v The values of user variables can be passed in on process execution.v User variables are supported in outbound triggers.v User variables are supported for use in custom macros.
To create a user variable1. From a flowchart in Edit mode, click the Options icon and select User
Variables.The User Variables dialog appears.
2. In the Variable Name column, enter a name for the new user variable byclicking the <Click here to add new item> hotspot.
3. In the Data Type column, select a data type from the drop-down list. If you donot select a data type, the application selects None when you click OK.The None data type may produce unpredictable results; to avoid this, specifythe correct data type.
© Copyright IBM Corp. 2001, 2012 223

4. In the Initial Value column, enter an initial (starting) value for the uservariable. You can also profile fields for available values by clicking the ellipsisbutton that becomes available when you click inside the column.
5. In the Current Value column, enter a current value for the user variable. Youcan also profile fields for available values by clicking the ellipsis button thatbecomes available when you click inside the column.
6. Repeat these steps for each user variable that you want to create.7. When you complete defining user variables, click OK.
The application stores the new user variables. You can access them later whenconfiguring processes.
After a flowchart run executes, the Current Value of each user variable isdisplayed in the Current Value section for each user variable. If the current valueis different from the initial value, you can restore the initial value by clickingRestore Defaults.
Note: If the Current Value of a user variable is redefined in a Select process,resetting the Current Value to the Initial Value manually will have no effect onthe value of the user variable during a flowchart, branch, or process run.
224 IBM Unica Distributed Marketing: Corporate Marketer's Guide

Contacting IBM Unica technical support
If you encounter a problem that you cannot resolve by consulting thedocumentation, your company’s designated support contact can log a call withIBM Unica technical support. Use the information in this section to ensure thatyour problem is resolved efficiently and successfully.
If you are not a designated support contact at your company, contact your IBMUnica administrator for information.
Information to gather
Before you contact IBM Unica technical support, gather the following information:v A brief description of the nature of your issue.v Detailed error messages you see when the issue occurs.v Detailed steps to reproduce the issue.v Related log files, session files, configuration files, and data files.v Information about your product and system environment, which you can obtain
as described in "System information."
System information
When you call IBM Unica technical support, you might be asked to provideinformation about your environment.
If your problem does not prevent you from logging in, much of this information isavailable on the About page, which provides information about your installed IBMUnica applications.
You can access the About page by selecting Help > About. If the About page is notaccessible, you can obtain the version number of any IBM Unica application byviewing the version.txt file located under the installation directory for eachapplication.
Contact information for IBM Unica technical support
For ways to contact IBM Unica technical support, see the IBM Unica ProductTechnical Support website: (http://www.unica.com/about/product-technical-support.htm).
© Copyright IBM Corp. 2001, 2012 225

226 IBM Unica Distributed Marketing: Corporate Marketer's Guide

Notices
This information was developed for products and services offered in the U.S.A.
IBM may not offer the products, services, or features discussed in this document inother countries. Consult your local IBM representative for information about theproducts and services currently available in your area. Any reference to an IBMproduct, program, or service is not intended to state or imply that only that IBMproduct, program, or service may be used. Any functionally equivalent product,program, or service that does not infringe any IBM intellectual property right maybe used instead. However, it is the user's responsibility to evaluate and verify theoperation of any non-IBM product, program, or service.
IBM may have patents or pending patent applications covering subject matterdescribed in this document. The furnishing of this document does not grant youany license to these patents. You can send license inquiries, in writing, to:
IBM Director of LicensingIBM CorporationNorth Castle DriveArmonk, NY 10504-1785U.S.A.
For license inquiries regarding double-byte (DBCS) information, contact the IBMIntellectual Property Department in your country or send inquiries, in writing, to:
Intellectual Property LicensingLegal and Intellectual Property LawIBM Japan Ltd.1623-14, Shimotsuruma, Yamato-shiKanagawa 242-8502 Japan
The following paragraph does not apply to the United Kingdom or any othercountry where such provisions are inconsistent with local law: INTERNATIONALBUSINESS MACHINES CORPORATION PROVIDES THIS PUBLICATION "AS IS"WITHOUT WARRANTY OF ANY KIND, EITHER EXPRESS OR IMPLIED,INCLUDING, BUT NOT LIMITED TO, THE IMPLIED WARRANTIES OFNON-INFRINGEMENT, MERCHANTABILITY OR FITNESS FOR A PARTICULARPURPOSE. Some states do not allow disclaimer of express or implied warranties incertain transactions, therefore, this statement may not apply to you.
This information could include technical inaccuracies or typographical errors.Changes are periodically made to the information herein; these changes will beincorporated in new editions of the publication. IBM may make improvementsand/or changes in the product(s) and/or the program(s) described in thispublication at any time without notice.
Any references in this information to non-IBM websites are provided forconvenience only and do not in any manner serve as an endorsement of thosewebsites. The materials at those websites are not part of the materials for this IBMproduct and use of those websites is at your own risk.
© Copyright IBM Corp. 2001, 2012 227

IBM may use or distribute any of the information you supply in any way itbelieves appropriate without incurring any obligation to you.
Licensees of this program who wish to have information about it for the purposeof enabling: (i) the exchange of information between independently createdprograms and other programs (including this one) and (ii) the mutual use of theinformation which has been exchanged, should contact:
IBM Corporation170 Tracer LaneWaltham, MA 02451U.S.A.
Such information may be available, subject to appropriate terms and conditions,including in some cases, payment of a fee.
The licensed program described in this document and all licensed materialavailable for it are provided by IBM under terms of the IBM Customer Agreement,IBM International Program License Agreement or any equivalent agreementbetween us.
Any performance data contained herein was determined in a controlledenvironment. Therefore, the results obtained in other operating environments mayvary significantly. Some measurements may have been made on development-levelsystems and there is no guarantee that these measurements will be the same ongenerally available systems. Furthermore, some measurements may have beenestimated through extrapolation. Actual results may vary. Users of this documentshould verify the applicable data for their specific environment.
Information concerning non-IBM products was obtained from the suppliers ofthose products, their published announcements or other publicly available sources.IBM has not tested those products and cannot confirm the accuracy ofperformance, compatibility or any other claims related to non-IBM products.Questions on the capabilities of non-IBM products should be addressed to thesuppliers of those products.
All statements regarding IBM's future direction or intent are subject to change orwithdrawal without notice, and represent goals and objectives only.
All IBM prices shown are IBM's suggested retail prices, are current and are subjectto change without notice. Dealer prices may vary.
This information contains examples of data and reports used in daily businessoperations. To illustrate them as completely as possible, the examples include thenames of individuals, companies, brands, and products. All of these names arefictitious and any similarity to the names and addresses used by an actual businessenterprise is entirely coincidental.
COPYRIGHT LICENSE:
This information contains sample application programs in source language, whichillustrate programming techniques on various operating platforms. You may copy,modify, and distribute these sample programs in any form without payment toIBM, for the purposes of developing, using, marketing or distributing applicationprograms conforming to the application programming interface for the operatingplatform for which the sample programs are written. These examples have not
228 IBM Unica Distributed Marketing: Corporate Marketer's Guide

been thoroughly tested under all conditions. IBM, therefore, cannot guarantee orimply reliability, serviceability, or function of these programs. The sampleprograms are provided "AS IS", without warranty of any kind. IBM shall not beliable for any damages arising out of your use of the sample programs.
If you are viewing this information softcopy, the photographs and colorillustrations may not appear.
TrademarksIBM, the IBM logo, and ibm.com are trademarks or registered trademarks ofInternational Business Machines Corp., registered in many jurisdictions worldwide.Other product and service names might be trademarks of IBM or other companies.A current list of IBM trademarks is available on the Web at “Copyright andtrademark information” at www.ibm.com/legal/copytrade.shtml.
Notices 229

230 IBM Unica Distributed Marketing: Corporate Marketer's Guide


����
Printed in USA