a practical guide to casting - bsnmedical.co.uk · to casting foreword this third edition is an...
TRANSCRIPT

A practical guide to
casting

A Practical Guide
to Casting
FOREWORD
This third edition is an invaluable guide for
both novice and expert casting staff. It
provides a useful overview of the relevant
anatomy and the injuries/conditions for
which casting may be an appropriate
treatment. This is essential knowledge for
those casting if they are to understand the
rationale for care.
The photographs of the principles of
casting and the more specialist casts give
a clear guide for practice. It is welcome to
see that the patient perspective is included,
with handy tips on living with a cast and
signs/symptoms of potential problems to
look out for.
The format is very user friendly and I would
hope that the guide will be utilised not only
in casting rooms but also more widely in
orthopaedic clinics, theatres and wards
as a reference text. The Royal College
of Nursing’s Society of Orthopaedic and
Trauma Nursing publication ‘A competency
framework for orthopaedic and trauma
practitioners’ (RCN 2012) emphasises the
need for underlying knowledge and skills
and this guide helps to provide this with
regard to casting.
Brian Lucas PhD, RN, ENB 219
Chair, RCN Society of Orthopaedic and
Trauma Nursing

3
1st EditionPublished in 1991
All rights reserved. No part of this publication may be reproduced, stored in a retrieval system, or transmitted in any form or by any means, electronic, mechanical, photocopying, recording, or otherwise, without the prior permission of BSN Medical Ltd.
The original was written by members of the Royal College of Nursing Society of Orthopaedic Nursing as a service to all those engaged in the art of casting at the initiative of BSN Medical Ltd.
Reprinted 1994.
2nd EditionPublished in 2000 by BSN Medical Ltd© BSN Medical 2000
3rd EditionThis edition has been edited and written by Susan Miles.Published in 2012 by BSN Medical Ltd© BSN Medical 2012
A Practical Guide to Casting
Contributors to 3rd EditionSusan Miles, BSc, RGN, ONC, FETC, Orth. Tech Cert. National Casting Training Advisor.
Peter Campbell, MBBS, FRCSEd(Orth) Consultant Orthopaedic & Trauma Surgeon, York Teaching Hospital
Contributors to 2nd EditionSusan Miles, RGN, ONC, FETC, Orth. Tech Cert. National Casting Training Advisor.
John W Burden, BSc, RGN, ONC, RNT, ENB 870. Lecturer in Orthopaedic Nursing.
Margaret Prior, RGN, ONC, FETC, P. Tech Cert. Orthopaedic and Casting Nurse Advisor.
The authors would like to acknowledge the following contributors to the first edition.
Lois Barr, RGN, ONC, P.Tech Cert. Asst. Organiser and Practical Teacher of BOA/RCN[SON]/AOT Casting Techniques Course.
Patricia Brodie, RGN, ONC, SCM, Dip N (London) RNT. Senior Tutor, Royal National Orthopaedic Hospital, Stanmore, Middlesex.
Keith Bucklitch, RGN, ONC, RNT. Head of Orthopaedic & Trauma Studies, Queen Elizabeth College of Nursing & Health Studies, Royal Orthopaedic Hospital, Birmingham.
Jacqueline A Scott, RGN, ONC, RNT, RCNT Course Co-ordinator, Dip N (Lond), B Ed (Hons). Lecturer Practitioner, Nuffield Orthopaedic Centre, Headington, Oxford. Chairman of the London Orthopaedic Group (SON)
Susan Miles, RGN, ONC, FETC, Orth. Tech Cert. National Casting Training Advisor.
John W Burden, BSc, RGN, ONC, RNT, ENB 870. Lecturer in Orthopaedic Nursing.
Margaret Prior, RGN, ONC, FETC, P. Tech Cert. Orthopaedic and Casting Nurse Advisor.
CastingAcademy ®

4
Contents
CHAPTER 1:
An Introduction to the Care and Management of Patients with Fractures and Orthopaedic Conditions
1.1 Terminology
1.2 Health and Safety in the Cast Room
1.3 Coping with Life in a Cast
1.4 General Anatomy
1.5 Fractures
Types
Diagnosis
Basics of Treatment
Complications
1.6 Orthopaedic Conditions
1.7 Principles of Casting
1.8 Casting Product Guidelines
CHAPTER 2:
Casting the Upper Limb 2.1 Anatomy of the Upper Limb
2.2 Fractures of the Upper Limb
2.3 Casts of the Upper Limb
CHAPTER 3:
Casting the Lower Limb 3.1 Anatomy of the Lower Limb
3.2 Fractures of the Lower Limb
3.3 Orthopaedic Conditions
3.4 Casts of the Lower Limb
CHAPTER 4:
Casting the Trunk 4.1 Anatomy of the Trunk
4.2 Fractures of the Spine
4.3 Orthopaedic Conditions
4.4 Casts of the Trunk
GLOSSARY
APPENDIX

5
An Introduction to Fractures and their Treatment
CONTENTS
1.1 Terminology
1.2 Health and Safety in the Cast Room
1.3 Coping with Life in a Cast
1.4 General Anatomy
1.5 Fractures
Types Diagnosis Basics of Treatment Complications
1.6 Orthopaedic Conditions
1.7 Principles of Casting
1.8 Casting Product Guidelines
CONTRIBUTORSSue Miles, BSc, RGN, ONC, FETC, Orth Tech CertNational Casting Training Adviser.
Peter Campbell, MBBS, FRCSEd(Orth) Consultant Orthopaedic & Trauma Surgeon York Teaching Hospital
A Practical Guide to Casting

6
A practitioner is someone who engages in
an occupation, profession, religion, or way
of life.
The Concise Oxford Dictionary describes
“Technician” as a person “skilled in
technique of an art or craft”. Further, it notes
him/her as a “person expert in the practical
application of science”. Whoever carries
out this skill, what the patient requires is
certainly an expert in the art or science of
the task in hand, a first class cast.
Orthopaedic TerminologyWhile working in the Cast Room you will want to understand and
be conversant with your professional colleagues on all facets of
medical and plaster care and to do that you need to understand
the vocabulary.
Although there is standard orthopaedic terminology, some of the
language you hear will be unique to that department, part of the
local ‘jargon’. Please ask your colleagues for a meaning, for they
will have been using these colloquialisms for so long that they will
have forgotten that they are not standard English.
Word StructureThe root of a word can comprise any part of the word but
always has the same meaning:
e.g. osteo-arthritis, periosteum relating to bone (osteo)
A prefix is the opening group of letters in a word that direct
its meaning:
e.g. ab means away from, as in absolve and abduction
A suffix is the closing group of letters in a word that direct
its meaning:
e.g. algia means pain, as in neuralgia
The following table is intended to provide a useful reference source
for some of the many words with which you will become familiar
in the Cast Room.
Meaning Example(s)
osteo bone osteoarthritis, periosteum
chondro cartilage chondroma
cyst sac cholecyst
ped/pes foot pes planus
pneum lung pneumothorax
Prefixes are opening letters of a word that
direct its meaning:
a/an absence of anuria
ab away from abduction
ad towards adduction
bi two bilateral
endo within or inner endosteum, endoscope
epi on or upon epicondyle
hemi half hemiplegia
hyper above or excessive hypertension
hypo below or deficient hypodermic
infra below infraglenoid
inter between intervertebral
intra within intravenous
macro large macroscopic
micro small microscopic
peri around or outer periosteum
poly many polyarthritis
post after post mortem
pre before premedication
pseud false pseudarthrosis
sub under subperiosteum
supra above supracondylar
trans across transdermal
Suffixes are closing letters of a word that
direct its meaning:
algia pain neuralgia
cyte cell erythrocyte
ectomy to remove appendicectomy
otomy to cut into osteotomy
ostomy to form an opening tracheostomy
1.1 Terminology

7
Please note this chapter does not cover all
aspects of Health and Safety in the Cast
Room, but gives an overview. Refer to the
Health and Safety Executive and check the
current regulations.
Safety in the Cast Room and other areas where
casting is undertaken is of paramount importance
to both patients and staff.
It is the duty of employees to see that they
do not, through negligence, cause harm to
themselves, each other, or to their patient.
It is the duty of employers to see that systems
exist whereby correct levels of trained staff are
available, with the required equipment maintained
in good working order to ensure safety of the
patient and of the staff.
Education should be available and is essential for safe practice.
For more information on casting courses see inside back page.
EnvironmentA health and safety assessment of the cast room must be undertaken
annually or if the environment changes. Health and safety officers
and/or the local HSE will advise and assist if necessary.
O The cast room must be kept clean to prevent the spread of infection.
O There must be good lighting to provide adequate inspection of wounds, sutures and pressure points.
O There must be adequate ventilation.
O The oscillating cast saw must have a dust extractor attached. Where the cast saw is used without an extractor, suitable disposable masks that prevent inhalation of dust must be worn. Refer to HSE 2009.
O The floor must be kept dry to prevent staff and patients slipping.
O Electrical equipment must be kept away from areas that may become wet and should only be touched with dry hands.
O Protective clothing available must include: aprons to prevent clothing becoming wet, or spoilt with casting materials, or infection from blood stained casts; masks to prevent inhalation of dust; gloves to prevent allergies and infection; ear muffs to prevent damage to hearing.
EquipmentMaterials: materials chosen after assessment of the patient and
tools appropriate for the task and in good working order, must be
assembled before treatment commences.
Equipment must always be used according to manufacturers’
product instructions. There must be a regular, recorded, maintenance
programme.
O Oscillator saw blades must be kept clean and unclogged at all times and not used if blunt or worn.
O The cast saw must have a vacuum extractor bag attached. This must be emptied regularly and hoses checked for splits; regular testing to check the efficiency of dust extraction should be part of a planned maintenance programme. It is advisable to use plaster shears when removing casts from children.
O Knives must be kept sharp and sheathed when not in use.
O Scissors that come into contact with the patient must have a rounded or bull-nosed tip to the end of the blades.
O The couch must be adjusted to the correct height, be easy to clean and have efficient brakes.
O Sharps must be disposed of in a sharps box.
O Disposal bags of sufficient size (the correct colour according to local policy) must be available and used.
O Electrical flexes must be enclosed in channels and/or tucked away to avoid accidents.
It should be remembered that the tools used may injure the patient
if not used according to accepted methods and correct practice.
Staff - TechniquesO A fully completed and signed medical prescription must
accompany the patient to the cast room.
O The patient’s documents and X-rays must be available before the patient is treated.
O Documentation is essential to provide clear evidence of the care planned, the decisions made, the care delivered and the information shared and a written record of the care undertaken must always be recorded within the patient’s documents as soon as possible after the event. They must be legibly signed, dated and timed. For full information see the N.M.C. code of conduct (N.M.C. 2008). The Cast Room Register must be a current record of all patients cared for and be completed after each care episode (RCN[SON] 2000).
O Staffing levels must be adequate for the workload.
O Verbal information must be given before treatment and verbal consent obtained. When treating children or vulnerable adults, please refer to the latest national policy regarding consent and get written guidance from your Trust. Both verbal and written advice should be given afterwards.
O Should there be an accident, in order to provide a record in case of possible litigation at a later date, the correct procedures must be followed according to local policy.
1.2 Health & Safety in Casting

8
COSHH (Control of Substances Hazardous to Health)The COSHH Regulation 2002 updates the previous codes, but the
main message is still that the employer must make a suitable and
sufficient assessment of risk in order to enable a valid decision to be
made about adequately controlling substances hazardous to health.
If you are in a position where you represent your employer remember
that your Trust/Hospital, Safety Officer and the HSE have guidelines
for assessment and are there to support you.
It is your duty to yourself and to your patient, to ensure that
assessment of risk has been undertaken to the standard required
by the Health and Safety Executive.
The COSHH regulations place a legal requirement on manufacturing
companies to provide information on their products. The guidelines
cover both manufacture of the product and its use.
Disinfectants
Manufacturers’ instructions, national and local policies must always
be followed.
Dust
COSHH refers to substances capable of entering the nose and
mouth during breathing and being thereby available for deposition
in the respiratory tract. It is important that consideration be given
to cast removal, the amount of dust generated and the measures
taken for protection.
Synthetic Materials
Gloves should be worn when handling synthetic casting material,
as resin is sometimes difficult to remove from the skin and may
cause irritation.
Body Fluids
Gloves should be worn when in contact with body fluid, clothes or
dressings that have been in contact with body fluids.
Noise
The Control of Noise at work regulations (2005) limit personal daily
exposure to 85 decibels for eight hours. If the noise level reaches
the region of 80 decibels, everything must be done to reduce the
noise and hearing protectors must be made available. The risk
must be assessed by someone competent to carry out this task.
The noise of oscillating cast saws is below that, but becomes louder
when the blade starts to bite into a cast. With the added noise of
an extractor it is wise to wear a hearing protector if using a cast
saw for any length of time. It may be kind to offer the patient a
hearing protector if the cast to be removed is a large one.
Regular staff health monitoring should be undertaken including tests
to ensure hearing loss or lung capacity changes are recognised.
(COSHH Health surveillance).
The COSHH regulations place a legal requirement on manufacturing
companies to provide information on their products as requested
by users of the product.
The guidelines cover both manufacture of the product and its use.
All casting products mentioned in this guide are supplied by
BSN medical Limited and further information on these products
is available as Material Safety Data Sheet (MSDS).
MSDSs give the following type of information:
O Product name
O Intended use
O Composition
O Physical and chemical properties
O Health hazards
O Fire hazard and emergency action
O Storage precautions
O Transport precautions
O Handling/use/protective clothing
O Disposal
O First aid
O Name, address and telephone number of supplier
All BSN Medical products have material safety data sheets and these can be obtained from:
BSN medical Ltd,
PO Box 258, Willerby, Hull, HU10 6WT
T: 01482 670100
F: 01482 670111
www.bsnmedical.co.uk
Further reading
Please visit www.hse.gov.uk for up to date information
Health and Safety Executive HSE Health and Safety Law (2009)
HSE COSHH Control of substances hazardous to health regulations
(2002).
HSE The Control of Noise at work regulations (2005)
NMC Code of Conduct (May 2008 ) Nursing and Midwifery Council
Royal College of Nursing Society of Orthopaedic Nursing (2000).
A Framework for Casting Standards, London, RCN Publishing
Company.
1.2 Health & Safety in Casting

9
HygieneCasts must be kept dry at all times.
If the padding under your cast gets wet it will take a long time to
dry and may not continue to protect your skin.
Plaster of Paris casts will soften if they become wet and may not
support your injury or operation.
Synthetic casts will not soften or disintegrate when wet, but you
cannot dry underneath them. If you bath or shower in them, the
skin under your cast can become very soggy and macerated. If
you have stitches or a wound under your cast and you get them
wet they may become infected.
Baby wipes are an easy and pleasant way to clean fingers and
toes without getting them too wet.
It could be difficult for you to bath, or shower, or just to wash but
there are various ways you can tackle this:
Before bathing or showering you will need to cover your cast to
prevent it getting wet. Use one of the commercial products on
the market, (details can be obtained from the Cast Room staff) to
keep it dry. Take care to remove the covering before it interferes
with your circulation.
Delta®-Dry waterproof padding is available which allow patients
to shower with the cast on providing the instructions are followed
carefully.
Showering You may find this easier than bathing, remember to cover your
cast as discussed above.
Bathing You may need help to get into the bath, so for the first time it’s
a good idea to have someone on hand to rescue you in case
you can’t manage on your own. Get them to fill the bath for
you, checking the depth and temperature before you get in. It is
generally easier to put the uncast leg in first and when getting
out to lead with the cast leg. If you have a leg cast on then you
are going to need to support the limb on something to prevent it
getting wet and do remember that the water level is going to rise
as you get into the bath.
It is easier to empty the water out of the bath, and dry yourself
before getting out, rather than trying to struggle out of a bath when
it is still full of water. A damp flannel or towel along the edge will
help to prevent you slipping when getting in or out.
If you have had an arm cast applied you may find a large rubber
glove will keep your hand dry. Persuade your family and friends
to wash the areas you cannot reach - your back, feet, hair etc.
1.3 Coping with Life in a Cast
In addition to the Instruction leaflets shown
in the Appendix, the following advice can
be offered to the patient to help him cope
with life in a cast, and show him how to
overcome some of the difficulties.
Safe EnvironmentWhilst in your cast try to move and exercise as regularly or as
often as you are allowed to in order to avoid becoming stiff. Change
the position of your limb in the cast regularly to avoid constant
pressure on one area of the limb.
O Always put your cast shoes on when you get up (providing you are allowed to weight bear). Don’t walk just on your cast, you are liable to slip. If possible wear a thick soled shoe on your good foot to even you up to match the height of the leg in the cast.
O Make sure you move loose mats or rugs out of your path so that you don’t trip up over them.
O Check the rubber ferule on your stick or crutches if you have been using them for some time. If you are using them outside they can wear out very quickly.
Some hospitals will provide you with a cast shoe that totally covers
your foot, and some with a cast sandal.
If you have only been provided with a cast sandal and you are
going out in the rain, do cover your cast to prevent it, and your foot,
from getting wet – a variety of specific cast covers are available for
purchase (details can be obtained from the Cast Room staff). Don’t
leave the cover on for too long or it will cause condensation, and
your leg and cast will become wet. Wear the plastic bag over your
cast but not over your shoe as that would make it very slippery.
If your cast is plaster of Paris and it gets wet it may become soft.
Don’t be tempted to go on the beach in the summer, sand under
your cast will really irritate, and could rub you sore.
If you drop something down your cast you need to have it removed.
If not, it will make an indentation in your skin which will turn into
a sore. You will have to tell the Cast Room staff, and let them
find the object!
For babies, toddlers and small children you may be able to obtain
adapted prams, carriages and trolleys, which will make life much
easier for you and much happier for your offspring, as they will be
able to get out and about without too much difficulty.
You may be able to obtain these from your hospital, or borrow
them from support groups.
If you live alone perhaps you ought to consider whether there is
someone who could come and stay with you to help. Can you let
your neighbours know you are incapacitated so that they can help
or keep an ear open for you to call if you need help?

10
ToiletingO This can be very awkward if you have a large cast, or for
babies that are not yet potty trained.
O If you have had a long leg cast applied, you will find it easier to sit on the toilet if you can prop your leg up on a stool. Make sure the furniture you are going to use for support is stable and secure.
O Commodes can sometimes be hired from the Red Cross or your GP.
O Loose floppy clothes and track suits are easier to pull up and down than fitted clothes.
If your child is in a hip spica or ‘frog’ type cast, and is not potty
trained, tuck a small nappy inside the nursing area at the front
and back of the cast, and cover with a larger sized nappy over
the cast. It is essential to change the nappy more frequently than
usual to keep the cast dry.
If your child is out of nappies and using a bedpan, their upper
body should be raised on pillows to keep it higher than their legs.
This is in order to prevent soiling of the cast.
Eating and DrinkingO Try to plan ahead if you can. If you are going to be on
your own all day it may help to get the family to put what you need within reach. High or low cupboards may be difficult to reach.
O Flasks can be prepared in advance with hot drinks or soup. If you cannot carry a tray, or saucer safely, then you may be able to carry a vacuum flask in a bag over your arm, or hanging from one of your crutches.
O A tea trolley is useful, you can load it up with a complete meal, and push it in front of you or you can hire one from the Red Cross. Also helpful is a small rucksack for carrying things around the house and leaving your hands free. Jug kettles may be easier to pick up than the traditional shape.
O If you are one handed and cannot cut food easily baby suction pads help to stop plates moving away from you.
O Bowls and spoons are easier to handle than plates, knives and forks.
O A mug half full will not spill as easily as a cup.
O If you have a below knee cast on it can be very tiring to prepare food; it may help you while standing to support your leg behind you on a padded stool or chair. Do try to sit down whenever you can.
O If you have a full leg cast on you may find it easier to perch your bottom on a tall stool when doing the chores at the sink, or using the ironing board.
O If you are in a jacket or body cast you will not be able to eat big meals; you should eat little and often. Big meals will probably give you indigestion and make your cast feel too tight. Fizzy drinks, e.g. beers and ales can make you feel very bloated.
Body TemperatureO Wearing a cast is like having an extra layer of clothing
on. The problem is that you cannot take it off at will, so you may find yourself becoming too hot. There is not a lot you can do about this. You can try not to put too many clothes on and keep your heating lower than usual. Let the family wear extra clothes if they are chilly. The solution is a lot easier if you are too cold. Obviously the first thing to do is to put on more clothes.
O If your leg is in a cast, extra large mountaineering socks or ‘leg warmers’ will help, especially if they are woollen. Wear a size too big for you so that you trap warm air in the folds and fibres.
O Track suit trousers are warm and comfortable.
O If your arm is in a cast, mittens, or socks wrapped over your fist may help.
O Don’t sit too close to a fire. You may not feel the heat until it is too late and your cast is so hot that you have burnt yourself.
DressingO Wide, loose clothes such as track suits are probably the
easiest to put on when you are coping with life in a cast. They are also comfortable and if you are trying to hide the fact that you have a cast on they are the clothes of choice.
O Extra large mountaineering socks will disguise your cast and fit in with your fashion colours. Even body casts and jackets can be hidden under sweatshirts.
O Velcro is excellent as a fastening for ease of use and speed when dressing and undressing, and it may be used in some cases to replace zips.
O Front fastening bras will help your independence if you cannot reach round behind your back.
O Fibreglass casts may catch on tights, frail materials, upholstery, or rub and scratch bare skin. Ask your hospital for stockinette to cover your cast.
EntertainmentO If you are going to be on your own all day and fairly
immobile you need to think about how you are going to get through the long hours and amuse yourself. First of all you need to plan for your boredom!
O Buy, beg, borrow or plead for magazines and books. The mobile library can be a boon to you if you are unable to travel far. You can’t spend all day reading though, so consider buying or borrowing puzzles and games. Make sure you have the radio, or the control for the television/DVD player within reach before you sit down or you are deserted for the day.
O Perhaps you should consider taking up a new hobby, like tapestry, or model making, or a new language?
1.3 Coping with Life in a Cast

11
SleepingO Sleeping at home in a cast can be harder than you expect
after hospital where everything is geared up for you. Your bed at home is probably softer than in hospital and you will sink into it and may find it harder to turn over.
O If you need to keep the bedclothes off your legs you can put a kitchen chair with its back placed against the bed and hang the bedclothes over the top of the back. It will take the weight off you. Alternatively, you can use a cardboard box, with one side cut out, turned onto its side under the bedclothes.
O If your partner is being kicked or knocked by your cast limb try covering the cast in something soft. Once again extra large socks can help.
O If you need to elevate your leg when you go to bed try a pillow under your mattress, or raise the end of your bed on concrete or wooden blocks.
O If you need to elevate your arm, rest it on a couple of pillows.
MobilityCoping with life in a cast can be quite exhausting, and getting
yourself from room to room may well feel like going on a three
mile hike. Going upstairs can feel like mountaineering.
If you have a leg cast on, do put your leg on a padded stool,
pouffe, or the sofa when you are sitting down. It will help your
circulation, prevent swelling and ease your pain if you have any.
If you have a family, see if you can persuade them to run errands
for you. Perhaps there is something you can do in return whilst
you are sitting down.
Walking with CrutchesMove crutches forward, and then swing your sound leg through to
the level of (or slightly in front of) your crutches, with the affected
leg following.
Going UpstairsAlways put the unaffected leg up first, then bring the splinted leg
up along with crutches.
Going DownstairsPut the crutches down one stair, followed by the affected leg and
finally the unaffected leg. You may find the following advice easy
to remember - ‘up to heaven with your good leg leading you up,
down to hell with your bad leg leading you down’!
Alternatively, you may find it easier to go up and down the stairs
on your bottom, taking care not to dent or crack your cast.
(for advice on the use of crutches see Appendix)
How to Get Up if you FallIf your leg cast or casts prevent you from getting back on your
feet in the usual way it may help to try the following:
Roll onto your tummy; get onto all fours (or all threes if you are in
a long leg cast); pull yourself into a kneeling position (using a stable
piece of furniture to help) and then pull yourself into a standing
position, straightening the unaffected limb as you go.
We hope these hints and tips may help you cope until the welcome
day when you hear your surgeon say ‘That cast can stay off now,
all is well’.
BSN medical Patient Information Booklets
Cast care instructions for patients (including children) can
be obtained from:
BSN medical Ltd
P.O. Box 258,
Willerby, Hull,
HU10 6WT
T: 01482 670100
F: 01482 670111
www.bsnmedical.co.uk
Support Groups
SCOPE
Information and support on all aspects of care.
Enquiries to their helpline - Tel 0808 800 3333
Email: [email protected]
website: www.scope.org.uk
STEPS: (National Association for children with lower
limb abnormalities)
Enquiries to their helplines -
Tel 01925 750271
E mail: [email protected]
website: www.steps-charity.org.uk
SCOLIOSIS ASSOCIATION:
Enquiries to their helpline -
Tel 020 8964 1166
Email: [email protected] website: www.sauk.org.uk
Further reading Pearson A. (1987) Living in a Plaster Cast.
RCN London and Tonbridge. The Whitefriars Press.
1.3 Coping with Life in a Cast

12
The Locomotor SystemsThe locomotor systems are those which enable a person to move
about, change position, hold articles and handle tools.
They are:
O The Skeletal System of Bones and Joints
O The Muscular System
O The Nervous System
The Skeletal System
The skeleton has the following functions:
O It forms the framework of the body.
O It is arranged to give protection to vulnerable tissues, e.g. the brain, lungs and heart, spinal cord, ovaries.
O It gives attachment for muscles which bring about movement or maintain posture.
O It takes part in the formation of joints, which also enable movement to take place.
O It supports and maintains the posture of the body.
O It is concerned with the use of calcium in the body, and the formation of the various blood cells.
Structure of Bone
1.4 General Anatomy
The skeletal system is formed of the bones of the skeleton,
symmetrically arranged. It is divided into:
O The appendicular skeleton, comprises the bones of the upper limb and shoulder girdle (clavicle and scapula) and the lower limb and pelvic girdle (innominate bone).
O The axial skeleton, comprising bones of the trunk and head.
Bone is formed of protein substance, 33% of which is collagen
and mineral salts, primarily calcium phosphate and carbonate,
which together make it both strong and resilient. Bone integrity
is maintained by the bone cells’ osteoblasts or bone builders and
osteoclasts bone consumers. It is a balance between osteoblastic
and osteoclastic activity that ensures healthy strong bone. The
surface layer, or compact bone, is smooth and rigid and gives
the individual bone its strength. Various protuberances allow
attachment for muscles.
Hollows and grooves on the surface allow room for neighbouring
blood vessels and other structures. Cancellous bone fills the centre
of individual bones. It is spongy in appearance, but firm and rigid
to touch. Its structure gives lightness to the bone. Its spaces
are filled with the red bone marrow, which produces the blood cells. Cavities which lie in the centre of the shaft of long bones
are filled with fatty yellow bone marrow. It is along this cavity
that intra-medullary nails are inserted.
Joints are sites where two or more bones meet. They are classified
as fibrous, cartilaginous or synovial joints according to the substance
separating the bones within the joint. Of most interest to cast room
staff will be synovial joints because they are mostly freely-movable
and hence disease prone.

13
Synovial Joints
The articulating bone surfaces are smooth and covered with
articular cartilage. In healthy joints, the two surfaces of cartilage
are in contact with each other and are lubricated by a thin film
of synovial fluid.
Synovial fluid nourishes and lubricates the intra-articular structures
including the articular cartilage. It is produced by the capillary network
within the synovial membrane which lines the joint capsule and
covers any bone within the joint not covered by articular cartilage.
A sleeve of strong fibrous tissue - the capsule - holds the two
bones together and surrounds the joint. The capsule may be
reinforced by strong extracapsular ligaments.
Synovial joints are also classified according to their pattern.
Ball and Socket Joint
Rounded head on one bone fits into cup shaped cavity on articulating
bone. e.g. hip joint or shoulder joint.
Single Hinge Joint
Usually comprises two bones only and moves in one plane. e.g.
ankle joint, interphalangeal joints or elbow joint.
Composite Hinge or Condyloid Joint
Two or more bones capable of moving in more than one plane.
e.g. the wrist joint.
Gliding Joint
Two flat surfaces slide over one another. e.g. the inter-vertebral joints.
1.4 General Anatomy

14
Saddle Joint
The two bones have convex and concave surfaces that articulate.
1st carpo-metacarpal joint.
Pivot Joint
One bone remains immobile while its articulating bone rotates around
it. Atlanto-axial joint or superior radio-ulnar joints.
The Muscular SystemThe principle characteristics of skeletal muscle are contraction (shortening) and extension (lengthening). A muscle consists of
the belly or fleshy part of the muscle and usually a tendon for
attachment to bone. The muscle must cross a joint in order to
bring about movement of that particular joint.
Extension of one muscle is usually brought about by contraction
of its opposing muscle. This is the simple basis of movement for
example, if you flex the elbow joint by contracting biceps brachii
and brachialis, the triceps, their antagonist will extend. Contract the
triceps to extend the elbow joint and biceps brachii and brachialis,
the antagonisers, will extend.
Muscle also pads the skeletal framework, forming the flesh which
gives the body its shape. In turn it is overlaid with varying amounts
of adipose tissue (fat).
1.4 General Anatomy
15
The Nervous SystemThe nervous system along with the endocrine system controls the
many bodily functions. It comprises the brain and spinal cord, the
peripheral nerves and the autonomic nervous system.
In the Cast Room the most important knowledge is an understanding
of motor function which is a combination of muscle and motor
nerve action. Peripheral nerves however are mixed nerves which
carry both motor and sensory neurones.
Neurones carry impulses from one part of the body to another.
Motor neurones carry impulses from the brain to muscles; Sensory
neurones carry impulses from the skin and internal organs to the brain.
Both types of neurones work together for the safety of the human
body. Injury to any part of the nervous system has damaging
consequences but can vary from temporary bruising with total
recovery as in sitting cross legged or hitting your “funny bone”, to
complete transection, leading to total paralysis and loss of sensation.
Peripheral nerves which lie close to the surface are vulnerable
especially to the application of casts and splints. This can result
in temporary or permanent disability e.g. pressure to the common
peroneal nerve as it winds around the neck of the fibula which will
result in an inability to dorsi-flex the foot, often called ‘foot drop’.
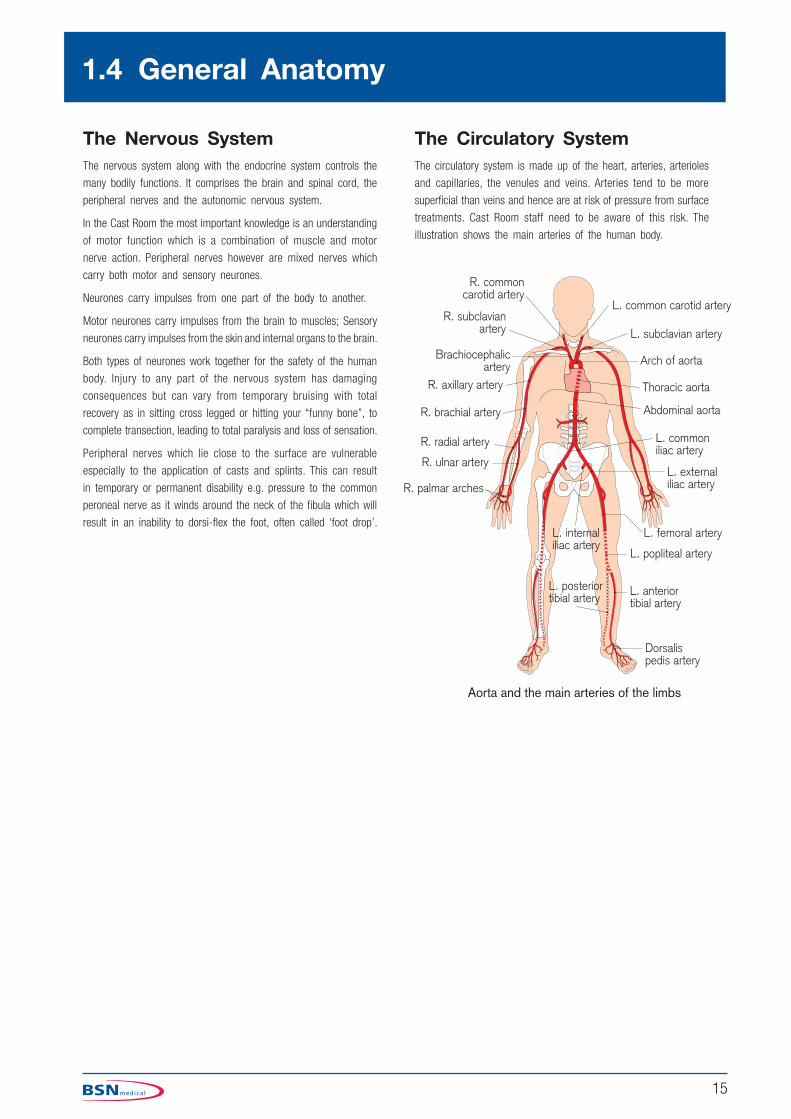
The Circulatory SystemThe circulatory system is made up of the heart, arteries, arterioles
and capillaries, the venules and veins. Arteries tend to be more
superficial than veins and hence are at risk of pressure from surface
treatments. Cast Room staff need to be aware of this risk. The
illustration shows the main arteries of the human body.
1.4 General Anatomy

16
Types of FractureFractures can be classified in a variety of ways. They can be
described in terms of what we can find when we examine the
patient, that is a clinical classification, or by the appearance of
the fracture on an X-ray, the X-ray classification which essentially
is a descriptive system. We can also classify fractures in terms
of the factors which have weakened the bone and made it more
susceptible to breaking. This latter grouping is the physiological classification.
What is a Fracture?
A fracture is defined as “a break in continuity of a bone”. In
layman’s terms a fracture is a break, and a break is a fracture.
Often the bone is broken completely across, but occasionally, the
break is only on one side of the bone, and we may describe such
a fracture to the patient as “greenstick fracture”. These incomplete
greenstick fractures most often occur in children.
Classification of Fractures: By Clinical Features
Simple or Closed Fractures
All fractures sustain some degree of surrounding soft tissue damage.
Provided that soft tissue remains intact, with no adjacent wounds,
the fracture can be termed ‘closed’. Even closed fractures may
have significant soft tissue damage, such that if the fracture is
mishandled, further injury may be sustained, producing compound
or complicated fractures.
Open Fractures
An open fracture (the term compound, sometimes used in the
past is misleading and should be avoided) is any fracture where
there is a skin wound which may connect with the fracture site.
The major risk here is infection, which if it becomes established
in the bone, can be extremely difficult to eradicate. Therefore any
suspected fracture with a nearby skin wound should be assumed
to be open until the wound is explored in sterile conditions, i.e.
in an operating theatre. Any wounds should be covered with a
sterile dressing. Intravenous antibiotics should be administered
and tetanus prophylaxis given. The size of the wound is of no
significance. Sometimes, the bone breaks and tears a small hole
in the skin, then disappears back inside. The hole in the muscle
however, may be massive, and there may be contaminated material
or even fragments of clothing caught in the bone ends. The wound
must be thoroughly explored and any fragments or dead tissue
removed. If the wound is simply closed, then major infection is
the likely outcome.
Open fractures may be further described as ‘direct’ or ‘indirect’.
In the direct open fracture, the object which has torn the skin has
continued on to break the bone; whereas the indirect compound
fracture is created when the bone is bent and tears its way out
through the skin.
1.5 Fractures
Simple or Closed
Open
Transverse
Spiral
Impacted
Greenstick and Torus
Comminuted

17
In addition to causing damage to the surrounding soft tissue envelope,
fractures may cause injury to nerves, arteries or tendons that are
in the zone of the injury. Assessment of neuro-vascular status
of the limb both before and after cast application is mandatory.
Complicated Fractures
In addition to causing damage to the surrounding soft tissue envelope,
fractures may cause injury to nerves, arteries or tendons that are
in the zone of injury. Assessment of neuro-vascular status of the
limb both before and after cast application is mandatory.
Classification of Fractures:
by X-ray AppearanceHere we are really describing the fracture as it is seen on an
X-ray, so this is very much a descriptive classification. The terms
used depict the appearance of the bone and often give a clue
as to the amount of force involved in breaking the bone, or the
direction of the force.
Transverse Fracture
This is the typical injury caused by a direct blow. Note that the
bone ends are displaced and angulated. The latter is caused by
the force of the blow but the displacement is caused by the pull
of muscles attached to the different ends of the bone. These
sometimes pull the bone apart at the fracture site, and unless this is
taken into consideration, can make reduction of the fracture difficult.
Spiral Fracture
Spiral fractures are usually caused by the leg being twisted, e.g.
a skiing accident to the leg.
Sometimes these fractures are difficult to hold out to length as the
broken ends are quite steep. When these occur in the lower leg,
always examine the X-ray carefully, as sometimes the fibula appears
to be intact. In fact it will have broken close to the knee and
you must make sure that the nerve close by is working properly
before, and after, you apply a plaster cast.
Oblique Fractures
When the bone is broken obliquely, it often signifies a leverage has
been applied to the bone. The edges of the bone are sharp, and
can cut their way out, so such fractures are often open.
1.5 Fractures

18
Comminuted Fracture
A comminuted fracture is one where the bone is broken into
several fragments, some of them may be quite small, with a poor
blood supply. These fractures therefore are slow to heal, and
sometimes never unite without further surgery. These two X-rays
were taken six months apart and in the later picture on the right
there is still no sign of union. The larger fragment of bone seen
in the middle of the left-hand picture is known as a ‘butterfly’
fragment from its shape. It takes a lot of force to produce a
comminuted fracture, so expect a lot of soft tissue damage and
swelling. Circumferential cast applications should be split to allow
for swelling. Comminuted fractures are unstable and reduction is
more difficult to control in a cast.
Impacted Fracture
Sometimes the bones of elderly people are broken by a fall, and
the broken ends are driven into each other by the force of the
blow or by muscle contraction. This can make the fracture very
difficult to see, as here where the tibia is broken just below the
knee joint. The clue to the fracture is the angle of the plateau at
the top of the tibia which should be almost horizontal, but in this
picture slopes backwards. A better known example of impacted
fracture is the Colles’ fracture near the wrist.
Depressed Fracture
When a flat bone is struck by a blunt object, the result is to force
a piece of bone inwards (depressed fracture). Two sites prone to
depressed fractures are the skull and the pelvis.
Stellate Fracture
This results when a flat bone is struck by a pointed object, e.g.
a kick or a bullet in the knee cap. The result is a star-shaped
fracture like a stone through a window. The fragments of the
patella may be held together by the surrounding tendon of the
quadriceps muscle.
The above are the most common terms used, but they are purely
descriptive, and as such may vary between clinicians.
1.5 Fractures

19
Classification of Fractures: by Physiological FactorsHere we are describing a situation where there is some feature
about the health or development of the bone which has contributed
to the manner of it breaking.
Greenstick and Torus Fractures
The bones of a child are much more pliable than adult bone and
as such an incomplete fracture may occur.
Torus fractures, or buckle fractures occur when one side of the
bone may buckle upon itself without disrupting the other side. The
word torus is derived from the Latin word ‘Tori’ meaning swelling
or protuberance. Children commonly sustain this injury by falling
on an outstretched hand. Treatment of a torus or buckle fracture
is made by casting the injury for a short duration, usually around
three weeks. These injuries tend to heal much more quickly than
the similar greenstick fractures.
A ‘greenstick fracture’ means that one side of the fracture has
broken and one side is bent. The name for a greenstick fracture
comes from the analogy of breaking a young, fresh tree branch.
The broken branch snaps on one side (the outer side of the bend),
while the inner side is bent, and still in continuity. Most often the
greenstick fracture must be bent back into the proper position and
then cast for about six weeks. Greenstick fractures can take a
long time to heal because they tend to occur in the middle, slower
growing parts of the bone.
Pathological Fracture
The essence of such a fracture is disease of the bone which has
weakened it, so that it breaks with comparatively trivial violence.
Sometimes the weakening is the result of generalised bone
disease, such as osteoporosis, but sometimes it is the result of a
bone tumour, and may be the first indication that the patient has
a tumour at all. Fractures in certain places, such as the spine,
top of femur or humerus, with a history of trivial violence should
always be considered with suspicion. Tumours of the breast, lung,
prostate, kidney and thyroid often metastasise to bone.
The Diagnosis of a FractureA fracture is diagnosed by the history of the incident and by a
clinical examination of the patient. X-rays can confirm the diagnosis,
but may be misleading, sometimes failing to reveal the fracture until
signs of union are appearing.
The signs and symptoms of a fracture are:
O Pain
O Swelling
O Deformity
O Loss of function
O Abnormal mobility
O Crepitus
Pain
Pain is a very common feature of fractures. Usually the patient
knows exactly where the pain is felt, and will indicate if you are
making it worse. Pain can worsen the patient’s condition, so always
handle the injured limb carefully. Support the limb and don’t allow
the bone ends to grate together.
Swelling
The amount of swelling is no guide to the type of fracture, as it
is partly related to the soft tissue damage, but mainly to the blood
flow through the injured limb. A fractured leg which has been
hanging down will always swell more than one which has been
elevated, therefore always raise the injured leg, both before and
after a cast has been applied. Once the limb has been splinted,
encouraging the patient to move the fingers or toes will also help
to reduce swelling.
Deformity
Sometimes the deformity is typical of the injury, as in a Colles’
fracture of the distal radius. Here the deformity is caused by the
direction of the force. At other times, the deformity is caused by
the action of muscles pulling on the fragments of bone, unopposed.
Loss of Function
It is not surprising that someone with a fracture avoids moving the
limb because of pain. However, once the pain is taken care of by
splinting and support, we should expect, and indeed encourage some
function of the injured limb, especially movement of the digits. If
the patient still cannot move his fingers/toes, then we have to look
for other reasons such as compartment syndrome, nerve injury or
a loss of the attachment of the muscles.
Abnormal Mobility
During examination of the patient, the Doctor will gently feel the
bones to asses if they are intact, noting any tenderness or abnormal
movement. This is not a task for anyone other than a Doctor, as
it is not only painful for the patient, but may do further damage.
However, if in the process of moving the patient you notice that his
leg bends in an unusual place, take care not to move the limb again
until it is supported properly, and report it to the medical officer.
Crepitus
Crepitus is the grating sound caused by the bone ends rubbing
together. It is similar to the sound heard if you rub your hair
between finger and thumb. Note if you hear it, but don’t go looking
for it as it is very painful for the patient.
1.5 Fractures

20
Healing and Treatment of Fractures
The Healing of the Bone
Bones heal in a slow process, passing through five defined stages:
O Haematoma Formation
O Cell Proliferation
O Callus Formation
O Consolidation
O Remodelling
Initially, there is bleeding from the broken bone ends, and the
surrounding soft tissues. This forms a clot or haematoma, which
provides a scaffold for new fibrous tissue and bone building cells
to move in, leading to stage two.
The early cells are fibroblasts, arising from the periosteum (a membrane
around the bone). These convert the blood clot to fibrous material
in about ten days, making the fracture “sticky”. The fibroblasts are
then replaced by bone building cells called osteoblasts.
The osteoblasts start to produce the first bone around the fracture.
At this stage, this begins to appear on an X-ray looking like cotton
wool, and is known as callus. The callus may be felt around the
bone, and the patient will usually notice that the bone is beginning
to feel stronger and less painful.
Over the next few weeks the callus will harden and consolidate
and the bone will regain its full strength.
The last stage of the process is the remodelling, when the excess
lump of new bone is removed. This is a slow process, carried out
by cells called osteoclasts. In children, the remodelling is good
enough to remove all trace of the fracture but adults are not so
lucky, so there is often evidence of the fracture in the bone for
many years.
The speed with which a fracture heals varies with the age of the
patient and the size of the bone. Young children heal quickly, adults
take longer. Small bones heal quicker than large ones. Other
factors such as the general health of the patient, or his nutrition
also have an effect on the speed of union of the fracture. The way
a fracture is treated also varies the healing. Rigid fixation of the
fracture seems to slow the process, whilst too much movement can
also prevent union. Early use of a limb, with adequate protection
seems to be the best way of encouraging a fracture to heal. The
result of all this is that you should never tell a patient how long
his fracture will take to heal, as he will be very aggrieved if it
takes longer.
The Aims of Treatment
When we are treating a patient with a fracture, we must determine
our aims and priorities: whether we are giving first-aid to the patient,
or the definitive hospital treatment. The prime objective must be to
consider the whole patient, not just the fractured part. We must
therefore impart confidence by our whole approach to the patient.
By what we say, and how we say it, as much as by what we
do. The way that we handle the patient - in such a manner as
to cause as little pain as possible, to safeguard his belongings, to
keep him informed of our intentions, and to gain his consent to our
actions and invasion of his privacy and person - is the key to a
successful outcome, whether we are technician, nurse, or surgeon.
The aims of treatment are to:
O Assess the Condition of the Patient and Priorities
O Reduce the Fracture
O Stabilise the Fracture
O Prevent Deformity
O Restore Function
Sometimes all of the stages outlined apply; at others, only one
may be required.
Assessment
The patient may be suffering from a variety of other injuries, many
of which, unlike the fracture, offer a much greater hazard to life.
These must be dealt with first. For example, is the patient breathing
easily? Does he have any difficulty or pain on breathing? Is the
blood circulating in the arms or legs? Is he in a state of shock from
blood loss? Is there any bleeding, etc? What about pain? It is
not within the scope of this document to discuss these aspects of
patient care and other manuals deal more fully with this information.
1.5 Fractures

21
There are some points to note concerning the assessment of
the fracture. We should check the state of the circulation in the
fingers/toes of the injured limb. This should be done when we
first encounter the patient, and frequently thereafter, and whenever
we have applied any form of splintage. Always do it for yourself,
never assume that someone else had done it.
The skin should be pinkish and reasonably warm to the touch once
the patient has been inside for a few minutes. Obviously if outside
on a cold day you have to take the weather conditions into account.
Likewise, with dark skinned patients, you must examine the nails
which are less pigmented. Squeeze the hand (foot) gently. Note
if it blanches, and how long it takes the colour to return. If the
veins are congested, the skin will be a dusky colour, and will blanch
only briefly, filling rapidly once the pressure is relieved. When the
arteries are obstructed, the skin will be pale, and cold. The most
common finding is of venous obstruction caused by swelling or
an over tight splint. If so, slacken the bandages slightly until the
colour returns to normal.
Reduction
By reduction of a fracture, we mean to restore the normal alignment
of the bone as closely as possible. Absolute alignment is rarely
necessary, and sometimes we need not bother about reducing the
fracture at all as the position is satisfactory. The main reason
for reduction is to improve the subsequent function of the limb.
Reduction may be important for cosmetic reasons in some cases.
After reduction, the bone should be straight without rotation or
angulation. On an X-ray, the bone ends may appear to be displaced
slightly, but this usually is unimportant, as long as the alignment
of the bone is satisfactory.
Reduction may be achieved by manipulation i.e. manually pulling
and adjusting the bone until in position. Adequate pain relief is
required to do this, and X-ray control must be available. Alternatively,
reduction may be achieved by placing the limb on traction and
applying a small force over a longer period of time. Gradually the
muscle spasm holding the displaced bones will relax and the bone
come into its correct position.
Holding the Fracture
Immobilisation of a fracture is not always required. There is evidence
that some movement of the fracture site is actually beneficial
in stimulating the formation of callus. The movement must be
controlled as too much can delay healing. A plaster cast is the
most common method of holding a fracture. Other methods include
splints, traction, or by internal or external fixation.
Plaster casts, splints and traction all exert their action on the bone
via the soft tissues, skin, muscles etc. Fixators are applied directly
on or into the bone. External fixators use pins which emerge through
the skin and are clamped into a frame. Internal fixation uses
plates, screws, pins etc. fastened directly onto or inside the bone.
Deformity
Preventing deformity is important for cosmetic reasons and very often
for functional purposes. Limbs which are bent or twisted don’t work
as well as they should. Nerves are stretched, muscles weakened
for example. To prevent deformity a good reduction is required,
and retained by adequate support. If nerves are injured, we must
protect the weakened muscle until the nerves have recovered, by
splinting the limb in the appropriate position.
Function
To restore function we must ensure that the muscles are maintained
in a healthy state, that joints are not allowed to become too stiff
and by encouraging the patient to make as much use of the limb
as possible, given the restrictive devices attached to it. Once a
cast has set firmly and is strong enough, the patient should use
the limb in normal daily activities. This helps to reduce swelling,
muscle wastage and fibrosis, and boosts the circulation and healing
of the bone. An adequate diet, with protein and minerals is also
required, and the patient may need advice on diet.
Complications of FracturesA ‘complicated’ fracture is one where there is a problem of other
tissues or organs of the body. The ‘complications’ of fractures are
situations which affect the healing of the bone or the recovery of
the patient. Some of them arise at the time of the injury, others
may be the result of mishandling or mishap. Some may arise later
as the fracture heals. There are two complications which affect
all fractures, however. They are pain and bleeding.
Pain
Because pain is a common feature (see ‘Diagnosis’ page 19), it
requires special attention as it can indicate things are going wrong.
Pain also increases shock and makes the patient less able to
cooperate and comprehend the information given to him. Pain
initially should be treated by suitable methods, usually analgesia,
by injection or inhalation. Once the fracture has been treated, pain
should begin to diminish slowly. Therefore any apparent increase
or change in character of pain must be investigated. An increase
in pain may indicate infection, entrapment of a nerve, obstruction
of circulation or later, non-union of the fracture.
Shock
All fractures bleed from the bone ends and the surrounding soft
tissues. In the major bones, the blood loss can be considerable
and the patient may be severely shocked, requiring blood transfusion.
For example, a haemorrhage into the thigh may be as much as six
units of blood, more if the fracture is open. Pelvic fractures also
may bleed a lot because the bone is very vascular. Careful and
frequent monitoring of the patient’s vital signs is therefore essential
when large bones are broken, and resuscitation equipment must
be readily available.
1.5 Fractures

22
Mal-union
This means that the fracture has united, but the position is
unsatisfactory, either because the function is impaired, or the
cosmetic result is unacceptable.
Delayed Union
Means that the fracture is taking longer to heal than expected.
There are several factors which affect the time taken for a fracture
to heal, but there are average times for similar injuries. Factors
which may impede healing are the type and effectiveness of fixation
or splintage, the circulatory state of the limb, the general nutritional
state of the patient, and the type of fracture. Comminuted fractures
always take longer to heal, for example.
Non-union
When a fracture shows no signs of healing after twice the expected
period we begin to talk about non-union. Changes in the bone
ends will be visible on the X-rays, and there will be a decrease
in bone density (osteoporosis) in the distal fragment of the bone.
Non-union may be due to inadequate reduction of the fracture,
inadequate blood supply, death of part of the bone, or soft tissue
getting in between the bone ends. Sometimes, too rigid fixation
will cause non-union and occasionally, the bone ends are separated
by internal fixation or too much traction.
Fat Embolism
When a bone breaks, microglobules of fat enter the circulation.
Usually these are small enough to cause little problem, but
sometimes they can coalesce and obstruct the blood flow in the
brain, liver, kidneys or lungs. If the patient becomes confused,
breathless or passes blood-stained urine within 72 hours of the
injury, this complication must be suspected. It can be fatal, but the
administration of oxygen for the first twenty-four hours after injury
seems to reduce the occurrence of this complication.
Nerve Injury
Certain nerves are vulnerable to injury at particular sites, e.g. the
radial nerve, as it winds around the shaft of the humerus. The
state of the nerve supply must be noted in the initial assessment
of the patient, and repeated after any treatment of the injury.
Sometimes the nerve is affected much later as the callus hardens
and entraps it, or perhaps if the bone grows deformed. The result
of nerve injury will be paralysis of muscles and a loss of sensation.
So a radial nerve injury will produce the deformity known as ‘wrist
drop’, where the patient is unable to extend his fingers or wrist.
Vascular Injury
At certain sites, there is a high risk of injury to the main blood
vessels. Frequently there is spasm and temporary obstruction of
blood flow, but if unrecognised and not treated, this may become
permanent leading to an ischaemic contracture (Volkmann’s). The first
development of interrupted blood supply to the muscles is tightening
of muscle fibres, and increasing pain in the belly of the muscle.
There will be swelling inside the muscle and the development of
a compartment syndrome. This may also be the result of too
tight a plaster or bandage. The action required is to relieve the
obstruction as quickly as possible, slacken any bandages, split
the plaster, or gently straighten the limb. Get medical assistance
urgently as immediate fasciotomy may be required.
The indicators of a developing compartment syndrome are:
O Increasing pain which is out of proportion to that expected by the injury, especially on stretching the muscles.
O Pain which does not respond to analgesia.
O Pins and needles or numbness (paraesthesia).
O Increasing paralysis.
O Pallor of the limb.
O Initially the distal pulses may be normal but increasing weakness is often observed and then absence of pulse.
Deep Vein Thrombosis (DVT)
Cast room staff should be aware of the symptoms of deep vein
thrombosis (DVT) and pulmonary embolism and check patients have
been assessed for Venous Thromboembolism risk before application
of a lower limb cas as per NICE Guidelines. (See Complications
of Casting for more details.)
Swelling
Swelling may lead to compartment syndrome and ischaemia if
constricted by bandaging. Treatment of the swelling involves
elevating the limb as high as possible, releasing the bandage and
encouraging movement of the digits. If the patient is unable to
move them himself then gentle passive movements should be made,
moving the joints through their full range.
Gradually the swelling will subside and the circulation improve.
Swelling may occur in the hand or foot if the cast is too short
at the lower end.
Cast Sores
Plaster sores and splint sores are caused by pressure or friction.
The cast may have insufficient padding over bony points or be too
tight, or even too loose. (See Section 1.7 for further information
on plaster sores).
1.5 Fractures

23
Infection
Infection is rare in a closed fracture, but is a major risk in a open
fracture or following internal fixation. Infection in a bone is very
difficult to eradicate, leading to non-union, osteomyelitis and skin
breakdown possibly necessitating amputation. Open fractures must be
thoroughly cleaned and any contaminated tissue removed. Antibiotics
may be instilled directly into the wound and given systemically
but strict aseptic techniques are an absolute in wound treatment.
Myositis Ossificans
This is a rare condition where a bony tissue is formed within a
muscle near a fracture. It occurs mostly around the elbow or in
the thigh. The cause is not known. If it occurs, the limb must
be rested until the callus has hardened. It may then be removed.
Joint Stiffness
Probably the most common complication after the fracture has united.
Some of this stiffness is due to the lack of use of the joint, some
will be due to muscle weakness, some may be due to fibrosis
of the muscles, perhaps due to a mild, undetected compartment
syndrome or myositis ossificans. The joint may require manipulation
under anaesthesia and intensive physiotherapy before a full range
of movement is restored.
Complex Regional Pain Syndrome (Sudeck’s Atrophy) (Post-Traumatic Reflex Dystrophy)
This is a condition of pain and stiffness which occurs some weeks
after the injury. The hand, which is most commonly affected,
is puffy, discoloured and moist. Recovery is slow but the hand
improves over a few months, during which time pain relief may
be required. It should be recognised and physiotherapy instigated
as soon as possible.
Osteoarthritis
Osteoarthritis will develop in joints where the surface is damaged,
or as a result of mal-union when the joint is mis-aligned or subject
to unusual stresses. Death of underlying bone (avascular necrosis)
may also be the cause.
1.5 Fractures

24
1.6 Orthopaedic Conditions
Infection of Bone and JointsAntibiotic drugs have revolutionised the prevention and treatment
of bone and joint infections but primary infections are still to be
seen in medical practice.
Osteomyelitis is the term used to describe an infection of bone
or bone marrow. It may present as an acute infection or in a
chronic form which is nearly always a late complication of an acute
form of the disease.
Organisms reach the site of infection by two routes:
O Through the bloodstream from an established infection elsewhere in the body.
O Introduction at the time of an open fracture or as a complication of surgery, although these events are usually avoided by prophylactic antibiotic therapy.
The patient presents with severe pain in the affected limb accompanied
by raised temperature and feeling unwell. The affected part may be
red and swollen and the regional lymph glands may be painful and
swollen. The erythrocyte sedimentation rate (ESR) and white blood
cell count will be raised. It may be possible to obtain pus from the
affected part and the organism identified. Antibiotic therapy will be
commenced as soon as possible, they may be given parenterally
or by mouth or both. A protective back slab or splint may be
ordered for comfort or to prevent pathological fracture where the
bone has been eroded.
Pyogenic Arthritis, sometimes called septic or infective arthritis,
is where the organism has managed to gain access to the joint
cavity and established infection there. The organism gains access
by one of three routes:
O From a septic focus, either within the joint vicinity or from a remote site.
O Blood borne, usually associated with recent local trauma.
O From a penetrating wound, or rarely as a result of a contaminated intra-articular injection.
The causative organism is commonly Staphylococcus aureus and
tests will be carried out to identify the appropriate antibiotic. An
infected joint will be painful, red and swollen.
The infection usually responds to conservative management including
the application of a back splint with elevation in order to rest the
limb. As well as antibiotic therapy the patient will require analgesics
to control the pain. Once the infection is resolved a period of
physiotherapy will be needed to restore full mobility.
Tuberculosis and Tuberculous Infection of Bone and Joints,
the incidence of which, has been much reduced due to public
health measures over the last five decades, is however undergoing
a small resurgence.
The tubercle bacillus reaches the bone or joint by local spread or
by the blood stream from an active lesion in the lungs or lymphatic
system. The common sites for infection are the vertebral bodies,
the hip joint or bones of the hands and feet. Efforts to improve the
patient’s general state of health will be made and antitubercular
drugs will be prescribed and their use continued for at least 6
months. Dependant on where the infection is sited a back splint
or body jacket may be required.
ArthritisTwo types of non infective arthritis may be seen in the cast room
- rheumatoid and osteo-arthritis. Though splints may not be used
in the conservative management of these conditions they may be
prescribed to support the long term consequences.
Rheumatoid Arthritis is a chronic inflammatory disease of joints
that is associated with systemic symptoms. At present the cause is
unknown. Many joints are affected, often symmetrically, particularly
the non-weight bearing joints. The synovial membrane becomes
thickened and eventually the articular cartilage is eroded. The
subchondral bone may become affected due to secondary osteo-
arthritic changes. The patient experiences swelling, warmth, severe
pain and stiffness of the joints that is worse after resting. Other
problems associated with rheumatoid arthritis are anaemia, vasculitis
and problems of the skin, heart and other systems.
There is no specific cure for the disease so treatment is aimed at
reducing the symptoms and promoting a mobility that is as free
of pain as can be achieved. Drugs in current use are:- the non-
steroidal anti-inflammatories; disease – modifying anti-rheumatic
drugs (DMARDS) such as methotrexate.or hydroxychloroquine or
under some circumstances penicillamine and gold salts may be
used; immunosuppressant drugs such as azathioprine.
Aspirin is a useful drug but its continued use may lead to gastric
erosion and bleeding. Steroids are effective but because of their
serious side effects they are mostly used in short courses. A newer
group of drugs called ‘biologicals’ are being tried.
Surgery is playing an increasing part in the treatment of rheumatoid
arthritis. Synovectomy and joint replacements may be used as well
as osteotomies and arthrodeses.
Splints will be required and can be made of plaster of Paris or
synthetic materials.
Osteo-arthritis is a non-inflammatory disease of the articular cartilage.
It may be primary, i.e. occurring without any precipitating cause
or secondary, i.e. following previous disease or injury involving
the articular cartilage.
The joints affected are mainly the weight bearing joints but any joint
may be involved. The articular cartilage is eroded and osteophytes
develop at the joint margins.
Treatment in the early stages is aimed at relieving pain. Other
measures will try to reduce the factors that have lead to the onset
of the disease such as reducing weight, physiotherapy and exercises
to strengthen the muscles and maintain movement.
Surgery plays an important part in the treatment, particularly in
the later stages of the disease. There are five types of operation
performed:

25
O Osteotomy is used to re-align bone where it is the malalignment that is producing the symptoms.
O Replacement arthroplasty or joint replacement is a common procedure in all our hospitals, in particular the hip and knee.
O Interposition of a silastic prosthesis as in the interphalangeal joints or ball spacers in the toes.
O Excision arthroplasty still plays a part in treatment. Though the Girdlestone operation is now used mostly as a salvage procedure following failed joint replacement of the hip, the Keller’s operation is still used occasionally as treatment for Hallux valgus.
O Arthrodesis may be used in some joints where strength is required and replacement is not available.
The skills of the cast room staff will often be required in support of
these treatments but it is difficult to be specific as exact roles vary.
OsteoporosisOsteoporosis is a disease of bone matrix due to an imbalance
between osteoblastic and osteoclastic activity. There is a
reduction in total bone mass. The quality of bone remains normal
but the quantity is less. This results in the strength of the bone
being reduced and leads to porous bones prone to collapse and
fracture. Cancellous bone is most affected and this explains the
pattern of fractures that occur as a result. It is referred to as the
silent disease, because it can be quite severe before it is recognised,
and often a fracture occurs before the condition is suspected. The
commonest sites for such fractures are the wrist, vertebral column,
humeral and the neck of the femur. Osteoporosis and hence these
fractures, are more common in women though there is increased
recognition of the condition in men. The causes may be due to
lifestyle, iatrogenic (see Glossary) or due to physiological changes
linked to the ageing process. Osteopenia is a normal aging process
of our bones. Oestrogen is a important hormone for maintaining bone
quantity because it inhibits bone re-absorption by the osteoclasts.
A late menarche or an early menopause or anything that reduces
the levels of oestrogen in the body is bad for our bones. A family
history will increase your likelyhood of the disease. Oral steroid
intake has a severe affect on bone mass. Other common factors
are lack of activity, smoking, excessive alcohol intake and poor
diet in early life.
The aims of management must be in educating the young concerning
diet and exercise in order to maximise peak bone mass, which
occurs around the age of thirty. This entails ensuring a good
calcium and vitamin D intake throughout life and maintenance of
physical activity, even a twenty minute walk per day can reduce the
risks. Established disease is treated mainly by the bisphosphonate
group of drugs, which act either by reducing the activity of the
osteoclasts or stimulating osteoblastic activity. Short-term hormone
replacement therapy for female sufferers can be useful, where
menopausal symptoms are being treated too, although this has to
be used carefully to avoid the risks. Testosterone for men is largely
still in its experimental phase.
Treating fractures associated with osteoporosis includes surgery
for fractures of the neck of the femur and the use of casts for
fractures of the wrist, humerus and vertebral column.
Following a low energy wrist fracture investigations & intervention
could reduce the risk of subsequent fractures. In the UK fewer than
30% of patients who suffer from a fracture undergo assessment
for osteoporosis. A full history should be taken to establish any
medical conditions, family history or lifestyle issues which may
put the patient at risk. The diagnosis is made when the DXA scan
shows low bone mass.
It is known that if patients follow the health and falls prevention
advice, their risk of further fractures will be reduced.
1.6 Orthopaedic Conditions

26
Casting is an art learnt by ‘hands-on’ practice,
but there are certain basic principles which
can be helpful. The only way to learn and/or
teach, is to do.
1.7 Principles of Casting
Equipment on Basic Trolley
O Plaster strips to finish
O Marking pencil
O Knife
O Scissors
O Elbow or knee rest
O Plastic sheeting
O Plastic aprons
O Plastic-covered pillows
O Bucket or bowl of water
O Bowl of water and cloth for washing patient’s skin
O Towel
O Rubbish bag
O Instruction leaflet
Care of the PatientO Check the patient’s details and the written instructions.
O Give reassurance, explanations and request permission from the patient to proceed. Children need a trusted adult with them for their comfort and support.
O Maintain privacy while removing relevant clothing.
O Remove and store safely any relevant rings or jewellery.
O Make the patient as comfortable as possible in the circumstances.
Assess the PatientO What is the pathology or injury?
O Why is the cast being applied?
O Is there an underlying condition, which may affect the way you apply the cast, e.g. diabetes, rheumatoid disease, neurological impairment or allergies?
O In the case of a lower limb cast, has the patient been assessed for venous thromboembolism risk?
O Look at the skin - is there a wound or redness anywhere?
O A neurovascular assessment of the limb should be undertaken.
O Which bony areas will need extra padding?
O Where are the blood vessels or nerves that are close to the surface and may be compromised?
O Is swelling expected?
O Is the cast to be weight bearing?
O Assess the number of staff required to safely hold the patient’s limb and apply the cast
Document that these checks have been made and any abnormal
findings in the notes. Based on the answer to these questions,
decide which padding and materials will be appropriate and gather
together the equipment that is required for the application of the
cast. Check this will conform to the medical prescription.
There are many varied techniques in casting procedures, all of
which have been proved reliable and effective. We can show only
one method for each condition. This method may vary from that,
with which you are familiar, but the basic principles remain the
same and this applies whether using plaster of Paris or synthetics.
The aim of the cast room staff should be to apply a good cast in
the correct position whilst attending to the needs of the patient.
A good cast:
O Is applied in the correct position.
O Is functional- does not obstruct movement unnecessarily – does not obstruct movement of those joints not held in the cast.
O Fits well - a loosely applied cast does not provide adequate splintage and can cause soreness by rubbing the skin.
O Does not cause constriction - a too tightly applied cast will obviously restrict blood supply and possibly nerve supply to the limb.
O Is smooth inside - the bandages applied with an even pressure and without any creases or ridges.
O Is lightweight - use only sufficient casting materials as necessary, thereby keeping the cast lightweight.
O One whole - fully laminated, not a succession of layers. This is achieved by speed of application and constant moulding to bond the layers.

27
Helpful Hints When Applying All Casts
Casting Materials
It is essential to read product information leaflets and to accept
any training offered by the manufacturing companies. Familiarity
with the idiosyncrasies of the products is necessary before using
it on a patient. There is a great deal to consider when choosing
the product to use on a patient. Remember, dipping techniques,
setting times, sharpness of edges, roughness or the smoothness
of the outside may vary, as well as layers required for strength,
rigidity and flexibility.
Most of the information leaflets on product talk about layers required
for strength. As an example of how layers form, if you cover the
previous turn of the bandage with the following approximate overlap.
1cm overlap on spiral turns = 1 layer
50% overlap = 2 layers
66% overlap = 3 layers
N.B. The sizes and amounts of stockinette,
padding and casting material listed in the
individual cast applications are a guide only
to the quantity required for an average sized
adult patient.
Positioning
The following tips have been found to be useful in practice, but
a risk assessment with a manual handling advisor is essential.
Make sure the patient, holder and applicator are in the most
comfortable position to avoid lifting and handling problems. Use
all the aids available e.g. adjustable height trolleys, knee supports,
hoists. Move as close to the patient as possible, bend your knees,
keeping your back straight.
Have assistance to hold the limb where needed for the patient’s
safety. Do not ask the patient to hold their injured limb themselves
as this is uncomfortable, potentially damaging and unsafe. Insist on
help if necessary, be your patient’s advocate.
Stockinette
It is usually safer not to use stockinette where swelling is expected.
If the cast has to be split the stockinette will wrinkle and crease
inside the cast when cut through. Do not use if a fracture is being
manipulated.
Do not fold in the stockinette before the first layer of casting
material has been applied, otherwise, after the cast has been on
a little while, the stockinette and padding will migrate inside the
cast and the patient is left with a raw edge next to their skin.
When folding the stockinette back over casting material before it
has set, be very careful, not to pull it as this creates ridges in the
material and can lead to a pressure sore.
Padding
It is best to pad bony areas with felt, because felt does not compress
over time and protects more effectively.
Casts must fit well and so apply a single layer of undercast padding
firmly, smoothly and evenly. However, there are many different types
of padding available. These vary in thickness and with some types
it may be necessary to use a 50% overlap to create a safe layer.
Do not make the cast loose by padding too much as this can
allow movement of the injury and/or excoriation of the skin. Use
2mm adhesive felt on the edges of casts especially if the patient
is elderly or has delicate skin.
Using strategically placed slabs allows you to cut down the total
number of bandages used. Reinforcing the cast in this way keeps
the overall thickness to a minimum. This technique has been used
with plaster of Paris for many years and works just as well with
synthetic casting materials. Thick casts are unnecessary, generate
more exothermic reaction during the setting process and are more
difficult to remove.
Some products allow flexibility and this can be used as an
advantage, especially at the edges of the cast. Check variations
of technique are compatible with the patient’s diagnosis and the
Medical instructions. Always check personally with the Orthopaedic
Consultant in charge before using a new technique and if it is very
different from accepted practice get permission in writing.
1.7 Principles of Casting

28
Applying a Plaster of Paris Cast
Application
The ideal would be to have sufficient staff for one person to position
and hold the limb, one to apply the bandages, one to immerse
and soak the bandages and one to comfort and reassure the
patient. In practice, however, compromises have to be made and
the whole application procedure is frequently carried out with one
or two people. However, do make sure there are sufficient staff to
support the limb safely. Do not put your patient or assistant at risk.
Position limb as instructed. Apply felt to any bony areas and a
layer of undercast paddingSoak the bandages
Roll on the bandages starting at one end Form tucks as necessary to accommodate the changes of
limb diameter
Smooth and rub bandages continuously to bond and laminate Completed cast
All equipment is gathered together on a table, trolley or tray.
Having decided on the type of padding and decide on the number
of bandages to be used and, if plaster of Paris, unwrap them,
placing them away from the water.
Use stockinette with care where swelling is expected. If the limb
swells and the cast is split, the stockinette is difficult to cut through
and may crease, thereby causing pressure. Do not use if a fracture
is being manipulated.
1 2
3 4
5 6
1.7 Principles of Casting

29
Applying a Plaster of Paris Cast Position the limb as instructed and maintain it in that position. The
medical officer is responsible for positioning the limb, but often
this is delegated to the cast room staff. It is important to position
the limb before applying the padding. The correct position of the
limb, which will be determined by the injury, must be maintained
throughout the application and until the cast has completely set,
as movement will make ridges in the cast. These ridges might
cause pressure sores. Additional staff and the appropriate use of
knee rests and other specialist supports may be required to help
support the limb effectively.
Prominent bony areas, such as the ulnar styloid, olecranon process,
medial and lateral epicondyles of the humerus, patella, the malleolli
or the head of fibula may require padding with felt. A covering of
undercast padding should be applied firmly, smoothly and evenly.
Soaking the bandages. The water should be lukewarm, 25OC. Cold
water retards and hot water quickens the setting process. Both
extremes are uncomfortable for the patient.
The bandage should be held loosely in the palm of the hand
with the first few centimetres unrolled to make it easier to find
the end for application. Immerse it in the water according to the
manufacturer’s instructions. Remove, squeeze very gently and hand
it to the applicator making sure the end is free. Soak only one
bandage at a time.
The bandages are then rolled on, starting from one end of the area
to be covered, covering approximately one third of the previous turn,
smoothly and without tension. To help the plaster bandage to fit
the contours of the limb it is allowed to form tucks. Never twist it
or a ridge will be formed.
All the required number of bandages are applied in quick succession,
smoothing and rubbing continuously so that the cast bonds
and laminates to be one whole and not a succession of layers.
Thereby, creating a cast that is strong, without wrinkles or ridges
and comfortable to wear. Moulding is done with the palms of the
hands as the cast can be dented at this stage. Continue to hold
until the cast has set as any movement at this time will cause
the cast to crack and ridges to form.
When the cast has finally set, the limb is rested on a pillow. Check
the cast is in the correct position. The edges of the cast are trimmed
to allow all joints not encased to move freely.
If stockinette was used it should be turned back over the edge of
the cast and held in place with strips of plaster of Paris.
Clean the patient’s skin and supply a sling or crutches as necessary.
A neurovascular assessment should be made by checking the colour,
sensation and movement of the joints at the distal end of the cast.
Make sure the patient has a follow up appointment.
Cast Care InstructionsFinally, give full verbal and written instructions to the patient
on the care of the plaster and the prevention of complications.
The written instructions should be clear and easy to understand,
with a tear-off strip for the patient to sign to acknowledge
receipt. These should include exercise sheets. (See Appendix
for full instructions for the patient on Cast Care). The patient
must understand the implications of ignoring the signs and
symptoms of complications.
1
2
345
6
1.7 Principles of Casting

30
Applying a Synthetic Cast
Application
Synthetic casting materials should be used with caution where there
is a danger of swelling, for example on fresh fractures or post-
operatively. If the cast requires splitting to relieve tightness it will
probably require bivalving to allow relief of symptoms. Depending on
the material and the number of layers used, a single cut especially in
a below knee cast may not expand to accommodate further swelling.
Consideration of the absorbent nature of all materials used should
be made before applying casts in the operating theatre, particularly
as blood loss will not easily stain through synthetic materials.
Apply stockinette and pad bony areas with felt Fig 2 Position the limb and apply a layer of undercast padding
Soak the bandage Roll on the bandages with controlled tension starting at one end
Maintaining the hold by moving only one hand at a time whilst
the bandage is rolled on
Finished cast
Follow the instructions as for application of a plaster of Paris cast,
as far as the application of the padding, except do not unwrap
the bandages.
1 2
3 4
5 6
1.7 Principles of Casting

31
Applying a Synthetic Cast
Application of the Padding
Prominent bony areas, such as the ulnar styloid, olecranon process,
medial and lateral epicondyles of the humerus, the patella, the
malleolli or the head of fibula may require padding with felt. A
layer of undercast padding should be applied firmly, smoothly and
evenly. Two firmly applied layers of padding are put around the top
and bottom of the limb to be cast or use a strip of 2mm adhesive
felt allowing it to overlap or turn back over the edges.
Application of the Bandages
When using synthetic casting materials, consider the strength of the
materials and use the correct number of layers as recommended
in the information leaflets. (see Helpful Hints for information on
creating layers) Open and soak the first bandage. The manufacturer’s
instructions regarding temperature of water and soaking techniques
need to be followed.
Always commence the bandaging from one end of the area to be
covered, rolling it around the limb evenly, and covering half of the
previous turn. The newer, improved products shape to the contours
of the limb with just a little adjustment to the tension. Apply
as many bandages as are required, according to manufacturer’s
guidelines, and as quickly as possible to aid lamination. (see Helpful
Hints Application section for guidance on how to count the number
of layers required)
Any moulding must be done with the palms of the hands before
the cast sets. The newer generation materials conform well to the
limb, remember when moulding the cast to hold the area until the
cast material has fully set or the mould will spring back. Do not
forget to maintain position.
If possible apply the casting material accurately to the whole
extent of the cast and turn over the stockinette, catching it in the
last layer of bandage. Be very careful, however, not to pull the
synthetic material back with the stockinette as this will create a
crease at the edge of the cast. A ridge at that area could cause
a cast sore and it would also form a bulky edge. When the cast
has finally set, rest the limb on a pillow. Check the cast is in the
correct position.
Never be afraid to trim the edges, as it is essential to allow full
movement of the joints not involved. Trimming can be done with
scissors or a knife within a few minutes of the setting. If set hard,
small shears or an electric saw may be needed. Take care to pad
the cut edges, then hold the stockinette in place with adhesive tape.
Clean the patient’s skin and supply crutches if necessary. A
neurovascular assessment should be made by checking the colour,
sensation and movement of the joints at the distal end of the cast.
Make sure the patient has a follow up appointment.
2
3
4
5
6
1
Cast Care InstructionsThese are the same as for plaster of Paris casts except that
the drying time for synthetics is only twenty minutes.
1.7 Principles of Casting

32
Removal of the CastWhen removing a cast, it should be cut into two halves for the
safety and comfort of the patient and so that either half can be used
as a back splint if required. This process is called bivalving. The
cutting lines should not pass directly over any bony prominences.
Equipment RequiredO Pencil
O Bandage
O Scissors
O Plaster shears
O Plaster spreaders
O Plaster benders
O Plaster knife
O Plastic sheeting
O Bowl for rubbish
O Electric oscillating saw
Before you commence, assess the patient
Explain the procedure and obtain consent. Obtain assistance if
needed to support the cast. If the patient is a child, have they a
relative or trusted adult present? A child may accept the shears
more readily as the electric saw can be noisy and frightening, so
make sure you practice your skills in both methods.
O What is the diagnosis? Is there any underlying pathology you need to consider such as rheumatoid disease, diabetes or lack of sensation? Are there likely to be any pins or Kirschner wires underneath the cast?
O Is the patient elderly with delicate skin?
O Is there swelling or oedema? The skin will cut easily if taut.
Inspect the Cast?O Is it fully padded or is the padding only at the edges?
There are many unpadded cast techniques used these days and such casts require extra care and judgement as to whether to use just scissors, shears or electric saw.
O Is there blood staining or was the cast applied in operating theatre? Blood soaked padding and gauze can be so hard that the oscillating saw blade will cut straight through to the skin.
When you have considered the results of the assessment, decide
the most appropriate way to bivalve the cast.
Bivalving with Shears
Mark the cutting area, avoiding bony prominences. For example,
when bivalving lower limb casts, mark in front of one malleolus
and behind the other.
Plaster shears are blunt instruments, which crush the plaster
between their jaws. The blade of the shears passes between the
plaster and the padding. Keep the blade parallel to the limb. If
it is tilted either way, the point or the heel will dig in and/or nip
the patient’s skin. Do not forget synthetic casting materials can
be removed with shears. It just requires practice of the correct
technique rather than strength.
After both sides have been cut, the plaster is eased open with the
spreaders and the padding cut with the bandage scissors.
Bivalving with the Electric Saw
The cast saw has an oscillating circular blade, which rubs its way
through the hard cast material. It is relatively safe to use if handled
correctly. It must be used on dry, padded casts with the blade
held at right angles to the cast and a straight cut made without
dragging the saw along the cast. Use an in and out motion whilst
cutting with the saw. It must be used in conjunction with some type
of vacuum to remove dust, in order to comply with current safety
regulations. For further Health and Safety details read chapter 1.2.
Do not handle the saw with wet hands or use it on a wet cast.
Beware, the saw blade can cut the skin or get hot enough to
create a burn in the following cases:
O You drag the blade along the cast, instead of using the in and out motion.
1.7 Principles of Casting

33
O The cast is blood stained the padding and gauze becomes hard and the saw will cut straight through.
O In the presence of swelling or oedema the skin may be taut and therefore easy to cut with the saw.
O Through prolonged use.
O The cast material is thick.
O On larger casts.
O The blade is blunt or damaged.
O The padding is thin the patient may feel the heat even in normal use.
O The cast is unpadded then special care is needed.
O The cast is a resin-based material, more energy is required to cut through the material and therefore heat is generated.
If the patient is moving between departments, the two halves of
the cast should be secured with adhesive tape or cotton bandage
for safety while in transit. If the patient’s fracture or operation is
not fully healed there is a real danger that fractures could be
displaced and the patient will not be fully protected without the
cast being held in place.
Skin Care
With permission from the medical staff, the plaster is removed and
the skin inspected. Any signs of pressure or careless bivalving must
be reported and recorded in the patient’s records.
The skin can be washed gently and patted dry. Skin which has
been enclosed in a cast for some time will have become dry and
scaly, so oil or cream can be applied and should be continued for
some days. Warn the patient to be careful when exposing the skin
to the sun as it may be more sensitive.
After removal of certain casts some support may be necessary to
control swelling. In such cases SOFFCREPE® bandages, a tubular
support bandage, or a wrist brace such as ACTIMOVE® Manus
maybe used.
ComplicationsA good casting technique is the best way of ensuring that
complications do not occur. Remember that prevention is always
better than cure.
All of the following complications can be prevented by good casting
techniques and by impressing upon the patient that he must return
immediately or seek help if he has any problems whatsoever.
The main complications which may occur are:
O Circulatory and nerve impairment
O Pressure sores
O Stiffness
O Allergic reactions
Circulatory and Nerve Impairment
CausesO Unexpected excessive swelling
O Cast being applied too tightly
O Insufficient padding to allow for expected swelling
O Local pressure on areas where the blood vessels or nerves are close to the skin
Arterial compression causes the extremities of the limb to appear
white then blue and finally black. The toe or finger nails will
remain white when pressed and mobility of the digits will be
impaired. If these signs and symptoms are ignored, ischaemia
could be permanent.
Venous compression causes the extremities of the limb to appear
excessively red and there is pain and sometimes swelling. This will
lead onto arterial compression if ignored. Nerve compression gives
a ‘pins and needles’ sensation followed by numbness, limitation of
movement and pain.
Treatment
The medical staff should be informed immediately as any delay in
treatment could have dire results. Elevate the limb except, if you
suspect compartment syndrome (see Page 34). Encourage movement
of the extremities and keep them warm. Split or bivalve the cast
right down to show the skin, as even one thread left uncut could
impair the circulation. Window the cast if there is local pressure
on a nerve.
1.7 Principles of Casting

34
Compartment SyndromeCompartment syndrome is a complication of fractures and/or soft
tissue injuries or surgery. Groups of muscles are surrounded by
fascial sheaths. These fascial sheaths create compartments containing
muscles, blood vessels and nerves.
In compartment syndrome there is an increase of pressure within
these compartments. The rise in pressure may reduce the blood
flow locally to the muscles and can ultimately lead to death of
tissue and possibly loss of limb. Early diagnosis is essential as a
fasciotomy may need to be undertaken immediately.
The indicators of a developing compartment syndrome are:
O Increasing pain
O Pain which is out of proportion to that expected by the injury
O Pain on passive movement of the extremities
O Pain that does not respond to analgesia
O Pins and needles or numbness (Parasthesia)
O Muscle weakness
O Initially the distal pulses may be normal, but increasing weakness of pulse is often observed and final lack of pulse
Treatment of Compartment SyndromeO The medical staff should be informed immediately as any
delay in treatment could have dire results
O Bivalve the cast and split to skin
O Remove limb from cast and examine. Elevate but not above heart height (Love 1998)
O If symptoms persist a fasciotomy would be required
Deep Vein Thrombosis (DVT) Cast room staff should be aware of the symptoms of deep vein
thrombosis (DVT) and pulmonary embolism and check patients have
been assessed for Venous Thromboembolism risk before application
of a lower limb cast as per NICE Guidelines.**
DVT Signs and symptoms:
O Pain in calf
O Oedema
O Sometimes redness
O Pain on palpation
O Homan’s sign - pain in the calf on dorsiflexion of the foot
If DVT is suspected, Doppler and / or ultra sound tests should
be undertaken.
**Reference
NICE Clinical Guidelines 92 – Venous thromboembolism: reducing
the risk
Love, C. (1998) “A discussion and analysis of nurse-led pain
assessment for the early detection of compartment syndrome”
Journal of Orthopaedic Nursing Vol 2, No. 3, pp 160-167
Pulmonary Embolism (PE) Blood clots in the lungs.
Signs and symptoms:O Unexplained breathlessness / cough
O Tachycardia
O Later:- Chest (pleuritic) pain and haemoptysis (coughing up blood)
Pressure/Cast Sores
CausesO Uneven bandaging techniques
O Insufficient padding over bony areas
O The cast is too tight or too loose
O Foreign objects inside the cast
Prevention
Good casting techniques will avoid the above causes.
In addition, advise the patient to change the position of the limb
that is in a cast, in order to avoid constant pressure on one area
inside the cast.
Signs and SymptomsO Burning or blister-like pain
O Local heat
O Offensive smell
O Staining of cast
O Pyrexia in a child
Treatment
A window is cut in the cast for inspection and the medical staff
informed if the skin is broken. To prevent local oedema, the
window must be replaced either by temporarily strapping it in place
or permanently by re-plastering. If it is not possible to do either,
a new lid has to be made.
1.7 Principles of Casting

35
To determine the site of a foreign object, X-rays may be taken
or it could be necessary to change the cast. Early treatment is
important because the skin ‘dies’ from prolonged pressure, the
pain disappears and a nasty ulcerated area that can reach down
to the bone occurs. It may take months to heal and even require
plastic surgery.
Stiffness of the JointsStiffness can occur not only in joints held in the cast but also in
those above and below the cast.
Prevention
Make absolutely sure that the cast is trimmed correctly to allow
full movement of the joints not held in the cast.
In joints that are free from the cast, stiffness can be prevented
by making sure that the patient is given good verbal and written
instructions to move them. Judicious use of functional bracing helps
to prevent stiffness in joints which have to be held within the cast.
Treatment
For joints which have been encased for some time, physiotherapy
may be required when the cast is removed. The same may be true
for the joints which were free of the cast if preventive instructions
have not been carried out.
Allergic ReactionsOccasionally allergic reactions may be caused by certain types
of paddings or casting materials. If the possibility of an allergic
reaction is anticipated (e.g. a history of skin allergies) the patient
should be warned to watch for wetness, discharge or excessive
irritation under the cast.
Treatment
Report the problem to the medical officer. Remove the cast, cleanse
the skin thoroughly and re-apply other materials.
1.7 Principles of Casting

36
1.8 Casting Products
The conservative management of soft
tissue injuries, fractures and orthopaedic
conditions, requires a broad range of high
quality, clinically-effective products that will
provide easy handling, cost-effectiveness and
maintain patient quality of life. BSN Medical
provides an all encompassing product
portfolio to meet the conservative treatment
needs of all patients.
DELTA-CAST® ConformableNon-Fibreglass Cast Tape
Best in class, DELTA-CAST® Conformable sets a benchmark in
standard and removable, non-fibreglass cast tapes and as such is
the UK’s No. 1 choice.
Its unique construction provides rigid and semi-rigid casting options
for primary and secondary casting applications where patient fit,
comfort and compliance are critical. DELTA-CAST® Conformable is
the only UK cast tape with clinical evidence* to support its use for
focused rigidity casting.
Clinical Evidence*In 1998 Anne C Petty and Chris Wardman from Bradford Royal
Infirmary carried out a clinical study using DELTA-CAST® Conformable
on over 200 patients. This study was published in the Journal of
Orthopaedic Nursing (1998), 2, 95 - 102.
• High performance 3-D stretch polyester bandage- Ultimate conformability allows uninterrupted application of
the roll without the need to tuck and fold and without creasing
- The 3-D stretch helps to master even difficult body contours
- No wrinkles, no pressure points, no additional cast changes- Long lasting durability and resiliency for minimal cast
breakdown
• Patented Resin Formula- Ensures high lamination of layers for optimum stability,
strength and reliability- Guarantees a consistent and reliable set time- Strong lamination of end lay down- Provides a smooth sensation during moulding which results
in a smooth finish to the cast
• Countless options- Versatile rigidity enables the practitioner to generate either
traditional or focused rigidity casts with just one product- FRC offers a straight through therapy: only one product for
all healing stages- Removable casts can be re-applied for greater control of
the healing process
The Casting Academy® is our commitment to
building close, long standing, working relationships
with our customers. Founded in 1999 it underpins
our belief that progress in patient care depends
on continuing professional development and
educational initiatives are an integral part of our
relationship with clinicians.
The Casting Academy® was launched in order to...
O Reward our loyal customers
O Provide professional education to all hospital cast
room staff
O Increase access to relevant training courses available
O Provide a range of quality cast room products,
educational materials and training aids
To access our training programmes
and to find out more please email
Or call the Casting Academy® hotline on
0845 1200033 for further details.
CastingAcademy ®

37
Used for primary and secondary casting applications. DELTA-CAST® Elite has been designed with ease of application and patient comfort in mind. Our patented non-fibreglass casting material combines strength and rigidity with soft edges for enhanced patient comfort.
• Non-fibreglass - Provides smooth and soft cast edges - Enhanced patient comfort
• Excellent strength, rigidity and durability• Easily conforms to body contours without folding or tucking - Increased patient comfort
• Consistent set-time - Easier cast applications
• Superior handling properties with your choice of gloves - Consistent unrolling tension
DELTA-CAST® EliteNon-Fibreglass Cast Tape
DELTA-LITE® PlusFibreglass Cast Tape
DELTA-LITE® Plus is a smooth, durable fibreglass cast tape that combines a fibreglass substrate and a polyurethane resin system with tack free properties. These properties allow ease of application and moulding using standard examination gloves.
• Very smooth surface - Less abrasive finished cast enhances patient comfort
• Excellent rigid support - Creates a long-lasting, light weight cast
• High lamination - Gives strength between cast layers - Improved cast strength
• Good conformability - Makes casting application easier around all body contours - No special application techniques required
• Low tack resin formulation - Use glove of your choice
• Outstanding moulding - Provides excellent anatomical support
DELTA-CAST® SoftNon-Fibreglass Flexible Casting Tape
DELTA-CAST® Soft is designed to provide functional support to fractures and soft tissue injuries. Its semi-rigidity allows for flexibility and mobility, helping to reduce immobilisation related problems such as muscle atrophy and joint stiffness. This improved flexibility and mobility can result in a faster healing process.
• 3 Way stretch/excellent conformability - Ease of handling on application - Allows for a perfect fit around difficult body contours with a wrinkle free application - Enhanced fit and support for the patient and a far more effective treatment
• Non-fibreglass - Superior durability which maintains cast functionality - Highly durable, reducing time and costs for the cast room associated with repair
• Unique pawprint design - Available in a unique patented PawPrint design
• 100% radiolucent - Allows clear X-ray images for diagnosis - Cast does not need to be removed for X-ray purposes, offering cost and time savings - Strength of the X-ray does not need to be increased to obtain a clear image through the cast
• Flexibility - Minimises the negative effect of total rigid immobilisation; muscle atrophy, joint stiffness and other immobilisation related issues - Improved circulation, a faster healing process and a shorter rehabilitation period
• Ease of removal - Can be removed by lifting and unpeeling - Can be removed using regular cast scissors - No cast saw required
• Excellent lamination - Excellent lamination of layers produces a strong, well bonded cast - Good end lay down provides a secure finish to the cast
1.8 Casting Products

38
GYPSONA® premium plaster of Paris bandage is made from a specially woven leno cloth, uniformly impregnated with the finest quality, creamy fast setting plaster of Paris that produces a strong cast with an excellent finish.
• Interlocked leno weave gauze - Provides excellent stability and conformability to the wet bandage - Minimises plaster loss - Provides stronger finished cast
• Smooth, creamy plaster formula - Allows for a smooth aesthetically pleasing cast - Improved moulding properties and excellent finish
• Nicked bandage edge design - Ensures minimal fraying and loose threads during application. Gives a smoother cast finish
• Round core - Improved handling stability
SPECIALIST® EPlaster of Paris
Specialist® E Plaster of Paris has a creamy texture resulting in a smooth feel and making it easy to apply. It forms a well fitting cast that is reassuringly tough and strong. It is the ideal choice for casting applications where a quick setting time is required
• Smooth, creamy texture - Results in a smooth, evenly finished cast - Minimal plaster loss
• Highly mouldable and strong - Produces an excellent fit around difficult body contours and delivers a well laminated cast
• Easy to apply and remove - Able to ‘window’ the cast after only 10 minutes
• Moisture proof packaging - Protects and prolongs the product shelf life
• Available in roll and 5ply slab format
• Specialist® Extra Fast available for Ponsetti
GYPSONA® BPPlaster of Paris
1.8 Casting Products
It is suitable for use with both plaster of Paris and synthetic casts.
• Highly absorbent natural viscose - Suitable for use where bleeding may occur - Absorbs exudate and moisture away from the skin - Reduces the risk of skin maceration and sensitivity
• Easy to apply - Excellent conformability around body contours - Easy to tear - Feathers easily and clings to itself - Blends to give a smooth even finish
• Excellent cushioning - Padding structure creates a material which is light, deep and stable, with good airflow - Protects from the rigid casting material - Also provides protection from the cast saw on cast removal
• Soft - Comfortable for the patient, soft and gentle against the skin
• Autoclavable - Can be sterilised - No need to remove the paper wrapping
SOFFBAN® NaturalNatural Viscose PaddingVELBAND®
Natural Rayon Padding
VELBAND® padding is a natural rayon fibre padding, highly absorbent, drawing moisture away from the skin. It has a unique 3 layer structure and is ideal for use in theatre, where absorbent cushioning is required.
• Unique construction - The KEYBAK™ material is a lightweight, breathable non woven fabric with a padding layer in between - The middle natural viscose layer gives excellent absorbent properties and cushioning
• Highly Absorbent - Suitable for use where bleeding may occur - Absorbs exudate and moisture away from the skin - Reduces the risk of skin maceration and sensitivity
• Excellent Cushioning - Unique 3 layer construction provides excellent cushioning for improved patient comfort - Reduces risk of pressure sores
• Autoclavable - Can be sterilised for theatre use - Sterile versions are also available

39
1.8 Casting Products
Suitable for use with both plaster of Paris and synthetic casts.
• Synthetic non absorbent material - Allows moisture to drain away from the skin - Reduces the risk of skin maceration and sensitivity - Cushioning ‘loft’ is retained even when padding becomes wet
• Odour controlling agent - Prevents bacteria from multiplying thereby reducing the source of cast of odour
• Easy to apply - Excellent conformability around body contours - Easy to tear - Feathers easily and clings to itself - Blends to give a smooth even finish
• Excellent cushioning - Padding structure creates a material which is light, deep and stable, with good airflow - Protects the patient with a reduced risk of skin abrasions - Also provides protection from the cast saw on cast removal
• Soft - Comfortable for the patient, soft and gentle against the skin
• Autoclavable - Can be sterilised - No need to remove the paper wrapping
SOFFBAN® Plus PaddingSynthetic Padding
DELTA-DRY® has a unique patented technology allowing patients to clean and rinse their cast and also bathe and shower as normal. DELTA-DRY® is conformable and easy to apply, resulting in a comfortable cast. No special tools are needed for application or removal of DELTA-DRY®.
Ideal for use with incontinent, elderly and less mobile patients when used with a synthetic cast tape
• Water resistant cast padding - Allows patients to shower and bathe as normal - Increases hygiene - Reduces odour - Improves patient compliance when wearing a cast
• Easy to apply - Good conformability around body contours - No special tools are needed for application or removal
• How does it work? - The open knit structure, along with the water resistant qualities of the fibres, allows the water to quickly drain from the cast - The majority of the water simply runs out of the cast. The remaining moisture evaporates through the cast heated by normal body temperature - Position the cast to allow water to drain from it - Long arm and leg casts must be positioned as to not allow water to pool in the vicinity of the heel or elbow - Casts will take 30 mins to 1 hour approximately to completely dry out
DELTA-DRY®
Water resistant cast padding

40
1.8 Casting Products
JERSEY STANDARDNatural Ribbed Stockinette
Jersey standard is a natural cotton stockinette. It is suitable for use with synthetic or plaster of Paris casting materials.
• Natural cotton - Soft and gentle to the patients skin with reduced risk of skin irritation
• Autoclavable - Compatible with steam and ethylene oxide sterilisation
DELTA® Terry-Net CNatural Terry Cloth StockinetteDelta® Terry Net is a cotton towelling stockinette that can be used underneath either synthetic or plaster of Paris casting materials where extra patient comfort is required.
• Terry knit design - Provides increased cushioning and protection for the patient
• Natural cotton - Soft and gentle to the patients skin with reduced risk of skin irritation
• Versatile - The cotton terry cast liner is ideal when used in conjunction with focused rigidity casting techniques
• Easy to use dispenser - Easily cut to length as required - Easy storage and handling
• Autoclavable - Compatible with steam and ethylene sterilisation
Jersey Bouclette is 100% cotton towelling stockinette that can be used underneath casting materials where extra patient comfort is required.
• Terry knit design - Provides increased cushioning and protection for the patient
• 100% natural cotton - Soft and gentle to the patients skin with reduced risk of skin irritation
• Versatile - Jersey Bouclette can be used in conjunction with focused rigidity casting techniques
• Autoclavable - Compatible with steam and ethylene oxide sterilisation
JERSEY BOUCLETTENatural Towelling Stockinette
DELTA-NET® is a soft, comfortable knitted synthetic stockinette suitable for use with synthetic or plaster of Paris materials.
• Synthetic material - Stretches readily and easily conforms to body contours
• Soft, comfortable knit - To protect the patient’s skin under casting materials
• Easy to use dispenser - Easily cut to length as required - Easy storage and handling
DELTA-NET® StockinetteSynthetic Stockinette
DELTA® Terry-Net SSynthetic Terry Cloth Stockinette
DELTA® Terry Net S is a synthetic towelling stockinette that can be used underneath either synthetic or plaster of Paris casting materials where extra patient comfort is required.
• Terry knit design - Provides increased cushioning and protection for the patient
• Versatile - Can be used in conjunction with focused rigidity casting techniques
• Easy to use dispenser - Easily cut to length as required - Easy storage and handling

41
1.8 Casting Products
SOLO®
Vinyl Cast Shoes
A versatile, hard-wearing cast shoe featuring an innovative rocker design. The SOLO® vinyl cast shoe has a textured upper surface and large heel cup to prevent movement. Straps are provided separately.
• Rocker sole design - Allows a natural walking gait - Limits hip problems during long term immobilisation• Longitudinally embedded steel strip - For greater rigidity and support• Cross-strap method - Easy touch and close fastening• Large heel cup to prevent movement on cast• Colour coded straps according to size - Easy recognition of required size• Universal left/right - Reduced stock holding required
DYNASOL®
Vinyl Cast Shoes
The anatomically curved design and hook and loop closure system of the DYNASOL® cast shoe allows a natural walking movement and easy fastening. It limits hip problems during long-term immobilisation by preventing external rotation of the foot, whilst the low profile sole allows for the use of a normal shoe with the non-immobilised foot. Straps are provided, but additional straps can be ordered separately as and when required.
• Designed for normal walking gait - Anatomical curved design allows for good walking movement - Limits hip-problems during long-term immobilisation by preventing external rotation of the foot - Low profile is compatible with the use of a normal shoe for the non-immobilised foot
• Synthetic straps with a hook and loop closure - Allows for easy and firm fastening - Can either be positioned as shown above or crossed over - Straps can also be purchased separately
ECO CANVAS CAST SANDALCast Shoes
The Eco Canvas cast sandal is constructed with only quality materials using the highest manufacturing standards, yet at an economical price. The non-slip, tri-level ribbed rocker sole provides shock absorption and assists normal smooth walking gait. The 3 hook and loop closure straps ensure a secure fit.
• Tri-level ribbed rocker sole - Provides shock absorption and assists smooth normal walking gait• High-level of durability - Constructed with heavy canvas upper• Precise fit - Three hook and loop closure straps ensure a secure fit• Universal left and right - Reduced stock holding required

42
1.8 Casting Products
Post-traumatic support for the upper limb.
• Non-stretch, foam strap - Maintains position of the limb during wear
• Soft, wide foam - Distributes forces evenly around the neck giving greater
patient comfort
• Y-tab fasteners - Allow for ease of adjustment for clinician and patient
• Various sling application techniques possible
• Two 12m rolls and Y-tabs - Presented in a convenient dispenser box for less wastage
• Washable at 30°C
ACTIMOVE® SLINGArm Sling
DYNACAST® Prelude is a synthetic splinting system specifically incorporating fibreglass, covered by a polypropylene padding. Stronger and more versatile than traditional plaster of Paris, it is ideal for trauma and post-op applications.
• Strong, light & durable - Resin coated fibreglass provides a high strength splint which is resistant to breakdown - Will not breakdown when wet like plaster of Paris
• Quick setting and early weight bearing - DYNACAST® Prelude has an initial set of 3-5 minutes and reaches weight bearing strength in 20 minutes
• No mess or waste - With no plaster mess DYNACAST® Prelude is ideally suited to the theatre and ward environment - The continuous roll format ensures the clinician will only use what is required and provides versatility to choose the length of splint to suit the indication
• Comfortable for the patient - Soft polypropylene padding covers the fibreglass splint minimising the risk of pressure points - Naturally aids moisture transmission away from the skin to enhance patient comfort
• ILS (interlocking strength) technology - Provides strength and durability - Minimises wrinkles and creases in the finished splint
• Acute through to rehabilitation phases
DYNACAST® PRELUDEAcute Synthetic Splint System

Casting the Upper LimbCONTENTS
2.1 Anatomy of the Upper Limb
2.2 Fractures of the Upper Limb
2.3 Casts of the Upper Limb
The table lists the casts used to treat the most common fractures of the upper limb. Each is discussed in more detail.
O Colles’ Type / Below Elbow
O Scaphoid
O Bennett’s Type
O Below Elbow Slab
O Smith’s
O Above Elbow / Long Arm
O Above Elbow / Long Arm Slab
O ‘U’- Slab
O Humeral Brace
CONTRIBUTORS
Sue Miles, BSc, RGN, ONC, FETC, Orth Tech CertNational Casting Training Adviser.
John W Burden, BSc, RGN, ONC, RNT, ENB 870Lecturer in Orthopaedic Nursing.
A Practical Guide to Casting

44
2.1 Anatomy of the Upper Limb
The upper limb is constructed for:
O Llifting, moving and carrying articles of all shapes and sizes within the individual’s capability.
O The manipulation and use of tools of all kinds, from the most powerful to the most intricate.
It is made up of the bones, muscles and joints of the:
O Thumb, Fingers and Hands - Phalanges and Metacarpals.
O Wrist – Carpals.
O Forearm - Ulna and Radius.
O Arm – Humerus.
O Joints – Interphalangeal , Metacarpal – Phalangeal, Carpo-metacarpal, Wrist, Radio-ulnar, Elbow and Shoulder.
Bones of the Fingers, Thumb and Hand
Each finger has three phalanges, the thumb has only two which
are thicker and stronger than the others.
The palm is formed of the five long bones - the metacarpals.
Four lie parallel to each other, numbers 2-5. The first is set at
an angle of approximately 45° to the others, on the lateral side
and the proximal phalanx of the thumb articulates with it, giving it
its characteristic position.
The knuckles are formed by the heads of metacarpals 2-5.
Bones of the WristThe wrist joint consists of two rows of irregular bones, proximal
and distal. The proximal row from thumb to little finger: scaphoid,
lunate, triquetral and pisiform. The distal row trapezium, trapezoid,
capitate and hamate. Most important for cast room staff are the
scaphoid, which lies in the proximal row and is the most frequently
fractured of all the carpal bones, and the trapezium, which articulates
with the first metacarpal and pisiform which can be felt as a bony
prominence on the antero-medial aspect of the wrist in line with
the little finger.
Trapezium
Scaphoid
Lunate
TrapezoidCapitate Hamate
Pisiform
Triquetral

45
Bones of the Forearm
The two long bones of the forearm, the radius and ulna, lie parallel
to each other when the forearm is supinated.
The Radius
Situated laterally, its shaft is expanded distally, to articulate with the
scaphoid and lunate. A distally pointing projection is the styloid
process, against which the radial pulse can be felt. Proximally,
the head, which forms part of the elbow, is a flat disc similar to
the £1 coin; immediately below this is the neck of the radius.
The Ulna
Situated medially, the shaft of the ulna can be felt along the medial
side of the forearm.
The head of the ulna is small and rounded. Attached to it is a
pad of fibro-cartilage, which articulates with the triquetral. Proximally,
the ulna has two forward projections, which fit into fossae of
the same name at the distal end of the humerus. The anterior
projection is the coronoid process and the posterior projection is
the olecranon process.
The Humerus
The long bone of the upper arm.
Coronoid fossa
Radial fossa
The epicondyles are two protuberances found distally. The medial
epicondyle can be easily felt. The ulna nerve lies behind it. If
the nerve is briefly compressed against the epicondyle, i.e. if it is
knocked, the familiar ‘pins and needles’ can be felt in the little finger.
The lateral epicondyle can be felt more easily with the elbow flexed.
Between the epicondyles are:
O The irregularly shaped articular surface - the trochlea articulates with the ulna, the capitulum with the radius.
O The olecranon fossa posteriorly.
O The coronoid fossa anteriorly.
The shaft - the radial nerve lies adjacent to the shaft posteriorly in
a groove - the radial groove. Fractures of the shaft of the humerus
are easily complicated by damage to the radial nerve - and wrist
drop can be the result. See diagram of upper limb innervation.
The proximal end of the shaft has three large protuberances:
O The greater tuberosity, which gives the shoulder its almost square outline.
O The lesser tuberosity, a little lower, on the anterior and medial aspects. The bicipital groove lies between the two tuberosities, the long head of the biceps runs in it.
O The rounded head of the humerus, situated on the medial upper corner, is surrounded by a shallow groove - the anatomical neck.
The surgical neck is a constriction on the humerus immediately
below the tuberosities. It is a frequent site for fractures.
2.1 Anatomy of the Upper Limb

46
Joints of the Upper Limb
The Elbow Joint (lateral)
The Wrist
The eight bones each articulate with their neighbours, at synovial
sliding joints.
The distal row articulates with the metacarpals - also sliding joints.
The first carpo-metacarpal joint is different. It is known as a
saddle joint; the two articulating surfaces look similar to saddles
set across each other. This gives the thumb its wide range of
movement, which includes opposition - its ability to move to meet
the fingers, which gives us our pinch grip.
The wrist joint is capable of flexion, extension, adduction and abduction. The muscles which bring about palmar flexion (flexion)
and dorsiflexion (extension) are attached to the medial and lateral
epicondyles of the humerus, these muscles form the bulk of the
forearm. Abduction and adduction are carried out by the abductor
and adductor muscles respectively.
Movement of the thumb (pollex) has a separate group of muscles
from the fingers (digits) which enable it to function independently.
The radio-ulna joints are two synovial pivot joints, the inferior where
the ulnar head articulates with a notch on the distal end of the
radius; the superior where the radial head articulates against a
notch on the ulna just below the coracoid process.
Movement at these two joints together will cause supination of
the forearm, with the bones lying parallel; and pronation where
the radius pivots across the ulna.
The Elbow
The elbow is a synovial hinge joint. The radial head articulates
with the capitulum; the articulating surface of the olecranon process
with the trochlea. The joint capsule is strengthened with lateral
and medial ligaments, so that flexion and extension can take
place. Elbow flexion is carried out primarily by biceps brachii
and brachialis. The biceps muscle is attached distally to the radial
tuberosity so that it also supinates the forearm. Elbow extension
is carried out by the triceps muscle which is attached proximally
to the lower edge of the glenoid cavity and the posterior surface
of the humerus, distally it is attached to the olecranon process of
the ulna. The joint space includes the superior radio-ulnar joint.
The Shoulder Joint
The shoulder joint is a freely movable, synovial, ball and socket joint.
It is formed by the spherical head of the humerus which articulates
with the shallow glenoid cavity of the scapula. The capsule is looser
than in the hip joint, especially anteriorly and inferiorly. The joint
is freely moveable, able to flex, extend, abduct, adduct, rotate laterally and medially and circumduct. However, because of its
structure it is much less stable than the hip and dislocates much
more easily (see also Section 4.1).
Many muscles are involved with the movement of the shoulder.
The deeper layer is known as the rotator cuff which comprises
of the supraspinatus, infraspinatus, teres minor and subscapularis
muscles. They are important factors in stabilising and moving the
shoulder joint. Superficially the following muscles also contribute to
the movement of the joint. Adduction is carried out by pectoralis
major which is attached medially to the clavicle, sternum and upper
ribs and laterally to the front of the humerus. It also rotates the
humerus inwards. Abduction is carried out by supraspinatus plus
deltoid a versatile muscle which is attached to clavicle anteriorly and
spine of scapula posteriorly, laterally it is attached to the greater
tuberosity of the humerus. It also contributes to forward flexion
and backward extension.
2.1 Anatomy of the Upper Limb

47
Nerve Distribution of the
Upper LimbThe muscles of the upper limb are innervated largely by radial,
median and ulnar nerves. Of major importance to cast room staff is
the knowledge that the radial nerve innervates the wrist extensors,
damage to this nerve therefore will lead to weak or lack of wrist
extension which is also known as wrist drop. The wrist flexors are
mainly innervated by the median nerve which passes underneath
the flexor retinaculum which forms the carpal tunnel. Swelling in
this area causes carpal tunnel syndrome resulting in pain in the
arm and weak flexion. The ulnar nerve distribution follows the ulnar
border of the forearm and hand (see diagram).
The innervation of the hand is by the radial, median and ulnar
nerves and is complex. Note the differences between dorsal and
palmar surfaces in attached diagram.
Further reading
See Chapter 1, Section 1.4
2.1 Anatomy of the Upper Limb

48
The table lists the fractures of the upper limb most commonly
treated with the involvement of cast room staff.
Humerus Neck
Shaft
Supracondylar
Forearm Head of radius
Olecranon
Shafts
Distal Radius (Including Colles’ and Smith’s fractures)
Wrist Scaphoid
Hand Metacarpals (Including Bennett’s fracture of the first
metacarpal)
Fingers
With all fractures of the arm, the circulatory state and the nerve
supply should be checked frequently, especially before and after
any treatment such as manipulation, application of cast or splint.
Remove any rings or jewellery and nail varnish. Support the injured
arm, on a pillow or in a sling.
Fractures of the Humerus
The Neck of the Humerus
This is the area just below the head of the humerus. It is most
commonly broken in elderly people as the result of a fall onto
the outstretched hand. Their bones are often more brittle due to
osteoporosis. The fracture ends may be driven into each other
(impacted) and the fracture is therefore quite stable. If the position
is satisfactory, the application of a sling or collar and cuff is all
that is required. If comminuted however, more aggressive treatment
such as the application of a cast may be required.
The main problem developing after these injuries is stiffness of the
shoulder and the elbow. There is also a lot of swelling, bruising
and discolouration. Once the pain is subsiding, gentle movements
of the shoulder should be started. This can be done without taking
the arm out of the sling, by leaning forward and allowing the arm
to swing slightly. The patient should be referred for physiotherapy.
This region is a common site for pathological fractures secondary
to tumours.
Fractures of the Shaft of the Humerus
The humerus is a large bone, and it takes considerable force to
fracture it. The risk of damage to other structures is high, particularly
to the radial nerve. The bone may be broken by a direct blow or
by a fall from a height.
Usually there is a degree of shortening of the bone, due to muscle
spasm, and some angulation. The classical treatment of fractures
of the shaft is to apply a:
2.2 Fractures of the Upper Limb
i) ACTIMOVE® Sling / Collar and Cuff type product only
ii) ‘U’ slab and ACTIMOVE® Sling / Collar and Cuff type product (see Section 2.3)
iii) Humeral brace
The radial nerve may be injured, leading to the development of
a ‘wrist drop’. Assess the ability of the patient to straighten the
fingers and wrist of the injured arm. Do this frequently, as the
nerve palsy may develop as a result of manipulation, or sometimes
later as the fracture begins to unite.
The brachial artery is rarely injured but the circulation may be
impaired by swelling or constriction if the cast becomes overtight.
As the muscles waste and the cast becomes loose, pressure in
the elbow crease may cause problems in the median nerve or
brachial artery. These fractures are sometimes fixed especially if
the patient is unconscious or has multiple injuries.
Supracondylar Fractures of the Humerus
This is a fracture usually occurring in children falling on the
outstretched arm. The elbow is displaced backwards, and there is
a high risk of injury to the brachial artery and the median nerve.
Treatment usually involves manipulation of the fracture under a
general anaesthetic, followed by application of a collar and cuff,
sometimes with a plaster back slab to maintain position. It is
important that provision is made to assess the pulse on the injured
arm. The child will be kept in hospital overnight for observation
before discharge home to the care of the parents.
If complications seem to be developing, call medical assistance,
then the sling should be slackened, and the arm gently straightened
until the pulse returns.
Dislocation of the Elbow
The elbow joint is very stable, and requires a lot of force to dislocate
it. There will be a lot of soft tissue damage and swelling, with
a risk of injury to nerves or blood vessels. Check the pulse and
nerve supply to the hand frequently.
The dislocation will be reduced under anaesthesia, and the arm
placed in a collar and cuff. A plaster back slab may be applied
for further stability.
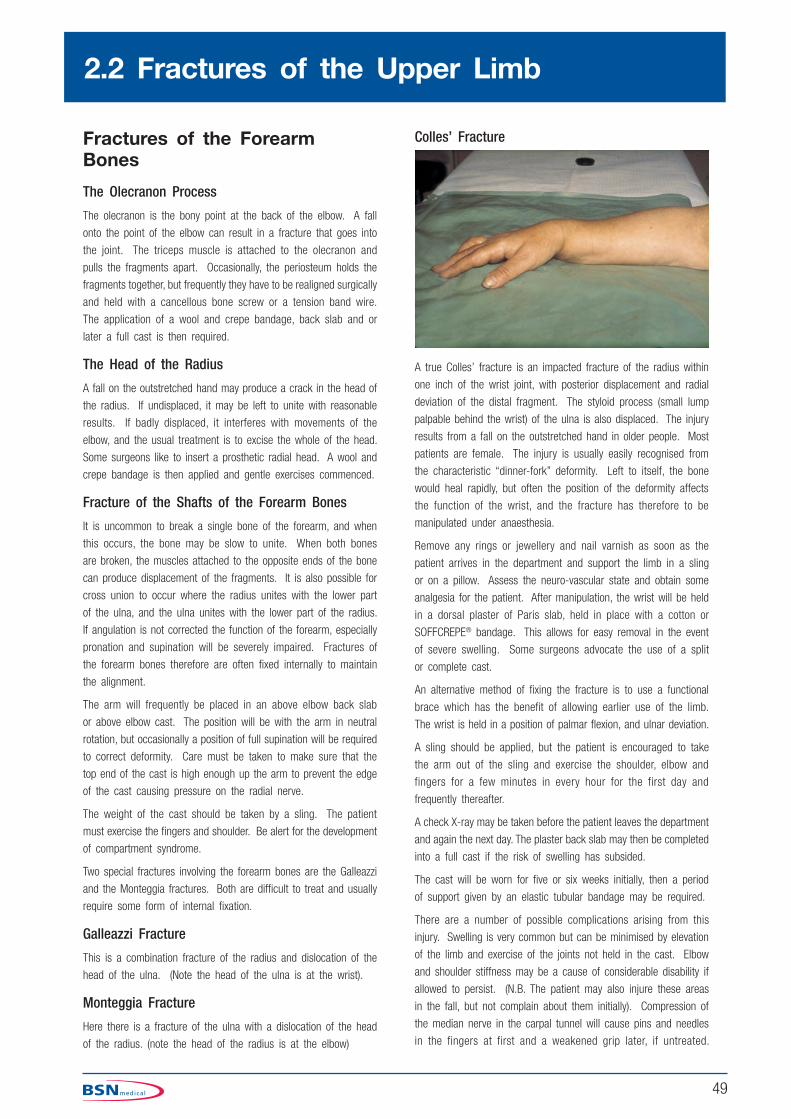
49
Fractures of the Forearm Bones
The Olecranon Process
The olecranon is the bony point at the back of the elbow. A fall
onto the point of the elbow can result in a fracture that goes into
the joint. The triceps muscle is attached to the olecranon and
pulls the fragments apart. Occasionally, the periosteum holds the
fragments together, but frequently they have to be realigned surgically
and held with a cancellous bone screw or a tension band wire.
The application of a wool and crepe bandage, back slab and or
later a full cast is then required.
The Head of the Radius
A fall on the outstretched hand may produce a crack in the head of
the radius. If undisplaced, it may be left to unite with reasonable
results. If badly displaced, it interferes with movements of the
elbow, and the usual treatment is to excise the whole of the head.
Some surgeons like to insert a prosthetic radial head. A wool and
crepe bandage is then applied and gentle exercises commenced.
Fracture of the Shafts of the Forearm Bones
It is uncommon to break a single bone of the forearm, and when
this occurs, the bone may be slow to unite. When both bones
are broken, the muscles attached to the opposite ends of the bone
can produce displacement of the fragments. It is also possible for
cross union to occur where the radius unites with the lower part
of the ulna, and the ulna unites with the lower part of the radius.
If angulation is not corrected the function of the forearm, especially
pronation and supination will be severely impaired. Fractures of
the forearm bones therefore are often fixed internally to maintain
the alignment.
The arm will frequently be placed in an above elbow back slab
or above elbow cast. The position will be with the arm in neutral
rotation, but occasionally a position of full supination will be required
to correct deformity. Care must be taken to make sure that the
top end of the cast is high enough up the arm to prevent the edge
of the cast causing pressure on the radial nerve.
The weight of the cast should be taken by a sling. The patient
must exercise the fingers and shoulder. Be alert for the development
of compartment syndrome.
Two special fractures involving the forearm bones are the Galleazzi
and the Monteggia fractures. Both are difficult to treat and usually
require some form of internal fixation.
Galleazzi Fracture
This is a combination fracture of the radius and dislocation of the
head of the ulna. (Note the head of the ulna is at the wrist).
Monteggia Fracture
Here there is a fracture of the ulna with a dislocation of the head
of the radius. (note the head of the radius is at the elbow)
Colles’ Fracture
A true Colles’ fracture is an impacted fracture of the radius within
one inch of the wrist joint, with posterior displacement and radial
deviation of the distal fragment. The styloid process (small lump
palpable behind the wrist) of the ulna is also displaced. The injury
results from a fall on the outstretched hand in older people. Most
patients are female. The injury is usually easily recognised from
the characteristic “dinner-fork” deformity. Left to itself, the bone
would heal rapidly, but often the position of the deformity affects
the function of the wrist, and the fracture has therefore to be
manipulated under anaesthesia.
Remove any rings or jewellery and nail varnish as soon as the
patient arrives in the department and support the limb in a sling
or on a pillow. Assess the neuro-vascular state and obtain some
analgesia for the patient. After manipulation, the wrist will be held
in a dorsal plaster of Paris slab, held in place with a cotton or
SOFFCREPE® bandage. This allows for easy removal in the event
of severe swelling. Some surgeons advocate the use of a split
or complete cast.
An alternative method of fixing the fracture is to use a functional
brace which has the benefit of allowing earlier use of the limb.
The wrist is held in a position of palmar flexion, and ulnar deviation.
A sling should be applied, but the patient is encouraged to take
the arm out of the sling and exercise the shoulder, elbow and
fingers for a few minutes in every hour for the first day and
frequently thereafter.
A check X-ray may be taken before the patient leaves the department
and again the next day. The plaster back slab may then be completed
into a full cast if the risk of swelling has subsided.
The cast will be worn for five or six weeks initially, then a period
of support given by an elastic tubular bandage may be required.
There are a number of possible complications arising from this
injury. Swelling is very common but can be minimised by elevation
of the limb and exercise of the joints not held in the cast. Elbow
and shoulder stiffness may be a cause of considerable disability if
allowed to persist. (N.B. The patient may also injure these areas
in the fall, but not complain about them initially). Compression of
the median nerve in the carpal tunnel will cause pins and needles
in the fingers at first and a weakened grip later, if untreated.
2.2 Fractures of the Upper Limb

50
Non-union is rare, but mal-union due to displacement is frequently
found, hence the need for a check X-ray at two weeks with further
manipulation if required.
An occasional problem is that of Complex Regional Pain Syndrome
(Sudeck’s Atrophy) Post-Traumatic Reflex Dystrophy)). This is a
condition where the hand becomes red, shiny and painful when the
plaster is removed. The discomfort clears up in about six months,
but is better avoided by encouraging the patient to make as much
use of the limb as possible whilst in plaster.
Smith’s Fracture
Sometimes called a reverse Colles’ because the displacement is
anterior, this injury results from a backward fall, knocking the wrist
forwards. The patient is often in middle age. The treatment is
to manipulate the fracture and apply an above elbow back-slab
or full arm cast. The position of the limb should be the wrist in
dorsiflexion, the hand supinated (palm upwards) and the elbow at
an angle of 90º. The main problem with this injury is slippage after
manipulation and so these fractures often require internal fixation.
Wrist and Hand
Scaphoid Fracture
The scaphoid bone is situated on the thumb side of the proximal row
of carpal bones, and may be injured by a fall on the outstretched
hand or by a blow to the wrist. This is a young person’s injury,
the typical patient being a young man. Sometimes the fracture
does not show up on the initial X-rays, (special views known as
‘Scaphoid Views’ are often requested) and should be repeated
two weeks later.
In the meantime, if the history and symptoms are suggestive of the
injury then it is treated as a scaphoid fracture until proved otherwise.
The most significant symptom is pain in the area known as the
“anatomical snuff box” on the thumb side of the wrist.
The wrist is held in a well fitting plaster cast which incorporates the
thumb, and holds the wrist in a position of dorsiflexion and radial
deviation. When correctly applied, the patient should be able to
oppose his thumb and index finger, but not the other fingers. The
angle of the wrist is important, because following the fracture, the
blood supply to the proximal fragment of the bone may be disrupted
leading to avascular necrosis and non-union. Many surgeons like
the plaster to be applied using a layer of stockinette and a single
layer of padding just over the fracture site. Recent debate questions
the need to include the thumb and the best position in which the
wrist should be held.
The cast is retained in place for six weeks, then an X-ray is
taken. If there is no sign of callus the plaster may be retained
for another six weeks, or a screw fixation performed. Stiffness of
the wrist is not uncommon following this prolonged splintage, but
will clear up with usage.
Bennett’s Fracture
A Bennett’s fracture is a fracture dislocation of the first carpo-
metacarpal joint at the base of the thumb.
It is caused by the thumb being knocked backwards. E.g. a ski-
pole injury. The joint is a saddle joint and it can be difficult to
hold the fracture in the correct position after reduction. The cast
used is known as a Bennett’s plaster. It requires traction to be
applied to the thumb, with pressure at the base of the thumb whilst
the plaster is setting. Alternatively, an open reduction and screw
fixation may be performed. The joint may have a limited range of
movement after this injury.
Metacarpal Fractures
The common cause of fractures to the metacarpals is a punch
with the fist. The bone commonly affected is the fifth, which is
usually angulated at the neck. If markedly displaced it may need
to be straightened and then a dorsal slab is applied, extending
as far as the proximal interphalangeal joint of the fourth and fifth
fingers. If undisplaced an elasticated bandage can be used. If
painful, plaster may be required. Occasionally these fractures may
require internal fixation.
Fractures of the Fingers
It is rare for fractures of the fingers to be placed in plaster. The
common method of treatment is to strap the finger to its neighbour
and encourage use. However, an injury known as a Mallett fracture,
which is an avulsion fracture of the insertion of the extensor tendon
from the terminal phalanx may be put into a plaster which holds
the D.I.P. joint in extension and the P.I.P. joint in flexion.
Fractured Scaphoid
2.2 Fractures of the Upper Limb

51
Below Elbow Plaster Slab
EQUIPMENT REQUIRED
Basic trolley see page 26 - plus:
PLASTER OF PARISO Stockinette 5cm
O SOFFBAN Plus padding 10cm x 1 roll
O GYPSONA BP (15cm or 20cm x 1 roll or use a slab dispenser of the equivalent size)
O SOFFCREPE bandage 7.5cm x 1 roll
O Strips of plaster of Paris
O ACTIMOVE Umerus Sling or Polysling
Application
The medical staff may prefer slabs to full casts. These are made
by measuring the length required, the extent being the same as
for a full cast. Add on 2cm to the length to allow the slab to be
long enough to conform to the contours of the limb. The required
length is cut from a plaster of Paris slab dispenser 15 or 20cm
wide, depending on the size of the patient, or by forming a slab
from 15 or 20cm plaster of Paris rolls using five to six layers. The
slabs are then shaped, trimming top and lower end as required.
The limb is positioned and padding applied as for a full cast. The
slab is folded concertina fashion and dipped into the water holding
the ends and maintaining the concertina folds. It is removed from
the water, squeezed gently and straightened out. The slab is then
carefully positioned on the limb and smoothed to fit the contours.
It is held in place with a wet crepe or cotton conforming bandage.
These must be pre-soaked and squeezed out to avoid further
shrinkage. The end of the bandage is fixed with a plaster of Paris
strip applied over the area of the slab.
Above Elbow Plaster Slab
EQUIPMENT REQUIRED
Basic trolley see page 26 - plus:
O GYPSONA BP 10cm x 2 rolls and 15cm x 2 rolls or use slab dispensers 10cm and 15cm
O SOFFBAN Plus padding 10cm x 2 rolls
O Stockinette 7.5cm (if used)
O SOFFCREPE bandage 10cm x 1 roll
O ACTIMOVE Umerus sling or Polysling
Application
The ultimate position of the limb will be dependent on the injury and
displacement, if any, but will generally be about 90° at the elbow.
Prepare a 15cm or 10cm plaster of Paris slab, depending on the size
of the patient, using 5 -7 layers. This slab should be long enough
to extend from the axilla to the knuckles of the hand. Remember
to allow a little for the slab to conform to the contours of the limb.
Prepare also 2 x 10cm plaster of Paris slabs of 5 layers and 25cm
long. Place these each side of the elbow joint to reinforce it. The
whole slab is then held in place by a pre-soaked and squeezed
out crepe or conforming cotton bandage. Finish the application
as for a below elbow slab.
2.3 Casts of the Upper Limb

52
Below Elbow or Colles’ Type CastA ‘Colles’ cast’ is a very loose term used to describe a type of cast
applied in the treatment of many wrist injuries and conditions. The
wrist should be positioned in slight palmar flexion and slight ulnar
deviation to a greater or lesser degree according to the amount
of displacement of the fracture. The position will be different for
other injuries.
The completed cast should extend from just below the elbow -
allowing full flexion there - to the knuckles at the back of the
hand and must show the palmar crease, to allow full flexion of
the metacarpal – phalangeal joints (MCP). The thumb should be
completely free.
EQUIPMENT REQUIRED
Basic trolley see page 26 - plus either of the following options
2.3 Casts of the Upper Limb
PLASTER OF PARISO Stockinette 5cm
O SOFFBAN Plus padding 10cm x 1 roll
O GYPSONA BP 10cm x 2 rolls
O strips of plaster of Paris
O ACTIMOVE sling or Polysling
Padding
Stockinette only if there is unlikely to be any swelling. The ulnar
styloid may require a circle of felt. A covering of undercast
padding is applied firmly, smoothly and evenly.
Application
Casting commences at the elbow end of the cast, rolling from
within out so that the bandage is brought up through the grip,
thereby spreading the heads of the metacarpals. Pass through
the grip twice with the first bandage. Start the second bandage
at the elbow end as before, this time taking one further turn
through the grip before completing the bandage back up the
arm to the elbow. Mould the cast well into the palm.
When the cast is finally set, the limb is rested on a pillow and
the cast is trimmed to allow all joints not encased to move
freely. Make sure the palmar crease is fully visible to allow
full flexion of the MCP joints.
If stockinette was used it should be turned back over the edge
of the cast and held in place with strips of plaster of Paris.
This applies to all upper limb casts. Full instructions must
be given to the patient on the care of their limb and of the
cast. These must be given verbally and in writing. A sling
may be required initially, but do not forget to give information
on exercises to prevent swelling and finger, elbow and shoulder
stiffness. (See Appendix) Follow-up care must also be arranged.

53
SYNTHETICO Stockinette 5cm
O Non-adhesive felt or Stockinetter 2.5cm
O Adhesive felt 2mm thick
O SOFFBAN Plus padding 10cm x 1 roll
O DELTA-CAST Conformable 5cm x 1 roll or 7.5cm x 1 roll
O TENSOPLAST Sport cast edge tape 3cm
O ACTIMOVE sling
Padding
Apply stockinette and pad the ulnar styloid with felt if prominent.
Use a thin layer of non-adhesive felt around the base of the thumb
or apply a smaller size stockinette to the thumb
The 2mm adhesive felt may be needed to pad the edges of the
cast. A covering of undercast padding is applied firmly, smoothly
and evenly.
Application
Use either 1 x 5cm or 1 x 7.5cm casting bandage depending on
the size of the limb. Bandaging commences at the elbow end of
the cast, rolling from within out so that the bandage is brought up
through the grip, thereby spreading the heads of the metacarpals
using a 50% overlap to create two layers. Make a slightly curved
cut to allow the bandage to go through the grip laying the bandage
on carefully
Continue across the metacarpals and around the hand going below
the thumb on the next turn and returning through the grip cutting
as before. Twice through the grip is sufficient. Continue with the
bandage back up the arm in a single layer turning in the stockinette
at the elbow end, catching it with the last turn of the bandage.
Mould well into the palm and hold until the material has set. Trim,
if necessary, turning in the remaining stockinette and hold in place
with the adhesive tape.
1 2
3 4
5
6
1
3
4
5
completedcast
completed cast
2
2.3 Casts of the Upper Limb

54
Scaphoid CastThe wrist is positioned in slight dorsiflexion with the thumb in
opposition, thereby forming the position of grasp.
Place the elbow on the rest and position the hand.
The cast should extend from the elbow to the hand, as for the
Colles’, but comes up the thumb to the interphalangeal joint, allowing
movement of the distal part of the thumb.
2.3 Casts of the Upper Limb
We would just like to reiterate that all these positions and extents
of the casts are not dogmatic. One has to be guided by the
policy of the medical officer.
EQUIPMENT REQUIRED
Basic trolley see page 26 - plus either of the following options
PLASTER OF PARISO Stockinette 2.5cm
O Stockinette 5cm
O SOFFBAN PLUS padding 10cm x 1 roll
O GYPSONA BP 10cm x 2 - 3 rolls
O Strips of plaster of Paris to finish
O ACTIMOVE sling or Polysling
Padding
Stockinette the arm and the thumb. Apply a covering of undercast
padding firmly, smoothly and evenly. Make sure the area around
the thumb is covered.
Application
Casting is commenced as before at the elbow, again from within
out. After coming up through the grip and across the back of
the hand, go round the thumb, making it fit neatly by cutting the
plaster of Paris bandage, and being careful not to pull. Three times
alternating through the grip and around the thumb are sufficient.
Mould well into the palm and around the thumb. An extra ½ to 1
x 10cm plaster of Paris bandage may be necessary. The remainder
of the procedure is as for a Colles’ cast.
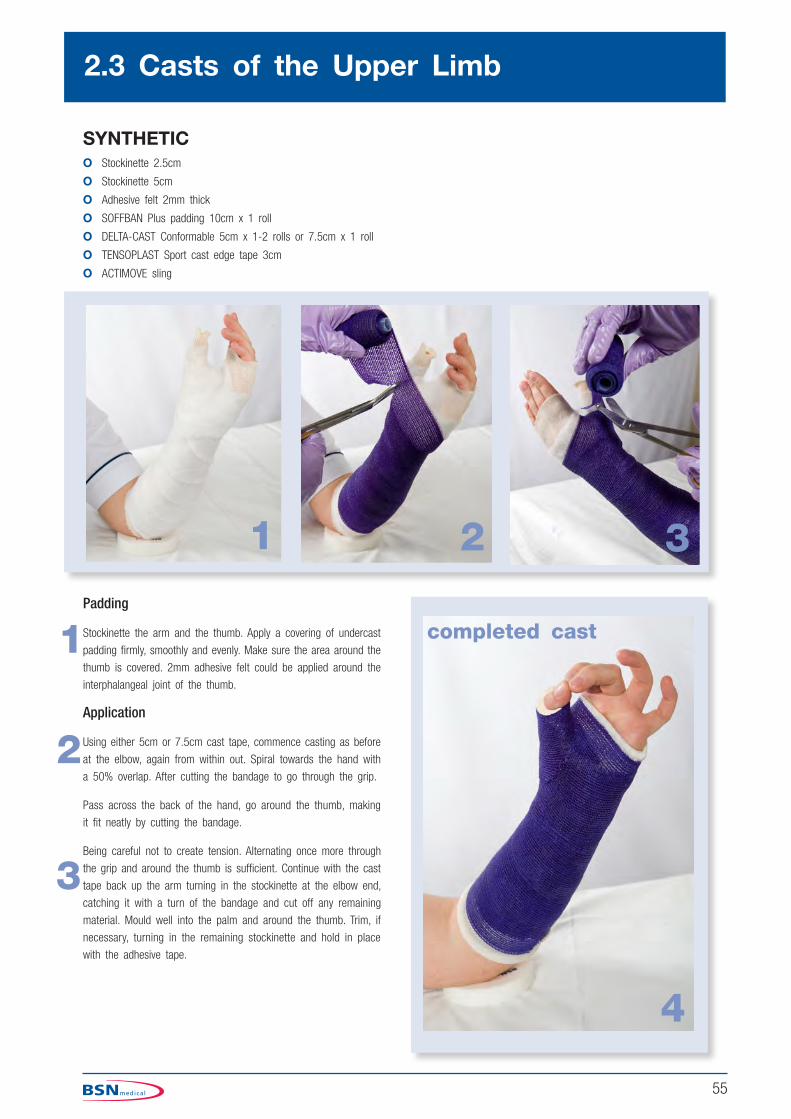
55
SYNTHETICO Stockinette 2.5cm
O Stockinette 5cm
O Adhesive felt 2mm thick
O SOFFBAN Plus padding 10cm x 1 roll
O DELTA-CAST Conformable 5cm x 1-2 rolls or 7.5cm x 1 roll
O TENSOPLAST Sport cast edge tape 3cm
O ACTIMOVE sling
Padding
Stockinette the arm and the thumb. Apply a covering of undercast
padding firmly, smoothly and evenly. Make sure the area around the
thumb is covered. 2mm adhesive felt could be applied around the
interphalangeal joint of the thumb.
Application
Using either 5cm or 7.5cm cast tape, commence casting as before
at the elbow, again from within out. Spiral towards the hand with
a 50% overlap. After cutting the bandage to go through the grip.
Pass across the back of the hand, go around the thumb, making
it fit neatly by cutting the bandage.
Being careful not to create tension. Alternating once more through
the grip and around the thumb is sufficient. Continue with the cast
tape back up the arm turning in the stockinette at the elbow end,
catching it with a turn of the bandage and cut off any remaining
material. Mould well into the palm and around the thumb. Trim, if
necessary, turning in the remaining stockinette and hold in place
with the adhesive tape.
2.3 Casts of the Upper Limb
1 2 3
4
1
2
3
completed cast

56
Bennett’s Type CastThis technique is for what we have deliberately termed a Bennett’s-
type cast, as the original Bennett’s cast incorporated fixed traction,
but is now seldom used.
The wrist is positioned in slight dorsiflexion, the thumb is adbucted
and pressure is applied over the fracture site. As previously stated
this is only one method and one must be guided by the dictates
of your medical officer. Before plastering is commenced an oval
EQUIPMENT REQUIRED
Basic trolley see page 26 - plus either of the following options
PLASTER OF PARISO Stockinette 5cm (this should not be used where swelling
is likely to occur)
O Stockinette 2.5cm
O SOFFBAN Plus padding 10cm x 1 roll
O A piece of adhesive felt
O GYPSONA BP 10cms x 2 rolls
O Strips of plaster of Paris to finish
O ACTIMOVE sling or Polysling
Padding
Stockinette the arm and the thumb. Apply a covering of padding
firmly, smoothly and evenly. Make sure the area around the thumb
is covered up to the tip. Apply a small oval of 5mm thick adhesive
felt positioned over the fracture site (photo 1).
Application
Apply the plaster of Paris bandage roll in the same way as for
the scaphoid cast, except reduce the size of the cut to allow the
material to come up to the tip of the thumb. Mould as described
above (photo 2).
When the cast is completed the patient should be asked to wait
for 20 minutes approximately to have a neurovascular assessment.
piece of felt should be placed at the base of the 1st metacarpal
over the fracture site, on top of the stockinette or other padding.
Adhesive should never be applied directly to the skin, as under a
cast it may cause maceration. The cast extends from just below the
elbow - allowing full flexion - to the knuckles at the back of the
hand and showing the palmar crease, to permit full flexion of the
fingers. It is continued up the thumb just leaving the tip showing.
1
2
11 2
3completed cast
2.3 Casts of the Upper Limb

57
SYNTHETICO Stockinette 2.5cm
O Stockinette 5cm
O Adhesive felt 2mm
O SOFFBAN Plus padding 10cm x 1 roll
O A piece of adhesive felt
O DELTA-CAST Conformable 5cm x 2 rolls or 7.5cm x 1 roll
O TENSOPLAST Sport cast edge tape 3cm
O ACTIMOVE sling
Padding
Stockinette the arm and the thumb. Apply a covering of padding
firmly, smoothly and evenly. Make sure the area around the thumb
is covered up to the tip. Apply a small oval of 5mm thick adhesive
felt positioned over the fracture site.
The 2mm felt could be used to pad the edges of the cast.
Application
Apply the casting bandage in the same way as for the scaphoid
cast, except reduce the size of the cut to allow the material to
come up to the tip of the thumb. Mould as described on page 56.
When the cast is completed the patient should be asked to wait
for 20 minutes approximately to have a neurovascular assessment.
1 2
1 2
completed cast
2.3 Casts of the Upper Limb

58
Above Elbow or Full Arm CastsThe limb is positioned with the wrist in neutral, the elbow at a
right angle and the palm facing the body. If applying the cast as
one whole, commencement should be at the axilla, bandaging from
within out. Try to have the elbow held at 85° whilst applying the
bandages and before setting takes place move the arm down to
90°. This helps to prevent ridges forming on the flexor aspect of
the elbow.
The completed cast should extend from as high up the arm as
possible and down over the hand as for the Colles’.
EQUIPMENT REQUIRED
Basic trolley see page 26 - plus either of the following options:
PLASTER OF PARISO Stockinette 7.5cm (if required)
O SOFFBAN Plus padding 10cm x 2 rolls
O GYPSONA BP 10cm x 5 rolls
O Strips of plaster of Paris to finish
O ACTIMOVE Umerus Sling or Polysling
Padding
Apply the stockinette, if used. Cut out the creased stockinette in
the flexor surface of the elbow. (see photo 1, facing page) Apply
a covering of undercast padding firmly, smoothly and evenly. An
extra layer of padding or a piece of felt may be needed around the
elbow to protect the olecranon process and the medial epicondyle.
Application
Commence the cast at the axilla end rolling from within out.
When applying the plaster of Paris roll, aim for the middle of
the bandage width to lay across the flexor surface and apply
evenly without missing anywhere.
This cast can also be applied in two parts. The below elbow part
is often done first. Apply two layers of padding at the join. Care
must be taken when the top half is joined, to avoid the edge
of the lower half pressing into the flexor surface of the elbow.
2.3 Casts of the Upper Limb

59
SYNTHETICO Stockinette 7.5cm
O Non adhesive felt
O Adhesive felt 2mm thick
O SOFFBAN Plus padding 10cm x 2 rolls
O DELTA-CAST Conformable 7.5cm x 2 rolls
O DELTA-CAST Conformable 5cm x 1 roll (spare if required)
O TENSOPLAST Sport cast edge tape 3cm
O ACTIMOVE sling or collar and cuff type product
Padding
Stockinette the arm, cutting out the creased stockinette in the flexor
surface of the elbow. Apply a covering of undercast padding firmly,
smoothly and evenly. An extra layer of padding or a piece of felt
may be needed around the elbow to protect the olecranon process
and the medial epicondyle.
Apply the thin non-adhesive felt around the thumb and web space
as for a below elbow cast or apply a smaller stockinette to the
thumb. 2mm adhesive felt may be used around the arm to pad
the proximal edge.
1 2
4
3
Application
Use a 7.5cm roll of casting bandage starting at the axilla end
rolling from within out. When rolling the casting tape, aim for the
middle of the bandage width to lay across the flexor surface and
apply evenly without missing anywhere.
Use either a 5cm or another 7.5cm roll to continue down the
forearm and cut the cast tape to go through the grip twice in the
same technique as the below elbow cast.
A two layer slab of cast tape material can be incorporated to
reinforce the posterior elbow area. This cast can also be applied
in two parts. The below elbow part is often done first. Apply two
layers of padding at the join. Care must be taken when the top
half is joined, to avoid the edge of the lower half pressing into the
flexor surface of the elbow.
4
1
2
34
completed cast
2.3 Casts of the Upper Limb

60
Smith’s CastA full, or above elbow, cast will be required with the wrist in
dorsiflexion, the forearm supinated (palm upwards) and the elbow
at a right angle.
‘U’ Slab
EQUIPMENT REQUIRED
Basic trolley see page 26 - plus
Padding
The humerus should be allowed to hang down in a straight line
to the body with the elbow at 90º and the palm facing the chest.
Do not let the patient lean over to one side or the finished slab
will be at the wrong angle and not sit down onto the shoulder.
Measure and pre-roll a piece of 10cm stockinette long enough to
reach from mid-forearm, up the arm and over to the opposite shoulder.
Roll this onto the arm gently, cutting the roll just in front of the
axilla and opening it out onto the shoulder up to the neck. Cut
the remainder in half and tie gently around the opposite side of
the neck or under the opposite axilla.
Apply a large semi-circle of 5mm adhesive felt over the shoulder
and a piece around the elbow to protect the olecranon process
and the medial and lateral epicondyles. Cover the arm with a
layer of undercast padding.
Application
Prepare a plaster of Paris slab 15cm wide of 8 -10 layers which
is long enough to travel the length of the cast. Add on 4cm to
the length to allow the slab to be long enough to conform to
the contours of the limb. Apply the slab from the axilla down
around the elbow and back up over the shoulder, fanning out
the slab over the shoulder and moulding it to fit snugly. Fix
in position with a pre-wet crepe or cotton conforming bandage.
Apply an ACTIMOVE sling to support the wrist and allow the
arm to hang beside the body using gravity to aid the position of
the fracture. This brings the humeral fragments into alignment.
Check that there is no pressure on the neck or axilla. Trim the
stockinette and turn back over the edge of the slab, holding in
position with 2 layer strips of plaster of Paris.
O Stockinette 10cm
O Adhesive felt 5mm thick x 1 sheet
O SOFFBAN Plus padding (10cm x 2 rolls)
O GYPSONA BP 15cm slab dispenser
O SOFFCREPE bandage 10cm
O ACTIMOVE sling or collar and cuff type product
The requirements and application are as for an above elbow cast.
1 2
2.3 Casts of the Upper Limb

61
Humeral BraceBasic trolley see page 26 - plus
O Stockinette 10cm
O DELTA Terry Net 10cm
O Adhesive felt 2mm thick x 1 sheet
O DELTA-CAST Conformable (1 x 7.5cm roll plus 1 x 5cm spare roll)
O SOFFCREPE bandage 10cm
O TENSOPLAST Sport cast edge tape 3cm
O Adhesive velcro hooks and non adhesive loops
O ACTIMOVE Sling or collar and cuff type product
This cast may be used once the initial swelling has reduced. The
cast should extend from the epicondyles of the humerus allowing
full flexion of the elbow to the acromioclavicular joint. With mid-
shaft fractures some Orthopaedic surgeons may prefer to let the
cast finish at the axilla level.
The humerus should be allowed to hang down in a straight line
to the body with the elbow at 90º and the palm facing the chest.
Padding
Measure and pre-roll a piece of 10cm stockinette long enough to
reach from mid-forearm, up the arm and onto the shoulder. Roll
this onto the arm gently. Stick a piece of 2mm adhesive felt to
protect the sensitive medial aspect of the arm. Place a strip of
2mm adhesive felt x 5cm wide down the lateral aspect of the arm.
Apply the terry towelling stockinette or a second layer of stockinette.
Application
Pre-wet and squeeze out the crepe bandage.
Apply a 7.5cm wide casting material from humeral epicondyles to
the acromioclavicular joint. You will need two layers of coverage
(50% overlap) to reach required strength. Cover with the pre-wet
crepe bandage and remove it, when initial set has occurred. Mark
the cast for any trimming required.
Draw a line down over the felt on the lateral aspect and cut
carefully with the electric cast saw. Mark, cut and remove a 1cm
of cast material alongside the cut already made.
This allows for adjustment to the splint. Spread the cast, cut the
felt and the terry towelling cast liner. Remove the cast gently from
the limb.
Where trimming is necessary, pull back the terry cast liner from
the edge. Trim as marked and test on the patient, checking that
they can fully flex of the elbow and there is no pressure on the
axilla. Use 2mm felt on the edges where needed and turn back
the terry towelling cast liner over the edges holding in place with
the adhesive tape.
Replace gently on the patient and hold the cast in place with the
adhesive velcro straps.
Apply ACTIMOVE Sling to support the wrist and allow the arm to
hang beside the body using gravity to aid the position of the fracture.
1 2 3
4
1
23
completed cast
4
2.3 Casts of the Upper Limb

62

Casting the Lower LimbCONTENTS
3.1 Anatomy of the Lower Limb
3.2 Fractures of the Lower Limb
3.3 Orthopaedic Conditions
3.4 Casts of the Lower Limb
The table lists the casts used to treat the most common fractures of the lower limb. Each is discussed in more detail.
O Slippers
O Below Knee Cast
O Below Knee Slab
O Tibial Bracing / Sarmiento
O Cylinder Cast
O Broomstick Cast
O Above Knee Cast / Long Leg Cast
CONTRIBUTORS
Sue Miles, BSc RGN, ONC, FETC, Orth. Tech Cert National Casting Training Adviser.
John W Burden, BSc, RGN, ONC, RNT, ENB 870 Lecturer in Orthopaedic Nursing.
A Practical Guide to Casting

64
3.1 Anatomy of the Lower Limb
Bones of the Lower LimbThe lower limb is constructed to carry the body weight and to
move the body from place to place
The lower limb comprises the thigh, knee, lower leg, ankle, feet
and toes.
Bones of the Toes and FeetEach toe has three phalanges, except the great toe (hallux) that
has only two, which are thicker and stronger.
The forefoot has five long bones, the metatarsals, that lie parallel.
Each is slightly curved to produce the arches of the foot. The
styloid process of the fifth metatarsal can be felt under the skin
and connective tissue.
The metatarsal heads are situated at the distal end of the metatarsals
where they form the metatarso-phalangeal joints which are often
affected in rheumatoid arthritis.
The Hind Foot - 7 tarsal bones, variously shaped, are arranged to
continue the arch of the foot back towards the heel and the instep.
The Talus - forms the highest part of the instep and contributes
towards the formation of the ankle.
The Calcaneus - the largest tarsal, the heel bone bears most of
the body weight when standing; muscles of the calf are attached
to it through the tendo-calcaneus (Achilles tendon).
The remaining tarsals are the navicular, the cuboid and the three
cuneiform bones.

65
Bones of the Leg
The Tibia
The longer, stronger of the two bones, is placed medially in the leg.
It extends from the knee to ankle and forms part of each of the
joints. It carries the body weight through to ankle and calcaneus.
The tibia’s distal end is irregular in shape, with a medial downward
projection (medial malleolus, which can be identified as the ankle
bone) and the shaft extends upwards. It is triangular in cross-section.
The anterior ridge (or crest) can be felt as the shin.
Anteriorly the tibial tuberosity provides attachment for the quadriceps
tendon and the patellar ligament.
The proximal end of the tibia is expanded to form the medial and
lateral tibial condyles, the articulating surface of the tibial plateau,
and the intercondylar eminences.
The Fibula
The fibula is slim and light, lateral to the tibia and its distal downward
projection forms the lateral malleolus (ankle bone).
The proximal fibular head articulates with the inferior surface of
the lateral tibial condyle. This can be felt below the knee joint.
The fibula provides attachment for many muscles. It is not involved
in weight bearing.
The Patella and Femur
The patella is a sesamoid bone in the quadriceps tendon. It
is triangular in shape with the apex pointing downwards and it
articulates with the patellar surfaces of the femur.
The patella can be felt lying under the skin on the anterior surface
of the knee.
The femur is the long bone of the thigh, the longest and strongest
bone in the body, that extends from the knee up to the hip and
forms part of both these joints. The femur is slightly bowed to
give a forward convex curve to the thigh. Its expanded distal end
forms the rounded medial and lateral condyles, separated by the
patella surface anteriorly and the intercondylar notch posteriorly.
The femoral shaft is rounded in cross section. Proximally two large
projections are present for muscle attachment:
O the greater trochanter which can be felt at the proximal end of the thigh, beneath the skin
O the lesser trochanter, medially and posteriorly to the shaft just below the level of the greater trochanter
Femoral Neck
The femoral neck is a medially projecting constriction, in adults set
at 130° to the shaft of the femur, that carries the femoral head,
which is rounded and forms part of the hip.
3.1 Anatomy of the Lower Limb

66
Joints of the Lower Limb
Ankle
A synovial hinge joint. Medial, lateral and superior surfaces of
the talus articulate with the medial and lateral malleolus and
the inferior surface of the tibia. The two long bones are bound
together by strong tibio-fibular ligaments. The capsule of the
ankle is reinforced by strong ligaments on either side, especially
the medial dorsal ligament.
The ankle allows plantarflexion (equinus) and dorsiflexion of the
foot only. Plantar Flexion is brought about by gastrocnemius and
soleus. These muscles form the bulk of the calf and they insert
into the calcaneus through the tendo-calcaneus (Achilles tendon).
Dorsiflexion is brought about by tibialis anterior, peroneus tertius
and the extensors of the toes.
Other movements of the foot e.g. inversion and eversion take
place at the subtaloid and midtarsal joints. Inversion is brought
about by tibialis anterior and posterior. Eversion is brought about
by the peroneal muscles.
The Knee
The knee is a synovial hinge joint which allows flexion and extension,
with a slight degree of rotation, brought about by the articulation of
the rounded femoral condyles on the flat tibial plateau. The fibula
is not involved. The capsule is reinforced by the strong medial
and lateral ligaments.
The patella, which articulates with the patellar surface of the femur,
is embedded in the quadriceps tendon, which itself is attached to
the tibial tuberosity. Cruciate ligaments forming a cross-arrangement
are attached to the tibial eminences and the intercondylar notch,
and prevent anterior-posterior movement.
The menisci (or semi-lunar cartilages) - two crescent shaped pieces
of fibrocartilage situated on the edges of the tibial plateau prevent
side to side movement.
Bursae (sacs of synovial fluid) around the patella to prevent friction.
Knee flexion is undertaken by the hamstring group of muscles and
gastrocnemius. Knee extension is undertaken by the quadriceps
group of muscles.
The Hip
The hip is a synovial ball and socket joint which allows flexion
and extension, internal and external rotation, abduction and
adduction of the lower limb.
It is formed by the articulation of the spherical head of femur (the
ball) and the acetabulum of the innominate bone (the socket). Inside
the joint is an acetabular pad of fat which acts as a shock absorber,
the acetabular labrum and ligamentum teres which aid joint stability.
The capsule completely surrounds the joint and is reinforced by
three extra-capsular ligaments the ilio-femoral, ischio-femoral and
pubo-femoral ligaments. Extension of the hip is undertaken by the
hamstring group of muscles and some of the fibres of gluteus
maximus. Flexion of the hip is undertaken by the ilio-psoas and
rectus femoris muscles. Hip abduction is undertaken by gluteus
medius and minimus and some fibres of gluteus maximus. Hip
adduction is carried out by the adductor group of muscles.
A very stable joint with a strong capsule reinforced by ligaments.
Main Nerves of the Leg
3.1 Anatomy of the Lower Limb
67
The table lists the fractures of the lower limb most commonly
treated with the involvement of cast room staff.
Femur Shaft
Supracondylar
Patella
Tibia Shaft
Ankle Malleolus
Foot Tarsal Bones
Metatarsals
Fractures of the leg are as likely to develop circulatory and
neurological problems as those in the arm. Measures taken should
include an early and frequent assessment of pulses in the foot.
Feel the dorsalis pedis pulse at the front of the ankle and the
tibial pulses at a point half way between the Achilles tendon and
the medial malleolus (the bony point on the inside of the ankle).
The foot should be elevated.
The leg should be protected in a splint which supports the foot and
prevents rotation. Sandbags and a towel will also serve to control the
foot. Avoid any pressure behind the knee. When moving the patient,
one person should have responsibility for supporting the injured leg.
If it is necessary to remove trousers by cutting them off then give
consideration to cutting along the seams rather than along the crease
at the front. Trousers cut thus can often be repaired with minimal
expense, or tapes attached so they can be fastened over a cast.
Fractures of the Femur
Fractures of the Upper End of the Femur
This is a very common fracture and it is unfortunate that it usually
occurs in the most vulnerable members of society, the elderly.
Osteoporosis is probably an underlying factor and because of this
it is more common in females. All areas of the upper end of the
femur may be affected and are described as capital, sub capital,
transcervical, inter-trochanteric or subtrochanteric. The treatment
prescribed will depend on many factors both physiological and
social. A crucial factor will be the estimated state of the blood
supply to the femoral head depending on whether the fracture is
intra or extra capsular.
Intracapsular fractures are treated either by replacing the femoral
head (a hemi-arthroplasty) or occasionally by total hip replacement.
Extracapsular fractures are mostly treated by internal fixation using a
dynamic hip screw. For a satisfactory outcome to be achieved an
aggressive regime of physiotherapy and a high input from nursing
staff is required. An occasional complication is post-operative
dislocation of the new joint and this may require the application
of a hip brace.
3.2 Fractures of the Lower Limb
Fractures of the Femoral Shaft
The femur is the largest bone in the body and takes the longest
time to heal. There is always considerable blood loss as a result
of the fracture even if closed, and the patient will be in a severe
state of shock.
This is an injury mostly associated with fit young men. Initial
treatment is usually by traction on a Thomas splint, by skeletal
traction or by internal fixation using an intramedullary nail.
When the fracture is showing signs of union, the leg may be placed
in a functional cast brace which might also be used following
internal fixation. The brace allows movement at the knee and ankle
and the patient is encouraged to commence weight bearing under
supervision. The bodyweight is transferred to the brace via the soft
tissues. There is some telescoping of the fracture as the patient
walks which has a beneficial effect on the development of callus.
The brace depends for its success on being a perfect fit around
the thigh for compression of the soft tissues around the fracture
and on its shape, for controlling and preventing rotation. The
cast takes a major part of the patient’s body weight as he walks.
Supracondylar Fractures of the Femur
Like supracondylar fractures of the humerus, there is a major risk
of arterial damage and compartment syndrome with these injuries.
Pulses should be checked frequently in the foot. The leg will be
splinted with the knee in a flexed position, to relax the muscles
which are displacing the distal fragment backwards.
Initially treated by traction, after a few weeks a functional brace
allows early return to walking. Some of these fractures may be
treated by internal fixation, particularly in the older patient.
Fractures of the Femoral Condyles
Fractures of the femoral condyles are potentially serious as they
invariably involve the articular surface of the lower end of the
femur within the knee joint. The usual method of treatment is by
internal fixation with a T-plate or cancellous screw. A leg cylinder
may be prescribed.
Fractures of the PatellaThe kneecap may fracture following a strong contraction of the
quadriceps muscle in elderly people or as a result of direct violence
as in hitting the car dashboard in a road traffic accident. The
treatment prescribed will depend on the severity of the injury and
the amount if any of the displacement. If indicated the bone may
be excised and the ruptured tendon must be sutured. Alternatively
the bone fragments may be wired together. If not repaired knee
extension will be permanently impaired.
The direct blow often produces the stellate type of fracture (see
diagram page 22). The fragments are usually held together by the
enclosing tendon. Treatment may be the application of a cylinder
with the knee usually in full extension.
In either fracture exercises to maintain the quadriceps muscle are
required.

68
Soft Tissue Injuries in and around the knee
Soft tissue injuries involving the knee joint are very common indeed.
They may be intracapsular including tears to cruciate ligaments or
semilunar cartilages (menisci) or extracapsular especially injuries to
medial and lateral collateral ligaments.
The anterior cruciate ligament is torn more frequently than the
posterior one. Abnormal movement of the femur on top of the
tibia will be noted. Although this can be an isolated injury it often
accompanies other injuries around the knee joint. Opinion differs
on primary treatment. The choices being early surgical repair or a
more conservative approach. Surgical intervention is often employed
later in order to overcome joint laxity. Following posterior cruciate
ligament injuries early treatment is usually conservative with follow
up surgery employed to correct persistent instability which would
lead to secondary osteoarthritic changes.
Of the extracapsular ligaments the medial collateral ligament is
the more common and often follows the so called “bumper injury”
whereby the car bumper is in contact with the lateral part of the
knee so forcing open the medial compartment. The rupture may be
accompanied by a fracture of the tibial condyle of the opposite side
to the ligamentous tear. Treatment depends on the severity of the
tear and ranges from support bandaging, a cylinder or surgical repair.
Fractures of the Tibial CondylesFracture of the lateral tibial condyle occurs due to abduction of the
tibia while the foot is anchored. The fracture can be comminuted,
impacted or oblique. Since the tibial plateau and hence the articular
cartilage is likely to be damaged, secondary osteo-arthritic changes
may occur later. Initially a haemarthrosis may be present. Treatment
involves aspiration of any haemarthrosis and an attempt at restoration
of the articular cartilage. This usually involves a period of rest and
then a period of intensive physiotherapy to prevent stiffness of the
joint. Occasionally open reduction may be carried out to restore the
congruity of the articular cartilage. A removable back slab may be
needed at night to protect the knee joint from movement which
will further damage the soft tissues and also for comfort. Functional
braces are often used after the initial treatment.
Fractures of the Tibia
The tibia has two anatomical features which give rise to problems
with a fracture. It is very close to the skin and therefore the
fracture is most likely to be open, and the blood supply to the lower
part of the bone enters near the top. Therefore, when the bone
is broken, the lower part relies on the blood from the periosteal
membrane. If the fracture is at all comminuted, the blood supply
may be inadequate leading to necrosis of fragments and non-union.
Even simple fractures of the tibia can take a long time to unite
because of the blood supply problems. The skin may also break
down after a few days exposing the bone beneath.
Support the injured leg without moving it, and assess the circulation
in the foot. Ask the patient to move the toes.
With undisplaced closed fractures, the common treatment is a long
leg cast. The cast may be split along its length if there is any risk
of swelling. When the fracture is beginning to unite, a functional
brace known as a Sarmiento cast may be applied and the patient
encouraged to walk normally. Stiffness of the knee and ankle joints
is common after conservative treatment of tibial fractures and may
handicap the patient for some time. For this reason displaced or
unstable fractures are usually treated with internal fixation.
If the fracture is open, then the cast MUST be split, or better still a
back slab applied until the swelling has subsided. External fixators
can be used where the fracture is comminuted or compound, where
access to a wound is required.
Fractures around the AnkleThese are often erroneously called Pott’s fractures. We should
more accurately name them in terms of the site of the injury, which
affects one or both malleoli, with varying degrees of displacement.
Tenderness is usually felt on the side of the fracture. The anatomy
around the ankle together with the direction of the forces dictates
the way in which the ankle is injured. The ankle joint is a mortice,
holding the tenon formed by the talus. The lateral ligament is
weak whilst the lateral malleolus is strong. The medial ligament
is strong, whilst the medial malleolus is weak.
Fractures of the ankle must be splinted in a position of the foot
at 90° to the leg, in neither inversion nor eversion (plantigrade).
Six weeks in cast is usually sufficient.
Medial Malleolar Fractures
This is commonly the result of the foot being everted. The malleolus
is pulled off by the strong medial ligament, producing an avulsion
fracture. Treatment is the application of a below knee cast.
When the foot is forced inwards (inversion) the common result is
to tear the lateral ligament because of its weakness. The talus
may then be displaced medially. If the medial malleolus is then
broken, the ankle joint becomes unstable and requires fixation of
the malleolar fragment with a screw.
3.2 Fractures of the Lower Limb

69
Lateral Malleolar Fractures
To break the lateral malleolus requires a lateral shift of the whole
foot. The alignment of the ankle joint will be altered and must be
restored if function is to be regained.
Instead of fracturing the malleolus the inferior tibio-fibular joint may
be separated (a diastasis). In mild separation a below knee plaster
cast is applied with adequate padding over the malleolii and gentle
compression applied by medical staff. This may close the gap or it
may be necessary to operate and insert a diastasis screw.
Less seriously, the tip of the lateral malleolus may be pulled off
(avulsed), but given the comparative weakness of the ligament it
is more common to sprain the lateral ligament. This may however
require a below-knee cast although elevation, strapping and rest
are often sufficient.
Bi-malleolar and tri-malleolar Fractures
Occasionally both medial and lateral malleoli may be fractured
plus the posterior part of the lower end of the tibia, sometimes
called the posterior malleolus. The ligaments surrounding the ankle
joint may also be damaged. This causes a major disruption of the
integrity of the ankle joint.
Treatment is geared towards the restoration of the joint congruity
and while this can be achieved by manipulation and application
of a below knee cast and elevation of the limb for a few days,
some will inevitably require open reduction and fixation with plate
and screws or screws alone. A below knee cast may be required,
non weight bearing, for a period of time and later a walking cast
will be applied.
Foot Fractures
Calcaneus
The heel bone may be fractured as the result of a fall onto the
heel, from a small height. Slipping off a ladder is common.
The bone is crushed against the talus and is often comminuted.
Swelling is considerable and early treatment is rest and elevation
until the swelling has subsided. Wool and crepe bandaging may
be replaced by a below-knee cast and the patient allowed to start
to walk. The heel may be painful for some considerable time.
Patients with heel fractures must always be examined for other
injuries, to hip, pelvis or spine.
Talus
Injuries to the talus are rare but disabling. Accurate alignment of
fragments is essential if the patient is to walk or stand without
discomfort. Early osteoarthritis of the ankle or subtalar joint is a
likely outcome. If the fracture is undisplaced a split plaster cast
may be utilised, but displaced fractures require open reduction and
fixation. The foot is then held in a plantar-flexed position for 3 weeks
then recast in a plantigrade position after the wires are removed.
The talus is at risk of avascular necrosis after this injury and may
ultimately lead to fusion of the ankle joint or joint replacement.
Metatarsal Fractures
Injured by crushing, treatment is manipulation and holding in a
below knee cast for some weeks. If swelling is severe then the
foot is elevated, and movements encouraged until this has subsided.
When the swelling has subsided a cast may be applied and the
patient allowed to walk.
Fractures of the 5th metatarsal are amongst the commonest
metatarsal fractures. A simple avulsion fracture of the tuberosity
must be distinguished from the less common Jones’ fracture. This
fracture occurs more proximal to the tuberosity, in the metaphyseal
region at the base of the metatarsal shaft. It extends into the
intermetatarsal facet joint not the metatarsal-cuboid joint. This
fracture is important to diagnose as it occurs at the junction of 2
separate blood supplies and is prone to delayed healing. Initial
treatment for acute fractures is 6-8 weeks non-weight bearing in
a cast. Surgical fixation may be required for delayed healing or
non union.
March Fracture
This is a stress fracture usually affecting the shaft of the 2nd, 3rd
or 4th metatarsal bone. It arises after unaccustomed walking, e.g.
in recruits to the armed services or police or during a walking
holiday. An X-ray taken soon after the onset of symptoms may
not reveal the fracture and it requires a second X-ray some two
weeks later when the callus formation is seen.
Treatment is symptomatic and may require the application of a
walking cast.
Fractures of the ToesThese are rarely treated by the application of plaster, the favoured
method being to strap the injured toe to its neighbour with a
STRAPPAL® Rigid Zinc Oxide Strapping Tape. If there is an
associated injury to metatarsal bones, then a below-knee cast with
a toe platform may be applied.
3.2 Fractures of the Lower Limb

70
3.3 Orthopaedic Conditions
Congenital Talipes Equinus Varus (CTEV)A condition present at birth that affects the foot and lower part of
the leg. The cause is as yet unknown. About one in 1000 babies
are born with this condition and it is twice as common in boys than
girls. In 50% it is bilateral. The foot is turned inwards (inverted)
and, although to a certain extent all babies have slightly inverted
feet, the examining midwife will be able to recognise the abnormal.
There are three elements that contribute to the deformity:
1. Inversion at the sub-talar joint
2. Adduction at the forefoot
3. Plantar flexion at the ankle joint
The eventual outcome of treatment depends largely on the age at
which treatment begins and the efficiency with which it is carried
out. Treatment is mostly conservative and occasionally surgical
may be necessary. The aims of treatment are to return the bones
to their normal relationship with one another and to maintain that
position until the muscles can maintain the position unaided.
Techniques can vary slightly, however the Ponseti Method is the accepted technique. To undertake Ponseti technique you should ensure that you receive appropriate training. Usually, medical staff hold the position of the foot and it is essential that the person applying the actual cast is experienced and qualified in casting.
The foot is manipulated and stretched first, then an above knee cast is applied with the knee at 90°flexion. The serial casts are changed weekly. The pes cavus is corrected first, then the forefoot adduction, the hindfoot and last the equinus. Often a percutaneous achilles tenotomy is performed when the equinus is corrected.
After the series of casts the child wears Dennis Brown type boots and bar. The feet are held in 70°of external rotation and 15° of dorsiflexion. They are worn for 23 hours a day for three months, then just at night and day sleeps until 3 years old.
Sometimes they do relapse and may need further Ponseti treatment.
Occasionally even after repeated treatment it may be unsuccessful and if this is so then operative measures will be required. This will be designed to release the soft tissues on the medial side of the foot and probably the tendo-calcaneus. Once the bones have been returned to their normal position then an above knee cast will be applied. When the cast is removed a night splint may be required and stretching of the soft tissues is continued to prevent a recurrence of the deformity.
Surgery may be required later to overcome problems where the
diagnosis has been made late or if treatment has failed.
Hallux ValgusThis is a deformity whereby the big toe is deviated away from the
mid-line of the body (valgus) and the first metatarsal drifts into
varus. It is more common in women than men. The cause is still
unknown although itt is often familial and it is thought that shoes
with pointed toes that are also too tight may be a contributory
factor. Thickened skin develops over the prominence and a bursa
underneath may become inflamed causing pain.
Treatment, if required, falls into three categories. Firstly, a first
metatarsal corrective osteotomy may be performed e.g. Scarf,
Mitchell’s or Wilson’s. Secondly, an arthrodesis of the metatarso-
phalangeal joint in slight dorsi-flexion. In elderly people Keller’s
Operation (excision of the proximal third of the 1st phalanx with an
exostectomy of the 1st metatarsus) may sometimes be performed.
Some surgeons use a below knee cast, slipper or special sandal
after surgery.
OsteochondritisThe term osteochondritis refers to a collection of conditions where
there is thought to be a temporary interruption in the blood supply
to a part of a bone (avascular necrosis), leading to softening and
in the case of weight bearing bones to collapse. Rehardening
occurs spontaneously over a period of time. There can be damage
to the apophyses. In order to maintain the integrity of the bone it
will need to be protected during the softened phase. This can be
done by the application of casts or splints.
Vascular Damage O Perthes affects Head of Femur (see below)
O Keinbock’s affects Lunate - treated in a Below Elbow Cast.
O Kohler’s affects Navicular - treated in a Below Knee Cast
Damage to the ApophysesO Osgood Schlatter’s affects the Tibial Tubercle - treated in a
Cylinder Cast
O Sever’s affects the Calcaneum - treated in a Below Knee Cast
These conditions normally respond to a period of rest in a cast.
Scheuermann’s Kyphosis may be an Osteochondritis of the Vertebral
Body.
Perthes’ Disease
Perthes’ disease is an osteochondrotic condition of the head of the
femur. The aim of treatment is to hold the head of the femur
within the acetabulum during the softened phase. At this stage the
cartilage continues to grow and can form a mushroom shaped head
if not contained within the acetabulum.
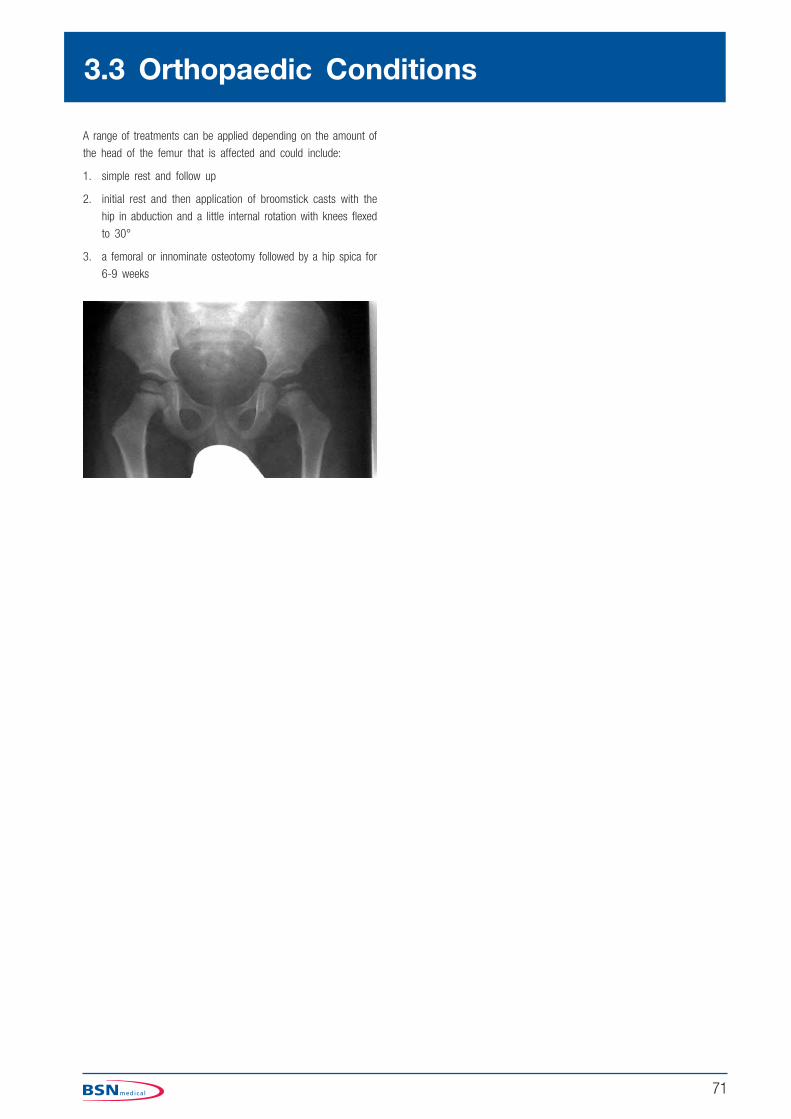
71
A range of treatments can be applied depending on the amount of
the head of the femur that is affected and could include:
1. simple rest and follow up
2. initial rest and then application of broomstick casts with the
hip in abduction and a little internal rotation with knees flexed
to 30°
3. a femoral or innominate osteotomy followed by a hip spica for
6-9 weeks
3.3 Orthopaedic Conditions

72

73
SlippersThese casts are very difficult to apply satisfactorily. They can be
applied following fracture of the metatarsals, operations for Hallux
Valgus and other foot conditions. The diagnosis will affect the way
these casts are applied. It may be applied up the tips of the toes
or with a toe piece between the hallux and 2nd toe. Patients with
a toe piece are much more comfortable with a platform under
all the toes.
3.4 Casts of the Lower Limb
Padding
Apply the stockinette from toes to mid-calf. Apply a covering of
undercast padding firmly, smoothly and evenly.
Application
Apply 1½–2 x 10cm plaster of Paris bandages from just above
the malleoli to the tips of the toes. Mould to fit well around the
heel and Achilles tendon. When initial set has taken place, trim
the cast. Anteriorly, it is trimmed to allow flexion of the ankle,
medially and laterally under the malleoli and rising at the back in
the form of a Dutch clog. Trim the toe area as required depending
on the diagnosis.
Reinforce for weight bearing using a 3 layer slab to reach from the
tip of the toes to just around the heel, cut from a 7.5cm casting
tape roll. Hold in position with the remainder of that bandage.
Check and remove any synthetic which has strayed over the original
trimming. Turn back the stockinette over the edges and hold in
place with the adhesive tape.
Combination casts are one of the best ways of making a comfortable
cast that the patient can walk on within 20 mins. When applying
a build-up, one must be very careful in positioning and stand the
patient up to check that nothing is rubbing and that he is well
balanced.
Toe Piece
The medical officer may wish to have the toe held in position by a
piece of plaster. Cut the stockinette between the first and second
toe and apply a strip of undercast padding around the toe in a
figure of eight down the medial side of the foot. Prepare a 5 layer
plaster of Paris slab 5cm x 20cm long.
Apply the slab in the same way as the padding after first applying
the first bandage to the level of the base of the toes. Commence
the second bandage at the toes incorporating the slab into the rest
of the cast before it sets. Reinforce for weightbearing as above.
Basic trolley see page 26 - plus
O Stockinette 7.5cm
O Piece of non adhesive felt for between the hallux and 2nd toe
O SOFFBAN Plus padding 10cm x 1 roll
O GYPSONA BP plaster of Paris bandages 10cm x 2 rolls
O DELTA-CAST Conformable 7.5cm x 1 roll
O TENSOPLAST Sport cast edge tape 3cm
O Knee rest

74
Slippers
SYNTHETICBasic trolley see page 26 - plus
O Stockinette 7.5cm
O Piece of non adhesive felt for between the hallux and 2nd toe
O SOFFBAN PLUS padding 10cm x 1 roll
O DELTA-CAST Conformable 7cm x 1 roll
O TENSOPLAST Sport cast edge tape 3cm
O Knee rest
3.4 Casts of the Lower Limb
Padding
Apply the stockinette from toes to mid-calf and, if the medical
officer wishes to have the toe held in position by a piece of
plaster, cut the stockinette between the first and second toe and
apply a small piece of non adhesive felt in between and strip of
undercast padding around the toe in a figure of eight down the
medial side of the foot.
Apply a strip of 2mm thin adhesive felt around under both malleoli.
Apply a covering of undercast padding firmly, smoothly and evenly
Application
Using 1 or 1 and a half x 7.5cm casting tape rolls apply a single
layer carefully from the ankle to the toes without making too
many layers over the dorsum of the foot. Cut twice to go through
between the hallux and the 2nd toe and around the hallux in a
figure of eight. Place a 2 or 3 layer slab to reach from the toes to
around the heel, apply and complete with a single layer coverage
back up to the ankle.
Trim under the malleolus and to allow movement of the ankle.
Leave a platform under the toes for comfort.
1 2 3
completed cast
4 5 6
123
456

75
Below Knee SlabPosition of the ankle depends on the injury being treated, but is
most commonly held at 90° and the foot in neutral inversion/
eversion. If the knee can be held at an angle of 10-15º with the
aid of a padded support e.g. knee rest, it is easier to hold and
maintain the foot in the correct position. It is very important not
to let the ankle be moved during the application, as it is all too
easy to make ridges around the ankle.
The slab should extend from just below the knee, but allowing free
movement of that joint, to the toes.
Padding
Stockinette and pad the limb as for a below knee cast.
According to the medical officer’s wishes the toes can be fully
exposed or supported by a platform.
There are certain injuries, which require different positioning. For
example, an injury to the Achilles tendon may require the foot to
be positioned in equinus and this may be achieved more easily by
placing the patient prone on the trolley.
A difficult reduction of a fracture may require the patient to be
positioned with the knee at a right angle over the edge of a trolley,
the foot being supported on the medical officer’s knee, thereby
leaving both hands free to hold the reduction.
EQUIPMENT REQUIRED
Basic trolley see page 26 - plus
O Stockinette 7.5cm
O Adhesive felt 2mm thick
O SOFFBAN Plus padding 15cm x 2 rolls
O GYPSONA BP plaster of Paris bandages or slab dispenser 15cm or 20cm
Application
Measure a slab of 6 - 8 layers of 15cm or 20cm plaster of
Paris to go the length of the cast allowing for shrinkage. Fan out
the upper end of the slab to fit the calf area. This slab is placed
from just below the knee posteriorly down to the toes. Cut two
side slabs 10cm x 22cm long. These are placed across either side
of the ankle joint.
A 10cm wide U-slab maybe used instead of the side slabs and
this should be applied down one side of the leg under the heel
of the foot and up the other side. Beware of putting tension on
the U-slab as this can cause pressure on the sole of the foot.
Great care must be taken not to let the slabs overlap anteriorly.
Hold the slabs in position with a pre-wet and squeezed out crepe
bandage.
1 2 3
1
2
3
O GYPSONA BP plaster of Paris bandages or slab dispenser 10cm
O SOFFCREPE bandages 15cm rolls
O Knee rest
O Patient trolley
3.4 Casts of the Lower Limb

76
Below Knee CastPosition of the ankle depends on the injury being treated, but is
most commonly held at 90° and the foot in neutral inversion/
eversion. If the knee can be held at an angle of 10-15º with the
aid of a padded support e.g. knee rest, it is easier to hold and
maintain the foot in the correct position. It is very important not
to let the ankle be moved during the application as it is all too
easy to make ridges around the ankle.
The complete plaster should extend from just below the knee, but
allowing free movement of that joint, to the toes.
According to the medical officer’s wishes the toes can be fully
exposed or supported by a platform.
There are certain injuries which require different positioning. For
example, an injury to the Achilles tendon may require the foot to
be positioned in equinus and this may be achieved more easily by
placing the patient prone on the trolley.
A difficult reduction of a fracture may require the patient to be
positioned with the knee at a right angle over the edge of a trolley,
the foot being supported on the medical officer’s knee or by an
assistant, thereby leaving both hands free to hold the reduction.
EQUIPMENT REQUIRED
Basic trolley see page 26 -plus either of the following options:
PLASTER OF PARISO Stockinette 7.5cm
O Adhesive felt 2mm thick
O SOFFBAN Plus padding 15cm x 2 rolls
O GYPSONA BP plaster of Paris bandages 15cm x 5 rolls
O Knee rest
Padding
Stockinette only if there is unlikely to be swelling. Bony areas, such as
the head of the fibula and the malleoli, may need padding with felt.
Apply a covering of undercast padding firmly, smoothly and evenly.
Application
Bandaging can commence at either end of the limb and all basic
plastering rules must be observed. When rolling the plaster of Paris
bandage, aim for the middle of the bandage to lay across the flexor
surface and apply evenly without missing anywhere.
If any of these casts are to be fully weight bearing then the sole
must be levelled and reinforced before an overshoe or walking
appliance is added. Synthetic Casting material such as DELTA-CAST
Conformable can be used to reinforce a plaster of Paris cast to
allow the patient to weight bear.
A pair of crutches will have to be issued and instructions given on
their usage and how to fit the overshoe.
1 2
3 4 5
12
3
4
completed cast
3.4 Casts of the Lower Limb

77
Below Knee Cast
SYNTHETICSO Stockinette 7.5cm
O Adhesive felt 2mm thick
O SOFFBAN Plus padding 15cm x 2 rolls
O DELTA-CAST Conformable 10cm x 2 rolls
O TENSOPLAST Sport cast edge tape 3cm
O Knee rest
Padding
Apply the stockinette. Bony areas, such as the head of the fibula
and the malleoli, may need padding with felt.
Apply a covering of undercast padding firmly, smoothly and evenly.
Application
First, measure the distance from the toes to just around the heel.
Commence at the proximal end of the cast, rolling the casting
bandage away from you.
Turn in the stockinette and catch in with the second turn. Continue
down the leg using 50% coverage. From the second bandage
quickly cut a 2 layer slab to the previously measured length. Hold
the slab in place from the toes with the remainder of the bandage
returning up the leg while making sure there is sufficient coverage
over the posterior aspect of the ankle.
It may be necessary with different synthetic casting materials to
increase the amount of material used.
Trim as necessary.
Fit an overshoe and give full instructions to the patient.
Complete cast.
12
34
5
1 2 3
4 5
completed cast
3.4 Casts of the Lower Limb

78
Tibial Bracing SarmientoPosition the foot with the ankle at 90° and the foot in neutral
inversion/eversion. The knee needs to be supported at between
30-40º. A good position is easier to achieve with the leg over the
edge of the trolley and held by an assistant sat on a stool at the
side. The applicator sits on a stool facing the patient’s leg.
The moulding of these casts will depend on the medical officer’s
wishes, but the method now given may be helpful.
With the knee still flexed, mould gently to shape the cast on either
side of the patella tendon supporting behind the cast just below
the knee. Do not press laterally over the head of the fibula as
you may cause nerve damage. Use the palm of the other hand to
gently compress the soft tissue at the posterior aspect of the cast.
The cast should extend from mid patella around to the medial and
lateral femoral condyles, and posteriorly to allow 90º of flexion of
the knee. Do not trim too low posteriorly or the soft tissue support
will be lost. Trim the distal end as for below knee cast.
Basic trolley see page 26 - plus either of the following options:
PLASTER OF PARISO Stockinette 7.5cm
O SOFFBAN Plus padding 10cm x 1-2 rolls
O GYPSONA BP plaster of Paris slab 15cm x 20cm
O GYPSONA BP plaster of Paris bandages 15cm x 5 rolls
Padding
Apply two layers of stockinette. Strips of 2mm thick adhesive felt
can be placed down either side of the leg between the layers of
stockinette to aid cast removal. Place a thin strip down the tibial
ridge. Place one layer of undercast padding around the leg to protect
the fibular head and patella and one layer from the malleoli to the
toes. Remember the padding must be kept to a minimum to allow
the cast to support the soft tissues, which in turn support the bone.
Application
Cut a five layer slab of 15cm plaster of Paris to fit from the
medial femoral condyle around the patella and to the lateral femoral
condyle. Apply two plaster of Paris bandages as for a below knee
cast but bring one higher around the knee. Place the plaster slab
on the patella and around to the femoral condyles. Complete the
cast with a further one or two plaster of Paris bandages. Mould
as discussed above.
To be fully weight bearing the cast can be reinforced with synthetic
casting material such as DELTA-CAST Conformable.
Apply an overshoe.
NB Mark the outside of the cast ‘MINIMAL PADDING’. This way the person removing the cast will know to take extra care.
1 2 3
12
3
3.4 Casts of the Lower Limb

79
Tibial Bracing Sarmiento
SYNTHETICSO Cast sock or stockinette 7.5cm
O Adhesive felt 2mm thick
O SOFFBAN Plus padding 10cm x 1 roll
O DELTA-CAST Conformable 10cm x 2 rolls
O DELTA-CAST Conformable 7.5cm x 1 roll
O TENSOPLAST Sport cast edge tape 3cm
Padding
Apply one layer of stockinette. Place strips of 2mm thick adhesive
felt down each side of the leg from the top of the cast to just
below the malleoli. (this allows easier removal of the cast and pads
the bony areas) Apply a second layer of stockinette.
Place one layer of 10cm padding down the tibial crest. 2mm
adhesive felt or undercast padding can be used to pad the proximal
end of the cast.
Use one layer of firmly applied layer of undercast padding around
the malleoli and foot.
Remember the padding must be kept to a minimum to allow the
cast to support the soft tissues, which in turn support the bone.
Application
Use a 10cm casting tape bandage to create a layer from the
proximal edge of the patella to the toes.
Quickly, cut a 1 or 2 layer slab 20cm long from the next 10cm
bandage. Place on the patella and around the femoral condyles.
Use the remainder of the bandage to take one turn around to hold
the slab in place and bandage down the leg in a single layer. Mould
as discussed on page 78.
Use the 7.5cm casting bandage to create the 2 layer slab for the
sole of the foot and complete the cast as for a below knee cast.
(see page 78)
Trim and turn back the stockinette and hold in place with cast
edge tape.
NB Mark the outside of the cast ‘MINIMAL PADDING’. This way the person removing the cast will know to take extra care.
1
2
3
45678
1 2 3
4 5 6
7
8
3.4 Casts of the Lower Limb

80
Cylinder Cast The knee is usually held in about 5°-10° flexion for comfort. If
the patella is fractured or there is damage / repair to the extensor
mechanism the knee is held in extension. Support the limb fully
throughout the application. Hold the foot against the chest and use
the hands to support the knee.
The cast should extend from as high up towards the groin as
possible allowing for comfort, and down to 3cm above the malleoli.
Before initial setting takes place the cast should be moulded well
with the palms of the hands on the medial and lateral sides of
the thigh, just above the knee. This helps to prevent the cast from
slipping down the leg.
Other methods of preventing the cast slipping are:
O Use 2 layers of stockinette, minimal adhesive felt padding and no undercast padding. Make the cast adjustable by using posterior slabs and minimal cast material anteriorly. Split the cast with a curved cut and holding in place using Velcro straps
O Attach a webbing strap to the top of the cast at the back, take the strap over the opposite shoulder and down to a buckle from a strap incorporated into the front of the cast. The strap should be padded over the shoulder and can be released if required
O Fit a heel cup or apply an above knee cast
EQUIPMENT REQUIRED
Basic trolley see page 26 - plus either of the following options:
PLASTER OF PARISO Stockinette 10cm (only if swelling is unlikely)
O 5mm thick adhesive felt
O SOFFBAN Plus padding 15cm x 2 rolls
O GYPSONA BP bandages 15cm x 6 rolls
O Strips of GYPSONA BP plaster of Paris to finish
Padding
Apply stockinette first. Then place a 7.5cm wide strip of 5mm
thick adhesive felt around the leg, 3cm above the malleoli. Apply
a covering of undercast padding firmly, smoothly and evenly. The
patella and head of fibula may require extra padding.
Application
Starting at the distal end of the cast leave 2.5cm of the adhesive
felt showing and apply the plaster of Paris cast following the basic
rules of casting.
Before initial setting takes place the cast should be moulded well
with the palms of the hands on the medial and lateral sides of
the thigh, just above the knee.
Completed cast
1 2completed cast
1 2
3
3.4 Casts of the Lower Limb

81
Cylinder Cast
SYNTHETICSO Stockinette 10cm
O 5mm thick adhesive felt
O 2mm thick adhesive felt
O SOFFBAN Plus padding 15cm x 2 rolls
O DELTA-CAST Conformable 10cm or 12.5cm x 3 rolls
O TENSOPLAST Sport cast edge tape 3cm
Padding
Apply stockinette first. Then place a 7.5cm wide strip of 5mm thick
adhesive felt around the leg, 3cm above the malleoli. The patella
and head of fibula may require extra padding. Pad the proximal
end of the cast with the 2mm adhesive felt.
Application
Starting at the distal end of the cast leave 2.5cm of the adhesive
felt showing and apply the casting tape bandage rolling away from
the applicator covering approximately 50% of the previous turn
progressing up the leg.
Do not turn in the top stockinette until the cast is set, as this is
inclined to roll down the casting material. Continue with a single
layer of casting material down the leg creating 3-4 layers in total
over the knee.
Before initial setting takes place the cast should be moulded well
with the palms of the hands on the medial and lateral sides of
the thigh, just above the knee.
Apply a covering of undercast padding firmly, smoothly and evenly.
1 2 3
4
completed cast
1 2
3 5
4
3.4 Casts of the Lower Limb
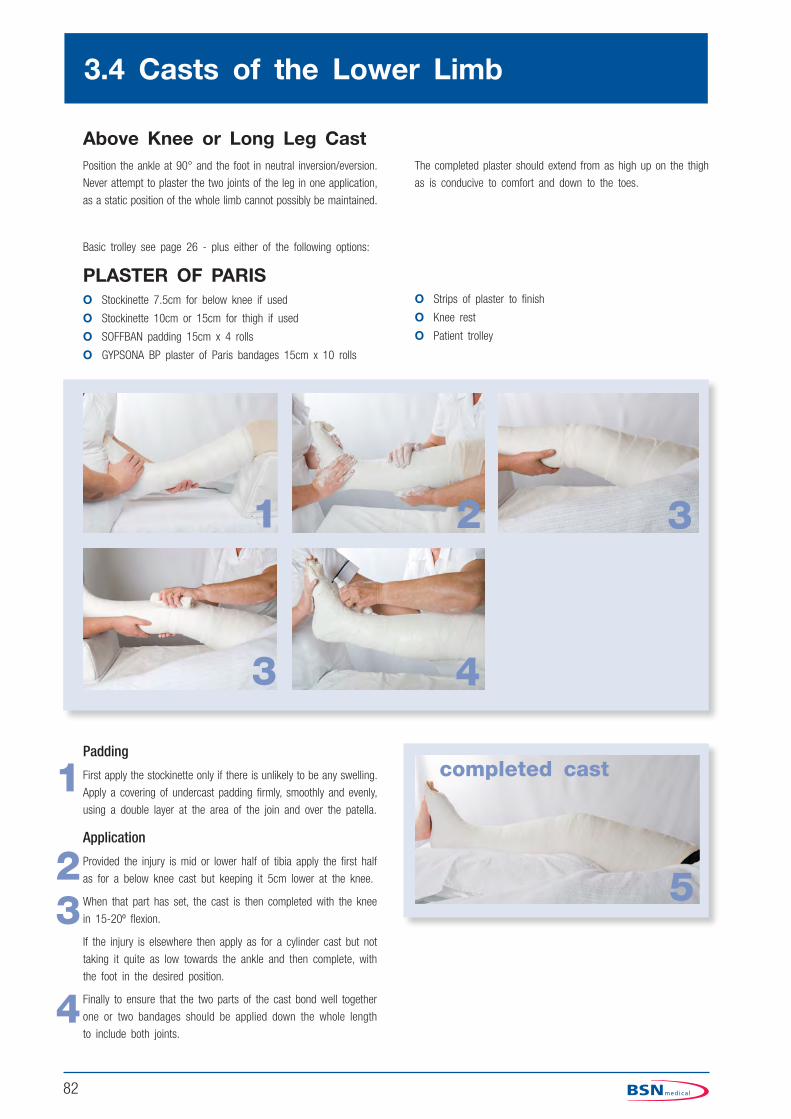
82
Above Knee or Long Leg CastPosition the ankle at 90° and the foot in neutral inversion/eversion.
Never attempt to plaster the two joints of the leg in one application,
as a static position of the whole limb cannot possibly be maintained.
The completed plaster should extend from as high up on the thigh
as is conducive to comfort and down to the toes.
Basic trolley see page 26 - plus either of the following options:
PLASTER OF PARISO Stockinette 7.5cm for below knee if used
O Stockinette 10cm or 15cm for thigh if used
O SOFFBAN padding 15cm x 4 rolls
O GYPSONA BP plaster of Paris bandages 15cm x 10 rolls
Padding
First apply the stockinette only if there is unlikely to be any swelling.
Apply a covering of undercast padding firmly, smoothly and evenly,
using a double layer at the area of the join and over the patella.
Application
Provided the injury is mid or lower half of tibia apply the first half
as for a below knee cast but keeping it 5cm lower at the knee.
When that part has set, the cast is then completed with the knee
in 15-20º flexion.
If the injury is elsewhere then apply as for a cylinder cast but not
taking it quite as low towards the ankle and then complete, with
the foot in the desired position.
Finally to ensure that the two parts of the cast bond well together
one or two bandages should be applied down the whole length
to include both joints.
O Strips of plaster to finish
O Knee rest
O Patient trolley
1 2 3
3 4
5
completed cast1
23
4
3.4 Casts of the Lower Limb

83
Above Knee or Long Leg Cast
SYNTHETICSO Stockinette 7.5cm for below knee
O Stockinette 10cm or 15cm for thigh
O adhesive felt 2mm thick
O SOFFBAN Plus padding 15cm x 4 rolls
O DELTA-CAST Conformable 10cm x 3 rolls
O DELTA-CAST Conformable 12.5cm x 1 roll)
O TENSOPLAST Sport cast edge tape 3cm
O Knee rest
O Patient trolley
Padding
First apply the stockinette in two pieces overlapping below the knee.
A circle of 2mm felt can be used at the proximal edge and at the
area of the join. Pad the malleoli as necessary.
Apply a covering of undercast padding firmly, smoothly and evenly,
using a double layer at the area of the join and over the patella.
Application
Provided the injury is mid or lower half of tibia apply two 10cm
casting bandages as for the below knee, but keeping it 5cm lower
at the knee.
When that part has set the cast is then completed with the knee
in 15-20º flexion. Apply the upper section padding and using the
12.5cm and remaining 10cm casting bandage to complete the
upper part. Continue down well over the area of the join to ensure
union of the two parts.
If the injury is elsewhere then apply as for a cylinder cast but not
taking it quite as low towards the ankle and then complete, with
the foot in the desired position.
1 2 3
4 5
6
completed cast1
2345
3.4 Casts of the Lower Limb

84
Broomstick CastsThese are bilateral leg cylinders applied with the limb position
maintained in a by means of two wooden or metal bars plastered
into position just below the knee areas, one bar anteriorly and
one posteriorly. These bars must run parallel to each other. The
position of the limbs is determined by the condition for which the
cast is applied and can be used in any age group (photo1). Often,
the hips are abducted and internally rotated and the knees flexed.
Sometimes the bars are adjustable so that the legs may be further
abducted if required (photo 2).
1
2
3.4 Casts of the Lower Limb

Casting the TrunkCONTENTS
4.1 Anatomy of the Trunk
4.2 Fractures of the Spine
4.3 Orthopaedic Conditions
4.4 Casts of the Trunk
The table lists the cast most commonly to treat fractures and orthopaedic conditions of the trunk. Each is discussed in more detail.
O Plaster Jacket
O Plaster Corset
O Minerva Jacket
O Shoulder Spica
O Hip Spica
O Frog Type Cast
CONTRIBUTORS
Sue Miles, BSc, RGN, ONC, FETC, Orth. Tech Cert National Casting Training Adviser.
John W Burden, BSc, RGN, ONC, RNT, ENB 870 Lecturer in Orthopaedic Nursing.
A Practical Guide to Casting

86
4.1 Anatomy of the Trunk
The Vertebral ColumnThirty three bones form a column, rather like a tower of children’s
bricks. However, the column is capable of moving without falling
down. The bones all have the same characteristic basic structure
but each bone has variations, which adapt to its structure, so that
no two bones are quite alike.
Structure of a Vertebra
All vertebrae have a roughly box shaped mass of bone - the vertebral body. Piled one on top of the other, the largest towards the base
of the spine, they give stability and carry the body’s weight. Between
each lies a cartilagineous inter-vertebral disc, which acts as a
shock absorber, and allows the body to move slightly in relation
to its neighbours. The disc is made up of two parts; an outer ring
of white fibro-cartilage called the annulus fibrosus and an inner,
softer, highly elastic structure called the nucleus pulposus. The discs
allow for limited movement and act as shock absorbers. They are
however vulnerable to damage from misuse. The neural arch is
attached to the posterior surface of the vertebral body. Situated in
a vertical line, they form a tube - the neural canal - which contains
and protects the spinal cord and spinal nerve roots.
The spinal nerves pass through the intervertebral notch, one on
either side at each level, into the neural canal where they become
attached to the spinal cord.
The trunk comprising the thoracic cavity,
the abdominal cavity and the pelvic cavity,
contains most of the vital organs for
example the lungs, heart, digestive system,
the internal organs of reproduction and the
spinal cord.
The skeletal framework of the trunk is therefore constructed to:
1. Protect the vital structures
2. Give stability and maintain the upright position
3. Allow flexibility and movement
The skeleton of the trunk consists of the vertebral column which
protects the spinal cord; the rib cage and sternum which protect
the lungs and heart and contribute to the process of respiration;
the shoulder girdle (clavicles and scapulae), by which the upper
limb is attached to the trunk; the pelvic girdle which protects the
bladder, rectum and internal sex organs, and also attaches the
lower limbs to the trunk.
The Skeleton of the Trunk

87
The Processes and Facets
Attached to each neural arch posteriorly, are the two transverse processes which are situated to either side and the spinous process which is situated centrally and posteriorly. The spinous
process can be felt in the cervical and thoracic regions. Also attached
to the neural arch are the superior and inferior articulating facets. These form gliding synovial joints between the facets of
each vertebrae and those above and below it. The facet joints
also contribute to the vertebral column’s flexibility.
Regions of the Vertebral Column
The Cervical Region - the upper seven bones, situated in the
neck, and identified as C1 to C7. C1 and C2 are also known
as the atlas and the axis respectively; their bodies are adapted
to form the pivot joint which allows the head to turn from side
to side.
The Thoracic Regions - identified as T1 to T12. The ribs are
also attached to these vertebrae at the costovertebral joints.
The Lumbar Region - L1 to L5.
The Sacrum - S1 to S5 are fused together to form one
bone. The neural canal continues through the sacrum but the
processes are very small or non-existent.
The Coccyx - four very rudimentary bones which are fused and
tilted forwards, so that they cannot be felt on the surface.
Curves of the Vertebral Column
When looked at from behind, the vertebral column should appear to
be vertical. However, when a person is viewed from the side, you
should be able to see that the vertebral column is curved anteriorly
or posteriorly in the different regions. The cervical region is convex
forwards, the thoracic region convex backwards, the lumbar region
convex forwards and the sacrum and coccyx convex backwards.
Ligaments
Long ligaments which lie along the length of the vertebral column,
and short ones which connect the processes of one vertebrae with
those of its neighbours are very important for maintaining the position
of the vertebrae. Torn ligaments can allow the intervertebral joints
to dislocate, thus allowing the neural canal to become distorted and
the spinal cord to become compressed.
Movements of the Spine
Movements of the spine are:
O flexion a forward movement brought about by the rectus abdominis which is attached to the 5th, 6th and 7th ribs superiorly and the crest of the pubis inferiorly
O extension a backwards movement of the spine is brought about by erector spinae a complex muscle with many attachments from the occiput superiorly to the iliac crest and sacrum inferiorly
O lateral flexion or side flexion is mainly brought about by the internal and external oblique muscles which are attached to the rib cage posteriorly and the iliac crest and the fascia or rectus abdominis. Quadratus lumborum is attached to the iliac crest inferiorly and the 12th rib superiorly and also helps with lateral flexion
O rotation of the spine is brought about by the combined action of quadratus lumborum and the internal and external oblique muscles
The Rib Cage (Ribs and Sternum)The ribs are comprised of twelve pairs of long bones which articulate
with the thoracic vertebrae, and which curve around the chest
wall. Anteriorly, costal cartilages attach the upper ten pairs to the
sternum. The eleventh and twelfth ribs are short and articulate
only with the lower thoracic vertebrae. They are therefore known
as ‘floating ribs’.
Sheets of intercostal muscles lie between and attach to each pair
of ribs. It is these muscles that bring about the rise and fall of
the chest wall with each breath.
The Sternum
The sternum or the breast bone is a flat bone that forms part of
the shoulder girdle.
It can be felt under the skin of the chest. The sternal notch of
its upper border is easy to see and feel.
4.1 Anatomy of the Trunk

88
The Shoulder GirdleThe shoulder girdle consists of two clavicles and two scapulae, as
well as the sternum.
The Clavicles
The clavicles (collar bones) are two long bones with S-shaped
curves. Easily felt under the skin they extend from cartilagineous
joints with the sternum to synovial gliding joints with the acromion
processes of the scapulae.
The Scapulae
The shoulder blades are two triangular flat bones that overlay but
are not attached to the posterior surface of the rib cage. They
can be felt to glide over the rib cage as the shoulder girdle moves.
The upper lateral angle is the glenoid cavity.
A ridge - the spine - lies on the posterior surface. It can be
felt to extend from the joint with the clavicle towards the medial
border of the scapula.
The Pelvic GirdleThe pelvic girdle is formed of three bones - the sacrum and two
innominate bones. The innominate bones articulate with the sacrum
at the sacro-iliac joint - a synovial plane joint. Sacro-iliac strain
is a frequent source of back pain. The pelvic girdle protects the
bladder, rectum and internal sex organs.
The Innominate BonesEach is formed of three separate bones in infancy - the ilium,
the ischium and the pubis - which fuse to form each innominate
bone by adulthood.
Easily identified landmarks are:
O the iliac crest and the anterior superior iliac spine - the bony projections which can be felt on either side of the abdomen
O the ischial tuberosities which carry the body weight when sitting upright
O the symphysis pubis, where the two pubic bones meet to from the arch of bone at the base of the abdomen
Muscles of the TrunkSome have been referred to elsewhere when referring to movements
of the limbs.
Other important muscles are:
O the sternocleidomastoid is attached to the sternum and clavicle and extending to the mastoid bone behind the ear, on each side of the neck. It is involved in head turning
O the trapezius is attached to the occiput of the skull and the cervical and thoracic vertebrae, it extends to the spine of the scapulae and lateral part of the clavicle. Involved in pulling the head backwards, and elevating the shoulder girdle. Together the two triangular muscles have a diamond shape, which gives them their name
The erector spinae muscles which lie on either side of the vertebral
column, extend from the sacrum to the back of the skull, participate
in extension of the trunk. Muscles of the abdominal wall flex the
trunk forwards.
4.1 Anatomy of the Trunk

89
4.2 Fractures of the Spine
The patient with the acute spinal injury is unlikely to appear in the
plaster department until his fracture is well on the way to healing.
At this stage the cast room staff personnel may be involved in
the application of a jacket to stabilise the neck such as a Minerva
jacket, or a plaster vest for a Halo splint, for example in the case
of cervical or high thoracic injury.
The main problem with spinal injuries is the risk of damage to
nerves or the spinal cord itself. This damage may arise as a result
of mishandling the patient. Before any cast is applied we must
ensure that there are sufficient staff to assist, who must all be
adequately briefed as to their roles. The patient may be able to
sit or stand for the application or there must be adequate support
for the patient. In addition, the cast may be applied with the patient
lying down and fully supported on a frame. The surgeon ought to
take personal responsibility for the positioning of the patient and
maintaining of the desired position.
If the patient has altered skin sensation, special care must be
taken to prevent skin breakdown under the cast, with adequate
padding and fit of the jacket. Sometimes the cast plaster room
staff personnel will be asked to manufacture resting splints to
maintain the position of paralysed limbs. Special care must be
taken to ensure that these splints do not cause skin breakdown.
Crush fracture of the vertebrae
Lateral view of spine showing fracture of the vertebra

90
ScoliosisScoliosis is a lateral curvature of the vertebral column. The problem
can be postural, sciatic or structural. Postural curves can be caused
by limb inequality or muscle spasm and will disappear when the
patient bends forward. Sciatic curves are secondary to a prolapsed
intervertebral disc or maybe spondylolisthesis and resolve when the
condition is treated.
In structural scoliosis there is a curvature of the spine accompanied
by a rotational abnormality of the vertebrae. When the patient
bends forward the rib hump is accentuated. The causes of structural
scoliosis are many. It can be due to for example a congenital
abnormality of the vertebrae or to a neuro-muscular imbalance but
most are idiopathic (unknown cause). Idiopathic scoliosis is further
described according to age at which it presents either Infantile
(0-3yrs), Juvenile (4-10yrs) or Adolescent (10-maturity).
The disease may affect any part of the vertebral column though
the thoracic and lumber regions are affected more frequently.
The first sign is usually a primary curve and then a secondary or
compensatory curve develops.
The treatment objectives are firstly to prevent the regression of
the curve and if indicated to stabilise the spine. Conservative
management involves the application of serial casts / jackets and/
or the use of various types of orthoses such as the Boston brace.
Surgical treatment comprises correction of the deformity, usually
done at the time of surgery, plus the fusion of the vertebrae
by internal fixation. In the post operative period an orthosis or
occasionally a synthetic jacket will be needed. The casts applied in
the management of scoliosis require a high level of skill on behalf
of the cast room staff personnel.
4.3 Orthopaedic Conditions
Low Back PainPain in the lumbar region is probably the most common symptom
requiring General Practitioner consultation. It is often referred to
as lumbago (pain in the lumbar region) or sciatica (pain along the
course and distribution of the sciatic nerve).
The source of the pain and hence the cause can be widespread in
the area from the inferior angle of the scapula to the natal cleft.
The origin of the pain can be the bones, muscles, nerves, internal
organs and skin.
The treatment usually involves physiotheraphy or sometimes a short
period of rest. The patient will usually require analgesia and a
muscle relaxant. The patient should commence a series of exercises
to strengthen and improve mobility.
The pain may be as a result of a prolapse of an intervertebral disc.
The disc is made up of two parts, an outer ring of fibrocartilage
called the annulus fibrosus and an inner soft mass called the nucleus
pulposus. When the disc ‘slips’ the nucleus pulposus herniates
through what is probably an already weakened annulus fibrosus.
If the problem does not resolve with rest and support then surgery
will need to be considered. This involves the decompression of the
nerve root that has been compressed and is thus causing the pain.

91
Developmental Dysplasia of the Hip (D.D.H.)(Previously called Congenital Dislocation of the Hip joint)
A condition in which 1-5 per 1000 newly born babies have hips
that are either dislocated or are dislocatable.
Factors associated with this condition are familial tendency, breech
delivery or presence of other congenital abnormalities. Girls are
affected more than boys and a third of these have bilateral hip
involvement.
The condition is treatable and you will encounter patients from birth
through to early adulthood requiring skilled application of splints.
The earlier that treatment begins the better will be the outcome. The
aims of treatment will be to relocate the femur in the acetabulum
of the innominate bone and maintain that position for a sufficient
time to allow moulding of the acetabulum to take place and to
encourage a normal development of surrounding soft tissues.
Initially this will require splinting in the reduced position with the hip
flexed and in 40–60 ° abduction for approximately three months.
Some surgeons prefer the use of one of the abduction harnesses
available commercially such as the Pavlik harness. If the child is
older, splintage may be by the use of a frog ‘type’ cast applied
in the humane position.
Cases that fail to respond to early treatment or those that are
diagnosed later in life may require operative reduction in order
to achieve a stable position. An open reduction and sometimes a
femoral or innominate osteotomy may be needed. Following surgery
the patient may require the application of a hip spica.
4.3 Orthopaedic Conditions

92
Paediatric Hip Spica (Single, One and a Half and Double)
4.4 Casts of the Trunk
These casts can be applied in resin based materials or plaster of
Paris only or in a combination of POP covered with resin based
materials. Consideration of the absorbent nature of materials used
should be made before applying casts post operatively, particularly as
blood loss will not stain through or absorb into resin based materials.
The position will depend on the injury and/or surgeons instructions.
It is worth noting that the hips and knees are most comfortable
in the slightly flexed position. For One and a Half or Double hip
spicas abduct the good leg to facilitate toileting and nursing care.
The cast extends from
Anteriorly - just below the nipple line to the symphasis pubis.
Posteriorly - below the tips of the scapula to the coccyx.
It continues down the legs to the knees, ankles or to include the
foot (depending on surgeon’s instructions).
Equipment required
Hip Spica frame or equivalent for casts applied with the patient
lying supine.
Electric Hoist for transfer if required (Please refer to local Handling
and Moving policy.)
Single Hip Spica One and a Half Hip Spica Double Hip Spica

93
Single Hip SpicaThese are generally applied with the patient lying on a hip spica table
with hip and knees slightly flexed. The hip is abducted according
to the medical officer’s wishes. Single hip spicas can be applied
whilst the patient is standing, if their condition allows.
The cast extends from just below the nipple line to the pubis
anteriorly and from the lower edges of the scapulae to the coccyx
posteriorly. It continues down the affected leg only to end at either
the knee, ankle or to the toes.
Plaster of ParisBasic trolley see page 26 plus
O Stockinette 15cm or 10cm depending on the trunk size.
O Stockinette 7.5cm
O Non-adhesive felt 5mm thick
O Adhesive felt 2mm thick
O Gamgee
O SOFFBAN Plus padding15 cm X 2rolls
O SOFFBAN Plus padding10 cm X 2rolls
O GYPSONA BP plaster of Paris bandages 15cm or 10cm depending on size of child
O GYPSONA BP plaster of Paris Slab 15cm or 10cm depending on size of child
O SOFFCREPE bandage 7.5cm X 1
O TENSOPLAST Sport cast edge tape 3cm
Padding
Stockinette is applied to the body with armholes cut like a vest.
The circle of gamgee is placed over the diaphragm, and non-
adhesive felt squares are placed over each iliac crest and one
down the spine over the sacral area. Apply a layer of undercast
padding firmly around the hip and down the leg – beware of the
beginner’s triangle on the posterior aspect of the hip. Use an extra
layer around the supra-condylar area of the femur.
Application
One layer of plaster of Paris bandage is followed by two plaster
of Paris slabs, each 0.5 metres long by 15cm wide, placed figure
of eight wise around the hip. (diagram 1 & 2) Two reinforcing
slabs, 30 cm long x 10cm wide, are placed, one anteriorly and
one posteriorly, to the hip joint. (diagram 3 & 4) A further layer
of bandages holds these slabs in place. Mould well over the top
of the iliac crests. If the spica is to be a long single hip spica
position the knee and pad and plaster to the ankle, then position
and complete down to the foot.
Remove the gamgee circle to create a space for breathing and
eating. Trim the nursing area anteriorly to above the symphysis
pubis around the legs and posteriorly make sure you trim to just
above the coccyx. Turn back the stockinette and hold in place with
two layer strips of plaster of Paris.
4.4 Casts of the Trunk

94
SYNTHETIC Single hip spicaBasic trolley see page 26 plus:-
O Stockinette 15cm or 10cm depending on the trunk size.
O Stockinette 7.5cm
O Non-adhesive felt 5mm thick
O Adhesive felt 2mm thick
O Gamgee
O SOFFBAN Plus padding15 cm X 2rolls
O SOFFBAN Plus padding10 cm X 2rolls
O DELTA-CAST Conformable 10cm, 7.5cm and 5cm depending on size of child
O SOFFCREPE bandage 7.5cm X 1
O TENSOPLAST Sport cast edge tape 3cm
Padding
Stockinette is applied to the body with armholes cut like a vest. The
circle of gamgee is placed over the diaphragm, and non-adhesive
felt squares are placed over each iliac crest and one down the
spine over the sacral area. Apply a layer of undercast padding
around the body and in a figure of eight around the hip and down
the leg. – beware of the beginner’s triangle on the posterior aspect
of the hip. Use an extra layer of padding or 2mm adhesive felt
around the supra-condylar area of the femur to protect the skin
at the join. It can be helpful to place a layer of thin felt on the
medial aspect of the proximal thigh. This is an area where synthetic
casting materials may end be pulled tight.
Application
Apply the casting bandages round the body and in a figure of eight
around the hip and down the leg to the knee. It is useful to cut
2 slabs of 10cm wide X 20cm three layers of cast material and
apply as the slabs in diagrams 3 & 4 on page 93.
Sandwich the slab between the layers of casting material. This
slab will strengthen the Beginner’s triangle at the back of the hip.
Continue down the legs as required. Finally take a bandage over
the joins and up and around the hip area. To bond the layers
well, apply a pre-wet and squeezed out crepe bandage firmly for
a 2 -3 minutes.
Remove the gamgee circle to create a space for breathing and
eating. Trim the nursing area anteriorly to above the symphysis
pubis around the legs and posteriorly make sure you trim to just
above the coccyx. Turn back the stockinette and hold in place with
stretchy adhesive tape.
One and a half or double spica For a one and a half or a double spica the patient is positioned on the hip spica table as before and the unaffected hip abducted to facilitate toilet care.
Padding
Pad as a single spica continuing the undercast padding down both legs.
Plaster of ParisApply the bandages as for a single hip spica but using a figure of eight technique around both hips.
The three plaster of Paris slabs required are slightly different - one slab being taken across the sacral area and anteriorly over both hips. (diagram 1 below) The second and third slabs are reversed, across the pubic area and round each hip, forming a figure of eight round the hips. (diagrams 2 & 3 below) Great care must be taken to ensure that the cast is strong over the posterior aspect of the hip joints, the so called ‘beginners triangle’.
4.4 Casts of the Trunk
SyntheticApply the bandages as for a single hip spica but using a figure of eight technique around both hips.
When using synthetic materials use one slab made from three layers of 10cm wide material as diagram 1 above.
A metal bar or strut made of twisted casting material should be placed between the legs of one and a half or double spicas, and plastered on to the outside of the cast once it has set. Pads of plaster of Paris should be positioned under and over the bar ends before plastering into position. This bar adds strength to the cast and facilitates moving the patient, but must not be used for such until the cast has finally set.
Care
All patients who have large body casts applied must, of course, receive full cast instructions prior to return home. Comprehensive guidance on coping with daily living whilst in such casts must also be given and additional information for parents:-
Nappies
Use a smaller size nappy, with a nappy liner if possible, tucked inside the nursing area of the cast. Cover with a second larger size nappy applied over the cast. The inside nappy needs to be changed more frequently than normal to prevent the cast from
becoming soiled.

95
Frog ‘Type’ Cast in the Humane PositionBasic Trolley - plus
O Stockinette 10cm
O Stockinette 5cm or 7.5cm
O Non-adhesive felt
O SOFFBAN Plus padding 10cm x 3-5 rolls
O GYPSONA BP plaster of Paris bandages 10cm x 4 rolls, plus 4 if to include below the knee
O DELTA-CAST Conformable 5cm x 2, 7.5cm x 1 rolls, plus 2 if to include below the knee
O TENSOPLAST Sport cast edge tape 3cm
O Small hip spica table
4.4 Casts of the Trunk
Padding
Apply stockinette 10cm to the body, cutting laterally at the hips,
and 5cm or 7.5cm for the legs.
It is essential that the medical officer positions the legs for this
cast. With the anaesthetised child on a small hip spica frame and
the medical officer holding the legs in the humane position, place
a non-adhesive felt pad to the sacral area and small felt strips to
the flexed area of the hips. Apply a firm layer of undercast padding.
Application
Apply 4 rolls of 10cm plaster of Paris bandages around the body
and the thighs and in a figure of eight across the hips. Make sure
to check at the back as it is easy to miss the corners of the sacral
area. It must then be moulded well, helping it to laminate. Once the
bandages have initially set apply the casting tape synthetic bandages
to strengthen the cast in the same technique as the plaster of Paris
bandages. Check the cover behind the hips again. Conform using a
wet crepe bandage remove as soon as the casting material has set.
The cast extends from just below the nipple line and can finish
either above the knees or is taken down to the ankle.
If the legs are to be included, place strips of felt around the legs
2.5cm above the malleoli and pad below the knee. Extend the cast
down to the ankle, taking care around the flexor surfaces of the knees.
Trim the nursing area anteriorly to above the symphysis pubis around
the legs and posteriorly to just above the coccyx.
Use 2mm adhesive felt to line the edges of the cast as necessary
and turn back the stockinette. Hold in place with the 3cm cast
edge tape.
As well as the usual cast instructions the parents / guardians need
to have explained the extra care required. Use a smaller size nappy,
with a nappy liner if possible, tucked inside the nursing area of the
cast. Cover with a second larger size nappy applied over the cast.
The inside nappy needs to be changed more frequently than normal
to prevent the cast becoming soiled.
Toileting
Whilst on a bedpan the upper part of the child should be raised on
pillows to keep it higher than the legs to prevent soiling the cast.
Skin care
Do not wet the cast but daily, wash all the skin you can reach
and dry well. Check the skin at the edges and under the cast for
redness. Contact the doctor if there are any problems.
Beginners Triangle:- this is the area over the posterior aspect of
the hips missed when applying these casts.

96
Plaster JacketAs stated previously, the actual position of the patient will be
decided by the medical officer but for clarity of application we will
presume that the jacket is applied with the patient standing upright.
The cast extends from the top of the sternum to the symphysis
pubis anteriorly, and from the lower edge of the scapula to the
4.4 Casts of the Trunk
coccyx posteriorly. It should be trimmed at the lower edge to
allow the patient to sit comfortably and also under the axilla to
allow full movement of the arms. An abdominal window can be
cut and the gamgee removed to create space over the diaphragm
and the stomach area.
EQUIPMENT REQUIRED
Basic trolley see page 26 - plus either of the following options:
PLASTER OF PARISO Stockinette 30cm
O SOFFBAN padding 15cm x 3 rolls
O Circle of gamgee
O Non-adhesive felt
O LEUKOPOR* (paper tape)
Padding
Stockinette is applied and taped over the shoulders. The circle
of gamgee is placed over the diaphragm, and felt squares placed
over each iliac crest and one down the spine over the sacral area.
Non-adhesive felt is preferable as it can be adjusted more easily
and gives no risk of an allergy. These are all held in place by a
single layer of undercast padding.
Application
Following basic rules casting is then commenced from top or
bottom and two or three 15cm plaster of Paris bandages applied.
Two plaster of Paris slabs, 20cm wide by 35cm long, are then
positioned down each side and one slab, 20 cm wide by 40cm
long, down the central back. A further two or three bandages
are then applied. A further slab, 20cm wide x 30cm long, may
be required across the top front of the chest, particularly in tall
patients. Before the cast has set it is moulded well over the top
of the iliac crests as this area will take the weight of the jacket.
O Paper pants
O GYPSONA BP plaster of Paris bandages 15cm x 6 rolls
O GYPSONA BP plaster of Paris slab dispenser 20cm
O Stool
O Standing frame if available

97
4.4 Casts of the Trunk
SYNTHETICO Stockinette 30cm
O LEUKOPOR Tape (non-woven tape for gentle fixation)
O circle of gamgee
O adhesive felt 2mm
O Non-adhesive felt
O SOFFBAN Plus padding 15cm x 3 rolls
O DELTA-CAST Conformable 4-5 x 10cm or 12.5cm rolls
O TENSOPLAST Sport cast edge tape 3cm
O paper pants
O Standing frame if available
Application
Use 10cm or 12.5cm DELTA-CAST Conformable casting material
depending on the size of the patient. Apply from top or bottom
edge covering at least 50% of the previous turn. Use a DELTA-
CAST Conformable slab 10cm x 30cm long slab of three layers
across the posterior lower edge sandwiched between the layers.
Using strategically placed slabs allows you to cut down on the total
material used and strengthen selected areas. Mould and trim as
described for plaster of Paris. The edges may need padding with
2mm adhesive felt.
Plaster CorsetIf a corset is asked for it is applied in the same way, but extends
from just below the bust to the symphysis pubis.
All casts are finished off by turning back the stockinette and holding
it in place with strips of plaster or adhesive stretchy tape.
Padding
Stockinette is applied and taped over the shoulders. The circle
of gamgee is placed over the diaphragm, and felt squares placed
over each iliac crest and one down the spine over the sacral area.
Non-adhesive felt is preferable as it can be adjusted more easily
and gives no risk of an allergy. These are all held in place by a
single layer of SOFFBAN undercast padding.

98
4.4 Casts of the Trunk
Minerva JacketFirst you need to organise a team to apply this cast. The position
of the patient will, of course, be dependent on the type of injury
and the medical officer’s instructions. A better fitting cast can be
applied with the patient standing or sitting with or without some form
of cervical traction. Therefore an overhead hook may be required.
If the patient has to be supine, then a frame, table or hip spica
table can be adjusted to accommodate them.
Basic trolley see page 26 - plus either of the following options:
PLASTER OF PARISO stockinette 10cm
O stockinette 30cm
O non-adhesive felt
O SOFFBAN Plus padding 15cm x 4 rolls
O SOFFBAN Plus padding 10cm x 2 rolls
O Gamgee, LEUKOPOR tape, paper pants, stool
O GYPSONA BP plaster of Paris Slab 15cm width
O GYPSONA BP plaster of Paris Slab 20cm width
O GYPSONA BP plaster of Paris bandages 15cm x 10 rolls
O GYPSONA BP plaster of Paris bandages 10cm x 6 rolls
Padding
Apply stockinette, fixing the body part to the head part with non-
allergenic tape and also fix across the shoulders. Pad the iliac
crests and sacral area with non-adhesive felt squares. Place the
circle of gamgee over the diaphragm and two small circles over
the ears under the stockinette. The gamgee can then be removed
through abdominal and ear windows during trimming. Apply a layer
of undercast padding overall.
Application
Apply the body part as for the plaster jacket, moulding well over
the iliac rests.
Once this has set apply plaster of Paris bandages as follows;
O a 10cm bandage round the head and neck
O a 15cm bandage over the shoulders in a figure of eight
The following plaster of Paris slabs are applied and held in position
by two or three further bandages:
O 2 x 35cm long and 20cm wide, one for chin and top of chest and one for occipital area and back of neck
O 2 x 25cm long and 20cm wide, across the front and back of shoulders
O 1 x 55cm long and 10cm wide, for circumference of head
O 2 x 10cm long and 5cm wide, for temporal area and front of ears
The cast should be well moulded round chin and occiput, but
should not put pressure on the throat.
Whichever position is chosen the medical officer ought to take personal
responsibility for placement and maintaining the desired position.
If the patient wears glasses or dentures, make sure that these are
in situ before commencing application. The jacket extends from
the symphysis pubis to the chin anteriorly and from the coccyx to
the upper border of the occiput posteriorly, with a band of plaster
carried from the occipital portion across the forehead anteriorly,
and the ears left free.

99
SYNTHETICO Stockinette 10cm
O Stockinette 30cm
O Non-adhesive felt 5mm
O Gamgee, LEUKOPOR tape, paper pants, stool
O SOFFBAN Plus padding 15cm x 4 rolls
O SOFFBAN Plus padding 10cm x 2 rolls
O DELTA-CAST Conformable 10cm or 12.5cm x 7 rolls
O DELTA-CAST Conformable 7.5cm x 3 rolls
O Pre-wet SOFFCREPE 1 x 10cm plus 1 x 15cm
O Adhesive felt 2mm
O TENSOPLAST Sport cast edge tape 3cm
Padding
Apply stockinette, fixing the body part to the head part with non-
allergenic tape and also fix across the shoulders. Pad the iliac
crests and sacral area with non-adhesive felt squares. Place the
circle of gamgee over the diaphragm and two small circles over
the ears under the stockinette. The gamgee can then be removed
through abdominal and ear windows during trimming. Apply a layer
of undercast padding overall.
Application
Apply the body part as for a jacket, moulding well over the iliac
crests, except use one less bandage at this stage.
Pad the upper part. Place a piece of thin non-adhesive felt from
the top of the occiput to the T2 area of the spine and a second
piece from the tip of the chin down the neck to the top of the
sternum. Hold in place with a layer of padding. Apply a 7.5cm
cast bandage around the head and neck and a 10cm over the
shoulders and under the axilla in a figure of eight. Cut and apply
a slab of three layers x 7.5cm to the front and back of the head
and neck as diagram 1 & 2. Apply a further 1 x 7.5cm around
the head and neck and 1 x 10cm over shoulders as before. Check
the area in front of the ear for strength. Complete the cast taking
a 10cm casting bandage over the join of the upper and body part
right down to the iliac crest area. Apply this bandage firmly and
cover all with firmly applied wet crepe bandages. This should assist
bonding of the two pieces.
Do take extreme care if using an electric oscillating saw to trim or
remove this jacket. The noise and vibration is most unpleasant for
the patient and remember too the blade can cut through the skull.
4.4 Casts of the Trunk

100
Shoulder SpicaA better fitting, more comfortable, cast can be applied if the patient
can sit or stand. If the cast is to be applied following a shoulder
operation, the trunk and lower two thirds of the upper limb can
be plastered 24-48 hours before the operation. These two parts
are then joined following the operation while the patient is still
anaesthetised. If the patient is a buxom female, it is advisable
to suggest that a brassiere be worn to prevent excoriation of the
skin beneath the breasts.
The cast should extend from just below the iliac crests to axilla
on the unaffected side and on the affected side should enclose
the shoulder and the upper limb down to the palmar crease and
metacarpal heads.
As for plaster jackets these casts must be well moulded over the
iliac crests so that no weight is taken on the shoulder.
Equipment required
Basic trolley see page 26 - plus either of the following options
PLASTER OF PARISO Stockinette 7.5cm
O Stockinette 10cm
O Stockinette 30cm
O SOFFBAN Plus padding 10cm x 3 rolls
O SOFFBAN Plus padding 15cm x 4 rolls
O Circle of Gamgee
O Non-adhesive felt
O LEUKOPOR (non-woven tape for gentle fixation)
O GYPSONA BP plaster of Paris bandages 10cm x 5 rolls
O GYPSONA BP plaster of Paris bandages 15cm x 8 rolls
O GYPSONA BP plaster of Paris Slab 15cm width
O GYPSONA BP plaster of Paris Slab 20cm width
Padding
As for plaster jacket and above elbow cast. Use extra layer at the
areas of the joins. A half roll of undercast padding is placed in the
axilla to prevent pressure there. Pad the shoulder, the olecranon
and the medial epicondyle with non-adhesive felt. Cover with a
layer of undercast padding.
Application
The body part is applied as for a plaster jacket but trimmed low
under the axilla on the affected side. An above elbow plaster to
mid humerus is then applied. These two parts of the cast are joined
by using 15cm plaster of Paris bandages and two plaster of Paris
slabs, 15cm wide and 65cm long, in a figure of eight around the
arm and shoulder and on to the body part. A 15cm wide plaster
of Paris slab is brought from the iliac crest through the axilla and
down the arm to just above the elbow. This eliminates the need
for a plaster bar from the iliac crest to the forearm. Cover the slabs
with a further layer of 15cm plaster of Paris bandages.
4.4 Casts of the Trunk

101
SYNTHETICO Stockinette 7.5cm
O Stockinette 10cm
O Stockinette 30cm
O SOFFBAN Plus padding 10cm x 3 rolls
O SOFFBAN Plus padding 15cm x 4 rolls
O Circle of gamgee
O Non-adhesive felt
O LEUKOPOR (non-woven tape for gentle fixation)
O Adhesive felt 2mm
O DELTA-CAST Conformable 10cm or 12.5cm x 8-10 rolls
O DELTA-CAST Conformable 7.5cm x 1-3 rolls
O DELTA-CAST Conformable 5cm x 1 roll
O TENSOPLAST Sport cast edge tape 3cm
Padding
Apply stockinette, fixing the body part to the head part with non-
allergic tape and also fix across the shoulders. Pad the iliac crests
and sacral area. Place the circle of gamgee over the diaphragm. The
gamgee can then be removed through the abdominal window during
trimming. Pad the shoulder, the olecranon and the medial epicondyle
with non-adhesive felt. Apply a layer of undercast padding overall.
The 2mm adhesive felt could be used at the areas of the joins
for extra protection. A half roll of undercast padding is placed in
the axilla to prevent pressure there.
Application
Apply following the instructions for a plaster jacket and the above
elbow cast finishing. The two parts are joined by using 10cm
casting material in a figure of eight around the arm and shoulder
and onto the body part. Make a slab of three layers 10cm x 50cm
long from a 10cm casting bandage placing it from the iliac crest
through the axilla and down the arm to just above the elbow and
incorporate it between layers. Complete the cast taking a 10cm
casting bandage over the join of the upper and body part right
down to the iliac crest area. Apply this bandage firmly and cover
all with firmly applied wet crepe bandages. This should assist
bonding of the two pieces.
4.4 Casts of the Trunk


Glossary and
Appendix
This is not intended to be a
comprehensive glossary of all
terminology used in this book.
Refer to a standard medical
dictionary for further explanation
A Practical Guide to Casting

104
Glossary
Abduction: movement away from the mid-line of the body
Adduction: movement towards the mid-line of the body
Anaemia: refers to a large group of problems involving the blood. Literally the word means without haem, this being the red pigment of red blood cells, the function of which is to carry oxygen around the bloodstream
Ankylosis: the elimination of a joint as a result of either fusion across a joint space by bony tissue or fibrous tissue
Anterior: the front, for example, anterior view in X-ray terminology
Aponeurosis: a sheet of fibrous tissue that replaces a tendon for attachment to bone, when the muscle is wide and flat
Arthrodesis: fusion of bones across a space by surgical means
Articulate: (in anatomy) to join together as in skeletal joints or articulations
Ataxia: the brain’s inability to co-ordinate the movements produced by different muscles
Atheroma: degeneration of the walls of arteries due to formation in them of fatty plaques and scar tissue
Atonia: without tone, referring to muscles
Atrophy: wasting of a normally developed tissue due to degeneration of cells
Avulsion: the tearing away of a structure (tendon, ligament or nerve) away from its point of insertion
Bursa: a small sac of synovial fluid which acts as a protector where parts move over one another for example ligaments or tendons sliding over bones
Cellulitis: an inflammatory disorder affecting the connective tissue between adjacent tissues and organs
Circumduction: movement whereby a limb moves in a circular movement from a fixed point
Chondrocyte: a cartilage cell
Collateral: has two common usages. (1) in the circulatory system it means an alternative circulation that develops to bypass an obstruction and (2) in the musculoskeletal system a collateral ligament is one that is secondary and intended to reinforce others
Compartment
syndrome: a condition where there is increasing pressure within a muscle compartment, which eventually leads to the death of the muscle tissue
Condyle: a rounded projection at the bone ends, for example the condyles at the upper end of the tibia
Congenital: a word to describe a condition that is present at birth
Crest: a ridge of bone as at the top of the innominate bone (iliac crest) or in the intertrochanteric region at the upper end of the femur
Deformity: an alteration of the normal contour of the body
Digit: finger, thumb or toe
Dislocation: complete loss of the normal relationship between joint surfaces
Distal: that part of the bone that is furthest from the centre of the body
Dorsiflexion: movement of the hand or foot in an upwards direction
Embolism: the blocking of an artery by an embolus
Embolus: a substance circulating in the blood of sufficient size to cause a blockage of a vessel. It may be blood, fat or a large quantity of air
Epicondyle: above the condyle, the best example are the small protuberances just above the condyles of the humerus always referred to as the epicondyles
Epidural
(extradural): outside the dura. The term is mostly used to describe a type of anaesthetic procedure whereby a local anaesthetic can be injected into this space to suppress sensation in the part of the body served by the affected nerve roots
Eversion: turning the sole of the foot outwards
Extension: the opposite of flexion, an increase in the angle between two bones
Facet: a flat articulating surface, the best example is to be found forming the facetal joints of the vertebral column
Flexion: a decrease in the angle between two bones
Foramen: a hole in a bone (plural is foramina)
Fossa: a depression or hollow
Fovea: a small depression
Fracture: an interruption in the normal continuity of a bone
Fusion: a term used in surgery to describe the joining together of two structures for example two vertebrae
Gangrene: death of part of the body due to deficiency or destruction of the blood supply
Gas gangrene: death of deep tissue caused by infection with the anaerobic organism Clostridium perfringens. The toxins produced as a result of the infection produce the typical gas
Gibbus: a deformity of the spine that produces a hump. It is usually associated with tuberculosis
Gout: a condition occasionally seen in orthopaedic settings whereby a joint or digit usually the big toe is painful and swollen due to a build up of uric acid in the tissues as a result of faulty metabolism
Haemarthrosis: bleeding into the joint cavity
Haematoma: a collection of blood in the tissues
Hallux: the big toe
Head: a rounded or disc like part of a bone. Look for the head of the radius at the elbow joint and the head of the femur
Iatrogenic: a condition caused by the treatment
Inversion: turning the sole of the foot inwards
Lamina: a thin plate of bone (plural is laminae)

105
Lateral rotation: rotation away from the mid-line of the body(external rotation)
Medial rotation: rotation towards the midline of the body (internal rotation)
Meniscus: the semilunar cartilages of the knee joint are called the menisci. They are crescent shaped pieces of white fibro cartilage which improve the articulating surface of the tibia for articulation with condyles of the femur
Metabolism: the sum of all the changes that take place within the body usually at the chemical level
Metacarpals: the bones of the hand
Metatarsals: the bones of the forefoot
Motor movement: a motor nerve is one where impulses travel from the central part of the nervous system to the periphery usually a muscle fibre where it stimulates the muscles into action
Myofibril: a muscle fibre
Neck: a constricted part of a bone
Neoplasm: an abnormal tissue growth, it may be benign or malignant
Neurapraxia: bruising a nerve causing a temporary alteration of sensation for example pins and needles
Neuroma: a tumour of nerve tissue
Neurone: a nerve cell, the basic functional unit of nerve tissue
Notch: an indentation of bone. Identify the greater sciatic notch of the innominate bone
Oedema: an excessive amount of fluid in the tissues
Osteo-arthritis: a painful disease of joint cartilage caused by degenerative changes
Osteomalacia: a disease of bone due to a reduction in the amount of calcium due to reduced intake or uptake of calcium. It may be due to deficiency of vitamin D which is necessary for the absorption of calcium
Osteophytes: outgrowths of bone at joint margins. A feature of osteo-arthritis
Osteoporosis: a disease of bone whereby the density of bone is reduced. The reduction is in the bone matrix as well as the mineral content
Osteotomy: cutting a bone as at surgery
Palmar flexion: flexion at the wrist joint resulting in the hand pointing forwards
Paraesthesia: an abnormal sensation for example numbness and tingling
Parenteral: administration of drugs or food other than through the mouth
Phalanges: the name applied to the bones of both the fingers and the toes
Plantarflexion: movement of the foot in downwards direction sometimes called equinus
Plantigrade: position of the foot which is at 90° to the leg and neutral in relation to inversion and eversion
Pollex: the thumb
Posterior: situated at the back of the body
Process: a local projection of bone. Identify the odontoid process or peg of the 2nd cervical vertebra (axis) or the spinous processes of the vertebrae below C7
Pronation: turning the palms of the hands backward in the anatomical position
Prophylaxis: prevention used particularly in primary health e.g. vaccination against poliomyelitis
Proximal: that part of a bone that is nearest to the centre of the body
Ramus: a straight piece of bone usually used to describe the inferior and superior rami (plural) of the pubis of the innominate bone
Sciatica: pain along the course and distribution of the sciatic nerve
Scoliosis: a lateral curvature of the spine
Septic: produced by, or due to, decomposition by microorganisms
Spine: a sharp process of bone as in the spine of the scapula. The word is often used to describe the vertebral column
Sprain: injury to a ligament caused by over stretching
Supination: turning the palms of the hands forward in the anatomical position
Synovitis: inflammation of the synovial lining of a joint or tendon sheath
Systemic: affecting the whole body
Tenotomy: cutting a tendon
Thrombosis: the development of a blood clot in a blood vessel
Traction: the act of pulling on a limb or other part of the body
Trochlea: an anatomical part of the body whereby it has the function of a pulley. Identify the trochlea of the humerus around which the trochlear surface of the ulna revolves
Tubercle: a small rounded protuberance on a bone, look for the infra and supra glenoid tubercles in the shoulder joint
Tuberosity or
Trochanter: a roughened and enlarged area of bone to which muscles are usually attached. The greater trochanter of the lateral aspect of the femur gives attachment to gluteal muscles
Tumour: the term is now used to describe an abnormal growth of tissue which may be benign or malignant
Valgus: the distal part of a bone or limb is bent or twisted away from the mid-line
Varus: the distal part of a bone or limb is bent or twisted towards the mid-line
Vasculitis: an inflammatory condition of the walls of blood vessels, it may also be called angiitis
Glossary

106
Hospital Trust Department
INSTRUCTIONS TO PATIENTS IN CASTSPlease read the following instructions carefully
Report to the above hospital, or your nearest Hospital with an A&E Department, immediately if you experience any of the following:
O The toes or fingers become blue or swollen or you are unable to move the limb
O The limbs become painful
O You have pain in the calf
O You have pain in the chest or shortness of breath
O You feel ‘pins and needles’ or numbness
O Any ‘blister-like pain’ or rubbing under the cast
O You have any discharge, wetness or smell under the cast
O If you drop any object in the cast
CARE
Exercise the joints not held in the cast as much as possible.
Do not let the limb hang down unless it is being used, elevate the limb especially during the first few days.
Allow the cast to dry naturally and if plaster of Paris leave it uncovered for 48 hours.
Do not sit close to the fire, as your cast may become hot and burn you.
Do not wet the cast, it may disintegrate or cause skin problems.
Do not cut, heat or otherwise interfere with your cast.
If the cast becomes cracked, soft, loose or tight or if you are worried return to the hospital.
The contact number is:
Or between 17:00hrs and 09:00hrs contact:
Appendix
I confirm that I have received a copy of ‘Instructions to Patients in Plaster’.
Name (Capital letters please)
Date of birth Signed Date

107
INSTRUCTIONS FOR USE OF CRUTCHES/STICKS
You have been issued with elbow crutches/sticks to aid your mobilisation. Please read the following carefully:
WALKING O Move both crutches forward a short distance - if non weight bearing holding injured leg off the floor.
O Lean on the crutches - taking weight through your arms and hands
O Step through with the good leg. Continue thus - keeping steps short and equal
STAIRS
O The safest way up and down is on your bottom. If there is a handrail - use it! Ascending: Place good leg up the step first, followed by crutches and bad leg.
Descending: Bad leg and crutches down first, good leg follows. Can be a dangerous procedure.
NOTE: Good leg to heaven! Bad leg to hell.
SITTING DOWN
O Stand on the good leg, close to the chair.
O Hold both crutches in one hand
O Feel for chair with other hand
O Sit down
STANDING UP
O Hold crutches in one hand. Push on arm or seat of chair
O Stand up on to good leg
O Place crutches in position
MAINTENANCE
O Ensure the crutches are adjusted to the corrected height
O Check crutches daily
O Look for wear or dirt on ferrules. (rubber ends)
O Make sure wing nuts (on axillary) are tight
O If you have a problem contact the department that issued them
O When they are no longer required, please return them promptly
I confirm that I have received a copy of “Instructions for use of crutches/sticks” and that I have been supplied
with crutches, sticks etc. Which I have/have not been taught to use. (Cross through where not applicable)
Name (Capital letters please) Hospital No
Date of birth Signed Date
Lois Barr 10 05 99
Appendix

108
SHOULDER, ELBOW AND HAND EXERCISE
For patients with a below elbow cast
When wearing a below elbow slab/cast it is important that you do not allow the joints that are not in the cast to become stiff. Exercise is important to prevent this. Unless you are advised otherwise, this exercise should be gentle and not to a degree that causes you pain.
These exercises should be done at least six times every morning, noon and evening to prevent shoulder and elbow stiffness:
1. Raise your arm above your head (if necessary help it with the other hand).
2. Touch the back of your neck with your hand.
3. Touch the small of your back with your hand.
4. Straighten and bend your elbow.
Hand exercisesThese exercises should be done at least 10 times an hour during the day and evening to prevent stiffness:
1. Make a fist with your fingers and thumb, relax it and then make a fist again.
2. Spread your fingers and thumb wide apart, relax and then spread them again.
Do not allow your hand to hang down for any length of time, as it may become swollen and painful. Elevate your hand to heart level when you are sitting or lying. If you have been given a sling, wear it for 24-48 hours unless you have been instructed otherwise. However, do not forget to remove the sling to do the above exercises.
If you are worried or have problems, contact the hospital where you had your slab/cast applied or go to your nearest hospital.
Appendix

109
SHOULDER AND HAND EXERCISE
For patients with an above elbow cast
When wearing an above elbow slab/cast it is important that you do not allow the joints that are not in the cast to become stiff. Exercise is important to prevent this. Unless you are advised otherwise, this exercise should be gentle and not to a degree that causes you pain.
These exercises should be done at least six times every morning, noon and evening to prevent shoulder stiffness:
1 Raise your arm above your head (if necessary help it with the other hand).
2 Touch the back of your neck with your hand.
3 Touch the small of your back with your hand.
You may not be able to do 2 and 3
HAND EXERCISES
These exercises should be done at least 10 times an hour during the day and evening to prevent stiffness:
1. Make a fist with your fingers and thumb, relax it and then make a fist again.
2. Spread your fingers and thumb wide apart, relax and then spread them again.
Do not allow your hand to hang down for any length of time, as it may become swollen and painful. Elevate your hand to heart level when you are sitting or lying. If you have been given a sling, wear it for 24-48 hours unless you have been instructed otherwise. However, do not forget to remove the sling to do the above exercises.
If you are worried or have problems, contact the hospital where you had your slab/cast applied or go to your nearest hospital.
Appendix

110
EXERCISES FOR LOWER LIMBS
For patients in below knee casts
When wearing a below knee cast, it is important that you do not allow the joints that are not in the cast to become stiff. Exercise is important in order to prevent this. Unless you are advised otherwise, this exercise should be gentle and not to a degree that causes you pain.
These exercises should be done at least six times every morning, noon and evening to prevent stiffness:
(Depending upon the extent of your cast, you may not be able to exercise all of your leg joints)
1 Bend your toes and then straighten them.
2 Move your leg out to the side and back, to keep your hip mobile.
3 Bend and straighten your knee.
4 Press your knee into a pillow and feel your thigh muscle tighten.
Do not allow your leg to hang down for any length of time, as it may become swollen and painful. Elevate it to heart level when you are sitting.
If you are worried or have problems, contact the hospital where you had your cast applied or go to your nearest hospital
Appendix

111
EXERCISES FOR LOWER LIMBS
For patients in a leg cylinder cast
When wearing a leg cylinder cast, it is important that you do not allow the joints that are not in the cast to become stiff. Exercise is important in order to prevent this. Unless you are advised otherwise, this exercise should be gentle and not to a degree that causes you pain.
These exercises should be done at least six times every morning, noon and evening to prevent stiffness:
1 Bend your toes and then straighten them.
2 Move your leg out to the side and back, to keep your hip mobile.
3 Exercise your ankle by pointing your toes away from you and then pulling your foot towards you.
4 Rotate your ankle, drawing a circle with your foot.
CHECK with medical staff or physiotherapist that you are allowed to do the next exercise
press your knee into the back of the cast and feel your thigh muscle tighten, pull your toes towards you at the same time (static quadriceps contraction)
Do not allow your leg to hang down for any length of time, as it may become swollen and painful. Elevate it to heart level when you are sitting.
If you are worried or have problems, contact the hospital where you had your cast applied or go to your nearest hospital
Appendix

112
FURTHER READINGRecommended reading for Cast Room Staff
ANATOMY AND PHYSIOLOGY
TITLE AUTHOR PUBLISHER DATE
Basic Anatomy and Physiology Rowett H.G.Q. John Murray 2003
Clinical Anatomy Monkhouse S Churchill Livingston 2002
The Concise book of the Moving Body Jarmey C Lotus publishing 2006
Introduction to Human Body - essentials of anatomy and physiology. Wiley Tortora and Grabowski 2004
Sixth edition.
Anatomy and Physiology in Health and Illness, Elsevier. Waugh,A., Grant,A.W. Ross & Wilson 2010
MANAGEMENT OF FRACTURES AND ORTHOPAEDIC CONDITIONS
TITLE AUTHOR PUBLISHER DATE
Practical Fracture Treatment McRae R Churchill Livingstone 2008
Essential Orthopaedics and Trauma Dandy D.J. Churchill Livingstone 2008 Edwards D.J.
Churchill’s Pocketbook of Orthopaedics, Duckworth A.D, Porter D, Churchill Pocketbooks 2009Trauma and Rheumatology Ralston S.H
Pocketbook of Orthopaedics and Fractures, 2nd edition McRae, R. Churchill Livingstone 2006
PHARMACOLOGY
British National Formulary twice yearly B.M.A.& Royal Published
Pharmaceutical
Society G.B.
A Framework for Casting Royal College of Nursing RCN Publishing 2000 1-873853-69Standards Society of Orthopaedic Company Nursing
Appendix

BRITISH CASTING CERTIFICATECOURSES AND EXAMINATIONSThe British Casting Certificate Qualification and courses have been running since
1982 and are held under the auspices of the Casting Techniques Subcommittee of the British Orthopaedic Association.
This committee has representatives of the British Orthopaedic Association (BOA), the Association of Orthopaedic Practitioners (AOP), Royal College of Nursing [Society of Orthopaedic and Trauma Nursing] and, since 2011, Glasgow Caledonian University (GCU).
These validated courses currently run either at:-
STANMORE • over 5 weeks courses that run 3 times a year
BRADFORD
• day release over 6 months
GLASGOW • day release over 6 months
NEWPORT • day release over 6 months
The courses are all followed by an External OSCE held at Stanmore. The students then undertake a 3000 word Assignment to complete the module” The Theory and Practice of Musculoskeletal Casting and Splinting”
If successful in both, they receive a Joint Award from the BOA, AOP and GCU the
BRITISH CASTING CERTIFICATE and 60 CREDITS at Diploma level 8 SCQF equivalent to level 5 NQF
For further information or enquiries on the Course and Examination please go to
www.boa.ac.uk/en/casting/information or contact:
Conference and Committee AdministratorBritish Orthopaedic Association, 35-43 Lincoln’s Inn Fields, London WC2A 3PE
Email: [email protected]

A practical guide to
casting
Further information
can be obtained from
BSN medical Limited.P.O. Box 258, Willerby, Hull
HU10 6WTTel: 01482 670100
Fax: 01482 670111www.bsnmedical.co.uk
® Registered Trade Mark of BSN medical Ltd. © BSN medical Ltd March 2013 All other trade marks are acknowledged. Diagrams not to scale.