55 lbs trolling motor - canadian tire · 55 lbs trolling motor model: 90038 owner's manual...
TRANSCRIPT

55 lbs TROLLING MOTORMODEL: 90038
Owner's Manual
WARNINGTOLL FREE HELPLINE: 1 866 456-8934
CAUTIONREAD THIS MANUAL CAREFULLY BEFORE OPERATING YOUR SHAKESPEARE ®
TROLLING MOTOR. RETAIN FOR FUTURE REFERENCE.

TABLE OF CONTENTS
FEATURE INFORMATION ..................................................................................................................
BATTERY .........................................................................................................................................
4-67
8-9
3ADJUSTMENT ..................................................................................................................................
OPERATION .........................................................................................................................................
10PROPELLER REPLACEMENT ..........................................................................................................
MAINTENANCE ..................................................................................................................................
EXPLODED VIEW ..............................................................................................................................
PARTS LIST .......................................................................................................................................
SPECIFICATIONSMODEL NO .................................................................................................................................
MOTOR ..........................................................................................................................................
90038
THRUST ......................................................................................................................................
12 V
55 lbs
PROP SPEED .............................................................................................................. 240-1820 RPM
FORWARD SPEED .............................................................................................................5 SPEEDS
REVERSE SPEED .............................................................................................................. 3 SPEEDS
NOTE: To be used with Deep Cycle 12 V marine battery (Sold Separately).
2
SPECIFICATIONS ............................................................................................................................... 2
TROUBLESHOOTING.........................................................................................................................
LIMITED WARRANTY.........................................................................................................................13
12
11
14
15

FEATURE INFORMATION
3
Tilt TwistTiller Handle
Battery Meter
Depth Collar Knob
Adjustable shaft
Clamp Screws
Propeller
Tilt lock lever
12 V DC Motor
Boat mounting bracket

ADJUSTMENT
4
MOUNTING THE MOTORInstall the motor on the transom of the boat. Be sure to tighten the clamp screws securely.
WARNING: When tilting motor, keep fingers clear of all hinge and pivot points and all moving parts.
CAUTION: Over-tightening the clamp screws can damage the bracket.
Tighten
Loosen

ADJUSTMENT
5
BRACKET ADJUSTMENTYou can lock your motor in a vertical position, angle it for shallow water or tilt it completely out of the water.• Firmly grasp the control head or steel shaft.• Depress and hold the tilt lock lever.• Tilt to any of the positions on the mounting bracket.• Release the lever.

ADJUSTMENT
6
DEPTH ADJUSTMENT• Firmly grasp the shaft and hold it steady.• Loosen the steering tension knob and depth collar knob until the tube slides freely.• Raise or lower the motor to the desired depth.• Tighten depth collar knob to secure the motor in place.
STEERING ADJUSTMENTAdjust the steering tension knob to provide enough tension to allow the motor to turn freely, yet remain in position without being held or; Tighten the knob and lock the motor in a preset position to leave your hands free for fishing.
IMPORTANT: When setting the depth, be sure the top of the motor is submerged at least 12” (30 cm) to avoid churning or agitation of surface water. The propeller must be completely submerged.
Depth Collar Knob
Steering tension knob

OPERATION
7
TILT TWIST TILLERThese motors offer a choice of five forward and three reverse speeds. The speed control may be operated in either direction, forward or reverse. • Turn the tilt twist tiller handle counterclockwise from O (off) to increase reverse speed.• Turn the tilt twist tiller handle clockwise from O (off) to increase forward speed.Thrust decreases as you approach O from either direction. The numbers printed on the twist grip handle represent a percentage of maximum thrust.
The twist grip tiller handle is shipped in the down position. Firmly pull the handle up to the horizontal position. The handle has five available positions:45º down, horizontal, 15º, 30º and 45º tilted up. The handle locks in the horizontal position, but can be tilted down by pushing the release button located on the left underside of the handle pivot.
CAUTION: Never operate your motor when it is out of the water.
OFF
Handle controls on/off,steering, forward/reverse
Release button

BATTERY
8
12 V BATTERY INFORMATIONThe motors will operate with any deep cycle marine 12 V battery.For best results it is recommended to use a deep cycle marine battery with a minimum of 105 ampere hour rating. As a general on the water estimate, your 12 V motor will draw one ampere per hour for each pound of thrust produced when the motor is running on high. The actual ampere draw is subject to your particular environmental conditions and operation requirements. Always store battery at full charge when not in use. Battery life will be extended by charging each time battery is used and every two weeks when not in use. (Use a lamp timer and charge each day for 1 hour even if battery is not use as this will help maintain a full battery level.)
BATTERY METERThe LED provides an accurate display of the remaining charge in the battery. TheLED's only illuminate when the motor in the ON position. The gauge reads as follows:• Four lights indicate full charge.• Three lights indicate good charge.• Two lights indicate low charge.• One light indicates recharge.
If you are using a crank battery to start a gasoline outboard it is strongly recom-mended to use a separate battery for trolling motor to ensure of enough start up power for the gasoline motor.
NOTE: Only trickle charge your battery to full power, do not speed/rapid charge the battery as this will shorten its life.

BATTERY
9
BATTERY CONNECTION12 V Systems1. Connect the positive (+) red lead to the positive (+) battery terminal.2. Connect the negative (-) blace lead to the negative (-) battery terminal.
NOTE: If installing a leadwire plug, observe proper polarity and follow instructions in your boat owner’s manual.
IMPORTANT: This is supplied as a quick reference guide however battery types, brands and sizes may vary in performance and abilities. Always read your battery manufacturers manual for specific battery requirements or contact the manufacturer for best practices and/or advice.
WARNING:• Before connecting battery, make sure the tiller twist handle is in the off position.• Use only 6 gauge wire to extend power lead.• Improper wiring of 12 V system could cause battery explosion!• Keep leadwire wing nut connection tight and solid to the battery terminals.• Locate battery in a ventilated compartment.
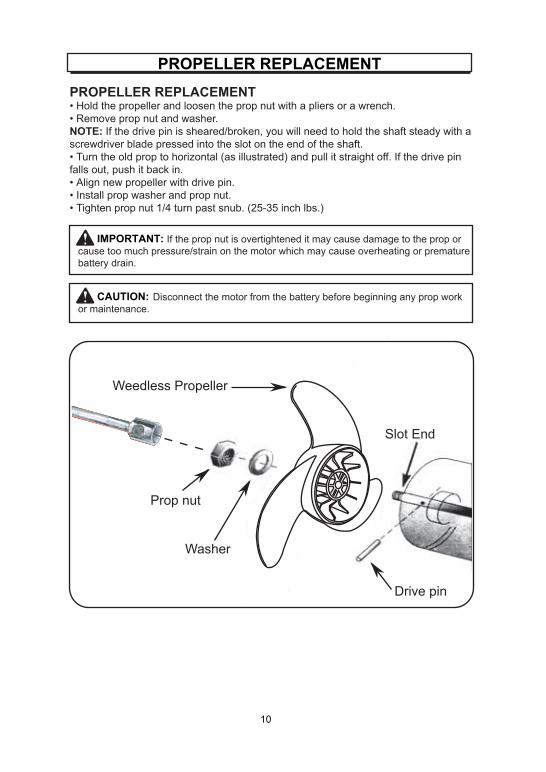
PROPELLER REPLACEMENT
10
Weedless Propeller
Drive pin
Prop nut
Washer
PROPELLER REPLACEMENT• Hold the propeller and loosen the prop nut with a pliers or a wrench.• Remove prop nut and washer. NOTE: If the drive pin is sheared/broken, you will need to hold the shaft steady with a screwdriver blade pressed into the slot on the end of the shaft.• Turn the old prop to horizontal (as illustrated) and pull it straight off. If the drive pin falls out, push it back in.• Align new propeller with drive pin.• Install prop washer and prop nut.• Tighten prop nut 1/4 turn past snub. (25-35 inch lbs.)
IMPORTANT: If the prop nut is overtightened it may cause damage to the prop or cause too much pressure/strain on the motor which may cause overheating or premature battery drain.
CAUTION: Disconnect the motor from the battery before beginning any prop work or maintenance.
Slot End

MAINTENANCE
11
• After use, these units should be rinsed with fresh water, then wiped down with a cloth dampened with an aqueous based silicone spray.• The propeller must be cleaned of weeds and fishing line. The line can get behind the prop, wear away the seals and allow water to enter the motor. Check this after every 20 hours of operation.• Before each use, check to see that the prop nut is secure.• To prevent accidental damage during trailering or storage, disconnect the battery whenever the motor is off of the water. For prolonged storage, lightly coat all metal parts with an aqueous based silicone spray.• For maximum performance, restore battery to full charge before each use.• Keep battery terminals clean with fine sandpaper or emery cloth.• The weedless wedge propeller is designed to provide absolute weed free operation with very high efficiency. To maintain this top performance, the leading edge of the blades must be kept smooth. If they are rough or nicked from use, restore to smooth by sanding with fine sandpaper.
NOTE: Replace propeller if unable to repair.

TROUBLESHOOTING
12
1. Motor fails to run or lacks power:• Check motor for obstructions. The motor may have gone into current limit. To reset: return to off position, remove obstruction and resume operation.• Check battery connections for proper polarity.• Make sure terminals are clean and corrosion free. Use fine sandpaper or emery cloth to clean terminals.• Check battery water level. Add water if needed.
2. Motor looses power after a short running time:• Check battery charge, if low, restore to full charge.
3. Motor is hard to steer:• Loosen the steering tension knob on the back of bracket.• Lubricate the composite shaft.
4. Your experience prop vibration during normal operation:• Remove and rotate the prop 180º. See removal instructions in prop section.
NOTE: If you do not understand the warnings and instructions in this Owner's manual, do not use this product. Call SHAKESPEARE® customer service for assistance.

LIMITED WARRANTY
13
2 —Year Limited WarrantyTHIS WARRANTY IS NOT TRANSFERABLE AND DOES NOT COVER:Products sold damaged or incomplete, sold “as is”, sold reconditioned or used as rental equipment.Delivery, installation or normal adjustments explained in the owner’s manual.Damage or liability caused by shipping, improper handling, improper installation, incorrect voltage or improperwiring, improper maintenance, improper modification, or the use of accessories and /or attachments not specifically recommended. Repairs necessary because of operator abuse or negligence, or the failure to install, operate, maintain and store the product according to the instructions in the owner’s manual. Damage caused by cold, heat, rain, excessive humidity, corrosive environments and materials, or other contaminants.Expendable items that become worn during normal use.Cosmetic defects that do not interfere with tool functionality.Freight costs from customer to vendor.ANY INCIDENTAL, INDIRECT OR CONSEQUENTIAL LOSS, DAMAGE, OR EXPENSE THAT MAY RESULT FROM ANY DEFECT, FAILURE OR MALFUNCTION OF THE PRODUCT.Some states or provinces do not allow the exclusion or limitations on how long an implied warranty lasts, so the above limitations may not apply to you……The propeller carries a 15 day warranty against defects in workmanship and materials.WARRANTY REPLACEMENT PARTS are available by calling 1 866 456-8934, 8:30am – 5:00pm EST, Monday to Friday.

EXPLODED VIEW
14

PARTS LIST
15
PartsNum. Model Num. Description. Qty123456789101112131415161718192021222324252627
34130193331061933413119334103193341081933340119334105193341061933340219334107193341041933220505341143532205113340319334201193322201933220811341011933111019333105193322101933310719332205373116019331106192
Tiller handleAluminum tube
ActuatorHandle (top half)
Bearing-handle pivotSpring-detentActuator-camPot adapter
SpringRelease button
Handle (Lower half)Screw
Cord retainerScrewSpring
Rubber bushingScrewScrew
Upper control housingControl board assy.
Lower control housingScrewCollarNut
Lead wire assy.Depth collar knob assy.
Collar28
34116193Nut
2932207192
Bushing30
34115193Tension block
3133102192
Steering tension knob assy.32
31111192Tension bracket assy.
3331112193
Nylon nut34
32205192Washer
3532203192
Propeller
3634114193
Pin37
33210193Motor assy.
3831150193
Screw39
3331019233902192 Anodic protector
1111211111114162122111111111
11111111
1111