3d modeling pipeline for games - theseus
TRANSCRIPT

3D Modeling Pipeline for Games
Work Methods for Low Poly Models with
Hand Painted Textures
Ana Catarina Fonseca
Bachelor’s thesis 2018
Degree Programme in Media
ABSTRACT
Tampereen ammattikorkeakoulu Tampere University of Applied Sciences Degree Programme in Media and Arts FONSECA, ANA CATARINA: 3D Modeling Creation Pipeline for Games Exploring and implementing work methods for low poly models with hand painted tex-tures Bachelor's thesis 49 pages 2018
This thesis is meant as a guidebook of the 3D modeling creation pipeline for games and
its workflow, with a special focus on texturing models using the hand painted texturing
style, as opposed to a more realistic style, by describing and elaborating on the various
steps of creating a 3D model from start to finish.
For this project, I create two 3D models from initial concept phase to finish, using
different techniques and work methods to find out which are the best, and most effective
practices to recreate the hand-painted texturing style made iconic by game studios like
Blizzard and Riot Games.
The information gathered in this essay works well as a starting guide for those who are
interested in creating 3D models for games and are just starting out, but especially for
those who are interested in the hand painted texturing style, as I document my process of
doing 3D models using different techniques and work methods that are used in the
industry.
Key words: 3d, games, digitally hand-painted, texturing

3
CONTENTS
1 INTRODUCTION ............................................................................................. 5
2 CONCEPT ART ................................................................................................ 6
3 HAND-PAINTED TEXTURING STYLE ........................................................ 7
3.1 PBR texturing style .................................................................................... 7
3.2 The difference between the styles .............................................................. 7
4 3D MODELING FOR GAMES ...................................................................... 10
4.1 Digital sculpting ....................................................................................... 10
4.1.1 Sculpting with Zspheres, Zsketch and Dynamesh ........................ 11
4.1.2 The sculpting process .................................................................... 12
4.2 Polygonal modeling ................................................................................. 13
4.2.1 Box modelling and poly-by-poly modeling .................................. 14
4.3 Retopology ............................................................................................... 14
4.4 Texturing .................................................................................................. 17
4.4.1 UV Unwrapping, UV Maps and Map baking ............................... 17
4.5 Hand-Painting the textures ....................................................................... 18
4.5.1 Value gradient and Patterning ....................................................... 19
4.5.2 The importance of color ................................................................ 21
5 IN PRACTICE ................................................................................................ 25
5.1 Modeling the slime .................................................................................. 28
5.1.1 Creating the base mesh for the slime ............................................ 28
5.1.2 Sculpting the slime ........................................................................ 29
5.1.3 Retopologizing the slime .............................................................. 30
5.1.4 UV unwrapping and Map Baking ................................................. 31
5.1.5 Texturing the slime ....................................................................... 32
5.2 Modeling the demon sword ..................................................................... 37
5.2.1 Creating the demon sword with polygonal modeling ................... 37
5.2.2 Texturing the demon sword .......................................................... 39
6 DISCUSSION ................................................................................................. 44
REFERENCES ...................................................................................................... 47

4
GLOSSARY
3D three-dimensional
2D two-dimensional
polygons straight-sided shapes defined by vertices and edges,
compromised of three or more sides
PBR physically based rendering
UV axes of the 2D textures, ”U” and ”V” respectively
topology the wireframe of a 3D model. How the polygons are placed
within the surface of the model in order to create the surface
of the mesh
retopology rebuilding a low poly mesh over the top of an existing high
poly mesh to make it game ready and suitable for animations

5
1 INTRODUCTION
This thesis serves as an introductory guide to anyone interested in 3D modeling for games
as it describes the workflow and the different steps in a concise, simple manner, making
it easy to follow and understand. It is especially useful for those who are interested in the
hand painted texturing style, a visual style made iconic by game studios like Blizzard,
with World of Warcraft and Diablo III, or Riot Games with League of Legends.
While there are several different visual styles that can be used when it comes to texturing
for games —from realistic to a much more stylized simplified one— I have always been
drawn to the hand-painted texturing style because it mimics a traditional digital painting,
where you can see all the brush strokes as if it was hand painted (hence the name), often
featuring a more stylized, cartoony look. With this project, I aim to research and document
the process of doing 3D models using different techniques and work methods to
effectively recreate this texturing style.
The 3D modeling creation pipeline for games is a long process requiring several steps
(modeling, sculpting, retopologizing and texturing), with a wide variety of work methods
and techniques to choose from. This can sometimes feel overwhelming for those
interested in it, or for those that have just started learning 3D modeling. Since I am
creating the 3D models from start to finish and documenting the process, this thesis can
also be helpful for those who are just starting to learn about the subject.
It also explores some of the practices and methods used to achieve professional level
results, as well as some of my own conclusions and findings, as I explore and implement
these techniques by creating two 3D models using different work methods in order to find
out which are the most valid practices to recreate the hand-painted texturing style.

6
2 CONCEPT ART
When designing a character, it is important to keep in mind the theme, or the story that
serves as a backdrop. It is important to ask questions such as who is this character? Where
do they come from and what other traits do they have? Character design is part of telling
a story through visual cues which need to be compliant with the setting, or the backstory
of the character. All the design choices are there to further enhance these themes. It is a
way to ensure the design stays unified and believable.
Concept art is like telling a story where theme, story and environment shape the design
decisions and all these should be taken into account during the design process. However,
another really important factor to keep in mind when designing a character is the
importance of the silhouette. A character’s silhouette emphasizes its readability and make
it easy to identify it at first glance. The same goes for any other type of designs such as
weapons or environment props. Considering that these designs are for games, it is
important to keep in mind that they must read well from a distance. Often, exaggerating
the silhouette can help with this readability and make for a more appealing design that
breaks the monotony of straight edges, though even those have their uses in some cases.
(Hai Phan 2016; Dota 2 Workshop 2016)

7
3 HAND-PAINTED TEXTURING STYLE
There are several different visual styles that can be used when it comes to texturing, from
realistic to a more stylized, simplified approach like hand-painted texturing. It is up to the
art director, or the 3D artist if they are working solo, to determine which visual style best
fulfills the visuals and artistic vision of the project or game.
Stylized hand painted texturing is a visual style made iconic by game studios like Blizzard
with “World of Warcraft” or Riot Games with “League of Legends”. It is a style born out
of the technical limitations of the time that called for a stricter polygon budget and
primitive shaders, lighting and rendering tools. (Hai Phan 2016)
3.1 PBR texturing style
When it comes to a more realistic approach, the emergence of Physically based rendering
(PBR) changed the way textures and materials are created for games. Physically based
rendering (PBR) is a method of shading and rendering that uses measured surface values
to achieve an accurate representation of how light interacts with surfaces. Besides its
rendering quality, it also retains a consistent look under different lighting conditions
(time-of-day, is an example). Contrary to hand painted texturing that often uses a diffuse
map only, PBR uses several maps and materials (normal maps, albedo, microsurface,
reflectivity, cavity, AO). (Joe Wilson 2015)
While this style is mostly used in games that are trying to be as realistic as possible, it is
also possible to achieve a stylized, cartoony look using PBR textures. A good example of
this is the game Overwatch. (Timothy Bermanseder 2016)
3.2 The difference between the styles
Visually, hand painted texturing often mimics a traditional digital painting, where you
can see all the brush strokes as if it was hand painted, often featuring a more stylized,
cartoony look. It mimics a traditional digital painting so well that when the camera is
static or if it is a render, it is often hard to tell if it is a 3D model or a 2D illustration. PBR
texturing is often used to emulate a very realistic look, as close to real-life as possible.

8
PICTURE 1. Dragon Katana (Benjamin Macdonald, Artstation, 2018)
PICTURE 2. Emerald Stormbreaker (Kelvin Tan, Artstation, 2014)
The model in the first picture was textured using PBR, while the model in the second
picture was textured using the hand-painted texturing style.
Unlike PBR texturing —that uses several texture maps and is heavily affected by the
lighting conditions of the scene— hand painted texturing uses only one diffuse map where
the lighting and shading information are painted directly on the texture. Ambient

9
Occlusion and skylight maps are baked mostly as an aid and starting point for the
texturing process, with the final outcome being a diffuse map only. (Dota 2 Workshop
2016; Yekaterina Bourykina 2015; Hai Phan 2016)
While it is possible to achieve a more stylized look using PBR textures, the focus of this
thesis is on the hand-painted texturing style using only one diffuse map.

10
4 3D MODELING FOR GAMES
3D modeling is the process of creating a 3D representation of any surface or object by
manipulating polygons, edges, and vertices in simulated 3D space through the use of
specialized software. (Justin Slick 2018)
The 3D modeling process starts with the creation of a base mesh, usually following the
design and style set forth by the concept artists. A base mesh is a low-resolution model
that serves as a foundation for digital sculpting. It is a very simple blocked-in model
representing the basic proportions and general shape of the concept design, and serves as
a versatile starting point for subsequent detailing and refinement. (Spencer S., 2010, 1)
Base meshes are usually created with simple polygonal modeling techniques and should
have good topology. Topology is the wireframe of a 3D model and how the polygons are
placed and distributed within the surface of the model in order to create the surface of the
mesh. Since a model with poorly distributed edge layout can create problems during the
sculpting process. The mesh should be comprised primarily of quads (four- sided
polygons), distributed in an evenly spaced way. This creates a uniform density over the
model, allowing for a consistent subdivision in the sculpting software of choice. (Spencer
S., 2011, 2)
Alternatively, base meshes can also be created in digital sculpting software like Zbrush
(further elaborated in 4.1.1)
4.1 Digital sculpting
The next step in the 3D modeling process is to refine and add detail to the base mesh
through digital sculpting. Digital sculpting mimics analog sculpting, allowing the
modeller to manipulate and work the mesh as if it was made out of clay. Softwares like
Zbrush have a series of brushes that emulate traditional sculpting tools, as well as a variety
of other powerful tools like dynamesh and zspheres, that allow the mesh to be shaped and
refined in a much more intuitive way. (Pixologic 2016, Zbrush features.)

11
4.1.1 Sculpting with Zspheres, Zsketch and Dynamesh
Creating a base mesh and then exporting it to a digital sculpting software is a common
method in the 3D modelling process, but it is also possible to forego this step and create
a sculpting mesh entirely in Zbrush. These methods of generating meshes within Zbrush
can be done with a variety of different tools and techniques like Zspheres, Zsketch and
Dynamesh.
When using Zspheres, the mesh is built through a series of interconnected spherical
volumes that are easy to create and manipulate, but are limiting when there is a need for
a better control over the mesh, such as proper edge placement. However, they are still a
very efficient method for creating meshes, quickly building an armature that can serve as
a good starting point for sculpting.
With Zsketch, the base mesh is created through a succession of brush strokes that adds
volume to the mesh, much like adding strips of clay to a model like in analog sculpting.
This method is often used in conjunction with Zspheres, where Zsketch is used to loosely
sketch the muscles and build the overall shape on top of an armature created with
Zspheres. (Spencer S., 2010, 1; Spencer S., 2011, 2)
PICTURE 3. Zspheres and Zsketch examples (Spencer S., Zbrush Character Creation:
Advanced Digital Sculpting, 2011)
Another powerful mesh generating tool in Zbrush is Dynamesh. With this method, the
modeler can easily begin a sculpt with just a simple sphere and is free to manipulate it at
will, like pulling, stretching it, adding other pieces of geometry or even cutting some
away. It is a very intuitive tool that allows for free-form sculpting without the need to

12
worry about topological constraints, since a regular base mesh cannot be manipulated so
easily without stretching the underlying topology and creating problems when sculpting
further. Dynamesh solves this issue by instantly retopologizing the model whenever
polygons become distorted from making large changes to the mesh, resulting in a
continuous uniform mesh that the modeler can continue working on. The meshes created
through this method do not have a good underlying topology, so this method is best used
for creating base to mid-detail meshes, and then retopologizing it before continuing on to
the next phase and sculpting the details. (Pixologic 2016, Dynamesh; Creative Bloq 2012)
PICTURE 4. Dynamesh (Pixologic, 2016)
4.1.2 The sculpting process
Digital sculpting follows the same principles as analog sculpting, thus it is important to
always keep in mind the principle of “gesture, form and proportion”. Gesture captures the
shape, pose and movement of a figure and its dynamism. Form represents the external
shape and appearance of an object, while proportion refers to how the basic forms of a
character relate to one another. Altering the underlying shape will determine the way light
and shadow will interact on the surface and thus define its form. This is why it is important
to first develop the overall form and shape of a model before adding details. (Spencer S.,
2011, 2)

13
The best approach is to work at the lowest subdivision level possible, focusing on defining
the big shapes first and gradually refining them. By breaking the forms into their most
basic shapes first, it is easier to understand how they relate to one another. This process
of simplification makes it easier to reproduce or create complex forms or structures.
Starting the details phase too early will make it a lot harder to focus on the overall shape,
since it is very hard to move or alter the shape dramatically when in high subdivision
levels, often resulting in a sculpture with an ugly, lumpy look. (Spencer S., 2011, 2)
Some general guidelines to keep in mind when sculpting is to work from big to small,
focusing on the overall, basic shapes first and only refining the details later. Always work
at a low subdivision level during this block-out phase and with a large brush size, this
helps focus on the big shapes over details and helps avoid the lumpy look. Smoothing as
you are building up the form also helps with avoiding this look. Work on all areas of the
figure at once and rotate often, to check how light and shadow are affecting the form.
(Spencer S., 2011, 2)
4.2 Polygonal Modeling
Polygonal modeling, or poly modeling, is often used to create base meshes before
exporting them to a sculpting software of choice, but it is possible to skip the digital
sculpting step entirely and continue refining the mesh to completion through the use of
other poly modeling techniques.
Polygonal modeling involves constructing a model out of polygons. The polygon mesh
created is composed of faces, edges and vertices, with the faces usually consisting of
triangles(tris) or quadrilaterals(quads). This method is often used when doing more
stylized 3D models where most of the details come from the textures, or when modeling
hard surfaces (objects with sharp edges and angular shapes like cars, weapons,
architectural elements, etc.) since it provides better control and accuracy when creating
the mesh topology. (Wikibooks 2016)

14
4.2.1 Box modelling and poly-by-poly modeling
Some of the most commonly used techniques are box/subdivision modeling and poly-by-
poly/edge modeling.
Box/subdivision modelling starts with a basic primitive shape (often a cube or “box”,
hence the name), that gets refined through extrusions, scaling and adding splits and cuts.
The shape and form of the mesh is gradually built upon and refined through continuous
subdivisions. With each subdivision, extra polygons are added to the mesh, giving it
enough geometry to refine and define the shape and for details to be added. This process
is repeated until the model properly conveys the design set forth during the concept art
stage.
Poly-by-poly/edge modeling is the opposite of box modelling, where instead of starting
with a primitive shape that gets refined, the mesh is built piece by piece from scratch,
with modelers often starting with a single vertex or plane and then gradually building the
form through the use of extrusions and other tools.
Neither technique is superior to the other, both having their advantages and
disadvantages. Box/subdivision modeling is better suited for creating a base mesh, or
when the model is still at an earlier stage, allowing to quickly build an initial form and
easily correct its shape and proportions. Poly-by-poly/edge modeling allows for a greater
control of the geometry and is much easier to use with complex shapes that require
precision and intricate topology such as a face or an ear. The best way to use these
techniques is to combine their strengths and use them both. For example, using
box/subdivision modeling to model the body and poly-by-poly/edge modeling for more
complex areas like the face and ears. (Wikibooks 2016; Justin Slick 2016)
4.3 Retopology
The next step in the 3D modeling process is retopology. Retopology means rebuilding a
low poly mesh over the top of an existing high poly mesh. It is an essential part of the
process, especially when working with sculpted meshes. These high poly meshes, often
sculpts, have an underlying topology that is not suitable for animation and are too high in
detail and polygon count, which are too taxing on the game engine. Because of this, the

15
high poly model needs to be retopologized by creating a new mesh surface on top of it.
The retopologized mesh conforms to the existing one, but now with a well-constructed
topology optimized for animation and with a much lower polygon count.
PICTURE 5. The underlying topology of the high-poly sculpt of the slime on the left,
and the underlying topology of the retopologized low-poly model on the right.
When retopologizing it is essential to create topology with good edge flow that mimics
real-world anatomy, especially in areas where the mesh will distort the most during
animation. Areas like the shoulder area, hips and the mouth should have extra edge loops
so they do not deform badly during animation. It is also important to understand anatomy
and how the underlying bone structure and muscles affect bodies, since good edge flow
often mimics real anatomy. A good example is the topology of the human face, where the
edge flow mirrors the muscle structure found in real-life, especially in the area around the
mouth and eyes. (Creative Bloq 2012; Polycount Wiki 2016)

16
PICTURE 6. Face topology (Tom Parker, Polygon Wiki, 2011)
Another thing to keep in mind when retopologizing is polygonal count. When playing a
game there can be thousands of assets being rendered at the same time, which takes a lot
of processing power. In order to maintain a constant frame rate and for the game to run
smoothly it is important to create 3D models with a low polygon count, as not to be taxing
on the game engine. With the advances of hardware, the number of polygon count each
asset can have has hugely increased, but it is still important to follow a strict polygon
budget, usually determined by the platforms the game will run on. (Pluralsight 2014)
Experienced modelers can sometimes skip the retopology step when creating models with
polygonal modeling if they are relatively simple, and if they are building the mesh with
good topology and low polygon count from the start. However, there is always a certain
degree of optimization and cleaning up to do even then, like adding extra edge loops
around the joints, to give the mesh extra geometry in the parts that bend and allowing it
to deform better, or optimizing the mesh to have the lowest polygonal count possible for
optimal engine performance.

17
4.4 Texturing
The final step when creating a 3D model is texturing. Textures are 2D images that are
applied to the surface of a 3D model and are designed to influence its appearance. They
can add color, texture, or even govern a specific material attribute like glossiness or
reflectivity, depending on the texturing style being used (Justin Slick 2018; CG Cookie
2018). Since games have a strict polygon budget for optimum performance, textures are
the best way to maintain the quality and high detail of the models while keeping their
polygon count low. (Pluralsight 2014)
There are different methods of texturing depending on the style being used. As mentioned
earlier, there is PBR texturing which uses several maps and materials (normal maps,
albedo, microsurface, reflectivity, cavity, AO), which is often used for a more realistic
approach. Then there is a more stylistic approach such as hand painted textures that use
one diffuse map only.
4.4.1 UV Unwrapping, UV Maps and Map baking
UV mapping, or the process of laying out the UVs, starts by unwrapping the surface of
the 3D model in order to create an unfolded, flattened out 2D image where the texture
can be painted on. UVs define a two-dimensional texture coordinate system, U and V
respectively, that help with the placement of image textures maps on a 3D model
(Autodesk, 2018)
In order to unwrap a 3D mesh, seams must be placed throughout the model. A good way
to figure out where to place the seams is to imagine the texture being like a wrapping
paper around the model, keeping in mind where the seams would naturally occur. It is
good practice to place them where they can be hidden, or less visible on the model
(depending on the camera angle used in the game), for example under the chin or even
under the arms. Most 3D applications nowadays have a paint tool that allows a modeler
to paint directly over the model, making it easy to fix these seams.
(Pluralsight 2014, Understanding UVs.)
When laying out UVs it is important to pack the UV islands together in an organized way,
wasting as little space as possible. Even so, it is important to leave at least a 4-10 pixels

18
space between them because of texture bleeding. It is best to reserve larger UV space for
more prominent areas of focus like the face, and other areas that require more detail. It is
also important to mirror the UVs as much as possible, reserving asymmetry for areas that
will be the most prominent in game cameras.
When organizing the UVs, it is also important to keep in mind what type of angle the
game camera will have. For example, if the game camera is locked in isometric view,
then the UVs of the upper part of the body should occupy the largest space, since they
come more into focus and thus require a higher level of detail, while the lower parts of
the body are more hidden from view, requiring less detail and thus should have a smaller
UV space. (Dota 2 Workshop 2016)
PICTURE 7. UV maps for the demon sword and the slime monster
4.5 Hand-Painting the textures
Once the UVs have been laid out, the textures can start being applied and worked on.
Often, these are done in a drawing and painting software like Photoshop, which allows
the artists to treat the texturing process as if it was an illustration or a drawing, or take
advantage of the layer modes for a more realistic approach. It is often a back and forth
process between texturing in a 2D painting software, and then assessing the results in the
actual 3D model by reloading the textures in the 3D modeling software of choice. Using
this method of texturing can be a bit confusing since the UVs are flattened out versions

19
of the model, making it sometimes hard to understand which area is being painted,
especially when working on fine details.
Nowadays, a lot of 3D modeling software allow artists to paint directly on the models
(3DCoat, Zbrush, etc.), and some are even designed for the purpose of texturing alone
(Substance Painter, Mari, etc.).
Being able to paint directly on the model and seeing the changes happen in real-time feels
a lot more intuitive than texturing on the flattened-out UVs. Also, when using this method
of texturing, seams become less of an issue, since you can paint directly over them. In the
end it is up to the texture artist to decide what software to use and what work methods
work best for them. Some have a software of choice, while others like to use a
combination of them in order to achieve the visual style they are trying to emulate.
When texturing, it is important to keep in mind that the scale of detail is relative to the
size of the character in-game, so it is important to be selective about what are the most
important details to render and how they will read when in-game. It is good practice to
have a good balance between areas with more detail, and therefore greater visual impact,
and larger areas of less detail where the eye can rest. It is important to strike a balance
between the two since too much detail can overwhelm the eye and become monotonous,
and larger areas with less detail read much clearer in game. Having a good harmony
between the two means that areas of detail will have greater visual impact. (Dota 2
Workshop 2016)
4.5.1 Value Gradient and Patterning
Value “is the range of lightness and darkness within a subject regardless of color and
saturation” (Dota 2 Workshop 2016). It is often considered more important than color,
since it is what allows us to see form by creating an illusion of depth and is what makes
objects look three dimensional. It can also be used to create focal points that help guide
the player’s eyes to the most important part of the character, or break the monotony of
large areas of color by bringing it variety and focus.

20
PICTURE 8. Value gradient used in various characters (Dota 2 Workshop, 2016)
The value gradient of a character usually “moves from darkest at feet/lower body to
lightest at the upper body and head. This helps draw the player’s eye to the most important
areas of the character.” (Dota 2 Workshop 2016)
The human eye is drawn to boundaries between different areas of contrast, thus it is
important to establish blocks of value to highlight the form of objects and characters.
Using the same principle as with value gradient, the upper parts of the model have a
greater visual interest by adding a higher value contrast to them, while the lower parts
have less. This ensures that once again the focus is kept on the upper parts of the model.
If a character model has different pieces, such as armor or weapons, separating them into
their own value helps read them as distinct element of their own. (Dota 2 Workshop 2016)
The picture below shows an efficient way of breaking the monotony of large areas of
color with the use of value and value patterning, by making the tail and paws have a
darker gradient.

21
PICTURE 9. Value patterning used in various characters (Dota 2 Workshop, 2016)
4.5.2 The importance of color
Just like in 2D painting, color balance and harmony play an important role when painting
textures for 3D models. When deciding on a color scheme for the model, it is good to
start by first choosing a primary color, then a second, or even a third one through the use
of complementary, split complementary, analogous, or triadic color schemes. These rules
are not meant to stifle creativity since “color schemes can be inventive but still
harmonious if they are created using structured combinations of hues from the color
wheel.” (Dota 2 Workshop 2016) The pictures below show examples of different color
schemes and their different functions.
PICTURE 10. Complementary color schemes (Dota 2 Workshop, 2016)
“Complementary hues are on opposite sides of the color wheel. These opposing colors
are more intense and “vibrate” when next to each other as they compete for the viewer’s
attention.” (Dota 2 Workshop 2016)

22
PICTURE 11. Split complementary color schemes (Dota 2 Workshop, 2016)
For Split Complementary color schemes, “one of the complementary colors is split off
into a pair of neighboring hues.” (Dota 2 Workshop 2016)
PICTURE 12. Analogous color schemes (Dota 2 Workshop, 2016)
“Analogous colors are next to one another on the color wheel. These colors appear to
"push" at each other, creating an optical illusion where each zone appears larger when it
has your attention.” (Dota 2 Workshop 2016)
PICTURE 13. Triad color schemes (Dota 2 Workshop, 2016)
“Triad hues are equidistant on the color wheel.” (Dota 2 Workshop 2016)
Some other points to keep in mind when selecting an initial color scheme is to avoid
colors that are dominant in the game’s environment, or map (Dota 2 Workshop 2016),

23
since similar colors will drown out the character and make it blend into the background.
The character should be easily distinguishable from the environment.
Once the source colors have been picked, they can be expanded upon by mixing, tinting
and shading them in order to get a full palette. In order to maintain color harmony, it is
important to introduce new colors “using blends of the original primary, secondary and
tertiary colors along with grayscale values.” (Dota 2 Workshop 2016)
The picture below is an example of muted colors created by mixing complementary
colors. ”The pure, saturated opposing colors become a desaturated grey tone as they are
mixed together.” (Dota 2 Workshop 2016)
PICTURE 14. Color saturation (Dota 2 Workshop, 2016)
The example below uses black shade and white tint to adjust color values.
PICTURE 15. Color tint shade (Dota 2 Workshop, 2016)
Another important thing to keep in mind when using color is saturation, or the intensity
of a color. Saturation draws the eye, so just like with value gradient, it should be less
intense in the lower body and increase towards the upper body. In short, it is best to leave
high levels of saturation to the areas you want the viewer’s eyes to focus on. However, it
is best to keep high levels of saturation small since “large areas of high saturation
overwhelm the viewer and distract from the visual harmony of the character.” (Dota 2
Workshop, 2016). These areas with “complicated texture details, high-contrast values or

24
strong saturation, can be balanced by areas of rest with fewer details, less value contrast
and reduced saturation.” (Dota 2 Workshop, 2016). It is also important not to use pure
saturation colors that max out the R, G or B values in order to allow the in-game lighting
to correctly influence them. (Hai Phan 2016; Dota 2 Workshop 2016)
PICTURE 16. Art color (Dota 2 Workshop, 2016)
The picture above shows examples of these principles already discussed: such as value
gradient, color schemes and saturation, all put into practice.
With these different examples, it is easy to notice the dark to light gradient starting on the
lower feet and increasing towards the upper torso, the different color schemes, and the
use of more saturated colors to create areas of visual interest as focus for the viewer’s
eyes. This is especially evident with the shoulder pads on the first character and the eyes
on the last one.

25
5 IN PRACTICE
Since the objective of this thesis was to improve my skills with a specific texturing style
by experimenting with different work methods and techniques, it would be better to create
a 3D model based on an already existing design. This would allow me to focus fully on
the modelling process itself without having to worry about design decisions. However, I
also wanted to take this opportunity to improve my character designing abilities and fully
experience the process of creating a 3D model from start to finish, including the concept
art phase.
As such, I decided to create a monster and a non-humanoid character for an imaginary
Role-Playing Game (RPG) as the theme for the concept design of this project. For the
monster I wanted to create a slime. Slimes are popular fantasy monsters, often found in
games with fantasy settings like Dungeon and Dragons. They resemble oozing blobs of
slime (hence the name) and usually engulf their victims, slowly digesting them in their
interior.
PICTURE 17. Gelatinous cube (Dungeons and Dragons, Wizards of the Coast)
Since they are usually found in a dark cave, I tried some design variations where they
once had eyes that evolved due to disuse and now just have a glossy layer of skin on top

26
of them —much like the fish you see in caves or in the deep ocean. The eyes are supposed
to glow in the dark to attract small prey, who then get caught in the slime. In the end, I
decided to go with a simpler design with a blob-like shape where you can see a hint of a
victim being digested in its interior. I believe this design is the one that best captures the
iconic look of the slime monster. The slime would move in a very slow, dragging motion,
suddenly attacking the victim with a sudden strike, like an elastic springing forth and then
quickly back to their initial position.
PICTURE 18. Concept art for the slime monster
For the non-humanoid character I decided to design a demon sword. This sword would
harbor the soul of a demon inside, so it would still be capable of speech but without having
a mouth at all. For this reason I decided that the focus of the design should be the large
eye at the center of the hilt of the sword. It would blink redder on and off whenever the
sword would talk, and the eye would move around and be capable of doing some subtle
expressions. While the sword itself is supposed to be a character, it is also meant to be
used as an actual weapon. Keeping in mind that it is a demon, I designed it as a mixture
of demon flesh, bone and teeth with the shape of a sword.

27
PICTURE 19. Concept art for the demon sword
When it comes to the silhouette of the designs created for this project, it was important to
keep in mind the nature of their concepts. In case of the demon sword, its general form
should easily identify it as a sword, while its angular, spiky edges should invoke
something rough and harsh, which fits the nature of a demonic weapon. In the case of the
other character, the soft, round and blob-like shape of the slime monster is already
reinforcing the viscous nature of the creature.

28
PICTURE 20. Silhouettes of the slime and the demon sword
Since I have used different modeling and texturing techniques to paint the models, I will
describe both processes separately below.
5.1 Modeling the slime
5.1.1 Creating the base mesh for the slime
I first created a base mesh for the slime in Blender 3D. Since I was going to sculpt the
model, it was possible to create the base mesh using Zbrush, but I still prefer to use
polygonal modeling to create my base meshes. I feel they give me more control over the
topology and this allows me to follow the original concept more closely. However, I do
hope that with practice I can also become more proficient at creating base meshes in
Zbrush, since its tools allow for a faster, more intuitive process, especially when it comes
to organic models.

29
PICTURE 21. The base mesh for the slime
5.1.2 Sculpting the slime
After importing the slime base mesh into Zbrush I started the sculpting process. I first
focused on refining the model’s basic form and overall shape, without getting too caught
up with adding details at first.
Even though the design of the slime monster is heavily stylized, it was still important to
find reference that could help with the sculpting and texturing process. While the monster
is a fantasy creature that does not exist in the real world, I still tried to find real-life
counterparts that could serve as reference point for the viscous look it has. I gathered
several photos as reference material ranging from things like jell-o, to melting ice-cream
and even thick flowing lava to understand how the thick substance looked when there
were several layers melting on top of each other. This reference helped me a lot during
this first important block-out phase.
Only after the form and underlying structure were all properly developed, did I move on
to the fine details phase, which is done at the highest possible subdivision levels. Learning
this process, and when to advance to a higher level of subdivision, was a real challenge.
At times, I started adding details too early on a level of subdivision that was too low, and
as a result the details would get completely lost when I moved to a higher level of

30
subdivision. I have now learned that the final polish and detail should only come at around
subdivision level 4 or 5 when using Zbrush, and before that my main focus is on building
the shape and form of the sculpt.
PICTURE 22. A high-poly sculpt of the slime
5.1.3 Retopologizing the slime
After sculpting the slime, I was left with a high-poly mesh that needed to be
retopologized. The finished sculpt did not differ much in general shape from the base
mesh I had created earlier, so I used this base mesh as a starting point for the retopology
of the slime.
I loaded the slime sculpt in Blender 3D and used the shrinkwrap modifier to wrap the
low-poly base mesh of the slime around its high-poly counterpart. The shrinkwrap
modifier “moves each vertex of the object being modified to the closest position on the
surface of the given mesh.” (Blender 2016).
This worked well as a starting point but I still had to modify and clean the topology in
order to ensure the polygon count stayed as low as possible. For certain areas of the slime
31
it was best to retopologize from scratch, which I did using software like Topogun which
makes the process faster and more intuitive (Topogun 2016)
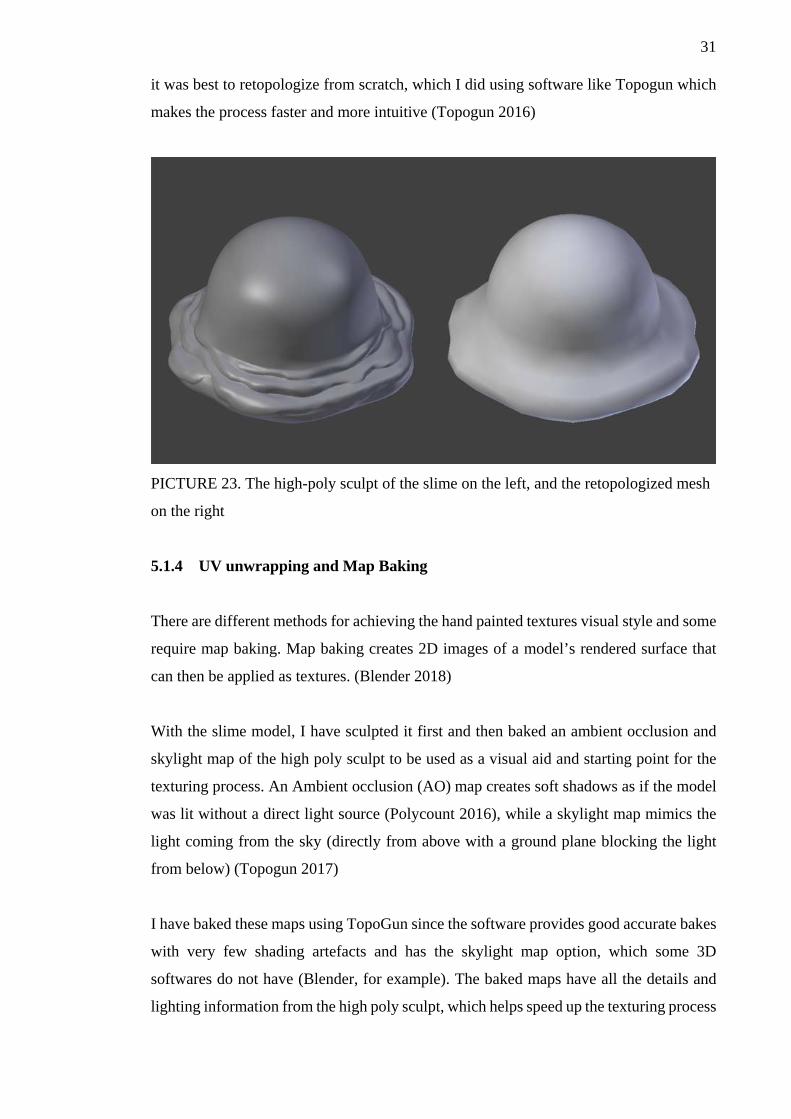
PICTURE 23. The high-poly sculpt of the slime on the left, and the retopologized mesh
on the right
5.1.4 UV unwrapping and Map Baking
There are different methods for achieving the hand painted textures visual style and some
require map baking. Map baking creates 2D images of a model’s rendered surface that
can then be applied as textures. (Blender 2018)
With the slime model, I have sculpted it first and then baked an ambient occlusion and
skylight map of the high poly sculpt to be used as a visual aid and starting point for the
texturing process. An Ambient occlusion (AO) map creates soft shadows as if the model
was lit without a direct light source (Polycount 2016), while a skylight map mimics the
light coming from the sky (directly from above with a ground plane blocking the light
from below) (Topogun 2017)
I have baked these maps using TopoGun since the software provides good accurate bakes
with very few shading artefacts and has the skylight map option, which some 3D
softwares do not have (Blender, for example). The baked maps have all the details and
lighting information from the high poly sculpt, which helps speed up the texturing process

32
since I no longer have to figure out the light and shadow information on my own, and
have a lot of the details already present.
PICTURE 24. The slime with the baked AO and skylight maps
5.1.5 Texturing the slime
While it is possible to paint textures directly on the model using softwares like 3D Coat,
I primarily use Paint Tool SAI (a software similar to Photoshop in regards to digital
painting) to paint my textures, since I have more experience with it and feels more like I
am working on a normal 2D illustration. I am fairly new to using 3D Coat, and I have had
some difficulty adjusting to the way its brushes blend color, but I have used it to tackle
more difficult areas that are easier to texture if I paint directly on the model.
I also use 3D Coat for finishing passes and polishing like getting rid of seams. However
I do want to become more proficient with 3D Coat, since I believe it is much more
intuitive to paint directly on the model and see the changes happening in real-time. 2D
softwares like Photoshop can then be used to further detail and polish the textures.
My target resolution for the slime textures was 1024x1024, so I worked directly in that
resolution. As mentioned earlier, I primarily used Photoshop and Paint Tool SAI to paint
the textures, only using 3D Coat on occasion to paint more difficult areas and to clean up
seams. Most of the texture work can be done in Photoshop, but I use it primarily to work

33
with different layer blending modes or to use its different image adjustment filters, while
doing most of the actual painting process in Paint Tool SAI since I prefer the way that
software blends colors when painting.
As a starting point I opened the slime’s UV map in Photoshop and added a flat base color
to it, and then added the baked AO map as a separate layer above in multiply mode. In
yet another layer, I added the baked skylight map in soft light mode. Both layers were at
50% opacity.
PICTURE 25. A screenshot from Photoshop during the process of painting the slime
textures
PICTURE 26. The slime with a base color and the AO and skylight maps
34
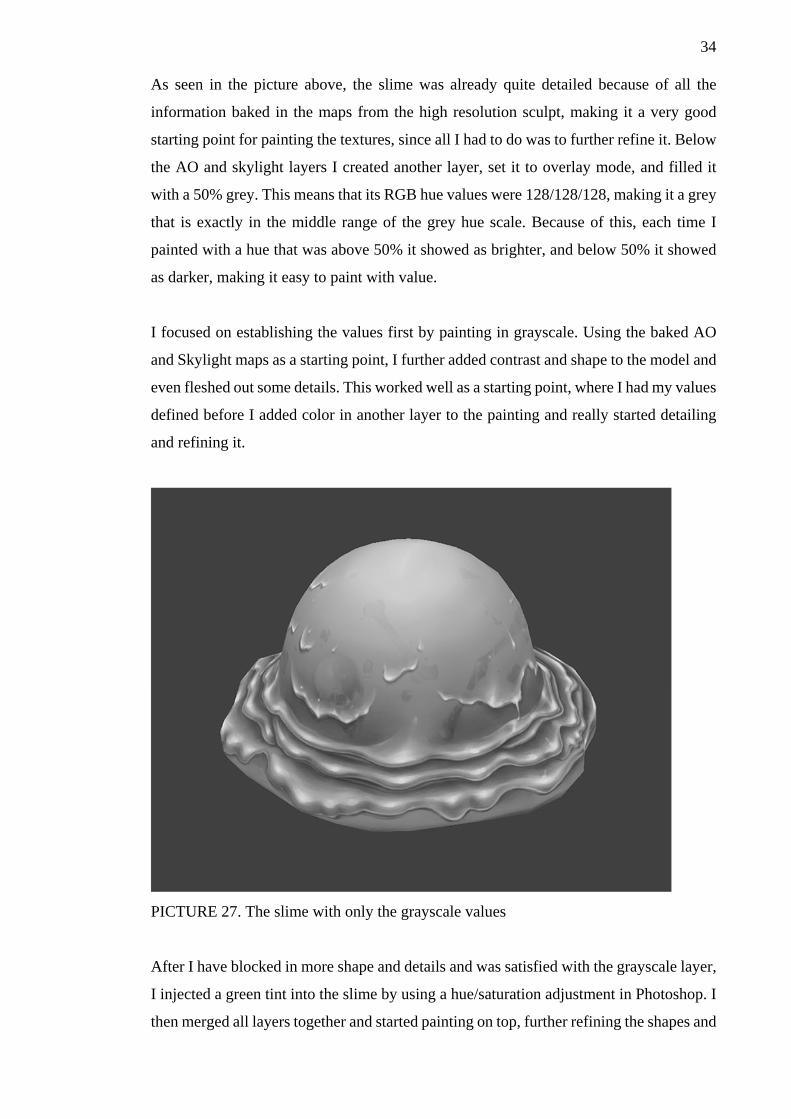
As seen in the picture above, the slime was already quite detailed because of all the
information baked in the maps from the high resolution sculpt, making it a very good
starting point for painting the textures, since all I had to do was to further refine it. Below
the AO and skylight layers I created another layer, set it to overlay mode, and filled it
with a 50% grey. This means that its RGB hue values were 128/128/128, making it a grey
that is exactly in the middle range of the grey hue scale. Because of this, each time I
painted with a hue that was above 50% it showed as brighter, and below 50% it showed
as darker, making it easy to paint with value.
I focused on establishing the values first by painting in grayscale. Using the baked AO
and Skylight maps as a starting point, I further added contrast and shape to the model and
even fleshed out some details. This worked well as a starting point, where I had my values
defined before I added color in another layer to the painting and really started detailing
and refining it.
PICTURE 27. The slime with only the grayscale values
After I have blocked in more shape and details and was satisfied with the grayscale layer,
I injected a green tint into the slime by using a hue/saturation adjustment in Photoshop. I
then merged all layers together and started painting on top, further refining the shapes and
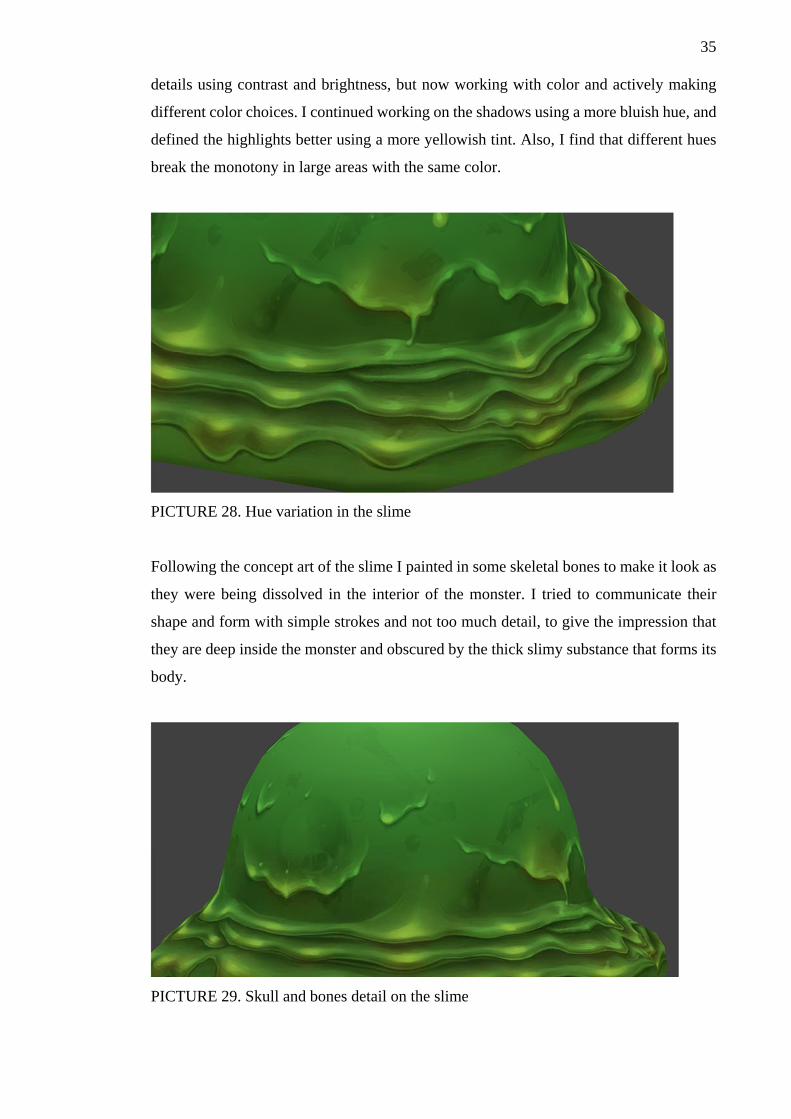
35
details using contrast and brightness, but now working with color and actively making
different color choices. I continued working on the shadows using a more bluish hue, and
defined the highlights better using a more yellowish tint. Also, I find that different hues
break the monotony in large areas with the same color.
PICTURE 28. Hue variation in the slime
Following the concept art of the slime I painted in some skeletal bones to make it look as
they were being dissolved in the interior of the monster. I tried to communicate their
shape and form with simple strokes and not too much detail, to give the impression that
they are deep inside the monster and obscured by the thick slimy substance that forms its
body.
PICTURE 29. Skull and bones detail on the slime

36
While I painted the textures, I always tried to keep zooming out and looking at my work
from afar so I would not get bogged down with rendering small details that would just
read as noise when seen from afar. Finally, I felt like the textures were complete with a
good balance between areas with more detail, and larger areas of less detail where the eye
can rest.
As a last step I loaded the model in 3D Coat and added a few final touches and polishes,
since it was easier to do it directly in the model, and also fixed any mismatched seams.
Then in Photoshop I did some final color tweaks with saturation and color balance
adjustments. The figure below shows the finished version of the slime monster and the
respective diffuse map.
PICTURE 30. The finished model of the slime monster

37
PICTURE 31. The diffuse map of the slime monster
5.2 Modeling the demon sword
I did not create a base mesh for the sword model since I did not do any sculpting with it.
Instead, the model was done entirely with polygonal modeling and the mesh topology and
poly count cleaned up and improved for the final version.
5.2.1 Creating the demon sword with polygonal modeling
I mostly used poly-by-poly modeling for the main blade combined with box modelling
for the hilt and the spikes. In this case, instead of using a cube as a primitive, I used a
cylinder and refined its shape until I got the desired result. Modeling the sword entirely
through poly modeling was a good challenge since it is a mixture of organic and hard

38
surface modelling, where you have to be mindful of the topology in order to get the right
look for the different surfaces.
PICTURE 32. The model of the demon sword without textures
I did not retopologize the demon sword because I kept the polygon count and an optimal
topology in mind while I was modeling it, since it is a good challenge and great learning
experience when it comes to understanding good topology and edge flow. Also, this
method was the best one to use since I wanted the mesh to be very simple and to just
retain the sword’s general shape, adding details later during the texturing process.

39
PICTURE 33. The underlying topology of the demon sword model
5.2.2 Texturing the demon sword
After UV unwrapping the demon sword in Blender, I began the texturing process. I could
have baked an ambient occlusion map as a starting point, but the 3D model was so simple
that I found it easier to work without one. Instead, using Paint Tool SAI, I painted in my
own ambient occlusion by adding a dark gradient that was darker at the bottom (towards
the lower part of the hilt of the sword) and lightest at the top (at the tip of the blade), thus
defining my light source. The demon sword was to be a character in itself and to be mostly
in a vertical position. With a soft brush I also painted in some of the harder shadows to
help me keep in mind the direction of light sources when painting.

40
When I textured the slime monster, I first established the values by painting in grayscale,
but I sometimes find this method restrictive since it robs me of being able to make color
choices as I paint, so for the sword model I skipped painting in grayscale and started using
color right away. I added in the base colors for the different areas of the demon sword,
and then with a hard brush I loosely sketched in the details of the sword.
PICTURE 34. The demon sword model with base colors and details sketched in
I started working on the shadows and the highlights, but always as just an initial block-
in and never starting details too early. In this starting phase I tried to define the forms and
shapes first, focusing on the general shading and leaving detailing for later.
I continued texturing further, making sure I was rendering the different materials right.
Light and shadow work differently in material like bone, guts and viscera, which I was
trying to emulate in the demon sword. It is also helpful to gather reference material in
order to properly render them. For the areas of flesh and viscera I tried adding stronger
highlights to better describe their slimier texture, while with the spikes I tried to render it
as bone with some of the surface area looking worn out and cracked.
The area of focus for this model is the eye at the center, therefore it is more brightly lit
and where I spent the most time with rendering and detailing.

41
PICTURE 35. Eye and hilt detail of the demon sword
Once in a while I turned the textures to grayscale to recheck values, and to try not to let
the value gradient going from bottom to top get lost as I painted. Just like with the slime
monster, I tried to strike a balance between areas with more detail with greater visual
impact, and larger areas of less detail where the eye can rest.
I fixed the seams and added some finishing passes and polish in 3D Coat like refining the
highlights. I also renewed the value gradient by adding a blue gradient darker at the
bottom and lighter at the top, and where I wanted the areas to distinguish themselves from
one another. Lastly, in Photoshop I did some color enhancements with saturation and
color balance adjustments.

42
PICTURE 36. The finished model of the demon sword

43
PICTURE 37. The diffuse map of the demon sword

44
6 DISCUSSION
While the 3D modeling creation pipeline for games is a long process requiring many
steps, it still gives modelers enough leeway to choose their preferred methods and
techniques to get the work done. While some might prefer to start with a base mesh
created through poly modeling, others would rather take advantage of the dynamesh
feature of Zbrush and start their model from a simple sphere primitive. There is also those
who prefer to paint directly on the model during the texturing phase using software like
3D coat, while some would rather use 2D painting software like Photoshop to texture
entirely on a flat 2D canvas. In the end, there are no rules on what software to use, or
what technique is superior to the other. What matters are the end results, and the 3D artist
should use the tools they feel most comfortable with.
The same principle applies to the different techniques for hand-painted textures that I
experimented with for the purpose of this thesis. Sculpting the model first in order to use
the baked lighting maps as a starting and reference point for the texturing, or skipping
sculpting and going straight to texturing without any visual aid, or even painting the
textures directly on the model or not -- neither is better than the other, it all depends on
which method an individual artist prefers to obtain the desired results, or they can even
use a combination of both.
When it comes to my own work, I find it that when it comes to characters, especially
those that have a lot of detail, it is better to sculpt the model first and then get all the detail
and lighting information from the sculpt to help with the texturing process. This speeds
up the texturing considerably, and it gives much better results. Having an accurate render
of light and shadow, as well as proper shape and form, work as invaluable starting points
for the texturing process. Then, all that is needed is to elaborate and further detail what is
already there from the baked maps. However, if the model I am working on is just a
simple prop that is not supposed to be the center of focus, then I find it better to skip
sculpting and paint the textures without the aid of baked maps. Sculpting-- while very
useful for the texturing process-- is time consuming and laborious, so it is a step best
reserved for characters with a lot of detail that will feature prominently in the game. It
does not justify spending days sculpting a book that will only be used as a background
prop that players will hardly notice.

45
While I do not have enough practice using software that allow me to paint directly on the
model like 3DCoat, it made me understand the advantage of using this technique instead
of painting textures on a 2D painting software like Photoshop. Painting directly on the
model is a lot more intuitive, especially since you know exactly where you are painting
and have a better understanding of the general shape and form of the model, instead of
having to interpret the flat UV maps. You can also see the results of the texturing in real
time, instead of having to go back and forth between the 2D painting software and the 3D
modeling software to see how the textures look like in the model. The problem I have
encountered with this technique so far, is that I found it hard to get used to the brushes
and the way they blend the colors, but with enough practice I can see the advantage of
using this technique, since it is faster and more intuitive.
Regardless of preferred tools and techniques, there are rules and principles that still need
to be followed when doing 3D models, such as keeping in mind “gesture, form and
proportion”, which are fundamentals of both analog and digital sculpting. Even of greater
importance is the need to learn how to create good topology and edge flow. Not only will
this ensure the mesh is optimal for animation, it also helps make the retopology step go
much easier and efficiently, by creating a mesh with an optimal edge flow and topology
while keeping the model’s polycount as low as required.
Equally important, is to learn how to model using several different techniques. While it
might be convenient to create a model entirely in Zbrush using its dynamesh feature and
sculpting tools, it is important to learn how to do polygonal modeling and its different
techniques like box modelling or poly-by-poly, since it is the best way to learn edge flow
and good topology. Another example that illustrates the need to learn these different
modeling techniques is when doing hard surface modeling. Hard surface modeling is the
name used to categorize more mechanized, man-made objects with a more angular,
geometrical shape like cars, weapons, houses, etc. (Pluralsight 2015). While Zbrush has
a variety of brushes created specifically for hard surface modeling, it is much easier to
create them through poly modeling in a 3D modeling software of choice where there is
much better control over the topology, and then bringing it back to Zbrush for detailing.
Overall, I am quite happy with how the 3D models turned out and how the experience
helped me understand the 3D modeling process for games better, as well as the different

46
texturing techniques to use in order to achieve the hand-painted look that studios like
Blizzard have made iconic. However, I still need more practice since I have a tendency
to add too many details to my work, which decreases the readability of the model,
especially when seen from a distance. This is especially evident with the demon sword
where there is too much detail overall and not enough areas of rest. I also should have
mirrored the sword when I unwrapped it, since it is meant to be used as a weapon for the
player character and therefore it does not justify having asymmetry. It was also hard to
maintain a gradient on the model (dark at the bottom, light at the top), since it got lost as
I painted, and even adding it again at the end did not produce the results I hoped for.
I still need a lot more practice in all areas, including sculpting, topology and texturing,
but that only comes with practice, so I am looking forward to working on my next models
and continue developing my skills.

47
REFERENCES
Dota 2 Workshop. Valve. Dota 2 Workshop – Character Art Guide. Guide. Read 12.11.2016 https://support.steampowered.com/kb/9334-YDXV-8590/dota-2-workshop-character-art-guide
Hai Phan. Vertex HD volume 1. Avian Defender. E-book. Read 21.11.2016. https://gumroad.com/ryanhawkins
Joe Wilson. Marmoset. 01.10.2015. Physically- based rendering, and you can too!. Tutorial. Read 22.11.2016. https://www.marmoset.co/posts/physically-based-rendering-and-you-can-too/
Timothy Bermanseder. 80 Level. 23.05.2016. Technical and visual analysis of Overwatch. Article. Read 29.11.2016. https://80.lv/articles/overwatch-technical-overview/
Benjamin Macdonald. Artstation. 2018. Dragon Katana. Read 18.10.2018. https://www.artstation.com/artwork/ew8lY
Kelvin Tan. Artstation. 2014. Emerald Stormbreaker. Read 18.10.2018. https://www.artstation.com/artwork/93DR
Yekaterina Bourykina. Sketchfab. 04.03.2015. Art spotlight: paladin Alyonushka. Article. Read 20.11.2016. https://blog.sketchfab.com/art-spotlight-paladin-alyonushka/
Justin Slick. Lifewire. Updated 24.08.2018. What is 3D modeling?. Read 21.11.2016. https://www.lifewire.com/what-is-3d-modeling-2164
Spencer S. 2010. Zbrush Digital Sculpting Human Anatomy. 2nd edition. John Willey & Sons Spencer S. 2011. Zbrush Character Creation: Advanced Digital Sculpting. Sybex Pixologic. Zbrush features. Online documentation. Read 18.11.2016. http://docs.pixologic.com/features/ Pixologic. Dynamesh. Online documentation. Read 05.11.2016. http://docs.pixologic.com/user-guide/3d-modeling/modeling-basics/creating-meshes/dynamesh/ Creative Bloq. 18.07.2012. Tips and tricks for organic modelling. Article. Read 07.08.2016. http://www.creativebloq.com/tips-and-tricks-organic-modelling-7123070 Wikibooks. Blender 3D: Noob to Pro. Wikibook. Read 04.09.2016. https://en.wikibooks.org/wiki/Blender_3D:_Noob_to_Pro

48
Justin Slick. Lifewire. 20.10.2016. 7 common modeling techniques for Film and Games. Article. Read 21.11.2016. https://www.lifewire.com/common-modeling-techniques-for-film-1953 Polycount Wiki. 06.02.2016. Retopology Modeling. Wiki page. Read 09.12.2016. http://wiki.polycount.com/wiki/ReTopologyModeling
Tom Parker. Polycount Wiki. 01.2011. Face Topology. Wiki page. Read 12.12.2016 http://wiki.polycount.com/wiki/FaceTopology Pluralsight. 08.04.2014. What’s the difference? A comparison of modeling for games and modeling for movies. Article. Read 09.12.2016. https://www.pluralsight.com/blog/film-games/whats-the-difference-a-comparison-of-modeling-for-games-and-modeling-for-movies Autodesk. Introduction to UV mapping. Online documentation. Read 29.11.2018. https://knowledge.autodesk.com/support/maya/learn-explore/caas/CloudHelp/cloudhelp/2015/ENU/Maya/files/UV-mapping-overview-Introduction-to-UV-mapping-htm.html
Justin Slick. Lifewire. Updated 09.07.2018. Surfacing 101: The Basics of Texture Mapping. Article. Read 12.08.2018. https://www.lifewire.com/texture-mapping-1956
CG Cookie. Fundamentals of Texturing. Tutorial. Read 12.08.2018. https://cgcookie.com/course/introduction-to-texturing
Pluralsight. 08.04.2014. What's the Difference? A Comparison of Modeling for Games and Modeling for Movies. Article. Read 11.11.2016. https://www.pluralsight.com/blog/film-games/whats-the-difference-a-comparison-of-modeling-for-games-and-modeling-for-movies
Pluralsight. 19.01.2014. Understanding UVs – Love them or hate them, they’re essential to know. Article. Read 11.11.2016. https://www.pluralsight.com/blog/film-games/understanding-uvs-love-them-or-hate-them-theyre-essential-to-know Blender. Shrinkwrap modifier. Online documentation. Read 22.11.2016. https://docs.blender.org/manual/en/dev/modeling/modifiers/deform/shrinkwrap.html
Blender. Render Baking. Online documentation. Read 29.11.2018. https://docs.blender.org/manual/ja/dev/render/blender_render/bake.html
Topogun. Topogun overview. Online documentation. Read 22.11.2016. http://www.topogun.com/about/overview.htm Polycount Wiki. Ambient occlusion map. Wiki page. Read 09.12.2016. http://wiki.polycount.com/wiki/Ambient_occlusion_map

49
Topogun. Baking Maps. Online documentation. Read 22.12.2017. http://www.topogun.com/Docs/docs/UserGuide.Bake.htm
Pluralsight. 16.06.2015. What’s the difference between hard surface and organic modeling?. Article. Read 10.02.2017. https://www.pluralsight.com/blog/film-games/whats-the-difference-between-hard-surface-and-organic-models