developing 2d games using unity 4 - theseus
TRANSCRIPT

Henri Suvanto
DEVELOPING 2D GAMES USING
UNITY 4.3
Bachelor's Thesis
Information Technology
May 2014

KUVAILULEHTI
Opinnäytetyön päivämäärä
27.5.2014
Tekijä(t)
Henri Suvanto
Koulutusohjelma ja suuntautuminen
Information Technology
Nimeke Developing 2D-games using Unity 4.3 Tiivistelmä Tämän opinnäytetyön tavoitteena oli tutkia Unityn uudessa 4.3 versiossa julkaistuja kaksiulotteisten pelien kehitystyökaluja ja ominaisuuksia sekä tarjota kirjoitettua tietoa uusista ominaisuuksista suomeksi. Älypuhelimien ja tablettien suosio on kasvattanut kysyntää kaksiulotteisille peleille joka on samalla myös kasvattanut tarvetta erilaisille ratkaisuille kaksiulotteisten pelien kehittämiseen. Tutkimuksen sisältö voisi auttaa aloittavia pelinkehittäjiä oppimaan enemmän Unityn käyttämisestä ja erityisesti Unityn uusista kaksiulotteistan pelien kehitystyökaluista. Tutkimuksen aikana kaikkia uusia Unityn esittelemiä ominaisuuksia testattiin ja opiskeltiin lukemalla Unityn verkkodokumentaatiota. Tärkeimmistä ja hyödyllisimmistä ominaisuuksista kehitettiin sitten niitä esittelevä demo. Demo tehtiin tutoriaalina joka tarjoaa tuleville pelinkehittäjille tietoa miten käyttää Unityn uusia ominaisuuksia ja mitkä ovat niiden toimintaperiaatteet. Lisäksi koska suurin osa olemassa olevasta materiaalista koskien pelinkehitystä Unityllä on tarjolla vain englanniksi, kehitettiin toinen demo josta kirjoitettiin suomenkielinen tutoriaali. Molemmat demot toteutettiin onnistuneesti ja ne esittelivät sekä käyttivät monia uusista ominaisuuksita helposti ymmärrettävällä tavalla. Kaikki demoissa käytetty materiaali tehtiin erityisesti tähän tarkoitukseen. Toista demoa, jota suomalaiset opiskelijat voisivat käyttää opiskellessaan pelinkehitystä, voisi jatkokehittävää selittämään joitain Unityn elementtejä tarkemmin. Tällähetkellä tutoriaalin seuraaminen vaati pohjatietoa Unitystä ja ei välttämättä ole helpostiymmärrettävä kaikille.
Asiasanat (avainsanat)
Unity, pelinkehitys, kaksiulotteiset pelit, tutoriaali Sivumäärä Kieli URN
30 s. + 18 s. liitteitä Englanti Huomautus (huomautukset liitteistä) Toinen liite on suomenkielinen tutoriaali. Ohjaavan opettajan nimi
Jukka Selin
Opinnäytetyön toimeksiantaja
MAMK/Jukka Selin

DESCRIPTION
Date of the bachelor’s thesis
27.5.2014
Author(s)
Henri Suvanto
Degree programme and option
Information Technology
Name of the bachelor’s thesis
Developing 2D-games using Unity 4.3 Abstract
The aim of this bachelor's thesis was to study the new tools and features for two-dimensional game de-velopment introduced in version 4.3 of Unity and also to provide written information about the new fea-tures in Finnish. The popularity of smart phones and tablets has increased the demand for two-dimensional video games, so the demand for studying different solutions for developing those games has also increased. Contents of the this study could help future game developers to learn more about using Unity and especially about using the new native two-dimensional features of Unity. During the study all the new features provided by Unity were tested and studied by reading the online documentation of Unity. The most important and useful features were then selected and used to create a demo of the features. This demo was made as a tutorial to provide future developers information about how to use the new features and how they function. Another tutorial was also made in Finnish to provide information about developing games with Unity, as most of tutorials and other material written about Unity are in English. Both of the demo cases were completed successfully and they represent and use many of the new features in an easily understandable way. All of the material used in the demos were made specifically for the purpose. The second example game, which could be used as study material for Finnish students, could be further develop to explain certain elements in Unity. Currently it still requires some base knowledge and might not be easy to understand for everyone. Subjectheadings, (keywords)
Unity, game development, two-dimensional video games, tutorial Pages Language URN
30 p. + 18 p. appendices
English
Remarks, notes on appendices
The second appendix is a tutorial written in Finnish Tutor
Jukka Selin
Bachelor’s thesis assigned by
MAMK/Jukka Selin
SISÄLTÖ
1 INTRODUCTION................................................................................................... 1
2 OVERVIEW OF UNITY ........................................................................................ 2
2.1 History ........................................................................................................... 2
2.2 Licenses ......................................................................................................... 3
2.3 Asset Store ..................................................................................................... 4
2.4 IDE User interface ......................................................................................... 4
3 UNITY 2D DEVELOPMENT ................................................................................ 6
3.1 Native 2D tools .............................................................................................. 7
3.1.1 Sprites ................................................................................................ 7
3.1.2 SpriteRenderer ................................................................................... 8
3.1.3 Sprite Animation ................................................................................ 8
3.1.4 2D physics ........................................................................................ 10
4 EXAMPLE GAME 1 ............................................................................................ 11
4.1 Creating the project ...................................................................................... 11
4.2 Setting up the scene ..................................................................................... 12
4.3 Sprites .......................................................................................................... 12
4.4 Animating the character ............................................................................... 13
4.5 Character physics ......................................................................................... 17
4.6 Level design ................................................................................................. 18
4.6.1 Collectible coins............................................................................... 20
4.6.2 Start and finish ................................................................................. 20
4.7 Scripts .......................................................................................................... 22
4.7.1 Character controller ......................................................................... 22
4.7.2 Camera Script................................................................................... 24
4.8 Build ............................................................................................................ 26
5 EXAMPLE GAME 2 ............................................................................................ 26
5.1 Scripts .......................................................................................................... 28
5.2 Result ........................................................................................................... 29
6 CONCLUSIONS ................................................................................................... 29
BIBLIOGRAPHY ................................................................................................. 31

APPENDICES
1 Example Game 1, Scripts
2 Example Game 2, Finnish tutorial

1
1 INTRODUCTION
Video game industry is growing fast, thanks to game apps for smart phones and tab-
lets. It has been shown that even a technically simple game can become a hugely pop-
ular title by combining addictive game-mechanics with an appealing graphical style.
Game engines such as Unity have made it possible for amateur game developers to
create visually impressive games with only the basic knowledge of programming. By
using Unity game developers have no need to create their own game engines and can
instead concentrate on game mechanics and gameplay.
Even though modern games can be stunningly beautiful and photorealistic, two-
dimensional games are still also very popular, especially on mobile devices. Because
of this, even Unity introduced native tools for two-dimensional game development. In
November 2013 Unity added a completely new 2D toolset. Before these new tools
were added, creating 2D games with Unity was more time consuming and the games
were less efficient. Because Unity is highly customizable, there was also a possibility
to buy third-party 2D toolsets from the Unity Asset Store, but with the native tools,
everyone now has access to the tools needed to create 2D games.
In this thesis I take a closer look into these new 2D tools of Unity and give a short tour
of the new features in two example cases. The aim is to present the advantages of us-
ing Unity and to study the new 2D features, which have not been very well document-
ed. Another objective was to create a tutorial of creating 2D games with Unity in
Finnish for Jukka Selin's game development course in Mikkeli University of Applied
Sciences. The Finnish tutorial will be added as an appendix to the thesis.
In the text I am using same spelling as Unity uses in their own documentation for the
different terms related to Unity, such as GameObject and View. This will make it eas-
ier for the reader to differentiate between text and terms specific for Unity.
The thesis also includes a tutorial to create your first 2D platformer from start to fin-
ish. By reading this thesis and doing the example game the reader should be able to
understand the basic functions of Unity and learn more about the new 2D features
introduced in Unity 4.3. The scripts used in the tutorial are done using C# and can be

2
found in the appendices. The tutorial should not be considered the most efficient or
only way of creating 2D games but rather as an introduction to some of the different
features available in Unity.
2 OVERVIEW OF UNITY
Unity is a game engine with its own IDE created by Unity Technologies. With Unity
you can build your game to multiple different operating systems and platforms with-
out doing any modification to your project. Unity combines scripting with a graphical
user interface in a innovative way which is efficient and gives the developer a chance
to spend more time polishing his game. Scripting in Unity is not quite straightforward
programming because Unity has a wide variety of functions ready-made and links the
graphical user interface to the scripts you write. The version 4.3.3 of Unity, which was
used in this thesis was released on January 2014.
Unity has 2,5 million registered developers and an average of 500 000 monthly active
developers. It also used by many big corporations ranging from LEGO to NASA. [1]
2.1 History
Unity's development began in 2001, but Unity 1 was officially launched at Apple's
Worldwide Developers Conference in 2005. Originally it was only meant for building
projects with Mac for Mac. [1]
Unity 2 was released in 2007 and by 2008 Unity Technologies had already tripled in
size. At this time Unity really started to grow and by 2009 the company had tripled in
size again. [1]
Unity 3 was released in 2010 and started to move Unity towards more high-end type
of development environment, and added many similar tools used by the big studios.
Few months before Unity 3, the free version Unity was also launched at Unite, Unity
Technologies' Developer Conference. [1]
Unity 4 is the most recent main version of Unity and the 4.0 version was released in
November 2012. The version 5 is currently under development and will introduce a

3
new audio system for real time routing and effects scenarios as well as WebGL de-
ployment [2].
2.2 Licenses
Unity's licensing is divided to two main licensing options, Unity Free and Unity Pro.
Main differences between these two licensing options are the difference in features
and the deployable platforms. It is also possible to purchase Unity Pro add-ons for
specific platforms. Unity Pro is available for purchase in the online store of Unity
Technologies, but educational institutes and developers that are interested in deploy-
ing their games for game consoles should contact Unity Technologies with an online
form in their website. [3]
Unity Free
Unity's free version is the more limited of the two possible licenses, but it still has
almost all of the most crucial features. Also if you ever require some of the features in
the pro version, you can upgrade the license and then just continue the project. The
project itself is not tied to any license, just the features on the IDE.
Your Unity Free stays free as long as you are not a commercial entity with annual
gross revenues over US$100 000 or an educational, academic, non-profit or govern-
ment with a total annual budget over US$100 000. While using the free version of
Unity your games will display splash screen with Unity logo and a watermark in web
games which cannot be customized or removed. [3]
Unity Pro
Unity's paid license is called Unity Pro and it also has Pro-options for Android,
BlackBerry, iOS and Windows Store. The Pro license offers additional features and
allows you to edit the splash screen of your game. The platform specific add-ons for
Unity Pro allow you to further polish the game and improve its performance. Once
you buy a license for a major version of Unity you also get all the Unity Pro updates
for that version for free. [3]

4
2.3 Asset Store
In 2010 Unity opened Unity Asset Store, which allows users to download and share
resources within the Unity Editor. Most of the polished assets are sold for a price, but
one can also find many useful assets available for free.
Assets available in Asset Store include:
- 3D models,
- animations,
- audio,
- complete projects,
- editor extensions,
- particle systems,
- scripts,
- services,
- shaders,
- textures and
- materials. [4]
Many games require the exact same features, so by using these assets available you
can avoid having to 'invent the wheel again'. It also makes it possible for developers to
test their game ideas easier by using ready-made assets from Asset Store to create a
prototype which they can use to test out the concept and then replace them with their
own assets when they are done.
All the assets in Asset Store can be freely used in your games, commercially or other-
wise, but you are not allowed to reproduce, distribute or otherwise share those assets.
It is of course still always important to make sure of the case-specific regulations and
limitations specific in the End User License Agreement of Unity. [5]
2.4 IDE User interface
Unity uses its own Unity Editor, which functions as the main workspace for a project.
The main editor window consists several tabbed windows which are called Views.
Unity has many different types of Views and each one of them has a specific purpose.
5
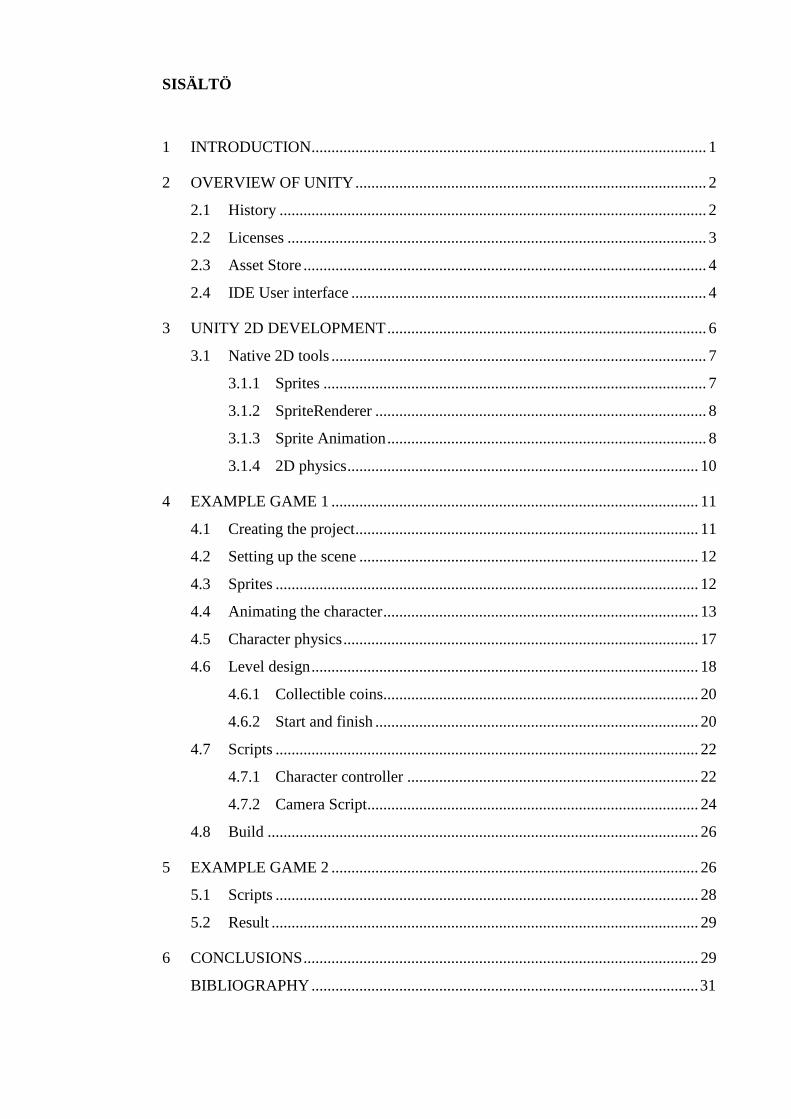
The main Views include:
- Project Browser,
- Hierarchy,
- Toolbar,
- Scene View,
- Game View and
- Inspector. [6]
The six Views above are the main ones you will see and use with Unity, but there are
six other Views used for a more specific purpose which are usually only made visible
momentarily. Figure 1 shows how the main Views are placed in the editor, using the 2
by 3 -layout. [7, p. 27; 8, p. 11]
FIGURE 1. The 2 by 3 layout
Project Browser contains a list of assets that are imported to a project. The preferences
of the assets can be edited by selecting them from the Project Browser, assets can also
be dragged from the Project Browser to the Scene View. By using the Project Browser

6
search option, it is possible to search different assets directly from the Unity Asset
Store.
Hierarchy view contains all of the GameObjects in the currently visible scene. The
GameObjects can be different instances of prefabs or GameObjects made from the
assets. By using Unity's parenting, you can make a GameObject the child of another
GameObject by dragging them on the desired parent in the Hierarchy. These child
elements inherit the position and rotation of its parent element.
Toolbar includes the basic controls of the project including transform tools and gizmo
for the Scene View, controls for the Game View, layer options for visibility in the
Scene View and a drop-down menu for controlling the layout of your Views.
Scene View is a very important View that can be used to graphically select and move
around your GameObjects in the scene. This View is one of the key features of Unity
and makes editing the current scene quick and easy.
Game View shows a preview of the current project in action, without the need to build
it. Pressing the play-button in the the Toolbar runs the currently active scene and dis-
plays the game running in the Game View. The image shown in the Game View is
captured by the camera(s) in the scene.
Inspector is used to edit the import settings of the project's assets or to show detailed
information about the selected GameObject. New components, for example scripts,
can be added to the GameObjects from the Inspector. GameObjects and components
are one of the most important features in Unity and are used as the basic building
blocks for creating games with Unity. [6; 8, p.11]
3 UNITY 2D DEVELOPMENT
It has always been possible to create two-dimensional games with Unity, but before
the version 4.3, Unity offered no official tools for 2D development. There were of
course editor extensions for 2D development in the Asset Store, but the addition of
official 2D tools made development even faster and easier.

7
3.1 Native 2D tools
Version 4.3 of Unity introduced their native 2D tools. The key features included the
new Sprite type, editor for auto-slicing your 2D graphics, upgraded animation window
and an integrated 2D physics engine. While it has always been possible to make 2D
games using unity, the release of 4.3 made it more efficient and flexible.
During the creation of a new project it is now possible to choose to setup defaults for
either 3D or 2D. In 2D mode the Scene View and the Main Camera -GameObject
have been set as orthographic instead of perspective and all textures are imported as
sprites. The main difference between orthographic and perspective camera is that in
orthographic mode the camera will render objects with no sense of perspective or
depth.
FIGURE 2. Visualization of different camera-modes
As seen in figure 2, the visual difference between using an orthographic or perspective
camera is obvious. In the picture the camera is in the exact same position with the
same settings, but because the orthographic camera does not handle depth, the cube's
size only depends on the actual size of the cube and the camera's Size-setting.
3.1.1 Sprites
Sprite is a new kind of object added in Unity 4.3. It is a graphic object which contains
a Texture2D bitmap image. Sprite in unity is defined by a Texture2D, pivot point and
a rectangle. Sprites also support vertex snapping, so you can choose a vertex from the
sprite's mesh and snap it accurately to a vertex of another mesh in the scene. Unfortu-

8
nately the sprites in free version of Unity all have a rectangular mesh, but the vertex
snapping still has its uses. [9]
In Unity Pro, a sprite has an internal mesh generated based on the pixel alpha values.
This means that when using Unity free, then every time the game draws the sprites, it
draws them with a rectangular mesh and if the sprite is not a rectangle Unity has to
draw the transparent pixels as well. This might cause performance problems in a low-
end mobile-device. [9]
In the Unity Editor, sprites can be created in the 'GameObject/Create Other/' -menu,
the menu creates a GameObject with a SpriteRenderer-component attached to it, but
without a sprite. The simplest way to use sprites is by dragging a sprite to the Hierar-
chy or Scene View, doing this will automatically create a GameObject with a
SpriteRenderer-component attached to it.
3.1.2 SpriteRenderer
SpriteRenderer is a new renderer in Unity used for rendering sprites. Each sprite re-
quires its own SpriteRenderer. Normally in a 3D environment the visual appearance of
an object will be different depending on lightning and from which direction the object
is seen from, but in 2D, the object will be rendered without any depth. [10]
With SpriteRenderer it is possible edit settings such as the material, colour, layer and
the order in layer. Color makes it possible to choose the vertex colour for the sprite's
mesh, material affects the interaction to lightning and the layer options define the
sprite's priority during rendering.
3.1.3 Sprite Animation
Unity makes animating sprites easy. Creating an animation requires no work at all
other than the actual drawing of the animation. To create an animation from separated
sprite files, the sprites can be dragged to the Hierarchy. Unity then automatically cre-
ates an animation and attaches an animation controller component to that GameOb-
ject.

9
It is also possible to use a spritesheet instead of separate files and Unity can automati-
cally slice the sheet into separate sprites, which can then be used like normal sprites.
Figure 3 shows that a normal walking animation done with sprites actually happens by
drawing enough different stages of walking and looping through those images. To the
human eye it will appear that the character is actually walking.
FIGURE 3. Sprite animation
Importing all the sprites by using an atlas can reduce the size of the project's assets
and simplify its structure. After importing a spritesheet, the Sprite Mode of the asset
should be changed in the Inspector. When the Sprite Mode of the asset has been
changed to multiple, it is possible to slice the spritesheet by using the Sprite Editor. In
the Slice Editor -window, the spritesheet can be sliced by using either automatic or
grid as the slicing type. When slicing a spritesheet of an animation, it is better to use
grid for slicing it. With grid the spritesheet is sliced into uniform pieces suitable for
animation. Automatic slicing can be used to slice spritesheets with static sprites.
Sliced spritesheets can be opened in the Project Browser to access the separate sprites
inside them. It is possible to create animations from these separated sprites by select-
ing the correct sprites used in an animations, and dragging all of them to the Scene
View or Hierarchy.

10
Unity will automatically create a GameObject with an animation created from the se-
lected sprites. It is possible to create multiple different animations and then combine
them to a single animation controller so that the animations can be controlled by
scripts. The animation motions created automatically by Unity can be dragged to the
animation controller and by using parameters and transition conditions it is possible to
create different states which fire different animations.
3.1.4 2D physics
One of the new 2D features also include 2D physics. It works very similarly to its 3D
counterpart. Unity added multiple different 2D physics components and uses the
popular Box2D physics engine.
RigidBody2D is a component that can be added to a Sprite so that the physics engine
can control it. Without any modifications this means that the sprite is affected by grav-
ity and forces can be applied to it by using scripts. You can edit the objects mass and
drag to your liking. By using Unity's physics there is no need to write any extra scripts
to implement physics into a game.
Colliders are components that can be added to a Sprite so that Sprites with the Rigid-
Body2D component can collide with each other. Colliders are shapes created to ap-
proximate the collisions. CircleCollider2D and BoxCollider2D are the simplest and
will create a circle or square shape used for collisions. By using PolygonCollider2D it
is possible to create more precise colliders from line segments and vertices. Unity can
create the shape automatically and it is possible to edit the shape by moving, removing
or adding vertices. EdgeCollider2D works similarly to PolygonCollider2D but does
not require that the shape is enclosed, so the collider can be a simple shape or a single
line. [11]
Physics Material 2D is a new 2D component of Unity that can be added to a 2D phys-
ics object. It is used to adjust the bounciness and friction of the object. This compo-
nent can be added to make sure that sprites that represent certain real world materials
will act as they should, i.e. ice can have less friction than wood.

11
Joints are 2D components that can be used to attach together two 2D physics objects.
SpringJoint2D will connect two objects together with a spring, it will try to keep the
objects a certain distance apart. Like a real spring, it causes a certain amount of oscil-
lation when the spring shoots the object back when it moves too far away. Distance-
Joint2D does the same thing, but with a rigid joint so that the distance will never
change. HingeJoint2D will create a hinge to a specific point so that the physics object
with the hinge component will rotate around the point. The rotation can happen pas-
sively from physics, or by a motor which can be set up from the component proper-
ties. SliderJoint2D will attach an object to a line which it can slide on. The sliding can
be passively controlled by physics or by a motor set up in the properties of the com-
ponent.
Box2D
The physics engine used in Unity, Box2D is an open source physics engine written by
Erin Catto. It is one of the most popular physics engines used in 2D games. It has been
originally written using C++, can be compiled in floating or fixed point modes and has
been used in many handheld consoles, mobile phones and different operating systems.
It has also been ported to multiple different programming languages. [12]
4 EXAMPLE GAME 1
To demonstrate the new 2D features of Unity 4.3a simple platformer which uses Uni-
ty's new physics engine was created. This part of the thesis will be written as a tutorial
and in the text I will be referring to the reader as 'you'. All the scripts used will be
found in the appendices of the thesis and will be commented to explain their function-
ality.
4.1 Creating the project
Creating the project starts by selecting 'File/New Project', in the window that opens,
select a location where to save your project and give your project a suitable name, for
this project I used ThesisExample. Below the location you can see a list of default
asset packages that come with Unity, for now these can be ignored. The last thing in

12
this window is the Setup defaults for -menu. Here you should choose 2D, for the rea-
sons mentioned earlier in the thesis.
4.2 Setting up the scene
Now that the project has been created you should familiarize yourself with the Unity
Editor and possibly change the layout if you so desire from 'Window/Layouts/'. Usual-
ly the first thing to do would be to importing assets to the project. Required for this
example project are at least: an animated character sprite, a background image, ground
textures and a collectible sprite.
4.3 Sprites
The most important sprite is of course the character. It is also usually the most com-
plex and animated GameObject in any Unity project. I used a simple character, I drew
myself to save time. When creating a game alone, it is usually better to start by finish-
ing the game mechanics and testing the functionality before starting to create detailed
and polished sprites, which can quite easily be added later to the project.
I call my simple character GreenMan and it has three simple animations to showcase
the usage of animation controllers and transitions. The first animation is a 8 frame
walk cycle which can be seen in the figure 4.
FIGURE 4. Character walk cycle
The animation is saved as one 3344x451 PNG-image. The same spritesheet could also
include the idle animation, which is used when the character is not walking to any
direction. But for the purposes of this tutorial I will import them as separate files to
demonstrate the difference between using separate files and spritesheets. The idle an-
imation will be made from two images seen in figure 5.

13
FIGURE 5. The idle animation in two separate files
Both of the idle animations frames are 418x451 PNG-images. All the images of the
character are exactly the same size and placed in the center of a 418x451 square to
make animating the sprite easier.
The third animation is a single frame animation for jumping. Because this animation
only uses one frame, there are some special circumstances concerning creation of the
animation. Basically at this point it is a PNG-image which is used when the character
is mid-air while jumping.
Before importing these images to your project it is good practice to create a new fold-
er for sprite assets using the Project View. To create a new folder, right click Assets
folder in your Project View and select Create/Folder, then name the new folder
Sprites. Now to import these assets you can simply drag and drop the images to the
folder in Unity or alternatively right click the Sprites folder and choose Import New
Asset.
4.4 Animating the character
Once the character has been imported you should select the images in your Sprites
folder and check the import settings visible in the Inspector. At the end of the import
settings you can see the Max Size and Format of the images. For this tutorial perfor-
mance should not be an issue, so Format should be set to Truecolor for all sprites, and
for the large spritesheet the Max Size should be 4096. If you want a more pixelated

14
nostalgic feel to your sprites, you can change filter mode to Point so Unity will do no
blurring to the images.
To create a walking animation from the spritesheet, the frames will need to be sliced
apart from the sheet. To do this, select the spritesheet asset and in the Inspector view
change Sprite Mode to multiple and open sprite editor. In the slice editor, click the
slice menu and change the type to grid. Because the spritesheet's size was 4433x451 it
can be calculated that each sprite is 418 pixels wide. So change the pixel size of the
grid to 418x451 as seen in image 6.
FIGURE 6. Slicing the sheet.
Then proceed to click slice and lastly click the apply button in the top-right corner of
the window. Now when you examine the asset in your sprites folder, it should have a
small arrow on the icon of the asset. Clicking the arrow will expand the asset to show
the separate sliced images.
To create an animation from these frames it is only required to select all the 8 frames
and drag them to the Scene View. Doing this should automatically create a GameOb-
ject with a SpriteRenderer and an Animator. You will also be prompted to save your
animation, the name should be something to describe the specific animation, in this
case: greenManWalk. To keep the project view tidy, it is recommended to also create
a specific folder where to save your animations and animation controllers.

15
At this point, without doing anything else, clicking the play button on the toolbar
should start the game and play the animation in the Game View. Now that the anima-
tion and controller has been created, the GameObject can be deleted from the scene.
Creating the idle animation is done using the same principle, except that in this case
the images are already separate so they just need to be both selected at once and
dragged into the Scene View. This should prompt you to save the animation with a
descriptive name like greenManIdle. Leave the idle animated GameObject to the sce-
ne and name it just GreenMan or Player, as it will be used as the actual player charac-
ter in this demo.
The automated animation creation in unity only works with sets of images and be-
cause the jump animation is made of only one image, the process is little different. To
create animations like this, the image needs to be dragged into the scene view. Then
the animation can be created manually using the Animation window. Select the sprite
in the Scene or Hierarchy View and open the Animation window from 'Win-
dow/Animation/. In the window that opens, click Add curve and save the animation as
with a name such as 'jump.anim'. Now by expanding the Sprite Renderer, clicking the
small plus-sign next the Sprite, marked in figure 7 with a red circle, should create an
animation with a single frame.
FIGURE 7. Creating a single frame animation.

16
Now that all of the animations have been created, they should be combined. Select the
GameObject in the scene with the idle animation. In the Inspector View, there is a
component called Animator. Double clicking the controller in the Animator compo-
nent will open the Mecanim Animator View. The view has two boxes in it, Any State
and greenManIdle. To add more animations to the character, locate the previously
created greenManWalk and jump animation from the assets, and drag them to the An-
imator View. Now the animator includes all the three main animations required for the
character.
To make it easier to trigger the right animation at the right time, the animations need
transitions. By using transitions you can choose which animations can trigger in the
current state, and what conditions cause the animation to change. The real benefits
will not be obvious from this example, as there are only three animations, but with
transitions you could, for example use different jump animations for jumping while
walking and standing still. By adding transitions from walking and idle states to dif-
ferent jumping animations with the same conditions you could use the same condition
in your script to jump, but depending on the state the animator would play the right
kind of jump animation.
In this case there are now states for idling, walking and jumping, and all of these can
trigger from any of the two other states. It would be possible to use the any state box
in the mecanim animator, but in this case the animations will be linked together in a
triangle with transitions. By right clicking any state in the animator, choose create
transition to the two other states. Do this for all of the three states, similarly to figure
8.
FIGURE 8. Animator transitions.

17
These transitions can now be triggered using conditions in the animator. You can use
either float, int, bool or trigger conditions, and all of these have their own uses de-
pending on your preference, structure, amount and type of animations. In this tutorial I
have used an int condition with the name Direction. To create a condition click the
plus sign in the lower-left corner of the animator view and choose int, and create a
parameter called Direction.
By using an int parameter, you can create conditions for playing any of the three pos-
sible animations. Conditions in this example should be so that value 0 means looping
the idle animation, value 1 means walking and value 2 means jumping. To use these
conditions click the transition pointing from the idle to the walking state. In the in-
spector view, you can see the current conditions for the transitions which only have
the exit time assigned, in this case you can delete the exit time condition and create a
new condition with the parameter Direction. Because the walking animation should be
fired when the value of Direction is 1, create a condition for when Direction equals 1.
Using the same principle, you should edit the transitions so that animations fire with
the right value of Direction and remove the exit time condition from all the transitions.
With this, the character is now animated.
4.5 Character physics
In this example the character movement will be done using the new 2D physics com-
ponents added in Unity 4.3. Select the player character -GameObject in your scene
with all the animations, and in the inspector-view, add the character two new compo-
nents: Rigidbody2D and BoxCollider2D. Both of the components can be found in
Physics2D-components.
In the settings of the Rigidbody2D-component, change to mass to 10 for now, this can
later be tweaked in order to achieve desired physics behaviour. Also check the Fixed
Angle -setting, this makes the character always stay upright and not fall over with
every jump. Leave everything else to defaults.
In the Box Collider 2D, edit the size of the collider so that the collider follows the
borders of the character sprite as closely as possible. In the Scene-View the green line
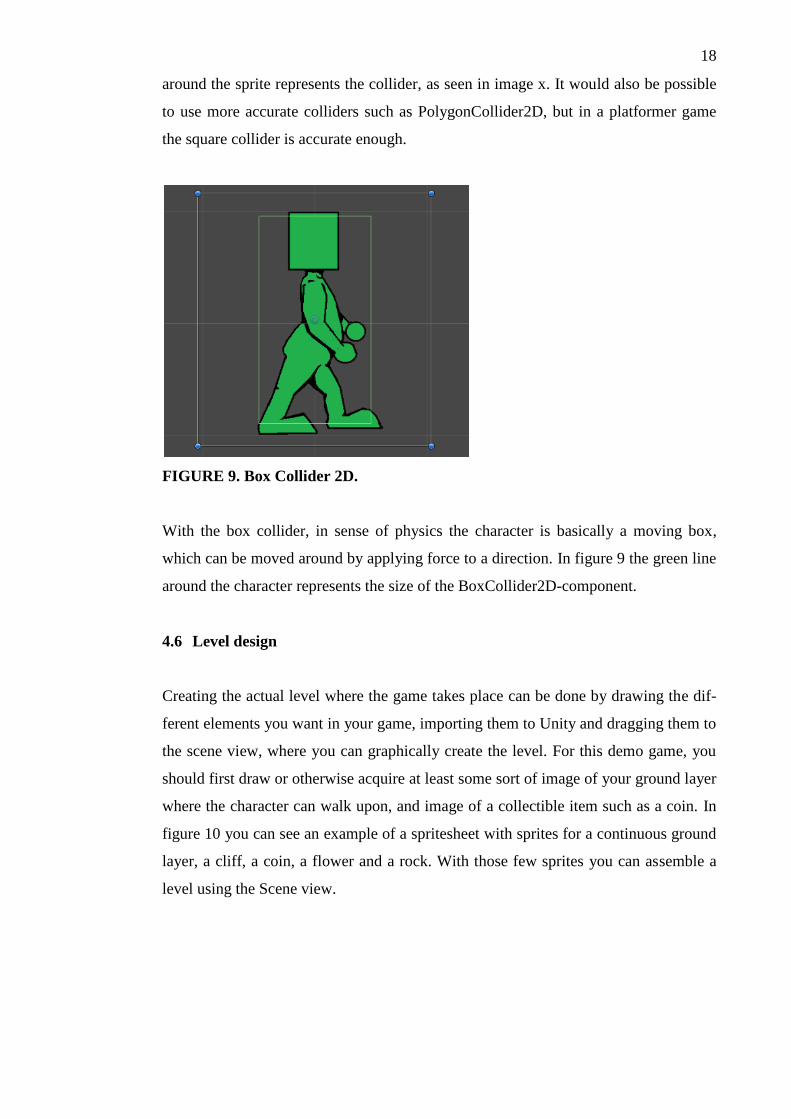
18
around the sprite represents the collider, as seen in image x. It would also be possible
to use more accurate colliders such as PolygonCollider2D, but in a platformer game
the square collider is accurate enough.
FIGURE 9. Box Collider 2D.
With the box collider, in sense of physics the character is basically a moving box,
which can be moved around by applying force to a direction. In figure 9 the green line
around the character represents the size of the BoxCollider2D-component.
4.6 Level design
Creating the actual level where the game takes place can be done by drawing the dif-
ferent elements you want in your game, importing them to Unity and dragging them to
the scene view, where you can graphically create the level. For this demo game, you
should first draw or otherwise acquire at least some sort of image of your ground layer
where the character can walk upon, and image of a collectible item such as a coin. In
figure 10 you can see an example of a spritesheet with sprites for a continuous ground
layer, a cliff, a coin, a flower and a rock. With those few sprites you can assemble a
level using the Scene view.

19
FIGURE 10. Spritesheet for the level.
This sheet can be sliced using the Sprite Editor's automatic slicing. After the sheet has
been sliced the images are ready to be used.
Designing levels for a simple platformer games such as this demo is technically very
easy thanks to Unity's graphical user interface. Start by creating an empty GameOb-
ject in the scene, then drag all of the sliced sprites into it separately. By putting the
sprites under an empty GameObject it is easier to control the whole level at once and
the hierarchy does not get too complex and messy.
Using the sprites you can now start building a level by duplicating, rotating and mov-
ing around the sprites. to make attaching the pieces together use the vertex snapping
by holding down V on your keyboard, hovering over a desired vertex and dragging the
sprites together. This way the sprites snap together without having to worry about hav-
ing empty pixels between the sprites. Also it is important to note the Order in Layer -
setting of each sprite, so that the rocks go on top of the ground and so on. The Order
in Layer setting of a selected sprite can be found in the Sprite Renderer component in
the Inspector View. Sprites are rendered starting from the lowest value of order in
layer, so a sprite with a higher order in layer will be rendered on top of a sprite with a
lower value.
Because the player character will use physics to move around, the level will also re-
quire a collider so to prevent the player from falling through. You can either create
separate colliders for all of the different sprites in the level, or attach an Edge Collider
2D to the empty parent GameObject of the environment sprites. Then by holding
down shift-key you can move and create new vertices to the collider and by holding
down ctrl-key you can delete vertices by clicking them. In the end the collider will
look similar to figure 11.

20
FIGURE 11. Edge Collider 2D
If you now move the character GameObject over the level and press the Play-button in
the toolbar, the character should fall down, collide with the ground collider and stand
there.
4.6.1 Collectible coins
The game should also have some sort of score. Scoring here will be done by calculat-
ing the amount of coins collected in a level. The sprite for the coin is in the same
spritesheet used in designing the level, and can be accessed like the other sprites.
At this point you should drag one coin sprite to the scene and add a CircleCollider2D
component to it. In the collider's settings in the inspector, check the Is Trigger -
checkbox so that colliding with the coin can be used to trigger an event using scripts,
but it will not physically stop the player when colliding with it. Make sure the collid-
er's size seems correct and then drag the coin into your assets in the project view, this
will create a prefab of the coin with collider attached and will allow you to later edit
all of the coins at once. Then from the assets, drag few instances of the coin to the
scene and position them evenly.
4.6.2 Start and finish
The game should also have a start and a finish. Usually in traditional platformers nor-
mally a level starts in the left, and by moving towards the right and jumping over the
obstacles the player will reach the end of the level. In this example you can use for

21
example signs similar to those in figure 12, to indicate the start and finish of the cur-
rent level.
FIGURE 12. Signs used in this tutorial.
The start-sign will have no other function than work as a collider to block the player
from going to the wrong direction. The finish-sign will have a script attached to it to
end the level and start the new one. At this point you should just drag both of them to
the scene and add both of them a collider of your choice.
With the sprites added so far you should have a some sort of level now built with a
start, finish, few obstacles and coins to collect. Example of a simple level to be used is
presented in figure 13. Now the only thing to add are the GUI-elements and scripts to
add the interactivity that is still missing.
FIGURE 13. A simple level from start to finish.

22
GUI
To create a simple graphical user interface, first create a new empty GameObject. This
empty GameObject will be used to store the new GUI-components. Name this
GameObject HUD and inside it, create two new empty GameObjects and name them
coinCount and playAgain. Now add the coinCount-GameObject a new GUIText-
component. Edit the settings of the GUIText-component by adding a text 'Coins col-
lected: 0' and then position the text to the upper right corner of the screen. Similarly
add a GUIText-component to the playAgain-GameObject, edit the settings of the
component to show 'Level Complete' -text in the middle of the screen. The playAgain-
GameObject should be disabled by unchecking the checkbox next to its name in the
Inspector-View.
4.7 Scripts
Most of the visual appearance and level design can be done graphically using Unity,
which greatly reduces the amount of code needed for creating games. But still much
of the functionality in a game made with Unity will come from scripts. Scripts can be
attached to GameObjects and you can access all the objects visible in your scene from
the scripts. Public variables created in scripts can be accessed in the graphical Unity
interface, you can assign values or even GameObjects to those variables. Scripts in
Unity can be written in either JavaScript, C# or Boo. In this tutorial the scripts are
written using C#.
4.7.1 Character controller
The character now has all the animations, and there is a level for it to move on, but it
still has no way of moving. Movement of the character will be done using a script
which allows you to move the character by applying force to the Rigidbody 2D com-
ponent.
Scripts used for controlling characters are typically called character controllers. To
create a controller for the player character, select the character in the Scene View, then
in the Inspector View click add component and New Script. Name the script green-

23
ManController. After creating the script you should again create a new folder for stor-
ing scripts using the Project View.
The idea for the greenManController script is that by using the arrow keys or WASD
you can make the character move and at the same time change the animators Direction
parameter to correspond to the characters actions. By using the functions available in
Unity you don't usually need to use any checks for specific keys or so. So here you
can use the Input.GetAxis -function, which by default is set for keyboard input. It will
return a value from -1 to 1 by pressing the arrow or WASD controls in your keyboard.
private Animator anim;
public float maxVelocity = 4f; //Maximum speed of the player
public float walkForce = 300f; //Force applied when walking starts
void Update () {
float x = Input.GetAxis("Horizontal");
if(Mathf.Abs(x) > 0){
anim.SetInteger("Direction", 1);
if(x * rigidbody2D.velocity.x < maxVelocity){
rigidbody2D.AddForce(Vector2.right * walkForce * x);
}
}
}
FIGURE 14. Moving the character with force
In figure 14 you can see the basic idea of how to use Input.GetAxis -function. In the
example script float x is set to the value of Input.GetAxis("Horizontol") which by de-
fault gets the values seen in table 1.
TABLE 1. Input GetAxis("Horizontal") -values with keyboard input.
Keyboard button Value
A 0...-1
D 0...1
Left arrow 0...-1
Right arrow 0...1
So in the example of figure 14 the value of Input.GetAxis("Horizontal") in the varia-
ble x is first converted to absolute value using Mathf.Abs and by checking it is over 0

24
the if-sentence will be true when any of the buttons in table 1 is pressed. And when
that happens the script will set the Direction parameter in the animator you created a
new value, which should trigger the condition to fire the walking animation.
And the inner if-sentence checks that the GameObject's velocity in the horizontal-axis
does not exceed the value of maximum velocity, and if not, then it applies the desig-
nated walkForce to the object. Because force applied to Rigidbody2D needs to be in
Vector2 form, the Vector2.Right means a Vector2 with a value (1,0), walkForce is the
amount and x is the direction. Usually FixedUpdate should be used instead of Update
while dealing with rigidbodies, but in an example such as this there will be no notice-
able difference.
Because we also need to have some way to store the amount of coins the character
controls, the script will also include an integer value indication the amount of coins
the player has collected. Because in this example the game will not have any saving
mechanism or need to keep the score to be used in the next level. In reality you would
wish to create a general game controller which keeps track and controls the general
functions such as score and the environment.
That is the basic idea behind adding movement using force, but the script would also
require some logic for jumping, turning and firing the idling animation. A more com-
plete example of a character controller script can be found in the appendices.
4.7.2 Camera Script
Now that the character is moving you probably want the camera to follow your char-
acter or optionally just make a static level where everything is already visible in the
camera, so that moving it is not required.
The most basic following camera could also be done without any scripts at all, by just
dragging the Main Camera object in your hierarchy under the player character. But by
creating a script for the cameras movement it is easier to add additional effects to your
camera and smoothen the way it follows the character.

25
Idea behind the script used here is that you want the camera to follow the player, but
with a small smoothing effect. The smoothing effect can be achieved by using Vec-
tor3.SmoothDamp which will change the current Vector3 value towards a destination
Vector3 value with a damp-value which is the total time in milliseconds it takes to
reach the destination. So the script should have the damp time, the players position as
the destination and the cameras position as the current position. By declaring a public
transform variable you can drag the player to the script in the inspector view of the
main camera. The script can be found in the appendices.
Coin script
The coins in the level are still static, but by adding a simple script to them you can
make it so that when the player collides with a coin, it will increase the coinCount
value in the player and destroy the coin so that it looks like the player collected the
coin and amount of coins collected shown in the GUI-text will increase. Because the
collider added to the coin was checked as a trigger, the script will perform an action
using OnTriggerEnter2D which will trigger when another collider enters the collider
of the coin.
Level finished & Level complete
Finishing a level is done by two separate scripts. The reachFinish-script is attached to
the finish-sign and the levelComplete-script will be attached to the playAgain-
GameObject.
Similarly to the coin script the reachFinish-script will use the OnTriggerEnter2D to
activate the endScreen-variable which should be assigned to be the playAgain-
GameObject in the scene. It will also disable the controls of the player character by
disabling the whole greenManController-script.
When the reachFinish-script activates the playAgain-GameObject, levelComplete-
script will also activate with it. It will also activate a GUIText informing you that you
have finished the level and button to play again. The script requires a texture for the
button, so at this point you should add a simple image of a button with the text 'Try
Again' to your assets. The texture should then be assigned to the public ButtonTx-

26
variable. After choosing to play again, the script reloads the whole scene where the
game has been built.
4.8 Build
Building the game so you can test it is quite straightforward in Unity. Because the
game made in this tutorial is a 2D platformer, it is mostly suited for desktop comput-
ers, because of this the two options to choose from are either Web Player or a
Standalone game for Windows, Mac and Linux. In this case, you should choose
Standalone.
You can start the process of building your game by clicking 'File/Build Settings' in the
main window of Unity. The window that opens has a section for choosing the scenes
you wish to include into your game, the possibility to choose your default platform
and a button to open the player settings. In the player settings you could edit the de-
fault preferences of your standalone game, but in this case it will not be necessary.
To build your game simply choose Standalone, the target platform and architecture
and click build. The development build can be ignored because the tutorial hasn't im-
plemented any logging or profiling into your game. Now simply choose a folder
where to build your game into and name the executable file accordingly. After a few
moments you have created a platformer that anyone using the chosen platform could
play.
5 EXAMPLE GAME 2
The second example game created for this thesis is a simple two-dimensional game, in
which the player must control a flying character's height and navigate through con-
stantly approaching obstacles. This example was done as a step-by-step tutorial in
Finnish which can be found in the appendices of this thesis. Unlike the first example
game, which was designed as a way to represent the new 2D features, this second
game was made to also provide Finnish students a way to learn more about using Uni-
ty in general.

27
Sprites
The game features only three different sprites: an animated bird, a pipe and a ground
sprite. The sprites were stylized as retro-looking with clearly visible pixels. The ani-
mation of the bird was made from two different sprites which were looped to create a
wing-flapping animation. All of the sprites used were created specifically for this tuto-
rial.
GameObjects
The sprites imported to the project were used to create the GameObjects in the scene.
The Bird-GameObject was assigned with the RigidBody2D and CircleCollider2D-
components which added physics to the GameObject. By using physics to move the
bird and to detect collisions, the code was simplified and the difficulty of the game
can easily be modified by changing the mass and drag of the GameObject.
BoxCollider2D-component was also added to the Ground-GameObject as well as an
EdgeCollider2D-component which is used to prevent the Bird from flying over the
screen.
An empty GameObject was used to create an Obstacle-GameObject from two of the
pipe sprites, one of the pipes was flipped and moved over the other pipe. BoxCollid-
er2D-components were then added to both of the pipes and then another BoxCollid-
er2D was added to the main Obstacle-GameObject. This third collider was moved to
the empty space in middle of the pipes and the Is Trigger -setting of the BoxCollid-
er2D-was enabled, the collider is used to detect when the Bird-GameObject passes
through an obstacle to keep track of the score.
Another empty GameObject was named GameController, this GameObject was used
as an attachment point for a script which controls the obstacles and other GameOb-
jects in the Scene. Three more empty GameObjects were created and named Score,
Start and Reset. GUIText-component was added to each of them and they were moved
inside the GameController. The Score- and Reset-GameObjects were set to be disa-
bled by default.

28
5.1 Scripts
Scripts in this example were divided to three main scripts. The game controller -
GameObject has a script called WorldController attached to it which controls all of
the games functions such as scrolling the world, graphical user interface elements and
keeping track of the score. After launching the game, it waits for the user to press the
left mouse button and displays a GUIText-component telling the user how to start
playing. Clicking activates a boolean value which then activates the game, by remov-
ing the GUIText. Once the game is activated, the bird will be affected by gravity and
start falling down, clicking causes the bird to jump up with an upward force applied to
the bird. The script then also spawns the first obstacle by instantiating an obstacle-
GameObject. After the first obstacles has been spawned the instantiated obstacles is
assigned into a private variable and by checking the location of that variable the
WorldController-script can determine when to create a new obstacle.
The WorldController-script also includes methods for stopping and resetting then
game. The StopGame()-method is called from the script attached to the bird when it
collides with an obstacle. It then activates two GUIText-components which tell the
user to restart the game by clicking, their score on this run and their best score. Re-
setGame()-method is called when the game has been stopped and it detects a click, it
will remove all existing obstacles from the scene and then reset the bird to the starting
position.
The bird character then has its own BirdBehaviour-script to determine what actions to
take after user input or collisions. With the first click, the WorldCollider-script re-
moves the IsKinematic-setting from the bird which is configured as an object with
physics. Now the BirdBehaviour-script waits for input of the left-mouse button, then it
applies force to the bird to make it jump up. This script also includes collision detec-
tion for the bird, which accesses the StopGame()-method of the WorldController-
script whenever the bird collides with anything. BirdBehaviour also keeps track of the
player's score by using a trigger-collider.
Lastly, while the game controller controls the actual scrolling and appearance of the
obstacles, the obstacles are instantiated GameObjects with a simple script attached to

29
them. The ObstacleBehaviour-script handles simple functions such as destroying the
GameObject after it has moved off the screen.
5.2 Result
After completing writing the scripts and attaching them to the GameObjects the game
worked flawlessly and the overall structure of the project stayed well organized and
clear. The finished game can be seen in figure 15.
FIGURE 15. Example Game 2.
The main work of this example was writing the Finnish step-by-step tutorial to make
this game. Because the example game was kept simple, the tutorial was finished suc-
cessfully.
6 CONCLUSIONS
During this thesis many of new 2D features of Unity 4.3 were introduced and used in
the tutorial. They are an useful addition to the already wide variety of tools in Unity
and make it a respectable option to think about when developing 2D games. Bigger
game development companies might have the resources needed and the required pro-
fessional skills to create their own development tools, but for small to medium sized

30
companies or even individual developers Unity offers many features which save time
and effort required in developing games. To reach the original goal of this study the
new features were studied to offer insight of their benefits and functionality.
Unity also clearly moves the focus of developing games even more towards the
graphics by making scripting so easy and visual. This might also be off-putting to
some more traditional programmers as scripting in Unity in many cases is not normal
object-oriented programming.
The study was from my perspective, a success, as it successfully introduces most of
the new features of Unity and the tutorials provided should help future game develop-
ers to learn more about using Unity to develop two-dimensional video games. Tutori-
als made in the thesis could be further developed to also include information about
building and publishing games to different platforms.
Unity's growing popularity indicates that the game developing community has found
its usefulness and it seems to be worth testing for even the bigger companies. Unity
also offers many customization options to the interface and the possibility to write
your own extensions that means, unless a game truly requires a remarkable game en-
gine, Unity cannot be ignored as an option.

31
BIBLIOGRAPHY
[1] Unity Technologies. Public relations. Website. 2014.
https://unity3d.com/company/public-relations/. Referred: 22.5.2014.
[2] Unity Technologies. Unity 5 Announced at GDC 2014. Website. 2014.
http://unity3d.com/company/public-relations/news/unity-announces-unity5/. Re-
ferred:22.5.2014.
[3] Unity Technologies. License Comparisons. Website. 2014.
http://unity3d.com/unity/licenses/. Referred: 22.5.2014.
[4] Unity Technologies. Asset Store. Website. 2014.
https://www.assetstore.unity3d.com/en/. Referred: 22.5.2014.
[5] Unity Technologies. Asset Store Terms of Service and EULA. Website. 4.9.2014.
http://unity3d.com/company/legal/as_terms/. Referred: 22.5.2014.
[6] Unity Technologies. Learning the Interface. Website. 29.5.2013.
https://docs.unity3d.com/Documentation/Manual/LearningtheInterface.html. Referred:
22.5.2014.
[7] Blackman, Sue. Beginning 3D Game Development with Unity 4. 2013. USA.
Apress.
[8] Smith, Matt & Queiroz, Chico. Unity 4.x Cookbook. 2013. UK. Packt Publishing.
[9] Unity Technologies. Sprite. Website. 2014.
http://docs.unity3d.com/Documentation/ScriptReference/Sprite.html. Referred:
22.5.2014.
[10] Unity Technologies. SpriteRenderer. Website. 2014.
http://docs.unity3d.com/Documentation/ScriptReference/SpriteRenderer.html. Re-
ferred: 22.5.2014.
[11] Unity Technologies. 2D Components. Website. 15.8.2013.
http://docs.unity3d.com/Documentation/Components/comp-2DGroup.html. Referred:
22.5.2014
[12] Catto, Erin. About Box2D. Website. 2014. http://box2d.org/about/. Referred:
22.5.2014.
[13] Unity Technologies. Unity 4.3. Website. 2014. http://unity3d.com/unity/whats-
new/unity-4.3/. Referred: 22.5.2014.
[14] Unity Technologies. 2D Power. Website. 2013. http://unity3d.com/pages/2d-
power/. Referred: 22.5.2014.
[15] Thorn, Alan. Learn Unity for 2D Game Development. 2013. USA. Apress.
[16] Norton, Terry. Learning C# by Developing Games with Unity 3D. 2013. UK.
Packt Publishing.

32
[17] EVERYDAY3D. Getting started with C# for Unity3D. Website. 21.7.2009.
http://www.everyday3d.com/blog/index.php/2009/07/21/c-sharp-for-unity3d/. Re-
ferred: 22.5.2014.
[18] Catlike Coding. Learn C# scripting in Unity. Website. 2014.
http://catlikecoding.com/unity/tutorials/. Referred: 22.5.2014.
[19] Goldstone, Will. Unity Game Development Essentials. 2009. UK. Packt Publish-
ing.
[20] Lambert, Steven. An Introduction to Spritesheet Animation. Website. 26.11.2013.
http://gamedevelopment.tutsplus.com/tutorials/an-introduction-to-spritesheet-
animation--gamedev-13099. Referred: 22.5.2014.
[21] CodeAndWeb. What is a sprite sheet? The Movie - Part 1 - Memory. Video.
2012. http://www.codeandweb.com/what-is-a-sprite-sheet. Referred: 22.5.2014.

LIITE 1(1).
Example Game 1, Scripts
SCRIPT FOR THE CHARACTER using UnityEngine; using System.Collections; public class greenManController : MonoBehaviour { private Animator anim; public float maxVelocity = 4f; //Maximum speed of the player public float walkForce = 300f; //Force applied when walking starts public float jumpForce = 3000f; //Force used for jumping private bool walkRight = true; //Checking which way to walk private bool canJump = false; //Bool to check the player can jump private Transform groundCheck; //Transform for groundchecking private bool jump = false; //Bool used as value for if jumping is possible public int coinCount = 0; //Int to store the coins collected public GameObject coinCounter; //gameobject where the coincounter is stored void Start () { anim = this.GetComponent<Animator>(); //Get the animator component groundCheck = transform.Find("groundCheck"); } void Update () { float x = Input.GetAxis("Horizontal"); if(Input.GetButtonDown("Jump") && canJump){ jump = true; } canJump = Physics2D.Linecast(transform.position, groundCheck.position, 1 << Layer-Mask.NameToLayer("Ground")); //Jumping, can happen at any time if (jump) { if(canJump){ rigidbody2D.AddForce(new Vector2(0f, jumpForce)); } jump = false; } //Walking, idling and setting animations if(Mathf.Abs(x) > 0 && canJump){ anim.SetInteger("Direction", 1); if(x * rigidbody2D.velocity.x < maxVelocity){ rigidbody2D.AddForce(Vector2.right * walkForce * x); } if(Mathf.Abs(rigidbody2D.velocity.x) > maxVelocity){ rigidbody2D.velocity = new Vector2(Mathf.Sign(rigidbody2D.velocity.x) * maxVe-locity, rigidbody2D.velocity.y); } } else if(!canJump){ anim.SetInteger("Direction", 3); if(Mathf.Abs (x) > 0){ if(x * rigidbody2D.velocity.x < maxVelocity){ rigidbody2D.AddForce(Vector2.right * (walkForce*0.5f) * x); } if(Mathf.Abs(rigidbody2D.velocity.x) > maxVelocity){ rigidbody2D.velocity = new Vec-tor2(Mathf.Sign(rigidbody2D.velocity.x) * maxVelocity, rigidbody2D.velocity.y); } } } else if(canJump) anim.SetInteger("Direction", 0); if (x > 0) // right arrow { if(!walkRight){ this.turn(); walkRight = true; }

LIITE 1(2).
Example Game 1, Scripts
} else if (x < 0) // left arrow { if(walkRight){ this.turn (); walkRight = false; } } } //function for flipping the character when changing direction, could also make a different animations and use the Direction void turn(){ Vector3 scale = transform.localScale; scale.x *= -1; transform.localScale = scale; } public void addCoin(){ coinCount++; coinCounter.guiText.text = "Coins collected: "+coinCount; } } CAMERA SCRIPT: using UnityEngine; using System.Collections; public class cameraScript: MonoBehaviour { public float dampTime = 0.15f; private Vector3 velocity = Vector3.zero; public Transform target; void Update () { //Smoothly transforms the cameras position towards the player Vector3 destination = new Vector3(target.position.x,target.position.y, trans-form.position.z); transform.position = Vector3.SmoothDamp(transform.position, destination, ref veloc-ity, dampTime); } } COIN SCRIPT ATTACHED TO THE COIN using UnityEngine; using System.Collections; public class coinScript : MonoBehaviour { //When the Player walks over a coin void OnTriggerEnter2D (Collider2D other){ if(other.tag == "Player") { other.GetComponent<greenManController>().addCoin(); Destroy(transform.root.gameObject); } } }

LIITE 1(3).
Example Game 1, Scripts
SCRIPT WHICH IS CALLED TO ACTIVATE HUD: using UnityEngine; using System.Collections; public class levelComplete : MonoBehaviour { public Texture buttonTx; void OnGUI () { if(GUI.Button(new Rect(Screen.width/2-207,Screen.height/2-44,415,89),buttonTx, "")){ Application.LoadLevel(0); } } } SCRIPT ATTACHED TO THE FINISH: using UnityEngine; using System.Collections; public class reachFinish : MonoBehaviour { public GameObject endScreen; public GameObject player; void OnTriggerEnter2D (Collider2D other){ if(other.tag == "Player") { player.GetComponent<greenManController>().enabled = false; player.GetComponent<Animator>().SetInteger("Direction", 0); endScreen.SetActive(true); } } }

LIITE 2(1).
Finnish tutorial of Example Game 2
Unity tutoriaali
2D Lintupeli
Mitä tarvitset?
Unity 4.3 (tai uudempi)
Spritetsheetit hahmolle, esteelle ja maalle
Tutoriaalissa käytetään kahta seuraavanlaista kuvaa, ja jotkut asetukset tutoriaalissa
olettavan kuvan koon olevan tämä, mutta voit myös hyvin käyttää erikokoisia kuvia jos otat
sen huomioon asetuksissa.
Animoitu hahmospritesheet 25x9 bird.PNG
Spritesheet, jossa sprite esteelle, ja sivussa sprite maalle(venytetään kokoonsa) 19x92
sheet2.PNG
Huomioi kuvissa myös läpinäkyvyys taustana.

LIITE 2(2).
Finnish tutorial of Example Game 2
1 Unity Projekti
Käynnistä Unity ja aloita uusi projekti.
'File/New Project...'
Tässä tutoriaalissa kaikki importattavat packaget voi ruksia pois, huomioitava asia
projektinluonti-ikkunassa on valita Setup defaults for -valikosta 2D.
Assettien tuominen
Assetteja voit tuoda Unityyn monella tapaa
- Assets/Import New Asset... -valikosta
- Viemällä tiedostot projektin alla olevaan Assets kansioon
- Raahaamalla assetit Unityn pääikkunan Project-näkymään
Tuo assetit, tässä tapauksessa siis kaksi kuvatiedostoa projektiin.
Huom. Varsinkin isommissa projekteissa, suositeltavaa on tehdä alikansioita
erityyppisille asseteille.
Jos käytät pieniä pikselöityjä kuvia kuten tutoriaalin esimerkkikuvissa, saatat haluta valita
kuvien import-asetuksista Filter Mode -asetukseksi Point. Näin saat kuvat pysymään
terävinä.
Import-asetukset löydät Unityn Inspector-näkymästä kun klikkaat assetin aktiiviseksi Project-
näkymästä.
Kuvien pilkkominen
Koska asseteina olevat spritet sisälsivät enemmän kuin yhden spriten per tiedosto, ne pitää
pilkkoa jotta niistä voidaan käyttää yksittäisiä osia. Pilkkominen tapahtuu import-asetuksista,
valitse siis asseteista lintu aktiiviseksi ja muuta Sprite Mode -asetukseksi Multiple.

LIITE 2(3).
Finnish tutorial of Example Game 2
Kun Sprite Modeksi on valittu Multiple, näkyviin tulee Sprite Editor -painike. Klikkaa
painiketta niin saat auki näkymän josta voit pilkkoa spritesheetin osiin.
Sprite Editor -ikkunassa saat pilkkomis-asetukset näkyviin ikkunan vasemmasta yläkulmasta,
Slice -painikkeen alta. Esimerkissä käytettävän linnun spritesheet pilkkoutuu oikein käyttäen
default-asetuksia, joten riittää että vain klikkaa Slice.
Kun pilkkominen on suoritettu niin hyväksy muutokset oikean yläkulman Apply-painikkeesta.
Jos kuvan pilkkominen onnistui, pitäisi Asset-näkymässä pilkotun linnun viereen ilmestyä
pieni nuoli, jonka alta saat näkyviin pilkotut kuvan osat.
Toisen spritesheetin (joka sisälsi esteen ja maan) pilkkominen tapahtuu samoin, ainoa
huomioitava seikka on maa-spriten koko (1px leveä) jonka takia Sprite Editorin Slice-valikosta
pitää muuttaa Minimum Size -asetus arvoon 1.

LIITE 2(4).
Finnish tutorial of Example Game 2
Scenen valmistelu
Nyt kun kaikki tarvittavat ulkoiset assetit on tuotu projektiin, seuraavana voi valmistella
pelinäkymän.
Aloita valitsemalla asseteista lintu, ja ota näkyviin sen pilkotut osut. Nyt valitse molemmat
kuvat (linnun nimestä riippuen, osat x_0 ja x_1) ja raahaa ne Hierarchy -näkymään tai itse
Sceneen. Raahalla molemmat kuvat samalla kertaa Unity tekee valituista kuvista
automaattisesti sprite-animaation. Tallenna animaatio jollain sopivalla nimellä, esim
fly.anim.
Huom. Unity luo automaattisesti kuvista animaation ja samalla animaatiolle
controllerin, mutta koska tässä esimerkissä on vain yksi kahden kuvan animaatio, ne
eivät vaadi enempää huomiota.
Nyt scenessäsi pitäisi olla yksi animoitu sprite ja automaattisesti luotu Main Camera -
GameObjekti.
Koska esimerkin kuvat ovat niin pieniä (25x9) näyttää lintu vielä Unityn Game-näkymässä
hyvin pieneltä. Tämä voidaan korjata joko, skaalaamalla luotua bird_0-GameObjektia tai
muuttamalla Main Cameran Size -asetusta.
Huom. Koska esimerkin spritet on tehty olemaan oikean kokoisia toisiinsa nähden, on
helpompi säätää kameraa.
Valitse Hierarchystä Main Camera ja muuta oikealle aukeavista kameran asetuksista Size-
asetukseen arvo 1 (tai, jokin muu oman maun mukaan).
Tässä vaiheessa voit myös muokata Background-värin mieleiseksesi, koska tähän esimerkkiin
ei tule erillistä taustakuvaa.
LIITE 2(5).
Finnish tutorial of Example Game 2
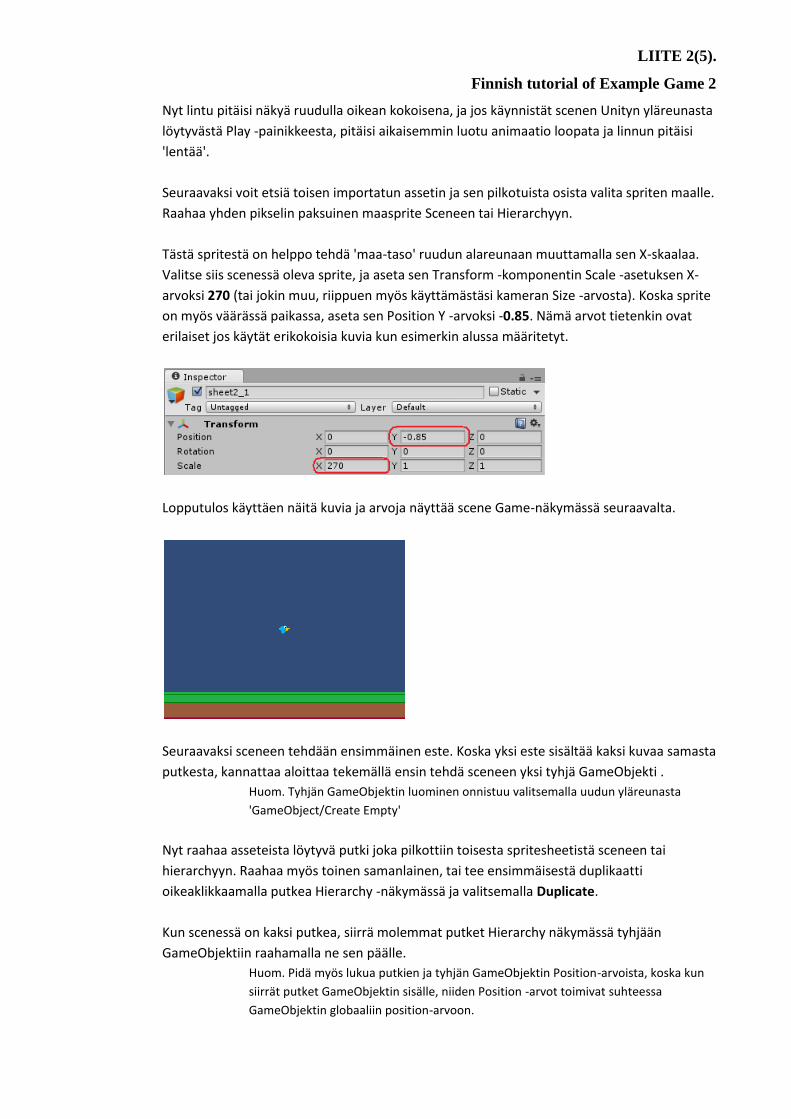
Nyt lintu pitäisi näkyä ruudulla oikean kokoisena, ja jos käynnistät scenen Unityn yläreunasta
löytyvästä Play -painikkeesta, pitäisi aikaisemmin luotu animaatio loopata ja linnun pitäisi
'lentää'.
Seuraavaksi voit etsiä toisen importatun assetin ja sen pilkotuista osista valita spriten maalle.
Raahaa yhden pikselin paksuinen maasprite Sceneen tai Hierarchyyn.
Tästä spritestä on helppo tehdä 'maa-taso' ruudun alareunaan muuttamalla sen X-skaalaa.
Valitse siis scenessä oleva sprite, ja aseta sen Transform -komponentin Scale -asetuksen X-
arvoksi 270 (tai jokin muu, riippuen myös käyttämästäsi kameran Size -arvosta). Koska sprite
on myös väärässä paikassa, aseta sen Position Y -arvoksi -0.85. Nämä arvot tietenkin ovat
erilaiset jos käytät erikokoisia kuvia kun esimerkin alussa määritetyt.
Lopputulos käyttäen näitä kuvia ja arvoja näyttää scene Game-näkymässä seuraavalta.
Seuraavaksi sceneen tehdään ensimmäinen este. Koska yksi este sisältää kaksi kuvaa samasta
putkesta, kannattaa aloittaa tekemällä ensin tehdä sceneen yksi tyhjä GameObjekti .
Huom. Tyhjän GameObjektin luominen onnistuu valitsemalla uudun yläreunasta
'GameObject/Create Empty'
Nyt raahaa asseteista löytyvä putki joka pilkottiin toisesta spritesheetistä sceneen tai
hierarchyyn. Raahaa myös toinen samanlainen, tai tee ensimmäisestä duplikaatti
oikeaklikkaamalla putkea Hierarchy -näkymässä ja valitsemalla Duplicate.
Kun scenessä on kaksi putkea, siirrä molemmat putket Hierarchy näkymässä tyhjään
GameObjektiin raahamalla ne sen päälle.
Huom. Pidä myös lukua putkien ja tyhjän GameObjektin Position-arvoista, koska kun
siirrät putket GameObjektin sisälle, niiden Position -arvot toimivat suhteessa
GameObjektin globaaliin position-arvoon.
LIITE 2(6).
Finnish tutorial of Example Game 2
Tässä vaiheessa hierarchy pitäisi näyttää jotakuinkin tältä.
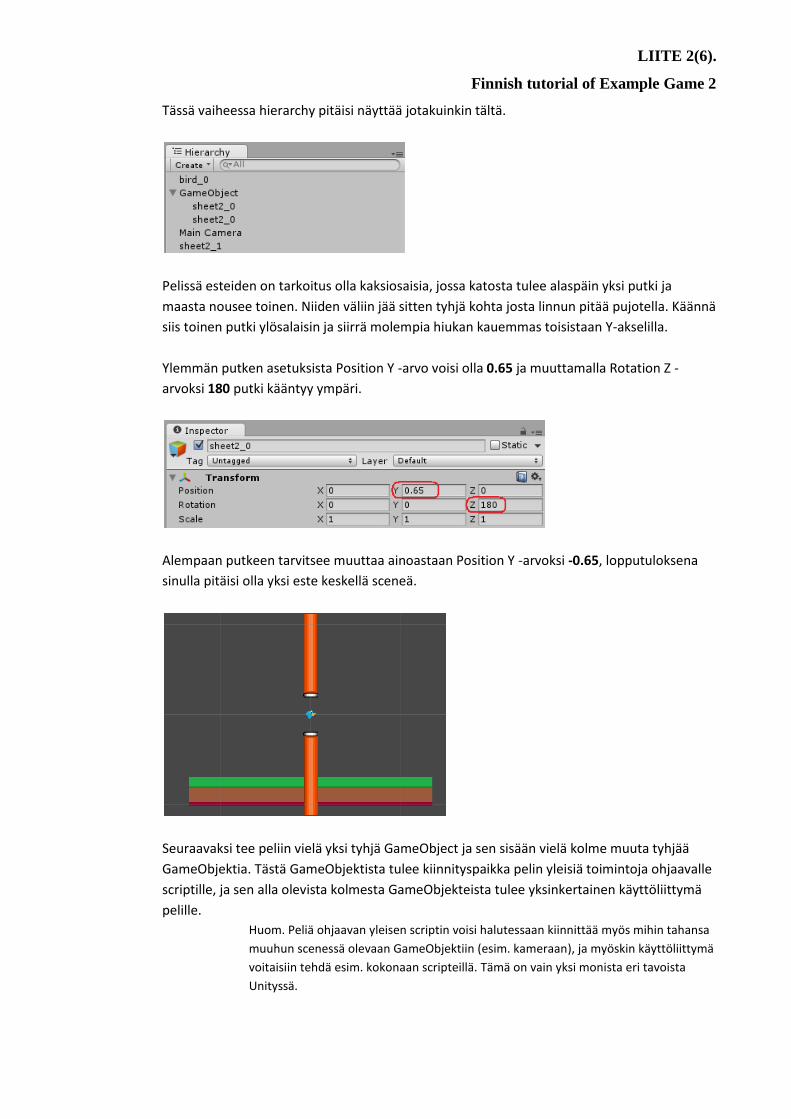
Pelissä esteiden on tarkoitus olla kaksiosaisia, jossa katosta tulee alaspäin yksi putki ja
maasta nousee toinen. Niiden väliin jää sitten tyhjä kohta josta linnun pitää pujotella. Käännä
siis toinen putki ylösalaisin ja siirrä molempia hiukan kauemmas toisistaan Y-akselilla.
Ylemmän putken asetuksista Position Y -arvo voisi olla 0.65 ja muuttamalla Rotation Z -
arvoksi 180 putki kääntyy ympäri.
Alempaan putkeen tarvitsee muuttaa ainoastaan Position Y -arvoksi -0.65, lopputuloksena
sinulla pitäisi olla yksi este keskellä sceneä.
Seuraavaksi tee peliin vielä yksi tyhjä GameObject ja sen sisään vielä kolme muuta tyhjää
GameObjektia. Tästä GameObjektista tulee kiinnityspaikka pelin yleisiä toimintoja ohjaavalle
scriptille, ja sen alla olevista kolmesta GameObjekteista tulee yksinkertainen käyttöliittymä
pelille.
Huom. Peliä ohjaavan yleisen scriptin voisi halutessaan kiinnittää myös mihin tahansa
muuhun scenessä olevaan GameObjektiin (esim. kameraan), ja myöskin käyttöliittymä
voitaisiin tehdä esim. kokonaan scripteillä. Tämä on vain yksi monista eri tavoista
Unityssä.

LIITE 2(7).
Finnish tutorial of Example Game 2
Nyt kun kaikki erilliset elementit joista peli rakennetaan on tehty, kaikki kannattaa nimetä
kuvaavimmilla nimillä, jotta niitä on helpompi käsitellä ja mahdollisesti hakea scripteillä.
Nimeä äsken luomasi vielä tyhjä GameObjekti nimellä GameController ja sen alla olevat
tyhjät GameObjektit nimillä Score, Reset ja Score. Muut aikasemmin luodut GameObjektit
voivat olla esim. Bird, Ground ja Obstacle. Lisäksi Obstaclen sisällä olevat GameObjektit voi
nimetä halutessaan nimillä Top ja Bottom.
Huom. Nimeämisen lisäksi GameObjekteille voi myös antaa tageja joilla niitä voi hakea
ja tehdä collider tarkistuksia, mutta vielä se ei ole tarpeen.
Kun kaikki on nimetty, scenen hierarchyn pitäisi näyttää kutakuinkin samalta kuin alla-
olevassa kuvassa.
Myöskin spritejen piirtojärjestystä voi halutessaan muuttaa siten että maa piirretään putken
päälle ja lintu kaiken päälle. Piirtojärjestystä voi muuttaa GameObjektin SpriteRenderer-
komponentin Order in Layer -asetuksella. Asetuksina voisi olla esimerkiksi linnulle 2, maalle 1
ja putkille 0.
Koska esteitä tarvitaan useita, kannattaa nyt myös tallentaa tehty este Prefabina. Prefabit
ovat käytännössä GameObjekteja jotka on tallennettu assetteihin asetustensa kanssa jotta
samoja objekteja ei tarvitse tehdä jatkossa uudelleen.
Huom. Suosittelen tekemään Assets kansioon uuden Prefabs alihakemiston jonne
tallennat esteen prefabin.
Kun este on tallennettu prefabina sen nimi pitäisi muuttua Hierarchy -näkymässä siniseksi.
Koska estettä ei tällä hetkellä tarvita voi sen nyt poistaa scenestä.

LIITE 2(8).
Finnish tutorial of Example Game 2
Linnun liikehdintä
Kaikki staattiset elementit ovat paikallaan ja nyt niihin voidaan nyt lisätä toiminnallisuutta.
Tässä pelissä linnun liikuttaminen ja putoaminen tapahtuu käyttäen Unityn omia
fysiikkakomponentteja.
Ensimmäisenä linnulle lisätään fysiikat. Valitse ja tuplaklikkaa linnun GameObjektia hierarchy
-näkymässä. Unityn oikealla reunassa olevassa Inspector -näkymässä voit lisätä
komponentteja lintuun, lisää ensimmäisenä 'Add Component/Physics 2D/Circle Collider 2D' -
komponentti. Colliderit ovat komponentteja jotka määrittävät GameObjektin muodon jota
käytetään fysiikan laskemisessa ja törmäysten tunnistuksessa.
Huom. Colliderin asetuksia säätämällä saat sen seuraamaan paremmin hahmosi
muotoa tai voit myös valita kokonaan erilaisen colliderin. Collder näkyy Scene
näkymässä GameObjektin ympärillä vihreänä viivana.
Kun olet saanut colliderin lisättyä, lisää seuraavaksi lintuun 'Add Component/Physics
2D/Rigidbody 2D' -komponentti. Rigidbody2D lisää GameObjektiin sen kaikki fyysiset
ominaisuudet kuten massan ja ilmanvastuksen. Samalla voit muokata Rigidbody2D-
komponentin arvoja siten että Mass on 0.3 ja Linear Drag 10. Kun lintuun on liitetty
Rigidbody2D-komponentti se ei enää pysy paikallaan pelimaailmassa kun peli käynnistetään
vaan on painovoiman vaikutuksen alaisena.
Huom. Muokkaamalla näitä arvoja vaikutat linnun käyttäytymiseen myöhemmin, ja ne
vaikuttavat suoraan pelin vaikeusasteeseen. Kannattaa siis kokeilla erilaisia arvoja ja
löytää omasta mielestään parhaat.
Koska hahmomme tulee liikkumaan fysiikoilla, ja animaatio vain heiluttaa linnun siipiä, tässä
vaiheessa kannattaa linnun Inspector näkymässä poistaa Apply Root Motion -asetus
Animator -komponentista. Jos tätä ei tee, voi animaatio aiheuttaa ei toivottua liikehdintää.

LIITE 2(9).
Finnish tutorial of Example Game 2
Seuraavaksi lisää linnulle vielä komponentiksi CSharp scripti ('Add Component/New Script') ja
anna sille nimeksi BirdBehaviour. Tähän scriptiin voi nyt kirjoittaa ohjauksen linnun
liikehdinnälle, joka tässätapauksessa tulee olemaan vain ylöspäin suuntaunut hypähdys
jokaisella hiirenpainalluksella.
Avaa juuri luomasi scripti tuplaklikkaamalla sitä Unityssä. Lisää scriptiin kaksi muuttujaa,
jumpForce ja gameController, jälkimmäistä käytetään myöhemmin tehtäviin tarkistuksiin
pelin tilasta ja siihen voidaan suoraan liittää scenssä oleva GameController-GameObjekti.
public float jumpForce = 60f;
public GameObject gameController;
Seuraavaksi lisää Update() metodin sisälle seuraava if-lause.
if (Input.GetMouseButtonDown(0))
this.gameObject.rigidbody2D.AddForce(new Vector2(0,1) * jumpForce);
Tämä if-lause käyttää Unityn omaa Input.GetMouseButtonDown funktiota joka arvolla 0
palauttaa true kun vasenta hiirenpainiketta painetaan. Jos ehto täyttyy niin lisätään
GameObjektiin johon skripti on kiinnitetty ylöspäin suuntaunut voima jumpForcen
vahvuisena. Koska molemmat muuttujat ovat public muuttujia, niitä voi muokata Unityn
omasta käyttöliittymästä lintuun liitetyssä scriptikomponentissa.
Lisää myös gameController-muuttujaan GameObjekti valitsemalla ensin Bird Hierarchystä ja
raahaamalla sitten Hierarchystä GameController Birdin scriptikomponentin gameController-
muuttujaan kuten kuvassa.
Jos nyt käynnistät pelin Unityssa, pitäisi lintusi hyppiä ylöspäin jokaisella hiirenpainalluksella.
Esteet ja maa
Jotta lintu ei vain lentäisi tai putoaisi läpi esteistä ja maasta, täytyy niihin lisätä collider-
komponentit. Valitse siis scenestä Ground ja lisää sille BoxCollider2D -komponentti.
Huom. Koska Ground on jo valmiiksi kulmikas pitäisi colliderin mennä oikein ilman sen
asetuksiin puuttumista, mutta varmista silti että colliderin reuna seuraa GameObjektin
reunoja.
Kun lintu osaa nyt hyppiä, tarvitsee se myös esteitä joita väistellä. Tuo nyt sceneen
aikasemmin tehty esteen prefab joka sisälsi kaksi putkea. Seuraavaksi lisää molempiin
Obstaclen alla oleviin GameObjekteihin BoxCollider2D-komponentit.
Huom. Tarkista taas colliderien istuvuus.

LIITE 2(10).
Finnish tutorial of Example Game 2
Seuraavaksi lisää Obstacleen uusi Csharp-scripti ja anna sille nimeksi ObstacleBehaviour.
Tällä scriptillä esteet liikkuvat tasaisesti vasemmalle ja tuhoutuvat kun päätyvät ruudun
ulkopuolelle. Liikuttamalla vain esteitä saadaan aikaan illuusio että lintu lentää eteenpäin
maailmassa vaikka vain esteet liikkuvat.
Lisää scriptiin kaksi muuttujaa: scrollSpeed ja moving. ScrollSpeed-muuttujalla määritetään
nopeus jolla esteet lähestyvät, ja moving-muuttujaa käytetään myöhemmin pysäyttämään
esteet kun lintu törmää.
public float scrollSpeed = 0.5f;
public bool moving = true;
Sitten lisää Update() metodin sisälle seuraavat kaksi if-lausetta.
if(moving)
this.transform.Translate(-(scrollSpeed*Time.deltaTime), 0, 0);
if(this.transform.position.x < -1.5)
Destroy(this.gameObject);
Niin kauan kuin moving on true, siirretään estettä X-akselin negatiiviseen suuntaan
scrollSpeedin ja deltaTimen kertoimella. Time.deltaTime-funktio palauttaa edellisestä
framesta kuluneen ajan, ja käyttämällä sitä liikkeen kertoimena varmistetaan että liike pysyy
tasaisena.
Toinen if-lause tarkistaa, että jos tämä este liikkuu kauemmas kuin -1.5 X-akselilla niin se
tuhotaan. Näin vältytään siltä että esteitä kertyisi peliin loputtomasti ruudun ulkopuolelle.
Arvo -1.5 on tosi jos kameran ja pelin asetukset vastaavat tutoriaalin asetuksia, mutta voit
helposti selvittää arvon liikuttamalla estettä scenessä vasemmalle kunnes se on kokonaan
poissa näkyvistä ja tarkistamalla sen Position X -arvon.
Kun esteen molemissa putkissa on oma colliderinsa ja scripti on liitetty Obstacleen, niin
tämän jälkeen lisää vielä Obstaclelle Respawn-tagi tällä tagilla voidaan myöhemmin hakea
useampia esteiden instansseja scripteillä. Päivitä muutokset Prefabiin klikkaamalla Inspector
-näkymän oikeassa yläkulmassa olevaa Apply-painiketta. Sen jälkeen voit taas poistaa
scenessä olevan esteen.
Esteiden luonti
Helpoin tapa luoda esteitä reaaliaikaisesti on luoda ne scriptillä joka instansioi tekemääsi
prefab objektia tietyin väliajoin. Aloita valitsemalla scenessä oleva GameController ja lisää
siihen uusi WorldController scripti.

LIITE 2(11).
Finnish tutorial of Example Game 2
Lisää siihen seuraavat muuttujat.
public GameObject obstacle;
public GameObject player;
private GameObject obstacleIns;
public float obstacleSpacing = 0.6f;
private float xPos = 1.5f;
private bool obsActive = false;
Kaksi ensimmäistä muuttujaa ovat tekemäsi este ja scenessä oleva lintu. Private obstacleIns-
muuttujaa käytetään instansioimaan este, obstacleSpacing-muuttujaa käytetään
muokkaamaan esteiden välistä etäisyyttä ja xPos on staattinen arvo X-akselilla josta esteet
lähtevät liikkeelle. Tämäkin arvo voi olla mahdollisesti eri kuin 1.5, mutta voit selvittää sen
lisäämällä skeneen esteen ja etsimällä sen Position X -arvon jolloin se katoaa näkyvistä
kamerasta oikealle. ObsActive-muuttuja muuttuu todeksi kun peli käynnistyy ja
ensimmäinen este ilmestyy kentälle.
Muuttujien jälkeen tee WorldControlleriin uusi metodi CreateObstacles(). Kun metodi
ajetaan, se tekee ensin ensimmäisen esteen xPos-muuttujan määrittämälle paikalle ja sen
jälkeen aina uuden esteen kun ensimmäinen on liikkunut obstacleSpacingin verran
vasemmalle.
private void CreateObstacles(){
if(!obsActive){
this.obstacleIns = (GameObject)Instantiate(this.obstacle, new Vec-
tor3(xPos,(float)Random.Range(-0.1f, 0.4f),0), transform.rotation);
obsActive = true;
}
else if(this.obstacleIns.transform.position.x < xPos-obstacleSpacing){
this.obstacleIns = (GameObject)Instantiate(this.obstacle, new Vec-
tor3(xPos,(float)Random.Range(-0.1f, 0.4f),0), transform.rotation);
}
}
Unityn instantiate-funktio tekee uuden kopion määritetystä GameObjektista ja sijoittaa sen
uuteen private muuttujaan. Tässä tapauksessa se tekee uuden esteen aina xPos
määrittämään paikkaan X-akselilla ja käyttäen Random.Range funktiota se tekee esteet
sattumanvaraisiin korkeuksiin. Jos esteet menevät liian ylös tai alas voit muokata staattisia -
0.1 ja 0.4 arvoja. Aja nyt Update()-metodin sisällä uusi oma metodisi CreateObstacles().
Tämän jälkeen tallenna scripti ja Unityn pääikkunassa raahaa WorldController-scriptin
kahteen public GameObject -arvoon scenestä lintu ja asseteista esteen prefab.
Nyt jos käynnistät pelin pitäisi ruudun oikeasta reunasta alkaa virtaamaan loputtomasti
esteitä joita voit yrittää väistellä linnulla hyppimällä.

LIITE 2(12).
Finnish tutorial of Example Game 2
Pisteet ja Törmäykset
Että pelissä olisi myös jotain tavoitteita, pitää linnun törmääminen maahan tai putkeen
tarkoittaa sitä, että joudut aloittamaan pelin alusta ja peli kertoo kuinka monen esteen
välistä pääsit ennen sitä. Valitse ensin pelissä oleva GameController ja lisää jokaiseen sen alla
olevaan GameObjektiin (Score, Start ja Reset) uusi komponentti 'Add
Component/Rendering/GUIText'. Nyt editoimalla näitä GUIText-komponenttien asetuksia
tee isot näkyvät tekstit 'Start by Clicking!', 'Click to Restart!' ja 'Score: 0, Best: 0'. Nämä
tekstit eivät tietenkään näy kaikki samaan aikaan joten kun olet saanut tekstit mieleisiksesi
niin sammuta Start- ja Reset-GameObjektit poistamalla ruksi niiden nimen vierestä
Inspector-näkymässä. Start jää näkyviin, koska se tulee olemaan aina päällä kun peli
käynnistyy.
Huom. GUIText komponentin teksti näkyy aina suhteessa kameraan. Position arvot
ovat 0-1. Jos esimerkiksi haluat keskittää tekstit niin aseta Position X ja Y arvoiski 0.5 ja
muuta anchor ja alignment keskitetyiksi.
Jotta peli osaa törmäyksen sattuessa resetoida pelin ja aloittaa uudestaan alkutilanteesta,
pitää WorldControlleriin lisätä tarkistuksia pelin tilasta sekä muuttujat pisteille. Lisää siis
WorldController -scriptiin seuraavat muuttujat.
public bool gameActive = false;
public bool gameOver = false;
public int currentScore = 0;
private int maxScore = 0;
Näillä muuttujilla peli tietää missä tilassa se on ja niiden avulla voidaan peli tarvittaessa
palauttaa alkutilanteeseen.
Tee nyt scriptiin kaksi uutta metodia: StopGame() ja ResetGame(). Tarkoituksena on, että
kun lintu törmää esteeseen niin laukaisee törmäys WorldControllerista StopGame()-metodin
joka tarkistaa rikoitko piste-ennätyksesi, aktivoi näytölle Score- ja Reset-tekstit ja pysäyttää
esteiden liikkumisen. Kun peli on sitten pysäytetty niin seuraava klikkaus käynnistää pelin
uudestaan.
public void StopGame(){
gameOver = true;
gameActive = false;
if(currentScore > maxScore)
maxScore = currentScore;
this.transform.GetChild(0).gameObject.SetActive(true);
this.transform.GetChild(1).gameObject.SetActive(true);
this.transform.GetChild(1).gameObject.guiText.text = "Score: "+currentScore+", Best:
"+maxScore;
foreach(GameObject obs in GameObject.FindGameObjectsWithTag("Respawn")) {
obs.GetComponent<ObstacleBehaviour>().moving = false;
}
}
Käytännössä StopGame() -metodi muuttaa pelin tilasta kertovien muuttujien arvoja, kirjaa
ylös mahdollisen uuden ennätyksen jonka jälkeen se aktivoi GameControllerin lapsiobjektit
Score ja Reset. Se myös etsii kaikki Obstacle-nimiset aktiiviset GameObjektit ja pysäyttää ne

LIITE 2(13).
Finnish tutorial of Example Game 2
käytten ObstacleBehaviour-scriptin moving-muuttujaa. Lapsiobjektien aktivoinnissa
kannattaa huomioida myös, että GetChild() -metodi aktivoi lapsiobjektit indeksin perusteella,
tämä olisi normaalisti epäkäytännöllistä ja monimutkaisemmissa peleissä ei suositeltavaa.
private void ResetGame(){
foreach(GameObject obs in GameObject.FindGameObjectsWithTag("Respawn")) {
Destroy(obs);
}
obsActive = false;
currentScore = 0;
this.transform.GetChild(0).gameObject.SetActive(false);
this.transform.GetChild(1).gameObject.SetActive(false);
this.transform.GetChild(2).gameObject.SetActive(true);
player.rigidbody2D.isKinematic = true;
player.transform.rotation = Quaternion.identity;
player.transform.position = new Vector3(0,0,0);
gameOver = false;
}
ResetGame() -metodi taas tuhoaa kaikki olemassa olevat esteet, päivittää obsActive ja
currentScore muuttujat alkutilanteeseen, käynnistää Start lapsiobjektin ja sammuttaa muut.
Se myös resetoi player muuttujan (johon sijoitettu Bird) position, rotation ja muuttaa sen
RigidBody2D -komponentin tilaksi Kinematic. Kinematic tilassa siihen eivät vaikuta enää
fyysiset voimat kuten painovoima, ja se tulee olemaan tästä lähtien Birdin alkutila jotta se ei
putoa ennenkuin käyttäjä kuittaa 'Start by Clicking!' ilmoituksen.
Seuraavaksi lisää vielä ja WorldController -scriptin Start() metodiin rivi jolla Birdin tilaksi
säädetään Kinematic kun peli käynnistetään.
void Start () {
player.rigidbody2D.isKinematic = true;
}
Viimeisenä muutoksena WorldControlleriin muokkaa Update() metodin sisältöä siten että
CreateObstacles() ajetaan vain jos peli on aktiivisena, muuten tarkastetaan onko peli alussa
vai lopussa ja toimitaan sen mukaan.
void Update () {
if(gameActive)
CreateObstacles();
else if(!gameOver){
if (Input.GetMouseButtonDown(0)){
player.rigidbody2D.isKinematic = false;
gameActive = true;
this.transform.GetChild(3).gameObject.SetActive(false);
}
}
else if(gameOver){
if (Input.GetMouseButtonDown(0)){
ResetGame();
}
}
}

LIITE 2(14).
Finnish tutorial of Example Game 2
Näillä ehdoilla peli käynnistyy 'Click to Start!' tekstin saattelemana odottamaan ensimmäistä
klikkausta, jonka jälkeen WorldController poistaa linnun Kinematic -asetuksen, muuttaa
gameActive muuttujan arvoa siten että CreateObstacles() metodi käynnistyy ja sammuttaa
Start lapsiobjektin. Jos taas lintu on törmännyt, niin seuraava klikkaus käynnistää
ResetGame() metodin ja peli palaa alkutilaansa.
Huom. Tämän kaiken voisi myös tehdä lataamalla koko scenen uudestaan, mutta näin
pienessä pelissä on melkein yhtä vaivatonta palauttaa peli alkutilaansa ja säästyä
turhalta scenen uudelleen lataukselta.
Ainoa puuttuva tapahtuma on enää linnun törmäys jonka pitäisi aktivoida WorldControllerin
StopGame() -metodi sekä pisteiden lisäys kun lintu lentää esteiden läpi. Pisteiden laskuun
tarvitsee muokata vielä Obstacle prefabia. Tuo sceneen asseteista Obstacle prefab, jotta
pisteitä voidaan laskea täytyy tähän GameObjektiin vielä lisätä yks collider jonka avulla
voidaan tunnistaa milloin lintu on lentänyt esteen läpi ja jotta collider toimisi se vaatii myös
RigidBody2D componentin. Lisää siis Obstacleen BoxCollider2D ja Rigidbody2D komponentit.
BoxCollider2D pitää asetella esteen keskellä olevaan läpimenoaukkoon siten, että ohut neliö
alkaa noin aukon puolivälissä ja loppuu toiseen reunaan.
Koska colliderin ei kuitenkaan ole tarkoitus pysäyttää lintua, niin komponentin asetuksista
säädetään BoxCollider2D-komponentin Is Trigger -asetus päälle ja koska fysiikoiden ei ole
muutenkaan tarkoitus vaikuttaa esteisiin laitetaan myös Rigibody2D-komponentin Is
Kinematic -asetus päälle.
Näiden muutosten jälkeen muista tallentaa muutokset prefabiin klikkaamalla Inspector-
näkymän oikeassa ylänurkassa Apply-painiketta.

LIITE 2(15).
Finnish tutorial of Example Game 2
Viimeisenä muutoksena lisätään BirdBehaviour scriptiin kaksi Unityn törmäyksentunnistus
metodia.
void OnCollisionEnter2D() {
gameController.GetComponent<WorldController>().StopGame();
}
void OnTriggerExit2D() {
gameController.GetComponent<WorldController>().currentScore++;
}
Koska pelin ainoa asia joka voi törmätä mihinkään, ei törmäyksille tarvi tehdä mitään sen
suurempia tarkistuksia. Linntuun kiinnitetty scripti aktivoi WorldController scriptistä
törmätessään StopGame() -metodin ja lentäessään läpi esteen triggeriksi asetetusta
colliderista se lisää yhden currentScore-muuttujaan.
Nyt jos käynnistät pelin pitäisi sen käynnistyä 'Click to Start!' näkyvillä, lintu paikallaan
lentäen ja ilman esteitä. Ensimmäinen klikkaus käynnistää pelin joka jatkuu niin kauan
kunnes lintu törmää esteeseen jonka jälkeen saat tietää pisteesi ja voit klikkaamalla aloittaa
pelin alusta.