30 drawing lessons from the creator of akiko
TRANSCRIPT


ContentsIntroduction
What You NeedMaking the Manga EyeCharacter DesignChoosing Your Style
C H A P T E R 1 : Heads and FacesFemale Front ViewFemale Three-Quarter ViewMale Front ViewMale Profile View20 Female Hairstyles20 Male HairstylesAdult Front ViewAdult Three-Quarter ViewFuller-Figured Character Front ViewFuller-Figured Character ¾ ViewChild Front ViewChild Profile View101 Manga Eyes12 Common Manga Facial Expressions
C H A P T E R 2 : Proportions and PosesDrawing the Human BodyProportion Tips and TricksThe Teen GirlAlternative Female Proportion StylesThe Teen BoyAlternative Male Proportion StylesThe Father FigureTips on Drawing AdultsFuller-Figured GirlDrawing Fuller-Figured CharactersThe Kid BrotherBabies and ToddlersSometimes You Can’t Help Being Big-HeadedChibi Variations20 Chibi Emotions50 Ways to Draw Hands

50 Ways to Draw FeetHitting Your StrideWalk This WayKissingXOXO: Displays of AffectionFightingThe Fight Club30 Classic PosesClothing Folds and WrinklesDress Pants and JeansSkirtsT-Shirts, Sweaters and Coats
C H A P T E R 3 : Setting the SceneFundamentals of PerspectiveStreet Scene Using One-Point PerspectiveObjects Big and SmallHouse Interior Using Two-Point PerspectiveTwo PointsSpace Station Exterior Using Three-Point PerspectivePoint of ViewInking TipsPutting Pen to PaperAnatomy of an Inked Manga IllustrationCrosshatchingPaneling and Page LayoutsLayout SequencesTo Panel or Not: Different LayoutsMaking Your Own Manga SequencesMaking the Leap: Advanced SequencingCan We Talk? Word BalloonsMake Some Noise
Conclusion
About the Author
Copyright
Metric Conversion Chart
Ideas. Instruction. Inspiration.


What You NeedMany aspiring artists worry too much about art supplies. There almost seems to be the belief thatbuying the right stuff is the single most important key to creating great art, but that’s like thinkingyou’ll be able to swim as fast as Olympic gold medalists do by wearing the right swimsuit. It doesn’twork that way.
What really matters is not the pencil but the brain of the person holding it. Experiment to find thesize, styles and brands you like best. If it feels right to you, that’s all that matters.

P A P E RI almost want to cry when I see that someone has put hours and hours of work into a drawing on a pieceof loose-leaf notebook paper. Do yourself a favor and get a pad of smooth bristol. It’s thick and sturdy,and can hold up to repeated erasing.
P E N C I L SPencils come down to personal preference. Perfect for me may be too hard or soft for you. I like asimple no. 2 pencil like the sort we all grew up with, but there are pencils of all kinds of hardness andquality. Try some out to see what kind of marks they make. The softer the lead, the more it may smear.
P E N SGet a good permanent-ink pen at an art store, one that won’t fade or bleed over time. Don’t confineyourself to super-fine tips. Have a variety of pens with different tip widths for the various lines youneed.
R U L E R S

R U L E R SGet yourself a nice, clear plastic ruler so that you can see the art as you make lines. A 15-inch (38cm)ruler is good for even some of the longest lines.
K N E A D E D E R A S E R SThese big soft erasers, available in art stores, are great for erasing huge areas without leaving tons ofpink dust behind. However, they aren’t always precise, so feel free to use them in combination with aregular pencil eraser.
P E N C I L S H A R P E N E R SI’ve come to prefer a simple hand-held disposable sharpener over an electric one. You’ll get the best useout of it while the blade is perfectly sharp.
Making the Manga EyeP U T T I N G Y O U R M A T E R I A L S T O W O R KLet’s get started with a warm-up exercise. Here’s a step-by-step demonstration that will get you usedto the process we’ll be using. Eyes are a great place to begin drawing as they are key to the characters,simple yet even if you’ve never drawn before.
Materials

Materialsbristol boardclear plastic rulerkneaded eraserno. 2 pencilpencil sharpenerpens in a variety of tip thicknesses
STEP 1Pencil in two horizontal lines 1 inch (25mm) apart. Connect them with four vertical lines, each an equaldistance apart. The three shapes that result should be slightly taller than they are wide.
STEP 2Draw the eyebrows, and upper and lower lash lines. The angle of each line tilts up slightly toward thecenter of the drawing. The upper eyelashes’ curves are more pronounced. Your guidelines help get theproper distances for the lash lines, but for the eyebrows you need to use your judgment to get the correctspace between each line and the lash lines below.

STEP 3Add the iris of each eye, leaving a small white circle at the top for the highlight.
STEP 4Place an oval behind the highlight within each iris. Add a smaller loop within each of those ovals toindicate the pupils. Extra credit if you replicate the slight flattening of the bottom of the ovals as they nearthe lower eyelashes. Add two curving lines above each eye for the eyelid folds.
STEP 5Use your pen of choice to ink. If you’ve been careful, you now know exactly where to put the heavy black

Use your pen of choice to ink. If you’ve been careful, you now know exactly where to put the heavy blacklines.
STEP 6Once the ink dries, erase all the pencilled guidelines.
Keep Your Pencil Lines Light!The pencil lines in the step-by-step lessons of this book appear darker for clarity, but you’ll want to keepthem quite light in your own drawings. Pencil lines need to be erased after inking.
Character Design

Choosing Your StyleNote that each head has as its base a circle at the top with intersecting lines in it. This is a great startingpoint because it’s the same every time. The dead center of a circle doesn’t change. Once I have thecircle, I add intersecting lines. The rest of the face can be built once you see where the lines should fallto produce the type of face you want.
RealisticThis face falls so close to true human anatomy it almost doesn’t qualify as manga. On a real human face, the eyes are much smaller, andthe nose and mouth far more prominent. The ears are at the same level as the eyes.

Slightly CartoonyThis facial construction is what you might see in boy’s action-oriented manga. The eyes get bigger, and the nose and mouth become lessdetailed. However, the distance between the eyes and the tip of the nose is still pretty close to real anatomy.
Very CartoonyIn this approach the enlarged eyes result in a different relationship with the rest of the features, and the ears are now level with thenose.
I can’t stress enough how important it is to replicate this balance if you want to do this style. Manga fans are a discerning bunch. Ifyou get it wrong, they’ll see it and let you know!

Extremely CartoonyWe’re reaching the far edge of the spectrum here, but have not pushed it to the limit. This style lends itself more to the shojo romancegenre, where expressive eyes are what it’s about. Looking at the circle of the blue-print drawing, you’ll find the eyebrows are very highon this head.
Pay Attention to the Whole FaceIn all these drawings it’s not just a matter of “the eyes get bigger.” They do, of course, but the nose andmouth get de-emphasized as well.

C H A P T E R 1
Heads and FacesThe face is far and away the most important aspect of manga drawing. If you’re great at drawingbackgrounds and clothing but are getting the faces wrong, you’ll have a hard time getting your artaccepted by manga fans.
Happily, drawing a manga face well is within the grasp of even the most inexperienced artist,provided you are willing to start with a few basic guidelines.
Female Front ViewSome artists draw faces that are nearly photographic, others draw characters with eyes the size ofdinner plates. In this lesson you’ll learn to draw a face structure somewhere between those twoextremes: Recognizably “manga” in its approach, but not too over-the-top.
The emphasis is on getting the head shape right and placing the eyes, nose and mouth in their properlocations.
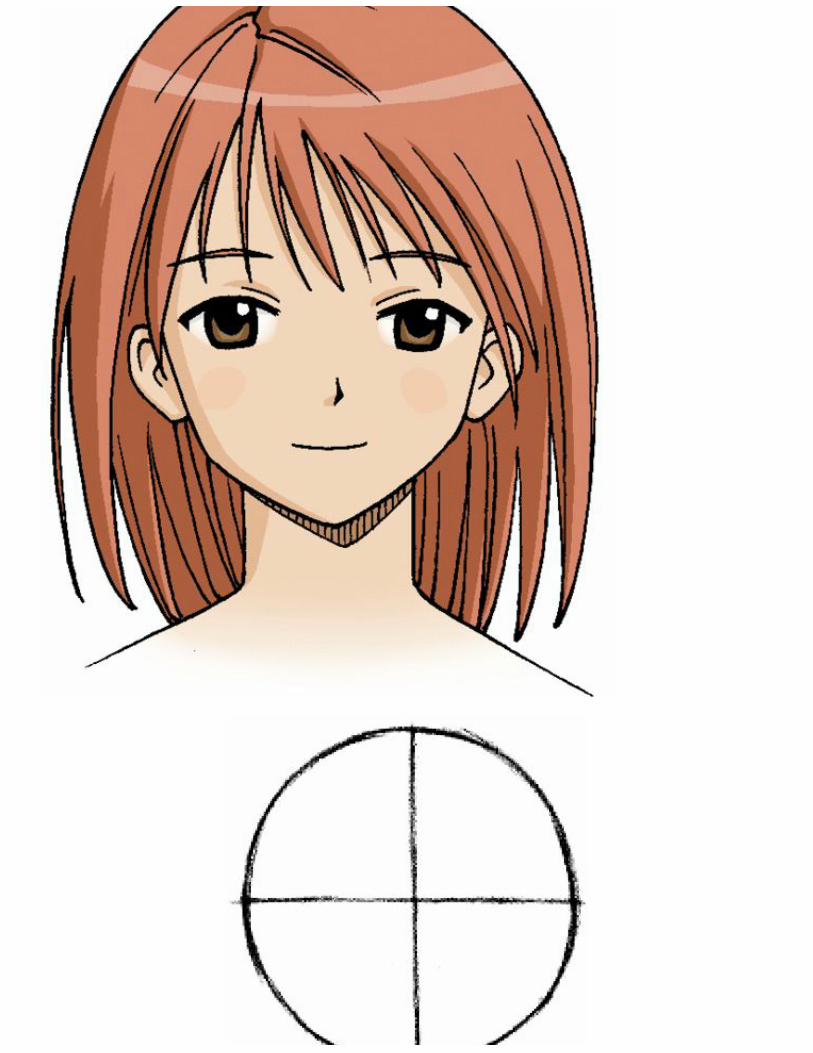

STEP 1 Draw Your CircleDraw a rough circle divided by a vertical line and a horizontal line. The vertical line is to help you placethe nose. The horizontal line will help place the eyebrows and eyes.
STEP 2 Mark the Feature LinesDivide the lower half of the circle into four equal sections with three lines. The first line will be for theeyebrows. The second will be for the upper eyelashes of the eyes. The third will be for the irises.

STEP 3 Outline the JawAdd lines for the jaw. Focus on the angles of each line and the shape created between them and thecircle. The distance between the bottom of the circle and the chin is about a quarter of the circle’sdiameter.
STEP 4 Place the FeaturesThe upper eyelash lines touch the edge of the circle on each side. Keep the width of one eye blankbetween the eyes. This blank space is as important as the eye shapes.
The nose rests on the bottom of the circle. Place it exactly in the center if you prefer. The mouth ismidway between the circle and the tip of the jaw.

midway between the circle and the tip of the jaw.
STEP 5 Draw the Ears and EyesThe top of the ear is about as high as the middle of each eye. The bottom is not quite as far down as theline of the mouth.
The line above each eye indicate the fold of the upper eyelid. Many artists place these lines above theinside corners of each eye, not stretching all the way across as they do in real life.

STEP 6 Form the Hair and NeckAdd lines for the hair, neck and shoulders. The upper line of the hair is a fair distance above the circle,nearly a quarter of the entire diameter. Manga heads tend to be fairly top heavy this way, whichcontributes to the youthful look of the characters.

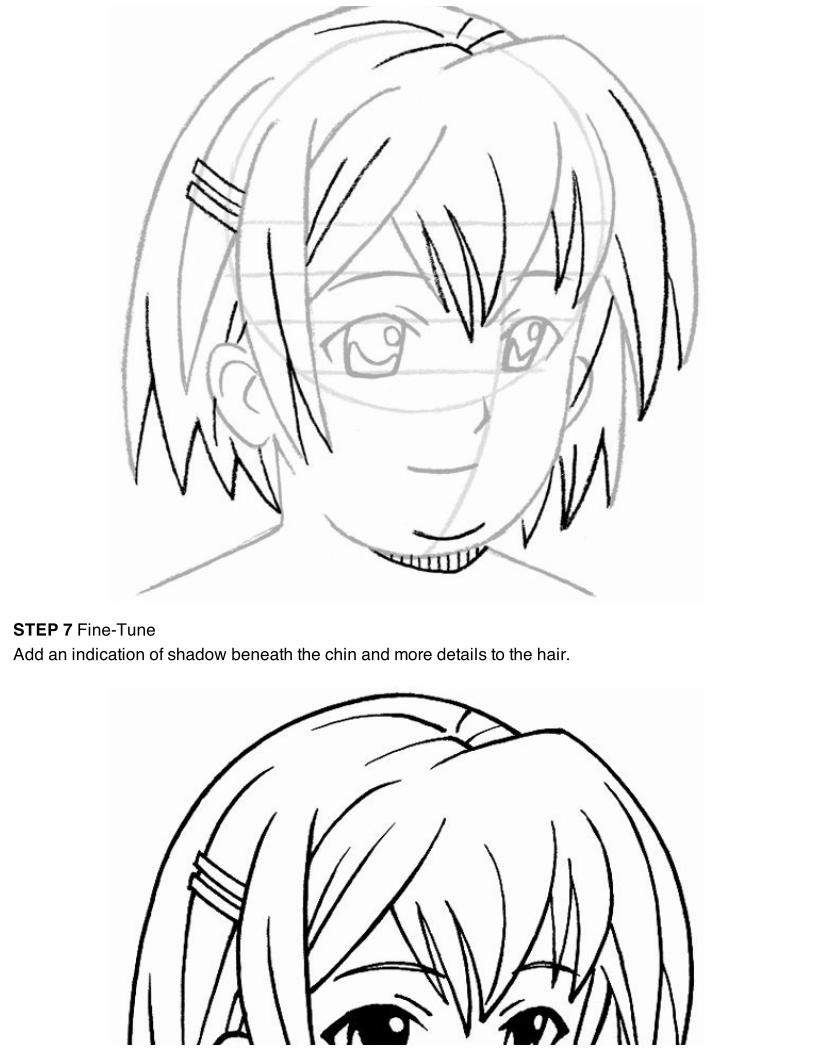
STEP 7 Fine-TuneIndicate the shadow beneath her chin and add details to her hair. The hair lines curve following theshape of the head.

STEP 8 Finish the DrawingInk all the lines you want to keep and erase the rough guidelines once the ink dries completely. Thefinished drawing can be enhanced with gray tones or given the full color treatment.
Female Three-Quarter ViewThe most important way of drawing a manga face is not the front view but the three-quarter view. Afterall, in an actual manga story it’s uncommon to have a character speak straight to the reader. More oftenthe character speaks to another character within the story and will be slightly turned to one side.
Fortunately it’s not that difficult and takes just a little practice to draw like a pro!

STEP 1 Draw Your CircleDivide it with a horizontal line.
STEP 2 Mark the Feature LinesDivide the lower half of the circle into four equal sections by adding three more lines.

STEP 3 Outline the JawAdd a gently curving vertical line that starts at the chin and heads a little off to one side. Focus on theselines and the shapes they make in relation to the circle. The line should stop at the brow line, secondfrom the top.
STEP 4 Place the FeaturesDraw the eyes, eyebrows, nose, and mouth. All four of these facial features touch the curving line atvarious intersections. Be careful placing the left eye. The blank spaces surrounding it are as important asthe eye itself.

the eye itself.Note that in the three-quarter view her right eyebrow is not directly above the eye, but a little off to one
side.
STEP 5 Draw the Ears and EyesCreate a highlight near the top and a curving shape at the bottom of each iris. Also add short curvinglines just above the inside corner of each eye.

STEP 6 Form the Hair and NeckDraw the neck so that it meets the intersection of the ear and cheek on one side, and the tip of the chin onthe other.
Begin sketching out the hair.
STEP 7 Fine-TuneAdd shape to the hair with additional lines. An extra stray hair or two at the top of her pigtails can add anatural look. Indicating a shadow beneath the chin helps the picture look three-dimensional.

STEP 8 Finish ItWe’re nearly done! Grab your pens and ink all the final lines. Let it dry then erase the guidelines to leavea polished, professional finish.
Happy HairstylingOf course, there’s no need to make your character have the same hairstyle you see here. You can findmore hairstyle ideas in 20 Female Hairstyles.
Male Front ViewIn the American and European style comic book tradition, male and female characters are drawn indramatically different ways. Superman’s face is much more square-jawed than Lois Lane’s, and if youwere to reverse the two facial structures the results would be bizarre indeed! This is not the case withthe majority of manga characters, where the differences between male and female facial structures areoften negligible. We are left to tell which is which mainly by the hair and just a hint of a difference inthe eyes.
This is good news for aspiring manga artists. If you can draw female faces well, you’re just a few lineadjustments away from drawing males. In fact, the first five steps are almost exactly the same!


STEP 1 Draw Your CircleDivide with horizontal and vertical lines.
STEP 2 Mark the Feature LinesDivide the lower half of the circle into four equal sections by adding three more lines.

STEP 3 Outline the JawFocus on the angles of each line and the shape that is created between them and the circle. Thedistance between the bottom of the circle and the tip of the jaw is about a quarter of the circle’s diameter.
STEP 4 Place the FeaturesThe upper eyelash lines touch the edge of the circle on each side. Keep a blank space the width of oneeye between the eyes.
The nose rests on the bottom of the circle. Place it in the center if you prefer.The mouth is midway between the circle and the tip of the jaw.

STEP 5 Draw the Ears and EyesThe top of the ear starts at the middle of each eye. The bottom is just above the line of the mouth.
The lines over the eyelids indicate folds. Place these lines above the inside corner of each eye. Thesmall circles in each iris are highlights and make the eyes look shiny.

STEP 6 Add the Hair and NecklineNot all boys have short hair, but a comparatively short haircut makes your character readable as a male.
STEP 7 Fine-Tune

Manga artists often structure the hair as I have here with the strands on the forehead parting so they don’tobstruct the eyes. Add an indication of shadow beneath the chin and you’re ready to ink.
STEP 8 Finish ItThe lines of the upper eyelashes are a little more thin than in the female version, a small but crucial detailbecause it is the only facial difference between the two.
Let the ink dry completely, then erase. Leave as is, shade or color!
Hair RaisingYou can try one of the 20 Male Hairstyles we talk about later, too!
Male Profile View

Male Profile ViewDrawing a realistic face in profile presents unique challenges that can trip up even the mostexperienced illustrators. A manga face in profile is considerably more streamlined and simplified, butnevertheless requires special effort to master. The distances between the various facial features mustbe learned, of course, but added to this is the challenge of drawing the contours of the forehead, noseand mouth.

STEP 1 Draw Your CircleDivide the circle by vertical and horizontal lines. This time the vertical line is there to help you place theear. The horizontal line will help you place the eyebrow.
STEP 2 Mark the Feature LinesDivide the lower half of the circle into four equal sections by adding three more lines.

STEP 3 Outline the JawBegin with a line that curves off from the circle between the 2nd and 3rd lines. The angle as it reachesthe tip of the nose is just a touch higher than the bottom horizontal line. From there draw a line down tothe chin with small bumps for the lips midway down.
Finally, add the curving line of the jaw, making it point back toward the bottom of the vertical line,without quite touching it.

STEP 4 Place the FeaturesAdd the eye, eyebrow, ear and mouth. The eye rests between the 2nd and 3rd horizontal line’s, and isclose to the edge of the circle, but doesn’t touch it.
The ear sits between the 2nd and 4th horizontal lines and is flat against the vertical line. The mouth isclose to the midway point between the nose and chin.
STEP 5 Add DetailsJoin the neck to the head a touch to the left of the ear on the back of the neck. The line of the throat startshalfway between the tip of chin and the bottom of the vertical line.
Add pupils to the eyes and curves to the inside of the ear.

STEP 6 Add the HairSketch in a rough hairstyle with a few lines.

STEP 7 Fine-TuneAdd individual strands of hair and a shadow beneath the chin.
STEP 8 Finish ItCarefully ink the drawing, taking care not to ink any of the rough guidelines. Let it dry, then erase thepencil lines.
The finished drawing can be left as is, enhanced with gray tones or given the full color treatment.
20 Female HairstylesKnowing how to draw hairstyles is absolutely crucial in manga. With facial features and sometimeseven school uniforms rendering characters all but indistinguishable from one another, the hairstylemay be the reader’s only means of telling one kid from another. These pages show twenty ways to draw

may be the reader’s only means of telling one kid from another. These pages show twenty ways to drawmanga hair for female characters.
Short HairA short haircut is often used to convey innocence and a childlike nature.Long HairA long, straight haircut can make a character appear more worldly.Curly HairManga artists tend to avoid the impression of frizzy hair and render curls in the form of waves or ringlets.

Pulled-Back HairDrawing hair into a ponytail or pigtails can be a quick way of differentiating one female from another in your story.Spiky HairManga artists tend to save seriously spiky hair for the boys, but can give a female character a bit of artistic flair.
20 Male HairstylesMale hairstyles are somewhat more limited in variety than for females’. Still, creative artists find waysof coiffing manga guys in distinctive ways that make them instantly recognizable.

Long HairDrawing a male character with long hair creates a special challenge. To distinguish your long-haired guy from your female characters,give him a thicker neck and angular facial features.The PompadourThis unusual hairstyle is generally reserved for bad boys, but who says you can’t have the bad boy with the heart of gold?

PonytailFemale ponytails tend to be more fluffy and full-bodied, while his is a bit more minimalist.WindblownManga characters tend to get caught in convenient “gusts of wind” when artists feel like calling attention to their hair. Why not play itup? Manga is all about creating a certain mood.
Adult Front ViewManga stories tend to be dominated by youthful characters in high school or fantasy characters who arevaguely teen-aged. Still, that doesn’t mean you’ll never need to draw an older character.
Manga artists tend to regard the older characters as inhabiting a different world in terms of the waythey are drawn. They often bear little resemblance to the kids at the heart of the story. Not only is thefacial structure quite different, but there are all those wrinkles to contend with.
But never fear: given the right guidelines, drawing an older character need be no more difficult thandrawing the young protagonists.

STEP 1 Draw Your CircleDivide the circle by a vertical and horizontal line.

STEP 2 Mark the Feature LinesDivide the lower half of the circle into four equal sections by adding three more lines.

STEP 3 Outline the Cheeks and JawThe shape is considerably more complicated than that of the youthful face, so extra attention must bepaid to get the lines right. Note the distance of the tip of the chin from the bottom of the circle: It’s roughlyequal to a third of the diameter of the entire circle.
STEP 4 Place the FeaturesNote that the eyebrows and eyes are a full line higher on the face than in younger characters.
Probably the biggest difference between young and old manga characters is the depiction of the nose.It is much more fully rendered for older characters.
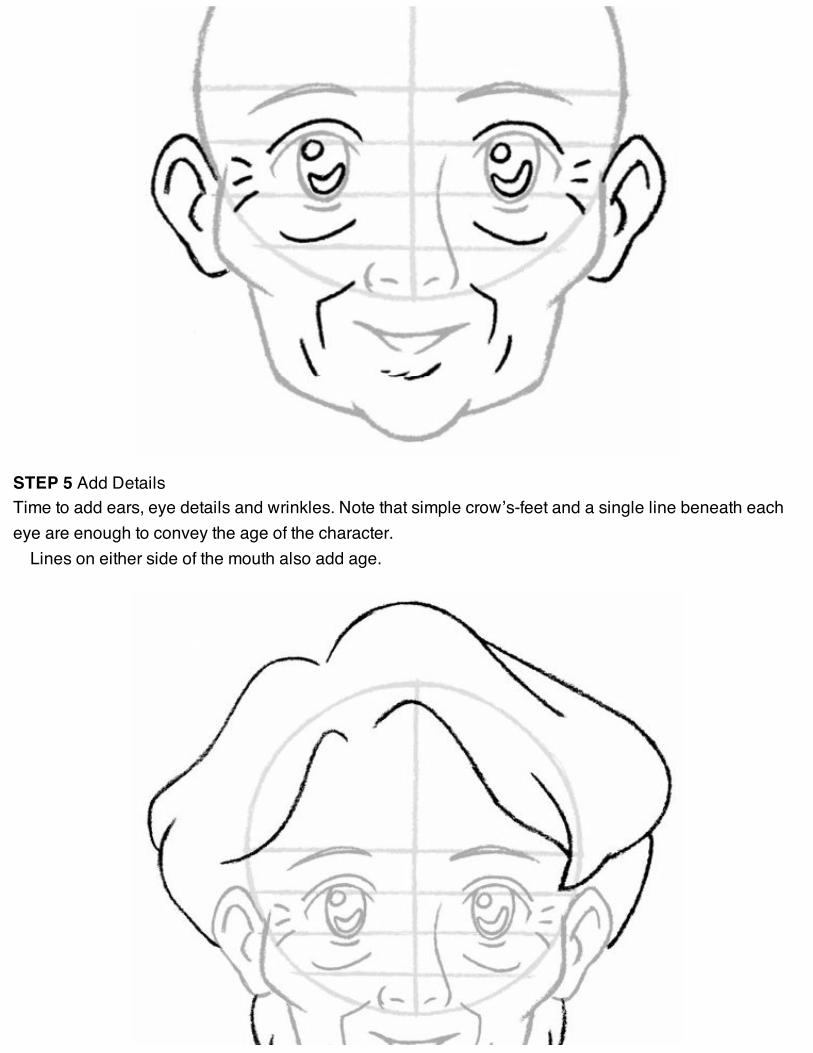
STEP 5 Add DetailsTime to add ears, eye details and wrinkles. Note that simple crow’s-feet and a single line beneath eacheye are enough to convey the age of the character.
Lines on either side of the mouth also add age.

STEP 6 Form the Hair and NeckSketch the neck lines in and add the basic lines of the hair. A larger forehead is typical. The hairstyles ofolder characters are generally less flashy than those of younger characters.
STEP 7 Fine-TuneAdd a shadow beneath the chin and more lines to define the hair. An elderly character will also have aline or two delineating the wrinkles of the neck.

STEP 8 Finish ItInk the lines and let it dry, then erase the guidelines. You can keep it black and white, add some graytones or color..
Less Is MoreAdding lines to the sides of a character’s mouth ages them. Be careful with details for any character youwant to look youthful.
Adult Three-Quarter ViewJust because you’re drawing an older character doesn’t mean they have to look like they’re ready forthe retirement home. Sometimes you want to draw someone who simply looks slightly older than yourteenaged protagonist.
With these characters you can’t rely on wrinkles and gray hair to show their age, so it’s going to bemore about the facial structure. Most manga artists opt to depict grown-up characters with faces thatare considerably closer to real human anatomy. This means that starting out with proper guidelines ismore important than ever.


STEP 1 Draw Your CircleDivide the circle by vertical and horizontal lines.
STEP 2 Mark the Feature LinesDivide the lower half of the circle into four equal sections by adding three more lines.

STEP 3 Outline the Jaw and EarThe upper cheek begins where the second horizontal line intersects the circle. Observe the unusualwhite shape created between the edge of the circle and the lines of the jaw.

STEP 4 Place the FeaturesAdd the eyebrows, eyes, nose and mouth. The iris of the eye on the left touches the vertical line. Use thatto place the left eyebrow.
The tip of the nose falls between the third and fourth horizontal lines on the edge of the circle.Place the mouth a little less than halfway between the chin and nose, just outside the edge of the
circle.
STEP 5 Add DetailsOne line below each eye suggests maturity without making him look grandfatherly.
Add lines defining the cheek bones and the curves of the ears.A line below the mouth defines the lips while one on the side adds maturity.

STEP 6 Form the Hair and NeckThe lines of the hair curve up and back to follow the surface of the head. A single line on the neck is notonly anatomically accurate but also adds a few years to the character.

STEP 7 Fine-TuneAdd a few more lines to the hair and a shadow beneath the chin. I’ve made my character clean shaven,but many manga artists give fatherly characters a mustache or beard to separate them from the youthfulprotagonists.

STEP 8 Finish ItInk the lines and let it dry, then erase the guidelines. You can keep it black and white, or add some graytones or color.
Find a bonus demonstration of an older character’s profile online at impact-books.com/mastering-manga.
Fuller-Figured Character Front ViewJust as older characters rarely get the limelight, fuller-figured characters are generally sidelined or leftout. But this doesn’t mean you’ll never want to include such characters in your stories.
Cartoonists have long rendered fuller-figured characters in an exaggerated, humorous way, but thatis not what I’m interested in. I’d like to present a respectful way of depicting fuller-figured characters,allowing them to be among the main characters of a story rather than forcing them into the backgroundas comic relief.

STEP 1 Draw Your CircleDivide the circle by vertical and horizontal lines.

STEP 2 Mark the Feature LinesDivide the lower half of the circle into four equal sections by adding three more lines.

STEP 3 Outline the JawThis is the main difference between the standard manga face and a fuller face. Instead of a point, the chincurves at the bottom.
STEP 4 Place the FeaturesAdd the eyes, eyebrows, nose and mouth. The locations of all these facial features are more or less

Add the eyes, eyebrows, nose and mouth. The locations of all these facial features are more or lessidentical to their locations on the standard manga face.
STEP 5 Add DetailsAdd the ears, details to the eyes and a double chin line near the bottom. Not all fuller-figured people havedouble chins, but it can be a good way to define your character.
STEP 6 Form the Hair and NeckThe neck is considerably wider than that of the standard manga character.
STEP 7 Fine-TuneAdd an indication of shadow beneath the chin and more details to the hair.
STEP 8 Finish ItInk the lines, let it dry, then erase guidelines. You can keep it black and white, and add some gray tonesor color.
Fuller-Figured Character ¾ View

Fuller-Figured Character ¾ ViewThe three-quarter view is the one we see in manga again and again. There’s just something morenatural and appealing about this point of view.
In essence it is only the shape of the jaw, not the facial features, that changes in comparison to theearlier three-quarter view lesson. It’s a tricky line to draw, though. At what point does the double chinbecome comical and overdone? I advise approaching it with subtlety.

STEP 1 Draw Your CircleDivide the circle by a horizontal line.
STEP 2 Mark the Feature LinesDivide the lower half of the circle into four equal sections by adding three more lines.

STEP 3 Outline the JawLike the front view, this chin curves. Draw a second curving line from the chin up to the second of the fourhorizontal lines. Take care to maintain the distance between this line and the outside line.

STEP 4 Place the FeaturesAdd the eyes, eyebrows, nose and mouth. The locations of all these facial features are more or lessidentical to their locations on the standard manga face, but the distance between the mouth and the chinline is markedly different.

STEP 5 Add DetailsAdd the ears and details to the eyes. The highlights will make the eyes shiny. The little dash above eacheye denotes the folding of the eyelid.
STEP 6 Form the Hair and NeckThe line of the neck begins at the base of the ear, and there is also a short line here suggesting the edgeof the cheek. This hairstyle is, of course, up to you..
STEP 7 Fine-TuneAdd an indication of shadow beneath the chin and more details to the hair.

STEP 8 Finish ItInk the lines and let it dry, then erase the guidelines. You can keep it black and white, and add some graytones or color.
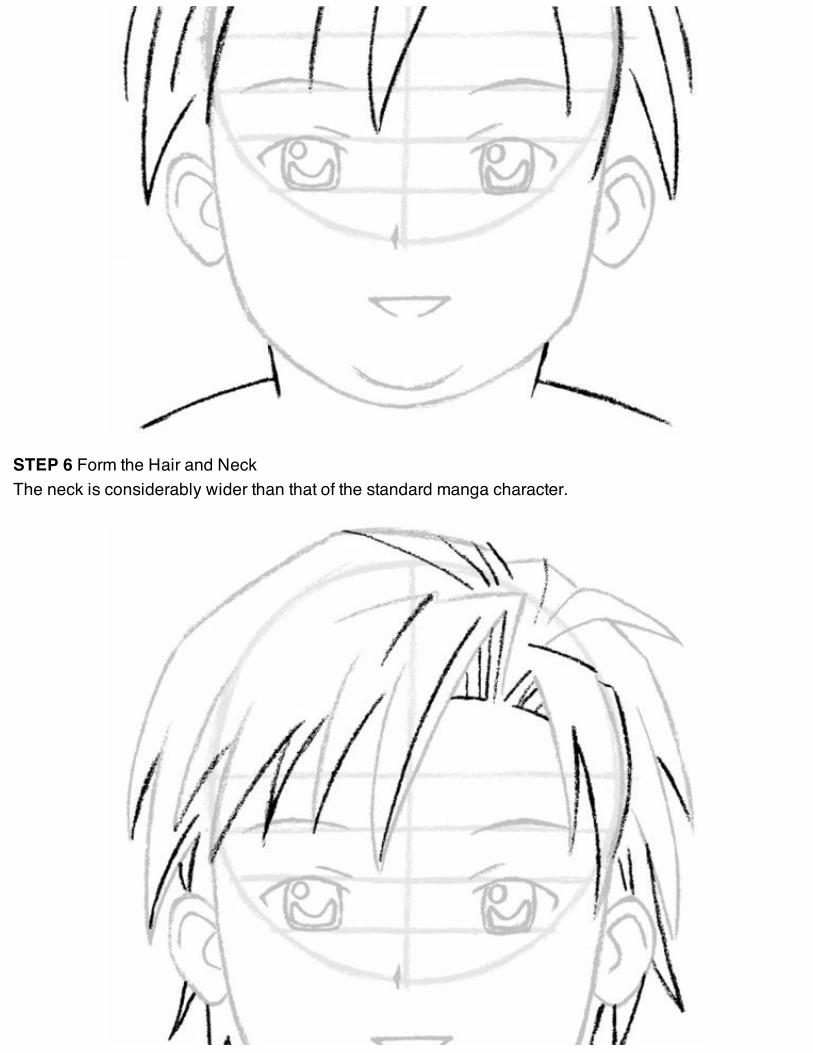
Child Front ViewYouthful manga characters intended to be teens (or even adults) are often drawn with oversized eyesthat make them reminiscent of children. So what do you do when the character you’re drawing issupposed to be a real child?
Relax. The main thing is to push things a little further than you do with your teen characters in termsof the eyes, cheeks and hair. As always, guidelines will give you your best chance of drawing thecharacter consistently from one panel to the next.

STEP 1 Draw Your CircleDivide the circle by vertical and horizontal lines.

STEP 2 Mark the Feature LinesDivide the lower half of the circle into three sections by adding two additional horizontal lines. The first ofthese two lines will be for placing the eyebrows. The second will be for the upper eyelashes.

STEP 3 Outline the JawThis is one of the big differences between the standard teen face and a child’s face. The jaw still comesto a point, but the cheeks are squared off to create that baby-faced look. Replicate the angles on eachside, connecting the jawline to the skull at the middle line.
STEP 4 Place the FeaturesAdd the eyes, eyebrows, nose and mouth. The key difference here is the space occupied by the eyes.This tyke’s eyes are nearly twice as big. The mouth is halfway between the circle and the tip of the chin.

STEP 5 Add DetailsDraw the ears and fill in the eyes. All of this is much the same as you’d do with a teen character, thoughyou could experiment with making the ears a bit larger if you want to add to the cuteness of the character.

STEP 6 Form the Hair and NeckThis bowl cut is a bit on the cartoonish side. The reader will see this character as a child from a mileaway, but you can give him a more natural ‘do if you’re so inclined.

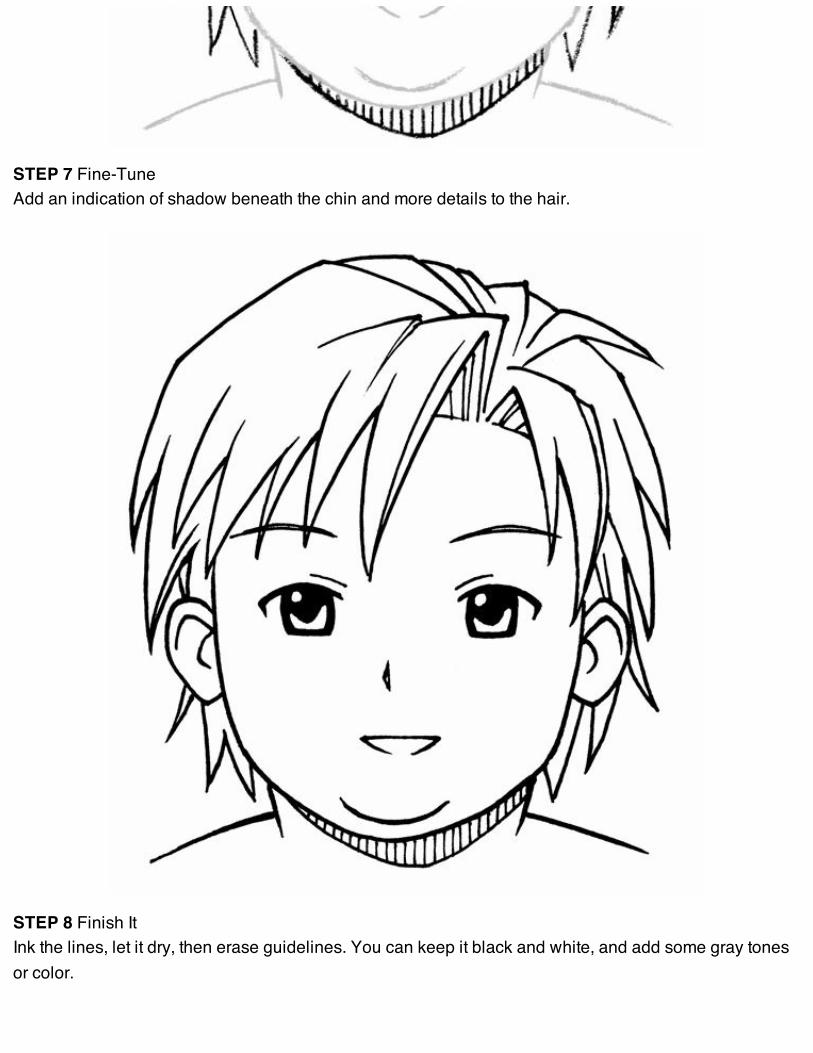
STEP 7 Fine-TuneSpeaking of cartoonish, I decided to add a couple of stray hairs popping off the top of the head. Again,ignore this part if you think it’s ridiculous. (It is.) Add a little shadow beneath the chin.
STEP 8 Finish ItInk the lines and let it dry, then erase the guidelines. You can keep it black and white, or add some graytones or color.
(Admit it: those stray hairs make the drawing!)
Child Profile ViewDrawing characters in profile can be tricky regardless of what kind of characters they are. Still, you’ll

Drawing characters in profile can be tricky regardless of what kind of characters they are. Still, you’llneed to draw all your characters in profile at one point or another, and the child’s facial proportionsmake profiles a new challenge from their older siblings.
How do we get it right? How else? Guidelines!

STEP 1 Draw Your CircleDivide the circle by vertical and horizontal lines.
STEP 2 Mark the Feature LinesDivide the lower half of the circle into four sections by adding three additional horizontal lines. The firstline is for placing the eyebrows. The second is for the upper eyelashes of the eyes.

STEP 3 Outline the JawDraw a line that gently curves off from the circle near the second of the four lines. It comes to a point atthe nose—the same level as the bottom horizontal line. From there bring the line down at an angle. Thisline is equal to the space between the first and last horizontal lines. From the point of the chin the linecurves back toward the bottom of the vertical line. Keep it mostly horizontal, curving up only at the tailend. Don’t let it touch the circle.

STEP 4 Place the FeaturesAdd the eyebrow, eye, mouth and ear. The eyebrow starts roughly above the chin; don’t let it touch thecircle. The mouth is halfway between the tip of the nose and chin. The ear connects at the vertical line;the top hits the second horizontal and curves just below the bottom line.
STEP 5 Add Details and Neck

Fill in the pupil and highlight to the eyes. Add curves to the ear.Draw the lines of the neck and shoulders. The front of the neck begins about two-thirds of the way
along the line of the jaw. The back begins about halfway between the vertical line and the back of herhead.
STEP 6 Form the HairIt may be cliché, but pigtails are a great way to identify a female child. Of course, your teen charactermight want to adopt a girlish look, but placing the pigtails high on the head and making her jaw and eyesyouthful will keep her little sister looking like the baby of the family.

STEP 7 Fine-TuneAdd more details to the hair—a stray hair popping off the forehead if you are so inclined (you know me, Ican’t resist drawing stray hairs).

STEP 8 Finish ItInk the lines and let it dry, then erase the guidelines. You can keep it black and white and add some graytones or color.
101 Manga EyesNothing says manga like the big, shiny eyes that the style has come to be known for. But every artistcomes at it a different way. Find the styles you like, then adapt them for your own characters.

Semirealistic Reminiscent of real human anatomy, but still recognizable as manga eyes.
Cartoony Typical of kids’ manga, this style is fun and never takes itself too seriously.
HighlightsMost manga eyes include at least one highlight to create a shiny effect. It can be at the top of each iris, atthe bottom or both.

Big Eyes A mainstay of shojo romance, these eyes get so big they become a landscape unto themselves.Hyper-Realistic Though rare, some manga artists do go for realism.No Pupils Manga artists sometimes leave out the pupils to create an unusual, glassy effect.

Single Highlight The “less is more” approach can be powerful. A single white dot is all these eyes need to achieve their haunting effect.Tiny Irises Sometimes artists shrink the irises down dramatically. The effect can be menacing or shifty looking.
12 Common Manga Facial ExpressionsJapanese artists have found a way of conveying emotions that is fresh, original and instantly readable topeople all over the world. Here are twelve facial expressions manga artists use most.

CheerfulThe default manga facial expression. The smile is subtle with a small, gentle curve. The bottoms of the eyes are often somewhatflattened, suggesting the cheeks rising to cover the eyes just a touch as the character smiles.

Ecstatic JoyPull this one out when simple happiness just won’t cut it. The “squeezed shut” eyes are a classic form of manga shorthand for conveyingbig time happiness. The bottom of the mouth may be left unrendered as a stylistic quirk.
ConfusionThis look of quiet befuddlement is conveyed mainly by the eyebrows. One is angled down as if slightly angry, the other raised as if

surprised.
ConcernThis is a great all-purpose expression to use whenever a character is serious or making an argument. The eyebrows are slightly curved,with just a hint of furrowing to the brow.

Sadness or RegretThe expression is in the eyebrows. They follow a crooked path as they curve toward the center of the forehead. The heavy eyelids andthe tiny frown add to the sense of melancholy.

BoredomFlatten the upper eyelashes and tuck the irises at least halfway underneath. The eyebrows float above the eyes at a very neutral angle,and the mouth is small and closed.
DeterminationA common emotional state in any action oriented manga. Make sure you get the angle and proximity of the eyebrows to the uppereyelashes right. The clenched teeth and the break in the line surrounding the mouth are common in manga faces.

AngerSimilar to the look of determination, but with extra crooks on the ends of the eyebrows. The wide-open mouth, the bared teeth,everything comes together to convey her rage.

DistressA manga staple, this look comes out at moments of crisis. The eyebrows curve upward and at least one of them ends in a zigzag,signifying a furrowed brow. The irises don’t quite touch the upper eyelids, adding to the sense of heightened emotion.

SurpriseThis look is seen again and again in love stories as the character discovers new information. Note the small irises, and how they floatwithin the whiteness of the eyes. The open, gasping mouth also adds to the effect.
EmbarrassmentA great one for comedic moments: the character is caught in an awkward position and must talk her way out of it. Combine theapologetic upturned eyebrows with a big smile. Add blush, wide-open eyes, and you’ve got someone going very red in the face.

SadnessMake the irises large and tuck them well beneath the upper eyelids. Don’t overdo the streaming tear. One or two are plenty. The shapeof the mouth suggests a quivering lower lip.

C H A P T E R 2
Proportions and PosesOnce you get the faces down, it’s time to turn your attention to drawing the manga body. Is it difficult?Absolutely.
But it’s nothing that can’t be mastered, provided you keep at it. If guidelines are important fordrawing the face, they are ten times as important for drawing the body. But where do the guidelines go?Read on, my friends, to learn that and a whole lot more in the chapter ahead.
Drawing the Human Body

Proportion Tips and TricksTo get a grip on body proportions start measuring in terms of how many “heads” tall or wide a personis. For example, if you’re confused about how long to make the arms, look at this picture to see howmany heads “long” they are.

The dotted line shows the difference in proportion between the top and bottom halves.
S T A N D I N G
Shoulders: Men are just over two heads wide. Make younger boys narrower and athletic buildswider. Women are under two heads wide. One and a half is cartoony. For a realistic look, gocloser to two.Arms: Two and a half heads from the shoulders to the tips of the fingers.Legs: Nearly three and a half heads from the top of the thigh to the toes. Stretch this out to makeyour female character more glamorous.Torso: Two heads tall from the base of the neck to the top of the inner thigh. The breast line isjust over the halfway point.

B E N D I N G A N D S I T T I N G
Upper and lower halves: The distance from hip to head is slightly longer than from hip to footand the difference between leg and arm length becomes apparent when side-by-side.Legs: When seated, the distance from knee to toe is nearly identical to the distance from knee tobackside.Arms: When seated with slack arms, the hand will reach past the thigh.
The Teen GirlDrawing the human body is always a challenge. If one or two lines aren’t in just the right place, thewhole drawing will look wrong. Though it takes a little extra time, the only way to guarantee properbody proportions is to make use of extensive preparatory guidelines.
Remember, this girl has her feet firmly planted in manga land and as a result bears little resemblanceto a real teenaged girl. If you want to progress in your art beyond the manga style—or even just takeyour manga drawings to a higher level—you should definitely study true human body proportions.

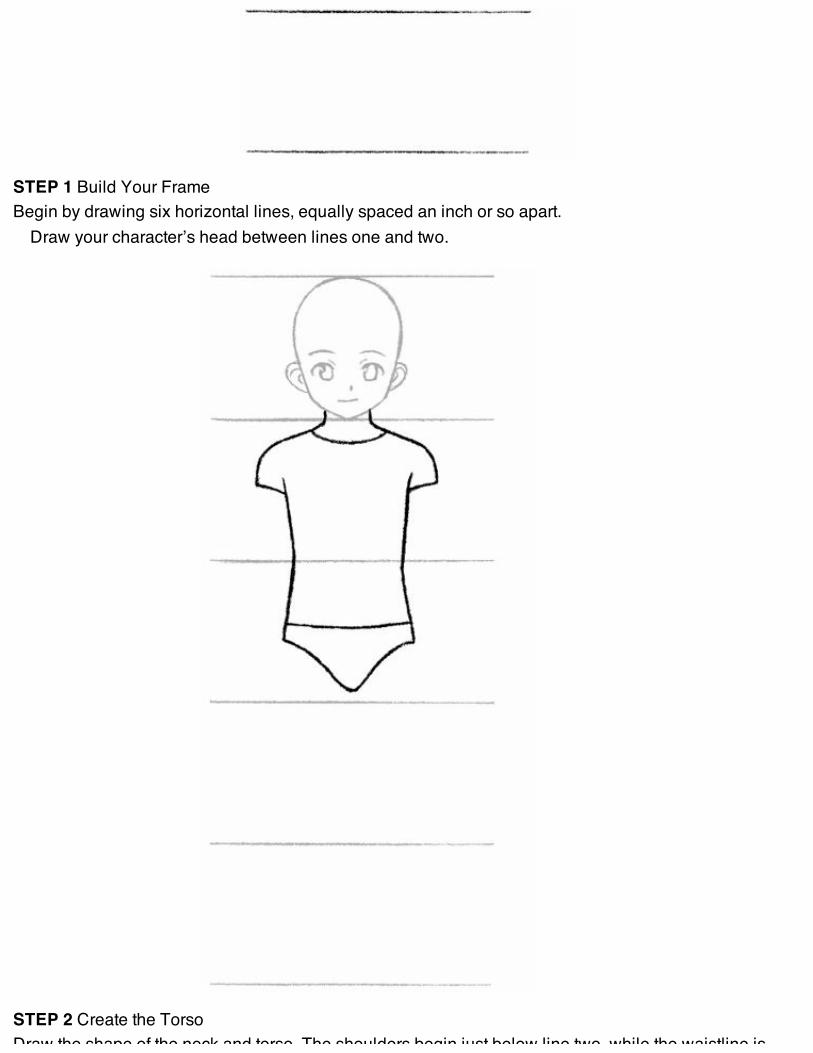
STEP 1 Build Your FrameBegin by drawing seven horizontal lines, equally spaced. You’ll want them to be at least an inch or moreapart to allow for details later on. Draw your character’s head (without hair, which will come later)between lines one and two.

between lines one and two.
STEP 2 Create the TorsoDraw the neck, shoulders and trunk. Use the horizontal lines as guides to help you see where the linesgo. The shoulders begin just past the second horizontal line. The waist is one third of the way betweenlines three and four. Don’t just replicate the lines; try to get the shapes.
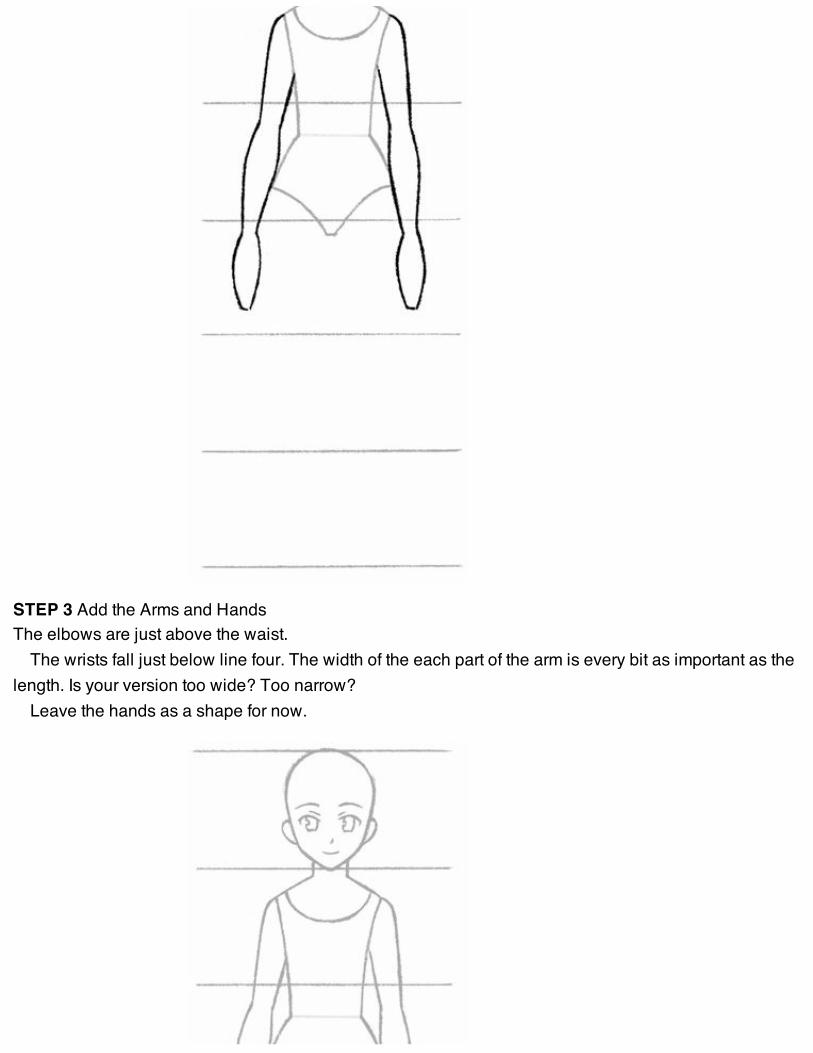
STEP 3 Add the Arms and HandsThe elbows are just above the waist.
The wrists fall just below line four. The width of the each part of the arm is every bit as important as thelength. Is your version too wide? Too narrow?
Leave the hands as a shape for now.

STEP 4 Sketch the Legs and FeetThis is one of the most challenging parts of the drawing. Go slowly, with super-light lines, only darkeningthem in after you’ve made sure they’re right.
The knees sit below line five while her heels rest on the bottom line. Her toes extend past to lookpointed toward the viewer.
Her thighs are wider than calves and make the knees almost twice as wide as the ankles.

STEP 5 Add DetailsDraw the hair in the style you prefer. The breasts curve just above line three.
Draw the base of the thumb higher than where the fingers begin. Allow them to curl in. Not every fingerwill be visible from this angle.

STEP 6 Fine-TuneDraw a couple of lines to delineate the collarbone and a few short lines to indicate the knees. Define thetoes and add a bit of shading to the arches of the feet.
STEP 7 Finish ItInk all the lines except the waistline. Let the ink dry, then erase the guidelines. Leave as is, add some

Ink all the lines except the waistline. Let the ink dry, then erase the guidelines. Leave as is, add somegray tones or color.
You’ve done it! A teen girl, head to toe, in classic manga proportions.
Thumbs Up!The hand in this position can be surprisingly difficult to draw. Check out 50 Ways to Draw Hands to seethis pose and others in greater detail.
Alternative Female Proportion StylesI always shake a fist when I see someone claiming that there is a single system for drawing manga bodyproportions. No way. Artists go all over the place in terms of the number of heads tall a character canbe. Here are three examples.

Super ElongatedAt well over eight heads tall, she may seem like a giant, but she’s only average height in a story populated by characters who all look thisway. I see this style most often in shojo romance stories.
RealisticNearly seven heads tall, this girl is not so far from the proportions of a real teen. She is cartoonishly idealized, though, with her waistand torso being considerably shrunken to create a hyper-feminine look.

Compacted CartoonAt just over five heads tall, this girl is starting to slip into chibi territory. And talk about cartoonish! Her waist and torso have beenreduced so much she couldn’t have lungs. By contrast, the feet are fairly large and the head is competing with the shoulders in terms ofwidth. This approach is generally used for kids’ manga, where the accent is on fun and friendly.
The Teen BoyThink you can draw one gender better than another?
If you’re able to draw the teen girl, there is absolutely no reason why you won’t be just as successfulfollowing this lesson. It’s all just lines and shapes, after all, and those things don’t discriminate betweenthe sexes.
Of course, this is not a real boy we’re drawing here. He’s our image of what an idealized, fairly buffmanga boy looks like. Drawing manga is fun, but you really owe it to yourself to study real human

anatomy if you ever get the chance. You won’t be sorry!

STEP 1 Build Your FrameBegin by drawing seven horizontal lines, equally spaced. You’ll want them to be at least an inch or moreapart to allow for details later on. Draw your character’s head (without hair, which will come later)between lines one and two.

STEP 2 Create the TorsoDraw the neck, shoulders and trunk. Use the horizontal lines as guides to help you see where the linesgo. The shoulders begin just past the second horizontal line. The shoulder area is two heads wide,maybe one shade narrower. The waistline is about a third of the way up between the third and fourthlines.
Draw his neck thicker than a girl’s, closer to the jaw.
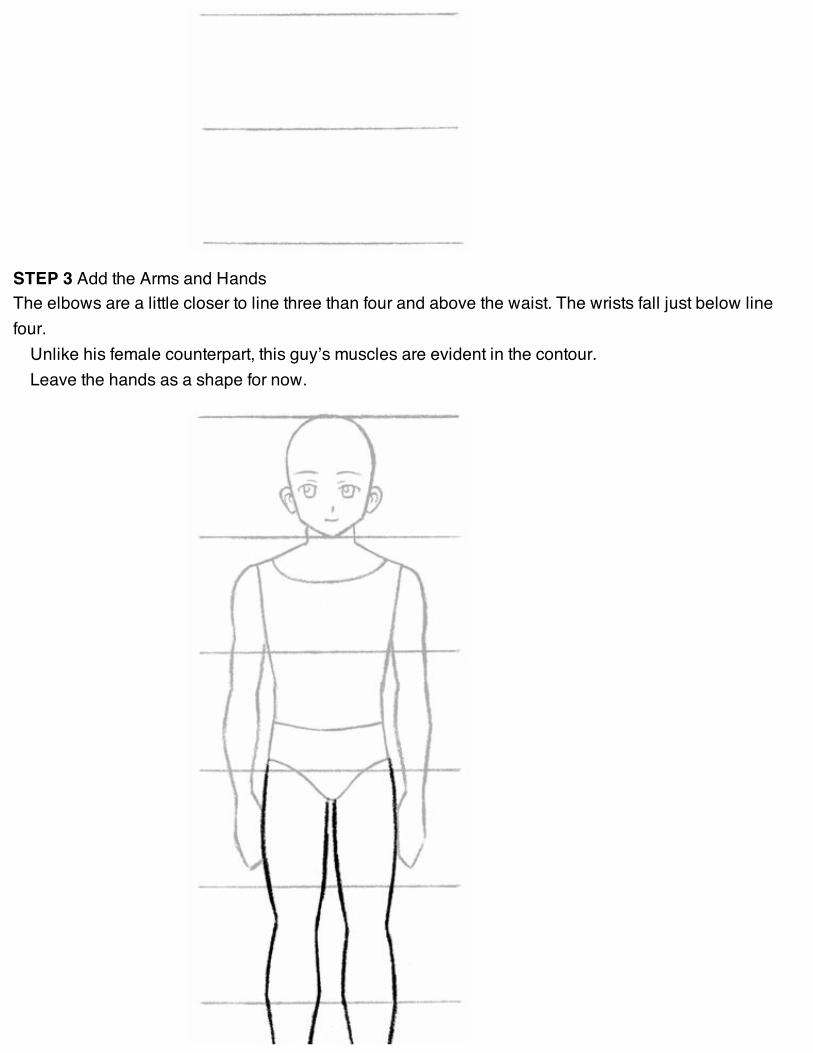
STEP 3 Add the Arms and HandsThe elbows are a little closer to line three than four and above the waist. The wrists fall just below linefour.
Unlike his female counterpart, this guy’s muscles are evident in the contour.Leave the hands as a shape for now.

STEP 4 Sketch the Legs and FeetMen’s legs are a bit more angular than women’s, so the lines don’t need to be so smooth and perfectlyplaced. Still, go slowly to make sure they’re right.
The knees sit closer to line five while his heels rest on line seven. His toes extend past to look pointedtoward the viewer.
Make the thighs a good deal wider than the calves. The knees should be a touch wider than theankles.
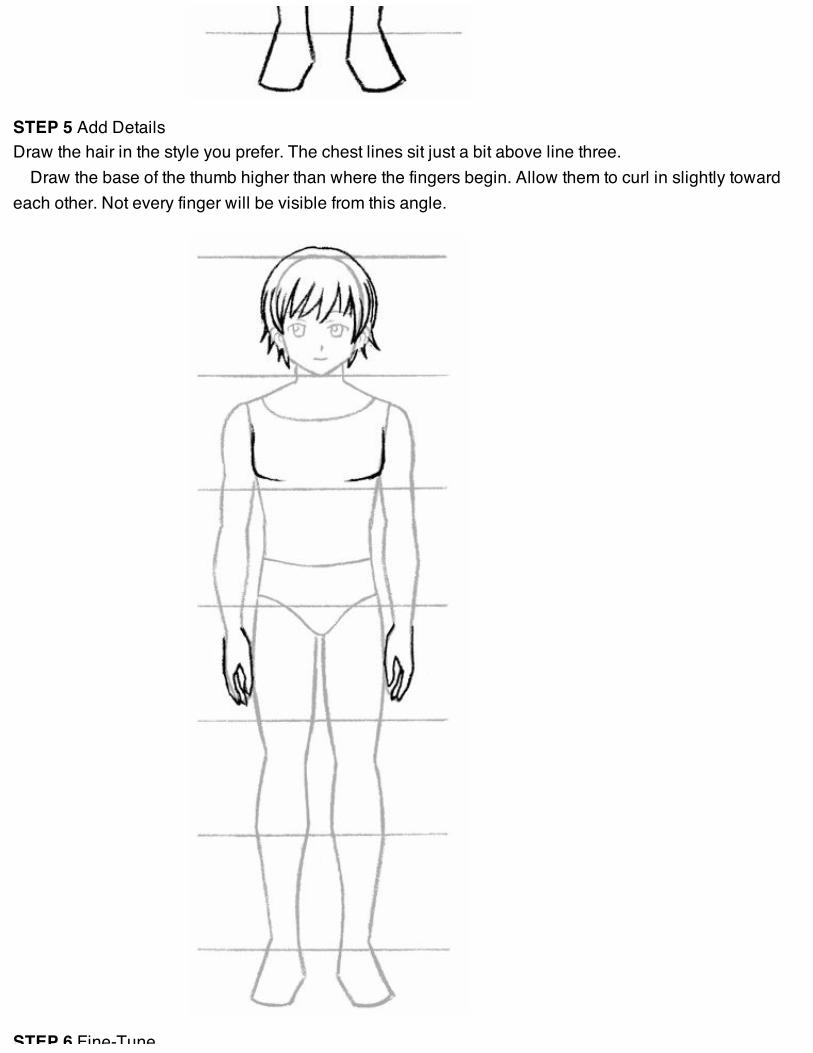
STEP 5 Add DetailsDraw the hair in the style you prefer. The chest lines sit just a bit above line three.
Draw the base of the thumb higher than where the fingers begin. Allow them to curl in slightly towardeach other. Not every finger will be visible from this angle.
STEP 6 Fine-Tune

STEP 6 Fine-TuneDraw a few lines to delineate the collarbone and neck, plus a couple of short lines to indicate eachkneecap.
Define the toes and shape the feet to add a bit of curve to the arches.
STEP 7 Finish ItInk all the lines except the waistline. Let the ink dry, then erase the guidelines. Leave as is or add somegray tones or color.

Alternative Male Proportion StylesManga artists are every bit as fanciful when it comes to the boys. These three examples can be neatlypaired with the girls in the Alternative Female Proportion Styles section.
Super ElongatedThis guy is tall at nine heads, but there are artists who will push it even further. Much of the length is in the legs, which are reallystarting to head into “circus man on stilts” territory. This style occurs most often in shojo romances.

RealisticAt over seven heads tall, this guy is not too far from the proportions of a real teen. Like his female counterpart, though, he is cartoonishlyidealized. The shoulders are broadened to accentuate his masculinity.

Compact CartoonThis guy’s torso is not altered nearly as much as his female friend’s, but his feet have very much the same clodhopper quality and hishead is huge.
The Father FigureSome manga stories take place in a world populated only by teenaged characters, where adults haveseemingly been banished from the scene. Still, even the most youth-obsessed story will have at least acouple representatives of the adult world, and if you’re going to draw them properly, you’ll need tolearn an entirely different system of body proportions.
Manga grown-ups are much closer to real human anatomy. Many of these adult characters havesmaller eyes and fully rendered noses that we are more likely to associate with Western comic bookcharacters.


STEP 1 Build Your FrameBegin by drawing eight horizontal lines, equally spaced. You’ll want them to be at least an inch or moreapart to allow for details later on. Draw your character’s head between lines one and two.
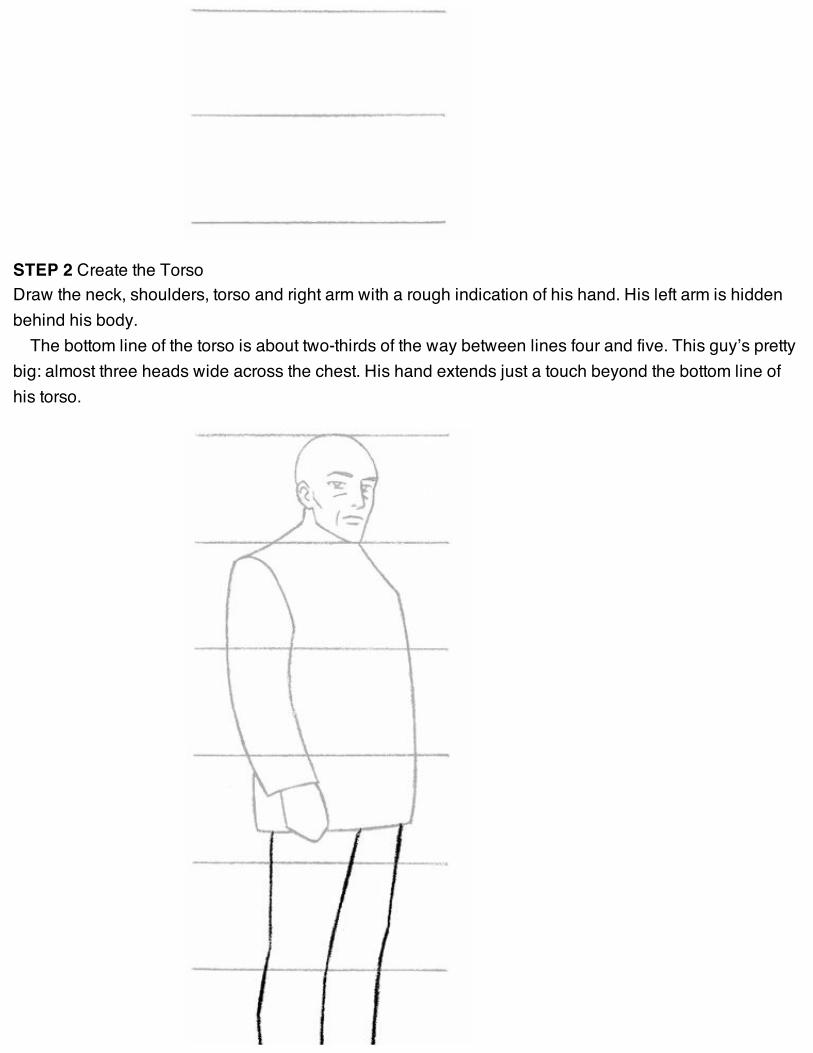
STEP 2 Create the TorsoDraw the neck, shoulders, torso and right arm with a rough indication of his hand. His left arm is hiddenbehind his body.
The bottom line of the torso is about two-thirds of the way between lines four and five. This guy’s prettybig: almost three heads wide across the chest. His hand extends just a touch beyond the bottom line ofhis torso.

STEP 3 Sketch in Legs and FeetThere’s no need to worry about the width of his ankles because his pants cover them.
The right foot touches line eight. The bottom line of his left foot is about one third of the way upbetween lines seven and eight. There is a slight diagonal lean to the legs. This will help to convey hissolid, confident stance.

STEP 4 Add Fingers and HairAdd a hairstyle suitable to his age and personality. You could even leave him bald.
Refine the hand, showing the curve of his fingers. The angle he’s holding his hand makes the indexfinger look longer and hides the thumb.
STEP 5 Draw ClothesPlace his tie, lapels and buttons closer to his left because he’s standing at an angle. Suit coats don’t
wrinkle much, so draw just a few lines near the elbow and shoulder.
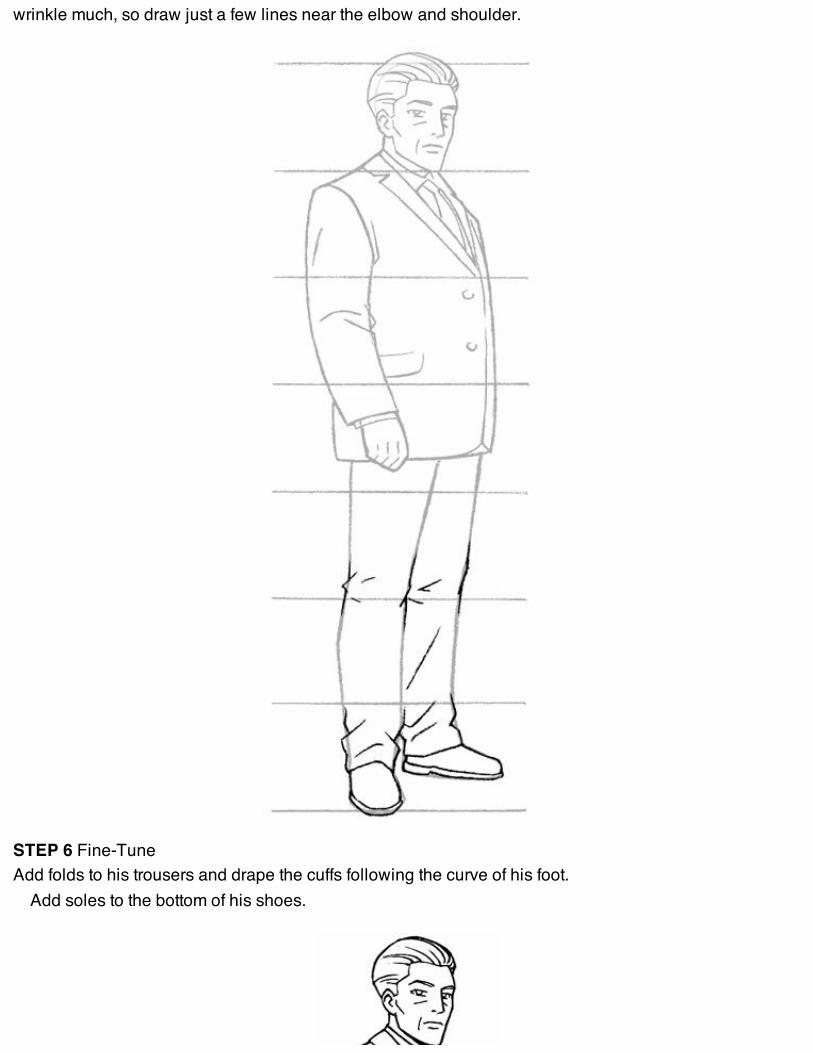
STEP 6 Fine-TuneAdd folds to his trousers and drape the cuffs following the curve of his foot.
Add soles to the bottom of his shoes.

STEP 7 Finish ItAdd ink and, if you like, gray tones or color.
He doesn’t look like a teenager, and that’s exactly what we want.
Toe the LineFeet are almost as hard as hands to get in proportion, and a shifting stance can make a huge difference.Check out 50 Ways to Draw Feet to get a better look at dress shoes from the side.
Tips on Drawing AdultsOkay, so grannies and gramps may not be your favorite characters, but you can’t get by without them.Many stories hinge on an adult who provides our heroes with crucial aid and advice, or stands in theirway as a formidable baddie. Here are a few tricks for making them fabulous—or fearsome!

Middle-Aged MomsA motherly character needs to appear observably older than her teenaged kids. Keep the lines subtle near the eyes and mouth.

Gray PowerDraw wrinkles where they occur in real life by using a model, either in real life or from a picture.
Lines fan out from the far left and right of each eye. This creates crow’s feet patterns in these areas. Lines delineating the cheekbonesand small choppy lines at the lips are classic hallmarks of the elderly character. You may also add horizontal lines across the foreheadand criss-crossing lines at the neck.

Fierce FoesManga writers often pit youth against age, making older characters the antagonists. Give your character a prominent nose, sunkencheeks and a scowl to mark him as a worthy opponent.
Learn more about older characters at impact-books.com/mastering-manga.
Fuller-Figured Girl

Fuller-Figured GirlOne of manga’s unfortunate sides is the tendency to populate its worlds with an idealized version ofhumanity rather than people as they are. We all need escapism, but characters, like people, can come inall ages, shapes and sizes, right?
I’ve made a special effort in this book to include the fuller-figured body type, a type of character thatreaders come across rarely in manga. The challenge is to draw such a body as it really is, not as anobject of derision. As with any artistic pursuit, once you’ve decided to do it, you should make sure youdo it right, drawing all the lines in the places they really occur.

STEP 1 Build Your FrameBegin by drawing seven horizontal lines, equally spaced. Between lines one and two, draw yourcharacter’s head using what you’ve learned about drawing faces.

STEP 2 Create the TorsoDraw the shape of the torso. The shoulders follow along line two, while the breast lines curve down totouch line three.
Her shoulders are much wider than those in our classic teen lesson, but that’s because, like our adultcharacters, she’s drawn a bit more realistically than her classic manga counterparts.

STEP 3 Add the Arms and HandsBecause one hand is on her hip, only her left wrist falls directly on line four. Her right elbow is raised toland on line three.

STEP 4 Add a Skirt and LegsHer left leg is almost directly below her head because it is holding all of her weight. Her right leg is fartheroff to one side.
Again, the horizontal lines can serve as your guide. Place her knees just under her hemline closer toline five. Draw her ankles narrower than her knees.
Draw her toes just crossing over line seven.

STEP 5 Draw Hair, Hands and FeetGive her a hairstyle that suits her personality and frames her eyes.
Add small curving lines to indicate where her elbows fold in. The fingers wrap around her hip and areset a little bit apart.
Draw shoes with a heel that is tall enough to be dressy, but comfortable for walking.
STEP 6 Fine-TuneAdd details to the dress, including folds where the skirt drapes and small seam marks around the arms.

STEP 7 Finish ItInk it and let dry, then erase the guidelines. You can shade it, add color, or leave as is. People come inall shapes and sizes. Why shouldn’t manga characters?
Drawing Fuller-Figured CharactersThe ever-present danger when drawing fuller-figured characters is straying over the line into offensivecaricature. Make sure you’re not drawing them as if they’re meant to be the punch line of every otherjoke. Studying photos of real people will help you draw these characters in a way that remainsrespectful.

A Powerful FigureGiving police chiefs and politicians a little extra size can accentuate their power by adding presence and filling the space.
This guy’s head is wider at the bottom than the top, which may be a little cartoonish, but works well to establish that his word is law.

Definite CurvesLike all characters, a fuller-figured woman looks very different in three-quarter view.
Define the waistline with a slight indentation on her right and let it disappear behind her left arm. Her hip and the back of her upperarm line up almost vertically.

Balanced BellyMake sure to balance a large belly by adding some width to the upper arms and the rest of the body.
See more characters at impact-books.com/mastering-manga.
The Kid BrotherEvery once in a while you come across an artist who’s tried to fake his way through drawing a child byjust redrawing one of his teen characters at a smaller scale. The results are laughable at best, genuinelybizarre at worst. Kids aren’t just miniature teenagers! Their body proportions are entirely differentfrom those of their older siblings.
Figuring it all out isn’t that hard. It’s just a matter of—you guessed it—starting with the rightguidelines.

STEP 1 Build Your FrameBegin by drawing six horizontal lines, equally spaced an inch or so apart.
Draw your character’s head between lines one and two.
STEP 2 Create the TorsoDraw the shape of the neck and torso. The shoulders begin just below line two, while the waistline is

Draw the shape of the neck and torso. The shoulders begin just below line two, while the waistline isexactly between lines three and four. Try to get not just the lines, but the shapes. The shoulders shouldbe a little under two heads wide, and the hips about a head and a half.
STEP 3 Add Arms and HandsThe elbows fall exactly at line three, the wrists well above line four, while the finger tips fall below it. Thewrists should be considerably narrower than the elbows.

STEP 4 Sketch Legs and FeetThe knees sit just below midway between the fourth and fifth lines. The heels rest on line six while thetoes fall below.
Make sure you capture the blank space between his legs and arms and torso. The knees are slightlywider than the ankles. His fingertips reach to about mid-thigh.

STEP 5 Fill In the DetailsThis hairstyle is less drastically kiddie than the bowl cut we saw in Heads and Faces. As a result he mayappear a bit older.
Add fingers to the hands. Because of the angle, we don’t see all five digits; only the index finger andthumb appear fully. The ring finger curves in toward the body.

STEP 6 Fine-TuneAdd toes to the feet and a couple of tiny lines to indicate the knees.

STEP 7 Finish ItDo the inking and let it dry, then erase the guidelines. You can add color or gray tones, or leave it as is.
Babies and ToddlersSo now you can draw kids that don’t look like miniature grown-ups. But what about babies?
It doesn’t take great powers of observation to see that they’re nearly as different from kids as kidsare from adults. As always, it comes back to the number of heads tall. But there’s more to it than that.

BabyA real baby is about four heads tall, a little more if the legs are perfectly straight. Infants are generally wider at the waist than at thechest. Throughout the early years the arms and legs are close to the same length.

ToddlerAround the time they learn to walk, toddlers are well over four heads tall. Draw them a bit pear-shaped to account for baby fat, and yes,a bit of a double chin. Stay away from any angular lines at this age. Everything’s round and curving.
Three-Year-OldAt nearly five heads tall, our boy is beginning to leave his baby fat behind and set his sights on kindergarten. The lines are getting alittle straighter. His chest is finally holding its own with his belly and his shoulders are almost two heads wide.
Sometimes You Can’t Help Being Big-Headed

One of manga’s crowning achievements is bestowing the chibi style upon the world. These ultra-cutecharacters have taken the world by storm, leaving smiles, hearts and oversized sweat drops in theirwake.
They are by definition simpler to draw—that’s the whole point! By presenting your characters interms of their facial expressions and just enough hair and clothing to keep them recognizable, you stripthem down to their very essence. But simpler to draw doesn’t mean impossible to screw up. Withoutcareful study your chibi characters will look like wannabes and not the real thing.

STEP 1 Build Your FrameBegin by drawing four horizontal lines, equally spaced. That’s right: four—this character is only threeheads tall.
This character is in three-quarter view, so the head shape reveals an indication of the cheek on her leftside. The curving vertical line is also off to one side about a third of the way.

STEP 2 Outline the FeaturesDraw the eyebrows, eyes, mouth and ears. Focus on the distances between the various lines.
The eyebrows curve over the horizontal line.The bottoms of the ears are at the same level as her jaw.Her left eye is compressed, narrower from side to side because of the angle of her head.

STEP 3 Draw the TorsoDraw the neck, shoulders and clothes. The width of the shoulders is less than the head.
No need to draw the clothing exactly as I have here. Be creative and dress your chibi as you see fit.
STEP 4 Add Arms and Legs

Chibi feet could hardly be simpler, but pay attention to the slight forward tilt of the legs. This wave-likeposture is common among standing characters, both cartoony and realistic.
Her feet cross over the bottom line while her hand extends just past line three, the same length as thedip of her skirt.
STEP 5 Draw Hair and EyesThere’s a considerable distance between the hairline and her actual head. If you don’t draw it, yourchibi’s head may not look right.

STEP 6 Fine-TuneAdd a collar to her shirt and pleats to the skirt. You may want to go for something more casual, though.
Have fun! That’s what the chibi style is all about.

STEP 7 Finish ItInk it and let dry, then erase the guidelines. You can add color or leave it as is.
Chibi VariationsAre they two heads tall? Three? Four? Hey, don’t worry about it! We’re drawing cartoons here, notbuilding an interstate highway system. There is no set-in-stone number: it all depends on who’s holdingthe pencil. Here are three of the many proportion systems out there.

Ultra-ChibiAt a head and a half, this is pushing the chibi concept about as far as it’ll go. As is often the case with chibi drawings, the feet areminimized to the point of being nearly indistinguishable from the legs.

Moderate ChibiThis is a more common style at two and a half heads tall. The body has a bit more shape though it still doesn’t approach the width of thehead.
Barely ChibiAt nearly four heads tall, probably the least common of these three approaches.
R A G E !If you just draw chibi characters standing there looking cute, you’re missing out on the glory of thechibi style! Here’s a quick lesson showing a chibi girl ticked off in a big way.


STEP 1 Build the FrameDraw a head with ears and a small, simple torso.
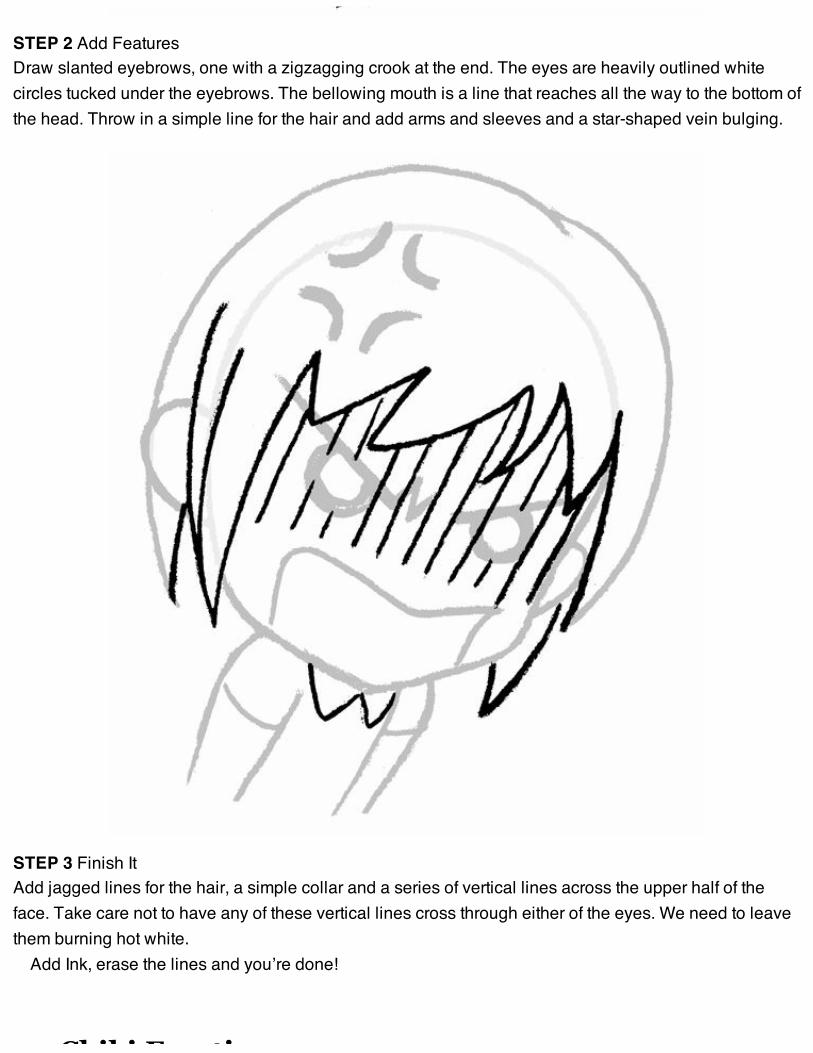
STEP 2 Add FeaturesDraw slanted eyebrows, one with a zigzagging crook at the end. The eyes are heavily outlined whitecircles tucked under the eyebrows. The bellowing mouth is a line that reaches all the way to the bottom ofthe head. Throw in a simple line for the hair and add arms and sleeves and a star-shaped vein bulging.
STEP 3 Finish ItAdd jagged lines for the hair, a simple collar and a series of vertical lines across the upper half of theface. Take care not to have any of these vertical lines cross through either of the eyes. We need to leavethem burning hot white.
Add Ink, erase the lines and you’re done!
20 Chibi Emotions

20 Chibi EmotionsJapanese manga artists have perfected techniques for conveying the breadth of human feeling in asimple cartoony shorthand. A beginning artist can master the various facial expressions in a way that isfun, not frustrating.
Angry
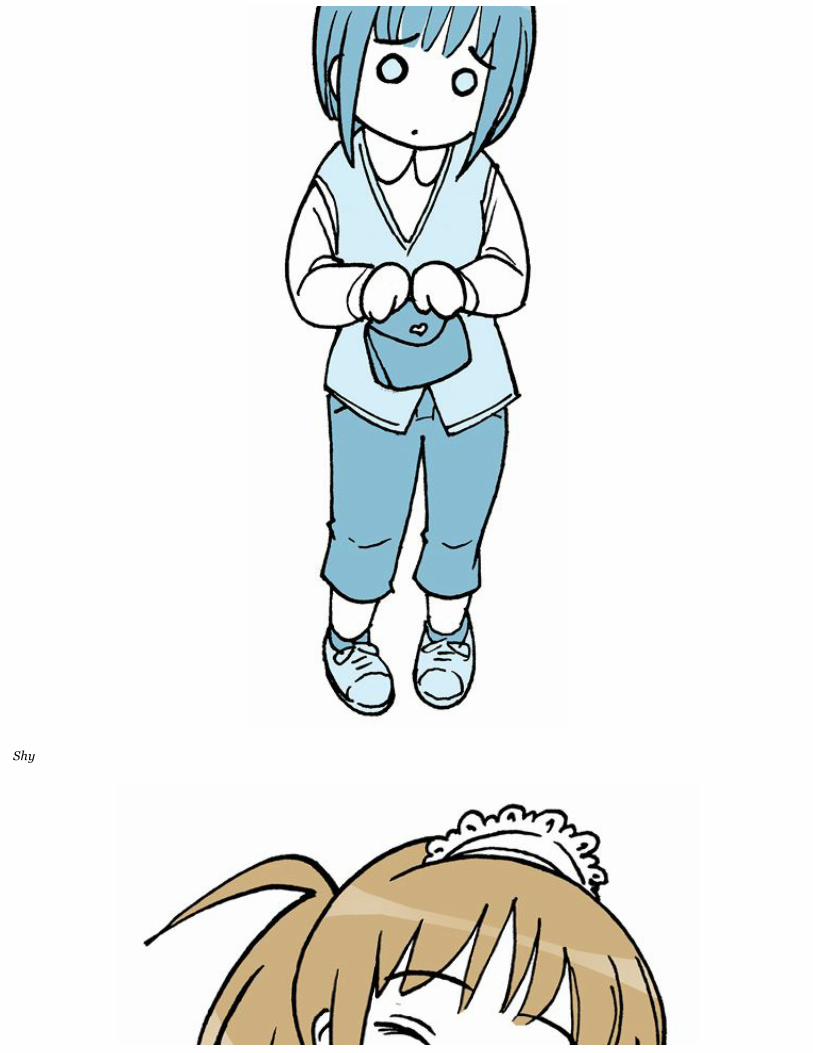
Shy

Elated

Embarrassed

Sassy-Cute

Tearful
In Love

Furious

Despondent

Happy-Energetic
Bored

Frustrated

Surprised

Disappointed

Devious

Disapproving

Shocked
Upset

Vulnerable/Unsure

Frightened
50 Ways to Draw HandsRegardless of how well you know the anatomy of the hand, it is almost impossible to accurately predictwhat it will look like from every angle and in every possible pose. Next time you’re having trouble, usethese pictures as reference.


50 Ways to Draw FeetDrawing feet properly can be as difficult as hands. They have a somewhat undefined shape, one that ishard to recall clearly from pretty much any angle. Rather than try to draw them from memory, usethese illustrations as reference.
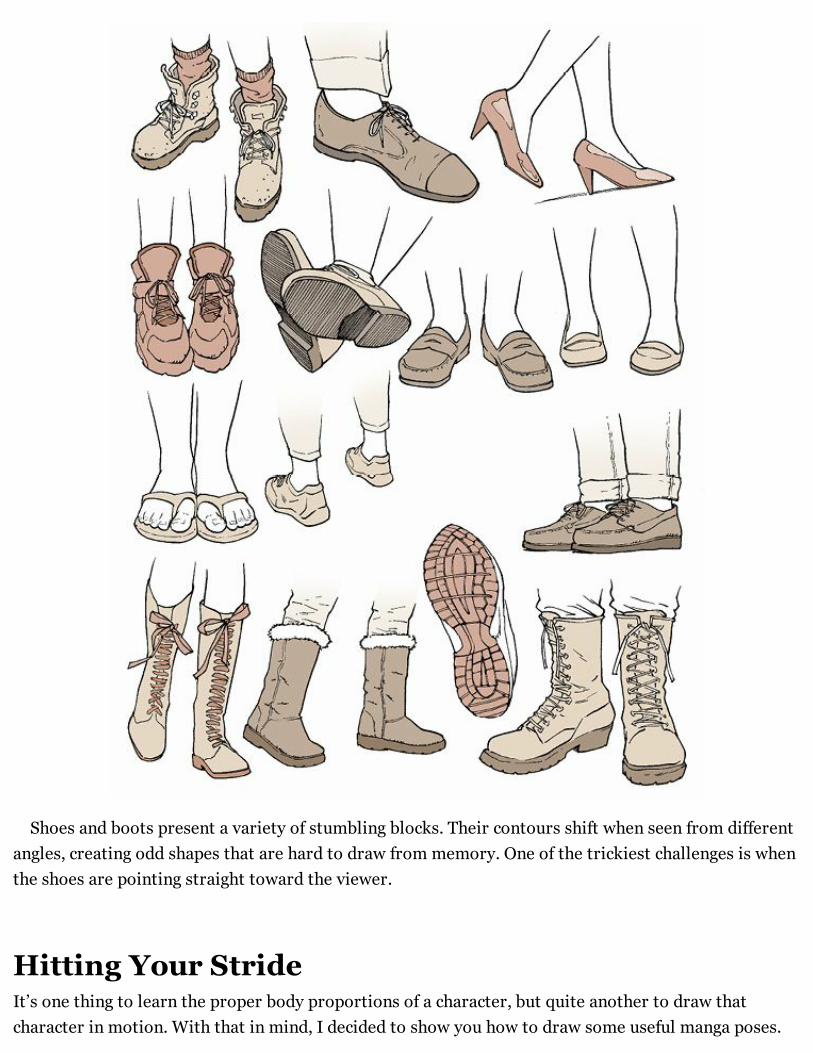
Shoes and boots present a variety of stumbling blocks. Their contours shift when seen from differentangles, creating odd shapes that are hard to draw from memory. One of the trickiest challenges is whenthe shoes are pointing straight toward the viewer.
Hitting Your StrideIt’s one thing to learn the proper body proportions of a character, but quite another to draw thatcharacter in motion. With that in mind, I decided to show you how to draw some useful manga poses.
First up is a common pose that proves difficult to draw from memory: a character walking straight

First up is a common pose that proves difficult to draw from memory: a character walking straighttoward the viewer. This pose is a staple of certain types of manga, and you may well see it multipletimes over the course of a single story. Happily, it’s not that hard to master.

STEP 1 Build the FrameStart with seven horizontal lines, evenly spaced. Draw a female manga face using what you’ve alreadylearned.

STEP 2 Create the TorsoIn this pose the line of the waist is about halfway between lines three and four. The shoulders slopedown because she’s leaning slightly into her steps; they should be about a head and a half wide. Thewaist at its narrowest is a touch wider than her head. Use this knowledge to create the curving shape.

STEP 3 Add the ArmsThis part is crucial to the overall walking pose. The arms move as she walks, alternating with her feet soher right arm is angling toward the viewer, bent at the elbow.
The elbows are just below line three. Her right hand is centered on line four; the other hand is wellbelow it. Don’t forget that the wrists are narrower than the elbow area.

STEP 4 Draw the Skirt and LegsStart with her left leg since it overlaps her right. Her left leg tilts ever so slightly inward so that the foot isalmost even with her head. Her right foot tilts inward, the foot partially concealed and the toes not quitereaching line seven.
Pay attention to the width of the thigh compared to the narrowness of the knee and even narrowerankle.

STEP 5 Add Hair, Hands and KneesA couple of tiny lines on each leg is all it takes to convey the kneecaps.
Her right hand is at a tricky angle so the little finger is barely visible.Choose whatever hairstyle suits your character. Pigtails are always fun!

STEP 6 Fine-TuneThis lesson is all about the stride and not about the clothes. What matters is that you’ve got the poseright: if you do she’ll look great no matter what outfit you throw on her.

STEP 7 Finish ItInk it and let it dry, erase the guidelines. All done!
Walk This WayWhat could be simpler than drawing a character walking across the street? Take it from me: loads ofthings are simpler than drawing a character walking across the street! Something about the way thefeet hit the ground and the legs overlap from different points of view makes walking something easierdone than drawn.

Walking AwayWhen drawing a character walking away, the legs tend to point inward a bit, creating a tapering silhouette.

Placing Arms and LegsPlacement of the arms and legs says a lot about the person’s stride. You can tell this guy is moving slow and steady: his rear foot is onlyslightly off the ground and his arms are pretty much slack against his side.

Speed It UpDrawing a character running is as much about the arms as the legs. The arms need to be up and in motion, one fairly straight, theother bent at the elbow.
The faster you want the run to be, the higher you place the rear foot. If her heel is nearly at the same height as her rear end, youknow she’s flying along at full sprint.
KissingAs poses go, kissing is not one you’re going to draw on every page. But if you’re creating a love story,you can’t afford a cruddy drawing when the big moment finally arrives for your star-crossed lovers.
We’re getting into advanced drawing here, and unfortunately that means pretty big leaps from onestep to the other. I won’t be able to walk you through each and every line. If you’re a novice and easilyfrustrated by the tough stuff, you might want to save this one for later in your studies. For the rest ofyou, get ready: she’s going to plant one on him, and you’re going to draw it.

STEP 1 Build Your FrameDraw two circles, one much lower on the page than the other. (I’ve added dotted lines to help you see therelationship between the two circles.) The circles need to be this exact distance from each other.
Add the two curving lines touching the circles, carefully replicating their angles and locations withintheir respective circles. Finally, add the arching line to the lower right of the circle on the left. This willhelp you draw the girl’s face in the next step.

STEP 2 Outline Her FeaturesTake your time here, starting with very light lines. You can darken them later.
Draw the outline of her nose and jaw. This is difficult but vital to get right. It touches the circle a littleless than midway between the dotted lines. The tip of the nose meets the outer arching line.
Her eye is just inside the circle, touching it, and the eyebrow sweeps back and down from near—butnot touching—where her nose meets her forehead.
Draw the outline of her ear, not quite touching the circle, lining up the top with her eyebrow.
STEP 3 Outline His FeaturesShe’s obscuring most of his profile so you won’t have to deal with that. Still, the angles of his jaw andnose lines have to be right. His jaw lines up with his ear line and meets hers. His nose line sits higher onthe page, pointed down toward the girl. Use the tip of her nose like a pointer to place his eye.

STEP 4 Sketch In the HairNo need to follow what I’ve done here. Give them both crew cuts if you like! But if you do want the classicmanga look, notice how the contours of the hair are a certain distance from the circles you drew in stepone. Follow too closely to those circles and your characters’ heads will appear too small by mangastandards.

STEP 5 Give Them BodiesHe’s leaning into her, so the line of his body should curve slightly. Her shoulder is pulled up and her faceangled, which puts it much closer to her ear and she’s leaning backwards.
STEP 6 Fine-TuneAdd folds to the clothing. Give him a shirt collar and add details to the hair.

STEP 7 Finish ItInk it and let it dry, then erase the guidelines.
Kissing: It’s definitely easier to do than to draw!
XOXO: Displays of AffectionHere are some reference illustrations to help you draw a variety of tender moments, not all of whichinvolve locking lips.

Pay Attention to the BuildupThe moment before a kiss can be just as important as the kiss itself. Her hands on his face, their noses nearly touching, this is the stuff oflove stories! The angle of the eyebrows shows vulnerability that heightens the sense of intimacy.
Remember the PeckA peck on the cheek is a cute scene to draw, and has the added bonus of allowing us a good look at the face—and inner emotional state—ofthe person on the receiving end of it.

Cuddle UpA warm hug can be as challenging to draw as a kiss. Characters of differing heights will each have their faces partially obscured as theembrace brings them together.
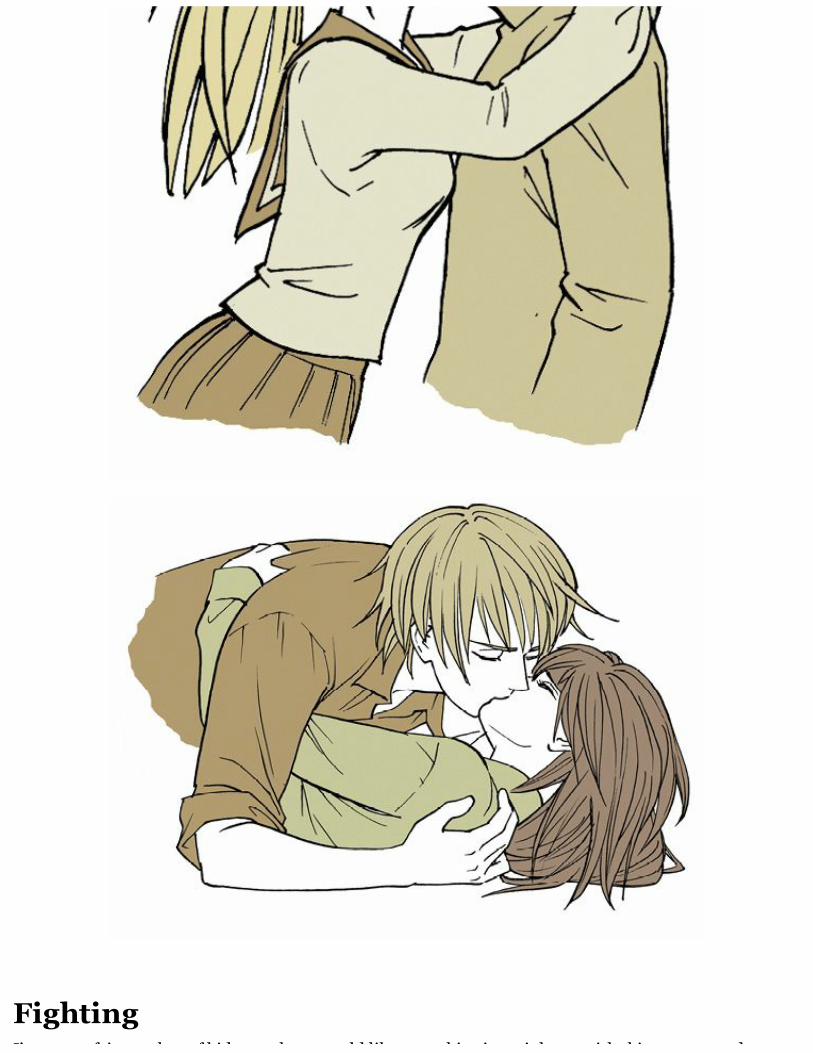
FightingI’m sure a fair number of kids out there would like some big-time violence with this one—swords,

I’m sure a fair number of kids out there would like some big-time violence with this one—swords,blood, the works—but you’ve come to the wrong guy. Entrails on the floor are not my thing. I’m goingto limit it to some good old-fashioned martial arts, and to me that means someone gets a foot in theface, karate-style.
Again, this is a highly advanced lesson, which means some pretty big leaps in detail from one step tothe next, especially toward the end.
STEP 1 Build Your FrameThese dotted lines, divided into four equal-sized rectangles, will get us started. Draw the two torsos,fitting the one on the left into its rectangle at a diagonal. The angle of his shoulder touches the dotted line.Use the triangles formed between the torso and the dotted lines to help you get the angle right.
The one on the right is much more vertical and crosses the lower dotted line.The first figure’s head is angled up and overlaps his torso.

STEP 2 Outline the First FigureDraw the kicking leg. The lower line of it intersects with the point made by your dotted lines. Make sureboth legs taper properly from great width at the thighs to considerable narrowness at the ankles.
The right hand comes near to the head but doesn’t quite touch it. His elbow sits almost directly in linebelow his chin, touching the lower dotted line. His left arm is straight behind his body.
STEP 3 Outline Figure Two

STEP 3 Outline Figure TwoStart with his left arm and place the forearm midway between the dotted horizontal lines. His hand anglesup from the wrist. When drawing his right arm, make the tip of the hand touch the dotted vertical line.
The left leg is foreshortened from knee to ankle. To get the angle of his right leg correct, the inside ofthe knee should just cross above the lower dotted line and then back down. The top of the foot sits justbelow the line of the second box.
STEP 4 Add DetailsDraw the heads, hands and feet. Don’t sweat it if the hair is different, but you’ll want the facial features tobe located as accurately as possible.

STEP 5 Add Clothing Lines to Figure OneThese lines don’t need to be drawn with anywhere near the accuracy of those used for the face, hands orfeet. No one is going to worry about the exact movement of his black belt, but do match up the movementto his action.
STEP 6 Add Clothing to Mr. Kicked-in-the-FaceThe lines don’t need to be precise here either, but try to make the clothes look like they are moving withhis body.

STEP 7 Finish ItInk and let dry, then erase the guidelines. No doubt about it, one of these guys is having a better day thanthe other.
The Fight ClubNo shonen manga would be complete without adversaries clashing in battle. When it comes to blows—or even just a menacing stare down—you need poses at your disposal that deliver the goods to youraction-hungry readers. Next time you need to spruce up a fight scene, come to this page and borrow anidea or two.

Blast OffMany manga stories involve battles between adversaries with supernatural abilities. In these scenes the only weapons may be thecharacters’ hands and their ability to conjure blasts of energy out of the air.

KO!Showing one character punching another is going to be one of the most intense moments of your story, so present it as dramatically aspossible. By bringing the boy’s free arm closer to the viewer, you accentuate the depth of the scene and make readers feel how far backthe other guy has been knocked.

30 Classic PosesHere are thirty classic manga poses that you can adapt to fit your own characters. By doing carefulstudies of these illustrations you can also improve your sense of manga body proportions. Try changingan arm or leg position to create poses all your own.

Sitting AroundOne of my favorite female poses is this simple but charming “sitting on the floor” pose. It has the advantage of creating an interestingcontour, virtually guaranteeing a nice page composition.

Don’t Just Stand TherePart of the challenge to drawing a proper standing pose is keeping the character relaxed. The solution is to create the sense of a gentlewave in the body. It starts in the shoulders (back), flows to the hips (forward), and continues down to the feet (back again).


Action!Dynamic action poses can be the hardest of all. This leaping character is made visually interesting by his body’s heading in onedirection while his head and arm are twisting back in another.
LegsOne of the girl’s thighs is pointed directly at the viewer, forcing the artist to foreshorten the whole thing. The bottom half of the other legis foreshortened in the opposite direction. Using both types of foreshortening in a single pose gives the whole drawing the illusion of

is foreshortened in the opposite direction. Using both types of foreshortening in a single pose gives the whole drawing the illusion ofdepth.


Stand TallThese simple standing poses are helpful for times when you’re trying to generate a new character design. What will his or her hair andclothing styles look like? Grab these poses and have at them. That’s what they’re here for.

A Body in MotionThis boy is moving visually from lower left to upper right. The lines of his body are soaring in that direction, which gives the wholedrawing a sense of movement.

Comfort ZoneThis boy enjoying a cup of coffee supplies a nice casual pose for that lazy afternoon feeling. Crossing the legs at the ankles adds visualinterest.


Sitting PrettyThis curled up pose might be a bit of an anatomical impossibility for most of us. But this is manga! Never let reality get in the way of anice pose!


For KicksThe legs in such poses go off in incredibly dramatic angles, creating visually dynamic contours and very nearly leaping off the page.


Turned AwayThis girl seems to be folding in on herself, conveying an air of sadness or introspection.

Beach Towel to Picnic BlanketHer front foot is tucked a bit under the back leg, allowing the legs to echo each other. No need to use this only as a swimsuit pose. Add adress and straw hat and she’s ready for a picnic.
Clothing Folds and WrinklesIt’s no wonder beginning artists of all kinds struggle with drawing folds in clothing. The sheer numberof lines involved is daunting!
Let’s look at various types of clothing and focus on where the folds tend to occur, starting with a shirtsleeve.

ArmrestAn arm at rest tends to produce folds in three different places: the shoulder, the inner elbow and above the cuff.

Elbows OutWhen the arm bends, the shoulder lines change direction while the number of elbow lines increases and a third set of lines emergeacross the forearm.
Around the BendWhen the arm bends tight, lines emerge across the upper arm. Lines at the inner elbow fan out and lines emerge near the cuff showinggreater tension on the sleeve.

Rolling AlongA rolled-up sleeve presents a challenge when rendering the folded cloth properly at the elbow. There tend to be extra folds across theupper arm as the sleeve folds in on itself.

Tucked InThe folds of a dress shirt emerge near the waist diagonally from the bottom corners and horizontally from side to side where the shirt istucked into pants.

Figure DrawingA woman’s body produces folds a man’s won’t. Note the small, short lines that fan out from the shoulder area across the bust. A shirt thatis untucked will produce horizontal folds near the waist and diagonal ones elsewhere.
Dress Pants and Jeans
Dressing UpDress pants are designed to create as few wrinkles as possible, resulting in long vertical lines and smooth, uninterrupted contours.

Denim DangerWrinkles erupt all over the place with denim, but particularly in the areas of the waist, knees and ankles. The silhouette lines of a pair ofblue jeans get a bit zigzaggy near the knees and even more so at the ankles.

Fold LinesWhen a person crouches down or sits on a curb, wrinkles pull across the legs with much greater tension than usual. Even so, it’s still thewaist, knees and ankles that get the most folds.
Short and SweetA pair of shorts is no different from a pair of jeans in terms of the wrinkles that emerge near the waist. The dominant direction ishorizontal as the cloth is pulled from side to side.
Find more about clothing folds at impact-books.com/mastering-manga.
SkirtsWrinkles on skirts are considerably less complicated than those on shirts and blue jeans. They seem tofall into one of two types in terms of folds: pleated skirts, in which the folds are largely vertical, and

fall into one of two types in terms of folds: pleated skirts, in which the folds are largely vertical, andstraight skirts, in which the few wrinkles tend to go horizontal.
Thigh LinesA seam along the thigh may produce a great number of mini-folds.

Hook, Line and SinkerLong skirts create vertical lines that extend from the waist to the floor. A few of the lines may have small hooks at the end.

Sitting PrettyA skillful artist can cause the pleat lines to wrap around the form, suggesting the legs beneath the skirt without ever sharply delineatingthem.
Pleating our CasePleated skirts divide into a few large, flat areas of cloth. In these skirts you may see a few horizontal wrinkles near the waist.

Skirting the IssueA floppy skirt produces unpredictable wrinkles. The cloth folds in on itself at irregular intervals, creating a mass of vertical and diagonallines.

LineupThis classic sailor suit skirt produces a regular array of near-vertical lines that fan out from the waist.
T-Shirts, Sweaters and Coats
Tricky TeesYou’d think a T-shirt would be easy enough to draw, but its wrinkles can trip you up. The lines tend to fan out from the underarm area,then gather more prominently around the waist.

Hooded FigureA hoodie can give your character a nice casual feel, but prepare yourself for a challenge if you’re going to have her wear it all the time.It’s wrinkles galore in all the usual places, plus new folds around the pockets and along the edges of the hood.

Weighted DownA thick sweater will produce noticeably fewer lines than a dress shirt, owing to its thick material.
Outer LayersThe wrinkles of winter coats will differ greatly depending on what material they’re made of. A dress coat will reveal a minimum offolds, but an outdoorsy coat will be among the biggest wrinkle-fests you’ll ever encounter.

C H A P T E R 3
Setting the SceneWhen we think of manga, the faces and poses are the first things that come to mind. But all those coolcharacters can’t just float around in the ether all day. Your drawings won’t be complete without settingsfor the characters to inhabit, and you won’t be able to render those settings convincingly without abasic understanding of perspective. Complicated? A little, but nothing that can’t be acquired with alittle practice. Learn the ropes of layouts, word balloons and sound effects, and you’ll have everythingyou’ll need to make your first manga story.
Fundamentals of PerspectiveThere’s no reason you shouldn’t be able to draw anything you want in perfect perspective, providedyou’re serious about learning the basic laws of vanishing points and the lines that lead toward them.Let’s start with the simplest and possibly the most useful of the three forms of perspective.

One-Point PerspectiveIf you’ve ever stood on a straight stretch of railroad track and looked way down to where rails almost seem to touch, you’ve seen thisstyle of perspective in action. Though in a real street these lines would be parallel, in a one-point perspective, they merge together asthey reach the horizon. This is the vanishing point.
W A R M - U PFollow this brief step-by-step lesson to draw an open cardboard box in perspective. It may not look likea masterpiece, but it’ll help you understand the basic concept of how it all works. Since all the otherperspectives build on the same concept, once you’ve mastered this, you can conquer those trickybackgrounds.

STEP 1Draw a horizon line, place a dot on it, and then draw a box alongside it. Try to put your box in the exactsame location I did for the best results.
STEP 2Now use your ruler to draw four light lines, one from each of the four corners of the box, all the way to thevanishing point.

STEP 3Draw a second, smaller square inside the first box, taking care to make the corners of the square restupon the perspective lines. Leave part of the square incomplete. That area will become the opaque sideof the box.
STEP 4Ink the lines of the box and visible horizon line. Erase your pencil lines once the ink is dry.
You have an open cardboard box drawn in absolutely perfect one-point perspective.

Two-Point PerspectiveUnlike one-point perspective, which merges into a single vanishing point, two-point perspective has two vanishing points set far apartfrom each other along the horizon line. You’ve seen this when you’ve stood on a street corner. The tops and bottoms of each building pointtoward their respective vanishing points.
Three-Point PerspectiveThree-point perspective is what you’d see from above (bird’s-eye view). The three points need to be very widely spaced for theperspective to look natural and convincing. There is no horizon line.
There is logic to this. Let’s say all the “north-south” streets are heading off toward the upper right-hand point. The “east-west” streetswill all point toward the upper left-hand point. And the sides of the buildings will all point down toward the bottom point.
It’s a lot of work, no getting around it. But if you master the three-point perspective, you’ll be rewarded with a bird’s-eye view that’sas good as anything you’d get from a helicopter.
Street Scene Using One-Point PerspectiveIf you stand on a city sidewalk and see how it recedes into the distance, getting smaller and smaller, youhave very nearly entered a living example of a one-point perspective drawing.
There will be many more lines than in our warm-up lesson on this subject, but there’s never going tobe anything other than one horizon line and one vanishing point.

STEP 1 Build Your FrameBegin by drawing a wide horizon line, indicated here in red, then place your vanishing point about one-fifth of the way from the left. With your ruler, make lines emanating from the vanishing point. Think abouthow many lines you’ll need for the street, the sidewalk, the bottoms and tops of buildings, etc.

STEP 2 Draw the Sidewalk and BuildingsUse the lines as your guide to determine heights and widths. With the buildings on the right it will beeasiest to start with the closest building since it overlaps the next building down.
Add lampposts if you like.
STEP 3 Add DetailsExtra details like the columns on the closest building on the right will give your scene variety and make itmore convincing. If you opted for lampposts, now’s the time to add more detail to them. As you add all ofthese extra lines, you will be struck by how many of them lead right back to that one crucial vanishingpoint.

STEP 4 Fine-TuneFill in windows and other details to the buildings. The sidewalk lines shouldn’t give you too much trouble.
The area of buildings in the distance on the right-hand side is a good place to experiment. Make yourbuildings taller or give them different style rooftops.
STEP 5 Finish ItInk all the lines. Inking with a ruler can be challenging, so try different rulers to find one that doesn’tsmear the ink. Let it dry, then erase the guidelines, and you have a city scene that obeys the laws of

smear the ink. Let it dry, then erase the guidelines, and you have a city scene that obeys the laws ofperspective every bit as much as one does in real life.
Objects Big and SmallJust because it’s the simplest doesn’t mean a one-point perspective can’t result in highly sophisticateddrawings. It’s all down to you, your creativity and the amount of structural detail you’re willing to add.Here are a few more ideas for putting one-point perspective to work.
Picture PerfectThis picture frame, presented as it might be seen by a child looking up at it on the wall, is a legitimate one-point perspective drawing. Ifyou followed those red lines on the left and right as far as they go, they would eventually intersect at a vanishing point.

Spatial FeaturesTake a good look at this chair because you’re going to see it again. See how even the bottoms of the chair legs are touching theperspective lines? If they didn’t, the chair wouldn’t look like it was firmly on the ground.

Office SpaceNot all one-point perspective environments are of the city sidewalk-type outdoor scenes. This office interior is ideal for the one-pointapproach. If I had tried to wing it without establishing a real vanishing point, the sense of space would be nowhere near as convincing.
House Interior Using Two-Point PerspectiveWe tend to think of exterior scenes as the best examples of perspective drawings, but as a mangacreator you’ll be using these skills at least as often for drawing rooms and other interior spaces.
One thing that complicates matters is that the heart of your drawing is often a considerable distancefrom at least one of the vanishing points. It’s worth temporarily taping on a separate sheet of paper toprovide yourself with the second vanishing point you need.

STEP 1 Build Your FrameBegin with a horizon line and two vanishing points a good distance from each other. Now use those twovanishing points to create these intersecting walls. The right-hand surfaces all recede toward the leftvanishing point. The left-hand surfaces all recede toward the right vanishing point.
STEP 2 Outline the FeaturesAdd a few details like borders near the ceiling and floor, a picture frame and door, a table (essentially asimple box at this stage) and a small rectangular carpet. All the lines but the verticals will be pointingtoward one of the two vanishing points.

STEP 3 Add DetailsDraw a bed and more details on the door, picture frame and table. Most of the lines of the bed arefollowing along with the perspective lines. Only the corners of the comforter are tapering off and doingtheir own thing, which keeps the comforter soft; otherwise it’ll look like it’s made of stainless steel!
You can add a hanging scroll on the left wall—it was looking a little empty.
STEP 4 Fine-TuneAdd another line or two on the borders, further structural detail on the table, and pillows on the bed. If youhave the patience for a hardwood floor, then drop it in. Every one of its lines will point toward the leftvanishing point.

STEP 5 Finish ItCarefully ink it and let it dry then and erase the guidelines. You’ve done it! A real three-dimensionallooking room, courtesy of the two-point perspective.
Two PointsThe uses of two-point perspective are truly endless. Once you start using it for objects andenvironments in your drawings you’re going to be amazed at how solidly three-dimensional everythingbecomes. Provided you remember the rule about keeping the two vanishing points a healthy distancefrom each other, you’re going to be able to able to apply this technique to almost anything.

By the BookA stack of books, with all its horizontal lines, is a perfect candidate for two-point perspective.
Sense of PerspectiveSee how it seems to pop out of the page? Compare it to the one-point perspective chair and you’ll see what a difference the two-pointapproach makes.

City DwellerA classic example of a two-point perspective: the modern cityscape. The boxy office towers are very cooperative about providing lines tosend off in both directions. It takes patience, but a good ruler is all you need to make a drawing like this.
Find more two point drawings online at impact-books.com/mastering-manga.
Space Station Exterior Using Three-PointPerspectiveThree-point perspective is by far the most complicated of the three perspective systems. Hold off onthis lesson until you’ve mastered one-point and two-point perspective drawing.
Just to mix things up a little I’ve decided to move away from a standard aerial cityscape drawing—themost common example of three-point perspective—and go for a sci-fi space station instead. There’s amethod to my madness, though. This Death Star-ish environment is composed almost entirely ofstraight lines and saves us from the chore of drawing row after row of office building windows, tree-lined streets and bird’s-eye view automobiles.

STEP 1 Build Your FrameStart with the very largest sheet of paper you can find and place your three vanishing points at the veryedges. To get the lines, you’ll need one vanishing point to be way up in the upper right-hand corner. Thesecond vanishing point will be on the left near the upper corner. Using a good long ruler, draw a numberof lines fanning out gently from both vanishing points, causing them to intersect in the middle of the pageto create a checkerboard pattern.

STEP 2 Add the Third Vanishing PointPlace your vanishing point at the very bottom of the page, slightly off center to the right. Use your ruler tocreate lines fanning out from it to the top of the page.
If you find that your lines are fanning out severely, it means your third vanishing point isn’t far enoughaway.
STEP 3 Sketch the ShapesBegin constructing the surface shapes of the space station. Nearly all of these lines connect only to theupper two vanishing points. As a result, they all lie flat. The only vertical element right now is the base ofa tower in the upper left corner. The three vertical lines that compose this tower all point down toward thethird vanishing point.

STEP 4 Add DepthDraw more lines across the space station surface, as well as a few vertical lines that cause some of therectangles to rise from or sink into the surface. All of these vertical lines taper off toward the lowestvanishing point.
STEP 5 Fine-TuneAdd in a few more vertical towers and stacks, making sure to keep your lines in perspective.

STEP 6 Finish ItInk your drawing, relying on your ruler to make the lines perfectly straight. Let it dry, then erase theguidelines.
Pat yourself on the back. Your three-dimensional-looking space station is complete.
Point of ViewWe tend to associate the three-point perspective with the bird’s-eye view, and that is indeed the sort ofdrawing that absolutely depends on it. But this style of perspective can also be applied to pretty muchanything. Dramatic scenes can be created when rooms, pieces of furniture and ordinary householdobjects are drawn in three-point perspective.
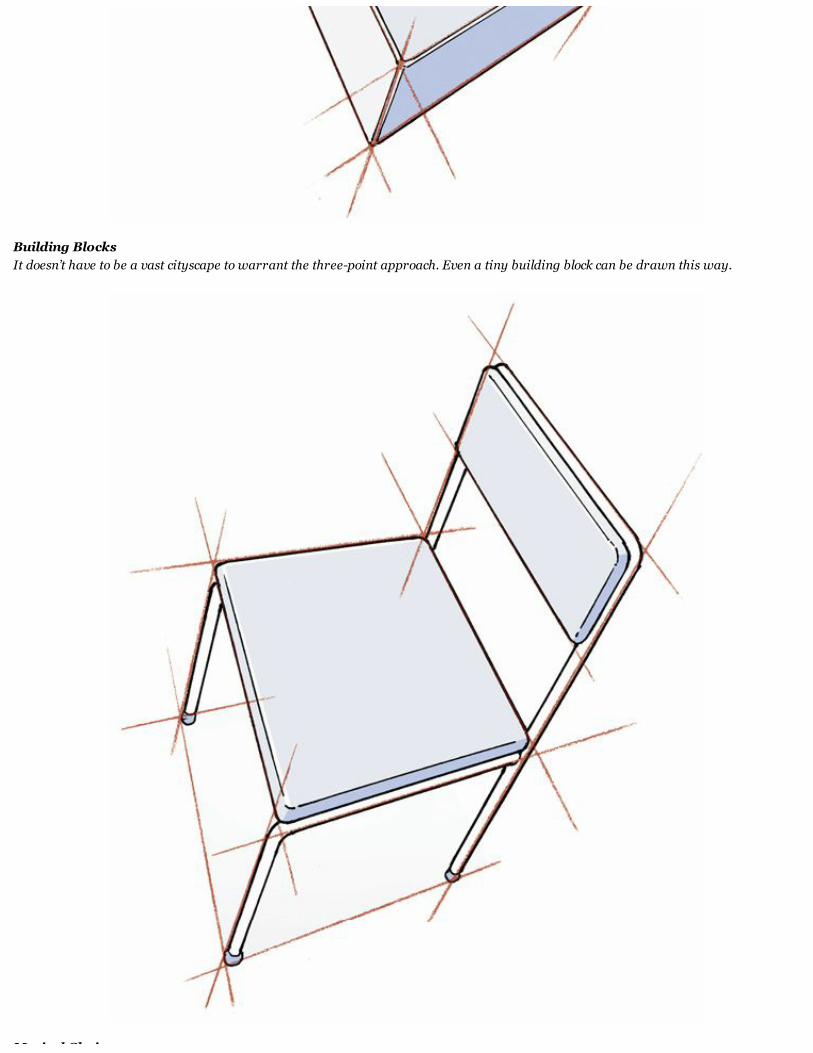
Building BlocksIt doesn’t have to be a vast cityscape to warrant the three-point approach. Even a tiny building block can be drawn this way.
Musical Chairs

Musical ChairsNow we see the same chair as rendered in three-point perspective. Compare it to the previous two versions to see the different points ofview you get in each drawing.
Well-GroundedEveryone loves a good bird’s-eye view, but the worm’s-eye view is every bit as useful. This view of the city is the one we’re all used toseeing. In this drawing pretty much every single line is heading off toward one of the three points.
Inking TipsA lousy drawing can’t be saved with beautiful inking, but a beautiful drawing will still look okay even inthe hands of a subpar inker.
Don’t worry too much about your inking skills until you’re comfortable with your drawing ability,but these tips will help you get started.
M A N G A I N K I N G V S . C O M I C B O O K I N K I N GAmerican comic book artists ink with great value being placed on lines that vary in width and displaythe artist’s dexterity with pen and brush.
However, the vast majority of manga artists ink with comparatively thin lines that don’t vary much inwidth. Manga that includes thick, brush-applied lines is rare indeed.
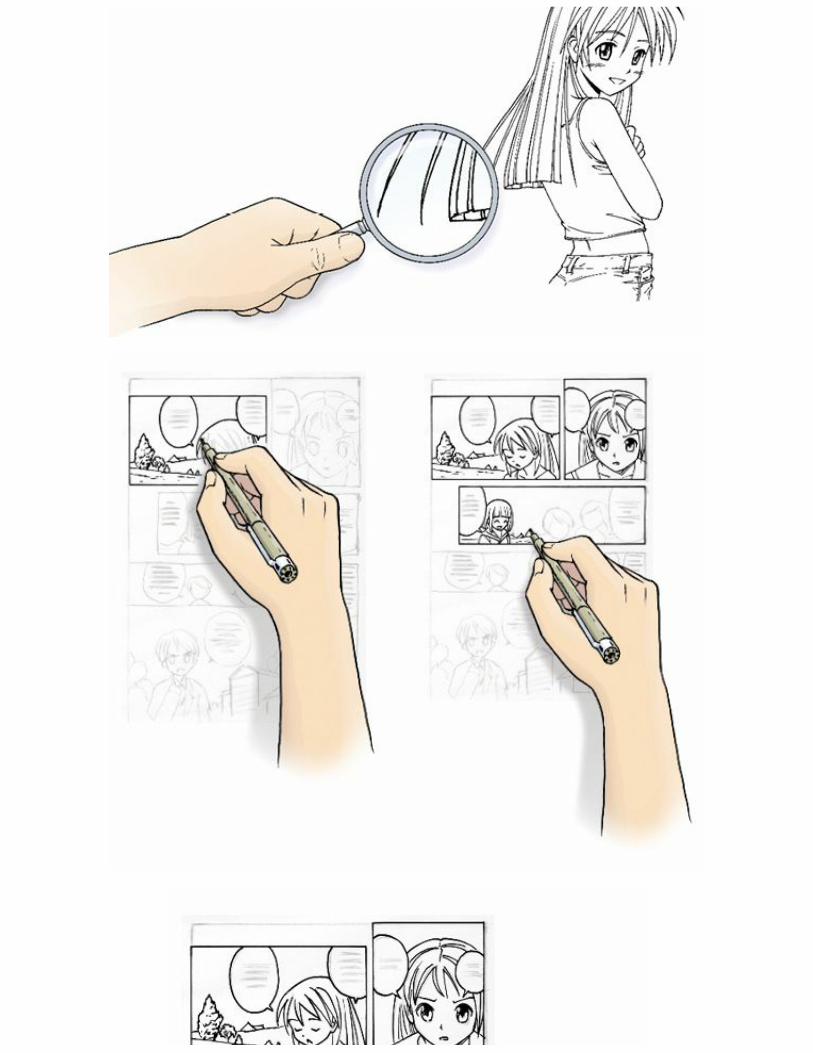

Keep It CleanThe main challenge with inking is to avoid smearing your lines while they’re still wet. If it happens, it’s not the end of the world. You’llmake things easier on yourself if you start in one corner—the upper left if you’re right-handed—and work your way down toward theopposite corner.
Whatever you do, don’t rush it. Practice your inking techniques on a separate sheet of paper before committing them to the page.
Putting Pen to PaperThe angle at which the pen hits the page affects the width of the line. Different brands of pens behave indifferent ways, so play around with the one you’re using to see which angle produces which type of line.

Tip-top ShapeAn angle perpendicular to the page often produces a thicker line. The ink flows from the very tip, not the sides. The trade-off is loss ofsome control.

A Different AngleA lower angle produces a thinner line. Only the edge of the tip touches the page, so less ink hits the paper. Lighter pressure will give athin, delicate line.
All in the WristUse the natural pivot point of your wrist to make curving lines. Spin the page and position it so your wrist can produce the curvingmotion naturally.
W R I S T W O R KWarm up your inking skills by using what you’ve drawn in previous lessons to practice your pivot.

Remember me?

STEP 1 Start on Your LeftThese curving lines will flow naturally from the pivot point of your wrist. Lefties will need to turn thedrawing upside down.
STEP 2 Continue on the Other SideSpin the page and ink the lines on the other side. You may need to turn the girl’s head upside down toget these lines to flow naturally with your wrist.

STEP 3 Don’t ResistYou can ignore the natural flow when drawing shorter lines like the ears and eyebrows, but smoothlonger lines are impossible if you’re fighting your wrist’s pivot point.
Anatomy of an Inked Manga IllustrationA high-quality manga illustration holds a wealth of information about inking. Study it properly and itcan provide you with a master class in the subject, free of charge. Here I’ve zoomed in on the lines thatmake up this picture so that you can see the qualities of the various lines and get a sense of how theywere produced.

CrosshatchingSome manga artists use moderate crosshatching, most use it sparingly, and many don’t use it at all. Still, if you like the look, it’s atechnique well worth adding to your arsenal.
Look closely at the girl’s eyes. There is variation in the darkness of the hatching. This is achieved by layering in more lines at the topand fewer at the bottom.

Long, Flowing LinesThe key to this is in the speed of the individual pen strokes. You can’t produce lines like this by clamping down on the pen and grittingyour teeth. The pen needs to glide over the page in long, uninterrupted movements of the wrist.
Bold Black AreasFilling in large areas of black doesn’t take a lot of skill.
I inked the area shown here using a brush, deliberately allowing the strokes of the brush to be seen at the bottom. Such visiblebrushwork is pretty rare in real published manga, but if you like the look, it’s a technique that can be used to good effect.
Short, Choppy LinesNot all inking needs to be as graceful and difficult to master as the long, flowing lines seen in the hair. The lines composing the girl’s furcoat can be dashed in with a minimum of fuss. If they are uneven and heading off in slightly different directions, so much the better,since that contributes to the fluffy effect.
Crosshatching

CrosshatchingEvery artist comes up with his or her own style of crosshatching, but they all come down to the samebasic idea: layering lines on top of each other to create the illusion of a fairly even tone.
STEP 1 Start With One DirectionMake some parallel lines in a single direction. Your lines should be much smaller than this on the page.
STEP 2 Move to anotherAdd the same number of lines on top, this time at a slightly different angle.
Pick a third direction to add yet another layer.

STEP 3 Repeat Until SatisfiedAdd more lines until a fairly even tone is formed.
A D D I N G S P E E D L I N E SEven the casual observer of manga will notice the art form’s copious use of speed lines.
Remember me from the fighting scene?

STEP 1 Mark Your Vanishing PointMake a dot outside the panel.
Grab your ruler. At the upper left corner, begin drawing lines from the top border to the vanishing point,allowing them to taper off into the white of the page for a kind of halo effect.
STEP 2 Add More LinesKeep the ruler firmly aligned with the vanishing point. Apply greatest pressure where the lines begin atthe upper right side of the panel and gradually lighten until the pen no longer touches the paper.

STEP 3 Complete the PanelMost manga artists will leave white gaps between groupings. Without them the lines will blend togetherand begin to read as a single flat tone.
Paneling and Page Layouts
C O M M O N M A N G A P A N E L S H A P E SA comic book page layout is built entirely of panels, and those panels should be a natural outgrowth ofthe drawings held within them.
PanoramaA cityscape is a naturally horizontal image, so it’s screaming out for you to put it in a nice wide horizontal panel.
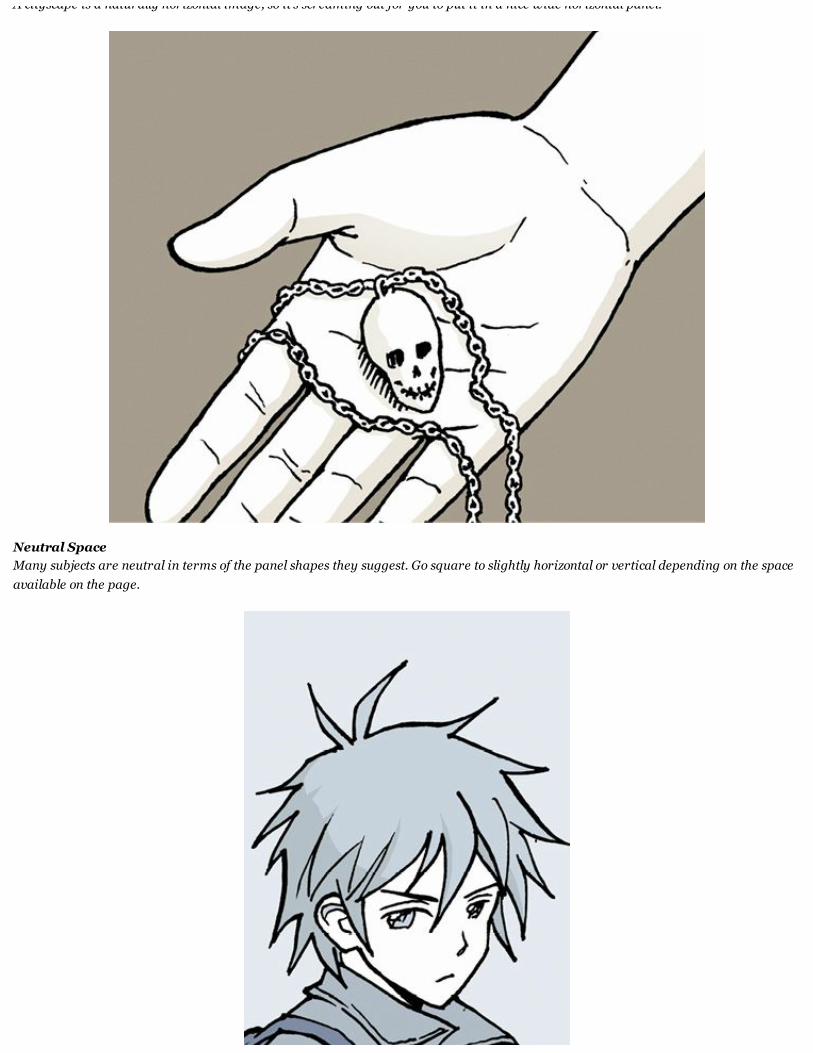
A cityscape is a naturally horizontal image, so it’s screaming out for you to put it in a nice wide horizontal panel.
Neutral SpaceMany subjects are neutral in terms of the panel shapes they suggest. Go square to slightly horizontal or vertical depending on the spaceavailable on the page.
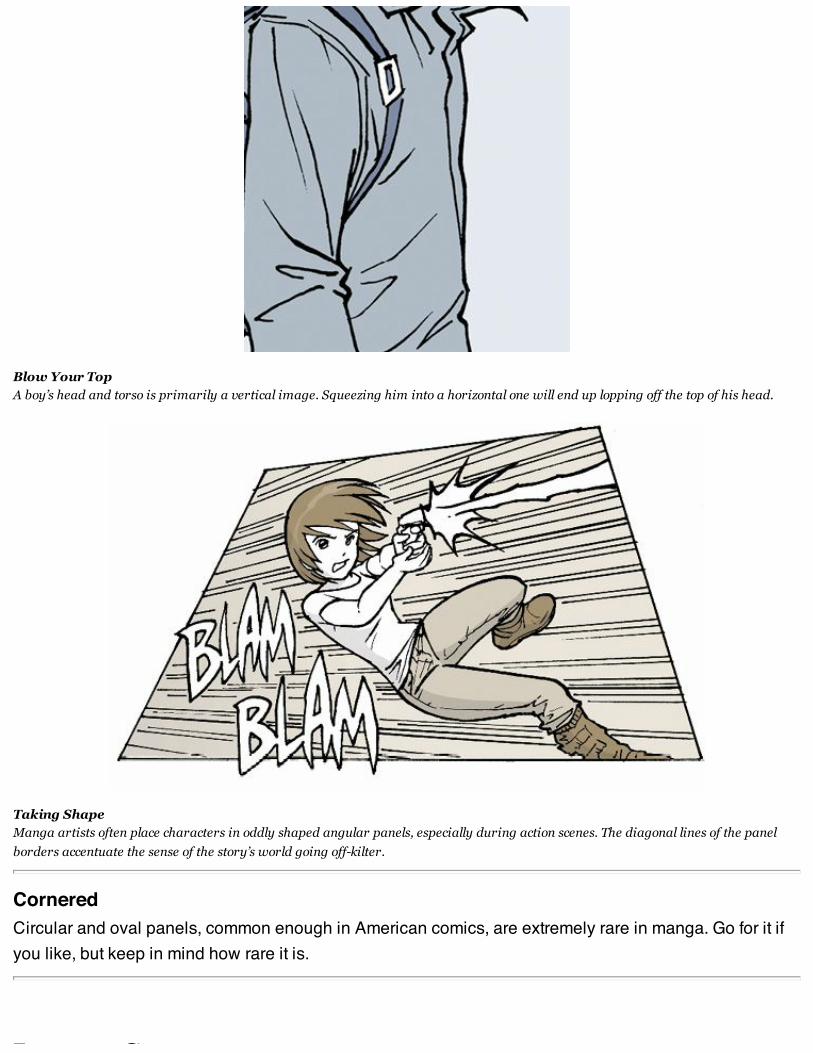
Blow Your TopA boy’s head and torso is primarily a vertical image. Squeezing him into a horizontal one will end up lopping off the top of his head.
Taking ShapeManga artists often place characters in oddly shaped angular panels, especially during action scenes. The diagonal lines of the panelborders accentuate the sense of the story’s world going off-kilter.
CorneredCircular and oval panels, common enough in American comics, are extremely rare in manga. Go for it ifyou like, but keep in mind how rare it is.
Layout Sequences

Layout SequencesOne of the most common styles of setting up a comic book sequence is to begin with an establishingshot then work toward a close-up. These three panels provide a pretty straightforward example of howit works.
Panel 1: Establish the SceneThe reader needs to know where the characters are. So the artist pulls back to reveal a lot of information: the desert locale, the exoticcity in the distance and the two characters featured in the scene.Panel 2: Zoom InThe focus shifts to the conversation. It’s unwise to jump straight to a close-up. The reader will get whiplash if we’re suddenly right up inone of the guy’s faces. By still keeping a little distance we create the feeling of a camera zooming in.Panel 3: The Close-UpNow we can go all the way in and study the character’s face. Having the character begin a sentence in one panel and finish it in the nextis a nice way of stitching together the panels, allowing the story to flow from one moment to the next.
F A C E - T I M EThis simple four-panel sequence supplies a surprising amount of information about the characters andhow they feel about the things that are being said.

Panel 1: The QuestionThis one is all set-up. The look on her face is innocent and fairly neutral: She has no idea what’s coming.Panels 2 & 3: He ReactsDeprived of dialogue, the reader must focus on the boy’s look of surprise. The reader hears a pause in the conversation.
In panel 3, we watch his face change to a look of embarrassment when he sheepishly answers the question.Panel 4: Her ReactionThis panel retains an echo of panel 1. There is humor as we see the drastic change in her facial expression. Master this style ofstorytelling and you’ll know the secret to making your readers want to see what happens next.
To Panel or Not: Different LayoutsThere’s incredible variety in the way manga pages are laid out, but they generally fall into one of threecategories, laid out below.

All Panels, All the TimeThis approach is especially evident in shonen action-oriented manga. The artist wants to put the story out there in a straightforwardway and stays away from experimental layouts that call a lot of attention to themselves.
Panels? What Panels?It’s exceedingly rare for an entire story to be told this way, but shojo manga will occasionally opt for this approach. The effect is to createa dreamy feeling of having entered the main character’s head, inhabiting her emotional state and leaving the real world—and thepanels—behind.
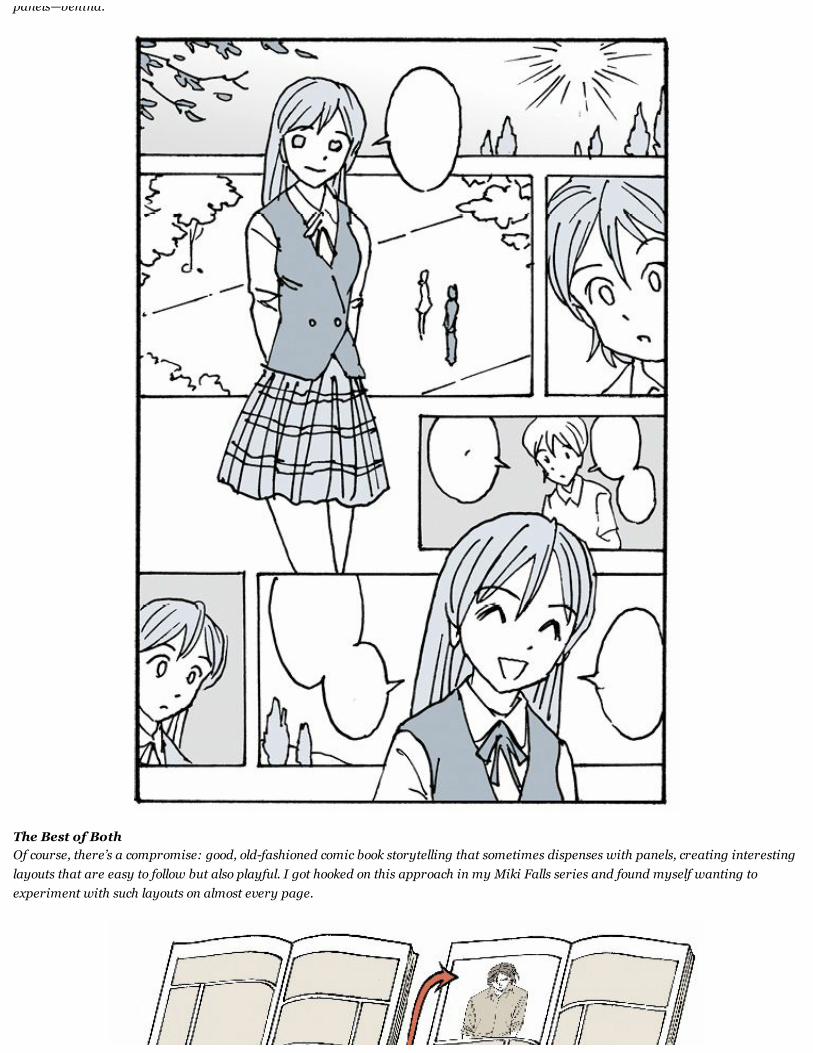
panels—behind.
The Best of BothOf course, there’s a compromise: good, old-fashioned comic book storytelling that sometimes dispenses with panels, creating interestinglayouts that are easy to follow but also playful. I got hooked on this approach in my Miki Falls series and found myself wanting toexperiment with such layouts on almost every page.

Spoilers!Put the big reveal in the first panel of a left-hand page. Readers can’t see it until they turn the page sothey’ll get the ultimate shock. If you put the surprise panel anywhere else, the readers will see it too soonand the dramatic opportunity will be lost.
Making Your Own Manga SequencesOkay, enough practice! You guys are more than ready to start putting some of this into practice Thissimple lesson will allow you to go beyond character poses and get your hands dirty with some honest-to-goodness storytelling. You know the drill: Pencils first, inks at the end.
STEP 1 Build Your Frames

Using your ruler, draw three panels. In each panel draw the rough guidelines of three heads, using theface three-quarter view. Give each head a bit of a tilt if you like.
STEP 2 Add FeaturesAdd the hair, shoulders and facial expressions. Do you have to work on all three panels at once?Absolutely not. Take them all to final one at a time if that’s what works for you.
STEP 3 Add DetailsChange the hairstyles or other details to make them your own.
STEP 4 Finish ItInk it and let dry, then erase the guidelines.
Making the Leap: Advanced Sequencing

Making the Leap: Advanced SequencingSo far, I’ve kept the lessons in this book simple and easy to follow. But now, you’re ready to move tothe next level.
The difference between steps one and two is like night and day, but if you take a closer look, you’llsee that the components of the drawing are based on our previous lessons, so feel free to return tothose anytime.
STEP 1 Set the SceneDraw two panels, one horizontal, the second vertical. In the first panel, draw a one-point perspectivesidewalk scene. In the second panel, outline a girl walking toward the reader. Draw one of her hands upnear her ear. Once you’ve got her in place, sketch in a bit of the background so that this scene will readas a continuation of the first panel.
STEP 2 Sketch the DetailsAdd telephone lines and some details to the buildings.
Add word balloons. These are based on dialogue I came up with, but your dialogue may be completely

different, resulting in different word balloons.
STEP 3 Ink ItInk and add lettering to the word balloons. Once the ink’s dry you can erase and kick back to admire yourown handiwork.
Can We Talk? Word BalloonsWord balloon placement may not seem like the most thrilling aspect of comics creation, but wiseartists will focus on it and plan their pictures around it. Nothing pulls a reader out of the story morejarringly than confusion over the reading order of the word balloons.

Turning Word Balloons Into Nuggets of SpeechFailing to break a big paragraph of speech into smaller components robs you of your opportunity to suggest pauses in speech. Readthese two examples and see if you don’t hear them differently in your head.
Word Balloon PlacementIn this version, there is ample opportunity for the reader to read things in the wrong order, thereby destroying the logic of theconversation. Don’t give them that opportunity!

Direct the EyeHere, the reading order is crystal clear: your eye moves naturally from sentence to sentence as they flow from top to bottom in acurving string of balloons.
Move the characters closer together if need be. This kind of thing should be worked out early so you don’t have to make time-consuming changes later on.
Make Some NoiseAlmost all comics employ sound-effect words of some kind. The manga approach is distinctive,sometimes suggesting sounds for things that are silent, like the sun’s glare in the sky.
You have to be careful with sound effects not to overdo it. We don’t need to hear the birds chirpingthroughout the entire picnic scene. Give us a CHIRRUP or two in the first panel, then let us use ourimaginations after that.
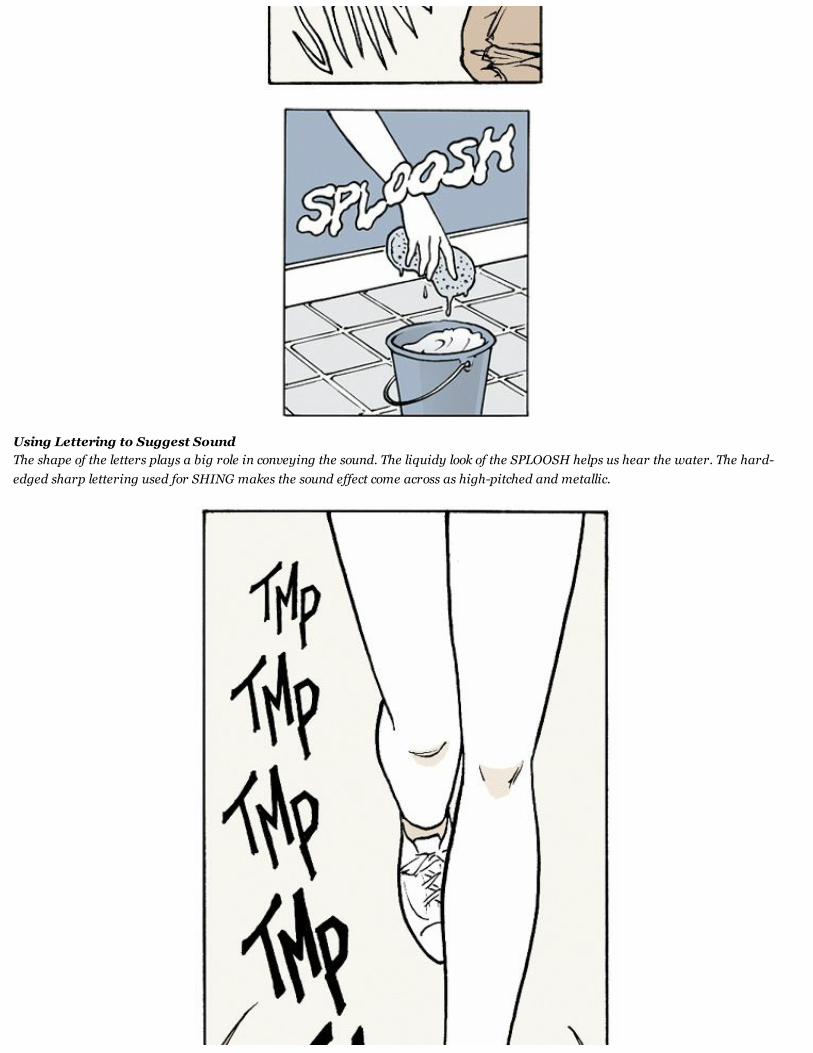
Using Lettering to Suggest SoundThe shape of the letters plays a big role in conveying the sound. The liquidy look of the SPLOOSH helps us hear the water. The hard-edged sharp lettering used for SHING makes the sound effect come across as high-pitched and metallic.

RepeatA small, repeating word may gradually grow larger, creating the sensation of the sound gradually getting closer. Some Japanese soundeffects like TMP have become standardized by translators as the go-to words for those particular noises.
Big BangAction-packed stories often call for big, earth-shaking sounds. Unlike their American counterparts, manga artists will often break asingle big sound into pieces and spread it across a whole panel.
Big jagged letters help convey the thunderous nature of the sound. (Jeez, I hope that guy’s okay.)

Conclusion

About the Author
Mark Crilley is the author and illustrator of several graphic novel and prose fiction book series,including thirteen-time Eisner nominee Akiko, Billy Clikk, Miki Falls and Brody’s Ghost. Since beingselected for Entertainment Weekly’s “It List” in 1998, Crilley has spoken at hundreds of venuesthroughout the world and become one of YouTube’s top 25 Most Subscribed Gurus, creating drawingdemonstration videos that have been viewed more than 60 million times. His work has been featuredin USA Today, the New York Daily News and Disney Adventures magazine, as well as on Comcast OnDemand and CNN Headline News.
This book is dedicated to my YouTube subscribers. This book would truly not exist if not for all ofyou and your many years of support.

Mastering Manga With Mark Crilley Copyright © 2012 by Mark Crilley. All rights reserved. No part of this book may be reproduced inany form or by any electronic or mechanical means including information storage and retrieval systems without permission in writing fromthe publisher, except by a reviewer who may quote brief passages in a review. Published by North Light Books, an imprint of F+W Media,Inc., 10151 Carver Rd, Blue Ash, OH 45242 (800) 289-0963. First Edition.
Other fine North Light Books are available from your favorite bookstore, art supply store or online supplier. Visit our website atfwmedia.com.
eISBN: 978-1-4403-2434-5This e-book edition: March 2012 (v.1.0)

Metric Conversion Chart
To convert to multiply by
Inches Centimeters 2.54
Centimeters Inches 0.4
Feet Centimeters 30.5
Centimeters Feet 0.03
Yards Meters 0.9
Meters Yards 1.1

Ideas. Instruction. Inspiration.
These and other fine IMPACT products are available at your local art & craft retailer, bookstore oronline supplier. Visit our website at impact-books.com.
IMPACT-Books.com
Connect with other artistsGet the latest in comic, fantasy and sci-fi artSpecial deals on your favorite artists