03. 3ds max design & mental raycontents.kocw.net/kocw/document/2015/hanyang/leejinkook1/... ·...
TRANSCRIPT
Design Computing
03. 3ds Max Design & Mental Ray
9/23/2015CAD & Graphics II | HOM2027 | Fall 2014 | Every Wednesday 2:00 pm – 5:50 pm
Jin Kook Lee, PhD. 02-2220-2645 | [email protected]
Assistant Professor, Space & Design IT Lab.Department of Interior Architecture Design, Hanyang University
+
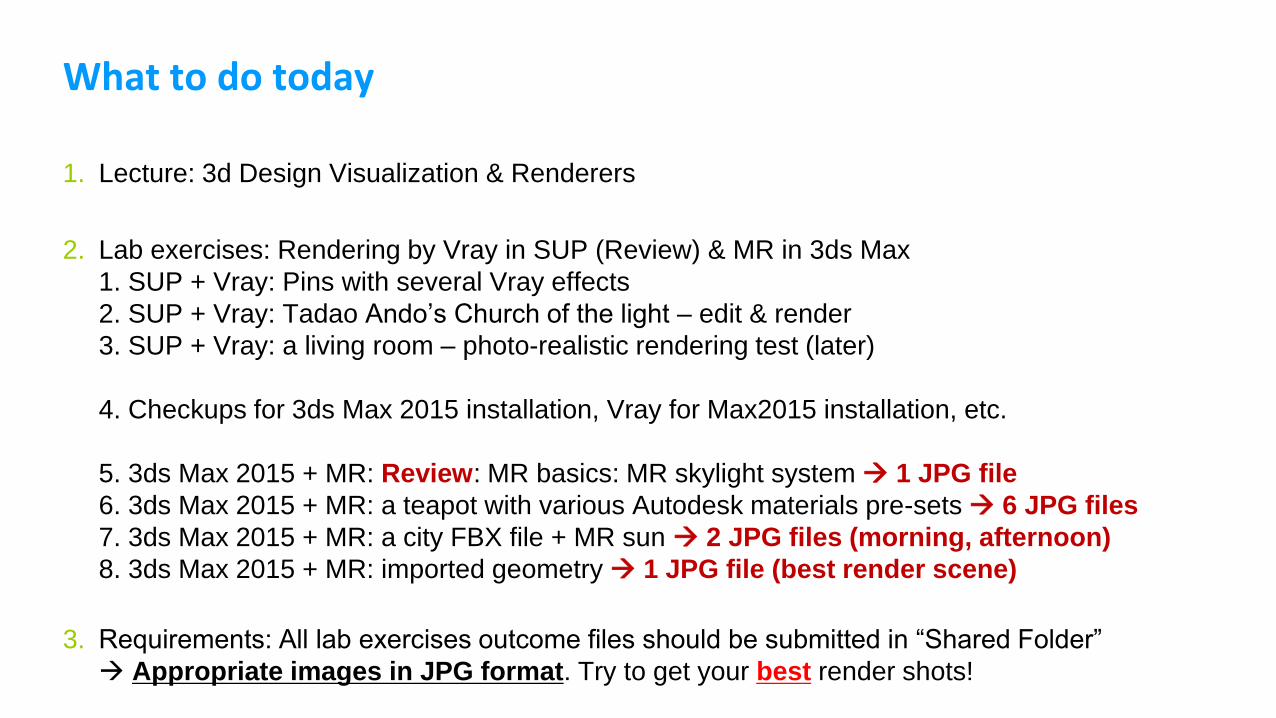
What to do today
1. Lecture: 3d Design Visualization & Renderers
2. Lab exercises: Rendering by Vray in SUP (Review) & MR in 3ds Max
1. SUP + Vray: Pins with several Vray effects
2. SUP + Vray: Tadao Ando’s Church of the light – edit & render
3. SUP + Vray: a living room – photo-realistic rendering test (later)
4. Checkups for 3ds Max 2015 installation, Vray for Max2015 installation, etc.
5. 3ds Max 2015 + MR: Review: MR basics: MR skylight system 1 JPG file
6. 3ds Max 2015 + MR: a teapot with various Autodesk materials pre-sets 6 JPG files
7. 3ds Max 2015 + MR: a city FBX file + MR sun 2 JPG files (morning, afternoon)
8. 3ds Max 2015 + MR: imported geometry 1 JPG file (best render scene)
3. Requirements: All lab exercises outcome files should be submitted in “Shared Folder”
Appropriate images in JPG format. Try to get your best render shots!

Again, Technical Note

1. Don’t forget to register the Course Web
https://sites.google.com/site/cadgraphicsiia2015/
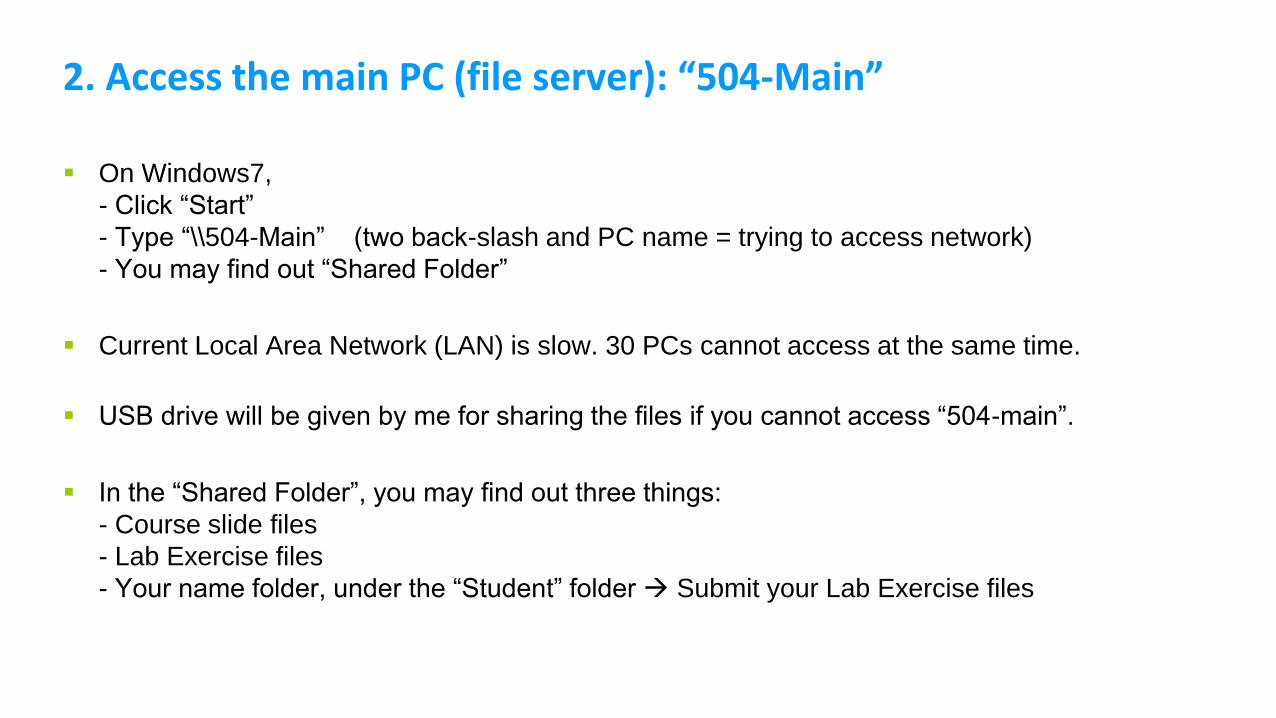
2. Access the main PC (file server): “504-Main”
On Windows7,
- Click “Start”
- Type “\\504-Main” (two back-slash and PC name = trying to access network)
- You may find out “Shared Folder”
Current Local Area Network (LAN) is slow. 30 PCs cannot access at the same time.
USB drive will be given by me for sharing the files if you cannot access “504-main”.
In the “Shared Folder”, you may find out three things:
- Course slide files
- Lab Exercise files
- Your name folder, under the “Student” folder Submit your Lab Exercise files

3. Save material on your USB or D drive: Keep clean the PCs
Save the files from the “Shared Folder” into your USB drive, or
D: drive on your PC (some PC has only C: drive, then save on C)
(본인의 USB, 또는 PC의 D드라이브 에 수업관련 파일을 항상 복사 – 본인 USB 또는 외장하드 항시 지참)
Never try to run (double-click) the files in the “Shared Folder” directly – it’s not your PC
(네트워크상에서 직접 파일 더블클릭 절대 금지 – 반드시 USB나 D에 복사 후 실행)
Never save the files on your PC’s Desktop
save them in your USB or D drive
(컴퓨터 바탕화면에 파일 저장 금지 – 수시로 지워질수 있으므로 본인 USB 또는 D드라이브 사용)
Files on Desktop will be removed occasionally
Never try to install any kind of software – keep the PCs safe
(바이러스 등의 위험으로 소프트웨어(특히 lol) 설치 금지 – 언어/지역설정 변경 금지)
(만일 필요에 의해 설치 또는 언어 변경 시 반드시 원래대로 복구 후 PC종료)

4. Autodesk student community access
Autodesk provides 3-year free software for students
Login into Autodesk Student Download Center
http://students.autodesk.com
You can get the Keys for following major Autodesk software for designers:
- AutoCAD 2015
- 3dsMAX Design 2015
- Revit 2015
- and so on
- new version software will be updated annually (2016 version comes in 2015 Spring)
You can access your keys again whenever you login into Autodesk Student site for installing on your
PC, laptop, etc. (3 times activation limit)

Autodesk Student Download – Free Autodesk tools
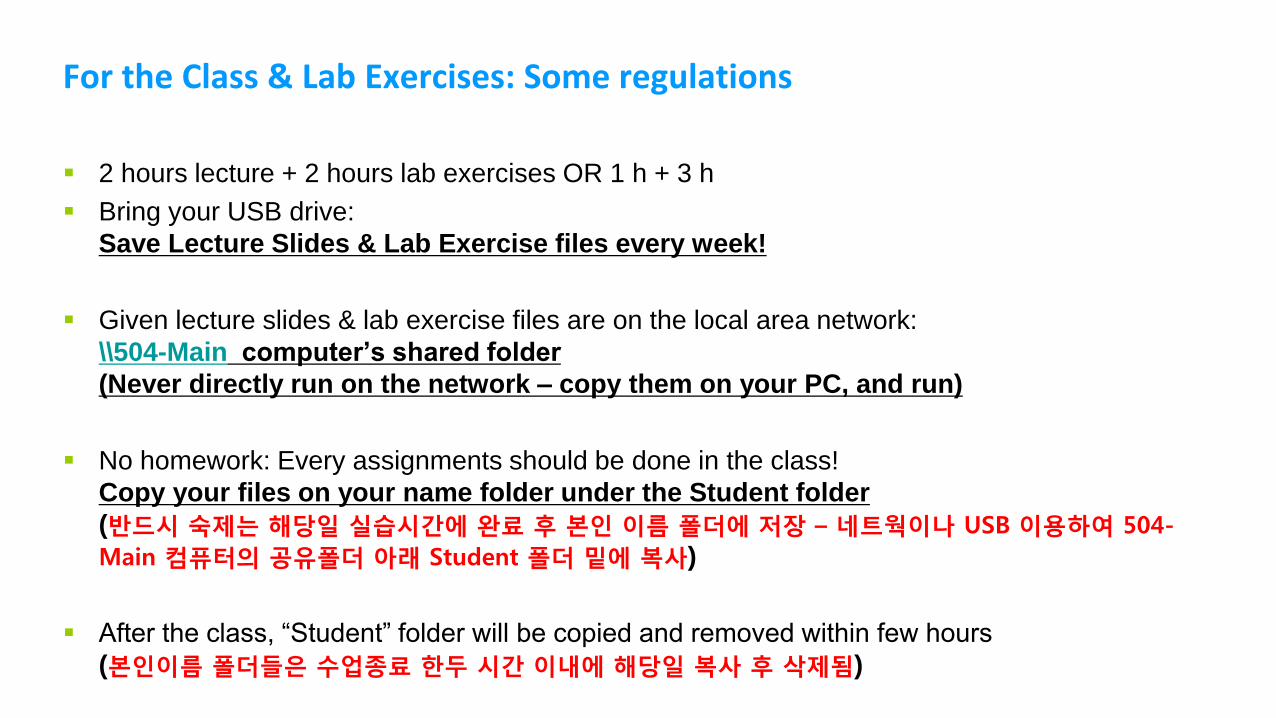
For the Class & Lab Exercises: Some regulations
2 hours lecture + 2 hours lab exercises OR 1 h + 3 h
Bring your USB drive:
Save Lecture Slides & Lab Exercise files every week!
Given lecture slides & lab exercise files are on the local area network:
\\504-Main computer’s shared folder
(Never directly run on the network – copy them on your PC, and run)
No homework: Every assignments should be done in the class!
Copy your files on your name folder under the Student folder
(반드시 숙제는 해당일 실습시간에 완료 후 본인 이름 폴더에 저장 – 네트웍이나 USB 이용하여 504-
Main 컴퓨터의 공유폴더 아래 Student 폴더 밑에 복사)
After the class, “Student” folder will be copied and removed within few hours
(본인이름 폴더들은 수업종료 한두 시간 이내에 해당일 복사 후 삭제됨)

Communication for the class
Basically this is a class of using “digital” – Use several computing tools for the course
Course Website is the official communication channel for the course
Course Web: open to class members
Professor’s Email: [email protected]
SNS
Office: College of Human Ecology, Room #511
Individual student meeting is on schedule. (After the class, 2~3 students per week)

Surface-based 3d Modeling & Visualization

Surface-based 3d model (polygon-based)
based on SketchUP & 3ds Max

History of computer-aided design is a history of understanding what is design
The design is a drawing of the product e.g. Geometric drafting in 2D
The design is a surface model of the product e.g. Geometric surface modeling in 3D
The design is a 3D model of the product e.g. Solid modeling
The design is an editable 3D model of the product e.g. Parametric modeling
The design is the integrated representation of
all the compositional, analytical and fabrication
representations of the product
(Geometry is just one part of the model) e.g. Product Data Modeling, Building Information Modeling
H
W
D
Parameters:H, W, D
+ Information
Information Modeling
SketchUP
3ds Max

SketchUP & 3ds Max models are surface-based models
SketchUP & 3ds Max models are Surface 3d, NOT Solid 3d
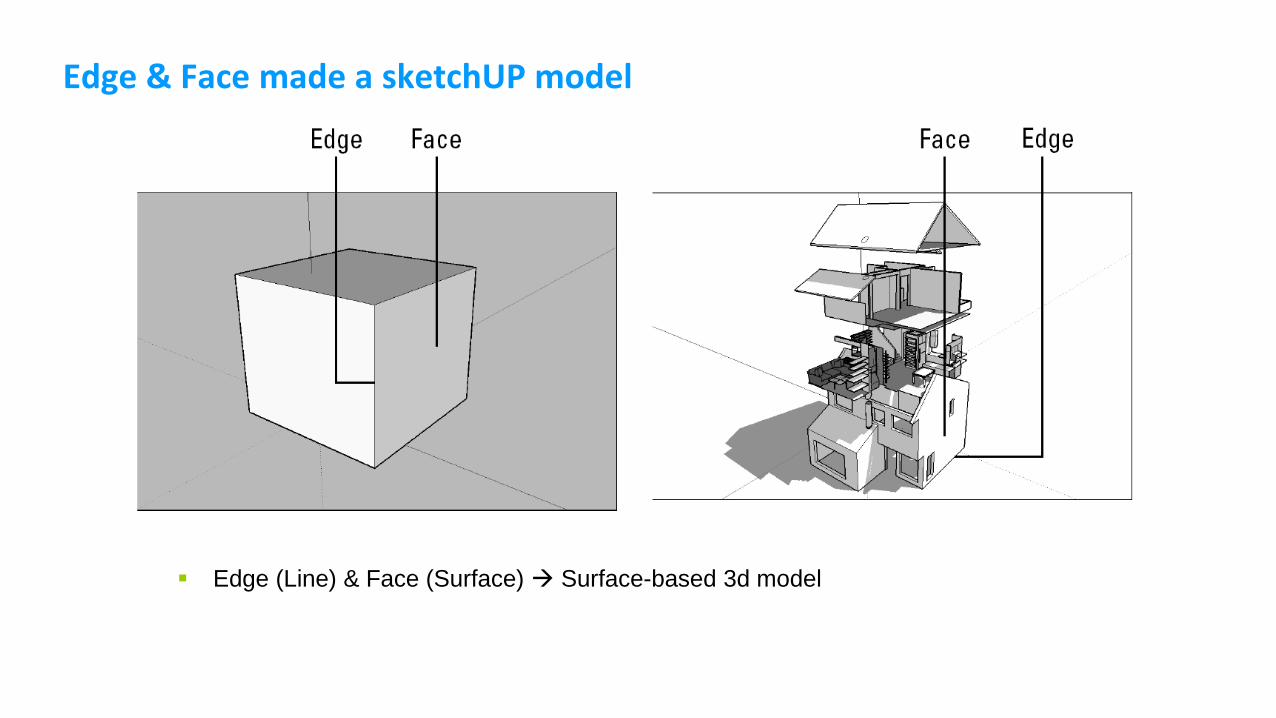
Edge & Face made a sketchUP model
Edge (Line) & Face (Surface) Surface-based 3d model
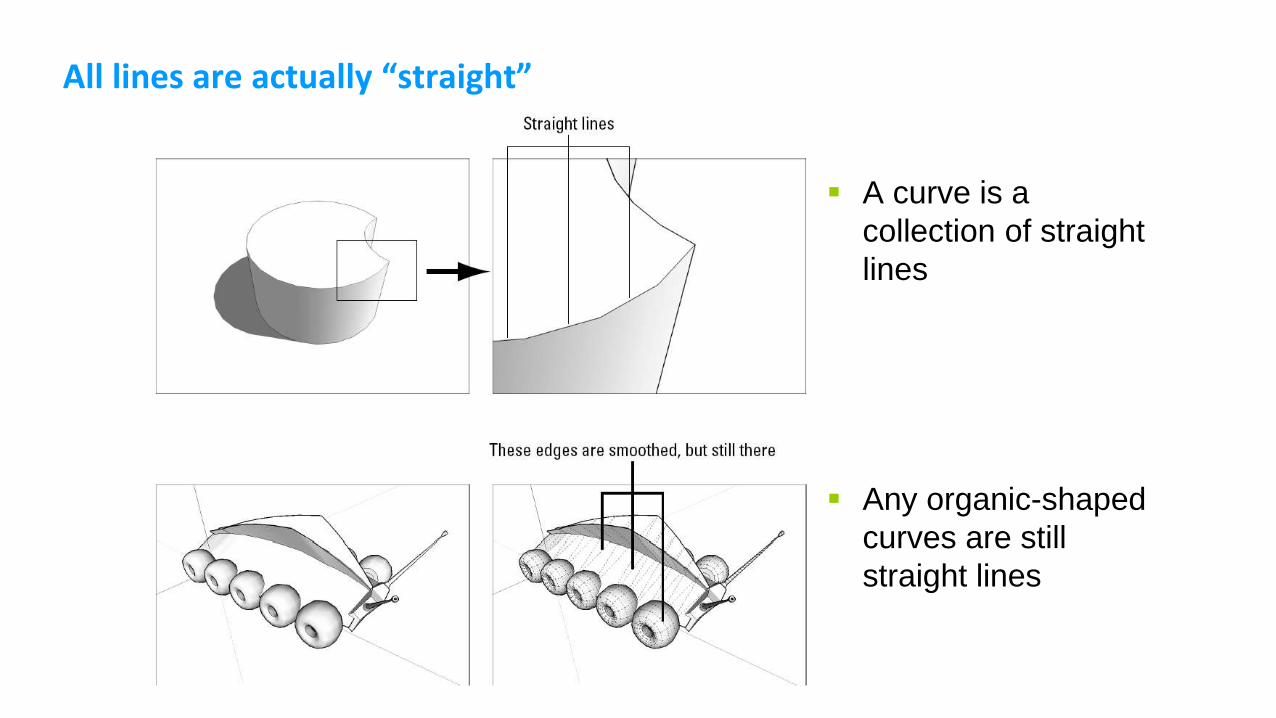
All lines are actually “straight”
A curve is a
collection of straight
lines
Any organic-shaped
curves are still
straight lines
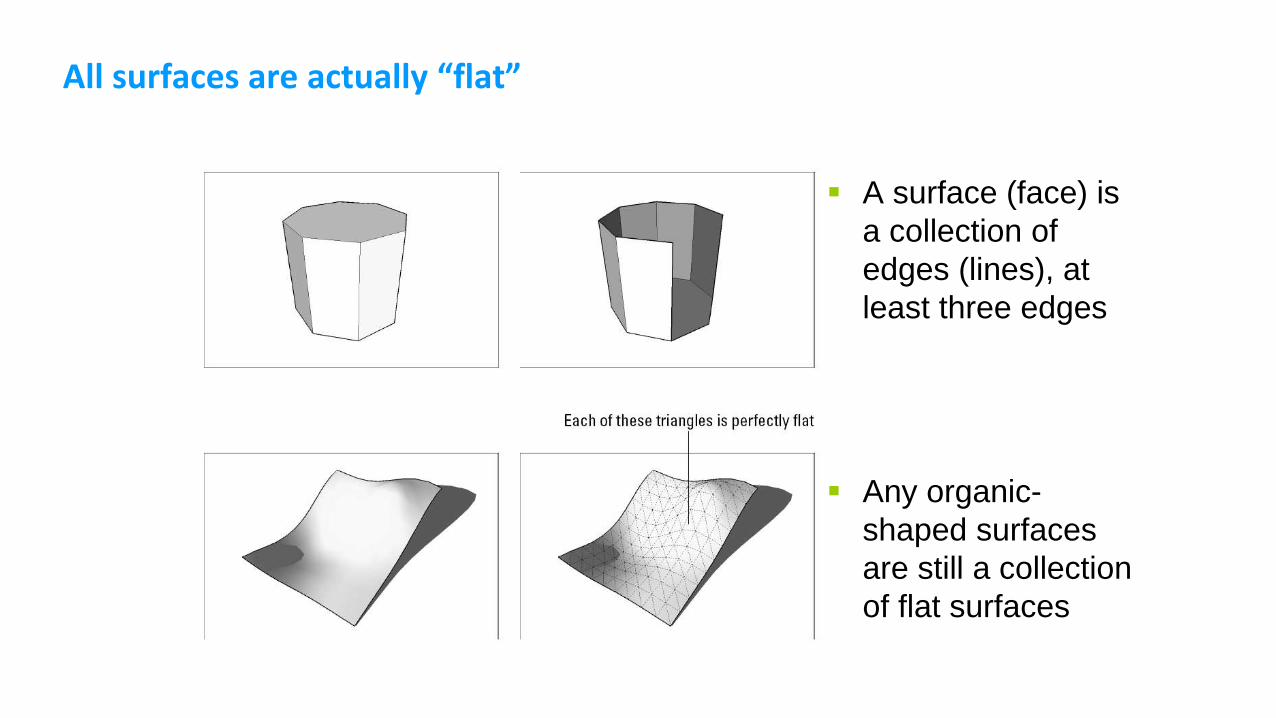
All surfaces are actually “flat”
A surface (face) is
a collection of
edges (lines), at
least three edges
Any organic-
shaped surfaces
are still a collection
of flat surfaces

Diffuse: color or a texture map on the 3D surface
A surface can be colored.
A surface can be texture-
mapped.
Realistic 3d visualization
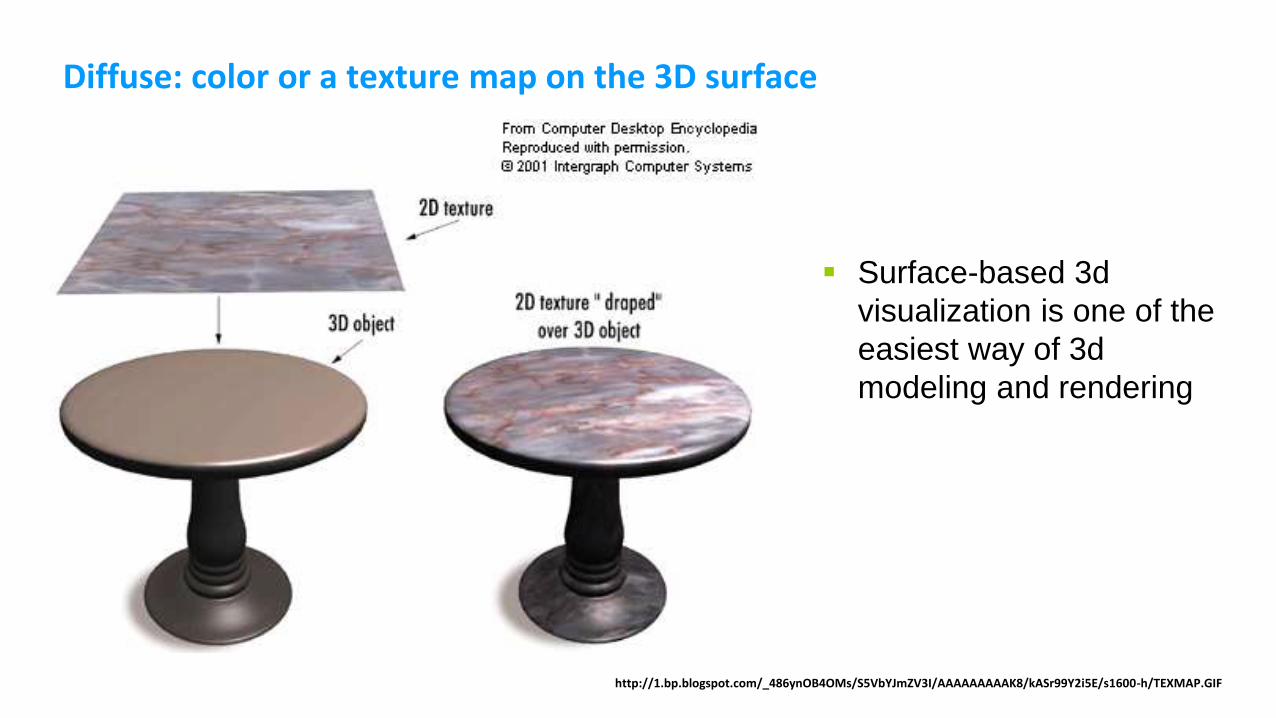
Diffuse: color or a texture map on the 3D surface
http://1.bp.blogspot.com/_486ynOB4OMs/S5VbYJmZV3I/AAAAAAAAAK8/kASr99Y2i5E/s1600-h/TEXMAP.GIF
Surface-based 3d
visualization is one of the
easiest way of 3d
modeling and rendering

A review of SketchUP+Vray Rendering

Use Google & YouTube for free tutorials
http://www.youtube.com/watch?v=XkLe4qwb1Us
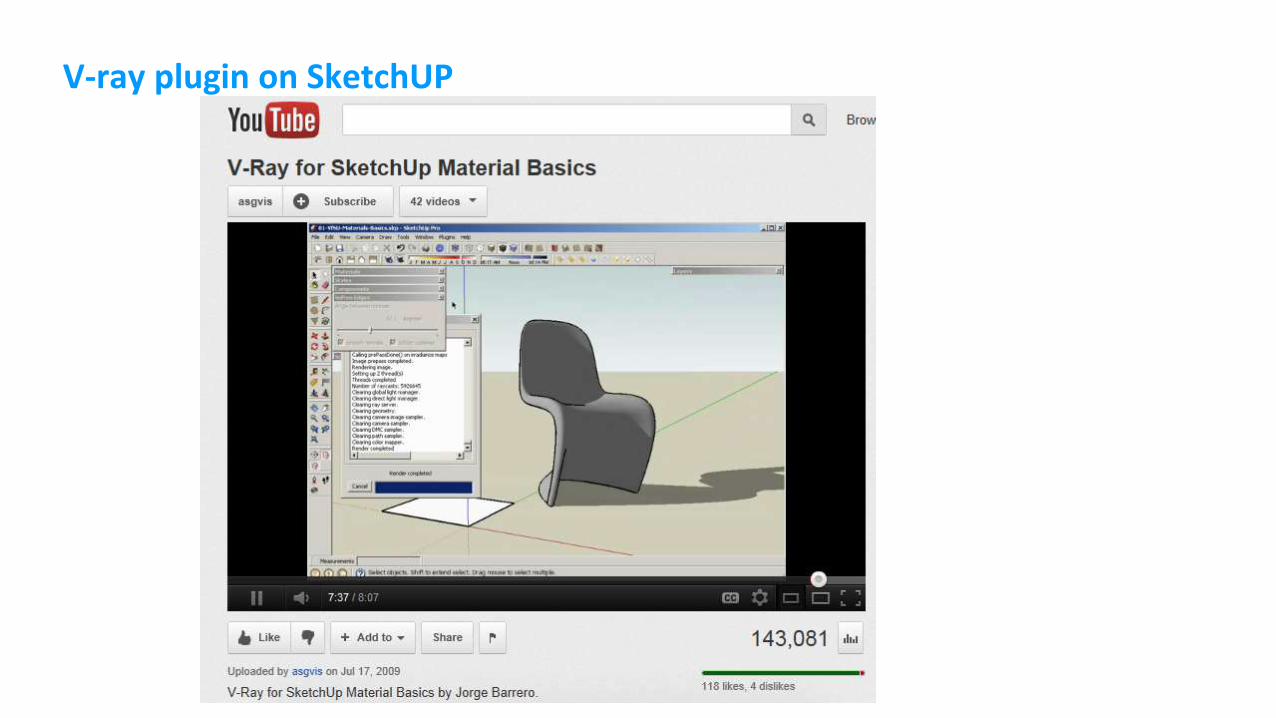
V-ray plugin on SketchUP

Rendered by V-Ray plugin, on SketchUP

http://www.vray.com/
Download V-Ray renderer for SketchUP (demo version)
Install it: V-Ray plugin panel icons will be available as shown below

3d warehouse: https://3dwarehouse.sketchup.com/
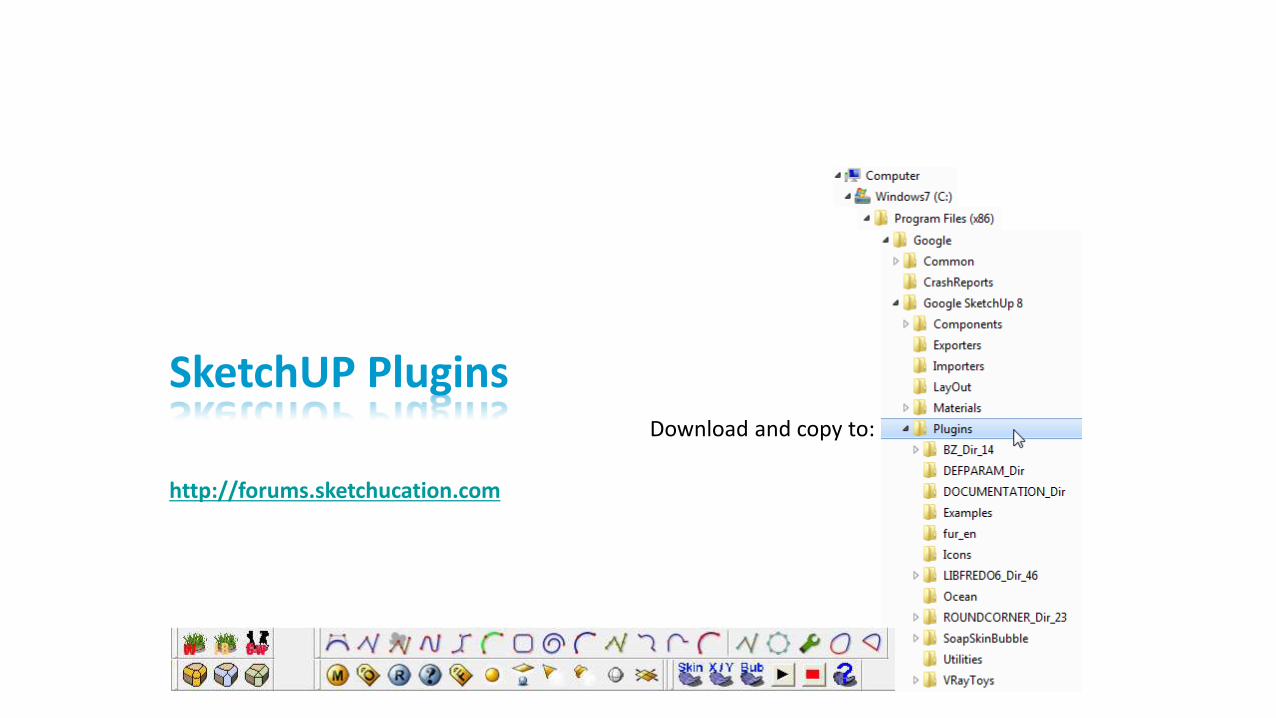
SketchUP Plugins
http://forums.sketchucation.com
Download and copy to:

Renderer: SketchUP + Vray
http://www.vray.com/vray_for_sketchup/manual
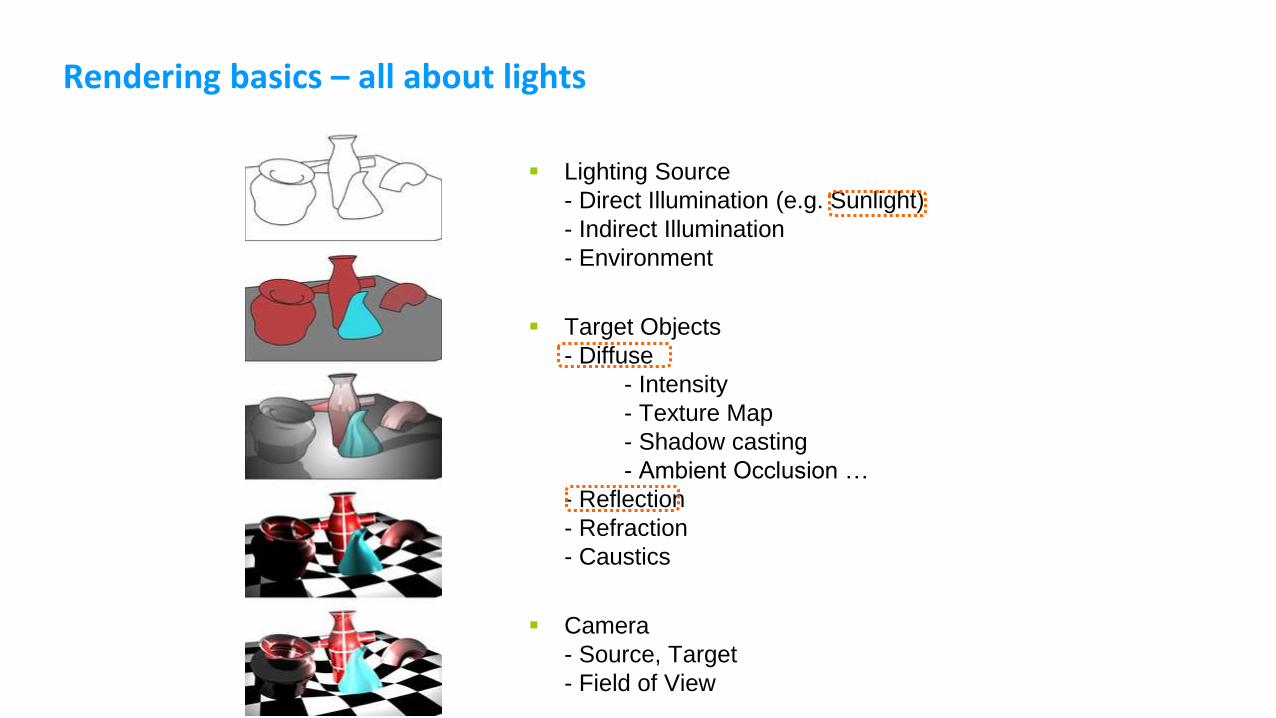
Rendering basics – all about lights
Lighting Source
- Direct Illumination (e.g. Sunlight)
- Indirect Illumination
- Environment
Target Objects
- Diffuse
- Intensity
- Texture Map
- Shadow casting
- Ambient Occlusion …
- Reflection
- Refraction
- Caustics
Camera
- Source, Target
- Field of View
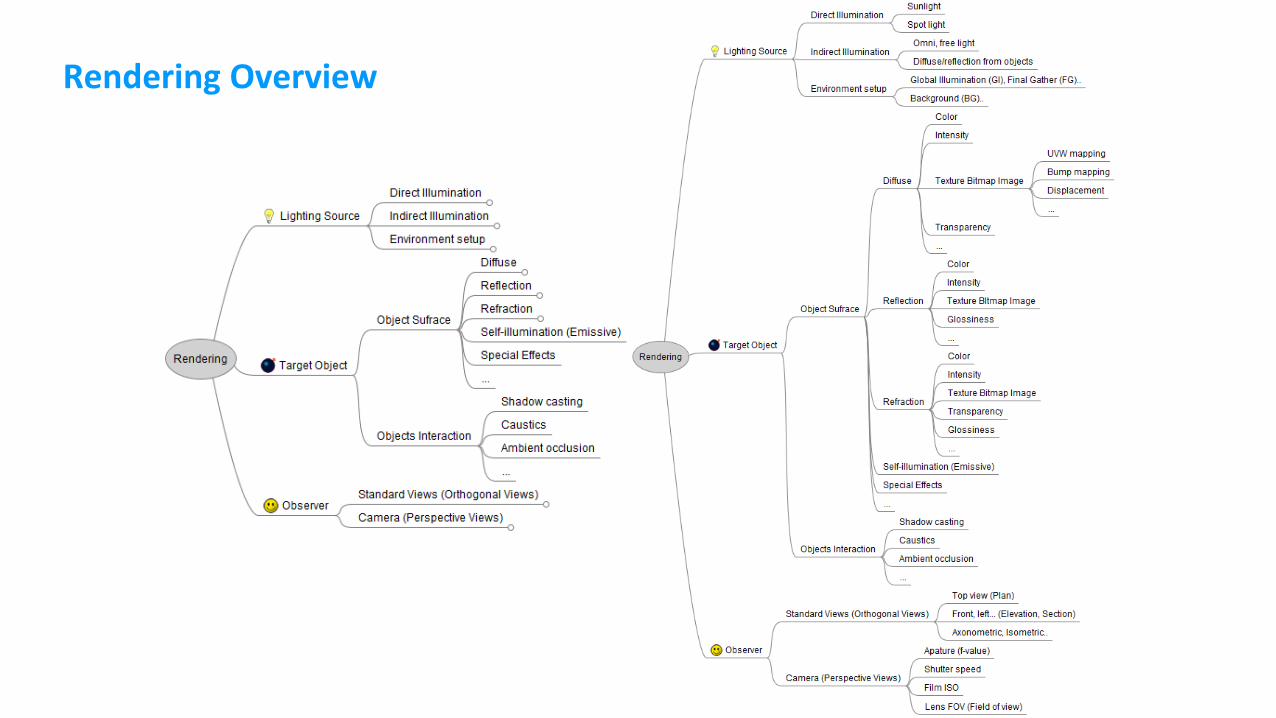
Rendering Overview

Diffuse
Color
Texture Map
Transparency: White = Transparent, Black = Opaque
BRDF: bidirectional reflectance distribution function
For Transparent Bitmap BG

Reflection
Reflection color: White Transparent, Black Opaque
Reflection Glossiness

Refraction
IOR: Index of Refraction

Emissive
SketchUP & Vray render tips

Save & Use PNG files for transparent background
In most cases, PNG file format is one of the best file formats because it
supports full color with transparent background. (JPG couldn’t do this, GIF
could but limited colors)

Texture Mapping
Right button – Texture
- Position: Control red, green, yellow, blue control pins
- Projected: Project texture to other surfaces

Bump Mapping (& Displacement, etc.)

Dynamic SketchUP Component
Always face camera: Set it when creating components

Renderers: Vray & Mental Ray (MR)
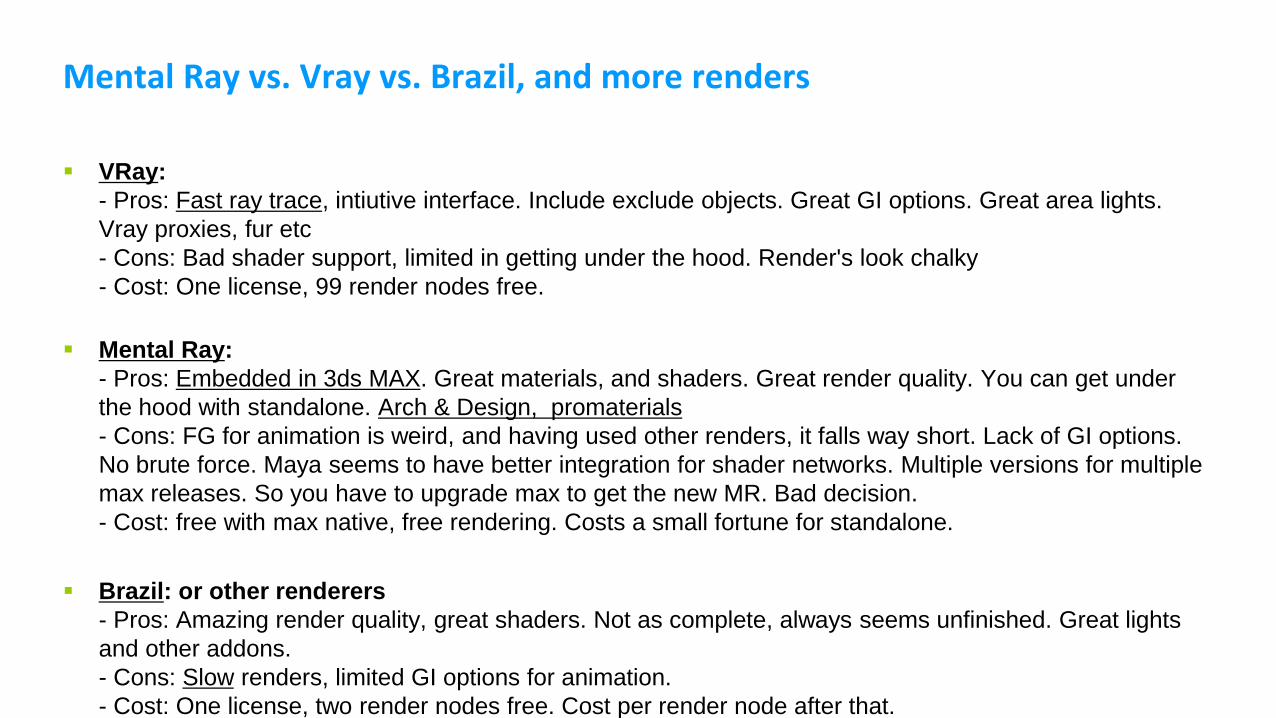
Mental Ray vs. Vray vs. Brazil, and more renders
VRay:
- Pros: Fast ray trace, intiutive interface. Include exclude objects. Great GI options. Great area lights.
Vray proxies, fur etc
- Cons: Bad shader support, limited in getting under the hood. Render's look chalky
- Cost: One license, 99 render nodes free.
Mental Ray:
- Pros: Embedded in 3ds MAX. Great materials, and shaders. Great render quality. You can get under
the hood with standalone. Arch & Design, promaterials
- Cons: FG for animation is weird, and having used other renders, it falls way short. Lack of GI options.
No brute force. Maya seems to have better integration for shader networks. Multiple versions for multiple
max releases. So you have to upgrade max to get the new MR. Bad decision.
- Cost: free with max native, free rendering. Costs a small fortune for standalone.
Brazil: or other renderers
- Pros: Amazing render quality, great shaders. Not as complete, always seems unfinished. Great lights
and other addons.
- Cons: Slow renders, limited GI options for animation.
- Cost: One license, two render nodes free. Cost per render node after that.
Mental Ray (in 3ds Max)
- Use preset Arch & Design Material / ProMaterials (Autodesk Material)
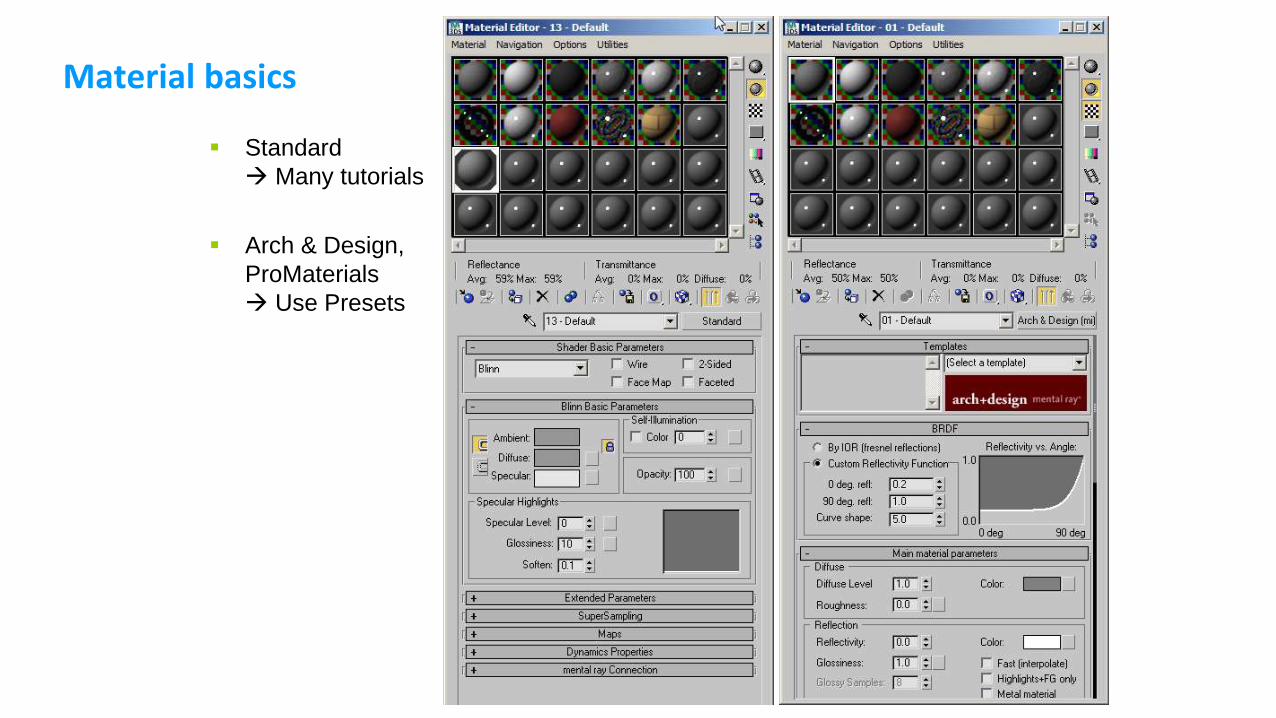
Material basics
Standard
Many tutorials
Arch & Design,
ProMaterials
Use Presets

Arch & Design Presets in 3ds MAX with Mental Ray – presetshttp://www.mrbluesummers.com/3731/3d-tutorials/3d-studio-max-arch-design-preset-examples
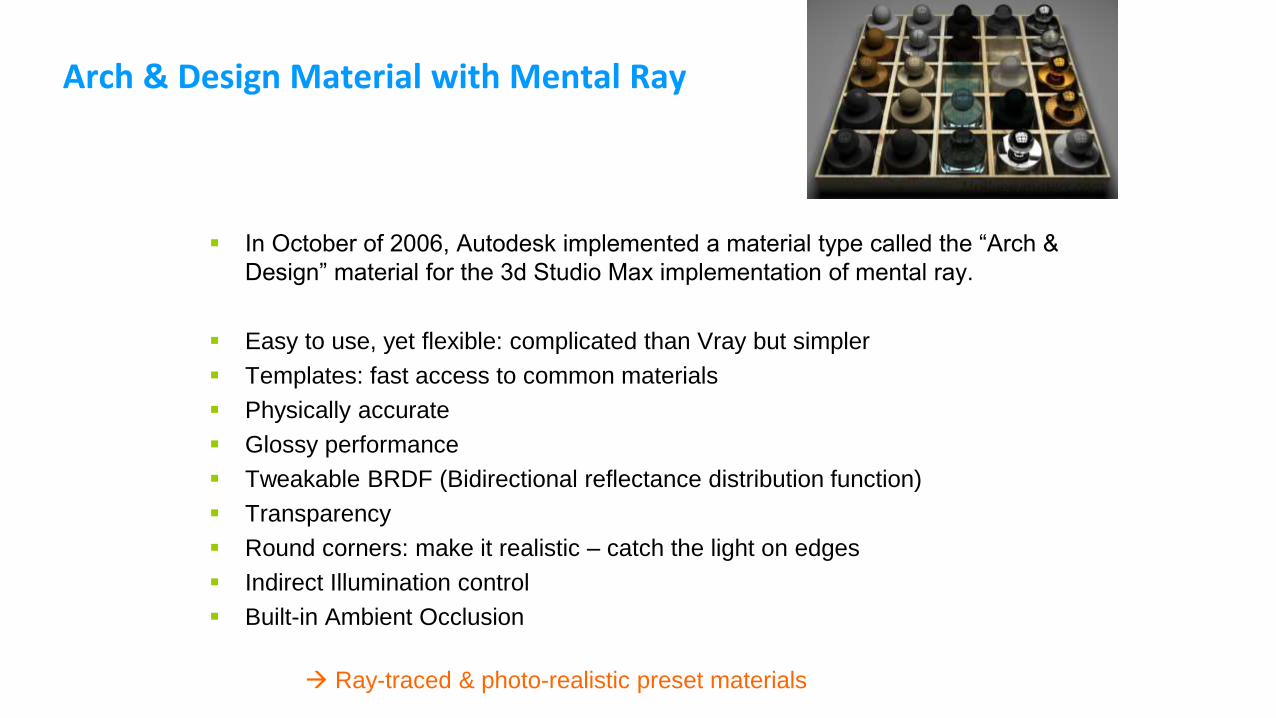
Arch & Design Material with Mental Ray
In October of 2006, Autodesk implemented a material type called the “Arch &
Design” material for the 3d Studio Max implementation of mental ray.
Easy to use, yet flexible: complicated than Vray but simpler
Templates: fast access to common materials
Physically accurate
Glossy performance
Tweakable BRDF (Bidirectional reflectance distribution function)
Transparency
Round corners: make it realistic – catch the light on edges
Indirect Illumination control
Built-in Ambient Occlusion
Ray-traced & photo-realistic preset materials

Preset Materials mapping test using Stanford Dragon Model http://www.mrbluesummers.com/3572/downloads/stanford-dragon-model
freely downloadable max file
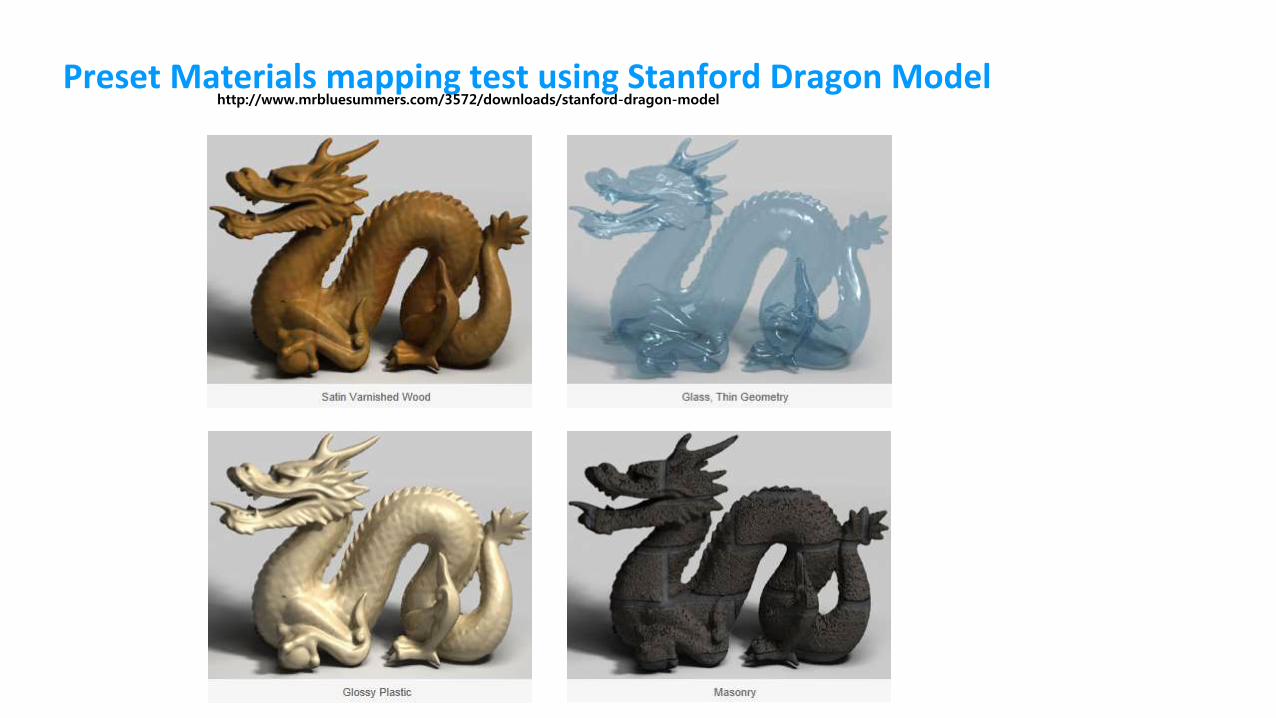
Preset Materials mapping test using Stanford Dragon Model http://www.mrbluesummers.com/3572/downloads/stanford-dragon-model

Various Preset Materials in Mental Ray Material/Map


Lab Exercises: Renderers: Vray & MR
Lab Exercises 01: Review – Various effects of Vray
SketchUP + Vray

Lab Exercise 01
Render a scene in SketchUP using Vray
Open AnglePins.skp and edit followings:
- Assign various Vray Materials using Diffuse, Reflection, Refraction, Emissive
- If needed, create more primitive objects (box, sphere, etc.)
- Bitmap Texture mapping on few objects: JPG, PNG files
- Your 3d text name
- And so on
Your final rendering image could be 1920 X 1080 pixels (Full HD, 1080p)
Render your final scene Store under your named folder


Diffuse Only
A bit reflection
Transparent Glass with Reflection & Refraction
Diffuse &
Reflection
Emissive Diffuse &
Reflection &
Refraction
Example
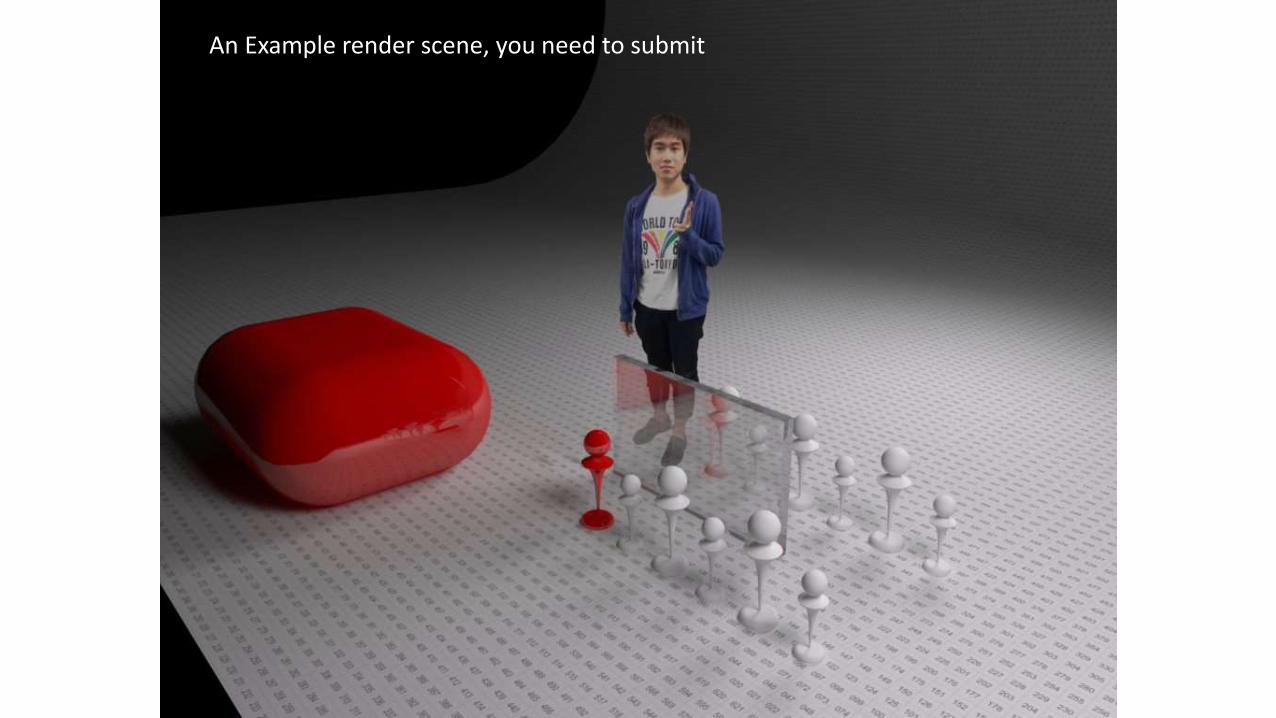
An Example render scene, you need to submit
Lab Exercises 02: Church of the Light (Tadao Ando)
SketchUP + Vray

Lab Exercise 02
Render a scene in SketchUP using Vray
Open Tadao_Ando~.skp and edit followings:
- Mapping a specific part of the house using Vray Material Editor
- Control Lights for your best scene
- Render a scene and save in PNG format so that the BG can be added in Photoshop
- And so on
Your final rendering image could be 1920 X 1080 pixels (Full HD, 1080p)
Render your final scene Store under your named folder


Example render scenes

Lab Exercise 03. Living room Interior Scene: a Test

Living room Interior Scene
Outdoor background image
Mapping and rendering a living room
Photo-realistic rendering


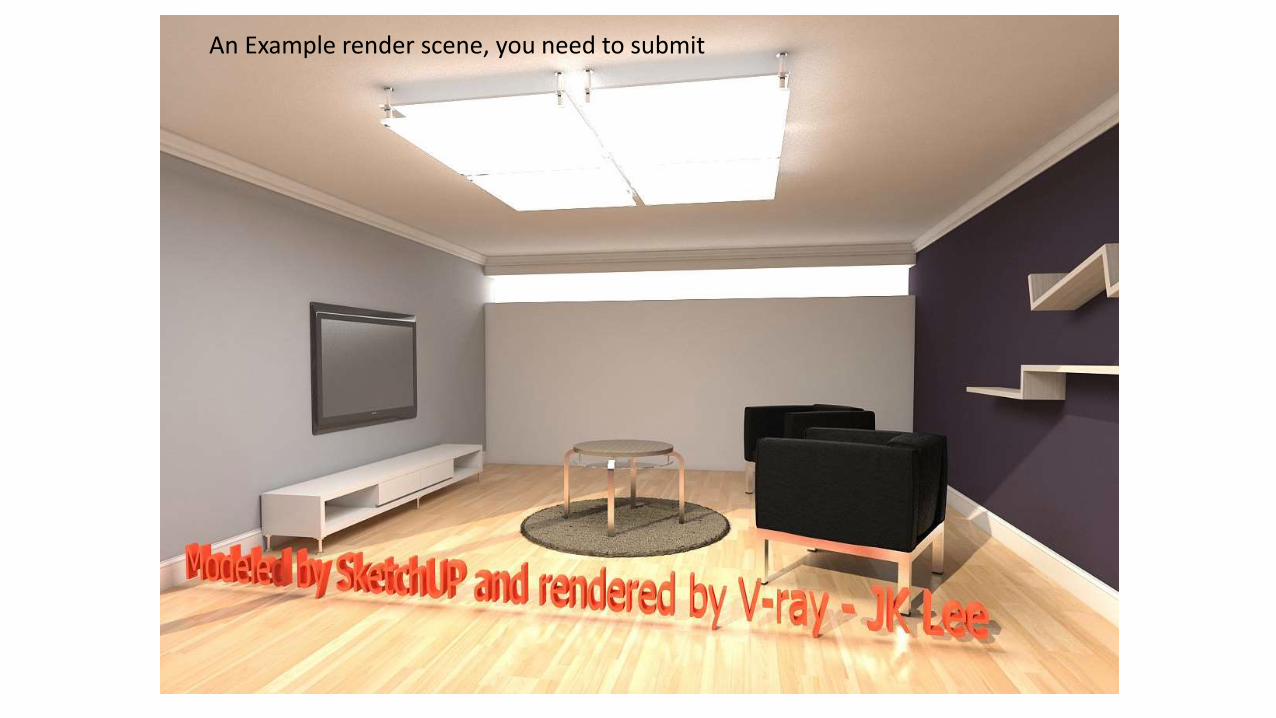
An Example render scene, you need to submit

An Example render scene, you need to submit

Lab Exercises 04:
Setup 3ds Max Design 2015 & Vray / MR environment

Lab Exercises 05:
3ds Max + Mental Ray (based on V-ray experiences)

Lab Exercise 05
Render a scene in 3ds Max using Mental Ray
Create a new Max file:
- Set a MR Sun
- Make primitive objects such as a box and a teapot
- Assign MR materials presets, without any experiences
- And so on
Render your final scene Store under your named folder

Lab Exercises 06: Various pre-set materials
3ds Max + Mental Ray + Autodesk Material

Various Preset Materials in Mental Ray Material/Map

Lab Exercises 07: Mental Ray (MR) Sun & MR Sky

Lab Exercise 07
Render three scenes in 3ds Max using Mental Ray
Create a new Max file
- Change current renderer to “Mental Ray” (default)
- Import an external geometry – UrbanCity.FBX file
- Create an MR Sun & Sky
- Change MR Sun & Sky’s current time: around 6 a.m. or 6 p.m. to show the sun disc
- Render scenes:
1. Dark grey city’s, e.g. 6:00 a.m.
2. Dark grey city’s, e.g. 12:00 p.m.
Render your final 2 scenes Store under your named folder (2 images)

6:00 a.m.
Rendering Example

12:00 p.m.
Rendering Example

Lab Exercises 08: Imported Geometry

Environment_MentalRay.max
1,000mm
1,000mm

Next Class
Primitive geometry in 3ds Max
3ds Max Design + Mental Ray