%qtrqtcvg 2n 5vg %jcpfngt #< r ^ h yyy … · 5 i. perimeter isolation strips note: it is...
TRANSCRIPT

120 E. Corporate Pl Ste 20, Chandler, AZ 85225p. 800.613.0996 | f. 888.541.8878
www.rubberflooringinc.com

Table of ContentsBASE PREPARATION
I. General Information ............................................................................3
II. Job Site Conditions .............................................................................3
III. Subfloor Requirements & Preparation ....................................................3
IV. Hazards .............................................................................................4
V. Material Storage and Handling ..............................................................4
INSTALLATION
I. Perimeter Isolation Strips ....................................................................5
II. Installation Methods ...........................................................................5
III. Floor Finish .......................................................................................6
IV. Baseboard Installation ........................................................................7
VII. Recommended Materials .......................................................................7
WARRANTY
Warranty Information .................................................................................8

I. GENERAL INFORMATIONThe QuietSound II™ rolled underlayment has been rigorously tested
to be as good as any sound isolation products
Currently produced, laboratory results available on request.. Made
from 100% resilient recycled rubber, from remanufactured car
and truck tires, QuietSound II™ qualifies many projects for up to
5 LEED points and makes an important statement that a builder,
developer, or architect cares about our environment. Used in
schools, hospitals, hotels and condominiums QuietSound II™ has
very low VOC’s and can be installed under most types of grouted,
glued and floating floors***( no adhesive required for floating
floors) including ceramic tile, stone, and engineered woods.
II. JOB SITE CONDITIONSLike most flooring products, do not consider installation until
there are suitable temperature and humidity controls operable
and working, and a suitably “clean” means of ingress and egress.
Complete building and job requirements are available online at
www.usrubber.com.
III. SUBFLOOR REQUIREMENTS & PREPARATION
NOTE: Please follow the subfloor requirements and preparation
recommendations determined by the flooring manufacturer. Use
the following subfloor requirements and preparation guidelines
only when no such recommendations exist for the floor finishing
product.
1. All subfloors/substrates must be inspected prior to installation.
2. Install QuietSound II™ over concrete, approved self-leveling
materials and wood.
3. Wood subfloors (when installed with use of grouted floor
coverings like tile) must be prepared according to ANSI L/360
standards, as required by the floor covering manufacturer.
NOTE: Particleboard, often called “chipboard,” masonite and lauan
are not suitable underlayments.
4. Concrete floors must be fully cured and permanently dry.
Subfloor shall be dry, clean, smooth, level and structurally
sound. It should be free of dust, solvent, paint, wax, oil, grease,
asphalt, sealers, curing and hardening compounds, alkaline
salts, old adhesive residue and other extraneous materials,
according to ASTM F710.
5. Subfloor should be smooth to prevent irregularities, roughness
or other defects from telegraphing through the material. The
surface should be flat to the equivalent of 3/16” (3.9mm)
in 10’, as described in ACI 117R, or as recommended by the
flooring manufacturer.
6. Mechanically remove all traces of old adhesives, paint or other
debris by scraping, sanding or scarifying the substrate. DO NOT
use solvents.
7. Grind all high spots until level and fill low spots with an
approved patching/leveling compound.
8. All saw cuts (control joints), cracks, indentations and other non-
moving joints in the concrete must be filled with an approved
patching/leveling compound. Allow patching material to dry
thoroughly.
9. Any concrete subfloor can be a source of moisture-related
flooring failures. It is the installer’s responsibility to test the
concrete or other cement-like material for moisture.
NOTE: The calcium chloride test (ASTM F1869) is not recommended
for use with gypsum products.
3
BASE PREPARATION
4
IV. HAZARDSSILICA WARNING
Concrete, floor patching compounds, toppings and leveling
compounds can contain free crystalline silica. Cutting, sawing,
grinding or drilling can produce respirable crystalline silica
(particles 1-10 micrometers). Respirable silica is classified by OSHA
as an IA carcinogen and is known to cause silicosis and other
respiratory diseases. Avoid actions that cause dust to become
airborne. Use local or general ventilation, or protective equipment
to reduce exposure below applicable exposure limits.
LEAD WARNING
Certain paints may contain lead. Exposure to excessive amounts
of lead dust presents a health hazard. Refer to applicable federal,
state and local laws and the publication, Lead Based Paint.
Guidelines for Hazard Identification and Abatement in Public and
Indian Housing, available from the United States Department of
Housing and Urban Development.
ASBESTOS WARNING
Resilient flooring, backing, Dining felt, paint or asphalted
“cutback” adhesives could contain asbestos fibers. Avoid actions
that cause dust to become airborne. DO NOT sand, dry sweep,
dry scrape, drill, saw, bead blast, mechanically chip or pulverize.
Regulations may require that the material be tested to determine
asbestos content. Consult the documents titled, Recommended
Work Practices for Removal of Existing Resilient Floor Coverings,
available from the Resilient Floor Covering Institute.
V. MATERIAL STORAGE AND HANDLING1. Deliver the material to the job site in its original, unopened
packaging with all labels intact and stored appropriately to
prevent damage.
2. Inspect all material for visual defects before beginning the
installation. U.S. Rubber will not honor any labor claim on
material installed with visually apparent defects.
4. The material and any adhesive must be acclimated at room
temperature for a minimum of 24 hours before starting the
installation.
5. Roll material is stretched slightly when it is rolled at the factory.
At the job site, the installer should allow all cuts to relax before
gluing down. Shaking the material once it is unrolled can help it
to relax more quickly.
5
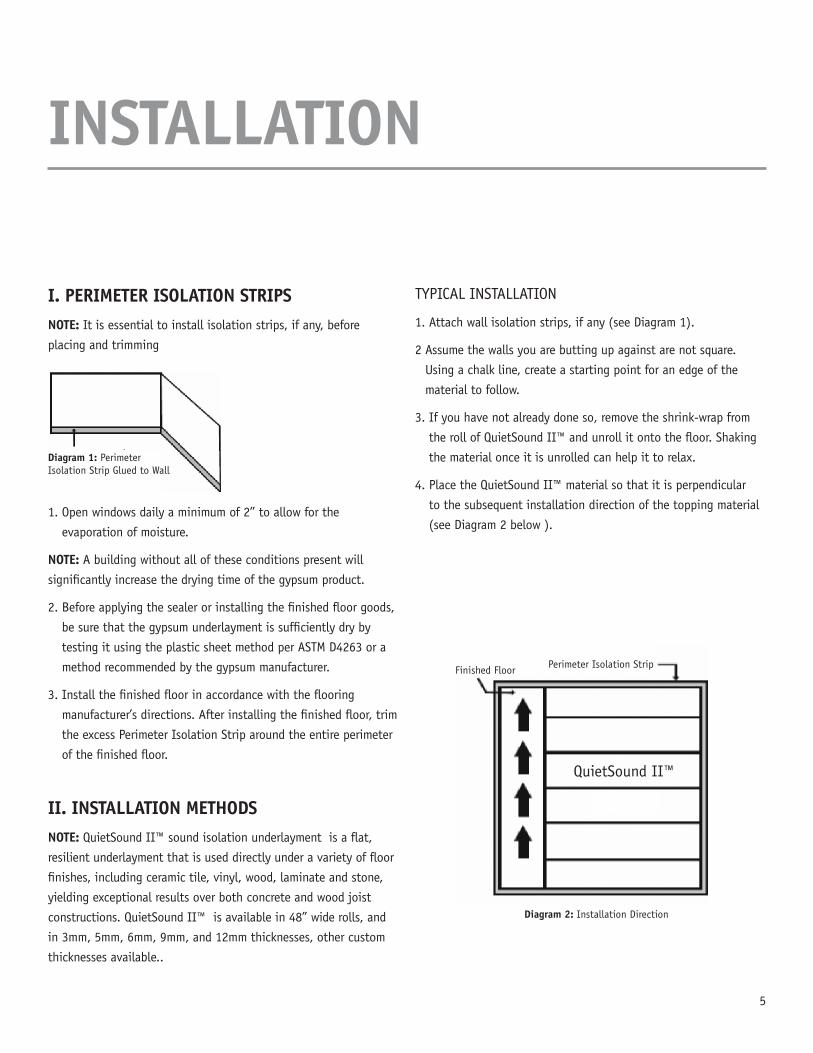
I. PERIMETER ISOLATION STRIPSNOTE: It is essential to install isolation strips, if any, before
placing and trimming
1. Open windows daily a minimum of 2” to allow for the
evaporation of moisture.
NOTE: A building without all of these conditions present will
significantly increase the drying time of the gypsum product.
2. Before applying the sealer or installing the finished floor goods,
be sure that the gypsum underlayment is sufficiently dry by
testing it using the plastic sheet method per ASTM D4263 or a
method recommended by the gypsum manufacturer.
3. Install the finished floor in accordance with the flooring
manufacturer’s directions. After installing the finished floor, trim
the excess Perimeter Isolation Strip around the entire perimeter
of the finished floor.
II. INSTALLATION METHODSNOTE: QuietSound II™ sound isolation underlayment is a flat,
resilient underlayment that is used directly under a variety of floor
finishes, including ceramic tile, vinyl, wood, laminate and stone,
yielding exceptional results over both concrete and wood joist
constructions. QuietSound II™ is available in 48” wide rolls, and
in 3mm, 5mm, 6mm, 9mm, and 12mm thicknesses, other custom
thicknesses available..
TYPICAL INSTALLATION
1. Attach wall isolation strips, if any (see Diagram 1).
2 Assume the walls you are butting up against are not square.
Using a chalk line, create a starting point for an edge of the
material to follow.
3. If you have not already done so, remove the shrink-wrap from
the roll of QuietSound II™ and unroll it onto the floor. Shaking
the material once it is unrolled can help it to relax.
4. Place the QuietSound II™ material so that it is perpendicular
to the subsequent installation direction of the topping material
(see Diagram 2 below ).
INSTALLATION
Diagram 1: Perimeter Isolation Strip Glued to Wall
Diagram 2: Installation Direction
Finished Floor Perimeter Isolation Strip
QuietSound II™

6
5. Trim the ends of each section as necessary in order to fit the
surface area to be covered. You may trim section ends to exact
dimensions required (e.g. joints with walls, etc.).
6. Align the lengthwise edge of the material exactly with that of
the neighboring section. Edges must contact but not overlap.
NOTE: When using grouted or fully adhered flooring materials,
the QuietSound II™ shall be fully adhered to the substrate with a
suitable adhesive, preferably Surebond II, or Acryli-Bond II. No
substitutions are permitted.
7. Fold the first drop lengthwise (half the width of the roll). Spread
adhesive using proper notch trowel.
NOTE: Temperature and humidity affect the open time of adhesive.
The installer should monitor on-site conditions and adjust open
time accordingly. Carefully lay the material into the wet adhesive,
dropping it may trap air which may affect adhesion. Carefully lay
the material into the wet adhesive.
8. Fold over second half of first
sheet and first half of second
sheet.
9. Spread the adhesive. At seam
area, spread adhesive at a
90 degree angle to the seam
to prevent excessive adhesive
oozing up to the surface of the material.
10. Continue the process for each consecutive drop. Always work
at a pace so that you are always folding material back into wet
adhesive.
11. Never leave adhesive ridges or puddles, as they may telegraph
through the material.
12. Use a 30 to 50 lb. roller to roll over the floor within 45
minutes to ensure proper transfer of adhesive. Overlap each
pass of the roller by 50% of the previous pass to ensure that
the floor is properly rolled.
13. Slice air pockets and wrinkles and smooth with a roller or the
flat side of a trowel. Align subsequent sheets and butt join the
seams tightly but do not overlap them.
USING TAPE (FOR FLOATING FLOOR COVERING INSTALLATIONS)
1. Dry lay the rolls onto the subfloor following the directions on
above.
2. Use duct tape or a high-quality carpet tape to secure the butt
joints and seams.
3. A high quality 3” wide duct tape can be used to prevent the
QuietSound II™ from moving on the substrate.
NOTE: Gluing down of the QuietSound II™ is not required for
floating Floors.
III. FLOOR FINISHGENERAL
DO NOT mechanically fasten any material through QuietSound II™.
Any mechanical connection, such as nails, screws, staples, etc.,
will transmit noise through to the building structure, compromising
the performance of Quiet Sound.
INSTALLATION
1. Install self-locking floors, such as wood laminates, over
QuietSound II™ following the manufacturer’s recommendations.
2. Glue standard wood flooring directly to QuietSound II™, (if
not floating), using the flooring manufacturer’s recommended
adhesive.
3. If a flooring manufacturer recommends the installation of a
layer of plywood or cement board between the QuiteSound II™
underlayment and the finished flooring, glue the recommended
board using a suitable adhesive.
Diagram 3: Seam Alignment

4. Heat welding of seams may allow the migration of some
chemicals into the flooring. As a preventative measure, install a
barrier between the QuietSound II™ and the flooring. A layer of
craft paper will work well for this application.
5. Install grouted flooring materials in a thin/thick mortar applied
directly on the QuietSound II™.
6. Trim any excess material flush with the floor.
IV. BASEBOARD INSTALLATION(If applicable)
1. After perimeter installation strip has been trimmed to finished
floor height install the baseboard.
2. Fix the baseboard to the wall above the QT. The baseboard must
not touch the finished floor (see Diagram 4).
3. Seal the entire perimeter with a permanently flexible
acoustical caulk.
V. RECOMMENDED MATERIALSNOTE: All materials shall be delivered to the job site in the original
containers with the manufacturer’s identification on each package.
Unauthorized modification to any product is not permitted. The
following materials are listed only as a convenience to the buyer.
URETHANE/ACRYLIC ADHESIVES
1. Surebond II (Urethane Based).
2. Acryli-Bond II-(Acrylic Based)
***NOTE: See page 6, no adhesive required for floating floors, just
tape seams
Diagram 4: Baseboard Installation
Finished Floor
Baseboard
Perimeter Isolation Strip
Do Not Allow Baseboard To Touch Finished Floor
7
