· © 2012 american honda motor co ... illuminated door aii 13049 sill trim p/n 08e12-tr0-101 2013...
TRANSCRIPT

Publications No.
Issue DateINSTALLATIONINSTRUCTIONS
Accessory Application
© 2012 American Honda Motor Co., Inc. – All Rights Reserved. AII 47335 (1211) 1 of 1608E12-TR0-1000-90
AII 13049ILLUMINATED DOOR SILL TRIM
P/N 08E12-TR0-101
2013 CIVIC 2 AND 4-DOOR
NOV 2012
PARTS LIST2 Front illuminated door sill trims
2 Rear door sill trims
2 Wire ties with holder
2 Aluminum tapes
14 Wire ties
Fuse label
Protective tape
Door sill trim harness
2 Clips
2 Alcohol swabs
TOOLS AND SUPPLIES REQUIRED
Phillips screwdriverRatchet10 mm SocketDiagonal cuttersUtility knifeRulerFelt-tip penMasking tapeTapeIsopropyl alcoholShop towelThe following tool is available through the Honda Tool and Equipment Program. On the iN, click on: Service > Service Bay > Tool and Equipment Program, then enter the number under “Search”. Or, call 888-424-6857.• Trim Tool Set (T/N SOJATP2014)
www.collegehillshonda.com

2 of 16 AII 47335 (1211) © 2012 American Honda Motor Co., Inc. – All Rights Reserved.
Illustration of the Illuminated Door Sill Trim in the Vehicle
INSTALLATION
1. Disconnect the negative cable from the battery.
Customer Information: The information in this installation instruction is intended for use only by skilled technicians who have the proper tools, equipment, and training to correctly and safely add equipment to your vehicle. These procedures should not be attempted by “do-it-yourselfers.”
QB62423AJ
FRONT ILLUMINATED DOOR SILL TRIM
FRONT ILLUMINATED DOOR SILL TRIM
REAR DOOR SILL TRIM
REAR DOOR SILL TRIM
2A FUSE
DOOR SILL TRIM HARNESS
2. Remove the passenger’s front door sill trim (six clips, two hooks, and four retaining tabs).
3. Pull away the door opening seal, and remove the passenger’s kick panel (two clips).
Q082003AK
FRONT
PASSENGER’S FRONT DOOR SILL TRIM
6 CLIPS
4 RETAINING TABS
2 HOOKS
Q081901AK PASSENGER’S KICK PANEL
CLIP
CLIP
DOOR OPENING SEAL(Pull away.)
www.collegehillshonda.com
© 2012 American Honda Motor Co., Inc. – All Rights Reserved. AII 47335 (1211) 3 of 16
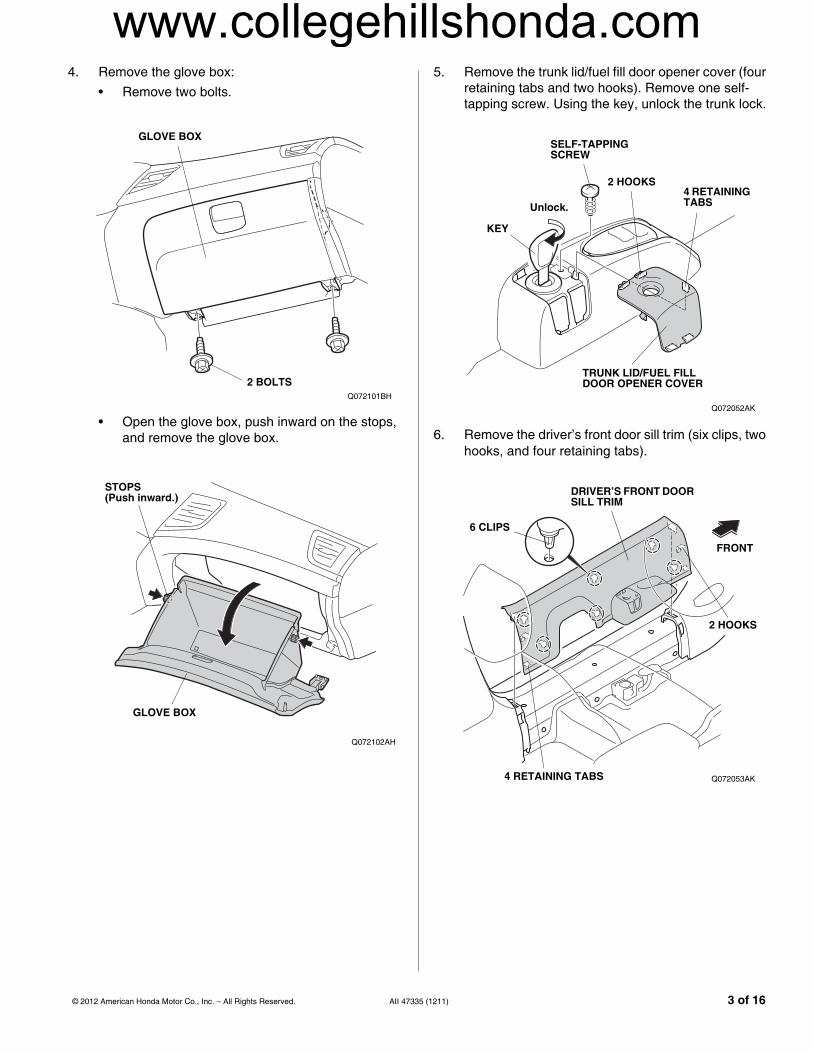
4. Remove the glove box:• Remove two bolts.
• Open the glove box, push inward on the stops, and remove the glove box.
Q072101BH
2 BOLTS
GLOVE BOX
Q072102AH
STOPS(Push inward.)
GLOVE BOX
5. Remove the trunk lid/fuel fill door opener cover (four retaining tabs and two hooks). Remove one self-tapping screw. Using the key, unlock the trunk lock.
6. Remove the driver’s front door sill trim (six clips, two hooks, and four retaining tabs).
Q072052AK
KEY
Unlock.
TRUNK LID/FUEL FILL DOOR OPENER COVER
4 RETAINING TABS
SELF-TAPPING SCREW
2 HOOKS
Q072053AK
6 CLIPS
DRIVER’S FRONT DOOR SILL TRIM
2 HOOKS
FRONT
4 RETAINING TABS
www.collegehillshonda.com

4 of 16 AII 47335 (1211) © 2012 American Honda Motor Co., Inc. – All Rights Reserved.
7. Pull away the door opening seal, and remove the driver’s kick panel (two clips).
8. Remove the driver’s dashboard lower cover (nine clips and unplug the vehicle connectors, if equipped).
Q072050AK
DOOR OPENING SEAL(Pull away.)
CLIP
DRIVER’S KICK PANEL
CLIP
QB62424AJ
DRIVER’S DASHBOARD LOWER COVER9 CLIPS
VEHICLE CONNECTORS(if equipped)
9. To protect the vehicle, attach tape to the dashboard in the areas shown. Move the shift lever to the N (neutral) position, and wrap a shop towel around the shift lever.
10. Remove the center lower panel (two self-tapping screws, four clips, and unplug the vehicle connectors, if equipped).
QB51501BK
TAPE
CENTER LOWERPANEL
SHOP TOWEL
SHIFT LEVER(N POSITION)
QB41901AK
4 CLIPSVEHICLE CONNECTORS (if equipped)
CENTER LOWER PANEL
2 SELF-TAPPING SCREWS
www.collegehillshonda.com

© 2012 American Honda Motor Co., Inc. – All Rights Reserved. AII 47335 (1211) 5 of 16
Routing the Door Sill Trim Harness
11. Using isopropyl alcohol on a shop towel, thoroughly clean the fuse case where the fuse label will attach.
12. Attach the fuse label (2A STEP ILLUMI) to the door sill trim harness fuse case.
13. Attached to the bottom of the fuse box, locate the vehicle 28-pin connector. Unplug the vehicle 28-pin connector and plug it into the door sill trim harness 28-pin connector. Plug the door sill trim harness 28-pin connector into the vehicle 28-pin connector.
QB62401AJ
FUSE CASE(Clean with isopropyl alcohol.)
DOOR SILL TRIM HARNESS
FUSE LABEL(2A STEP ILLUMI)
QB62402BJ
FUSE BOX
2 VEHICLE 28-PIN CONNECTORS
2 DOOR SILL TRIM HARNESS 28-PIN CONNECTORS
14. Attach the door sill trim harness 28-pin connector to the vehicle 28-pin connector.
15. Attach the door sill trim harness fuse case to the bottom of fuse box.
QB62403BJDOOR SILL TRIM HARNESS 28-PIN CONNECTOR
VEHICLE 28-PIN CONNECTOR
QB62404AJ
DOOR SILL TRIM HARNESS FUSE CASE
DOOR SILL TRIM HARNESS
FUSE BOX
DOOR SILL TRIM HARNESS FUSE CASE
www.collegehillshonda.com

6 of 16 AII 47335 (1211) © 2012 American Honda Motor Co., Inc. – All Rights Reserved.
16. Secure the door sill trim harness to the vehicle harness with one wire tie.
17. At the door sill area, secure the door sill trim harness to the vehicle harness with two wire ties.
QB62405AJ
WIRE TIE
VEHICLE HARNESS
DOOR SILL TRIM HARNESS
QB62406AJ2 WIRE TIES
VEHICLE HARNESS
DOOR SILL TRIM HARNESS
18. Continue to route the door sill trim harness along the vehicle harness, then loop the connector back to the measurement shown. Secure the door sill trim harness to the vehicle harness with one wire tie.
19. Route the other end of the door sill trim harness up and over to the vehicle harness. Secure the door sill trim harness to the vehicle harness with one wire tie.
Q002601AH
60 mm(2.4 in.)
VEHICLE HARNESS
WIRE TIE
DOOR SILL TRIM HARNESS
VEHICLE HOLE
DOOR SILL TRIM 2-PIN CONNECTOR
QB62407AJ
WIRE TIE
VEHICLE HARNESS
DOOR SILL TRIM HARNESS
www.collegehillshonda.com

© 2012 American Honda Motor Co., Inc. – All Rights Reserved. AII 47335 (1211) 7 of 16
20. Secure the door sill trim harness to the holes in the dashboard panel with two wire ties. If another accessory harness is already attached to the dashboard panel, route and attach the other harness below the door sill trim harness.
21. Route the door sill trim harness toward the passenger side of the vehicle, and secure it to the vehicle frame with one wire tie.
QB62408AJ
2 HOLES
DOOR SILL TRIM HARNESS
2 WIRE TIES
DASHBOARD PANEL
2 WIRE TIES DOOR SILL TRIM HARNESS
ANOTHER ACCESSORY HARNESS
WITH ANOTHER ACCESSORY HARNESS
INSIDE VIEW
DASHBOARDPANEL
Q002604BHWIRE TIE
DOOR SILL TRIM HARNESS
VEHICLE FRAME
22. Route the door sill trim harness through the center lower panel opening.
23. Route the door sill trim harness through the glove box opening.
Q002605AH
DOOR SILL TRIM HARNESS
CENTER LOWER PANEL OPENING
Q002606AH
DOOR SILL TRIM HARNESS
GLOVE BOX OPENING
www.collegehillshonda.com

8 of 16 AII 47335 (1211) © 2012 American Honda Motor Co., Inc. – All Rights Reserved.
24. Align the green tape on the door sill trim harness with the hole in the glove box frame, and secure the door sill trim harness to the glove box frame with one wire tie.
25. Secure the door sill trim harness to the glove box frame with one wire tie.
Q002607AHDOOR SILL TRIM HARNESS
WIRE TIE
GREEN TAPE
HOLEGLOVE BOX FRAME
Q002608AH
DOOR SILL TRIM HARNESS
GLOVE BOX OPENING
WIRE TIE GLOVE BOX FRAME
26. Inside the center lower panel opening, secure the door sill trim harness to the vehicle harness with two wire ties.
27. Secure the door sill trim harness to the glove box frame and the vehicle harness with two wire ties.
QB62409AJ
DOOR SILL TRIM HARNESS
CENTER LOWER PANEL OPENING VEHICLE
HARNESS
2 WIRE TIES
Q002610AH
WIRE TIE
HOLE
WIRE TIE
Align.
DOOR SILL TRIM HARNESS
WIRE TIE
GLOVE BOX FRAME
VEHICLE HARNESS
www.collegehillshonda.com

© 2012 American Honda Motor Co., Inc. – All Rights Reserved. AII 47335 (1211) 9 of 16
28. Using isopropyl alcohol on a shop towel, thoroughly clean the vehicle panel where the aluminum tape will attach.
29. Secure the door sill trim harness to the vehicle panel with two aluminum tapes.Do not attach the aluminum tape over any vehicle holes.
Q002611AH
DOOR SILL TRIM HARNESS
2 ALUMINUM TAPES
ALUMINUM TAPE VEHICLE
HOLE
ALUMINUM TAPE
VEHICLE HOLE
VEHICLE PANEL(Clean with isopropyl alcohol.)
Installing the Front Illuminated Door Sill Trim (Driver’s side)
30. Using a utility knife, cut one protective tape at the measurements shown.
31. Pull away the left front door opening seal.
32. Attach a strip of masking tape to the vehicle panel at the location shown.
7D1509BR
A
PROTECTIVE TAPE
B40 mm (1.6 in.)
30 mm (1.2 in.)
30 mm (1.2 in.)
UTILITY KNIFE
PROTECTIVE TAPE LINE
Q002612AH
LEFT FRONT DOOR OPENING SEAL
VEHICLE HOLE
VEHICLE PANEL
MASKING TAPE
DRIVER’S SEAT
www.collegehillshonda.com

10 of 16 AII 47335 (1211) © 2012 American Honda Motor Co., Inc. – All Rights Reserved.
33. Position the front illuminated door sill trim with the masking tape.
34. Route the front illuminated door sill trim harness over the vehicle panel of the door opening seal.
35. Using isopropyl alcohol on a shop towel, clean the vehicle panel around the harness, then use a felt-tip pen to mark the vehicle panel at the harness.
Q002613AH
FRONT ILLUMINATED DOOR SILL TRIM
MASKING TAPE (Attached in step 32.)
FRONT ILLUMINATED DOOR SILL TRIM
Align.
QB62410AJ
FELT-TIP PEN
FRONT ILLUMINATED DOOR SILL TRIM HARNESS
FRONT ILLUMINATED DOOR SILL TRIM
VEHICLE PANEL(Clean with isopropyl alcohol.)
MARK
DOOR OPENING SEAL
36. Remove the front illuminated door sill trim from the vehicle panel.
37. Attach one protective tape A over the mark you made on the vehicle panel, and install one clip over the protective tape.
QB62411AJ
FRONT ILLUMINATED DOOR SILL TRIM
QAD1512AH
CLIP
MARK
VEHICLE PANEL
PROTECTIVE TAPE A(Cut in step 30.)
www.collegehillshonda.com

© 2012 American Honda Motor Co., Inc. – All Rights Reserved. AII 47335 (1211) 11 of 16
38. Peel back the ends of three adhesive backings on the front illuminated door sill trim and attach them to the front of the trim with masking tape. Remove the other two adhesive backings.
39. Using an alcohol swab, thoroughly clean the vehicle panel where the front illuminated door sill trim will attach.
Q002617AH
3 ADHESIVE BACKINGS(Peel back.)
MASKING TAPE
2 ADHESIVE BACKINGS(Remove.)
FRONT ILLUMINATED DOOR SILL TRIM
QB62412AJ
VEHICLE PANEL(Clean withan alcohol swab.)
ALCOHOL SWAB
40. Position the front illuminated door sill trim on the vehicle panel and align it with the masking tape.
41. Attach the front illuminated door sill trim to the vehicle panel by removing three adhesive backings in the order shown and pressing on the trim firmly with your hands.
42. Remove the masking tape.
Q002618AH
FRONT ILLUMINATED DOOR SILL TRIM
MASKING TAPE (Attached in step 32.)
FRONT ILLUMINATED DOOR SILL TRIM
Align.
Q002619AH
SECTION VIEW
3 ADHESIVE BACKINGS (Remove.)
MASKING TAPE (Remove.)
FRONT ILLUMINATED DOOR SILL TRIM
1
2
3
FRONTILLUMINATEDDOOR SILLTRIM
www.collegehillshonda.com

12 of 16 AII 47335 (1211) © 2012 American Honda Motor Co., Inc. – All Rights Reserved.
43. Route the front illuminated door sill trim harness through the clip you installed, and attach one piece of protective tape B over the clip.
44. Plug the front illuminated door sill trim harness 2-pin connector into the door sill trim harness 2-pin connector.
QB62413AJFRONT ILLUMINATED DOOR SILL TRIM
PROTECTIVE TAPE B(Cut in step 30.)
CLIP
FRONT ILLUMINATED DOOR SILL TRIM HARNESS
QB62414AJDOOR SILL TRIM HARNESS 2-PIN CONNECTOR
FRONT ILLUMINATED DOOR SILL TRIM HARNESS 2-PIN CONNECTOR
45. Bundle up the excess front illuminated door sill trim harness, and secure it to the vehicle harness with one wire tie with holder.
Installing the Front Illuminated Door Sill Trim (Passenger’s side)
46. Pull away the right front door opening seal.
47. Attach a strip of masking tape to the vehicle panel at the location shown.
QB62415AJ
FRONT ILLUMINATED DOOR SILL TRIM HARNESS (Bundle up.)
VEHICLE HARNESS
WIRE TIE WITH HOLDER
WIRE TIE WITH HOLDER
FRONT ILLUMINATED DOOR SILL TRIM HARNESS2-PIN CONNECTOR
Q002625AH
RIGHT FRONT DOOR OPENING SEAL
VEHICLE HOLE
VEHICLE PANEL
MASKING TAPE
PASSENGER’S SEAT
www.collegehillshonda.com

© 2012 American Honda Motor Co., Inc. – All Rights Reserved. AII 47335 (1211) 13 of 16
48. Position the front illuminated door sill trim with the masking tape.
49. Route the front illuminated door sill trim harness over the vehicle panel of the door opening seal.
50. Using isopropyl alcohol on a shop towel, clean the vehicle panel around the harness, then use a felt-tip pen to mark the vehicle panel at the harness.
Q002626AH
FRONT ILLUMINATED DOOR SILL TRIM
MASKING TAPE(Attached in step 47.)
FRONT ILLUMINATED DOOR SILL TRIM
Align.
QB62416AJ
FELT-TIP PEN
FRONT ILLUMINATED DOOR SILL TRIM HARNESS
MARK
FRONT ILLUMINATED DOOR SILL TRIM
VEHICLE PANEL(Clean with isopropyl alcohol.)
DOOR OPENING SEAL
51. Remove the front illuminated door sill trim from the vehicle panel.
52. Attach one protective tape A over the mark you made on the vehicle panel, and install one clip over the protective tape.
QB62417AJ
FRONT ILLUMINATED DOOR SILL TRIM
QAD1512AH
CLIP
MARK
VEHICLE PANEL
PROTECTIVE TAPE A(Cut in step 30.)
www.collegehillshonda.com

14 of 16 AII 47335 (1211) © 2012 American Honda Motor Co., Inc. – All Rights Reserved.
53. Peel back the ends of three adhesive backings on the front illuminated door sill trim and attach them to the front of the trim with masking tape. Remove the other two adhesive backings.
54. Using an alcohol swab, thoroughly clean the vehicle panel where the front illuminated door sill trim will attach.
Q002617AH
3 ADHESIVE BACKINGS(Peel back.)
MASKING TAPE
2 ADHESIVE BACKINGS(Remove.)
FRONT ILLUMINATED DOOR SILL TRIM
QB62418AJ
VEHICLE PANEL(Clean with an alcohol swab.)
ALCOHOL SWAB
55. Position the front illuminated door sill trim on the vehicle panel and align it with the masking tape.
56. Attach the front illuminated door sill trim to the vehicle panel by removing three adhesive backings in the order shown and pressing on the trim firmly with your hands.
57. Remove the masking tape.
Q002630AH
FRONT ILLUMINATED DOOR SILL TRIM
MASKING TAPE(Attached in step 47.)
FRONT ILLUMINATED DOOR SILL TRIM
Align.
Q002631AH
SECTION VIEW
3 ADHESIVE BACKINGS (Remove.)
MASKING TAPE (Remove.)
FRONT ILLUMINATED DOOR SILL TRIM
FRONT ILLUMINATED DOOR SILL TRIM
1
2
3
www.collegehillshonda.com

© 2012 American Honda Motor Co., Inc. – All Rights Reserved. AII 47335 (1211) 15 of 16
58. Route the front illuminated door sill trim harness through the clip you installed, and attach one piece of protective tape B over the clip.
59. Plug the front illuminated door sill trim harness 2-pin connector into the door sill trim harness 2-pin connector.
QB62419AJ
FRONT ILLUMINATED DOOR SILL TRIM HARNESS
PROTECTIVE TAPE B(Cut in step 30.)
CLIP
FRONT ILLUMINATED DOOR SILL TRIM
QB62420AJ
DOOR SILL TRIM HARNESS 2-PIN CONNECTOR
FRONT ILLUMINATED DOOR SILL TRIM HARNESS 2-PIN CONNECTOR
60. Bundle up the excess front illuminated door sill trim harness, and secure it to the vehicle harness with one wire tie with holder.
Installing the Rear Door Sill Trim
61. Open the left rear door.
62. Attach a strip of masking tape to the vehicle panel at the measurement shown.
63. Using an alcohol swab, thoroughly clean the vehicle panel where the rear door sill trim will attach.
QB62421AJFRONT ILLUMINATED DOOR SILL TRIM HARNESS (Bundle up.)
VEHICLE HARNESS
WIRE TIE WITH HOLDER
FRONT ILLUMINATED DOOR SILL TRIM HARNESS 2-PIN CONNECTOR
WIRE TIE WITH HOLDER
QB62422AJ
END OF THE CENTER PILLAR LOWER TRIM
MASKING TAPE
26 mm (1.0 in.)
VEHICLE PANEL(Clean with an alcohol swab.)
ALCOHOL SWAB
MASKING TAPE
www.collegehillshonda.com

16 of 16 AII 47335 (1211) © 2012 American Honda Motor Co., Inc. – All Rights Reserved.
64. Peel back the ends of two adhesive backings on the rear door sill trim and attach them to the front of the trim with masking tape. Remove the other two adhesive backings.
65. Position the rear door sill trim with the masking tape.
Q092307AJ
2 ADHESIVE BACKINGS(Remove.)
REAR DOOR SILL TRIM
MASKING TAPE
2 ADHESIVE BACKINGS(Peel back.)
Q092308AJ
REAR DOOR SILL TRIM
MASKING TAPE(Attached in step 62.)
REAR DOOR SILL TRIM(Align the masking tape.)
SECTION VIEW
66. Attach the rear door sill trim to the vehicle panel by removing two adhesive backings and pressing on the trim firmly with your hands.
67. Remove the masking tape.68. Repeat steps 61 through 67 to install the rear door
sill trim on the right side of the vehicle.
69. Check that all wire harnesses are routed properly and all connectors are plugged in.
70. Reinstall all removed parts.71. Reconnect the negative cable to the battery and
check the operation of all lights and electrical accessories.
72. Press and hold the radio power button for two seconds to restore the radio and navi (if equipped) system functions.
73. Reset the clock.74. The front illuminated door sill trims come on when
each door opens.75. If the IMA battery level gauge is at zero, start the
engine and hold the rpm between 3500 and 4000 (no load) in P or N position until the Charge/Assist meter indicates the IMA system has stopped charging the battery.
Q092309AJ
2 ADHESIVE BACKINGS(Remove.)
MASKING TAPE (Remove.)
REAR DOOR SILL TRIM
www.collegehillshonda.com