使用零接触调配(ztp)安装和设置ise 3
TRANSCRIPT

使用零接触调配(ZTP)安装和设置ISE 3.1 目录
简介先决条件要求使用的组件ISE 3.1零接触调配 ZTP ISE安装(按VM用户数据) ZTP ISE安装(按ISE配置映像)限制
简介
本文档介绍如何在ISE 3.1中通过零接触调配(ZTP)安装和设置ISE。
作者:安全咨询工程师Saravanan Manoharan。
先决条件
要求
Cisco 建议您具有以下主题的基础知识:
ISE●
VMware虚拟机●
乌邦图●
使用的组件
本文档中的信息基于Cisco ISE版本3.1。
本文档中的信息都是基于特定实验室环境中的设备编写的。本文档中使用的所有设备最初均采用原始(默认)配置。如果您的网络处于活动状态,请确保您了解所有命令的潜在影响。
ISE 3.1零接触调配
本文档介绍ISE 3.1中ZTP的两个选项
ZTP ISE安装(按VM用户数据) 1.ZTP ISE安装(按ISE配置映像)2.
ZTP ISE安装(按VM用户数据)
Note:此方法仅支持在虚拟机中安装ISE。本文档使用ESXi 6.7,并且仅ESXi 6.5及更高版本支持VM用户数据安装ZTP ISE的此方法
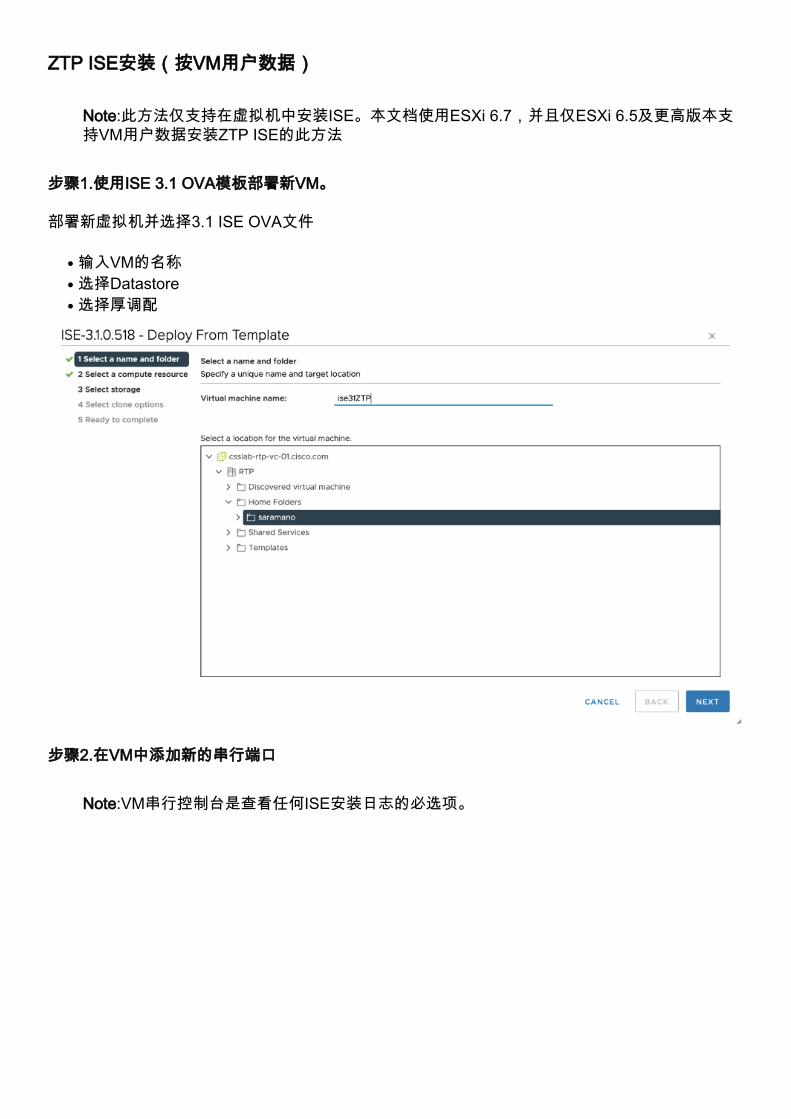
步骤1.使用ISE 3.1 OVA模板部署新VM。
部署新虚拟机并选择3.1 ISE OVA文件
输入VM的名称●
选择Datastore●
选择厚调配●
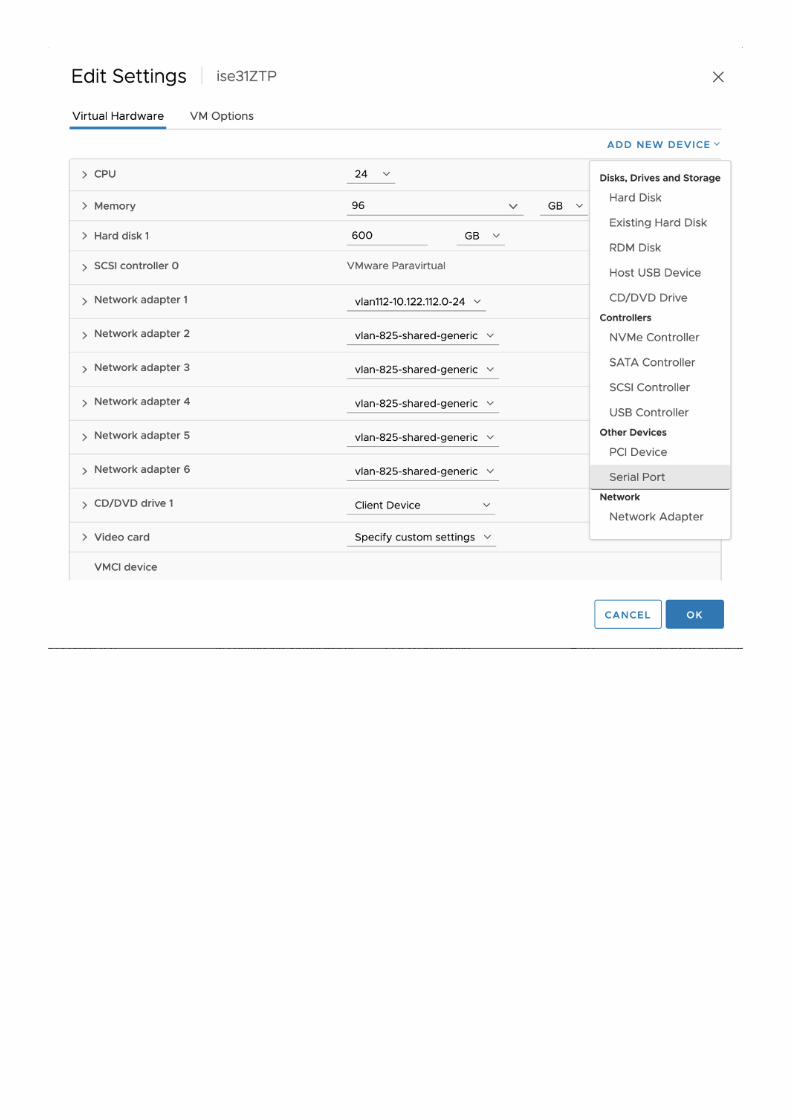
步骤2.在VM中添加新的串行端口
Note:VM串行控制台是查看任何ISE安装日志的必选项。
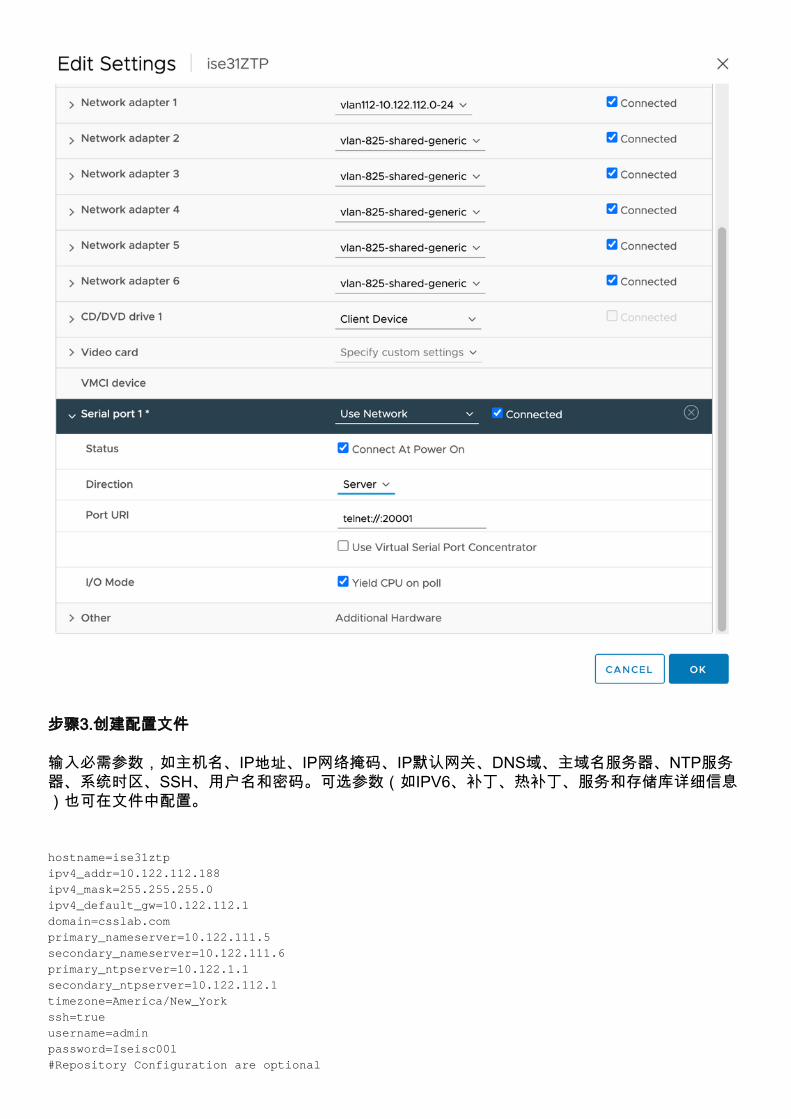
步骤3.创建配置文件
输入必需参数,如主机名、IP地址、IP网络掩码、IP默认网关、DNS域、主域名服务器、NTP服务器、系统时区、SSH、用户名和密码。可选参数(如IPV6、补丁、热补丁、服务和存储库详细信息)也可在文件中配置。
hostname=ise31ztp
ipv4_addr=10.122.112.188
ipv4_mask=255.255.255.0
ipv4_default_gw=10.122.112.1
domain=csslab.com
primary_nameserver=10.122.111.5
secondary_nameserver=10.122.111.6
primary_ntpserver=10.122.1.1
secondary_ntpserver=10.122.112.1
timezone=America/New_York
ssh=true
username=admin
password=Iseisc00l
#Repository Configuration are optional

repository_name=csslab_FTP
repository_protocol=FTP
repository_server_name=10.122.109.4
repository_path=cisco/saramano
ers=true
openapi=true
pxgrid=true
pxGrid_Cloud=true
步骤4.获取配置文件的Encoded字符串
使用https://www.base64encode.org/对步骤3中的内容进行编码。
步骤5.在ISE VM用户数据中输入编码字符串
从第4步复制编码字符串,导航至VM选项>高级>配置参数>编辑配置>添加配置参数
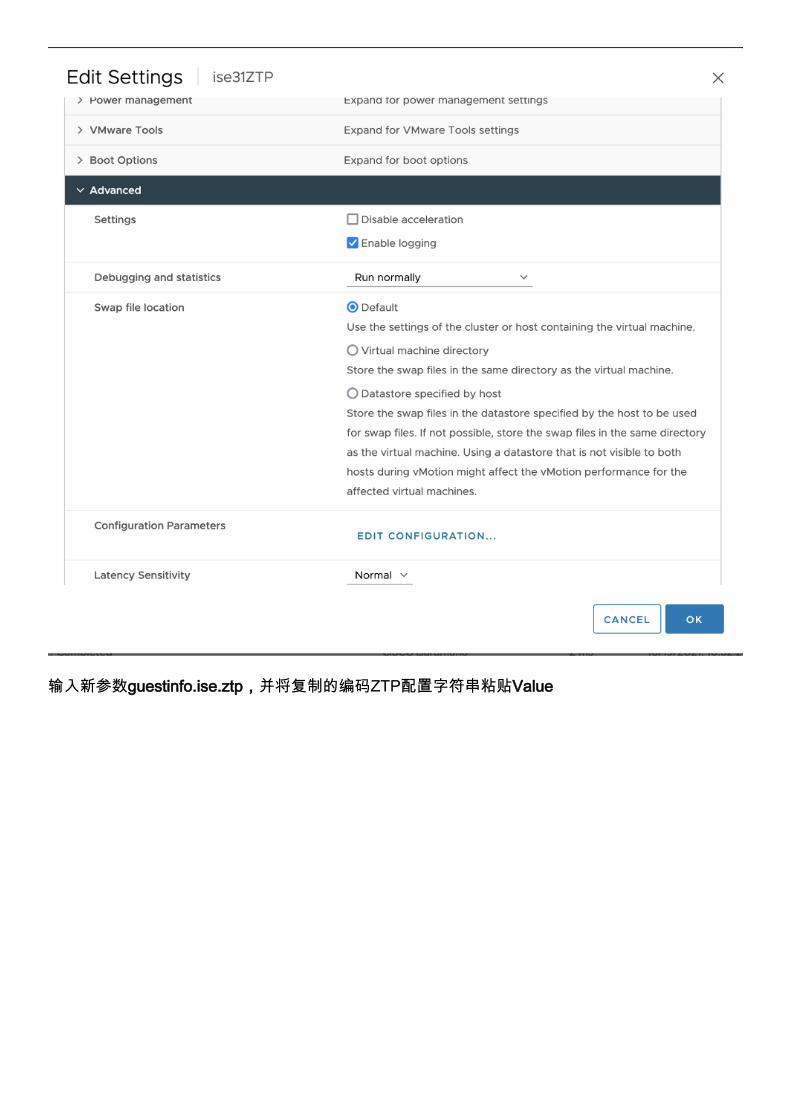
输入新参数guestinfo.ise.ztp,并将复制的编码ZTP配置字符串粘贴Value

步骤6.启动VM和ISE设置的ZTP将自动启动
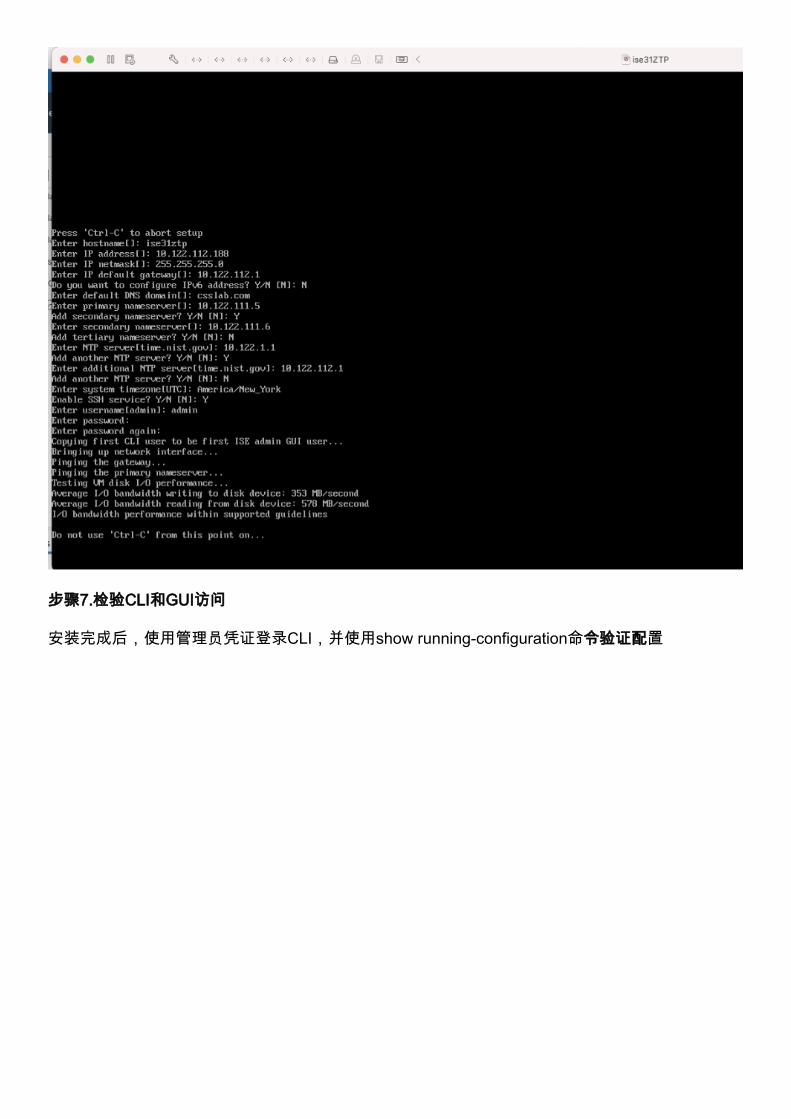
步骤7.检验CLI和GUI访问
安装完成后,使用管理员凭证登录CLI,并使用show running-configuration命令验证配置

现在,验证Web GUI访问
ZTP ISE安装(按ISE配置映像)
Note:VM和物理设备中的ISO/OVA安装支持通过.img文件设置实现的ZTP
创建ISE ZTP配置映像
以下步骤1-4在具有根访问权限的ubuntu计算机中执行

步骤1.从3.1指南复制脚本
复制脚本,无需从ISE 3.1 ZTP指南进行任何修改
#!/bin/bash
###########################################################
# This script is used to generate ise ztp image with ztp
# configuration file.
#
# Need to pass ztp configuration file as input.
#
# Copyright (c) 2021 by Cisco Systems, Inc.
# All rights reserved.
# Note:
# To mount the image use below command
# mount ise_ztp_config.img /ztp
# To mount the image from cdrom
# mount -o ro /dev/sr1 /ztp
#############################################################
if [ -z "$1" ];then
echo "Usage:$0 <ise-ztp.conf> [out-ztp.img]"
exit 1
elif [ ! -f $1 ];then
echo "file $1 not exist"
exit 1
else
conf_file=$1
fi
if [ -z "$2" ] ;then
image=ise_config.img
else
image=$2
fi
mountpath=/tmp/ise_ztp
ztplabel=ISE-ZTP
rm -fr $mountpath
mkdir -p $mountpath
dd if=/dev/zero of=$image bs=1k count=1440 > /dev/null 2>&1
if [ `echo $?` -ne 0 ];then
echo "Image creation failed\n"
exit 1
fi
mkfs.ext4 $image -L $ztplabel -F > /dev/null 2>&1
mount -o rw,loop $image $mountpath
cp $conf_file $mountpath/ise-ztp.conf
sync
umount $mountpath
sleep 1
# Check for automount and unmount
automountpath=$(mount | grep $ztplabel | awk '{print $3}')
if [ -n "$automountpath" ];then
umount $automountpath
fi
echo "Image created $image"
步骤2.使脚本可执行
本示例中使用Nano创建外壳脚本(create_ztp_image.sh)。
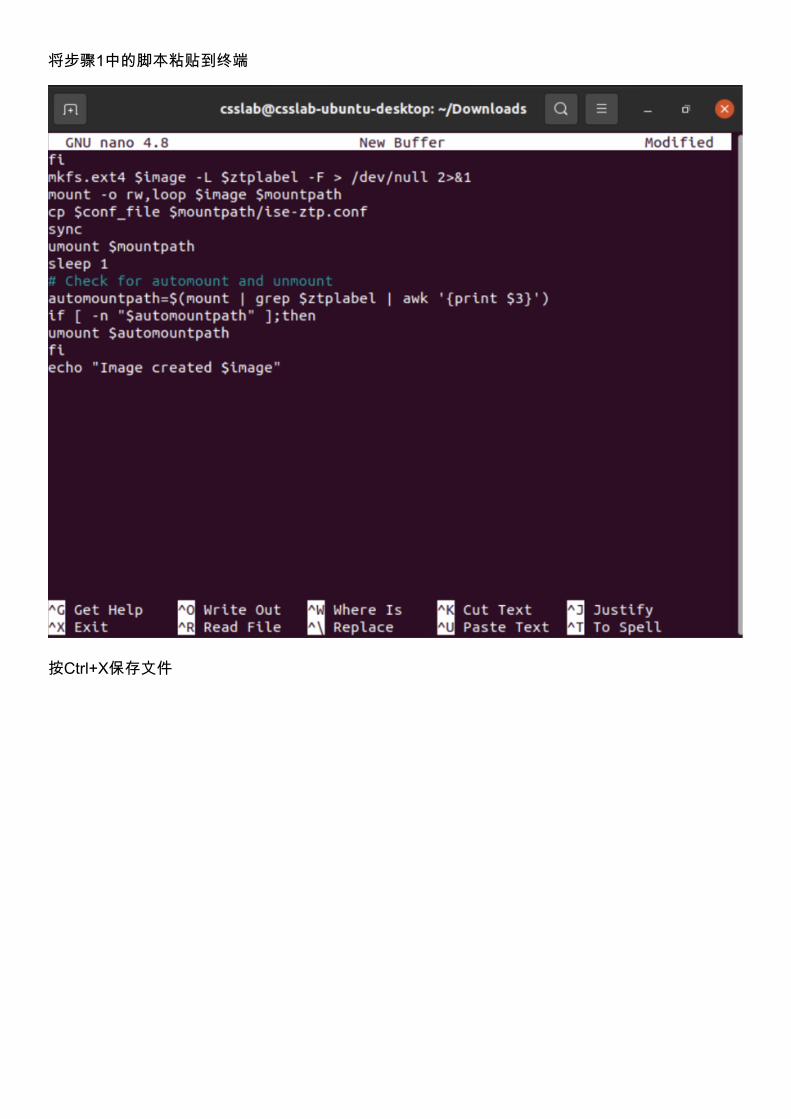
将步骤1中的脚本粘贴到终端
按Ctrl+X保存文件

将文件命名为create_ztp_image.sh

使上述脚本可执行。此脚本可在RHEL、CentOS或Ubuntu上执行
步骤3.创建ISE ZTP配置文件
输入必需参数,如主机名、IP地址、IP网络掩码、IP默认网关、DNS域、主域名服务器、NTP服务器、系统时区、SSH、用户名和密码。可选参数(如IPV6、补丁、热补丁、服务和存储库详细信息)也可在文件中配置。
hostname=ise31ztp_B
ipv4_addr=10.122.111.54
ipv4_mask=255.255.255.0
ipv4_default_gw=10.122.111.1
domain=csslab.com
primary_nameserver=10.122.111.5
secondary_nameserver=10.122.111.6
primary_ntpserver=10.122.1.1
secondary_ntpserver=10.122.111.1
timezone=America/New_York
ssh=true
username=admin
password=Iseisc00l
#Repository Configuration are optional
repository_name=csslab_FTP
repository_protocol=FTP
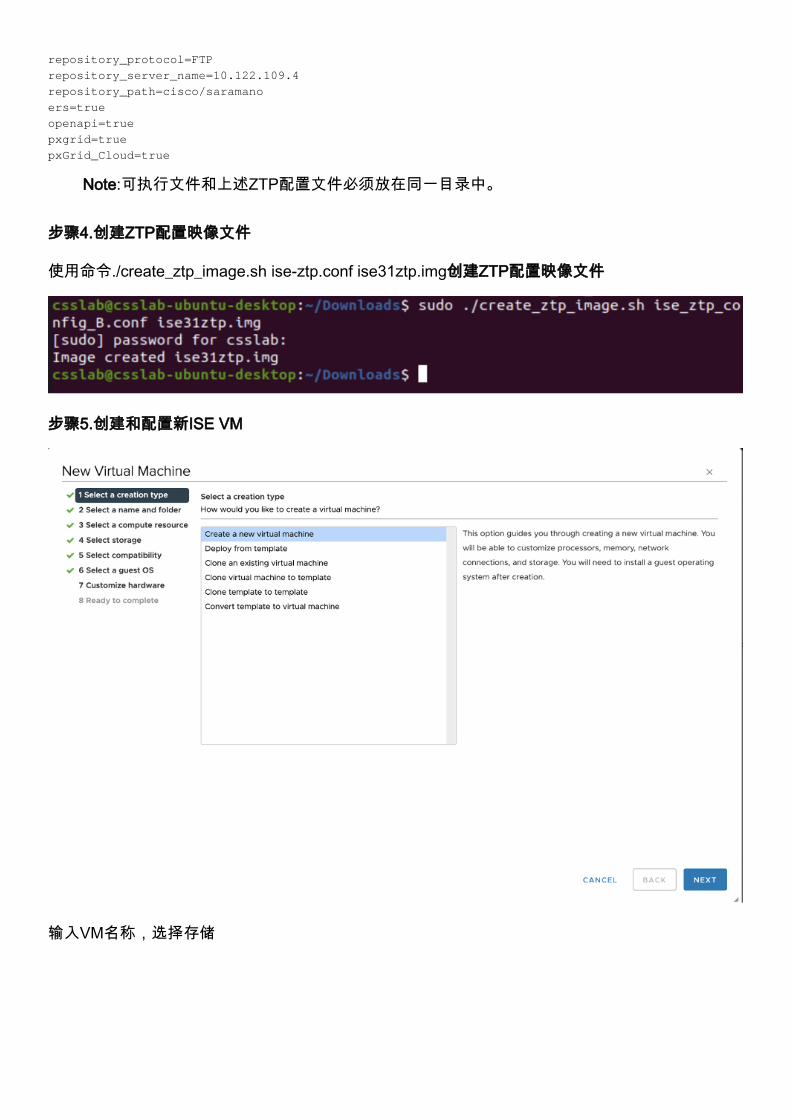
repository_server_name=10.122.109.4
repository_path=cisco/saramano
ers=true
openapi=true
pxgrid=true
pxGrid_Cloud=true
Note:可执行文件和上述ZTP配置文件必须放在同一目录中。
步骤4.创建ZTP配置映像文件
使用命令./create_ztp_image.sh ise-ztp.conf ise31ztp.img创建ZTP配置映像文件
步骤5.创建和配置新ISE VM
输入VM名称,选择存储
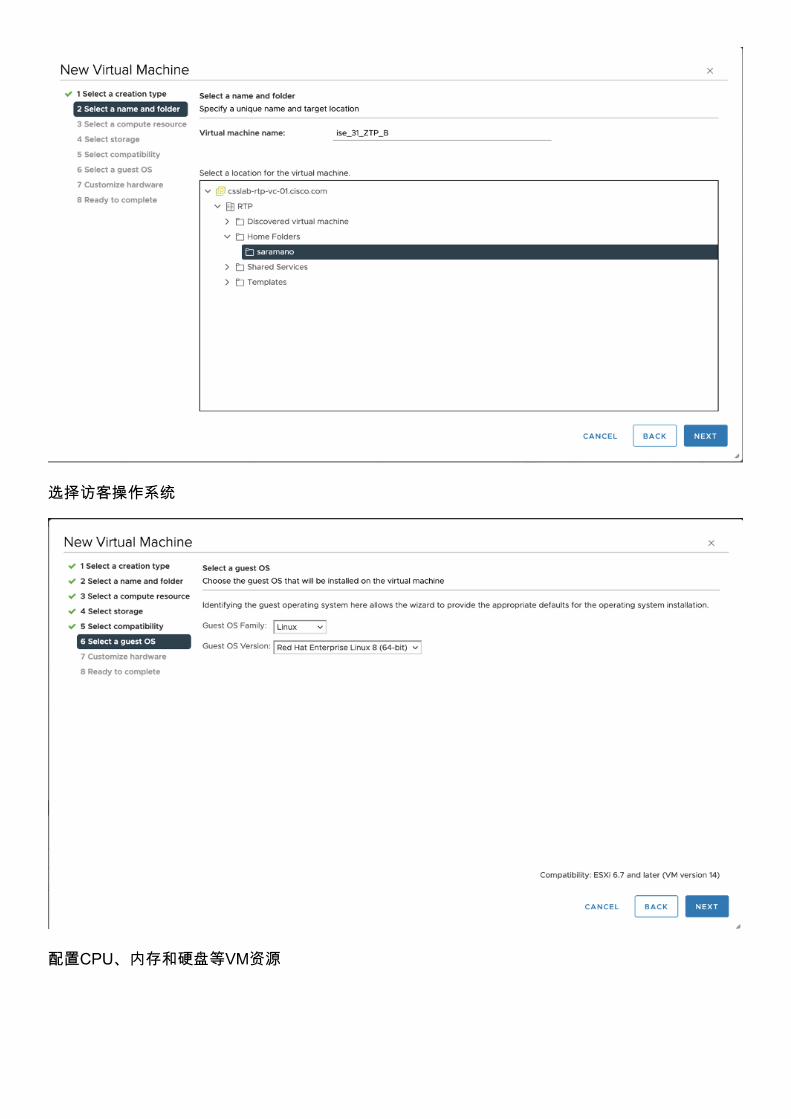
选择访客操作系统
配置CPU、内存和硬盘等VM资源
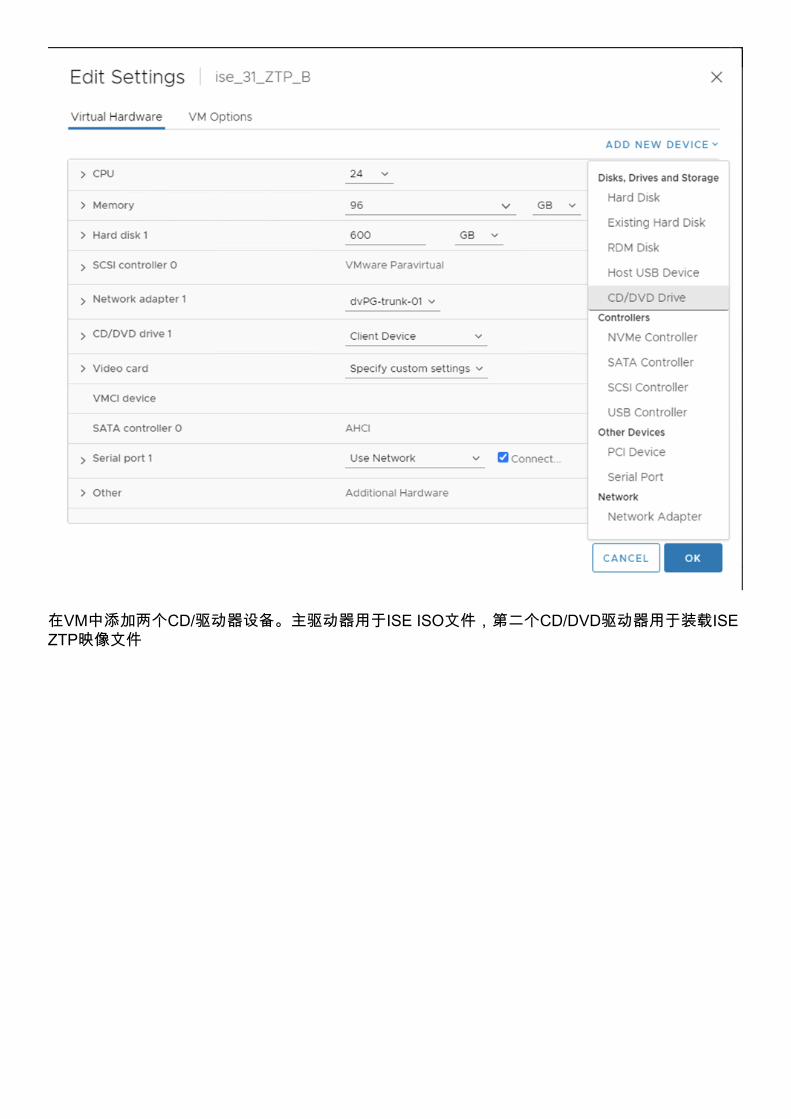
在VM中添加两个CD/驱动器设备。主驱动器用于ISE ISO文件,第二个CD/DVD驱动器用于装载ISEZTP映像文件
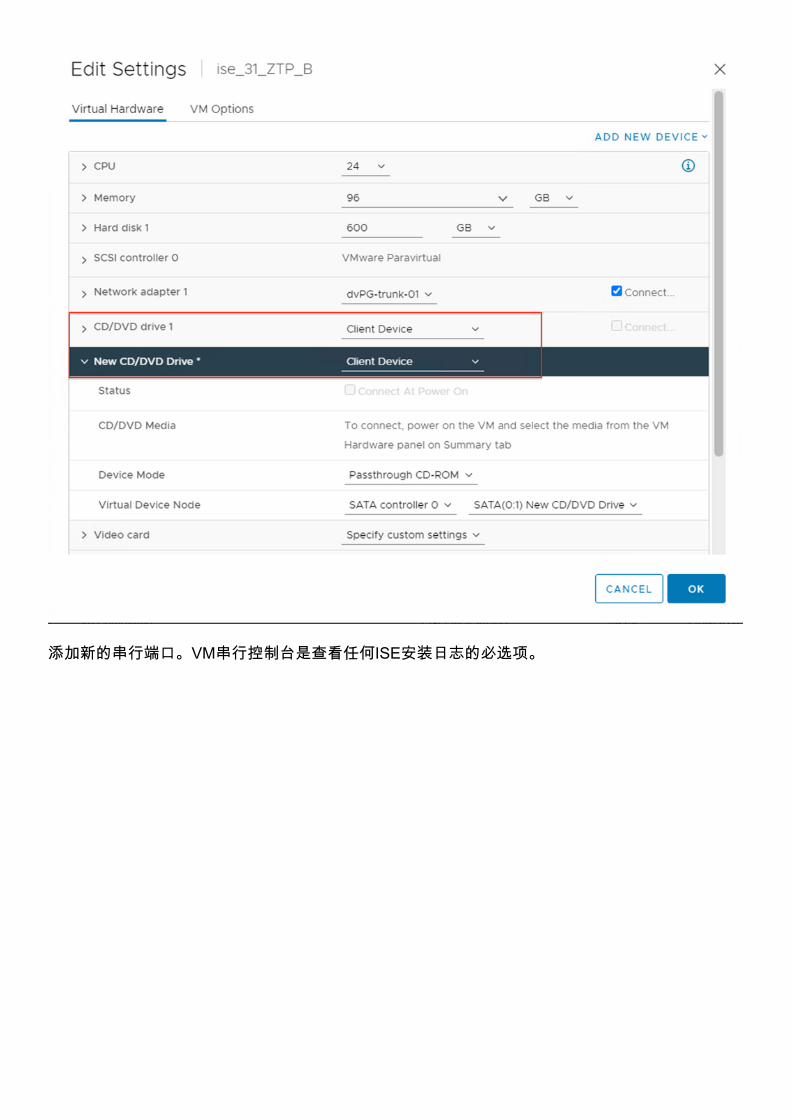
添加新的串行端口。VM串行控制台是查看任何ISE安装日志的必选项。

完成所有必要配置后,打开VM电源。
步骤6.安装ISO和ZTP映像
在VM控制台上,选择Removable devices并在主CD/DVD驱动器上安装ISE 3.1 ISO

在第二个CD/DVD驱动器上安装ise31ztp映像文件
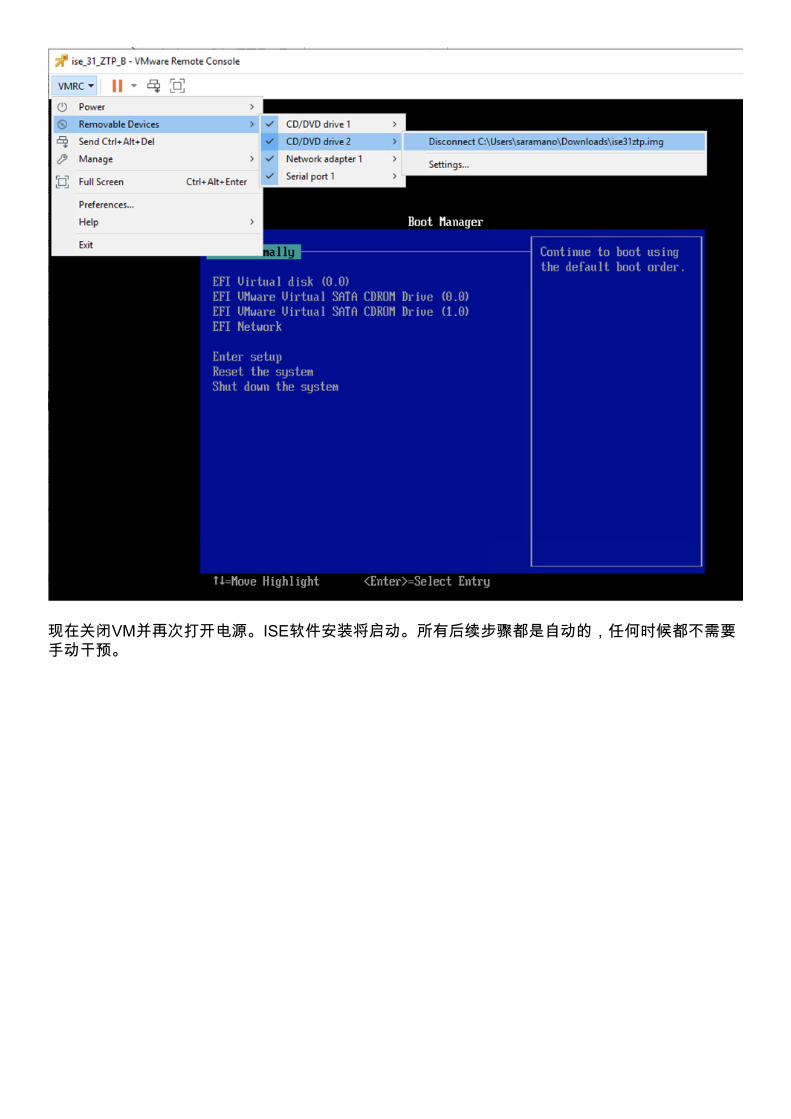
现在关闭VM并再次打开电源。ISE软件安装将启动。所有后续步骤都是自动的,任何时候都不需要手动干预。
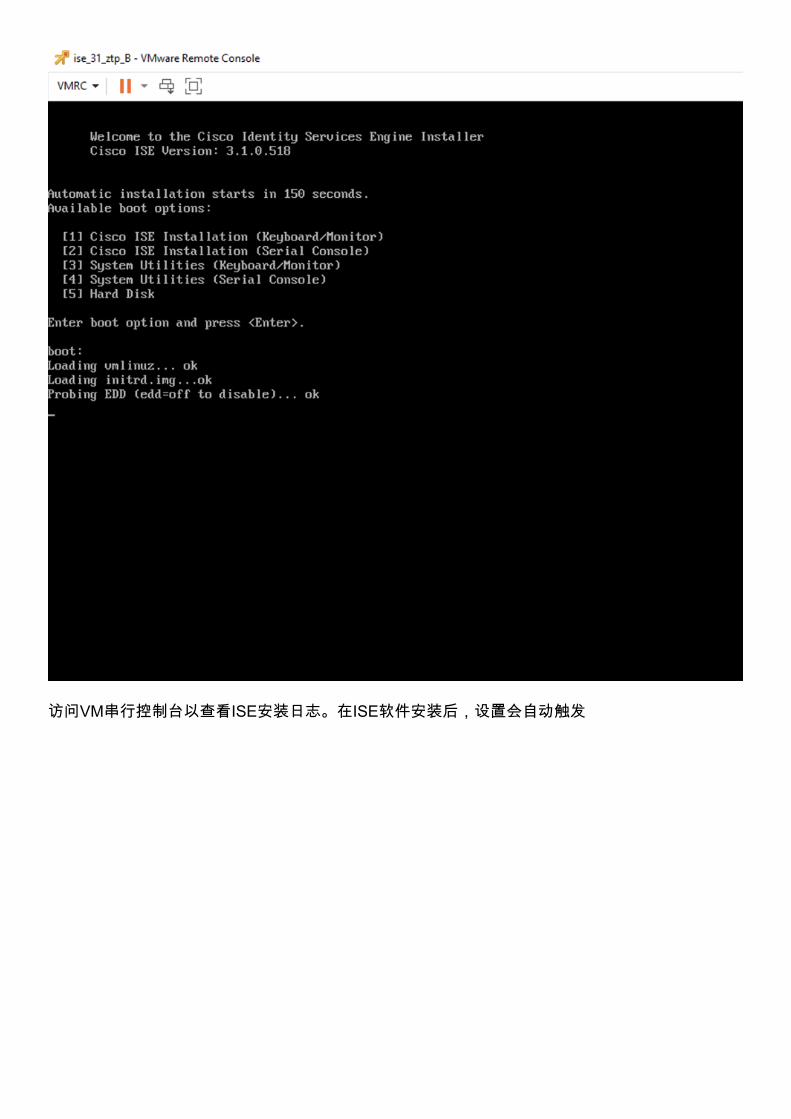
访问VM串行控制台以查看ISE安装日志。在ISE软件安装后,设置会自动触发
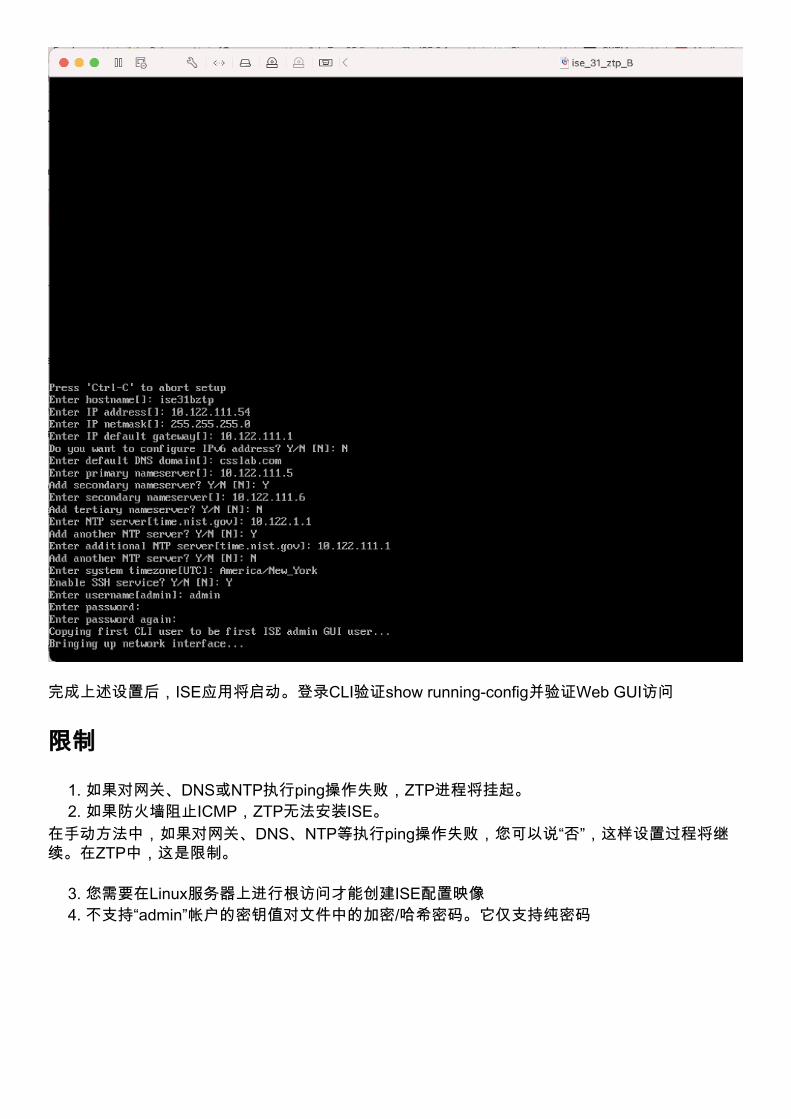
完成上述设置后,ISE应用将启动。登录CLI验证show running-config并验证Web GUI访问
限制
如果对网关、DNS或NTP执行ping操作失败,ZTP进程将挂起。1.如果防火墙阻止ICMP,ZTP无法安装ISE。2.
在手动方法中,如果对网关、DNS、NTP等执行ping操作失败,您可以说“否”,这样设置过程将继续。在ZTP中,这是限制。
您需要在Linux服务器上进行根访问才能创建ISE配置映像 3.不支持“admin”帐户的密钥值对文件中的加密/哈希密码。它仅支持纯密码4.