zorka user guide - odu - old dominion university · yes yes 40 x 4 = 160 40 x 8 = 320 smp 4 four...
TRANSCRIPT
Old Dominion University | ACCOUNTS 1
USER GUIDE FOR ZORKA
Table of Contents ACCOUNTS .................................................................................................................................................... 2
Zorka System Information............................................................................................................................. 2
High Performance Linpack Benchmark: ................................................................................................ 3
LOGIN AND INTERACTIVE ENVIRONMENT .................................................................................................... 5
Access Zorka through DNS load balanced login: ................................................................................... 5
Accessing from Windows Environment: ............................................................................................... 5
Zorka Naming Convention: ................................................................................................................... 5
Login and Password: ODU MIDAS ID..................................................................................................... 5
Interactive Jobs on Zorka ...................................................................................................................... 6
APPLICATION ENVIRONMENT ....................................................................................................................... 6
Applications available on Zorka ............................................................................................................ 6
Setting the environment for jobs .......................................................................................................... 6
Using Modules to define the job environment ..................................................................................... 7
FILE SYSTEM .................................................................................................................................................. 8
File systems available on Zorka: ............................................................................................................ 8
Directory structure on Zorka:................................................................................................................ 8
Attributes of available scratch spaces: ................................................................................................. 9
Access to Mass Storage for archiving ................................................................................................... 9
How to move files from/to Zorka? ........................................................................................................ 9
COMPILING AND RUNNING JOBS................................................................................................................ 10
Compilers available on Zorka: ............................................................................................................. 10
Notes on Intel Compiler Options: ....................................................................................................... 10
Message Passing Interface (MPI) ........................................................................................................ 11
Submitting Jobs using Sun Grid Engine (SGE) ............................................................................................. 12
DEBUGGING AND PROFILING ...................................................................................................................... 16
MATH LIBRARIES ......................................................................................................................................... 17
Appendix A: Research Computing Use Statement ...................................................................................... 18
Appendix B: Modules User Guide .............................................................................................................. 19
Appendix C: Summary of Intel MPI Benchmarks (IMB) .............................................................................. 22
Old Dominion University | ACCOUNTS 2
Appendix D: Quick List of SGE Commands .................................................................................................. 23
ACCOUNTS Who can use Zorka?
o Any valid Old Dominion University student, faculty or staff member conducting research
o Research collaborators sponsored by ODU faculty/staff.
How to apply?
o Prerequisites:
A valid MIDAS username and password ( http://midas.odu.edu)
Activate LIONS account
(http://www.lions2.odu.edu:8080/lions/documentation/hpcdocs/documentation/account_request)
o Use FootPrints to request an HPC cluster account account (https://fp.odu.edu)
What are the conditions of use?
o Users are expected to review and adhere to the research computing acceptable use
statement (Appendix A).
HELP!
o Your request for assistance from the Research Computing group are documented and
tracked using FootPrints: https://fp.odu.edu.
o Email: {msachon, rigloria, mhalappa, ahkumar} @odu.edu
o Phone: {msachon, rigloria, mhalappa, ahkumar} 757-683-{4856, 4842, 3073, 3092}
o Location: Engineering & Computational Sciences Bldg, Suite 4300, 4700 Elkhorn Avenue,
Norfolk VA – 23529
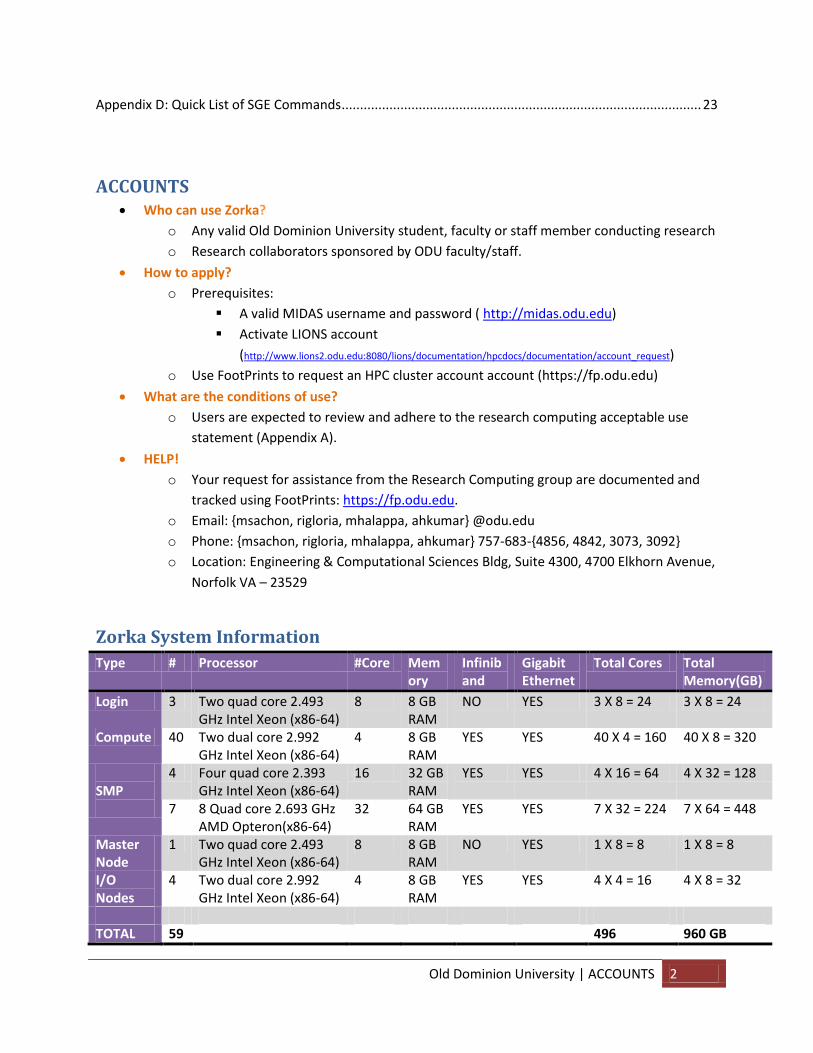
Zorka System Information
Type # Processor #Core Memory
Infiniband
Gigabit Ethernet
Total Cores Total Memory(GB)
Login 3 Two quad core 2.493 GHz Intel Xeon (x86-64)
8 8 GB RAM
NO YES 3 X 8 = 24 3 X 8 = 24
Compute 40 Two dual core 2.992 GHz Intel Xeon (x86-64)
4 8 GB RAM
YES YES 40 X 4 = 160 40 X 8 = 320
SMP
4 Four quad core 2.393 GHz Intel Xeon (x86-64)
16 32 GB RAM
YES YES 4 X 16 = 64 4 X 32 = 128
7 8 Quad core 2.693 GHz AMD Opteron(x86-64)
32 64 GB RAM
YES YES 7 X 32 = 224 7 X 64 = 448
Master Node
1 Two quad core 2.493 GHz Intel Xeon (x86-64)
8 8 GB RAM
NO YES 1 X 8 = 8 1 X 8 = 8
I/O Nodes
4 Two dual core 2.992 GHz Intel Xeon (x86-64)
4 8 GB RAM
YES YES 4 X 4 = 16 4 X 8 = 32
TOTAL 59 496 960 GB
Old Dominion University | Zorka System Information 3
Theoretical Peak Performance:
Rpeak = (# of nodes) X (# of CPU cores per node) X (Clock speed in GHz) X (Flops/cycle) GFLOPS/S
Single compute node: Rpeak = 1 X 4 X 2.992 X 2 = 23.936 GFLOPS/S
Single “SMP – Intel Xeon Processor” node: Rpeak = 1 X 16 X 2.393 X 4 = 153.152 GFLOPS/S
Single “SMP – AMD Opteron Processor” node: Rpeak = 1 X 32 X 2.693 X 2 = 172.352 GFLOPS/S
Node Type # of nodes Rpeak (GFLOPS/S) Estimated (Infiniband)* Estimated (GigE)*
Compute 40 957.44 778 (81.29% of peak) 682 (71.23% of peak) SMP Intel 4 612.608 441 (72.03% of peak) 387 (63.11% of peak) SMP AMD 7 1206.464 803 (66.83% of peak) N/A Total 44 1,570.048 GFLOPS/S 1,219 GFLOPS/S 1,069 GFLOPS/S
*Estimated Performance: Processor RAM (2 GB per
core) Infiniband (4X) GigE
79% of peak (Compute) 98% of peak 105% of peak 92% of peak 70% of peak (SMP - Intel) 98% of peak 105% of peak 92% of peak
Compute Node: Estimated Rmax = 19 (Actual Performance) = 81.29% of peak SMP Intel Node: Estimated Rmax = 110 (Actual performance) = 72.03% of peak
High Performance Linpack Benchmark:
The HPL benchmark suite compiled with GCC compilers and using ATLAS CBLAS libraries yielded a maximum of 869 GFLOPS/S on the 40 compute nodes. A complete set of results is provided in another document referenced in the Table of Contents.
Old Dominion University | Zorka System Information 4
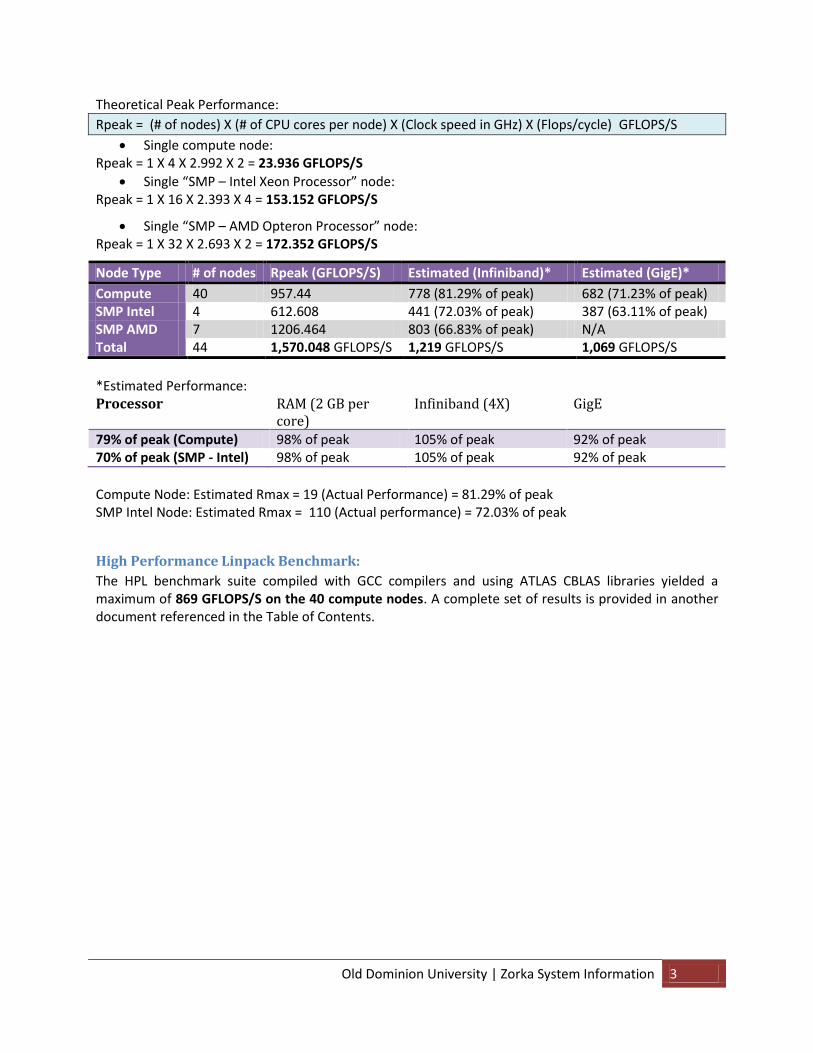
Figure 1: Zorka HPC Cluster Architecture

Old Dominion University | LOGIN AND INTERACTIVE ENVIRONMENT 5
LOGIN AND INTERACTIVE ENVIRONMENT
Access Zorka through DNS load balanced login:
ssh –X go-zorka.hpc.odu.edu
Go-zorka will assign users to one of the three login nodes using a round robin methodology. The log in
node where you are assigned is cached on your local SSH client and you may occasionally end up on the
same node when going to go-zorka before the cache is flushed. You can also directly log into a specific
login node if necessary as follows:
ssh –X zorka0.hpc.odu.edu ssh –X zorka1.hpc.odu.edu ssh –X zorka2.hpc.odu.edu
Note: While all other directories like /home, /scratch (nfs and pvfs) will be accessible from any of these machines, each login node has a directory, /tmp, that is local to each. If your work on a login node results in output to /tmp which you want to have available from other login nodes, copy this information first to an accessible directory.
Accessing from Windows Environment:
You will need an SSH client like PuTTy or Secure Shell Client. Using your MIDAS username and password, you can download SSH client X-Win32 from (http://occs.odu.edu/hardwaresoftware/downloads/index.shtml)
Zorka Naming Convention:
Node Type Start End
Compute zorka-0-0.local zorka-0-39.local
SMP zorka-44-0.local zorka-44-3.local
zorka-84-0.local zorka-84-6.local
Login Nodes zorka-24-0.local (zorka0.hpc.odu.edu)
zorka-24-2.local (zorka2.hpc.odu.edu)
Login and Password: ODU MIDAS ID
Please use your ODU MIDAS login and password for accessing the login nodes. Once you have logged
into any of the login nodes, you should be able to perform a password-less login into all the other nodes.
In order to do that you will have to select a null SSH PASSPHRASE when you are prompted the very first
time you login. If you have added a non-null password phrase, you can delete the ~/.ssh directory,
logout and log back in. If you do not prefer to use a null passphrase then you will have to start an SSH
agent each time you login: ssh-agent /bin/tcsh; ssh-add. Some applications like MPI-based jobs need
password-less login capability to successfully run jobs across nodes.

Old Dominion University | APPLICATION ENVIRONMENT 6
Interactive Jobs on Zorka
Note: The “-X” switch during initial login (and every subsequent login) is very important to forward all
the X-related streams. An alternative will be to issue the following commands (for TCSH shell): setenv
DISPLAY <my-ip-address>:0 (or export DISPLAY <my-ip-address>:0 for bash).
APPLICATION ENVIRONMENT
Applications available on Zorka
Default location: /opt or /share/opt
Naming Convention: Base-Name/Version/Compiler/App-specific/
Name Type Default Location & Remarks
abaqus Parallel /opt/abaqus
atlas Serial /opt/atlas
Bio Serial/Parallel /opt/Bio ‘Also includes gromacs’
charmm Serial/Parallel /share/opt
fftw Serial/Parallel /opt/fftw ‘2.1.5 is parallel and 3.1.2 is serial’
fluent Serial/parallel /share/opt/fluent
g03 Serial/Parallel /opt/g03
smxgauss Serial /share/opt/smxgauss
google-perftools Serial /opt/google-perftools
gotoblas Serial /opt/gotoblas
gromacs Serial/Parallel /opt/gromacs
IMB_2.3 Parallel /opt/IMB_2.3
lapack Serial /opt/lapack
matlab Serial/Parallel /share/opt/matlab
metis Serial /opt/metis
mumps Parallel (MPI) /opt/mumps
parmetis Parallel (MPI) /opt/parmetis
petsc Serial/Parallel (MPI) /opt/petsc
superlu-dist Parallel (MPI) /opt/superlu-dist
valgrind Serial /opt/valgrind
zoltan Parallel (MPI) /opt/zoltan
Setting the environment for jobs
The two ways in which the user can set up his environment for an application: A) Using Modules B) Using .tcshrc (.bashrc) file

Old Dominion University | APPLICATION ENVIRONMENT 7
Using Modules to define the job environment
Modules is a package that enables easy dynamic modification of user’s environment variables via
modulesfiles.
Each modulefile contains the information needed to configure the shell for an application. Once the
Modules package is initialized, the environment can be modified on a per-module basis using the
module command which interprets modulefiles. Typically modulefiles instruct the module command to
alter or set shell environment variables such as PATH, MANPATH, etc. Modulefiles may be shared by
many users on a system. Users may have their own Modules loaded and unloaded dynamically and
atomically, in an clean fashion.
All popular shells are supported, including bash, ksh, zsh, sh, csh, tcsh, as well as some scripting
languages such as perl.collection to supplement or replace the shared modulefiles.
>> Example 1: To load intel Compilers into your environment:
# module load intel/v10.1/compiler
Now you can readily access Intel compiler binaries and libraries from any directory without worrying
about providing path information.
>>Example 2: In order to compile your Intel compiler based MPI programs, you have to setup your
environment variables to point to the right MPI libaray based on the choice of compiler:
This can be achieved using modules with the following steps:
Step 1) Check for available MPI modulefiles: Command to use: “module which”
Step 2) Load the respective module: Command to use: “module load module-name”
#] module which 3.2.6 : Changes the MODULE_VERSION environment variable dot : adds `.' to your PATH environment variable gcc/v4.1.2/compiler : Loads the GCC v4.1.2 Compiler specific environment variables. intel/v10.1/compiler : Loads the Intel v10.1 Compiler specific environment variables. modules : loads the modules environment mvapich2-v1.0.3/gcc/gen2: Adds GCC Complied MVAPICH2 v1.0.3 specific environment variables to the current environtment. mvapich2-v1.0.3/intel/gen2: Adds Intel Compiled MVAPICH2 v1.0.3 specific environment variables to the current environtment.
# module load mvapich2-v1.0.3/intel/gen2 At this point after the above command is typed, you can compile your MPI programs with the MPI compiler of your choice without even knowing its install location. Compare this method with manually editing .tcshrc file in the following section.
For more information on using Modules, please refer Appendix B.
a) Using .tcshrc(.bashrc) files
In order to make any application executables readily available from command prompt, users have to add
a complete path, to the respective application binaries, into .tcshrc file. Also required is to update the
respective LD_LIBRARY_PATH for the correct functioning of the application during run-time. All of these
require a user to manipulate his/her .tcshrc file often.

Old Dominion University | FILE SYSTEM 8
For example: To load Intel based MPI compiler into a user’s environments settings a user has to add the
following line into his/her .tcshrc file. With the following lines added, now the user has to source his
setenv MPI_HOME /opt/mvapich2/1.0.3/intel-10.1/gen2 set path = ( $MPI_HOME/bin $path ) set path= ($MPI_HOME/sbin $path ) setenv LD_LIBRARY_PATH $MPI_HOME/lib:$LD_LIBRARY_PATH
.tcshrc file.
# source ~/.tcshrc
At this point after the above command is type, you can compile your MPI programs with the MPI
compiler of your choice. Compare this method with using modules as described int the previous
section.
FILE SYSTEM
File systems available on Zorka:
Local file system: Specific to each node, for example: /opt, /tmp, etc.
Network file system: Can be accessed from any node in the cluster, for example: /home,
/share/apps, /share/opt, /scratch/nfs, /ms etc.
Parallel file system (PVFS2): High performance file system accessible from all compute and SMP
nodes, for example: /scratch-pvfs2
Directory structure on Zorka:
Directory Type Limit Remark:
/home NFS 2 GB Not high performance; Do not run file intensive jobs from here.
/ms NFS mounted Archival storage
Unlimited This accesses the Research Mass Storage archival disk/tape system. MS is only accessible on login nodes; compute nodes cannot access mass storage.
/scratch/pvfs2 PVFS 9.1 TB High performance parallel scratch accessed over Infiniband.
/scratch/nfs NFS 3.3 TB Non parallel scratch space over Gigabit Ethernet.

Old Dominion University | FILE SYSTEM 9
/scratch/smp0 Local ext3 FS 512 GB Remote mounted on login nodes for staging and moving results. Use this ONLY when running jobs on the respective SMP node.
/scratch/smp1 Local ext3 FS 512 GB
/scratch/smp2 Local ext3 FS 512 GB
/scratch/smp3 Local ext3 FS 512 GB
Attributes of available scratch spaces:
a) /scratch/pvfs2: This is a high performance parallel scratch. It is well suited for large parallel I/O
jobs. Therefore, if your application is I/O intensive then by using this file system will be critical
for better performance. If your application uses MPI + ROMIO then using PVFS2 will add to the
performance improvement significantly. For further information on PVFS2 please refer
http://www.pvfs.org/documentation/
b) /scratch/nfs: This is a regular non-parallel NFS scratch. Use of this scratch is encouraged for non-
I/O intensive applications, parallel or serial.
c) /scratch/smpX: Where X is a place hodler for SMP’s local scratch 0, 1, 2 or 3. This scratch space
is only accessible for jobs that are contained within an individual SMP node. They are made
accessible outside of the SMP nodes only for convenience. To contain your job within a
particular SMP node, a specific queue request has to be made to SGE. This is discussed in detail
under the section titled “Submmitting Jobs using SGE”.
Access to Mass Storage for archiving
Mass Storage is a hierarchical archival storage. Use this storage only to backup your research
data. You are not permitted to run jobs directly using this storage space.
Two ways to access your Mass Storage using Windows:
a) WINSCP: Follow the link for more on how to access Mass Storage using WINSCP
http://www.lions.odu.edu:8080/hpcdocs/masstor/winscp
b) WebDrive: Webdrive allows you to access external file systems on your windows computer as a
mounted drive (e.g. L: drive). Contact your college’s desktop TSP to have Webdrive installed on
your windows machine and the research computing group to configure Webdrive.
How to move files from/to Zorka?
o Unix/Linux Unix/Linux: using command scp
o Windows Linux : Tools like WinSCP (http://winscp.net)
## Using scp for moving files: #Single File: Zorka:] scp myFile.dat [email protected]:/home/my-id/ #Entire Directory: Zorka:] scp -r myDirectory [email protected]:/home/my-id/

Old Dominion University | COMPILING AND RUNNING JOBS 10
COMPILING AND RUNNING JOBS
Compilers available on Zorka:
GNU Compilers: Version: 4.1.2
Language File Suffix Serial MPI
Fortran 77 .f Gfortran mpif77 Fortran90 .f90, .F Gfortran mpif90 C .c Gcc mpicc C++ .cc, .cpp g++ mpicxx
Use “-m64” switch for building 64-bit (“-m32” for 32-bit) libraries and executables.
Intel Compilers: Version: 10.1
Language File Suffix Serial MPI OpenMP
Fortran 77 .f Ifort mpif77 -openmp Fortran90 .f90, .F Ifort mpif90 -openmp C .c Icc mpicc -openmp C++ .cc, .cpp Icpc mpicxx -openmp
Setting up environment for compilers of your choice: You can either use Modules to link to the
compilers of your choice or set up the environment using .tcshrc file.
GNU compilers (4.1.2) are available by default. In order to access Intel compilers, please add these lines
to your .tcshrc files:
#Intel Compilers: source /opt/intel/cce/10.1.015/bin/iccvars.csh source /opt/intel/fce/10.1.015/bin/ifortvars.csh #Linking with MKL Libraries: setenv LD_LIBRARY_PATH /usr/X11R6/lib:$LD_LIBRARY_PATH setenv LD_LIBRARY_PATH /opt/intel/mkl/10.0.1.014/lib/em64t:$LD_LIBRARY_PATH
Notes on Intel Compiler Options:
Optimization Options “Specific” for Intel Platforms:
Dual-Core Intel Xeon 5300/5100/3000 series : -axT Quad-Core Intel Xeon : -axT Quad-Core AMD Opteron : -xW
Other Switches: Automatic Parallelization : -parallel OpenMP : -openmp

Old Dominion University | COMPILING AND RUNNING JOBS 11
Optimization flags:
Linux Comment
-O0 No optimization
-O1 Optimize for size
-O2 Optimize for speed and enable some optimization
-O3 Enable all optimizations as O2, and intensive loop optimizations
-fast Shorthand for "-O3 -ipo -static -xT -no-prec-div". Note that the processor specific optimizations (-xT) will change with new compiler versions. Useful if you want to compile your program for release.
-prof_gen Compile the program and instrument it for a profile generating run.
-prof_use May only be used after running a program that was previously compiled using prof_gen. Uses profile information during each step of the compilation process.
Message Passing Interface (MPI)
There are three main parameters in chosing a particular flavor of MPI:
Interconnect: Gigabit Ethernet or Infiniband (always prefer Infiniband over GigE)
o Infiniband: MVAPICH2; Ethernet: OpenMPI
Base Compilers: GNU V/s Intel (prefer Intel over GCC)
MPI Standard: 1 or 2 (by default only MPI-2 is available on Zorka)
GCC Intel
Infiniband /opt/mvapich2/1.0.3/gcc-4.1.2/gen2 /opt/mvapich2/1.0.3/intel-10.1/gen21 Gigabit Enthernet /opt/openmpi/1.2.7/gcc-4.1.2/64 /opt/openmpi/1.2.7/intel-10.1/64
Again there are two ways of setting up your environment for a particular flavor of MPI:
Modules, or
.tcshrc
Please refer to section on Modules for setting up MPI using Modules. For more information on Modules,
please refer Appendix B.
To setup your environment using .tcshrc
Add the following lines to your .tcshrc file to link to your favorite MPI flavor:
Old Dominion University | Submitting Jobs using Sun Grid Engine (SGE) 12
#MPI Settings: setenv MPI_HOME /opt/mvapich2/1.0.3/intel-10.1/gen2 set path = ( $MPI_HOME/bin $path ) set path= ($MPI_HOME/sbin $path ) setenv LD_LIBRARY_PATH $MPI_HOME/lib:$LD_LIBRARY_PATH
Submitting Jobs using Sun Grid Engine (SGE) Sun Grid Engine is a workload management system used in our clusters. SGE allows users to share
important system resources.
Because all users are required to use SGE (see policies), managing jobs under SGE is an important skill.
The minimum required tasks for managing a job under SGE are staging the job, submitting the job to
SGE, and managing the job’s results and output (i.e, clean-up). Additional tasks that are optional are
covered at the end of this section.
The staging of a job and the management of its results and output require only basic knowledge of
operating system (OS) commands. In particular, expect to use the OS commands “ls”, “cp”, and “mv” at
the command line, or their various equivalents in different environments (e.g., a GUI). Efficient practice
of these tasks benefits from a good understanding of the system architecture as discussed elsewhere.
The last step of managing your job’s results and output (or clean-up) is needed so that you can comply
with usage policies, for example, with the use of scratch spaces.
Therefore, job submission is the key task that you need to understand. The SGE job submission
commands are “qsub” and “qrsh”. The “qsub” command is used for batch submissions, while the
“qrsh” command is for interactive use. When you are logged in, do use the manpages for these
commands frequently as a reference.
The minimum required argument for the SGE “qsub” command is the job script. The syntax for this
basic usage is shown below (the “$ > ” sign is your OS command prompt).
$ > qsub job.script Your job 170 ("job.script") has been submitted
In every case, you will receive a response from SGE (similar to the one shown) after you press the
<Enter> key. The response shows the job ID (“170”, in this case), and it echoes the filename of your job
script (assuming you did not provide other options that change the job name).
Sun Grid Engine allows us to define parallel programming and runtime environments, allowing for the
execution of shared memory or distributed memory parallelized applications, under the name Parallel
Environments(PE). We here at OCCS have defined a set of PE’s for Zorka cluster to fit the needs of the
commonly used applications and its run-time environments. An individual can identify the parallel
Old Dominion University | Following are the tables showing the association of PE’s for both Batch and Interactive Jobs.
13
environment based on the application he/she wants to run and request the Parallel environment (PE)
through his/her job script using the switch “-pe pe_name number_of_slots” . A detailed example of the
job script showing how to request a PE is discussed in the section “Job Script”.
If an individual chooses not to mention a PE in his/her job script OR requires to run a sequential job then
one need not request any PE and exclude the switch “-pe pe_name number_of_slots” from the
command line parameter or the job script.
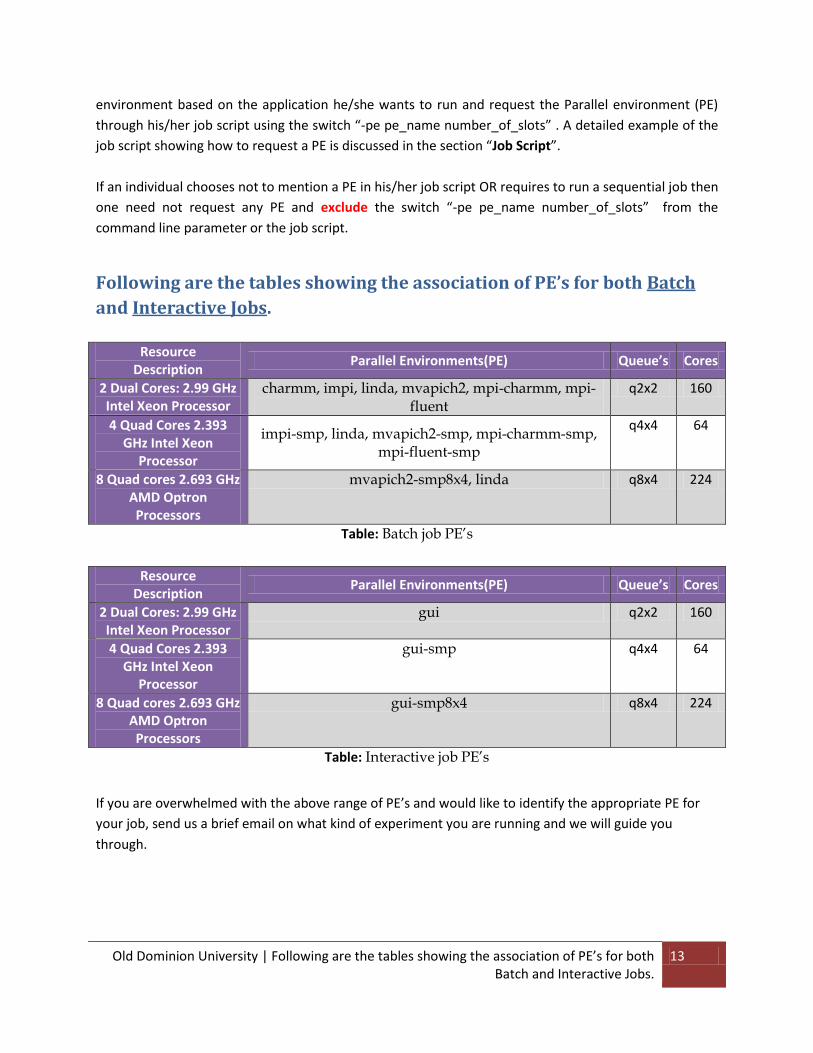
Following are the tables showing the association of PE’s for both Batch
and Interactive Jobs.
Resource Description
Parallel Environments(PE) Queue’s Cores
2 Dual Cores: 2.99 GHz Intel Xeon Processor
charmm, impi, linda, mvapich2, mpi-charmm, mpi-fluent
q2x2 160
4 Quad Cores 2.393 GHz Intel Xeon
Processor
impi-smp, linda, mvapich2-smp, mpi-charmm-smp, mpi-fluent-smp
q4x4 64
8 Quad cores 2.693 GHz AMD Optron Processors
mvapich2-smp8x4, linda q8x4 224
Table: Batch job PE’s
Resource Description
Parallel Environments(PE) Queue’s Cores
2 Dual Cores: 2.99 GHz Intel Xeon Processor
gui q2x2 160
4 Quad Cores 2.393 GHz Intel Xeon
Processor
gui-smp q4x4 64
8 Quad cores 2.693 GHz AMD Optron Processors
gui-smp8x4 q8x4 224
Table: Interactive job PE’s
If you are overwhelmed with the above range of PE’s and would like to identify the appropriate PE for
your job, send us a brief email on what kind of experiment you are running and we will guide you
through.

Old Dominion University | Following are the tables showing the association of PE’s for both Batch and Interactive Jobs.
14
Job Script: A job script is an ACSII file – this implies that you can read its contents using the OS “cat” command. The
file “job.script” must not be a binary executable file. Usually, a “#” at the beginning of a line indicates
a comment. The special “#!” on the first line indicates the shell (please refer to shell documentation
for details). SGE uses the “#$” to indicate “qsub” arguments stored within the job script file - saves
you time and the need to remember the correct “tried-and-true” options for your job.
The following is a sample job script for a sequential job:
#!/bin/tcsh # # Replace the “a.out” with your application’s binary executable filename. # If your program accepts or requires arguments, they are listed after the name # of the program – please refer to your application’s documentation for details. # # For example: # a.out output.file # a.out
To use the job script template shown, change the “a.out” file as necessary.
You can add many typical OS shell commands (“tcsh” in this case) to this script to automate many of the
tasks you need to do, including some of the staging and clean-up tasks. For example, for staging, you can
compile some programs you want. As another example, after “a.out”, you can delete files that you know
won’t be needed later.

Old Dominion University | Following are the tables showing the association of PE’s for both Batch and Interactive Jobs.
15
The following is a sample job script for a MVAPICH2 parallel job:
#!/bin/tcsh # # Check out the SGE options listed here # #$ -cwd #$ -o MyOutPutFile.txt -j y #$ -S /bin/tcsh #$ -q q2x2 # # Modify the 6 at the end of this option to request a different number of # parallel slots # #$ -pe mvapich2 6 # # Tell SGE of the version of MVAPICH2 to use # #$ -v mvapich2="mvapich2-v1.0.3/intel/gen2" # # Load the repective module file # module load mvapich2-v1.0.3/intel/gen2 # # Run the binary executable file hello.exe # Refer to MVAPICH2 application development on how to get hello.exe # mpiexec -machinefile $TMPDIR/machines -n $NSLOTS ./hello.exe
Note the use of “#$” to specify various SGE “qsub” options within the job script.
For other types of job scripts, we ask you consult with us and specific application documentation.
There are other SGE commands (refer Appendix D)that are useful, though not absolutely necessary for
using SGE. Some of these commands are listed in the two tables below, along with their functions. Some
options are shown, try them out, or check the manpage for the function.
Old Dominion University | DEBUGGING AND PROFILING 16
DEBUGGING AND PROFILING Tools for debugging:
Valgrind: /opt/valgrind/3.3.1
GDB
Tools for Profiling:
Google Perftools: /opt/google-perftools/0.98/gcc-4.1.2
Mpdtrace: -mpe=mpdtrace
Jumpshot: -mpe=mpilog
Google Perftools details:
#Google Performance Tools setenv GooglePerf_HOME /opt/google-perftools/0.98/gcc-4.1.2 set path = ( $GooglePerf_HOME/bin $path ) setenv LD_LIBRARY_PATH $GooglePerf_HOME/lib:$LD_LIBRARY_PATH setenv PROFILEFREQUENCY 1000000 #CPUPROFILE=/tmp/profile /usr/local/netscape
JumpShot Details:
#Compilation: mpicc –mpe=mpilog myMpiCode.c #Execution: mpiexec –np x myMpiCode.exe #This will create myMpuCode.exe.clog2 file #Conversion: clog2ToSlog myFile.clog2 #This will create a Slog2 file, to visualize: jumpshot myFile.slog2
Sample JumpShot Picture: continued on next page…

Old Dominion University | MATH LIBRARIES 17
Figure 2: A smaple Jumpshot picture
MATH LIBRARIES Math libraries currently available on Zorka:
Intel MKL: /opt/intel/mkl/10.0.1.014
Atlas: /opt/atlas/3.8.1/gcc-4.1.2
Goto BLAS: /opt/gotoblas/1.26
LAPACK: /opt/lapack/3.1.1
FFTW: /opt/fftw (versions 2.1.5 and 3.1.2)
Solvers that are currently available are:
SuperLU-Dist: /opt/superlu-dist/2.2/intel-10.1/mpich2-1.0.7-default
MUMPS: /opt/mumps/4.7.3/intel-10.1/mpich2-1.0.7-default
PETSc: /opt/petsc/2.3.3/intel-10.1/mpich2-1.0.7-default
MATLAB: /opt/matlab

Old Dominion University | Appendix A: Research Computing Use Statement 18
Appendix A: Research Computing Use Statement The purpose of the following guidelines is to promote awareness of computer security issues and to
ensure that the ODU's computing systems are used in an efficient, ethical, and lawful manner. Users
must adhere to the computing Acceptable Usage Policy (available at http://midas.odu.edu on the
security setting link). In addition, the following guidelines are established for use of the research
facilities.
1. While no hard limits are set for a maximum time limit or the number of nodes, jobs requiring extraordinary resources should be discussed with the research support group prior to execution.
2. ODU cluster accounts are to be used only for the university research activity. Use is not allowed for non- research or commercial activities. Unauthorized use may constitute grounds for account termination and/or legal action.
3. The research computing systems are non-classified systems. Classified information may not be processed, entered, or stored.
4. Users are responsible for protecting and archiving any programs/data/results. 5. Users are required to report any incident in computer security to the research computing
group. Users shall not download, install, or run security programs or utilities to identify weaknesses in the security of a system. For example, ODU users shall not run password cracking programs.
6. Users shall not attempt to access any data or programs contained on systems for which they do not have authorization or explicit consent of the owner of the data.
7. Users must have proper authorization and licenses to install or use copyrighted programs or data. Unauthorized use can lead to account suspension, account termination and may be subject to legal action.
8. You must use your odu login name when using research facilities and may not access anothers account. Users shall not provide information to others for unauthorized access.
9. Users shall not intentionally engage in activities to: harass other users; degrade the performance of systems; deprive an authorized user access to a resource; obtain extra resources beyond those allocated; circumvent computer security measures or gain access to a system for which proper authorization has not been given; misuse batch queues or other resources in ways not authorized or intended.
Old Dominion University | Appendix B: Modules User Guide 19
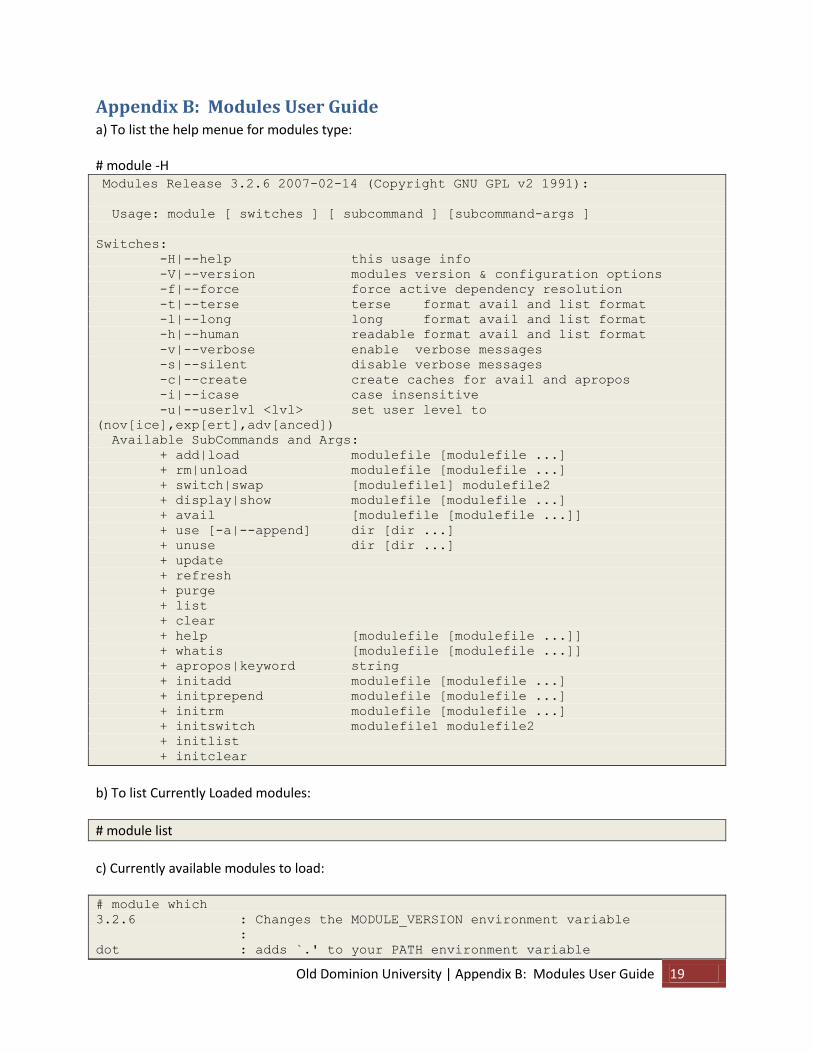
Appendix B: Modules User Guide a) To list the help menue for modules type: # module -H Modules Release 3.2.6 2007-02-14 (Copyright GNU GPL v2 1991):
Usage: module [ switches ] [ subcommand ] [subcommand-args ]
Switches:
-H|--help this usage info
-V|--version modules version & configuration options
-f|--force force active dependency resolution
-t|--terse terse format avail and list format
-l|--long long format avail and list format
-h|--human readable format avail and list format
-v|--verbose enable verbose messages
-s|--silent disable verbose messages
-c|--create create caches for avail and apropos
-i|--icase case insensitive
-u|--userlvl <lvl> set user level to
(nov[ice],exp[ert],adv[anced])
Available SubCommands and Args:
+ add|load modulefile [modulefile ...]
+ rm|unload modulefile [modulefile ...]
+ switch|swap [modulefile1] modulefile2
+ display|show modulefile [modulefile ...]
+ avail [modulefile [modulefile ...]]
+ use [-a|--append] dir [dir ...]
+ unuse dir [dir ...]
+ update
+ refresh
+ purge
+ list
+ clear
+ help [modulefile [modulefile ...]]
+ whatis [modulefile [modulefile ...]]
+ apropos|keyword string
+ initadd modulefile [modulefile ...]
+ initprepend modulefile [modulefile ...]
+ initrm modulefile [modulefile ...]
+ initswitch modulefile1 modulefile2
+ initlist
+ initclear
b) To list Currently Loaded modules:
# module list
c) Currently available modules to load: # module which
3.2.6 : Changes the MODULE_VERSION environment variable
:
dot : adds `.' to your PATH environment variable
Old Dominion University | Appendix B: Modules User Guide 20
mvapich2-v1.0.3/gcc/gen2:
Adds GCC Complied MVAPICH2 v1.0.3 specific environment
variables to the current environtment.
mvapich2-v1.0.3/intel/gen2:
Adds Intel Compiled MVAPICH2 v1.0.3 specific environment
variables to the current environtment.
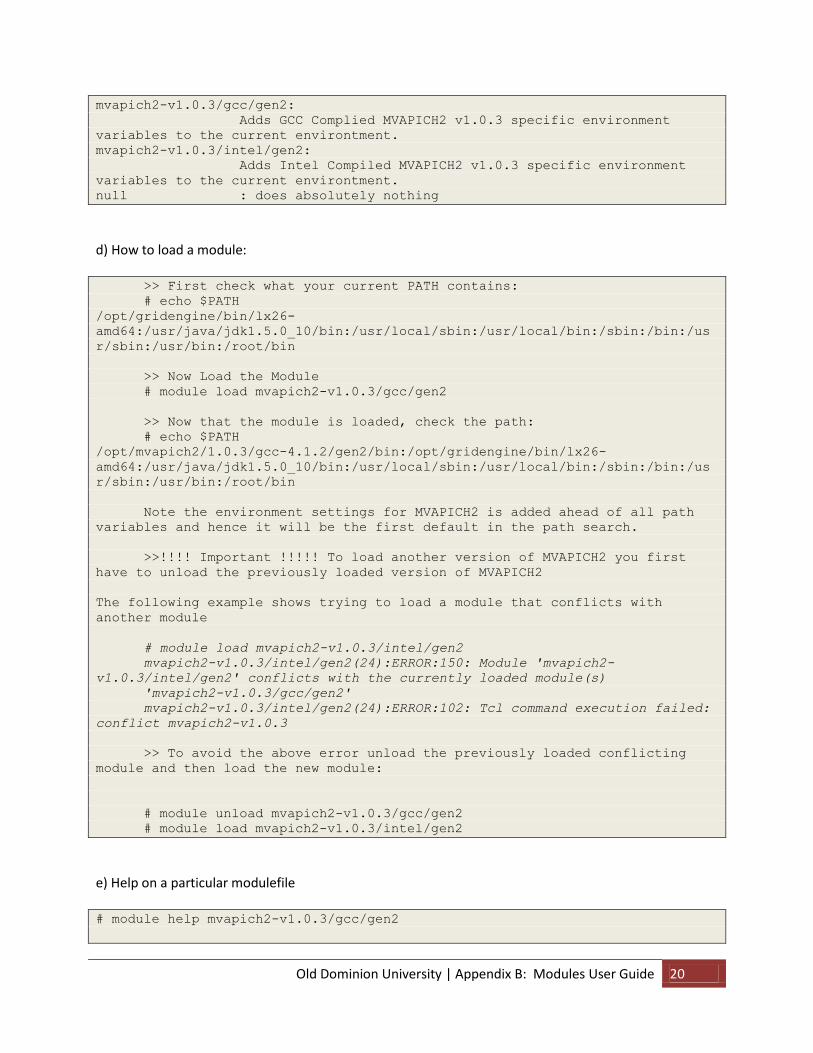
null : does absolutely nothing
d) How to load a module: >> First check what your current PATH contains:
# echo $PATH
/opt/gridengine/bin/lx26-
amd64:/usr/java/jdk1.5.0_10/bin:/usr/local/sbin:/usr/local/bin:/sbin:/bin:/us
r/sbin:/usr/bin:/root/bin
>> Now Load the Module
# module load mvapich2-v1.0.3/gcc/gen2
>> Now that the module is loaded, check the path:
# echo $PATH
/opt/mvapich2/1.0.3/gcc-4.1.2/gen2/bin:/opt/gridengine/bin/lx26-
amd64:/usr/java/jdk1.5.0_10/bin:/usr/local/sbin:/usr/local/bin:/sbin:/bin:/us
r/sbin:/usr/bin:/root/bin
Note the environment settings for MVAPICH2 is added ahead of all path
variables and hence it will be the first default in the path search.
>>!!!! Important !!!!! To load another version of MVAPICH2 you first
have to unload the previously loaded version of MVAPICH2
The following example shows trying to load a module that conflicts with
another module
# module load mvapich2-v1.0.3/intel/gen2
mvapich2-v1.0.3/intel/gen2(24):ERROR:150: Module 'mvapich2-
v1.0.3/intel/gen2' conflicts with the currently loaded module(s)
'mvapich2-v1.0.3/gcc/gen2'
mvapich2-v1.0.3/intel/gen2(24):ERROR:102: Tcl command execution failed:
conflict mvapich2-v1.0.3
>> To avoid the above error unload the previously loaded conflicting
module and then load the new module:
# module unload mvapich2-v1.0.3/gcc/gen2
# module load mvapich2-v1.0.3/intel/gen2
e) Help on a particular modulefile # module help mvapich2-v1.0.3/gcc/gen2

Old Dominion University | Appendix B: Modules User Guide 21
----------- Module Specific Help for 'mvapich2-v1.0.3/gcc/gen2' -------------
--------------
mvapich2-v1.0.3/gcc/gen2 - Load this module ...
1) To add MPICH2 v1.0.3 sepcific PATH & LD_LIBRAY_PATH
variables to the current environment
2) To compile your programs written using MPI.
3) In your job submit script to run MPI jobs in parallel.
f) To show the environment changes made by a specific module: # module show mvapich2-v1.0.3/intel/gen2
-------------------------------------------------------------------
/usr/local/Modules/3.2.6/modulefiles/mvapich2-v1.0.3/intel/gen2:
module-whatis
Adds Intel Compiled MVAPICH2 v1.0.3 specific
environment variables to the current environtment.
conflict mvapich2-v1.0.3
setenv MPI_HOME /opt/mvapich2/1.0.3/intel-10.1/gen2
prepend-path PATH /opt/mvapich2/1.0.3/intel-10.1/gen2/bin
prepend-path MANPATH /opt/mvapich2/1.0.3/intel-10.1/gen2/man
prepend-path LD_LIBRARY_PATH /opt/mvapich2/1.0.3/intel-10.1/gen2/lib
Old Dominion University | Appendix C: Summary of Intel MPI Benchmarks (IMB) 22
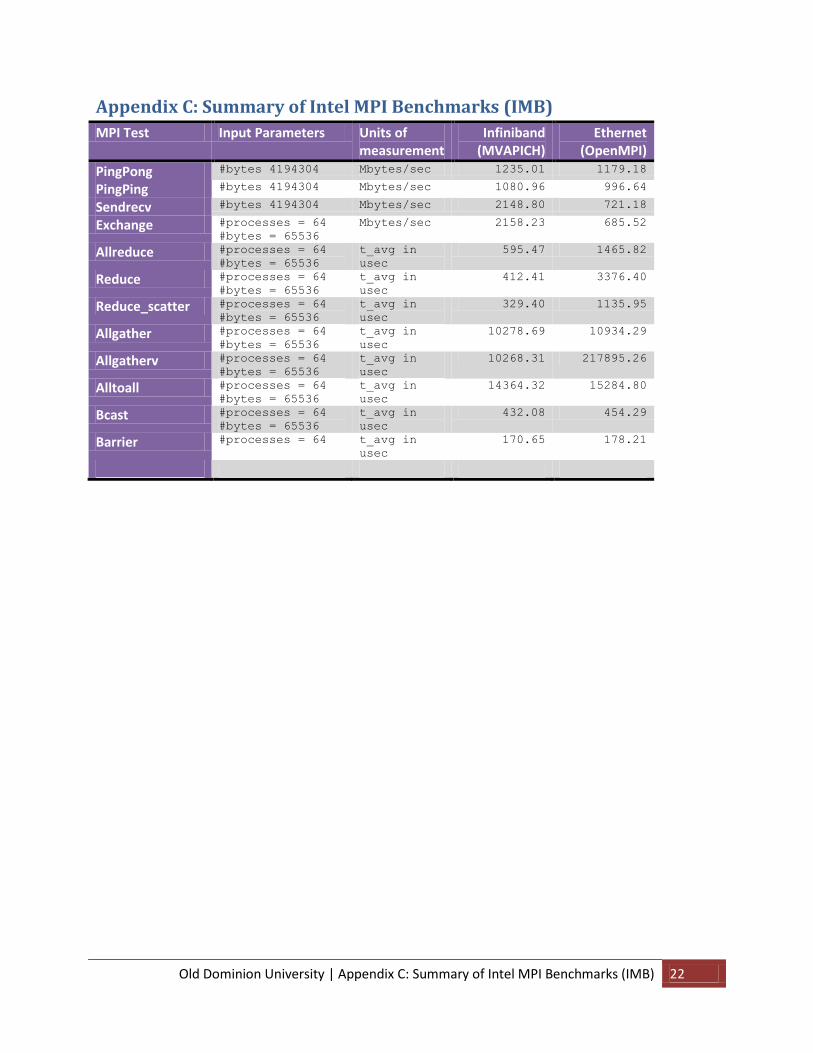
Appendix C: Summary of Intel MPI Benchmarks (IMB)
MPI Test Input Parameters Units of measurement
Infiniband (MVAPICH)
Ethernet (OpenMPI)
PingPong #bytes 4194304 Mbytes/sec 1235.01 1179.18
PingPing #bytes 4194304 Mbytes/sec 1080.96 996.64
Sendrecv #bytes 4194304 Mbytes/sec 2148.80 721.18
Exchange #processes = 64
#bytes = 65536 Mbytes/sec 2158.23 685.52
Allreduce #processes = 64
#bytes = 65536 t_avg in
usec
595.47 1465.82
Reduce #processes = 64
#bytes = 65536 t_avg in
usec
412.41 3376.40
Reduce_scatter #processes = 64
#bytes = 65536 t_avg in
usec
329.40 1135.95
Allgather #processes = 64
#bytes = 65536 t_avg in
usec
10278.69 10934.29
Allgatherv #processes = 64
#bytes = 65536 t_avg in
usec
10268.31 217895.26
Alltoall #processes = 64
#bytes = 65536 t_avg in
usec
14364.32 15284.80
Bcast #processes = 64
#bytes = 65536 t_avg in
usec
432.08 454.29
Barrier #processes = 64 t_avg in
usec
170.65 178.21
Old Dominion University | Appendix D: Quick List of SGE Commands 23
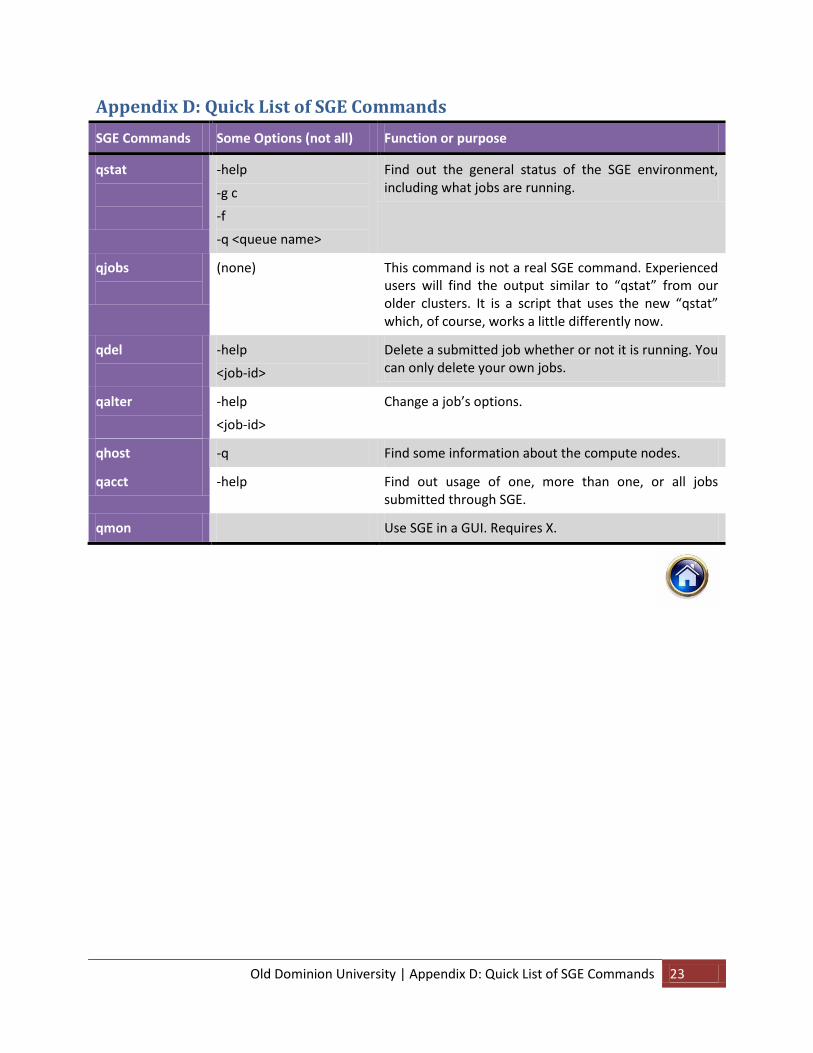
Appendix D: Quick List of SGE Commands
SGE Commands Some Options (not all) Function or purpose
qstat
-help
-g c
-f
-q <queue name>
Find out the general status of the SGE environment, including what jobs are running.
qjobs
(none) This command is not a real SGE command. Experienced users will find the output similar to “qstat” from our older clusters. It is a script that uses the new “qstat” which, of course, works a little differently now.
qdel
-help
<job-id>
Delete a submitted job whether or not it is running. You can only delete your own jobs.
qalter
-help
<job-id>
Change a job’s options.
qhost -q Find some information about the compute nodes.
qacct -help Find out usage of one, more than one, or all jobs submitted through SGE.
qmon Use SGE in a GUI. Requires X.