zimbra connector for microsoft outlook - email.it instructions connector for... · iv vmware zimbra...
TRANSCRIPT
Zimbra Connector for Microsoft OutlookUser Guide
ZCO 7.2
April 2012
Legal Notices
Copyright ©2005-2012 VMware, Inc. All rights reserved. This product is protected by U.S. and international copyright and intellectual property laws. VMware products are covered by one or more patents listed at http://www.vmware.com/go/patents.
VMware and Zimbra are registered trademarks or trademarks of VMware, Inc. in the United States and/or other jurisdiction. All other marks and names mentioned herein may be trademarks of their respective companies.
VMware, Inc.3401 Hillview AvenuePalo Alto, California 94304 USA
www.zimbra.com
Zimbra Connector for Microsoft Outlook 7.2
April 2012
Table of Contents
1 Introduction . . . . . . . . . . . . . . . . . . . . . . . . . . . . . . . . . . . . . . . . . . . . . . . . 5
Supported Versions of Microsoft Outlook . . . . . . . . . . . . . . . . . . . . . . . . 5
2 Installing and Configuring ZCO . . . . . . . . . . . . . . . . . . . . . . . . . . . . . . . . 7
Preparing to Install ZCO . . . . . . . . . . . . . . . . . . . . . . . . . . . . . . . . . . . . . 7Installing ZCO . . . . . . . . . . . . . . . . . . . . . . . . . . . . . . . . . . . . . . . . . . . . . 7Configuring Your ZCO Settings . . . . . . . . . . . . . . . . . . . . . . . . . . . . . . . . 8
Configure ZCO Settings . . . . . . . . . . . . . . . . . . . . . . . . . . . . . . . . . . . 8Upgrading ZCO . . . . . . . . . . . . . . . . . . . . . . . . . . . . . . . . . . . . . . . . . . . . 9
3 Synchronizing with the Zimbra Server . . . . . . . . . . . . . . . . . . . . . . . . . . 11
After Your Initial Synchronization . . . . . . . . . . . . . . . . . . . . . . . . . . . . . 11
4 Managing Your ZCO Account . . . . . . . . . . . . . . . . . . . . . . . . . . . . . . . . . 13
Managing Zimbra Profiles . . . . . . . . . . . . . . . . . . . . . . . . . . . . . . . . . . . 13Use Previous Mail Profiles . . . . . . . . . . . . . . . . . . . . . . . . . . . . . . . . 13Combine Mail Profile Accounts . . . . . . . . . . . . . . . . . . . . . . . . . . . . 13Compact Your Zimbra ZDB Profile. . . . . . . . . . . . . . . . . . . . . . . . . . 14Save Your Outlook Notes and Journal Files in PST Format . . . . . . 14
Creating Different Email Identities . . . . . . . . . . . . . . . . . . . . . . . . . . . . . 14Add a Persona . . . . . . . . . . . . . . . . . . . . . . . . . . . . . . . . . . . . . . . . . 14Select a Default Persona . . . . . . . . . . . . . . . . . . . . . . . . . . . . . . . . . 15Sync Personas . . . . . . . . . . . . . . . . . . . . . . . . . . . . . . . . . . . . . . . . . 15Delete a Persona . . . . . . . . . . . . . . . . . . . . . . . . . . . . . . . . . . . . . . . 15
Using Zimbra Tags and Outlook Categories . . . . . . . . . . . . . . . . . . . . . 16Using Filters to Manage Email Messages . . . . . . . . . . . . . . . . . . . . . . . 16
Create a New Email Rule . . . . . . . . . . . . . . . . . . . . . . . . . . . . . . . . . 16Edit an Email Rule . . . . . . . . . . . . . . . . . . . . . . . . . . . . . . . . . . . . . . 17Delete an Email Rule . . . . . . . . . . . . . . . . . . . . . . . . . . . . . . . . . . . . 18
Sharing Folders . . . . . . . . . . . . . . . . . . . . . . . . . . . . . . . . . . . . . . . . . . . 18Enable Sharing Folders . . . . . . . . . . . . . . . . . . . . . . . . . . . . . . . . . . 18Create Internal, External, and Public Shares . . . . . . . . . . . . . . . . . . 18Assign Roles and Access Privileges . . . . . . . . . . . . . . . . . . . . . . . . 19Share Multiple Folders Using Parent Permissions . . . . . . . . . . . . . . 19Share a Folder with Another Zimbra User . . . . . . . . . . . . . . . . . . . . 19Share a Folder with an External User . . . . . . . . . . . . . . . . . . . . . . . 20Create a Public Share . . . . . . . . . . . . . . . . . . . . . . . . . . . . . . . . . . . 20Change or Revoke Shared Access . . . . . . . . . . . . . . . . . . . . . . . . . 21Mount Shared Folders . . . . . . . . . . . . . . . . . . . . . . . . . . . . . . . . . . . 21
Create and Out-of-Office Email Message . . . . . . . . . . . . . . . . . . . . . . . 22Viewing Mail Storage Quota . . . . . . . . . . . . . . . . . . . . . . . . . . . . . . . . . 22
Regain Storage Space . . . . . . . . . . . . . . . . . . . . . . . . . . . . . . . . . . . 22Working Offline . . . . . . . . . . . . . . . . . . . . . . . . . . . . . . . . . . . . . . . . . . . 22
VMware Zimbra Collaboration Server iii
Zimbra Connector for Microsoft Outlook User Guide
5 Zimbra Features in Outlook . . . . . . . . . . . . . . . . . . . . . . . . . . . . . . . . . . 23
Zimbra Features in Outlook . . . . . . . . . . . . . . . . . . . . . . . . . . . . . . . . . . 23Personal Email Certificates (S/MIME) . . . . . . . . . . . . . . . . . . . . . . . 24
Zimbra Feature Differences for Outlook Users . . . . . . . . . . . . . . . . . . . 24Outlook AutoArchive Disabled for Zimbra Profiles and Folders . . . . 24
iv VMware Zimbra Collaboration Server
1 Introduction
The Zimbra Connector provides real time, two-way synchronization of email messages, folders, tags, address books, tasks, and calendaring between Outlook and your Zimbra account.
This guide covers installation, configuration, synchronization and Zimbra-specific features for ZCO.
Note: Examples in this guide refer to ZCO features using Outlook 2007. In Outlook 2010, equivalent ZCO features are accessed from the Zimbra tab on the ribbon.
Supported Versions of Microsoft Outlook
ZCO can be used with Microsoft Outlook 2003, 2007, and 2010
• Outlook 2003: Client computers must have Microsoft Office Outlook 2003 SP3 or later installed.
• Outlook 2007: Client computers must have Microsoft Office Outlook 2007 SP2 or later installed.
• Outlook 2010: 32-bit and 64-bit editions of Microsoft Office are supported.
VMware Zimbra Collaboration Server ZCO 7.2 5
Zimbra Connector for Microsoft Outlook User Guide
6 ZCO 7.2 VMware Zimbra Collaboration Server
2 Installing and Configuring ZCO
This chapter explains how to prepare and install ZCO.
Topics in this chapter include:
Preparing to Install ZCO
Installing ZCO
Configuring Your ZCO Settings
Upgrading ZCO
Preparing to Install ZCO
If you are running McAfee® Security On-Delivery E-mail Scanner feature, the initial sync might be very slow. To speed up the process, turn off this option before installing ZCO and your initial synchronization.
You must have administrative privileges on your computer to install ZCO. If you do not, you can obtain administrative privileges temporarily from your system administrator.
Before you begin to install ZCO, make sure you know the following information. This information is used to sync to the email server.
• The Zimbra server host name
• Whether the server requires a secure connection
• Your Zimbra email address
• Your Zimbra account password
Installing ZCO
To install ZCO, you must download the ZCO .msi installation file to your computer. The ZCO .msi installation file can be obtained from your system administrator. The installer walks you through the process of installing ZCO.
1. If Outlook is open, close it.
2. Double-click the ZCO .msi installation file on your computer.
3. Click Run to execute the installer.
VMware Zimbra Collaboration Server ZCO 7.2 7
Zimbra Connector for Microsoft Outlook User Guide
4. Click Next.
5. Read the end-user license agreement and click I accept the terms in the License Agreement.
6. Click Next.
7. To begin the installation, click Next.
8. When finished installing, the Installation Complete dialog displays. Click Close.
Configuring Your ZCO Settings
Before you can synchronize ZCO with Outlook, you must enter Zimbra server configuration information. This includes your account information, which is used to sign in and confirm your account and other optional settings.
Server Configuration: These settings are used to connect to the Zimbra server and include the Zimbra server domain name, your email address, and your password.
Connection Settings: ZCO uses Windows Internet Explorer (IE) proxy settings by default. If you want to manually configure proxy settings, you can enter an HTTP proxy and port number or select to use no proxy.
Download Settings: This setting determines how messages are downloaded. To save storage space on your computer, you can configure ZCO to download only the email message header instead of the complete message. The default is to download the complete message, including attachments.
ZDB Configuration: This is the roaming profile settings for your account. Setting up a roaming profile lets you move between computers and access your Outlook mail. You store your Outlook profile information and settings on a remote machine.
Configure ZCO Settings
1. Open Outlook.
2. Depending on the Outlook version you are using:
a. From the Choose Profile dialog, select your profile or create a New profile. (Optional) Set as default profile. Click OK.
b. Select File>Data File Management>Account Settings>E-mail. Double click Zimbra - <your account> in the name field.
The Zimbra Server Configuration dialog displays. This is where you enter your server credentials to log in.
3. On the Server Configuration dialog, enter:
a. Server Name. The Zimbra server domain name (DNS), for example server.domain.com.
8 ZCO 7.2 VMware Zimbra Collaboration Server
Installing and Configuring ZCO
b. Email Address. This is the Zimbra email account address set up for you by your system administrator.
c. Password. This is your Zimbra email account password.
4. Click the Connection Settings tab and select either:
• No proxy.
• Use IE proxy settings. This is the default setting.
• Manual proxy configuration. Enter an http address and port number, which you can get from your system administrator.
5. Click the Download Settings tab and select either:
• Download headers only. Download only the From and Subject information.
• Preserve transport headers. If your organization has set up Outlook rules that use transport headers, select this option. This option uses more storage space on your computer.
6. Click the ZDB Configuration tab to set your roaming profile settings.
Setting up a roaming profile lets you move between computers and access your Outlook mail. Your Outlook profile information and settings are stored on a remote machine (default location), or you can store on your own machine. You can also relocate your ZDB file and save disk space by compacting your profile information and settings.
Select either:
• Store ZDB in the profile. Selecting this option will store your ZDB in your profile.
• Store ZDB in the external folder. To store your ZDB in an external folder, select this option and click Browse. Select the directory in which you want to store your ZDB and click OK.
• Move ZDB. If you want to move your ZDB, click this option and follow the on-screen instructions.
• Compact ZDB. Click this option to compress your ZDB to save disk space.
7. Click Apply and OK.
Upgrading ZCO
If your system administrator has installed a newer version of ZCO on the server, and if you already have a version of ZCO installed on your system, upon your next login you are asked if you want to upgrade ZCO.
You can select to upgrade, skip the version, or never upgrade. Once you select to upgrade, the latest version downloads to your computer and the upgrade begins.
VMware Zimbra Collaboration Server ZCO 7.2 9
Zimbra Connector for Microsoft Outlook User Guide
10 ZCO 7.2 VMware Zimbra Collaboration Server
3 Synchronizing with the Zimbra Server
The first time you open Outlook after ZCO is installed and configured, your Outlook mailbox automatically synchronizes with the ZCS server.
This initial synchronization can take some time depending on the size of the mailbox being synchronized. The progress of your synchronization is displayed in the Zimbra Send/Receive Progress dialog.
You can use Outlook during the synchronization because ZCO synchronizes in the background. New mail received during the synchronization is delivered immediately.
If the synchronization does not start automatically, you can manually start the synchronization by clicking Send/Receive located on the toolbar.
After Your Initial Synchronization
After your first synchronization, you can access your Zimbra account using Outlook.
Your Zimbra mail folders display in the Navigation pane. You can view your calendar, contacts, and tasks by clicking the application bar below your mail folders, located at the lower left of the pane.
The most recent email received displays in your Inbox in the Content pane. The Content pane also displays the details of appointments, contacts, and tasks, depending on what application bar is active.
Your upcoming appointments and tasks display in the To-Do Bar on the right side of the view.
Synchronized data is saved in the Zimbra database (ZDB).
VMware Zimbra Collaboration Server ZCO 7.2 11
Zimbra Connector for Microsoft Outlook
12 ZCO 7.2 VMware Zimbra Collaboration Server
4 Managing Your ZCO Account
Topics in this chapter include:
Managing Zimbra Profiles
Creating Different Email Identities
Using Zimbra Tags and Outlook Categories
Using Filters to Manage Email Messages
Sharing Folders
Create and Out-of-Office Email Message
Viewing Mail Storage Quota
Working Offline
Managing Zimbra Profiles
When you initially install ZCO, a new profile is created in Outlook named Zimbra - <your name>. Outlook automatically uses this profile as its default profile when you launch Outlook. You can combine your Zimbra profile with non-Zimbra email accounts.
A profile contains email account and data file information. You can have multiple profiles to manage different email accounts. For example, you might have a profile for your work-related email account and another for your personal email account.
Use Previous Mail Profiles
The new Zimbra profile does not remove any previous Outlook profiles or email accounts. Previous profiles can be viewed by navigating to Start>Settings>Control Panel>Mail.
Combine Mail Profile Accounts
Mail profiles can be combined with the Zimbra profile account with an IMAP, Exchange, or POP account. You cannot add more than one Zimbra account to a profile.
VMware Zimbra Collaboration Server ZCO 7.2 13
Zimbra Connector for Microsoft Outlook User Guide
1. Select Start>Settings>Control Panel>Mail>Show Profiles>Add... and follow the prompts to add a new email account.
Compact Your Zimbra ZDB Profile
Compacting your Zimbra ZDB profile allows you to save disk space by compressing your profile information and settings.
1. In Outlook, select File>Data File Management.
2. In the Account Settings dialog, click the Data Files tab.
3. Select the Zimbra profile for which you want to compact the ZDB and click Settings, or double-click on the profile to compact.
4. In the Zimbra Server Configuration Settings dialog, select the ZDB Configuration tab.
5. Click Compact ZDB. A progress window opens. When the window closes, the ZDB compaction is finished.
6. Click OK.
Save Your Outlook Notes and Journal Files in PST Format
When using ZCO, you cannot access Outlook Notes and Journal. If have created Notes and a Journal, save them in PST format before synchronizing ZCO and Outlook. You then import the .pst file after the initial synchronization.
Creating Different Email Identities
A Zimbra persona allows you to create a separate email identity to manage different types of email. For example, you can create a business persona for your business email and a personal persona for your personal email. By using a persona, you can specify a From address and/or a Reply To address for emails sent using that persona. All outgoing email displays the email address of the persona that you are using.
You can view, add, edit, and delete your Zimbra Personas from Outlook.
Note: If you previously created personas using the Zimbra Web Client, the personas also exist in Outlook.
Add a Persona
1. Select Tools>Options.
2. Click the Personas tab and click Add.
3. Enter the name for the new persona and click OK.
14 ZCO 7.2 VMware Zimbra Collaboration Server
Managing Your ZCO Account
4. (Optional) In the Personas Settings area, edit the From name field. The name and email you enter is displayed in the From field of outgoing emails sent using this persona. For example, emails sent from a business persona might be sent by Sam Sample, while emails sent from a personal persona might be sent by Sam.
5. (Optional) Check the Set the “Reply-to” field of email messages to box.
Enter the Reply-to name and email address. This displays in the Reply-to field of outgoing emails sent using this persona.
Replies sent to these emails are automatically directed to the Reply-to address.
6. Click Apply to save your changes.
Select a Default Persona
You can select to use a persona as your default Outlook identity.
1. Select Tools>Account Settings.
2. Select the address and click Set as Default. You can only have one default Outlook identity.
Sync Personas
If you are composing a new email message and you do not see the Account menu in the New Message dialog, or you do not see your persona in the Account menu, you can sync your personas to resolve the issue.
1. Go to Tools>Options>Personas.
2. Confirm your account is in the Personas list. If your Persona is not listed, you need to add a persona.
3. Click OK. This action syncs personas and displays the Account menu in the New Message dialog.
Delete a Persona
1. Select Tools>Options>Personas.
2. Select the persona you want to delete.
3. Click Delete. The persona is deleted.
4. Click OK.
5. To recover a deleted persona before changes are applied, click Cancel.
You cannot delete the default Persona. Personas cannot be recovered or restored once your changes are applied.
VMware Zimbra Collaboration Server ZCO 7.2 15
Zimbra Connector for Microsoft Outlook User Guide
Using Zimbra Tags and Outlook Categories
In your Zimbra account, Outlook Categories are identified as tags. In Outlook, you can assign categories to email messages, contacts, tasks, and appointments. These categories are synchronized to your Zimbra account and are identified as tags when viewing your account from the Zimbra Web Client.
You can use tags to organize and find particular items. You can apply more than one tag to an item.
1. To browse your account by category, go to your Zimbra mail folder in the ZCO Navigation pane
2. Select Search Folders>Categorized Mail. The mail is displayed grouped by category in the Content pane.
Using Filters to Manage Email Messages
Outlook local rules for filtering are not executed automatically when you use ZCO. You can use the Zimbra Server Rules feature to create filters to manage your email and Calendar invitations from Outlook.
A filter consists of rules or conditions. If the rule is met, a specified action is performed. Zimbra Server Rules let you create filters to do the following:
Move an email into a specific folder
Delete a message
Forward a message
Assign an email to a category
Flag a message
Mark a message as read
You can edit and view your Zimbra mail filters in Outlook from Tools>Zimbra Server Rules.
Note: Outlook local rules for filtering are not executed automatically.
Create a New Email Rule
1. Select Tools>Zimbra Server Rules.
2. In the Rules dialog box, click the New. A Rules Wizard dialog displays.
3. In the Select condition(s) section, select the conditions that the message must match. As you select the conditions, they display in Edit the Rule Description section.
4. If the condition you selected requires a value, such as “with specific words in the body”, you must enter the values or parameters for the condition:
16 ZCO 7.2 VMware Zimbra Collaboration Server
Managing Your ZCO Account
a. Click the condition line in the Edit the Rule Description section.
b. In the dialog that opens, enter, add, or select the value(s) or parameter(s) for the condition and click OK.
5. Click Next.
6. In the Select actions section select what you want to do with the message, such as moving or forwarding the message. As you select the action, it displays in the Edit the Rule Description section.
7. If the action you selected requires a value, you must enter the values or parameters for the action:
a. Click the action line in the Edit the Rule Description section.
b. In the dialog that opens, enter, add, or select the value(s) or parameter(s) for the action and click OK.
8. Click Next.
9. In the Select exception(s) section, select the exceptions that the message must match. As you select the exceptions, they display in Edit the Rule Description section.
10. If the exception you selected requires a value, you must enter the values or parameters for the exception:
a. Click the exception line in the Edit the Rule Description section.
b. In the dialog that opens, enter, add, or select the value(s) or parameter(s) for the condition and click OK.
11. Click Next.
12. Enter a name for your new rule in the Specify a name for this rule field.
13. Select whether to apply the rule to messages that meet Any condition or All conditions.
14. (Optional) Select Do not process additional filter rules if applicable.
15. Review your rule description.
• To make changes, click Back.
• If your rule description is correct, click Finish.
Your new rule displays in the Rule list.
Edit an Email Rule
1. Select Tools>Zimbra Server Rules.
2. Select the rule you want to edit.
3. Click Edit.
VMware Zimbra Collaboration Server ZCO 7.2 17
Zimbra Connector for Microsoft Outlook User Guide
4. Select the condition, action, exception, or other detail you want to edit.
5. Click Next.
6. Click Finish when you are finished editing the rule.
7. Click Apply to exit the Rules Wizard and save your changes.
Delete an Email Rule
1. Select Tools>Zimbra Server Rules.
2. Select the rule you want to delete.
3. Click Delete.
4. Click Apply to exit the Rules Wizard and save your changes.
Sharing Folders
You can share your email, address book, calendar, tasks, and briefcase folders with others either in your organization, external guests, or the public. You can share with internal users who can be given complete manager access to the folder, external guests that must use a password to view the folder content, and public access so that anyone who has the URL can view the content of the folder.
Enable Sharing Folders
To share items, you must have the Zimbra sharing add-in enabled.
1. Select Help>Disabled Items.
2. Select the Zimbra sharing add-in and click Enable.
Create Internal, External, and Public Shares
When you share your folder, you identify whether to share your folder internally, externally, or to create a public share.
Internal share. Zimbra users or groups listed in the Global Address List (GAL) can view your folder. You select the types of privileges to grant to internal users.
External share. External users can view your folder using their email address and a password that you assign. External users cannot make any changes to the information they view.
Public shares. Anyone can view your folder using the URL of the folder. Viewers cannot make changes to the information they view.
Note: Mail folders can only be shared internally.
18 ZCO 7.2 VMware Zimbra Collaboration Server
Managing Your ZCO Account
Assign Roles and Access Privileges
Roles are preset combinations of access privileges. The access privileges are defined as follows:
Read. View items in the folder.
Edit. Change the content of the folder.
Create. Add items to the folder.
Delete. Delete items from the folder.
Act on workflow. Respond to requests.
Administer folder. Modify the permissions of the folder.
The following are the roles that can be granted to an internal user:
Note: All external and public shares are assigned the role of Reviewer. This cannot be changed.
Share Multiple Folders Using Parent Permissions
By default, the grantees and access privileges assigned to a folder only apply to that folder and not to any folders stored inside the folder (child folders). The Inherit permissions from parent option in the Sharing tab allows you to apply the same grantees and access privileges as the parent folder. This option allows you to assign grantees and access privileges to multiple folders without setting up individual shares for each one.
Share a Folder with Another Zimbra User
1. Right-click the folder you want to share and select Properties.
2. Click the Sharing tab.
3. Click Add.
4. Select Internal and click OK.
5. In the Search field, start to type the name to show the access list. Make sure you select the Address Book from which you want to search names.
6. Select who you want to delegate access.
Role Permissions
Administrator Read, Edit, Create, Delete, Act on workflow, Administer folder. The grantee has the same access to the folder as the owner.
Delegate Read, Edit, Create, Delete, Act on workflow
Reviewer Read. This role is the default.
VMware Zimbra Collaboration Server ZCO 7.2 19
Zimbra Connector for Microsoft Outlook User Guide
7. Click OK. The name displays in the Properties dialog.
Note: You can only add one person at a time. To share with more than one person, repeat these steps.
8. From the Permission Level menu, select the role that defines the access privileges:
• Administrator: Can create, read, edit and delete items. Can also administer a folder and act on workflow items.
• Delegate: Can create, read, edit and delete items and act on workflow items.
• Reviewer: Has read-only privileges.
But if you want to have the permission level the same as the “parent” folder’s, check the Inherit permissions from parent.
9. Click Apply.
10. Click OK.
A notification email is sent to the person with the sharing information.
Share a Folder with an External User
1. Right-click the folder to share and select Properties.
2. Click the Sharing tab.
3. On the Sharing tab, click Add.
4. Select External.
5. In the Email Address field, type the email address of the external user.
6. In the Password field, type a password for the person to use to access the folder being shared.
7. Click OK. The email address of the external user is listed in the Sharing tab. The permission level is set to Reviewer. This cannot be changed.
8. Click Apply. To add other users to the Sharing list, repeat these steps.
A notification email with the URL of the folder and login information is sent.
Create a Public Share
To access the folder, the external user must enter the URL in a Web browser. go to the folder’s URL using a Web browser and then enter the email address and the password that you assigned to them.
1. Right-click the folder to share and select Properties.
20 ZCO 7.2 VMware Zimbra Collaboration Server
Managing Your ZCO Account
2. Go to the Sharing tab.
3. On the Sharing tab, click Add.
4. Select Public.
5. Click OK. Public is listed in the Sharing tab. The permission level is set to Reviewer. This cannot be changed.
6. Click OK.
To access this public share, users must enter the folder's URL in a Web browser. The URL is your mail server’s address, followed by /home/username/folder. For example, if your mail server is http://mail.example.com/, your username is Joe, the folder you are sharing is Tasks, the URL is http://mail.example.com/home/Joe/Tasks.
Change or Revoke Shared Access
You can change the role that you assigned and delete access.
1. Right-click the folder that is shared and select Properties.
2. Click the Sharing tab to see who has been given permission to access the folder.
3. Select the name and change the permission levels. To cancel the access, select the name and click Remove.
4. Click OK.
The next time the grantee syncs with the Zimbra server, the shared folder information is updated. If you deleted access, the folder is removed when the grantee syncs. If you deleted an external or public share, the grantee cannot access the folder.
Mount Shared Folders
If you have been granted access to someone’s folder, you access the folder as follows:
1. On the Outlook menu bar, go to File>Open>Other User’s Mailbox. The address book dialog opens with the Global Address List displayed.
2. Browse to the name of the person who has given you access, or enter the email address.
3. Click OK. The shared folder is added to the bottom of your Folders list.
4. To see all folders in the mailbox that are shared, view the Folder List in the Navigation pane.
VMware Zimbra Collaboration Server ZCO 7.2 21
Zimbra Connector for Microsoft Outlook User Guide
Create and Out-of-Office Email Message
You can send an automatic response to people who send you messages when you are out of the office.
1. Click Tools>Out of Office Assistant.
2. Select I am currently Out of the Office.
3. In the text box, type the message to be sent, such as “I am on vacation from June 1 to June 6 and will not be checking for messages.”
4. Set the start and end dates for using this message.
5. Click OK. The away message starts on the date you specified.
Viewing Mail Storage Quota
You can store email messages on the Zimbra server up to the quota set for your mailbox. Email messages, attachments to messages, address books, calendars, tasks, and the items in your Trash folder contribute to your used quota. When your quota is reached, email messages sent to you can be rejected.
You can check your Zimbra Mailbox Quota from Outlook.
1. Select Tools>Mailbox Quota to view your total quota and your used quota.
Regain Storage Space
Delete email messages and old calendar appointments from your account. Empty your trash after you delete items to update your storage space.
Detach email attachments and save them to your computer to free up storage space. The attachment file is deleted from your account on the server.
Archive messages in Outlook.
After you delete items, use the Refresh feature to check for the most recent quota.
Working Offline
When you are working offline, only the files on your computer are available. If you configured the settings to download headers only, only the messages that you have downloaded are available.
New mail is not synchronized to your computer until you connect to the Zimbra server. Email that you create while working offline is saved to your Outbox and is automatically sent when you connect to the Zimbra server.
22 ZCO 7.2 VMware Zimbra Collaboration Server
5 Zimbra Features in Outlook
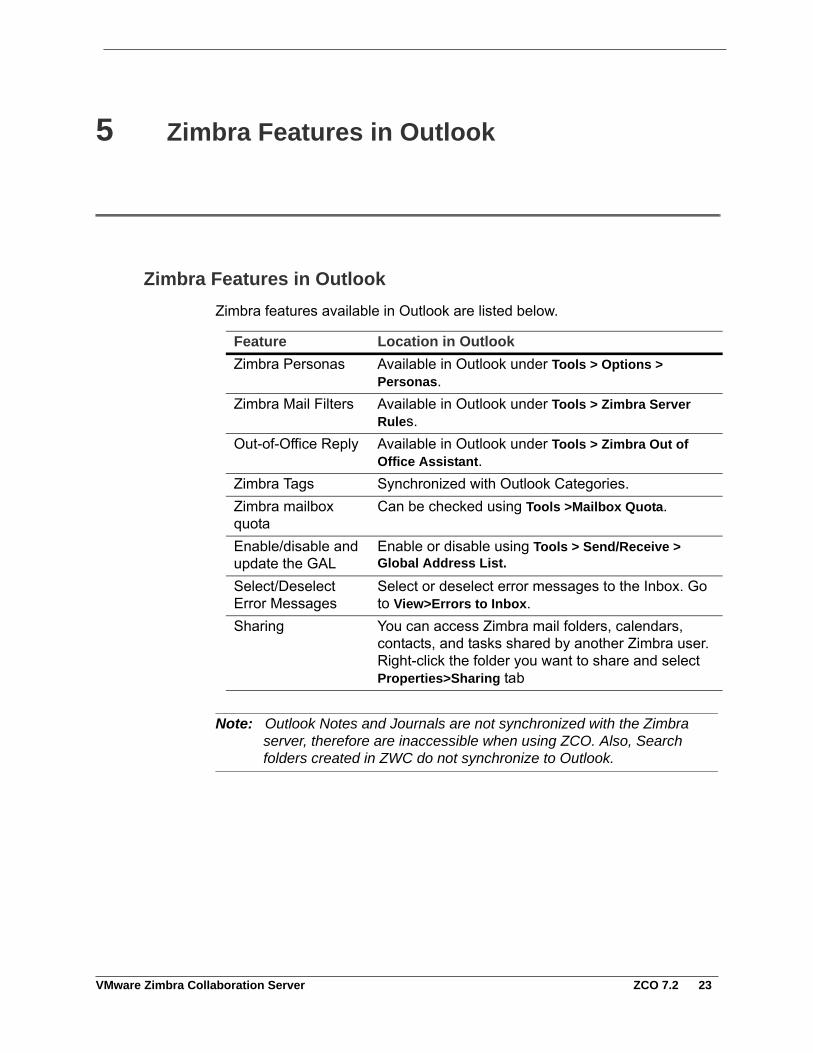
Zimbra Features in Outlook
Zimbra features available in Outlook are listed below.
Note: Outlook Notes and Journals are not synchronized with the Zimbra server, therefore are inaccessible when using ZCO. Also, Search folders created in ZWC do not synchronize to Outlook.
Feature Location in Outlook
Zimbra Personas Available in Outlook under Tools > Options > Personas.
Zimbra Mail Filters Available in Outlook under Tools > Zimbra Server Rules.
Out-of-Office Reply Available in Outlook under Tools > Zimbra Out of Office Assistant.
Zimbra Tags Synchronized with Outlook Categories. Zimbra mailbox quota
Can be checked using Tools >Mailbox Quota.
Enable/disable and update the GAL
Enable or disable using Tools > Send/Receive > Global Address List.
Select/Deselect Error Messages
Select or deselect error messages to the Inbox. Go to View>Errors to Inbox.
Sharing You can access Zimbra mail folders, calendars, contacts, and tasks shared by another Zimbra user. Right-click the folder you want to share and select Properties>Sharing tab
VMware Zimbra Collaboration Server ZCO 7.2 23
Zimbra Connector for Microsoft Outlook User Guide
Personal Email Certificates (S/MIME)
Personal Email Certificates (S/MIME) synchronize in the GAL from ZCS, which allows you to send and receive signed and encrypted email messages. Certificates are stored in two places, including the GAL (synchronized to ZCO during GAL sync), and in Personal Contacts (synchronized bi-directionally with ZCS).
Zimbra Feature Differences for Outlook Users
ZCS and Zimbra offer account configuration by Class of Service and by account. When you use Outlook, many of the features and options configured for the Zimbra account are not enforced in Outlook. Only restrictions that are controlled by the server are enforced.
You can configure your own Outlook preferences. These are not synchronized with the Zimbra server.
Outlook AutoArchive Disabled for Zimbra Profiles and Folders
The Outlook AutoArchive function is disabled for Zimbra profiles and folders. This feature should not be enabled. Auto-archiving removes files from the server, including items shared with others. This can cause data loss or problems with recurring appointments, shared items, and historical calendar data.
Note: Outlook’s global AutoArchive function remains enabled for Outlook features that are not Zimbra specific.
24 ZCO 7.2 VMware Zimbra Collaboration Server