zetadocs express installation guidedownload.equisys.com/pub/express/documentation... · zetadocs...
TRANSCRIPT

Zetadocs Express for Microsoft
Dynamics NAV - Installation Guide
Version history
Version: 7.1
Published: 24th
September 2015
Equisys Ltd
Equisys House
32 Southwark Bridge Road
London SE1 9EU
United Kingdom
Equisys Inc
30,000 Mill Creek Avenue
Suite 335
Alpharetta GA 30022
USA
Further Support and Information
For further assistance and guidance on your Installation please refer to the support area of the Equisys
website.
Copyright Notice
© Equisys Ltd. All rights reserved.
No part of this document may be reproduced or transmitted in any form or by any means, electronic or
mechanical, including photocopying, without the prior written permission of Equisys Ltd.
All trademarks are acknowledged.

Zetadocs Express for Microsoft Dynamics NAV Installation Guide
This edition 24th
September 2015 © Equisys Ltd All trademarks acknowledged All rights reserved Page 2
Technical Requirements
For the latest technical information please see our website.
Installation Pack Contents
Zetadocs®
Client Side Installer (Setup.exe) which installs the required client components.
Zetadocs SharePoint Extensions via a .WSP file to provide enhanced SharePoint functionality.
Zetadocs NAV Server Side Components in .fob files containing code/table objects to import into
NAV and the Web Client Document FactBox add-in.
Zetadocs Server Extensions which installs the Zetadocs NAV Server Extensions.
Zetadocs Archive Service installer and its prerequisite SQL Express files.
Zetadocs Express Installation Guide and Help files.
1. Client Installation
Zetadocs Express allows you to email and archive documents from within NAV, simply follow the steps
below to get your system up and running.
1.1 Install Steps
1. Navigate to your product download and open the Zetadocs Express Client folder and run the
setup.exe file.
2. You may be presented with a UAC warning depending on your settings, following that you will
receive a message asking if you wish to run the setup.exe installer.
3. You may be required to install the SharePoint Foundation 2010 Client Object Model
Redistributable, tick the I accept checkbox and click Next followed by OK to continue.
4. On returning to the Zetadocs installer, click Next to continue before reviewing the End User Licence
Agreement (EULA).
5. Once you have read and are satisfied with the EULA, select the I accept option and then Next to
continue.
6. On the next screen select Install to install the various components, you will then be asked to click
Finish once the install is complete.
2. Archive Setup
Zetadocs Express allows you to use either SharePoint Archiving or the Zetadocs Archive to archive your
documents.
Client Installation
Archive Setup
NAV Server Install and Configuration
System Testing
Further Client Machine System Rollout

Zetadocs Express for Microsoft Dynamics NAV Installation Guide
This edition 24th
September 2015 © Equisys Ltd All trademarks acknowledged All rights reserved Page 3
2.1 SharePoint Archiving
Prerequisites
Before beginning the installation of the Zetadocs SharePoint Extensions you require the following
prerequisites.
Suitable SharePoint Site or Site Collection created for your archive.
Adding the Zetadocs SharePoint Extensions
You need to add the Zetadocs content type to your Site and later configure the Document Library to use it.
1. Log into SharePoint as a Site Collection Administrator using Internet Explorer 8 or later with
Javascript enabled.
2. On the Site Actions menu, click Site Settings.
3. In the Web Designer Galleries section, click Solutions, if this is not available ensure you are
looking at the settings for the correct level. Use the Go to top level site settings option to achieve
this.
4. Click Solutions on the ribbon and then Upload Solution.
5. Browse to the Zetadocs SharePoint Extensions folder of your product download and select the
Zetadocs SharePoint Extensions.wsp file.
6. In the Upload Document dialog box, click OK.
7. The Solution Gallery – Activate Solution dialog box appears, click on Activate.
8. Return to the Site Settings and select Manage Site Features from the Site Actions section.
9. Scroll down the list and activate the Zetadocs elements in the following order:
a. Zetadocs Content Type
b. Zetadocs Document Library
c. Zetadocs Workflow (Note: Do not activate this item. The workflows feature is not
available.)
2.2 Zetadocs Archive
The Zetadocs Archive Service runs on a server machine on your network and handles the archiving of
documents captured and sent using Zetadocs. The Zetadocs Archive Service makes use of a SQL database
to store the metadata and act as an index for the archive to allow searching for documents by any metadata
field.
Creating the Zetadocs Archive Folder
The archive requires a network folder into which captured documents are placed and to which users require
access permissions.
1. Create a folder with the name Zetadocs Archive, the Zetadocs Archive Service searches for this
exact name and will not work with any other naming.
2. Ensure this location has sufficient disk space, a technical note is available here should you need
assistance determining your requirements.
3. View its Properties and select the Share tab, followed by Advanced Sharing.
4. Check the Share this folder checkbox and add the share name Zetadocs Archive.
5. Select the Permissions button and add required users and groups:
a. All users of Zetadocs require Read permissions, add these individually or create a
Zetadocs group.
b. The Zetadocs Archive Service must have access to the folder, by default it runs as Local
System and for it to function correctly the system account requires FULL permissions.
6. Next return to the Properties for the folder and select the Security tab.
7. Select the Edit… button and in the window which appears select Add…
8. Add the users and groups you created earlier in steps 5a and b to grant your users and the
Zetadocs Archive Service access to the Zetadocs Archive folder.
Installing the Service
Note: If you are running on Windows Server 2003 you must carry out the additional steps in this technical
note before proceeding with the steps below.
1. Locate the Zetadocs Archive Service folder of your product download and run the setup.exe file,
please note the Zetadocs Archive Service installer may require you to reboot your server to
complete.
Zetadocs Express for Microsoft Dynamics NAV Installation Guide
This edition 24th
September 2015 © Equisys Ltd All trademarks acknowledged All rights reserved Page 4
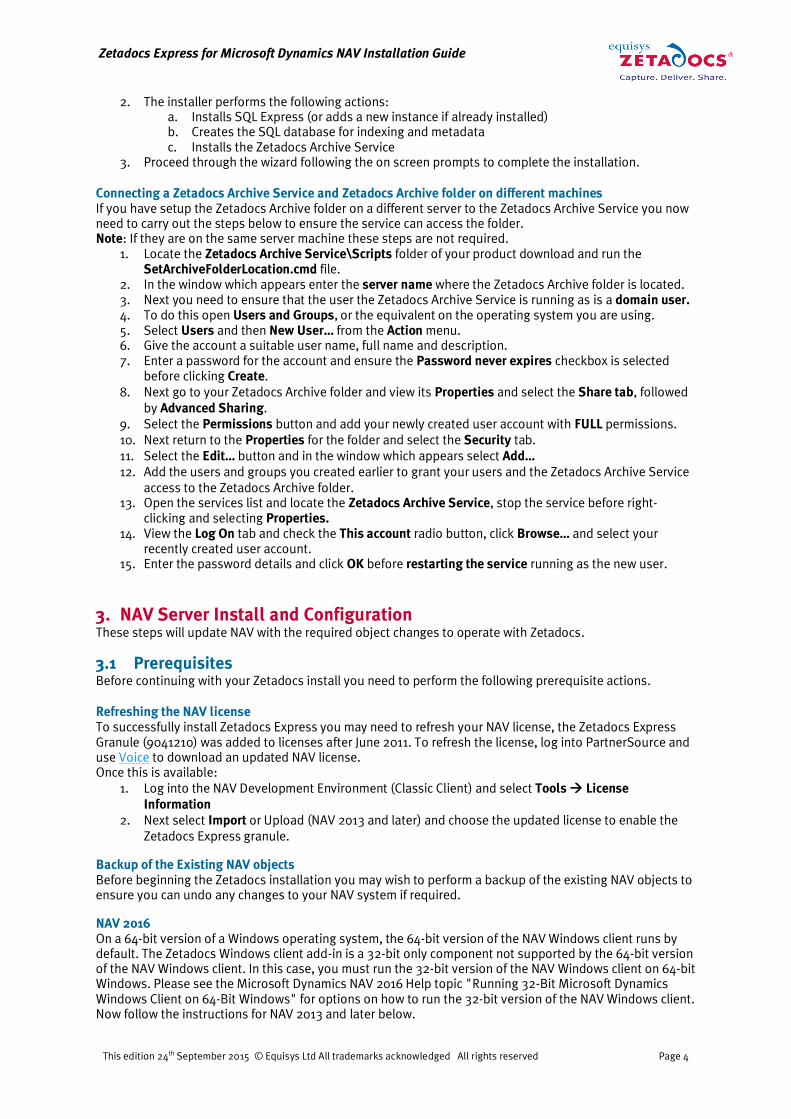
2. The installer performs the following actions:
a. Installs SQL Express (or adds a new instance if already installed)
b. Creates the SQL database for indexing and metadata
c. Installs the Zetadocs Archive Service
3. Proceed through the wizard following the on screen prompts to complete the installation.
Connecting a Zetadocs Archive Service and Zetadocs Archive folder on different machines
If you have setup the Zetadocs Archive folder on a different server to the Zetadocs Archive Service you now
need to carry out the steps below to ensure the service can access the folder.
Note: If they are on the same server machine these steps are not required.
1. Locate the Zetadocs Archive Service\Scripts folder of your product download and run the
SetArchiveFolderLocation.cmd file.
2. In the window which appears enter the server name where the Zetadocs Archive folder is located.
3. Next you need to ensure that the user the Zetadocs Archive Service is running as is a domain user.
4. To do this open Users and Groups, or the equivalent on the operating system you are using.
5. Select Users and then New User… from the Action menu.
6. Give the account a suitable user name, full name and description.
7. Enter a password for the account and ensure the Password never expires checkbox is selected
before clicking Create.
8. Next go to your Zetadocs Archive folder and view its Properties and select the Share tab, followed
by Advanced Sharing.
9. Select the Permissions button and add your newly created user account with FULL permissions.
10. Next return to the Properties for the folder and select the Security tab.
11. Select the Edit… button and in the window which appears select Add…
12. Add the users and groups you created earlier to grant your users and the Zetadocs Archive Service
access to the Zetadocs Archive folder.
13. Open the services list and locate the Zetadocs Archive Service, stop the service before right-
clicking and selecting Properties.
14. View the Log On tab and check the This account radio button, click Browse… and select your
recently created user account.
15. Enter the password details and click OK before restarting the service running as the new user.
3. NAV Server Install and Configuration
These steps will update NAV with the required object changes to operate with Zetadocs.
3.1 Prerequisites
Before continuing with your Zetadocs install you need to perform the following prerequisite actions.
Refreshing the NAV license
To successfully install Zetadocs Express you may need to refresh your NAV license, the Zetadocs Express
Granule (9041210) was added to licenses after June 2011. To refresh the license, log into PartnerSource and
use Voice to download an updated NAV license.
Once this is available:
1. Log into the NAV Development Environment (Classic Client) and select Tools License
Information
2. Next select Import or Upload (NAV 2013 and later) and choose the updated license to enable the
Zetadocs Express granule.
Backup of the Existing NAV objects
Before beginning the Zetadocs installation you may wish to perform a backup of the existing NAV objects to
ensure you can undo any changes to your NAV system if required.
NAV 2016
On a 64-bit version of a Windows operating system, the 64-bit version of the NAV Windows client runs by
default. The Zetadocs Windows client add-in is a 32-bit only component not supported by the 64-bit version
of the NAV Windows client. In this case, you must run the 32-bit version of the NAV Windows client on 64-bit
Windows. Please see the Microsoft Dynamics NAV 2016 Help topic "Running 32-Bit Microsoft Dynamics
Windows Client on 64-Bit Windows" for options on how to run the 32-bit version of the NAV Windows client.
Now follow the instructions for NAV 2013 and later below.
Zetadocs Express for Microsoft Dynamics NAV Installation Guide
This edition 24th
September 2015 © Equisys Ltd All trademarks acknowledged All rights reserved Page 5
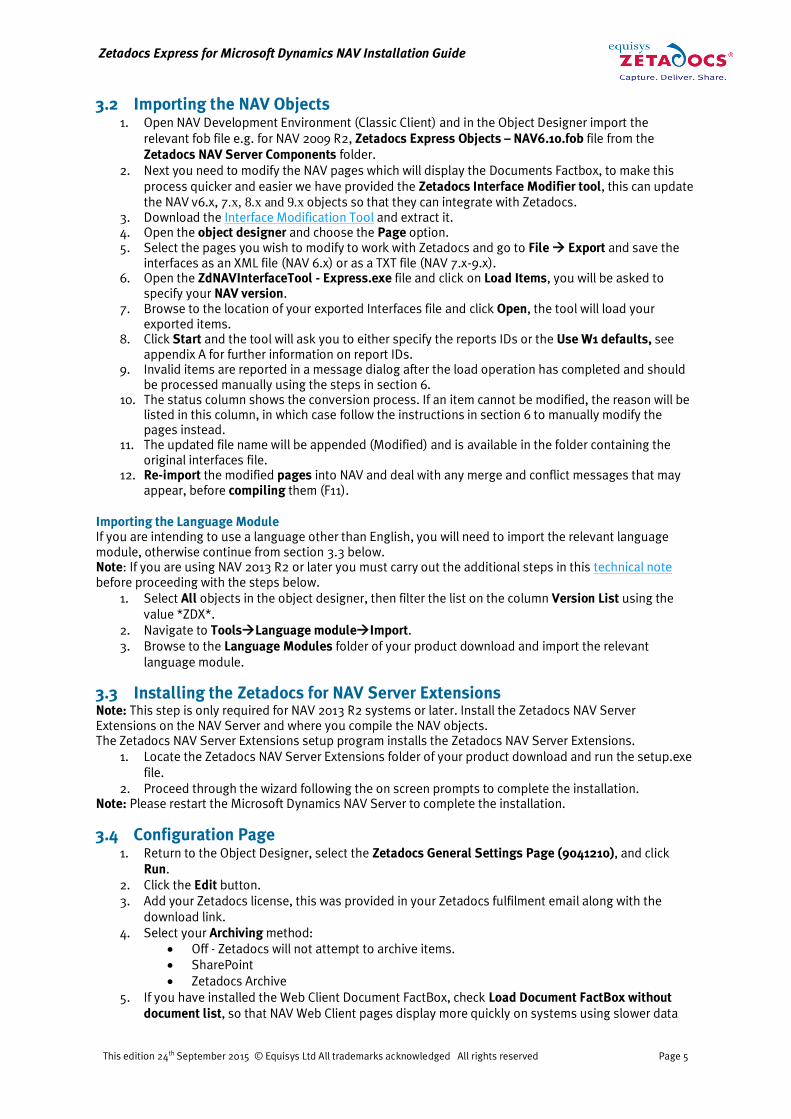
3.2 Importing the NAV Objects
1. Open NAV Development Environment (Classic Client) and in the Object Designer import the
relevant fob file e.g. for NAV 2009 R2, Zetadocs Express Objects – NAV6.10.fob file from the
Zetadocs NAV Server Components folder.
2. Next you need to modify the NAV pages which will display the Documents Factbox, to make this
process quicker and easier we have provided the Zetadocs Interface Modifier tool, this can update
the NAV v6.x, 7.x, 8.x and 9.x objects so that they can integrate with Zetadocs.
3. Download the Interface Modification Tool and extract it.
4. Open the object designer and choose the Page option.
5. Select the pages you wish to modify to work with Zetadocs and go to File Export and save the
interfaces as an XML file (NAV 6.x) or as a TXT file (NAV 7.x-9.x).
6. Open the ZdNAVInterfaceTool - Express.exe file and click on Load Items, you will be asked to
specify your NAV version.
7. Browse to the location of your exported Interfaces file and click Open, the tool will load your
exported items.
8. Click Start and the tool will ask you to either specify the reports IDs or the Use W1 defaults, see
appendix A for further information on report IDs.
9. Invalid items are reported in a message dialog after the load operation has completed and should
be processed manually using the steps in section 6.
10. The status column shows the conversion process. If an item cannot be modified, the reason will be
listed in this column, in which case follow the instructions in section 6 to manually modify the
pages instead.
11. The updated file name will be appended (Modified) and is available in the folder containing the
original interfaces file.
12. Re-import the modified pages into NAV and deal with any merge and conflict messages that may
appear, before compiling them (F11).
Importing the Language Module
If you are intending to use a language other than English, you will need to import the relevant language
module, otherwise continue from section 3.3 below.
Note: If you are using NAV 2013 R2 or later you must carry out the additional steps in this technical note
before proceeding with the steps below.
1. Select All objects in the object designer, then filter the list on the column Version List using the
value *ZDX*.
2. Navigate to ToolsLanguage moduleImport.
3. Browse to the Language Modules folder of your product download and import the relevant
language module.
3.3 Installing the Zetadocs for NAV Server Extensions
Note: This step is only required for NAV 2013 R2 systems or later. Install the Zetadocs NAV Server
Extensions on the NAV Server and where you compile the NAV objects.
The Zetadocs NAV Server Extensions setup program installs the Zetadocs NAV Server Extensions.
1. Locate the Zetadocs NAV Server Extensions folder of your product download and run the setup.exe
file.
2. Proceed through the wizard following the on screen prompts to complete the installation.
Note: Please restart the Microsoft Dynamics NAV Server to complete the installation.
3.4 Configuration Page
1. Return to the Object Designer, select the Zetadocs General Settings Page (9041210), and click
Run.
2. Click the Edit button.
3. Add your Zetadocs license, this was provided in your Zetadocs fulfilment email along with the
download link.
4. Select your Archiving method:
Off - Zetadocs will not attempt to archive items.
SharePoint
Zetadocs Archive
5. If you have installed the Web Client Document FactBox, check Load Document FactBox without
document list, so that NAV Web Client pages display more quickly on systems using slower data

Zetadocs Express for Microsoft Dynamics NAV Installation Guide
This edition 24th
September 2015 © Equisys Ltd All trademarks acknowledged All rights reserved Page 6
stores (e.g. SharePoint Online). This option is also applied to the NAV Windows Client when using
Web Client Document FactBox in server only deployments.
6. If you are using SharePoint for your archive, input your SharePoint site or site collection address as
required, this is the bold section shown here:
https://equisys.SharePoint.com/sites/MicrosoftDynamics/default.aspx.
Note: Please ensure that you have only included the site collection address and not the specific page
reference which appears at the end.
a. Once you have added a site address click the test button at the end of the field to verify it.
7. If you are using the Zetadocs Archive, enter the server name on your network where the Zetadocs
Archive Service has been installed into the Service Address field e.g. http://example-
server/ZetadocsArchive ensuring there are no spaces in the name.
a. Once you have added the service address click the test button at the end of the field to
verify it, this will open a browser window and if successful in connecting to the service it
will display a page titled ArchiveService Service with the confirmation message You have
created a service below it.
8. Next import the Zetadocs configuration by selecting Actions and then Import Configuration Data.
9. On the import dialog, select the Zetadocs Express Configuration.xml file from the Zetadocs
Express folder.
10. Click Import and you should be notified when the import has finished successfully.
3.5 Installing the Help Files
Help provision is handled differently depending on the version of NAV and the client that is being used,
please follow the steps below relating to your NAV version.
NAV2013 R2 or later and Help Server
If you have installed the help server please follow the steps below to integrate the Zetadocs Express help
with the main NAV help files.
To integrate the Zetadocs help files with the Microsoft Dynamics NAV Help you need to copy the Zetadocs
help files into the main NAV help file folder and update the table of contents file to enable your users to
locate the help they need.
1. Locate your product download and select all of the files present from the folder below:
\Zetadocs Express\Documentation\<language>\Zetadocs NAV Help
2. Copy these to the NAV Help Server folder:
Typically: C:\inetpub\wwwroot\DynamicsNAVxxHelp\Help\<languagecode>
3. This adds the help files into the server where they can be accessed by pressing F1 on a Zetadocs
field, a further step is required to add them to the Table of Contents so the content can be easily
browsed for.
4. Open the ToC_Additions.xml in file in a suitable editor and copy the contents and paste them into
the ToC.xml file near the bottom, above the second last </Node> tag and Save the changes.
NAV2013 and earlier - Windows Client/Role Tailored Client
The Zetadocs for NAV help file needs to be copied to the Microsoft Dynamics NAV help folder so they are
available to users.
The addin_a.hh file should be copied from:
\Zetadocs Express\Documentation\<language>\
To the following locations, for NAV 2013:
Program Files\Microsoft Dynamics NAV\70\Service\ENG
For NAV 2009 R2:
Program Files\Microsoft Dynamics NAV\60\Service\ENG
Substitute ENG for the language pertinent to the install e.g. ENU for US systems.
You may need to restart the Microsoft Dynamics NAV server service to get the help files to appear as
expected.
3.6 User and Permissions Setup for NAV 2013 and later
1. Open the NAV Windows Client.
2. In the search bar, search for Configuration Packages and open the Configuration Packages page.
3. Select Import Package… from the Process group on the Home tab and select the Zetadocs Express

Zetadocs Express for Microsoft Dynamics NAV Installation Guide
This edition 24th
September 2015 © Equisys Ltd All trademarks acknowledged All rights reserved Page 7
Permission Sets and Permissions - NAV7.xx-NAV9.00.RAPIDSTART file from your product
download.
4. In the Process group, click on Apply Package to complete import of the settings.
5. Setup the required users as per the steps in section 3.7 of the Zetadocs Express Installation Guide.
3.7 Permissions Setup for NAV 2009 R2
The ZETADOCSEXPRESS role grants access to the standard Zetadocs Express tables and allows users to use
Zetadocs Express.
1. Run the Data Migration form (8614).
2. Select Functions and then Import from XML.
3. Browse to the Zetadocs Express folder and select the Zetadocs Express Roles.xml file.
4. Next, select the Migration button and then Apply Migration Data.
5. Repeat 1 - 4 to import and apply the Zetadocs Express Permissions.xml file.
6. Next select Tools Security Synchronize All Logins.
3.8 Setting up Users
Once the standard permission set and permissions have been imported you will need to assign the role to
your users.
1. In the NAV Windows Client type User Setup in the search bar and navigate to that page.
2. Select the NAV user to enable for Zetadocs and choose Edit from the Home tab.
3. In the User Permission Sets fast tab, select an empty row and add the ZETADOCSEXPRESS
Permission Set.
4. Click OK when finished and the user is now set up to use Zetadocs Express.
4. System Testing
To ensure that the features have been correctly configured we recommend that you run a number of simple
tests of the Zetadocs functionality.
4.1 Authentication
Windows Live ID Authentication for SharePoint on Office 365
It is recommended that users initially sign in using their web browser at https://login.microsoftonline.com
with their username and password details. On first logging in users are asked to change their password
from its default value, once this has been done you are ready to connect via NAV.
1. Open NAV and proceed to one of the Zetadocs enabled pages e.g. Sales Order page.
2. The Zetadocs Documents FactBox will display a login box requesting their Office 365 username and
password.
3. Add these and select OK to continue, this establishes the connection between Zetadocs and
SharePoint.
4. These details will be stored locally in Windows Credential Manager meaning that the user will only
be requested to provide them again should they be changed or a problem connecting occurs.
5. This should be repeated on all required user accounts.
4.2 Document Capture Testing
1. Open the NAV Windows Client and navigate to and open a Sales Quote record, or other supported
record type.
2. Locate a suitable test file and drag and drop this into the Drag Files Here area in the Documents
FactBox.
3. Ensure this appears in the Related Document List and is archived.
4.3 Web Client Document FactBox Testing
1. Open the NAV Web Client and navigate to and open a Sales Quote record, or other supported
record type.
2. Select Add from the Documents FactBox Menu (…) actions and browse for an item to add to the
archive using Windows Explorer or the equivalent on the device.
3. Ensure this item appears in the Related Document List and is archived.

Zetadocs Express for Microsoft Dynamics NAV Installation Guide
This edition 24th
September 2015 © Equisys Ltd All trademarks acknowledged All rights reserved Page 8
4.4 Save and Send Testing
1. Open the NAV Windows Client and navigate to and open a Sales Quote record, or other supported
record type.
2. Click the Save and Send button and then Select the Save and Send option.
3. On selecting OK an Outlook email message should open with an attachment and with customer
addressing information already populated.
Note: On selecting Save and Send for the first time you will be presented with up to four warnings such
as:
o Server has requested to run Scriptcontrol object
o Server has requested to run OApplication class
o Server has requested to run OSendMail class
o Server has requested to run BSTRConverter class
These are to be expected and you should simply select Always Allow in each instance, they will not appear
again on this machine.
For NAV 2013 an additional security warning will occur every session, you can simply select Allow for this
session each time, alternatively you can follow these steps alter the security configuration.
4. Locate and open the ClientUserSettings.config file, this can be found here:
C:\Users\<username>\AppData\Roaming\Microsoft\Microsoft Dynamics NAV\70
5. Find the line <add key="ServicePrincipalNameRequired" value="false" /> and change false to
true
6. Next find or add the line <add key="UnknownSpnHint"
value="(net.tcp://example.equisys.com:7046/DynamicsNAV70/Service)=NoSpn;" /> and
change NoSpn to Spn.
7. Save your changes and test the save and send feature the warning should no longer appear.
8. To test Save and Send adjust the email address to one you have access to, so the customer doesn’t
receive the email, and send the email.
9. Check it was delivered as expected and that the document appears in the Documents FactBox.
5. Further Client Machine System Rollout
Now that we have made the necessary modifications to NAV we can roll Zetadocs out across the other client
machines. To do this simply log onto client machine in question with an account with admin rights and
follow the instructions in section 1.1 to run the Zetadocs Express Installer program. This will add all of the
necessary components onto the machine to enable it to utilize the Zetadocs functionality. You should
perform the brief tests in section 4.34 to process the four warnings describe above, it is also recommended
that you perform the other tests in section 4.1 to confirm that Zetadocs is operating as expected.
6. Appendix A - Manually Modifying NAV Pages
The Documents FactBox can be implemented throughout NAV by editing the pages using the Zetadocs
Interface Modification tool, which can be found on our website, or by following the manual steps below.
Equisys has tested many of the most common pages but cannot guarantee these steps will work in all
circumstances. For systems with existing Sales and Purchase modified pages it is possible to use these
steps to install Zetadocs without importing the Interfaces fob file.
6.1 Feature Availability
Save and Send Functionality is available for reports that can be saved as PDF using the NAV
SAVEREPORTASPDF function.
The Documents FactBox with drag and drop support can be added throughout NAV on pages which
support FactBoxes.
The ability to retrieve related documents for a record after posting is restricted to the Sales and
Purchase pages by default, to add Zetadocs functionality to other areas of NAV please see this
technical note for further details.
Note: That save and send and drag and drop support are not available from the Web Client Document
FactBox.

Zetadocs Express for Microsoft Dynamics NAV Installation Guide
This edition 24th
September 2015 © Equisys Ltd All trademarks acknowledged All rights reserved Page 9
6.2 Adding the Document FactBox
Adding the Document FactBox is handled differently depending on the version of NAV and the client that is
being used, please follow the steps below relating to your NAV version.
NAV2013 R2 or later
1. Open the object designer (Shift + F12) and select the page that needs to be modified and click the
Design button, in this example we will be looking at the Employee card.
2. Add the following entry at the top of the FactBox area
Name: WebClient
Caption: Documents
Type: Part
Subtype: Page
3. Once you’ve added the line select it and open the properties (shift+F4) for it.
4. Scroll down to the PagePartID field and select Zetadocs Web Rel. Docs. Page, ID: 9041211.
5. Then scroll up to the Visible field and type ZDWebAddinVisible.
6. Close the Properties dialog.
7. Add the following entry below the WebClient entry in the FactBox area
Name: Zetadocs
Caption: Documents
Type: Part
Subtype: Page
8. Once you’ve added the line select it and open the properties (shift+F4) for it.
9. Scroll down to the PagePartID field and select Zetadocs Rel. Docs. Page Part, ID:9041209.
10. Then scroll up to the Visible field and type ZDWinAddinVisible.
11. Close the Properties dialog.
12. Select ViewCA/L Globals and select the Variable tab, create four new global variables with the
values:
----
Name: ZdRecRef
DataType: RecordRef
----
Name: ZDWinAddinVisible
DataType: Boolean
----
Name: ZDWebAddinVisible
DataType: Boolean
----
Name: ZDSaveAndSendVisible
DataType: Boolean
----
Name: ZdPrevRecID
DataType: RecordID
13. Close the CA/L Globals dialog.
14. Click ViewC/AL Code or press F9 to open the C/AL Editor, scroll down to the
OnAfterGetCurrRecord section and append the following:
IF GUIALLOWED THEN
BEGIN
ZdRecRef.GETTABLE(Rec);
IF ZdRecRef.GET(ZdRecRef.RECORDID) AND (ZdRecRef.RECORDID <> ZdPrevRecID) THEN
BEGIN
ZdPrevRecID := ZdRecRef.RECORDID;
IF ZDWinAddinVisible THEN
BEGIN
CurrPage.Zetadocs.PAGE.SetRecordID(ZdRecRef.RECORDID);
CurrPage.Zetadocs.PAGE.ACTIVATE(TRUE);
END;
IF ZDWebAddinVisible THEN
BEGIN
CurrPage.WebClient.PAGE.SetRecordID(ZdRecRef.RECORDID);

Zetadocs Express for Microsoft Dynamics NAV Installation Guide
This edition 24th
September 2015 © Equisys Ltd All trademarks acknowledged All rights reserved Page 10
CurrPage.WebClient.PAGE.UPDATE;
END;
END;
END;
15. Scroll up to the OnInit section.
16. Select ViewCA/L Locals and select the Variables tab, create a new local variable with the values:
Name: ZDAddin
DataType: Codeunit
Subtype: Zetadocs-Capture Addin
17. Close the CA/L Locals dialog.
18. In the OnInit section enter the following:
ZDWinAddinVisible := ZDAddin.IsWebClient OR ZDAddin.IsWinClientAddinPresent;
ZDWebAddinVisible := ZDAddin.IsWebClient OR (NOT ZDWinAddinVisible);
ZDSaveAndSendVisible := ZDAddin.IsWinClientAddinPresent;
19. Close the page and compile it. The Document FactBox can now be used in the NAV Windows client
(RTC) or NAV Web Client.
NAV2013 and earlier - Windows Client/Role Tailored Client
1. Open the object designer (Shift + F12) and select the page that needs to be modified and click the
Design button, in this example we will be looking at the Employee card.
2. Add the following entry at the top of the FactBox area
Name: Zetadocs
Caption: Documents
Type: Part
Subtype: Page
3. Once you’ve added the line select it and open the properties (shift+F4) for it.
4. Scroll down to the PagePartID field and select Zetadocs Rel. Docs. Page Part, ID:9041209.
5. Close the Properties dialog.
6. Select ViewCA/L Globals and select the Variable tab, create a new global variable with the
values:
Name: ZdRecRef
DataType: RecordRef
----
Name: ZdPrevRecID
DataType: RecordID
7. Close the CA/L Globals dialog.
8. Click ViewC/AL Code or press F9 to open the C/AL Editor , scroll down to the OnAfterGetRecord
section and enter the following:
For NAV 2009 R2
ZdRecRef.GETTABLE(Rec);
IF ZdRecRef.GET(ZdRecRef.RECORDID) THEN
BEGIN
CurrPage.Zetadocs.FORM.SetRecordID(ZdRecRef.RECORDID);
END;
For NAV 2013
ZdRecRef.GETTABLE(Rec);
IF ZdRecRef.GET(ZdRecRef.RECORDID) AND (ZdRecRef.RECORDID <> ZdPrevRecID) THEN
BEGIN
ZdPrevRecID := ZdRecRef.RECORDID;
CurrPage.Zetadocs.PAGE.SetRecordID(ZdRecRef.RECORDID);
CurrPage.Zetadocs.PAGE.ACTIVATE(TRUE);
END;
9. The Document FactBox can now be used in the NAV Windows client (RTC).
6.3 Save and Send Functionality
Zetadocs Express supports Sales and Purchase Order Processing reports out of the box, for reports based
on other tables you will need to add some code to one of our Zetadocs Save and Send Integration codeunit

Zetadocs Express for Microsoft Dynamics NAV Installation Guide
This edition 24th
September 2015 © Equisys Ltd All trademarks acknowledged All rights reserved Page 11
(9041223). To add Save and Send functionality to a page you need to do the following, after you have
added the Documents FactBox to it.
1. Locate the page you wish to modify using the object designer and select Design.
2. Scroll to the bottom empty row and select View Control actions.
3. View the control actions and under Action Items add a new row.
4. Enter the Caption: Save and Send and Type: Action.
5. Select the row and view the properties for it.
6. Set the values as follows:
ToolTip: Save document to the archive and/or Send it via Outlook
Image: Invoice
Promoted: Yes
PromotedisBig: Yes
PromotedCategory: Process
Visible: ZDSaveAndSendVisible
Note: Only set the Visible value for NAV 2013 R2 systems or later.
7. Close the dialog and make a note of the name value corresponding to the caption Save and Send.
8. Next we need to add the relevant code for the page, press F9 to view the code and then locate the
row which matches the name value for Save and Send.
9. In this row add the following code for NAV 2009 R2: CurrPage.Zetadocs.Form.SaveAndSend(ID);
where ID is the value for the report you wish to run. E.g.
CurrPage.Zetadocs.Form.SaveAndSend(204);
For NAV 2013 and later: CurrPage.Zetadocs.Page.SaveAndSend(ID); where ID is the value for the
report you wish to run. E.g. CurrPage.Zetadocs.Page.SaveAndSend(204);
10. The tables below displays the tables supported out of the box and the default report IDs for the W1
database. For instructions on reports based on other tables, please see the installation notes page
on our website.
Sales
Page FactBox Save & Send Default Report*
41 Sales Quote Y Y 204 Sales Quote
42 Sales Order Y Y 205 Order Confirmation
507 Blanket Sales Order Y Y 210 Blanket Sales Order
43 Sales Invoice Y N N/A
132 Posted Sales Invoice Y Y 206 Sales Invoice
44 Sales Credit Memo Y N N/A
134 Posted Sales Credit Memo Y Y 207 Sales - Credit Memo
130 Posted Sales Shipment Y Y 208 Sales - Shipment
6630 Sales Return Order Y Y 6631 Return Order Confirmation
6660 Posted Sales Return Receipt Y Y 6646 Sales - Return Receipt
*SQL Reporting Services only
Purchases
Page FactBox Save & Send Default Report

Zetadocs Express for Microsoft Dynamics NAV Installation Guide
This edition 24th
September 2015 © Equisys Ltd All trademarks acknowledged All rights reserved Page 12
49 Purchase Quote Y Y 404 Purchase Quote
50 Purchase Order Y Y 405 Order
509 Blanket Purchase Order Y Y 410 Blanket Purchase Order
51 Purchase Invoice Y N N/A
138 Posted Purchase Invoice Y Y 406 Purchase - Invoice
52 Purchase Credit Memo Y N N/A
140 Posted Purchase Credit Memo Y Y 407 Purchase - Credit Memo
6650 Posted Return Shipment Y Y 6636 Purchase - Return Shipment
6640 Purchase Return Order Y Y 6641 Return Order
136 Posted Purchase Receipt Y Y 408 Purchase - Receipt
*SQL Reporting Services only
7. Appendix B
For information on performing other activities such as Security Hardening, System Backup and Restore or
performing an uninstall of Zetadocs please see the installation notes page on our website for more details.