you thank elzen copy, - wordpress.com · copy, thank you hans van der elzen 101 hans van der elzen...
TRANSCRIPT

Do not
copy
, than
k you
Hans v
an de
r Elze
n

99
Hans van der Elzen
CHAPTER 13: DERBY BLUCHER
Derby Blucher
Do not
copy
, than
k you
Hans v
an de
r Elze
n

100
Hans van der Elzen
Derby Blucher
A Derby Blucher for the shoe designer is one of the most satisfying shoe types. On this type of shoe he can design many variations of application. The closure of this type of shoe adapts well to the foot, so that a perfect fit can be achieved.
It is this type of shoe that you see a lot from the orthopedics and footwear manufactures, as sport, walking, or comfort shoes. The proper modeling of this type of shoe is very important because many people wear this type of shoe.
When the last has the right fit it can be that by incorrectly modeling the correct fit it can turn out negatively.
It is possible that two different shoe designers are modeling on the same last the derby Moliere and that one shoe designer create a perfect fit, while the other creates the opposite result.
Sometimes in a situation like this they thinking that the bad fitting of the last cause the wrong look but is in fact a question of wrong modeling. The correct modeling for standards we explain step by step in this book. Drawing a paper pattern in the correct manner we ensure proper fit of the upper on each type of last.
Do not
copy
, than
k you
Hans v
an de
r Elze
n

101
Hans van der Elzen
Derby Blucher
1. Toecap2. Vamp3. Yelets holes 4. Tongue5. Medial quarter part6. Lateral quarter part
A. Folding lineB. Quarter flap lineC. Vamp quarter lineD. Lateral quarter lineE. Medial quarter lineF. Quarter lay-on lineG. Tongue line
H. Quarter back lineJ. Vamp under lay lineK. Trench stitching lineL. Montage folding lineM. Paper copy lineN. Toecap line
Do not
copy
, than
k you
Hans v
an de
r Elze
n

102
Hans van der Elzen
Under-lay
Illustration 1
Illustration 2
Every pattern part what is stitched UNDER another pattern part must have under-lay.
The under-lay is normally 10 mm wide. Illustration 2 shows you that the vamp (B) has under-lay for the toe-puff (A) and the quarter part (C).
For the finish of model lines (cutting edges) we can make side folding of the upper material. For side folding we add 5 mm to the pattern parts, see illustration 3 in blue color.
On upper vamp part B we mark the under-lay lines for the correct stitching from the upper material parts A an C.
Illustration 3
Derby Blucher
Do not
copy
, than
k you
Hans v
an de
r Elze
n

103
Hans van der Elzen
Derby Blucher
The quarter line (lateral) of a Blucher is not an easy line to draw. Create a distribution of the help lines (see picture) so it is somewhat easier to draw the quarter line in the appropriate way. (Fig.2)
(Fig.2)
The dotted line A is the normal quarter line, line B is a quarter line that is drawn too high. The quarter Line B will cut in the foot and will hurt the ankle, while the design of the quarterback will look to heavy (Fig.3).
(Fig.3)
Do not
copy
, than
k you
Hans v
an de
r Elze
n

104
Hans van der Elzen
Dotted line A is the normal quarter line. Quarter Line B is a quarter line that is drawn too low. Quarter Line B will yawn and therefore will stay open from the last, because the lines are very close to the flanks of the last. (Fig.4)
(Fig.4)
(Fig.5)
The modeling of a low shoe type has a medial and lateral quarter line. This is necessary in connection with the arches; the arch is medially higher than laterally. Both quarter construction lines indicate how the quarter lines must be drawn. (Fig.5)
Derby Blucher
Do not
copy
, than
k you
Hans v
an de
r Elze
n

105
Hans van der Elzen
Derby Blucher
(Fig.6)
On Illustration 1, the “quarter back part line” is a line that must fit perfectly on the last.It is very important that we draw the “quarter back part line”, 3 mm inside the paper copy. At the heel height we draw the “quarter back part line” 2 mm outside the paper copy in order to give space for the counter between the lining and upper leather.
On illustration 2, you see the “quarter back part line” too round and therefore point B will not fit on the last and gives too much space for
the counter. Point A is drawn too much inside the paper pattern and this will damage the feet.
On illustration 3, you see that the “quarter back part line” by point A is not drawn inside of the paper pattern. The feet will slip out of the shoe during walking.Do n
ot co
py, th
ank y
ou
Hans v
an de
r Elze
n

106
Hans van der Elzen
Derby Blucher
Fig.7)The quarter flaps from the Blucher Derby must follow as close as possible to the construction lines of the paper copy (A).The vamp quarter line we draw 4 mm below the lateral quarter line in order to get enough and good instep space. (See fig.7).
(Fig.8)Fig. 8, see the correct quarter flaps from a Blucher Derby on the last shape.
Do not
copy
, than
k you
Hans v
an de
r Elze
n

107
Hans van der Elzen
Derby Blucher
(Fig.9)The quarter flaps from the Blucher Derby are drawn to round below the construction lines (A). This will result in an ugly look for this type of shoe (Fig.9).
(Fig.10)Fig.10, see the quarter flaps from a Blucher Derby on the last shape when the lines are not correctly drawn.
Do not
copy
, than
k you
Hans v
an de
r Elze
n

108
Hans van der Elzen
Derby Blucher
(Fig.11)
Illustration 1, the lay-on lines we draw in a way that we have enough space on the quarter between the quarter line and lay-on line, for adding an application stitching.
The trenches we stitch on the quarters are 12 mm long for thin calf leather, and 15 mm long for thicker leather. The trenches we stitch 10 mm above the lay-on line.
On illustration 2, you see point A is the normal lay-on line. B is drawn too low and the quarter part at this point looks too heavy and not nice.
On Illustration 3, you see A as the normal lay-on line. B is drawn too high and the quarter part at this point is too small and the look is not nice.
Do not
copy
, than
k you
Hans v
an de
r Elze
n

109
Hans van der Elzen
Derby Blucher
(Fig. 12)
After we have drawn the quarter part and trenches we set-up the folding line points.(A folding line is the line where we fold the paper in order to make the vamp and other parts of the paper patterns).
The folding point for the vamp we set-up with a winkle.
- The winkle we place on line A. at the top of the paper copy (Fig.12).(See Fig.2, on Page 96, Line A is the line through point C1 and point F)
- Point C is at the end of the trench from the quarter part.
In this way we find the exact space needed between the medial and lateral trenches.Point B is the correct folding point for the vamp.
Both quarters (medial and lateral) must have the correct space between the trenches otherwise the upper will not fit correctly on the last.
The leather between the trenches will show wrinkles and after the last is pull out from the finished shoe the shoe will show a bad and ugly shape.
Do not
copy
, than
k you
Hans v
an de
r Elze
n

110
Hans van der Elzen
Derby Blucher
(Fig.13
Fig.13, point 1 we found with the winkle, point 2 we find at the top of the last and set-up on the paper pattern, 3 mm inside of the paper copy. The measurement for point 2 is the distance between the sole side and the nose-top of the last. At this point 2, the folding line lay under the last copy. Here we save leather material and by montage the upper on the last we get fewer wrinkles. The leather between the trenches on
the vamp by a Blucher is not stitched. Therefore a folding line drawn at the nose-point under the paper copy will give extra force to the flanks of the last and the vamp will not be pushed too much to the front. By montage of the upper on the last, it will be easier when front part of the upper is already looking downwards (through the correct folding line) and easy to place between the grips of the molding machine.
(Fig.14)
After finding the points 1 and 2 we can draw the folding line 3 on the paper pattern (Fig.14).
Do not
copy
, than
k you
Hans v
an de
r Elze
n

111
Hans van der Elzen
Derby Blucher
(Fig.15)
Fig.15 shows clearly how we need to drawn a folding line for a Blucher Derby.
Winkle A, is the correct way, equal to the copy line C1-F.
Winkle B, is in the wrong way, too low and under the instep point.
Winkle C, is in the wrong way, too high above the instep point.
It is VERY IMPORTANT that you set-up the folding line correct, by not set-up the folding line correctly it will influence the fitting and the look of the shoe in a very negative way.
Do not
copy
, than
k you
Hans v
an de
r Elze
n
112
Hans van der Elzen
Derby Blucher
(Fig.16)
(Fig.17)
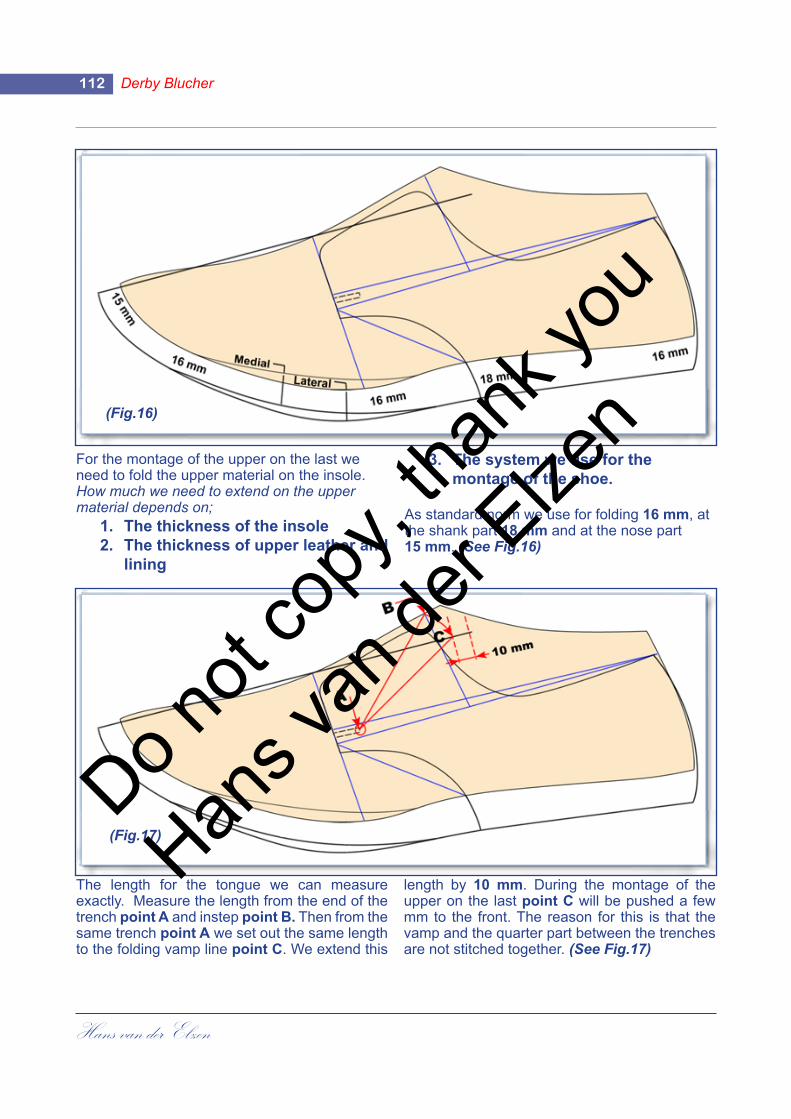
For the montage of the upper on the last we need to fold the upper material on the insole.How much we need to extend on the upper material depends on;
1. The thickness of the insole2. The thickness of upper leather and
lining
3. The system we use for the montage of the shoe.
As standard norm we use for folding 16 mm, at the shank part 18 mm and at the nose part15 mm. (See Fig.16)
The length for the tongue we can measure exactly. Measure the length from the end of the trench point A and instep point B. Then from the same trench point A we set out the same length to the folding vamp line point C. We extend this
length by 10 mm. During the montage of the upper on the last point C will be pushed a few mm to the front. The reason for this is that the vamp and the quarter part between the trenches are not stitched together. (See Fig.17)
Do not
copy
, than
k you
Hans v
an de
r Elze
n

113
Hans van der Elzen
Derby Blucher
(Fig.18)When we know the correct measurement of the tongue we can draw the tongue line with a small curve between the quarter help lines.
Depending on the shoe size the tongue is between 6 and 7 cm wide (see A).
Draw the tongue line to the end of the trenches and then continue the drawing line with a distance of 10 mm the lay-on help line (See Fig.18).
(Fig.19)
Fig.19 shows you how we need to design the tongue of the shoe.
The feet get during the day bigger, around 5%. The quarter flaps will get more distance from each other by point B.
The tongue must protect our feet by point A.
A tongue that is wide enough will protect our feet better and give us also the possibility to place a softer material when necessary by exostosis.
Do not
copy
, than
k you
Hans v
an de
r Elze
n

114
Hans van der Elzen
Derby Blucher
(Fig.20)When we draw the tongue we make several times the mistake at the beginning of folded vamp line. The tongue line we draw is too small at this place
and the feet gets less protection especially at the first point of eyelets and laces (See Fig.20).
(Fig.21)Also it happens that we draw the tongue line too round, (see by point B) here count the same as we explain by Fig.20.
Draw always the tongue line at the folded vamp line a little curved as you can see on page 113 (Fig.19)
Do not
copy
, than
k you
Hans v
an de
r Elze
n

115
Hans van der Elzen
Derby Blucher
(Fig.22)The small lace or eyelet holes we set-up in general 10 to 12 mm from the sides of the quarter flaps. The distance between them is around 15 mm. We must take care that we don’t put them to close to the sides, because during the closing of the laces we risk that they will tear out.
When we want to put bigger lace or eyelets holes we must add them with greater distances from each other. Reinforce the quarter flaps, especially when you use thin upper leathers. (Fig.22)
(Fig.23)It is VERY IMPORTANT that the quarter top part lines (see A and B) are drawn UNDER the medial and lateral quarter help lines. When you draw these points A and B higher, than the
shoe it will damage the ankle and make it almost impossible to walk (Fig.23).Later in this book I will explain how to draw these quarter top part lines for Sportive shoes.
Do not
copy
, than
k you
Hans v
an de
r Elze
n

116
Hans van der Elzen
Derby Blucher
(Fig.24)
To draw the quarter lining must be done very carefully. The quarter lining must fit perfectly in the upper quarter part. The patterns for the lining we make 4 mm bigger at the quarter flaps as then we can stitch the lining better to the upper material. Especially take care at the end of the
trenches points as at those points the quarter and vamp lining must fit together. At the back part of the quarter we must take in (shorten), the counter must fit between the lining and upper material. By not shorten enough will lead to many wrinkles in the back part of the shoe (Fig.24).
(Fig.25)
The vamp lining we draw 2 mm under the folding line at the nose-part from the upper material.At the tongue we make the vamp lining 2 mm larger for stitching the vamp lining to the upper. By the end of the trenches both parts (quarter and vamp) of the lining fit perfectly
together. At the side parts, the quarter and vamp lining overlay is 10 mm.These parts we stitch first together and after that we place and glue the lining inside of the upper. After stitching we remove the extra lining from the upper material (Fig.25).
Do not
copy
, than
k you
Hans v
an de
r Elze
n