yoga teacher training...promote vitality, improve circulation, reduce fatigue and soothe the nervous...
TRANSCRIPT

Yoga Teacher Training
Teaching and Practicing Seated Postures
By: Nancy Wile
Yoga Education Institute
© Yoga Education Institute, 2014 All rights reserved. Any unauthorized use, sharing, reproduction, or distribution of these materials by any means is strictly prohibited.

Teaching and Practicing Seated Postures
1
Table of Contents Introduction…………………………………………………………………. 2 Seated Postures
Pigeon (Eka Pada Rajakapotasana)………………………………. 3 Kneeling (Bhujrasana)………………………………………………. 5 Child’s Pose (Balasana)…………………………………………….. 7 Melting Heart (Anahatasana)……….……………………………… 8 Anchor…………………………………………………………………. 9 Cow’s Face (Gomukhasana)………………………………………. 10 Easy Seated Pose (Siddhasana)…………………………………. 11 Sun Worshipper……………………………………………………... 12 Boat (Navasana)……………………………………………………… 13 Cobbler’s Pose………………………………………………………. 15 Inclined Plane (Purvottanasana)………………………………….. 16 Table Top……………………………………………………………… 17 Seated Staff Pose (Dandasana)…………………………………… 18 Seated Forward Fold (Paschimottanasana)…………………….. 19 Seated One Leg Forward Fold (Janu Sirsasana)………………. 21 Seated One Leg Side Bend (Parivrtta Janu Sirsasana)……….. 22 Seated One Leg Bind……………………………………………….. 23 Seated Forward Fold – One Knee Up (Marichyasana)………… 24 Heron (Krounchasana)……………………………………………… 26 Splits (Hanumanasana)……………………………………………... 27 Lotus (Padmasana)………………………………………………….. 29 Seated Twist (Bharadvajasana)…………………………………… 31 Seated Straddle/Open Angle (Upavistha Konasana)………….. 33 Butterfly………………………………………………………………. 36 Turtle (Kurmasana)………………………………………………….. 37 Hero (Virasana)………………………………………………………. 38 Knee to Knee Forward Fold………………………………………… 39 Prayer Squat (Malasana)…………………………………………… 40
Sequencing Seated Postures (Samples)………………………………… 42 Create Your Own Seated Sequence……………………………………… 42 Review Questions…………………………………………………………… 43

Teaching and Practicing Seated Postures
2
Introduction Seated postures are generally more calming and nurturing than standing and balancing postures, although some are fairly active, requiring a stronger engagement of certain muscles. Sitting poses usually fall into three categories: 1) forward bends (or otherwise flexing the hips), whereby the trunk and legs come towards each other; 2) spinal twists, in which the spine rotates to both the left and right, and 3) spinal extensions, in which the back is arched while the legs are on the ground. When planning seated postures for a class, try to incorporate all three types of postures so that the spine and hips are moved in many different directions. When practiced with proper alignment of the spine and pelvis, seated postures promote vitality, improve circulation, reduce fatigue and soothe the nervous system. Forward bending seated postures stretch the entire back, creating more flexibility and often relieve sciatic pain due to pressure on the sciatic nerve. The stable base created by sitting frees you from the concerns of balancing or supporting the body, leaving you more energy to devote to the stretching. However, due to such habits as slouching in chairs for long periods of time and not being in the habit of sitting cross legged, there is often some basic work to be done before students can fully enjoy these asanas. For example, when practicing forward bending seated postures, it is important for students to maintain a flat back (or lengthen the spine) by pressing back through the tailbone and reaching forward with the chest. This helps to strengthen and properly stretch the muscles of the back. Rounding the upper back during a seated forward fold can weaken and strain back muscles. Seated forward bends stretch the hamstrings and engage the abdominal muscles. Seated twists massage the abdominal organs and aid the digestive process. They also improve lateral flexion (side bending) of the spine and remove stiffness in the neck and upper back. Seated spinal extensions help to open the chest and stretch the muscles across the front of the chest and shoulders. Sitting poses are best done after standing poses – once the muscles are sufficiently warm. The yoga poses in this part of the manual are ordered in the way that they would be sequenced in a yoga class. Make special note of this ordering when designing your own classes.

Teaching and Practicing Seated Postures
3
Pigeon (Eka Pada Rajakapotasana)
Benefits:
Opens the hips, thighs, chest and shoulders
Stimulates digestion Steps:
Start in down dog or on all fours
Bend right knee, sweep right knee forward, placing right knee close to right wrist
Move right foot forward towards left wrist
Press left foot back, dropping hips as close to floor as possible
Draw finger tips back and squeeze shoulder blades together
Look up and breathe deeply, staying in this position for 3-4 slow breaths
From here, you can go back to starting position or do the following variations:
Variations: Variation 1 Variation 2

Teaching and Practicing Seated Postures
4
Variation 1: From Pigeon, walk hands forward and drop chest and forehead towards the floor This provides a more intense stretch for the rotator muscles of the hip and thigh – remind students to carefully come into this position Stay in this position for 4-5 deep breaths Variation 2: From Pigeon:
Bend back knee, placing back foot in elbow crease of same arm (left arm above)
Inhale, reach right arm overhead, then bend elbow, dropping right hand down back towards left hand
Clasp hands together, if possible
Square hips towards the front
Stay in this position for 4-5 long, slow breaths Teaching Points: Students will often lean onto the same hip as their bent knee due to limited hip flexibility. Encourage students to keep their hips a few inches off the floor and square their hips forward, only dropping down as much as is comfortable for them. This will help to focus the stretch on the hip rotator muscles. Modification: For students who have knee problems, have them practiced “reclined hip opener” (see later in this section) instead of pigeon. It will still stretch the hip rotator muscles, but without placing pressure on the knee. Reclined Hip Opener

Teaching and Practicing Seated Postures
5
Kneeling/Sitting on Heels (Bhujrasana)
Benefits:
Stretches the toes, feet and ankles
Improves flexibility of the knees and hips
Relieves low back tension Steps:
Start on all fours (hands and knees)
Sit back on heels, while raising torso
Lift up through the top of the head and tuck tailbone slightly to lengthen the spine
Stay in this position for 3-4 long breaths, focusing on breath, or move onto other postures that use sitting on heels as a base
Variation: Sitting on Heels with Toes Curled Under
In this variation the toes are curled under, providing an intense stretch for the toes and arches of the feet.

Teaching and Practicing Seated Postures
6
Counter any kneeling positions with Down Dog to stretch out the backs of the legs.
Teaching Points: Remind students to tuck their tailbone slightly under to prevent a swayback which can place strain on the low back. Also, with beginning students make sure not to keep them in this position too long, otherwise their legs may feel overly stiff.

Teaching and Practicing Seated Postures
7
Child’s Pose (Balasana)
Benefits:
Relieves stress and anxiety
Gently stretches the back
Alleviates headache
Stretches the ankles, knees and hips Steps:
Sit on heels
Fold forward, bringing chest towards thighs and forehead towards floor
Keep hands at sides with palms turned up
Stay in this position for 4-5 breaths, breathing into back
Raise head and chest to come back to sitting Variation: Students may also like to extend their arms in front of them. This provides a deeper stretch to the back. To increase the stretch in the upper back or neck, suggest that students tuck their chin towards their chest. Modification: Some students may find it uncomfortable to fold forward in this position, finding it more difficult to breathe. Suggest that students spread their knees apart to make more room for their belly, making breathing easier. Teaching Points: Encourage students to breathe into the bottom part of their lungs, so that the belly presses against thighs on inhale, and belly relaxes on exhale. This provides a gentle massage to the internal organs and helps to strengthen the diaphragm.

Teaching and Practicing Seated Postures
8
Melting Heart (Anahatasana)
Benefits:
Opens the chest and shoulders
Relieves tension in the upper back
Calms the nervous system Steps:
Start in all fours, with your hands directly under your shoulders and your knees at a right angle and directly under your hips.
Keeping your hips directly over your knees, begin to walk your hands forward as you drop your chest towards the floor.
If it feels okay, you can bring your chin to the floor and look straight ahead, otherwise drop your forehead towards the floor.
Stay in this posture for 6-8 breaths.
Slowly come out of this posture by pressing back into child’s pose, or by coming all the way down onto your belly on the floor.

Teaching and Practicing Seated Postures
9
Anchor
Benefits:
Improves shoulder flexibility
Opens chest
Stimulates digestion
Relieves headache and tension Steps:
Start sitting on heels
Clasp hands behind the back with fingers interlaced
Exhale, fold forward, reaching head forward as belly drops towards thighs
Bring forehead towards mat
Reach hands up and away from tailbone
Breathe deeply through nose
Stay in this position for 4-5 deep breaths
On next inhale, slowly sit up, dropping hands behind back Modifications: If students can not clasp their hands behind their back, give them a strap to hold between their hands, so they can work on bringing their hands closer together. Teaching Points: Remind students to reach forward with their head as they fold forward. This will help to lengthen their spine and help them fold from their hips, rather than rounding their back too much.
Teaching and Practicing Seated Postures
10
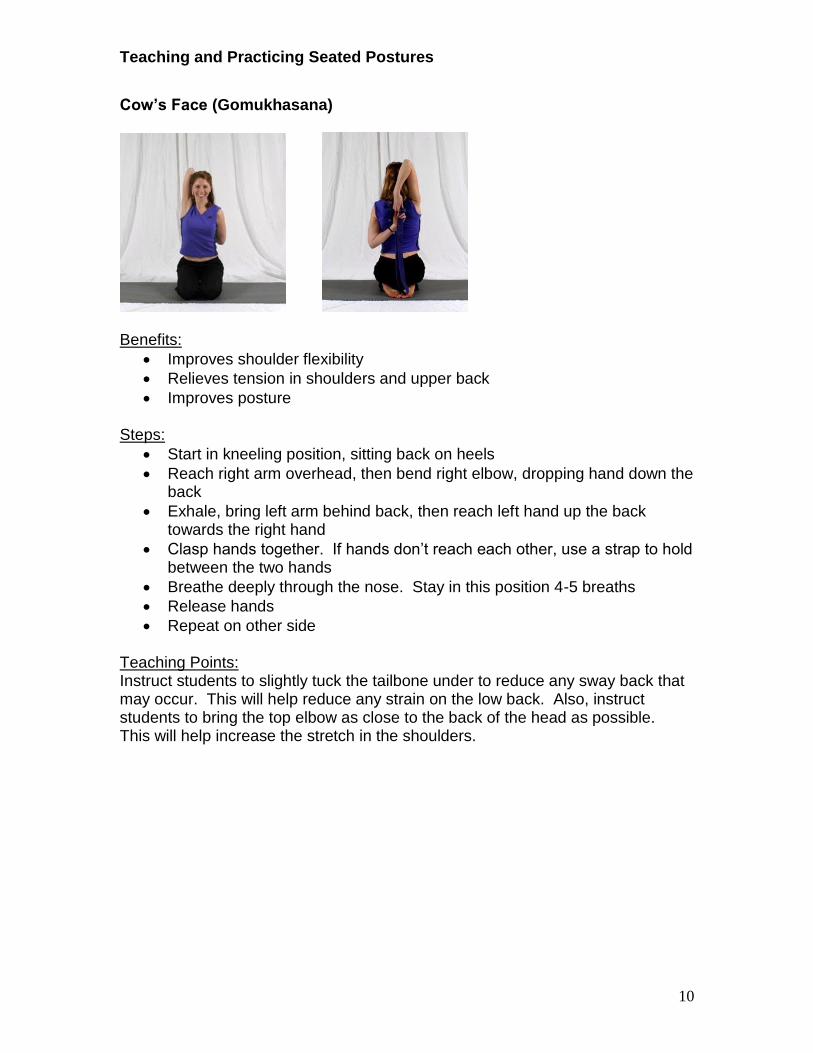
Cow’s Face (Gomukhasana)
Benefits:
Improves shoulder flexibility
Relieves tension in shoulders and upper back
Improves posture Steps:
Start in kneeling position, sitting back on heels
Reach right arm overhead, then bend right elbow, dropping hand down the back
Exhale, bring left arm behind back, then reach left hand up the back towards the right hand
Clasp hands together. If hands don’t reach each other, use a strap to hold between the two hands
Breathe deeply through the nose. Stay in this position 4-5 breaths
Release hands
Repeat on other side Teaching Points: Instruct students to slightly tuck the tailbone under to reduce any sway back that may occur. This will help reduce any strain on the low back. Also, instruct students to bring the top elbow as close to the back of the head as possible. This will help increase the stretch in the shoulders.

Teaching and Practicing Seated Postures
11
Easy Seated Position
Benefits:
Improves hip flexibility
Stretches the knees
Brings awareness to posture Steps:
Start sitting with legs extended
Bend the right knee, bringing the right foot in close to the body (to the point in the center of the hips), keeping the foot on the floor
Bend the left knee, brining the left foot just in front of the right foot, so the heels of both feet are lined up with each other
Stay here and focus on breathing for 4-5 breaths
Repeat on the other side Variation: From easy seated position, have students walk their hands forward, reaching forward with their head and chest. This will increase the stretch in the muscles in the back of the hip. Teaching Points: Some students with limited hip flexibility may find it uncomfortable sitting in a cross legged position. Have these students sit on a block or rolled blanket, with their sitting bones on the block/rolled blanket and their legs on the floor. Raising the hips while the legs remain crossed on the floor requires less hip flexibility than sitting on the floor with legs crossed. Eventually students can reduce the height of the prop (block/rolled blanket) and then eliminate it completely. Also, it’s important for students to switch sides, so each foot has a chance to be in the inside position. This helps bring balance to hip flexibility. Many students will have only practiced the cross legged position on one side and will have their favorite side. Encourage them to practice sitting cross legged with their other foot in close to bring more balance to their hip flexibility.

Teaching and Practicing Seated Postures
12
Sun Worshipper
Benefits:
Relieves tension in upper back
Stretches shoulders and chest
Opens throat and enhances breathing Steps:
Start sitting with legs crossed or sitting back on heels (from kneeling)
Bring hands back, placing hands on the floor with fingertips pointing back
Inhale, lift up through chest and squeeze shoulder blades together to open chest more
Exhale, let head fall back
Breathe deeply through nose
Stay in this position for 4-5 deep breaths
On inhale, relax shoulders, rolling them forward and lift head, coming back to starting position
Teaching Points: Check that students’ wrists are directly under their shoulders and that students keep squeezing shoulder blades and open through the chest. For any students with neck problems, have them look forward, rather than let the head fall back, but encourage them to still squeeze their shoulder blades together and lift up through the chest. This will allow them to still stretch the shoulders and chest and relieve upper back tension without compromising their neck.

Teaching and Practicing Seated Postures
13
Boat (Navasana)
Benefits:
Builds core strength
Improves balance, digestion and circulation
Strengthens the legs, hips, abdomen and arms
Improves posture Steps:
Start sitting with knees together and bent towards the ceiling and feet on the floor
Place hands under thighs and draw shoulders back to open through chest
Keep focus forward (not up or down)
Lean back towards tailbone, while keeping chest open and shoulders back
When ready, lift feet off floor
Exhale, extend legs up and away from body
Release hands from thighs, bringing hands to sides
Stay in this position for 3-4 soft breaths
Slowly come back down
Counter with Cobbler’s Pose, then with Inclined Plane Variation

Teaching and Practicing Seated Postures
14
This variation of Boat helps students to practice flexibility more than strength. To get into this pose, have students place their hands around the soles of their feet rather than place their hands under their thighs. As they exhale, they extend their legs, while still holding their feet. Teaching Points: Check that students keep their shoulders back and chest open. Many students have a tendency to round their backs as they attempt to keep their legs up. Encourage students to continue holding under their thighs if necessary. Remember to have students do Cobbler’s pose after Boat. This brings the pelvis in the opposite position and stretches many of the muscles that were previously contracted in Boat Pose.

Teaching and Practicing Seated Postures
15
Cobbler’s Pose
Benefits:
Opens hips
Stretches muscles of the back and hips
Relieves stress and tension Steps:
From sitting, bring soles of feet together
Press feet forward until legs make a diamond shape
Hold onto shins or ankles and pull shoulders back
Exhale, fold forward, bringing chest towards feet
Relax head and neck, and drop elbows out to the sides
Stay in this position for 4-5 long, slow breaths
Slowly raise head and chest and come back to sitting Exploration: Try Cobbler’s Pose first with feet only out to the point where they are in line with the knees. As you fold forward, you’ll notice more of a stretch in the inner thigh. Raise head and chest back to sitting. Then press your feet out a little further away from your body. As you fold forward, notice how the stretch changes. You will most likely now feel the stretch more in the back of the hips and back of the upper thigh. As you press your feet farther away, notice how the stretch is felt increasingly further down the back of the thigh. Teaching Points: Many students familiar with butterfly position automatically bring their feet in close. Remind students to press their feet forward to bring the stretch into their thighs. Also remind students to fold forward from the hips by pressing back through their sitting bones and tipping the pelvis forward rather than only rounding the back.

Teaching and Practicing Seated Postures
16
Inclined Plane (Purvottanasana)
Benefits:
Improves balance
Opens chest, shoulders and throat
Stretches the wrist, shoulders and ankle joints
Increases arm strength and core strength
Energizes the body Steps:
Start seated with legs together, knees straight and toes pointing forward
Place hands behind back with fingers pointing either forward or back
Inhale, lift up through chest, look up and squeeze shoulder blades together
Exhale, press down through heels and lift hips as high as possible, allowing head to fall back
Stay in this position for 3-4 deep breaths
Slowly lower hips back to floor and look forward, coming back to sitting Teaching Points: Remind students to place hands directly under their shoulders before lifting hips. This will help reduce any strain on the wrists. Have students point their toes before lifting hips. This brings heels into the proper position, so heels remain stable during the lift. If a student has neck problems, they can keep looking forward, while still squeezing their shoulder blades together.

Teaching and Practicing Seated Postures
17
Variation: Table Top
The steps are the same as for Inclined Plane, but keep knees bent throughout the pose. This makes it easier to lift the hips and stay up.
Teaching and Practicing Seated Postures
18
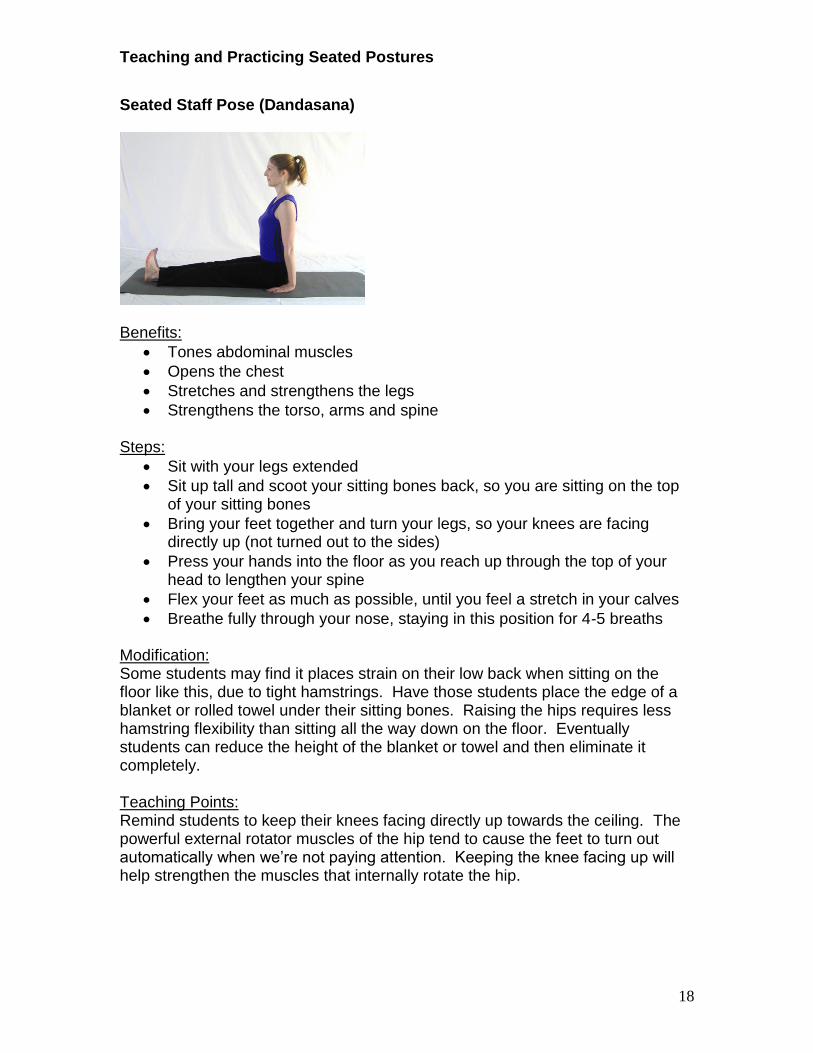
Seated Staff Pose (Dandasana)
Benefits:
Tones abdominal muscles
Opens the chest
Stretches and strengthens the legs
Strengthens the torso, arms and spine Steps:
Sit with your legs extended
Sit up tall and scoot your sitting bones back, so you are sitting on the top of your sitting bones
Bring your feet together and turn your legs, so your knees are facing directly up (not turned out to the sides)
Press your hands into the floor as you reach up through the top of your head to lengthen your spine
Flex your feet as much as possible, until you feel a stretch in your calves
Breathe fully through your nose, staying in this position for 4-5 breaths Modification: Some students may find it places strain on their low back when sitting on the floor like this, due to tight hamstrings. Have those students place the edge of a blanket or rolled towel under their sitting bones. Raising the hips requires less hamstring flexibility than sitting all the way down on the floor. Eventually students can reduce the height of the blanket or towel and then eliminate it completely. Teaching Points: Remind students to keep their knees facing directly up towards the ceiling. The powerful external rotator muscles of the hip tend to cause the feet to turn out automatically when we’re not paying attention. Keeping the knee facing up will help strengthen the muscles that internally rotate the hip.

Teaching and Practicing Seated Postures
19
Seated Forward Fold (Paschimottanasana)
Benefits:
Strengthens the spine
Stretches the calves and hamstrings
Improves digestion
Stretches the low back Steps:
Start sitting with legs extended out in front of you
Scoot back through the hips, so you are sitting on the front part of your sitting bones
Place your hands at your sides and flex your feet (this is Dandasana – Staff Pose)
Inhale, reach arms up to shoulder height (arms are about shoulder width apart with palms facing each other)
Exhale, reach forward with arms, head and chest, as belly drops towards thighs
Drop arms to either side of legs, relaxing elbows and shoulders
Breathe deeply through the nose, focusing on the exhalation
Stay in this position for 4-5 breaths
Inhale, come back up to sitting
Repeat one more time Teaching Points: In many yoga texts, you’ll find this pose started with arms overhead instead of at shoulder height. Arms overhead is the traditional way to come into this pose, however placing the arms overhead places more weight on the back and can strain the back. Placing the arms at shoulder height eliminates this problem and requires less back strength to keep the back straight, rather than slouched.

Teaching and Practicing Seated Postures
20
Many students desire to get their head to their legs – more than keeping proper alignment for a safe and beneficial stretch. Remind students to keep reaching forward with their head and chin as they press back through their sitting bones. This will help lengthen the spine and tilt the pelvis, so they are folding from the hip joints rather than rounding down from their back. Also, encourage students to bend their knees to start and slowly begin to straighten their legs once they are in position. This helps them bring their pelvis and back into proper position first and then focus on gradually developing more flexibility in their hamstrings.

Teaching and Practicing Seated Postures
21
Seated One-Leg Forward Fold (Janu Sirsasana)
Benefits:
Stretches the calve, hamstrings and lower back muscles
Improves digestion
Strengthens low back
Alleviates headache and stress Steps:
Start seated with legs extended
Bend the left knee, placing the sole of the left foot next to the right thigh
Scoot back, so you are on the front part of sitting bones
Sit up tall
Raise arms forward and up to shoulder height
Exhale, reach forward, as belly drops toward thigh
Keep reaching forward with head and chin, while pressing back through the hips
Relax arms, shoulders and neck
Breathe deeply through the nose, focusing on the exhalation, staying in this position for 4-5 breaths.
Inhale, slowly come up to sitting
Extend left leg next to right leg and shake out legs
Repeat on the other side Teaching Points: Sitting forward bends with one foot tucked in are among the most useful hip flexibility stretches for beginning and intermediate students. They do not place as much stress on the lower back and sacroiliac joints as keeping both legs straight, and are helpful for working on right-left imbalances. However, many students are more concerned about getting their head to their leg, rather than maintaining proper alignment to create a more beneficial stretch. Remind students to keep their chin away from their chest and to press back through the hips. Keeping the chin away from the chest helps prevent the upper back from rounding too much. Pressing back through the hips helps tilt the pelvis, so students are bending from the hips rather than rounding from the back, which can strain the low back.

Teaching and Practicing Seated Postures
22
Variation: Seated One-Leg Side Bend (Parivrtta Janu Sirsasana)
Benefits:
Stretches the calve, hamstrings and lower back muscles
Stretches the sides of the body
Improves digestion
Strengthens low back Steps:
Start seated with legs extended
Bend the left knee, placing the sole of the left foot next to the right thigh
Scoot back, so you are on the front part of sitting bones
Turn towards the left
Inhale, reach left arm overhead
Exhale, slide right hand down the right leg and lean to the right, while keeping the left arm next to the left ear
Reach right hand around inside edge of the right foot and hold onto sole of the right foot
Reach left hand around the outside edge of the right foot and hold onto the sole of the right foot
Holding onto the foot with both hands and keeping arms next to ears, turn chest open to the side
Breathe deeply through the nose, staying in this position for 4-5 breaths
Inhale, release hands and slowly come back up to sitting
From here, you place left hand on floor behind you and reach right hand back, as you lift up hips, for a counter pose. Then come back to sitting.
Extend left leg next to right leg and shake out legs
Repeat on other side Modification: Many students can’t reach their hands to the foot of their extended leg while keeping their chest open to the side. Encourage them to simply slide their right hand down their right leg towards their foot, while reaching up and right with their left hand.

Teaching and Practicing Seated Postures
23
Seated One Leg Bind (from Janu Sirsasana)
From Janu Sirsasana, come back up. Bring the foot that is next to the thigh, to the space on top of the thigh. Turn towards the bent knee, and reach behind your back with your other hand to hold onto your foot.

Teaching and Practicing Seated Postures
24
Seated Forward Fold – One Knee Up (Marichyasana)
Benefits:
Tones abdominal muscles
Stimulates digestion
Strengthens and stretches the legs and shoulders
Opens chest and shoulders Steps:
Start in Dandasana
Press your hands down into the floor to lengthen your spine
Bend your left knee, placing your left foot next to your right thigh
Distribute your weight evenly between your sitting bones
Inhale, reach your arms up to shoulder height (photo 2) with both arms to the right of the left knee
Exhale, stretch your arms and head forward
Reach your left arm around the front of your left leg (left arm pit next to left shin) and bring your left hand towards your back
Reach right hand behind your back
Clasp hands together behind your back
Reach your chin towards your knee

Teaching and Practicing Seated Postures
25
Breathe softly through your nose
Stay in this position for 4-5 breaths
Inhale, release arms and come back up to sitting
Extend left leg next to right leg
Repeat on other side (bending right knee) Counter with Inclined Plane
Inclined plane helps to stretch and strengthen the opposing muscles of Marichyasana.

Teaching and Practicing Seated Postures
26
Heron (Krounchasana)
Benefits:
Stretches the shoulders, back and hamstrings
Improves digestion
Relieves backache and fatigue Steps:
Start sitting with your legs extended in front of you
Bend your left knee, placing your left foot next to the inside of your right thigh
Bend your right knee, bringing your right foot in close and wrapping your hands around the sole of your right foot
Inhale, sit up tall, reaching up through the top of your head to lengthen your spine
Exhale, extend your right leg, reaching the sole of your right foot up towards the ceiling
Focus on a point directly in front of you and focus on your breath, making it smooth and even
Stay in this position for 3-4 breaths
Exhale, bend your right knee and place your right foot back on the floor
Repeat on the other side Teaching Points: Students often round their backs a lot in an attempt to bring their head to their raised leg. Remind students to keep reaching up through the top of their head to lengthen their spine and to focus on only moving their raised leg, bringing their shin towards their chin, rather than moving their torso.

Teaching and Practicing Seated Postures
27
Splits (Hanumanasana)
Benefits:
Opens the hips
Stretches the hamstrings
Improves circulation
Tones the legs
Improves balance Steps:
Start on all fours (hands and knees)
Bring right foot forward, placing right foot between the hands
Press left foot back until left leg is straight (lunge position)
Flex right foot and slowly begin to press right foot forward, dropping hips towards the floor
Stop at any point that the stretch becomes uncomfortable
Stay in this position for 4-6 slow breaths, breathing through the nose and focusing on one point in front of you
Begin to bend knees and raise hips, coming back to lunge position
Bring right foot back next to left foot, coming back to all fours
Repeat splits on the other side Teaching Points: The full splits position is not advisable for many students due to lack of flexibility in the hips, psoas and hamstring muscles. Due to having the body weight over the legs in this position, it’s important for students to be completely warmed up and to go slow when trying this position. Remind students to back off slightly when they feel any discomfort and let their muscles relax by using slow deep breathing. Students can slowly come into the position, backing off slightly when they feel discomfort, then going to their edge again. This is a good pose for helping students learn to listen to their body and increase their body awareness, while also learning to play with their “edge”, as discussed in part 1 of this manual.

Teaching and Practicing Seated Postures
28
Modification:
To modify splits have students bend the front knee to reduce the stretch in the hamstring muscles of the front leg and the hip extensor muscles of the back leg. Students can also modify this posture by practicing it over a bolster. Place a bolster horizontally across your mat. Sit on the bolster in a hurdler’s position (one leg forward and the other bent with your foot near your bottom and the knee out to the side). Begin to straighten the back leg as you square your hips forward. The bolster will support you without having to go completely into the splits position. Variation: Splits with arms overhead
This variation places more weight over the hips, so students should be careful coming into this position, bringing hands back to the floor at the first sign of strain in their hips or legs.

Teaching and Practicing Seated Postures
29
Lotus (Padmasana)
Benefits:
Opens the hips
Increases knee flexibility
Improves posture Steps:
Start sitting in Staff Pose (Dandasana)
Bring your right heel towards your navel
Externally rotate your leg and foot and place the top of your right foot on your left thigh at the hip crease (the sole of your right foot faces up towards the ceiling)
Bring your left heel towards your navel, rotate your leg and foot and place the top of your left foot on your right thigh near the hip crease
Place your hands on your thighs or at your sides
Inhale deeply and extend from your low belly up through the top of your head
Lengthen up through the sides of your body and draw your shoulders back
Close your eyes and focus on your breath, breathing slowly through your nose
Stay in this position for 4-5 breaths
Use your hands to gently remove your left foot from your right thigh and then remove your right foot from the left thigh
Shake out your legs
Repeat on the other side
Teaching and Practicing Seated Postures
30
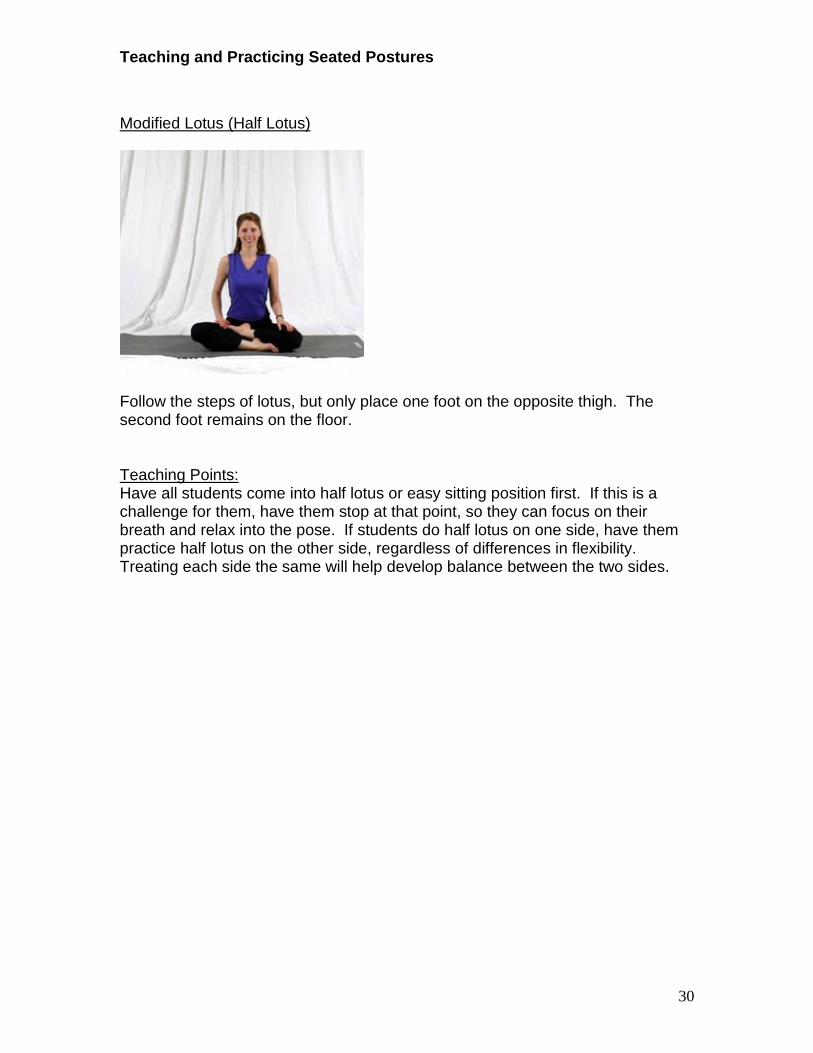
Modified Lotus (Half Lotus)
Follow the steps of lotus, but only place one foot on the opposite thigh. The second foot remains on the floor. Teaching Points: Have all students come into half lotus or easy sitting position first. If this is a challenge for them, have them stop at that point, so they can focus on their breath and relax into the pose. If students do half lotus on one side, have them practice half lotus on the other side, regardless of differences in flexibility. Treating each side the same will help develop balance between the two sides.

Teaching and Practicing Seated Postures
31
Seated Twist (Bharadvajasana)
Benefits:
Opens the chest and shoulders
Stretches the muscles surrounding the hips
Improves spinal flexibility
Stimulates digestion Steps:
Start sitting
Bend left knee, placing left foot next to right sitting bone
Bend right knee, placing right foot to the outside of the left knee
Place right hand just behind right hip
Wrap left arm around right knee, hugging right thigh in close to body
Make sure that the sitting bones on both sides are still pressing down into the floor.
Inhale, sit up tall
Exhale, twist to the right and look over the right shoulder
On every inhale, sit a little taller. On every exhale, twist a little deeper
Work into this position for 3-4 breaths
Turn back to center and release left arm
Extend both legs out
Repeat on the other side Teaching Points: It’s easy for students to simply hang out in this position. Encourage students to actively work into this position by continually stretching up as they inhale and twisting more as they exhale. Also, remind students to hug their top leg close to their chest and to keep both sitting bones on the floor. This will help increase the stretch to the hip rotator muscles.

Teaching and Practicing Seated Postures
32
Variation: Seated Twist with Bind
Steps:
Start in seated twist (with right leg on top)
Bring left arm in front of right leg
Thread the left arm through the hole between the two legs
Bring the right hand behind the back and clasp the two hands together
Inhale, sit up tall
Exhale, twist more to the right, looking over the right shoulder Modification: Half Seated Twist (one leg)
In this modification, the left leg (bottom leg) stays straight while the right leg crosses over. Wrap the left arm around the right leg and twist to the right. It follows the same steps as the full twist with the only change being the extended (instead of bent) bottom leg. This makes the twist easier, requiring less hip flexibility. Counter Pose:
Twist to the other side and lower your chest towards the floor.

Teaching and Practicing Seated Postures
33
Seated Straddle/Open Angle (Upavistha Konasana)
Benefits:
Opens the hips and groin
Stretches the hamstrings, calves and inner thighs
Strengthens the low back
Lengthens the spine Steps:
Sit with legs extended
Widen your legs and rotate them slightly inward, so your feet and knees point straight up
Bring your hands behind your back
Press down through your hands and slightly lift your hips, then press back through your hips, tilting your pelvis forward, so that as you sit back down you are now sitting on the front of your sitting bones
Lift up through the top of your head and lengthen your spine
With your arms still behind you, squeeze your shoulder blades together and look up slightly
Breathe deeply through your nose, opening more through your chest
You can stay here, or inhale, bring your hands in front of you, being careful to keep your shoulders back and chest lifted
Exhale, reach forward with your head and chest, keeping your hands no further away from you than your shoulders
If you feel your shoulders begin to round, stop at that point, draw your shoulders back and breathe here
If you can keep your back fairly flat, drop your forearms to the floor and allow your forearms to help support your weight
Stay in this position for 4-6 breaths, breathing deeply through your nose and focusing on the exhalations
Use your hands to press against the floor and lift your torso back up to sitting
Slowly bring your legs together and shake your legs

Teaching and Practicing Seated Postures
34
Teaching Points: Proper alignment is most important in this pose. Often beginning students allow their knees to roll outward or backward. This action stretches the hamstrings unevenly and causes students to sit back towards their tailbone and round their lower back. Remind your students to keep kneecaps pointing to the ceiling. It is critical that your students understand the need to bend forward from the hips/ pelvis and not from the lower back. Often students have a desire to try to touch their head to the floor, no matter what the cost to their lumbar spine. This can create strain on the inter-vertebral discs and other soft tissue surrounding the spine. Make sure that your students start their straddle position sitting on the front part of their sitting bones to tip the pelvis forward before starting the forward fold. Also, remind them to press back through their sitting bones and tailbone as they fold forward, while reaching their head forward (rather than dropping their head down), keeping their chin away from chest. Finally, only tip slightly forward yourself, showing your students that it’s more important to have proper alignment than to worry about how far down you can go. Encourage students to close their eyes and focus on their slow deep breath, so they can focus on the feelings of the stretch and on relaxing their muscles. Variation: Side Straddle
Benefits:
Opens the hips and groin
Stretches the hamstrings, calves and inner thighs
Strengthens the low back
Lengthens the spine
Stretches the sides of the body Steps:
From a seated straddle (sitting upright), place left hand on the inside of the right thigh

Teaching and Practicing Seated Postures
35
Inhale, reach right arm overhead, placing arm next to ear
Exhale, reach the right hand to the left, while keeping the chest open to the front and the left hand next to the right thigh
If your right hand reaches the left foot (with the chest staying open to the front), hold onto the left foot
Draw the right shoulder back to open the chest more
Breathe deeply through the nose
Stay in this position for 4-5 breaths
Inhale, release your foot and come back up to sitting
Repeat on the other side
Bring legs together and shake them out Teaching Points: Students often turn their chest towards the floor in this side stretch in order to get their torso closer to their leg. Encourage students to simply reach in the direction of their foot while maintaining an open chest to the front. Have them focus on one point in front of them and imagine a straight line from their heart to that focal point. Have them focus on rotating the upper shoulder back and opening the chest more, and have them focus on the feeling of the stretch, trying to bring more stretch into the side of the body, rather than focusing on the look of the pose.

Teaching and Practicing Seated Postures
36
Butterfly
Benefits:
Opens hips
Stretches muscles of the back and hips
Relieves stress and tension
Improves posture Steps:
From sitting, bring soles of feet together
Bring heels in towards your body
Interlace your fingers and wrap your hands around your feet
Inhale, pull against your feet and sit up tall
Exhale, drop your knees towards the floor
Continue to sit up tall as you inhale, and drop your knees as you exhale for the next 4-5 breaths
On your next exhale, reach your chest forward and slowly fold forward.
Stay in this position for 4-5 breaths
On your next inhale, slowly raise head and chest and come back to sitting

Teaching and Practicing Seated Postures
37
Turtle (Kurmasana)
Benefits:
Stretches the legs, hips, back and shoulders
Relieves tension in neck and upper back
Strengthens the legs
Works abdominal muscles and improves digestion Steps:
Start seated with knees bent and feet on the floor about hip width apart
Bend elbows, bringing hands up next to sides with palms facing out
Inhale, sit up tall
Exhale, reach head and chest forward, as you drop the tops of the hands to the floor between the legs with your fingertips pointing behind you
Begin pressing your hands under your legs and behind you with palms up
Bring hands behind the back, clasping hands behind the back
Bring feet towards each other and drop head towards feet
Breathe softly in this position, staying in this position for 4-5 breaths
To come out of the pose, release hands and press down with hands to come back to sitting
Teaching Points: Many students will have a difficult time clasping their hands behind their backs. Have them focus on simply reaching back with their hands, as they press back through their hips and reach forward with their head. This will help them to lengthen the spine and go further into the stretch.

Teaching and Practicing Seated Postures
38
Hero (Virasana)
Benefits:
Stretches the hip, knee and ankle joints
Relieves low back discomfort
Improves posture Steps:
Start in a kneeling position with knees about hip width apart and feet slightly wider
Keep tops of the feet on the floor as you slowly sit down, sitting between your two feet
Reach up through the top of your head as you sit, lengthening through the spine
Focus on a point in front of you and on your breath, making your breath smooth and even
Stay in this position for 4-5 breaths
To come out of this position, place hands in front of you, coming onto all fours
Lift feet off the floor (so only hands and knees are on the floor) and rotate ankles to bring more circulation back to that area
Counter with down dog to stretch out the backs of the legs Teaching Points: This posture can cause too much strain on the knee joint for many students. To modify this posture, have students sit on a bolster, with the bolster running long ways between their legs. If you don’t have a bolster, students can also sit on a block or a rolled blanket.

Teaching and Practicing Seated Postures
39
Knee to Knee Forward Fold
Benefits:
Stretches the knees and thighs
Improves flexibility of the hips Steps:
Start seated
Bend your left knee and place your left on the floor next to your right sitting bone and hip.
Bend your right knee and stack your right knee on top of your left knee
Place your hands on top of your feet and press down
Inhale, sit up tall
Exhale, begin folding forward, bringing your belly and chest towards your knees
Stay in this position for 4-6 breaths, dropping down further with each exhale
Slowly come back up to sitting
Extend both legs in front of you and shake your legs out
Repeat on the other side

Teaching and Practicing Seated Postures
40
Prayer Squat (Malasana)
Benefits:
Opens the hips (stretches the gracilis, vastas lateralis, vastas intermedialis, vastas medialis)
Relieves sciatica
Improves balance
Strengthens the arches of the feet and the ankles, stretches the ankle joint
Alleviates low back pain
Helps relieve constipation Steps:
Start standing with feet a little wider than hip width apart and turned out
With hands on your hips or out in front of you, squat down keeping your hips off the floor
Bring hands to heart and use elbows to press knees farther apart
Keep heels pressing into or towards the floor
Drop head and press thumbs against forehead to encourage relaxation
Stay in this position for 5-6 long, slow breaths
Sit down when done and shake legs out Modification: For students who have difficulty squatting fully, they can squat only half way down with a wall behind their back for support. Students can also practice Cobbler’s Pose instead (see later in this section) to open the hips without having to bend the knees as far. Teaching Points: Many students will keep their heels raised due to less flexibility in ankle joint. Encourage students to gently press down through their heels to help stretch and improve flexibility in this area.
Teaching and Practicing Seated Postures
41
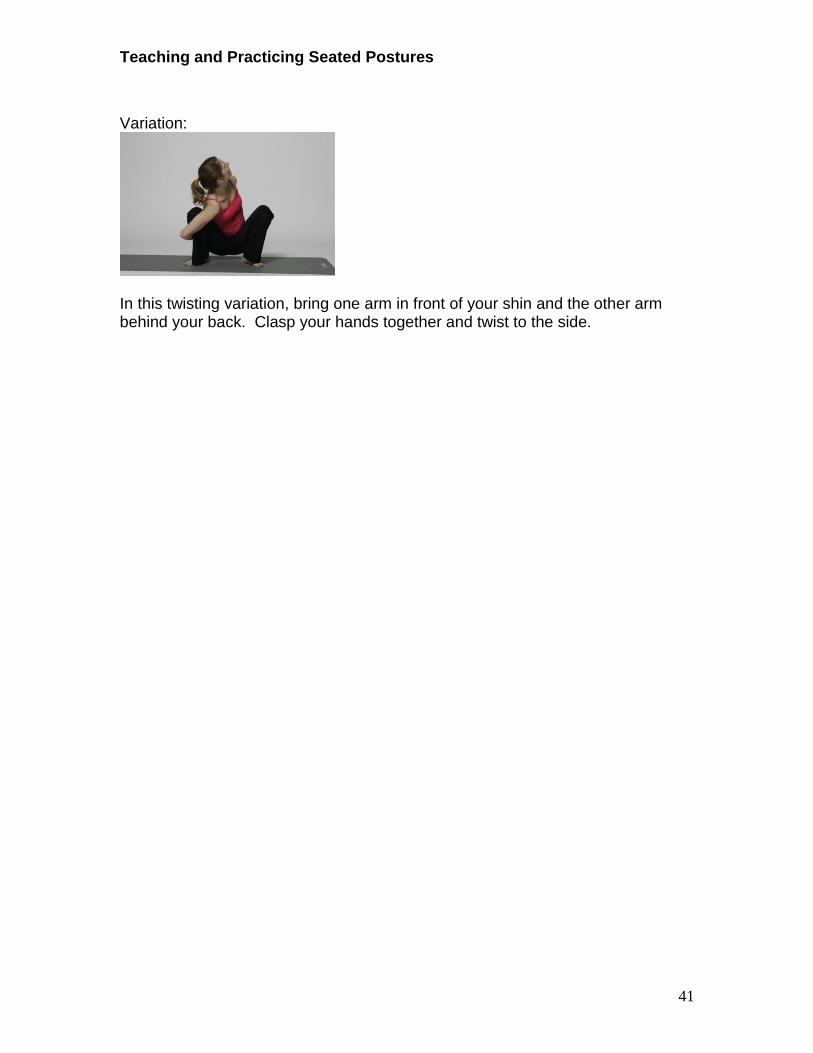
Variation:
In this twisting variation, bring one arm in front of your shin and the other arm behind your back. Clasp your hands together and twist to the side.

Teaching and Practicing Seated Postures
42
Samples of a Seated Sequence Sample #1 Down Dog, Pigeon (right knee forward) Down Dog, Pigeon (left knee forward) Child’s Pose Sun Worshipper Boat Cobbler’s Pose Inclined Plane Sample #2 Dandasana (Seated Staff Pose) Janu Sirsasana, Seated Twist (right leg straight for both) Janu Sirsasana, Seated Twist (left leg straight for both) Table Top Cobbler’s Pose Turtle Create Your Own Seated Sequence – Using 5-6 postures

Teaching and Practicing Seated Postures
43
Review Questions for Teaching and Practicing Seated Postures
1) In what part of a practice is it best to include seated postures? (before/after which types of postures)?
2) What are the benefits of Pigeon? What is a modification that can be used for people with knee problems?
3) What are the benefits of anchor posture and what are some teaching points to consider?
4) Why should you instruct students to tuck the tailbone under when sitting on their heels, such as in cow’s face?
5) Why should students practice easy seated position by switching the foot that is inside?
6) Name a counter pose that students can do after boat pose? Why is this a good counter pose?
7) What are some instructions you can give students in seated forward folds (janu sirsasana, paschimottanasana) so they fold at the hip rather than rounding too much in the back?
8) What are the benefits of a seated twist? How can you get students to more actively work in this position? What are some variations of the seated twist?
9) What are the benefits of Malasana (squat)? What are some modifications for students who have difficulty squatting?
10) Create a sequence of 5-6 seated postures that flow well together and move the spine in different directions.