yii2 guide
DESCRIPTION
Yii2 frameworkTRANSCRIPT

The De�nitive Guide
to
Yii 2.0
Qiang Xue,
Alexander Makarov,
Carsten Brandt,
Klimov Paul
and
the Yii community
Copyright 2014 Yii Software LLC.


Contents
1 Introduction 1
1.1 What is Yii . . . . . . . . . . . . . . . . . . . . . . . . . . . . 11.2 Upgrading from Version 1.1 . . . . . . . . . . . . . . . . . . . 2
2 Getting Started 13
2.1 Installing Yii . . . . . . . . . . . . . . . . . . . . . . . . . . . 132.2 Running Applications . . . . . . . . . . . . . . . . . . . . . . 182.3 Saying Hello . . . . . . . . . . . . . . . . . . . . . . . . . . . . 212.4 Working with Forms . . . . . . . . . . . . . . . . . . . . . . . 242.5 Working with Databases . . . . . . . . . . . . . . . . . . . . . 302.6 Generating Code with Gii . . . . . . . . . . . . . . . . . . . . 352.7 Looking Ahead . . . . . . . . . . . . . . . . . . . . . . . . . . 41
3 Application Structure 43
3.1 Overview . . . . . . . . . . . . . . . . . . . . . . . . . . . . . 433.2 Entry Scripts . . . . . . . . . . . . . . . . . . . . . . . . . . . 443.3 Applications . . . . . . . . . . . . . . . . . . . . . . . . . . . . 463.4 Application Components . . . . . . . . . . . . . . . . . . . . . 583.5 Controllers . . . . . . . . . . . . . . . . . . . . . . . . . . . . 603.6 Models . . . . . . . . . . . . . . . . . . . . . . . . . . . . . . . 703.7 Views . . . . . . . . . . . . . . . . . . . . . . . . . . . . . . . 803.8 Managing assets . . . . . . . . . . . . . . . . . . . . . . . . . 96
4 Handling Requests 105
4.1 URL Management . . . . . . . . . . . . . . . . . . . . . . . . 1114.2 Error Handling . . . . . . . . . . . . . . . . . . . . . . . . . . 1184.3 Logging . . . . . . . . . . . . . . . . . . . . . . . . . . . . . . 120
5 Key Concepts 123
5.1 Components . . . . . . . . . . . . . . . . . . . . . . . . . . . . 1235.2 Properties . . . . . . . . . . . . . . . . . . . . . . . . . . . . . 1255.3 Events . . . . . . . . . . . . . . . . . . . . . . . . . . . . . . . 1275.4 Behaviors . . . . . . . . . . . . . . . . . . . . . . . . . . . . . 1335.5 Con�gurations . . . . . . . . . . . . . . . . . . . . . . . . . . 138
iii

iv CONTENTS
5.6 Aliases . . . . . . . . . . . . . . . . . . . . . . . . . . . . . . . 144
5.7 Class Autoloading . . . . . . . . . . . . . . . . . . . . . . . . 146
5.8 Service Locator . . . . . . . . . . . . . . . . . . . . . . . . . . 148
5.9 Dependency Injection Container . . . . . . . . . . . . . . . . . 150
6 Working with Databases 157
6.1 Database basics . . . . . . . . . . . . . . . . . . . . . . . . . . 157
6.2 Query Builder and Query . . . . . . . . . . . . . . . . . . . . 163
6.3 Active Record . . . . . . . . . . . . . . . . . . . . . . . . . . . 171
6.4 Database Migration . . . . . . . . . . . . . . . . . . . . . . . . 193
7 Getting Data from Users 205
7.1 Working with Forms . . . . . . . . . . . . . . . . . . . . . . . 205
7.2 Validating Input . . . . . . . . . . . . . . . . . . . . . . . . . 209
7.3 Uploading Files . . . . . . . . . . . . . . . . . . . . . . . . . . 218
8 Displaying Data 225
8.1 Data providers . . . . . . . . . . . . . . . . . . . . . . . . . . 229
8.2 Data widgets . . . . . . . . . . . . . . . . . . . . . . . . . . . 231
8.3 Theming . . . . . . . . . . . . . . . . . . . . . . . . . . . . . . 239
9 Security 241
9.1 Authentication . . . . . . . . . . . . . . . . . . . . . . . . . . 241
9.2 Authorization . . . . . . . . . . . . . . . . . . . . . . . . . . . 243
9.3 Security . . . . . . . . . . . . . . . . . . . . . . . . . . . . . . 257
10 Caching 263
10.1 Caching . . . . . . . . . . . . . . . . . . . . . . . . . . . . . . 263
10.2 Data Caching . . . . . . . . . . . . . . . . . . . . . . . . . . . 263
10.3 Fragment Caching . . . . . . . . . . . . . . . . . . . . . . . . 270
10.4 Page Caching . . . . . . . . . . . . . . . . . . . . . . . . . . . 273
10.5 HTTP Caching . . . . . . . . . . . . . . . . . . . . . . . . . . 274
11 RESTful Web Services 279
11.1 Quick Start . . . . . . . . . . . . . . . . . . . . . . . . . . . . 279
11.2 Resources . . . . . . . . . . . . . . . . . . . . . . . . . . . . . 283
11.3 Controllers . . . . . . . . . . . . . . . . . . . . . . . . . . . . 287
11.4 Routing . . . . . . . . . . . . . . . . . . . . . . . . . . . . . . 291
11.5 Response Formatting . . . . . . . . . . . . . . . . . . . . . . . 292
11.6 Authentication . . . . . . . . . . . . . . . . . . . . . . . . . . 295
11.7 Rate Limiting . . . . . . . . . . . . . . . . . . . . . . . . . . . 298
11.8 Versioning . . . . . . . . . . . . . . . . . . . . . . . . . . . . . 299
11.9 Error Handling . . . . . . . . . . . . . . . . . . . . . . . . . . 301

CONTENTS v
12 Development Tools 303
12.1 Debug toolbar and debugger . . . . . . . . . . . . . . . . . . . 30312.2 The Gii code generation tool . . . . . . . . . . . . . . . . . . 307
13 Testing 315
13.1 Testing . . . . . . . . . . . . . . . . . . . . . . . . . . . . . . . 31513.2 Fixtures . . . . . . . . . . . . . . . . . . . . . . . . . . . . . . 31913.3 Managing Fixtures . . . . . . . . . . . . . . . . . . . . . . . . 324
14 Extending Yii 327
14.1 Extending Yii . . . . . . . . . . . . . . . . . . . . . . . . . . . 32714.2 Helper Classes . . . . . . . . . . . . . . . . . . . . . . . . . . 33214.3 Using 3rd-Party Libraries . . . . . . . . . . . . . . . . . . . . 33314.4 Composer . . . . . . . . . . . . . . . . . . . . . . . . . . . . . 339
15 Special Topics 343
15.1 Advanced application template . . . . . . . . . . . . . . . . . 34315.2 Creating your own Application structure . . . . . . . . . . . . 34915.3 Console applications . . . . . . . . . . . . . . . . . . . . . . . 35015.4 Core Validators . . . . . . . . . . . . . . . . . . . . . . . . . . 35315.5 Internationalization . . . . . . . . . . . . . . . . . . . . . . . . 36515.6 Mailing . . . . . . . . . . . . . . . . . . . . . . . . . . . . . . 37415.7 Performance Tuning . . . . . . . . . . . . . . . . . . . . . . . 37815.8 Using template engines . . . . . . . . . . . . . . . . . . . . . . 385
16 Widgets 389
16.1 Bootstrap Widgets . . . . . . . . . . . . . . . . . . . . . . . . 389
17 Helpers 393
17.1 Helpers . . . . . . . . . . . . . . . . . . . . . . . . . . . . . . 393

vi CONTENTS

Chapter 1
Introduction
1.1 What is Yii
Yii is a high performance, component-based PHP framework for rapidlydeveloping modern Web applications. The name Yii (pronounced Yee or [ji
:]) means �simple and evolutionary� in Chinese. It can also be thought ofas an acronym for Yes It Is!
1.1.1 What is Yii Best for?
Yii is a generic Web programming framework, meaning that it can be usedfor developing all kinds of Web applications based on PHP. Because of itscomponent-based architecture and sophisticated caching support, it is espe-cially suitable for developing large-scale applications such as portals, forums,content management systems (CMS), e-commerce projects, RESTful Webservices, and so on.
1.1.2 How does Yii Compare with Other Frameworks?
• Like most PHP frameworks, Yii implements the MVC (Model-View-Controller) design pattern and promotes code organization based onthis pattern.
• Yii takes the philosophy that code should be written in a simple yetelegant way. It will never try to over-design things mainly for thepurpose of following some design pattern.
• Yii is a full-stack framework providing many proven and ready-to-usefeatures, such as: query builders and ActiveRecord, for both relationaland NoSQL databases; RESTful API development support; multi-tiercaching support; and more.
1

2 CHAPTER 1. INTRODUCTION
• Yii is extremely extensible. You can customize or replace nearly everypiece of core code. You can also take advantage of its solid extensionarchitecture, to use or develop redistributable extensions.
• High performance is always a primary goal of Yii.
Yii is not a one-man show, it is backed up by a strong core developer team1 aswell as a large community with many professionals constantly contributing tothe development of Yii. The Yii developer team keeps a close eye on the latesttrends of Web development, and on the best practices and features foundin other frameworks and projects. The most relevant best practices andfeatures found elsewhere are regularly incorporated into the core frameworkand exposed via simple and elegant interfaces.
1.1.3 Yii Versions
Yii currently has two major versions available: 1.1 and 2.0. Version 1.1 isthe old generation and is now in maintenance mode. Version 2.0 is a com-plete rewrite of Yii, adopting the latest technologies and protocols, includingComposer, PSR, namespaces, traits, and so forth. Version 2.0 represents thelatest generation of the framework and will receive our main developmente�orts in the next few years. This guide is mainly about version 2.0.
1.1.4 Requirements and Prerequisites
Yii 2.0 requires PHP 5.4.0 or above. You can �nd more detailed requirementsfor individual features by running the requirement checker included in everyYii release.
Using Yii requires basic knowledge about object-oriented programming(OOP), as Yii is a pure OOP-based framework. Yii 2.0 also makes use ofthe latest features of PHP, such as namespaces2 and traits3. Understandingthese concepts will help you more easily pick up Yii 2.0.
1.2 Upgrading from Version 1.1
There are many di�erences between versions 1.1 and 2.0 of Yii as the frame-work was completely rewritten for 2.0. As a result, upgrading from version1.1 is not as trivial as upgrading between minor versions. In this guide you'll�nd the major di�erences between the two versions.
If you have not used Yii 1.1 before, you can safely skip this section andturn directly to �Getting started�.
1http://www.yiiframework.com/about/2http://www.php.net/manual/en/language.namespaces.php3http://www.php.net/manual/en/language.oop5.traits.php

1.2. UPGRADING FROM VERSION 1.1 3
Please note that Yii 2.0 introduces more new features than are coveredin this summary. It is highly recommended that you read through the wholede�nitive guide to learn about them all. Chances are that some features youpreviously had to develop for yourself are now part of the core code.
1.2.1 Installation
Yii 2.0 fully embraces Composer4, the de facto PHP package manager. In-stallation of the core framework, as well as extensions, are handled throughComposer. Please refer to the Starting from Basic App section to learn howto install Yii 2.0. If you want to create new extensions, or turn your existing1.1 extensions into 2.0-compatible extensions, please refer to the CreatingExtensions section of the guide.
1.2.2 PHP Requirements
Yii 2.0 requires PHP 5.4 or above, which is a huge improvement over PHPversion 5.2 that is required by Yii 1.1. As a result, there are many di�erenceson the language level that you should pay attention to. Below is a summaryof the major changes regarding PHP:
• Namespaces5.
• Anonymous functions6.
• Short array syntax [...elements...] is used instead of array(...elements...).
• Short echo tags <?= are used in view �les. This is safe to use startingfrom PHP 5.4.
• SPL classes and interfaces7.
• Late Static Bindings8.
• Date and Time9.
• Traits10.
• intl11. Yii 2.0 makes use of the intl PHP extension to support inter-nationalization features.
4https://getcomposer.org/5http://php.net/manual/en/language.namespaces.php6http://php.net/manual/en/functions.anonymous.php7http://php.net/manual/en/book.spl.php8http://php.net/manual/en/language.oop5.late-static-bindings.php9http://php.net/manual/en/book.datetime.php
10http://php.net/manual/en/language.oop5.traits.php11http://php.net/manual/en/book.intl.php

4 CHAPTER 1. INTRODUCTION
1.2.3 Namespace
The most obvious change in Yii 2.0 is the use of namespaces. Almost everycore class is namespaced, e.g., yii\web\Request. The �C� pre�x is no longerused in class names. The naming scheme now follows the directory structure.For example, yii\web\Request indicates that the corresponding class �le is web/Request.php under the Yii framework folder.
(You can use any core class without explicitly including that class �le,thanks to the Yii class loader.)
1.2.4 Component and Object
Yii 2.0 breaks the CComponent class in 1.1 into two classes: yii\base\Objectand yii\base\Component. The yii\base\Object class is a lightweight baseclass that allows de�ning object properties via getters and setters. The yii\base\Component class extends from yii\base\Object and supports eventsand behaviors.
If your class does not need the event or behavior feature, you shouldconsider using yii\base\Object as the base class. This is usually the casefor classes that represent basic data structures.
1.2.5 Object Con�guration
The yii\base\Object class introduces a uniform way of con�guring objects.Any descendant class of yii\base\Object should declare its constructor (ifneeded) in the following way so that it can be properly con�gured:
class MyClass extends \yii\base\Object
{
public function __construct($param1, $param2, $config = [])
{
// ... initialization before configuration is applied
parent::__construct($config);
}
public function init()
{
parent::init();
// ... initialization after configuration is applied
}
}
In the above, the last parameter of the constructor must take a con�gurationarray that contains name-value pairs for initializing the properties at the endof the constructor. You can override the yii\base\Object::init() methodto do initialization work that should be done after the con�guration has beenapplied.

1.2. UPGRADING FROM VERSION 1.1 5
By following this convention, you will be able to create and con�gurenew objects using a con�guration array:
$object = Yii::createObject([
'class' => 'MyClass',
'property1' => 'abc',
'property2' => 'cde',
], [$param1, $param2]);
More details about con�gurations can be found in the Object Con�gurationssection.
1.2.6 Events
In Yii 1, events were created by de�ning an on-method (e.g., onBeforeSave).In Yii 2, you can now use any event name. You trigger an event by callingthe yii\base\Component::trigger() method:
$event = new \yii\base\Event;
$component->trigger($eventName, $event);
To attach a handler to an event, use the yii\base\Component::on()method:
$component->on($eventName, $handler);
// To detach the handler, use:
// $component->off($eventName, $handler);
There are many enhancements to the event features. For more details, pleaserefer to the Events section.
1.2.7 Path Aliases
Yii 2.0 expands the usage of path aliases to both �le/directory paths andURLs. Yii 2.0 also now requires an alias name to start with the @ character,to di�erentiate aliases from normal �le/directory paths or URLs. For exam-ple, the alias @yii refers to the Yii installation directory. Path aliases aresupported in most places in the Yii core code. For example, yii\caching\FileCache::cachePath can take both a path alias and a normal directorypath.
A path alias is also closely related to a class namespace. It is recom-mended that a path alias be de�ned for each root namespace, thereby allow-ing you to use Yii the class autoloader without any further con�guration.For example, because @yii refers to the Yii installation directory, a class likeyii\web\Request can be autoloaded. If you use a third party library, such asthe Zend Framework, you may de�ne a path alias @Zend that refers to thatframework's installation directory. Once you've done that, Yii will be ableto autoload any class in that Zend Framework library, too.
More on path aliases can be found in the Path Aliases section.

6 CHAPTER 1. INTRODUCTION
1.2.8 Views
The most signi�cant change about views in Yii 2 is that the special variable$this in a view no longer refers to the current controller or widget. Instead,$this now refers to a view object, a new concept introduced in 2.0. The view
object is of type yii\web\View, which represents the view part of the MVCpattern. In you want to access the controller or widget in a view, you canuse $this->context.
To render a partial view within another view, you use $this->render(),not $this->renderPartial(). The call to render also now has to be explicitlyechoed, as the render() method returns the rendering result, rather thandirectly displaying it. For example:
echo $this->render('_item', ['item' => $item]);
Besides using PHP as the primary template language, Yii 2.0 is also equippedwith o�cial support for two popular template engines: Smarty and Twig.The Prado template engine is no longer supported. To use these templateengines, you need to con�gure the view application component by settingthe yii\base\View::$renderers property. Please refer to the TemplateEngines section for more details.
1.2.9 Models
Yii 2.0 uses yii\base\Model as the base model, similar to CModel in 1.1.The class CFormModel has been dropped entirely. Instead, in Yii 2 you shouldextend yii\base\Model to create a form model class.
Yii 2.0 introduces a new method called yii\base\Model::scenarios()
to declare supported scenarios, and to indicate under which scenario anattribute needs to be validated, can be considered as safe or not, etc. Forexample:
public function scenarios()
{
return [
'backend' => ['email', 'role'],
'frontend' => ['email', '!name'],
];
}
In the above, two scenarios are declared: backend and frontend. For thebackend scenario, both the email and role attributes are safe, and can bemassively assigned. For the frontend scenario, email can be massively assignedwhile role cannot. Both email and role should be validated using rules.
The yii\base\Model::rules() method is still used to declare the val-idation rules. Note that due to the introduction of yii\base\Model::
scenarios(), there is no longer an unsafe validator.

1.2. UPGRADING FROM VERSION 1.1 7
In most cases, you do not need to override yii\base\Model::scenarios()if the yii\base\Model::rules() method fully speci�es the scenarios thatwill exist, and if there is no need to declare unsafe attributes.
To learn more details about models, please refer to the Models section.
1.2.10 Controllers
Yii 2.0 uses yii\web\Controller as the base controller class, similar toCWebController in Yii 1.1. yii\base\Action is the base class for actionclasses.
The most obvious impact of these changes on your code is that a con-troller action should return the content that you want to render instead ofechoing it:
public function actionView($id)
{
$model = \app\models\Post::findOne($id);
if ($model) {
return $this->render('view', ['model' => $model]);
} else {
throw new \yii\web\NotFoundHttpException;
}
}
Please refer to the Controllers section for more details about controllers.
1.2.11 Widgets
Yii 2.0 uses yii\base\Widget as the base widget class, similar to CWidget inYii 1.1.
To get better support for the framework in IDEs, Yii 2.0 introduces a newsyntax for using widgets. The static methods yii\base\Widget::begin(),yii\base\Widget::end(), and yii\base\Widget::widget() have been in-troduced, to be used like so:
use yii\widgets\Menu;
use yii\widgets\ActiveForm;
// Note that you have to "echo" the result to display it
echo Menu::widget(['items' => $items]);
// Passing an array to initialize the object properties
$form = ActiveForm::begin([
'options' => ['class' => 'form-horizontal'],
'fieldConfig' => ['inputOptions' => ['class' => 'input-xlarge']],
]);
... form input fields here ...
ActiveForm::end();
Please refer to the Widgets section for more details.

8 CHAPTER 1. INTRODUCTION
1.2.12 Themes
Themes work completely di�erently in 2.0. They are now based on a pathmapping mechanism that maps a source view �le path to a themed view�le path. For example, if the path map for a theme is ['/web/views' => '/
web/themes/basic'], then the themed version for the view �le /web/views/site
/index.php will be /web/themes/basic/site/index.php. For this reason, themescan now be applied to any view �le, even a view rendered outside of thecontext of a controller or a widget.
Also, there is no more CThemeManager component. Instead, theme is a con-�gurable property of the view application component.
Please refer to the Theming section for more details.
1.2.13 Console Applications
Console applications are now organized as controllers, like Web applications.Console controllers should extend from yii\console\Controller, similarto CConsoleCommand in 1.1.
To run a console command, use yii <route>, where <route> stands for acontroller route (e.g. sitemap/index). Additional anonymous arguments arepassed as the parameters to the corresponding controller action method,while named arguments are parsed according to the declarations in yii
\console\Controller::options().
Yii 2.0 supports automatic generation of command help information fromcomment blocks.
Please refer to the Console Commands section for more details.
1.2.14 I18N
Yii 2.0 removes the built-in date formatter and number formatter pieces infavor of the PECL intl PHP module12.
Message translation is now performed via the i18n application compo-nent. This component manages a set of message sources, which allows youto use di�erent message sources based on message categories.
Please refer to the Internationalization section for more details.
1.2.15 Action Filters
Action �lters are implemented via behaviors now. To de�ne a new, custom�lter, extend from yii\base\ActionFilter. To use a �lter, attach the �lterclass to the controller as a behavior. For example, to use the yii\filters
\AccessControl �lter, you would have the following code in a controller:
12http://pecl.php.net/package/intl

1.2. UPGRADING FROM VERSION 1.1 9
public function behaviors()
{
return [
'access' => [
'class' => 'yii\filters\AccessControl',
'rules' => [
['allow' => true, 'actions' => ['admin'], 'roles' => ['@']],
],
],
];
}
Please refer to the Filtering section for more details.
1.2.16 Assets
Yii 2.0 introduces a new concept called asset bundle that replaces the scriptpackage concept found in Yii 1.1.
An asset bundle is a collection of asset �les (e.g. JavaScript �les, CSS�les, image �les, etc.) within a directory. Each asset bundle is representedas a class extending yii\web\AssetBundle. By registering an asset bundlevia yii\web\AssetBundle::register(), you make the assets in that bundleaccessible via the Web. Unlike in Yii 1, the page registering the bundle willautomatically contain the references to the JavaScript and CSS �les speci�edin that bundle.
Please refer to the Managing Assets section for more details.
1.2.17 Helpers
Yii 2.0 introduces many commonly used static helper classes, including.
• yii\helpers\Html
• yii\helpers\ArrayHelper
• yii\helpers\StringHelper
• yii\helpers\FileHelper
• yii\helpers\Json
• yii\helpers\Security
Please refer to the Helper Overview section for more details.

10 CHAPTER 1. INTRODUCTION
1.2.18 Forms
Yii 2.0 introduces the �eld concept for building a form using yii\widgets
\ActiveForm. A �eld is a container consisting of a label, an input, an er-ror message, and/or a hint text. A �eld is represented as an yii\widgets
\ActiveField object. Using �elds, you can build a form more cleanly thanbefore:
<?php $form = yii\widgets\ActiveForm::begin(); ?>
<?= $form->field($model, 'username') ?>
<?= $form->field($model, 'password')->passwordInput() ?>
<div class="form-group">
<?= Html::submitButton('Login') ?>
</div>
<?php yii\widgets\ActiveForm::end(); ?>
Please refer to the Creating Forms section for more details.
1.2.19 Query Builder
In 1.1, query building was scattered among several classes, including CDbCommand
, CDbCriteria, and CDbCommandBuilder. Yii 2.0 represents a DB query in termsof a yii\db\Query object that can be turned into a SQL statement with thehelp of yii\db\QueryBuilder behind the scene. For example:
$query = new \yii\db\Query();
$query->select('id, name')
->from('user')
->limit(10);
$command = $query->createCommand();
$sql = $command->sql;
$rows = $command->queryAll();
Best of all, such query building methods can also be used when working withActive Record.
Please refer to the Query Builder section for more details.
1.2.20 Active Record
Yii 2.0 introduces a lot of changes to Active Record. The two most obviousones involve query building and relational query handling.
The CDbCriteria class in 1.1 is replaced by yii\db\ActiveQuery in Yii 2.That class extends from yii\db\Query, and thus inherits all query buildingmethods. You call yii\db\ActiveRecord::find() to start building a query:
// To retrieve all *active* customers and order them by their ID:
$customers = Customer::find()
->where(['status' => $active])
->orderBy('id')
->all();

1.2. UPGRADING FROM VERSION 1.1 11
To declare a relation, simply de�ne a getter method that returns an yii\db
\ActiveQuery object. The property name de�ned by the getter representsthe relation name. For example, the following code declares an orders relation(in 1.1, you would have to declare relations in a central place relations()):
class Customer extends \yii\db\ActiveRecord
{
public function getOrders()
{
return $this->hasMany('Order', ['customer_id' => 'id']);
}
}
Now you can use $customer->orders to access a customer's orders from therelated table. You can also use the following code to perform an on-the-�yrelational query with a customized query condition:
$orders = $customer->getOrders()->andWhere('status=1')->all();
When eager loading a relation, Yii 2.0 does it di�erently from 1.1. In partic-ular, in 1.1 a JOIN query would be created to select both the primary andthe relational records. In Yii 2.0, two SQL statements are executed withoutusing JOIN: the �rst statement brings back the primary records and thesecond brings back the relational records by �ltering with the primary keysof the primary records.
Instead of returning yii\db\ActiveRecord objects, you may chain theyii\db\ActiveQuery::asArray() method when building a query to returna large number of records. This will cause the query result to be returnedas arrays, which can signi�cantly reduce the needed CPU time and memoryif large number of records . For example,
$customers = Customer::find()->asArray()->all();
Another change is that you can't de�ne attribute default values throughpublic properties anymore. If you need those, you should set them in theinit method of your record class.
public function init()
{
parent::init();
$this->status = self::STATUS_NEW;
}
There where some problems with overriding the constructor of an ActiveRe-cord class in 1.1. These are not present in version 2.0 anymore. Note thatwhen adding parameters to the constructor you might have to override yii
\db\ActiveRecord::instantiate().
There are many other changes and enhancements to Active Record.Please refer to the Active Record section for more details.

12 CHAPTER 1. INTRODUCTION
1.2.21 User and IdentityInterface
The CWebUser class in 1.1 is now replaced by yii\web\User, and there isno more CUserIdentity class. Instead, you should implement the yii\web
\IdentityInterface which is much more straightforward to use. The ad-vanced application template provides such an example.
Please refer to the Authentication, Authorization, and Advanced Appli-cation Technique sections for more details.
1.2.22 URL Management
URL management in Yii 2 is similar to that in 1.1. A major enhancementis that URL management now supports optional parameters. For example,if you have a rule declared as follows, then it will match both post/popular
and post/1/popular. In 1.1, you would have had to use two rules to achievethe same goal.
[
'pattern' => 'post/<page:\d+>/<tag>',
'route' => 'post/index',
'defaults' => ['page' => 1],
]
Please refer to the Url manager docs section for more details.
1.2.23 Using Yii 1.1 and 2.x together
If you have legacy Yii 1.1 code that you want to use together with Yii 2.0,please refer to the Using Yii 1.1 and 2.0 Together section.

Chapter 2
Getting Started
2.1 Installing Yii
You can install Yii in two ways, using Composer1 or by downloading anarchive �le. The former is the preferred way, as it allows you to install newextensions or update Yii by simply running a single command.
Note: Unlike with Yii 1, standard installations of Yii 2 resultsin both the framework and an application skeleton being down-loaded and installed.
2.1.1 Installing via Composer
If you do not already have Composer installed, you may do so by followingthe instructions at getcomposer.org2. On Linux and Mac OS X, you'll runthe following commands:
curl -s http://getcomposer.org/installer | php
mv composer.phar /usr/local/bin/composer
On Windows, you'll download and run Composer-Setup.exe3.
Please refer to the Composer Documentation4 if you encounter any prob-lems or want to learn more about Composer usage.
With Composer installed, you can install Yii by running the followingcommand under a Web-accessible folder:
composer create-project --prefer-dist yiisoft/yii2-app-basic basic
The above command installs Yii as a directory named basic.
1http://getcomposer.org/2https://getcomposer.org/download/3https://getcomposer.org/Composer-Setup.exe4https://getcomposer.org/doc/
13

14 CHAPTER 2. GETTING STARTED
Tip: If you want to install the latest development version ofYii, you may use the following command, which adds a stabilityoption5:
composer create-project --prefer-dist --stability=dev yiisoft/
yii2-app-basic basic
Note that the development version of Yii should not be used forproduction as it may break your running code.
2.1.2 Installing from an Archive File
Installing Yii from an archive �le involves two steps:
1. Download the archive �le from yiiframework.com6.
2. Unpack the downloaded �le to a Web-accessible folder.
2.1.3 Other Installation Options
The above installation instructions show how to install Yii, which also createsa basic Web application that works out of the box. This approach is a goodstarting point for small projects, or for when you just start learning Yii.
But there are other installation options available:
• If you only want to install the core framework and would like to buildan entire application from scratch, you may follow the instructions asexplained in Building Application from Scratch.
• If you want to start with a more sophisticated application, better suitedto team development environments, you may consider installing theAdvanced Application Template.
2.1.4 Verifying the Installation
After installation, you can use your browser to access the installed Yii ap-plication with the following URL:
http://localhost/basic/web/index.php
This URL assumes you have installed Yii in a directory named basic, directlyunder the Web server's document root directory, and that the Web server isrunning on your local machine(localhost), you may have to adjust it to yourinstallation environment.
5https://getcomposer.org/doc/04-schema.md#minimum-stability6http://www.yiiframework.com/download/yii2-basic

2.1. INSTALLING YII 15
You should see the above �Congratulations!� page in your browser. Ifnot, please check if your PHP installation satis�es Yii's requirements. Youcan check if the minimum requirements are met using one of the followingapproaches:
• Use a browser to access the URL http://localhost/basic/requirements.
php
• Run the following commands:
cd basic
php requirements.php
You should con�gure your PHP installation so that it meets the minimum re-quirements of Yii. Most importantly, you should have PHP 5.4 or above. Youshould also install the PDO PHP Extension7 and a corresponding databasedriver (such as pdo_mysql for MySQL databases), if your application needs adatabase.
2.1.5 Con�guring Web Servers
Info: You may skip this subsection for now if you are just testdriving Yii with no intention of deploying it to a productionserver.
7http://www.php.net/manual/en/pdo.installation.php

16 CHAPTER 2. GETTING STARTED
The application installed according to the above instructions should workout of box with either an Apache HTTP server8 or an Nginx HTTP server9,on Windows, Mac OS X, or Linux.
On a production server, you may want to con�gure your Web serverso that the application can be accessed via the URL http://www.example.com
/index.php instead of http://www.example.com/basic/web/index.php. Such con-�guration requires pointing the document root of your Web server to thebasic/web folder. You may also want to hide index.php from the URL, asdescribed in the URL Parsing and Generation section. In this subsection,you'll learn how to con�gure your Apache or Nginx server to achieve thesegoals.
Info: By setting basic/web as the document root, you also pre-vent end users from accessing your private application code andsensitive data �les that are stored in the sibling directories ofbasic/web. Denying access to those other folders is a producentsecurity improvement.
Info: If your application will run in a shared hosting environ-ment where you do not have permission to modify its Web servercon�guration, you may still adjust the structure of your appli-cation for better security. Please refer to the Shared HostingEnvironment section for more details.
Recommended Apache Con�guration
Use the following con�guration in Apache's httpd.conf �le or within a virtualhost con�guration. Note that you should replace path/to/basic/web with theactual path for basic/web.
# Set document root to be "basic/web"
DocumentRoot "path/to/basic/web"
<Directory "path/to/basic/web">
RewriteEngine on
# If a directory or a file exists, use the request directly
RewriteCond %{REQUEST_FILENAME} !-f
RewriteCond %{REQUEST_FILENAME} !-d
# Otherwise forward the request to index.php
RewriteRule . index.php
# ...other settings...
</Directory>
8http://httpd.apache.org/9http://nginx.org/

2.1. INSTALLING YII 17
Recommended Nginx Con�guration
You should have installed PHP as an FPM SAPI10 to use Nginx11. Use thefollowing Nginx con�guration, replacing path/to/basic/web with the actualpath for basic/web and mysite.local with the actual hostname to serve.
server {
charset utf-8;
client_max_body_size 128M;
listen 80; ## listen for ipv4
#listen [::]:80 default_server ipv6only=on; ## listen for ipv6
server_name mysite.local;
root /path/to/basic/web;
index index.php;
access_log /path/to/basic/log/access.log main;
error_log /path/to/basic/log/error.log;
location / {
# Redirect everything that isn't a real file to index.php
try_files $uri $uri/ /index.php?$args;
}
# uncomment to avoid processing of calls to non-existing static files by
Yii
#location ~ \.(js|css|png|jpg|gif|swf|ico|pdf|mov|fla|zip|rar)$ {
# try_files $uri =404;
#}
#error_page 404 /404.html;
location ~ \.php$ {
include fastcgi.conf;
fastcgi_pass 127.0.0.1:9000;
#fastcgi_pass unix:/var/run/php5-fpm.sock;
}
location ~ /\.(ht|svn|git) {
deny all;
}
}
When using this con�guration, you should also set cgi.fix_pathinfo=0 in thephp.ini �le in order to avoid many unnecessary system stat() calls.
Also note that when running an HTTPS server, you need to add fastcgi_param
HTTPS on; so that Yii can properly detect if a connection is secure.
10http://php.net/install.fpm11http://wiki.nginx.org/

18 CHAPTER 2. GETTING STARTED
2.2 Running Applications
After installing Yii, you have a working Yii application that can be ac-cessed via the URL http://hostname/basic/web/index.php or http://hostname/
index.php, depending upon your con�guration. This section will introducethe application's built-in functionality, how the code is organized, and howthe application handles requests in general.
Info: For simplicity, throughout this �Getting Started� tutorial,it's assumed that you have set basic/web as the document rootof your Web server, and con�gured, the URL for accessing yourapplication to be http://hostname/index.php or something similar.For your needs, please adjust the URLs in our descriptions ac-cordingly.
2.2.1 Functionality
The basic application installed contains four pages:
• The homepage, displayed when you access the URL http://hostname/
index.php,
• the �About� page,
• the �Contact� page, which displays a contact form that allows end usersto contact you via email,
• and the �Login� page, which displays a login form that can be used toauthenticate end users. Try logging in with �admin/admin�, and youwill �nd the �Login� main menu item will change to �Logout�.
These pages share a common header and footer. The header contains a mainmenu bar to allow navigation among di�erent pages.
You should also see a toolbar at the bottom of the browser window.This is a useful debugger tool provided by Yii to record and display a lot ofdebugging information, such as log messages, response statuses, the databasequeries run, and so on.
2.2.2 Application Structure
The most important directories and �les in your application are (assumingthe application's root directory is basic):
basic/ application base path
composer.json used by Composer, describes package information
config/ contains application and other configurations
console.php the console application configuration
web.php the Web application configuration

2.2. RUNNING APPLICATIONS 19
commands/ contains console command classes
controllers/ contains controller classes
models/ contains model classes
runtime/ contains files generated by Yii during runtime, such
as logs and cache files
vendor/ contains the installed Composer packages, including
the Yii framework itself
views/ contains view files
web/ application Web root, contains Web accessible files
assets/ contains published asset files (javascript and css)
by Yii
index.php the entry (or bootstrap) script for the application
yii the Yii console command execution script
In general, the �les in the application can be divided into two types: thoseunder basic/web and those under other directories. The former can be directlyaccessed via HTTP (i.e., in a browser), while the latter can not and shouldnot be.
Yii implements the model-view-controller (MVC)12 design pattern, whichis re�ected in the above directory organization. The models directory con-tains all model classes, the views directory contains all view scripts, and thecontrollers directory contains all controller classes.
The following diagram shows the static structure of an application.
12http://wikipedia.org/wiki/Model-view-controller

20 CHAPTER 2. GETTING STARTED
Each application has an entry script web/index.php which is the only Webaccessible PHP script in the application. The entry script takes an incomingrequest and creates an application instance to handle it. The applicationresolves the request with the help of its components, and dispatches therequest to the MVC elements. Widgets are used in the views to help buildcomplex and dynamic user interface elements.
2.2.3 Request Lifecycle
The following diagram shows how an application handles a request.
1. A user makes a request to the entry script web/index.php.
2. The entry script loads the application con�guration and creates anapplication instance to handle the request.
3. The application resolves the requested route with the help of the re-quest application component.
4. The application creates a controller instance to handle the request.
5. The controller creates an action instance and performs the �lters forthe action.
6. If any �lter fails, the action is cancelled.

2.3. SAYING HELLO 21
7. If all �lters pass, the action is executed.
8. The action loads a data model, possibly from a database.
9. The action renders a view, providing it with the data model.
10. The rendered result is returned to the response application component.
11. The response component sends the rendered result to the user's browser.
2.3 Saying Hello
This section describes how to create a new �Hello� page in your application.To achieve this goal, you will create an action and a view:
• The application will dispatch the page request to the action
• and the action will in turn render the view that shows the word �Hello�to the end user.
Through this tutorial, you will learn three things:
1. How to create an action to respond to requests,
2. how to create a view to compose the response's content, and
3. how an application dispatches requests to actions.
2.3.1 Creating an Action
For the �Hello� task, you will create a say action that reads a message pa-rameter from the request and displays that message back to the user. Ifthe request does not provide a message parameter, the action will display thedefault �Hello� message.
Info: Actions are the objects that end users can directly refer tofor execution. Actions are grouped by controllers. The executionresult of an action is the response that an end user will receive.
Actions must be declared in controllers. For simplicity, you may declare thesay action in the existing SiteController. This controller is de�ned in theclass �le controllers/SiteController.php. Here is the start of the new action:
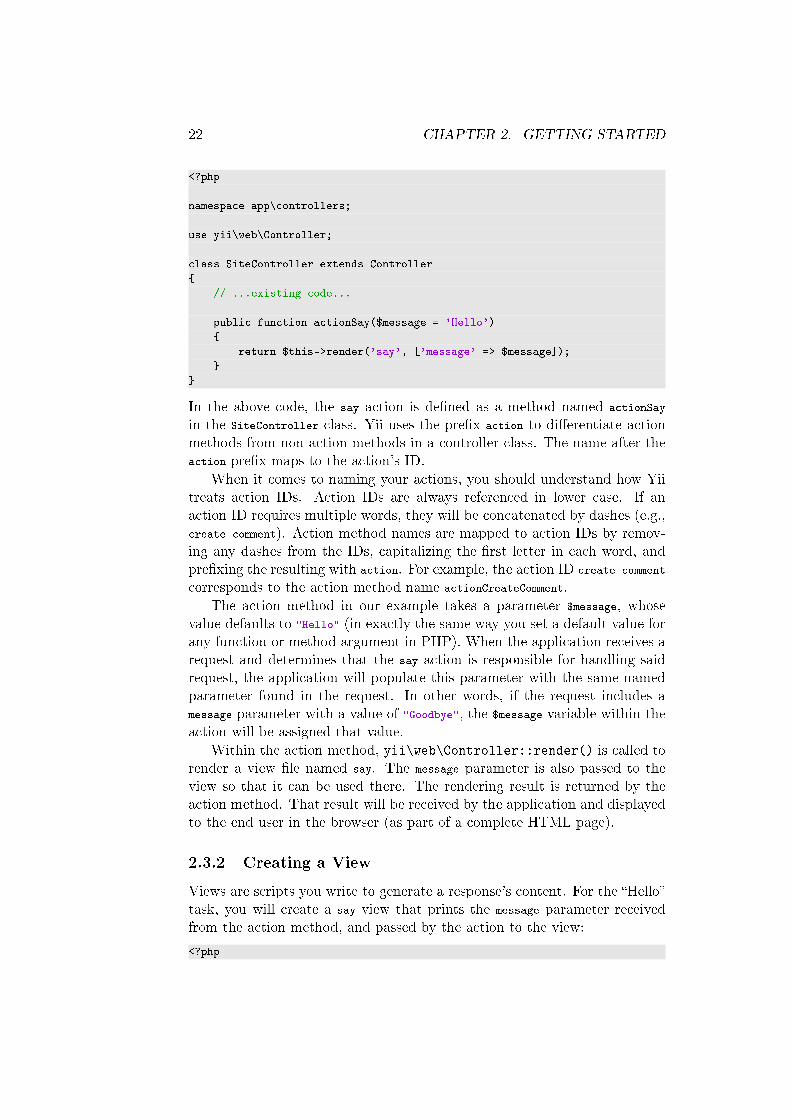
22 CHAPTER 2. GETTING STARTED
<?php
namespace app\controllers;
use yii\web\Controller;
class SiteController extends Controller
{
// ...existing code...
public function actionSay($message = 'Hello')
{
return $this->render('say', ['message' => $message]);
}
}
In the above code, the say action is de�ned as a method named actionSay
in the SiteController class. Yii uses the pre�x action to di�erentiate actionmethods from non-action methods in a controller class. The name after theaction pre�x maps to the action's ID.
When it comes to naming your actions, you should understand how Yiitreats action IDs. Action IDs are always referenced in lower case. If anaction ID requires multiple words, they will be concatenated by dashes (e.g.,create-comment). Action method names are mapped to action IDs by remov-ing any dashes from the IDs, capitalizing the �rst letter in each word, andpre�xing the resulting with action. For example, the action ID create-comment
corresponds to the action method name actionCreateComment.
The action method in our example takes a parameter $message, whosevalue defaults to "Hello" (in exactly the same way you set a default value forany function or method argument in PHP). When the application receives arequest and determines that the say action is responsible for handling saidrequest, the application will populate this parameter with the same namedparameter found in the request. In other words, if the request includes amessage parameter with a value of "Goodbye", the $message variable within theaction will be assigned that value.
Within the action method, yii\web\Controller::render() is called torender a view �le named say. The message parameter is also passed to theview so that it can be used there. The rendering result is returned by theaction method. That result will be received by the application and displayedto the end user in the browser (as part of a complete HTML page).
2.3.2 Creating a View
Views are scripts you write to generate a response's content. For the �Hello�task, you will create a say view that prints the message parameter receivedfrom the action method, and passed by the action to the view:
<?php

2.3. SAYING HELLO 23
use yii\helpers\Html;
?>
<?= Html::encode($message) ?>
The say view should be saved in the �le views/site/say.php. When the methodyii\web\Controller::render() is called in an action, it will look for a PHP�le named as views/ControllerID/ViewName.php.
Note that in the above code, the message parameter is yii\helpers\Html::encode() before being printed. This is necessary as the parameter comesfrom an end user, making it vulnerable to cross-site scripting (XSS) attacks13
by embedding malicious JavaScript code in the parameter.Naturally, you may put more content in the say view. The content can
consist of HTML tags, plain text, and even PHP statements. In fact, the say
view is just a PHP script that is executed by the yii\web\Controller::
render() method. The content printed by the view script will be returned tothe application as the response's result. The application will in turn outputthis result to the end user.
2.3.3 Trying it Out
After creating the action and the view, you may access the new page byaccessing the following URL:
http://hostname/index.php?r=site/say&message=Hello+World
This URL will result in a page displaying �Hello World�. The page sharesthe same header and footer as the other application pages.
13http://en.wikipedia.org/wiki/Cross-site_scripting

24 CHAPTER 2. GETTING STARTED
If you omit the message parameter in the URL, you would see the pagedisplay just �Hello�. This is because message is passed as a parameter to theactionSay() method, and when it is omitted, the default value of "Hello" willbe used instead.
Info: The new page shares the same header and footer as otherpages because the yii\web\Controller::render() method willautomatically embed the result of the say view in a so-calledlayout which in this case is located at views/layouts/main.php.
The r parameter in the above URL requires more explanation. It stands forroute, an application wide unique ID that refers to an action. The route'sformat is ControllerID/ActionID. When the application receives a request, itwill check this parameter, using the ControllerID part to determine whichcontroller class should be instantiated to handle the request. Then, thecontroller will use the ActionID part to determine which action should beinstantiated to do the real work. In this example case, the route site/say
will be resolved to the SiteController controller class and the say action. Asa result, the SiteController::actionSay() method will be called to handle therequest.
Info: Like actions, controllers also have IDs that uniquely identifythem in an application. Controller IDs use the same namingrules as action IDs. Controller class names are derived fromcontroller IDs by removing dashes from the IDs, capitalizing the�rst letter in each word, and su�xing the resulting string withthe word Controller. For example, the controller ID post-comment
corresponds to the controller class name PostCommentController.
2.3.4 Summary
In this section, you have touched the controller and view parts of the MVCdesign pattern. You created an action as part of a controller to handle aspeci�c request. And you also created a view to compose the response'scontent. In this simple example, no model was involved as the only dataused was the message parameter.
You have also learned about routes in Yii, which act as the bridge betweenuser requests and controller actions.
In the next section, you will learn how to create a model, and add a newpage containing an HTML form.
2.4 Working with Forms
In this section, we will describe how to create a new page to get data fromusers. The page will display a form with a name input �eld and an email

2.4. WORKING WITH FORMS 25
input �eld. After getting these data from a user, the page will echo themback to the user for con�rmation.
To achieve this goal, besides creating an action and two views, you willalso create a model.
Through this tutorial, you will learn
• How to create a model to represent the data entered by a user;
• How to declare rules to validate the data entered by users;
• How to build an HTML form in a view.
2.4.1 Creating a Model
To represent the data entered by a user, create an EntryForm model class asshown below and save the class in the �le models/EntryForm.php. Please referto the Class Autoloading section for more details about the class �le namingconvention.
<?php
namespace app\models;
use yii\base\Model;
class EntryForm extends Model
{
public $name;
public $email;
public function rules()
{
return [
[['name', 'email'], 'required'],
['email', 'email'],
];
}
}
The class extends from yii\base\Model, a base class provided by Yii thatis commonly used to represent form data.
The class contains two public members, name and email, which are used tokeep the data entered by the user. It also contains a method named rules()
which returns a set of rules used for validating the data. The validation rulesdeclared above state that
• both the name and email data are required;
• the email data must be a valid email address.

26 CHAPTER 2. GETTING STARTED
If you have an EntryForm object populated with the data entered by a user,you may call its yii\base\Model::validate() to trigger the data valida-tion. A data validation failure will turn on the yii\base\Model::hasErrorsproperty, and through yii\base\Model::getErrors you may learn whatvalidation errors the model has.
2.4.2 Creating an Action
Next, create an entry action in the site controller, like you did in the previoussection.
<?php
namespace app\controllers;
use Yii;
use yii\web\Controller;
use app\models\EntryForm;
class SiteController extends Controller
{
// ...existing code...
public function actionEntry()
{
$model = new EntryForm;
if ($model->load(Yii::$app->request->post()) && $model->validate())
{
// valid data received in $model
// do something meaningful here about $model ...
return $this->render('entry-confirm', ['model' => $model]);
} else {
// either the page is initially displayed or there is some
validation error
return $this->render('entry', ['model' => $model]);
}
}
}
The action �rst creates an EntryForm object. It then tries to populate themodel with the data from $_POST which is provided in Yii through yii\web
\Request::post(). If the model is successfully populated (i.e., the user hassubmitted the HTML form), it will call yii\base\Model::validate() tomake sure the data entered are valid.
If everything is �ne, the action will render a view named entry-confirm tocon�rm with the user that the data he has entered is accepted. Otherwise,the entry view will be rendered, which will show the HTML form togetherwith the validation error messages (if any).

2.4. WORKING WITH FORMS 27
Info: The expression Yii::$app represents the application instancewhich is a globally accessible singleton. It is also a service loca-tor providing components, such as request, response, db, etc. tosupport speci�c functionalities. In the above code, the request
component is used to access the $_POST data.
2.4.3 Creating Views
Finally, create two views named entry-confirm and entry that are renderedby the entry action, as described in the last subsection.
The entry-confirm view simply displays the name and email data. Itshould be stored as the �le views/site/entry-confirm.php.
<?php
use yii\helpers\Html;
?>
<p>You have entered the following information:</p>
<ul>
<li><label>Name</label>: <?= Html::encode($model->name) ?></li>
<li><label>Email</label>: <?= Html::encode($model->email) ?></li>
</ul>
The entry view displays an HTML form. It should be stored as the �leviews/site/entry.php.
<?php
use yii\helpers\Html;
use yii\widgets\ActiveForm;
?>
<?php $form = ActiveForm::begin(); ?>
<?= $form->field($model, 'name') ?>
<?= $form->field($model, 'email') ?>
<div class="form-group">
<?= Html::submitButton('Submit', ['class' => 'btn btn-primary']) ?>
</div>
<?php ActiveForm::end(); ?>
The view uses a powerful widget called yii\widgets\ActiveForm to buildthe HTML form. The begin() and end() methods of the widget render theopening and close form tags, respectively. Between the two method calls, in-put �elds are created by the yii\widgets\ActiveForm::field() method.The �rst input �eld is about the �name� data, and the second the �email�data. After the input �elds, the yii\helpers\Html::submitButton()methodis called to generate a submit button.

28 CHAPTER 2. GETTING STARTED
2.4.4 Trying it Out
To see how it works, use your browser to access the following URL:
http://hostname/index.php?r=site/entry
You will see a page displaying a form with two input �elds. In front of eachinput �eld, a label is also displayed indicating what data you need to enter.If you click the submit button without entering anything, or if you do notprovide a valid email address, you will see an error message that is displayednext to each problematic input �eld.
After entering a valid name and email address and clicking the submitbutton, you will see a new page displaying the data that you just entered.

2.4. WORKING WITH FORMS 29
Magic Explained
You may wonder how the HTML form works behind the scene, because itseems almost magical that it can display a label for each input �eld and showerror messages if you do not enter the data correctly without reloading thepage.
Yes, the data validation is actually done on the client side using JavaScriptas well as on the server side. yii\widgets\ActiveForm is smart enough toextract the validation rules that you have declared in EntryForm, turn theminto JavaScript code, and use the JavaScript to perform data validation. Incase you have disabled JavaScript on your browser, the validation will stillbe performed on the server side, as shown in the actionEntry() method. Thisensures data validity in all circumstances.
The labels for input �elds are generated by the field() method based onthe model property names. For example, the label Name will be generated forthe name property. You may customize a label by the following code:
<?= $form->field($model, 'name')->label('Your Name') ?>
<?= $form->field($model, 'email')->label('Your Email') ?>
Info: Yii provides many such widgets to help you quickly buildcomplex and dynamic views. As you will learn later, writing anew widget is also extremely easy. You may turn much of yourview code into reusable widgets to simplify view development infuture.

30 CHAPTER 2. GETTING STARTED
2.4.5 Summary
In this section, you have touched every part in the MVC design pattern.You have learned how to create a model class to represent the user data andvalidate them.
You have also learned how to get data from users and how to displaythem back. This is a task that could take you a lot of time when developingan application. Yii provides powerful widgets to make this task very easy.
In the next section, you will learn how to work with databases which areneeded in nearly every application.
2.5 Working with Databases
In this section, we will describe how to create a new page to display thecountry data fetched from from a database table country. To achieve thisgoal, you will con�gure a database connection, create an Active Record class,and then create an action and a view.
Through this tutorial, you will learn
• How to con�gure a DB connection;
• How to de�ne an Active Record class;
• How to query data using the Active Record class;
• How to display data in a view in a paginated fashion.
Note that in order to �nish this section, you should have basic knowledge andexperience about databases. In particular, you should know how to create adatabase and how to execute SQL statements using a DB client tool.
2.5.1 Preparing a Database
To begin with, create a database named yii2basic from which you will fetchdata in your application. You may create a SQLite, MySQL, PostgreSQL,MSSQL or Oracle database. For simplicity, we will use MySQL in the fol-lowing description.
Create a table named country in the database and insert some sampledata. You may run the following SQL statements.
CREATE TABLE `country` (
`code` char(2) NOT NULL PRIMARY KEY,
`name` char(52) NOT NULL,
`population` int(11) NOT NULL DEFAULT '0'
) ENGINE=InnoDB DEFAULT CHARSET=utf8;
INSERT INTO `Country` VALUES ('AU','Australia',18886000);
INSERT INTO `Country` VALUES ('BR','Brazil',170115000);

2.5. WORKING WITH DATABASES 31
INSERT INTO `Country` VALUES ('CA','Canada',1147000);
INSERT INTO `Country` VALUES ('CN','China',1277558000);
INSERT INTO `Country` VALUES ('DE','Germany',82164700);
INSERT INTO `Country` VALUES ('FR','France',59225700);
INSERT INTO `Country` VALUES ('GB','United Kingdom',59623400);
INSERT INTO `Country` VALUES ('IN','India',1013662000);
INSERT INTO `Country` VALUES ('RU','Russia',146934000);
INSERT INTO `Country` VALUES ('US','United States',278357000);
To this end, you have a database named yii2basic, and within this databasethere is a country table with ten rows of data.
2.5.2 Con�guring a DB Connection
Make sure you have installed the PDO14 PHP extension and the PDO driverfor the database you are using (e.g. pdo_mysql for MySQL). This is a basicrequirement if your application uses a relational database.
Open the �le config/db.php and adjust the content based on your databaseinformation. By default, the �le contains the following content:
<?php
return [
'class' => 'yii\db\Connection',
'dsn' => 'mysql:host=localhost;dbname=yii2basic',
'username' => 'root',
'password' => '',
'charset' => 'utf8',
];
This is a typical �le-based con�guration. It speci�es the parameters neededto create and initialize a yii\db\Connection instance through which youcan make SQL queries against the underlying database.
The DB connection con�gured above can be accessed in the code via theexpression Yii::$app->db.
Info: The config/db.php �le will be included in the main applica-tion con�guration config/web.php which speci�es how the applica-tion instance should be initialized. For more information, pleaserefer to the Con�gurations section.
2.5.3 Creating an Active Record
To represent and fetch the data in the country table, create an Active Recordclass named Country and save it in the �le models/Country.php.
<?php
namespace app\models;
14http://www.php.net/manual/en/book.pdo.php

32 CHAPTER 2. GETTING STARTED
use yii\db\ActiveRecord;
class Country extends ActiveRecord
{
}
The Country class extends from yii\db\ActiveRecord. You do not need towrite any code inside of it. Yii will guess the associated table name fromthe class name. In case this does not work, you may override the yii\db
\ActiveRecord::tableName() method to explicitly specify the associatedtable name.
Using the Country class, you can manipulate the data in the country tableeasily. Below are some code snippets showing how you can make use of theCountry class.
use app\models\Country;
// get all rows from the country table and order them by "name"
$countries = Country::find()->orderBy('name')->all();
// get the row whose primary key is "US"
$country = Country::findOne('US');
// displays "United States"
echo $country->name;
// modifies the country name to be "U.S.A." and save it to database
$country->name = 'U.S.A.';
$country->save();
Info: Active Record is a powerful way of accessing and manipu-lating database data in an object-oriented fashion. You may �ndmore detailed information in the Active Record. Besides ActiveRecord, you may also use a lower-level data accessing methodcalled Data Access Objects.
2.5.4 Creating an Action
To expose the country data to end users, you need to create a new action. In-stead of doing this in the site controller like you did in the previous sections,it makes more sense to create a new controller speci�cally for all actions aboutmanipulating country data. Name this new controller as CountryController
and create an index action in it, as shown in the following,
<?php
namespace app\controllers;
use yii\web\Controller;

2.5. WORKING WITH DATABASES 33
use yii\data\Pagination;
use app\models\Country;
class CountryController extends Controller
{
public function actionIndex()
{
$query = Country::find();
$pagination = new Pagination([
'defaultPageSize' => 5,
'totalCount' => $query->count(),
]);
$countries = $query->orderBy('name')
->offset($pagination->offset)
->limit($pagination->limit)
->all();
return $this->render('index', [
'countries' => $countries,
'pagination' => $pagination,
]);
}
}
Save the above code in the �le controllers/CountryController.php.The index action calls Country::find() to build a DB query and retrieve
all data from the country table. To limit the number of countries returned ineach request, the query is paginated with the help of a yii\data\Paginationobject. The Pagination object serves for two purposes:
• Sets the offset and limit clauses for the SQL statement represented bythe query so that it only returns a single page of data (at most 5 rowsin a page).
• Being used in the view to display a pager consisting of a list of pagebuttons, as will be explained in the next subsection.
At the end, the index action renders a view named index and passes thecountry data as well as the pagination information to it.
2.5.5 Creating a View
Under the views directory, �rst create a sub-directory named country. Thiswill used to hold all views rendered by the country controller. Within theviews/country directory, create a �le named index.php with the following con-tent:
<?php
use yii\helpers\Html;

34 CHAPTER 2. GETTING STARTED
use yii\widgets\LinkPager;
?>
<h1>Countries</h1>
<ul>
<?php foreach ($countries as $country): ?>
<li>
<?= Html::encode("{$country->name} ({$country->code})") ?>:
<?= $country->population ?>
</li>
<?php endforeach; ?>
</ul>
<?= LinkPager::widget(['pagination' => $pagination]) ?>
The view consists of two parts. In the �rst part, the country data is traversedand rendered as an unordered HTML list. In the second part, a yii\widgets\LinkPager widget is rendered using the pagination information passed fromthe action. The LinkPager widget displays a list of page buttons. Clicking onany of them will refresh the country data in the corresponding page.
2.5.6 Trying it Out
To see how it works, use your browser to access the following URL:
http://hostname/index.php?r=country/index
You will see a page showing �ve countries. And below the countries, youwill see a pager with four buttons. If you click on the button �2�, you willsee that the page displays another �ve countries in the database. Observemore carefully and you will �nd the URL in the browser changes to

2.6. GENERATING CODE WITH GII 35
http://hostname/index.php?r=country/index&page=2
Behind the scene, yii\data\Pagination is playing the magic.
• Initially, yii\data\Pagination represents the �rst page, which setsthe country query with the clause LIMIT 5 OFFSET 0. As a result, the�rst �ve countries will be fetched and displayed.
• The yii\widgets\LinkPager widget renders the page buttons usingthe URLs created by yii\data\Pagination::createUrl(). The URLswill contain the query parameter page representing di�erent page num-bers.
• If you click the page button �2�, a new request for the route country/
index will be triggered and handled. yii\data\Pagination reads thepage query parameter and sets the current page number 2. The newcountry query will thus have the clause LIMIT 5 OFFSET 5 and returnback the next �ve countries for display.
2.5.7 Summary
In this section, you have learned how to work with a database. You havealso learned how to fetch and display data in pages with the help of yii
\data\Pagination and yii\widgets\LinkPager.In the next section, you will learn how to use the powerful code generation
tool, called Gii, to help you rapidly implement some commonly requiredfeatures, such as the Create-Read-Update-Delete (CRUD) operations aboutthe data in a DB table. As a matter of fact, the code you have just writtencan all be automatically generated using this tool.
2.6 Generating Code with Gii
In this section, we will describe how to use Gii to automatically generate thecode that implements some common features. To achieve this goal, all youneed is just to enter the needed information according to the instructionsshowing on the Gii Web pages.
Through this tutorial, you will learn
• How to enable Gii in your application;
• How to use Gii to generate an Active Record class;
• How to use Gii to generate the code implementing the CRUD opera-tions for a DB table.
• How to customize the code generated by Gii.

36 CHAPTER 2. GETTING STARTED
2.6.1 Starting Gii
Gii is provided by Yii in terms of a module. You can enable Gii by con�guringit in the yii\base\Application::modules property of the application. Inparticular, you may �nd the following code is already given in the config/web
.php �le - the application con�guration,
$config = [ ... ];
if (YII_ENV_DEV) {
$config['bootstrap'][] = 'gii';
$config['modules']['gii'] = 'yii\gii\Module';
}
The above con�guration states that when in development environment, theapplication should include a module named gii which is of class yii\gii
\Module.If you check the entry script web/index.php of your application, you will
�nd the following line which essentially makes YII_ENV_DEV to be true.
defined('YII_ENV') or define('YII_ENV', 'dev');
Therefore, your application has already enabled Gii, and you can access itvia the following URL:
http://hostname/index.php?r=gii
2.6.2 Generating an Active Record Class
To use Gii to generate an Active Record class, select the �Model Generator�and �ll out the form as follows,

2.6. GENERATING CODE WITH GII 37
• Table Name: country
• Model Class: Country
Click on the �Preview� button. You will see models/Country.php is listedin the result. You may click on it to preview its content.
Because in the last section, you have already created the same �le models
/Country.php, if you click the diff button next to the �le name, you will seethe di�erence between the code to be generated and the code that you havealready written.

38 CHAPTER 2. GETTING STARTED
Check the checkbox next to �overwrite� and then click on the �Generate�button. You will see a con�rmation page indicating the code has been suc-cessfully generated and your existing models/Country.php is overwritten withthe newly generated code.
2.6.3 Generating CRUD Code
To create CRUD code, select the �CRUD Generator�. Fill out the form asfollows:
• Model Class: app\models\Country
• Search Model Class: app\models\CountrySearch
• Controller Class: app\controllers\CountryController

2.6. GENERATING CODE WITH GII 39
Click on the �Preview� button. You will see a list of �les to be generated,as shown below.
Make sure you have checked the overwrite checkboxes for both controllers
/CountryController.php and views/country/index.php �les. This is needed be-cause you have already created these �les in the previous section and youwant to have them overwritten to have full CRUD support.
2.6.4 Trying it Out
To see how it works, use your browser to access the following URL:
http://hostname/index.php?r=country/index
You will see a data grid showing the countries in the database table. You maysort the grid or �lter it by entering �lter conditions in the column headers.
For each country displayed in the grid, you may choose to view its detail,update it or delete it. You may also click on the �Create Country� buttonon top of the grid to create a new country.

40 CHAPTER 2. GETTING STARTED
The following is the list of the generated �les in case you want to dig outhow these features are implemented, or if you want to customize them.
• Controller: controllers/CountryController.php

2.7. LOOKING AHEAD 41
• Models: models/Country.php and models/CountrySearch.php
• Views: views/country/*.php
Info: Gii is designed to be a highly customizable and extensiblecode generation tool. Using it wisely can greatly accelerate yourapplication development speed. For more details, please refer tothe Gii section.
2.6.5 Summary
In this section, you have learned how to use Gii to generate the code thatimplements a complete set of CRUD features regarding a database table.
2.7 Looking Ahead
To this end, you have created a complete Yii application, and you havelearned how to implement some commonly needed features, such as gettingdata from users using an HTML form, fetching data from database anddisplaying it in a paginated fashion. You have also learned how to use Giito generate code automatically, which turns programming into a task assimple as just �lling out some forms. In this section, we will summarize theresources about Yii that help you be more productive when using Yii.
• Documentation
� The De�nitive Guide: As the name indicates, the guide preciselyde�nes how Yii should work and gives you a general guidanceabout using Yii. It is the single most important Yii tutorial thatyou should read through before writing any Yii code.
� The Class Reference: This speci�es the usage of every class pro-vided by Yii. It should be mainly used when you are writing codeand want to understand the usage of a particular class, method,property.
� The Wiki Articles: The wiki articles are written by Yii usersbased on their own experiences. Most of them are written likecookbook recipes which show how to solve particular problemsusing Yii. While the quality of these articles may be as good asthe De�nitive Guide, they are useful in that they cover broadertopics and can often provide to you ready-to-use solutions.
� Books

42 CHAPTER 2. GETTING STARTED
• Extensions15: Yii boasts a library of thousands of user-contributedextensions that can be easily plugged into your applications and makeyour application development even faster and easier.
• Community
� Forum16
� GitHub17
� Facebook18
� Twitter19
� LinkedIn20
15http://www.yiiframework.com/extensions/16http://www.yiiframework.com/forum/17https://github.com/yiisoft/yii218https://www.facebook.com/groups/yiitalk/19https://twitter.com/yiiframework20https://www.linkedin.com/groups/yii-framework-1483367

Chapter 3
Application Structure
3.1 Overview
Yii applications are organized according to the model-view-controller (MVC)1
design pattern. Models represent data, business logic and rules; views areoutput representation of models; and controllers take input and convert itto commands for models and views.
Besides MVC, Yii applications also have the following entities:
• entry scripts: they are PHP scripts that are directly accessible by endusers. They are responsible for starting a request handling cycle.
• applications: they are globally accessible objects that manage applica-tion components and coordinate them to ful�ll requests.
• application components: they are objects registered with applicationsand provide various services for ful�lling requests.
• modules: they are self-contained packages that contain complete MVCby themselves. An application can be organized in terms of multiplemodules.
• �lters: they represent code that need to be invoked before and afterthe actual handling of each request by controllers.
• widgets: they are objects that can be embedded in views. They maycontain controller logic and can be reused in di�erent views.
The following diagram shows the static structure of an application:
1http://wikipedia.org/wiki/Model-view-controller
43

44 CHAPTER 3. APPLICATION STRUCTURE
3.2 Entry Scripts
Entry scripts are the �rst chain in the application bootstrapping process.An application (either Web application or console application) has a singleentry script. End users make requests to entry scripts which instantiateapplication instances and forward the requests to them.
Entry scripts for Web applications must be stored under Web accessibledirectories so that they can be accessed by end users. They are often namedas index.php, but can also use any other names, provided Web servers canlocate them.
Entry scripts for console applications are usually stored under the basepath of applications and are named as yii (with the .php su�x). They shouldbe made executable so that users can run console applications through thecommand ./yii <route> [arguments] [options].
Entry scripts mainly do the following work:
• De�ne global constants;
• Register Composer autoloader2;
• Include the Yii class �le;
2http://getcomposer.org/doc/01-basic-usage.md#autoloading

3.2. ENTRY SCRIPTS 45
• Load application con�guration;
• Create and con�gure an application instance;
• Call yii\base\Application::run() to process the incoming request.
3.2.1 Web Applications
The following is the code in the entry script for the Basic Web ApplicationTemplate.
<?php
defined('YII_DEBUG') or define('YII_DEBUG', true);
defined('YII_ENV') or define('YII_ENV', 'dev');
// register Composer autoloader
require(__DIR__ . '/../vendor/autoload.php');
// include Yii class file
require(__DIR__ . '/../vendor/yiisoft/yii2/Yii.php');
// load application configuration
$config = require(__DIR__ . '/../config/web.php');
// create, configure and run application
(new yii\web\Application($config))->run();
3.2.2 Console Applications
Similarly, the following is the code for the entry script of a console applica-tion:
#!/usr/bin/env php
<?php
/**
* Yii console bootstrap file.
*
* @link http://www.yiiframework.com/
* @copyright Copyright (c) 2008 Yii Software LLC
* @license http://www.yiiframework.com/license/
*/
defined('YII_DEBUG') or define('YII_DEBUG', true);
// fcgi doesn't have STDIN and STDOUT defined by default
defined('STDIN') or define('STDIN', fopen('php://stdin', 'r'));
defined('STDOUT') or define('STDOUT', fopen('php://stdout', 'w'));
// register Composer autoloader
require(__DIR__ . '/vendor/autoload.php');
// load application configuration

46 CHAPTER 3. APPLICATION STRUCTURE
require(__DIR__ . '/vendor/yiisoft/yii2/Yii.php');
// load application configuration
$config = require(__DIR__ . '/config/console.php');
$application = new yii\console\Application($config);
$exitCode = $application->run();
exit($exitCode);
3.2.3 De�ning Constants
Entry scripts are the best place for de�ning global constants. Yii supportsthe following three constants:
• YII_DEBUG: speci�es whether the application is running in debug mode.When in debug mode, an application will keep more log information,and will reveal detailed error call stacks if exceptions are thrown. Forthis reason, debug mode should be used mainly during development.The default value of YII_DEBUG is false.
• YII_ENV: speci�es which environment the application is running in. Thishas been described in more detail in the Con�gurations section. Thedefault value of YII_ENV is 'prod', meaning the application is runningin production environment.
• YII_ENABLE_ERROR_HANDLER: speci�es whether to enable the error handlerprovided by Yii. The default value of this constant is true.
When de�ning a constant, we often use the code like the following:
defined('YII_DEBUG') or define('YII_DEBUG', true);
which is equivalent to the following code:
if (!defined('YII_DEBUG')) {
define('YII_DEBUG', true);
}
Clearly the former is more succinct and easier to understand.
Constant de�nitions should be done at the very beginning of an entryscript so that they can take e�ect when other PHP �les are being included.
3.3 Applications
Applications are objects that govern the overall structure and lifecycle of Yiiapplication systems. Each Yii application system contains a single appli-cation object which is created in the entry script and is globally accessiblethrough the expression \Yii::$app.

3.3. APPLICATIONS 47
Info: Depending on the context, when we say �an application�, itcan mean either an application object or an application system.
There are two types of applications: yii\web\Application and yii\console\Application. As the names indicate, the former mainly handles Web re-quests while the latter console command requests.
3.3.1 Application Con�gurations
When an entry script creates an application, it will load a con�guration andapply it to the application, like the following:
require(__DIR__ . '/../vendor/autoload.php');
require(__DIR__ . '/../vendor/yiisoft/yii2/Yii.php');
// load application configuration
$config = require(__DIR__ . '/../config/web.php');
// instantiate and configure the application
(new yii\web\Application($config))->run();
Like normal con�gurations, application con�gurations specify how to ini-tialize properties of application objects. Because application con�gurationsare often very complex, they usually are kept in con�guration �les, like theweb.php �le in the above example.
3.3.2 Application Properties
There are many important application properties that you should con�gurein application con�gurations. These properties typically describe the envi-ronment that applications are running in. For example, applications needto know how to load controllers, where to store temporary �les, etc. In thefollowing, we will summarize these properties.
Required Properties
In any application, you should at least con�gure two properties: yii\base
\Application::id and yii\base\Application::basePath.
yii\base\Application::id The yii\base\Application::id propertyspeci�es a unique ID that di�erentiates an application from others. It ismainly used programmatically. Although not a requirement, for best inter-operability it is recommended that you use alphanumeric characters onlywhen specifying an application ID.

48 CHAPTER 3. APPLICATION STRUCTURE
yii\base\Application::basePath The yii\base\Application::basePathproperty speci�es the root directory of an application. It is the directory thatcontains all protected source code of an application system. Under this direc-tory, you normally will see sub-directories such as models, views, controllers,which contain source code corresponding to the MVC pattern.
You may con�gure the yii\base\Application::basePath property us-ing a directory path or a path alias. In both forms, the corresponding direc-tory must exist, or an exception will be thrown. The path will be normalizedby calling the realpath() function.
The yii\base\Application::basePath property is often used to deriveother important paths (e.g. the runtime path). For this reason, a path aliasnamed @app is prede�ned to represent this path. Derived paths may then beformed using this alias (e.g. @app/runtime to refer to the runtime directory).
Important Properties
The properties described in this subsection often need to be con�gured be-cause they di�er across di�erent applications.
yii\base\Application::aliases This property allows you to de�ne aset of aliases in terms of an array. The array keys are alias names, and thearray values are the corresponding path de�nitions. For example,
[
'aliases' => [
'@name1' => 'path/to/path1',
'@name2' => 'path/to/path2',
],
]
This property is provided such that you can de�ne aliases in terms of appli-cation con�gurations instead of the method calls Yii::setAlias().
yii\base\Application::bootstrap This is a very useful property. Itallows you to specify an array of components that should be run duringthe application yii\base\Application::bootstrap(). For example, if youwant a module to customize the URL rules, you may list its ID as an elementin this property.
Each component listed in this property may be speci�ed in one of thefollowing formats:
• an application component ID as speci�ed via components.
• a module ID as speci�ed via modules.
• a class name.
• a con�guration array.

3.3. APPLICATIONS 49
For example,
[
'bootstrap' => [
// an application component ID or module ID
'demo',
// a class name
'app\components\TrafficMonitor',
// a configuration array
[
'class' => 'app\components\Profiler',
'level' => 3,
]
],
]
During the bootstrapping process, each component will be instantiated. Ifthe component class implements yii\base\BootstrapInterface, its yii
\base\BootstrapInterface::bootstrap() method will be also be called.Another practical example is in the application con�guration for the Ba-
sic Application Template, where the debug and gii modules are con�guredas bootstrap components when the application is running in developmentenvironment,
if (YII_ENV_DEV) {
// configuration adjustments for 'dev' environment
$config['bootstrap'][] = 'debug';
$config['modules']['debug'] = 'yii\debug\Module';
$config['bootstrap'][] = 'gii';
$config['modules']['gii'] = 'yii\gii\Module';
}
Note: Putting too many components in bootstrap will degradethe performance of your application because for each request,the same set of components need to be run. So use bootstrapcomponents judiciously.
yii\web\Application::catchAll This property is supported by yii\web
\Application only. It speci�es a controller action which should handle alluser requests. This is mainly used when the application is in maintenancemode and needs to handle all incoming requests via a single action.
The con�guration is an array whose �rst element speci�es the route ofthe action. The rest of the array elements (key-value pairs) specify theparameters to be bound to the action. For example,
[
'catchAll' => [
'offline/notice',

50 CHAPTER 3. APPLICATION STRUCTURE
'param1' => 'value1',
'param2' => 'value2',
],
]
yii\base\Application::components This is the single most importantproperty. It allows you to register a list of named components called appli-cation components that you can use in other places. For example,
[
'components' => [
'cache' => [
'class' => 'yii\caching\FileCache',
],
'user' => [
'identityClass' => 'app\models\User',
'enableAutoLogin' => true,
],
],
]
Each application component is speci�ed as a key-value pair in the array. Thekey represents the application ID, while the value represents the componentclass name or con�guration.
You can register any component with an application, and the componentcan later be accessed globally using the expression \Yii::$app->ComponentID.
Please read the Application Components section for details.
yii\base\Application::controllerMap This property allows you to mapa controller ID to an arbitrary controller class. By default, Yii maps con-troller IDs to controller classes based on a convention (e.g. the ID post wouldbe mapped to app\controllers\PostController). By con�guring this property,you can break the convention for speci�c controllers. In the following exam-ple, account will be mapped to app\controllers\UserController, while article
will be mapped to app\controllers\PostController.
[
'controllerMap' => [
[
'account' => 'app\controllers\UserController',
'article' => [
'class' => 'app\controllers\PostController',
'enableCsrfValidation' => false,
],
],
],
]
The array keys of this property represent the controller IDs, while the arrayvalues represent the corresponding controller class names or con�gurations.

3.3. APPLICATIONS 51
yii\base\Application::controllerNamespace This property speci�esthe default namespace under which controller classes should be located. Itdefaults to app\controllers. If a controller ID is post, by convention the corre-sponding controller class name (without namespace) would be PostController,and the fully quali�ed class name would be app\controllers\PostController.
Controller classes may also be located under sub-directories of the direc-tory corresponding to this namespace. For example, given a controller IDadmin/post, the corresponding fully quali�ed controller class would be app\
controllers\admin\PostController.
It is important that the fully quali�ed controller classes should be au-toloadable and the actual namespace of your controller classes match thevalue of this property. Otherwise, you will receive �Page Not Found� errorwhen accessing the application.
In case you want to break the convention as described above, you maycon�gure the controllerMap property.
yii\base\Application::language This property speci�es the languagein which the application should display content to end users. The defaultvalue of this property is en, meaning English. You should con�gure thisproperty if your application needs to support multiple languages.
The value of this property determines various internationalization as-pects, including message translation, date formatting, number formatting,etc. For example, the yii\jui\DatePicker widget will use this propertyvalue by default to determine in which language the calendar should be dis-played and how should the date be formatted.
It is recommended that you specify a language in terms of an IETFlanguage tag3. For example, en stands for English, while en-US stands forEnglish (United States).
More details about this property can be found in the Internationalizationsection.
yii\base\Application::modules This property speci�es the modulesthat the application contains.
The property takes an array of module classes or con�gurations with thearray keys being the module IDs. For example,
[
'modules' => [
// a "booking" module specified with the module class
'booking' => 'app\modules\booking\BookingModule',
// a "comment" module specified with a configuration array
'comment' => [
'class' => 'app\modules\comment\CommentModule',
3http://en.wikipedia.org/wiki/IETF_language_tag

52 CHAPTER 3. APPLICATION STRUCTURE
'db' => 'db',
],
],
]
Please refer to the Modules section for more details.
yii\base\Application::name This property speci�es the application namethat may be displayed to end users. Unlike the yii\base\Application::
id property which should take a unique value, the value of this property ismainly for display purpose and does not need to be unique.
You do not always need to con�gure this property if none of your codeis using it.
yii\base\Application::params This property speci�es an array of glob-ally accessible application parameters. Instead of using hardcoded numbersand strings everywhere in your code, it is a good practice to de�ne them asapplication parameters in a single place and use the parameters in placeswhere needed. For example, you may de�ne the thumbnail image size as aparameter like the following:
[
'params' => [
'thumbnail.size' => [128, 128],
],
]
Then in your code where you need to use the size value, you can simply usethe code like the following:
$size = \Yii::$app->params['thumbnail.size'];
$width = \Yii::$app->params['thumbnail.size'][0];
Later if you decide to change the thumbnail size, you only need to modify itin the application con�guration without touching any dependent code.
yii\base\Application::sourceLanguage This property speci�es the lan-guage that the application code is written in. The default value is 'en-US',meaning English (United States). You should con�gure this property if thetext content in your code is not in English.
Like the language property, you should con�gure this property in termsof an IETF language tag4. For example, en stands for English, while en-US
stands for English (United States).
More details about this property can be found in the Internationalizationsection.
4http://en.wikipedia.org/wiki/IETF_language_tag

3.3. APPLICATIONS 53
yii\base\Application::timeZone This property is provided as an alter-native way of setting the default time zone of PHP runtime. By con�guringthis property, you are essentially calling the PHP function date_default_timezone_set()5.For example,
[
'timeZone' => 'America/Los_Angeles',
]
yii\base\Application::version This property speci�es the version ofthe application. It defaults to '1.0'. You do not always need to con�gurethis property if none of your code is using it.
Useful Properties
The properties described in this subsection are not commonly con�guredbecause their default values stipulate common conventions. However, youmay still con�gure them in case you want to break the conventions.
yii\base\Application::charset This property speci�es the charset thatthe application uses. The default value is 'UTF-8' which should be kept as isfor most applications unless you are working with some legacy systems thatuse a lot of non-unicode data.
yii\base\Application::defaultRoute This property speci�es the routethat an application should use when a request does not specify one. Theroute may consist of child module ID, controller ID, and/or action ID. Forexample, help, post/create, admin/post/create. If action ID is not given, it willtake the default value as speci�ed in yii\base\Controller::defaultAction.
For [yii\web\Application|Web applications], the default value of thisproperty is 'site', which means the SiteController controller and its defaultaction should be used. As a result, if you access the application withoutspecifying a route, it will show the result of app\controllers\SiteController::actionIndex().
For [yii\console\Application|console applications], the default value is '
help', which means the core command yii\console\controllers\HelpController::actionIndex() should be used. As a result, if you run the command yii
without providing any arguments, it will display the help information.
yii\base\Application::extensions This property speci�es the list ofextensions that are installed and used by the application. By default, itwill take the array returned by the �le @vendor/yiisoft/extensions.php. Theextensions.php �le is generated and maintained automatically when you use
5http://php.net/manual/en/function.date-default-timezone-set.php

54 CHAPTER 3. APPLICATION STRUCTURE
Composer6 to install extensions. So in most cases, you do not need to con-�gure this property.
In the special case when you want to maintain extensions manually, youmay con�gure this property like the following:
[
'extensions' => [
[
'name' => 'extension name',
'version' => 'version number',
'bootstrap' => 'BootstrapClassName', // optional, may also be a
configuration array
'alias' => [ // optional
'@alias1' => 'to/path1',
'@alias2' => 'to/path2',
],
],
// ... more extensions like the above ...
],
]
As you can see, the property takes an array of extension speci�cations. Eachextension is speci�ed with an array consisting of name and version elements. Ifan extension needs to run during the bootstrap property, a bootstrap elementmay be speci�ed with a bootstrap class name or a con�guration array. Anextension may also de�ne a few aliases.
yii\base\Application::layout This property speci�es the name of thedefault layout that should be used when rendering a view. The default valueis 'main', meaning the layout �le main.php under the layout path should beused. If both of the layout path and the view path are taking the defaultvalues, the default layout �le can be represented as the path alias @app/views
/layouts/main.php.You may con�gure this property to be false if you want to disable layout
by default, although this is very rare.
yii\base\Application::layoutPath This property speci�es the path wherelayout �les should be looked for. The default value is the layouts sub-directory under the view path. If the view path is taking its default value, thedefault layout path can be represented as the path alias @app/views/layouts.
You may con�gure it as a directory or a path alias.
yii\base\Application::runtimePath This property speci�es the pathwhere temporary �les, such as log �les, cache �les, can be generated. Thedefault value is the directory represented by the alias @app/runtime.
6http://getcomposer.org

3.3. APPLICATIONS 55
You may con�gure it as a directory or a path alias. Note that the runtimepath must be writable by the process running the application. And the pathshould be protected from being accessed by end users because the temporary�les under it may contain sensitive information.
To simplify accessing to this path, Yii has prede�ned a path alias named@runtime for it.
yii\base\Application::viewPath This property speci�es the root direc-tory where view �les are located. The default value is the directory repre-sented by the alias @app/views. You may con�gure it as a directory or a pathalias.
yii\base\Application::vendorPath This property speci�es the vendordirectory managed by Composer7. It contains all third party libraries usedby your application, including the Yii framework. The default value is thedirectory represented by the alias @app/vendor.
You may con�gure this property as a directory or a path alias. When youmodify this property, make sure you also adjust the Composer con�gurationaccordingly.
To simplify accessing to this path, Yii has prede�ned a path alias named@vendor for it.
yii\console\Application::enableCoreCommands This property is sup-ported by yii\console\Application only. It speci�es whether the corecommands included in the Yii release should be enabled. The default valueis true.
3.3.3 Application Events
An application triggers several events during the lifecycle of handling anrequest. You may attach event handlers to these events in application con-�gurations like the following,
[
'on beforeRequest' => function ($event) {
// ...
},
]
The use of the on eventName syntax is described in the Con�gurations section.
Alternatively, you may attach event handlers during the bootstrappingprocess process after the application instance is created. For example,
\Yii::$app->on(\yii\base\Application::EVENT_BEFORE_REQUEST, function ($event
) {
7http://getcomposer.org

56 CHAPTER 3. APPLICATION STRUCTURE
// ...
});
yii\base\Application::EVENT_BEFORE_REQUEST
This event is triggered before an application handles a request. The actualevent name is beforeRequest.
When this event is triggered, the application instance has been con�guredand initialized. So it is a good place to insert your custom code via theevent mechanism to intercept the request handling process. For example, inthe event handler, you may dynamically set the yii\base\Application::
language property based on some parameters.
yii\base\Application::EVENT_BEFORE_REQUEST
This event is triggered after an application �nishes handling a request butbefore sending the response. The actual event name is afterRequest.
When this event is triggered, the request handling is completed and youmay take this chance to do some postprocessing of the request or customizethe response.
Note that the yii\web\Response component also triggers some eventswhile it is sending out response content to end users. Those events aretriggered after this event.
yii\base\Application::EVENT_BEFORE_REQUEST
This event is triggered before running every controller action. The actualevent name is beforeAction.
The event parameter is an instance of yii\base\ActionEvent. An eventhandler may set the yii\base\ActionEvent::isValid property to be false
to stop running the action. For example,
[
'on beforeAction' => function ($event) {
if (some condition) {
$event->isValid = false;
} else {
}
},
]
Note that the same beforeAction event is also triggered by modules and[controllers)(structure-controllers.md). Application objects are the �rst onestriggering this event, followed by modules (if any), and �nally controllers. Ifan event handler sets yii\base\ActionEvent::isValid to be false, all thefollowing events will NOT be triggered.

3.3. APPLICATIONS 57
yii\base\Application::EVENT_BEFORE_REQUEST
This event is triggered after running every controller action. The actualevent name is afterAction.
The event parameter is an instance of yii\base\ActionEvent. Throughthe yii\base\ActionEvent::result property, an event handler may accessor modify the action result. For example,
[
'on afterAction' => function ($event) {
if (some condition) {
// modify $event->result
} else {
}
},
]
Note that the same afterAction event is also triggered by modules and [controllers)(structure-controllers.md). These objects trigger this event in the reverse order as forthat of beforeAction. That is, controllers are the �rst objects triggering thisevent, followed by modules (if any), and �nally applications.
3.3.4 Application Lifecycle
When an entry script is being executed to handle a request, an applicationwill undergo the following lifecycle:
1. The entry script loads the application con�guration as an array.
2. The entry script creates a new instance of the application:
• yii\base\Application::preInit() is called, which con�guressome high priority application properties, such as yii\base\Application::basePath.
• Register the yii\base\Application::errorHandler.
• Con�gure application properties.
• yii\base\Application::init() is called which further calls yii\base\Application::bootstrap() to run bootstrap components.
3. The entry script calls yii\base\Application::run() to run the ap-plication:
• Trigger the yii\base\Application::EVENT_BEFORE_REQUEST event.
• Handle the request: resolve the request into a route and the associ-ated parameters; create the module, controller and action objectsas speci�ed by the route; and run the action.
• Trigger the yii\base\Application::EVENT_AFTER_REQUEST event.

58 CHAPTER 3. APPLICATION STRUCTURE
• Send response to the end user.
4. The entry script receives the exit status from the application and com-pletes the request processing.
3.4 Application Components
Applications are service locators. They host a set of the so-called applica-
tion components that provide di�erent services for processing requests. Forexample, the urlManager component is responsible for routing Web requeststo appropriate controllers; the db component provides DB-related services;and so on.
Each application component has an ID that uniquely identi�es itselfamong other application components in the same application. You can accessan application component through the expression
\Yii::$app->ComponentID
For example, you can use \Yii::$app->db to get the yii\db\Connection, and\Yii::$app->cache to get the yii\caching\Cache registered with the appli-cation.
Application components can be any objects. You can register them bycon�guring the yii\base\Application::components property in applica-tion con�gurations. For example,
[
'components' => [
// register "cache" component using a class name
'cache' => 'yii\caching\ApcCache',
// register "db" component using a configuration array
'db' => [
'class' => 'yii\db\Connection',
'dsn' => 'mysql:host=localhost;dbname=demo',
'username' => 'root',
'password' => '',
],
// register "search" component using an anonymous function
'search' => function () {
return new app\components\SolrService;
},
],
]
Info: While you can register as many application componentsas you want, you should do this judiciously. Application com-ponents are like global variables. Using too many application

3.4. APPLICATION COMPONENTS 59
components can potentially make your code harder to test andmaintain. In many cases, you can simply create a local compo-nent and use it when needed.
3.4.1 Core Application Components
Yii de�nes a set of core application components with �xed IDs and defaultcon�gurations. For example, the yii\web\Application::request compo-nent is used to collect information about a user request and resolve it intoa route; the yii\base\Application::db component represents a databaseconnection through which you can perform database queries. It is with helpof these core application components that Yii applications are able to handleuser requests.
Below is the list of the prede�ned core application components. You maycon�gure and customize them like you do with normal application compo-nents. When you are con�guring a core application component, if you donot specify its class, the default one will be used.
• yii\web\AssetManager: manages asset bundles and asset publishing.Please refer to the Managing Assets section for more details.
• yii\db\Connection: represents a database connection through whichyou can perform DB queries. Note that when you con�gure this com-ponent, you must specify the component class as well as other requiredcomponent properties, such as yii\db\Connection::dsn. Please referto the Data Access Objects section for more details.
• yii\base\Application::errorHandler: handles PHP errors and ex-ceptions. Please refer to the Handling Errors section for more details.
• yii\base\Formatter: formats data when they are displayed to endusers. For example, a number may be displayed with thousand separa-tor, a date may be formatted in long format. Please refer to the DataFormatting section for more details.
• yii\i18n\I18N: supports message translation and formatting. Pleaserefer to the Internationalization section for more details.
• yii\log\Dispatcher: manages log targets. Please refer to the Loggingsection for more details.
• yii\swiftmailer\Mailer: supports mail composing and sending. Pleaserefer to the Mailing section for more details.
• yii\base\Application::response: represents the response being sentto end users. Please refer to the Responses section for more details.

60 CHAPTER 3. APPLICATION STRUCTURE
• yii\base\Application::request: represents the request received fromend users. Please refer to the Requests section for more details.
• yii\web\Session: represents the session information. This compo-nent is only available in yii\web\Application. Please refer to theSessions and Cookies section for more details.
• yii\web\UrlManager: supports URL parsing and creation. Please re-fer to the URL Parsing and Generation section for more details.
• yii\web\User: represents the user authentication information. Thiscomponent is only available in yii\web\Application Please refer tothe Authentication section for more details.
• yii\web\View: supports view rendering. Please refer to the Viewssection for more details.
3.5 Controllers
Controllers are part of the MVC8 architecture. They are objects responsiblefor processing requests and generating responses. In particular, after takingover the control from applications, controllers will analyze incoming requestdata, pass them to models, inject model results into views, and �nally gen-erate outgoing responses.
Controllers are composed by actions which are the most basic units thatend users can address and request for execution. A controller can have oneor multiple actions.
The following example shows a post controller with two actions: view andcreate:
namespace app\controllers;
use Yii;
use app\models\Post;
use yii\web\Controller;
use yii\web\NotFoundHttpException;
class PostController extends Controller
{
public function actionView($id)
{
$model = Post::findOne($id);
if ($model === null) {
throw new NotFoundHttpException;
}
8http://en.wikipedia.org/wiki/Model%E2%80%93view%E2%80%93controller

3.5. CONTROLLERS 61
return $this->render('view', [
'model' => $model,
]);
}
public function actionCreate()
{
$model = new Post;
if ($model->load(Yii::$app->request->post()) && $model->save()) {
return $this->redirect(['view', 'id' => $model->id]);
} else {
return $this->render('create', [
'model' => $model,
]);
}
}
}
In the view action (de�ned by the actionView() method), the code �rst loadsthe model according to the requested model ID; If the model is loaded suc-cessfully, it will display it using a view named view. Otherwise, it will throwan exception.
In the create action (de�ned by the actionCreate() method), the code issimilar. It �rst tries to populate the model using the request data and savethe model. If both succeed it will redirect the browser to the view actionwith the ID of the newly created model. Otherwise it will display the create
view through which users can provide the needed input.
3.5.1 Routes
End users address actions through the so-called routes. A route is a stringthat consists of the following parts:
• a module ID: this exists only if the controller belongs to a non-applicationmodule;
• a controller ID: a string that uniquely identi�es the controller amongall controllers within the same application (or the same module if thecontroller belongs to a module);
• an action ID: a string t hat uniquely identi�es the action among allactions within the same controller.
Routes take the following format:
ControllerID/ActionID
or the following format if the controller belongs to a module:
ModuleID/ControllerID/ActionID

62 CHAPTER 3. APPLICATION STRUCTURE
So if a user requests with the URL http://hostname/index.php?r=site/index,the index action in the site controller will be executed. For more details howroutes are resolved into actions, please refer to the Routing section.
3.5.2 Creating Controllers
In yii\web\Application, controllers should extend from yii\web\Controller
or its child classes. Similarly in yii\console\Application, controllersshould extend from yii\console\Controller or its child classes. The fol-lowing code de�nes a site controller:
namespace app\controllers;
use yii\web\Controller;
class SiteController extends Controller
{
}
Controller IDs
Usually, a controller is designed to handle the requests regarding a particulartype of resource. For this reason, controller IDs are often nouns referring tothe types of the resources that they are handling. For example, you may usearticle as the ID of a controller that handles article data.
By default, controller IDs should contain these characters only: Englishletters in lower case, digits, underscores, dashes and forward slashes. Forexample, article, post-comment, admin/post2-comment are all valid controllerIDs, while article?, PostComment, admin\post are not.
The dashes in a controller ID are used to separate words, while the for-ward slashes to organize controllers in sub-directories.
Controller Class Naming
Controller class names can be derived from controller IDs according to thefollowing rules:
• Turn the �rst letter in each word separated by dashes into upper case.Note that if the controller ID contains slashes, this rule only applies tothe part after the last slash in the ID.
• Remove dashes and replace any forward slashes with backward slashes.
• Append the su�x Controller.
• And prepend the yii\base\Application::controllerNamespace.

3.5. CONTROLLERS 63
The followings are some examples, assuming the yii\base\Application::
controllerNamespace takes the default value app\controllers:
• article derives app\controllers\ArticleController;
• post-comment derives app\controllers\PostCommentController;
• admin/post2-comment derives app\controllers\admin\Post2CommentController.
Controller classes must be autoloadable. For this reason, in the above ex-amples, the article controller class should be saved in the �le whose aliasis @app/controllers/ArticleController.php; while the admin/post2-comment con-troller should be in @app/controllers/admin/Post2CommentController.php.
Info: The last example admin/post2-comment shows how you canput a controller under a sub-directory of the yii\base\Application::controllerNamespace. This is useful when you want to orga-nize your controllers into several categories and you do not wantto use modules.
Controller Map
You can con�gure yii\base\Application::controllerMap to overcome theconstraints of the controller IDs and class names described above. This ismainly useful when you are using some third-party controllers which you donot control over their class names.
You may con�gure yii\base\Application::controllerMap in the ap-plication con�guration like the following:
[
'controllerMap' => [
[
// declares "account" controller using a class name
'account' => 'app\controllers\UserController',
// declares "article" controller using a configuration array
'article' => [
'class' => 'app\controllers\PostController',
'enableCsrfValidation' => false,
],
],
],
]
Default Controller
Each application has a default controller speci�ed via the yii\base\Application::defaultRoute property. When a request does not specify a route, the

64 CHAPTER 3. APPLICATION STRUCTURE
route speci�ed by this property will be used. For yii\web\Application, itsvalue is 'site', while for yii\console\Application, it is help. Therefore, ifa URL is http://hostname/index.php, it means the site controller will handlethe request.
You may change the default controller with the following applicationcon�guration:
[
'defaultRoute' => 'main',
]
3.5.3 Creating Actions
Creating actions can be as simple as de�ning the so-called action methods ina controller class. An action method is a public method whose name startswith the word action. The return value of an action method represents theresponse data to be sent to end users. The following code de�nes two actionsindex and hello-world:
namespace app\controllers;
use yii\web\Controller;
class SiteController extends Controller
{
public function actionIndex()
{
return $this->render('index');
}
public function actionHelloWorld()
{
return 'Hello World';
}
}
Action IDs
An action is often designed to perform a particular manipulation about aresource. For this reason, action IDs are usually verbs, such as view, update,etc.
By default, action IDs should contain these characters only: English let-ters in lower case, digits, underscores and dashes. The dashes in an actionIDare used to separate words. For example, view, update2, comment-post are allvalid action IDs, while view?, Update are not.
You can create actions in two ways: inline actions and standalone ac-tions. An inline action is de�ned as a method in the controller class, whilea standalone action is a class extending yii\base\Action or its child class.

3.5. CONTROLLERS 65
Inline actions take less e�ort to create and are often preferred if you haveno intention to reuse these actions. Standalone actions, on the other hand,are mainly created to be used in di�erent controllers or be redistributed asextensions.
Inline Actions
Inline actions refer to the actions that are de�ned in terms of action methodsas we just described.
The names of the action methods are derived from action IDs accordingto the following criteria:
• Turn the �rst letter in each word of the action ID into upper case;
• Remove dashes;
• Prepend the pre�x action.
For example, index becomes actionIndex, and hello-world becomes actionHelloWorld.
Note: The names of the action methods are case-sensitive. If youhave a method named ActionIndex, it will not be considered as anaction method, and as a result, the request for the index actionwill result in an exception. Also note that action methods mustbe public. A private or protected method does NOT de�ne aninline action.
Inline actions are the most commonly de�ned actions because they take littlee�ort to create. However, if you plan to reuse the same action in di�erentplaces, or if you want to redistribute an action, you should consider de�ningit as a standalone action.
Standalone Actions
Standalone actions are de�ned in terms of action classes extending yii\base\Action or its child classes. For example, in the Yii releases, there are yii
\web\ViewAction and yii\web\ErrorAction, both of which are standaloneactions.
To use a standalone action, you should declare it in the action map byoverriding the yii\base\Controller::actions() method in your controllerclasses like the following:
public function actions()
{
return [
// declares "error" action using a class name

66 CHAPTER 3. APPLICATION STRUCTURE
'error' => 'yii\web\ErrorAction',
// declares "view" action using a configuration array
'view' => [
'class' => 'yii\web\ViewAction',
'viewPrefix' => '',
],
];
}
As you can see, the actions() method should return an array whose keys areaction IDs and values the corresponding action class names or con�gurations.Unlike inline actions, action IDs for standalone actions can contain arbitrarycharacters, as long as they are declared in the actions() method.
To create a standalone action class, you should extend yii\base\Action
or its child class, and implement a public method named run(). The role ofthe run() method is similar to that of an action method. For example,
<?php
namespace app\components;
use yii\base\Action;
class HelloWorldAction extends Action
{
public function run()
{
return "Hello World";
}
}
Action Results
The return value of an action method or the run() method of a standaloneaction is signi�cant. It stands for the result of the corresponding action.
The return value can be a response object which will be sent to as theresponse to end users.
• For yii\web\Application, the return value can also be some arbi-trary data which will be assigned to yii\web\Response::data and befurther converted into a string representing the response body.
• For [[yii\console\Application|console applications], the return valuecan also be an integer representing the yii\console\Response::exitStatusof the command execution.
In the examples shown above, the action results are all strings which will betreated as the response body to be sent to end users. The following exampleshows how an action can redirect the user browser to a new URL by returning

3.5. CONTROLLERS 67
a response object (because the yii\web\Controller::redirect() methodreturns a response object):
public function actionForward()
{
// redirect the user browser to http://example.com
return $this->redirect('http://example.com');
}
Action Parameters
The action methods for inline actions and the run() methods for standaloneactions can take parameters, called action parameters. Their values are ob-tained from requests. For yii\web\Application, the value of each actionparameter is retrieved from $_GET using the parameter name as the key;for yii\console\Application, they correspond to the command line argu-ments.
In the following example, the view action (an inline action) has declaredtwo parameters: $id and $version.
namespace app\controllers;
use yii\web\Controller;
class PostController extends Controller
{
public function actionView($id, $version = null)
{
// ...
}
}
The action parameters will be populated as follows for di�erent requests:
• http://hostname/index.php?r=post/view&id=123: the $id parameter will be�lled with the value '123', while $version is still null because there isno version query parameter.
• http://hostname/index.php?r=post/view&id=123&version=2: the $id and $version
parameters will be �lled with '123' and '2', respectively.
• http://hostname/index.php?r=post/view: a yii\web\BadRequestHttpExceptionexception will be thrown because the required $id parameter is not pro-vided in the request.
• http://hostname/index.php?r=post/view&id[]=123: a yii\web\BadRequestHttpExceptionexception will be thrown because $id parameter is receiving an unex-pected array value ['123'].
If you want an action parameter to accept array values, you should type-hintit with array, like the following:

68 CHAPTER 3. APPLICATION STRUCTURE
public function actionView(array $id, $version = null)
{
// ...
}
Now if the request is http://hostname/index.php?r=post/view&id[]=123, the $id
parameter will take the value of ['123']. If the request is http://hostname
/index.php?r=post/view&id=123, the $id parameter will still receive the samearray value because the scalar value '123' will be automatically turned intoan array.
The above examples mainly show how action parameters work for Webapplications. For console applications, please refer to the Console Commandssection for more details.
Default Action
Each controller has a default action speci�ed via the yii\base\Controller::defaultAction property. When a route contains the controller ID only,it implies that the default action of the speci�ed controller is requested.
By default, the default action is set as index. If you want to change thedefault value, simply override this property in the controller class, like thefollowing:
namespace app\controllers;
use yii\web\Controller;
class SiteController extends Controller
{
public $defaultAction = 'home';
public function actionHome()
{
return $this->render('home');
}
}
3.5.4 Controller Lifecycle
When processing a request, an application will create a controller based onthe requested route. The controller will then undergo the following lifecycleto ful�ll the request:
1. The yii\base\Controller::init() method is called after the con-troller is created and con�gured.
2. The controller creates an action object based on the requested actionID:

3.5. CONTROLLERS 69
• If the action ID is not speci�ed, the yii\base\Controller::
defaultAction will be used.
• If the action ID is found in the yii\base\Controller::actions(),a standalone action will be created;
• If the action ID is found to match an action method, an inlineaction will be created;
• Otherwise an yii\base\InvalidRouteException exception willbe thrown.
3. The controller sequentially calls the beforeAction() method of the ap-plication, the module (if the controller belongs to a module) and thecontroller.
• If one of the calls returns false, the rest of the uncalled beforeAction
() will be skipped and the action execution will be cancelled.
• By default, each beforeAction()method call will trigger a beforeAction
event to which you can attach a handler.
4. The controller runs the action:
• The action parameters will be analyzed and populated from therequest data;
5. The controller sequentially calls the afterAction() method of the con-troller, the module (if the controller belongs to a module) and theapplication.
• By default, each afterAction()method call will trigger an afterAction
event to which you can attach a handler.
6. The application will take the action result and assign it to the response.
3.5.5 Best Practices
In a well-designed application, controllers are often very thin with each actioncontaining only a few lines of code. If your controller is rather complicated,it usually indicates that you should refactor it and move some code to otherclasses.
In summary, controllers
• may access the request data;
• may call methods of models and other service components with requestdata;
• may use views to compose responses;

70 CHAPTER 3. APPLICATION STRUCTURE
• should NOT process the request data - this should be done in models;
• should avoid embedding HTML or other presentational code - this isbetter done in views.
3.6 Models
Models are part of the MVC9 architecture. They are objects representingbusiness data, rules and logic.
You can create model classes by extending yii\base\Model or its childclasses. The base class yii\base\Model supports many useful features:
• Attributes: represent the business data and can be accessed like normalobject properties or array elements;
• Attribute labels: specify the display labels for attributes;
• Massive assignment: supports populating multiple attributes in a sin-gle step;
• Validation rules: ensures input data based on the declared validationrules;
• Data Exporting: allows model data to be exported in terms of arrayswith customizable formats.
The Model class is also the base class for more advanced models, such asActive Record. Please refer to the relevant documentation for more detailsabout these advanced models.
Info: You are not required to base your model classes on yii
\base\Model. However, because there are many Yii componentsbuilt to support yii\base\Model, it is usually the preferable baseclass for a model.
3.6.1 Attributes
Models represent business data in terms of attributes. Each attribute is likea publicly accessible property of a model. The method yii\base\Model::
attributes() speci�es what attributes a model class has.
You can access an attribute like accessing a normal object property:
9http://en.wikipedia.org/wiki/Model%E2%80%93view%E2%80%93controller

3.6. MODELS 71
$model = new \app\models\ContactForm;
// "name" is an attribute of ContactForm
$model->name = 'example';
echo $model->name;
You can also access attributes like accessing array elements, thanks to thesupport for ArrayAccess10 and ArrayIterator11 by yii\base\Model:
$model = new \app\models\ContactForm;
// accessing attributes like array elements
$model['name'] = 'example';
echo $model['name'];
// iterate attributes
foreach ($model as $name => $value) {
echo "$name: $value\n";
}
De�ning Attributes
By default, if your model class extends directly from yii\base\Model, allits non-static public member variables are attributes. For example, theContactForm model class below has four attributes: name, email, subject andbody. The ContactForm model is used to represent the input data receivedfrom an HTML form.
namespace app\models;
use yii\base\Model;
class ContactForm extends Model
{
public $name;
public $email;
public $subject;
public $body;
}
You may override yii\base\Model::attributes() to de�ne attributes in adi�erent way. The method should return the names of the attributes in amodel. For example, yii\db\ActiveRecord does so by returning the columnnames of the associated database table as its attribute names. Note that youmay also need to override the magic methods such as __get(), __set() so thatthe attributes can be accessed like normal object properties.
10http://php.net/manual/en/class.arrayaccess.php11http://php.net/manual/en/class.arrayiterator.php

72 CHAPTER 3. APPLICATION STRUCTURE
Attribute Labels
When displaying values or getting input for attributes, you often need to dis-play some labels associated with attributes. For example, given an attributenamed firstName, you may want to display a label First Name which is moreuser-friendly when displayed to end users in places such as form inputs anderror messages.
You can get the label of an attribute by calling yii\base\Model::getAttributeLabel().For example,
$model = new \app\models\ContactForm;
// displays "Label"
echo $model->getAttributeLabel('name');
By default, attribute labels are automatically generated from attribute names.The generation is done by the method yii\base\Model::generateAttributeLabel().It will turn camel-case variable names into multiple words with the �rst let-ter in each word in upper case. For example, username becomes Username, andfirstName becomes First Name.
If you do not want to use automatically generated labels, you may over-ride yii\base\Model::attributeLabels() to explicitly declare attributelabels. For example,
namespace app\models;
use yii\base\Model;
class ContactForm extends Model
{
public $name;
public $email;
public $subject;
public $body;
public function attributeLabels()
{
return [
'name' => 'Your name',
'email' => 'Your email address',
'subject' => 'Subject',
'body' => 'Content',
];
}
}
For applications supporting multiple languages, you may want to translateattribute labels. This can be done in the yii\base\Model::attributeLabels()method as well, like the following:
public function attributeLabels()
{

3.6. MODELS 73
return [
'name' => \Yii::t('app', 'Your name'),
'email' => \Yii::t('app', 'Your email address'),
'subject' => \Yii::t('app', 'Subject'),
'body' => \Yii::t('app', 'Content'),
];
}
You may even conditionally de�ne attribute labels. For example, based onthe scenario the model is being used in, you may return di�erent labels forthe same attribute.
Info: Strictly speaking, attribute labels are part of views. Butdeclaring labels in models is often very convenient and can resultin very clean and reusable code.
3.6.2 Scenarios
A model may be used in di�erent scenarios. For example, a User modelmay be used to collect user login inputs, but it may also be used for theuser registration purpose. In di�erent scenarios, a model may use di�erentbusiness rules and logic. For example, the email attribute may be requiredduring user registration, but not so during user login.
A model uses the yii\base\Model::scenario property to keep track ofthe scenario it is being used in. By default, a model supports only a singlescenario named default. The following code shows two ways of setting thescenario of a model:
// scenario is set as a property
$model = new User;
$model->scenario = 'login';
// scenario is set through configuration
$model = new User(['scenario' => 'login']);
By default, the scenarios supported by a model are determined by the valida-tion rules declared in the model. However, you can customize this behaviorby overriding the yii\base\Model::scenarios() method, like the follow-ing:
namespace app\models;
use yii\db\ActiveRecord;
class User extends ActiveRecord
{
public function scenarios()
{
return [
'login' => ['username', 'password'],
'register' => ['username', 'email', 'password'],

74 CHAPTER 3. APPLICATION STRUCTURE
];
}
}
Info: In the above and following examples, the model classesare extending from yii\db\ActiveRecord because the usage ofmultiple scenarios usually happens to Active Record classes.
The scenarios() method returns an array whose keys are the scenario namesand values the corresponding active attributes. An active attribute can bemassively assigned and is subject to validation. In the above example, theusername and password attributes are active in the login scenario; while in theregister scenario, email is also active besides username and password.
The default implementation of scenarios() will return all scenarios foundin the validation rule declaration method yii\base\Model::rules(). Whenoverriding scenarios(), if you want to introduce new scenarios in addition tothe default ones, you may write code like the following:
namespace app\models;
use yii\db\ActiveRecord;
class User extends ActiveRecord
{
public function scenarios()
{
$scenarios = parent::scenarios();
$scenarios['login'] = ['username', 'password'];
$scenarios['register'] = ['username', 'email', 'password'];
return $scenarios;
}
}
The scenario feature is primarily used by validation and massive attributeassignment. You can, however, use it for other purposes. For example, youmay declare attribute labels di�erently based on the current scenario.
3.6.3 Validation Rules
When the data for a model is received from end users, it should be validatedto make sure it satis�es certain rules (called validation rules, also knownas business rules). For example, given a ContactForm model, you may wantto make sure all attributes are not empty and the email attribute containsa valid email address. If the values for some attributes do not satisfy thecorresponding business rules, appropriate error messages should be displayedto help the user to �x the errors.
You may call yii\base\Model::validate() to validate the receiveddata. The method will use the validation rules declared in yii\base\Model

3.6. MODELS 75
::rules() to validate every relevant attribute. If no error is found, it willreturn true. Otherwise, it will keep the errors in the yii\base\Model::
errors property and return false. For example,
$model = new \app\models\ContactForm;
// populate model attributes with user inputs
$model->attributes = \Yii::$app->request->post('ContactForm');
if ($model->validate()) {
// all inputs are valid
} else {
// validation failed: $errors is an array containing error messages
$errors = $model->errors;
}
To declare validation rules associated with a model, override the yii\base
\Model::rules() method by returning the rules that the model attributesshould satisfy. The following example shows the validation rules declared forthe ContactForm model:
public function rules()
{
return [
// the name, email, subject and body attributes are required
[['name', 'email', 'subject', 'body'], 'required'],
// the email attribute should be a valid email address
['email', 'email'],
];
}
A rule can be used to validate one or multiple attributes, and an attributemay be validated by one or multiple rules. Please refer to the ValidatingInput section for more details on how to declare validation rules.
Sometimes, you may want a rule to be applied only in certain scenarios.To do so, you can specify the on property of a rule, like the following:
public function rules()
{
return [
// username, email and password are all required in "register"
scenario
[['username', 'email', 'password'], 'required', 'on' => 'register'],
// username and password are required in "login" scenario
[['username', 'password'], 'required', 'on' => 'login'],
];
}
If you do not specify the on property, the rule would be applied in all sce-narios. A rule is called an active rule if it can be applied in the current yii\base\Model::scenario.

76 CHAPTER 3. APPLICATION STRUCTURE
An attribute will be validated if and only if it is an active attributedeclared in scenarios() and is associated with one or multiple active rulesdeclared in rules().
3.6.4 Massive Assignment
Massive assignment is a convenient way of populating a model with userinputs using a single line of code. It populates the attributes of a model byassigning the input data directly to the yii\base\Model::attributes prop-erty. The following two pieces of code are equivalent, both trying to assignthe form data submitted by end users to the attributes of the ContactForm
model. Clearly, the former, which uses massive assignment, is much cleanerand less error prone than the latter:
$model = new \app\models\ContactForm;
$model->attributes = \Yii::$app->request->post('ContactForm');
$model = new \app\models\ContactForm;
$data = \Yii::$app->request->post('ContactForm', []);
$model->name = isset($data['name']) ? $data['name'] : null;
$model->email = isset($data['email']) ? $data['email'] : null;
$model->subject = isset($data['subject']) ? $data['subject'] : null;
$model->body = isset($data['body']) ? $data['body'] : null;
Safe Attributes
Massive assignment only applies to the so-called safe attributes which arethe attributes listed in yii\base\Model::scenarios() for the current yii\base\Model::scenario of a model. For example, if the User model has thefollowing scenario declaration, then when the current scenario is login, onlythe username and password can be massively assigned. Any other attributeswill be kept untouched.
public function scenarios()
{
return [
'login' => ['username', 'password'],
'register' => ['username', 'email', 'password'],
];
}
Info: The reason that massive assignment only applies to safeattributes is because you want to control which attributes can bemodi�ed by end user data. For example, if the User model hasa permission attribute which determines the permission assignedto the user, you would like this attribute to be modi�able byadministrators through a backend interface only.

3.6. MODELS 77
Because the default implementation of yii\base\Model::scenarios() willreturn all scenarios and attributes found in yii\base\Model::rules(), ifyou do not override this method, it means an attribute is safe as long as itappears in one of the active validation rules.
For this reason, a special validator aliased safe is provided so that you candeclare an attribute to be safe without actually validating it. For example,the following rules declare that both title and description are safe attributes.
public function rules()
{
return [
[['title', 'description'], 'safe'],
];
}
Unsafe Attributes
As described above, the yii\base\Model::scenarios() method serves fortwo purposes: determining which attributes should be validated, and de-termining which attributes are safe. In some rare cases, you may want tovalidate an attribute but do not want to mark it safe. You can do so bypre�xing an exclamation mark ! to the attribute name when declaring it inscenarios(), like the secret attribute in the following:
public function scenarios()
{
return [
'login' => ['username', 'password', '!secret'],
];
}
When the model is in the login scenario, all three attributes will be validated.However, only the username and password attributes can be massively assigned.To assign an input value to the secret attribute, you have to do it explicitlyas follows,
$model->secret = $secret;
3.6.5 Data Exporting
Models often need to be exported in di�erent formats. For example, youmay want to convert a collection of models into JSON or Excel format. Theexporting process can be broken down into two independent steps. In the�rst step, models are converted into arrays; in the second step, the arrays areconverted into target formats. You may just focus on the �rst step, becausethe second step can be achieved by generic data formatters, such as yii\web\JsonResponseFormatter.
The simplest way of converting a model into an array is to use the yii
\base\Model::attributes property. For example,

78 CHAPTER 3. APPLICATION STRUCTURE
$post = \app\models\Post::findOne(100);
$array = $post->attributes;
By default, the yii\base\Model::attributes property will return the val-ues of all attributes declared in yii\base\Model::attributes().
A more �exible and powerful way of converting a model into an array isto use the yii\base\Model::toArray() method. Its default behavior is thesame as that of yii\base\Model::attributes. However, it allows you tochoose which data items, called �elds, to be put in the resulting array andhow they should be formatted. In fact, it is the default way of exportingmodels in RESTful Web service development, as described in the ResponseFormatting.
Fields
A �eld is simply a named element in the array that is obtained by callingthe yii\base\Model::toArray() method of a model.
By default, �eld names are equivalent to attribute names. However,you can change this behavior by overriding the yii\base\Model::fields()and/or yii\base\Model::extraFields() methods. Both methods shouldreturn a list of �eld de�nitions. The �elds de�ned by fields() are de-fault �elds, meaning that toArray() will return these �elds by default. TheextraFields() method de�nes additionally available �elds which can also bereturned by toArray() as long as you specify them via the $expand parameter.For example, the following code will return all �elds de�ned in fields() andthe prettyName and fullAddress �elds if they are de�ned in extraFields().
$array = $model->toArray([], ['prettyName', 'fullAddress']);
You can override fields() to add, remove, rename or rede�ne �elds. Thereturn value of fields() should be an array. The array keys are the �eldnames, and the array values are the corresponding �eld de�nitions whichcan be either property/attribute names or anonymous functions returningthe corresponding �eld values. In the special case when a �eld name is thesame as its de�ning attribute name, you can omit the array key. For example,
// explicitly list every field, best used when you want to make sure the
changes
// in your DB table or model attributes do not cause your field changes (to
keep API backward compatibility).
public function fields()
{
return [
// field name is the same as the attribute name
'id',
// field name is "email", the corresponding attribute name is "
email_address"
'email' => 'email_address',
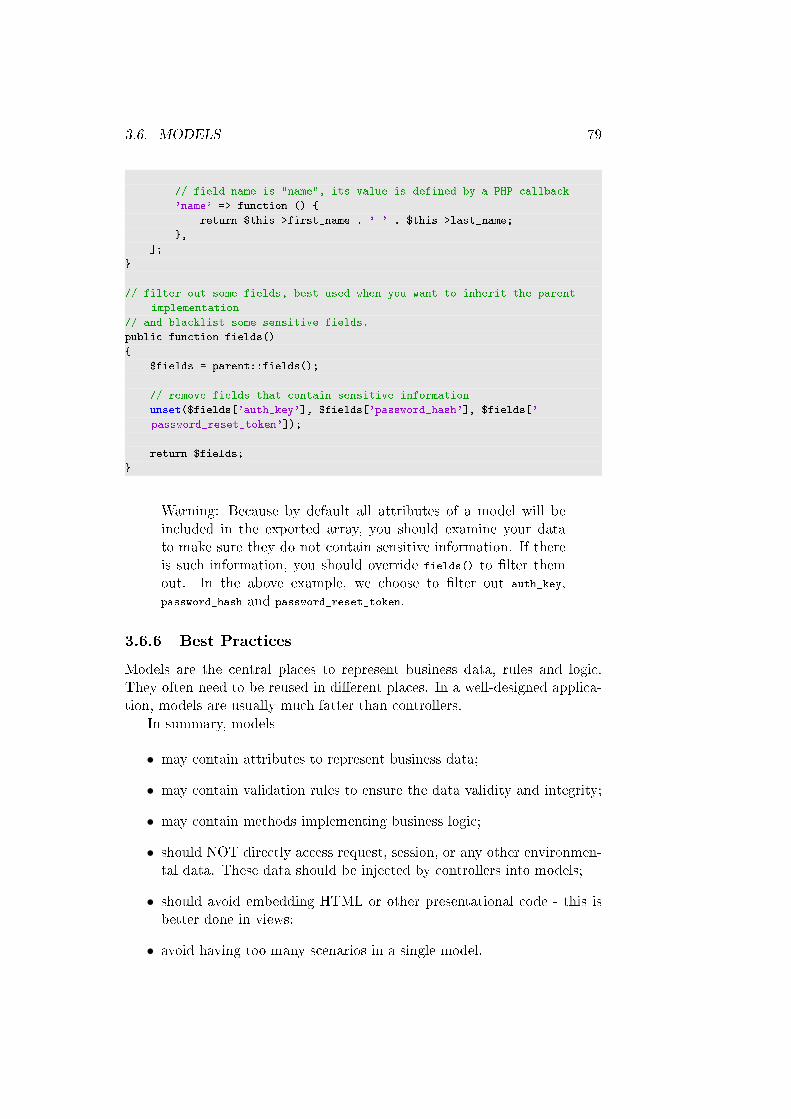
3.6. MODELS 79
// field name is "name", its value is defined by a PHP callback
'name' => function () {
return $this->first_name . ' ' . $this->last_name;
},
];
}
// filter out some fields, best used when you want to inherit the parent
implementation
// and blacklist some sensitive fields.
public function fields()
{
$fields = parent::fields();
// remove fields that contain sensitive information
unset($fields['auth_key'], $fields['password_hash'], $fields['
password_reset_token']);
return $fields;
}
Warning: Because by default all attributes of a model will beincluded in the exported array, you should examine your datato make sure they do not contain sensitive information. If thereis such information, you should override fields() to �lter themout. In the above example, we choose to �lter out auth_key,password_hash and password_reset_token.
3.6.6 Best Practices
Models are the central places to represent business data, rules and logic.They often need to be reused in di�erent places. In a well-designed applica-tion, models are usually much fatter than controllers.
In summary, models
• may contain attributes to represent business data;
• may contain validation rules to ensure the data validity and integrity;
• may contain methods implementing business logic;
• should NOT directly access request, session, or any other environmen-tal data. These data should be injected by controllers into models;
• should avoid embedding HTML or other presentational code - this isbetter done in views;
• avoid having too many scenarios in a single model.

80 CHAPTER 3. APPLICATION STRUCTURE
You may usually consider the last recommendation above when you are de-veloping large complex systems. In these systems, models could be very fatbecause they are used in many places and may thus contain many sets ofrules and business logic. This often ends up in a nightmare in maintainingthe model code because a single touch of the code could a�ect several dif-ferent places. To make the mode code more maintainable, you may take thefollowing strategy:
• De�ne a set of base model classes that are shared by di�erent applica-tions or modules. These model classes should contain minimal sets ofrules and logic that are common among all their usages.
• In each application or module that uses a model, de�ne a crete modelclass by extending from the corresponding base model class. The con-crete model classes should contain rules and logic that are speci�c forthat application or module.
For example, in the Advanced Application Template, you may de�ne a basemodel class common\models\Post. Then for the front end application, you de-�ne and use a concrete model class frontend\models\Post which extends fromcommon\models\Post. And similarly for the back end application, you de�nebackend\models\Post. With this strategy, you will be sure that the code infrontend\models\Post is only speci�c to the front end application, and if youmake any change to it, you do not need to worry if the change may breakthe back end application.
3.7 Views
Views are part of the MVC12 architecture. They are responsible for present-ing data to end users. In a Yii application, the view layer is composed byview templates and view components. The former contains presentationalcode (e.g. HTML), while the latter provides common view-related featuresand is responsible for turning view templates into response content. We oftenuse �views� to refer to view templates.
3.7.1 View Templates
You turn a view template into response content by pushing model data intothe template and rendering it. For example, in the post/view action below,the view template is rendered with the $model data. The rendering result isa string which is returned by the action as the response content.
namespace app\controllers;
12http://en.wikipedia.org/wiki/Model%E2%80%93view%E2%80%93controller

3.7. VIEWS 81
use Yii;
use app\models\Post;
use yii\web\Controller;
use yii\web\NotFoundHttpException;
class PostController extends Controller
{
public function actionView($id)
{
$model = Post::findOne($id);
if ($model === null) {
throw new NotFoundHttpException;
}
return $this->render('view', [
'model' => $model,
]);
}
}
Rendering Views in Controllers
Rendering Views in Widgets
Rendering Views in Views
View Names
By default, a view template is simply a PHP script �le (called view �le).Like models and controllers, view �les are usually organized under the so-called view paths. For views rendered by controllers that directly belong toan application, they are located under the @app/views path.
• applications:
• modules:
• controllers:
• widgets and other components:
When rendering a view template, you can specify it using a view name, aview �le path, or an alias to the view �le path.
If a view name is used, it will be resolved into a view �le path accordingto the current yii\base\View::context using one of the following rules:
• If the view name starts with double slashes //, the corresponding view�le path is considered to be @app/views/ViewName. For example, //site/about will be resolved into @app/views/site/about.

82 CHAPTER 3. APPLICATION STRUCTURE
• If the view name starts with a single slash /, the view �le path is formedby pre�xing the view name with the yii\base\Module::viewPath ofthe currently active module. If there is no active module, @app/views/ViewName will be used. For example, /user/create will be resolved into@app/modules/user/views/user/create, if the currently active module isuser. If there is no active module, the view �le path would be @app/
views/user/create.
• If the view is rendered with a yii\base\View::context, the view �lepath will be pre�xed with the yii\base\ViewContextInterface::
getViewPath(). For example, site/about will be resolved into @app/
views/site/about if the context is the SiteController.
• If a view was previously rendered, the directory containing that view�le will be pre�xed to the new view name.
3.7.2 Layouts
Nested Layouts
Accessing Data
3.7.3 View Components
3.7.4 Creating Views
Setting page title
Adding meta tags
Registering link tags
Registering CSS
Registering scripts
Static Pages
Assets
3.7.5 Alternative Template Engines
3.7.6 Basics
By default, Yii uses PHP in view templates to generate content and elements.A web application view typically contains some combination of HTML, alongwith PHP echo, foreach, if, and other basic constructs. Using complex PHPcode in views is considered to be bad practice. When complex logic andfunctionality is needed, such code should either be moved to a controller ora widget.

3.7. VIEWS 83
The view is typically called from controller action using the yii\base
\Controller::render() method:
public function actionIndex()
{
return $this->render('index', ['username' => 'samdark']);
}
The �rst argument to yii\base\Controller::render() is the name of theview to display. In the context of the controller, Yii will search for its viewsin views/site/ where site is the controller ID. For details on how the viewname is resolved, refer to the yii\base\Controller::render() method.
The second argument to yii\base\Controller::render() is a data ar-ray of key-value pairs. Through this array, data can be passed to the view,making the value available in the view as a variable named the same as thecorresponding key.
The view for the action above would be views/site/index.php and can besomething like:
<p>Hello, <?= $username ?>!</p>
Any data type can be passed to the view, including arrays or objects.
Besides the above yii\web\Controller::render() method, the yii
\web\Controller class also provides several other rendering methods. Be-low is a summary of these methods:
• yii\web\Controller::render(): renders a view and applies the lay-out to the rendering result. This is most commonly used to render acomplete page.
• yii\web\Controller::renderPartial(): renders a view without ap-plying any layout. This is often used to render a fragment of a page.
• yii\web\Controller::renderAjax(): renders a view without apply-ing any layout, and injects all registered JS/CSS scripts and �les. Itis most commonly used to render an HTML output to respond to anAJAX request.
• yii\web\Controller::renderFile(): renders a view �le. This is sim-ilar to yii\web\Controller::renderPartial() except that it takesthe �le path of the view instead of the view name.
3.7.7 Widgets
Widgets are self-contained building blocks for your views, a way to combinecomplex logic, display, and functionality into a single component. A widget:
• May contain advanced PHP programming

84 CHAPTER 3. APPLICATION STRUCTURE
• Is typically con�gurable
• Is often provided data to be displayed
• Returns HTML to be shown within the context of the view
There are a good number of widgets bundled with Yii, such as active form,breadcrumbs, menu, and wrappers around bootstrap component framework.Additionally there are extensions that provide more widgets, such as theo�cial widget for jQueryUI13 components.
In order to use a widget, your view �le would do the following:
// Note that you have to "echo" the result to display it
echo \yii\widgets\Menu::widget(['items' => $items]);
// Passing an array to initialize the object properties
$form = \yii\widgets\ActiveForm::begin([
'options' => ['class' => 'form-horizontal'],
'fieldConfig' => ['inputOptions' => ['class' => 'input-xlarge']],
]);
... form inputs here ...
\yii\widgets\ActiveForm::end();
In the �rst example in the code above, the yii\base\Widget::widget()
method is used to invoke a widget that just outputs content. In the sec-ond example, yii\base\Widget::begin() and yii\base\Widget::end()
are used for a widget that wraps content between method calls with itsown output. In case of the form this output is the <form> tag with someproperties set.
3.7.8 Security
One of the main security principles is to always escape output. If violated itleads to script execution and, most probably, to cross-site scripting known asXSS leading to leaking of admin passwords, making a user to automaticallyperform actions etc.
Yii provides a good tool set in order to help you escape your output. Thevery basic thing to escape is a text without any markup. You can deal withit like the following:
<?php
use yii\helpers\Html;
?>
<div class="username">
<?= Html::encode($user->name) ?>
</div>
13http://www.jqueryui.com

3.7. VIEWS 85
When you want to render HTML it becomes complex so we're delegatingthe task to excellent HTMLPuri�er14 library which is wrapped in Yii as ahelper yii\helpers\HtmlPurifier:
<?php
use yii\helpers\HtmlPurifier;
?>
<div class="post">
<?= HtmlPurifier::process($post->text) ?>
</div>
Note that besides HTMLPuri�er does excellent job making output safe it'snot very fast so consider caching result.
3.7.9 Alternative template languages
There are o�cial extensions for Smarty15 and Twig16. In order to learn morerefer to Using template engines section of the guide.
3.7.10 Using View object in templates
An instance of yii\web\View component is available in view templates as$this variable. Using it in templates you can do many useful things includingsetting page title and meta, registering scripts and accessing the context.
Setting page title
A common place to set page title are view templates. Since we can accessview object with $this, setting a title becomes as easy as:
$this->title = 'My page title';
Adding meta tags
Adding meta tags such as encoding, description, keywords is easy with viewobject as well:
$this->registerMetaTag(['encoding' => 'utf-8']);
The �rst argument is an map of <meta> tag option names and values. Thecode above will produce:
<meta encoding="utf-8">
Sometimes there's a need to have only a single tag of a type. In this caseyou need to specify the second argument:
14http://htmlpurifier.org/15http://www.smarty.net/16http://twig.sensiolabs.org/

86 CHAPTER 3. APPLICATION STRUCTURE
$this->registerMetaTag(['name' => 'description', 'content' => 'This is my
cool website made with Yii!'], 'meta-description');
$this->registerMetaTag(['name' => 'description', 'content' => 'This website
is about funny raccoons.'], 'meta-description');
If there are multiple calls with the same value of the second argument (meta-description in this case), the latter will override the former and only a singletag will be rendered:
<meta name="description" content="This website is about funny raccoons.">
Registering link tags
<link> tag is useful in many cases such as customizing favicon, pointing toRSS feed or delegating OpenID to another server. Yii view object has amethod to work with these:
$this->registerLinkTag([
'title' => 'Lives News for Yii Framework',
'rel' => 'alternate',
'type' => 'application/rss+xml',
'href' => 'http://www.yiiframework.com/rss.xml/',
]);
The code above will result in
<link title="Lives News for Yii Framework" rel="alternate" type="application
/rss+xml" href="http://www.yiiframework.com/rss.xml/" />
Same as with meta tags you can specify additional argument to make surethere's only one link of a type registered.
Registering CSS
You can register CSS using yii\web\View::registerCss() or yii\web\View::registerCssFile(). The former registers a block of CSS code while thelatter registers an external CSS �le. For example,
$this->registerCss("body { background: #f00; }");
The code above will result in adding the following to the head section of thepage:
<style>
body { background: #f00; }
</style>
If you want to specify additional properties of the style tag, pass an arrayof name-values to the third argument. If you need to make sure there'sonly a single style tag use fourth argument as was mentioned in meta tagsdescription.
$this->registerCssFile("http://example.com/css/themes/black-and-white.css",
[BootstrapAsset::className()], ['media' => 'print'], 'css-print-theme')
;

3.7. VIEWS 87
The code above will add a link to CSS �le to the head section of the page.
• The �rst argument speci�es the CSS �le to be registered.
• The second argument speci�es that this CSS �le depends on yii\bootstrap\BootstrapAsset, meaning it will be added AFTER the CSS �les inyii\bootstrap\BootstrapAsset. Without this dependency speci�ca-tion, the relative order between this CSS �le and the yii\bootstrap
\BootstrapAsset CSS �les would be unde�ned.
• The third argument speci�es the attributes for the resulting <link> tag.
• The last argument speci�es an ID identifying this CSS �le. If it is notprovided, the URL of the CSS �le will be used instead.
It is highly recommended that you use asset bundles to register external CSS�les rather than using yii\web\View::registerCssFile(). Using assetbundles allows you to combine and compress multiple CSS �les, which isdesirable for high tra�c websites.
Registering scripts
With the yii\web\View object you can register scripts. There are two ded-icated methods for it: yii\web\View::registerJs() for inline scripts andyii\web\View::registerJsFile() for external scripts. Inline scripts areuseful for con�guration and dynamically generated code. The method foradding these can be used as follows:
$this->registerJs("var options = ".json_encode($options).";", View::POS_END,
'my-options');
The �rst argument is the actual JS code we want to insert into the page.The second argument determines where script should be inserted into thepage. Possible values are:
• yii\web\View::POS_HEAD for head section.
• yii\web\View::POS_BEGIN for right after opening <body>.
• yii\web\View::POS_END for right before closing </body>.
• yii\web\View::POS_READY for executing code on document ready event.This will register yii\web\JqueryAsset automatically.
• yii\web\View::POS_LOAD for executing code on document load event.This will register yii\web\JqueryAsset automatically.

88 CHAPTER 3. APPLICATION STRUCTURE
The last argument is a unique script ID that is used to identify code blockand replace existing one with the same ID instead of adding a new one. Ifyou don't provide it, the JS code itself will be used as the ID.
An external script can be added like the following:
$this->registerJsFile('http://example.com/js/main.js', [JqueryAsset::
className()]);
The arguments for yii\web\View::registerJsFile() are similar to thosefor yii\web\View::registerCssFile(). In the above example, we registerthe main.js �le with the dependency on JqueryAsset. This means the main.js
�le will be added AFTER jquery.js. Without this dependency speci�cation,the relative order between main.js and jquery.js would be unde�ned.
Like for yii\web\View::registerCssFile(), it is also highly recom-mended that you use asset bundles to register external JS �les rather thanusing yii\web\View::registerJsFile().
Registering asset bundles
As was mentioned earlier it's preferred to use asset bundles instead of usingCSS and JavaScript directly. You can get details on how to de�ne assetbundles in asset manager section of the guide. As for using already de�nedasset bundle, it's very straightforward:
\frontend\assets\AppAsset::register($this);
Layout
A layout is a very convenient way to represent the part of the page thatis common for all or at least for most pages generated by your application.Typically it includes <head> section, footer, main menu and alike elements.You can �nd a �ne example of the layout in a basic application template.Here we'll review the very basic one without any widgets or extra markup.
<?php
use yii\helpers\Html;
?>
<?php $this->beginPage() ?>
<!DOCTYPE html>
<html lang="<?= Yii::$app->language ?>">
<head>
<meta charset="<?= Yii::$app->charset ?>"/>
<title><?= Html::encode($this->title) ?></title>
<?php $this->head() ?>
</head>
<body>
<?php $this->beginBody() ?>
<div class="container">
<?= $content ?>
</div>

3.7. VIEWS 89
<footer class="footer">© 2013 me :)</footer>
<?php $this->endBody() ?>
</body>
</html>
<?php $this->endPage() ?>
In the markup above there's some code. First of all, $content is a variablethat will contain result of views rendered with controller's $this->render()
method.
We are importing yii\helpers\Html helper via standard PHP use state-ment. This helper is typically used for almost all views where one need toescape outputted data.
Several special methods such as yii\web\View::beginPage()/yii\web\View::endPage(), yii\web\View::head(), yii\web\View::beginBody()/yii\web\View::endBody() are triggering page rendering events that are usedfor registering scripts, links and process page in many other ways. Alwaysinclude these in your layout in order for the rendering to work correctly.
By default layout is loaded from views/layouts/main.php. You may changeit at controller or module level by setting di�erent value to layout property.
In order to pass data from controller to layout, that you may need forbreadcrumbs or similar elements, use view component params property. Incontroller it can be set as:
$this->view->params['breadcrumbs'][] = 'Contact';
In a view it will be:
$this->params['breadcrumbs'][] = 'Contact';
In layout �le the value can be used like the following:
<?= Breadcrumbs::widget([
'links' => isset($this->params['breadcrumbs']) ? $this->params['
breadcrumbs'] : [],
]) ?>
You may also wrap the view render result into a layout using yii\base\View::beginContent(), yii\base\View::endContent(). This approach can beused while applying nested layouts:
<?php $this->beginContent('//layouts/overall') ?>
<div class="content">
<?= $content ?>
<div>
<?php $this->endContent() ?>
Partials
Often you need to reuse some HTML markup in many views and often it'stoo simple to create a full-featured widget for it. In this case you may usepartials.

90 CHAPTER 3. APPLICATION STRUCTURE
Partial is a view as well. It resides in one of directories under views andby convention is often started with _. For example, we need to render a listof user pro�les and, at the same time, display individual pro�le elsewhere.
First we need to de�ne a partial for user pro�le in _profile.php:
<?php
use yii\helpers\Html;
?>
<div class="profile">
<h2><?= Html::encode($username) ?></h2>
<p><?= Html::encode($tagline) ?></p>
</div>
Then we're using it in index.php view where we display a list of users:
<div class="user-index">
<?php
foreach ($users as $user) {
echo $this->render('_profile', [
'username' => $user->name,
'tagline' => $user->tagline,
]);
}
?>
</div>
Same way we can reuse it in another view displaying a single user pro�le:
echo $this->render('_profile', [
'username' => $user->name,
'tagline' => $user->tagline,
]);
When you call render() to render a partial in a current view, you may usedi�erent formats to refer to the partial. The most commonly used format isthe so-called relative view name which is as shown in the above example. Thepartial view �le is relative to the directory containing the current view. If thepartial is located under a subdirectory, you should include the subdirectoryname in the view name, e.g., public/_profile.
You may use path alias to specify a view, too. For example, @app/views/common/_profile.
And you may also use the so-called absolute view names, e.g., /user/
_profile, //user/_profile. An absolute view name starts with a single slashesor double slashes. If it starts with a single slash, the view �le will be lookedfor under the view path of the currently active module. Otherwise, it willwill be looked for under the application view path.
Accessing context
Views are generally used either by controller or by widget. In both cases theobject that called view rendering is available in the view as $this->context.

3.7. VIEWS 91
For example if we need to print out the current internal request route in aview rendered by controller we can use the following:
echo $this->context->getRoute();
Static Pages
If you need to render static pages you can use class ViewAction. It representsan action that displays a view according to a user-speci�ed parameter.
Usage of the class is simple. In your controller use the class via actions
method:
class SiteController extends Controller
{
public function actions()
{
return [
'static' => [
'class' => '\yii\web\ViewAction',
],
];
}
//...
}
Then create index.php in @app/views/site/pages/:
//index.php
<h1>Hello, I am a static page!</h1>
That's it. Now you can try it using /index.php?r=site/static.By default, the view being displayed is speci�ed via the view GET pa-
rameter. If you open /index.php?r=site/static?&view=about then @app/views/
site/pages/about.php view �le will be used.If not changed or speci�ed via GET defaults are the following:
• GET parameter name: view.
• View �le used if parameter is missing: index.php.
• Directory where views are stored (viewPrefix): pages.
• Layout for the page rendered matches the one used in controller.
For more information see yii\web\ViewAction.
Caching blocks
To learn about caching of view fragments please refer to caching section ofthe guide.

92 CHAPTER 3. APPLICATION STRUCTURE
3.7.11 Customizing View component
Since view is also an application component named view you can replaceit with your own component that extends from yii\base\View or yii\web\View. It can be done via application con�guration �le such as config/web.
php:
return [
// ...
'components' => [
'view' => [
'class' => 'app\components\View',
],
// ...
],
];
You may apply some action �lters to controller actions to accomplishtasks such as determining who can access the current action, decorating theresult of the action, etc.
An action �lter is an instance of a class extending yii\base\ActionFilter.
To use an action �lter, attach it as a behavior to a controller or a module.The following example shows how to enable HTTP caching for the index
action:
public function behaviors()
{
return [
'httpCache' => [
'class' => \yii\filters\HttpCache::className(),
'only' => ['index'],
'lastModified' => function ($action, $params) {
$q = new \yii\db\Query();
return $q->from('user')->max('updated_at');
},
],
];
}
You may use multiple action �lters at the same time. These �lters will beapplied in the order they are declared in behaviors(). If any of the �ltercancels the action execution, the �lters after it will be skipped.
When you attach a �lter to a controller, it can be applied to all actions ofthat controller; If you attach a �lter to a module (or application), it can beapplied to the actions of any controller within that module (or application).
To create a new action �lter, extend from yii\base\ActionFilter andoverride the yii\base\ActionFilter::beforeAction() and yii\base\ActionFilter::afterAction() methods. The former will be executed before an actionruns while the latter after an action runs. The return value of yii\base
\ActionFilter::beforeAction() determines whether an action should be

3.7. VIEWS 93
executed or not. If beforeAction() of a �lter returns false, the �lters after thisone will be skipped and the action will not be executed.
The authorization section of this guide shows how to use the yii\filters\AccessControl �lter, and the caching section gives more details about theyii\filters\PageCache and yii\filters\HttpCache �lters. These built-in �lters are also good references when you learn to create your own �lters.

94 CHAPTER 3. APPLICATION STRUCTURE
Error: not existing �le: structure-widgets.md

3.7. VIEWS 95
Error: not existing �le: structure-modules.md

96 CHAPTER 3. APPLICATION STRUCTURE
3.8 Managing assets
Note: This section is under development.
An asset in Yii is a �le that is included into the page. It could be CSS,JavaScript or any other �le. The framework provides many ways to workwith assets from basics such as adding <script src="..."> tags for a �le whichis covered by the View section, to advanced usage such as publishing �lesthat are not under the webservers document root, resolving JavaScript de-pendencies or minifying CSS, which we will cover in the following.
3.8.1 Declaring asset bundles
In order to de�ne a set of assets the belong together and should be used onthe website you declare a class called an �asset bundle�. The bundle de�nesa set of asset �les and their dependencies on other asset bundles.
Asset �les can be located under the webservers accessable directory butalso hidden inside of application or vendor directories. If the latter, theasset bundle will care for publishing them to a directory accessible by thewebserver so they can be included in the website. This feature is usefulfor extensions so that they can ship all content in one directory and makeinstallation easier for you.
To de�ne an asset you create a class extending from yii\web\AssetBundle
and set the properties according to your needs. Here you can see an exampleasset de�nition which is part of the basic application template, the AppAsset
asset bundle class. It de�nes assets required application wide:
<?php
use yii\web\AssetBundle as AssetBundle;
class AppAsset extends AssetBundle
{
public $basePath = '@webroot';
public $baseUrl = '@web';
public $css = [
'css/site.css',
];
public $js = [
];
public $depends = [
'yii\web\YiiAsset',
'yii\bootstrap\BootstrapAsset',
];
}
In the above $basePath speci�es web-accessible directory assets are servedfrom. It is a base for relative $css and $js paths i.e. @webroot/css/site.css

3.8. MANAGING ASSETS 97
for css/site.css. Here @webroot is an alias that points to application's web
directory.$baseUrl is used to specify base URL for the same relative $css and $js
i.e. @web/css/site.css where @web is an alias that corresponds to your websitebase URL such as http://example.com/.
In case you have asset �les under a non web accessible directory, that isthe case for any extension, you need to specify $sourcePath instead of $basePathand $baseUrl. All �les from the source path will be copied or symlinkedto the web/assets directory of your application prior to being registered. Inthis case $basePath and $baseUrl are generated automatically at the timeof publishing the asset bundle. This is the way to work with assets whenyou want to publish the whole directory no matter what's in be it images,webfonts etc.
Note: do not use the web/assets path to put your own �les init. It is meant to be used only for asset publishing. When youcreate �les that are already in web accessable directory put themin folders like web/css or web/js.
Dependencies on other asset bundles are speci�ed via $depends property. Itis an array that contains fully quali�ed class names of bundle classes thatshould be published in order for this bundle to work properly. Javascriptand CSS �les for AppAsset are added to the header after the �les of yii\web\YiiAsset and yii\bootstrap\BootstrapAsset in this example.
Here yii\web\YiiAsset adds Yii's JavaScript library while yii\bootstrap\BootstrapAsset includes Bootstrap17 frontend framework.
Asset bundles are regular classes so if you need to de�ne another one,just create alike class with unique name. This class can be placed anywherebut the convention for it is to be under assets directory of the application.
Additionally you may specify $jsOptions, $cssOptions and $publishOptions
that will be passed to yii\web\View::registerJsFile(), yii\web\View::registerCssFile() and yii\web\AssetManager::publish() respectivelyduring registering and publising an asset.
Language-speci�c asset bundle
If you need to de�ne an asset bundle that includes JavaScript �le dependingon the language you can do it the following way:
class LanguageAsset extends AssetBundle
{
public $language;
public $sourcePath = '@app/assets/language';
public $js = [
];
17http://getbootstrap.com

98 CHAPTER 3. APPLICATION STRUCTURE
public function registerAssetFiles($view)
{
$language = $this->language ? $this->language : Yii::$app->language;
$this->js[] = 'language-' . $language . '.js';
parent::registerAssetFiles($view);
}
}
In order to set language use the following code when registering an assetbundle in a view:
LanguageAsset::register($this)->language = $language;
3.8.2 Registering asset bundle
Asset bundle classes are typically registered in view �les or widgets thatdepend on the css or javascript �les for providing its functionality. An ex-ception to this is the AppAsset class de�ned above which is added in theapplications main layout �le to be registered on any page of the application.Registering an asset bundle is as simple as calling the yii\web\AssetBundle::register() method:
use app\assets\AppAsset;
AppAsset::register($this);
Since we're in a view context $this refers to View class. To register an assetinside of a widget, the view instance is available as $this->view:
AppAsset::register($this->view);
Note: If there is a need to modify third party asset bundles itis recommended to create your own bundles depending on thirdparty ones and use CSS and JavaScript features to modify be-havior instead of editing �les directly or copying them over.
3.8.3 Overriding asset bundles
Sometimes you need to override some asset bundles application wide. Agood example is loading jQuery from CDN instead of your own server. Inorder to do it we need to con�gure assetManager application component viacon�g �le. In case of basic application it is config/web.php:
return [
// ...
'components' => [
'assetManager' => [
'bundles' => [
'yii\web\JqueryAsset' => [
'sourcePath' => null,

3.8. MANAGING ASSETS 99
'js' => ['//ajax.googleapis.com/ajax/libs/jquery/1.8.3/
jquery.min.js']
],
],
],
],
];
In the above we're adding asset bundle de�nitions to the yii\web\AssetManager::bundles property of asset manager. Keys are fully quali�ed class namesto asset bundle classes we want to override while values are key-value arraysof class properties and corresponding values to set.
Setting sourcePath to null tells asset manager not to copy anything whilejs overrides local �les with a link to CDN.
3.8.4 Enabling symlinks
Asset manager is able to use symlinks instead of copying �les. It is turned o�by default since symlinks are often disabled on shared hosting. If your hostingenvironment supports symlinks you certainly should enable the feature viaapplication con�g:
return [
// ...
'components' => [
'assetManager' => [
'linkAssets' => true,
],
],
];
There are two main bene�ts in enabling it. First it is faster since no copyingis required and second is that assets will always be up to date with source�les.
3.8.5 Compressing and combining assets
To improve application performance you can compress and then combineseveral CSS or JS �les into lesser number of �les therefore reducing numberof HTTP requests and overall download size needed to load a web page. Yiiprovides a console command that allows you to do both.
Preparing con�guration
In order to use asset command you should prepare a con�guration �rst. Atemplate for it can be generated using
yii asset/template /path/to/myapp/config.php
The template itself looks like the following:

100 CHAPTER 3. APPLICATION STRUCTURE
<?php
/**
* Configuration file for the "yii asset" console command.
* Note that in the console environment, some path aliases like '@webroot'
and '@web' may not exist.
* Please define these missing path aliases.
*/
return [
// Adjust command/callback for JavaScript files compressing:
'jsCompressor' => 'java -jar compiler.jar --js {from} --js_output_file {
to}',
// Adjust command/callback for CSS files compressing:
'cssCompressor' => 'java -jar yuicompressor.jar --type css {from} -o {to
}',
// The list of asset bundles to compress:
'bundles' => [
// 'yii\web\YiiAsset',
// 'yii\web\JqueryAsset',
],
// Asset bundle for compression output:
'targets' => [
'app\config\AllAsset' => [
'basePath' => 'path/to/web',
'baseUrl' => '',
'js' => 'js/all-{hash}.js',
'css' => 'css/all-{hash}.css',
],
],
// Asset manager configuration:
'assetManager' => [
'basePath' => __DIR__,
'baseUrl' => '',
],
];
In the above keys are properties of AssetController. bundles list containsbundles that should be compressed. These are typically what's used byapplication. targets contains a list of bundles that de�ne how resulting �leswill be written. In our case we're writing everything to path/to/web that canbe accessed like http://example.com/ i.e. it is website root directory.
Note: in the console environment some path aliases like `@we-broot' and `@web' may not exist, so corresponding paths insidethe con�guration should be speci�ed directly.
JavaScript �les are combined, compressed and written to js/all-{hash}.js
where {hash} is replaced with the hash of the resulting �le.
jsCompressor and cssCompressor are console commands or PHP callbacks,which should perform JavaScript and CSS �les compression correspondingly.You should adjust these values according to your environment. By default

3.8. MANAGING ASSETS 101
Yii relies on Closure Compiler18 for JavaScript �le compression, and on YUICompressor19. You should install this utilities manually, if you wish to usethem.
Providing compression tools
The command relies on external compression tools that are not bundled withYii so you need to provide CSS and JS compressors which are correspondinglyspeci�ed via cssCompressor and jsCompression properties. If compressor isspeci�ed as a string it is treated as a shell command template which shouldcontain two placeholders: {from} that is replaced by source �le name and {to}
that is replaced by output �le name. Another way to specify compressor isto use any valid PHP callback.
By default for JavaScript compression Yii tries to use Google Closurecompiler20 that is expected to be in a �le named compiler.jar.
For CSS compression Yii assumes that YUI Compressor21 is looked upin a �le named yuicompressor.jar.
In order to compress both JavaScript and CSS, you need to downloadboth tools and place them under the directory containing your yii consolebootstrap �le. You also need to install JRE in order to run these tools.
You may customize the compression commands (e.g. changing the loca-tion of the jar �les) in the config.php �le like the following,
return [
'cssCompressor' => 'java -jar path.to.file\yuicompressor.jar --type
css {from} -o {to}',
'jsCompressor' => 'java -jar path.to.file\compiler.jar --js {from} --
js_output_file {to}',
];
where {from} and {to} are tokens that will be replaced with the actual sourceand target �le paths, respectively, when the asset command is compressingevery �le.
Performing compression
After con�guration is adjusted you can run the compress action, using createdcon�g:
yii asset /path/to/myapp/config.php /path/to/myapp/config/assets_compressed.
php
Now processing takes some time and �nally �nished. You need to adjustyour web application con�g to use compressed assets �le like the following:
18https://developers.google.com/closure/compiler/19https://github.com/yui/yuicompressor/20https://developers.google.com/closure/compiler/21https://github.com/yui/yuicompressor/

102 CHAPTER 3. APPLICATION STRUCTURE
'components' => [
// ...
'assetManager' => [
'bundles' => require '/path/to/myapp/config/assets_compressed.php',
],
],
3.8.6 Using asset converter
Instead of using CSS and JavaScript directly often developers are using theirimproved versions such as LESS or SCSS for CSS or Microsoft TypeScriptfor JavaScript. Using these with Yii is easy.
First of all, corresponding compression tools should be installed andshould be available from where yii console bootstrap �le is. The follow-ing lists �le extensions and their corresponding conversion tool names thatYii converter recognizes:
• LESS: less - lessc
• SCSS: scss, sass - sass
• Stylus: styl - stylus
• Co�eeScript: coffee - coffee
• TypeScript: ts - tsc
So if the corresponding tool is installed you can specify any of these in assetbundle:
class AppAsset extends AssetBundle
{
public $basePath = '@webroot';
public $baseUrl = '@web';
public $css = [
'css/site.less',
];
public $js = [
'js/site.ts',
];
public $depends = [
'yii\web\YiiAsset',
'yii\bootstrap\BootstrapAsset',
];
}
In order to adjust conversion tool call parameters or add new ones you canuse application con�g:

3.8. MANAGING ASSETS 103
// ...
'components' => [
'assetManager' => [
'converter' => [
'class' => 'yii\web\AssetConverter',
'commands' => [
'less' => ['css', 'lessc {from} {to} --no-color'],
'ts' => ['js', 'tsc --out {to} {from}'],
],
],
],
],
In the above we've left two types of extra �le extensions. First one is less
that can be speci�ed in css part of an asset bundle. Conversion is performedvia running lessc {from} {to} --no-color where {from} is replaced with LESS�le path while {to} is replaced with target CSS �le path. Second one is ts
that can be speci�ed in js part of an asset bundle. The command that isrun during conversion is in the same format that is used for less.

104 CHAPTER 3. APPLICATION STRUCTURE
Error: not existing �le: structure-extensions.md

Chapter 4
Handling Requests
105

106 CHAPTER 4. HANDLING REQUESTS
Error: not existing �le: runtime-bootstrapping.md

107
Error: not existing �le: runtime-routing.md

108 CHAPTER 4. HANDLING REQUESTS
Error: not existing �le: runtime-requests.md

109
Error: not existing �le: runtime-responses.md

110 CHAPTER 4. HANDLING REQUESTS
Error: not existing �le: runtime-sessions-cookies.md

4.1. URL MANAGEMENT 111
4.1 URL Management
Note: This section is under development.
The concept of URL management in Yii is fairly simple. URL management isbased on the premise that the application uses internal routes and parameterseverywhere. The framework itself will then translate routes into URLs, andvice versa, according to the URL manager's con�guration. This approachallows you to change site-wide URLs merely by editing a single con�guration�le, without ever touching the application code.
4.1.1 Internal routes
When implementing an application using Yii, you'll deal with internal routes,often referred to as routes and parameters. Each controller and controlleraction has a corresponding internal route such as site/index or user/create.In the �rst example, site is referred to as the controller ID while index isreferred to as the action ID. In the second example, user is the controller IDand create is the action ID. If the controller belongs to a module, the internalroute is pre�xed with the module ID. For example blog/post/index for a blogmodule (with post being the controller ID and index being the action ID).
4.1.2 Creating URLs
The most important rule for creating URLs in your site is to always doso using the URL manager. The URL manager is a built-in applicationcomponent named urlManager. This component is accessible from both weband console applications via \Yii::$app->urlManager. The component makesavailable the two following URL creation methods:
• createUrl($params)
• createAbsoluteUrl($params, $schema = null)
The createUrl method creates an URL relative to the application root, suchas /index.php/site/index/. The createAbsoluteUrl method creates an URLpre�xed with the proper protocol and hostname: http://www.example.com/
index.php/site/index. The former is suitable for internal application URLs,while the latter is used when you need to create URLs for external resources,such as connecting to third party services, sending email, generating RSSfeeds etc.
Some examples:
echo \Yii::$app->urlManager->createUrl(['site/page', 'id' => 'about']);
// /index.php/site/page/id/about/
echo \Yii::$app->urlManager->createUrl(['date-time/fast-forward', 'id' =>
105])

112 CHAPTER 4. HANDLING REQUESTS
// /index.php?r=date-time/fast-forward&id=105
echo \Yii::$app->urlManager->createAbsoluteUrl('blog/post/index');
// http://www.example.com/index.php/blog/post/index/
The exact format of the URL depends on how the URL manager is con�g-ured. The above examples may also output:
• /site/page/id/about/
• /index.php?r=site/page&id=about
• /index.php?r=date-time/fast-forward&id=105
• /index.php/date-time/fast-forward?id=105
• http://www.example.com/blog/post/index/
• http://www.example.com/index.php?r=blog/post/index
In order to simplify URL creation there is yii\helpers\Url helper. Assum-ing we're at /index.php?r=management/default/users&id=10 the following is howUrl helper works:
use yii\helpers\Url;
// currently active route
// /index.php?r=management/default/users
echo Url::to('');
// same controller, different action
// /index.php?r=management/default/page&id=contact
echo Url::toRoute(['page', 'id' => 'contact']);
// same module, different controller and action
// /index.php?r=management/post/index
echo Url::toRoute('post/index');
// absolute route no matter what controller is making this call
// /index.php?r=site/index
echo Url::toRoute('/site/index');
// url for the case sensitive action `actionHiTech` of the current
controller
// /index.php?r=management/default/hi-tech
echo Url::toRoute('hi-tech');
// url for action the case sensitive controller, `DateTimeController::
actionFastForward`
// /index.php?r=date-time/fast-forward&id=105
echo Url::toRoute(['/date-time/fast-forward', 'id' => 105]);
// get URL from alias

4.1. URL MANAGEMENT 113
// http://google.com/
Yii::setAlias('@google', 'http://google.com/');
echo Url::to('@google');
// get home URL
// /index.php?r=site/index
echo Url::home();
Url::remember(); // save URL to be used later
Url::previous(); // get previously saved URL
Tip: In order to generate URL with a hashtag, for example /index.php?r=site/page&id=100#title, you need to specify the parameternamed # using Url::to(['post/read', 'id' => 100, '#' => 'title'
]).
There's also Url::canonical() method that allows you to generate canonicalURL1 for the currently executing action. The method ignores all actionparameters except ones passed via action arguments:
namespace app\controllers;
use yii\web\Controller;
use yii\helpers\Url;
class CanonicalController extends Controller
{
public function actionTest($page)
{
echo Url::canonical();
}
}
When accessed as /index.php?r=canonical/test&page=hello&number=42 canonicalURL will be /index.php?r=canonical/test&page=hello.
4.1.3 Customizing URLs
By default, Yii uses a query string format for URLs, such as /index.php?r
=news/view&id=100. In order to make URLs human-friendly i.e., more read-able, you need to con�gure the urlManager component in the application'scon�guration �le. Enabling �pretty� URLs will convert the query string for-mat to a directory-based format: /index.php/news/view?id=100. Disabling theshowScriptName parameter means that index.php will not be part of the URLs.Here's the relevant part of the application's con�guration �le:
<?php
return [
// ...
1https://en.wikipedia.org/wiki/Canonical_link_element

114 CHAPTER 4. HANDLING REQUESTS
'components' => [
'urlManager' => [
'enablePrettyUrl' => true,
'showScriptName' => false,
],
],
];
Note that this con�guration will only work if the web server has been properlycon�gured for Yii, see installation.
Named parameters
A rule can be associated with a few GET parameters. These GET parametersappear in the rule's pattern as special tokens in the following format:
<ParameterName:ParameterPattern>
ParameterName is a name of a GET parameter, and the optional ParameterPatternis the regular expression that should be used to match the value of the
GET parameter. In case ParameterPattern is omitted, it means the parametershould match any characters except /. When creating a URL, these param-eter tokens will be replaced with the corresponding parameter values; whenparsing a URL, the corresponding GET parameters will be populated withthe parsed results.
Let's use some examples to explain how URL rules work. We assumethat our rule set consists of three rules:
[
'posts'=>'post/list',
'post/<id:\d+>'=>'post/read',
'post/<year:\d{4}>/<title>'=>'post/read',
]
• Calling Url::toRoute('post/list') generates /index.php/posts. The �rstrule is applied.
• Calling Url::toRoute(['post/read', 'id' => 100]) generates /index.php/
post/100. The second rule is applied.
• Calling Url::toRoute(['post/read', 'year' => 2008, 'title' => 'a sample
post']) generates /index.php/post/2008/a%20sample%20post. The thirdrule is applied.
• Calling Url::toRoute('post/read') generates /index.php/post/read. Noneof the rules is applied, convention is used instead.
In summary, when using createUrl to generate a URL, the route and the GET
parameters passed to the method are used to decide which URL rule to beapplied. If every parameter associated with a rule can be found in the GET

4.1. URL MANAGEMENT 115
parameters passed to createUrl, and if the route of the rule also matches theroute parameter, the rule will be used to generate the URL.
If the GET parameters passed to Url::toRoute are more than those requiredby a rule, the additional parameters will appear in the query string. Forexample, if we call Url::toRoute(['post/read', 'id' => 100, 'year' => 2008]),we will obtain /index.php/post/100?year=2008.
As we mentioned earlier, the other purpose of URL rules is to parse therequesting URLs. Naturally, this is an inverse process of URL creation. Forexample, when a user requests for /index.php/post/100, the second rule in theabove example will apply, which resolves in the route post/read and the GET
parameter ['id' => 100] (accessible via Yii::$app->request->get('id')).
Parameterizing Routes
We may reference named parameters in the route part of a rule. This allowsa rule to be applied to multiple routes based on matching criteria. It mayalso help reduce the number of rules needed for an application, and thusimprove the overall performance.
We use the following example rules to illustrate how to parameterizeroutes with named parameters:
[
'<controller:(post|comment)>/<id:\d+>/<action:(create|update|delete)>'
=> '<controller>/<action>',
'<controller:(post|comment)>/<id:\d+>' => '<controller>/read',
'<controller:(post|comment)>s' => '<controller>/list',
]
In the above example, we use two named parameters in the route part ofthe rules: controller and action. The former matches a controller ID to beeither post or comment, while the latter matches an action ID to be create,update or delete. You may name the parameters di�erently as long as theydo not con�ict with GET parameters that may appear in URLs.
Using the above rules, the URL /index.php/post/123/create will be parsedas the route post/create with GET parameter id=123. Given the route comment
/list and GET parameter page=2, we can create a URL /index.php/comments?
page=2.
Parameterizing hostnames
It is also possible to include hostnames in the rules for parsing and creatingURLs. One may extract part of the hostname to be a GET parameter. Thisis especially useful for handling subdomains. For example, the URL http://
admin.example.com/en/profile may be parsed into GET parameters user=admin
and lang=en. On the other hand, rules with hostname may also be used tocreate URLs with parameterized hostnames.

116 CHAPTER 4. HANDLING REQUESTS
In order to use parameterized hostnames, simply declare URL rules withhost info, e.g.:
[
'http://<user:\w+>.example.com/<lang:\w+>/profile' => 'user/profile',
]
In the above example the �rst segment of the hostname is treated as theuser parameter while the �rst segment of the path info is treated as the langparameter. The rule corresponds to the user/profile route.
Note that yii\web\UrlManager::showScriptName will not take e�ectwhen a URL is being created using a rule with a parameterized hostname.
Also note that any rule with a parameterized hostname should NOTcontain the subfolder if the application is under a subfolder of the Web root.For example, if the application is under http://www.example.com/sandbox/blog,then we should still use the same URL rule as described above without thesubfolder sandbox/blog.
Faking URL Su�x
<?php
return [
// ...
'components' => [
'urlManager' => [
'suffix' => '.html',
],
],
];
Handling REST requests
TBD: - RESTful routing: yii\filters\VerbFilter, yii\web\UrlManager::$rules - Json API: - response: yii\web\Response::format - request:yii\web\Request::$parsers, yii\web\JsonParser
4.1.4 URL parsing
Complimentary to creating URLs Yii also handles transforming custom URLsback into internal routes and parameters.
Strict URL parsing
By default if there's no custom rule for a URL and the URL matches thedefault format such as /site/page, Yii tries to run the corresponding con-troller's action. This behavior can be disabled so if there's no custom rulematch, a 404 not found error will be produced immediately.

4.1. URL MANAGEMENT 117
<?php
return [
// ...
'components' => [
'urlManager' => [
'enableStrictParsing' => true,
],
],
];
4.1.5 Creating your own rule classes
yii\web\UrlRule class is used for both parsing URL into parameters andcreating URL based on parameters. Despite the fact that default imple-mentation is �exible enough for the majority of projects, there are situationswhen using your own rule class is the best choice. For example, in a car dealerwebsite, we may want to support the URL format like /Manufacturer/Model,where Manufacturer and Model must both match some data in a database ta-ble. The default rule class will not work because it mostly relies on staticallydeclared regular expressions which have no database knowledge.
We can write a new URL rule class by extending from yii\web\UrlRule
and use it in one or multiple URL rules. Using the above car dealer websiteas an example, we may declare the following URL rules in application con�g:
// ...
'components' => [
'urlManager' => [
'rules' => [
'<action:(login|logout|about)>' => 'site/<action>',
// ...
['class' => 'app\components\CarUrlRule', 'connectionID' => 'db',
/* ... */],
],
],
],
In the above, we use the custom URL rule class CarUrlRule to handle theURL format /Manufacturer/Model. The class can be written like the following:
namespace app\components;
use yii\web\UrlRule;
class CarUrlRule extends UrlRule
{
public $connectionID = 'db';
public function createUrl($manager, $route, $params)
{

118 CHAPTER 4. HANDLING REQUESTS
if ($route === 'car/index') {
if (isset($params['manufacturer'], $params['model'])) {
return $params['manufacturer'] . '/' . $params['model'];
} elseif (isset($params['manufacturer'])) {
return $params['manufacturer'];
}
}
return false; // this rule does not apply
}
public function parseRequest($manager, $request)
{
$pathInfo = $request->getPathInfo();
if (preg_match('%^(\w+)(/(\w+))?$%', $pathInfo, $matches)) {
// check $matches[1] and $matches[3] to see
// if they match a manufacturer and a model in the database
// If so, set $params['manufacturer'] and/or $params['model']
// and return ['car/index', $params]
}
return false; // this rule does not apply
}
}
Besides the above usage, custom URL rule classes can also be implementedfor many other purposes. For example, we can write a rule class to log theURL parsing and creation requests. This may be useful during developmentstage. We can also write a rule class to display a special 404 error page incase all other URL rules fail to resolve the current request. Note that in thiscase, the rule of this special class must be declared as the last rule.
4.2 Error Handling
Note: This section is under development.
Error handling in Yii is di�erent than handling errors in plain PHP. First ofall, Yii will convert all non-fatal errors to exceptions:
use yii\base\ErrorException;
use Yii;
try {
10/0;
} catch (ErrorException $e) {
Yii::warning("Tried dividing by zero.");
}
// execution may continue
As demonstrated above you may handle errors using try-catch.Second, even fatal errors in Yii are rendered in a nice way. This means
that in debugging mode, you can trace the causes of fatal errors in order tomore quickly identify the cause of the problem.

4.2. ERROR HANDLING 119
4.2.1 Rendering errors in a dedicated controller action
The default Yii error page is great when developing a site, and is acceptablefor production sites if YII_DEBUG is turned o� in your bootstrap index.php
�le. But you may want to customize the default error page to make it moresuitable for your project.
The easiest way to create a custom error page it is to use a dedicatedcontroller action for error rendering. First, you'll need to con�gure theerrorHandler component in the application's con�guration:
// ...
'components' => [
// ...
'errorHandler' => [
'errorAction' => 'site/error',
],
]
With that con�guration in place, whenever an error occurs, Yii will executethe error-action of the site-controller. That action should look for an excep-tion and, if present, render the proper view �le, passing along the exception:
public function actionError()
{
$exception = \Yii::$app->errorHandler->exception;
if ($exception !== null) {
return $this->render('error', ['exception' => $exception]);
}
}
Next, you would create the views/site/error.php �le, which would make useof the exception. The exception object has the following properties:
• statusCode: the HTTP status code (e.g. 403, 500). Available for yii\web\HttpException only.
• code: the code of the exception.
• message: the error message.
• file: the name of the PHP script �le where the error occurs.
• line: the line number of the code where the error occurs.
• trace: the call stack of the error.
4.2.2 Rendering errors without a dedicated controller action
Instead of creating a dedicated action within the Site controller, you couldjust indicate to Yii what class should be used to handle errors:

120 CHAPTER 4. HANDLING REQUESTS
public function actions()
{
return [
'error' => [
'class' => 'yii\web\ErrorAction',
],
];
}
After associating the class with the error as in the above, de�ne the views/
site/error.php �le, which will automatically be used. The view will be passedthree variables:
• $name: the error name
• $message: the error message
• $exception: the exception being handled
The $exception object will have the same properties as outlined above.
4.3 Logging
Note: This section is under development.
Yii provides �exible and extensible logger that is able to handle messagesaccording to severity level or their type. You may �lter messages by multiplecriteria and forward them to �les, email, debugger etc.
4.3.1 Logging basics
Basic logging is as simple as calling one method:
\Yii::info('Hello, I am a test log message');
You can log simple strings as well as more complex data structures such asarrays or objects. When logging data that is not a string the defaulf yii logtargets will serialize the value using yii\helpers\Vardumper::export().
Message category
Additionally to the message itself message category could be speci�ed inorder to allow �ltering such messages and handing these di�erently. Messagecategory is passed as a second argument of logging methods and is applicationby default.

4.3. LOGGING 121
Severity levels
There are multiple severity levels and corresponding methods available:
• Yii::trace used maily for development purpose to indicate work�owof some code. Note that it only works in development mode whenYII_DEBUG is set to true.
• Yii::error used when there's unrecoverable error.
• Yii::warning used when an error occurred but execution can be con-tinued.
• Yii::info used to keep record of important events such as adminis-trator logins.
4.3.2 Log targets
When one of the logging methods is called, message is passed to yii\log
\Logger component accessible as Yii::getLogger(). Logger accumulates mes-sages in memory and then when there are enough messages or when thecurrent request �nishes, sends them to di�erent log targets, such as �le oremail.
You may con�gure the targets in application con�guration, like the fol-lowing:
[
'components' => [
'log' => [
'targets' => [
'file' => [
'class' => 'yii\log\FileTarget',
'levels' => ['trace', 'info'],
'categories' => ['yii\*'],
],
'email' => [
'class' => 'yii\log\EmailTarget',
'levels' => ['error', 'warning'],
'message' => [
'to' => ['[email protected]', '[email protected]
'],
'subject' => 'New example.com log message',
],
],
],
],
],
]
In the con�g above we are de�ning two log targets: yii\log\FileTarget
and yii\log\EmailTarget. In both cases we are �ltering messages handles

122 CHAPTER 4. HANDLING REQUESTS
by these targets by severity. In case of �le target we're additionally �lter bycategory. yii\* means all categories starting with yii\.
Each log target can have a name and can be referenced via the yii\log\Logger::targets property as follows:
Yii::$app->log->targets['file']->enabled = false;
When the application ends or yii\log\Logger::flushInterval is reached,Logger will call yii\log\Logger::flush() to send logged messages to dif-ferent log targets, such as �le, email, web.
4.3.3 Pro�ling
Performance pro�ling is a special type of message logging that can be usedto measure the time needed for the speci�ed code blocks to execute and �ndout what the performance bottleneck is.
To use it we need to identify which code blocks need to be pro�led.Then we mark the beginning and the end of each code block by inserting thefollowing methods:
\Yii::beginProfile('myBenchmark');
...code block being profiled...
\Yii::endProfile('myBenchmark');
where myBenchmark uniquely identi�es the code block.Note, code blocks need to be nested properly such as
\Yii::beginProfile('block1');
// some code to be profiled
\Yii::beginProfile('block2');
// some other code to be profiled
\Yii::endProfile('block2');
\Yii::endProfile('block1');
Pro�ling results could be displayed in debugger.

Chapter 5
Key Concepts
5.1 Components
Components are the main building blocks of Yii applications. Componentsare instances of yii\base\Component or an extended class. The three mainfeatures that components provide to other classes are:
• Properties
• Events
• Behaviors,
Separately and combined, these features make Yii classes much more cus-tomizable and easier to use. For example, the included yii\jui\DatePicker,a user interface component, can be used in a view to generate an interactivedate picker:
use yii\jui\DatePicker;
echo DatePicker::widget([
'language' => 'ru',
'name' => 'country',
'clientOptions' => [
'dateFormat' => 'yy-mm-dd',
],
]);
The widget's properties are easily writable because the class extends yii
\base\Component.
While components are very powerful, they are a bit heavier than normalobjects, due to the fact that it takes extra memory and CPU time to supportevents and behaviors in particular. If your components do not need thesetwo features, you may consider extending your component class from yii
\base\Object instead of yii\base\Component. Doing so will make your
123

124 CHAPTER 5. KEY CONCEPTS
components as e�cient as normal PHP objects, but with the added supportfor properties.
When extending your class from yii\base\Component or yii\base\Object,it is recommended that you follow these conventions:
• If you override the constructor, specify a $config parameter as the con-structor's last parameter, and then pass this parameter to the parentconstructor.
• Always call the parent constructor at the end of your overriding con-structor.
• If you override the yii\base\Object::init() method, make sure youcall the parent implementation of init at the beginning of your init
method.
For example:
namespace yii\components\MyClass;
use yii\base\Object;
class MyClass extends Object
{
public $prop1;
public $prop2;
public function __construct($param1, $param2, $config = [])
{
// ... initialization before configuration is applied
parent::__construct($config);
}
public function init()
{
parent::init();
// ... initialization after configuration is applied
}
}
Following these guideliness will make your components con�gurable whenthey are created. For example:
$component = new MyClass(1, 2, ['prop1' => 3, 'prop2' => 4]);
// alternatively
$component = \Yii::createObject([
'class' => MyClass::className(),
'prop1' => 3,
'prop2' => 4,
], [1, 2]);

5.2. PROPERTIES 125
Info: While the approach of calling Yii::createObject() looksmore complicated, it is more powerful due to the fact that it isimplemented on top of a dependency injection container.
The yii\base\Object class enforces the following object lifecycle:
1. Pre-initialization within the constructor. You can set default propertyvalues here.
2. Object con�guration via $config. The con�guration may overwrite thedefault values set within the constructor.
3. Post-initialization within yii\base\Object::init(). You may over-ride this method to perform sanity checks and normalization of theproperties.
4. Object method calls.
The �rst three steps all happen within the object's constructor. This meansthat once you get an object instance, it has already been initialized to aproper state that you can reliably work with.
5.2 Properties
In PHP, class member variables are also called properties. These variablesare part of the class de�nition, and are used to represent the state of a classinstance (i.e., to di�erentiate one instance of the class from another). Inpractice, you may often want to handle the reading or writing of propertiesin special ways. For example, you may want to trim a string when it is beingassigned to a label property. You could use the following code to achievethis task:
$object->label = trim($label);
The drawback of the above code is that you have to call trim() everywherein your code where you met set the label property. If in the future, the label
property gets a new requirement, such as the �rst letter must be captialized,you would again have to modify every bit of code that assigns a value tolabel. The repetition of code leads to bugs and is a practice you want toavoid as much as possible.
To solve this problem, Yii introduces a base class called yii\base\Objectthat supports de�ning properties based on getter and setter class methods.If a class needs such support, it should extend from yii\base\Object or achild class.

126 CHAPTER 5. KEY CONCEPTS
Info: Nearly every core class in the Yii framework extends fromyii\base\Object or a child class. This means that wheneveryou see a getter or setter in a core class, you can use it like aproperty.
A getter method is a method whose name starts with the word get; a settermethod starts with set. The name after the get or set pre�x de�nes the nameof a property. For example, a getter getLabel() and/or a setter setLabel()
de�nes a property named label, as shown in the following code:
namespace app\components;
use yii\base\Object;
class Foo extend Object
{
private $_label;
public function getLabel()
{
return $this->_label;
}
public function setLabel($value)
{
$this->_label = trim($value);
}
}
(To be clear, the getter and setter methods create the property label, whichin this case internally refer to a private attributed named _label.)
Properties de�ned by getters and setters can be used like class membervariables. The main di�erence is that when such a property is being read,the corresponding getter method will be called; when the property is be-ing assigned a value, the corresponding setter method will be called. Forexample:
// equivalent to $label = $object->getLabel();
$label = $object->label;
// equivalent to $object->setLabel('abc');
$object->label = 'abc';
A property de�ned by a getter without a setter is read only. Trying to assigna value to such a property will cause an yii\base\InvalidCallException.Similarly, a property de�ned by a setter without a getter is write only, andtrying to read such a property will also cause an exception. It is not commonto have write-only properties.
There are several special rules for, and limitations on, the propertiesde�ned via getters and setters:

5.3. EVENTS 127
• The names of such properties are case-insensitive. For example, $object->label and $object->Label are the same. This is because method namesin PHP are case-insensitive.
• If the name of such a property is the same as a class member variable,the latter will take precedence. For example, if the above Foo class hasa member variable label, then the assignment $object->label = 'abc'
will a�ect the member variable `label', that line would not call thesetLabel() setter method.
• These properties do not support visibility. It makes no di�erence forthe visibility of a property if the de�ning getter or setter method ispublic, protected or private.
• The properties can only be de�ned by non-static getters and/or setters.Static methods will not be treated in this same manner.
Returning back to the problem described at the beginning of this guide,instead of calling trim() everywhere a label value is assigned, trim() onlyneeds to be invoked within the setter setLabel(). And if a new requirementcomes that requires the label be initially capitalized, the setLabel() methodcan quickly be modi�ed without touching any other code. The one changewill universally a�ect every assignment to label.
5.3 Events
Events allow you to inject custom code into existing code at certain executionpoints. You can attach custom code to an event so that when the event istriggered, the code gets executed automatically. For example, a mailer objectmay trigger a messageSent event when it successfully sends a message. If youwant to keep track of the messages that are successfully sent, you could thensimply attach the tracking code to the messageSent event.
Yii introduces a base class called yii\base\Component to support events.If a class needs to trigger events, it should extend from yii\base\Component
or a child class.
5.3.1 Triggering Events
Events are triggered by calling the yii\base\Component::trigger()method.The method requires an event name, and optionally an event object that de-scribes the parameters to be passed to the event handlers. For example:
namespace app\components;
use yii\base\Component;
use yii\base\Event;

128 CHAPTER 5. KEY CONCEPTS
class Foo extends Component
{
const EVENT_HELLO = 'hello';
public function bar()
{
$this->trigger(self::EVENT_HELLO);
}
}
In the above code, when you call bar(), it will trigger an event named hello.
Tip: It is recommended to use class constants to represent eventnames. In the above example, the constant EVENT_HELLO is usedto represent hello. This approach has two bene�ts. First, itprevents typos and can impact IDE auto-completion support.Second, you can tell what events are supported by a class bysimply checking the constant declarations.
Sometimes when triggering an event, you may want to pass along additionalinformation to the event handlers. For example, a mailer may want passthe message information to the handlers of the messageSent event so that thehandlers can know the particulars of the sent messages. To do so, you canprovide an event object as the second parameter to the yii\base\Component::trigger()method. The event object must be an instance of the yii\base\Event class or a child class. For example:
namespace app\components;
use yii\base\Component;
use yii\base\Event;
class MessageEvent extends Event
{
public $message;
}
class Mailer extends Component
{
const EVENT_MESSAGE_SENT = 'messageSent';
public function send($message)
{
// ...sending $message...
$event = new MessageEvent;
$event->message = $message;
$this->trigger(self::EVENT_MESSAGE_SENT, $event);
}
}

5.3. EVENTS 129
When the yii\base\Component::trigger() method is called, it will callhandlers that are attached to the named event.
5.3.2 Event Handlers
An event handler is a PHP callback1 that gets executed when the event it isattached to is triggered. You can use one of the following callbacks:
• a global PHP function speci�ed in terms of a string, e.g., 'trim()';
• an object method speci�ed in terms of an array of an object and amethod name, e.g., [$object, $method];
• a static class method speci�ed in terms of an array of a class name anda method name, e.g., [$class, $method];
• an anonymous function, e.g., function ($event) { ... }.
The signature of an event handler is:
function ($event) {
// $event is an object of yii\base\Event or its child class
}
Through the $event parameter, an event handler may get the following in-formation about an event:
• yii\base\Event::name
• yii\base\Event::sender: the object whose trigger()method is called.
• yii\base\Event::data: the data that is provided when attaching theevent handler (to be explained shortly).
5.3.3 Attaching Event Handlers
You can attach a handler to an event by calling the yii\base\Component::on() method. For example,
$foo = new Foo;
// the handler is a global function
$foo->on(Foo::EVENT_HELLO, 'function_name');
// the handler is an object method
$foo->on(Foo::EVENT_HELLO, [$object, 'methodName']);
// the handler is a static class method
$foo->on(Foo::EVENT_HELLO, ['app\components\Bar', 'methodName']);
1http://www.php.net/manual/en/language.types.callable.php

130 CHAPTER 5. KEY CONCEPTS
// the handler is an anonymous function
$foo->on(Foo::EVENT_HELLO, function ($event) {
// event handling logic
});
You may also attach event handlers through con�gurations. For more details,please refer to the Con�gurations section.
When attaching an event handler, you may provide additional data asthe third parameter to yii\base\Component::on(). The data will be madeavailable to the handler when the event is triggered and the handler is called.For example,
// The following code will display "abc" when the event is triggered
// because $event->data contains the data passed to "on"
$foo->on(Foo::EVENT_HELLO, function ($event) {
echo $event->data;
}, 'abc');
You may attach one or multiple handlers to a single event. When an event istriggered, the attached handlers will be called in the order they are attachedto the event. If a handler needs to stop the invocation of the handlersbehind it, it may set the yii\base\Event::handled property of the $event
parameter to be true, like the following,
$foo->on(Foo::EVENT_HELLO, function ($event) {
$event->handled = true;
});
By default, a newly attached handler is appended to the existing handlerqueue for the event. As a result, the handler will be called in the last placewhen the event is triggered. To insert the new handler at the start of thehandler queue so that the handler gets called �rst, y ou may call yii\base\Component::on() by passing the fourth parameter $append as false:
$foo->on(Foo::EVENT_HELLO, function ($event) {
// ...
}, $data, false);
5.3.4 Detaching Event Handlers
To detach a handler from an event, call the yii\base\Component::off()
method. For example,
// the handler is a global function
$foo->off(Foo::EVENT_HELLO, 'function_name');
// the handler is an object method
$foo->off(Foo::EVENT_HELLO, [$object, 'methodName']);
// the handler is a static class method
$foo->off(Foo::EVENT_HELLO, ['app\components\Bar', 'methodName']);

5.3. EVENTS 131
// the handler is an anonymous function
$foo->off(Foo::EVENT_HELLO, $anonymousFunction);
Note that in general you should not try to detach an anonymous functionunless you store it somewhere when it is attached to the event. In theabove example, we assume the anonymous function is stored as a variable$anonymousFunction.
To detach ALL handlers from an event, simply call yii\base\Component::off() without the second parameter:
$foo->off(Foo::EVENT_HELLO);
5.3.5 Class-Level Event Handlers
In the above subsections, we have described how to attach a handler to anevent at instance level. Sometimes, you may want to respond to an eventtriggered by EVERY instance of a class instead of a speci�c instance. Insteadof attaching an event handler to every instance, you may attach the handlerat class level by calling the static method yii\base\Event::on().
For example, an Active Record object will trigger a yii\base\ActiveRecord::EVENT_AFTER_INSERT event whenever it inserts a new record into thedatabase. In order to track insertions done by EVERY Active Record object,you may write the following code:
use Yii;
use yii\base\Event;
use yii\db\ActiveRecord;
Event::on(ActiveRecord::className(), ActiveRecord::EVENT_AFTER_INSERT,
function ($event) {
Yii::trace(get_class($event->sender) . ' is inserted');
});
The event handler will get invoked whenever an instance of yii\base\ActiveRecordor its child class triggers the yii\base\ActiveRecord::EVENT_AFTER_INSERTevent. In the handler, you can get the object that triggers the event through$event->sender.
When an object triggers an event, it will �rst call instance-level handlers,followed by class-level handlers.
You may trigger an class-level event by calling the static method yii
\base\Event::trigger(). A class-level event is not associated with a par-ticular object. As a result, it will cause the invocation of class-level eventhandlers only. For example,
use yii\base\Event;
Event::on(Foo::className(), Foo::EVENT_HELLO, function ($event) {
echo $event->sender; // displays "app\models\Foo"
});
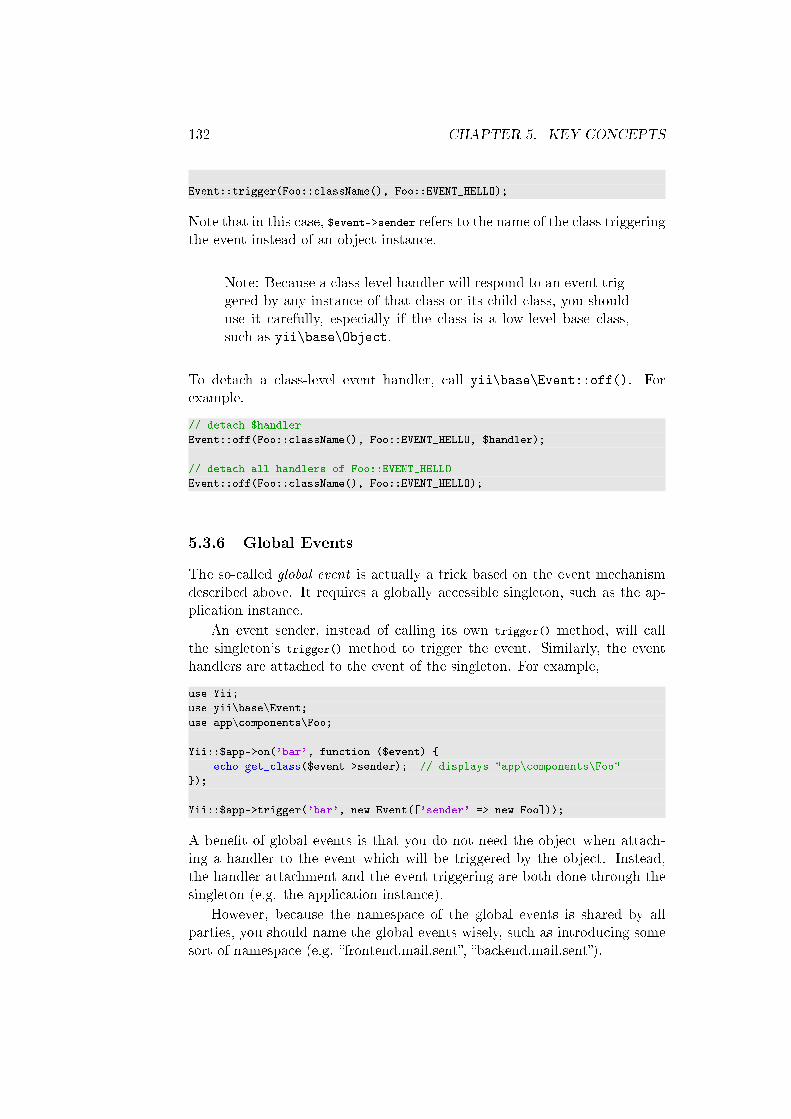
132 CHAPTER 5. KEY CONCEPTS
Event::trigger(Foo::className(), Foo::EVENT_HELLO);
Note that in this case, $event->sender refers to the name of the class triggeringthe event instead of an object instance.
Note: Because a class-level handler will respond to an event trig-gered by any instance of that class or its child class, you shoulduse it carefully, especially if the class is a low-level base class,such as yii\base\Object.
To detach a class-level event handler, call yii\base\Event::off(). Forexample,
// detach $handler
Event::off(Foo::className(), Foo::EVENT_HELLO, $handler);
// detach all handlers of Foo::EVENT_HELLO
Event::off(Foo::className(), Foo::EVENT_HELLO);
5.3.6 Global Events
The so-called global event is actually a trick based on the event mechanismdescribed above. It requires a globally accessible singleton, such as the ap-plication instance.
An event sender, instead of calling its own trigger() method, will callthe singleton's trigger() method to trigger the event. Similarly, the eventhandlers are attached to the event of the singleton. For example,
use Yii;
use yii\base\Event;
use app\components\Foo;
Yii::$app->on('bar', function ($event) {
echo get_class($event->sender); // displays "app\components\Foo"
});
Yii::$app->trigger('bar', new Event(['sender' => new Foo]));
A bene�t of global events is that you do not need the object when attach-ing a handler to the event which will be triggered by the object. Instead,the handler attachment and the event triggering are both done through thesingleton (e.g. the application instance).
However, because the namespace of the global events is shared by allparties, you should name the global events wisely, such as introducing somesort of namespace (e.g. �frontend.mail.sent�, �backend.mail.sent�).

5.4. BEHAVIORS 133
5.4 Behaviors
Behaviors are instances of yii\base\Behavior or its child class. Behav-iors, also known as mixins2, allow you to enhance the functionality of anexisting yii\base\Component class without the need of changing its classinheritance. When a behavior is attached to a component, it will �inject� itsmethods and properties into the component, and you can access these meth-ods and properties as if they are de�ned by the component class. Moreover,a behavior can respond to the events triggered by the component so that itcan customize or adapt the normal code execution of the component.
5.4.1 Using Behaviors
To use a behavior, you �rst need to attach it to a yii\base\Component. Wewill describe how to attach a behavior in the next subsection.
Once a behavior is attached to a component, its usage is straightforward.You can access a public member variable or a property de�ned by a getter
and/or a setter of the behavior through the component it is attached to, likethe following,
// "prop1" is a property defined in the behavior class
echo $component->prop1;
$component->prop1 = $value;
You can also call a public method of the behavior similarly,
// bar() is a public method defined in the behavior class
$component->bar();
As you can see, although $component does not de�ne prop1 and bar(), theycan be used as if they are part of the component de�nition.
If two behaviors de�ne the same property or method and they are bothattached to the same component, the behavior that is attached to the compo-nent �rst will take precedence when the property or method is being accessed.
A behavior may be associated with a name when it is attached to acomponent. If this is the case, you may access the behavior object using thename, like the following,
$behavior = $component->getBehavior('myBehavior');
You may also get all behaviors attached to a component:
$behaviors = $component->getBehaviors();
5.4.2 Attaching Behaviors
You can attach a behavior to a yii\base\Component either statically ordynamically. The former is more commonly used in practice.
2http://en.wikipedia.org/wiki/Mixin

134 CHAPTER 5. KEY CONCEPTS
To attach a behavior statically, override the yii\base\Component::behaviors()method of the component class that it is being attached. For example,
namespace app\models;
use yii\db\ActiveRecord;
use app\components\MyBehavior;
class User extends ActiveRecord
{
public function behaviors()
{
return [
// anonymous behavior, behavior class name only
MyBehavior::className(),
// named behavior, behavior class name only
'myBehavior2' => MyBehavior::className(),
// anonymous behavior, configuration array
[
'class' => MyBehavior::className(),
'prop1' => 'value1',
'prop2' => 'value2',
],
// named behavior, configuration array
'myBehavior4' => [
'class' => MyBehavior::className(),
'prop1' => 'value1',
'prop2' => 'value2',
]
];
}
}
The yii\base\Component::behaviors() method should return a list of be-havior con�gurations. Each behavior con�guration can be either a behaviorclass name or a con�guration array.
You may associate a name with a behavior by specifying the array keycorresponding to the behavior con�guration. In this case, the behavior iscalled a named behavior. In the above example, there are two named be-haviors: myBehavior2 and myBehavior4. If a behavior is not associated with aname, it is called an anonymous behavior.
To attach a behavior dynamically, call the yii\base\Component::attachBehavior()method of the component that it is attached to. For example,
use app\components\MyBehavior;
// attach a behavior object
$component->attachBehavior('myBehavior1', new MyBehavior);
// attach a behavior class

5.4. BEHAVIORS 135
$component->attachBehavior('myBehavior2', MyBehavior::className());
// attach a configuration array
$component->attachBehavior('myBehavior3', [
'class' => MyBehavior::className(),
'prop1' => 'value1',
'prop2' => 'value2',
]);
You may also attach behaviors through con�gurations. For more details,please refer to the Con�gurations section.
5.4.3 Detaching Behaviors
To detach a behavior, you can call yii\base\Component::detachBehavior()with the name associated with the behavior:
$component->detachBehavior('myBehavior1');
You may also detach all behaviors:
$component->detachBehaviors();
5.4.4 De�ning Behaviors
To de�ne a behavior, create a class by extending from yii\base\Behavior
or its child class. For example,
namespace app\components;
use yii\base\Model;
use yii\base\Behavior;
class MyBehavior extends Behavior
{
public $prop1;
private $_prop2;
public function getProp2()
{
return $this->_prop2;
}
public function setProp2($value)
{
$this->_prop2 = $value;
}
public function foo()
{
// ...
}
}

136 CHAPTER 5. KEY CONCEPTS
The above code de�nes the behavior class app\components\MyBehavior whichwill provide two properties prop1 and prop2, and one method foo() to thecomponent it is attached to. Note that property prop2 is de�ned via thegetter getProp2() and the setter setProp2(). This is so because yii\base
\Object is an ancestor class of yii\base\Behavior, which supports de�ningproperties by getters/setters.
Within a behavior, you can access the component that the behavior isattached to through the yii\base\Behavior::owner property.
If a behavior needs to respond to the events triggered by the compo-nent it is attached to, it should override the yii\base\Behavior::events()method. For example,
namespace app\components;
use yii\db\ActiveRecord;
use yii\base\Behavior;
class MyBehavior extends Behavior
{
// ...
public function events()
{
return [
ActiveRecord::EVENT_BEFORE_VALIDATE => 'beforeValidate',
];
}
public function beforeValidate($event)
{
// ...
}
}
The yii\base\Behavior::events() method should return a list of eventsand their corresponding handlers. The above example declares that the yii\db\ActiveRecord::EVENT_BEFORE_VALIDATE event and its handler beforeValidate(). When specifying an event handler, you may use one of the followingformats:
• a string that refers to the name of a method of the behavior class, likethe example above;
• an array of an object or class name, and a method name, e.g., [$object, 'methodName'];
• an anonymous function.
The signature of an event handler should be as follows, where $event refersto the event parameter. Please refer to the Events section for more detailsabout events.

5.4. BEHAVIORS 137
function ($event) {
}
5.4.5 Using TimestampBehavior
To wrap up, let's take a look at yii\behaviors\TimestampBehavior - abehavior that supports automatically updating the timestamp attributes ofan yii\db\ActiveRecord when it is being saved.
First, attach this behavior to the yii\db\ActiveRecord class that youplan to use.
namespace app\models\User;
use yii\db\ActiveRecord;
use yii\behaviors\TimestampBehavior;
class User extends ActiveRecord
{
// ...
public function behaviors()
{
return [
[
'class' => TimestampBehavior::className(),
'attributes' => [
ActiveRecord::EVENT_BEFORE_INSERT => ['created_at', '
updated_at'],
ActiveRecord::EVENT_BEFORE_UPDATE => ['updated_at'],
],
],
];
}
}
The behavior con�guration above speci�es that
• when the record is being inserted, the behavior should assign the cur-rent timestamp to the created_at and updated_at attributes;
• when the record is being updated, the behavior should assign the cur-rent timestamp to the updated_at attribute.
Now if you have a User object and try to save it, you will �nd its created_at
and updated_at are automatically �lled with the current timestamp:
$user = new User;
$user->email = '[email protected]';
$user->save();
echo $user->created_at; // shows the current timestamp

138 CHAPTER 5. KEY CONCEPTS
The yii\behaviors\TimestampBehavior also o�ers a useful method yii
\behaviors\TimestampBehavior::touch() which will assign the currenttimestamp to a speci�ed attribute and save it to the database:
$user->touch('login_time');
5.4.6 Comparison with Traits
While behaviors are similar to traits3 in that they both �inject� their prop-erties and methods to the primary class, they di�er in many aspects. Asexplained below, they both have pros and cons. They are more like comple-ments rather than replacements to each other.
### Pros for Behaviors
Behavior classes, like normal classes, support inheritance. Traits, on theother hand, can be considered as language-supported copy and paste. Theydo not support inheritance.
Behaviors can be attached and detached to a component dynamicallywithout requiring you to modify the component class. To use a trait, youmust modify the class using it.
Behaviors are con�gurable while traits are not.
Behaviors can customize the code execution of a component by respond-ing to its events.
When there is name con�ict among di�erent behaviors attached to thesame component, the con�ict is automatically resolved by respecting thebehavior that is attached to the component �rst. Name con�ict caused bydi�erent traits requires you to manually resolve it by renaming the a�ectedproperties or methods.
Pros for Traits
Traits are much more e�cient than behaviors because behaviors are objectswhich take both time and memory.
IDEs are more friendly to traits as they are language construct.
5.5 Con�gurations
Con�gurations are widely used in Yii for creating new objects or initializingexisting objects. They usually include the class names of the objects beingcreated and a list of initial values that should be assigned to object prop-erties. They may also include a list of handlers that should be attached tothe object events, and/or a list of behaviors that should be attached to theobjects.
3http://www.php.net/traits

5.5. CONFIGURATIONS 139
In the following, a con�guration is used to create and initialize a DBconnection:
$config = [
'class' => 'yii\db\Connection',
'dsn' => 'mysql:host=127.0.0.1;dbname=demo',
'username' => 'root',
'password' => '',
'charset' => 'utf8',
];
$db = Yii::createObject($config);
The Yii::createObject() method takes a con�guration and creates an ob-ject based on the class name speci�ed in the con�guration. When the objectis being instantiated, the rest of the con�guration will be used to initializethe object properties, event handlers and/or behaviors.
If you already have an object, you may use Yii::configure() to initial-ize the object properties with a con�guration, like the following,
Yii::configure($object, $config);
Note that in this case, the con�guration should not contain the class element.
5.5.1 Con�guration Format
The format of a con�guration can be formally described as follows,
[
'class' => 'ClassName',
'propertyName' => 'propertyValue',
'on eventName' => $eventHandler,
'as behaviorName' => $behaviorConfig,
]
where
• The class element speci�es a fully quali�ed class name for the objectbeing created.
• The propertyName elements specify the property initial values. The keysare the property names, and the values are the corresponding initialvalues. Only public member variables and properties de�ned by get-ters/setters can be con�gured.
• The on eventName elements specify what handlers should be attached tothe object events. Notice that the array keys are formed by pre�xingevent names with on . Please refer to the Events section for supportedevent handler formats.
• And the as behaviorName elements specify what behaviors should be at-tached to the object. Notice that the array keys are formed by pre�xing

140 CHAPTER 5. KEY CONCEPTS
behavior names with on . $behaviorConfig represents the con�gurationfor creating a behavior, like a normal con�guration as we are describinghere.
Below is an example showing a con�guration with property initial values,event handlers and behaviors:
[
'class' => 'app\components\SearchEngine',
'apiKey' => 'xxxxxxxx',
'on search' => function ($event) {
Yii::info("Keyword searched: " . $event->keyword);
},
'as indexer' => [
'class' => 'app\components\IndexerBehavior',
// ... property init values ...
],
]
5.5.2 Using Con�gurations
Con�gurations are used in many places in Yii. At the beginning of thissection, we have shown how to use create an object according to a con�gu-ration by using Yii::createObject(). In this subsection, we will describeapplication con�gurations and widget con�gurations - two major usages ofcon�gurations.
Application Con�gurations
Con�guration for an application is probably one of the most complex con�g-urations. This is because the yii\web\Application class has a lot of con�g-urable properties and events. More importantly, its yii\web\Application::components property can receive an array of con�gurations for creatingcomponents that are registered through the application. The following isan abstract from the application con�guration �le for the basic applicationtemplate.
$config = [
'id' => 'basic',
'basePath' => dirname(__DIR__),
'extensions' => require(__DIR__ . '/../vendor/yiisoft/extensions.php'),
'components' => [
'cache' => [
'class' => 'yii\caching\FileCache',
],
'mail' => [
'class' => 'yii\swiftmailer\Mailer',
],
'log' => [
'class' => 'yii\log\Dispatcher',

5.5. CONFIGURATIONS 141
'traceLevel' => YII_DEBUG ? 3 : 0,
'targets' => [
[
'class' => 'yii\log\FileTarget',
],
],
],
'db' => [
'class' => 'yii\db\Connection',
'dsn' => 'mysql:host=localhost;dbname=stay2',
'username' => 'root',
'password' => '',
'charset' => 'utf8',
],
],
];
The con�guration does not have a class key. This is because it is used asfollows in an entry script, where the class name is already given,
(new yii\web\Application($config))->run();
For more details about con�guring the components property of an applicationcan be found in the Applications section and the Service Locator section.
Widget Con�gurations
When using widgets, you often need to use con�gurations to customize thewidget properties. Both of the yii\base\Widget::widget() and yii\base
\Widget::beginWidget() methods can be used to create a widget. Theytake a con�guration array, like the following,
use yii\widgets\Menu;
echo Menu::widget([
'activateItems' => false,
'items' => [
['label' => 'Home', 'url' => ['site/index']],
['label' => 'Products', 'url' => ['product/index']],
['label' => 'Login', 'url' => ['site/login'], 'visible' => Yii::$app
->user->isGuest],
],
]);
The above code creates a Menu widget and initializes its activeItems propertyto be false. The items property is also con�gured with menu items to bedisplayed.
Note that because the class name is already given, the con�guration arrayshould NOT have the class key.
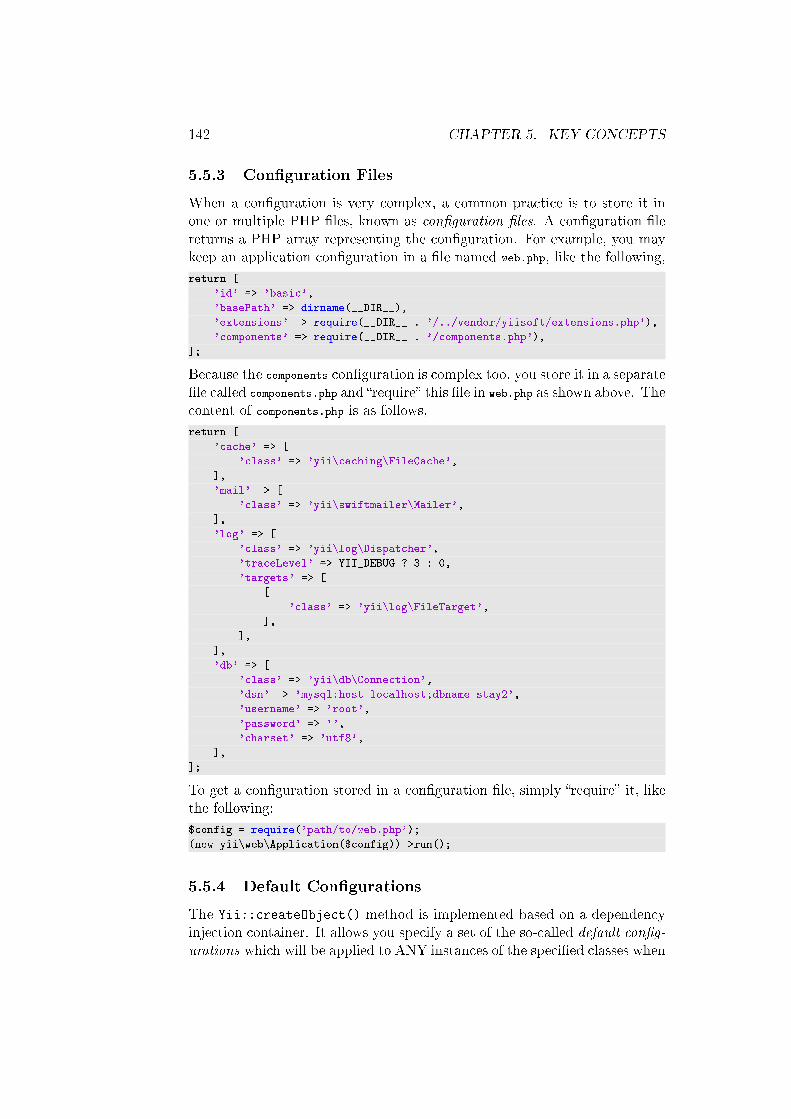
142 CHAPTER 5. KEY CONCEPTS
5.5.3 Con�guration Files
When a con�guration is very complex, a common practice is to store it inone or multiple PHP �les, known as con�guration �les. A con�guration �lereturns a PHP array representing the con�guration. For example, you maykeep an application con�guration in a �le named web.php, like the following,
return [
'id' => 'basic',
'basePath' => dirname(__DIR__),
'extensions' => require(__DIR__ . '/../vendor/yiisoft/extensions.php'),
'components' => require(__DIR__ . '/components.php'),
];
Because the components con�guration is complex too, you store it in a separate�le called components.php and �require� this �le in web.php as shown above. Thecontent of components.php is as follows,
return [
'cache' => [
'class' => 'yii\caching\FileCache',
],
'mail' => [
'class' => 'yii\swiftmailer\Mailer',
],
'log' => [
'class' => 'yii\log\Dispatcher',
'traceLevel' => YII_DEBUG ? 3 : 0,
'targets' => [
[
'class' => 'yii\log\FileTarget',
],
],
],
'db' => [
'class' => 'yii\db\Connection',
'dsn' => 'mysql:host=localhost;dbname=stay2',
'username' => 'root',
'password' => '',
'charset' => 'utf8',
],
];
To get a con�guration stored in a con�guration �le, simply �require� it, likethe following:
$config = require('path/to/web.php');
(new yii\web\Application($config))->run();
5.5.4 Default Con�gurations
The Yii::createObject() method is implemented based on a dependencyinjection container. It allows you specify a set of the so-called default con�g-
urations which will be applied to ANY instances of the speci�ed classes when

5.5. CONFIGURATIONS 143
they are being created using Yii::createObject(). The default con�gura-tions can be speci�ed by calling Yii::$container->set() in the bootstrappingcode.
For example, if you want to customize yii\widgets\LinkPager so thatALL link pagers will show at most 5 page buttons (the default value is 10),you may use the following code to achieve this goal,
\Yii::$container->set('yii\widgets\LinkPager', [
'maxButtonCount' => 5,
]);
Without using default con�gurations, you would have to con�gure maxButtonCountin every place where you use link pagers.
5.5.5 Environment Constants
Con�gurations often vary according to the environment in which an applica-tion runs. For example, in development environment, you may want to usea database named mydb_dev, while on production server you may want to usethe mydb_prod database. To facilitate switching environments, Yii providesa constant named YII_ENV that you may de�ne in the entry script of yourapplication. For example,
defined('YII_ENV') or define('YII_ENV', 'dev');
You may de�ne YII_ENV as one of the following values:
• prod: production environment. The constant YII_ENV_PROD will evaluateas true. This is the default value of YII_ENV if you do not de�ne it.
• dev: development environment. The constant YII_ENV_DEV will evaluateas true.
• test: testing environment. The constant YII_ENV_TEST will evaluate astrue.
With these environment constants, you may specify your con�gurations con-ditionally based on the current environment. For example, your applicationcon�guration may contain the following code to enable the debug toolbarand debugger in development environment.
$config = [...];
if (YII_ENV_DEV) {
// configuration adjustments for 'dev' environment
$config['bootstrap'][] = 'debug';
$config['modules']['debug'] = 'yii\debug\Module';
}
return $config;

144 CHAPTER 5. KEY CONCEPTS
5.6 Aliases
Aliases are used to represent �le paths or URLs to avoid hard-coding absolutepaths or URLs in your code. An alias must start with a @ character so that itcan be di�erentiated from �le paths and URLs. For example, the alias @yii
represents the installation path of the Yii framework, while @web representsthe base URL for the currently running Web application.
5.6.1 De�ning Aliases
You can call Yii::setAlias() to de�ne an alias for a given �le path or URL.For example,
// an alias of file path
Yii::setAlias('@foo', '/path/to/foo');
// an alias of URL
Yii::setAlias('@bar', 'http://www.example.com');
Note: A �le path or URL being aliased may NOT necessarilyrefer to an existing �le or resource.
Given an alias, you may derive a new alias (without the need of calling Yii
::setAlias()) by appending a slash / followed with one or several pathsegments. We call the aliases de�ned via Yii::setAlias() root aliases,while the aliases derived from them derived aliases. For example, @foo is aroot alias, while @foo/bar/file.php is a derived alias.
You can de�ne an alias using another alias (either root alias or derivedalias is �ne):
Yii::setAlias('@foobar', '@foo/bar');
Root aliases are usually de�ned during the bootstrapping stage. For exam-ple, you may call Yii::setAlias() in the entry script. For convenience,Application provides a writable property named aliases that you can con-�gure in the application con�guration, like the following,
return [
// ...
'aliases' => [
'@foo' => '/path/to/foo',
'@bar' => 'http://www.example.com',
],
];
5.6.2 Resolving Aliases
You can call Yii::getAlias() to resolve a root alias into the �le path orURL it is representing. The same method can also resolve a derived aliasinto the corresponding �le path or URL. For example,

5.6. ALIASES 145
echo Yii::getAlias('@foo'); // displays: /path/to/foo
echo Yii::getAlias('@bar'); // displays: http://www.example.
com
echo Yii::getAlias('@foo/bar/file.php'); // displays: /path/to/foo/bar/file
.php
The path/URL represented by a derived alias is determined by replacing theroot alias part with its corresponding path/URL in the derived alias.
Note: The Yii::getAlias() method does not check whether theresulting path/URL refers to an existing �le or resource.
A root alias may also contain slash / characters. The Yii::getAlias()
method is intelligent enough to tell which part of an alias is a root alias andthus correctly determines the corresponding �le path or URL. For example,
Yii::setAlias('@foo', '/path/to/foo');
Yii::setAlias('@foo/bar', '/path2/bar');
Yii::getAlias('@foo/test/file.php'); // displays: /path/to/foo/test/file.
php
Yii::getAlias('@foo/bar/file.php'); // displays: /path2/bar/file.php
If @foo/bar is not de�ned as a root alias, the last statement would display/path/to/foo/bar/file.php.
5.6.3 Using Aliases
Aliases are recognized in many places in Yii without the need of calling Yii::getAlias() to convert them into paths/URLs. For example, yii\caching\FileCache::cachePath can accept both a �le path and an alias represent-ing a �le path, thanks to the @ pre�x which allows it to di�erentiate a �lepath from an alias.
use yii\caching\FileCache;
$cache = new FileCache([
'cachePath' => '@runtime/cache',
]);
Please pay attention to the API documentation to see if a property or methodparameter supports aliases.
5.6.4 Prede�ned Aliases
Yii prede�nes a set of aliases to ease the need of referencing commonly used�le paths and URLs. The following is the list of the prede�ned aliases:
• @yii: the directory where the BaseYii.php �le is located (also called theframework directory).

146 CHAPTER 5. KEY CONCEPTS
• @app: the yii\base\Application::basePath of the currently runningapplication.
• @runtime: the yii\base\Application::runtimePath of the currentlyrunning application.
• @vendor: the [[yii\base\Application::vendorPath|Composer vendor di-rectory].
• @webroot: the Web root directory of the currently running Web appli-cation.
• @web: the base URL of the currently running Web application.
The @yii alias is de�ned when you include the Yii.php �le in your entry script,while the rest of the aliases are de�ned in the application constructor whenapplying the application con�guration.
5.6.5 Extension Aliases
An alias is automatically de�ned for each extension that is installed viaComposer. The alias is named after the root namespace of the extensionas declared in its composer.json �le, and it represents the root directory ofthe package. For example, if you install the yiisoft/yii2-jui extension, youwill automatically have the alias @yii/jui de�ned during the bootstrappingstage:
Yii::setAlias('@yii/jui', 'VendorPath/yiisoft/yii2-jui');
5.7 Class Autoloading
Yii relies on the class autoloading mechanism4 to locate and include requiredclass �les. It provides a high-performance class autoloader that is compliantto the PSR-4 standard5. The autoloader is installed when you include theYii.php �le.
Note: For simplicity of description, in this section we will onlytalk about autoloading of classes. However, keep in mind that thecontent we are describing here applies to autoloading of interfacesand traits as well.
4http://www.php.net/manual/en/language.oop5.autoload.php5https://github.com/php-fig/fig-standards/blob/master/proposed/
psr-4-autoloader/psr-4-autoloader.md

5.7. CLASS AUTOLOADING 147
5.7.1 Using the Yii Autoloader
To make use of the Yii class autoloader, you should follow two simple ruleswhen creating and naming your classes:
• Each class must be under some namespace (e.g. foo\bar\MyClass).
• Each class must be saved in an individual �le whose path is determinedby the following algorithm:
// $className is a fully qualified class name with the leading backslash
$classFile = Yii::getAlias('@' . str_replace('\\', '/', $className) . '.php'
);
For example, if a class name is foo\bar\MyClass, the alias for the correspondingclass �le path would be @foo/bar/MyClass.php. In order for this alias to be ableto be resolved into a �le path, either @foo or @foo/bar must be a root alias.
When you are using the Basic Application Template, you may put yourclasses under the top-level namespace app so that they can be autoloaded byYii without the need of de�ning a new alias. This is because @app is a prede-�ned alias, and a class name like app\components\MyClass can be resolved intothe class �le AppBasePath/components/MyClass.php, according to the algorithmwe just described.
In the Advanced Application Template, each tier has its own root alias.For example, the front-end tier has a root alias @frontend while the back-end tier @backend. As a result, you may put the front-end classes under thenamespace frontend while the back-end classes under backend. This will allowthese classes to be autoloaded by the Yii autoloader.
5.7.2 Class Map
The Yii class autoloader supports the class map feature which maps classnames to the corresponding class �le paths. When the autoloader is loadinga class, it will �rst check if the class is found in the map. If so, the cor-responding �le path will be included directly without further check. Thismakes class autoloading super fast. In fact, all core Yii classes are beingautoloaded this way.
You may add a class to the class map Yii::$classMap as follows,
Yii::$classMap['foo\bar\MyClass'] = 'path/to/MyClass.php';
Aliases can be used to specify class �le paths. You should set the class mapin the bootstrapping process so that the map is ready before your classes areused.

148 CHAPTER 5. KEY CONCEPTS
5.7.3 Using Other Autoloaders
Because Yii embraces Composer as a package dependency manager, it isrecommended that you also install the Composer autoloader. If you areusing some 3rd-party libraries that have their autoloaders, you should alsoinstall them.
When you are using the Yii autoloader together with other autoloaders,you should include the Yii.php �le after all other autoloaders are installed.This will make the Yii autoloader to be the �rst one responding to any classautoloading request. For example, the following code is extracted from theentry script of the Basic Application Template. The �rst line installs theComposer autoloader, while the second line installs the Yii autoloader.
require(__DIR__ . '/../vendor/autoload.php');
require(__DIR__ . '/../vendor/yiisoft/yii2/Yii.php');
You may use the Composer autoloader alone without the Yii autoloader.However, by doing so, the performance of your class autoloading may bedegraded, and you must follow the rules set by Composer in order for yourclasses to be autoloadable.
Info: If you do not want to use the Yii autoloader, you mustcreate your own version of the Yii.php �le and include it in yourentry script.
5.7.4 Autoloading Extension Classes
The Yii autoloader is capable of autoloading extension classes. The solerequirement is that an extension speci�es the autoload section correctly inits composer.json �le. Please refer to the Composer documentation6 for moredetails about specifying autoload.
In case you do not use the Yii autoloader, the Composer autoloader canstill autoload extension classes for you.
5.8 Service Locator
A service locator is an object that knows how to provide all sorts of services(or components) that an application might need. Within a service locator,each component has only a single instance which is uniquely identi�ed by anID. You use the ID to retrieve a component from the service locator.
In Yii, a service locator is simply an instance of yii\di\ServiceLocatoror its child class.
The most commonly used service locator in Yii is the application objectwhich can be accessed through \Yii::$app. The services it provides are called
6https://getcomposer.org/doc/04-schema.md#autoload

5.8. SERVICE LOCATOR 149
application components, such as the request, response, urlManager components.You may con�gure these components or even replace them with your ownimplementations easily through functionality provided by the service locator.
Besides the application object, each module object is also a service loca-tor.
To use a service locator, the �rst step is to register components. A compo-nent can be registered via yii\di\ServiceLocator::set(). The followingcode shows di�erent ways of registering components:
use yii\di\ServiceLocator;
use yii\caching\FileCache;
$locator = new ServiceLocator;
// register "cache" using a class name that can be used to create a
component
$locator->set('cache', 'yii\caching\ApcCache');
// register "db" using a configuration array that can be used to create a
component
$locator->set('db', [
'class' => 'yii\db\Connection',
'dsn' => 'mysql:host=localhost;dbname=demo',
'username' => 'root',
'password' => '',
]);
// register "db" using an anonymous function that builds a component
$locator->set('search', function () {
return new app\components\SolrService;
});
// register "pageCache" using a component
$locator->set('pageCache', new FileCache);
Once a component is registered, you can access it using its ID in one of thefollowing two ways:
$cache = $locator->get('cache');
// or alternatively
$cache = $locator->cache;
As shown above, yii\di\ServiceLocator allows you to access a componentlike a property using the component ID. When you access a component forthe �rst time, yii\di\ServiceLocator will use the component registrationinformation to create a new instance of the component and return it. Laterif the component is accessed again, the service locator will return the sameinstance.
You may use yii\di\ServiceLocator::has() to check if a componentID has already been registered. If you call yii\di\ServiceLocator::get()with an invalid ID, an exception will be thrown.

150 CHAPTER 5. KEY CONCEPTS
Because service locators are often being created with con�gurations,a writable property named yii\di\ServiceLocator::setComponents() isprovided so that you can con�gure it and register multiple components atonce. The following code shows a con�guration array that can be used tocon�gure an application and register the �db�, �cache� and �search� compo-nents:
return [
// ...
'components' => [
'db' => [
'class' => 'yii\db\Connection',
'dsn' => 'mysql:host=localhost;dbname=demo',
'username' => 'root',
'password' => '',
],
'cache' => 'yii\caching\ApcCache',
'search' => function () {
return new app\components\SolrService;
},
],
];
5.9 Dependency Injection Container
A dependency injection (DI) container is an object that knows how to in-stantiate and con�gure objects and all their dependent objects. Martin'sarticle7 has well explained why DI container is useful. Here we will mainlyexplain the usage of the DI container provided by Yii.
5.9.1 Dependency Injection
Yii provides the DI container feature through the class yii\di\Container.It supports the following kinds of dependency injection:
• Constructor injection;
• Setter and property injection;
• PHP callable injection.
Constructor Injection
The DI container supports constructor injection with the help of type hintsfor constructor parameters. The type hints tell the container which classesor interfaces are dependent when it is used to create a new object. The
7http://martinfowler.com/articles/injection.html

5.9. DEPENDENCY INJECTION CONTAINER 151
container will try to get the instances of the dependent classes or interfacesand then inject them into the new object through the constructor. Forexample,
class Foo
{
public function __construct(Bar $bar)
{
}
}
$foo = $container->get('Foo');
// which is equivalent to the following:
$bar = new Bar;
$foo = new Foo($bar);
Setter and Property Injection
Setter and property injection is supported through con�gurations. Whenregistering a dependency or when creating a new object, you can provide acon�guration which will be used by the container to inject the dependenciesthrough the corresponding setters or properties. For example,
use yii\base\Object;
class Foo extends Object
{
public $bar;
private $_qux;
public function getQux()
{
return $this->_qux;
}
public function setQux(Qux $qux)
{
$this->_qux = $qux;
}
}
$container->get('Foo', [], [
'bar' => $container->get('Bar'),
'qux' => $container->get('Qux'),
]);
PHP Callable Injection
In this case, the container will use a registered PHP callable to build newinstances of a class. The callable is responsible to resolve the dependenciesand inject them appropriately to the newly created objects. For example,

152 CHAPTER 5. KEY CONCEPTS
$container->set('Foo', function () {
return new Foo(new Bar);
});
$foo = $container->get('Foo');
5.9.2 Registering Dependencies
You can use yii\di\Container::set() to register dependencies. The reg-istration requires a dependency name as well as a dependency de�nition. Adependency name can be a class name, an interface name, or an alias name;and a dependency de�nition can be a class name, a con�guration array, or aPHP callable.
$container = new \yii\di\Container;
// register a class name as is. This can be skipped.
$container->set('yii\db\Connection');
// register an interface
// When a class depends on the interface, the corresponding class
// will be instantiated as the dependent object
$container->set('yii\mail\MailInterface', 'yii\swiftmailer\Mailer');
// register an alias name. You can use $container->get('foo')
// to create an instance of Connection
$container->set('foo', 'yii\db\Connection');
// register a class with configuration. The configuration
// will be applied when the class is instantiated by get()
$container->set('yii\db\Connection', [
'dsn' => 'mysql:host=127.0.0.1;dbname=demo',
'username' => 'root',
'password' => '',
'charset' => 'utf8',
]);
// register an alias name with class configuration
// In this case, a "class" element is required to specify the class
$container->set('db', [
'class' => 'yii\db\Connection',
'dsn' => 'mysql:host=127.0.0.1;dbname=demo',
'username' => 'root',
'password' => '',
'charset' => 'utf8',
]);
// register a PHP callable
// The callable will be executed each time when $container->get('db') is
called
$container->set('db', function ($container, $params, $config) {
return new \yii\db\Connection($config);

5.9. DEPENDENCY INJECTION CONTAINER 153
});
// register a component instance
// $container->get('pageCache') will return the same instance each time it
is called
$container->set('pageCache', new FileCache);
Tip: If a dependency name is the same as the correspondingdependency de�nition, you do not need to register it with the DIcontainer.
A dependency registered via set() will generate an instance each time thedependency is needed. You can use yii\di\Container::setSingleton()
to register a dependency that only generates a single instance:
$container->setSingleton('yii\db\Connection', [
'dsn' => 'mysql:host=127.0.0.1;dbname=demo',
'username' => 'root',
'password' => '',
'charset' => 'utf8',
]);
5.9.3 Resolving Dependencies
Once you have registered dependencies, you can use the DI container tocreate new objects, and the container will automatically resolve dependenciesby instantiating them and injecting them into the newly created objects. Thedependency resolution is recursive, meaning that if a dependency has otherdependencies, those dependencies will also be resolved automatically.
You can use yii\di\Container::get() to create new objects. Themethod takes a dependency name, which can be a class name, an interfacename or an alias name. The dependency name may or may not be regis-tered via set() or setSingleton(). You may optionally provide a list of classconstructor parameters and a con�guration to con�gure the newly createdobject. For example,
// "db" is a previously registered alias name
$db = $container->get('db');
// equivalent to: $engine = new \app\components\SearchEngine($apiKey, ['type
' => 1]);
$engine = $container->get('app\components\SearchEngine', [$apiKey], ['type'
=> 1]);
Behind the scene, the DI container does much more work than just creatinga new object. The container will �rst inspect the class constructor to �ndout dependent class or interface names and then automatically resolve thosedependencies recursively.

154 CHAPTER 5. KEY CONCEPTS
The following code shows a more sophisticated example. The UserLister
class depends on an object implementing the UserFinderInterface interface;the UserFinder class implements this interface and depends on a Connection
object. All these dependencies are declared through type hinting of theclass constructor parameters. With property dependency registration, theDI container is able to resolve these dependencies automatically and createsa new UserLister instance with a simple call of get('userLister').
namespace app\models;
use yii\base\Object;
use yii\db\Connection;
use yii\di\Container;
interface UserFinderInterface
{
function findUser();
}
class UserFinder extends Object implements UserFinderInterface
{
public $db;
public function __construct(Connection $db, $config = [])
{
$this->db = $db;
parent::__construct($config);
}
public function findUser()
{
}
}
class UserLister extends Object
{
public $finder;
public function __construct(UserFinderInterface $finder, $config = [])
{
$this->finder = $finder;
parent::__construct($config);
}
}
$container = new Container;
$container->set('yii\db\Connection', [
'dsn' => '...',
]);
$container->set('app\models\UserFinderInterface', [
'class' => 'app\models\UserFinder',
]);
$container->set('userLister', 'app\models\UserLister');

5.9. DEPENDENCY INJECTION CONTAINER 155
$lister = $container->get('userLister');
// which is equivalent to:
$db = new \yii\db\Connection(['dsn' => '...']);
$finder = new UserFinder($db);
$lister = new UserLister($finder);
5.9.4 Practical Usage
Yii creates a DI container when you include the Yii.php �le in the entry scriptof your application. The DI container is accessible via Yii::$container.When you call Yii::createObject(), the method will actually call the con-tainer's yii\di\Container::get()method to create a new object. As afore-mentioned, the DI container will automatically resolve the dependencies (ifany) and inject them into the newly created object. Because Yii uses Yii::createObject() in most of its core code to create new objects, this meansyou can customize the objects globally by dealing with Yii::$container.
For example, you can customize globally the default number of paginationbuttons of yii\widgets\LinkPager:
\Yii::$container->set('yii\widgets\LinkPager', ['maxButtonCount' => 5]);
Now if you use the widget in a view with the following code, the maxButtonCountproperty will be initialized as 5 instead of the default value 10 as de�ned inthe class.
echo \yii\widgets\LinkPager::widget();
You can still override the value set via DI container, though:
echo \yii\widgets\LinkPager::widget(['maxButtonCount' => 20]);
Another example is to take advantage of the automatic constructor injectionof the DI container. Assume your controller class depends on some otherobjects, such as a hotel booking service. You can declare the dependencythrough a constructor parameter and let the DI container to resolve it foryou.
namespace app\controllers;
use yii\web\Controller;
use app\components\BookingInterface;
class HotelController extends Controller
{
protected $bookingService;
public function __construct($id, $module, BookingInterface
$bookingService, $config = [])
{

156 CHAPTER 5. KEY CONCEPTS
$this->bookingService = $bookingService;
parent::__construct($id, $module, $config);
}
}
If you access this controller from browser, you will see an error complainingthe BookingInterface cannot be instantiated. This is because you need to tellthe DI container how to deal with this dependency:
\Yii::$container->set('app\components\BookingInterface', 'app\components\
BookingService');
Now if you access the controller again, an instance of app\components\BookingServicewill be created and injected as the 3rd parameter to the controller's con-structor.
5.9.5 When to Register Dependencies
Because dependencies are needed when new objects are being created, theirregistration should be done as early as possible. The followings are therecommended practices:
• If you are the developer of an application, you can register dependenciesin your application's entry script or in a script that is included by theentry script.
• If you are the developer of a redistributable extension, you can registerdependencies in the bootstrap class of the extension.
5.9.6 Summary
Both dependency injection and service locator are popular design patternsthat allow building software in a loosely-coupled and more testable fash-ion. We highly recommend you to read Martin's article8 to get a deeperunderstanding of dependency injection and service locator.
Yii implements its service locator on top of the dependency injection(DI) container. When a service locator is trying to create a new objectinstance, it will forward the call to the DI container. The latter will resolvethe dependencies automatically as described above.
8http://martinfowler.com/articles/injection.html

Chapter 6
Working with Databases
6.1 Database basics
Note: This section is under development.
Yii has a database access layer built on top of PHP's PDO1. It providesuniform API and solves some inconsistencies between di�erent DBMS. Bydefault Yii supports the following DBMS:
• MySQL2
• MariaDB3
• SQLite4
• PostgreSQL5
• CUBRID6: version 9.1.0 or higher.
• Oracle7
• MSSQL8: version 2012 or above is required if you want to use LIM-IT/OFFSET.
1http://www.php.net/manual/en/book.pdo.php2http://www.mysql.com/3https://mariadb.com/4http://sqlite.org/5http://www.postgresql.org/6http://www.cubrid.org/7http://www.oracle.com/us/products/database/overview/index.html8https://www.microsoft.com/en-us/sqlserver/default.aspx
157

158 CHAPTER 6. WORKING WITH DATABASES
6.1.1 Con�guration
In order to start using database you need to con�gure database connectioncomponent �rst by adding db component to application con�guration (for�basic� web application it's config/web.php) like the following:
return [
// ...
'components' => [
// ...
'db' => [
'class' => 'yii\db\Connection',
'dsn' => 'mysql:host=localhost;dbname=mydatabase', // MySQL,
MariaDB
//'dsn' => 'sqlite:/path/to/database/file', // SQLite
//'dsn' => 'pgsql:host=localhost;port=5432;dbname=mydatabase',
// PostgreSQL
//'dsn' => 'cubrid:dbname=demodb;host=localhost;port=33000', //
CUBRID
//'dsn' => 'sqlsrv:Server=localhost;Database=mydatabase', // MS
SQL Server, sqlsrv driver
//'dsn' => 'dblib:host=localhost;dbname=mydatabase', // MS SQL
Server, dblib driver
//'dsn' => 'mssql:host=localhost;dbname=mydatabase', // MS SQL
Server, mssql driver
//'dsn' => 'oci:dbname=//localhost:1521/mydatabase', // Oracle
'username' => 'root',
'password' => '',
'charset' => 'utf8',
],
],
// ...
];
There is a peculiarity when you want to work with the database through theODBC layer. When using ODBC, connection DSN doesn't indicate uniquely whatdatabase type is being used. That's why you have to override driverName
property of yii\db\Connection class to disambiguate that:
'db' => [
'class' => 'yii\db\Connection',
'driverName' => 'mysql',
'dsn' => 'odbc:Driver={MySQL};Server=localhost;Database=test',
'username' => 'root',
'password' => '',
],
Please refer to the PHP manual9 for more details on the format of the DSNstring.
After the connection component is con�gured you can access it using thefollowing syntax:
9http://www.php.net/manual/en/function.PDO-construct.php

6.1. DATABASE BASICS 159
$connection = \Yii::$app->db;
You can refer to yii\db\Connection for a list of properties you can con-�gure. Also note that you can de�ne more than one connection componentand use both at the same time if needed:
$primaryConnection = \Yii::$app->db;
$secondaryConnection = \Yii::$app->secondDb;
If you don't want to de�ne the connection as an application component youcan instantiate it directly:
$connection = new \yii\db\Connection([
'dsn' => $dsn,
'username' => $username,
'password' => $password,
]);
$connection->open();
Tip: if you need to execute additional SQL queries right afterestablishing a connection you can add the following to your ap-plication con�guration �le:
return [
// ...
'components' => [
// ...
'db' => [
'class' => 'yii\db\Connection',
// ...
'on afterOpen' => function($event) {
$event->sender->createCommand("SET time_zone = '
UTC'")->execute();
}
],
],
// ...
];
6.1.2 Basic SQL queries
Once you have a connection instance you can execute SQL queries using yii
\db\Command.
SELECT
When query returns a set of rows:
$command = $connection->createCommand('SELECT * FROM post');
$posts = $command->queryAll();
When only a single row is returned:

160 CHAPTER 6. WORKING WITH DATABASES
$command = $connection->createCommand('SELECT * FROM post WHERE id=1');
$post = $command->queryOne();
When there are multiple values from the same column:
$command = $connection->createCommand('SELECT title FROM post');
$titles = $command->queryColumn();
When there's a scalar value:
$command = $connection->createCommand('SELECT COUNT(*) FROM post');
$postCount = $command->queryScalar();
UPDATE, INSERT, DELETE etc.
If SQL executed doesn't return any data you can use command's execute
method:
$command = $connection->createCommand('UPDATE post SET status=1 WHERE id=1')
;
$command->execute();
Alternatively the following syntax that takes care of proper table and columnnames quoting is possible:
// INSERT
$connection->createCommand()->insert('user', [
'name' => 'Sam',
'age' => 30,
])->execute();
// INSERT multiple rows at once
$connection->createCommand()->batchInsert('user', ['name', 'age'], [
['Tom', 30],
['Jane', 20],
['Linda', 25],
])->execute();
// UPDATE
$connection->createCommand()->update('user', ['status' => 1], 'age > 30')->
execute();
// DELETE
$connection->createCommand()->delete('user', 'status = 0')->execute();
6.1.3 Quoting table and column names
Most of the time you would use the following syntax for quoting table andcolumn names:
$sql = "SELECT COUNT([[$column]]) FROM {{table}}";
$rowCount = $connection->createCommand($sql)->queryScalar();

6.1. DATABASE BASICS 161
In the code above [[X]] will be converted to properly quoted column namewhile {{Y}} will be converted to properly quoted table name.
For table names there's a special variant {{%Y}} that allows you to auto-matically appending table pre�x if it is set:
$sql = "SELECT COUNT([[$column]]) FROM {{%table}}";
$rowCount = $connection->createCommand($sql)->queryScalar();
The code above will result in selecting from tbl_table if you have table pre�xcon�gured like the following in your con�g �le:
return [
// ...
'components' => [
// ...
'db' => [
// ...
'tablePrefix' => 'tbl_',
],
],
];
The alternative is to quote table and column names manually using yii\db
\Connection::quoteTableName() and yii\db\Connection::quoteColumnName():
$column = $connection->quoteColumnName($column);
$table = $connection->quoteTableName($table);
$sql = "SELECT COUNT($column) FROM $table";
$rowCount = $connection->createCommand($sql)->queryScalar();
6.1.4 Prepared statements
In order to securely pass query parameters you can use prepared statements:
$command = $connection->createCommand('SELECT * FROM post WHERE id=:id');
$command->bindValue(':id', $_GET['id']);
$post = $command->query();
Another usage is performing a query multiple times while preparing it onlyonce:
$command = $connection->createCommand('DELETE FROM post WHERE id=:id');
$command->bindParam(':id', $id);
$id = 1;
$command->execute();
$id = 2;
$command->execute();
6.1.5 Transactions
You can perform transactional SQL queries like the following:

162 CHAPTER 6. WORKING WITH DATABASES
$transaction = $connection->beginTransaction();
try {
$connection->createCommand($sql1)->execute();
$connection->createCommand($sql2)->execute();
// ... executing other SQL statements ...
$transaction->commit();
} catch(Exception $e) {
$transaction->rollBack();
}
You can also nest multiple transactions, if needed:
// outer transaction
$transaction1 = $connection->beginTransaction();
try {
$connection->createCommand($sql1)->execute();
// inner transaction
$transaction2 = $connection->beginTransaction();
try {
$connection->createCommand($sql2)->execute();
$transaction2->commit();
} catch (Exception $e) {
$transaction2->rollBack();
}
$transaction1->commit();
} catch (Exception $e) {
$transaction1->rollBack();
}
6.1.6 Working with database schema
Getting schema information
You can get a yii\db\Schema instance like the following:
$schema = $connection->getSchema();
It contains a set of methods allowing you to retrieve various informationabout the database:
$tables = $schema->getTableNames();
For the full reference check yii\db\Schema.
Modifying schema
Aside from basic SQL queries yii\db\Command contains a set of methodsallowing to modify database schema:
• createTable, renameTable, dropTable, truncateTable
• addColumn, renameColumn, dropColumn, alterColumn

6.2. QUERY BUILDER AND QUERY 163
• addPrimaryKey, dropPrimaryKey
• addForeignKey, dropForeignKey
• createIndex, dropIndex
These can be used as follows:
// CREATE TABLE
$connection->createCommand()->createTable('post', [
'id' => 'pk',
'title' => 'string',
'text' => 'text',
]);
For the full reference check yii\db\Command.
6.2 Query Builder and Query
Note: This section is under development.
Yii provides a basic database access layer as described in the Database ba-sics section. The database access layer provides a low-level way to interactwith the database. While useful in some situations, it can be tedious anderror-prone to write raw SQLs. An alternative approach is to use the QueryBuilder. The Query Builder provides an object-oriented vehicle for generat-ing queries to be executed.
A typical usage of the query builder looks like the following:
$rows = (new \yii\db\Query())
->select('id, name')
->from('user')
->limit(10)
->all();
// which is equivalent to the following code:
$query = (new \yii\db\Query())
->select('id, name')
->from('user')
->limit(10);
// Create a command. You can get the actual SQL using $command->sql
$command = $query->createCommand();
// Execute the command:
$rows = $command->queryAll();

164 CHAPTER 6. WORKING WITH DATABASES
6.2.1 Query Methods
As you can see, yii\db\Query is the main player that you need to dealwith. Behind the scene, Query is actually only responsible for representingvarious query information. The actual query building logic is done by yii
\db\QueryBuilder when you call the createCommand() method, and the queryexecution is done by yii\db\Command.
For convenience, yii\db\Query provides a set of commonly used querymethods that will build the query, execute it, and return the result. Forexample,
• yii\db\Query::all(): builds the query, executes it and returns allresults as an array.
• yii\db\Query::one(): returns the �rst row of the result.
• yii\db\Query::column(): returns the �rst column of the result.
• yii\db\Query::scalar(): returns the �rst column in the �rst row ofthe result.
• yii\db\Query::exists(): returns a value indicating whether the queryresults in anything.
• yii\db\Query::count(): returns the result of a COUNT query. Othersimilar methods include sum($q), average($q), max($q), min($q), whichsupport the so-called aggregational data query. $q parameter is manda-tory for these methods and can be either the column name or expres-sion.
6.2.2 Building Query
In the following, we will explain how to build various clauses in a SQLstatement. For simplicity, we use $query to represent a yii\db\Query object.
SELECT
In order to form a basic SELECT query, you need to specify what columns toselect and from what table:
$query->select('id, name')
->from('user');
Select options can be speci�ed as a comma-separated string, as in the above,or as an array. The array syntax is especially useful when forming the selec-tion dynamically:
$query->select(['id', 'name'])
->from('user');

6.2. QUERY BUILDER AND QUERY 165
Info: You should always use the array format if your SELECT clausecontains SQL expressions. This is because a SQL expression likeCONCAT(first_name, last_name) AS full_name may contain commas.If you list it together with other columns in a string, the expres-sion may be split into several parts by commas, which is not whatyou want to see.
When specifying columns, you may include the table pre�xes or columnaliases, e.g., user.id, user.id AS user_id. If you are using array to specify thecolumns, you may also use the array keys to specify the column aliases, e.g.,['user_id' => 'user.id', 'user_name' => 'user.name'].
To select distinct rows, you may call distinct(), like the following:
$query->select('user_id')->distinct()->from('post');
FROM
To specify which table(s) to select data from, call from():
$query->select('*')->from('user');
You may specify multiple tables using a comma-separated string or an array.Table names can contain schema pre�xes (e.g. 'public.user') and/or tablealiases (e.g. 'user u'). The method will automatically quote the table namesunless it contains some parenthesis (which means the table is given as a sub-query or DB expression). For example,
$query->select('u.*, p.*')->from(['user u', 'post p']);
When the tables are speci�ed as an array, you may also use the array keysas the table aliases (if a table does not need alias, do not use a string key).For example,
$query->select('u.*, p.*')->from(['u' => 'user', 'p' => 'post']);
You may specify a sub-query using a Query object. In this case, the corre-sponding array key will be used as the alias for the sub-query.
$subQuery = (new Query())->select('id')->from('user')->where('status=1');
$query->select('*')->from(['u' => $subQuery]);
WHERE
Usually data is selected based upon certain criteria. Query Builder has someuseful methods to specify these, the most powerful of which being where. Itcan be used in multiple ways.
The simplest way to apply a condition is to use a string:
$query->where('status=:status', [':status' => $status]);

166 CHAPTER 6. WORKING WITH DATABASES
When using strings, make sure you're binding the query parameters, notcreating a query by string concatenation. The above approach is safe to use,the following is not:
$query->where("status=$status"); // Dangerous!
Instead of binding the status value immediately, you can do so using params
or addParams:
$query->where('status=:status');
$query->addParams([':status' => $status]);
Multiple conditions can simultaneously be set in where using the hash format :
$query->where([
'status' => 10,
'type' => 2,
'id' => [4, 8, 15, 16, 23, 42],
]);
That code will generate the following SQL:
WHERE (`status` = 10) AND (`type` = 2) AND (`id` IN (4, 8, 15, 16, 23, 42))
NULL is a special value in databases, and is handled smartly by the QueryBuilder. This code:
$query->where(['status' => null]);
results in this WHERE clause:
WHERE (`status` IS NULL)
You can also create sub-queries with Query objects like the following,
$userQuery = (new Query)->select('id')->from('user');
$query->where(['id' => $userQuery]);
which will generate the following SQL:
WHERE `id` IN (SELECT `id` FROM `user`)
Another way to use the method is the operand format which is [operator,
operand1, operand2, ...].
Operator can be one of the following:
• and: the operands should be concatenated together using AND. For ex-ample, ['and', 'id=1', 'id=2'] will generate id=1 AND id=2. If an operandis an array, it will be converted into a string using the rules describedhere. For example, ['and', 'type=1', ['or', 'id=1', 'id=2']] will gen-erate type=1 AND (id=1 OR id=2). The method will NOT do any quotingor escaping.
• or: similar to the and operator except that the operands are concate-nated using OR.

6.2. QUERY BUILDER AND QUERY 167
• between: operand 1 should be the column name, and operand 2 and 3should be the starting and ending values of the range that the columnis in. For example, ['between', 'id', 1, 10] will generate id BETWEEN 1
AND 10.
• not between: similar to between except the BETWEEN is replaced with NOT
BETWEEN in the generated condition.
• in: operand 1 should be a column or DB expression. Operand 2 canbe either an array or a Query object. It will generate an IN condition.If Operand 2 is an array, it will represent the range of the values thatthe column or DB expression should be; If Operand 2 is a Query object,a sub-query will be generated and used as the range of the columnor DB expression. For example, ['in', 'id', [1, 2, 3]] will generateid IN (1, 2, 3). The method will properly quote the column name andescape values in the range. The in operator also supports compositecolumns. In this case, operand 1 should be an array of the columns,while operand 2 should be an array of arrays or a Query object repre-senting the range of the columns.
• not in: similar to the in operator except that IN is replaced with NOT IN
in the generated condition.
• like: operand 1 should be a column or DB expression, and operand 2be a string or an array representing the values that the column or DBexpression should be like. For example, ['like', 'name', 'tester'] willgenerate name LIKE '%tester%'. When the value range is given as an ar-ray, multiple LIKE predicates will be generated and concatenated usingAND. For example, ['like', 'name', ['test', 'sample']] will generatename LIKE '%test%' AND name LIKE '%sample%'. You may also provide anoptional third operand to specify how to escape special characters inthe values. The operand should be an array of mappings from thespecial characters to their escaped counterparts. If this operand is notprovided, a default escape mapping will be used. You may use false
or an empty array to indicate the values are already escaped and noescape should be applied. Note that when using an escape mapping(or the third operand is not provided), the values will be automaticallyenclosed within a pair of percentage characters.
Note: When using PostgreSQL you may also use ilike10
instead of like for case-insensitive matching.
• or like: similar to the like operator except that OR is used to concate-nate the LIKE predicates when operand 2 is an array.
10http://www.postgresql.org/docs/8.3/static/functions-matching.html#
FUNCTIONS-LIKE

168 CHAPTER 6. WORKING WITH DATABASES
• not like: similar to the like operator except that LIKE is replaced withNOT LIKE in the generated condition.
• or not like: similar to the not like operator except that OR is used toconcatenate the NOT LIKE predicates.
• exists: requires one operand which must be an instance of yii\db
\Query representing the sub-query. It will build a EXISTS (sub-query)
expression.
• not exists: similar to the exists operator and builds a NOT EXISTS (sub
-query) expression.
If you are building parts of condition dynamically it's very convenient to useandWhere() and orWhere():
$status = 10;
$search = 'yii';
$query->where(['status' => $status]);
if (!empty($search)) {
$query->andWhere(['like', 'title', $search]);
}
In case $search isn't empty the following SQL will be generated:
WHERE (`status` = 10) AND (`title` LIKE '%yii%')
Building Filter Conditions When building �lter conditions based onuser inputs, you usually want to specially handle �empty inputs� by ignoringthem in the �lters. For example, you have an HTML form that takes user-name and email inputs. If the user only enters something in the usernameinput, you may want to build a query that only tries to match the enteredusername. You may use the filterWhere() method achieve this goal:
// $username and $email are from user inputs
$query->filterWhere([
'username' => $username,
'email' => $email,
]);
The filterWhere() method is very similar to where(). The main di�erence isthat filterWhere() will remove empty values from the provided condition. Soif $email is �empty�, the resulting query will be ...WHERE username=:username;and if both $username and $email are �empty�, the query will have no WHERE
part.A value is empty if it is null, an empty string, a string consisting of
whitespaces, or an empty array.You may also use andFilterWhere() and orFilterWhere() to append more
�lter conditions.

6.2. QUERY BUILDER AND QUERY 169
ORDER BY
For ordering results orderBy and addOrderBy could be used:
$query->orderBy([
'id' => SORT_ASC,
'name' => SORT_DESC,
]);
Here we are ordering by id ascending and then by name descending.
### `GROUP BY` and `HAVING`
In order to add `GROUP BY` to generated SQL you can use the following:
```php
$query->groupBy('id, status');
If you want to add another �eld after using groupBy:
$query->addGroupBy(['created_at', 'updated_at']);
To add a HAVING condition the corresponding having method and its andHaving
and orHaving can be used. Parameters for these are similar to the ones forwhere methods group:
$query->having(['status' => $status]);
LIMIT and OFFSET
To limit result to 10 rows limit can be used:
$query->limit(10);
To skip 100 �st rows use:
$query->offset(100);
JOIN
The JOIN clauses are generated in the Query Builder by using the applicablejoin method:
• innerJoin()
• leftJoin()
• rightJoin()
This left join selects data from two related tables in one query:
$query->select(['user.name AS author', 'post.title as title'])
->from('user')
->leftJoin('post', 'post.user_id = user.id');

170 CHAPTER 6. WORKING WITH DATABASES
In the code, the leftJoin() method's �rst parameter speci�es the table tojoin to. The second parameter de�nes the join condition.
If your database application supports other join types, you can use thosevia the generic join method:
$query->join('FULL OUTER JOIN', 'post', 'post.user_id = user.id');
The �rst argument is the join type to perform. The second is the table tojoin to, and the third is the condition.
Like FROM, you may also join with sub-queries. To do so, specify the sub-query as an array which must contain one element. The array value mustbe a Query object representing the sub-query, while the array key is the aliasfor the sub-query. For example,
$query->leftJoin(['u' => $subQuery], 'u.id=author_id');
UNION
UNION in SQL adds results of one query to results of another query. Columnsreturned by both queries should match. In Yii in order to build it you can�rst form two query objects and then use union method:
$query = new Query();
$query->select("id, 'post' as type, name")->from('post')->limit(10);
$anotherQuery = new Query();
$anotherQuery->select('id, 'user' as type, name')->from('user')->limit(10);
$query->union($anotherQuery);
6.2.3 Batch Query
When working with large amount of data, methods such as yii\db\Query::all() are not suitable because they require loading all data into the mem-ory. To keep the memory requirement low, Yii provides the so-called batchquery support. A batch query makes uses of data cursor and fetches data inbatches.
Batch query can be used like the following:
use yii\db\Query;
$query = (new Query())
->from('user')
->orderBy('id');
foreach ($query->batch() as $users) {
// $users is an array of 100 or fewer rows from the user table
}
// or if you want to iterate the row one by one

6.3. ACTIVE RECORD 171
foreach ($query->each() as $user) {
// $user represents one row of data from the user table
}
The method yii\db\Query::batch() and yii\db\Query::each() return anyii\db\BatchQueryResult object which implements the Iterator interfaceand thus can be used in the foreach construct. During the �rst iteration, aSQL query is made to the database. Data are since then fetched in batchesin the iterations. By default, the batch size is 100, meaning 100 rows of dataare being fetched in each batch. You can change the batch size by passingthe �rst parameter to the batch() or each() method.
Compared to the yii\db\Query::all(), the batch query only loads 100rows of data at a time into the memory. If you process the data and thendiscard it right away, the batch query can help keep the memory usage undera limit.
If you specify the query result to be indexed by some column via yii\db
\Query::indexBy(), the batch query will still keep the proper index. Forexample,
use yii\db\Query;
$query = (new Query())
->from('user')
->indexBy('username');
foreach ($query->batch() as $users) {
// $users is indexed by the "username" column
}
foreach ($query->each() as $username => $user) {
}
6.3 Active Record
Note: This section is under development.
Active Record11 provides an object-oriented interface for accessing datastored in a database. An Active Record class is associated with a databasetable, an Active Record instance corresponds to a row of that table, and anattribute of an Active Record instance represents the value of a column inthat row. Instead of writing raw SQL statements, you can work with Ac-tive Record in an object-oriented fashion to manipulate the data in databasetables.
For example, assume Customer is an Active Record class is associated withthe customer table and name is a column of customer table. You can write thefollowing code to insert a new row into customer table:
11http://en.wikipedia.org/wiki/Active_record_pattern

172 CHAPTER 6. WORKING WITH DATABASES
$customer = new Customer();
$customer->name = 'Qiang';
$customer->save();
The above code is equivalent to using the following raw SQL statement,which is less intuitive, more error prone, and may have compatibility problemfor di�erent DBMS:
$db->createCommand('INSERT INTO customer (name) VALUES (:name)', [
':name' => 'Qiang',
])->execute();
Below is the list of databases that are currently supported by Yii ActiveRecord:
• MySQL 4.1 or later: via yii\db\ActiveRecord
• PostgreSQL 7.3 or later: via yii\db\ActiveRecord
• SQLite 2 and 3: via yii\db\ActiveRecord
• Microsoft SQL Server 2010 or later: via yii\db\ActiveRecord
• Oracle: via yii\db\ActiveRecord
• CUBRID 9.1 or later: via yii\db\ActiveRecord
• Sphnix: via yii\sphinx\ActiveRecord, requires yii2-sphinx extension
• ElasticSearch: via yii\elasticsearch\ActiveRecord, requires yii2-
elasticsearch extension
• Redis 2.6.12 or later: via yii\redis\ActiveRecord, requires yii2-
redis extension
• MongoDB 1.3.0 or later: via yii\mongodb\ActiveRecord, requiresyii2-mongodb extension
As you can see, Yii provides Active Record support for relational databasesas well as NoSQL databases. In this tutorial, we will mainly describe theusage of Active Record for relational databases. However, most contentdescribed here are also applicable to Active Record for NoSQL databases.
6.3.1 Declaring Active Record Classes
To declare an Active Record class you need to extend yii\db\ActiveRecord
and implement the tableName method that returns the name of the databasetable associated with the class:

6.3. ACTIVE RECORD 173
namespace app\models;
use yii\db\ActiveRecord;
class Customer extends ActiveRecord
{
/**
* @return string the name of the table associated with this
ActiveRecord class.
*/
public static function tableName()
{
return 'customer';
}
}
6.3.2 Accessing Column Data
Active Record maps each column of the corresponding database table rowto an attribute in the Active Record object. An attribute behaves like aregular object public property. The name of an attribute is the same as thecorresponding column name and is case-sensitive.
To read the value of a column, you can use the following syntax:
// "id" and "email" are the names of columns in the table associated with
$customer ActiveRecord object
$id = $customer->id;
$email = $customer->email;
To change the value of a column, assign a new value to the associated prop-erty and save the object:
$customer->email = '[email protected]';
$customer->save();
6.3.3 Connecting to Database
Active Record uses a yii\db\Connection to exchange data with database.By default, it uses the db application component as the connection. Asexplained in Database basics, you may con�gure the db component in theapplication con�guration �le like follows,
return [
'components' => [
'db' => [
'class' => 'yii\db\Connection',
'dsn' => 'mysql:host=localhost;dbname=testdb',
'username' => 'demo',
'password' => 'demo',
],
],
];

174 CHAPTER 6. WORKING WITH DATABASES
If you are using multiple databases in your application and you want to usea di�erent DB connection for your Active Record class, you may override theyii\db\ActiveRecord::getDb() method:
class Customer extends ActiveRecord
{
// ...
public static function getDb()
{
return \Yii::$app->db2; // use "db2" application component
}
}
6.3.4 Querying Data from Database
Active Record provides two entry methods for building DB queries and pop-ulating data into Active Record instances:
• yii\db\ActiveRecord::find()
• yii\db\ActiveRecord::findBySql()
Both methods return an yii\db\ActiveQuery instance, which extends yii\db\Query, and thus supports the same set of �exible and powerful DBquery building methods, such as where(), join(), orderBy(), etc. The followingexamples demonstrate some of the possibilities.
// to retrieve all *active* customers and order them by their ID:
$customers = Customer::find()
->where(['status' => Customer::STATUS_ACTIVE])
->orderBy('id')
->all();
// to return a single customer whose ID is 1:
$customer = Customer::find()
->where(['id' => 1])
->one();
// to return the number of *active* customers:
$count = Customer::find()
->where(['status' => Customer::STATUS_ACTIVE])
->count();
// to index the result by customer IDs:
$customers = Customer::find()->indexBy('id')->all();
// $customers array is indexed by customer IDs
// to retrieve customers using a raw SQL statement:
$sql = 'SELECT * FROM customer';
$customers = Customer::findBySql($sql)->all();

6.3. ACTIVE RECORD 175
Tip: In the code above Customer::STATUS_ACTIVE is a constant de-�ned in Customer. It is a good practice to use meaningful constantnames rather than hardcoded strings or numbers in your code.
Two shortcut methods are provided to return Active Record instances match-ing a primary key value or a set of column values: findOne() and findAll().The former returns the �rst matching instance while the latter returns all ofthem. For example,
// to return a single customer whose ID is 1:
$customer = Customer::findOne(1);
// to return an *active* customer whose ID is 1:
$customer = Customer::findOne([
'id' => 1,
'status' => Customer::STATUS_ACTIVE,
]);
// to return customers whose ID is 1, 2 or 3:
$customers = Customer::findAll([1, 2, 3]);
// to return customers whose status is "deleted":
$customer = Customer::findAll([
'status' => Customer::STATUS_DELETED,
]);
Retrieving Data in Arrays
Sometimes when you are processing a large amount of data, you may wantto use arrays to hold the data retrieved from database to save memory. Thiscan be done by calling asArray():
// to return customers in terms of arrays rather than `Customer` objects:
$customers = Customer::find()
->asArray()
->all();
// each element of $customers is an array of name-value pairs
Retrieving Data in Batches
In Query Builder, we have explained that you may use batch query to keepyour memory usage under a limit when querying a large amount of data fromdatabase. You may use the same technique in Active Record. For example,
// fetch 10 customers at a time
foreach (Customer::find()->batch(10) as $customers) {
// $customers is an array of 10 or fewer Customer objects
}
// fetch 10 customers at a time and iterate them one by one
foreach (Customer::find()->each(10) as $customer) {
// $customer is a Customer object

176 CHAPTER 6. WORKING WITH DATABASES
}
// batch query with eager loading
foreach (Customer::find()->with('orders')->each() as $customer) {
}
6.3.5 Manipulating Data in Database
Active Record provides the following methods to insert, update and deletea single row in a table associated with a single Active Record instance:
• yii\db\ActiveRecord::save()
• yii\db\ActiveRecord::insert()
• yii\db\ActiveRecord::update()
• yii\db\ActiveRecord::delete()
Active Record also provides the following static methods that apply to awhole table associated with an Active Record class. Be extremely carefulwhen using these methods as they a�ect the whole table. For example,deleteAll() will delete ALL rows in the table.
• yii\db\ActiveRecord::updateCounters()
• yii\db\ActiveRecord::updateAll()
• yii\db\ActiveRecord::updateAllCounters()
• yii\db\ActiveRecord::deleteAll()
The following examples show how to use these methods:
// to insert a new customer record
$customer = new Customer();
$customer->name = 'James';
$customer->email = '[email protected]';
$customer->save(); // equivalent to $customer->insert();
// to update an existing customer record
$customer = Customer::findOne($id);
$customer->email = '[email protected]';
$customer->save(); // equivalent to $customer->update();
// to delete an existing customer record
$customer = Customer::findOne($id);
$customer->delete();
// to delete several customers
Customer::deleteAll('age > :age AND gender = :gender', [':age' => 20, ':
gender' => 'M']);

6.3. ACTIVE RECORD 177
// to increment the age of ALL customers by 1
Customer::updateAllCounters(['age' => 1]);
Info: The save() method will call either insert() or update(),depending on whether the Active Record instance is new or not(internally it will check the value of yii\db\ActiveRecord::
isNewRecord). If an Active Record is instantiated via the new
operator, calling save() will insert a row in the table; callingsave() on active record fetched from database will update thecorresponding row in the table.
Data Input and Validation
Because Active Record extends from yii\base\Model, it supports the samedata input and validation features as described in Model. For example, youmay declare validation rules by overwriting the yii\base\Model::rules()
method; you may massively assign user input data to an Active Recordinstance; and you may call yii\base\Model::validate() to trigger datavalidation.
When you call save(), insert() or update(), these methods will automat-ically call yii\base\Model::validate(). If the validation fails, the corre-sponding data saving operation will be cancelled.
The following example shows how to use an Active Record to collect/-validate user input and save them into database:
// creating a new record
$model = new Customer;
if ($model->load(Yii::$app->request->post()) && $model->save()) {
// the user input has been collected, validated and saved
}
// updating a record whose primary key is $id
$model = Customer::findOne($id);
if ($model === null) {
throw new NotFoundHttpException;
}
if ($model->load(Yii::$app->request->post()) && $model->save()) {
// the user input has been collected, validated and saved
}
Loading Default Values
Your table columns may be de�ned with default values. Sometimes, you maywant to pre-populate your Web form for an Active Record with these values.To do so, call the loadDefaultValues() method before rendering the form:

178 CHAPTER 6. WORKING WITH DATABASES
$customer = new Customer();
$customer->loadDefaultValues();
// ... render HTML form for $customer ...
6.3.6 Active Record Life Cycles
It is important to understand the life cycles of Active Record when it is usedto manipulate data in database. These life cycles are typically associatedwith corresponding events which allow you to inject code to intercept orrespond to these events. They are especially useful for developing ActiveRecord behaviors.
When instantiating a new Active Record instance, we will have the fol-lowing life cycles:
1. constructor
2. yii\db\ActiveRecord::init(): will trigger an yii\db\ActiveRecord::EVENT_INIT event
When querying data through the yii\db\ActiveRecord::find() method,we will have the following life cycles for EVERY newly populated ActiveRecord instance:
1. constructor
2. yii\db\ActiveRecord::init(): will trigger an yii\db\ActiveRecord::EVENT_INIT event
3. yii\db\ActiveRecord::afterFind(): will trigger an yii\db\ActiveRecord::EVENT_AFTER_FIND event
When calling yii\db\ActiveRecord::save() to insert or update an Ac-tiveRecord, we will have the following life cycles:
1. yii\db\ActiveRecord::beforeValidate(): will trigger an yii\db
\ActiveRecord::EVENT_BEFORE_VALIDATE event
2. yii\db\ActiveRecord::afterValidate(): will trigger an yii\db\ActiveRecord::EVENT_AFTER_VALIDATE event
3. yii\db\ActiveRecord::beforeSave(): will trigger an yii\db\ActiveRecord::EVENT_BEFORE_INSERT or yii\db\ActiveRecord::EVENT_BEFORE_UPDATEevent
4. perform the actual data insertion or updating

6.3. ACTIVE RECORD 179
5. yii\db\ActiveRecord::afterSave(): will trigger an yii\db\ActiveRecord::EVENT_AFTER_INSERT or yii\db\ActiveRecord::EVENT_AFTER_UPDATEevent
And Finally when calling yii\db\ActiveRecord::delete() to delete anActiveRecord, we will have the following life cycles:
1. yii\db\ActiveRecord::beforeDelete(): will trigger an yii\db\ActiveRecord::EVENT_BEFORE_DELETE event
2. perform the actual data deletion
3. yii\db\ActiveRecord::afterDelete(): will trigger an yii\db\ActiveRecord::EVENT_AFTER_DELETE event
6.3.7 Working with Relational Data
You can use ActiveRecord to also query a table's relational data (i.e., se-lection of data from Table A can also pull in related data from Table B).Thanks to ActiveRecord, the relational data returned can be accessed like aproperty of the ActiveRecord object associated with the primary table.
For example, with an appropriate relation declaration, by accessing $customer
->orders you may obtain an array of Order objects which represent the ordersplaced by the speci�ed customer.
To declare a relation, de�ne a getter method which returns an yii\db
\ActiveQuery object that has relation information about the relation con-text and thus will only query for related records. For example,
class Customer extends \yii\db\ActiveRecord
{
public function getOrders()
{
// Customer has_many Order via Order.customer_id -> id
return $this->hasMany(Order::className(), ['customer_id' => 'id']);
}
}
class Order extends \yii\db\ActiveRecord
{
public function getCustomer()
{
// Order has_one Customer via Customer.id -> customer_id
return $this->hasOne(Customer::className(), ['id' => 'customer_id'])
;
}
}
The methods yii\db\ActiveRecord::hasMany() and yii\db\ActiveRecord::hasOne() used in the above are used to model the many-one relationshipand one-one relationship in a relational database. For example, a customer

180 CHAPTER 6. WORKING WITH DATABASES
has many orders, and an order has one customer. Both methods take twoparameters and return an yii\db\ActiveQuery object:
• $class: the name of the class of the related model(s). This should bea fully quali�ed class name.
• $link: the association between columns from the two tables. Thisshould be given as an array. The keys of the array are the names ofthe columns from the table associated with $class, while the values ofthe array are the names of the columns from the declaring class. It isa good practice to de�ne relationships based on table foreign keys.
After declaring relations, getting relational data is as easy as accessing acomponent property that is de�ned by the corresponding getter method:
// get the orders of a customer
$customer = Customer::findOne(1);
$orders = $customer->orders; // $orders is an array of Order objects
Behind the scene, the above code executes the following two SQL queries,one for each line of code:
SELECT * FROM customer WHERE id=1;
SELECT * FROM order WHERE customer_id=1;
Tip: If you access the expression $customer->orders again, it willnot perform the second SQL query again. The SQL query is onlyperformed the �rst time when this expression is accessed. Anyfurther accesses will only return the previously fetched resultsthat are cached internally. If you want to re-query the relationaldata, simply unset the existing one �rst: unset($customer->orders
);.
Sometimes, you may want to pass parameters to a relational query. Forexample, instead of returning all orders of a customer, you may want toreturn only big orders whose subtotal exceeds a speci�ed amount. To do so,declare a bigOrders relation with the following getter method:
class Customer extends \yii\db\ActiveRecord
{
public function getBigOrders($threshold = 100)
{
return $this->hasMany(Order::className(), ['customer_id' => 'id'])
->where('subtotal > :threshold', [':threshold' => $threshold])
->orderBy('id');
}
}
Remember that hasMany() returns an yii\db\ActiveQuery object which al-lows you to customize the query by calling the methods of yii\db\ActiveQuery.

6.3. ACTIVE RECORD 181
With the above declaration, if you access $customer->bigOrders, it will onlyreturn the orders whose subtotal is greater than 100. To specify a di�erentthreshold value, use the following code:
$orders = $customer->getBigOrders(200)->all();
Note: A relation method returns an instance of yii\db\ActiveQuery.If you access the relation like an attribute (i.e. a class property),the return value will be the query result of the relation, whichcould be an instance of yii\db\ActiveRecord, an array of that,or null, depending the multiplicity of the relation. For exam-ple, $customer->getOrders() returns an ActiveQuery instance, while$customer->orders returns an array of Order objects (or an emptyarray if the query results in nothing).
6.3.8 Relations with Pivot Table
Sometimes, two tables are related together via an intermediary table calledpivot table12. To declare such relations, we can customize the yii\db
\ActiveQuery object by calling its yii\db\ActiveQuery::via() or yii\db\ActiveQuery::viaTable() method.
For example, if table order and table item are related via pivot tableorder_item, we can declare the items relation in the Order class like the fol-lowing:
class Order extends \yii\db\ActiveRecord
{
public function getItems()
{
return $this->hasMany(Item::className(), ['id' => 'item_id'])
->viaTable('order_item', ['order_id' => 'id']);
}
}
The yii\db\ActiveQuery::via()method is similar to yii\db\ActiveQuery::viaTable() except that the �rst parameter of yii\db\ActiveQuery::
via() takes a relation name declared in the ActiveRecord class instead ofthe pivot table name. For example, the above items relation can be equiva-lently declared as follows:
class Order extends \yii\db\ActiveRecord
{
public function getOrderItems()
{
return $this->hasMany(OrderItem::className(), ['order_id' => 'id']);
}
public function getItems()
12Pivot table on Wikipedia: http://en.wikipedia.org/wiki/Pivot_table

182 CHAPTER 6. WORKING WITH DATABASES
{
return $this->hasMany(Item::className(), ['id' => 'item_id'])
->via('orderItems');
}
}
6.3.9 Lazy and Eager Loading
As described earlier, when you access the related objects the �rst time, Ac-tiveRecord will perform a DB query to retrieve the corresponding data andpopulate it into the related objects. No query will be performed if you accessthe same related objects again. We call this lazy loading. For example,
// SQL executed: SELECT * FROM customer WHERE id=1
$customer = Customer::findOne(1);
// SQL executed: SELECT * FROM order WHERE customer_id=1
$orders = $customer->orders;
// no SQL executed
$orders2 = $customer->orders;
Lazy loading is very convenient to use. However, it may su�er from a per-formance issue in the following scenario:
// SQL executed: SELECT * FROM customer LIMIT 100
$customers = Customer::find()->limit(100)->all();
foreach ($customers as $customer) {
// SQL executed: SELECT * FROM order WHERE customer_id=...
$orders = $customer->orders;
// ...handle $orders...
}
How many SQL queries will be performed in the above code, assuming thereare more than 100 customers in the database? 101! The �rst SQL querybrings back 100 customers. Then for each customer, a SQL query is per-formed to bring back the orders of that customer.
To solve the above performance problem, you can use the so-called eager
loading approach by calling yii\db\ActiveQuery::with():
// SQL executed: SELECT * FROM customer LIMIT 100;
// SELECT * FROM orders WHERE customer_id IN (1,2,...)
$customers = Customer::find()->limit(100)
->with('orders')->all();
foreach ($customers as $customer) {
// no SQL executed
$orders = $customer->orders;
// ...handle $orders...
}
As you can see, only two SQL queries are needed for the same task!

6.3. ACTIVE RECORD 183
Info: In general, if you are eager loading N relations among whichM relations are de�ned with via() or viaTable(), a total numberof 1+M+N SQL queries will be performed: one query to bring backthe rows for the primary table, one for each of the M pivot tablescorresponding to the via() or viaTable() calls, and one for eachof the N related tables.
Note: When you are customizing select() with eager loading,make sure you include the columns that link the related models.Otherwise, the related models will not be loaded. For example,
$orders = Order::find()->select(['id', 'amount'])->with('customer')->all();
// $orders[0]->customer is always null. To fix the problem, you should do
the following:
$orders = Order::find()->select(['id', 'amount', 'customer_id'])->with('
customer')->all();
Sometimes, you may want to customize the relational queries on the �y. Thiscan be done for both lazy loading and eager loading. For example,
$customer = Customer::findOne(1);
// lazy loading: SELECT * FROM order WHERE customer_id=1 AND subtotal>100
$orders = $customer->getOrders()->where('subtotal>100')->all();
// eager loading: SELECT * FROM customer LIMIT 100
// SELECT * FROM order WHERE customer_id IN (1,2,...) AND
subtotal>100
$customers = Customer::find()->limit(100)->with([
'orders' => function($query) {
$query->andWhere('subtotal>100');
},
])->all();
6.3.10 Inverse Relations
Relations can often be de�ned in pairs. For example, Customer may have arelation named orders while Order may have a relation named customer:
class Customer extends ActiveRecord
{
....
public function getOrders()
{
return $this->hasMany(Order::className(), ['customer_id' => 'id']);
}
}
class Order extends ActiveRecord
{
....
public function getCustomer()

184 CHAPTER 6. WORKING WITH DATABASES
{
return $this->hasOne(Customer::className(), ['id' => 'customer_id'])
;
}
}
If we perform the following query, we would �nd that the customer of anorder is not the same customer object that �nds those orders, and accessingcustomer->orders will trigger one SQL execution while accessing the customer
of an order will trigger another SQL execution:
// SELECT * FROM customer WHERE id=1
$customer = Customer::findOne(1);
// echoes "not equal"
// SELECT * FROM order WHERE customer_id=1
// SELECT * FROM customer WHERE id=1
if ($customer->orders[0]->customer === $customer) {
echo 'equal';
} else {
echo 'not equal';
}
To avoid the redundant execution of the last SQL statement, we could declarethe inverse relations for the customer and the orders relations by calling theyii\db\ActiveQuery::inverseOf() method, like the following:
class Customer extends ActiveRecord
{
....
public function getOrders()
{
return $this->hasMany(Order::className(), ['customer_id' => 'id'])->
inverseOf('customer');
}
}
Now if we execute the same query as shown above, we would get:
// SELECT * FROM customer WHERE id=1
$customer = Customer::findOne(1);
// echoes "equal"
// SELECT * FROM order WHERE customer_id=1
if ($customer->orders[0]->customer === $customer) {
echo 'equal';
} else {
echo 'not equal';
}
In the above, we have shown how to use inverse relations in lazy loading.Inverse relations also apply in eager loading:
// SELECT * FROM customer
// SELECT * FROM order WHERE customer_id IN (1, 2, ...)
$customers = Customer::find()->with('orders')->all();
// echoes "equal"

6.3. ACTIVE RECORD 185
if ($customers[0]->orders[0]->customer === $customers[0]) {
echo 'equal';
} else {
echo 'not equal';
}
Note: Inverse relation cannot be de�ned with a relation that in-volves pivoting tables. That is, if your relation is de�ned with yii
\db\ActiveQuery::via() or yii\db\ActiveQuery::viaTable(),you cannot call yii\db\ActiveQuery::inverseOf() further.
6.3.11 Joining with Relations
When working with relational databases, a common task is to join multipletables and apply various query conditions and parameters to the JOIN SQLstatement. Instead of calling yii\db\ActiveQuery::join() explicitly tobuild up the JOIN query, you may reuse the existing relation de�nitions andcall yii\db\ActiveQuery::joinWith() to achieve this goal. For example,
// find all orders and sort the orders by the customer id and the order id.
also eager loading "customer"
$orders = Order::find()->joinWith('customer')->orderBy('customer.id, order.
id')->all();
// find all orders that contain books, and eager loading "books"
$orders = Order::find()->innerJoinWith('books')->all();
In the above, the method yii\db\ActiveQuery::innerJoinWith() is a short-cut to yii\db\ActiveQuery::joinWith() with the join type set as INNER
JOIN.You may join with one or multiple relations; you may apply query con-
ditions to the relations on-the-�y; and you may also join with sub-relations.For example,
// join with multiple relations
// find out the orders that contain books and are placed by customers who
registered within the past 24 hours
$orders = Order::find()->innerJoinWith([
'books',
'customer' => function ($query) {
$query->where('customer.created_at > ' . (time() - 24 * 3600));
}
])->all();
// join with sub-relations: join with books and books' authors
$orders = Order::find()->joinWith('books.author')->all();
Behind the scene, Yii will �rst execute a JOIN SQL statement to bring backthe primary models satisfying the conditions applied to the JOIN SQL. Itwill then execute a query for each relation and populate the correspondingrelated records.
The di�erence between yii\db\ActiveQuery::joinWith() and yii\db
\ActiveQuery::with() is that the former joins the tables for the primary

186 CHAPTER 6. WORKING WITH DATABASES
model class and the related model classes to retrieve the primary models,while the latter just queries against the table for the primary model class toretrieve the primary models.
Because of this di�erence, you may apply query conditions that are onlyavailable to a JOIN SQL statement. For example, you may �lter the primarymodels by the conditions on the related models, like the example above. Youmay also sort the primary models using columns from the related tables.
When using yii\db\ActiveQuery::joinWith(), you are responsible todisambiguate column names. In the above examples, we use item.id andorder.id to disambiguate the id column references because both of the ordertable and the item table contain a column named id.
By default, when you join with a relation, the relation will also be ea-gerly loaded. You may change this behavior by passing the $eagerLoading
parameter which speci�es whether to eager load the speci�ed relations.
And also by default, yii\db\ActiveQuery::joinWith() uses LEFT JOIN
to join the related tables. You may pass it with the $joinType parameter tocustomize the join type. As a shortcut to the INNER JOIN type, you may useyii\db\ActiveQuery::innerJoinWith().
Below are some more examples,
// find all orders that contain books, but do not eager loading "books".
$orders = Order::find()->innerJoinWith('books', false)->all();
// which is equivalent to the above
$orders = Order::find()->joinWith('books', false, 'INNER JOIN')->all();
Sometimes when joining two tables, you may need to specify some extracondition in the ON part of the JOIN query. This can be done by callingthe yii\db\ActiveQuery::onCondition() method like the following:
class User extends ActiveRecord
{
public function getBooks()
{
return $this->hasMany(Item::className(), ['owner_id' => 'id'])->
onCondition(['category_id' => 1]);
}
}
In the above, the yii\db\ActiveRecord::hasMany()method returns an yii
\db\ActiveQuery instance, upon which yii\db\ActiveQuery::onCondition()is called to specify that only items whose category_id is 1 should be returned.
When you perform query using yii\db\ActiveQuery::joinWith(), theon-condition will be put in the ON part of the corresponding JOIN query.For example,
// SELECT user.* FROM user LEFT JOIN item ON item.owner_id=user.id AND
category_id=1
// SELECT * FROM item WHERE owner_id IN (...) AND category_id=1
$users = User::find()->joinWith('books')->all();

6.3. ACTIVE RECORD 187
Note that if you use eager loading via yii\db\ActiveQuery::with() or lazyloading, the on-condition will be put in the WHERE part of the correspond-ing SQL statement, because there is no JOIN query involved. For example,
// SELECT * FROM user WHERE id=10
$user = User::findOne(10);
// SELECT * FROM item WHERE owner_id=10 AND category_id=1
$books = $user->books;
6.3.12 Working with Relationships
ActiveRecord provides the following two methods for establishing and break-ing a relationship between two ActiveRecord objects:
• yii\db\ActiveRecord::link()
• yii\db\ActiveRecord::unlink()
For example, given a customer and a new order, we can use the followingcode to make the order owned by the customer:
$customer = Customer::findOne(1);
$order = new Order();
$order->subtotal = 100;
$customer->link('orders', $order);
The yii\db\ActiveRecord::link() call above will set the customer_id ofthe order to be the primary key value of $customer and then call yii\db\ActiveRecord::save() to save the order into database.
6.3.13 Cross-DBMS Relations
ActiveRecord allows to establish relationship between entities from di�er-ent DBMS. For example: between relational database table and MongoDBcollection. Such relation does not require any special code:
// Relational database Active Record
class Customer extends \yii\db\ActiveRecord
{
public static function tableName()
{
return 'customer';
}
public function getComments()
{
// Customer, stored in relational database, has many Comments,
stored in MongoDB collection:
return $this->hasMany(Comment::className(), ['customer_id' => 'id'])
;
}

188 CHAPTER 6. WORKING WITH DATABASES
}
// MongoDb Active Record
class Comment extends \yii\mongodb\ActiveRecord
{
public static function collectionName()
{
return 'comment';
}
public function getCustomer()
{
// Comment, stored in MongoDB collection, has one Customer, stored
in relational database:
return $this->hasOne(Customer::className(), ['id' => 'customer_id'])
;
}
}
All Active Record features like eager and lazy loading, establishing andbreaking a relationship and so on, are available for cross-DBMS relations.
Note: do not forget Active Record solutions for di�erent DBMSmay have speci�c methods and features, which may not be ap-plied for cross-DBMS relations. For example: usage of yii\db\ActiveQuery::joinWith() will obviously not work with rela-tion to the MongoDB collection.
6.3.14 Scopes
When you call yii\db\ActiveRecord::find() or yii\db\ActiveRecord::findBySql(), it returns an yii\db\ActiveQuery instance. You may calladditional query methods, such as yii\db\ActiveQuery::where(), yii\db\ActiveQuery::orderBy(), to further specify the query conditions.
It is possible that you may want to call the same set of query methods indi�erent places. If this is the case, you should consider de�ning the so-calledscopes. A scope is essentially a method de�ned in a custom query class thatcalls a set of query methods to modify the query object. You can then usea scope like calling a normal query method.
Two steps are required to de�ne a scope. First create a custom queryclass for your model and de�ne the needed scope methods in this class. Forexample, create a CommentQuery class for the Comment model and de�ne theactive() scope method like the following:
namespace app\models;
use yii\db\ActiveQuery;
class CommentQuery extends ActiveQuery
{

6.3. ACTIVE RECORD 189
public function active($state = true)
{
$this->andWhere(['active' => $state]);
return $this;
}
}
Important points are:
1. Class should extend from yii\db\ActiveQuery (or another ActiveQuery
such as yii\mongodb\ActiveQuery).
2. A method should be public and should return $this in order to allowmethod chaining. It may accept parameters.
3. Check yii\db\ActiveQuery methods that are very useful for modify-ing query conditions.
Second, override yii\db\ActiveRecord::find() to use the custom queryclass instead of the regular yii\db\ActiveQuery. For the example above,you need to write the following code:
namespace app\models;
use yii\db\ActiveRecord;
class Comment extends ActiveRecord
{
/**
* @inheritdoc
* @return CommentQuery
*/
public static function find()
{
return new CommentQuery(get_called_class());
}
}
That's it. Now you can use your custom scope methods:
$comments = Comment::find()->active()->all();
$inactiveComments = Comment::find()->active(false)->all();
You can also use scopes when de�ning relations. For example,
class Post extends \yii\db\ActiveRecord
{
public function getActiveComments()
{
return $this->hasMany(Comment::className(), ['post_id' => 'id'])->
active();
}
}

190 CHAPTER 6. WORKING WITH DATABASES
Or use the scopes on-the-�y when performing relational query:
$posts = Post::find()->with([
'comments' => function($q) {
$q->active();
}
])->all();
Default Scope
If you used Yii 1.1 before, you may know a concept called default scope. Adefault scope is a scope that applies to ALL queries. You can de�ne a defaultscope easily by overriding yii\db\ActiveRecord::find(). For example,
public static function find()
{
return parent::find()->where(['deleted' => false]);
}
Note that all your queries should then not use yii\db\ActiveQuery::where()but yii\db\ActiveQuery::andWhere() and yii\db\ActiveQuery::orWhere()to not override the default condition.
6.3.15 Transactional operations
When a few DB operations are related and are executedTODO: FIXME:WIP, TBD, https://github.com/yiisoft/yii2/issues/
226
, yii\db\ActiveRecord::afterSave(), yii\db\ActiveRecord::beforeDelete()and/or yii\db\ActiveRecord::afterDelete() life cycle methods. Devel-oper may come to the solution of overriding ActiveRecord yii\db\ActiveRecord::save() method with database transaction wrapping or even using trans-action in controller action, which is strictly speaking doesn't seem to be agood practice (recall �skinny-controller / fat-model� fundamental rule).
Here these ways are (DO NOT use them unless you're sure what youare actually doing). Models:
class Feature extends \yii\db\ActiveRecord
{
// ...
public function getProduct()
{
return $this->hasOne(Product::className(), ['id' => 'product_id']);
}
}
class Product extends \yii\db\ActiveRecord
{
// ...

6.3. ACTIVE RECORD 191
public function getFeatures()
{
return $this->hasMany(Feature::className(), ['product_id' => 'id']);
}
}
Overriding yii\db\ActiveRecord::save() method:
class ProductController extends \yii\web\Controller
{
public function actionCreate()
{
// FIXME: TODO: WIP, TBD
}
}
Using transactions within controller layer:
class ProductController extends \yii\web\Controller
{
public function actionCreate()
{
// FIXME: TODO: WIP, TBD
}
}
Instead of using these fragile methods you should consider using atomicscenarios and operations feature.
class Feature extends \yii\db\ActiveRecord
{
// ...
public function getProduct()
{
return $this->hasOne(Product::className(), ['product_id' => 'id']);
}
public function scenarios()
{
return [
'userCreates' => [
'attributes' => ['name', 'value'],
'atomic' => [self::OP_INSERT],
],
];
}
}
class Product extends \yii\db\ActiveRecord
{
// ...
public function getFeatures()
{

192 CHAPTER 6. WORKING WITH DATABASES
return $this->hasMany(Feature::className(), ['id' => 'product_id']);
}
public function scenarios()
{
return [
'userCreates' => [
'attributes' => ['title', 'price'],
'atomic' => [self::OP_INSERT],
],
];
}
public function afterValidate()
{
parent::afterValidate();
// FIXME: TODO: WIP, TBD
}
public function afterSave($insert)
{
parent::afterSave($insert);
if ($this->getScenario() === 'userCreates') {
// FIXME: TODO: WIP, TBD
}
}
}
Controller is very thin and neat:
class ProductController extends \yii\web\Controller
{
public function actionCreate()
{
// FIXME: TODO: WIP, TBD
}
}
6.3.16 Optimistic Locks
TODO
6.3.17 Dirty Attributes
TODO
6.3.18 See also
• Model
• yii\db\ActiveRecord

6.4. DATABASE MIGRATION 193
6.4 Database Migration
Note: This section is under development.
Like source code, the structure of a database evolves as a database-drivenapplication is developed and maintained. For example, during development,a new table may be added; Or, after the application goes live, it may bediscovered that an additional index is required. It is important to keep trackof these structural database changes (called migration), just as changes tothe source code is tracked using version control. If the source code and thedatabase become out of sync, bugs will occur, or the whole application mightbreak. For this reason, Yii provides a database migration tool that can keeptrack of database migration history, apply new migrations, or revert existingones.
The following steps show how database migration is used by a teamduring development:
1. Tim creates a new migration (e.g. creates a new table, changes acolumn de�nition, etc.).
2. Tim commits the new migration into the source control system (e.g.Git, Mercurial).
3. Doug updates his repository from the source control system and re-ceives the new migration.
4. Doug applies the migration to his local development database, therebysyncing his database to re�ect the changes Tim made.
Yii supports database migration via the yii migrate command line tool. Thistool supports:
• Creating new migrations
• Applying, reverting, and redoing migrations
• Showing migration history and new migrations
6.4.1 Creating Migrations
To create a new migration, run the following command:
yii migrate/create <name>
The required name parameter speci�es a very brief description of the migra-tion. For example, if the migration creates a new table named news, you'duse the command:
yii migrate/create create_news_table

194 CHAPTER 6. WORKING WITH DATABASES
As you'll shortly see, the name parameter is used as part of a PHP class namein the migration. Therefore, it should only contain letters, digits and/orunderscore characters.
The above command will create a new �le named m101129_185401_create_news_table
.php. This �le will be created within the @app/migrations directory. Initially,the migration �le will be generated with the following code:
class m101129_185401_create_news_table extends \yii\db\Migration
{
public function up()
{
}
public function down()
{
echo "m101129_185401_create_news_table cannot be reverted.\n";
return false;
}
}
Notice that the class name is the same as the �le name, and follows thepattern m<timestamp>_<name>, where:
• <timestamp> refers to the UTC timestamp (in the format of yymmdd_hhmmss) when the migration is created,
• <name> is taken from the command's name parameter.
In the class, the up() method should contain the code implementing theactual database migration. In other words, the up() method executes codethat actually changes the database. The down() method may contain codethat reverts the changes made by up().
Sometimes, it is impossible for the down() to undo the database migration.For example, if the migration deletes table rows or an entire table, that datacannot be recovered in the down() method. In such cases, the migration iscalled irreversible, meaning the database cannot be rolled back to a previousstate. When a migration is irreversible, as in the above generated code,the down() method returns false to indicate that the migration cannot bereverted.
As an example, let's show the migration about creating a news table.
use yii\db\Schema;
class m101129_185401_create_news_table extends \yii\db\Migration
{
public function up()
{
$this->createTable('news', [
'id' => 'pk',

6.4. DATABASE MIGRATION 195
'title' => Schema::TYPE_STRING . ' NOT NULL',
'content' => Schema::TYPE_TEXT,
]);
}
public function down()
{
$this->dropTable('news');
}
}
The base class [\yii\db\Migration] exposes a database connection via db
property. You can use it for manipulating data and schema of a database.The column types used in this example are abstract types that will be
replaced by Yii with the corresponding types depended on your databasemanagement system. You can use them to write database independent mi-grations. For example pk will be replaced by int(11) NOT NULL AUTO_INCREMENT
PRIMARY KEY for MySQL and integer PRIMARY KEY AUTOINCREMENT NOT NULL forsqlite. See documentation of yii\db\QueryBuilder::getColumnType() formore details and a list of available types. You may also use the constantsde�ned in yii\db\Schema to de�ne column types.
Note: You can add constraints and other custom table optionsat the end of the table description by specifying them as simplestring. For example in the above migration, after content at-tribute de�nition you can write 'CONSTRAINT ...' or other customoptions.
6.4.2 Transactional Migrations
While performing complex DB migrations, we usually want to make sure thateach migration succeed or fail as a whole so that the database maintains theconsistency and integrity. In order to achieve this goal, we can exploit DBtransactions. We could use special methods safeUp and safeDown for thesepurposes.
use yii\db\Schema;
class m101129_185401_create_news_table extends \yii\db\Migration
{
public function safeUp()
{
$this->createTable('news', [
'id' => 'pk',
'title' => Schema::TYPE_STRING . ' NOT NULL',
'content' => Schema::TYPE_TEXT,
]);

196 CHAPTER 6. WORKING WITH DATABASES
$this->createTable('user', [
'id' => 'pk',
'login' => Schema::TYPE_STRING . ' NOT NULL',
'password' => Schema::TYPE_STRING . ' NOT NULL',
]);
}
public function safeDown()
{
$this->dropTable('news');
$this->dropTable('user');
}
}
When your code uses more then one query it is recommended to use safeUp
and safeDown.
Note: Not all DBMS support transactions. And some DB queriescannot be put into a transaction. In this case, you will have toimplement up() and down(), instead. And for MySQL, some SQLstatements may cause implicit commit13.
6.4.3 Applying Migrations
To apply all available new migrations (i.e., make the local database up-to-date), run the following command:
yii migrate
The command will show the list of all new migrations. If you con�rm toapply the migrations, it will run the up() method in every new migrationclass, one after another, in the order of the timestamp value in the classname.
After applying a migration, the migration tool will keep a record in adatabase table named migration. This allows the tool to identify which mi-grations have been applied and which are not. If the migration table doesnot exist, the tool will automatically create it in the database speci�ed bythe db application component.
Sometimes, we may only want to apply one or a few new migrations. Wecan use the following command:
yii migrate/up 3
This command will apply the 3 new migrations. Changing the value 3 willallow us to change the number of migrations to be applied.
We can also migrate the database to a speci�c version with the followingcommand:
13http://dev.mysql.com/doc/refman/5.1/en/implicit-commit.html

6.4. DATABASE MIGRATION 197
yii migrate/to 101129_185401
That is, we use the timestamp part of a migration name to specify the versionthat we want to migrate the database to. If there are multiple migrationsbetween the last applied migration and the speci�ed migration, all thesemigrations will be applied. If the speci�ed migration has been applied before,then all migrations applied after it will be reverted (to be described in thenext section).
6.4.4 Reverting Migrations
To revert the last one or several applied migrations, we can use the followingcommand:
yii migrate/down [step]
where the optional step parameter speci�es how many migrations to be re-verted back. It defaults to 1, meaning reverting back the last applied migra-tion.
As we described before, not all migrations can be reverted. Trying torevert such migrations will throw an exception and stop the whole revertingprocess.
6.4.5 Redoing Migrations
Redoing migrations means �rst reverting and then applying the speci�edmigrations. This can be done with the following command:
yii migrate/redo [step]
where the optional step parameter speci�es how many migrations to be re-done. It defaults to 1, meaning redoing the last migration.
6.4.6 Showing Migration Information
Besides applying and reverting migrations, the migration tool can also dis-play the migration history and the new migrations to be applied.
yii migrate/history [limit]
yii migrate/new [limit]
where the optional parameter limit speci�es the number of migrations to bedisplayed. If limit is not speci�ed, all available migrations will be displayed.
The �rst command shows the migrations that have been applied, whilethe second command shows the migrations that have not been applied.
6.4.7 Modifying Migration History
Sometimes, we may want to modify the migration history to a speci�c migra-tion version without actually applying or reverting the relevant migrations.

198 CHAPTER 6. WORKING WITH DATABASES
This often happens when developing a new migration. We can use the fol-lowing command to achieve this goal.
yii migrate/mark 101129_185401
This command is very similar to yii migrate/to command, except that itonly modi�es the migration history table to the speci�ed version withoutapplying or reverting the migrations.
6.4.8 Customizing Migration Command
There are several ways to customize the migration command.
Use Command Line Options
The migration command comes with four options that can be speci�ed incommand line:
• interactive: boolean, speci�es whether to perform migrations in aninteractive mode. Defaults to true, meaning the user will be promptedwhen performing a speci�c migration. You may set this to false shouldthe migrations be done in a background process.
• migrationPath: string, speci�es the directory storing all migration class�les. This must be speci�ed in terms of a path alias, and the corre-sponding directory must exist. If not speci�ed, it will use the migrations
sub-directory under the application base path.
• migrationTable: string, speci�es the name of the database table forstoring migration history information. It defaults to migration. Thetable structure is version varchar(255) primary key, apply_time integer.
• connectionID: string, speci�es the ID of the database application com-ponent. Defaults to `db'.
• templateFile: string, speci�es the path of the �le to be served as thecode template for generating the migration classes. This must be spec-i�ed in terms of a path alias (e.g. application.migrations.template). Ifnot set, an internal template will be used. Inside the template, the to-ken {ClassName} will be replaced with the actual migration class name.
To specify these options, execute the migrate command using the followingformat
yii migrate/up --option1=value1 --option2=value2 ...
For example, if we want to migrate for a forum module whose migration �lesare located within the module's migrations directory, we can use the followingcommand:
yii migrate/up --migrationPath=@app/modules/forum/migrations

6.4. DATABASE MIGRATION 199
Con�gure Command Globally
While command line options allow us to con�gure the migration commandon-the-�y, sometimes we may want to con�gure the command once for all.For example, we may want to use a di�erent table to store the migrationhistory, or we may want to use a customized migration template. We can doso by modifying the console application's con�guration �le like the following,
'controllerMap' => [
'migrate' => [
'class' => 'yii\console\controllers\MigrateController',
'migrationTable' => 'my_custom_migrate_table',
],
]
Now if we run the migrate command, the above con�gurations will take e�ectwithout requiring us to enter the command line options every time. Othercommand options can be also con�gured this way.

200 CHAPTER 6. WORKING WITH DATABASES
Error: not existing �le: db-sphinx.md

6.4. DATABASE MIGRATION 201
Error: not existing �le: db-redis.md

202 CHAPTER 6. WORKING WITH DATABASES
Error: not existing �le: db-mongodb.md

6.4. DATABASE MIGRATION 203
Error: not existing �le: db-elastic-search.md

204 CHAPTER 6. WORKING WITH DATABASES

Chapter 7
Getting Data from Users
7.1 Working with Forms
Note: This section is under development.
The primary way of using forms in Yii is through yii\widgets\ActiveForm.This approach should be preferred when the form is based upon a model.Additionally, there are some useful methods in yii\helpers\Html that aretypically used for adding buttons and help text to any form.
When creating model-based forms, the �rst step is to de�ne the modelitself. The model can be either based upon the Active Record class, or themore generic Model class. For this login example, a generic model will beused:
use yii\base\Model;
class LoginForm extends Model
{
public $username;
public $password;
/**
* @return array the validation rules.
*/
public function rules()
{
return [
// username and password are both required
[['username', 'password'], 'required'],
// password is validated by validatePassword()
['password', 'validatePassword'],
];
}
/**
* Validates the password.
* This method serves as the inline validation for password.
205

206 CHAPTER 7. GETTING DATA FROM USERS
*/
public function validatePassword()
{
$user = User::findByUsername($this->username);
if (!$user || !$user->validatePassword($this->password)) {
$this->addError('password', 'Incorrect username or password.');
}
}
/**
* Logs in a user using the provided username and password.
* @return boolean whether the user is logged in successfully
*/
public function login()
{
if ($this->validate()) {
$user = User::findByUsername($this->username);
return true;
} else {
return false;
}
}
}
The controller will pass an instance of that model to the view, wherein theyii\widgets\ActiveForm widget is used:
use yii\helpers\Html;
use yii\widgets\ActiveForm;
<?php $form = ActiveForm::begin([
'id' => 'login-form',
'options' => ['class' => 'form-horizontal'],
]) ?>
<?= $form->field($model, 'username') ?>
<?= $form->field($model, 'password')->passwordInput() ?>
<div class="form-group">
<div class="col-lg-offset-1 col-lg-11">
<?= Html::submitButton('Login', ['class' => 'btn btn-primary'])
?>
</div>
</div>
<?php ActiveForm::end() ?>
In the above code, yii\widgets\ActiveForm::begin() not only creates aform instance, but also marks the beginning of the form. All of the con-tent placed between yii\widgets\ActiveForm::begin() and yii\widgets
\ActiveForm::end() will be wrapped within the <form> tag. As with anywidget, you can specify some options as to how the widget should be con-�gured by passing an array to the begin method. In this case, an extra CSSclass and identifying ID are passed to be used in the opening <form> tag.

7.1. WORKING WITH FORMS 207
In order to create a form element in the form, along with the element's la-bel, and any application JavaScript validation, the yii\widgets\ActiveForm::field() method of the Active Form widget is called. When the invoca-tion of this method is echoed directly, the result is a regular (text) input. Tocustomize the output, you can chain additional methods to this call:
<?= $form->field($model, 'password')->passwordInput() ?>
// or
<?= $form->field($model, 'username')->textInput()->hint('Please enter your
name')->label('Name') ?>
This will create all the <label>, <input> and other tags according to thetemplate de�ned by the form �eld. To add these tags yourself you can usethe Html helper class.
If you want to use one of HTML5 �elds you may specify input typedirectly like the following:
<?= $form->field($model, 'email')->input('email') ?>
Specifying the attribute of the model can be done in more sophisticated ways.For example when an attribute may take an array value when uploadingmultiple �les or selecting multiple items you may specify it by appending []
to the attribute name:
// allow multiple files to be uploaded:
echo $form->field($model, 'uploadFile[]')->fileInput(['multiple'=>'multiple'
]);
// allow multiple items to be checked:
echo $form->field($model, 'items[]')->checkboxList(['a' => 'Item A', 'b' =>
'Item B', 'c' => 'Item C']);
Tip: in order to style required �elds with asterisk you can usethe following CSS:
div.required label:after {
content: " *";
color: red;
}
7.1.1 Handling multiple models with a single form
Sometimes you need to handle multiple models of the same kind in a singleform. For example, multiple settings where each setting is stored as name-value and is represented by Setting model. The following shows how toimplement it with Yii.
Let's start with controller action:

208 CHAPTER 7. GETTING DATA FROM USERS
namespace app\controllers;
use Yii;
use yii\base\Model;
use yii\web\Controller;
use app\models\Setting;
class SettingsController extends Controller
{
// ...
public function actionUpdate()
{
$settings = Setting::find()->indexBy('id')->all();
if (Model::loadMultiple($settings, Yii::$app->request->post()) &&
Model::validateMultiple($settings)) {
foreach ($settings as $setting) {
$setting->save(false);
}
return $this->redirect('index');
}
return $this->render('update', ['settings' => $settings]);
}
}
In the code above we're using indexBy when retrieving models from databaseto make array indexed by model ids. These will be later used to identifyform �elds. loadMultiple �lls multiple modelds with the form data comingfrom POST and validateMultiple validates all models at once. In order toskip validation when saving we're passing false as a parameter to save.
Now the form that's in update view:
<?php
use yii\helpers\Html;
use yii\widgets\ActiveForm;
$form = ActiveForm::begin();
foreach ($settings as $index => $setting) {
echo Html::encode($setting->name) . ': ' . $form->field($setting, "[
$index]value");
}
ActiveForm::end();
Here for each setting we are rendering name and an input with a value. It isimportant to add a proper index to input name since that is how loadMultiple
determines which model to �ll with which values.

7.2. VALIDATING INPUT 209
7.2 Validating Input
As a rule of thumb, you should never trust the data received from end usersand should always validate them before putting them to good use.
Given a model populated with user inputs, you can validate the inputs bycalling the yii\base\Model::validate() method. The method will returna boolean value indicating whether the validation succeeds or not. If not,you may get the error messages from the yii\base\Model::errors property.For example,
$model = new \app\models\ContactForm;
// populate model attributes with user inputs
$model->attributes = \Yii::$app->request->post('ContactForm');
if ($model->validate()) {
// all inputs are valid
} else {
// validation failed: $errors is an array containing error messages
$errors = $model->errors;
}
Behind the scene, the validate() method does the following steps to performvalidation:
1. Determine which attributes should be validated by getting the at-tribute list from yii\base\Model::scenarios() using the current yii\base\Model::scenario. These attributes are called active attributes.
2. Determine which validation rules should be used by getting the rule listfrom yii\base\Model::rules() using the current yii\base\Model::scenario. These rules are called active rules.
3. Use each active rule to validate each active attribute associated withthat rule. If the rule fails, keep an error message for the attribute inthe model.
7.2.1 Declaring Rules
To make validate() really work, you should declare validation rules for theattributes you plan to validate. This should be done by overriding the yii
\base\Model::rules() method. The following example shows how the val-idation rules for the ContactForm model are declared:
public function rules()
{
return [
// the name, email, subject and body attributes are required
[['name', 'email', 'subject', 'body'], 'required'],

210 CHAPTER 7. GETTING DATA FROM USERS
// the email attribute should be a valid email address
['email', 'email'],
];
}
The yii\base\Model::rules()method should return an array of rules, eachof which is an array of the following format:
[
// required, specifies which attributes should be validated by this rule
.
// For a single attribute, you can use the attribute name directly
// without having it in an array instead of an array
['attribute1', 'attribute2', ...],
// required, specifies the type of this rule.
// It can be a class name, validator alias, or a validation method name
'validator',
// optional, specifies in which scenario(s) this rule should be applied
// if not given, it means the rule applies to all scenarios
'on' => ['scenario1', 'scenario2', ...],
// optional, specifies additional configurations for the validator
object
'property1' => 'value1', 'property2' => 'value2', ...
]
For each rule you must specify at least which attributes the rule applies toand what is the type of the rule. You can specify the rule type in one of thefollowing forms:
• the alias of a core validator, such as required, in, date, etc. Please referto the Core Validators for the complete list of core validators.
• the name of a validation method in the model class, or an anonymousfunction. Please refer to the Inline Validators subsection for moredetails.
• the name of a validator class. Please refer to the Standalone Validatorssubsection for more details.
A rule can be used to validate one or multiple attributes, and an attributemay be validated by one or multiple rules. A rule may be applied in certainscenarios only by specifying the on option. If you do not specify an on option,it means the rule will be applied to all scenarios.
When the validate() method is called, it does the following steps toperform validation:
1. Determine which attributes should be validated by checking the cur-rent yii\base\Model::scenario against the scenarios declared in yii
\base\Model::scenarios(). These attributes are the active attributes.

7.2. VALIDATING INPUT 211
2. Determine which rules should be applied by checking the current yii\base\Model::scenario against the rules declared in yii\base\Model::rules(). These rules are the active rules.
3. Use each active rule to validate each active attribute which is associatedwith the rule.
According to the above validation steps, an attribute will be validated if andonly if it is an active attribute declared in scenarios() and is associated withone or multiple active rules declared in rules().
Customizing Error Messages
Most validators have default error messages that will be added to the modelbeing validated when its attributes fail the validation. For example, the yii\validators\RequiredValidator validator will add a message �Usernamecannot be blank.� to a model when its username attribute fails the rule usingthis validator.
You can customize the error message of a rule by specifying the message
property when declaring the rule, like the following,
public function rules()
{
return [
['username', 'required', 'message' => 'Please choose a username.'],
];
}
Some validators may support additional error messages to more precisely de-scribe di�erent causes of validation failures. For example, the yii\validators\NumberValidator validator supports yii\validators\NumberValidator
::tooBig and yii\validators\NumberValidator::tooSmall to describethe validation failure when the value being validated is too big and toosmall, respectively. You may con�gure these error messages like con�guringother properties of validators in a validation rule.
Conditional Validation
To validate attributes only when certain conditions apply, e.g. the validationof one attribute depends on the value of another attribute you can use theyii\validators\Validator::when property to de�ne such conditions. Forexample,
[
['state', 'required', 'when' => function($model) {
return $model->country == 'USA';
}],
]

212 CHAPTER 7. GETTING DATA FROM USERS
The yii\validators\Validator::when property takes a PHP callable withthe following signature:
/**
* @param Model $model the model being validated
* @param string $attribute the attribute being validated
* @return boolean whether the rule should be applied
*/
function ($model, $attribute)
If you also need to support client-side conditional validation, you should con-�gure the yii\validators\Validator::whenClient property which takesa string representing a JavaScript function whose return value determineswhether to apply the rule or not. For example,
[
['state', 'required', 'when' => function ($model) {
return $model->country == 'USA';
}, 'whenClient' => "function (attribute, value) {
return $('#country').value == 'USA';
}"],
]
Data Filtering
User inputs often need to be �ltered or preprocessed. For example, you maywant to trim the spaces around the username input. You may use validationrules to achieve this goal. The following rule declaration shows how to trimthe spaces in the input by using the trim core validator:
[
['username', 'trim'],
]
You may also use the more general �lter validator if your data �ltering needis more complex than space trimming.
As you can see, these validation rules do not really validate the inputs.Instead, they will process the values and save them back to the attributesbeing validated.
7.2.2 Ad Hoc Validation
Sometimes you need to do ad hoc validation for values that are not boundto any model.
If you only need to perform one type of validation (e.g. validating emailaddresses), you may call the yii\validators\Validator::validate()methodof the desired validator, like the following:
$email = '[email protected]';
$validator = new yii\validators\EmailValidator();

7.2. VALIDATING INPUT 213
if ($validator->validate($email, $error)) {
echo 'Email is valid.';
} else {
echo $error;
}
Note: Not all validators support such kind of validation. Anexample is the unique core validator which is designed to workwith a model only.
If you need to perform multiple validations against several values, you canuse yii\base\DynamicModel which supports declaring both attributes andrules on the �y. Its usage is like the following:
public function actionSearch($name, $email)
{
$model = DynamicModel::validateData(compact('name', 'email'), [
[['name', 'email'], 'string', 'max' => 128],
['email', 'email'],
]);
if ($model->hasErrors()) {
// validation fails
} else {
// validation succeeds
}
}
The yii\base\DynamicModel::validateData()method creates an instanceof DynamicModel, de�nes the attributes using the given data (name and email inthis example), and then calls yii\base\Model::validate() with the givenrules.
Alternatively, you may use the following more �classic� syntax to performad hoc data validation:
public function actionSearch($name, $email)
{
$model = new DynamicModel(compact('name', 'email'));
$model->addRule(['name', 'email'], 'string', ['max' => 128])
->addRule('email', 'email')
->validate();
if ($model->hasErrors()) {
// validation fails
} else {
// validation succeeds
}
}
After validation, you can check if the validation succeeds or not by callingthe yii\base\DynamicModel::hasErrors() method, and then get the vali-dation errors from the yii\base\DynamicModel::errors property, like you

214 CHAPTER 7. GETTING DATA FROM USERS
do with a normal model. You may also access the dynamic attributes de�nedthrough the model instance, e.g., $model->name and $model->email.
7.2.3 Creating Validators
Besides using the core validators included in the Yii releases, you may alsocreate your own validators. You may create inline validators or standalonevalidators.
Inline Validators
An inline validator is one de�ned in terms of a model method or an anony-mous function. The signature of the method/function is:
/**
* @param string $attribute the attribute currently being validated
* @param array $params the additional name-value pairs given in the rule
*/
function ($model, $attribute)
If an attribute fails the validation, the method/function should call yii\base\Model::addError() to save the error message in the model so that it canbe retrieved back later to present to end users.
Below are some examples:
use yii\base\Model;
class MyForm extends Model
{
public $country;
public $token;
public function rules()
{
return [
// an inline validator defined as the model method
validateCountry()
['country', 'validateCountry'],
// an inline validator defined as an anonymous function
['token', function ($attribute, $params) {
if (!ctype_alnum($this->$attribute)) {
$this->addError($attribute, 'The token must contain
letters or digits.');
}
}],
];
}
public function validateType($attribute, $params)
{
if (!in_array($this->$attribute, ['USA', 'Web'])) {

7.2. VALIDATING INPUT 215
$this->addError($attribute, 'The country must be either "USA" or
"Web".');
}
}
}
Standalone Validators
A standalone validator is a class extending yii\validators\Validator orits child class. You may implement its validation logic by overriding the yii\validators\Validator::validateAttribute() method. If an attributefails the validation, call yii\base\Model::addError() to save the error mes-sage in the model, like you do with inline validators. For example,
namespace app\components;
use yii\validators\Validator;
class CountryValidator extends Validator
{
public function validateAttribute($model, $attribute)
{
if (!in_array($model->$attribute, ['USA', 'Web'])) {
$this->addError($attribute, 'The country must be either "USA" or
"Web".');
}
}
}
If you want your validator to support validating a value without a model,you should also override yii\validators\Validator::validate(). Youmay also override yii\validators\Validator::validateValue() insteadof validateAttribute() and validate() because by default the latter two meth-ods are implemented by calling validateValue().
Handling Empty Inputs
Validators often need to check if an input is empty or not. You may call yii\validators\Validator::isEmpty() to perform this check. By default,this method will return true if a value is an empty string, an empty array ornull.
Users of validators can customize the default empty detection logic bycon�guring the yii\validators\Validator::isEmpty property. For exam-ple,
[
['agree', 'required', 'isEmpty' => function ($value) {
return empty($value);
}],
]

216 CHAPTER 7. GETTING DATA FROM USERS
7.2.4 Client-Side Validation
Client-side validation based on JavaScript is desirable when end users pro-vide inputs via HTML forms, because it allows users to �nd out input errorsfaster and thus provides better user experience. You may use or implementa validator that supports client-side validation in addition to server-side val-idation.
Info: While client-side validation is desirable, it is not a must. Itmain purpose is to provider users better experience. Like inputdata coming from end users, you should never trust client-sidevalidation. For this reason, you should always perform server-side validation by calling yii\base\Model::validate(), like de-scribed in the previous subsections.
Using Client-Side Validation
Many core validators support client-side validation out-of-box. All you needto do is just to use yii\widgets\ActiveForm to build your HTML forms.For example, LoginForm below declares two rules: one uses the required corevalidator which is supported on both client and server sides; the other usesthe validatePassword inline validator which is only supported on the serverside.
namespace app\models;
use yii\base\Model;
use app\models\User;
class LoginForm extends Model
{
public $username;
public $password;
public function rules()
{
return [
// username and password are both required
[['username', 'password'], 'required'],
// password is validated by validatePassword()
['password', 'validatePassword'],
];
}
public function validatePassword()
{
$user = User::findByUsername($this->username);
if (!$user || !$user->validatePassword($this->password)) {

7.2. VALIDATING INPUT 217
$this->addError('password', 'Incorrect username or password.');
}
}
}
The HTML form built by the following code contains two input �elds usernameand password. If you submit the form without entering anything, you will�nd the error messages requiring you to enter something appear right awaywithout any communication with the server.
<?php $form = yii\widgets\ActiveForm::begin(); ?>
<?= $form->field($model, 'username') ?>
<?= $form->field($model, 'password')->passwordInput() ?>
<?= Html::submitButton('Login') ?>
<?php yii\widgets\ActiveForm::end(); ?>
Behind the scene, yii\widgets\ActiveForm will read the validation rulesdeclared in the model and generate appropriate JavaScript code for validatorsthat support client-side validation. When a user changes the value of aninput �eld or submit the form, the client-side validation JavaScript will betriggered.
If you do not want client-side validation, you may simply con�gure theyii\widgets\ActiveForm::enableClientValidation property to be false.
Implementing Client-Side Validation
To create a validator that supports client-side validation, you should imple-ment the yii\validators\Validator::clientValidateAttribute()methodwhich returns a piece of JavaScript code that performs the validation on theclient side. Within the JavaScript code, you may use the following prede�nedvariables:
• attribute: the name of the attribute being validated.
• value: the value being validated.
• messages: an array used to hold the validation error messages for theattribute.
In the following example, we create a StatusValidator which validates if aninput is a valid status input against the existing status data. The validatorsupports both server side and client side validation.
namespace app\components;
use yii\validators\Validator;
use app\models\Status;
class StatusValidator extends Validator
{

218 CHAPTER 7. GETTING DATA FROM USERS
public function init()
{
parent::init();
$this->message = 'Invalid status input.';
}
public function validateAttribute($model, $attribute)
{
$value = $model->$attribute;
if (!Status::find()->where(['id' => $value])->exists()) {
$model->addError($attribute, $this->message);
}
}
public function clientValidateAttribute($model, $attribute, $view)
{
$statuses = json_encode(Status::find()->select('id')->asArray()->
column());
$message = json_encode($this->message);
return <<<JS
if (!$.inArray(value, $statuses)) {
messages.push($message);
}
JS;
}
}
Tip: The above code is given mainly to demonstrate how to sup-port client-side validation. In practice, you may use the in corevalidator to achieve the same goal. You may write the validationrule like the following: `php [
['status', 'in', 'range' => Status::find()->select('id')->
asArray()->column()],
] `
7.3 Uploading Files
Note: This section is under development.
Uploading �les in Yii is done via form model, its validation rules and somecontroller code. Let's review what's needed to handle uploads properly.
7.3.1 Form model
First of all, you need to create a model that will handle �le upload. Createmodels/UploadForm.php with the following content:

7.3. UPLOADING FILES 219
namespace app\models;
use yii\base\Model;
use yii\web\UploadedFile;
/**
* UploadForm is the model behind the upload form.
*/
class UploadForm extends Model
{
/**
* @var UploadedFile|Null file attribute
*/
public $file;
/**
* @return array the validation rules.
*/
public function rules()
{
return [
[['file'], 'file'],
];
}
}
In the code above, we created a model UploadForm with an attribute $file
that will become <input type="file"> in the HTML form. The attribute hasthe validation rule named file that uses yii\validators\FileValidator.
7.3.2 Form view
Next create a view that will render the form.
<?php
use yii\widgets\ActiveForm;
$form = ActiveForm::begin(['options' => ['enctype' => 'multipart/form-data'
]]); ?>
<?= $form->field($model, 'file')->fileInput() ?>
<button>Submit</button>
<?php ActiveForm::end(); ?>
The 'enctype' => 'multipart/form-data' is important since it allows �le up-loads. fileInput() represents a form input �eld.
7.3.3 Controller
Now create the controller that connects form and model together:

220 CHAPTER 7. GETTING DATA FROM USERS
namespace app\controllers;
use Yii;
use yii\web\Controller;
use app\models\UploadForm;
use yii\web\UploadedFile;
class SiteController extends Controller
{
public function actionUpload()
{
$model = new UploadForm();
if (Yii::$app->request->isPost) {
$model->file = UploadedFile::getInstance($model, 'file');
if ($model->validate()) {
$model->file->saveAs('uploads/' . $model->file->baseName . '
.' . $model->file->extension);
}
}
return $this->render('upload', ['model' => $model]);
}
}
Instead of model->load(...) we are using UploadedFile::getInstance(...).\yii\web\UploadedFile does not run the model validation. It only pro-vides information about the uploaded �le. Therefore, you need to run val-idation manually via $model->validate(). This triggers the yii\validators
\FileValidator that expects a �le:
$file instanceof UploadedFile || $file->error == UPLOAD_ERR_NO_FILE //in
code framework
If validation is successful, then we're saving the �le:
$model->file->saveAs('uploads/' . $model->file->baseName . '.' . $model->
file->extension);
If you're using �basic� application template then folder uploads should becreated under web.
That's it. Load the page and try uploading. Uplaods should end up inbasic/web/uploads.
7.3.4 Additional information
Required rule
If you need to make �le upload mandatory use skipOnEmpty like the following:
public function rules()
{
return [

7.3. UPLOADING FILES 221
[['file'], 'file', 'skipOnEmpty' => false],
];
}
MIME type
It is wise to validate type of the �le uploaded. FileValidator has property$types for the purpose:
public function rules()
{
return [
[['file'], 'file', 'types' => 'gif, jpg',],
];
}
The thing is that it validates only �le extension and not the �le content. Inorder to validate content as well use mimeTypes property of ImageValidator:
public function rules()
{
return [
[['file'], 'image', 'mimeTypes' => 'image/jpeg, image/png',],
];
}
Uploading multiple �les
If you need download multiple �les at once some adjustments are required.View:
<?php
use yii\widgets\ActiveForm;
$form = ActiveForm::begin(['options' => ['enctype' => 'multipart/form-data'
]]);
if ($model->hasErrors()) { //it is necessary to see all the errors for all
the files.
echo '<pre>';
print_r($model->getErrors());
echo '</pre>';
}
?>
<?= $form->field($model, 'file[]')->fileInput(['multiple' => '']) ?>
<button>Submit</button>
<?php ActiveForm::end(); ?>
The di�erence is the following line:
<?= $form->field($model, 'file[]')->fileInput(['multiple' => '']) ?>

222 CHAPTER 7. GETTING DATA FROM USERS
Controller:
namespace app\controllers;
use Yii;
use yii\web\Controller;
use app\models\UploadForm;
use yii\web\UploadedFile;
class SiteController extends Controller
{
public function actionUpload()
{
$model = new UploadForm();
if (Yii::$app->request->isPost) {
$files = UploadedFile::getInstances($model, 'file');
foreach ($files as $file) {
$_model = new UploadForm();
$_model->file = $file;
if ($_model->validate()) {
$_model->file->saveAs('uploads/' . $_model->file->
baseName . '.' . $_model->file->extension);
} else {
foreach ($_model->getErrors('file') as $error) {
$model->addError('file', $error);
}
}
}
if ($model->hasErrors('file')){
$model->addError(
'file',
count($model->getErrors('file')) . ' of ' . count($files
) . ' files not uploaded'
);
}
}
return $this->render('upload', ['model' => $model]);
}
}
The di�erence is UploadedFile::getInstances($model, 'file'); instead of UploadedFile::getInstance($model, 'file');. Former returns instances for all uploaded�les while the latter gives you only a single instance.

7.3. UPLOADING FILES 223
Error: not existing �le: input-multiple-models.md

224 CHAPTER 7. GETTING DATA FROM USERS

Chapter 8
Displaying Data
225

226 CHAPTER 8. DISPLAYING DATA
Error: not existing �le: output-formatting.md

227
Error: not existing �le: output-pagination.md

228 CHAPTER 8. DISPLAYING DATA
Error: not existing �le: output-sorting.md

8.1. DATA PROVIDERS 229
8.1 Data providers
Note: This section is under development.
Data provider abstracts data set via yii\data\DataProviderInterface andhandles pagination and sorting. It can be used by grids, lists and other datawidgets.
In Yii there are three built-in data providers: yii\data\ActiveDataProvider,yii\data\ArrayDataProvider and yii\data\SqlDataProvider.
8.1.1 Active data provider
ActiveDataProvider provides data by performing DB queries using yii\db
\Query and yii\db\ActiveQuery.
The following is an example of using it to provide ActiveRecord instances:
$provider = new ActiveDataProvider([
'query' => Post::find(),
'pagination' => [
'pageSize' => 20,
],
]);
// get the posts in the current page
$posts = $provider->getModels();
And the following example shows how to use ActiveDataProvider withoutActiveRecord:
$query = new Query();
$provider = new ActiveDataProvider([
'query' => $query->from('post'),
'sort' => [
// Set the default sort by name ASC and created_at DESC.
'defaultOrder' => [
'name' => SORT_ASC,
'created_at' => SORT_DESC
]
],
'pagination' => [
'pageSize' => 20,
],
]);
// get the posts in the current page
$posts = $provider->getModels();
8.1.2 Array data provider
ArrayDataProvider implements a data provider based on a data array.

230 CHAPTER 8. DISPLAYING DATA
The yii\data\ArrayDataProvider::$allModels property contains alldata models that may be sorted and/or paginated. ArrayDataProvider willprovide the data after sorting and/or pagination. You may con�gure theyii\data\ArrayDataProvider::$sort and yii\data\ArrayDataProvider
::$pagination properties to customize the sorting and pagination behav-iors.
Elements in the yii\data\ArrayDataProvider::$allModels array maybe either objects (e.g. model objects) or associative arrays (e.g. queryresults of DAO). Make sure to set the yii\data\ArrayDataProvider::$keyproperty to the name of the �eld that uniquely identi�es a data record orfalse if you do not have such a �eld.
Compared to ActiveDataProvider, ArrayDataProvider could be less e�cientbecause it needs to have yii\data\ArrayDataProvider::$allModels ready.
ArrayDataProvider may be used in the following way:
$query = new Query();
$provider = new ArrayDataProvider([
'allModels' => $query->from('post')->all(),
'sort' => [
'attributes' => ['id', 'username', 'email'],
],
'pagination' => [
'pageSize' => 10,
],
]);
// get the posts in the current page
$posts = $provider->getModels();
Note: if you want to use the sorting feature, you must con�gurethe sort property so that the provider knows which columns canbe sorted.
8.1.3 SQL data provider
SqlDataProvider implements a data provider based on a plain SQL state-ment. It provides data in terms of arrays, each representing a row of queryresult.
Like other data providers, SqlDataProvider also supports sorting andpagination. It does so by modifying the given yii\data\SqlDataProvider::$sql statement with �ORDER BY� and �LIMIT� clauses. You may con�gurethe yii\data\SqlDataProvider::$sort and yii\data\SqlDataProvider
::$pagination properties to customize sorting and pagination behaviors.
SqlDataProvider may be used in the following way:
$count = Yii::$app->db->createCommand('
SELECT COUNT(*) FROM user WHERE status=:status
', [':status' => 1])->queryScalar();

8.2. DATA WIDGETS 231
$dataProvider = new SqlDataProvider([
'sql' => 'SELECT * FROM user WHERE status=:status',
'params' => [':status' => 1],
'totalCount' => $count,
'sort' => [
'attributes' => [
'age',
'name' => [
'asc' => ['first_name' => SORT_ASC, 'last_name' => SORT_ASC
],
'desc' => ['first_name' => SORT_DESC, 'last_name' =>
SORT_DESC],
'default' => SORT_DESC,
'label' => 'Name',
],
],
],
'pagination' => [
'pageSize' => 20,
],
]);
// get the user records in the current page
$models = $dataProvider->getModels();
Note: if you want to use the pagination feature, you must con-�gure the yii\data\SqlDataProvider::$totalCount propertyto be the total number of rows (without pagination). And if youwant to use the sorting feature, you must con�gure the yii\data\SqlDataProvider::$sort property so that the provider knowswhich columns can be sorted.
8.1.4 Implementing your own custom data provider
TBD
8.2 Data widgets
Note: This section is under development.
8.2.1 ListView
8.2.2 DetailView
DetailView displays the detail of a single data yii\widgets\DetailView::
$model.It is best used for displaying a model in a regular format (e.g. each
model attribute is displayed as a row in a table). The model can be eitheran instance of \yii\base\Model or an associative array.

232 CHAPTER 8. DISPLAYING DATA
DetailView uses the yii\widgets\DetailView::$attributes propertyto determines which model attributes should be displayed and how theyshould be formatted.
A typical usage of DetailView is as follows:
echo DetailView::widget([
'model' => $model,
'attributes' => [
'title', // title attribute (in plain text)
'description:html', // description attribute in HTML
[ // the owner name of the model
'label' => 'Owner',
'value' => $model->owner->name,
],
],
]);
8.2.3 GridView
Data grid or GridView is one of the most powerful Yii widgets. It is extremelyuseful if you need to quickly build admin section of the system. It takes datafrom data provider and renders each row using a set of columns presentingdata in a form of a table.
Each row of the table represents the data of a single data item, anda column usually represents an attribute of the item (some columns maycorrespond to complex expression of attributes or static text).
Grid view supports both sorting and pagination of the data items. Thesorting and pagination can be done in AJAX mode or normal page request.A bene�t of using GridView is that when the user disables JavaScript, thesorting and pagination automatically degrade to normal page requests andare still functioning as expected.
The minimal code needed to use GridView is as follows:
use yii\grid\GridView;
use yii\data\ActiveDataProvider;
$dataProvider = new ActiveDataProvider([
'query' => Post::find(),
'pagination' => [
'pageSize' => 20,
],
]);
echo GridView::widget([
'dataProvider' => $dataProvider,
]);
The above code �rst creates a data provider and then uses GridView todisplay every attribute in every row taken from data provider. The displayedtable is equipped with sorting and pagination functionality.

8.2. DATA WIDGETS 233
Grid columns
Yii grid consists of a number of columns. Depending on column type andsettings these are able to present data di�erently.
These are de�ned in the columns part of GridView con�g like the follow-ing:
echo GridView::widget([
'dataProvider' => $dataProvider,
'columns' => [
['class' => 'yii\grid\SerialColumn'],
// A simple column defined by the data contained in $dataProvider.
// Data from model's column1 will be used.
'id',
'username',
// More complex one.
[
'class' => 'yii\grid\DataColumn', // can be omitted, default
'value' => function ($data) {
return $data->name;
},
],
],
]);
Note that if columns part of con�g isn't speci�ed, Yii tries to show all possibledata provider model columns.
Column classes
Grid columns could be customized by using di�erent column classes:
echo GridView::widget([
'dataProvider' => $dataProvider,
'columns' => [
[
'class' => 'yii\grid\SerialColumn', // <-- here
// you may configure additional properties here
],
Additionally to column classes provided by Yii that we'll review below youcan create your own column classes.
Each column class extends from \yii\grid\Column so there some com-mon options you can set while con�guring grid columns.
• header allows to set content for header row.
• footer allows to set content for footer row.
• visible is the column should be visible.
• content allows you to pass a valid PHP callback that will return datafor a row. The format is the following:

234 CHAPTER 8. DISPLAYING DATA
function ($model, $key, $index, $grid) {
return 'a string';
}
You may specify various container HTML options passing arrays to:
• headerOptions
• contentOptions
• footerOptions
• filterOptions
Data column Data column is for displaying and sorting data. It is defaultcolumn type so specifying class could be omitted when using it.
TBD
Action column Action column displays action buttons such as update ordelete for each row.
echo GridView::widget([
'dataProvider' => $dataProvider,
'columns' => [
[
'class' => 'yii\grid\ActionColumn',
// you may configure additional properties here
],
Available properties you can con�gure are:
• controller is the ID of the controller that should handle the actions. Ifnot set, it will use the currently active controller.
• template the template used for composing each cell in the action col-umn. Tokens enclosed within curly brackets are treated as controlleraction IDs (also called button names in the context of action column).They will be replaced by the corresponding button rendering callbacksspeci�ed in yii\grid\ActionColumn::$buttons. For example, the to-ken {view} will be replaced by the result of the callback buttons['view'].If a callback cannot be found, the token will be replaced with an emptystring. Default is {view} {update} {delete}.
• buttons is an array of button rendering callbacks. The array keys arethe button names (without curly brackets), and the values are thecorresponding button rendering callbacks. The callbacks should usethe following signature:

8.2. DATA WIDGETS 235
function ($url, $model) {
// return the button HTML code
}
In the code above $url is the URL that the column creates for the button,and $model is the model object being rendered for the current row.
• urlCreator is a callback that creates a button URL using the speci�edmodel information. The signature of the callback should be the sameas that of yii\grid\ActionColumn::createUrl(). If this property isnot set, button URLs will be created using yii\grid\ActionColumn
::createUrl().
Checkbox column CheckboxColumn displays a column of checkboxes.
To add a CheckboxColumn to the yii\grid\GridView, add it to the yii\grid\GridView::$columns con�guration as follows:
echo GridView::widget([
'dataProvider' => $dataProvider,
'columns' => [
// ...
[
'class' => 'yii\grid\CheckboxColumn',
// you may configure additional properties here
],
],
Users may click on the checkboxes to select rows of the grid. The selectedrows may be obtained by calling the following JavaScript code:
var keys = $('#grid').yiiGridView('getSelectedRows');
// keys is an array consisting of the keys associated with the selected rows
Serial column Serial column renders row numbers starting with 1 andgoing forward.
Usage is as simple as the following:
echo GridView::widget([
'dataProvider' => $dataProvider,
'columns' => [
['class' => 'yii\grid\SerialColumn'], // <-- here
// ...
Sorting data
• https://github.com/yiisoft/yii2/issues/1576

236 CHAPTER 8. DISPLAYING DATA
Filtering data
For �ltering data the GridView needs a model that takes the input from the�ltering form and adjusts the query of the dataProvider to respect the searchcriteria. A common practice when using active records is to create a searchModel class that extends from the active record class. This class then de�nesthe validation rules for the search and provides a search() method that willreturn the data provider.
To add search capability for the Post model we can create PostSearch likein the following example:
<?php
namespace app\models;
use Yii;
use yii\base\Model;
use yii\data\ActiveDataProvider;
class PostSearch extends Post
{
public function rules()
{
// only fields in rules() are searchable
return [
[['id'], 'integer'],
[['title', 'creation_date'], 'safe'],
];
}
public function scenarios()
{
// bypass scenarios() implementation in the parent class
return Model::scenarios();
}
public function search($params)
{
$query = Post::find();
$dataProvider = new ActiveDataProvider([
'query' => $query,
]);
// load the seach form data and validate
if (!($this->load($params) && $this->validate())) {
return $dataProvider;
}
// adjust the query by adding the filters
$query->andFilterWhere(['id' => $this->id]);
$query->andFilterWhere(['like', 'title', $this->name])
->andFilterWhere(['like', 'creation_date', $this->

8.2. DATA WIDGETS 237
creation_date]);
return $dataProvider;
}
}
You can use this function in the controller to get the dataProvider for theGridView:
$searchModel = new PostSearch();
$dataProvider = $searchModel->search($_GET);
return $this->render('myview', [
'dataProvider' => $dataProvider,
'searchModel' => $searchModel,
]);
And in the view you then assign the $dataProvider and $searchModel to theGridView:
echo GridView::widget([
'dataProvider' => $dataProvider,
'filterModel' => $searchModel,
]);
Working with model relations
When displaying active records in a GridView you might encounter the casewhere you display values of related columns such as the post's author's nameinstead of just his id. You do this by de�ning the attribute name in columnsas author.name when the Post model has a relation named author and theauthor model has an attribute name. The GridView will then display thename of the author but sorting and �ltering are not enabled by default. Youhave to adjust the PostSearch model that has been introduced in the lastsection to add this functionality.
To enable sorting on a related column you have to join the related tableand add the sorting rule to the Sort component of the data provider:
$query = Post::find();
$dataProvider = new ActiveDataProvider([
'query' => $query,
]);
// join with relation `author` that is a relation to the table `users`
// and set the table alias to be `author`
$query->joinWith(['author' => function($query) { $query->from(['author' => '
users']); }]);
// enable sorting for the related column
$dataProvider->sort->attributes['author.name'] = [
'asc' => ['author.name' => SORT_ASC],
'desc' => ['author.name' => SORT_DESC],
];

238 CHAPTER 8. DISPLAYING DATA
// ...
Filtering also needs the joinWith call as above. You also need to de�ne thesearchable column in attributes and rules like this:
public function attributes()
{
// add related fields to searchable attributes
return array_merge(parent::attributes(), ['author.name']);
}
public function rules()
{
return [
[['id'], 'integer'],
[['title', 'creation_date', 'author.name'], 'safe'],
];
}
In search() you then just add another �lter condition with $query->andFilterWhere
(['LIKE', 'author.name', $this->getAttribute('author.name')]);.
Info: For more information on joinWith and the queries performedin the background, check the active record docs on eager and lazyloading.
Multiple GridViews on one page
You can use more than one GridView on a single page but some additionalcon�guration is needed so that they do not interfere. When using multipleinstances of GridView you have to con�gure di�erent parameter names forthe generated sort and pagination links so that each GridView has its in-dividual sorting and pagination. You do so by setting the yii\data\Sort
::sortParam and yii\data\Pagination::pageParam of the dataProvidersyii\data\BaseDataProvider::$sort and yii\data\BaseDataProvider::
$pagination instance.
Assume we want to list Post and User models for which we have alreadyprepared two data providers in $userProvider and $postProvider:
use yii\grid\GridView;
$userProvider->pagination->pageParam = 'user-page';
$userProvider->sort->sortParam = 'user-sort';
$postProvider->pagination->pageParam = 'post-page';
$postProvider->sort->sortParam = 'post-sort';
echo '<h1>Users</h1>';
echo GridView::widget([
'dataProvider' => $userProvider,

8.3. THEMING 239
]);
echo '<h1>Posts</h1>';
echo GridView::widget([
'dataProvider' => $postProvider,
]);
Using GridView with Pjax
TBD
8.3 Theming
Note: This section is under development.
A theme is a directory of view and layout �les. Each �le of the theme over-rides corresponding �le of an application when rendered. A single applicationmay use multiple themes and each may provide totally di�erent experience.At any time only one theme can be active.
Note: Themes usually do not meant to be redistributed sinceviews are too application speci�c. If you want to redistributecustomized look and feel consider CSS and JavaScript �les inform of asset bundles instead.
8.3.1 Con�guring a theme
Theme con�guration is speci�ed via view component of the application. Inorder to set up a theme to work with basic application views the followingshould be in your application con�g �le:
'components' => [
'view' => [
'theme' => [
'pathMap' => ['@app/views' => '@app/themes/basic'],
'baseUrl' => '@web/themes/basic',
],
],
],
In the above pathMap de�nes a map of original paths to themed paths whilebaseUrl de�nes base URL for resources referenced from theme �les.
In our case pathMap is ['@app/views' => '@app/themes/basic']. That meansthat every view in @app/views will be �rst searched under @app/themes/basic
and if a view exists in the theme directory it will be used instead of theoriginal view.
For example, with a con�guration above a themed version of a view �le@app/views/site/index.php will be @app/themes/basic/site/index.php. It basi-cally replaces @app/views in @app/views/site/index.php with @app/themes/basic.

240 CHAPTER 8. DISPLAYING DATA
Theming modules
In order to theme modules pathMap may look like the following:
'components' => [
'view' => [
'theme' => [
'pathMap' => [
'@app/views' => '@app/themes/basic',
'@app/modules' => '@app/themes/basic/modules', // <-- !!!
],
],
],
],
It will allow you to theme @app/modules/blog/views/comment/index.php with @app
/themes/basic/modules/blog/views/comment/index.php.
Theming widgets
In order to theme a widget view located at @app/widgets/currency/views/index
.php you need the following con�g for view component theme:
'components' => [
'view' => [
'theme' => [
'pathMap' => ['@app/widgets' => '@app/themes/basic/widgets'],
],
],
],
With the con�g above you can create themed version of @app/widgets/currency/index.php view in @app/themes/basic/widgets/currency/index.php.
8.3.2 Using multiple paths
It is possible to map a single path to multiple theme paths. For example,
'pathMap' => [
'@app/views' => [
'@app/themes/christmas',
'@app/themes/basic',
],
]
In this case, the view will be searched in @app/themes/christmas/site/index.php
then if it's not found it will check @app/themes/basic/site/index.php. If there'sno view there as well application view will be used.
This ability is especially useful if you want to temporary or conditionallyoverride some views.

Chapter 9
Security
9.1 Authentication
Note: This section is under development.
Authentication is the act of verifying who a user is, and is the basis of the lo-gin process. Typically, authentication uses the combination of an identi�er�ausername or email address�and a password. The user submits these valuesthrough a form, and the application then compares the submitted informa-tion against that previously stored (e.g., upon registration).
In Yii, this entire process is performed semi-automatically, leaving thedeveloper to merely implement yii\web\IdentityInterface, the most im-portant class in the authentication system. Typically, implementation ofIdentityInterface is accomplished using the User model.
You can �nd a fully featured example of authentication in the advancedapplication template. Below, only the interface methods are listed:
class User extends ActiveRecord implements IdentityInterface
{
// ...
/**
* Finds an identity by the given ID.
*
* @param string|integer $id the ID to be looked for
* @return IdentityInterface|null the identity object that matches the
given ID.
*/
public static function findIdentity($id)
{
return static::findOne($id);
}
/**
* Finds an identity by the given token.
*
241

242 CHAPTER 9. SECURITY
* @param string $token the token to be looked for
* @return IdentityInterface|null the identity object that matches the
given token.
*/
public static function findIdentityByAccessToken($token, $type = null)
{
return static::findOne(['access_token' => $token]);
}
/**
* @return int|string current user ID
*/
public function getId()
{
return $this->id;
}
/**
* @return string current user auth key
*/
public function getAuthKey()
{
return $this->auth_key;
}
/**
* @param string $authKey
* @return boolean if auth key is valid for current user
*/
public function validateAuthKey($authKey)
{
return $this->getAuthKey() === $authKey;
}
}
Two of the outlined methods are simple: findIdentity is provided with anID value and returns a model instance associated with that ID. The getId
method returns the ID itself. Two of the other methods�getAuthKey andvalidateAuthKey�are used to provide extra security to the �remember me�cookie. The getAuthKey method should return a string that is unique foreach user. You can create reliably create a unique string using Security::
generateRandomKey(). It's a good idea to also save this as part of the user'srecord:
public function beforeSave($insert)
{
if (parent::beforeSave($insert)) {
if ($this->isNewRecord) {
$this->auth_key = Security::generateRandomKey();
}
return true;
}
return false;

9.2. AUTHORIZATION 243
}
The validateAuthKey method just needs to compare the $authKey variable,passed as parameter (itself retrieved from a cookie), with the value fetchedfrom database.
9.2 Authorization
Note: This section is under development.
Authorization is the process of verifying that a user has enough permissionto do something. Yii provides two authorization methods: Access ControlFilter (ACF) and Role-Based Access Control (RBAC).
9.2.1 Access Control Filter
Access Control Filter (ACF) is a simple authorization method that is bestused by applications that only need some simple access control. As its nameindicates, ACF is an action �lter that can be attached to a controller or amodule as a behavior. ACF will check a set of yii\filters\AccessControl::rules to make sure the current user can access the requested action.
The code below shows how to use ACF which is implemented as yii
\filters\AccessControl:
use yii\filters\AccessControl;
class SiteController extends Controller
{
public function behaviors()
{
return [
'access' => [
'class' => AccessControl::className(),
'only' => ['login', 'logout', 'signup'],
'rules' => [
[
'allow' => true,
'actions' => ['login', 'signup'],
'roles' => ['?'],
],
[
'allow' => true,
'actions' => ['logout'],
'roles' => ['@'],
],
],
],
];
}
// ...
}

244 CHAPTER 9. SECURITY
In the code above ACF is attached to the site controller as a behavior. Thisis the typical way of using an action �lter. The only option speci�es that theACF should only be applied to login, logout and signup actions. The rules
option speci�es the yii\filters\AccessRule, which reads as follows:
• Allow all guest (not yet authenticated) users to access `login' and`signup' actions. The roles option contains a question mark ? which isa special token recognized as �guests�.
• Allow authenticated users to access `logout' action. The @ character isanother special token recognized as authenticated users.
When ACF performs authorization check, it will examine the rules one by onefrom top to bottom until it �nds a match. The allow value of the matchingrule will then be used to judge if the user is authorized. If none of the rulesmatches, it means the user is NOT authorized and ACF will stop furtheraction execution.
By default, ACF does only of the followings when it determines a user isnot authorized to access the current action:
• If the user is a guest, it will call yii\web\User::loginRequired(),which may redirect the browser to the login page.
• If the user is already authenticated, it will throw a yii\web\ForbiddenHttpException.
You may customize this behavior by con�guring the yii\filters\AccessControl::denyCallback property:
[
'class' => AccessControl::className(),
'denyCallback' => function ($rule, $action) {
throw new \Exception('You are not allowed to access this page');
}
]
yii\filters\AccessRule support many options. Below is a summary ofthe supported options. You may also extend yii\filters\AccessRule tocreate your own customized access rule classes.
• yii\filters\AccessRule::allow: speci�es whether this is an �allow�or �deny� rule.
• yii\filters\AccessRule::actions: speci�es which actions this rulematches. This should be an array of action IDs. The comparison iscase-sensitive. If this option is empty or not set, it means the ruleapplies to all actions.

9.2. AUTHORIZATION 245
• yii\filters\AccessRule::controllers: speci�es which controllersthis rule matches. This should be an array of controller IDs. Thecomparison is case-sensitive. If this option is empty or not set, itmeans the rule applies to all controllers.
• yii\filters\AccessRule::roles: speci�es which user roles that thisrule matches. Two special roles are recognized, and they are checkedvia yii\web\User::isGuest: - ?: matches a guest user (not authenti-cated yet) - @: matches an authenticated user Using other role namesrequires RBAC (to be described in the next section), and yii\web
\User::can() will be called. If this option is empty or not set, itmeans this rule applies to all roles.
• yii\filters\AccessRule::ips: speci�es which yii\web\Request::
userIP this rule matches. An IP address can contain the wildcard *
at the end so that it matches IP addresses with the same pre�x. Forexample, `192.168.*` matches all IP addresses in the segment `192.168.'.If this option is empty or not set, it means this rule applies to all IPaddresses.
• yii\filters\AccessRule::verbs: speci�es which request method (e.g.GET, POST) this rule matches. The comparison is case-insensitive.
• yii\filters\AccessRule::matchCallback: speci�es a PHP callablethat should be called to determine if this rule should be applied.
• yii\filters\AccessRule::denyCallback: speci�es a PHP callablethat should be called when this rule will deny the access.
Below is an example showing how to make use of the matchCallback option,which allows you to write arbitrary access check logic:
use yii\filters\AccessControl;
class SiteController extends Controller
{
public function behaviors()
{
return [
'access' => [
'class' => AccessControl::className(),
'only' => ['special-callback'],
'rules' => [
[
'actions' => ['special-callback'],
'allow' => true,
'matchCallback' => function ($rule, $action) {
return date('d-m') === '31-10';
}
],

246 CHAPTER 9. SECURITY
],
],
];
}
// Match callback called! This page can be accessed only each October 31
st
public function actionSpecialCallback()
{
return $this->render('happy-halloween');
}
}
9.2.2 Role based access control (RBAC)
Role-Based Access Control (RBAC) provides a simple yet powerful central-ized access control. Please refer to the Wiki article1 for details about com-paring RBAC with other more traditional access control schemes.
Yii implements a General Hierarchical RBAC, following the NIST RBACmodel2. It provides the RBAC functionality through the yii\rbac\ManagerInterfaceapplication component.
Using RBAC involves two parts of work. The �rst part is to build up theRBAC authorization data, and the second part is to use the authorizationdata to perform access check in places where it is needed.
To facilitate our description next, we will �rst introduce some basicRBAC concepts.
Basic Concepts
A role represents a collection of permissions (e.g. creating posts, updatingposts). A role may be assigned to one or multiple users. To check if a userhas a speci�ed permission, we may check if the user is assigned with a rolethat contains that permission.
Associated with each role or permission, there may be a rule. A rulerepresents a piece of code that will be executed during access check to deter-mine if the corresponding role or permission applies to the current user. Forexample, the �update post� permission may have a rule that checks if thecurrent user is the post creator. During access checking, if the user is NOTthe post creator, he/she will be considered not having the �update post�permission.
Both roles and permissions can be organized in a hierarchy. In particular,a role may consist of other roles or permissions; and a permission may consistof other permissions. Yii implements a partial order hierarchy which includes
1http://en.wikipedia.org/wiki/Role-based_access_control2http://csrc.nist.gov/rbac/sandhu-ferraiolo-kuhn-00.pdf

9.2. AUTHORIZATION 247
the more special tree hierarchy. While a role can contain a permission, it isnot true vice versa.
Con�guring RBAC Manager
Before we set o� to de�ne authorization data and perform access checking,we need to con�gure the yii\base\Application::authManager applicationcomponent. Yii provides two types of authorization managers: yii\rbac
\PhpManager and yii\rbac\DbManager. The former uses a PHP script �leto store authorization data, while the latter stores authorization data indatabase. You may consider using the former if your application does notrequire very dynamic role and permission management.
The following code shows how to con�gure authManager in the applicationcon�guration:
return [
// ...
'components' => [
'authManager' => [
'class' => 'yii\rbac\PhpManager',
],
// ...
],
];
The authManager can now be accessed via \Yii::$app->authManager.
Building Authorization Data
Building authorization data is all about the following tasks:
• de�ning roles and permissions;
• establishing relations among roles and permissions;
• de�ning rules;
• associating rules with roles and permissions;
• assigning roles to users.
Depending on authorization �exibility requirements the tasks above couldbe done in di�erent ways.
If your persmissions hierarchy doesn't change at all and you have a �xednumber of users you can create a console command that will initialize au-thorization data once via APIs o�ered by authManager:
<?php
namespace app\commands;

248 CHAPTER 9. SECURITY
use yii\console\Controller;
class RbacController extends Controller
{
public function actionInit()
{
$auth = Yii::$app->authManager;
// add "createPost" permission
$createPost = $auth->createPermission('createPost');
$createPost->description = 'Create a post';
$auth->add($createPost);
// add "updatePost" permission
$updatePost = $auth->createPermission('updatePost');
$updatePost->description = 'Update post';
$auth->add($updatePost);
// add "author" role and give this role the "createPost" permission
$author = $auth->createRole('author');
$auth->add($author);
$auth->addChild($author, $createPost);
// add "admin" role and give this role the "updatePost" permission
// as well as the permissions of the "author" role
$admin = $auth->createRole('admin');
$auth->add($admin);
$auth->addChild($admin, $updatePost);
$auth->addChild($admin, $author);
// Assign roles to users. 1 and 2 are IDs returned by
IdentityInterface::getId()
// usually implemented in your User model.
$auth->assign($author, 2);
$auth->assign($admin, 1);
}
}
After executing the command we'll get the following hierarchy:

9.2. AUTHORIZATION 249
Author can create post, admin can update post and do everything authorcan.
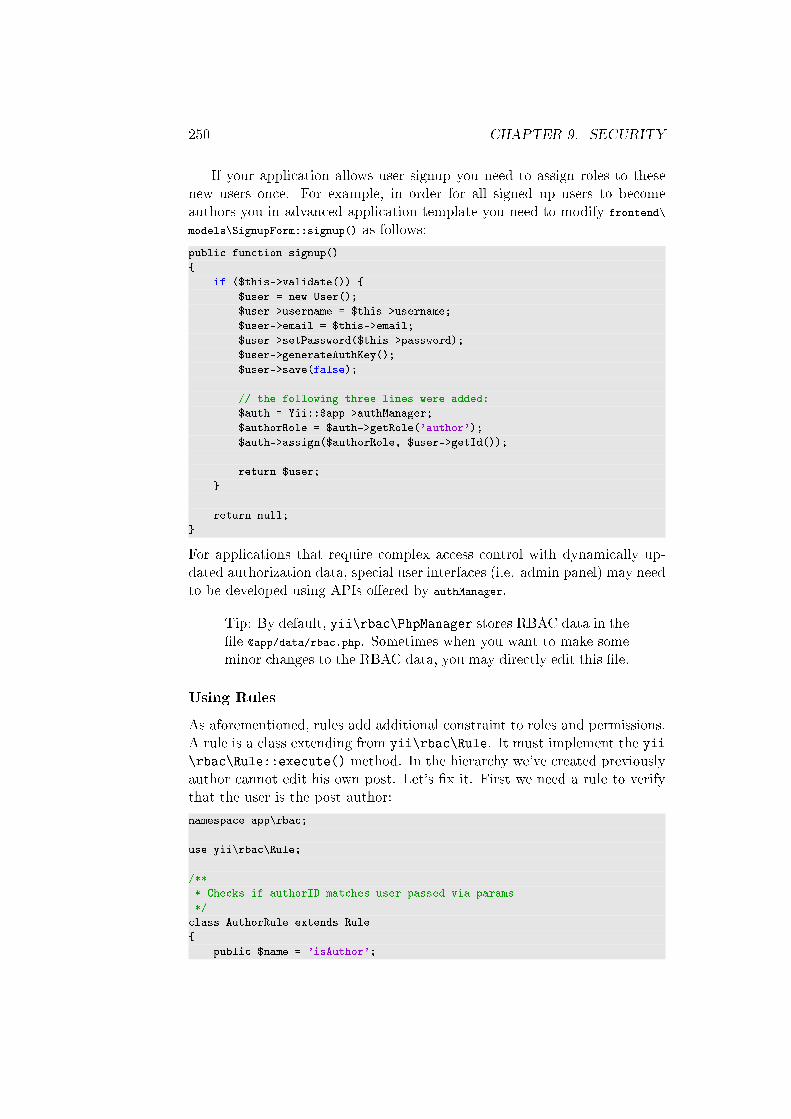
250 CHAPTER 9. SECURITY
If your application allows user signup you need to assign roles to thesenew users once. For example, in order for all signed up users to becomeauthors you in advanced application template you need to modify frontend\
models\SignupForm::signup() as follows:
public function signup()
{
if ($this->validate()) {
$user = new User();
$user->username = $this->username;
$user->email = $this->email;
$user->setPassword($this->password);
$user->generateAuthKey();
$user->save(false);
// the following three lines were added:
$auth = Yii::$app->authManager;
$authorRole = $auth->getRole('author');
$auth->assign($authorRole, $user->getId());
return $user;
}
return null;
}
For applications that require complex access control with dynamically up-dated authorization data, special user interfaces (i.e. admin panel) may needto be developed using APIs o�ered by authManager.
Tip: By default, yii\rbac\PhpManager stores RBAC data in the�le @app/data/rbac.php. Sometimes when you want to make someminor changes to the RBAC data, you may directly edit this �le.
Using Rules
As aforementioned, rules add additional constraint to roles and permissions.A rule is a class extending from yii\rbac\Rule. It must implement the yii\rbac\Rule::execute() method. In the hierarchy we've created previouslyauthor cannot edit his own post. Let's �x it. First we need a rule to verifythat the user is the post author:
namespace app\rbac;
use yii\rbac\Rule;
/**
* Checks if authorID matches user passed via params
*/
class AuthorRule extends Rule
{
public $name = 'isAuthor';

9.2. AUTHORIZATION 251
/**
* @param string|integer $user the user ID.
* @param Item $item the role or permission that this rule is associated
with
* @param array $params parameters passed to ManagerInterface::
checkAccess().
* @return boolean a value indicating whether the rule permits the role
or permission it is associated with.
*/
public function execute($user, $item, $params)
{
return isset($params['post']) ? $params['post']->createdBy == $user
: false;
}
}
The rule above checks if the post is created by $user. We'll create a specialpermission updateOwnPost in the command we've used previously:
// add the rule
$rule = new \app\rbac\AuthorRule;
$auth->add($rule);
// add the "updateOwnPost" permission and associate the rule with it.
$updateOwnPost = $this->auth->createPermission('updateOwnPost');
$updateOwnPost->description = 'Update own post';
$updateOwnPost->ruleName = $rule->name;
$auth->add($updateOwnPost);
// "updateOwnPost" will be used from "updatePost"
$auth->addChild($updateOwnPost, $updatePost);
// allow "author" to update their own posts
$auth->addChild($author, $updateOwnPost);
Now we've got the following hierarchy:

252 CHAPTER 9. SECURITY
Access Check
With the authorization data ready, access check is as simple as a call tothe yii\rbac\ManagerInterface::checkAccess() method. Because mostaccess check is about the current user, for convenience Yii provides a shortcutmethod yii\web\User::can(), which can be used like the following:
if (\Yii::$app->user->can('createPost')) {
// create post
}
If the current user is Jane with ID=1 we're starting at createPost and tryingto get to Jane:

9.2. AUTHORIZATION 253
In order to check if user can update post we need to pass an extra pa-rameter that is required by the AuthorRule described before:
if (\Yii::$app->user->can('updatePost', ['post' => $post])) {
// update post
}
Here's what happens if current user is John:

254 CHAPTER 9. SECURITY
We're starting with the updatePost and going through updateOwnPost. Inorder to pass it AuthorRule should return true from its execute method. Themethod receives its $params from can method call so the value is ['post'
=> $post]. If everything is OK we're getting to author that is assigned toJohn.
In case of Jane it is a bit simpler since she's an admin:

9.2. AUTHORIZATION 255
Using Default Roles
A default role is a role that is implicitly assigned to all users. The call to yii\rbac\ManagerInterface::assign() is not needed, and the authorizationdata does not contain its assignment information.
A default role is usually associated with a rule which determines if therole applies to the user being checked.
Default roles are often used in applications which already have some sortof role assignment. For example, an application may have a �group� columnin its user table to represent which privilege group each user belongs to. Ifeach privilege group can be mapped to a RBAC role, you can use the defaultrole feature to automatically assign each user to a RBAC role. Let's use anexample to show how this can be done.
Assume in the user table, you have a group column which uses 1 to rep-resent the administrator group and 2 the author group. You plan to havetwo RBAC roles admin and author to represent the permissions for these two

256 CHAPTER 9. SECURITY
groups, respectively. You can create set up the RBAC data as follows,
namespace app\rbac;
use Yii;
use yii\rbac\Rule;
/**
* Checks if authorID matches user passed via params
*/
class UserGroupRule extends Rule
{
public $name = 'userGroup';
public function execute($user, $item, $params)
{
if (!Yii::$app->user->isGuest) {
$group = Yii::$app->user->identity->group;
if ($item->name === 'admin') {
return $group == 1;
} elseif ($item->name === 'author') {
return $group == 1 || $group == 2;
}
}
return false;
}
}
$rule = new \app\rbac\UserGroupRule;
$auth->add($rule);
$author = $auth->createRole('author');
$author->ruleName = $rule->name;
$auth->add($author);
// ... add permissions as children of $author ...
$admin = $auth->createRole('admin');
$admin->ruleName = $rule->name;
$auth->add($admin);
$auth->addChild($admin, $author);
// ... add permissions as children of $admin ...
Note that in the above, because �author� is added as a child of �admin�, whenyou implement the execute() method of the rule class, you need to respectthis hierarchy as well. That is why when the role name is �author�, theexecute() method will return true if the user group is either 1 or 2 (meaningthe user is in either �admin� group or �author� group).
Next, con�gure authManager by listing the two roles in yii\rbac\BaseManager::$defaultRoles:
return [
// ...
'components' => [
'authManager' => [

9.3. SECURITY 257
'class' => 'yii\rbac\PhpManager',
'defaultRoles' => ['admin', 'author'],
],
// ...
],
];
Now if you perform an access check, both of the admin and author roles willbe checked by evaluating the rules associated with them. If the rule returnstrue, it means the role applies to the current user. Based on the above ruleimplementation, this means if the group value of a user is 1, the admin rolewould apply to the user; and if the group value is 2, the author role wouldapply.
9.3 Security
Note: This section is under development.
Good security is vital to the health and success of any application. Unfortu-nately, many developers cut corners when it comes to security, either due toa lack of understanding or because implementation is too much of a hurdle.To make your Yii powered application as secure as possible, Yii has includedseveral excellent and easy to use security features.
9.3.1 Hashing and verifying passwords
Most developers know that passwords cannot be stored in plain text, butmany developers believe it's still safe to hash passwords using md5 or sha1.There was a time when using the aforementioned hashing algorithms wassu�cient, but modern hardware makes it possible to reverse such hashesvery quickly using brute force attacks.
In order to provide increased security for user passwords, even in theworst case scenario (your application is breached), you need to use a hashingalgorithm that is resilient against brute force attacks. The best current choiceis bcrypt. In PHP, you can create a bcrypt hash using the crypt function3. Yiiprovides two helper functions which make using crypt to securely generateand verify hashes easier.
When a user provides a password for the �rst time (e.g., upon registra-tion), the password needs to be hashed:
$hash = \yii\helpers\Security::generatePasswordHash($password);
The hash can then be associated with the corresponding model attribute, soit can be stored in the database for later use.
When a user attempts to log in, the submitted password must be veri�edagainst the previously hashed and stored password:
3http://php.net/manual/en/function.crypt.php

258 CHAPTER 9. SECURITY
use yii\helpers\Security;
if (Security::validatePassword($password, $hash)) {
// all good, logging user in
} else {
// wrong password
}
9.3.2 Generating Pseudorandom data
Pseudorandom data is useful in many situations. For example when resettinga password via email you need to generate a token, save it to the database,and send it via email to end user which in turn will allow them to proveownership of that account. It is very important that this token be uniqueand hard to guess, else there is a possibility and attacker can predict thetoken's value and reset the user's password.
Yii security helper makes generating pseudorandom data simple:
$key = \yii\helpers\Security::generateRandomKey();
Note that you need to have the openssl extension installed in order to gen-erate cryptographically secure random data.
9.3.3 Encryption and decryption
Yii provides convenient helper functions that allow you to encrypt/decryptdata using a secret key. The data is passed through and encryption functionso that only the person which has the secret key will be able to decrypt it.For example, we need to store some information in our database but we needto make sure only the user which has the secret key can view it (even if theapplication database is compromised):
// $data and $secretKey are obtained from the form
$encryptedData = \yii\helpers\Security::encrypt($data, $secretKey);
// store $encryptedData to database
Subsequently when user wants to read the data:
// $secretKey is obtained from user input, $encryptedData is from the
database
$data = \yii\helpers\Security::decrypt($encryptedData, $secretKey);
9.3.4 Con�rming data integrity
There are situations in which you need to verify that your data hasn't beentampered with by a third party or even corrupted in some way. Yii providesan easy way to con�rm data integrity in the form of two helper functions.
Pre�x the data with a hash generated from the secret key and data
// $secretKey our application or user secret, $genuineData obtained from a
reliable source
$data = \yii\helpers\Security::hashData($genuineData, $secretKey);

9.3. SECURITY 259
Checks if the data integrity has been compromised
// $secretKey our application or user secret, $data obtained from an
unreliable source
$data = \yii\helpers\Security::validateData($data, $secretKey);
todo: XSS prevention, CSRF prevention, cookie protection, refer to 1.1 guideYou also can disable CSRF validation per controller and/or action, by
setting its property:
namespace app\controllers;
use yii\web\Controller;
class SiteController extends Controller
{
public $enableCsrfValidation = false;
public function actionIndex()
{
// CSRF validation will not be applied to this and other actions
}
}
To disable CSRF validation per custom actions you can do:
namespace app\controllers;
use yii\web\Controller;
class SiteController extends Controller
{
public function beforeAction($action)
{
// ...set `$this->enableCsrfValidation` here based on some
conditions...
// call parent method that will check CSRF if such property is true.
return parent::beforeAction($action);
}
}
9.3.5 Securing Cookies
• validation
• httpOnly is default
9.3.6 See also
• Views security

260 CHAPTER 9. SECURITY
Error: not existing �le: security-auth-clients.md

9.3. SECURITY 261
Error: not existing �le: security-best-practices.md

262 CHAPTER 9. SECURITY

Chapter 10
Caching
10.1 Caching
Caching is a cheap and e�ective way to improve the performance of a Webapplication. By storing relatively static data in cache and serving it fromcache when requested, the application saves the time that would be requiredto generate the data from scratch every time.
Caching can occur at di�erent levels and places in a Web application.On the server side, at the lower level, cache may be used to store basic data,such as a list of most recent article information fetched from database; andat the higher level, cache may be used to store fragments or whole of Webpages, such as the rendering result of the most recent articles. On the clientside, HTTP caching may be used to keep most recently visited page contentin the browser cache.
Yii supports all these caching mechanisms:
• Data caching
• Fragment caching
• Page caching
• HTTP caching
10.2 Data Caching
Data caching is about storing some PHP variable in cache and retrievingit later from cache. It is also the foundation for more advanced cachingfeatures, such as query caching and content caching.
The following code is a typical usage pattern of data caching, where$cache refers to a cache component:
263

264 CHAPTER 10. CACHING
// try retrieving $data from cache
$data = $cache->get($key);
if ($data === false) {
// $data is not found in cache, calculate it from scratch
// store $data in cache so that it can be retrieved next time
$cache->set($key, $data);
}
// $data is available here
10.2.1 Cache Components
Data caching relies on the so-called cache components which represent vari-ous cache storage, such as memory, �les, databases.
Cache components are usually registered as application components sothat they can be globally con�gurable and accessible. The following codeshows how to con�gure the cache application component to use memcached1
with two cache servers:
'components' => [
'cache' => [
'class' => 'yii\caching\MemCache',
'servers' => [
[
'host' => 'server1',
'port' => 11211,
'weight' => 100,
],
[
'host' => 'server2',
'port' => 11211,
'weight' => 50,
],
],
],
],
You can then access the above cache component using the expression Yii::
$app->cache.Because all cache components support the same set of APIs, you can
swap the underlying cache component with a di�erent one by recon�guringit in the application con�guration without modifying the code that uses thecache. For example, you can modify the above con�guration to use yii
\caching\ApcCache:
'components' => [
'cache' => [
1http://memcached.org/

10.2. DATA CACHING 265
'class' => 'yii\caching\ApcCache',
],
],
Tip: You can register multiple cache application components.The component named cache is used by default by many cache-dependent classes (e.g. yii\web\UrlManager).
Supported Cache Storage
Yii supports a wide range of cache storage. The following is a summary:
• yii\caching\ApcCache: uses PHP APC2 extension. This option canbe considered as the fastest one when dealing with cache for a central-ized thick application (e.g. one server, no dedicated load balancers,etc.).
• yii\caching\DbCache: uses a database table to store cached data. Touse this cache, you must create a table as speci�ed in yii\caching
\DbCache::cacheTable.
• yii\caching\DummyCache: serves as a cache placeholder which doesno real caching. The purpose of this component is to simplify thecode that needs to check the availability of cache. For example, duringdevelopment or if the server doesn't have actual cache support, youmay con�gure a cache component to use this cache. When an actualcache support is enabled, you can switch to use the correspondingcache component. In both cases, you may use the same code Yii::$app
->cache->get($key) to attempt retrieving data from the cache withoutworrying that Yii::$app->cache might be null.
• yii\caching\FileCache: uses standard �les to store cached data.This is particular suitable to cache large chunk of data, such as pagecontent.
• yii\caching\MemCache: uses PHP memcache3 and memcached4 ex-tensions. This option can be considered as the fastest one when dealingwith cache in a distributed applications (e.g. with several servers, loadbalancers, etc.)
• yii\redis\Cache: implements a cache component based on Redis5
key-value store (redis version 2.6.12 or higher is required).
2http://php.net/manual/en/book.apc.php3http://php.net/manual/en/book.memcache.php4http://php.net/manual/en/book.memcached.php5http://redis.io/

266 CHAPTER 10. CACHING
• yii\caching\WinCache: uses PHP WinCache6 (see also7) extension.
• yii\caching\XCache: uses PHP XCache8 extension.
• Zend Data Cache9 as the underlying caching medium.
Tip: You may use di�erent cache storage in the same application.A common strategy is to use memory-based cache storage to storedata that is small but constantly used (e.g. statistical data), anduse �le-based or database-based cache storage to store data thatis big and less frequently used (e.g. page content).
10.2.2 Cache APIs
All cache components have the same base class yii\caching\Cache and thussupport the following APIs:
• yii\caching\Cache::get(): retrieves a data item from cache with aspeci�ed key. A false value will be returned if the data item is notfound in the cache or is expired/invalidated.
• yii\caching\Cache::set(): stores a data item identi�ed by a key incache.
• yii\caching\Cache::add(): stores a data item identi�ed by a key incache if the key is not found in the cache.
• yii\caching\Cache::mget(): retrieves multiple data items from cachewith the speci�ed keys.
• yii\caching\Cache::mset(): stores multiple data items in cache.Each item is identi�ed by a key.
• yii\caching\Cache::madd(): stores multiple data items in cache.Each item is identi�ed by a key. If a key already exists in the cache,the data item will be skipped.
• yii\caching\Cache::exists(): returns a value indicating whetherthe speci�ed key is found in the cache.
• yii\caching\Cache::delete(): removes a data item identi�ed by akey from the cache.
6http://iis.net/downloads/microsoft/wincache-extension7http://php.net/manual/en/book.wincache.php8http://xcache.lighttpd.net/9http://files.zend.com/help/Zend-Server-6/zend-server.htm#data_cache_
component.htm

10.2. DATA CACHING 267
• yii\caching\Cache::flush(): removes all data items from the cache.
Some cache storage, such as MemCache, APC, support retrieving multiplecached values in a batch mode, which may reduce the overhead involvedin retrieving cached data. The APIs yii\caching\Cache::mget() and yii
\caching\Cache::madd() are provided to exploit this feature. In case theunderlying cache storage does not support this feature, it will be simulated.
Because yii\caching\Cache implements ArrayAccess, a cache componentcan be used liked an array. The followings are some examples:
$cache['var1'] = $value1; // equivalent to: $cache->set('var1', $value1);
$value2 = $cache['var2']; // equivalent to: $value2 = $cache->get('var2');
Cache Keys
Each data item stored in cache is uniquely identi�ed by a key. When youstore a data item in cache, you have to specify a key for it. Later when youretrieve the data item from cache, you should provide the corresponding key.
You may use a string or an arbitrary value as a cache key. When a keyis not a string, it will be automatically serialized into a string.
A common strategy of de�ning a cache key is to include all determiningfactors in terms of an array. For example, yii\db\Schema uses the followingkey to cache schema information about a database table:
[
__CLASS__, // schema class name
$this->db->dsn, // DB connection data source name
$this->db->username, // DB connection login user
$name, // table name
];
As you can see, the key includes all necessary information needed to uniquelyspecify a database table.
When the same cache storage is used by di�erent applications, you shouldspecify a unique cache key pre�x for each application to avoid con�icts ofcache keys. This can be done by con�guring the yii\caching\Cache::
keyPrefix property. For example, in the application con�guration you canwrite the following code:
'components' => [
'cache' => [
'class' => 'yii\caching\ApcCache',
'keyPrefix' => 'myapp', // a unique cache key prefix
],
],
To ensure interoperability, only alphanumeric characters should be used.

268 CHAPTER 10. CACHING
Cache Expiration
A data item stored in a cache will remain there forever unless it is removedbecause of some caching policy enforcement (e.g. caching space is full andthe oldest data are removed). To change this behavior, you can provide anexpiration parameter when calling yii\caching\Cache::set() to store adata item. The parameter indicates for how many seconds the data item canremain valid in the cache. When you call yii\caching\Cache::get() toretrieve the data item, if it has passed the expiration time, the method willreturn false, indicating the data item is not found in the cache. For example,
// keep the data in cache for at most 45 seconds
$cache->set($key, $data, 45);
sleep(50);
$data = $cache->get($key);
if ($data === false) {
// $data is expired or is not found in the cache
}
Cache Dependencies
Besides expiration setting, cached data item may also be invalidated bychanges of the so-called cache dependencies. For example, yii\caching
\FileDependency represents the dependency of a �le's modi�cation time.When this dependency changes, it means the corresponding �le is modi�ed.As a result, any outdated �le content found in the cache should be invalidatedand the yii\caching\Cache::get() call should return false.
Cache dependencies are represented as objects of yii\caching\Dependencydescendant classes. When you call yii\caching\Cache::set() to store adata item in the cache, you can pass along an associated cache dependencyobject. For example,
// Create a dependency on the modification time of file example.txt.
$dependency = new \yii\caching\FileDependency(['fileName' => 'example.txt'])
;
// The data will expire in 30 seconds.
// It may also be invalidated earlier if example.txt is modified.
$cache->set($key, $data, 30, $dependency);
// The cache will check if the data has expired.
// It will also check if the associated dependency was changed.
// It will return false if any of these conditions is met.
$data = $cache->get($key);
Below is a summary of the available cache dependencies:
• yii\caching\ChainedDependency: the dependency is changed if anyof the dependencies on the chain is changed.

10.2. DATA CACHING 269
• yii\caching\DbDependency: the dependency is changed if the queryresult of the speci�ed SQL statement is changed.
• yii\caching\ExpressionDependency: the dependency is changed ifthe result of the speci�ed PHP expression is changed.
• yii\caching\FileDependency: the dependency is changed if the �le'slast modi�cation time is changed.
• yii\caching\GroupDependency: marks a cached data item with agroup name. You may invalidate the cached data items with the samegroup name all at once by calling yii\caching\GroupDependency::
invalidate().
10.2.3 Query Caching
Query caching is a special caching feature built on top of data caching. It isprovided to cache the result of database queries.
Query caching requires a yii\db\Connection and a valid cache applica-tion component. The basic usage of query caching is as follows, assuming$db is a yii\db\Connection instance:
$duration = 60; // cache query results for 60 seconds.
$dependency = ...; // optional dependency
$db->beginCache($duration, $dependency);
// ...performs DB queries here...
$db->endCache();
As you can see, any SQL queries in between the beginCache() and endCache()
calls will be cached. If the result of the same query is found valid in thecache, the query will be skipped and the result will be served from the cacheinstead.
Query caching can be used for DAO as well as ActiveRecord.
Info: Some DBMS (e.g. MySQL10) also support query caching onthe DB server side. You may choose to use either query cachingmechanism. The query caching described above has the advan-tage that you may specify �exible cache dependencies and arepotentially more e�cient.
Con�gurations
Query caching has two two con�gurable options through yii\db\Connection:
10http://dev.mysql.com/doc/refman/5.1/en/query-cache.html

270 CHAPTER 10. CACHING
• yii\db\Connection::queryCacheDuration: this represents the num-ber of seconds that a query result can remain valid in the cache.The duration will be overwritten if you call yii\db\Connection::beginCache() with an explicit duration parameter.
• yii\db\Connection::queryCache: this represents the ID of the cacheapplication component. It defaults to 'cache'. Query caching is en-abled only when there is a valid cache application component.
Limitations
Query caching does not work with query results that contain resource han-dles. For example, when using the BLOB column type in some DBMS, thequery result will return a resource handle for the column data.
Some caching storage has size limitation. For example, memcache limitsthe maximum size of each entry to be 1MB. Therefore, if the size of a queryresult exceeds this limit, the caching will fail.
10.3 Fragment Caching
Fragment caching refers to caching a fragment of a Web page. For example,if a page displays a summary of yearly sale in a table, you can store thistable in cache to eliminate the time needed to generate this table for eachrequest. Fragment caching is built on top of data caching.
To use fragment caching, use the following construct in a view:
if ($this->beginCache($id)) {
// ... generate content here ...
$this->endCache();
}
That is, enclose content generation logic in a pair of yii\base\View::
beginCache() and yii\base\View::endCache() calls. If the content isfound in the cache, yii\base\View::beginCache() will render the cachedcontent and return false, thus skip the content generation logic. Otherwise,your content generation logic will be called, and when yii\base\View::
endCache() is called, the generated content will be captured and stored inthe cache.
Like data caching, a unique $id is needed to identify a content cache.
10.3.1 Caching Options
You may specify additional options about fragment caching by passing theoption array as the second parameter to the yii\base\View::beginCache()method. Behind the scene, this option array will be used to con�gure a

10.3. FRAGMENT CACHING 271
yii\widgets\FragmentCache widget which implements the actual fragmentcaching functionality.
Duration
Perhaps the most commonly used option of fragment caching is yii\widgets\FragmentCache::duration. It speci�es for how many seconds the contentcan remain valid in a cache. The following code caches the content fragmentfor at most one hour:
if ($this->beginCache($id, ['duration' => 3600])) {
// ... generate content here ...
$this->endCache();
}
If the option is not set, it will take the default value 0, which means thecached content will never expire.
Dependencies
Like data caching, content fragment being cached can also have dependen-cies. For example, the content of a post being displayed depends on whetheror not the post is modi�ed.
To specify a dependency, set the yii\widgets\FragmentCache::dependencyoption, which can be either an yii\caching\Dependency object or a con�g-uration array for creating a dependency object. The following code speci�esthat the fragment content depends on the change of the updated_at columnvalue:
$dependency = [
'class' => 'yii\caching\DbDependency',
'sql' => 'SELECT MAX(updated_at) FROM post',
];
if ($this->beginCache($id, ['dependency' => $dependency])) {
// ... generate content here ...
$this->endCache();
}
Variations
Content being cached may be variated according to some parameters. Forexample, for a Web application supporting multiple languages, the samepiece of view code may generate the content in di�erent languages. There-fore, you may want to make the cached content variated according to thecurrent application language.

272 CHAPTER 10. CACHING
To specify cache variations, set the yii\widgets\FragmentCache::variationsoption, which should be an array of scalar values, each representing a par-ticular variation factor. For example, to make the cached content variatedby the language, you may use the following code:
if ($this->beginCache($id, ['variations' => [Yii::$app->language]])) {
// ... generate content here ...
$this->endCache();
}
Toggling Caching
Sometimes you may want to enable fragment caching only when certainconditions are met. For example, for a page displaying a form, you onlywant to cache the form when it is initially requested (via GET request).Any subsequent display (via POST request) of the form should not be cachedbecause the form may contain user input. To do so, you may set the yii
\widgets\FragmentCache::enabled option, like the following:
if ($this->beginCache($id, ['enabled' => Yii::$app->request->isGet])) {
// ... generate content here ...
$this->endCache();
}
10.3.2 Nested Caching
Fragment caching can be nested. That is, a cached fragment can be enclosedwithin another fragment which is also cached. For example, the commentsare cached in an inner fragment cache, and they are cached together withthe post content in an outer fragment cache. The following code shows howtwo fragment caches can be nested:
if ($this->beginCache($id1)) {
// ...content generation logic...
if ($this->beginCache($id2, $options2)) {
// ...content generation logic...
$this->endCache();
}
// ...content generation logic...
$this->endCache();
}

10.4. PAGE CACHING 273
Di�erent caching options can be set for the nested caches. For example, theinner caches and the outer caches can use di�erent cache duration values.Even when the data cached in the outer cache is invalidated, the inner cachemay still provide the valid inner fragment. However, it is not true vice versa.If the outer cache is evaluated to be valid, it will continue to provide the samecached copy even after the content in the inner cache has been invalidated.Therefore, you must be careful in setting the durations or the dependenciesof the nested caches, otherwise the outdated inner fragments may be kept inthe outer fragment.
10.3.3 Dynamic Content
When using fragment caching, you may encounter the situation where a largefragment of content is relatively static except at one or a few places. Forexample, a page header may display the main menu bar together with thename of the current user. Another problem is that the content being cachedmay contain PHP code that must be executed for every request (e.g. thecode for registering an asset bundle). Both problems can be solved by theso-called dynamic content feature.
A dynamic content means a fragment of output that should not be cachedeven if it is enclosed within a fragment cache. To make the content dynamicall the time, it has to be generated by executing some PHP code for everyrequest, even if the enclosing content is being served from cache.
You may call yii\base\View::renderDynamic() within a cached frag-ment to insert dynamic content at the desired place, like the following,
if ($this->beginCache($id1)) {
// ...content generation logic...
echo $this->renderDynamic('return Yii::$app->user->identity->name;');
// ...content generation logic...
$this->endCache();
}
The yii\base\View::renderDynamic() method takes a piece of PHP codeas its parameter. The return value of the PHP code is treated as the dynamiccontent. The same PHP code will be executed for every request, no matterthe enclosing fragment is being served from cached or not.
10.4 Page Caching
Page caching refers to caching the content of a whole page on the server side.Later when the same page is requested again, its content will be served fromthe cache instead of regenerating it from scratch.

274 CHAPTER 10. CACHING
Page caching is supported by yii\filters\PageCache, an action �lter.It can be used like the following in a controller class:
public function behaviors()
{
return [
[
'class' => 'yii\filters\PageCache',
'only' => ['index'],
'duration' => 60,
'variations' => [
\Yii::$app->language,
],
'dependency' => [
'class' => 'yii\caching\DbDependency',
'sql' => 'SELECT COUNT(*) FROM post',
],
],
];
}
The above code states that page caching should be used only for the index
action; the page content should be cached for at most 60 seconds and shouldbe variated by the current application language; and the cached page shouldbe invalidated if the total number of posts is changed.
As you can see, page caching is very similar to fragment caching. Theyboth support options such as duration, dependencies, variations, and enabled.Their main di�erence is that page caching is implemented as an action �lterwhile fragment caching a widget.
You can use fragment caching as well as dynamic content together withpage caching.
10.5 HTTP Caching
Besides server-side caching that we have described in the previous sections,Web applications may also exploit client-side caching to save the time forgenerating and transmitting the same page content.
To use client-side caching, you may con�gure yii\filters\HttpCache
as a �lter for controller actions whose rendering result may be cached on theclient side. yii\filters\HttpCache only works for GET and HEAD requests.It can handle three kinds of cache-related HTTP headers for these requests:
• yii\filters\HttpCache::lastModified
• yii\filters\HttpCache::etagSeed
• yii\filters\HttpCache::cacheControlHeader
10.5. HTTP CACHING 275
10.5.1 Last-Modified Header
The Last-Modified header uses a timestamp to indicate if the page has beenmodi�ed since the client caches it.
You may con�gure the yii\filters\HttpCache::lastModified prop-erty to enable sending the Last-Modified header. The property should bea PHP callable returning a UNIX timestamp about the page modi�cationtime. The signature of the PHP callable should be as follows,
/**
* @param Action $action the action object that is being handled currently
* @param array $params the value of the "params" property
* @return integer a UNIX timestamp representing the page modification time
*/
function ($action, $params)
The following is an example of making use of the Last-Modified header:
public function behaviors()
{
return [
[
'class' => 'yii\filters\HttpCache',
'only' => ['index'],
'lastModified' => function ($action, $params) {
$q = new \yii\db\Query();
return $q->from('post')->max('updated_at');
},
],
];
}
The above code states that HTTP caching should be enabled for the index
action only. It should generate a Last-Modified HTTP header based on thelast update time of posts. When a browser visits the index page for the �rsttime, the page will be generated on the server and sent to the browser; If thebrowser visits the same page again and there is no post being modi�ed duringthe period, the server will not re-generate the page, and the browser will usethe cached version on the client side. As a result, server-side rendering andpage content transmission are both skipped.
10.5.2 ETag Header
The �Entity Tag� (or ETag for short) header use a hash to represent thecontent of a page. If the page is changed, the hash will be changed as well.By comparing the hash kept on the client side with the hash generated onthe server side, the cache may determine whether the page has been changedand should be re-transmitted.
You may con�gure the yii\filters\HttpCache::etagSeed property toenable sending the ETag header. The property should be a PHP callable

276 CHAPTER 10. CACHING
returning a seed for generating the ETag hash. The signature of the PHPcallable should be as follows,
/**
* @param Action $action the action object that is being handled currently
* @param array $params the value of the "params" property
* @return string a string used as the seed for generating an ETag hash
*/
function ($action, $params)
The following is an example of making use of the ETag header:
public function behaviors()
{
return [
[
'class' => 'yii\filters\HttpCache',
'only' => ['view'],
'etagSeed' => function ($action, $params) {
$post = $this->findModel(\Yii::$app->request->get('id'));
return serialize([$post->title, $post->content]);
},
],
];
}
The above code states that HTTP caching should be enabled for the view
action only. It should generate an ETag HTTP header based on the title andcontent of the requested post. When a browser visits the view page for the�rst time, the page will be generated on the server and sent to the browser;If the browser visits the same page again and there is change to the titleand content of the post, the server will not re-generate the page, and thebrowser will use the cached version on the client side. As a result, server-siderendering and page content transmission are both skipped.
ETags allow more complex and/or more precise caching strategies thanLast-Modified headers. For instance, an ETag can be invalidated if the sitehas switched to another theme.
Expensive ETag generation may defeat the purpose of using HttpCache
and introduce unnecessary overhead, since they need to be re-evaluated onevery request. Try to �nd a simple expression that invalidates the cache ifthe page content has been modi�ed.
Note: In compliant to RFC 2616, section 13.3.411, HttpCache willsend out both ETag and Last-Modified headers if they are bothcon�gured. Consequently, both will be used for cache validationif sent by the client.
11http://tools.ietf.org/html/rfc2616#section-13.3.4

10.5. HTTP CACHING 277
10.5.3 Cache-Control Header
The Cache-Control header speci�es the general caching policy for pages. Youmay send it by con�guring the yii\filters\HttpCache::cacheControlHeaderproperty with the header value. By default, the following header will be sent:
Cache-Control: public, max-age=3600
10.5.4 Session Cache Limiter
When a page uses session, PHP will automatically send some cache-relatedHTTP headers as speci�ed in the session.cache_limiter PHP INI setting.These headers may interfere or disable the caching that you want fromHttpCache. To prevent this problem, by default HttpCache will disable sendingthese headers automatically. If you want to change this behavior, you shouldcon�gure the yii\filters\HttpCache::sessionCacheLimiter property. Theproperty can take a string value, including public, private, private_no_expire,and nocache. Please refer to the PHPmanual about session_cache_limiter()12
for explanations about these values.
10.5.5 SEO Implications
Search engine bots tend to respect cache headers. Since some crawlers havea limit on how many pages per domain they process within a certain timespan, introducing caching headers may help indexing your site as they reducethe number of pages that need to be processed.
12http://www.php.net/manual/en/function.session-cache-limiter.php

278 CHAPTER 10. CACHING

Chapter 11
RESTful Web Services
11.1 Quick Start
Yii provides a whole set of tools to simplify the task of implementing RESTfulWeb Service APIs. In particular, Yii supports the following features aboutRESTful APIs:
• Quick prototyping with support for common APIs for Active Record;
• Response format (supporting JSON and XML by default) negotiation;
• Customizable object serialization with support for selectable output�elds;
• Proper formatting of collection data and validation errors;
• Support for HATEOAS1;
• E�cient routing with proper HTTP verb check;
• Built-in support for the OPTIONS and HEAD verbs;
• Authentication and authorization;
• Data caching and HTTP caching;
• Rate limiting;
In the following, we use an example to illustrate how you can build a set ofRESTful APIs with some minimal coding e�ort.
Assume you want to expose the user data via RESTful APIs. The userdata are stored in the user DB table, and you have already created the yii\db\ActiveRecord class app\models\User to access the user data.
1http://en.wikipedia.org/wiki/HATEOAS
279

280 CHAPTER 11. RESTFUL WEB SERVICES
11.1.1 Creating a Controller
First, create a controller class app\controllers\UserController as follows,
namespace app\controllers;
use yii\rest\ActiveController;
class UserController extends ActiveController
{
public $modelClass = 'app\models\User';
}
The controller class extends from yii\rest\ActiveController. By specify-ing yii\rest\ActiveController::modelClass as app\models\User, the con-troller knows what model can be used for fetching and manipulating data.
11.1.2 Con�guring URL Rules
Then, modify the con�guration about the urlManager component in your ap-plication con�guration:
'urlManager' => [
'enablePrettyUrl' => true,
'enableStrictParsing' => true,
'showScriptName' => false,
'rules' => [
['class' => 'yii\rest\UrlRule', 'controller' => 'user'],
],
]
The above con�guration mainly adds a URL rule for the user controller sothat the user data can be accessed and manipulated with pretty URLs andmeaningful HTTP verbs.
11.1.3 Trying it Out
With the above minimal amount of e�ort, you have already �nished yourtask of creating the RESTful APIs for accessing the user data. The APIsyou have created include:
• GET /users: list all users page by page;
• HEAD /users: show the overview information of user listing;
• POST /users: create a new user;
• GET /users/123: return the details of the user 123;
• HEAD /users/123: show the overview information of user 123;
• PATCH /users/123 and PUT /users/123: update the user 123;

11.1. QUICK START 281
• DELETE /users/123: delete the user 123;
• OPTIONS /users: show the supported verbs regarding endpoint /users;
• OPTIONS /users/123: show the supported verbs regarding endpoint /users/123.
Info: Yii will automatically pluralize controller names for use inendpoints.
You may access your APIs with the curl command like the following,
$ curl -i -H "Accept:application/json" "http://localhost/users"
HTTP/1.1 200 OK
Date: Sun, 02 Mar 2014 05:31:43 GMT
Server: Apache/2.2.26 (Unix) DAV/2 PHP/5.4.20 mod_ssl/2.2.26 OpenSSL/0.9.8y
X-Powered-By: PHP/5.4.20
X-Pagination-Total-Count: 1000
X-Pagination-Page-Count: 50
X-Pagination-Current-Page: 1
X-Pagination-Per-Page: 20
Link: <http://localhost/users?page=1>; rel=self,
<http://localhost/users?page=2>; rel=next,
<http://localhost/users?page=50>; rel=last
Transfer-Encoding: chunked
Content-Type: application/json; charset=UTF-8
[
{
"id": 1,
...
},
{
"id": 2,
...
},
...
]
Try changing the acceptable content type to be application/xml, and you willsee the result is returned in XML format:
$ curl -i -H "Accept:application/xml" "http://localhost/users"
HTTP/1.1 200 OK
Date: Sun, 02 Mar 2014 05:31:43 GMT
Server: Apache/2.2.26 (Unix) DAV/2 PHP/5.4.20 mod_ssl/2.2.26 OpenSSL/0.9.8y
X-Powered-By: PHP/5.4.20
X-Pagination-Total-Count: 1000
X-Pagination-Page-Count: 50
X-Pagination-Current-Page: 1
X-Pagination-Per-Page: 20
Link: <http://localhost/users?page=1>; rel=self,

282 CHAPTER 11. RESTFUL WEB SERVICES
<http://localhost/users?page=2>; rel=next,
<http://localhost/users?page=50>; rel=last
Transfer-Encoding: chunked
Content-Type: application/xml
<?xml version="1.0" encoding="UTF-8"?>
<response>
<item>
<id>1</id>
...
</item>
<item>
<id>2</id>
...
</item>
...
</response>
Tip: You may also access your APIs via Web browser by enteringthe URL http://localhost/users. However, you may need somebrowser plugins to send speci�c request headers.
As you can see, in the response headers, there are information about thetotal count, page count, etc. There are also links that allow you to navigateto other pages of data. For example, http://localhost/users?page=2 wouldgive you the next page of the user data.
Using the fields and expand parameters, you may also specify which �eldsshould be included in the result. For example, the URL http://localhost/
users?fields=id,email will only return the id and email �elds.
Info: You may have noticed that the result of http://localhost/users includes some sensitive �elds, such as password_hash, auth_key. You certainly do not want these to appear in your API result.You can and should �lter out these �elds as described in theResponse Formatting section.
11.1.4 Summary
Using the Yii RESTful API framework, you implement an API endpoint interms of a controller action, and you use a controller to organize the actionsthat implement the endpoints for a single type of resource.
Resources are represented as data models which extend from the yii
\base\Model class. If you are working with databases (relational or NoSQL),it is recommended you use yii\db\ActiveRecord to represent resources.
You may use yii\rest\UrlRule to simplify the routing to your APIendpoints.

11.2. RESOURCES 283
While not required, it is recommended that you develop your RESTfulAPIs as a separate application, di�erent from your Web front end and backend for easier maintenance.
11.2 Resources
RESTful APIs are all about accessing and manipulating resources. You mayview resources as models in the MVC paradigm.
While there is no restriction in how to represent a resource, in Yii youusually would represent resources in terms of objects of yii\base\Model orits child classes (e.g. yii\db\ActiveRecord), for the following reasons:
• yii\base\Model implements the yii\base\Arrayable interface, whichallows you to customize how you want to expose resource data throughRESTful APIs.
• yii\base\Model supports input validation, which is useful if yourRESTful APIs need to support data input.
• yii\db\ActiveRecord provides powerful DB data access and manip-ulation support, which makes it a perfect �t if your resource data isstored in databases.
In this section, we will mainly describe how a resource class extending fromyii\base\Model (or its child classes) can specify what data may be returnedvia RESTful APIs. If the resource class does not extend from yii\base
\Model, then all its public member variables will be returned.
11.2.1 Fields
When including a resource in a RESTful API response, the resource needs tobe serialized into a string. Yii breaks this process into two steps. First, theresource is converted into an array by yii\rest\Serializer. Second, thearray is serialized into a string in a requested format (e.g. JSON, XML) byyii\web\ResponseFormatterInterface. The �rst step is what you shouldmainly focus when developing a resource class.
By overriding yii\base\Model::fields() and/or yii\base\Model::
extraFields(), you may specify what data, called �elds, in the resourcecan be put into its array representation. The di�erence between these twomethods is that the former speci�es the default set of �elds which shouldbe included in the array representation, while the latter speci�es additional�elds which may be included in the array if an end user requests for themvia the expand query parameter. For example,

284 CHAPTER 11. RESTFUL WEB SERVICES
// returns all fields as declared in fields()
http://localhost/users
// only returns field id and email, provided they are declared in fields()
http://localhost/users?fields=id,email
// returns all fields in fields() and field profile if it is in extraFields
()
http://localhost/users?expand=profile
// only returns field id, email and profile, provided they are in fields()
and extraFields()
http://localhost/users?fields=id,email&expand=profile
Overriding fields()
By default, yii\base\Model::fields() returns all model attributes as �elds,while yii\db\ActiveRecord::fields() only returns the attributes whichhave been populated from DB.
You can override fields() to add, remove, rename or rede�ne �elds. Thereturn value of fields() should be an array. The array keys are the �eldnames, and the array values are the corresponding �eld de�nitions whichcan be either property/attribute names or anonymous functions returningthe corresponding �eld values. In the special case when a �eld name is thesame as its de�ning attribute name, you can omit the array key. For example,
// explicitly list every field, best used when you want to make sure the
changes
// in your DB table or model attributes do not cause your field changes (to
keep API backward compatibility).
public function fields()
{
return [
// field name is the same as the attribute name
'id',
// field name is "email", the corresponding attribute name is "
email_address"
'email' => 'email_address',
// field name is "name", its value is defined by a PHP callback
'name' => function () {
return $this->first_name . ' ' . $this->last_name;
},
];
}
// filter out some fields, best used when you want to inherit the parent
implementation
// and blacklist some sensitive fields.
public function fields()
{
$fields = parent::fields();

11.2. RESOURCES 285
// remove fields that contain sensitive information
unset($fields['auth_key'], $fields['password_hash'], $fields['
password_reset_token']);
return $fields;
}
Warning: Because by default all attributes of a model will beincluded in the API result, you should examine your data to makesure they do not contain sensitive information. If there is suchinformation, you should override fields() to �lter them out. Inthe above example, we choose to �lter out auth_key, password_hashand password_reset_token.
Overriding extraFields()
By default, yii\base\Model::extraFields() returns nothing, while yii
\db\ActiveRecord::extraFields() returns the names of the relations thathave been populated from DB.
The return data format of extraFields() is the same as that of fields
(). Usually, extraFields() is mainly used to specify �elds whose values areobjects. For example, given the following �eld declaration,
public function fields()
{
return ['id', 'email'];
}
public function extraFields()
{
return ['profile'];
}
the request with http://localhost/users?fields=id,email&expand=profile mayreturn the following JSON data:
[
{
"id": 100,
"email": "[email protected]",
"profile": {
"id": 100,
"age": 30,
}
},
...
]

286 CHAPTER 11. RESTFUL WEB SERVICES
11.2.2 Links
HATEOAS2, an abbreviation for Hypermedia as the Engine of ApplicationState, promotes that RESTful APIs should return information that allowclients to discover actions supported for the returned resources. The key ofHATEOAS is to return a set of hyperlinks with relation information whenresource data are served by the APIs.
Your resource classes may support HATEOAS by implementing the yii\web\Linkable interface. The interface contains a single method yii\web
\Linkable::getLinks() which should return a list of yii\web\Link. Typ-ically, you should return at least the self link representing the URL to theresource object itself. For example,
use yii\db\ActiveRecord;
use yii\web\Link;
use yii\web\Linkable;
use yii\helpers\Url;
class User extends ActiveRecord implements Linkable
{
public function getLinks()
{
return [
Link::REL_SELF => Url::to(['user', 'id' => $this->id], true),
];
}
}
When a User object is returned in a response, it will contain a _links elementrepresenting the links related to the user, for example,
{
"id": 100,
"email": "[email protected]",
// ...
"_links" => [
"self": "https://example.com/users/100"
]
}
11.2.3 Collections
Resource objects can be grouped into collections. Each collection contains alist of resource objects of the same type.
While collections can be represented as arrays, it is usually more desirableto represent them as data providers. This is because data providers supportsorting and pagination of resources, which is a commonly needed featurefor RESTful APIs returning collections. For example, the following actionreturns a data provider about the post resources:
2http://en.wikipedia.org/wiki/HATEOAS

11.3. CONTROLLERS 287
namespace app\controllers;
use yii\rest\Controller;
use yii\data\ActiveDataProvider;
use app\models\Post;
class PostController extends Controller
{
public function actionIndex()
{
return new ActiveDataProvider([
'query' => Post::find(),
]);
}
}
When a data provider is being sent in a RESTful API response, yii\rest\Serializer will take out the current page of resources and serialize them asan array of resource objects. Additionally, yii\rest\Serializer will alsoinclude the pagination information by the following HTTP headers:
• X-Pagination-Total-Count: The total number of resources;
• X-Pagination-Page-Count: The number of pages;
• X-Pagination-Current-Page: The current page (1-based);
• X-Pagination-Per-Page: The number of resources in each page;
• Link: A set of navigational links allowing client to traverse the resourcespage by page.
An example may be found in the Quick Start section.
11.3 Controllers
After creating the resource classes and specifying how resource data shouldbe formatted, the next thing to do is to create controller actions to exposethe resources to end users through RESTful APIs.
Yii provides two base controller classes to simplify your work of creatingRESTful actions: yii\rest\Controller and yii\rest\ActiveController.The di�erence between these two controllers is that the latter provides adefault set of actions that are speci�cally designed to deal with resourcesrepresented as Active Record. So if you are using Active Record and arecomfortable with the provided built-in actions, you may consider extendingyour controller classes from yii\rest\ActiveController, which will allowyou to create powerful RESTful APIs with minimal code.

288 CHAPTER 11. RESTFUL WEB SERVICES
Both yii\rest\Controller and yii\rest\ActiveController providethe following features, some of which will be described in detail in the nextfew sections:
• HTTP method validation;
• Content negotiation and Data formatting;
• Authentication;
• Rate limiting.
yii\rest\ActiveController in addition provides the following features:
• A set of commonly needed actions: index, view, create, update, delete,options;
• User authorization in regarding to the requested action and resource.
11.3.1 Creating Controller Classes
When creating a new controller class, a convention in naming the controllerclass is to use the type name of the resource and use singular form. For exam-ple, to serve user information, the controller may be named as UserController.
Creating a new action is similar to creating an action for a Web applica-tion. The only di�erence is that instead of rendering the result using a viewby calling the render() method, for RESTful actions you directly return thedata. The yii\rest\Controller::serializer and the yii\web\Responsewill handle the conversion from the original data to the requested format.For example,
public function actionView($id)
{
return User::findOne($id);
}
11.3.2 Filters
Most RESTful API features provided by yii\rest\Controller are imple-mented in terms of �lters. In particular, the following �lters will be executedin the order they are listed:
• yii\filters\ContentNegotiator: supports content negotiation, tobe explained in the Response Formatting section;
• yii\filters\VerbFilter: supports HTTP method validation;
• yii\filters\AuthMethod: supports user authentication, to be ex-plained in the Authentication section;

11.3. CONTROLLERS 289
• yii\filters\RateLimiter: supports rate limiting, to be explained inthe Rate Limiting section.
These named �lters are declared in the yii\rest\Controller::behaviors()method. You may override this method to con�gure individual �lters, dis-able some of them, or add your own �lters. For example, if you only wantto use HTTP basic authentication, you may write the following code:
use yii\filters\auth\HttpBasicAuth;
public function behaviors()
{
$behaviors = parent::behaviors();
$behaviors['authenticator'] = [
'class' => HttpBasicAuth::className(),
];
return $behaviors;
}
11.3.3 Extending ActiveController
If your controller class extends from yii\rest\ActiveController, you shouldset its yii\rest\ActiveController::modelClass property to be the nameof the resource class that you plan to serve through this controller. The classmust extend from yii\db\ActiveRecord.
Customizing Actions
By default, yii\rest\ActiveController provides the following actions:
• yii\rest\IndexAction: list resources page by page;
• yii\rest\ViewAction: return the details of a speci�ed resource;
• yii\rest\CreateAction: create a new resource;
• yii\rest\UpdateAction: update an existing resource;
• yii\rest\DeleteAction: delete the speci�ed resource;
• yii\rest\OptionsAction: return the supported HTTP methods.
All these actions are declared through the yii\rest\ActiveController::
actions() method. You may con�gure these actions or disable some of themby overriding the actions() method, like shown the following,
public function actions()
{
$actions = parent::actions();

290 CHAPTER 11. RESTFUL WEB SERVICES
// disable the "delete" and "create" actions
unset($actions['delete'], $actions['create']);
// customize the data provider preparation with the "prepareDataProvider
()" method
$actions['index']['prepareDataProvider'] = [$this, 'prepareDataProvider'
];
return $actions;
}
public function prepareDataProvider()
{
// prepare and return a data provider for the "index" action
}
Please refer to the class references for individual action classes to learn whatcon�guration options are available.
Performing Access Check
When exposing resources through RESTful APIs, you often need to check ifthe current user has the permission to access and manipulate the requestedresource(s). With yii\rest\ActiveController, this can be done by over-riding the yii\rest\ActiveController::checkAccess() method like thefollowing,
/**
* Checks the privilege of the current user.
*
* This method should be overridden to check whether the current user has
the privilege
* to run the specified action against the specified data model.
* If the user does not have access, a [[ForbiddenHttpException]] should be
thrown.
*
* @param string $action the ID of the action to be executed
* @param \yii\base\Model $model the model to be accessed. If null, it means
no specific model is being accessed.
* @param array $params additional parameters
* @throws ForbiddenHttpException if the user does not have access
*/
public function checkAccess($action, $model = null, $params = [])
{
// check if the user can access $action and $model
// throw ForbiddenHttpException if access should be denied
}
The checkAccess() method will be called by the default actions of yii\rest\ActiveController. If you create new actions and also want to performaccess check, you should call this method explicitly in the new actions.
11.4. ROUTING 291
Tip: You may implement checkAccess() by using the Role-BasedAccess Control (RBAC) component.
11.4 Routing
With resource and controller classes ready, you can access the resources usingthe URL like http://localhost/index.php?r=user/create, similar to what youcan do with normal Web applications.
In practice, you usually want to enable pretty URLs and take advantageof HTTP verbs. For example, a request POST /users would mean accessingthe user/create action. This can be done easily by con�guring the urlManager
application component in the application con�guration like the following:
'urlManager' => [
'enablePrettyUrl' => true,
'enableStrictParsing' => true,
'showScriptName' => false,
'rules' => [
['class' => 'yii\rest\UrlRule', 'controller' => 'user'],
],
]
Compared to the URL management for Web applications, the main newthing above is the use of yii\rest\UrlRule for routing RESTful API re-quests. This special URL rule class will create a whole set of child URLrules to support routing and URL creation for the speci�ed controller(s).For example, the above code is roughly equivalent to the following rules:
[
'PUT,PATCH users/<id>' => 'user/update',
'DELETE users/<id>' => 'user/delete',
'GET,HEAD users/<id>' => 'user/view',
'POST users' => 'user/create',
'GET,HEAD users' => 'user/index',
'users/<id>' => 'user/options',
'users' => 'user/options',
]
And the following API endpoints are supported by this rule:
• GET /users: list all users page by page;
• HEAD /users: show the overview information of user listing;
• POST /users: create a new user;
• GET /users/123: return the details of the user 123;
• HEAD /users/123: show the overview information of user 123;

292 CHAPTER 11. RESTFUL WEB SERVICES
• PATCH /users/123 and PUT /users/123: update the user 123;
• DELETE /users/123: delete the user 123;
• OPTIONS /users: show the supported verbs regarding endpoint /users;
• OPTIONS /users/123: show the supported verbs regarding endpoint /users/123.
You may con�gure the only and except options to explicitly list which actionsto support or which actions should be disabled, respectively. For example,
[
'class' => 'yii\rest\UrlRule',
'controller' => 'user',
'except' => ['delete', 'create', 'update'],
],
You may also con�gure patterns or extraPatterns to rede�ne existing patternsor add new patterns supported by this rule. For example, to support a newaction search by the endpoint GET /users/search, con�gure the extraPatterns
option as follows,
[
'class' => 'yii\rest\UrlRule',
'controller' => 'user',
'extraPatterns' => [
'GET search' => 'search',
],
You may have noticed that the controller ID user appears in plural form asusers in the endpoints. This is because yii\rest\UrlRule automaticallypluralizes controller IDs for them to use in endpoints. You may disable thisbehavior by setting yii\rest\UrlRule::pluralize to be false, or if youwant to use some special names you may con�gure the yii\rest\UrlRule
::controller property.
11.5 Response Formatting
When handling a RESTful API request, an application usually takes thefollowing steps that are related with response formatting:
1. Determine various factors that may a�ect the response format, suchas media type, language, version, etc. This process is also known ascontent negotiation3.
2. Convert resource objects into arrays, as described in the Resourcessection. This is done by yii\rest\Serializer.
3http://en.wikipedia.org/wiki/Content_negotiation

11.5. RESPONSE FORMATTING 293
3. Convert arrays into a string in the format as determined by the contentnegotiation step. This is done by yii\web\ResponseFormatterInterfaceregistered with the yii\web\Response::formatters application com-ponent.
11.5.1 Content Negotiation
Yii supports content negotiation via the yii\filters\ContentNegotiator
�lter. The the RESTful API base controller class yii\rest\Controller
is equipped with this �lter under the name of contentNegotiator. The �lerprovides response format negotiation as well as language negotiation. Forexample, if a RESTful API request contains the following header,
Accept: application/json; q=1.0, */*; q=0.1
it will get a response in JSON format, like the following:
$ curl -i -H "Accept: application/json; q=1.0, */*; q=0.1" "http://localhost
/users"
HTTP/1.1 200 OK
Date: Sun, 02 Mar 2014 05:31:43 GMT
Server: Apache/2.2.26 (Unix) DAV/2 PHP/5.4.20 mod_ssl/2.2.26 OpenSSL/0.9.8y
X-Powered-By: PHP/5.4.20
X-Pagination-Total-Count: 1000
X-Pagination-Page-Count: 50
X-Pagination-Current-Page: 1
X-Pagination-Per-Page: 20
Link: <http://localhost/users?page=1>; rel=self,
<http://localhost/users?page=2>; rel=next,
<http://localhost/users?page=50>; rel=last
Transfer-Encoding: chunked
Content-Type: application/json; charset=UTF-8
[
{
"id": 1,
...
},
{
"id": 2,
...
},
...
]
Behind the scene, before a RESTful API controller action is executed, theyii\filters\ContentNegotiator �lter will check the Accept HTTP headerin the request and set the yii\web\Response::format to be 'json'. Afterthe action is executed and returns the resulting resource object or collection,yii\rest\Serializer will convert the result into an array. And �nally, yii

294 CHAPTER 11. RESTFUL WEB SERVICES
\web\JsonResponseFormatter will serialize the array into a JSON stringand include it in the response body.
By default, RESTful APIs support both JSON and XML formats. Tosupport a new format, you should con�gure the yii\filters\ContentNegotiator::formats property of the contentNegotiator �lter like the following in yourAPI controller classes:
use yii\web\Response;
public function behaviors()
{
$behaviors = parent::behaviors();
$behaviors['contentNegotiator']['formats']['text/html'] = Response::
FORMAT_HTML;
return $behaviors;
}
The keys of the formats property are the supported MIME types, while thevalues are the corresponding response format names which must be sup-ported in yii\web\Response::formatters.
11.5.2 Data Serializing
As we have described above, yii\rest\Serializer is the central piece re-sponsible for converting resource objects or collections into arrays. It recog-nizes objects implementing yii\base\ArrayableInterface as well as yii
\data\DataProviderInterface. The former is mainly implemented by re-source objects, while the latter resource collections.
You may con�gure the serializer by setting the yii\rest\Controller::serializer property with a con�guration array. For example, sometimesyou may want to help simplify the client development work by includingpagination information directly in the response body. To do so, con�gurethe yii\rest\Serializer::collectionEnvelope property as follows:
use yii\rest\ActiveController;
class UserController extends ActiveController
{
public $modelClass = 'app\models\User';
public $serializer = [
'class' => 'yii\rest\Serializer',
'collectionEnvelope' => 'items',
];
}
You may then get the following response for request http://localhost/users:
HTTP/1.1 200 OK
Date: Sun, 02 Mar 2014 05:31:43 GMT
Server: Apache/2.2.26 (Unix) DAV/2 PHP/5.4.20 mod_ssl/2.2.26 OpenSSL/0.9.8y
X-Powered-By: PHP/5.4.20

11.6. AUTHENTICATION 295
X-Pagination-Total-Count: 1000
X-Pagination-Page-Count: 50
X-Pagination-Current-Page: 1
X-Pagination-Per-Page: 20
Link: <http://localhost/users?page=1>; rel=self,
<http://localhost/users?page=2>; rel=next,
<http://localhost/users?page=50>; rel=last
Transfer-Encoding: chunked
Content-Type: application/json; charset=UTF-8
{
"items": [
{
"id": 1,
...
},
{
"id": 2,
...
},
...
],
"_links": {
"self": "http://localhost/users?page=1",
"next": "http://localhost/users?page=2",
"last": "http://localhost/users?page=50"
},
"_meta": {
"totalCount": 1000,
"pageCount": 50,
"currentPage": 1,
"perPage": 20
}
}
11.6 Authentication
Unlike Web applications, RESTful APIs should be stateless, which meanssessions or cookies should not be used. Therefore, each request should comewith some sort of authentication credentials because the user authenticationstatus may not be maintained by sessions or cookies. A common practiceis to send a secret access token with each request to authenticate the user.Since an access token can be used to uniquely identify and authenticate auser, the API requests should always be sent via HTTPS to preventfrom man-in-the-middle (MitM) attacks.
There are di�erent ways to send an access token:
• HTTP Basic Auth4: the access token is sent as the username. This
4http://en.wikipedia.org/wiki/Basic_access_authentication

296 CHAPTER 11. RESTFUL WEB SERVICES
is should only be used when an access token can be safely stored onthe API consumer side. For example, the API consumer is a programrunning on a server.
• Query parameter: the access token is sent as a query parameter in theAPI URL, e.g., https://example.com/users?access-token=xxxxxxxx. Be-cause most Web servers will keep query parameters in server logs, thisapproach should be mainly used to serve JSONP requests which cannotuse HTTP headers to send access tokens.
• OAuth 25: the access token is obtained by the consumer from an autho-rization server and sent to the API server via HTTP Bearer Tokens6,according to the OAuth2 protocol.
Yii supports all of the above authentication methods. You can also easilycreate new authentication methods.
To enable authentication for your APIs, do the following two steps:
1. Specify which authentication methods you plan to use by con�guringthe authenticator behavior in your REST controller classes.
2. Implement yii\web\IdentityInterface::findIdentityByAccessToken()in your yii\web\User::identityClass.
For example, to use HTTP Basic Auth, you may con�gure authenticator asfollows,
use yii\filters\auth\HttpBasicAuth;
public function behaviors()
{
$behaviors = parent::behaviors();
$behaviors['authenticator'] = [
'class' => HttpBasicAuth::className(),
];
return $behaviors;
}
If you want to support all three authentication methods explained above,you can use CompositeAuth like the following,
use yii\filters\auth\CompositeAuth;
use yii\filters\auth\HttpBasicAuth;
use yii\filters\auth\HttpBearerAuth;
use yii\filters\auth\QueryParamAuth;
public function behaviors()
{
5http://oauth.net/2/6http://tools.ietf.org/html/rfc6750

11.6. AUTHENTICATION 297
$behaviors = parent::behaviors();
$behaviors['authenticator'] = [
'class' => CompositeAuth::className(),
'authMethods' => [
HttpBasicAuth::className(),
HttpBearerAuth::className(),
QueryParamAuth::className(),
],
];
return $behaviors;
}
Each element in authMethods should be an auth method class name or acon�guration array.
Implementation of findIdentityByAccessToken() is application speci�c. Forexample, in simple scenarios when each user can only have one access token,you may store the access token in an access_token column in the user table.The method can then be readily implemented in the User class as follows,
use yii\db\ActiveRecord;
use yii\web\IdentityInterface;
class User extends ActiveRecord implements IdentityInterface
{
public static function findIdentityByAccessToken($token, $type = null)
{
return static::findOne(['access_token' => $token]);
}
}
After authentication is enabled as described above, for every API request,the requested controller will try to authenticate the user in its beforeAction()step.
If authentication succeeds, the controller will perform other checks (suchas rate limiting, authorization) and then run the action. The authenticateduser identity information can be retrieved via Yii::$app->user->identity.
If authentication fails, a response with HTTP status 401 will be sent backtogether with other appropriate headers (such as a WWW-Authenticate headerfor HTTP Basic Auth).
11.6.1 Authorization
After a user is authenticated, you probably want to check if he or she has thepermission to perform the requested action for the requested resource. Thisprocess is called authorization which is covered in detail in the Authorizationsection.
If your controllers extend from yii\rest\ActiveController, you mayoverride the yii\rest\Controller::checkAccess() method to perform au-thorization check. The method will be called by the built-in actions providedby yii\rest\ActiveController.

298 CHAPTER 11. RESTFUL WEB SERVICES
11.7 Rate Limiting
To prevent abuse, you should consider adding rate limiting to your APIs.For example, you may limit the API usage of each user to be at most 100API calls within a period of 10 minutes. If too many requests are receivedfrom a user within the period of the time, a response with status code 429(meaning Too Many Requests) should be returned.
To enable rate limiting, the yii\web\User::identityClass should im-plement yii\filters\RateLimitInterface. This interface requires imple-mentation of the following three methods:
• getRateLimit(): returns the maximum number of allowed requests andthe time period, e.g., [100, 600] means at most 100 API calls within600 seconds.
• loadAllowance(): returns the number of remaining requests allowed andthe corresponding UNIX timestamp when the rate limit is checked lasttime.
• saveAllowance(): saves the number of remaining requests allowed andthe current UNIX timestamp.
You may use two columns in the user table to record the allowance andtimestamp information. And loadAllowance() and saveAllowance() can thenbe implementation by reading and saving the values of the two columnscorresponding to the current authenticated user. To improve performance,you may also consider storing these information in cache or some NoSQLstorage.
Once the identity class implements the required interface, Yii will auto-matically use yii\filters\RateLimiter con�gured as an action �lter foryii\rest\Controller to perform rate limiting check. The rate limiter willthrown a yii\web\TooManyRequestsHttpException if rate limit is exceeded.You may con�gure the rate limiter as follows in your REST controller classes,
public function behaviors()
{
$behaviors = parent::behaviors();
$behaviors['rateLimiter']['enableRateLimitHeaders'] = false;
return $behaviors;
}
When rate limiting is enabled, by default every response will be sent with thefollowing HTTP headers containing the current rate limiting information:
• X-Rate-Limit-Limit: The maximum number of requests allowed with atime period;
• X-Rate-Limit-Remaining: The number of remaining requests in the cur-rent time period;

11.8. VERSIONING 299
• X-Rate-Limit-Reset: The number of seconds to wait in order to get themaximum number of allowed requests.
You may disable these headers by con�guring yii\filters\RateLimiter::
enableRateLimitHeaders to be false, like shown in the above code example.
11.8 Versioning
Your APIs should be versioned. Unlike Web applications which you have fullcontrol on both client side and server side code, for APIs you usually do nothave control of the client code that consumes the APIs. Therefore, backwardcompatibility (BC) of the APIs should be maintained whenever possible, andif some BC-breaking changes must be introduced to the APIs, you shouldbump up the version number. You may refer to Semantic Versioning7 formore information about designing the version numbers of your APIs.
Regarding how to implement API versioning, a common practice is toembed the version number in the API URLs. For example, http://example
.com/v1/users stands for /users API of version 1. Another method of APIversioning which gains momentum recently is to put version numbers inthe HTTP request headers, typically through the Accept header, like thefollowing:
// via a parameter
Accept: application/json; version=v1
// via a vendor content type
Accept: application/vnd.company.myapp-v1+json
Both methods have pros and cons, and there are a lot of debates about them.Below we describe a practical strategy of API versioning that is kind of amix of these two methods:
• Put each major version of API implementation in a separate modulewhose ID is the major version number (e.g. v1, v2). Naturally, the APIURLs will contain major version numbers.
• Within each major version (and thus within the corresponding mod-ule), use the Accept HTTP request header to determine the minorversion number and write conditional code to respond to the minorversions accordingly.
For each module serving a major version, it should include the resourceclasses and the controller classes serving for that speci�c version. To betterseparate code responsibility, you may keep a common set of base resourceand controller classes, and subclass them in each individual version module.Within the subclasses, implement the concrete code such as Model::fields().
Your code may be organized like the following:
7http://semver.org/

300 CHAPTER 11. RESTFUL WEB SERVICES
api/
common/
controllers/
UserController.php
PostController.php
models/
User.php
Post.php
modules/
v1/
controllers/
UserController.php
PostController.php
models/
User.php
Post.php
v2/
controllers/
UserController.php
PostController.php
models/
User.php
Post.php
Your application con�guration would look like:
return [
'modules' => [
'v1' => [
'basePath' => '@app/modules/v1',
],
'v2' => [
'basePath' => '@app/modules/v2',
],
],
'components' => [
'urlManager' => [
'enablePrettyUrl' => true,
'enableStrictParsing' => true,
'showScriptName' => false,
'rules' => [
['class' => 'yii\rest\UrlRule', 'controller' => ['v1/user',
'v1/post']],
['class' => 'yii\rest\UrlRule', 'controller' => ['v2/user',
'v2/post']],
],
],
],
];
As a result, http://example.com/v1/users will return the list of users in version1, while http://example.com/v2/users will return version 2 users.
Using modules, code for di�erent major versions can be well isolated.And it is still possible to reuse code across modules via common base classes

11.9. ERROR HANDLING 301
and other shared classes.To deal with minor version numbers, you may take advantage of the con-
tent negotiation feature provided by the yii\filters\ContentNegotiator
behavior. The contentNegotiator behavior will set the yii\web\Response::
acceptParams property when it determines which content type to support.For example, if a request is sent with the HTTP header Accept: application
/json; version=v1, after content negotiation, yii\web\Response::acceptParamswill contain the value ['version' => 'v1'].
Based on the version information in acceptParams, you may write condi-tional code in places such as actions, resource classes, serializers, etc.
Since minor versions require maintaining backward compatibility, hope-fully there are not much version checks in your code. Otherwise, chances arethat you may need to create a new major version.
11.9 Error Handling
When handling a RESTful API request, if there is an error in the user requestor if something unexpected happens on the server, you may simply throw anexception to notify the user that something wrong has happened. If you canidentify the cause of the error (e.g. the requested resource does not exist), youshould consider throwing an exception with a proper HTTP status code (e.g.yii\web\NotFoundHttpException representing a 404 HTTP status code).Yii will send the response with the corresponding HTTP status code andtext. It will also include in the response body the serialized representationof the exception. For example,
HTTP/1.1 404 Not Found
Date: Sun, 02 Mar 2014 05:31:43 GMT
Server: Apache/2.2.26 (Unix) DAV/2 PHP/5.4.20 mod_ssl/2.2.26 OpenSSL/0.9.8y
Transfer-Encoding: chunked
Content-Type: application/json; charset=UTF-8
{
"type": "yii\\web\\NotFoundHttpException",
"name": "Not Found Exception",
"message": "The requested resource was not found.",
"code": 0,
"status": 404
}
The following list summarizes the HTTP status code that are used by theYii REST framework:
• 200: OK. Everything worked as expected.
• 201: A resource was successfully created in response to a POST request.The Location header contains the URL pointing to the newly createdresource.

302 CHAPTER 11. RESTFUL WEB SERVICES
• 204: The request is handled successfully and the response contains nobody content (like a DELETE request).
• 304: Resource was not modi�ed. You can use the cached version.
• 400: Bad request. This could be caused by various reasons from theuser side, such as invalid JSON data in the request body, invalid actionparameters, etc.
• 401: Authentication failed.
• 403: The authenticated user is not allowed to access the speci�ed APIendpoint.
• 404: The requested resource does not exist.
• 405: Method not allowed. Please check the Allow header for allowedHTTP methods.
• 415: Unsupported media type. The requested content type or versionnumber is invalid.
• 422: Data validation failed (in response to a POST request, for example).Please check the response body for detailed error messages.
• 429: Too many requests. The request is rejected due to rate limiting.
• 500: Internal server error. This could be caused by internal programerrors.

Chapter 12
Development Tools
12.1 Debug toolbar and debugger
Note: This section is under development.
Yii2 includes a handy toolbar, and built-in debugger, for faster developmentand debugging of your applications. The toolbar displays information aboutthe currently opened page, while the debugger can be used to analyze datayou've previously collected (i.e., to con�rm the values of variables).
Out of the box these tools allow you to:
• Quickly get the framework version, PHP version, response status, cur-rent controller and action, performance info and more via toolbar
• Browse the application and PHP con�guration
• View the request data, request and response headers, session data, andenvironment variables
• See, search, and �lter the logs
• View any pro�ling results
• View the database queries executed by the page
• View the emails sent by the application
All of this information will be available per request, allowing you to revisitthe information for past requests as well.
12.1.1 Installing and con�guring
To enable these features, add these lines to your con�guration �le to enablethe debug module:
303

304 CHAPTER 12. DEVELOPMENT TOOLS
'bootstrap' => ['debug'],
'modules' => [
'debug' => 'yii\debug\Module',
]
By default, the debug module only works when browsing the website from lo-calhost. If you want to use it on a remote (staging) server, add the parameterallowedIPs to the con�guration to whitelist your IP:
'bootstrap' => ['debug'],
'modules' => [
'debug' => [
'class' => 'yii\debug\Module',
'allowedIPs' => ['1.2.3.4', '127.0.0.1', '::1']
]
]
If you are using enableStrictParsing URL manager option, add the followingto your rules:
'urlManager' => [
'enableStrictParsing' => true,
'rules' => [
// ...
'debug/<controller>/<action>' => 'debug/<controller>/<action>',
],
],
Note: the debugger stores information about each request in the@runtime/debug directory. If you have problems using The debug-ger such as weird error messages when using it or the toolbar notshowing up or not showing any requests, check whether the webserver has enough permissions to access this directory and the�les located inside.
Extra con�guration for logging and pro�ling
Logging and pro�ling are simple but powerful tools that may help you tounderstand the execution �ow of both the framework and the application.These tools are useful for development and production environments alike.
While in a production environment, you should log only signi�cantlyimportant messages manually, as described in logging guide section. It hurtsperformance too much to continue to log all messages in production.
In a development environment, the more logging the better, and it'sespecially useful to record the execution trace.
In order to see the trace messages that will help you to understand whathappens under the hood of the framework, you need to set the trace level inthe con�guration �le:

12.1. DEBUG TOOLBAR AND DEBUGGER 305
return [
// ...
'components' => [
'log' => [
'traceLevel' => YII_DEBUG ? 3 : 0, // <-- here
By default, the trace level is automatically set to 3 if Yii is running in debugmode, as determined by the presence of the following line in your index.php
�le:
defined('YII_DEBUG') or define('YII_DEBUG', true);
Note: Make sure to disable debug mode in production environ-ments since it may have a signi�cant and adverse performancee�ect. Further, the debug mode may expose sensitive informa-tion to end users.
12.1.2 Creating your own panels
Both the toolbar and debugger are highly con�gurable and customizable. Todo so, you can create your own panels that collect and display the speci�cdata you want. Below we'll describe the process of creating a simple custompanel that:
• Collects the views rendered during a request
• Shows the number of views rendered in the toolbar
• Allows you to check the view names in the debugger
The assumption is that you're using the basic application template.First we need to implement the Panel class in panels/ViewsPanel.php:
<?php
namespace app\panels;
use yii\base\Event;
use yii\base\View;
use yii\base\ViewEvent;
use yii\debug\Panel;
class ViewsPanel extends Panel
{
private $_viewFiles = [];
public function init()
{
parent::init();
Event::on(View::className(), View::EVENT_BEFORE_RENDER, function (
ViewEvent $event) {

306 CHAPTER 12. DEVELOPMENT TOOLS
$this->_viewFiles[] = $event->sender->getViewFile();
});
}
/**
* @inheritdoc
*/
public function getName()
{
return 'Views';
}
/**
* @inheritdoc
*/
public function getSummary()
{
$url = $this->getUrl();
$count = count($this->data);
return "<div class=\"yii-debug-toolbar-block\"><a href=\"$url\">
Views <span class=\"label\">$count</span></a></div>";
}
/**
* @inheritdoc
*/
public function getDetail()
{
return '<ol><li>' . implode('<li>', $this->data) . '</ol>';
}
/**
* @inheritdoc
*/
public function save()
{
return $this->_viewFiles;
}
}
The work�ow for the code above is:
1. init is executed before any controller action is run. This method is thebest place to attach handlers that will collect data during the controlleraction's execution.
2. save is called after controller action is executed. The data returned bythis method will be stored in a data �le. If nothing is returned by thismethod, the panel won't be rendered.
3. The data from the data �le is loaded into $this->data. For the tool-bar, this will always represent the latest data, For the debugger, this

12.2. THE GII CODE GENERATION TOOL 307
property may be set to be read from any previous data �le as well.
4. The toolbar takes its contents from getSummary. There, we're showingthe number of view �les rendered. The debugger uses getDetail for thesame purpose.
Now it's time to tell the debugger to use the new panel. In config/web.php,the debug con�guration is modi�ed to:
if (YII_ENV_DEV) {
// configuration adjustments for 'dev' environment
$config['bootstrap'][] = 'debug';
$config['modules']['debug'] = [
'class' => 'yii\debug\Module',
'panels' => [
'views' => ['class' => 'app\panels\ViewsPanel'],
],
];
// ...
That's it. Now we have another useful panel without writing much code.
12.2 The Gii code generation tool
Note: This section is under development.
Yii includes a handy tool, named Gii, that provides rapid prototyping bygenerating commonly used code snippets as well as complete CRUD con-trollers.
12.2.1 Installing and con�guring
Gii is an o�cial Yii extension. The preferred way to install this extension isthrough composer1.
You can either run this command:
php composer.phar require --prefer-dist yiisoft/yii2-gii "*"
Or you can add this code to the require section of your composer.json �le:
"yiisoft/yii2-gii": "*"
Once the Gii extension has been installed, you enable it by adding these linesto your application con�guration �le:
return [
'bootstrap' => ['gii'],
'modules' => [
'gii' => 'yii\gii\Module',
1http://getcomposer.org/download/

308 CHAPTER 12. DEVELOPMENT TOOLS
// ...
],
// ...
];
You can then access Gii through the following URL:
http://localhost/path/to/index.php?r=gii
If you have enabled pretty URLs, you may use the following URL:
http://localhost/path/to/index.php/gii
Note: if you are accessing gii from an IP address other thanlocalhost, access will be denied by default. To circumvent thatdefault, add the allowed IP addresses to the con�guration:
'gii' => [
'class' => 'yii\gii\Module',
'allowedIPs' => ['127.0.0.1', '::1', '192.168.0.*', '
192.168.178.20'] // adjust this to your needs
],
Basic application
In basic application template con�guration structure is a bit di�erent so Giishould be con�gured in config/web.php:
// ...
if (YII_ENV_DEV) {
// configuration adjustments for 'dev' environment
$config['bootstrap'][] = 'debug';
$config['modules']['debug'] = 'yii\debug\Module';
$config['bootstrap'][] = 'gii';
$config['modules']['gii'] = 'yii\gii\Module'; // <--- here
}
So in order to adjust IP address you need to do it like the following:
if (YII_ENV_DEV) {
// configuration adjustments for 'dev' environment
$config['bootstrap'][] = 'debug';
$config['modules']['debug'] = 'yii\debug\Module';
$config['bootstrap'][] = 'gii';
$config['modules']['gii'] = [
'class' => 'yii\gii\Module',
'allowedIPs' => ['127.0.0.1', '::1', '192.168.0.*', '192.168.178.20'
],
];
}

12.2. THE GII CODE GENERATION TOOL 309
12.2.2 How to use it
When you open Gii you �rst see the entry page that lets you choose a gen-erator.
By default there are the following generators available:
• Model Generator - This generator generates an ActiveRecord classfor the speci�ed database table.
• CRUD Generator - This generator generates a controller and viewsthat implement CRUD (Create, Read, Update, Delete) operations forthe speci�ed data model.
• Controller Generator - This generator helps you to quickly gener-ate a new controller class, one or several controller actions and theircorresponding views.
• Form Generator - This generator generates a view script �le thatdisplays a form to collect input for the speci�ed model class.
• Module Generator - This generator helps you to generate the skele-ton code needed by a Yii module.
• Extension Generator - This generator helps you to generate the �lesneeded by a Yii extension.
After choosing a generator by clicking on the �Start� button you will seea form that allows you to con�gure the parameters of the generator. Fill

310 CHAPTER 12. DEVELOPMENT TOOLS
out the form according to your needs and press the �Preview� button toget a preview of the code that gii is about to generated. Depending on thegenerator you chose and whether the �les already existed or not, you willget an output similar to what you see in the following picture:
Clicking on the �le name you can view a preview of the code that will begenerated for that �le. When the �le already exists, gii also provides a di�view that shows what is di�erent between the code that exists and the onethat will be generated. In this case you can also choose which �les shouldbe overridden and which not.
Tip: When using the Model Generator to update models afterdatabase change, you can copy the code from gii preview andmerge the changes with your own code. You can use IDE featureslike PHPStorms compare with clipboard2 for this, which allowsyou to merge in relevant changes and leave out others that mayrevert your own code.
After you have reviewed the code and selected the �les to be generated youcan click the �Generate� button to create the �les. If all went �ne you aredone. When you see errors that gii is not able to generate the �les you haveto adjust directory permissions so that your webserver is able to write to thedirectories and create the �les.
Note: The code generated by gii is only a template that has to beadjusted to your needs. It is there to help you create new thingsquickly but it is not something that creates ready to use code.We often see people using the models generated by gii withoutchange and just extend them to adjust some parts of it. This isnot how it is meant to be used. Code generated by gii may beincomplete or incorrect and has to be changed to �t your needsbefore you can use it.
2http://www.jetbrains.com/phpstorm/webhelp/comparing-files.html

12.2. THE GII CODE GENERATION TOOL 311
12.2.3 Creating your own templates
Every generator has a form �eld Code Template that lets you choose a templateto use for code generation. By default gii only provides one template default
but you can create your own templates that are adjusted to your needs.If you open a folder @app\vendor\yiisoft\yii2-gii\generators, you'll see six
folders of generators. ` + controller - crud
+ default
• extension
• form
• model
• module
This is name generator. If you open any of these folders, you can see
the folder `default`. This folder is name of the template.
Copy folder @app\vendor\yiisoft\yii2-gii\generators\crud\default to anotherlocation, for example @app\myTemplates\crud\. Now open this folder and mod-ify any template to �t your desires, for example, add errorSummary in views\
_form.php:
<?php
//...
<div class="<?= Inflector::camel2id(StringHelper::basename($generator->
modelClass)) ?>-form">
<?= "<?php " ?>$form = ActiveForm::begin(); ?>
<?= "<?=" ?> $form->errorSummary($model) ?> <!-- ADDED HERE -->
<?php foreach ($safeAttributes as $attribute) {
echo " <?= " . $generator->generateActiveField($attribute) . "
?>\n\n";
} ?>
//...
Now you need to tell GII about our template.The setting is made in thecon�g �le:
// config/web.php for basic app
// ...
if (YII_ENV_DEV) {
$config['modules']['gii'] = [
'class' => 'yii\gii\Module',
'allowedIPs' => ['127.0.0.1', '::1', '192.168.0.*', '192.168.178.20'
],
'generators' => [ //here
'crud' => [ //name generator
'class' => 'yii\gii\generators\crud\Generator', //class
generator

312 CHAPTER 12. DEVELOPMENT TOOLS
'templates' => [ //setting for out templates
'myCrud' => '@app\myTemplates\crud\default', //name
template => path to template
]
]
],
];
}
Open the CRUD generator and you will see that in the �eld Code Template ofform appeared own template .
12.2.4 Creating your own generators
Open the folder of any generator and you will see two �les form.php andGenerator.php. One is the form, the second is the class generator. For createyour own generator, you need to create or override these classes in any folder.Again as in the previous paragraph customize con�guration:
//config/web.php for basic app
//..
if (YII_ENV_DEV) {
$config['modules']['gii'] = [
'class' => 'yii\gii\Module',
'allowedIPs' => ['127.0.0.1', '::1', '192.168.0.*', '192.168.178.20'
],
'generators' => [
'myCrud' => [
'class' => 'app\myTemplates\crud\Generator',
'templates' => [
'my' => '@app/myTemplates/crud/default',
]
]
],
];
}
// @app/myTemplates/crud/Generator.php
<?php
namespace app\myTemplates\crud;
class Generator extends \yii\gii\Generator
{
public function getName()
{
return 'MY CRUD Generator';
}
public function getDescription()
{
return 'My crud generator. The same as a native, but he is mine...';
}

12.2. THE GII CODE GENERATION TOOL 313
// ...
}
Open Gii Module and you will see a new generator appears in it.

314 CHAPTER 12. DEVELOPMENT TOOLS
Error: not existing �le: tool-api-doc.md

Chapter 13
Testing
13.1 Testing
TBD
315

316 CHAPTER 13. TESTING
Error: not existing �le: test-unit.md

13.1. TESTING 317
Error: not existing �le: test-functional.md

318 CHAPTER 13. TESTING
Error: not existing �le: test-acceptance.md

13.2. FIXTURES 319
13.2 Fixtures
Note: This section is under development.
Fixtures are important part of testing. Their main purpose is to set up theenvironment in a �xed/known state so that your tests are repeatable andrun in an expected way. Yii provides a �xture framework that allows you tode�ne your �xtures precisely and use them easily.
A key concept in the Yii �xture framework is the so-called �xture objects.A �xture object represents a particular aspect of a test environment and isan instance of yii\test\Fixture or its child class. For example, you mayuse UserFixture to make sure the user DB table contains a �xed set of data.You load one or multiple �xture objects before running a test and unloadthem when �nishing.
A �xture may depend on other �xtures, speci�ed via its yii\test\Fixture::depends property. When a �xture is being loaded, the �xtures it dependson will be automatically loaded BEFORE the �xture; and when the �xture isbeing unloaded, the dependent �xtures will be unloaded AFTER the �xture.
13.2.1 De�ning a Fixture
To de�ne a �xture, create a new class by extending yii\test\Fixture oryii\test\ActiveFixture. The former is best suited for general purpose�xtures, while the latter has enhanced features speci�cally designed to workwith database and ActiveRecord.
The following code de�nes a �xture about the User ActiveRecord and thecorresponding user table.
<?php
namespace app\tests\fixtures;
use yii\test\ActiveFixture;
class UserFixture extends ActiveFixture
{
public $modelClass = 'app\models\User';
}
Tip: Each ActiveFixture is about preparing a DB table for test-ing purpose. You may specify the table by setting either the yii\test\ActiveFixture::tableName property or the yii\test\ActiveFixture::modelClass property. If the latter, the table name will betaken from the ActiveRecord class speci�ed by modelClass.
The �xture data for an ActiveFixture �xture is usually provided in a �lelocated at FixturePath/data/TableName.php, where FixturePath stands for thedirectory containing the �xture class �le, and TableName is the name of the

320 CHAPTER 13. TESTING
table associated with the �xture. In the example above, the �le should be@app/tests/fixtures/data/user.php. The data �le should return an array ofdata rows to be inserted into the user table. For example,
<?php
return [
'user1' => [
'username' => 'lmayert',
'email' => '[email protected]',
'auth_key' => 'K3nF70it7tzNsHddEiq0BZ0i-OU8S3xV',
'password' => '$2y$13$WSyE5hHsG1rWN2jV8LRHzubilrCLI5Ev/
iK0r3jRuwQEs2ldRu.a2',
],
'user2' => [
'username' => 'napoleon69',
'email' => '[email protected]',
'auth_key' => 'dZlXsVnIDgIzFgX4EduAqkEPuphhOh9q',
'password' => '$2y$13$kkgpvJ8lnjKo8RuoR30ay.RjDf15bMcHIF7Vz1zz/6
viYG5xJExU6',
],
];
You may give an alias to a row so that later in your test, you may refer tothe row via the alias. In the above example, the two rows are aliased as user1and user2, respectively.
Also, you do not need to specify the data for auto-incremental columns.Yii will automatically �ll the actual values into the rows when the �xture isbeing loaded.
Tip: You may customize the location of the data �le by settingthe yii\test\ActiveFixture::dataFile property. You mayalso override yii\test\ActiveFixture::getData() to providethe data.
As we described earlier, a �xture may depend on other �xtures. For exam-ple, UserProfileFixture depends on UserFixture because the user pro�le tablecontains a foreign key pointing to the user table. The dependency is speci�edvia the yii\test\Fixture::depends property, like the following,
namespace app\tests\fixtures;
use yii\test\ActiveFixture;
class UserProfileFixture extends ActiveFixture
{
public $modelClass = 'app\models\UserProfile';
public $depends = ['app\tests\fixtures\UserFixture'];
}
In the above, we have shown how to de�ne a �xture about a DB table.To de�ne a �xture not related with DB (e.g. a �xture about certain �les

13.2. FIXTURES 321
and directories), you may extend from the more general base class yii
\test\Fixture and override the yii\test\Fixture::load() and yii\test
\Fixture::unload() methods.
13.2.2 Using Fixtures
If you are using CodeCeption1 to test your code, you should consider usingthe yii2-codeception extension which has the built-in support for loading andaccessing �xtures. If you are using other testing frameworks, you may useyii\test\FixtureTrait in your test cases to achieve the same goal.
In the following we will describe how to write a UserProfile unit test classusing yii2-codeception.
In your unit test class extending yii\codeception\DbTestCase or yii\codeception\TestCase, declare which �xtures you want to use in the yii\test\FixtureTrait::fixtures() method. For example,
namespace app\tests\unit\models;
use yii\codeception\DbTestCase;
use app\tests\fixtures\UserProfileFixture;
class UserProfileTest extends DbTestCase
{
public function fixtures()
{
return [
'profiles' => UserProfileFixture::className(),
];
}
// ...test methods...
}
The �xtures listed in the fixtures() method will be automatically loadedbefore running every test method in the test case and unloaded after �n-ishing every test method. And as we described before, when a �xture isbeing loaded, all its dependent �xtures will be automatically loaded �rst.In the above example, because UserProfileFixture depends on UserFixture,when running any test method in the test class, two �xtures will be loadedsequentially: UserFixture and UserProfileFixture.
When specifying �xtures in fixtures(), you may use either a class nameor a con�guration array to refer to a �xture. The con�guration array will letyou customize the �xture properties when the �xture is loaded.
You may also assign an alias to a �xture. In the above example, theUserProfileFixture is aliased as profiles. In the test methods, you may thenaccess a �xture object using its alias. For example, $this->profiles will returnthe UserProfileFixture object.
1http://codeception.com/

322 CHAPTER 13. TESTING
Because UserProfileFixture extends from ActiveFixture, you may furtheruse the following syntax to access the data provided by the �xture:
// returns the data row aliased as 'user1'
$row = $this->profiles['user1'];
// returns the UserProfile model corresponding to the data row aliased as '
user1'
$profile = $this->profiles('user1');
// traverse every data row in the fixture
foreach ($this->profiles as $row) ...
Info: $this->profiles is still of UserProfileFixture type. The aboveaccess features are implemented through PHP magic methods.
13.2.3 De�ning and Using Global Fixtures
The �xtures described above are mainly used by individual test cases. Inmost cases, you also need some global �xtures that are applied to ALL ormany test cases. An example is yii\test\InitDbFixture which does twothings:
• Perform some common initialization tasks by executing a script locatedat @app/tests/fixtures/initdb.php;
• Disable the database integrity check before loading other DB �xtures,and re-enable it after other DB �xtures are unloaded.
Using global �xtures is similar to using non-global ones. The only di�er-ence is that you declare these �xtures in yii\codeception\TestCase::
globalFixtures() instead of fixtures(). When a test case loads �xtures, itwill �rst load global �xtures and then non-global ones.
By default, yii\codeception\DbTestCase already declares InitDbFixturein its globalFixtures() method. This means you only need to work with @app
/tests/fixtures/initdb.php if you want to do some initialization work beforeeach test. You may otherwise simply focus on developing each individualtest case and the corresponding �xtures.
13.2.4 Organizing Fixture Classes and Data Files
By default, �xture classes look for the corresponding data �les under thedata folder which is a sub-folder of the folder containing the �xture class�les. You can follow this convention when working with simple projects.For big projects, chances are that you often need to switch di�erent data�les for the same �xture class for di�erent tests. We thus recommend thatyou organize the data �les in a hierarchical way that is similar to your classnamespaces. For example,

13.2. FIXTURES 323
# under folder tests\unit\fixtures
data\
components\
fixture_data_file1.php
fixture_data_file2.php
...
fixture_data_fileN.php
models\
fixture_data_file1.php
fixture_data_file2.php
...
fixture_data_fileN.php
# and so on
In this way you will avoid collision of �xture data �les between tests and usethem as you need.
Note: In the example above �xture �les are named only for ex-ample purpose. In real life you should name them according towhich �xture class your �xture classes are extending from. Forexample, if you are extending from yii\test\ActiveFixture forDB �xtures, you should use DB table names as the �xture data�le names; If you are extending for yii\mongodb\ActiveFixturefor MongoDB �xtures, you should use collection names as the �lenames.
The similar hierarchy can be used to organize �xture class �les. Instead ofusing data as the root directory, you may want to use fixtures as the rootdirectory to avoid con�ict with the data �les.
13.2.5 Summary
In the above, we have described how to de�ne and use �xtures. Below wesummarize the typical work�ow of running unit tests related with DB:
1. Use yii migrate tool to upgrade your test database to the latest version;
2. Run a test case:
• Load �xtures: clean up the relevant DB tables and populate themwith �xture data;
• Perform the actual test;
• Unload �xtures.
3. Repeat Step 2 until all tests �nish.
To be cleaned up below

324 CHAPTER 13. TESTING
13.3 Managing Fixtures
// todo: this tutorial may be merged into test-�xture.mdFixtures are important part of testing. Their main purpose is to populate
you with data that needed by testing di�erent cases. With this data usingyour tests becoming more e�cient and useful.
Yii supports �xtures via the yii fixture command line tool. This toolsupports:
• Loading �xtures to di�erent storage such as: RDBMS, NoSQL, etc;
• Unloading �xtures in di�erent ways (usually it is clearing storage);
• Auto-generating �xtures and populating it with random data.
13.3.1 Fixtures format
Fixtures are objects with di�erent methods and con�gurations, refer to o�-cial documentation2 on them. Lets assume we have �xtures data to load:
#users.php file under fixtures data path, by default @tests\unit\fixtures\
data
return [
[
'name' => 'Chase',
'login' => 'lmayert',
'email' => '[email protected]',
'auth_key' => 'K3nF70it7tzNsHddEiq0BZ0i-OU8S3xV',
'password' => '$2y$13$WSyE5hHsG1rWN2jV8LRHzubilrCLI5Ev/
iK0r3jRuwQEs2ldRu.a2',
],
[
'name' => 'Celestine',
'login' => 'napoleon69',
'email' => '[email protected]',
'auth_key' => 'dZlXsVnIDgIzFgX4EduAqkEPuphhOh9q',
'password' => '$2y$13$kkgpvJ8lnjKo8RuoR30ay.RjDf15bMcHIF7Vz1zz/6
viYG5xJExU6',
],
];
If we are using �xture that loads data into database then these rows will beapplied to users table. If we are using nosql �xtures, for example mongodb
�xture, then this data will be applied to users mongodb collection. In orderto learn about implementing various loading strategies and more, refer too�cial documentation3. Above �xture example was auto-generated by yii2
-faker extension, read more about it in these section. Fixture classes nameshould not be plural.
2https://github.com/yiisoft/yii2/blob/master/docs/guide/test-fixture.md3https://github.com/yiisoft/yii2/blob/master/docs/guide/test-fixture.md

13.3. MANAGING FIXTURES 325
13.3.2 Loading �xtures
Fixture classes should be su�xed by Fixture class. By default �xtures will besearched under tests\unit\fixtures namespace, you can change this behaviorwith con�g or command options.
To load �xture, run the following command:
yii fixture/load <fixture_name>
The required fixture_name parameter speci�es a �xture name which data willbe loaded. You can load several �xtures at once. Below are correct formatsof this command:
// load `users` fixture
yii fixture/load User
// same as above, because default action of "fixture" command is "load"
yii fixture User
// load several fixtures. Note that there should not be any whitespace
between ",", it should be one string.
yii fixture User,UserProfile
// load all fixtures
yii fixture/load all
// same as above
yii fixture all
// load fixtures, but for other database connection.
yii fixture User --db='customDbConnectionId'
// load fixtures, but search them in different namespace. By default
namespace is: tests\unit\fixtures.
yii fixture User --namespace='alias\my\custom\namespace'
// load global fixture `some\name\space\CustomFixture` before other fixtures
will be loaded.
// By default this option is set to `InitDbFixture` to disable/enable
integrity checks. You can specify several
// global fixtures separated by comma.
yii fixture User --globalFixtures='some\name\space\Custom'
13.3.3 Unloading �xtures
To unload �xture, run the following command:
// unload Users fixture, by default it will clear fixture storage (for
example "users" table, or "users" collection if this is mongodb fixture
).
yii fixture/unload User
// Unload several fixtures. Note that there should not be any whitespace
between ",", it should be one string.

326 CHAPTER 13. TESTING
yii fixture/unload User,UserProfile
// unload all fixtures
yii fixture/unload all
Same command options like: db, namespace, globalFixtures also can be appliedto this command.
13.3.4 Con�gure Command Globally
While command line options allow us to con�gure the migration commandon-the-�y, sometimes we may want to con�gure the command once for all.For example you can con�gure di�erent migration path as follows:
'controllerMap' => [
'fixture' => [
'class' => 'yii\console\controllers\FixtureController',
'db' => 'customDbConnectionId',
'namespace' => 'myalias\some\custom\namespace',
'globalFixtures' => [
'some\name\space\Foo',
'other\name\space\Bar'
],
],
]
13.3.5 Auto-generating �xtures
Yii also can auto-generate �xtures for you based on some template. Youcan generate your �xtures with di�erent data on di�erent languages andformats. These feature is done by Faker4 library and yii2-faker extension.See extension guide5 for more docs.
4https://github.com/fzaninotto/Faker5https://github.com/yiisoft/yii2/tree/master/extensions/faker

Chapter 14
Extending Yii
14.1 Extending Yii
Note: This section is under development.
The Yii framework was designed to be easily extendable. Additional featurescan be added to your project and then reused, either by yourself on otherprojects or by sharing your work as a formal Yii extension.
14.1.1 Code style
To be consistent with core Yii conventions, your extensions ought to adhereto certain coding styles:
• Use the core framework code style1.
• Document classes, methods and properties using phpdoc2. - Exten-sion classes should not be pre�xed. Do not use the format TbNavBar,EMyWidget, etc.
Note that you can use Markdown within your code for docu-mentation purposes. With Markdown, you can link to propertiesand methods using the following syntax: [[name()]], [[namespace\MyClass::name()]].
Namespace
Yii 2 relies upon namespaces to organize code. (Namespace support wasadded to PHP in version 5.3.) If you want to use namespaces within yourextension,
1https://github.com/yiisoft/yii2/wiki/Core-framework-code-style2http://www.phpdoc.org/
327

328 CHAPTER 14. EXTENDING YII
• Do not use yiisoft anywhere in your namespaces.
• Do not use \yii, \yii2 or \yiisoft as root namespaces.
• Namespaces should use the syntax vendorName\uniqueName.
Choosing a unique namespace is important to prevent name collisions, andalso results in faster autoloading of classes. Examples of unique, consistentnamepacing are:
• samdark\wiki
• samdark\debugger
• samdark\googlemap
14.1.2 Distribution
Beyond the code itself, the entire extension distribution ought to have certainthings.
There should be a readme.md �le, written in English. This �le shouldclearly describe what the extension does, its requirements, how to install it,and to use it. The README should be written using Markdown. If youwant to provide translated README �les, name them as readme_ru.md whereru is your language code (in this case, Russian).
It is a good idea to include some screenshots as part of the documentation,especially if your extension provides a widget.
It is recommended to host your extensions at Github3.Extensions should also be registered at Packagist4 in order to be instal-
lable via Composer.
Composer package name
Choose your extension's package name wisely, as you shouldn't change thepackage name later on. (Changing the name leads to losing the Composerstats, and makes it impossible for people to install the package by the oldname.)
If your extension was made speci�cally for Yii2 (i.e. cannot be used as astandalone PHP library) it is recommended to name it like the following:
yii2-my-extension-name-type
Where:
• yii2- is a pre�x.
3https://github.com4https://packagist.org

14.1. EXTENDING YII 329
• The extension name is in all lowercase letters, with words separatedby -.
• The -type post�x may be widget, behavior, module etc.
Dependencies
Some extensions you develop may have their own dependencies, such as rely-ing upon other extensions or third-party libraries. When dependencies exist,you should require them in your extension's composer.json �le. Be certain toalso use appropriate version constraints, eg. 1.*, @stable for requirements.
Finally, when your extension is released in a stable version, double-checkthat its requirements do not include dev packages that do not have a stable
release. In other words, the stable release of your extension should only relyupon stable dependencies.
Versioning
As you maintain and upgrading your extension,
• Use the rules of semantic versioning5.
• Use a consistent format for your repository tags, as they are treatedas version strings by composer, eg. 0.2.4, 0.2.5,0.3.0,1.0.0.
composer.json
Yii2 uses Composer for installation, and extensions for Yii2 should as well.Towards that end,
• Use the type yii2-extension in composer.json �le if your extension isYii-speci�c.
• Do not use yii or yii2 as the Composer vendor name.
• Do not use yiisoft in the Composer package name or the Composervendor name.
If your extension classes reside directly in the repository root directory, youcan use the PSR-4 autoloader in the following way in your composer.json �le:
{
"name": "myname/mywidget",
"description": "My widget is a cool widget that does everything",
"keywords": ["yii", "extension", "widget", "cool"],
"homepage": "https://github.com/myname/yii2-mywidget-widget",
"type": "yii2-extension",
5http://semver.org

330 CHAPTER 14. EXTENDING YII
"license": "BSD-3-Clause",
"authors": [
{
"name": "John Doe",
"email": "[email protected]"
}
],
"require": {
"yiisoft/yii2": "*"
},
"autoload": {
"psr-4": {
"myname\\mywidget\\": ""
}
}
}
In the above, myname/mywidget is the package name that will be registeredat Packagist6. It is common for the package name to match your Githubrepository name. Also, the psr-4 autoloader is speci�ed in the above, whichmaps the myname\mywidget namespace to the root directory where the classesreside.
More details on this syntax can be found in the Composer documenta-tion7.
Bootstrap with extension
Sometimes, you may want your extension to execute some code during thebootstrap stage of an application. For example, your extension may want torespond to the application's beginRequest event. You can ask the extensionuser to explicitly attach your event handler in the extension to the applica-tion's event. A better way, however, is to do all these automatically.
To achieve this goal, you can create a bootstrap class by implementingyii\base\BootstrapInterface.
namespace myname\mywidget;
use yii\base\BootstrapInterface;
use yii\base\Application;
class MyBootstrapClass implements BootstrapInterface
{
public function bootstrap($app)
{
$app->on(Application::EVENT_BEFORE_REQUEST, function () {
// do something here
});
}
}
6https://packagist.org7http://getcomposer.org/doc/04-schema.md#autoload

14.1. EXTENDING YII 331
You then list this bootstrap class in composer.json as follows,
{
"extra": {
"bootstrap": "myname\\mywidget\\MyBootstrapClass"
}
}
When the extension is installed in an application, Yii will automaticallyhook up the bootstrap class and call its bootstrap() while initializing theapplication for every request.
14.1.3 Working with database
Extensions sometimes have to use their own database tables. In such asituation,
• If the extension creates or modi�es the database schema, always useYii migrations instead of SQL �les or custom scripts.
• Migrations should be applicable to di�erent database systems.
• Do not use Active Record models in your migrations.
14.1.4 Assets
• Register assets through bundles.
14.1.5 Events
TBD
14.1.6 i18n
• If extension outputs messages intended for end user these should bewrapped into Yii::t() in order to be translatable.
• Exceptions and other developer-oriented message should not be trans-lated.
• Consider proving config.php for yii message command to simplify trans-lation.
14.1.7 Testing your extension
• Consider adding unit tests for PHPUnit.

332 CHAPTER 14. EXTENDING YII
14.2 Helper Classes
Note: This section is under development.
Yii provides many classes that help simplify common coding tasks, such asstring or array manipulations, HTML code generation, and so forth. Thesehelper classes are organized under the yii\helpers namespace and are allstatic classes (meaning they contain only static properties and methods andshould not be instantiated).
You use a helper class by directly calling one of its static methods:
use yii\helpers\ArrayHelper;
$c = ArrayHelper::merge($a, $b);
14.2.1 Extending Helper Classes
To make helper classes easier to extend, Yii breaks each helper class intotwo classes: a base class (e.g. BaseArrayHelper) and a concrete class (e.g.ArrayHelper). When you use a helper, you should only use the concreteversion, never use the base class.
If you want to customize a helper, perform the following steps (usingArrayHelper as an example):
1. Name your class the same as the concrete class provided by Yii, in-cluding the namespace: yii\helpers\ArrayHelper
2. Extend your class from the base class: class ArrayHelper extends \yii\
helpers\BaseArrayHelper.
3. In your class, override any method or property as needed, or add newmethods or properties.
4. Tell your application to use your version of the helper class by includingthe following line of code in the bootstrap script:
Yii::$classMap['yii\helpers\ArrayHelper'] = 'path/to/ArrayHelper.php';
Step 4 above will instruct the Yii class autoloader to load your version ofthe helper class instead of the one included in the Yii distribution.
Tip: You can use Yii::$classMap to replace ANY core Yii classwith your own customized version, not just helper classes.

14.3. USING 3RD-PARTY LIBRARIES 333
14.3 Using 3rd-Party Libraries
Note: This section is under development.
Yii is carefully designed so that third-party libraries can be easily integratedto further extend Yii's functionalities.
14.3.1 Using Packages Installed via Composer
Packages installed via Composer can be directly used in Yii without anyspecial handling.
14.3.2 Using Downloaded Libraries
If a library has its own class autoloader, please follow its instruction on howto install the autoloader.
If a library does not have a class autoloader, you may face one of thefollowing scenarios:
• The library requires speci�c PHP include path con�guration.
• The library requires explicitly including one or several of its �les.
• Neither of the above.
In the last scenario, the library is not written very well, but you can still dothe following work to make it work with Yii:
• Identify which classes the library contains.
• List the classes and the corresponding �le paths in Yii::$classMap.
For example, if none of the classes in a library is namespaced, you may reg-ister the classes with Yii like the following in the entry script after includingyii.php:
Yii::$classMap['Class1'] = 'path/to/Class1.php';
Yii::$classMap['Class2'] = 'path/to/Class2.php';
// ...
14.3.3 Using Yii in 3rd-Party Systems
Yii can also be used as a self-contained library to support developing andenhancing existing 3rd-party systems, such as WordPress, Joomla, etc. Todo so, include the following code in the bootstrap code of the 3rd-partysystem:
$yiiConfig = require(__DIR__ . '/../config/yii/web.php');
new yii\web\Application($yiiConfig); // No 'run()' invocation!

334 CHAPTER 14. EXTENDING YII
The above code is very similar to the bootstrap code used by a typical Yiiapplication except one thing: it does not call the run() method after creatingthe Web application instance.
Now we can use most features o�ered by Yii when developing 3rd-partyenhancements. For example, we can use Yii::$app to access the applicationinstance; we can use the database features such as ActiveRecord; we can usethe model and validation feature; and so on.
14.3.4 Using Yii2 with Yii1
Yii2 can be used along with Yii1 at the same project. Since Yii2 uses names-paced class names they will not con�ict with any class from Yii1. Howeverthere is single class, which name is used both in Yii1 and Yii2, it named`Yii'. In order to use both Yii1 and Yii2 you need to resolve this collision.To do so you need to de�ne your own `Yii' class, which will combine contentof `Yii' from 1.x and `Yii' from 2.x.
When using composer you add the following to your composer.json inorder to add both versions of yii to your project:
"require": {
"yiisoft/yii": "*",
"yiisoft/yii2": "*",
},
Start from de�ning your own descendant of yii\BaseYii:
$yii2path = '/path/to/yii2';
require($yii2path . '/BaseYii.php');
class Yii extends \yii\BaseYii
{
}
Yii::$classMap = include($yii2path . '/classes.php');
Now we have a class, which suites Yii2, but causes fatal errors for Yii1. So,�rst of all, we need to include YiiBase of Yii1 source code to our `Yii' classde�nition �le:
$yii2path = '/path/to/yii2';
require($yii2path . '/BaseYii.php'); // Yii 2.x
$yii1path = '/path/to/yii1';
require($yii1path . '/YiiBase.php'); // Yii 1.x
class Yii extends \yii\BaseYii
{
}
Yii::$classMap = include($yii2path . '/classes.php');

14.3. USING 3RD-PARTY LIBRARIES 335
Using this, de�nes all necessary constants and autoloader of Yii1. Now weneed to add all �elds and methods from YiiBase of Yii1 to our `Yii' class.Unfortunately, there is no way to do so but copy-paste:
$yii2path = '/path/to/yii2';
require($yii2path . '/BaseYii.php');
$yii1path = '/path/to/yii1';
require($yii1path . '/YiiBase.php');
class Yii extends \yii\BaseYii
{
public static $classMap = [];
public static $enableIncludePath = true;
private static $_aliases = ['system'=>YII_PATH,'zii'=>YII_ZII_PATH];
private static $_imports = [];
private static $_includePaths;
private static $_app;
private static $_logger;
public static function getVersion()
{
return '1.1.15-dev';
}
public static function createWebApplication($config=null)
{
return self::createApplication('CWebApplication',$config);
}
public static function app()
{
return self::$_app;
}
// Rest of \YiiBase internal code placed here
...
}
Yii::$classMap = include($yii2path . '/classes.php');
Yii::registerAutoloader(['Yii', 'autoload']); // Register Yii2 autoloader
via Yii1
Note: while copying methods you should NOT copy method �autoload()�!Also you may avoid copying �log()�, �trace()�, �beginPro�le()�, �endPro�le()�in case you want to use Yii2 logging instead of Yii1 one.
Now we have `Yii' class, which suites both Yii 1.x and Yii 2.x. So boot-strap code used by your application will looks like following:
require(__DIR__ . '/../components/my/Yii.php'); // include created 'Yii'
class
$yii2Config = require(__DIR__ . '/../config/yii2/web.php');
new yii\web\Application($yii2Config); // create Yii 2.x application

336 CHAPTER 14. EXTENDING YII
$yii1Config = require(__DIR__ . '/../config/yii1/main.php');
Yii::createWebApplication($yii1Config)->run(); // create Yii 1.x application
Then in any part of your program `Yii::$apprefers to Yii 2.x application,
whileYii::app()` refers to Yii 1.x application:
echo get_class(Yii::app()); // outputs 'CWebApplication'
echo get_class(Yii::$app); // outputs 'yii\web\Application'

14.3. USING 3RD-PARTY LIBRARIES 337
Error: not existing �le: extend-embedding-in-others.md

338 CHAPTER 14. EXTENDING YII
Error: not existing �le: extend-using-v1-v2.md

14.4. COMPOSER 339
14.4 Composer
Note: This section is under development.
Yii2 uses Composer as its dependency management tool. Composer is a PHPutility that can automatically handle the installation of needed libraries andextensions, thereby keeping those third-party resources up to date whileabsolving you of the need to manually manage the project's dependencies.
14.4.1 Installing Composer
In order to install Composer, check the o�cial guide for your operatingsystem:
• Linux8
• Windows9
All of the details can be found in the guide, but you'll either downloadComposer directly from http://getcomposer.org/, or run the followingcommand:
curl -s http://getcomposer.org/installer | php
We strongly recommend a global composer installation.
14.4.2 Working with composer
The act of installing a Yii application with
composer.phar create-project --stability dev yiisoft/yii2-app-basic
creates a new root directory for your project along with the composer.json
and compoer.lock �le.While the former lists the packages, which your application requires di-
rectly together with a version constraint, while the latter keeps track of allinstalled packages and their dependencies in a speci�c revision. Therefore thecomposer.lock �le should also be committed to your version control system10.
These two �les are strongly linked to the two composer commands updateand install. Usually, when working with your project, such as creatinganother copy for development or deployment, you will use
composer.phar install
to make sure you get exactly the same packages and versions as speci�ed incomposer.lock.
Only if want to intentionally update the packages in your project youshould run
8http://getcomposer.org/doc/00-intro.md#installation-nix9http://getcomposer.org/doc/00-intro.md#installation-windows
10https://getcomposer.org/doc/01-basic-usage.md#composer-lock-the-lock-file

340 CHAPTER 14. EXTENDING YII
composer.phar update
As an example, packages on dev-master will constantly get new updates whenyou run update, while running install won't, unless you've pulled an updateof the composer.lock �le.
There are several paramaters available to the above commands. Verycommonly used ones are --no-dev, which would skip packages in the require-
dev section and --prefer-dist, which downloads archives if available, insteadof checking out repositories to your vendor folder.
Composer commands must be executed within your Yii project'sdirectory, where the composer.json �le can be found. Dependingupon your operating system and setup, you may need to providepaths to the PHP executable and to the composer.phar script.
14.4.3 Adding more packages to your project
To add two new packages to your project run the follwing command:
composer.phar require "michelf/php-markdown:>=1.3" "ezyang/htmlpurifier
:>4.5.0"
This will resolve the dependencies and then update your composer.json �le.The above example says that a version greater than or equal to 1.3 ofMichaelf's PHP-Markdown package is required and version 4.5.0 or greaterof Ezyang's HTMLPuri�er.
For details of this syntax, see the o�cial Composer documentation11.
The full list of available Composer-supported PHP packages can be foundat packagist12. You may also search packages interactively just by enteringcomposer.phar require.
Manually editing your version constraints
You may also edit the composer.json �le manually. Within the require section,you specify the name and version of each required package, same as with thecommand above.
{
"require": {
"michelf/php-markdown": ">=1.4",
"ezyang/htmlpurifier": ">=4.6.0"
}
}
Once you have edited the composer.json, you can invoke Composer to down-load the updated dependencies. Run
11https://getcomposer.org/doc/01-basic-usage.md#package-versions12http://packagist.org/

14.4. COMPOSER 341
composer.phar update michelf/php-markdown ezyang/htmlpurifier
afterwards.
Depending on the package additional con�guration may be re-quired (eg. you have to register a module in the con�g), butautoloading of the classes should be handled by composer.
14.4.4 Using a specifc version of a package
Yii always comes with the latest version of a required library that it iscompatible with, but allows you to use an older version if you need to.
A good example for this is jQuery which has dropped old IE browsersupport13 in version 2.x. When installing Yii via composer the installedjQuery version will be the latest 2.x release. When you want to use jQuery1.10 because of IE browser support you can adjust your composer.json byrequiring a speci�c version of jQuery like this:
{
"require": {
...
"yiisoft/jquery": "1.10.*"
}
}
14.4.5 FAQ
Getting �You must enable the openssl extension to download �les
via https�
If you're using WAMP check this answer at StackOver�ow14.
Getting �Failed to clone <URL here>, git was not found, check
that it is installed and in your Path env.�
Either install git or try adding --prefer-dist to the end of install or update
command.
Should I Commit The Dependencies In My Vendor Directory?
Short answer: No. Long answer, see here15.
13http://jquery.com/browser-support/14http://stackoverflow.com/a/14265815/110690815https://getcomposer.org/doc/faqs/should-i-commit-the-dependencies-in-my-vendor-directory.
md

342 CHAPTER 14. EXTENDING YII
14.4.6 See also
• O�cial Composer documentation16.
16http://getcomposer.org

Chapter 15
Special Topics
15.1 Advanced application template
Note: This section is under development.
This template is for large projects developed in teams where the backend isdivided from the frontend, application is deployed to multiple servers etc.This application template also goes a bit further regarding features and pro-vides essential database, signup and password restore out of the box.
15.1.1 Installation
Install via Composer
If you do not have Composer1, you may download it from http://getcomposer.
org/2 or run the following command on Linux/Unix/MacOS:curl -sS http://getcomposer.org/installer | php
You can then install the application using the following command:php composer.phar create-project �prefer-dist �stability=dev yiisoft/yii2-
app-advanced /path/to/yii-application
15.1.2 Getting started
After you install the application, you have to conduct the following steps toinitialize the installed application. You only need to do these once for all.
1. Execute the init command and select dev as environment.
php /path/to/yii-application/init
Otherwise, in production execute init in non-interactive mode.
php /path/to/yii-application/init --env=Production overwrite=All
1http://getcomposer.org/2http://getcomposer.org/
343

344 CHAPTER 15. SPECIAL TOPICS
2. Create a new database and adjust the components.db con�guration incommon/config/main-local.php accordingly.
3. Apply migrations with console command yii migrate.
4. Set document roots of your web server:
• for frontend /path/to/yii-application/frontend/web/ and using the URLhttp://frontend/
• for backend /path/to/yii-application/backend/web/ and using the URLhttp://backend/
15.1.3 Directory structure
The root directory contains the following subdirectories:
• backend - backend web application.
• common - �les common to all applications.
• console - console application.
• environments - environment con�gs.
• frontend - frontend web application.
Root directory contains a set of �les.
• .gitignore contains a list of directories ignored by git version system.If you need something never get to your source code repository, add itthere.
• composer.json - Composer con�g described in detail below.
• init - initialization script described in �Composer con�g described indetail below�.
• init.bat - same for Windows.
• LICENSE.md - license info. Put your project license there. Especiallywhen opensourcing.
• README.md - basic info about installing template. Consider replacing itwith information about your project and its installation.
• requirements.php - Yii requirements checker.
• yii - console application bootstrap.
• yii.bat - same for Windows.

15.1. ADVANCED APPLICATION TEMPLATE 345
15.1.4 Prede�ned path aliases
• @yii - framework directory.
• @app - base path of currently running application.
• @common - common directory.
• @frontend - frontend web application directory.
• @backend - backend web application directory.
• @console - console directory.
• @runtime - runtime directory of currently running web application.
• @vendor - Composer vendor directory.
• @web - base URL of currently running web application.
• @webroot - web root directory of currently running web application.
The aliases speci�c to the directory structure of the advanced application(@common, @frontend, @backend, and @console) are de�ned in common/config/aliases
.php.
15.1.5 Applications
There are three applications in advanced template: frontend, backend andconsole. Frontend is typically what is presented to end user, the projectitself. Backend is admin panel, analytics and such functionality. Console istypically used for cron jobs and low-level server management. Also it's usedduring application deployment and handles migrations and assets.
There's also a common directory that contains �les used by more than oneapplication. For example, User model.
frontend and backend are both web applications and both contain theweb directory. That's the webroot you should point your web server to.
Each application has its own namespace and alias corresponding to itsname. Same applies to common directory.
15.1.6 Con�guration and environments
There are multiple problems with a typical approach to con�guration:
• Each team member has its own con�guration options. Committingsuch con�g will a�ect other team members.
• Production database password and API keys should not end up in therepository.

346 CHAPTER 15. SPECIAL TOPICS
• There are multiple server environments: development, testing, produc-tion. Each should have its own con�guration.
• De�ning all con�guration options for each case is very repetitive andtakes too much time to maintain.
In order to solve these issues Yii introduces a simple environments concept.Each environment is represented by a set of �les under the environments
directory. The init command is used to switch between these. What itreally does is copy everything from the environment directory over to theroot directory where all applications are.
Typically environment contains application bootstrap �les such as index
.php and con�g �les su�xed with -local.php. These are added to .gitignore
and never added to source code repository.
In order to avoid duplication con�gurations are overriding each other.For example, the frontend reads con�guration in the following order:
• common/config/main.php
• common/config/main-local.php
• frontend/config/main.php
• frontend/config/main-local.php
Parameters are read in the following order:
• common/config/params.php
• common/config/params-local.php
• frontend/config/params.php
• frontend/config/params-local.php
The later con�g �le overrides the former.
Here's the full scheme:

15.1. ADVANCED APPLICATION TEMPLATE 347
15.1.7 Con�guring Composer
After the application template is installed it's a good idea to adjust defaultcomposer.json that can be found in the root directory:
{
"name": "yiisoft/yii2-app-advanced",
"description": "Yii 2 Advanced Application Template",
"keywords": ["yii", "framework", "advanced", "application template"],
"homepage": "http://www.yiiframework.com/",
"type": "project",
"license": "BSD-3-Clause",
"support": {
"issues": "https://github.com/yiisoft/yii2/issues?state=open",
"forum": "http://www.yiiframework.com/forum/",

348 CHAPTER 15. SPECIAL TOPICS
"wiki": "http://www.yiiframework.com/wiki/",
"irc": "irc://irc.freenode.net/yii",
"source": "https://github.com/yiisoft/yii2"
},
"minimum-stability": "dev",
"require": {
"php": ">=5.4.0",
"yiisoft/yii2": "*",
"yiisoft/yii2-swiftmailer": "*",
"yiisoft/yii2-bootstrap": "*",
"yiisoft/yii2-debug": "*",
"yiisoft/yii2-gii": "*"
},
"scripts": {
"post-create-project-cmd": [
"yii\\composer\\Installer::setPermission"
]
},
"extra": {
"writable": [
"backend/runtime",
"backend/web/assets",
"console/runtime",
"console/migrations",
"frontend/runtime",
"frontend/web/assets"
]
}
}
First we're updating basic information. Change name, description, keywords,homepage and support to match your project.
Now the interesting part. You can add more packages your applicationneeds to the require section. All these packages are coming from packag-ist.org3 so feel free to browse the website for useful code.
After your composer.json is changed you can run php composer.phar update
--prefer-dist, wait till packages are downloaded and installed and then justuse them. Autoloading of classes will be handled automatically.
15.1.8 Creating links from backend to frontend
Often it's required to create links from the backend application to the fron-tend application. Since the frontend application may contain its own URLmanager rules you need to duplicate that for the backend application bynaming it di�erently:
return [
'components' => [
3https://packagist.org/

15.2. CREATING YOUR OWN APPLICATION STRUCTURE 349
'urlManager' => [
// here is your normal backend url manager config
],
'urlManagerFrontend' => [
// here is your frontend URL manager config
],
],
];
After it is done, you can get an URL pointing to frontend like the following:
echo Yii::$app->urlManagerFrontend->createUrl(...);
15.2 Creating your own Application structure
Note: This section is under development.
While basic and advanced application templates are great for most of yourneeds you may want to create your own application template to start yourprojects with.
Application templates are repositories containing composer.json and reg-istered as Composer packages so you can make any repository a package andit will be installable via create-project command.
Since it's a bit too much to start building your template from scratch itis better to use one of built-in templates as a base. Let's use basic template.
15.2.1 Clone basic template repository from git
git clone [email protected]:yiisoft/yii2-app-basic.git
And wait till it's downloaded. Since we don't need to push our changes backto Yii's repository we delete .git and all of its contents.
15.2.2 Modify �les
Now we need to modify composer.json. Change name, description, keywords
, homepage, license, support to match your new template. Adjust require,require-dev, suggest and the rest of the options.
Note: In composer.json �le writable under extra is functionalityadded by Yii that allows you to specify per �le permissions toset after an application is created using the template.
Next actually modify the structure of the future application as you like andupdate readme.

350 CHAPTER 15. SPECIAL TOPICS
15.2.3 Make a package
Create git repository and push your �les there. If you're going to make itopen source github is the best way to host it. If it should remain private,any git repository would do.
Then you need to register your package. For public templates it shouldbe registered at packagist4. For private ones it is a bit more tricky but wellde�ned in Composer documentation5.
15.2.4 Use it
That's it. Now you can create projects using a template:
php composer.phar create-project --prefer-dist --stability=dev mysoft/yii2-
app-coolone new-project
15.3 Console applications
Note: This section is under development.
Yii has full featured support for console applications, whose structure isvery similar to a Yii web application. A console application consists of oneor more yii\console\Controller classes, which are often referred to as�commands� in the console environment. Each controller can also have oneor more actions, just like web controllers.
15.3.1 Usage
You execute a console controller action using the following syntax:
yii <route> [--option1=value1 --option2=value2 ... argument1 argument2 ...]
For example, the yii\console\controllers\MigrateController::actionCreate()with yii\console\controllers\MigrateController::$migrationTable setcan be called from command line like so:
yii migrate/create --migrationTable=my_migration
In the above yii is the console application entry script described below.
15.3.2 Entry script
The console application entry script is equivalent to the index.php bootstrap�le used for the web application. The console entry script is typically calledyii, and located in your application's root directory. The contents of theconsole application entry script contains code like the following:
4https://packagist.org/5https://getcomposer.org/doc/05-repositories.md#hosting-your-own

15.3. CONSOLE APPLICATIONS 351
#!/usr/bin/env php
<?php
/**
* Yii console bootstrap file.
*/
defined('YII_DEBUG') or define('YII_DEBUG', true);
// fcgi doesn't have STDIN and STDOUT defined by default
defined('STDIN') or define('STDIN', fopen('php://stdin', 'r'));
defined('STDOUT') or define('STDOUT', fopen('php://stdout', 'w'));
require(__DIR__ . '/vendor/autoload.php');
require(__DIR__ . '/vendor/yiisoft/yii2/Yii.php');
$config = require(__DIR__ . '/config/console.php');
$application = new yii\console\Application($config);
$exitCode = $application->run();
exit($exitCode);
This script will be created as part of your application; you're free to editit to suit your needs. The YII_DEBUG constant can be set false if you donot want to see a stack trace on error, and/or if you want to improve theoverall performance. In both basic and advanced application templates, theconsole application entry script has debugging enabled to provide a moredeveloper-friendly environment.
15.3.3 Con�guration
As can be seen in the code above, the console application uses its own con-�guration �le, named console.php. In this �le you should con�gure variousapplication components and properties for the console application in partic-ular.
If your web application and the console application share a lot of con�g-uration parameters and values, you may consider moving the common partsinto a separate �le, and including this �le in both of the application con�gu-rations (web and console). You can see an example of this in the �advanced�application template.
Sometimes, you may want to run a console command using an applicationcon�guration that is di�erent from the one speci�ed in the entry script. Forexample, you may want to use the yii migrate command to upgrade yourtest databases, which are con�gured in each individual test suite. To dochange the con�guration dynamically, simply specify a custom applicationcon�guration �le via the appconfig option when executing the command:
yii <route> --appconfig=path/to/config.php ...

352 CHAPTER 15. SPECIAL TOPICS
15.3.4 Creating your own console commands
Console Controller and Action
A console command is de�ned as a controller class extending from yii
\console\Controller. In the controller class, you de�ne one or more actionsthat correspond to sub-commands of the controller. Within each action, youwrite code that implements the appropriate tasks for that particular sub-command.
When running a command, you need to specify the route to the controlleraction. For example, the route migrate/create invokes the sub-commandthat corresponds to the yii\console\controllers\MigrateController::
actionCreate() action method. If a route o�ered during execution doesnot contain an action ID, the default action will be executed (as with a webcontroller).
Options
By overriding the yii\console\Controller::options() method, you canspecify options that are available to a console command (controller/actionID).The method should return a list of the controller class's public properties.When running a command, you may specify the value of an option using thesyntax --OptionName=OptionValue. This will assign OptionValue to the OptionNameproperty of the controller class.
If the default value of an option is of an array type and you set thisoption while running the command, the option value will be converted intoan array by splitting the input string on any commas.
Arguments
Besides options, a command can also receive arguments. The argumentswill be passed as the parameters to the action method corresponding to therequested sub-command. The �rst argument corresponds to the �rst pa-rameter, the second corresponds to the second, and so on. If not enougharguments are provided when the command is called, the corresponding pa-rameters will take the declared default values, if de�ned. If no default valueis set, and no value is provided at runtime, the command will exit with anerror.
You may use the array type hint to indicate that an argument should betreated as an array. The array will be generated by splitting the input stringon commas.
The follow examples show how to declare arguments:
class ExampleController extends \yii\console\Controller
{
// The command "yii example/create test" will call "actionCreate('test')
"

15.4. CORE VALIDATORS 353
public function actionCreate($name) { ... }
// The command "yii example/index city" will call "actionIndex('city', '
name')"
// The command "yii example/index city id" will call "actionIndex('city
', 'id')"
public function actionIndex($category, $order = 'name') { ... }
// The command "yii example/add test" will call "actionAdd(['test'])"
// The command "yii example/add test1,test2" will call "actionAdd(['
test1', 'test2'])"
public function actionAdd(array $name) { ... }
}
Exit Code
Using exit codes is a best practice for console application development. Con-ventionally, a command returns 0 to indicate that everything is OK. If thecommand returns a number greater than zero, that's considered to be in-dicative of an error. The number returned will be the error code, potentiallyusable to �nd out details about the error. For example 1 could stand gener-ally for an unknown error and all codes above would be reserved for speci�ccases: input errors, missing �les, and so forth.
To have your console command return an exit code, simply return aninteger in the controller action method:
public function actionIndex()
{
if (/* some problem */) {
echo "A problem occured!\n";
return 1;
}
// do something
return 0;
}
15.4 Core Validators
Yii provides a set of commonly used core validators, found primarily un-der the yii\validators namespace. Instead of using lengthy validator classnames, you may use aliases to specify the use of these core validators. Forexample, you can use the alias required to refer to the yii\validators
\RequiredValidator class:
public function rules()
{
return [
[['email', 'password'], 'required'],
];

354 CHAPTER 15. SPECIAL TOPICS
}
The yii\validators\Validator::builtInValidators property declares allsupported validator aliases.
In the following, we will describe the main usage and properties of everycore validator.
15.4.1 yii\validators\BooleanValidator
[
// checks if "selected" is either 0 or 1, regardless of data type
['selected', 'boolean'],
// checks if "deleted" is of boolean type, either true or false
['deleted', 'boolean', 'trueValue' => true, 'falseValue' => false, '
strict' => true],
]
This validator checks if the input value is a boolean.
• trueValue: the value representing true. Defaults to '1'.
• falseValue: the value representing false. Defaults to '0'.
• strict: whether the type of the input value should match that oftrueValue and falseValue. Defaults to false.
Note: Because data input submitted via HTML forms are allstrings, you normally should leave the yii\validators\BooleanValidator::strict property as false.
15.4.2 yii\captcha\CaptchaValidator
[
['verificationCode', 'captcha'],
]
This validator is usually used together with yii\captcha\CaptchaAction
and yii\captcha\Captcha to make sure an input is the same as the veri�-cation code displayed by yii\captcha\Captcha widget.
• caseSensitive: whether the comparison of the veri�cation code is casesensitive. Defaults to false.
• captchaAction: the route corresponding to the yii\captcha\CaptchaActionthat renders the CAPTCHA image. Defaults to 'site/captcha'.
• skipOnEmpty: whether the validation can be skipped if the input isempty. Defaults to false, which means the input is required.

15.4. CORE VALIDATORS 355
15.4.3 yii\validators\CompareValidator
[
// validates if the value of "password" attribute equals to that of "
password_repeat"
['password', 'compare'],
// validates if age is greater than or equal to 30
['age', 'compare', 'compareValue' => 30, 'operator' => '>='],
]
This validator compares the speci�ed input value with another one and makesure if their relationship is as speci�ed by the operator property.
• compareAttribute: the name of the attribute whose value should be com-pared with. When the validator is being used to validate an attribute,the default value of this property would be the name of the attributesu�xed with _repeat. For example, if the attribute being validated ispassword, then this property will default to password_repeat.
• compareValue: a constant value that the input value should be comparedwith. When both of this property and compareAttribute are speci�ed,this property will take precedence.
• operator: the comparison operator. Defaults to ==, meaning checkingif the input value is equal to that of compareAttribute or compareValue.The following operators are supported:
� ==: check if two values are equal. The comparison is done is non-strict mode.
� ===: check if two values are equal. The comparison is done is strictmode.
� !=: check if two values are NOT equal. The comparison is doneis non-strict mode.
� !==: check if two values are NOT equal. The comparison is doneis strict mode.
� >: check if value being validated is greater than the value beingcompared with.
� >=: check if value being validated is greater than or equal to thevalue being compared with.
� <: check if value being validated is less than the value being com-pared with.
� <=: check if value being validated is less than or equal to the valuebeing compared with.

356 CHAPTER 15. SPECIAL TOPICS
15.4.4 yii\validators\DateValidator
[
[['from', 'to'], 'date'],
]
This validator checks if the input value is a date, time or datetime in a properformat. Optionally, it can convert the input value into a UNIX timestampand store it in an attribute speci�ed via yii\validators\DateValidator::
timestampAttribute.• format: the date/time format that the value being validated should bein. Please refer to the PHPmanual about date_create_from_format()6
for details about specifying the format string. The default value is 'Y-
m-d'.
• timestampAttribute: the name of the attribute to which this validatormay assign the UNIX timestamp converted from the input date/time.
15.4.5 yii\validators\DefaultValueValidator
[
// set "age" to be null if it is empty
['age', 'default', 'value' => null],
// set "country" to be "USA" if it is empty
['country', 'default', 'value' => 'USA'],
// assign "from" and "to" with a date 3 days and 6 days from today, if
they are empty
[['from', 'to'], 'default', 'value' => function ($model, $attribute) {
return date('Y-m-d', strtotime($attribute === 'to' ? '+3 days' : '+6
days'));
}],
]
This validator does not validate data. Instead, it assigns a default value tothe attributes being validated if the attributes are empty.
• value: the default value or a PHP callable that returns the defaultvalue which will be assigned to the attributes being validated if theyare empty. The signature of the PHP callable should be as follows,
function foo($model, $attribute) {
// ... compute $value ...
return $value;
}
Info: How to determine if a value is empty or not is a separatetopic covered in the Empty Values section.
6http://www.php.net/manual/en/datetime.createfromformat.php

15.4. CORE VALIDATORS 357
15.4.6 yii\validators\NumberValidator
[
// checks if "salary" is a double number
['salary', 'double'],
]
This validator checks if the input value is a double number. It is equivalentto the number validator.
• max: the upper limit (inclusive) of the value. If not set, it means thevalidator does not check the upper limit.
• min: the lower limit (inclusive) of the value. If not set, it means thevalidator does not check the lower limit.
15.4.7 yii\validators\EmailValidator
[
// checks if "email" is a valid email address
['email', 'email'],
]
This validator checks if the input value is a valid email address.• allowName: whether to allow name in the email address (e.g. John Smith
<[email protected]>). Defaults to false.
• checkDNS, whether to check whether the email's domain exists and haseither an A or MX record. Be aware that this check may fail due totemporary DNS problems, even if the email address is actually valid.Defaults to false.
• enableIDN, whether the validation process should take into account IDN(internationalized domain names). Defaults to false. Note that in orderto use IDN validation you have to install and enable the intl PHPextension, or an exception would be thrown.
15.4.8 yii\validators\ExistValidator
[
// a1 needs to exist in the column represented by the "a1" attribute
['a1', 'exist'],
// a1 needs to exist, but its value will use a2 to check for the
existence
['a1', 'exist', 'targetAttribute' => 'a2'],
// a1 and a2 need to exist together, and they both will receive error
message
[['a1', 'a2'], 'exist', 'targetAttribute' => ['a1', 'a2']],

358 CHAPTER 15. SPECIAL TOPICS
// a1 and a2 need to exist together, only a1 will receive error message
['a1', 'exist', 'targetAttribute' => ['a1', 'a2']],
// a1 needs to exist by checking the existence of both a2 and a3 (using
a1 value)
['a1', 'exist', 'targetAttribute' => ['a2', 'a1' => 'a3']],
// a1 needs to exist. If a1 is an array, then every element of it must
exist.
['a1', 'exist', 'allowArray' => true],
]
This validator checks if the input value can be found in a table column.It only works with Active Record model attributes. It supports validationagainst either a single column or multiple columns.
• targetClass: the name of the Active Record class that should be usedto look for the input value being validated. If not set, the class of themodel currently being validated will be used.
• targetAttribute: the name of the attribute in targetClass that shouldbe used to validate the existence of the input value. If not set, it willuse the name of the attribute currently being validated. You may usean array to validate the existence of multiple columns at the sametime. The array values are the attributes that will be used to validatethe existence, while the array keys are the attributes whose values areto be validated. If the key and the value are the same, you can justspecify the value.
• filter: additional �lter to be applied to the DB query used to checkthe existence of the input value. This can be a string or an arrayrepresenting the additional query condition (refer to yii\db\Query::
where() on the format of query condition), or an anonymous functionwith the signature function ($query), where $query is the yii\db\Queryobject that you can modify in the function.
• allowArray: whether to allow the input value to be an array. Defaultsto false. If this property is true and the input is an array, then ev-ery element of the array must exist in the target column. Note thatthis property cannot be set true if you are validating against multiplecolumns by setting targetAttribute as an array.
15.4.9 yii\validators\FileValidator
[
// checks if "primaryImage" is an uploaded image file in PNG, JPG or GIF
format.
// the file size must be less than 1MB
['primaryImage', 'file', 'types' => ['png', 'jpg', 'gif'], 'maxSize' =>
1024*1024*1024],

15.4. CORE VALIDATORS 359
]
This validator checks if the input is a valid uploaded �le.• types: a list of �le name extensions that are allowed to be uploaded.This can be either an array or a string consisting of �le extension namesseparated by space or comma (e.g. �gif, jpg�). Extension names arecase-insensitive. Defaults to null, meaning all �le name extensions areallowed.
• minSize: the minimum number of bytes required for the uploaded �le.Defaults to null, meaning no lower limit.
• maxSize: the maximum number of bytes allowed for the uploaded �le.Defaults to null, meaning no upper limit.
• maxFiles: the maximum number of �les that the given attribute canhold. Defaults to 1, meaning the input must be a single uploaded �le.If it is greater than 1, then the input must be an array consisting of atmost maxFiles number of uploaded �les.
FileValidator is used together with yii\web\UploadedFile. Please refer tothe Uploading Files section for complete coverage about uploading �les andperforming validation about the uploaded �les.
15.4.10 yii\validators\FilterValidator
[
// trim "username" and "email" inputs
[['username', 'email'], 'filter', 'filter' => 'trim', 'skipOnArray' =>
true],
// normalize "phone" input
['phone', 'filter', 'filter' => function ($value) {
// normalize phone input here
return $value;
}],
]
This validator does not validate data. Instead, it applies a �lter on the inputvalue and assigns it back to the attribute being validated.
• filter: a PHP callback that de�nes a �lter. This can be a globalfunction name, an anonymous function, etc. The function signaturemust be function ($value) { return $newValue; }. This property mustbe set.
• skipOnArray: whether to skip the �lter if the input value is an array.Defaults to false. Note that if the �lter cannot handle array input, youshould set this property to be true. Otherwise some PHP error mightoccur.

360 CHAPTER 15. SPECIAL TOPICS
Tip: If you want to trim input values, you may directly use trimvalidator.
15.4.11 yii\validators\ImageValidator
[
// checks if "primaryImage" is a valid image with proper size
['primaryImage', 'image', 'types' => 'png, jpg',
'minWidth' => 100, 'maxWidth' => 1000,
'minHeight' => 100, 'maxHeight' => 1000,
],
]
This validator checks if the input value represents a valid image �le. Itextends from the �le validator and thus inherits all its properties. Besides,it supports the following additional properties speci�c for image validationpurpose:
• minWidth: the minimum width of the image. Defaults to null, meaningno lower limit.
• maxWidth: the maximum width of the image. Defaults to null, meaningno upper limit.
• minHeight: the minimum height of the image. Defaults to null, meaningno lower limit.
• maxHeight: the maximum height of the image. Defaults to null, meaningno upper limit.
• mimeTypes: a list of �le MIME types that are allowed to be uploaded.This can be either an array or a string consisting of �le MIME typesseparated by space or comma (e.g. �image/jpeg, image/png�). Mimetype names are case-insensitive. Defaults to null, meaning all MIMEtypes are allowed.
15.4.12 yii\validators\RangeValidator
[
// checks if "level" is 1, 2 or 3
['level', 'in', 'range' => [1, 2, 3]],
]
This validator checks if the input value can be found among the given list ofvalues.
• range: a list of given values within which the input value should belooked for.

15.4. CORE VALIDATORS 361
• strict: whether the comparison between the input value and the givenvalues should be strict (both the type and value must be the same).Defaults to false.
• not: whether the validation result should be inverted. Defaults to false.When this property is set true, the validator checks if the input valueis NOT among the given list of values.
• allowArray: whether to allow the input value to be an array. When thisis true and the input value is an array, every element in the array mustbe found in the given list of values, or the validation would fail.
15.4.13 yii\validators\NumberValidator
[
// checks if "age" is an integer
['age', 'integer'],
]
This validator checks if the input value is an integer.
• max: the upper limit (inclusive) of the value. If not set, it means thevalidator does not check the upper limit.
• min: the lower limit (inclusive) of the value. If not set, it means thevalidator does not check the lower limit.
15.4.14 yii\validators\RegularExpressionValidator
[
// checks if "username" starts with a letter and contains only word
characters
['username', 'match', 'pattern' => '/^[a-z]\w*$/i']
]
This validator checks if the input value matches the speci�ed regular expres-sion.
• pattern: the regular expression that the input value should match. Thisproperty must be set, or an exception will be thrown.
• not: whether to invert the validation result. Defaults to false, meaningthe validation succeeds only if the input value matches the pattern. Ifthis is set true, the validation is considered successful only if the inputvalue does NOT match the pattern.
15.4.15 yii\validators\NumberValidator

362 CHAPTER 15. SPECIAL TOPICS
[
// checks if "salary" is a number
['salary', 'number'],
]
This validator checks if the input value is a number. It is equivalent to the[double](#double] validator.
• max: the upper limit (inclusive) of the value. If not set, it means thevalidator does not check the upper limit.
• min: the lower limit (inclusive) of the value. If not set, it means thevalidator does not check the lower limit.
15.4.16 yii\validators\RequiredValidator
[
// checks if both "username" and "password" are not empty
[['username', 'password'], 'required'],
]
This validator checks if the input value is provided and not empty.• requiredValue: the desired value that the input should be. If not set, itmeans the input should not be empty.
• strict: whether to check data types when validating a value. Defaultsto false. When requiredValue is not set, if this property is true, thevalidator will check if the input value is not strictly null; If this propertyis false, the validator will use a loose rule to determine a value is emptyor not. When requiredValue is set, the comparison between the inputand requiredValue will also check data types if this property is true.
Info: How to determine if a value is empty or not is a separatetopic covered in the Empty Values section.
15.4.17 yii\validators\SafeValidator
[
// marks "description" to be a safe attribute
['description', 'safe'],
]
This validator does not perform data validation. Instead, it is used to markan attribute to be a safe attribute.
15.4.18 yii\validators\StringValidator
[
// checks if "username" is a string whose length is between 4 and 24
['username', 'string', 'length' => [4, 24]],
]

15.4. CORE VALIDATORS 363
This validator checks if the input valueValidates that the attribute value is of certain length.• length: speci�es the length limit of the input string being validated.This can be speci�ed in one of the following forms:
� an integer: the exact length that the string should be of;
� an array of one element: the minimum length of the input string(e.g. [8]). This will overwrite min.
� an array of two elements: the minimum and maximum lengths ofthe input string (e.g. [8, 128]). This will overwrite both minand max`.
• min: the minimum length of the input string. If not set, it means nominimum length limit.
• max: the maximum length of the input string. If not set, it means nomaximum length limit.
• encoding: the encoding of the input string to be validated. If not set,it will use the application's yii\base\Application::charset valuewhich defaults to UTF-8.
15.4.19 yii\validators\FilterValidator
[
// trims the white spaces surrounding "username" and "email"
[['username', 'email'], 'trim'],
]
This validator does not perform data validation. Instead, it will trim thesurrounding white spaces around the input value. Note that if the inputvalue is an array, it will be ignored by this validator.
15.4.20 yii\validators\UniqueValidator
[
// a1 needs to be unique in the column represented by the "a1" attribute
['a1', 'unique'],
// a1 needs to be unique, but column a2 will be used to check the
uniqueness of the a1 value
['a1', 'unique', 'targetAttribute' => 'a2'],
// a1 and a2 need to be unique together, and they both will receive
error message
[['a1', 'a2'], 'unique', 'targetAttribute' => ['a1', 'a2']],
// a1 and a2 need to be unique together, only a1 will receive error
message
['a1', 'unique', 'targetAttribute' => ['a1', 'a2']],

364 CHAPTER 15. SPECIAL TOPICS
// a1 needs to be unique by checking the uniqueness of both a2 and a3 (
using a1 value)
['a1', 'unique', 'targetAttribute' => ['a2', 'a1' => 'a3']],
]
This validator checks if the input value is unique in a table column. It onlyworks with Active Record model attributes. It supports validation againsteither a single column or multiple columns.
• targetClass: the name of the Active Record class that should be usedto look for the input value being validated. If not set, the class of themodel currently being validated will be used.
• targetAttribute: the name of the attribute in targetClass that shouldbe used to validate the uniqueness of the input value. If not set, it willuse the name of the attribute currently being validated. You may usean array to validate the uniqueness of multiple columns at the sametime. The array values are the attributes that will be used to validatethe uniqueness, while the array keys are the attributes whose valuesare to be validated. If the key and the value are the same, you can justspecify the value.
• filter: additional �lter to be applied to the DB query used to checkthe uniqueness of the input value. This can be a string or an arrayrepresenting the additional query condition (refer to yii\db\Query::
where() on the format of query condition), or an anonymous functionwith the signature function ($query), where $query is the yii\db\Queryobject that you can modify in the function.
15.4.21 yii\validators\UrlValidator
[
// checks if "website" is a valid URL. Prepend "http://" to the "website
" attribute
// if it does not have a URI scheme
['website', 'url', 'defaultScheme' => 'http'],
]
This validator checks if the input value is a valid URL.
• validSchemes: an array specifying the URI schemes that should be con-sidered valid. Defaults to ['http', 'https'], meaning both http andhttps URLs are considered to be valid.
• defaultScheme: the default URI scheme to be prepended to the inputif it does not have the scheme part. Defaults to null, meaning do notmodify the input value.

15.5. INTERNATIONALIZATION 365
• enableIDN: whether the validator should take into account IDN (inter-nationalized domain names). Defaults to false. Note that in orderto use IDN validation you have to install and enable the intl PHPextension, otherwise an exception would be thrown.
15.5 Internationalization
Note: This section is under development.
Internationalization (I18N) refers to the process of designing a software ap-plication so that it can be adapted to various languages and regions withoutengineering changes. For Web applications, this is of particular importancebecause the potential users may be worldwide.
15.5.1 Locale and Language
There are two languages de�ned in Yii application: yii\base\Application::$sourceLanguage and yii\base\Application::$language.
Source language is the language original application messages are writtenin such as:
echo \Yii::t('app', 'I am a message!');
Tip: Default is English and it's not recommended to changeit. The reason is that it's easier to �nd people translating fromEnglish to any language than from non-English to non-English.
Target language is what's currently used. It's de�ned in application con�g-uration like the following:
// ...
return [
'id' => 'applicationID',
'basePath' => dirname(__DIR__),
'language' => 'ru-RU' // <- here!
Later you can easily change it in runtime:
\Yii::$app->language = 'zh-CN';
Format is ll-CC where ll is two- or three-letter lowercase code for a languageaccording to ISO-6397 and CC is country code according to ISO-31668.
If there's no translation for ru-RU Yii will try ru as well before failing.
Note: you can further customize details specifying language asdocumented in ICU project9.
7http://www.loc.gov/standards/iso639-2/8http://www.iso.org/iso/en/prods-services/iso3166ma/
02iso-3166-code-lists/list-en1.html9http://userguide.icu-project.org/locale#TOC-The-Locale-Concept

366 CHAPTER 15. SPECIAL TOPICS
15.5.2 Message translation
Basics
Yii basic message translation in its basic variant works without additionalPHP extension. What it does is �nding a translation of the message fromsource language into target language. Message itself is speci�ed as the second\Yii::t method parameter:
echo \Yii::t('app', 'This is a string to translate!');
Yii tries to load appropriate translation from one of the message sourcesde�ned via i18n component con�guration:
'components' => [
// ...
'i18n' => [
'translations' => [
'app*' => [
'class' => 'yii\i18n\PhpMessageSource',
//'basePath' => '@app/messages',
//'sourceLanguage' => 'en-US',
'fileMap' => [
'app' => 'app.php',
'app/error' => 'error.php',
],
],
],
],
],
In the above app* is a pattern that speci�es which categories are handled bythe message source. In this case we're handling everything that begins withapp. You can also specify default translation, for more info see this example.
class de�nes which message source is used. The following message sourcesare available:
• PhpMessageSource that uses PHP �les.
• GettextMessageSource that uses GNU Gettext MO or PO �les.
• DbMessageSource that uses database.
basePath de�nes where to store messages for the currently used messagesource. In this case it's messages directory in your application directory.In case of using database this option should be skipped.
sourceLanguage de�nes which language is used in \Yii::t second argument.If not speci�ed, application's source language is used.
fileMap speci�es how message categories speci�ed in the �rst argument of\Yii::t() are mapped to �les when PhpMessageSource is used. In the examplewe're de�ning two categories app and app/error.
Instead of con�guring fileMap you can rely on convention which is BasePath/messages/LanguageID/CategoryName.php.

15.5. INTERNATIONALIZATION 367
Named placeholders You can add parameters to a translation messagethat will be substituted with the corresponding value after translation. Theformat for this is to use curly brackets around the parameter name as youcan see in the following example:
$username = 'Alexander';
echo \Yii::t('app', 'Hello, {username}!', [
'username' => $username,
]);
Note that the parameter assignment is without the brackets.
$sum = 42;
echo \Yii::t('app', 'Balance: {0}', $sum);
Tip: Try keep message strings meaningful and avoid using toomany positional parameters. Remember that translator has sourcestring only so it should be obvious about what will replace eachplaceholder.
Advanced placeholder formatting
In order to use advanced features you need to install and enable intl10 PHPextension. After installing and enabling it you will be able to use extendedsyntax for placeholders. Either short form {placeholderName, argumentType
} that means default setting or full form {placeholderName, argumentType,
argumentStyle} that allows you to specify formatting style.Full reference is available at ICU website11 but since it's a bit cryptic we
have our own reference below.
$sum = 42;
echo \Yii::t('app', 'Balance: {0, number}', $sum);
You can specify one of the built-in styles (integer, currency, percent):
$sum = 42;
echo \Yii::t('app', 'Balance: {0, number, currency}', $sum);
Or specify custom pattern:
$sum = 42;
echo \Yii::t('app', 'Balance: {0, number, ,000,000000}', $sum);
Formatting reference12.
10http://www.php.net/manual/en/intro.intl.php11http://icu-project.org/apiref/icu4c/classMessageFormat.html12http://icu-project.org/apiref/icu4c/classicu_1_1DecimalFormat.html

368 CHAPTER 15. SPECIAL TOPICS
echo \Yii::t('app', 'Today is {0, date}', time());
Built in formats (short, medium, long, full):
echo \Yii::t('app', 'Today is {0, date, short}', time());
Custom pattern:
echo \Yii::t('app', 'Today is {0, date, YYYY-MM-dd}', time());
Formatting reference13.
echo \Yii::t('app', 'It is {0, time}', time());
Built in formats (short, medium, long, full):
echo \Yii::t('app', 'It is {0, time, short}', time());
Custom pattern:
echo \Yii::t('app', 'It is {0, date, HH:mm}', time());
Formatting reference14.
echo \Yii::t('app', '{n,number} is spelled as {n, spellout}', ['n' => 42]);
echo \Yii::t('app', 'You are {n, ordinal} visitor here!', ['n' => 42]);
Will produce �You are 42nd visitor here!�.
echo \Yii::t('app', 'You are here for {n, duration} already!', ['n' => 47]);
Will produce �You are here for 47 sec. already!�.
Plurals Di�erent languages have di�erent ways to in�ect plurals. Somerules are very complex so it's very handy that this functionality is providedwithout the need to specify in�ection rule. Instead it only requires yourinput of in�ected word in certain situations.
echo \Yii::t('app', 'There {n, plural, =0{are no cats} =1{is one cat} other{
are # cats}}!', ['n' => 0]);
13http://icu-project.org/apiref/icu4c/classicu_1_1SimpleDateFormat.html14http://icu-project.org/apiref/icu4c/classicu_1_1SimpleDateFormat.html

15.5. INTERNATIONALIZATION 369
Will give us �There are no cats!�.
In the plural rule arguments above =0 means exactly zero, =1 stands forexactly one other is for any other number. # is replaced with the n argumentvalue. It's not that simple for languages other than English. Here's anexample for Russian:
Çäåñü
{n, plural, êîòîâ=0{ íåò} åñòü=1{ îäèí êîò} one{# êîò} few{# êîòà} many{#
êîòîâ} other{# êîòà}}!
In the above it worth mentioning that =1 matches exactly n = 1 while one
matches 21 or 101.
Note that if you are using placeholder twice and one time it's used asplural another one should be used as number else you'll get �Inconsistenttypes declared for an argument: U_ARGUMENT_TYPE_MISMATCH�error:
Total {count, number} {count, plural, one{item} other{items}}.
To learn which in�ection forms you should specify for your language you canreferrer to rules reference at unicode.org15.
Selections You can select phrases based on keywords. The pattern in thiscase speci�es how to map keywords to phrases and provides a default phrase.
echo \Yii::t('app', '{name} is {gender} and {gender, select, female{she}
male{he} other{it}} loves Yii!', [
'name' => 'Snoopy',
'gender' => 'dog',
]);
Will produce �Snoopy is dog and it loves Yii!�.
In the expression female and male are possible values. other handler valuesthat do not match. Strings inside brackets are sub-expressions so could bejust a string or a string with more placeholders.
Specifying default translation
You can specify default translation that will be used as a fallback for cat-egories that don't match any other translation. This translation should bemarked with *. In order to do it add the following to the con�g �le (for theyii2-basic application it will be web.php):
//configure i18n component
'i18n' => [
'translations' => [
'*' => [
15http://unicode.org/repos/cldr-tmp/trunk/diff/supplemental/language_
plural_rules.html

370 CHAPTER 15. SPECIAL TOPICS
'class' => 'yii\i18n\PhpMessageSource'
],
],
],
Now you can use categories without con�guring each one that is similar toYii 1.1 behavior. Messages for the category will be loaded from a �le underdefault translation basePath that is @app/messages:
echo Yii::t('not_specified_category', 'message from unspecified category');
Message will be loaded from @app/messages/<LanguageCode>/not_specified_category
.php.
Translating module messages
If you want to translate messages for a module and avoid using a singletranslation �le for all messages, you can make it like the following:
<?php
namespace app\modules\users;
use Yii;
class Module extends \yii\base\Module
{
public $controllerNamespace = 'app\modules\users\controllers';
public function init()
{
parent::init();
$this->registerTranslations();
}
public function registerTranslations()
{
Yii::$app->i18n->translations['modules/users/*'] = [
'class' => 'yii\i18n\PhpMessageSource',
'sourceLanguage' => 'en-US',
'basePath' => '@app/modules/users/messages',
'fileMap' => [
'modules/users/validation' => 'validation.php',
'modules/users/form' => 'form.php',
...
],
];
}
public static function t($category, $message, $params = [], $language =
null)
{
return Yii::t('modules/users/' . $category, $message, $params,
$language);

15.5. INTERNATIONALIZATION 371
}
}
In the example above we are using wildcard for matching and then �lteringeach category per needed �le. Instead of using fileMap you can simply useconvention of category mapping to the same named �le and use Module::t
('validation', 'your custom validation message') or Module::t('form', 'some
form label') directly.
Translating widgets messages
Same rules can be applied for widgets too, for example:
<?php
namespace app\widgets\menu;
use yii\base\Widget;
use Yii;
class Menu extends Widget
{
public function init()
{
parent::init();
$this->registerTranslations();
}
public function registerTranslations()
{
$i18n = Yii::$app->i18n;
$i18n->translations['widgets/menu/*'] = [
'class' => 'yii\i18n\PhpMessageSource',
'sourceLanguage' => 'en-US',
'basePath' => '@app/widgets/menu/messages',
'fileMap' => [
'widgets/menu/messages' => 'messages.php',
],
];
}
public function run()
{
echo $this->render('index');
}
public static function t($category, $message, $params = [], $language =
null)
{
return Yii::t('widgets/menu/' . $category, $message, $params,
$language);

372 CHAPTER 15. SPECIAL TOPICS
}
}
Instead of using fileMap you can simply use convention of category mappingto the same named �le and use Menu::t('messages', 'new messages {messages}
', ['{messages}' => 10]) directly.
Note: For widgets you also can use i18n views, same rules as forcontrollers are applied to them too.
Translating framework messages
Sometimes you want to correct default framework message translation foryour application. In order to do so con�gure i18n component like the follow-ing:
'components' => [
'i18n' => [
'translations' => [
'yii' => [
'class' => 'yii\i18n\PhpMessageSource',
'sourceLanguage' => 'en-US',
'basePath' => '/path/to/my/message/files'
],
],
],
],
Now you can place your adjusted translations to /path/to/my/message/files.
Handling missing translations
If the translation is missing at the source, Yii displays the requested messagecontent. Such behavior very convenient in case your raw message is a validverbose text. However, sometimes it is not enough. You may need to per-form some custom processing of the situation, when requested translation ismissing at the source. This can be achieved via `missingTranslation' eventof the yii\i18n\MessageSource.
For example: lets mark all missing translations with something notable,so they can be easily found at the page. First we need to setup event handler,this can be done via con�guration:
'components' => [
// ...
'i18n' => [
'translations' => [
'app*' => [
'class' => 'yii\i18n\PhpMessageSource',
'fileMap' => [
'app' => 'app.php',

15.5. INTERNATIONALIZATION 373
'app/error' => 'error.php',
],
'on missingTranslation' => ['TranslationEventHandler', '
handleMissingTranslation']
],
],
],
],
Now we need to implement own handler:
use yii\i18n\MissingTranslationEvent;
class TranslationEventHandler
{
public static function(MissingTranslationEvent $event) {
$event->translatedMessage = "@MISSING: {$event->category}.{$event->
message} FOR LANGUAGE {$event->language} @";
}
}
If yii\i18n\MissingTranslationEvent::translatedMessage is set by eventhandler it will be displayed as translation result.
Attention: each message source handles its missing translationsseparately. If you are using several message sources and wishthem treat missing translation in the same way, you should assigncorresponding event handler to each of them.
15.5.3 Views
You can use i18n in your views to provide support for di�erent languages.For example, if you have view views/site/index.php and you want to createspecial case for russian language, you create ru-RU folder under the view pathof current controller/widget and put there �le for russian language as followsviews/site/ru-RU/index.php.
Note: If language is speci�ed as en-US and there are no corre-sponding views, Yii will try views under en before using originalones.
15.5.4 i18n formatter
i18n formatter component is the localized version of formatter that supportsformatting of date, time and numbers based on current locale. In order touse it you need to con�gure formatter application component as follows:
return [
// ...
'components' => [
'formatter' => [

374 CHAPTER 15. SPECIAL TOPICS
'class' => 'yii\i18n\Formatter',
],
],
];
After con�guring the component can be accessed as Yii::$app->formatter.Note that in order to use i18n formatter you need to install and enable
intl16 PHP extension.In order to learn about formatter methods refer to its API documenta-
tion: yii\i18n\Formatter.
15.6 Mailing
Note: This section is under development.
Yii supports composition and sending of the email messages. However, theframework core provides only the content composition functionality and basicinterface. Actual mail sending mechanism should be provided by the exten-sion, because di�erent projects may require its di�erent implementation andit usually depends on the external services and libraries.
For the most common cases you can use yii2-swiftmailer17 o�cial exten-sion.
15.6.1 Con�guration
Mail component con�guration depends on the extension you have chosen. Ingeneral your application con�guration should look like:
return [
//....
'components' => [
'mail' => [
'class' => 'yii\swiftmailer\Mailer',
],
],
];
15.6.2 Basic usage
Once `mail' component is con�gured, you can use the following code to sendan email message:
Yii::$app->mail->compose()
->setFrom('[email protected]')
->setTo('[email protected]')
->setSubject('Message subject')
16http://www.php.net/manual/en/intro.intl.php17https://github.com/yiisoft/yii2/tree/master/extensions/swiftmailer

15.6. MAILING 375
->setTextBody('Plain text content')
->setHtmlBody('<b>HTML content</b>')
->send();
In above example method compose() creates an instance of the mail message,which then is populated and sent. You may put more complex logic in thisprocess if needed:
$message = Yii::$app->mail->compose();
if (Yii::$app->user->isGuest) {
$message->setFrom('[email protected]')
} else {
$message->setFrom(Yii::$app->user->identity->email)
}
$message->setTo(Yii::$app->params['adminEmail'])
->setSubject('Message subject')
->setTextBody('Plain text content')
->send();
Note: each `mail' extension comes in 2 major classes: `Mailer' and`Message'. `Mailer' always knows the class name and speci�c ofthe `Message'. Do not attempt ot instantiate `Message' objectdirectly - always use compose() method for it.
You may also send several messages at once:
$messages = [];
foreach ($users as $user) {
$messages[] = Yii::$app->mail->compose()
// ...
->setTo($user->email);
}
Yii::$app->mail->sendMultiple($messages);
Some particular mail extensions may bene�t from this approach, using singlenetwork message etc.
15.6.3 Composing mail content
Yii allows composition of the actual mail messages content via special view�les. By default these �les should be located at `@app/mail' path.
Example mail view �le content:
<?php
use yii\helpers\Html;
use yii\helpers\Url;
/**
* @var \yii\web\View $this view component instance
* @var \yii\mail\BaseMessage $message instance of newly created mail
message
*/

376 CHAPTER 15. SPECIAL TOPICS
?>
<h2>This message allows you to visit out site home page by one click</h2>
<?= Html::a('Go to home page', Url::home('http')) ?>
In order to compose message content via view �le simply pass view name tothe compose() method:
Yii::$app->mail->compose('home-link') // message body becomes a view
rendering result here
->setFrom('[email protected]')
->setTo('[email protected]')
->setSubject('Message subject')
->send();
You may pass additional view parameters to compose() method, which willbe available inside the view �les:
Yii::$app->mail->compose('greetings', [
'user' => Yii::$app->user->identity,
'advertisement' => $adContent,
]);
You can specify di�erent view �les for HTML and plain text message con-tents:
Yii::$app->mail->compose([
'html' => 'contact-html',
'text' => 'contact-text',
]);
If you specify view name as a scalar string, its rendering result will be usedas HTML body, while plain text body will be composed by removing allHTML entities from HTML one.
View rendering result can be wrapped into the layout, which an be setupusing yii\mail\BaseMailer::htmlLayout and yii\mail\BaseMailer::textLayout.It will work the same way like layouts in regular web application. Layoutcan be used to setup mail CSS styles or other shared content:
<?php
use yii\helpers\Html;
/**
* @var \yii\web\View $this view component instance
* @var string $content main view render result
*/
?>
<?php $this->beginPage() ?>
<!DOCTYPE html PUBLIC "-//W3C//DTD XHTML 1.0 Strict//EN" "http://www.w3.org/
TR/xhtml1/DTD/xhtml1-strict.dtd">
<html xmlns="http://www.w3.org/1999/xhtml">
<head>
<meta http-equiv="Content-Type" content="text/html; charset=<?= Yii::
$app->charset ?>" />
<style type="text/css">
.heading {...}

15.6. MAILING 377
.list {...}
.footer {...}
</style>
<?php $this->head() ?>
</head>
<body>
<?php $this->beginBody() ?>
<?= $content ?>
<div class="footer">With kind regards, <?= Yii::$app->name ?> team</div>
<?php $this->endBody() ?>
</body>
</html>
<?php $this->endPage() ?>
15.6.4 File attachment
You can add attachments to message using methods attach() and attachContent
():
$message = Yii::$app->mail->compose();
// Attach file from local file system:
$message->attach('/path/to/source/file.pdf');
// Create attachment on-the-fly
$message->attachContent('Attachment content', ['fileName' => 'attach.txt', '
contentType' => 'text/plain']);
15.6.5 Embed images
You can embed images into the message content using embed() method. Thismethod returns the attachment id, which should be then used at `img' tag.This method is easy to use when composing message content via view �le:
Yii::$app->mail->compose('embed-email', ['imageFileName' => '/path/to/image.
jpg'])
// ...
->send();
Then inside view �le you can use following code:
<img src="<?= $message->embed($imageFileName); ?>">
15.6.6 Testing and debugging
Developer often a to check, what actual emails are sent by application, whatwas their content and so on. Such ability is granted by Yii via yii\mail
\BaseMailer::useFileTransport. If enabled, this option enforces saving mailmessage data into the local �les instead of regular sending. These �les willbe saved under yii\mail\BaseMailer::fileTransportPath, which is `@runtime/-mail' by default.

378 CHAPTER 15. SPECIAL TOPICS
Note: you can either save messages to the �le or send them toactual recipients, but can not do both simultaneously.
Mail message �le can be opened by regular text �le editor, so you can browseactual message headers, content and so on. This mechanism amy prove itself,while debugging application or running unit test.
Note: mail message �le content is composed via \yii\mail\MessageInterface
::toString(), so it depends on actual mail extension you are usingin your application.
15.6.7 Creating your own mail solution
In order to create your own custom mail solution, you need to create 2classes: one for the `Mailer' and another one for the `Message'. You canuse yii\mail\BaseMailer and yii\mail\BaseMessage as a base classes for yoursolution. These classes already contains basic logic, which is described inthis guide. However, their usage is not mandatory, it is enough to implementyii\mail\MailerInterface and yii\mail\MessageInterface interfaces. Then youneed to implement all abstract methods to build you solution.
15.7 Performance Tuning
Note: This section is under development.
The performance of your web application is based upon two parts. First isthe framework performance and the second is the application itself. Yii has apretty low performance impact on your application out of the box and can be�ne-tuned further for production environment. As for the application, we'llprovide some of the best practices along with examples on how to applythem to Yii.
15.7.1 Preparing environment
A well con�gured environment to run PHP application really matters. Inorder to get maximum performance:
• Always use latest stable PHP version. Each major release brings sig-ni�cant performance improvements and reduced memory usage.
• Use APC18 for PHP 5.4 and less or Opcache19 for PHP 5.5 and more.It gives a very good performance boost.
18http://ru2.php.net/apc19http://php.net/opcache

15.7. PERFORMANCE TUNING 379
15.7.2 Preparing framework for production
Disabling Debug Mode
First thing you should do before deploying your application to productionenvironment is to disable debug mode. A Yii application runs in debug modeif the constant YII_DEBUG is de�ned as true in index.php so to disable debugthe following should be in your index.php:
defined('YII_DEBUG') or define('YII_DEBUG', false);
Debug mode is very useful during development stage, but it would impactperformance because some components cause extra burden in debug mode.For example, the message logger may record additional debug informationfor every message being logged.
Enabling PHP opcode cache
Enabling the PHP opcode cache improves any PHP application performanceand lowers memory usage signi�cantly. Yii is no exception. It was testedwith both PHP 5.5 OPcache20 and APC PHP extension21. Both cache andoptimize PHP intermediate code and avoid the time spent in parsing PHPscripts for every incoming request.
Turning on ActiveRecord database schema caching
If the application is using Active Record, we should turn on the schemacaching to save the time of parsing database schema. This can be done bysetting the Connection::enableSchemaCache property to be true via applicationcon�guration protected/config/main.php:
return [
// ...
'components' => [
// ...
'db' => [
'class' => 'yii\db\Connection',
'dsn' => 'mysql:host=localhost;dbname=mydatabase',
'username' => 'root',
'password' => '',
'enableSchemaCache' => true,
// Duration of schema cache.
// 'schemaCacheDuration' => 3600,
// Name of the cache component used. Default is 'cache'.
//'schemaCache' => 'cache',
],
20http://php.net/manual/en/book.opcache.php21http://php.net/manual/en/book.apc.php

380 CHAPTER 15. SPECIAL TOPICS
'cache' => [
'class' => 'yii\caching\FileCache',
],
],
];
Note that cache application component should be con�gured.
Combining and Minimizing Assets
It is possible to combine and minimize assets, typically JavaScript and CSS,in order to slightly improve page load time and therefore deliver better ex-perience for end user of your application.
In order to learn how it can be achieved, refer to assets guide section.
Using better storage for sessions
By default PHP uses �les to handle sessions. It is OK for development andsmall projects but when it comes to handling concurrent requests it's betterto switch to another storage such as database. You can do so by con�guringyour application via protected/config/main.php:
return [
// ...
'components' => [
'session' => [
'class' => 'yii\web\DbSession',
// Set the following if want to use DB component other than
// default 'db'.
// 'db' => 'mydb',
// To override default session table set the following
// 'sessionTable' => 'my_session',
],
],
];
You can use CacheSession to store sessions using cache. Note that some cachestorage such as memcached has no guarantee that session data will not belost leading to unexpected logouts.
If you have Redis22 on your server, it's highly recommended as sessionstorage.
15.7.3 Improving application
Using Serverside Caching Techniques
As described in the Caching section, Yii provides several caching solutionsthat may improve the performance of a Web application signi�cantly. If the
22http://redis.io/

15.7. PERFORMANCE TUNING 381
generation of some data takes long time, we can use the data caching ap-proach to reduce the data generation frequency; If a portion of page remainsrelatively static, we can use the fragment caching approach to reduce itsrendering frequency; If a whole page remains relative static, we can use thepage caching approach to save the rendering cost for the whole page.
Leveraging HTTP to save processing time and bandwidth
Leveraging HTTP caching saves both processing time, bandwidth and re-sources signi�cantly. It can be implemented by sending either ETag or Last-
Modified header in your application response. If browser is implemented ac-cording to HTTP speci�cation (most browsers are), content will be fetchedonly if it is di�erent from what it was prevously.
Forming proper headers is time consuming task so Yii provides a shortcutin form of controller �lter yii\filters\HttpCache. Using it is very easy.In a controller you need to implement behaviors method like the following:
public function behaviors()
{
return [
'httpCache' => [
'class' => \yii\filters\HttpCache::className(),
'only' => ['list'],
'lastModified' => function ($action, $params) {
$q = new Query();
return strtotime($q->from('users')->max('updated_timestamp')
);
},
// 'etagSeed' => function ($action, $params) {
// return // generate etag seed here
//}
],
];
}
In the code above one can use either etagSeed or lastModified. Implementingboth isn't necessary. The goal is to determine if content was modi�ed in away that is cheaper than fetching and rendering that content. lastModified
should return unix timestamp of the last content modi�cation while etagSeed
should return a string that is then used to generate ETag header value.
Database Optimization
Fetching data from database is often the main performance bottleneck ina Web application. Although using caching may alleviate the performancehit, it does not fully solve the problem. When the database contains enor-mous data and the cached data is invalid, fetching the latest data could beprohibitively expensive without proper database and query design.

382 CHAPTER 15. SPECIAL TOPICS
Design index wisely in a database. Indexing can make SELECT queriesmuch faster, but it may slow down INSERT, UPDATE or DELETE queries.
For complex queries, it is recommended to create a database view forit instead of issuing the queries inside the PHP code and asking DBMS toparse them repetitively.
Do not overuse Active Record. Although Active Record is good at mod-eling data in an OOP fashion, it actually degrades performance due to thefact that it needs to create one or several objects to represent each row ofquery result. For data intensive applications, using DAO or database APIsat lower level could be a better choice.
Last but not least, use LIMIT in your SELECT queries. This avoids fetchingoverwhelming data from database and exhausting the memory allocated toPHP.
Using asArray
A good way to save memory and processing time on read-only pages is touse ActiveRecord's asArray method.
class PostController extends Controller
{
public function actionIndex()
{
$posts = Post::find()->orderBy('id DESC')->limit(100)->asArray()->
all();
return $this->render('index', ['posts' => $posts]);
}
}
In the view you should access �elds of each individual record from $posts asarray:
foreach ($posts as $post) {
echo $post['title']."<br>";
}
Note that you can use array notation even if asArray wasn't speci�ed andyou're working with AR objects.
Processing data in background
In order to respond to user requests faster you can process heavy parts ofthe request later if there's no need for immediate response.
• Cron jobs + console.
• queues + handlers.
TBD

15.7. PERFORMANCE TUNING 383
If nothing helps
If nothing helps, never assume what may �x performance problem. Alwayspro�le your code instead before changing anything. The following tools maybe helpful:
• Yii debug toolbar and debugger
• XDebug pro�ler23
• XHProf24
23http://xdebug.org/docs/profiler24http://www.php.net/manual/en/book.xhprof.php

384 CHAPTER 15. SPECIAL TOPICS
Error: not existing �le: tutorial-shared-hosting.md

15.8. USING TEMPLATE ENGINES 385
15.8 Using template engines
Note: This section is under development.
By default, Yii uses PHP as its template language, but you can con�gureYii to support other rendering engines, such as Twig25 or Smarty26.
The view component is responsible for rendering views. You can add acustom template engine by recon�guring this component's behavior:
[
'components' => [
'view' => [
'class' => 'yii\web\View',
'renderers' => [
'tpl' => [
'class' => 'yii\smarty\ViewRenderer',
//'cachePath' => '@runtime/Smarty/cache',
],
'twig' => [
'class' => 'yii\twig\ViewRenderer',
//'cachePath' => '@runtime/Twig/cache',
//'options' => [], /* Array of twig options */
'globals' => ['html' => '\yii\helpers\Html'],
],
// ...
],
],
],
]
In the code above, both Smarty and Twig are con�gured to be useable bythe view �les. But in order to get these extensions into your project, youneed to also modify your composer.json �le to include them, too:
"yiisoft/yii2-smarty": "*",
"yiisoft/yii2-twig": "*",
That code would be added to the require section of composer.json. Aftermaking that change and saving the �le, you can install the extensions byrunning composer update --prefer-dist in the command-line.
15.8.1 Twig
To use Twig, you need to create templates in �les that have the .twig exten-sion (or use another �le extension but con�gure the component accordingly).Unlike standard view �les, when using Twig you must include the extensionin your $this->render() controller call:
return $this->render('renderer.twig', ['username' => 'Alex']);
25http://twig.sensiolabs.org/26http://www.smarty.net/

386 CHAPTER 15. SPECIAL TOPICS
Template syntax
The best resource to learn Twig basics is its o�cial documentation you can�nd at twig.sensiolabs.org27. Additionally there are Yii-speci�c addtionsdescribed below.
Method and function calls If you need result you can call a method ora function using the following syntax:
{% set result = my_function({'a' : 'b'}) %}
{% set result = myObject.my_function({'a' : 'b'}) %}
If you need to echo result instead of assigning it to a variable:
{{ my_function({'a' : 'b'}) }}
{{ myObject.my_function({'a' : 'b'}) }}
In case you don't need result you shoud use void wrapper:
{{ void(my_function({'a' : 'b'})) }}
{{ void(myObject.my_function({'a' : 'b'})} }}
Forms There are two form helper functions form_begin and form_end to makeusing forms more convenient:
{% set form = form_begin({
'id' : 'login-form',
'options' : {'class' : 'form-horizontal'},
}) %}
{{ form.field(model, 'username') | raw }}
{{ form.field(model, 'password').passwordInput() | raw }}
<div class="form-group">
<input type="submit" value="Login" class="btn btn-primary" />
</div>
{{ form_end() }}
URLs There are two functions you can use for building URLs:
<a href="{{ path('blog/view', {'alias' : post.alias}) }}">{{ post.title }}</
a>
<a href="{{ url('blog/view', {'alias' : post.alias}) }}">{{ post.title }}</a
>
path generates relative URL while url generates absolute one. Internally bothare using \yii\helpers\Url.
27http://twig.sensiolabs.org/documentation

15.8. USING TEMPLATE ENGINES 387
Additional variables Within Twig templates the following variables arealways de�ned:
• app, which equates to \Yii::$app
• this, which equates to the current View object
Additional con�guration
Yii Twig extension allows you to de�ne your own syntax and bring regularhelper classes into templates. Let's review con�guration options.
Globals You can add global helpers or values via the application con�g-uration's globals variable. You can de�ne both Yii helpers and your ownvariables there:
'globals' => [
'html' => '\yii\helpers\Html',
'name' => 'Carsten',
'GridView' => '\yii\grid\GridView',
],
Once con�gured, in your template you can use the globals in the followingway:
Hello, {{name}}! {{ html.a('Please login', 'site/login') | raw }}.
{{ GridView.widget({'dataProvider' : provider}) | raw }}
Functions You can de�ne additional functions like the following:
'functions' => [
'rot13' => 'str_rot13',
'truncate' => '\yii\helpers\StringHelper::truncate',
],
In template they could be used like the following:
`{{ rot13('test') }}`
`{{ truncate(post.text, 100) }}`
Filters Additional �lters may be added via the application con�guration'sfilters option:
'filters' => [
'jsonEncode' => '\yii\helpers\Json::encode',
],
Then in the template you can apply �lter using the following syntax:
{{ model|jsonEncode }}

388 CHAPTER 15. SPECIAL TOPICS
15.8.2 Smarty
To use Smarty, you need to create templates in �les that have the .tpl exten-sion (or use another �le extension but con�gure the component accordingly).Unlike standard view �les, when using Smarty you must include the exten-sion in your $this->render() or $this->renderPartial() controller calls:
return $this->render('renderer.tpl', ['username' => 'Alex']);
Additional functions
Yii adds the following construct to the standard Smarty syntax:
<a href="{path route='blog/view' alias=$post.alias}">{$post.title}</a>
Internally, the path() function calls Yii's Url::to() method.
Additional variables
Within Smarty templates, you can also make use of these variables:
• $app, which equates to \Yii::$app
• $this, which equates to the current View object

Chapter 16
Widgets
16.1 Bootstrap Widgets
Note: This section is under development.
Out of the box, Yii includes support for the Bootstrap 31 markup and com-ponents framework (also known as �Twitter Bootstrap�). Bootstrap is anexcellent, responsive framework that can greatly speed up the client-side ofyour development process.
The core of Bootstrap is represented by two parts:
• CSS basics, such as a grid layout system, typography, helper classes,and responsive utilities.
• Ready to use components, such as forms, menus, pagination, modalboxes, tabs etc.
16.1.1 Basics
Yii doesn't wrap the bootstrap basics into PHP code since HTML is verysimple by itself in this case. You can �nd details about using the basics atbootstrap documentation website2. Still Yii provides a convenient way toinclude bootstrap assets in your pages with a single line added to AppAsset.php
located in your @app/assets directory:
public $depends = [
'yii\web\YiiAsset',
'yii\bootstrap\BootstrapAsset', // this line
// 'yii\bootstrap\BootstrapThemeAsset' // uncomment to apply bootstrap 2
style to bootstrap 3
];
Using bootstrap through Yii asset manager allows you to minimize its re-sources and combine with your own resources when needed.
1http://getbootstrap.com/2http://getbootstrap.com/css/
389

390 CHAPTER 16. WIDGETS
16.1.2 Yii widgets
Most complex bootstrap components are wrapped into Yii widgets to al-low more robust syntax and integrate with framework features. All widgetsbelong to \yii\bootstrap namespace:
• yii\bootstrap\ActiveForm
• yii\bootstrap\Alert
• yii\bootstrap\Button
• yii\bootstrap\ButtonDropdown
• yii\bootstrap\ButtonGroup
• yii\bootstrap\Carousel
• yii\bootstrap\Collapse
• yii\bootstrap\Dropdown
• yii\bootstrap\Modal
• yii\bootstrap\Nav
• yii\bootstrap\NavBar
• yii\bootstrap\Progress
• yii\bootstrap\Tabs
16.1.3 Using the .less �les of Bootstrap directly
If you want to include the Bootstrap css directly in your less �les3 youmay need to disable the original bootstrap css �les to be loaded. You cando this by setting the css property of the yii\bootstrap\BootstrapAsset
to be empty. For this you need to con�gure the assetManager applicationcomponent as follows:
'assetManager' => [
'bundles' => [
'yii\bootstrap\BootstrapAsset' => [
'css' => [],
]
]
]
3http://getbootstrap.com/getting-started/#customizing

16.1. BOOTSTRAP WIDGETS 391
Error: not existing �le: jui-widgets.md

392 CHAPTER 16. WIDGETS

Chapter 17
Helpers
17.1 Helpers
Note: This section is under development.
Helper classes typically contain static methods only and are used as follows:
use \yii\helpers\Html;
echo Html::encode('Test > test');
There are several classes provided by framework:
• ArrayHelper
• Console
• FileHelper
• Html
• HtmlPuri�er
• Image
• In�ector
• Json
• Markdown
• Security
• StringHelper
• Url
• VarDumper
393

394 CHAPTER 17. HELPERS
Error: not existing �le: helper-array.md

17.1. HELPERS 395
Error: not existing �le: helper-html.md

396 CHAPTER 17. HELPERS
Error: not existing �le: helper-url.md

17.1. HELPERS 397
Error: not existing �le: helper-security.md