xen cluster management with ganeti on debian etch · xen cluster management with ganeti on debian...
TRANSCRIPT
Xen Cluster Management With Ganeti On Debian Etch
By Falko TimmePublished: 2007-09-16 19:47
Xen Cluster Management With Ganeti On Debian Etch
Version 1.0 Author: Falko Timme <ft [at] falkotimme [dot] com> Last edited 09/14/2007
Ganeti is a cluster virtualization management system based on Xen. In this tutorial I will explain how to create one virtual Xen machine (called an instance) on a cluster of two physical nodes, and how to manage and failover this instance between the two physical nodes.
This document comes without warranty of any kind! I do not issue any guarantee that this will work for you!
1 Preliminary Note
Ganeti is still in an early stage. Right now, it can be installed on Debian Etch nodes, and you can create virtual machines with it that use Debian Etch aswell. Other Linux distributions should theoretically work, too, but there's no documentation yet.
In this tutorial I will use the physical nodes node1.example.com and node2.example.com: - node1.example.com: IP address 192.168.0.100; will be the master of the cluster. - node2.example.com: IP address 192.168.0.101; will be the primary node of the virtual machine (aka instance).
Both have a 50GB hard drive of which I use 10GB for the / partition, 1GB for swap, and leave the rest unpartitioned so that it can be used by Ganeti (theminimum is 20GB!). Of course, you can change the partitioning to your liking, but remember about the minimum unused space.
The cluster I'm going to create will be named cluster1.example.com, and it will also have the IP address 192.168.0.100.
The Xen virtual machine (called an instance in Ganeti speak) will be named inst1.example.com with the IP address 192.168.0.105. inst1.example.com will be mirrored between the two physical nodes using DRBD - you can see this as a kind of network RAID1.
Copyright © 2007 All Rights Reserved. HowtoForge Page 1 of 81

Xen Cluster Management With Ganeti On Debian Etch http://www.howtoforge.com/
As you see, node1.example.com will be the cluster master, i.e. the machine from which you can control and manage the cluster, and node2.example.comwill be the primary node of inst1.example.com, i.e. inst1.example.com will run on node2.example.com (with all changes on inst1.example.commirrored back to node1.example.com with DRBD) until your fail it over to node1.example.com (if you want to take down node2.example.com formaintenance, for example). This is an active-passive configuration.
I think it's good practice to split up the roles between the two nodes, so that you don't lose the cluster master and the primary node at once should one nodego down.
In my tests I was using two systems with 204MB RAM each for node1 and node2. This is pretty low, and you should use considerably more RAM,especially on production systems. For my tests it was ok, though. Because of the low RAM, I restricted my Xen dom0s (node1 and node2) to use 64MBRAM. The Ganeti installation guide says that 512MB are reasonable - I think 256MB should work, too. Anyway, your system must have more RAM thanwhat you specify for dom0 so that enough RAM is left over for the virtual machine(s).
One last thing to note is that all hostnames mentioned here should be resolvable to all hosts, which means that they must either exist in DNS, or you mustput all hostnames in all /etc/hosts files on all hosts (which is what I will do here).
Ok, let's start...
2 Installing A Base Debian System On The Physical Nodes
Set up a minimal Debian Etch systems on both node1 and node2:
node1/node2:
Insert your Debian Etch Netinstall CD into your system and boot from it. Press ENTER to boot:
Copyright © 2007 All Rights Reserved. HowtoForge Page 2 of 81

Xen Cluster Management With Ganeti On Debian Etch http://www.howtoforge.com/
The installation starts, and first you have to choose your language:
Copyright © 2007 All Rights Reserved. HowtoForge Page 3 of 81

Xen Cluster Management With Ganeti On Debian Etch http://www.howtoforge.com/
Then select your location:
Copyright © 2007 All Rights Reserved. HowtoForge Page 4 of 81

Xen Cluster Management With Ganeti On Debian Etch http://www.howtoforge.com/
Copyright © 2007 All Rights Reserved. HowtoForge Page 5 of 81

Xen Cluster Management With Ganeti On Debian Etch http://www.howtoforge.com/
Choose a keyboard layout:
Copyright © 2007 All Rights Reserved. HowtoForge Page 6 of 81

Xen Cluster Management With Ganeti On Debian Etch http://www.howtoforge.com/
The installer checks the installation CD, your hardware, and configures the network with DHCP if there is a DHCP server in the network:
Copyright © 2007 All Rights Reserved. HowtoForge Page 7 of 81

Xen Cluster Management With Ganeti On Debian Etch http://www.howtoforge.com/
Enter the hostname. For node1.example.com, enter node1, for node2.example.com, enter node2:
Copyright © 2007 All Rights Reserved. HowtoForge Page 8 of 81

Xen Cluster Management With Ganeti On Debian Etch http://www.howtoforge.com/
Enter your domain name. In this example, this is example.com:
Copyright © 2007 All Rights Reserved. HowtoForge Page 9 of 81

Xen Cluster Management With Ganeti On Debian Etch http://www.howtoforge.com/
Now we have to partition the hard drive. As stated in chapter 1, I want a 10GB / partition, a 1GB swap partition, and leave the rest unpartitioned. Select Manual as the partitioning method:
Copyright © 2007 All Rights Reserved. HowtoForge Page 10 of 81

Xen Cluster Management With Ganeti On Debian Etch http://www.howtoforge.com/
Select the hard drive:
Copyright © 2007 All Rights Reserved. HowtoForge Page 11 of 81

Xen Cluster Management With Ganeti On Debian Etch http://www.howtoforge.com/
Select Yes when you are asked Create new empty partition table on this device?:
Copyright © 2007 All Rights Reserved. HowtoForge Page 12 of 81

Xen Cluster Management With Ganeti On Debian Etch http://www.howtoforge.com/
Select the free space on the hard drive:
Copyright © 2007 All Rights Reserved. HowtoForge Page 13 of 81

Xen Cluster Management With Ganeti On Debian Etch http://www.howtoforge.com/
Choose Create a new partition:
Copyright © 2007 All Rights Reserved. HowtoForge Page 14 of 81

Xen Cluster Management With Ganeti On Debian Etch http://www.howtoforge.com/
Enter 10 GB as the partition size (or whatever size you want the / partition to have):
Copyright © 2007 All Rights Reserved. HowtoForge Page 15 of 81

Xen Cluster Management With Ganeti On Debian Etch http://www.howtoforge.com/
Choose Primary as the partition type:
Copyright © 2007 All Rights Reserved. HowtoForge Page 16 of 81

Xen Cluster Management With Ganeti On Debian Etch http://www.howtoforge.com/
Select Beginning:
Copyright © 2007 All Rights Reserved. HowtoForge Page 17 of 81

Xen Cluster Management With Ganeti On Debian Etch http://www.howtoforge.com/
Make sure that you set the Bootable flag to on, then select Done setting up the partition:
Copyright © 2007 All Rights Reserved. HowtoForge Page 18 of 81

Xen Cluster Management With Ganeti On Debian Etch http://www.howtoforge.com/
The / partition is not set up. Now let's create the swap partition. Select the free space again:
Copyright © 2007 All Rights Reserved. HowtoForge Page 19 of 81

Xen Cluster Management With Ganeti On Debian Etch http://www.howtoforge.com/
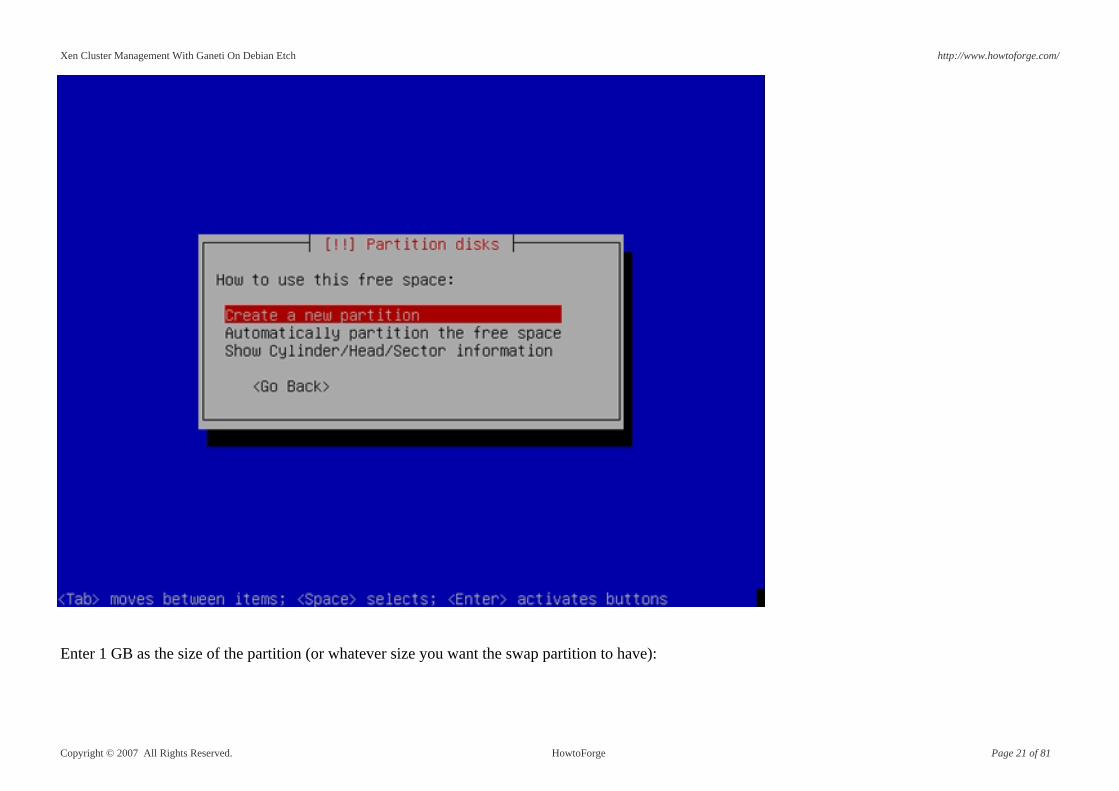
Pick Create a new partition again:
Copyright © 2007 All Rights Reserved. HowtoForge Page 20 of 81
Xen Cluster Management With Ganeti On Debian Etch http://www.howtoforge.com/
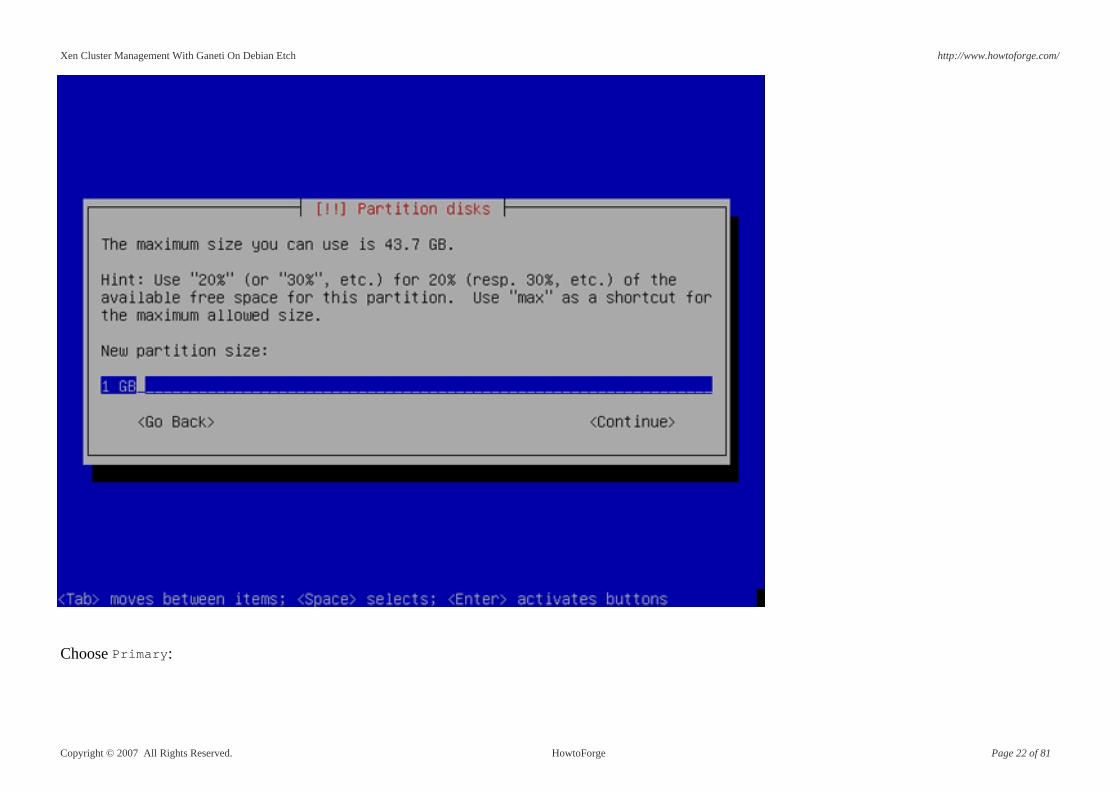
Enter 1 GB as the size of the partition (or whatever size you want the swap partition to have):
Copyright © 2007 All Rights Reserved. HowtoForge Page 21 of 81
Xen Cluster Management With Ganeti On Debian Etch http://www.howtoforge.com/
Choose Primary:
Copyright © 2007 All Rights Reserved. HowtoForge Page 22 of 81

Xen Cluster Management With Ganeti On Debian Etch http://www.howtoforge.com/
Select Beginning:
Copyright © 2007 All Rights Reserved. HowtoForge Page 23 of 81

Xen Cluster Management With Ganeti On Debian Etch http://www.howtoforge.com/
Then move to the Use as: row and press ENTER:
Copyright © 2007 All Rights Reserved. HowtoForge Page 24 of 81

Xen Cluster Management With Ganeti On Debian Etch http://www.howtoforge.com/
Select swap area:
Copyright © 2007 All Rights Reserved. HowtoForge Page 25 of 81

Xen Cluster Management With Ganeti On Debian Etch http://www.howtoforge.com/
Afterwards, choose Done setting up the partition:
Copyright © 2007 All Rights Reserved. HowtoForge Page 26 of 81

Xen Cluster Management With Ganeti On Debian Etch http://www.howtoforge.com/
Afterwards, select Finish partitioning and write changes to disk (make sure that you have at least 20 GB of unpartitioned disk space):
Copyright © 2007 All Rights Reserved. HowtoForge Page 27 of 81

Xen Cluster Management With Ganeti On Debian Etch http://www.howtoforge.com/
Select Yes when you're asked Write changes to disks?:
Copyright © 2007 All Rights Reserved. HowtoForge Page 28 of 81

Xen Cluster Management With Ganeti On Debian Etch http://www.howtoforge.com/
Afterwards, your new partitions are being created and formatted:
Copyright © 2007 All Rights Reserved. HowtoForge Page 29 of 81

Xen Cluster Management With Ganeti On Debian Etch http://www.howtoforge.com/
Afterwards, give the root user a password:
Copyright © 2007 All Rights Reserved. HowtoForge Page 30 of 81

Xen Cluster Management With Ganeti On Debian Etch http://www.howtoforge.com/
Confirm that password to avoid typos:
Copyright © 2007 All Rights Reserved. HowtoForge Page 31 of 81

Xen Cluster Management With Ganeti On Debian Etch http://www.howtoforge.com/
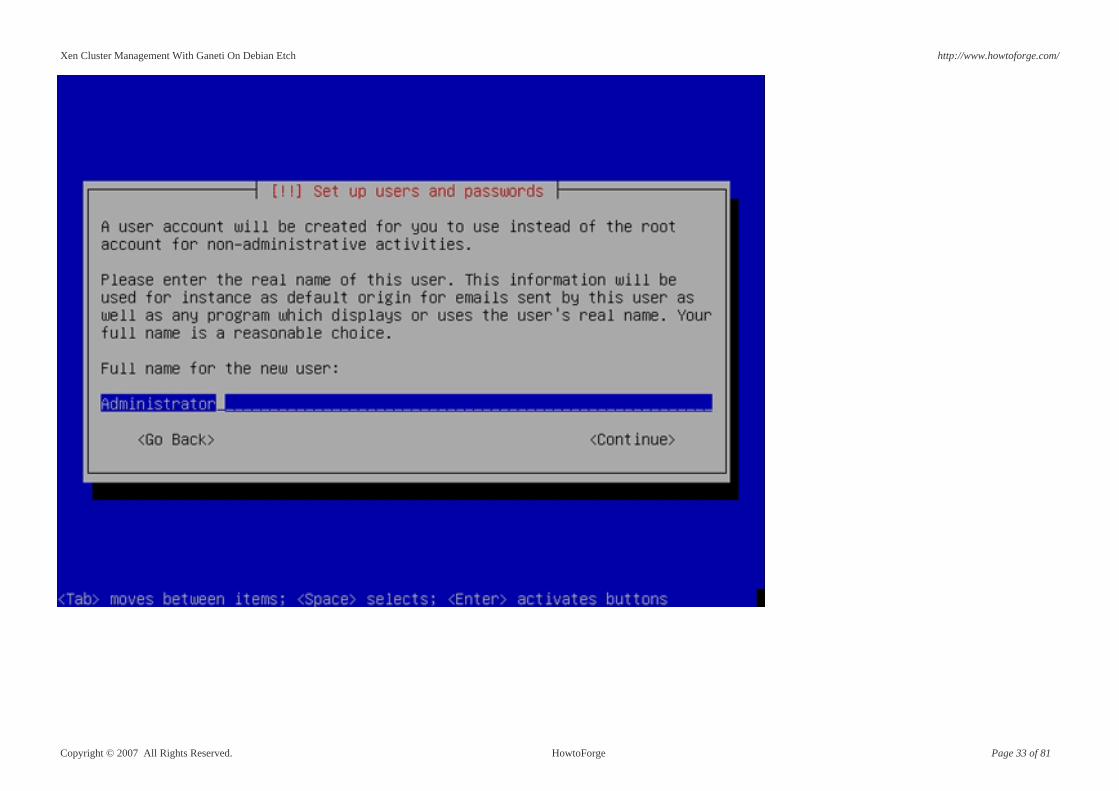
Create a normal user account, for example the user Administrator with the user name administrator (don't use the user name admin as it is a reservedname on Debian Etch):
Copyright © 2007 All Rights Reserved. HowtoForge Page 32 of 81
Xen Cluster Management With Ganeti On Debian Etch http://www.howtoforge.com/
Copyright © 2007 All Rights Reserved. HowtoForge Page 33 of 81

Xen Cluster Management With Ganeti On Debian Etch http://www.howtoforge.com/
Copyright © 2007 All Rights Reserved. HowtoForge Page 34 of 81

Xen Cluster Management With Ganeti On Debian Etch http://www.howtoforge.com/
Copyright © 2007 All Rights Reserved. HowtoForge Page 35 of 81

Xen Cluster Management With Ganeti On Debian Etch http://www.howtoforge.com/
Now the base system is being installed:
Copyright © 2007 All Rights Reserved. HowtoForge Page 36 of 81

Xen Cluster Management With Ganeti On Debian Etch http://www.howtoforge.com/
Next you must configure apt. Because you are using the Debian Etch Netinstall CD which contains only a minimal set of packages, you must use a networkmirror:
Copyright © 2007 All Rights Reserved. HowtoForge Page 37 of 81

Xen Cluster Management With Ganeti On Debian Etch http://www.howtoforge.com/
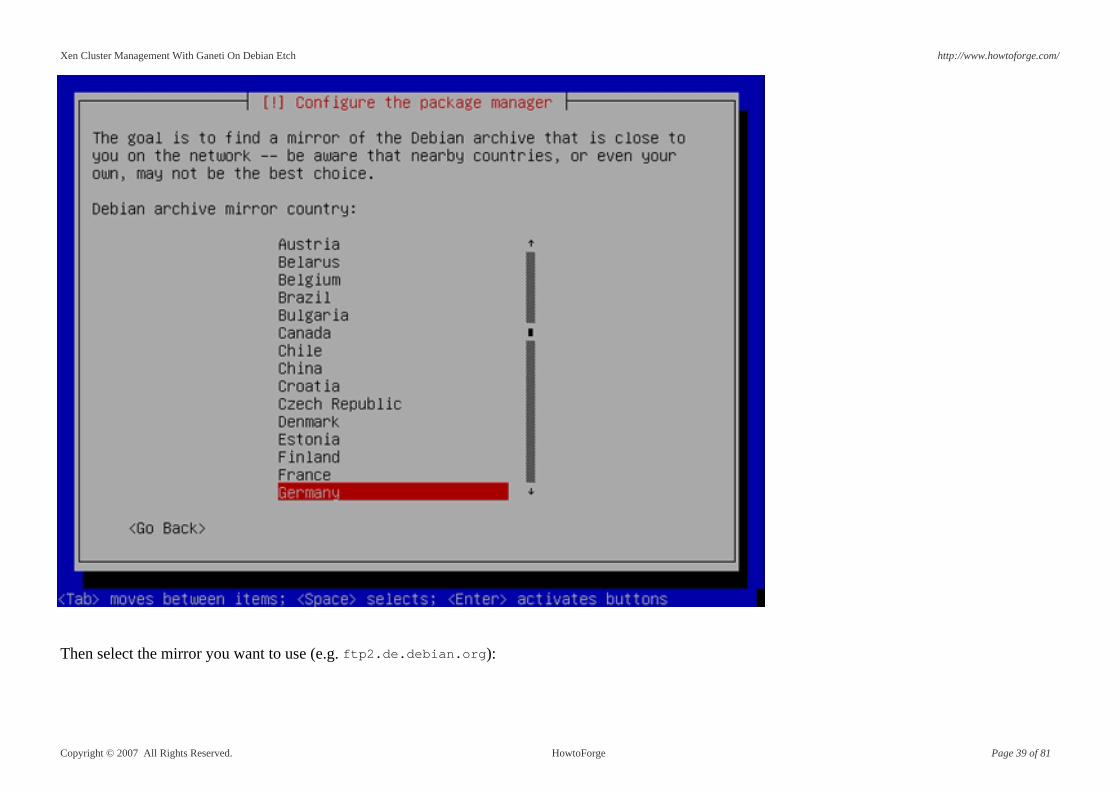
Select the country where the network mirror that you want to use is located (usually this is the country where your Debian Etch system is located):
Copyright © 2007 All Rights Reserved. HowtoForge Page 38 of 81
Xen Cluster Management With Ganeti On Debian Etch http://www.howtoforge.com/
Then select the mirror you want to use (e.g. ftp2.de.debian.org):
Copyright © 2007 All Rights Reserved. HowtoForge Page 39 of 81

Xen Cluster Management With Ganeti On Debian Etch http://www.howtoforge.com/
Unless you use an HTTP proxy, leave the following field empty and hit Continue:
Copyright © 2007 All Rights Reserved. HowtoForge Page 40 of 81

Xen Cluster Management With Ganeti On Debian Etch http://www.howtoforge.com/
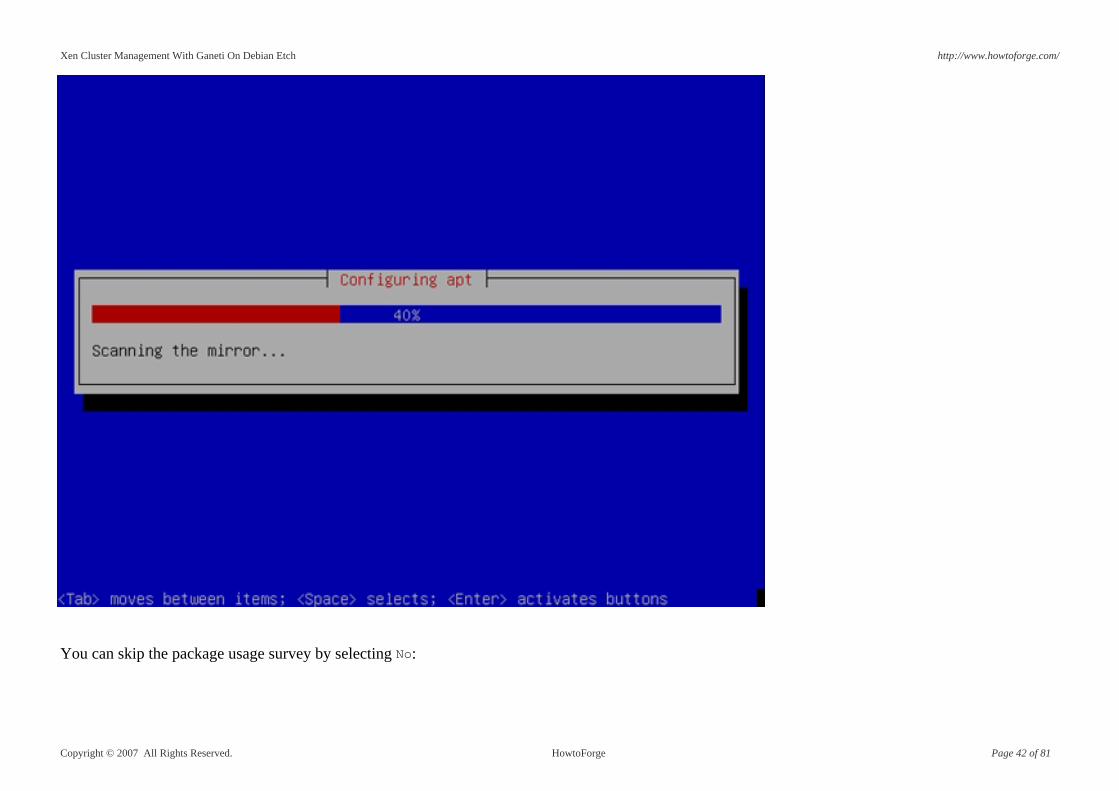
Apt is now updating its packages database:
Copyright © 2007 All Rights Reserved. HowtoForge Page 41 of 81
Xen Cluster Management With Ganeti On Debian Etch http://www.howtoforge.com/
You can skip the package usage survey by selecting No:
Copyright © 2007 All Rights Reserved. HowtoForge Page 42 of 81

Xen Cluster Management With Ganeti On Debian Etch http://www.howtoforge.com/
We want a minimal system, therefore we just select Standard system and hit Continue:
Copyright © 2007 All Rights Reserved. HowtoForge Page 43 of 81

Xen Cluster Management With Ganeti On Debian Etch http://www.howtoforge.com/
The required packages are being installed on the system:
Copyright © 2007 All Rights Reserved. HowtoForge Page 44 of 81

Xen Cluster Management With Ganeti On Debian Etch http://www.howtoforge.com/
When you're asked Install the GRUB boot loader to the master boot record, select Yes:
Copyright © 2007 All Rights Reserved. HowtoForge Page 45 of 81

Xen Cluster Management With Ganeti On Debian Etch http://www.howtoforge.com/
The base system installation is now finished. Remove the Debian Etch Netinstall CD from the CD drive and hit Continue to reboot the system:
Copyright © 2007 All Rights Reserved. HowtoForge Page 46 of 81

Xen Cluster Management With Ganeti On Debian Etch http://www.howtoforge.com/
On to the next step...
3 Preparing The Physical Nodes
Copyright © 2007 All Rights Reserved. HowtoForge Page 47 of 81

Xen Cluster Management With Ganeti On Debian Etch http://www.howtoforge.com/
node1/node2:
First we update the packages database:
apt-get update
Then we install OpenSSH and a full-featured vim text editor (unless you prefer another text editor such as nano):
apt-get install ssh openssh-server vim-full
node1:
Because the Debian Etch installer has configured our system to get its network settings via DHCP, we have to change that now because a server shouldhave a static IP address. Edit /etc/network/interfaces and adjust it to your needs (please note that I replace allow-hotplug eth0 with auto eth0;otherwise restarting the network doesn't work, and we'd have to reboot the whole system):
vi /etc/network/interfaces
# The loopback network interface
auto lo
iface lo inet loopback
# The primary network interface
#allow-hotplug eth0
#iface eth0 inet dhcp
auto eth0
iface eth0 inet static
address 192.168.0.100
netmask 255.255.255.0
Copyright © 2007 All Rights Reserved. HowtoForge Page 48 of 81

Xen Cluster Management With Ganeti On Debian Etch http://www.howtoforge.com/
network 192.168.0.0
broadcast 192.168.0.255
gateway 192.168.0.1
Then restart your network:
/etc/init.d/networking restart
Then edit /etc/hosts. Make it look like this:
vi /etc/hosts
127.0.0.1 localhost.localdomain localhost
192.168.0.100 node1.example.com node1 cluster1.example.com cluster1
192.168.0.101 node2.example.com node2
192.168.0.105 inst1.example.com inst1
# The following lines are desirable for IPv6 capable hosts
::1 ip6-localhost ip6-loopback
fe00::0 ip6-localnet
ff00::0 ip6-mcastprefix
ff02::1 ip6-allnodes
ff02::2 ip6-allrouters
ff02::3 ip6-allhosts
Next we must make sure that the commands
hostname
Copyright © 2007 All Rights Reserved. HowtoForge Page 49 of 81

Xen Cluster Management With Ganeti On Debian Etch http://www.howtoforge.com/
and
hostname -f
print out the full hostname (node1.example.com). If you get something different (e.g. just node1), do this:
echo node1.example.com > /etc/hostname
/etc/init.d/hostname.sh start
Afterwards, the hostname commands should show the full hostname.
node2:
Now we do the same again on node2.example.com:
vi /etc/network/interfaces
# The loopback network interface
auto lo
iface lo inet loopback
# The primary network interface
#allow-hotplug eth0
#iface eth0 inet dhcp
auto eth0
iface eth0 inet static
address 192.168.0.101
netmask 255.255.255.0
Copyright © 2007 All Rights Reserved. HowtoForge Page 50 of 81

Xen Cluster Management With Ganeti On Debian Etch http://www.howtoforge.com/
network 192.168.0.0
broadcast 192.168.0.255
gateway 192.168.0.1
/etc/init.d/networking restart
vi /etc/hosts
127.0.0.1 localhost.localdomain localhost
192.168.0.100 node1.example.com node1 cluster1.example.com cluster1
192.168.0.101 node2.example.com node2
192.168.0.105 inst1.example.com inst1
# The following lines are desirable for IPv6 capable hosts
::1 ip6-localhost ip6-loopback
fe00::0 ip6-localnet
ff00::0 ip6-mcastprefix
ff02::1 ip6-allnodes
ff02::2 ip6-allrouters
ff02::3 ip6-allhosts
echo node2.example.com > /etc/hostname
/etc/init.d/hostname.sh start
node1/node2:
Copyright © 2007 All Rights Reserved. HowtoForge Page 51 of 81

Xen Cluster Management With Ganeti On Debian Etch http://www.howtoforge.com/
Edit /etc/apt/sources.list. Comment out the CD. It should look like this:
vi /etc/apt/sources.list
#
# deb cdrom:[Debian GNU/Linux 4.0 r0 _Etch_ - Official i386 NETINST Binary-1 20070407-11:29]/ etch contrib main
#deb cdrom:[Debian GNU/Linux 4.0 r0 _Etch_ - Official i386 NETINST Binary-1 20070407-11:29]/ etch contrib main
deb http://ftp2.de.debian.org/debian/ etch main
deb-src http://ftp2.de.debian.org/debian/ etch main
deb http://security.debian.org/ etch/updates main contrib
deb-src http://security.debian.org/ etch/updates main contrib
Then run
apt-get update
to update the apt packages database and
apt-get upgrade
to install the latest updates (if there are any). Afterwards, install the build-essential package:
apt-get install build-essential
Copyright © 2007 All Rights Reserved. HowtoForge Page 52 of 81

Xen Cluster Management With Ganeti On Debian Etch http://www.howtoforge.com/
4 Installing Xen
node1/node2:
Next we install Xen on both physical nodes:
apt-get install xen-linux-system-2.6.18-5-xen-686 libc6-xen
Then we edit /etc/xen/xend-config.sxp and modify the dom0-min-mem line so that it looks like this:
vi /etc/xen/xend-config.sxp
[...]
# Dom0 will balloon out when needed to free memory for domU.
# dom0-min-mem is the lowest memory level (in MB) dom0 will get down to.
# If dom0-min-mem=0, dom0 will never balloon out.
(dom0-min-mem 0)
[...]
Next open /boot/grub/menu.lst and find the # xenhopt= and # xenkopt= lines and modify them as follows (don't remove the # at the beginning!):
vi /boot/grub/menu.lst
[...]
## Xen hypervisor options to use with the default Xen boot option
# xenhopt=dom0_mem=64M
Copyright © 2007 All Rights Reserved. HowtoForge Page 53 of 81

Xen Cluster Management With Ganeti On Debian Etch http://www.howtoforge.com/
## Xen Linux kernel options to use with the default Xen boot option
# xenkopt=console=tty0 nosmp
[...]
(Remember what I said about memory in chapter 1. If you have enough RAM, you should probably use 256M or 512M here, at least on production systems.)
Afterwards, update the GRUB boot loader:
update-grub
and reboot both physical nodes:
shutdown -r now
At the boot prompt, select the new Xen kernel and boot from it.
After the nodes have come up, do this:
cd /boot
ln -s vmlinuz-`uname -r` vmlinuz-2.6-xenU
ln -s initrd.img-`uname -r` initrd-2.6-xenU
5 Installing DRBD
node1/node2:
Copyright © 2007 All Rights Reserved. HowtoForge Page 54 of 81

Xen Cluster Management With Ganeti On Debian Etch http://www.howtoforge.com/
Next we install DRBD:
apt-get install drbd0.7-module-source drbd0.7-utils
Now we must compile and enable the DRBD kernel module:
m-a update
m-a a-i drbd0.7
echo drbd minor_count=64 >> /etc/modules
modprobe drbd minor_count=64
6 Installing LVM And A Few Other Needed Packages
node1/node2:
Now we install LVM and some other needed packages:
apt-get install lvm2 ssh bridge-utils iproute iputils-arping fping python2.4 python-twisted-core python-pyopenssl openssl mdadm
You will see this question:
MD arrays needed for the root filesystem: <-- all
7 Reconfiguring The Network For Ganeti
Copyright © 2007 All Rights Reserved. HowtoForge Page 55 of 81

Xen Cluster Management With Ganeti On Debian Etch http://www.howtoforge.com/
Ganeti relies on Xen running in bridge mode, using a bridge called xen-br0 on dom0. Therefore we have to reconfigure the network on our physical nodes(dom0):
node1:
Edit /etc/network/interfaces and replace the eth0 stanza with a stanza for xen-br0 so that it looks like this:
vi /etc/network/interfaces
# This file describes the network interfaces available on your system
# and how to activate them. For more information, see interfaces(5).
# The loopback network interface
auto lo
iface lo inet loopback
# The primary network interface
#allow-hotplug eth0
#iface eth0 inet dhcp
auto xen-br0
iface xen-br0 inet static
address 192.168.0.100
netmask 255.255.255.0
network 192.168.0.0
broadcast 192.168.0.255
gateway 192.168.0.1
bridge_ports eth0
bridge_stp off
bridge_fd 0
Copyright © 2007 All Rights Reserved. HowtoForge Page 56 of 81

Xen Cluster Management With Ganeti On Debian Etch http://www.howtoforge.com/
Then take down eth0 and bring up xen-br0:
ifdown eth0
ifup xen-br0
Afterwards, check that your new bridge is working:
ip a show xen-br0
node1:~# ip a show xen-br0
4: xen-br0: <BROADCAST,MULTICAST,UP,10000> mtu 1500 qdisc noqueue
link/ether 00:0c:29:d6:b1:55 brd ff:ff:ff:ff:ff:ff
inet 192.168.0.100/24 brd 192.168.0.255 scope global xen-br0
inet6 fe80::20c:29ff:fed6:b155/64 scope link
valid_lft forever preferred_lft forever
node1:~#
brctl show xen-br0
node1:~# brctl show xen-br0
bridge name bridge id STP enabled interfaces
xen-br0 8000.000c29d6b155 no eth0
node1:~#
ifconfig
node1:~# ifconfig
eth0 Link encap:Ethernet HWaddr 00:0C:29:D6:B1:55
Copyright © 2007 All Rights Reserved. HowtoForge Page 57 of 81
Xen Cluster Management With Ganeti On Debian Etch http://www.howtoforge.com/
inet6 addr: fe80::20c:29ff:fed6:b155/64 Scope:Link
UP BROADCAST RUNNING MULTICAST MTU:1500 Metric:1
RX packets:26917 errors:7 dropped:1408 overruns:0 frame:0
TX packets:1571 errors:0 dropped:0 overruns:0 carrier:0
collisions:0 txqueuelen:1000
RX bytes:22665198 (21.6 MiB) TX bytes:178098 (173.9 KiB)
Interrupt:17 Base address:0x1400
lo Link encap:Local Loopback
inet addr:127.0.0.1 Mask:255.0.0.0
inet6 addr: ::1/128 Scope:Host
UP LOOPBACK RUNNING MTU:16436 Metric:1
RX packets:8 errors:0 dropped:0 overruns:0 frame:0
TX packets:8 errors:0 dropped:0 overruns:0 carrier:0
collisions:0 txqueuelen:0
RX bytes:560 (560.0 b) TX bytes:560 (560.0 b)
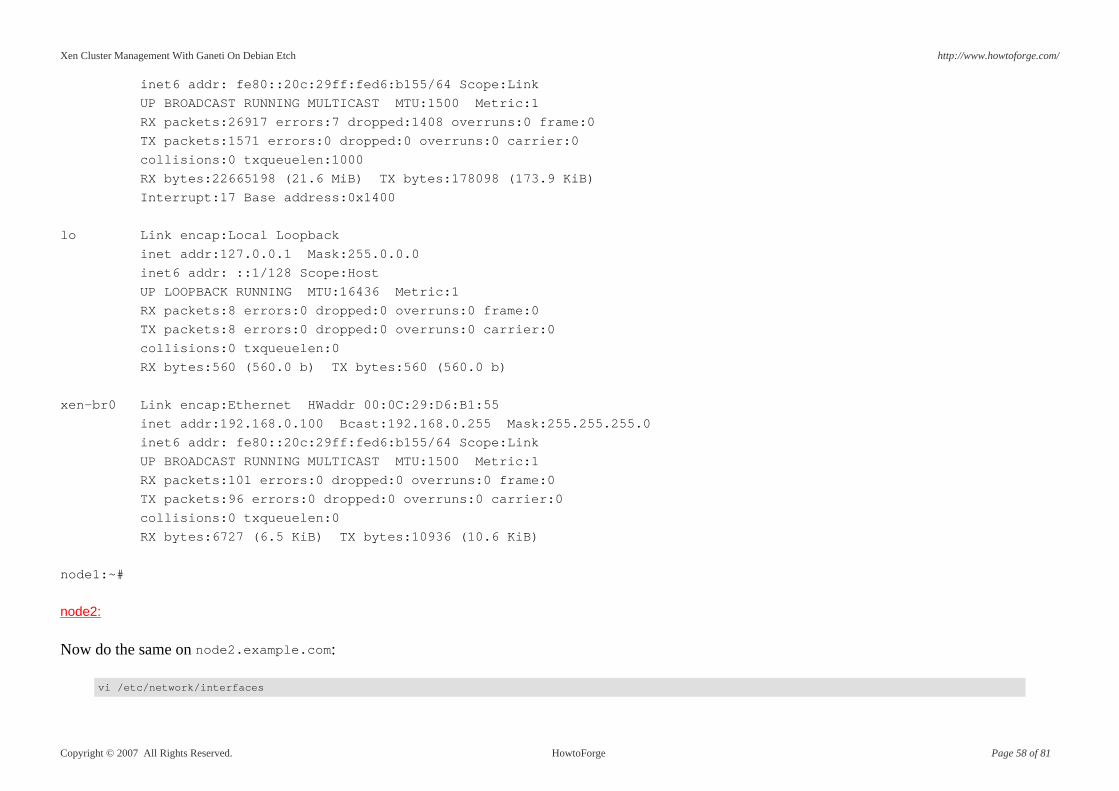
xen-br0 Link encap:Ethernet HWaddr 00:0C:29:D6:B1:55
inet addr:192.168.0.100 Bcast:192.168.0.255 Mask:255.255.255.0
inet6 addr: fe80::20c:29ff:fed6:b155/64 Scope:Link
UP BROADCAST RUNNING MULTICAST MTU:1500 Metric:1
RX packets:101 errors:0 dropped:0 overruns:0 frame:0
TX packets:96 errors:0 dropped:0 overruns:0 carrier:0
collisions:0 txqueuelen:0
RX bytes:6727 (6.5 KiB) TX bytes:10936 (10.6 KiB)
node1:~#
node2:
Now do the same on node2.example.com:
vi /etc/network/interfaces
Copyright © 2007 All Rights Reserved. HowtoForge Page 58 of 81

Xen Cluster Management With Ganeti On Debian Etch http://www.howtoforge.com/
# This file describes the network interfaces available on your system
# and how to activate them. For more information, see interfaces(5).
# The loopback network interface
auto lo
iface lo inet loopback
# The primary network interface
#allow-hotplug eth0
#iface eth0 inet dhcp
auto xen-br0
iface xen-br0 inet static
address 192.168.0.101
netmask 255.255.255.0
network 192.168.0.0
broadcast 192.168.0.255
gateway 192.168.0.1
bridge_ports eth0
bridge_stp off
bridge_fd 0
ifdown eth0
ifup xen-br0
ip a show xen-br0
Copyright © 2007 All Rights Reserved. HowtoForge Page 59 of 81

Xen Cluster Management With Ganeti On Debian Etch http://www.howtoforge.com/
node2:~# ip a show xen-br0
4: xen-br0: <BROADCAST,MULTICAST,UP,10000> mtu 1500 qdisc noqueue
link/ether 00:0c:29:d0:19:53 brd ff:ff:ff:ff:ff:ff
inet 192.168.0.101/24 brd 192.168.0.255 scope global xen-br0
inet6 fe80::20c:29ff:fed0:1953/64 scope link
valid_lft forever preferred_lft forever
node2:~#
brctl show xen-br0
node2:~# brctl show xen-br0
bridge name bridge id STP enabled interfaces
xen-br0 8000.000c29d01953 no eth0
node2:~#
ifconfig
node2:~# ifconfig
eth0 Link encap:Ethernet HWaddr 00:0C:29:D0:19:53
inet6 addr: fe80::20c:29ff:fed0:1953/64 Scope:Link
UP BROADCAST RUNNING MULTICAST MTU:1500 Metric:1
RX packets:9469 errors:8 dropped:3521 overruns:0 frame:0
TX packets:1655 errors:0 dropped:0 overruns:0 carrier:0
collisions:0 txqueuelen:1000
RX bytes:8597242 (8.1 MiB) TX bytes:183126 (178.8 KiB)
Interrupt:16 Base address:0x1400
lo Link encap:Local Loopback
inet addr:127.0.0.1 Mask:255.0.0.0
inet6 addr: ::1/128 Scope:Host
UP LOOPBACK RUNNING MTU:16436 Metric:1
Copyright © 2007 All Rights Reserved. HowtoForge Page 60 of 81

Xen Cluster Management With Ganeti On Debian Etch http://www.howtoforge.com/
RX packets:8 errors:0 dropped:0 overruns:0 frame:0
TX packets:8 errors:0 dropped:0 overruns:0 carrier:0
collisions:0 txqueuelen:0
RX bytes:560 (560.0 b) TX bytes:560 (560.0 b)
xen-br0 Link encap:Ethernet HWaddr 00:0C:29:D0:19:53
inet addr:192.168.0.101 Bcast:192.168.0.255 Mask:255.255.255.0
inet6 addr: fe80::20c:29ff:fed0:1953/64 Scope:Link
UP BROADCAST RUNNING MULTICAST MTU:1500 Metric:1
RX packets:18 errors:0 dropped:0 overruns:0 frame:0
TX packets:24 errors:0 dropped:0 overruns:0 carrier:0
collisions:0 txqueuelen:0
RX bytes:1070 (1.0 KiB) TX bytes:2832 (2.7 KiB)
node2:~#
8 Setting Up LVM On The Free HDD Space
node1/node2:
Let's find out about our hard drive:
fdisk -l
node1:~# fdisk -l
Disk /dev/sda: 53.6 GB, 53687091200 bytes
255 heads, 63 sectors/track, 6527 cylinders
Units = cylinders of 16065 * 512 = 8225280 bytes
Device Boot Start End Blocks Id System
/dev/sda1 * 1 1216 9767488+ 83 Linux
Copyright © 2007 All Rights Reserved. HowtoForge Page 61 of 81

Xen Cluster Management With Ganeti On Debian Etch http://www.howtoforge.com/
/dev/sda2 1217 1338 979965 82 Linux swap / Solaris
node1:~#
We will now create the partition /dev/sda3 (on both physical nodes) using the rest of the hard drive and prepare it for LVM:
fdisk /dev/sda
node1:~# fdisk /dev/sda
The number of cylinders for this disk is set to 6527.
There is nothing wrong with that, but this is larger than 1024,
and could in certain setups cause problems with:
1) software that runs at boot time (e.g., old versions of LILO)
2) booting and partitioning software from other OSs
(e.g., DOS FDISK, OS/2 FDISK)
Command (m for help): <-- mCommand action
a toggle a bootable flag
b edit bsd disklabel
c toggle the dos compatibility flag
d delete a partition
l list known partition types
m print this menu
n add a new partition
o create a new empty DOS partition table
p print the partition table
q quit without saving changes
s create a new empty Sun disklabel
t change a partition's system id
u change display/entry units
v verify the partition table
Copyright © 2007 All Rights Reserved. HowtoForge Page 62 of 81

Xen Cluster Management With Ganeti On Debian Etch http://www.howtoforge.com/
w write table to disk and exit
x extra functionality (experts only)
Command (m for help): <-- nCommand action
e extended
p primary partition (1-4)
<-- pPartition number (1-4): <-- 3First cylinder (1339-6527, default 1339): <-- ENTERUsing default value 1339
Last cylinder or +size or +sizeM or +sizeK (1339-6527, default 6527): <-- ENTERUsing default value 6527
Command (m for help): <-- tPartition number (1-4): <-- 3Hex code (type L to list codes): <-- L
0 Empty 1e Hidden W95 FAT1 80 Old Minix be Solaris boot 1 FAT12 24 NEC DOS 81 Minix / old Lin bf Solaris
2 XENIX root 39 Plan 9 82 Linux swap / So c1 DRDOS/sec (FAT-
3 XENIX usr 3c PartitionMagic 83 Linux c4 DRDOS/sec (FAT-
4 FAT16 <32M 40 Venix 80286 84 OS/2 hidden C: c6 DRDOS/sec (FAT-
5 Extended 41 PPC PReP Boot 85 Linux extended c7 Syrinx
6 FAT16 42 SFS 86 NTFS volume set da Non-FS data
7 HPFS/NTFS 4d QNX4.x 87 NTFS volume set db CP/M / CTOS / .
8 AIX 4e QNX4.x 2nd part 88 Linux plaintext de Dell Utility
9 AIX bootable 4f QNX4.x 3rd part 8e Linux LVM df BootIt
a OS/2 Boot Manag 50 OnTrack DM 93 Amoeba e1 DOS access
b W95 FAT32 51 OnTrack DM6 Aux 94 Amoeba BBT e3 DOS R/O
c W95 FAT32 (LBA) 52 CP/M 9f BSD/OS e4 SpeedStor
e W95 FAT16 (LBA) 53 OnTrack DM6 Aux a0 IBM Thinkpad hi eb BeOS fs
f W95 Ext'd (LBA) 54 OnTrackDM6 a5 FreeBSD ee EFI GPT
Copyright © 2007 All Rights Reserved. HowtoForge Page 63 of 81

Xen Cluster Management With Ganeti On Debian Etch http://www.howtoforge.com/
10 OPUS 55 EZ-Drive a6 OpenBSD ef EFI (FAT-12/16/
11 Hidden FAT12 56 Golden Bow a7 NeXTSTEP f0 Linux/PA-RISC b
12 Compaq diagnost 5c Priam Edisk a8 Darwin UFS f1 SpeedStor
14 Hidden FAT16 <3 61 SpeedStor a9 NetBSD f4 SpeedStor
16 Hidden FAT16 63 GNU HURD or Sys ab Darwin boot f2 DOS secondary
17 Hidden HPFS/NTF 64 Novell Netware b7 BSDI fs fd Linux raid auto
18 AST SmartSleep 65 Novell Netware b8 BSDI swap fe LANstep
1b Hidden W95 FAT3 70 DiskSecure Mult bb Boot Wizard hid ff BBT
1c Hidden W95 FAT3 75 PC/IX
Hex code (type L to list codes): <-- 8eChanged system type of partition 3 to 8e (Linux LVM)
Command (m for help): <-- wThe partition table has been altered!
Calling ioctl() to re-read partition table.
WARNING: Re-reading the partition table failed with error 16: Device or resource busy.
The kernel still uses the old table.
The new table will be used at the next reboot.
Syncing disks.
node1:~#
Now let's take a look at our hard drive again:
fdisk -l
node1:~# fdisk -l
Disk /dev/sda: 53.6 GB, 53687091200 bytes
255 heads, 63 sectors/track, 6527 cylinders
Units = cylinders of 16065 * 512 = 8225280 bytes
Copyright © 2007 All Rights Reserved. HowtoForge Page 64 of 81

Xen Cluster Management With Ganeti On Debian Etch http://www.howtoforge.com/
Device Boot Start End Blocks Id System
/dev/sda1 * 1 1216 9767488+ 83 Linux
/dev/sda2 1217 1338 979965 82 Linux swap / Solaris
/dev/sda3 1339 6527 41680642+ 8e Linux LVM
node1:~#
Looks good. Now we must reboot both physical nodes so that the kernel can read in the new partition table:
shutdown -r now
After the reboot, we prepare /dev/sda3 for LVM on both nodes and add it to the volume group xenvg:
pvcreate /dev/sda3
vgcreate xenvg /dev/sda3
It is recommended to configure LVM not to scan the DRBD devices. Therefore we open /etc/lvm/lvm.conf and replace the filter line as follows:
vi /etc/lvm/lvm.conf
[...]
filter = [ "r|/dev/cdrom|", "r|/dev/drbd[0-9]+|" ]
[...]
9 Installing Ganeti
node1/node2:
Copyright © 2007 All Rights Reserved. HowtoForge Page 65 of 81

Xen Cluster Management With Ganeti On Debian Etch http://www.howtoforge.com/
First, install docbook-utils:
apt-get install docbook-utils
Then download and install Ganeti as follows:
cd /tmp
wget http://ganeti.googlecode.com/files/ganeti-1.2b1.tar.gz
tar xvzf ganeti-1.2b1.tar.gz
cd ganeti-1.2b1
./configure --localstatedir=/var
make
make install
mkdir /srv/ganeti/ /srv/ganeti/os /srv/ganeti/export
Copy the Ganeti init script to /etc/init.d...
cp docs/examples/ganeti.initd /etc/init.d/ganeti
... and tell both nodes to start Ganeti at boot time:
update-rc.d ganeti defaults 20 80
Copyright © 2007 All Rights Reserved. HowtoForge Page 66 of 81

Xen Cluster Management With Ganeti On Debian Etch http://www.howtoforge.com/
10 Installing The Ganeti Scripts For Debian Etch Instances
node1/node2:
Next we install the scripts that Ganeti needs to install Debian Etch in a virtual machine (or instance):
cd /srv/ganeti/os
wget http://ganeti.googlecode.com/files/instance-debian-etch-0.1.tar
tar xvf instance-debian-etch-0.1.tar
mv instance-debian-etch-0.1 debian-etch
We also need the debootstrap package:
apt-get install debootstrap
11 Initializing The Cluster
node1:
Now we can initialize our cluster (this has to be done only once per cluster). Our clustername is cluster1.example.com, and I want node1.example.comto be the master, therefore we run the following command on node1.example.com:
gnt-cluster init cluster1.example.com
12 Adding node2.example.com To The Cluster
node1:
Copyright © 2007 All Rights Reserved. HowtoForge Page 67 of 81

Xen Cluster Management With Ganeti On Debian Etch http://www.howtoforge.com/
Now that node1 is the master, we run all commands for managing the cluster on node1. In order to add node2.example.com to the cluster, we run:
gnt-node add node2.example.com
This will look like this:
node1:/srv/ganeti/os# gnt-node add node2.example.com
The authenticity of host 'node2.example.com (192.168.0.101)' can't be established.
RSA key fingerprint is 1c:83:24:cc:05:ab:9a:d6:51:ba:4d:31:42:1f:0a:6f.
Are you sure you want to continue connecting (yes/no)? <-- yes
[email protected]'s password:node1:/srv/ganeti/os#
Now let's check if our cluster really consists out of node1 and node2:
gnt-node list
You should get something like this:
node1:/srv/ganeti/os# gnt-node list
Node DTotal DFree MTotal MNode MFree Pinst Sinst
node1.example.com 40700 40700 203 64 124 0 0
node2.example.com 40700 40700 203 64 124 0 0
node1:/srv/ganeti/os#
13 Setting Up An Instance
node1:
Now let's create our first virtual machine (called an instance in Ganeti speak), inst1.example.com. I want to use DRBD for it (remote RAID1), I want node2 to be the primary node, and I want the instance to have a 5 GB hard drive, 256 MB swap and 64 MB RAM. Again, we run the command on the
Copyright © 2007 All Rights Reserved. HowtoForge Page 68 of 81

Xen Cluster Management With Ganeti On Debian Etch http://www.howtoforge.com/
cluster master, node1.example.com:
gnt-instance add -t remote_raid1 -n node2.example.com --secondary-node node1.example.com -o debian-etch -s 5g --swap-size 256 -m 64
inst1.example.com
This can take some time. This is how the output looks:
node1:~# gnt-instance add -t remote_raid1 -n node2.example.com --secondary-node node1.example.com -o debian-etch -s 5g
--swap-size 256 -m 64 inst1.example.com
* creating instance disks...
adding instance inst1.example.com to cluster config
Waiting for instance inst1.example.com to sync disks.
- device sda: 18.90% done, 2661 estimated seconds remaining
- device sda: 22.10% done, 1278 estimated seconds remaining
- device sda: 26.40% done, 1611 estimated seconds remaining
- device sda: 30.70% done, 1301 estimated seconds remaining
- device sda: 34.70% done, 1524 estimated seconds remaining
- device sda: 38.80% done, 894 estimated seconds remaining
- device sda: 43.30% done, 1753 estimated seconds remaining
- device sda: 48.40% done, 1195 estimated seconds remaining
- device sda: 52.70% done, 1213 estimated seconds remaining
- device sda: 57.70% done, 1011 estimated seconds remaining
- device sda: 61.10% done, 730 estimated seconds remaining
- device sda: 64.60% done, 698 estimated seconds remaining
- device sda: 69.40% done, 595 estimated seconds remaining
- device sda: 73.80% done, 430 estimated seconds remaining
- device sda: 78.30% done, 438 estimated seconds remaining
- device sda: 82.00% done, 169 estimated seconds remaining
- device sda: 85.80% done, 298 estimated seconds remaining
- device sda: 91.20% done, 146 estimated seconds remaining
- device sda: 95.50% done, 85 estimated seconds remaining
- device sda: 99.20% done, 18 estimated seconds remaining
Copyright © 2007 All Rights Reserved. HowtoForge Page 69 of 81

Xen Cluster Management With Ganeti On Debian Etch http://www.howtoforge.com/
Instance inst1.example.com's disks are in sync.
creating os for instance inst1.example.com on node node2.example.com
* running the instance OS create scripts...
* starting instance...
node1:~#
Ganeti has created a complete virtual machine (using Debian Etch) which you can now use.
14 Configuring The Instance
node1:
To get to inst1.example.com's command line, run
gnt-instance console inst1.example.com
on node1.
inst1.example.com:
Now you can log in to inst1.example.com. The username is root along with no password. Therefore the first thing we do after the login is create apassword for root:
passwd
Next we must add a stanza for eth0 to /etc/network/interfaces. Right now, inst1.example.com has no network connectivity because only lo (theloopback interface) is up.
As I said in chapter 1, I want inst1.example.com to have the IP address 192.168.0.105:
vi /etc/network/interfaces
Copyright © 2007 All Rights Reserved. HowtoForge Page 70 of 81

Xen Cluster Management With Ganeti On Debian Etch http://www.howtoforge.com/
auto lo
iface lo inet loopback
auto eth0
iface eth0 inet static
address 192.168.0.105
netmask 255.255.255.0
network 192.168.0.0
broadcast 192.168.0.255
gateway 192.168.0.1
Restart the network afterwards:
/etc/init.d/networking restart
Run
apt-get update
to update the packages database on inst1, and then install OpenSSH and a full-featured vim:
apt-get install ssh openssh-server vim-full
Now you can connect to inst1.example.com using an SSH client such as PuTTY on the IP address 192.168.0.105.
To leave inst1's console and get back to node1, type CTRL+] if you are at the console, or CTRL+5 if you're using PuTTY (this is the same as if you were
Copyright © 2007 All Rights Reserved. HowtoForge Page 71 of 81

Xen Cluster Management With Ganeti On Debian Etch http://www.howtoforge.com/
using Xen's xm commands instead of Ganeti).
15 Further Ganeti Commands
To learn more about what you can do with Ganeti, take a look at the following man pages:
man gnt-instance
man gnt-cluster
man gnt-node
man gnt-os
man gnt-backup
man 7 ganeti
man 7 ganeti-os-interface
and also at the Ganeti administrator's guide that comes with the Ganeti package (in /docs/admin.html). The Ganeti installation tutorial also has somehints.
The most interesting commands should be these:
Start an instance:
Copyright © 2007 All Rights Reserved. HowtoForge Page 72 of 81

Xen Cluster Management With Ganeti On Debian Etch http://www.howtoforge.com/
gnt-instance startup inst1.example.com
Stop an instance:
gnt-instance shutdown inst1.example.com
Go to an instance's console:
gnt-instance console inst1.example.com
Failover an instance to its secondary node:
gnt-instance failover inst1.example.com
Delete an instance:
gnt-instance remove inst1.example.com
Get a list of instances:
gnt-instance list
node1:~# gnt-instance list
Instance OS Primary_node Autostart Status Memory
inst1.example.com debian-etch node2.example.com yes running 64
node1:~#
Copyright © 2007 All Rights Reserved. HowtoForge Page 73 of 81

Xen Cluster Management With Ganeti On Debian Etch http://www.howtoforge.com/
Get more details about instances:
gnt-instance info
node1:~# gnt-instance info
Instance name: inst1.example.com
State: configured to be up, actual state is up
Nodes:
- primary: node2.example.com
- secondaries: node1.example.com
Operating system: debian-etch
Hardware:
- memory: 64MiB
- NICs: {MAC: aa:00:00:ac:67:3a, IP: None, bridge: xen-br0}
Block devices:
- sda, type: md_raid1, physical_id: a8984725:92a66329:e9453b29:5f438b80
primary: /dev/md0 (9:0) in sync, status ok
- type: drbd, logical_id: ('node2.example.com', 'node1.example.com', 11000)
primary: /dev/drbd0 (147:0) in sync, status ok
secondary: /dev/drbd0 (147:0) in sync, status ok
- type: lvm, logical_id: ('xenvg', '577164fd-b0cb-4043-9d57-aa59f41fddf1.sda_data')
primary: /dev/xenvg/577164fd-b0cb-4043-9d57-aa59f41fddf1.sda_data (253:0)
secondary: /dev/xenvg/577164fd-b0cb-4043-9d57-aa59f41fddf1.sda_data (253:0)
- type: lvm, logical_id: ('xenvg', '22071c7b-37e7-4aa1-be4a-74021599c1a7.sda_meta')
primary: /dev/xenvg/22071c7b-37e7-4aa1-be4a-74021599c1a7.sda_meta (253:1)
secondary: /dev/xenvg/22071c7b-37e7-4aa1-be4a-74021599c1a7.sda_meta (253:1)
- sdb, type: md_raid1, physical_id: 1e974569:29fa6cab:e9453b29:5f438b80
primary: /dev/md1 (9:1) in sync, status ok
- type: drbd, logical_id: ('node2.example.com', 'node1.example.com', 11001)
primary: /dev/drbd1 (147:1) in sync, status ok
secondary: /dev/drbd1 (147:1) in sync, status ok
- type: lvm, logical_id: ('xenvg', 'd89067b9-cae6-4b15-ba3b-76f17f70553e.sdb_data')
Copyright © 2007 All Rights Reserved. HowtoForge Page 74 of 81

Xen Cluster Management With Ganeti On Debian Etch http://www.howtoforge.com/
primary: /dev/xenvg/d89067b9-cae6-4b15-ba3b-76f17f70553e.sdb_data (253:2)
secondary: /dev/xenvg/d89067b9-cae6-4b15-ba3b-76f17f70553e.sdb_data (253:2)
- type: lvm, logical_id: ('xenvg', 'c17a8468-b3f5-4aa3-8644-0a2c890d68be.sdb_meta')
primary: /dev/xenvg/c17a8468-b3f5-4aa3-8644-0a2c890d68be.sdb_meta (253:3)
secondary: /dev/xenvg/c17a8468-b3f5-4aa3-8644-0a2c890d68be.sdb_meta (253:3)
node1:~#
Get info about a cluster:
gnt-cluster info
node1:~# gnt-cluster info
Cluster name: node1.example.com
Master node: node1.example.com
Architecture (this node): 32bit (i686)
node1:~#
Check if everything is alright with the cluster:
gnt-cluster verify
node1:~# gnt-cluster verify
* Verifying global settings
* Gathering data (2 nodes)
* Verifying node node1.example.com
* Verifying node node2.example.com
* Verifying instance inst1.example.com
* Verifying orphan volumes
* Verifying remaining instances
node1:~#
Copyright © 2007 All Rights Reserved. HowtoForge Page 75 of 81

Xen Cluster Management With Ganeti On Debian Etch http://www.howtoforge.com/
Find out who's the cluster master:
gnt-cluster getmaster
Failover the master if the master has gone down (fails over the master to the node on which this command is run):
gnt-cluster masterfailover
Find out about instance volumes on the cluster nodes:
gnt-node volumes
node1:~# gnt-node volumes
Node PhysDev VG Name Size Instance
node1.example.com /dev/sda3 xenvg 22071c7b-37e7-4aa1-be4a-74021599c1a7.sda_meta 128 inst1.example.com
node1.example.com /dev/sda3 xenvg 577164fd-b0cb-4043-9d57-aa59f41fddf1.sda_data 10240 inst1.example.com
node1.example.com /dev/sda3 xenvg c17a8468-b3f5-4aa3-8644-0a2c890d68be.sdb_meta 128 inst1.example.com
node1.example.com /dev/sda3 xenvg d89067b9-cae6-4b15-ba3b-76f17f70553e.sdb_data 4096 inst1.example.com
node2.example.com /dev/sda3 xenvg 22071c7b-37e7-4aa1-be4a-74021599c1a7.sda_meta 128 inst1.example.com
node2.example.com /dev/sda3 xenvg 577164fd-b0cb-4043-9d57-aa59f41fddf1.sda_data 10240 inst1.example.com
node2.example.com /dev/sda3 xenvg c17a8468-b3f5-4aa3-8644-0a2c890d68be.sdb_meta 128 inst1.example.com
node2.example.com /dev/sda3 xenvg d89067b9-cae6-4b15-ba3b-76f17f70553e.sdb_data 4096 inst1.example.com
node1:~#
Removing a node from a cluster:
gnt-node remove node2.example.com
Find out about the operating systems supported by the cluster (currently only Debian Etch):
Copyright © 2007 All Rights Reserved. HowtoForge Page 76 of 81

Xen Cluster Management With Ganeti On Debian Etch http://www.howtoforge.com/
gnt-os list
16 A Failover Example
Now let's assume you want to take down node2.example.com due to maintenance, but you want inst1.example.com to not go down.
First, let's find out about our instances:
node1:
gnt-instance list
As you see, node2 is the primary node:
node1:~# gnt-instance list
Instance OS Primary_node Autostart Status Memory
inst1.example.com debian-etch node2.example.com yes running 64
node1:~#
To failover inst1.example.com to node1, we run the following command (again on node1):
gnt-instance failover inst1.example.com
Afterwards, we run
gnt-instance list
again. node1 should now be the primary node:
Copyright © 2007 All Rights Reserved. HowtoForge Page 77 of 81

Xen Cluster Management With Ganeti On Debian Etch http://www.howtoforge.com/
node1:~# gnt-instance list
Instance OS Primary_node Autostart Status Memory
inst1.example.com debian-etch node1.example.com yes running 64
node1:~#
Now you can take down node2:
node2:
shutdown -h now
After node2 has gone down, you can try to connect to inst1.example.com - it should still be running.
Now after the maintenance on node2 is finished and we have booted it again, we'd like to make it the primary node again.
Therefore we try a failover on node1 again:
node1:
gnt-instance failover inst1.example.com
This time we get this:
node1:~# gnt-instance failover inst1.example.com
Failover will happen to image inst1.example.com. This requires a
shutdown of the instance. Continue?
y/[n]: <-- y
* checking disk consistency between source and target Can't get any data from node node2.example.com
Failure: command execution error:
Disk sda is degraded on target node, aborting failover.
Copyright © 2007 All Rights Reserved. HowtoForge Page 78 of 81

Xen Cluster Management With Ganeti On Debian Etch http://www.howtoforge.com/
node1:~#
The failover doesn't work because inst1.example.com's hard drive on node2 is degraded (i.e., not in sync).
To fix this, we can replace inst1.example.com's disks on node2 by mirroring the disks from the current primary node, node1, to node2:
node1:
gnt-instance replace-disks -n node2.example.com inst1.example.com
During this process (which can take some time) inst1.example.com can stay up.
node1:~# gnt-instance replace-disks -n node2.example.com inst1.example.com
Waiting for instance inst1.example.com to sync disks.
- device sda: 0.47% done, 474386 estimated seconds remaining
- device sdb: 22.51% done, 593 estimated seconds remaining
- device sda: 0.68% done, 157798 estimated seconds remaining
- device sdb: 70.50% done, 242 estimated seconds remaining
- device sda: 0.87% done, 288736 estimated seconds remaining
- device sda: 0.98% done, 225709 estimated seconds remaining
- device sda: 1.10% done, 576135 estimated seconds remaining
- device sda: 1.22% done, 161835 estimated seconds remaining
- device sda: 1.32% done, 739075 estimated seconds remaining
- device sda: 1.53% done, 120064 estimated seconds remaining
- device sda: 1.71% done, 257668 estimated seconds remaining
- device sda: 1.84% done, 257310 estimated seconds remaining
- device sda: 3.43% done, 4831 estimated seconds remaining
- device sda: 6.56% done, 4774 estimated seconds remaining
- device sda: 8.74% done, 4700 estimated seconds remaining
- device sda: 11.20% done, 4595 estimated seconds remaining
- device sda: 13.49% done, 4554 estimated seconds remaining
- device sda: 15.57% done, 4087 estimated seconds remaining
Copyright © 2007 All Rights Reserved. HowtoForge Page 79 of 81

Xen Cluster Management With Ganeti On Debian Etch http://www.howtoforge.com/
- device sda: 17.49% done, 3758 estimated seconds remaining
- device sda: 19.82% done, 4166 estimated seconds remaining
- device sda: 22.11% done, 4075 estimated seconds remaining
- device sda: 23.94% done, 3651 estimated seconds remaining
- device sda: 26.69% done, 3945 estimated seconds remaining
- device sda: 29.06% done, 3745 estimated seconds remaining
- device sda: 31.07% done, 3567 estimated seconds remaining
- device sda: 33.41% done, 3498 estimated seconds remaining
- device sda: 35.77% done, 3364 estimated seconds remaining
- device sda: 38.05% done, 3274 estimated seconds remaining
- device sda: 41.17% done, 3109 estimated seconds remaining
- device sda: 44.11% done, 2974 estimated seconds remaining
- device sda: 46.21% done, 2655 estimated seconds remaining
- device sda: 48.40% done, 2696 estimated seconds remaining
- device sda: 50.84% done, 2635 estimated seconds remaining
- device sda: 53.33% done, 2449 estimated seconds remaining
- device sda: 55.75% done, 2362 estimated seconds remaining
- device sda: 58.73% done, 2172 estimated seconds remaining
- device sda: 60.91% done, 2015 estimated seconds remaining
- device sda: 63.16% done, 1914 estimated seconds remaining
- device sda: 65.41% done, 1760 estimated seconds remaining
- device sda: 68.15% done, 1681 estimated seconds remaining
- device sda: 70.61% done, 1562 estimated seconds remaining
- device sda: 73.55% done, 1370 estimated seconds remaining
- device sda: 76.01% done, 1269 estimated seconds remaining
- device sda: 78.14% done, 1108 estimated seconds remaining
- device sda: 80.59% done, 1011 estimated seconds remaining
- device sda: 82.86% done, 858 estimated seconds remaining
- device sda: 85.25% done, 674 estimated seconds remaining
- device sda: 87.74% done, 638 estimated seconds remaining
- device sda: 90.01% done, 518 estimated seconds remaining
- device sda: 92.40% done, 392 estimated seconds remaining
- device sda: 94.87% done, 265 estimated seconds remaining
Copyright © 2007 All Rights Reserved. HowtoForge Page 80 of 81

Xen Cluster Management With Ganeti On Debian Etch http://www.howtoforge.com/
- device sda: 97.10% done, 147 estimated seconds remaining
- device sda: 99.38% done, 30 estimated seconds remaining
Instance inst1.example.com's disks are in sync.
node1:~#
Afterwards, we can failover inst1.example.com to node2:
gnt-instance failover inst1.example.com
node2 should now be the primary again:
gnt-instance list
node1:~# gnt-instance list
Instance OS Primary_node Autostart Status Memory
inst1.example.com debian-etch node2.example.com yes running 64
node1:~#
17 Links - Ganeti: http://code.google.com/p/ganeti - Xen: http://xen.xensource.com - DRBD: http://www.drbd.org - LVM: http://sourceware.org/lvm2 - Debian: http://www.debian.org
Copyright © 2007 All Rights Reserved. HowtoForge Page 81 of 81