x-sight hd series - ecx.images-amazon.comecx.images-amazon.com/images/i/b1bk1s72zgs.pdf · x-sight...
TRANSCRIPT

X-Sight HD SeriesDAY/ N I G H T W E A P O N S I G H T S
M A N U A L
AMERICANTECHNOLOGIES
NETWORKCORP.
X-SIGHT USER’S GUIDE (REV. 2, MARCH, 2015)

2
PICATINNY RAIL
DIOPTER ADJUSTMENT
MOUNTING SYSTEM
POWER BUTTONFOCUS
ADJUSTMENT RING
THIS PRODUCT CONTAINS NATURAL RUBBER LATEX WHICH MAY CAUSE ALLERGIC REACTIONS.CAUTION!
The information in this manual furnished for information use only, is subject to change without notice, is not to be construed as a commitment by ATN Corp.
ATN Corp. assumes no responsibility or liability for any errors or inaccuracies that may appear in this book.©2015 ATN Corp. All right reserved.
Register your product warranty online at www.atncorp.com/warranty
BATTERY HOUSING CAP
RIGHT ARROW BUTTON
ENTER BUTTON
LEFT ARROW BUTTON
UP ARROW BUTTON
DOWN ARROW BUTTON
MICRO SD, MICRO HDMI & MICRO USB
X-Sight HD 5-18
X-Sight HD 3-12
850 mW Infra-Red illuminator
(included)

3
TABLE OF CONTENTS
Features . . . . . . . . . . . . . . . . . . . . . . . . . . . . . . . . . . . . . . . . . .4
Application . . . . . . . . . . . . . . . . . . . . . . . . . . . . . . . . . . . . . . . .4
Specifications . . . . . . . . . . . . . . . . . . . . . . . . . . . . . . . . . . . . . .4
Preparing for Operation . . . . . . . . . . . . . . . . . . . . . . . . . . . . . .5Unpacking . . . . . . . . . . . . . . . . . . . . . . . . . . . . . . . . . . . . .5Installation of batteries . . . . . . . . . . . . . . . . . . . . . . . . . . . .5USB, HDMI and SD ports . . . . . . . . . . . . . . . . . . . . . . . . .5Firmware Update . . . . . . . . . . . . . . . . . . . . . . . . . . . . . . . .6ON/OFF . . . . . . . . . . . . . . . . . . . . . . . . . . . . . . . . . . . . . . .7Using your Keypad . . . . . . . . . . . . . . . . . . . . . . . . . . . . . . .7Focusing X-Sight . . . . . . . . . . . . . . . . . . . . . . . . . . . . . . . .7Mounting . . . . . . . . . . . . . . . . . . . . . . . . . . . . . . . . . . . . . .8Long range 850 mW infra-red illuminator . . . . . . . . . . . . . .8Compass calibration . . . . . . . . . . . . . . . . . . . . . . . . . . . . .9
Operation . . . . . . . . . . . . . . . . . . . . . . . . . . . . . . . . . . . . . . . .10Info bar(s) and Home screen . . . . . . . . . . . . . . . . . . . . . .10Video/Image Capture . . . . . . . . . . . . . . . . . . . . . . . . . . . .10Geo-Tagging . . . . . . . . . . . . . . . . . . . . . . . . . . . . . . . . . . 11Brightness . . . . . . . . . . . . . . . . . . . . . . . . . . . . . . . . . . . .12Night Vision Mode . . . . . . . . . . . . . . . . . . . . . . . . . . . . . .13Reticle Selection . . . . . . . . . . . . . . . . . . . . . . . . . . . . . . .14Zeroing In. . . . . . . . . . . . . . . . . . . . . . . . . . . . . . . . . . . . .15Zoom . . . . . . . . . . . . . . . . . . . . . . . . . . . . . . . . . . . . . . . .16WiFi/GPS . . . . . . . . . . . . . . . . . . . . . . . . . . . . . . . . . . . . .16Customize the Name and password of SSID . . . . . . . . . .17Indicator Positions . . . . . . . . . . . . . . . . . . . . . . . . . . . . . .18Setup . . . . . . . . . . . . . . . . . . . . . . . . . . . . . . . . . . . . . . . .18
Servicing X-Sight and FAQ . . . . . . . . . . . . . . . . . . . . . . . . . . .20Cleaning Eyepiece . . . . . . . . . . . . . . . . . . . . . . . . . . . . . .20Cleaning the lenses . . . . . . . . . . . . . . . . . . . . . . . . . . . . .20Frequently asked questions . . . . . . . . . . . . . . . . . . . . . . .20Troubleshooting . . . . . . . . . . . . . . . . . . . . . . . . . . . . . . . .21Warnings and cautions . . . . . . . . . . . . . . . . . . . . . . . . . .21Warranty . . . . . . . . . . . . . . . . . . . . . . . . . . . . . . . . . . . . .21
Applications . . . . . . . . . . . . . . . . . . . . . . . . . . . . . . . . . . . . . .22Mobile Apps (Android, iOS) . . . . . . . . . . . . . . . . . . . . . . .22ATN Obsidian for Android . . . . . . . . . . . . . . . . . . . . . . . .22ATN Obsidian for iOS . . . . . . . . . . . . . . . . . . . . . . . . . . . .24
Video tutorial . . . . . . . . . . . . . . . . . . . . . . . . . . . . . . . . . . . . . .25

4
FEATURES
Day / night E-compass
WiFi Altitude
Record video / Capture Pictures
Velocity
GPS E-Zoom
Image stabilization/gyroscope
Geotag
SPECIFICATIONS
Item ATN X-Sight 3-12x ATN X-Sight 5-18xGeneration Smart HD Optics
Magnification 3-12X 5-18X
Eye relief 67 mm
IR Illuminator 850 Detachable - 850 mW
Sensor HD 1080p ATN L130 Sensor
Display 800 x 600 px
Diopter adjustment ±5
Ports Micro HDMI, Micro USB, Micro SD
Power 4 AA type batteries
Micro SD Card 2 to 32 Gb
Video Out 1080p at 30 fps & 720p at 60 fps
Remote View Finder via IOS or Android app
Dimensions 9.5” x 3.25” x 3.13” 238 x 83 x 79 mm
10.3 x 3.5 x 3.2” 262 x 88 x 82 mm
Weight 2.3 lb / 1.05 kg 2.7 lb / 1.22 kg
* ATN reserves the right to change the above specifications at any time without notice
APPLICATIONThe ATN X-Sight weapon scopes are powered by the new revolutionary ATN
Obsidian Core that runs a suite of sensors to cover all your needs. Perfect clarity in day or night, GPS, Geotag, WiFi, E-Zoom, Record HD Video/Images, Compass, Gyroscope, and much more.
X-Sight — the weapon scope for the 21st century.
5
PREPARING FOR OPERATION
UNPACKINGThe following steps must be accomplished prior to each mission where the sight
is used.1. Open carrying case, remove the scope and check contents for completeness.2. Inspect the scope for obvious evidence of damage to optical surfaces, body,
eyecups, operation buttons, etc. Ensure that all optical surfaces are clean and ready for use. Clean with lens tissue.
INSTALLATION OF BATTERIESThe X-Sight HD will operate with four AA batteries type.Install AA batteries as follows:1. Remove the battery cap by unscrewing it
counter clockwise.2. Insert batteries as shown.3. Replace battery cap into the housing.
Screw clockwise until finger tight. Do not over tighten as it will be difficult to remove the next time you replace batteries.
NOTEWe highly recommend using lithium AA
batteries. They will provide much longer battery life.
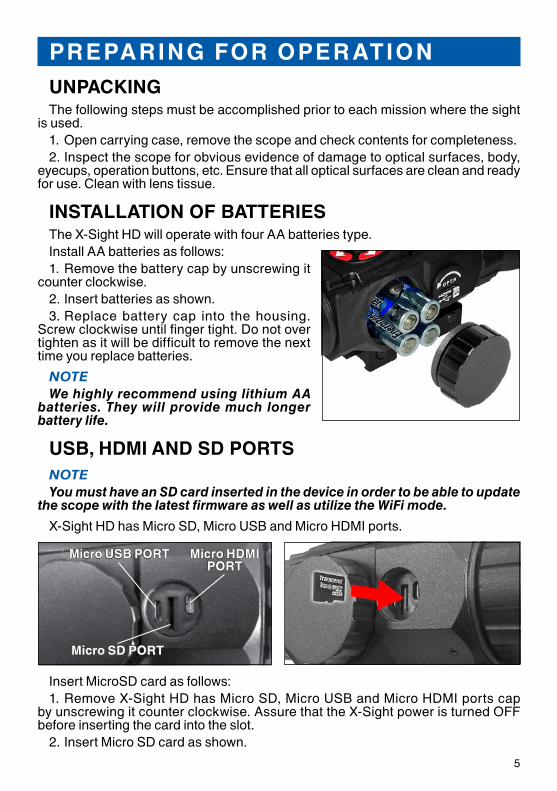
USB, HDMI AND SD PORTSNOTEYou must have an SD card inserted in the device in order to be able to update
the scope with the latest firmware as well as utilize the WiFi mode.
X-Sight HD has Micro SD, Micro USB and Micro HDMI ports.
Micro SD PORT
Micro USB PORT Micro HDMI PORT
Insert MicroSD card as follows:1. Remove X-Sight HD has Micro SD, Micro USB and Micro HDMI ports cap
by unscrewing it counter clockwise. Assure that the X-Sight power is turned OFF before inserting the card into the slot.
2. Insert Micro SD card as shown.

6
3. Replace port cap into the housing. Screw clockwise until finger tight. Do not over tighten as it will be difficult to remove.
NOTEThere is only one correct direction to insert
the Micro SD card. Do not force the card into the slot as it may damage both the camera and the Micro SD card. Insert the card, as indicated.
A new Micro SD card should be formatted before using.
NOTETo lock when inserting Micro SD card in the
slot, push it a thin object (a small coin, paper clip, toothpick, ballpen) until it clicks into place. To remove the Micro SD card from the slot, push it in the same thin object. When it pops up a few millimeters, it can pull with your fingers or tweezers.
NOTEIf you are going to record video then Micro
SD Card should be of Class 10.
FIRMWARE UPDATENOTEBefore operating your X-Sight please update the firmware to the latest version.
To Update Firmware:1. Please register your scope at http://www.atncorp.com/firmware/xsight2. Download latest firmware file.3. Copy or transfer that file to your Micro SD Card.4. Make sure that your X-Sight is turned OFF5. Insert Micro SD card into your X-Sight6. Turn ON X-Sight and follow prompts on the screen.7. At the end of the firmware when X-Sight is turned OFF, remove the memory
card.8. Turn ON X-Sight and wait until the firmware is installed.
NOTEYou must make sure that the batteries in the X-Sight are fully charged before
updating your device. In the event of a power failure during an updated the X-Sight may need to be sent back to the factory for service.

7
ON/OFFTo turn ON your device please press and hold
the POWER button.To turn OFF your device please press and hold
the POWER button — you will see “device shut-ting down” with a count down, please continue to hold the POWER button throughout the entire cycle.
USING YOUR KEYPADThe Keypad on the X-Sight is designed to be
tapped not pressed and held!When using each key on the keypad to operate the X-Sight please be aware that
you need to tap each key. Hold a key no longer than 1 second.
NOTEThere are two exceptions to the rule:ON/OFF — when turning the unit ON you need to press and hold the POWER
button for a few seconds. When turning the unit OFF you need to press and hold it for 3 seconds; you will see “device shutting down” with a count down on the screen. It’s done to make sure that you do not turn off the device acci-dentally by tapping the wrong key.
ZOOM — by pressing and holding the UP or DOWN button you will be able to Zoom IN and OUT your device.
FOCUSING X-SIGHTModel X-Sight HD 3-12 has a fixed focus lens
and does not need to be focused.
NOTEThe 3-12 focus is set to infinity and therefore
viewing targets at very close range may not give you optimal clarity.
Model X-Sight HD 5-18 focuses as follows:1. Turn On Device — turn on X-Sight by holding
the Power Button down for more than 3 seconds.2. Diopter Adjustment — Do not take the
Rubber Cap off the Objective lens. Look through the eyepiece while focusing on the reticle on the screen. By rotating the Diopter Adjustment you will achieve optimal sharpness for your vision.
NOTEYou should not need to re-adjust the Diopter
Adjustment unless another user with different vision then yourself will be using the scope.
3. Distance Focus — Remove the Cap from the Objective Lens. Adjust the focus ring as neces-sary to achieve proper focus at various distances.
ENTER BUTTON
RIGHT BUTTON
DOWN BUTTON
POWER UP BUTTON
LEFT BUTTON
FOCUS ADJUSTMENT RING
DIOPTER ADJUSTMENT

8
MOUNTING1. Slightly loosen the fixing screws on the 7/8” weaver mount built into the scope.2. Place the scope on the weaver rail of the fire arm.3. Tighten the fixing screws.
NOTEFixing screws may need to
be tightened after continuous shooting.
In the event that you need more fine adjustments on your rail you can use the “Rail With Fixing Projection”. This will allow you to adjust the groove by 1/3 of an inch.
To change the position of the “Rail With Fixing Projection” follow the steps mentioned below:
1. Unscrew the two screws, which attach the rail to the mount-ing bracket.
2. Take the rail out of the mount. 3. Reposition Rail With Fixing
Projection About-face.4. Fix the rail with the two
screws.
NOTEWe recommend using “Loc-
tite” to make sure the screws will not loosen during shooting.
LONG RANGE 850 MW INFRA-RED ILLUMINATORInfra-red (IR) Illuminators are common for night vision technology. The IR light
greatly enhances the performance of your device, while remaining almost totally invisible to the naked eye. Staying in the dark, switch on your night vision device. If the visibility is low, you may use ATN IR850 to improve the situation. Still, you should remember that the IR illuminator is just a source of infrared light so the greater is the chosen range of observation, the lesser its brightness becomes.
The ATN IR850 is powered with two CR123A lithium batteries To install batteries unscrew the cap of the battery housing and insert batteries following the polarity arrows marked on the housing. Put the cap in place.
The IR850 illuminator has a control panel with two buttons. To switch the IR illu-minator on/off press “+” and “–” buttons simultaneously. When the IR illuminator is switched on you can see the green LED lit on the back side of IR850. By pushing the buttons “+” and “–” you may adjust the IR brightness.
The IR beam is focusable to change the field of coverage. To change the beam width slightly turn the IR lens.
FIXING SCREWSWEAVER RAIL
GROOVERAIL WITH A FIXING PROJECTION
SCREWS MOUNTINGSYSTEM

9
BATTERY HOUSING
FIXING NUT
IR ELEVATION ADJUSTMENT
IR FOCUSING
NUT
POWER LED INDICATOR
ALLEN KEYWRENCH
IR BRIGHTNESS ADJUSTMENT
BATTERY HOUSING CAP
IR WINDAGE ADJUSTMENT
You may need adjust the focusing of the IR beam to change the field of coverage. Do it by slightly rotating the IR lens. The windage and elevation screws help adjust the direction of the IR beam from the IR850 in order to focus on the scene observed in the viewfinder of your NVD. Use the included Allen wrench to rotate the adjusting screws until the IR beam is centered. Please remember the adjustments should be performed in darkness or semi darkness (an IR beam is greatly diminished and may not been noticeable at all during daylight conditions).
You can change the position of the IR control panel to meet your needs. The wrench that is included in the set, is used to loosen the nut located on the body of the IR. Rotate the IR to the desired position. Tighten the nut with the wrench to secure the new position.
COMPASS CALIBRATIONIf the compass shows the device incorrectly — please calibrate each time you turn
on the device.1. Try to stay away from magnetic fields as far as you can.2. Put the device on a flat surface. 3. Move the X-Sight slowly, 5 seconds per full rotation is
OK. The direction of rotation doesn’t matter. 4. Rotate the X-Sight three full cycles around the axis
pointing upward.5. Rotate the X-Sight three full cycles around the axis
pointing away from you.6. Rotate the X-Sight three full cycles around the axis
pointing right.Using the compass, remember that the maximum accu-
racy is achieved when the device is in a horizontal position relative to the ground.
NUT
CONTROL PANEL
WRENCH
TOTIGHTEN
NUT
TOLOOSEN
NUT

10
OPERATION
INFO BAR(S) AND HOME SCREENTurn on the device. Press and
release ENTER button once.Once pressed you will see a
number of indicators appearing around the screen providing you useful information on your envi-ronment. Example: Velocity, Ele-vation, Clock, Zoom Level, etc...
NOTEThe information on the
bottom of the screen will stay on for a set period of time. If you wish for the information to be constantly displayed on the screen please move the infor-mation to the top of the screen (see Settings).
Double Tap on the Enter button to go into Home Screen.Home Screen provides you quick commands as well as visual cues to their use.
To move between Icons once they appear on the screen use LEFT and RIGHT buttons.
Currently, Home Screen has the following four Icons:
Photo / video mode Day/night mode
Brightness Menu
VIDEO/IMAGE CAPTURE
Photo/Video Mode — this is your standard mode of opera-tion and will allow you to quickly and easily capture Photos, record Videos and Zoom IN and OUT. Use the keys indicated on screen to activate either image capture or record video.
Example: Tap LEFT button to capture a photo.
Screen with the bottom banner

11
NOTEThe Photo/Video Icon does not need to be on screen for these buttons to work.
You must simply have selected the mode for these buttons to be activated.
NOTEYou will not be able to capture photos while recording a video.
You must have a Micro SD card inserted in the device for these features to work. All files will be stored on the Micro SD card.
Menu > Capture contains a number of settings for Video and Photo Capture.• Resolution — X-Sight
records in two video modes: 1080p @ 30fps — Standard Full HD or 720p @ 60fps — Slow Mode in HD.
• Microphone — X-Sight has a built-in Microphone that may be turned ON or OFF for record-ing Videos.
NOTE60fps — Slow Mode in Day
Mode only.It may best to turn OFF the
Microphone in conditions of extreme wind.
Timed — you may turn Timed ON or OFF. If Timed ON, X-Sight will do a series of shots. If Timed OFF, X-Sight will do one shot.
If Timed ON, the following set-tings are available:
• Number of shots — The number of shots in burst. Select the value from 2 to 10.
• Delay between shots (sec) — It’s interval between shots (sec). Select the value from 2 to 15.
GEO-TAGGINGMenu > Capture contains of settings for Record Geo-Tagging.Record Geo-Tagging — all photos and Videos captured by X-Sight may have
Geo-tags attached to them. Geo-tags are additional data files that allow the user to capture information on the exact location of where photos or videos were taken from. Geo-tags are saved in the special GPX or KML files on Micro SD card. Using

12
special software, the information recorded in GPX file can be viewed on the various cartographic resources as the trajectory.
(Please see Geo-tagging for more information.)
NOTEThe KML files are available
only on Google resources (Google Maps and Google Earth).
NOTEI f GPS turn OFF, the
Geo-Tagging does not work.
BRIGHTNESSTap once on the ENTER
button to select brightness of your display. You will see a brightness indicator as visual-ized by a light bulb.
You may use LEFT and RIGHT buttons to adjust brightness of your display to your desired level.

13
You can also change the Brightness in the Menu (see Display section). This is your setting for the display ranging from 1 to 5.
NIGHT VISION MODEDay/Night ModeTap once on the ENTER
button to switch between Day and Night Mode.
Please note that turning on Night Mode during Daylight will NOT HARM your device, how-ever you may not be able to see anything due to the image being too bright. In that event we rec-ommend that you switch back to Day Mode or move into a darker environment.
NOTEWe highly recommend using
the IR Illuminator included with your X-Sight.
NOTEIR Illuminator is effective
only in night mode.
B&W/GreenWhile having Day/Night Mode
ICON selected on the screen you may use the DOWN button to change between Black and White night mode and Green night mode. Simply tap the DOWN button to move between modes.
Day Mode
Night Mode (Green)

14
Light AmplificationAlso you may use the UP
button to change Light Amplifi-cation mode. HIGH, MEDIUM, LOW selection are possible.
NOTELight Amplification does not
change when changing color modes.
Menu > Display > Day/Night Mode — these same settings may be adjusted in your Home Screen Day/Night ICON.
• Day/Night Mode — DAY or NIGHT selection are possible.
• N ight Mode Color — WHITE or GREEN selection are possible. White indicated Black & White mode.
• Light Amplification — HIGH, MEDIUM, LOW selection are possible.
RETICLE SELECTIONMenu > Display > ReticleReticle — all Reticle settings
including the Zeroing-in of your X-Sight are located here.
Reticle Display — you may turn the Reticle ON or OFF. Turning the Reticle off may be useful when using the X-Sight for observational purposes only.
Night Mode (White)

15
Reticle Type — tap ENTER button to select desired Reticle and return to previous screen.
NOTEWe plan to add additional
Reticles in the future firmware releases and when added they will appear in the Reticle Type section.
ZEROING IN.Single shot zero instructions1. Power on device.2. Press the “ENTER” button
twice to bring up your menu icons, use the keypad arrows to select “MENU” and press “ENTER”.
3. Select “DISPLAY”.4. Select “RETICLE”.5. Select “Zero Setup”.6. Aim at your target (prefera-
bly bullseye).7. Shoot your target while
keeping your reticle on the bull-seye.
8. Using the keypad arrows, move your reticle to the point of impact and press “ENTER” to save the new reticle location. This will be your weapon’s zero.
NOTEAfter setting your zero once, the red dot will always be your screen’s center,
and the green dot will be your previous zero.
NOTEUpon pressing “ENTER” when saving your zero, you will be directed to the
previous screen. If you would like to confirm your zero, repeat step 5.

16
ZOOMZOOM — by pressing and
holding the UP or DOWN button you will be able to Zoom IN and OUT your device.
WIFI/GPSMenu > WiFi and GPSSetting for your WiFi and GPS
are contained here.WiFi — Turn the X-Sight’s WiFi
ON or OFF. Please be aware that the Obsidian Core power-ing your X-Sight is in essence a miniature computer and just like any computer it does take time to fully boot up its WiFi. Please wait between 1 to 3 minutes after first turning ON your WiFi before attempting to connect to your X-Sight.
NOTEWe highly recommend that WiFi is kept OFF when not in use due to severely
increasing your X-Sight’s power consumption and draining its batteries.
• SSID — this is name of your X-Sight’s WiFi.
• Password — password for your X-Sight’s WiFi.
• MAC — your unique MAC address.
GPS — Turn the X-Sight’s GPS ON or OFF.

17
NOTEWe highly recommend that GPS is kept OFF when not in use to reduce
unnecessary power consumption.GPS may not function correctly indoors or in environments where the signal
to the GPS antenna is blocked. The GPS antenna resides on top of the X-Sight and underneath the GPS/Wi-Fi indicator.
CUSTOMIZE THE NAME AND PASSWORD OF SSIDCreate the WiFi config file. This step is performed only once 1. Insert an SD card, power up the device and turn on the WiFi.2. Wait for the WiFi icon appear and remove the card.
For every device that needs to be updated
1. On the SD card open and edit the following text file:
/MISC/wifi.conf
2. Find the line that starts with AP_SSID (most likely line number 26) and change it
from: AP_SSID=atn_obsidianto: AP_SSID=<whateverNewSSID>
and save the wifi.conf file
NOTEThere are several other lines that have keys with the value “atn_obsidian.”
Do not confuse them, you are only changing the AP_SSID.
3. Start the device with the SD card inserted.4. Start the WiFi if it’s not currently running.5. It is now safe to remove the SD card (the new SSID is saved in the device’s
internal memory).

18
INDICATOR POSITIONS
The Display screen contains a Indicator Positions (Compass, Speedometer, Altitude, Clock).
NOTEIf you are going to use Com-
pass it’s desirable to calibrate (see “Compass calibration”) it after you switch ON the device.
SETUPSetup contains a number of
settings for Date/Time, Units, etc.
Date/Time settings• Date and clock source —
Manual / WiFi. If you select WiFi, you can set date and time on your device using our applica-tion. It is enough to choose Date or Time item on the screen Set-tings and set the required num-bers.
• Date — set date• Time — set time• Date format — select the
date format (MM-DD-YYYY / DD - MM -Y Y Y Y / Y Y Y Y-MM-DD).

19
• Clock format — select the time format (12h / 24h).
• Units — US Standard/Metric.
• Restore factory settings. If you select this item, you will see a warning message. Select the desired setting by using the LEFT-RIGHT buttons, and press ENTER.
• F i rmware vers ion . I t shows the current firmware ver-sion of the X-Sight.

20
SERVICING X- S IGHT AND FAQ
CLEANING EYEPIECEOver time debris or dust particles
may find themselves on the micro dis-play in your eyepiece. Please follow the following instructions to remove the debris.
1. Remove the Eyepiece — by first loosening the two Set Screws that hold the Eyepiece in place (you will need a 1.5 mm hex key). Then unscrew the eyepiece and remove it entirely.
NOTEOnce the set screws have been
loosened the eyepiece should be relatively easy to unscrew, do not use excessive force.
2. To clean the Micro Display — we recommend using a compressed air canister. Just blow the air all around the micro display and then blow the air on the display itself. The plastic screen covering the display will bend under the air pressure and will allow burst of air inside of the micro display housing.
3. Replace Eyepiece — check if all debris has disap-peared from your view. If more debris remains Repeat Step 1 and 2.
NOTEDo not forget to re-tighten the Set Screws after
completing your cleaning. Do not over tighten.
CLEANING THE LENSESCAUTION• The scope is a precision electro-optical instrument and must be handled
carefully.• Do not scratch the external lens surfaces or touch them with your fingers.
FREQUENTLY ASKED QUESTIONSQ: How to remove the Micro SD Card from the SD slot?A: Push the SD Card with a thin object (a small coin, paper clip, toothpick, ball-
point pen, etc).
Q: How to install the X-Sight newest firmware?A: To update the firmware to the latest version please refer to section Firmware
Update.
Q: What size photos are taken by the X-Sight?A: Full HD (1920 x 1080 px).

21
TROUBLESHOOTINGThe table below lists common malfunctions that you may find with your X-Sight. This table cannot list all the malfunctions that may occur, all the tests and inspec-
tions needed to find the fault, or all the corrective actions needed to correct the fault. If the equipment malfunction is not listed or actions listed do not correct the fault please contact our Customer Service for further assistance.
OPERATOR’S TROUBLESHOOTING
Malfunction Test or inspection Corrective action
1. X-Sight fails to turn ON.
Check Power Button
Check for defective, miss-ing or improperly installed battery.
To turn ON your device please press and hold the POWER button. Hold for at least 2-3 seconds.
Replace battery or install correctly.
2. Poor image quality.
Check objective lens or eye-piece lens focus.
Check for fogging or dirt on objective lens or eyepiece lens.
Refocus per section “Focusing X-Sight”.
Clean lens surface per section “Cleaning the lenses”.
WARNINGS AND CAUTIONS• Always remember to turn off the X-Sight when it is not in use. If you do not plan
on using your scope for a period of more than 10 days, you should remove the bat-teries.
• Keep lens cap on when not in use.• Avoid contact with dust, steam, and gas.• The scope is not harmful to the user or the environment.• Do not disassemble: it will void your warranty.• This product contains natural rubber latex which may cause allergic reactions.
WARRANTYPlease visit www.atncorp.com/warranty for warranty details and information.Please make sure the create a separate warranty file that can be downloaded
inside the Support Download section of the device. Also, please make sure to take out all references of Voiding warranty if the device is used during Daytime Opera-tion.

22
APPLICATIONS
MOBILE APPS (ANDROID, IOS)
In order to take advantage of a number of functions and WiFi connectivity you will need to download either an iOS or Android App. Currently, we offer apps for Apple and Android devices.
ATN OBSIDIAN FOR ANDROID
1. Download & Install – ATN Obsidian 2. Turn On WiFi inside the X-Sight (see WiFi). Make sure to note both the name of
the X-Sight’s WiFi network as well as it’s password. It may take several minutes for the WiFi network to come up.
3. Go to Settings on your Mobile device. Open WiFi and find your X-Sight’s net-work. Connect to it using the password. Close Settings.
4. Open ATN Obsidian . Your mobile device should now be connected to your X-Sight.
About Obsidian App
The “Obsidian” mobile application is intended to operate remotely the devices of the new ATN Company batch.

23
To operate the device with the help of the “Obsidian” application you need to connect to the Internet via Wi-Fi on the device.
After launching Wi-Fi go to Wi-Fi net settings of your mobile device, choose the name of Wi-Fi net for your device from the list (the default name “atn_obsidian”) and connect to it.
Launch “Obsidian” program on your mobile device. In case your mobile/tablet connected correctly the buttons on the main screen of the application are to be back-lighted.
The application allows using the viewfinder mode and provides a large range of your device settings giving the possibility for remote operation.
You can also set Date/Time on your device using our application. It is enough to choose “Date”/“-Time” item in “Settings” screen and enter the required numbers.
Main functionalityViewfinder functionality pro-
vides users with an ability to watch a video stream in real time on the screen of mobile device from X-Sight device.
Settings screen gives the user a lot of settings of X-Sight device for detailed tuning. Moreover, the “Settings” menu contains special reticle’s settings - the user is able to choose the color and the type of the reticle, and adjust the position of the reticle over the viewfinder video stream, remotely via WiFi.

24
ATN OBSIDIAN FOR IOS
1. Download & Install ATN Obsidian 2. Turn On WiFi inside the X-Sight (see WiFi). Make sure to note both the name of
the X-Sight’s WiFi network as well as it’s password. It may take several minutes for the WiFi network to come up.
3. Go to Settings on your Mobile device. Open WiFi and find your X-Sight’s net-work. Connect to it using the password. Close Settings.
4. Open ATN Obsidian . Your mobile device should now be connected to your X-Sight.
About Obsidian AppThe “Obsidian” mobile appli-
cation is intended to operate remotely the devices of the new ATN Company batch.
To operate the device with the help of the “Obsidian” application you need to connect to the Internet via Wi-Fi on the device.
After launching Wi-Fi go to Wi-Fi net settings of your mobile device, choose the name of Wi-Fi net for your device from the list (the default name “atn_obsidian”) and connect to it.
Launch “Obsidian” program on your mobile device. In case your

25
mobile/tablet connected correctly the buttons on the main screen of the application are to be back-lighted.
The application allows using the viewfinder mode and provides a large range of your device settings giving the possibility for remote operation.
You can also set Date/Time on your device using our applica-tion. It is enough to choose “Date / Time” item in “Settings” screen and enter the required numbers.
Main functionalityViewfinder functionality pro-
vides users with an ability to watch a video stream in real time on the screen of mobile device from X sight device.
Settings screen gives the user a lot of settings of X-Sight device for detailed tuning. Moreover, the “Settings” menu contains special reticle’s settings — the user is able to choose the color and the type of the reticle, and adjust the position of the reticle over the view-finder video stream, remotely via WiFi.
VIDEO TUTORIALVideo tutorial can be found here: https://youtu.be/Gj7aM7LwNSk

26
INDEXA ANDROID 22
APPLE 22, 24APPLICATION 22, 24
B BATTERIES 5, 6, 9, 16, 21BRIGHTNESS 9, 10, 12, 13
C CAPTURE 4, 10CAUTIONS 21CLEANING 20CONTROL BUTTONS 7, 9
D DATE 18, 22DATE FORMAT 18DAY MODE 10, 13DELAY 11DIOPTER 7
F FACTORY SETTINGS 19FIRMWARE 6, 19FOCUS 7FOCUSING 7, 9FRAME RATE 11FRAME RESOLUTION 11
G GEO-TAGGING 11, 12GPS 4, 11, 12, 16
H HDMI 5, 6
I IR ILLUMINATOR 8, 9, 13IR850 8, 9
K KEYPAD 7
L LIGHT AMPLIFICATION 14
M MAC ADDRESS 16, 17MENU 10MENU SHORTCUTS 10MICRO HDMI 5, 6MICRO SD CARD 5, 6, 17 MICRO USB 5, 6MICROPHONE 11MOUNTING 8
N NETWORK 17, 22, 24NIGHT MODE 10, 13, 14NIGHT MODE COLOR 14NUMBER OF SHOTS 11
P PASSWORD 16, 17PHOTO MODE 10, 11PICATINNY RAIL 2, 8POWER 7
Q QUESTIONS 20
R RAIL 2, 8RETICLE 7, 14, 15
S SD CARD 5, 6, 17SSID 16, 17
T TIME 18, 19, 22TIME FORMAT 19TIMED 11TRAJECTORY 12TROUBLESHOOTING 21
U UNITS 19USB 5, 6
V VIDEO MODE 10, 11VIEWFINDER 22, 23, 24, 25
W WARNINGS 21WARRANTY 21WIFI 4, 5, 6, 17, 18, 22, 24
Z ZERO 15ZERO SETUP 15ZOOM 16

27

©2015 ATN Corporation
For customer service and technical support, please contact
American Technologies Network Corp.1341 San Mateo Avenue, South San Francisco, CA 94080phone: 800-910-2862, 650-989-5100; fax: 650-875-0129
www.atncorp.com