wright brothers
DESCRIPTION
flightTRANSCRIPT
Learning to Fly: The Wright Brothers’ Adventure is availablein electronic format through NASA Spacelink—one of NASA’selectronic resources specifically developed for the educationalcommunity. This publication and other educational productsmay be accessed at the following address:
http://spacelink.nasa.gov/products
i
National Aeronautics and Space Administration
This publication is in the public domain. It is not protected bycopyright, and permission is not required for duplication.
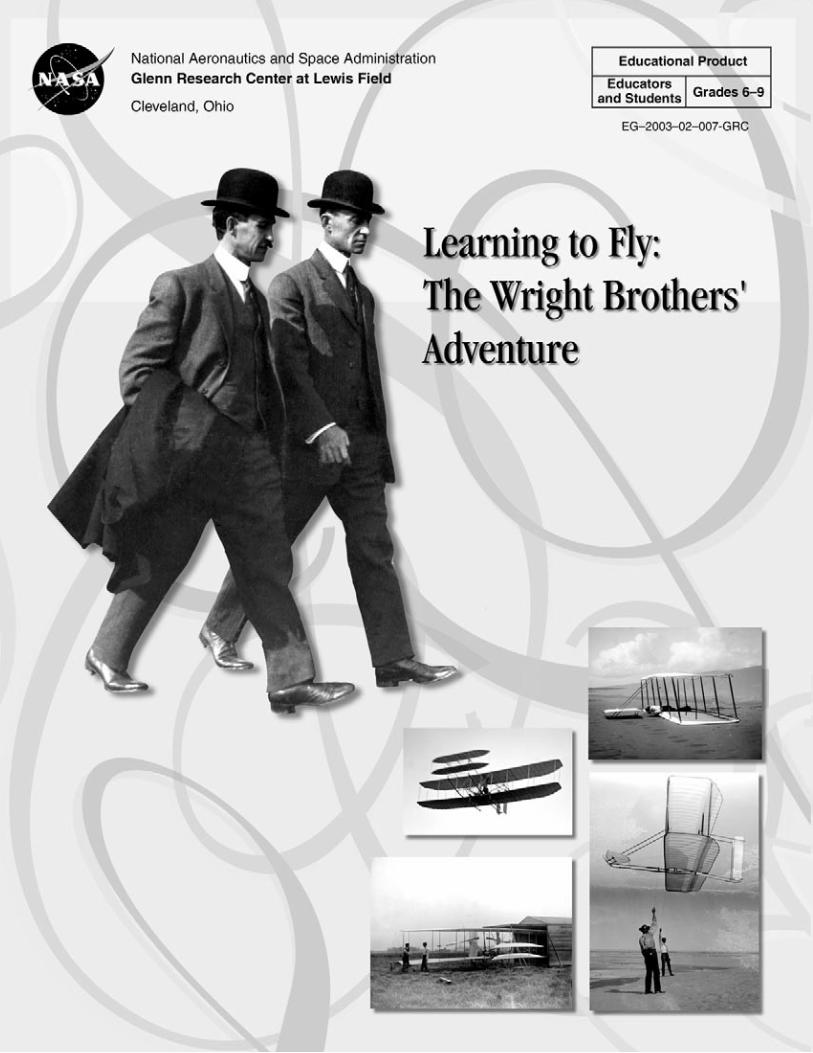
Learning to Fly:The Wright Brothers’ Adventure
A Guide for Educators and Students WithActivities in Aeronautics
ii
This guide was produced by the NASA Glenn Research Center Office ofEducational Programs in Cleveland, OH, and the NASA Aerospace Educa-tional Coordinating Committee.
NASA gratefully acknowledges the generosity of Wright State Universityin Dayton, OH, for permission to use many of the photographs in thisbook.
Acknowledgments
Writers and ContributorsRoger StormThomas BensonCarol GalicaPatty McCredie
EditorPatty McCredie
Layout and Graphic IllustrationKelly ShanklandShanessa Jackson
Model DesignsRoger Storm
PhotographyRoger StormCarol Galica

iii
Activity 1 Early Aviation X X X X
Activity 2 Your First Interview X X X
Activity 3 Your First Report X X X X X
Activity 4 Build a Model of the 1900 Glider X X X
Activity 5 Questions on the 1900 Glider X X X X X
Activity 6 What Would You Design? X X X X
Activity 7 Build a Model of the 1901 Glider X X X
Activity 8 Forces on the 1901 Glider X X
Activity 9 Questions on the 1901 Glider X X X
Activity 10 Wrong Ideas X X X
Activity 11 The Wrights’ Wind Tunnel X X X X
Activity 12 Operate the Wrights’ Tunnel X X X X X X
Activity 13 Build a Model of the 1902 Glider X X X
Activity 14 Compare the 1900, 1901, and 1902 Gliders X X X X
Activity 15 Prices Then and Now X X
Activity 16 Build a Model of the 1903 Flyer X X X
Activity 17 Balancing Forces X X X X X
Activity 18 Center of Gravity X X X X
Activity 19 How Far Did They Fly? X X
Activity 20 How To Launch the Flyer X X X
Activity 21 Write a Press Release X X
Activity 22 Design a Mission Patch X X
Activity 23 Be an Inventor X X X
National Science Standards
Evi
den
ce, M
od
els,
and
Exp
lana
tion
Cha
nge,
Co
nsta
ncy,
and
Mea
sure
men
t
Fo
rm a
nd F
unct
ion
Und
erst
and
ing
Ab
out
Sci
entif
ic In
qui
ry
Tran
sfer
of
Ene
rgy
Mo
tions
and
Fo
rces
Ab
ilitie
s o
f Te
ch-
nolo
gic
al D
esig
n
Sci
ence
as
a H
uman
End
eavo
r
Nat
ure
of
Sci
ence
His
tory
of
Sci
ence
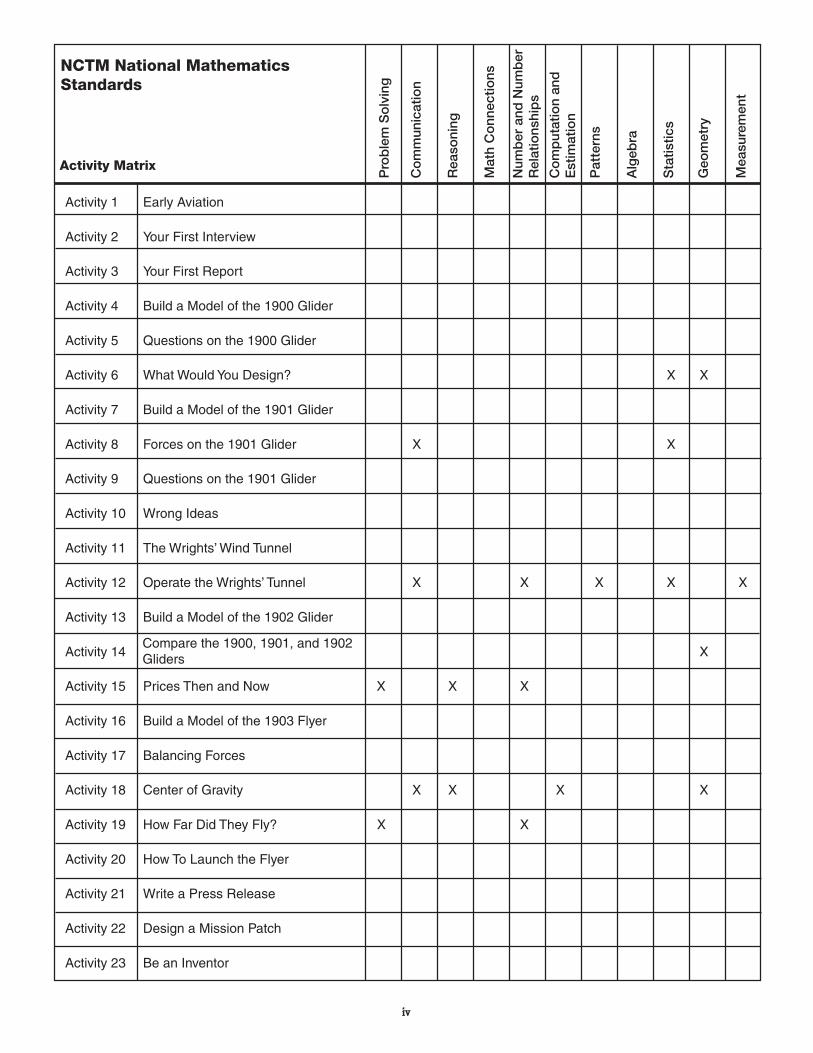
Activity Matrix
iv
Pro
ble
m S
olv
ing
Co
mm
unic
atio
n
Rea
soni
ng
Mat
h C
onn
ectio
ns
Num
ber
and
Num
ber
Rel
atio
nshi
ps
Co
mp
utat
ion
and
Est
imat
ion
Pat
tern
s
Alg
ebra
Sta
tistic
s
Geo
met
ry
Mea
sure
men
t
NCTM National MathematicsStandards
Activity Matrix
Activity 1 Early Aviation
Activity 2 Your First Interview
Activity 3 Your First Report
Activity 4 Build a Model of the 1900 Glider
Activity 5 Questions on the 1900 Glider
Activity 6 What Would You Design? X X
Activity 7 Build a Model of the 1901 Glider
Activity 8 Forces on the 1901 Glider X X
Activity 9 Questions on the 1901 Glider
Activity 10 Wrong Ideas
Activity 11 The Wrights’ Wind Tunnel
Activity 12 Operate the Wrights’ Tunnel X X X X X
Activity 13 Build a Model of the 1902 Glider
Activity 14 X
Activity 15 Prices Then and Now X X X
Activity 16 Build a Model of the 1903 Flyer
Activity 17 Balancing Forces
Activity 18 Center of Gravity X X X X
Activity 19 How Far Did They Fly? X X
Activity 20 How To Launch the Flyer
Activity 21 Write a Press Release
Activity 22 Design a Mission Patch
Activity 23 Be an Inventor
Compare the 1900, 1901, and 1902Gliders

v
Contents
I. Introduction . . . . . . . . . . . . . . . . . . . . . . . . . . . . . . . . . . . . . . . . . . . . . . . . . . . . . . . . . . . . . . . . . . . vii
Flight According to Principle . . . . . . . . . . . . . . . . . . . . . . . . . . . . . . . . . . . . . . . . . . . . . . . . . . . . . 1
About Wilbur and Orville . . . . . . . . . . . . . . . . . . . . . . . . . . . . . . . . . . . . . . . . . . . . . . . . . . . . . . . . 4
II. Reliving the Invention of Flight . . . . . . . . . . . . . . . . . . . . . . . . . . . . . . . . . . . . . . . . . . . . . . . . . . . . . . 7
The Society . . . . . . . . . . . . . . . . . . . . . . . . . . . . . . . . . . . . . . . . . . . . . . . . . . . . . . . . . . . . . . . . . . . 8
Meet the Wrights . . . . . . . . . . . . . . . . . . . . . . . . . . . . . . . . . . . . . . . . . . . . . . . . . . . . . . . . . . . . . . 11
1900: Kitty Hawk . . . . . . . . . . . . . . . . . . . . . . . . . . . . . . . . . . . . . . . . . . . . . . . . . . . . . . . . . . . . . . 13
1901: The First Improvement . . . . . . . . . . . . . . . . . . . . . . . . . . . . . . . . . . . . . . . . . . . . . . . . . . . . 17
New Data . . . . . . . . . . . . . . . . . . . . . . . . . . . . . . . . . . . . . . . . . . . . . . . . . . . . . . . . . . . . . . . . . . . 20
1902: Success at Last . . . . . . . . . . . . . . . . . . . . . . . . . . . . . . . . . . . . . . . . . . . . . . . . . . . . . . . . . . . 25
1903: Powered Flight . . . . . . . . . . . . . . . . . . . . . . . . . . . . . . . . . . . . . . . . . . . . . . . . . . . . . . . . . . 28
1904: Improvements in Dayton . . . . . . . . . . . . . . . . . . . . . . . . . . . . . . . . . . . . . . . . . . . . . . . . . . . 34
1905: Complete Flight at Last . . . . . . . . . . . . . . . . . . . . . . . . . . . . . . . . . . . . . . . . . . . . . . . . . . . . 37
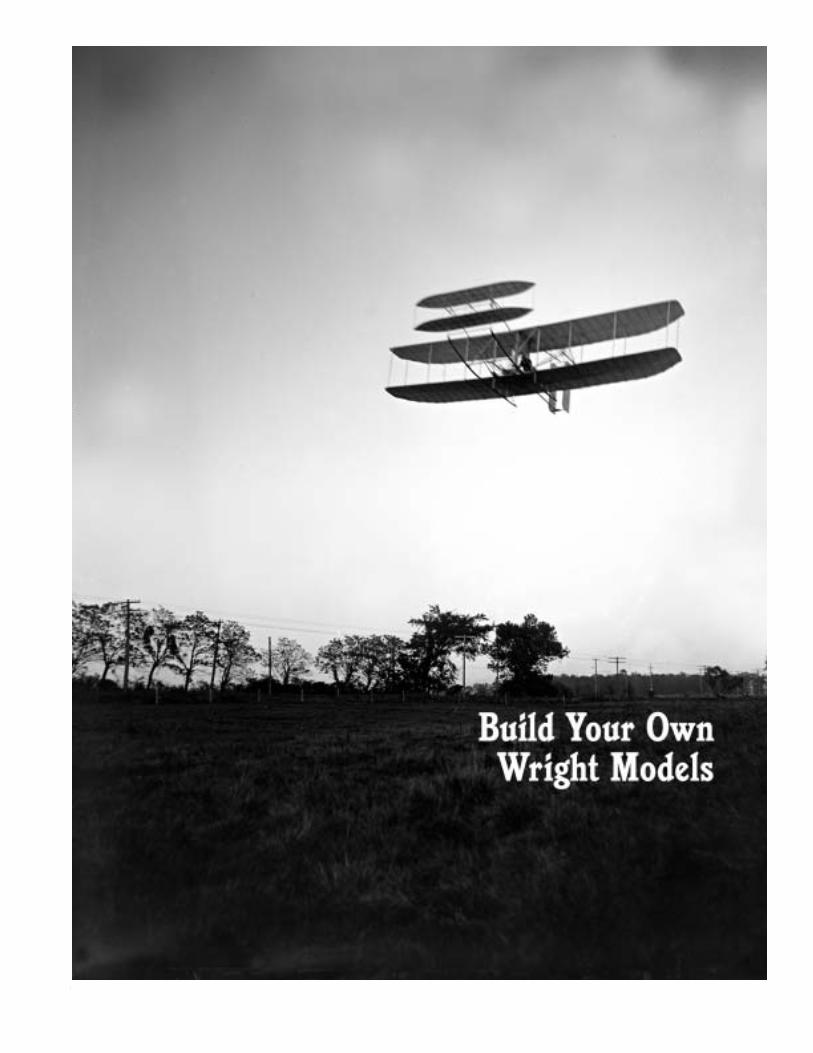
III. Build Your Own Wright Models . . . . . . . . . . . . . . . . . . . . . . . . . . . . . . . . . . . . . . . . . . . . . . . . . . . . 39
Wright Brothers 1900 Glider . . . . . . . . . . . . . . . . . . . . . . . . . . . . . . . . . . . . . . . . . . . . . . . . . . . . 40
Wright Brothers 1901 Glider . . . . . . . . . . . . . . . . . . . . . . . . . . . . . . . . . . . . . . . . . . . . . . . . . . . . 46
Wright Brothers 1902 Glider . . . . . . . . . . . . . . . . . . . . . . . . . . . . . . . . . . . . . . . . . . . . . . . . . . . . 54
Wright Brothers 1903 Flyer . . . . . . . . . . . . . . . . . . . . . . . . . . . . . . . . . . . . . . . . . . . . . . . . . . . . . 62
IV. Glossary of Terms . . . . . . . . . . . . . . . . . . . . . . . . . . . . . . . . . . . . . . . . . . . . . . . . . . . . . . . . . . . . . . 75
V. Activity Answers . . . . . . . . . . . . . . . . . . . . . . . . . . . . . . . . . . . . . . . . . . . . . . . . . . . . . . . . . . . . . . . . 77
VI. Teacher Information . . . . . . . . . . . . . . . . . . . . . . . . . . . . . . . . . . . . . . . . . . . . . . . . . . . . . . . . . . . . . 87
VI. Model Templates . . . . . . . . . . . . . . . . . . . . . . . . . . . . . . . . . . . . . . . . . . . . . . . . . . . . . . . . . . . . . . 103
A note to teachers: Students who will complete the role-playing activity (section II) should skip section Iand start with “The Society.” All activities are on their own page for ease of duplication. Model activitiesbegin on page 39.
For more information on the Wright Brothers’ visit wright.nasa.gov.
vii
1Learning to Fly: The Wright Brothers’ Adventure EG–2002–12–007–GRC
Flight According to Principle
One very cold and windy morning on a North Carolina beach, a lonely group of men huddled on the sand neartheir pride and joy: a kitelike contraption, built of cloth and wood and outfitted with bicycle parts. On the countof three, with the motor turning and heavy wind gusting, one man started to run alongside and guide the craft;in an instant, the pilot lying on the wing steered the craft to flight a few feet above the ground. The aircraftwobbled forward in the air for no more than 12 seconds, and settled triumphantly back to the ground. To anoutsider, it would seem like a modest achievement. But it was the first time in history that an aircraftpropelled by a motor and controlled by a pilot had left the ground. It was a moment that Wilbur and OrvilleWright had labored to achieve for nearly 5 years.
On December 17, 2003, the world will celebrate the 100th anniversary of the first flight of the Wright Flyer.Before 1903, some people had flown gliders without engines; some had piloted lighter-than-air craft like hot-airballoons. Now a pilot would have the power to fly an aircraft at will, over long distances. No one could know in1903 how that power would change the world.
Today we are so used to seeing jets in the sky, we forget that people were not always able to fly like birds. Someearly aviators thought that building wings like those of birds would be enough to accomplish flight. The WrightBrothers, on the other hand, knew that flying would not be so simple. They were willing to think and work—and scratch their heads in perplexity—and think and work again for years to accomplish that first flight:
“… I would hardly think today of making my first flight on a strange machine in a 27-mile wind . . .I look with amazement upon our audacity in attempting flights with a new and untried machine under suchcircumstances. Yet faith in our calculations and the design of the first machine, based upon our tables of airpressures, secured by months of careful laboratory work, and confidence in our system of control … hadconvinced us that the machine was capable of lifting and maintaining itself in the air . . .”
—Orville Wright, from “How We Made the First Flight”
In the early days of aviation, flying was extremely dangerous. Many daredevils were killed trying out crazy newflying machines. Otto Lilienthal, the German hang glider and foremost authority on aeronautics, had just beenkilled in one of his gliders in 1896 when the Wrights started to become interested in the idea of a flyingmachine. When Wilbur heard about Lilienthal’s accident, he quickly read everything he could find about aircraftand wrote to the Smithsonian Institution for information on aeronautical research.
2Learning to Fly: The Wright Brothers’ Adventure EG–2002–12–007–GRC
Lilienthal was a great influence on the brothers; he was not just a daredevil. He advocated using piloted glidersto learn about aerodynamics. He is considered to be the first person to design heavier-than-air aircraft carefullyand deliberately. He developed many functioning gliders and was famous around the world. The brothersadopted his thoughtful approach to designing aircraft. Like Lilienthal, every time they made an innovation, it waswell thought out.
“To invent an airplane is nothing. To build one is something. But to fly is everything.” —Otto Lilienthal
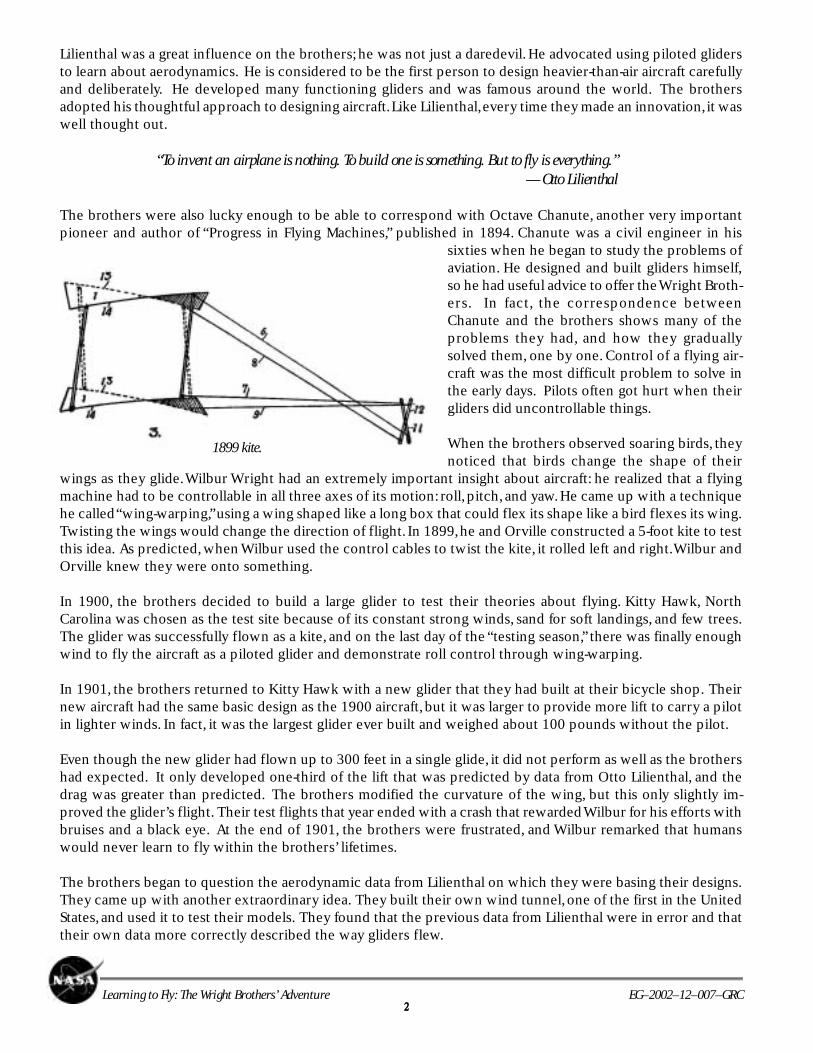
The brothers were also lucky enough to be able to correspond with Octave Chanute, another very importantpioneer and author of “Progress in Flying Machines,” published in 1894. Chanute was a civil engineer in his
sixties when he began to study the problems ofaviation. He designed and built gliders himself,so he had useful advice to offer the Wright Broth-ers. In fact, the correspondence betweenChanute and the brothers shows many of theproblems they had, and how they graduallysolved them, one by one. Control of a flying air-craft was the most difficult problem to solve inthe early days. Pilots often got hurt when theirgliders did uncontrollable things.
When the brothers observed soaring birds, theynoticed that birds change the shape of their
wings as they glide. Wilbur Wright had an extremely important insight about aircraft: he realized that a flyingmachine had to be controllable in all three axes of its motion: roll, pitch, and yaw. He came up with a techniquehe called “wing-warping,” using a wing shaped like a long box that could flex its shape like a bird flexes its wing.Twisting the wings would change the direction of flight. In 1899, he and Orville constructed a 5-foot kite to testthis idea. As predicted, when Wilbur used the control cables to twist the kite, it rolled left and right. Wilbur andOrville knew they were onto something.
In 1900, the brothers decided to build a large glider to test their theories about flying. Kitty Hawk, NorthCarolina was chosen as the test site because of its constant strong winds, sand for soft landings, and few trees.The glider was successfully flown as a kite, and on the last day of the “testing season,” there was finally enoughwind to fly the aircraft as a piloted glider and demonstrate roll control through wing-warping.
In 1901, the brothers returned to Kitty Hawk with a new glider that they had built at their bicycle shop. Theirnew aircraft had the same basic design as the 1900 aircraft, but it was larger to provide more lift to carry a pilotin lighter winds. In fact, it was the largest glider ever built and weighed about 100 pounds without the pilot.
Even though the new glider had flown up to 300 feet in a single glide, it did not perform as well as the brothershad expected. It only developed one-third of the lift that was predicted by data from Otto Lilienthal, and thedrag was greater than predicted. The brothers modified the curvature of the wing, but this only slightly im-proved the glider’s flight. Their test flights that year ended with a crash that rewarded Wilbur for his efforts withbruises and a black eye. At the end of 1901, the brothers were frustrated, and Wilbur remarked that humanswould never learn to fly within the brothers’ lifetimes.
The brothers began to question the aerodynamic data from Lilienthal on which they were basing their designs.They came up with another extraordinary idea. They built their own wind tunnel, one of the first in the UnitedStates, and used it to test their models. They found that the previous data from Lilienthal were in error and thattheir own data more correctly described the way gliders flew.
1899 kite.
3Learning to Fly: The Wright Brothers’ Adventure EG–2002–12–007–GRC
In 1902, Wilbur and Orville returned to Kitty Hawk with a new aircraft based on their new data. This aircrafthad about the same wing area as the 1901 aircraft, but its wings were long and thin and it had a new movablerudder at the rear. The movable rudder worked with the wing-warping to keep the nose of the aircraft pointedinto the curved flight path. With this new aircraft, the brothers completed flights of over 650 feet. This machinewas the first aircraft that had active controls for all three axes: roll, pitch, and yaw. At the end of 1902, thebrothers knew that all they needed to do was develop a motor and propellers and they would have the firstsuccessful airplane.
The Wrights could not find a manufacturer who would meet their requirements for a lightweight engine withsufficient horsepower, so they built their own 12-horsepower engine in just 6 weeks. They also created the firstworking aircraft propellers. In September 1903, they returned to Kitty Hawk with their new powered aircraft.With the pilot and the motor, the 1903 aircraft weighed a little over 700 pounds. On December 17, 1903, thebrothers finally made four successful flights. After more than 5 years of solving problem after problem, Wilburand Orville Wright had conquered powered flight.
But the brothers’ work didn’t end there. The 1903 airplane was only the first, and crudest, working airplane. Itwas very difficult to fly, especially since it tended to pitch down nose first into the ground. It took quite a bitmore time and effort to develop a fully controllable craft.
By the end of 1904, the Wrights were making flights of several minutes at Huffman Prairie in a new aircraft witha new 18-horsepower engine. The brothers tried to solve the pitch problem by adding 200 pounds of ballast tothe airplane, but the craft was still hard to control and difficult for the engine to lift.
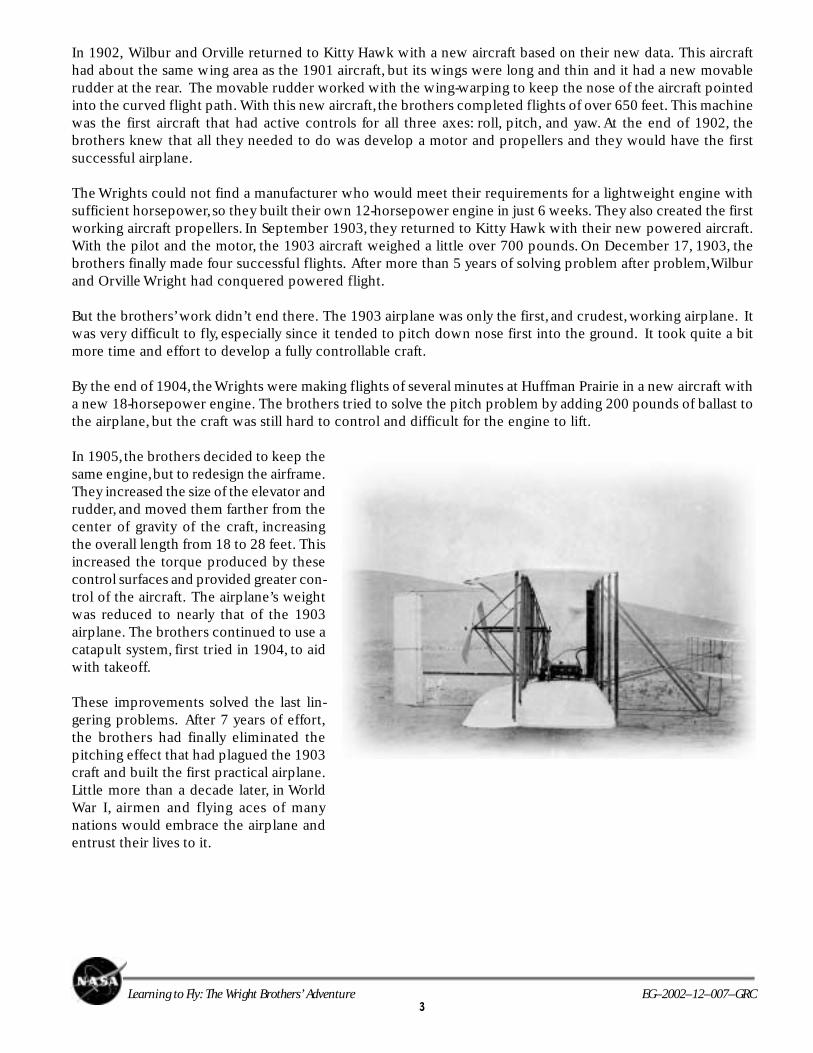
In 1905, the brothers decided to keep thesame engine, but to redesign the airframe.They increased the size of the elevator andrudder, and moved them farther from thecenter of gravity of the craft, increasingthe overall length from 18 to 28 feet. Thisincreased the torque produced by thesecontrol surfaces and provided greater con-trol of the aircraft. The airplane’s weightwas reduced to nearly that of the 1903airplane. The brothers continued to use acatapult system, first tried in 1904, to aidwith takeoff.
These improvements solved the last lin-gering problems. After 7 years of effort,the brothers had finally eliminated thepitching effect that had plagued the 1903craft and built the first practical airplane.Little more than a decade later, in WorldWar I, airmen and flying aces of manynations would embrace the airplane andentrust their lives to it.
4Learning to Fly: The Wright Brothers’ Adventure EG–2002–12–007–GRC
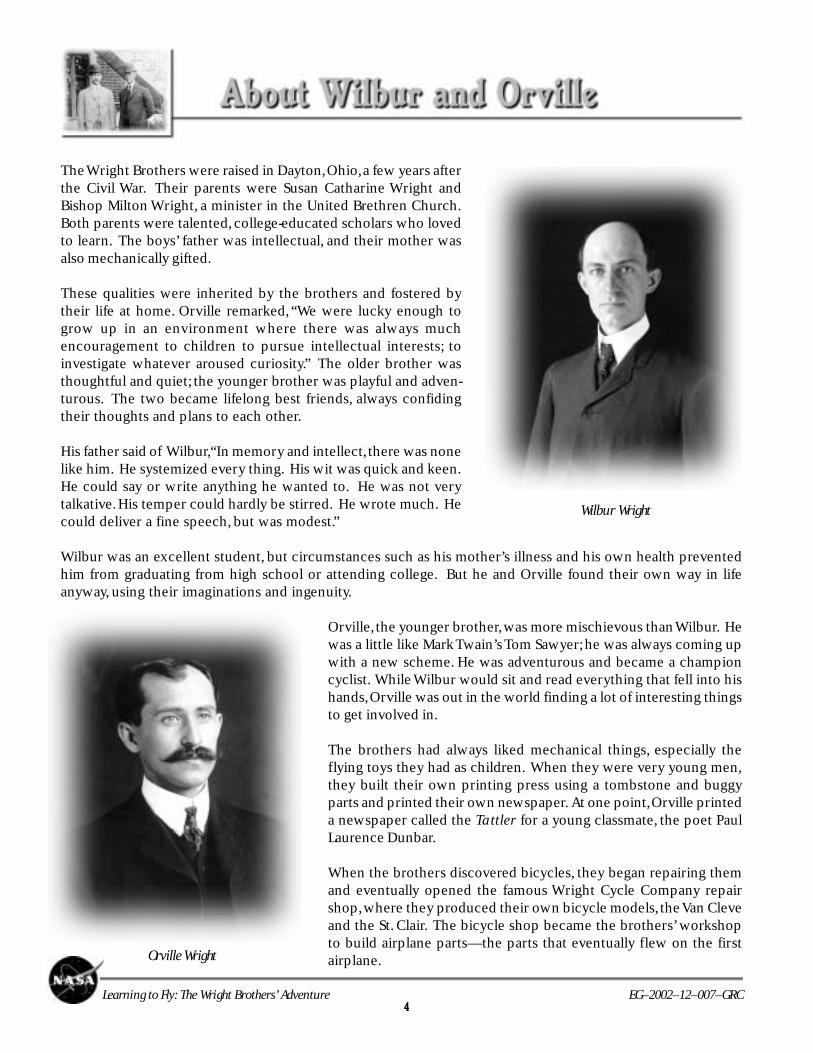
Wilbur Wright
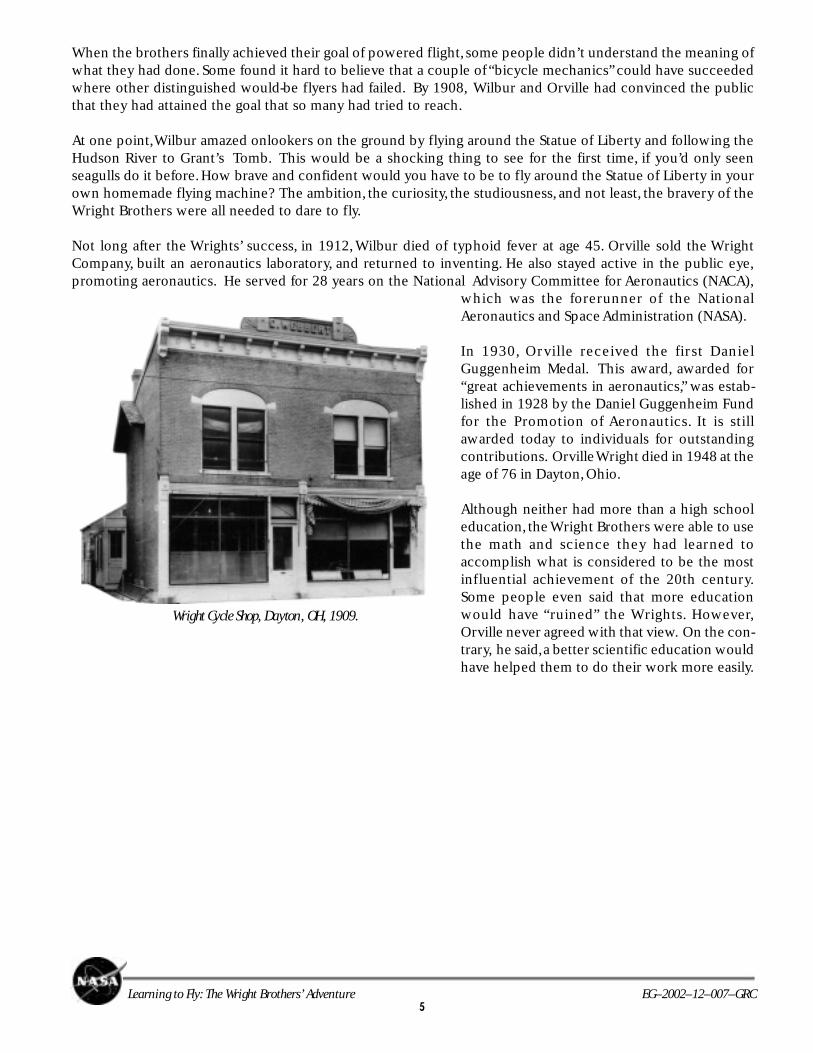
Orville Wright
The Wright Brothers were raised in Dayton, Ohio, a few years afterthe Civil War. Their parents were Susan Catharine Wright andBishop Milton Wright, a minister in the United Brethren Church.Both parents were talented, college-educated scholars who lovedto learn. The boys’ father was intellectual, and their mother wasalso mechanically gifted.
These qualities were inherited by the brothers and fostered bytheir life at home. Orville remarked, “We were lucky enough togrow up in an environment where there was always muchencouragement to children to pursue intellectual interests; toinvestigate whatever aroused curiosity.” The older brother wasthoughtful and quiet; the younger brother was playful and adven-turous. The two became lifelong best friends, always confidingtheir thoughts and plans to each other.
His father said of Wilbur, “In memory and intellect, there was nonelike him. He systemized every thing. His wit was quick and keen.He could say or write anything he wanted to. He was not verytalkative. His temper could hardly be stirred. He wrote much. Hecould deliver a fine speech, but was modest.”
Wilbur was an excellent student, but circumstances such as his mother’s illness and his own health preventedhim from graduating from high school or attending college. But he and Orville found their own way in lifeanyway, using their imaginations and ingenuity.
Orville, the younger brother, was more mischievous than Wilbur. Hewas a little like Mark Twain’s Tom Sawyer; he was always coming upwith a new scheme. He was adventurous and became a championcyclist. While Wilbur would sit and read everything that fell into hishands, Orville was out in the world finding a lot of interesting thingsto get involved in.
The brothers had always liked mechanical things, especially theflying toys they had as children. When they were very young men,they built their own printing press using a tombstone and buggyparts and printed their own newspaper. At one point, Orville printeda newspaper called the Tattler for a young classmate, the poet PaulLaurence Dunbar.
When the brothers discovered bicycles, they began repairing themand eventually opened the famous Wright Cycle Company repairshop, where they produced their own bicycle models, the Van Cleveand the St. Clair. The bicycle shop became the brothers’ workshopto build airplane parts—the parts that eventually flew on the firstairplane.
5Learning to Fly: The Wright Brothers’ Adventure EG–2002–12–007–GRC
Wright Cycle Shop, Dayton, OH, 1909.
When the brothers finally achieved their goal of powered flight, some people didn’t understand the meaning ofwhat they had done. Some found it hard to believe that a couple of “bicycle mechanics” could have succeededwhere other distinguished would-be flyers had failed. By 1908, Wilbur and Orville had convinced the publicthat they had attained the goal that so many had tried to reach.
At one point, Wilbur amazed onlookers on the ground by flying around the Statue of Liberty and following theHudson River to Grant’s Tomb. This would be a shocking thing to see for the first time, if you’d only seenseagulls do it before. How brave and confident would you have to be to fly around the Statue of Liberty in yourown homemade flying machine? The ambition, the curiosity, the studiousness, and not least, the bravery of theWright Brothers were all needed to dare to fly.
Not long after the Wrights’ success, in 1912, Wilbur died of typhoid fever at age 45. Orville sold the WrightCompany, built an aeronautics laboratory, and returned to inventing. He also stayed active in the public eye,promoting aeronautics. He served for 28 years on the National Advisory Committee for Aeronautics (NACA),
which was the forerunner of the NationalAeronautics and Space Administration (NASA).
In 1930, Orville received the first DanielGuggenheim Medal. This award, awarded for“great achievements in aeronautics,” was estab-lished in 1928 by the Daniel Guggenheim Fundfor the Promotion of Aeronautics. It is stillawarded today to individuals for outstandingcontributions. Orville Wright died in 1948 at theage of 76 in Dayton, Ohio.
Although neither had more than a high schooleducation, the Wright Brothers were able to usethe math and science they had learned toaccomplish what is considered to be the mostinfluential achievement of the 20th century.Some people even said that more educationwould have “ruined” the Wrights. However,Orville never agreed with that view. On the con-trary, he said, a better scientific education wouldhave helped them to do their work more easily.
7Learning to Fly: The Wright Brothers’ Adventure EG–2002–12–007–GRC

8Learning to Fly: The Wright Brothers’ Adventure EG–2002–12–007–GRC
Chanute showing off the multiplane soaring machine “Katydid.”Courtesy of the National Air and Space Museum,
Smithsonian Institute. Negative 1A-20406 A494771(http://www.smithsonian.org/).
The year is 1900, and you are employed by the Cincinnati Scientific Society, a group of about 100 progress-minded people who are interested in learning about the latest advances in science and technology. Some of themembers are very wealthy and regularly sponsor lectures, studies, and expeditions. At the Society meeting lastmonth, Mr. Pierpont reported that his cousin from Dayton had written him about her neighbors, two bicyclesalesmen named Wilbur and Orville Wright. People were saying that they were making a large glider in the backof their bicycle shop. In talking with the Wrights, Mr. Pierpont’s cousin had learned that they were attemptingto invent a flying machine.
This is just the kind of thing the Society is interested in. Society members had avidly read reports about thegliding experiments of the German Otto Lilienthal, who was killed when his glider went out of control andcrashed in Germany in 1896; about the Englishman Percy Pilcher, who died the same way in 1899; and about theAmericans Octave Chanute and Samuel Langley. Mr. Sidney Krause makes a motion that the Society send aninvestigator to report on the efforts of the Wright Brothers. The motion passes unanimously; you are selected tobe the investigator. The Society gives you strict instructions to report only the facts and not to mention thename of the Society in your investigations. (Society members want to avoid the appearance of being out to stealanyone’s ideas. They are just interested in science.) Mr. Pierpont gives you the address of the Wrights and theirshop, and you set off for Dayton the next morning.
Langley’s “Great Aerodrome” perched aboard a houseboaton the Potomac, just before a disastrous launch that
tumbled the aircraft down into the river.
Lilienthal’s flight station near his home in Steglitz(today part of Berlin).
Courtesy of Archive Otto-Lilienthal-Museum(www.lilienthal-museum.de. Inquiries are directed to
9Learning to Fly: The Wright Brothers’ Adventure EG–2002–12–007–GRC
Activity 1—Early Aviation
Before you go to Dayton to investigate the Wright Brothers, it is important to do some research and get somebackground information. You need to go to the library and/or the Internet and find out about the progress ofattempts to build a flying machine up to the year 1900 (try searching under terms like “early aviators” on theInternet). Write a short paragraph about each of the following and their accomplishments up to 1900:
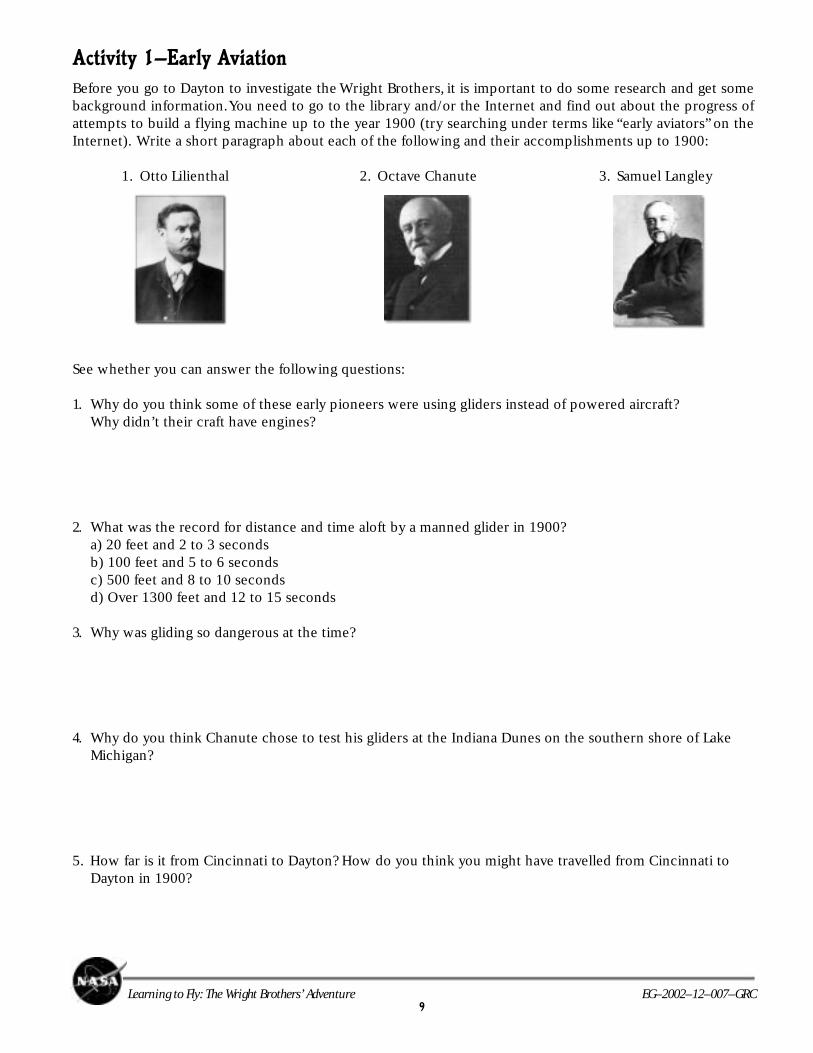
1. Otto Lilienthal 2. Octave Chanute 3. Samuel Langley
See whether you can answer the following questions:
1. Why do you think some of these early pioneers were using gliders instead of powered aircraft?Why didn’t their craft have engines?
2. What was the record for distance and time aloft by a manned glider in 1900?a) 20 feet and 2 to 3 secondsb) 100 feet and 5 to 6 secondsc) 500 feet and 8 to 10 secondsd) Over 1300 feet and 12 to 15 seconds
3. Why was gliding so dangerous at the time?
4. Why do you think Chanute chose to test his gliders at the Indiana Dunes on the southern shore of LakeMichigan?
5. How far is it from Cincinnati to Dayton? How do you think you might have travelled from Cincinnati toDayton in 1900?
10Learning to Fly: The Wright Brothers’ Adventure EG–2002–12–007–GRC
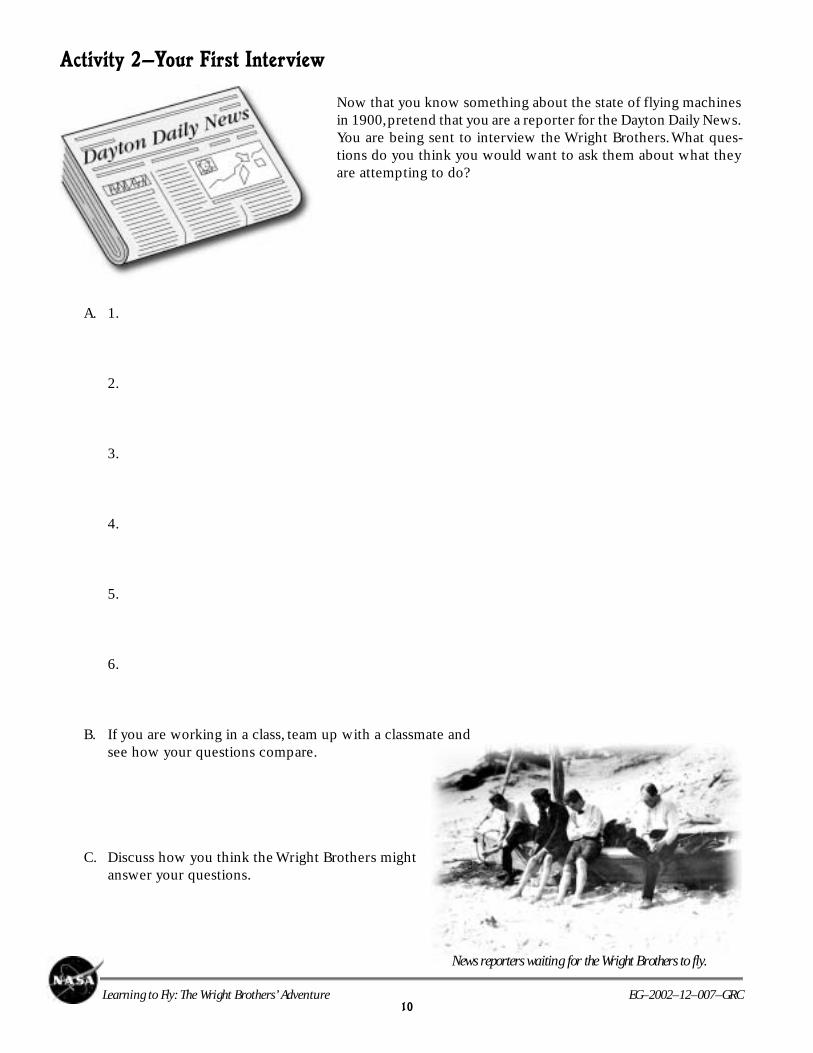
Activity 2—Your First Interview
Now that you know something about the state of flying machinesin 1900, pretend that you are a reporter for the Dayton Daily News.You are being sent to interview the Wright Brothers. What ques-tions do you think you would want to ask them about what theyare attempting to do?
A. 1.
2.
3.
4.
5.
6.
B. If you are working in a class, team up with a classmate andsee how your questions compare.
C. Discuss how you think the Wright Brothers mightanswer your questions.
News reporters waiting for the Wright Brothers to fly.
11Learning to Fly: The Wright Brothers’ Adventure EG–2002–12–007–GRC
Having been appointed by the Society to learn about the flying experiments of Wilbur and Orville Wright, youtravel by train to Dayton. The trip takes about 2 hours, and when you arrive in Dayton, you ask for directions tothe Wright Cycle Shop located on West Third Street. You catch the streetcar as directed.
Instead of going directly to the cycle shop, you decide to talk first with the neighbors. You run into a bunch ofkids playing in the street and ask them what they know of the Wright Brothers. “They can fix anything,” says oneyoungster. “They’re good with bicycles,” says another. “I like their kites!” pipes in another.
This is what you came to hear. “Last year, Wilbur made the biggest, best kite!” a boy declares. “It had two wings,was 5 feet across, and had four strings to it, one to each corner. When he pulled on the strings, the kite twistedand dove through the air. He could make it go any direction and he just about dove it into us kids. It reallyscared us!”
You thank the kids. Near the bicycle shop, you introduce yourself to a lady sitting on her porch. Does she knowthe Wrights? “Indeed I do, ever since they was little,” she says. “Oh, they was always up to somethin’, they was.They used to publish their own newspaper. Now they fix and sell bicycles. They really don’t talk too much,” shecontinued. “I hear tell they’re buildin’ some big flyin’ contraption in their shop, but I ain’t seen nothin’. I’d ask,but they pretty much like to keep to theirselves.” You thank her, and go over to the cycle shop.
As you enter the shop, a tall man with sharp features comes out of the back room and introduces himself asWilbur Wright. He asks you if he can help you, and you pretend to be interested in a bicycle. He shows youseveral makes, including some that he and his brother Orville designed themselves.
As you look at bicycles, you talk about a number of things. A shorter man in a derby hat comes in and Wilburintroduces him as his brother, Orville. As you talk about bicycles and transportation in general, you mentionsomething about Octave Chanute and glider flights on the Indiana dunes. The eyes of both brothers light up atthis, and they mention that they too have done a bit of researchon the subject of flight. Wilbur says the key to success is beingable to control a craft in the air. “The lack of control,” says Orville,“cost Lilienthal and others their lives.” The brothers say that theyplan to carry out some experiments in North Carolina in the fall,but don’t offer any more details. You shake hands and leave theshop.
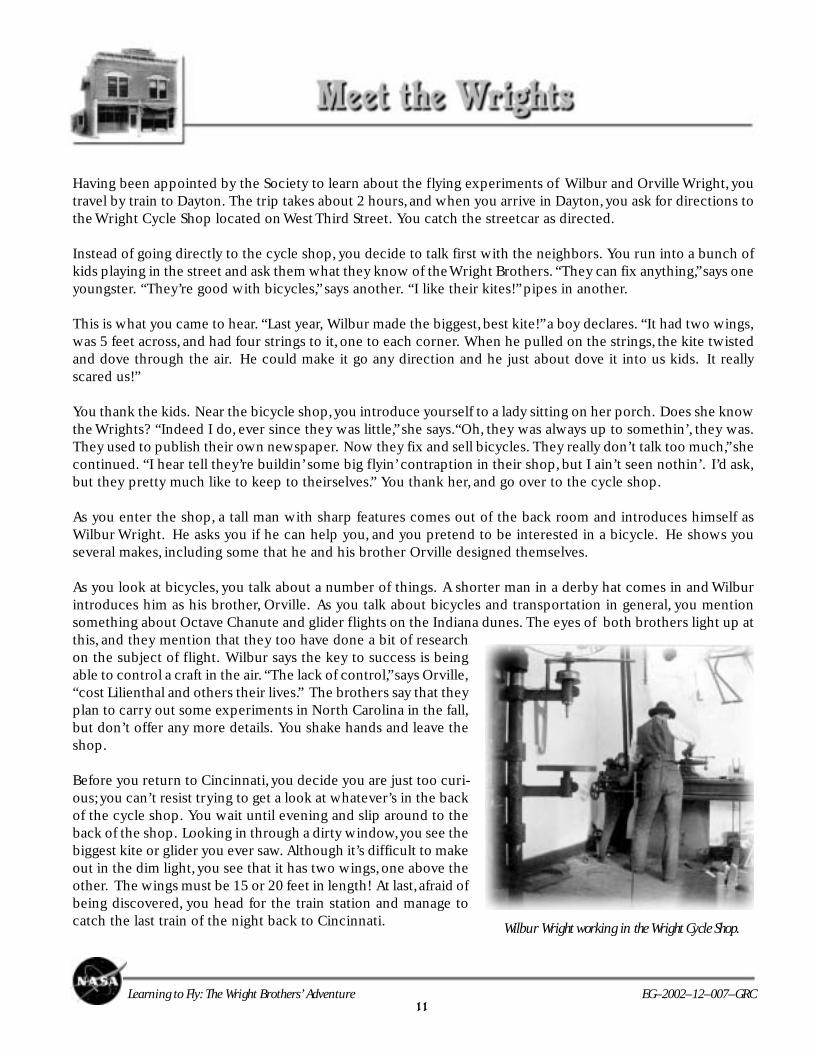
Before you return to Cincinnati, you decide you are just too curi-ous; you can’t resist trying to get a look at whatever’s in the backof the cycle shop. You wait until evening and slip around to theback of the shop. Looking in through a dirty window, you see thebiggest kite or glider you ever saw. Although it’s difficult to makeout in the dim light, you see that it has two wings, one above theother. The wings must be 15 or 20 feet in length! At last, afraid ofbeing discovered, you head for the train station and manage tocatch the last train of the night back to Cincinnati. Wilbur Wright working in the Wright Cycle Shop.
12Learning to Fly: The Wright Brothers’ Adventure EG–2002–12–007–GRC
Activity 3—Your First Report
1. From what you learned on your trip to Dayton, why do you think Wilbur was flying a large kite in the summer of 1899? What do you think he learned from doing it?
2. Having arrived back in Cincinnati after visiting the Wrights, you must make a written report to the Scientific Society. What are the key points that you would put in your report?
3. Why do you think the Wright Brothers are headed to North Carolina? What kind of conditions do you think they are looking for to carry out their glider experiments?
13Learning to Fly: The Wright Brothers’ Adventure EG–2002–12–007–GRC
Having visited the Wrights in Dayton, you make your report to the members of the Society. Everyone isextremely interested in the craft being built in the back of the shop; the members excitedly discuss the possibili-ties of human flight. Mr. Pierpont’s cousin says that the Wrights’ sister Katharine told her that they are going toa place called “Kitty Hawk” in September. This sparsely populated North Carolina spot has high sandy hills, fewtrees, and almost continuous winds from the ocean: ideal conditions to test a glider.
The Society is anxious to send you there to learn ofthe experiments, but not in an obvious way. It isdecided that you will apply for a temporary positionwith the U.S. Lifesaving Service, which has a stationnear Kitty Hawk. Several Society members help you tosecure a job as a lookout while you also maintain yourposition and salary with the Society. The adventureand the money are too good to pass up.
You arrive in Elizabeth City, North Carolina, in Augustand catch a ride on the mail boat out to the LifesavingStation near Kitty Hawk. If a shipwreck occurs, yourcrew’s job is to brave the surf and rescue strandedsailors.
On September 13, Wilbur Wright arrives in Kitty Hawk and stays with William Tate, the local postmaster. Soon,Orville arrives and they set up a tent camp about a one-half mile from the Tates. You receive word that thebrothers’ kite has arrived, so you decide to visit their camp.
You introduce yourself to the Wrights as a lookout from theLifesaving Station. Wilbur recognizes you from your visit totheir shop in Dayton, and you tell him you are a college stu-dent from Cincinnati and were in Dayton visiting friends.
The brothers remember your interest in flight and proudlyshow you their creation. This is the same large craft that yousaw in their shop. It has two wings about 17 feet long and 5feet deep, one set about 4 feet above the other. Both wingsare made of a tightly woven white material stretched over alight wooden frame. Wire bracing keeps the structure tight.A square structure that looks like a small wing made of thesame white material is sticking out a few feet in the front.You note that the wings are arched. When you ask about the
open space you see in the lower wing, Orville informs you that the pilot rides there, lying on his stomach, so itis indeed a glider. Due to light winds, they are testing the glider with chains to simulate the weight of a pilot.You ask permission to stay and watch, and they ask whether you’d be willing to help!
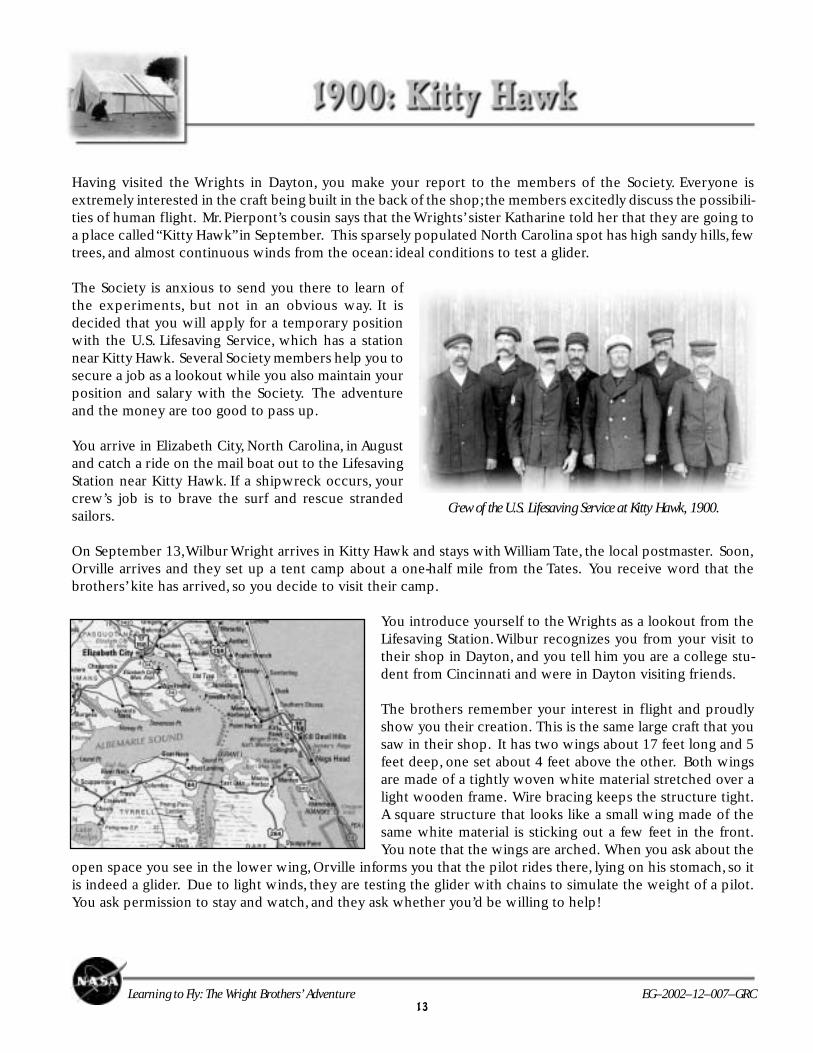
Crew of the U.S. Lifesaving Service at Kitty Hawk, 1900.

14Learning to Fly: The Wright Brothers’ Adventure EG–2002–12–007–GRC
As strong breezes blow, the glider, which must weighnearly 100 pounds with the chains, just floats in the air.You and Orville struggle to hold onto cables that act askite strings; Wilbur is behind the glider pulling on an-other set of wires. As he pulls on one wire, the wingstwist and the glider tilts and drifts to the side. When hepulls the other wire, the glider turns in the oppositedirection. This is just like the kite the kids in Dayton haddescribed to you. The control was truly wonderful! Youwant to stay all day, but your shift as a lookout is comingup. The brothers thank you for your help and invite youback.
You visit the camp a few more times, and you notice thatthe curvature of the small front wing is sometimesdifferent, and this seems to cause the glider to fly at adifferent angle. You always see the brothers flying the glider as a kite, but the other men at the station tell youthat one day they had seen Wilbur actually piloting the glider. On that particularly windy day, they say, he hadglided for 10 to 20 seconds and covered 300 to 400 feet before suffering a minor crash landing.
Soon after, the Wrights pack up and return to Dayton, leaving their crashed glider in the sand; Postmaster Tate’swife washes the fine sateen fabric of the wings and makes dresses for her daughters. You take leave of theLifesaving Station and return to Cincinnati to report to the Scientific Society.
Wilbur Wright at first camp at Kitty Hawk, 1900.
The Wrights’ 1900 Glider. October 1900: 10-year-old Tommy Tate, son of Kitty Hawkpostmaster William Tate, standing in front of the 1900 Glider with
his drum fish. Tommy flew as a lightweight pilot on some of theWright Brothers’ glider flights.
Activity 4—Build a Model of the 1900 GliderThe Society asks you to make a model of the Wright’s 1900 aircraft as a part of your report. Turn to page 41and follow the instructions to make your model.
15Learning to Fly: The Wright Brothers’ Adventure EG–2002–12–007–GRC
Activity 5—Questions on the 1900 Glider
Your report to the Cincinnati Scientific Society stimulates a lot of discussion. The members have many ques-tions as they try to understand the Wrights’ experiments. How do you think you would answer this sampling oftheir questions?
1. Why did the Wrights use a two-wing (biplane) arrangement?
2. What was the purpose of having the wings be curved or arched?
3. Why did the pilot of the Wright Glider lie down on the wing instead of hanging from the glider, as in Lilienthal and Chanute’s gliders?
4. Why do you think twisting the wings caused the glider to drift left or right? How much did the wings twist? If they stayed twisted, do you think the glider would fly in circles or crash? Why?
16Learning to Fly: The Wright Brothers’ Adventure EG–2002–12–007–GRC
Activity 6—What Would You Design?
Orville told you that he and Wilbur are determined to create a flyable machine, and that to do this they are goingto have to get more lift out of their craft so it can support a pilot. When you report this to the CincinnatiScientific Society, the members start to debate about what they think is the best way to accomplish this. It isdecided to have a contest to see who can produce the best design to improve upon the Wright Glider.
1. If you were to enter this contest, what specific changes would you make to give the 1900 Glider more lift?
2. How do you think each change would improve the original design?
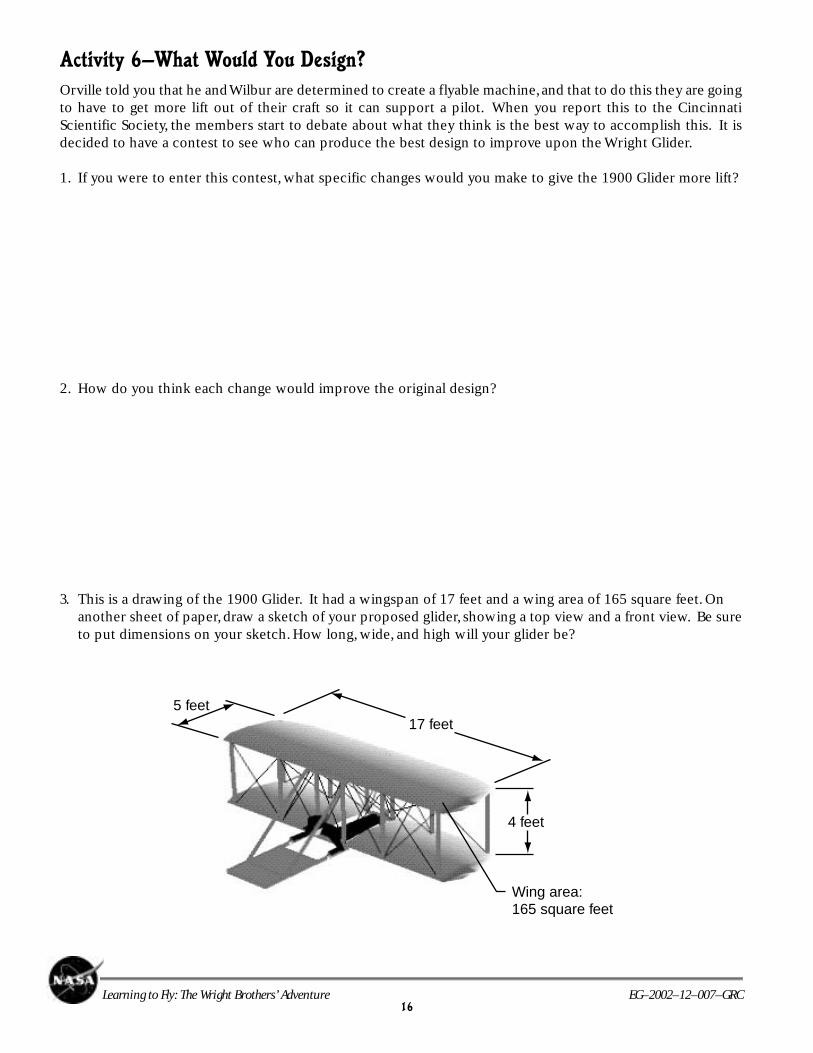
3. This is a drawing of the 1900 Glider. It had a wingspan of 17 feet and a wing area of 165 square feet. Onanother sheet of paper, draw a sketch of your proposed glider, showing a top view and a front view. Be sureto put dimensions on your sketch. How long, wide, and high will your glider be?
17 feet
4 feet
Wing area:165 square feet
5 feet
17Learning to Fly: The Wright Brothers’ Adventure EG–2002–12–007–GRC
You are involved with various activities as secretary for the Cincinnati Scientific Society when a letter arrives inMarch from the cousin of Mr. Pierpont, the neighbor of the Wright Brothers. She has spoken with KatharineWright, who told her that her brothers have constructed a new glider and intend to go to Kitty Hawk for testingmuch earlier than last year, leaving sometime in July. With anticipation, you arrange to return to the LifesavingStation at Kill Devil Hills in late June to resume duties as a temporary lookout so you can observe the new trials.
The Wright Brothers arrive on July 10, 1901. This year, in order to be closer to their launch site at Kill Devil Hills,they move their camp about 4 miles south to the base of Big Hill. This puts them much closer to your station,and it’s easier to observe their experiments.
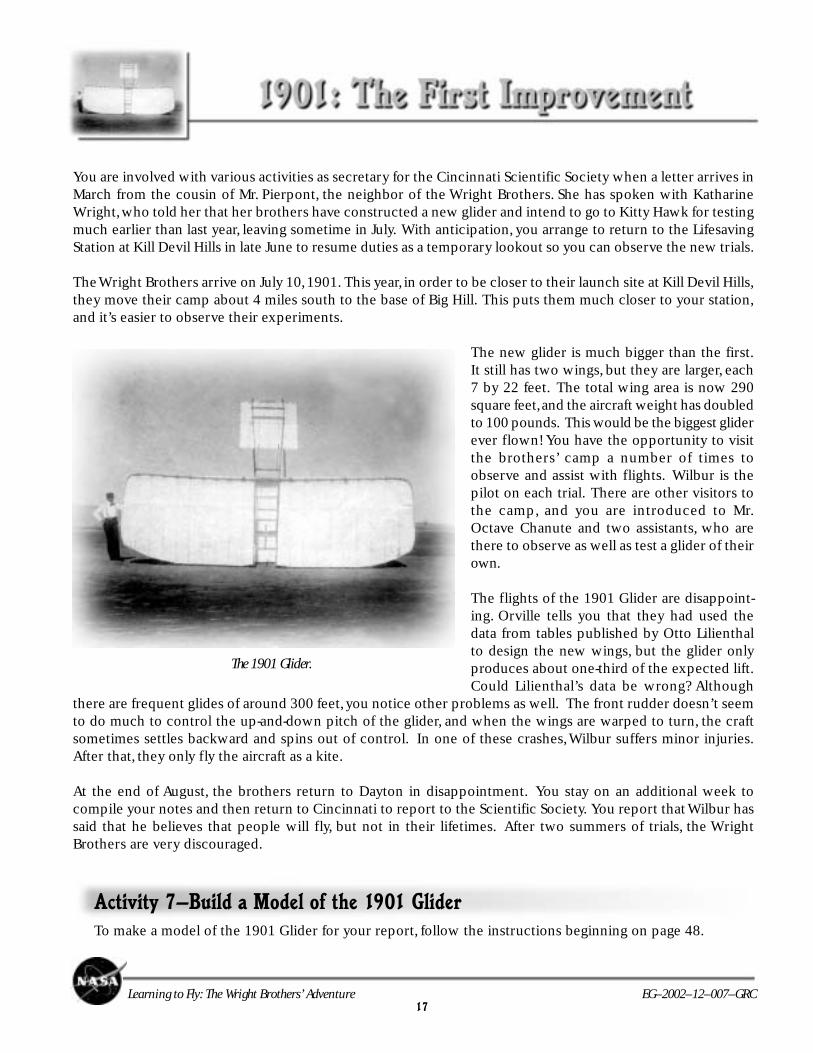
The new glider is much bigger than the first.It still has two wings, but they are larger, each7 by 22 feet. The total wing area is now 290square feet, and the aircraft weight has doubledto 100 pounds. This would be the biggest gliderever flown! You have the opportunity to visitthe brothers’ camp a number of times toobserve and assist with flights. Wilbur is thepilot on each trial. There are other visitors tothe camp, and you are introduced to Mr.Octave Chanute and two assistants, who arethere to observe as well as test a glider of theirown.
The flights of the 1901 Glider are disappoint-ing. Orville tells you that they had used thedata from tables published by Otto Lilienthalto design the new wings, but the glider onlyproduces about one-third of the expected lift.Could Lilienthal’s data be wrong? Although
there are frequent glides of around 300 feet, you notice other problems as well. The front rudder doesn’t seemto do much to control the up-and-down pitch of the glider, and when the wings are warped to turn, the craftsometimes settles backward and spins out of control. In one of these crashes, Wilbur suffers minor injuries.After that, they only fly the aircraft as a kite.
At the end of August, the brothers return to Dayton in disappointment. You stay on an additional week tocompile your notes and then return to Cincinnati to report to the Scientific Society. You report that Wilbur hassaid that he believes that people will fly, but not in their lifetimes. After two summers of trials, the WrightBrothers are very discouraged.
The 1901 Glider.
Activity 7—Build a Model of the 1901 GliderTo make a model of the 1901 Glider for your report, follow the instructions beginning on page 48.

18Learning to Fly: The Wright Brothers’ Adventure EG–2002–12–007–GRC
Activity 8—Forces on the 1901 Glider
The picture below shows the Wright Brothers at Kitty Hawk, NC, with their 1901 Glider being flown as a kite. Itweighed 98 pounds and had a wingspan of 22 feet. The kite appears to be floating in the air, but it is actuallybeing held motionless because the forces that are acting on it are “balanced.”
1. You know that wind is needed to fly a kite, so draw an arrow on the picture to show which way the windwould be pushing on the glider.
2. There are three other forces that are acting on the kite. One of these is the lift caused by the wind acting onthe wings of the glider. Draw an arrow to show the direction that this force acts on the glider.
3. The third force acts on you and all other objects on Earth all the time. It is called _________________. Drawan arrow to show the direction that this force acts on the glider.
4. Look at the men in the picture and see if you can determine the direction of the fourth force. Keep in mindthat the glider is motionless, so the fourth force must act to balance out the other three forces. Draw an arrowto show the direction of the fourth force.
5. Do you see anything in the picture that shows that all the forces are canceling each other out? If yes, whatis it?
6. If the speed of the wind increased, what would happen to the glider?
19Learning to Fly: The Wright Brothers’ Adventure EG–2002–12–007–GRC
Activity 9—Questions on the 1901 Glider
The report of the summer of 1901’s activities caused quite a stir in the Cincinnati Scientific Society. When youmailed sketches of the new craft back in July, many members had thought that the additional surface added tothe wings would provide the lift needed. Clearly something was wrong.
1. Why do you think that the new glider with its larger wings failed to perform as expected?
2. If you were Wilbur or Orville Wright, what would you do at this point? Why would you do this?
3. To solve a problem, the Wright Brothers would only make a single change at a time. Why is this a scientificway to do an experiment?
Activity 10—Wrong Ideas
Advances in science are often hindered by making wrong assumptions, making assumptions based on incorrectinformation, or by not understanding information or data in the right context. The Wright Brothers thought thereason their 1901 Glider did not perform up to expectations was that Lilienthal’s data, on which they had basedtheir calculations, were wrong.
Choose one or more of the following ideas that were once accepted as correct in science. Find out who mayhave challenged these ideas and how our thinking changed as a result. Write down your answers.
1. The Earth is flat.
2. The Sun revolves around the Earth.
3. There are only four elements: earth, air, fire, and water.
20Learning to Fly: The Wright Brothers’ Adventure EG–2002–12–007–GRC
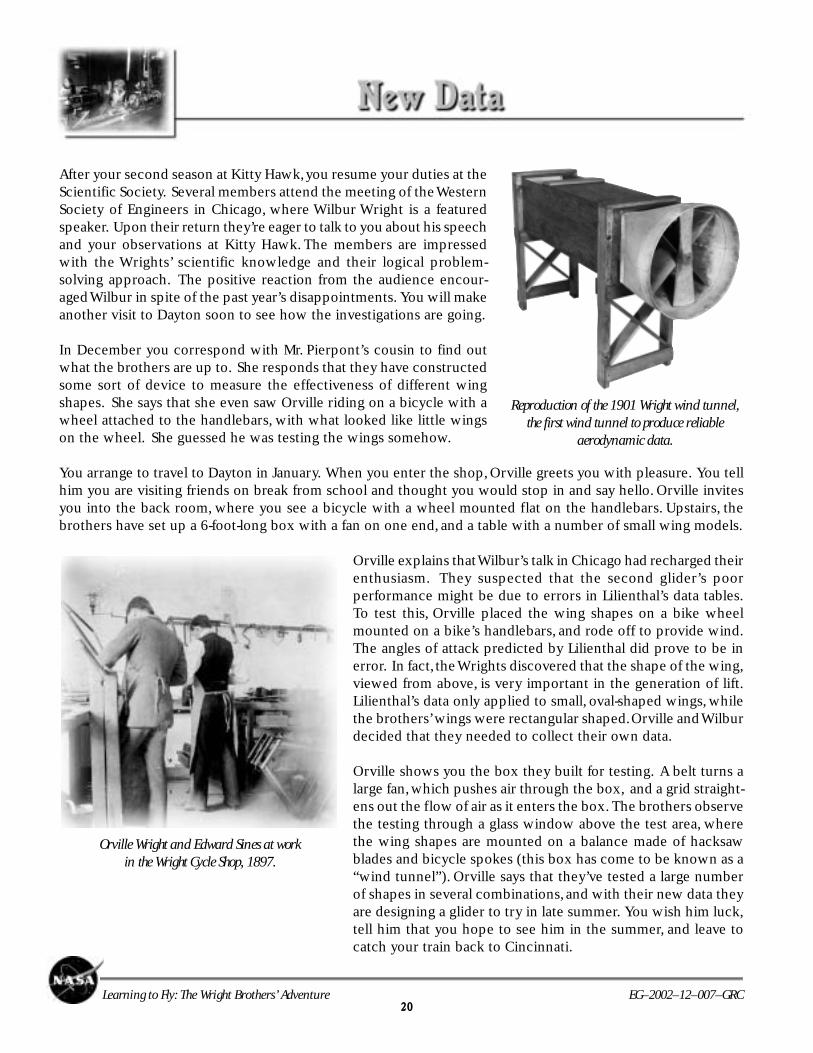
After your second season at Kitty Hawk, you resume your duties at theScientific Society. Several members attend the meeting of the WesternSociety of Engineers in Chicago, where Wilbur Wright is a featuredspeaker. Upon their return they’re eager to talk to you about his speechand your observations at Kitty Hawk. The members are impressedwith the Wrights’ scientific knowledge and their logical problem-solving approach. The positive reaction from the audience encour-aged Wilbur in spite of the past year’s disappointments. You will makeanother visit to Dayton soon to see how the investigations are going.
In December you correspond with Mr. Pierpont’s cousin to find outwhat the brothers are up to. She responds that they have constructedsome sort of device to measure the effectiveness of different wingshapes. She says that she even saw Orville riding on a bicycle with awheel attached to the handlebars, with what looked like little wingson the wheel. She guessed he was testing the wings somehow.
You arrange to travel to Dayton in January. When you enter the shop, Orville greets you with pleasure. You tellhim you are visiting friends on break from school and thought you would stop in and say hello. Orville invitesyou into the back room, where you see a bicycle with a wheel mounted flat on the handlebars. Upstairs, thebrothers have set up a 6-foot-long box with a fan on one end, and a table with a number of small wing models.
Orville explains that Wilbur’s talk in Chicago had recharged theirenthusiasm. They suspected that the second glider’s poorperformance might be due to errors in Lilienthal’s data tables.To test this, Orville placed the wing shapes on a bike wheelmounted on a bike’s handlebars, and rode off to provide wind.The angles of attack predicted by Lilienthal did prove to be inerror. In fact, the Wrights discovered that the shape of the wing,viewed from above, is very important in the generation of lift.Lilienthal’s data only applied to small, oval-shaped wings, whilethe brothers’ wings were rectangular shaped. Orville and Wilburdecided that they needed to collect their own data.
Orville shows you the box they built for testing. A belt turns alarge fan, which pushes air through the box, and a grid straight-ens out the flow of air as it enters the box. The brothers observethe testing through a glass window above the test area, wherethe wing shapes are mounted on a balance made of hacksawblades and bicycle spokes (this box has come to be known as a“wind tunnel”). Orville says that they’ve tested a large numberof shapes in several combinations, and with their new data theyare designing a glider to try in late summer. You wish him luck,tell him that you hope to see him in the summer, and leave tocatch your train back to Cincinnati.
Reproduction of the 1901 Wright wind tunnel,the first wind tunnel to produce reliable
aerodynamic data.
Orville Wright and Edward Sines at workin the Wright Cycle Shop, 1897.
21Learning to Fly: The Wright Brothers’ Adventure EG–2002–12–007–GRC
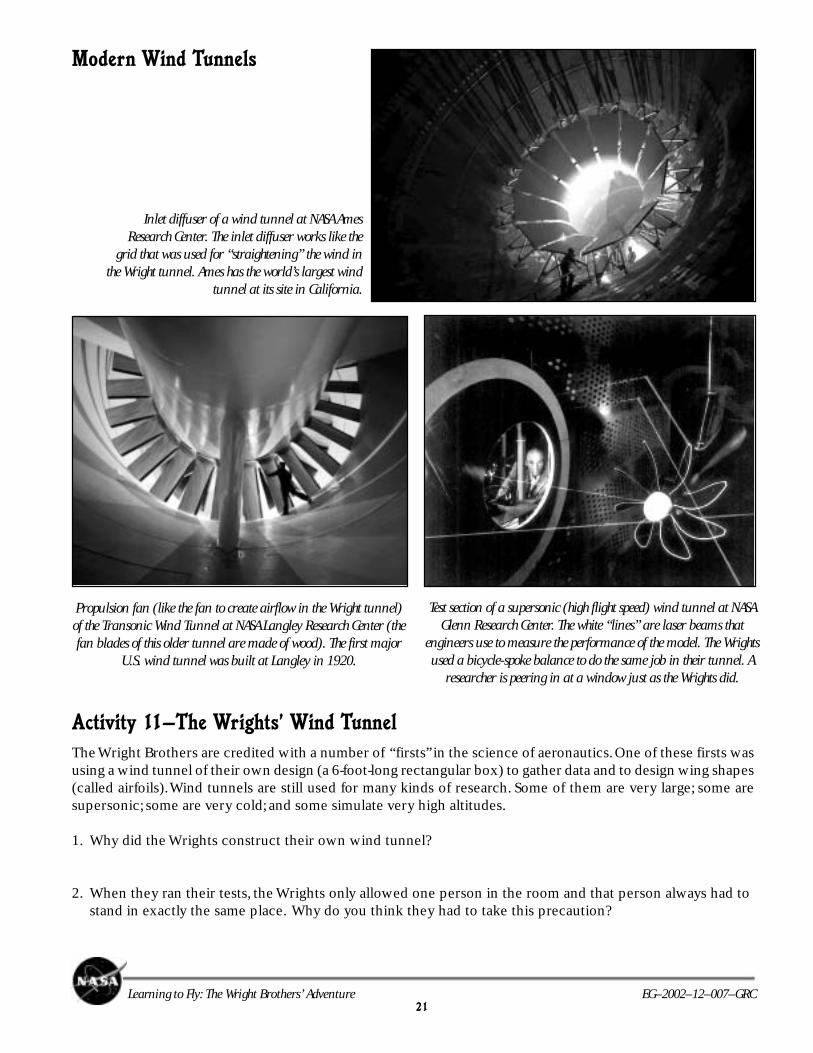
Activity 11—The Wrights’ Wind Tunnel
The Wright Brothers are credited with a number of “firsts” in the science of aeronautics. One of these firsts wasusing a wind tunnel of their own design (a 6-foot-long rectangular box) to gather data and to design wing shapes(called airfoils). Wind tunnels are still used for many kinds of research. Some of them are very large; some aresupersonic; some are very cold; and some simulate very high altitudes.
1. Why did the Wrights construct their own wind tunnel?
2. When they ran their tests, the Wrights only allowed one person in the room and that person always had tostand in exactly the same place. Why do you think they had to take this precaution?
Propulsion fan (like the fan to create airflow in the Wright tunnel)of the Transonic Wind Tunnel at NASA Langley Research Center (thefan blades of this older tunnel are made of wood). The first major
U.S. wind tunnel was built at Langley in 1920.
Test section of a supersonic (high flight speed) wind tunnel at NASAGlenn Research Center. The white “lines” are laser beams that
engineers use to measure the performance of the model. The Wrightsused a bicycle-spoke balance to do the same job in their tunnel. A
researcher is peering in at a window just as the Wrights did.
Modern Wind Tunnels
Inlet diffuser of a wind tunnel at NASA AmesResearch Center. The inlet diffuser works like the
grid that was used for “straightening” the wind inthe Wright tunnel. Ames has the world’s largest wind
tunnel at its site in California.
22Learning to Fly: The Wright Brothers’ Adventure EG–2002–12–007–GRC
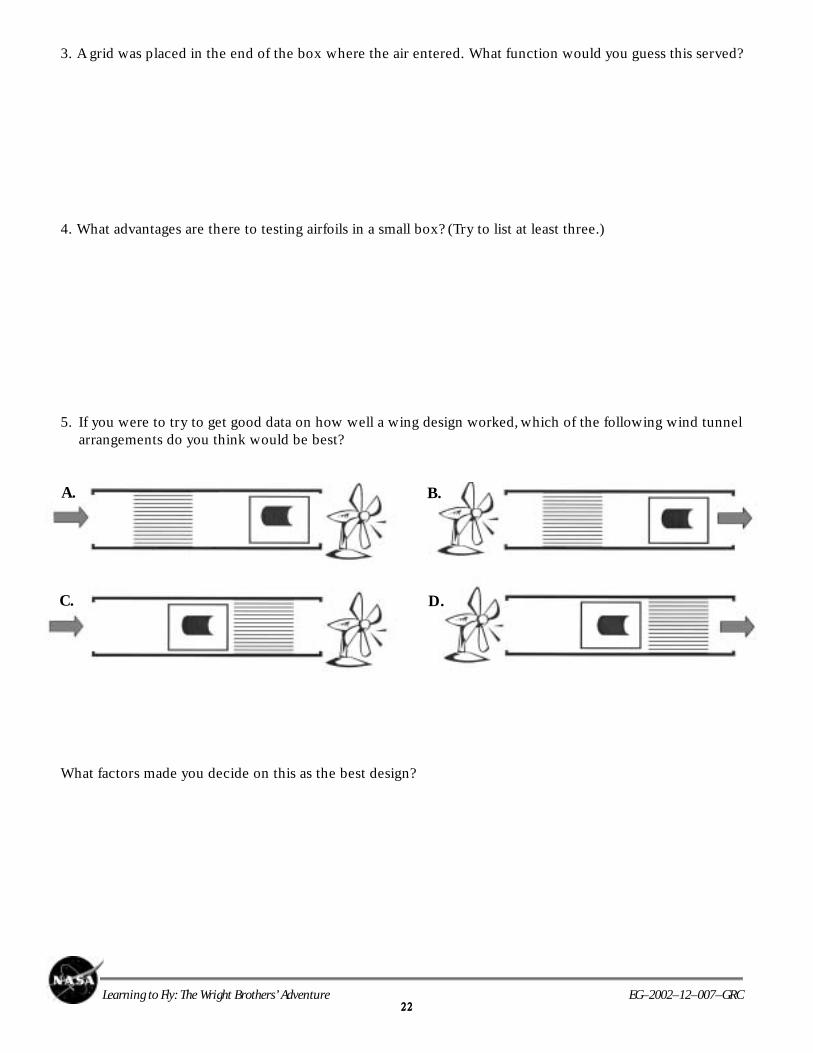
3. A grid was placed in the end of the box where the air entered. What function would you guess this served?
4. What advantages are there to testing airfoils in a small box? (Try to list at least three.)
you were to try to get good data on which wing worked the best, which of the following designs do you think5. If you were to try to get good data on how well a wing design worked, which of the following wind tunnel
arrangements do you think would be best?
What factors made you decide on this as the best design?
A.
C.
B.
D.
23Learning to Fly: The Wright Brothers’ Adventure EG–2002–12–007–GRC
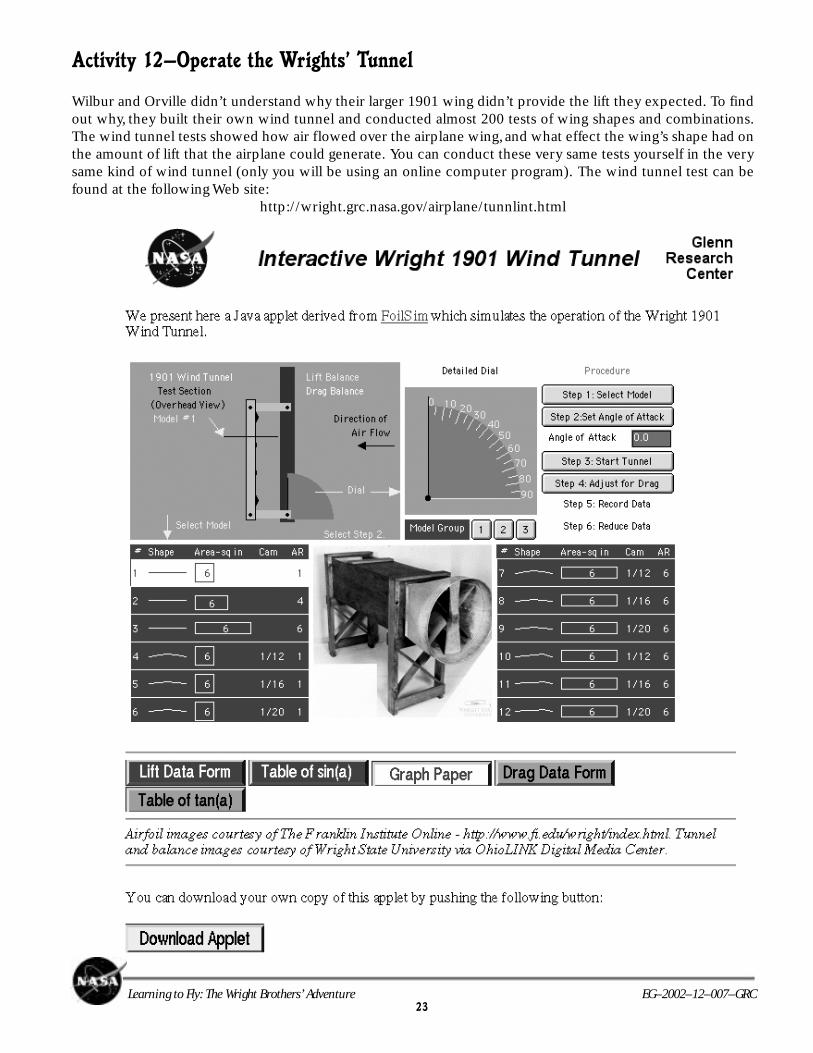
Activity 12—Operate the Wrights’ Tunnel
Wilbur and Orville didn’t understand why their larger 1901 wing didn’t provide the lift they expected. To findout why, they built their own wind tunnel and conducted almost 200 tests of wing shapes and combinations.The wind tunnel tests showed how air flowed over the airplane wing, and what effect the wing’s shape had onthe amount of lift that the airplane could generate. You can conduct these very same tests yourself in the verysame kind of wind tunnel (only you will be using an online computer program). The wind tunnel test can befound at the following Web site:
http://wright.grc.nasa.gov/airplane/tunnlint.html
24Learning to Fly: The Wright Brothers’ Adventure EG–2002–12–007–GRC
To operate the balance, follow these steps:
1. Choose a wing model to be placed in the tunnel from the menus at the bottom left and right.2. Set the angle of attack by clicking on the Set Angle of Attack button and enter numbers in the box.
Or use the mouse to move the arm in the diagram.3. Start the tunnel with the Start Tunnel button.4. Adjust for the drag caused by the balance with the Adjust for Drag button.5. Record the reading on the Lift Dial. The greater the deflection on the Lift Dial, the more lift is being
provided by the wing.
A. Which wing shape is better, short and wide (model 1) or long and thin (model 3)?1. Choose model 1, set the angle of attack to 3 degrees, start the tunnel, adjust for drag, and record the
reading on the Lift Dial.2. Repeat this at angles of 6, 9, 12, 15, and 18 degrees.3. Now choose model 3 (which has the same area as model 1) and record the data for the same angles.
You can get a copy of a form to record your data by pushing the “Data Form” button.4. Make a graph of your results. There should be two lines on your graph. Which wing shape is providing
more lift? Which shape is better, short and wide or long and thin?
B. Which wing surface provides more lift, a flat surface or a curved surface?1. Choose model 3, set the angle of attack to 3 degrees, start the tunnel, adjust for drag, and record the
reading on the Lift Dial.2. Repeat this at angles of 6, 9, 12, 15, and 18 degrees.3. Now choose model 9 (which has the same area as model 3, but is curved) and record the data for the
same angles.4. Make a graph of your results. There should be two lines on your graph. Which wing is providing more
lift? Which wing surface is better, flat or curved?
C. Which provides more lift, a more strongly curved surface (model 4) or a less strongly curved surface (model 6)?
1. Choose model 4, set the angle of attack to 3 degrees, start the tunnel, adjust for drag, and record thereading on the Lift Dial.
2. Repeat this at angles of 6, 9, 12, 15, and 18 degrees.3. Now choose model 6 (which has the same area as model 4) and record the data for the same angles.4. Make a graph of your results. There should be two lines on your graph. Which wing is providing more
lift? Which wing surface is better, more curved or less curved?
25Learning to Fly: The Wright Brothers’ Adventure EG–2002–12–007–GRC
When the Society hears of the Wright Brothers’ logical approachto overcoming the 1901 disappointments and their successfulwind tunnel trials, excitement builds about human flight.Arrangements are again made for you to resume your positionas a lookout with the Kill Devil Lifesaving Station. Your friendsat the station are glad to see you again.
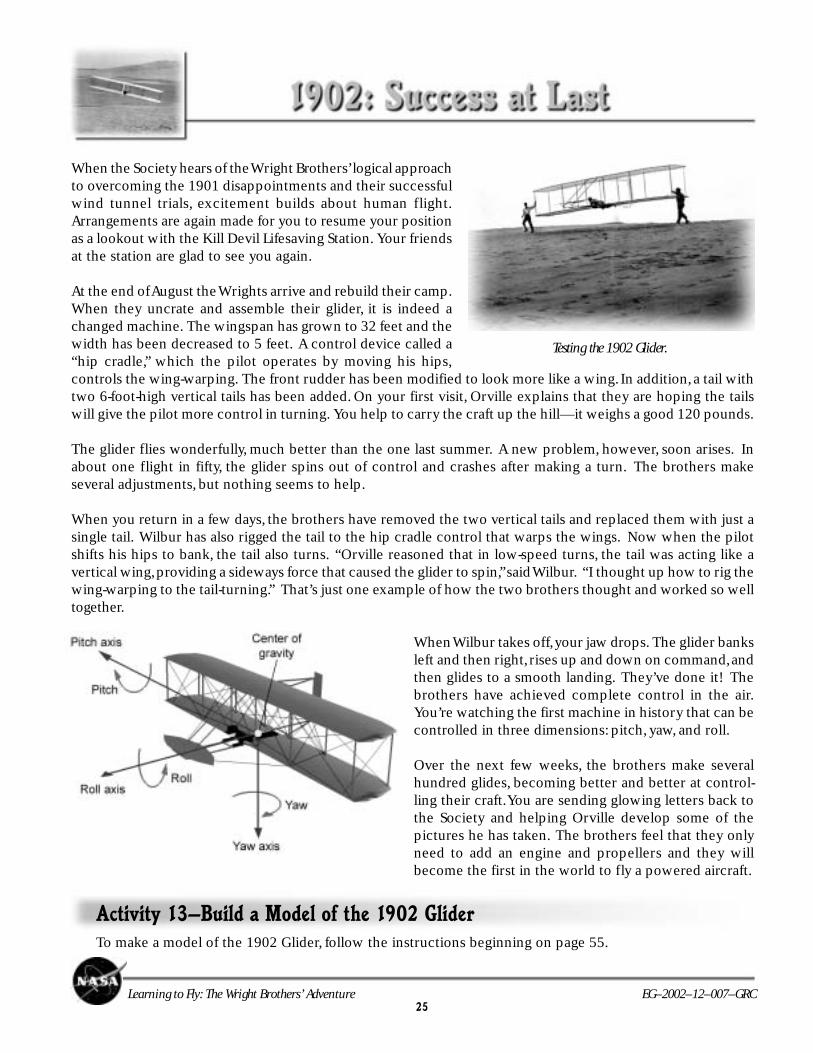
At the end of August the Wrights arrive and rebuild their camp.When they uncrate and assemble their glider, it is indeed achanged machine. The wingspan has grown to 32 feet and thewidth has been decreased to 5 feet. A control device called a“hip cradle,” which the pilot operates by moving his hips,controls the wing-warping. The front rudder has been modified to look more like a wing. In addition, a tail withtwo 6-foot-high vertical tails has been added. On your first visit, Orville explains that they are hoping the tailswill give the pilot more control in turning. You help to carry the craft up the hill—it weighs a good 120 pounds.
The glider flies wonderfully, much better than the one last summer. A new problem, however, soon arises. Inabout one flight in fifty, the glider spins out of control and crashes after making a turn. The brothers makeseveral adjustments, but nothing seems to help.
When you return in a few days, the brothers have removed the two vertical tails and replaced them with just asingle tail. Wilbur has also rigged the tail to the hip cradle control that warps the wings. Now when the pilotshifts his hips to bank, the tail also turns. “Orville reasoned that in low-speed turns, the tail was acting like avertical wing, providing a sideways force that caused the glider to spin,” said Wilbur. “I thought up how to rig thewing-warping to the tail-turning.” That’s just one example of how the two brothers thought and worked so welltogether.
When Wilbur takes off, your jaw drops. The glider banksleft and then right, rises up and down on command, andthen glides to a smooth landing. They’ve done it! Thebrothers have achieved complete control in the air.You’re watching the first machine in history that can becontrolled in three dimensions: pitch, yaw, and roll.
Over the next few weeks, the brothers make severalhundred glides, becoming better and better at control-ling their craft. You are sending glowing letters back tothe Society and helping Orville develop some of thepictures he has taken. The brothers feel that they onlyneed to add an engine and propellers and they willbecome the first in the world to fly a powered aircraft.
Testing the 1902 Glider.
Activity 13—Build a Model of the 1902 GliderTo make a model of the 1902 Glider, follow the instructions beginning on page 55.
26Learning to Fly: The Wright Brothers’ Adventure EG–2002–12–007–GRC
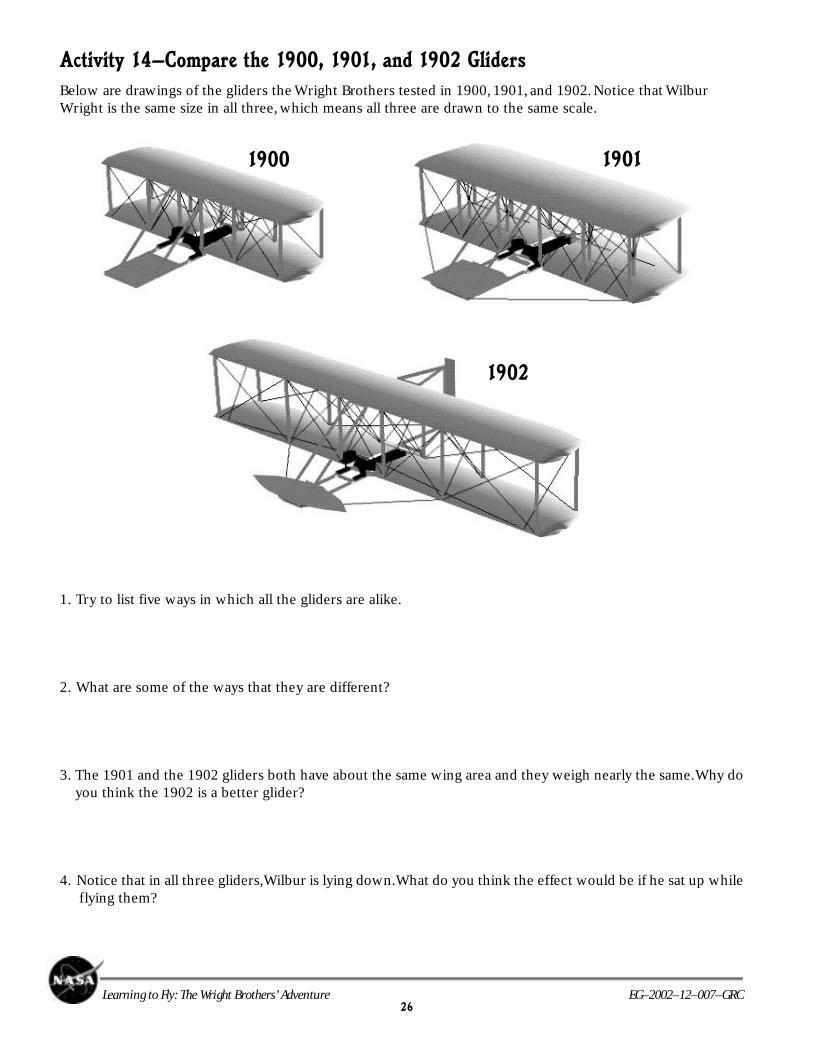
Activity 14—Compare the 1900, 1901, and 1902 Gliders
Below are drawings of the gliders the Wright Brothers tested in 1900, 1901, and 1902. Notice that WilburWright is the same size in all three, which means all three are drawn to the same scale.
1. Try to list five ways in which all the gliders are alike.
2. What are some of the ways that they are different?
3. The 1901 and the 1902 gliders both have about the same wing area and they weigh nearly the same. Why do you think the 1902 is a better glider?
4. Notice that in all three gliders, Wilbur is lying down. What do you think the effect would be if he sat up while flying them?
1900 1901
1902
27Learning to Fly: The Wright Brothers’ Adventure EG–2002–12–007–GRC
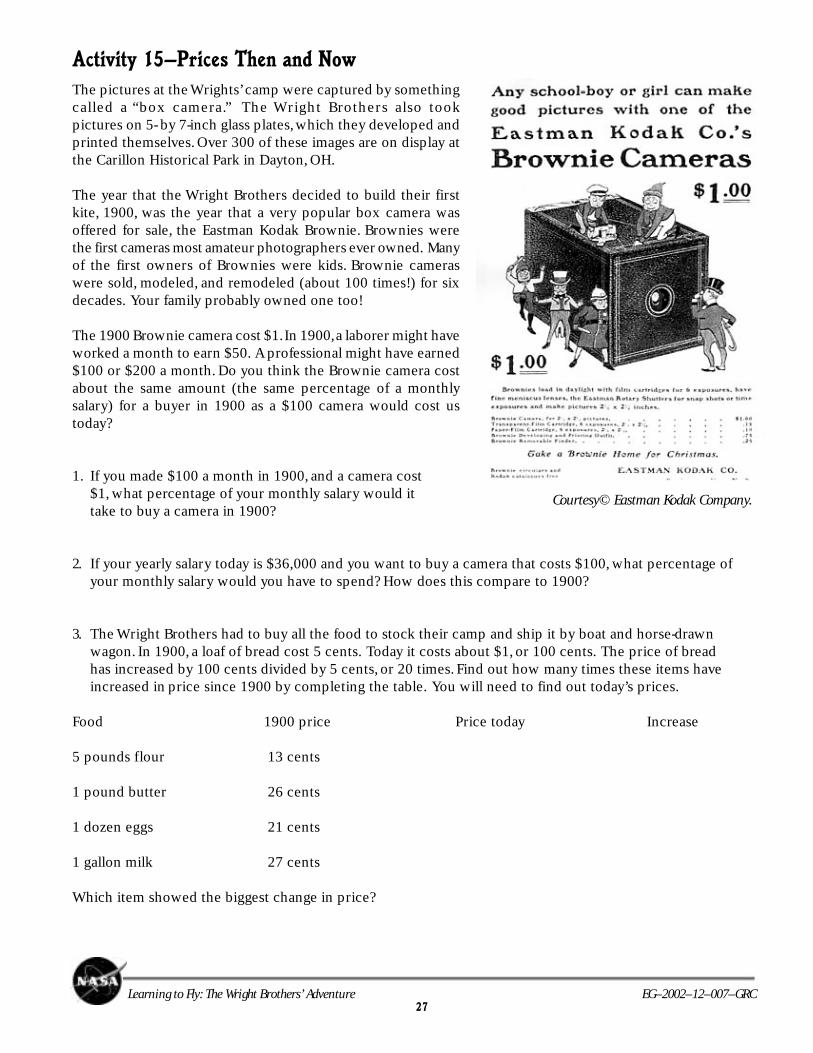
Activity 15—Prices Then and Now
The pictures at the Wrights’ camp were captured by somethingcalled a “box camera.” The Wright Brothers also tookpictures on 5- by 7-inch glass plates, which they developed andprinted themselves. Over 300 of these images are on display atthe Carillon Historical Park in Dayton, OH.
The year that the Wright Brothers decided to build their firstkite, 1900, was the year that a very popular box camera wasoffered for sale, the Eastman Kodak Brownie. Brownies werethe first cameras most amateur photographers ever owned. Manyof the first owners of Brownies were kids. Brownie cameraswere sold, modeled, and remodeled (about 100 times!) for sixdecades. Your family probably owned one too!
The 1900 Brownie camera cost $1. In 1900, a laborer might haveworked a month to earn $50. A professional might have earned$100 or $200 a month. Do you think the Brownie camera costabout the same amount (the same percentage of a monthlysalary) for a buyer in 1900 as a $100 camera would cost ustoday?
1. If you made $100 a month in 1900, and a camera cost$1, what percentage of your monthly salary would ittake to buy a camera in 1900?
2. If your yearly salary today is $36,000 and you want to buy a camera that costs $100, what percentage ofyour monthly salary would you have to spend? How does this compare to 1900?
3. The Wright Brothers had to buy all the food to stock their camp and ship it by boat and horse-drawnwagon. In 1900, a loaf of bread cost 5 cents. Today it costs about $1, or 100 cents. The price of breadhas increased by 100 cents divided by 5 cents, or 20 times. Find out how many times these items haveincreased in price since 1900 by completing the table. You will need to find out today’s prices.
Food 1900 price Price today Increase
5 pounds flour 13 cents
1 pound butter 26 cents
1 dozen eggs 21 cents
1 gallon milk 27 cents
Which item showed the biggest change in price?
Courtesy© Eastman Kodak Company.
28Learning to Fly: The Wright Brothers’ Adventure EG–2002–12–007–GRC
The Society thanks you for the report on the success of the 1902 Glider. They are also following the progress ofSamuel Langley’s flying research. Langley had successfully flown a steam-powered aircraft three-quarters of amile and won a $50,000 government grant to develop a passenger-carrying powered aircraft. Society memberswondered whether the Wrights could beat him on their small budget, having spent less than $1,000 so far.
You have been on this project for almost 3 years, and the Society president asks you if you want to continue. Yousay yes. By now you have come to admire the Wrights and their genius and want to see them succeed. You knowthat powered flight is moving closer to becoming reality.
The reports from Dayton are that the brothers had been trying to find an engine with at least 8 horsepower andweighing less than 200 pounds. They couldn’t find an engine like that, or a company willing to make one, sowith the aid of their bicycle mechanic Charlie Taylor, they have been building their own engine. You travel toDayton to check on progress, and when you arrive, they are already testing it. In just 6 weeks, having never madean engine before, they have produced one weighing 179 pounds that develops 12 horsepower! They nevercease to amaze you.
Orville tells you that they are having difficultywith the design of the propellers. There areno reliable data on air propellers, only onwater propellers, which would not apply toan aircraft. “Our only solution,” he says, “is todesign our own!” You wish them luck and theysay they hope to see you at Kitty Hawk in thefall. You return to Cincinnati wonderingwhether they will get it right.
Further reports from Mr. Pierpont’s cousin inDayton indicate that the brothers intend toreturn to Kitty Hawk at the end of September,so once again, you head back to the LifesavingStation. The Wrights arrive on September 25,1903, and are glad to enlist your help in re-building their camp buildings and unpackingthe crates holding the new craft. “This is thevery first time we’ve seen it all together,” com-ments Wilbur. “There just wasn’t room in ourshop.” The aircraft looks like the 1902 model, but measures 40 feet from wing tip to wing tip and has twin rearrudders. On the lower wing opposite the pilot position is the motor, connected by chains to two long, thinpropellers at the rear of the wing.
“We spent 5 months working on those propellers,” said Wilbur. “Orville finally figured out that they needed to beshaped like rotating wings.” Once the aircraft is together and testing begins, there are problems with the propel-ler shafts. Quick fixes don’t work, so Orville travels back to Dayton to get new, stronger shafts.
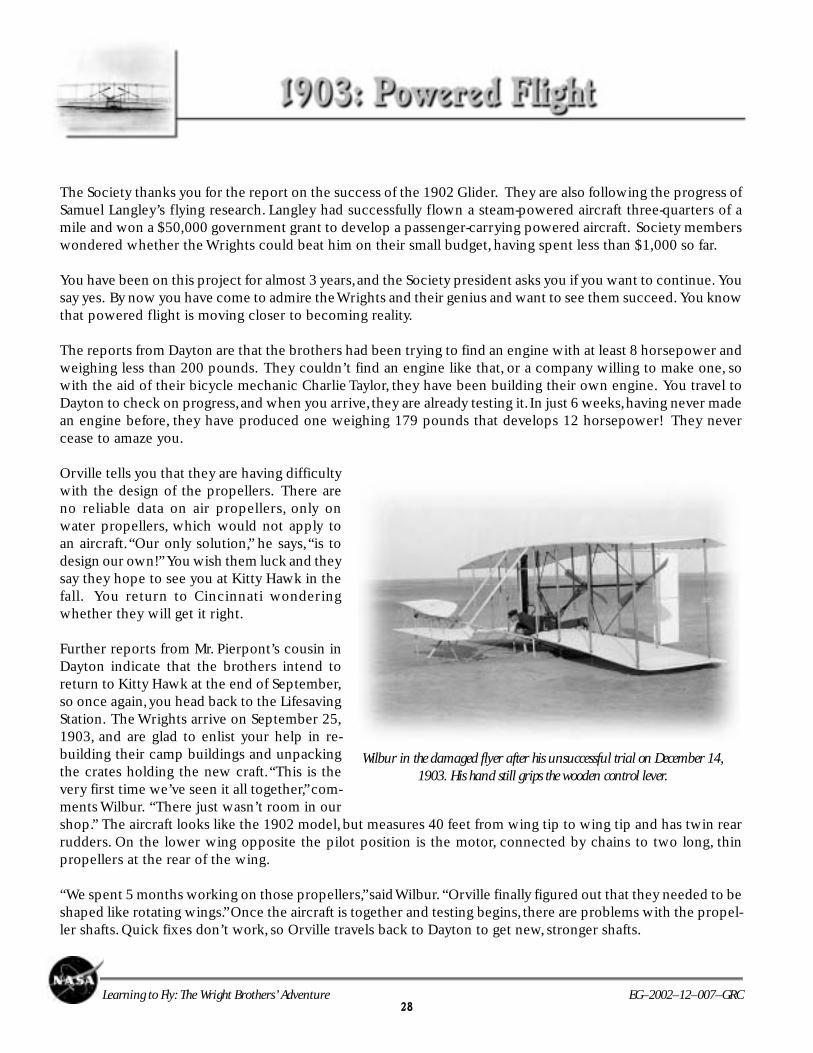
Wilbur in the damaged flyer after his unsuccessful trial on December 14,1903. His hand still grips the wooden control lever.
29Learning to Fly: The Wright Brothers’ Adventure EG–2002–12–007–GRC
He returns on December 11 and everything is ready to test on December 14. The brothers hoist their red flag, asignal for you and the Lifesaving crew to come help. The wind is not strong enough to launch from level ground,so the 60-foot launching track is set up on the side of Big Hill (the launching track consists of 15-foot sections ofwooden rail, on which runs a launch cradle with bicycle hubs for wheels). The aircraft is pushed to the top ofthe track on its launch cradle. With the restraining rope in place, the motor is started and the propellers start toturn. Orville and Wilbur toss a coin to see who will be the first pilot. Wilbur wins and takes his position. He pullsthe release rope, and the aircraft rolls on the cradle about 40 feet down the track, and starts to become airborne.Wilbur pulls up the nose a bit too sharply, and it stalls and settles back in the sand, breaking a few parts. It hadbeen airborne just 3 seconds.
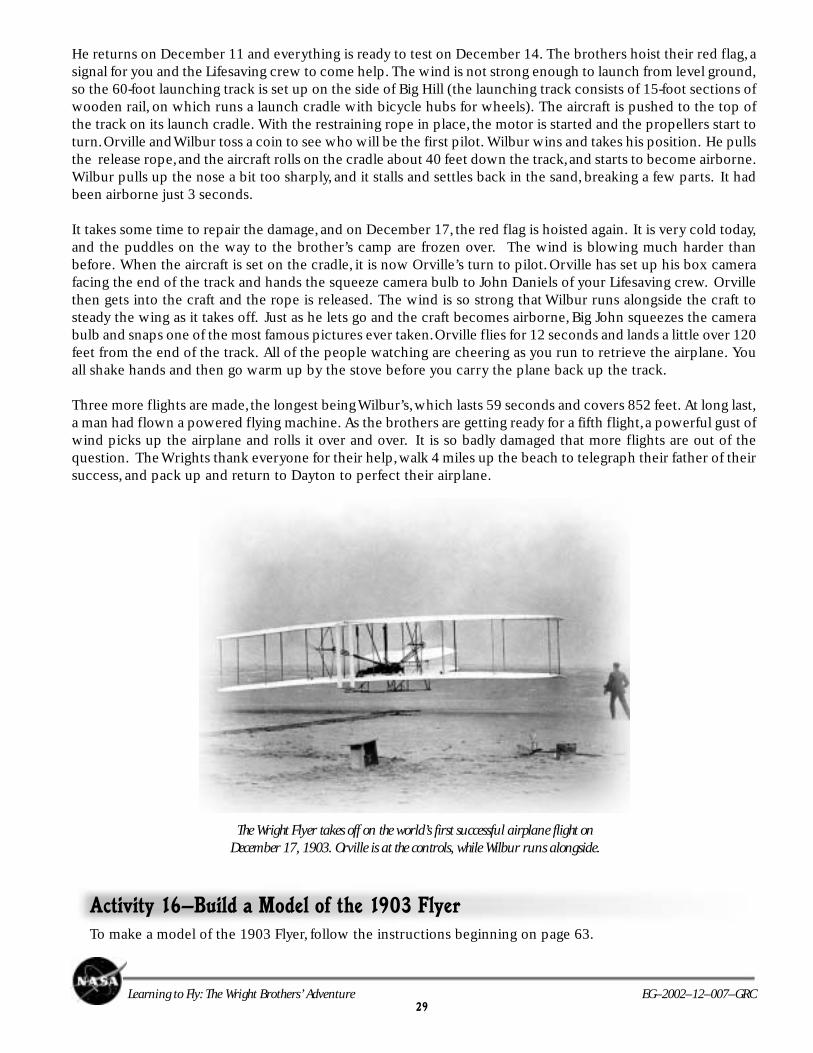
It takes some time to repair the damage, and on December 17, the red flag is hoisted again. It is very cold today,and the puddles on the way to the brother’s camp are frozen over. The wind is blowing much harder thanbefore. When the aircraft is set on the cradle, it is now Orville’s turn to pilot. Orville has set up his box camerafacing the end of the track and hands the squeeze camera bulb to John Daniels of your Lifesaving crew. Orvillethen gets into the craft and the rope is released. The wind is so strong that Wilbur runs alongside the craft tosteady the wing as it takes off. Just as he lets go and the craft becomes airborne, Big John squeezes the camerabulb and snaps one of the most famous pictures ever taken. Orville flies for 12 seconds and lands a little over 120feet from the end of the track. All of the people watching are cheering as you run to retrieve the airplane. Youall shake hands and then go warm up by the stove before you carry the plane back up the track.
Three more flights are made, the longest being Wilbur’s, which lasts 59 seconds and covers 852 feet. At long last,a man had flown a powered flying machine. As the brothers are getting ready for a fifth flight, a powerful gust ofwind picks up the airplane and rolls it over and over. It is so badly damaged that more flights are out of thequestion. The Wrights thank everyone for their help, walk 4 miles up the beach to telegraph their father of theirsuccess, and pack up and return to Dayton to perfect their airplane.
The Wright Flyer takes off on the world’s first successful airplane flight onDecember 17, 1903. Orville is at the controls, while Wilbur runs alongside.
Activity 16—Build a Model of the 1903 FlyerTo make a model of the 1903 Flyer, follow the instructions beginning on page 63.
30Learning to Fly: The Wright Brothers’ Adventure EG–2002–12–007–GRC
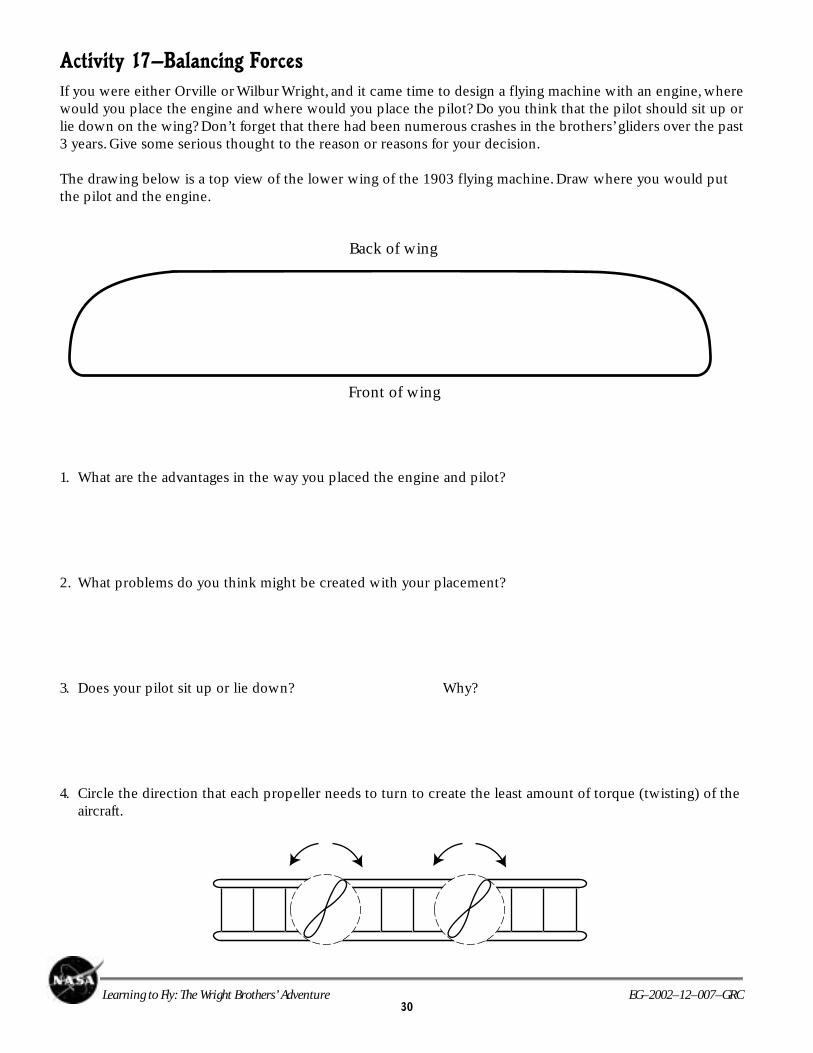
Activity 17—Balancing Forces
If you were either Orville or Wilbur Wright, and it came time to design a flying machine with an engine, wherewould you place the engine and where would you place the pilot? Do you think that the pilot should sit up orlie down on the wing? Don’t forget that there had been numerous crashes in the brothers’ gliders over the past3 years. Give some serious thought to the reason or reasons for your decision.
The drawing below is a top view of the lower wing of the 1903 flying machine. Draw where you would putthe pilot and the engine.
1. What are the advantages in the way you placed the engine and pilot?
2. What problems do you think might be created with your placement?
3. Does your pilot sit up or lie down? Why?
4. Circle the direction that each propeller needs to turn to create the least amount of torque (twisting) of theaircraft.
Back of wing
Front of wing
31Learning to Fly: The Wright Brothers’ Adventure EG–2002–12–007–GRC
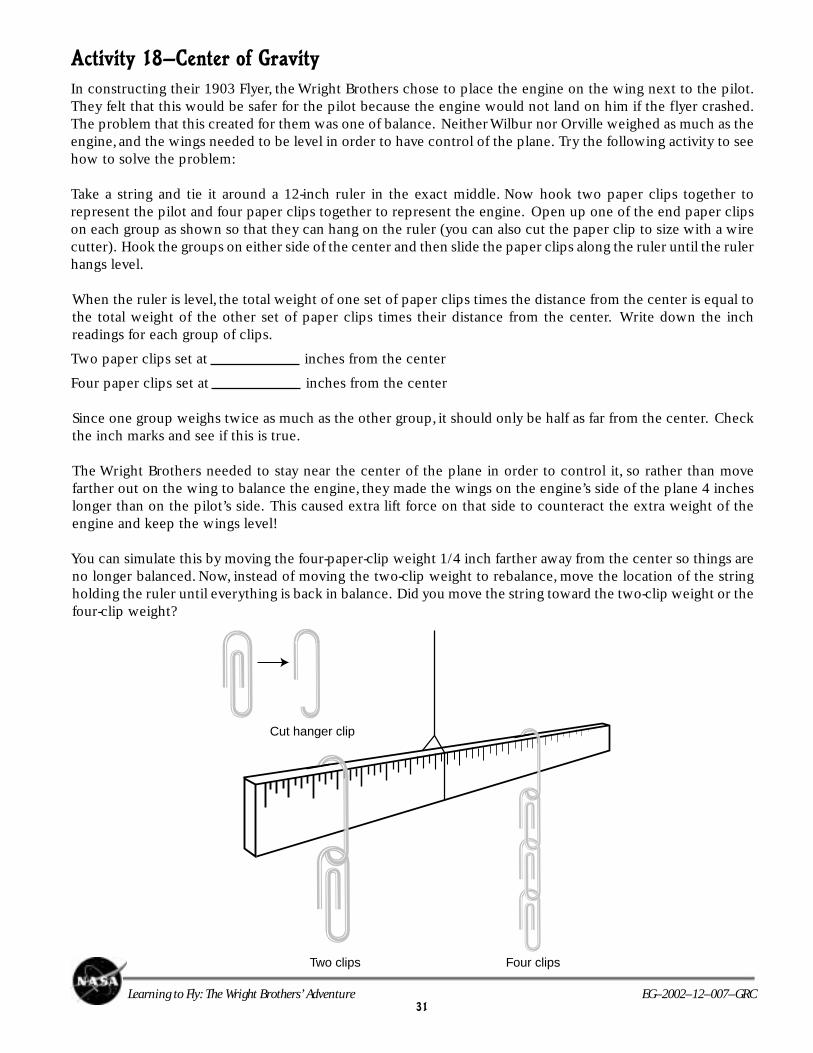
Activity 18—Center of Gravity
In constructing their 1903 Flyer, the Wright Brothers chose to place the engine on the wing next to the pilot.They felt that this would be safer for the pilot because the engine would not land on him if the flyer crashed.The problem that this created for them was one of balance. Neither Wilbur nor Orville weighed as much as theengine, and the wings needed to be level in order to have control of the plane. Try the following activity to seehow to solve the problem:
Take a string and tie it around a 12-inch ruler in the exact middle. Now hook two paper clips together torepresent the pilot and four paper clips together to represent the engine. Open up one of the end paper clipson each group as shown so that they can hang on the ruler (you can also cut the paper clip to size with a wirecutter). Hook the groups on either side of the center and then slide the paper clips along the ruler until the rulerhangs level.
When the ruler is level, the total weight of one set of paper clips times the distance from the center is equal tothe total weight of the other set of paper clips times their distance from the center. Write down the inchreadings for each group of clips.
Two paper clips set at inches from the center
Four paper clips set at inches from the center
Since one group weighs twice as much as the other group, it should only be half as far from the center. Checkthe inch marks and see if this is true.
The Wright Brothers needed to stay near the center of the plane in order to control it, so rather than movefarther out on the wing to balance the engine, they made the wings on the engine’s side of the plane 4 incheslonger than on the pilot’s side. This caused extra lift force on that side to counteract the extra weight of theengine and keep the wings level!
You can simulate this by moving the four-paper-clip weight 1/4 inch farther away from the center so things areno longer balanced. Now, instead of moving the two-clip weight to rebalance, move the location of the stringholding the ruler until everything is back in balance. Did you move the string toward the two-clip weight or thefour-clip weight?
Cut hanger clip
Two clips Four clips
32Learning to Fly: The Wright Brothers’ Adventure EG–2002–12–007–GRC
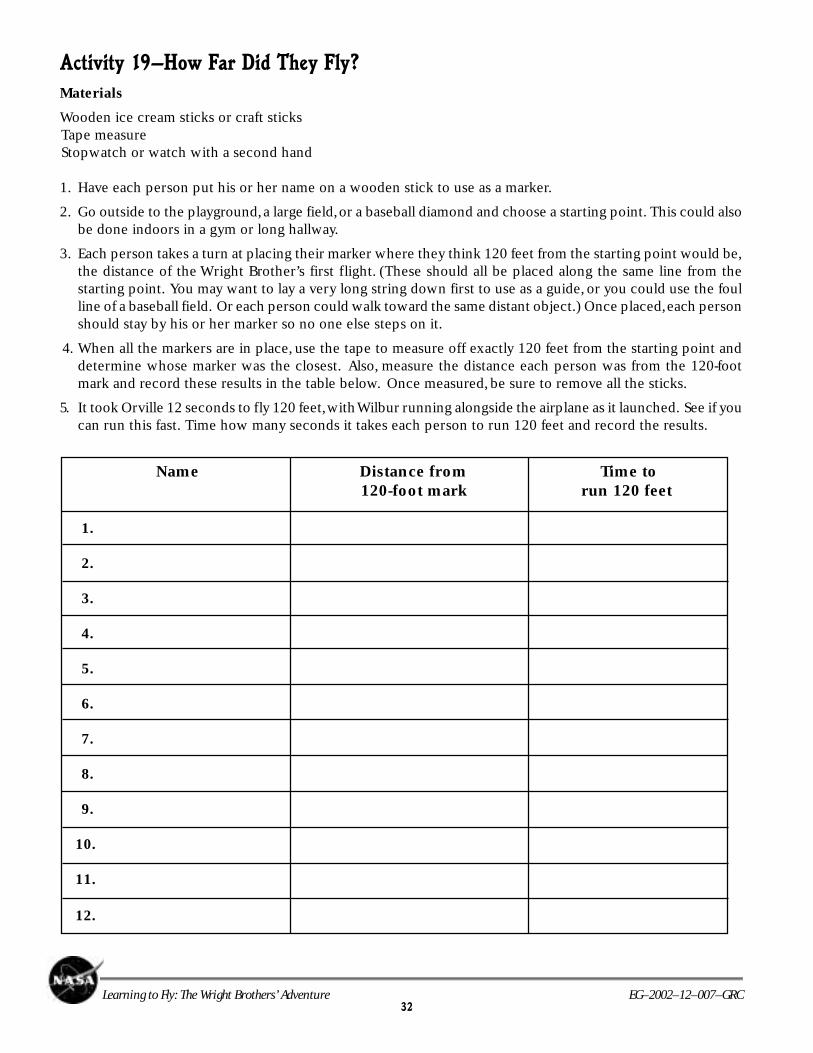
Activity 19—How Far Did They Fly?
Materials
Wooden ice cream sticks or craft sticksTape measureStopwatch or watch with a second hand
1. Have each person put his or her name on a wooden stick to use as a marker.
2. Go outside to the playground, a large field, or a baseball diamond and choose a starting point. This could alsobe done indoors in a gym or long hallway.
3. Each person takes a turn at placing their marker where they think 120 feet from the starting point would be,the distance of the Wright Brother’s first flight. (These should all be placed along the same line from thestarting point. You may want to lay a very long string down first to use as a guide, or you could use the foulline of a baseball field. Or each person could walk toward the same distant object.) Once placed, each personshould stay by his or her marker so no one else steps on it.
4. When all the markers are in place, use the tape to measure off exactly 120 feet from the starting point anddetermine whose marker was the closest. Also, measure the distance each person was from the 120-footmark and record these results in the table below. Once measured, be sure to remove all the sticks.
5. It took Orville 12 seconds to fly 120 feet, with Wilbur running alongside the airplane as it launched. See if youcan run this fast. Time how many seconds it takes each person to run 120 feet and record the results.
Name Distance from Time to 120-foot mark run 120 feet
1.
2.
3.
4.
5.
6.
7.
8.
9.
10.
11.
12.
33Learning to Fly: The Wright Brothers’ Adventure EG–2002–12–007–GRC
Questions
1. Whose stick was the closest to the actual 120-foot mark? Do you think this is a very far distance to fly?
2. Could the Wright Brothers have flown . . .
A. From home plate to first base on a baseball field?
B. From home plate to the outfield wall of the nearest professional baseball stadium?
C. From one wing tip of a Boeing 747 jumbo jet to the other?
D. From one goal line to the other goal line on a football field?
3. Make a graph showing the distance from each person’s marker to the actual 120-foot mark of the first flight.Did the group make good estimations of the distance? Find the average distance from the 120-foot mark.
4. Make a graph showing how long it took each person to run 120 feet. Did the group run faster than the WrightFlyer flew? Find the average time for the group.
Math challenge
1. Your car can easily go 60 miles per hour and a jet airliner can cruise at 600 miles per hour. If the WrightBrothers flew 120 feet in 12 seconds on their first flight, calculate their speed in miles per hour.
Hint: To do this you need to change feet to miles by dividing 120 feet by 5280, the number of feet in1 mile. Then you need to change 12 seconds to minutes by dividing by 60, the number of seconds in1 minute, and then change minutes to hours by dividing your last answer by 60, the number of minutes in1 hour. Now divide the number of miles by the number of hours to find speed in miles per hour.
34Learning to Fly: The Wright Brothers’ Adventure EG–2002–12–007–GRC
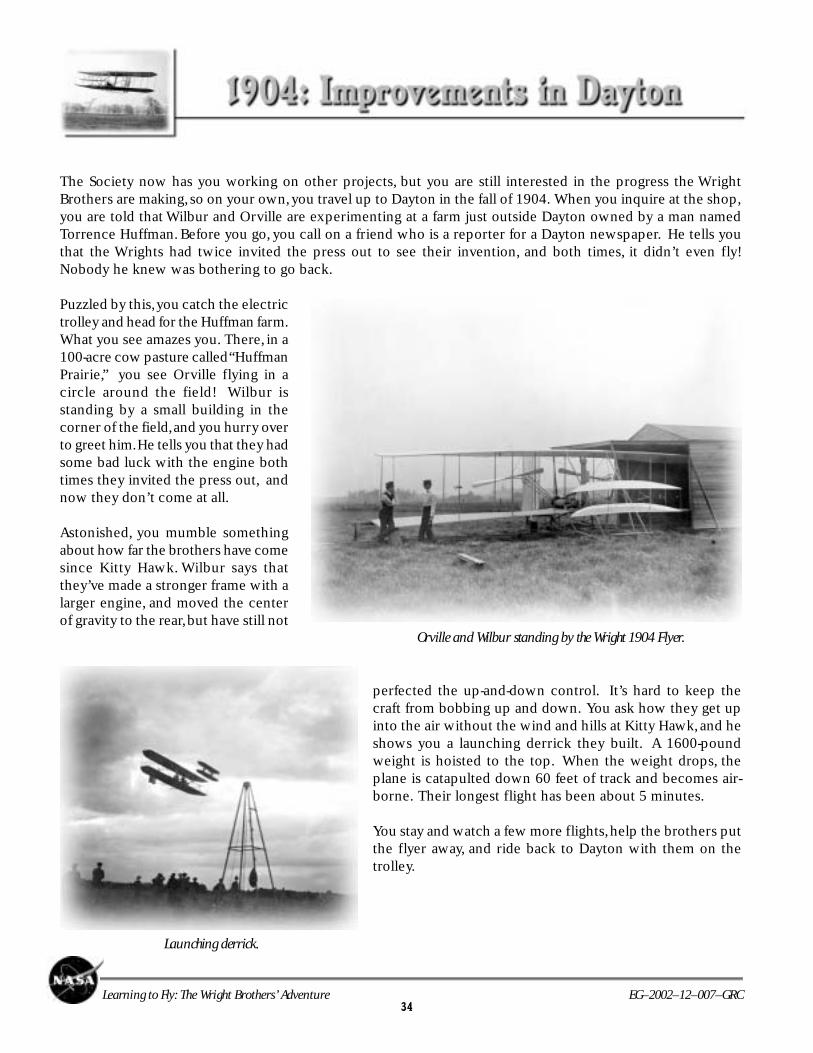
The Society now has you working on other projects, but you are still interested in the progress the WrightBrothers are making, so on your own, you travel up to Dayton in the fall of 1904. When you inquire at the shop,you are told that Wilbur and Orville are experimenting at a farm just outside Dayton owned by a man namedTorrence Huffman. Before you go, you call on a friend who is a reporter for a Dayton newspaper. He tells youthat the Wrights had twice invited the press out to see their invention, and both times, it didn’t even fly!Nobody he knew was bothering to go back.
Puzzled by this, you catch the electrictrolley and head for the Huffman farm.What you see amazes you. There, in a100-acre cow pasture called “HuffmanPrairie,” you see Orville flying in acircle around the field! Wilbur isstanding by a small building in thecorner of the field, and you hurry overto greet him. He tells you that they hadsome bad luck with the engine bothtimes they invited the press out, andnow they don’t come at all.
Astonished, you mumble somethingabout how far the brothers have comesince Kitty Hawk. Wilbur says thatthey’ve made a stronger frame with alarger engine, and moved the centerof gravity to the rear, but have still not
perfected the up-and-down control. It’s hard to keep thecraft from bobbing up and down. You ask how they get upinto the air without the wind and hills at Kitty Hawk, and heshows you a launching derrick they built. A 1600-poundweight is hoisted to the top. When the weight drops, theplane is catapulted down 60 feet of track and becomes air-borne. Their longest flight has been about 5 minutes.
You stay and watch a few more flights, help the brothers putthe flyer away, and ride back to Dayton with them on thetrolley.
Orville and Wilbur standing by the Wright 1904 Flyer.
Launching derrick.
35Learning to Fly: The Wright Brothers’ Adventure EG–2002–12–007–GRC
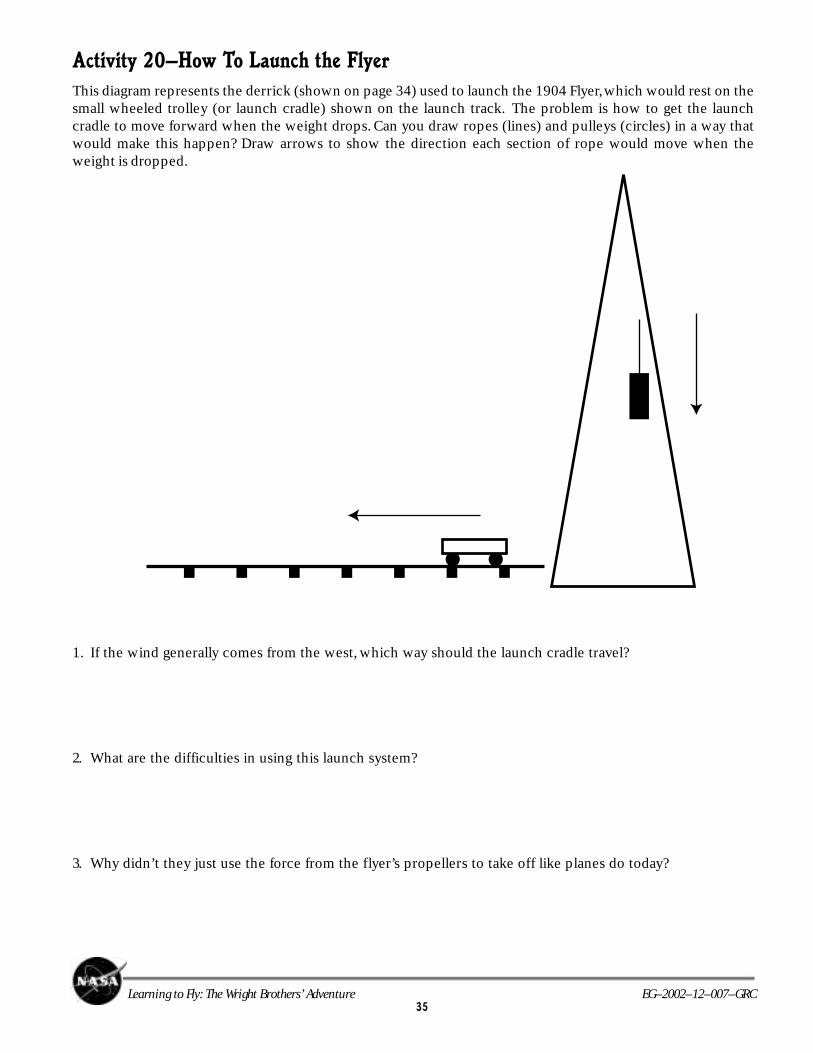
Activity 20—How To Launch the Flyer
This diagram represents the derrick (shown on page 34) used to launch the 1904 Flyer, which would rest on thesmall wheeled trolley (or launch cradle) shown on the launch track. The problem is how to get the launchcradle to move forward when the weight drops. Can you draw ropes (lines) and pulleys (circles) in a way thatwould make this happen? Draw arrows to show the direction each section of rope would move when theweight is dropped.
1. If the wind generally comes from the west, which way should the launch cradle travel?
2. What are the difficulties in using this launch system?
3. Why didn’t they just use the force from the flyer’s propellers to take off like planes do today?
36Learning to Fly: The Wright Brothers’ Adventure EG–2002–12–007–GRC
Activity 21—Write a Press Release
Since the Wright Brothers got very little mention in the newspapers of the day, write an article about yourobservations of the accomplishments of the Wright Brothers that you can submit to the Dayton newspaper. Besure that it is short and factual, just like a real news article.
Press Release
37Learning to Fly: The Wright Brothers’ Adventure EG–2002–12–007–GRC
You hear from your Dayton friends that Orville and Wilbur have still not given up on perfecting flight. It is now7 years since their kite experiments of 1899. After all the crashes, how easy it would have been for the brothersto quit long ago. You see a few items in the Cincinnati papers about their flights, but none of the New York orChicago papers pick up these stories. The world still doesn’t know much about their great achievements. Youdecide to visit again, and when you reach Huffman Prairie in October, you see that some major changes haveoccurred.
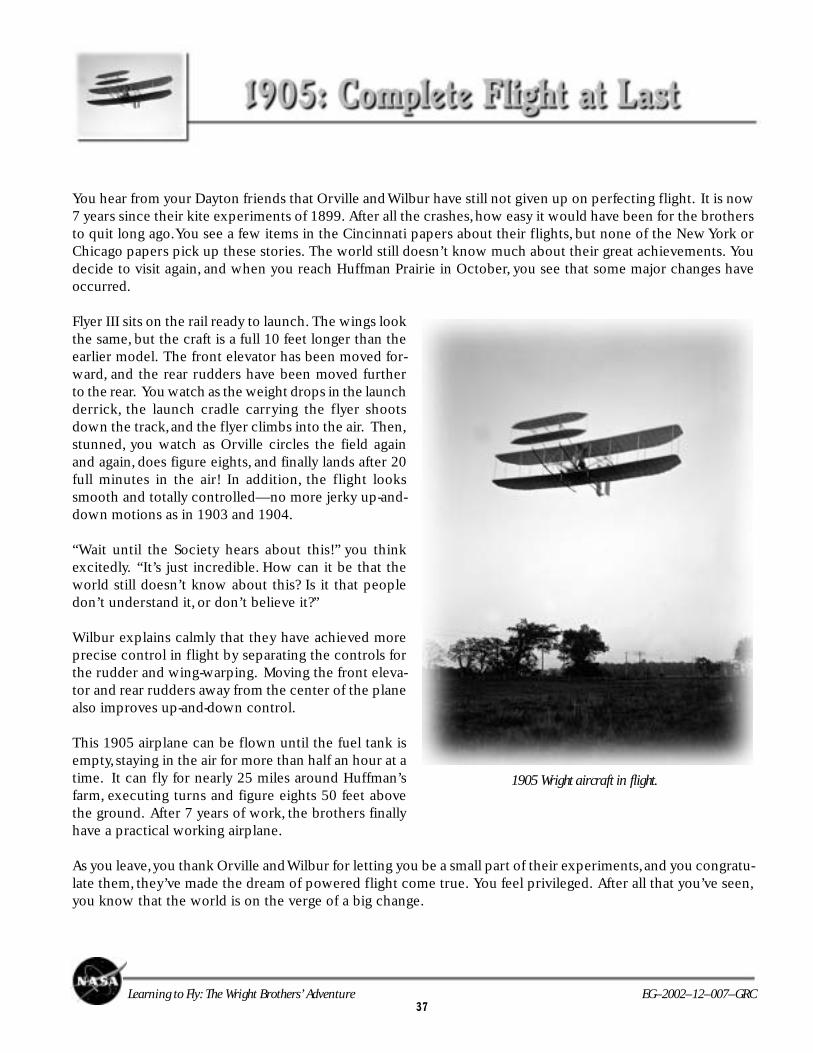
Flyer III sits on the rail ready to launch. The wings lookthe same, but the craft is a full 10 feet longer than theearlier model. The front elevator has been moved for-ward, and the rear rudders have been moved furtherto the rear. You watch as the weight drops in the launchderrick, the launch cradle carrying the flyer shootsdown the track, and the flyer climbs into the air. Then,stunned, you watch as Orville circles the field againand again, does figure eights, and finally lands after 20full minutes in the air! In addition, the flight lookssmooth and totally controlled—no more jerky up-and-down motions as in 1903 and 1904.
“Wait until the Society hears about this!” you thinkexcitedly. “It’s just incredible. How can it be that theworld still doesn’t know about this? Is it that peopledon’t understand it, or don’t believe it?”
Wilbur explains calmly that they have achieved moreprecise control in flight by separating the controls forthe rudder and wing-warping. Moving the front eleva-tor and rear rudders away from the center of the planealso improves up-and-down control.
This 1905 airplane can be flown until the fuel tank isempty, staying in the air for more than half an hour at atime. It can fly for nearly 25 miles around Huffman’sfarm, executing turns and figure eights 50 feet abovethe ground. After 7 years of work, the brothers finallyhave a practical working airplane.
As you leave, you thank Orville and Wilbur for letting you be a small part of their experiments, and you congratu-late them, they’ve made the dream of powered flight come true. You feel privileged. After all that you’ve seen,you know that the world is on the verge of a big change.
1905 Wright aircraft in flight.
38Learning to Fly: The Wright Brothers’ Adventure EG–2002–12–007–GRC
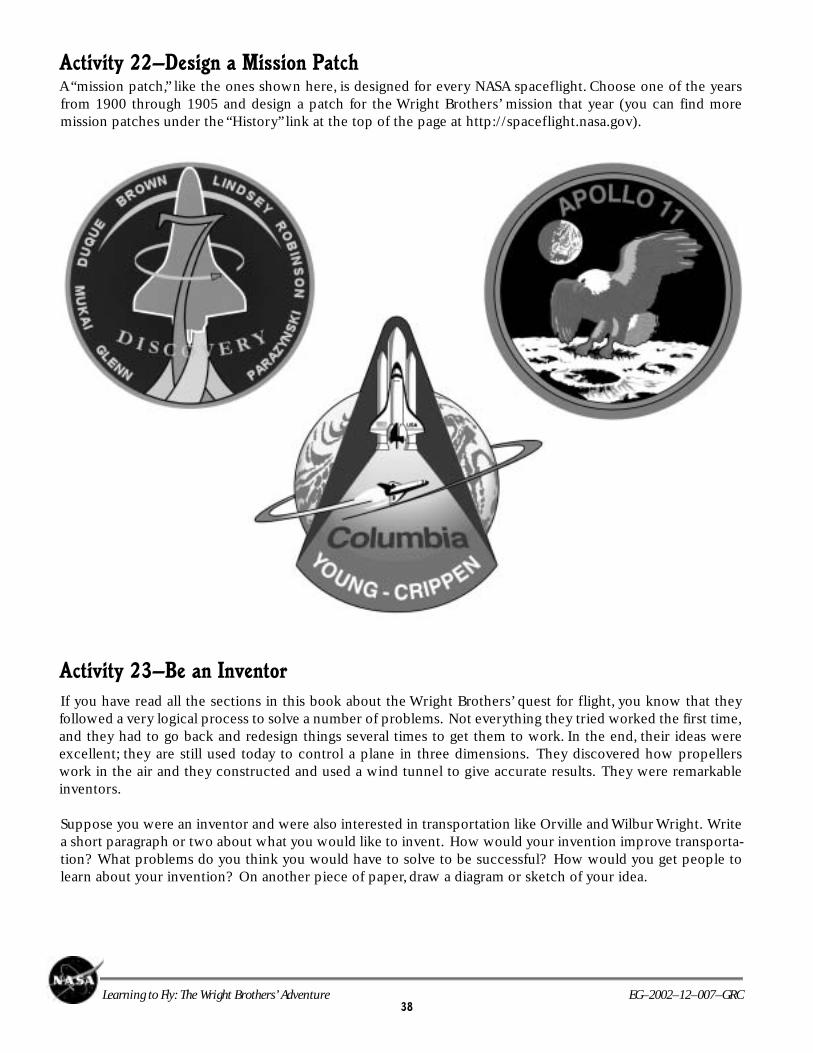
Activity 22—Design a Mission PatchA “mission patch,” like the ones shown here, is designed for every NASA spaceflight. Choose one of the yearsfrom 1900 through 1905 and design a patch for the Wright Brothers’ mission that year (you can find moremission patches under the “History” link at the top of the page at http://spaceflight.nasa.gov).
Activity 23—Be an Inventor
If you have read all the sections in this book about the Wright Brothers’ quest for flight, you know that theyfollowed a very logical process to solve a number of problems. Not everything they tried worked the first time,and they had to go back and redesign things several times to get them to work. In the end, their ideas wereexcellent; they are still used today to control a plane in three dimensions. They discovered how propellerswork in the air and they constructed and used a wind tunnel to give accurate results. They were remarkableinventors.
Suppose you were an inventor and were also interested in transportation like Orville and Wilbur Wright. Writea short paragraph or two about what you would like to invent. How would your invention improve transporta-tion? What problems do you think you would have to solve to be successful? How would you get people tolearn about your invention? On another piece of paper, draw a diagram or sketch of your idea.
39Learning to Fly: The Wright Brothers’ Adventure EG–2002–12–007–GRC
40Learning to Fly: The Wright Brothers’ Adventure EG–2002–12–007–GRC
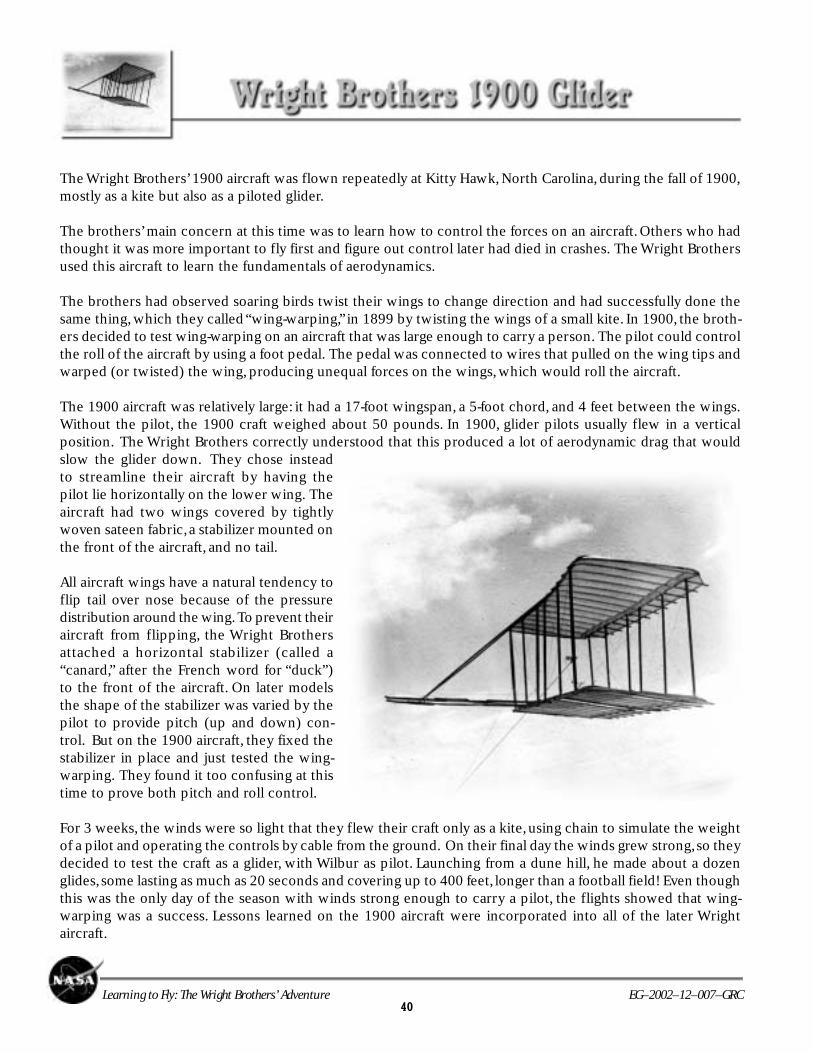
The Wright Brothers’ 1900 aircraft was flown repeatedly at Kitty Hawk, North Carolina, during the fall of 1900,mostly as a kite but also as a piloted glider.
The brothers’ main concern at this time was to learn how to control the forces on an aircraft. Others who hadthought it was more important to fly first and figure out control later had died in crashes. The Wright Brothersused this aircraft to learn the fundamentals of aerodynamics.
The brothers had observed soaring birds twist their wings to change direction and had successfully done thesame thing, which they called “wing-warping,” in 1899 by twisting the wings of a small kite. In 1900, the broth-ers decided to test wing-warping on an aircraft that was large enough to carry a person. The pilot could controlthe roll of the aircraft by using a foot pedal. The pedal was connected to wires that pulled on the wing tips andwarped (or twisted) the wing, producing unequal forces on the wings, which would roll the aircraft.
The 1900 aircraft was relatively large: it had a 17-foot wingspan, a 5-foot chord, and 4 feet between the wings.Without the pilot, the 1900 craft weighed about 50 pounds. In 1900, glider pilots usually flew in a verticalposition. The Wright Brothers correctly understood that this produced a lot of aerodynamic drag that wouldslow the glider down. They chose insteadto streamline their aircraft by having thepilot lie horizontally on the lower wing. Theaircraft had two wings covered by tightlywoven sateen fabric, a stabilizer mounted onthe front of the aircraft, and no tail.
All aircraft wings have a natural tendency toflip tail over nose because of the pressuredistribution around the wing. To prevent theiraircraft from flipping, the Wright Brothersattached a horizontal stabilizer (called a“canard,” after the French word for “duck”)to the front of the aircraft. On later modelsthe shape of the stabilizer was varied by thepilot to provide pitch (up and down) con-trol. But on the 1900 aircraft, they fixed thestabilizer in place and just tested the wing-warping. They found it too confusing at thistime to prove both pitch and roll control.
For 3 weeks, the winds were so light that they flew their craft only as a kite, using chain to simulate the weightof a pilot and operating the controls by cable from the ground. On their final day the winds grew strong, so theydecided to test the craft as a glider, with Wilbur as pilot. Launching from a dune hill, he made about a dozenglides, some lasting as much as 20 seconds and covering up to 400 feet, longer than a football field! Even thoughthis was the only day of the season with winds strong enough to carry a pilot, the flights showed that wing-warping was a success. Lessons learned on the 1900 aircraft were incorporated into all of the later Wrightaircraft.
41Learning to Fly: The Wright Brothers’ Adventure EG–2002–12–007–GRC
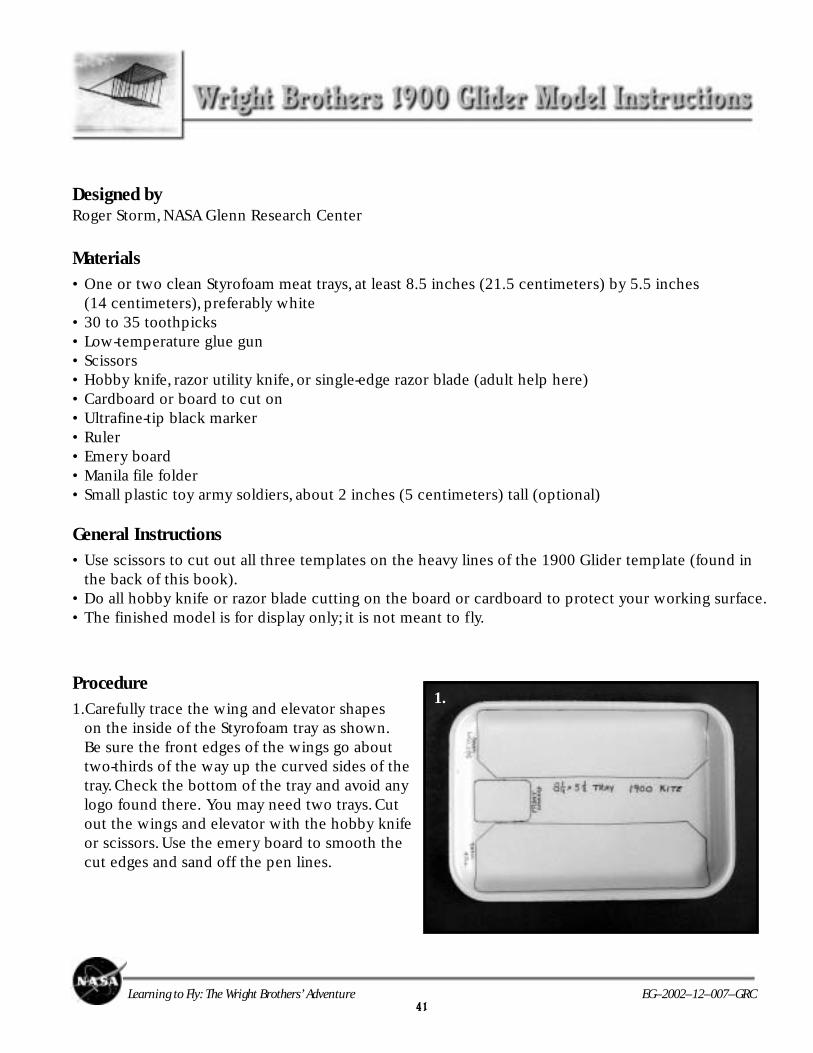
Designed byRoger Storm, NASA Glenn Research Center
Materials• One or two clean Styrofoam meat trays, at least 8.5 inches (21.5 centimeters) by 5.5 inches
(14 centimeters), preferably white• 30 to 35 toothpicks• Low-temperature glue gun• Scissors• Hobby knife, razor utility knife, or single-edge razor blade (adult help here)• Cardboard or board to cut on• Ultrafine-tip black marker• Ruler• Emery board• Manila file folder• Small plastic toy army soldiers, about 2 inches (5 centimeters) tall (optional)
General Instructions• Use scissors to cut out all three templates on the heavy lines of the 1900 Glider template (found in
the back of this book).• Do all hobby knife or razor blade cutting on the board or cardboard to protect your working surface.• The finished model is for display only; it is not meant to fly.
Procedure1.Carefully trace the wing and elevator shapes
on the inside of the Styrofoam tray as shown.Be sure the front edges of the wings go abouttwo-thirds of the way up the curved sides of thetray. Check the bottom of the tray and avoid anylogo found there. You may need two trays. Cutout the wings and elevator with the hobby knifeor scissors. Use the emery board to smooth thecut edges and sand off the pen lines.
1.
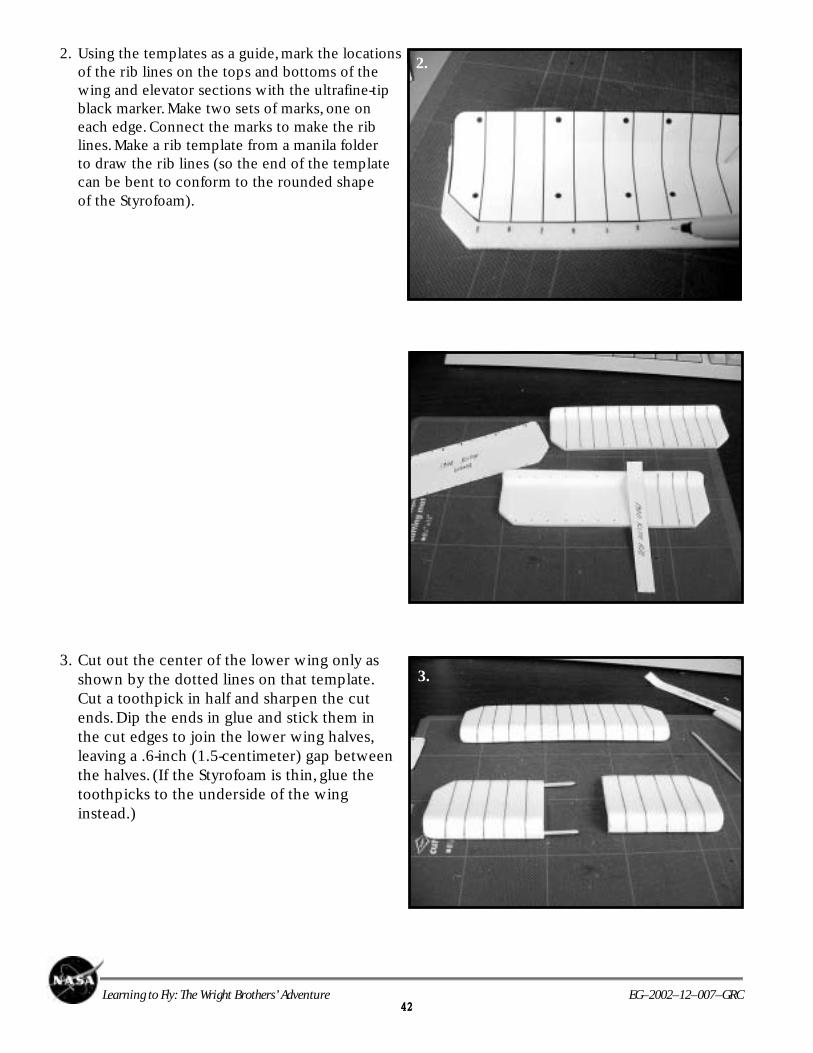
42Learning to Fly: The Wright Brothers’ Adventure EG–2002–12–007–GRC
2. Using the templates as a guide, mark the locationsof the rib lines on the tops and bottoms of thewing and elevator sections with the ultrafine-tipblack marker. Make two sets of marks, one oneach edge. Connect the marks to make the riblines. Make a rib template from a manila folderto draw the rib lines (so the end of the templatecan be bent to conform to the rounded shapeof the Styrofoam).
3. Cut out the center of the lower wing only asshown by the dotted lines on that template.Cut a toothpick in half and sharpen the cutends. Dip the ends in glue and stick them inthe cut edges to join the lower wing halves,leaving a .6-inch (1.5-centimeter) gap betweenthe halves. (If the Styrofoam is thin, glue thetoothpicks to the underside of the winginstead.)
3.
2.
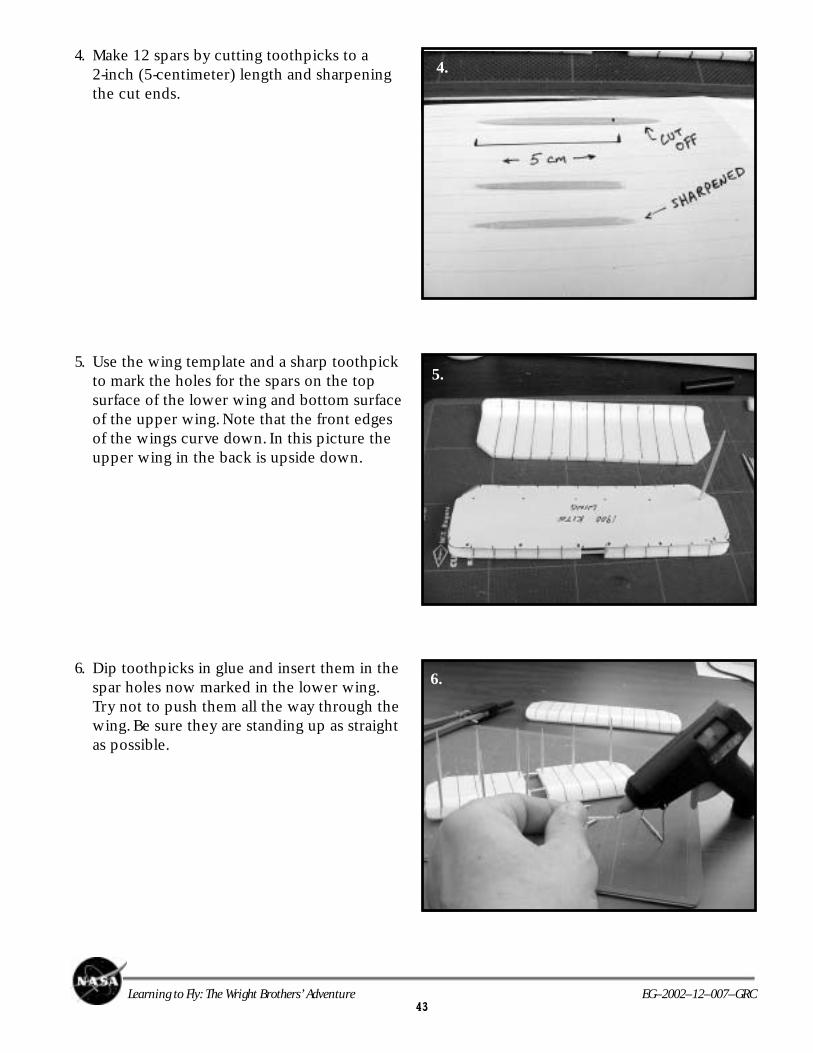
43Learning to Fly: The Wright Brothers’ Adventure EG–2002–12–007–GRC
4. Make 12 spars by cutting toothpicks to a2-inch (5-centimeter) length and sharpeningthe cut ends.
5. Use the wing template and a sharp toothpickto mark the holes for the spars on the topsurface of the lower wing and bottom surfaceof the upper wing. Note that the front edgesof the wings curve down. In this picture theupper wing in the back is upside down.
6. Dip toothpicks in glue and insert them in thespar holes now marked in the lower wing.Try not to push them all the way through thewing. Be sure they are standing up as straightas possible.
5.
4.
6.
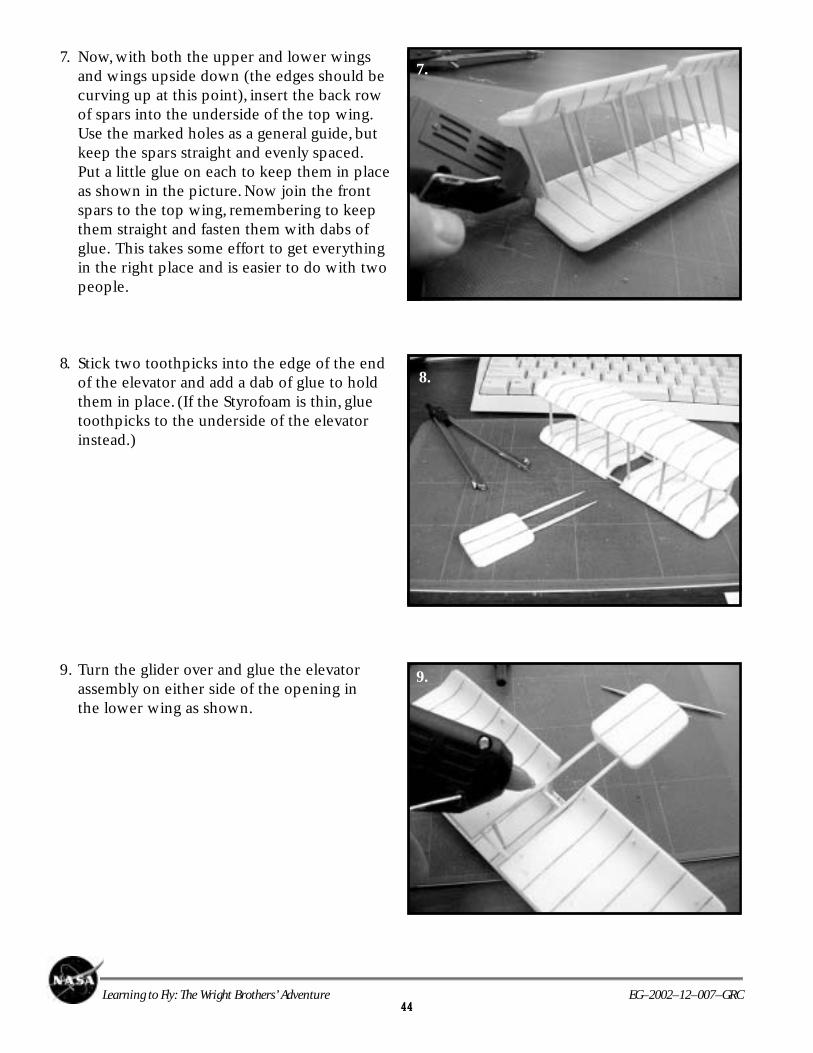
44Learning to Fly: The Wright Brothers’ Adventure EG–2002–12–007–GRC
7. Now, with both the upper and lower wingsand wings upside down (the edges should becurving up at this point), insert the back rowof spars into the underside of the top wing.Use the marked holes as a general guide, butkeep the spars straight and evenly spaced.Put a little glue on each to keep them in placeas shown in the picture. Now join the frontspars to the top wing, remembering to keepthem straight and fasten them with dabs ofglue. This takes some effort to get everythingin the right place and is easier to do with twopeople.
8. Stick two toothpicks into the edge of the endof the elevator and add a dab of glue to holdthem in place. (If the Styrofoam is thin, gluetoothpicks to the underside of the elevatorinstead.)
9. Turn the glider over and glue the elevatorassembly on either side of the opening inthe lower wing as shown.
7.
8.
9.
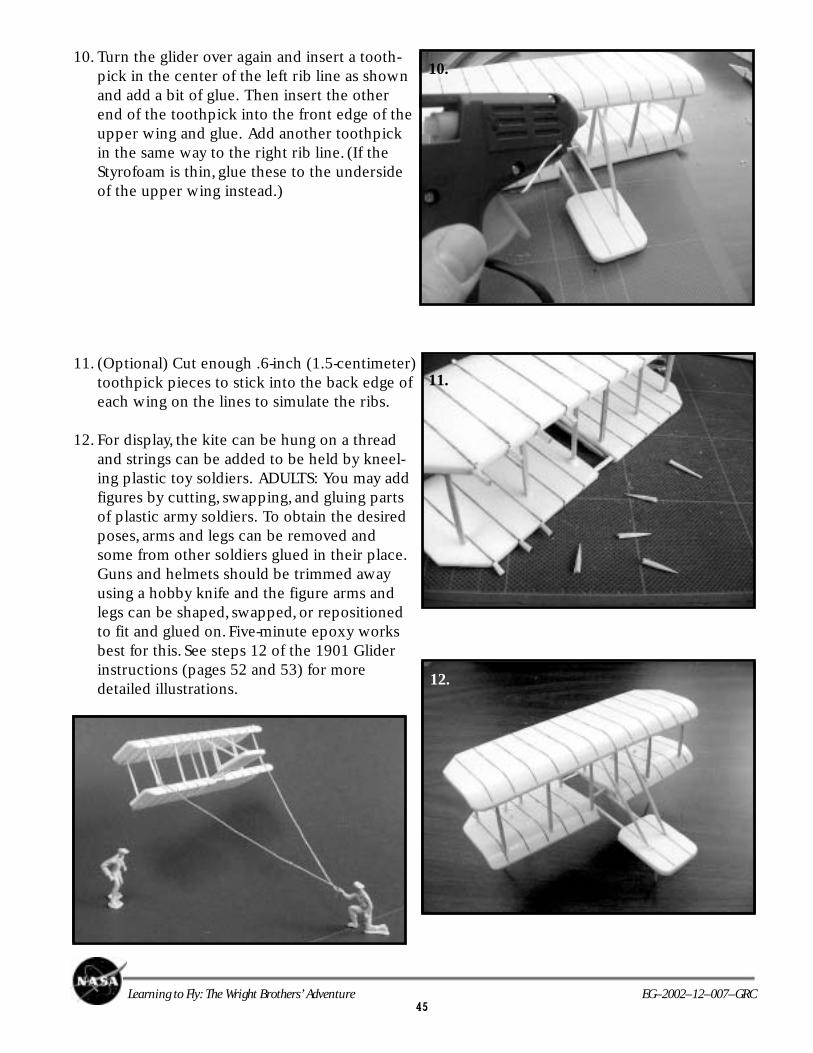
45Learning to Fly: The Wright Brothers’ Adventure EG–2002–12–007–GRC
10. Turn the glider over again and insert a tooth-pick in the center of the left rib line as shownand add a bit of glue. Then insert the otherend of the toothpick into the front edge of theupper wing and glue. Add another toothpickin the same way to the right rib line. (If theStyrofoam is thin, glue these to the undersideof the upper wing instead.)
11. (Optional) Cut enough .6-inch (1.5-centimeter)toothpick pieces to stick into the back edge ofeach wing on the lines to simulate the ribs.
12. For display, the kite can be hung on a threadand strings can be added to be held by kneel-ing plastic toy soldiers. ADULTS: You may addfigures by cutting, swapping, and gluing partsof plastic army soldiers. To obtain the desiredposes, arms and legs can be removed andsome from other soldiers glued in their place.Guns and helmets should be trimmed awayusing a hobby knife and the figure arms andlegs can be shaped, swapped, or repositionedto fit and glued on. Five-minute epoxy worksbest for this. See steps 12 of the 1901 Gliderinstructions (pages 52 and 53) for moredetailed illustrations.
10.
11.
12.
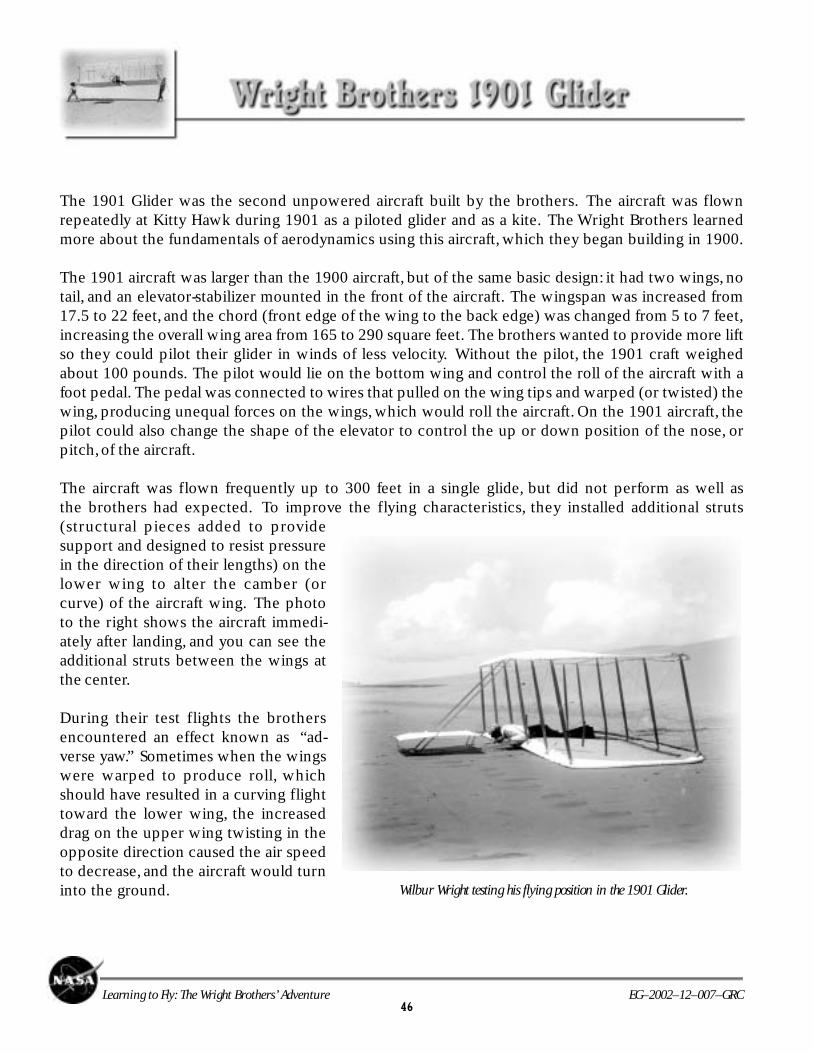
46Learning to Fly: The Wright Brothers’ Adventure EG–2002–12–007–GRC
The 1901 Glider was the second unpowered aircraft built by the brothers. The aircraft was flownrepeatedly at Kitty Hawk during 1901 as a piloted glider and as a kite. The Wright Brothers learnedmore about the fundamentals of aerodynamics using this aircraft, which they began building in 1900.
The 1901 aircraft was larger than the 1900 aircraft, but of the same basic design: it had two wings, notail, and an elevator-stabilizer mounted in the front of the aircraft. The wingspan was increased from17.5 to 22 feet, and the chord (front edge of the wing to the back edge) was changed from 5 to 7 feet,increasing the overall wing area from 165 to 290 square feet. The brothers wanted to provide more liftso they could pilot their glider in winds of less velocity. Without the pilot, the 1901 craft weighedabout 100 pounds. The pilot would lie on the bottom wing and control the roll of the aircraft with afoot pedal. The pedal was connected to wires that pulled on the wing tips and warped (or twisted) thewing, producing unequal forces on the wings, which would roll the aircraft. On the 1901 aircraft, thepilot could also change the shape of the elevator to control the up or down position of the nose, orpitch, of the aircraft.
The aircraft was flown frequently up to 300 feet in a single glide, but did not perform as well asthe brothers had expected. To improve the flying characteristics, they installed additional struts(structural pieces added to providesupport and designed to resist pressurein the direction of their lengths) on thelower wing to alter the camber (orcurve) of the aircraft wing. The phototo the right shows the aircraft immedi-ately after landing, and you can see theadditional struts between the wings atthe center.
During their test flights the brothersencountered an effect known as “ad-verse yaw.” Sometimes when the wingswere warped to produce roll, whichshould have resulted in a curving flighttoward the lower wing, the increaseddrag on the upper wing twisting in theopposite direction caused the air speedto decrease, and the aircraft would turninto the ground. Wilbur Wright testing his flying position in the 1901 Glider.
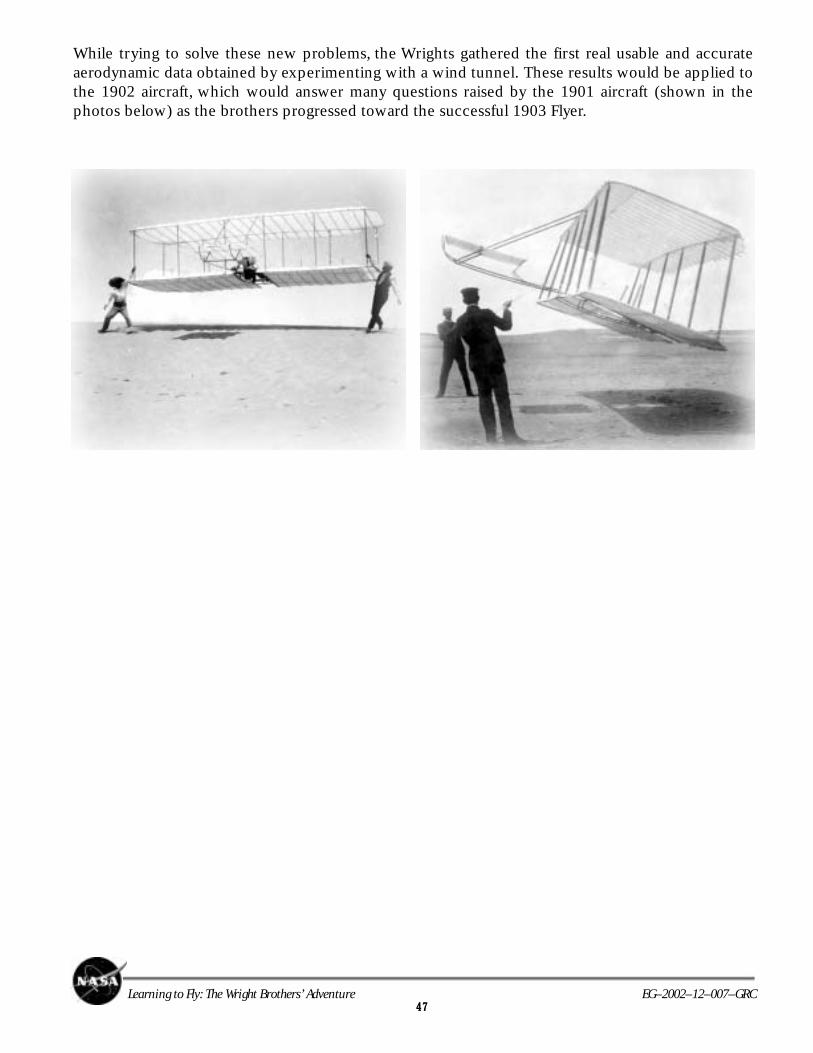
47Learning to Fly: The Wright Brothers’ Adventure EG–2002–12–007–GRC
While trying to solve these new problems, the Wrights gathered the first real usable and accurateaerodynamic data obtained by experimenting with a wind tunnel. These results would be applied tothe 1902 aircraft, which would answer many questions raised by the 1901 aircraft (shown in thephotos below) as the brothers progressed toward the successful 1903 Flyer.
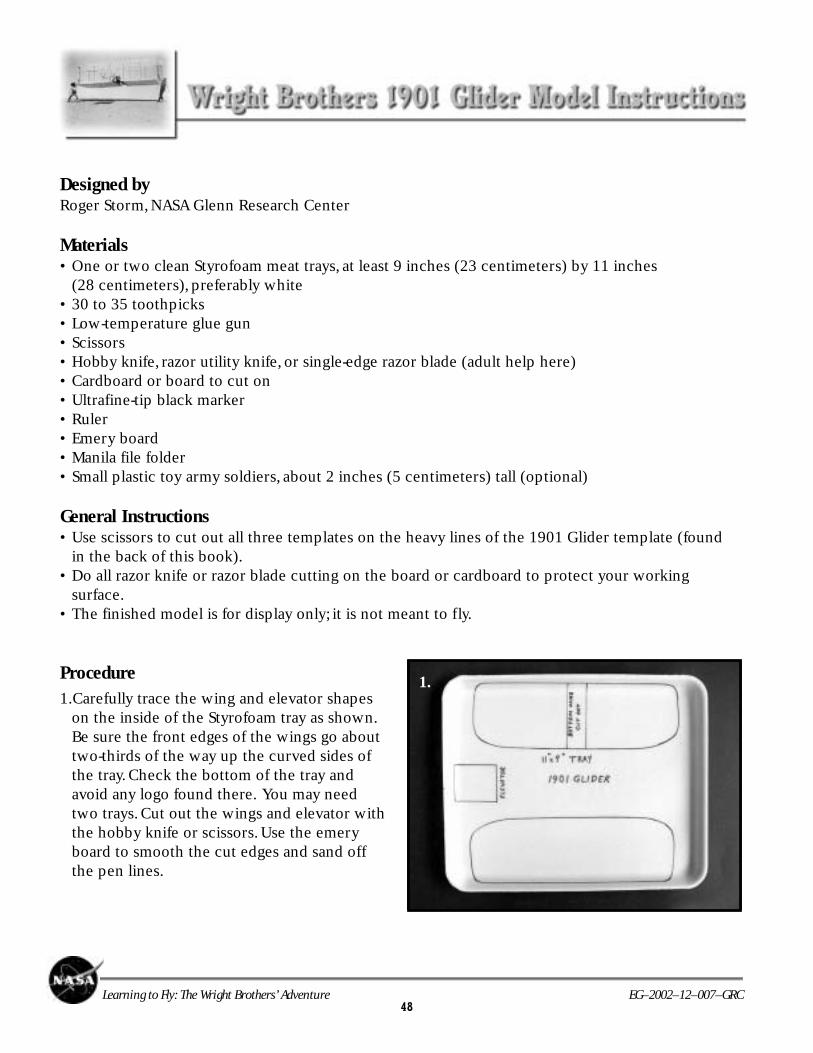
48Learning to Fly: The Wright Brothers’ Adventure EG–2002–12–007–GRC
Designed byRoger Storm, NASA Glenn Research Center
Materials• One or two clean Styrofoam meat trays, at least 9 inches (23 centimeters) by 11 inches
(28 centimeters), preferably white• 30 to 35 toothpicks• Low-temperature glue gun• Scissors• Hobby knife, razor utility knife, or single-edge razor blade (adult help here)• Cardboard or board to cut on• Ultrafine-tip black marker• Ruler• Emery board• Manila file folder• Small plastic toy army soldiers, about 2 inches (5 centimeters) tall (optional)
General Instructions• Use scissors to cut out all three templates on the heavy lines of the 1901 Glider template (found
in the back of this book).• Do all razor knife or razor blade cutting on the board or cardboard to protect your working
surface.• The finished model is for display only; it is not meant to fly.
Procedure1.Carefully trace the wing and elevator shapes
on the inside of the Styrofoam tray as shown.Be sure the front edges of the wings go abouttwo-thirds of the way up the curved sides ofthe tray. Check the bottom of the tray andavoid any logo found there. You may needtwo trays. Cut out the wings and elevator withthe hobby knife or scissors. Use the emeryboard to smooth the cut edges and sand offthe pen lines.
1..
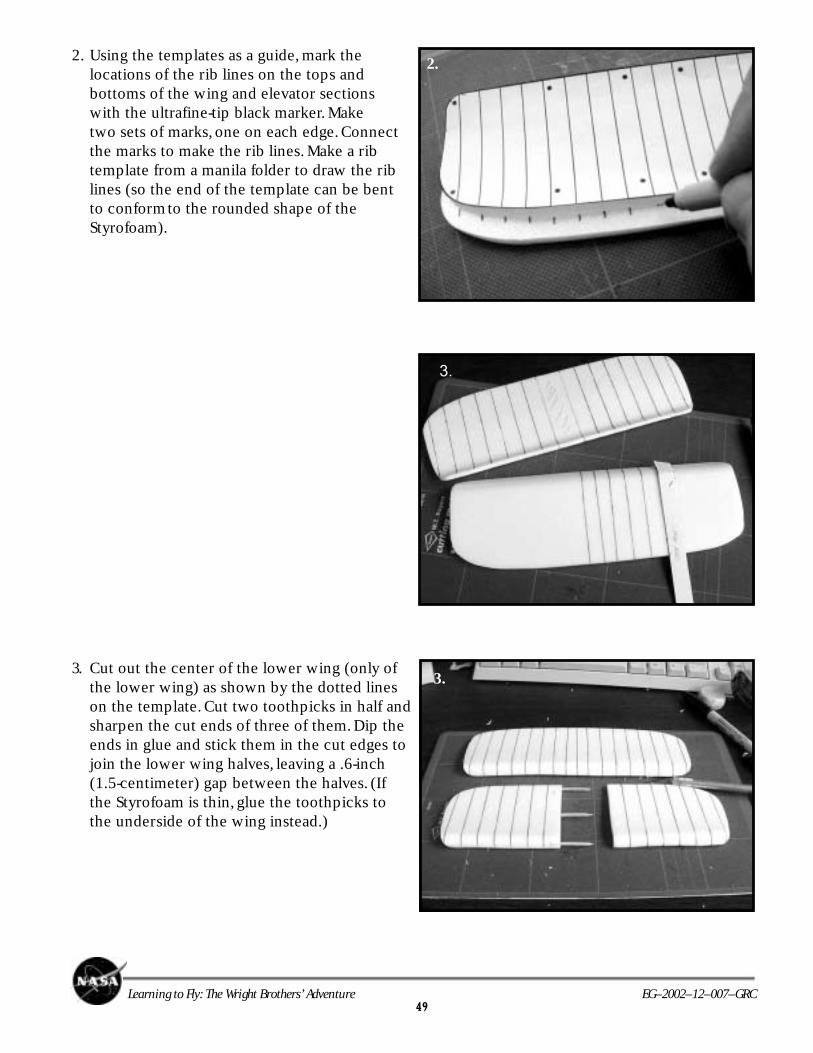
49Learning to Fly: The Wright Brothers’ Adventure EG–2002–12–007–GRC
2. Using the templates as a guide, mark thelocations of the rib lines on the tops andbottoms of the wing and elevator sectionswith the ultrafine-tip black marker. Maketwo sets of marks, one on each edge. Connectthe marks to make the rib lines. Make a ribtemplate from a manila folder to draw the riblines (so the end of the template can be bentto conformto the rounded shape of theStyrofoam).
3. Cut out the center of the lower wing (only ofthe lower wing) as shown by the dotted lineson the template. Cut two toothpicks in half andsharpen the cut ends of three of them. Dip theends in glue and stick them in the cut edges tojoin the lower wing halves, leaving a .6-inch(1.5-centimeter) gap between the halves. (Ifthe Styrofoam is thin, glue the toothpicks tothe underside of the wing instead.)
3.
3.
2.
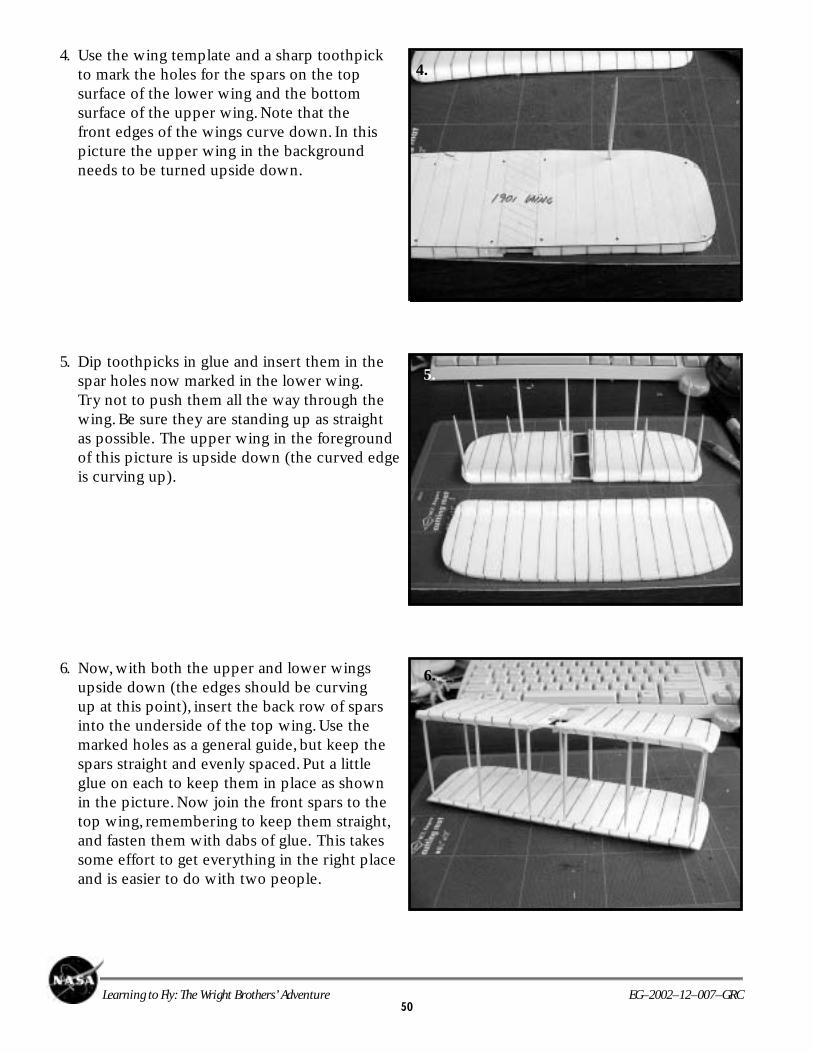
50Learning to Fly: The Wright Brothers’ Adventure EG–2002–12–007–GRC
4. Use the wing template and a sharp toothpickto mark the holes for the spars on the topsurface of the lower wing and the bottomsurface of the upper wing. Note that thefront edges of the wings curve down. In thispicture the upper wing in the backgroundneeds to be turned upside down.
5. Dip toothpicks in glue and insert them in thespar holes now marked in the lower wing.Try not to push them all the way through thewing. Be sure they are standing up as straightas possible. The upper wing in the foregroundof this picture is upside down (the curved edgeis curving up).
6. Now, with both the upper and lower wingsupside down (the edges should be curvingup at this point), insert the back row of sparsinto the underside of the top wing. Use themarked holes as a general guide, but keep thespars straight and evenly spaced. Put a littleglue on each to keep them in place as shownin the picture. Now join the front spars to thetop wing, remembering to keep them straight,and fasten them with dabs of glue. This takessome effort to get everything in the right placeand is easier to do with two people.
4.
5.
6..
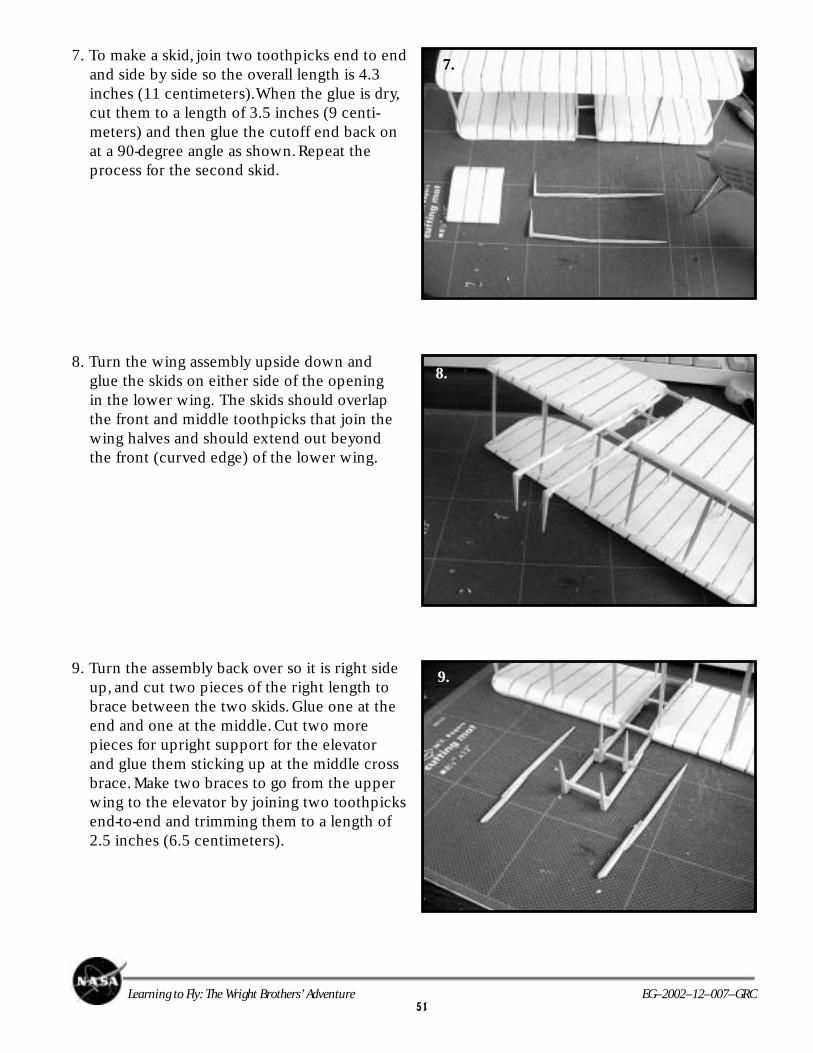
51Learning to Fly: The Wright Brothers’ Adventure EG–2002–12–007–GRC
7. To make a skid, join two toothpicks end to endand side by side so the overall length is 4.3inches (11 centimeters). When the glue is dry,cut them to a length of 3.5 inches (9 centi-meters) and then glue the cutoff end back onat a 90-degree angle as shown. Repeat theprocess for the second skid.
8. Turn the wing assembly upside down andglue the skids on either side of the openingin the lower wing. The skids should overlapthe front and middle toothpicks that join thewing halves and should extend out beyondthe front (curved edge) of the lower wing.
9. Turn the assembly back over so it is right sideup, and cut two pieces of the right length tobrace between the two skids. Glue one at theend and one at the middle. Cut two morepieces for upright support for the elevatorand glue them sticking up at the middle crossbrace. Make two braces to go from the upperwing to the elevator by joining two toothpicksend-to-end and trimming them to a length of2.5 inches (6.5 centimeters).
8.
9.
7.
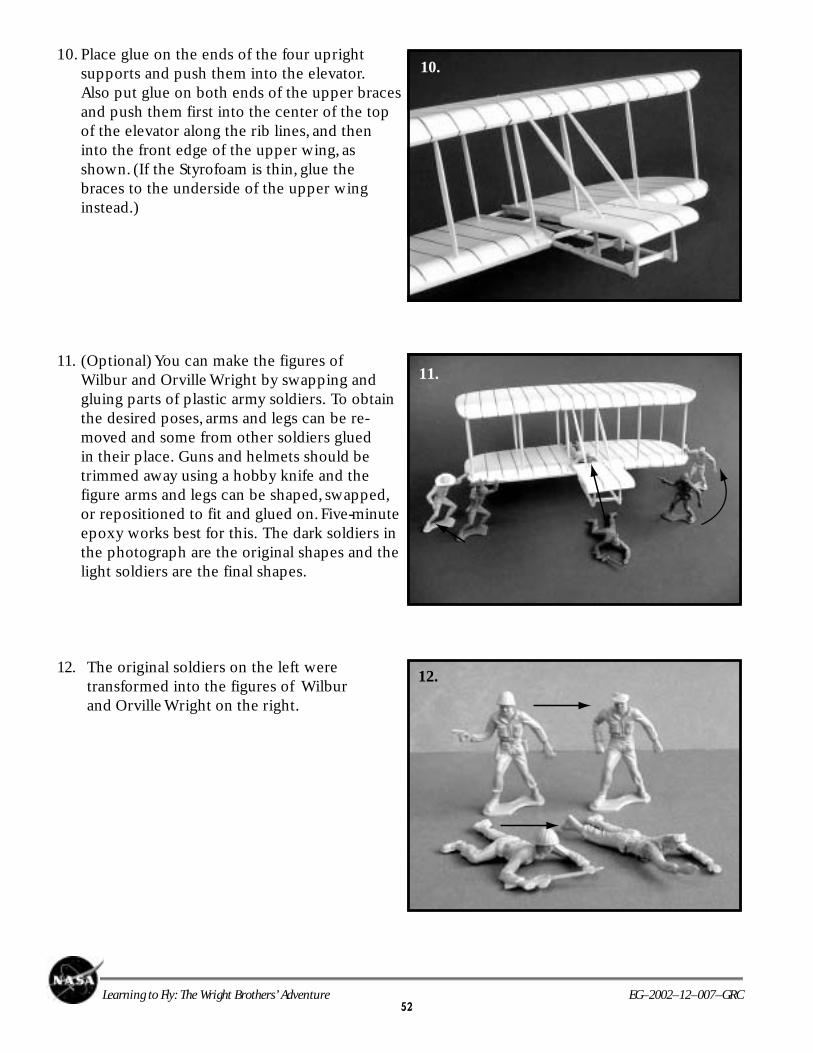
52Learning to Fly: The Wright Brothers’ Adventure EG–2002–12–007–GRC
10. Place glue on the ends of the four uprightsupports and push them into the elevator.Also put glue on both ends of the upper bracesand push them first into the center of the topof the elevator along the rib lines, and theninto the front edge of the upper wing, asshown. (If the Styrofoam is thin, glue thebraces to the underside of the upper winginstead.)
11. (Optional) You can make the figures ofWilbur and Orville Wright by swapping andgluing parts of plastic army soldiers. To obtainthe desired poses, arms and legs can be re-moved and some from other soldiers gluedin their place. Guns and helmets should betrimmed away using a hobby knife and thefigure arms and legs can be shaped, swapped,or repositioned to fit and glued on. Five-minuteepoxy works best for this. The dark soldiers inthe photograph are the original shapes and thelight soldiers are the final shapes.
12. The original soldiers on the left weretransformed into the figures of Wilburand Orville Wright on the right.
10.
11.
12.
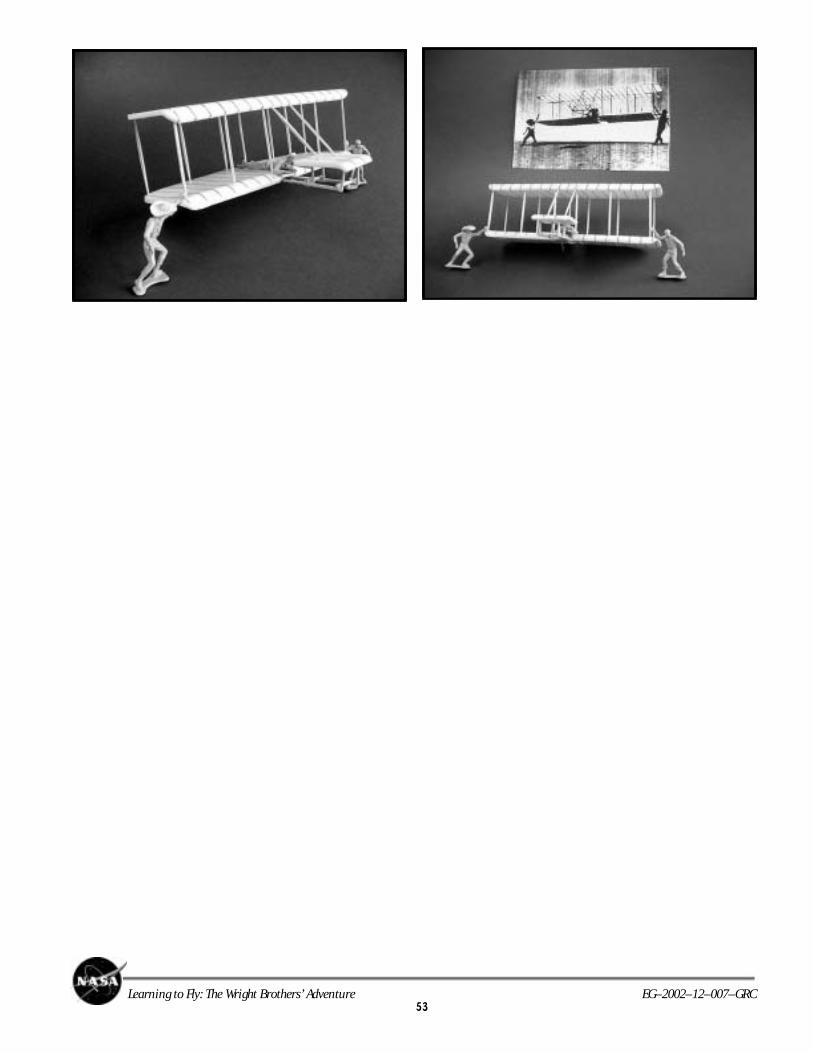
53Learning to Fly: The Wright Brothers’ Adventure EG–2002–12–007–GRC

54Learning to Fly: The Wright Brothers’ Adventure EG–2002–12–007–GRC
The Wright Brothers’ 1902 Glider was their third unpowered aircraft. It was flown repeatedly at Kitty Hawkduring 1902 as a kite and as a piloted glider. The brothers used this aircraft to solve some of the problemsencountered with the 1901 Glider. They also used it to develop their piloting skills, because this was the firstaircraft in the world that had active controls for all three axes: roll, pitch, and yaw.
The 1902 aircraft had two wings and an elevator-stabilizer mounted in the front, like the 1901 aircraft. It had a32-foot wingspan, a 5-foot chord, and 5 feet between the wings. Without the pilot, it weighed about 120 pounds.As before, the pilot lies on the bottom wing and controls the roll of the aircraft by warping the wing shape. Onthe 1902 aircraft, however, and on all flyers through 1905, the warping was controlled by a control device calleda “hip cradle,” instead of the pedals that were used on the 1900 and 1901 aircraft.
There were other major differences between this aircraft and its predecessors as well. Data from the 1901 windtunnel experiments showed that a longer, thinner wing gave less drag and a better lift-to-drag (L/D) ratio, so theaspect ratio (ratio of wingspan to wing chord or width) was changed from 3:1 on the 1901 aircraft to 6:1 on the1902 aircraft. To try to solve the problem of adverse yaw from the 1901 Glider, two 6-foot rudders were addedto the rear of the craft.
Test flights went better than in 1901, but occasionally,the glider would spin out of control on recovering froma turn at low speed. Lying awake one night, Orvilleconcluded that the rudder was acting like a verticalwing, in which turning generated an angle of attack,and thus, an unwanted force in the wrong direction.To correct this, a single, movable rudder was attachedat the rear and connected to the wing-warping.
Now perfected, the glider worked beautifully, keepingthe nose of the aircraft pointed into the curved flightpath. On the 1902 aircraft, the pilot could also changethe angle of the elevator to control the up and downposition, or pitch, of the nose of the aircraft. For thefirst time in history, a craft could be controlled inthree dimensions. With this new aircraft, the brotherscompleted gliding flights of over 650 feet.
At the end of 1902, all that remained for the firstsuccessful airplane was the development of the pro-pulsion system. During the following winter and spring,the brothers built their own small engine from scratchand perfected their own propeller design for the 1903flyer.
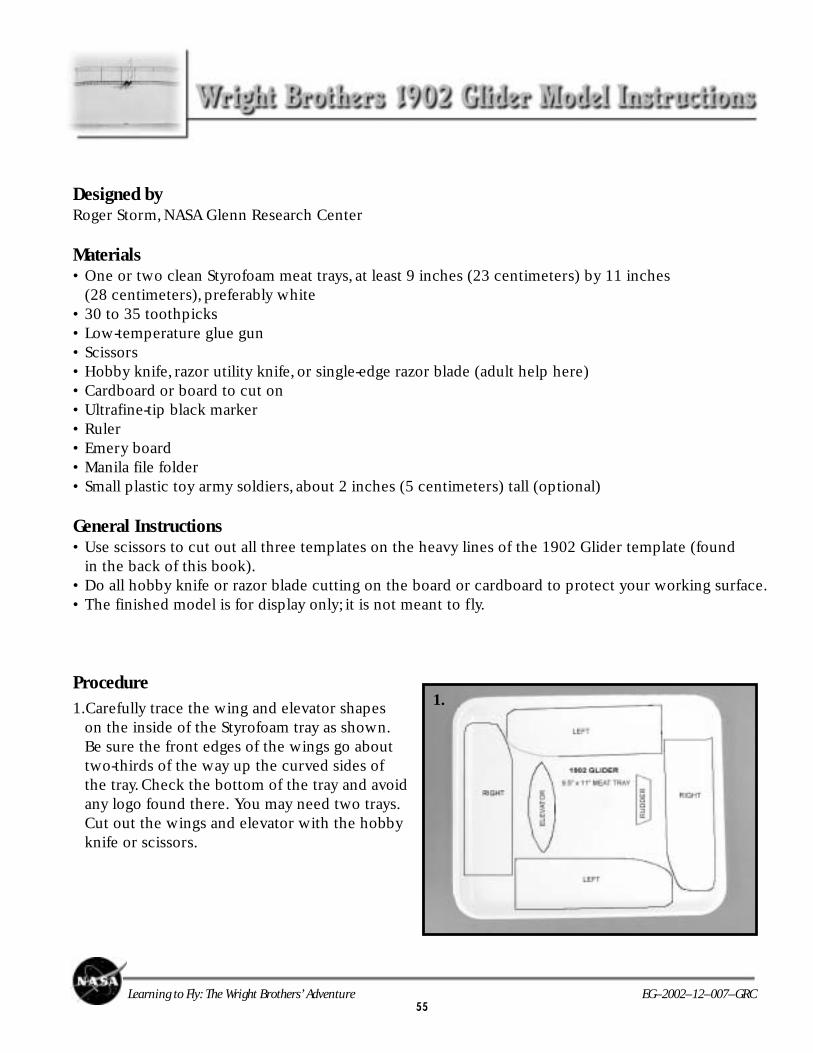
55Learning to Fly: The Wright Brothers’ Adventure EG–2002–12–007–GRC
Designed byRoger Storm, NASA Glenn Research Center
Materials• One or two clean Styrofoam meat trays, at least 9 inches (23 centimeters) by 11 inches
(28 centimeters), preferably white• 30 to 35 toothpicks• Low-temperature glue gun• Scissors• Hobby knife, razor utility knife, or single-edge razor blade (adult help here)• Cardboard or board to cut on• Ultrafine-tip black marker• Ruler• Emery board• Manila file folder• Small plastic toy army soldiers, about 2 inches (5 centimeters) tall (optional)
General Instructions• Use scissors to cut out all three templates on the heavy lines of the 1902 Glider template (found
in the back of this book).• Do all hobby knife or razor blade cutting on the board or cardboard to protect your working surface.• The finished model is for display only; it is not meant to fly.
Procedure1.Carefully trace the wing and elevator shapes
on the inside of the Styrofoam tray as shown.Be sure the front edges of the wings go abouttwo-thirds of the way up the curved sides ofthe tray. Check the bottom of the tray and avoidany logo found there. You may need two trays.Cut out the wings and elevator with the hobbyknife or scissors.
1.
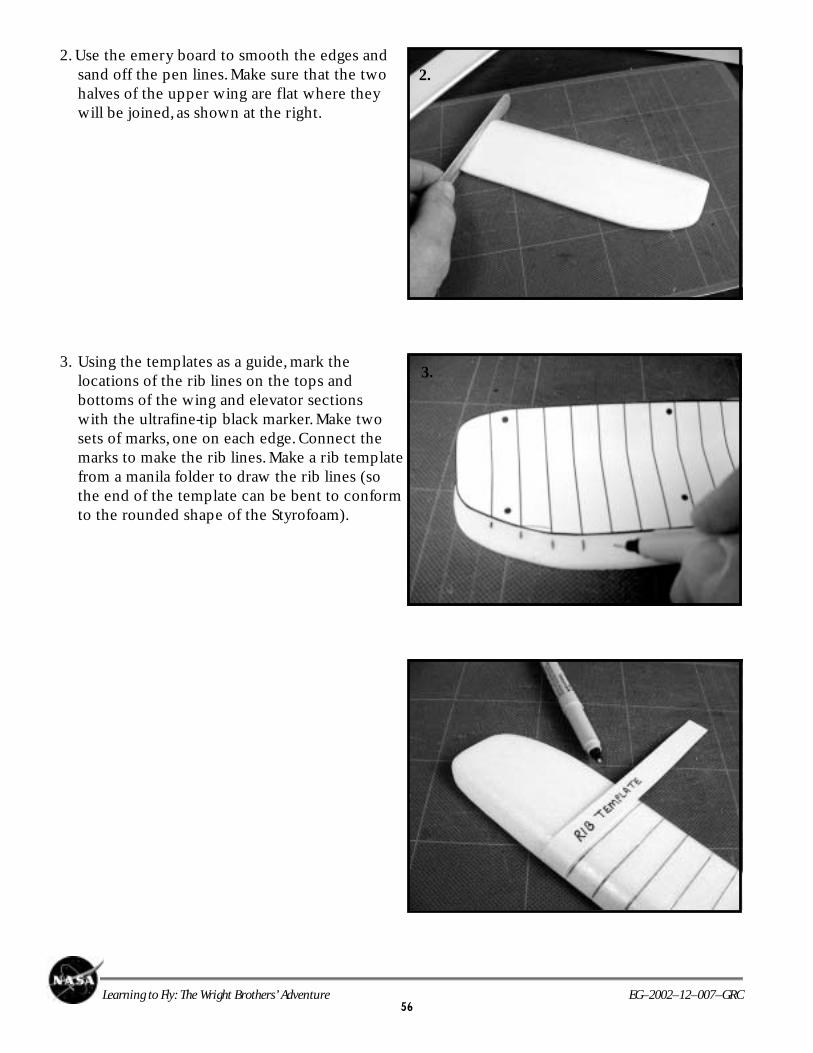
56Learning to Fly: The Wright Brothers’ Adventure EG–2002–12–007–GRC
2. Use the emery board to smooth the edges andsand off the pen lines. Make sure that the twohalves of the upper wing are flat where theywill be joined, as shown at the right.
3. Using the templates as a guide, mark thelocations of the rib lines on the tops andbottoms of the wing and elevator sectionswith the ultrafine-tip black marker. Make twosets of marks, one on each edge. Connect themarks to make the rib lines. Make a rib templatefrom a manila folder to draw the rib lines (sothe end of the template can be bent to conformto the rounded shape of the Styrofoam).
3.
3.
2.

57Learning to Fly: The Wright Brothers’ Adventure EG–2002–12–007–GRC
4. Place glue on the flat edge of the upper winghalves and join them as shown.
5. Cut off the parts of the lower left and rightwing only as shown by the dotted line onthe template. Cut a toothpick in half andsharpen the cut ends. Dip the ends in glueand stick them in the cut edges to join thelower wing halves, leaving a .6-inch (1.5-centimeter) gap between the halves. (If theStyrofoam is thin, glue the toothpicks to theunderside of the wing instead.)
6. Use the wing template and a sharp toothpickto mark the holes for the spars on the topsurface of the lower wing (the front edgeshould curve down as shown) and the bottomsurface of the upper wing.
5.
6.
4.
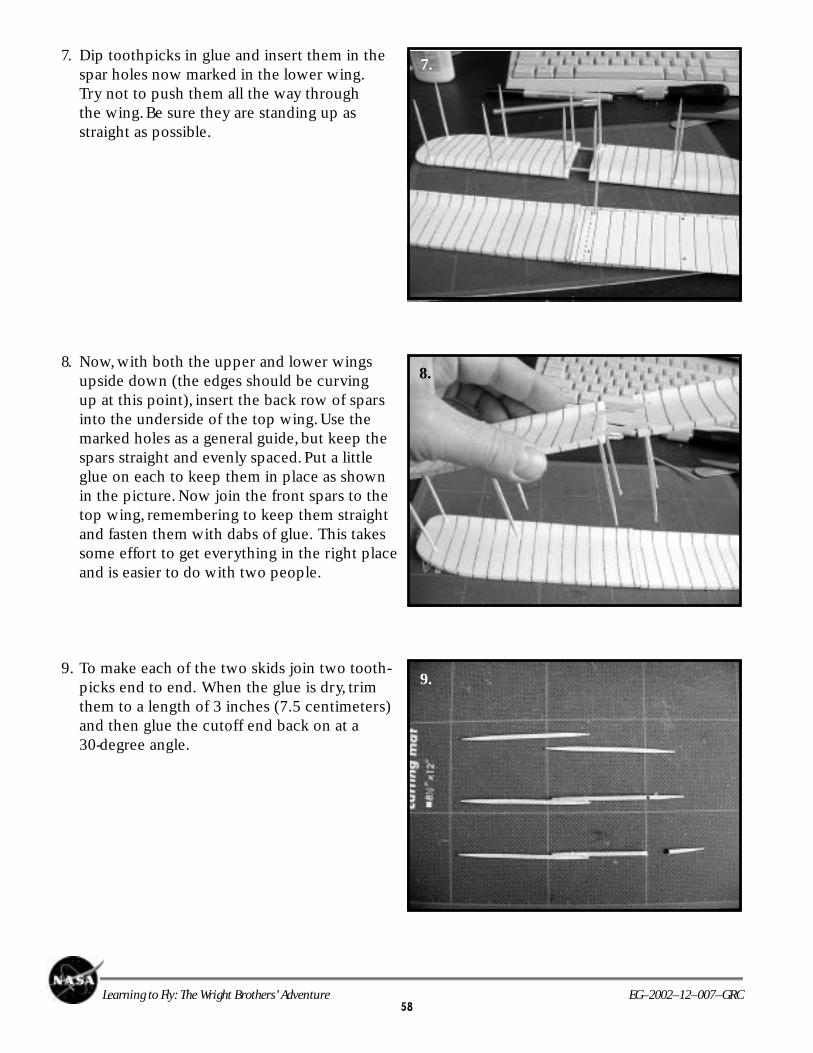
58Learning to Fly: The Wright Brothers’ Adventure EG–2002–12–007–GRC
7. Dip toothpicks in glue and insert them in thespar holes now marked in the lower wing.Try not to push them all the way throughthe wing. Be sure they are standing up asstraight as possible.
8. Now, with both the upper and lower wingsupside down (the edges should be curvingup at this point), insert the back row of sparsinto the underside of the top wing. Use themarked holes as a general guide, but keep thespars straight and evenly spaced. Put a littleglue on each to keep them in place as shownin the picture. Now join the front spars to thetop wing, remembering to keep them straightand fasten them with dabs of glue. This takessome effort to get everything in the right placeand is easier to do with two people.
9. To make each of the two skids join two tooth-picks end to end. When the glue is dry, trimthem to a length of 3 inches (7.5 centimeters)and then glue the cutoff end back on at a30-degree angle.
7.
8.
9.
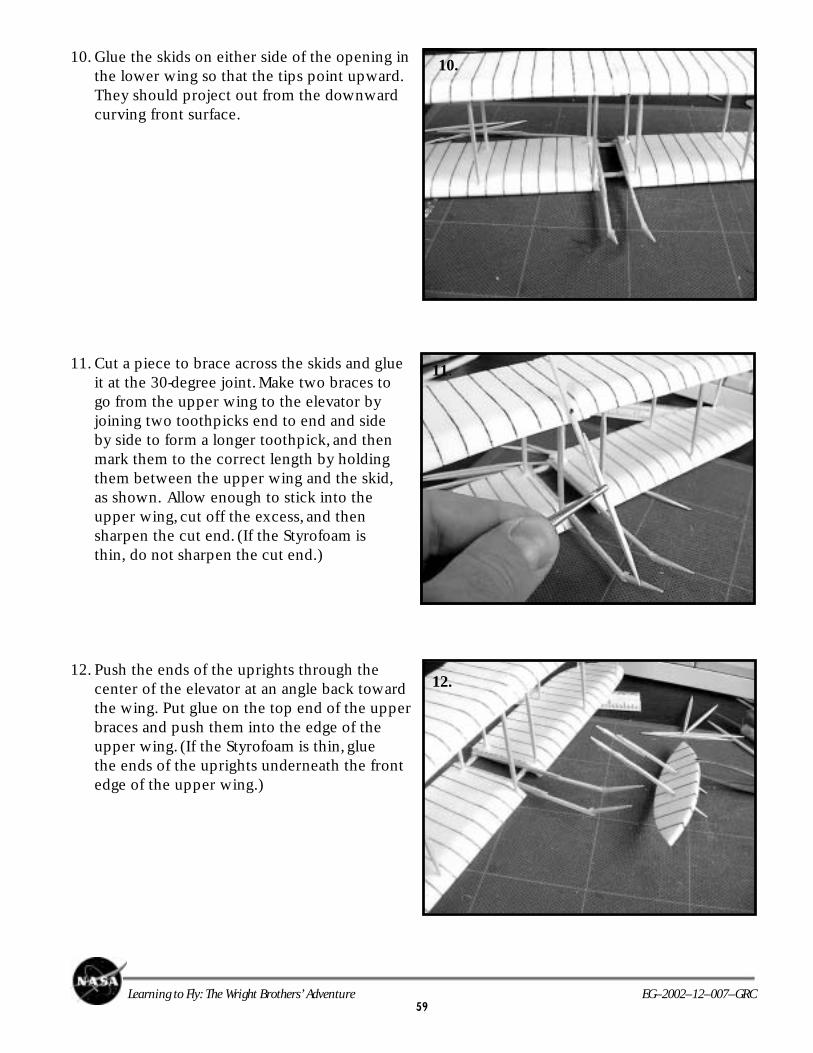
59Learning to Fly: The Wright Brothers’ Adventure EG–2002–12–007–GRC
10. Glue the skids on either side of the opening inthe lower wing so that the tips point upward.They should project out from the downwardcurving front surface.
11. Cut a piece to brace across the skids and glueit at the 30-degree joint. Make two braces togo from the upper wing to the elevator byjoining two toothpicks end to end and sideby side to form a longer toothpick, and thenmark them to the correct length by holdingthem between the upper wing and the skid,as shown. Allow enough to stick into theupper wing, cut off the excess, and thensharpen the cut end. (If the Styrofoam isthin, do not sharpen the cut end.)
12. Push the ends of the uprights through thecenter of the elevator at an angle back towardthe wing. Put glue on the top end of the upperbraces and push them into the edge of theupper wing. (If the Styrofoam is thin, gluethe ends of the uprights underneath the frontedge of the upper wing.)
12.
10.
11.
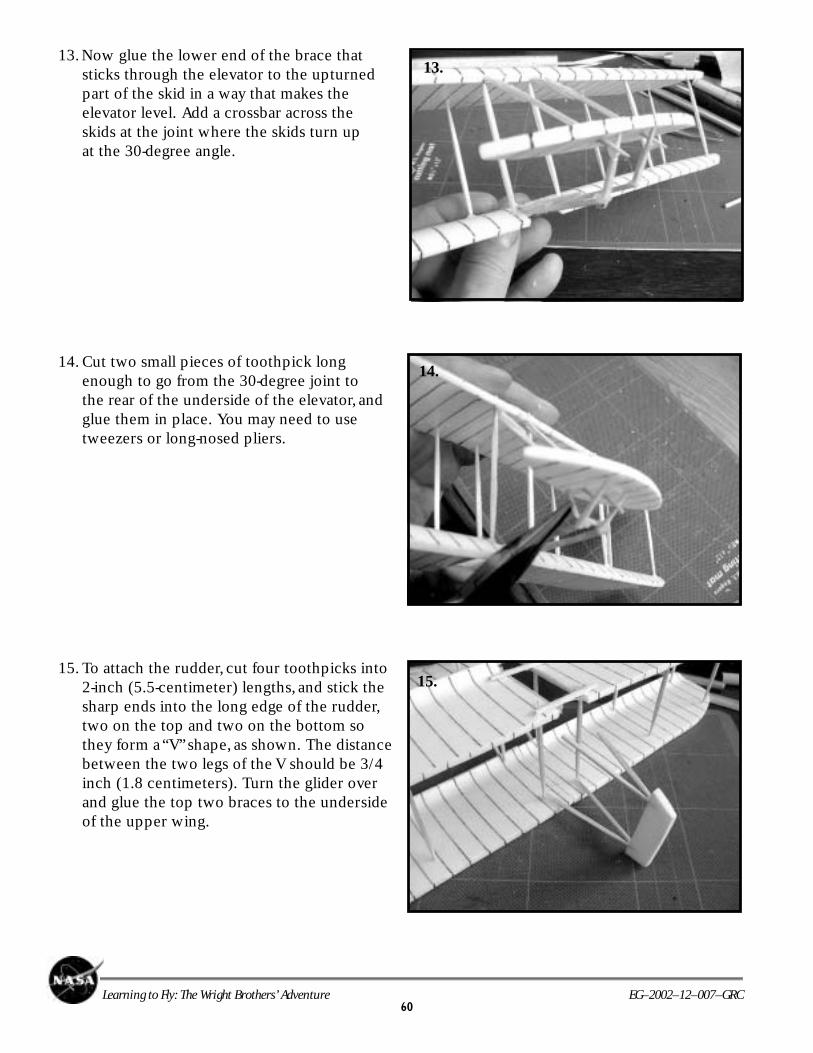
60Learning to Fly: The Wright Brothers’ Adventure EG–2002–12–007–GRC
13. Now glue the lower end of the brace thatsticks through the elevator to the upturnedpart of the skid in a way that makes theelevator level. Add a crossbar across theskids at the joint where the skids turn upat the 30-degree angle.
14. Cut two small pieces of toothpick longenough to go from the 30-degree joint tothe rear of the underside of the elevator, andglue them in place. You may need to usetweezers or long-nosed pliers.
15. To attach the rudder, cut four toothpicks into2-inch (5.5-centimeter) lengths, and stick thesharp ends into the long edge of the rudder,two on the top and two on the bottom sothey form a “V” shape, as shown. The distancebetween the two legs of the V should be 3/4inch (1.8 centimeters). Turn the glider overand glue the top two braces to the undersideof the upper wing.
13.
14.
15.
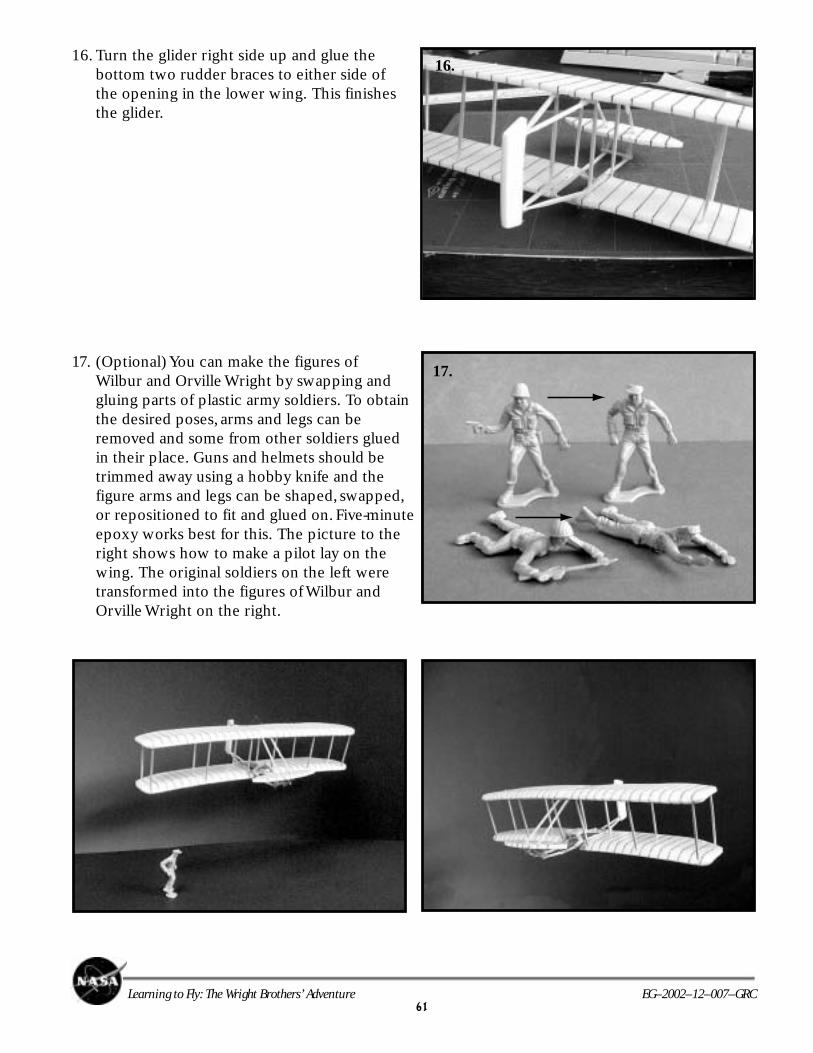
61Learning to Fly: The Wright Brothers’ Adventure EG–2002–12–007–GRC
16. Turn the glider right side up and glue thebottom two rudder braces to either side ofthe opening in the lower wing. This finishesthe glider.
17. (Optional) You can make the figures ofWilbur and Orville Wright by swapping andgluing parts of plastic army soldiers. To obtainthe desired poses, arms and legs can beremoved and some from other soldiers gluedin their place. Guns and helmets should betrimmed away using a hobby knife and thefigure arms and legs can be shaped, swapped,or repositioned to fit and glued on. Five-minuteepoxy works best for this. The picture to theright shows how to make a pilot lay on thewing. The original soldiers on the left weretransformed into the figures of Wilbur andOrville Wright on the right.
16.
17.
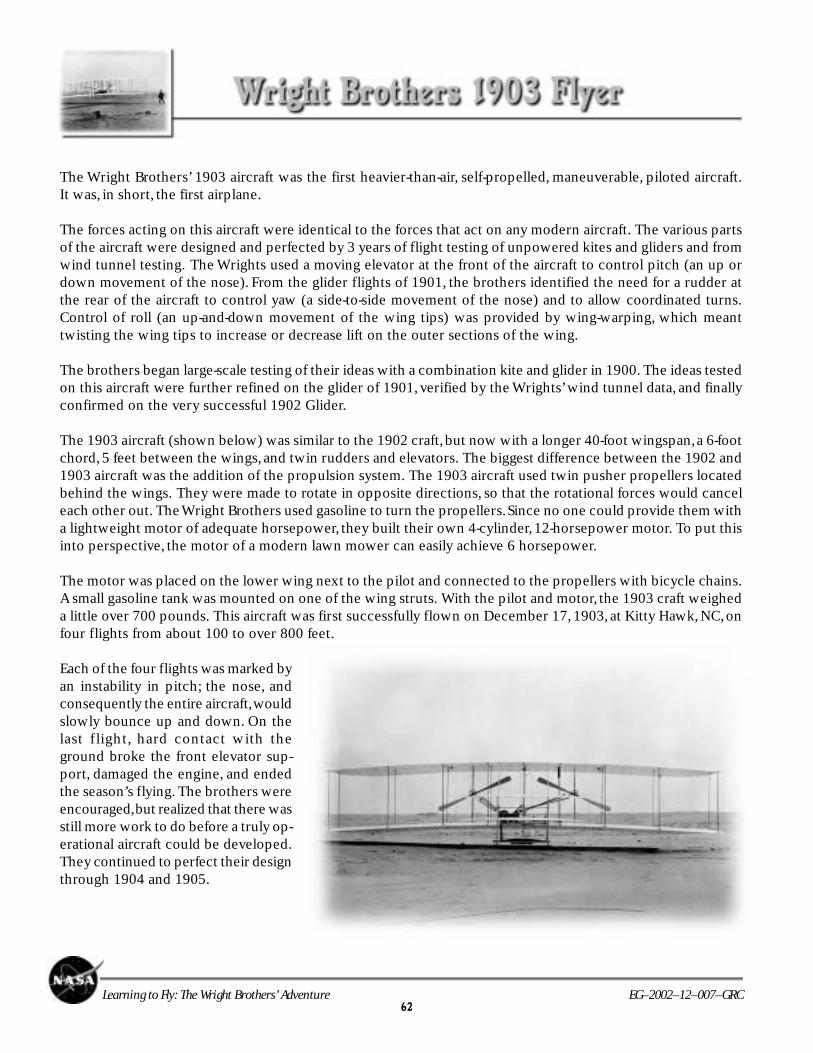
62Learning to Fly: The Wright Brothers’ Adventure EG–2002–12–007–GRC
The Wright Brothers’ 1903 aircraft was the first heavier-than-air, self-propelled, maneuverable, piloted aircraft.It was, in short, the first airplane.
The forces acting on this aircraft were identical to the forces that act on any modern aircraft. The various partsof the aircraft were designed and perfected by 3 years of flight testing of unpowered kites and gliders and fromwind tunnel testing. The Wrights used a moving elevator at the front of the aircraft to control pitch (an up ordown movement of the nose). From the glider flights of 1901, the brothers identified the need for a rudder atthe rear of the aircraft to control yaw (a side-to-side movement of the nose) and to allow coordinated turns.Control of roll (an up-and-down movement of the wing tips) was provided by wing-warping, which meanttwisting the wing tips to increase or decrease lift on the outer sections of the wing.
The brothers began large-scale testing of their ideas with a combination kite and glider in 1900. The ideas testedon this aircraft were further refined on the glider of 1901, verified by the Wrights’ wind tunnel data, and finallyconfirmed on the very successful 1902 Glider.
The 1903 aircraft (shown below) was similar to the 1902 craft, but now with a longer 40-foot wingspan, a 6-footchord, 5 feet between the wings, and twin rudders and elevators. The biggest difference between the 1902 and1903 aircraft was the addition of the propulsion system. The 1903 aircraft used twin pusher propellers locatedbehind the wings. They were made to rotate in opposite directions, so that the rotational forces would canceleach other out. The Wright Brothers used gasoline to turn the propellers. Since no one could provide them witha lightweight motor of adequate horsepower, they built their own 4-cylinder, 12-horsepower motor. To put thisinto perspective, the motor of a modern lawn mower can easily achieve 6 horsepower.
The motor was placed on the lower wing next to the pilot and connected to the propellers with bicycle chains.A small gasoline tank was mounted on one of the wing struts. With the pilot and motor, the 1903 craft weigheda little over 700 pounds. This aircraft was first successfully flown on December 17, 1903, at Kitty Hawk, NC, onfour flights from about 100 to over 800 feet.
Each of the four flights was marked byan instability in pitch; the nose, andconsequently the entire aircraft, wouldslowly bounce up and down. On thelast f light, hard contact with theground broke the front elevator sup-port, damaged the engine, and endedthe season’s flying. The brothers wereencouraged, but realized that there wasstill more work to do before a truly op-erational aircraft could be developed.They continued to perfect their designthrough 1904 and 1905.
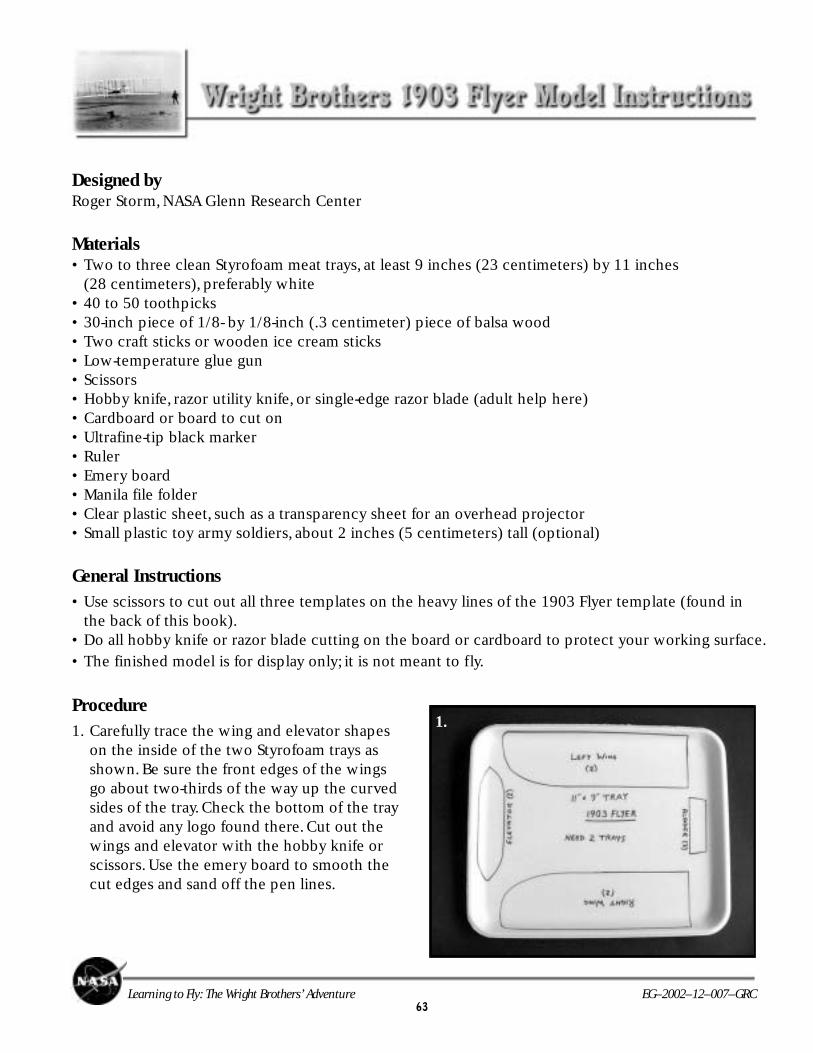
63Learning to Fly: The Wright Brothers’ Adventure EG–2002–12–007–GRC
Designed byRoger Storm, NASA Glenn Research Center
Materials• Two to three clean Styrofoam meat trays, at least 9 inches (23 centimeters) by 11 inches
(28 centimeters), preferably white• 40 to 50 toothpicks• 30-inch piece of 1/8- by 1/8-inch (.3 centimeter) piece of balsa wood• Two craft sticks or wooden ice cream sticks• Low-temperature glue gun• Scissors• Hobby knife, razor utility knife, or single-edge razor blade (adult help here)• Cardboard or board to cut on• Ultrafine-tip black marker• Ruler• Emery board• Manila file folder• Clear plastic sheet, such as a transparency sheet for an overhead projector• Small plastic toy army soldiers, about 2 inches (5 centimeters) tall (optional)
General Instructions• Use scissors to cut out all three templates on the heavy lines of the 1903 Flyer template (found in
the back of this book).• Do all hobby knife or razor blade cutting on the board or cardboard to protect your working surface.
• The finished model is for display only; it is not meant to fly.
Procedure1. Carefully trace the wing and elevator shapes
on the inside of the two Styrofoam trays asshown. Be sure the front edges of the wingsgo about two-thirds of the way up the curvedsides of the tray. Check the bottom of the trayand avoid any logo found there. Cut out thewings and elevator with the hobby knife orscissors. Use the emery board to smooth thecut edges and sand off the pen lines.
1.
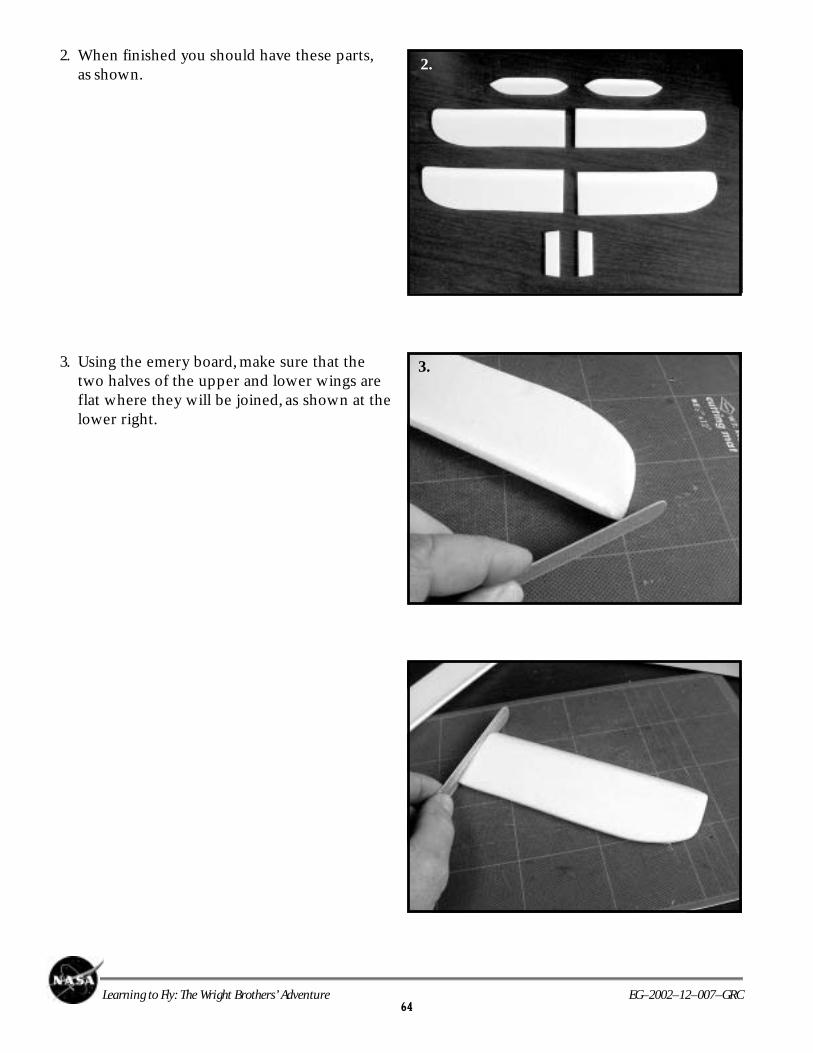
64Learning to Fly: The Wright Brothers’ Adventure EG–2002–12–007–GRC
2. When finished you should have these parts,as shown.
3. Using the emery board, make sure that thetwo halves of the upper and lower wings areflat where they will be joined, as shown at thelower right.
3.
2.
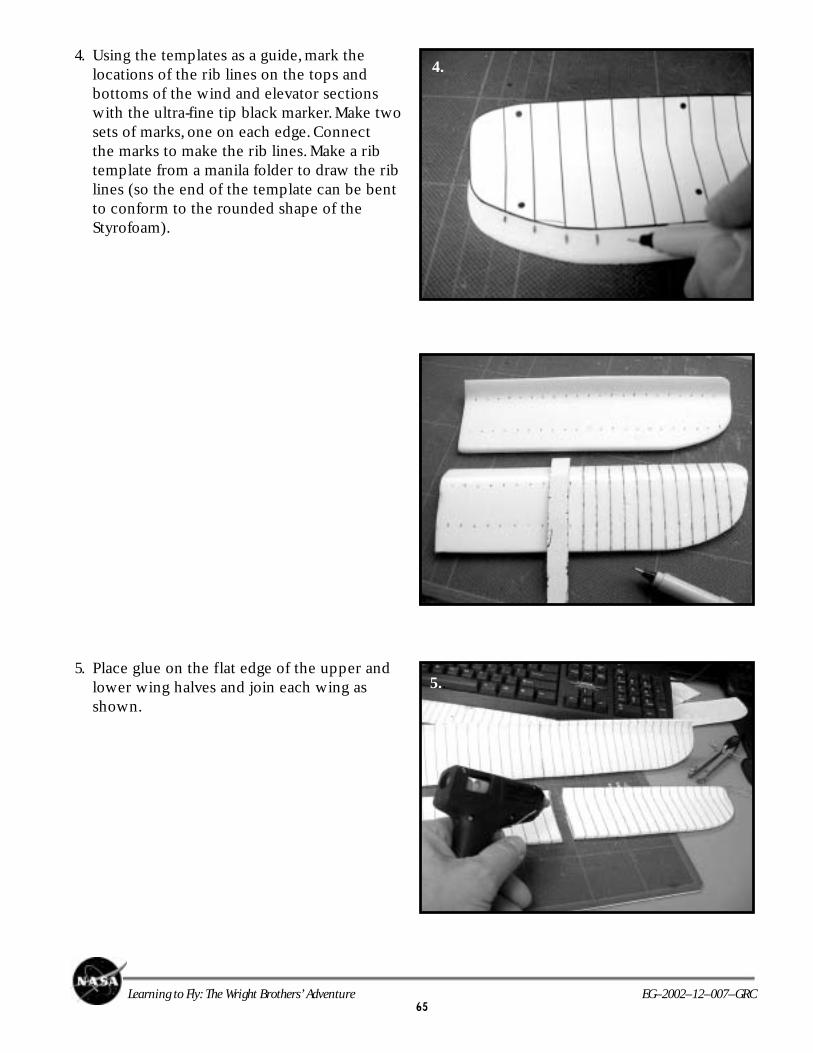
65Learning to Fly: The Wright Brothers’ Adventure EG–2002–12–007–GRC
4. Using the templates as a guide, mark thelocations of the rib lines on the tops andbottoms of the wind and elevator sectionswith the ultra-fine tip black marker. Make twosets of marks, one on each edge. Connectthe marks to make the rib lines. Make a ribtemplate from a manila folder to draw the riblines (so the end of the template can be bentto conform to the rounded shape of theStyrofoam).
5. Place glue on the flat edge of the upper andlower wing halves and join each wing asshown.
5..
4.
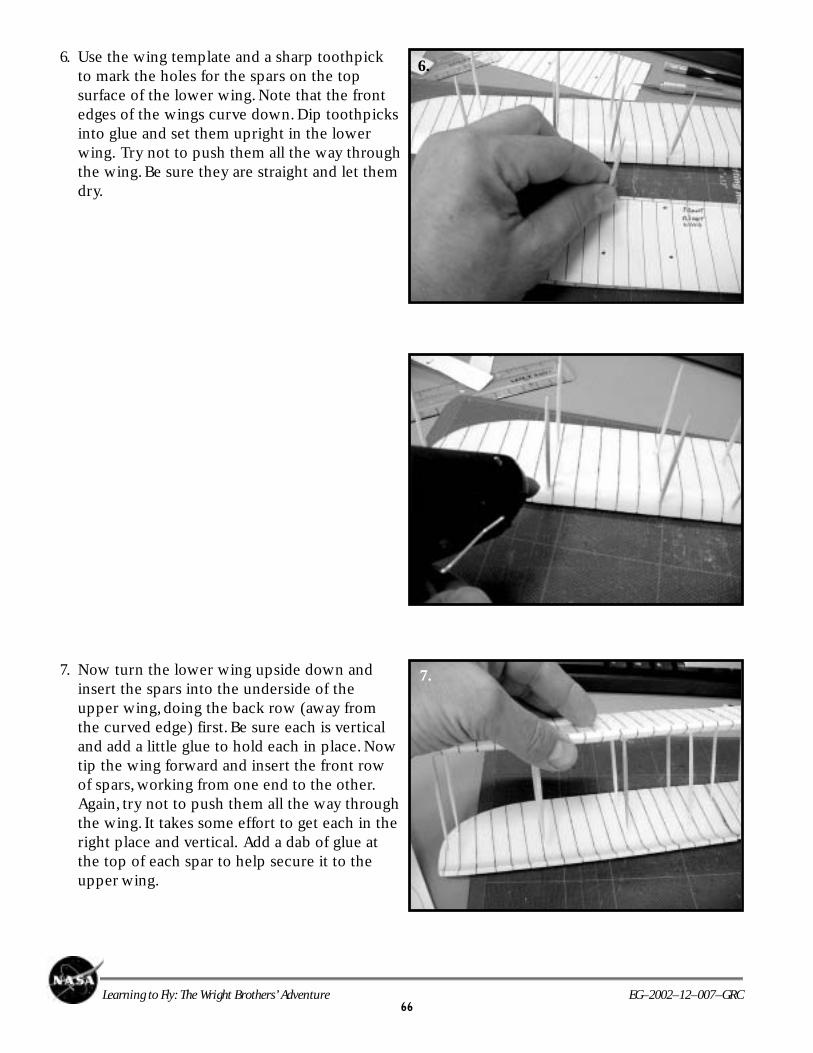
66Learning to Fly: The Wright Brothers’ Adventure EG–2002–12–007–GRC
6. Use the wing template and a sharp toothpickto mark the holes for the spars on the topsurface of the lower wing. Note that the frontedges of the wings curve down. Dip toothpicksinto glue and set them upright in the lowerwing. Try not to push them all the way throughthe wing. Be sure they are straight and let themdry.
7. Now turn the lower wing upside down andinsert the spars into the underside of theupper wing, doing the back row (away fromthe curved edge) first. Be sure each is verticaland add a little glue to hold each in place. Nowtip the wing forward and insert the front rowof spars, working from one end to the other.Again, try not to push them all the way throughthe wing. It takes some effort to get each in theright place and vertical. Add a dab of glue atthe top of each spar to help secure it to theupper wing.
7.
6.
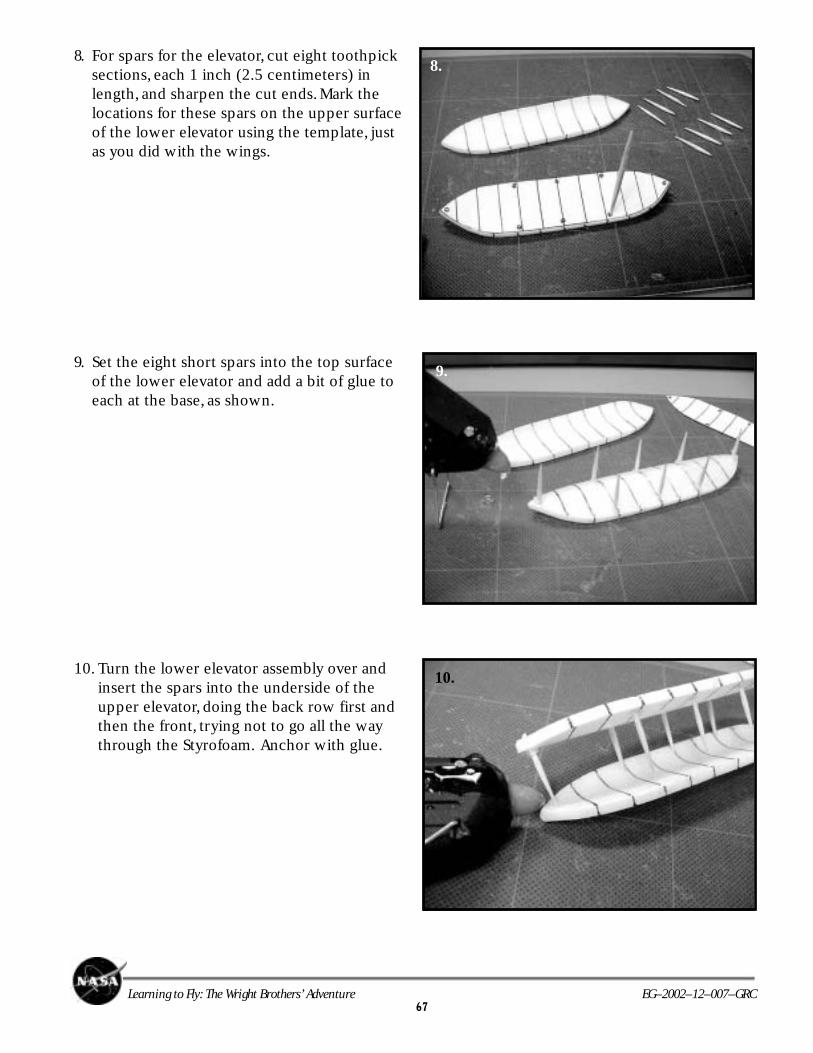
67Learning to Fly: The Wright Brothers’ Adventure EG–2002–12–007–GRC
8. For spars for the elevator, cut eight toothpicksections, each 1 inch (2.5 centimeters) inlength, and sharpen the cut ends. Mark thelocations for these spars on the upper surfaceof the lower elevator using the template, justas you did with the wings.
9. Set the eight short spars into the top surfaceof the lower elevator and add a bit of glue toeach at the base, as shown.
10. Turn the lower elevator assembly over andinsert the spars into the underside of theupper elevator, doing the back row first andthen the front, trying not to go all the waythrough the Styrofoam. Anchor with glue.
9.
10.
8.
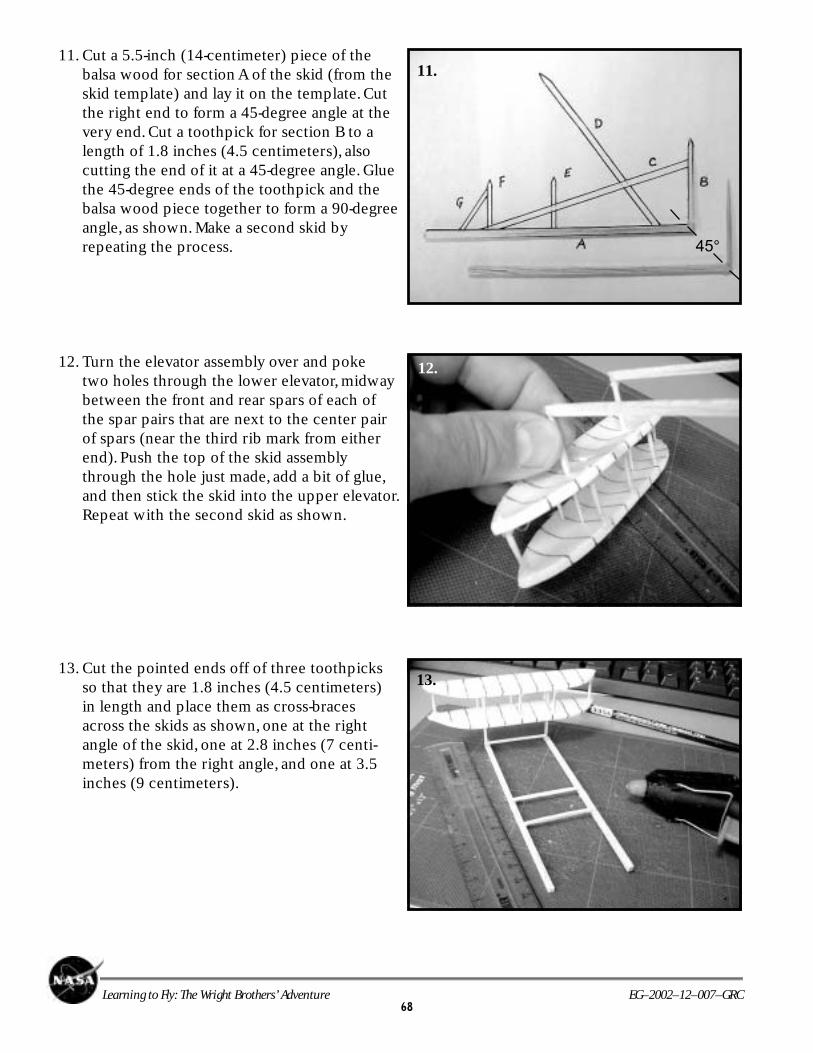
68Learning to Fly: The Wright Brothers’ Adventure EG–2002–12–007–GRC
11. Cut a 5.5-inch (14-centimeter) piece of thebalsa wood for section A of the skid (from theskid template) and lay it on the template. Cutthe right end to form a 45-degree angle at thevery end. Cut a toothpick for section B to alength of 1.8 inches (4.5 centimeters), alsocutting the end of it at a 45-degree angle. Gluethe 45-degree ends of the toothpick and thebalsa wood piece together to form a 90-degreeangle, as shown. Make a second skid byrepeating the process.
12. Turn the elevator assembly over and poketwo holes through the lower elevator, midwaybetween the front and rear spars of each ofthe spar pairs that are next to the center pairof spars (near the third rib mark from eitherend). Push the top of the skid assemblythrough the hole just made, add a bit of glue,and then stick the skid into the upper elevator.Repeat with the second skid as shown.
13. Cut the pointed ends off of three toothpicksso that they are 1.8 inches (4.5 centimeters)in length and place them as cross-bracesacross the skids as shown, one at the rightangle of the skid, one at 2.8 inches (7 centi-meters) from the right angle, and one at 3.5inches (9 centimeters).
12.
13.
11.
45°
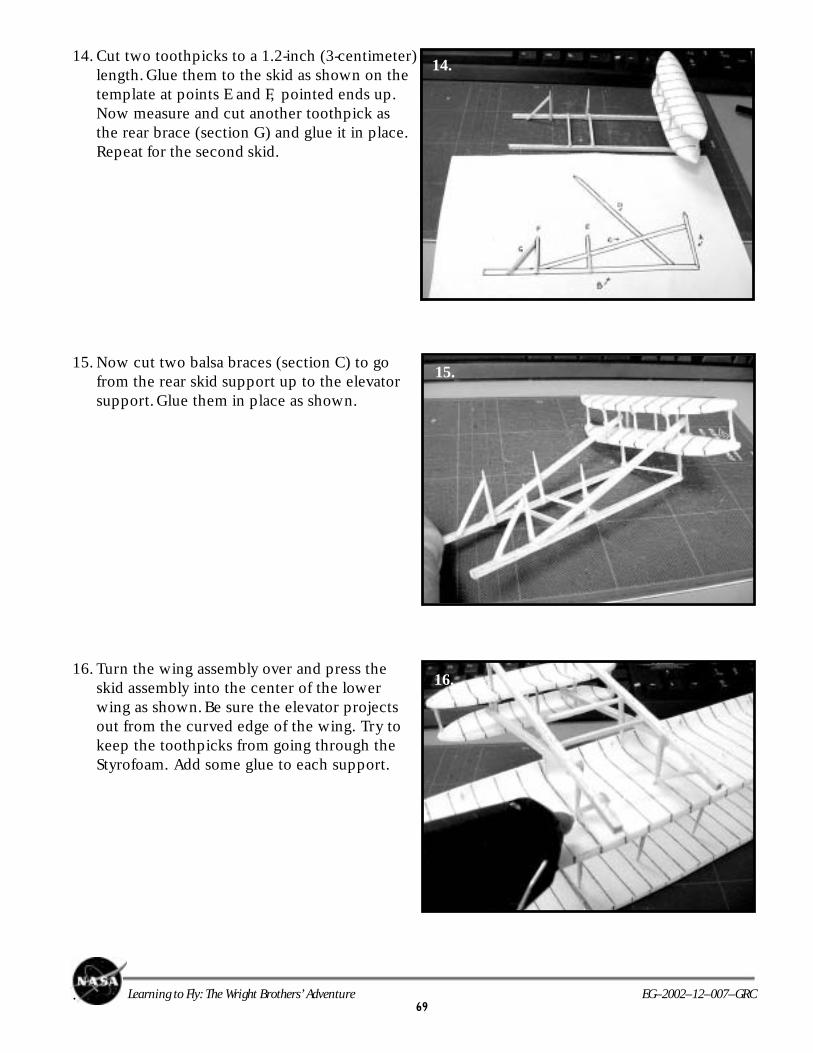
69Learning to Fly: The Wright Brothers’ Adventure EG–2002–12–007–GRC
14. Cut two toothpicks to a 1.2-inch (3-centimeter)length. Glue them to the skid as shown on thetemplate at points E and F, pointed ends up.Now measure and cut another toothpick asthe rear brace (section G) and glue it in place.Repeat for the second skid.
15. Now cut two balsa braces (section C) to gofrom the rear skid support up to the elevatorsupport. Glue them in place as shown.
16. Turn the wing assembly over and press theskid assembly into the center of the lowerwing as shown. Be sure the elevator projectsout from the curved edge of the wing. Try tokeep the toothpicks from going through theStyrofoam. Add some glue to each support.
.
15.
16.
14.
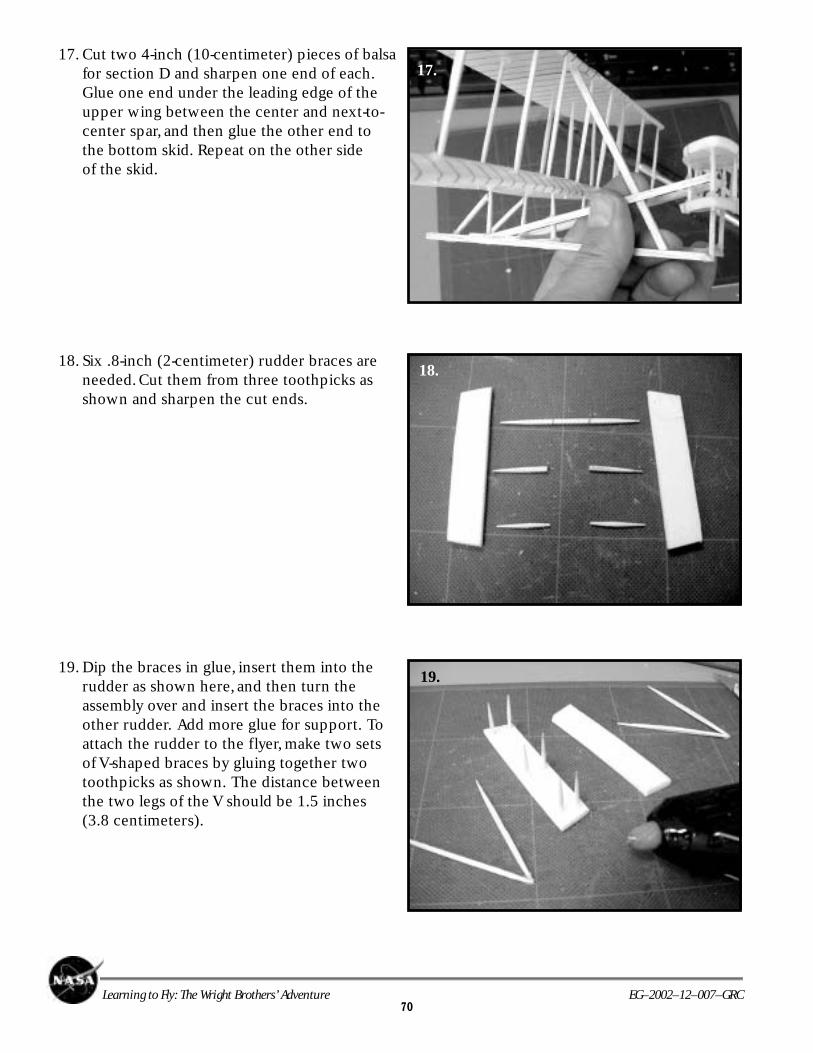
70Learning to Fly: The Wright Brothers’ Adventure EG–2002–12–007–GRC
17. Cut two 4-inch (10-centimeter) pieces of balsafor section D and sharpen one end of each.Glue one end under the leading edge of theupper wing between the center and next-to-center spar, and then glue the other end tothe bottom skid. Repeat on the other sideof the skid.
18. Six .8-inch (2-centimeter) rudder braces areneeded. Cut them from three toothpicks asshown and sharpen the cut ends.
19. Dip the braces in glue, insert them into therudder as shown here, and then turn theassembly over and insert the braces into theother rudder. Add more glue for support. Toattach the rudder to the flyer, make two setsof V-shaped braces by gluing together twotoothpicks as shown. The distance betweenthe two legs of the V should be 1.5 inches(3.8 centimeters).
18.
19.
17.
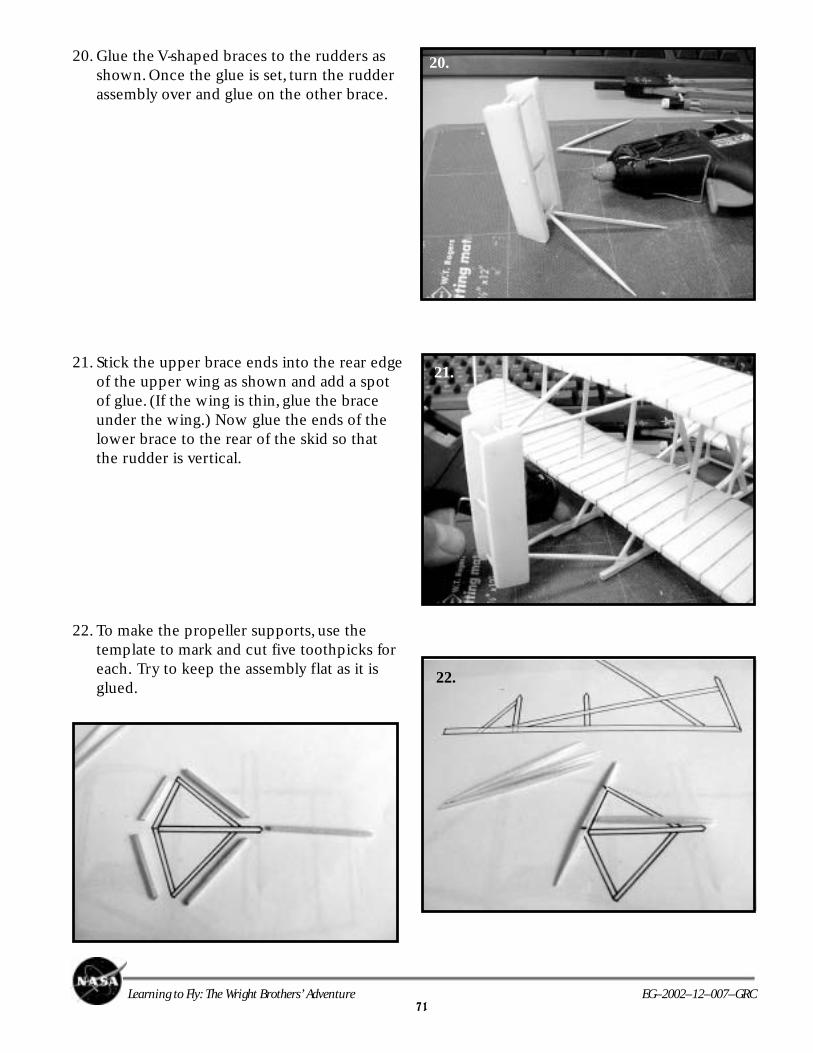
71Learning to Fly: The Wright Brothers’ Adventure EG–2002–12–007–GRC
20. Glue the V-shaped braces to the rudders asshown. Once the glue is set, turn the rudderassembly over and glue on the other brace.
21. Stick the upper brace ends into the rear edgeof the upper wing as shown and add a spotof glue. (If the wing is thin, glue the braceunder the wing.) Now glue the ends of thelower brace to the rear of the skid so thatthe rudder is vertical.
22. To make the propeller supports, use thetemplate to mark and cut five toothpicks foreach. Try to keep the assembly flat as it isglued.
22.
21.
20.
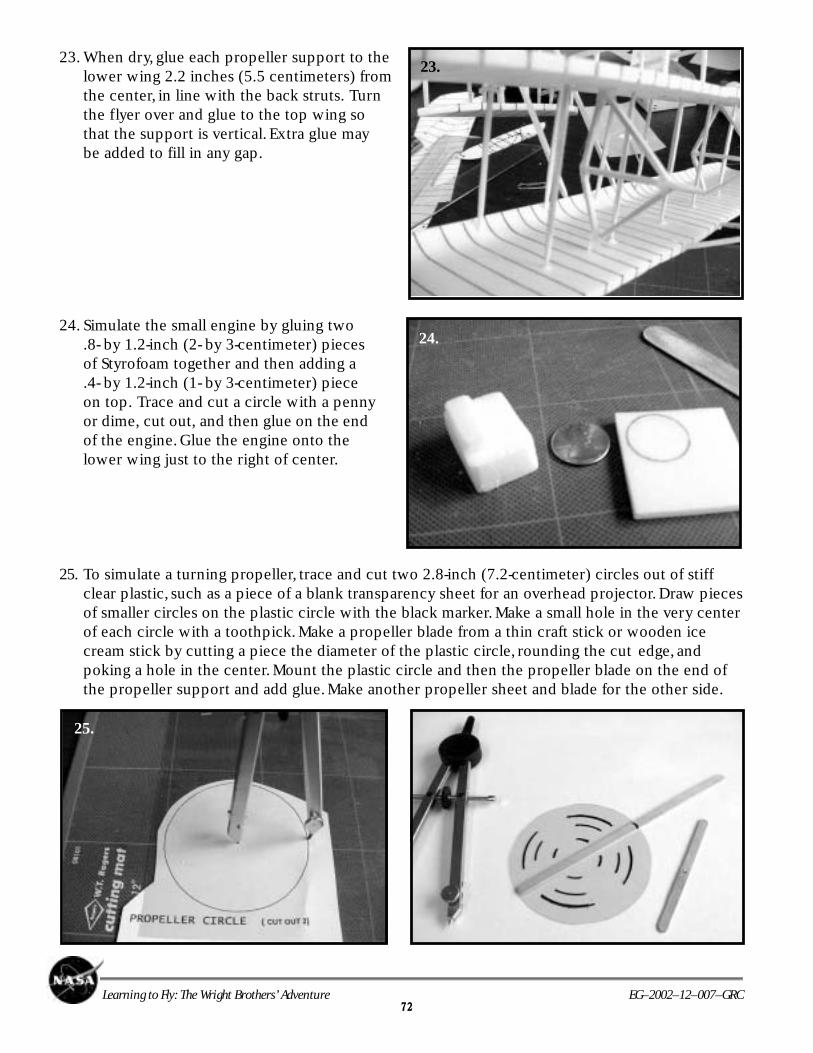
72Learning to Fly: The Wright Brothers’ Adventure EG–2002–12–007–GRC
23. When dry, glue each propeller support to thelower wing 2.2 inches (5.5 centimeters) fromthe center, in line with the back struts. Turnthe flyer over and glue to the top wing sothat the support is vertical. Extra glue maybe added to fill in any gap.
24. Simulate the small engine by gluing two.8- by 1.2-inch (2- by 3-centimeter) piecesof Styrofoam together and then adding a.4- by 1.2-inch (1- by 3-centimeter) pieceon top. Trace and cut a circle with a pennyor dime, cut out, and then glue on the endof the engine. Glue the engine onto thelower wing just to the right of center.
25. To simulate a turning propeller, trace and cut two 2.8-inch (7.2-centimeter) circles out of stiffclear plastic, such as a piece of a blank transparency sheet for an overhead projector. Draw piecesof smaller circles on the plastic circle with the black marker. Make a small hole in the very centerof each circle with a toothpick. Make a propeller blade from a thin craft stick or wooden icecream stick by cutting a piece the diameter of the plastic circle, rounding the cut edge, andpoking a hole in the center. Mount the plastic circle and then the propeller blade on the end ofthe propeller support and add glue. Make another propeller sheet and blade for the other side.
23.
24.
25.
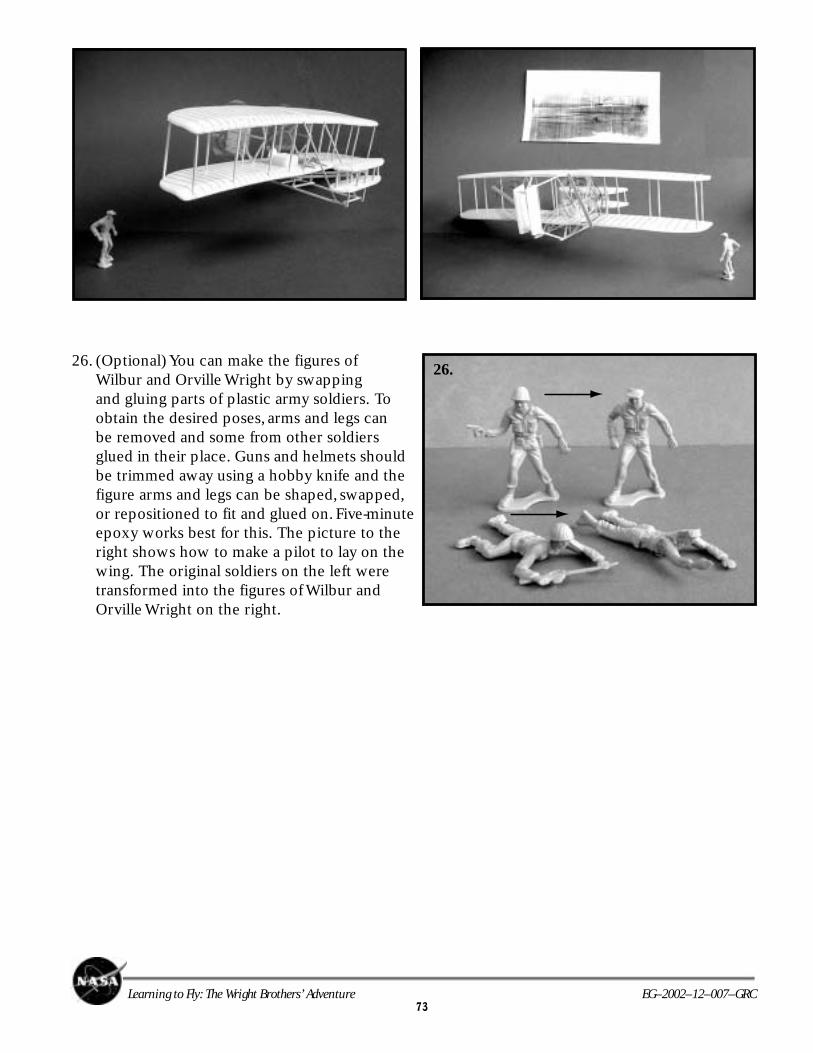
73Learning to Fly: The Wright Brothers’ Adventure EG–2002–12–007–GRC
26. (Optional) You can make the figures ofWilbur and Orville Wright by swappingand gluing parts of plastic army soldiers. Toobtain the desired poses, arms and legs canbe removed and some from other soldiersglued in their place. Guns and helmets shouldbe trimmed away using a hobby knife and thefigure arms and legs can be shaped, swapped,or repositioned to fit and glued on. Five-minuteepoxy works best for this. The picture to theright shows how to make a pilot to lay on thewing. The original soldiers on the left weretransformed into the figures of Wilbur andOrville Wright on the right.
26.
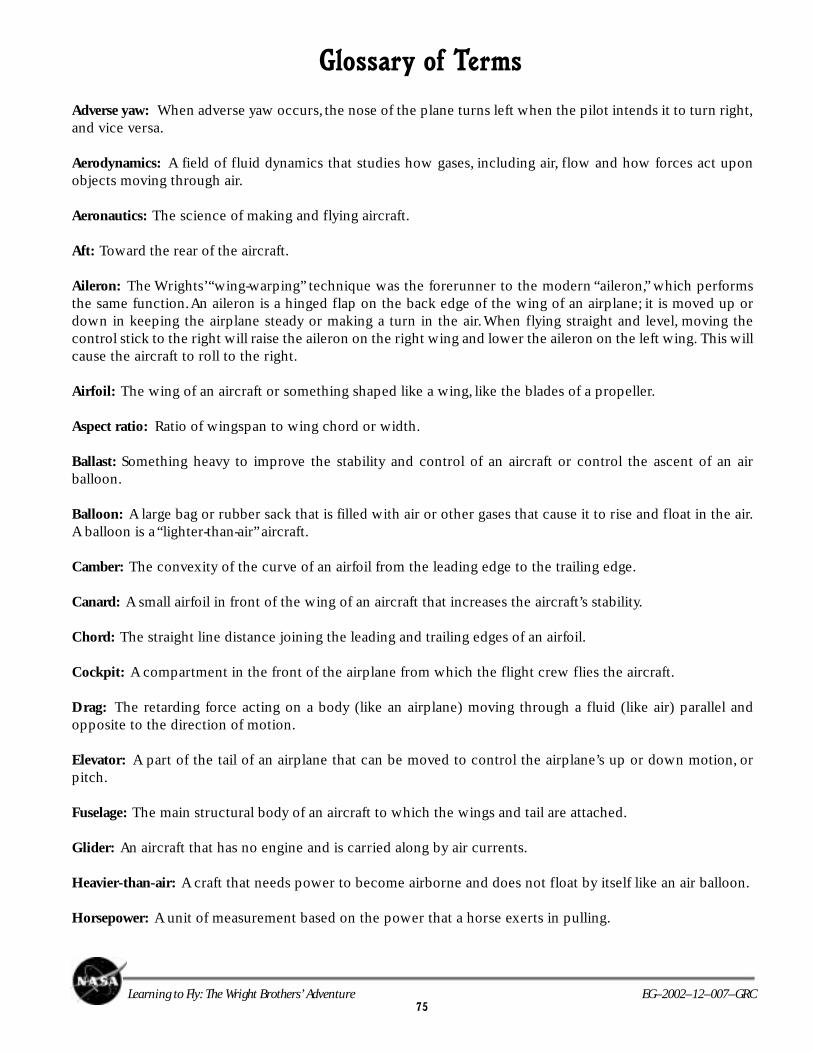
75Learning to Fly: The Wright Brothers’ Adventure EG–2002–12–007–GRC
Glossary of Terms
Adverse yaw: When adverse yaw occurs, the nose of the plane turns left when the pilot intends it to turn right,and vice versa.
Aerodynamics: A field of fluid dynamics that studies how gases, including air, flow and how forces act uponobjects moving through air.
Aeronautics: The science of making and flying aircraft.
Aft: Toward the rear of the aircraft.
Aileron: The Wrights’ “wing-warping” technique was the forerunner to the modern “aileron,” which performsthe same function. An aileron is a hinged flap on the back edge of the wing of an airplane; it is moved up ordown in keeping the airplane steady or making a turn in the air. When flying straight and level, moving thecontrol stick to the right will raise the aileron on the right wing and lower the aileron on the left wing. This willcause the aircraft to roll to the right.
Airfoil: The wing of an aircraft or something shaped like a wing, like the blades of a propeller.
Aspect ratio: Ratio of wingspan to wing chord or width.
Ballast: Something heavy to improve the stability and control of an aircraft or control the ascent of an airballoon.
Balloon: A large bag or rubber sack that is filled with air or other gases that cause it to rise and float in the air.A balloon is a “lighter-than-air” aircraft.
Camber: The convexity of the curve of an airfoil from the leading edge to the trailing edge.
Canard: A small airfoil in front of the wing of an aircraft that increases the aircraft’s stability.
Chord: The straight line distance joining the leading and trailing edges of an airfoil.
Cockpit: A compartment in the front of the airplane from which the flight crew flies the aircraft.
Drag: The retarding force acting on a body (like an airplane) moving through a fluid (like air) parallel andopposite to the direction of motion.
Elevator: A part of the tail of an airplane that can be moved to control the airplane’s up or down motion, orpitch.
Fuselage: The main structural body of an aircraft to which the wings and tail are attached.
Glider: An aircraft that has no engine and is carried along by air currents.
Heavier-than-air: A craft that needs power to become airborne and does not float by itself like an air balloon.
Horsepower: A unit of measurement based on the power that a horse exerts in pulling.
76Learning to Fly: The Wright Brothers’ Adventure EG–2002–12–007–GRC
Kite: A tethered glider that is lifted by the wind. A kite was the first heavier-than-air aircraft.
Lift-to-drag ratio: The amount of lift that is achieved compared to the amount of drag on an aircraft.
Lighter than air: A craft like an air balloon that is lighter than air and naturally rises.
Pitch: A rotational motion in which an airplane turns around its lateral axis (major down movement of thenose). Pushing forward on the control stick will lower the elevators, which forces the tail upward. The pilot willthen see the nose of the aircraft fall, or “pitch.”
Roll: A rotational motion in which the aircraft turns around its longitudinal axis (an up-and-down movement ofthe wing tips). Pushing the control stick to the left will raise the aileron on the left wing and lower the aileronon the right wing. This will cause the airplane to roll to the left. The pilot will see the left wing tip fall and theright wing tip rise.
Rudder: A control surface on the trailing edge of the vertical part of the tail that is used to make the aircraft“yaw.” The rudder is controlled by rudder pedals. Pushing the left rudder pedal will tilt the rudder to the left.This will cause the nose of the aircraft to turn to the left.
Self-propelled: An aircraft that has a source of power like an engine.
Stabilizer: A surface that helps to provide stability for an aircraft. An airplane has two stabilizers: a verticalstabilizer and a horizontal stabilizer. Stabilizers are like the feathers on an arrow, which keep the arrow pointedin the right direction.
Struts: Structural pieces added to provide support and designed to resist pressure in the direction of theirlengths.
Torque: Rotational force about an axis.
Warping: Twisting of the wing surface, as the Wrights described it.
Wind tunnel: A small or large tunnel with a fan that can create constant wind conditions for research purposes.
Yaw: A rotational motion in which the aircraft turns around its vertical axis, or from side to side. This causes theaircraft’s nose to move to the pilot’s right or left. Pushing the right rudder pedal will tilt the rudder to the right.The pilot will see the nose of the aircraft turn to the right.
77Learning to Fly: The Wright Brothers’ Adventure EG–2002–12–007–GRC
Activity AnswersActivity 1 answers
Before you go to Dayton to investigate the Wright Brothers, it is important to do some research and get somebackground information. You need to go to the library and/or the Internet and find out about the progress ofattempts to build a flying machine up to the year 1900. Write a short paragraph about each of the followingand their accomplishments up to 1900:
1. Otto Lilienthal 2. Octave Chanute 3. Samuel Langley
See whether you can answer the following questions:1. Why do you think some of these early pioneers were using gliders instead of powered aircraft? Why
didn’t their craft have engines?The glider wings they had constructed could not provide enough lift to handle the weight of the pilot plus theweight of the engine.
2. What was the record for distance and time aloft by a manned glider in 1900?d. Otto Lilienthal had glided over 1300 feet and stayed aloft 12 to 15 seconds.
3. Why was gliding so dangerous at the time?Fliers did not understand how to control the gliders in the air. Lilienthal thought that just by shifting his weight hecould control the direction the glider flew. This proved to be inadequate, and he crashed from a height of over 50feet. Pilcher also died in a similar fashion.
4. Why do you think Chanute chose to test his gliders at the Indiana Dunes on the southern shore of LakeMichigan?There are steady winds coming off the lake, which are needed to fly a glider. There were also hills (dunes) fromwhich to launch and soft sand to land on.
5. How far is it from Cincinnati to Dayton? How do you think you might have travelled there in 1900?49.5 miles, travel by train.
Activity 2 answers
Now that you know something about the state of flying machines in 1900, pretend that you are a reporter forthe Dayton Daily News. You are being sent to interview the Wright Brothers. What questions do you thinkyou’d want to ask them about what they are attempting to do?
Student answers will vary.Some possible questions might be
How will you control your glider?Where will you fly?Are you going to try to use a motor?Who will be the pilot?Are you afraid?How will you get your glider into the air?How will you land without getting hurt?What materials will you use to construct the glider?How are you going to finance your experiment?If you succeed, what will you do with your invention?How high and how far would you like to fly?How will you record your progress? Will you take pictures?How will you take off?

78Learning to Fly: The Wright Brothers’ Adventure EG–2002–12–007–GRC
Activity 3 answers
1. From your trip, why do you think Wilbur was flying a large kite in the summer of 1899? What do youthink he learned from doing it?He was learning how to control an object in the air.
2. Having arrived back in Cincinnati after visiting the Wrights in Dayton, you must make a written report tothe Scientific Society. What are the key points that you need to report?A. The Wrights have learned to control a craft in the air by twisting the wings.B. They have constructed a very large craft to test their ideas.C. They will be testing somewhere in North Carolina in the fall.
3. Why do you think the Wright Brothers are headed to North Carolina? What kind of conditions do youthink they are seeking to carry out their glider experiments?They are going to Kitty Hawk in North Carolina because it has nearly constant high winds, the strongest in thecountry. There are also hills (dunes) from which to launch, sand to land on, and few trees to crash into.
Activity 5 answers
Your report to the Cincinnati Scientific Society stimulates a lot of discussion. The members have many ques-tions as they try to understand the Wright’s experiments. How do you think you would answer this samplingof their questions?
1. Why did the Wrights use a two-wing (biplane) arrangement?Two wings provide twice the amount of lift.
2. What was the purpose of having the wings be curved or arched?Giving the wings a curved surface (called camber in modern planes) causes the air to turn as it flows over thewings, and this provides lift.
3. Why did the pilot of the Wright Glider lie down on the wing instead of hanging from the glider, as inLilienthal and Chanute’s gliders?Lying down on the wing greatly reduces wind resistance. It also makes control of the glider easier to achieve andprotects the pilot from hard landings.
4. Why do you think twisting the wings caused the glider to drift left or right? How much did thewings twist? If they stayed twisted, do you think the glider would fly in circles or crash? Why?Twisting the wings changes the amount of lift they provide, so the craft rolls left or right. The wings only need totwist a small amount to cause a roll. If the wings stay twisted, the glider is likely to crash. For a glider to fly, itneeds to stay facing into the wind like a kite, so it would not be able to circle.
Activity 6 answers
Orville told you that he and Wilbur are determined to create a flyable machine, and that to do this they are goingto have to get more lift out of their craft so it can support a pilot. When you report this to the CincinnatiScientific Society, the members start to debate about what they think is the best way to accomplish this. It isdecided to have a contest to see who can produce the best design to improve upon the Wright Glider.
1. If you were to enter this contest, what specific changes would you make to give the 1900 Glider morelift? Answers will vary. Longer wings, wider wings, more curved wings, lighter weight material

79Learning to Fly: The Wright Brothers’ Adventure EG–2002–12–007–GRC
2. How do you think each change would improve the original design?Answers should focus on providing more lift through bigger wings and/or less weight.
3. This is a drawing of the 1900 Glider. It had a wingspan of 17 feet and a wing area of 165 square feet. Onanother sheet of paper draw a sketch of your proposed glider, showing a top view and a front view. Besure to put dimensions on your sketch. How long, wide, and high will your glider be?
See student drawings. They should have two views and labeled dimensions.
Activity 8 answers
The picture below shows the Wright Brothers at Kitty Hawk, NC, with their 1901 Glider being flown as a kite.It weighed 98 pounds and had a wingspan of 22 feet. The kite appears to be floating in the air, but it isactually being held motionless because the forces that are acting on it are “balanced.”
1. You know that wind is needed to fly a kite, so draw an arrow on the picture to show which way the windwould be pushing on the glider.
2. There are three other forces that are acting on the kite. One of these is the lift caused by the wind acting onthe wings of the glider. Draw an arrow to show the direction that this force acts on the glider.
3. The third force acts on you and all other objects on Earth all the time. It is called gravity. Draw an arrow toshow the direction that this force acts on the glider.
4. Look at the men in the picture and see if you can determine the direction of the fourth force. Keep in mindthat the glider is motionless, so the fourth force must act to balance out the other three forces. Draw an arrowto show the direction of the fourth force.
5. Do you see anything in the picture that shows that all the forces are canceling each other out? If yes, whatis it? Yes, because the glider is not moving.
6. If the speed of the wind increased, what would happen to the glider? The glider would fly up and away.
2
1
3
4
wind
80Learning to Fly: The Wright Brothers’ Adventure EG–2002–12–007–GRC
Activity 9 answers
The report of the summer of 1901’s activities caused quite a stir in the Cincinnati Scientific Society. Whenyou mailed sketches of the new craft back in July, many members had thought that the additional surfaceadded to the wings would provide the lift needed. Clearly something was wrong.
1. Why do you think that the new glider with its larger wings failed to perform as expected?Answers will vary. Some possibilities might be that it was too heavy, the wings weren’t curved enough, the bigwings caused too much drag, inaccurate design data, etc.
2. If you were Wilbur or Orville Wright, what would you do at this point? Why would you do this?Answers will vary. Some possibilities might be to quit, ask an expert for help, do more research, change the wingshape, change the wing size, make it lighter, reevaluate your data, etc.
3. To solve a problem, the Wright Brothers would only make a single change at a time. Why is this ascientific way to do an experiment?Because if there is a difference in data after making a single change, it will be clear why it happened.
Activity 10 answers
Advances in science are often hindered by making wrong assumptions, making assumptions based on incorrectinformation, or by not understanding information or data in the right context. The Wright Brothers thought thereason their 1901 Glider did not perform up to expectations was that Lilienthal’s data, on which they had basedtheir calculations, were wrong.
Choose one or more of the following ideas that were once accepted as correct in science. Find out whochallenged these ideas and how our thinking changed as a result. Write down your answers.
1. The Earth is flat.Answers will vary. Eratosthenes used the Sun shining into a well to calculate the Earth’s diameter in 230 BC.Columbus did not sail off the edge of the Earth. Magellan was able to circumnavigate the Earth.
2. The Sun revolves around the Earth.In 1530, Nicolas Copernicus showed that the Earth revolved around the Sun in addition to turning on its axis.Galileo observed moons orbiting Jupiter in 1630.
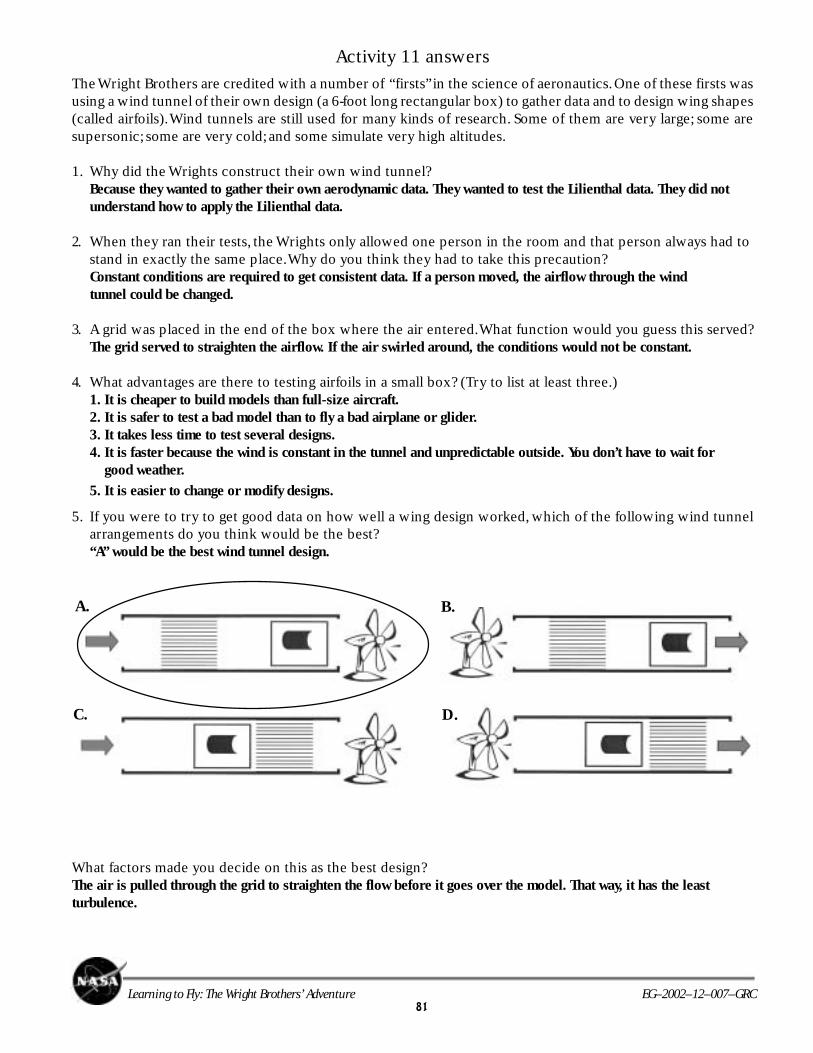
81Learning to Fly: The Wright Brothers’ Adventure EG–2002–12–007–GRC
Activity 11 answers
The Wright Brothers are credited with a number of “firsts” in the science of aeronautics. One of these firsts wasusing a wind tunnel of their own design (a 6-foot long rectangular box) to gather data and to design wing shapes(called airfoils). Wind tunnels are still used for many kinds of research. Some of them are very large; some aresupersonic; some are very cold; and some simulate very high altitudes.
1. Why did the Wrights construct their own wind tunnel?Because they wanted to gather their own aerodynamic data. They wanted to test the Lilienthal data. They did notunderstand how to apply the Lilienthal data.
2. When they ran their tests, the Wrights only allowed one person in the room and that person always had tostand in exactly the same place. Why do you think they had to take this precaution?Constant conditions are required to get consistent data. If a person moved, the airflow through the windtunnel could be changed.
3. A grid was placed in the end of the box where the air entered. What function would you guess this served?The grid served to straighten the airflow. If the air swirled around, the conditions would not be constant.
4. What advantages are there to testing airfoils in a small box? (Try to list at least three.)1. It is cheaper to build models than full-size aircraft.2. It is safer to test a bad model than to fly a bad airplane or glider.3. It takes less time to test several designs.4. It is faster because the wind is constant in the tunnel and unpredictable outside. You don’t have to wait for good weather.
5. It is easier to change or modify designs.
5. If you were to try to get good data on how well a wing design worked, which of the following wind tunnelarrangements do you think would be the best?“A” would be the best wind tunnel design.
What factors made you decide on this as the best design?The air is pulled through the grid to straighten the flow before it goes over the model. That way, it has the leastturbulence.
A.
C.
B.
D.

82Learning to Fly: The Wright Brothers’ Adventure EG–2002–12–007–GRC
Activity 12 answers
Part D.Students should recognize that a glider with long, slender, curved wings is more efficient.
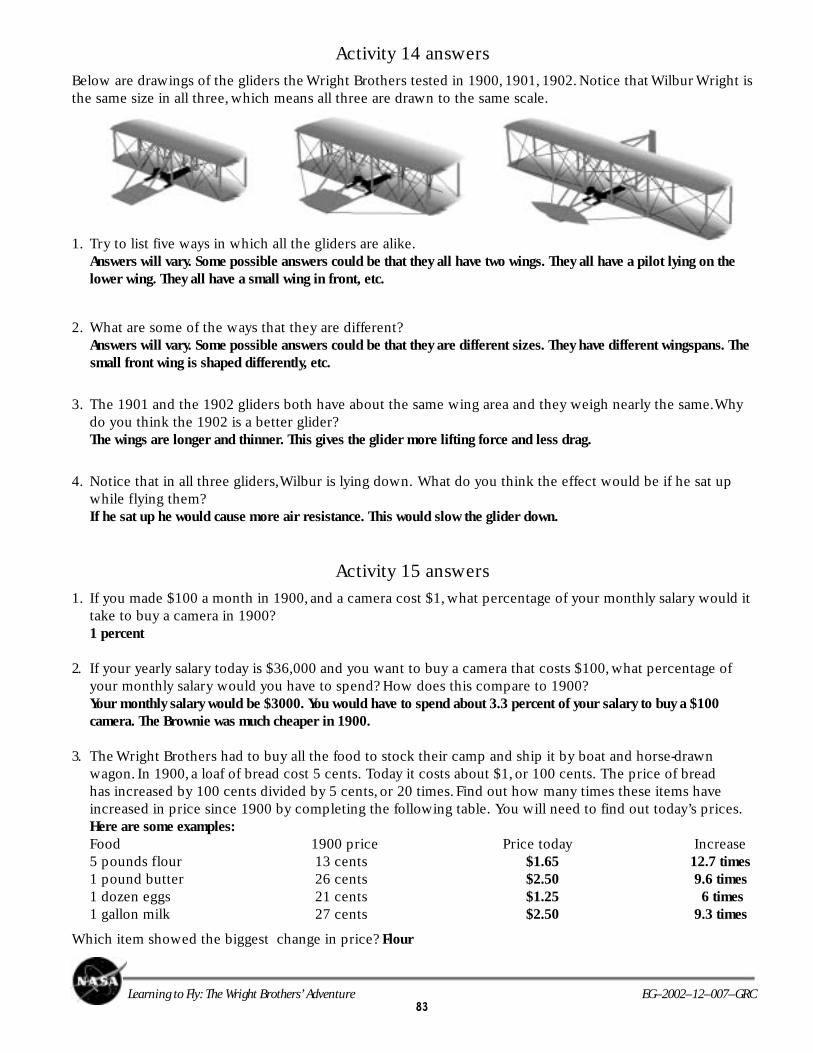
83Learning to Fly: The Wright Brothers’ Adventure EG–2002–12–007–GRC
Activity 14 answers
Below are drawings of the gliders the Wright Brothers tested in 1900, 1901, 1902. Notice that Wilbur Wright isthe same size in all three, which means all three are drawn to the same scale.
1. Try to list five ways in which all the gliders are alike.Answers will vary. Some possible answers could be that they all have two wings. They all have a pilot lying on thelower wing. They all have a small wing in front, etc.
2. What are some of the ways that they are different?Answers will vary. Some possible answers could be that they are different sizes. They have different wingspans. The
small front wing is shaped differently, etc.
3. The 1901 and the 1902 gliders both have about the same wing area and they weigh nearly the same. Whydo you think the 1902 is a better glider?The wings are longer and thinner. This gives the glider more lifting force and less drag.
4. Notice that in all three gliders, Wilbur is lying down. What do you think the effect would be if he sat upwhile flying them?If he sat up he would cause more air resistance. This would slow the glider down.
Activity 15 answers
1. If you made $100 a month in 1900, and a camera cost $1, what percentage of your monthly salary would ittake to buy a camera in 1900?1 percent
2. If your yearly salary today is $36,000 and you want to buy a camera that costs $100, what percentage ofyour monthly salary would you have to spend? How does this compare to 1900?Your monthly salary would be $3000. You would have to spend about 3.3 percent of your salary to buy a $100camera. The Brownie was much cheaper in 1900.
3. The Wright Brothers had to buy all the food to stock their camp and ship it by boat and horse-drawnwagon. In 1900, a loaf of bread cost 5 cents. Today it costs about $1, or 100 cents. The price of breadhas increased by 100 cents divided by 5 cents, or 20 times. Find out how many times these items haveincreased in price since 1900 by completing the following table. You will need to find out today’s prices.Here are some examples:Food 1900 price Price today Increase5 pounds flour 13 cents $1.65 12.7 times1 pound butter 26 cents $2.50 9.6 times1 dozen eggs 21 cents $1.25 6 times1 gallon milk 27 cents $2.50 9.3 times
Which item showed the biggest change in price? Flour
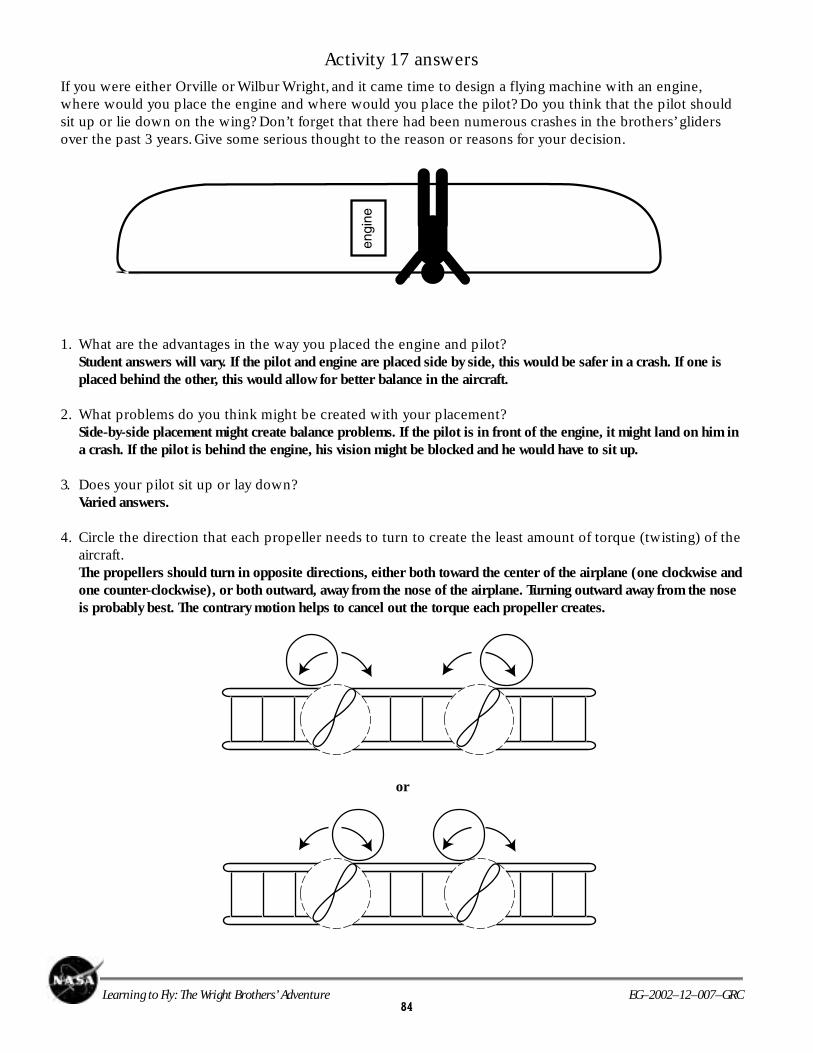
84Learning to Fly: The Wright Brothers’ Adventure EG–2002–12–007–GRC
Activity 17 answers
If you were either Orville or Wilbur Wright, and it came time to design a flying machine with an engine,where would you place the engine and where would you place the pilot? Do you think that the pilot shouldsit up or lie down on the wing? Don’t forget that there had been numerous crashes in the brothers’ glidersover the past 3 years. Give some serious thought to the reason or reasons for your decision.
1. What are the advantages in the way you placed the engine and pilot?Student answers will vary. If the pilot and engine are placed side by side, this would be safer in a crash. If one isplaced behind the other, this would allow for better balance in the aircraft.
2. What problems do you think might be created with your placement?Side-by-side placement might create balance problems. If the pilot is in front of the engine, it might land on him ina crash. If the pilot is behind the engine, his vision might be blocked and he would have to sit up.
3. Does your pilot sit up or lay down?Varied answers.
4. Circle the direction that each propeller needs to turn to create the least amount of torque (twisting) of theaircraft.The propellers should turn in opposite directions, either both toward the center of the airplane (one clockwise andone counter-clockwise), or both outward, away from the nose of the airplane. Turning outward away from the noseis probably best. The contrary motion helps to cancel out the torque each propeller creates.
or
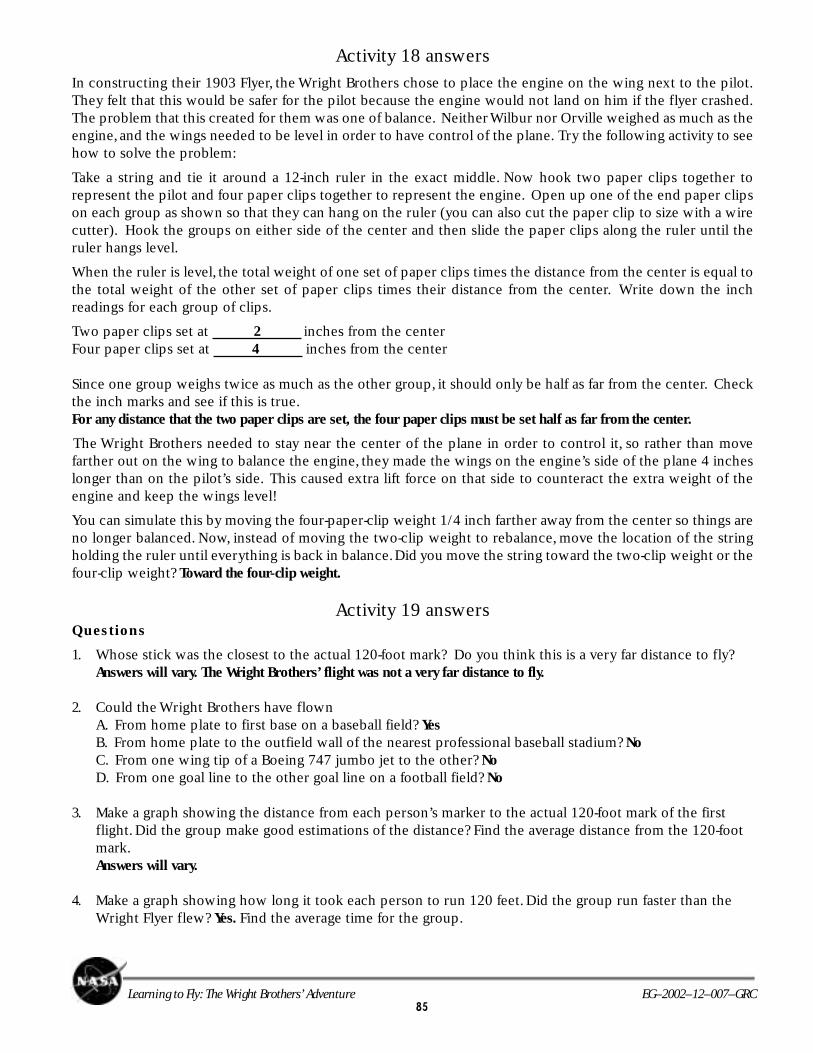
85Learning to Fly: The Wright Brothers’ Adventure EG–2002–12–007–GRC
Activity 18 answers
In constructing their 1903 Flyer, the Wright Brothers chose to place the engine on the wing next to the pilot.They felt that this would be safer for the pilot because the engine would not land on him if the flyer crashed.The problem that this created for them was one of balance. Neither Wilbur nor Orville weighed as much as theengine, and the wings needed to be level in order to have control of the plane. Try the following activity to seehow to solve the problem:
Take a string and tie it around a 12-inch ruler in the exact middle. Now hook two paper clips together torepresent the pilot and four paper clips together to represent the engine. Open up one of the end paper clipson each group as shown so that they can hang on the ruler (you can also cut the paper clip to size with a wirecutter). Hook the groups on either side of the center and then slide the paper clips along the ruler until theruler hangs level.
When the ruler is level, the total weight of one set of paper clips times the distance from the center is equal tothe total weight of the other set of paper clips times their distance from the center. Write down the inchreadings for each group of clips.
Two paper clips set at 2 inches from the centerFour paper clips set at 4 inches from the center
Since one group weighs twice as much as the other group, it should only be half as far from the center. Checkthe inch marks and see if this is true.For any distance that the two paper clips are set, the four paper clips must be set half as far from the center.
The Wright Brothers needed to stay near the center of the plane in order to control it, so rather than movefarther out on the wing to balance the engine, they made the wings on the engine’s side of the plane 4 incheslonger than on the pilot’s side. This caused extra lift force on that side to counteract the extra weight of theengine and keep the wings level!
You can simulate this by moving the four-paper-clip weight 1/4 inch farther away from the center so things areno longer balanced. Now, instead of moving the two-clip weight to rebalance, move the location of the stringholding the ruler until everything is back in balance. Did you move the string toward the two-clip weight or thefour-clip weight? Toward the four-clip weight.
Activity 19 answersQuestions
1. Whose stick was the closest to the actual 120-foot mark? Do you think this is a very far distance to fly?Answers will vary. The Wright Brothers’ flight was not a very far distance to fly.
2. Could the Wright Brothers have flownA. From home plate to first base on a baseball field? YesB. From home plate to the outfield wall of the nearest professional baseball stadium? NoC. From one wing tip of a Boeing 747 jumbo jet to the other? NoD. From one goal line to the other goal line on a football field? No
3. Make a graph showing the distance from each person’s marker to the actual 120-foot mark of the firstflight. Did the group make good estimations of the distance? Find the average distance from the 120-footmark.Answers will vary.
4. Make a graph showing how long it took each person to run 120 feet. Did the group run faster than theWright Flyer flew? Yes. Find the average time for the group.
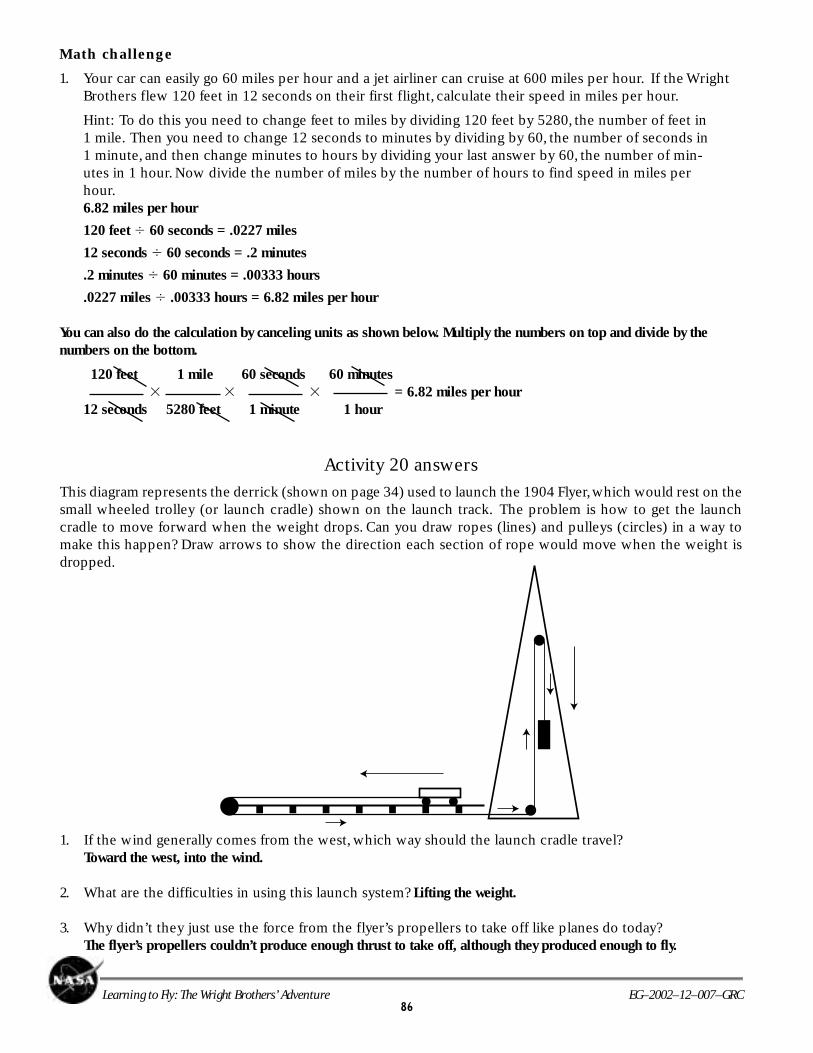
86Learning to Fly: The Wright Brothers’ Adventure EG–2002–12–007–GRC
Activity 20 answers
This diagram represents the derrick (shown on page 34) used to launch the 1904 Flyer, which would rest on thesmall wheeled trolley (or launch cradle) shown on the launch track. The problem is how to get the launchcradle to move forward when the weight drops. Can you draw ropes (lines) and pulleys (circles) in a way tomake this happen? Draw arrows to show the direction each section of rope would move when the weight isdropped.
1. If the wind generally comes from the west, which way should the launch cradle travel?Toward the west, into the wind.
2. What are the difficulties in using this launch system? Lifting the weight.
3. Why didn’t they just use the force from the flyer’s propellers to take off like planes do today?The flyer’s propellers couldn’t produce enough thrust to take off, although they produced enough to fly.
Math challenge
1. Your car can easily go 60 miles per hour and a jet airliner can cruise at 600 miles per hour. If the WrightBrothers flew 120 feet in 12 seconds on their first flight, calculate their speed in miles per hour.
Hint: To do this you need to change feet to miles by dividing 120 feet by 5280, the number of feet in1 mile. Then you need to change 12 seconds to minutes by dividing by 60, the number of seconds in1 minute, and then change minutes to hours by dividing your last answer by 60, the number of min-utes in 1 hour. Now divide the number of miles by the number of hours to find speed in miles perhour.6.82 miles per hour
120 feet � 60 seconds = .0227 miles
12 seconds � 60 seconds = .2 minutes
.2 minutes � 60 minutes = .00333 hours
.0227 miles � .00333 hours = 6.82 miles per hour
You can also do the calculation by canceling units as shown below. Multiply the numbers on top and divide by thenumbers on the bottom.
120 feet 1 mile 60 seconds 60 minutes � � � = 6.82 miles per hour12 seconds 5280 feet 1 minute 1 hour
87Learning to Fly: The Wright Brothers’ Adventure EG–2002–12–007–GRC
Teacher Information
Activity 1: Early Aviation
ObjectiveThe student will1. Learn about the experiments of aviation pioneers2. Recognize the requirements for gliding
National Science StandardsUnderstanding About Scientific InquiryMotions and ForcesScience as a Human EndeavorHistory of Science
DescriptionThe students pretend to be employed by the fictional “Cincinnati Scientific Society.” They will look up information onaviation prior to 1900, write short paragraphs on early aviators, and answer some questions on their research.
Time requirements40 minutes for research20 minutes for writing
MaterialsLibrary, reference books, and/or Internet accessPencil and paper
ProceduresStudents can research each topic or the work can be divided among groups and the results shared.
Background information
The Wright Brothers based their experiments on a body of knowledge collected by early aviators like Lilienthal and Chanute.The brothers were especially indebted to them for information on how to construct lightweight gliders. Curved wingsurfaces, biplanes with wire bracing, and soft sand landing sites had all been used before 1900.
The German Otto Lilienthal was a respected aviator who built several successful gliders before being killed in flight. He hadsaid, famously, “Sacrifices must be made.” Lilienthal was the first to carry out glider experiments carefully and methodically,taking note of important data. He was a great inspiration to the Wrights.
Octave Chanute was a civil engineer and scientist who began to study the problems of flight later in life. He was a closefriend and mentor to the Wright Brothers, guiding and encouraging them.
Samuel Langley was a physicist and astronomer who served for a time as secretary of the Smithsonian Institute. Langleysucceeded in flying a steam-driven airplane model three-fourths of a mile in 1896 and received a Congressional grant of$50,000. His further attempts to fly were failures. It is said that the jeers of the newspapers and cynics crushed his spirit.
For further information, see http://wright.nasa.gov/researched.htm
Assessment activityCheck student answers against the Activity Answers section. Students may give their reports orally to the class.
Activity 2: Your First Interview
ObjectiveThe student will1. Determine what questions to ask in a fictional interview with the Wright Brothers
National Science StandardsAbilities of Technological DesignScience as a Human EndeavorNature of Science
88Learning to Fly: The Wright Brothers’ Adventure EG–2002–12–007–GRC
DescriptionStudents are to assume the role of a newspaper reporter and determine relevant questions to ask the Wright Brothers abouttheir intended experiments. They will try to determine how the Wrights would answer their questions. Questions shouldcenter on the Wrights’ motivation to learn how to fly.
Time requirements20 minutes
MaterialsLibrary, reference books, and/or Internet accessPencil and paper
ProceduresThe students write questions to ask the Wright Brothers. Students can research a single topic or the work can be dividedamong groups and the results shared.
Background information(See pages 4, 5, and 8.)
Assessment activityStudents may compare their questions with a partner. The class may stage a mock interview using the questions andpossible responses that they have prepared.
Activity 3: Your First Report
ObjectiveThe student will1. Learn why the Wright Brothers wanted to gain control of a craft in the air2. Learn about the Wright Brothers and how they planned to do their work
National Science StandardsForm and FunctionMotion and ForcesAbilities of Technological DesignScience as a Human EndeavorNature of Science
DescriptionStudents meet the Wrights and gain a little insight into what they are intending to do through a “personal encounter” in theWrights’ bicycle shop.
Time requirements20 to 25 minutes
MaterialsPencil and paper
ProceduresStudents read “Meet the Wrights” on page 11.
Background informationThe Wrights’ early intentions were to add to the body of knowledge needed to eventually fly. They recognized that Lilienthaland others had been killed because they failed to control their machines. Their first goal was to learn to control a craft inthe air and not be at the mercy of the wind. The brothers had tested their ideas on a large kite and then decided toconstruct a large, man-carrying glider in their bike shop to test at Kitty Hawk in North Carolina. (See pages 1 to 3.)
For further information, see http://wright.nasa.gov/airplane/kite00.html
Assessment activityStudents are to write a report on their “visit.”
89Learning to Fly: The Wright Brothers’ Adventure EG–2002–12–007–GRC
Activity 4: Build a Model of the 1900 Glider
ObjectiveThe student will1. Construct a scale model of the 1900 Wright Glider
National Science StandardsForm and FunctionAbilities of Technological DesignHistory of Science
DescriptionStudents read “1900: Kitty Hawk” on page 13 and then build a model of the Wrights’ 1900 Glider to understand its size, scale,and function.
Time requirements60 to 90 minutes
Materials(See page 41.)
Procedures(See page 41.)
Background informationYou may decide to have students read the additional background information about the 1900 Glider on page 40 in connec-tion with making the model. Try a local supermarket as a source for the Styrofoam trays.
Students have trouble setting the templates so the leading (front) edges of the wings curve downward. They will get thebest results if they go step by step with the directions and pictures in the book.
Assessment activityCompare models to pictures in activity book.
Activity 5: Questions on the 1900 Glider
ObjectiveThe student will1. Understand how the Wrights control their craft in the air2. Recognize that testing models is a way to prove theories3. Understand the advantages of testing at Kitty Hawk
National Science StandardsEvidence, Models, and ExplanationChange, Constancy, and MeasurementForm and FunctionMotion and ForcesAbilities of Technological Design
DescriptionStudents answer questions based on reading about an imaginary visit to the Wrights’ 1900 camp at Kitty Hawk. Thequestions center on the factors that affect the flight of the glider.
Time requirements10 minutes to read15 minutes to answer the questions
MaterialsPencil and paper
ProceduresStudents read “1900: Kitty Hawk” on page 13.
90Learning to Fly: The Wright Brothers’ Adventure EG–2002–12–007–GRC
Background informationThe students are “visitors” to the Wrights’ 1900 experiments. Additional information on the 1900 Glider is available on page40.
For further information, see http://wright.nasa.gov/airplane/air1900.html
Assessment activityStudents answers can be evaluated either in writing or in oral discussion.
Activity 6: What Would You Design?
ObjectiveThe student will1. Make design suggestions to increase lift
National Science StandardsChange, Constancy, and MeasurementForm and FunctionMotion and ForcesAbilities of Technological Design
National Math StandardsGeometryMeasurement
DescriptionHaving seen that the 1900 Glider has barely enough lift to carry a pilot, the students are asked to suggest how to redesignthe glider. This also involves doing a dimensional drawing of their redesign.
Time requirements60 minutes
MaterialsLibrary, reference books, and/or Internet accessPencil, ruler, and paper
ProceduresStudents read “1900: Kitty Hawk” on page 13.
Background informationAfter their experiments in 1900, the Wrights realized that they needed to get more lift to be able to pilot a craft, so theyredesigned their glider. You may wish to have the students do some research on factors affecting lift.
For further information, see http://wright.nasa.gov/airplane/liftold.html
Assessment activityStudents answers can be evaluated either in writing and drawing or in oral discussion. They can also present their designsto the class for discussion.
Activity 7: Build a Model of the 1901 Glider
ObjectiveThe student will1. Construct a scale model of the 1901 Wright Glider
National Science StandardsForm and FunctionAbilities of Technological DesignHistory of Science
91Learning to Fly: The Wright Brothers’ Adventure EG–2002–12–007–GRC
DescriptionStudents read “1901: The First Improvement” on page 17 and then build a model of the Wrights’ 1901 Glider to understandits size, scale, and function.
Time requirements90 to 120 minutes
Materials(See page 48.)
Procedures(See page 48.)
Background informationYou may decide to have students read the additional background information about the 1901 Glider on pages 46 and 47 inconnection with making the model. Try a local supermarket as a source for the Styrofoam trays.
Students may have trouble setting the templates so the leading (front) edges of the wings curve downward. They will getthe best results if they go step by step with the directions and pictures in the book.
Assessment activityCompare models to pictures in activity book.
Activity 8: Forces on the 1901 Glider
ObjectiveThe student will1. Be able to recognize the four forces that act on an aircraft2. Recognize that a change in a force will affect the position of the aircraft
National Science StandardsEvidence, Models, and ExplanationMotions and Forces
National Math StandardsCommunicatingGeometry
DescriptionUsing a picture of the 1900 Glider being flown as a kite, the students are asked to describe the forces that are acting uponit and to make a prediction about the results of changing one of the forces.
Time requirements25 minutes
MaterialsLibrary, reference books, and/or Internet accessPencil, ruler, and paper
ProceduresThe class may work on these questions individually or they can work in pairs or discussion groups.
Background informationThe interactions of lift versus gravity forces and thrust versus drag forces are the core of this activity. These are vectorforces, but are not presented as such. Since this exercise concerns a kite, which is affected by the static pull on its ropes toachieve balance in the wind, the forces are different than those on a glider or airplane. The main idea is that balance ismaintained through opposing forces.
For further information, see http://wright.nasa.gov/airplane/kitefor.html
Assessment activityStudents should compare their drawings to the actual answers.
92Learning to Fly: The Wright Brothers’ Adventure EG–2002–12–007–GRC
Activity 9: Questions on the 1901 Glider
ObjectiveThe student will1. Be able to suggest reasons for the problems with the 1901 Glider design2. Learn about a scientific method of conducting experiments3. Recognize that it is important to for scientists to learn from failures and continue trying
National Science StandardsEvidence, Models, and ExplanationUnderstanding About Scientific InquiryScience as a Human Endeavor
DescriptionHaving read about the 1901 experiments, the students are asked to propose reasons why the larger wings may havegenerated less lift. They are also asked what a scientist might do to solve the problem, and to suggest what course theWrights should take at this point.
Time requirements20 minutes
MaterialsPencil and paperReference books and/or Internet access
ProceduresThe class may work on these questions individually or they can work in pairs or discussion groups.
Background informationThe Wrights realized that there was a factor or factors that they were not considering in trying to generate lift. They wereon the verge of giving up when they decided to reevaluate their data and build a wind tunnel. The Wrights, like scientiststoday, were careful to change just one variable at a time to note the effect of each change separately. This is an importantpoint to make with students. It is also important that this experiment, like most experiments, did not work as expected thefirst time. The Wright Brothers worked through their failures until they eventually succeeded.
For further information, see http://wright.nasa.gov/airplane/test1901.html
Assessment activityStudents should be able to discuss their answers and give reasons and evidence for their choices.
Activity 10: Wrong Ideas
ObjectiveThe student will1. See that incorrect assumptions can lead to wrong ideas and conclusions2. Recognize that incorrect ideas are sometimes widely accepted as correct
National Science StandardsUnderstanding About Scientific InquiryNature of ScienceHistory of Science
DescriptionIn this activity the students research some wrong ideas that at one time were thought to be correct.
Time requirements45 minutes
93Learning to Fly: The Wright Brothers’ Adventure EG–2002–12–007–GRC
MaterialsLibrary, reference books, and/or Internet accessPencil and paper
ProceduresThe students need to research the origins of some scientific theories that were once accepted as correct.
Background informationThroughout history people have had to change their ideas about the way the world worked when new evidence waspresented. Many times in the past, ideas have been accepted as true on the basis of authority or reputation, religious beliefs,or just bad measurements.
The Wright Brothers also had to “question authority.” The accepted data of the time that they were using simply did notgive the results they expected. Because the data came from Otto Lilienthal, the preeminent authority on aeronautics, theWrights assumed that they were correct. Ultimately, the brothers conducted their own wind tunnel tests to determinewhat was wrong.
In fact, there were two sources of errors in the Wrights’ initial design calculations. There was a pressure coefficient, called“Smeaton’s coefficient,” which was used as the reference for published aerodynamic data at the time. The Wrights used theaccepted value for this coefficient, as did Lilienthal. But there was a large error in the value of the coefficient because it isa very difficult measurement to make accurately. The brothers discovered the error and derived a more accurate value.
The second error was in the use of Lilienthal’s lift coefficients. The brothers did not understand the important effects ofwing planform shape on lift until they conducted their wind tunnel tests. The planform is the shape of the wing whenviewed looking down onto the wing. Lilienthal had tested his models as small oval shapes, and the brother’s wings wererectangles. The difference in shape makes a difference in the amount of lift generated. Wilbur writes, “Any table (of lift) isliable to great misconstruction if the surface to which it is applicable is not clearly specified.” The brothers’ actually testedLilienthal’s shape and found that his data was “. . . as near correct as it is possible to make it with the methods he used.”
—Wilbur Wright, from a 1901 letter to Octave Chanute.
For further information, see http://wright.nasa.gov/airplane/smeaton.html and http://wright.nasa.gov/airplane/models.html
Assessment activityStudents present their results to the class for discussion.
Activity 11: The Wrights’ Wind Tunnel
ObjectiveThe student will1. Be able to describe the function of a wind tunnel and point out how its parts operate2. Understand that a wind tunnel can be used to collect data under controlled conditions that can be applied on a larger scale
National Science StandardsEvidence, Models, and ExplanationChange, Constancy, and MeasurementForm and FunctionAbilities of Technological Design
DescriptionThis activity is designed to show students how a wind tunnel can be used to collect aeronautical data. Students learn thatprocedures used by the Wrights are still used in wind tunnels today.
Time requirements45 minutes
MaterialsLibrary, reference books, and/or Internet accessPencil and paper
ProceduresThe students read “New Data” on page 20 prior to answering the questions.
94Learning to Fly: The Wright Brothers’ Adventure EG–2002–12–007–GRC
Background informationOrville and Wilbur’s tunnel was not the first wind tunnel ever constructed, but it was the first that gave accurate and usefuldata. It was also the first tunnel that could be used to verify earlier testing results and design future aircraft. For a windtunnel to give accurate information, the flow of air needs to be as free of turbulence as possible, so the brothers used gridsto straighten the airstream. Students should recognize that testing small-scale models saves time and expense.
For further information, see http://wright.nasa.gov/airplane/tunnel.html
Assessment activityCheck student answers against the Activity Answers section.
Activity 12: Operate the Wrights’ Tunnel
ObjectiveThe student will1. Become more familiar with how a wind tunnel operates2. Recognize that some wing forms give better lift3. Understand how the Wrights gathered data from wind tunnel experiments
National Science StandardsEvidence, Models, and ExplanationChange, Constancy, and MeasurementForm and FunctionUnderstanding Scientific InquiryAbilities of Technological DesignNature of Science
National Math StandardsCommunicationNumbers and Number RelationshipsPatternsStatisticsGeometryMeasurement
DescriptionStudents operate a virtual Wright wind tunnel on a computer and collect data on a variety of wing forms actually used bythe Wrights.
Time requirements45 minutes
MaterialsInternet accessPencil
ProceduresStudents print out a data form and then follow a set of activities in which they compare different aspects of wing design.They graph their results to draw conclusions.
Background informationThe simulation in this activity operates in the same way as the Wrights’ original tunnel. The student can choose from any ofthe wing shapes tested by the Wrights (taken from the actual models now housed in the Franklin Institute in Philadelphia)and collect data in the same way they did. The student places a wing model in the tunnel, starts the fan, and then adjusts forthe drag caused by the balance itself. The angle is read and the data graphed. The students should discover that long, thinwings give the best results.
For further information, see http://wright.nasa.gov/airplane/tunnlint.html
Assessment activityThe students could be given several of the wing forms at random and asked to comment on which might give the bestresults based on the data they have just collected. They can also compare graphs and discuss the best results.
95Learning to Fly: The Wright Brothers’ Adventure EG–2002–12–007–GRC
Activity 13: Build a Model of the 1902 Glider
ObjectiveThe student will1. Construct a scale model of the 1902 Wright Glider
National Science StandardsForm and FunctionAbilities of Technological DesignHistory of Science
DescriptionStudents read “1902: Success at Last” on page 25 and then build a model of the Wrights’ 1902 Glider to understand its size,scale, and function.
Time requirements120 minutes
Materials(See page 55.)
Procedures(See page 55.)
Background informationYou may decide to have students read the additional background information about the 1902 Glider on page 54 in connec-tion with making the model. Try a local supermarket as a source for the Styrofoam trays.
Students have trouble setting the templates so the leading (front) edges of the wings curve downward. They will get thebest results if they go step by step with the directions and pictures in the book.
Assessment activityCompare models to pictures in activity book.
Activity 14: Compare the 1900, 1901, and 1902 Gliders
ObjectiveThe student will1. Be able to list similarities and differences in the first three Wright gliders2. Recognize the relationship between wing shape and performance
National Science StandardsEvidence, Models, and ExplanationForm and FunctionMotions and ForcesAbilities of Technological Design
National Math StandardsGeometry
DescriptionDrawings of the 1900, 1901, and 1902 gliders are shown on page 26 at the same scale for the purpose of comparison.Students are asked to list similarities and differences and then speculate about reasons for the 1902 success.
Time requirements25 minutes
MaterialsPencil
ProceduresThe students compare glider features.
96Learning to Fly: The Wright Brothers’ Adventure EG–2002–12–007–GRC
Background informationWith each gliding season, the Wrights arrived at Kitty Hawk with a redesigned glider. When the 1900 Glider proved barelyable to lift itself with a pilot, the brothers designed a glider with much greater wing surface in 1901, trying to create morelift. It turned out that this glider, although able to carry a pilot more easily, only produced about one-third of the expectedlift. On the verge of giving up, the Wrights conducted wind tunnel tests during the winter of 1901 and determined that theyhad made the wrong choice with the 1901 Glider. Instead of short, wide wings, they should have made long, thin wings.The 1902 Glider had long, thin wings of nearly the same wing area as the 1901 Glider, but it set world records for gliding.
For further information, see http://wright.nasa.gov/airplane/air1902.html
Assessment activityStudents should be able to point out how the 1902 design differed from the previous gliders.
Activity 15: Prices Then and Now
ObjectiveThe student will1. Gain perspective on the relative costs of goods over a 100-year period2. Be able to calculate percentages based on real data
National Science StandardsChange, Constancy, and MeasurementUnderstanding About Scientific Inquiry
National Math StandardsProblem SolvingMath ConnectionsComputation and Estimation
DescriptionSince Orville Wright recorded the brothers’ experiments with a box camera, 1900 prices are given for cameras as well as forseveral common items. The activity has students calculate the percentage of a salary to buy a camera then and now. It alsohas the students compare how the prices on a number of common items have risen since 1900.
Time requirements30 minutes
MaterialsPencil, paper, and calculator
ProceduresThe students collect data on some food costs today, compare them to food costs in 1900, and calculate the percentagechange. They also calculate the percentage of a monthly salary needed to buy a camera in 1900 and today.
Background informationOrville took and developed a large number of pictures of the brothers’ experiments to document their results. The glassnegatives were developed back in Dayton, where large numbers of them remain today. All of the Wrights’ experimentsthrough 1903, including travel, cost them about $1,200.
Assessment activityStudents should be able to calculate percentage increases. Teachers might want to have students put their problems on thechalkboard.
Activity 16: Build a Model of the 1903 Flyer
ObjectiveThe student will1. Construct a scale model of the 1903 Wright Flyer
97Learning to Fly: The Wright Brothers’ Adventure EG–2002–12–007–GRC
National Science StandardsForm and FunctionAbilities of Technological DesignHistory of Science
DescriptionStudents read “1903: Powered Flight” on pages 28 and 29 and then make a model of the Wrights’ 1903 Flyer to understandits size, scale, and function.
Time requirements120 minutes
Materials(See page 63.)
Procedures(See page 63.)
Background informationYou may decide to have students read the additional background information about the 1903 Flyer on page 62 in connec-tion with making the model. Try a local supermarket as a source for the Styrofoam trays.
Students have trouble setting the templates so the leading (front) edges of the wings curve downward. They will get thebest results if they go step by step with the directions and pictures in the book.
Assessment activityCompare models to pictures in activity book.
Activity 17: Balancing Forces
ObjectiveThe student will1. Understand some of the challenges of making a powered flying machine
National Science StandardsEvidence, Models, and ExplanationForm and FunctionUnderstanding About Scientific InquiryMotions and ForcesAbilities of Technological Design
DescriptionThe students need to propose solutions to engine and pilot placement problems and also choose how to cancel the torque(twist) produced by two rotating propellers.
Time requirements20 minutes
MaterialsPencil
ProceduresThe students plot the location of the pilot and engine on the wing of the 1903 Flyer. They need to justify their placement,especially in terms of safety and balance.
Background informationHaving crashed a number of times over the years, the Wrights were concerned about crashing into a hot engine or havingthe engine crash onto them. With this in mind, they put the engine on the wing beside the pilot. This created a balanceproblem because the engine was heavier than either Wilbur or Orville. To compensate for the extra weight, the brothersmade the wing on the engine side 4 inches longer to add extra lift on that side and balance the plane.
98Learning to Fly: The Wright Brothers’ Adventure EG–2002–12–007–GRC
They also made the propellers turn in opposite directions to have them cancel out each other’s torque. To make thishappen, they twisted one of the chains used to turn the propellers into a figure eight. This made the correspondingpropeller rotate in the opposite direction.
For further information, see http://wright.nasa.gov/airplane/propeller.html
Assessment activityStudents should put the pilot next to the engine and have the propellers rotating in opposite directions.
Activity 18: Center of Gravity
ObjectiveThe student will1. Understand how balance is a function of both mass and distance from the center of rotation
National Science StandardsEvidence, Models, and ExplanationChange, Constancy, and MeasurementUnderstanding About Scientific MeasurementMotions and Forces
National Math StandardsReasoningMath ConnectionsPatternsMeasurement
DescriptionThis is a followup to Activity 17 and deals with balancing the aircraft. The students balance paper clips on a ruler andinvestigate the relationship between mass and distance from the center.
Time requirements30 minutes
MaterialsString, 12-inch ruler, and paper clips
ProceduresThe students attempt to keep a ruler hanging from a string level by sliding paper clips out from the center.
Background informationThis activity takes patience and small adjustments. Students often have difficulty with this and may need assistance to getgood results.
For further information, see http://wright.nasa.gov/airplane/cg.html
Assessment activityStudents should be able to tell how far from the center one must hang one paper clip (6 inches) to balance three paperclips hanging on the other side located 2 inches from the center.
Activity 19: How Far Did They Fly?
ObjectiveThe student will1. Estimate a distance of 120 feet2. Realize how slow the Wrights flew at first3. Collect and graph data4. Calculate speed by dividing distance by time
99Learning to Fly: The Wright Brothers’ Adventure EG–2002–12–007–GRC
National Science StandardsChange, Constancy, and MeasurementUnderstanding About Scientific Inquiry
National Math StandardsProblem SolvingMath ConnectionsComputation and Estimation
DescriptionStudents try to estimate the distance that Orville Wright first flew. Then they find out how long it takes them to run thisdistance. They graph both results for discussion.
Time requirements45 minutes to collect data45 minutes to graph and answer questions
MaterialsLibrary, reference books, and/or Internet accessPencil, paper, ruler, and calculatorCraft sticks or other devices to mark distancesMeasuring tape (the longer the better)Timer to measure seconds150-foot string (optional)
ProceduresStudents estimate the distance of 120 feet down a line or string and place their marker at their estimate. Then the actual120-foot distance is measured and the distance from each marker to the true 120-foot distance is measured and recorded.After the students pick up their markers, each student is timed as he or she runs 120 feet and this time is recorded. Studentswill need to measure several familiar distances to get a relative sense of scale (such as the length from home to first base ona baseball diamond, the length of a familiar hall at school, etc.).
Background informationOrville flew an estimated 12 seconds (he forgot to start the watch!) and landed 120 feet from the starting point. This wasnot far for an airplane flight, especially by today’s standards. The students should realize that this is the case and they shouldsee that they can run faster than the flyer flew.
Assessment activityCheck student answers against the Activity Answers section.
Activity 20: How to Launch the Flyer
ObjectiveThe student will1. Be able to show how to change the direction of a force2. Recognize the advantage of launching into the wind
National Science StandardsEvidence, Models, and ExplanationTransfer of EnergyMotions and Forces
DescriptionStudents are asked to complete a diagram of how the Wrights launched their flyer using a falling weight.
Time requirements20 minutes
MaterialsPencil
100Learning to Fly: The Wright Brothers’ Adventure EG–2002–12–007–GRC
ProceduresThe students draw the ropes and pulleys that will correctly transfer the force of the falling weight.
Background informationOnce the Wrights had a powered flyer, they decided they did not need to journey to North Carolina to get sufficient windfor testing. However, although the Wright Flyer could sustain itself in the air, it still lacked the power for an unassisted take-off. They solved this problem by using the energy from a falling weight. Launching into the wind added extra lift.
For further information, see http://wright.nasa.gov/airplane/air1905.html
Assessment activityCheck student answers against the Activity Answers section.
Activity 21: Write a Press Release
ObjectiveThe student will1. Be able to use what he or she has learned about the Wright’s efforts to write a factual press release
National Science StandardsAbilities of Technological DesignScience as a Human Endeavor
DescriptionStudents take on the role of an eyewitness to the Wright Brothers’ experiments and are asked to turn their “observations”into a press release.
Time requirements30 minutes
MaterialsPencil and paper
ProceduresStudents review their observations of the Wright Brothers‘ experiments in the booklet and write a press release.
Background informationIn 1903, to be prepared, the Wrights wrote their own press release in advance of their first successful flight. When theytelegraphed their success to their sister Katharine, she took it to the local papers. Very little was printed at the timebecause, as one editor put it, “Had they flown for 12 minutes instead of 12 seconds, that would have been news.”
Assessment activityHave students pose as newspaper editors to select the best press releases to print.
Activity 22: Design a Mission Patch
ObjectiveThe student will1. Be able to relate a design to the Wrights’ achievement
National Science StandardsScience as a Human Endeavor
DescriptionSince all NASA missions are commemorated with a patch, the students are asked to design a Wright Brothers patch.
Time requirements30 to 45 minutes
MaterialsColored pencils, crayons, markers, and paper
101Learning to Fly: The Wright Brothers’ Adventure EG–2002–12–007–GRC
ProceduresStudents can review NASA patches for ideas. They should then draw their own patch for the Wright Brothers. The shapeand content is up to the student.
Background informationThe Web site shows all the patches for the NASA missions. Patches can also be obtained from NASA visitor centers.
Assessment activityDisplays should be made of student work.
Activity 23: Be an Inventor
ObjectiveThe student will1. Understand that invention requires imagination2. Realize that inventors always face difficulties
National Science StandardsUnderstanding About Scientific InquiryAbilities of Technological DesignScience as a Human Endeavor
DescriptionHaving followed the Wrights’ invention process, students are asked to use their imaginations to propose an invention toimprove transportation.
Time requirements45 minutes
MaterialsPencil and paper
ProceduresStudents can review the Wright Brothers’ “observations” of their experiments in the booklet, and then write about some-thing they would like to invent to improve transportation. They should consider problems they may encounter and decidehow to publicize their efforts.
Background informationThe invention process can be difficult for children. Emphasize to them that anything is possible and tell them not to limittheir thinking. However, they should consider such things as cost and safety when they evaluate their ideas.
Assessment activityHave students share their ideas and sketches with the class and let the class choose those that they think would be the mostsuccessful.
103Learning to Fly: The Wright Brothers’ Adventure EG–2002–12–007–GRC
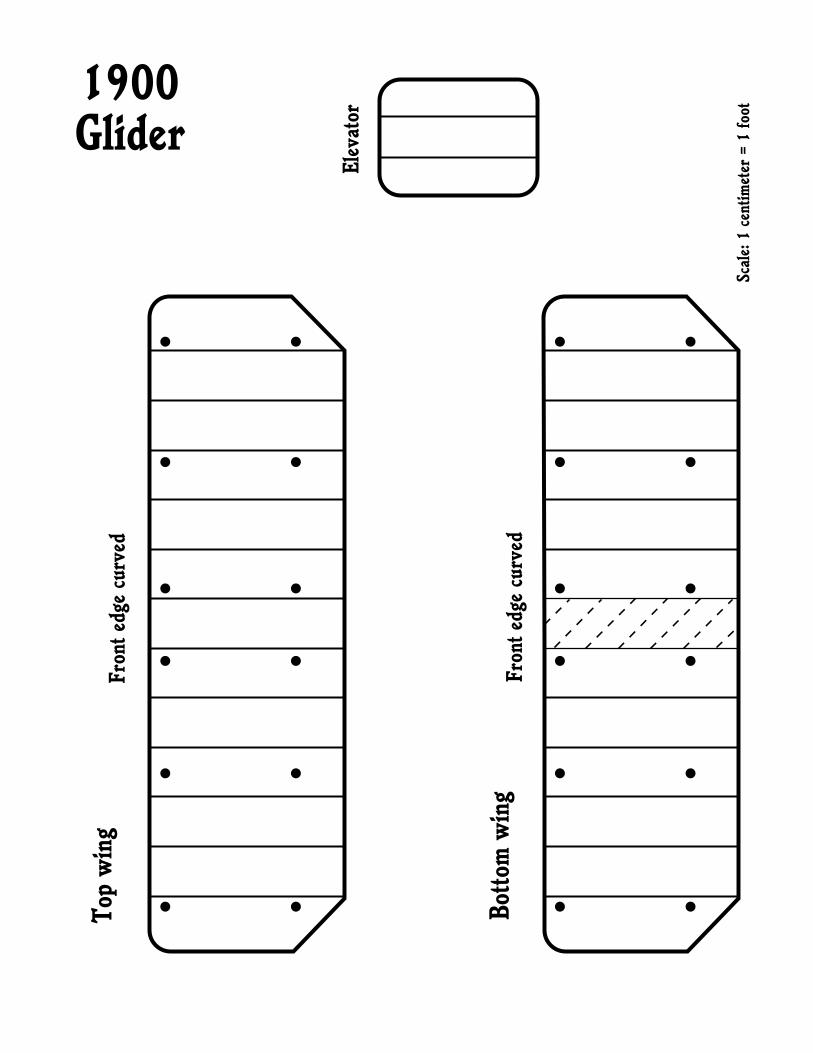
105Learning to Fly: The Wright Brothers’ Adventure EG–2002–12–007–GRC
1900Glider
Ele
vato
r
Fro
nt e
dge
curv
edT
op w
ing
Bot
tom
win
gFro
nt e
dge
curv
ed
Sca
le: 1 c
entim
eter
= 1
foo
t
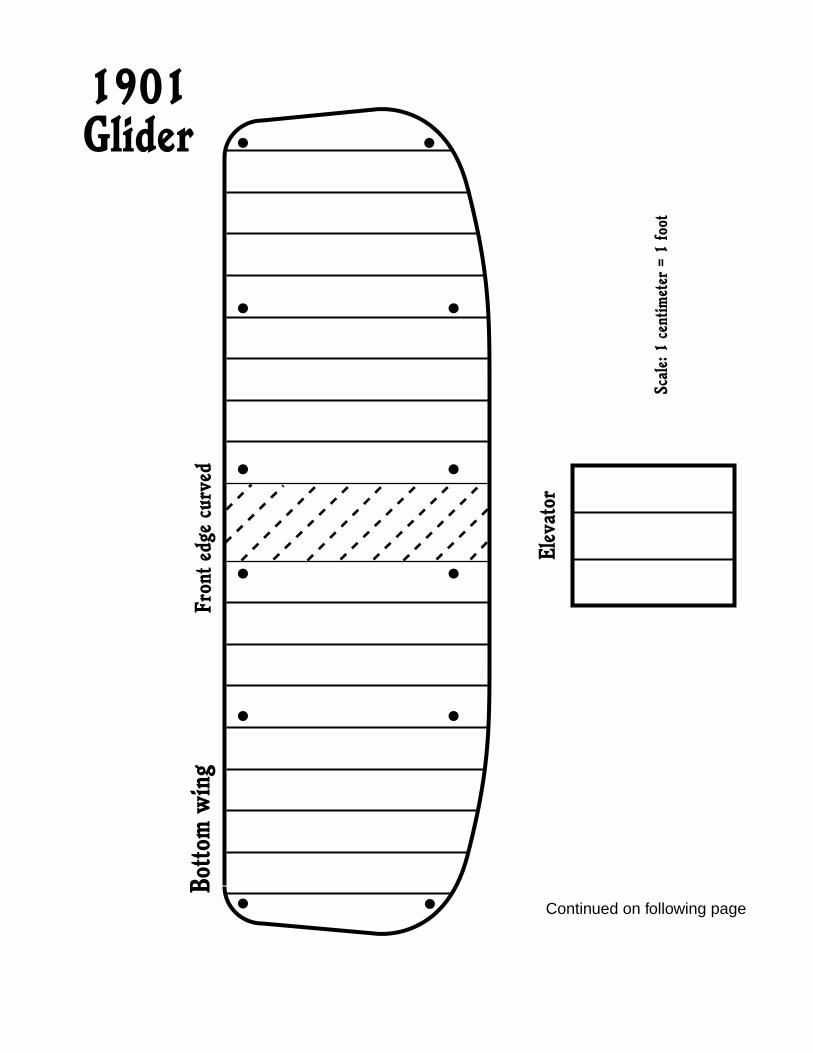
107Learning to Fly: The Wright Brothers’ Adventure EG–2002–12–007–GRC
Fro
nt e
dge
curv
ed
1901Glider
Ele
vato
r
Sca
le: 1 c
entim
eter
= 1
foo
t
Bot
tom
win
g
Continued on following page
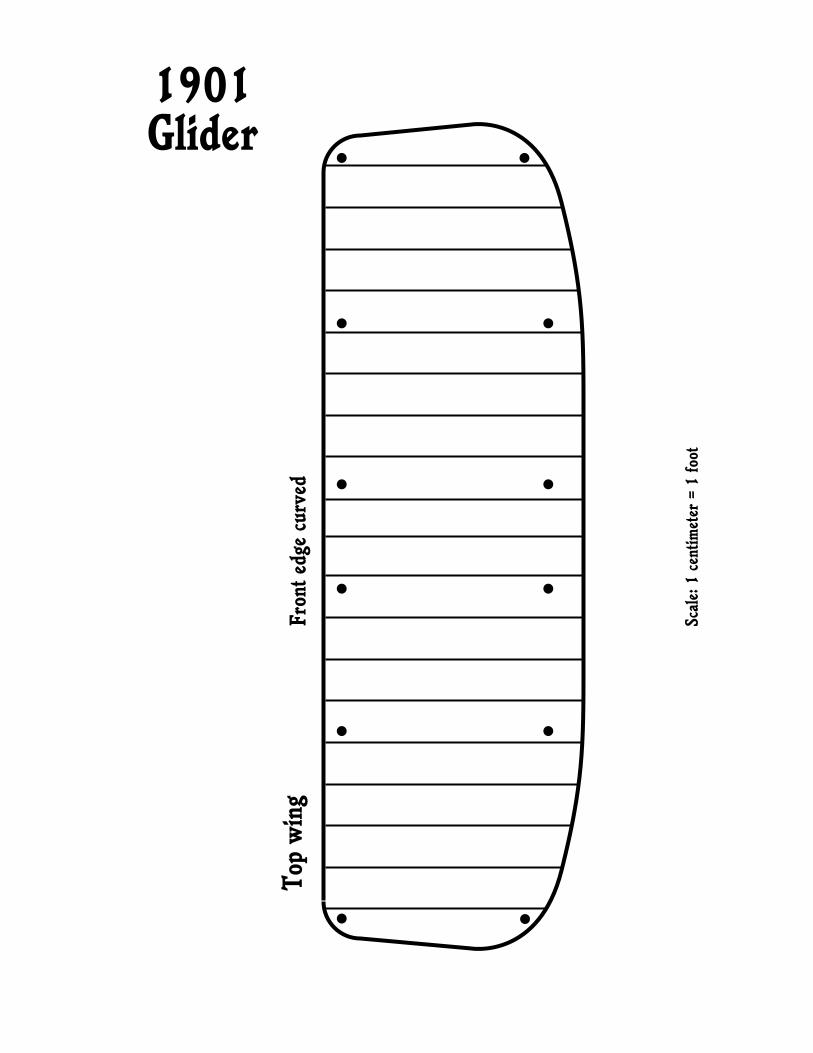
109Learning to Fly: The Wright Brothers’ Adventure EG–2002–12–007–GRC
Fro
nt e
dge
curv
ed
Sca
le: 1 c
entim
eter
= 1
foo
t
Top
win
g
1901Glider

111Learning to Fly: The Wright Brothers’ Adventure EG–2002–12–007–GRC
Fro
nt e
dge
curv
ed
1902Glider
Ele
vato
r
Rud
der
Sca
le: 1 c
entim
eter
= 1
foo
t
Rig
ht w
ing
(cut
out
tw
o)
Fro
nt e
dge
curv
ed
Lef
t w
ing
(cut
out
tw
o)
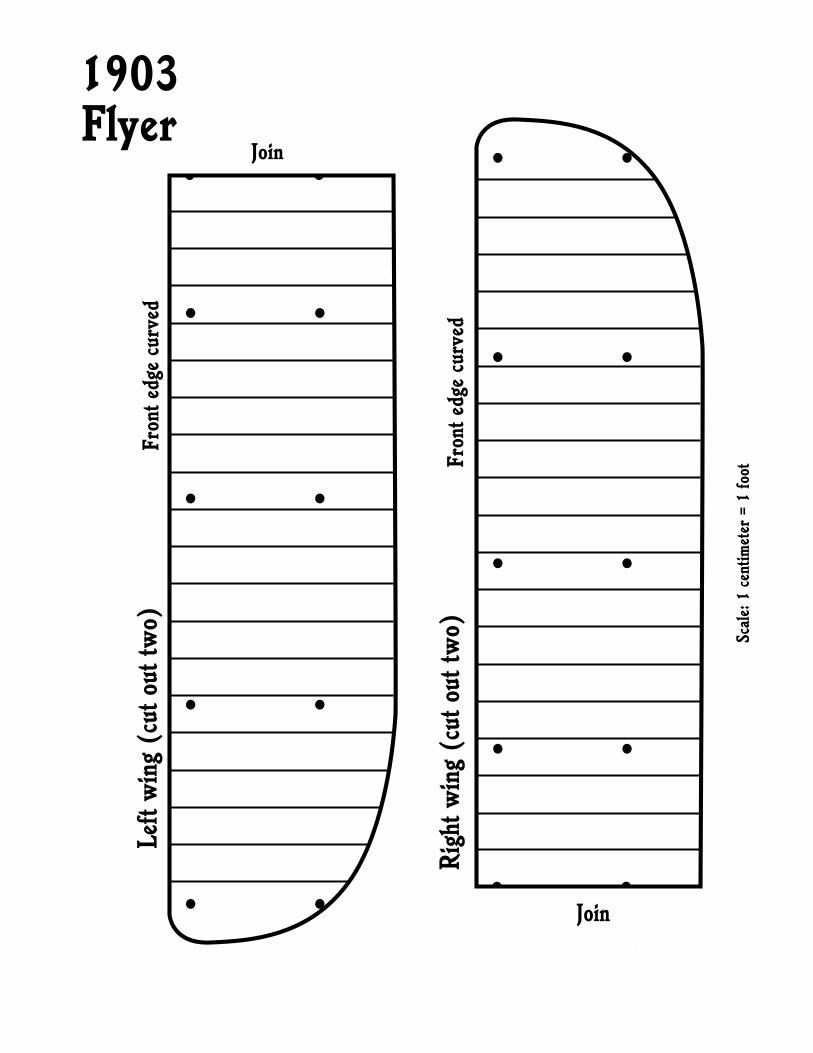
113Learning to Fly: The Wright Brothers’ Adventure EG–2002–12–007–GRC
Fro
nt e
dge
curv
ed
1903Flyer
JoinLef
t w
ing
(cut
out
tw
o)
Sca
le: 1 c
entim
eter
= 1
foo
t
Join
Fro
nt e
dge
curv
edR
ight
win
g (c
ut o
ut t
wo)
Continued on following page
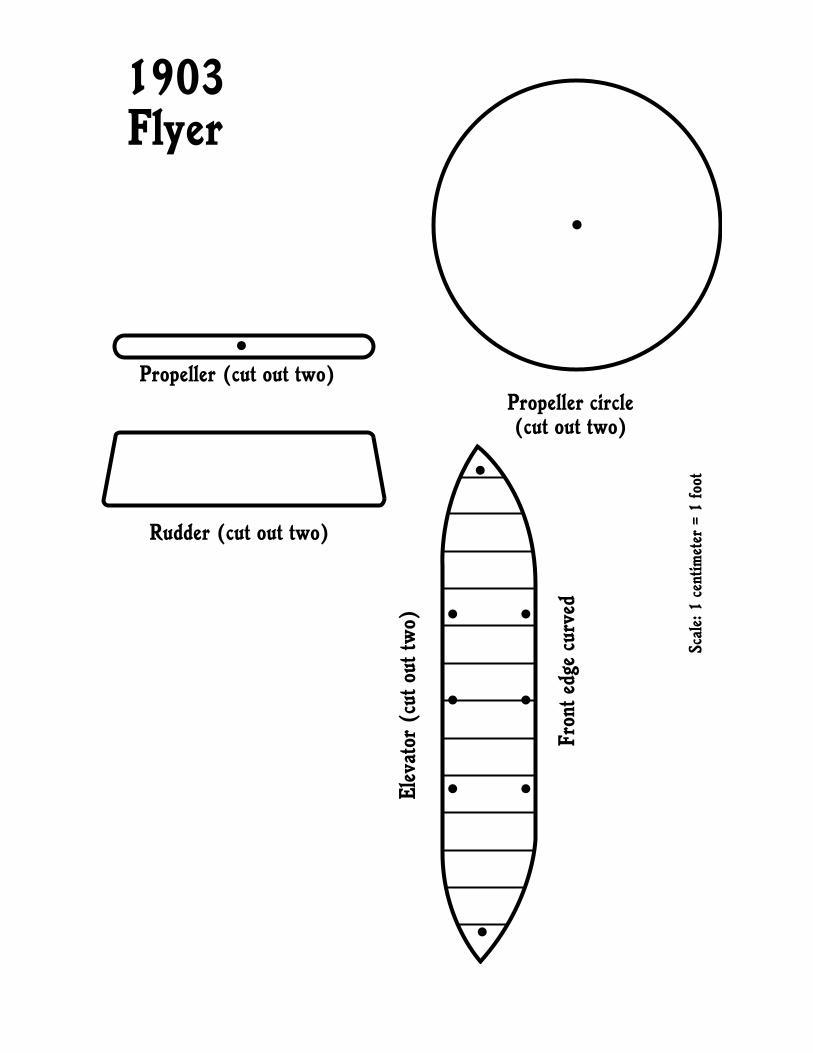
115Learning to Fly: The Wright Brothers’ Adventure EG–2002–12–007–GRC
Ele
vato
r (c
ut o
ut t
wo)
Sca
le: 1 c
entim
eter
= 1
foo
t
Propeller circle(cut out two)
Rudder (cut out two)
Propeller (cut out two)
Fro
nt e
dge
curv
ed
1903Flyer
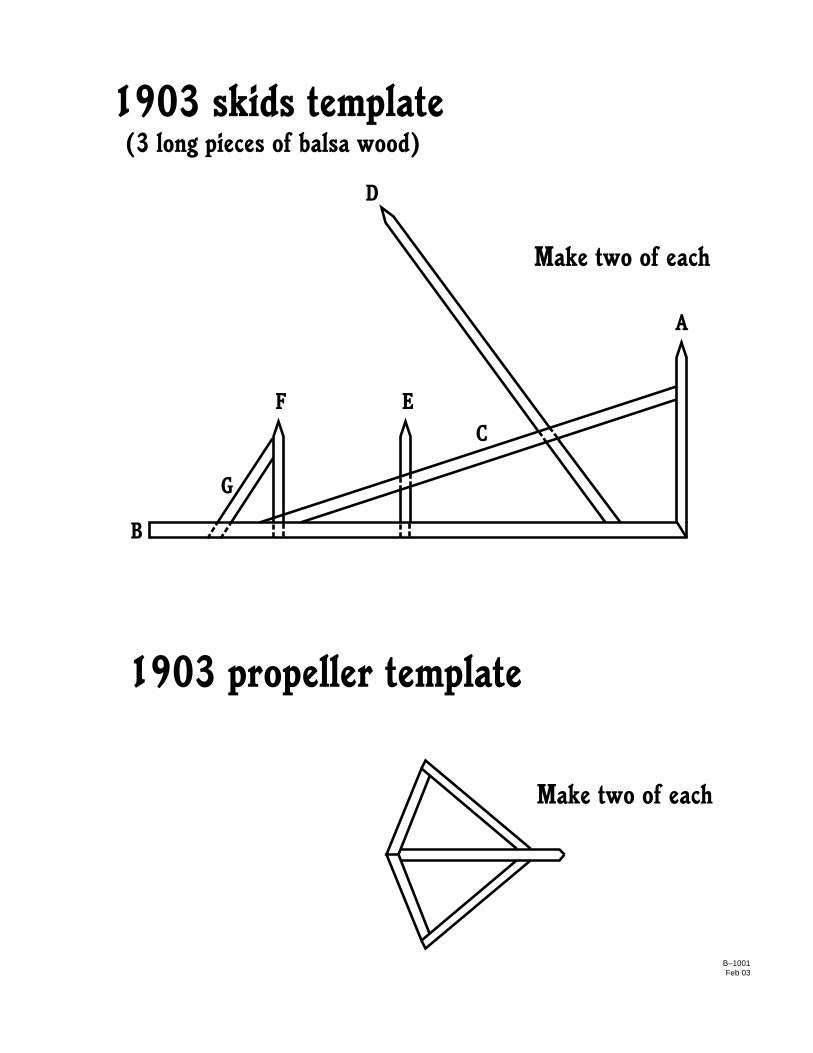
117Learning to Fly: The Wright Brothers’ Adventure EG–2002–12–007–GRC
B–1001Feb 03
1903 skids template(3 long pieces of balsa wood)
1903 propeller template
Make two of each
Make two of each
D
EF
G
C
B
A
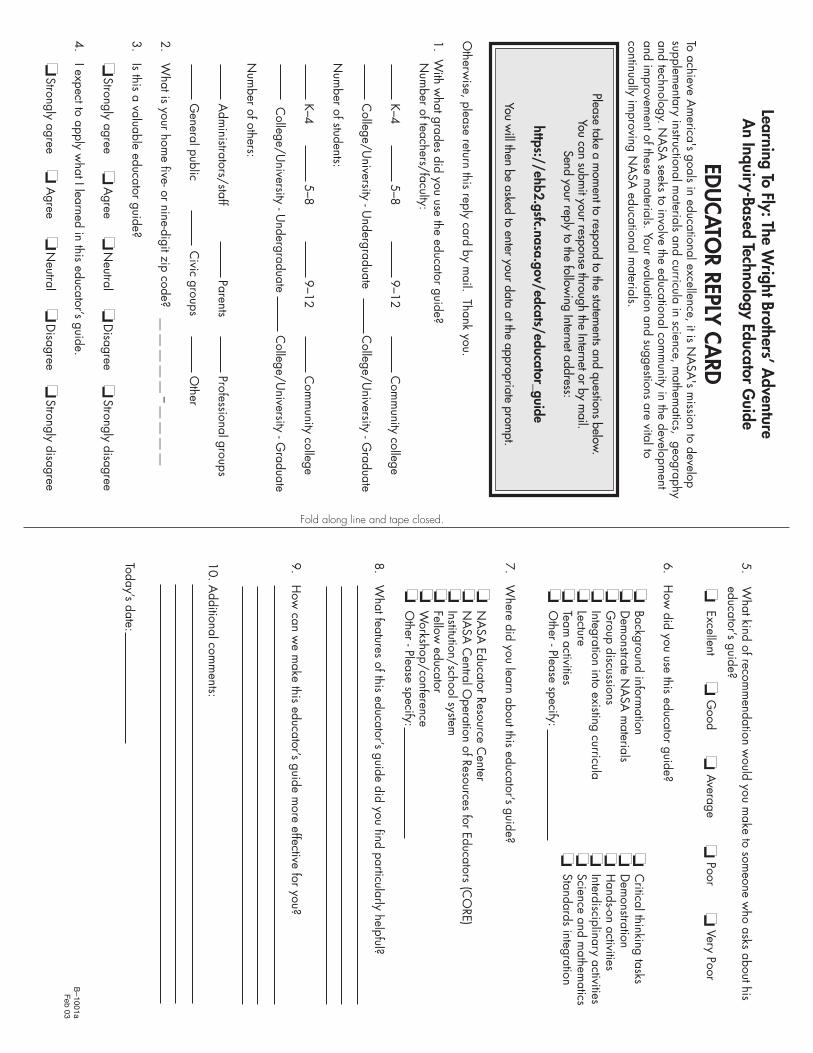
Fold along line and tape closed.
Learning To Fly: The Wright Brothers’ A
dventureA
n Inquiry-Based Technology Educator Guide
EDU
CATOR REPLY CA
RDTo achieve A
merica's goals in educational excellence, it is N
ASA
's mission to develop
supplementary instructional m
aterials and curricula in science, mathem
atics, geographyand technology. N
ASA
seeks to involve the educational comm
unity in the development
and improvem
ent of these materials. Your evaluation and suggestions are vital to
continually improving N
ASA
educational materials.
Please take a mom
ent to respond to the statements and questions below
.You can subm
it your response through the Internet or by mail.
Send your reply to the following Internet address:
https://ehb2.gsfc.nasa.gov/edcats/educator_guide
You will then be asked to enter your data at the appropriate prom
pt.
Otherw
ise, please return this reply card by mail. Thank you.
1. With w
hat grades did you use the educator guide? N
umber of teachers/faculty:
K–45–8
9–12C
omm
unity college
College/U
niversity - Undergraduate
College/U
niversity - Graduate
Num
ber of students:
K–45–8
9–12C
omm
unity college
College/U
niversity - Undergraduate
College/U
niversity - Graduate
Num
ber of others:
Adm
inistrators/staffParents
Professional groups
General public
Civic groups
Other
2. What is your hom
e five- or nine-digit zip code? __ __ __ __ __ – __ __ __ __
3. Is this a valuable educator guide?
Strongly agree Agree N
eutral Disagree Strongly disagree
4. I expect to apply what I learned in this educator’s guide.
Strongly agree Agree N
eutral Disagree Strongly disagree
5.W
hat kind of recomm
endation would you m
ake to someone w
ho asks about hiseducator’s guide?
Excellent Good Average Poor Very Poor
6. How
did you use this educator guide?
Background information
Critical thinking tasks
Dem
onstrate NA
SA m
aterialsD
emonstration
Group discussions
Hands-on activities
Integration into existing curriculaInterdisciplinary activities
LectureScience and m
athematics
Team activities
Standards integrationO
ther - Please specify:
7. Where did you learn about this educator’s guide?
NA
SA Educator Resource C
enterN
ASA
Central O
peration of Resources for Educators (CO
RE)Institution/school systemFellow
educatorW
orkshop/conferenceO
ther - Please specify:
8. What features of this educator’s guide did you find particularly helpful?
9. How
can we m
ake this educator’s guide more effective for you?
10. Additional com
ments:
Today’s date:
B–1001aF
eb 03
NATIONALAERONAUTICSANDSPACEADMINISTRATION
EDUCATIONDIVISION
MAILCODEN
WASHINGTONDC20546-0001
PLACE
STAMP
HERE