world of warcraft priest guide - matts-mods.com › files › wow › crap guides › class... ·...
TRANSCRIPT

World of Warcraft Priest Guide
Last Update: July 2006
Contact: [email protected]
Website: http://www.killerguides.com
© Copyright www.killerguides.com 2006. All rights reserved.

World of Warcraft Priest Guide
Table of Contents
1. Introduction ......................................................................................................... - 1 -
2. Priest Basics ....................................................................................................... - 2 -
2.1. Character Creation.......................................................................................... - 2 -
2.1.1. Statistics and Their Role ............................................................................. - 2 -
2.1.2. Starting Statistics ........................................................................................ - 3 -
2.1.3. Character Choices ...................................................................................... - 3 -
2.1.4. Racial Abilities............................................................................................. - 4 -
2.1.5. Racial Spells ............................................................................................... - 6 -
2.1.6. Conclusion .................................................................................................. - 8 -
3. Skills.................................................................................................................. - 10 -
3.1. Skill Listing .................................................................................................... - 10 -
3.2. Discussion..................................................................................................... - 10 -
4. Talents .............................................................................................................. - 17 -
4.1. Holy Tree ...................................................................................................... - 17 -
4.1.1. Talent Tree................................................................................................ - 17 -
4.1.2. Talent Discussion...................................................................................... - 20 -
4.2. Discipline Tree .............................................................................................. - 24 -
4.2.1. Talent Tree................................................................................................ - 24 -
4.2.2. Talent Discussion...................................................................................... - 26 -
4.3. Shadow Tree................................................................................................. - 31 -
4.3.1. Talent Tree................................................................................................ - 31 -
4.3.2. Talent Discussion...................................................................................... - 34 -
5. Talent Builds ..................................................................................................... - 39 -
5.1. Shadow Leveling Build.................................................................................. - 39 -
5.2. Pure PvP Build.............................................................................................. - 43 -
5.3. Discipline Build.............................................................................................. - 46 -
5.4. Healing Build................................................................................................. - 50 -
5.5. Tri-Build......................................................................................................... - 53 -
6. Priest Strategies................................................................................................ - 57 -
6.1. Solo Strategies.............................................................................................. - 57 -
I

World of Warcraft Priest Guide
6.2. Grinding Locations ........................................................................................ - 61 -
6.3. Group Strategies........................................................................................... - 66 -
6.3.1. Healing as you Level................................................................................. - 66 -
6.3.2. Healing at 60............................................................................................. - 67 -
6.3.3. Healing and Threat.................................................................................... - 68 -
6.3.4. Instance List .............................................................................................. - 69 -
6.4. PvP Strategies .............................................................................................. - 71 -
6.5. Class Strategies............................................................................................ - 72 -
6.5.1. Druid.......................................................................................................... - 72 -
6.5.2. Hunter ....................................................................................................... - 73 -
6.5.3. Mage ......................................................................................................... - 73 -
6.5.4. Paladin ...................................................................................................... - 74 -
6.5.5. Priest ......................................................................................................... - 75 -
6.5.6. Rogue........................................................................................................ - 75 -
6.5.7. Shaman..................................................................................................... - 76 -
6.5.8. Warlock ..................................................................................................... - 77 -
6.5.9. Warrior ...................................................................................................... - 78 -
6.6. Honour Kills and Contribution Points ............................................................ - 79 -
7. Making Gold...................................................................................................... - 81 -
7.1. Locations for Grinding................................................................................... - 83 -
7.2. Auction House Items..................................................................................... - 84 -
8. Professions ....................................................................................................... - 87 -
8.1. Primary Professions...................................................................................... - 87 -
8.2. Secondary Professions ................................................................................. - 89 -
8.3. Suggested Professions ................................................................................. - 89 -
9. Gear .................................................................................................................. - 91 -
10. Appendix a ...................................................................................................... - 107 -
10.1. Skill listing ................................................................................................... - 107 -
© Copyright www.killerguides.com 2006. All rights reserved.
II

World of Warcraft Priest Guide
1. Introduction Welcome to the guide for all budding young priests out there. You have taken the first
step in becoming the best possible priest. The priest class is most commonly known as
the primary healer in the game, but through following this guide you can learn how to
dominate PvP, easily solo to level 60, and also how to effectively function in groups. You
will be the most in demand class in the game, constantly being invited to join groups to
access high-end gear and content. You can easily kill any other class in PvP.
- 1 -

World of Warcraft Priest Guide
2. Priest Basics The priest is a class that relies on healing and mitigating damage to survive. With the
ability to wear only Cloth armour, you are unable to take any significant physical damage.
To alleviate this, the priest has access to strong heals, buffs, and debuffs. In groups you
will be the primary healer, it is your job in this situation to keep everyone else alive. In
solo play you may kill slower than other classes, but using the right build you can level at
a quick pace with minimal risk of death.
2.1. Character Creation
2.1.1. Statistics and Their Role
There are 5 different stats that every class in World of Warcraft uses. For a priest, there
are 3 main stats which you focus your character around. These are Stamina, Intellect and
Spirit.
• Strength (STR) increases your attack power. Priests can and do attack between
spells, but forgoing other stats for strength is not worth the investment.
• Agility (AGI) increases armour, dodge and crit chance, and attack power with
ranged weapons. This is a mostly average stat for any priest. It can increase the damage
of your wand, and combined with Wand Specilization, can be moderately effective. Some
pieces of armour will have this as an additional stat, and this is the only situation where
you should add agility to your gear.
• Stamina (STA) increases your health points. One point of stamina is equal to ten
hit points. This is an essential stat, especially for priests focusing on PvP.
• Intellect (INT) increases your mana, your rate at which you learn weapon skills,
and you chance to score a critical hit with spells. This is the most important stat for
priests, because for priests, mana can equal life. Because you can heal any damage you
take, and buff your hit points with shields, the more mana you have the longer you can do
this for. Try and get equipment with high INT.
• Spirit (SPI) affects health and mana regeneration. This stat is less important than
stamina or intellect, but can be used to great effect in certain builds. 3 points of SPI is
roughly equal to 1 mana regen per tick. When leveling, its often a tactic to swap INT/STA
equipment for INT/SPI equipment. This works particularly well when combined with Spirit
Tap for reducing downtime.
- 2 -

World of Warcraft Priest Guide
2.1.2. Starting Statistics
Below are the starting stats for each race.
Strength Agility Stamina Intellect Spirit
Dwarf 23 19 24 19 20
Human 20 20 20 22 23
Night Elf 24 19 23 17 22
Troll 26 18 23 16 22
Undead 21 24 22 17 22
Starting stats should not really play a role in race choice. Towards the end of the game
items add large amounts of stat points, balancing any difference between initial values.
More discussion on the pros and cons of each stat will be discussed in the equipment
section.
2.1.3. Character Choices
Before you venture into the lands of World of Warcraft you must first create a character.
There are a number of choices you must face when deciding who your priest will be. The
first choice you must make is a server choice. In World of Warcraft there are 3 different
server rulesets. The first is normal, in which you cannot be attacked by player controlled
members of the opposing faction at any time. If you prefer killing monsters to people, then
this is the server for you. The second is roleplaying. These servers encourage absolute
immersion in the world. If you enjoy roleplaying your character then this is the server for
you. The third server type is PvP. If you decide on a PvP server, any members of the
opposing faction will be able to attack you at any time, in contested territory.
Now that you have chosen your server, you have to decide upon a faction. There are two
choices – Alliance and the Horde. The alliance consists of Humans, Dwarves, Gnomes
and Night Elves. The Horde includes Undead, Trolls, Tauren and Orcs.
The next step is to choose a race. The priest class is playable by 5 different races. On
the Alliance side, Humans, Dwarves and Night Elves can play as priests. For the Horde,
- 3 -

World of Warcraft Priest Guide
Undead and Troll races can choose priest. Choosing the correct race is very important
when playing a priest, as you gain access to additional spells and abilities.
2.1.4. Racial Abilities
Dwarf
• Stoneform - active
o While active, grants immunity to Bleed, Poison, and Disease effects. In
addition, Armour increases by 5% and speed reduced to 70% of normal. Lasts 20
sec. - 3 min cooldown
• Gun Specialization - passive
o Dwarves get +5 to Gun Skill
• Frost Resistance - passive
o All Dwarves get +10 Cold Resistance
• Treasure Finding - passive
o Activate to see treasure chests on mini map - lasts until canceled - no
cooldown
Human
• Perception - active
o Activate to increase stealth detection radius by 10 yards - lasts 20 sec - 3
min cooldown
• The Human Spirit - passive
o Increase Spirit by 5%
• Diplomacy - passive
o 10% bonus to faction point gain
• Sword Specialization - passive
o Humans get +5 to Sword skill
• Mace Specialization - passive
o Humans get +5 to Mace skill
- 4 -

World of Warcraft Priest Guide
Night Elves
• Shadowmeld - active
o Activate while immobile and out of combat to enter stealth mode - lasts until
canceled - no cooldown
• Quickness - passive
o Dodge chance increased by 1%
• Wisp Spirit - passive
o Become a wisp when dead with movement speed increase of 50% (25%
faster than normal ghost)
• Nature Resistance - passive
o All Night Elves get +10 Nature Resistance
Trolls
• Berserking - active
o Usable after being the target of a critical hit. Increases melee, ranged and
spell casting speed by 25% but increases all damage taken by 10% for the
duration.
• Regeneration - passive
o 10% health regen bonus, 10% active in combat
• Beast Slaying - passive
o 5% damage bonus to Beasts
• Throwing Weapon Specialization - passive
o +5 to Throwing Weapon skill
Undead
• Will of the Forsaken - active
o Activate to become immune to fear, sleep, and charm effects - lasts 20 sec
- 3 min cooldown
• Cannibalize - active
- 5 -

World of Warcraft Priest Guide
o Increase health regeneration by 200% while consuming a corpse - lasts 15
sec - 3 min cooldown
• Underwater Breathing - passive
o Underwater breath increased by 4x (400%)
• Shadow Resistance - passive
o All Undead get +10 Shadow Resistance
2.1.5. Racial Spells
In addition to these racial abilities, each race gets two specific racial spells. These are
accessable through a quest, which simply involves talking to a specific priest trainer at
your race’s major city.
Dwarf
• Desperate Prayer (available level 10)
o This spell instantly heals the caster for a significant amount. It has no
mana cost so can be used at any time. However, it has a 30 minute cooldown. A
good skill to use in a desperate situation.
• Fear Ward (available level 20)
o Wards any friendly target against fear for 10 minutes. The next fear spell
cast against the target will be resisted. This is a fantastic spell for PvP to use
against other priests and warlocks.
Human
• Desperate Prayer (available level 10)
o This spell instantly heals the caster for a significant amount. It has no
mana cost so can be used at any time. However, it has a 30 minute cooldown. A
good skill to use in a desperate situation
• Feedback (available level 20)
o Enchants the priest to cause feedback on enemy targets. Each successful
spell cast on the priest will drain mana. For each point of mana drained in this way,
the target takes 1 damage. Overall an average spell.
- 6 -

World of Warcraft Priest Guide
Night Elves
• Starshards (available level 10)
o A channeled spell which deals arcane damage over time. The damage
iterations increase as the spell is channeled, with more damage being dealt
towards the end. Can deal a good amount of damage for a holy oriented priest
who does not have access to mind flay, but is not the most mana efficient damage
spell available.
• Elune’s Grace (available level 20)
o Reduces range damage taken by a set amount, and increase dodge for 15
seconds. Has the possibility to be useful in a pinch, but don’t use it against
warriors or overpower will destroy you.
Trolls
• Hex of Weakness (available level 10)
o Weakens the target enemy, reducing physical damage caused, as well as
now reducing healing. An average useful as a starter for young priests, this spell
is now also very effective in the end game , especially in PvP combat. Throw it on
opposition healers when they are alone, or the flag carrier in Warsong to make
your team love you.
• Shadowguard (available level 20)
o The caster is surrounded by shadows. When a melee or ranged attacker
hits the caster, the attacker will be struck for shadow damage. Attackers can only
be damaged once every few seconds. 3 charges. Lasts 10 minutes. A good
source of additional damage which can be cast outside of battle to conserve mana.
This spell works in a similar fashion to the shaman’s lightning shield, but causes no
threat.
Undead
• Touch of Weakness (available level 10)
o The next melee attack by the caster causes additional shadow damage,
and reduces the damage caused by the target for 2 minutes. It’s 64 damage at
level 60, which is negligible. The damage reduction is -20, which is also negligible.
Similar situational use to the Troll ability Hex of Weakness.
• Devouring Plague (available level 20)
- 7 -

World of Warcraft Priest Guide
o Affects the target with a disease that causes shadow damage over 24
seconds. Damage caused by Devouring Plague heals the caster for and equal
amount. This is a great spell for one on one PvP, adding significant damage over
time. A high mana cost makes it restrictive in PvE combat.
2.1.6. Conclusion
Every race is suitable for play as a priest – but some have significant advantages over
others in certain areas.
Dwarves
Dwarves make very good priests for the Alliance. Their racial abilities, while better suited
to some other classes, are nice, especially the active skill Stoneform. Desperate Prayer
can help prevent a group wipe in a nasty situation, and can help escape in PvP. Fear
Ward is among the best of the race specific spells available to the class, especially in end
game PvE situations, against bosses with fear. The best class for PvE priests.
Humans
Humans rank slightly lower than Dwarves as priests. They also have access to Desperate
Prayer, which, as mentioned above, can be very useful at times. The race ability The
Human Spirit is also nice for priests focusing on high amounts of spirit. Overall a good
choice for any priest. Additionally, Diplomacy is extremely useful, as a large portion of the
end game focuses on gaining reputation.
Night Elves
The 2 racial spells available to Night Elves are sub-par, only helping them in limited
situations. However, this is alleviated by their active racial ability Shadowmeld.
Shadowmeld is very useful on PvP servers to escape from gankers or to ambush any by
passers. It can also be used when going AFK to prevent death from creatures or players.
After having Shadowmeld, you will not want to play without it.
- 8 -

World of Warcraft Priest Guide
Trolls
Despite recent buffs, troll priests are still not as effective as undead for the Horde.
Berserking is not bad now, especially when fighting rogues, who crit often, but the other 3
racial skills are lackluster. The racial spells they have access to are also on the lower end
of the scale.
Undead
Undead priests are very strong, far better than their troll counterparts, especially in PvP
combat. Will of the Forsaken is one of the best racial abilities available in the game, and
can turn the tide of battle. They also have access to an additional DoT (damage over
time) spell, that also heals for the damage it deals, which makes them the obvious choice
for the Horde priest.
However, the racial abilities should not be the deciding factor on your class choice.
Choose whatever suits your play style best.
- 9 -

World of Warcraft Priest Guide
3. Skills
3.1. Skill Listing
For a listing of skills, mana cost, range and description by level, see appendix a.
3.2. Discussion
Abolish Disease
At level 32 this skill becomes available as a replacement for Cure Disease. For 40 mana
more than Cure Disease, it abolishes 1 disease every 5 seconds for 20 seconds. Once
this becomes available, this should be your main method of curing diseases.
Cure Disease
Use this skill until abolish disease is available. It’s generally best to save your mana for
heals when in groups, unless it is a disease that causes damage or drains mana. Wait
until after the battle to removes diseases. It’s up to your discretion whether to cure a
disease mid battle.
Dispel Magic
This is a fantastic spell for PvP and a useful spell in some PvE situations. Unless you are
being ganked, you should begin every fight with a dispel magic. All the armour increasing
spells are dispel able, as are health and mana buffs. Potion effects are also dispel able.
Against most classes you will need to cast this twice to remove all the buffs. This can also
be used to remove SW:Pain when fighting priests and a number of Warlock DoT’s. It can
also remove the negative effects of a Shaman’s shocks. Dispel magic now checks that a
target can be dispelled before expending any mana, which has made it even more
powerful.
Divine Spirit
This is an average spell, which has been improved by its new position in the talent tree. It
synergises well with other priest talents also. It is always nice to have an extra buff
available to give to your party. 3 points of Spirit = 1 mana per tick, so at max level this
gives an extra 11 mana per tick. There is no hard or soft cap on spirit, but it is less useful
- 10 -
World of Warcraft Priest Guide
because of 5 second rule, which means mana cannot be regenerated until 5 seconds after
a spell has been cast.
Fade
Fade is an essential spell in any group situation. At higher levels, elite mobs can plow
through your health in seconds. This removes a set amount of agro, hopefully enabling
the tank to resume his role. How Fade works in regards to agro reduction is complicated,
and will be explained in another section. This is a spell that should be on any healer’s
hotbar.
Flash Heal
Flash heal is a fast casting, medium healing spell. It is less mana efficient than Greater
Heal, but can be more effective in situations where damage fluctuates. In the end game
raid instances, Flash Heal will be your primary healing spell in most situations, combined
with Renew. Critical hits and monster damage at that level is so high that tanks can die
before a Greater Heal can be accomplished. You should also use this heal on any other
cloth wearers in your group.
Greater Heal
Greater Heal has a long cast time but heals for a large amount. It is also affected by more
talents than Flash Heal. With all talents applied, Greater Heal is the most mana efficient
heal, assuming no healing is wasted. With the recent talent changes, Greater Heal has
become a lot more attractive as a main healing spell. It now has a 3 second base cast
time, which can be further reduced to 2.5 seconds with talents. It is now possible to use
this as a primary heal, combined mainly with Renew to keep a tank topped up.
Heal
Heal, Lesser Heal and Greater Heal all have the same mana efficiency in terms of health
per mana point, so they are essentially the same spell. Once Greater Heal is available at
level 40, Heal becomes obsolete.
- 11 -

World of Warcraft Priest Guide
Holy Fire
Holy Fire no longer requires a point in the Holy tree, and thus is a stronger spell. It has a
long casting time (which can be reduced with talents). As the damage is split between an
initial burst, then a DoT element over ten seconds, it is more effective as an opener than
when used constantly. Use this when pulling in PvE, and in some PvP builds with certain
specs and gear.
Holy Nova
Now an 11 point talent, Holy Nova is more a fun spell to spam than a useful talent point.
The best element of this spell is that it creates no threat, which means it can be used with
impunity in situations where mana is not a concern (such as the Vael fight). It can also be
useful in battlegrounds, where it is sometimes difficult to use your mana before dying.
Inner Fire
The best armour buff spell in the game in terms of damage reduction. This should more
than double your base armour, which can be helpful for paper-thin priests. The spell now
lasts 10 minutes, but comes with a rather limited 20 charges. The armour value of each
level has been increased, making it a stronger spell on a whole, with a slight down side.
Lesser Heal
Lower rank of Greater Heal with a shorter cast time but the same mana efficiency. Only
useful at low levels.
Levitate
This spell is fun when you first get it at level 34. After a few test runs, it becomes
apparent how useless and restrictive it is. It can be used in instances to get to a better
spot to heal from, but very rarely. Any damage will cancel the effect, as will entering the
water. This would be an average spell if it didn’t have a reagent. Adding in a reagent that
can’t be purchased and can only be found on mobs 20 levels below you when it finally
becomes available, makes this pretty much worthless. It prevents damage when falling
from heights.
- 12 -

World of Warcraft Priest Guide
Mana Burn
In PvE, this spell is rather limited. However, this is an awesome PvP spell, especially
against hybrid classes, like paladins and shamans. Burning their mana not only prevents
them from healing, it damages them at the same time. It is not worth using on mages or
druids, as their mana pools tend to be too large for it to have an effect. Against any hybrid
class, however, it dominates them.
Mind Blast
Mind Blast is the bread and butter damage spell of every priest. It has a short cast time,
fair mana cost, and good damage. The cooldown prevents spamming, but it should be
cast whenever available. It is less mana efficient than Mind Flay, but can critical for a
large amount. The short cast time makes it harder to interrupt when PW:Shield is down.
Mind Control
Mind Control is a fun and useful spell in certain situations. In PvE situations, it can be
used to eliminate 1 or two mobs from linked groups, allowing for easier killing. When Mind
Controlling NPC characters, you gain access to all of their abilities. This can be used to
great effect when you have another healer in the group. By using Mind Control in an
instance, you can eliminate 1 mob from a group. However, when Mind Control breaks,
be aware that agro will go to you, and virtually nothing can remove agro. You need to
have a good group or be significantly higher than the mobs for this to be an effective
strategy.
In PvP this spell can be used in a number of ways. If you DoT an opponent before Mind
Controlling them, they will take damage from your spell while being under your control.
You can also use this to flee, by running an enemy as far away as possible from you, and
then running in the opposite direction. Mind Control can also be used to kill players and
NPCs through the environment. For example, you can throw enemies off the Great Lift in
the Barrens to a guaranteed death. In PvP situations Mind Control rarely lasts more than
15 seconds, and is subject to diminishing returns.
Mind Flay
Mind Flay is the best damage spell available to the shadow specced priest. At max level,
it deals 2.1 damage per point of mana, making it the most mana efficient spell, even
- 13 -

World of Warcraft Priest Guide
beating out a talent-upgraded SW:Pain. It also slows by 50%. The downside of this spell
is that it is channeled, meaning that without a shield up, any mob attacking will interrupt,
reducing the damage caused.
Mind Soothe
A situational use which has undergone many changes since its original version. It now
casts instantly, but still only works on humanoid targets. BEWARE: it can cause agro if
the spell fails, and may wipe your group if you have insufficient +hit or –resist gear.
Mind Vision
This spell has limited applications but can be fun nonetheless. The second level,
available at level 44, significantly improves it, making it castable on creatures out of your
line of sight, up to a maximum range of 10’000 yards. This can be used to great effect for
exploring new areas, by chain casting this on each mob you see until you reach your goal.
Power Word: Fortitude
This is the priest’s best buff spell and adds a significant amount of hit points. At level 60,
it boosts stamina by 54 unbuffed, or 70 points of stamina full buffed through talents. This
equates to an additional 700 hit points for everyone in your party. This should always be
active wherever you go. Try to cast it before traveling to allow your health and mana to
regenerate, as at level 60 it costs a whopping 1695 mana to cast. Also available is Prayer
of Fortitude, which buffs your entire party at the same time, with a reagent cost. Prayer of
Fortitude is only available through a random world drop from high end instances.
Power Word: Shield
This is the class defining spell for the priests, the spell that separates us from the other
healing classes and makes us the best. It is an instant cast shield which absorbs 942
damage at level 60. This spell can help save a party member that would otherwise have
died, allowing a few seconds to cast a healing spell.
It also is useful when soloing for preventing interruption through damage to your spell
casting. Apply this before the battle begins and wait 5-10 seconds to regenerate some
mana. When you cast this spell, the target is also afflicted with the “Weakened Soul”
- 14 -

World of Warcraft Priest Guide
effect, which prevents re-casting within 30 seconds. This time can be reduced through
talents.
Prayer of Healing
Prayer of Healing is another spell which separates the priest from the other healing
classes. While druids have access to a HoT channeled group heal, priests are the only
class with access to an immediate heal for an entire party. This is a fantastic spell to use
when multiple members of your group have sustained damage and are in danger. The
breakpoint for mana efficiency is 3 members. If three people in your group are going to be
healed for the full amount from this spell, use it. Other wise stick to Flash Heal.
Psychic Scream
Psychic Scream is the spell that wins duels for priests. It is the spell that people will
complain about when you beat them over and over again. When you fear someone, you
have 8 seconds (when it is not resisted or breaks early) to heal, deal some damage, or
run away. During this time you should be able to take down a significant chunk of their
life, or put some distance between yourself and a ganker, allowing you to escape. Use
this sparingly in PvE situations, as any mobs that run into other groups will bring adds
when they return.
Renew
Renew is a mana efficient heal over time, which can be used to mitigate damage or heal
while drinking after a battle. Without talents, it is an average spell. With all talents,
applied, it becomes exceptional, healing for an additional 25% and costing 10% less mana
to cast. Use Renew on your tank at the start of a battle to keep his life up, and on any
other classes who take damage momentarily.
Resurrection
A great spell to have in any group situation. This spell brings a dead player back to life
with some health and mana. However, Resurrection cannot be cast in combat. Druids
are the only class who have access to a combat res. If you are looking to save money for
a mount or an equipment upgrade, or are just strapped for cash, leave this skill at base
level. Because it can only be used out of combat, a resurrected player can just drink and
eat to refill his bars.
- 15 -

World of Warcraft Priest Guide
Shackle Undead
This spell is good in limited situations. It is the priest’s only true form of crowd control, and
is very good in areas with lots of Undead, such as Duskwood and the Scholomance
instance. Elsewhere it is useless.
Shadow Protection
This adds a significant amount of shadow resistance and can greatly hamper an enemy
warlock, whom have a number of shadow-based damage spells. Against other priests, it
will be dispelled, and therefore not really effective. Certain mobs also cast shadow (for
example, Shadowcasters in the Zul’furrak instance), so cast this on your party before
engaging them. Otherwise it’s not worth the mana.
Shadow Word: Pain
Shadow Word: Pain (or SW: Pain for short) is the main source of damage for every priest,
in both PvP and PvE damage. It is the best DoT in the game, because it is instant cast,
meaning it can be cast on the run, facing any direction, and has a respectable damage to
mana ratio. Keep this on your opponent at all times in a PvP situation. If you die while
you enemy is at low health, it is likely that SW: Pain will finish them off. The talent
associated with this spill increases its effectiveness and efficiency further, and is worth
taking.
Smite
Smite is a sub-par damage spell which nevertheless remains an essential part of a Holy-
specced priest’s damage arsenal. It is mana inefficient in comparison to other spells, but
is necessary to cast during the cooldown of Mind Blast. A Shadow-specced priest should
never use this spell once Mind Flay is available, and it is not worth purchasing the
advanced levels. Save your money for your mount. Unfortunately for Holy priests, they
have to use it to survive. Because of the structural changes to the Holy tree, smite has
now become more effective on a whole, and can be used to farm in both PvP and PvE.
- 16 -

World of Warcraft Priest Guide
4. Talents Like every class, the priest’s talents are divided into three sections; Holy, Discipline and
Shadow. Unlike many other classes, however, two of the trees are almost mutually
exclusive. Because the priest has been designed to be played as the primary healer in a
group and an effective solo character, there are 2 trees dedicated to those specific roles.
Holy focuses mainly on improving healing spells, while the Shadow tree is majority
focused on doing damage.
The “other” tree, Discipline, is the bread and butter of every priest. Virtually every priest
will call themselves “Holy” or “Shadow” specced, and rarely “Discipline”. However, most
every priest does and should take at least 8 of the Discipline talents.
4.1. Holy Tree
As previously stated, the Holy tree is focused around improving heals, as well as holy
spells. In a strange design choice by Blizzard, the best talents are at the bottom of the
tree. The further up you go, the less powerful the talents become. To be the best
possible healer, the Holy tree is absolutely necessary. However, until the end game
instances, it is entirely possible to be an adequate healer without any points in either Holy
or Discipline. It is much easier on the group and the priest if he or she has spent at least
15 points in the holy tree, however, when it comes to the raid-based instances at level 60.
Most players choose to level as a shadow-specced priest, and the respec at or near 60 to
get some talents in the holy tree.
4.1.1. Talent Tree
Name Tier Description
Improved Renew 1
Rank 1 Increases the amount healed by your Renew spell by 5%.
Rank 2 Increases the amount healed by your Renew spell by 10%.
Rank 3 Increases the amount healed by your Renew spell by 15%.
Healing Focus 1
Rank 1 Gives you a 35% chance to avoid interruption
- 17 -

World of Warcraft Priest Guide
caused by damage while casting any healing spell.
Rank 1 Gives you a 70% chance to avoid interruption caused by damage while casting any healing spell.
Holy Specialization 1
Rank 1 Increases the critical effect chance of your Holy spells by 1%.
Rank 2 Increases the critical effect chance of your Holy spells by 2%.
Rank 3 Increases the critical effect chance of your Holy spells by 3%.
Rank 4 Increases the critical effect chance of your Holy spells by 4%.
Rank 5 Increases the critical effect chance of your Holy spells by 5%.
Spell Warding 2
Rank 1 Reduces all spell damage taken by 2%.
Rank 2 Reduces all spell damage taken by 4%.
Rank 3 Reduces all spell damage taken by 6%.
Rank 4 Reduces all spell damage taken by 8%.
Rank 5 Reduces all spell damage taken by 10%.
Divine Fury 2
Rank 1 Reduces the casting time of your Smite, Holy Fire, Heal and Greater Heal spells by -0.1 sec.
Rank 2 Reduces the casting time of your Smite, Holy Fire, Heal and Greater Heal spells by -0.2 sec.
Rank 3 Reduces the casting time of your Smite, Holy Fire, Heal and Greater Heal spells by -0.3 sec.
Rank 4 Reduces the casting time of your Smite, Holy Fire, Heal and Greater Heal spells by -0.4 sec.
Rank 5 Reduces the casting time of your Smite, Holy Fire, Heal and Greater Heal spells by -0.5 sec.
Holy Nova 3
Rank 1
Causes an explosion of holy light around the caster, causing 28 to 32 Holy damage to all enemy targets within 10 yards and healing all party members within 10 yards for 52 to 60. These effects cause no threat.
Inspiration 3
Rank 1 Increases your target's Armour by 8% for 15 seconds after getting a critical effect from your Flash Heal, Heal, Greater Heal, or Prayer of Healing spell.
- 18 -

World of Warcraft Priest Guide
Rank 2 Increases your target's Armour by 16% for 15 seconds after getting a critical effect from your Flash Heal, Heal, Greater Heal, or Prayer of Healing spell.
Rank 3 Increases your target's Armour by 25% for 15 seconds after getting a critical effect from your Flash Heal, Heal, Greater Heal, or Prayer of Healing spell.
Blessed Recovery 3
Rank 1 After being struck by a melee or ranged critical hit,
heal 8% of the damage taken over 6 seconds.
Rank 2 After being struck by a melee or ranged critical hit, heal 16% of the damage taken over 6 seconds.
Rank 3 After being struck by a melee or ranged critical hit, heal 25% of the damage taken over 6 seconds.
Holy Reach 4
Rank 1
Increases the range of your Smite and Holy Fire
spells and the radius of your Prayer of Healing and
Holy Nova spells by 10%.
Rank 2 Increases the range of your Smite and Holy Fire spells and the radius of your Prayer of Healing and Holy Nova spells by 10%.
Searing Light 4 Requires 5 points in Divine Fury
Rank 1 Increases the damage of your Smite and Holy Fire spells by 5%.
Rank 2 Increases the damage of your Smite and Holy Fire spells by 10%.
Improved Healing 4
Rank 1 Reduces the Mana cost of your Lesser Heal, Heal, and Greater Heal spells by -5%.
Rank 2 Reduces the Mana cost of your Lesser Heal, Heal, and Greater Heal spells by -10%.
Rank 3 Reduces the Mana cost of your Lesser Heal, Heal, and Greater Heal spells by -15%.
Improved Prayer of Healing 5
Rank 1 Reduces the Mana cost of your Prayer of Healing spell by 10%.
Rank 2 Reduces the Mana cost of your Prayer of Healing spell by 20%.
Rank 1 Increases the damage of your Smite and Holy Fire spells by 5%.
Spirit of Redemption 5
- 19 -

World of Warcraft Priest Guide
Rank 1
Upon death, the priest becomes the Spirit of Redemption for 10 seconds. The Spirit of Redemption cannot move, attack, be attacked or targeted by any spells or effects. While in this form the priest can cast any healing spell free of cost. When the effect ends, the priest dies.
Spiritual Guidance 5
Rank 1 Increases spell damage and healing by up to 5% of your total Spirit.
Rank 2 Increases spell damage and healing by up to 10% of your total Spirit.
Rank 3 Increases spell damage and healing by up to 15% of your total Spirit.
Rank 4 Increases spell damage and healing by up to 20% of your total Spirit.
Rank 5 Increases spell damage and healing by up to 25% of your total Spirit.
Spiritual Healing 6
Rank 1 Increases the amount healed by your healing spells by 2%.
Rank 2 Increases the amount healed by your healing spells by 4%.
Rank 3 Increases the amount healed by your healing spells by 6%.
Rank 4 Increases the amount healed by your healing spells by 8%.
Rank 5 Increases the amount healed by your healing spells by 10%.
Lightwell 7 Requires 1 point in Spirit of Redemption
Rank 1
Creates a holy Lightwell near the priest. Friendly targets can click the Lightwell to restore 800 health over 10 seconds. Being attacked cancels the effect. Lightwell lasts for 3 minutes or 5 charges.
4.1.2. Talent Discussion
Improved Renew
Improved Renew is a great talent, especially useful because it is situated on tier 1 of the
talent tree. Combined with Spiritual Healing, Renew heals for an extra 25% every tick, a
significant amount. A fully talent-improved Renew becomes the second most effective
heal in terms of health per mana spent, only behind Greater Heal. Renew is a great spell
to use on tanks before battle, to help mitigate some of the initial damage, and the low
- 20 -

World of Warcraft Priest Guide
mana cost makes it useful to use on any of the other party members who happen to take
some damage, but are not in immediate danger.
Holy Specialization
Combined with a bonus from Intellect, this should take your critical chance to around 10%.
This is another good talent situated so low in the tree, but is overshadowed by its rival
Improved Renew + Healing Focus. Critical heals can be lifesavers, but are generally too
unreliable to be useful, and in most cases the extra healing will go to waste. It is more
effective to those who like to use Flash Heal over Greater Heal, because the criticals have
more chance of healing for the full amount. Healing crits have been fixed recently, making
this a more viable talent, but still underwhelming.
Healing Focus
This is one of the best talents in the game, and should be taken by any priest regardless
of what their role will be. It costs only 2 talent points, is situated on the first tier, and is a
huge boost to effectiveness. Brilliant in both PvE and PvP. A must have talent.
Spell Warding
This talent is not a bad alternative to Divine Fury or a full Tier 1 build in some
circumstances. It can come in handy in PvP against casters. However, the strength of
priests against most of the casting classes, makes this talent less attractive. Against
mages, for example, the reduction is not enough to prevent instant death from a Trinket
mage who blows cooldowns. Perhaps more helpful against hybrids, such as shaman and
paladins.
Divine Fury
This is quite a useful talent for those spending points past the first tier. It affects both
healing and the damage dealing role of a priest, so it gets bonus points there.
Additionally, it helps in an area that holy priests usually suffer; dealing damage. It also
makes Greater Heal a 2.5 second cast, making it extremely useful as a main healing spell.
Blessed Recovery
A good talent on paper that is unfortunately let down in practice. The way the heal is
calculated makes this talent sub-par. The amount to be healed depends on the most
- 21 -

World of Warcraft Priest Guide
recent critical hit, rather than the highest, so huge crits can be overwritten by smaller
ones. This is especially noticable against rogues, who crit often, with large and small
amounts.
Inspiration
This talent is average at best. In theory, it can be very useful. With a group of priests all
healing the one tank, Inspiration could be applied almost continually. However, it is rare
to find one priest with this talent, let alone an entire group devoted to it. Another downside
to this talent is the fact that armour in high numbers is affected by diminishing returns,
meaning some of the effect of his talent will be wasted on your plate-wearing tanks.
Holy Reach
Talents that increase range are generally considered essential in most builds. Holy
Reach is not essential in the sense that Shadow Reach is, but it is still a nice talent to
have. If you plan on doing any PvP as a Holy priest, you should definitely consider this
talent. Otherwise, it becomes less attractive.
Improved Healing
This is the point in the tree when the effectiveness of the talents becomes questionable.
15% reduced mana cost is a significant amount, and further improves and already very
mana efficient spell, but using Greater Heal over Flash Heal can be a risk. The
effectiveness of this talent (and the entire tree) has been greatly improved by the
reduction in cast time of Greater Heal. This now synergises very well with Divine Fury,
and Greater Heal can be used as an effective main heal. A worthwhile talent for healing
priests.
Searing Light
Useful only if you intend to PvP, or have no ability to make cash other than through
farming. A smite based damage build can be fun in both PvP and PvE, and although not
as powerful as a Shadow priest, is till a viable alternative. I would suggest taking this if
you ever need to farm or want to PvP, and you have spent the points to get this far in the
tree.
- 22 -

World of Warcraft Priest Guide
Spirit of Redemption
This talent is extremely powerful in certain situations, and you will see a lot of angels
appearing, especially in battlegrounds. This is the ultimate talent for PvP healers, as it
can change the tide of battle. The most effective way to overcome an opposition force is
to remove their healer, but with this talent you will have 10 free seconds of healing ability
after dying. As priests are often the first target, this can be a great way to change the tide
of battle.
Spiritual Healing
Every healer should have this talent. 10% extra to every single heal you make separates
you from the wannabe Shadow priests who think they can heal as well as you.. This is an
essential talent for any healer. It now requires a heavier talent investment that previously,
but that has not reduced its effectiveness as a healing talent. If you have spent the points
to get this far, take this talent.
Lightwell
A talent of questionable effect, and with the structure of the trees, not really worth an
investment. By spending a point here, you will miss out on other, stronger 21 point
talents. Of possible use if you are designated to healing rogues in raids, for example.
- 23 -
World of Warcraft Priest Guide
4.2. Discipline Tree
The discipline tree is the all-round tree useful for every priest. It is focused on improving
efficiency and mana, as well as boosting many often-used skills. I would recommend
every priest spend at least 8 points in the tree to get Improved Power Word: Shield as
quickly as possible. This talent makes a lot of difference. The most effective healing build
actually has more points in the Discipline tree than the Holy tree.
4.2.1. Talent Tree
Name Tier Description Unbreakable Will 1
Rank 1 Increases your chance to resist Stun, Fear, and Silence effects by 3%.
Rank 2 Increases your chance to resist Stun, Fear, and Silence effects by 6%.
Rank 3 Increases your chance to resist Stun, Fear, and Silence effects by 9%.
Rank 4 Increases your chance to resist Stun, Fear, and Silence effects by 12%.
Rank 5 Increases your chance to resist Stun, Fear, and Silence effects by 15%.
Wand Specialization 1
Rank 1 Increases your damage with Wands by 5%.
Rank 2 Increases your damage with Wands by 10%.
Rank 3 Increases your damage with Wands by 15%.
Rank 4 Increases your damage with Wands by 20%.
Rank 5 Increases your damage with Wands by 25%.
Silent Resolve 2
Rank 1 Reduces the threat generated by your spells by 4%.
Rank 2 Reduces the threat generated by your spells by 8%.
Rank 3 Reduces the threat generated by your spells by 12%.
Rank 4 Reduces the threat generated by your spells by 16%.
Rank 5 Reduces the threat generated by your spells by 20%.
Martyrdom 2
Rank 1 Gives you a 50% chance to gain the Focused Casting effect that lasts for 6 seconds after being the victim of a critical strike. The Focused Casting effect prevents you
- 24 -

World of Warcraft Priest Guide
from losing casting time when taking damage.
Rank 2
Gives you a 100% chance to gain the Focused Casting effect that lasts for 6 seconds after being the victim of a critical strike. The Focused Casting effect prevents you from losing casting time when taking damage.
Improved Power Word: Shield 2
Rank 1 Increases the damage absorbed by your Power Word: Shield by 5%.
Rank 2 Increases the damage absorbed by your Power Word: Shield by 10%.
Rank 3 Increases the damage absorbed by your Power Word: Shield by 15%.
Improved Power Word: Fortitude 2
Rank 1 Increases the effect of your Power Word: Fortitude and Prayer of Fortitude spells by 15%.
Rank 2 Increases the effect of your Power Word: Fortitude and Prayer of Fortitude spells by 30%.
Inner Focus 3
Rank 1 When activated, reduces the Mana cost of your next spell by -100% and increases its critical effect chance by 25% if it is capable of a critical effect.
Meditation 3
Rank 1 Allows 3% of your Mana regeneration to continue while casting.
Rank 2 Allows 6% of your Mana regeneration to continue while casting.
Rank 3 Allows 9% of your Mana regeneration to continue while casting.
Improved Inner Fire 4
Rank 1 Increases the effects of your Inner Fire spell by 10%.
Rank 2 Increases the effects of your Inner Fire spell by 20%.
Rank 3 Increases the effects of your Inner Fire spell by 30%.
Mental Agility 4
Rank 1 Reduces the mana cost of your instant cast spells by 2%.
Rank 2 Reduces the mana cost of your instant cast spells by 4%.
Rank 3 Reduces the mana cost of your instant cast spells by 6%.
Rank 4 Reduces the mana cost of your instant cast spells by 8%.
Rank 5 Reduces the mana cost of your instant cast spells by 10%.
Improved Mana Burn 4
- 25 -

World of Warcraft Priest Guide
Rank 1 Reduces the casting time of your Mana Burn spell by -0.2 secs.
Rank 2 Reduces the casting time of your Mana Burn spell by -0.5 sec.
Mental Strength 5
Rank 1 Increases your maximum Mana by 2%.
Rank 2 Increases your maximum Mana by 4%.
Rank 3 Increases your maximum Mana by 6%.
Rank 4 Increases your maximum Mana by 8%.
Rank 5 Increases your maximum Mana by 10%.
Divine Spirit 5 Requires 4 points in Meditation
Rank Holy power infuses the target, increasing their Spirit by 17 for 30 minutes.
Force of Will 6
Rank 1 Increases your spell damage by 1% and the critical strike chance of your offensive spells by 1%.
Rank 2 Increases your spell damage by 2% and the critical strike chance of your offensive spells by 2%.
Rank 3 Increases your spell damage by 3% and the critical strike chance of your offensive spells by 3%.
Rank 4 Increases your spell damage by 4% and the critical strike chance of your offensive spells by 4%.
Rank 5 Increases your spell damage by 5% and the critical strike chance of your offensive spells by 5%.
Divine Spirit 7 Requires 5 points in Mental Strength
Rank 1 Infuses the target with power, increasing their spell damage and healing by 20%. Lasts 15 seconds.
4.2.2. Talent Discussion
Unbreakable Will
This is a fantastic talent that should be taken by every priest. Resisting stun is essential
to beat any rogue in PvP, and in PvE situations, Silence and Fear can really cause bad
things for the party. It’s a 5 point wonder talent, much better than silent resolve, and
taking 5 points allows you to access the all important second-tier talents in the Discipline
tree.
- 26 -

World of Warcraft Priest Guide
Wand Specialization
This talent almost seems thrown in because Blizzard could not be bothered to think of
anything else. Wands can make up a good part of the DpS of a soloing priest, particularly
those not specced in the Shadow tree. However, boosting their damage by 25% for the
cost of 5 talent points is not worth it in any way. There are much better ways to increase
damage in all three trees. Don’t waste any talent points on this spell.
Silent Resolve
This talent has been combined with Subtlety from the Holy tree to now reduce threat from
all spells cast by 20% at max level. It is now an excellent spell for healers, and should be
taken by most people who expect to heal in the end game.
Martyrdom
With only 2 talent points invested, Martyrdom allows you to ignore damage interruptions
after being the victim of a critical strike. The talent in itself is not great – critical strikes
occur to rarely to be relied on, and when they do, the can still occur when you don’t need
the focused casting effect. However, spending two talent points here unlocks the
Focused Casting talent, which is quite useful in many situations. Take this talent if you
intend to take Focused Casting. Otherwise, skip it.
Improved Power Word: Shield
This no longer reduces the recast downtime associated with the spell. There is now a 15
second Weakened Soul effect, without talents. Instead, this talent now buffs the damage
absorbed. While not as essential, it is still a good talent, and is the choice here for all
those not engaging in PvE healing.
Improved Power Word: Fortitude
This is a significant buff to an already good skill, and is a talent worth taking. The only
situation where I would suggest not taking this skill is if you are always going to be
grouped with another priest who can buff you with the improved skill. Otherwise, more
health is always a nice thing to have. Take this talent if you intend to head further down
the Discipline tree. The only reason you should not take this talent is if you cannot spare
the 2 points.
- 27 -

World of Warcraft Priest Guide
Inner Focus
I really like Inner Focus. It is useful in many situations. For soloing, it can help get off that
last Mind Blast or Psychic Scream to finish off a mob when you are completely out of
mana. It really shines in group situations though, as a last ditch heal to save your party. I
recommend saving it for Prayer of Healing, which costs lots of mana and is not very
efficient. The 25% critical bonus also means that you should get 1 crit out of you party.
Meditation
Meditation is good to take if you plan on healing through long raid battles like Onyxia or
the Molten Core. These can last for long periods, making mana regeneration essential. If
you have 300 spirit, you should be regenerating 100 mana/tick when not casting. That is
15 mana/tick during casting and during the 5 second rule. The 5 second rule is that no
mana can regenerate during the period of 5 seconds after a spell is cast. While this talent
is not superb, it should be taken if you plan to heal effectively.
Improved Inner Fire
Inner Fire is a good spell because it adds a significant amount of armour for little mana.
However, it doesn’t do enough to warrant improvement and an investment of 3 talent
points which would be better spent elsewhere. You only have 51 talent points to spend,
and it is better to save the three from here and put them into Mental Agility or anything
else, really. At level 60, armour should be around 2000 with gear. Barely enough for any
damage reduction at all. You are better off trying to avoid damage than trying to minimize
it when getting hit. In addition, the armour bonus has been reduced to 30% from 45%,
making this talent less attractive.
Mental Agility
This is another great talent that makes the Discipline line so strong. There are a large
number of instant cast spells available to the priest, and this makes all of them more
efficient. PW: Shield, Renew, and SW: Pain are the main spells that benefit from this
talent, but many more are also effected. This talent also makes you a more efficient
healer by reducing the mana cost of Renew and PW: Sheild. With Improved Renew,
Spiritual Healing and Mental Agility, Renew is the second most mana efficient heal
available.
- 28 -

World of Warcraft Priest Guide
Mental Strength
This is another strong talent in the Discipline tree, well worth investing 15 points to access
it and then another 5 to maximize it. 10% mana at level should be between 600 and 800,
depending on gear, which is a significant amount. If you plan on being a healer, you
should take this talent. Shadow priests can also ignore some damage potential in favour
of better survivability by taking this talent. Worth the investment.
Improved Mana Burn
I like this much more than Improved Inner Fire. Mana Burn is very slow to cast with a 3
second casting time. With only 2 talent points, you can reduce that by .5 seconds. This
talent will give you the edge in PvP against other priests, and also against any hybrid
classes. It can also be useful in PvE situations for preventing a mob from healing or
casting status effects by draining their mana. If you have access to it, I would suggest
taking it.
Divine Spirit
Divine Spirit, now requiring 21 talent points as opposed to 31, is a much more attractive
talent. It synergises well with the Holy tree, and is a useful buff for healing. It is also
easier to cast now, with Prayer of Spirit an available drop. If you are going to spend the
points to get this far into the tree, it is worth dropping one in here for the free boost to
spirit.
Force of Will
Force of will is a good talent for soloing Discipline-heavy priests, but not really worth the
talent investment. If it were lower down the tree it would be more useful, but having it so
high means that it costs at least 30 talent points to be able to max it, talents which could
be better spent elsewhere. If you really need a damage boost and have no where else to
spend the points, get it. Otherwise, ignore it.
Power Infusion
This is an exceptional talent, which makes the discipline tree one of the most useful and
versatile trees in the game. It can be used on any target, not just yourself, which is where
- 29 -

World of Warcraft Priest Guide
its strength lies. This is a stronger talent than Lightwell, and is comparable in power to
Shadowform. This will get a lot of use, if you choose it, in both PvP and PvE. A build with
31 in Discipline is now my favoured build, simply for versatility and overall strength.
- 30 -

World of Warcraft Priest Guide
4.3. Shadow Tree
The Shadow tree contains most of the damage-increasing talents available to the priest.
It is the most well constructed tree, with very few useless talents. It is definitely the tree
you should take if you intend to solo a lot, or if PvP is the final aim for your priest. With
the right talents, you can achieve 35% bonus damage to all your Shadow spells, as well
as having access to Silence and Vampiric Embrace, which heals for each point of damage
you do. Most players take Shadow as their main tree while leveling, and then re-spec for
healing in end game instances.
4.3.1. Talent Tree
Name Tier Description Spirit Tap 1
Rank 1
Gives you a 20% chance to gain a 100% bonus to your Spirit after killing a target that yields experience. For the duration, your Mana may regenerate at a 50% rate while casting. Lasts 15 seconds.
Rank 2
Gives you a 40% chance to gain a 100% bonus to your Spirit after killing a target that yields experience. For the duration, your Mana may regenerate at a 50% rate while casting. Lasts 15 seconds.
Rank 3
Gives you a 60% chance to gain a 100% bonus to your Spirit after killing a target that yields experience. For the duration, your Mana may regenerate at a 50% rate while casting. Lasts 15 seconds.
Rank 4
Gives you a 80% chance to gain a 100% bonus to your Spirit after killing a target that yields experience. For the duration, your Mana may regenerate at a 50% rate while casting. Lasts 15 seconds.
Rank 5
Gives you a 100% chance to gain a 100% bonus to your Spirit after killing a target that yields experience. For the duration, your Mana may regenerate at a 50% rate while casting. Lasts 15 seconds.
Blackout 1
Rank 1 Gives your Shadow damage spells a 2% chance to stun the target for 3 seconds.
Rank 2 Gives your Shadow damage spells a 4% chance to stun the target for 3 seconds.
Rank 3 Gives your Shadow damage spells a 6% chance to stun the target for 3 seconds.
Rank 4 Gives your Shadow damage spells a 8% chance to stun the
- 31 -

World of Warcraft Priest Guide
target for 3 seconds.
Rank 5 Gives your Shadow damage spells a 10% chance to stun the target for 3 seconds.
Shadow Affinity 2
Rank 1 Reduces the threat generated by your Shadow spells by -8%.
Rank 2 Reduces the threat generated by your Shadow spells by -16%.
Rank 3 Reduces the threat generated by your Shadow spells by -25%.
Improved Shadow Word: Pain 2
Rank 1 Increases the duration of your Shadow Word: Pain spell by 3.0 sec.
Rank 2 Increases the duration of your Shadow Word: Pain spell by 6.0 sec.
Shadow Focus 2
Rank 1 Reduces your target's chance to resist your Shadow spells by 2%.
Rank 2 Reduces your target's chance to resist your Shadow spells by 4%.
Rank 3 Reduces your target's chance to resist your Shadow spells by 6%.
Rank 4 Reduces your target's chance to resist your Shadow spells by 8%.
Rank 5 Reduces your target's chance to resist your Shadow spells by 10%.
Improved Psychic Scream 3
Rank 1 Reduces the cooldown of your Psychic Scream spell by -2.0 sec.
Rank 2 Reduces the cooldown of your Psychic Scream spell by -4.0 sec.
Improved Mind Blast 3
Rank 1 Reduces the cooldown of your Mind Blast spell by -0.5 sec.
Rank 2 Reduces the cooldown of your Mind Blast spell by -1.0 sec.
Rank 3 Reduces the cooldown of your Mind Blast spell by -1.5 sec.
Rank 4 Reduces the cooldown of your Mind Blast spell by -2.0 sec.
Rank 5 Reduces the cooldown of your Mind Blast spell by -2.5 sec.
Mind Flay 3
Rank 1 Assault the target's mind with Shadow energy, causing 75
- 32 -

World of Warcraft Priest Guide
Shadow damage over 3 seconds and slowing the target to 50% of their movement speed.
Improved Fade 4
Rank 1 Decreases the cooldown of your Fade ability by 3 sec.
Rank 2 Decreases the cooldown of your Fade ability by 6 sec.
Shadow Reach 4
Rank 1 Increases the range of your Shadow damage spells by 6%.
Rank 2 Increases the range of your Shadow damage spells by 13%.
Rank 3 Increases the range of your Shadow damage spells by 20%.
Silence 5 Requires 2 point(s) in Improved Psychic Scream.
Rank Silences the target, preventing them from casting spells for 5 seconds.
Shadow Weaving 4
Rank 1
Your Shadow damage spells have a 20% chance to cause your target to be vulnerable to Shadow damage. This vulnerability increases the Shadow damage dealt to your target by 3% and lasts 15 seconds. Stacks up to 5 times.
Rank 2
Your Shadow damage spells have a 40% chance to cause your target to be vulnerable to Shadow damage. This vulnerability increases the Shadow damage dealt to your target by 3% and lasts 15 seconds. Stacks up to 5 times.
Rank 3
Your Shadow damage spells have a 60% chance to cause your target to be vulnerable to Shadow damage. This vulnerability increases the Shadow damage dealt to your target by 3% and lasts 15 seconds. Stacks up to 5 times.
Rank 4
Your Shadow damage spells have a 80% chance to cause your target to be vulnerable to Shadow damage. This vulnerability increases the Shadow damage dealt to your target by 3% and lasts 15 seconds. Stacks up to 5 times.
Rank 5
Your Shadow damage spells have a 100% chance to cause your target to be vulnerable to Shadow damage. This vulnerability increases the Shadow damage dealt to your target by 3% and lasts 15 seconds. Stacks up to 5 times.
Vampiric Embrace 5
Rank 1 Afflicts your target with Shadow energy that causes all party members to be healed for 20% of any Shadow damage you deal for 60 seconds.
Improved Vampiric Embrace 5 Requires 1 point in Vampiric Embrace.
Rank 1 Increases the percentage healed by Vampiric Embrace by an additional 5%
Rank 2 Increases the percentage healed by Vampiric Embrace by an additional 10%
- 33 -

World of Warcraft Priest Guide
Darkness 6
Rank 1 Increases your Shadow spell damage by 2%.
Rank 2 Increases your Shadow spell damage by 4%.
Rank 3 Increases your Shadow spell damage by 6%.
Rank 4 Increases your Shadow spell damage by 8%.
Rank 5 Increases your Shadow spell damage by 10%.
Shadowform 7 Requires 1 point in Vampiric Embrace
Rank 1
Assume a Shadowform, increasing your Shadow damage by 15% and reducing Physical damage done to you by -15%. However, you may only cast Shadow and Discipline spells while in this form.
4.3.2. Talent Discussion
Spirit Tap
Spirit Tap is a great talent, virtually essential for any soloing priest. It doubles your regen
after a kill, for a duration of 15 seconds – which is generally long enough for you to be at
full mana after a fight. Moreover, during that 15 seconds, your mana regenerates at 50%
of this rate during casting, which is effectively your natural mana regeneration. This
means that you can chain mobs one after the other without taking a break. This helps
when a pull goes wrong, or when a wandering mob joins the fight, or even when fighting
for limited mobs. With Spirit Tap and high spirit you can chain quite a few mobs before
needing to drink, something other priests can not do.
Blackout
Stuns are very strong in World of Warcraft. They allow you time to recover, time to get off
some damage, or time to heal yourself. More importantly for PvP, they confuse the
enemy. Few people expect to be stunned by a priest at range. PvP is where this talent
shines, and is essential. The stun coming at an opportune moment can turn the tide of
battle your way.
Be aware that only the first tick of any DoT can trigger the stun. This applies to Mind Flay
and Shadow Word: Pain. Also be aware that rank 2 is currently bugged, and does not in
fact ever trigger. I advice getting to rank 3 as quickly as possible.
- 34 -

World of Warcraft Priest Guide
Shadow Affinity
While reduced agro is good for some classes, for priests it is a waste of talent points. You
won’t have the opportunity to be a damage dealer in groups because you will be expected
to heal. Don’t take this talent unless you know you are going to be grouping the entire
time with a warrior, for example. It’s useless in solo, and in a group, you shouldn’t be
dealing any damage anyway.
Improved Shadow Word: Pain
This is a great talent. Shadow Word: Pain is our best damage spell, and the best DoT in
the game. It’s instacast, meaning it can be cast on the run, is improved by shadow
damage talents, and is very mana efficient. Increasing its length only makes sense.
There is a common misconception about this talent, that it actually reduces the damage
per tick by extending the duration. This is not the case. You get two more damage
iterations for the same mana cost by maxing this talent. The damage per tick stays the
same. You will notice a difference – it won’t run out before the end of a battle if you have
this talent.
Shadow Focus
Shadow Focus is a talent worth investing some points in. The generally regarded wisdom
is that 3/5 talent points is the way to go with Shadow Focus. This reduces resist chance
by 6%. At this level, I never had resists on mobs 2 levels higher than me. Mobs 3 levels
higher resisted less than they normally would, making them solo-able. More importantly,
3/5 talent points allows you to put 2 into Improved Shadow Word: Pain and not have any
wasted talents.
Improved Psychic Scream
On paper, this doesn’t seem like the best talent. Psychic Scream has a 30 second
cooldown, this talent reduces it to 26 seconds. In practice, this is a great talent for two
reasons – it means you can recast Psychic Scream sooner, essential in PvP situations. It
also grants access to Silence, one of the best spells available to a priest. If you intend on
spending at least 21 point in the Shadow tree to access silence, you should take this
talent. If you only want to go up to Mind Flay, save your points.
- 35 -

World of Warcraft Priest Guide
Improved Mind Blast
Mind Blast is the priest’s best damage spell. It has a short cast time and does good
damage. The only downside is the cooldown. This talent reduces that by a significant
amount at level 5, reducing it to a 5.5 second cast. This means you have 5.5 seconds
between casts to wait, which isn’t too bad. You need to take this talent if you intend to
PvP a lot. Mind Blast is the best spell to use in a PvP situation because it isn’t channeled
(like Mind Flay) and can crit.
Mind Flay
Mind Flay is an awesome 1-point wonder talent. It is the most mana efficient damage
spell available to the priest, and can do significant damage when combined with shadow
talents. To top it off, it has a slow effect, preventing running mobs from reaching help. I
would recommend getting this talent as soon as possible. It makes soloing a lot easier,
and reduces downtime greatly (because you will be using less mana).
Improved Fade
In my mind this talent is worthless. Fade, as far as it is understood, reduces a set amount
of agro instantly from the priest. During the period that Fade is active, healing and
damage still causes agro, so increasing the duration really does not help much, if at all.
You would be better suited spending these 2 points in another tree than putting them
here. More on how agro and Fade works will appear later.
Shadow Reach
I really like Shadow Reach. Distance is an important thing in both PvE and PvP. In PvE,
the extra 5 or so yards Shadow Reach affords you can make pulling a lot easier. You can
get off 2 Mind Flays with good timing before a mob even reaches you. The less a mob is
hitting you, the better, and the further away they are, the better. This talent also helps kite
in a PvP situation. You can keep your enemies away from you using Mind Flay and
Psychic Scream.
Silence
The simple fact is: Silence destroys all casters. 5 seconds is a long time without any
heals or damage, and more so, it often confuses your PvP opponents. Cast this on a
Mage in the middle of his casting animation and it you can get at least 8 seconds of free
- 36 -

World of Warcraft Priest Guide
time (casting time + silence time). You can also use it on Druids/Shamans/Paladins to
prevent healing. With Silence, you have 2 ways to interrupt spell casting, which gives
every caster a hard time against you.
Shadow Weaving
This is a great talent for adding damage once you have it maxed. After 5 casts your
damage will be increased by 15%. It has 2 downsides – it requires some time to become
fully activated, and it can be dispelled. However, this is worth maxing if you are going to
spend the points to get to 31
Vampiric Embrace
Vampiric Embrace is an excellent talent for any soloist. It generally cannot heal enough to
keep you at full health, but what it is best used for is damage mitigation. Combined with
Renew or Shadowform, Vampiric Embrace can reduce the damage take to an insignificant
amount. It also helps when taking on multiple mobs – it has a 10s recast, so apply it
combined with a SW: Pain on the second mob to help heal while you defeat the first. It
also has a small mana cost, so it should be used in any situation.
Improved Vampiric Embrace
Adds a small amount of additional healing to an already effective spell. This talent isn’t
spectacular, but may be worth taking for pure PvP builds that are heavily shadow focused.
Vampiric Embrace is a talent that can help decide battles, and improving it is not a bad
thing at all.
Darkness
Unlike Shadow Weaving, this is a passive skill, and does not require activation and cannot
be dispelled. It is a great boost to damage and any Shadow specced priest who has
spent the points to access this far down the tree should take this talent.
Shadowform
Shadowform adds a significant amount of damage (15%) and also reduces damage taken
by the same amount. On the downside, you can only cast Shadow and Discipline spells
while in this form. This is the best soloing talent. It makes a huge difference to kill speed
- 37 -

World of Warcraft Priest Guide
and damage taken. However, for PvP priests, it is not worth taking. In PvP, the priest’s
number one strength is his ability to heal at any time. You can’t kill fast enough, even in
Shadowform, to not have to heal. The extra damage and damage mitigation afforded by
this spell is not worth sacrificing the versatility of having a number of different healing
spells available. Definitely use it for PvE though.
- 38 -
World of Warcraft Priest Guide
5. Talent Builds
Because two of the three talent trees are entirely opposing (Shadow and Holy), the priest
has very little in the form of diversity. There are 2 functions required of the priest: healing
your party members, and killing things in solo play. There are also 1 talent tree devoted to
each aspect, meaning you will have to choose one tree that suits your play style better.
Fortunately in the World of Warcraft respeccing your talents is available. However, it
costs a fee, which increases every time. It is best to know exactly what you want your end
game talents to look like before you start allocating them. In this fashion, all the following
talent trees are based around level 60 characters.
I would recommend that everyone focus on the Shadow tree until at least level 50. There
is absolutely no reason not to. You do not need the extra healing power afforded by the
Holy line until the most difficult instances, which all occur at level 60. The only advantage
a Holy-specced priest has in leveling over a Shadow priest is the ability to do instances at
a lower level than would be the norm.
I would also suggest every priest max Spirit Tap as soon as possible. This will make
soloing a lot less of a chore. The majority of the game is solo-able, and most players
spend the majority of their time out of groups in the early stages. Spirit Tap doubles your
mana regen after a battle, reducing downtime significantly.
Another talent I feel is essential for very priest is Improved Power Word: Shield. This
makes soloing, healing, and PvP much easier. It really is one of the best talents available.
After that, the rest is up to you. Decide what you want to do with your priest, and go with
it.
5.1. Shadow Leveling Build
Shadow Tree
- 39 -

World of Warcraft Priest Guide
Spirit Tap
Rank: 5/5
Gives you a 100% chance to gain a 100% bonus to your Spirit after killing a target. For the
duration mana renegnerates at a 50% rate while casting. Lasts 15 secs.
Improved Shadow Word Pain
Rank: 2/2
Increases the duration of your Shadow Word: Pain spell by 6 seconds.
Shadow Focus
Rank: 3/5
Reduces your targets chance to resist your Shadow spells by 6%.
Improved Psychic Scream
Rank: 2/2
Reduces the cooldown timer of Psychic Scream by 4 seconds.
Improved Mind Blast
Rank: 4/5
Reduces the cooldown of your Mind Blast spell by 2 seconds.
Mind Flay
Rank: 1/1
Assault the target's mind with Shadow energy causing 75 damage over 3 seconds and
slows the target to 50% of their movement speed.
Shadow Reach
Rank: 3/3
Increases the range of your Shadow damage spells by 20%.
- 40 -

World of Warcraft Priest Guide
Silence
Rank: 1/1
Silences the target, preventing them from casting spells for 5 seconds.
Shadow Weaving
Rank: 5/5
Shadow damage spells have a 100% chance to cause your target to be vulnerable to
Shadow damage.
Vampiric Embrace
Rank: 1/1
Afflicts your target with Shadow energy that causes all party members to be healed for
20% of any Shadow damage you deal for 1 minute.
Darkness
Rank: 5/5
Increases your Shadow spell damage by 10%.
Shadowform
Rank: 1/1
Assume a Shadowform, increasing your Shadow damage by 15% and reducing Physical
damage done to you by 15%. However you may only cast Shadow and Discipline spells
while in this form.
Discipline Tree
Wand Specialisation
Rank: 5/5
Increases the damage with Wandsby 25%.
Improved Power Word: Shield
Rank: 3/3
- 41 -

World of Warcraft Priest Guide
Increases the damage abosrobed by your Power Word: Shield by 15%.
Improved Power Word: Fortitude
Rank: 2/2
Increases the effect of your Power Word: Fortitude spell by 30%.
Unbreakable Will
Rank: 5/5
Increases your chance to resist Stun, Fear, and Silence effects by an additional 15%.
Martyrdom
Rank: 2/2
Gives you a 100% chance to gain the Focused Casting effect that lasts for 6 seconds after
being the victim of a melee or ranged critical strike. The Focused Casting effect prevents
you from losing casting time when taking damage and increases resistance to Interrupt
effects by 20%.
Inner Focus
Rank 1/1
When activated, reduces the Mana cost of your next spell by 100% and increases its
critical effect chance by 25% if it is capable of a critical effect.
This build is focused around leveling and kill speed, combined with mana efficiency and
versatility. All of the strong Shadow talents are here: Silence for casters, Shadowform for
damage, and enough depth in the Discipline tree to allow some versatility when it comes
to healing and soloing. Improved Mind Blast is 4/5 because it allowed advancement to tier
4 without taking Improved Fade (which is not worth it). It’s not maxed because I feel a 2
second reduction is satisfactory. This is a great talent build to use while you are leveling.
It has the essential damage and mana talents, as well as Improved Power Word: Sheild
for survivability.
As for talent order, Spirit Tap should be taken first, followed by improved wands. This
may seem crazy, but wands are an effective way to kill mana-free, and allow you to regen
- 42 -

World of Warcraft Priest Guide
to full using Spirit Tap after a fight. The best strategy is to wand the last 40% or so. More
detail to follow in the strategy section.
5.2. Pure PvP Build
Shadow Tree
Blackout
Rank: 5/5
Gives your Shadow damage spells a 10% chance to stun the target for 3 seconds.
Improved Shadow Word Pain
Rank: 2/2
Increases the duration of your Shadow Word: Pain spell by 6 seconds.
Shadow Focus
Rank: 5/5
Reduces your targets chance to resist your Shadow spells by 10%.
Improved Psychic Scream
Rank: 2/2
Reduces the cooldown of Psychic Scream by 4 seconds.
Improved Mind Blast
Rank: 4/5
Reduces the cooldown of your Mind Blast spell by 2 seconds.
Mind Flay
Rank: 1/1
Assault the target's mind with Shadow energy causing damage over 3 seconds and slows
the target to 50% of their movement speed.
- 43 -

World of Warcraft Priest Guide
Shadow Reach
Rank: 3/3
Increases the range of your Shadow damage spells by 20%.
Silence
Rank: 1/1
Silences the target, preventing them from casting spells for 5 seconds.
Shadow Weaving
Rank: 5/5
Shadow damage spells have a 100% chance to cause your target to be vulnerable to
Shadow damage.
Vampiric Embrace
Rank: 1/1
Afflicts your target with Shadow energy that causes all party members to be healed for
20% of any Shadow damage you deal for 1 minute.
Darkness
Rank: 5/5
Increases your Shadow spell damage by 10%.
Shadowform
Rank: 1/1
Assume a Shadowform, increasing your Shadow damage by 15% and reducing Physical
damage done to you by 15%. However you may only cast Shadow and Discipline spells
while in this form.
Discipline Tree
Unbreakable Will
Rank: 5/5
- 44 -

World of Warcraft Priest Guide
Increases your chance to resist Stun, Fear and Silence effects by 15%.
Improved Power Word: Shield
Rank: 3/3
Increases the damage absorbed by your Power Word: Shield by 15%.
Improved Power Word: Fortitude
Rank: 2/2
Increases the effect of your Power Word: Fortitude spell by 30%.
Martyrdom
Rank: 2/2
Gives you a 100% chance to gain the Focused Casting effect that lasts for 6 seconds after
being the victim of a melee or ranged critical strike. The Focused Casting effect prevents
you from losing casting time when taking damage and increases resistance to Interrupt
effects by 20%.
Inner Focus
Rank 1/1
When activated, reduces the Mana cost of your next spell by 100% and increases its
critical effect chance by 25% if it is capable of a critical effect.
Meditation
Rank 3/3
Allows 15% of your Mana regeneration to continue while casting.
Improved Mana Burn
Rank 2/2
Reduces the cast time of your Mana Burn spell by .05 sec.
- 45 -

World of Warcraft Priest Guide
Holy
Healing Focus
Rank 2/2
Gives you a 70% chance to avoid interuption caused by damage while casting any healing
spell.
This is an end-game build designed around PvP. This is just a sample build – there are a
few options to consider when deciding on the final placement of your 51 talent points.
What this build has is Blackout over Spirit Tap. This is due to the strength of stuns in PvP
situations. Stuns can change the tide of battle. Blackout is a fairly reliable source, and
statistically if you cast 10 damage spells in a fight (which you should) then Blackout
should trigger. It is much more useful for dueling than Spirit Tap. Shadowform is taken,
with it’s 15% damage reduction proving useful against heavy damage dealers like
Rogues and Warriors. Vampiric Embrace, especially if you take the improvement talent,
is also an effective way to deal with these classes.
One of the main choices to be made here is between Shadow Focus and Improved Mind
Blast. Without taking Shadowform, one of the above talents should drop one point. For
the purposes of this build I chose to drop a point from Improved Mind Blast, over Shadow
Focus, due to the fact that I feel that Shadow Resistance potions and items will soon
become prevalent, and the reduced risk chance makes dueling well-equipped foes much
easier. The reduce cooldown of Mind Blast does little if it is being resisted often. I chose
to max Improved Mana Burn because it is the only way to duel another priest. Priest vs
priest battles will always result in mana standoffs, who can live burn the other’s mana first.
A priest specced in Discipline with Mental Strength and Improved Mana Burn will always
beat a priest without. With Improved Mana Burn, you will have an edge over others who
chose to spend an extra 2 points in the Shadow Tree.
5.3. Discipline Burst Damage Build
Discipline
- 46 -

World of Warcraft Priest Guide
Unbreakable Will
Rank 5 / 5
Increases your chance to resist Stun, Fear, and Silence effects by an additional 15%.
Martyrdom
Rank 2/2
Gives you a 100% chance to gain the Focused Casting effect that lasts for 6 seconds after
being the victim of a melee or ranged critical strike. The Focused Casting effect prevents
you from losing casting time when taking damage and increases resistance to Interrupt
effects by 20%.
Improved Power Word: Fortitude
Rank 2 / 2
Increases the effect of your Power Word: Fortitude and Prayer of Fortitude spells by 30%.
Improved Power Word: Shield
Rank 2 / 3
Increases the damage absorbed by your Power Word: Shield by 10%.
Meditation
Rank 3 / 3
Allows 15% of your Mana regeneration to continue while casting.
Inner Focus
Rank 1 / 1
When activated, reduces the Mana cost of your next spell by 100% and increases its
critical effect chance by 25% if it is capable of a critical effect.
Mental Agility
Rank 5 / 5
- 47 -

World of Warcraft Priest Guide
Reduces the mana cost of your instant cast spells by 10%.
Mental Strength
Rank 5 / 5
Increases your maximum Mana by 10%.
Divine Spirit
Rank 1 / 1
Holy power infuses the target, increasing their Spirit by 17 for 30 minutes.
Force of Will
Rank 5 / 5
Increases your spell damage by 5% and the critical strike chance of your offensive spells
by 5%.
Power Infusion
Rank 1 / 1
Infuses the target with power, increasing their spell damage and healing by 20%. Lasts 15
seconds.
Holy
Holy Specialization
Rank 5 / 5
Increases the critical effect chance of your Holy spells by 5%.
Healing Focus
Rank 2 / 2
Gives you a 70% chance to avoid interruption caused by damage while casting any
healing spell.
- 48 -

World of Warcraft Priest Guide
Improved Renew
Rank 2 / 3
Increases the amount healed by your Renew spell by 10%.
Divine Fury
Rank 5 / 5
Reduces the casting time of your Smite, Holy Fire, Heal and Greater Heal spells by 0.5
sec.
Holy Nova
Rank 1 / 1
Causes an explosion of holy light around the caster, causing 28-33 Holy damage to all
enemy targets within 10 yards and healing all party members within 10 yards for 52-61.
These effects cause no threat.
Searing Light
Rank 2 / 2
Increases the damage of your Smite and Holy Fire spells by 10%.
Holy Reach
Rank 2 / 2
Increases the range of your Smite and Holy Fire spells and the radius of your Prayer of
Healing and Holy Nova spells by 20%.
I called this build the Discipline Burst Damage build because that is what it is exceptional
at doing – provided you have the gear to back it up. It is an excellent PvP build for a
battle-healer play style. It is more versatile than the shadow heavy build because you can
heal at any time, and is more team oriented with the inclusion of Power Infusion, which
can be cast on your team’s mages and warlocks for some huge burst damage. It is also
helpful solo, especially when combined with items like the Zandalian Hero Charm for huge
crits. With this build, Smite and Holy Fire will be your spells of choice, with their reduced
- 49 -

World of Warcraft Priest Guide
casting time and increased damage through talents. You will also have better than
average healing ability with this build, meaning it is a viable option if you are raiding end-
game and still need to be able to play solo. Additionally, this is my favoured build
because it is fun!
5.4. Healing Build
Discipline
Unbreakable Will
Rank 5 / 5
Increases your chance to resist Stun, Fear, and Silence effects by an additional 15%.
Silent Resolve
Rank 5 / 5
Reduces the threat generated by your spells by 20%.
Martyrdom
Rank 1 / 2
Gives you a 50% chance to gain the Focused Casting effect that lasts for 6 seconds after
being the victim of a melee or ranged critical strike. The Focused Casting effect prevents
you from losing casting time when taking damage and increases resistance to Interrupt
effects by 10%.
Meditation
Rank 3 / 3
Allows 15% of your Mana regeneration to continue while casting.
Inner Focus
Rank 1 / 1
When activated, reduces the Mana cost of your next spell by 100% and increases its
critical effect chance by 25% if it is capable of a critical effect.
- 50 -

World of Warcraft Priest Guide
Mental Agility
Rank 5 / 5
Reduces the mana cost of your instant cast spells by 10%.
Divine Spirit
Rank 1 / 1
Holy power infuses the target, increasing their Spirit by 17 for 30 minutes.
Holy
Holy Specialization
Rank 1 / 5
Increases the critical effect chance of your Holy spells by 1%.
Healing Focus
Rank 2 / 2
Gives you a 70% chance to avoid interruption caused by damage while casting any
healing spell.
Improved Renew
Rank 3 / 3
Increases the amount healed by your Renew spell by 15%.
Divine Fury
Rank 5 / 5
Reduces the casting time of your Smite, Holy Fire, Heal and Greater Heal spells by 0.5
sec.
Holy Reach
Rank 2 / 2
Increases the range of your Smite and Holy Fire spells and the radius of your Prayer of
Healing and Holy Nova spells by 20%.
- 51 -

World of Warcraft Priest Guide
Inspiration
Rank 3 / 3
Increases your target's armor by 25% for 15 seconds after getting a critical effect from
your Flash Heal, Heal, Greater Heal, or Prayer of Healing spell.
Improved Healing
Rank 3 / 3
Reduces the Mana cost of your Lesser Heal, Heal, and Greater Heal spells by 15%.
Holy Nova
Rank 1 / 1
Causes an explosion of holy light around the caster, causing 28-33 Holy damage to all
enemy targets within 10 yards and healing all party members within 10 yards for 52-61.
These effects cause no threat.
Spiritual Guidance
Rank 5 / 5
Increases spell damage and healing by up to 25% of your total Spirit.
Spiritual Healing
Rank 5 / 5
Increases the amount healed by your healing spells by 10%.
This is, as the title says, a healing build. 30 points are taken to access Spiritual Healing,
which is a good boost to healing power. The healing is provided before gear, which makes
it slightly less attractive for players with extremely high level gear. If that is the case,
Mental Strength may be a better alternative, as it scales with gear. 21 is taken in
Discipline as opposed to 31 in Holy for Divine Spirit over Lightwell. Lightwell is a
lackluster spell, and when compared to Divine Spirit, the choice is obvious. The only
downside to this build is the lack of Improved Power Word: Fortitude, which means your
- 52 -

World of Warcraft Priest Guide
party will miss out on some extra health. However, if you can get another priest to buff
your group that is easily overcome.
5.5. Tri-Build
Discipline
Unbreakable Will
Rank 5 / 5
Increases your chance to resist Stun, Fear, and Silence effects by an additional 15%.
Martyrdom
Rank 2/2
Gives you a 100% chance to gain the Focused Casting effect that lasts for 6 seconds after
being the victim of a melee or ranged critical strike. The Focused Casting effect prevents
you from losing casting time when taking damage and increases resistance to Interrupt
effects by 20%.
Improved Power Word: Fortitude
Rank 2 / 2
Increases the effect of your Power Word: Fortitude and Prayer of Fortitude spells by 30%.
Improved Power Word: Shield
Rank 3 / 3
Increases the damage absorbed by your Power Word: Shield by 15%.
Inner Focus
Rank 1 / 1
When activated, reduces the Mana cost of your next spell by 100% and increases its
critical effect chance by 25% if it is capable of a critical effect.
- 53 -

World of Warcraft Priest Guide
Holy
Improved Renew
Rank 3 / 3
Increases the amount healed by your Renew spell by 15%.
Healing Focus
Rank 2 / 2
Gives you a 70% chance to avoid interruption caused by damage while casting any
healing spell.
Spell Warding
Rank 5 / 5
Reduces all spell damage taken by 10%.
Holy Nova
Rank 1 / 1
Causes an explosion of holy light around the caster, causing 28-33 Holy damage to all
enemy targets within 10 yards and healing all party members within 10 yards for 52-61.
These effects cause no threat.
Blessed Recovery
Rank 3 / 3
After being struck by a melee or ranged critical hit, heal 25% of the damage taken over 6
seconds.
Shadow
Blackout
Rank 5 / 5
Gives your Shadow damage spells a 10% chance to stun the target for 3 seconds.
- 54 -

World of Warcraft Priest Guide
Shadow Focus
Rank 3 / 5
Reduces your target's chance to resist your Shadow spells by 6%.
Improved Shadow Word: Pain
Rank 2 / 2
Increases the duration of your Shadow Word: Pain spell by 6 sec.
Improved Mind Blast
Rank 4 / 5
Reduces the cooldown of your Mind Blast spell by 2 sec.
Mind Flay
Rank 1 / 1
Assault the target's mind with Shadow energy, causing Shadow damage over 3 seconds
and slowing their movement speed by 50%.
Improved Psychic Scream
Rank 2 / 2
Reduces the cooldown of your Psychic Scream spell by 4 sec.
Shadow Reach
Rank 3 / 3
Increases the range of your Shadow damage spells by 20%.
Silence
Rank 1 / 1
Silences the target, preventing them from casting spells for 5 seconds.
- 55 -

World of Warcraft Priest Guide
Vampiric Embrace
Rank 1 / 1
Afflicts your target with Shadow energy that causes all party members to be healed for
20% of any Shadow spell damage you deal for 1 minute.
Improved Vampiric Embrace
Rank 2 / 2
Increases the percentage healed by Vampiric Embrace by an additional 10%
I added this build as an alternative to the two-tier builds that most priests utilise. The
purpose of this build is maximising survivability – outlast your opponents and bring them
down with Shadow Word: Pain. Vampiric Embrace is an important part of this, which is
why Improved Vampiric Embrace is taken. Silence is also essential for survivability, and
the improved cooldown on Psychich Scream should help you live longer.
In the Discipline tree, all the talents which improve life or healing ability were taken. The
improvement to Power Word: Shield, while not huge, can make the difference between life
and death. Martyrdom is an excellent survival skill, and will help a lot against rogues and
warriors, two classes who have high crit rates and who often trouble priests.
In the Holy tree, Healing Focus is taken (of course) as it is simply one of the best bang-
for-buck talents available. Renew is an important element in surviving, so any talent that
improves it is worth it. Spell Warding will help against mages and warlocks, particularly
those with trinkets that boost damage, and may allow you to survive the initial onslaught.
Blessed Recovery, while not an excellent talent and still quite buggy, is nevertheless
taken, as it can help against high criting melee classes.
- 56 -

World of Warcraft Priest Guide
6. Priest Strategies The priest is generally the designated healer in any group, and you will rarely be dealing
any damage. However, there are 3 aspects to World of Warcraft: solo play, group play,
and PvP. Priest can be very effective at all three, given the right talent builds.
6.1. Solo Strategies
1-20
These levels are the hardest for any priest. Your spells do poor damage, take loads of
mana, and are generally ineffective. Make sure you don’t venture out of your starting area
before about level 12. Grind on lower level mobs if you have to. You will have a much
easier time of it if you do.
The key in these levels is picking your fights. Don’t try and solo mobs more than 1 level
above you unless you only need 1 for a quest. It will just slow you down and cause you
significant problems if you get an add. If this is your first character, loot everything you find
and sell whatever you don’t use. You will need the money for spells. You should also
make sure you get your new spells as soon as they are available. Always carry a stack of
drinks with you as you will be drinking often.
You will want to train in wands, daggers and staves as soon as possible. This is going to
cost you 30s, so save up for that. There is always the chance that you will find new gear
to improve your damage, so it’s best to be able to use it when it becomes available.
20-40
At level 14, Spirit Tap should be maxed for every priest. This drastically reduces
downtime and makes life a lot easier for the soloing priest. At 20 you get the next
significant increase in soloing capability through Mind Flay (all of this is assuming that you
have spent the first 11 points in the shadow tree, which I encourage everyone to do
regardless of the end aim for their priest, be it solo, group or PvP). Mind Flay is the most
efficient spell in terms of damage/mana spent.
The key to using Mind Flay is to avoid interruption through damage. Because it is a
channeled spell, any damage will cause interruption to the casting, reducing the damage
- 57 -

World of Warcraft Priest Guide
done. Mind Flay damages in three 1 second iterations, so if you are being interrupted you
will generally only get 1 damage iteration off. There are a few ways to accomplish avoid
these interruptions. The first and most obvious is the use of Power Word: Shield. This
absorbs all damage and prevents interruptions through damage (you can still be
interrupted through status effects such as stuns). The second way many priests use Mind
Flay is as an opener and a closer. Because of the slow effect, if you cast Mind Flay first
or second in your spell series, you will get off an entire channel before the mob hits you.
A good way to open a fight is with Mind Blast at maximum distance, and then Shadow
Word: Pain immediately after that. As they are running towards you, cast Mind Flay. You
should be able to get all three off before the mob reaches you, assuming you started at
maximum casting distance.
The third strategy is the use of Psychic Scream to prevent a mob attacking. There are 2
essential things to be aware of before pursuing this strategy: Undead are immune to fear,
and Psychic Scream can be broken by damage, including DoT spells such as Shadow
Word: Pain. This strategy is much more mana efficient than using shield, especially if you
use rank 1 Psychic Scream. It’s wise to have both the latest rank of Psychic Scream and
Rank1 both on your hotbar, as in one on one situations, it is better to conserve mana.
You should pull the mob using the same method as above. As soon as your Mind Flay
has finished channeling, cast Psychic Scream. This will send the mob fleeing in a random
direction. Cast Mind Flay on it as it runs – this will cause you to spin around and face the
mob regardless of its direction. If your Psychic Scream (also known as fear) lasts the
entire duration, you should be able to fire off 3 Mind Flays during this period. If the
monster reaches you and is not dead, cast Mind Blast to finish it off.
Another key to effective soloing as a shadow priest is the correct use of Spirit Tap. Spirit
Tap doubles your spirit after you kill a mob, and allows you to regenerate at 100% while
casting. The key to this is the second part – if you use a direct damage spell like Mind
Blast or Mind Flay to kill a mob, you are reducing the effectiveness of Spirit Tap. If you
get the timing down right, you can allow Shadow Word: Pain to finish off a mob, which
means you aren’t casting. This allows you to regenerate at 200% for the entire 15
seconds, rather than 5 seconds at 100% and 10 at 200%.
- 58 -

World of Warcraft Priest Guide
For non-shadow Priests, things are tough here (they will get tougher though, don’t worry).
Anyone choosing a Holy or Disc build needs to have a good wand and a Dagger/Off-hand
combo. You will lose a few stats by not using a staff, but will gain a much needed way to
kill mobs without using Smite over and over again. The reason you need a dagger is
simple – they are fast.
Your wand should be at least .1 seconds slower than the speed of your dagger. This
allows the wand to recharge before the next swing of your dagger. Once you see your
dagger swing for the first time, hit your wand hotkey (it’s probably best to bind it to an easy
to reach number or key on your board). This will fire your wand. Then keep pressing the
wand button as it cools down so it will fire as soon as it is ready. If you get the timing
right, the wand and dagger should cooldown at virtually the same time, allowing both to
attack simultaneously. This should significantly increase your DPS, and save you a lot of
mana. The reason why this doesn’t work with a staff is because they are too slow. They
may have a higher listed damage, but it is too hard to combine the wand and staff swing
without one interrupting the other.
40-60
These levels are where things either get really easy and fun or really hard depending on
your spec. You should grind from about 36 onwards on humanoid mobs that drop cloth –
this will help you get your mount at level 40, a nice bonus that everyone strives for. The
easiest way to do this is with a heavy shadow spec.
At this stage, you should have invested 10 points into the Discipline tree if you are on a
PvP server. This well help when you are being ganked. This will happen a lot, but
thankfully, priests are the most immune to ganking of any class. As long as your fear is
not resisted you should be ok (this doesn’t work against Undead Rogues who have fear
immunity in the form of Will of the Forsaken). Just fear and run in the opposite direction.
Hide behind some trees if you have to. Night Elf priests are the most fortunate – they get
Shadowmeld. If someone is repeatedly ganking you, move on to a new location. Another
point to consider when grinding, particularly in areas heavily populated with the opposing
is to stick near a graveyard. This will make any trips after death significantly shorter.
It is during these levels that you gain access to the best talents any of the three trees have
to offer. At level 40, assuming you put all points into shadow, you will gain access to
- 59 -
World of Warcraft Priest Guide
Shadowform, which increases shadow damage by 15% and reduces melee damage by
15%. This is the best soloing talent for any class in the game. Use it when soloing,
because you wont get much use out of it any where else.
You should mow down mobs with high speed and efficiency. Average kill time should be
between 20 and 30 seconds, and if you wait the entire duration of spirit tap, you should
only have to drink every 5 or so kills. Allowing time for drinking, that’s roughly 70 kills an
hour, which is very high. And these are conservative estimates. If you get the maximum
water available to you, and drink in readily rather than sparingly, things can go
significantly faster than that.
The fastest way to level is grinding, bar none. If you want to get to 60 in the fastest
possible time, quest to around level 35, and grind from there out. It just makes sense
mathematically. You may get 5000 experience from finishing a quest, but when you can
kill 10 mobs for the same experience, questing starts to look less attractive. You can kill
mobs much faster than you can complete most quests. The exception to this rule are
collection and kill x of x monster quests. These can be done while grinding. It’s a good
idea to collect a bunch of these when you enter a new area, and only hand them in when
you are ready to log.
The best mobs to grind a generally casters, because they have lower hitpoints and will die
faster. If you get healing mobs, be sure to use Silence before they cast their heal. Also,
some mobs have a Renew-type spell, so always dispel this.
For any non-shadow Priests, these levels just plain suck unless you are constantly
grouped. I suggest that you don’t try and grind unless you absolutely have to. You should
have no problems getting into instance groups in any case. You can stay in SM till the low
40’s at which point you should be able to get into Uldaman groups. After Uldaman, do
Zul’furrak, then Maraudon. Sunken Temple can take you up to about 55, at which point
you will get less experience. From there you can try and get into Blackrock Depths
groups. This is much easier if you have a good guild behind you that are willing to accept
a priest below level 60.
- 60 -
World of Warcraft Priest Guide
6.2. Grinding Locations
Grinding (or repeatedly killing mobs over and over) is inarguably the fastest way to level in
World of Warcraft. Shadow priests are very good grinders because we can kill mobs
quickly, especially with Shadowform, and Spirit Tap helps limit downtime.
If you are going to grind, I’d suggest you take skinning and mining as your primary
professions. This allows you greater options on the mobs you should kill, because leather
can sell well, and many of the good grinding locations have mineral nodes close by.
Choose your mobs carefully when grinding. Casters are the best, especially if you have
Silence. They generally have less hit points and die a lot faster. If they have the ability to
heal, you can silence them.
Grinding generally isn’t worth it below level 20, you can quest effectively at this point. It’s
actually quite difficult for priests to grind until about 35, and is still not as effective as
questing. Level 35 is when many of the best talents start to kick in. At level 40, when
Shadowform becomes available, kill speed really takes off, and things get a lot easier.You
miss out on some good starting gear and basic game mechanic knowledge.
Levels 1-20
Stay in your starting area until at least level 10. If you go further, you will die. From level
10 on, move to the next starting zone for your race. For Alliance, it’s Loch Modan,
Westfall or Darkshore. For the Horde, it’s the Barrens and Silverpine Forest. Do your
quests. If you find you are running out of quests, or they are becoming too difficult, switch
zones. It’s easy to pick up a whole bunch of new quests in a different zone, and then
come back to complete those that you couldn’t do earlier.
Make sure you collect and keep everything that drops. It’s a good idea to buy or make (if
you are a tailor) 4 bags as soon as possible. It’s a lot easier to make some money for
your spells when you sell everything. Use linen and wool to skill up your first aid, and sell
what you can’t use, because it can really help late game to have runecloth bandages,
which are a free heal when you run out of mana (or when you need to conserve it).
- 61 -

World of Warcraft Priest Guide
Don’t worry too much about gear at this stage – just wear what you find and what you can
get from quest rewards. Buying gear isn’t worth it, especially for a priest. Save your
money for your spells.
If you choose a gathering proffession, make sure you collect every node you can. It’s very
annoying entering a new zone with higher level nodes/herbs/skins and not being able to
harvest them because you don’t have the required level. It’s worthwhile to just level the
skill early, and sell to the vendor anything you can’t use or sell to other players.
Levels 20-30
You should still be questing at this point. At around level 20, you can do your first
instance. Deadmines for the Alliance, Ragefire Chasm slightly earlier for Horde, or
Wailing Caverns and Shadowfang Keep a bit later on. You can get some good items from
these that will take you well into your 30’s.
Now is a good time to upgrade your bags to 8 or 10 slotters, allowing you to collect more
loot and stay in battle longer. Gear should becoming more important at this stage, but
unless you have a lot of spare cash, it’s still not worth buying it.
For general questing, Duskwood, Redridge and the Wetlands are good for the Alliance.
There are plenty of quests between the three and you shouldn’t ever run out. The
Duskwood quests generally require a lot of back-and-forth running, so if you are looking to
level fast, I would advise against spending large amount of time questing here. It is a
good place to grind though, because there are packs of undead mobs, which are easy if
you get adds because of Shackle Undead.
Horde have Stonetalon and Thousand Needles. There are lots of quests here for Horde,
but also some for Alliance, so if you are on a PvP server, watch out. Generally though,
the Horde characters will outnumber the Alliance, so you shouldn’t have too many
hassles.
Levels 30-40
Stranglethorn Vale, south of Duskwood is the place to be for the majority of these levels.
There are a wide variety of mobs and levels to accommodate everyone.
- 62 -

World of Warcraft Priest Guide
The quests in the hunter’s camp at Nessingwary’s Expedition are really good to get. You
can pick up a bunch of quests there and do them in succession. They are simple quests
which require you to kill x number of Raptors, Panthers and Tigers.
It’s also good to buy/collect the pages of the Green Hills of Strangelthorn book (the quest
is given in the Hunter’s camp also). It gives a ton of exp and is very easy to complete.
You can grind the trolls around Strangelthorn for pages – they also drop silver and cloth,
and are quite easy to kill. You should keep any pages that you don’t need, as you can
generally sell them to other players, which is a good way to supplement your income.
This is a contested area, and a heavily contested one at that. You will probably get
ganked a few times if you are on a PvP server, and there is no avoiding that. Generally
though, priests are pretty resistant to gankings, as we have Psychic Scream, Power Word:
Shield, and heals. You should immediately fear if a member of the opposite faction is
attacking you, and then Shield. If you know you can’t beat them, run, heal, and hide. If
you are going to die, you should make sure that you are killed by them rather than a mob,
as this will prevent durability loss to your items.
At around level 35 you will want to switch from questing to grinding. It serves two
purposes: you should be able to get your mount at 40, and you will get faster exp doing it.
There are a bunch of humanoid mobs around that drop cloth and coins, and also often
drop green items. The mobs in the Kurzen camp are easy to kill, although the medics
have a heal, so be prepared to silence when they get low. The Venture co Geologistsa
are the best mobs to grind in the game, just about. They drop silver, cloth, and lots of
grey items that sell well. They are level 36, and at around level 37 you should start
grinding these mobs, until you have enough cash for your mount.
In your late 30’s go to the Hilsbrad foothills and pick up a few quests for there. They are
easy, and there are two good grinding spots. The Murlocs below Southshore are good for
the Alliance, while the Naga nearby are good for both. Turtles also drop some grey items
that vendor well, and can be skinned. The ogres to the north are also easy to kill and drop
silver and cloth.
You shouldn’t be buying any gear at all in these levels. Having enough cash for a mount
should be a priority, as mounts make life a lot easier for a priest. We have no speed
- 63 -
World of Warcraft Priest Guide
increase other than this. You may have to skip some skills in order to be able to afford it.
My suggestion, in this case, would be to pickup any damage skills that you can, and skip
the rest until you are able to afford them. You should also ask any mages in the area or in
you guild to conjure some water for you. This is the best way to save money.
Levels 40-50
Here is where grinding becomes easy. Shadowform adds significant damage and also
allows you to take more hits before your shield goes down. You should get it at 40.
As for grinding, Badlands is a good spot in the early levels. There are a few quests
scattered around, which are easy to combine with grinding. The quest givers arent in any
one place, but look around each of the pillars on the map. There is a quest giver at each,
for the most part. The Earth Elementals also drop plenty of items that can be vendored
for a fair amount. The dragons are also easy to kill and drop well. They have a small
chance of dropping a rare non-combat pet, which can be sold for a large amount on the
auction house of many servers. You can grind these and hope for a drop.
There are some Naga in Feralas which are plentiful and easy to kill. There are also a
bunch of easy quests for the area. Just pick them up at your faction’s town. After
Feralas, move to Tanaris. There are a bunch of quests here, and some easy mobs. The
Wastewander Bandits are easy and drop water, which can be handed in for a quest which
gives exp and a food/drink reward. Later on the Ogres are also good to grind.
Azshara is one of the best places to grind in the game, which is why it is where gold
farmers usually locate themselves. The ghosts drop lots of mageweave and silver, and
are easy to kill. However, you will be contesting with many people for spawns, and
sometimes it can be difficult to get kills.
The Searing Gorge has a bunch of different mobs to grind, including elementals, beasts,
and humanoids. The spiders drop different kinds of silk, some which are used in tailoring
and can be sold on the auction house, others which are grey and sell well. You can grind
them for money, and they are easy to kill. If you are grinding here, it’s a good idea to stay
off the main road, as this area leads to a number of level 60 instances, and you are likely
to be ganked if you make yourself to visible.
- 64 -

World of Warcraft Priest Guide
Levels 50-60
You can grind Deadwood Village in Felwood from about 49-52. The mobs drop well, and
at the same time, you can raise your Timbermaw faction, which will stop the mobs agroing
when you run through the cave to Winterspring, and allows you to purhcase some
excellent tradeskill recipes. I would take this spot over any other if you are an Enchanter,
as it allows you to purchase the +15 agility weapon enchant at honoured. Other tradeskill
recipes are sold, so if you have picked any of the production trades, this is an essential
grinding spot. There are 2 locations for questgivers, the most coming from the far south in
the Emerald Sanctuary. There are also a few from the north, in the Felpaw Village. This
is probably the best spot for tailors to grind, as there is a vendor here who sells a pattern
which is only available after you achieve an honoured status with the timbermaw.
At level 50 head to Un’goro crater. There are tons of mobs, easy quests, and lots of herbs
and mineral nodes for collectors. The quest givers are mostly at the very top of the map,
in Marshall’s Refuge. There is also one quest giver south-east, who gives a number of
quests. The mobs range from 48-52, and there are some non-hostile mobs as well, so
you don’t have to worry about pulls.
After about 52, head to Western Plaguelands. You can spend the rest of your time to 60
in Western and Eastern Plaguelands, if you want to grind. The undead mobs are
generally easy to kill, and if you get any adds you cant just shackle them. The 4 farms in
Western Plaguelands each have different levels in mobs. You can stick to these until you
get to 58, at which point you should move to the Eastern side and the Browman Mill, just
north of Light’s Hope Chapel. The Argent Dawn quests can be done here, from Chillwind
Camp in the Western Plaguelands and Light’s Hope Chapel in the Eastern Plaguelands.
Not only do the mobs drop tons of Runecloth and silver, they also give Argent Dawn
reputation, which allows you to buy some good items from the Argent Dawn Vendors.
The reputation from non-elite kills stops at ½ way through friendly, but the mobs still drop
plenty of scourgestones you are easily able to gain rep. If you are going to try and get into
the Revered/Exalted reputation range, I’d suggest hodling onto the Argent Dawn tokens
until ½ way through Honoured, at which point all reputation from kills, including elites,
stops completely.
- 65 -

World of Warcraft Priest Guide
This is another location where ganking is often prevalent, so it’s a good idea to be on your
guard. If you do get killed, say something on general chat. There should be some level
60’s roaming about looking for Honour Kills, so they can come and help you.
6.3. Group Strategies
In groups you will virtually always be the designated primary healer. You will have little
chance to do any significant damage other than wand blasts between heals. During the
easier early fights of an instance you may be able to cast Shadow Word: Pain on some
mobs.
Generally, you will spend the entire time healing. Being an effective and efficient healer
takes a bit of practice, but if you know the basics, it becomes a lot easier. I will divide this
section into 2 parts to deal with healing as you level, and healing at 60, because they can
be very different.
6.3.1. Healing as you Level
Most of your instance groups as you level to 60 will be what are known as pickup groups,
with people who advertise on the general or looking for group channel. These groups will
often be comprised of jerks, newbies and morons. They will also often have a less than
desirable class makeup. If you get in a bad group with one of the above, bail out as soon
as you can. You are better off trying to find a new group, and generally it’s pretty easy as
a priest.
During most of the game, Greater Heal can be used as your primary heal on tanks. The
monsters in the non end game instances generally don’t hit hard or fast enough to
facilitate the need to use Flash Heal. Renew is also a fantastic heal to use in these
situations on both your main tank or any other party members who take AoE damage
during a fight, or if the tank loses agro momentarily to another party member.
Using Greater Heal requires some timing and some trust from your tank. The advantage
in using Greater Heal over Flash Heal is mana efficiency. To use it effectively, it’s best to
wait till your tank is at about 60% of their maximum health. You can then start to cast
Greater Heal. By the time casting is finished, your tank should be at about 50%. The heal
- 66 -

World of Warcraft Priest Guide
should then return him to full. Play around with the numbers a little, but that is a general
rule.
Prayer of Healing is another important spell for any priest. Priests are the best primary
healers for group play because of this spell. It costs a bucketload of mana, however, and
should not be used in every situation. If a mage or rogue gets agro and takes a small
amount of mana, and then the tank regains agro, you should not use Prayer of Healing.
When fighting a boss with big AoE damage attacks, like the Maraudon Princess for
example, Prayer of Healing should be used. The general breakpoint for Prayer of Healing
is 3 people to full health. If there are less than three people who are going to be fully
healed by the spell, it’s better to use Flash Heal. It’s also important to know that Prayer of
Healing creates a significant amount of threat because of the amount of health healed.
This is a good spell to use in combination with Inner Focus if you have that talent.
6.3.2. Healing at 60
In the end game instances, especially the raid encounters, strategies have to change.
Greater Heal is too slow to be an effective tank heal. You will need to spam Flash Heal
on the main tank to keep him alive when he is taking damage in the thousands per hit.
For example, Onyxia has a flame attack that deals between 3 and four thousand damage,
in addition to her standard attacks. That kind of damage coming at short intervals cannot
be effectively counter through Greater Heal.
During the long battles in raid instances Meditation becomes an extremely valuable talent
to have. When you are chain casting Flash Heal, you will have no time to stop and regen
some mana. While only 15%, Mediation will allow at least some mana to regen while you
are healing.
In any instance the most important person to keep alive is the main tank. If a mage or a
rogue takes agro off the tank, it will cost significant mana and cause high threat to the
priest to keep them alive. In some situations it can be better to let the other members die.
This does not mean don’t heal them – throw up a Power Word: Shield, and a Flash Heal,
but don’t keep casting Flash Heal over and over again. Explain to your members what
happens when you get threat (they all die) and try and get them to go a bit easier on the
DPS next time. It can help prevent a wipe. It’s much easier to res 1 person than to have
- 67 -

World of Warcraft Priest Guide
everyone travel all the way back to the instance portal and then through the instance to
where you left off.
The key to many of the end-game encounters is effective strategy. You need to know
where to place your tank, what mobs to use crowd control on, and where to go. Don’t
worry, much of it you will pick up on your own.
6.3.3. Healing and Threat
Healing threat is what gets priests killed. If you have a tank that can’t hold agro
effectively, you will end up attracting the mobs to you, and dying. A priest can take few
hits before death.
Basically, healing threat is based on amount of hp healed. This means that a tank will
have to do some damage to a mob to generate hate before you can heal them. For this
reason, it is not a good idea to have a tank that is more than 2 levels below the highest
level mob in an instance, because they will just miss far too much.
Healing vs damage equates to around 50% with the subtlety talent. What this means is
that your tank will have to do around half as much damage as you heal to hold agro on a
target.
Overhealing does not add additional threat. What this means is that if your target is at
50/100 health, and you heal for 1000 health, you have only created 50hp worth of threat.
Your tank will have to do roughly 25 damage to maintain threat. (These are only example
figures, obviously). Certain abilities like Sunder Armour (for the Warrior) create large
amounts of threat. Try and get your tank to use these as often as possible.
Heal over time spells, like Renew (and First Aid if you choose to take it) create threat on
each tick of health, not initial or at the end of the duration. This is generally a better way
to heal, as it means a tank can create threat over a period of time.
Power Word: Shield, which is very mana inefficient but a great lifesaver, actually creates
less threat for the caster than healing for an equal amount. It’s roughly half as much
threat to use Power Word Shield than an equivalent hp heal on a tank. This becomes
- 68 -

World of Warcraft Priest Guide
even more effective when not specced with Silent Resolve. Contrary to what some
people say, Power Word: Shield is applied after armour, so it’s good to use on high hp
classes, and it also does not affect Rage generation of warriors in any significant way.
This means that it is a good idea to apply a shield before a big fight to act as a buffer.
Fade is rather complicated in the way it works. It appears to reduce a set amount of agro
from the priest immediately. It should generally remove a mob from you from over-
healing, unless you have a very poor tank and have been doing significant heals to more
than one person. Threat from healing is still generated while fading. It doesn’t appear to
be reduced, either, which makes the usefulness of the Improved Fade talent questionable.
If Fade does not remove a mob, it means you are in big trouble. The tank will have a hard
time pulling the mob off, especially with your desperate efforts to stay alive. The best way
is to just cast Power Word: Shield on yourself and hope the tank can do his job.
As long as you don’t do anything right before Fade expires, you should not regain agro
afterwards. That includes Renew. The first tick of Renew after fading can bring that big
hitting mob straight back to you, so be careful how you use it, especially on your tank.
6.3.4. Instance List
Name Suggested Levels Location
Ragefire Chasm 13-15 Orgrimmar
Deadmines 18-22 Westfall
Wailing Caverns 16-21 Barrens
Shadowfang keep 19-24 Silverpine
Blackfathom Deeps 20-27 Ashenvale
The Stockades 23-28 Stormwind
Razorfen Kraul 25-31 Barrens
Gnomeregan 30-35 Dun Morogh
Scarlet Monastery 38-42 Trisfal Glades
Razorfen Downs 35-40 Barrens
Uldaman 42-47 Badlands
Zul’Farrak 45-50 Tanaris
Maraudon 48-52 Desolace
- 69 -

World of Warcraft Priest Guide
The Sunken Temple 50-55 Swamp of Sorrows
Blacrock Depths 54-60 Blackrock Mountain*
Blackrock Spire 58,60† Blackrock Mountain*
Stratholme 60 Eastern Plaguelands
Schoomance 60 Western Plaguelands
Dire Maul 60 Feralas
Onyxia’s Lair 60 (Raid) Dustwallow Marsh
The Molten Core 60 (Raid Blackrock Mountain*
*Blackrock Mountain has two entrances, one in Searing Gorge, the other in Burning
Steppes.
†Upper Blackrock Spire generally requires a group of level 60s.
The suggested levels are generally for party members, not the actual priest. Usually a
priest can get away with being a few levels below the recommended level.
All of the instances can be done 5 man bar a few. Upper Blackrock Spire is generally
raided by groups of 15. Stratholme is 5-mannable, but you will see a lot of people doing
ten man runs for loot, generally to Baron Rivendare. Dire Maul is the only instance with a
5 man cap. The others are limited to 10.
Onyxia’s lair and the Molten Core are end-game raid instances. To access Onyxia, a
lengthy quest series needs to be completed which grants the Drakefire Amulet, the key to
her lair. Access to the Molten Core requires the clearing of Blackrock Depths the entering
the Molten Core and retrieving a quest item. After that, you can just jump through the
window next to the quest giver to access the instance.
The best instances to do are The Scarlet Monastery, Maruadon, and the Sunken Temple,
and of course the level 60 ones. Zul’Farrak can be extremely difficult in parts, and also
has many bugs associated with it. It’s generally pretty annoying, but the staircase section
is quite fun the first time. Uldaman is also long and at times annoying, but is worth doing
once, for your first taste of what it’s like to have to strategize against a boss. Maraudon is
un and rewarding, and you can run the Princess (the end boss) once you have completed
- 70 -

World of Warcraft Priest Guide
a quest in pretty quick time. The Sunken Temple is a well built instance that has many
interesting encounters. It’s fun to do it a couple of times.
All of the end game instances are worthwhile for loot alone. You can get your Devout set
pieces there, and there are also some good quest rewards.
6.4. PvP Strategies
The strategies below assume a player at level 60 with all talent points assigned. You can
certainly PvP effectively below this level, but often will have higher level players kill you.
PvP as a priest is all about not letting the opponent hit you. While we have strong heals,
cloth armour makes us very fragile, especially against melee classes. You don’t want
someone to be attacking you without a shield and/or renew up. You need to use Flash
Heal if you start to lose health, because certain abilities can take away big chunks of
damage before you can heal them.
Against all classes Psychic Scream is your most powerful weapon. This skill is one of the
strongest PvP skills, and is the most often complained about skill for our class. If it
doesn’t break on damage, you have 8 free seconds to attack/heal/run. Use it as soon as
you can, so if the fight goes long, it will have cooled down before the end. 26 seconds is
all you need to survive for the cooldown to refresh.
The main bulk of your damage vs most classes will come from Shadow Word: Pain. Make
sure this is on at all times. It does great damage, is instant cast (so can be cast on the
run) and is mana efficient, especially considering the Mental Agility talent. Mind Blast
should be your nuke of choice. Cast it as often as the cooldown allows. Mind Flay can be
used in limited situations, for example when someone is fleeing due to being feared
(Psychic Scream) or when they are heading towards you. At other times, it’s not as
useful, as channeled spells are easily interrupted.
Silence is also a powerful spell against many classes. The key to beating many good
players is the prop timing of Silence. If you miss-time it, or use it to early, it is wasted. It’s
best to use towards the end of a long-casting spell, so the opponent wastes time casting
- 71 -

World of Warcraft Priest Guide
and then has to wait a further 5 seconds to cast again. Each class requires a different
moment to cast Silence, more on that below.
Another important point about PvP is to ensure to keep some distance between yourself
and your opponent (this is mainly for melee classes. For casters and Hunters, strategies
are different). Start off the fight at the 35 yard range to cast Shadow Word: Pain and Mind
Blast. As they are charging towards you, use Mind Flay. Once they hit you, fear them,
and then use Mind Flay again. It’s then best to reposition yourself to be at maximum
distance again. You can often beat people without them ever touching you.
6.5. Class Strategies
6.5.1. Druid
Druid battles can be very difficult and drawn out. Because both classes have access to
strong heals, it’s often difficult to kill each other. The main tactic to use against druids is
Dispel and Mana Burn.
Two of the druid’s main heals have strong HoT components, which are easily dispelled by
a priest. Good druids won’t even bother to cast these, but if they do, dispel them early
before they can heal. You should also start out the battle to remove Mark of the Wild and
any other buffs they may have on them.
While they are in caster form, spam Mana Burn. It does low damage, but it burns a
significant amount of mana, and a druid without mana is a druid that can’t heal. When a
druid is getting low, they will generally shift to their dire bear form. Stop using Mana Burn
now, it has now effect. While in bear form, they have increased armour and hp, but most
of all have access to a significant heal in the form of Frenzied Regeneration. This heals
based on rage generation. If you see a druid gaining health while in bear form, don’t try
and dispel it, it doesn’t work. Instead, fear them and move as far away as possible. This
will prevent rage generation and hopefully limit their healing ability.
When they shift back into caster form, as they are getting low on health, cast silence. This
will prevent them from healing, and at this point, it’s usually fairly easy to finish them off.
- 72 -

World of Warcraft Priest Guide
6.5.2. Hunter
Hunters can be difficult because of their stings, one of which drains a significant amount of
mana. Viper Sting at level 56 drains 1108 mana over 8 seconds, and is a poison, so it
can’t be dispelled by a priest.
You should always ignore a hunter’s pet. They don’t do as much damage as the hunter,
and there is not point killing them, as meanwhile the hunter will be killing you. Hunters a
strongest when they have the range advantage. As soon as possible, bridge that gap.
Fear the pet is an option if it is annoying you. That way you can focus entirely on the
hunter.
The trick to beating hunters is exploiting their minimum range. Hunter range attacks can
only be used at 8-35 yards, while their melee attacks have a 5 yard range. There’s a 3
yard difference between the two where a hunter cannot attack you. Learn where this is,
and use it to your advantage. When they are meleeing, run back. When they are
shooting, run towards them. After you fear and cast whatever spells you need (whether it
be a heal or a damage spell) run towards where they are, rather than away. This will
prevent them from applying the crippling Viper Sting on you.
Often hunters will try to flee from you by using Aspect of the Cheetah. I personally love it
when they do this. Make sure you have Shadow Word: Pain up on them, and follow.
They will be constantly dazed, and make a very easy target.
6.5.3. Mage
Mages are the king of ranged DPS and crowd control. Generally, Shadow priests have
the edge over mages, because of Silence and Fear, as well as heals. However, Frost
mages can be tough with their kiting, and if a fire mage gets a lucky crit, you can die very
quickly.
Mages will invariably open with Polymorph. This allows them some time to cast
Pyroblast, which should have 100% crit rate, as long as the talent Combustion is not on
cooldown. If they wait for your shield to expire, which it should, this will do up to 1470
damage instantly, with 1 or 2 DoT components. This is huge damage. As soon as you
are out of Polymorph (and possible stun, their fire spells should have a 10% chance to
- 73 -

World of Warcraft Priest Guide
stun) cast silence. If you don’t they will kill you. If you try and heal first, they will Silence
you, and you will be dead. You now have 5 seconds where they can’t do anything. Make
sure you heal yourself to full and have your shield up and ready. This is where the battle
begins.
After you have healed and Shielded, run next to them. On the way, cast Shadow Word:
Pain. They will probably try and freeze you here. Don’t waste your Psychic Scream if you
are frozen. Instead, use this opportunity as they blink/run away to cast Mind Blast. Follow
them to where they are. Make sure you are always within range to cast Psychic Scream.
Once they have used Blink and Frost Nova, fear them, and then unload as much damage
as you can. Keep casting Mind Blast and healing as necessary, and always keep them
Pained.
If you can survive the initial onslaught and heal yourself to full, you should be able to beat
a mage the majority of the time.
6.5.4. Paladin
Paladin’s can be quite difficult fights for priests because of their heals and Divine Shield.
They can often last long enough to make you run out of mana, at which point they have
the advantage because they can do significant melee damage.
The key to beating Paladins is using Mana Burn and Silence/Fear at the correct moments.
Because they only have small mana pools, Mana Burn is an effective way to stop them
from healing. It will drain them fast. When you get a Paladin to around 30% life, Silence
them. This will prevent them healing (they can still cast Divine Shield, however). When
Silence wears off, Fear them to finish them off.
If you don’t burn their mana and prevent them from healing, they will just use Divine
Shield and heal themselves to full, wasting your mana. It’s said that paladins have 3 lives,
and this is definitely the case. The trick to beating them is not to let them use their lives at
all. You can’t outlast a paladin – your mana pool will run out before theirs – but your heals
can mitigate any melee damage they cause while you Burn away their ability to heal any
damage you are causing.
- 74 -

World of Warcraft Priest Guide
6.5.5. Priest
Ah, the most hated fight of any priest. Priest vs priest fights aren’t about strategy, they are
about mana pools and talent allocations.
Believe it or not, a Holy/Disc priest will have the advantage against a Shadow priest in a 1
on 1 situation. They will generally have a larger mana pool, and their heals will be more
mana efficient. If they have Improved Mana Burn, they have a distinct advantage, even
considering Silence.
Priest vs priest battles are long, drawn out fights that only end when one person runs out
of mana and can no longer heal. Therefore, the strategy is to reduce your opponent to 0
mana before they do the same to you. The main thing to note about this is to not waste
mana. Don’t cast Renew. Don’t cast Shadow Word Pain. Don’t cast Power Word:
Shield. This is the only battle where this is the case. Why? They will always be
dispelled. Dispel is cheaper mana wise than any of those spells. If your opponent casts
any of those, Dispel them immediately. They have just wasted mana.
Your main spell should be Mana Burn in the early stages of battle. Once you deplete their
mana, you can use Silence and try using Fear, although it may be difficult to get the latter
off. A good priest won’t let you near. Blackout Proc is the best way to close the gap. Try
and keep ahead of them in mana at all times. If you take damage, heal, but don’t waste it.
If you are going to overheal, wait.
You should also use your wand and melee if you have some good equipment. This can
supplement your Mana Burn damage and help to make them heal before you have to. It’s
also great for interrupting their casting, especially if you have a fast dagger.
6.5.6. Rogue
Rogues are a priest’s worst nightmare. Generally rogues will only ever attack you and
you are already engaged with a mob. They will always have the initial advantage in this
case.
The worst type of rogue to fight is a stunlock rogue. With a succession of attacks, they
can keep you stunned until you are dead (this is assuming they get the jump on you. If
- 75 -

World of Warcraft Priest Guide
you see a rogue before he attack you, you start out an advantage). In this case you need
to keep pressing fear. You may just get any opportunity to use it, giving you time to heal.
The second thing you have to worry about with rogues is Will of the Forsaken and other
fear immunity trinkets. Undead rogues will give you a very hard time, and will come out
on top the majority of the time. The only tactic here is to use fear as early as possible,
which will use up their Will of the Forsaken. You then have to survive for 26 seconds until
you can fear again. Chain cast Flash Heal and Shield yourself whenever you can. As
soon as you can, use fear again, at which point you should unload as much damage as
possible.
Always have Shadow Word: Pain on a rogue. This will prevent them from vanishing and
going back into stealth, allowing them to get off their best abilities. Don’t just stand still in
the one place, this will allow dagger rogues to sit behind you and use Backstab, and
prevent you from casting your damage spells. It’s better to jump around, just as they
would do to you.
If you get the jump on a rogue, it’s pretty much an easy battle. Rogues need to start from
stealth for a number of specials, and it helps them generate their initial combo points.
Without combo points, rogues are useless. Just keep them feared and away from you,
and they will be dead before they know what hit them.
6.5.7. Shaman
Shamans are the undisputed kings of PvP. With their shocks, they can own any melee
class by keeping them at range. Their Windfury attack allows them to chew threw cloth
wearing casters, and their heals and totems give them added versatility that not many
classes can match.
The key to beating a Shaman is precise use of Silence and the depletion of their mana.
This is another fight where Mana Burn should be your weapon of choice. If you allow a
shaman to have full mana, they will just heal when you are near to killing them.
Keep burning their mana away while at the same time healing yourself. The Frost Shock
effect can be dispelled if you need to get in close or add some range, and if they try to
shift into Ghost Wolf form, dispel them. This will remove it.
- 76 -

World of Warcraft Priest Guide
A shaman will generally throw down a grounding totem. These absorb harmful spells like
fear, and need to be destroyed asap. They will also generally try and interrupt your first
heal with an Earth Shock. A good counter to this is to start casting your hearthstone. The
glowing green will trick some shamans and they will waste their Earth Shock, at which
point you can heal.
If they get low, make sure they can’t heal. Their heal only takes 1.5 seconds to cast, so
make sure you don’t miss your opportunity to Silence. Once you have them at this point,
Mind Blast and Mind Flay, and try and finish them off. If Silence wears off and they can
heal, you are in big trouble.
6.5.8. Warlock
Before you fight, make sure you have Shadow Protection up, as Warlocks have a number
of shadow Spells.
Like priests, Fear is the main weapon available to warlocks. However, they don’t really
have the capacity to outright kill a priest in the time their Fear lasts. They will do
significant damage to you, but once it’s over, you can heal yourself.
If they do crit with Shadowbolt and you are low on health after the first fear, it’s a good
idea to use Silence as soon as you can. This will allow you to heal and dispel Corruption
and Immolate, if they have used them. You should also use this time to run to where they
are and use Fear on them.
Whether you are able to defeat a warlock 1 on 1 will depend on which pet he has out and
how he is specced. If you can ambush him with any pet other than his Felhunter out, you
should have a good chance of causing some damage. Felhunters, especially on a Soul
Link Warlock, are a priest’s worst nightmare. They will have massive resists, be able to
remove your buffs (or debuffs such as Shadow Word: Pain), and have the ability to
Silence you with Spell Lock. Do not try to kill the Felhunter, as it has even higher resists
and most of your spells will fail. If you are a Smite build, then you should have an easier
time against Felhunter Warlocks, as they do not provide protection from Holy spells.
- 77 -

World of Warcraft Priest Guide
If the warlock has a succubus out, it is likely he is a nuker, and you should be careful
because he will chain mez you and blast you before you have a chance to react. If you
can fear before he Seduces, then you have won the battle, because his hitpoints will be
vastly lower than his Soul Link counterpart, and his survivability will be impaired because
of his gear choices.
A voidwalker means sacrifice, which is a damage shield similar to Power Word: Shield.
Often a Warlock with a Voidwalker out will be able to summon another through talents
almost instantly, so you have to be wary that they have another shield.
If a warlock has an imp out, you should laugh and kill him quickly. Although an Imp that is
boosted by Black Book can output a fair bit of damage, you should be able to survive
through it and kill the Warlock with mana to spare.
Focus all your damage on the Warlock, always have him DoTed, and use Mind Blast
whenever you can. Warlocks generally have high HP, so they can take a while to bring
down, but as long as you keep your self Shielded and use Flash Heal when you need to
you should come out on top.
The warlock’s Felhunter pet is designed to take out casters, and as such is a very difficult
battle for a priest to fight. The strategy remains the same though – try and bring them
down before your mana runs out. Try and time you fears to hit both the pet and the
warlock.
6.5.9. Warrior
A good warrior can be tough to beat. We have no real way of reducing their damage
output, because we can’t improve our armour. They also have some damaging abilities
that can reduce our healing and do significant damage if we go below 20%. Make sure
you always stay above this point, or you are toast. Don’t wait to heal against warriors. It
doesn’t help.
You have to try and keep them away from you as much as possible. Fear is important
here, as is jumping around during the battle. If you can jump through your opponent, it
may cancel a swing and disorient them.
- 78 -

World of Warcraft Priest Guide
Don’t bother trying to get distance at the start of the fight, they will just charge you. There
is also little point in trying this in the middle of the fight, as the ability Intercept allows them
to immediately close the distance and stun for 3 seconds. This is only usable from 8-35
range, so stay below 8 yards away and they can’t use it.
Shield Bash will be your biggest problem here. It interrupts casting and prevents any spell
in that field from being cast for 6 seconds. It’s very difficult to get a heal off when this
ability is being used often. If you see them at low rage, it’s a good time to heal.
Keep Pain up at all times, Mind Blast when you can, and don’t get below 20%. The key
here is surviving long enough to allow your Pain to wear them down. Shield, Renew and
Flash Heal are you best bets in this battle.
6.6. Honour Kills and Contribution Points
As of the recently released patch, successful kills of opposition players will yield honour,
which in turn gains you ranks and allows access to new items. This system, while
accessible to all, mainly benefits level 60 characters, and as such, this section is designed
with those who have achieved maximum level in mind.
Honour kills are gained through killing anyone that would normally yield experience (if they
were a mob). At level 60 this is any character above level 48. Anything below this level
does not yield an honour kill.
Contribution points are how you gain ranks and access the items these ranks afford.
Contribution points are based on damage dealt. The more % damage you do to a target,
the more points you get. The best way to do this is solo, of course, because you will get
the full amount of Contribution points (which is 166 points for the lowest rank level 60
character. The higher level a person is up the PvP ranking system, the more points they
will give.) Shadow priests make excellent solo PvPers.
To effectively solo, choose an area where there are a number of opposition characters,
but none to close together that may join a 1v1 battle. Grinding locations for 50+
characters are good, such as the Plaguelands or Azshara (for the gold farmers). Another
- 79 -

World of Warcraft Priest Guide
tactic in contested zones without towns (Eastern Plaguelands, for example), is to camp
near the Gryphon/Windrider master and kill opposing players as the exit the flight. A little
cheap, but definitely effective.
Another tactic if you don’t like the threat of solo killing is to head to Hilsbrad Foothills.
There are constant back and forth battles between Horde and Alliance there, and it’s quite
easy to rack up a large number of kills. However, in these situations the contributions
from your kills tend to be lower. Instead of using Shadow Word: Pain in these situations,
it’s better to stick to Mind Blast and Smite, because they do direct damage and can’t be
dispelled. Starshards, for Night Elft Priests is actually quite useful in this situation,
because it has a 30yd range (longer than Mind Flay) and the channeling can continue on
targets who go out of range.
The Hillsbrad battles are generally good because if you play carefully you won’t die, and
you can get a large number of HK’s. The contribution points aren’t as good, but if you can
manage to pick off some stragglers solo, its quite respectable.
However, if you are on a server with a population imbalance that favours the opposition,
it’s probably better off staying away from Hillsbrad, as you will get swamped, and find it
difficult to get kills.
- 80 -

World of Warcraft Priest Guide
7. Making Gold There are 2 ways to make gold in World of Warcraft, and two main items that most people
generally spend their gold on. The first way is to farm for it, through the repeated killing of
mobs that drop money, and generally cloth or items that sell well to vendors. The second
way is to play the auction house.
Farming is the best way to get cash for your mount at level 40. You should start doing this
at around level 35. If you grind from 35 to 40, you should have enough gold to get your
mount straight away.
The key to farming for gold at these levels, and indeed any level, is to maximise kill speed
and efficiency. You should kill mobs 2 levels below you, which should leave you with
minimal down time (assuming you are shadow specced, of course). To minimise costs
you should ask any mages in the area to conjure some water for you. Drinks are
expensive, and this is a good way to keep costs down. Most are usually very helpful, and
if you ask nicely, will give you a stack or two.
Make sure you have plenty of bag space. Put any items you don’t need in your bank
before you go out grinding. The less trips to town you have to make, the better. You
should also try and get some runecloth bags at some stage. These are generally quite
cheap (rough 2-2.5 gold each), and are 14 slotters. It’s not worth getting the 16 slot
Mooncloth bags or Travellers Backpack’s as they cost around 20g each, for only 8 slots
more in total.
Any good green gear is worth keeping to sell at the Auction House. A rough guide for
armour is: Cloth – anything with +Int and +Stamina or +Spirit; Leather - +Agility, +Stamina;
Mail – Virtually all stats for Horde, for Alliance, +Agility +Stamina, +Strength (below 40);
Plate - +Strength, +Stamina. Any green weapons with high DPS are generally good to
sell at the Auction House.
Blue items should always be sold on the Auction House (or by advertising in the trade
channels). When you first find an item, search the Auction House for others, and base
your price roughly on that. You may want to do a few comparisons to make sure you get
- 81 -

World of Warcraft Priest Guide
the best out of the item. Also, don’t list it if there rae a number on there. Save it for when
there are none, and then list it. The above strategy is the same for Epic quality items.
Once you have a good money base built up, you can start to play the Auction House for
profit. This involves a simple strategy of any finance institution – buy low and sell high.
Each day, do a search for Rare items, and go through the list, looking for anything which
is underpriced. Buyout the item, and then re-list it immediately at the standard price.
For example, take the Devout set Bracer piece. This is a fairly rare Bind on Equip drop,
that only comes from a small number of mobs in a rarely entered instance (Stratholme
Scarlet side). The general price can range between 200 and 250g. If you see this item
for a buyout of less than 200g, for example, buy it and list it with a start price of 200g and
a buyout of 250. This is the best way to make cash, if you can find some good bargains.
Another riskier way to play the Auction House is to artificially increase prices. This only
works if you have a lot of time and a large cash base. Basically, you need to buy out all
the items of 1 type, then relist them all at a higher price. Buyout one of a highly used
crafting item, for example, then list it ar aroun 1.5x the normal price. People who need it
straight away will buy it, and you have made some easy cash. This strategy can make
you a lot of money, but has a high element of risk associated with it in regards to unsold
goods, and can turn other players on your server against you. I’d suggest doing it on an
alt if you are going to do it at all, and to proceed with caution.
Professions are also a great way to make money. Stick to the gathering professions
rather than production ones. Unless you can get a Rare or Epic pattern that few people
on the server have, you won’t make any money out of producing items. Each profession
generally has one item that sells well: Herbalism has a number of different ones, but
mainly Ghost Mushroom; Mining has Arcane Crystals; Skinning has Core Leather. You
can also make some money with a few production proffessions, such as Alchemy’s
transmutes, or creating and selling Mooncloth for tailors. These are on a timer, however,
and it is harder to make money this way.
If you are going to buy your epic mount, it’s a good idea to get to at least the rank of
Sergeant through the PvP rewards system. This will give you a further 10% discount on
fanction purchases (combined with the 10% for getting to honoured, this means 20%
- 82 -

World of Warcraft Priest Guide
total), which will reduce the cost from 1000g down to 800g, a huge saving for a relatively
easy investment. You can try and do this to save you 10g at level 40, but it is difficult for
lower levels to gain ranks, and it’s probably not worth the effort. You are better of just
grinding the 10g.
7.1. Locations for Grinding
Grinding for cash can be a great way to make money, but only really after around level 35
(or until silk cloth can consistantly drop from the humanoid mobs you kill. On established
servers, you can make reliable cash out of wool cloth, because it doesn’t drop from a wide
range of mobs, and can often be in high demand from high level characters building up
their tailoring or first aid skills, so you should sell all that you find at the Auction House.
Before the mid 30’s, you make more money out of general questing than you can through
grinding, because the mobs won’t drop consistant amounts of money, and the green items
they drop don’t generally sell well.
If you really need to make cash pre-35, pick the quests that offer cash rewards, and do
them over others. You can see the reward you will recieve in the quest log. Quests
ataround level 20 can give 10 silver, which is quite a good amount for that level, and not
really achievable through cash collection.
Another important tip regarding cloth, is that if you don’t intend to sell it at the Auction
House, you should convert it (either by making bandages or bolts of cloth, if you are a
tailor). These sell better than their components, and Silk bandages are easy to get up to.
Sell any quest reward items you get that you can’t use. If you are an enchanter, you can
disenchant them and sell the shards at the Auction House (or use them, of course).
From level 36, you should be grinding the Venture Co. Meteorlogists in the Stranglethorn
Vale. They drop lots of gold and die quickly. These mobs can single-handedly pay for
your level 40 mount. Grind these guys until you have enough cash to pay for it, then
move on.
The next spot for cash grinding is throughout the Badlands. There are a ton of rock
elementals here that drop all sorts of grey and white items that vendor well. You can
- 83 -

World of Warcraft Priest Guide
make tons of cash of these guys, and they are mostly easy to kill. Elementals are good to
grind because they always drop something, they are never in packs, and don’t call for
backup. They also don’t flee, so they can’t bring adds unless you make a mistake with
fear. They generally make for safe kills.
From about 45, head to Tanaris, and kill the wastewander bandits, followed by the pirates.
Later on there are also ogres to kill. These 3 groups drop silver and cloth, and many
chests can be found in the area. This should take you into the 50’s.
My favourite grinding area for cash and experience is the Eastern and Western
Plaguelands. The mobs there are undead, so if things go pear-shaped, you can shackle
and flee. They also drop silver and cloth. The best part is they increase your faction with
Argent Dawn through kills and the scourgestones they drop. This allows you access to
some items that they sell, including good food and shoulder enchants.
7.2. Auction House Items
The best items to look for in the Auction House on an established server are the high-end
ones that benefit PvP combat. This includes green items of level 54+. You should look
out for any green gear with + Stamina and + another stat, which changes with armour
class.
Cloth: +Intellect
Leather: +Agility
Mail: +Agility
Plate: +Strength
An item that normal sells for about 2.5-4g base Auction House price (the price the game
reccomends you set) can be sold for 3-4x that amount, because of the demand for gear
with Stamina and another stat. You should list these items at 5g for leve 54-56, 7.5 for
56-57 and for 58+ items list them for 10g. Make the buyouts 1.5x or double the list price.
These items generally sell quickly. If you see them listed at any less than 5g, buy them
and list higher.
- 84 -
World of Warcraft Priest Guide
Blue items to look out for change from server to server, but generally, any weapon with
high DpS is going to sell well, especially the 50+ items. Devout Bracers are ridiculously
overpriced on my server, and if you see them for cheap, buy them and re-list. Most of the
other end-game set items generally remain at a pretty static price, which falls quickly.
Pristine Black Diamonds also sell very well, and you may get lucky and get one listed
cheaply, which you should buy and re-list. They can sell for over 200g now, because they
are needed for Paladins to get their epic mounts.
It’s a learning proccess to see what items sell well, and can vary greatly on different
servers. Always keep an eye on the Auction House, and you can easily make plenty of
cash.
7.3. Disenchanting for Profit
Disenchanting is an excellent money maker, even if you are not an Enchanter by trade. It
is not essential to take Enchanting on your main character for this to work – you can make
an alt and get him to level 5, at which point he will be able to disenchant. Then all you
need to do is sit him in town near a mailbox and get started.
As you level, you will find many green items that might not sell well at the auction house
(for example bad stat combinations, like spirit and agility). Send all these to your
disenchanter to turn into dusts and essences (and possibly shards).
The best thing about this method is that enchanting materials cost nothing to list on the
Auction House, whereas the green item it came from does. If the enchanting material
doesn’t sell, you do not lose any money.
If you are going to quest your way to 60, I would suggest taking Enchanting as a tradeskill
simply to disenchant all the bind on pickup quest rewards you will be receiving. You can
still mail the dusts to an alt for storage and sale purposes.
A more advanced and possibly risky tactic is to buy items off the Auction House, and then
disenchant them for the dust to re list. It is essential to know what an item is going to
disenchant into before you purchase it, and the comparitive market price of the dust that
- 85 -

World of Warcraft Priest Guide
will most likely come from it. For example, 41-50 items disenchant into Dream Dust, while
51-60 greens disenchant into Illusion dust most of the time. Additionally, weapons will
mostly disenchant into essences, which generally sell for more, while armour will usually
disenchant into dust. Occasionally you will get a shard, which sell for even more again,
depending on the market.
An essential point to not when pursuing this tactic is not to flood the market. This will
drive prices down and cut into your profit margin. If someone is listing dusts much
cheaper than yours, buy them out and re-list at your price. This will force people to pay
what you want for the items, and can be a very effective strategy with limits. The best
part about doing this with dusts and essences is that they have no list price, so they are
relatively risk free.
- 86 -
World of Warcraft Priest Guide
8. Professions There are 9 primary and 3 secondary professions available in World of Warcraft. You can
only have 2 primary professions at any time, but you cant pick up all 3 secondary
professions if you wish.
8.1. Primary Professions
Alchemy
Alchemists create potions using herbs found around the world. The potions available
include healing and mana potions, which instantly restore a set amount of life. There are
also a number of powerful buff potions which can add life, stats, and armour, to name a
few. Alchemists can also transmute a number of substances, which can yield good
income.
The best potions to make are of course the health and mana ones. There are some good
buff potions that require a ton of reagents and cannot be dispelled. These are called
flasks. The best of these is the Flask of Distilled Wisdom, which increases mana by 2000
for 2 hours. Great for raids, but if you die, you have just wasted 30 Dreamfoil, 10 Icecap,
1 Black Lotus and the gold to by the Crystal Vial.
Blacksmithing
Blacksmiths create mail and plate items out of minerals mined from nodes. The items are
restricted in use, and generally only warriors, and paladins pursue this path. There are a
number of different sub-branches to pursue, including armoursmith and weaponsmith.
Enchanting
Enchanters add stats to items to improve them. There are a large number of enchants
available, some of them very powerful. Enchanting can be a very hard profession – it
requires shards which are acquired from disenchanting items, which destroys them. This
makes it expensive to level and expensive to apply.
- 87 -
World of Warcraft Priest Guide
Engineering
Engineers make bombs, trinkets and other gadgets which enhance their ability in combat.
Bombs do AoE damage, and some have stun/ disorient components. Some of their
trinkets include the Discombobulator, which transforms an opponent into a leper gnome (a
spell similar to polymorph), and the Gnomish Shrink Ray, which reduces size and attack
power for a period.
The discombobulator is especially good in PvP combat, because it is the only way to
dismount a fleeing opponent. The Mage’s Polymorph spell is the only other way to
dismount someone.
Also good are the Rocket Boots which increase run speed, and the deepdive helmet,
which allows underwater breathing.
Herbalism
Herbalists gather herbs, which are then used to make potions for alchemists. This is a
good way to make money, and also a good skill when combined with alchemy.
Leatherworking
Leatherworking is a profession based around the creation of leather items from the skins
of beasts in the world. It’s a profession primarily for leather and mail wearers, and not
really suitable for a priest.
Mining
Mineral nodes are scattered throughout the world, and miners harvest these for metals
and gems. Mining goes well with blacksmithing and engineering, but can also be used as
a money-making profession, by selling what you find on the auction house.
Skinning
Skinners harvest the skins of beast-class animals found throughout the world. These
skins are then used to make leather items by a leatherworker.
- 88 -
World of Warcraft Priest Guide
Tailoring
Tailors create cloth-class items from the cloth that drops off humanoid mobs throughout
the world. This is a profession generally for caster characters. At level 300 skill, if you are
lucky enough, you can pick up some excellent epic patterns off high-end bosses that not
only are great items, they are great money makers also.
8.2. Secondary Professions
Cooking
Cooking is used to create food from ingredients dropped by animals around the world.
Food can heal health (and sometimes mana), and often gives buffs to stamina, strength
and spirit.
First Aid
First Aid is used to create bandages from cloth found on humanoid mobs. Bandages heal
damage over time, and can be used to supplement healing when you run out of mana.
Fishing
Fishing allows you to catch fish in most of the bodies of water around the world. Fishing
has recently been nerfed to near uselessness – though it can be a fun way to pass time
while waiting for a boat/ a group member to catch up.
8.3. Suggested Professions
• Herbalism/ Alchemy
o A good combination for a priest for the buffs and instant healing that
potions provide.
o Can make limited amounts of money through the re-selling of potions and
the transmuting service.
o Because of the wide variety of herbs, can sometimes be frustrating when
you need a specific herb for a potion which you don’t have.
• Tailoring/ Enchanting
- 89 -

World of Warcraft Priest Guide
o Tailored items can be great for a leveling priest, as they are easy to create
and often have quite good bonuses.
o Green and Blue tailored items can be disenchanted for use in enchanting.
o End game items are generally better when found rather than crafted.
o Enchanting can be difficult and money-consuming to level and maintain.
• Mining/ Engineering
o Engineering is a fun profession with many interesting combat bonuses.
o Great for PvP priests for some added damage and different combat tactics.
o Some of the items can backfire, and many of them aren’t as effective as the
description indicates.
• Skinning/ Mining or Herbalism
o The combination of two gathering professions can generate significant
income.
o No need to buy ingredients for profession items saves money.
All three of the combinations are quite successful and add to the priest. There are some
fantastic epic crafted items that tailors can make, but on the downside the ingredients
generally cost a lot of money. Enchanting is a huge money sink, but if you can get it high
enough, you can make a steady profit from it.
Potions are always nice to have, and excess herbs can always be sold. Engineering is
probably the most “fun” and versatile of the professions, and is very useful in PvP
situations.
However, I feel that the best combination of professions, especially for the beginning
priest, is choosing 2 gathering professions. This way you should definitely have your
mount at level 40 without having to scrounge money, and you will also be able to buy
some needed items along the way.
- 90 -

World of Warcraft Priest Guide
9. Gear Gear is very important in WoW. The main stats to look for on any piece of equipment are
Intellect, Stamina and Spirit. Intellect should generally be your number 1 priority on gear.
Try and get as big a mana pool as possible It will allow you to heal longer, and deal out
more damage in solo play.
Spirit and Stamina should be your second priorities. 3 points of Spirit is roughly equal to 1
mana regen a tick (every 2 seconds). There is no hard or soft cap on Spirit. It’s good to
have high Spirit in certain situations (it helps with downtime when leveling, especially
combined with Spirit Tap. It’s also good for long end-game raids), but generally, Spirit
isn’t the best stat. Stamina is better, because with more hitpoints, you will survive longer.
Also good to look out for with the new patch are items that add to healing and damage.
They are much improved, and now often come with other stats on the items. They can
now compete with stat gear for spots.
The following is a list of gear to look out for, the level reqs, and the stats.
Ragefire Chasm
Crystalline Cuffs, Level 13, 14 Armour, +2 Spirit, +1 Intellect (Taragaman the Hungerer)
Robe of Evocation, Level 13, 32 Armour, +4 Intellect, +3 Stamina (Jergosh the Invoker)
Deadmines
Lavishly Jeweled Ring, Level 17, +6 Intellect, +2 Agility (Gilnid)
Emberstone Staff, Level 18, 19.7 dps, +8 Intellect, +5 Spirit, +5 Stamina (Captain
Greenskin)
Corsair's Overshirt, Level 19, 42 Armour, +11 Spirit, +5 Stamina (Edwin VanCleef)
Staff of Westfall, 20.5 dps, +5 Intellect, +11 Spirit (quest reward)
Wailing Caverns
- 91 -

World of Warcraft Priest Guide
Living Root, Level 20, 21.2 dps, +12 Spirit, +2 Stamina, +5 Nature Resistance (Verdan the
Deep Everliving)
Fathom Ring, Level 21, +6 Spirit, +3 Stamina, +3 Intellect (Mutanus the Devourer)
Sizzle Fang (wand), 17.6 dps (quest reward)
Crescent Staff, 20.3 dps, +7 Intellect, +7 Stamina, +7 Spirit (quest reward)
Shadowfang Keep
Odo's Ley Staff, Level 21, 21.7 dps, +12 Spirit, +5 Stamina (Odo the Blindwatcher)
Feline Mantle, Level 23, 34 Armour, +10 Intellect, +3 Spirit, +2 Agility (Wolf Master
Nandos)
Belt of Arugal, Level 24, 26 Armour, +10 Intellect, +3 Spirit, +2 Agility (Archamge Arugal)
Robes of Arugal, Level 24, 46 Armour, +10 Spirit, +9 Intellect, +5 Stamina, +3 Agility
(Archmage Arugal)
Ghostly Mantle, 34 Armour, +5 Intellect, +5 Spirit (quest reward)
Blackfathom Deeps
Leech Pants, Level 26, 42 Armour, +15 Spirit, +5 Intellect, +1 Stamina (Aku'mai)
Glowing Thresher Cape, Level 24, 23 Armour, +8 Spirit, +3 Strength (Old Serra'kis)
Rod of the Sleepwalker, Level 24, 23.9 dps, +11 Intellect, +10 Spirit (Twilight Lord Kelris)
Gravestone Scepter (wand), 29 dps, +1 Spirit, +5 Shadow Resistance
Gnomeregan
Electrocutioner Lagnut, Level 29, +9 Spirit, +4 Stamina (Electrocutioner 6000)
Civinad Robes, 54 Armour, +7 Stamina, +18 Spirit
Razorfen Kraul
Swinetusk Shank, Level 30, 23.0 dps, +6 Stamina, +4 Spirit (Agathelos the Raging)
- 92 -

World of Warcraft Priest Guide
Stygian Bone Amulet, Level 23, +8 Spirit, +4 Stamina (Blind Hunter)
Batwing Mantle, Level 27, 37 Armour, +10 Intellect, +5 Spirit, +3 Agility (Blind Hunter)
Agamaggan's Clutch, Level 31, +9 Spirit, +5 Stamina (Charlga Razorflank)
Wind Spirit Staff, Level 27, 26.7 dps, +15 Spirit, +5 Intellect, +3 Stamina (Earthcaller
Halmgar)
The Scarlet Monastery
Blighted Leggings, Level 30, 45 Armour, +17 Spirit, up to +7 Shadow damage (Azshir the
Sleepless)
Ghostshard Talisman, Level 30, +9 Stamina, +4 Spirit (Azshir the Sleepless)
Necrotic Wand, Level 30, 33.2 dps (Azshir the Sleepless)
Embalmed Shroud, Level 30, 42 Armour, +12 Spirit, +11 Intellect, +7 Stamina (Fallen
Champion)
Hypnotic Blade, Level 34, 26.8 dps, +8 Intellect, +3 Spirit (Arcanist Doan)
Illusionary Rod, Level 34, 34.7 dps, +15 Intellect, +10 Spirit, +7 Stamina (Arcanist Doan)
Hand of Righteousness, Level 39, 29.8 dps, +8 Spirit, up to +14 healing (High Inquisitor
Whitemane)
Triune Amulet, Level 39, +7 Intellect, +7 Spirit, +7 Stamina (High Inquisitor Whitemane)
Whitemane's Chapeau, Level 39, 52 Armour, +14 Intellect, +14 Spirit, +9 Stamina (High
Inquisitor Whitemane)
Orb of Lorica (off hand) +6 Intellect, +11 Spirit (quest reward)
Prophetic Cane (offhand) +5 Stamina, +12 Intellect (quest reward)
Razorfen Downs
Silky Spider Cape, Level 35, 30 Armour, +11 Stamina, +5 Spirit (Tuten'kash)
Deathmage Sash, Level 36, 33 Armour, +15 Intellect, +6 Stamina (Mordresh Fire Eye)
Glowing Eye for Ordresh, Level 36, +11 Spirit, +5 Intellect (Mordresh Fire Eye)
Robes of the Lich, Level 39, 64 Armour, +10 Intellect, +20 Stamina (Amnennar the
Coldbringer)
- 93 -

World of Warcraft Priest Guide
Uldaman
Stoneweaver Leggings, Level 35, 51 Armour, +15 Spirit, +9 Stamina, +8 Intellect (Ironaya)
Grimlok's Tribal Vestments, Level 42, 68 Armour, +20 Spirit, +10 Stamina, +5 Intellect
(Grimlock)
Zul'Farrak
Lifeblood Amulet, Level 43, +13 Stamina, +5 Spirit (Antu'sul)
Bad Mojo Mask, Level 44, 57 Armour, +24 Intellect, up to +10 Shadow damage
(Shadowpriest Sezz'ziz)
Maraudon
Satyrmane Sash, Level 45, 40 Armour, +15 Intellect, +10 Stamina, +10 Shadow
Resistance (Lord Vyletongue)
Noxious Shooter, Level 46, 50.0 dps, +7 Stamina, +5 Nature Resistance (Noxxion)
Heart of Noxxion, Level 46, +10 Nature Resistance, use: removes one poison effect
(Noxxion)
Vinerot Sandals, Level 46, 50 Armour, +12 Intellect, +12 Spirit, +12 Nature Resistance
(Razorlash)
Grovekeeper's Drape, Level 47, 37 Armour, +12 Stamina, +10 Nature Resistance
(Celebras the Cursed)
Cloud Stone, Level 48, +10 Intellect, +10 Spirit, +10 Arcane Resistance (Landslide)
Rotgrip Mantle, Level 48, 57 Armour, +17 Intellect, +11 Spirit (Rotgrip)
Charstone Dirk, Level 49, 35.9 dps, +11 Intellect, +2 mana every 5 sec. (Princess
Theradras)
Eye of Theradras, Level 49, 63 Armour, +20 Intellect, +13 Stamina, +11 Spirit (Princess
Theradras)
Gemshard Heart, Level 49, +10 Intellect, +10 Stamina, +6 Spirit (Princess Theradras)
Resurgence Rod, 45.8 Dps, Equip: Restores 8 mana every 5 seconds, Equip: Restores 2
health every 5 seconds (quest reward)
- 94 -

World of Warcraft Priest Guide
The Sunken Temple
Featherskin Cape, Level 49, 39 Armour, +15 Spirit, +4 Intellect, +4 Stamina (Avatar of
Hakkar)
Spire of Hakkar, Level 49, 46.5 dps, +16 Spirit, +16 Stamina, up to +10 on magical
damage and healing (Avater of Hakkar)
Gloves of the Atal'ai Prophet, Level 50, 49 Armour, +20 Spirit, +6 Stamina, +5 Strength
(Jammal'an the Prophet)
Kilt of the Atal'ai Prophet, Level 50, 69 Armour, +18 Spirit, +18 Intellect, +9 Stamina, +4
Strength (Jammal'an the Prophet)
Vestments of the Atal'ai Prophet, Level 50, 78 Armour, +27 Spirit, +11 Intellect
(Jammal'an the Prophet)
Dragon's Eye, Level 51, +15 Spirit, +6 Stamina (Shade of Eranikus)
Rod of Corrosion, Level 51, 55.0 dps, +10 Nature Resistance (Shade of Eranikus)
Blackrock Depths
Kindling Staff, Level 48, +25 Spirit, +10 Stamina, +15 Fire Resistance (Pyromancer
Loregrain)
Cyclopean Band, Level 49, +15 Spirit, +4 Intellect, +4 Strength (Ok'thor the Breaker)
Graverot Capt, Level 50, 36 Armour, +11 Stamina, +6 Spirit (Anub'shiah)
Chief Architect's Monocle, Level 50, 64 Armour, +27 Intellect, +10 Stamina, +3 Spirit
(Fineous Darkvire)
Blood-etched Blade, Level 52, 20.3 dps, chance on hit: causes 120 damage and converts
that damage into your mana (Doom'rel, Dope'rel, Hate'rel, Seeth'rel, Vile'rel)
Cape of the Fire Salamander, Level 53, 41 Armour, +16 Spirit, +5 Stamina, +7 Fire
Resistance (Ambassador Flamelash)
High Priestess Boots, Level 54, +20 Stamina, +7 Spirit, +10 Shadow Resistance (High
Priestess of Thaurissan)
Robes of the Royal Crown, Level 55, 85 Armour, +29 Spirit, +9 Intellect, +5 Stamina, +3
Sgility (Emperor Dagran Thaurissan)
Thaurissan's Royal Scepter, Level 55, +15 Spirit, +5 Intellect, +5 Stamina (Emperor
Dargan Thaurissan)
- 95 -

World of Warcraft Priest Guide
Blackrock Spire, Scholomance, and Stratholme
These 3 locations drop various pieces of the Devout, Magister’s and Dreadmist sets.
Devout is the priest focused set, with the total stat bonuses of +134 Intellect, +115 Spirit,
and +65 stamina. It also adds bonuses aimed at a priest for completion of part of the set.
The bonuses are:
3 pieces: Increases damage done by Shadow spells and effects by up to 5.
5 pieces: Increases damage done to Undead by magical spells and effects by up to 10.
6 pieces: +15 Shadow Resistance.
7 pieces: +20 Spirit.
8 pieces: Increases healing done by spells and effects by up to 50.
The Magister’s set is aimed at mages, and has the following main stats: +167 Intellect,
+82 Spirit, and +59 Stamina. The set bonuses are:
3 pieces: Increases damage done by Frost spells and effects by up to 5.
5 pieces: +5 Arcane Resistance.
5 pieces: +5 Fire Resistance.
5 pieces: +5 Frost Resistance.
6 pieces: Increases damage done by Arcane spells and effects by up to 15.
7 pieces: Increases damage done by Fire spells and effects by up to 20.
8 pieces: +10 Intellect.
8 pieces: Restores 8 mana every 5 sec.
The Dreadmist set is aimed at Warlocks and features the following stat bonuses: +124
Intellect, +95 Spirit, and +110 Stamina. The set bonuses are:
3 pieces: +4 Fire Resistance.
3 pieces: +4 Shadow Resistance.
5 pieces: Increases damage done to Demons by magical spells and effects by up to 10.
- 96 -

World of Warcraft Priest Guide
6 pieces: Increases damage done by Shadow spells and effects by up to 15.
7 pieces: Restores 2 health every 5 sec.
8 pieces: Increases the Attack Power of your pet by +40.
Dire Maul
Holy Bologna: What the Light Won't Tell You, starts a quest that leads to Royal Seal of
Eldre'Thalas, +10 Fire Resistance, +4 mana ever 5 sec., up to +30 healing (various)
Tempest Talisman, Level 53, +7 Intellect, +6 Spirit, +1% critical strike with spells
(Hydrospawn)
Whipvine Cord, Level 54, 47 Armour, +9 Intellect, +6 mana every 5 sec., up to +28 healing
(Alzzin the Wildshaper)
Ring of Demonic Guile, Level 54, +10 Intellect, +6 mana every 5 sec. (Alzzin the
Wildshaper)
Ring of Demonic Potency, Level 54, +10 Stamina, +4 health every 5 sec. (Alzzin the
Wildshaper)
Brightspark Gloves, Level 55, 53 Armour, +15 Intellect, +9 Stamina, +1% critical strike
with spells (Tsu'zee)
Band of the Hierophant, Level 55, +11 Spirit, +10 Intellect, +7 Stamina (The Razza)
Maiden's Circle, Level 55, +7 Intellect, +6 Spirit, up to +10 on magical damage and
healing (The Razza)
Mana Channeling Wand, Level 56, 60.9 dps, +4 mana every 5 sec. (Cho'Rush the
Observer)
Mindtap Talisman, Level 56, +11 mana every 5 sec. (Magister Kalendris)
Elder Magus Pendant, Level 56, +10 Intellect, +7 Spirit, +6 Stanmina (Magister Kalendris)
Padre's Trousers, Level 56, 76 Armour, +20 Intellect, +6 mana every 5 sec., up to +38
healing (Illyanna Ravenoak)
Robe of the Everlasting Night, Level 57, 88 Armour, +13 Intellect, +11 Stamina, +5 Spirit,
up to +19 on magical damage and healing (Immol'thar)
Cloak of the Cosmos, Level 57, 44 Armour, +11 Intellect, +7 Stamina, up to +24 healing
(Immol'thar)
Boots of the Full Moon, Level 57, 60 Armour, +12 Intellect, +12 Stamina, +9 Spirit, up to
+24 healing (Captain Kromcrush)
- 97 -

World of Warcraft Priest Guide
Emerald Flame Ring, Level 57, +12 Intellect, +8 Spirit, +7 Stamina, up to +14 healing
(Prince Tortheldrin)
Brightly Glowing Stone, Level 58, +7 Stamina, up to +34 healing (King Gordok)
Crown of the Ogre King, Level 58, 73 Armour, +18 Intellect, +16 Stamina, +11 Spirit, +1%
critical strike with spells (King Gordok)
End game, you basically want either the full Devout set for high spirit gear, or a
combination of the three, depending on situations. There are also two epic sets, the
Vestements of Prophecy and the Vestements of Transcendence. These only drop from
Molten Core and Onyxia, and are extremely hard to get, as it requires a 40 member raid to
complete this section.
Vestements of Prophecy (tier 1)
Boots of Prophecy
Binds when picked up
Feet Cloth
70 Armour
+8 Agility
+11 Intellect
+20 Spirit
+9 Stamina
+10 Fire Resistance
+10 Arcane Resistance
Requires Level 60
Circlet of Prophecy
Binds when picked up
Head Cloth
83 Armour
+23 Intellect
+23 Spirit
+15 Stamina
- 98 -

World of Warcraft Priest Guide
Requires Level 60
Passive: Increases damage done by Shadow spells and effects
by up to 15.
Passive: Increases healing done by spells and effects by up
to 20.
Use:
Girdle of Prophecy
Binds when equipped
Waist Cloth
57 Armour
+22 Intellect
+15 Spirit
+7 Nature Resistance
+8 Shadow Resistance
Requires Level 60
Passive: Increases healing done by spells and effects by up
to 20.
Gloves of Prophecy
Binds when picked up
Hands Cloth
63 Armour
+10 Intellect
+22 Spirit
+6 Stamina
+5 Frost Resistance
+5 Shadow Resistance
Requires Level 60
Passive: Increases damage done by Shadow spells and effects
by up to 15.
- 99 -

World of Warcraft Priest Guide
Pants of Prophecy
Binds when picked up
Legs Cloth
89 Armour
+10 Agility
+17 Intellect
+27 Spirit
+10 Stamina
+5 Fire Resistance
+5 Nature Resistance
+5 Shadow Resistance
Requires Level 60
Passive: Increases healing done by spells and effects by up
to 30.
Mantle of Prophecy
Binds when picked up
Shoulder Cloth
76 Armour
+3 Agility
+23 Intellect
+10 Spirit
+10 Stamina
+7 Frost Resistance
Requires Level 60
Passive: Increases healing done by spells and effects by up
to 20.
Robes of Prophecy
Binds when picked up
Chest(Robe) Cloth
102 Armour
- 100 -

World of Warcraft Priest Guide
+24 Intellect
+23 Spirit
+20 Stamina
+5 Fire Resistance
+5 Nature Resistance
+5 Frost Resistance
+5 Shadow Resistance
+5 Arcane Resistance
Requires Level 60
Passive: Increases damage done by Shadow spells and effects
by up to 5.
Vambraces of Prophecy
Binds when equipped
Wrist Cloth
44 Armour
+11 Intellect
+15 Spirit
+3 Stamina
+5 Fire Resistance
+5 Shadow Resistance
Requires Level 60
Passive: Increases healing done by spells and effects by up
to 20.
Set Bonuses:
3 pieces: -0.1 sec to the casting time of your Flash Heal spell.
5 pieces: Improves your chance to get a critical strike with Holy spells by 2%.
8 pieces: 15% chance your next Smite after casting Greater Heal requires -300 less mana
to cast.
- 101 -
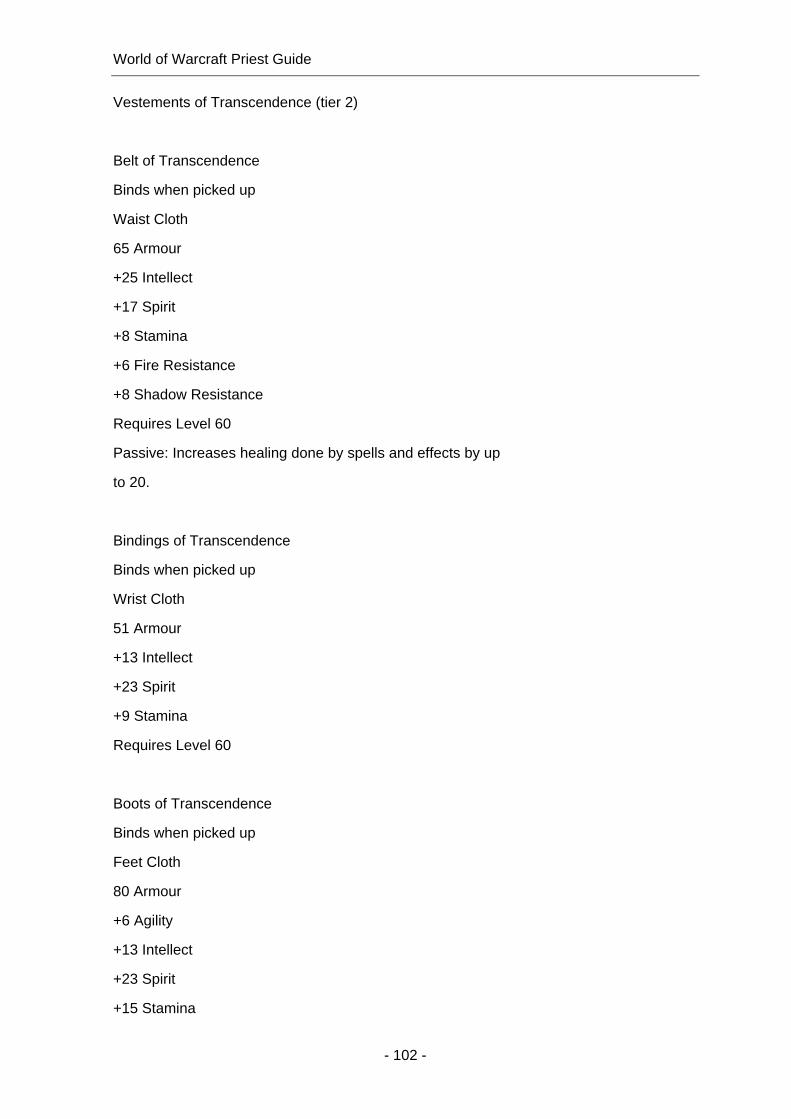
World of Warcraft Priest Guide
Vestements of Transcendence (tier 2)
Belt of Transcendence
Binds when picked up
Waist Cloth
65 Armour
+25 Intellect
+17 Spirit
+8 Stamina
+6 Fire Resistance
+8 Shadow Resistance
Requires Level 60
Passive: Increases healing done by spells and effects by up
to 20.
Bindings of Transcendence
Binds when picked up
Wrist Cloth
51 Armour
+13 Intellect
+23 Spirit
+9 Stamina
Requires Level 60
Boots of Transcendence
Binds when picked up
Feet Cloth
80 Armour
+6 Agility
+13 Intellect
+23 Spirit
+15 Stamina
- 102 -

World of Warcraft Priest Guide
Requires Level 60
Passive: Increases damage done by Shadow spells and effects
by up to 15.
Halo of Transcendence
Binds when picked up
Head Cloth
94 Armour
+27 Intellect
+26 Spirit
+17 Stamina
+12 Fire Resistance
+12 Nature Resistance
+12 Shadow Resistance
Requires Level 60
Handguards of Transcendence
Binds when picked up
Hands Cloth
72 Armour
+13 Intellect
+25 Spirit
+6 Nature Resistance
+12 Arcane Resistance
Requires Level 60
Passive: Increases healing done by spells and effects by up
to 30.
Leggings of Transcendence
Binds when picked up
Legs Cloth
101 Armour
- 103 -

World of Warcraft Priest Guide
+23 Intellect
+31 Spirit
+8 Stamina
+14 Frost Resistance
+3 Arcane Resistance
Requires Level 60
Passive: Increases damage done by Shadow spells and effects
by up to 20.
Pauldrons of Transcendence
Binds when picked up
Shoulder Cloth
87 Armour
+4 Agility
+25 Intellect
+13 Spirit
+12 Stamina
+5 Fire Resistance
+3 Nature Resistance
Requires Level 60
Passive: Increases healing done by spells and effects by up
to 20.
Passive: Increases damage done by Shadow spells and effects
by up to 10.
Robes of Transcendence
Binds when picked up
Chest(Robe) Cloth
116 Armour
+27 Intellect
+27 Spirit
+17 Stamina
- 104 -

World of Warcraft Priest Guide
+8 Shadow Resistance
+3 Arcane Resistance
Requires Level 60
Passive: Increases healing done by spells and effects by up
to 40.
Set Bonuses:
3 pieces: Allows 15% of your Mana regeneration to continue while casting.
5 pieces: When struck in melee there is a 10% chance you will Fade for 4 seconds.
8 pieces: When you cast Greater Heal, you now automatically cast Renew (Rank 5) as
well for free.
As you can see, these are the ultimate items for any priest. The set bonuses on
Transcendence are simply amazing. I would suggest a final aim of 5 pieces of
Transcendence and 3 pieces of Prophecy to get the best of the set bonuses.
Keep in mind though that this gear is Molten Core and Onyxia only, and is extremely hard
to get. You can only raid these places once every 6 days, and even then you have to
contend with a number of other priests for the chance to get these items.
Now available, through an epic quest, is the ultimate staff for any priest, which can switch
between 2 forms. To start the quest you need a drop off Majordomo in the Molten Core
instance, another drop of Kazzak, and complete a trying quest.
The Benediction stats are as follows
59.3 Dps
+10 Stamina
+30 Intellect
+12 Spirit
+20 Shadow Resistance
Use: Calls forth Anathema
- 105 -

World of Warcraft Priest Guide
Equip: Increases the Critical chance of your holy spells by 2%
Equip: Increases healing done by spells and effects by up to 106
Anathema:
59.3 Dps
+22 Stamina
+31 Intellect
+20 Shadow Resistance
Use: Calls forth Benediction
Equip: Restores 7 mana every 5 seconds.
Equip: Increases damage done by Shadow Spells and effects by up to 69.
- 106 -

World of Warcraft Priest Guide
10. Appendix a
10.1. Skill listing
Name Category Mana Cast Range Description
Level 1
Lesser Heal Rank 1 Holy 35 1.50 40 yards Heal your target for 46 to 56.
Smite Rank 1 Holy 25 1.50 30 yards Smite an enemy for 13 to 17 Holy
damage.
Vampiric Embrace Rank 1
Shadow Magic 40 0.00 30 yards
Afflicts your target with Shadow energy that causes all party members to be healed for 20% of any Shadow damage you deal for 60 seconds.
Shoot Wands 0 0.00 30 yards Attack with an equipped wand.
Power Word: Fortitude Rank 1
Discipline 60 0.00 30 yards Power infuses the target increasing their Stamina by 3 for 30 minutes.
Level 4
Lesser Heal Rank 2 Holy 50 2.00 40 yards Heal your target for 71 to 85.
Shadow Word: Pain Rank 1
Shadow Magic 25 0.00 30 yards A word of darkness that causes 30 Shadow damage over 18 seconds.
Level 6
Smite Rank 2 Holy 35 2.00 30 yards Smite an enemy for 25 to 31 Holy
damage.
Power Word: Shield Rank 1
Discipline 45 0.00 40 yards
Draws on the soul of the party member to shield them, absorbing 44 damage. Lasts 30 seconds. While the shield holds, spellcasting will not be interrupted by damage. Once shielded, the target cannot be shielded again for 30 seconds.
Level 8
Renew Rank 1 Holy 30 0.00 40 yards Heals the target of 45 damage over
15 seconds.
Fade Rank 1 Shadow Magic 40 0.00 Self Only Fade out, discouraging enemies from
attacking you for 10 seconds.
Level 10
Resurrection Rank 1 Holy 0 10.00 30 yards
Brings a dead player back to life with 70 health and 135 mana. Cannot be cast when in combat.
*Desperate Prayer Rank 1
Holy 0 0.00 Self Only Instantly heals the caster for 134 to 170.
Lesser Heal Rank 3 Holy 85 2.50 40 yards Heal your target for 135 to 157.
- 107 -

World of Warcraft Priest Guide
*Hex of Weakness Rank 1
Shadow Magic 45 0.00 30 yards Weakens the target enemy, reducing damage caused by -2 for 2 minutes.
*Touch of Weakness Rank 1
Shadow Magic 40 0.00 Self Only
The caster's next damaging melee attack will cause 8 additional Shadow damage and reduce the damage caused by that target by -2 for 2 minutes.
Mind Blast Rank 1 Shadow Magic 50 1.50 30 yards
Blasts the target for 39 to 43 Shadow damage, but causes a high amount of threat.
Shadow Word: Pain Rank 2
Shadow Magic 50 0.00 30 yards A word of darkness that causes 66 Shadow damage over 18 seconds.
*Starshards Rank 1 Discipline 75 0.00 30 yards
Rains starshards down on the enemy target's head, causing 72 Arcane damage over 4 seconds.
Level 12
Power Word: Fortitude Rank 2
Discipline 155 0.00 30 yards Power infuses the target increasing their Stamina by 8 for 30 minutes.
Inner Fire Rank 1 Discipline 20 0.00 Self Only
A burst of Holy energy fills the caster, increasing her attack power by 20 and Armour by 210 for 3 minutes.
Power Word: Shield Rank 2
Discipline 80 0.00 40 yards
Draws on the soul of the party member to shield them, absorbing 88 damage. Lasts 30 seconds. While the shield holds, spellcasting will not be interrupted by damage. Once shielded, the target cannot be shielded again for 30 seconds.
Level 14
Smite Rank 3 Holy 65 2.50 30 yards Smite an enemy for 54 to 62 Holy
damage.
Renew Rank 2 Holy 65 0.00 40 yards Heals the target of 100 damage over
15 seconds.
Cure Disease Holy 60 0.00 30 yards Removes 1 diseases from the friendly target.
Psychic Scream Rank 1
Shadow Magic 100 0.00 Self Only The caster lets out a psychic scream, causing 2 nearby enemies to flee for 8 seconds.
Level 16
Heal Rank 1 Holy 170 3.00 40 yards Heal your target for 295 to 341.
Mind Blast Rank 2 Shadow Magic 80 1.50 30 yards
Blasts the target for 72 to 78 Shadow damage, but causes a high amount of threat.
Level 18
*Desperate Prayer Holy 0 0.00 Self Only Instantly heals the caster for 263 to
325.
- 108 -

World of Warcraft Priest Guide
Rank 2
Shadow Word: Pain Rank 3
Shadow Magic 95 0.00 30 yards A word of darkness that causes 132 Shadow damage over 18 seconds.
Power Word: Shield Rank 3
Discipline 130 0.00 40 yards
Draws on the soul of the party member to shield them, absorbing 158 damage. Lasts 30 seconds. While the shield holds, spellcasting will not be interrupted by damage. Once shielded, the target cannot be shielded again for 30 seconds.
Dispel Magic Rank 1 Discipline 75 0.00 30 yards
Dispels magic on the target, removing 1 harmful spells from a friend or 1 beneficial spells from an enemy.
*Starshards Rank 2 Discipline 125 0.00 30 yards
Rains starshards down on the enemy target's head, causing 135 Arcane damage over 5 seconds.
Level 20
Renew Rank 3 Holy 105 0.00 40 yards Heals the target of 175 damage over
15 seconds.
Holy Fire Rank 1 Holy 110 5.00 30 yards
Consumes the enemy in flames that cause 90 to 116 Fire damage and an additional 28 Fire damage over 8 seconds.
*Fear Ward Holy 100 0.00 30 yards
Wards the friendly target against fear. The next fear effect used against the target will fail, using up the ward. Lasts 10 minutes.
Flash Heal Rank 1 Holy 125 1.50 40 yards Heals a friendly target for 193 to 237.
Touch of *Weakness Rank 2
Shadow Magic 75 0.00 Self Only
The caster's next damaging melee attack will cause 15 additional Shadow damage and reduce the damage caused by that target by -4 for 2 minutes.
*Hex of Weakness Rank 2
Shadow Magic 75 0.00 30 yards Weakens the target enemy, reducing damage caused by -4 for 2 minutes.
*Shadowguard Rank 1 Shadow Magic 50 1.50 Self Only
The caster is surrounded by shadows. When a melee or ranged attacker hits the caster, the attacker will be struck for 20 Shadow damage. Attackers can only be damaged once every few seconds. 3 charges. Lasts 10 minutes.
*Devouring Plague Rank 1
Shadow Magic 215 0.00 30 yards
Afflicts the target with a disease that causes 152 Shadow damage over 24 seconds. Damage caused by the Devouring Plague heals the caster.
Mind Flay Rank 1 Shadow Magic 45 0.00 20 yards
Assault the target's mind with Shadow energy, causing 75 Shadow damage over 3 seconds and slowing the target
- 109 -

World of Warcraft Priest Guide
to 50% of their movement speed.
Fade Rank 2 Shadow Magic 75 0.00 Self Only
Fade out, discouraging enemies from attacking you for 10 seconds. More effective than Fade (rank 1).
Mind Soothe Rank 1 Shadow Magic 50 0.00 40 yards
Soothes the target, reducing the range at which it will attack you by -10 yards. Only affects targets level $v or lower. Lasts 15 seconds.
Shackle Undead Rank 1
Discipline 90 1.50 30 yards
Shackles the target undead enemy for up to 30 seconds. The shackled unit is unable to move, attack or cast spells. Any damage caused will release the target. Only one target can be shackled at a time.
Inner Fire Rank 2 Discipline 45 0.00 Self Only
A burst of Holy energy fills the caster, increasing her attack power by 35 and Armour by 330 for 3 minutes.
Feedback Rank 1 Discipline 140 0.00 Self Only
Enchants the Priest's weapon to cause feedback on enemy targets. Each hit has a chance of draining 18 mana from the target. For each mana drained in this way, the target takes 1 damage.
*Elune's Grace Rank 1 Discipline 150 0.00 Self Only Reduces ranged damage taken by -7
for 3 minutes.
Level 22
Resurrection Rank 2 Holy 0 10.00 30 yards
Brings a dead player back to life with 160 health and 300 mana. Cannot be cast when in combat.
Smite Rank 4 Holy 100 2.50 30 yards Smite an enemy for 91 to 105 Holy
damage.
Heal Rank 2 Holy 265 3.50 40 yards Heal your target for 499 to 571.
Mind Blast Rank 3 Shadow Magic 110 1.50 30 yards
Blasts the target for 112 to 120 Shadow damage, but causes a high amount of threat.
Mind Vision Rank 1 Shadow Magic 65 0.00 100 yards Allows the caster to see through the
target's eyes for 60 seconds.
Level 24
Holy Fire Rank 2 Holy 135 5.00 30 yards
Consumes the enemy in flames that cause 120 to 154 Fire damage and an additional 36 Fire damage over 8 seconds.
Power Word: Fortitude Rank 3
Discipline 400 0.00 30 yards Power infuses the target increasing their Stamina by 20 for 30 minutes.
Power Word: Shield Rank 4
Discipline 175 0.00 40 yards
Draws on the soul of the party member to shield them, absorbing 234 damage. Lasts 30 seconds. While the shield holds, spellcasting will not be interrupted by damage.
- 110 -

World of Warcraft Priest Guide
Once shielded, the target cannot be shielded again for 30 seconds.
Mana Burn Rank 1 Discipline 95 3.00 30 yards
Drains 191 to 203 mana from a target. For each mana drained in this way, the target takes 0.5 damage.
Level 26
Renew Rank 4 Holy 140 0.00 40 yards Heals the target of 245 damage over
15 seconds.
*Desperate Prayer Rank 3
Holy 0 0.00 Self Only Instantly heals the caster for 447 to 543.
Flash Heal Rank 2 Holy 155 1.50 40 yards Heals a friendly target for 258 to 314.
Shadow Word: Pain Rank 4
Shadow Magic 155 0.00 30 yards A word of darkness that causes 234 Shadow damage over 18 seconds.
*Starshards Rank 3 Discipline 205 0.00 30 yards
Rains starshards down on the enemy target's head, causing 246 Arcane damage over 6 seconds.
Level 28
Heal Rank 3 Holy 375 4.00 40 yards Heal your target for 754 to 856.
*Devouring Plague Rank 2
Shadow Magic 350 0.00 30 yards
Afflicts the target with a disease that causes 272 Shadow damage over 24 seconds. Damage caused by the Devouring Plague heals the caster.
*Shadowguard Rank 2 Shadow Magic 85 1.50 Self Only
The caster is surrounded by shadows. When a melee or ranged attacker hits the caster, the attacker will be struck for 35 Shadow damage. Attackers can only be damaged once every few seconds. 3 charges. Lasts 10 minutes.
Mind Flay Rank 2 Shadow Magic 70 0.00 20 yards
Assault the target's mind with Shadow energy, causing 126 Shadow damage over 3 seconds and slowing the target to 50% of their movement speed.
Mind Blast Rank 4 Shadow Magic 150 1.50 30 yards
Blasts the target for 167 to 177 Shadow damage, but causes a high amount of threat.
Psychic Scream Rank 2
Shadow Magic 140 0.00 Self Only The caster lets out a psychic scream, causing 3 nearby enemies to flee for 8 seconds.
Level 30
Prayer of Healing Rank 1
Holy 410 3.00 Self Only A powerful prayer heals nearby party members for 301 to 321.
Smite Rank 5 Holy 150 2.50 30 yards Smite an enemy for 150 to 170 Holy
damage.
Holy Fire Holy 170 5.00 30 yards Consumes the enemy in flames that
- 111 -
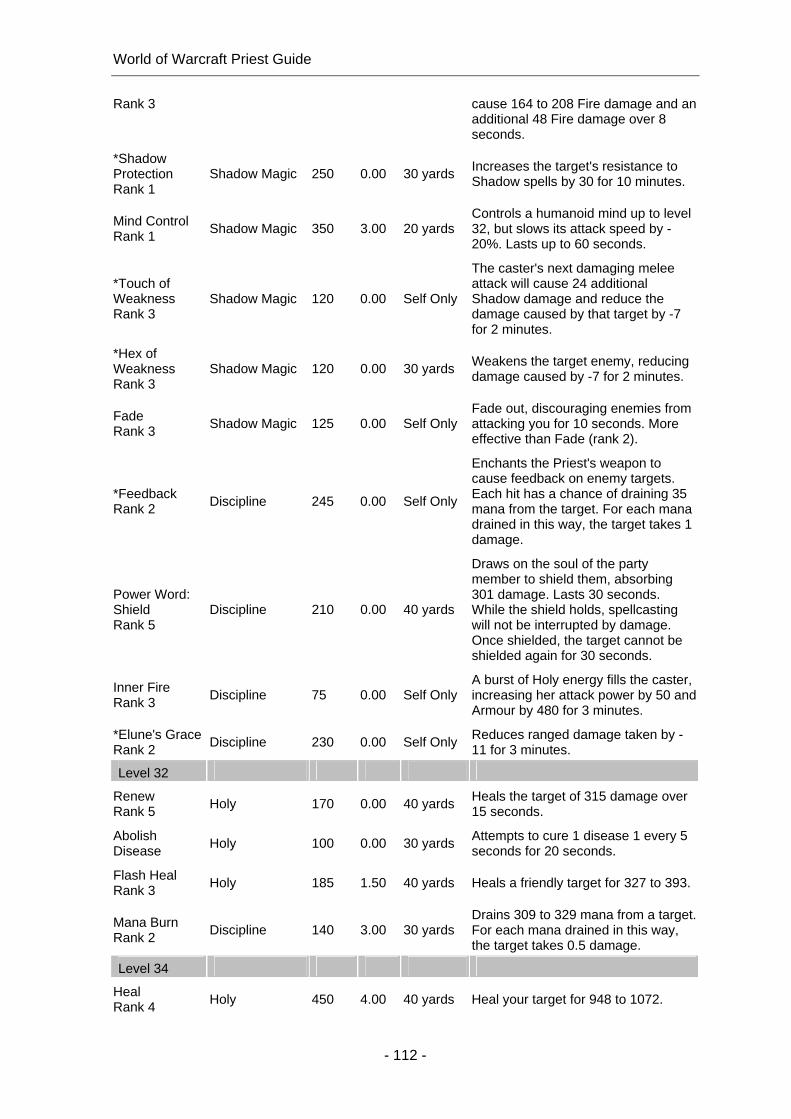
World of Warcraft Priest Guide
Rank 3 cause 164 to 208 Fire damage and an additional 48 Fire damage over 8 seconds.
*Shadow Protection Rank 1
Shadow Magic 250 0.00 30 yards Increases the target's resistance to Shadow spells by 30 for 10 minutes.
Mind Control Rank 1 Shadow Magic 350 3.00 20 yards
Controls a humanoid mind up to level 32, but slows its attack speed by -20%. Lasts up to 60 seconds.
*Touch of Weakness Rank 3
Shadow Magic 120 0.00 Self Only
The caster's next damaging melee attack will cause 24 additional Shadow damage and reduce the damage caused by that target by -7 for 2 minutes.
*Hex of Weakness Rank 3
Shadow Magic 120 0.00 30 yards Weakens the target enemy, reducing damage caused by -7 for 2 minutes.
Fade Rank 3 Shadow Magic 125 0.00 Self Only
Fade out, discouraging enemies from attacking you for 10 seconds. More effective than Fade (rank 2).
*Feedback Rank 2 Discipline 245 0.00 Self Only
Enchants the Priest's weapon to cause feedback on enemy targets. Each hit has a chance of draining 35 mana from the target. For each mana drained in this way, the target takes 1 damage.
Power Word: Shield Rank 5
Discipline 210 0.00 40 yards
Draws on the soul of the party member to shield them, absorbing 301 damage. Lasts 30 seconds. While the shield holds, spellcasting will not be interrupted by damage. Once shielded, the target cannot be shielded again for 30 seconds.
Inner Fire Rank 3 Discipline 75 0.00 Self Only
A burst of Holy energy fills the caster, increasing her attack power by 50 and Armour by 480 for 3 minutes.
*Elune's Grace Rank 2 Discipline 230 0.00 Self Only Reduces ranged damage taken by -
11 for 3 minutes.
Level 32
Renew Rank 5 Holy 170 0.00 40 yards Heals the target of 315 damage over
15 seconds.
Abolish Disease Holy 100 0.00 30 yards Attempts to cure 1 disease 1 every 5
seconds for 20 seconds.
Flash Heal Rank 3 Holy 185 1.50 40 yards Heals a friendly target for 327 to 393.
Mana Burn Rank 2 Discipline 140 3.00 30 yards
Drains 309 to 329 mana from a target. For each mana drained in this way, the target takes 0.5 damage.
Level 34
Heal Rank 4 Holy 450 4.00 40 yards Heal your target for 948 to 1072.
- 112 -

World of Warcraft Priest Guide
*Desperate Prayer Rank 4
Holy 0 0.00 Self Only Instantly heals the caster for 588 to 708.
Resurrection Rank 3 Holy 0 10.00 30 yards
Brings a dead player back to life with 300 health and 520 mana. Cannot be cast when in combat.
Shadow Word: Pain Rank 5
Shadow Magic 230 0.00 30 yards A word of darkness that causes 366 Shadow damage over 18 seconds.
Mind Blast Rank 5 Shadow Magic 185 1.50 30 yards
Blasts the target for 217 to 231 Shadow damage, but causes a high amount of threat.
Levitate Discipline 100 0.00 Self Only
Allows the caster to levitate, floating a few feet above the ground. While levitating, you will fall at a reduced speed and travel over water-like surfaces. Any damage will cancel the effect. Lasts 120 seconds.
*Starshards Rank 4 Discipline 275 0.00 30 yards
Rains starshards down on the enemy target's head, causing 354 Arcane damage over 6 seconds.
Level 36
Holy Fire Rank 4 Holy 205 5.00 30 yards
Consumes the enemy in flames that cause 211 to 265 Fire damage and an additional 60 Fire damage over 8 seconds.
*Shadowguard Rank 3 Shadow Magic 120 1.50 Self Only
The caster is surrounded by shadows. When a melee or ranged attacker hits the caster, the attacker will be struck for 51 Shadow damage. Attackers can only be damaged once every few seconds. 3 charges. Lasts 10 minutes.
*Devouring Plague Rank 3
Shadow Magic 495 0.00 30 yards
Afflicts the target with a disease that causes 400 Shadow damage over 24 seconds. Damage caused by the Devouring Plague heals the caster.
Mind Flay Rank 3 Shadow Magic 100 0.00 20 yards
Assault the target's mind with Shadow energy, causing 186 Shadow damage over 3 seconds and slowing the target to 50% of their movement speed.
Mind Soothe Rank 2 Shadow Magic 70 0.00 40 yards
Soothes the target, reducing the range at which it will attack you by -10 yards. Only affects targets level $v or lower. Lasts 15 seconds.
Power Word: Fortitude Rank 4
Discipline 745 0.00 30 yards Power infuses the target increasing their Stamina by 32 for 30 minutes.
Power Word: Shield Rank 6
Discipline 250 0.00 40 yards
Draws on the soul of the party member to shield them, absorbing 381 damage. Lasts 30 seconds. While the shield holds, spellcasting
- 113 -

World of Warcraft Priest Guide
will not be interrupted by damage. Once shielded, the target cannot be shielded again for 30 seconds.
Dispel Magic Rank 2 Discipline 125 0.00 30 yards
Dispels magic on the target, removing 2 harmful spells from a friend or 2 beneficial spells from an enemy.
Level 38
Renew Rank 6 Holy 205 0.00 40 yards Heals the target of 400 damage over
15 seconds.
Smite Rank 6 Holy 195 2.50 30 yards Smite an enemy for 212 to 240 Holy
damage.
Flash Heal Rank 4 Holy 215 1.50 40 yards Heals a friendly target for 400 to 478.
Level 40
Prayer of Healing Rank 2
Holy 560 3.00 Self Only A powerful prayer heals nearby party members for 444 to 472.
Greater Heal Rank 1 Holy 545 4.00 40 yards A slow casting spell that heals a
single target for 1201 to 1353.
Holy Nova Rank 1 Holy 225 0.00 Self Only
Causes an explosion of holy light around the caster, causing 96 to 105 Holy damage to all targets within 10 yards. The effect also temporarily reduces your threat level against nearby targets for 5 seconds.
*Hex of Weakness Rank 4
Shadow Magic 175 0.00 30 yards Weakens the target enemy, reducing damage caused by -11 for 2 minutes.
*Touch of Weakness Rank 4
Shadow Magic 175 0.00 Self Only
The caster's next damaging melee attack will cause 35 additional Shadow damage and reduce the damage caused by that target by -11 for 2 minutes.
Fade Rank 4 Shadow Magic 175 0.00 Self Only
Fade out, discouraging enemies from attacking you for 10 seconds. More effective than Fade (rank 3).
Mind Blast Rank 6 Shadow Magic 225 1.50 30 yards
Blasts the target for 279 to 297 Shadow damage, but causes a high amount of threat.
Shackle Undead Rank 2
Discipline 120 1.50 30 yards
Shackles the target undead enemy for up to 40 seconds. The shackled unit is unable to move, attack or cast spells. Any damage caused will release the target. Only one target can be shackled at a time.
*Feedback Rank 3 Discipline 355 0.00 Self Only
Enchants the Priest's weapon to cause feedback on enemy targets. Each hit has a chance of draining 54 mana from the target. For each mana drained in this way, the target takes 1 damage.
- 114 -

World of Warcraft Priest Guide
Divine Spirit Rank 1 Discipline 420 0.00 30 yards
Holy power infuses the target, increasing their Spirit by 23 for 30 minutes.
Inner Fire Rank 4 Discipline 115 0.00 Self Only
A burst of Holy energy fills the caster, increasing her attack power by 70 and Armour by 630 for 3 minutes.
Mana Burn Rank 3 Discipline 185 3.00 30 yards
Drains 442 to 468 mana from a target. For each mana drained in this way, the target takes 0.5 damage.
*Elune's Grace Rank 3 Discipline 350 0.00 Self Only Reduces ranged damage taken by -
17 for 3 minutes.
Level 42
*Desperate Prayer Rank 5
Holy 0 0.00 Self Only Instantly heals the caster for 834 to 994.
Holy Fire Rank 5 Holy 245 5.00 30 yards
Consumes the enemy in flames that cause 267 to 333 Fire damage and an additional 76 Fire damage over 8 seconds.
Shadow Word: Pain Rank 6
Shadow Magic 305 0.00 30 yards A word of darkness that causes 510 Shadow damage over 18 seconds.
Psychic Scream Rank 3
Shadow Magic 180 0.00 Self Only The caster lets out a psychic scream, causing 4 nearby enemies to flee for 8 seconds.
*Shadow Protection Rank 2
Shadow Magic 450 0.00 30 yards Increases the target's resistance to Shadow spells by 45 for 10 minutes.
Divine Spirit Rank 2 Discipline 610 0.00 30 yards
Holy power infuses the target, increasing their Spirit by 29 for 30 minutes.
Power Word: Shield Rank 7
Discipline 300 0.00 40 yards
Draws on the soul of the party member to shield them, absorbing 484 damage. Lasts 30 seconds. While the shield holds, spellcasting will not be interrupted by damage. Once shielded, the target cannot be shielded again for 30 seconds.
*Starshards Rank 5 Discipline 350 0.00 30 yards
Rains starshards down on the enemy target's head, causing 486 Arcane damage over 6 seconds.
Level 44
Renew Rank 7 Holy 250 0.00 40 yards Heals the target of 510 damage over
15 seconds.
Flash Heal Rank 5 Holy 265 1.50 40 yards Heals a friendly target for 518 to 616.
*Shadowguard Rank 4 Shadow Magic 160 1.50 Self Only
The caster is surrounded by shadows. When a melee or ranged attacker hits the caster, the attacker will be struck for 70 Shadow damage. Attackers can only be damaged once every few
- 115 -

World of Warcraft Priest Guide
seconds. 3 charges. Lasts 10 minutes.
*Devouring Plague Rank 4
Shadow Magic 645 0.00 30 yards
Afflicts the target with a disease that causes 544 Shadow damage over 24 seconds. Damage caused by the Devouring Plague heals the caster.
Mind Flay Rank 4 Shadow Magic 135 0.00 20 yards
Assault the target's mind with Shadow energy, causing 261 Shadow damage over 3 seconds and slowing the target to 50% of their movement speed.
Mind Control Rank 2 Shadow Magic 550 3.00 20 yards
Controls a humanoid mind up to level 47, but slows its attack speed by -20%. Lasts up to 60 seconds.
Mind Vision Rank 2 Shadow Magic 150 0.00 Unlimited
Allows the caster to see through the target's eyes for 60 seconds. Will not work if the target is in another instance or on another continent.
Level 46
Resurrection Rank 4 Holy 0 10.00 30 yards
Brings a dead player back to life with 500 health and 750 mana. Cannot be cast when in combat.
Smite Rank 7 Holy 245 2.50 30 yards Smite an enemy for 287 to 323 Holy
damage.
Greater Heal Rank 2 Holy 665 4.00 40 yards A slow casting spell that heals a
single target for 1531 to 1717.
Mind Blast Rank 7 Shadow Magic 265 1.50 30 yards
Blasts the target for 346 to 366 Shadow damage, but causes a high amount of threat.
Level 48
Holy Fire Rank 6 Holy 280 5.00 30 yards
Consumes the enemy in flames that cause 320 to 398 Fire damage and an additional 92 Fire damage over 8 seconds.
Prayer of Fortitude Rank 1
Discipline 2600 0.00 30 yards Power infuses the party, increasing their Stamina by 43 for 60 minutes.
Power Word: Shield Rank 8
Discipline 355 0.00 40 yards
Draws on the soul of the party member to shield them, absorbing 605 damage. Lasts 30 seconds. While the shield holds, spellcasting will not be interrupted by damage. Once shielded, the target cannot be shielded again for 30 seconds.
Power Word: Fortitude Rank 5
Discipline 1170 0.00 30 yards Power infuses the target increasing their Stamina by 43 for 30 minutes.
Mana Burn Rank 4 Discipline 225 3.00 30 yards
Drains 576 to 610 mana from a target. For each mana drained in this way, the target takes 0.5 damage.
Level 50
Holy Nova Holy 290 0.00 Self Only Causes an explosion of holy light
- 116 -

World of Warcraft Priest Guide
Rank 2 around the caster, causing 135 to 147 Holy damage to all targets within 10 yards. The effect also temporarily reduces your threat level against nearby targets for 5 seconds.
*Desperate Prayer Rank 6
Holy 0 0.00 Self Only Instantly heals the caster for 1101 to 1305.
Renew Rank 8 Holy 305 0.00 40 yards Heals the target of 650 damage over
15 seconds.
Flash Heal Rank 6 Holy 315 1.50 40 yards Heals a friendly target for 644 to 764.
Prayer of Healing Rank 3
Holy 770 3.00 Self Only A powerful prayer heals nearby party members for 657 to 695.
*Hex of Weakness Rank 5
Shadow Magic 240 0.00 30 yards Weakens the target enemy, reducing damage caused by -15 for 2 minutes.
*Touch of Weakness Rank 5
Shadow Magic 240 0.00 Self Only
The caster's next damaging melee attack will cause 48 additional Shadow damage and reduce the damage caused by that target by -15 for 2 minutes.
Shadow Word: Pain Rank 7
Shadow Magic 385 0.00 30 yards A word of darkness that causes 672 Shadow damage over 18 seconds.
Fade Rank 5 Shadow Magic 225 0.00 Self Only
Fade out, discouraging enemies from attacking you for 10 seconds. More effective than Fade (rank 4).
*Feedback Rank 4 Discipline 470 0.00 Self Only
Enchants the Priest's weapon to cause feedback on enemy targets. Each hit has a chance of draining 77 mana from the target. For each mana drained in this way, the target takes 1 damage.
Inner Fire Rank 5 Discipline 165 0.00 Self Only
A burst of Holy energy fills the caster, increasing her attack power by 90 and Armour by 780 for 3 minutes.
*Starshards Rank 6 Discipline 430 0.00 30 yards
Rains starshards down on the enemy target's head, causing 642 Arcane damage over 6 seconds.
*Elune's Grace Rank 4 Discipline 465 0.00 Self Only Reduces ranged damage taken by -
23 for 3 minutes.
Level 52
Greater Heal Rank 3 Holy 800 4.00 40 yards A slow casting spell that heals a
single target for 1919 to 2147.
*Shadowguard Rank 5 Shadow Magic 200 1.50 Self Only
The caster is surrounded by shadows. When a melee or ranged attacker hits the caster, the attacker will be struck for 90 Shadow damage. Attackers can only be damaged once every few
- 117 -

World of Warcraft Priest Guide
seconds. 3 charges. Lasts 10 minutes.
*Devouring Plague Rank 5
Shadow Magic 810 0.00 30 yards
Afflicts the target with a disease that causes 712 Shadow damage over 24 seconds. Damage caused by the Devouring Plague heals the caster.
Mind Flay Rank 5 Shadow Magic 165 0.00 20 yards
Assault the target's mind with Shadow energy, causing 330 Shadow damage over 3 seconds and slowing the target to 50% of their movement speed.
Mind Soothe Rank 3 Shadow Magic 90 0.00 40 yards
Soothes the target, reducing the range at which it will attack you by -10 yards. Only affects targets level $v or lower. Lasts 15 seconds.
Mind Blast Rank 8 Shadow Magic 310 1.50 30 yards
Blasts the target for 425 to 449 Shadow damage, but causes a high amount of threat.
Level 54
Holy Fire Rank 7 Holy 325 5.00 30 yards
Consumes the enemy in flames that cause 391 to 483 Fire damage and an additional 112 Fire damage over 8 seconds.
Smite Rank 8 Holy 295 2.50 30 yards Smite an enemy for 371 to 415 Holy
damage.
Divine Spirit Rank 3 Discipline 860 0.00 30 yards
Holy power infuses the target, increasing their Spirit by 35 for 30 minutes.
Power Word: Shield Rank 9
Discipline 425 0.00 40 yards
Draws on the soul of the party member to shield them, absorbing 763 damage. Lasts 30 seconds. While the shield holds, spellcasting will not be interrupted by damage. Once shielded, the target cannot be shielded again for 30 seconds.
Level 56
Flash Heal Rank 7 Holy 380 1.50 40 yards Heals a friendly target for 812 to 958.
Renew Rank 9 Holy 365 0.00 40 yards Heals the target of 810 damage over
15 seconds.
Psychic Scream Rank 4
Shadow Magic 210 0.00 Self Only The caster lets out a psychic scream, causing 5 nearby enemies to flee for 8 seconds.
Shadow Protection Rank 3
Shadow Magic 650 0.00 30 yards Increases the target's resistance to Shadow spells by 60 for 10 minutes.
Mana Burn Rank 5 Discipline 270 3.00 30 yards
Drains 738 to 780 mana from a target. For each mana drained in this way, the target takes 0.5 damage.
Level 58
Resurrection Rank 5 Holy 0 10.00 30 yards Brings a dead player back to life with
750 health and 1000 mana. Cannot
- 118 -

World of Warcraft Priest Guide
be cast when in combat.
*Desperate Prayer Rank 7
Holy 0 0.00 Self Only Instantly heals the caster for 1324 to 1562.
Holy Nova Rank 3 Holy 345 0.00 Self Only
Causes an explosion of holy light around the caster, causing 171 to 188 Holy damage to all targets within 10 yards. The effect also temporarily reduces your threat level against nearby targets for 5 seconds.
Greater Heal Rank 4 Holy 960 4.00 40 yards A slow casting spell that heals a
single target for 2396 to 2674.
Shadow Word: Pain Rank 8
Shadow Magic 470 0.00 30 yards A word of darkness that causes 852 Shadow damage over 18 seconds.
Mind Control Rank 3 Shadow Magic 750 3.00 20 yards
Controls a humanoid mind up to level 62, but slows its attack speed by -20%. Lasts up to 60 seconds.
Mind Blast Rank 9 Shadow Magic 350 1.50 30 yards
Blasts the target for 503 to 531 Shadow damage, but causes a high amount of threat.
*Starshards Rank 7 Discipline 505 0.00 30 yards
Rains starshards down on the enemy target's head, causing 798 Arcane damage over 6 seconds.
Level 60
Holy Fire Rank 8 Holy 365 5.00 30 yards
Consumes the enemy in flames that cause 464 to 570 Fire damage and an additional 128 Fire damage over 8 seconds.
Prayer of Healing Rank 4
Holy 1030 3.00 Self Only A powerful prayer heals nearby party members for 939 to 991.
*Shadowguard Rank 6 Shadow Magic 250 1.50 Self Only
The caster is surrounded by shadows. When a melee or ranged attacker hits the caster, the attacker will be struck for 116 Shadow damage. Attackers can only be damaged once every few seconds. 3 charges. Lasts 10 minutes.
*Hex of Weakness Rank 6
Shadow Magic 320 0.00 30 yards Weakens the target enemy, reducing damage caused by -20 for 2 minutes.
*Devouring Plague Rank 6
Shadow Magic 985 0.00 30 yards
Afflicts the target with a disease that causes 904 Shadow damage over 24 seconds. Damage caused by the Devouring Plague heals the caster.
*Touch of Weakness Rank 6
Shadow Magic 320 0.00 Self Only
The caster's next damaging melee attack will cause 64 additional Shadow damage and reduce the damage caused by that target by -20 for 2 minutes.
- 119 -
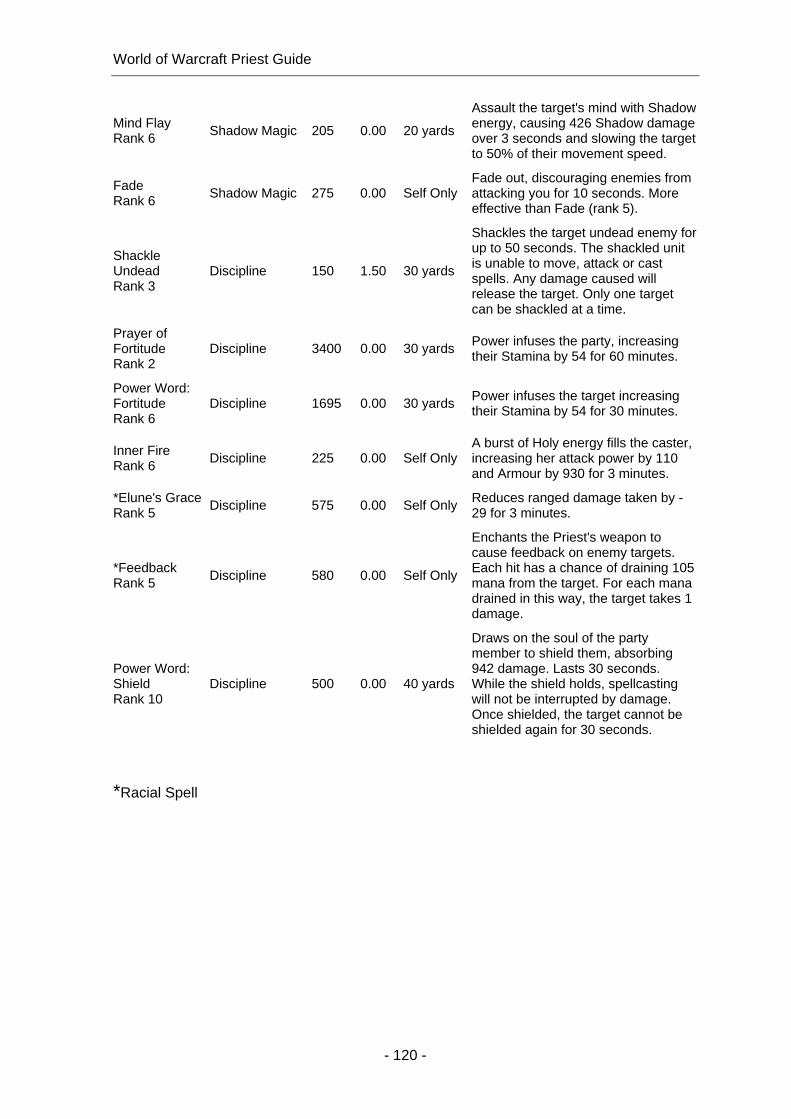
World of Warcraft Priest Guide
Mind Flay Rank 6 Shadow Magic 205 0.00 20 yards
Assault the target's mind with Shadow energy, causing 426 Shadow damage over 3 seconds and slowing the target to 50% of their movement speed.
Fade Rank 6 Shadow Magic 275 0.00 Self Only
Fade out, discouraging enemies from attacking you for 10 seconds. More effective than Fade (rank 5).
Shackle Undead Rank 3
Discipline 150 1.50 30 yards
Shackles the target undead enemy for up to 50 seconds. The shackled unit is unable to move, attack or cast spells. Any damage caused will release the target. Only one target can be shackled at a time.
Prayer of Fortitude Rank 2
Discipline 3400 0.00 30 yards Power infuses the party, increasing their Stamina by 54 for 60 minutes.
Power Word: Fortitude Rank 6
Discipline 1695 0.00 30 yards Power infuses the target increasing their Stamina by 54 for 30 minutes.
Inner Fire Rank 6 Discipline 225 0.00 Self Only
A burst of Holy energy fills the caster, increasing her attack power by 110 and Armour by 930 for 3 minutes.
*Elune's Grace Rank 5 Discipline 575 0.00 Self Only Reduces ranged damage taken by -
29 for 3 minutes.
*Feedback Rank 5 Discipline 580 0.00 Self Only
Enchants the Priest's weapon to cause feedback on enemy targets. Each hit has a chance of draining 105 mana from the target. For each mana drained in this way, the target takes 1 damage.
Power Word: Shield Rank 10
Discipline 500 0.00 40 yards
Draws on the soul of the party member to shield them, absorbing 942 damage. Lasts 30 seconds. While the shield holds, spellcasting will not be interrupted by damage. Once shielded, the target cannot be shielded again for 30 seconds.
*Racial Spell
- 120 -