working with the data view web part - united … · web viewwhen you create a data-driven web site,...
TRANSCRIPT
Working With the Data View Web Part A Microsoft® Office FrontPage® 2003 White Paper
This white paper gives an overview of the Data View Web Part in FrontPage 2003 and shows how you can use it to build powerful, data-driven Web sites based on XML and XSLT technologies. It also discusses the Data Source Catalog and how you can use FrontPage 2003 to manage it.
Note: The instructions, screenshots, and behavior discussed in this white paper are based on Microsoft Internet Explorer version 5.5 or above. The user experience with prior versions of Microsoft Internet Explorer and with other browsers is going to be different – in general, the same level of features may not be available.
The examples in this white paper assume that Windows SharePoint Services is installed on a server named myserver1024. This server also has Microsoft SQL Server with the Northwind sample database installed on it
Published: November 2003
For the latest information, please see http://www.microsoft.com/frontpage/default.htm

Contents
Introduction........................................................................................................................... 1
What is the Data View?.........................................................................................................2
Data-driven Web Sites.....................................................................................................2
Data Binding....................................................................................................................2
Data Views: XSLT-based Presentation of XML.................................................................2
Adding a Data View...............................................................................................................4
Creating a Database Connection......................................................................................4
Inserting Data View into the Page.....................................................................................5
Working with Hierarchies.......................................................................................................7
Example XML Source.......................................................................................................7
Creating an XML Data Source..........................................................................................8
Selecting Data to Display.................................................................................................8
Formatting the Data View....................................................................................................11
Applying Styles..............................................................................................................11
Manually Editing XSLT...................................................................................................12
Working with Data View Toolbars...................................................................................13
Setting Data View Record Options..................................................................................15
Conditional Formatting...................................................................................................15
Data Views as Web Parts...............................................................................................17
Grouping, Filtering and Sorting............................................................................................18
SharePoint Services-based Lists as Data Views..................................................................23

Working with Data Sources Catalog....................................................................................25
Adding a Data Source....................................................................................................25
Referencing External Catalogs.......................................................................................26
Searching for Data Sources............................................................................................26
Deleting Data Sources....................................................................................................26
Conclusion.......................................................................................................................... 27
References......................................................................................................................... 28
Other Microsoft Resources.............................................................................................28

IntroductionData View Web Parts, also known as Data Views, enable the display of data from various data sources using the formalism of Extensible Stylesheet Language Transformations (XSLTs). A data view retrieves data from the data source in the form of XML, and applies XSLTs to it. This gives the developer a powerful and standards based way to display formatted data.
XSL Transformations (XSLT) is an XML-based language that enables you to transform one class of XML document to another. XSLT offers great flexibility for presenting and exchanging data between disparate devices and business systems. For example, with XSLT style sheets, you can dynamically transform an XML purchase order from one schema to another before sending the order to a supplier. In addition, with XSLT you can dynamically transform an XML document so it can be rendered on a variety of Internet-enabled devices.
From within FrontPage 2003, you can format the data within a Data View by directly applying formatting from Design view. FrontPage 2003 applies formatting to all data points at the same level in the XML by modifying the XSLT style sheet attached to the page. You can change the XSLT style sheet without having to know anything about XSLT. This new feature in FrontPage 2003 is the first-of-its-kind WYSIWYG XSLT editor on the market today.
FrontPage 2003 goes one step ahead and provides a visual way of creating XSLTs to the XML behind an instance of a data view. This means that you do not have to know XSLT to create a visually pleasing data-driven Web site.
In this document, we will examine how you can use the Data View Web Part to connect to various data sources, choose the structure of the data you want displayed, apply filters and sort conditions, and specify groupings. We will also see how Windows SharePoint Services lists can be converted to data views and we will discuss conditional formatting of data displayed in a data view. Finally, we will take a look at the Data Sources Catalog and how it can be used to manage all your various sources of data – from XML files to scripts to databases.

What is the Data View?Data View Web Part is the primary component used for data presentation when building data-driven Web sites using FrontPage 2003 and Windows SharePoint Services. When you create a data-driven Web site, you select data sources from a Data Source Catalog and use Data View Web Parts to present data. Data View Web Parts render data by using Extensible Stylesheet Language Transformation (XSLT).
Data-driven Web SitesFrontPage 2003 has many features for building live, data-driven webs. Central to any data-driven Web page is the ability to collect and present live customer data on the fly on a page – that is, you are effectively building a page based on data (hence the term data-driven). These features fall into two categories:
Sites based on ASP or ASP.NET: using the Database Results Wizard and the Database Interface Wizard. You can create Web pages that display interactive views of desktop-based or server-based data by using ASP code or ASP.NET controls.
Sites based on Windows SharePoint Services: using the Data Source Catalog and Data View Task panes. You can access a wide range of data sources, including desktop-based and server-based databases, XML files, Web services, and SharePoint Services-based lists.
In this document, we focus on the second set of features.
Data BindingWhen working with a Windows SharePoint Services-based site, FrontPage 2003 allows live views of customer data from a variety of different sources:
SharePoint Services-based Lists and Libraries
OLEDB data sources, including Microsoft SQL Server
XML Web Services
XML Files
The key technology enabling this versatile data access is the data retrieval service, which is a new data binding mechanism in Windows SharePoint Services. A data retrieval service enables data consumers and data sources to communicate with each other through Simple Object Access Protocol (SOAP) and XML. In essence, it is an XML Web service that returns XML data from different data sources or manipulates data against those data sources. A data retrieval service is installed and runs on a server running Microsoft Windows SharePoint Services. Windows SharePoint Services includes a default set of data retrieval services for working with data in SharePoint Services-based lists, OLEDB, and XML data sources.
Data Views: XSLT-based Presentation of XMLThe Data View Web Part is a special Web Part which acts as a client to the data retrieval service as it can retrieve and manipulate data from any data source supported by data retrieval services. As we mentioned before, the data retrieval service is a Web service, thus, it

returns data in the form of XML. The Data View uses Extensible Stylesheet Language Transformations (XSLT) on this XML to format the data.
data retrieval service
A key feature of the Data View is that it provides WYSIWYG authoring of XSLT to produce formatted views of data. The visual editor produces XSLT; the XSL transformation code is inserted directly into the HTML of your page. Once inserted on your page, you can use any WYSIWYG formatting tools from within the Data View in FrontPage 2003, such as adding table columns with certain font formatting, and FrontPage 2003 will generate the new XSLT on the fly. You can also change or add to the XSLT in the CODE view of the FP 2003 editor
Because of the data retrieval services architecture, live data is available at authoring time; furthermore, data is available as XML regardless of how it is stored at the data source. Recall that the data retrieval service is an XML Web service.
Data Views can be connected to build rich pages that combine data from multiple sources, and/or provide rich views on top of hierarchical data (such as master-detail).

Adding a Data ViewNote: In the rest of this paper, we will work with the default Windows SharePoint Services site. In this document, the URL for this site is: http://MyServer1024/ default.aspx)
The first step in inserting a data view on a Web page is to open the Data Source Catalog and select the desired data source. The Data Source Catalog acts as a single location for accessing data sources in your Web site and enables you to simplify the process of managing them. It doesn't matter whether the data source exists on your server or on an external server. If you have access rights to the data source, you can interact with it by using the Data Source Catalog. We will discuss Data Source Catalogs in more detail later in this document.
To open the Data Source Catalog, follow these steps:
1. Open the Web site in FrontPage 2003.
2. Click on the page you wish to work with. In our example, this page is default.aspx.
3. Click on Data, Insert Data View. This brings up the Data Source Catalog task pane on the right.
As you can see, there are many different data sources that you can use: SharePoint Services-based Lists and Libraries, OLEDB data sources (called as Database Connections in the catalog), XML Files, Server side scripts, and XML Web Services.
Note: A server–side script begins to run when a browser requests an .asp file from the Web server. The Web server then calls ASP, which processes the requested file from top to bottom, executes any script commands, and sends a Web page to the browser. Because scripts run on the server instead of on the client browser, the Web server does all the work that is involved in generating the HTML pages that are sent to browsers.
Notice that FrontPage 2003 automatically created data sources for the lists and libraries that exist on your Windows SharePoint Services site.
Creating a Database ConnectionWe will create a database connection to a Microsoft SQL Server database and our connection will get data from the “Products” table in the “Northwind” sample database.
To create a new database connection, follow these steps:
1. In the Data Source Catalog task pane, click on the + sign next to Database Connections and click the Add to catalog link. This brings up the Data Source Properties dialog box.
2. Click on the General tab and enter a name for the connection. This should be a name that easily identifies the data associated with this connection. We chose Northwind_Products (the Products table in Northwind database).
3. Click on the Source tab and click the Configure Database Connection button to bring up the Configure Database Connection dialog box.
4. Enter the name of the server; in our example, this is myserver1024.
5. Choose the authentication type; the following choices available:

Save this username… allows you to type in a specific user name and password that identifies you to the data source.
Use Windows Authentication uses integrated security – your windows credentials are used for authentication at the data source. If you choose this option, make sure that integrated security is supported by the data source (for example, Microsoft SQL Server), and that it is configured to accept Windows sign-on credentials.
Use Single Sign-On… can be used when this site is part of a portal created using Microsoft SharePoint Portal Server.
Use Custom… lets you specify an OLEDB connection string used to connect to the database. This option can be used for fine grained control of the connection.
We have chosen the Use Windows Authentication option.
Note We assume that the SQL Server and Windows Sharepoint Services exist on the same machine. If you need to connect to an external database, you should use Save this username… or Use Single Sign-on… authentication types. This is because, when using Windows Authentication, only “one-hop” of the credentials are allowed. Thus external databases cannot be authenticated using the users Windows credentials.
6. Click Next to select the table, view or stored procedure that you want to use as the source of data for this connection.
7. Choose Northwind in the drop down list of databases.
8. Select Products from the Table, view or stored procedure list.
Note: You can also specify a custom query instead of using the drop down list.
9. Click Finish to complete this wizard. You are now back to the Data Source Properties dialog box, which looks like the following screenshot:
Data Source Properties dialog box
10. Click OK to complete database connection setup.

Inserting Data View into the PageOnce the database connection has been created, the next step is to insert a Data View based on this connection into the page:
To insert a Data View, follow these steps:
1. Create a new Web Part Zone into which you will insert the new data view:
a. Open default.aspx in design view.
b. Position the cursor at the end of the page by pressing ctrl-End.
c. Click Data/Insert New Web Part Zone.
Note: Like any other Web Part, a Data View can reside either within or outside a Web Part Zone. A Web Part which is not in a Web Part Zone is called Static Web Part and is subject to certain limitations in its ability to be customizable at run-time. For more information, see Static Web Parts, pg. 17 of Working with Web Part Pages. However, it is common practice to put web parts inside a zone and we have followed this in all the examples in this paper.
For the following steps, make sure the new Web Part Zone is selected.
2. Click on Data/Insert Data View to display the Data Source Catalog task pane.
3. Under Database Connections, locate Northwind_Products.
4. Position the cursor on this and click the right arrow at the end of the name.
5. Choose Insert Data View.
6. Now run the page in the browser by typing in the appropriate URL (for our example, it is http://myserver1024/default.aspx) or pressing the F12 key on your keyboard.

Data View
As you can see, with a few simple drag and drop actions, your Windows SharePoint Services Web page can be extended with data from the source of your choice. Furthermore, since Data View is essentially a Web Part, all the advantages of the Web Part Infrastructure are available to you: runtime customization, applying themes, shared and personal views, etc. For more information about how Web Parts can be customized, see the Customizing Web Parts White paper.
What we have seen so far are just the basics. Data Views have many rich and powerful capabilities built into them, such as grouping, filtering, sorting, toolbars, layout and formatting capabilities, working with hierarchical data, etc. In the next few sections, we will explore each of these areas in more detail.

Working with HierarchiesThe Data View Web Part works with data in XML format. The XML formalism can be used naturally to describe hierarchical data; consequently, the Data View Web Part has built into it the intelligence to deal with data hierarchies. In this section, we will examine these features.
Example XML SourceWe will use an example XML file which contains the data we need throughout the rest of this section and in many places throughout in this document. This file, called cust-ord.xml, contains a list of customers; for each customer, there is the list of orders and for each order, there is a list of the products that comprise that order. The following diagram represents the structure of this data:
Shown below is a fragment from this XML file. The entire file is available at http://www.sharepointcustomization.com/resources/whitepapers/webpartdocs/cust-ord.xml .
<?xml version="1.0" encoding="utf-8" ?>
<CustomerOrders>
<Customer>
<CompanyName>Ernst Handel</CompanyName>
<Orders>
<OrderID>10258</OrderID>
<OrderDate>1996-07-17T00:00:00</OrderDate>
<Products>
<ProductName>Chef Anton's Gumbo Mix</ProductName>

<Quantity>65</Quantity>
<UnitPrice>17.0000</UnitPrice>
<total>1105.0000</total>
</Products>
</Orders>
</Customer>
<Customer>
<CompanyName>Frankenversand</CompanyName>
<Orders>
<OrderID>10267</OrderID>
<OrderDate>1996-07-29T00:00:00</OrderDate>
<Products>
<ProductName>Raclette Courdavault</ProductName>
<Quantity>70</Quantity>
<UnitPrice>44.0000</UnitPrice>
<total>3080.0000</total>
</Products>
</Orders>
</Customer>
</CustomerOrders>
Our example file contains 63 Customer records and each of them has zero or more orders and each order has zero or more products.
Creating an XML Data SourceThe steps in creating an XML data source are similar to those you followed in creating a database connection in the previous section.
Note: For the following steps, we assume the Data View Web Part that was inserted in the previous section has been deleted. To do this, you can simply click on the Web Part and press the delete key.
To create an XML Data Source, follow these steps:

1. Download the XML file for this example and save it on your local machine as cust-ord.xml. The file is available at http://www.sharepointcustomization.com/resources/whitepapers/webpartdocs/cust-ord.xml .
2. Open the Web http://myserver1024 in FrontPage 2003, and open default.aspx in design view
3. Click Data/Insert Data View to bring up the Data Source Catalog task pane, and click on the + sign next to XML Files.
4. Click the Add to catalog link. This brings up the Data Source Properties dialog box.
5. Click on the Source tab and click the Browse button and locate the cust-ord.xml that you downloaded in step one above. Choose this file.
6. A dialog box asks if you want to import this file to the Web Site. Click OK and OK again to finish the import.
Now you should have an XML data source corresponding to the imported XML file.
Selecting Data to DisplayThe cust-ord.xml file contains data that is hierarchical – each customer has a set of orders and each order consists of a set of products. We will now select data from various places in the hierarchy and create a Data View that presents the data in the desired way. Specifically, we want to display the name of each company, the names of the products they have ordered, the quantity, unit price and the total.
In doing so, we want to preserve the hierarchy – that is, we want the product information for a given company to appear under that company name. The following steps build on the default.aspx created in the previous section.
To create a Data view, follow these steps:
1. Create a new Web Part Zone into which we will be inserting the new data view*:
a. Open default.aspx in design view
b. Position cursor at the end of the page by pressing ctrl-End.
c. Click Data/Insert New Web Part Zone
For the following steps, make sure the new Web Part Zone is selected.
2. Click on Data/Insert Data View to display the Data Source Catalog task pane.
3. Click the + button next to XML Files and click on cust-ord.xml. In the pop-up menu, choose Show Data. This opens the Data View Details task pane, which should look like the screenshot below:
*

4. Under the Work With Data category, you will see data in this file displayed. Note the following:
The hierarchy inherent in the structure is preserved. You can use the left and right arrow buttons to navigate among the records in the file
5. Click on Company Name and select Insert Data View. This inserts only the name of the company in the view. Notice that because FrontPage 2003 detected that you have only selected one field from your data to insert as a view, it picked the most appropriate style, which is the bulleted list.
6. In the Manage View Settings category of the task pane, click on Style. This brings up the View Styles dialog box.
7. In the General tab, select Repeating Form with Border style. These styles are a key WYSIWYG formatting provided by FrontPage 2003.
8. In the Options tab, locate the radio button Display items in sets of this size and set its value to 5. This displays five records at a time in the Data View.
9. Click OK.
Now that we have added the customer name to the view, we will add the detail data for each customer.
10. Click at the end of the first row of displayed data.
11. On the Data View Details task pane, click on the Products node and select Insert Subview

These actions indicate what data you want: by choosing the Products node, and where you want the data: by positioning the cursor at the end of the first row.
This inserts product data for each customer right under the name of that customer.
12. Run this page in the browser by using the shortcut key F12.
You should see something similar to the screenshot below:

Formatting the Data ViewOne of the most powerful features of the Data View is that it allows XSL based WYSIWYG formatting of data, thus providing multiple presentation options with just a few mouse clicks. The power of WYSIWYG lies in the fact that you can work entirely in Design View. The powerful design tools in FrontPage 2003, formatting toolbars, etc., are readily available to format a Data View any way you want right in Design View
We will continue our exploration of the Data View by examining these features below.
Applying StylesFrontPage 2003 provides several built in styles for the Data View. The application of these styles is done using the Style link in the Data View Details task pane.
In the following steps, we will continue designing the default.aspx page from where we left off in the previous section. The Data View consists of an outer view which contains the Company Name, and inside it is a subview which contains the product details ordered by this company. You can format each view individually using different styles.
To apply a style, follow these steps:
1. Ensure that the Data View Details task pane is displayed. If it is not, you can display it by right clicking anywhere in the Data View and choosing Data View Properties in the pop up menu)
2. Click on any piece of data that comprise the outer view – for instance, the string CompanyName on the first row. This will set context to the outer view so style setting will apply to it.
3. In the Manage view settings category of the Data View Details task pane, click on Style link. This brings up the View Styles dialog box. In the list of available HTML styles, choose Two Column Repeating Form With Border style.
4. Click on the Options tab, and locate the radio button Display items in sets of this size; set its value to 6. This displays six records at a time in the Data View. Now click OK.
5. To format the subview; click anywhere on the subview to set the context to it. For example, you can click on the ProductName field of the first record.
6. Bring up the View Styles dialog box by clicking on the Styles Link. This time, choose the Repeating Form With Border style. Click OK.
7. Run the page in the browser by typing the appropriate URL. For our example, this is http://myserver1024/default.aspx.
You should see something similar to the screenshot below:

As mentioned before, Data Views provide WYSIWYG formatting using XSL Transformations. The mouse clicks and other actions performed in the previous steps generated XSLT code and put this code inline within the HTML of your page.
To see this, ensure that default.aspx is open in design view in FrontPage 2003, and click anywhere on the Data View. Now switch to Split view by clicking on Split in the view selection bar at the bottom left of the page. This displays both the code and the design surface simultaneously. The code corresponding to the Data View is automatically highlighted in the code pane. Notice that XSLTs appear as CDATA with the <dvwp:XSL> tag. FrontPage 2003 generated these stylesheet transformations because of your actions in the WYSIWYG UI.
Manually Editing XSLTThe auto-generated XSLTs can also be manually edited to allow a high degree of flexibility to the author of the page. We will look at a simple illustration of this. Suppose that you wanted to change the string CompanyName in the Data View so that it is italicized in addition to being boldfaced and we want to change the string Products: so that it is italicized instead of being boldfaced.
To manually edit the XSLT, follow these steps:
1. Position the cursor anywhere on the Data View
2. Switch to Split view
3. In the code pane, locate the set of lines which set the format of these strings

It should look like the fragment shown below (if you have followed the steps exactly the way it has been outlined in the previous sections, then it should start at or close to line 432):
<table border="0" cellspacing="0" width="100%">
<tr>
<td width="25%" class="ms-vb">
<b>CompanyName:</b>
</td>
<td width="75%" class="ms-vb">
<xsl:value-of select="CompanyName"/>
</td>
</tr>
<tr>
<td width="25%" class="ms-vb">
<b>Products:</b>
</td>
<td width="75%" class="ms-vb">
<xsl:call-template name="dvt_2"/>
</td>
</tr>
</table>
4. Change the two highlighted lines above to the following:
<b></i>CompanyName:</i></b>
<i>Products:</i>
5. Save your changes.
6. Run the page in the browser by typing the appropriate URL. For our example, this is http://myserver1024/default.aspx.
Verify that the formatting changes that you made appear on the page.
This example is admittedly rather simple. The same effect could have been achieved within the design view by simply selecting the desired text and clicking Format/Font…But it highlights this important feature of FrontPage 2003: Data Views allow WYSIWYG XSLT

editing, and the user can change the generated transformations directly within FrontPage 2003’s Code view. XSLT editing can be used to accomplish things that are not available in the design view.
Working with Data View ToolbarsThe Data View is more that just a great way to present customer data; it also allows the user to interact dynamically with the data by grouping, filtering and sorting†. These actions are enabled using the Data View toolbar.
By default, when a Data View is inserted onto a page, it does not come with a toolbar; however, the page author may choose to add one to the view. The following steps build on the default.aspx from the previous section.
To add a toolbar to the Data View, follow these steps:
1. Ensure the Data View Details task pane is displayed. If it is not, you can display it by right clicking anywhere in the Data View and choosing Data View Properties in the pop up menu
2. Click anywhere on the Data View to set context.
3. In the Manage view settings category of the Data View Details task pane, click on Style link. This brings up the View Styles dialog box.
4. Click on the Options tab.
5. Check the box labeled Show Toolbar with Options for and ensure that Filter, Sort, and Group boxes are checked as well.
6. Click OK to close this dialog box and save your changes.
7. Run the page in the browser by typing the appropriate URL. For our example, this is http://myserver1024/default.aspx.
Shown below is a screenshot of the Data View as it appears in the browser:
† Grouping, filtering, and sorting can also be done at design time. When done at design time, these operations determine the shape, contents, and order rows in the data view itself; at run time, these operations affect what data is presented to the user, not the actual contents of the data view. Design time grouping, filtering, and sorting are explained in detail in a later section.

The toolbar has a button to specify the filter and two drop downs to specify the sorting and grouping.
When you click on the Filter button in the browser, the Filter Choices pane is displayed; this allows you to specify a filter on the desired column. Note the following:
Any column in the outermost data view can be used for filtering.
The UI for choosing the filter is a drop down list. The only possible filter is of the form column=value, where value is one of the known-to-exist values for that column (hence it is presented as an entry in the dropdown).
For any subviews (such as the Products subview in our example), the only choice is to set an <all> or <empty> condition on it.
Sorting is accomplished by choosing a column to sort on from the drop down list. Sorting is allowed only on the columns of the outermost view. Once you choose a column to sort on, a little arrow (↓) appears next to the drop down, showing the sort order – ascending or descending. Clicking the arrow changes the sort order from one to the other.
Grouping is done similarly to sorting: by picking a column to group by from the drop down list. Grouping is allowed only on the columns in the outermost view. Groups can be expanded and collapsed.
Note: The Data View toolbar is enabled only at the top level of the Data View; subviews cannot have toolbars of their own.

Setting Data View Record OptionsThe Data View allows the author to control the number of records displayed. This is done under the Options tab of the View Styles dialog box, within the Record sets category. There are three options available, surfaced as radio buttons:
Display all items: This option displays all records in the view on a single page.
Display items in sets of size: This option displays records in sets of the specified size; navigation buttons are provided at the bottom of the Data View, which allow the user to move to the next set of records (next), the previous set of records (previous), or to the first set of records (reset).
Limit the total number of items displayed to: This is the same as #1 above, but the number of records displayed is limited by the specified size.
Note: These are design time settings; the end user cannot modify this in the browser.
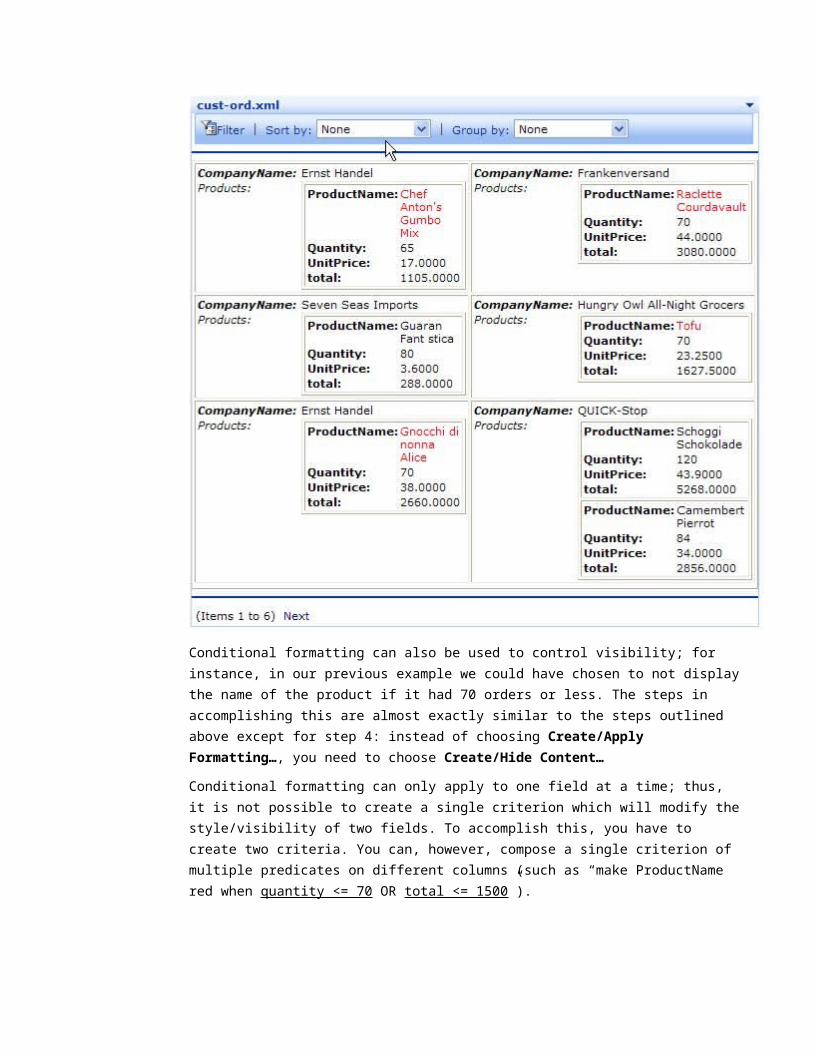
Conditional FormattingData Views offer another powerful feature: the formatting applied to the various fields in the view can be driven by conditions on the data. This allows, for instance, the author to display in red all product names for which the total sales are less than 1000 units. Data Views also allow conditional display; whether a field is displayed or not can be controlled by predicates on other data within the view.
The Conditional Formatting task pane contains all the UI for setting data based formatting criteria. We will illustrate this feature by walking through an example – we will display in red all the names of all products which have had 70 orders or less. The following steps build on the default.aspx from the previous section:
To apply conditional formatting, follow these steps:
1. Open default.aspx in design view.
2. On the cust-ord.xml Data View, click on any product name (such as “Chef Anton’s Gumbo Mix”). Notice that this automatically selects the entire field and how this field in all the other records also gets highlighted in a different color. This is the UI’s way of informing you that subsequent operations apply to the ProductName field.
Note: We have to distinguish here between the notions of field name and field value. The string ProductName is the name of the field; it is a piece of metadata associated with that field. The actual value of the field is “Chef Anton’s Gumbo Mix”. Conditional formatting is always applied to field values, not field names.
3. Right click and in the pop-up menu choose Conditional Formatting…. This brings up the Conditional Formatting task pane.
4. Choose Create/Apply Formatting. The Condition Criteria dialog comes up.
5. Click where it says Click here to add a clause.
6. Under Field Name, choose the field Quantity (Number).
Note: All XML nodes at this level and levels below are available. For example, if the field you chose was CompanyName, then all the nodes at this level and nodes below it – such as OrderID, ProductName, etc. - would have been available in the drop-down.

7. Choose Less Than Or Equal as the comparison operator, and type 70 as the value. Now click OK. This brings up the Modify Style dialog box. In the previous steps, we specified the conditions which trigger the application of special formatting; this dialog box allows you to spell-out what this formatting is.
8. Choose Format/Font…
9. In the Font dialog box, choose the red color.
10. Click OK twice to close the dialog boxes; save the changes.
11. Run the page in the browser by typing the appropriate URL. For our example, this is http://myserver1024/default.aspx.
You should see something similar to the screenshot below:
Conditional formatting can also be used to control visibility; for instance, in our previous example we could have chosen to not display the name of the product if it had 70 orders or less. The steps in accomplishing this are almost exactly similar to the steps outlined above

except for step 4: instead of choosing Create/Apply Formatting…, you need to choose Create/Hide Content…
Conditional formatting can only apply to one field at a time; thus, it is not possible to create a single criterion which will modify the style/visibility of two fields. To accomplish this, you have to create two criteria. You can, however, compose a single criterion of multiple predicates on different columns (such as “make ProductName red when quantity <= 70 OR total <= 1500”).
Data Views as Web Parts A Data View is, at its heart, a Web Part like any other; this means that in addition to all the formatting, grouping, sorting, filtering, etc., it provides, it automatically leverages all the features of the Web Part Infrastructure present in Windows SharePoint Services.
Specifically, this means:
Data Views support personal and shared views (when inside a Web Part Zone), just like every other Web Part. This means that a user can make personalizations which are visible only to him or her; the user can also customize the shared view of the same Data View.
Data Views support run-time customization using a browser based interface, when inside a Web Part Zone.
Data Views have the standard set of customizable properties shared by all Web Parts, such as Title, Height, Width, Frame State, etc.
Data Views support Web part connection authoring, but require FrontPage 2003 to create the connection string.
For more information about how to customize a Web Part, see the Customizing Web Parts white paper>

Grouping, Filtering and SortingIn the previous section, we examined how the Data View toolbar can be used to group, filter, and sort the data displayed. This was performed at run time in the browser by the end user. The author may wish to perform the similar operations at design time.
Conceptually, when a filter condition is applied to a Data View at run time using the Data View toolbar, it only affects the presentation of the data; the Data View itself contains the entire set of records. When a Data View is filtered at design time however, one is actually limiting what records are available in the data view. Similar comments apply to design time vs. run time sorting and grouping.
In this section, we examine how Data View’s can be filtered, sorted, and grouped at design time. These operations can be performed under the Manage View Settings category of the Data View Details task pane.
We want the Data View to contain records for companies whose names start with an ‘S’. These records should be sorted by the Company Name, and they should also be grouped by the same field. The following steps build on the default.aspx from the previous section.
To group, filter, and sort the data displayed at design time, follow these steps:
1. Open default.aspx in design view
2. Ensure the Data View Details task pane is displayed. If it is not, you can display it by right clicking anywhere in the Data View and choosing Data View Properties in the pop up menu.
3. On the cust-ord.xml Data View, click on any company name (such as “Ernst Handel”).
4. In the Data View Details task pane, click on Filter under the Manage view settings category. This brings up the Filter Criteria dialog box.
5. Click where it says Click here to add a clause.
6. Under Field Name, choose the field CompanyName.
7. Choose Begins With as the comparison operator, and type S as the value. Now click OK.
8. Run the page in the browser by typing the appropriate URL. For our example, this is http://myserver1024/default.aspx.
You should see something similar to the screenshot below in the browser:

Noticed in step six that filter predicates can be set on fields that are descendants of the CompanyName field. For instance, it is possible to set a filter on the Quantity field so only records for which the value of this field is less than or equal to 100 are selected. However, note that filter predicates on nested items apply only to the first record within the nesting. Thus, if this filter is applied to the Data View in addition to the CompanyName filter applied above, then (moving clockwise in the above screenshot with top-left record – the one for “Seven Seas Imports” – set to 1):
Record 3 (“Save-a-lot Markets” with product names “Perth Pastries” and “Rogedesild”) is removed
Record 4 is removed (“Save-a-lot Markets” with product name “Rh nbru Klosterbier”)
These are to be expected; however, what about record six (“Save-a-lot Markets” with product names “Queso Manchego La Pastora” and “Jack’s New England Clam Chowder”)? Specifically, consider the second product sub-record for which Quantity is 120: should it go or stay? You will notice when you run the page this actually stays even though Quantity is greater than 100. This is because the filter predicate applies only to the first sub-record – for which Quantity is 100 and hence it satisfies the predicate.
You can also set filters on the sub-view; for instance, it is possible to set a filter on the products sub-view such that only those records with a Total greater than 1000 are selected. If this filter is applied to the Data View in addition to the CompanyName filter (but not the

Quantity) filter, then (moving clockwise in the above screenshot with top-left record – the one for “Seven Seas Imports” – set to 1):
Record 1 (“Sever Seas Imports”) will have no sub-records
The sub-records for records 2 and 3 (“Save-a-lot Markets”) will remain unchanged
Record 4 (“Save-a-lot Markets”) will have no sub-records
The sub-records for records 5 and 6 (“Save-a-lot Markets”) will remain unchanged
The filter criteria are XPath expressions; the Filter Criteria dialog box is simply a visual editor which translates the UI into XPath. However, like all visual editors which sit on top of a language formalism, there are things which cannot be expressed visually but can be achieved by directly editing the XPath. The XPath behind a filter can be edited by clicking on the Advanced button in the Filter Criteria dialog box, and also from the conditional clause composition dialog for conditional formatting.
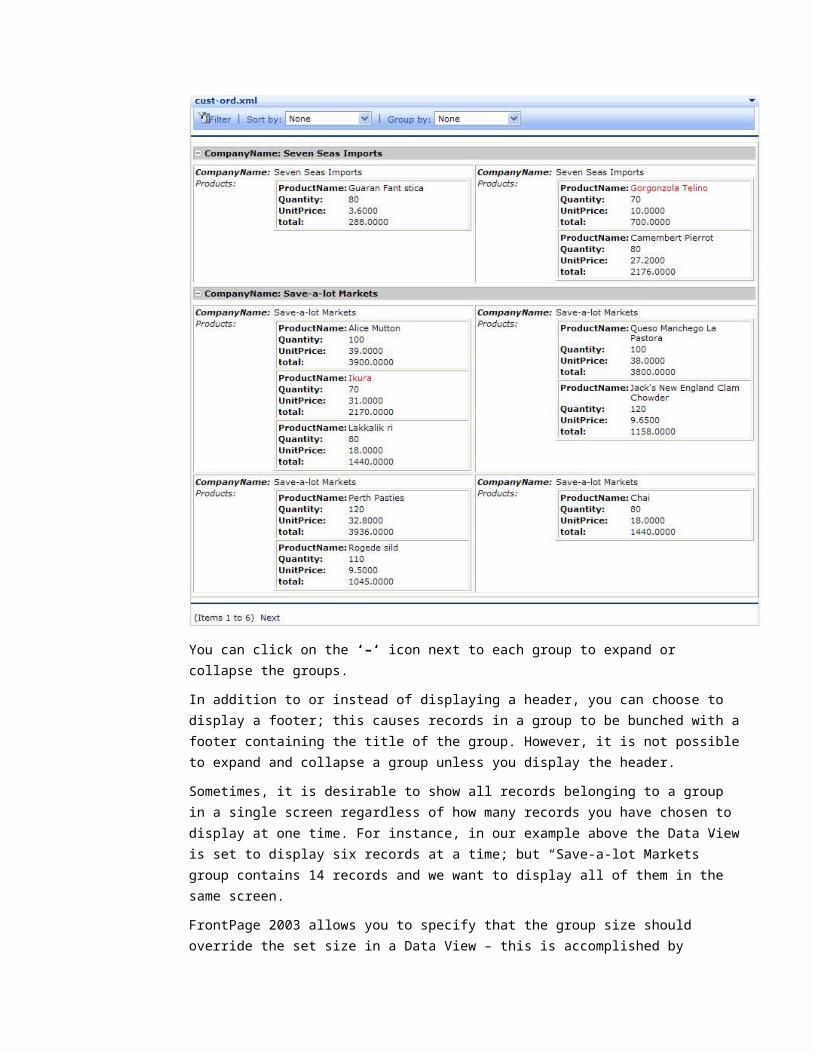
Sorting and grouping are related operations, and they go hand in hand; if you are sorting by a field, the effect is that all records that have the same value for this field are displayed one after the other. This is an elementary form of grouping. Thus, you can only group on fields on which you have specified sorting.
9. In the Data View Details task pane, click on Sort & group under the Manage view settings category. This brings up the Sort and Group dialog box.
10. Under Available Fields choose CompanyName and click Add. Set Sort Properties to Descending.
Now that the Data View is sorted on the CompanyName field, you can optionally add group headers or group footers to each group. A group is defined as a set of records which have the same value for the grouping field. When you add a group header, the records in the group will be bunched together under a header; the header displays the value of the grouping field. You can also expand or collapse a group of records.
11. If the Sort and Group dialog box is not open, open it. Under Group Properties, check Show group header; choose Expand group by default.
12. Ensure that all other check boxes under Group Properties are unchecked.
13. Click OK to close this dialog box.
14. Run the page in the browser by typing the appropriate URL. For our example, this is http://myserver1024/default.aspx.
You should see something similar to the screenshot below of the Data View as it appears in the browser:

You can click on the ‘–‘ icon next to each group to expand or collapse the groups.
In addition to or instead of displaying a header, you can choose to display a footer; this causes records in a group to be bunched with a footer containing the title of the group. However, it is not possible to expand and collapse a group unless you display the header.
Sometimes, it is desirable to show all records belonging to a group in a single screen regardless of how many records you have chosen to display at one time. For instance, in our example above the Data View is set to display six records at a time; but “Save-a-lot Markets” group contains 14 records and we want to display all of them in the same screen.
FrontPage 2003 allows you to specify that the group size should override the set size in a Data View – this is accomplished by checking the Keep group items together check box in the Sort and Group dialog box.
If you check the Hide group details check box, only the group captions are displayed and the individual fields are hidden.
You may have noticed that the Sort and Group dialog box lets you sort/group on fields both at the top level of a view and all nested levels. Sort and Group criteria on nested fields apply

only to the first record within the nesting, but you can go into the nested view and sort/filter/group from there. This is similar to how the filter predicates work as described earlier in this document.
SharePoint Services-based Lists as Data ViewsData is stored in Windows SharePoint Services in the form of lists. SharePoint Services-based Lists can act as a data source to a Data View. Windows SharePoint Services also ships with several Web Parts, each of which is tailored to access data in a particular SharePoint list‡. FrontPage 2003 allows the conversion of these Web Parts into Data Views. The advantage of converting them to Data Views is that the rich formatting, filtering, sorting, grouping, and other features can be used against this data.
Note: The list view Web Part itself allows operations such as filter, sort, group, etc. But when compared with Data Views on a feature by feature basis, the Data View is more comprehensive for its ability to work with and enable presentation of data.
The following example shows how to convert the Links Web Part into a Data View and leverage Data View specific features to create a customized presentation. To follow along with this example, we suggest that you add a few links to the default links Web Part that exists on the default.aspx page on your site.
To convert the Links Web Part into a Data View, follow these steps:
1. Open default.aspx in design view
2. Right-click on the Links Web Part (which should be on the right side of the page, near the top)
3. In the pop-up menu, choose Convert to XSLT Data View.
As soon as the Web Part is converted to a Data View, FrontPage 2003 automatically displays the Data View Details task pane. You can see all the fields that are available in this SharePoint List under the Work with data category.
4. Change the style of this Data View to Repeating form (centered). The steps to change the style of a Data View have been described earlier in the document.
5. In the Data View, select any field which begins with “URL:”. Press the delete key. This should leave empty rows in the Data View. By this action, you have effectively removed a field from the Data View.
6. Ensure that your cursor is positioned on the empty row. In the Work with data category under the Data View Details task pane, locate the field called Notes. Click on this field and click Insert Selected Item.
7. Click OK to save your changes.
8. Run the page in the browser by typing the appropriate URL. For our example, this is http://myserver1024/default.aspx.
You should see something similar to the screenshot below of the Data View as it appears in the browser:
‡ Actually they are all instances of a generic ListView Web Part, with their formatting and default properties optimized for the display of a given type of SharePoint list. For instance, the Events Web Part is a ListView Web Part which is customized to display data in the Events list, and so on.

As you can see, you can use Data Views with SharePoint Services-based Lists to enable powerful authoring capabilities that seamlessly integrate the authoring platform provided by FrontPage 2003 with the data-driven infrastructure of Windows SharePoint Services.

Working with Data Sources CatalogThe Data Sources Catalog acts as the central repository of all your data sources. It is the single location from which all your data sources can be accessed and managed. It doesn't matter whether the data source exists on your server or on an external server. If you have access rights to the data source, you can interact with it by using the Data Source Catalog.
Adding a Data Source FrontPage 2003 uses the data retrieval technologies in Windows SharePoint Services to provide data access. Data retrieval technologies retrieve data from many different sources and present them in an XML format. There are many different data source types that can be accessed:
SharePoint Services-based Lists
SharePoint libraries
Database Connections to OLEDB enabled databases such as Microsoft SQL Server, desktop databases, etc
XML Files
Server side scripts
XML Web Services
Adding a data source is done through the Data Source Catalog task pane in FrontPage 2003. To open this task pane, click on View/Task Pane and in the task pane, select Data Source Catalog. The process of adding a data source depends on the type of source. In the previous sections, we have already seen how to add a database connection and an XML file.
To add a SharePoint List, follow these steps:
1. Under SharePoint Services-based Lists, click Create new SharePoint list.
2. On the Lists tab in the SharePoint List dialog box, select the list you want.
3. In the Specify the name for the new list box, type a name for the list.
To add a SharePoint Library, follow these steps:
1. Under SharePoint Libraries, click Create new Document Library.
2. On the Document Libraries tab in the SharePoint List dialog box, select the library you want.
3. In the Specify the name for the new document library box, type a name for the library.
To add a new server-side script, follow these steps
1. Under Server-side Scripts, click Add to Catalog.
2. In the Data Source Properties dialog box, type the path to the script in the URL box, and then select whether to run the script on a Get or a Post by using the Method option.
3. To add the parameters to use when running the script from a Web page, click the Add button.

Note: If there is a proxy server involved, the server administrator needs to enable this by changing the web.config file
To add a new XML Web service, follow these steps
1. Under XML Web Services, click Add to Catalog.
2. In the Service description location box in the Data Source Properties dialog box, type the URL for the Web service.
3. Click Connect Now.
Note: If there is a proxy server involved, the server administrator needs to enable this by changing the web.config file
Referencing External CatalogsEach Windows SharePoint Services site has a collection of data sources which consists of at least the SharePoint Services-based Lists and libraries on that site; in addition, it may have other data sources which the site administrator or users have added.
The Data Sources Catalog from any Windows SharePoint Services site can be made available at your site. This is a powerful feature which allows the user to share data sources instead of having to recreate them.
To reference a catalog from a different site, follow these steps:
1. In the Data Source Catalog task pane, click Manage catalog.
2. In the Manage Catalog dialog box, click Add.
3. In the Collection Properties dialog box, type the display name and location for the collection you want to add.
Searching for Data Sources As a site changes and users create or reference multiple data sources, it is often difficult to keep track of the sources that you are interested in. This is when the search feature of the catalog becomes useful.
To search for a data source, follow these steps:
1. In the Data Source Catalog task pane, click Find a Data Source.
2. In the Search box, enter the location you want to search.
3. In the For box, type the search term.
4. Click Search Now.
Note that the search occurs on the name of the data source. The search process simply looks for the presence of the search string within the data source name without worrying about word boundaries.

Deleting Data Sources Deleting a data source is as simple as right-clicking on it and selecting Remove. FrontPage 2003 creates a data source for each SharePoint list and SharePoint library in your site. These data sources cannot be removed.

ConclusionData View Web Parts enable the display of data from various data sources using the formalism of Extensible Stylesheet Language Transformations (XSLTs). A data view retrieves data from the data source in the form of XML, and applies XSLTs to it. This gives the developer a powerful and standards based way to display formatted data.
From within FrontPage 2003, you can format the data within a Data View by directly applying formatting from Design view. FrontPage 2003 applies formatting to all data points at the same level in the XML by modifying the XSLT style sheet attached to the page. You can change the XSLT style sheet without having to know anything about XSLT, which makes FrontPage 2003 the first-of-its-kind WYSIWYG XSLT editor.
You can also use the Data View Web Part to connect to various data sources, choose the structure of the data you want displayed, apply filters and sort conditions, and specify groupings.
FrontPage 2003 also allows the conversion of SharePoint Services-based Lists into Data Views. The advantage of converting them to Data Views is that the rich formatting, filtering, sorting, grouping, and other features can be used against this data.
The Data Sources Catalog acts as the central repository of all your data sources. It is the single location from which all your data sources can be accessed and managed. It doesn't matter whether the data source exists on your server or on an external server. If you have access rights to the data source, you can interact with it by using the Data Source Catalog. FrontPage 2003 makes managing the Data Source Catalog easy.
ReferencesFrontPage 2003: Overview of Web Parts Framework
FrontPage 2003: Customizing Web Parts
FrontPage 2003: Working with Web Part Libraries
FrontPage 2003: Connecting Web Parts
FrontPage 2003: Working with Web Part Pages
FrontPage 2003: An Architectural Introduction to Web Parts and ASP.NET
Other Microsoft ResourcesMicrosoft FrontPage 2003 Customization Kit Web: http://www.sharepointcustomization.com
Microsoft FrontPage Web site:http://www.microsoft.com/frontpage/default.htm
Microsoft FrontPage Add-in Center: http://www.microsoft.com/frontpage/downloads/addin/default.asp
Microsoft SharePoint Products and Technologies:http://www.microsoft.com/sharepoint/default.asp
SharePoint Products and Technologies Web Component Directory:http://www.microsoft.com/sharepoint/downloads/components/default.asp

The information contained in this document represents the current view of Microsoft Corporation on the issues discussed as of the date of publication. Because Microsoft must respond to changing market conditions, it should not be interpreted to be a commitment on the part of Microsoft, and Microsoft cannot guarantee the accuracy of any information presented after the date of publication.
This white paper is for informational purposes only. MICROSOFT MAKES NO WARRANTIES, EXPRESS OR IMPLIED, IN THIS DOCUMENT.
Complying with all applicable copyright laws is the responsibility of the user. Without limiting the rights under copyright, no part of this document may be reproduced, stored in, or introduced into a retrieval system, or transmitted in any form or by any means (electronic, mechanical, photocopying, recording, or otherwise), or for any purpose, without the express written permission of Microsoft Corporation.
Microsoft may have patents, patent applications, trademarks, copyrights, or other intellectual property rights covering subject matter in this document. Except as expressly provided in any written license agreement from Microsoft, the furnishing of this document does not give you any license to these patents, trademarks, copyrights, or other intellectual property.
© 2001 Microsoft Corporation. All rights reserved.
The example companies, organizations, products, domain names, e-mail addresses, logos, people, places, and events depicted herein are fictitious. No association with any real company, organization, product, domain name, e-mail address, logo, person, place, or event is intended or should be inferred.
Microsoft, FrontPage, and SharePoint are either registered trademarks or trademarks of Microsoft Corporation in the United States and/or other countries.