workbook - university of edinburgh
TRANSCRIPT
Introduction to using NVivo
Workbook
Edition 3 January 2019 Document Reference: 3766-2019

If you require this document in an alternative format, such as large print, please email [email protected].
Copyright © IS 2017
Permission is granted to any individual or institution to use, copy or redistribute this document
whole or in part, so long as it is not sold for profit and provided that the above copyright notice
and this permission notice appear in all copies.
Where any part of this document is included in another document, due acknowledgement is
required.
Introduction to using NVivo
Contents
1 Introduction .............................................................................................. 1 2 NVivo interface orientation ....................................................................... 2
3 Creating a new NVivo project ................................................................... 3 4 Organising your files ................................................................................ 3 5 Importing data .......................................................................................... 4 6 Coding text files with Nodes ..................................................................... 5 7 Node hierarchies ...................................................................................... 9
8 Coding image files.................................................................................. 10 9 Coding video and audio files .................................................................. 12 10 Visualising nodes and files ..................................................................... 13 11 Word tree query ..................................................................................... 14 12 Exporting simple reports ........................................................................ 15


Introduction to using NVivo 1
1 Introduction
This course is intended as a basic introduction to using NVivo. The screenshots are from NVivo 12 Pro, but are largely easily recognisable in other versions. No particular methodological approach to analysis is adopted in the activities; rather the aim is to introduce key mechanisms of the software which may be applied as required by different analytical approaches.
In the course that accompanies this guide we use the sample project data that is shipped with NVivo for the exercises, but you can use your own data if you prefer.
Why use NVivo?
NVivo is a large and complex piece of software which is most helpful when working with large amounts of data, particularly where the data include different formats. It is useful for managing and organising projects with many separate data sources to support more transparent and systematic approaches to coding. For projects with small datasets, NVivo may be unnecessarily complex.
Course aims
By the end of this course, you will be able to
Add data files to NVivo (text, image, audio visual)
Create thematic nodes for coding
Code data using thematic nodes
Organise node hierarchies for coding
Use two tools to interrogate your coding and files (diagrams and word trees)
Generate simple coding reports that can be shared
Further resources
QSR video tutorials: http://www.qsrinternational.com/support_tutorials.aspx
Follow QSR on twitter for information about free training seminars, updates and tips: @QSRInt
Mantra practical on research data management (data files are in NVivo 9): http://datalib.edina.ac.uk/mantra/softwarepracticals.html
Bazeley, P. Resources for qualitative data analysis and users of NVivo http://www.researchsupport.com.au/ (website with freely available resources)
Bazeley, P. and Jackson, K. (2013). Doing qualitative data analysis with NVivo. 2nd Ed. London: SAGE.
LinkedIn NVivo Users Group – good source of advice from experienced users. Free, but requires a LinkedIn account and application to join the group https://www.linkedin.com/groups/NVivo-Users-Group-145388/about
Learn Nvivo: the basics [video tutorial course]. Lynda. Released 23 Nov 2016. (uses the basic NVivo 11 Starter version) https://www.lynda.com/NVivo-tutorials/Learn-NVivo-Basics/530082-2.html?org=ed.ac.uk

2 Introduction to using NVivo
2 NVivo interface orientation
The NVivo interface is divided into different sections, the contents of which vary depending on the elements or tools being used. The image below has numbers next to the main elements we will be using on this course, and the name of each element is listed under the image.
1. Tabs – the tabs along the top of the NVivo window give access to different operations or tools.
2. Ribbon – like recent versions of Microsoft Office, the operations or tools available within each tab are presented in a ribbon along the top.
3. Navigation View – This view provides access to all your project items. Items are organized under group buttons e.g. Data, Codes and Cases. Items can be added to the Quick Access area at the top of the pane by right clicking the item and choosing Add to Quick Access
4. Quick Coding Bar – provides a fast way to code or uncode and allows you to code by nickname.
5. List view – this pane lists the contents of whatever is selected in the Navigation View (3).
6. Detail view – this pane shows in detail the item selected in the list pane (5).
The sizes of the different sections can be increased or decreased by clicking and dragging on the dividing lines. The layout can also be changed by using the options in the Workspace section of the ribbon while you have the Home tab selected.
1
2
3
4
5
6
Introduction to using NVivo 3
3 Creating a new NVivo project
1. In NVivo, go to the File tab and select New.
2.
3. In the New Project dialog, give your project a title and use the Browse button to save it into the Documents folder on your computer.
4 Organising your files
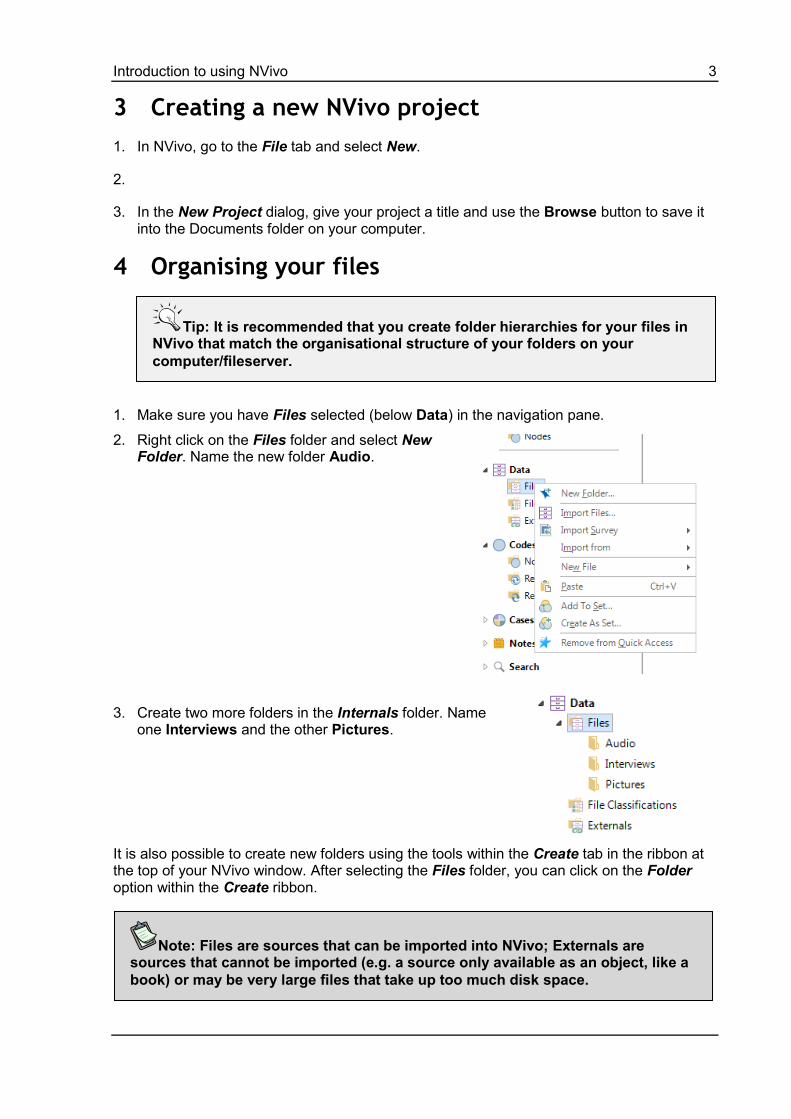
1. Make sure you have Files selected (below Data) in the navigation pane.
2. Right click on the Files folder and select New Folder. Name the new folder Audio.
3. Create two more folders in the Internals folder. Name one Interviews and the other Pictures.
It is also possible to create new folders using the tools within the Create tab in the ribbon at the top of your NVivo window. After selecting the Files folder, you can click on the Folder option within the Create ribbon.
Tip: It is recommended that you create folder hierarchies for your files in NVivo that match the organisational structure of your folders on your
computer/fileserver.
Note: Files are sources that can be imported into NVivo; Externals are sources that cannot be imported (e.g. a source only available as an object, like a
book) or may be very large files that take up too much disk space.

4 Introduction to using NVivo
5 Importing data
NVivo can import many different file types. For a full list see:
https://help-nv.qsrinternational.com/12/win/v12.1.55-d3ea61/Content/files/files.htm
We will import a selection of files from the sample project data folders.
1. Click on your new Interviews folder in the navigation pane so that it is highlighted.
2. Right-click in the main window, and in the menu that pops up, select Import Items.
3. In the Import Files dialog box, use Browse to navigate to find the Interviews folder in the sample data files.
4. Select one or more of the interview documents, then click Open.
5. In the Import Files dialog box, click Import.
6. When you select a single file for import, a Document Properties window opens that you can use to add descriptive information. This is helpful when you are working with others on the project, but is good practice even if you are conducting the analysis alone. Click OK to complete the import. If you select multiple files for import at the same time, you can right-click in the list of files to edit Properties and add the description.
You should now see at least one document shown in the list view pane.
7. There is also a video-recorded interview in the Sample Data – right click again in the Interviews window, and import the video as well: Right-click in the main window, and in the menu that pops up, select Import Items.
8. Select the Pictures folder and import the photograph from the Sample Data into the Pictures folder.
9. Select the Audio folder and import the audio file from the Sample Data into the Audio folder.
Introduction to using NVivo 5
6 Coding text files with Nodes
A node is like a concept or thematic tag. It’s possible to create nodes for coding on the fly, or to create node lists in advance – or a combination. It’s also possible to create and modify hierarchies of nodes.
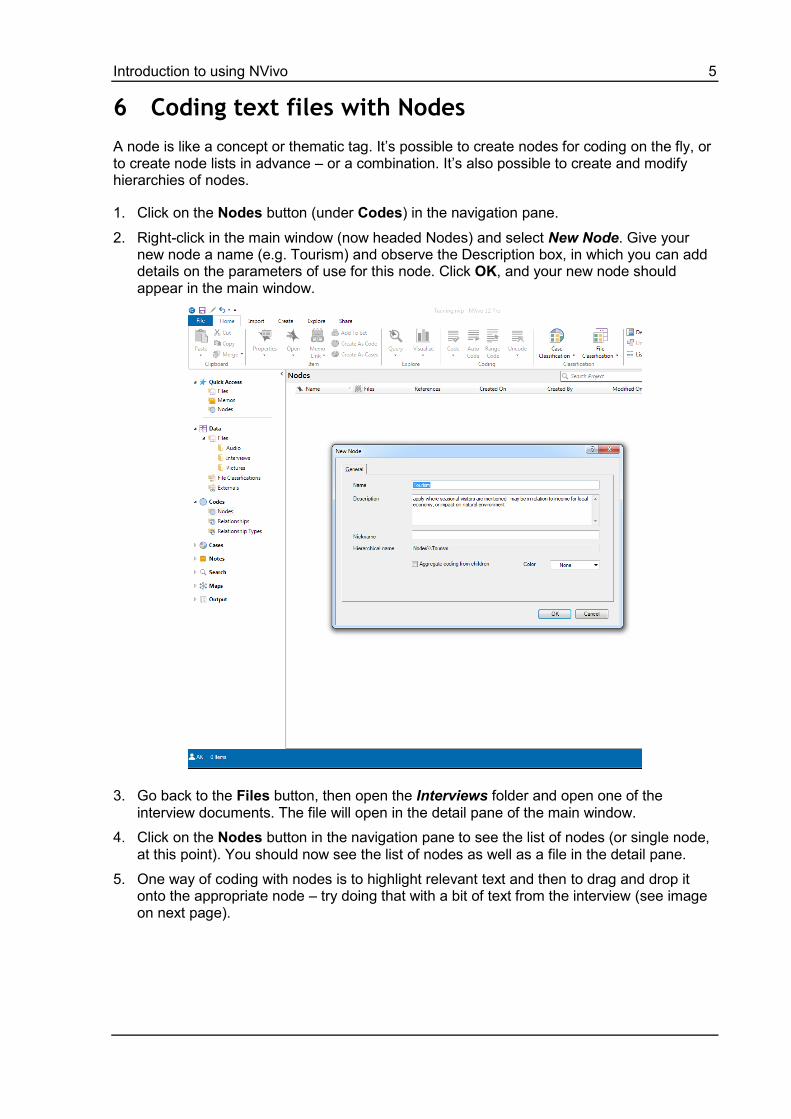
1. Click on the Nodes button (under Codes) in the navigation pane.
2. Right-click in the main window (now headed Nodes) and select New Node. Give your new node a name (e.g. Tourism) and observe the Description box, in which you can add details on the parameters of use for this node. Click OK, and your new node should appear in the main window.
3. Go back to the Files button, then open the Interviews folder and open one of the interview documents. The file will open in the detail pane of the main window.
4. Click on the Nodes button in the navigation pane to see the list of nodes (or single node, at this point). You should now see the list of nodes as well as a file in the detail pane.
5. One way of coding with nodes is to highlight relevant text and then to drag and drop it onto the appropriate node – try doing that with a bit of text from the interview (see image on next page).

6 Introduction to using NVivo
6. Create two or three more nodes (e.g. Fishing and Ecosystem) and code a few more sections of text by highlighting and dragging and dropping onto these nodes.
Note: You can also create new nodes and code by:
using the buttons in the Coding section of the Home tab
the ‘quick coding bar’ at the bottom of the NVivo window
right clicking over the highlighted text and selecting the relevant coding options
Introduction to using NVivo 7
6.1 Is it working? Visualising what’s been coded
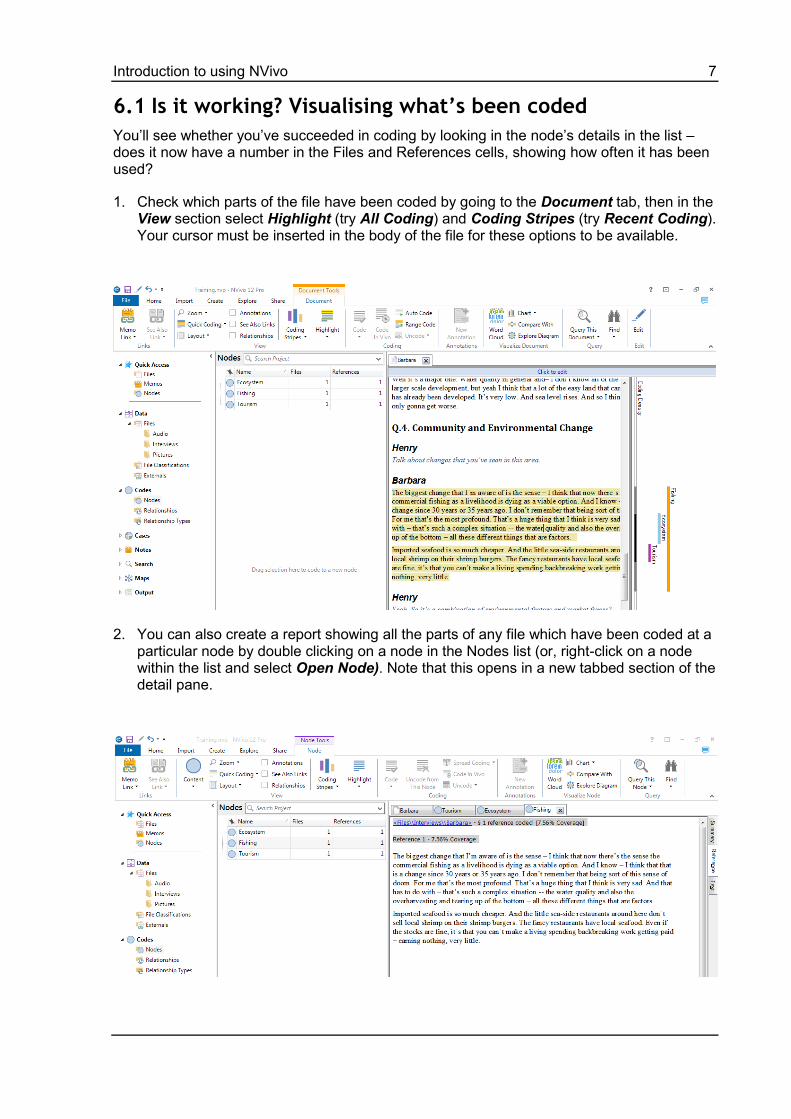
You’ll see whether you’ve succeeded in coding by looking in the node’s details in the list – does it now have a number in the Files and References cells, showing how often it has been used?
1. Check which parts of the file have been coded by going to the Document tab, then in the View section select Highlight (try All Coding) and Coding Stripes (try Recent Coding). Your cursor must be inserted in the body of the file for these options to be available.
2. You can also create a report showing all the parts of any file which have been coded at a particular node by double clicking on a node in the Nodes list (or, right-click on a node within the list and select Open Node). Note that this opens in a new tabbed section of the detail pane.

8 Introduction to using NVivo
6.2 More on coding – and uncoding
You can create nodes 'on the fly' as you examine files, as well as create 'in vivo' nodes using verbatim phrases in the file. At the bottom of the detail view (where the file is shown), you should see the ‘quick coding’ tool bar.
1. Open a document and have it ready for coding: you may need to go back to the Files folder, then open the Interviews folder and open one of the interview documents. The file will open in the detail pane of the main window.
2. Highlight a bit of text in an interview, and then create a new node on the fly by typing a new code name (e.g. Community) in the Code At box, then clicking the green tick button to the right (or hitting the Return key).
3. To create ‘in vivo’ nodes, highlight a key word or phrase in the text, then click the third button with the blue NVivo icon. A new node will be created out of that phrase, and the highlighted text will be coded at that node.
4. Next, open at least one different interview document (text) and practise doing some coding. It's helpful for a future step in this workbook if you could apply at least one node to more than one file.
5. Try to remove some coding: select previously coded text (easier to see with highlighting on), then right click and select Uncode or Uncode from Recent Nodes and then choose a node. Alternatively, with coding stripes visible, you can right click on the relevant coding stripe and select Uncode.

Introduction to using NVivo 9
7 Node hierarchies
Nodes can be organised into hierarchies for broader (parent) and narrower (child) concepts. This is helpful in clustering concepts and showing relationships between themes.
1. Click on the Nodes button in the navigation pane (lower left area of NVivo), so that you see the list of nodes in the list pane.
2. Re-organise existing nodes: click on a node to highlight it, release the mouse button, then click to drag and drop the node onto another node in the list (e.g. drop Fishing onto Ecosystem - or another combination that seems logical to you). The dropped node becomes a child and shows as indented in the list display.
When you create node hierarchies, sometimes it is useful to be able to pool together all the coding at the parent and child nodes together. Right click on a parent node, then select Aggregate coding from child nodes.
The child nodes may still be used separately from parent nodes, and will appear as distinct nodes in, for example, the coding stripes, but exports of extracts for a parent node will include all coding with aggregated child nodes.
If you change your mind about a child node and wish to make it a peer with the other parent nodes, dragging and dropping will not work.
3. Decide on one of the child nodes to remove from a hierarchy just for practice.
4. Left-click on the node to select the child node you wish to move, then right click and select Copy.
5. Then move your mouse over the blank area at the bottom of the nodes list, right click and select Paste.
You have made a copy of the child node, so the original should now be deleted – or, if you are brave, you can select Cut in step 4 above instead of Copy, then you won’t have the deletion step.
10 Introduction to using NVivo
8 Coding image files
Like text-based files, sections of images may be highlighted and coded with nodes.
1. Open the photograph you imported earlier. (In the navigation pane, click on the Files button. Open the photograph from the Pictures folder in the Files list.)
2. In the navigation pane, click on the Nodes button so that the nodes are listed in the list view.
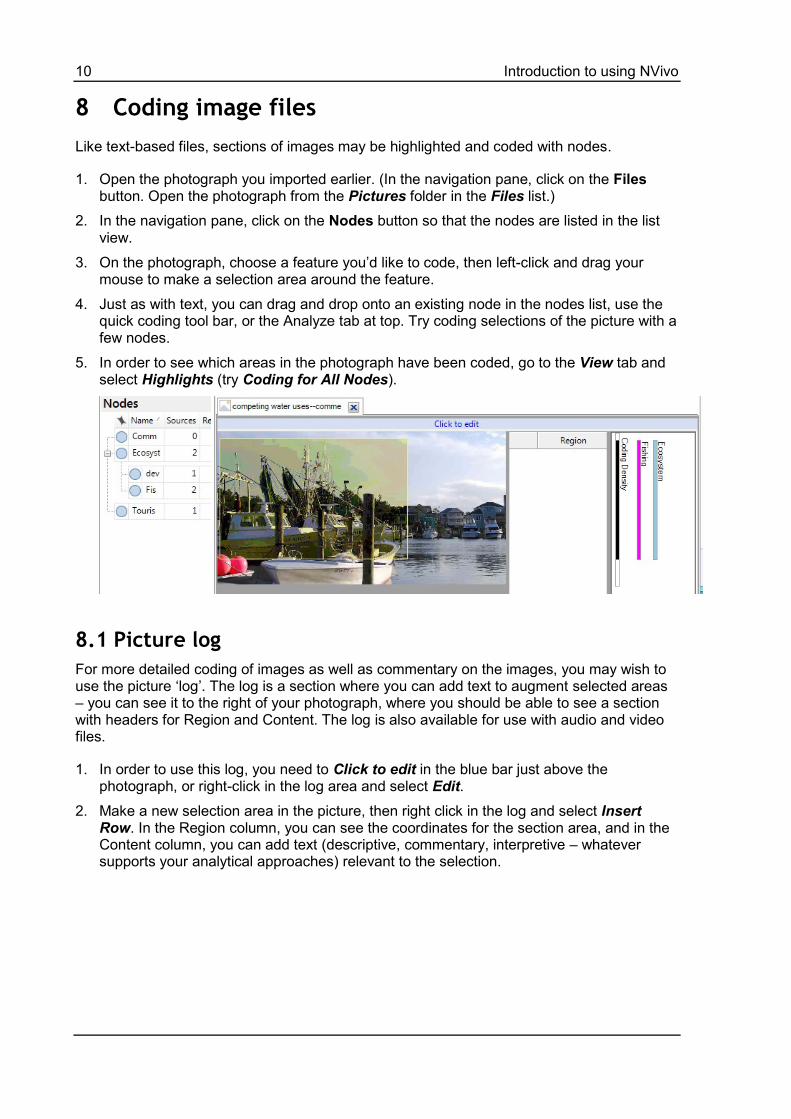
3. On the photograph, choose a feature you’d like to code, then left-click and drag your mouse to make a selection area around the feature.
4. Just as with text, you can drag and drop onto an existing node in the nodes list, use the quick coding tool bar, or the Analyze tab at top. Try coding selections of the picture with a few nodes.
5. In order to see which areas in the photograph have been coded, go to the View tab and select Highlights (try Coding for All Nodes).
8.1 Picture log
For more detailed coding of images as well as commentary on the images, you may wish to use the picture ‘log’. The log is a section where you can add text to augment selected areas – you can see it to the right of your photograph, where you should be able to see a section with headers for Region and Content. The log is also available for use with audio and video files.
1. In order to use this log, you need to Click to edit in the blue bar just above the photograph, or right-click in the log area and select Edit.
2. Make a new selection area in the picture, then right click in the log and select Insert Row. In the Region column, you can see the coordinates for the section area, and in the Content column, you can add text (descriptive, commentary, interpretive – whatever supports your analytical approaches) relevant to the selection.

Introduction to using NVivo 11
It is also possible to code text in the Content column. This is called shadow coding, and is applied to the selected areas of the image as well as text in the log. Shadow coding is indirect coding of the original file, and when you code the text of the Content column, the node will automatically be applied to the selected portion of the image (to save you coding twice).

12 Introduction to using NVivo
9 Coding video and audio files
Video and audio files can be played and coded within NVivo.
1. Open the video recorded interview you imported earlier. (In the navigation pane, click on the Files button. Open the video named Ken from the Interviews folder in the Files list.)
Videos are presented in the same way as audio files, except there is no image with the audio file. You can play, pause or stop the audio or video using the Video tab controls. Try playing the video to make sure you can see and hear it.
2. ‘Click to edit’ in the blue bar just above the audio track, or right-click in the log area and select Edit.
3. Left-click and drag to select a portion of the audio track – you should see a selection rectangle appear.
4. Code at least one section of audio: drag and drop a selected area onto a node (or apply using the Quick Coding bar, or Home tab, whichever you prefer).
As with images, you can also create a log. To ‘log’ sections of the recording, select a section of the audio track, then right-click in the log and Insert Row. The time-stamp of the selection will be shown, and you can add text.
5. Add at least one log row, add text to the Content column, and code the selection.
6. Go to the Video tab and turn on highlighting and coding stripes. Finally, open one of the nodes you used to code, and look at how the references from the video are presented in the report. If you click on a reference link, it should take you back to the file, with that reference highlighted.
7. Open the audio file that you imported into Files earlier, and apply one or two nodes - just to see the similarities and differences between coding audio and video in NVivo.
Note: A transcript of the recording can be created in the log within NVivo using the ‘transcribe mode’. In the Media tab, you can control the speed of play.
Specialised transcription equipment is probably easier to use, and if you have an interview transcript with time-stamps, you can import the transcript and
synchronise it with the audio track.

Introduction to using NVivo 13
10 Visualising nodes and files
You can visualise your coding and create models which may give you new insights on your data. As an example, one simple visualisation is to generate a graph of nodes associated with a particular file.
1. Open the Files folder in NVivo, and from the list view, select one of the interviews that you know you have coded.
2. Go to the Explore tab, and select Explore Diagram.
3. To edit or save the graph as an image, right click over the graph and select Export Diagram.
It may be more insightful to visualise coding between two files or nodes (or cases – but this workbook does not cover cases) using the Comparison Diagram.
1. Go to the Explore tab, and click on Comparison Diagram.
2. Select Compare Files, and use the dialog window to select two files you know you have coded. Click OK to generate the diagram.

14 Introduction to using NVivo
11 Word tree query
This is just one way of interrogating text-based data, as an introduction. The word tree may help you to see unexpected associations in transcripts, for example.
1. Go to the Explore tab, and select Text Search. In the Search for box, type a word or phrase (if you are using the Sample data, use something like ‘fishing’).
It is possible to make the search more flexible by changing the Find slider to find stems, synonyms, etc. (This is not always advisable!)
2. Click Run Query, and your search report should appear in the main window. At the far right you can see tabs for the search reports. Have a look at the report in each tab - in particular, try Word Tree.
The word tree may help to see contexts of use of particular words that could give insight for analysis.
The branched lines on each side of the search term are not in the same vertical order. To see how the words flow in the original statements, click on one of the branches, and you will see the original statement highlighted.
Introduction to using NVivo 15
12 Exporting simple reports
We already saw how to create a set of extracts coded at a particular node (section 6) by double-clicking on a node, or by right-clicking and selecting Open Node – that report can be exported into a Word document for reading or sharing outside NVivo.
However, that method above does not work well for multimedia content like images, video and audio, since only image coordinates or timestamps are indicated in the node report we used in section 6. The Export options allow better visualisation of coded sections for images, and allow the coded audio/video sections to be fully audible/visible, showing how a particular file has been coded.
12.1 Exporting coded extracts
1. In the navigation pane, click on the Codes and then Nodes button so that the nodes are listed in the list view.
2. Right click on one of the nodes in the list (one you have used) and select Export, then Export Node.
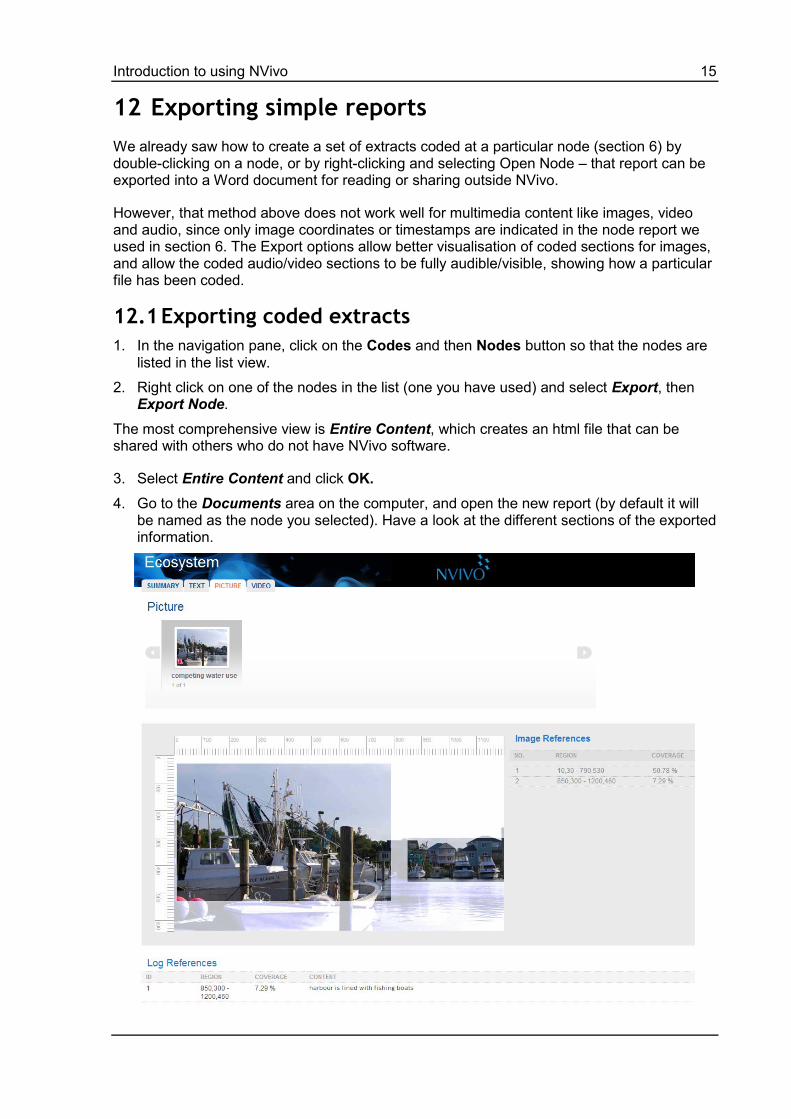
The most comprehensive view is Entire Content, which creates an html file that can be shared with others who do not have NVivo software.
3. Select Entire Content and click OK.
4. Go to the Documents area on the computer, and open the new report (by default it will be named as the node you selected). Have a look at the different sections of the exported information.
16 Introduction to using NVivo
12.2 Exporting files with their codes
Files may be exported with their coding stripes.
1. In the navigation pane, click on the Files button and select the Interviews folder so that the interview files are listed in the list view.
2. Double-click on one of the text interviews to open it in the detail view.
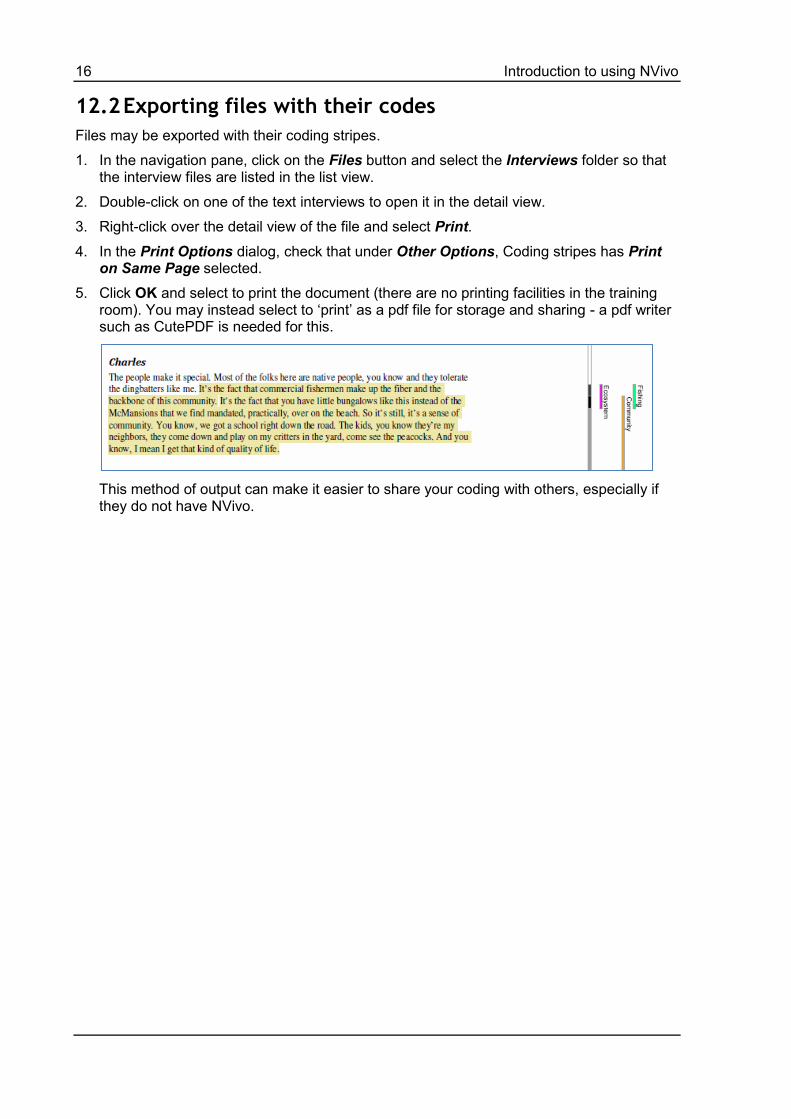
3. Right-click over the detail view of the file and select Print.
4. In the Print Options dialog, check that under Other Options, Coding stripes has Print on Same Page selected.
5. Click OK and select to print the document (there are no printing facilities in the training room). You may instead select to ‘print’ as a pdf file for storage and sharing - a pdf writer such as CutePDF is needed for this.
This method of output can make it easier to share your coding with others, especially if they do not have NVivo.