word 2010 advanced - stl-training.co.uk · word 2010 advanced microsoft application series. your...
TRANSCRIPT
Version 1
Best STL � Courses never cancelled: guaranteed
� Last minute rescheduling
� 24 months access to Microsoft trainers
� 12+ months schedule
� UK wide delivery
www.microsofttraining.net
Word 2010 Advanced
Microsoft Application Series

Your Best STL Learning Tools
Welcome to your Best STL training course.
As part of your training, we provide you with the following tools and resources to support and enhance your learning experience.
Thank you for choosing Best STL.
To guide you through yourtraining while you are on thecourse.
Contains unit objectives,exercises and space towrite notes.
In-course
handbook112 months
access to Microsoft
trainers3
Available through online support forum.
Need help? Our team ofMicrosoft qualified trainersare on hand to offer adviceand support.
Your delegate accountgives you access to:
• Reference material
• Course exercise files• Advice & support forum• Rewards programme
• Promotions & Newsletters
Delegate
account4
Hints and tips available
online from our Microsoftqualified trainers for:
• All MS Office applications
• VBA• MS Project• MS Visio
+ more
Trainer hints
and tips5
Save on further training courses you book with Promotions.
• 30% off list price(time limited)
• £50 off list price
(blue card discount)
Save with
Promotions6
Reference
material
Available online throughyour delegate account.
Comprehensive referencematerial with 100+ pages, containing step-by-stepinstructions.
2
E&OE
Best STL reserves the right to revise this publication and make changes from time to time in its content without notice.
Contents
Using Mail Merge .................................................................................................................. 1
Starting the Mail Merge Wizard.......................................................................................... 1
Using Mail Merge to create letters ..................................................................................... 1
Using Mail Merge to create labels ...................................................................................... 2
Practice Activity: Using Mail Merge .................................................................................... 3
Creating Forms ..................................................................................................................... 4
The Developer Ribbon ....................................................................................................... 4
Form controls .................................................................................................................... 4
Creating a form .................................................................................................................. 5
Practice Activity: Working with Forms ................................................................................ 7
Working with large documents .............................................................................................. 8
Master documents ............................................................................................................. 8
Footnotes and Endnotes ................................................................................................. 10
Indexes ............................................................................................................................ 11
Table of Contents ............................................................................................................ 13
Bookmarks ...................................................................................................................... 14
Cross-references ............................................................................................................. 16
Practice Activity: Working with large documents .............................................................. 17
Managing document revision .............................................................................................. 18
Using Track Changes ...................................................................................................... 18
Comparing Documents .................................................................................................... 21
Combining documents ..................................................................................................... 22
Practice Activity: Managing document revision ................................................................ 23
Automation and customisation ............................................................................................ 24
Macros ............................................................................................................................ 24
Customising Word ........................................................................................................... 27
Practice Activity: Automation and Customisation ............................................................. 28

www.microsofttraining.net Tel: 0207 987 3777 Page 1 © Best STL 2013
Using Mail Merge
Objectives:
1. Create letters for mass mailings using the Mail Merge Wizard.
2. Edit mail merge settings and data sources to update a form letter.
3. Create labels for mass mailings.
Starting the Mail Merge Wizard 1. Create your letter ready for mailing, and save.
2. Go to Mailings/Start Mail Merge group and click the Start Mail Merge button.
3. Select Step by Step Mail Merge Wizard from the list provided. The Mail Merge task pane appears on the right of your screen.
Using Mail Merge to create letters Follow through the six steps in the Mail Merge Wizard to create a letter for a mass mailing.
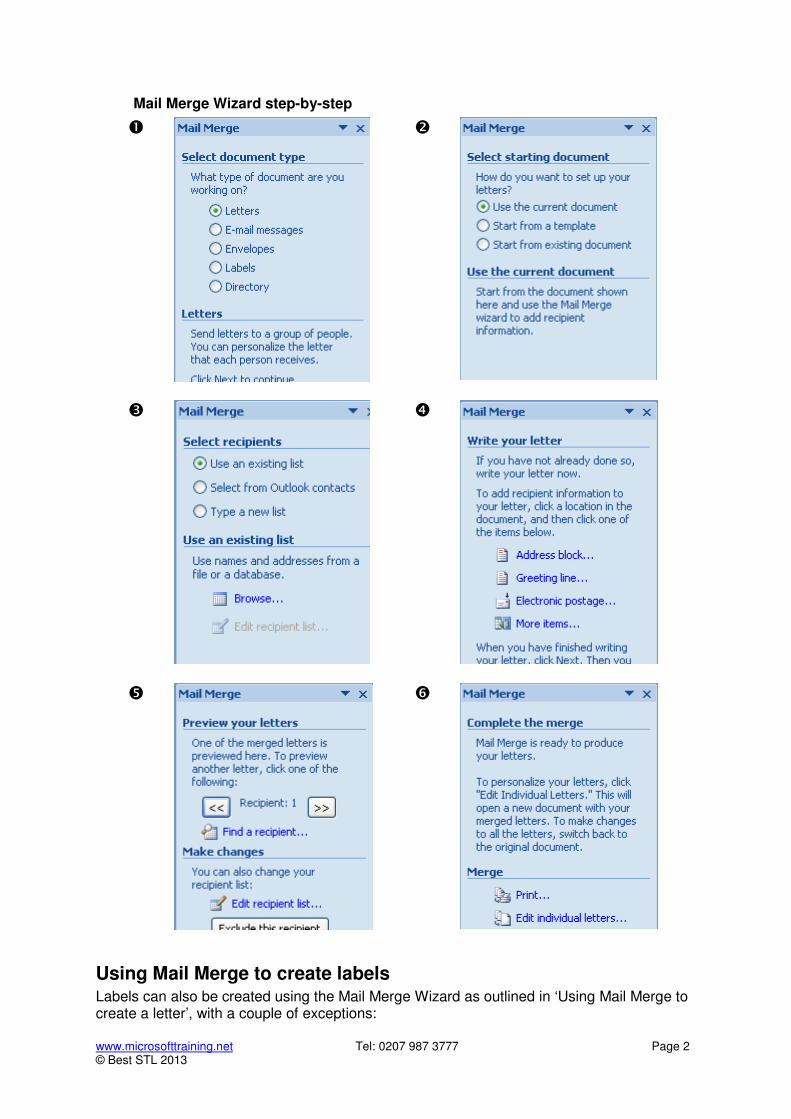
1. Select the type of document you are creating from the options provided, and click Next at the bottom of the task pane.
2. Select the appropriate option for the starting document. If you have the letter document open, select the ‘Use the current document’ option. Click Next at the bottom of the task pane.
3. Select the data source containing the names and addresses of the letter recipients. Typically this will be from an Excel file, database or Outlook contacts. Select the appropriate option, click Browse to select the data source. You will be shown a preview of the data source. Click OK, then click Next to continue to step 4.
4. Insert the fields to be used for addressing and saluation purposes by clicking the More Items link. This allows you to insert the relevant fields from your data source into the letter. Select a field and click Insert to enter the field into the document. Click Next to continue.
5. Preview the letters to your recipients. You have the opportunity to exclude unintended recipents at this step. Click Next to continue.
6. The letters are ready to be printed, edited or saved using the ‘Print’ or ‘Edit Individual Letters’ options respectively.
� �
�
www.microsofttraining.net Tel: 0207 987 3777 Page 2 © Best STL 2013
Mail Merge Wizard step-by-step
�
�
�
�
�
�
Using Mail Merge to create labels Labels can also be created using the Mail Merge Wizard as outlined in ‘Using Mail Merge to create a letter’, with a couple of exceptions:

www.microsofttraining.net Tel: 0207 987 3777 Page 3 © Best STL 2013
1. Select the Labels option at step 1.
2. Select the type of labels you are using by clicking the Label options link at step 2, if you are using labels from a manufacturer that are a standard size(e.g. Avery).
Practice Activity: Using Mail Merge
1. Open Practice memo.
2. Resave as Practice memo merge.
3. Use the Mail Merge Wizard to create a letter from the Practice memo merge document.
4. At step 3, select the Use an existing list option and select the file Addresses.docx as the source data. Exclude the employees who work in the Information Technology department from the recipient list.
5. At step 4 of the wizard, use the More Items link to insert the following fields at the top of the Practice memo merge document to create the mailing address:
First name Last name
Emp_address
City
State Postalcode
6. Also at step 4 of the wizard, insert the First name field after the word Dear to complete the salutation at the beginning of the letter.
7. At step 5, preview the merge results. You should have four letters, if you excluded the employees in the Information Technology department at instruction 4 above.
8. At step 6, choose the Edit Individual Letters option, and save the document containing the letters as Practice memo merge complete.
9. Close the mail merge documents.
10. If you wish to do so, start a new document and use the Mail Merge Wizard to create mailing labels for the letters.

www.microsofttraining.net Tel: 0207 987 3777 Page 4 © Best STL 2013
Creating Forms Objectives:
1. Creating a form using form controls.
2. Editing form control properties.
3. Protecting and testing a form
The Developer Ribbon Tools for creating form controls are accessed through the Developer ribbon. If the Developer ribbon is not visible at the top of the Word 2010 screen, do the following.
1. Click the Office button and then click Word Options.
2. In the Popular category, check “Show Developer tab in the Ribbon” and click OK. The Developer Ribbon appears at the top of the screen to the right of the other ribbons.
�
�
Form controls Form controls are located on the Developer ribbon. Controls allow users to enter information into the form.

www.microsofttraining.net Tel: 0207 987 3777 Page 5 © Best STL 2013
Creating a form When creating a form, consider using a table as the basis of the form as form controls can be entered into their own cells in the table. This then makes it easy to control alignment.
Inserting a control into a form
1. Place the cursor where the control is to be inserted.
2. Select the icon for the desired control from the Developer ribbon/Controls group. The control appears at the position of the cursor.
Modifying a control’s properties
1. After inserting the control, select the control to be modified (e.g. if you wish to add items to a dropdown list control).
2. Go to Developer/Control group and click the Properties button.

www.microsofttraining.net Tel: 0207 987 3777 Page 6 © Best STL 2013
Protecting a form
Once the form is ready for use, it must be protected so users can only use the controls in the form for the purposes of filling the form in.
1. Go to Developer/Protect group and click the Protect Document button.
2. Check the box underneath Editing Restrictions and select Filling in Forms.
3. Click the Yes, Start Enforcing Protection button.
4. Enter and reconfirm a password to apply protection.
�
�
�
�
Saving a form
As a form is used numerous times once created, consider saving the form as a template file once it has been set up and is ready to use.
1. Go to the Office button, select Save as then select Word template.
2. Save the file to an appropriate location.
Testing the form
1. Start a new document from the template file.
2. Fill in the form, checking that the control used are working as desired.

www.microsofttraining.net Tel: 0207 987 3777 Page 7 © Best STL 2013
Practice Activity: Working with Forms
1. Open the file Practice employee.
2. Resave the file as Practice Employee Form.
3. In the second column of the table, insert form controls (Developer/Controls group) as follows:
Name: Text control
Address: Text control
Division: Dropdown list
Gender: Dropdown list
Date of hire: Date picker
4. Select the Text control for the Address, and change the Properties setting to Allow Carriage Returns (multiple paragraphs).
5. Select the Dropdown list control for Division, and use Properties to create the following items for the list: Finance, Information Technology, Marketing, Sales
6. Select the Dropdown list control for Gender, and create Male and Female list items.
7. Select the Date picker control and use Properties to check that an appropriate date format is set for it (UK type date display instead of US type date display).
8. Protect the form, setting Filling in Forms under Editing Restrictions before applying the protection so users will be able to use the form controls.
9. Resave the file as Practice Employee Form Test.
10. Test the form by filling in the form using Practice Employee Form Test.
11. Save and close all files related to this practice activity.
www.microsofttraining.net Tel: 0207 987 3777 Page 8 © Best STL 2013
Working with large documents
Objectives:
1. Create, edit and format using master documents and subdocuments.
2. Insert and delete footnotes and endnotes.
3. Mark index entries and use index entries to create an index.
4. Create and update a Table of Contents.
5. Create and use bookmarks and cross-references to locate text and objects in a document.
Master documents A master document is a document that contains a set of related documents called sub documents. The purpose of a master document is to break up a large document into sub documents for easier organisation and manageability. This can be useful if several different people are working on creating parts of the same document, e.g. a report.
Note: Master document and sub document files must all be saved into the same folder.
Creating a master document
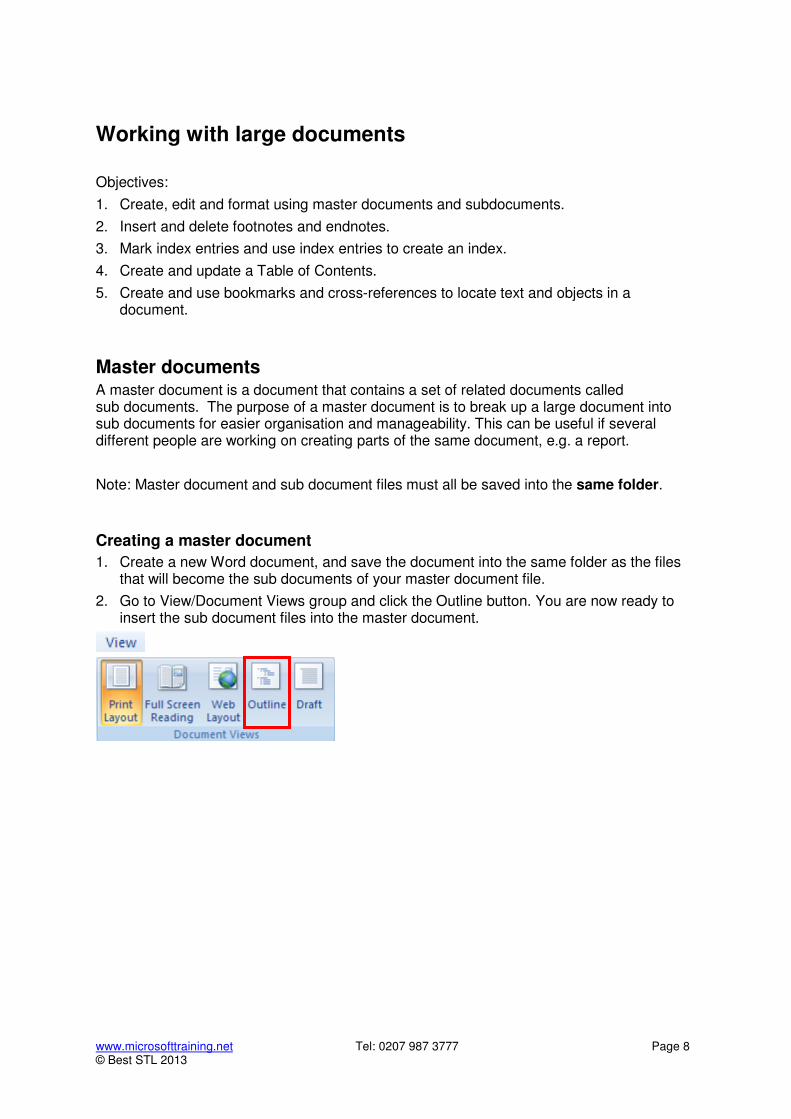
1. Create a new Word document, and save the document into the same folder as the files that will become the sub documents of your master document file.
2. Go to View/Document Views group and click the Outline button. You are now ready to insert the sub document files into the master document.
www.microsofttraining.net Tel: 0207 987 3777 Page 9 © Best STL 2013
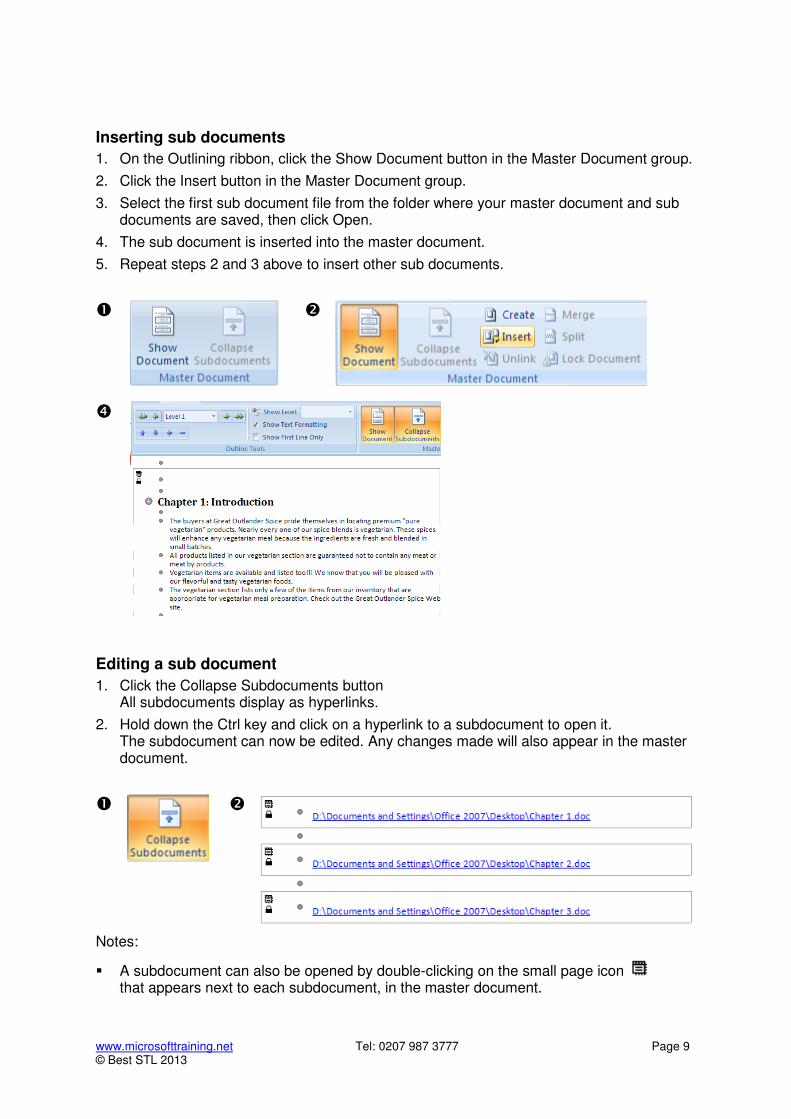
Inserting sub documents
1. On the Outlining ribbon, click the Show Document button in the Master Document group.
2. Click the Insert button in the Master Document group.
3. Select the first sub document file from the folder where your master document and sub documents are saved, then click Open.
4. The sub document is inserted into the master document.
5. Repeat steps 2 and 3 above to insert other sub documents.
�
�
�
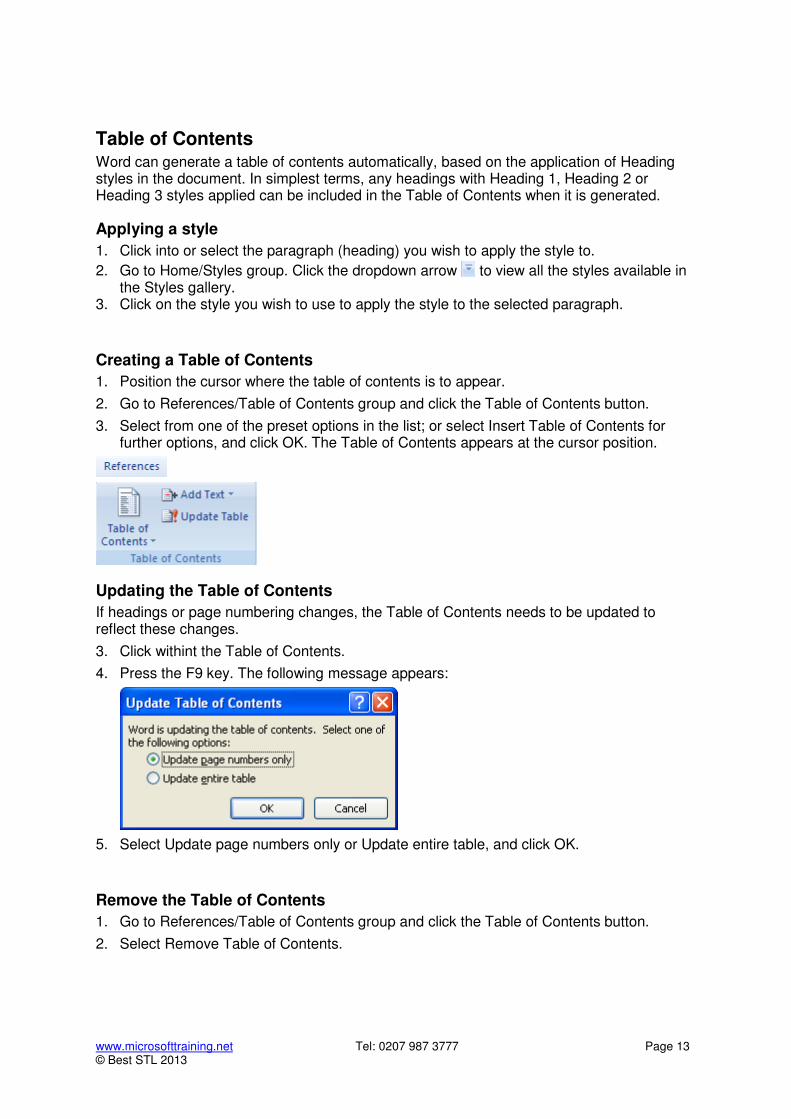
Editing a sub document
1. Click the Collapse Subdocuments button All subdocuments display as hyperlinks.
2. Hold down the Ctrl key and click on a hyperlink to a subdocument to open it. The subdocument can now be edited. Any changes made will also appear in the master document.
�
�
Notes:
� A subdocument can also be opened by double-clicking on the small page icon
that appears next to each subdocument, in the master document.

www.microsofttraining.net Tel: 0207 987 3777 Page 10 © Best STL 2013
� Editing changes made to a subdocument within the master document will be reflected in the subdocument when it is next opened.
Moving and deleting a subdocument
Using the small page icon a subdocument can be moved by dragging and dropping; or deleted from the master document by clicking on the icon and pressing the Delete key.
Footnotes and Endnotes
Inserting a footnote or endnote
1. Place the cursor where the footnote or endnote number is to appear in the document text, and go to References/Footnotes group.
2. To insert a footnote, click the Insert Footnote button; to insert an endnote, click the Insert Endnote button.
3. Enter the text for the footnote or endnote; then click away from where you have typed.
�
�
Review footnotes or endnotes in a document
1. Go to References/Footnotes group.
2. Click the dropdown arrow to the right of the Next Footnote button.
3. Select from the options provided to proceed directly to the next or previous footnote or endnote in the document.
�
�
Delete footnotes or endnotes
1. Select the footnote or endnote number from within the document text.
2. Press Delete.

www.microsofttraining.net Tel: 0207 987 3777 Page 11 © Best STL 2013
Indexes
Marking index entries
1. Select the word or phrase from within the document text.
2. Go to References/Index group and click the Mark Entry button.
3. In the Mark Index Entry dialogue box, click Mark to mark the selected occurrence of the word/phrase. To mark all occurrences of this text in the document, click Mark All
4. With the Mark Index Entry dialogue box open, repeat steps 1 and 3 to continue marking other words/phrases in the document.
5. Click Close to exit the dialogue box.
� �
�

www.microsofttraining.net Tel: 0207 987 3777 Page 12 © Best STL 2013
Creating an index
1. Position the cursor where the index is to appear.
2. Go to Reference/Index and click the Insert Index button.
3. Select settings for index formatting using the Index dialogue box, and click OK.
�
�
Updating the index
To include additional index entries once the index has been created:
1. Mark the words or phrases to be added to the index (see ‘Marking index entries’).
2. Click within the existing index.
3. Go to References/Index and click the Update Index button; or press the F9 key.
www.microsofttraining.net Tel: 0207 987 3777 Page 13 © Best STL 2013
Table of Contents Word can generate a table of contents automatically, based on the application of Heading styles in the document. In simplest terms, any headings with Heading 1, Heading 2 or Heading 3 styles applied can be included in the Table of Contents when it is generated.
Applying a style
1. Click into or select the paragraph (heading) you wish to apply the style to.
2. Go to Home/Styles group. Click the dropdown arrow to view all the styles available in the Styles gallery.
3. Click on the style you wish to use to apply the style to the selected paragraph.
Creating a Table of Contents
1. Position the cursor where the table of contents is to appear.
2. Go to References/Table of Contents group and click the Table of Contents button.
3. Select from one of the preset options in the list; or select Insert Table of Contents for further options, and click OK. The Table of Contents appears at the cursor position.
Updating the Table of Contents
If headings or page numbering changes, the Table of Contents needs to be updated to reflect these changes.
3. Click withint the Table of Contents.
4. Press the F9 key. The following message appears:
5. Select Update page numbers only or Update entire table, and click OK.
Remove the Table of Contents
1. Go to References/Table of Contents group and click the Table of Contents button.
2. Select Remove Table of Contents.

www.microsofttraining.net Tel: 0207 987 3777 Page 14 © Best STL 2013
Bookmarks A bookmark identifies a location or a selection of text that you name and identify for future reference. You can also add cross-references to bookmarks.
Creating a bookmark
1. Select the text to be bookmarked.
2. Go to Insert/Links group and click the Bookmark button.
3. Under Bookmark name, type or select a name. Bookmark names must begin with a letter, can contain numbers but can't include spaces.
4. Click Add. The Bookmark dialogue box closes.
�
�
�

www.microsofttraining.net Tel: 0207 987 3777 Page 15 © Best STL 2013
Locating a bookmark
1. Go to Insert/Links group and click the Bookmark button.
2. Select the bookmark name from the list.
3. Click Go To.
�
�
Note: Pressing the F5 key opens the Go To feature in Word, where you can select a bookmark to go to its location in the document.

www.microsofttraining.net Tel: 0207 987 3777 Page 16 © Best STL 2013
Cross-references A cross-reference directs a document reader from one point in the document to another. The cross-reference can refer to any of the following: a numbered item, a heading, a bookmark, a captioned table or graphic; a footnote or endnote.
Creating a cross-reference
1. Enter the text that will be the preamble to the cross-reference – e.g. (see [cross reference]).
2. Go to Insert/Links and click the Cross-reference button.
3. Under Reference type, select the appropriate item.
4. Under Insert reference to, select what will be displayed in the cross-reference itself.
5. Click Insert, then Close. The cross-reference appears in the text.
�
�
�
�
�
www.microsofttraining.net Tel: 0207 987 3777 Page 17 © Best STL 2013
Practice Activity: Working with large documents
1. Create a new document and save it as Practice master.
2. Change into Outline view.
3. Insert the files Chapter 1 and Chapter 2 as subdocuments.
4. Close Outline view.
5. Within the Chapter 1 text, find the heading Helpdesk. Enter a footnote after the word ‘email’ which reads: [email protected]
6. Create bookmarks for the headings Chapter 1 and Chapter 2.
7. To test your bookmarks work, place your cursor at the beginning of the document, and use the bookmark for Chapter 2 to go to the beginning of Chapter 2. Then use the Chapter 1 bookmark to go to the beginning of Chapter 1.
8. Within the Chapter 1 text, find the highlighted sentence under the heading About our other products.
9. Insert a cross-reference at the end of this sentence, which refers to Chapter 2.
Optional activities
1. Mark four different words or phrases in the Practice master document, and create an index at the end of the document.
2. Create a Table of Contents at the beginning of the document, based on applying Heading styles to Table of Contents entries in the document.

www.microsofttraining.net Tel: 0207 987 3777 Page 18 © Best STL 2013
Managing document revision Objectives:
1. Use the Track Changes feature to mark changes.
2. Review a document to accept and reject changes.
3. Compare documents for changes.
4. Combine documents from multiple authors together.
Using Track Changes
Turning Track Changes on
Go to Review/Tracking group and click the Track Changes button, or use Ctrl+Shift+E. Track Changes is now turned on.
To add a Track Changes indicator to the status bar, right-click the status bar and select Track Changes.
Turning Track Changes off
When you turn off change tracking, you can revise the document without marking what has changed.
To turn off Track Changes:
1. Go to Review/Tracking group and click the Track Changes button; or
2. Use Ctrl+Shift+E; or
3. Click the Track Change indicator on the status bar once.
Note: turning off the Track Changes feature does not remove any changes that have already been tracked. To remove tracked changes, use the Accept and Reject commands on the Review tab in the Changes group (see the section on ‘Reviewing Changes’, page 20).

www.microsofttraining.net Tel: 0207 987 3777 Page 19 © Best STL 2013
Using Tracking Options and Balloons
Tracking options allows you to set how tracked changes in the document are displayed.
Typically changes are displayed in the following way:
� Insertions (where additional text is entered) are shown with an underline
� Deletions (where text is deleted) are shown with a strikethrough
� Changed lines (marks all changes) are shown as a vertical line to the left of the line or paragraph where a change has been made.
To change how tracked changes are displayed:
1. Go to Review/Tracking group and click the dropdown arrow on the Track Changes button.
2. Select Change Tracking Options.
You can also opt to have changes displayed in balloons which appear outside of the document text. Options for display of balloons can be changed using the dropdown arrow on the Balloons button.
www.microsofttraining.net Tel: 0207 987 3777 Page 20 © Best STL 2013
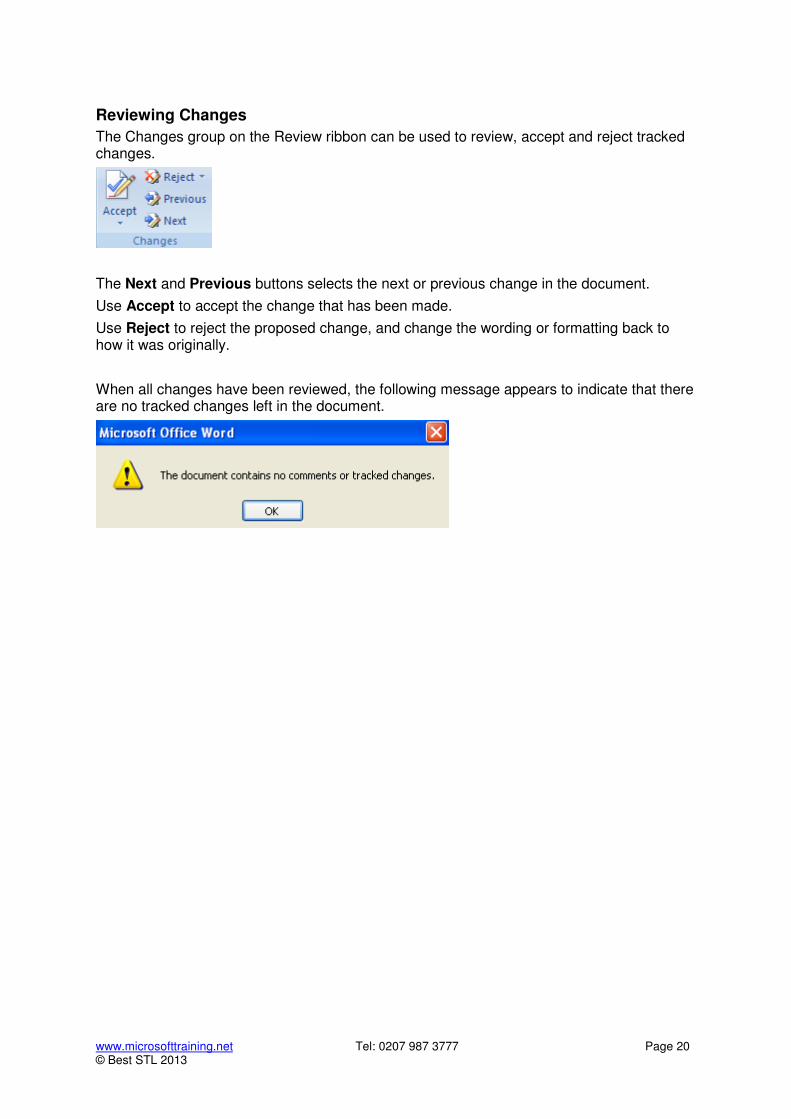
Reviewing Changes
The Changes group on the Review ribbon can be used to review, accept and reject tracked changes.
The Next and Previous buttons selects the next or previous change in the document.
Use Accept to accept the change that has been made.
Use Reject to reject the proposed change, and change the wording or formatting back to how it was originally.
When all changes have been reviewed, the following message appears to indicate that there are no tracked changes left in the document.
www.microsofttraining.net Tel: 0207 987 3777 Page 21 © Best STL 2013
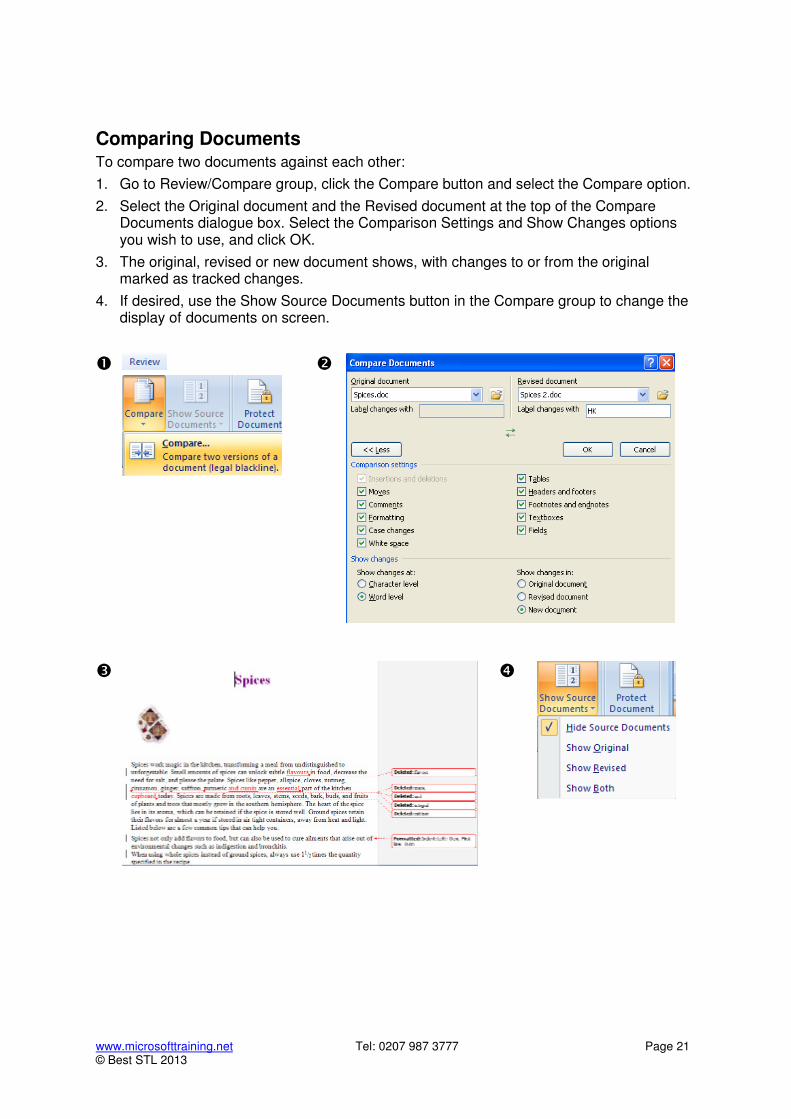
Comparing Documents To compare two documents against each other:
1. Go to Review/Compare group, click the Compare button and select the Compare option.
2. Select the Original document and the Revised document at the top of the Compare Documents dialogue box. Select the Comparison Settings and Show Changes options you wish to use, and click OK.
3. The original, revised or new document shows, with changes to or from the original marked as tracked changes.
4. If desired, use the Show Source Documents button in the Compare group to change the display of documents on screen.
�
�
�
�

www.microsofttraining.net Tel: 0207 987 3777 Page 22 © Best STL 2013
Combining documents To combine two documents together:
1. Go to Review/Compare group, click the Compare button and select Combine.
2. Select the Original document and the Revised document at the top of the Compare Documents dialogue box. Select the Comparison Settings and Show Changes options you wish to use, and click OK.
3. The original, revised or new document shows, with changes to or from the original marked as tracked changes.
4. Review the changes using buttons from Review/Changes group (see the section on ‘Reviewing Changes’, page 20).
�
�
�
�

www.microsofttraining.net Tel: 0207 987 3777 Page 23 © Best STL 2013
Practice Activity: Managing document revision
1. Open Practice herbs.
2. Ensure Track Changes is turned on in the document.
3. Review each of the changes, accepting or rejecting them until there are no tracked changes remaining in the document.
4. Use the Combine feature (Review/Compare Group – Compare button) to combine Practice herbs and Practice herbs revised into a new document.
5. Save the Combine result document as Practice herb combined.
www.microsofttraining.net Tel: 0207 987 3777 Page 24 © Best STL 2013
Automation and customisation
Objectives:
1. Record and run a macro.
2. Modify and delete a macro.
3. Customise the Quick Access Toolbar and Ribbon display in Word.
Macros Frequently used tasks or performed routines can be automated by creating a macro. A macro is a series of commands and instructions that you group together as a single command to accomplish a task automatically.
Typical uses for macros are:
� To speed up routine editing and formatting
� To combine multiple commands — for example, to insert a table with a specific size and borders, and with a specific number of rows and columns
� To make an option in a dialog box more accessible
� To automate a complex series of tasks
To record, run, modify or delete macros, the Developer Ribbon must be showing in Word firstly (see the section on ‘The Developer Ribbon’, page 4).
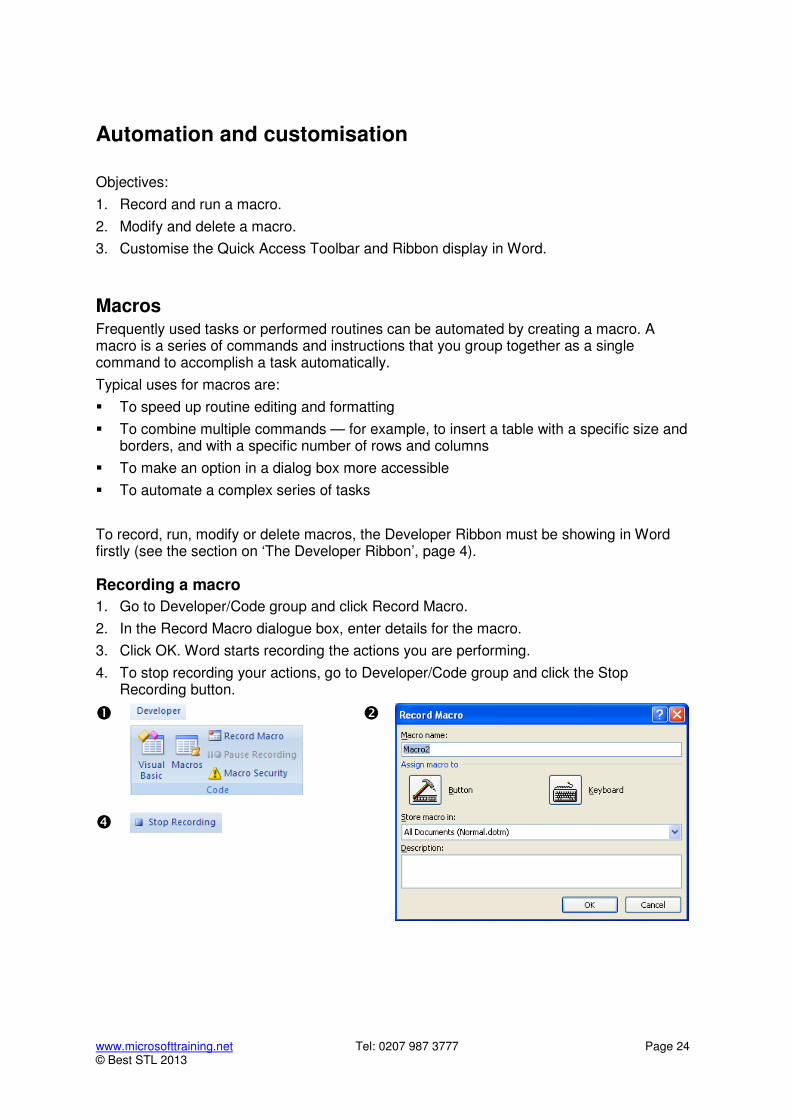
Recording a macro
1. Go to Developer/Code group and click Record Macro.
2. In the Record Macro dialogue box, enter details for the macro.
3. Click OK. Word starts recording the actions you are performing.
4. To stop recording your actions, go to Developer/Code group and click the Stop Recording button.
�
�
�

www.microsofttraining.net Tel: 0207 987 3777 Page 25 © Best STL 2013
Notes:
� If you give a new macro the same name as a built-in macro in Office Word 2010, the new macro actions will replace the built-in macro. To view a list of built-in macros, on the Developer tab, in the Code group, click Macros. In the Macros in list, click Word Commands.
� When you record a macro, you can use the mouse to click commands and options, but not to select text. You must use the keyboard to select text instead.
Running a macro
1. Go to Developer/Code Group and click the Macros button.
2. Select the macro you wish to run from the list of available macros.
3. Click Run.
�
�
�
www.microsofttraining.net Tel: 0207 987 3777 Page 26 © Best STL 2013
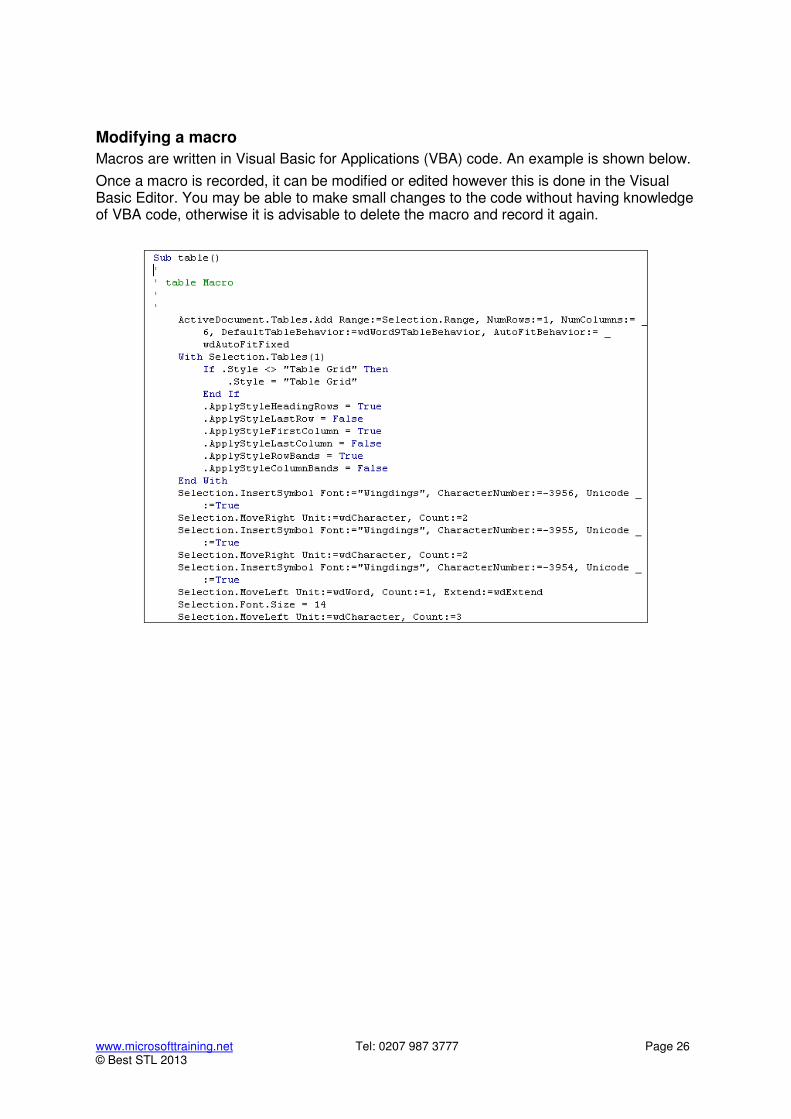
Modifying a macro
Macros are written in Visual Basic for Applications (VBA) code. An example is shown below.
Once a macro is recorded, it can be modified or edited however this is done in the Visual Basic Editor. You may be able to make small changes to the code without having knowledge of VBA code, otherwise it is advisable to delete the macro and record it again.

www.microsofttraining.net Tel: 0207 987 3777 Page 27 © Best STL 2013
Deleting a macro
1. Go to Developer/Code Group and click the Macros button.
2. Select the macro you wish to delete from the list of available macros.
3. Click Delete.
�
�
�
Customising Word The Word 2010 interface can be customised to provide quick access to the features of Word you use most often.
Customising the Quick Access Toolbar
By default, the Quick Access toolbar contains three buttons: Save, Undo and Redo.
Buttons can easily be added or removed from the toolbar.
� To add a button to the toolbar, right-click on the feature you wish to add and select Add to Quick Access Toolbar.
� To remove a button from the toobar, right-click on the button you wish to remove and select Remove from Quick Access Toolbar.
The dropdown arrow to the right of the Quick Access Toolbar provides access to further options, including the options to:
� Show Below the Ribbon which moves the toolbar underneath the ribbon
� Minimize the Ribbon which shows just the tabs for each ribbon. The whole ribbon will display when the tab is clicked.

www.microsofttraining.net Tel: 0207 987 3777 Page 28 © Best STL 2013
Practice Activity: Automation and Customisation This is a self-directed activity where you can create and run your own macro. Your trainer may give you some guidance on this before you begin.