winsieve users guide - gaea
TRANSCRIPT

WWinSieinSieveveVersion 1
Copyright 2000. GAEA Technologies Ltd. All rights reserved.
Printed in Canada.


WinSieve
Software License Agreement and Limited Warranty
This License Agreement is made and entered into by and between GAEA Environmental Engineering Ltd. having a office at 44Canadian Oaks Drive, Whitby, Ontario, Canada, L1N 6W8 (the "Distributor") and the Licensee, with reference to the followingterms and conditions:
A. The Distributor has the legal right to distribute software and documentation currentlycalled "WinSieve" (the "Licensed Product").
B. The Licensee now desires to license the use of the Licensed Products.
NOW THEREFORE, the parties agree as follows:
LicenseDistributor grants, and the Licensee hereby accepts, the nonexclusive license to use the Licensed Product subject to the termsand conditions contained in this agreement.
Licensee May:1.Unless otherwise agreed in writing, use the Licensed Product on any single computer system at the licensed facility.2.Transfer the Licensed Product from one location to another so long as it is not installed simultaneously on more than onecomputer.
Licensee May Not:1.Make copies of the Licensed Product.2.Make copies of the software documentation.3.Unless otherwise agreed in writing, install the software onto more than one computer at a time.4.Alter, decompile, disassemble, or reverse engineer the Licensed Product.5.Remove, alter, or obscure the copyright notices.
TermThis License Agreement is effective from the date of purchase by the Licensee of the Licensed Product and shall remain inforce until terminated. The Licensee's rights to use the Licensed Product will terminate if the Licensee fails to comply with anyof the terms or conditions of this License Agreement. Upon such termination, the Licensee shall return the Licensed Product tothe Distributor immediately.

Limited WarrantyIf the Licensee finds a Licensed Product diskette to be defective in materials or workmanship (which shall not include problemsrelating to the nature or operation of the Licensed Product) under normal use, the Distributor will replace it free of charge withinone year following the date of purchase. Any request for replacement of a defective diskette must be accompanied by the origi-nal defective diskette.
The Licensed Product is provided "as is" without warranty of any kind, either expressed or implied, including but not limited tothe implied warranties of merchantability and fitness for a particular purpose. The Distributor does not warrant that the func-tions contained in the program will meet your requirements or that the operation of the program will be uninterrupted or errorfree. Neither the Distributor nor anyone else who has been involved in the creation or production of this product shall be liablefor any direct, indirect, incidental, special, or consequential damages, whether arising out of the use or inability to use the prod-uct, or any breach of a warranty, and the Distributor shall have no responsibility except to replace the Licensed Product pursuantto this limited warranty.
General1. The laws of the Province of Ontario, Canada, shall govern the validity, interpretation and performance of this License Agree-ment.2. If any provision of this License Agreement is determined to be invalid under any applicable statute of rule of law, it shall bedeemed omitted and the remaining provisions shall continue in full force and effect. 3. The entire agreement between the Distributor and the Licensee is embodied in this Agreement.4. Any modifications of this License Agreement shall be void unless appearing in writing signed by duly authorised representatives of the License and the Distributor.5. This License Agreement shall be binding upon and shall inure to the benefit of each party hereto and its successors andassigns except that any assignment of this License Agreement by the Licensee without the written consent of the Distributorshall be void.

WinFence User’s Guide
Introduction Features . . . . . . . . . . . . . . . . . . . . . . . .ii
Chapter 1 Getting Started The Distribution Package . . . . . . . . . . .2Required Equipment . . . . . . . . . . . . . . .2Installing WinSieve . . . . . . . . . . . . . . . .3Network Installation . . . . . . . . . . . . . . .4README File . . . . . . . . . . . . . . . . . . . .4Uninstalling WinSieve . . . . . . . . . . . . . .4Registering and Unlocking WinSieve . .5Transferring the Registration . . . . . . . .6Using WinSieve . . . . . . . . . . . . . . . . . .8Starting WinSieve . . . . . . . . . . . . . . . . .8Menu Bar . . . . . . . . . . . . . . . . . . . . . . .9
File Menu . . . . . . . . . . . . . . . . . . . . .9Edit Menu . . . . . . . . . . . . . . . . . . .10View Menu . . . . . . . . . . . . . . . . . . .11Window Menu . . . . . . . . . . . . . . . .11Help Menu . . . . . . . . . . . . . . . . . . .12
Popup Menus . . . . . . . . . . . . . . . . . . .12Project Popup Menu . . . . . . . . . . .12Sieve Analysis Popup Menu . . . . .13Template Popup Menu . . . . . . . . .13
Toolbars . . . . . . . . . . . . . . . . . . . . . . .14Project Toolbar . . . . . . . . . . . . . . . . . .14Sieve Analysis Toolbar . . . . . . . . . . . .15Template Toolbar . . . . . . . . . . . . . . . .16Desktop . . . . . . . . . . . . . . . . . . . . . . .18
Chapter 2 Tutorial Starting a New Project . . . . . . . . . . . .22Creating a New Sieve Analysis . . . . . .23Entering New Test Data . . . . . . . . . . .25Sample Information . . . . . . . . . . . . . .25Grain Size Data . . . . . . . . . . . . . . . . .25Sieve Data . . . . . . . . . . . . . . . . . . . . .26Washed Sieve Data . . . . . . . . . . . . . .26Hydrometer Data . . . . . . . . . . . . . . . .27Plotting the Test Data . . . . . . . . . . . . .28Displaying the Test Data . . . . . . . . . . .28Printing the Sieve Analysis . . . . . . . . .29Saving the Sieve Analysis . . . . . . . . .29
Chapter 3 Projects Creating a New Project . . . . . . . . . . . .33Opening an Existing Project . . . . . . . .35Opening the Last Project . . . . . . . . . .36Closing the Project . . . . . . . . . . . . . . .36Deleting a Project . . . . . . . . . . . . . . . .36Importing a Project . . . . . . . . . . . . . . .37Importing Data . . . . . . . . . . . . . . . . . .38Exporting Data . . . . . . . . . . . . . . . . . .38
Exchange Files . . . . . . . . . . . . . . .39Clipboard . . . . . . . . . . . . . . . . . . . .39Bitmap File . . . . . . . . . . . . . . . . . .40Metafile . . . . . . . . . . . . . . . . . . . . .40
Editing Sieve Sizes . . . . . . . . . . . . . . .41Editing Hydrometer Times . . . . . . . . .41Entering Specifications . . . . . . . . . . . .42Printing a Project . . . . . . . . . . . . . . . .43Setting Program Preferences . . . . . . .44
Contents
WinFence User’s Guide
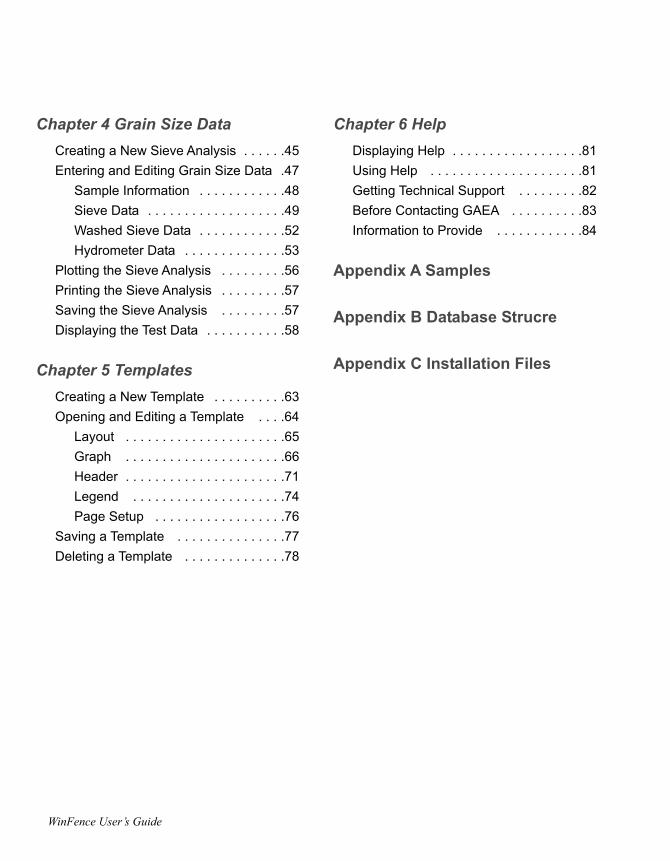
Chapter 4 Grain Size Data Creating a New Sieve Analysis . . . . . .45Entering and Editing Grain Size Data .47
Sample Information . . . . . . . . . . . .48Sieve Data . . . . . . . . . . . . . . . . . . .49Washed Sieve Data . . . . . . . . . . . .52Hydrometer Data . . . . . . . . . . . . . .53
Plotting the Sieve Analysis . . . . . . . . .56Printing the Sieve Analysis . . . . . . . . .57Saving the Sieve Analysis . . . . . . . . .57Displaying the Test Data . . . . . . . . . . .58
Chapter 5 Templates Creating a New Template . . . . . . . . . .63Opening and Editing a Template . . . .64
Layout . . . . . . . . . . . . . . . . . . . . . .65Graph . . . . . . . . . . . . . . . . . . . . . .66Header . . . . . . . . . . . . . . . . . . . . . .71Legend . . . . . . . . . . . . . . . . . . . . .74Page Setup . . . . . . . . . . . . . . . . . .76
Saving a Template . . . . . . . . . . . . . . .77Deleting a Template . . . . . . . . . . . . . .78
Chapter 6 Help Displaying Help . . . . . . . . . . . . . . . . . .81Using Help . . . . . . . . . . . . . . . . . . . . .81Getting Technical Support . . . . . . . . .82Before Contacting GAEA . . . . . . . . . .83Information to Provide . . . . . . . . . . . .84
Appendix A Samples
Appendix B Database Strucre
Appendix C Installation Files


Introduction

IntroductionWinSieve can be used to quickly enter, edit and printgrain size analysis charts in several standard or customformats. Each grain size analysis test can include sievedata, washed sieve data, and hydrometer data as specifiedin ASTM Test Method D-422. There is no limit to thenumber of samples in a project and the number of testsper sample.
Each grain size analysis chart is composed of three parts;a graph, an optional legend, and a header. The graphicalwindows interface displays the charts as they are enteredand shows how the chart will look when it is printed. Testresults can be printed in black and white or color.
All test results, sample and project information is storedin a Microsoft Access relational database. This databaseallows for the quick storage and retrieval of sample andtest data, and can be interfaced with a variety of otherprograms. There is no limit to the number of projects,samples, and test results that can be stored in the data-base. The database is setup to work across a network ifdesired, with each project stored in a separate directory.
A master project database is maintained by the programto track the status and locations of projects. This databasecontains the project number, name, and directory loca-tion.
Grain size analysis results for up to 5 tests can be plottedon a single graph. In addition, the grain size specifica-tions can also be plotted on the graph. Classification sys-tem, fonts, colors, scales, line types, point types, andtitles can be easily customized for each graph.
9WinFence User’s Guide
The classification system is plotted beneath each graph to provide easycomparison with sample results. Several standard classification systemsare provided including:
USCS (Unified Soil Classification System)USDAASSHTOInternationalModified WentworthAustralian
The sieve analysis can also have an optional legend block at the top orbottom, which can be used to display sample information, classificationresults, and grain size analysis results. A header is also displayed at thetop or bottom of each graph, which can be used to show a companylogo or site map (stored as a bitmap and imported into the program),project name and number, borehole information, sample information, orother text.
WinSieve is compatible with Windows 95/98/2000 and NT, and sup-ports all of the fonts, displays, and printers available in Windows.
Features
The WinSieve program has numerous features to make the entry, edit-ing, and printing of grain size analysis charts easier and faster. In addi-tion, the use of a standard database format means that the data is readilyavailable to other applications.
Features

10 WinFence User’s Guide
Features of the graphical user interface of the WinSieve programinclude:
- pull-down and popup menus;- toolbars for most commonly used commands;- dynamic hints for data entry fields;- on-line context sensitive help;- support for all Windows fonts, printers, and displays;- Windows network compatible.
The entry and editing of grain size charts is supported by the followingfeatures:
- Standard Windows file and print commands.- Data is stored in a Microsoft Access database.- No limit on the number of projects, samples, or tests results.- User defined project, sample, and test fields.· Up to 5 grain size test results can be plotted on one graph.· Grain size specifications can be plotted on the same graph.· Support for several standard classification systems.· Fonts, scales, line types, point types, titles, and classification sys-tem can be easily customized.· Automatic calculation of classification data, D10, D30, D60, Cu,and Cc.
· Customizable Legend at top or bottom of graph can display sam-ple, classification, and test information.· Company logos, site plans, project name and number, sampleinformation, and text can be included in the Header.
Introduction

11WinFence User’s Guide
12 WinFence User’s Guide
Introduction
1.GettingStarted

1.GettingStartedBefore you begin working with the WinSieve program:
1. Check the contents of your distribution package; 2. Make sure you have the necessary equipment; 3. Run the installation program; 4. Read the README file; 5. Then Start the WinSieve program.
This chapter discusses each of these steps.
The Distribution Package
The WinSieve distribution package you received shouldinclude this User’s Guide and a CD-ROM.
Required Equipment
WinSieve requires the following hardware and softwareto run efficiently:
1. Windows 95/98/2000 or NT; 2. At least 32 MB of RAM; 3. At least 32 MB of hard disk space; 4. A screen resolution of at least 600 x 800;5. A CD-ROM drive.
15WinSieve User’s Guide
Installing WinSieve
To get WinSieve up and running, run the installation programSETUP.EXE on the CD-ROM. For example, to install from drive D:
1. Start Windows2. Insert the CD-ROM into drive D;3. Choose File | Run and type D:SETUP.EXE, or double-click onD:SETUP.EXE in Windows Explorer, or double-click on theAdd/Remove Programs icon in the Control;4. Enter the requested information in the installation forms, discussedin the next section.
On some computer systems, depending on how they are configured,inserting the CD-ROM into the drive will automatically start theSETUP.EXE program.
The SETUP program does the following:
1. Creates one or more directories on your hard disk and copies thecontents of the WinSieve disk into them;2. Creates a Windows application group and installs the WinSieve pro-gram and help icons.
A complete list of files that are copied and the directories they arecopied to is provided in Appendix C.
Requested Information
The installation dialog boxes will request the directories to put the Win-Sieve program and databases, and the name of the application group forthe WinSieve program icons.
Tip
If you are re-installing orupgrading the program, selectCustom Setup. Using CustomSetup you can select not toinstall the empty databases, thiswill avoid over-writing yourexisting databases.
Installing WinSieve

16 WinSieve User’s Guide
Network Installation
The following items should be checked before installing WinSieve on anetwork:
1. Ensure that you have sufficient network rights to the drive on whichyou will install WinSieve (for example, you will need to be able tocopy, write, delete, read and create files and directories); 2. Check to see if you have sufficient disk space available for the pro-gram files (at least 32 MB); 3. Verify that the drive letters that you specify during installation areconsistent with those that are available on your server; 4. Make sure the total number of WinSieve copies in use does notexceed the number that is licensed. If you need more copies than arecurrently licensed, contact GAEA to order additional licenses.
To install the WinSieve program on a network server follow the instal-lation instructions provided above. After the WinSieve program hasbeen installed the users must be given network access to the WinSieveprogram directories.
README File
Any last-minute changes, additions or trouble-shooting tips are docu-mented in the README file. When the SETUP program has finishedinstalling the WinSieve program, it will automatically install an icon forthe README file in the application group. To view the README fileclick on this icon.
Uninstalling WinSieve
The WinSieve program files can be removed from your hard disk usingthe Add/Remove programs option in the Windows Control Panel. Unin-stalling the WinSieve program will also remove the WinSieve icons,and application group.
Tip
When installing a second user ona network do not install the data-bases from the CD. This willoverwrite the existing masterand main databases on theserver.
Getting Started
17WinSieve User’s Guide
Registering and Unlocking WinSieve
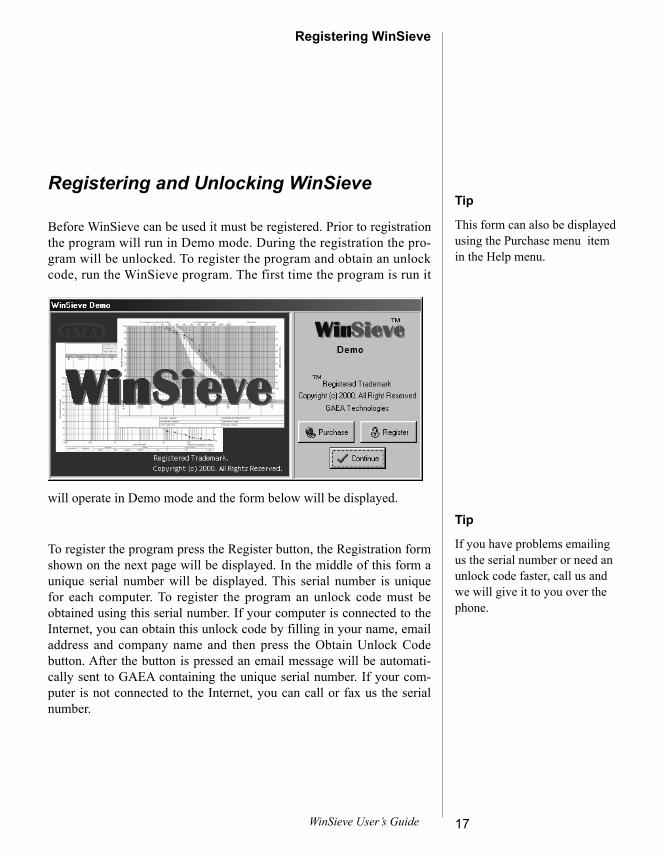
Before WinSieve can be used it must be registered. Prior to registrationthe program will run in Demo mode. During the registration the pro-gram will be unlocked. To register the program and obtain an unlockcode, run the WinSieve program. The first time the program is run it
will operate in Demo mode and the form below will be displayed.
To register the program press the Register button, the Registration formshown on the next page will be displayed. In the middle of this form aunique serial number will be displayed. This serial number is uniquefor each computer. To register the program an unlock code must beobtained using this serial number. If your computer is connected to theInternet, you can obtain this unlock code by filling in your name, emailaddress and company name and then press the Obtain Unlock Codebutton. After the button is pressed an email message will be automati-cally sent to GAEA containing the unique serial number. If your com-puter is not connected to the Internet, you can call or fax us the serialnumber.
Tip
This form can also be displayedusing the Purchase menu itemin the Help menu.
Tip
If you have problems emailingus the serial number or need anunlock code faster, call us andwe will give it to you over thephone.
Registering WinSieve

18 WinSieve User’s Guide
After GAEA has received your unique serial number, an unlock codewill be generated and emailed or faxed to you. When you receive theunlock code enter it in the space at the bottom of the Registration formand then press the Store Unlock Code button. The WinSieve program isnow registered and the Demo form will no longer be displayed whenthe program is run.
Transferring the Registration
After the WinSieve program has been registered, the unlocked programcan be transferred to a different computer using the Transfer utility.This utility allows you to move the WinSieve program between com-puters without requiring assistance from GAEA. After the registrationhas been transferred the WinSieve program will only run on the newcomputer. The Transfer utility should be used with caution, since ifincorrect serial numbers are entered you will lose the registration onboth computers. If this happens contact GAEA for a new unlock code.Transferring the registration is a two step process.
Getting Started

19WinSieve User’s Guide
Step 1. The first step is to obtain the unique serial number of the newcomputer. Install and run WinSieve on the new computer. Initially theprogram will start in Demo mode and the Demo form will be displayed.Press the Register button and write down the unique serial number forthe new computer.
Step 2. In the second step the Transfer utility is used to generate anunlock code for the new computer. Start the Transfer utility by selectingTransfer Registration from the WinSieve Program Group using the Startbutton. The Transfer Registration form below will be displayed. Enterthe serial number of the new computer and then press the Transfer Reg-istration button. An unlock code for the new computer will be dis-played. Enter this unlock code in the Registration form on the newcomputer, and then press the Store Unlock Code button.
Transferring the Registration

20 WinSieve User’s Guide
Using WinSieve
This section explains how to interact with the various parts of the Win-Sieve program. It discusses how to use the various toolbars and menus.
Starting WinSieve
To begin working with WinSieve after you have installed the program,start it by selecting Start | Programs | WinSieve or double-clicking onthe WinSieve icon in its application group.
When you first start the program a form will be displayed as shownbelow. After selecting an option and completing any additional forms,the main WinSieve screen will be displayed.
Tip
If you do not want the Startupform displayed every time youstart the program, click on the“Do not show this screen again”box at the bottom of the form.This form can be turned back onusing program preferences.
Getting Started
21WinSieve User’s Guide
The main window of the WinSieve program consists of a title bar,menu bar, optional toolbars and desktop. In addition, popup menus canbe displayed by clicking the right mouse button. This section explainshow to interact with the various parts of the WinSieve program.
Menu Bar
The menu bar contains the main level of commands. It uses standardWindows pull-down menus. You can choose any menu item on anysubmenu that is not dimmed (WinSieve will know when certain menucommands are not available, and prevents you from choosing them).The majority of these commands can also be selected using the speedbuttons on the toolbars (see below).
When the program is first started and no sieve analyses or templates areopened, the File, View, Window, and Help items will appear on themenu bar.
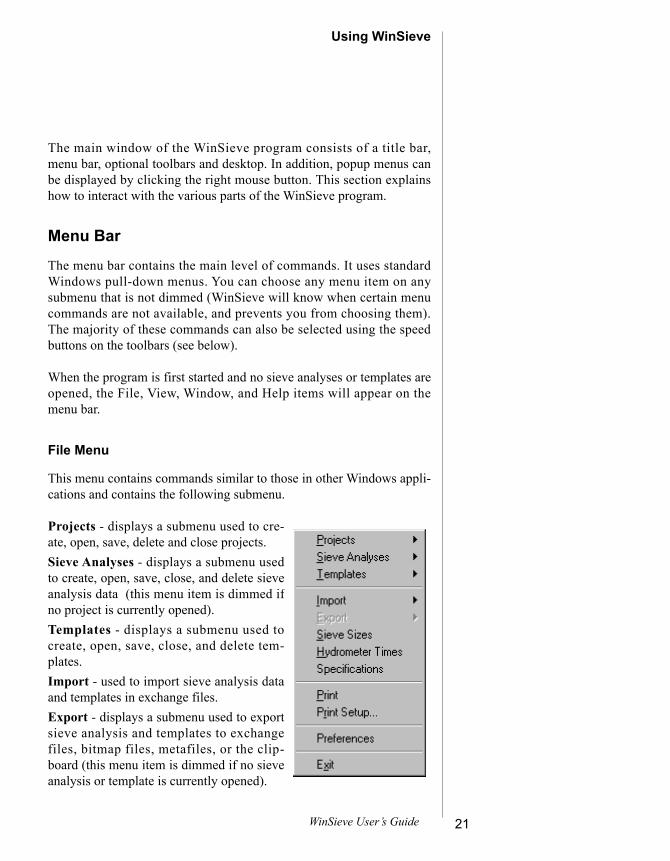
File Menu
This menu contains commands similar to those in other Windows appli-cations and contains the following submenu.
Projects - displays a submenu used to cre-ate, open, save, delete and close projects.Sieve Analyses - displays a submenu usedto create, open, save, close, and delete sieveanalysis data (this menu item is dimmed ifno project is currently opened).Templates - displays a submenu used tocreate, open, save, close, and delete tem-plates.Import - used to import sieve analysis dataand templates in exchange files.Export - displays a submenu used to exportsieve analysis and templates to exchangefiles, bitmap files, metafiles, or the clip-board (this menu item is dimmed if no sieveanalysis or template is currently opened).
Using WinSieve

22 WinSieve User’s Guide
Sieve Sizes - used to edit the standard sieve sizes to use when enteringsieve analysis data.Hydrometer Times - used to edit the standard hydrometer times usedwhen entering sieve analysis data.Specifications - used to edit standard specifications.Print - used to print sieve analyses and templates (this menu item isdimmed if no sieve analysis or template is currently opened).Print Setup - used to adjust the printer settings.Preferences - used to set program preferences.Exit - closes the program.
Edit Menu
After a sieve analysis or template has been opened the Edit menu willappear on the menu bar. The contents of the Edit menu will varydepending on what is currently displayed on the desktop.
Sieve Analysis
If a sieve analysis is currently displayed on the desktop the edit menuwill contain the following commands.
Sample Info - used to edit the sample information. Test Data - used to edit the test data for the sieveanalysis.Plot Results - used to plot the sieve analysisresults and to plot results from other sieve analy-ses.Data Sheet - used to display and print the inputdata for the sieve analysis.
Tip
If a menu item contains anunderlined letter it can beselected by holding down the Altkey and pressing that letter.
Getting Started

23WinSieve User’s Guide
Template
If a template is currently displayed on the desktop the edit menu willcontain the following commands.
Layout - used to edit the layout.Graph - used to edit the format of the graph.Header - used to edit the format of the header.Legend - used to edit the format of the legend.Page Setup - used to change the margins and ori-entation of the page.
View Menu
This menu contains commands for adjusting the view and togglingtoolbars on and off.
Full Screen - displays the desktop infull screen mode.Zoom In - used to zoom in on thegraph. Zoom Out - used to zoom out on thegraph.Show Project Toolbar - if checked theProject toolbar will be displayed.Show Sieve Toolbar - if checked theSieve Analysis toolbar will be dis-played.Show Template Toolbar - if checked the Template toolbar will be dis-played.
Menu Bar

24 WinSieve User’s Guide
Window Menu
This menu contains the standard Windows commands for selecting andarranging windows on the desktop.
Help Menu
Accesses online help and information about the program.
Popup Menus
Popup menus can be displayed at any time by pressing the right mousebutton. The menu that will be displayed depends upon what is currentlydisplayed on the desktop.
Project Popup Menu
If no sieve analysis or template is displayed the Project Popup Menuwill be displayed. This menu contains the following menu items:
Open Project - used to open an exist-ing project.New Sieve Analysis - creates a newsieve analysis (dimmed if no project iscurrently opened).Open Sieve Analysis - opens an exist-ing sieve analysis (dimmed if no pro-ject is currently opened).Open Template - opens an existingtemplate.Exit - exits the WinSieve program.
Tip
The exact version number ofthe program can be obtainedby selecting the Help andAbout command. This versionnumber should be reportedwhen obtaining technical sup-port.
Tip
Standard popup menus containingthe cut, copy, and paste com-mands are available when enter-ing data.
Getting Started

25WinSieve User’s Guide
Sieve Analysis Popup MenuIf a sieve analysis is currently displayed on the desktop the SieveAnalysis Popup Menu will be displayed This popup menu contains thefollowing commands.
Save - saves the sieve analysis in the database.Close - closes the sieve analysis.Sample Info - used to edit the sample informa-tion. Test Data - used to edit the test data for the sieveanalysis.Plot Results - used to plot the sieve analysisresults and to plot results from other sieve analy-ses.Data Sheet - used to display and print the inputdata for the sieve analysis.
Template Popup Menu
If a template is currently displayed on the desktop the Template PopupMenu will be displayed This popup menu contains the following com-mands.
Save - saves the template in the database.Close - closes the template.Layout - used to edit the layout.Graph - used to edit the format of the graph.Header - used to edit the format of the header.Legend - used to edit the format of the legend.Page Setup - used to change the margins andorientation of the page.
Popup Menus

26 WinSieve User’s Guide
Toolbars
There are three toolbars that can be displayed on the desktop; they arethe Project Toolbar, Sieve Analysis Toolbar, and Template Toolbar. Thedisplay of these toolbars is controlled in the View menu.
These toolbars can either float overtop of the desktop
or be dockedto the top sideor left side ofthe desktop.
To make the toolbar float click and hole down the left mouse button onthe edge of the toolbar. Then drag the mouse to where you want thetoolbar and release the button. The number of rows in the floating tool-bar can be adjusted by changing the size of the toolbar with the mouse.
The toolbars can also be collapsed and expanded by clicking onthe 3-letter toolbar name at the beginning of each toolbar.
Each toolbar contains several speed buttons that can be used to performthe same tasks as the menu bar at the top of the desktop.
Project Toolbar
The Project Toolbar is used tocreate, open, and close projects.
Getting Started

27WinSieve User’s Guide
Each of the speed buttons on the toolbar is explained below and indetail in Chapter 3.
The New button is used to create a new project.
The Open button is used to open an existing project.
The Close button is used to close an open project (this button willbe dimmed if no project is currently opened).
The Print button is used to print the sieve analysis or template(this button will be dimmed if no project is currently opened).
The Help button is used to display help on using the program.
The Exit button is used to exit the program.
Sieve Analysis Toolbar
The Sieve Analysis Toolbar is used to edit sieve analyses.
Each of the speed buttons on the toolbar is explained below and indetail in Chapter 4.
The New button is used to create a new sieve analysis.
The Open button is used to open an existing sieve analysis.
Toolbars

28 WinSieve User’s Guide
The speed buttons below will be dimmed if no sieve analysis is cur-rently opened.
The Close button is used to close a sieve analysis.
The Save button is used to save changes to the sieve analysis.
The SaveAs button is used to save the sieve analysis under a dif-ferent name.
The Print button is used to print the sieve analysis.
The Undo button is used to undo changes to the sieve analysis.
The Zoom-in button is used to zoom in on the graph of the sieveanalysis. To zoom-in on the graph click this button and then clickon the part of the graph to be zoomed in.
The Zoom-out button is used to zoom out on the graph of thesieve analysis. To zoom-out on the graph click this button andthen click on the part of the graph to be zoomed-out.
The Full-Screen button is used to reset the zoom factor to fullscreen.
The Change Template button is used to change the template thatis used to format the sieve analysis.
Template Toolbar
The Template Toolbar is displayed below and is used to edit templates.
Getting Started

29WinSieve User’s Guide
Each of the speed buttons on the toolbar is explained below and indetail in Chapter 5.
The New button is used to create a new template.
The Open button is used to open an existing template.
The speed buttons below will be dimmed if no template is currentlyopened.
The Close button is used to close a template.
The Save button is used to save changes to the template.
The SaveAs button is used to save the template under a differentname.
The Print button is used to print the template.
The Undo button is used to undo changes to the template.
The Zoom-in button is used to zoom in on the graph of the sieveanalysis. To zoom-in on the graph click this button and thenclick on the part of the graph to be zoomed in.
The Zoom-out button is used to zoom out on the graph of thesieve analysis. To zoom-out on the graph click this button andthen click on the part of the graph to be zoomed-out.
The Full-Screen button is used to reset the zoom factor to fullscreen.
Toolbars
30 WinSieve User’s Guide
Desktop
The desktop is used to display numerous child windows. These childwindows can contain sieve analysis and templates. The data is dis-played graphically and you can add new data or edit existing data byclicking on the data in the window.
Each child window has the standard Windows icons for minimizing,maximizing, and closing the window. When a child window is mini-mized an icon for the window will be displayed at the bottom of thedesktop. The display of the child windows can also be adjusted usingthe Window command on the menu bar.
Getting Started

2.Tutorial

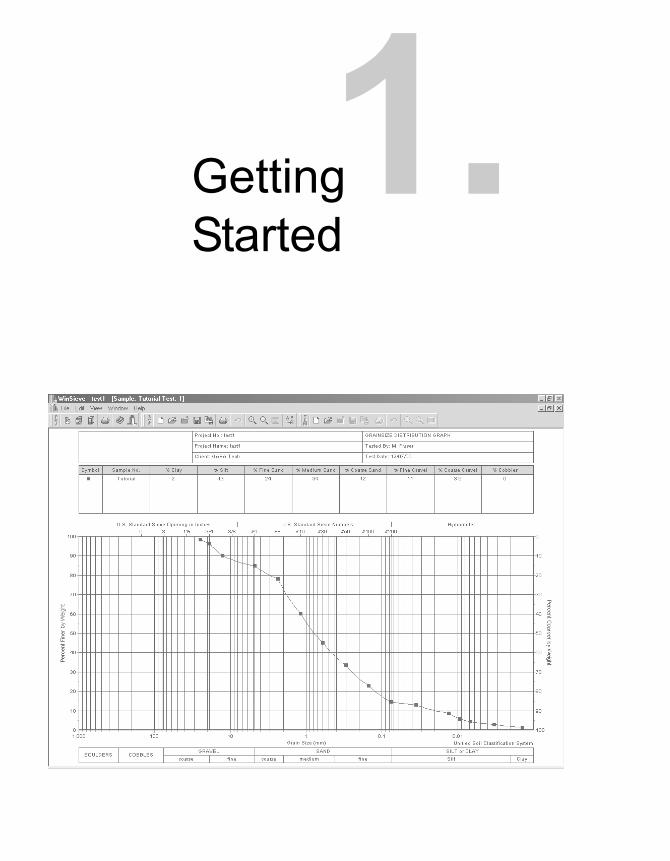
2.TutorialGrain size charts are used to display the results of sieveand hydrometer tests. They are used to present the distri-bution of grain sizes in a soil or aggregate sample. Thedistribution of grain sizes larger than 75 mm (retained onthe No. 200 sieve) are determined using a sieve test, andthe distribution of grain sizes smaller than 75 mm aredetermined using a hydrometer test. The standard ASTMtest for determining the grain size of a soil or aggregatesample is D 422-63.
The grain size distribution as determined by sieve andhydrometer tests is normally presented as a curve on asemi-logarithmic plot. The ordinate of the graph is thepercentage by weight of grains passing or retained by thesize given by the abscissa. Grain size is presented on alogarithmic scale so that soils with the same degree ofuniformity have the same distribution curve shaperegardless of their positions on the graph.
In general, the flatter the distribution curve the greaterthe range in grain sizes and the steeper the curve thesmaller the range in grain sizes. The shape of the distrib-ution curve is often used to characterize the soil sample.A well-graded soil will be coarse grained and have noexcess of grains in any size range and will not lack anyintermediate sizes. A poorly-graded soil will either have ahigh proportion of grains within narrow limits (a uni-form-graded soil) or have both large and small grainsizes with little intermediary sizes (a gap-graded soil).

33WinFence User’s Guide
The distribution curve can be used to determine the grain size that cor-responds to any specified value of the percentage passing (smaller). Forexample, the grain size such that 10% of the grains are smaller than thatsize is referred to as D10. The D10 size of the soil is often referred to asthe effective size.
Grain size distribution curves can be described using the coefficient ofuniformity (Cu) and the coefficient of curvature (Cc), as defined below:
Cu = D60 / D10 Cc = D230 / D60D10
In WinSieve the results of the grain size tests are stored in a databasecomposed of a set of tables that are stored in the project directory. Afterthe test results are entered into the database they can be retrieved anddisplayed on grain size curves. Up to 5 sets of test results can be dis-played on one grain size graph.
In addition to grain size test results, specifications can also be displayedon the charts. These specifications are used to determine if the soil oraggregate sample meets designated requirements. These requirementswill depend upon the use of the soil or aggregate. Typically specifica-tions consist of a set of maximum and minimum percentages that thegrain size of the sample must meet. If the sample's grain sizes are inbetween the maximum and minimum specifications, then the sample isreferred to as being within specification. And if some of the sample'sgrain sizes are outside of the maximum and minimum specifications,then the sample is referred to as being out of specification.
Each grain size distribution chart contains a legend and a header thatcan be either at the bottom or top of the graph. The format of the leg-end, header, and graph can be fully customized and saved as a template.After the template has been saved it can be re-used to present testresults from other samples and projects.
Tutorial

34 WinFence User’s Guide
The steps involved in creating and printing a grain size distributionchart for a new project are:
1. Create a new project 2. Create a new sieve analysis3. Enter new test results4. Plot the test results5. Print the graph
Each of these steps is discussed in detail below. Detailed instructionson entering and editing grain size data and specifications are providedin Chapter 4, and detailed instructions on customizing templates areprovided in Chapter 5.
Starting a New Project
Since grain size test results are associated with specific samples of pro-jects, prior to entering any test results a project must be either createdor an existing project opened. To create a new project use either theNew Project menu item in the Files menu or the New button on theProject toolbar. A project information form will be displayed, as shownbelow. Enter the project information shown and then press the OK but-ton.
Tip
It is recommended that each pro-ject reside in a separate directory(usually the same as the projectID). This provides an efficientmethod to organizing your pro-jects on a network or local com-puter.
Tutorial

35WinFence User’s Guide
You will not be able to enter the Project Name and Directory, until afterthe Project ID has been entered. The project directory can be as shownabove or any other directory could be used. It is not necessary to enter alocation and reference grid.
Creating a New Sieve Analysis
After the project has been created a sieve analysis can be entered. Toenter a new sieve analysis use either the New Sieve Analysis menu itemin the Files menu or the New button on the Sieve Analysis toolbar. TheSelect Template form will be displayed. This form lets you select thetemplate to be used to format the sieve analysis. Select the "Unified"template and press the Ok button.
After the template has been selected, the New Sieve Analysis form willbe displayed on the next page. This form displays all of the currentsieve tests in the project and lets you enter the IDs for this test.
Tip
To make it easier to enter thesieve analysis data, the SieveAnalysis toolbar should beturned on if it is not currentlydisplayed. If the Show SieveAnalysis Toolbar option in theView menu is not checked,click on the option to displaythe toolbar. If the Sieve Analy-sis toolbar is displayed in col-lapsed mode, then click on the"SVE" button to expand thetoolbar.
Creating a New Sieve Analysis

36 WinFence User’s Guide
The first thing that must be entered is the Borehole ID, Sample ID, andTest ID of the sieve analysis. These IDs are used to uniquely identifythe sieve analysis in the project database. The combination of the threeIDs must be unique. However, more than one sample can be entered fora borehole and more than one test can be entered for a sample. If thesample did not come from a borehole the Borehole ID can be left blank.
For this tutorial enter the information shown on the form below andthen press the Ok button.
After the Ok button is pressed a blank sieve analysis form will be dis-played.
Tutorial

37WinFence User’s Guide
Entering New Test Data
Sample Information
The sample information for the sieve analysis can be entered by click-ing on the header at the top of the screen or be selecting the SampleInfo menu item from the Edit menu. Enter the information shown in theSample Information form below and then press the Ok button.
Grain Size Data
To enter the grain size data either select the Test Data menu item on theEdit menu or click on the Graph part of the screen. The Data Entryform on the next page will be displayed. This form will have either twoor three tabs, depending upon whether the sample has been split. Thetabs are for the Sieve Data, Washed Sieve Data, and Hydrometer Data.
Tip
These menu items can also beselected from the Sieve Analysispopup menu. This menu can beobtained by clicking the rightmouse button.
Entering New Test Data

38 WinFence User’s Guide
Sieve Data
The information on the Sieve Data tab consists of the test date, name ofthe person testing the sample, whether the sample was split for wash-ing, sample and pan weights, and the weights retained on the sieves.For this tutorial enter the test data shown above.
Washed Sieve Data
If the sample has been split and the Split Sample checkbox on the SieveData tab has been checked, the Washed Sieve tab will be displayed.This tab is used to enter the sample and pan weights for the washedsieve and the weights retained on the sieves.
For this tutorial enter the test data shown on the next page. The Cumu-lative Percentage Passing column in the Washed Sieve tab will be blankuntil the hydrometer data has been entered.
Tip
You only need to enter theweight retained for a sieve. Thecumulative weight will be auto-matically calculated by the pro-gram.
Tutorial

39WinFence User’s Guide
Hydrometer Data
The Hydrometer Data tab is used to enter the hydrometer readings andcalculate the hydroscopic moisture content. For this tutorial enter thehydrometer data shown below. After the hydrometer data has beenentered the cumulative percent passing on the Washed Sieve tab will befilled in automatically by the program.
Sieve Data

40 WinFence User’s Guide
Plotting the Test Data
Normally, the test data will be automatically plotted on the sieve analy-sis graph when the Ok button on the Sieve Data form is pressed. If thedata is not displayed select the Plot Results menu item and from theEdit menu. The Plot Sieve Analysis Results form below will be dis-played. To plot the current results check the Plot Current Results box.This form can also be used to overlay results from other sieve analyses.
Displaying the Test Data
After the data has been entered it can be displayed and printed in textform by selecting the Data Sheet menu item from the Edit menu. TheSieve Data Sheet form shown below will be displayed. The text on thisform can be edited and printed using the toolbar at the top of the form.
Tip
The test data sheet can be usedto provide a printed copy of theinput data for the sieve analysis.In addition, a blank test datasheet could be used to gather testdata.
Tutorial

41WinFence User’s Guide
Printing the Sieve Analysis
To print the sieve analysis, either select the Print menu item from theFile menu or click the Print button on the Sieve Analysis toolbar. Theprinted version of the sieve analysis should look similar to that shownbelow.
Saving the Sieve Analysis
To save the sieve analysis either select the Save Sieve Analysis menuitem from the File menu or click on the Save button on the SieveAnalysis toolbar.
Printing the Sieve Analysis
42 WinFence User’s Guide
Tutorial

3.Projects

3.ProjectsAs discussed in the introduction, the WinSieve programis based upon the project concept for data storage. Usingthis method, a separate Microsoft Access 97 database isused to store each project for each application. Each pro-ject is stored in a separate directory, which can be on thesame computer or spread across a network. The numberof databases for each project will depend upon the appli-cations being used for that project. If for example, theWinLoG and WinSieve programs are being used with theproject, there will be two project databases.
The names of the project databases are the project namecombined with the application name. For example, if theproject name is "980205" then the project database nameof the WinSieve data would be "980205winsieve.mdb".Typically, this project would be stored in the subdirectory"\980205".
This chapter describes how to:
1. Create a new project.2. Open an existing project.3. Open the last project.4. Close a project. 5. Delete a project.6. Import a project.7. Import Data8. Export Data9. Edit Sieve Sizes

45WinFence User’s Guide
10. Edit Hydrometer Times11. Enter Specifications12. Print a project13. Set program preferences.
These tasks can be performed using menu commands on the File menuor buttons on the Project toolbar, shown below.
Creating a New Project
To create a new project either select the New Project menu item of theProjects sub menu, or click the New Project button on the Project Tool-bar. In addition, at the start of the program the Create a New Projectbutton can be selected on the Startup Form. After one of these tasks isperformed, the New Project form will be displayed.
Creating a New Project

46 WinFence User’s Guide
The following information can be entered for the project:
Project ID: A unique project number (up to 100 characters).
Project Name: The name of the project (up to 255 characters).
Directory: The directory to store the project database tables (up to 255characters). This directory can be on a local computer or a networkserver. Each project should have it's own directory. This is the directorywhere the project databases will be stored. If the directory entered doesnot exist, the program will create it. Typically, this directory is n a m e dafter the Project Id or Name. The Select Directory button to the right ofthe directory name can be used to select an existing directory.
Location: The location of the project (up to 255 characters). This fieldis not currently used in WinLoG and is primarily for other applications.
Reference Grid: The reference grid for the X and Y co-ordinate system(up to 255 characters). This field is not currently used in WinSieve andis primarily for other applications.
Tip
It is recommended that each pro-ject reside in a separate directory(usually the same as the projectID). This provides an efficientmethod to organizing your pro-jects on a network or local com-puter.
Projects

47WinFence User’s Guide
Opening an Existing Project
To work with an existing project you can open it by selecting the OpenProject menu item of the Projects submenu or clicking the Open buttonon the Project Toolbar. In addition, at the start of the program the Openan Existing Project button can be selected on the Startup Form. A list ofavailable projects will be displayed in the Open Project Form as shownbelow. The desired project can be selected by clicking on it in the listand then pressing the OK button.
The directory that a project is stored in can be changed by clicking onthe Edit Directory button. This will display a Select Directory form thatcan be used to select the new directory for the project. Changing thedirectory will not move any of the project files. The purpose of thisoption is to allow for the movement of projects on a network.
The arrow buttons at the bottom of the list can be used to move theselection to the start of the list, the previous record, the next record, orthe end of the list.
Tip
The list of projects will includeprojects created in other GAEAapplications; such as, WinLoGand WinFence. These projectsare listed to allow for theexchange of data between pro-jects.
Tip
If a project was previously cre-ated in another application likeWinLoG or WinFence, there isno need to create it in WinSieve.It can be opened as an existingproject instead.
Opening an Existing Project

48 WinFence User’s Guide
Opening the Last Project
At the start of the program, the last opened project can be selected byselecting the Open Last Project button on the Startup Form. The pro-gram automatically stores the last project used.
Closing the Project
The current project can be closed so that no more changes can be madeby selecting the Close Project menu item of the Projects submenu or·clicking the Close button on the Project Toolbar.
Deleting a Project
An existing project can be deleting by selecting the Delete Projectmenu item from the Projects submenu. When this is selected, a list ofexisting projects will be displayed as shown below. Select the project tobe deleted, and then press Ok. Note that once a project is deleted thedata can not be recovered.
Tip
If a project contains data fromother applications such as Win-LoG or WinFence, you will beasked whether to delete this dataas well. If the other applicationdata is not deleted, the projectwill still appear in the projectlist, but it will not have any Win-Sieve data.
Projects

49WinFence User’s Guide
The arrow buttons at the bottom of the list can be used to move theselection to the start of the list, the previous record, the next record, orthe end of the list.
Importing a Project
Existing projects can be imported by selecting the Import Project menuitem of the Projects submenu. When selected the Import Project formthe below will be displayed.
This form can be used to specify the following information:
Project ID: A unique project number (up to 100 characters).
Project Name: The name of the project (up to 255 characters).
Directory: The directory to be used to store the project database tables(up to 255 characters). This directory can be on a local computer or anetwork server. The select directory button to the right of the directoryname can be used to select an existing directory.
This option should be used to import projects that have been previouslycreated but are not included in the Master Project database.
Tip
When importing a project it isvery important that the correctProject ID be specified. The Pro-ject ID is used to determine thename of the database file to beimported. For example, if theProject ID is 98020 then thename of the database file toimport would be 98020win-sieve.mdb.
Importing a Project
50 WinFence User’s Guide
Importing Data
Exchange files are used to transfer sieve analysis data and templatesbetween projects or to other companies. The data in these files is storedas ASCII text. Sieve data exchange files have the extension ".sve" andtemplate exchange files have the extension “.stm”. After the data hasbeen exported from another project, it can then be imported into thecurrent project.
To import an exchange file select either the Template or Sieve Analysismenu item from the Import submenu. The Import form below will bedisplayed. Select the file to import and press the Open button. If no pro-ject is currently open the Sieve Analysis menu item is disabled.
Exporting Data
Sieve analysis data and legends can be exported for use in other pro-grams using the Export submenu. Sieve analysis data and templates canbe exported to exchange files, the clipboard (in bitmap format), abitmap file, or an enhanced metafile.
Tip
When importing data it is possi-ble to over-write existing data inthe database if it has the samename. To avoid this the SaveAsbutton can be used to save theimported data as a new name.
Projects

51WinFence User’s Guide
Exchange Files
Exchange files are used to transfer sieve analysis data and templatesbetween projects or to other companies. The data in these files is storedas ASCII text. Sieve data exchange files have the extension ".sve" andtemplate exchange files have the extension “.stm”. After the data hasbeen exported from another project, it can then be imported into thecurrent project.
To export the currently displayed sieve analysis or template select theExchange File menu item from the Export submenu. The Export formwill be displayed. Specify the file name for the exported data and thenpress the Save button.
Clipboard
Any currently displayed sieve analysis or template can be exported tothe Windows clipboard. The format used to store the data in the clip-board is similar to a bitmap file. To export the data to the clipboardselect the Clipboard menu item from the Export submenu.
Tip
To send a sieve analysis or tem-plate to Technical Support itshould first be exported to anexchange file. This exchange filecan then be emailed to TechnicalSupport.
Exporting Data
52 WinFence User’s Guide
Bitmap File
Exporting to a bitmap file is the same as exporting to the clipboard,except that the bitmap is stored in a file instead of the clipboard. Thefile format is a Windows bitmap .BMP file. Any currently displayedsieve analysis or template can be exported to a bitmap file.
To export to a bitmap file select the Bitmap File menu item from theExport submenu. Specify the file name on the SaveAs form and thenpress the Save button.
Metafile
Exporting to an enhanced metafile is the same as exporting to a bitmapfile. Any currently displayed sieve analysis or template can beexported.
To export to a metafile select the Metafile menu item from the Exportsubmenu. Specify the file name on the SaveAs form and then press theSave button.
Projects

53WinFence User’s Guide
Editing Sieve Sizes
The sieve labels and sizes dis-played in the Data Entry andSpecification forms are storedin the WinSieve master data-base. These sieve sizes areautomatically added when anew sieve analysis or specifica-tion is created.
The sieve numbers and sizescan be edited using the SieveSizes menu item of the Filemenu. In this form the SieveNo. and Sieve Size (mm) canbe entered or edited. The navi-gator bar at the bottom of theform can be used to movebetween sieve sizes, add a newsieve size, or delete a sievesize.
Editing HydrometerTimesThe hydrometer times displayed in theData Entry form are also stored in theWinSieve master database. Thesetimes are automatically added when anew sieve analysis is created. To editthe hydrometer times select theHydrometer Times menu item fromthe File menu.
The navigator bar at the bottom of the form can be used to movebetween times, add a new time, or delete a time.
Tip
Changing the sieve sizes orhydrometer times on these twoforms will only affect new sieveanalyses and specifications. Anyexisting sieve analyses or speci-fications will not be affected bythe changes.
Tip
A set of sieves that gives uni-form spacing on the graph con-sists of the following:
3 in No. 16
11/2 in No. 30
3/4 in No. 50
3/8 in No. 100
No. 4 No. 200
No. 8
Editing Sieve Sizes

54 WinFence User’s Guide
Entering Specifications
In addition to plotting the grain size analysis test results, soil and aggre-gate specifications can also be shown on the chart. These specificationsare typically provided by the department of transportation, design engi-neer, ASTM, etc.
The program comes with several standard specifications. These specifi-cations are stored in the WinSieve master database. All projects haveaccess to this central database and share the specifications. Additionalspecifications can be entered and edited by selecting the Specificationssubmenu of the File menu. The Specifications form below will then bedisplayed.
The form will initially display the first specification in the database.Other specifications can be displayed using the navigation buttons atthe bottom of the form. To add a specification click on the Add buttonto display a blank form.
Projects

55WinFence User’s Guide
The following information can be entered for the specifications:
Spec. ID: A unique number or name (up to 100 characters) to use forthe specification.
Spec. Name: The name of the specification (up to 255 characters).
Agency: The agency that issued the specification (e.g. ASTM, APWA,FHWA).
Description: A description of the specification (text field no limit onthe length).
Sieve No.: The standard number of the sieve as specified in the SieveEntry menu. Typically, these are the Standard Sieve Openings in Inchesand the Standard Sieve Numbers. These numbers are automaticallyentered when a new specification is created. The sieve numbers that areentered are those specified in the Sieve Sizes form.
Sieve Size: The size of the sieve in millimetres. These numbers areautomatically entered, and are specified in the Sieve Sizes form.
Lower Limit: The minimum percentage passing required by the speci-fication that the sample must meet.
Upper Limit: The maximum percentage passing required by the speci-fication that the sample must meet.
The display and formatting of the specification is controlled by the tem-plate, and can be adjusted in the Graph Options form (see Chapter 5).
Printing a Project
The currently displayed sieve analysis or template can be printed byselecting the Print menu item form the File menu or by clicking on thePrint button on the Project toolbar.
Tip
If there is no lower and upperlimit for a sieve size the limitscan be left as zero. Limits speci-fied as zero will not be displayedon the graph.
Specifications

56 WinFence User’s Guide
Setting Program Preferences
Using the Preferences menu item of the File menu, preferences for filedirectories and display characteristics can be set for the WinSieve pro-gram. When this menu item is selected the Preferences form below isdisplayed. This form has two tabs used for setting Page parameters, andDirectories.
The following parameters can be set on the Page tab shown above:
Background Color: Press the Background Color button to change thecolor of the background when the program is first started.
Skip Introduction Screen: When this box is checked the Startup Intro-duction screen will not be displayed.
Projects

57WinFence User’s Guide
The Directories tab shown on the previous page is used to specify thefollowing parameters:
Main Database: This is the directory where the Master Project Data-base is located. It should only be changed if the database has beenmoved. The directory can be changed by entering the new directory orpressing the Select Directory button to the right of the input line.
Default Directory: This is the directory where temporary files arestored and is the initial directory used when importing and exportingdata. These files are created by the undo process. If you are using theprogram on a network, this directory should be on the local computer.
Setting Program Preferences
58 WinFence User’s Guide
Projects

4.Grain SizeData
4.Grain SizeDataThe grain size distribution as determined by sieve andhydrometer tests is normally presented as a curve on asemi-logarithmic plot. The ordinate of the graph is thepercentage by weight of grains passing or retained by thesize given by the abscissa. Grain size is presented on alogarithmic scale so that soils with the same degree ofuniformity have the same distribution curve shaperegardless of their positions on the graph.
In WinSieve the results of the grain size tests are storedin a database composed of a set of tables that are storedin the project directory. After the test results are enteredinto the database they can be retrieved and displayed ongrain size curves.
Each grain size distribution chart contains a legend and aheader that can be either at the bottom or top of thegraph. The format of the legend, header, and graph canbe fully customized and saved as a template (see Chapter5).
This chapter describes how to:
1. Create a new sieve analysis2. Enter and edit grain size data3. Plot and print a sieve analysis4. Save a sieve analysis5. Display the test data

61WinSieve User’s Guide
These tasks can be performed using menu com-mands on the Edit menu or buttons on the SieveAnalysis toolbar.
Creating a New Sieve Analysis
After a project has been created a sieve analysis can be entered. Toenter a new sieve analysis use either the New Sieve Analysis menu itemin the Files menu or the New button on the Sieve Analysis toolbar. ASelect Template form will be displayed, that can be used to select thetemplate to format the sieve analysis.
TipTo make it easier to enter thesieve analysis data, the SieveAnalysis toolbar should beturned on if it is not currentlydisplayed. If the Show SieveAnalysis Toolbar option in theView menu is not checked,click on the option to displaythe toolbar. If the Sieve Analy-sis toolbar is displayed in col-lapsed mode, then click on the"SVE" button to expand thetoolbar.
Creating a New Sieve Analysis

62 WinSieve User’s Guide
After the template has been selected, the New Sieve Analysis form willbe displayed. This form displays all of the current sieve tests in theproject and lets you enter the IDs for this test.
The following information must be entered:
Borehole ID: The name of the borehole (up to 100characters), if thesample wasn't taken from a borehole the Borehole ID can be left blank.
Sample ID: The sample number (up to 100 characters).
Test ID: The test number (up to 100 characters).
These IDs are used to uniquely identify the sieve analysis in the projectdatabase. The combination of the three IDs must be unique. However,more than one sample can be entered for a borehole and more than onetest can be entered for a sample. After the Ok button is pressed a blanksieve analysis form will be displayed.
Grain Size Data

63WinSieve User’s Guide
Entering and Editing Grain Size Data
To enter or edit data, a sieve analysis must first be created as describedabove or an existing sieve analysis opened. Sieve analyses in the cur-rent project can be opened for editing by either selecting the OpenSieve Analysis menu item of the File menu or clicking the Open buttonon the Sieve Analysis toolbar. The Open Sieve Analysis form belowwill be displayed. Select a sieve analysis and then press the Ok button.
After the sieve analysis has been created or opened the data can beentered and edited as described in the sections below.
Tip
The New Sieve Analysis andOpen Sieve Analysis menu itemscan also be selected from theProject popup menu. This menucan be displayed by clicking theright mouse button when nosieve analysis or template is cur-rently open.
Entering and Editing Grain Size Data

64 WinSieve User’s Guide
Sample Information
The sample information for the sieve analysis can be entered by click-ing on the header at the top of the screen or be selecting the SampleInfo menu item from the Edit menu. The Sample Information formshown below will be displayed
The following information can be entered for the sample information:
Borehole ID: The borehole number (up to 100 characters). This fieldis disabled and can not be edited unless the Edit button is pressed. If thesample wasn't taken from a borehole the Borehole ID can be left blank.
Sample ID: The sample number (up to 100 characters). This field isalso disabled and can not be edited unless the Edit button is pressed.
Test ID: The test number (up to 100 characters). This field is also dis-abled and can not be edited unless the Edit button is pressed.
Tip
The sample information is usedfor display purposes only. Ifnone of this information is toappear in the header, it does notneed to be entered.
Grain Size Data

65WinSieve User’s Guide
Edit Button: This button can be used to change the Borehole ID, Sam-ple ID, and Test ID. These IDs are used to uniquely identify the sieveanalysis in the project database. The combination of the three IDs mustbe unique. However, more than one sample can be entered for a bore-hole and more than one test can be entered for a sample.
Description: A description of the sample (unlimited number of charac-ters).
Client: The client for the project or sieve analysis (up to 255 charac-ters).
Location: The location where the sample was collected (up to 255characters).
Source: The source where the sample was collected or the method ofcollection (up to 255 characters).
Northing: The north-south co-ordinate for the sample location, relativeto the reference grid defined for the project.
Easting: The east-west co-ordinate for the sample location, relative tothe reference grid defined for the project.
Depth: The depth where the sample was collected.
Length: The length or size of the sample.
Collected by: The person who collected the sample.
User Defined Field: Any user defined text data (up to 255 characters).
Sieve Data
To enter the grain size data either select the Test Data menu item on theEdit menu or click on the Graph part of the screen. The Data Entryform on the next page will be displayed. This form will have either twoor three tabs, depending upon whether the sample has been split. Thetabs are for the Sieve Data, Washed Sieve Data, and Hydrometer Data.
Sample Information

66 WinSieve User’s Guide
The following information can be entered or calculated for the sievedata items in italics are read only):
Test Date: The date the test was conducted.When the down arrow beside the input lineis clicked, a calendar will be displayed thatcan be used to select a date.
Tested By: The person that conducted the test (up to 255 characters).
User Defined Field: Any user defined text data (up to 255 characters).
Sample Split for Washing: Check this box if the sample was split todo a hydrometer and/or a washed sieve analysis as per ASTM D-422.
Sieve Used for Split: If the Sample Split for Washing box is checked adrop-down list box will be displayed with the available sieves that canbe used. According to the ASTM D-422 standard the #10 sieve is nor-mally used.
Tip
The Test Date, Tested By, andUser Defined information is fordisplay purposes only. If thisdata is not appearing in theheader, it does not need to beentered.
Tip
According to ASTM TestMethod D 422, the weight of thesample portion retained on theNo. 10 sieve should depend onthe maximum grain size. Theschedule below is provided inthe test method.
Largest Minimum
Grain Size Weight (g)
3/8” 500
3/4” 1000
1” 2000
11/2” 3000
2 4000
3 5000

Name of Section
67WinSieve User’s Guide
Wet Sample and Pan Weight: The weight of the wet sample and thepan before splitting in grams. This weight is also used to calculate thehydroscopic moisture in the Hydrometer tab.
Dry Sample and Pan Weight: The weight of the oven dried sampleand the pan before splitting in grams. This weight is also used to cal-culate the hydroscopic moisture in the Hydrometer tab.
Weight of the Pan: The weight of the pan (grams).
Dry Sample Weight: The calculated weight of the dry sample obtainedby subtracting the pan weight from the dry sample and pan weight.This weight is used to calculate the Percentage Passing.
Sieve No.: The standard number of the sieve as specified in the SieveSizes form. Typically, these are Standard Sieve Openings in Inches andthe Standard Sieve Numbers. These numbers are automatically enteredwhen the sieve analysis is created.
Sieve Size: The size of the sieve in millimetres. These numbers areautomatically entered when the sieve analysis is created
Weight Retained: The individual weight retained by the sieve ingrams. Either the weight retained can be entered or the cumulativeweight retained can be entered, it is not necessary to enter both. Onlythe weights retained for the sieves used need to be entered, sieves thatwere not used can be left blank.
Cumulative Weight Retained: The cumulative weight retained by thissieve and the preceding sieves. The cumulative weight retained can beentered or the individual weight retained can be entered, it is not neces-sary to enter both. Only the cumulative weights retained for the sievesused need to be entered, sieves that were not used can be left blank.
Cumulative % Passing: This is the cumulative percentage of mass thatpasses this sieve, it is automatically calculated and can not be changedin the data entry form. This percentage is calculated using the Cumula-tive Weight Retained and Dry Sample Weight.
Tip
Only the weight retained for asieve needs to be entered. Thecumulative weight will be auto-matically calculated by the pro-gram. Weights for sieves thatwere not used can be left blank.
Tip
Weights should be accurate towithin 0.1% of the sampleweight for weights retained onthe No. 10 sieve and above.

68 WinSieve User’s Guide
Washed Sieve Data
If the test sample was split (i.e. the Split Sample for Washing box waschecked on the Sieve Data tab) for a washed sieve and hydrometer, theWashed Sieve tab will be displayed on the Data Entry form.
The following information can be entered or calculated for the washedsieve (items in italics are read only):
Dry Sample and Pan Weight: The weight in grams of the dry sampleand pan. This is the sample that was transferred from the hydrometer asper the ASTM standard.
Weight of Pan: The weight of the pan in grams.
Dry Sample Weight: This is the calculated weight of the dry sample,calculated by subtracting the pan weight from the dry sample and panweight.
Weight after Sieving: This is the calculated weight of the sample fromthe sieve results. It is calculated from the adding all of the weightsretained and is the same as the last cumulative weight retained.
Tip
Weights should be accurate towithin 0.01 grams for weightspassing the No. 10 sieve.
Tip
According to ASTM TestMethod D 422, the size of thesample passing the No. 10 sieveshould be approximately 115grams for sandy soils andapproximately 65 grams for siltand clay soils.
Grain Size Data

69WinSieve User’s Guide
% Accuracy: This is the calculated accuracy of the sieving and isobtained by taking the percentage difference between the Dry SampleWeight and the Weight after Sieving. It should be less than 5%.
Sieve No.: The standard number of the sieve as specified in the SieveSizes form. Typically, these are the Standard Sieve Openings in Inchesand the Standard Sieve Numbers. These numbers are automaticallyentered when the sieve analysis is created.
Sieve Size: The size of the sieve in millimetres. These numbers areautomatically entered.
Weight Retained: The individual weight retained by the sieve ingrams. The weight retained can be entered or the cumulative weightretained can be entered, it is not necessary to enter both. Only theweights retained for the sieves actually used need to be entered, sievesthat were not used can be left blank.
Cumulative Weight Retained: The cumulative weight retained by thissieve and the preceding sieves. The cumulative weight retained can beentered or the individual weight retained can be entered, it is not neces-sary to enter both. Only the cumulative weights retained for the sievesused need to be entered, sieves that were not used can be left blank.
Cumulative % Passing: This is the cumulative percentage of mass thatpasses this sieve. It is automatically calculated. This percentage is cal-culated using the Cumulative Weight Retained and Dry Sample Weight.The Cumulative Percentage Passing column in the Washed Sieve tabwill be blank until the hydrometer data has been entered.
Hydrometer Data
The Hydrometer Data tab shown on the next page is used to enter thehydrometer readings and calculate the hydroscopic moisture content.After the hydrometer data has been entered the cumulative percentpassing on the Washed Sieve tab will be filled in by the program.
Washed Sieve Data

70 WinSieve User’s Guide
Before entering the data for the hydrometer, the information for theHydroscopic Mositure Percentage should be entered. It is a number lessthan one, except when there is no moisture in the sample in which caseit is one. The ratio of the dry and wet sample weights is used to calcu-late the Moisture Percentage.
The following information is entered or calculated for the HydroscopicMoisture (items in italics are read only):
Wet Sample Weight: The weight of the wet or air dried sample, ingrams. This weight is automatically calculated from the weightsentered in the Sieve Data tab. However, the weight can also be enteredmanually.
Dry Sample Weight: The weight of the oven dried sample, in grams.This weight is automatically calculated from the weights entered in theSieve Data tab. However, the weight can also be entered manually.
Moisture Percentage: The percentage of hydroscopic moisture in thesample calculated from the Wet Sample Weight and Dry SampleWeight.
TipThis factor can be calculatedfrom the wet and dry sampleweights entered in the SieveData tab or by extracting a 10to 15 gram portion of the sam-ple that is to be used for thehydrometer test.
Tip
According to ASTM TestMethod D 422, if the soil ismostly composed of clay and siltthe sample weight should beapproximately 50 g. If the soil ismostly composed of sand thesample weight should beapproximately 100 g.
Grain Size Data

71WinSieve User’s Guide
The following information can be entered or calculated for the hydrom-eter (items in italics are read only):
Sample and Pan Weight: The weight, in grams, of the air dried sam-ple and pan used for the hydrometer.
Pan Weight: The weight of the pan in grams.
Sample Weight: This is the calculated weight of the wet or air driedsample. Calculated by subtracting the pan weight from the sample andpan weight.
Weight Retained on No. 10: The weight, in grams, of the air driedsample that was retained on the No. 10 sieve prior (or whatever sievewas used for splitting) to conducting the hydrometer test.
Corrected Weight: This is the dry sample weight that was used for thehydrometer test. Calculated by subtracting the weight of the sampleretained on the No. 10 sieve from the sample weight and then correct-ing for hydroscopic moisture.
Specific Gravity: The specific gravity of the soil particles can beselected from the drop-down list. It must be between 2.45 and 2.95.
Hydrometer Type: The type of hydrometer used for the test. It must beeither 151H or 152H.
Time: The time of the reading in minutes. These times are automati-cally entered when the sieve analysis is created. The times entered canbe edited using the Hydrometer Times form.
Corrected Reading: The hydrometer reading with the composite cor-rection applied. This correction is determined empirically. It correctsfor the use of a dispersing agent in the water, changes in temperature,and readings taken from the top of the meniscus instead of the bottom.
Temperature: The temperature at the time the reading was taken. Ifonly the first temperature is specified than all of the subsequent temper-atures are assumed to be the same. If no temperature is specified it isassumed to be 20°C.
Soil Diameter: The soil diameter of the particles in millimetres. It isautomatically calculated by the program, using the equations and tablesspecified in ASTM Standard D-422.
Tip
According to ASTM TestMethod D 422, the compositecorrection can be obtained bypreparing a 1000 mL samplecomposed of distilled water anddispersing agent in the same pro-portion that will be used inhydrometer tests. The liquidsample is placed in the sedimen-tation cylinder at the same tem-perature that will be used for thehydrometer test. After the tem-perature in the liquid sample andhydrometer becomes constant, ahydrometer reading is taken atthe top of the meniscus. Forhydrometer 151H the compositecorrection is the differencebetween this reading and one.For hydrometer 152H the com-posite correction is the differ-ence between this reading andzero.
Tip
Temperature readings should beaccurate to within 0.5 degree Cor 1 degree F.
Hydrometer Data
72 WinSieve User’s Guide
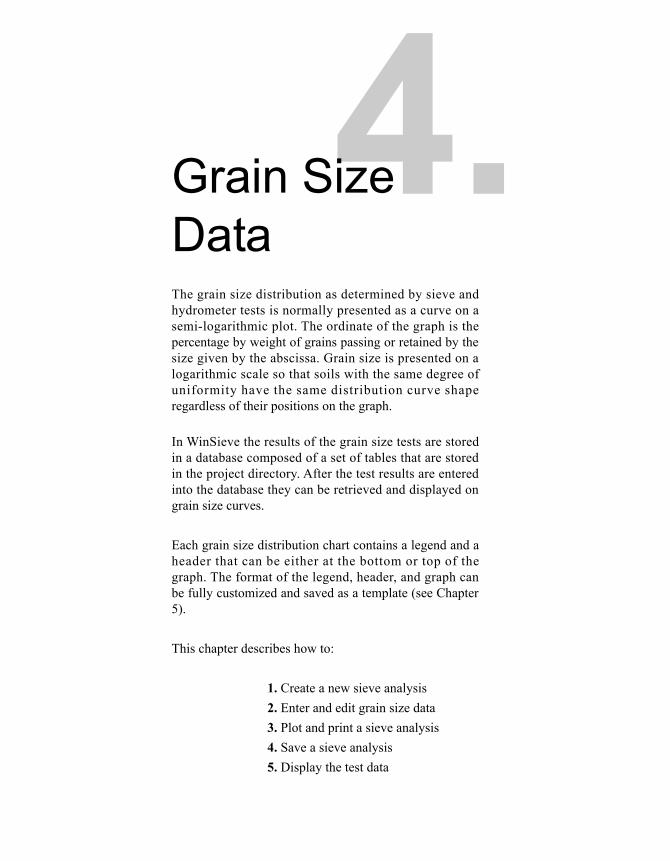
% Passing: The percentage of soil remaining in suspension at the timeof the reading. It is automatically calculated by the program using theequations and tables specified in ASTM Standard D-422.
Plotting the Sieve Analysis
The test data will be automatically plotted on the sieve analysis graphwhen the Ok button on the Sieve Data form is pressed. If the data is notdisplayed select the Plot Results menu item from the Edit menu. ThePlot Sieve Analysis Results form below will be displayed. To plot thecurrent results check the Plot Current Results box.
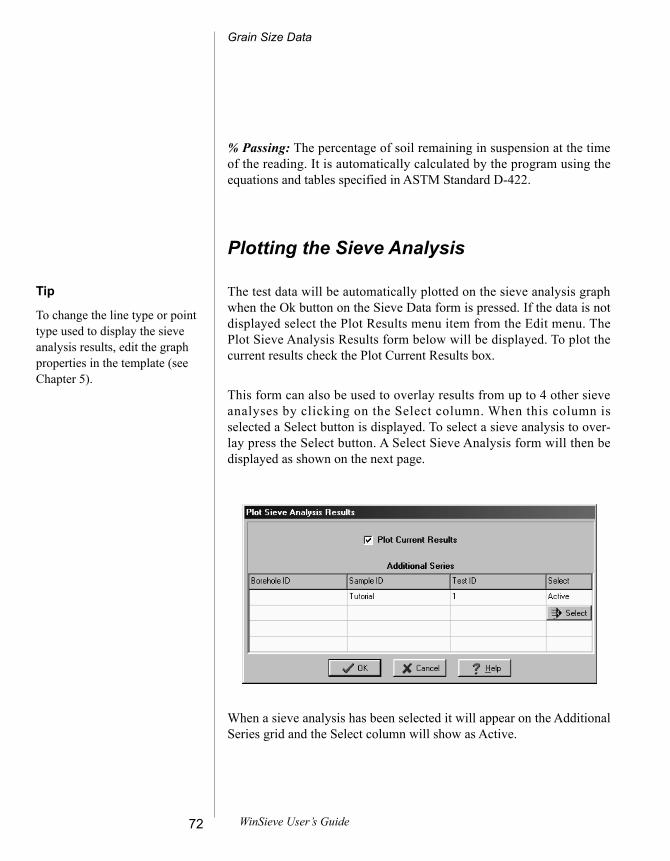
This form can also be used to overlay results from up to 4 other sieveanalyses by clicking on the Select column. When this column isselected a Select button is displayed. To select a sieve analysis to over-lay press the Select button. A Select Sieve Analysis form will then bedisplayed as shown on the next page.
When a sieve analysis has been selected it will appear on the AdditionalSeries grid and the Select column will show as Active.
Tip
To change the line type or pointtype used to display the sieveanalysis results, edit the graphproperties in the template (seeChapter 5).
Grain Size Data
73WinSieve User’s Guide
Printing the Sieve Analysis
To print the sieve analysis, either select the Print menu item from theFile menu or click the Print button on the Sieve Analysis toolbar.
Saving the Sieve Analysis
To save the sieve analysis either select the Save Sieve Analysis menuitem from the File menu or click on the Save button on the SieveAnalysis toolbar.
The sieve analysis can also be saved under a new name byselecting the SaveAs button on the Sieve Analysis toolbar.
Plotting the Sieve Analysis

74 WinSieve User’s Guide
Displaying the Test Data
After the data has been entered it can be displayed and printed in textform by selecting the Data Sheet command from the Edit menu. TheSieve Data Sheet form shown below will be displayed. The text on thisform can be edited, saved and printed using the toolbar at the top of theform.
At the top of the Sieve Data Sheet form is the Rich Text toolbar, thistoolbar can be used to modify the format of the text. Before selecting aspeed button, the text to be modified should be selected with the mouseor the cursor should be placed at the desired insertion point.
The speed buttons of the toolbar perform the following functions:
The Font Typeface box is used toselect the name of the font to use forthe selected text.
The Font Size box is used to set the size of the font for theselected text.
The Font Color box is used to select the color of the font forthe selected text.
Tip
The test data sheet can be usedto provide a printed copy of theinput data for the sieve analysis.In addition, a blank test datasheet could be used to gather testdata.
Grain Size Data

75WinSieve User’s Guide
The Paragraph Color box is used to select the backgroundcolor of the selected paragraph or table cell.
The Bold button is used to toggle the bold attribute of theselected text on and off.
The Italics button is used to toggle the italic attribute of theselected text on and off.
The Underline button is used to toggle the underline attribute ofthe selected text on and off.
The Superscript button is used to toggle the superscript attributeof the selected text on and off.
The Subscript button is used to toggle the subscript attribute ofthe selected text on and off.
The Left Justify button will left justify the selected text.
The Center Justify button will center justify the selected text.
The Full Justify button will perform full justification of theselected text.
The Right Justify button will right justify the selected text.
The Save button will save the data to either an ASCII or RichText file. The save to HTML format file option is not working inthis version of WinSieve.
The Close button will close this form.
The Print button will print the data to the default printer.
The Print Setup button will display a standard printer setup form.
The Select All button will select all of the text in the description.
The Cut button will remove the selected text and place it in theclipboard.
The Copy button will copy the selected text to the clipboard.
The Paste button will paste the text in the clipboard, at the currentposition of the cursor.
The Find button will find the specified text.
The Replace button will replace the specified text.
Displaying the Test Data

76 WinSieve User’s Guide
The Create Table button will create a new table with a specifiednumber or rows and columns.
The Select Row button will select a row in a table.
The Insert Row button will insert a row in a table.
The Delete Row button will delete a row in a table.
The Select Column button will select a column in a table.
The Bullets button will format the selected text with bullets.
The Numbers button will format the selected text with numbers.
Grain Size Data

5.Templates

5.Templates
Templates are used to control the layout and formattingof the sieve analyses. In general, all of the sieve analysesin a project would use one or two templates. In this way,a consistent format can be established within a projectand across projects. Once a template is created it is avail-able to all projects.
WinSieve comes with numerous easily customized tem-plates, which can be edited and saved as new templates.You can also create a new template by specifying thedesired layout. Each template consists of a header, leg-end, and graph. Templates can be customized to displaydifferent header titles, legend columns, graph format, andspecifications.
Templates are stored in the WinSieve master database.The format of the master database is Microsoft Access97. This database is stored in the Main Database Direc-tory. For a detailed discussion of the database structure,see Database Structure in the Introduction Chapter orAppendix B.
This chapter describes how to:
1. Create a new template2. Enter and edit a template3. Save a template4. Delete a template
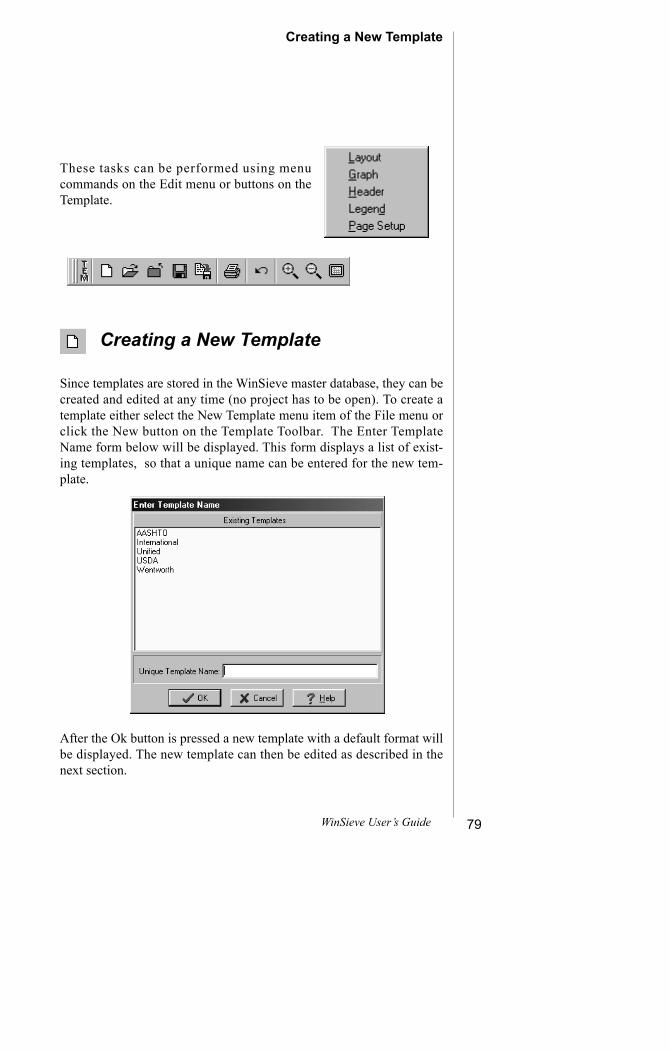
79WinSieve User’s Guide
These tasks can be performed using menucommands on the Edit menu or buttons on theTemplate.
Creating a New Template
Since templates are stored in the WinSieve master database, they can becreated and edited at any time (no project has to be open). To create atemplate either select the New Template menu item of the File menu orclick the New button on the Template Toolbar. The Enter TemplateName form below will be displayed. This form displays a list of exist-ing templates, so that a unique name can be entered for the new tem-plate.
After the Ok button is pressed a new template with a default format willbe displayed. The new template can then be edited as described in thenext section.
Creating a New Template

80 WinSieve User’s Guide
Opening and Editing a Template
To edit data in a template, the template must first be created asdescribed above or an existing template opened. Existing templates canbe opened for editing by selecting the Open Template menu item of theFile menu or clicking the Open button on the Template Toolbar. Thetemplate to be opened can then by selected from the Open Templateform.After the template has been opened and displayed, the template datacan be entered and edited as described in the sections below.
Tip
If no template or sieve analysisis currently displayed, the OpenTemplate menu item can also beselected from the Project popupmenu. This menu can be dis-played by clicking the rightmouse button.
Templates
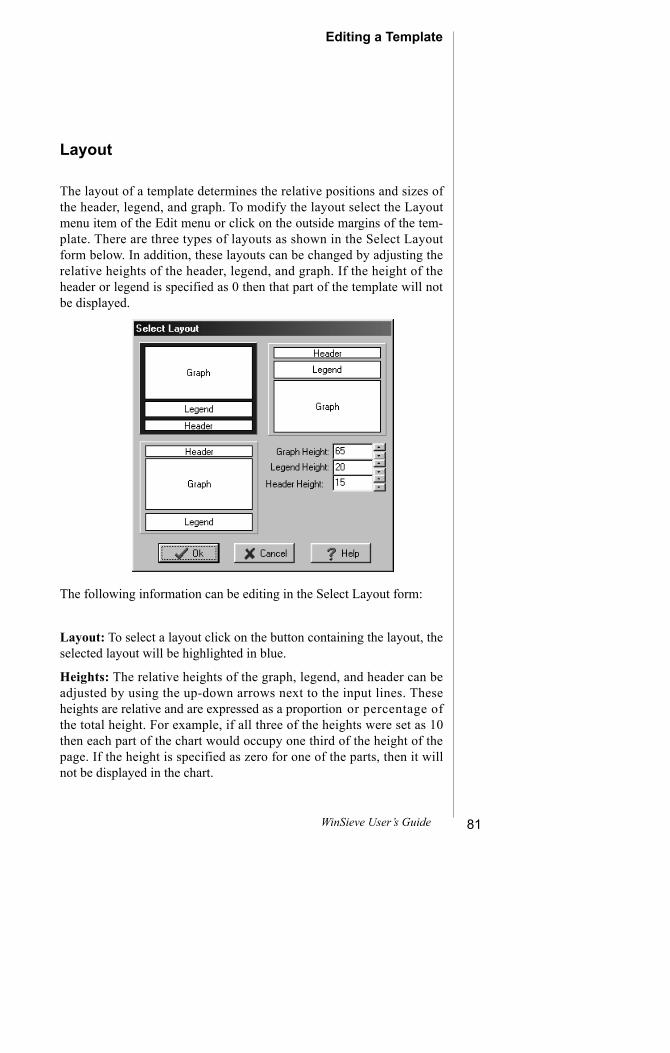
81WinSieve User’s Guide
Layout
The layout of a template determines the relative positions and sizes ofthe header, legend, and graph. To modify the layout select the Layoutmenu item of the Edit menu or click on the outside margins of the tem-plate. There are three types of layouts as shown in the Select Layoutform below. In addition, these layouts can be changed by adjusting therelative heights of the header, legend, and graph. If the height of theheader or legend is specified as 0 then that part of the template will notbe displayed.
The following information can be editing in the Select Layout form:
Layout: To select a layout click on the button containing the layout, theselected layout will be highlighted in blue.
Heights: The relative heights of the graph, legend, and header can beadjusted by using the up-down arrows next to the input lines. Theseheights are relative and are expressed as a proportion or percentage ofthe total height. For example, if all three of the heights were set as 10then each part of the chart would occupy one third of the height of thepage. If the height is specified as zero for one of the parts, then it willnot be displayed in the chart.
Editing a Template

82 WinSieve User’s Guide
Graph
The graph options of the template are used to determine the display ofclassification systems, axes, data series, and specifications. To edit thegraph options select the Graph menu item of the Edit menu or click onthe Graph part of the template. The Graph Options form below willthen be displayed. This form has tabs for the Classification, Axes, DataSeries, and Specifications.
The Classification tab shown above can be used to edit the followinginformation:
System: The soil classification (Unified, International, AASHTO,USDA, Modified Wentworth) to be used to determine the percentagesof gravel, sand, silt, and clay in the sample. The classification system isalso plotted beneath the graph. If None is selected then no classificationsystem will be used.
Font: The font of the text to be used for the classification system ischanged by clicking on the Font button. A Font selection form will bedisplayed and the font name, size, color, and style can be modified.
TipIf the Classification System youuse is not displayed in the list,contact GAEA. We may be ableto add it in a future release.
Templates

83WinSieve User’s Guide
Classification Line: This is thetype, width, and color of lines to beused to draw the Classification sys-tem below the graph. Clicking onthe Line button will display the LineProperties form that can be used toadjust the style, width, and color ofthe lines.
Graph Line: This is the type, width, and color of lines to be used todraw the Classification system within the graph.
The Axes tab shown above can be used to edit the following informa-tion:
Show Sieve Sizes/Numbers: Check to show the Standard Sieves andNumbers above the graph. If unchecked no sieve sizes or numbers willbe shown.
Sieve Size/Number Font: The font of the text to be used for the sievesizes and numbers can be changed by clicking on the button.
Graph
84 WinSieve User’s Guide
Grain Size Title: This is the horizontal title for the graph. This loga-rithmic axis is used to represent the grain size in millimetres.
Grain Size Min: This is the minimum value to use for the grain sizeaxis in millimeter. If the minimum is greater than the maximum thedirection of the axis will be reversed.
Grain Size Max: This is the maximum value to use for the grain sizeaxis in millimeter. If the minimum is greater than the maximum thedirection of the axis will be reversed.
Grain Size Font: The font of the text to be used for the grain size axiscan be changed by clicking on the button.
Grain Size Line: This is the type, width, and color of lines to be usedto draw the vertical grid lines of the grain size axis.
Percent Finer Title: This is the left vertical title for the graph. Thisaxis is used to represent the percentage of soil finer, and rangesbetween 0% at the bottom and 100% at the top.
Percent Coarser Title: This is the right vertical title for the graph. Thisaxis is used to represent the percentage of soil coarser, and rangesbetween 100% at the bottom and 0% at the top.
Percentage Min: This is the minimum percentage to use for the leftaxis and the maximum percentage to use for the right axis. If the mini-mum is greater than the maximum the direction of the axes will bereversed.
Percentage Max: This is the maximum percentage to use for the leftaxis and the minimum percentage to use for the right axis. If the mini-mum is greater than the maximum the direction of the axes will bereversed.
Percentage Font: The font of the text to be used for the percentageaxis can be changed by clicking on the button.
Percentage Line: This is the type, width, and color of lines to be usedto draw the horizontal grid lines of the percentage axes.
Templates
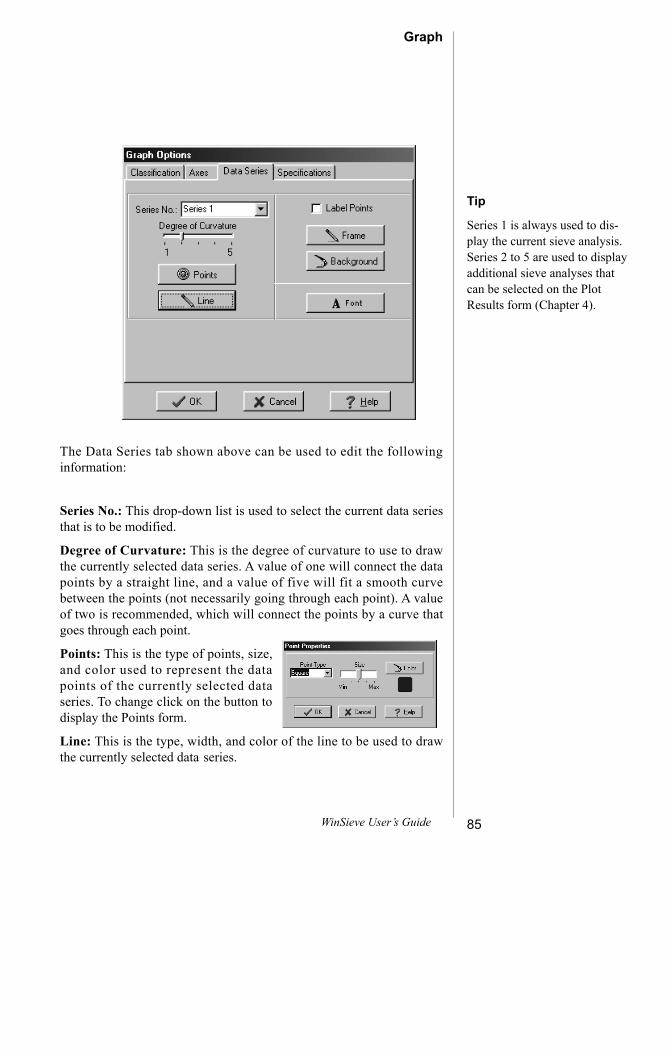
85WinSieve User’s Guide
The Data Series tab shown above can be used to edit the followinginformation:
Series No.: This drop-down list is used to select the current data seriesthat is to be modified.
Degree of Curvature: This is the degree of curvature to use to drawthe currently selected data series. A value of one will connect the datapoints by a straight line, and a value of five will fit a smooth curvebetween the points (not necessarily going through each point). A valueof two is recommended, which will connect the points by a curve thatgoes through each point.
Points: This is the type of points, size,and color used to represent the datapoints of the currently selected dataseries. To change click on the button todisplay the Points form.
Line: This is the type, width, and color of the line to be used to drawthe currently selected data series.
Tip
Series 1 is always used to dis-play the current sieve analysis.Series 2 to 5 are used to displayadditional sieve analyses thatcan be selected on the PlotResults form (Chapter 4).
Graph

86 WinSieve User’s Guide
Label Points: Check to show labels at all of the data points for the cur-rently selected data series. The labels will indicate the percentage finerat each point.
Label Frame: This is the type, width, and color of the line to be usedto draw the frame around the labels of the data points for the currentlyselected data series. If Label Points is not checked this button is in-active.
Background: This is the background color to be used for the labels ofthe data points for the currently selected data series. If Label Points isnot checked this button is in-active.
Label Font: The font of the text to be used for the labels of the currentdata series, can be changed by clicking on the button.
The Specifications tab shown above can be used to edit or display thefollowing information (items in italics are read only):
Show Specification: Check this box to display a specification on thegraph.
Templates
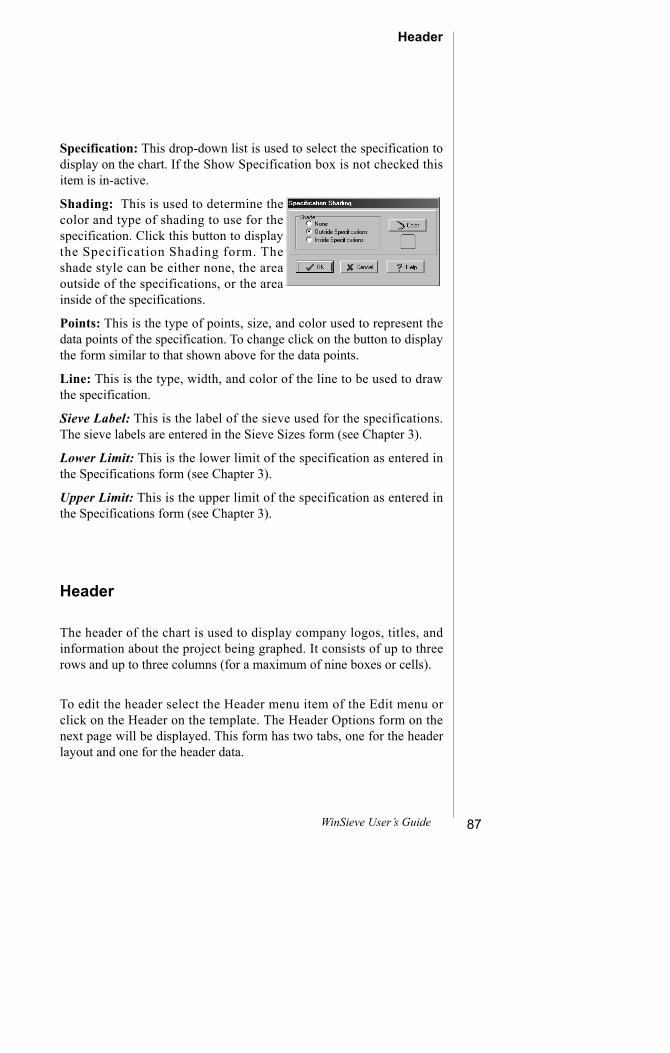
87WinSieve User’s Guide
Specification: This drop-down list is used to select the specification todisplay on the chart. If the Show Specification box is not checked thisitem is in-active.
Shading: This is used to determine thecolor and type of shading to use for thespecification. Click this button to displaythe Specification Shading form. Theshade style can be either none, the areaoutside of the specifications, or the areainside of the specifications.
Points: This is the type of points, size, and color used to represent thedata points of the specification. To change click on the button to displaythe form similar to that shown above for the data points.
Line: This is the type, width, and color of the line to be used to drawthe specification.
Sieve Label: This is the label of the sieve used for the specifications.The sieve labels are entered in the Sieve Sizes form (see Chapter 3).
Lower Limit: This is the lower limit of the specification as entered inthe Specifications form (see Chapter 3).
Upper Limit: This is the upper limit of the specification as entered inthe Specifications form (see Chapter 3).
Header
The header of the chart is used to display company logos, titles, andinformation about the project being graphed. It consists of up to threerows and up to three columns (for a maximum of nine boxes or cells).
To edit the header select the Header menu item of the Edit menu orclick on the Header on the template. The Header Options form on thenext page will be displayed. This form has two tabs, one for the headerlayout and one for the header data.
Header
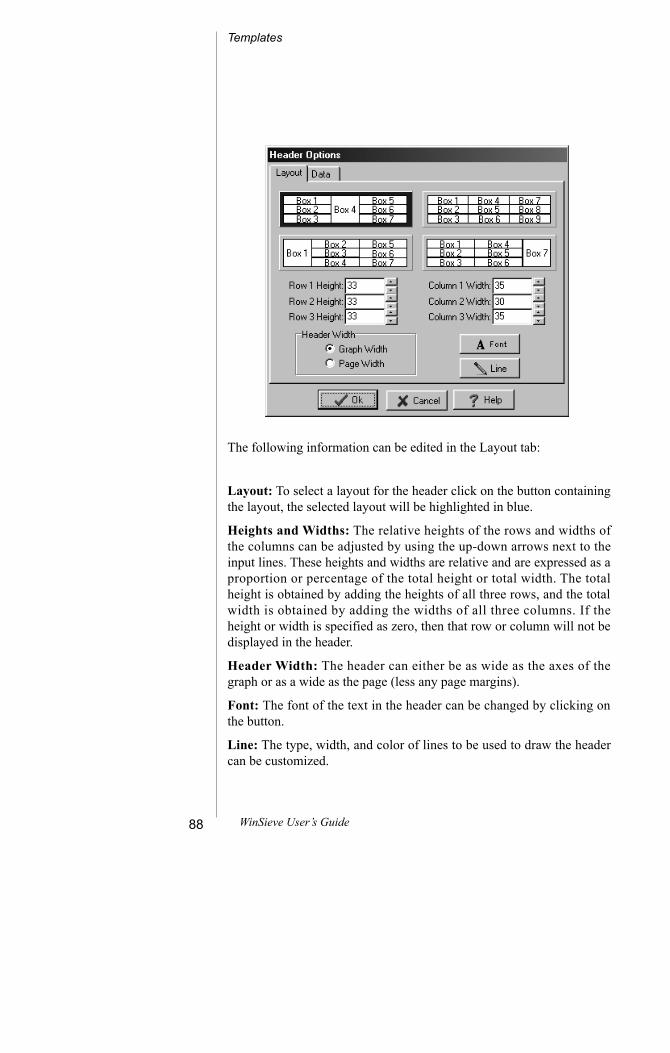
88 WinSieve User’s Guide
The following information can be edited in the Layout tab:
Layout: To select a layout for the header click on the button containingthe layout, the selected layout will be highlighted in blue.
Heights and Widths: The relative heights of the rows and widths ofthe columns can be adjusted by using the up-down arrows next to theinput lines. These heights and widths are relative and are expressed as aproportion or percentage of the total height or total width. The totalheight is obtained by adding the heights of all three rows, and the totalwidth is obtained by adding the widths of all three columns. If theheight or width is specified as zero, then that row or column will not bedisplayed in the header.
Header Width: The header can either be as wide as the axes of thegraph or as a wide as the page (less any page margins).
Font: The font of the text in the header can be changed by clicking onthe button.
Line: The type, width, and color of lines to be used to draw the headercan be customized.
Templates

89WinSieve User’s Guide
The following information can be edited in the Data tab shown below:
Header Type: This specifies the con-tents of each of the cells or boxes in theheader (up to a maximum of 9 cells).To specify the contents of a cell clickon the header type line next to the cell.A drop-down list will be displayed.
If the data type is bitmap or stretched bitmap, the Select Bitmap formon the next page will be displayed. The name of the bitmap file can bespecified using this form. A thumbnail of the bitmap contained in theselected file will be displayed in the right portion of the form. The dif-ference between a bitmap and a stretched bitmap is that the stretchedbitmap will be stretched to fit inside the header box or cell.
Header

90 WinSieve User’s Guide
If the data type is text the Header Text form below will be displayed,and the text can be entered. All of the other data types will display theinformation from the project or sample data.
Legend
The legend of the chart is used to display information about the grainsize data being graphed. It consists of several rows with each row usedfor a different data series. The columns of the legend are used to dis-play different information about each data series. The contents, width,and title of each column of the legend can be defined. The order of thecolumns is specified from the left to the right.
To edit the legend select the Legend menu item of the Edit menu orclick on the Legend part of the template. The Legend Options form onthe next page will be displayed.
Templates
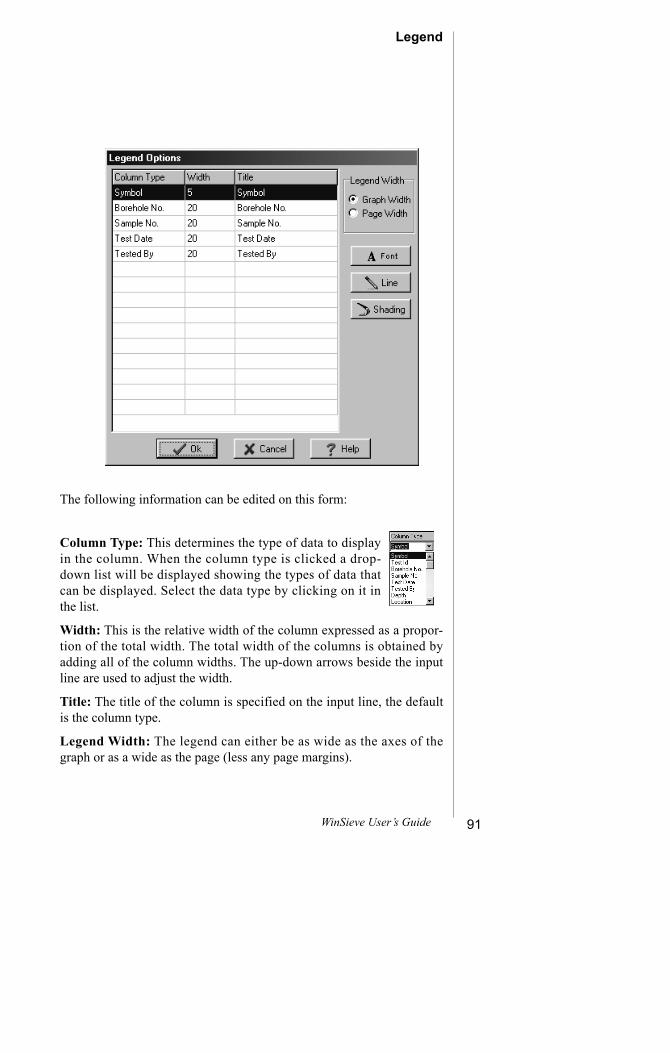
91WinSieve User’s Guide
The following information can be edited on this form:
Column Type: This determines the type of data to displayin the column. When the column type is clicked a drop-down list will be displayed showing the types of data thatcan be displayed. Select the data type by clicking on it inthe list.
Width: This is the relative width of the column expressed as a propor-tion of the total width. The total width of the columns is obtained byadding all of the column widths. The up-down arrows beside the inputline are used to adjust the width.
Title: The title of the column is specified on the input line, the defaultis the column type.
Legend Width: The legend can either be as wide as the axes of thegraph or as a wide as the page (less any page margins).
Legend

92 WinSieve User’s Guide
Font: The font of the text in the legend can be changed by clicking onthe button.
Line: This controls the type, width, and color of lines to be used todraw the legend.
Shading: The color of the shading for the legend titles can be selectedby clicking on the Shading button.
Page Setup
The page preferences that will be used when printing the sieve analysiscan be adjusted using the Page Setup menu item of the Edit menu. Thiswill display the Page Setup form shown below. Using the settings in thepage setup the printed copy of the sieve analysis will be automaticallyscaled according to the paper size.
The following information can be edited on this form:
Margins: The top, bottom, left, and right margins can be adjusted usingthe up and down arrows beside each margin. The units of adjustmentare expressed as a percentage of page width.
Orientation: The chart can be printed in either landscape or portraitmode on the page.
Tip
The sieve analysis will be auto-matically scaled to fit whateverpaper size is currently loaded inthe printer.
Templates

93WinSieve User’s Guide
Resolution: The resolution controls the scaling of the fonts when thepage is printed. Since printers have a much higher resolution than thescreen, smaller fonts at higher resolutions can be used. To adjust theresolution slide the bar left or right.
Saving a Template
To save the template either select the Save Template menu item fromthe File menu or click on the Save button on the Template toolbar.
The template can also be saved under a new name by selectingthe SaveAs button on the Template toolbar. The Enter TemplateName form below will be displayed. This form will list the cur-
rent templates in the database. Enter a unique name for the templateand then press the Ok button.
Saving a Template

94 WinSieve User’s Guide
Deleting a Template
To delete a template from the database select the Delete Template menuitem on the File menu. The Delete Template form below will be dis-played. Select the template to delete and press the Ok button.
Templates

6.Help

6.HelpWinSieve uses the latest type of help system forMicrosoft Windows called HTML Help. This help sys-tem uses a similar style of display as Internet Explorer.
The Help System can be used to find information on-linerather than by using this manual. Both sources will pro-vide the same information, but are organized somewhatdifferently. Help will appear in a separate window withits own menu bar and controls as shown below.
This chapter describes how to:
1. Display help2. Use help3. Get technical support

97WinSieve User’s Guide
Displaying Help
There are several ways to access the Help System, these are:- Press the Help button. To display the help contents at any timepress the help button on the Toolbar.
- Click a Help button in a form. For more information on using aparticular form click the Help button.
- Choose a command from the Help menu. The Help menu offersseveral options:
- Contents displays the same Help Contents that appear whenyou press F1 with no commands highlighted.
- Search displays the Search dialog box and a list of keywordsyou can use to find topics.
- About WinSieve gives information about the program,including the 3-digit version number required by technicalsupport.
Using Help
You can move back and forth between topics or search through theentire help system for the topic you want. Topics that are underlinedcan be displayed by clicking on them, and topics that have dottedunderlines can have their definition displayed by clicking on them.
The tabs on the Help form are used for the following:- Contents displays the complete Table of Contents of the HelpSystem.
- Index is used to look for help topics listed by keyword.
- Search can be used to search for a specific help topic by one ormore keywords.
Displaying Help

98 WinSieve User’s Guide
The buttons at the top of the Help form are used for the following:
- Hide is used to hide the tabs on the left side of the form.
- Back displays the previous help topic, if any.
- Print is used to print the current help topic.
- Options is used to change the preferences for the Help system.
Getting Technical Support
GAEA offers a variety of services to help you with your questions andproblems. You will be automatically registered when you obtain anunlock code for the program. Free technical support to registered usersincludes assistance in the use of the software and in getting any bugsyou may find in the software fixed.
How to Contact GAEA
To expedite support services, we prefer electronic communications,through email or the Internet. These communications minimize the pos-sibility for any mistakes, and allow us to better track your request. Fortechnical support contact your dealer.
Help

99WinSieve User’s Guide
After receiving your communication, GAEA will respond promptlywith either the solution to the problem or a schedule for solving theproblem.
Before Contacting GAEA
Before contacting technical support, we suggest you try the followingto help us resolve your problem.
· Determine if the problem is specific to the sieve analysis you arecreating. Does it occur with other templates or other sieve analyses?
· Does the problem occur every time or intermittently?
· If you have another PC, does the problem occur on it?
Getting Technical Support

100 WinSieve User’s Guide
Information to Provide
When contacting GAEA, please include or have the following informa-tion available.
· The 3-digit version of the WinSieve program you are using. Thiscan be obtained from the About form on the Help menu.
· A description of the problem to help us duplicate the problem.Including any error messages.
· Copies of the sieve analysis and template files. These can beexported in Exchange format and then emailed to us.
· The type and model of your PC.
· The Windows version you are using.
Help


AExamples


Examples

Examples

Examples

Examples

Examples
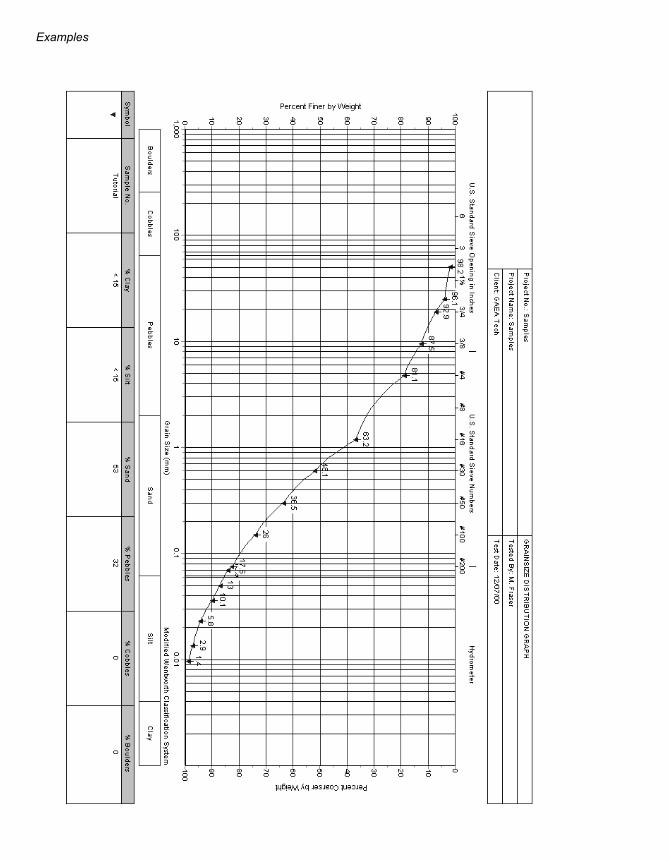
Examples

BDatabaseStructure


Database Structure
Database DesignThe WinSieve program has been designed around the concept of projects. A schematic ofthe database structure is shown on the next page followed by a detailed description of allthe data fields. This data storage method allows for the expansion, archival, and networkadministration of a large number of projects.
Using this method a separate Microsoft Access 97 database is used to store each projectfor each application. Each project is stored in a separate directory, which can be on thesame computer or spread across a network. The number of databases for each project willdepend upon the applications being used for that project. If for example, the WinLoG andWinSieve programs are being used with the project, there will be two project databases
The names of the project databases are the project number combined with the applicationsuffix. For example, if the project number were "A980205" then the project databasename of the WinSieve data would be "A980205winsieve.mdb". Typically, this projectwould be stored in the subdirectory "\A980205".
A master project database, also in Microsoft Access 97 format, is used to keep track of theprojects and their locations on the network. This master project database is also used tostore data (such as symbol libraries and text macros) that is common to all projects andapplications. The name of the project master database is "gaeaprojects.mdb". The data-base is stored in a directory specified by the user when the program is installed.
In addition to the master project database, separate application master databases are usedto store data that is common to all projects but specific to the application. A WinSievemaster database is used to store templates and legends, which can be accessed by all pro-jects. The name of this database is "winsieve.mdb". All of the application master data-bases are stored in the same directory as the master project database.
If the master databases are moved, the "Master Database Directory" in the program pref-erences must be changed to reflect the new directory.

Database Structure
Master Database Directory
Project 1 Directory Project 2 Directory
Master Project Database
WinLoG Master Database WinSieve Master Database WinFence Master Database
WinLoG ProjectDatabase
WinSieve ProjectDatabase
WinLoG ProjectDatabase
WinSieve ProjectDatabase
WinFence ProjectDatabase

Database Structure
Project Database Fields
Sieves Table
SieveSizeData Table
Field Name Data Type Field Size Key
ProjectNumberBoreholeNumberSampleNumberTestNumberDescriptionLocationSourceClientNorthingEastingDepth LengthCollected ByUserDefined1Template
TextTextTextText
MemoTextTextText
DoubleDoubleDoubleDouble
TextTextText
100100100100
255255255
255255255
****
Field Name Data Type Field Size Key
ProjectNumberBoreholeNumberSampleNumberTestNumberSieveIndexSieveSizeSieveLabelWeightRetainedCumulativeWeight
TextTextTextText
DoubleDouble
TextDoubleDouble
100100100100
100
*****
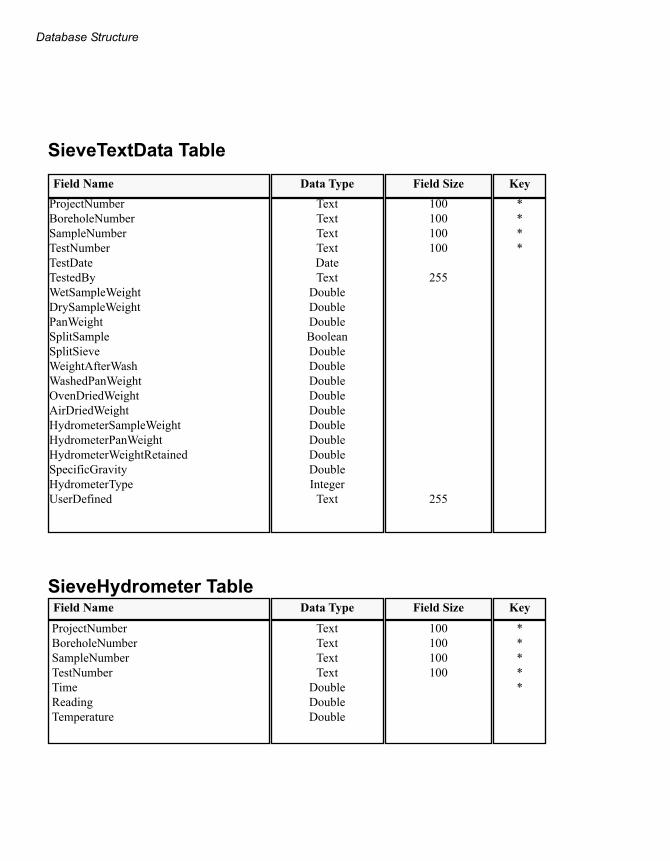
Database Structure
SieveTextData Table
SieveHydrometer Table
Field Name Data Type Field Size KeyProjectNumberBoreholeNumberSampleNumberTestNumberTestDateTestedByWetSampleWeightDrySampleWeightPanWeightSplitSampleSplitSieveWeightAfterWashWashedPanWeightOvenDriedWeightAirDriedWeightHydrometerSampleWeightHydrometerPanWeightHydrometerWeightRetainedSpecificGravityHydrometerTypeUserDefined
TextTextTextTextDateText
DoubleDoubleDoubleBooleanDoubleDoubleDoubleDoubleDoubleDoubleDoubleDoubleDoubleInteger
Text
100100100100
255
255
****
Field Name Data Type Field Size Key
ProjectNumberBoreholeNumberSampleNumberTestNumberTimeReadingTemperature
TextTextTextText
DoubleDoubleDouble
100100100100
*****

Database Structure
SieveResults TableField Name Data Type Field Size Key
ProjectNumberBoreholeNumberSampleNumberTestNumberSizePercentPassing
TextTextTextText
DoubleDouble
100100100100
*****

Database Structure

CInstallationFiles

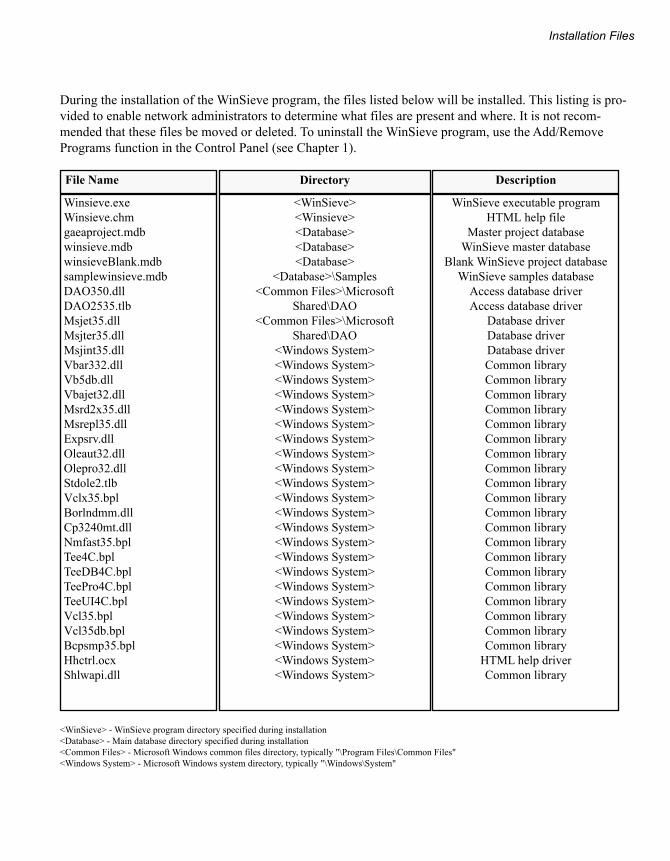
Installation Files
During the installation of the WinSieve program, the files listed below will be installed. This listing is pro-vided to enable network administrators to determine what files are present and where. It is not recom-mended that these files be moved or deleted. To uninstall the WinSieve program, use the Add/RemovePrograms function in the Control Panel (see Chapter 1).
File Name Directory Description
Winsieve.exeWinsieve.chmgaeaproject.mdbwinsieve.mdbwinsieveBlank.mdbsamplewinsieve.mdbDAO350.dllDAO2535.tlbMsjet35.dllMsjter35.dllMsjint35.dllVbar332.dllVb5db.dllVbajet32.dllMsrd2x35.dllMsrepl35.dllExpsrv.dllOleaut32.dllOlepro32.dllStdole2.tlbVclx35.bplBorlndmm.dllCp3240mt.dllNmfast35.bplTee4C.bplTeeDB4C.bplTeePro4C.bplTeeUI4C.bplVcl35.bplVcl35db.bplBcpsmp35.bplHhctrl.ocxShlwapi.dll
<WinSieve><Winsieve><Database><Database><Database>
<Database>\Samples<Common Files>\Microsoft
Shared\DAO<Common Files>\Microsoft
Shared\DAO<Windows System><Windows System><Windows System><Windows System><Windows System><Windows System><Windows System><Windows System><Windows System><Windows System><Windows System><Windows System><Windows System><Windows System><Windows System><Windows System><Windows System><Windows System><Windows System><Windows System><Windows System><Windows System><Windows System>
WinSieve executable programHTML help file
Master project databaseWinSieve master database
Blank WinSieve project databaseWinSieve samples database
Access database driverAccess database driver
Database driverDatabase driverDatabase driverCommon libraryCommon libraryCommon libraryCommon libraryCommon libraryCommon libraryCommon libraryCommon libraryCommon libraryCommon libraryCommon libraryCommon libraryCommon libraryCommon libraryCommon libraryCommon libraryCommon libraryCommon libraryCommon libraryCommon library
HTML help driverCommon library
<WinSieve> - WinSieve program directory specified during installation<Database> - Main database directory specified during installation<Common Files> - Microsoft Windows common files directory, typically "\Program Files\Common Files"<Windows System> - Microsoft Windows system directory, typically "\Windows\System"


