winlink with soundcard, paclink, and agwpe v5.pdfpaclink, and agwpe installation and configuration...
TRANSCRIPT

© 2011, Jon Perelstein WB2RYV 1 11/21/2011 5:55 PM
Winlink with Internal Soundcard Interfaces, Paclink, and AGWPE
Installation and Configuration
Jon Perelstein WB2RYV
11/17/2011
Version 5
Winlink with Internal Soundcard Interfaces, Paclink, and AGWPE
© 2011, Jon Perelstein WB2RYV 2 11/21/2011 5:55 PM
Table of Contents 1. Target Audience ............................................................................................................................... 3
2. Overview .......................................................................................................................................... 4
3. Windows Vista/Windows 7 Install Folders ...................................................................................... 5
4. Installing AGWPE.............................................................................................................................. 6
5. Configuring AGWPE with Internal Soundcard Interfaces ................................................................ 7
5.1. Finding Your COM Port ................................................................................................................. 7
5.2. Configuration ................................................................................................................................ 7
6. Installing Paclink ............................................................................................................................ 11
7. Configuring Paclink ........................................................................................................................ 12

Winlink with Internal Soundcard Interfaces, Paclink, and AGWPE
© 2011, Jon Perelstein WB2RYV 3 11/21/2011 5:55 PM
1. Target Audience This document describes how to set up a VHF/UHF FM Winlink (WL2K) station using Paclink, AGWPE,
and a soundcard interface such as the RIGblaster Plug&Play or Donner Digital interface.
IT DOES NOT COVER THE RIGblaster Advantage, which is a cross between the internal and external
soundcard interfaces. I may in the future do a special addendum for the Advantage.
This document is specifically not relevant to VHF/UHF Winlink user stations running RMS Express
because RMS Express is not “AGWPE aware”.
This document will not cover installation and configuration of the interface itself since those are well-
covered in the user guides that come with the interfaces. As of this writing:
The RIGBlaster documentation can be found at
http://www.westmountainradio.com/content.php?page=wmr-downloads
The Donner Digital material can be found at
http://donnerstorenet.ipage.com/DCC/index.php?main_page=index&cPath=2&zenid=a09da87b
55187d01d7dc0e631e6013e0
Similarly, this document will not cover the configuration of your e-mail client since that depends on
which e-mail client you use. The LOADING_WL2K_USER_PROGRAMS Yahoo Group covers the
configuration of Outlook Express as one of their “NEWE-Mail Assignments” (discussed later in this
document).
NOTE: In Winlink terminology, this document is focused on the “WL2K User”, which is the end-user of
the Winlink e-mail service. That is to say, it is focused on the station to whom a message is being sent
(the ‘To:’ in an e-mail message address) or is the originator of a message (the ‘From:’ in an e-mail
message address). That being said, these instructions will work for RMS Packet (the primary WL2K
Gateway software).
NOTE: I have personally tested this material with the the RIGBlaster Plug&Play, the Donner Digital
Interface, and the RIGBlaster NOMIC.
Winlink with Internal Soundcard Interfaces, Paclink, and AGWPE
© 2011, Jon Perelstein WB2RYV 4 11/21/2011 5:55 PM
2. Overview There are three types of soundcard interfaces
Those with their own built-in soundcards such as the Signalink USB. These are usually referred
as external soundcard interfaces. These interfaces include VOX circuitry to hear sound coming
out of your computer and trigger the PTT.
Those that use the computer’s internal soundcard such as all the other RIGBlasters and the
Donner Digitial interface. These are usually referred to as internal soundcard interfaces1. These
interfaces use a serial comm line coming out of one of the computer’s COM ports to trigger the
PTT.
The RIGBlaster Advantage is a cross between the two types – it has an external soundcard and
the VOX circuitry, but gives you the option of using the VOX circuitry or using a serial comm line
to trigger the PTT.
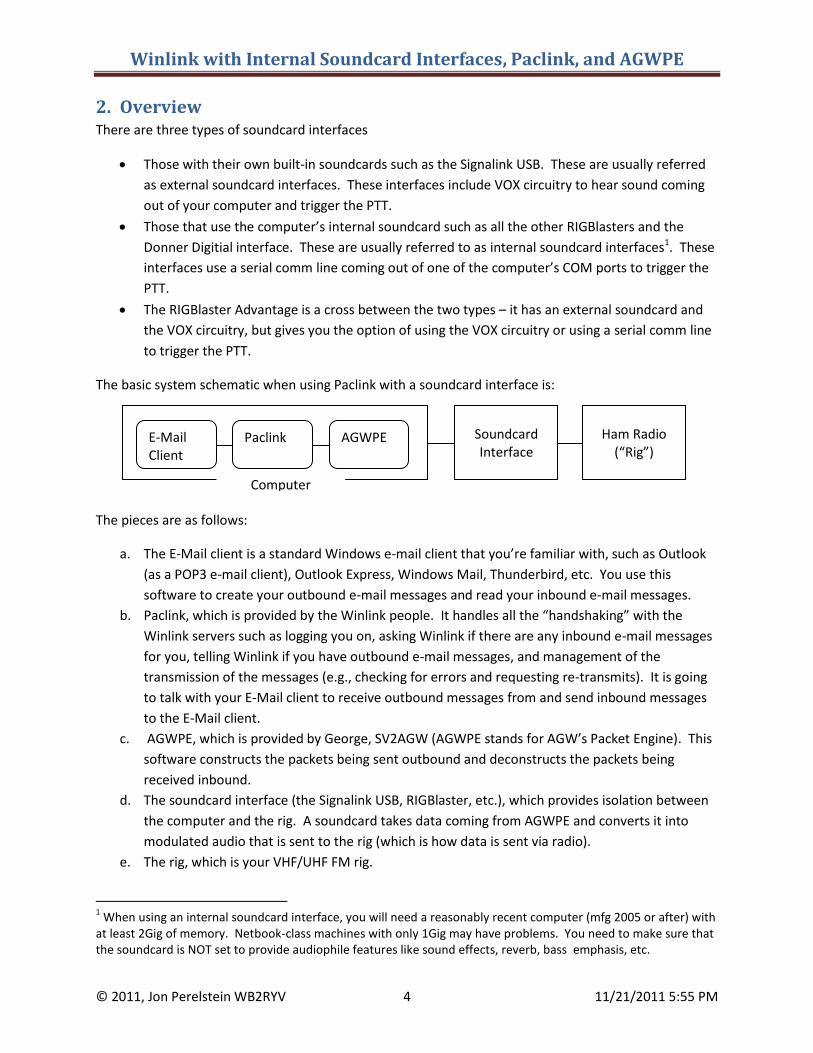
The basic system schematic when using Paclink with a soundcard interface is:
The pieces are as follows:
a. The E-Mail client is a standard Windows e-mail client that you’re familiar with, such as Outlook
(as a POP3 e-mail client), Outlook Express, Windows Mail, Thunderbird, etc. You use this
software to create your outbound e-mail messages and read your inbound e-mail messages.
b. Paclink, which is provided by the Winlink people. It handles all the “handshaking” with the
Winlink servers such as logging you on, asking Winlink if there are any inbound e-mail messages
for you, telling Winlink if you have outbound e-mail messages, and management of the
transmission of the messages (e.g., checking for errors and requesting re-transmits). It is going
to talk with your E-Mail client to receive outbound messages from and send inbound messages
to the E-Mail client.
c. AGWPE, which is provided by George, SV2AGW (AGWPE stands for AGW’s Packet Engine). This
software constructs the packets being sent outbound and deconstructs the packets being
received inbound.
d. The soundcard interface (the Signalink USB, RIGBlaster, etc.), which provides isolation between
the computer and the rig. A soundcard takes data coming from AGWPE and converts it into
modulated audio that is sent to the rig (which is how data is sent via radio).
e. The rig, which is your VHF/UHF FM rig.
1 When using an internal soundcard interface, you will need a reasonably recent computer (mfg 2005 or after) with
at least 2Gig of memory. Netbook-class machines with only 1Gig may have problems. You need to make sure that the soundcard is NOT set to provide audiophile features like sound effects, reverb, bass emphasis, etc.
E-Mail Client
Paclink AGWPE
Computer
Soundcard Interface
Ham Radio (“Rig”)
Winlink with Internal Soundcard Interfaces, Paclink, and AGWPE
© 2011, Jon Perelstein WB2RYV 5 11/21/2011 5:55 PM
3. Windows Vista/Windows 7 Install Folders There are a number of web sites that provide instructions for installing AGWPE and Paclink (e.g.,
www.soundcardpacket.org). They all seem to have been written for Windows XP in that they make
reference to installing AGWPE and Paclink under the c:\Program Files folder. In fact, the Paclink installer
will try to install into a folder under c:\Program Files.
You CANNOT install either AGWPE or Paclink under c:\Program Files when running Windows Vista or
Windows 7. Microsoft changed their security model in Vista to eliminate a massive security flaw in the
way that they allowed programs to use that folder, and that change required some basic changes to how
programs are installed. Neither AGWPE nor Paclink has been updated to follow the new security model
– nor have many other programs from smaller software providers. Note that the change Microsoft
made is a good thing even if it does create a problem for older software.
Because of this change, people running Vista or Win 7 must install AGWPE and Paclink somewhere other
than under c:\Program Files. I have my AGWPE installed in c:\AGW\AGWPE and my Paclink installed in
c:\Paclink. I also have AGWMonitor installed (c:\AGW\AGWMonitor) and AGWTerm installed
(c:\AGW\AGWTerm). AGWMonitor is useful because it lets you see the contents of the packets flowing
into and out of the computer.
If you've already installed AGWPE under c:\Program Files, delete out what you've installed for AGWPE.
If you've already installed Paclink under c:\Program Files, you need to remove it using Control Panel -->
Programs.
Winlink with Internal Soundcard Interfaces, Paclink, and AGWPE
© 2011, Jon Perelstein WB2RYV 6 11/21/2011 5:55 PM
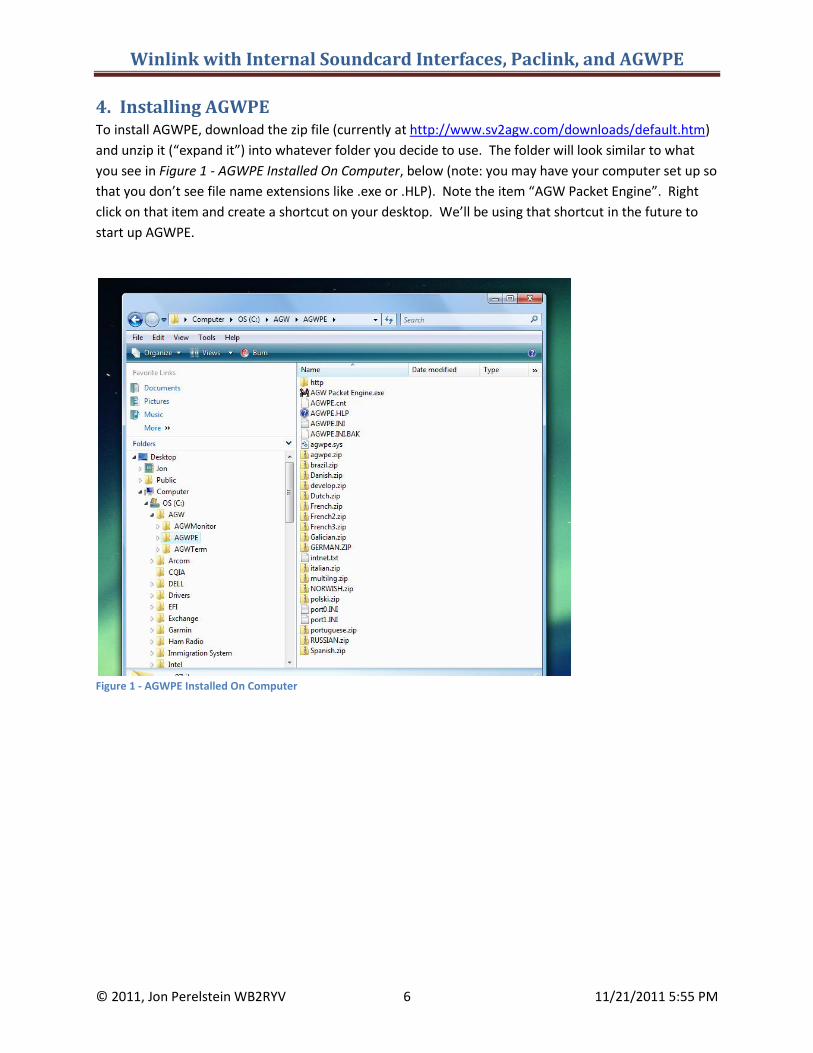
4. Installing AGWPE To install AGWPE, download the zip file (currently at http://www.sv2agw.com/downloads/default.htm)
and unzip it (“expand it”) into whatever folder you decide to use. The folder will look similar to what
you see in Figure 1 - AGWPE Installed On Computer, below (note: you may have your computer set up so
that you don’t see file name extensions like .exe or .HLP). Note the item “AGW Packet Engine”. Right
click on that item and create a shortcut on your desktop. We’ll be using that shortcut in the future to
start up AGWPE.
Figure 1 - AGWPE Installed On Computer
Winlink with Internal Soundcard Interfaces, Paclink, and AGWPE
© 2011, Jon Perelstein WB2RYV 7 11/21/2011 5:55 PM
5. Configuring AGWPE with Internal Soundcard Interfaces
YOU MUST HAVE YOUR INTERFACE PLUGGED INTO THE COMPUTER TO CONFIGURE AGWPE!!!
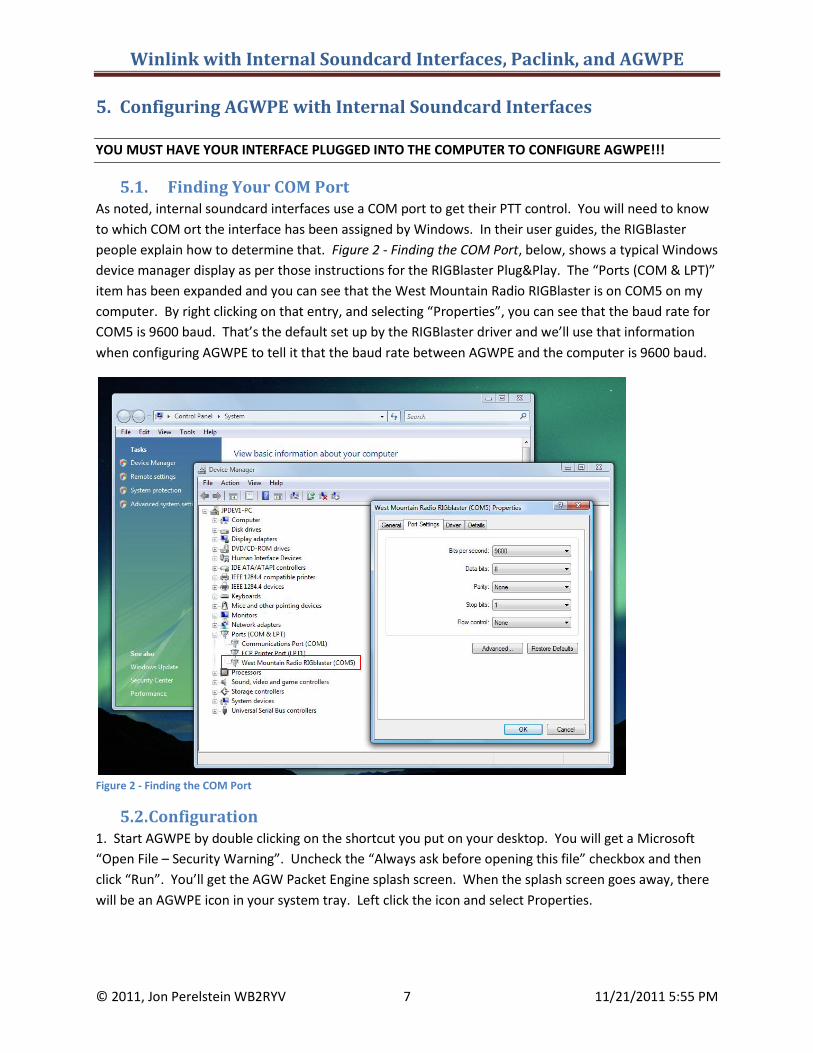
5.1. Finding Your COM Port As noted, internal soundcard interfaces use a COM port to get their PTT control. You will need to know
to which COM ort the interface has been assigned by Windows. In their user guides, the RIGBlaster
people explain how to determine that. Figure 2 - Finding the COM Port, below, shows a typical Windows
device manager display as per those instructions for the RIGBlaster Plug&Play. The “Ports (COM & LPT)”
item has been expanded and you can see that the West Mountain Radio RIGBlaster is on COM5 on my
computer. By right clicking on that entry, and selecting “Properties”, you can see that the baud rate for
COM5 is 9600 baud. That’s the default set up by the RIGBlaster driver and we’ll use that information
when configuring AGWPE to tell it that the baud rate between AGWPE and the computer is 9600 baud.
Figure 2 - Finding the COM Port
5.2. Configuration 1. Start AGWPE by double clicking on the shortcut you put on your desktop. You will get a Microsoft
“Open File – Security Warning”. Uncheck the “Always ask before opening this file” checkbox and then
click “Run”. You’ll get the AGW Packet Engine splash screen. When the splash screen goes away, there
will be an AGWPE icon in your system tray. Left click the icon and select Properties.
Winlink with Internal Soundcard Interfaces, Paclink, and AGWPE
© 2011, Jon Perelstein WB2RYV 8 11/21/2011 5:55 PM
2. You should see a window titled “RadioPort Selection” as shown in Error! Reference source not
found., above. For a new install, you’ll see either no RadioPorts at all or only one showing says “Port1
?>NOTHING IDLE;”. That’s because we do not yet have anything set up. Click the “New Port” command
button. You'll get a popup telling you that a new TncPort has been created and that you must first
configure and then restart. Click OK.
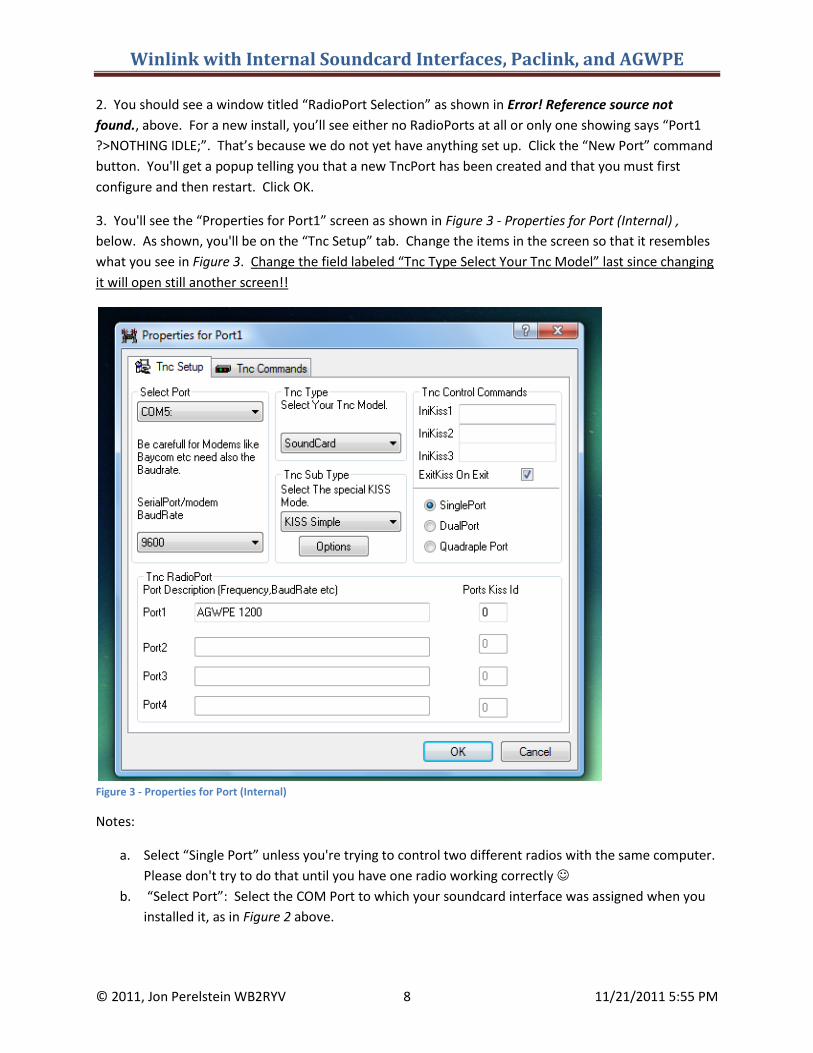
3. You'll see the “Properties for Port1” screen as shown in Figure 3 - Properties for Port (Internal) ,
below. As shown, you'll be on the “Tnc Setup” tab. Change the items in the screen so that it resembles
what you see in Figure 3. Change the field labeled “Tnc Type Select Your Tnc Model” last since changing
it will open still another screen!!
Figure 3 - Properties for Port (Internal)
Notes:
a. Select “Single Port” unless you're trying to control two different radios with the same computer.
Please don't try to do that until you have one radio working correctly
b. “Select Port”: Select the COM Port to which your soundcard interface was assigned when you
installed it, as in Figure 2 above.
Winlink with Internal Soundcard Interfaces, Paclink, and AGWPE
© 2011, Jon Perelstein WB2RYV 9 11/21/2011 5:55 PM
c. "SerialPort/modem baud rate" is the baud rate between the computer and the serial device
(TNC). Set it to the baud rate of the communications between the computer and the interface
device, which is also shown in Figure 2 above (normally 9600 baud for a RIGBlaster device).
d. The "Tnc RadioPort/Port Description" is just a name being assigned to this RadioPort for later
reference in Paclink. It will default to something like '145.650Mhz 1200 baud'. You can either
leave the name as-is or make it something you feel is more meaningful such as ‘AGWPE 1200'.
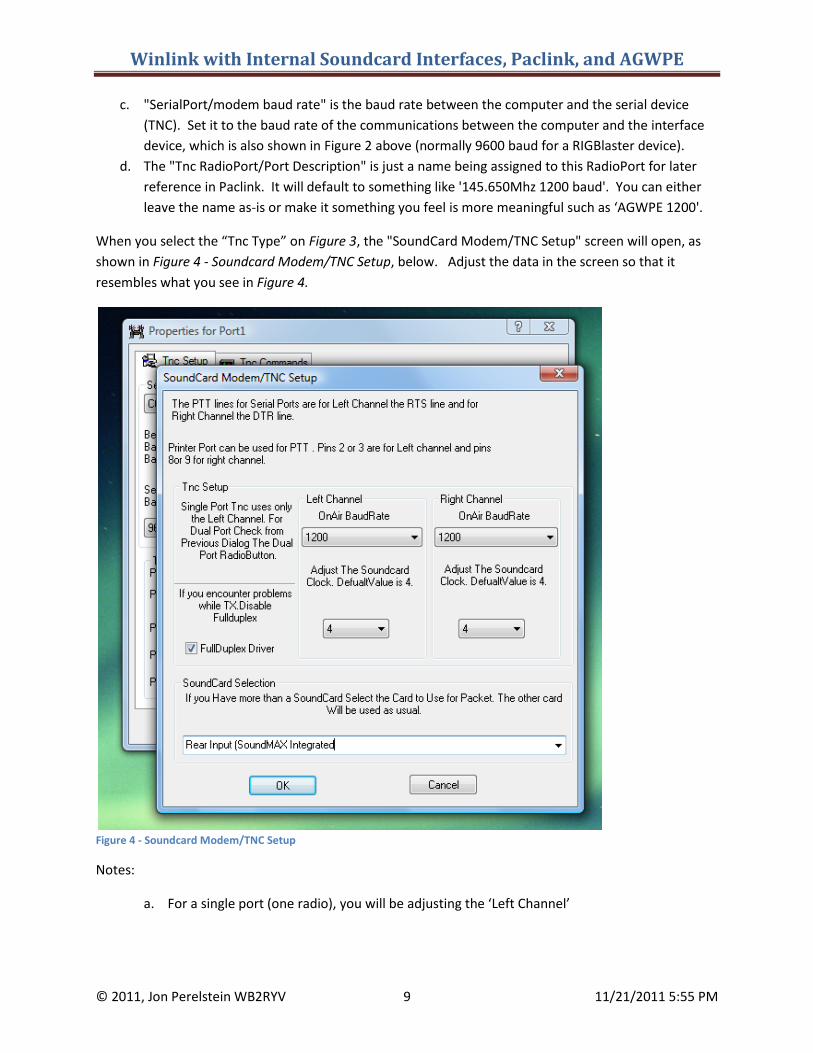
When you select the “Tnc Type” on Figure 3, the "SoundCard Modem/TNC Setup" screen will open, as
shown in Figure 4 - Soundcard Modem/TNC Setup, below. Adjust the data in the screen so that it
resembles what you see in Figure 4.
Figure 4 - Soundcard Modem/TNC Setup
Notes:
a. For a single port (one radio), you will be adjusting the ‘Left Channel’
Winlink with Internal Soundcard Interfaces, Paclink, and AGWPE
© 2011, Jon Perelstein WB2RYV 10 11/21/2011 5:55 PM
b. The “OnAir Baud Rate” is determined by the baud rate you’re using on your rig, which in
turn is determined by the baud rate of the WL2K gateway you’re connecting to. Most
gateways are 1200 baud.
c. Under “SoundCard Selection”: select the computer’s internal soundcard. There may be
more than one if you have a special one for gaming or music/video. Whichever one you
select, make sure that you turn off all special audio effects such as bass emphasis (Start
Control Panel Sounds).
You're done configuring, so close the screens (“OK”), exit the program and then restart it.
Depending on what model interface you have, you may or may not have gain controls on the interface.
If you do have gain controls, it’s easiest to go into your Windows sound settings (Start Control Panel
Sound) and set the volume for both the default playback and recording devices to the max (‘100’).
Then use the TX and RX gain knobs on the interface to adjust gain. If the interface does not have its own
gain controls, you will have to use the Windows volume controls and adjust the gain by experimenting a
little on the air.
Since you’re using your computer’s default soundcard, all Windows sounds will go out via that
soundcard, and if your rig is turned on that means it will try to transmit those sounds.

Winlink with Internal Soundcard Interfaces, Paclink, and AGWPE
© 2011, Jon Perelstein WB2RYV 11 11/21/2011 5:55 PM
6. Installing Paclink As of this writing, the Paclink software is located at http://www.winlink.org/ClientSoftware. Paclink is
downloaded as a Windows Installer Package, and double clicking on it will start up a standard Windows
install process. As previously noted, it will attempt to install itself under the c:\Program Files folder and
should not be installed there if you’re running Windows Vista or Windows 7. I have my Paclink installed
at c:\Paclink.
When you install Paclink, you should see a folder arrangement similar to that shown in Figure 5 - Paclink
Installed On Computer
Figure 5 - Paclink Installed On Computer
Note the Application file Paclink.exe in the Bin folder under c:\Paclink (if you have the display of
extensions turned off, you’ll see a couple of different files called ‘Paclink’ and you’ll have to go to Views
Detail to see which one is the Application. That’s the actual program file and you should create a
shortcut to it on your desktop so that you can double click on the shortcut to start Paclink.
Winlink with Internal Soundcard Interfaces, Paclink, and AGWPE
© 2011, Jon Perelstein WB2RYV 12 11/21/2011 5:55 PM
7. Configuring Paclink
You always want AGWPE to be running when you start Paclink because Paclink is going to be using
services provided by AGWPE. Wait until the AGWPE splash screen closes before starting Paclink.
The basic configuration and operation of Paclink is explained in a number of places on the internet. If
you’re a newbie to Winlink, you should join the Yahoo! Group called
‘LOADING_WL2K_USER_PROGRAMS’, which is specifically intended to help people get started with
Winlink. The ‘Files’ section of the group has a folder called ‘NEW E-MAIL ASSIGNMENTS’ containing a
number of files that start with the words ‘NEWE-Mail Assignment’. Do the following assignments:
NEWE-Mail Assignment #1.pdf
NEWE-Mail Assignment #2.pdf
NEWE-Mail Assignment #3.pdf
NEWE-Mail Assignment #4PACLINK.pdf
Note however that you can bypass the pieces that deal with Winpack because you’re not going to be
using that functionality.
Assignment #4 tells you how to configure a typical e-mail client (in this case Outlook Express) to work
with Paclink. Configuring to other e-mail clients is similar in concept but may have slight differences
depending on the client.
It is not worth reading through assignments 5, 6, and 7 because they are focused on using Paclink with a
TNC and you’re not using a TNC. Instead, the material that follows replaces the material in those
assignments.
When you start Paclink for the first time, it's best to be connected to the internet because Paclink will
try to do an auto update and will give you all sorts of nasty messages if it can’t find the internet. If you
are connected to the internet, you will see a string of auto update messages. Once the auto update is
finished:
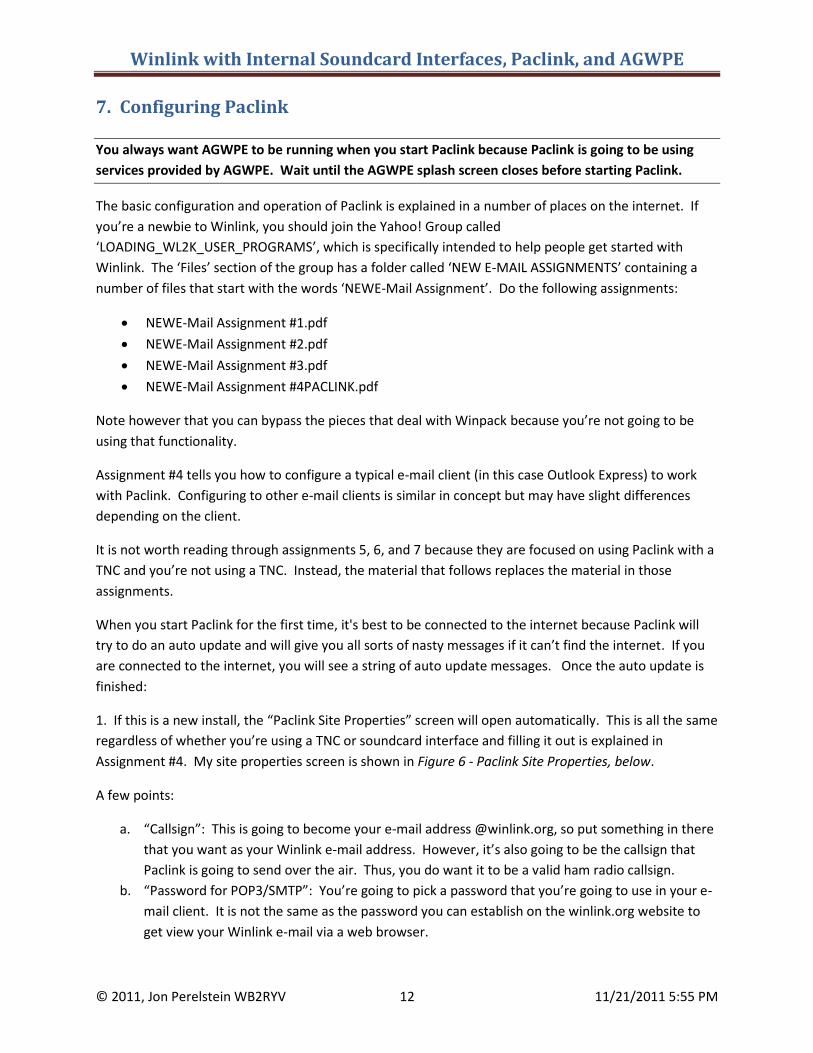
1. If this is a new install, the “Paclink Site Properties” screen will open automatically. This is all the same
regardless of whether you’re using a TNC or soundcard interface and filling it out is explained in
Assignment #4. My site properties screen is shown in Figure 6 - Paclink Site Properties, below.
A few points:
a. “Callsign”: This is going to become your e-mail address @winlink.org, so put something in there
that you want as your Winlink e-mail address. However, it’s also going to be the callsign that
Paclink is going to send over the air. Thus, you do want it to be a valid ham radio callsign.
b. “Password for POP3/SMTP”: You’re going to pick a password that you’re going to use in your e-
mail client. It is not the same as the password you can establish on the winlink.org website to
get view your Winlink e-mail via a web browser.
Winlink with Internal Soundcard Interfaces, Paclink, and AGWPE
© 2011, Jon Perelstein WB2RYV 13 11/21/2011 5:55 PM
Figure 6 - Paclink Site Properties
Click Update to save your site properties.
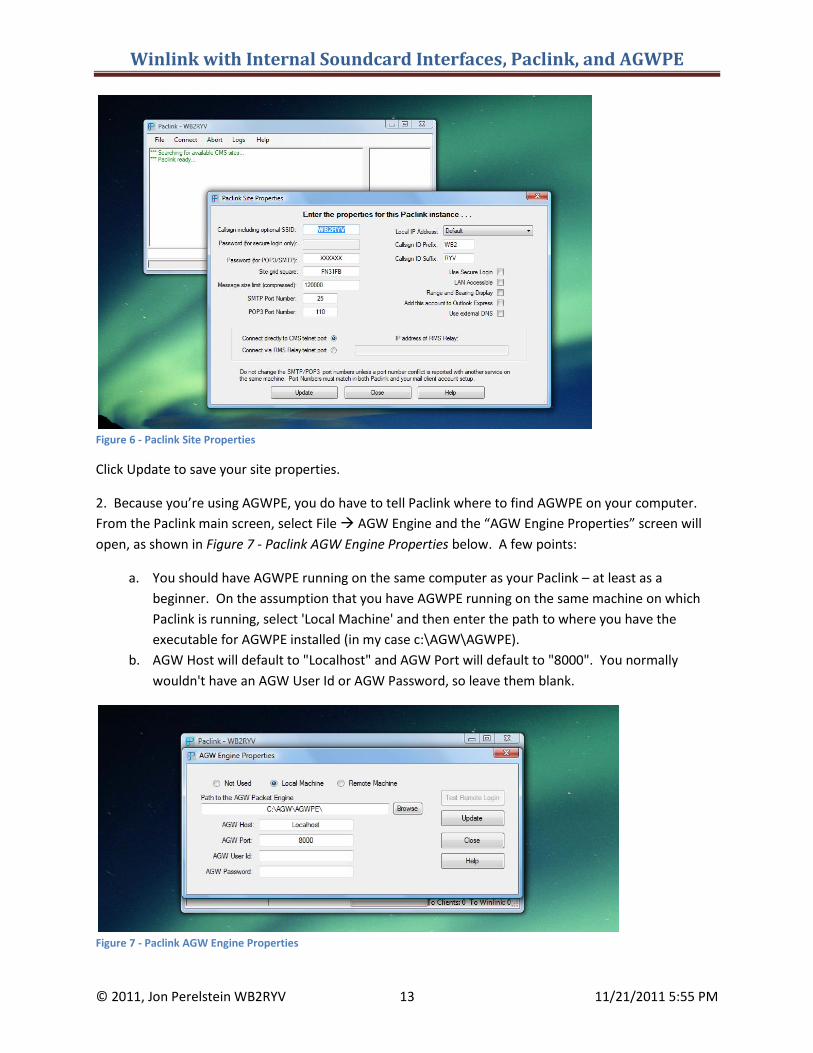
2. Because you’re using AGWPE, you do have to tell Paclink where to find AGWPE on your computer.
From the Paclink main screen, select File AGW Engine and the “AGW Engine Properties” screen will
open, as shown in Figure 7 - Paclink AGW Engine Properties below. A few points:
a. You should have AGWPE running on the same computer as your Paclink – at least as a
beginner. On the assumption that you have AGWPE running on the same machine on which
Paclink is running, select 'Local Machine' and then enter the path to where you have the
executable for AGWPE installed (in my case c:\AGW\AGWPE).
b. AGW Host will default to "Localhost" and AGW Port will default to "8000". You normally
wouldn't have an AGW User Id or AGW Password, so leave them blank.
Figure 7 - Paclink AGW Engine Properties
Winlink with Internal Soundcard Interfaces, Paclink, and AGWPE
© 2011, Jon Perelstein WB2RYV 14 11/21/2011 5:55 PM
Click Update to save your data.
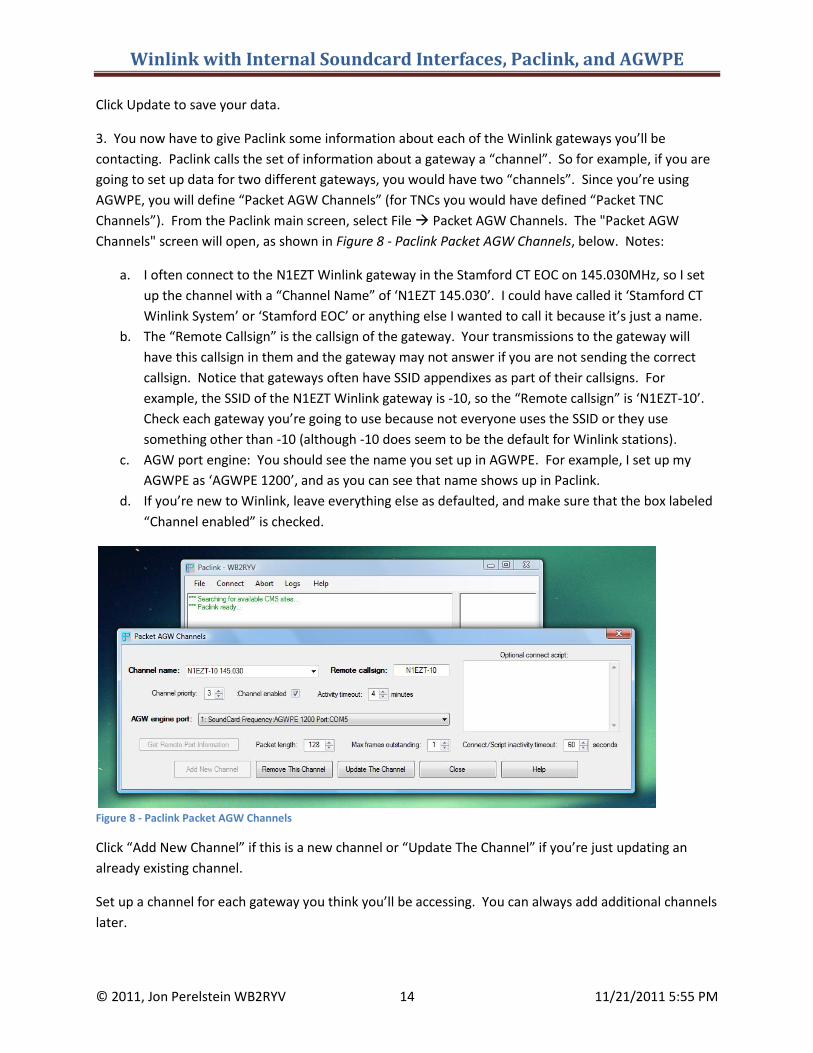
3. You now have to give Paclink some information about each of the Winlink gateways you’ll be
contacting. Paclink calls the set of information about a gateway a “channel”. So for example, if you are
going to set up data for two different gateways, you would have two “channels”. Since you’re using
AGWPE, you will define “Packet AGW Channels” (for TNCs you would have defined “Packet TNC
Channels”). From the Paclink main screen, select File Packet AGW Channels. The "Packet AGW
Channels" screen will open, as shown in Figure 8 - Paclink Packet AGW Channels, below. Notes:
a. I often connect to the N1EZT Winlink gateway in the Stamford CT EOC on 145.030MHz, so I set
up the channel with a “Channel Name” of ‘N1EZT 145.030’. I could have called it ‘Stamford CT
Winlink System’ or ‘Stamford EOC’ or anything else I wanted to call it because it’s just a name.
b. The “Remote Callsign” is the callsign of the gateway. Your transmissions to the gateway will
have this callsign in them and the gateway may not answer if you are not sending the correct
callsign. Notice that gateways often have SSID appendixes as part of their callsigns. For
example, the SSID of the N1EZT Winlink gateway is -10, so the “Remote callsign” is ‘N1EZT-10’.
Check each gateway you’re going to use because not everyone uses the SSID or they use
something other than -10 (although -10 does seem to be the default for Winlink stations).
c. AGW port engine: You should see the name you set up in AGWPE. For example, I set up my
AGWPE as ‘AGWPE 1200’, and as you can see that name shows up in Paclink.
d. If you’re new to Winlink, leave everything else as defaulted, and make sure that the box labeled
“Channel enabled” is checked.
Figure 8 - Paclink Packet AGW Channels
Click “Add New Channel” if this is a new channel or “Update The Channel” if you’re just updating an
already existing channel.
Set up a channel for each gateway you think you’ll be accessing. You can always add additional channels
later.