windows client installation and user guide triad … windows... · windows client installation and...
TRANSCRIPT

Windows Client Installation and User Guide
TRIAD v4.12 Clinical Trials
Version August 29, 2018

Table of Contents Slide 4: Hardware Requirements Slide 5: Software Requirements Slide 6: Installation Slide 7: Account types to login to TRIAD Slide 9: Login to TRIAD Clinical Trials (NCI Oncology) Domain Slide 10: Login to Clinical Trials Domain Slide 12: Login to IDEAS Domain Slide 14: Login to Clinical Trials (Custom) Domain Slide 15: Submission Sources Slide 16: Submit Files from Computer / Network Drive Slide 17: Submit Files from PACS Slide 23: Preview Panel Slide 24: View Images Slide 25: Clean Pixel Data Slide 27: Pixel Cleaning on Multiple Images Slide 32: Add Attachments Slide 33: View DICOM Metadata Slide 34: Add Comments Slide 35: Move for Submission

Table of Contents (cont.) Slide 36: Submission Types Slide 38: Submission Queue Clinical Trials Domain Slide 40: Submission Queue Clinical Trials (NCI Oncology) Domain Slide 43: Submission Queue for Clinical Trials (Custom) Domain Slide 44: Submission Type for Clinical Trials (Custom) Domain Slide 45: Submission Queue -- Anonymization Result Slide 46: Validation Result Slide 48: Validation Result for RT structure Slide 49: Validation Result for Diagnostic Imaging Slide 50: Submission Queue -- Submit Studies Slide 51: Submission History Slide 52: Submission Status Slide 53: Exiting TRIAD Slide 54: Data Transfer Settings Slide 55: Export Logs Slide 56: TRIAD Support

Hardware RequirementsHardware requirements (recommended):
2 GB RAM 2.4 GHz Processor 60 GB Hard Disk space The system should be able to communicate to TRIAD Server
using HTTPS on Port 443 For optimal file transfers, TCP (33001) and UDP (33001-33500)
ports need to allow for outbound connections Ethernet connection is required for large data transfers For high-resolution screens (>1920x1200dpi), ensure text scale is
set to 100% Automatic sleep/lock feature is acceptable however log-out feature
is not recommended for large file (10+ GB) submissions
4

Software RequirementsSoftware requirements:
Microsoft .NET 4.5.2 or Higher Framework Full Version - also install the .NET Framework 4.5.2 patch - Hotfix rollup 3146711(requires administrative privileges on the computer to install)
Microsoft Visual C++ 2010 Redistributable (x86) (requires administrative privileges on the computer to install)
Microsoft Visual C++ 2012 Redistributable (x86) (requires administrative privileges)
Transport Layer Security (TLS) 1.1 and 1.2 must be enabled OS: Windows 7 (32 and 64 bit) , Windows 8.1 (32 and 64 bit ),
Windows 10 Enterprise (32 and 64 bit)
5

Installation
Open the following link to install the latest TRIAD Windows Client:
https://triadinstall.acr.org/triadclient/
TRIAD will launch after the installation is completed successfully. If TRIAD does not launch automatically, then check if the computer satisfies the hardware and software requirements for TRIAD.
6
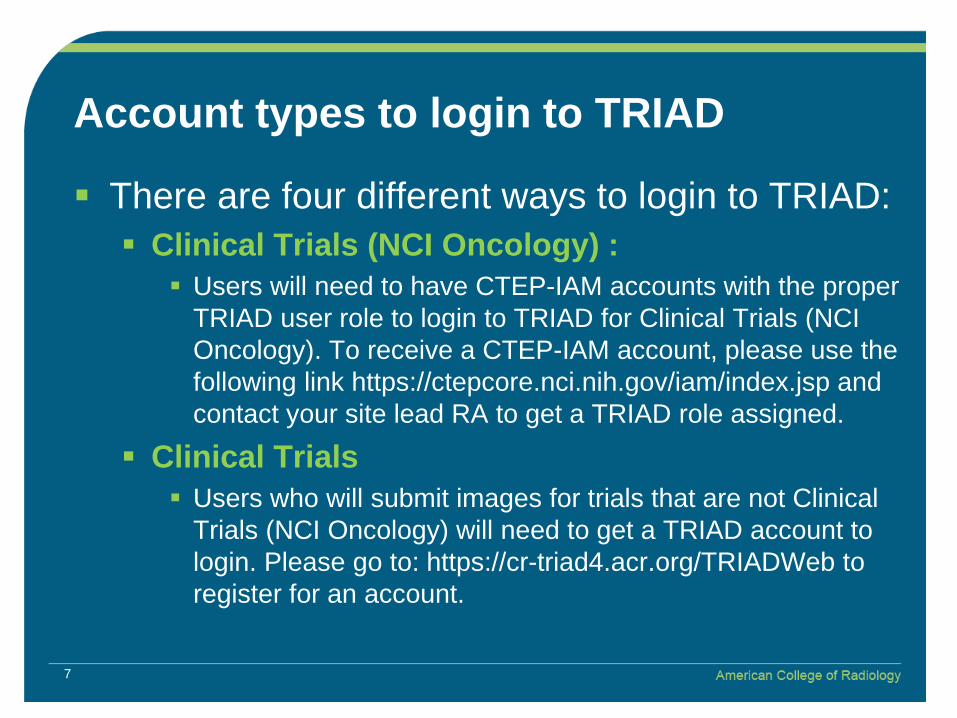
Account types to login to TRIAD
There are four different ways to login to TRIAD: Clinical Trials (NCI Oncology) :
Users will need to have CTEP-IAM accounts with the proper TRIAD user role to login to TRIAD for Clinical Trials (NCI Oncology). To receive a CTEP-IAM account, please use the following link https://ctepcore.nci.nih.gov/iam/index.jsp and contact your site lead RA to get a TRIAD role assigned.
Clinical Trials Users who will submit images for trials that are not Clinical
Trials (NCI Oncology) will need to get a TRIAD account to login. Please go to: https://cr-triad4.acr.org/TRIADWeb to register for an account.
7

Account types to login to TRIAD (cont.) IDEAS
Users who will submit images for IDEAS will need to use their assigned IDEAS ID . Information about IDEAS user accounts can be found at: https://app.ideas-study.org/
Clinical Trials (Custom) =>PRESERVE trial Users who will submit images for trials included in Clinical
Trials (Custom) will need to get a TRIAD account to login. Please go to: https://cr-prest4-web.acr.org/TriadWeb/Home.aspx to register for an account.
Same user may potentially have trials that will require them to login to TRIAD using both IDs
8

Login to TRIAD Clinical Trials (NCI Oncology) Domain
Domain(selectable drop-down menu) Use a CTEP-IAM account to log
into TRIAD Clinical Trials (NCI Oncology) domain.
9

Login to Clinical Trials Domain
Enter the email registered for TRIAD and click on Submit
10
Use the Username and Password that you received when registered on the TRIAD website
Click on Forgot Password link to reset password

Clinical Trials and Clinical Trial (NCI Onc.) domains: Select Site & Trial Information
Select the Site & Trial from the dropdowns for which
the files are to be uploaded
Site/trial are from RSS for CTEP trials
11
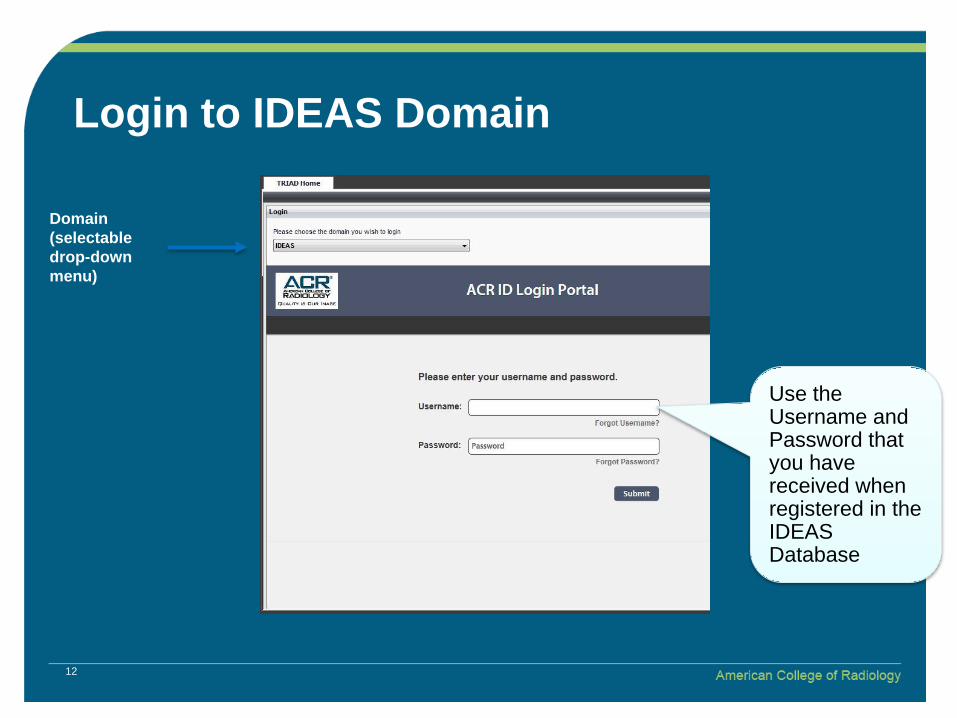
Login to IDEAS Domain
Use the Username and Password that you have received when registered in the IDEAS Database
Domain (selectable drop-down menu)
12
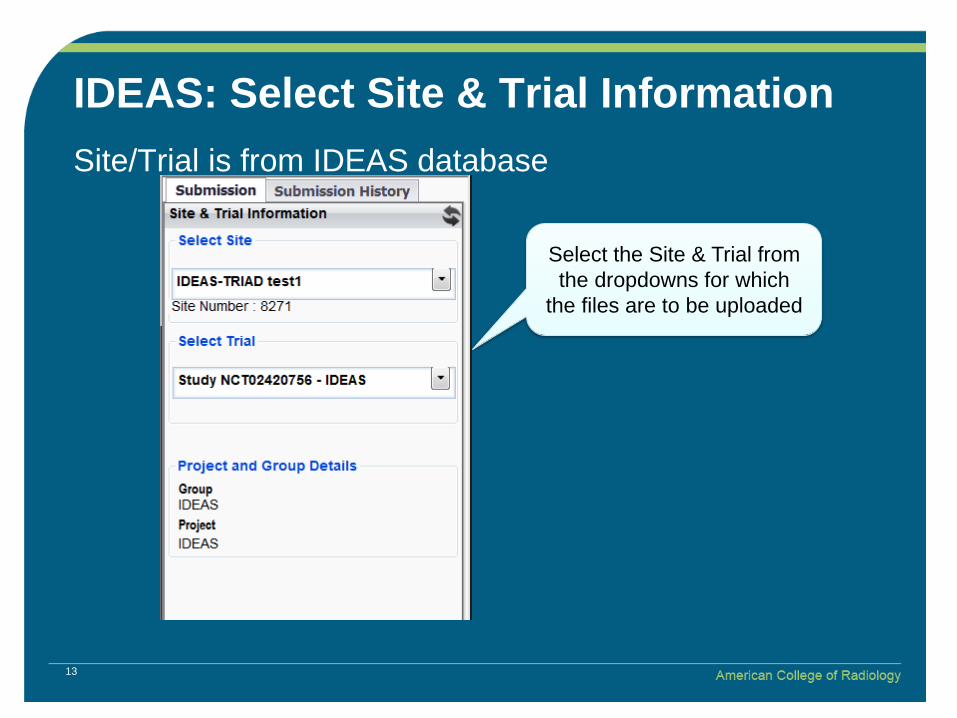
IDEAS: Select Site & Trial InformationSite/Trial is from IDEAS database
Select the Site & Trial from the dropdowns for which
the files are to be uploaded
13

Login to Clinical Trials (Custom) Domain
Domain (selectable drop-down menu)
**Once you are logged in your facility ID will be automatically populated. 14
Use the Username and Password that you have received when registered for a TRIAD Account

Submission Sources
TRIAD provides features for submitting files from multiple sources: Local computer / network drive: Files can be located
in local computer folders, local CD/DVD drives or network drives. There are two ways to upload data: Files: User can select single or multiple files Folders: User can select a folder and by selecting folder, all
files in the folder will also be selected automatically PACS: TRIAD has ability to query PACS for the
study to submit
15

Submit Files / Select Folder from Computer / Network Drive
16
Click on either Select Files or Select Folder to retrieve files from your computer or network drive
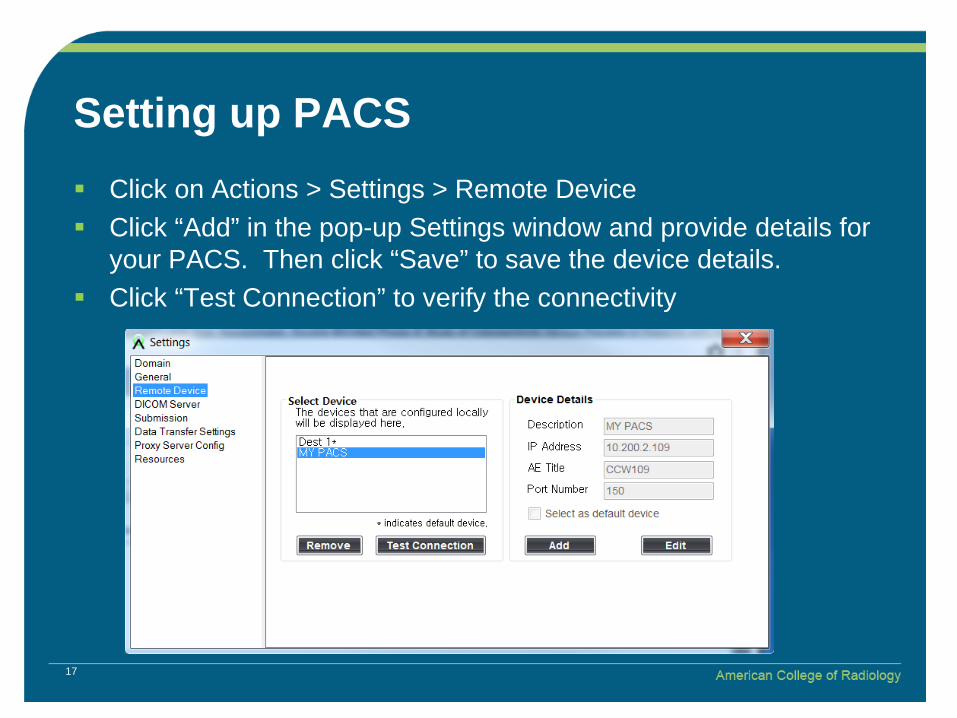
Setting up PACS Click on Actions > Settings > Remote Device Click “Add” in the pop-up Settings window and provide details for
your PACS. Then click “Save” to save the device details. Click “Test Connection” to verify the connectivity
17

Getting DICOM Information
Click on Actions > Settings > DICOM Server
Configure the PACS with these details.

TRIAD Windows Client Running In the Background TRIAD Windows Client will accept data from PACS
without having to login to a domain TRIAD Windows Client will need to remain open but
you do not have to be logged in for TRIAD to retrieve data.
DICOM Listener Status Active: TRIAD accepting data Stopped: TRIAD is not accepting data. Check the log file for
errors. (See the Export Logs slide for instructions)
DICOM Listener Status
19
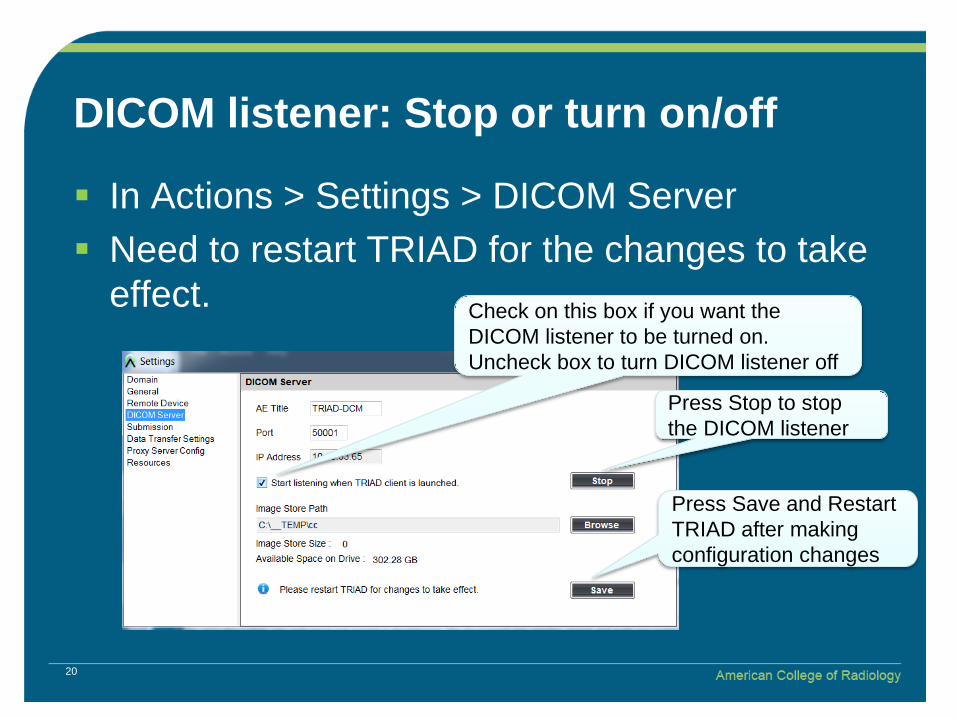
DICOM listener: Stop or turn on/off
In Actions > Settings > DICOM Server Need to restart TRIAD for the changes to take
effect. Check on this box if you want the DICOM listener to be turned on. Uncheck box to turn DICOM listener off
Press Save and Restart TRIAD after making configuration changes
Press Stop to stop the DICOM listener
20

Select Files from PACS
Click ‘Select from PACS’ to open a new window to search for images in PACS
21

Query and Retrieve from PACS
22
Provide the ‘Search’ details and click on ‘Search’
Select images and click Retrieve Selected Studies
Select PACS from dropdown
Select images and click Load Selected Studies to load into the TRIAD preview panel

Preview Panel
23
Files selected from Computer/PACS are loaded into the TRIAD preview panel
Click on ‘+’ icon to expand the DICOM study and view all the series in that study

View Images View images loaded in the preview panel before moving
them to “Submission Queue” Double click on the thumbnail to view images in series
by using default “QC Viewer”.
24

Clean Pixel Data
25
• Clean any patient data that may be on the images by using ‘Clean Pixel Data’ feature. The clean pixel data tool propagate across all images in the series.
• Open the clean pixel data window by clicking ‘Clean’ button.

Clean Pixel Data (cont.)
You can specify how many objects that will display per page.
Total count of images Click arrow buttons to change pages.
Edit Image or double-click on an image to clean

Pixel Cleaning on Multiple Images
27
Draw a rectangle that would cover the data.
Select a rectangle that was drawn
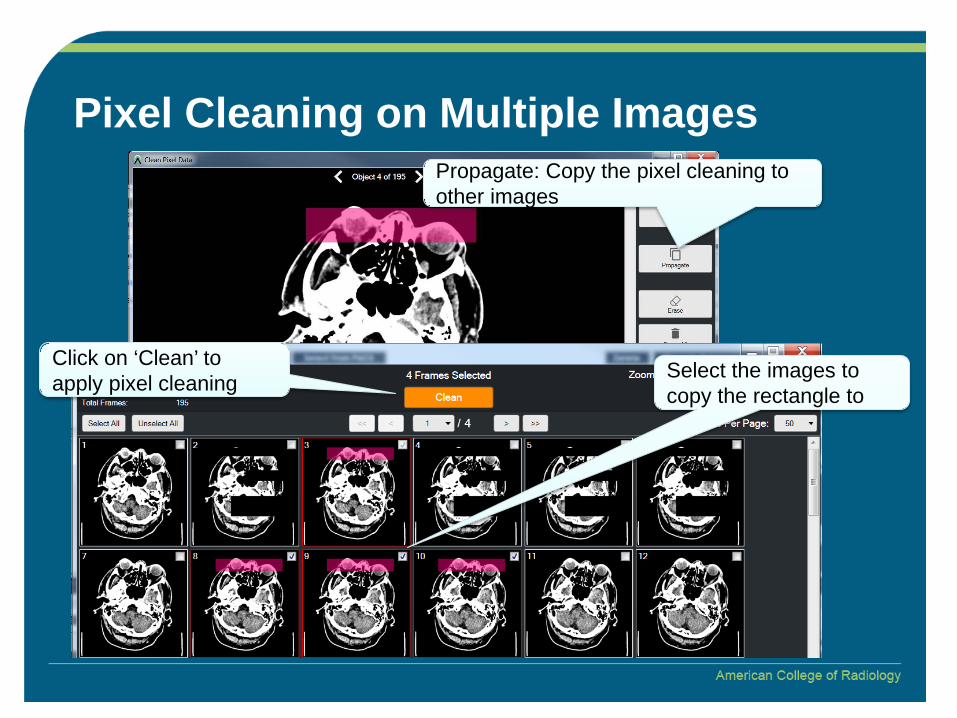
Pixel Cleaning on Multiple ImagesPropagate: Copy the pixel cleaning to other images
Select the images to copy the rectangle to
Click on ‘Clean’ to apply pixel cleaning

Pixel Cleaning on Multiple Images (cont.)
Select the images to apply the pixel cleaning
Then press ‘Propagate to selected images’
29
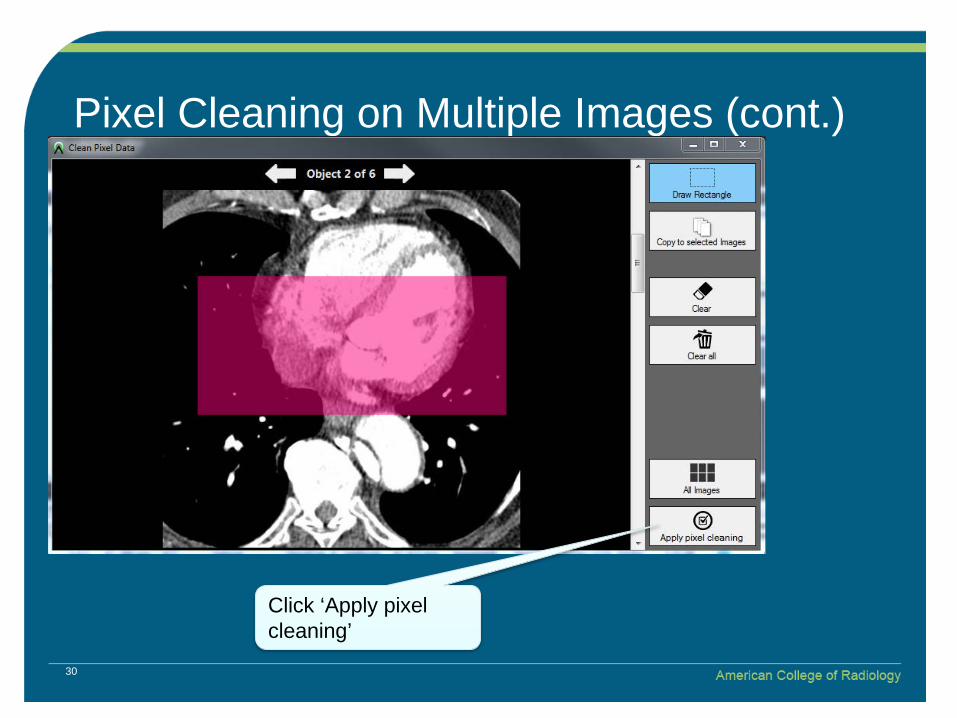
Pixel Cleaning on Multiple Images (cont.)
Click ‘Apply pixel cleaning’
30

Pixel Cleaning on Multiple Images (cont.)
Click ‘Confirm clean pixel’
31
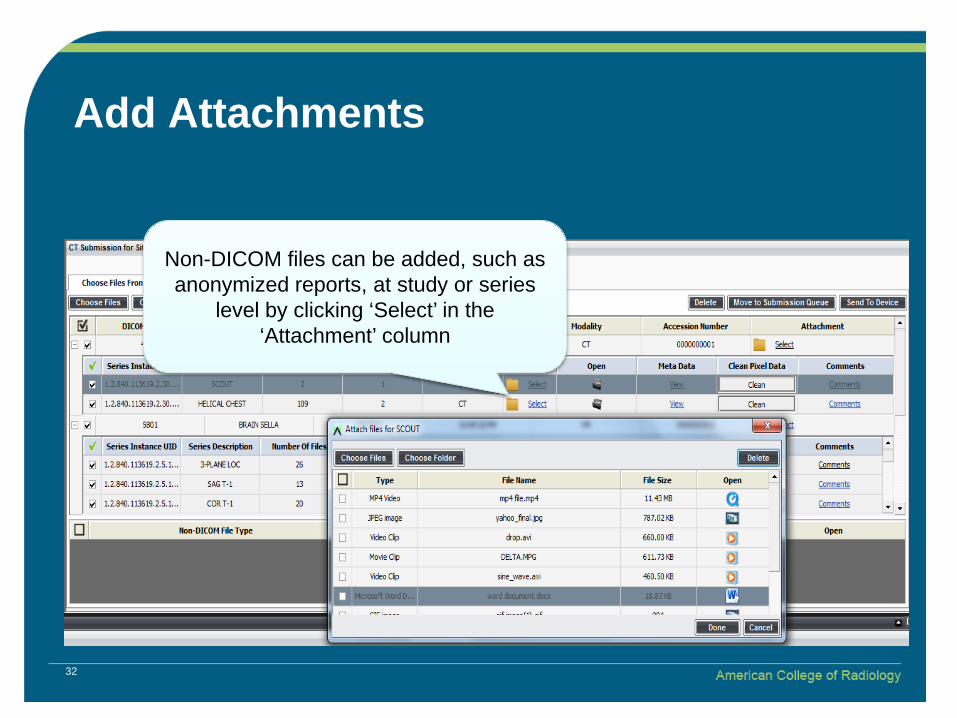
Add Attachments
Non-DICOM files can be added, such as anonymized reports, at study or series
level by clicking ‘Select’ in the ‘Attachment’ column
32
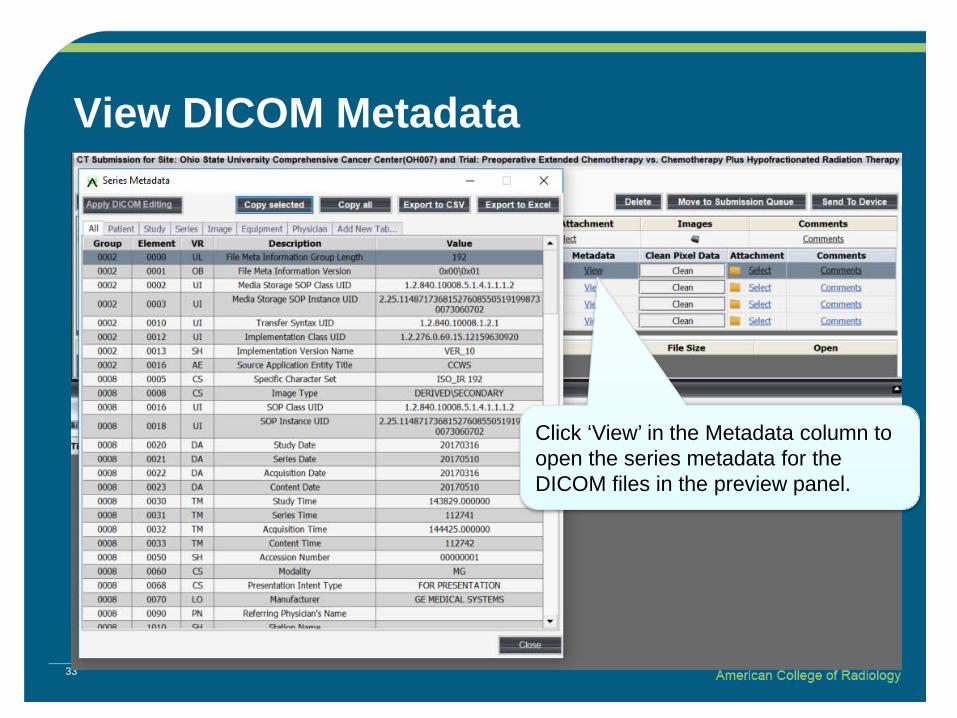
View DICOM Metadata
33
Click ‘View’ in the Metadata column to open the series metadata for the DICOM files in the preview panel.

Add Comments
34
Comments can be added for each series by clicking the “Comments” link.Click ‘Save’ after entering comments in the pop-up window.

Move for SubmissionSelect the series / series that are ready for submission by clicking the check boxes.
Click ‘Move to Submission Queue’ button to move the studies to Submission Queue
35
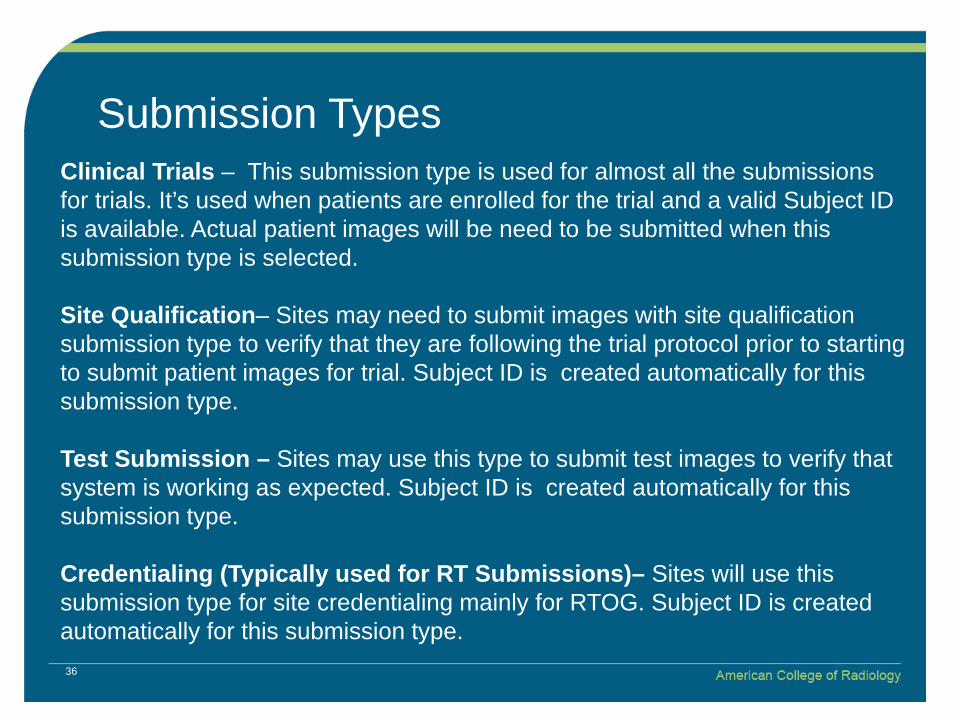
Clinical Trials – This submission type is used for almost all the submissions for trials. It’s used when patients are enrolled for the trial and a valid Subject ID is available. Actual patient images will be need to be submitted when this submission type is selected.
Site Qualification– Sites may need to submit images with site qualification submission type to verify that they are following the trial protocol prior to starting to submit patient images for trial. Subject ID is created automatically for this submission type.
Test Submission – Sites may use this type to submit test images to verify that system is working as expected. Subject ID is created automatically for this submission type.
Credentialing (Typically used for RT Submissions)– Sites will use this submission type for site credentialing mainly for RTOG. Subject ID is created automatically for this submission type.
Submission Types
36
Submission Queue
SUBMISSION: Clinical Trials Domain
37
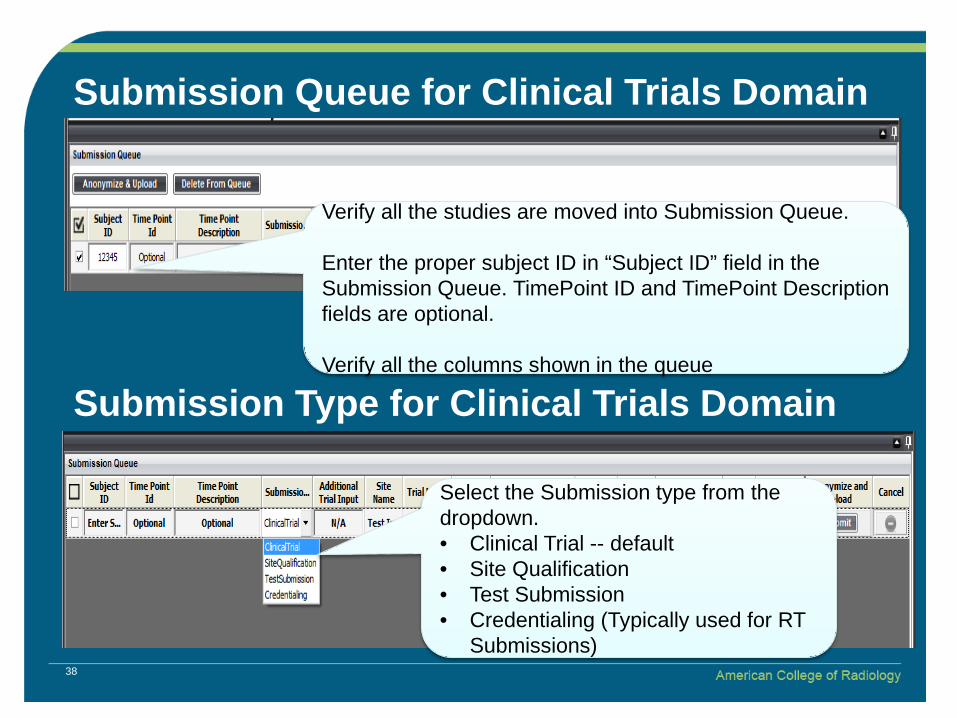
Verify all the studies are moved into Submission Queue.
Enter the proper subject ID in “Subject ID” field in the Submission Queue. TimePoint ID and TimePoint Description fields are optional.
Verify all the columns shown in the queue
Submission Queue for Clinical Trials Domain
Select the Submission type from the dropdown.• Clinical Trial -- default• Site Qualification• Test Submission• Credentialing (Typically used for RT
Submissions)
Submission Type for Clinical Trials Domain
38
Submission Queue
SUBMISSION: Clinical Trials (NCI Oncology) Domain
39
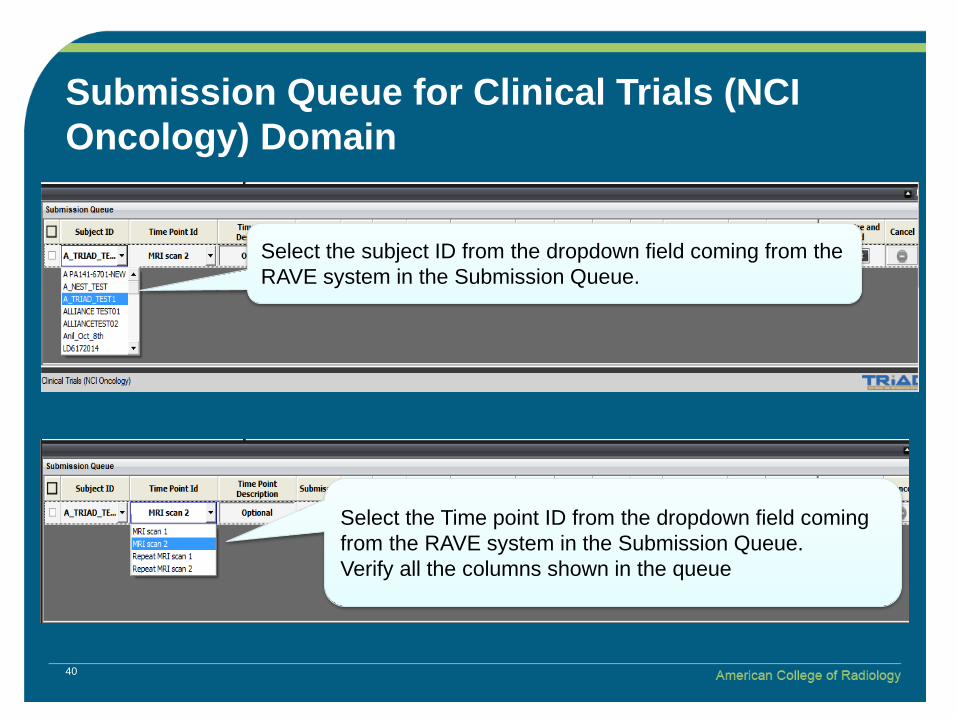
Select the Time point ID from the dropdown field coming from the RAVE system in the Submission Queue.Verify all the columns shown in the queue
Select the subject ID from the dropdown field coming from the RAVE system in the Submission Queue.
Submission Queue for Clinical Trials (NCI Oncology) Domain
40
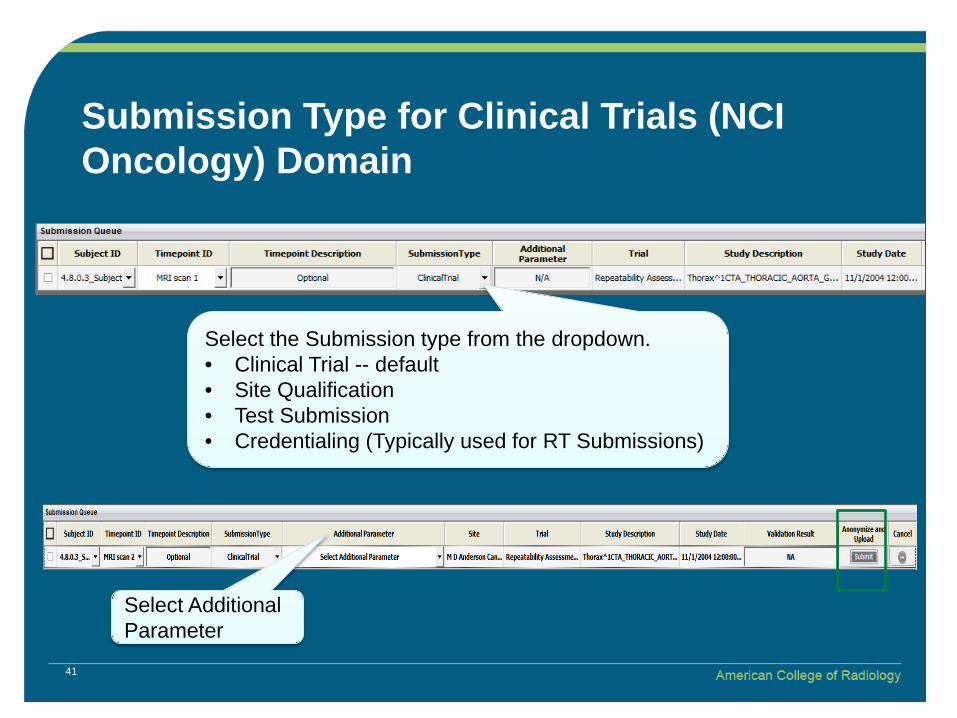
Submission Type for Clinical Trials (NCI Oncology) Domain
Select the Submission type from the dropdown.• Clinical Trial -- default• Site Qualification• Test Submission• Credentialing (Typically used for RT Submissions)
Select Additional Parameter
41
Submission Queue
SUBMISSION: Clinical Trials (Custom) Domain
42

Submission Queue for Clinical Trials (Custom) Domain
Select the subject ID from the dropdown field. Subject ID’s are pre-populated. Tip: begin typing your site id-subject id
Select the ‘Image Code” from the dropdown field. Image codes are pre-populated
43

Submission Type for Clinical Trials (Custom) Domain
Image Type is auto populated based on your Image Code selection.
Select ClinicalTrial from dropdown
44
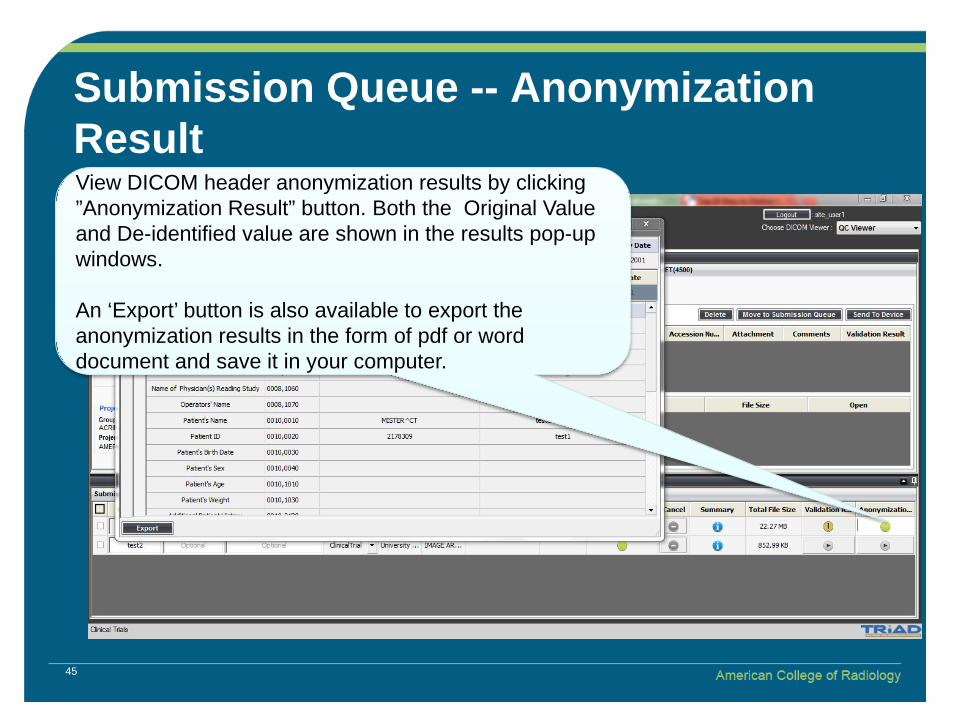
Submission Queue -- AnonymizationResultView DICOM header anonymization results by clicking ”Anonymization Result” button. Both the Original Value and De-identified value are shown in the results pop-up windows.
An ‘Export’ button is also available to export the anonymization results in the form of pdf or word document and save it in your computer.
45

Validation Result1. Click the “Validation Result” to check
whether the series have the values to satisfy for the requirements of the trial
2. Check how many of the series are in Range or Out of range of the validation parameters and how many are not validated
3. The system will allow submission of studies irrespective of the validation result
Click to Check the validation result for RT structure
46

Validation Result
If there are no validation profiles assigned for a Site and Trial combination, they system will display ‘N/A’ in the Validation Result column.
47

Validation Result for RT structure
48
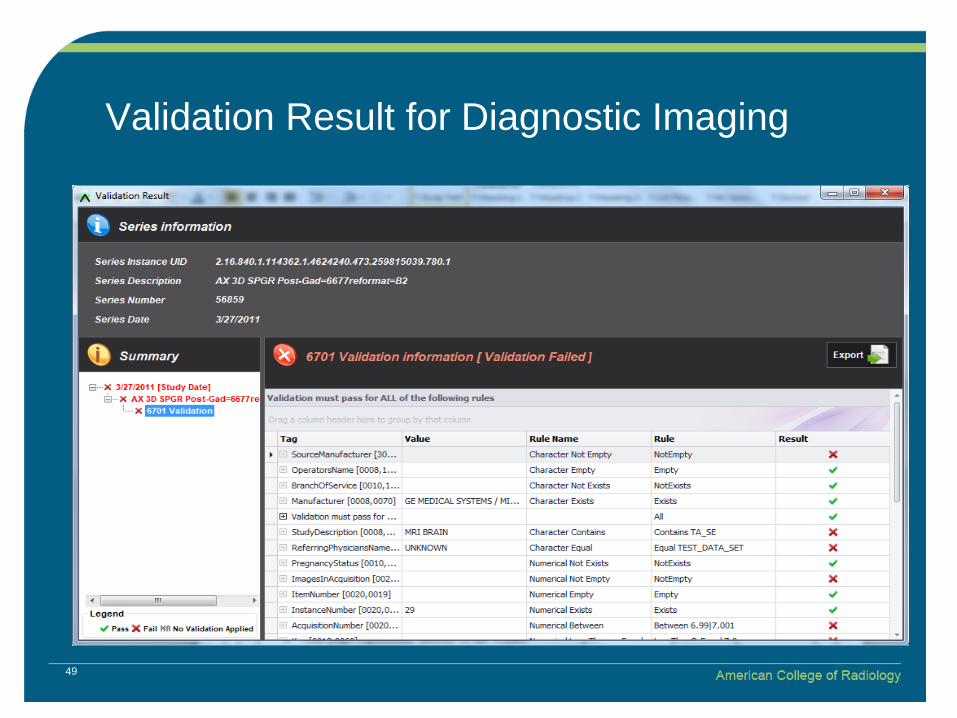
Validation Result for Diagnostic Imaging
49
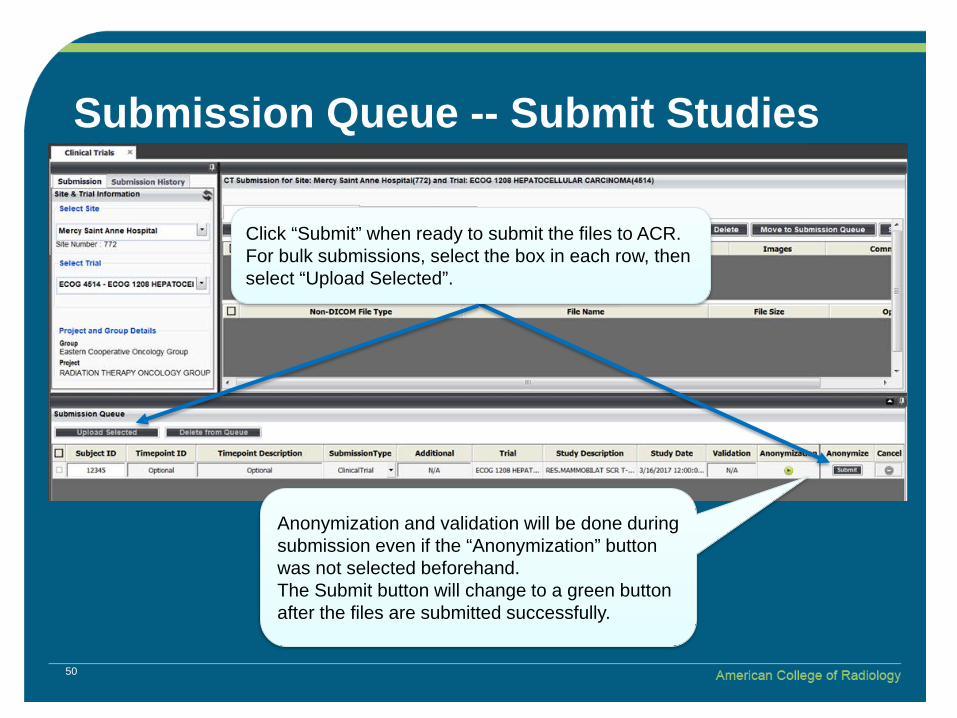
Submission Queue -- Submit Studies
Click “Submit” when ready to submit the files to ACR. For bulk submissions, select the box in each row, then select “Upload Selected”.
Anonymization and validation will be done during submission even if the “Anonymization” button was not selected beforehand. The Submit button will change to a green button after the files are submitted successfully.
50
Submission History
51
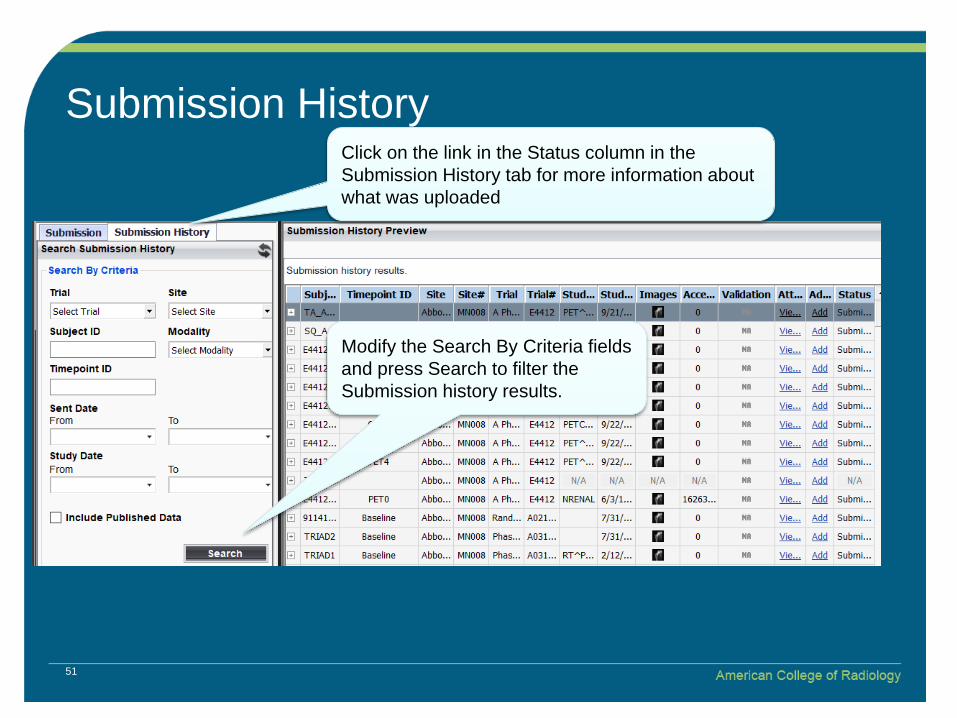
Click on the link in the Status column in the Submission History tab for more information about what was uploaded
Modify the Search By Criteria fields and press Search to filter the Submission history results.
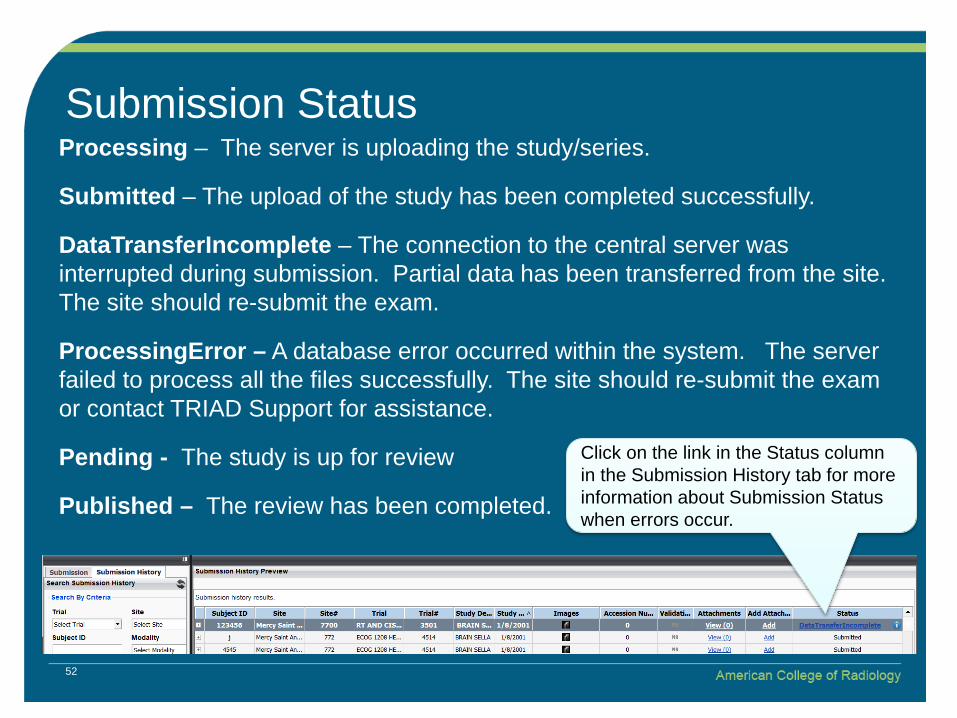
Processing – The server is uploading the study/series.
Submitted – The upload of the study has been completed successfully.
DataTransferIncomplete – The connection to the central server was interrupted during submission. Partial data has been transferred from the site. The site should re-submit the exam.
ProcessingError – A database error occurred within the system. The server failed to process all the files successfully. The site should re-submit the exam or contact TRIAD Support for assistance.
Pending - The study is up for review
Published – The review has been completed.
Submission Status
Click on the link in the Status column in the Submission History tab for more information about Submission Status when errors occur.
52
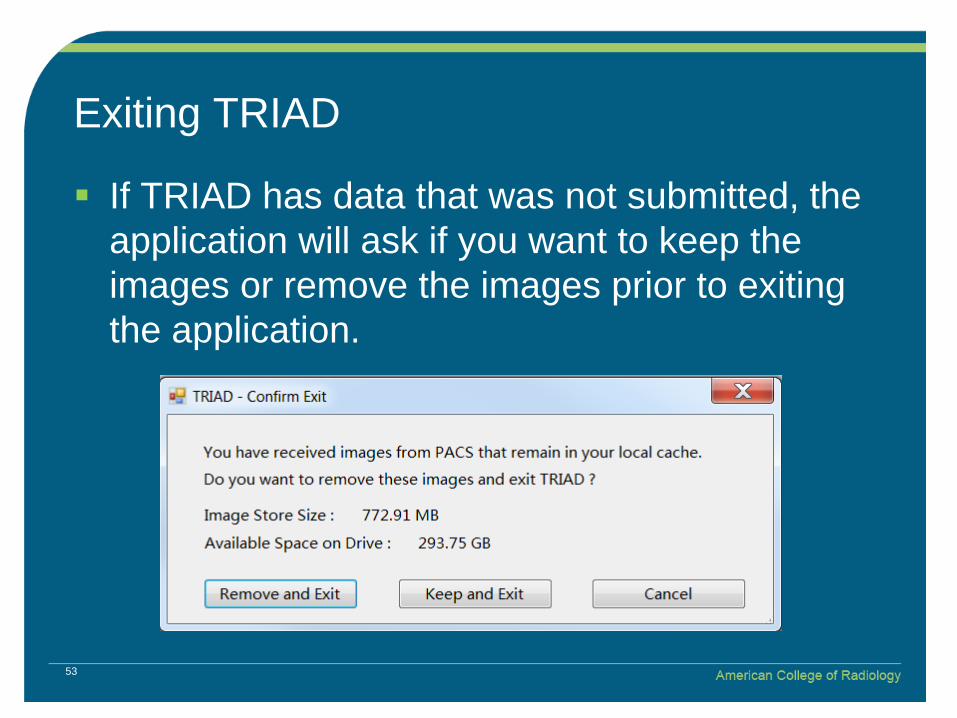
Exiting TRIAD
If TRIAD has data that was not submitted, the application will ask if you want to keep the images or remove the images prior to exiting the application.
53

Data Transfer Settings In Actions > Settings > Data Transfer Settings
Optimal Data Transfer Default mode for submissions Used for faster uploads TCP (33001) and UDP (33001-33500) ports must allow outbound
connections In case of any failures with submissions, the system will
automatically switch to Standard Data Transfer mode Ethernet connection is required for large submissions
Standard Data Transfer Traditional way to upload files
54

Export Logs
Export TRIAD debug log files to send to TRIAD Support when issues occur.
Click on Export Logs
Select the location on where you would like to put the file. Press Save.
55

TRIAD Support If you have any questions or issues, please contact ACR
TRIAD support services Support Hours: 8am – 5pm EST Monday – Friday except
ACR observed holidays Support contact:
[email protected] or 703-390-9858 (Select option 1)
For any additional information, please check the TRIAD web site at: http://triadhelp.acr.org
56