windows 8.1 icon: windows 10 icon · 2019-09-19 · 1 hshs byod wireless connection windows 8.1 and...
TRANSCRIPT

1 HSHS BYOD Wireless Connection
Windows 8.1 and Windows 10 a) Connect to wireless network • Click on the wireless icon in taskbar.
Windows 8.1 icon: Windows 10 icon:
• Select “detnsw” and click on “Connect”.
or
• Enter credentials in format below – your DEC username, including any numbers, followed by @detnsw and your DEC password. If you are unsure of password, get your teacher to reset it. Click on “OK”.
or
• Click on “Connect”. If Wi-fi doesn’t show as “Connected” you need to restart and go through the process again.

2 HSHS BYOD Wireless Connection
b) Enter proxy settings • Search for “Internet Options” or right click on Windows button on bottom left of your desktop and go to Control Panel > Network and Internet > Internet Options.
• Select “Connections” tab and Click on “LAN settings”. In LAN settings check “Automatically detect settings”.
• Click on “OK” on LAN Settings box and “OK” on Internet Properties box to close “Internet options”. • Open www.google.com.au in a web browser and enter your DEC username and password if credential box appears. Make sure you can browse the internet successfully as this means your proxy settings are correct.
3 HSHS BYOD Wireless Connection
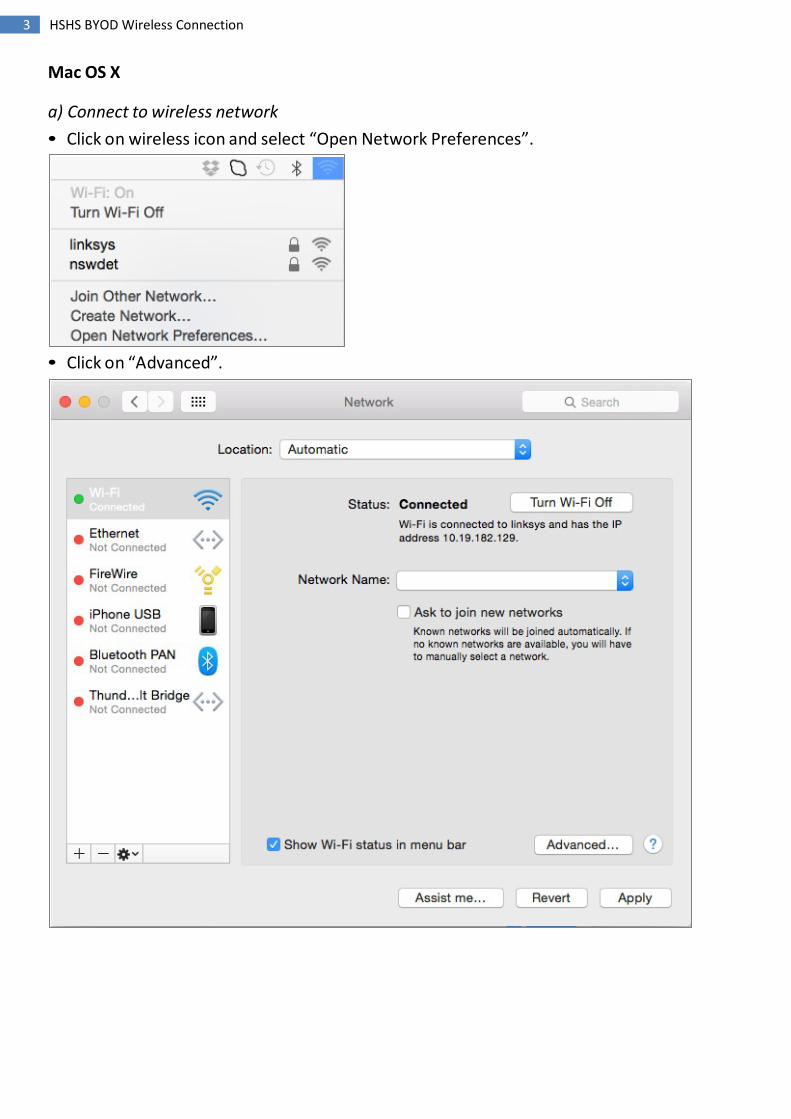
Mac OS X a) Connect to wireless network • Click on wireless icon and select “Open Network Preferences”.
• Click on “Advanced”.

4 HSHS BYOD Wireless Connection
• Click on the “+” symbol to add a new network profile. • Enter network details and credentials in format below – your DEC username, including any numbers, followed by @detnsw and your DEC password. If you are unsure of your password, ask your teacher to reset it. Click on “OK”.
• If the “Verify Certificate” box appears click on “Continue”.

5 HSHS BYOD Wireless Connection
• If the message below appears, enter your administrator username and password to allow the changes to your “Certificate Trust Settings”.
• Once the network is connected the status in “Network Preferences” will appear as below. Note that authentication may take up to a minute.

6 HSHS BYOD Wireless Connection
b) Enter proxy settings • Click on “Advanced” and select “Proxies” tab and check “Auto Proxy Discovery”. and click on “OK”.
• Click on “Apply” in main “Network Preferences” window and close the application. • Open www.google.com.au in a web browser and enter your DEC username and password if credential box appears. Make sure you can browse the internet successfully as this means your proxy settings are correct.

7 HSHS BYOD Wireless Connection
Windows 7 a) Configure wireless network settings • Click on the wireless icon in taskbar.
• Select “Open Network and Sharing Center”
• Select “Manage Wireless Networks”.
• Click on “Add”.

8 HSHS BYOD Wireless Connection
• Select “Manually create a network profile”. • Enter network details as below and click on “Next”.
• Select “Change connection settings”.

9 HSHS BYOD Wireless Connection
• Select “Security” tab and click on “Settings”. • Uncheck “Validate server certificate” and click on “Configure”.

10 HSHS BYOD Wireless Connection
• Uncheck “Automatically use my Windows logon name and password…” and click on “OK” and “OK” again to close “Protected EAP Properties”.
• In “Security” tab click on “Advanced Settings” and check “Specify authentication mode” and use drop down box select “User authentication”. Click on “OK” and “OK” to close all the dialog boxes.
b) Connect to wireless network • Click on the message below so that credential box appears.
• Enter credentials in format below – your DEC username, including any numbers, followed by @detnsw and your DEC password. If you are unsure of your password, get your teacher to reset it, before you try to connect. Click on “OK”.
11 HSHS BYOD Wireless Connection
• If the wireless does not connect, click on wireless icon in taskbar to display available networks, select detnsw network and click on “Disconnect” followed by “Connect”. This will cause credential box to reappear. Sometimes you may need to type in your credentials multiple times before you will be connected to the wireless network.
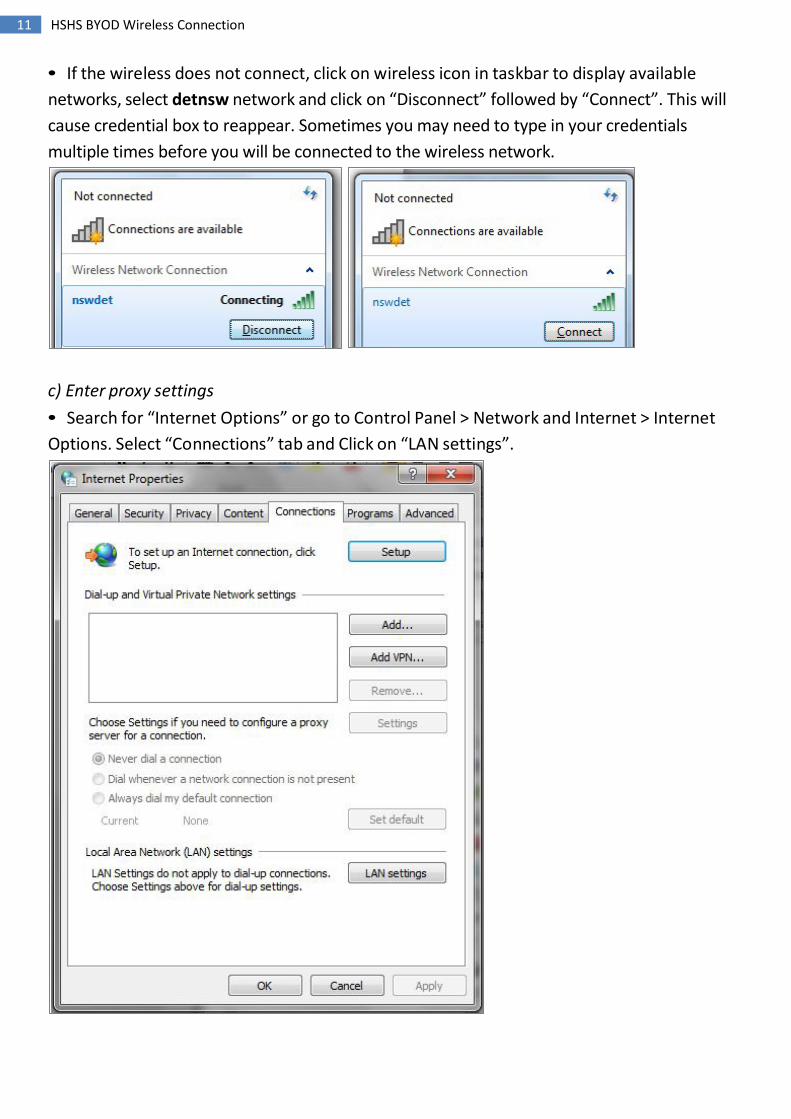
c) Enter proxy settings • Search for “Internet Options” or go to Control Panel > Network and Internet > Internet Options. Select “Connections” tab and Click on “LAN settings”.

12 HSHS BYOD Wireless Connection
• Check “Automatically detect settings” • Click on “OK” and “OK” again to close “Internet options”. • Open www.google.com.au in a web browser and enter your DEC username and password when credential box appears. Make sure you can browse the internet successfully as this means your proxy settings are correct.

13 HSHS BYOD Wireless Connection
Mac iOS a) Connect to wireless network • Tap the “Settings” icon on Home screen and select “Wi-fi”. Select detnsw network.
• Enter credentials in format below – your DEC username, including any numbers, followed by @detnsw and your DEC password. If you are unsure of your password, get your teacher to reset it before you try to connect. Tap on “Join”.
• When the “Certificate” box appears tap on “Accept”.

14 HSHS BYOD Wireless Connection
b) Enter proxy settings • Tap on icon next to detnsw.
• Select “Auto” in “HTTP PROXY” settings and click on “OK”.
• Close “Settings”. • Open www.google.com.au in a web browser and enter your DEC username and password if credential box appears. Make sure you can browse the internet successfully as this means your proxy settings are correct.