wilfley pumps
TRANSCRIPT

WILFLEY PUMPS MODEL S3
Installation, Operation, Maintenance, and Storage Instructions

WILFLEY
Form A1381 rev – 1
FOREWORD
This manual provides instructions for the Installation, Operation, Maintenance, and Storage of the Wilfley Model S3 Standard Pump. This manual covers the standard product plus common options that are available. For special options, supplemental instructions are supplied. This manual must be read and understood before installation and start-up. The design, materials, and workmanship incorporated in the construction of Wilfley pumps makes them capable of giving trouble-free service. The life and satisfactory service of any mechanical unit, however, is enhanced and extended by correct application, proper installation, periodic inspection, condition monitoring and careful maintenance. This instruction manual was prepared to assist operators in understanding the construction and the correct methods of installing, operating, maintaining, and storing these pumps. Wilfley shall not be liable for damage or delays caused by a failure to observe the instructions for Installation, Operation, Maintenance, and Storage, contained in this manual. Warranty is valid only when genuine Wilfley parts are used. Contact your local Wilfley representative for basic warranty information and before making any changes. Use of the equipment on a service other than stated in the order could nullify the warranty, unless written approval is obtained in advance from A.R. Wilfley and Sons, Inc. To assure proper installation, supervision from an authorized manufacturer’s representative is recommended. Additional manuals can be obtained by contacting your local Wilfley representative. THIS MANUAL EXPLAINS
• Proper Storage • Proper Installation • Start-up Procedures • Operating Procedures • Preventive Maintenance • Pump Overhaul • Trouble Shooting • Ordering Spares or Repair

WILFLEY
TABLE OF CONTENTS
1.0 INTRODUCTION.............................. 3
2.0 SAFETY CONSIDERATIONS.......... 3
3.0 GENERAL INFORMATION.............. 4
3.1 Storage Requirements.................. 4
3.2 Handling.......................................... 5
4.0 INSTALLATION ............................... 6
4.1 Factory Preliminary Alignment Procedure ............................................... 7
4.2 Recommended Procedure for Baseplate Installation and Final Field Alignment ................................... 7
4.3 Piping Connection – Suction/Discharge.............................. 11
4.4 DryLock Seal ............................... 12
4.5 Coupling........................................ 12
4.6 Coupling Guard........................... 12
5.0 OPERATION .................................. 13
5.1 Rotation Check............................ 13
5.2 Pre Start-Up Checks................... 13
5.3 Start-Up Considerations............ 14
5.4 Starting The Pump And Adjusting Flow................................... 15
5.5 Operation In Sub-Freezing Conditions ............................................16
5.6 Shutdown Considerations..........16
6.0 PREVENTIVE MAINTENANCE ..... 16
6.1 General Servicing........................16
6.2 Periodic Servicing .......................16
6.3 Maintenance Troubleshooting..17
7.0 S3 WITH DRYLOCK SEAL DISASSEMBLY & REASSEMBLY...... 20
7.1 Disassembly..................................21
7.2 Cleaning/Inspection ....................22
7.3 Critical Measurement and Tolerances ............................................23
7.4 Assembly .......................................23
7.5 DryLock Seal Troubleshooting33
8.0 LUBRICATION............................... 36
9.0 ORDERING PARTS....................... 36
10.0 SPECIAL SERVICE ..................... 37
LIST OF FIGURES
Figure 1 ………………………………………..………..6 Figure 2 ……………………………………..…………..6 Figure 3 …………………………………..……………..6 Figure 4 ………………………………..……………9,10 Figure 5 ………………………………………………..13 Figure 6 ………………………………………………..21
Form A1381 rev – 2

WILFLEY
Figure 7 ………………………………………………..26 Figure 8 ………………………………………………..36
1.0 INTRODUCTION This manual contains instructions and guidelines for the installation, operation, maintenance, and storage of the Wilfley S3 Standard Pump. There are many factors affecting the successful installation, operation, and maintenance of a pump. From one pump to the next there is typically significant variation in these factors. This makes it impossible to create a bulletin that covers all situations. Therefore, the information contained herein is meant to serve only as a general guideline. If detailed questions or problems arise, contact the Wilfley Sales Office or Distributor/Representative. It is extremely important that this entire manual be read prior to installation or start-up of the pump. This is important for safety, for proper performance of the pump, and for maximum Mean Time Between Planned Maintenance (MTBPM).
2.0 SAFETY CONSIDERATIONS Like all machinery, centrifugal pumps can be dangerous if used improperly. Any of the following misuses may result in a pump that does not function properly. A pump that does not function properly may be a hazard and could cause damage or injury. For maximum safety and reliability, use only factory supplied parts and closely follow all maintenance and operating recommendations and instructions. Do not change the pumping conditions or installations of a Wilfley pump without consulting A.R. Wilfley & Sons, Inc. first to ascertain if the pump is capable of handling the new conditions and/or fluid.
It is not possible to list all the conceivable misuses. Therefore, the following list is not meant to be complete and is provided only as a guide of the types of misuse that can damage a pump and cause injury. The list will also give a good idea of the kinds of misuses that will void any and all warranties. 1) Do not run a pump with the discharge
valve closed. 2) Do not run a pump in the reverse
direction. 3) Do not start a pump that is “wind-milling”
in the reserve direction due to fluid flowing back down the discharge pipe.
4) Do not continue to operate a pump when there are indications that something is rubbing, binding or knocking.
5) Do not continue to run a pump that gives an indication of overheating.
6) Do not operate a pump with the coupling guard removed. Make sure the guard fits snugly around the coupling so there are no openings.
7) Do not operate a pump that is vibrating, surging, or making abnormal noise.
8) Do not work on a pump unless the drive system is locked out and the pump is disconnected from the drive system.
9) Do not connect the pump to the drive system without first checking to see that the drive system is running in the correct direction.
10) Do not rely on the factory’s alignment of the pump and the drive system. Alignment may have changed during shipment.
11) Do not put a cold liquid in or on a hot pump or a hot liquid in or on a cold pump.
12) Do not hit a pump with any object. 13) Do not use worn or faulty parts. 14) Do not stick hands, arms, legs or any
other object into the discharge, suction or any other opening of a pump.
15) Do not weld attachments to the pump. 16) Do not apply external heat to the pump. 17) Do not lift the pump by its case only. 18) Do not examine a pump without using
proper eye and face protection. 19) Do not run equipment dry or start the
pump without the proper prime (Casing Flooded).
Form A1381 rev – 3
WILFLEY
Form A1381 rev – 4
20) Do not exceed the maximum design pressure (MDP) at the temperature shown on pump nameplate.
The Wilfley S3 process pump has been designed and manufactured for safe operation. In order to ensure safe operation, it is very important that this manual be read in its entirety prior to installing or operating the pump. Wilfley shall not be liable for physical injury, damage or delays caused by a failure to observe the instructions for installation, operation and maintenance contained in this manual. Remember that every pump has the potential to be dangerous, because of the following factors: • Parts are rotating at high speeds. • High pressures may be present. • High temperatures may be present. • Highly corrosive and/or toxic chemicals may be present. Paying constant attention to safety is always extremely important. However, there are often situations that require special attention. These situations are indicated throughout this book by the following symbols:
DANGER – Immediate hazards which WILL result in severe personal injury or death.
WARNING – Hazards or unsafe practices which COULD result in severe personal injury or death.
CAUTION - Hazards or unsafe practices, which COULD result in minor personal injury or product or property damage. NOTE: ALWAYS COORDINATE REPAIR ACTIVITY WITH OPERATIONS PERSONNEL, AND FOLLOW ALL PLANT SAFETY
REQUIREMENTS AND APPLICABLE SAFETY AND HEALTH LAWS/REGULATIONS. SAFTEY TIPS APPAREL
• Insulated work gloves when handling hot bearings or using bearing heater
• Heavy work gloves when handling parts with sharp edges, especially impellers
• Safety glasses (with side shields) for eye protection, especially in machine shop areas
• Steel-toed shoes for protection when handling parts, heavy tools, etc.
• Other personal protective equipment to protect against hazardous/toxic fluids
MAINTENANCE
• Always lockout power • Ensure pump is isolated from system and
pressure is relieved before disassembling pump, removing plugs, or disconnecting piping
• Use proper lifting and supporting equipment to prevent serious injury
• Observe proper decontamination procedures
• Know and follow company safety regulations
• Never apply heat to remove impeller • Observe all cautions and warnings
highlighted in pump instruction manual
3.0 GENERAL INFORMATION 3.1 Storage Requirements If the pump is inoperative for a long period of time, it is recommended that the pump be flushed and drained to minimize corrosion. It is also advisable to drain the lines and case if there is a possibility of freezing. If the pump is to be stored for more than 15 days, the pump should be rotated once a week to lubricate and to prevent rusting of the bearings.

WILFLEY
Long Term Storage The following guidelines should be followed when the pump or parts will be idle for a period of one month or more. PUMP STORAGE
1. All machined metal surfaces should be coated with a suitable corrosion inhibitor to ensure the integrity of these surfaces at the time of installation. 2. All openings must be covered with suitable covers to protect against contaminants. 3. Storage of the Components and Assemblies should be kept away from all potential vibration sources. (ie, motors, rotating pumps, engines, etc.). This is to prevent unwanted vibration and possible brineling of the bearings. 4. Components and Assemblies are required to be stored indoors in a dry location. Temperature range should be between 40 degrees and 100 degrees Fahrenheit. If the environment is excessively humid, over 70%, a suitable desiccant should be used. 5. Pump shafts are required to be rotated 5 full revolutions weekly to ensure that the bearings are properly covered with lubricant. PARTS STORAGE
Not all parts are packaged in a suitable manner from the factory for long-term storage. To ensure a parts satisfactory performance, the part must be protected from corrosion and contamination. MOTOR AND SEAL STORAGE Refer to the manufacturers manuals for storage instructions for these items.
3.2 Handling The following describes how to lift pump components, assembled pumps, or pump, motor and baseplate assemblies. Do not attempt to lift a pump mounted on a baseplate by itself. Only a pump-motor assembly may be lifted after installed on a baseplate. Lifting should only be done by trained personnel. Pumps and motors often have integral lifting eyes or eye bolts. These are intended for use in lifting the individual piece of equipment.
Do not use eyebolts or cast-in lifting lugs to lift pump, motor, and baseplate assemblies. Before lifting the equipment refer to the pump data sheet for the complete assembly weight. Pump Components:
Casing: Use a choker hitch pulled tight around the discharge nozzle.
Bearing frame: Insert a sling between the upper and lower support ribs between the housing barrel and the casing attachment flange. Use a choker hitch when slinging. Caution; make sure there are no sharp edges on the bottom side of the ribs that could cut the sling. Bare Pump: Sling around the pump discharge nozzle, and around the outboard end of the bearing housing with separate slings. Choker hitches must be used at both attachment points and pulled tight. Make sure the completion of the choker hitch on the discharge nozzle is toward the coupling end of the pump shaft as shown in Figure 1. The sling lengths should be adjusted to balance the load before attaching the lifting hook.
Form A1381 rev – 5

WILFLEY
Figure 1
Pump, motor and steel baseplate assembly: Insert lifting S hooks in the lifting lugs and use slings or chains to connect to the lifting eye as shown in Figure 2. Do not use slings through the lifting holes.
Figure 2
Pump, motor and cast iron or non-metallic baseplate assembly: Non-metallic baseplates can easily be damaged in handling. Be careful to handle it gently and avoid any shocks. This assembly utilizes a wooden shipping palette that should be left intact until final installation. The assembly should be forklifted on the palette to the installation site and than removed only when ready to be installed. Sling around the pump discharge nozzle, and around the motor-mounting end of the baseplate as shown in Figure 3. Choker hitches must be used at both attachment points and pulled tight. The sling lengths should be adjusted to balance the load before attaching
the lifting hook. Do not use slings through any lifting holes and be careful not to damage the baseplate material.
Figure 3
4.0 INSTALLATION Inspection upon Arrival Your pump has been carefully inspected and tested prior to shipment to ensure that it meets your requirements. Please inspect the pump upon arrival for any damage that may have occurred during shipment. Report any damage immediately to the carrier. Leave all shipping covers attached to the pump unit until it is ready for installation. If installation is to be delayed more than 15 days, the pump shaft should be rotated by hand once a week to lubricate the bearings and prevent rusting. Choosing Pump Location The following recommendations may be helpful when choosing the best location for your pump:
1. Locate the pump as close to the liquid source as practical so the suction pipe is
Form A1381 rev – 6

WILFLEY
short and direct with a minimum of elbows, fittings and valves.
2. Place the pump in a location so the unit is accessible for inspection during operation as well as for maintenance operations involving removal and disassembly.
Foundation The foundation should be sufficient to absorb any vibration and to form a permanent, rigid support for the baseplate. This is important to maintain the correct alignment of the direct connected unit. A concrete foundation on a solid base is satisfactory. Foundation bolts of the proper size should be embedded in the concrete located as indicated on the outline drawing. Alignment The pump and motor are aligned at the factory before shipment. Realignment may be necessary after the complete unit has been leveled on the foundation and after the foundation bolts have been tightened. Procedures for checking and aligning the pump components are in section 4.2 of this manual and may also be found in the Hydraulic Institute Standards. Piping Both suction and discharge pipes should be supported independently near the pump so when the flange bolts are tightened no strain will be transmitted to the pump casing. Discharge Piping A valve should be installed in the discharge line to prevent fluid from flowing back through the pump when it is shut down. The valve should block the discharge line during maintenance. Suction Piping Care should be taken in sizing and locating suction piping to prevent cavitation. A valve should be installed in the suction line to prevent
fluid from flowing into the pump when it is shut down. Auxiliary Piping - Purge Piping When required, purge piping is supplied with the pump. An external connection should be made at the pump so purge flow can be varied as required by valving and the pressure can be monitored. Piping fittings and gauges must be corrosion resistant to the fluid being pumped. Piping Note Refer to the Hydraulic Institute Standards for centrifugal pumps for additional piping information. 4.1 Factory Preliminary Alignment Procedure The pump and motor are aligned at the factory to verify the assembly. 4.2 Recommended Procedure for Baseplate Installation and Final Field Alignment NEW GROUTED BASEPLATES 1. The pump foundation should be located as close to the source of the fluid to be pumped as practical. There should be adequate space for workers to install, operate, and maintain the pump. The foundation should be sufficient to absorb any vibration and should provide a rigid support for the pump and motor. Recommended mass of a concrete foundation should be three times that of the pump, motor and base. 2. Level the pump baseplate assembly with the pump and motor on the baseplate. The proper surfaces to reference when leveling the pump baseplate assembly are the pump suction and discharge flanges. DO NOT stress the baseplate. Do not bolt the suction or discharge flanges of the pump to the piping until the baseplate foundation is completely installed. If equipped, use leveling jackscrews to level the baseplate. If jackscrews
Form A1381 rev – 7

WILFLEY
Form A1381 rev – 8
are not provided, shims and wedges should be used. Check for levelness in both the longitudinal and lateral directions. Shims should be placed at all base anchor bolt locations, and in the middle edge of the base if the base is more than five feet long. Do not rely on the bottom of the baseplate to be flat. Standard baseplate bottoms are not machined, and it is not likely that the field-mounting surface is flat. 3. After leveling the baseplate, tighten the anchor bolts. If shims were used, make sure that the baseplate was shimmed near each anchor bolt before tightening. Failure to do this may result in a twist of the baseplate, which could make it impossible to obtain final alignment. Check the level of the baseplate to make sure that tightening the anchor bolts did not disturb the level of the baseplate. If the anchor bolts did change the level, adjust the jackscrews or shims as needed to level the baseplate. Continue adjusting the jackscrews or shims and tightening the anchor bolts until the baseplate is level. 4. Check initial alignment between the pump and driver with a straight edge and correct as needed. 5. Grout the baseplate. A non-shrinking grout should be used. Make sure that the grout fills the area under the baseplate. After the grout has cured, check for voids and repair them. Jackscrews, shims and wedges should be removed from under the baseplate at this time. If they were to be left in place, they could rust, swell, and cause distortion in the baseplate. 6. Run piping to the suction and discharge of the pump. There should be no piping loads transmitted to the pump after connection is made. Recheck the alignment to verify that there are no significant loads. 7. Use the following procedure and set-up the final alignment between the pump and driver. Step 8 follows the alignment section.
ALIGNMENT PROCEDURE
Before beginning any alignment procedure make sure driver power is locked out The points at which alignment is checked and adjusted are:
• Initial Alignment is done prior to operation when the pump and the driver are at ambient temperature
• Final Alignment is done after operation when the pump and driver are at operating temperature
Adding or removing shims under the feet of the motor and pump, and by shifting equipment horizontally as needed, achieves alignment. NOTE: Proper alignment is the responsibility of the installer and user of the unit, not Wilfley. Accurate alignment of the equipment must be obtained and sustained. Trouble free operation can be accomplished by following the proper procedures. ALIGNMENT CHECKS Initial Alignment (Cold Alignment)
• Before Grouting Baseplate – To ensure alignment can be obtained.
• After Grouting Baseplate – To ensure no changes have occurred during the grout process
• After Connecting Piping – To ensure pipe strains haven’t altered alignment. If changes have occurred, alter piping to remove pipe strains on pump flanges.
Final Alignment (Hot Alignment)
• After First Run – To obtain correct alignment when both pump and driver are at operating temperature. Thereafter, alignment should be checked periodically in accordance with plant operating procedures.

WILFLEY
Form A1381 rev – 9
ALIGNMENT CRITERIA Good alignment is achieved when the dial indicator readings are specified in the alignment procedure as .05mm (.002 in.) Total Indicated Reading (T.I.R.) or less when the pump and driver are at operating temperature (Final Alignment). During the installation phase, however, it is necessary to set the parallel alignment in the vertical direction to a different criteria due to differences in expansion rates of the pump and driver. Recommended preliminary (cold) settings for electric motor driven pumps based on different pumpage temperatures are listed in the following table.
VERTICAL COLD SETTING VALUES Pumpage Temp Set Driver Shaft
10°C (50°F) .05mm (.002in) LOW 50°C (122°F) .03mm (.001in) HIGH 150°C (302°F) .12mm (.005in) HIGH
SET UP
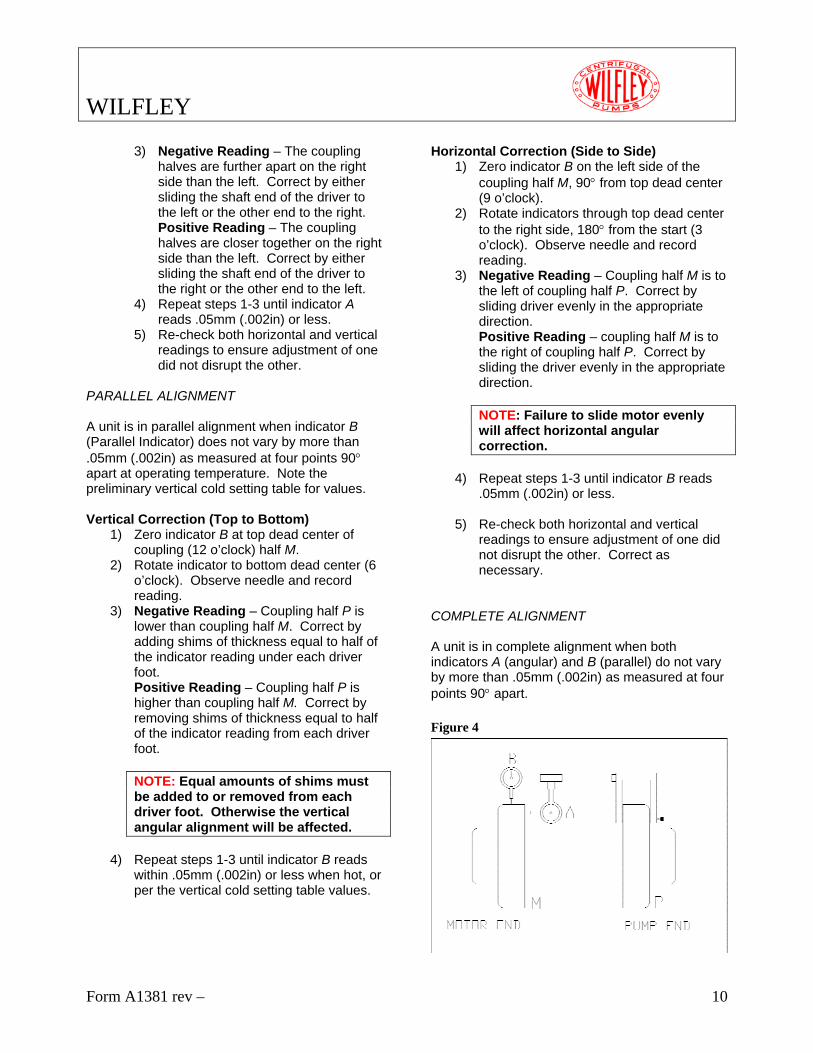
1) Mount two dial indicators on one of the coupling halves P so they contact the other coupling half M.
2) Check setting of indicators by rotating coupling half P to ensure indicators stay in contact with coupling half M but do not bottom out. Adjust indicators accordingly.
Figure 4
MEASUREMENT 1) To ensure accuracy of indicator readings,
always rotate both coupling halves together so indicators contact the same point on coupling half M. This will eliminate any measurement problems due to runout on coupling half M.
2) Take indicator measurements with driver feet hold-down bolts tightened. Loosen hold down bolts prior to making alignment corrections.
3) Take care not to damage indicators when moving driver during alignment corrections.
ANGULAR ALIGNMENT A unit is in angular alignment when indicator A (Angular Indicator) does not vary by more that .05mm (.002in) as measured at four points 90° apart. Vertical Correction (Top to Bottom)
1) Zero indicator A at top dead center (12 o’clock) of coupling half M.
2) Rotate indicators to bottom dead center (6 o’clock). Observe needle and record reading.
3) Negative Reading – The coupling halves are further apart at the bottom than the top. Correct by either raising the driver feet at the shaft end (add shims) or lowering the driver feet at the other end (remove shims). Positive Reading – The coupling halves are closer at the bottom than at the top. Correct by either lowering the driver feet at the shaft end (remove shims) or raising the driver feet at the other end (add shims).
4) Repeat steps 1-3 until indicator A reads .05mm (.002in) or less.
Horizontal Correction (Side to Side)
1) Zero indicator A on the left side of coupling half M, 90° from top dead center (9 o-clock).
2) Rotate indicators through top dead center to the right side, 180° from the start (3 o’clock). Observe needle and record reading.
WILFLEY
Form A1381 rev – 10
3) Negative Reading – The coupling halves are further apart on the right side than the left. Correct by either sliding the shaft end of the driver to the left or the other end to the right. Positive Reading – The coupling halves are closer together on the right side than the left. Correct by either sliding the shaft end of the driver to the right or the other end to the left.
4) Repeat steps 1-3 until indicator A reads .05mm (.002in) or less.
5) Re-check both horizontal and vertical readings to ensure adjustment of one did not disrupt the other.
PARALLEL ALIGNMENT A unit is in parallel alignment when indicator B (Parallel Indicator) does not vary by more than .05mm (.002in) as measured at four points 90° apart at operating temperature. Note the preliminary vertical cold setting table for values. Vertical Correction (Top to Bottom)
1) Zero indicator B at top dead center of coupling (12 o’clock) half M.
2) Rotate indicator to bottom dead center (6 o’clock). Observe needle and record reading.
3) Negative Reading – Coupling half P is lower than coupling half M. Correct by adding shims of thickness equal to half of the indicator reading under each driver foot. Positive Reading – Coupling half P is higher than coupling half M. Correct by removing shims of thickness equal to half of the indicator reading from each driver foot. NOTE: Equal amounts of shims must be added to or removed from each driver foot. Otherwise the vertical angular alignment will be affected.
4) Repeat steps 1-3 until indicator B reads within .05mm (.002in) or less when hot, or per the vertical cold setting table values.
Horizontal Correction (Side to Side) 1) Zero indicator B on the left side of the
coupling half M, 90° from top dead center (9 o’clock).
2) Rotate indicators through top dead center to the right side, 180° from the start (3 o’clock). Observe needle and record reading.
3) Negative Reading – Coupling half M is to the left of coupling half P. Correct by sliding driver evenly in the appropriate direction. Positive Reading – coupling half M is to the right of coupling half P. Correct by sliding the driver evenly in the appropriate direction. NOTE: Failure to slide motor evenly will affect horizontal angular correction.
4) Repeat steps 1-3 until indicator B reads .05mm (.002in) or less.
5) Re-check both horizontal and vertical
readings to ensure adjustment of one did not disrupt the other. Correct as necessary.
COMPLETE ALIGNMENT A unit is in complete alignment when both indicators A (angular) and B (parallel) do not vary by more than .05mm (.002in) as measured at four points 90° apart. Figure 4

WILFLEY
Form A1381 rev – 11
Vertical Correction (Top to Bottom)
1) Zero indicators A and B at top dead center (12 o’clock) of coupling half M.
2) Rotate indicator to bottom dead center (6 o’clock). Observe the needles and record the readings.
3) Make corrections as outlined previously. Horizontal Correction (Side to Side)
1) Zero indicators A and B on the left side of coupling half M, 90° from top dead center (9 o’clock).
2) Rotate indicators through top dead center to the right side, 180° from the start (3 o’clock). Observe the needle, measure and record the reading.
3) Make corrections as outlined previously. 4) Re-check both vertical and horizontal
readings to ensure adjustment of one did not disrupt the other. Correct as necessary.
NOTE: With experience, the installer will understand the interaction between angular and parallel and will make corrections appropriately. ALIGNMENT TROBLESHOOTING
PROBLEM POSSIBLE CAUSE
RECOMMENDED REMEDY
Driver feet bolt bound.
Loosen pump hold down bolts and slide pump and driver until horizontal alignment is achieved.
Can’t obtain horizontal (side to side) alignment, angular or parallel.
Baseplate not leveled properly, possibly twisted.
Determine which corner(s) of the baseplate are high or low and remove or add shims at the appropriate corner(s) and realign.
Can’t obtain vertical (top to bottom) alignment, angular or parallel.
Baseplate not leveled properly, possibly bowed.
Determine if center of baseplate should be raised or lowered and correct by evenly adding or removing shims at the center of the baseplate.
8. Operate the pump for at least an hour, or until it reaches final operating temperature. Shut the pump down and recheck alignment while the
pump is hot. Piping thermal expansion may change the alignment. Realign pump as necessary. EXISTING GROUTED BASEPLATES When a pump is being installed on an existing grouted baseplate, the procedure is somewhat different from the previous section “New Grouted Baseplates.” 1. Mount the pump on the existing baseplate. 2. Level the pump by putting a level on the discharge flange. If not level, adjust the footpiece by adding or deleting shims between the bearing frame and baseplate. 3. Check initial alignment between the pump and driver with a straight edge and correct as needed. 4. Run piping to the suction and discharge flanges of the pump. (Step 6 above) 5. Perform final alignment. (Step 7 above) 6. Recheck alignment after pump is hot. (Step 8 above) 4.3 Piping Connection – Suction/Discharge All piping must be independently supported, accurately aligned and preferably connected to the pump by a short length of flexible piping. The pump should not have to support the weight of the pipe or compensate for misalignment. It should be possible to install suction and discharge bolts through mating flanges without pulling or prying either of the flanges. All piping must be tight. Pumps may air-bind if air is allowed to leak into the piping. If the pump flange(s) have tapped holes, select flange fasteners with thread engagement at least equal to the fastener diameter but that do not bottom out in the tapped holes before the joint is tight.

WILFLEY
Piping Forces: Take care during installation and operation to minimize pipe forces and/or moments on the pump casing. Suction Piping To avoid NPSH and suction problems, suction pipe sizes must be at least as large as the pump suction connection. Never use pipe or fittings on the suction that are smaller in diameter than the pump suction size. The ideal piping configuration should have a minimum of 10 pipe diameters between the source and the pump suction. In most cases, horizontal reducers should be eccentric and mounted with the flat side on top or up with a maximum of one pipe size reduction. Never mount eccentric reducers with the flat side down. Horizontally mounted concentric reducers should not be used if there is any possibility of entrained air in the process fluid. Vertically mounted concentric reducers are acceptable. In applications where the fluid is completely deaerated and free of any vapor or suspended solids, concentric reducers are preferable to eccentric reducers. Avoid the use of throttling valves and strainers in the suction line. Start up strainers must be removed shortly after start up. When the pump is installed below the source of supply, a valve should be installed in the suction line to isolate the pump and to permit pump inspection and maintenance. However, never place a valve directly on the suction nozzle of the pump. Refer to the Centrifugal Pump IOM Section of the Hydraulic Institute Standards for additional recommendations on suction piping. Discharge Piping Install a valve in the discharge line. This valve is required for regulating flow and/or to isolate the pump for inspection and maintenance.
A rapidly closing discharge valve can cause a damaging pressure surge. A dampening arrangement should be provided in the piping. Pump and Shaft Alignment Check After connecting piping, rotate the pump drive shaft clockwise (view from motor end) by hand several complete revolutions to be sure there is no binding and that all parts are free. Recheck shaft alignment. If piping caused unit to be out of alignment, correct piping to relieve strain on the pump. 4.4 DryLock Seal When the pump is intended to be equipped with a DryLock seal, it is Wilfley’s standard practice to install the DryLock seal in the pump prior to shipment. Specific order requirements may specify that the seal be shipped separately, or none be supplied. It is the pump installer’s responsibility to determine if a seal was installed. If a seal was supplied but not installed, use the seal installation instructions found in section 7.4. 4.5 Coupling The coupling should be installed as advised by the coupling manufacturer. Pumps are shipped without the spacer installed. If the spacer has been installed to facilitate alignment, then it must be removed prior to checking rotation. Remove protective material from the coupling and any exposed portions of the shaft before installing the coupling. 4.6 Coupling Guard
Power must never be applied to the driver when the coupling guard is not installed. Wilfley coupling guards are safety devices intended to protect workers from inherent dangers
Form A1381 rev – 12

WILFLEY
of the rotating pump shaft, motor shaft and coupling. It is intended to prevent entry of hands, fingers or other body parts into a point of hazard by reaching through, over, under or around the guard. No standard coupling guard provides complete protection from a disintegrating coupling. Wilfley cannot guarantee their guards will completely contain an exploding coupling. The Wilfley coupling guard conforms to ASME B15.1, “Safety Standard for Mechanical Power Transmission Apparatus.”
5.0 OPERATION 5.1 Rotation Check
A direction arrow is cast on the front of the Casing (See Figure 3) Make sure the motor rotates in the same direction before coupling the motor to the Pump. It is absolutely essential that the rotation of the motor be checked before connecting the shaft coupling. Incorrect rotation of the pump, for even a short time, can dislodge the impeller, which may cause serious damage to the pump. All Wilfley Model S3 pumps turn clockwise as viewed from the motor end, or conversely, counterclockwise when viewed from the suction end as shown in Figure 5. Figure 5
5.2 Pre Start-Up Checks Prior to starting the pump it is essential that the following checks be made. • Visually check all main and auxiliary piping to ensure that all connections have been properly made. • Check voltage, fuse, starter amperage ratings and frequency on the motor nameplate against the electrical supply characteristics. • Visually inspect all electrical connections to the motor and control circuit. • Check the rotation of the motor by momentarily starting the motor with motor disconnected from the pump assembly. Direction of rotation must be as shown by the arrow on the pump case and the direction of rotation plate on the top of the frame. Starting or running pump backwards will cause damage. • Pump and Motor are properly secured to the baseplate • All fasteners tightened to the correct torques • Coupling guard in place and not rubbing • Impeller clearance setting • Bearing lubrication • Pump instrumentation is operational • Pump is primed As a final step in preparation for operation, it is important to rotate the shaft by hand to be certain that all rotating parts move freely, and that there are no foreign objects in the pump casing. Starting Before starting the pump, it is advisable to have the pump casing and suction line filled with liquid. It is normal to have the discharge valve momentarily closed when the pump is started since much less horsepower is required under these conditions. DO NOT OPERATE THE PUMP IN A DEAD - HEADED (NO FLOW) CONDITION
Form A1381 rev – 13

WILFLEY
5.3 Start-Up Considerations ENSURING PROPER NPSHA Net Positive Suction Head – Available (NPSHA) is the measure of the energy in a liquid above the vapor pressure. It is used to determine the likelihood that a fluid will vaporize in the pump. It is critical because a centrifugal pump is designed to pump a liquid, not a vapor. Vaporization in a pump will result in damage to the pump, deterioration of the Total Differential Head (TDH), and possibly a complete stopping of pumping. Net Positive Suction Head – Required (NPSHR) is the decrease of fluid energy between the inlet of the pump, and the point of lowest pressure in the pump. This decrease occurs because of friction losses and fluid accelerations in the inlet region of the pump, and particularly accelerations as the fluid enters the impeller vanes. The value for NPSHR for the specific pump purchased is given in the pump data sheet, and on the pump performance curve. For a pump to operate properly the NPSHA must be greater than the NPSHR. Good practice dictates that this margin should be at least 3 ft (1 m) or 20%, whichever is greater.
Ensuring that NPSHA is larger than NPSHR by the suggested margin will greatly enhance pump performance and reliability. It will also reduce the likelihood of cavitation, which can severely damage the pump. MINIMUM FLOW Minimum continuous stable flow is the lowest flow at which the pump can operate satisfactorily. Pumps may be operated at lower flows, but it must be recognized that the pump operating life may be significantly reduced. For example, vibration may exceed normal industry standards. The size of the pump, the energy absorbed, and the liquid pumped are some of the considerations in determining the minimum flow. The allowable S3 operating range of the pump is in accordance to the severity of the slurry duty. The S3 family of
pumps covers the following range classified by specific gravity and average particle size.
1 .0
1 .1
1 .2
1 .3
1 .4
1 .5
1 .6
1 .7
1 .8
1 .9
1 0 0 1 0 0 0A V ER A G E P A R TIC L E SIZE (d ,m ic ron s)
1
2
3
5 0
0 .0 3 0 .0 8 0 .1 3 0 .180 .0 5 0 .1 0 0 .1 5 0 .2 0
A V ER A G E P A R TIC LE S IZ E ( d , inches)5 0
S
lurr
y sp
ecifi
c gr
avity
The maximum impeller peripheral speed for zone #1- low specific gravity and low mean particle size is 8500 fpm, while in zone #3- the maximum acceptable speed is 6500 fpm. The design operating limits indicated in the following table are recommendations and should be used with caution. GENERAL RECOMMENDATIONS FOR THE MINIMUM CONTINUOUS FLOW
Parameter Service zone 1 2 3 Max. discharge velocity
40 ft/s 12.2 m/s
32 ft/s 9.8 m/s
27 ft/s 8.2 m/s
Max. impeller peripheral speed
8500 ft/m 43 m/s
7500 ft/m 38 m/s
6500 ft/m 33 m/s
Allowable % BEP range
20-120 % 30-110 % 40-100 %
All Wilfley S3 pumps also have a “Minimum Thermal Flow.” This is defined as the minimum flow that will not cause an excessive temperature rise. Minimum Thermal Flow is application dependent.
Form A1381 rev – 14

WILFLEY
Do not operate the pump at or below Minimum Thermal Flow, as this could cause an excessive temperature rise. Contact a Wilfley Sales Engineer for determination of Minimum Thermal Flow. 5.4 Starting The Pump And Adjusting Flow 1. Open the suction valve to full open position. It is very important to leave the suction valve open while the pump is operating. Any throttling or adjusting of flow must be done through the discharge valve. Partially closing the suction valve can create serious NPSH and pump performance problems.
Never operate pump with both the suction and discharge valves closed. This could cause an explosion. 2. A standard centrifugal pump will not move liquid unless the pump is primed. A pump is said to be “primed” when the casing and the suction piping are completely filled with liquid. Open discharge valve a slight amount. This will allow any entrapped air to escape and will normally allow the pump to prime, if the suction source is above the pump. When a condition exists where the suction pressure may drop below the pump’s capability, it is advisable to add a low-pressure control device to shut the pump down when the pressure drops below a predetermined minimum. 3. All cooling, heating, and flush lines must be started and regulated. 4. Start the driver (typically, the electric motor). 5. Slowly open the discharge valve until the desired flow is reached, keeping in mind the minimum flow restrictions listed above.
It is important that the discharge valve be opened within a short interval after starting the driver. Failure to do this could cause a dangerous build up of heat, and possibly an explosion. 6. Reduced Capacity Avoid running a centrifugal pump at drastically reduced capacities or with the discharge valve closed for extended periods of time. This can cause severe temperature rise and the liquid in the pump may reach its boiling point. If this occurs at a minimum, the seal may be damaged, as it will be exposed to vapor, with no lubrication, and may score or seize to the stationary parts. It is also possible that it can create an explosive condition. If the suction valve is also closed, there is an even greater risk of catastrophic failure such as an explosion. Thermostats may be used to safeguard against over heating by shutting down the pump at a predetermined temperature Safeguards should also be taken against possible operation with a closed discharge valve, such as installing a bypass back to the suction source. The size of the bypass line and the required bypass flow rate is a function of the input horsepower and the allowable temperature rise. 7. Reduced Head Note that when discharge head drops, the pump’s flow rate usually increases rapidly. Check motor for temperature rise as this may cause overload. If overloading occurs, throttle the discharge. 8. Surging Condition A rapidly closing discharge valve can cause a damaging pressure surge. A dampening arrangement should be provided in the piping.
Form A1381 rev – 15

WILFLEY
5.5 Operation In Sub-Freezing Conditions When using the pump in sub-freezing conditions where the pump is periodically idle, the pump should be properly drained or protected with thermal devices which will keep the liquid in the pump from freezing. High chrome iron pumps are not recommended for applications below 0°F (-18°C). 5.6 Shutdown Considerations When the pump is being shutdown, the procedure should be the reverse of the start-up procedure. First, slowly close the discharge valve, shutdown the driver, then close the suction valve. Remember, closing the suction valve while the pump is running is a safety hazard and could seriously damage the pump and other equipment.
6.0 PREVENTIVE MAINTENANCE 6.1 General Servicing Your Wilfley Model S3 pump is designed to provide long and trouble-free service with a minimum of maintenance. It is recommended that the pump be inspected at regular intervals. It is also suggested that a service record be kept for the pump. Motor Refer to the motor manufacturer’s manual for recommended service instructions. It is recommended that the motor be well ventilated when in operation. 6.2 Periodic Servicing The following table contains recommended service checks that should be performed on a periodic basis.
After First Start-Up
Every Week
Every 6 Months
Flow, Pressure, Temperature (a) X X
Visual (b) X X
Noise Vibration X X
Oil Level X X
Grease Bearings X X
a. Flow, Pressure, Temperature: All flow, pressure and temperature gauges should be monitored to ensure that the pump is operating within specified limits. If the frame temperatures are monitored, this temperature generally should not exceed 1600 F (71.10 C).
b. Visual: Periodic visual inspection should be made of the pump and its installation. This inspection should include the following: 1. All mounting supports should be secure. 2. All external nuts, bolts and fittings should be tight. 3. All suction and discharge piping should be secure. 4. All surfaces and joints should show no signs of leakage.
To re-grease bearings under coupling guard, stop pump, lock the motor, remove coupling guard, then re-grease the bearings.
Form A1381 rev – 16

WILFLEY
NEED FOR MAINTENANCE RECORDS A procedure for keeping accurate maintenance records is a critical part of any program to improve pump reliability. There are many variables that can contribute to pump failures. Analyzing these variables through pump maintenance records can only solve often-long term and repetitive problems. NEED FOR CLEANLINESS One of the major causes of pump failure is the presence of contaminants in the bearing housing. This contamination can be in the form of moisture, dust, dirt and other solid particles such as metal chips. Contamination can also be harmful to the seal (especially the seal faces) as well as other parts of the pumps. For example, dirt in the impeller threads could cause the impeller to not be seated properly against the shaft. This, in turn, could cause a series of other problems. For these reasons, it is very important that proper cleanliness be maintained. 6.3 Maintenance Troubleshooting The following is a guide to troubleshooting problems with Wilfley pumps. Common problems are analyzed and solutions are offered. Obviously, it is impossible to cover every possible scenario. If a problem exists that is not covered by one of the examples, then contact a Wilfley Sales Engineer or Distributor/Representative for assistance. See next page.
Form A1381 rev – 17

WILFLEY
PROBLEM POSSIBLE CAUSE RECOMMENDED REMEDY
Insufficient NPSH. Recalculate NPSH available. It must be greater than the NPSH required by pump at desired flow. If not, redesign suction piping, holding number of elbows and number of planes to a minimum to avoid adverse flow rotation as it approaches the impeller.
System head greater than anticipated.
Reduce system head by increasing pipe size and/or reducing number of fittings.
Entrained air. Air leak from atmosphere on suction side.
Check suction line gaskets and threads for tightness. If vortex formation is observed in suction tank, install vortex breaker. Check for minimum submergence.
Entrained gas from process. Process generated gases may require larger pumps. Speed too low. Check motor speed against design speed.
Direction of rotation wrong. After confirming wrong rotation, reverse any two of three leads on a three-phase motor. The pump should be disassembled and inspected before it is restarted.
Impeller too small. Replace with proper diameter impeller. NOTE: Increasing impeller diameter may require use of a larger motor.
Impeller clearance too large. Reset impeller clearance. Plugged impeller, suction line or casing which may be due to a product or large solids.
Reduce length of fiber when possible. Reduce solids in the process fluid when possible. Consider larger pump.
Pump not reaching design flow rate. Problem #1
Wet end parts (casing cover, impeller) worn, corroded or missing.
Replace part or parts.
Pump not reaching design head (TDH). Problem #2
Refer to possible causes under Problem #1 Refer to remedies listed for Problem #1 & #3
Not properly primed. Repeat priming operation, recheck instructions. If pump has run dry, disassemble and inspect the pump before operation.
Direction of rotation wrong. After confirming wrong rotation, reverse any two of three leads on a three-phase motor. The pump should be disassembled and inspected before operation.
Entrained air. Air leak from atmosphere on suction side.
Check suction line gaskets and threads for tightness. If vortex formation is observed in suction tank, install vortex breaker. Check for minimum submergence.
Plugged impeller, suction line casing which may be due to a fibrous product or large solids.
Reduce length of fiber when possible. Reduce solids in the process fluid when possible. Consider larger pump.
No discharge or flow. Problem #3
Damaged pump shaft, impeller. Replace damaged parts.
Insufficient NPSH. Recalculate NPSH available. It must be greater than the NPSH required by pump at desired flow. If not, redesign suction piping, holding number of elbows and number of planes to a minimum to avoid adverse flow rotation as it approaches the impeller.
Pump operates for short period, then loses prime. Problem #4 Entrained air. Air leak from
atmosphere on suction side.
Check suction line gaskets and threads for tightness. If vortex formation is observed in suction tank, install vortex breaker. Check for minimum submergence.
Form A1381 rev – 18

WILFLEY
PROBLEM POSSIBLE CAUSE RECOMMENDED REMEDY
Cavitation - insufficient NPSH available.
Recalculate NPSH available. It must be greater than the NPSH required by pump at desired flow. If not, redesign suction piping, holding number of elbows and number of planes to a minimum to avoid adverse flow rotation as it approaches the impeller.
Abnormal fluid rotation due to complex suction piping.
Redesign suction piping, holding number of elbows and number of planes to a minimum to avoid adverse fluid complex suction piping rotation as it approaches the impeller.
Excessive noise from wet end. Problem # 5
Impeller rubbing. Check and reset impeller clearance. Check outboard bearing assembly for axial endplay.
Bearing contamination appearing on the raceways as scoring, pitting, scratching, or rusting caused adverse environment and entrance of abrasive contaminants from atmosphere.
Replace bearings. Work with clean tools in clean surroundings. Remove all outside dirt from housing before exposing bearings. Handle with clean dry hands. Treat a used bearing as carefully as a new one. Use clean solvent and flushing oil. Protect disassembled bearing from dirt and moisture. Keep bearings wrapped in paper or clean cloth while not in use. Clean inside of housing before replacing bearings. Check oil seals and replace as required. Check all plugs and tapped openings to make sure that they are tight.
Brinelling of bearing identified by indentation on the ball races, usually caused by incorrectly applied forces in assembling the bearing or by shock loading such as hitting the bearing or drive shaft with a hammer.
Replace bearings. When mounting the bearing on the drive shaft use a proper size ring and apply the pressure against the inner ring only. Be sure when mounting a bearing to apply the mounting pressure slowly and evenly.
False brinelling of bearing identified by either axial or circumferential indentations usually caused by vibration of the balls between the races in a stationary bearing.
Replace bearings. Where bearings are oil lubricated and employed in units that may be out of service for extended periods, the drive shaft should be turned over periodically to re-lubricate all bearing surfaces at intervals of one-to- three months. Correct the source of vibration.
Excessive noise from power end. Problem #6
Thrust overload on bearing identified by flaking ball path on one side of the outer race or in the case of maximum capacity bearings, may appear as a spalling of the races in the vicinity of the loading slot. These thrust failures are caused by improper mounting of the bearing or excessive thrust loads.
Replace bearings. Follow correct mounting procedures for bearings.
Form A1381 rev – 19

WILFLEY
PROBLEM POSSIBLE CAUSE RECOMMENDED REMEDY Misalignment identified by fracture of ball retainer or a wide ball path on the inner race and a narrower cocked ball path on the outer race. Misalignment is caused by poor mounting practices or defective drive shaft. For example, bearing not square with the centerline or possibly a bent shaft due to improper handling.
Replace bearings. Handle parts carefully and follow recommended mounting procedures. Check all parts for proper fit and alignment.
Bearing damaged by electric arcing identified as electro-etching of both inner and outer ring as a pitting or cratering. Electrical arcing is caused by a static electrical charge emanating from belt drives, electrical leakage or short-circuiting.
Replace bearings. Where current shunting through the bearing cannot be corrected, a shunt in the form of a slip ring assembly should be incorporated. Check all wiring, insulation and rotor windings to be sure that they are sound and all connections are properly made. Where pumps are belt driven, consider the elimination of static charges by proper grounding or consider belt material that is less generative.
Cont. Excessive noise from power end. Problem #6
Bearing damage due to improper lubrication, identified by one or more of the following: Abnormal bearing temperature rise A stiff cracked grease appearance. A brown or bluish discoloration of the bearing races.
Replace bearings. Be sure the lubricant is clean. Be sure proper amount of lubricant is used. In the case of greased lubricated bearings, be sure that there is space adjacent to the bearing into which it can rid itself of excessive lubricant, otherwise the bearing may overheat and fail prematurely. Be sure the proper grade of lubricant is used.
7.0 S3 with DRYLOCK SEAL DISASSEMBLY & REASSEMBLY The following sections of this manual give instructions on how to perform a complete maintenance overhaul. However, it is also important to periodically repeat the “Pre start-up checks” listed on page 13. These checks will help extend pump life as well as the length of time between major overhauls. Refer to Figures 6, 7, and 8 for item number references used throughout this section. Note: The pictures in the following section represent typical parts to clarify assembly. Details of the parts may differ slightly from parts supplied with the pump.
Form A1381 rev – 20

WILFLEY
Figure 6
S3 with DryLock Seal
7.1 Disassembly
1. Before performing any maintenance, disconnect the driver from its power supply and lock it off line.
Lock out power to driver to prevent personal injury. 2. Close the discharge and suction valves, and drain all liquid from the pump.
3. Close all valves on auxiliary equipment and piping, then disconnect all piping. 4. Decontaminate the pump as necessary.
If Wilfley pumps contain dangerous chemicals, it is important to follow plant safety guidelines to avoid personal injury or death. 5. Remove the coupling guard. 6. Remove the spacer from the coupling.
Form A1381 rev – 21

WILFLEY
Form A1381 rev – 22
7. Disconnect any seal drain piping. 8. Remove the fasteners holding the bearing frame (61) and case (1) to the baseplate. Remove pump and relocate to a workstation.
It is important to follow plant safety guidelines when lifting pump components. 9. Remove drain plug (61B) and drain oil from the bearing frame (61). Replace drain plug when done. 10. Remove the coupling hub from the pump shaft. 11. Remove the fasteners (1A) holding the casing to the bearing frame, remove casing (1) and discard the casing gasket (3). 12. Using the shaft key mount the shaft wrench to the end of the shaft (62). With the wrench handle pointing to the left when viewed from the impeller (14) end, grasp the impeller firmly with both hands (wear heavy gloves), by turning the impeller in the clockwise direction move the wrench handle to the 11:00 o’clock position and then spin the impeller quickly in a counterclockwise direction so that the wrench makes a sudden impact with a hard surface. After several sharp raps, the impeller should be free. If a shaft wrench is not available use a spanner wrench. 13. Unscrew the impeller and remove it from the shaft.
Do not apply heat to the impeller. An explosion could occur. 14. Remove the case plate (15) and the expeller (17). Next, remove the large o-ring (30A) found between the plate and the seal housing (30), then remove the complete seal housing assembly.
15. Loosen the three jam nuts (72B) on the three jacking bolts (75) on the bearing carrier (72), then remove the three bolts. Loosen and remove the three retaining bolts (75). 16. Remove the bearing carrier assembly with the shaft and bearings from the bearing frame and discard the o-ring (72A). 17. Remove the oil seals (67 and 76) from the frame and bearing carrier and discard them. Further disassembly is not required unless the bearings are to be replaced. Replacing the Bearings 18. Remove the snap ring (73) from the groove of the bearing carrier (72). 19. The bearing locknut (62C) may now be removed from the shaft. 20. An arbor or hydraulic press may be used to remove the bearings from the shaft. It is extremely important to apply even pressure to the inner bearing race only. Never apply pressure to the outer race as this exerts excess load on the balls and causes damage. We recommend that all bearings be replaced after disassembly.
Applying pressure to the outer race could permanently damage the bearings. 7.2 Cleaning/Inspection All parts should now be thoroughly cleaned and inspected. New bearings, O-rings, gaskets, and oil seals should be used. Any parts that show wear or corrosion should be replaced with new genuine Wilfley parts. Casing
• Thoroughly clean gasket surfaces and alignment fits to remove rust and debris.

WILFLEY
Form A1381 rev – 23
• Inspect for any unusual erosive wear in volute.
Impeller/Expeller
• Inspect leading and trailing edges of vanes for pitting, and erosion or corrosion damage.
Frame
• Inspect frame and frame foot for cracks. • Inspect for corrosion or pitting if frame has
been exposed to pumpage. • Inspect shafts and sleeves for wear. • Inspect frame bearing bores for
roundness.
It is important that only non-flammable, non-contaminated cleaning fluids are used. These fluids must comply with plant safety and environmental guidelines. 7.3 Critical Measurement and Tolerances To maximize reliability of pumps, it is important that certain parameters and dimensions are measured and maintained within specified tolerances. Any parts that do not conform to the specifications should be replaced with new Wilfley parts. Shaft The seal-mounting surface includes the shaft and/or shaft sleeve outside diameter within the seal housing and extending beyond to accommodate outside seals. To provide for the possible use of a mechanical seal, the tolerance of that diameter shall not exceed nominal minus 0.002 in. (0.05 mm).
Shaft runout shall be limited as follows:
1. Shaft rotated on centers: 0.001 in. (0.025mm) full indicator movement reading at any point.
2. Outside diameter of shaft or removable sleeve when installed on pump: 0.002 in. (0.05mm) full indicator movement at the gland end of the seal housing.
7.4 Assembly Full thread length engagement is required for all fasteners. Bearing Installation Mounting of bearings on shafts must be done in a clean environment. Bearing and power end life can be drastically reduced if even very small foreign particles work their way into the bearings. Bearings should be removed from their protective packaging only immediately before assembly to limit exposure to possible contamination. After removing the packaging they should only come in contact with clean hands, fixtures, tools and work surfaces. Note that the term “inboard bearing” refers to the bearing nearest to the casing. “Outboard bearing” refers to the bearing nearest to the motor. Both bearings have a slight and preferred interference fit that requires that they be pressed on the shaft with an arbor or hydraulic press. Even force should be applied to the inner race only. Never press on the outer race, as the force will damage the balls and races. An alternate and preferred method of installing bearings is to heat the bearings to 200°F (93°C) in an oven or with an induction heater. Then place them quickly in position on the shaft.

WILFLEY
1. Install the outboard bearing (62B) and locknut (62C) onto the shaft (62). We recommend that a bearing heater be used when installing bearings to avoid damage to the races. Be sure the bearing seats against the shoulder of the shaft. If the pump is grease lubricated, hand pack the bearings with the appropriate grease (reference Section 8) after the bearings are seated on the shaft.
Never heat the bearings above 230°F (110°C). To do so will likely cause the bearing fits to permanently change, leading to early failure
2. Slide retaining ring (73) onto shaft, be sure chamfered edge faces away from rear bearing. Install the inboard bearing (62A) onto shaft, being sure the bearing groove faces in (stamped side out). Frame 2 requires a cylindrical roller bearing. Install the bearing washer on the shaft prior to the bearing body.
3. Slide the bearing carrier (72) onto outboard bearing and secure with retaining ring. Extreme duty bearings have a bearing plate that bolts to the bearing retainer instead of a retaining ring.
4. Install the inboard bearing (62A) onto the shaft.
5. Install the inboard oil seal (67) into the frame.
Form A1381 rev – 24

WILFLEY
6. Install the breather (61A), sight glass (79), and drain plug (61B) into the frame.
7. Install the bearing carrier o-ring (72A) into the groove of the bearing carrier. To avoid damage, lubricate the o-ring with light oil and slide the assembly into the frame. The word “top” on the carrier must face up. Attach the bearing carrier with three retaining bolts (75), jacking bolts (75), and jam nuts (72B). Clearance values and adjustment procedure follows the DryLock Seal assembly steps. See next page.
Form A1381 rev – 25
WILFLEY
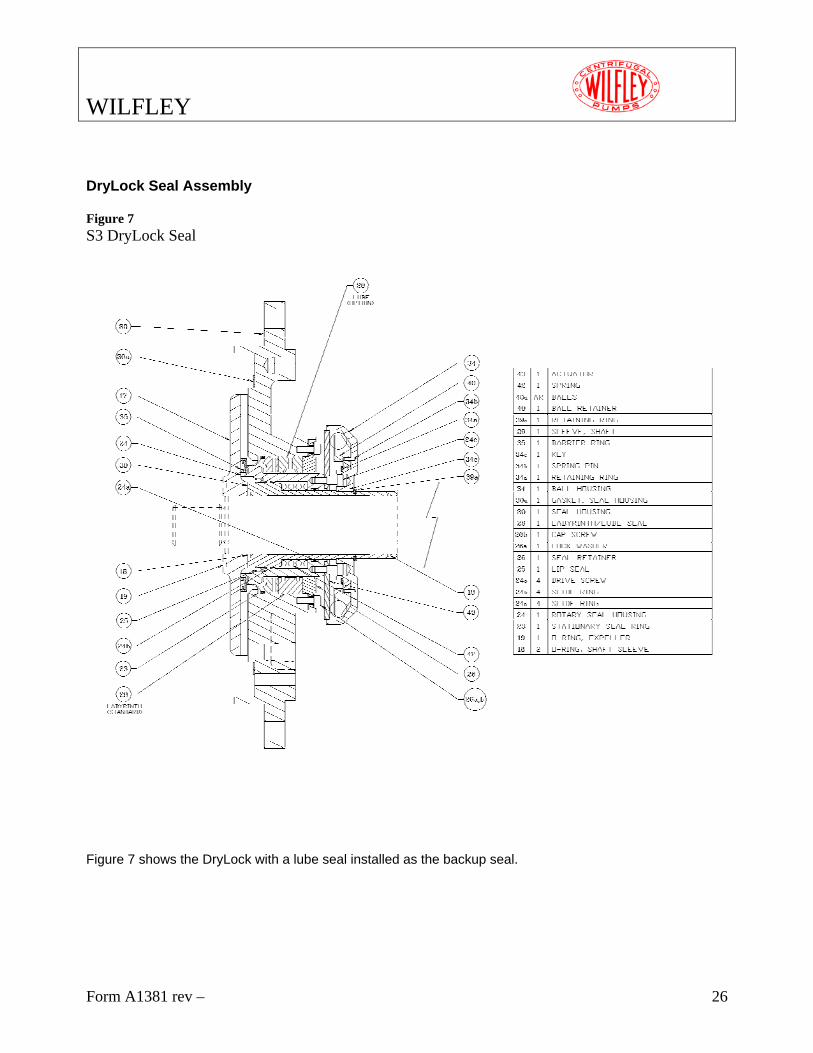
DryLock Seal Assembly Figure 7 S3 DryLock Seal
Figure 7 shows the DryLock with a lube seal installed as the backup seal.
Form A1381 rev – 26

WILFLEY PUMPS
1. Place the slide rings (24A & 24B) into the bore of the rotary seal housing (24). The shortest slide ring goes into the rear of the housing.
2. Insert the lip seal (25) into the rotary seal housing. Be sure the internal spring of the seal faces out. The seal must seat completely in the groove of the rotary seal housing.
3. Insert the spring (42) into the bore of the rotary seal housing. Be careful not to damage the lip seal.
4. Slide the rotary seal housing over the shaft sleeve (24). Carefully push the sleeve past the slide rings and the lip seal. The rotary seal housing must fit completely over the shaft sleeve. Install the shaft o-ring (20) into the groove in the shaft sleeve.

WILFLEY
5. Carefully inspect the stationary seal ring (23) before installation. The inside surface of the seal ring is the stationary seal face and must be free of scratches or nicks. Lightly lubricate all seal o-rings to prevent damage. Install the stationary seal ring into the seal housing (30). Be careful not to damage the lip of the seal.
6. Place the backup seal (28) (which ever type that was supplied) onto the top of the stationary seal ring. (Note: if using a lube seal, pack with grease before installing on the stationary seal ring.)
7. Attach the seal retainer (26) to the seal housing. Lock washers (26A) must be used with cap screws (26B). Be sure the cap screws are securely tightened.
8. Slide the seal housing assembly over the shaft sleeve assembly, be careful not to damage the lips of the stationary seal.
Form A1381 rev – 28
WILFLEY
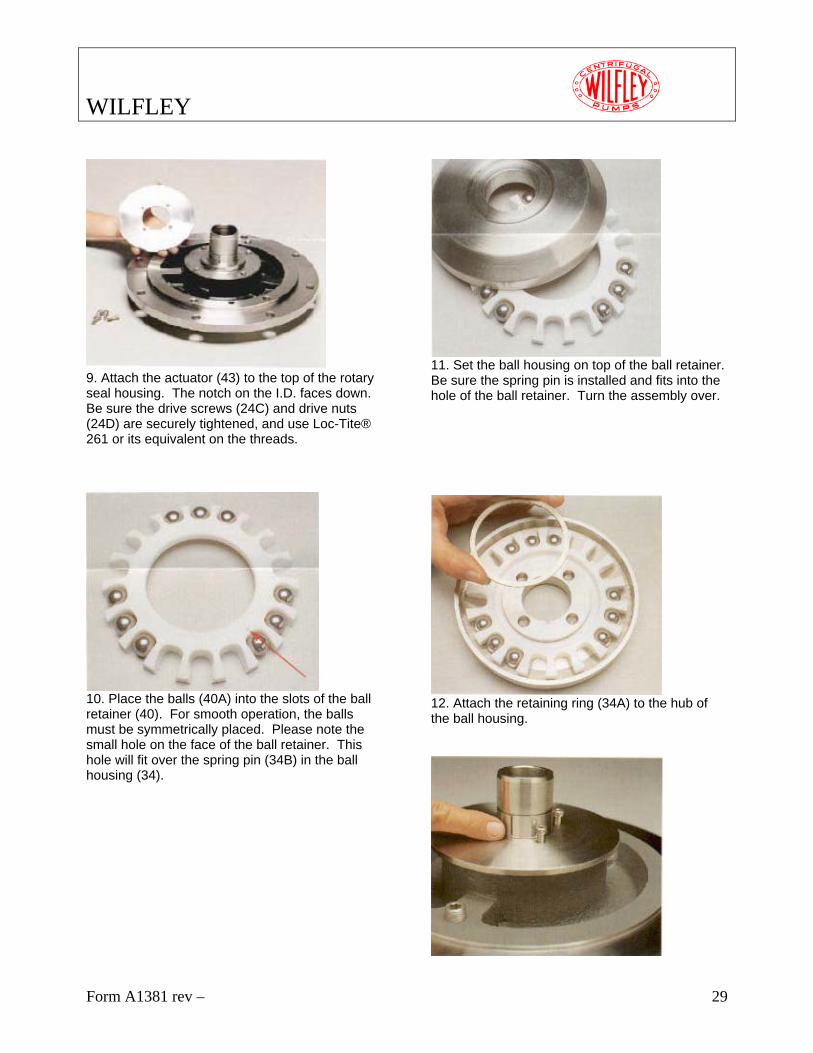
9. Attach the actuator (43) to the top of the rotary seal housing. The notch on the I.D. faces down. Be sure the drive screws (24C) and drive nuts (24D) are securely tightened, and use Loc-Tite® 261 or its equivalent on the threads.
10. Place the balls (40A) into the slots of the ball retainer (40). For smooth operation, the balls must be symmetrically placed. Please note the small hole on the face of the ball retainer. This hole will fit over the spring pin (34B) in the ball housing (34).
11. Set the ball housing on top of the ball retainer. Be sure the spring pin is installed and fits into the hole of the ball retainer. Turn the assembly over.
12. Attach the retaining ring (34A) to the hub of the ball housing.
Form A1381 rev – 29

WILFLEY
13. Slide the key (34C) into the slot on the shaft sleeve. You may need to push down and compress the seal assembly to fit the key into its slot.
14. Place the ball housing over the shaft sleeve and secure with c-clip retaining ring (39A). Be sure the drive screws are seated in the holes of the ball housing. You may need to push down and compress the seal assembly to fit the retaining ring into its groove. A small block placed under the shaft sleeve will help fully compress the assembly. DryLock Seal assembly complete. Continue with step 8.
8. Install the seal assembly to the frame. Be careful not to damage the shaft o-ring during assembly. The top of the seal housing has two bosses and the bottom has only one.
9. Install the barrier ring (35) to the hub of the rotary seal housing. The exposed metal insert faces away from the frame.
10. Slide the shaft sleeve o-ring (18) onto the shaft and install the expeller. Be sure the o-ring is seated into the groove on the shaft sleeve.
11. Install the seal housing gasket (30A) and case plate (15) to the frame. The studs (15A) go through the frame to secure with nuts (15B). 12. Install expeller o-ring (19) into groove on the expeller and install the impeller (14).
Form A1381 rev – 30

WILFLEY
13. Apply a thin layer of grease to the casing gasket (3) and install it onto the casing plate (15). The grease will help keep the gasket in position. 14. Screw the impeller (14) onto the shaft. Be sure the impeller is securely tightened on the shaft. A shaft wrench is available to assist this tightening process. 15. Secure the casing (1) to the frame with the supplied bolts (1A). (Note: If a lube seal is used, be sure the seal is filled with grease. Attach the pipe nipples and lubricator. Adjust the lubricator timer to lube at pre-determined time intervals. Make a note of the start-up date and schedule to
replace the lubricator before it runs out of grease.) Set the clearances within the pump using one of the following methods. Wilfley recommends that the dial indicator method be used to set the clearances. See next page.
Impeller Clearance
Dial Indicator Method (preferred method)
Form A1381 rev – 31

WILFLEY
1) Loosen cap screws (75) and the nuts (72B) on jacking screws (75). Tighten the jacking cap screws to pull the rear bearing carrier (72) out from the frame (61) until the shaft (62) will not turn due to metal-to-metal contact in the pump.
2) Set the dial indicator so that the button contacts the end of the shaft. Set indicator at a minimum of .040-inch.
3) Draw the bearing unit into the frame with the cap screws a total of .020-inch. Evenly tighten all screws and nuts. Check the indicator to insure the proper clearance has been maintained.
4) Check the shaft to be sure it turns freely. Feeler Gauge Method
1) Loosen cap screws (75) and the nuts
(72B) on the jacking screws (75). Tighten the jacking cap screws to pull the rear bearing carrier (72) out from the frame (61) until the shaft (62) will not turn due to metal to metal contact in the pump.
2) Measure the total clearance between frame and bearing unit. Draw the bearing unit into the frame with the cap screws until the gap is .020-inch less than the original measurement.
3) Evenly tighten all screws and nuts. Re-measure the gap between the frame and the rear bearing carrier in several places to insure proper clearance has been maintained.
4) Check the shaft to be sure it turns freely.
REINSTALLATION
Form A1381 rev – 32

WILFLEY
16. Reinstall the pump to the base.
The pump should be reinstalled as described in the installation section by following the field installation and alignment procedures. 17. Install the coupling following the manufacturers installation instructions. 18. Install the coupling guard ensuring that the guard is not in contact with the shaft and coupling. Please refer to the pre-starting instructions. Follow all safety precautions and ensure that all safety guards are in place.
7.4 Assembly Troubleshooting
SYMPTOM CAUSE Excessive shaft endplay.
Bearing internal clearance too great. Replace bearings with correct type. Snap ring loose in bearing housing groove. Reseat.
Excessive shaft/ sleeve runout.
Sleeve worn. Replace. Shaft bent. Replace.
Excessive bearing frame flange runout.
Shaft bent. Replace. Bearing frame flange distorted. Replace.
Excessive frame adapter runout.
Corrosion. Replace. Adapter to frame gasket not seated properly. Reseat.
Excessive seal housing box cover runout.
Seal housing not properly seated in frame. Corrosion or wear. Replace.
Excessive impeller vane tip runout.
Bent vane(s). Replace impeller.
See next page
7.5 DryLock Seal Troubleshooting Figure 8
Form A1381 rev – 33

WILFLEY
DryLock Seal Leakage Paths
Use Figure 8 and refer to the following page for troubleshooting tips.
Form A1381 rev – 34

WILFLEY
Form A1381 rev – 35
TPump Leaks. T Whenever leakage is encountered and before removing your Wilfley pump, determine when the leakage is occurring… while running, or while not running. During these inspections you should try to determine the exact origin of the leak. Special attention should be given to the shaft sleeve. Once you have determined when the pump is leaking, refer to the guide below.
TPump Leaks While Running. T
Test Test Results Indicates
TLeakage from the seal area at shaft sleeve. T
TPump suction pressure exceeds expeller capacity. T
TExcessive expellers wear, corrosion, clearance or plating between vanes.T
TPump running too slow. T
TVisually determine the exact leakage pointT
Leakage comes from case or gasket area.
Damaged seal surface, gasket failure or loose bolts.
TPump Leaks While UNOT URunning. T
Test Test Results Indicates
TVerify that leakage originates from the seal area. T
TLeakage comes from case or gasket area. T
TDamaged sealing surface gasket failure or loose bolts. T
Verify that leakage originates from the seal area.
Leakage is observed on seal or shaft sleeve.
Seal or actuator problem.
TLube Seal Vapor Leak.T
Test Test Results Indicates
TVapors detected. T TLubricator is out of lubricant. T
TCheck for vapors coming from the seal area.T
TLubricator has failed. T

WILFLEY
Form A1381 rev – 36
8.0 Lubrication Bearing Lubrication Oil Lubrication Fill the frame until the oil level is approximately in the middle of the sight glass.
Acceptable Oils: Chevron GTS oil 68 Exxon Teresstic EP 68 Gulf Harmony 68 Mobil DTE 26 300 SSU 38ºC (100ºF) Phillips Magnus oil grade 315 Phillips MM motor oil SAE 20-20W Phillips HDS motor oil SAE 20-20
Lubricating Oil Requirements: Bearing
temp below 82ºC
(180ºF)
Bearing temp above 82ºC
(180ºF)
ISO Grade VG 68 VG 100 Approx. SSU @ 38º C (100ºF)
300 470
DIN 51517 C68 C100 Kinem. viscosity @ 40ºC (105ºF) mm^2. sec
68 100
Grease Lubrication Bearings should be hand packed during assembly and reassembly. Further lubrication should be done per periodic servicing. Ref. (section 6.2) Recommended grease: Chevron SRI #2
9.0 Ordering Parts Please include the serial number of your pump when ordering spare parts. With this number we can determine and duplicate the original configuration and materials of construction.
WILFLEY
10.0 Special Service The seal assembly is extremely important to the total, efficient operation of Wilfley S3 pumps. It’s parts, gaskets and seals must be in good working order. Many times parts are replaced unnecessarily due to the unfamiliarity with the assembly. The reverse is also true, parts that should be replaced are, at times, left in the assembly. For these reasons, we provide the service of rebuilding this assembly in our factory. Your Wilfley S3 pumps and seals may be returned to the factory, at any time, for complete overhaul and repair. Each pump is completely disassembled and worn or inoperable parts are replaced. All rebuilt pumps are subjected to the same testing procedures as newly constructed units. We charge the standard price for parts and a minimal reassembly fee. The utilization of this service provides you with almost instantaneous pump repair at an economical price. The units are overhauled and returned to you quickly. Please contact A.R. Wilfley & Sons or any of our representatives at any time, concerning our pumps or parts. You can be assured that we will do all within our power to ensure your complete satisfaction with Wilfley products. A.R Wilfley & Sons, Inc. P.O. Box 2330 Denver, Colorado 80201 1-(303) 779-17771-(800) 525-9930 www.wilfley.com Additional pages feature drawings for tear-out and field use.
Form A1381 rev – 37

WILFLEY
Form A1381 rev – 38

WILFLEY
Form A1381 rev – 39

WILFLEY
Form A1381 rev – 40