wi certificate of rent paid - hab inc · 3 general information the wisconsin certificate of rent...
TRANSCRIPT
1
WI Certificate of Rent Paid
Documentation Manual
2014
2
WIS CRP Table of Contents
WIS CRP Table of Contents ........................................................................................................................... 2
General Information ................................................................................................................................... 3 About this Manual ...................................................................................................................................... 3
Processing CRP Forms ................................................................................................................................... 4 General Information ................................................................................................................................... 4 CRP Wisconsin Rent Certificate File Tab .................................................................................................. 6 Designate Codes for Rent ........................................................................................................................... 7 Clear out Rent Certificates ......................................................................................................................... 8 Generate Rent Certificates .......................................................................................................................... 9 Maintain Rent Certificates .........................................................................................................................11
Exit ........................................................................................................................................................11 Find ........................................................................................................................................................12 New .......................................................................................................................................................12 Save .......................................................................................................................................................12 Delete.....................................................................................................................................................13 Print .......................................................................................................................................................13 View ......................................................................................................................................................13 Landlord Button.....................................................................................................................................13
CRP Wisconsin Rent Certificate Reports Tab ...........................................................................................14 Post-Generation Error Report ................................................................................................................15 Rent Certificates ....................................................................................................................................16 Print Rent Certificates Labels ................................................................................................................17 Print Rent Certificate Register ...............................................................................................................18 Print Detail Register by Project .............................................................................................................19 Detail Register for Share .......................................................................................................................20

3
General Information The Wisconsin Certificate of Rent Paid (WIS CRP) has been designed to allow Public
Housing Authorities in the State of Wisconsin to generate and maintain their CRP forms
that need to be issued to tenants for each year’s rent payments.
WIS CRP generates the forms from the transactions entered via HAB’s Tenant
Accounting System (WinTAR). The actual forms can then be printed to plain paper (all
appropriate text is automatically printed on the form).
A CRP Register can be generated, listing each tenant who is receiving a CRP form along
with the amounts that will print on the forms. This report can be used for reconciliation
and reference.
About this Manual The H.M.S. CRP User’s Guide describes the HAB, INC. CRP Program (WIS CRP), and
provides instructions for its use. The manual consists of a single chapter explaining the
major functions of the system.
As the user will see in detail later in this manual, the WIS CRP system is an excellent
tool for processing and maintaining vital CRP information. Its ease in setup and
reporting options allow users to process CRP forms in record time. HAB INC. hopes
users will enjoy working with the system and trusts it will provide staff with efficient
form generation previously unavailable to operations that will serve to improve overall
efficiency and productivity.

4
Processing CRP Forms
General Information This chapter describes the information that must be established before the CRP forms can
be generated, and then describes the generation and maintenance process. Specifically,
the chapter describes how to:
Setup Housing Authority Information
Clear a previously processed year
Generate CRP forms
Maintain CRP forms already generated
To access H.M.S. CRP log into Encompass.
Select the Tenant/Applicant Mgt Tab and click on the winTAR button.

5
Select the Reports Tab and click on the CRP button.
From the drop-down menu choose WI Cert.
This will bring up the CRP Wisconsin Rent Certificate menu box.
6
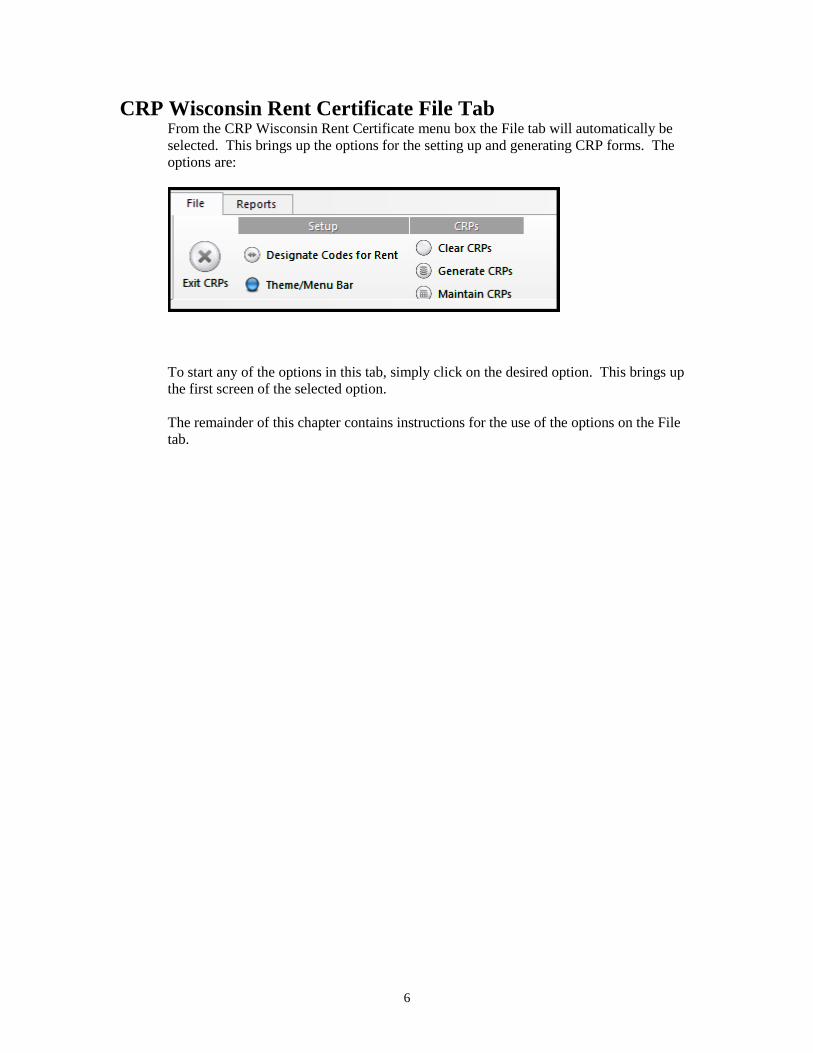
CRP Wisconsin Rent Certificate File Tab From the CRP Wisconsin Rent Certificate menu box the File tab will automatically be
selected. This brings up the options for the setting up and generating CRP forms. The
options are:
To start any of the options in this tab, simply click on the desired option. This brings up
the first screen of the selected option.
The remainder of this chapter contains instructions for the use of the options on the File
tab.
7
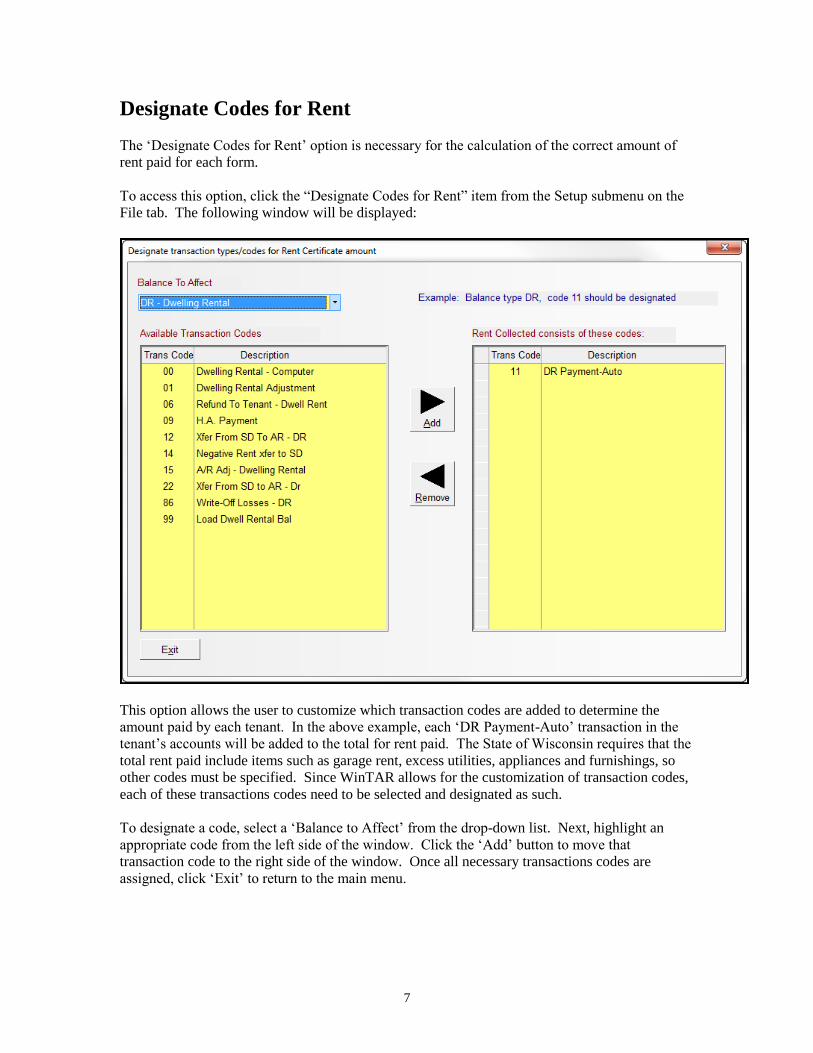
Designate Codes for Rent
The ‘Designate Codes for Rent’ option is necessary for the calculation of the correct amount of
rent paid for each form.
To access this option, click the “Designate Codes for Rent” item from the Setup submenu on the
File tab. The following window will be displayed:
This option allows the user to customize which transaction codes are added to determine the
amount paid by each tenant. In the above example, each ‘DR Payment-Auto’ transaction in the
tenant’s accounts will be added to the total for rent paid. The State of Wisconsin requires that the
total rent paid include items such as garage rent, excess utilities, appliances and furnishings, so
other codes must be specified. Since WinTAR allows for the customization of transaction codes,
each of these transactions codes need to be selected and designated as such.
To designate a code, select a ‘Balance to Affect’ from the drop-down list. Next, highlight an
appropriate code from the left side of the window. Click the ‘Add’ button to move that
transaction code to the right side of the window. Once all necessary transactions codes are
assigned, click ‘Exit’ to return to the main menu.

8
Clear out Rent Certificates The Clear out Rent Certificates option is not necessary unless forms were generated for a
calendar year that shouldn’t have been processed. Prior year Certificates will not interfere with
current year forms, so previous years do not need to be cleared before processing another.
To clear a previously processed year from the Certificates, click ‘Clear CRPs’ from the CRPs
submenu on the File tab. The following window will be displayed:
Select the year to clear Certificate info for, and then click ‘Clear’. A message will appear, asking
the user to verify this:
Click ‘Yes’ to clear or ‘No’ to cancel. If ‘Yes’ was clicked, the following confirmation box will
appear:
Click ‘Ok’ to return to the File tab.
9
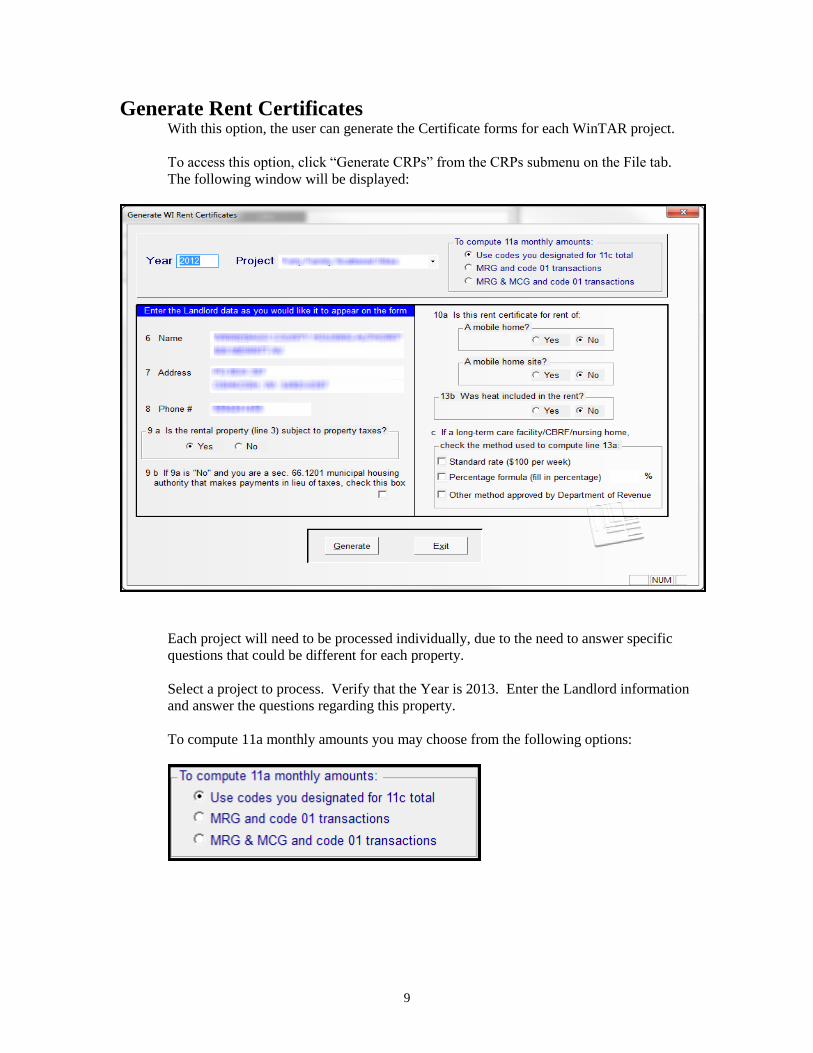
Generate Rent Certificates With this option, the user can generate the Certificate forms for each WinTAR project.
To access this option, click “Generate CRPs” from the CRPs submenu on the File tab.
The following window will be displayed:
Each project will need to be processed individually, due to the need to answer specific
questions that could be different for each property.
Select a project to process. Verify that the Year is 2013. Enter the Landlord information
and answer the questions regarding this property.
To compute 11a monthly amounts you may choose from the following options:
10
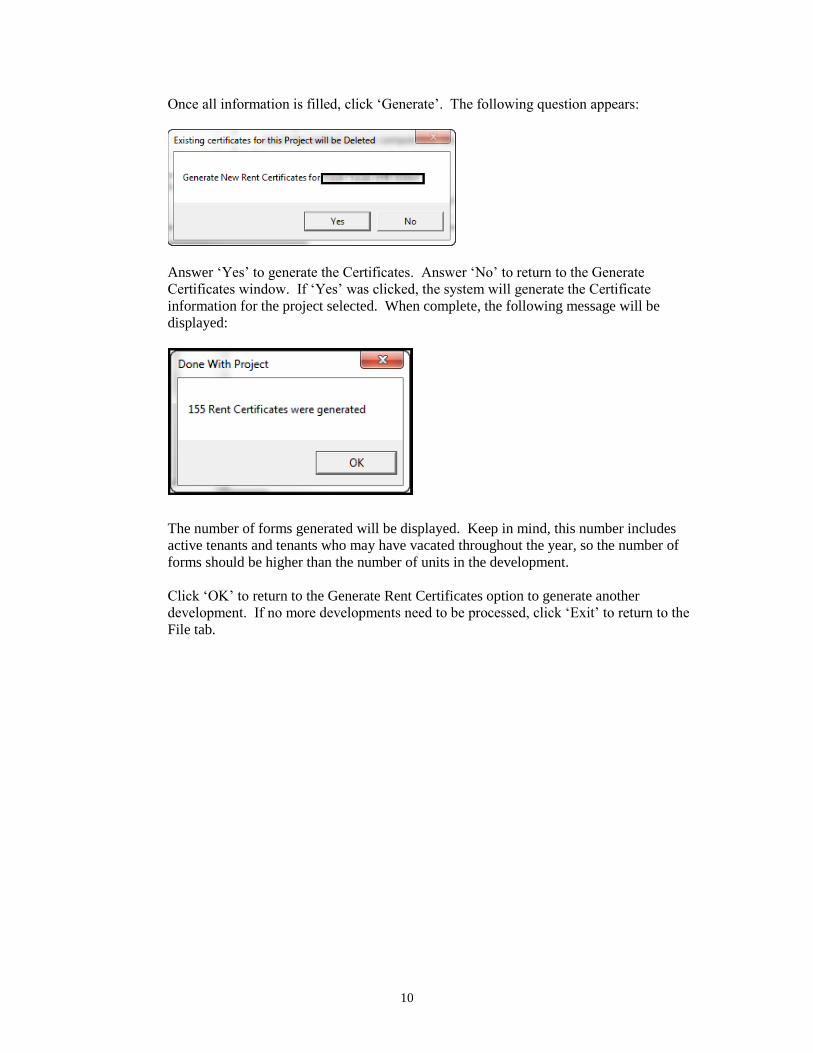
Once all information is filled, click ‘Generate’. The following question appears:
Answer ‘Yes’ to generate the Certificates. Answer ‘No’ to return to the Generate
Certificates window. If ‘Yes’ was clicked, the system will generate the Certificate
information for the project selected. When complete, the following message will be
displayed:
The number of forms generated will be displayed. Keep in mind, this number includes
active tenants and tenants who may have vacated throughout the year, so the number of
forms should be higher than the number of units in the development.
Click ‘OK’ to return to the Generate Rent Certificates option to generate another
development. If no more developments need to be processed, click ‘Exit’ to return to the
File tab.
11
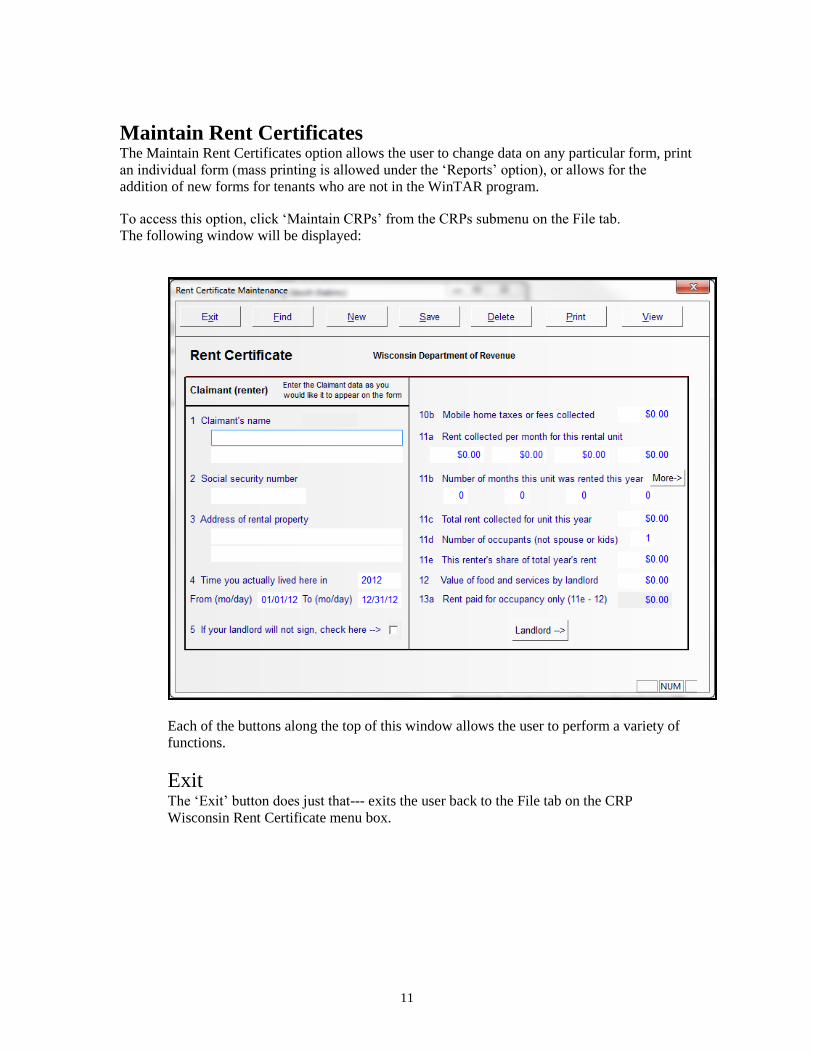
Maintain Rent Certificates The Maintain Rent Certificates option allows the user to change data on any particular form, print
an individual form (mass printing is allowed under the ‘Reports’ option), or allows for the
addition of new forms for tenants who are not in the WinTAR program.
To access this option, click ‘Maintain CRPs’ from the CRPs submenu on the File tab.
The following window will be displayed:
Each of the buttons along the top of this window allows the user to perform a variety of
functions.
Exit The ‘Exit’ button does just that--- exits the user back to the File tab on the CRP
Wisconsin Rent Certificate menu box.
12
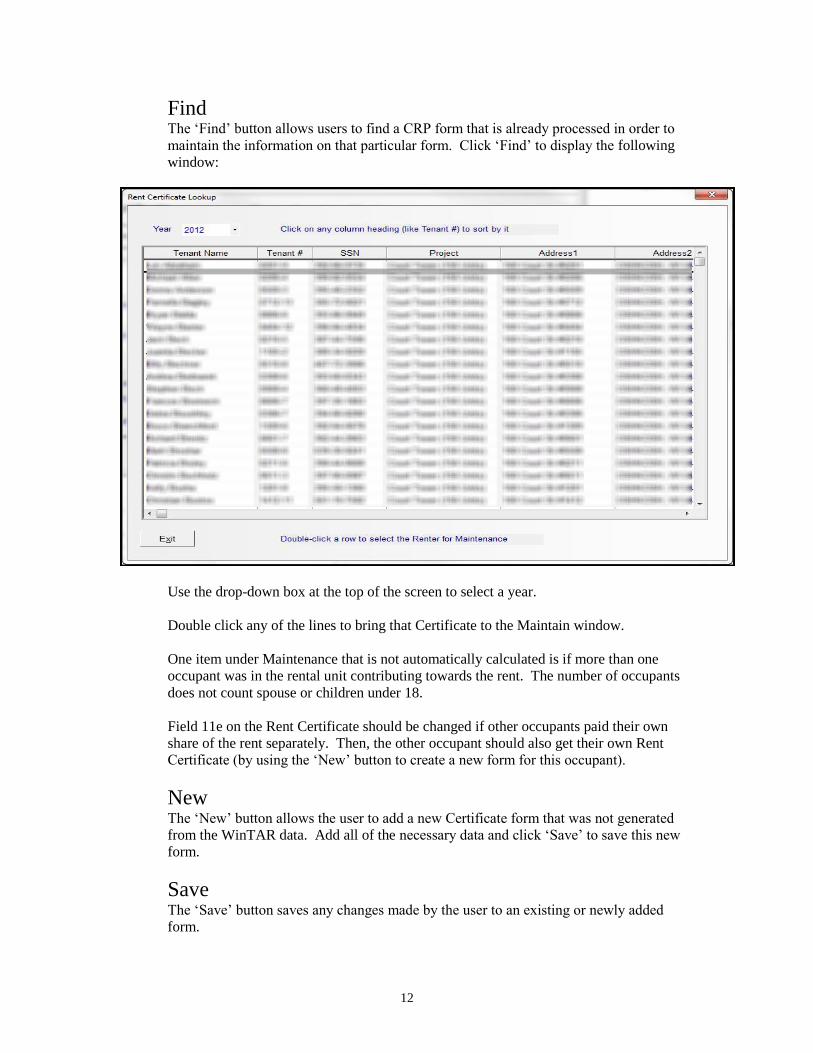
Find The ‘Find’ button allows users to find a CRP form that is already processed in order to
maintain the information on that particular form. Click ‘Find’ to display the following
window:
Use the drop-down box at the top of the screen to select a year.
Double click any of the lines to bring that Certificate to the Maintain window.
One item under Maintenance that is not automatically calculated is if more than one
occupant was in the rental unit contributing towards the rent. The number of occupants
does not count spouse or children under 18.
Field 11e on the Rent Certificate should be changed if other occupants paid their own
share of the rent separately. Then, the other occupant should also get their own Rent
Certificate (by using the ‘New’ button to create a new form for this occupant).
New The ‘New’ button allows the user to add a new Certificate form that was not generated
from the WinTAR data. Add all of the necessary data and click ‘Save’ to save this new
form.
Save The ‘Save’ button saves any changes made by the user to an existing or newly added
form.

13
Delete The ‘Delete’ button deletes any Certificate form displayed at the time the Delete button is
depressed. This does not delete the tenant or their payment history from the WinTAR
program.
Print The ‘Print’ button allows the user to print a single Certificate for an individual tenant.
Use the ‘Find’ button to find an existing Certificate. Click ‘Print’ once the tenant’s
Certificate info is displayed. The form will be sent to the user’s default printer.
View The ‘View’ button allows the user to view a single form for an individual tenant. Use the
‘Find’ button to find an existing form. Click ‘View’ once the tenant’s Certificate info is
displayed. The form will be seen on the user’s screen. Once in the view mode, the form
can also be printed by selecting the ‘Print’ option from the view.
Click ‘Exit’ to return to the Certificates Main Menu.
Landlord Button The ‘Landlord’ button on the bottom-right side of the window allows the user to access
the landlord information (the information added from the Generate Rent Certificates
option) in order to perform maintenance on the landlord information for a specific form.
If the landlord information was answered incorrectly for All forms processed, they can be
regenerated through the ‘Generate’ option instead of performing maintenance on each
individual Rent Certificate.

14
CRP Wisconsin Rent Certificate Reports Tab The Reports tab offers a variety of viewing and printing options. Clicking the ‘Reports’
tab on the CRP main menu box will bring up the following list:
Click on the desired report in order to process, view and print it.
Following are instructions on processing each individual report and a printed example.
15
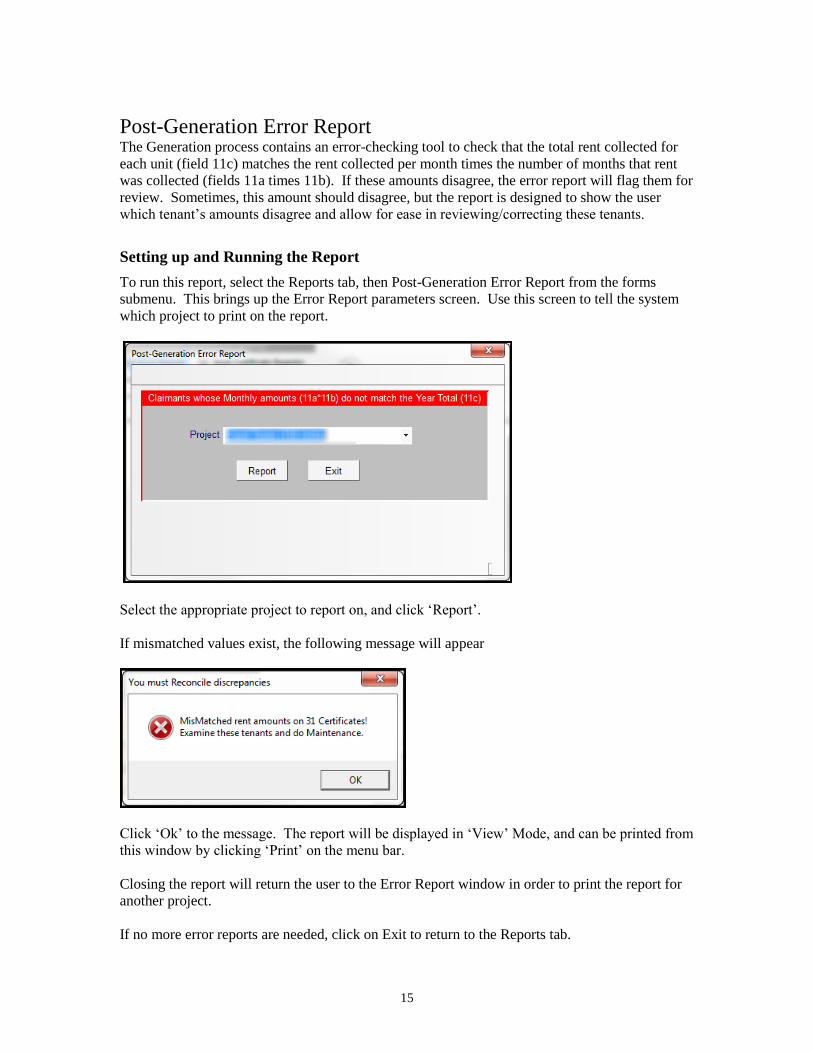
Post-Generation Error Report The Generation process contains an error-checking tool to check that the total rent collected for
each unit (field 11c) matches the rent collected per month times the number of months that rent
was collected (fields 11a times 11b). If these amounts disagree, the error report will flag them for
review. Sometimes, this amount should disagree, but the report is designed to show the user
which tenant’s amounts disagree and allow for ease in reviewing/correcting these tenants.
Setting up and Running the Report
To run this report, select the Reports tab, then Post-Generation Error Report from the forms
submenu. This brings up the Error Report parameters screen. Use this screen to tell the system
which project to print on the report.
Select the appropriate project to report on, and click ‘Report’.
If mismatched values exist, the following message will appear
Click ‘Ok’ to the message. The report will be displayed in ‘View’ Mode, and can be printed from
this window by clicking ‘Print’ on the menu bar.
Closing the report will return the user to the Error Report window in order to print the report for
another project.
If no more error reports are needed, click on Exit to return to the Reports tab.

16
Rent Certificates
The Rent Certificates report allows user to print all of the rent certificates for a particular year and
for specific projects or tenants.
Setting up and Running the Report
To run this report, select Reports, then Rent Certificates. This brings up the Rent Certificates
parameters screen. Use this screen to tell the system how to select and delimit the data to be
included on the report.
Verify that the printer is the printer you wish to print this report to. If this is not the correct
printer, click on the “Setup” button to change default printers.
Select the number of copies of this report you would like to print. The default is 1.
In order to print forms for the year in process, select the appropriate year in the from/thru
parameters. To further delimit the information on the report, you can select a project or tenant
name.
To print this report directly to the printer, click on “Print”.
To display this report on your monitor, click on “View”. You will then have the option of
printing from the view mode.
If you do not wish to run this report, click on <Esc> Exit.
17
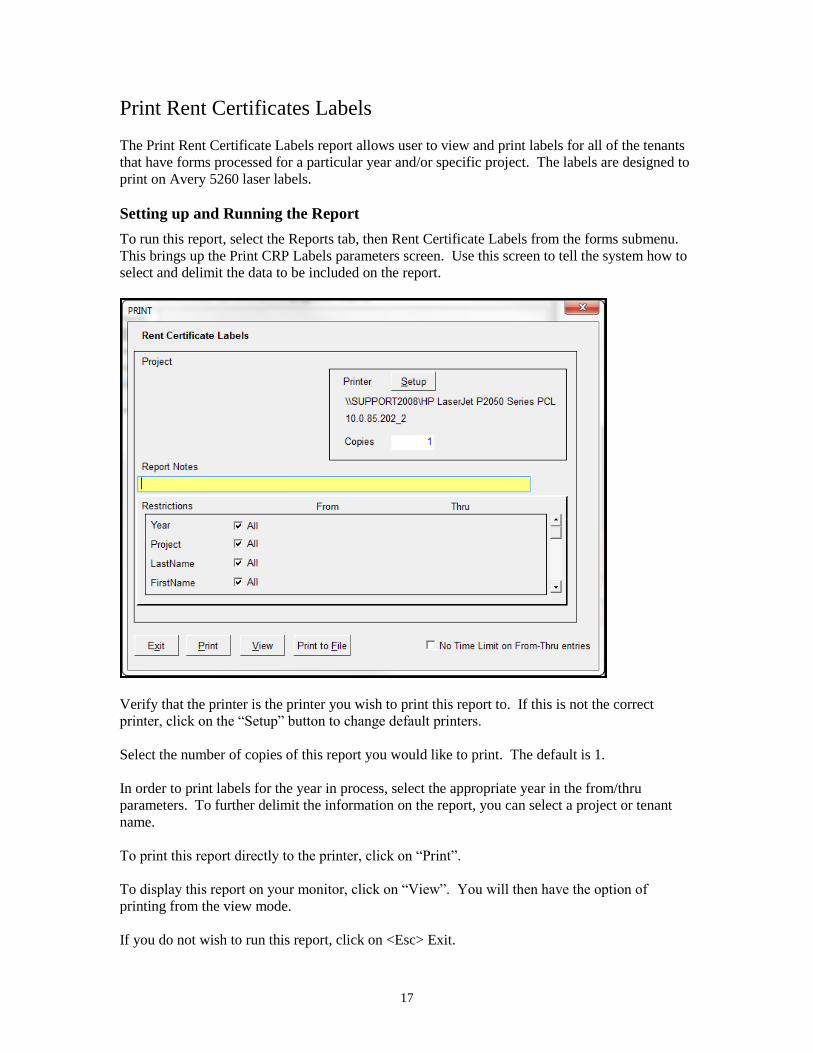
Print Rent Certificates Labels
The Print Rent Certificate Labels report allows user to view and print labels for all of the tenants
that have forms processed for a particular year and/or specific project. The labels are designed to
print on Avery 5260 laser labels.
Setting up and Running the Report
To run this report, select the Reports tab, then Rent Certificate Labels from the forms submenu.
This brings up the Print CRP Labels parameters screen. Use this screen to tell the system how to
select and delimit the data to be included on the report.
Verify that the printer is the printer you wish to print this report to. If this is not the correct
printer, click on the “Setup” button to change default printers.
Select the number of copies of this report you would like to print. The default is 1.
In order to print labels for the year in process, select the appropriate year in the from/thru
parameters. To further delimit the information on the report, you can select a project or tenant
name.
To print this report directly to the printer, click on “Print”.
To display this report on your monitor, click on “View”. You will then have the option of
printing from the view mode.
If you do not wish to run this report, click on <Esc> Exit.
18
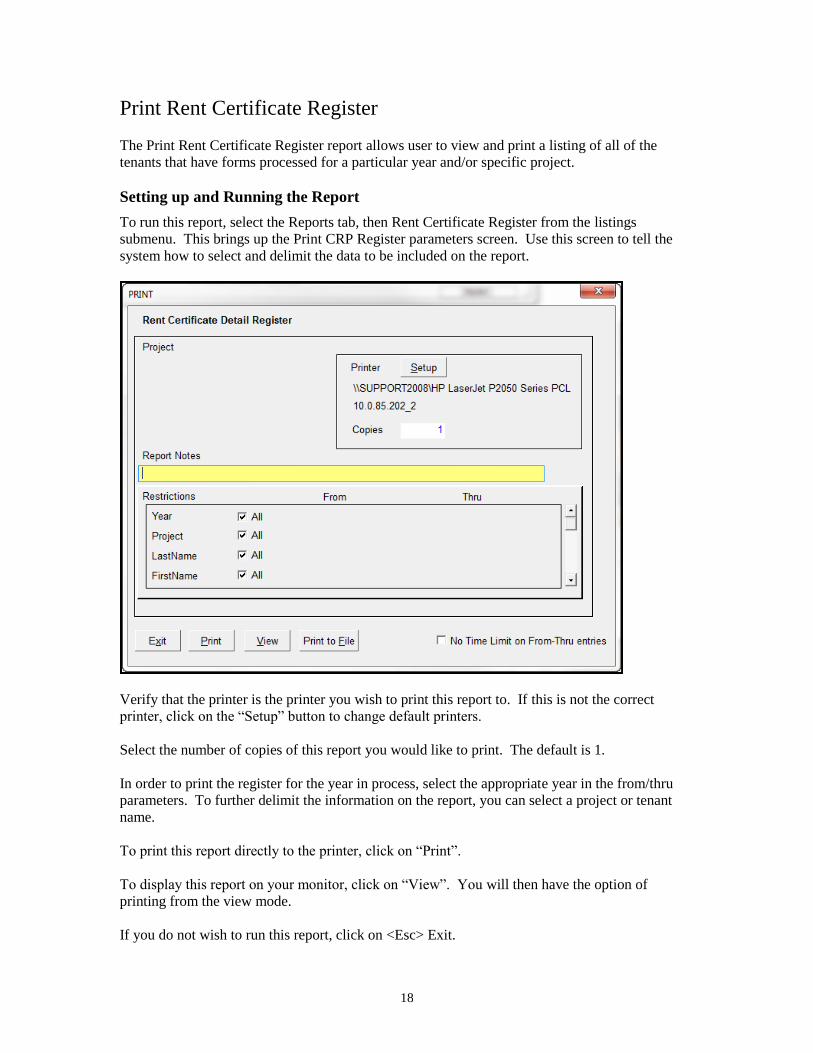
Print Rent Certificate Register
The Print Rent Certificate Register report allows user to view and print a listing of all of the
tenants that have forms processed for a particular year and/or specific project.
Setting up and Running the Report
To run this report, select the Reports tab, then Rent Certificate Register from the listings
submenu. This brings up the Print CRP Register parameters screen. Use this screen to tell the
system how to select and delimit the data to be included on the report.
Verify that the printer is the printer you wish to print this report to. If this is not the correct
printer, click on the “Setup” button to change default printers.
Select the number of copies of this report you would like to print. The default is 1.
In order to print the register for the year in process, select the appropriate year in the from/thru
parameters. To further delimit the information on the report, you can select a project or tenant
name.
To print this report directly to the printer, click on “Print”.
To display this report on your monitor, click on “View”. You will then have the option of
printing from the view mode.
If you do not wish to run this report, click on <Esc> Exit.

19
Print Detail Register by Project The Print Detail Register by Project report allows user to print a listing of all of the tenants that
have forms processed for a particular year and/or specific project. This is similar to the Rent
Certificate Register, but there are break groups for each Project.
Setting up and Running the Report
To run this report, select Reports, then Detail Register by Project. This brings up the Detail
Register parameters screen. Use this screen to tell the system how to select and delimit the data
to be included on the report.
Verify that the printer is the printer you wish to print this report to. If this is not the correct
printer, click on the “Setup” button to change default printers.
Select the number of copies of this report you would like to print. The default is 1.
In order to print the register for the year in process, select the appropriate year in the from/thru
parameters. To further delimit the information on the report, you can select a project or tenant
name.
To print this report directly to the printer, click on “Print”.
To display this report on your monitor, click on “View”. You will then have the option of
printing from the view mode.
If you do not wish to run this report, click on <Esc> Exit.
20
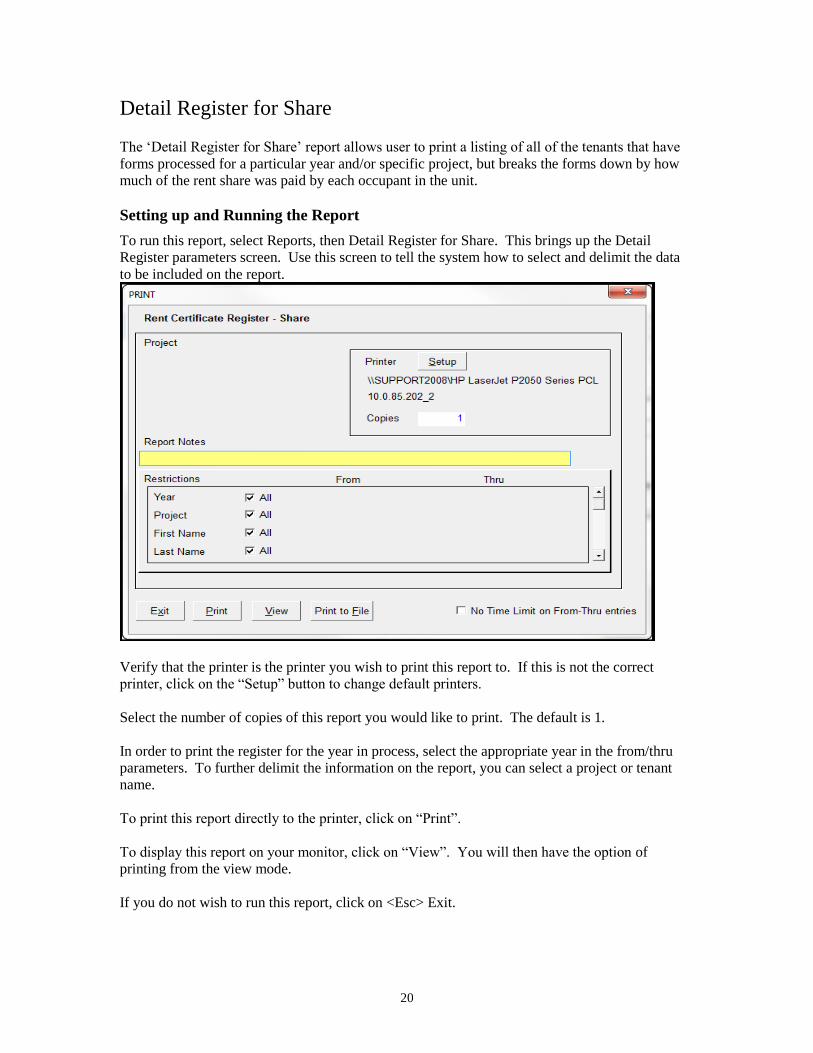
Detail Register for Share The ‘Detail Register for Share’ report allows user to print a listing of all of the tenants that have
forms processed for a particular year and/or specific project, but breaks the forms down by how
much of the rent share was paid by each occupant in the unit.
Setting up and Running the Report
To run this report, select Reports, then Detail Register for Share. This brings up the Detail
Register parameters screen. Use this screen to tell the system how to select and delimit the data
to be included on the report.
Verify that the printer is the printer you wish to print this report to. If this is not the correct
printer, click on the “Setup” button to change default printers.
Select the number of copies of this report you would like to print. The default is 1.
In order to print the register for the year in process, select the appropriate year in the from/thru
parameters. To further delimit the information on the report, you can select a project or tenant
name.
To print this report directly to the printer, click on “Print”.
To display this report on your monitor, click on “View”. You will then have the option of
printing from the view mode.
If you do not wish to run this report, click on <Esc> Exit.